
We are super pumped to announce that the Next Generation of FunnelKit’s Automation Builder is now live!
For those who are unfamiliar, FunnelKit Automations (formerly Autonami) is the ultimate marketing automation tool and lightweight CRM for WordPress.
At FunnelKit, our team has been working relentlessly to deliver a truly world-class automation building experience.
We envisioned what it would mean to create smarter automation workflows at the same level as some of the well-known CRM tools out there.
The result?
A complete rewrite of our existing automation engine.
We launched the Beta version back in February with FunnelKit Automations’s power users and our Beta users were thrilled when they experienced the cutting-edge automation builder.
Now, this is available to you!
So without further ado, let’s explore the major features of Next Generation Automation Builder.
Table of Contents
- 1 Feature 1: An Ever-Growing Library of Pre-built Recipes
- 2 Feature 2: The All-New Canvas Builder
- 3 Feature 3: Ability to Change an Event
- 4 Feature 4: Freely Move the Nodes to Wherever You Want
- 5 Feature 5: Add Notes to Enrich Your Workflows
- 6 Feature 6: Full-Screen Mode
- 7 Feature 7: Improved Actions
- 8 Feature 8: Powerful Delay to Time the Messages
- 9 Feature 9: Infinite Conditional Branching
- 10 Feature 10: Goal Node to Skip the Step
- 11 Feature 11: Jump Node to Take the User Back to Any Node
- 12 Feature 12: Exit Node
- 13 Feature 13: View Individual Contact's Journey
- 14 Feature 14: In-line Analytics
- 15 Feature 15: Per Contact Actions
- 16 BONUS: Backward Compatibility with the Previous Automation Builder
- 17 Ready to Level Up Your Automation Game?
Feature 1: An Ever-Growing Library of Pre-built Recipes
Building automated sequences is indeed easy. But sometimes, you may just want to import a workflow and start from there.
You will be happy to know that FunnelKit Automations now provides a library of pre-built one-click import recipes.

This includes the entire sequence- with pre-set delay intervals, goals, coupon codes, emails - pre-written email copy.
So by importing a workflow with a single click, you can make modifications to suit your needs and go live.
For example, here’s the workflow for abandoned cart recovery.
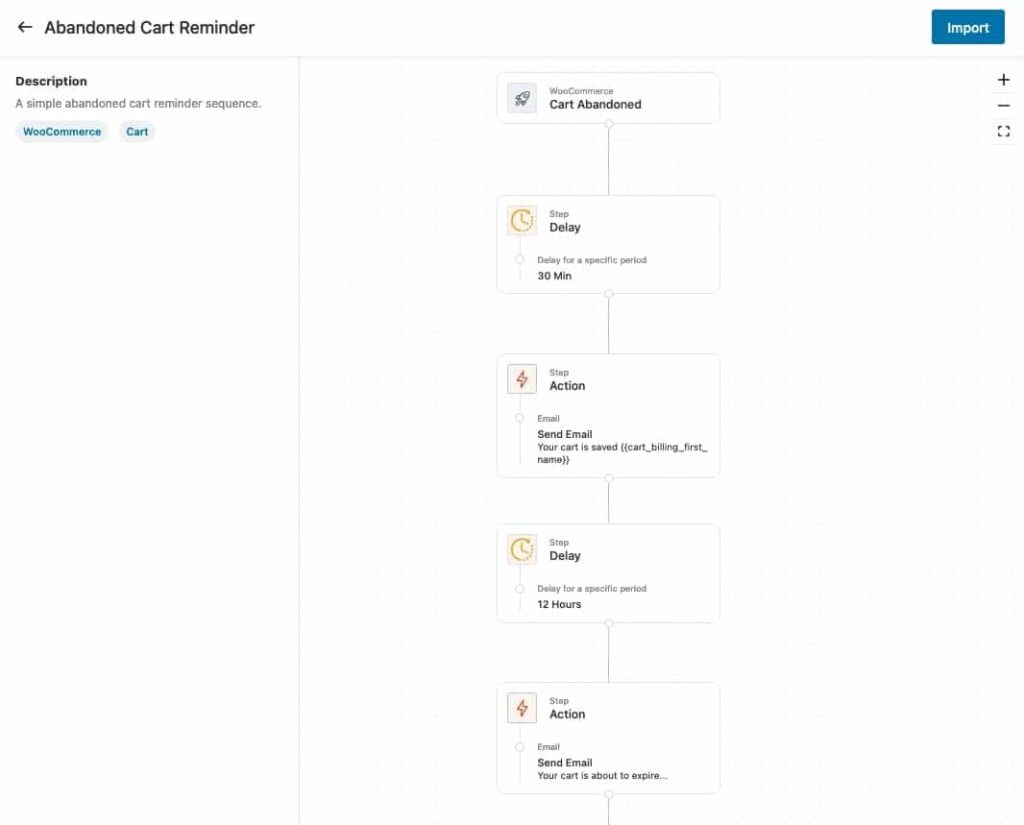
It’s a simple automated sequence with no complex conditional logic.
We are starting with Recipes from WooCommerce, Funnel Builder, LearnDash, AffiliateWP, and more.
As FunnelKit Automations continues to grow and integrate with more plugins - this library will continue to grow!
Give it a go.
If you have a cool idea and want it to get included, feel free to contact us. 😎
Feature 2: The All-New Canvas Builder
One of the most powerful features of the next-generation automation builder is its new Canvas mode.
Minimalist Interface. Low learning curve.
We’ve purposefully designed the interface to be minimalist and distraction-free. This allows you to build useful workflows from scratch.
Take a look:

We worked with UI experts and had detailed conversations with our users to create an interface that makes the process of building a workflow, a breeze.
The interface while minimalist is loaded with features that we shall cover in the following points.
By the end of it, we’re pretty sure that you will know that NextGen is a beast! 👍
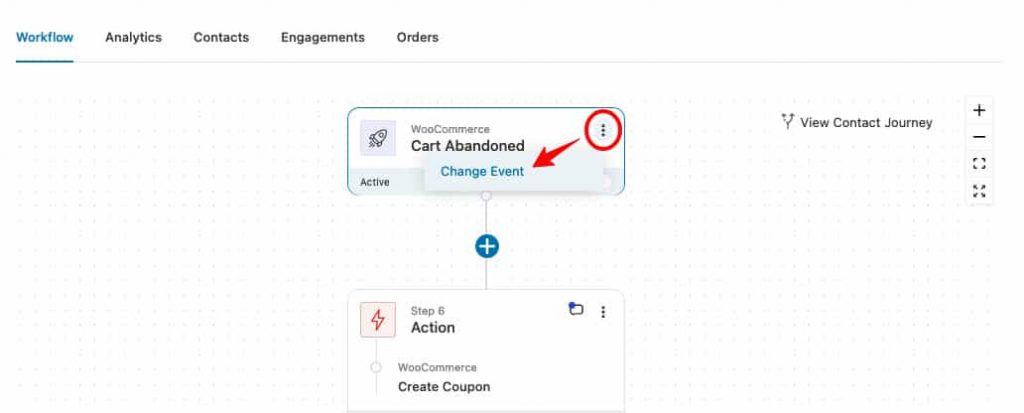
Feature 3: Ability to Change an Event
One of the constant pain points of the previous Automation builder was its lack of ability to change Events once automation was created.
Folks could not use automation if they decided to change the main event.
This pain has been eliminated.
Feature 4: Freely Move the Nodes to Wherever You Want
When creating sophisticated workflows, you'd love the ability to copy, paste and delete nodes with ease.
Copy and paste would save time as you wouldn't have to add a new step over and over, especially in an email sequence, while 'delete' lets you change your mind.
To copy a step - simply click on the three dots right next to the step and hit copy.

After you’ve copied it - all the locations where the step can be pasted will get highlighted, allowing you to paste the step with a single click.

While the 'copy' option creates a duplicate of the step, 'move' allows you to place the selected step elsewhere in the workflow.
Feature 5: Add Notes to Enrich Your Workflows
By adding notes to your workflows you can remember why you added a certain step, defined a specific delay, adding a coupon of a certain amount, and more.
When you re-visit the workflow, you can view notes to be reminded of what you did and why.
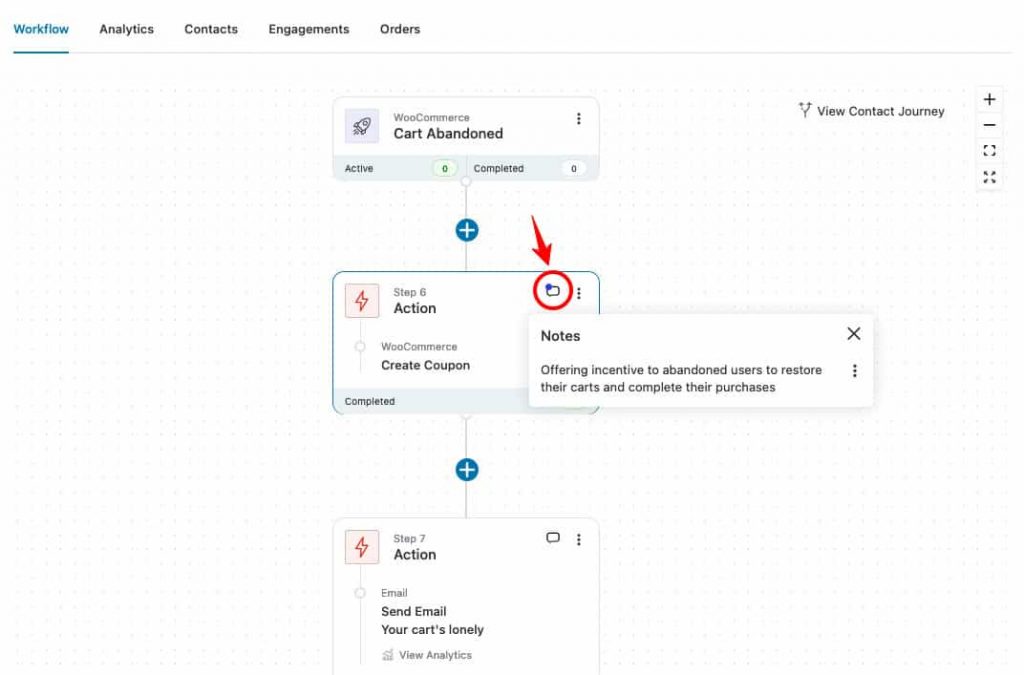
Moreover, if you have more members in the team, notes can be pretty useful for understanding an automated sequence well.
Feature 6: Full-Screen Mode
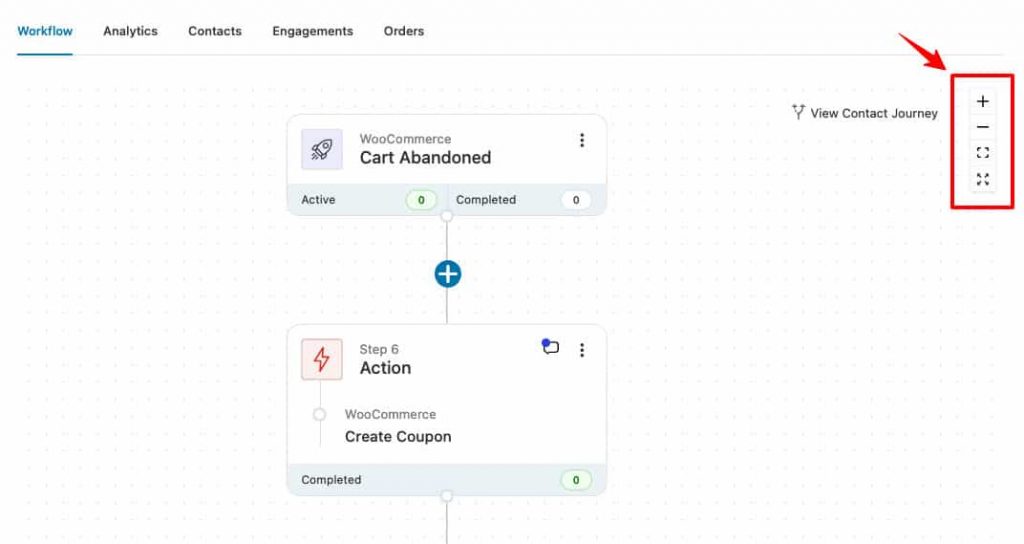
The full-screen mode allows you to view the entire workflow on a full screen without zooming in.
To zoom in and out of the interface, you can use the + and - signs on the right-hand side. You can also fit the automation to the screen to get better control over the workflow you’ve built.
Feature 7: Improved Actions
Choosing an action lets you define what next step will occur after the event takes place.
Sending an email, adding a tag, and creating a coupon are all examples of actions. Take a look at how you can add action to a workflow:
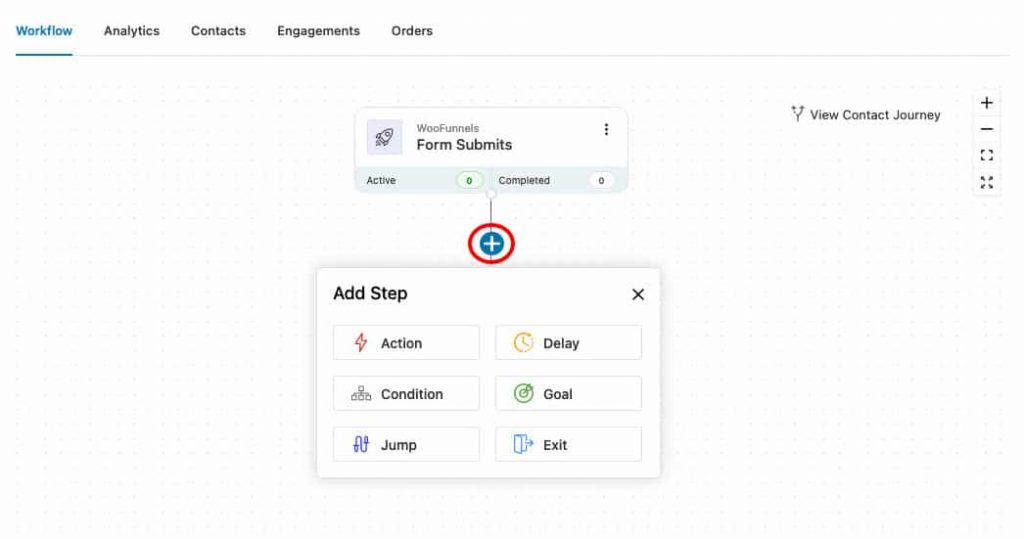
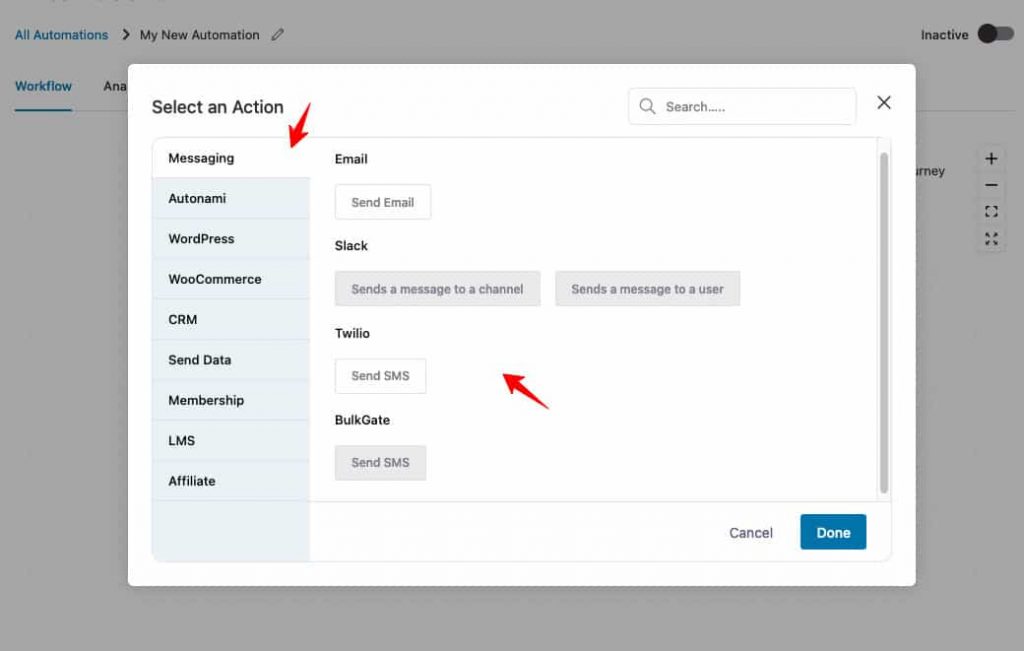
Within messaging- you can choose ‘send email’ or pick from Slack, Twilio, BulkGate, and more, based on your active integrations.
Since FunnelKit Automations you can choose a tag to get added, the contact to get subscribed to a list, update a custom field, and more.
Under WooCommerce, there are relevant actions for adding/deleting coupons, changing order status, and more.
If you’re making FunnelKit Automations communicate with an external CRM such as Drip, Active Campaign, MailChimp, etc. - then you can select CRM and perform actions for adding a tag/adding to a list/ updating a custom field, and more.
Feature 8: Powerful Delay to Time the Messages
Delay allows you to add a time gap to your actions.
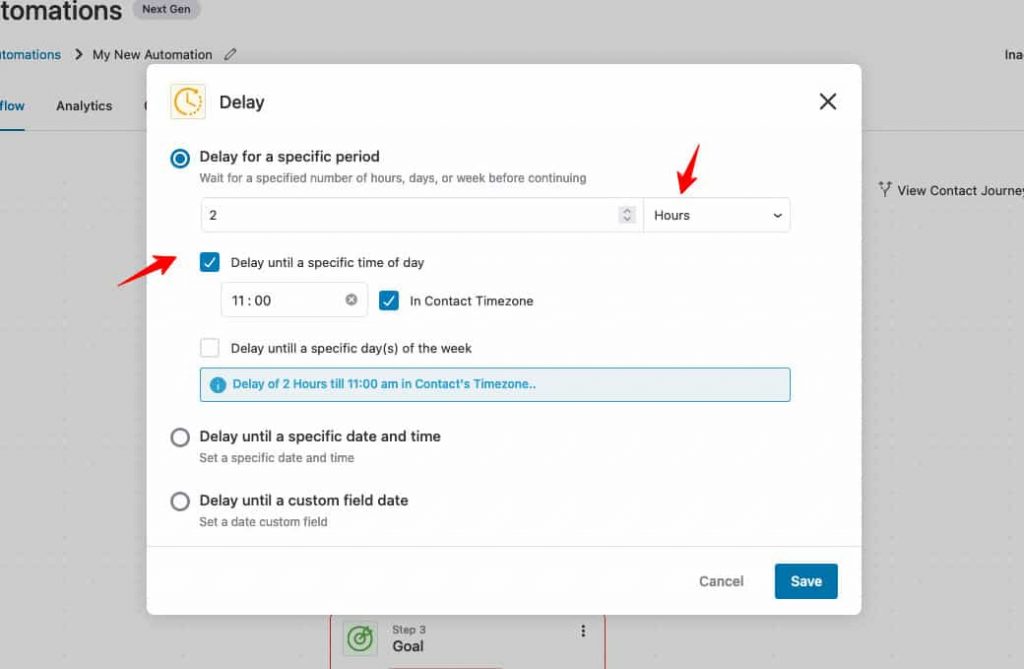
Delay for a specific time period: Choose the number of minutes, hours, or days that you’d like an action to be delayed for.
You can also delay until a specific time of the day- think of a time when your open rate and click-through rates are high.
Until a specific day of the week: You may want to delay an action until a chosen day of the week. Let’s say you have a sequence of emails that go out only on Fridays- Funnel Fridays or Baking Sundays.
Delay until specific date and time: Select the exact date and time to delay the action. Perfect for webinar reminder sequences.
Delay until a custom field date: Here you can delay an action until a date and time is picked by the user on a form submitted. Think of automating birthday campaigns and anniversary emails.
Delay until a custom field date: Here you can delay an action until a date and time is picked by the user on a form submitted. Think of automating birthday campaigns and anniversary emails.
Feature 9: Infinite Conditional Branching
FunnelKit Automations now gives you the power to build highly complex automations.
You can add as many branches as you want to create advanced workflows.

When a condition gets met, you can set an action to be performed or add another condition that needs to be met, and so on.
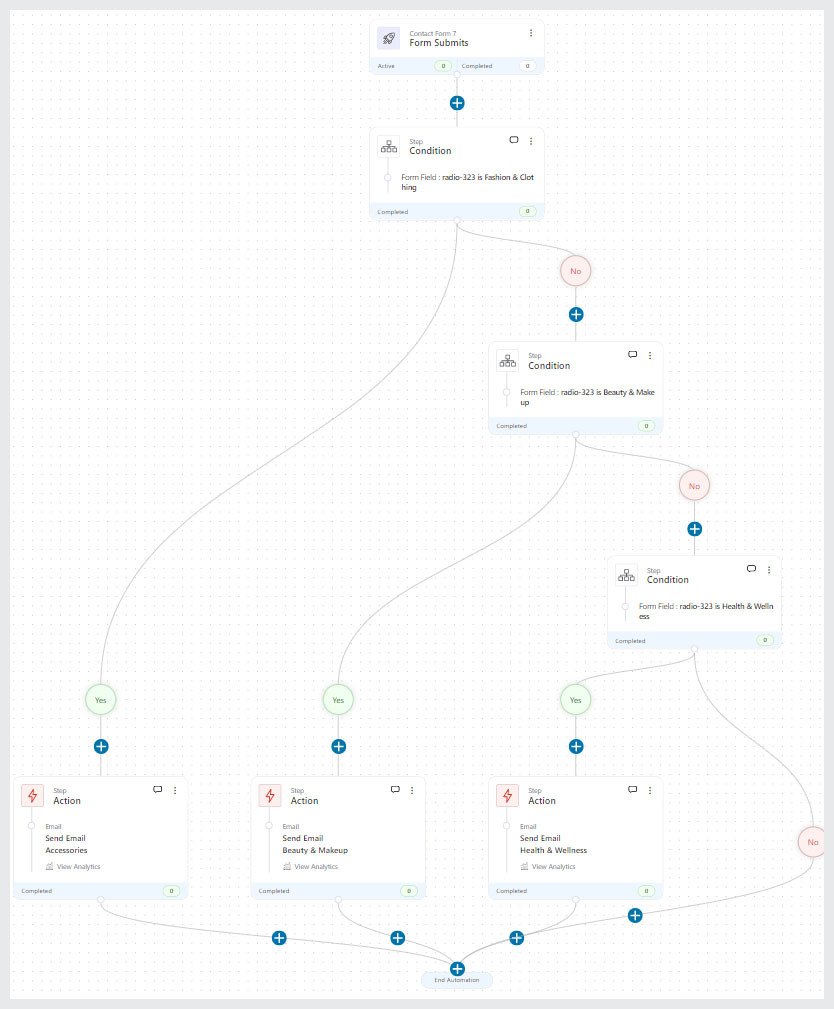
This allows you to create automations like in some of the popular and powerful CRM tools out there.
Feature 10: Goal Node to Skip the Step
Different sequences can have different goals. A goal is a milestone that you’d like to have met.
For example, a double opt-in sequence’s goal could be ‘link is clicked’ or a certain tag is added on the contact.
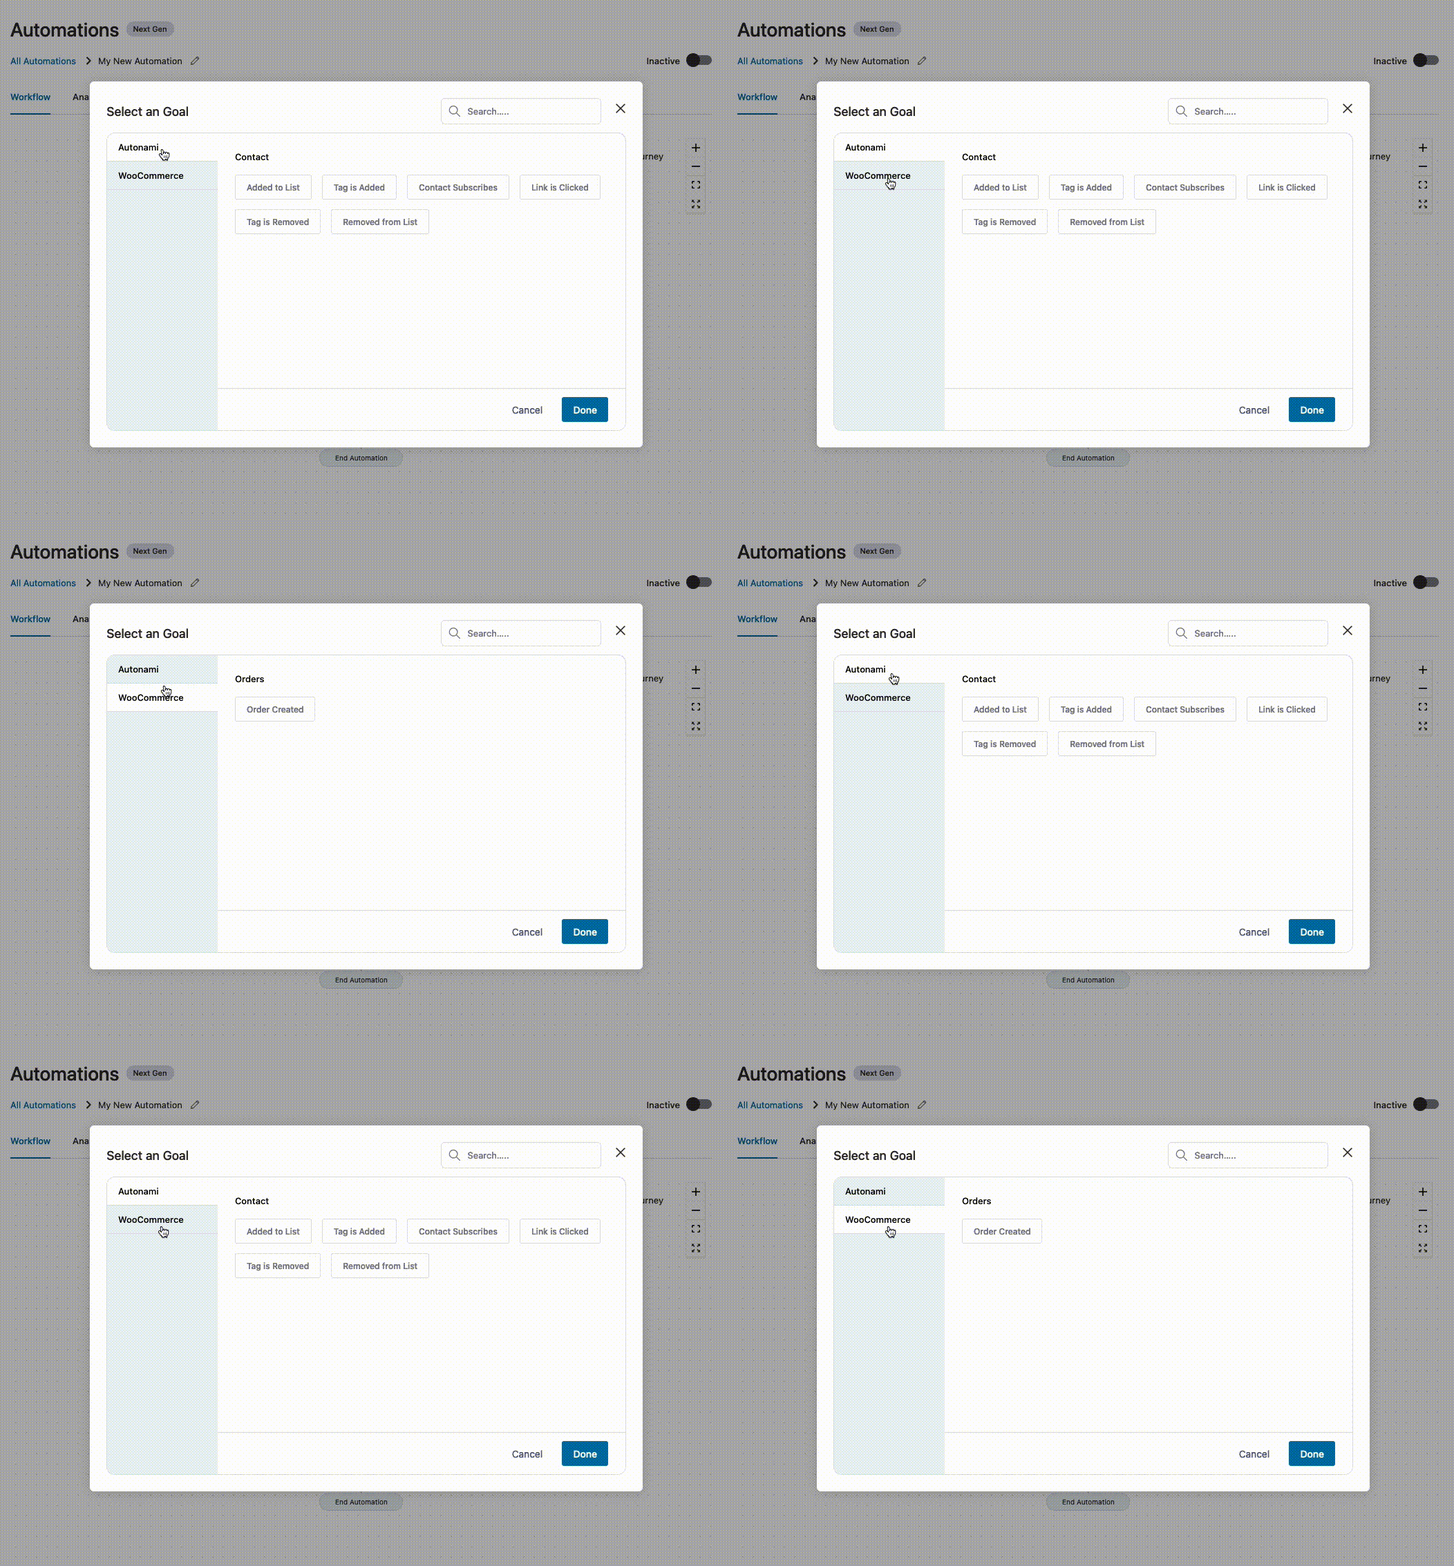
If you have a sequence of 3-5 emails and if the link gets clicked in the first email itself then the following emails will not go.
Another example of a goal is ‘order created’ - again if the order is placed from say the second email, the next email in sequence will not go.

Feature 11: Jump Node to Take the User Back to Any Node
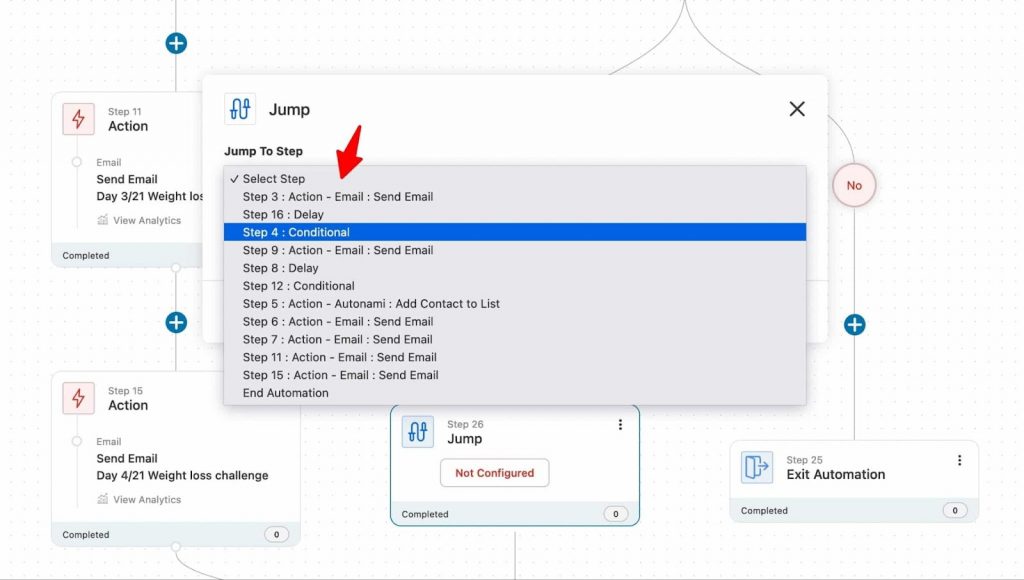
The Jump node will be very useful when you’re creating complex workflows with multiple branches.
So if you want to make the contact jump to a certain step - you can use the jump node and define which step.
This means you can connect various nodes with each other.
Feature 12: Exit Node
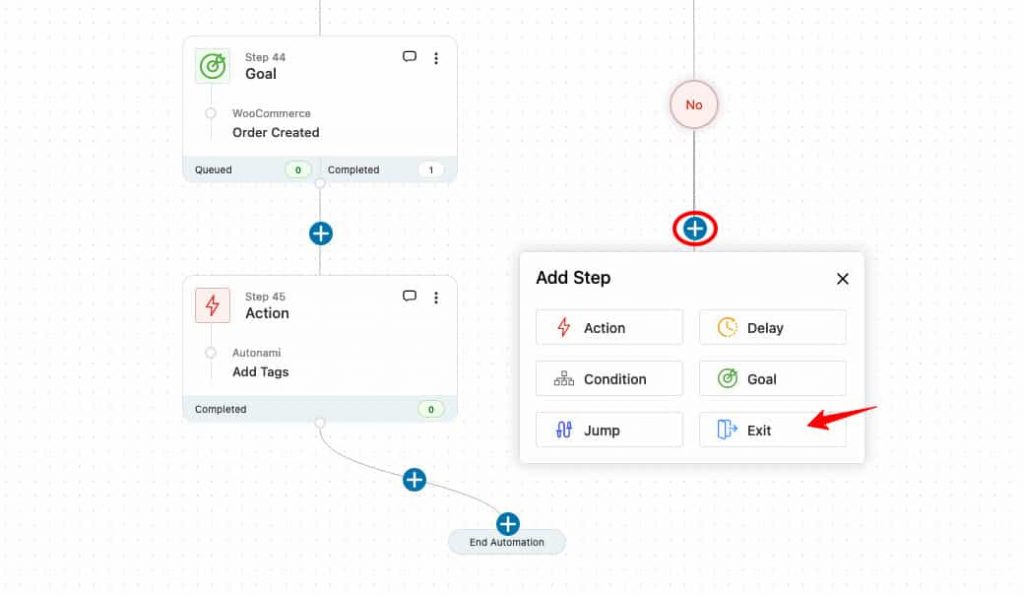
Adding an exit node to your workflow allows contacts to exit particular automation. They don’t keep waiting at the final step in the flow.
You can also split the workflow such that if a condition gets met then an email can be sent and if it doesn’t then the contacts can be made to exit the automation.
Feature 13: View Individual Contact's Journey
Imagine being able to track each customer's journey on the automation canvas - i.e. at what step they are in the workflow.
Apart from viewing the completed task, skipped task, and queued task, you can also view the exact time stamp of occurrence.
Enter the name of any contact to view their journey.
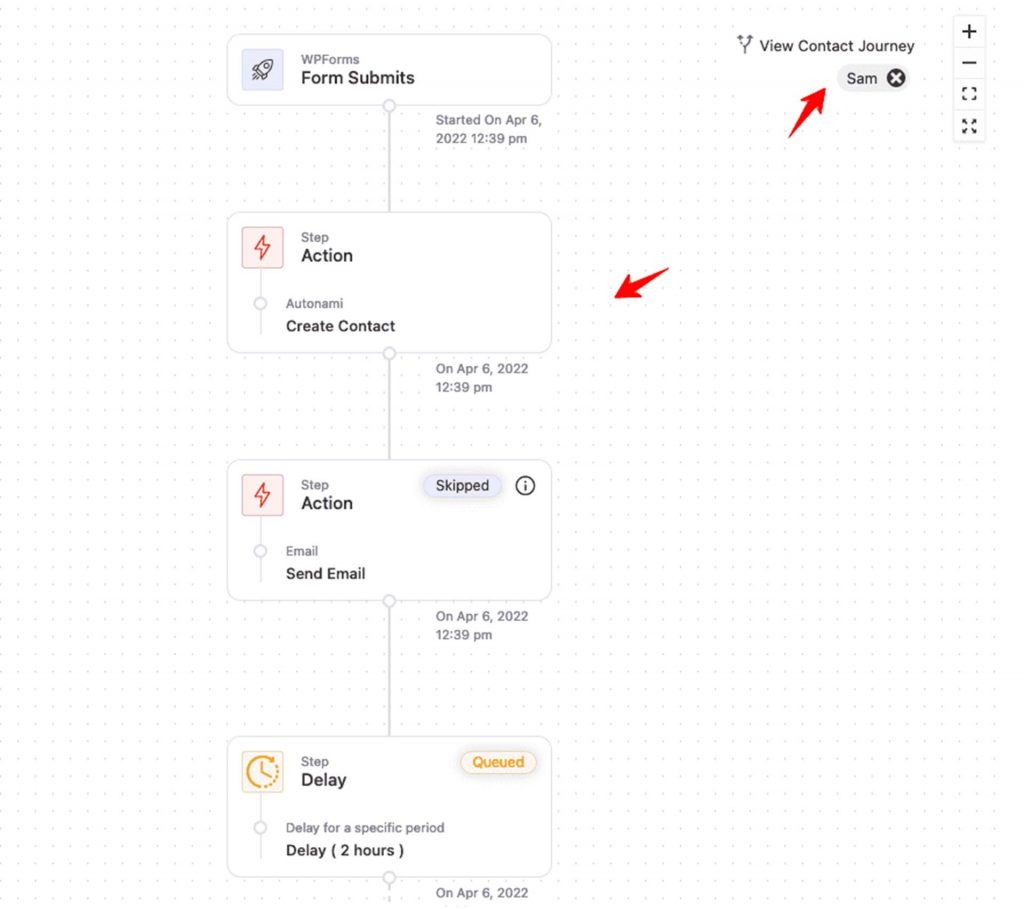
These insights are powerful - you can even use them for troubleshooting purposes.
Feature 14: In-line Analytics
We've been continuously asking ourselves what we can do to make analytics more intuitive for our users so that they're able to make meaningful improvements to their workflows.
The answer: Introduce In-line analytics.
You always have the option to view in-depth analytics on a separate interface, but FunnelKit Automations allows you to view important details such as open rate, clickthrough rate, and more on the automation canvas itself!
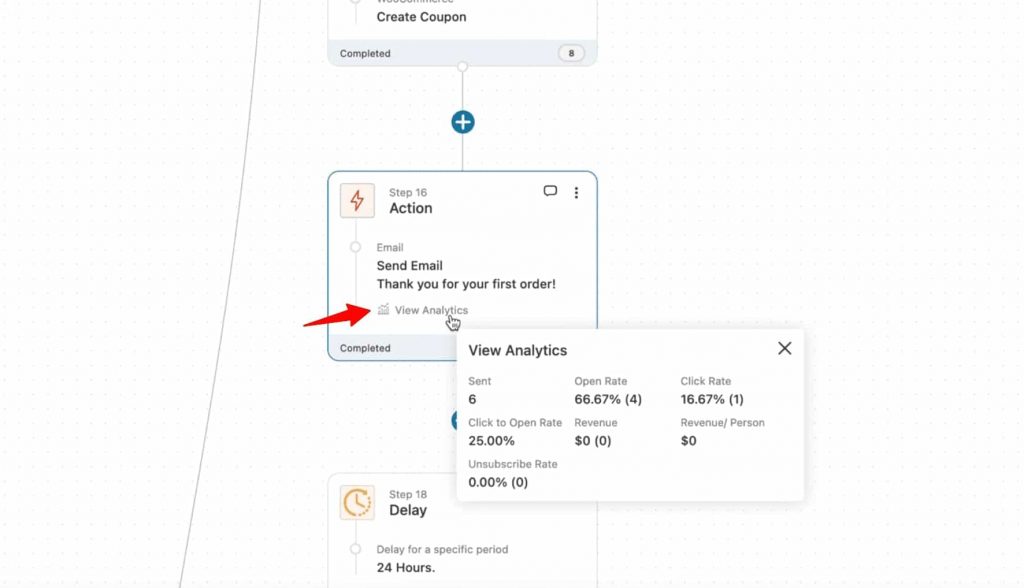
When analytics is so easily accessible, it will surely make a meaningful contribution to your automated workflows.
Feature 15: Per Contact Actions
FunnelKit Automations lets you perform certain actions such as 'run now', 'pause', 'end', and 'delete' on each contact.
This is particularly useful for troubleshooting purposes.
So if there's automation running and a particular contact hasn't received the email or your wish to pause automation on a contact - you can do that and more.

'Run now' will also let you run the automation on a particular contact right away.
That's how easy it is!
BONUS: Backward Compatibility with the Previous Automation Builder
This isn’t exactly a feature but it’s a part of our core philosophy. If you’re an existing user of FunnelKit Automations, you can still use your previously built automations. Those automated workflows that were built before we launched the all-new automation canvas.
To access those, all you have to do is go to FunnelKit Automations’s main menu at the top and hover over ‘Campaigns’. Here you’ll see two options:
- Automations Next-Gen
- Automations
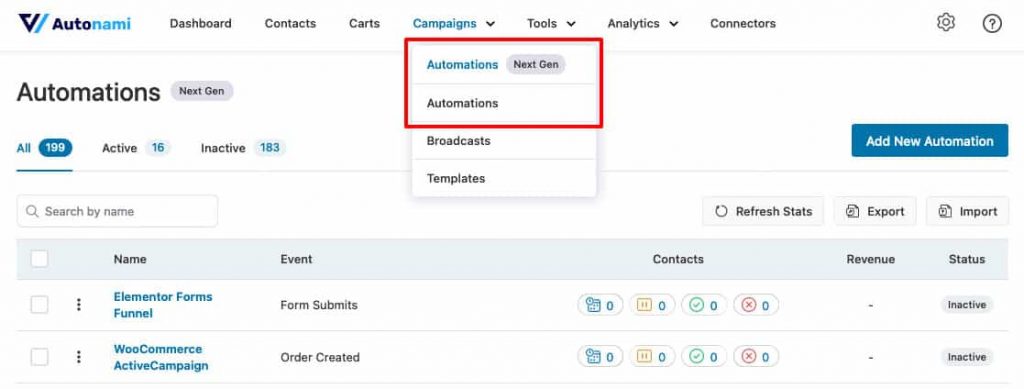
It’s under automations that you can access your previously built workflows.
Ready to Level Up Your Automation Game?
There you go! So those were 15 major features of the next-gen Automation Builder.
Each of these has been developed with meticulous planning, thought, and in-depth conversations with our users.
If you're currently using FunnelKit Automations, upgrade yourself to the latest version from the dashboard.
Not a user of FunnelKit Automations yet? What are you waiting for? Get FunnelKit Automations!
THAT’S NOT ALL
It doesn't end here. Now that the next-gen automation builder is out, we will have a number of additional updates coming in the near future! Join our private Facebook group here to stay in the loop!
Editorial Team
January 22, 2026FunnelKit Automations 3.7.0 is here! 🎉 And it brings meaningful improvements that make building and managing your marketing automation easier than ever. This release is all about giving you more...
Editorial Team
June 9, 2025FunnelKit Automations 3.6 is here, and it’s packed with powerful features to help you grow smarter and faster. With this release, you can: Export abandoned cart data with a click...
Editorial Team
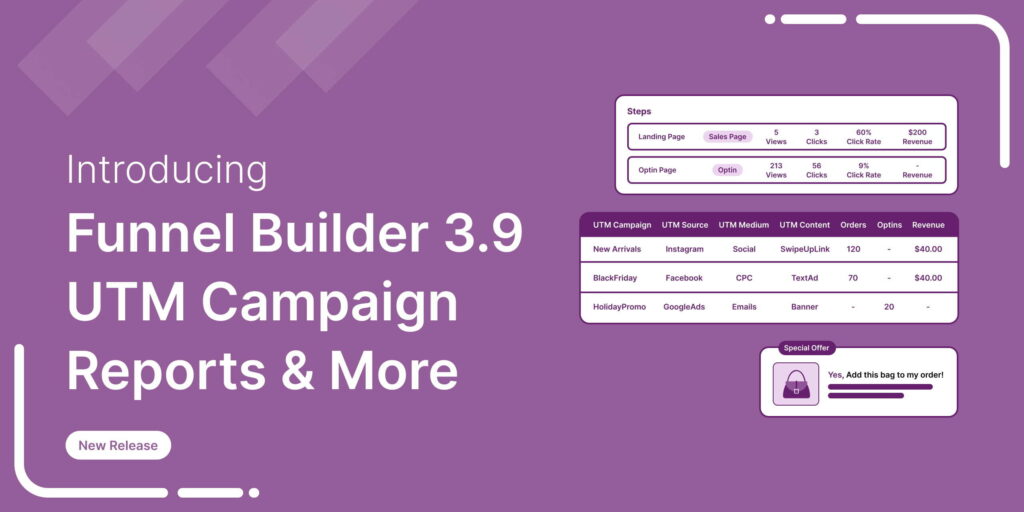
February 4, 2025The wait is over! We’re proud to announce the latest FunnelKit Funnel Builder version 3.9 release. This new release is packed with powerful new features designed to streamline your checkout...


