
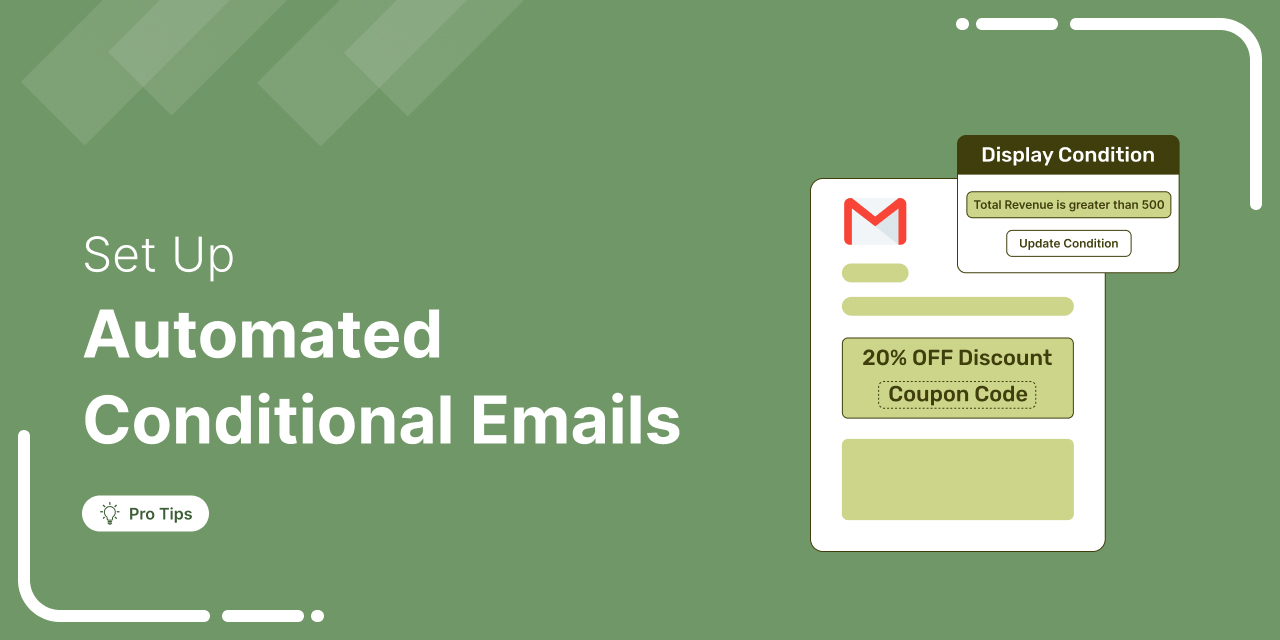
Discover why sending the same email to everyone can hurt engagement and how WooCommerce conditional emails help you deliver personalized messages for better results.
Not every customer should get the same email.
A first-time buyer is in a very different place than someone who's ordered from you ten times, and neither one is the customer who only ever buys when there's a discount on the table.
Send all three the same generic message, and most of it lands flat.
That's why so many store owners rely on WooCommerce conditional emails. Instead of one email going out to your entire list, the message bends around the customer, what they bought, how much they spent, their location, or their order history.
Tweaks that small move the needle on response rates more than most people expect.
Table of Contents
- 1 What are WooCommerce Conditional Emails?
- 2 Key Parameters for Creating Conditional Emails in WooCommerce
- 3 How to Set Up Automated WooCommerce Conditional Emails?
- 4 How to Send Conditional Content in WooCommerce Transactional Emails
- 5 Benefits of WooCommerce Conditional Emails
- 6 Frequently Asked Questions About Conditional Emails in WooCommerce
- 7 Does WooCommerce support conditional emails by default?
- 8 What is the difference between conditional sending and conditional content?
- 9 Can I show different content in the same WooCommerce email?
- 10 Do I need to write code to set up conditional emails?
- 11 Can I add conditional content to WooCommerce transactional emails?
- 12 Ready to Send WooCommerce Conditional Emails?
What are WooCommerce Conditional Emails?
WooCommerce conditional emails are emails that adjust based on conditions you set.
That plays out in two ways. The first decides who actually gets the email, so it only reaches customers who meet a rule you've chosen. The second decides what shows up inside, letting one template display different content depending on who opens it. WooCommerce can't do this on its own, so you'll need a plugin for it.
Here are some examples of WooCommerce conditional email content:
- Purchase history: If a customer purchases from a particular category, you can recommend related products.
- Order information: If a previous order was worth more than a certain amount, you can offer a discount on the next purchase while ensuring a minimum profit.
- Geography: Depending on the customer’s location, you can offer different product recommendations. For instance, you can suggest winter clothing for customers in colder climates, etc.
- Engagement: Based on how a customer interacted with your previous emails, you can display specific content to them.
- VIP customers: Show a higher discount coupon to your VIP customers, which could be based on a list, the number of orders placed, or a high amount spent in your store.
These are just a few examples of WooCommerce conditional content. You can add many more conditions, which we will discuss later in this blog.
Key Parameters for Creating Conditional Emails in WooCommerce
Since WooCommerce doesn’t include built-in conditional email features, you’ll need a plugin to enable advanced personalization.
FunnelKit Automations offers all the key parameters required to create dynamic, behavior-based emails triggered by actions like purchases, cart abandonment, user roles, and more.
What sets FunnelKit Automations apart is its extensive range of conditional options, giving you full control over when emails are sent, who receives them, and what content is displayed.
Here’s an overview of the key condition types you can use to tailor your messaging:
| Condition Type | What You Can Target | Example Use Case |
|---|---|---|
| Order | 20+ order conditions, including purchased products, order total, billing/shipping address, coupons used, payment method, and more | Send a discount to customers who spent over $200 |
| WooCommerce | 12+ customer metrics such as lifetime revenue, total orders, purchased products, average order value, and more | Reward customers who have placed 5+ orders |
| Geography | Country, state, city, and postcode | Recommend seasonal products based on the customer's location |
| Segment | Tags, lists, and custom audiences created in FunnelKit Automations | Send exclusive offers to your wholesale customer list |
| Contact Details | Name, email, gender, and date of birth | Automatically send birthday coupons |
| Contact Fields | Custom fields like business type, referral count, interests, and other stored data | Target B2B customers with bulk purchase offers |
| User | Logged-in status, user role, and account information | Show member-only pricing or promotions |
| Engagement | Email opens, link clicks, engagement level, and other interaction data | Resend a campaign to subscribers who didn't open the first email |
| Broadcast | Whether a broadcast email was sent, opened, or clicked | Follow up only with subscribers who didn't click your previous email |
| Automation | Active, completed, or skipped automation workflows | Exclude customers already in a welcome series |
| FunnelKit | Funnel Builder checkout, order bump, upsell, and funnel activity | Trigger follow-up emails after a purchase through a specific sales funnel |
| DateTime | Current time, date, day, week, month, and year | Send campaigns only during business hours or on specific days |
Using these powerful parameters, you can control exactly which emails are sent to which audience, ensuring your messages are always relevant.
And it's not just about sending, you can even apply conditions within the email body to show or hide specific content based on user attributes or behavior.
With this level of flexibility, you can craft emails that truly reflect your customers’ needs, driving higher engagement, stronger relationships, and better conversions.
How to Set Up Automated WooCommerce Conditional Emails?
In this section, we will show you how to send conditional emails by applying different conditions before sending them, and how to display dynamic email content for more personalized messaging.
As an example, we will share how to design a conditional content for product recommendation emails, but you can use the same process to display conditional content in all your WooCommerce emails.
We’ll use FunnelKit Automations.
You need to install and activate both the free and pro versions of this plugin.
Step 1: Create an automation to send WooCommerce conditional emails
From the WordPress dashboard, navigate to FunnelKit Automations ⇒ Automations and hit “Create Automation”.
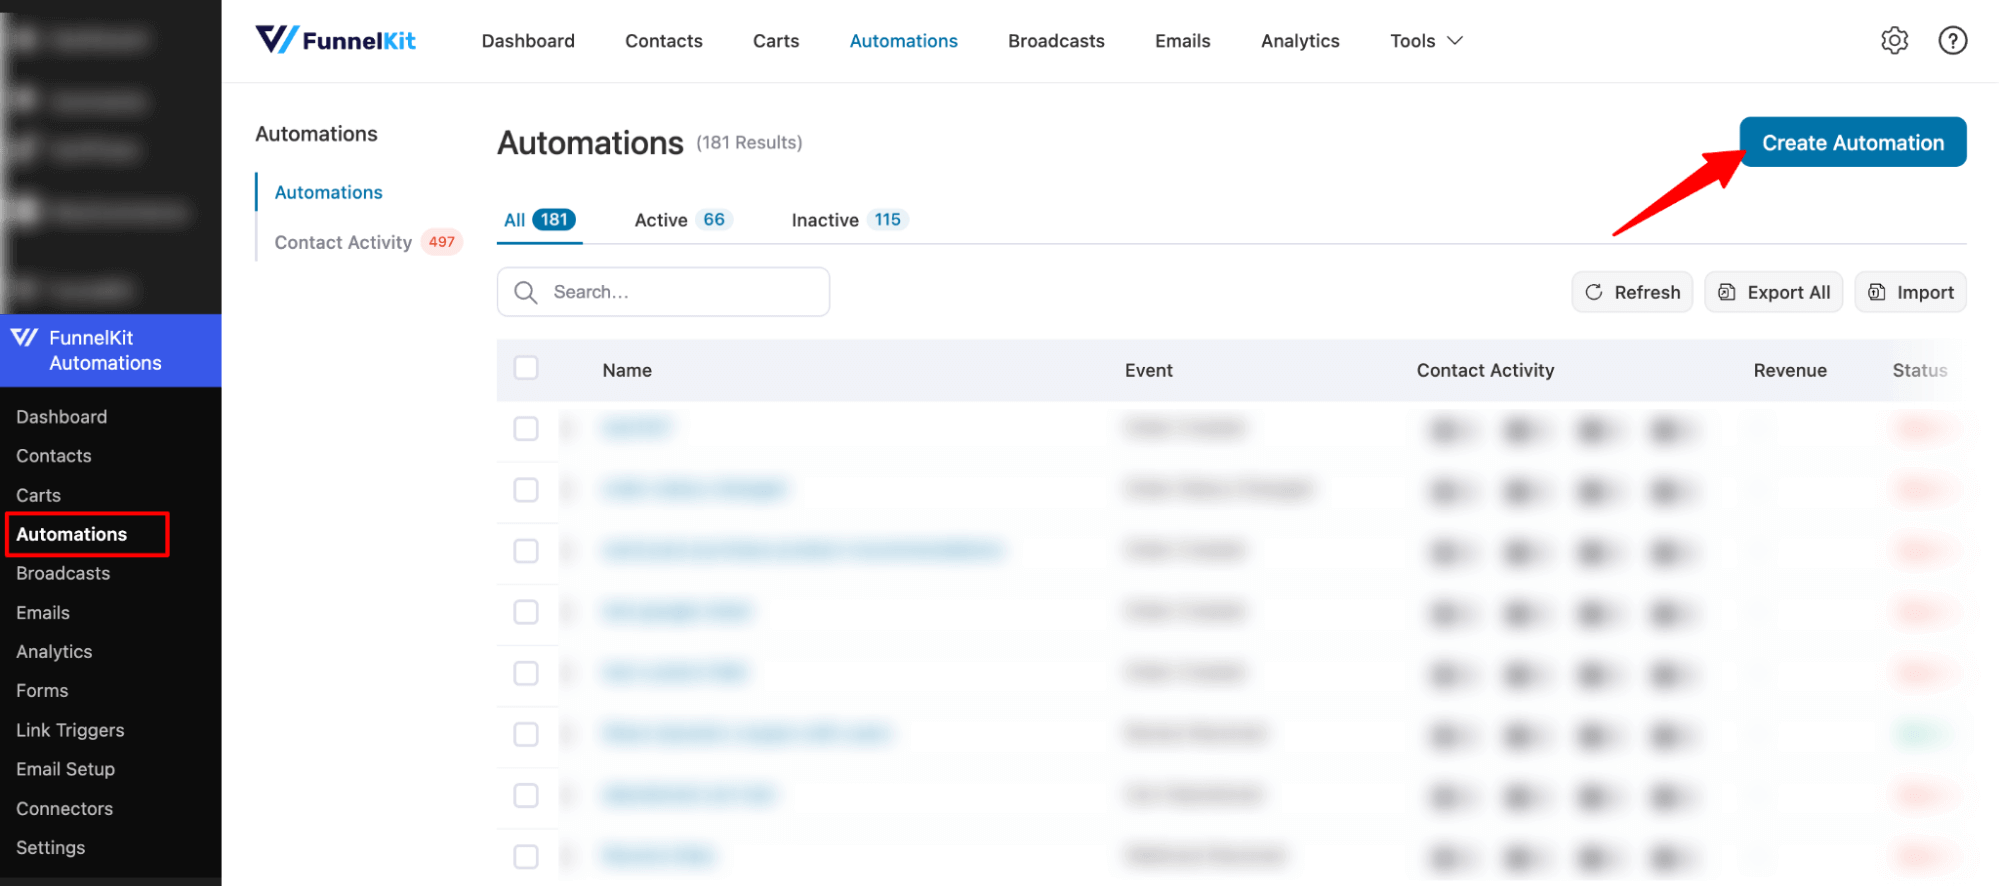
We will build automation from scratch. For this, click on “Start from scratch”, provide a name, and hit “create”.

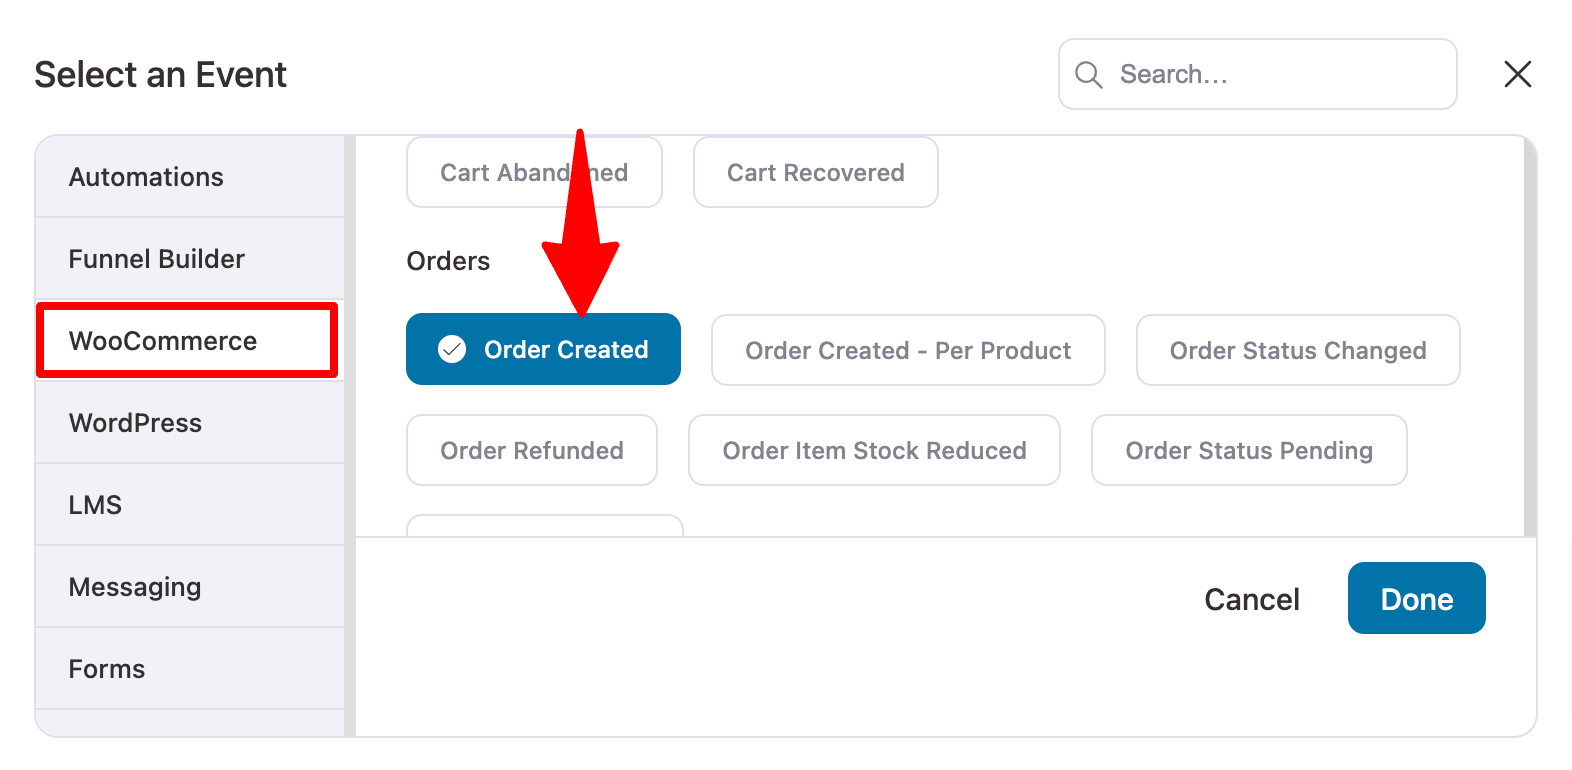
Now, it’s time to select a trigger. To do so, click on the “Select Trigger” option.
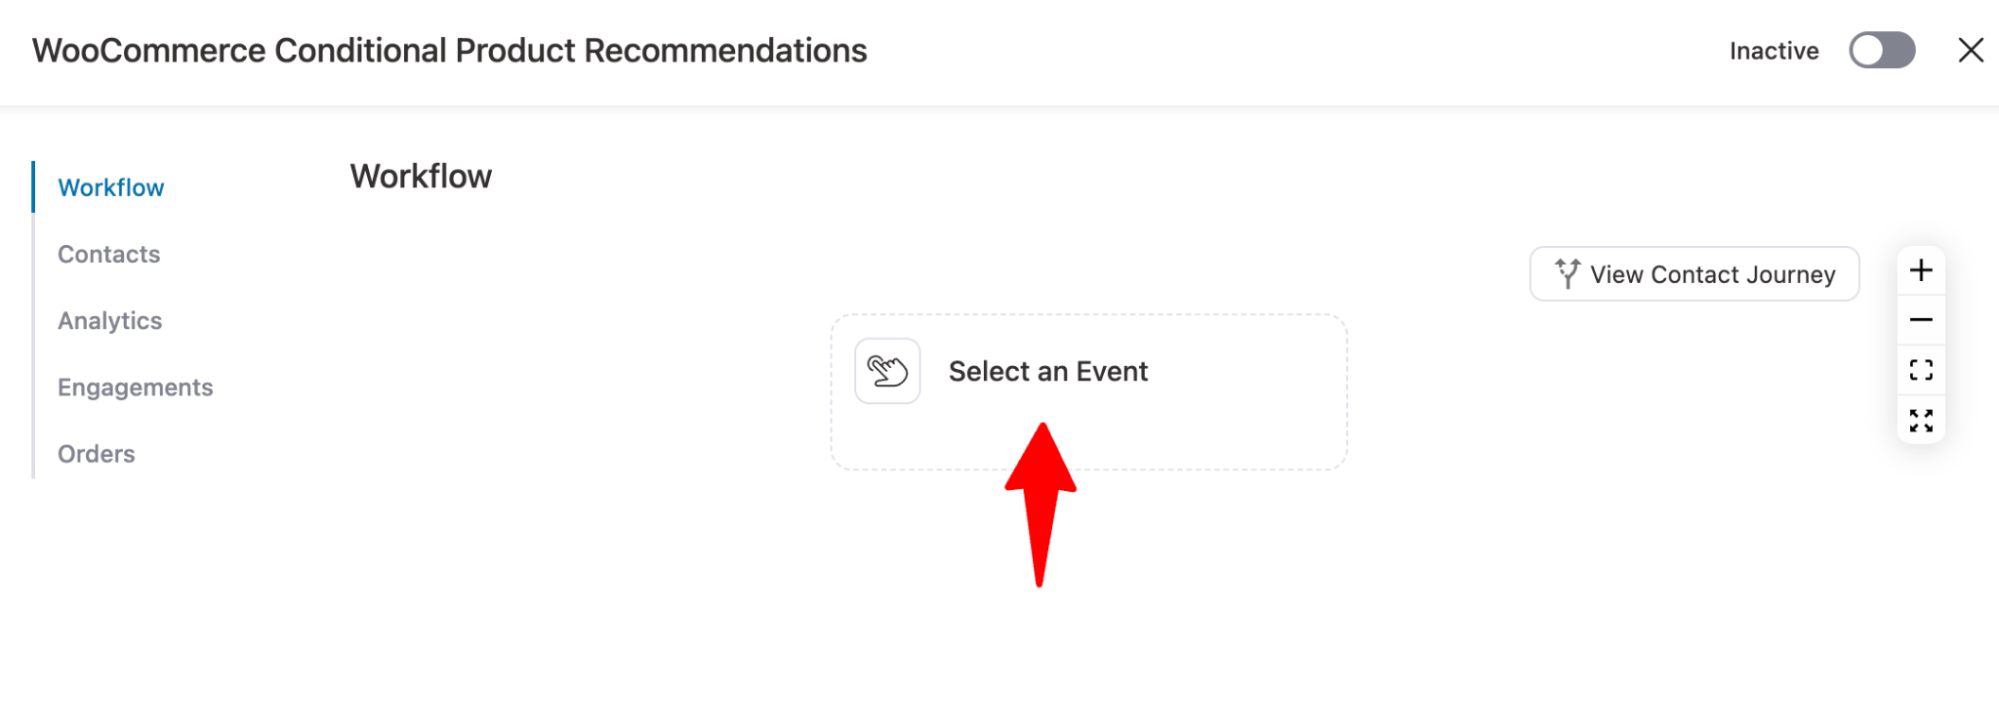
On the WooCommerce tab, select the “Order Created” event. This will trigger the automation once someone places an order on your WooCommerce site.
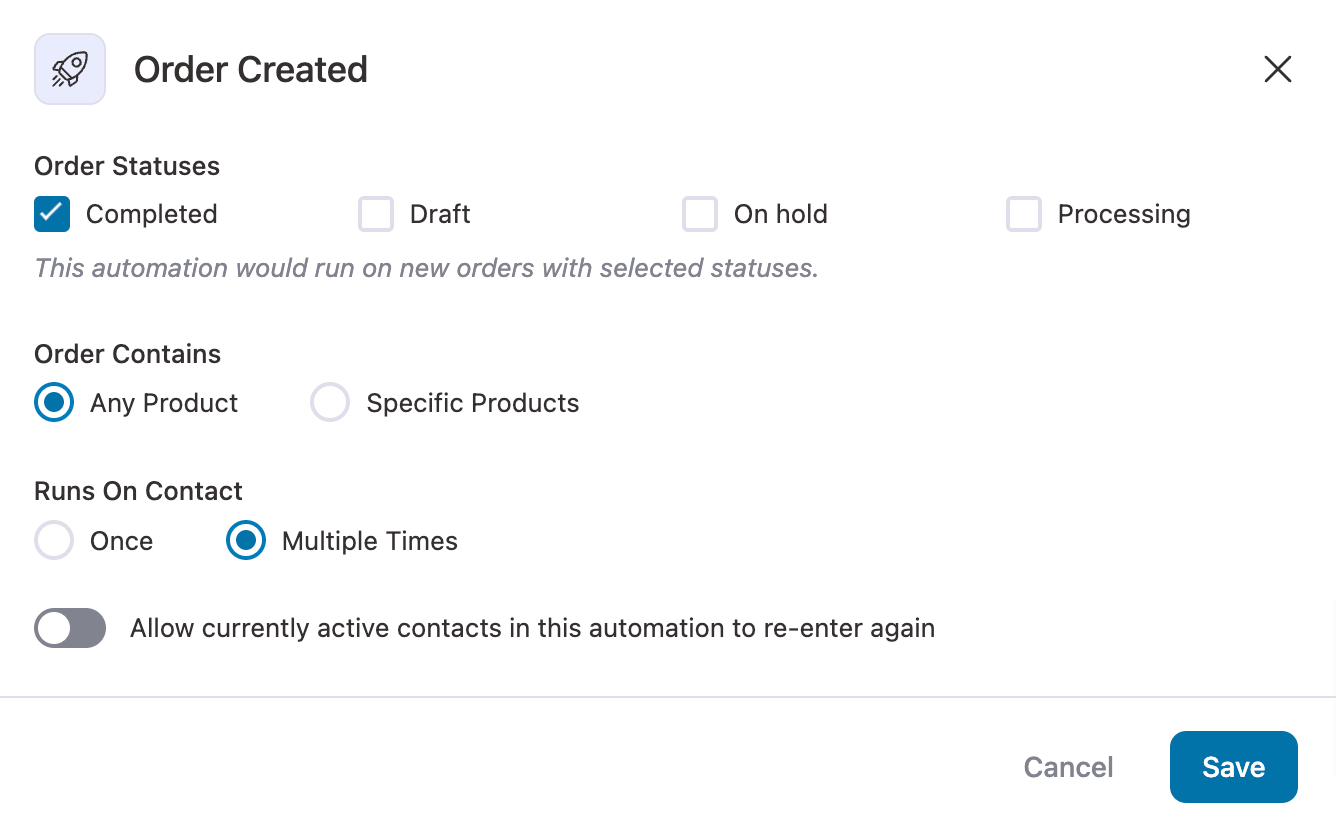
Choose the order statutes for which you want this automation to trigger. Here, we are going with the order completed as we want to send product recommendations after the previous order is delivered.
Choose "Multiple times" for runs on contact to send recommendations to customers every time they place an order.
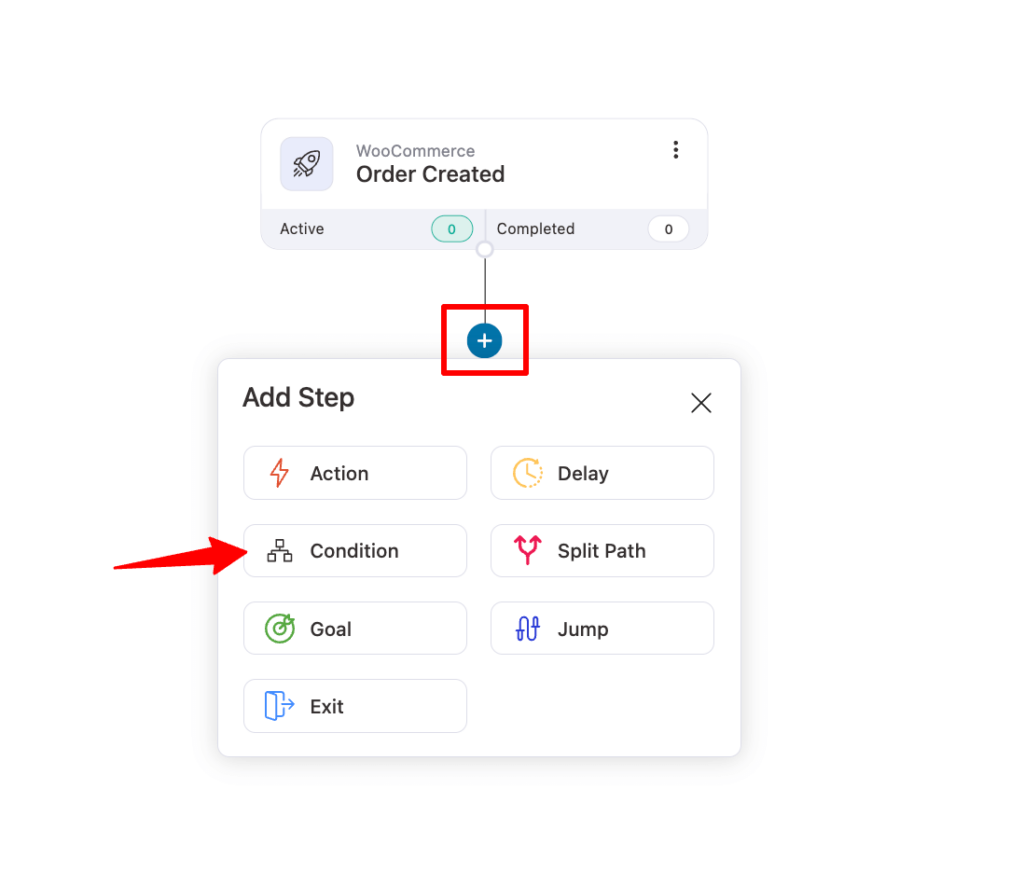
Step 2: Set conditions to target your emails
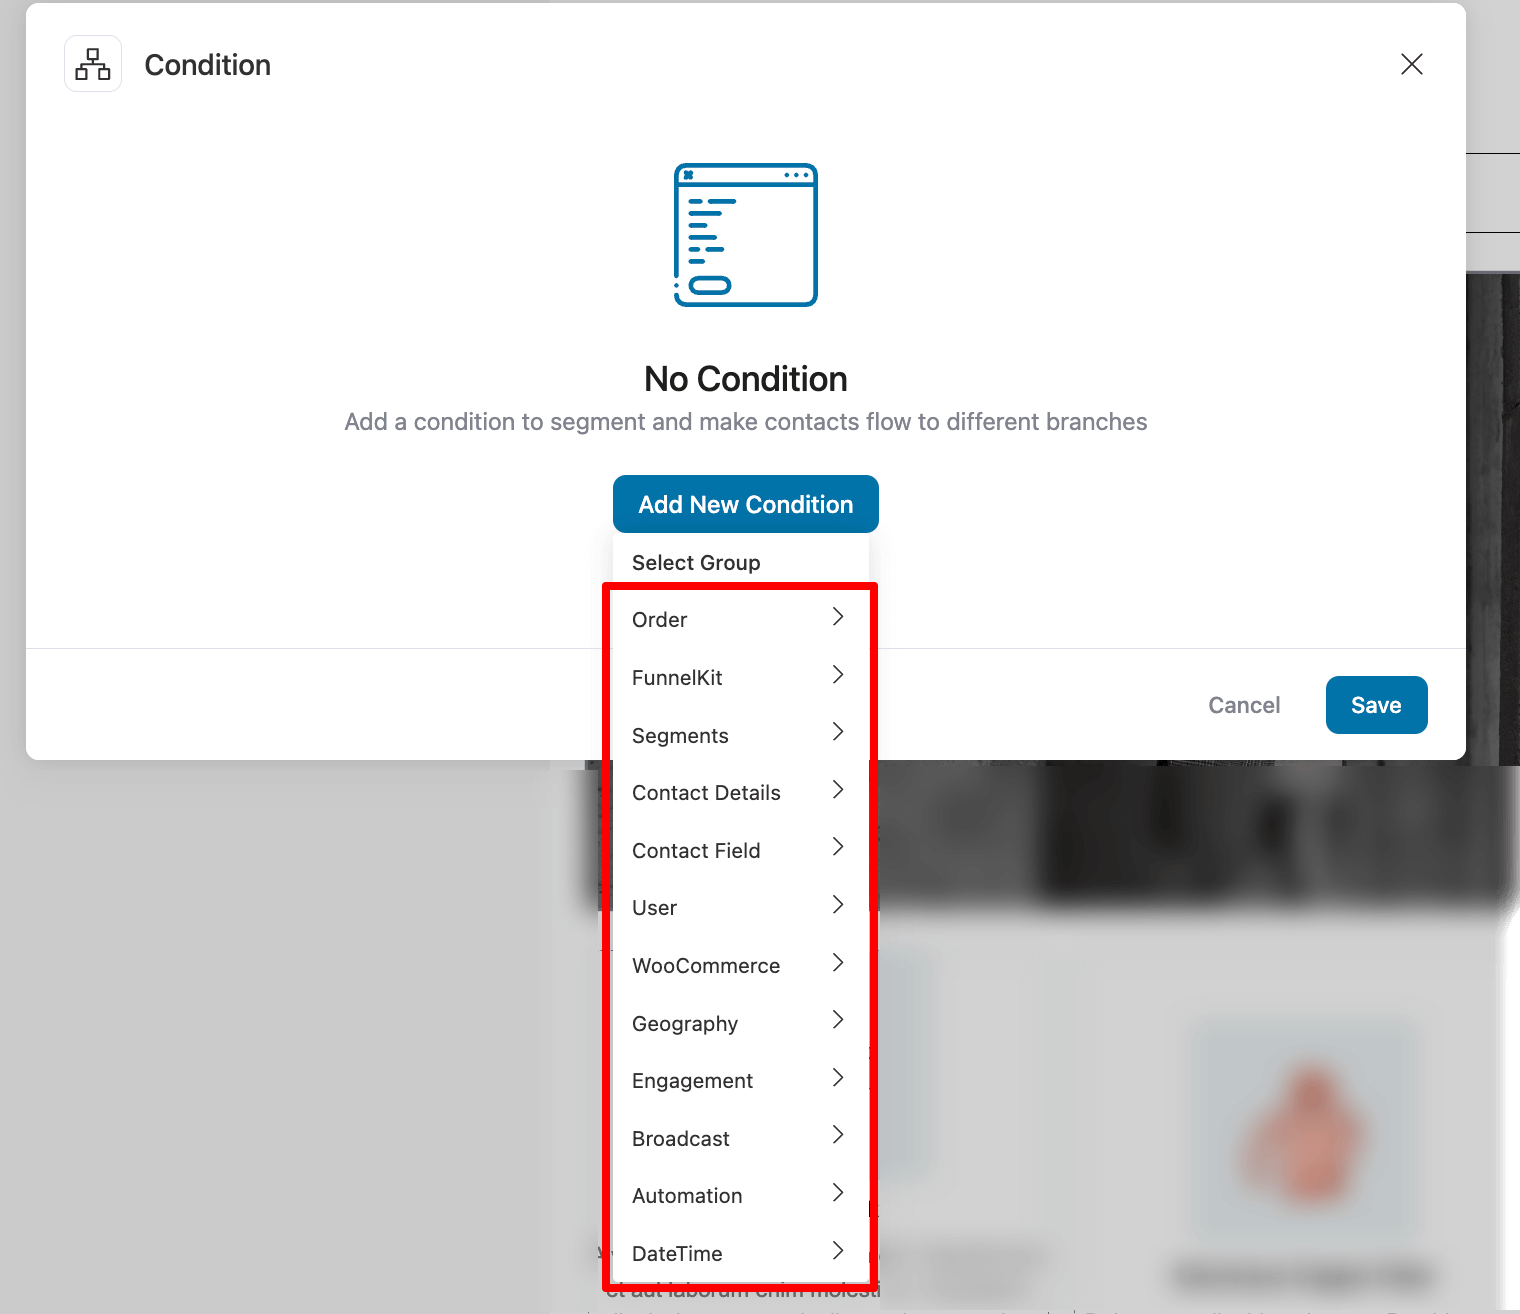
Now you can add conditions here. To add a condition, hit the + icon and choose Condition.
Now you can set different conditions using the parameters we discussed earlier. For example, here we’ll send the product recommendation email only to VIP users who have spent more than $200.

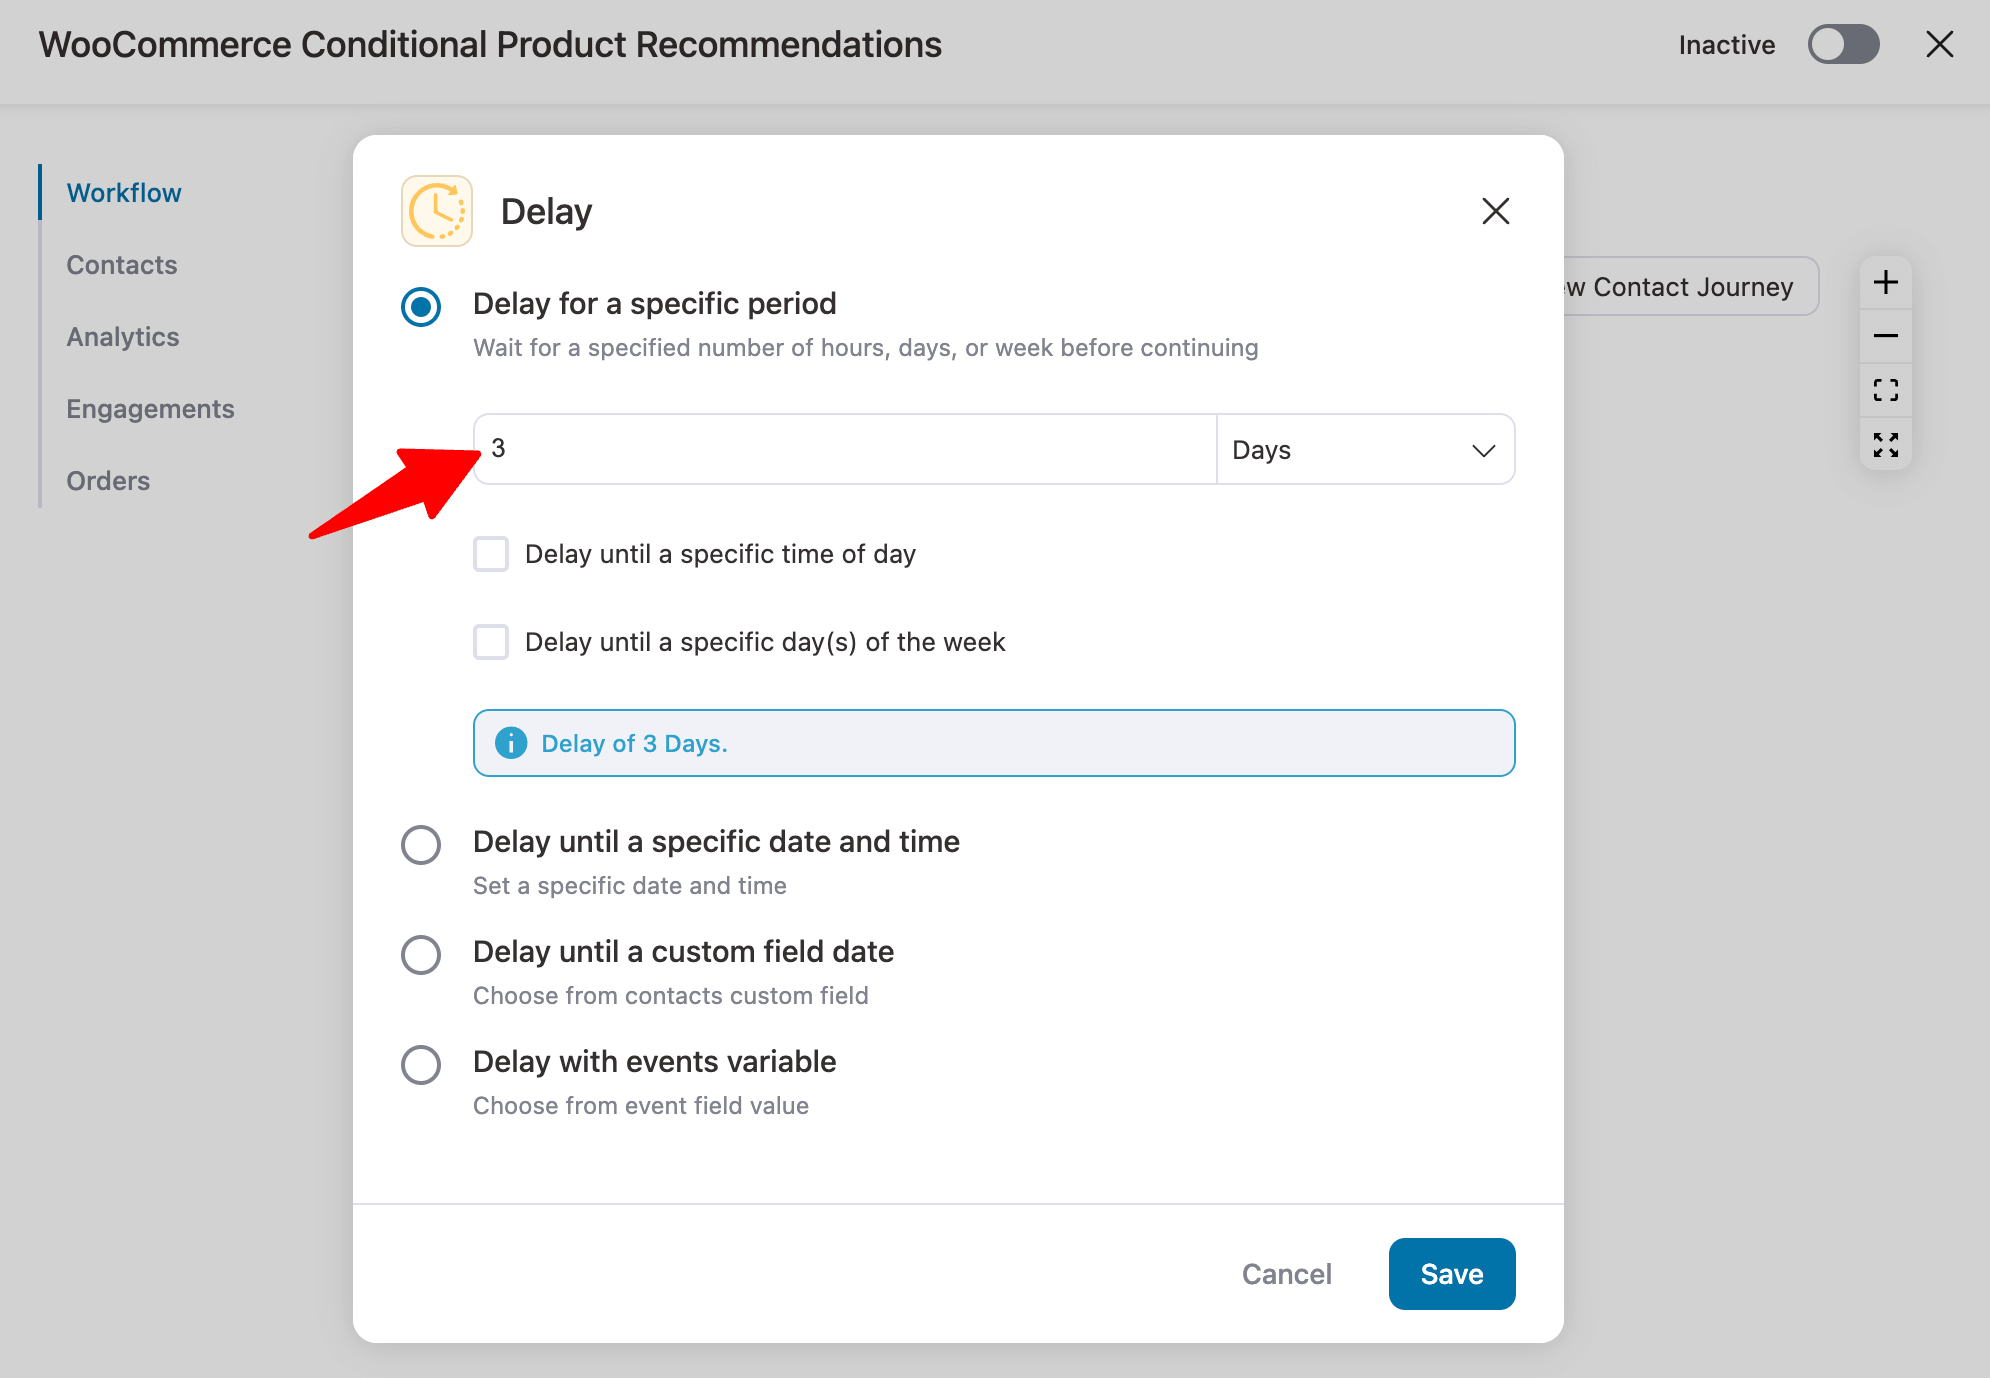
Step 3: Add delay
Now, we will add a delay so you don’t overwhelm the user immediately after they place an order. You should recommend their product after some time has passed.
We will add the delay if the condition is met.
To do so, click the "+" icon, then click Delay.

After that, add a delay and click on Save changes. We have added a 3-day delay.
Step 4: Add send email action
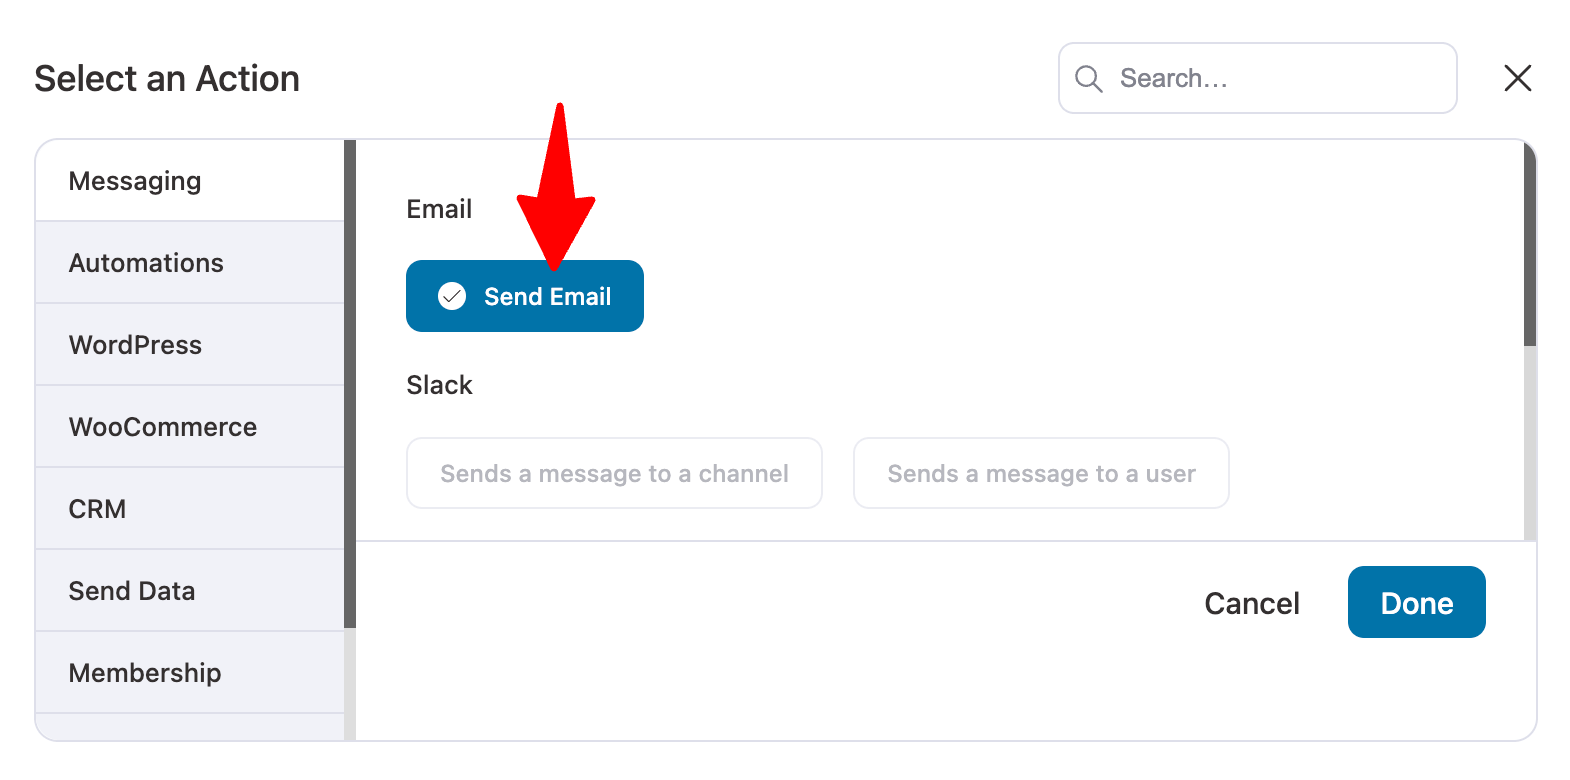
Now, you need to add another action that will send the email. To do so, click the "+" icon, then select Action.
After that, from the Messaging tab, choose the “Send Email” action and click on Done to add the action.
Step 5: Design a WooCommerce conditional email
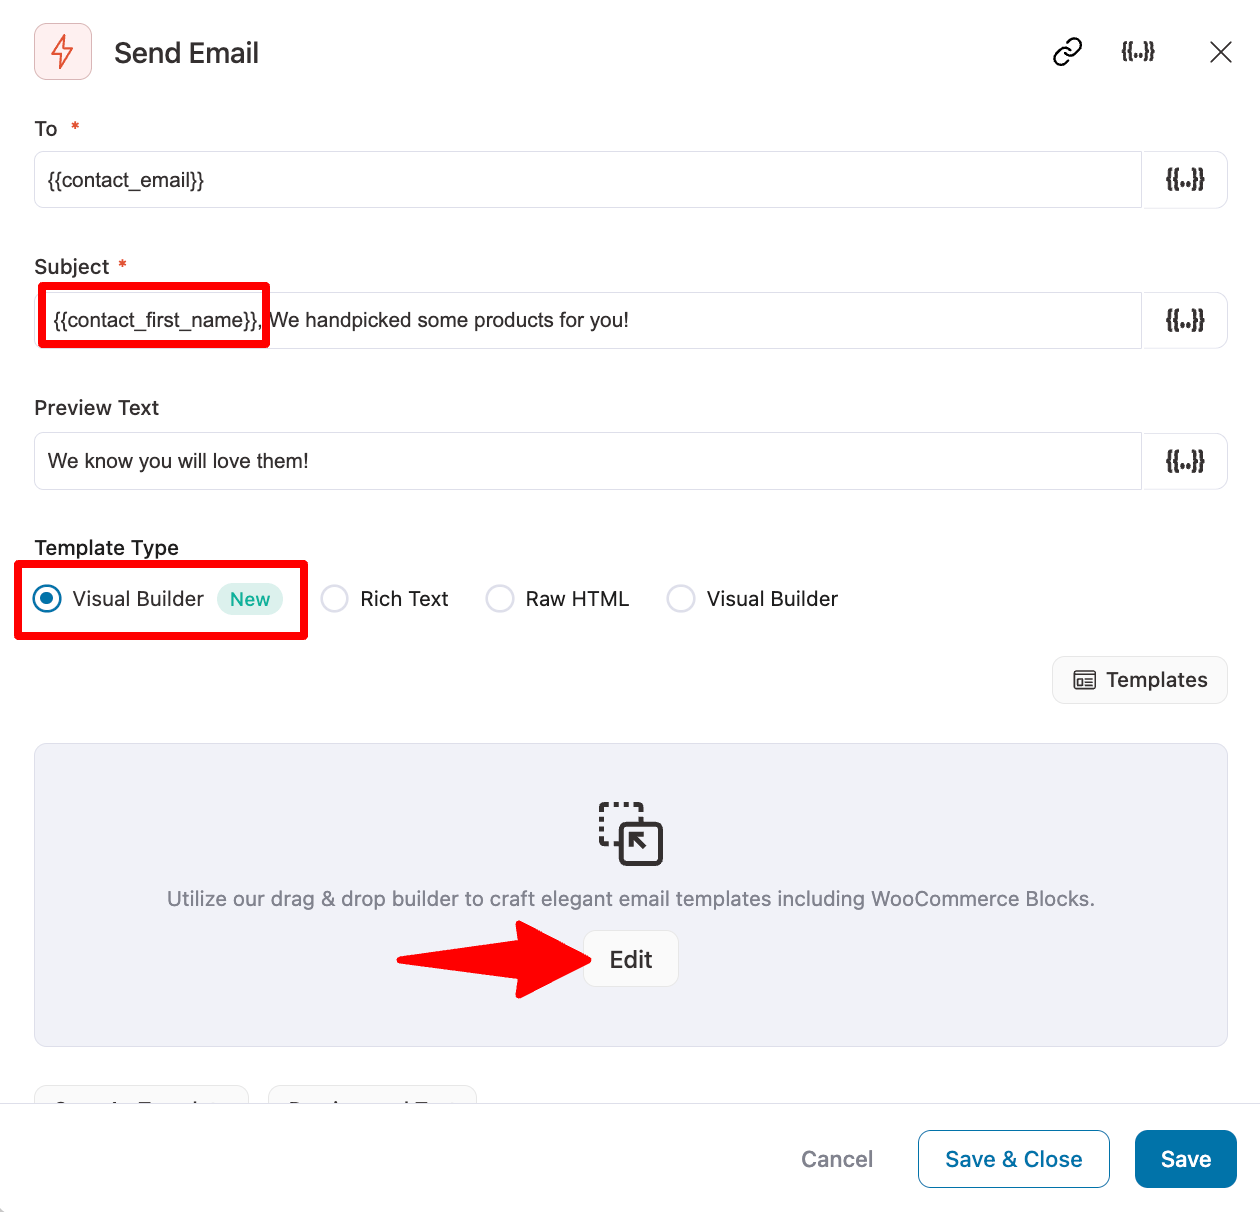
First, set the email subject line and preview the text. Make sure to use the merge tag for personalization.
We are going with the visual builder because it includes a feature for displaying conditional content.
Plus, with its wide range of prebuilt email templates, you can design a stunning device-responsive email in no time.
Then, choose the Visual Builder (New) and hit ‘Edit’.
Now look for the cross-sell template, hover, and hit Preview.
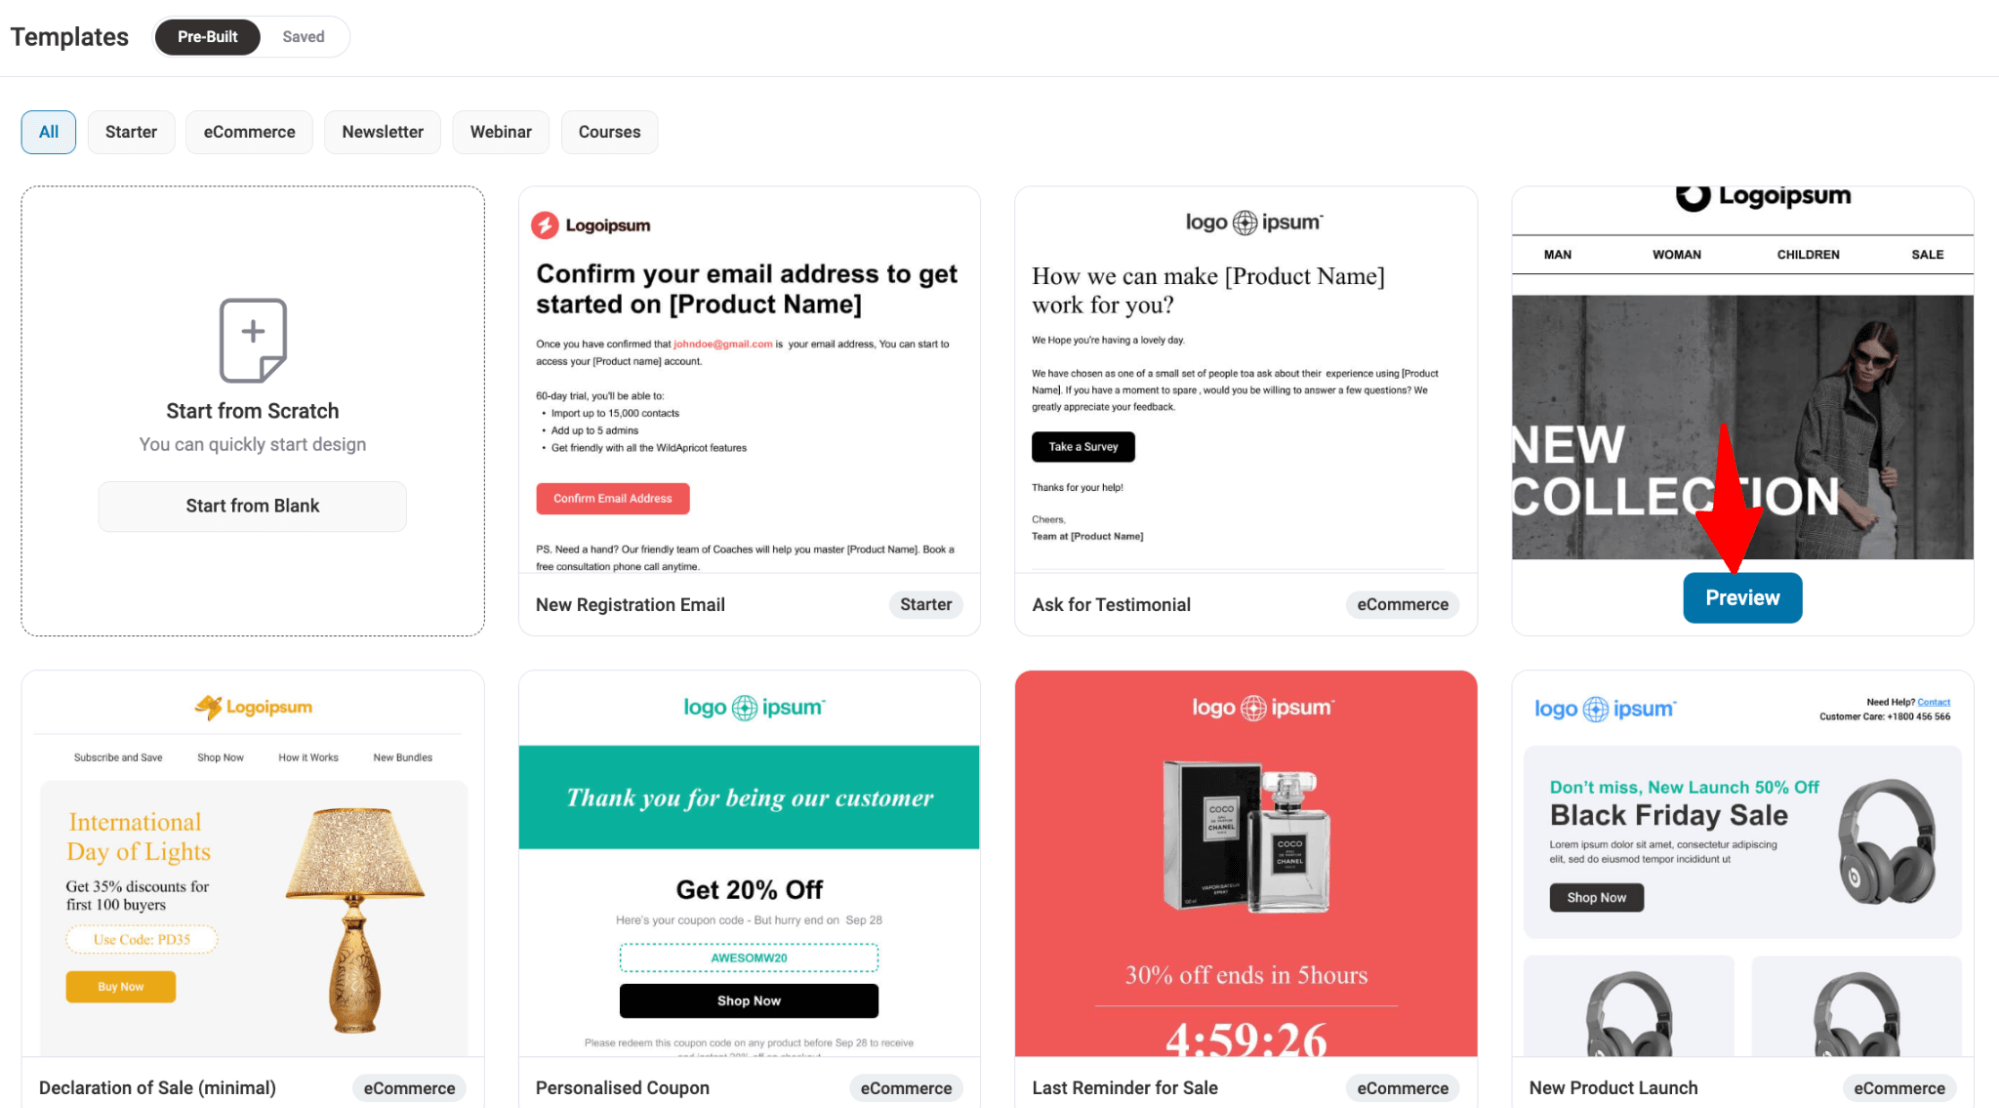
Hit “Import Template” to import the prebuilt cross-sell email template.
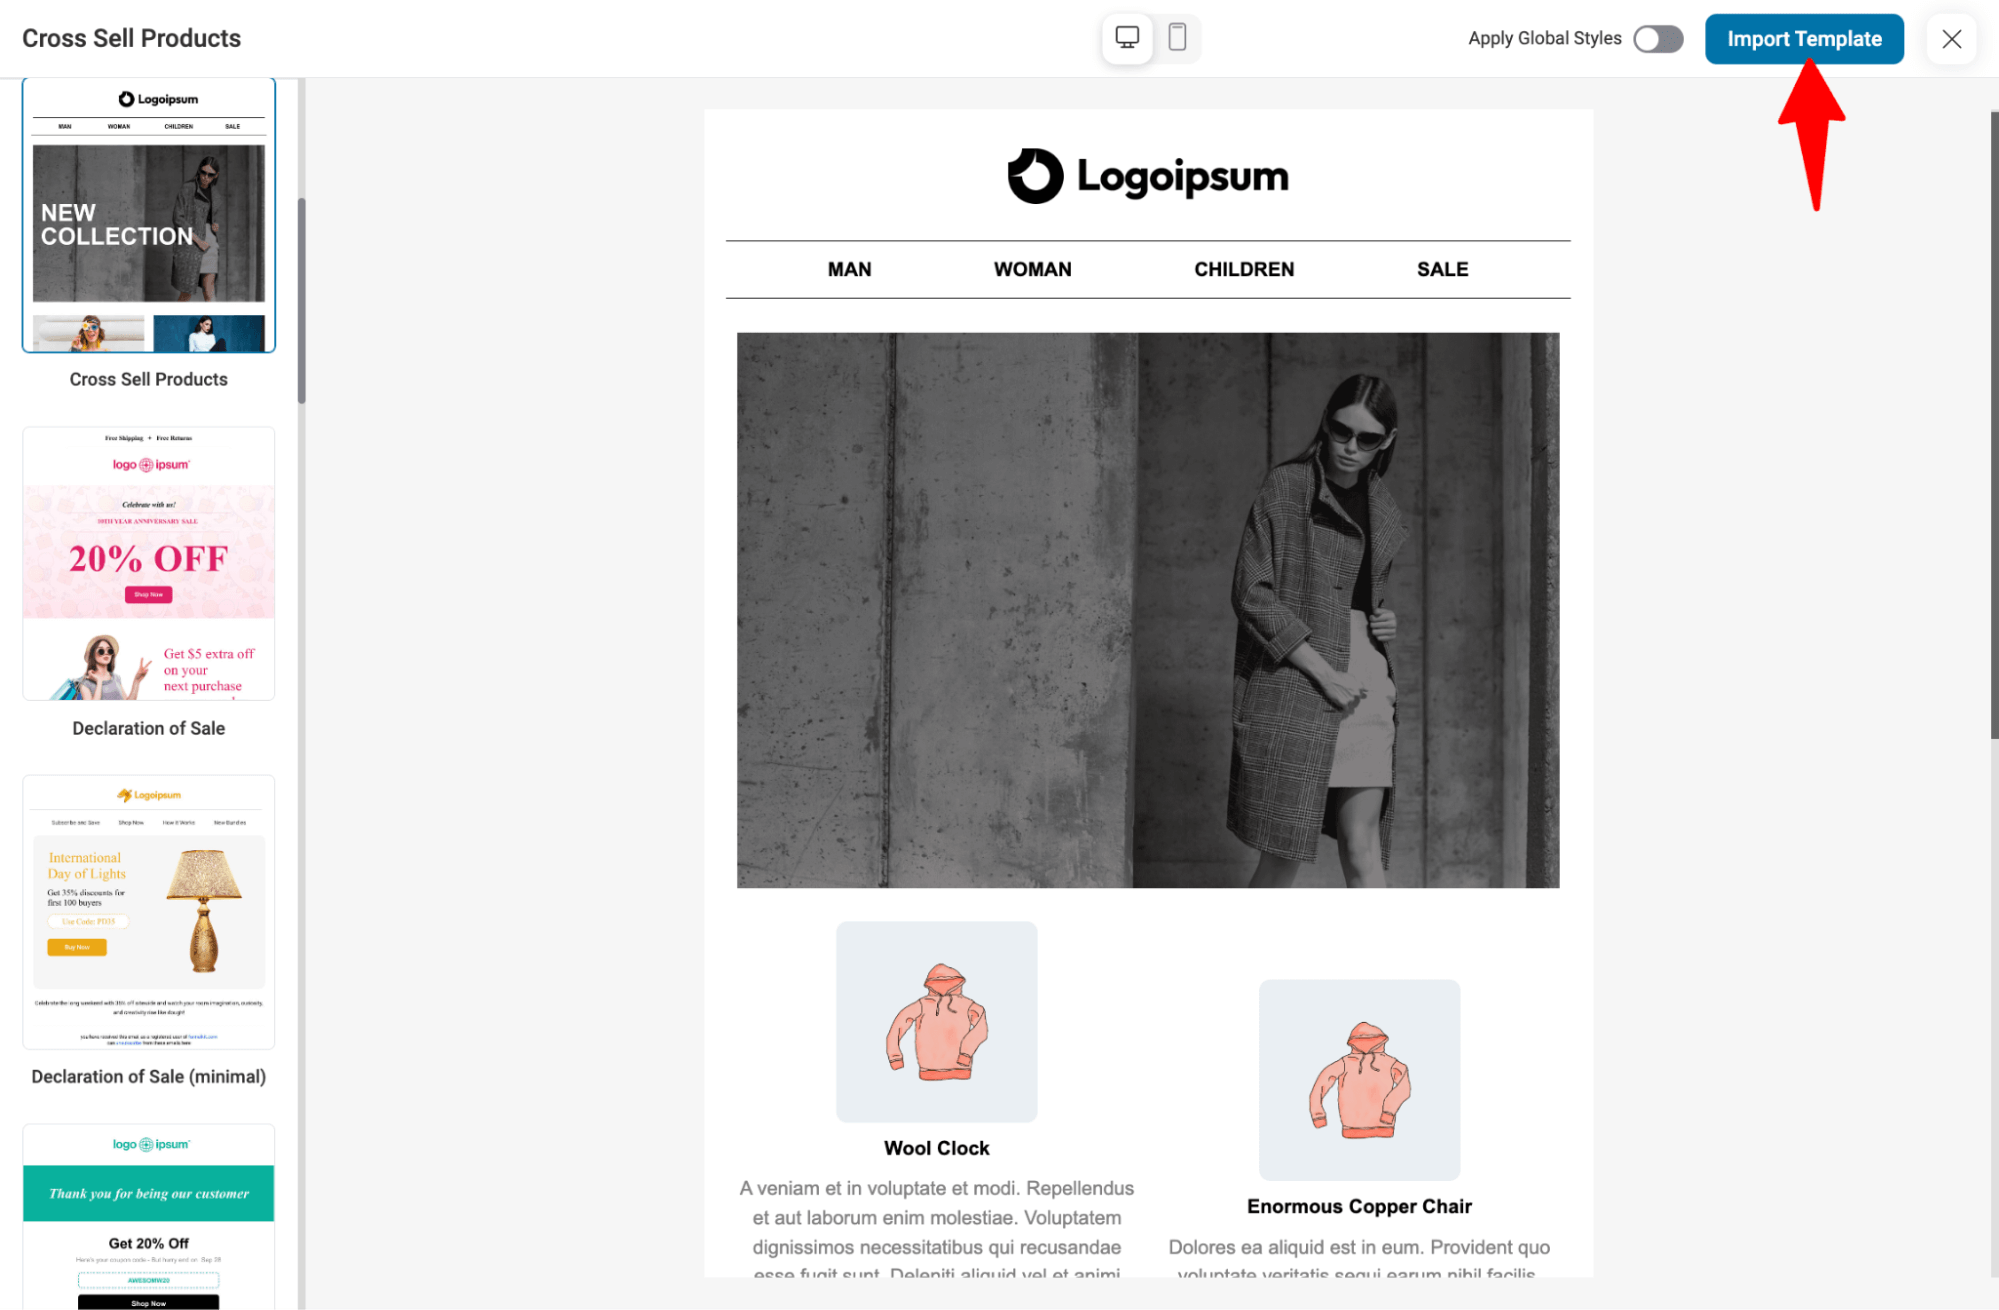
This is a basic product recommendation email template with a banner, product block, and a CTA.
Now, we will add more content and apply different conditions so that different audiences receive more personalized emails.
So, let’s begin.
Add conditions to the banner
You can display different banners based on the time of the year. For instance, you can show a summer banner during warm months or a winter banner during colder months.
Using date-time parameters, you can set up different banners to show up in different seasons.
For this, add a summer banner and replace the default banner. Then click on “Add Condition”.
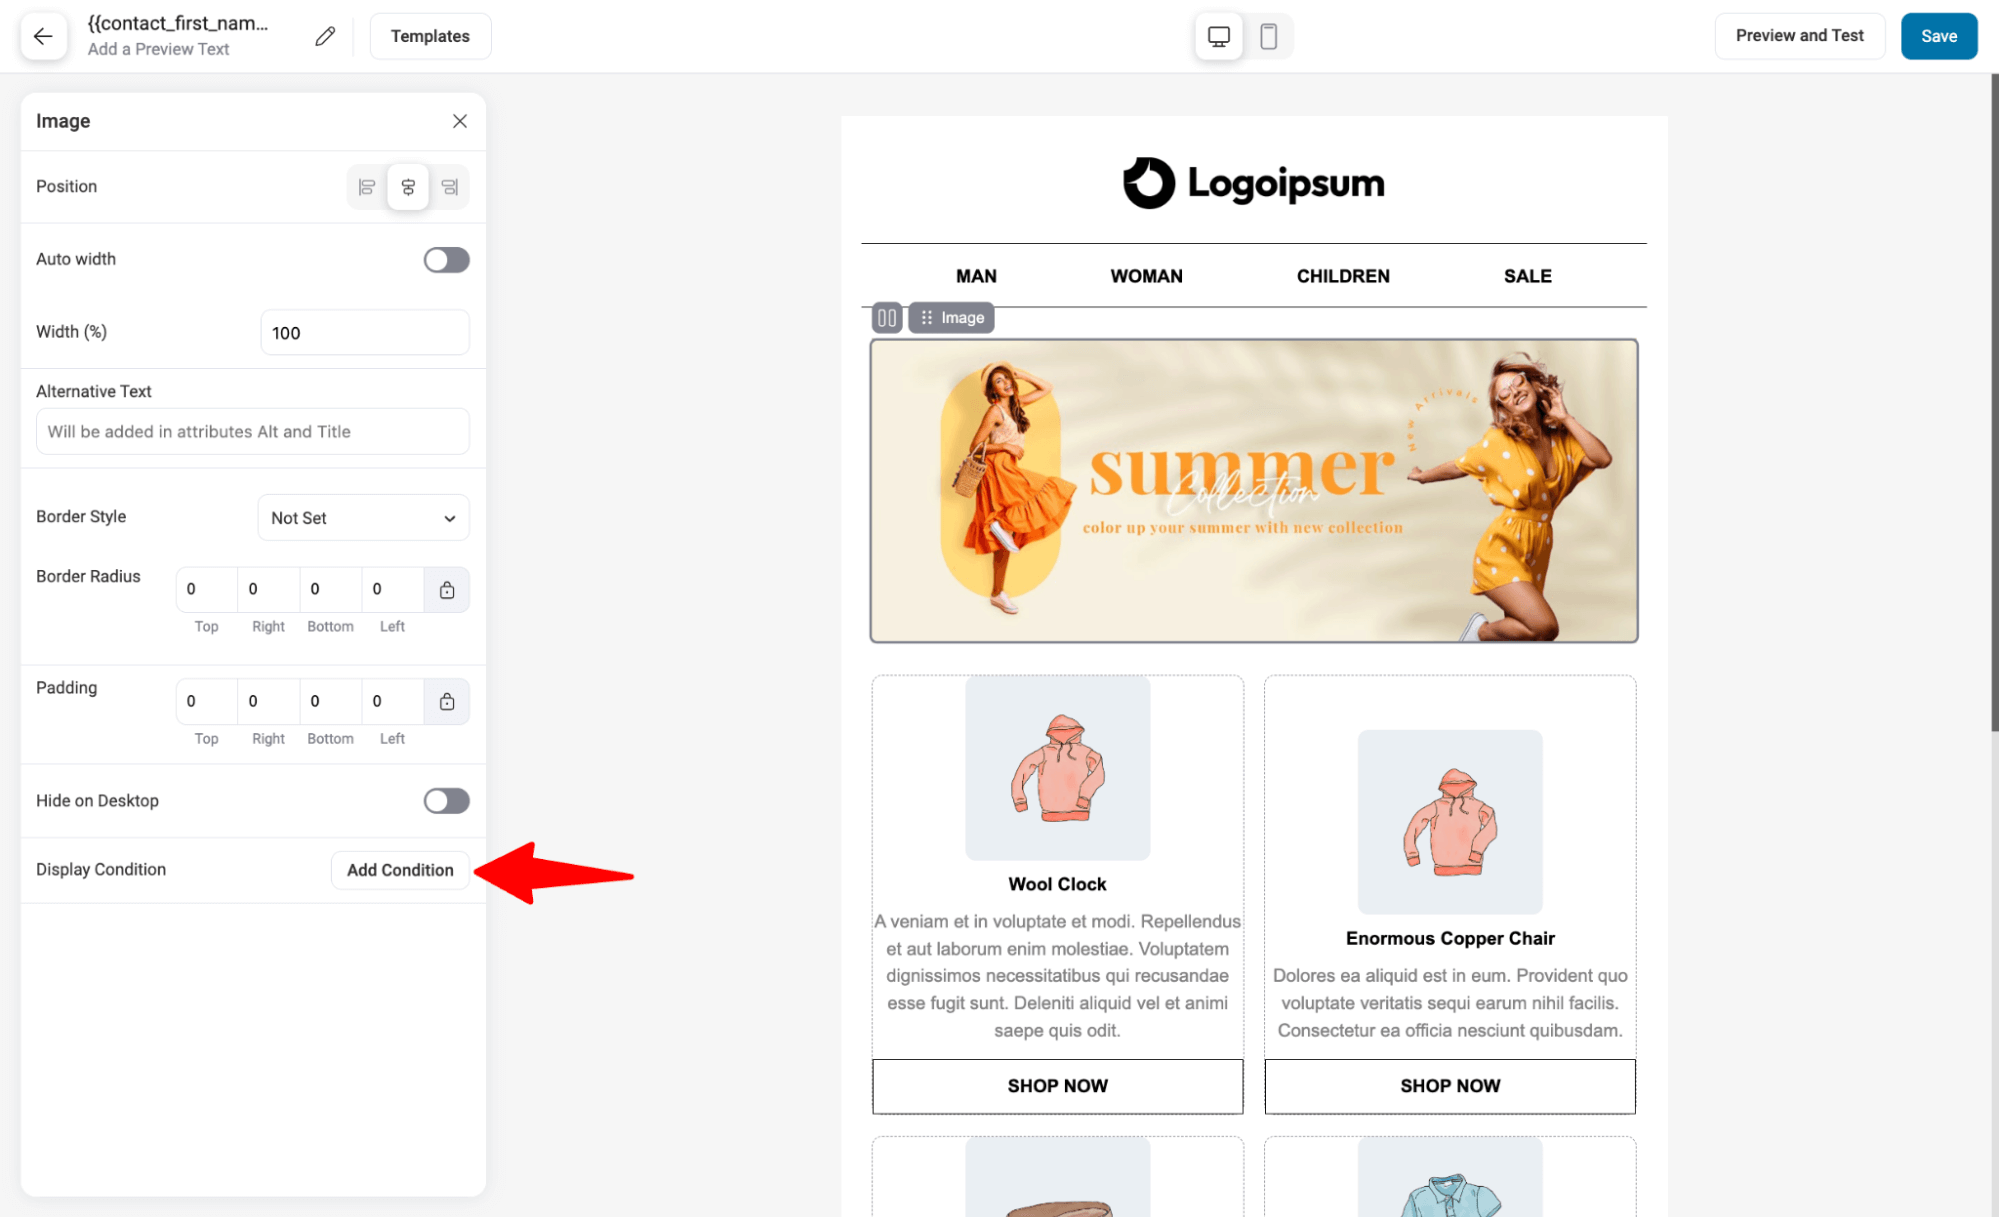
Suppose we are setting up a summer collection banner for a USA audience, and showing it only from June to August, under certain conditions, it is probably a good idea.
For this, choose DateTime and then CurrentDateTime. Set the condition to “is on or after,” and then the starting date and time.
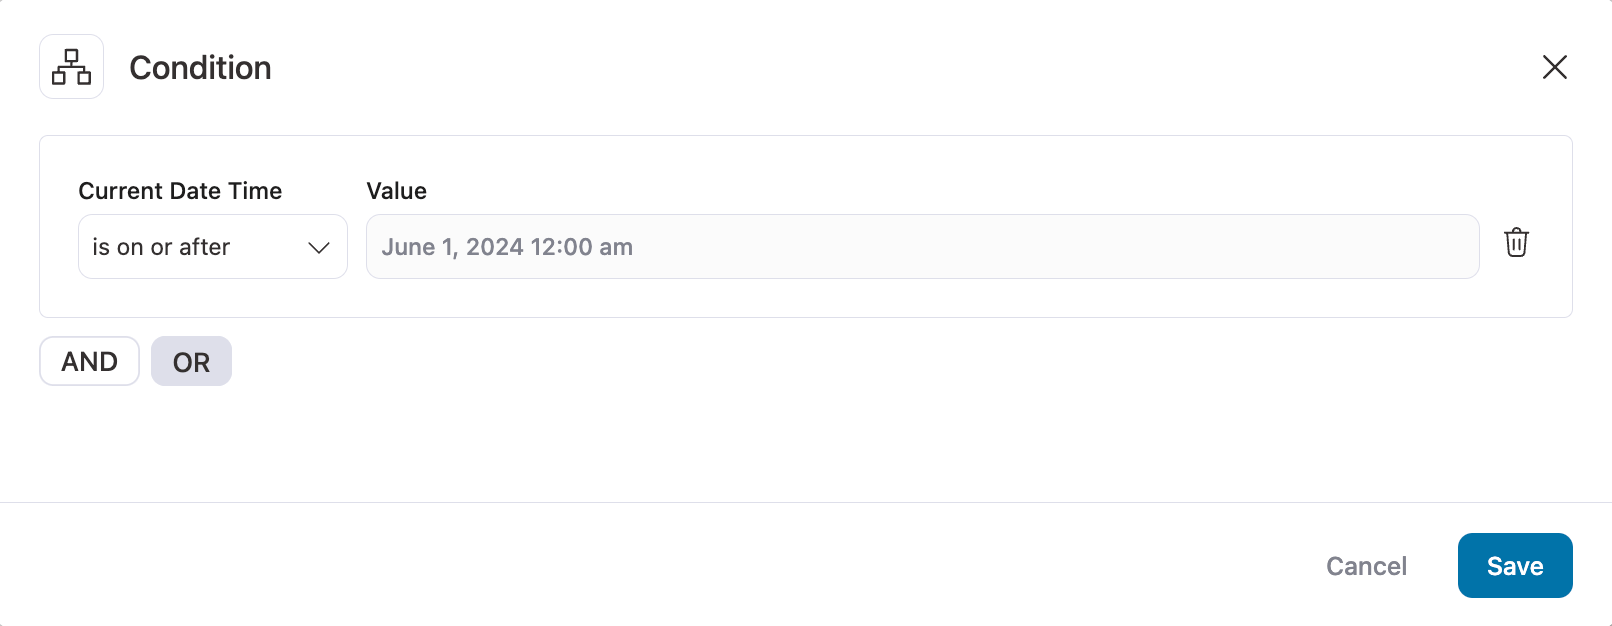
After that, use the “AND” operator, then add the last date limit you want, with the option “Current Time Date is on or before.”
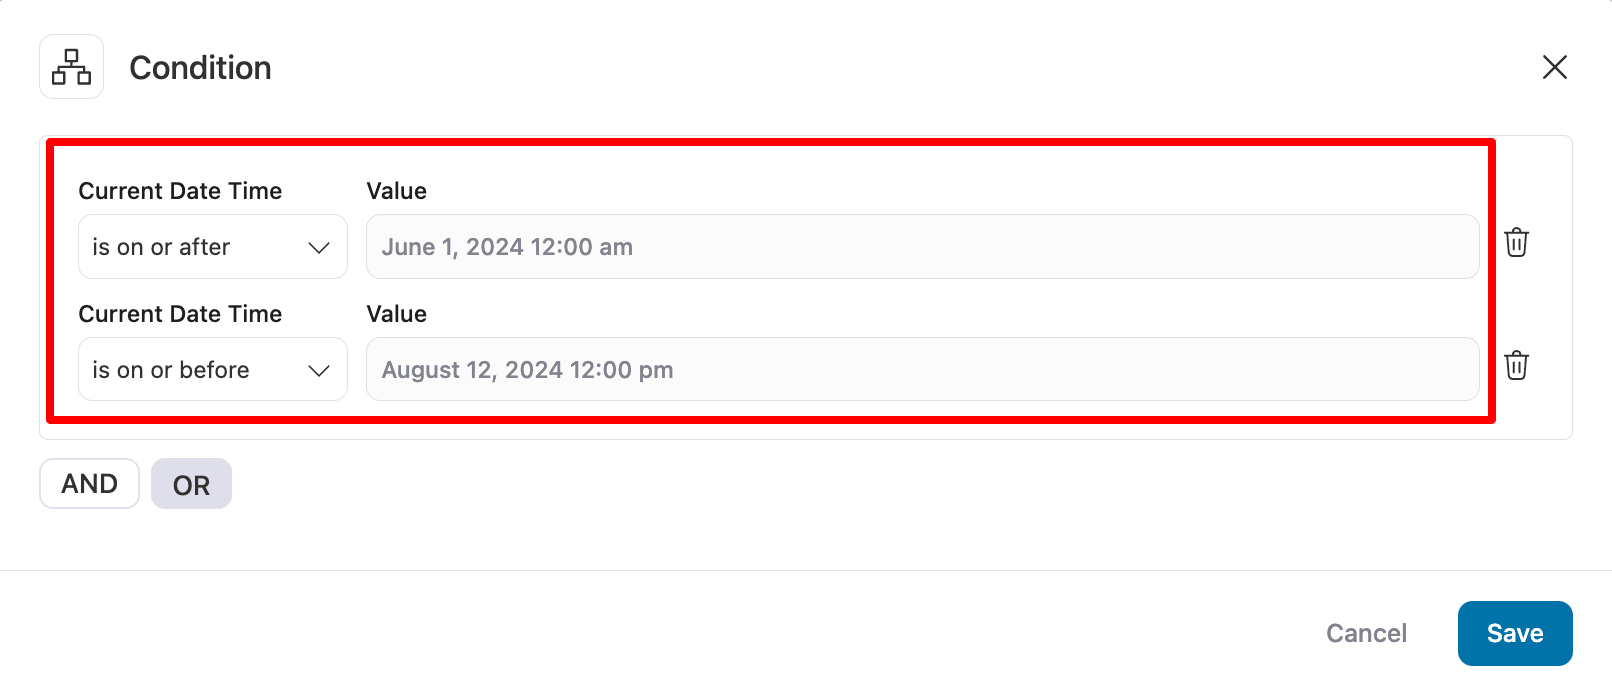
This summer banner will only be visible in the email when it meets the DateTime Condition.
Conditional product recommendations
You can also apply conditions to product recommendations. For example, if a previously purchased product belongs to a certain category, you can recommend products exclusively from that category.
You can also recommend products based on the customer’s gender: female products for women and male products for men.
For this, click on the existing product block and add a condition:
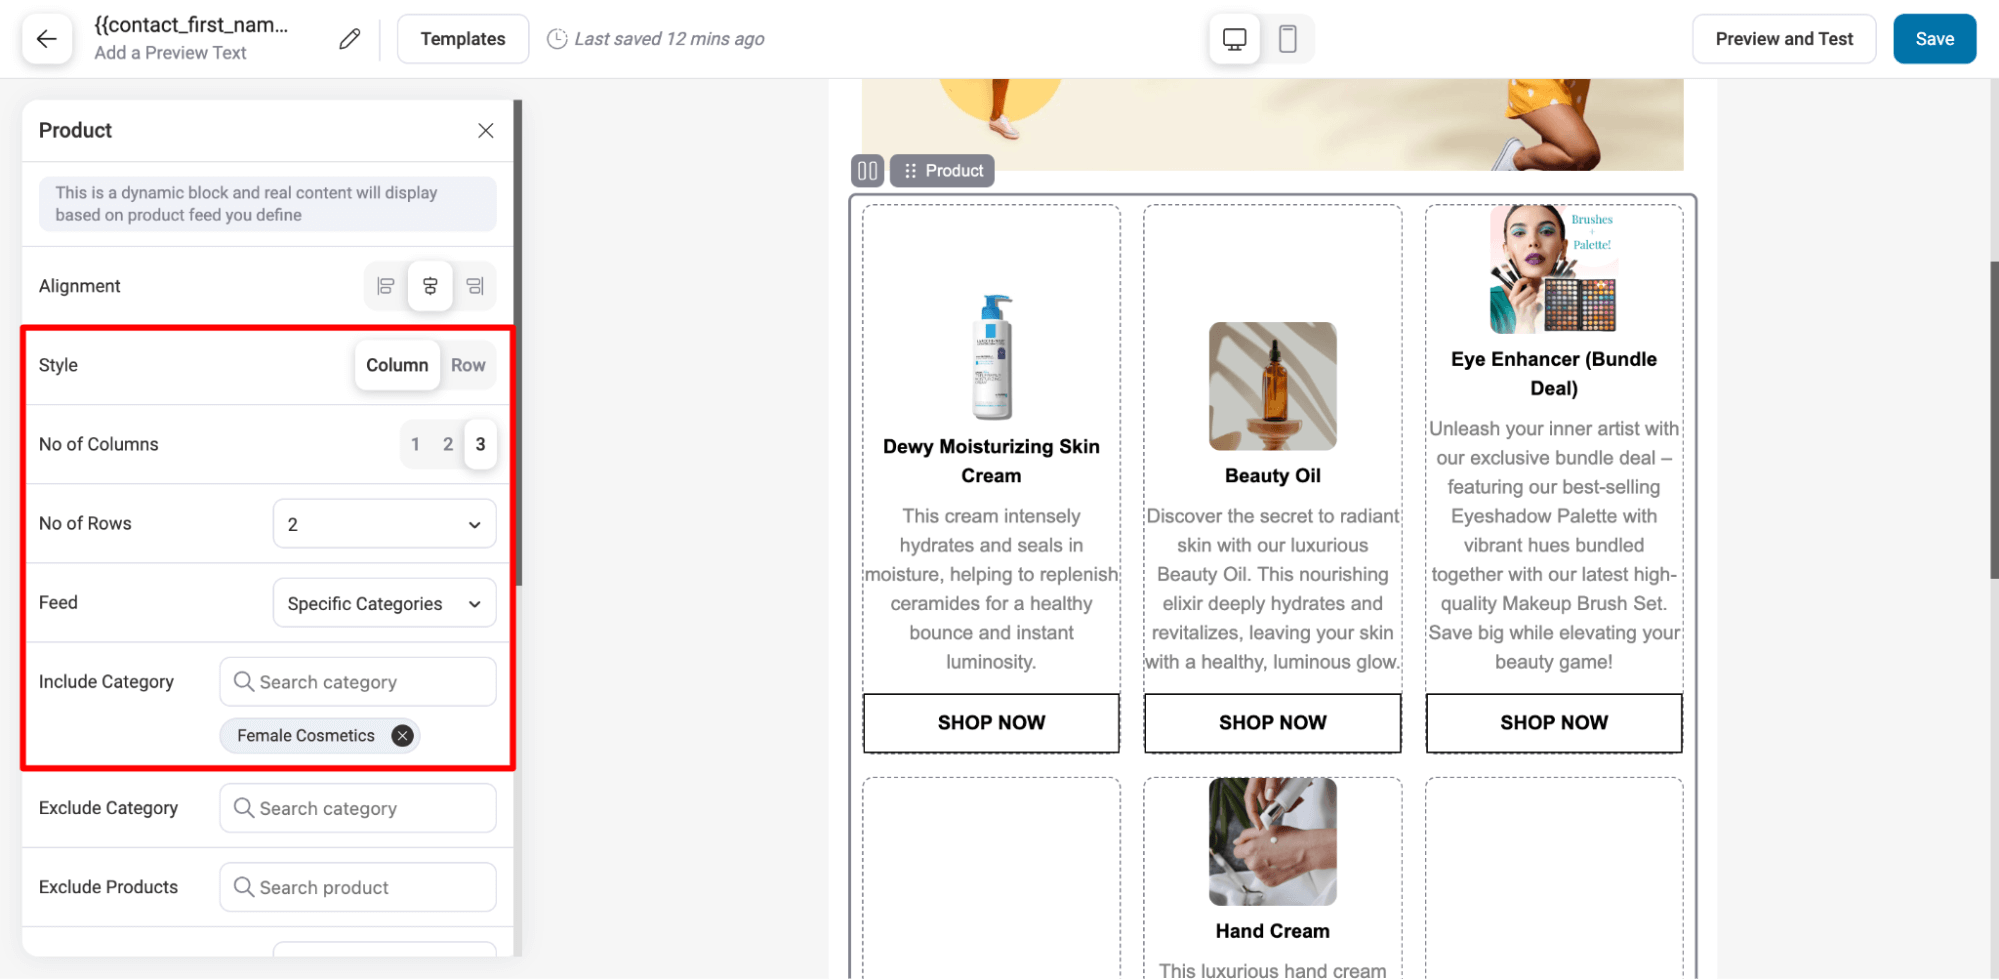
Then set the condition that the customer's gender is female.
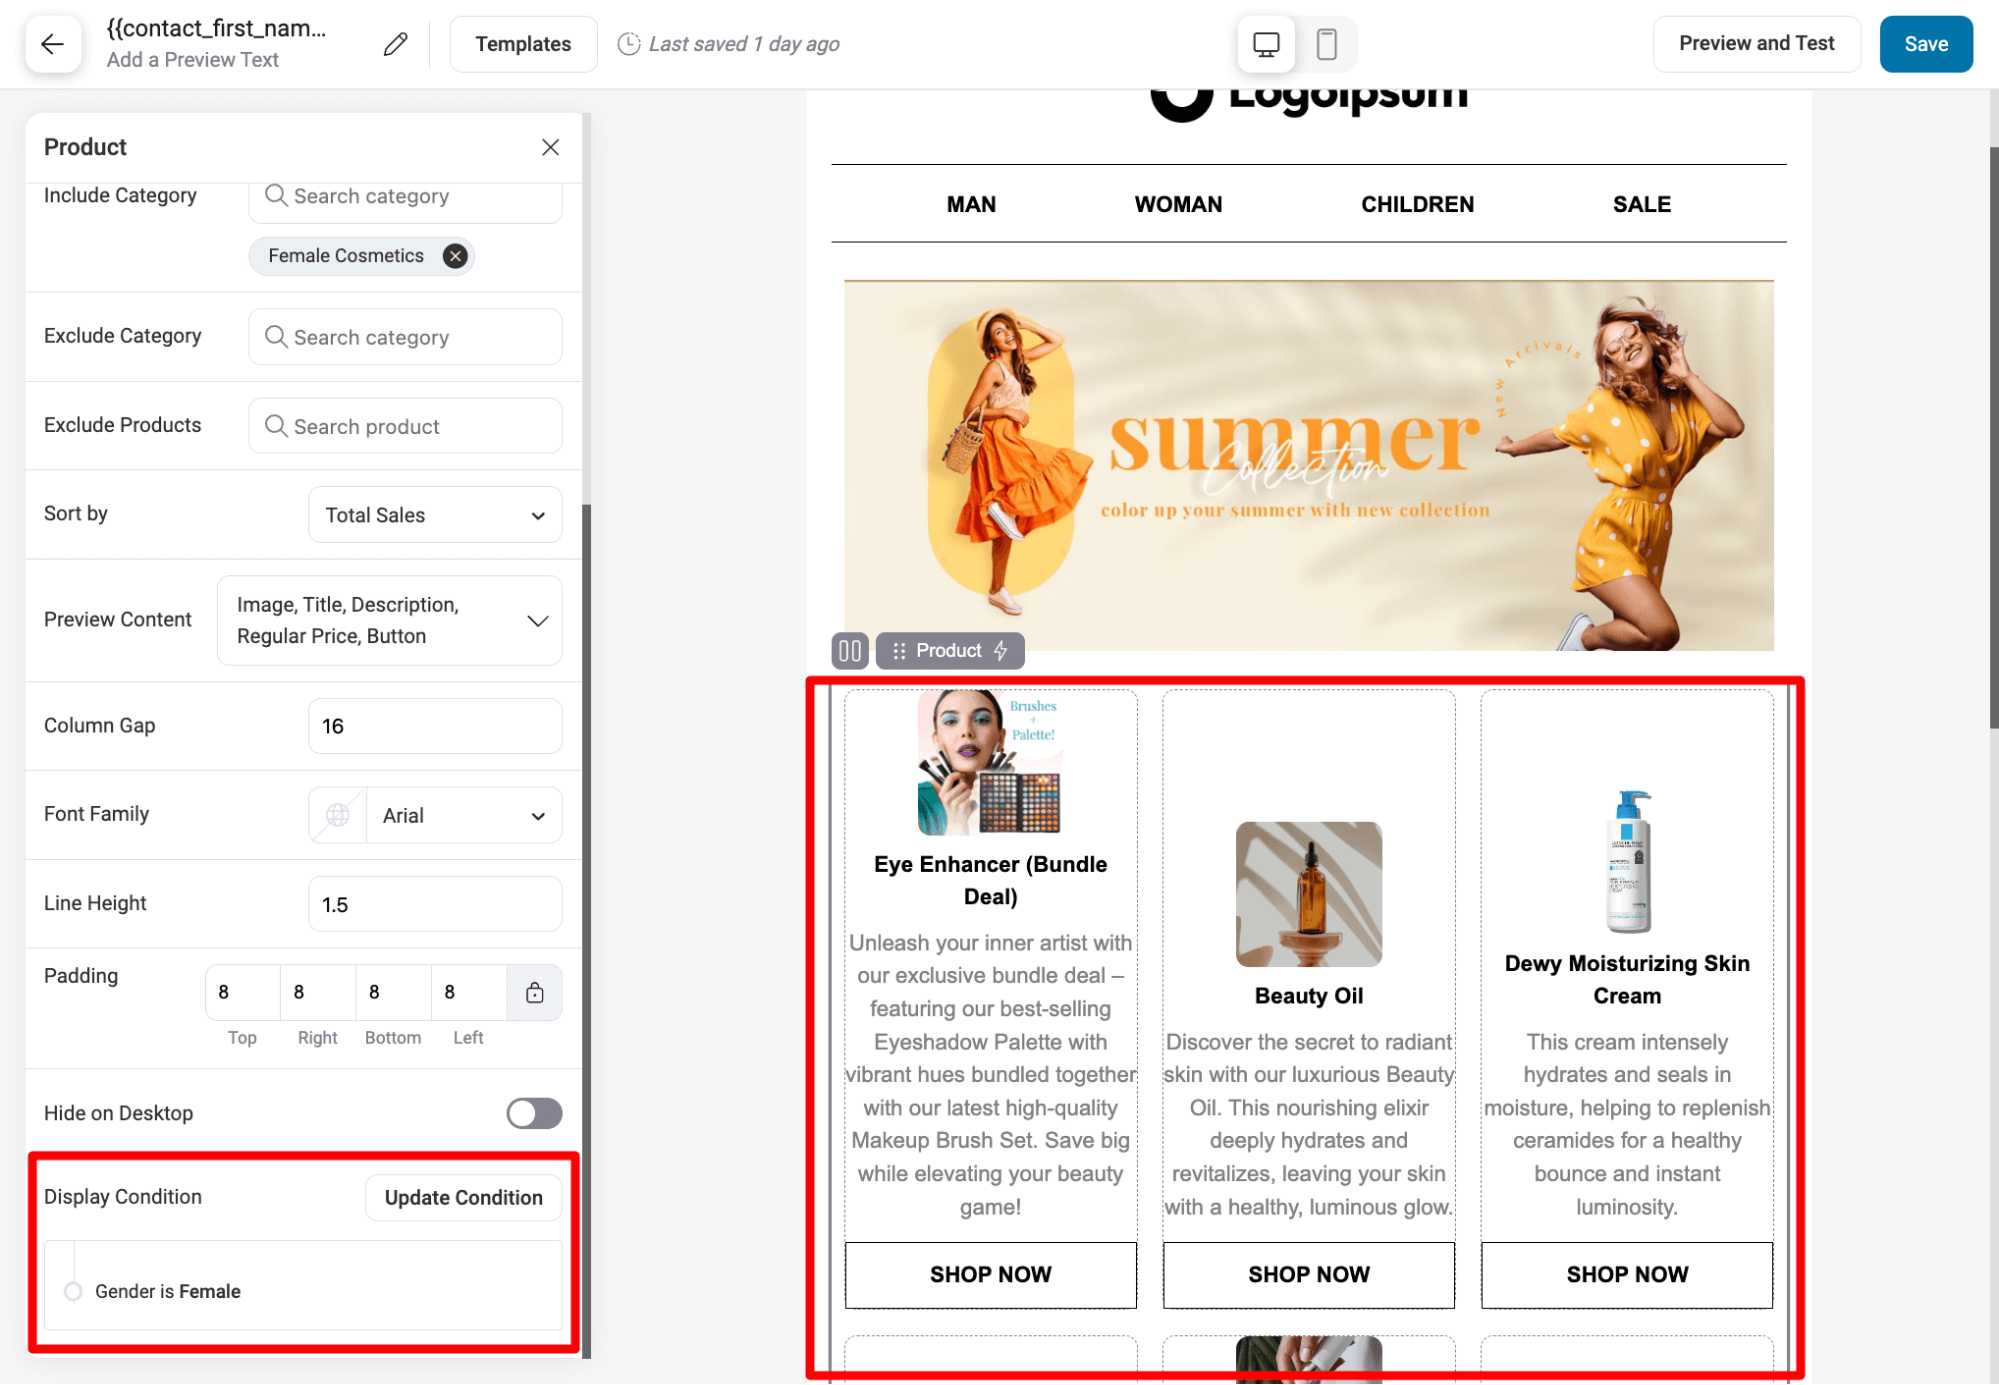
Similarly, you can set a different one for the male category or any other category.
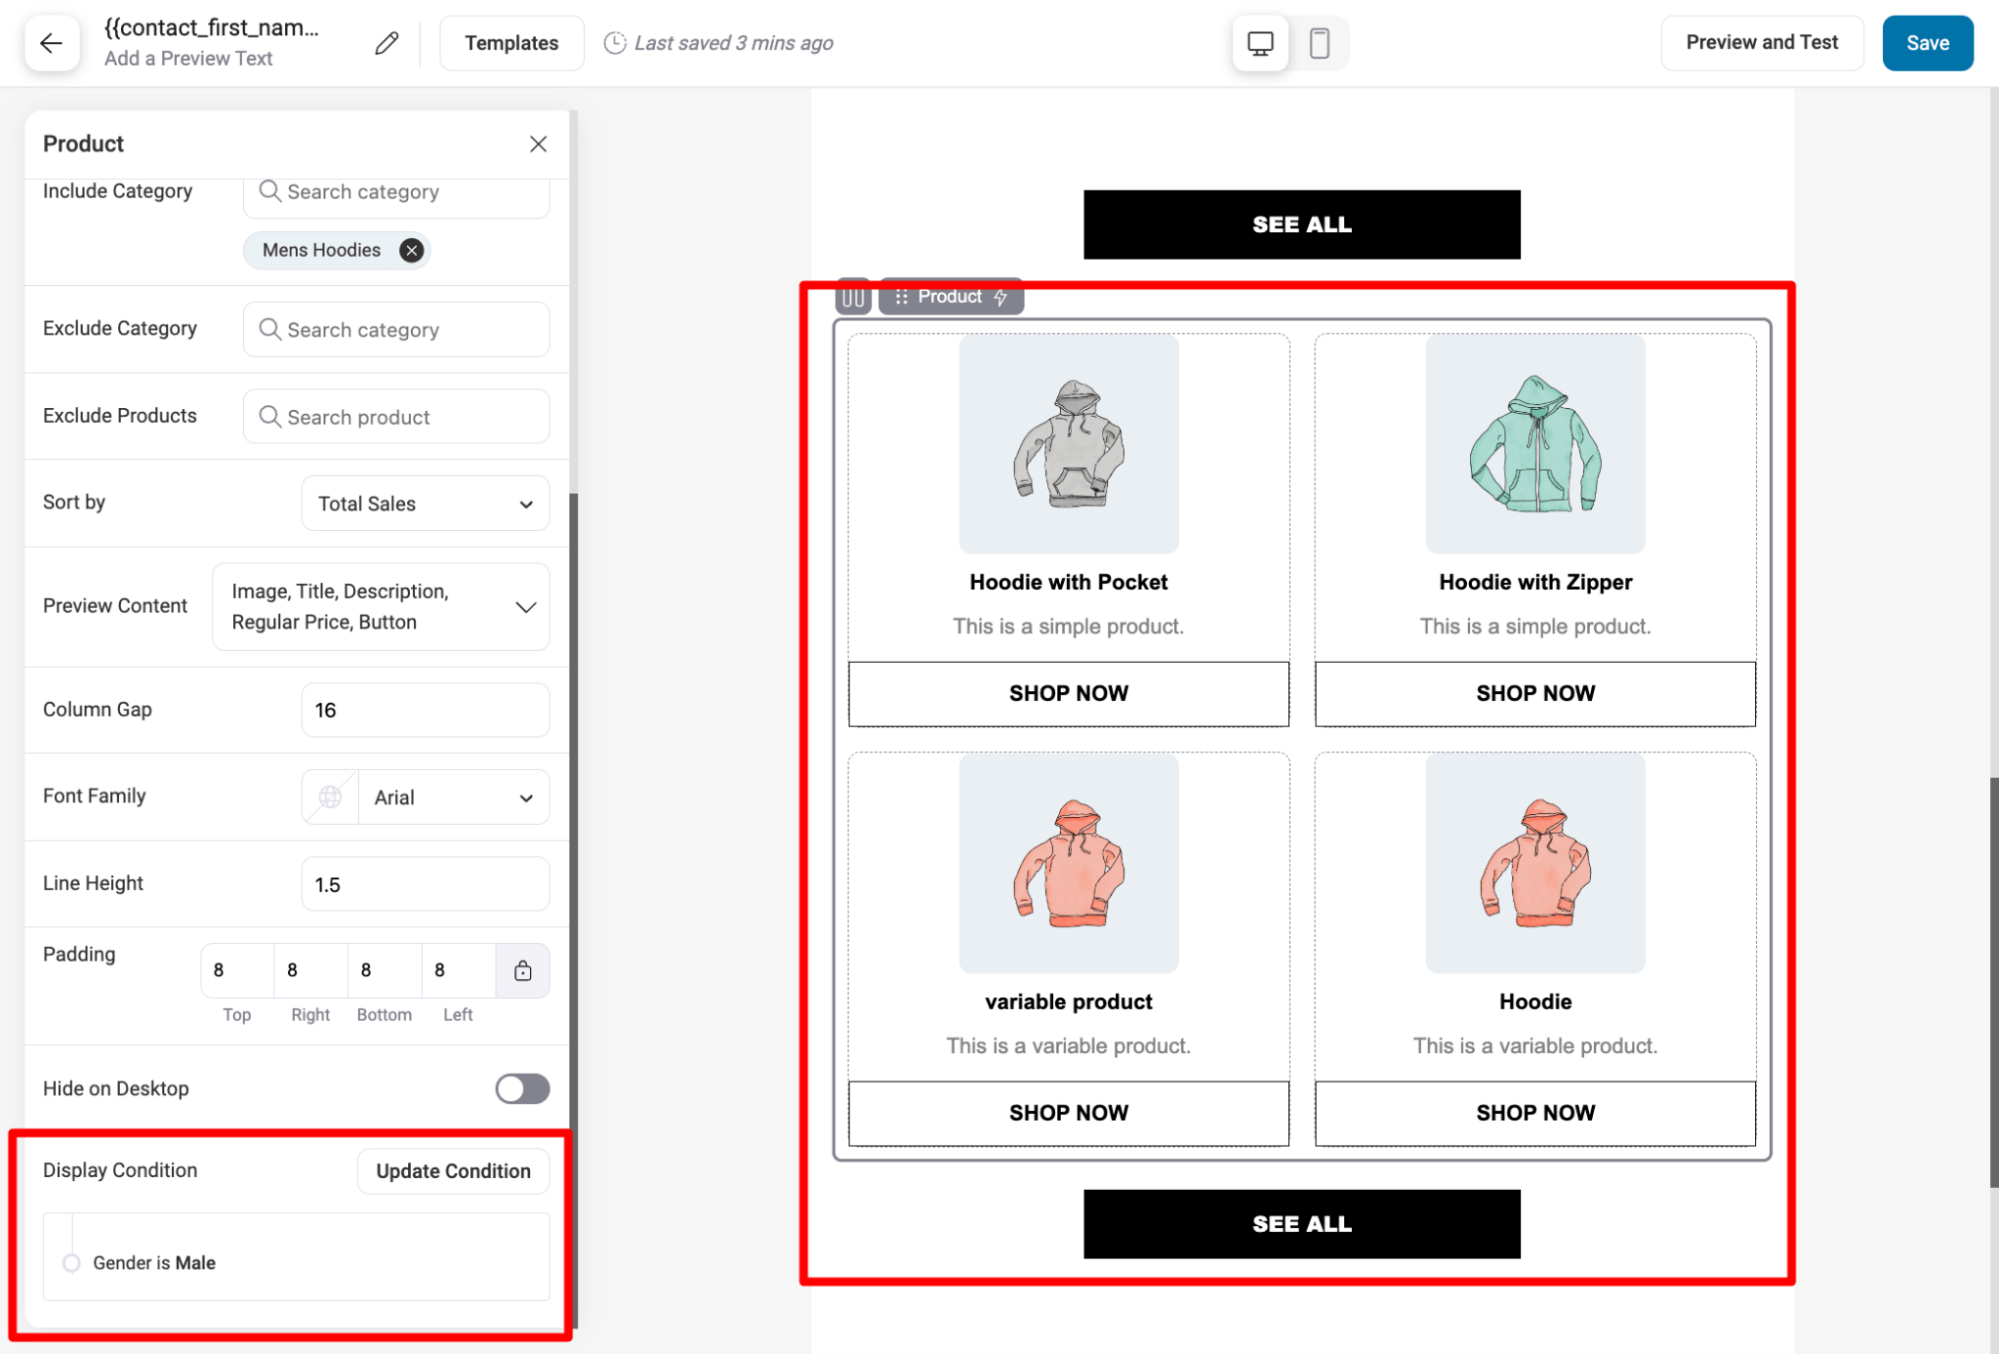
Note: With FunnelKit Automations, you can add product recommendations with other feeds as well, such as related products, best-selling products, the latest products, etc.
Different shipping policies based on location
Again, depending on the customer's location, you can show different shipping policies to different ones to make the email seem clearer and more concise.
For this, add a shipping address to your email with two text blocks: one for local and one for international users.
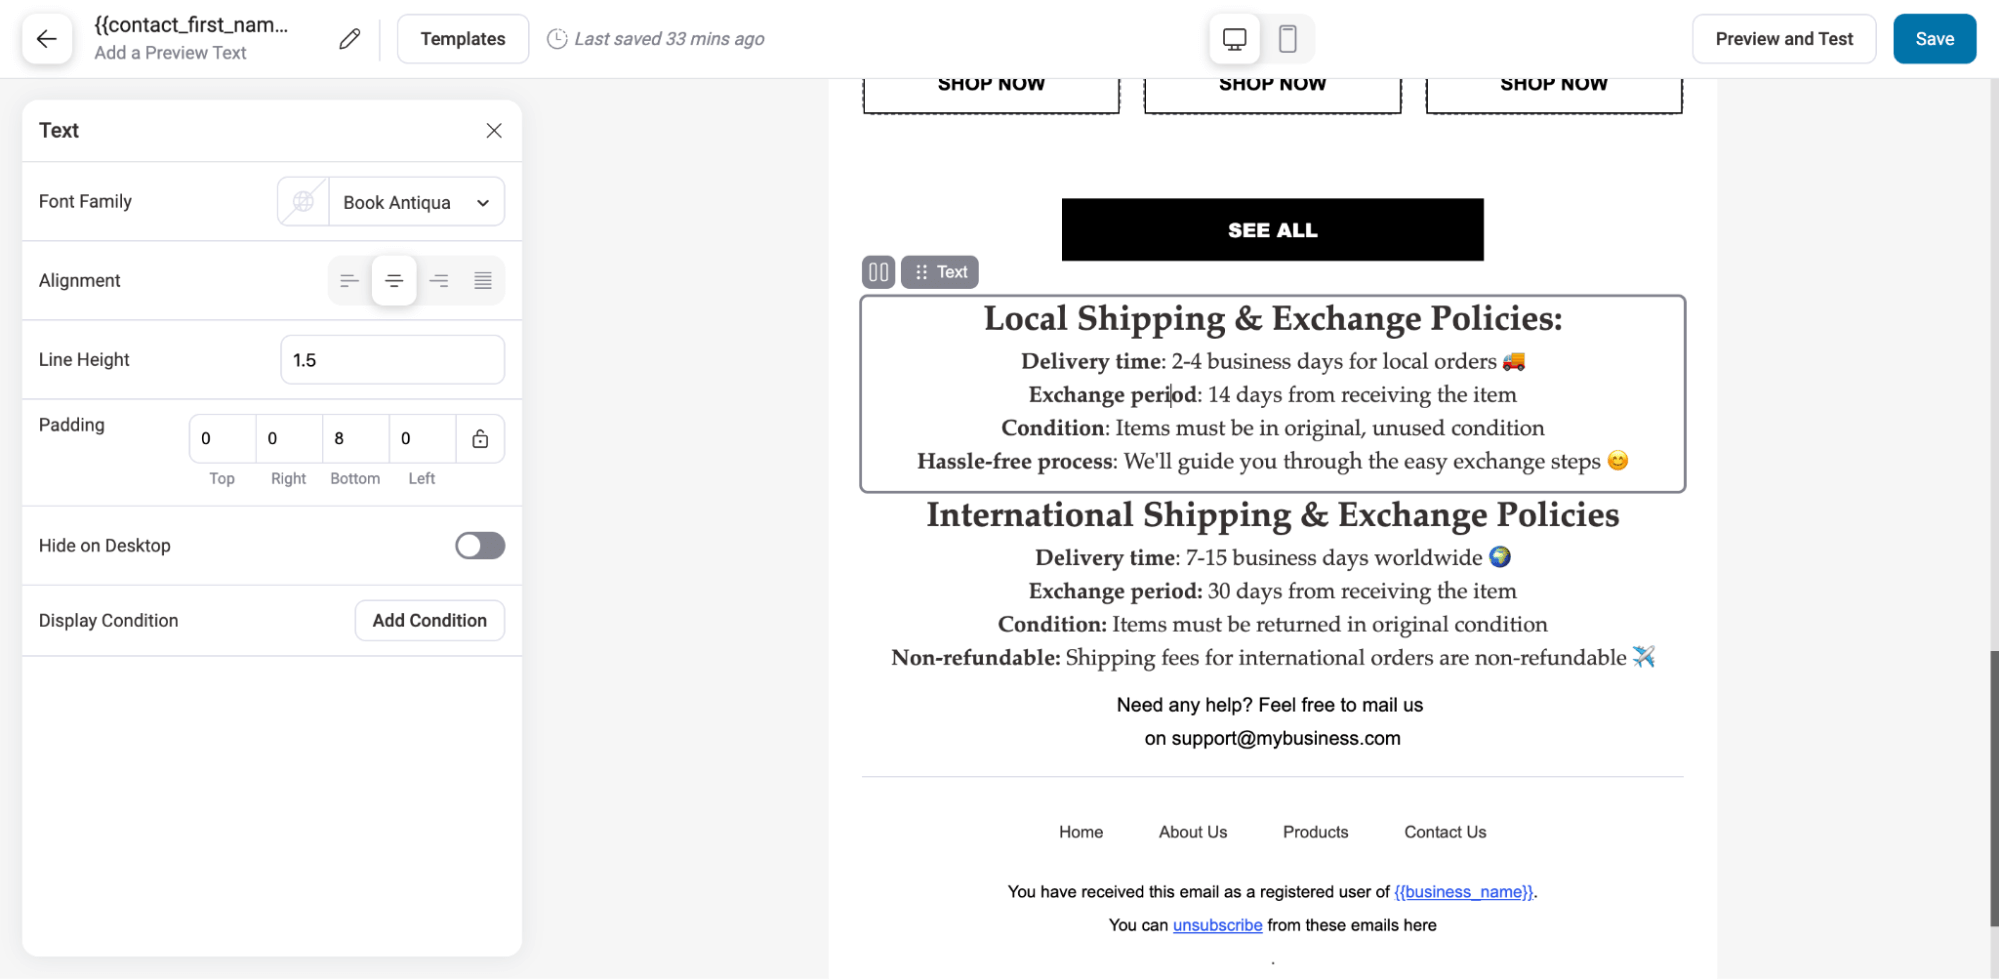
Now, for the local, apply a condition so it is only visible when the customer's shipping address is in the home country. In our case, we are setting it to the USA.
For this, click on Add condition, then choose order ⇒ order shipping country, then choose the value of your local country.

Again, for the international one, you can set the condition that the shipping country matches none of the options in “Your choice of the country”. This way, customers with any international shipping address will see the shipping policies for international users.
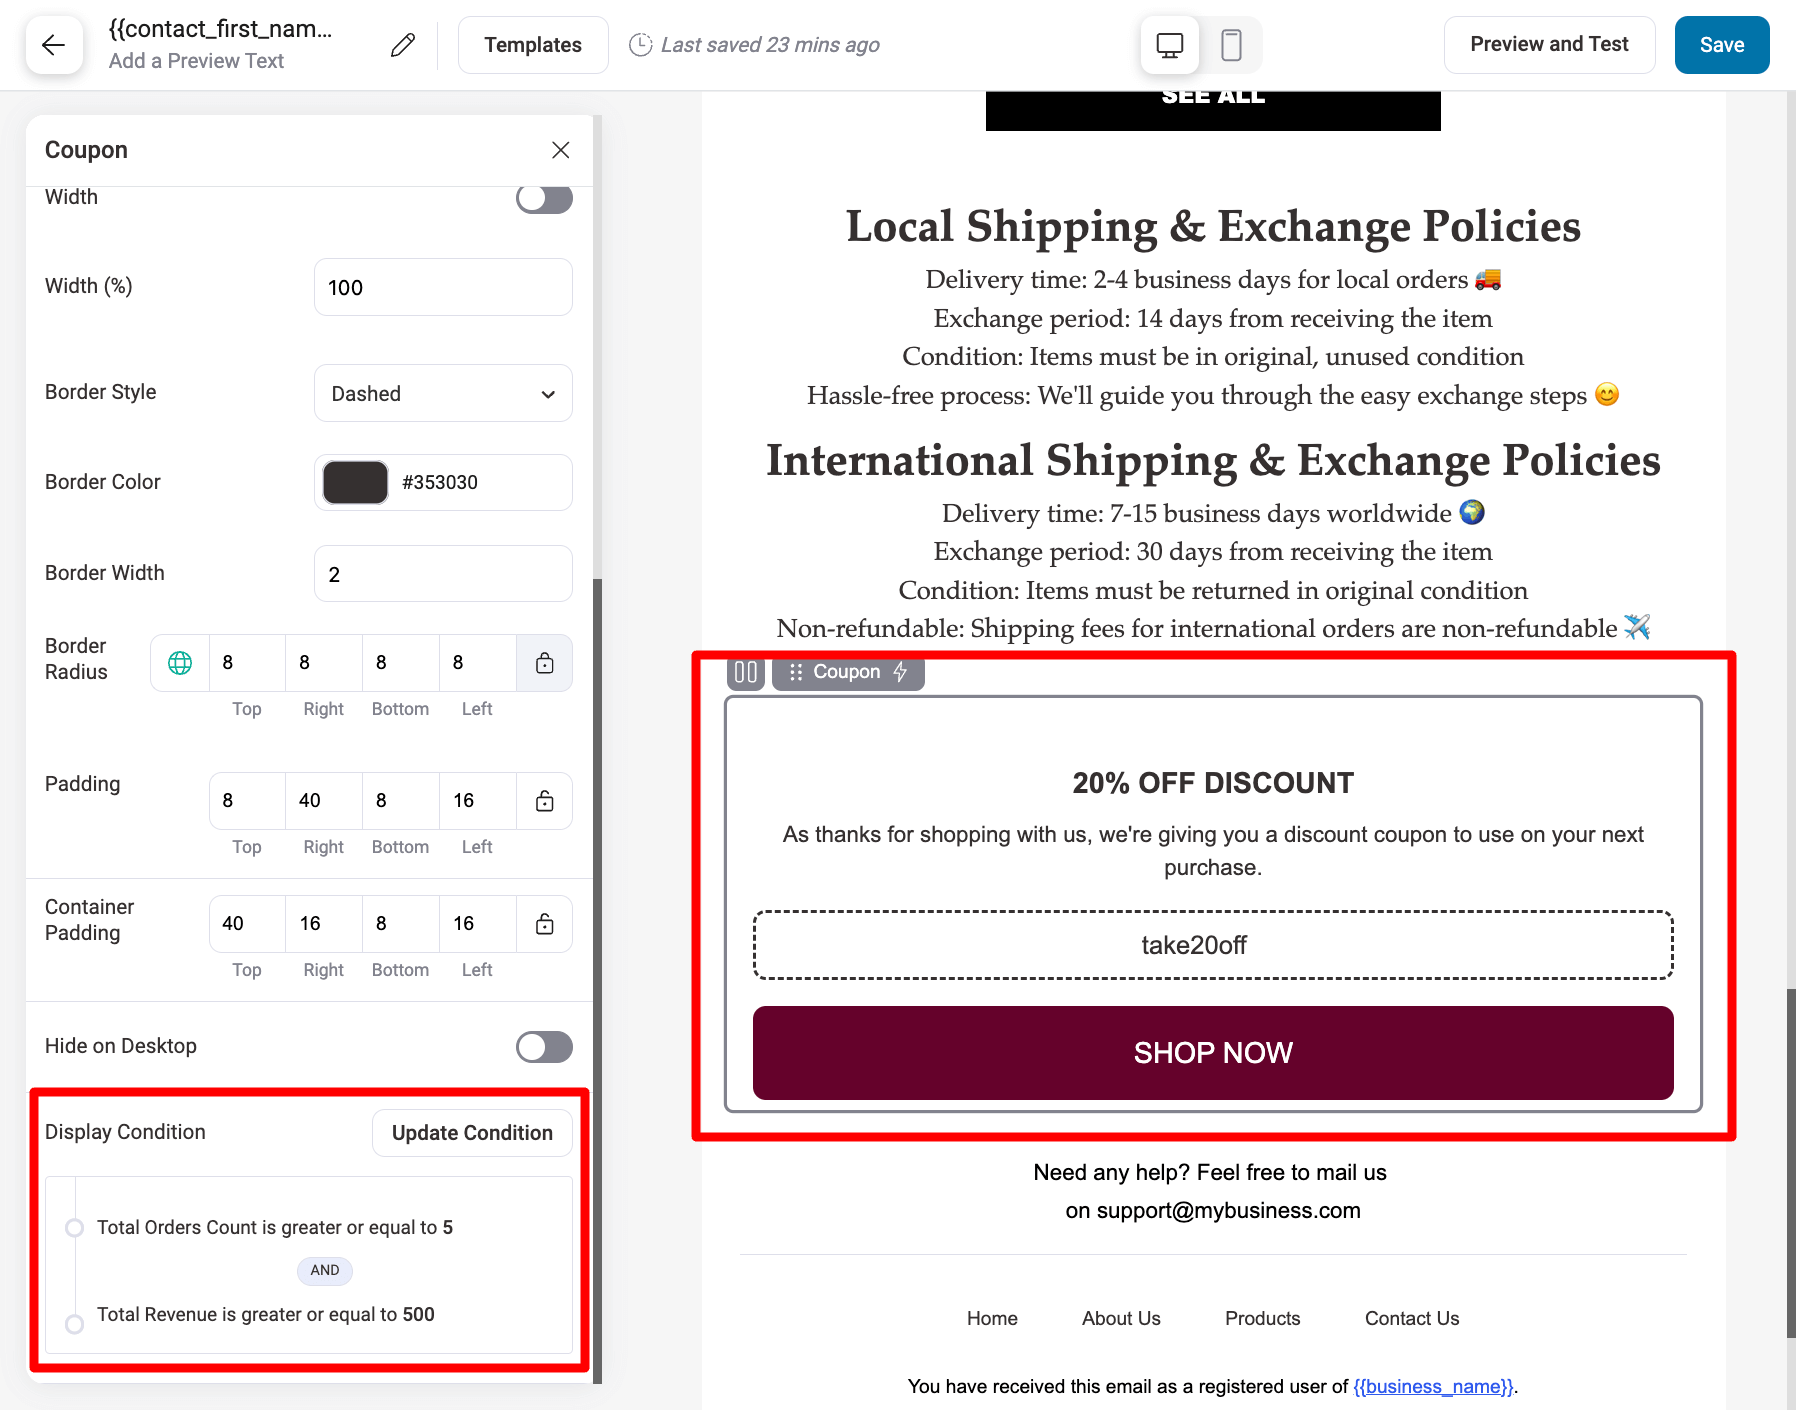
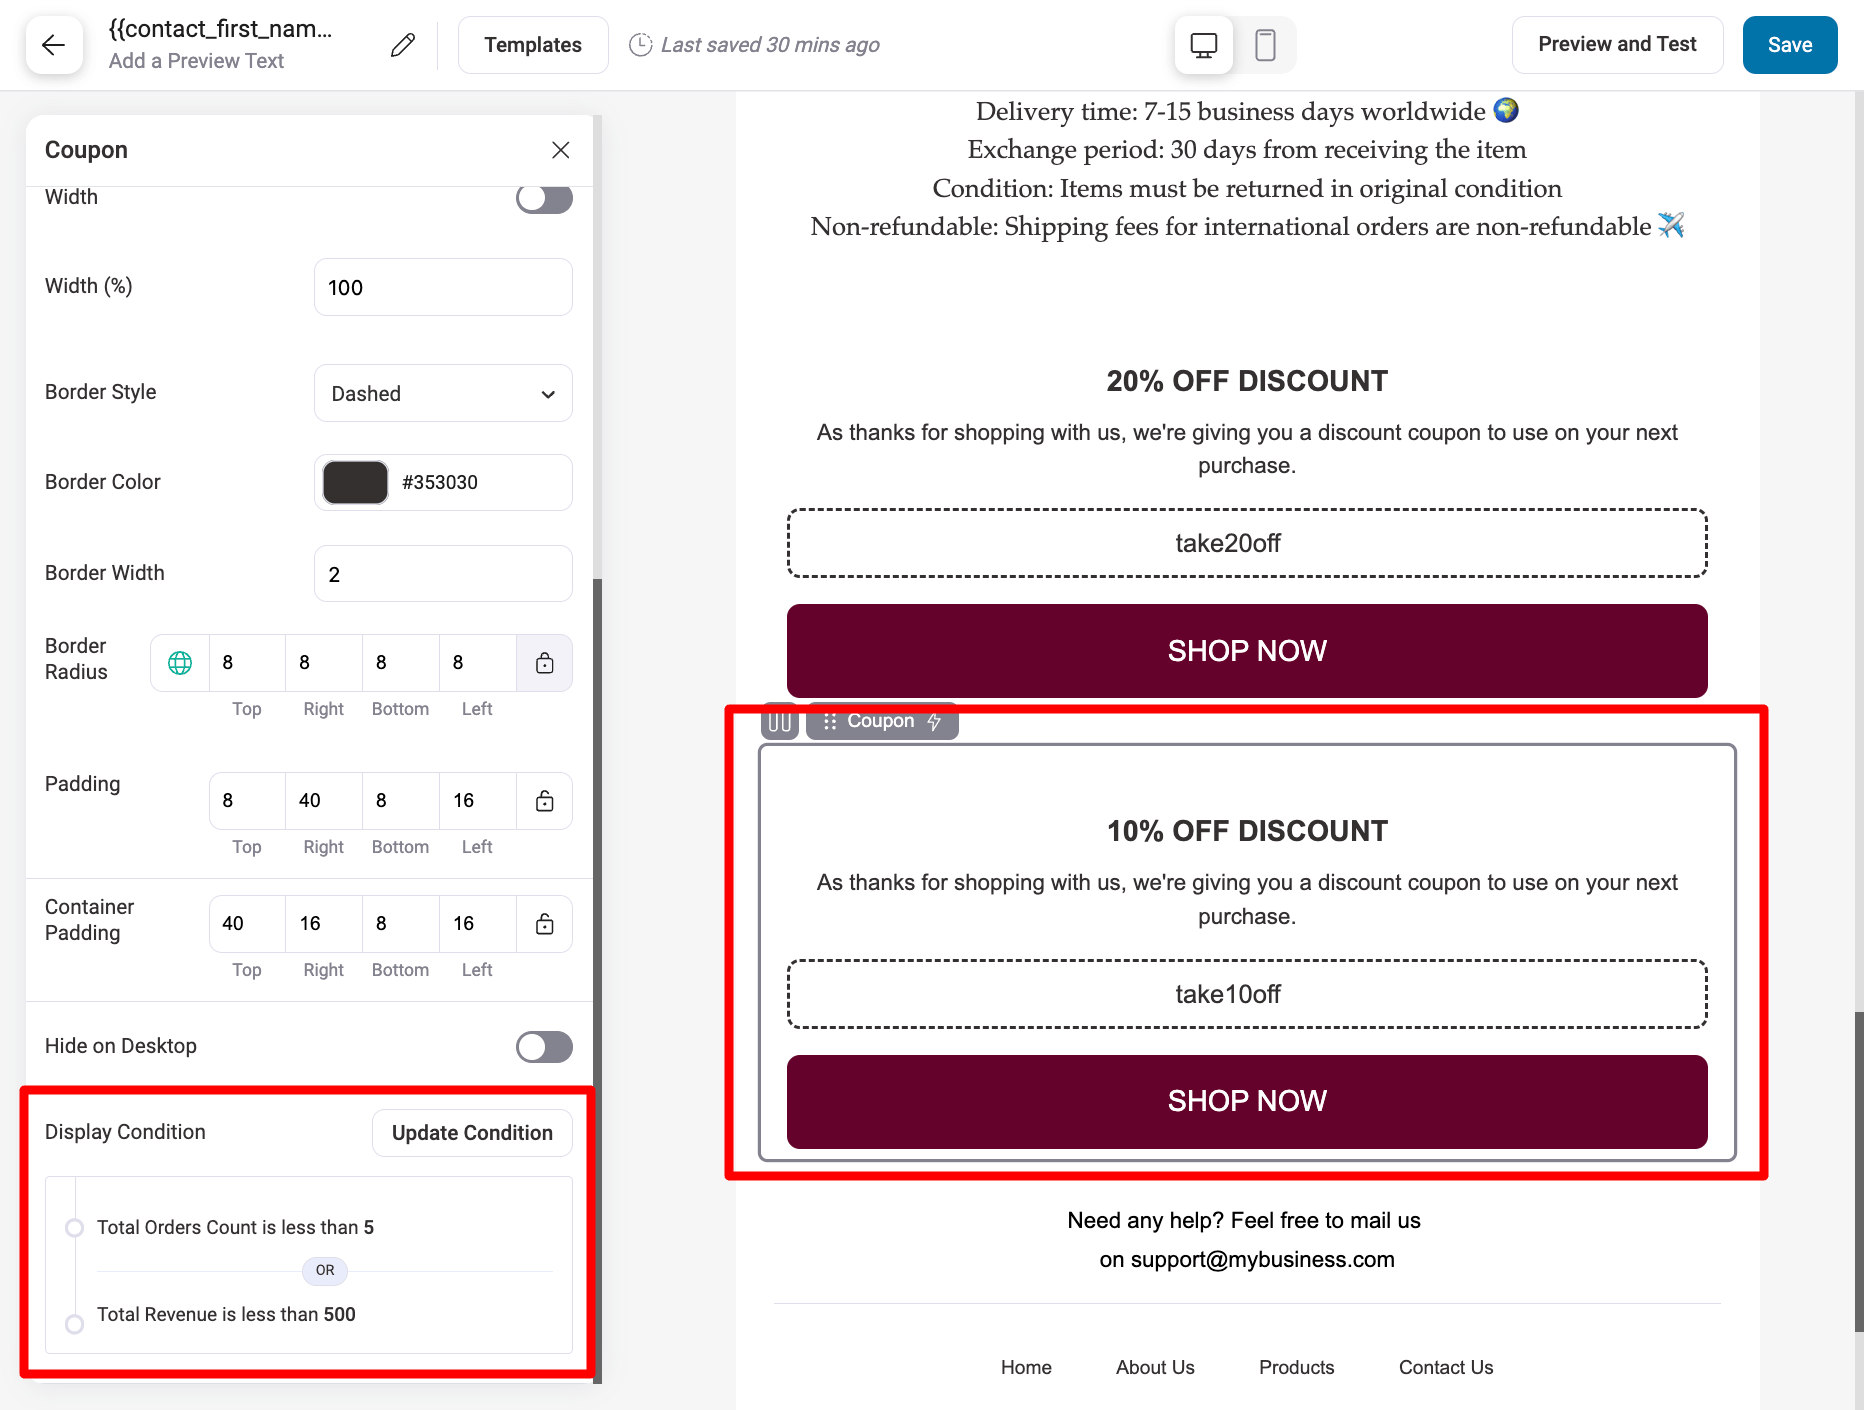
Conditional discount coupon
Another great example of conditional content is offering discounts based on specific conditions. This way, you can offer discounts to only the high-value customers with high order values.
This way, you can ensure that offering discounts will bring in more high-value orders.
First, drag and drop a discount coupon, and then add the coupon code. You can add an existing discount coupon or a dynamic discount coupon.

Then, add the conditions. For example, we will offer a 20% discount to our VIP customers who have placed at least five orders and have spent more than $700.
For this, click Add Condition, then select WooCommerce ⇒ Total Order Count is greater than or equal to 5. Using the AND operator, add another condition that WooCommerce Total Revenue is greater than or equal to $500.

For all other users, we can offer a 10% discount and set the conditions so it's visible to everyone who doesn't fall within the VIP customer bracket. This includes anyone with fewer than five total orders or less than $500 in total revenue or both.
🔔 Note: We shared a few examples of how to utilize the different conditional parameters. You can follow the same process to add many other conditions to create WooCommerce conditional content.
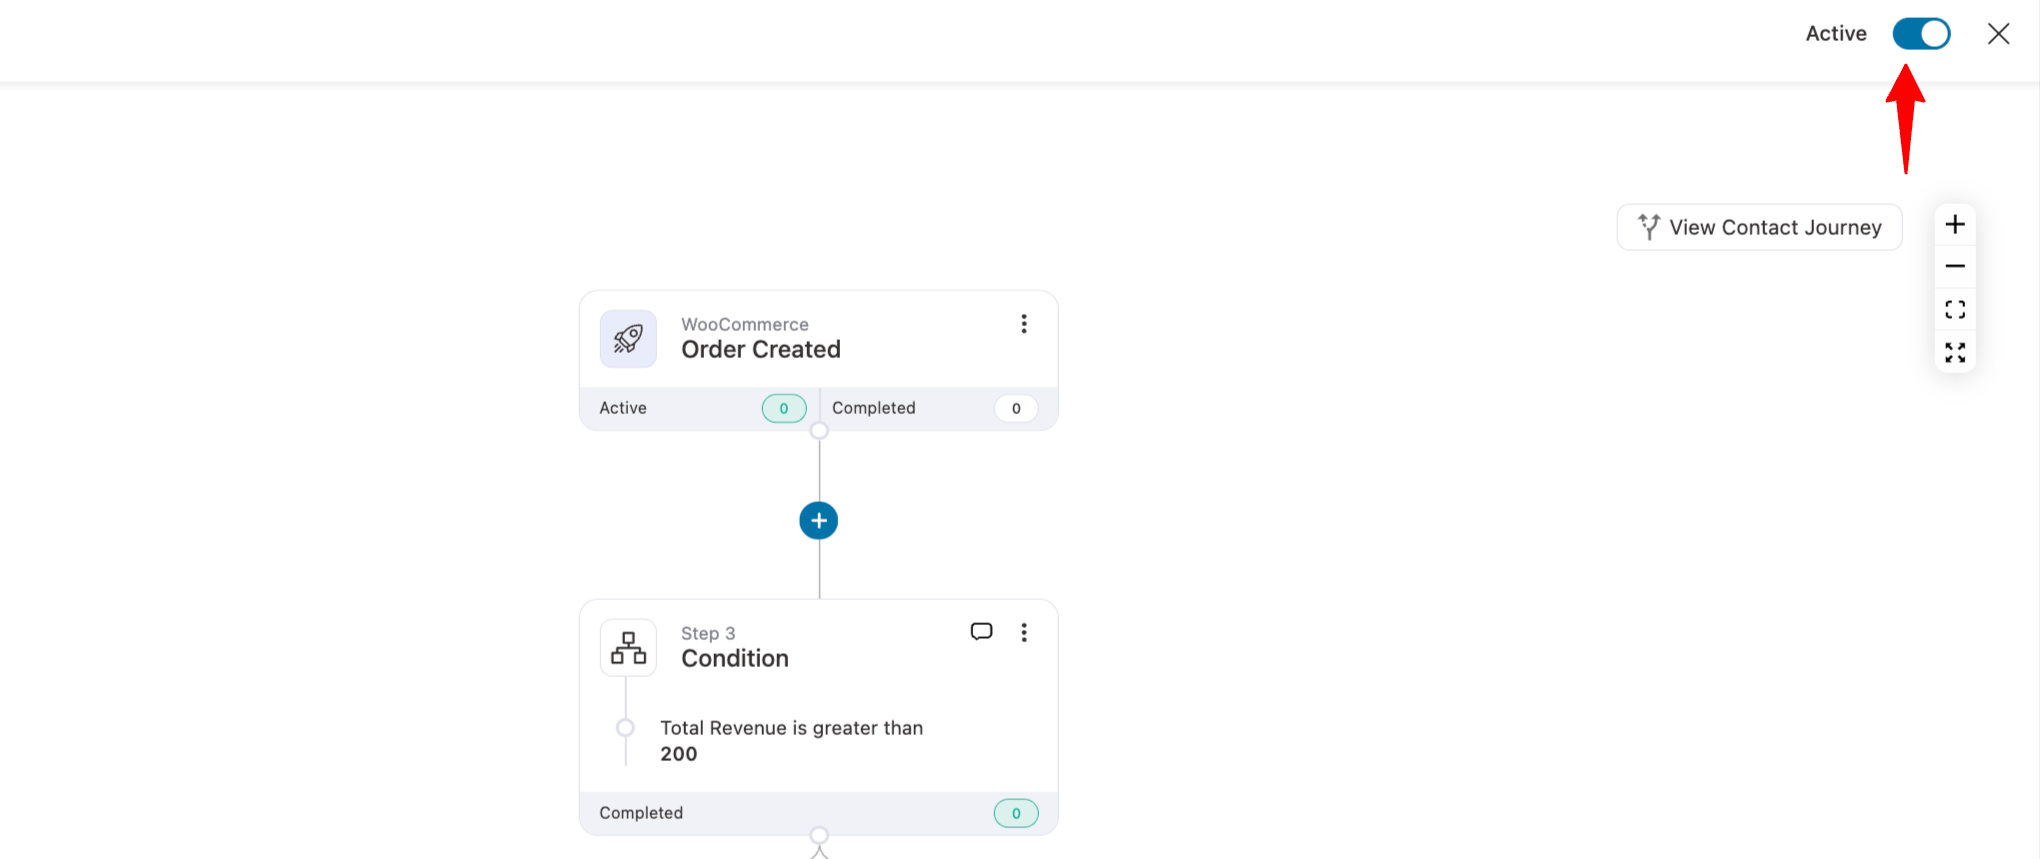
Step 6: Activate the automation with WooCommerce conditional content
Lastly, ensure that you activate the automation by toggling the button.
Here is an order we placed to test the WooCommerce conditional email. The order was placed by a VIP customer in September with a shipping location in the United States.
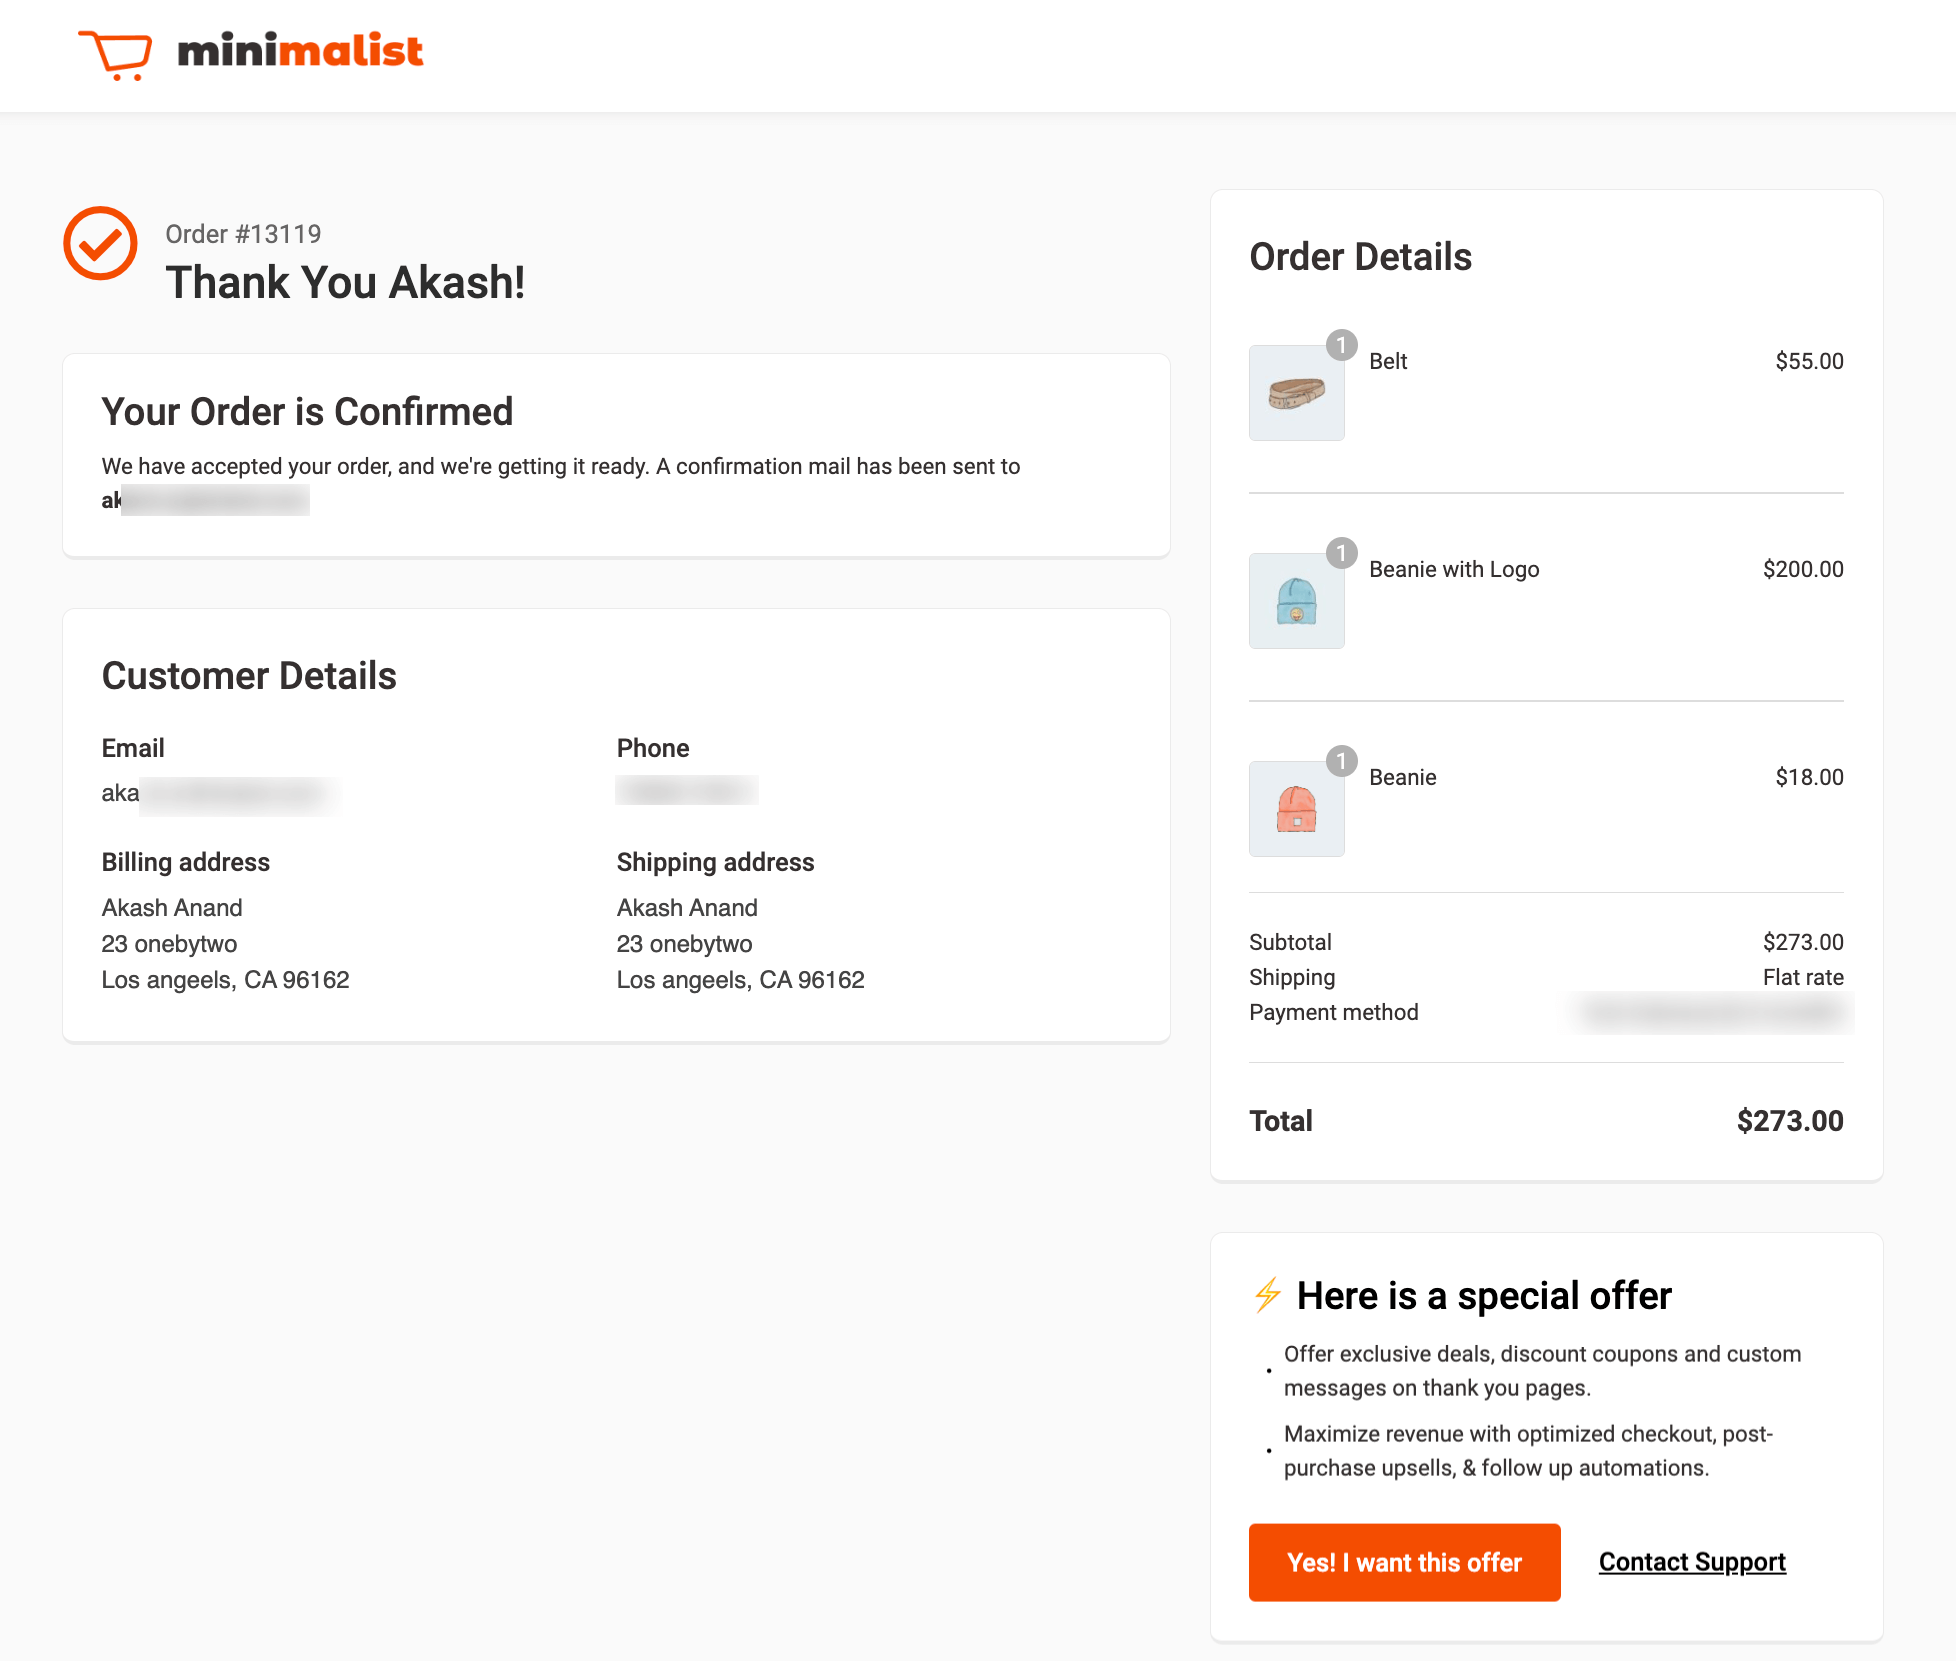
Here is the email we received:

How to Send Conditional Content in WooCommerce Transactional Emails
Transactional emails are the automatic ones WooCommerce already sends: order confirmations, completed-order notices, and shipping updates.
People actually open these far more than marketing emails, making them prime real estate for a well-placed conditional block.
With FunnelKit Automations, you can add display conditions straight into those default emails. A first-time buyer and a returning customer can open the same order confirmation and see a different message inside it.
To use conditional content in transactional emails, go to FunnelKit Automations ⇒ Emails ⇒ Transactional Emails and click "Edit" on the email you want to work on.
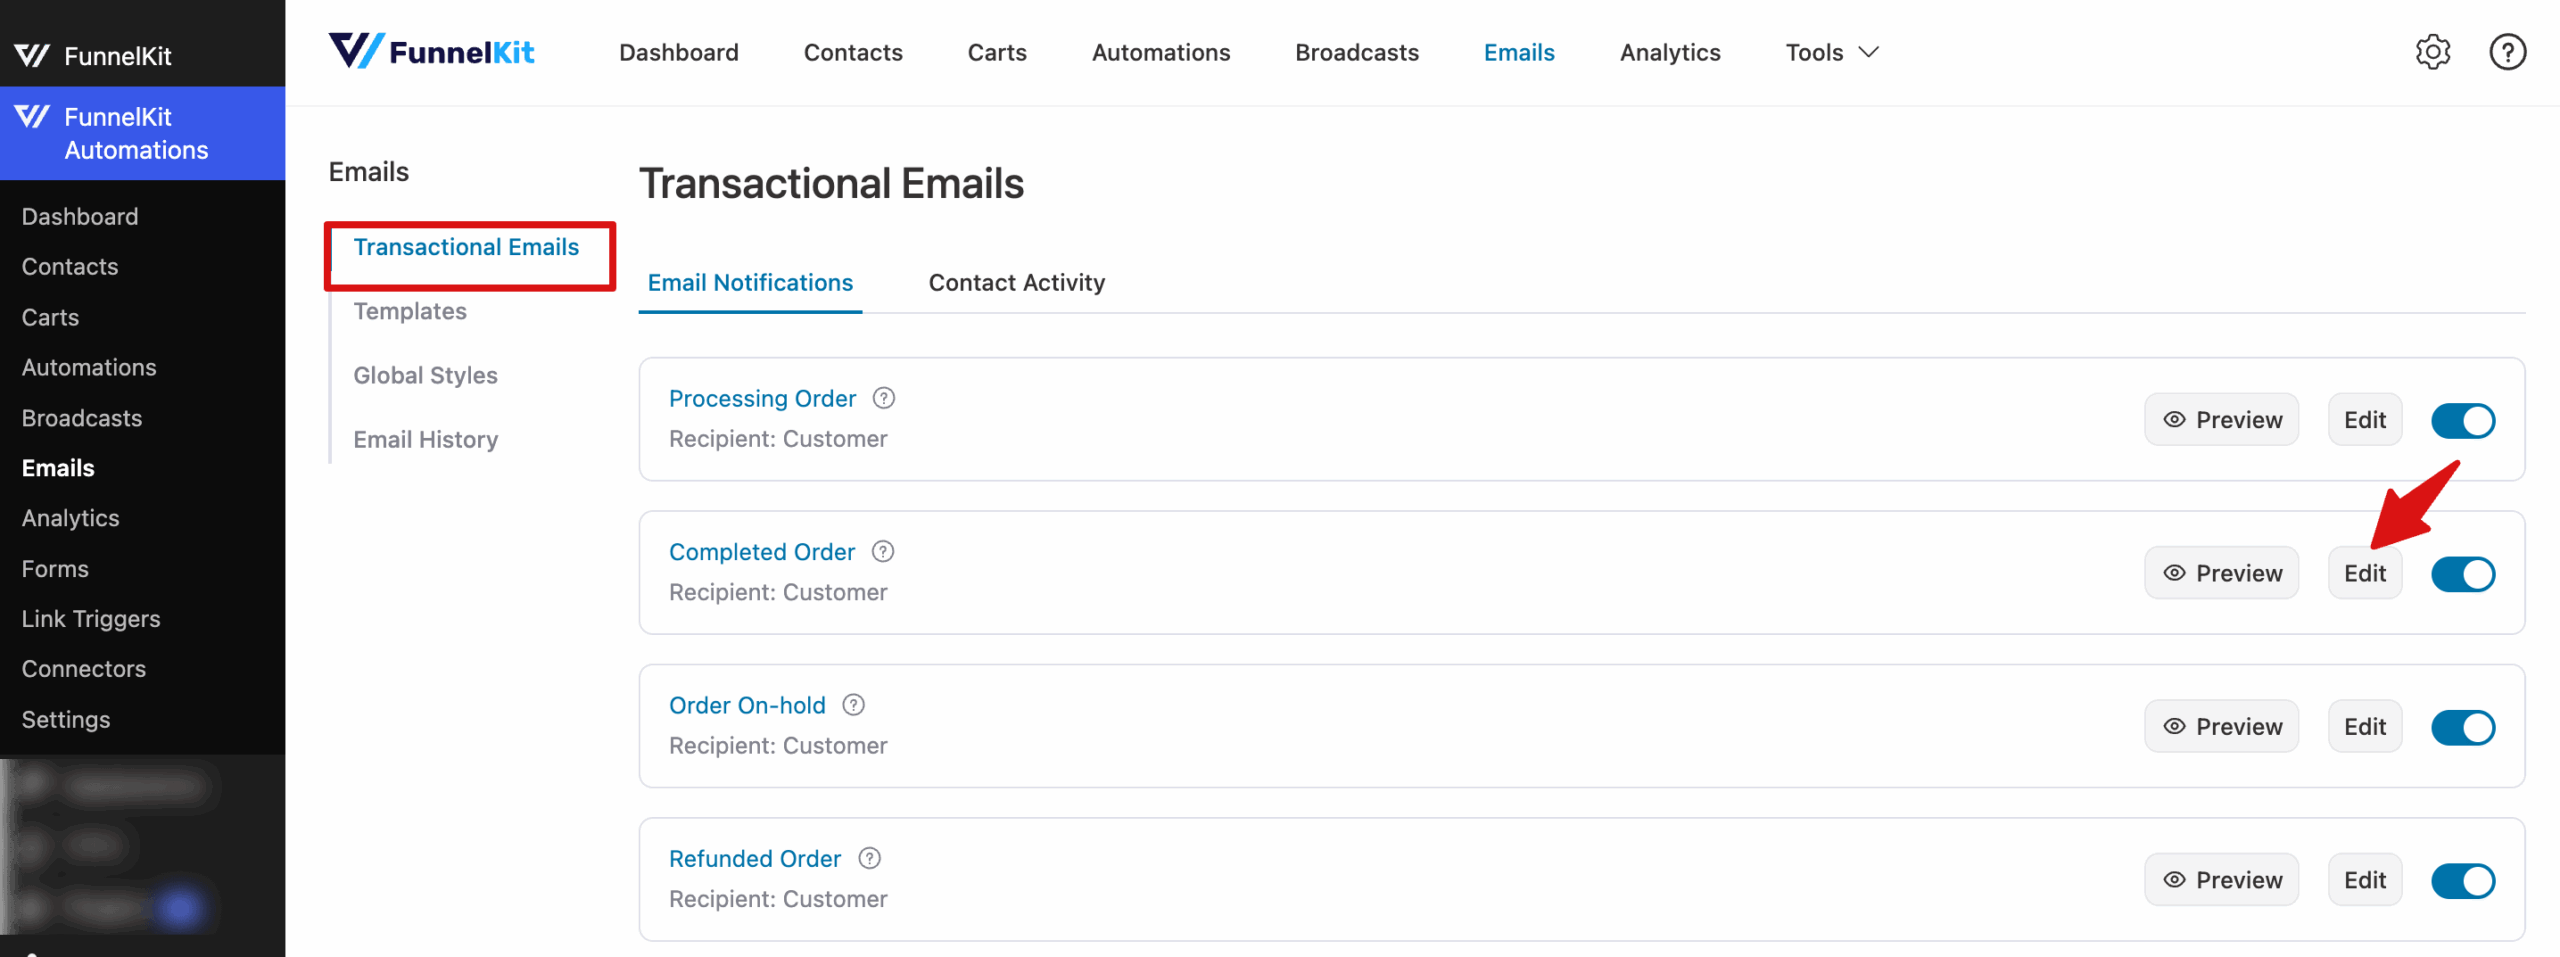
Open it in the Visual Builder. Next, click the block or section you want to make conditional. In the bottom-left panel, under "Display Condition", click "Add Condition".

Then add a new condition. To show a discount only on orders above $200, select Order Total under the Current Woo Order condition group and set it greater than or equal to 200.
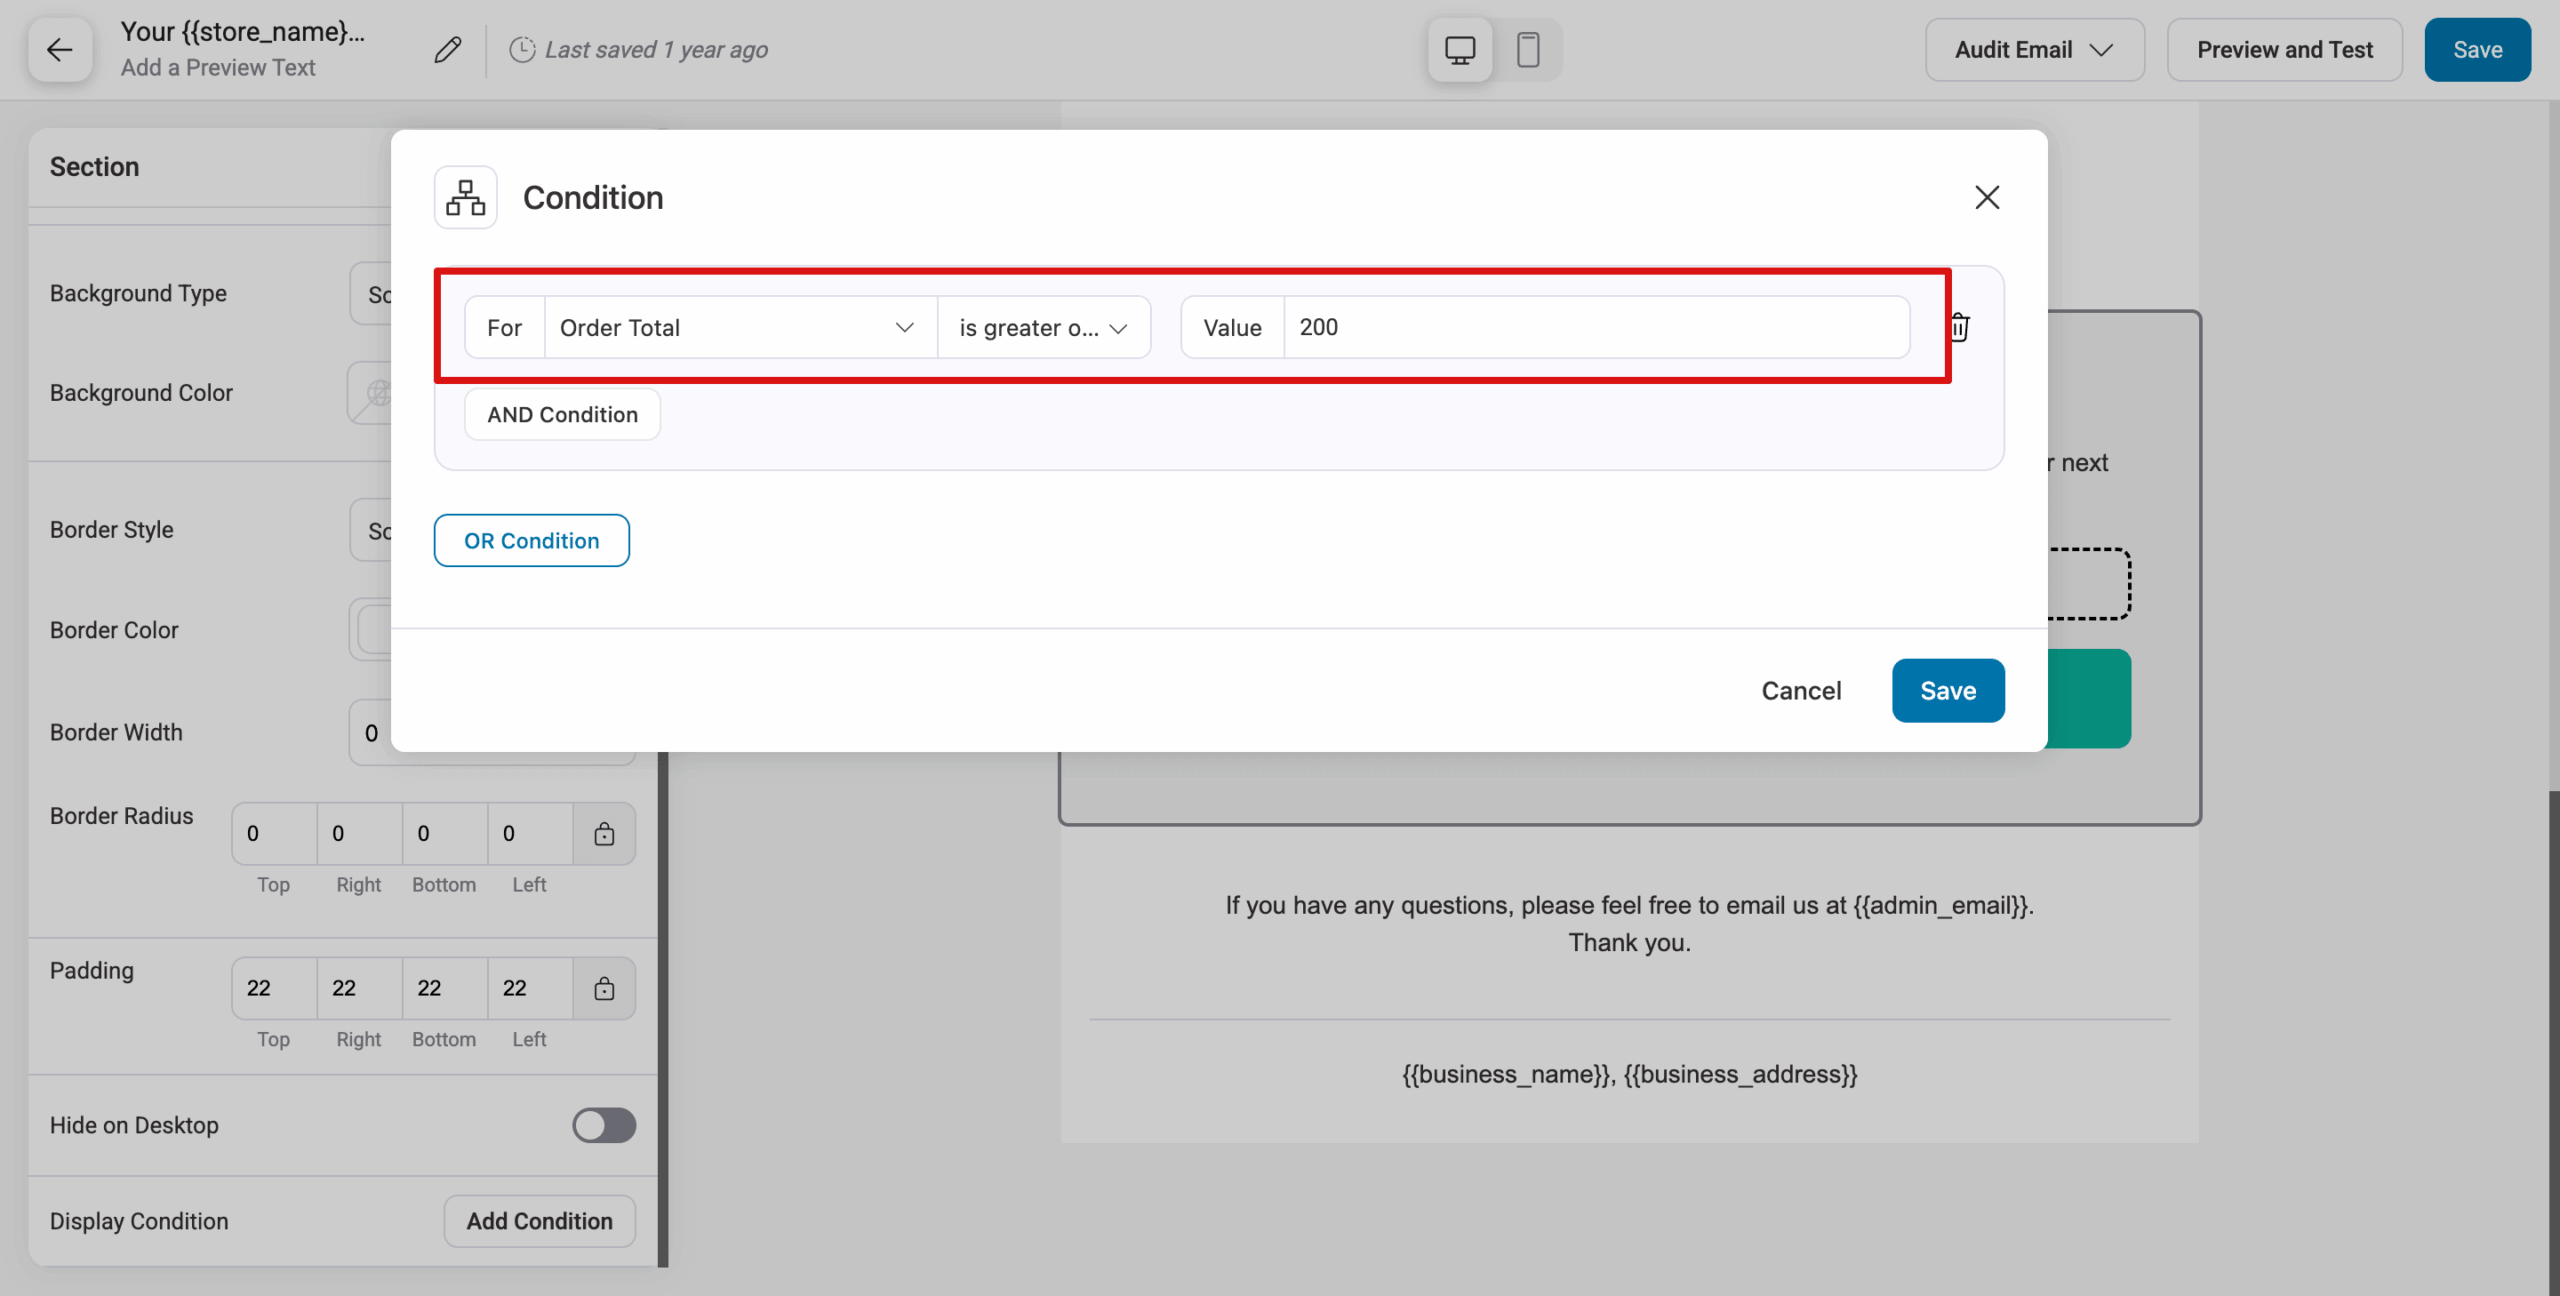
Make sure to hit Save. Once you're done, send yourself a test order to confirm that the block shows and hides as you expect.
Benefits of WooCommerce Conditional Emails
- Boost personalization
Personalized emails resonate better with recipients. By setting conditions, you ensure that each email is relevant to the recipient’s recent actions or preferences.
For example, if a customer frequently purchases premium products, you can highlight high-end or exclusive items, offering personalized recommendations that align with their preferences.
- Increase engagement
Engagement rates soar when emails are targeted. Conditional emails, crafted based on customer interactions, are more likely to be opened and acted upon.
Whether it’s a follow-up after a purchase or a special offer for loyal customers, these emails keep your audience engaged and connected with your brand.
- Drive conversions
Sending the right message at the right time can significantly boost conversions. Conditional emails allow you to display tailored promotions, recommendations, and incentives that align with the customer’s preferences or past purchases.
If a customer lives in a specific region, you can tailor emails to feature products relevant to their local climate or preferences, like warm clothing for colder climates.
- Enhance customer relationships
Building strong relationships with your customers is key to long-term success. Conditional emails provide an opportunity to nurture these relationships by delivering content that aligns with the customer’s journey.
Personalized recommendations, special offers, and relevant messaging all contribute to a positive customer experience and foster loyalty.
- Optimize marketing efforts
With conditional emails, you can optimize your marketing efforts by focusing on specific customer segments.
By analyzing the performance of these emails, you gain insights into customer behavior and preferences, allowing you to refine your strategies and improve overall effectiveness.
Frequently Asked Questions About Conditional Emails in WooCommerce
Got more questions? Have a look at these:
Does WooCommerce support conditional emails by default?
No, WooCommerce has no built-in conditional email feature. Its default emails fire on order status and reach every customer the same way. Sending by condition, or changing what appears inside an email, takes a plugin like FunnelKit Automations.
What is the difference between conditional sending and conditional content?
Conditional sending controls who receives an email, while conditional content controls what shows up inside it. The first uses rules like order total or location to decide who gets the message. The second uses display conditions to reveal or hide individual blocks, so one template can quietly serve several different audiences.
Can I show different content in the same WooCommerce email?
Yes, display conditions let one email show different blocks to different people. Picture a single order confirmation that hands VIP customers a 20% coupon and everyone else a 10% one. Each shopper sees only their version, and neither knows the other exists.
Do I need to write code to set up conditional emails?
No, you can build conditional emails without touching code. FunnelKit Automations runs on a visual builder where you set the rules and drag in the blocks. The entire setup happens inside your WordPress dashboard.
Can I add conditional content to WooCommerce transactional emails?
Yes, you can apply display conditions to default transactional emails like order confirmations and shipping notices. The feature arrived in FunnelKit Automations 3.7.0, so you edit the transactional email in the Visual Builder and drop a condition onto any block.
Ready to Send WooCommerce Conditional Emails?
WooCommerce conditional emails make messaging more targeted by allowing you to send personalized communications based on specific customer actions, purchase behaviors, order details, and more, ensuring each email is relevant and timely.
With FunnelKit Automation, you can create conditional emails based on order-related and personal customer information, helping you maximize the effectiveness of your emails.
Plus, the conditional email builder is intuitive and makes designing conditional blocks a breeze.
So, are you ready to send more personalized emails using WooCommerce conditional emails?
Editorial Team
July 6, 2026Discover how to collect birthdates and share personalized birthday coupons automatically in WooCommerce. Want loyal customers who keep coming back? WooCommerce birthday coupons let you offer personalized discounts or gifts,...
Editorial Team
June 25, 2026There are two things most people get wrong about the WooCommerce order confirmation email. First, they don't realize it's the Processing order email they need to switch on and not...
Editorial Team
June 24, 2026Discover the best WooCommerce plugins to recover abandoned carts and boost your sales. Losing sales to abandoned carts? It’s more common than you realize. Around 70% of shoppers leave without...


