
Looking for a proven way to attract new customers and boost first-time sales?
A WooCommerce first-order discount is a powerful promotional strategy that gives new customers a special deal on their first purchase, encouraging them to try your store and build trust from the start.
Offering a first-order discount helps you grab shoppers' attention and increase conversions.
With most consumers actively seeking deals, this straightforward strategy can convert casual visitors into loyal buyers.
In this post, we’ll guide you through setting up a first-order discount in WooCommerce and discuss best practices for maximizing your results.
Let’s get started!
Table of Contents
- 1 What is a WooCommerce First-Order Discount and How Does It Work?
- 2 How to Automatically Create and Send WooCommerce First-Order Discounts to New Customers
- 2.1 Step 1: Create a new automation for opt-in subscribers
- 2.2 Step 2: Choose a form collecting trigger
- 2.3 Step 3: Configure your form and map the field
- 2.4 Step 4: Create a dynamic, personalized coupon
- 2.5 Step 5: Design an email with a dynamic discount coupon code
- 2.6 Step 6: Activate the automation to share the first-order discount coupon
- 3 How to Track and Analyze WooCommerce First-Order Discount Usage
- 4 5 Best Practices for Maximizing WooCommerce First-Order Discounts
- 4.1 1. Set a time limit on offer to create a sense of urgency
- 4.2 2. Set minimum and maximum spend limits on your discount coupon
- 4.3 3. Offer free shipping to enhance the first order experience
- 4.4 4. Restrict the coupon code to customer's email for exclusive use
- 4.5 5. Don’t stop at one email, send follow-up reminders to seal the deal
- 5 3 WooCommerce First Order Discount Plugins Recommendations
- 6 More Questions About WooCommerce First Order Discount
- 7 Start Offering WooCommerce First-Order Discounts Today
What is a WooCommerce First-Order Discount and How Does It Work?
Offering a WooCommerce first order discount is a smart way to convert visitors into customers.
The idea is simple: capture a user’s email with a form and reward them with an exclusive one-time discount for their first purchase.
Here is the flow: user submits email → receives discount coupon → redeems it at checkout → becomes a loyal customer.
You can offer different types of discounts to first-time users, like
- Percentage discount – e.g., 20% off the cart
- Fixed cart discount – e.g., $10 off the total
- Fixed product discount – e.g., $5 off each item
- Free shipping
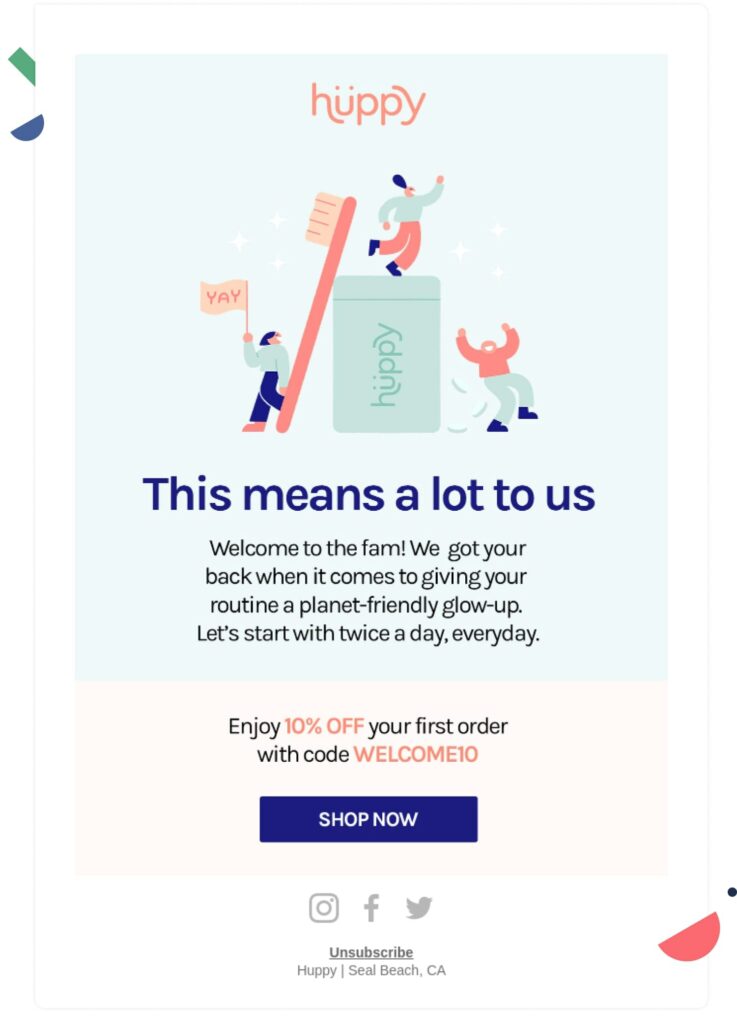
In the example above, the welcome email greets the customer, offers a first-order discount, and includes a clear CTA to claim it. This simple, effective strategy converts new subscribers into buyers.
You can easily use tools like FunnelKit Optin, WPForms, or OptinMonster to create pop-ups, floating bars, or dedicated landing pages.
Once someone signs up, automatically email them the discount code, valid for first-time orders only. This is the perfect strategy for generating leads and growing your WooCommerce sales.
Once you’ve captured the email, the next step is to encourage that first purchase, and that’s where your exclusive discount coupon does the heavy lifting.
To automate this process and share the discount coupon instantly, proceed to the next section, where we guide you through setting up an automated email sequence.
To automate this process and share the discount coupon instantly, proceed to the next section, where we guide you through setting up an automated email sequence.
How to Automatically Create and Send WooCommerce First-Order Discounts to New Customers
To create and deliver exclusive first-order discounts via email, FunnelKit Automations is the tool you need.
With this powerful automation plugin, you can dynamically generate personalized discount coupons, even including the customer’s first name in the code to add a custom touch (e.g., WelcomeJANE3XSK9kZbb). This not only feels more personal but also boosts engagement.
You can also:
- Set time-sensitive coupons to create urgency and drive action (hello, FOMO!)
- Send follow-up emails to those who haven’t redeemed the code yet
- A/B test your subject lines, email design, or even the discount itself to find what works best
- Track key metrics like open rate, click rate, conversions, revenue, and unsubscribes in one dashboard
Using FunnelKit Automations, you’re not just offering a discount. You’re building a smart, high-converting email funnel that drives real sales.
Before we proceed with the primary process, ensure that you have installed and activated FunnelKit Automations (both the free and premium versions).
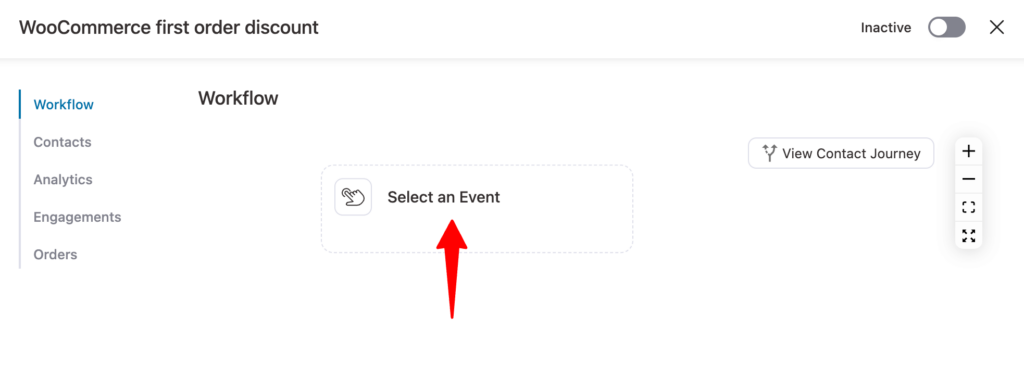
Step 1: Create a new automation for opt-in subscribers
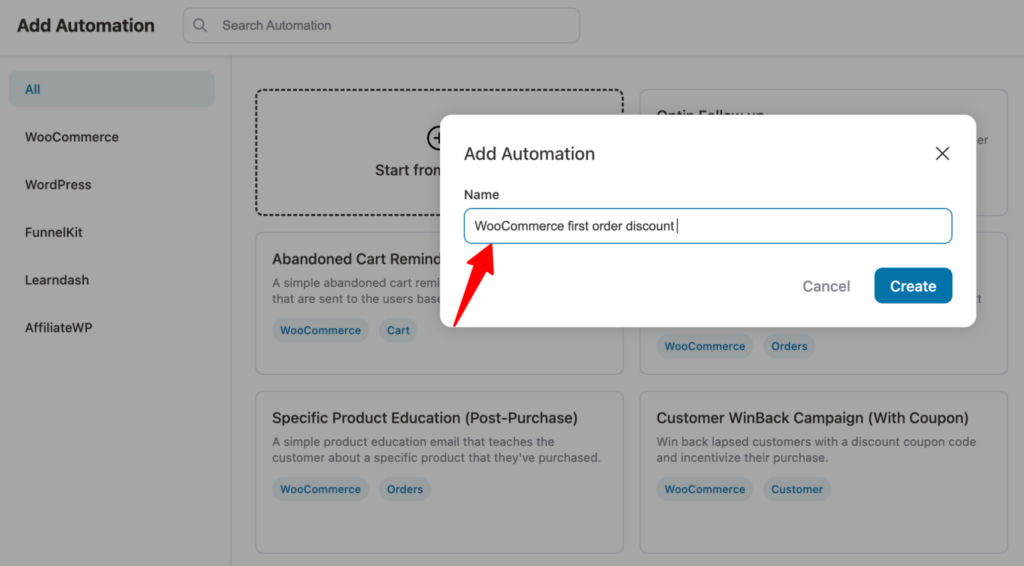
The first step is to create a new automation. For that, navigate to FunnelKit Automations ⇒ Automations (Next Gen) and then click on "Create Automation".
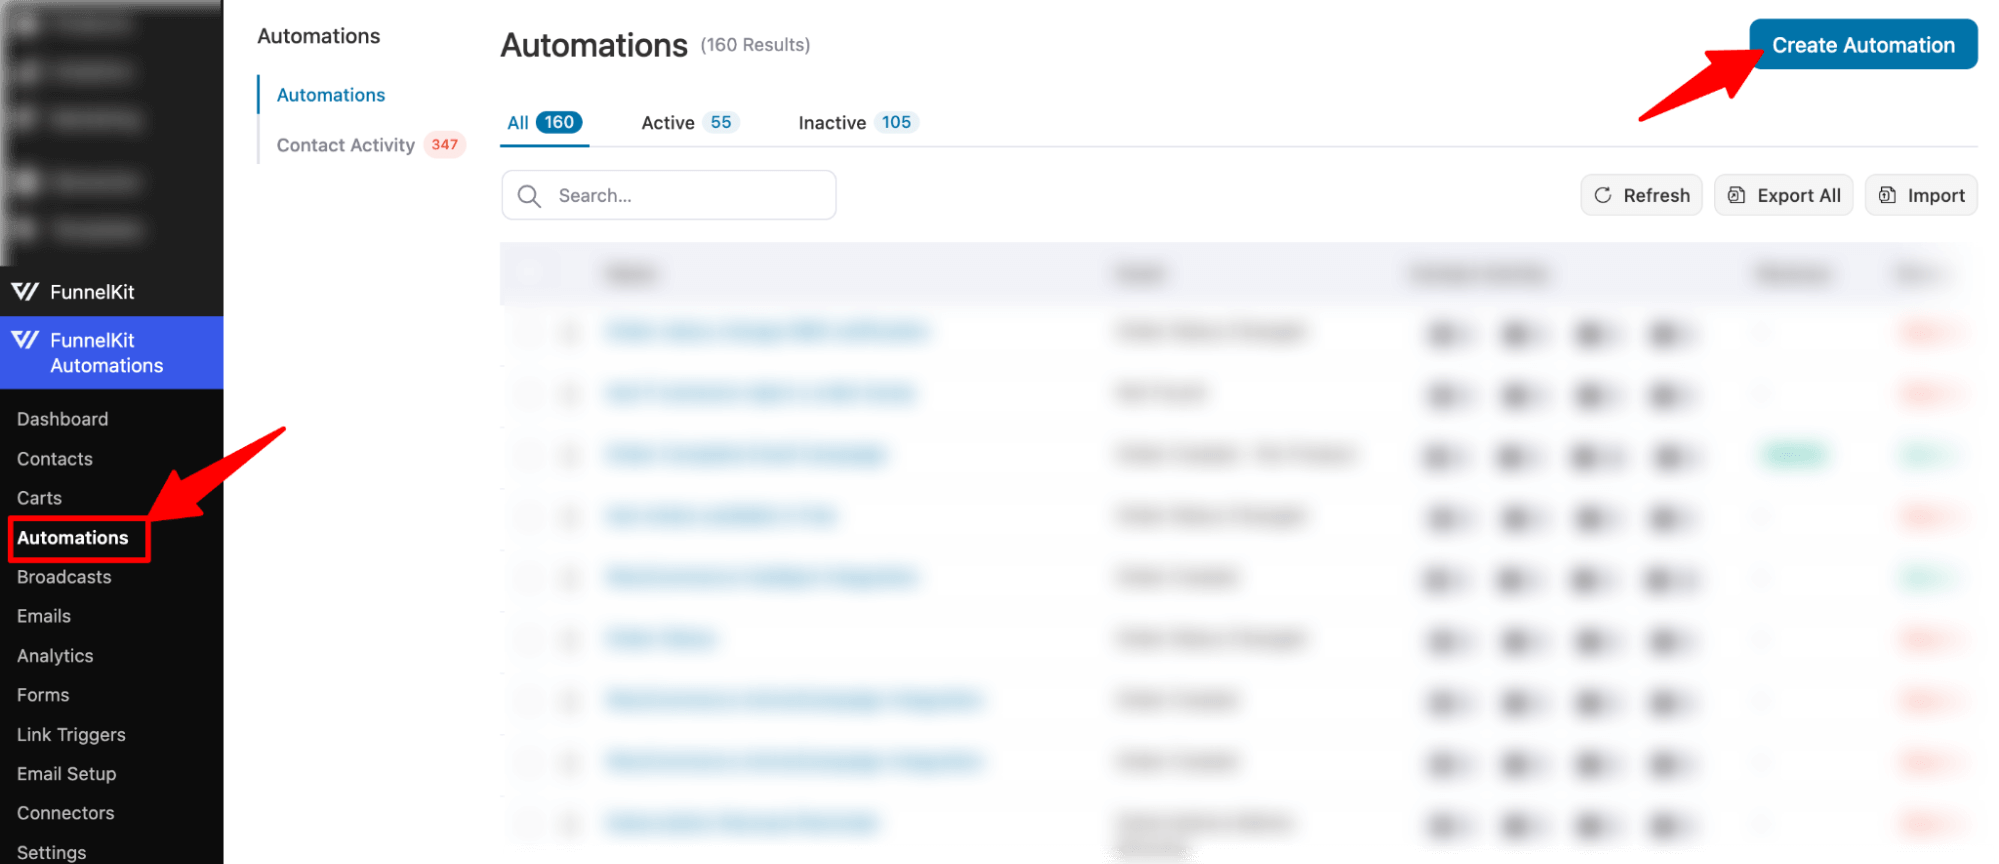
Now select the black template, provide a name, and click on Create.
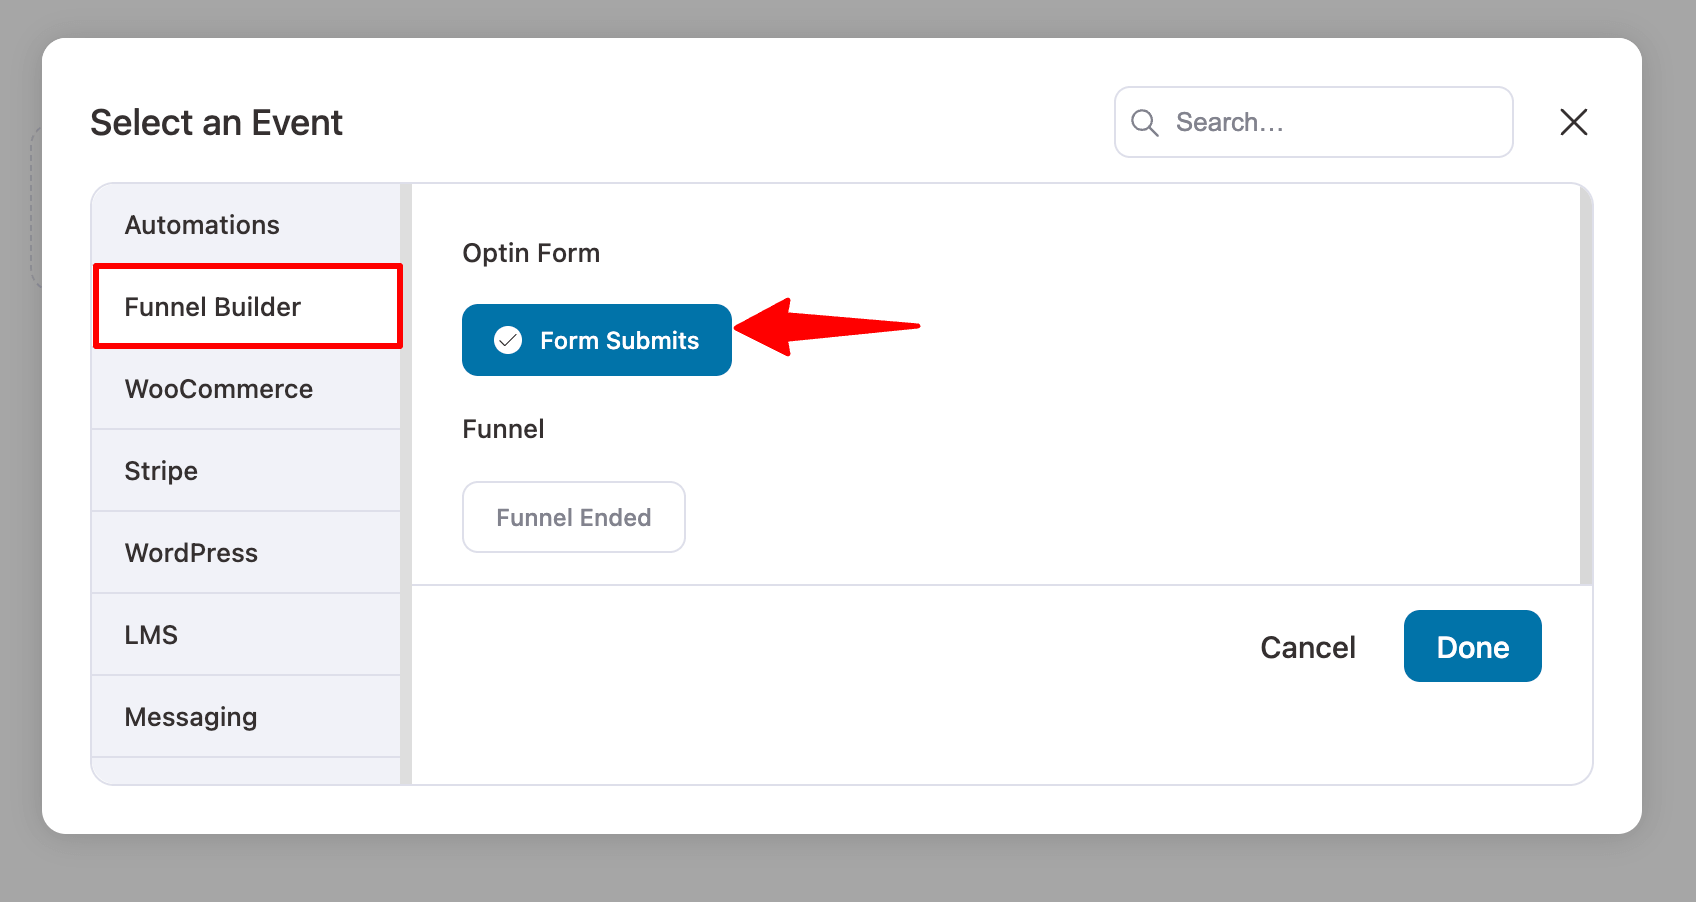
Step 2: Choose a form collecting trigger
In this step, we will select a trigger that initiates the process of creating a personalized coupon code and sends it to the subscribers via email. In our case, the trigger is when someone fills out the form, and we collect a lead.
Click on the Trigger button.
On the Funnel Builder tab, under Optin Form, choose “Form Submits” and click on Done.
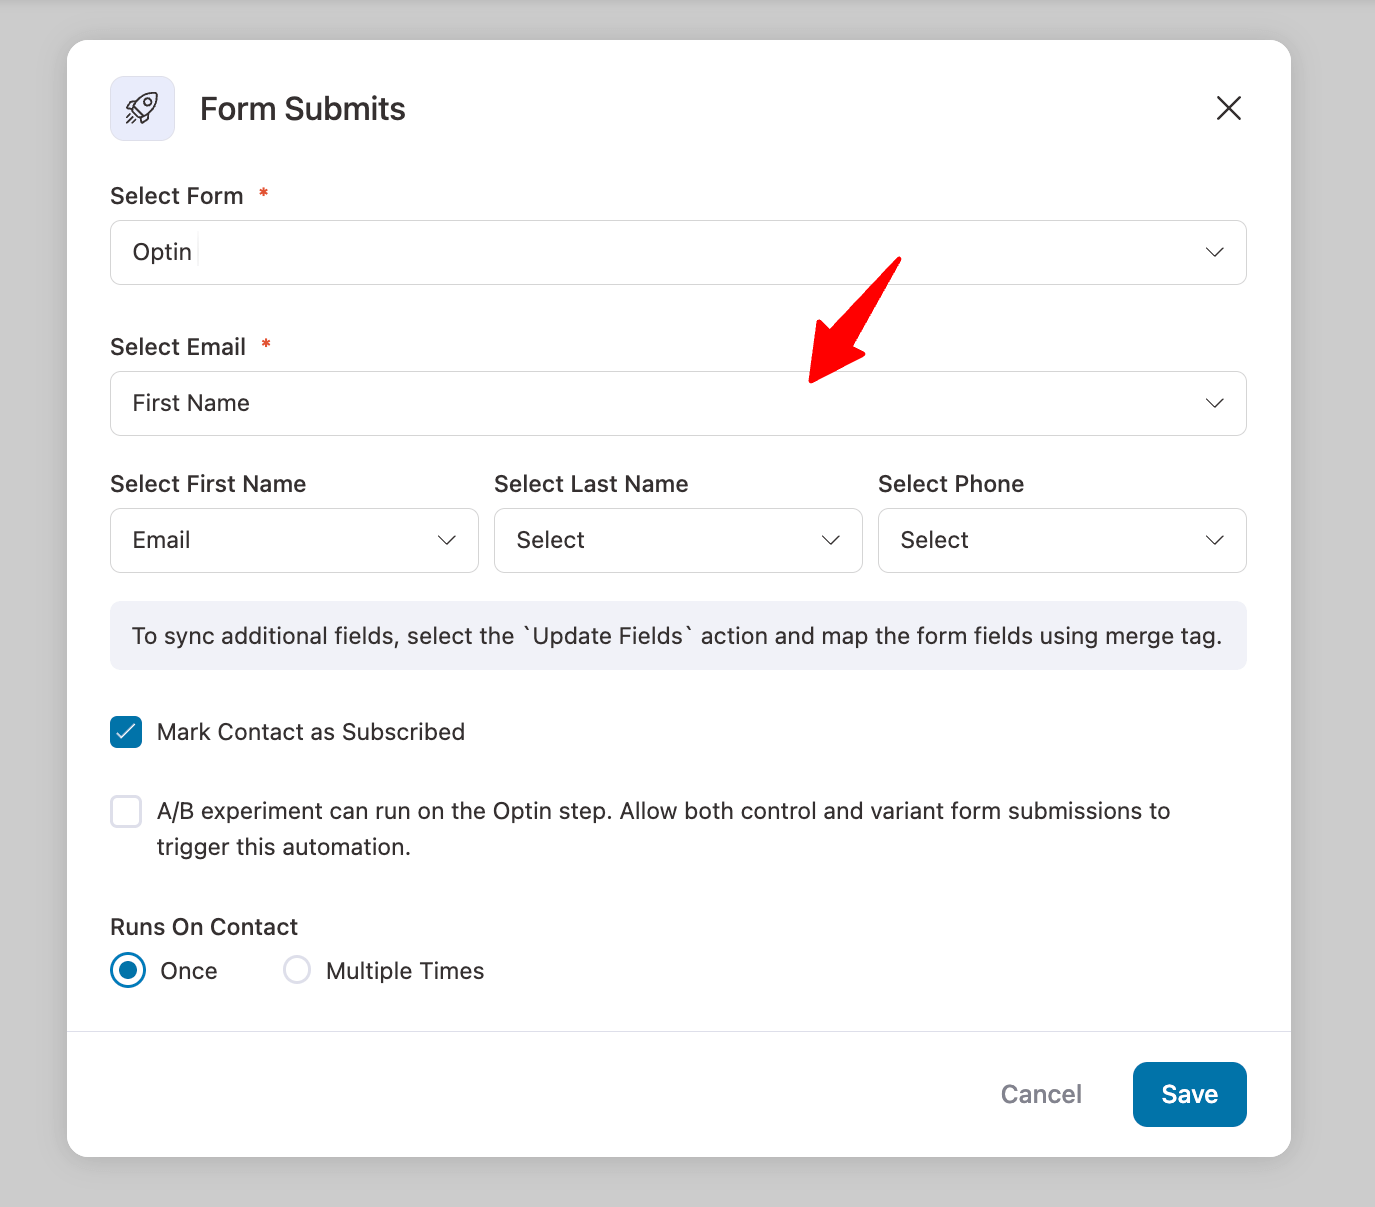
Step 3: Configure your form and map the field
Now, you need to select the lead generation form and map the field.
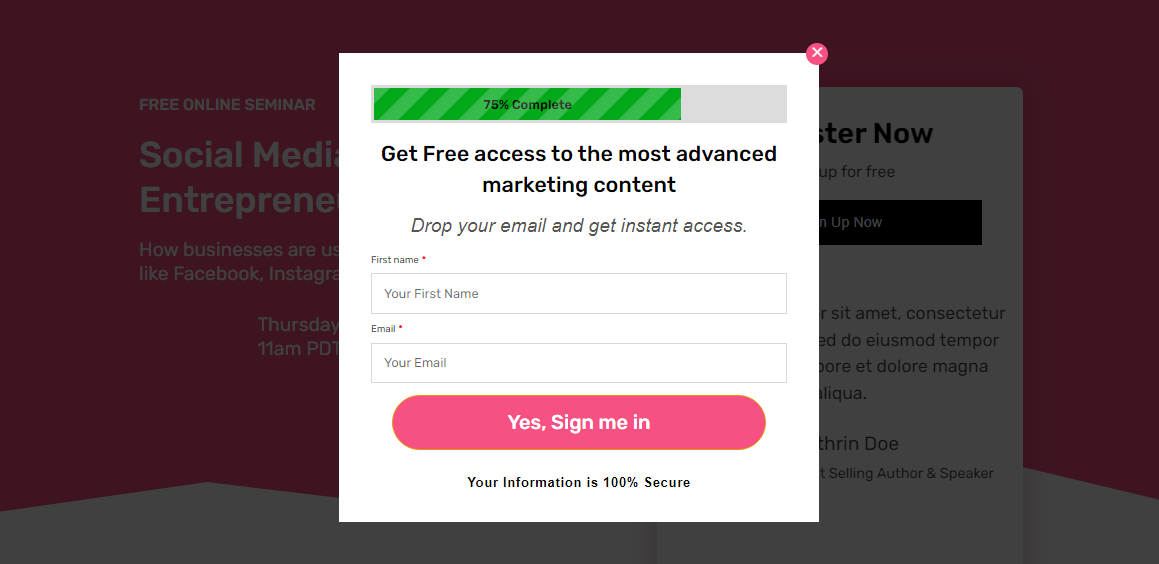
As mentioned earlier, we used the Charmer template to create an opt-in funnel. This template has two versions: one an inline form and another a pop-up form.
Here, we are going with pop-up form. Here is what the form looks like :
For this, you need to set up the following options:
- Select Form: Choose the Opt-in form from the dropdown.
- Select Email Field: Select the email field here.
- Select First Name: Here, choose the first name.
- Select Last Name: Our form has only two fields: email and first name, so we are going to skip this field.
- Select Phone: We will skip this one as well.
- Mark Contact as Subscribed: Checking this box will mark all the generated leads as subscribed contacts.
- Runs On Contact: Choose once, as we will offer first-order discounts only once.
Finally, click on Save to update changes.
Step 4: Create a dynamic, personalized coupon
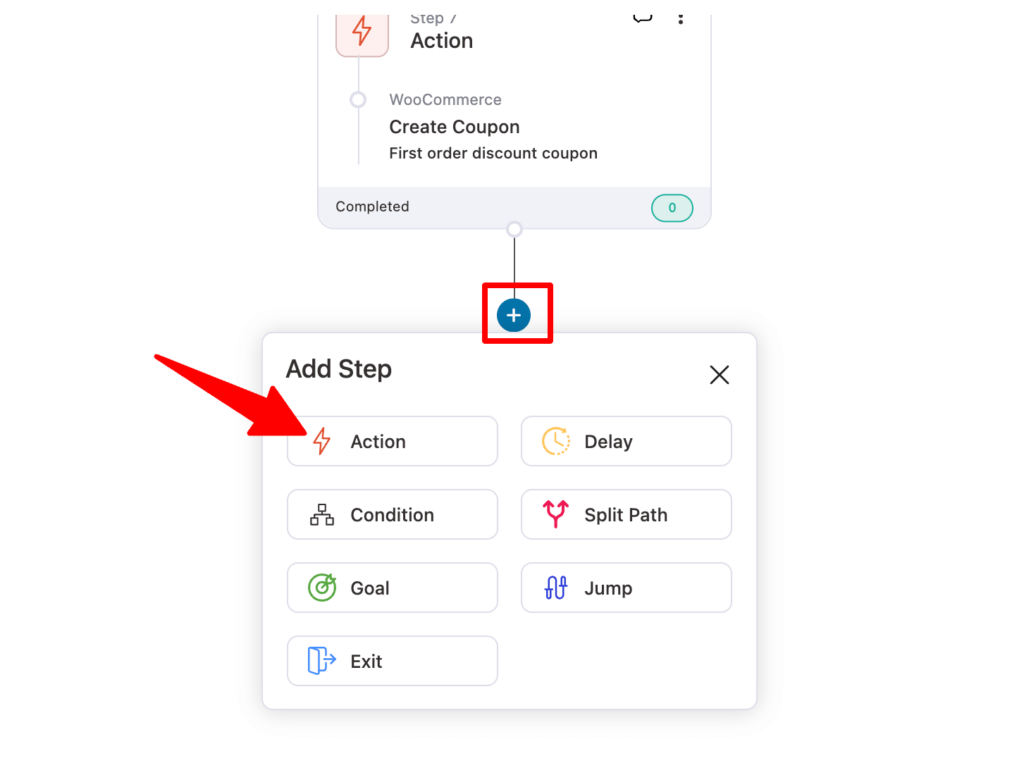
We will now create an action that will generate the coupon code. To do so, click on the “+” icon and choose “Action.”
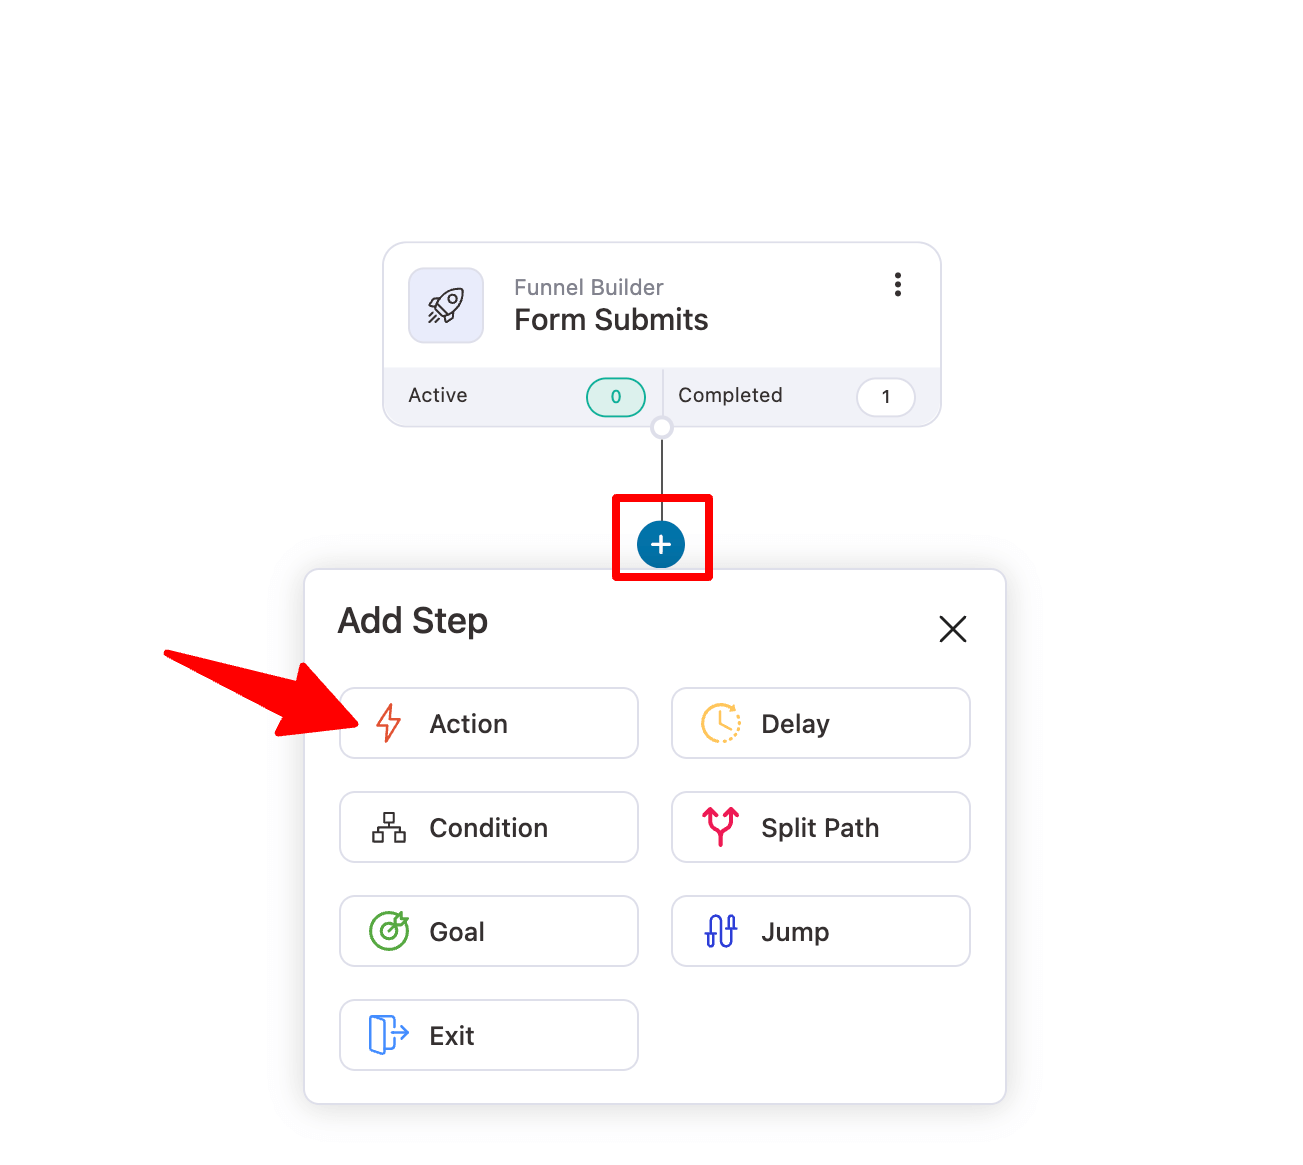
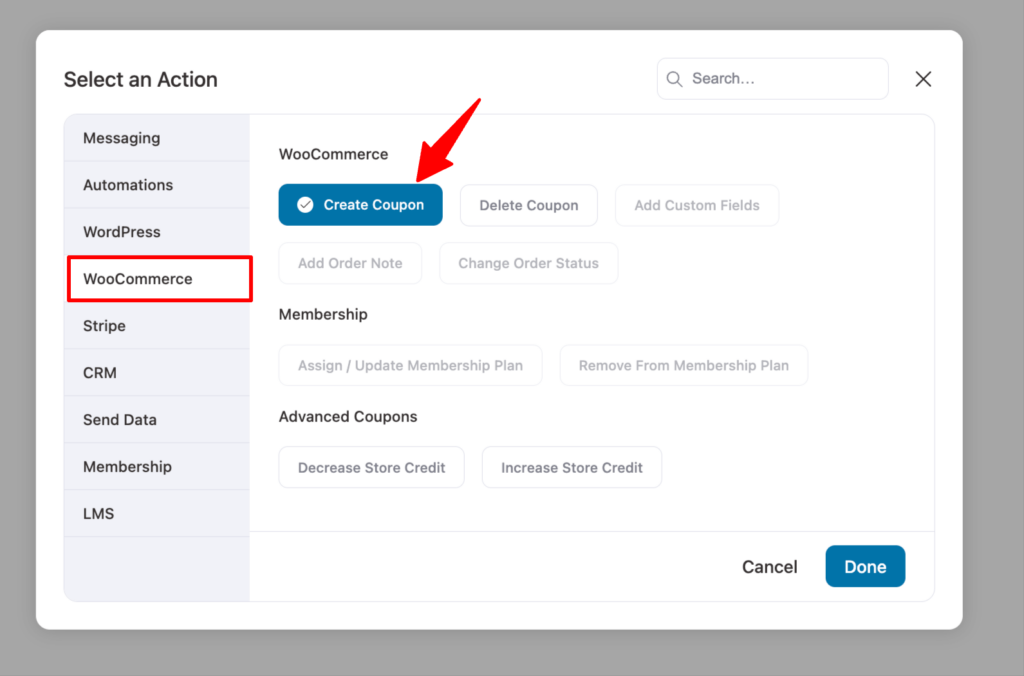
Now on the WooCommerce tab, choose “Create Coupon” and click on Done.
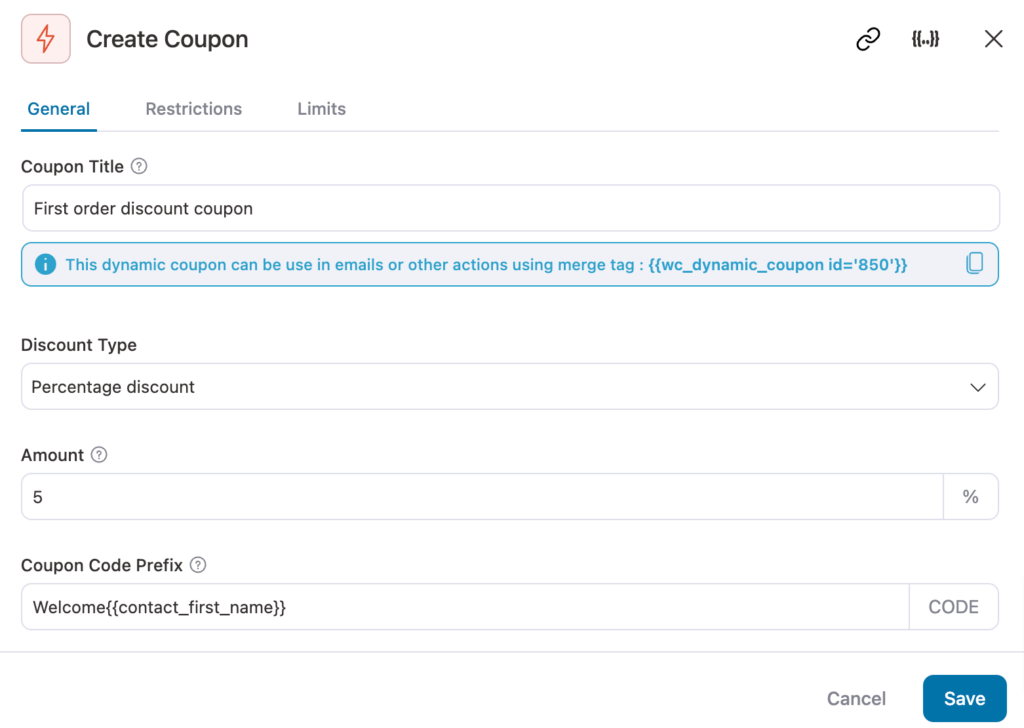
Now, provide the following information:
- Coupon Title: Provide a coupon title.
- Discount Type: Choose the discount type. The options are percentage discount, fixed cart discount, and fixed product discount.
- Amount: Here, enter the discount amount.
- Coupon Code Prefix: Here, you can provide the text that will be added to the start of the discount code. For example, we are using the prefix 'welcome' appended with the customer's first name, which we added using a merge tag.
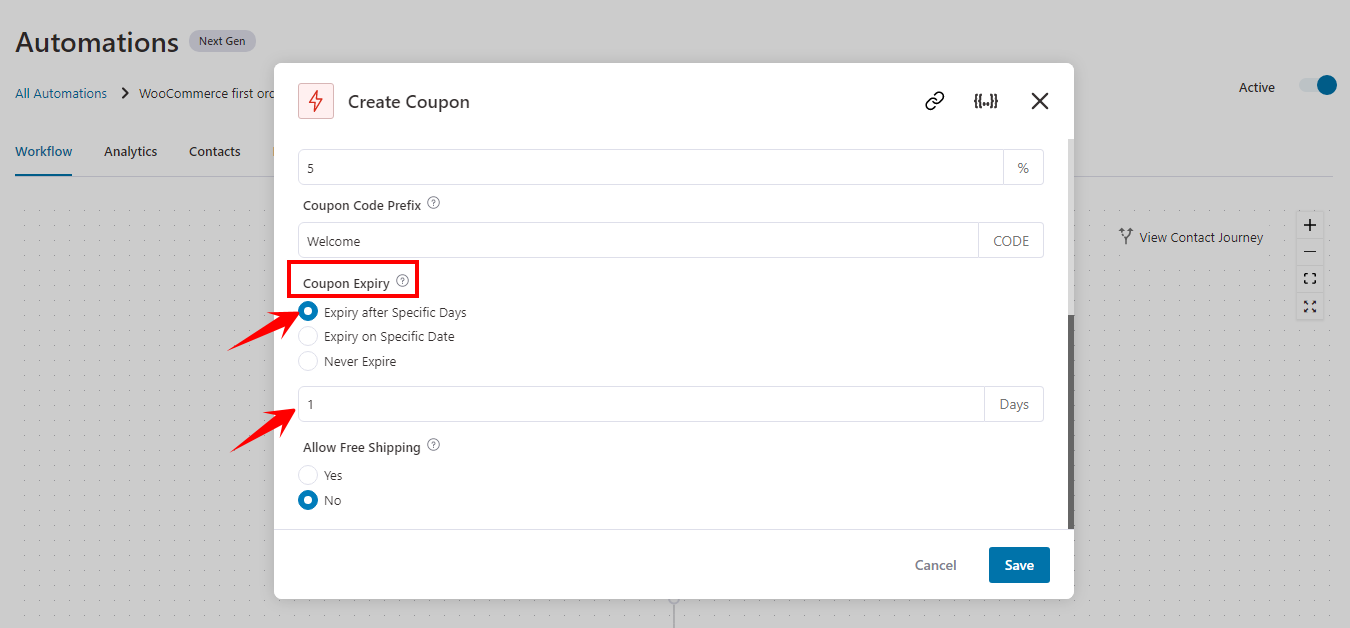
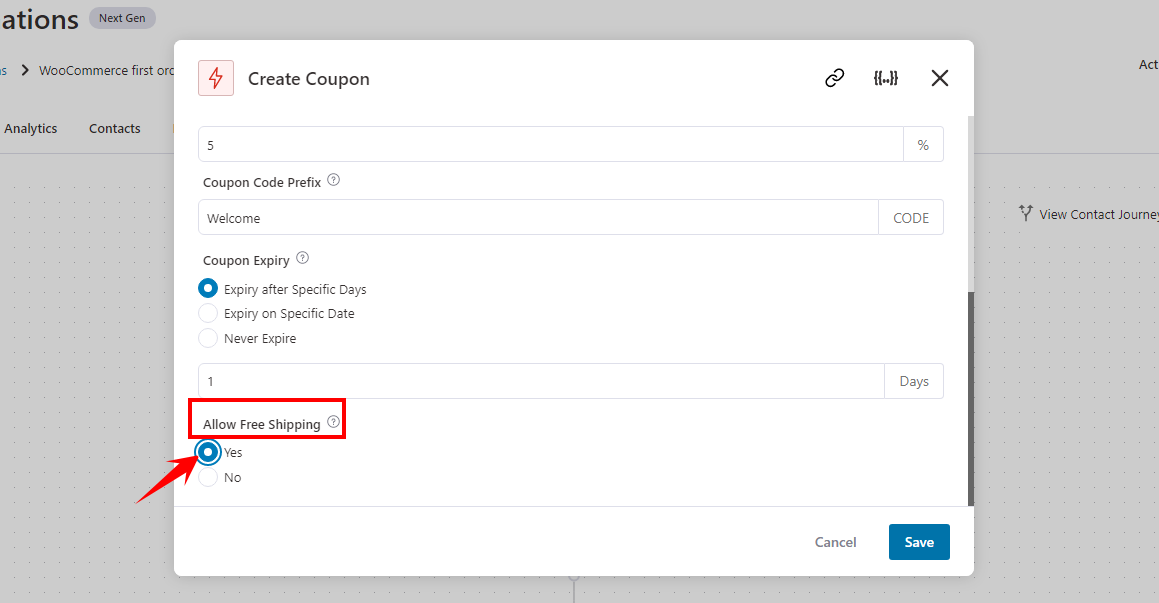
- Coupon Expiry: You can set the discount code to expire after specific Days or on a specific date. We recommend setting the expiration date after a specific day, such as one day or three days. This will create an urgency in the users to make the order fast and also give them enough time to place the order.
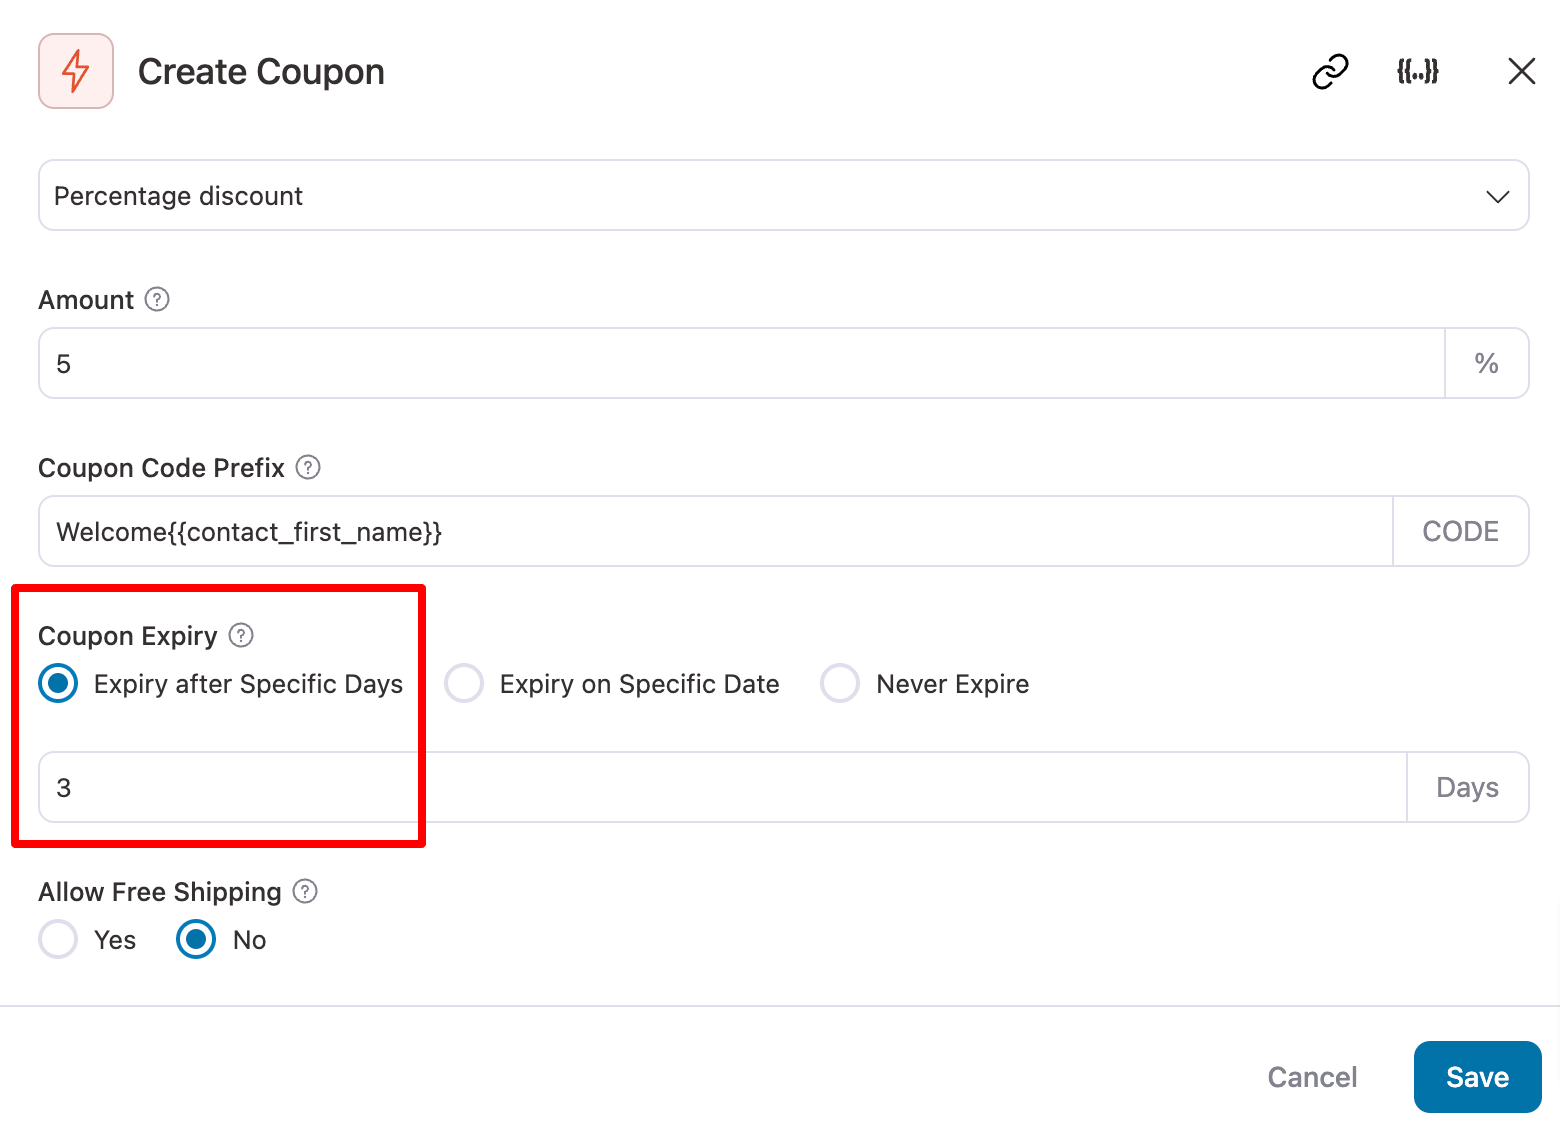
- Allow Free Shipping: If you want, you can allow free shipping.
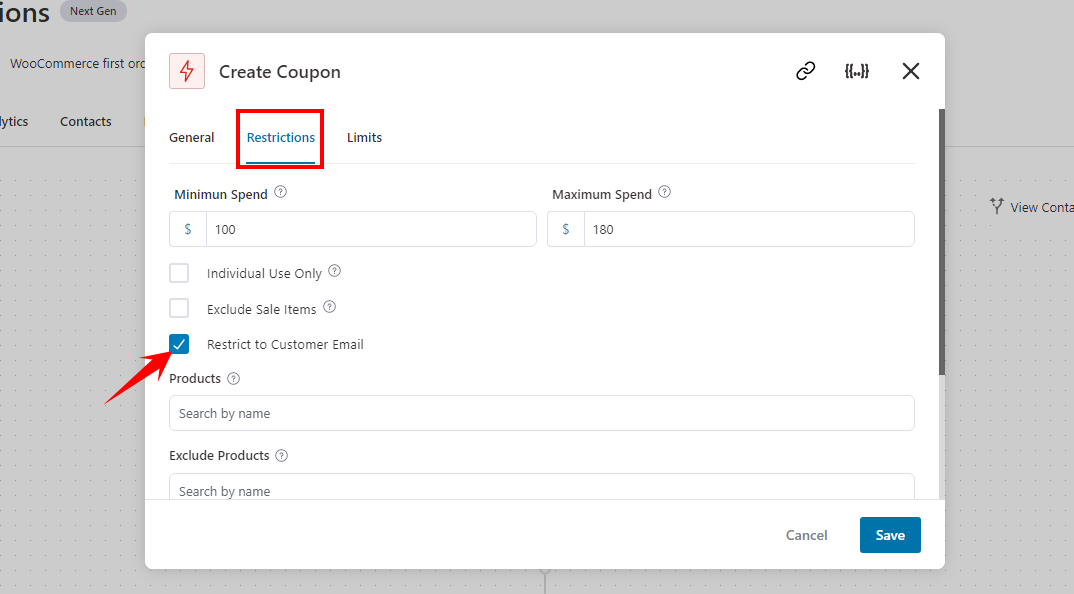
You can switch to the Restrictions tab to set conditions like minimum/maximum spend, exclude sale items, enable individual use, and limit the coupon by customer email, specific products, or categories.
For example, if you want to offer a WooCommerce first-order discount for certain product categories, just add those categories here.
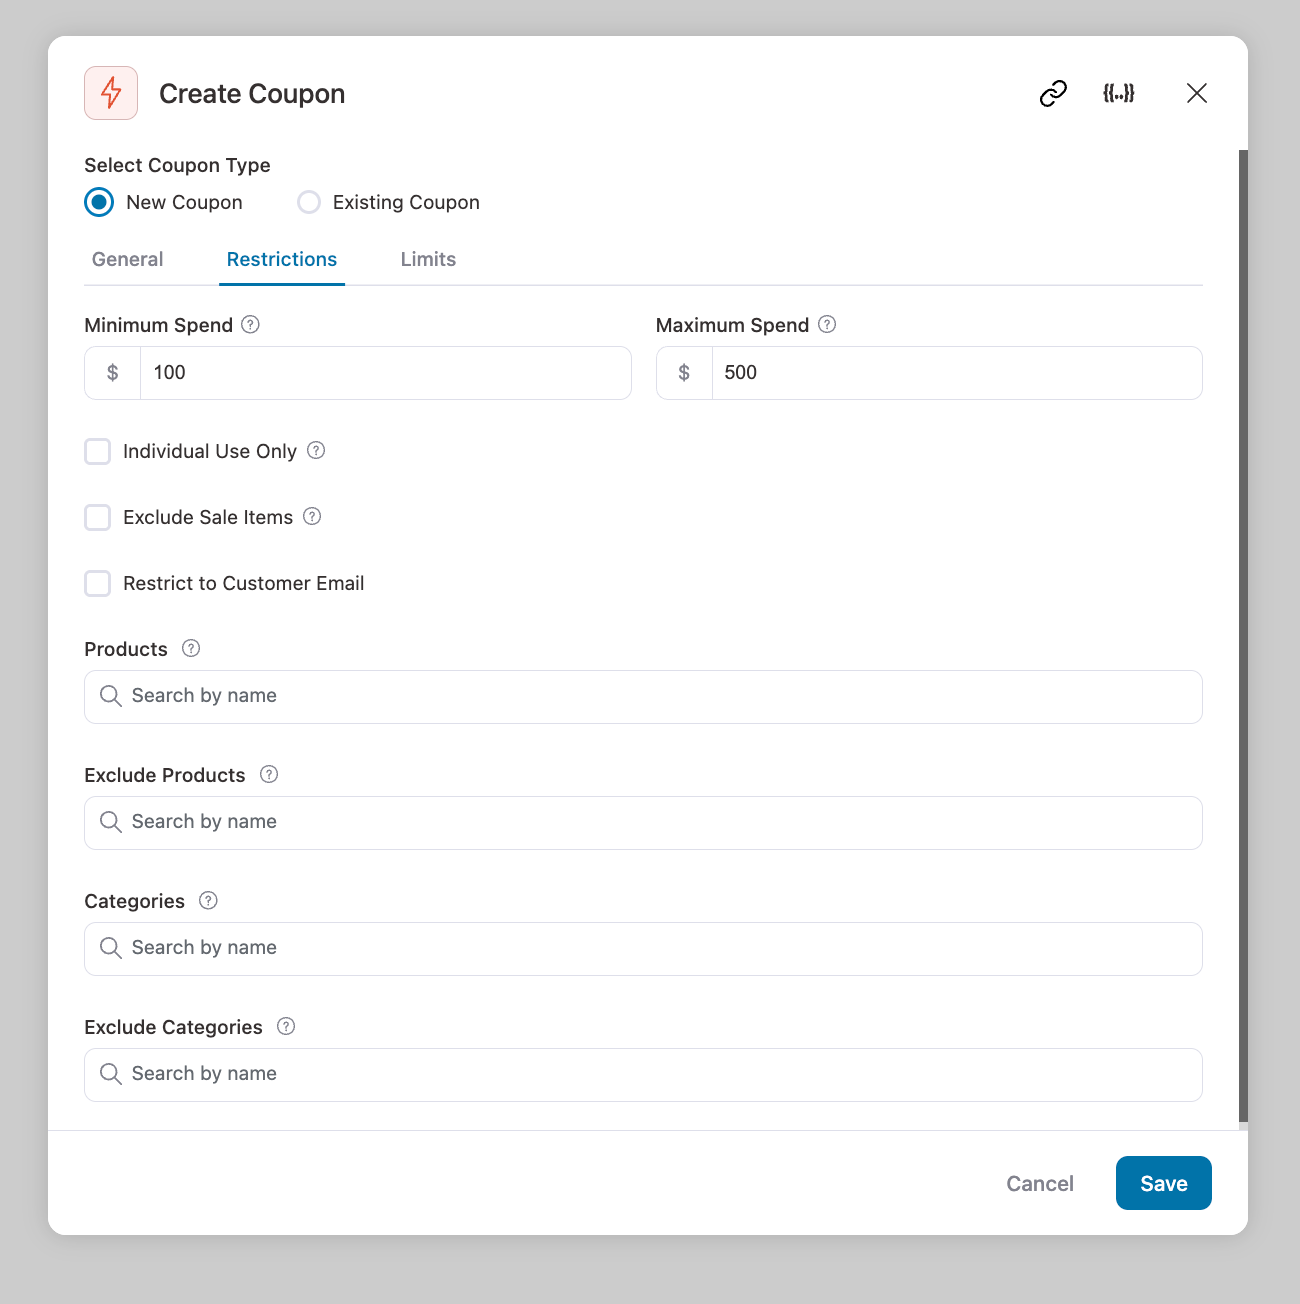
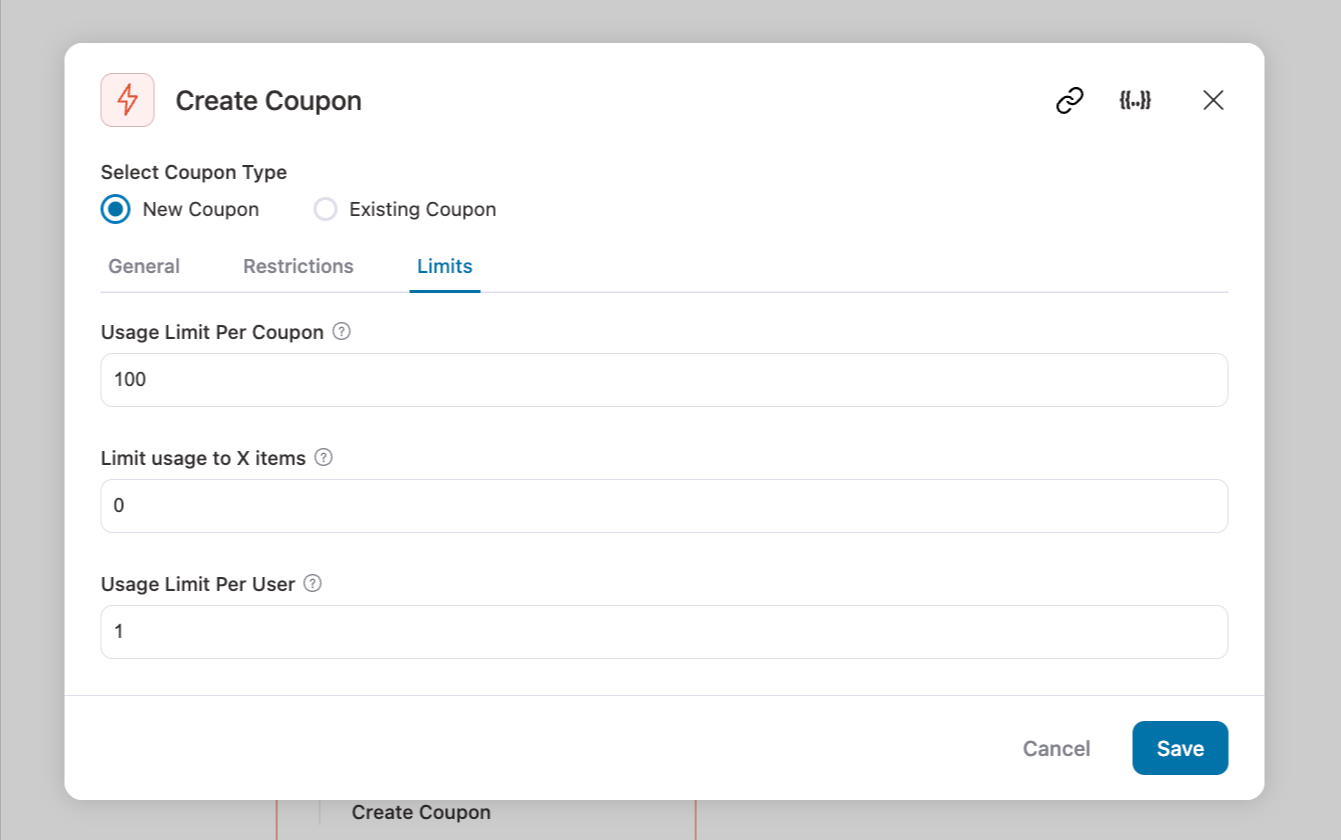
On the Limits tab, control total coupon uses, limit usage per item, and set usage limits per individual user.
After providing the details, click on Save.
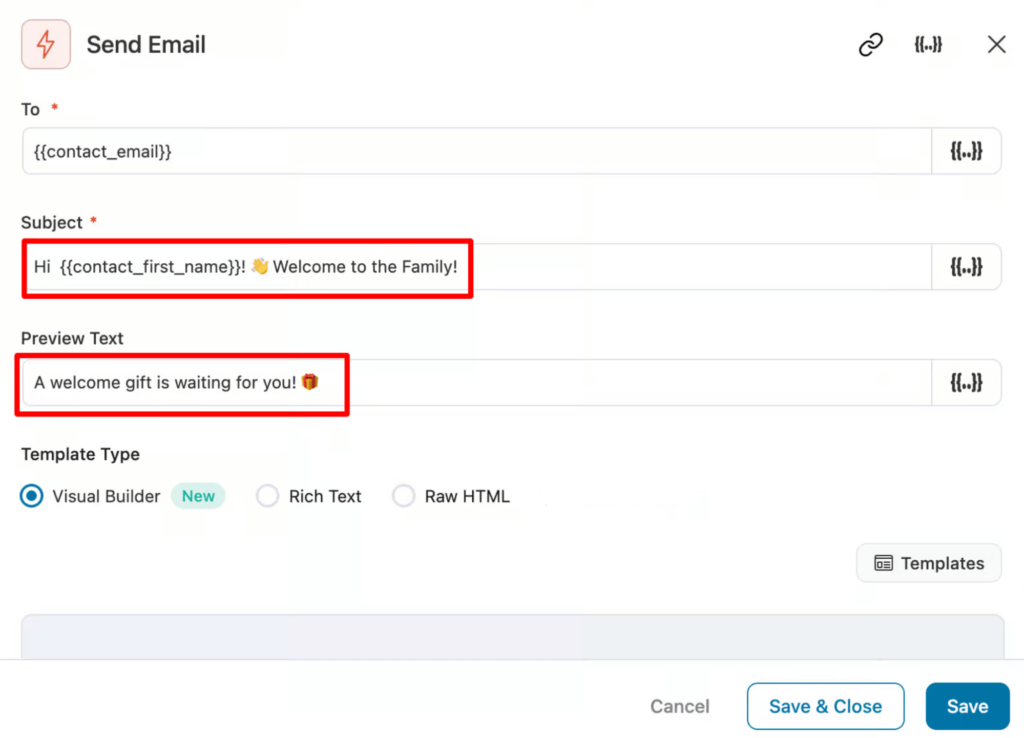
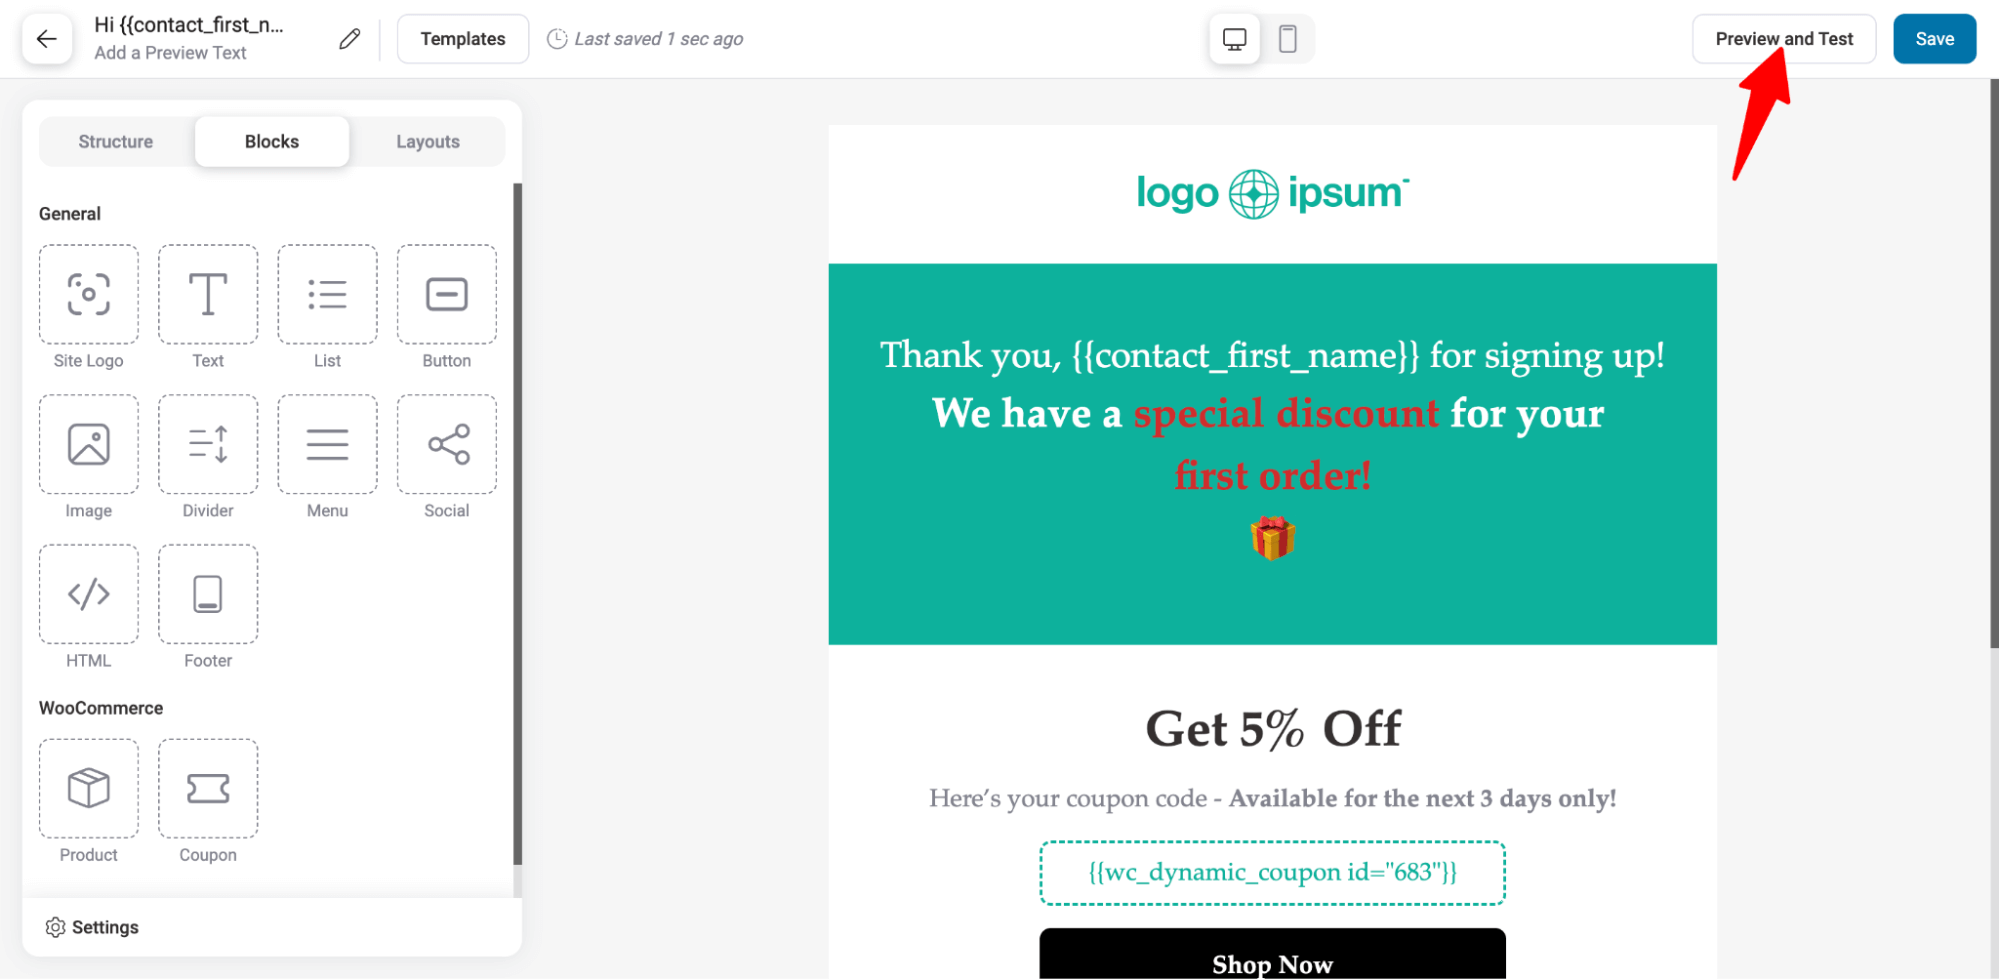
Step 5: Design an email with a dynamic discount coupon code
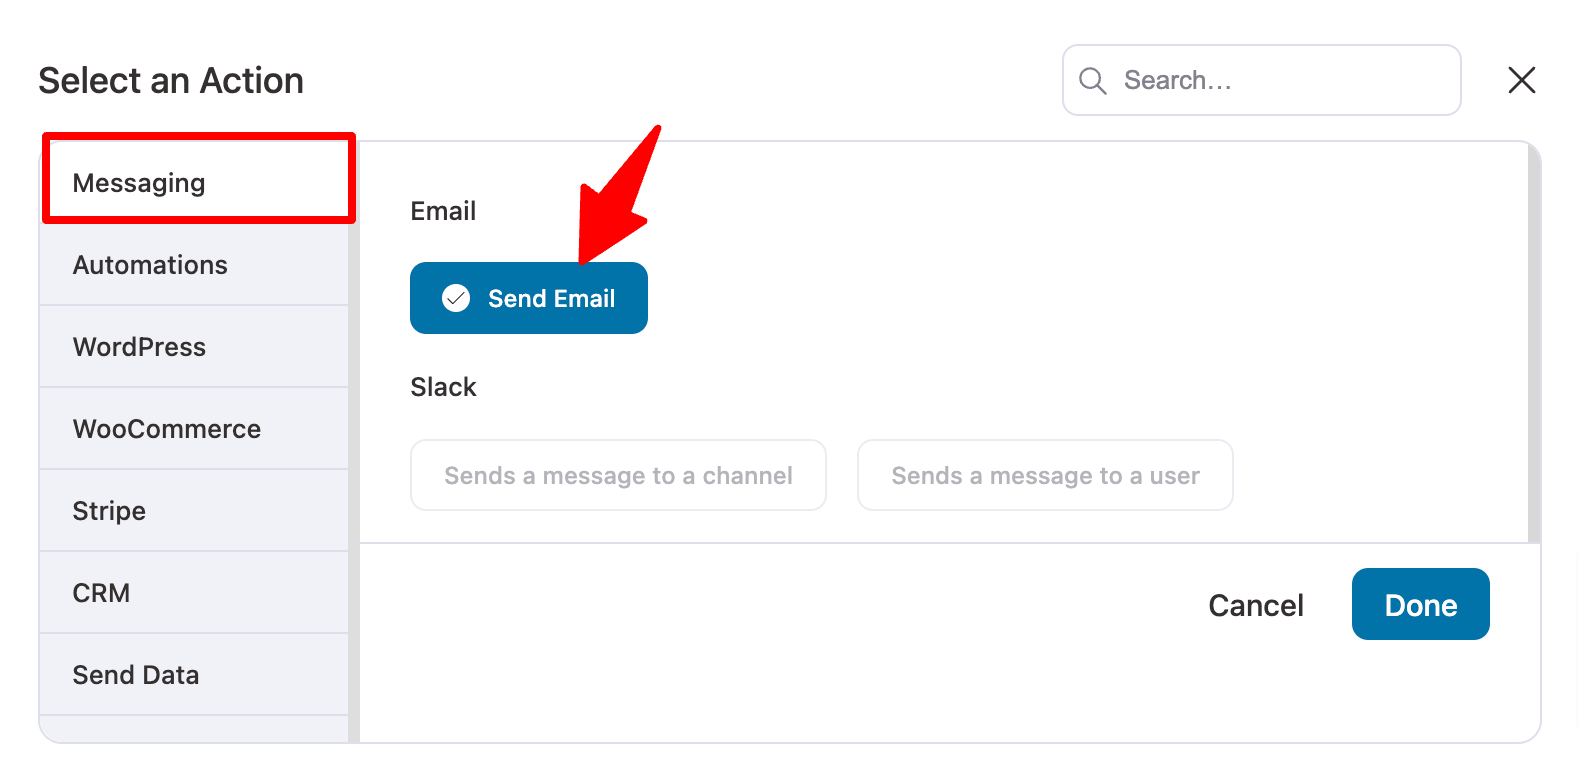
Before creating the email, you need to add another action to send the email.
For this, like previously, click on the “+” icon and then select “Action”.
Now, on the Messaging tab, select “Send Email” and click on Done.
Now add the Email Subject and Preview Text. You can use the merge tag to personalize the subject and preview Line.
Here, we are using the “{{contact_first_name}}” tag, which will dynamically display the user's name.
You can design the email template in three ways: Visual Builder (New), Rich Text, and Raw HTML.
🔔 Note: Don’t use the Raw HTML option unless you are a pro at HTML.
Here, we are going to use Visual Builder (New).
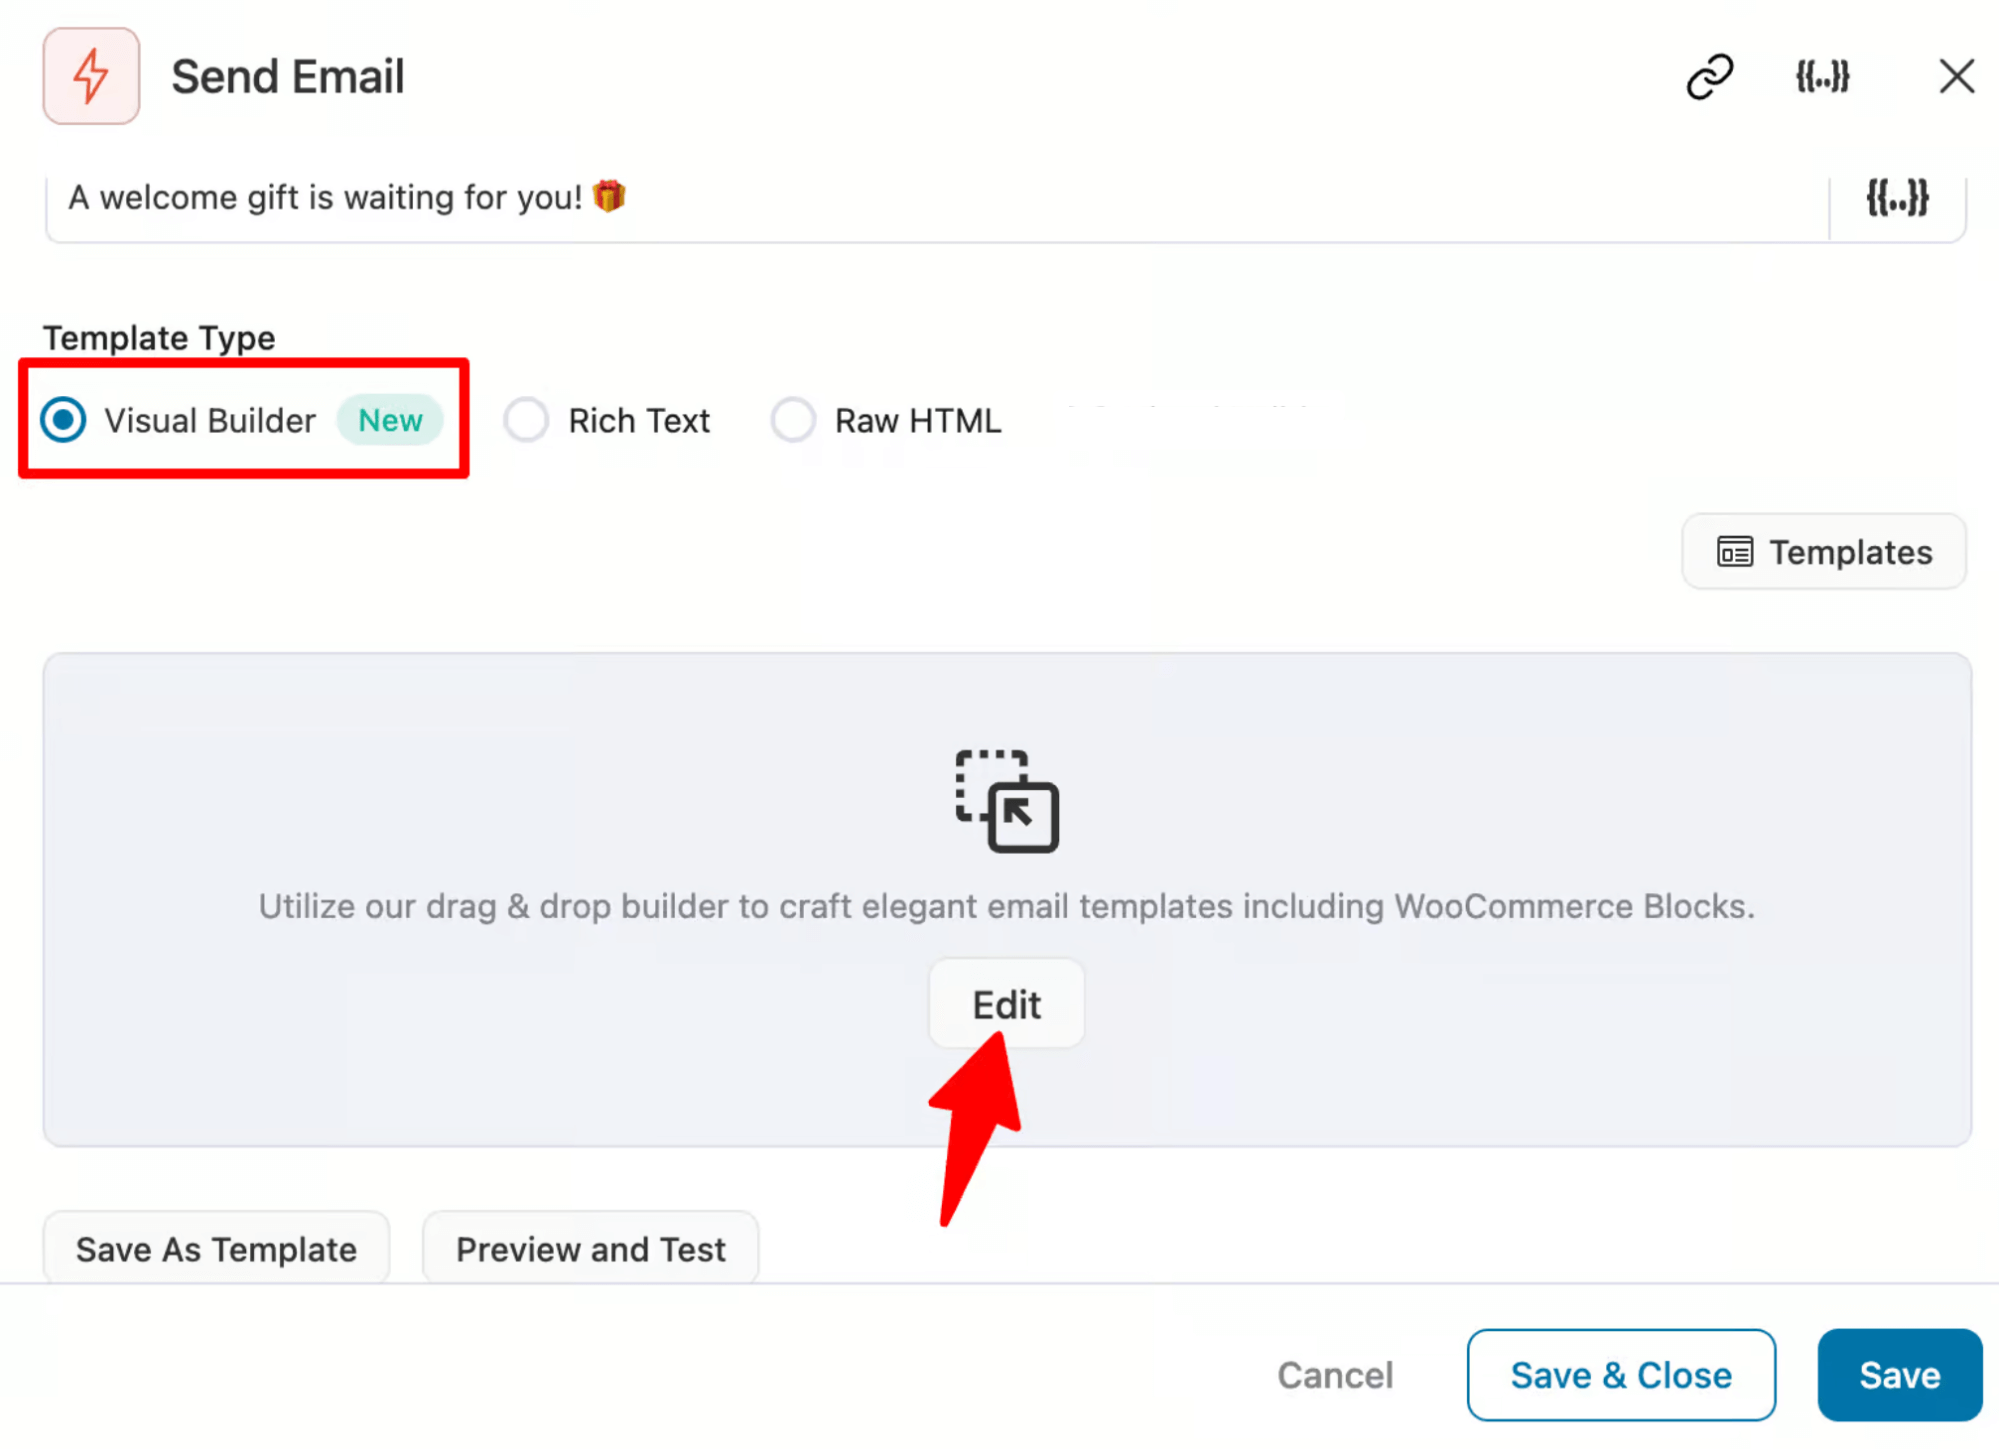
FunnelKit Automations provides many prebuilt email templates. You can choose any of these and customize it according to your needs.
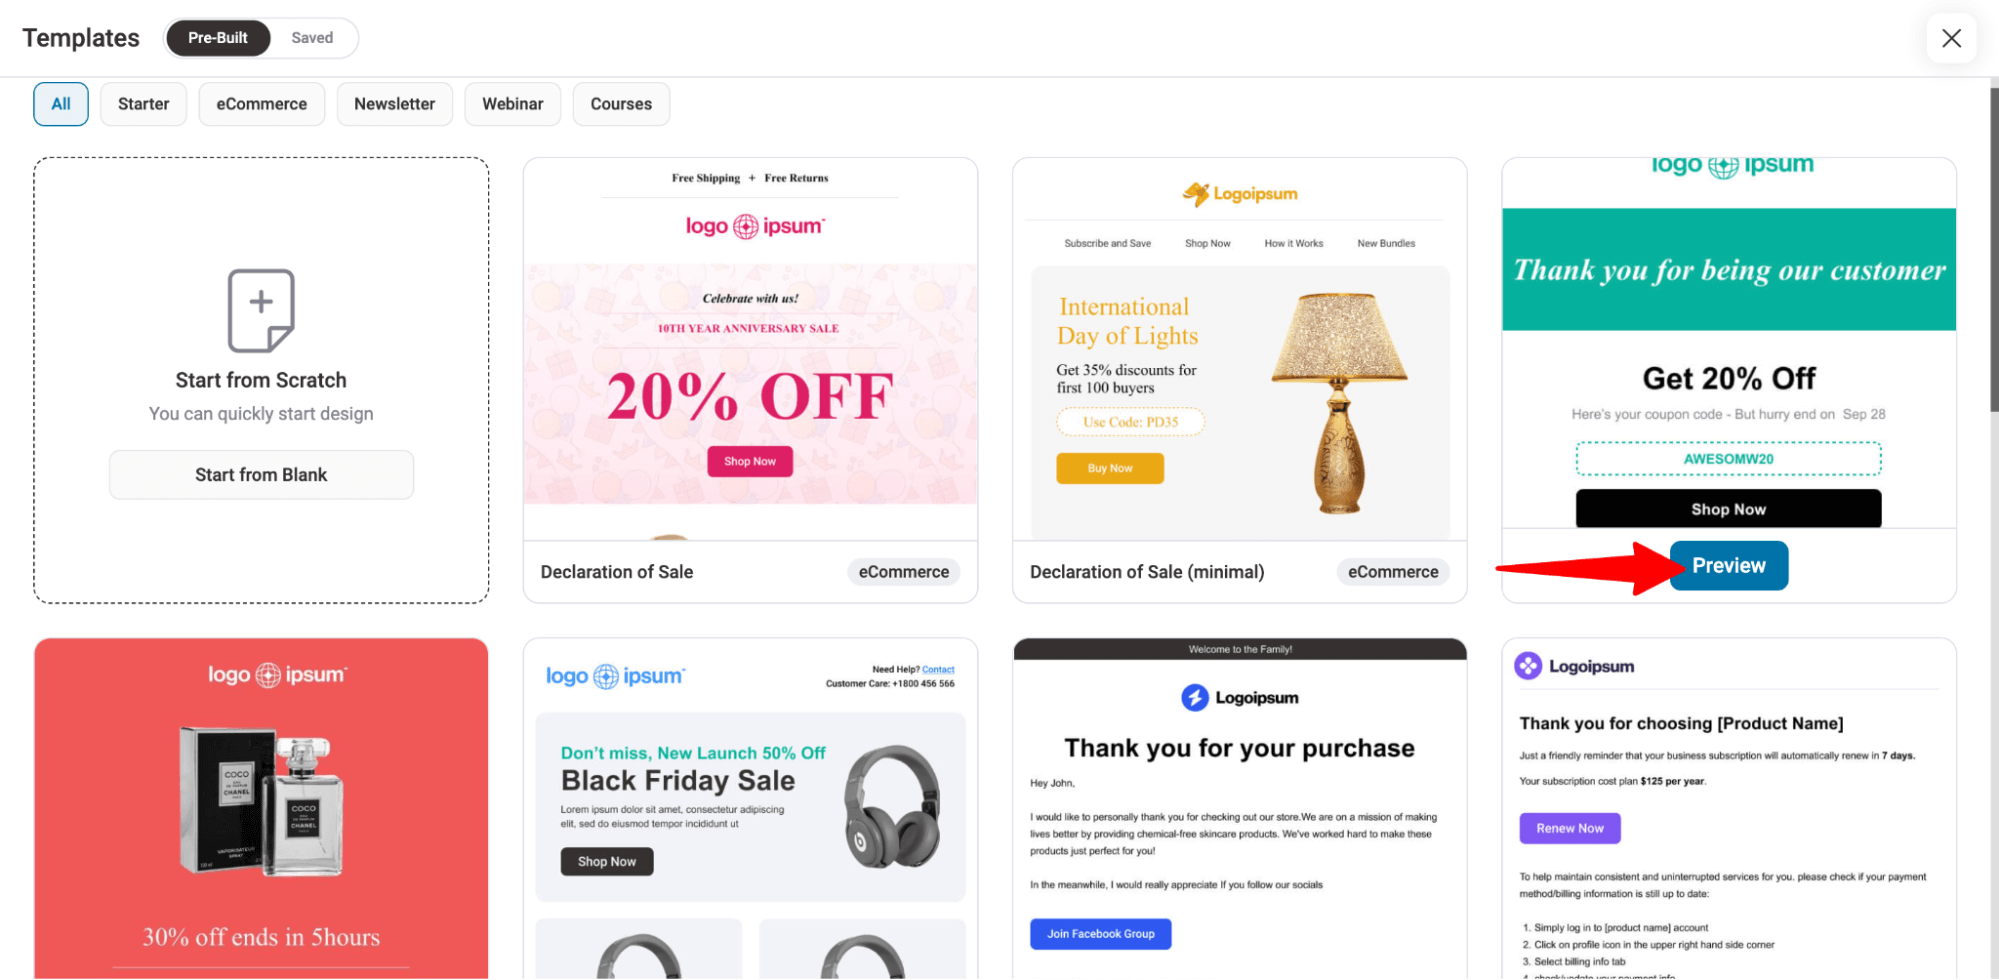
Here, we are using the “Personalized Coupon” template to share the discount first buyers can use to avail themselves of the discount.
Hover on the template and click on Preview.
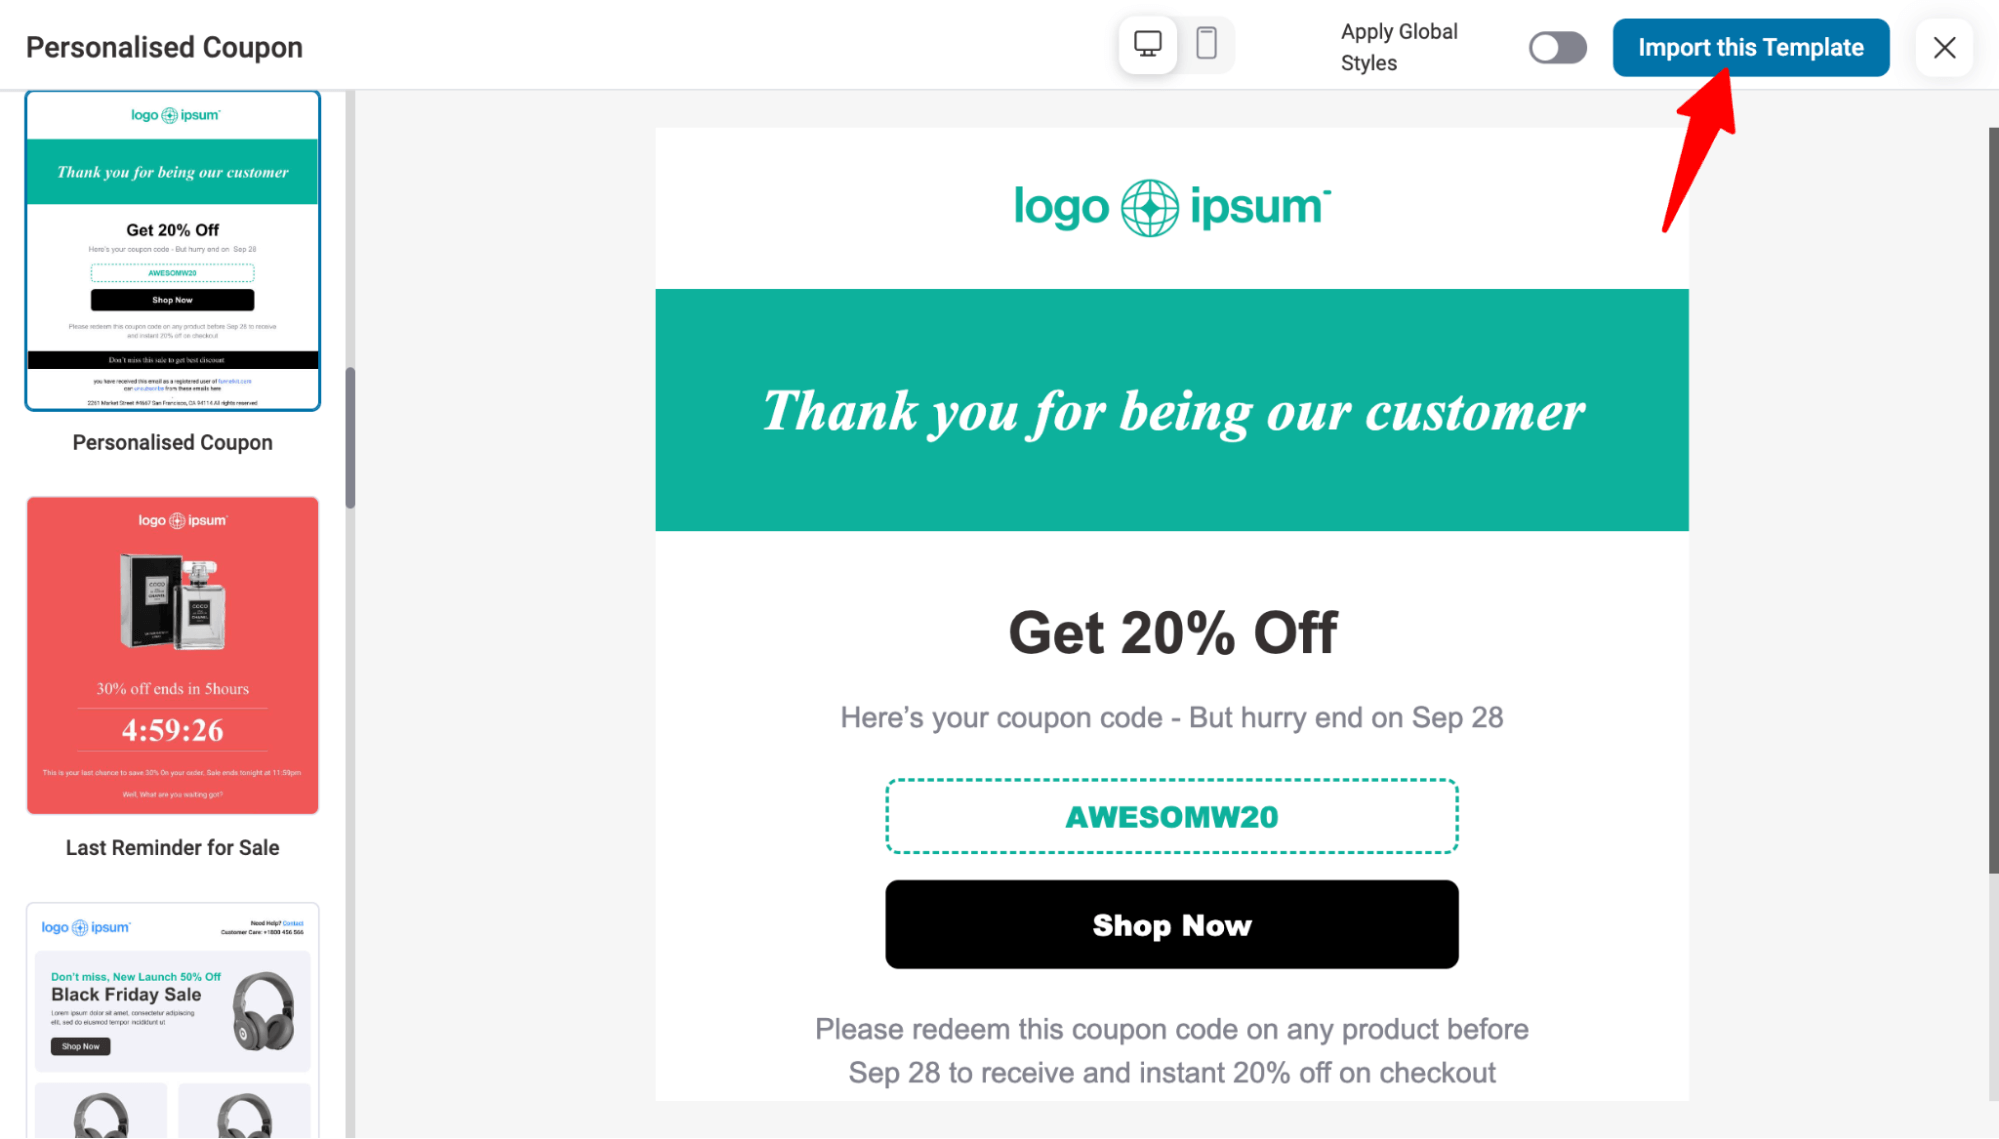
Now, to import, click on the “Import This Template”.
After importing, you can customize the email template as you want. For instance, you can change the logo and add a welcome text for new users to let them know about the first-order discount.
We are adding the customer's first name in the message to make it more personalized.
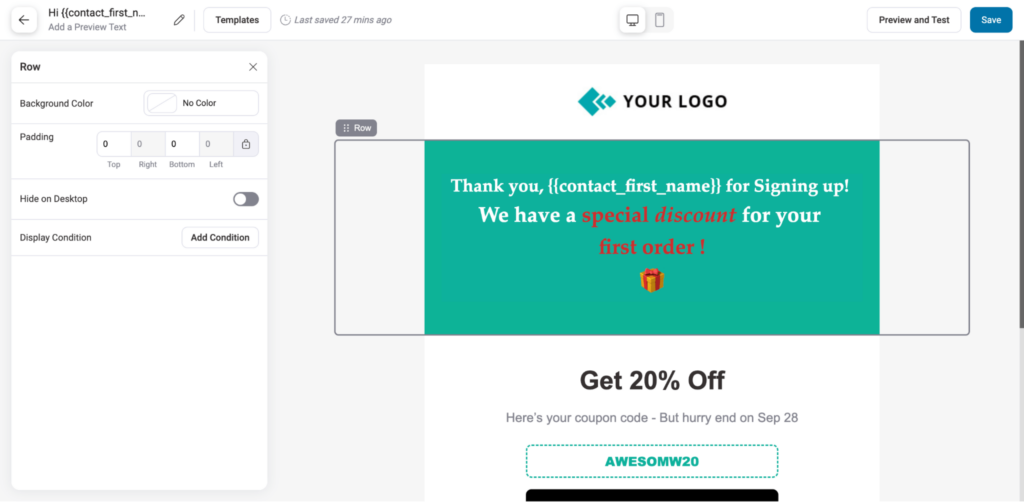
After that, customize all the discount-related text according to the discount you want to offer users on their first order in your WooCommerce store.
🔔 Note: Here, we will share the dynamic coupon created in the previous step, so make sure the texts reflect this.
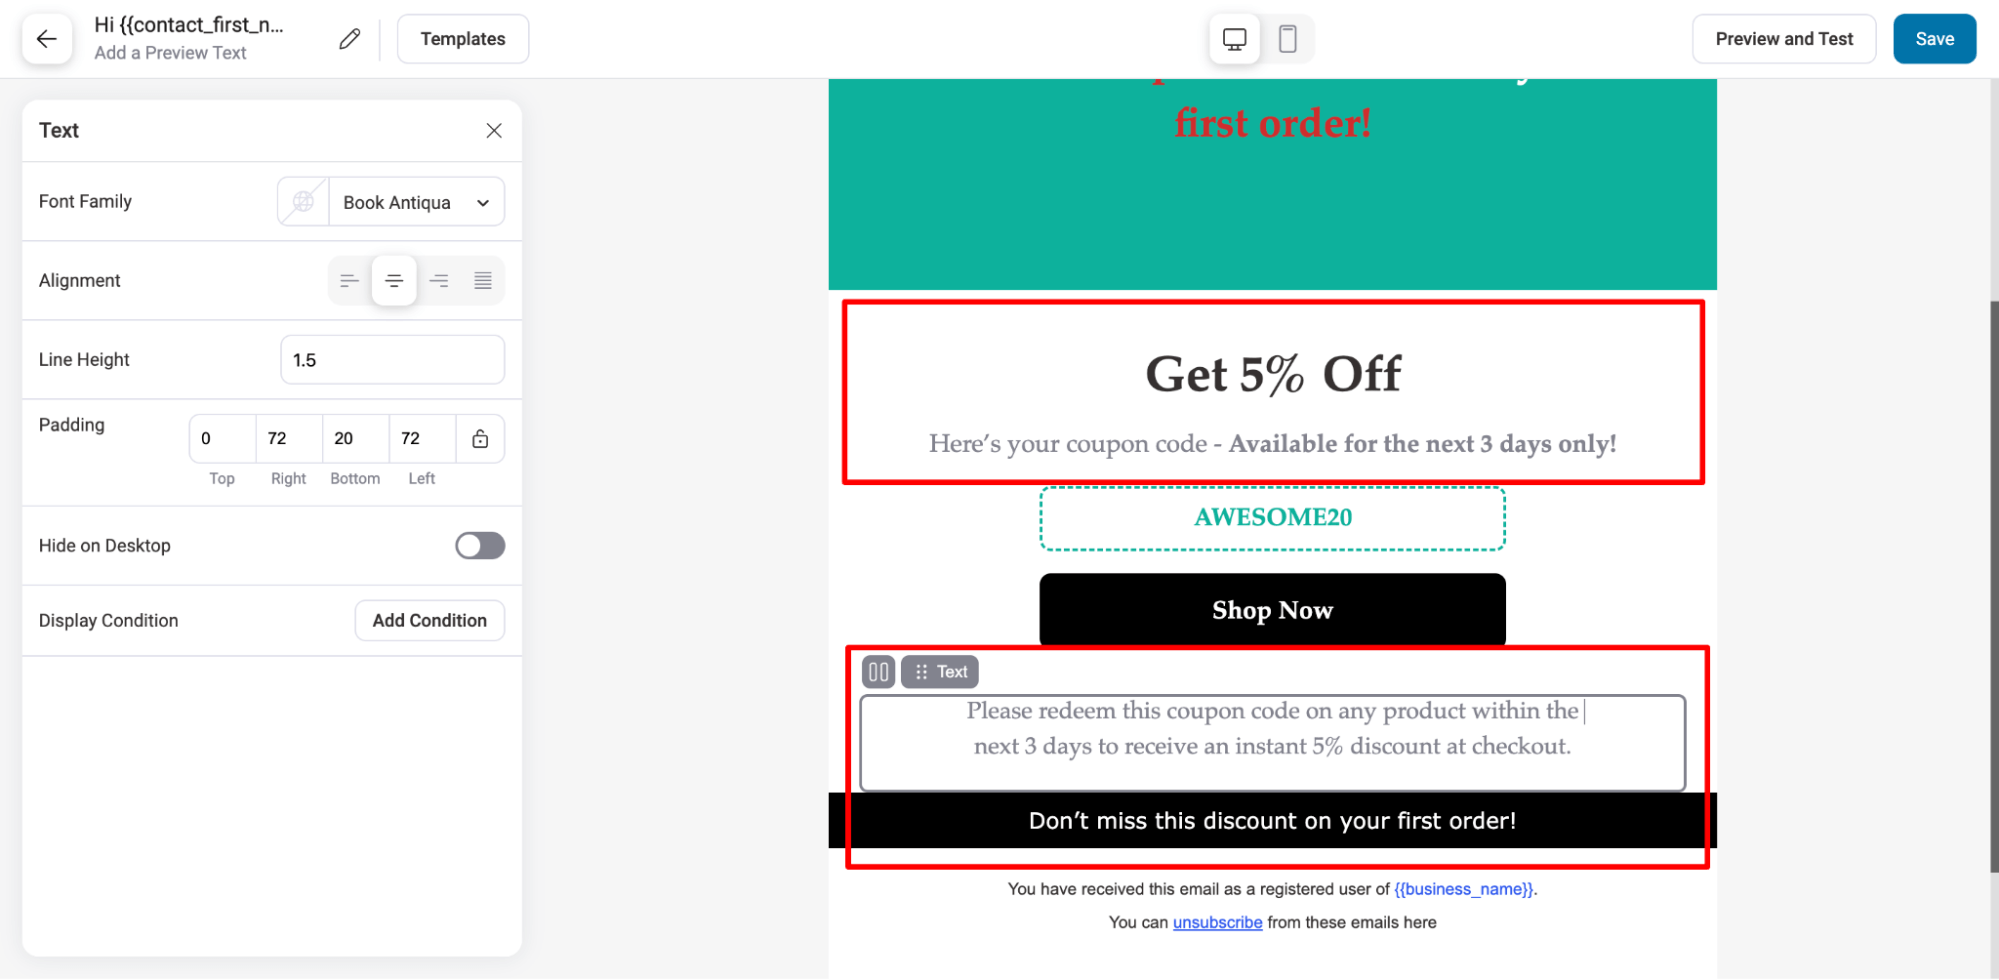
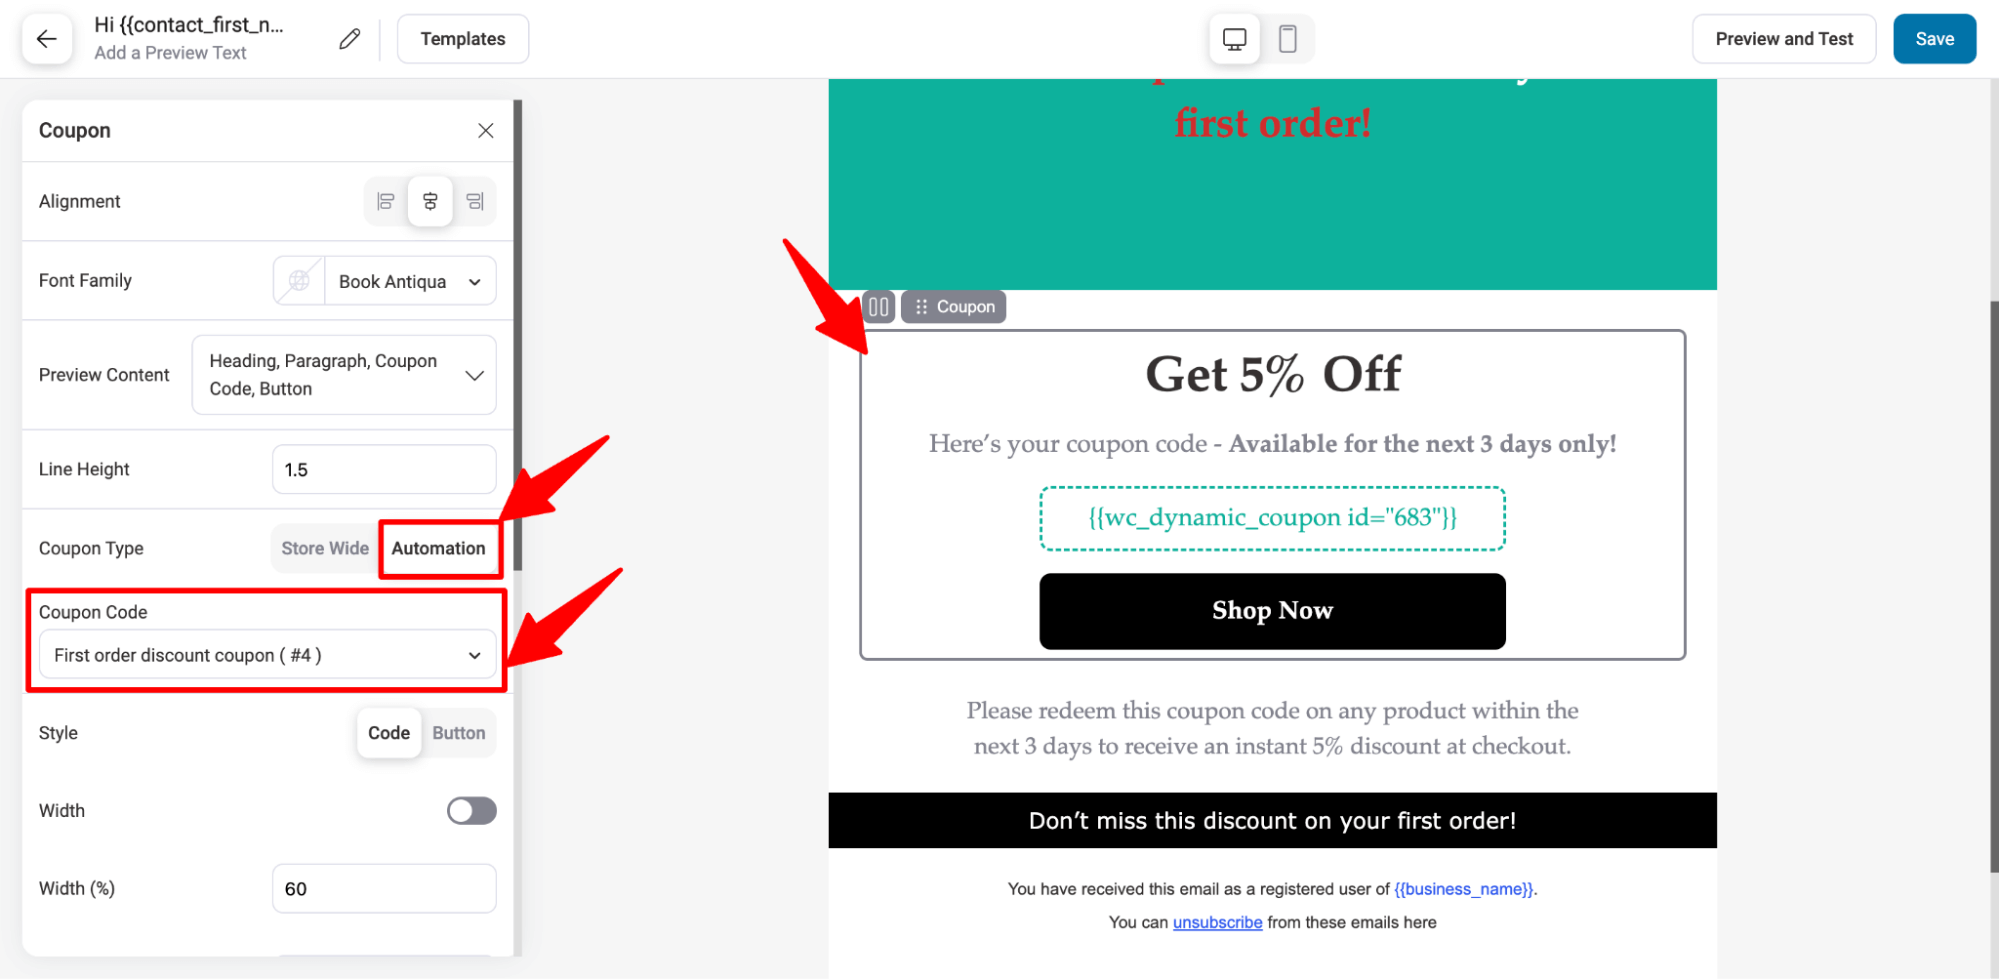
Now it’s time to embed the dynamic, personalized coupon that will be shared with each new customer through this email to offer WooCommerce a first-order discount.
For this, click on the “Coupon” block, then move to the Automation tab on the left and choose Automation from the dropdown menu for the Coupon code.
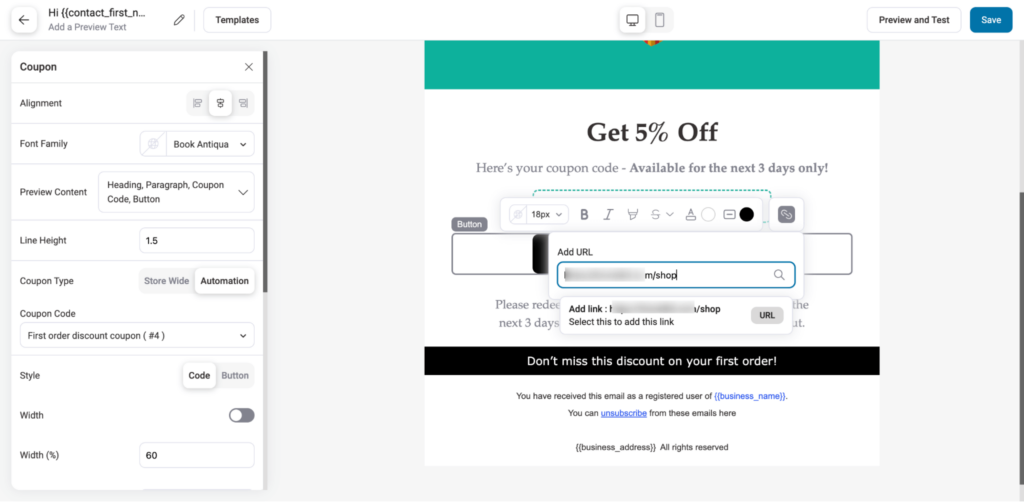
Also, add a link to your shop page to the “Shop Now” CTA so users can directly land on your website to shop and redeem the coupon.
After making the changes, make sure to click on Save to update.
And that’s it. Your email automation with WooCommerce first-order discount is ready.
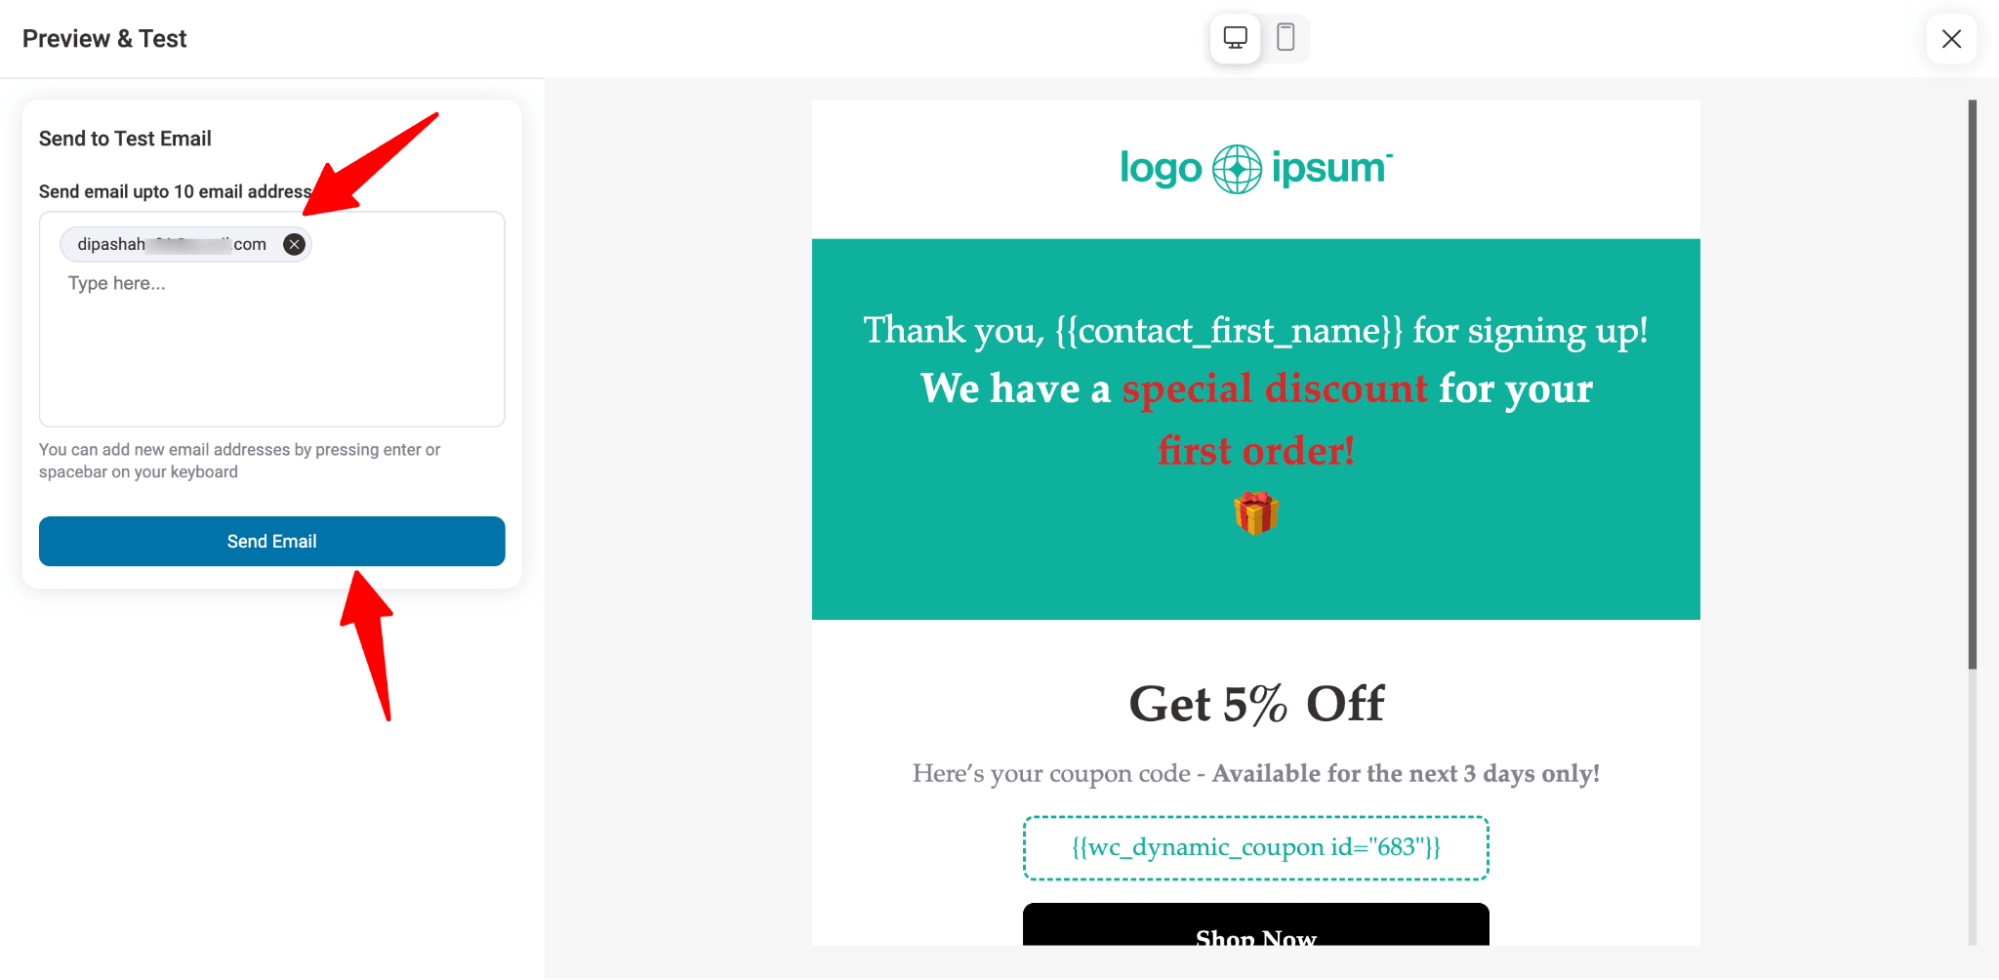
You can also send a test email to check how the email will look when an actual user receives it in their email inbox.
To send a test email, click on Preview and Test.
Add the email address to which you want to send test emails and click on “Send Email”.
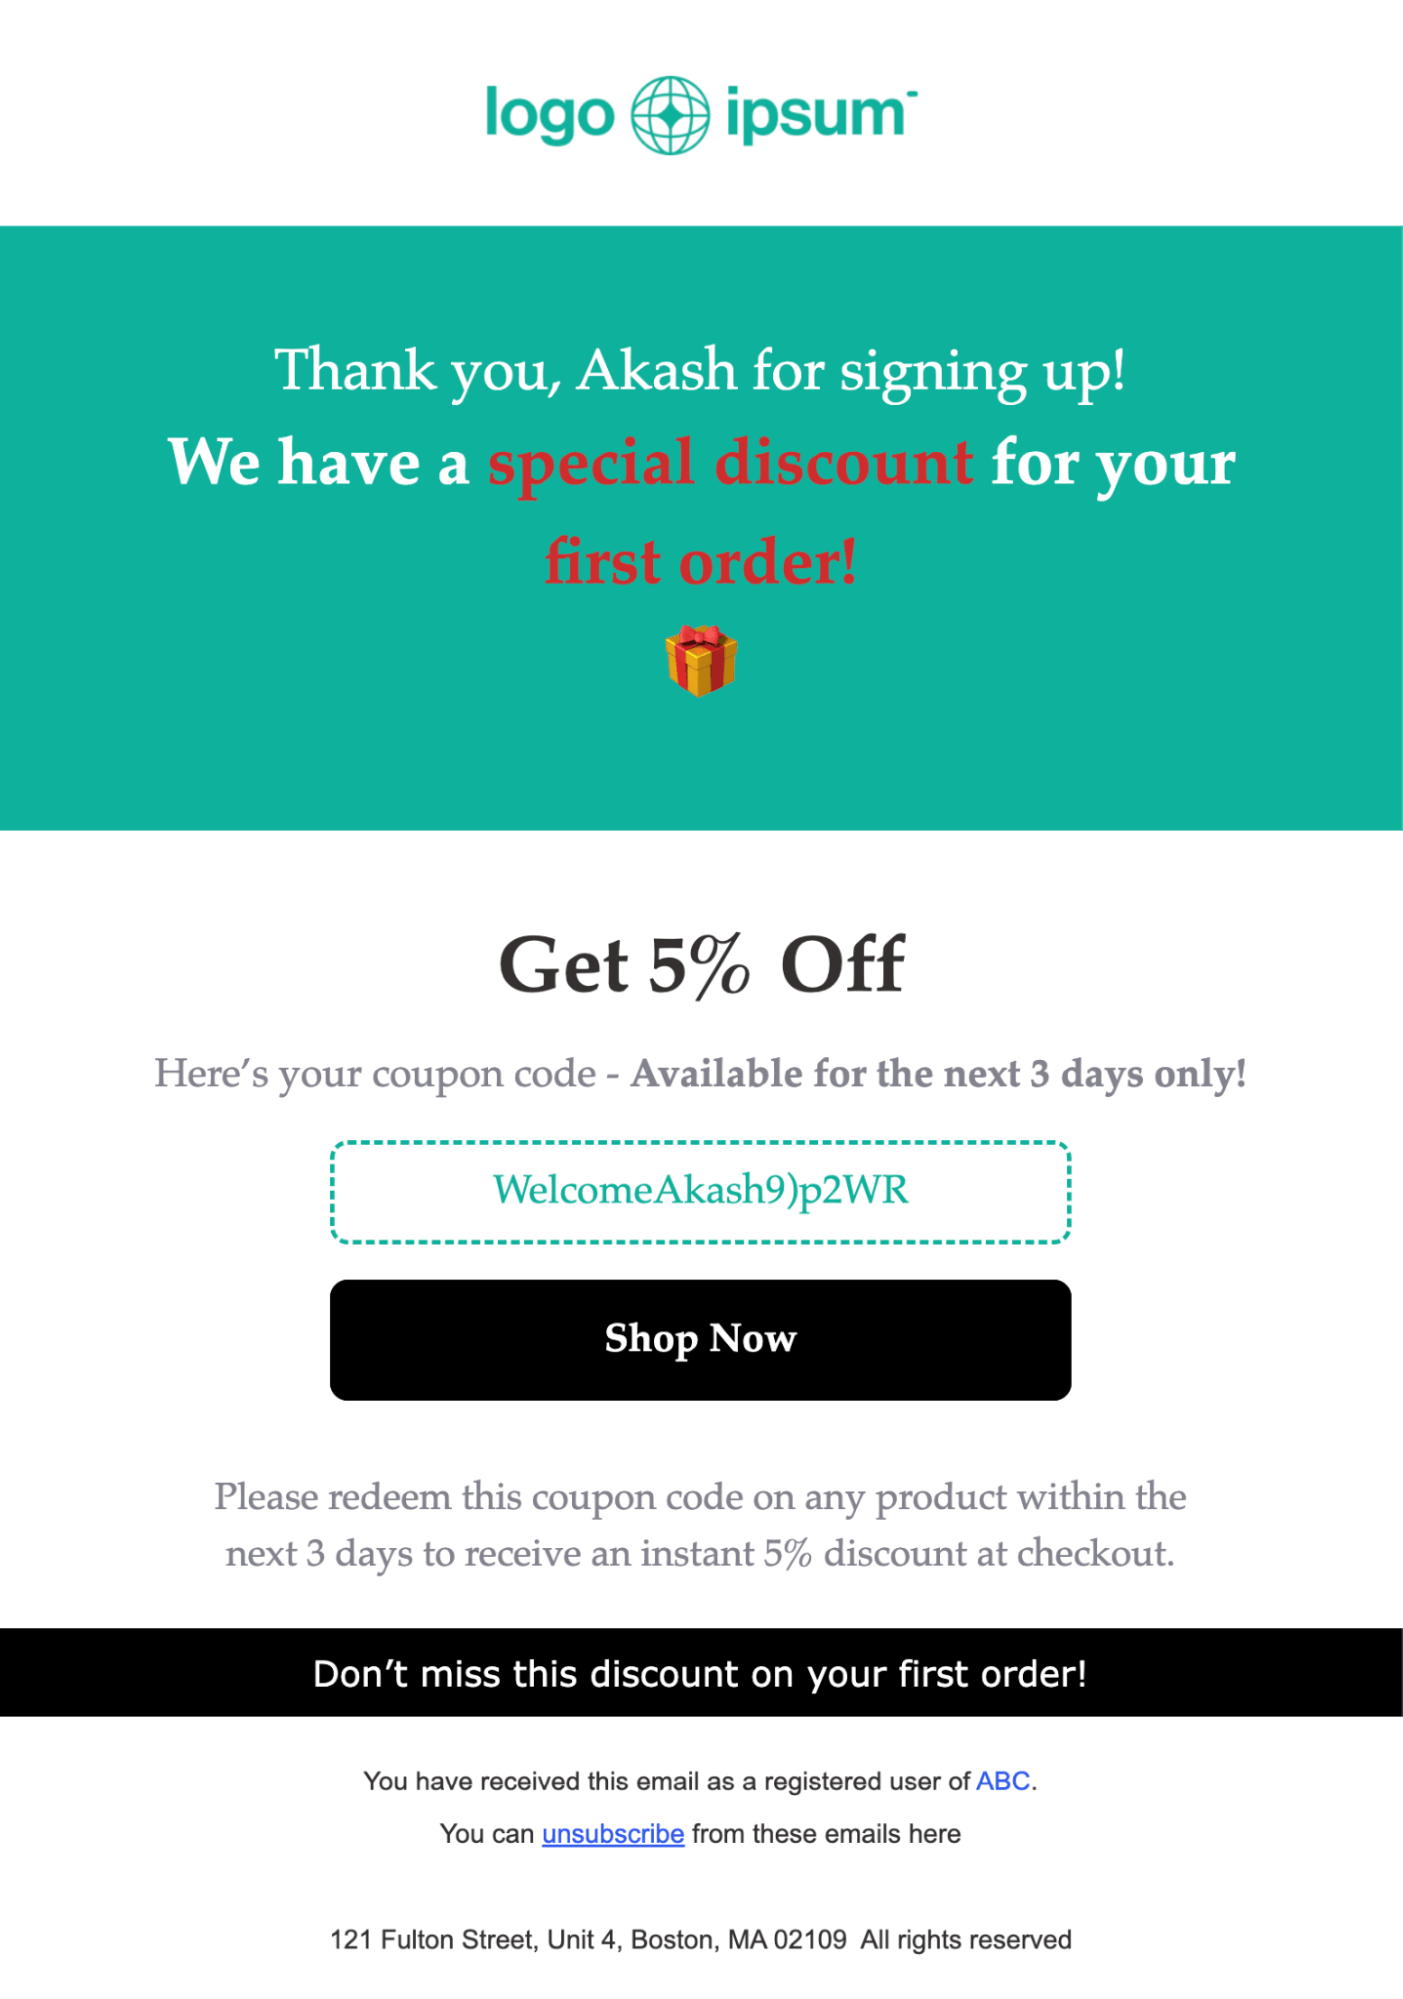
Here is a preview of the email with the WooCommerce first order discount.
Step 6: Activate the automation to share the first-order discount coupon
The last step is to activate the automation. For that, close the email builder and turn on the toggle in the top right corner.

And that’s it. Your campaign is live to generate and share a discount code for first-time users automatically.
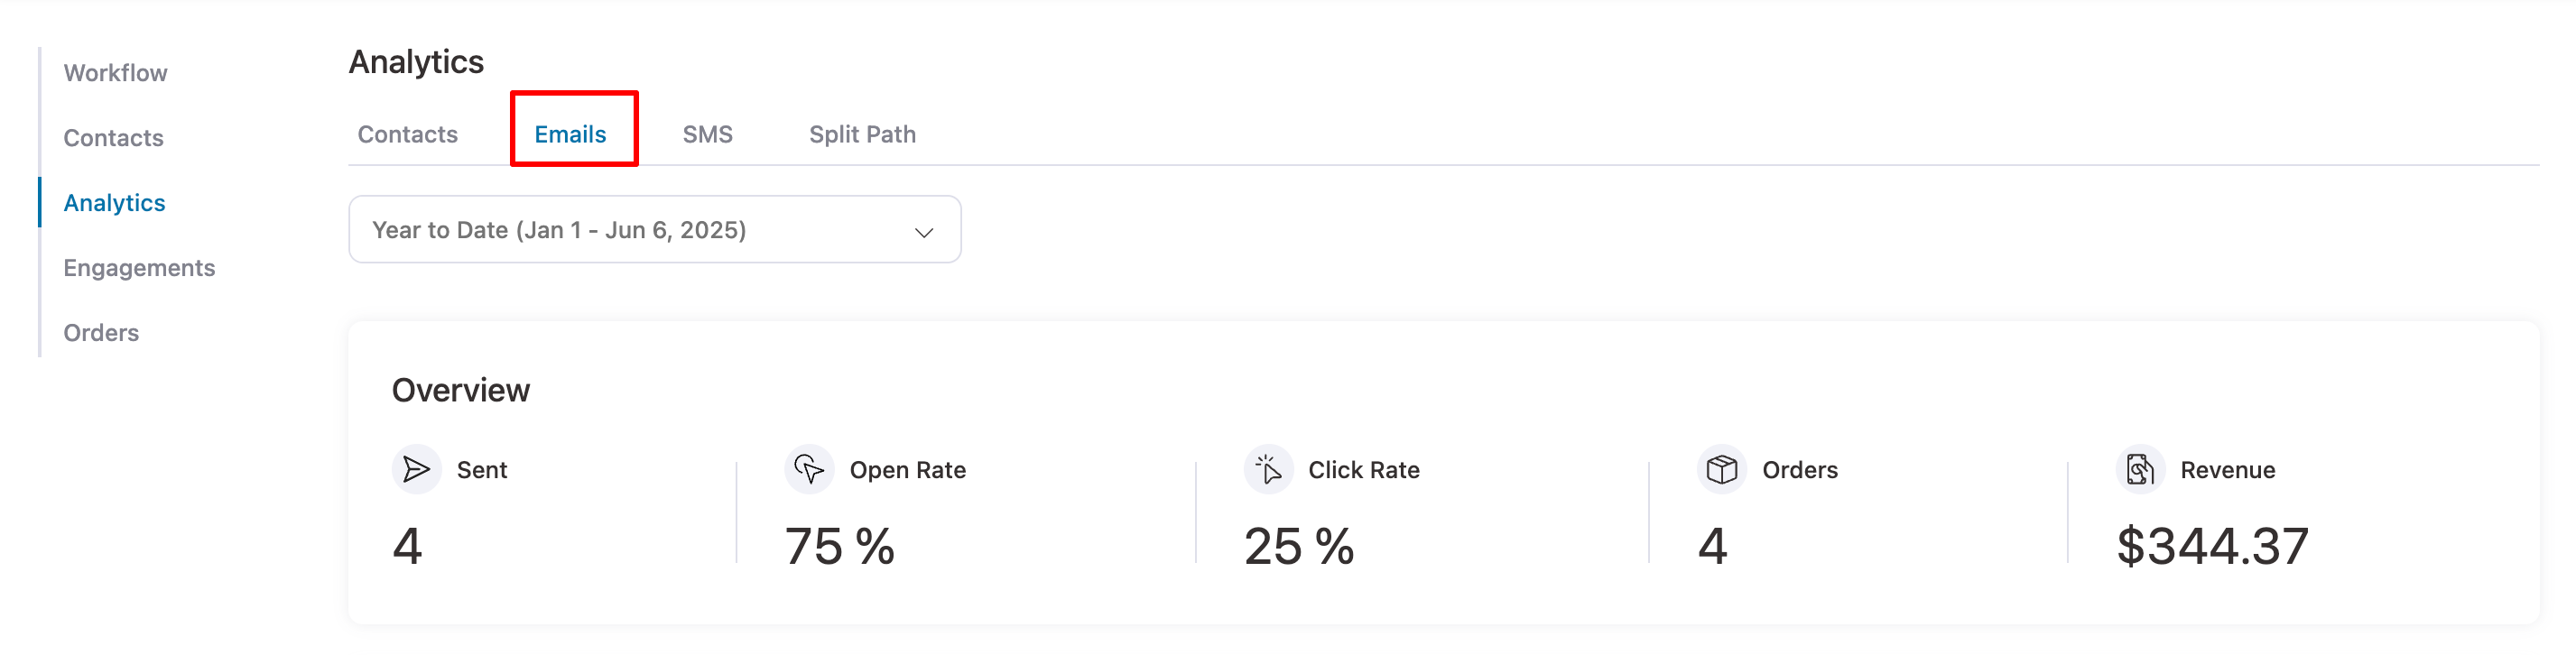
How to Track and Analyze WooCommerce First-Order Discount Usage
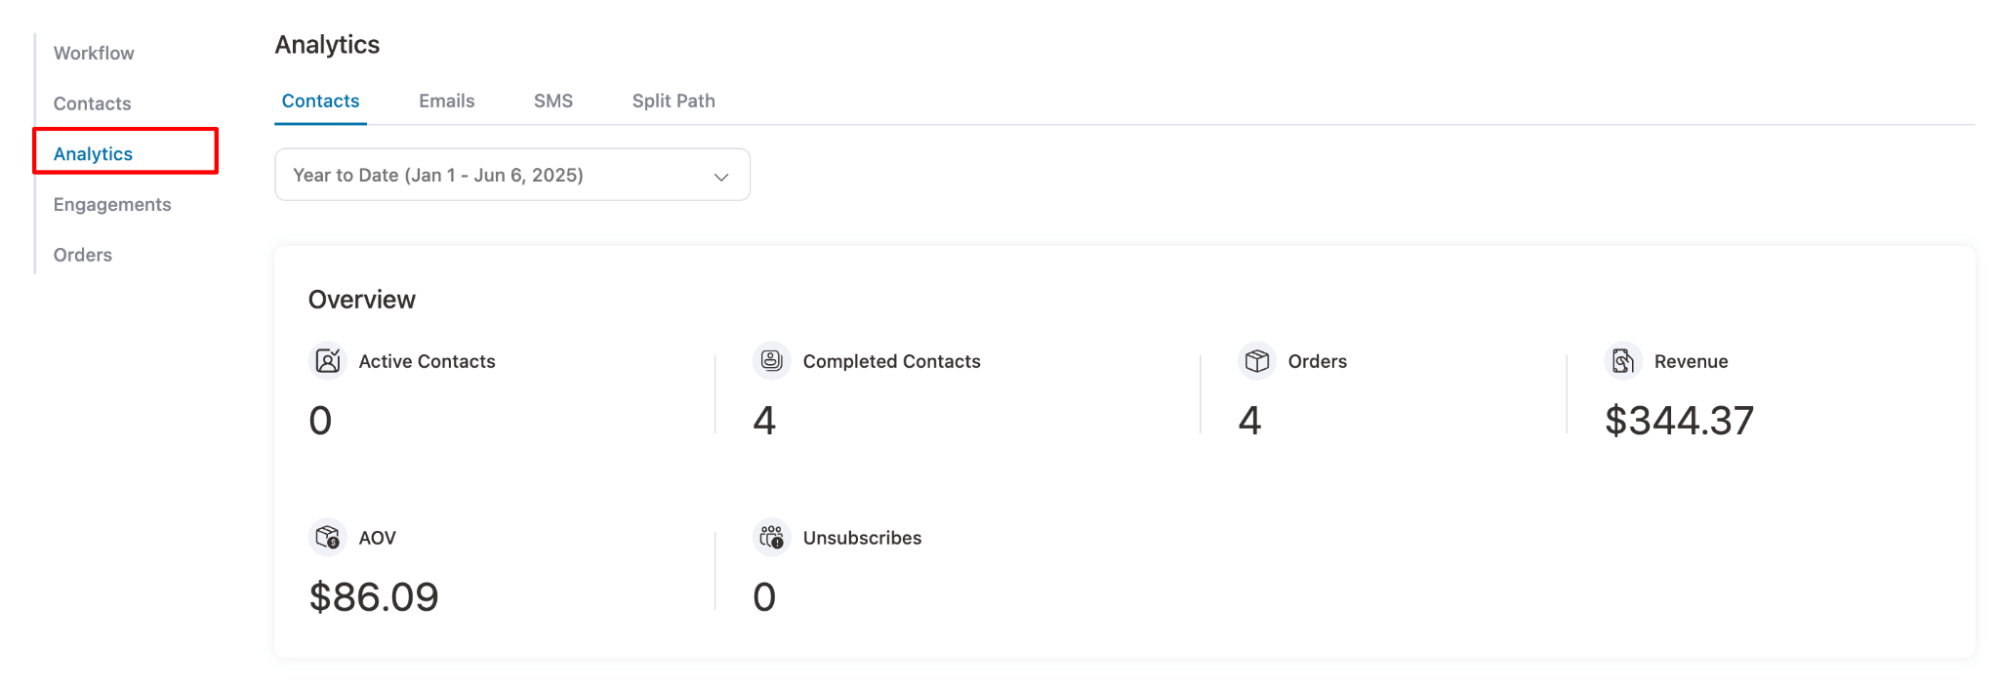
With FunnelKit Automations, you can track detailed insights about the contacts who entered the automation, see how your emails are performing, count the number of people who used the discount, and see who placed an order.
Go to Analytics ⇒ Contact, and you'll find metrics like active contacts, completed contacts, orders, revenue, average order value (AOV), and unsubscribes.
Next, move to the Emails tab under Analytics, and here you will find total emails sent, open rate, click rate, orders and revenue.
If you want to check individual order places from this automation, move to the orders tab. Here, you can find all the first-time users who placed orders using the dynamic discount coupon. You can order ID, contact, purchased items, revenue, and date.
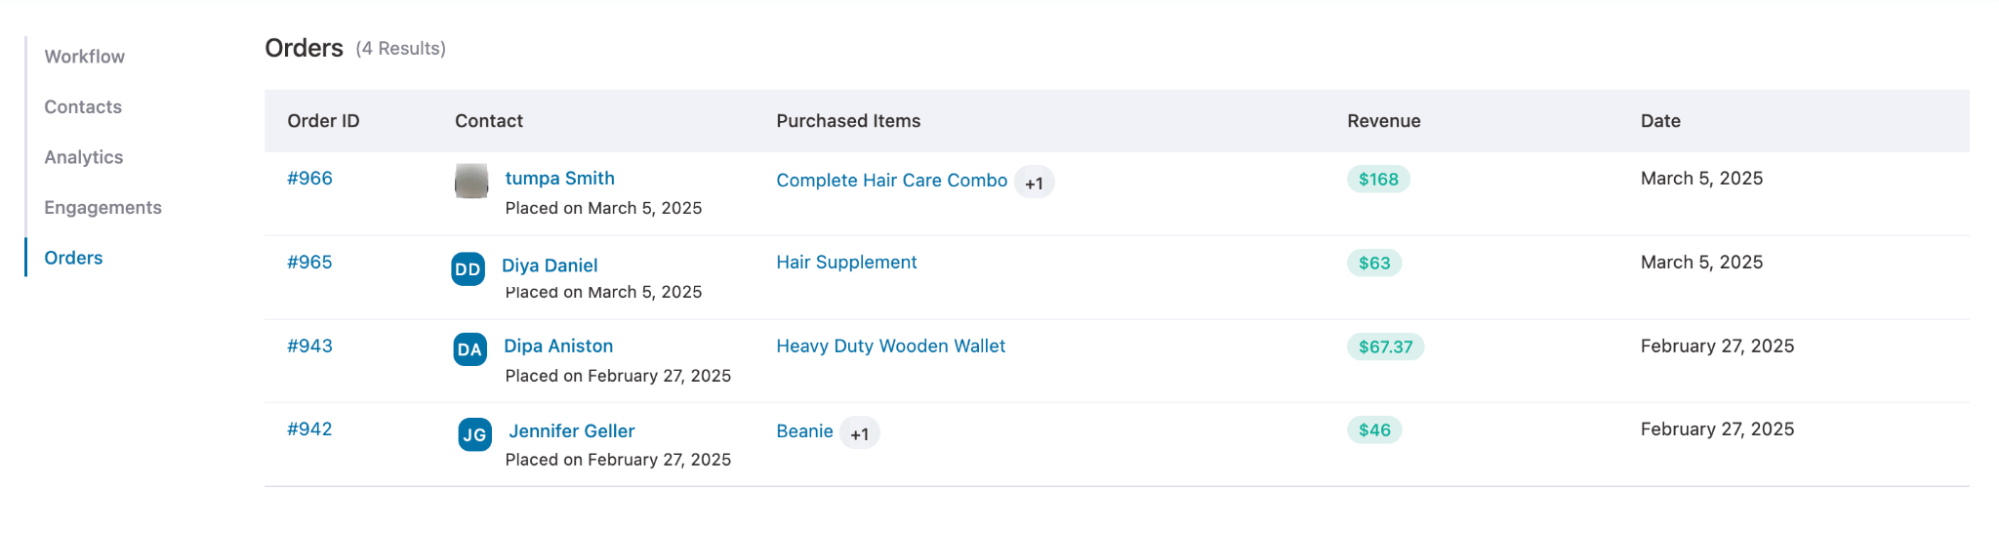
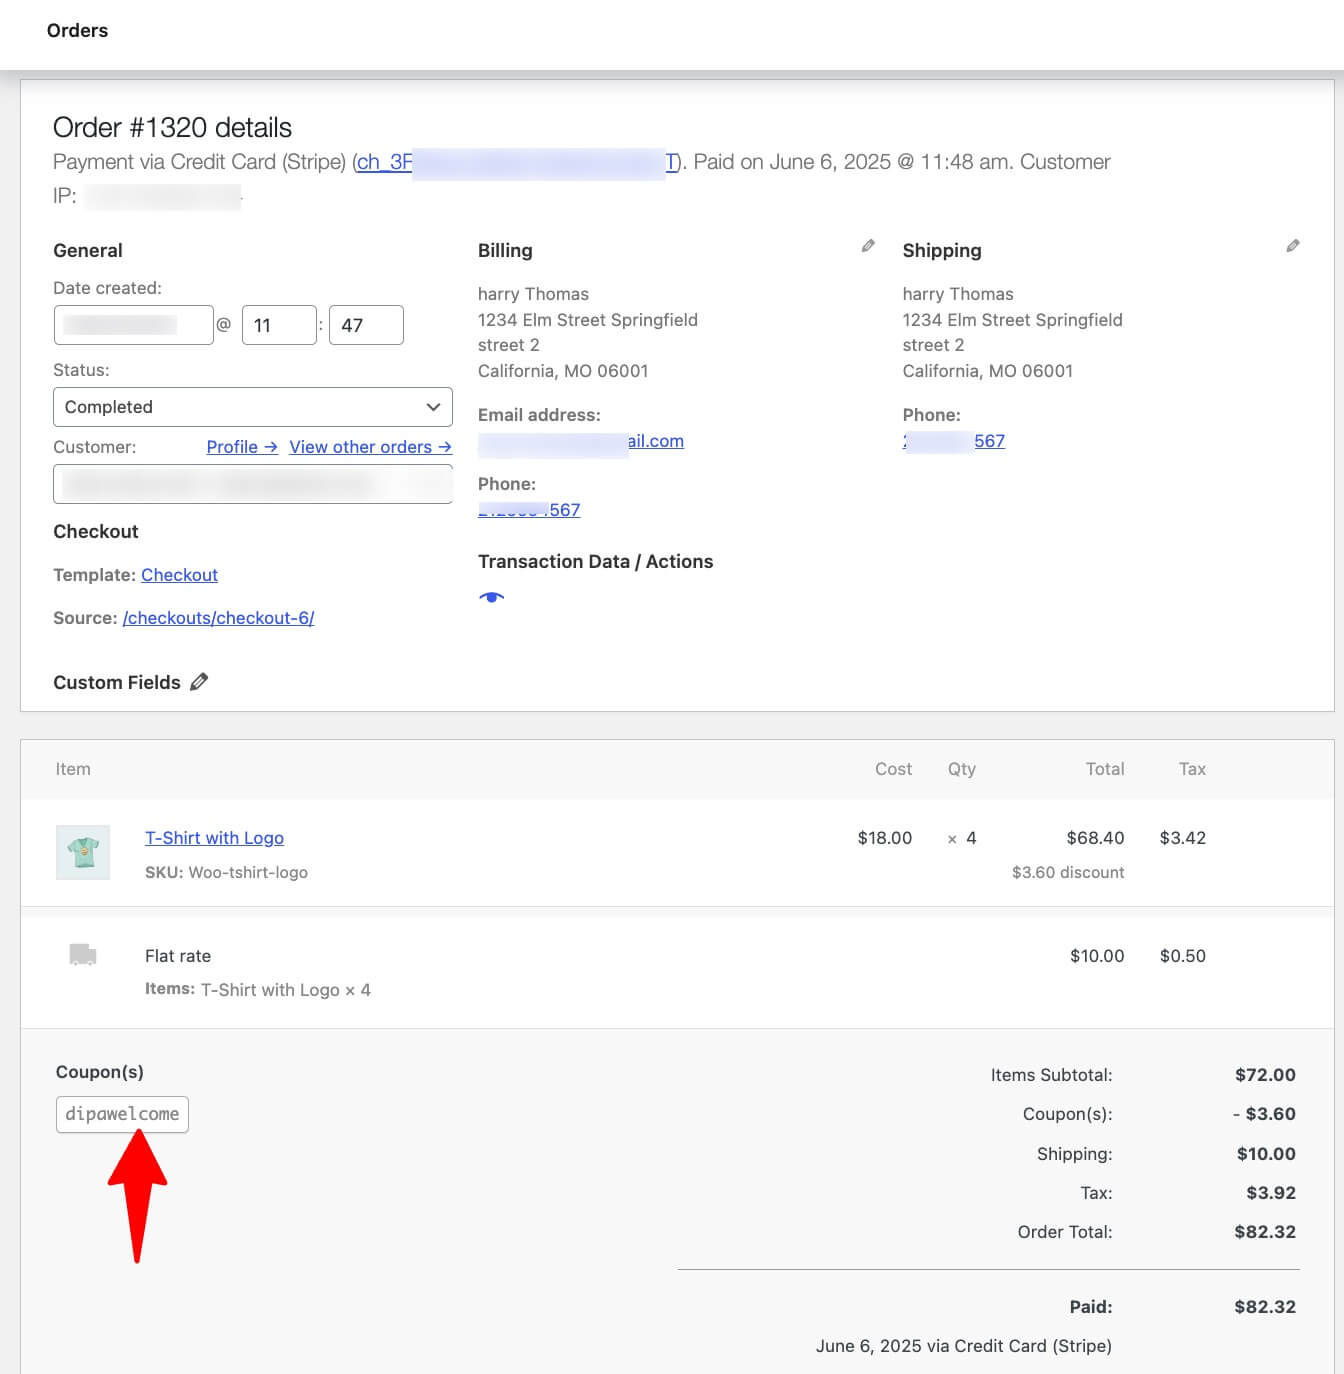
You can click on the Order ID to go directly to the order details page in the backend and see which coupon was used during checkout.
5 Best Practices for Maximizing WooCommerce First-Order Discounts
Follow these best practices when offering WooCommerce first order discount to get maximum orders:
1. Set a time limit on offer to create a sense of urgency
Setting a time limit on your WooCommerce first order discount creates urgency, encouraging shoppers to act quickly.
Time-sensitive coupons help your store stand out and prompt customers to prioritize purchasing from you over competitors.
With FunnelKit Automations, you can easily set expiration dates on your first-order discount coupons. Use the Coupon Expiry feature to define a specific number of days or set a fixed expiration date, making your offers more compelling and driving faster conversions.
2. Set minimum and maximum spend limits on your discount coupon
To protect your profit while offering discounts, it’s smart to set both minimum and maximum spend limits on your WooCommerce first order discount coupon.
A minimum spend limit encourages customers to purchase more by requiring a minimum cart value before the discount applies. This helps increase your average order size.
On the other hand, a maximum spend limit prevents giving away too large a discount, especially when offering percentage-based discounts, so you maintain control over your costs.
With FunnelKit Automation, you can set both minimum and maximum spend limit when you set the coupon code action under the restrictions tab

3. Offer free shipping to enhance the first order experience
Did you know 93% of shoppers say free shipping convinced them to complete a purchase? Offering free shipping alongside your WooCommerce first order discount is a powerful way to boost conversions and create a positive shopping experience.
If budget is a concern, you can adjust the discount amount accordingly to include free shipping without impacting your margins too much.
With FunnelKit Automations, it’s simple to attach free shipping to your first order discount coupon, making your offer even more irresistible.
4. Restrict the coupon code to customer's email for exclusive use
To ensure only your registered subscribers can use the first order discount, restrict the coupon code to customer emails. This way, anyone wanting to redeem the discount must first subscribe to your email list, helping you grow qualified leads.
In FunnelKit Automations, simply enable the “Restrict to Customer Email” option under the restrictions tab to set this up easily and securely.
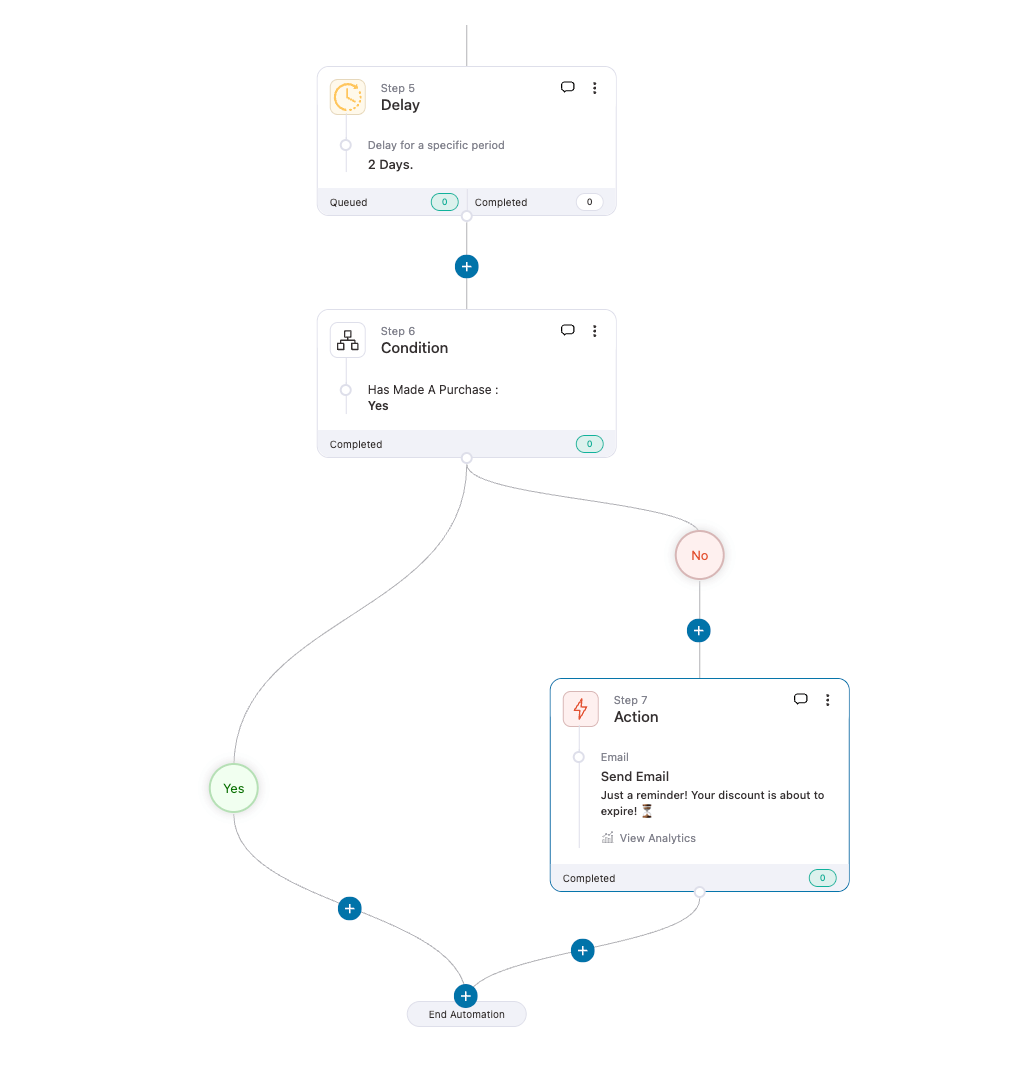
5. Don’t stop at one email, send follow-up reminders to seal the deal
Reminding subscribers about their limited-time first-order discount significantly boosts the chances they’ll complete their purchase.
For example, if your discount code is valid for 3 days, you can set up an automation to check if the user has redeemed it after 2 days. If not, send a follow-up email reminding them before the offer expires.
Use FunnelKit Automations to schedule follow-up emails so subscribers don’t miss out on their exclusive first order discount.
Set a delay of 2 days after the initial email, then add a condition to check whether the user has made a purchase. If the condition is not met, trigger a reminder email to nudge them toward completing their order.
If you use all these best practices, you will be on your way to enjoying the maximum profit with your first order discount campaign.
3 WooCommerce First Order Discount Plugins Recommendations
So far, we’ve explored how to offer first-order discounts through email onboarding. But you can also apply the coupon automatically, without requiring customers to enter anything manually. Here are three plugins, each offering a different way to deliver that first-time buyer incentive:
1. FunnelKit Automations – Send a dynamic first-order discount coupon via email
FunnelKit Automations lets you generate and send personalized, one-time-use coupons to new users after signup. These dynamic coupons can include the user’s name or email, making the offer feel tailored and exclusive. You can easily send follow-ups and track each email and order placed using the discount code.
2. Advanced Coupons –Smartly apply a discount coupon for first-time buyers
Advanced Coupon’s Smart Apply feature automatically applies discounts using a URL, one-click notices on the cart/checkout page, or silently in the background. It’s a seamless way to reward new customers without interrupting the buying process.

3. First Purchase Discount for WooCommerce – Auto-apply discount coupon on checkout for first-time buyers
Want to auto-apply the first order discount on the checkout page? This plugin is the solution. Customers don’t need coupon codes or to hit any URL. It keeps the experience frictionless while ensuring your new customers get their special offer.
More Questions About WooCommerce First Order Discount
It’s best to keep your first-order discount time-limited, usually around 3 to 7 days. This short window creates a sense of urgency and motivates new shoppers to act quickly. When people know the offer won’t last long, they’re more likely to complete their purchase right away.
With tools like FunnelKit Automations, you can create and share coupons exclusively with first-time buyers, ensuring that only new users can redeem them.
- Percentage (%) off works best for higher-priced products.
- Fixed discounts are ideal for stores with a low average order value (AOV).
- Free shipping helps boost conversions without significantly reducing profit margins.
Yes. When setting up coupon generation action using FunnelKit, select specific products or categories under “ Restrictions” to control where the discount applies.
Slightly, yes. However, it can increase customer lifetime value (CLV) by turning first-time buyers into repeat customers.
You can do that using a plugin like First Purchase Discount for WooCommerce, which automatically applies the discount to eligible first-time customers at checkout.
Start Offering WooCommerce First-Order Discounts Today
Offering a first-order discount is a powerful way to attract new customers, increase conversions, and grow your email list. With the right strategy, it not only boosts your initial sales but also sets the stage for long-term customer relationships.
Using FunnelKit Automations, you can create personalized, time-limited discount coupons for first-time shoppers, restrict them to email subscribers, and automate reminder emails to recover missed conversions.
Everything you need to run a high-converting WooCommerce first-order discount campaign is done automatically.
Start today and turn new visitors into loyal customers with ease.
More WooCommerce Guides
- The Complete Guide to WooCommerce Discounts
- How to Automate Next Order Coupons
- How to Offer WooCommerce Quantity Discounts
- How to Use WooCommerce Free Gift Coupon
- Best WooCommerce Coupon Plugins
- How to offer BOGO in WooCommerce

Editorial Team
July 7, 2026Are shoppers adding products to their cart and leaving before they buy? According to Baymard Institute research on checkout usability, 18% of shoppers who abandon their cart do so because...
Editorial Team
June 29, 2026Broadcast emails are one-time campaigns sent to a specific audience, ideal for sharing sneak peeks, announcing offers, or revealing major updates. You can use them to announce a sale, introduce...
Editorial Team
June 25, 2026There are two things most people get wrong about the WooCommerce order confirmation email. First, they don't realize it's the Processing order email they need to switch on and not...


