
There are two things most people get wrong about the WooCommerce order confirmation email.
First, they don't realize it's the Processing order email they need to switch on and not the "Completed order or new order notification.
Second, once it's on, it lands in spam or never sends at all, because WordPress's default wp_mail() function isn't built for reliable delivery.
In this article, we'll enable the right email in under two minutes and learn how to brand it (with code or a drag-and-drop builder).
We'll also troubleshoot why the email isn't reaching customers and move beyond basic aesthetics to transform your confirmation email into a strategic tool that validates the purchase, builds trust, and drives repeat revenue.
Prefer watching over reading? Check out our video below 👇
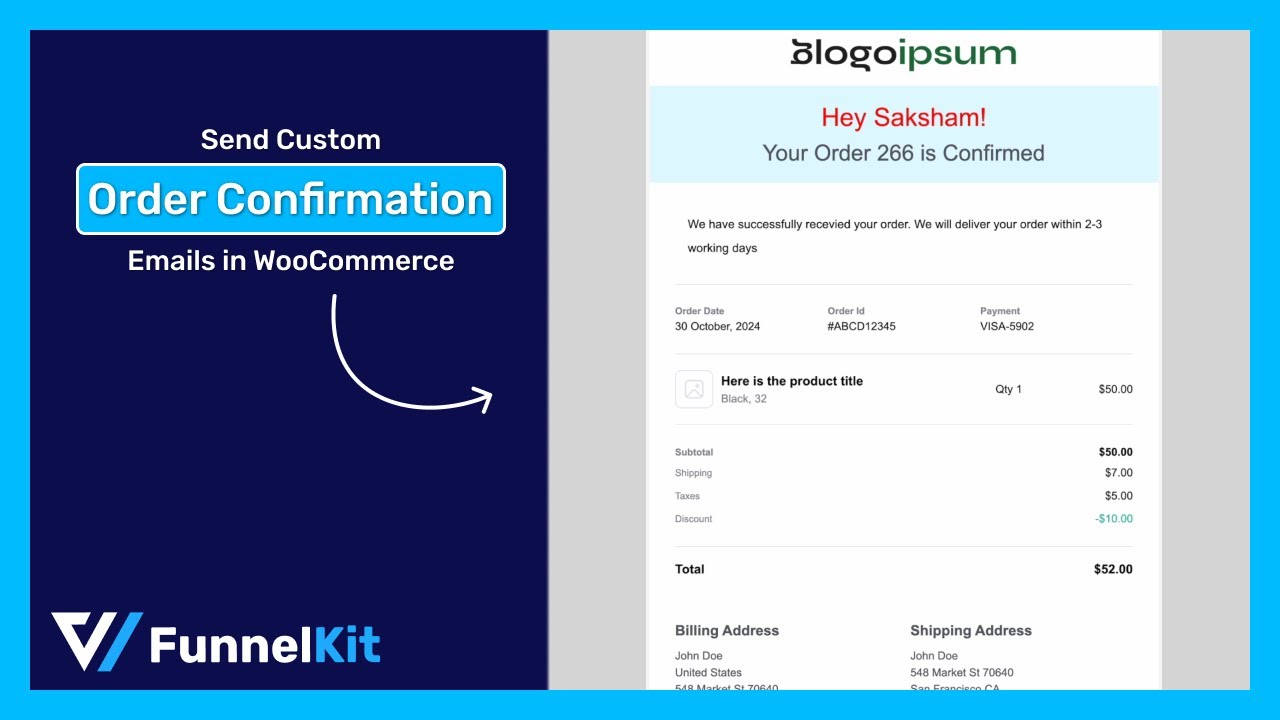
Table of Contents
- 1 What is a WooCommerce Order Confirmation Email?
- 2 Method 1: How to Enable & Send the Order Confirmation Email (Using Default Options)
- 3 Method 2: Customize WooCommerce Order Confirmation Email With a No-Code Builder
- 3.1 Step 1: Install and activate FunnelKit Automations
- 3.2 Step 2: Navigate to transactional emails in FunnelKit Automations
- 3.3 Step 3: Design your WooCommerce order confirmation email
- 3.4 Step 4: Offer a discount on the next purchase to increase repeat sales (optional)
- 3.5 Step 5: Activate the WooCommerce order confirmation email
- 4 Method 3: Customize the Order Confirmation Email with Code (Hooks & Template Override)
- 5 Why Is My WooCommerce Order Confirmation Email Not Sending? (7 Fixes)
- 5.1 Fix 1: The order is stuck in "Pending payment"
- 5.2 Fix 2: The notification is simply disabled
- 5.3 Fix 3: PHP mail() is being silently dropped
- 5.4 Fix 4: Verify delivery with an email log
- 5.5 Fix 5: Wrong "From" name and "From" address
- 5.6 Fix 6: The email is sending, but going to spam
- 5.7 Fix 7: Caching or cron is blocking the trigger
- 6 How to Set Up SMTP So Order Emails Actually Arrive?
- 7 How to Track Analytics for Order Confirmation Emails in WooCommerce?
- 8 6 Best Practices for Crafting Effective WooCommerce Order Confirmation Emails
- 9 Frequently Asked Questions (FAQs)
- 10 Start Turning WooCommerce Order Confirmation Emails Into Repeat Customers
What is a WooCommerce Order Confirmation Email?
A WooCommerce order confirmation email is the automated transactional message a customer receives immediately after a successful purchase, confirming that their payment went through and their order is being prepared.
Usually, such emails include order confirmation details such as:
- Customer name and details: Provide brief details, including the customer's name, email address, and phone number (if applicable).
- Items they bought with prices: A detailed list of purchased item summaries with descriptions, quantities, and prices.
- Order total: The total value of all the item prices in the order.
- Shipping address and billing address: Provide comprehensive shipping and billing details for the customer to whom the order will be shipped.
- Payment method: The payment details, such as whether it has been paid or is a cash-on-delivery order.
- Estimated delivery date: An expected delivery date that helps customers reduce uncertainty and potential queries.
In WooCommerce's default setup, this is the Processing order notification. This is the biggest point of confusion in the platform, so let's settle it with a table.
| WooCommerce email | When it sends | What it actually is | Goes to |
|---|---|---|---|
| Processing order | The instant payment clears (order status goes to Processing) | The real order confirmation/receipt | Customer |
| Completed order | When you mark the order Completed | Shipping/fulfillment confirmation | Customer |
| New order | The instant a new order is placed | Internal admin alert (not for customer) | Store admin |
| On-hold order | Order awaiting payment (example, bank transfer) | Order received but awaiting payment | Customer |
The key takeaway is that the Processing order email is your confirmation email.
The completed order email arrives later and tells the customer that their package is on the way; it is a shipping confirmation, not a payment receipt.
And the new order email never reaches the customer because it's meant for the admin inbox.
Method 1: How to Enable & Send the Order Confirmation Email (Using Default Options)
You don't need a plugin or a developer to turn this on. Here's the fast path.
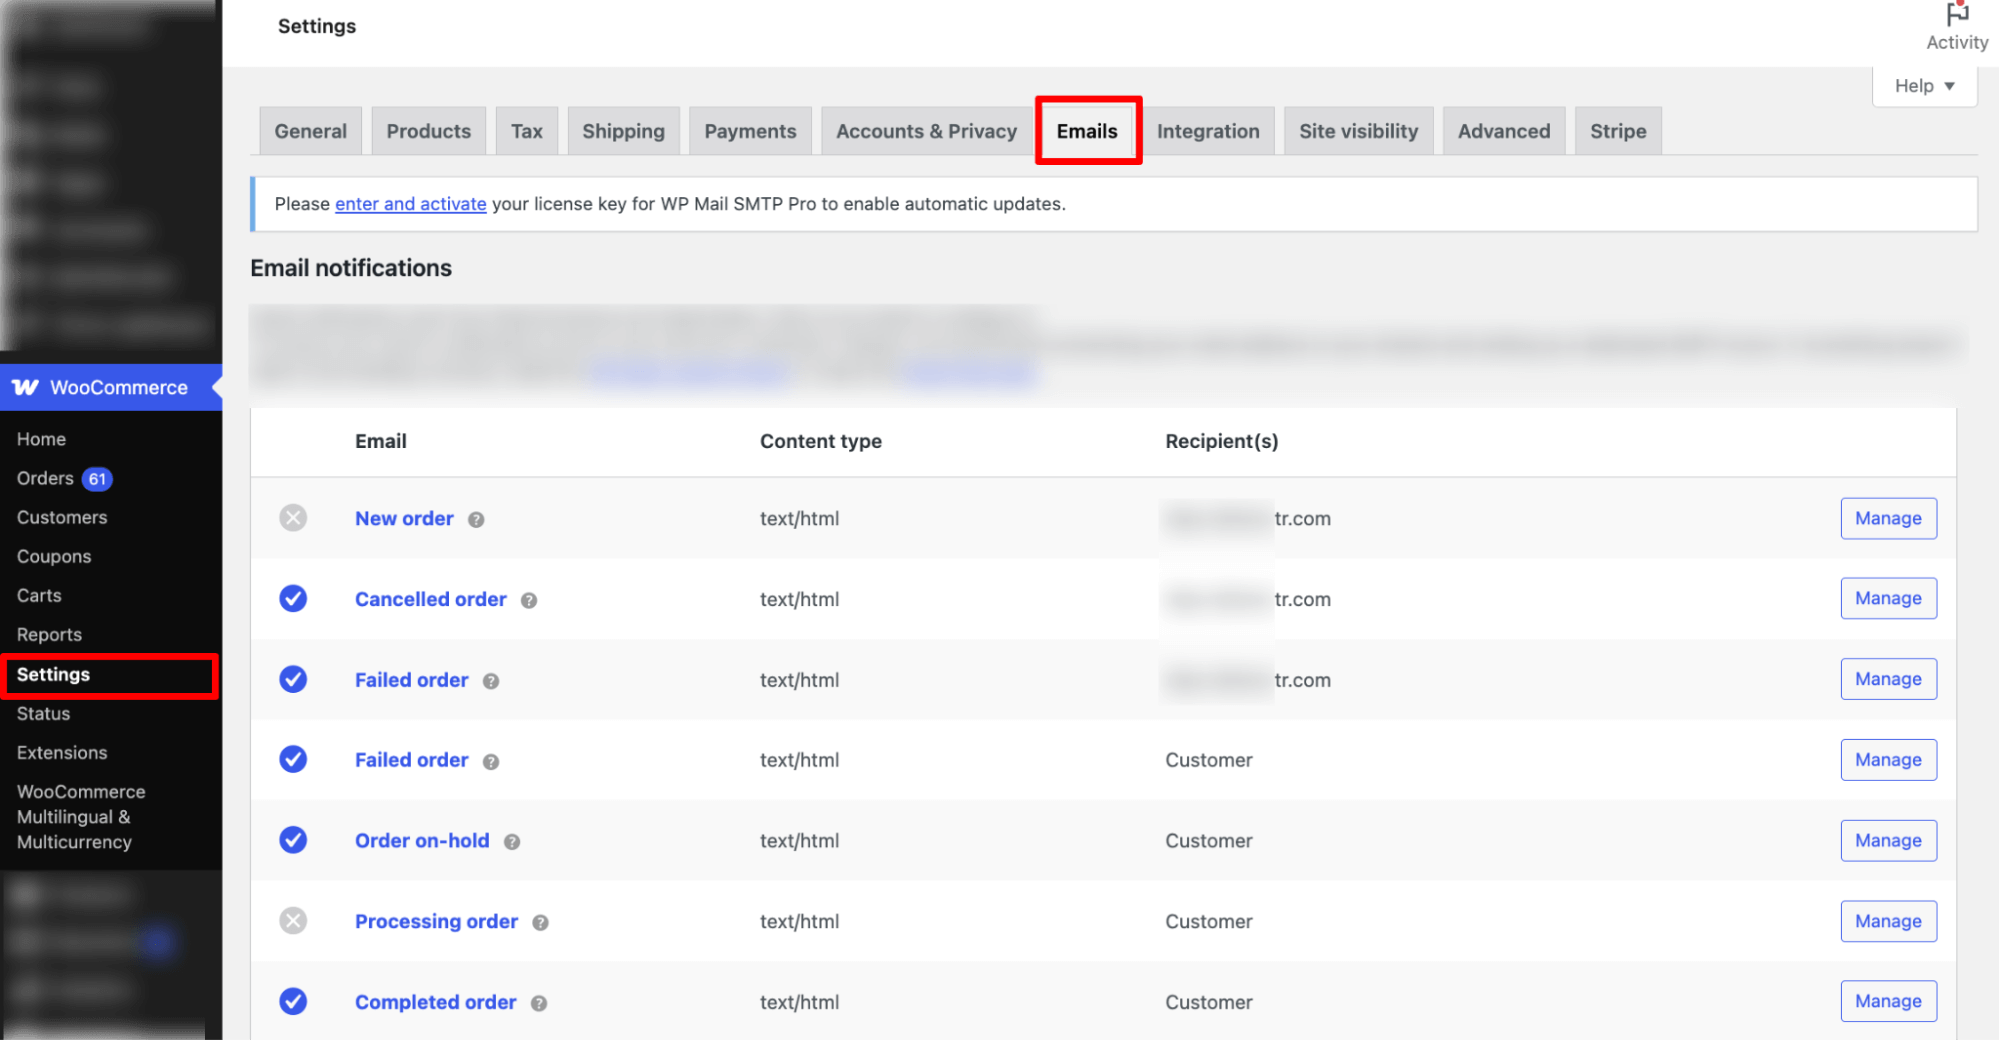
Step 1: Navigate to WooCommerce email settings
From the WordPress dashboard, navigate to WooCommerce ⇨ Settings ⇨ Emails.
You'll see the full list of notification emails WooCommerce can send, such as New order, Cancelled order, Failed order, Processing order, Completed order, and more.
Step 2: Enable the processing order notification
Find the processing order in the list and click 'Manage'.
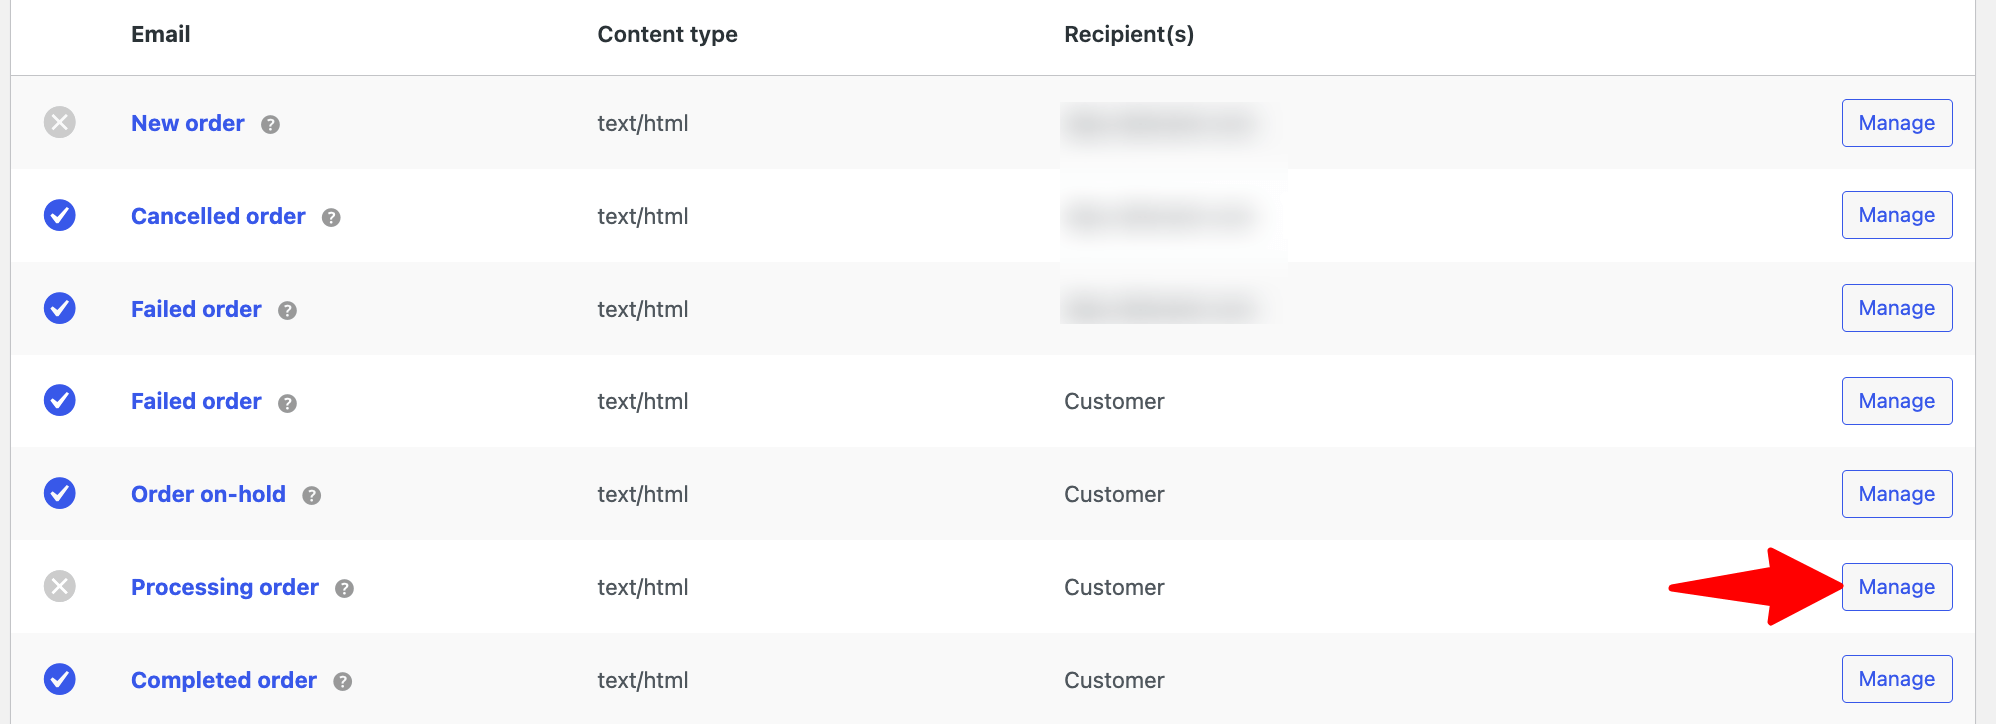
In the Enable/Disable row, tick "Enable this email notification" and save.
That's the switch that turns your order confirmation on. (If the status column already says Enabled, you're set.)
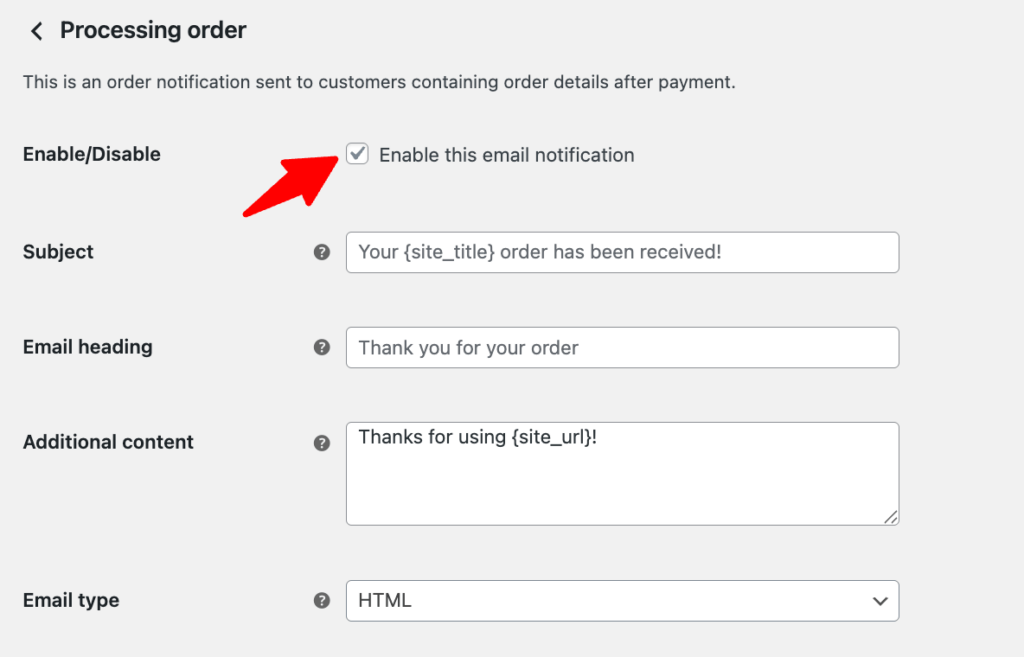
Step 3: Edit the email subject, heading and additional content
After enabling the email notification option, you can customize the following:
- Subject: Leave blank to use the default, or set your own. Accepts placeholders like {site_title} and {order_number}. A clear subject, such as "Your {site_title} order #{order_number} is confirmed", outperforms the bland default.
- Email heading: Add your large heading inside the email body here.
- Additional content: A short line that appears below the order details. A thank-you note plus a shipping-time expectation ("We'll dispatch within 1-2 business days") works well here.
- Email type: Select the format- HTML, Plain Text, or Multipart.
- Leave the Recipient field blank so WooCommerce auto-fills each buyer's address.
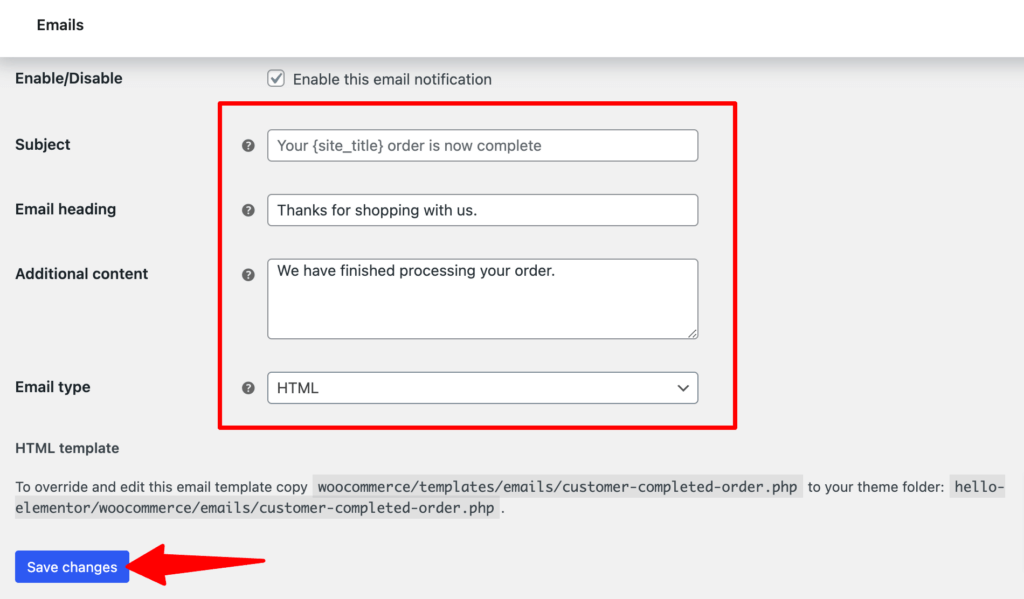
Make sure to click on 'Save Changes' to update the custom content.
Step 4: Send a test order confirmation email
Don't guess whether it works; instead, verify it. Create a manual order under WooCommerce → Orders → Add order, add a product, set a billing email you control, and set the status to Processing.
WooCommerce fires the confirmation to that address. If it lands, you're set. If it doesn't, head straight to our deliverability troubleshooting section in this article.
Method 2: Customize WooCommerce Order Confirmation Email With a No-Code Builder
WooCommerce's native settings only let you change the sender, subject, heading, and a content block. You can't easily add product recommendations, brand layouts, conditional logic, or a follow-up sequence without development work.
A visual builder closes that gap. With FunnelKit Automations, you replace WooCommerce's plain Processing email with a drag-and-drop, on-brand template and a full automation trigger, no PHP, no template override.
This tool customizes all your marketing and transactional emails, as well as broadcasts and newsletters.
It features a drag-and-drop builder for easy design and includes email logs with resend options.
Step 1: Install and activate FunnelKit Automations
First, you need to install and activate FunnelKit Automations. Please note that FunnelKit has free (lite) and premium versions.
We will need both versions for this guide. Refer to this installation guide to install and activate FunnelKit Automations on your website.
Step 2: Navigate to transactional emails in FunnelKit Automations
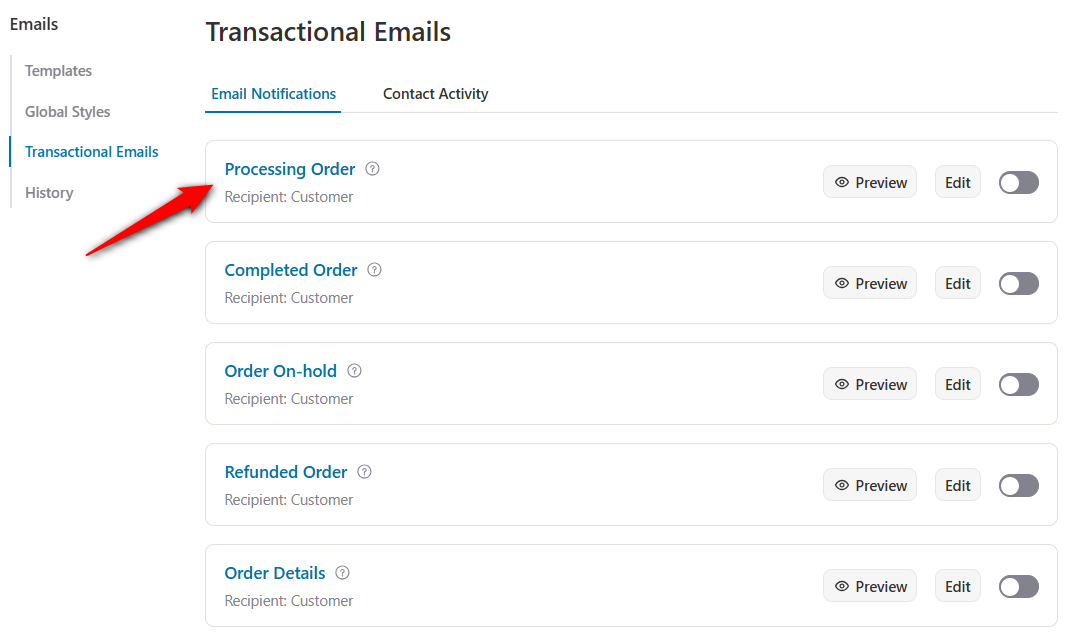
Navigate to FunnelKit Automations ⇨ Emails and click on the 'Transactional Emails' section.
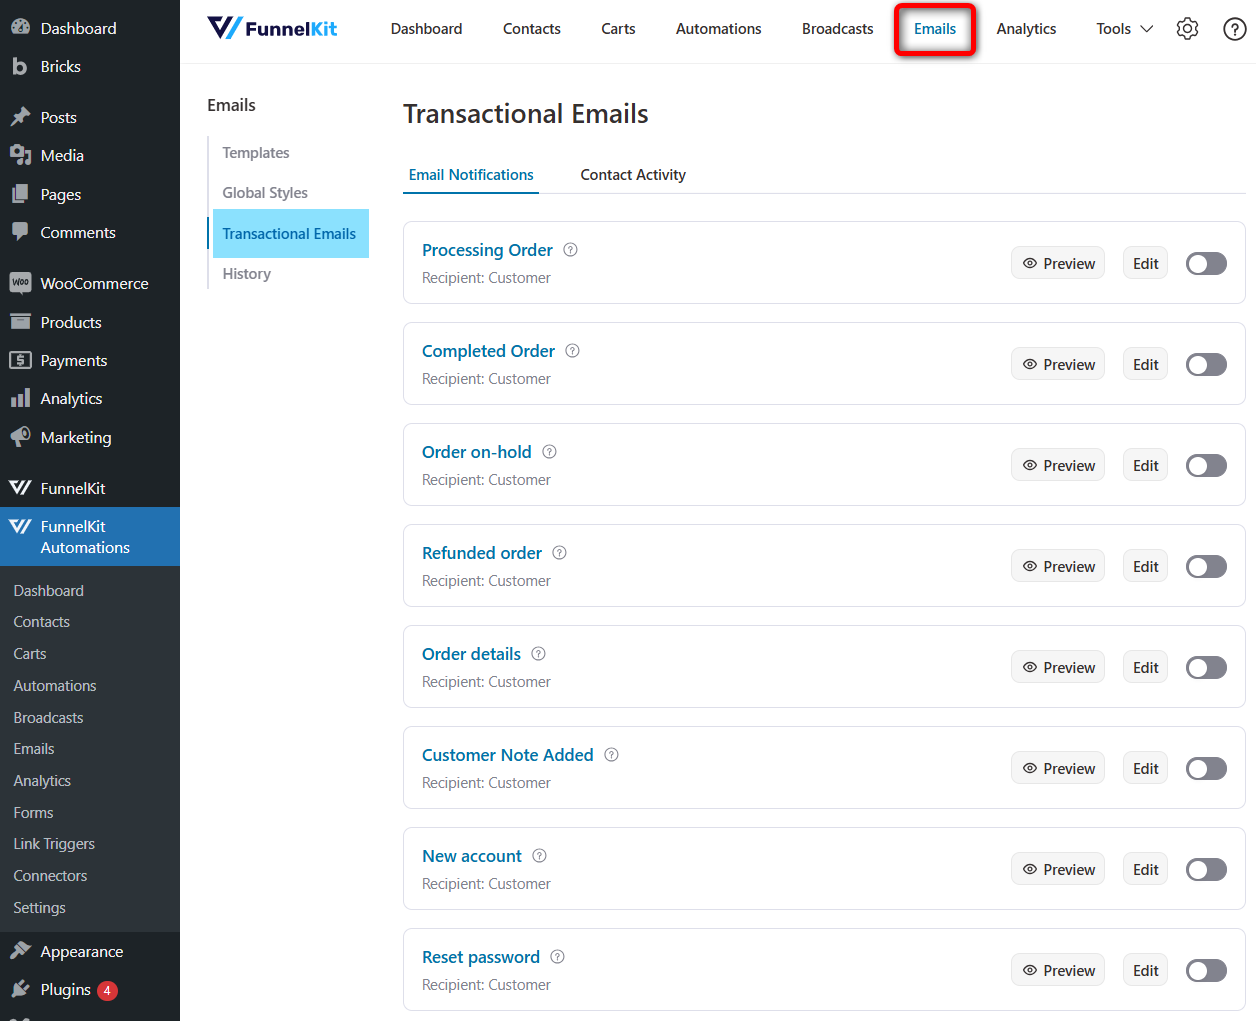
You’ll see 12 transactional emails that you can customize:
- Processing order
- Completed order
- Order on hold
- Refunded order
- Order details
- Customer note added
- New account
- Reset password
- New order
- Failed order
- Cancelled order
Click on the 'Processing' order to customize our order confirmation email in WooCommerce.
Step 3: Design your WooCommerce order confirmation email
Start with the subject line. Using Funnelkit's merge tag feature, you can incorporate dynamic information, such as customer emails, into the subject line and throughout the email.
To add any merge tag, click on the "{{..}}" icon, then search for the tag you want to use and click on the 'Copy' Icon to add it to your email.
For example, use the subject line - Your Order No. #000 is confirmed, Customer Name!
You can use merge tags for the customer name and order number, so that whenever a customer receives this email, they see their name and order number.
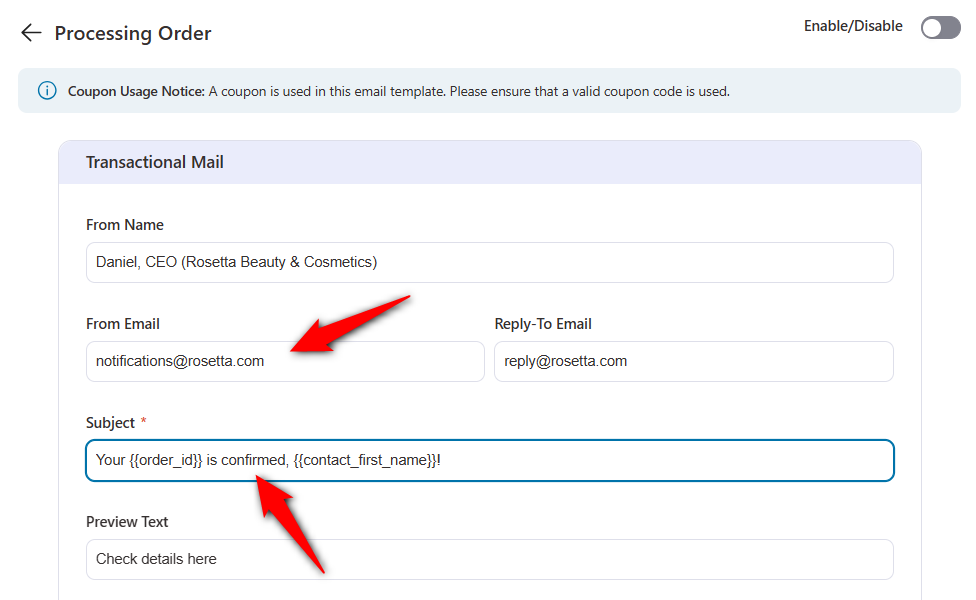
Now, provide a suitable preview text.
After that, click on 'Edit' to design your email body using the FunnelKit Automations' built-in enhanced visual builder.
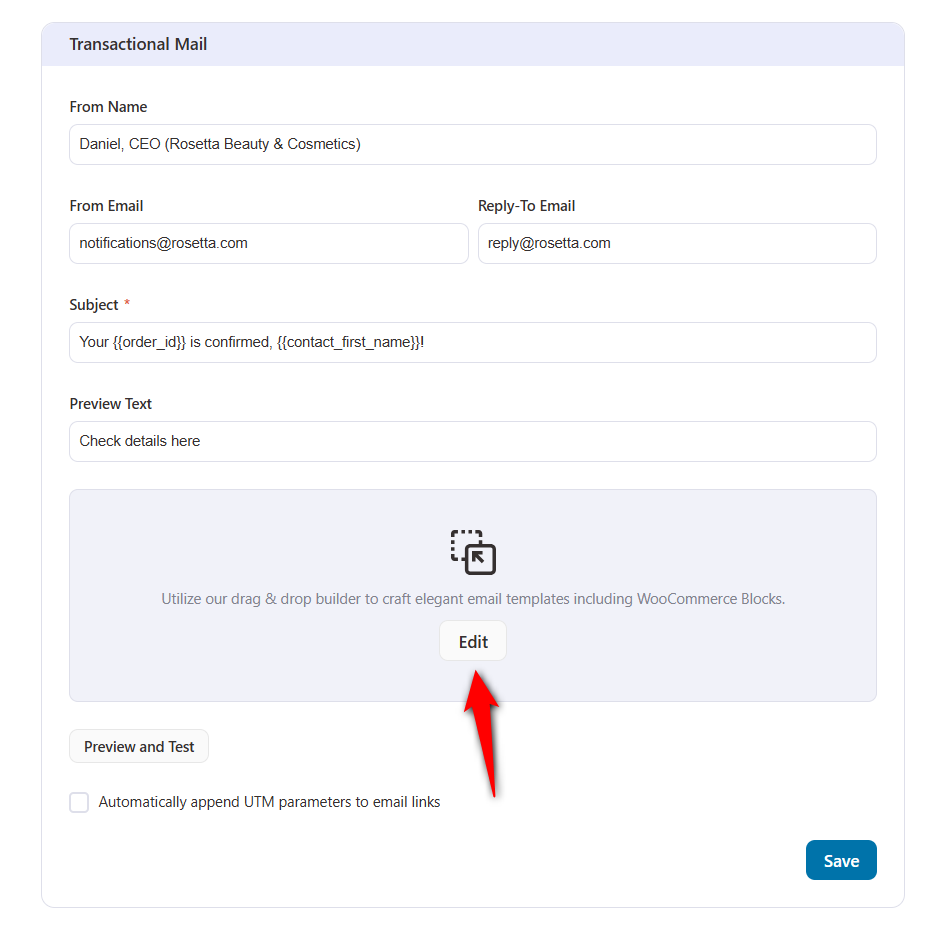
Now, you can customize the template to fit your brand and the message you want to send to your customers.
Business logo
You can start by changing the logo. After changing the logo, you can customize the related element from the left tools area.
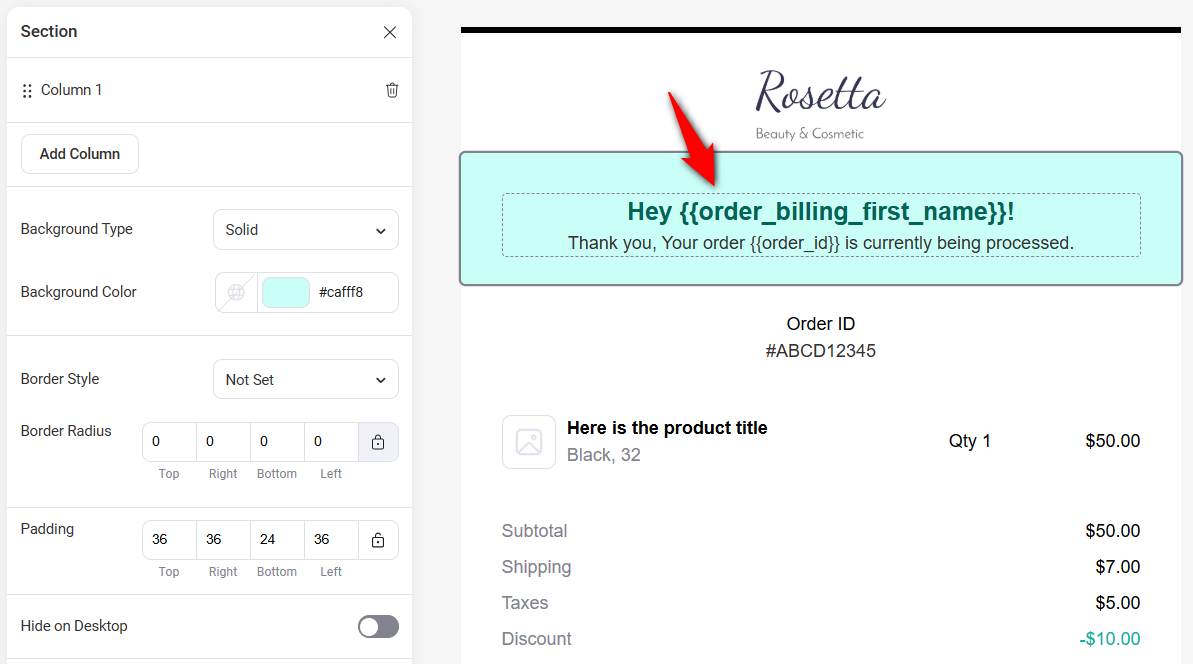
Heading
Similarly, you can customize the heading.
It’s essential to place the {{contact_first_name}} merge tag to dynamically display the customer's first name, regardless of who receives it.
Also, add the {{order_id}} merge tag to the header.
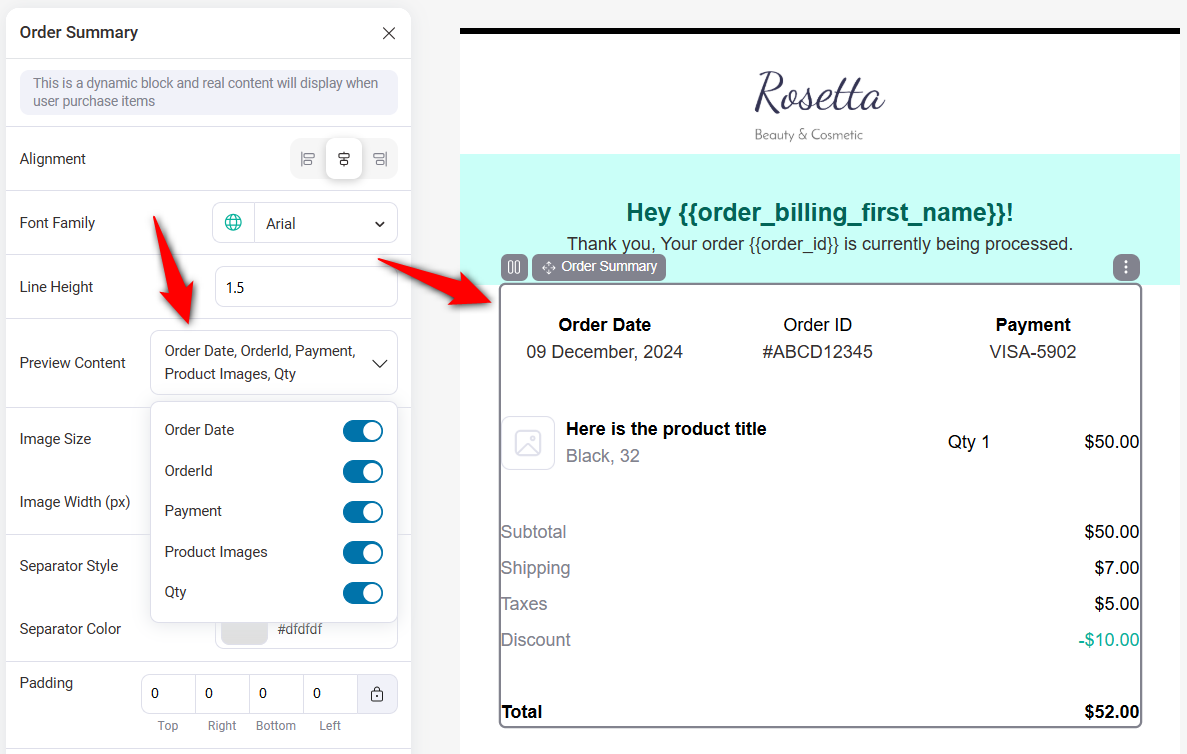
Order summary
Similarly, you can customize the order summary section.
Under Preview Content, you can choose which information to display, like Order Date, OrderId, Payment, Product Images, and Qty.
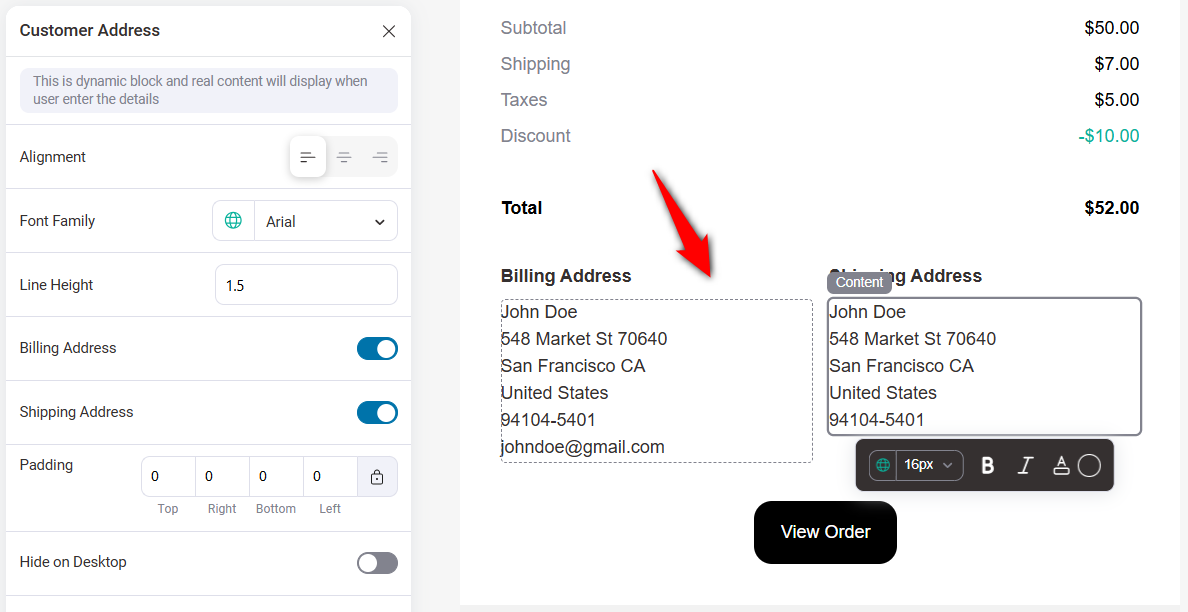
Billing and shipping address
The Billing and Shipping addresses will show up automatically in the Customer Address section.
Once you click the section on the left, you can hide the Billing or Shipping addresses. You can also customize things like alignment, font family, and line height.
Call-to-action (CTA) button
Customize the text and button color of your CTA. Make sure to hyperlink it to the correct path on your WooCommerce store.

Follow the same steps to customize all the sections of this WooCommerce order confirmation email template.
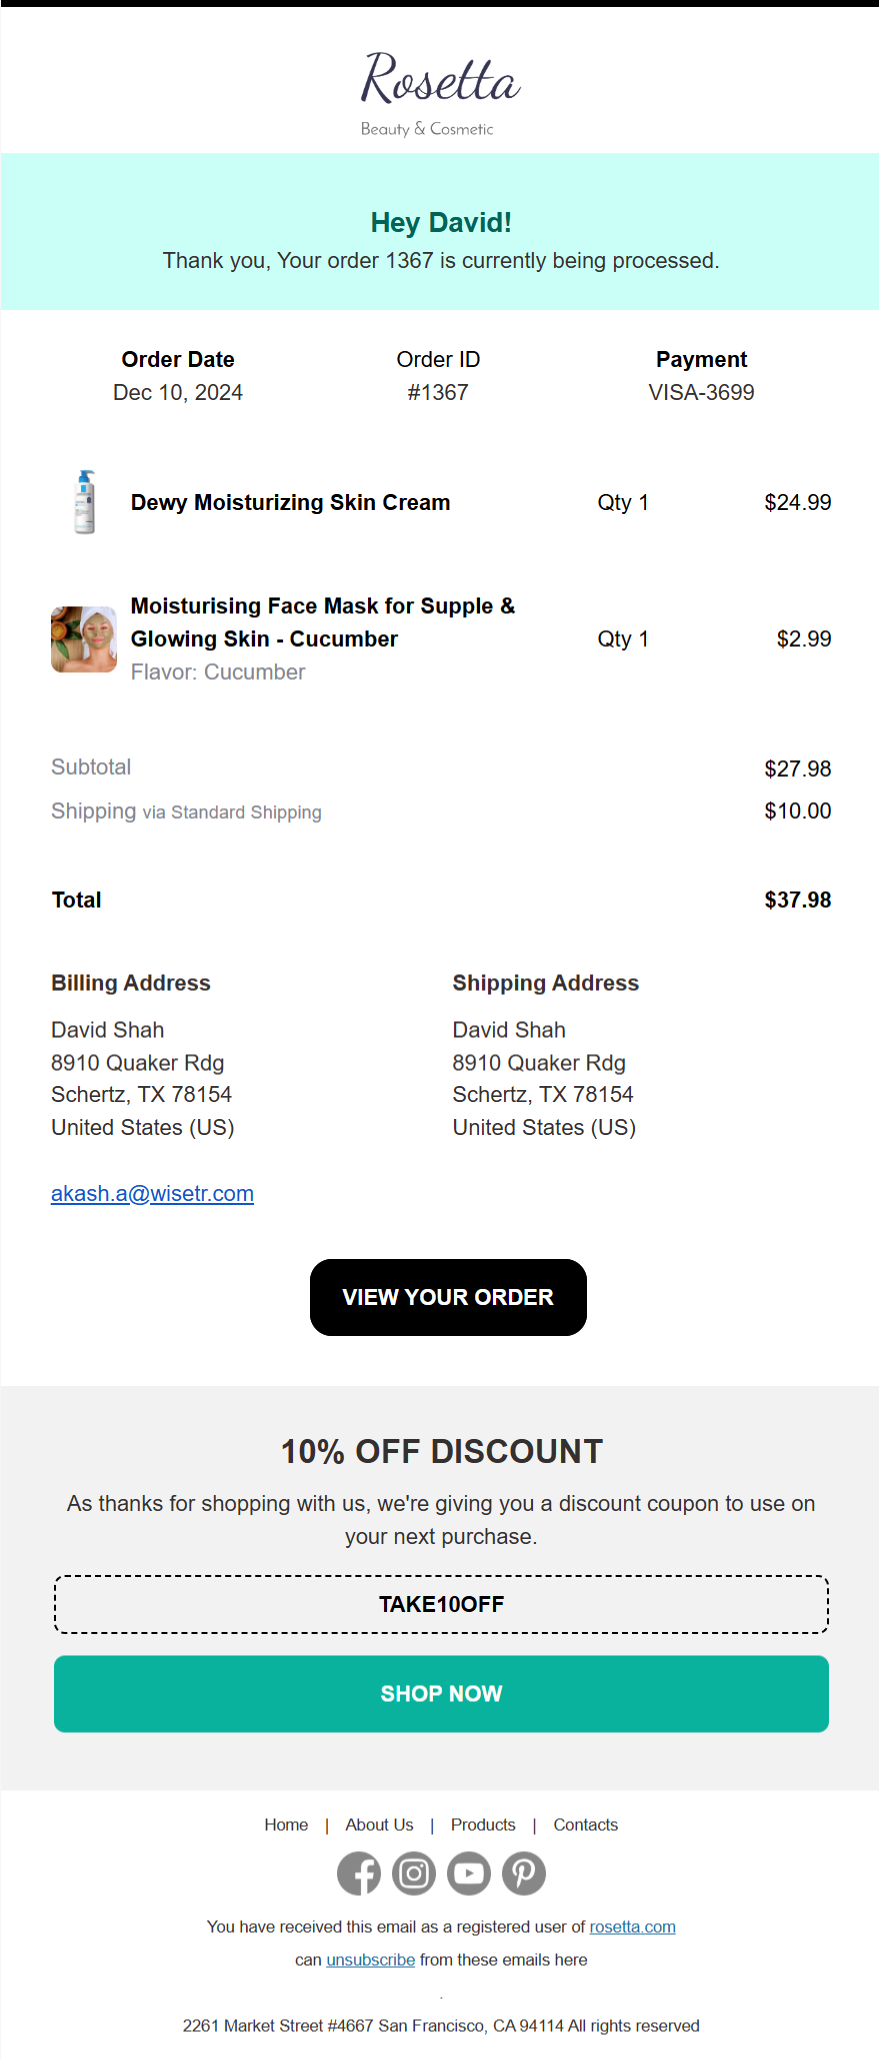
Step 4: Offer a discount on the next purchase to increase repeat sales (optional)
If you don’t want to be offered a discount, you can simply delete the discount code section.
You can also use the prebuilt coupon template to encourage customers to make another purchase by offering a discount on their next purchase.
For this to work, click Coupon Code and select the coupon you want to offer.
You can choose a coupon code you already created in your WooCommerce store or a dynamically generated coupon code using FunnelKit Automations.
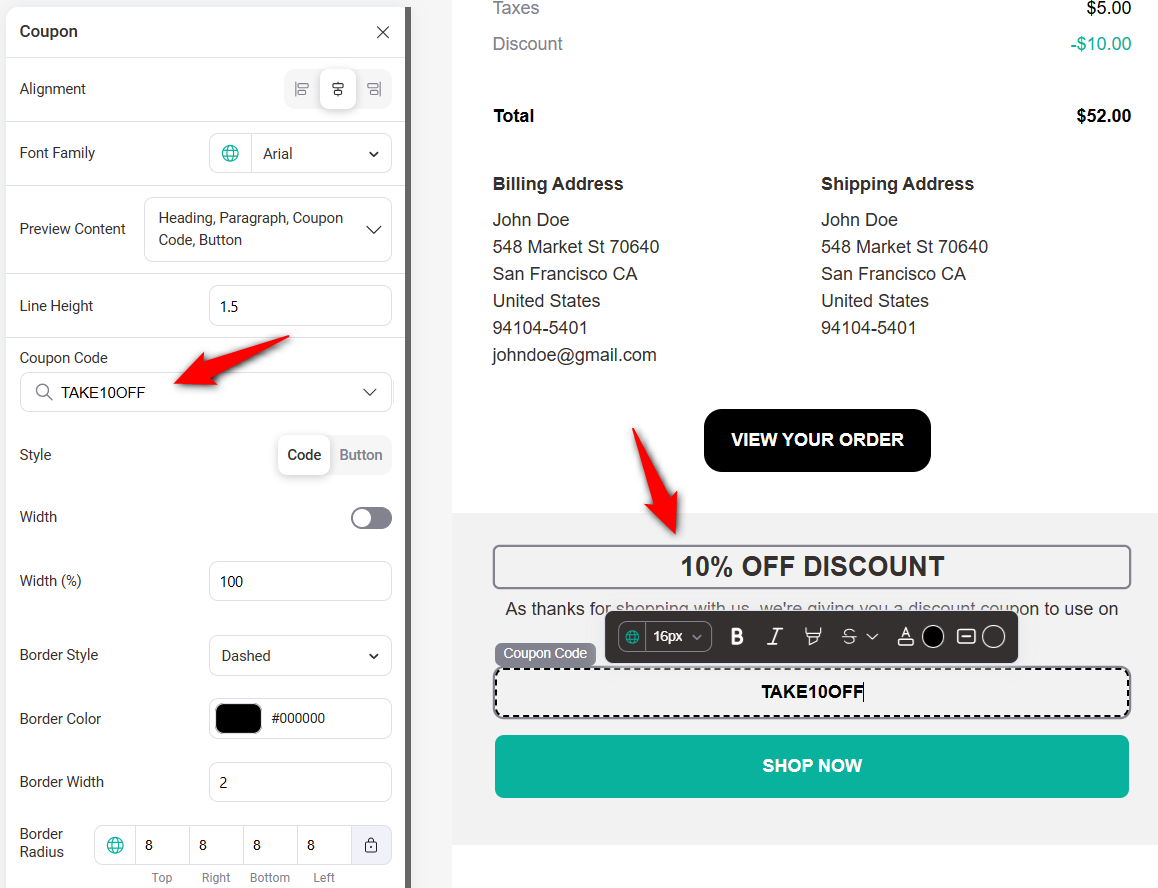
After adding the coupon code, ensure to customize the coupon-related text.
Also, add the URL (shop page or any promotional page) you want customers to visit when they click on the CTA.
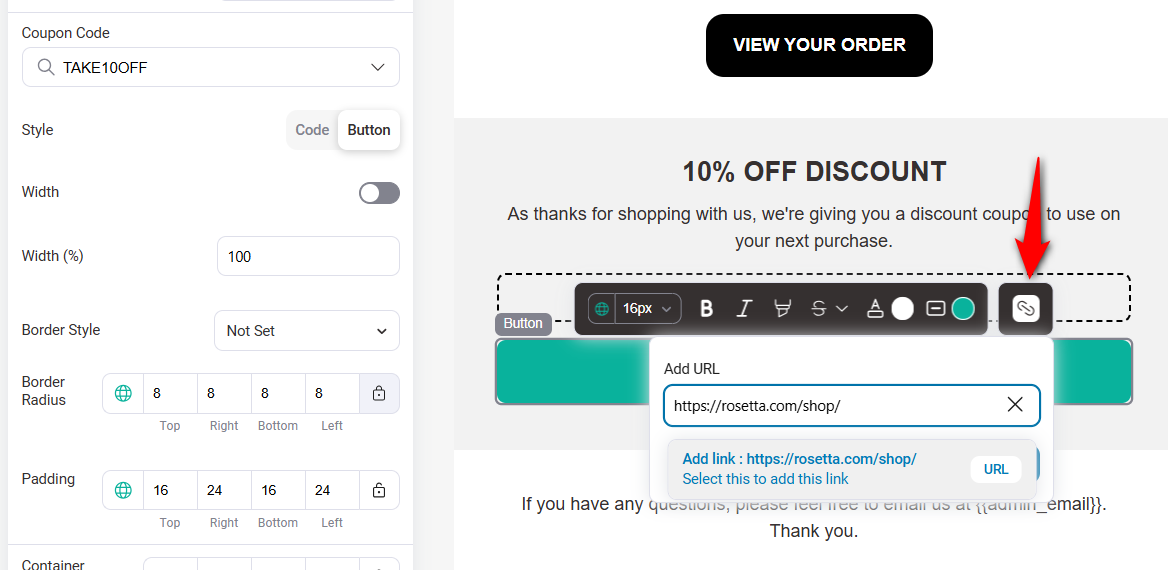
You can link to your store's shop page or best-selling products page.
It lets you audit your emails to identify and fix potential issues before they reach your customers.
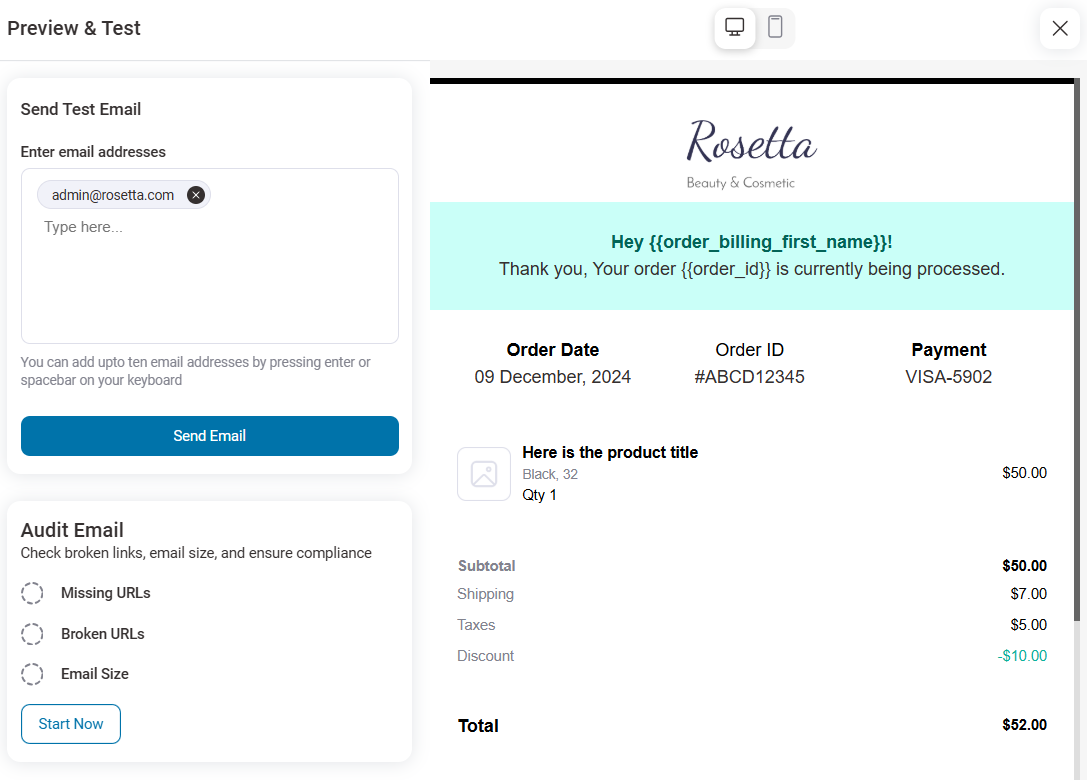
If you are happy with how the email appears in the inbox, save the email template.
Here is a preview of the WooCommerce order confirmation email template:
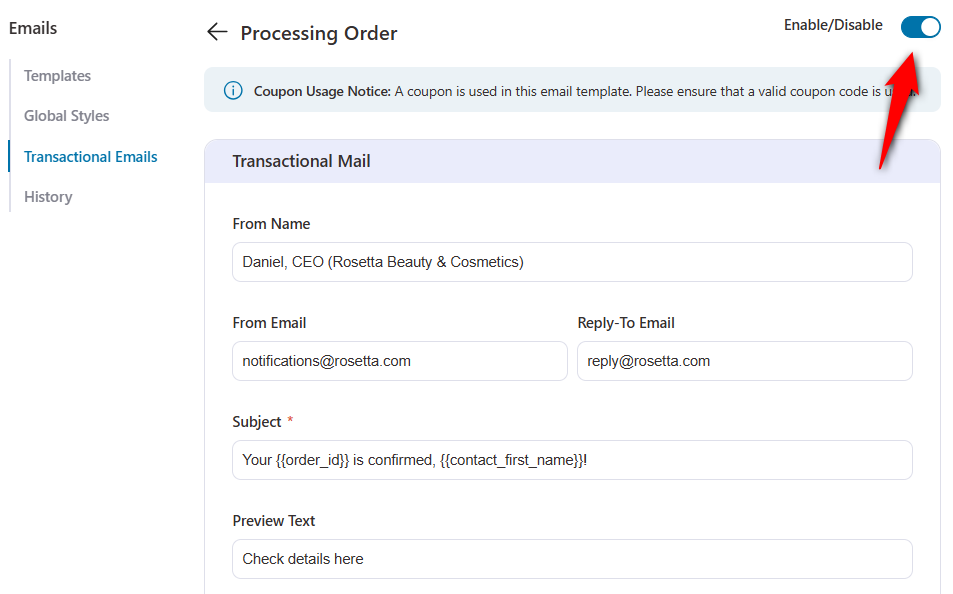
Step 5: Activate the WooCommerce order confirmation email
Turn the toggle button next to Processing order transactional email.
Once you activate it, every customer who orders on your website will receive this email.
Well done! This is how you can design a custom WooCommerce order confirmation email to drive repeat sales.
Method 3: Customize the Order Confirmation Email with Code (Hooks & Template Override)
If you’re comfortable with PHP, you have two upgrade-safe routes. Never edit files directly inside the WooCommerce plugin, as WooCommerce updates can wipe your changes.
Use a child theme override or a hook in a code-snippets plugin.
Option A - Override the template in your child theme
The confirmation email's template is customer-processing-order.php. Override it by copying it and keeping the folder structure, minus /templates/ to your child theme:
wp-content/plugins/woocommerce/templates/emails/customer-processing-order.php
        ↓ copy to ↓
wp-content/themes/your-child-theme/woocommerce/emails/customer-processing-order.php
Edit the copy in your child theme. Because it lives in your theme, plugin updates won't overwrite it.
Please note that this is the customer-processing-order.php template, which is the confirmation. Do not override customer-completed-order.php; that's the shipping email.)
Option B - Inject content with a hook (no template copy)
If you only want to add content rather than restructure the layout, hook into the email body and target the confirmation by its email ID, customer_processing_order:
add_action( 'woocommerce_email_before_order_table', 'funnelkit_add_confirmation_message', 20, 4 );

function funnelkit_add_confirmation_message( $order, $sent_to_admin, $plain_text, $email ) {
    // Only run for the Processing (order confirmation) email.
    if ( isset( $email->id ) && 'customer_processing_order' === $email->id ) {
        echo '<p style="font-size:15px;">Thanks for your order — we\'re packing it now and will email tracking as soon as it ships.</p>';
    }
}
The key is the condition 'customer_processing_order' === $email->id. That's the correct email ID for the order confirmation.
Using customer_completed_order here would target the shipping email instead, which is a common copy-paste mistake worth avoiding.
Useful related hooks for the same email: woocommerce_email_header, woocommerce_email_order_details, woocommerce_email_customer_details, and woocommerce_email_footer.
Why Is My WooCommerce Order Confirmation Email Not Sending? (7 Fixes)
WooCommerce hands every email to WordPress's wp_mail() function, which by default uses PHP's mail(), i.e., a system that most hosts throttle, block, or flag as spam. Work through these in order.
Fix 1: The order is stuck in "Pending payment"
No confirmation sends until the status reaches processing. Check WooCommerce ⇨ Orders for this.
If orders sit in Pending payment or On hold, the gateway never confirms payment, so no email is fired. Resolve the gateway/payment issue first.
Fix 2: The notification is simply disabled
Go to WooCommerce ⇨ Settings ⇨ Emails ⇨ Processing order ⇨ Manage and confirm "Enable this email notification" is ticked.
A surprising share of not-sending cases is nothing more than a switched-off processing notification.
Fix 3: PHP mail() is being silently dropped
This is the #1 root cause. Shared hosts frequently disable or rate-limit PHP mail(), and inbox providers distrust mail sent without authentication.
The fix is to route email through an authenticated SMTP connection instead of PHP mail(). Install an SMTP plugin (covered in full in the next section).
Fix 4: Verify delivery with an email log
Before you keep guessing, install a mail-logging plugin (such as WP Mail Logging) to see whether WooCommerce attempted to send the email and whether the server accepted it.
A log tells you exactly where the chain breaks: WooCommerce never tried, the server rejected it, or it left successfully but landed in spam.
It's important to diagnose and not speculate.
Fix 5: Wrong "From" name and "From" address
Under WooCommerce ⇨ Settings ⇨ Emails, scroll to the sender options. Use a From address on your own domain (for example, [email protected]), never a free Gmail/Yahoo address.
A mismatched sender domain is a fast track to the spam folder and to outright rejection by strict mail servers.
Fix 6: The email is sending, but going to spam
If your log shows the mail was sent successfully, but customers don't see it, it's a reputation/authentication problem.
Add SPF, DKIM, and DMARC records (in the next section), keep the subject non-salesy, and include a plain-text alternative, which will boost deliverability scores.
Fix 7: Caching or cron is blocking the trigger
WooCommerce emails fire on WordPress cron. If a caching/optimization plugin or a misconfigured server cron is interfering, scheduled email events stall.
Confirm WP-Cron is running (or set up a real server cron), and exclude transactional pages from aggressive caching.
How to Set Up SMTP So Order Emails Actually Arrive?
SMTP is the highest-impact fix for WooCommerce email problems because it replaces unreliable PHP mail() with an authenticated connection to a mailbox provider that can be trusted.
Follow these steps below.
1. Install an SMTP plugin
WP Mail SMTP is the most widely used. After activating it, you'll connect it to a sending service, such as Gmail/Google Workspace, Brevo, SendLayer, Mailgun, Postmark, or SendGrid.
A dedicated sending service provides delivery dashboards so you can track each message's journey from server to inbox.
2. Authenticate your domain with SPF, DKIM and DMARC
These are three DNS records that prove your store is allowed to send mail from your domain:
- SPF: Lists which servers may send email for your domain.
- DKIM: Cryptographically signs each message so receivers can verify it wasn't tampered with.
- DMARC: Tells receiving servers what to do with mail that fails SPF/DKIM.
Most sending services hand you copy-and-paste records during setup. Add them to your DNS zone (in your domain registrar or host), wait for propagation, and your authentication will be done.
3. Send a test email and confirm in the log
Use the SMTP plugin's built-in test, then check your mail log. Once a test message lands in the inbox (not spam), trigger a real Processing-order test.
With SMTP and SPF/DKIM/DMARC in place, the WooCommerce not sending email problem disappears for the vast majority of stores.
How to Track Analytics for Order Confirmation Emails in WooCommerce?
The native WooCommerce emails don't report opens or clicks.
To measure performance, send through a tool that logs delivery and engagement.
An SMTP service dashboard gives you delivery/bounce data, while an email automation platform (like FunnelKit Automations) adds open rate, click rate, and revenue per email so you can see whether a redesign or a cross-sell row actually increased revenue.
Inside FunnelKit, you can easily track the performance of all order-related emails, including order confirmation and processing order emails.
Each email includes detailed analytics and activity logs, so you know exactly how customers engage with your messages.
For the activity log, navigate to the Contact Activity tab to see if the processing order email was sent, opened, or clicked.
You can view the email by clicking View, or resend it if it was opened but not clicked.

Under the Email History tab, you’ll find a complete list of all order confirmation and processing emails sent.
For each email, you can see key details such as:
- Recipient name
- Source
- Type
- Subject
- Sent on
- Status
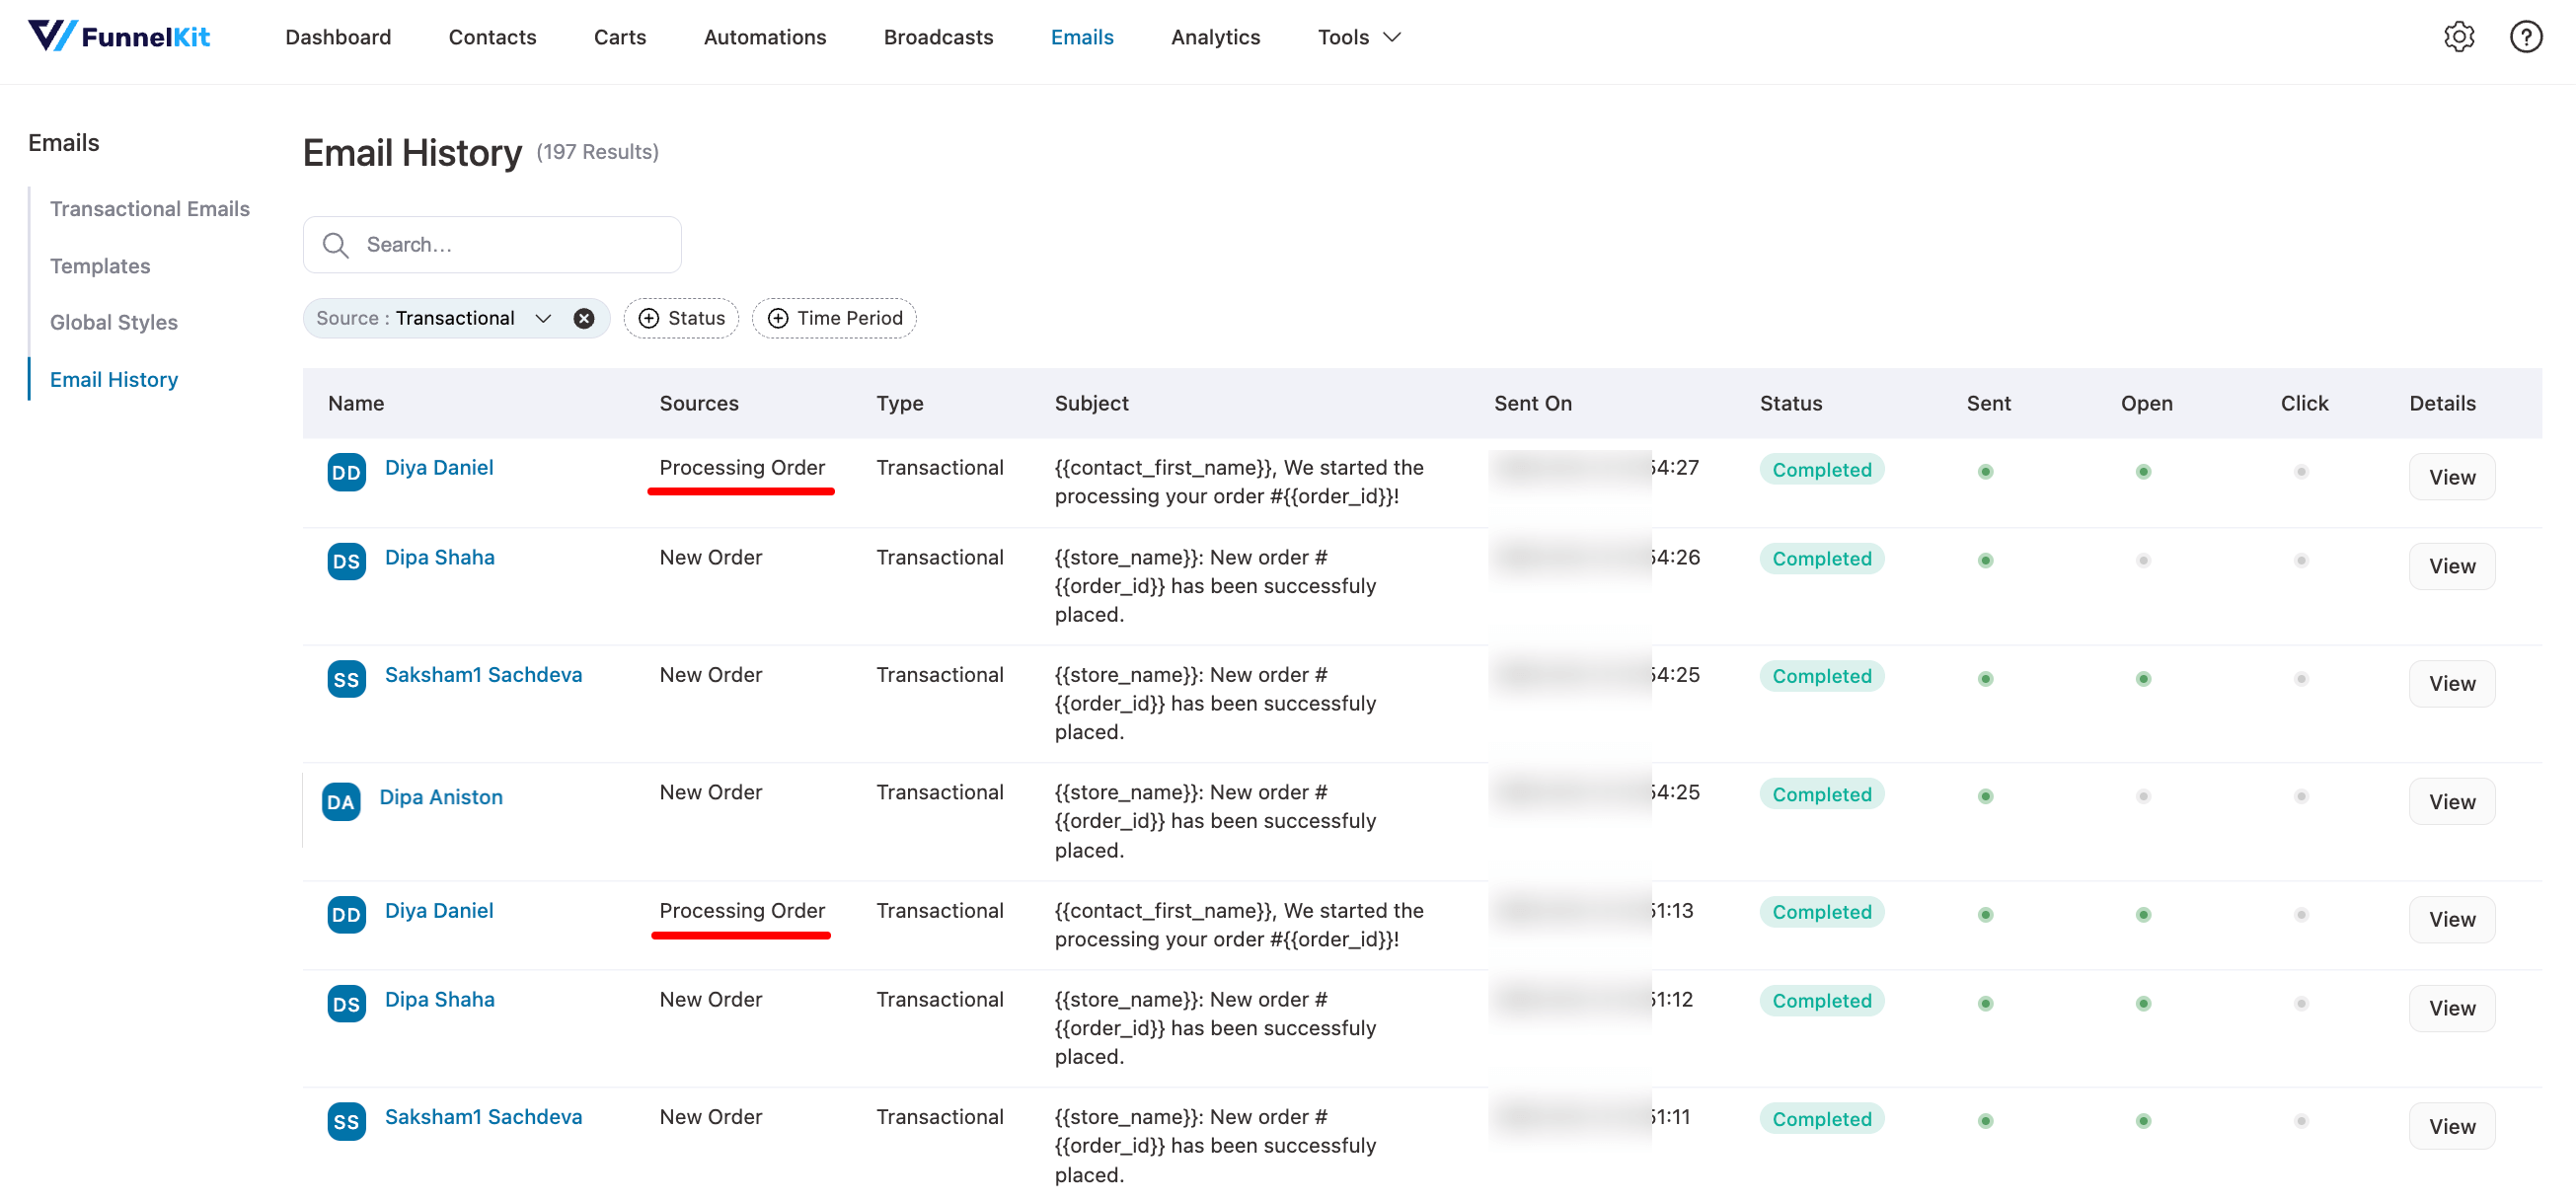
This gives you complete visibility into how your transactional emails are performing and where you can improve engagement.
6 Best Practices for Crafting Effective WooCommerce Order Confirmation Emails
Over the years, I have audited hundreds of email templates. The ones that perform the best get opened, clicked, and generate revenue, always follow these six golden rules:
- Send confirmation emails immediately
Speed matters. Your order confirmation email must land in the customer’s inbox within seconds of the payment clearing.
If a customer waits 5 minutes, they start checking their spam folder. If they wait 10 minutes, they start worrying that they were scammed.
Ensure your WordPress hosting has a reliable cron job setup, or better yet, use a dedicated SMTP provider (like WP Mail SMTP) to ensure instant email delivery.
- Craft clear, personalized subject lines
Make it evident that the email confirms the customer’s order.
Include details like the Order ID and the Brand Name in the subject line. This makes the email searchable later when the customer is looking for their receipt.
You can even personalize it with the customer’s name to boost open rates and engagement.
- Use the scannable “F-Pattern” layout
Eye-tracking studies consistently show that users scan emails in an F-pattern. They look at the top, scan across, and then scroll down the left side.
Place your logo top-left or center. Put the most critical info (order status or shipping address) immediately below the headline.
Save the cross-sells for the bottom, after the trust has been established.
- Provide complete, accurate order details
Include order ID, summary, billing/shipping addresses, payment method, total, and estimated delivery date.
Clear details reassure customers and reduce support inquiries.
While we want to upsell, never obscure the email's primary purpose: the receipt.
Your cross-sells and “Next Steps” should never take up more visual weight than the order details. If the customer has to scroll past three banners to see what they bought, you have failed the user experience test.
- Add engaging, brand-building content
Leverage high open rates by including personalized product recommendations, exclusive discounts, referral incentives, or social media invites with strong calls to action.
- Use a clean, mobile-responsive design
Prioritize readability with a minimalist layout, clear sections, easy fonts, and ample white space to help customers quickly find key information without overwhelming them.
With over 60% of emails opened on mobile, your email must look and function flawlessly across devices. Test extensively on mobile, tablet, and desktop.
Frequently Asked Questions (FAQs)
WooCommerce order confirmation emails do more than confirm a purchase. They play a key role in customer satisfaction and post-purchase engagement.
1. Confirm the order and reduce post-purchase anxiety
2. Build customer trust and long-term relationships
3. Create opportunities for upselling and repeat sales
4. Combine functionality with smart marketing
Not really. The default emails are basic and limited. You can change colors and text, but you cannot customize the layout without coding. Custom order confirmation emails let you:
1. Build brand trust with personalized design and tone
2. Boost engagement with tailored messages and product suggestions
3. Improve customer experience with useful info like tracking and policies
4. Drive repeat sales by including discounts and upsell offers
5. Customizing your emails makes a more substantial impact and helps grow your store.
In this blog, we shared a step-by-step guide to sending a custom order confirmation email in WooCommerce.
The order confirmation email is the message we've covered, including the Processing email delivered to the customer's inbox. The order confirmation page (the "Thank You" / Order Received page) is what appears on your site immediately after checkout, displaying the order summary on-screen.
If you want to edit what customers see on the page after buying (not in their inbox), you edit the Order Confirmation template in the Site Editor (Appearance → Editor → Templates → Order Confirmation) on a block theme, or the Thank You / Order Received endpoint on a classic theme.
Editing the page does not change the email, and editing the email does not change the page. If your goal is the inbox message, stay with the sections above.
- The clean receipt (default-plus): Logo at top, a one-line "Thanks, [First name], your order is confirmed", the order-details table, billing/shipping address, and a single support line. This is the minimum that looks professional. Achievable in the native settings alone using the heading + additional-content fields.
- The branded confirmation: Adds your brand colors to the header band, a hero image or banner, expected dispatch time, and a clear "What happens next" section (payment received → packing → shipping email to follow). Best built with a template override or a visual builder.
- The branded + cross-sell confirmation: Everything above, plus a tasteful "You might also like" row of 2–3 related products below the receipt. The receipt stays the hero; the upsell is a quiet footer. This is where a builder with dynamic product blocks earns its keep.
If done correctly, email deliverability gets improved. Clean code and relevant, engaging content are positive signals to email providers. However, ensure you aren’t overloading the email with massive image files, as slow load times can trigger spam filters.
FunnelKit Automations lets you audit your emails to ensure they are delivered to your customers’ inboxes.
It can, if you over-design it. Keep a plain-text alternative, avoid spammy subject lines, don’t stuff it with images/links, and send from your own authenticated domain. A clean branded template with SMTP authentication delivers fine.
The block checkout changes how orders are created (orders start in Draft until submitted, then move to Pending → Processing), but the confirmation email is still the Processing order email, sent once payment clears. Your setup and troubleshooting steps are unchanged.
Start Turning WooCommerce Order Confirmation Emails Into Repeat Customers
Your WooCommerce order confirmation email is the Processing order email that enables it in WooCommerce email settings.
Make sure it actually delivers with SMTP plus SPF/DKIM/DMARC, then customize the look once the fundamentals are solid.
Get those three in order, and you turn a frequent source of support tickets and refund anxiety into a moment of instant trust.
When you're ready to go beyond a plain receipt, including branded layouts, dynamic product blocks, and a post-purchase follow-up sequence without touching code, FunnelKit Automations lets you build it visually on top of the foundation you just set.
Now’s the time to take your post-purchase communication to the next level.
Start designing your custom WooCommerce order confirmation email today, and watch it strengthen customer trust and boost your revenue!
Editorial Team
July 27, 2026WooCommerce subscription upsell can help boost your revenue through subscription-based sales. Moreover, subscription-based products allow you to add predictability to your revenue. You can sell physical and digital products and...

Editorial Team
July 7, 2026Are shoppers adding products to their cart and leaving before they buy? According to Baymard Institute research on checkout usability, 18% of shoppers who abandon their cart do so because...

Editorial Team
June 29, 2026Broadcast emails are one-time campaigns sent to a specific audience, ideal for sharing sneak peeks, announcing offers, or revealing major updates. You can use them to announce a sale, introduce...


