


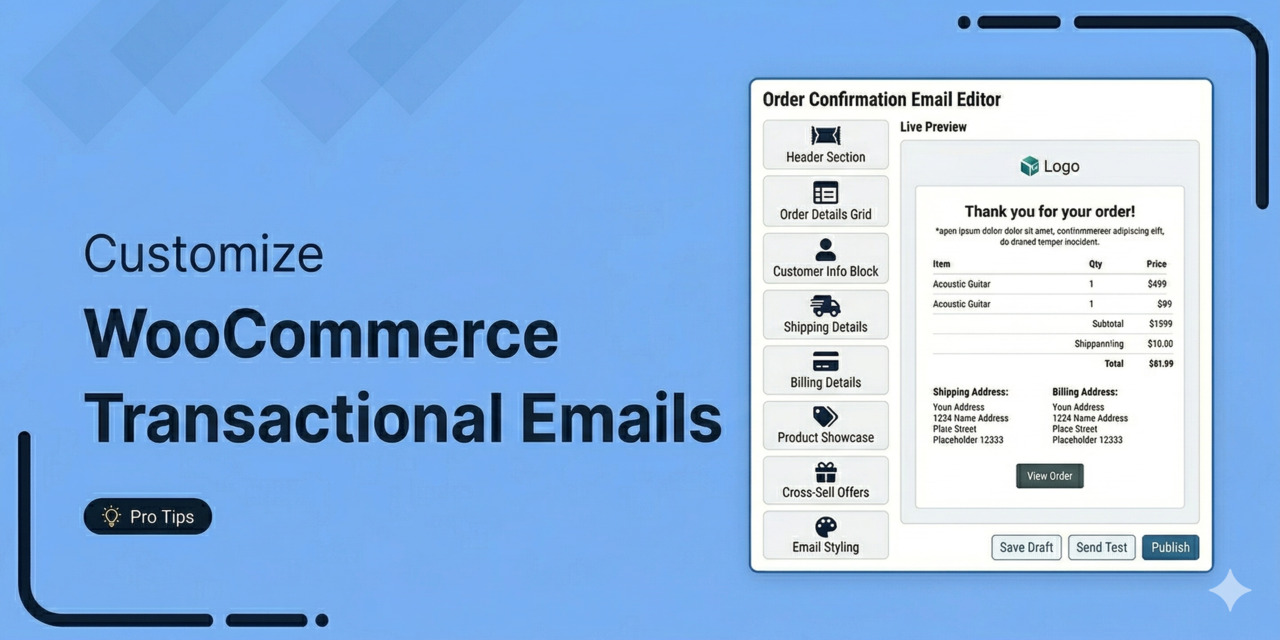
WooCommerce transactional emails are the most-read messages your store will ever send. Most stores leave them on the default template and never look again.
Buy a coffee at almost any chain and you get a receipt. Most people glance at it and bin it.
Some chains even print a coupon on the back. 20% off your next visit, valid for a week, and guess what: a slice of those customers come back within the week who otherwise would not have.
The receipt costs the same to print either way. The only difference is that one was designed and the other was left as the default.
Your order confirmation is that receipt, except every single customer opens it.
Say your store does 500 orders a month at a $60 average. Turn even two percent of those buyers into a second order, and that is $720 a month, from an email you were already sending.
Then there is the half nobody checks. Plenty of stores send the grey table WooCommerce ships with and never find out whether it arrived.
In this guide, we will fix both halves. First, we will make sure your store emails actually reach the inbox. Then we will walk through three ways to customize them, including WooCommerce’s own block-based editor.
Watch this quick tutorial if you want to skip the post:
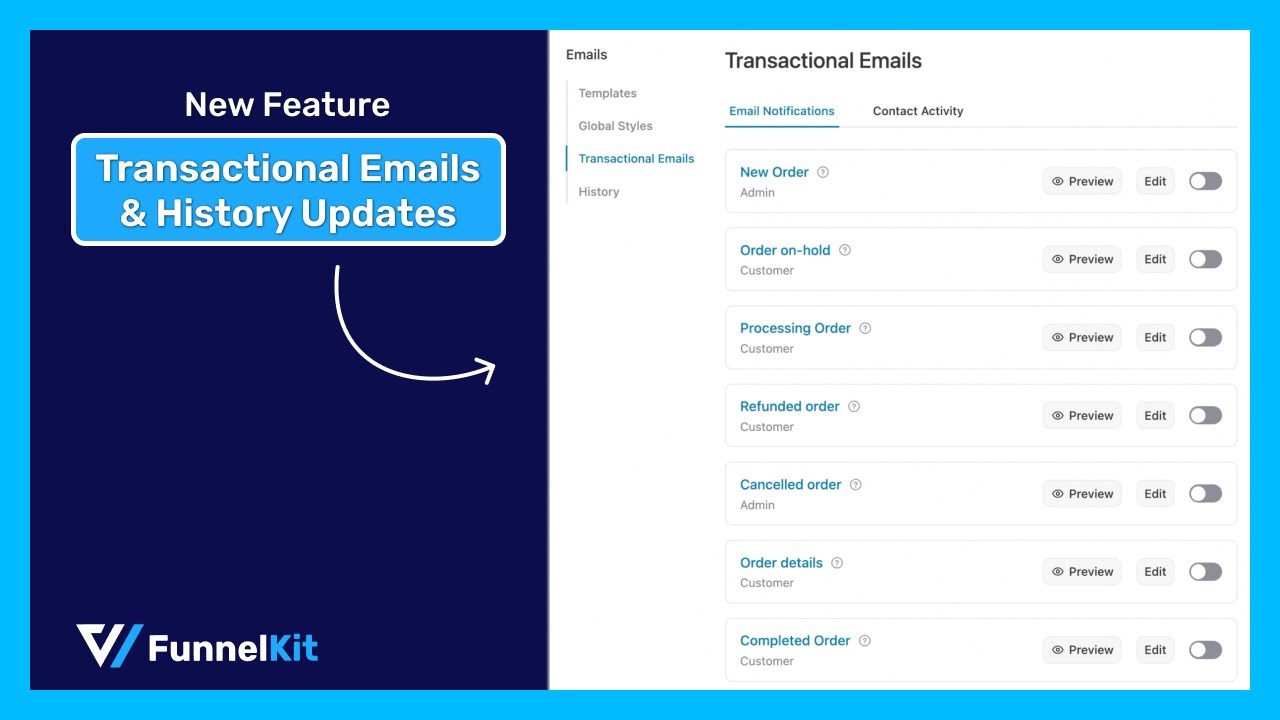
Skip to the detailed email customization shown in the video
Table of Contents
- 1 What Are WooCommerce Transactional Emails?
- 2 Three Ways to Customize WooCommerce Transactional Emails
- 3 Before You Customize Anything: Fix WooCommerce Email Deliverability
- 4 Method 1: Customize With WooCommerce’s Built-In Settings
- 5 Method 2: Use WooCommerce's Native Block Email Editor
- 6 Method 3: Design Order Emails With a Drag-and-Drop Builder
- 7 Edit WooCommerce Email Templates With Code
- 8 Transactional Emails vs Marketing Emails: Where the Line Sits?
- 9 6 Best Practices to Get More Value From Every WooCommerce Transactional Email
- 10 Frequently Asked Questions
- 11 Ready to Transform Your WooCommerce Transactional Emails?
What Are WooCommerce Transactional Emails?
A transactional email is triggered by something a customer did. They placed an order, an order status changed, or they requested a password reset.
The message carries the information they are waiting for.
That wait is why these emails matter. Transactional emails see open rates of 80-85%, while most marketing emails land somewhere around 20-25%.
Because only a few open a newsletter. But almost everybody opens an order confirmation.
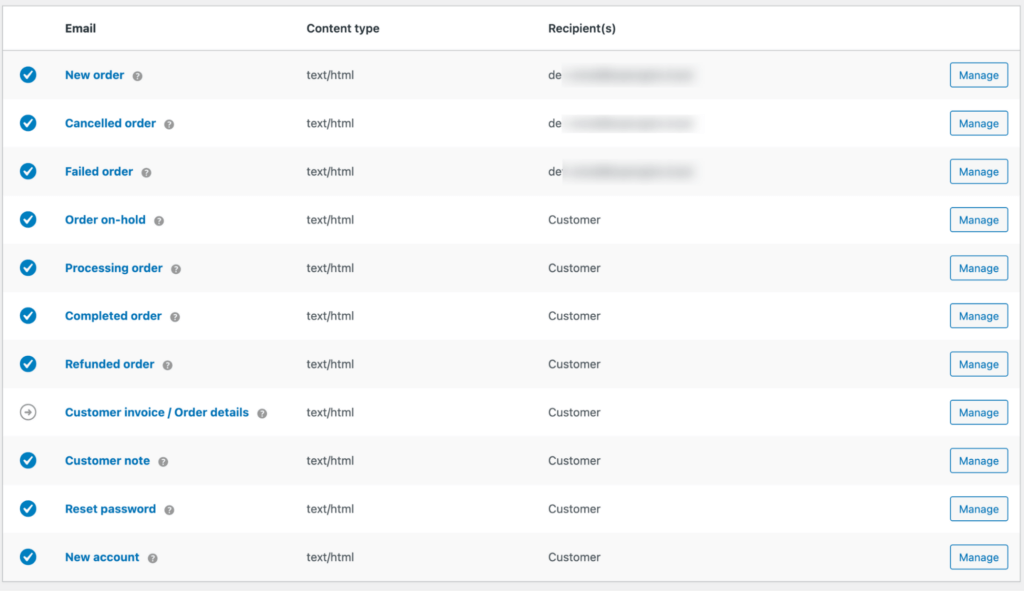
WooCommerce ships with 11 of them out of the box.
- New order: Sent to the admin to inform them that a new order has been placed.
- Cancelled order: Informs the admin that previously processed or held orders are marked as cancelled.
- Failed order: Sent to the admin when previously processed or held orders are marked as failed.
- Order on hold: Sent to customers when an order status is placed on hold from Pending. On hold means there is a temporary pause in order processing.
- Processing order: Sent to customers when payment is completed and the order details are confirmed.
- Completed order: Sent to customers when the order is shipped.
- Refunded order: Sent to customers to inform them that their order has been refunded.
- Customer invoice/Order details: Includes order information and payment links. Users can use the payment link to complete payment.
- Customer note: Sent to customers if the store owner adds one to the order.
- Reset password: Sent to customers with a reset link when they request a password reset.
- New account: Sent to customers when they create their accounts in your WooCommerce store.
- Confirm email address: Sent to customers to verify their email address.
Extensions register their own on top of this. Subscription renewals, POS orders, and shipment tracking notifications all add templates, and they customize them the same way the core ones do.
There is a second category worth naming, because it is where most of the revenue hides.
Abandoned cart reminders, review requests, and post-purchase education emails are all triggered by customer behavior, but WooCommerce does not send any of them.
Those need a plugin, which is Method 3 below.
Three Ways to Customize WooCommerce Transactional Emails
Once the emails are landing, you have three practical routes to changing how they look, plus a code path for developers.
| Method | Best for | Effort | Design control | Survives updates |
|---|---|---|---|---|
| Built-in WooCommerce settings | Logo, colors, footer, and subject lines | Low | Basic | Yes |
| Native block email editor (beta) | Editing email content like a post | Low | Moderate | Yes, with a review prompt |
| Drag-and-drop builder | Full branded layouts, product blocks, coupons | Low to medium | High | Yes |
| Template file overrides | Custom layouts and logic | High | Complete | Only if maintained |
Most stores never need the code route, so choose your method wisely.
Before You Customize Anything: Fix WooCommerce Email Deliverability
There is no point styling an email that never lands. This is the more common failure and has nothing to do with design.
WordPress sends mail through the PHP mail() function. Most hosting servers aren't configured to send email properly, and many hosts disable the function outright.
Even when the message leaves your server, it often fails authentication and gets filtered into spam.
Here's what causes it most of the time:
- Your From address is on a public domain: If WooCommerce sends from an @gmail.com or @yahoo.com address, receiving servers see a mismatch between the declared sender and the server that actually sent the message, and they are likely to block it or route it to spam. Use an address on your own store domain.
- Your host relays outbound mail through its own servers: Your server IP is in your SPF record, but that is not the machine that sent the email, so SPF fails no matter how many times you edit the record. This one comes up constantly in the WooCommerce community, usually from someone who ran a test in mail-tester and was told their SPF was failing for reasons nobody at their host could explain.
Route WooCommerce emails through an SMTP service
Install an SMTP plugin such as WP Mail SMTP, FluentSMTP, or Easy WP SMTP, and connect it to a transactional email provider with an API key.
Then authenticate your domain with three DNS records.
SPF tells receiving servers which servers may send for your domain. DKIM signs your emails so recipients can verify they were not altered in transit. DMARC tells receiving servers what to do when either check fails.
Your provider generates these for you. Add them at your DNS host, verify them in the provider dashboard, and allow up to 48 hours to propagate.
Check whether an email was actually sent
Since WooCommerce 10.9, transactional email logging is built into core. You no longer need a separate plugin.
Trigger the email, then go to WooCommerce ⇨ Status ⇨ Logs and open the log source named transactional-emails. Each entry records one of three outcomes:
- Sent: WooCommerce handed the email to your mail system successfully. If the customer still didn't get it, the problem is deliverability, not WooCommerce.
- Failed: The email broke before leaving your site and was logged as a warning, with a reason where available.
- Not attempted: The email is disabled in settings, or WooCommerce skipped it because a precondition was not met, such as a missing recipient.
For a full walkthrough of delivery failures, see our guide to why WooCommerce is not sending emails.
Pick a transactional email service
The right service depends almost entirely on volume, and for most stores the price difference is a few dollars a month.
Please note that setup friction matters more than cost.
| Monthly volume | What matters | Commonly used |
|---|---|---|
| Under 500 | A free tier and onboarding that validates your DNS for you | Brevo, Resend, Mailtrap, SendLayer |
| 500 to 5,000 | Reliable delivery, message logs, simple pricing | Postmark, Mailgun, ZeptoMail |
| 5,000+ | Lowest cost per email, detailed reporting | Amazon SES, Mailgun, Postmark |
Amazon SES is the cheapest option at scale, but new accounts are routinely denied production access, and the rejection asks you to establish a billing history with other AWS services first.
If SES is the only reason you are opening an AWS account, pick something else and save yourself the round trip.
Also, free tiers get changed frequently, so check current plans before committing.
Method 1: Customize With WooCommerce’s Built-In Settings
WooCommerce covers sender details, subject lines, extra content, and global styling with no plugin. Every store should do this much.
Step 1: Enable and edit the email
From the WordPress dashboard, navigate to WooCommerce ⇨ Settings and click on the 'Emails' tab.
You will see every notification your store can send and whether each is currently on.
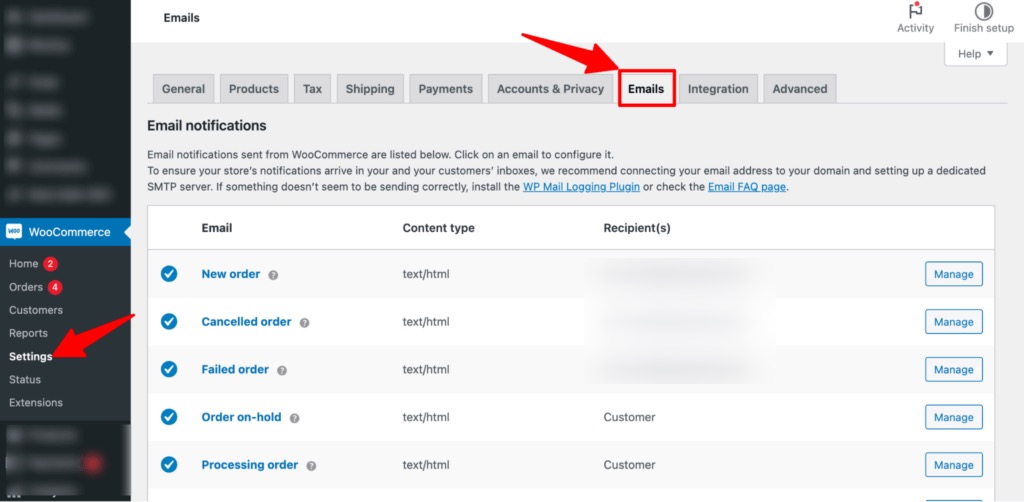
Click 'Manage' next to Processing order, then check Enable this email notification if it is not already ticked.
For example, we will show how to customize the emails sent for 'Processing Order'. This email notifies users when their order is successfully received and the store begins processing it.
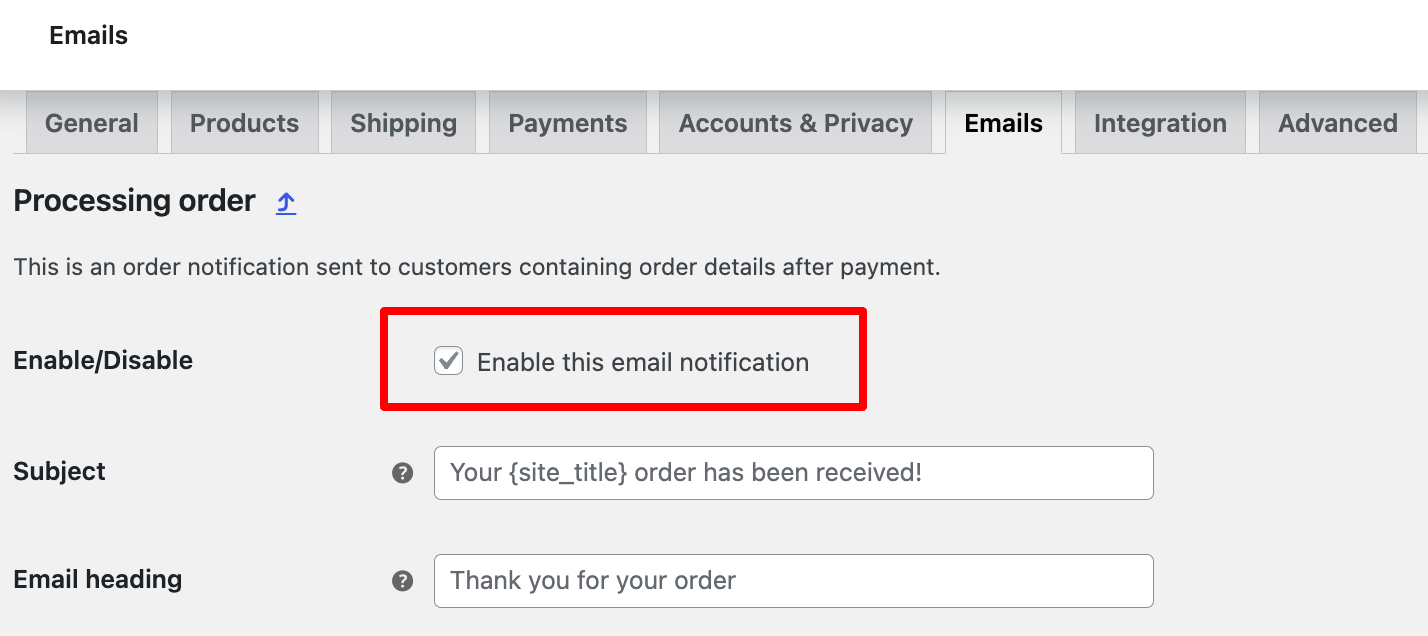
Scroll down to customize this email.
Step 2: Rewrite the subject line and content
Now, you can customize the following options for email content:
- Subject: Set the email subject line. Use {site_title}, {order_number}. and {order_date} to dynamically print the store name in the subject line.
- Email heading: Enter the email heading here.
- Additional content: Enter additional content to include in this email.
- Email type: Choose an email type such as HTML, Plain Text, or Multipart.
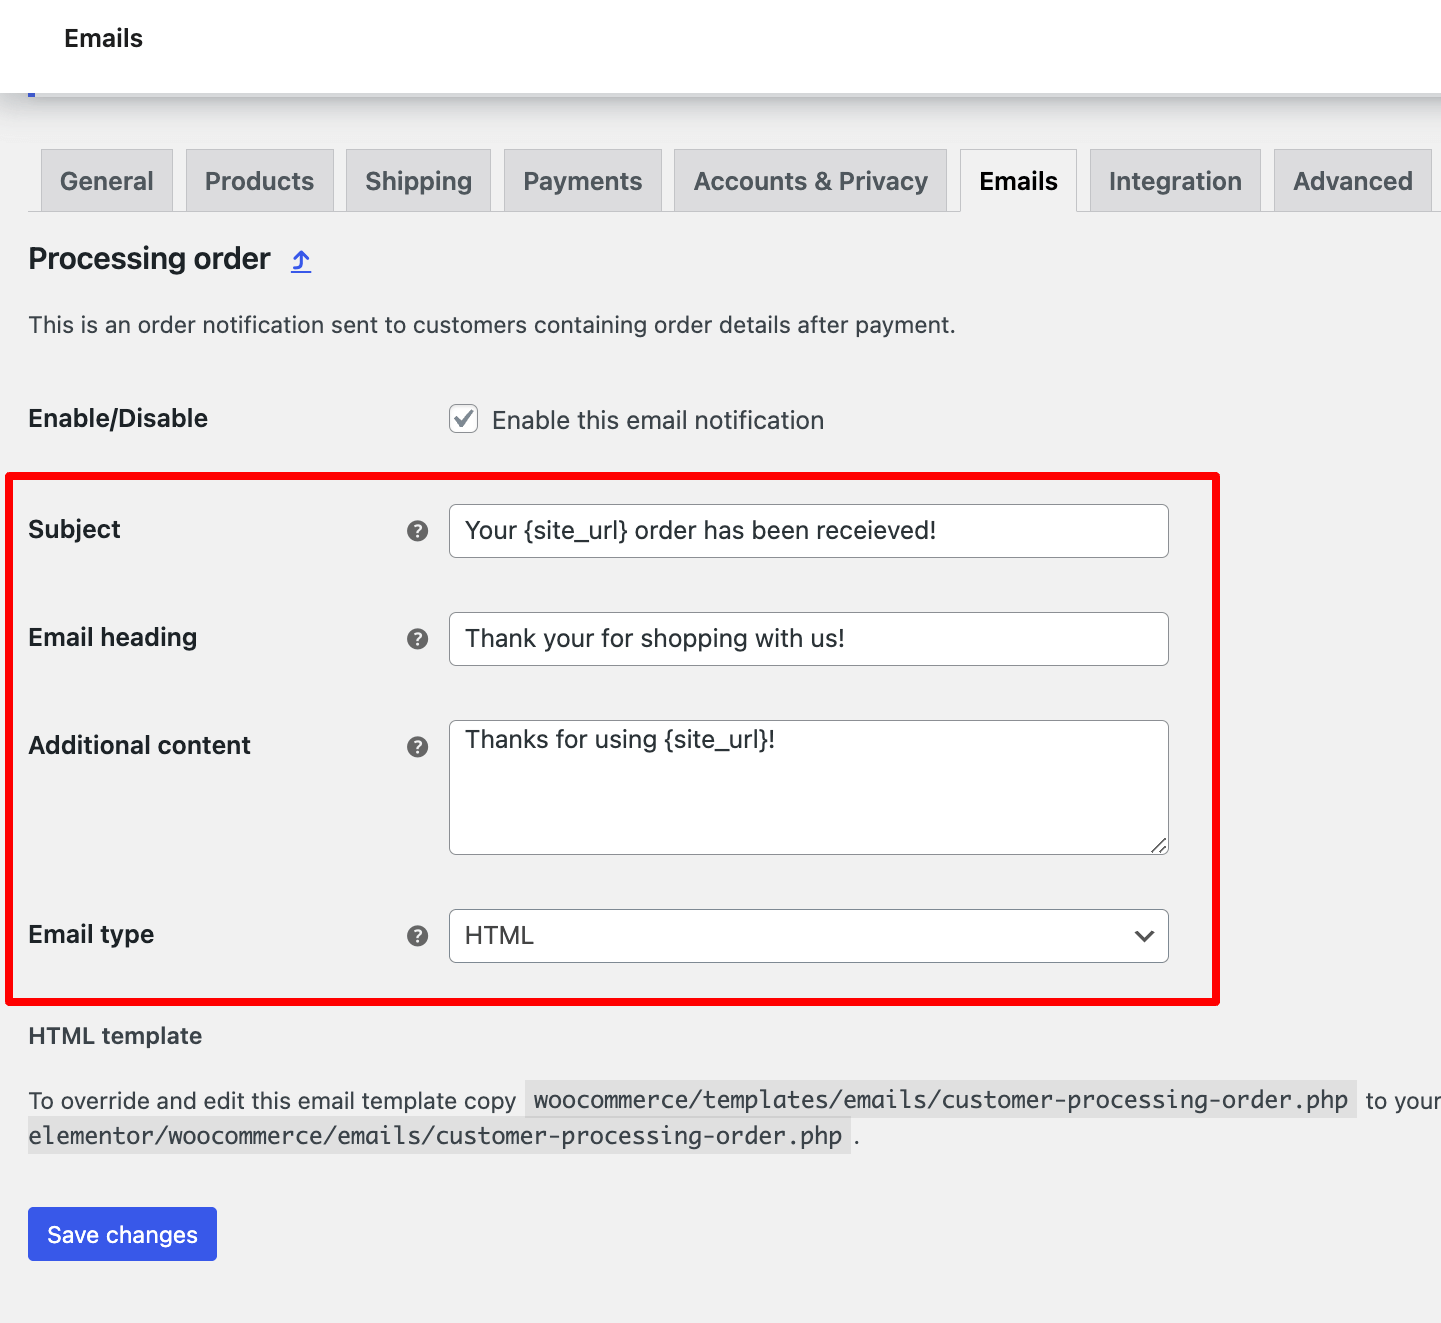
Save your changes when done.
🔔 Note: Repeat Steps 2 and 3 to customize each email type in WooCommerce.
Step 3: Fix your sender details
Back on the Emails tab, scroll to the sender options.
- "From" name: Set the name you want to show as the sender.
- "From" address: The email address from which emails will be sent.
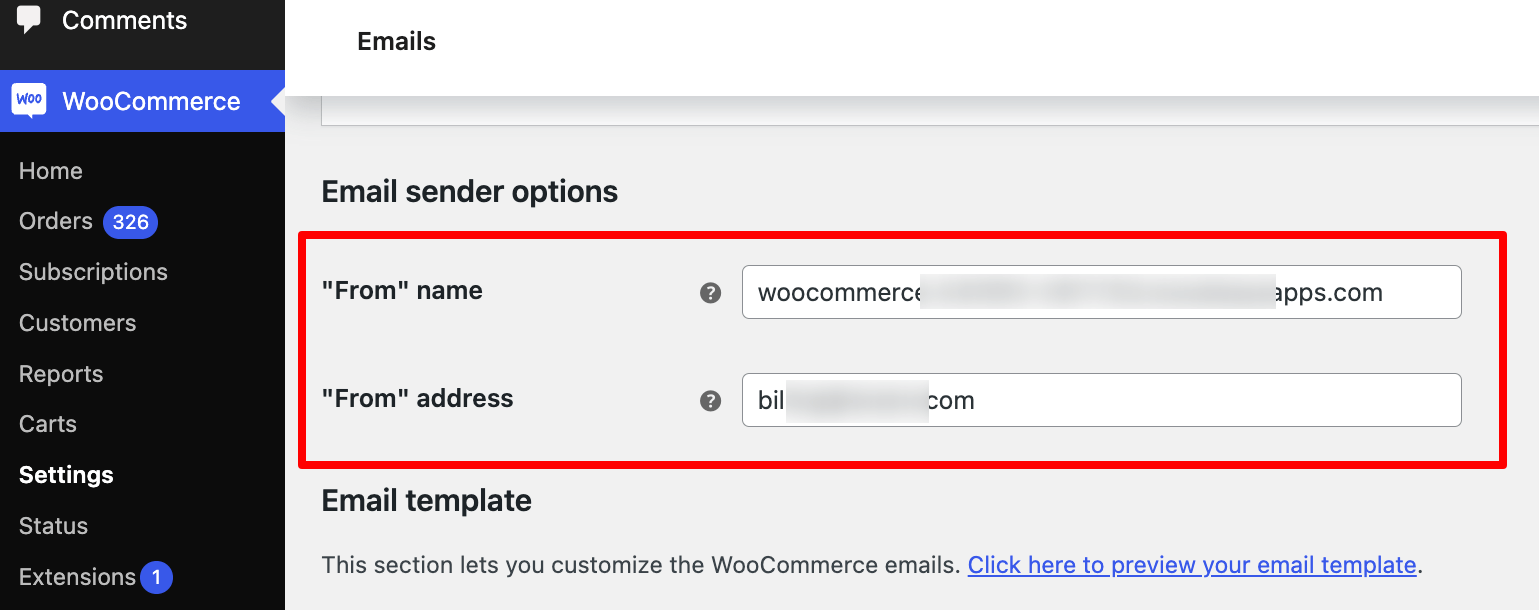
Getting this wrong undoes the DNS work you just did.
Step 4: Apply your template styling and test
Scroll down a bit further to customize the email style with the following settings:
- Header image: Enter the URL of the image you want to use as the header image in your email
- Footer text: Specify the text that will appear in the email footer
- Base color: Select the base color for your email template
- Background color: Choose the background color for your email template
- Body background color: Set the background color for the main body of the email
- Body text color: Select the color for the body text
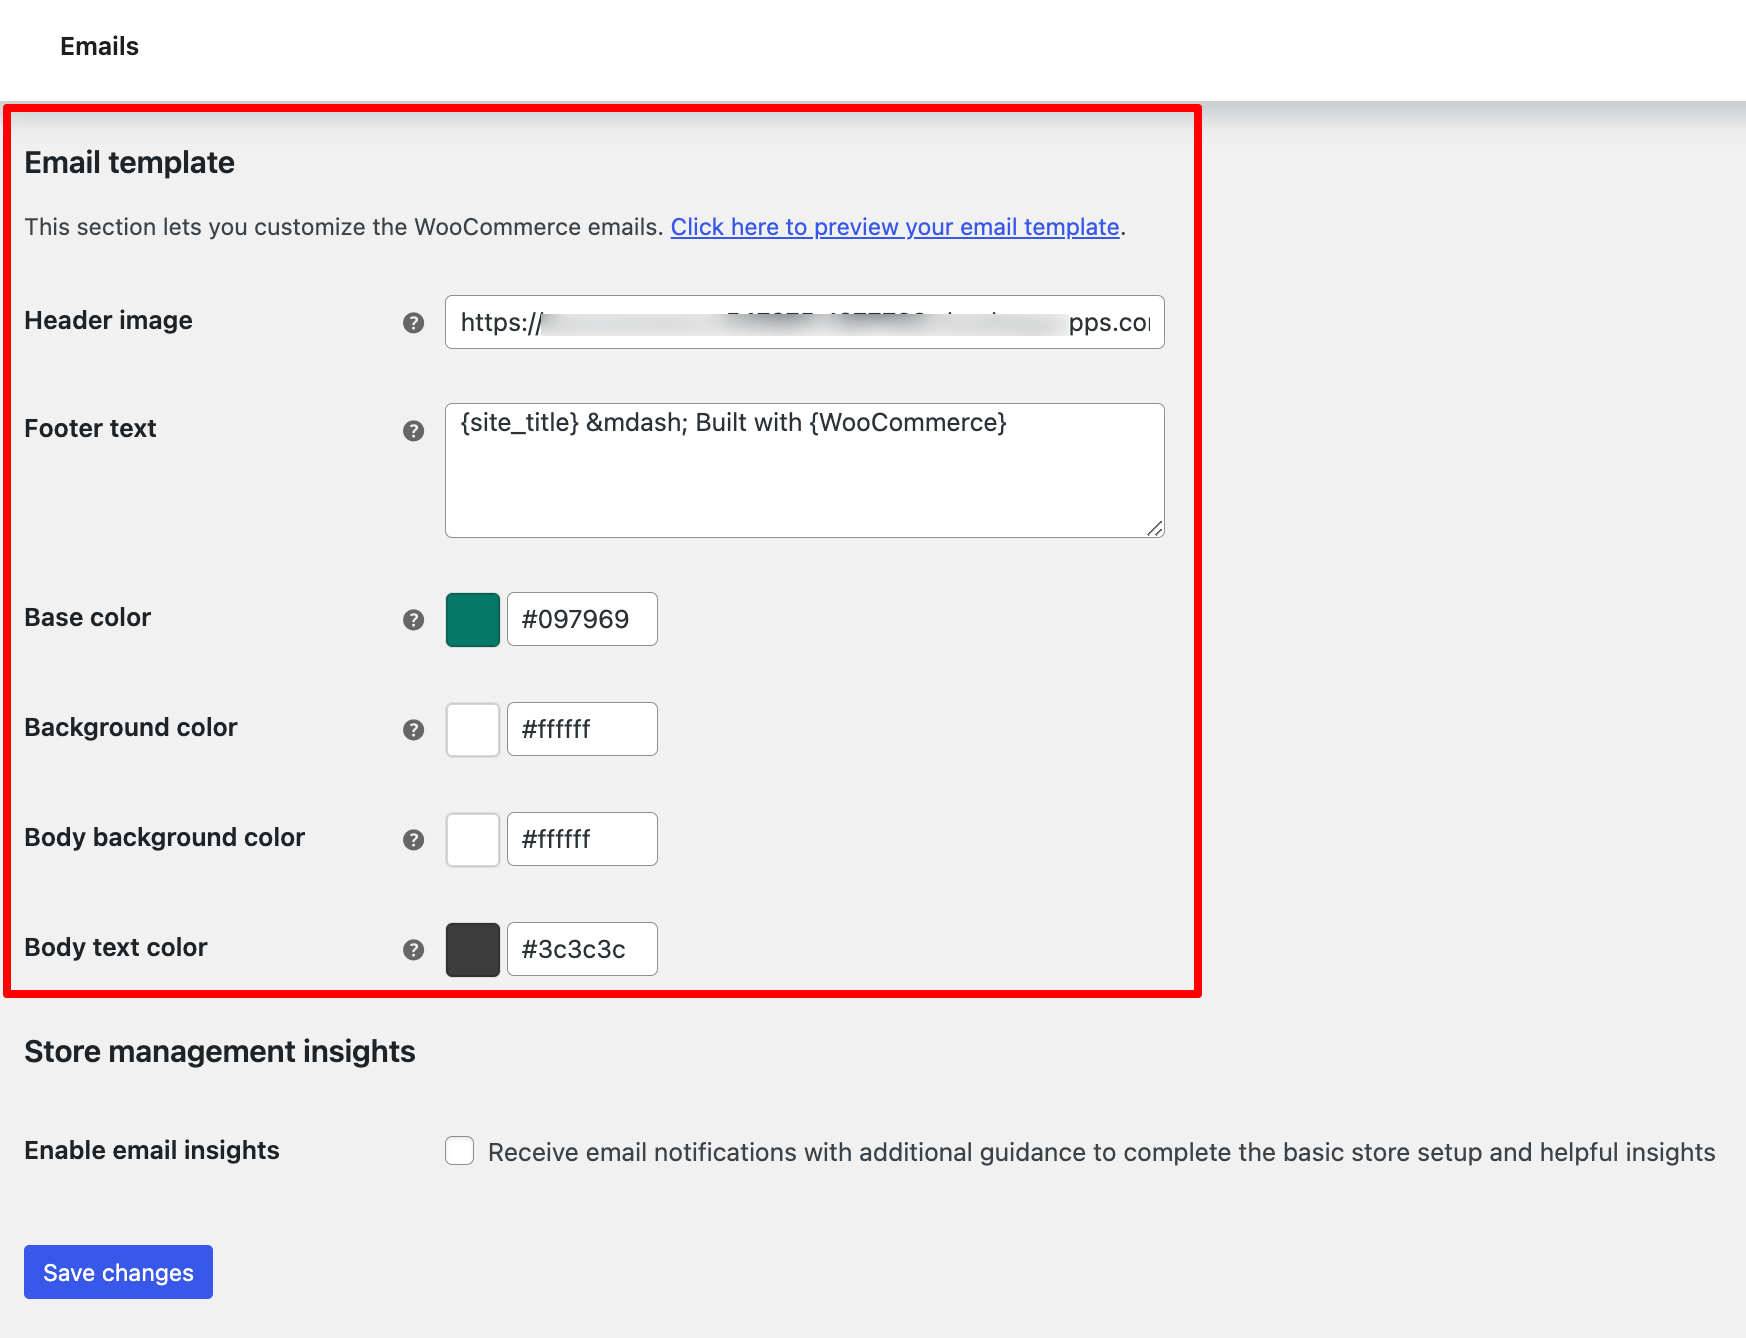
Preview, save, and place a test order for the serum using cash on delivery to confirm the styled version arrives.
You now have a branded email.
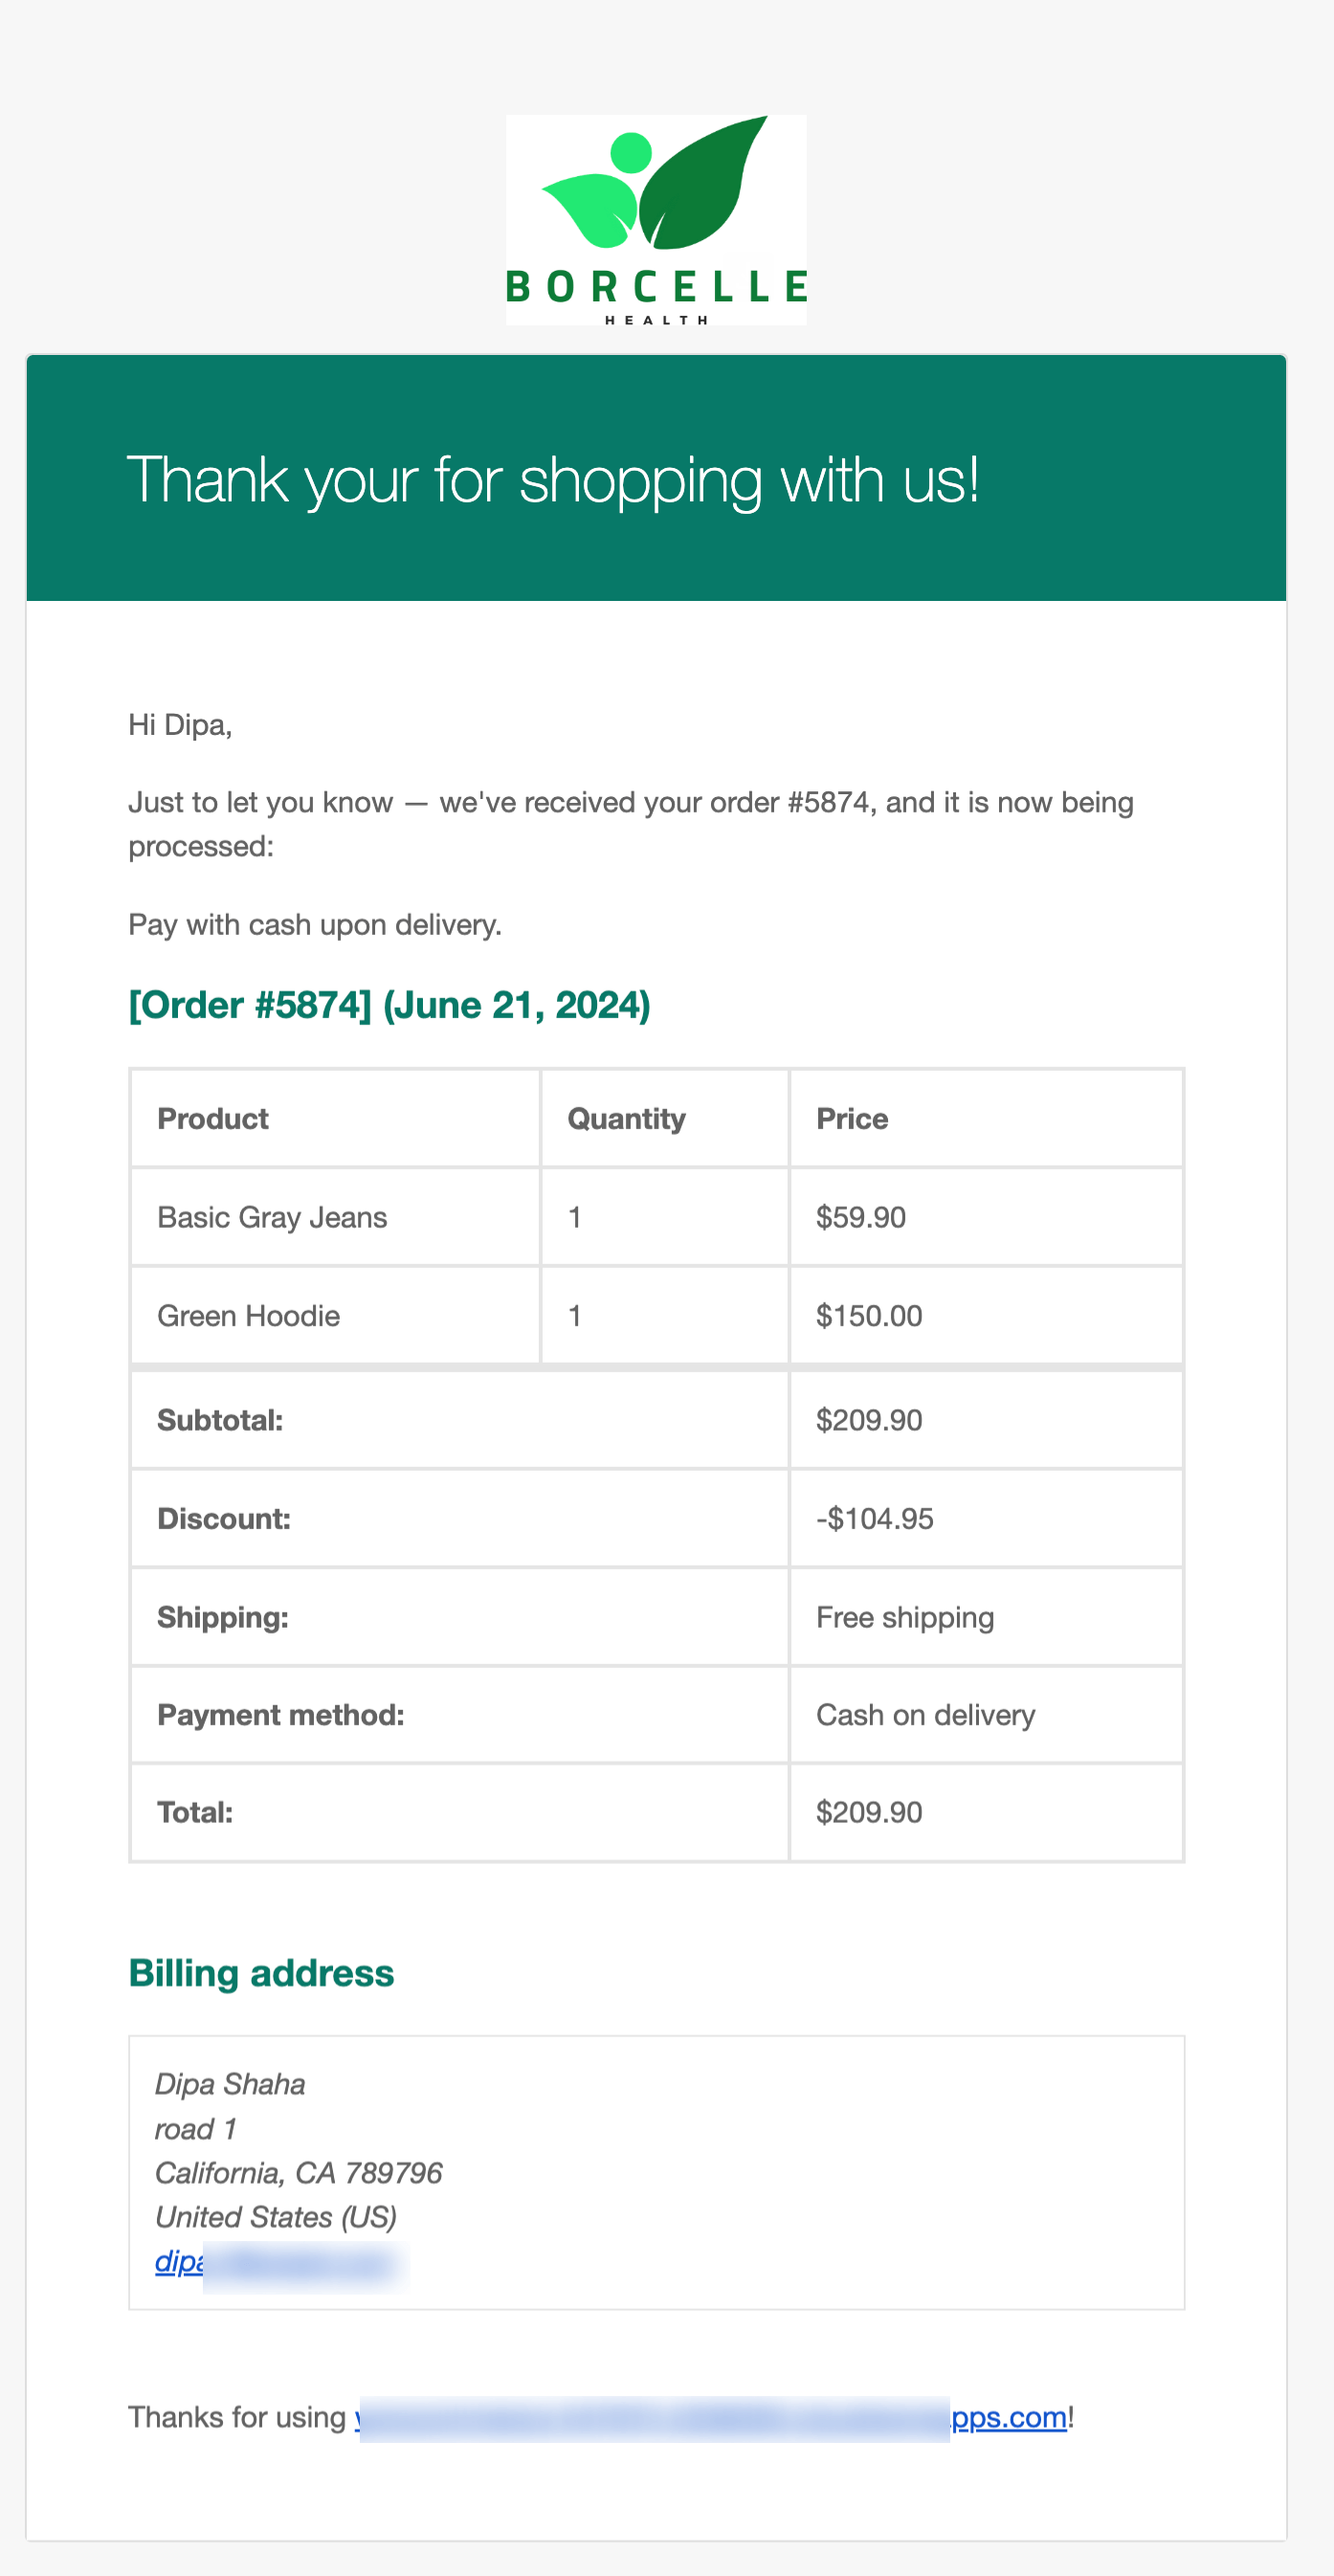
These default emails look nice, but customization options are limited when creating your brand identity and maximizing personalization to turn customers into loyal repeat customers.
For instance, you can’t change the layout or add product recommendations, discount coupons, or customer information in the subject line, which is essential to personalization.
Method 2: Use WooCommerce's Native Block Email Editor
WooCommerce has been building a block editor into core so you can edit email content the way you edit a post.
As of mid-2026, it is still behind a feature flag and has real limits, but it is free, native, and worth knowing.
Step 1: Turn on the block modification
Go to WooCommerce ⇨ Settings ⇨ Advanced ⇨ Features and enable the block email editor.
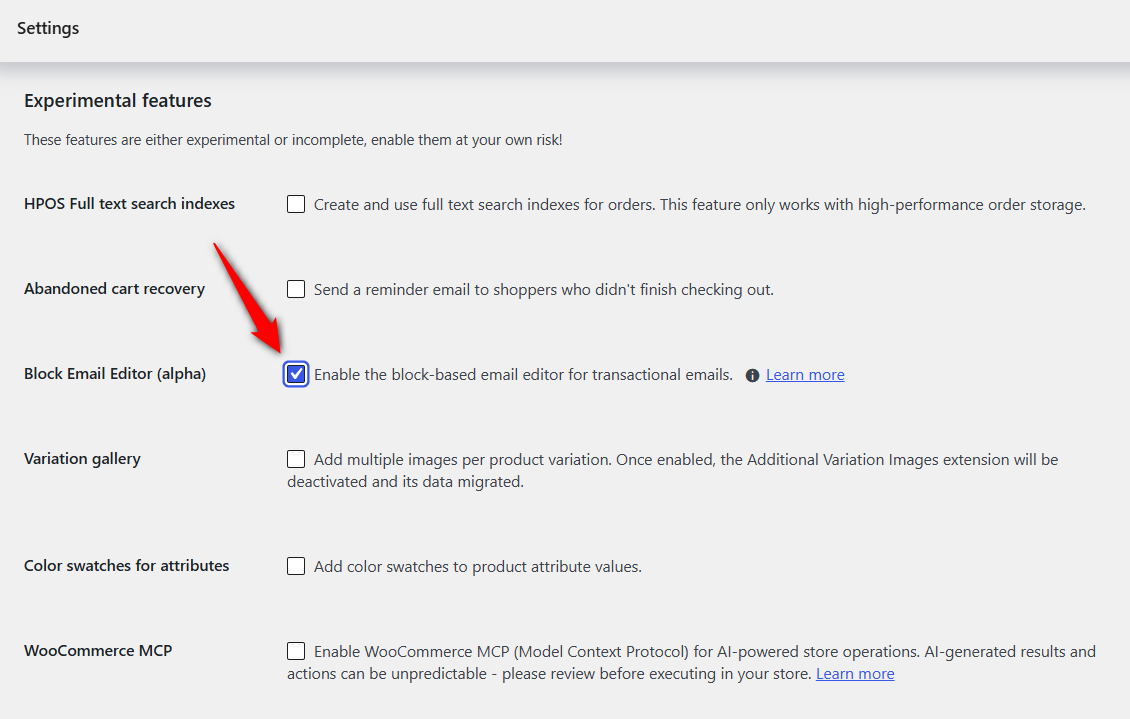
It is off by default. Once it is on, each notification on the Emails screen gains an Edit action that opens the block editor instead of the classic form.
Step 2: Edit the content with blocks
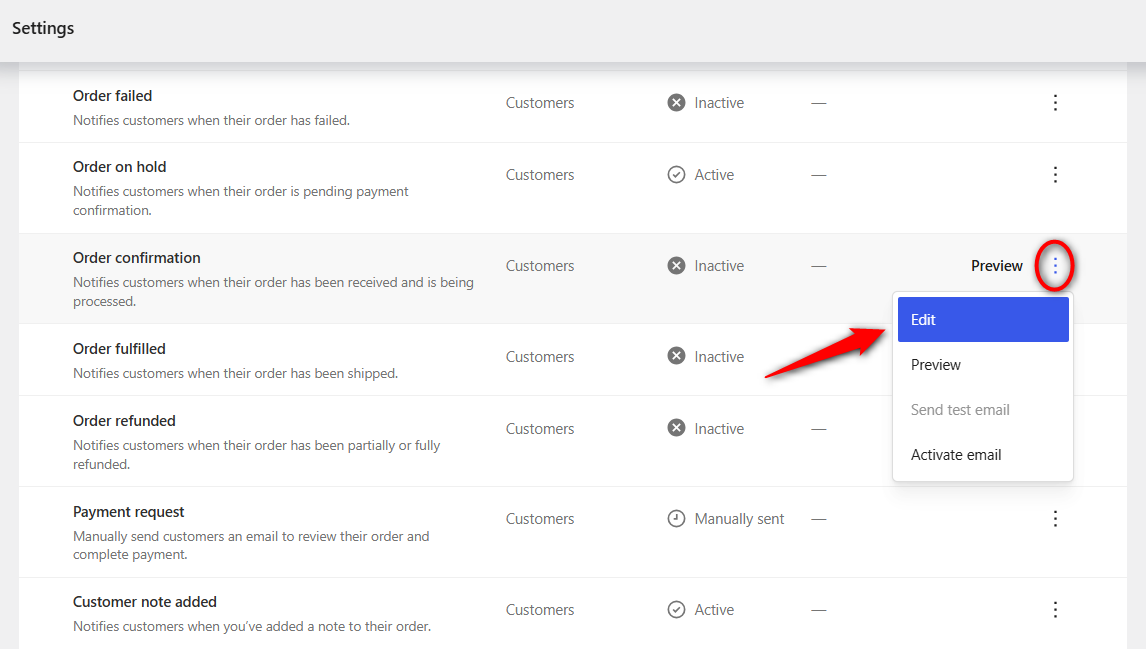
Open the Actions menu for order confirmation and select Edit.
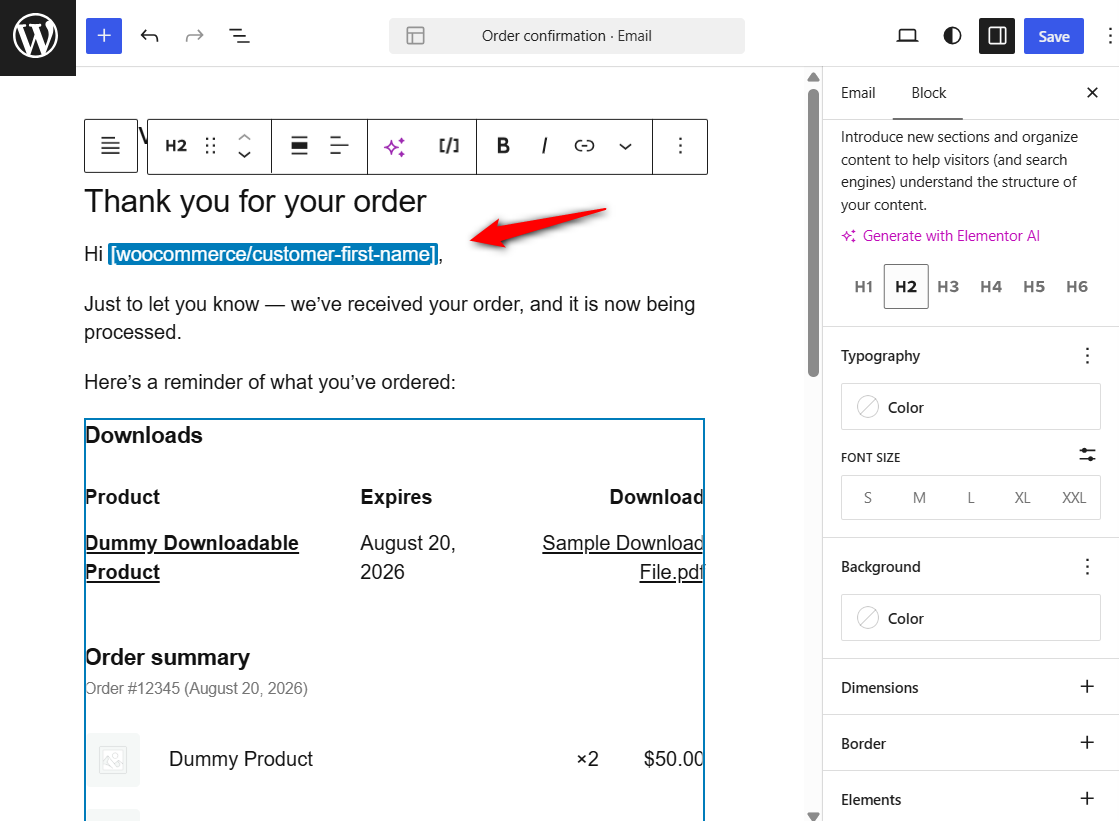
Add paragraphs, images, buttons, and spacing exactly as you would in the WordPress editor.
From WooCommerce 11.0, pasting a public YouTube, Vimeo, TikTok, VideoPress, or Dailymotion URL on its own line converts it into a clickable video thumbnail.
Use a 40-second product explainer video sitting under the order summary.
Step 3: Edit the wrapping template
The content editor only changes the part unique to that one notification.
To change the header, footer, and frame around every email, select the template area on the canvas and choose Edit template.
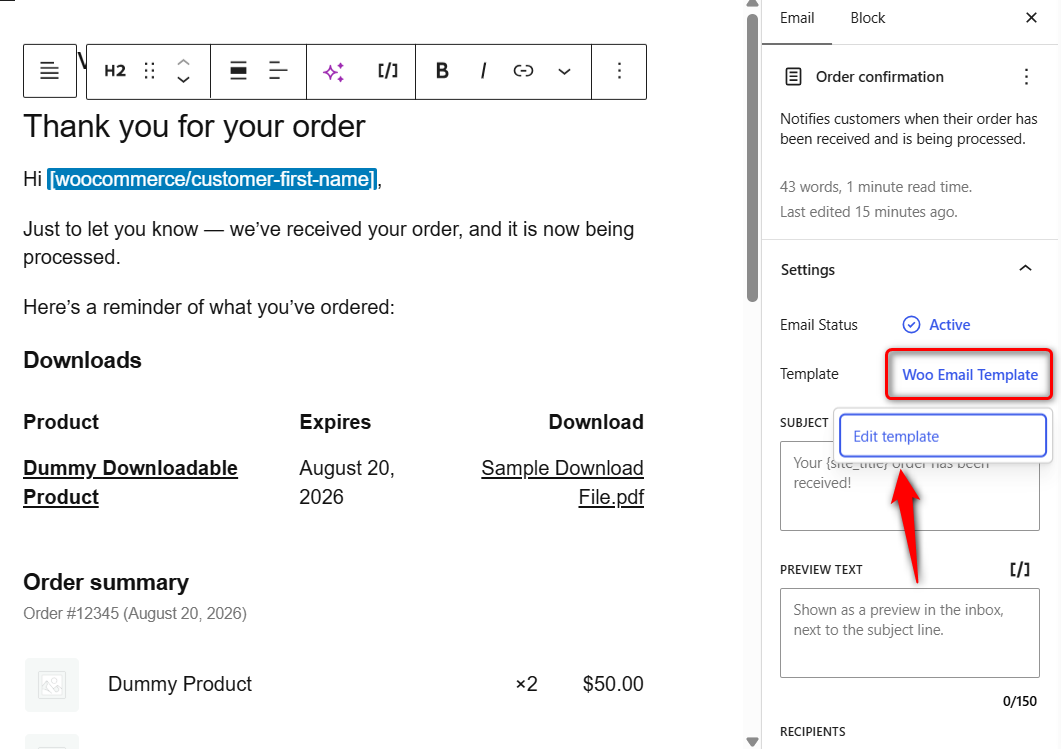
That template is shared, so edits here apply to all your block-based emails.
Step 4: Handle core template updates
When WooCommerce ships a newer version of a template you have customized, the Emails screen shows Review update in the Updates column.
Open it, expand Show changes to read the summary, then apply the update selectively so you don't lose your work.
Save, then use the View menu to send a test.
Treat this as a fast-moving option rather than a settled one.
If you need conditional logic, dynamic product blocks, or subject-line personalization, check out the next section (method 3).
Method 3: Design Order Emails With a Drag-and-Drop Builder
The two methods above change how the default email looks. Neither of them changes what the email does.
Adding a related-product block, a coupon that only fires above a certain order value, or a different confirmation for digital versus physical orders needs a builder.
We will use FunnelKit Automations, which replaces the WooCommerce templates with designs you build visually and handles the emails WooCommerce does not send, like cart recovery and review requests, from the same screen.
FunnelKit Automations has a free version on WordPress.org that covers transactional email customization.
Pro adds conditional logic, product recommendation feeds, dynamic coupons, and split testing.
After installing FunnelKit Automations, follow these next steps:
Step 1: Open the transactional email you want to rebuild
Navigate to FunnelKit Automations ⇒ Emails and click on the 'Transactional Emails' section.
Here, you will find prebuilt transactional email automations for your WooCommerce store:
- Processing order
- Completed order
- Order on hold
- Refunded order
- Order details
- Customer note added
- New account
- Reset password
- New order
- Failed order
- Cancelled order
Click on 'Processing Order', which we'll customize using the built-in visual email builder.
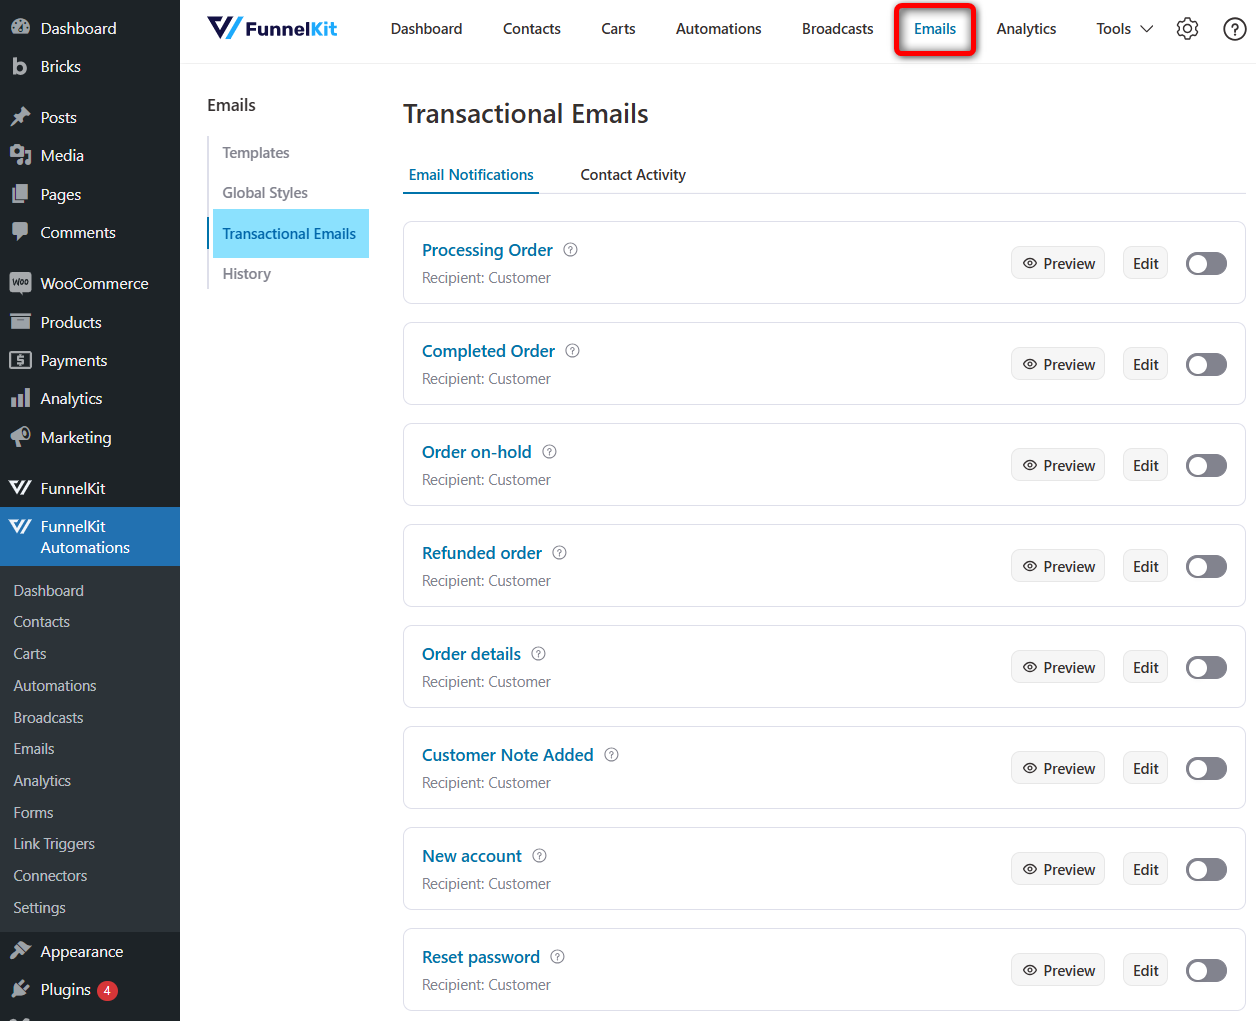
Let’s start customizing this email.
Step 2: Personalise the subject line and preview text
Now, it’s time to customize and design the Order Processing email.
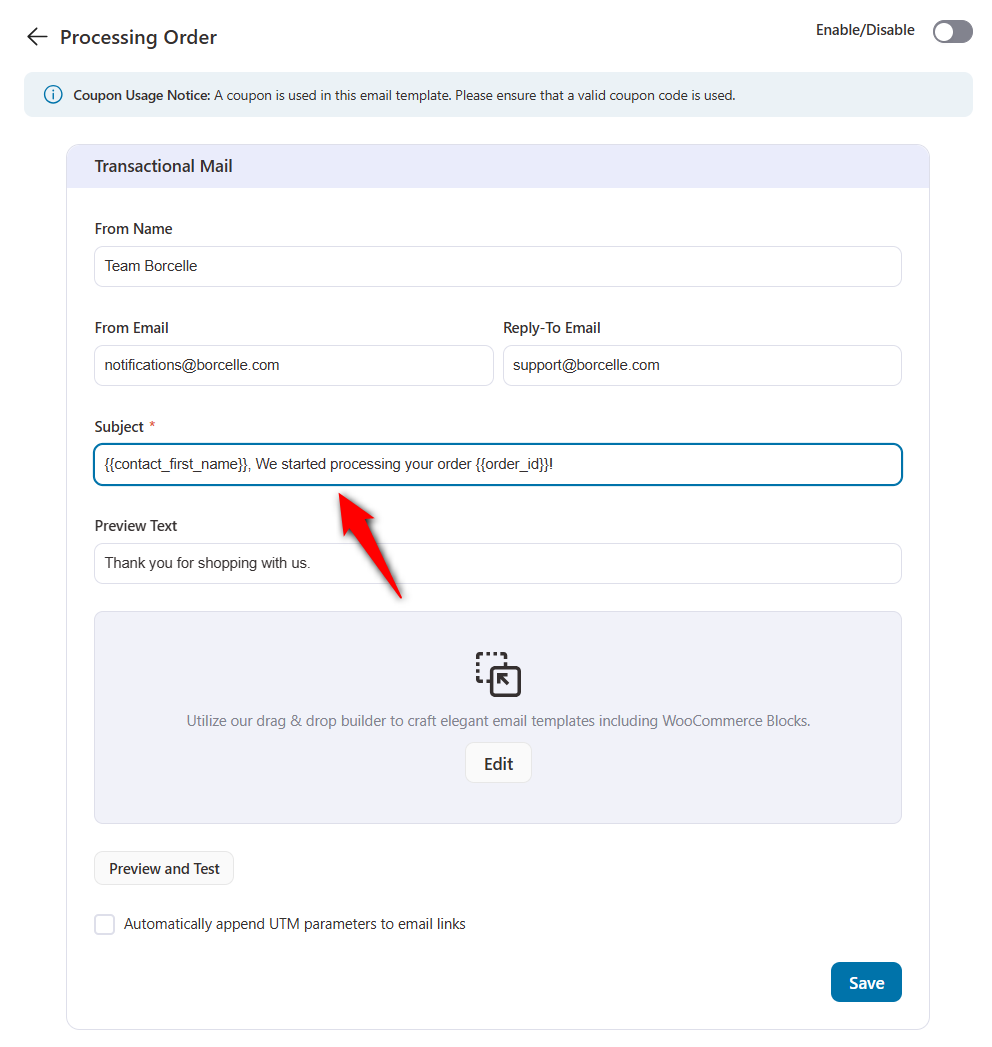
Before we move to the email body, let's customize the subject line and preview text.
You can use the Merge tag feature of FunnelKit Automations to personalize the email subject line, preview text, and email body.
To add any merge tag, click on the “{{..}}” icon, then search for the tag you want to use and click on the Copy Icon to add it to your email.
Here, we’re incorporating the customer's first name and order ID into the subject line and preview text to make them more personalized and attention-grabbing.
Step 3: Design the email body
Now, we need to design the body of your transactional email. Click ‘Edit’ to customize the email with FunnelKit Automations’ drag-and-drop builder.
You can customize the email to make it an order-processing email. For instance, here, we updated the logo, heading, etc. Make sure to add merge tags in the heading text to personalize it.
🔔 Note: You can customize the email style and layout along with the content.
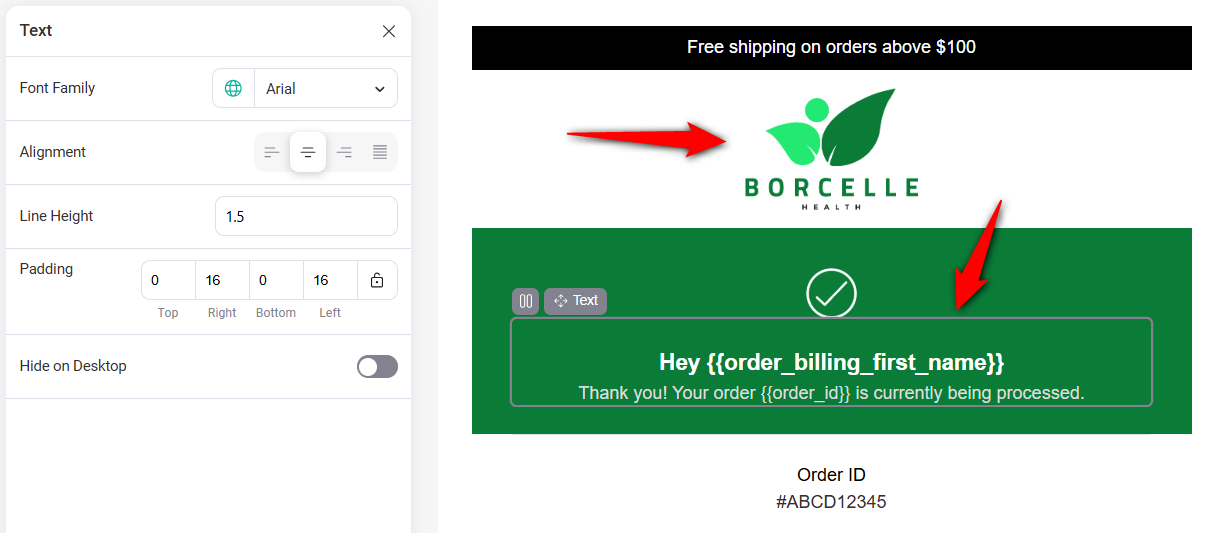
The prebuilt template already includes sections for order summary, billing, and shipping information, so there’s no need to add these.
However, feel free to modify the appearance if desired.
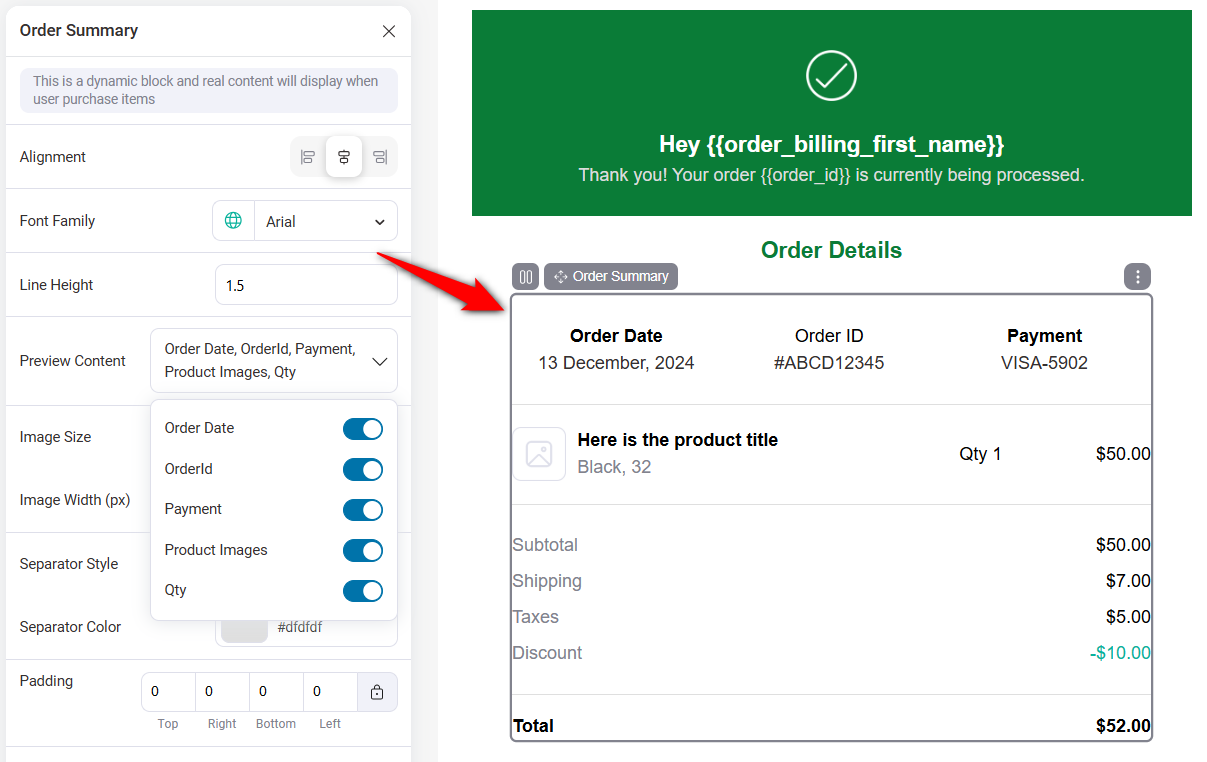
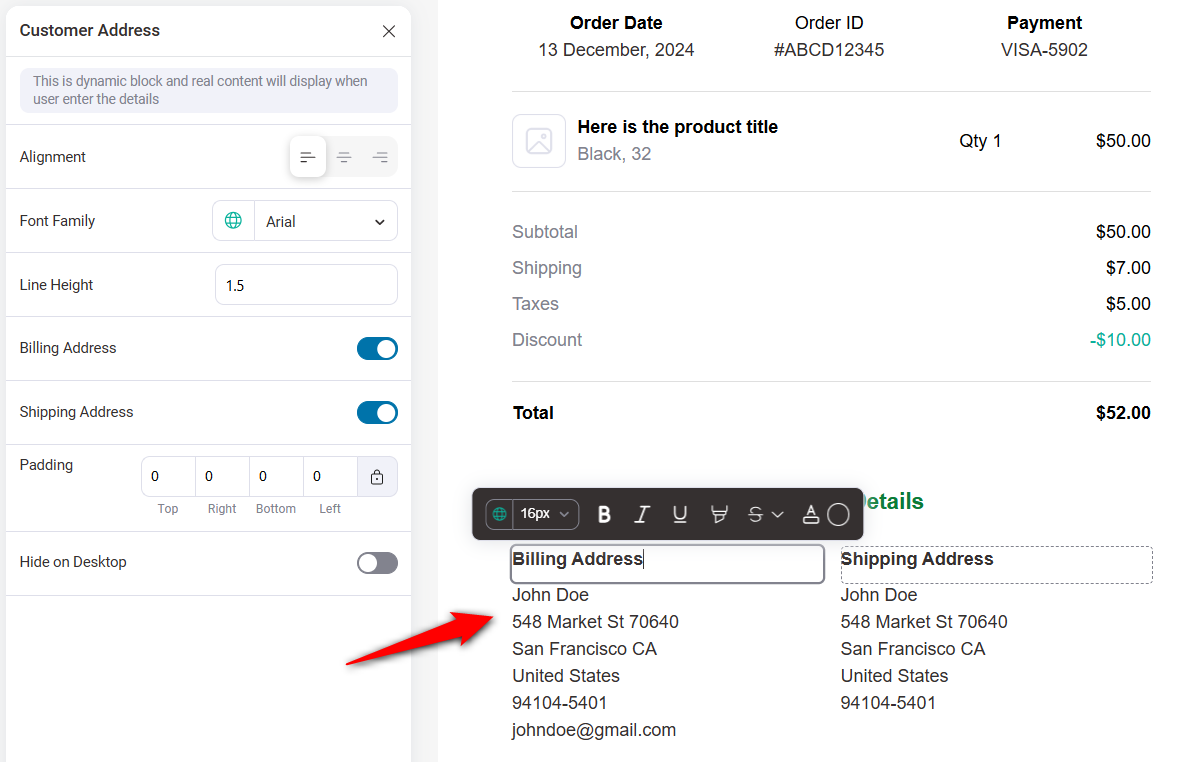
You can change the alignment, font, and line height, show or hide the billing and shipping addresses, set padding, and more.
This email template has a coupon field section where you can share discount coupons with your users.
You can either use a store discount coupon from your WooCommerce store or a dynamic coupon built with automation.
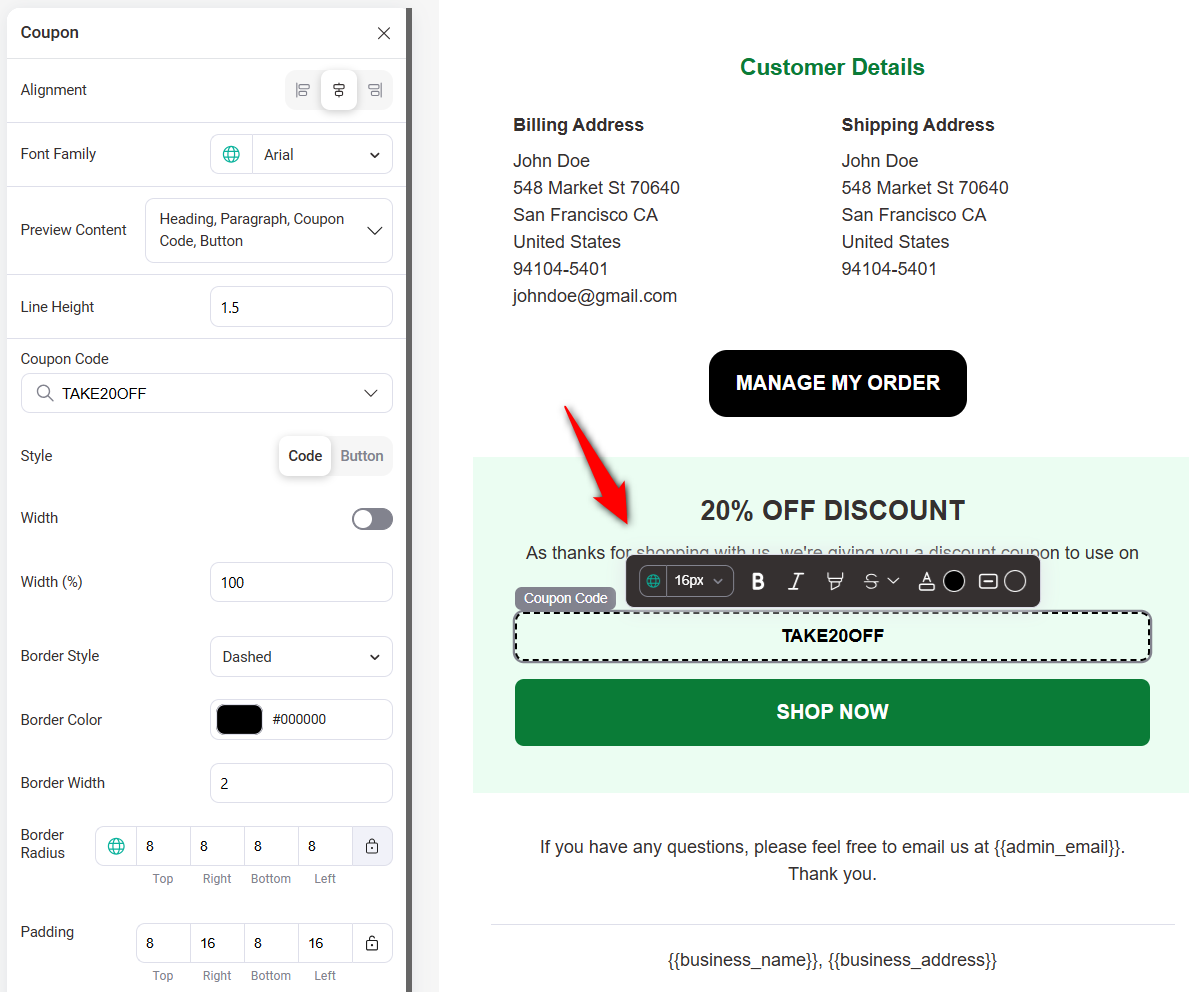
🔔 Note: It is a better idea to share a discount coupon with the order confirmation email instead of the order processing email.
You can also add a product recommendation section to this email using the product block.
Here, you can select the feed for related products, specific or latest upsells, cross-sells, or best-selling products.
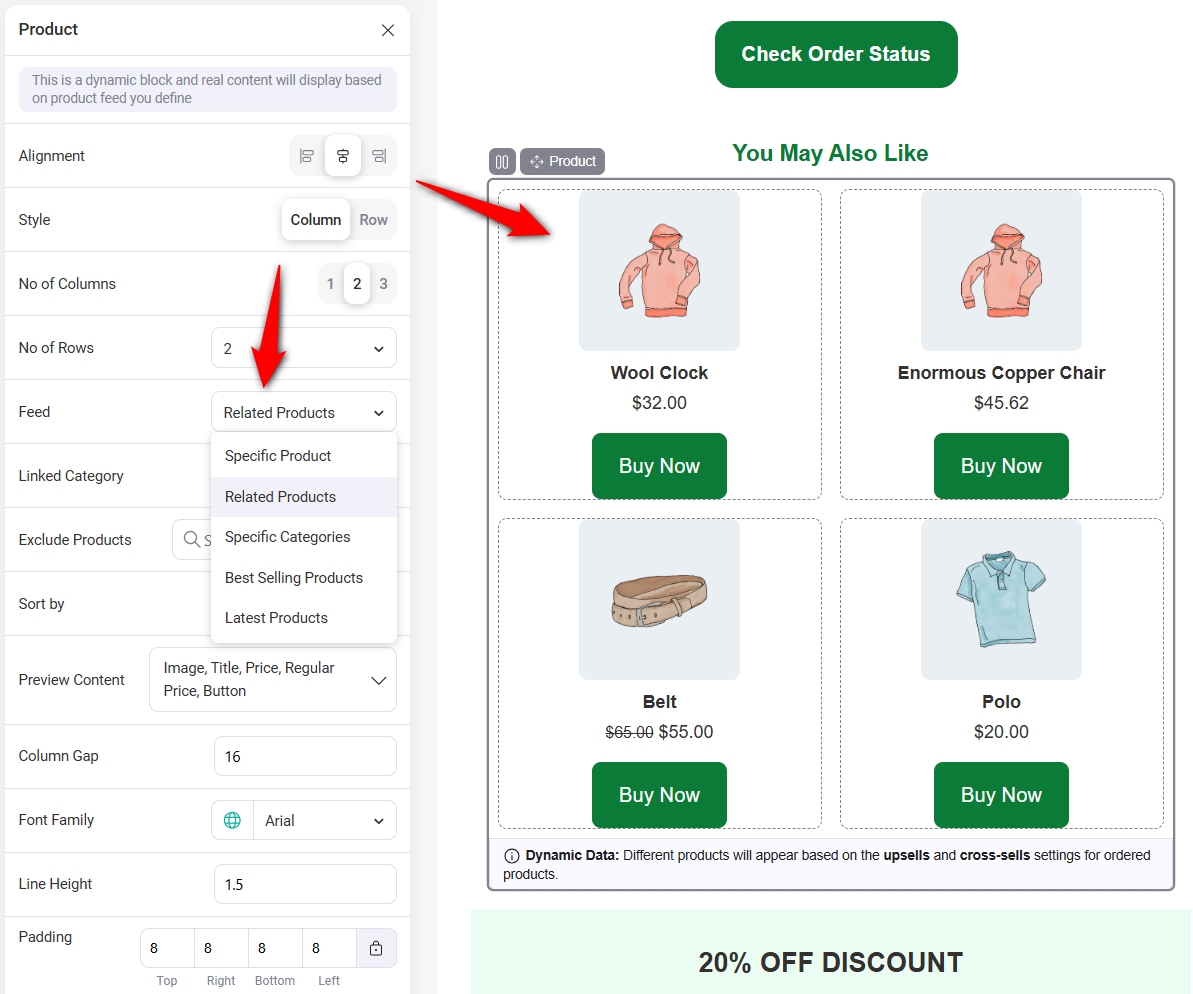
It’s also a good idea to add a check order status or explore best-sellers on your store's call-to-action button.
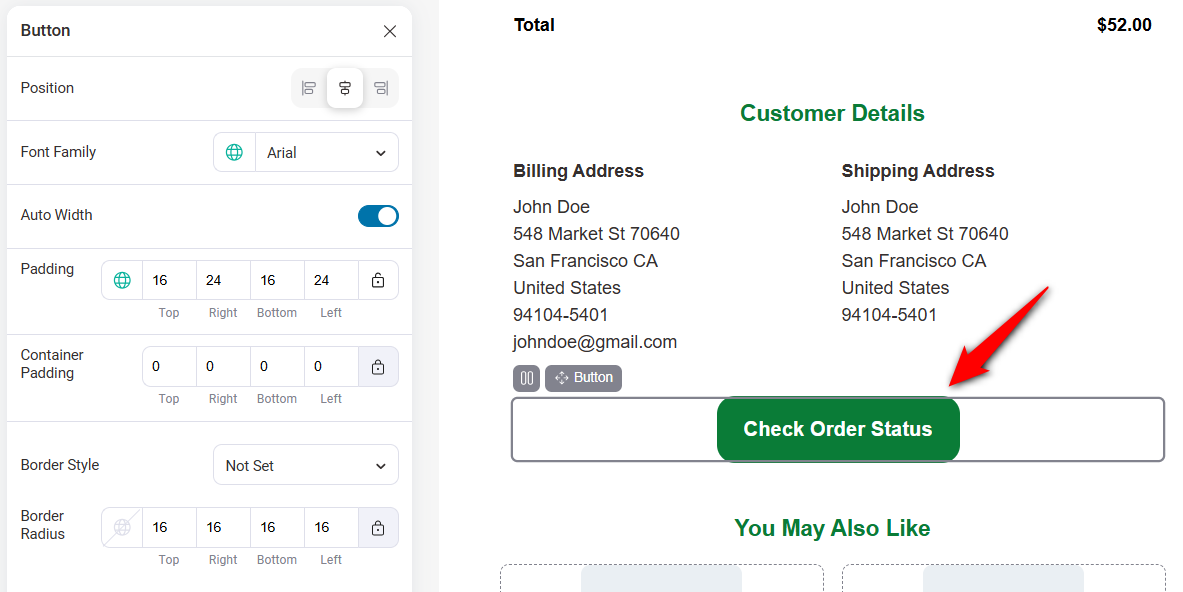
Use the pre-built footer layout to add high-converting footer text and social media links to your transactional email.
Once you’re satisfied with the design, save the template.
Step 4: Preview and send yourself a test
Once done, click “Preview and Test” to view how the email appears and send a test email to experience how the layout, design, and content appear in an actual inbox.
You can even audit your email to find issues before it goes to your customer.
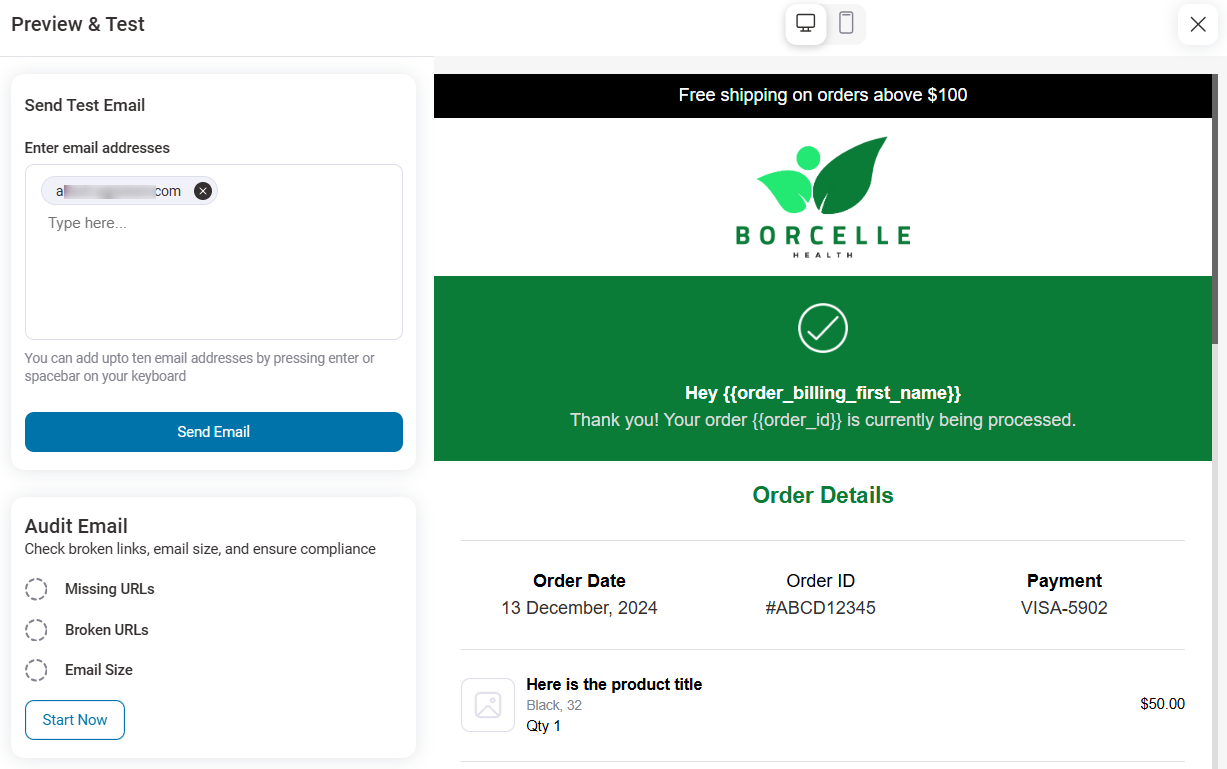
Here is the preview of the WooCommerce transactional email built with FunnelKit Automations:
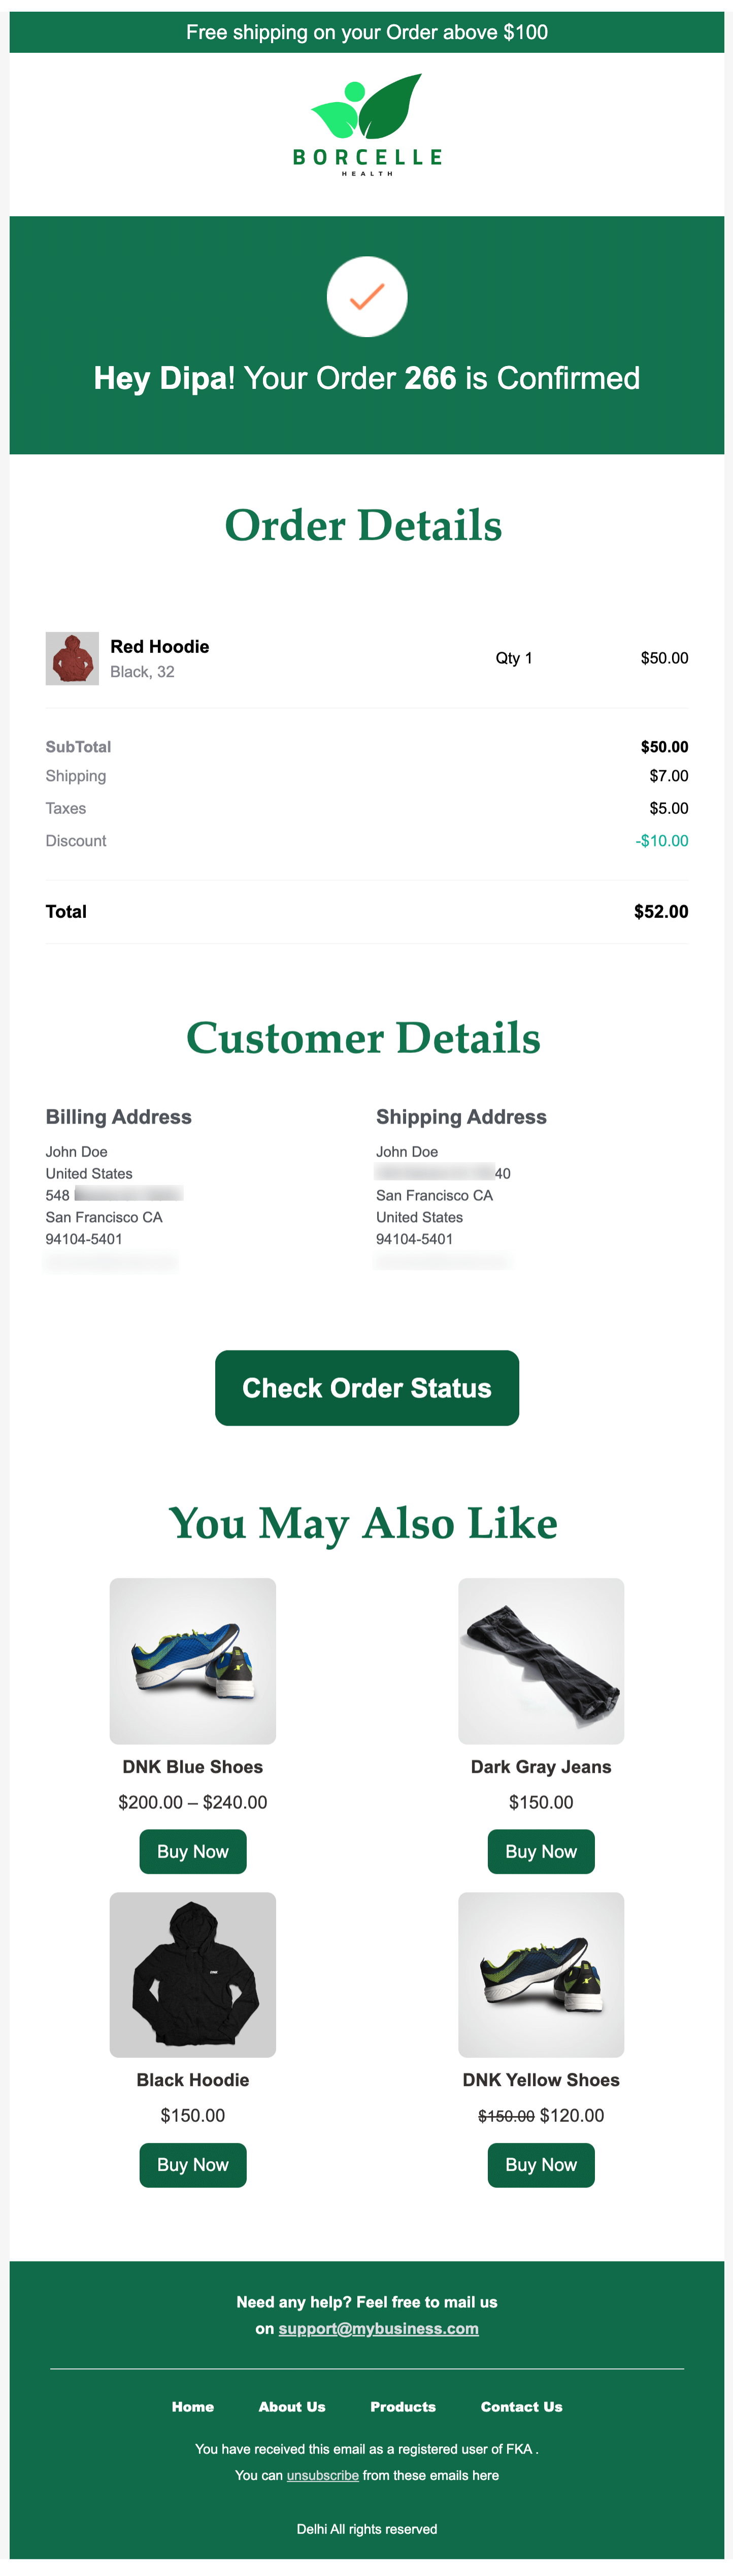
Great! This is how you can design a custom order processing email in WooCommerce that is engaging and on-brand.
Step 5: Activate it and place a real test order
Go back to your transactional email window and turn on the toggle to enable the order-processing transactional email.
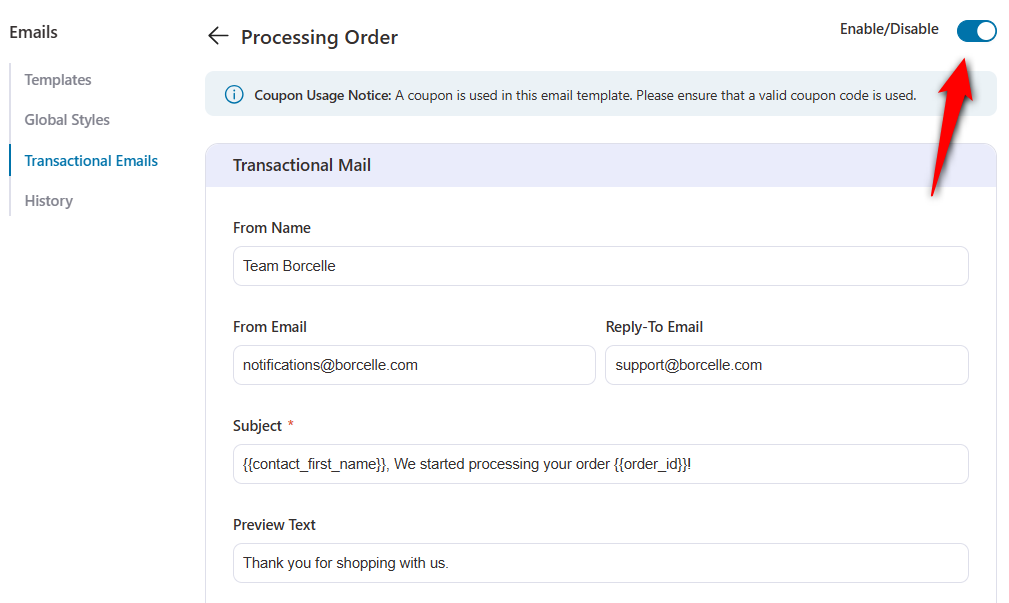
Now that you have activated this email, every customer will receive this email as soon as they place an order on your website.
If your catalog spans very different product types, the next step is to send different emails per product so a digital download and a shipped order don't get the same confirmation.
Edit WooCommerce Email Templates With Code
If you write PHP, you can edit the templates directly and control everything.
WooCommerce keeps them in woocommerce/templates/emails/. Never edit in place, because the next update overwrites your work.
Copy the template into your theme instead, keeping the folder structure:
yourtheme/woocommerce/emails/Copy customer-processing-order.php to yourtheme/woocommerce/emails/customer-processing-order.php and edit the copy.
WooCommerce loads the theme version automatically. Use a child theme so it survives theme updates too.
For adding content rather than replacing a whole template, hooks are safer.
woocommerce_email_header, woocommerce_email_after_order_table, and woocommerce_email_footer insert content at fixed points from your theme’s functions.php.
The cost is maintenance. When WooCommerce changes a template’s structure, your override keeps serving the old version and can break quietly.
Test on a staging site after every update.
For the full hook list and code examples, see our guide to WooCommerce email hooks.
Transactional Emails vs Marketing Emails: Where the Line Sits?
A transactional email is triggered by a customer action and delivers information that the customer needs.
A marketing email is sent proactively to promote something.
Transactional messages are generally exempt from the unsubscribe requirements that apply to bulk commercial email, which is why a password reset doesn't include an opt-out link.
That exemption is not unconditional. In most jurisdictions, it depends on the message's primary purpose.
An order confirmation with a related-product block near the bottom is still primarily transactional.
An order confirmation that leads with a sale banner and buries the order details is a campaign wearing a receipt’s clothing, and it can lose the exemption.
Here are four rules to keep you on the right side of it:
- Order information leads to keep it at the top and make it the visual focus.
- Promotional content sits below the order details, never above them.
- Never fire a campaign off a transactional trigger, so if the real purpose is the offer, send it as marketing with an unsubscribe link.
- Apply the defense test if you'd struggle to argue the email is information the customer asked for, treat it as marketing.
Deliverability rides on this too. Mailboxes that start classifying your confirmations as promotional will filter them accordingly, and those are the emails you can least afford to lose.
6 Best Practices to Get More Value From Every WooCommerce Transactional Email
Here are some steps you should follow to make the most of transactional emails to foster customer loyalty:
- Write engaging subject lines
Replace default subject lines like "Your order is complete" with ones that include the order number or customer name, as personalized email subject lines can increase open rates by 26%.
So, personalize your email subject and preview text, along with the email body.
For example, "Your order #1234 has shipped, Sarah" is more engaging and easier to find in a crowded inbox.
- Keep the email design consistent with your storefront
Maintain consistency in branding, tone, and design to reinforce brand identity and build customer trust.
Ensure the email's purpose is clearly communicated concisely to avoid confusion and save customers time.
- Ensure emails are device-responsive
Optimize transactional emails for mobile devices so they're easy to access and read on smartphones and tablets.
Apply your brand colors, logo, and tone of voice to every WooCommerce email template.
- Add a clear call-to-action (CTA)
Include clear CTAs to encourage customers to take further action, such as adding a “track order” button to the order-processing email we designed in this article.
Similarly, you can add additional CTAs for actions such as leaving a review, signing up for updates, or exploring related products.
- Follow up to cultivate customer relationships
Don’t stop with one email; follow up after transaction emails to cultivate ongoing relationships.
You can follow up with emails that ask for feedback, offer exclusive deals, or provide helpful resources to foster ongoing engagement and loyalty.
- A/B test your emails to find customer insights
A/B test your emails to determine what works best for your audience.
You can A/B test your email subject line, preview text, and email content to optimize performance.
With FunnelKit Automations, you can efficiently conduct split path testing and gather insights to improve your email strategy.
- Track email performance and iterate
Monitor open rates, click-through rates, and conversion rates on your transactional emails.
If a cross-sell block in your order confirmation email is not getting clicks, test different products, placements, or copy.
Small improvements in transactional email engagement compound over time because these emails are sent to every single customer.
Frequently Asked Questions
Usually a From address on a public domain, missing SPF or DKIM records, or sending through your host instead of a dedicated service.
Run your store address through mail-tester to see which checks are failing before you change anything.
The best service depends on your sending volume and budget. Amazon SES is the most affordable option for high-volume stores, which costs fractions of a cent per email. Postmark offers excellent deliverability and a clean dashboard for transactional-only sending.
For stores sending a few hundred emails per month, a free SMTP plugin connected to a service like Brevo works well and incurs no monthly cost.
Open the order in WooCommerce ⇨ Orders and use the Order actions dropdown to resend the customer invoice or order details.
WooCommerce doesn't have a built-in resend for every notification type, which is why the core email log is useful for confirming what went out.
Two plugins may be hooking the same order status transition, or a payment gateway may be triggering the status change twice.
Check your logs for two entries against one order ID, then disable plugins one at a time until it stops.
Yes, you can send different emails based on product type or order value with a plugin that supports conditional logic. FunnelKit Automations and ShopMagic both let you set conditions such as sending different emails based on the product category, order total, customer location, or payment method.
For example, you could send a different order confirmation email for digital products versus physical products, or include a coupon code only for orders above a certain amount.
You can also automate WooCommerce order emails with delayed actions, such as sending a review request three days after delivery.
You can, and plenty of stores do it for brand consistency and unified reporting.
Password resets and other WordPress system emails still need working SMTP underneath, so splitting the two is usually less work than moving everything across.
Ready to Transform Your WooCommerce Transactional Emails?
Your customers open these emails. All of them, every time, whether or not you have done anything to deserve it.
The only question is whether the email that arrives is a grey table or something that brings them back.
Get the delivery right first with SMTP and authenticated DNS, then pick the method that matches how far you want to take the design.
For stores that want branded layouts, product recommendations, and conditional content without touching a template file, FunnelKit Automations covers the transactional emails and the follow-up sequences from one place.
Start personalizing your transactional emails today and watch your engagement soar, loyalty strengthen, and sales thrive!
Editorial Team
October 7, 2026WooCommerce upsells are products you recommend in place of the one a shopper is viewing, usually a better or higher-priced version of it. WooCommerce has a built-in upsell field for...
Editorial Team
October 6, 2026WooCommerce taxes start with a rate table you set up yourself. If you leave a state out of that table, orders going there can pass through with no tax. Say...
Editorial Team
October 5, 2026A WooCommerce Shopify checkout recreates the parts of Shopify’s checkout that shoppers already know. It includes a logo-only header, email first, express payment options at the top, address autocomplete, a...






