
Ever noticed how Amazon seems to know exactly what you want, often leading you to buy more than planned?
That’s the power of personalized product recommendations.
In fact, Amazon generates around 35% of its sales from personalized recommendations, which inspired me to adopt the same strategy in WooCommerce to boost sales and engagement.
After implementing this strategy in different WooCommerce stores, I saw a significant increase in AOV (average order value) and a boost in completed purchases.
In short, WooCommerce product recommendations are a proven way to lift order value, boost conversions, and keep customers engaged.
In this guide, I’ll walk you through seven powerful strategies for implementing product recommendation strategies in WooCommerce and optimizing every step of your customer’s journey, from discovery to checkout.
Let’s get started!
Table of Contents
- 1 What Are the Different Types of Product Recommendations in WooCommerce?
- 2 Method 1: Recommend Items on the Product Page to Boost Visibility
- 3 Method 2: Recommend Products on the Cart Page to Use Cart Reviews For More Sales
- 4 Top 5 WooCommerce Product Recommendation Plugins
- 5 Method 3: Offer Product Recommendations in the Slide Cart to Boost AOV
- 6 Method 4: Recommend Complementary Items at Checkout to Capitalize on Buying Intent
- 7 Method 5: Offer Upsells Post-Checkout to Capitalize on Buying Momentum and Boost Order Value
- 8 Method 6: Recommend Products on Exit Intent Popup to Prevent Losing Customers
- 9 Method 7: Send Post-Purchase Recommendations Via Email to Leverage Cross-Sell Opportunities
- 10 5 Practical Tips to Maximize Revenue from WooCommerce Product Recommendations
- 11 Frequently Asked Questions (FAQs)
- 12 Ready to Boost Sales with Powerful Product Recommendations?
What Are the Different Types of Product Recommendations in WooCommerce?
WooCommerce product recommendations are personalized suggestions that help increase sales by guiding customers towards additional items based on their browsing behavior, past purchases, and preferences.
These recommendations can also highlight popular, seasonal, or sale items, making it easier for customers to discover new products and enhance their shopping experience.
By strategically displaying the right products at the right time, you can significantly boost average order value (AOV) and improve overall store performance.
Here’s a breakdown of the most effective types of product recommendations in WooCommerce:
| Type | Description & Example | Why It Works |
|---|---|---|
| Related Products | Products related to what the customer is viewing, like a laptop bag with a laptop. | Increases engagement by suggesting complementary items, boosting purchase chances. |
| Cross-Sell Products | Complementary items to what’s in the cart, such as headphones with a smartphone. | Recalls interest, increasing revisit, and purchase likelihood. |
| Upsell Products | Premium versions of the selected product, like a premium smartwatch over a basic model. | Encourages customers to opt for a better product, increasing revenue. |
| Recently Viewed | Recalls interest, increasing revisit, and purchase likelihood. | Recalls interest, increasing revisit and purchase likelihood. |
| Best-Selling Products | Popular items, such as top-rated shoes. | Social proof builds trust and encourages purchases. |
| Personalized Suggestions | Based on past purchases, like suggesting running shoes after buying athletic gear. | Makes suggestions more relevant, improving purchase likelihood |
| Top-Rated Products | Highly rated products, like a 5-star Bluetooth speaker. | Builds trust through positive reviews, encouraging purchase. |
Each of these product recommendation types helps to optimize your WooCommerce store’s performance by encouraging customers to add more items to their cart.
By tailoring recommendations based on customer behavior, you can create a personalized shopping experience that enhances both engagement and sales..
How Product Recommendations Help Grow Your WooCommerce Store?
Adding product recommendations to WooCommerce can offer several benefits, including enhanced user experience, boosted sales, and improved store performance, all of which contribute to growing your business.
Here are more details:
- Increases average order value (AOV)
Product recommendations, in any form, upsells, cross-sells, best sellers, etc., encourage users to add more items to their carts.
This increases the AOV and generates more revenue per transaction, helping you grow your business profit.
- Improves customer experience
Personalized recommendations make shopping easier by helping customers discover items that match their interests and needs.
This reduces decision fatigue and speeds up the buying process, creating a smoother, more engaging shopping experience.
- Boosts conversion rates
According to Salesforce, shoppers who clicked on product recommendations were 4.5 times more likely to add items to their cart and complete a purchase.
So, recommendations are highly effective when it comes to boosting the conversion rate of your store.
- Encourages repeat purchases
Re-engage customers and encourage repeat business by suggesting products based on previous purchases.
Offering personalized suggestions in follow-up emails or on thank-you pages strengthens customer relationships.
- Promote high-performing or seasonal products
Recommendations can highlight best-sellers, seasonal products, or sales items, increasing their visibility and potential.
Highlighting popular items builds trust with customers because they’re seeing what others love and encourages purchases by leveraging social proof.
Let’s explore WooCommerce’s default product recommendation features. With the default, you can showcase recommended products directly on the product and cart pages to boost engagement and sales.
Method 1: Recommend Items on the Product Page to Boost Visibility
Why recommend products on the WooCommerce product page?
Recommending products directly on the product page makes it easier for customers to discover more options. This increased visibility increases their chances of adding additional items to their cart, boosting sales and improving the shopping experience.
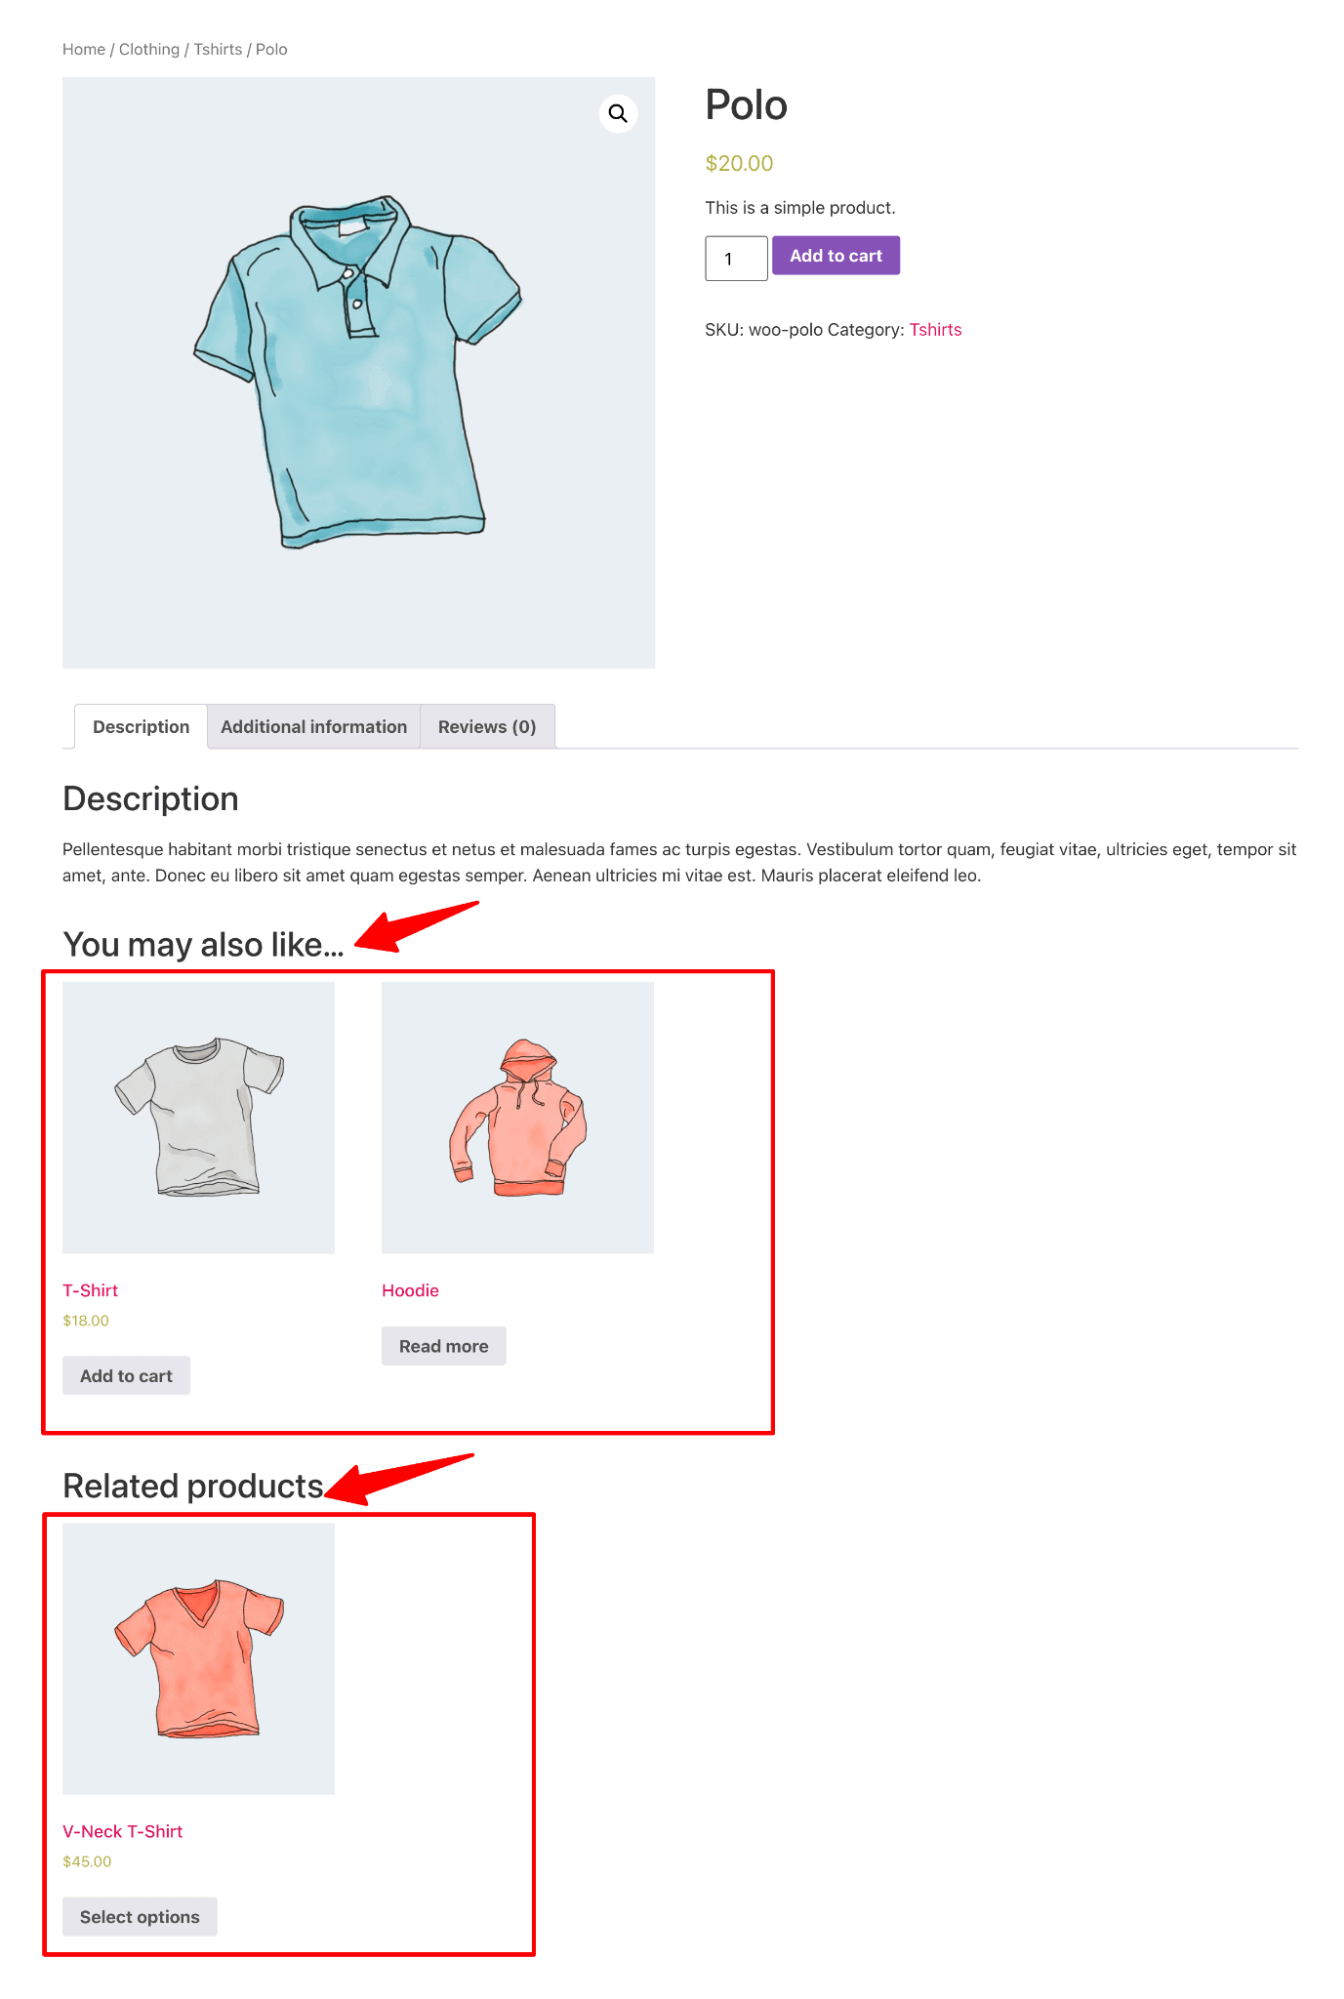
On each product page, WooCommerce recommends the upsell products you would set in the background in the section headlined “You may also like…”.
You can add upsell products from the Linked Products tab in the Product Data section of the WooCommerce product options.
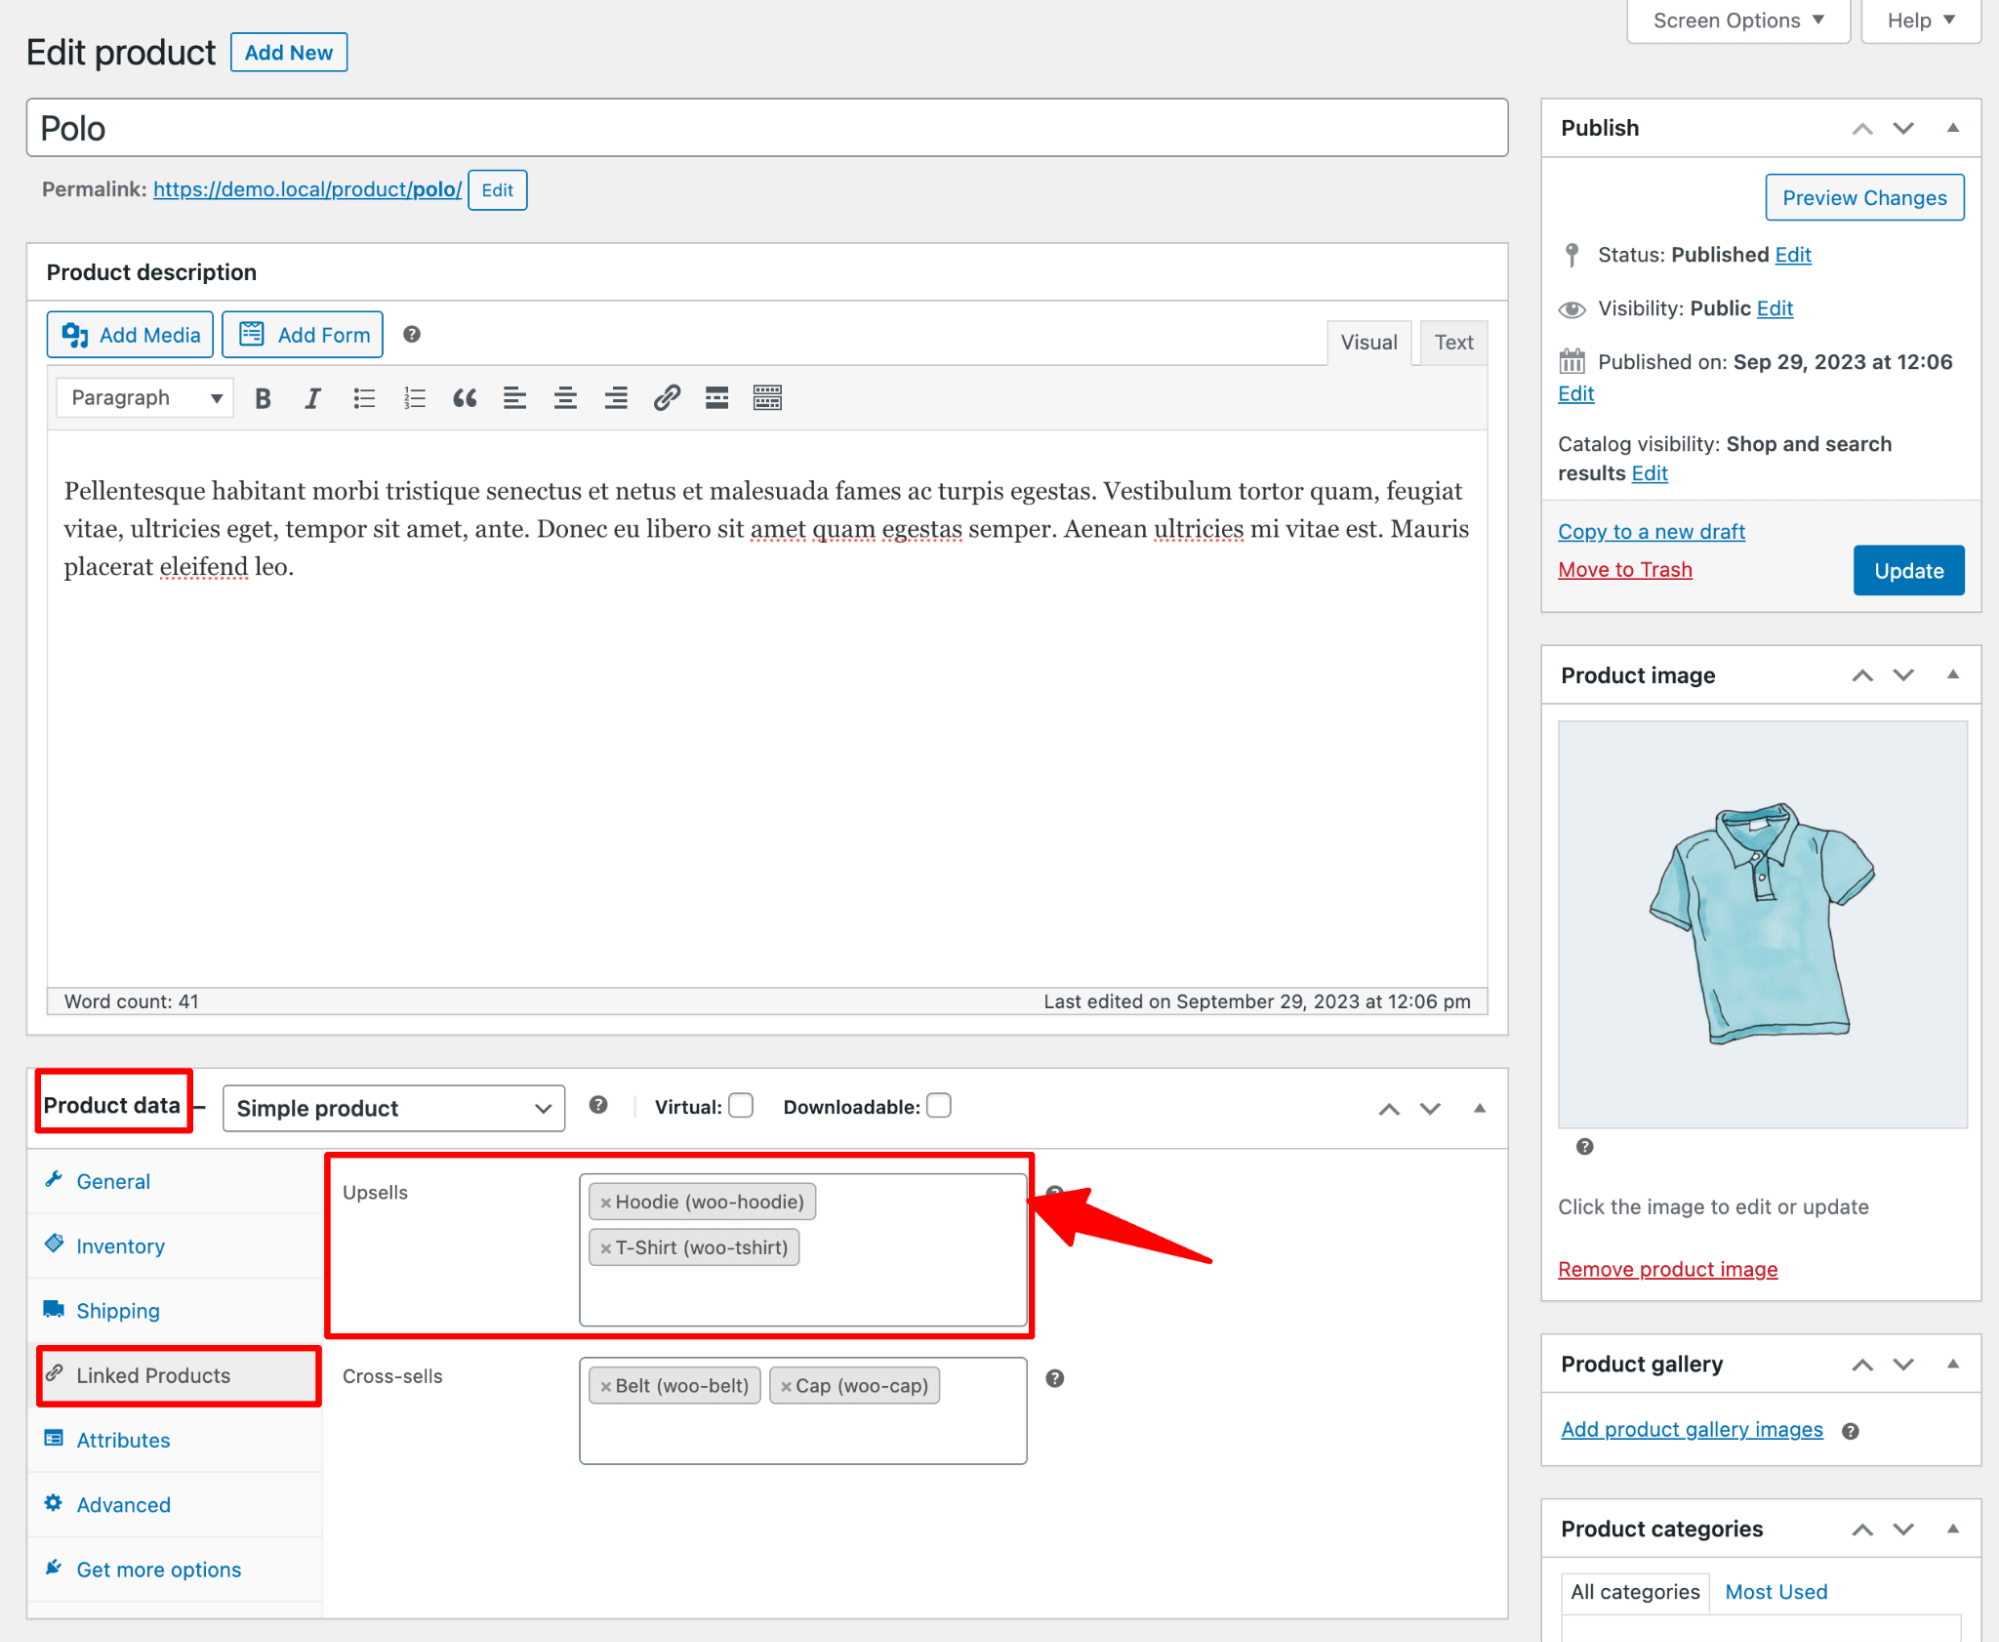
Along with upselling products, WooCommerce automatically recommends products from the same category in the “Related products” section.
Method 2: Recommend Products on the Cart Page to Use Cart Reviews For More Sales
Why recommend products on the WooCommerce cart page?
On the cart page, users can see their items, order details, and even apply a coupon. This allows them to rethink what they want to buy before heading to the checkout. By recommending complementary products on this page, you can boost your sales.
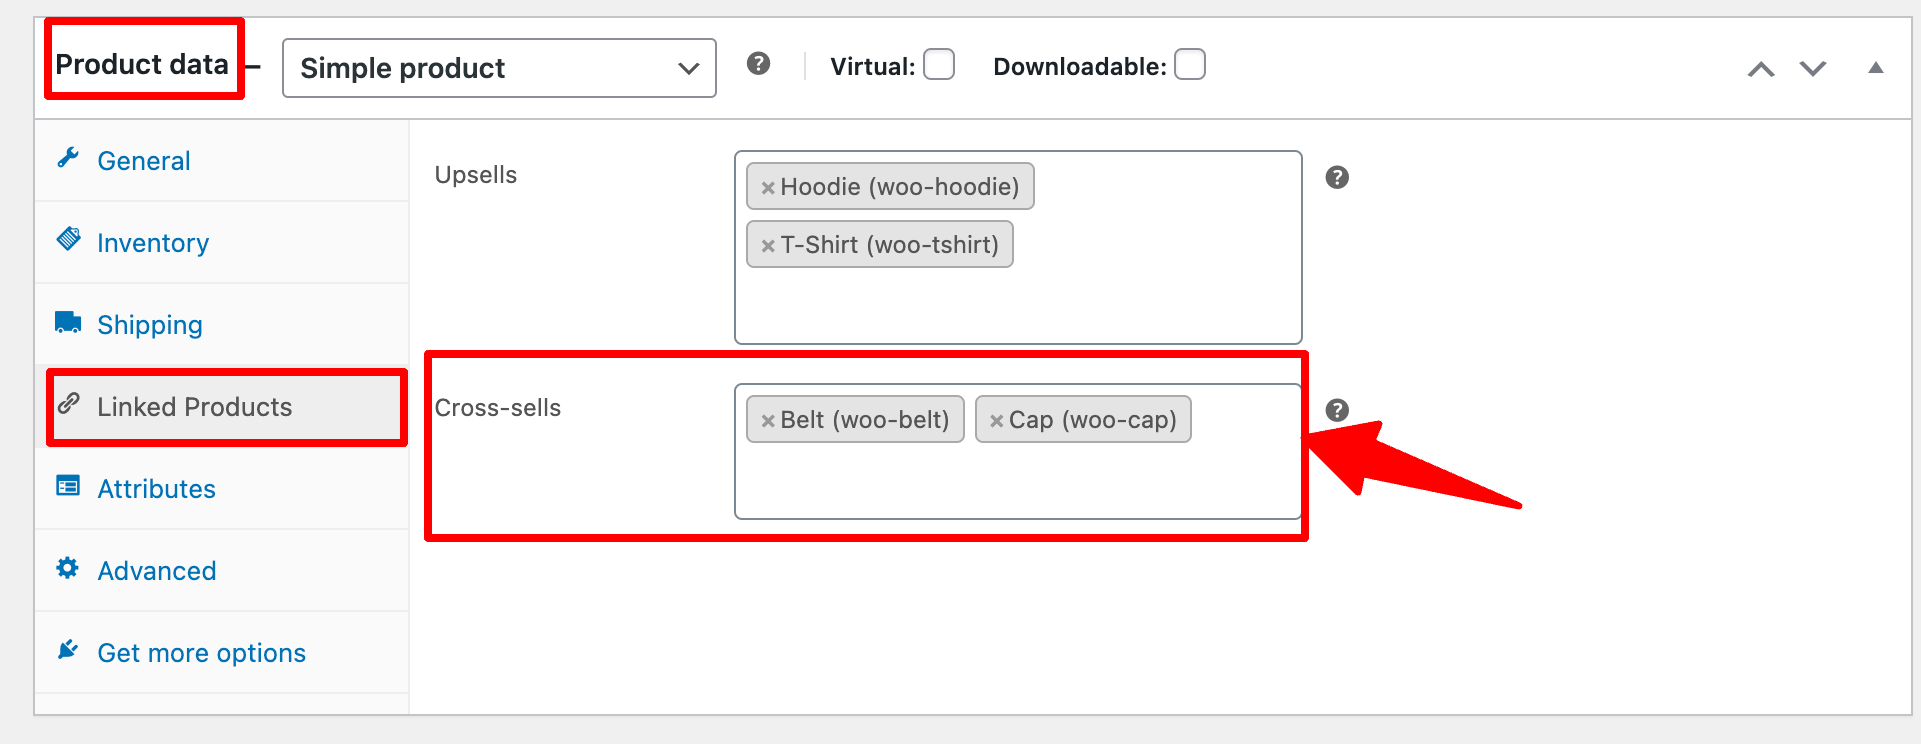
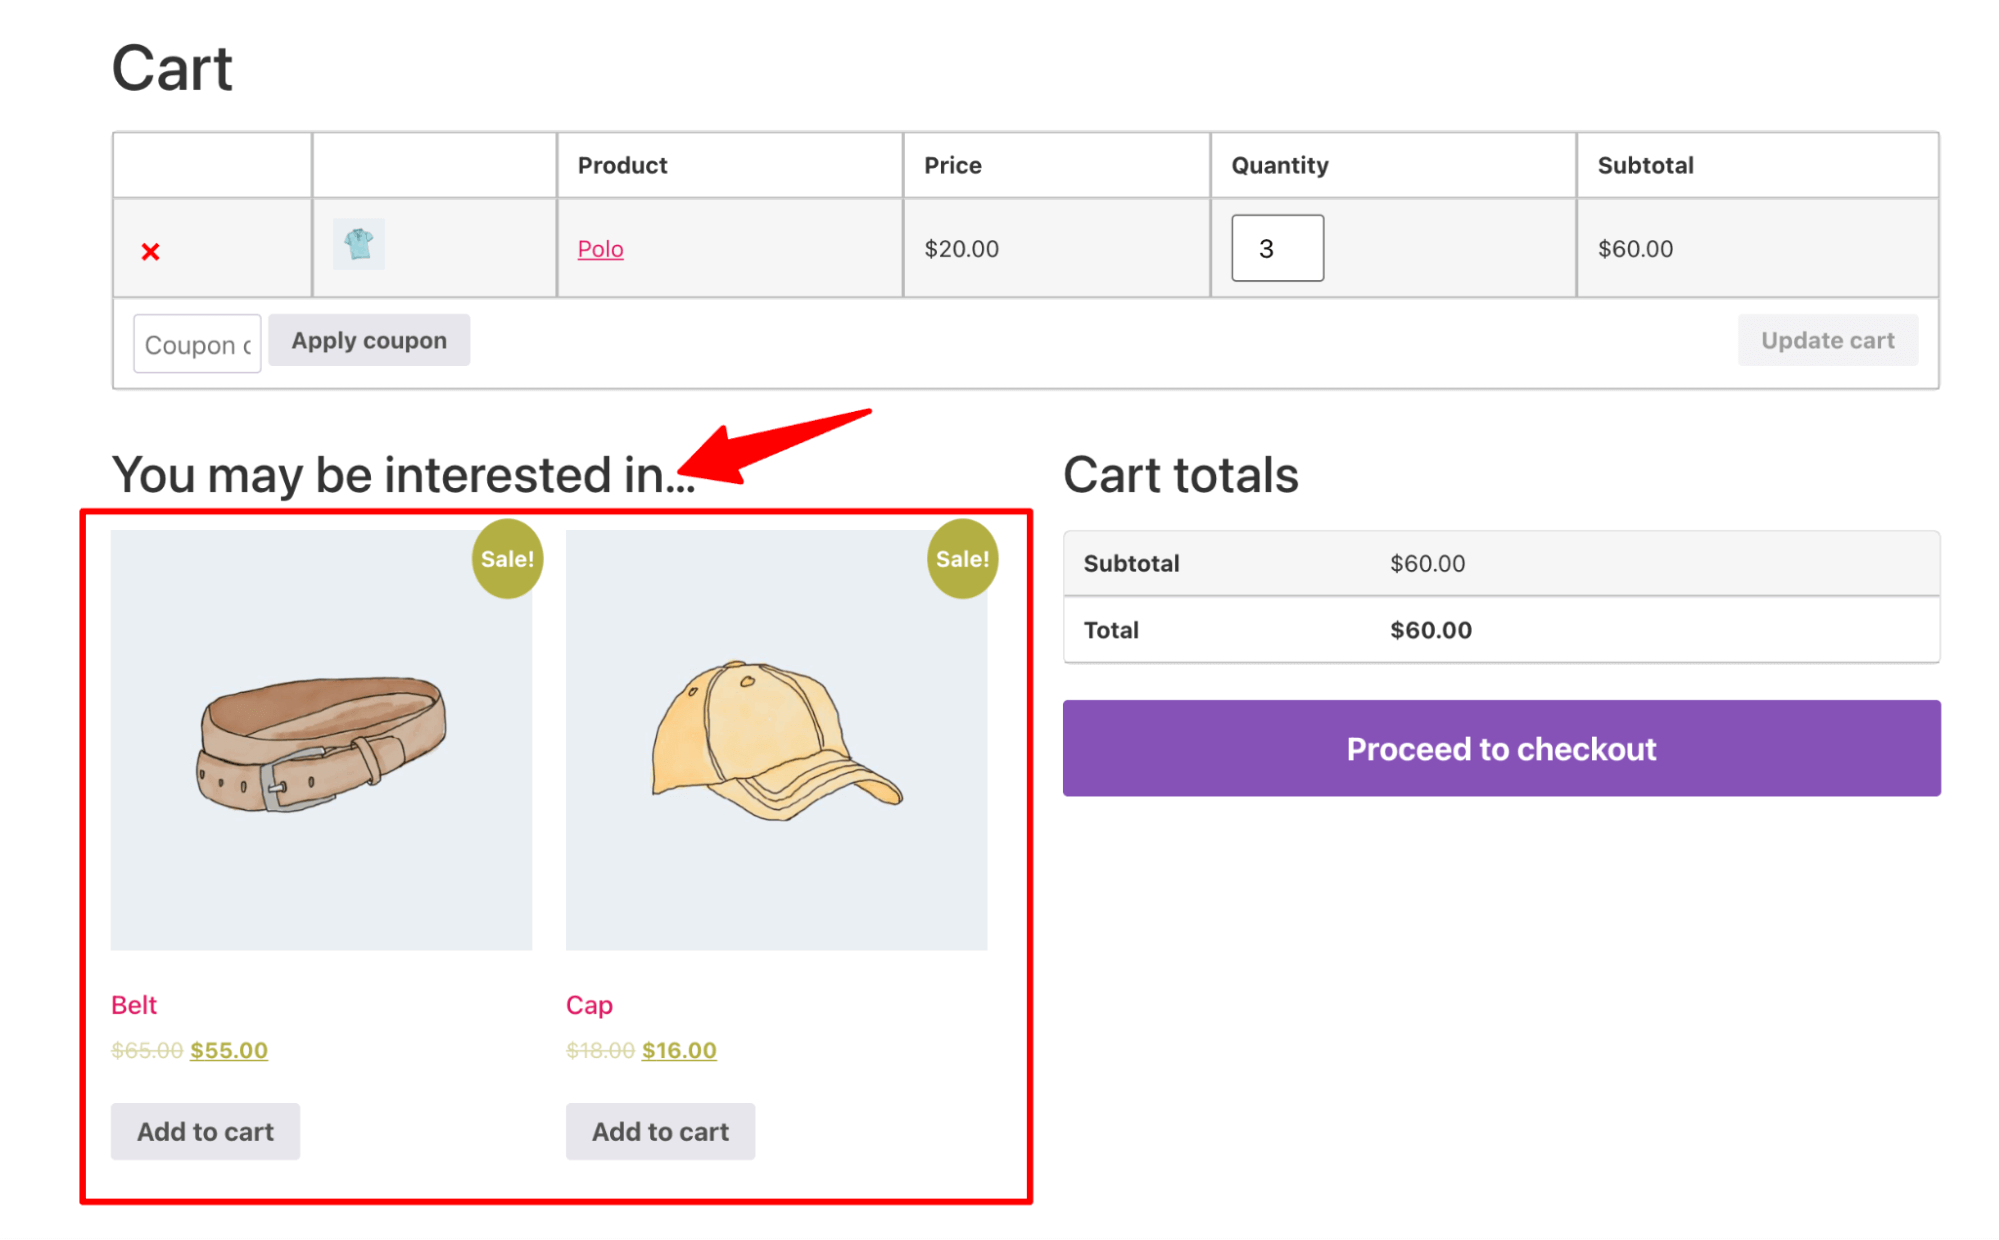
WooCommerce recommends cross-selling products on the cart page of a store under the heading “You may be interested in…”
You can set up cross-sell products like upsell products from the Linked Products tab.
Here is what the cross-sell recommendation looks like on the default cart page:
So, these are the two options available by default in WooCommerce for product recommendations. To fully leverage the power of product recommendations, you’ll need additional plugins that offer advanced techniques.
You need additional plugins to use more recommendation techniques. The following section lists the best WooCommerce product recommendation plugins.
Top 5 WooCommerce Product Recommendation Plugins
Our experts have handpicked the five best WooCommerce product recommendation plugins you can use to optimize your store for a better experience.
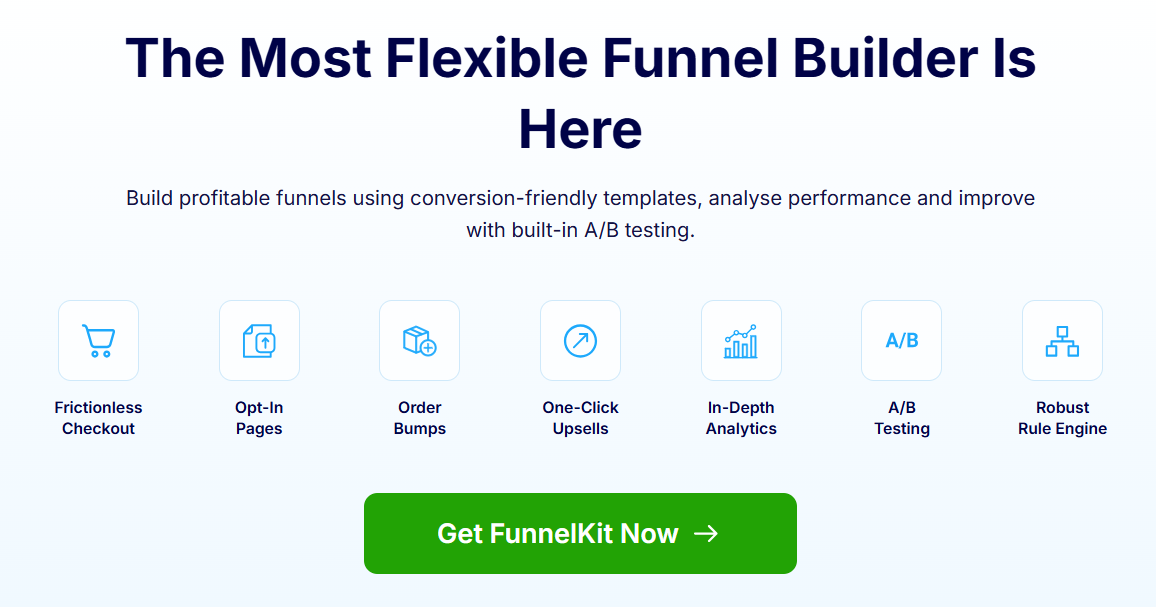
1. FunnelKit Funnel Builder
FunnelKit Funnel Builder is the most potent product recommendation tool. It capitalizes on customers' buying momentum by suggesting products at checkout, right before checkout, and as one-click upsells immediately after checkout.
More than just recommendations, it’s a WordPress sales funnel builder that transforms your store’s checkout flow into a conversion-optimized system with AOV-boosting features.
In addition, you can create high-converting sales funnel pages, including opt-in pages, landing pages, checkout pages, order bumps, one-click upsells, and thank you pages.
Features of the FunnelKit Funnel Builder:
- Order bumps: On the checkout page, offer relevant products that users can add to their orders with a single click.
- One-click upsells: Offer high-value upsell recommendations after the checkout page by tokenizing the payment method.
- Prebuilt templates: You receive prebuilt templates that can be easily customized using popular page builders, such as Elementor, Divi, Bricks, and Oxygen.
- Rule-based personalized offers: Create personalized offers using a rule-based matrix that considers order details, customer history, and other relevant factors.
- A/B testing: A/B tests multiple variants of your order bumps and one-click upsells to determine which one performs best, directing traffic to it to achieve maximum conversions.
- Detailed analytics: You receive detailed analytics on the number of product recommendations accepted and the impact on order value.
Price: It is available in both Lite (free) and premium versions, which start at $99.50 annually.
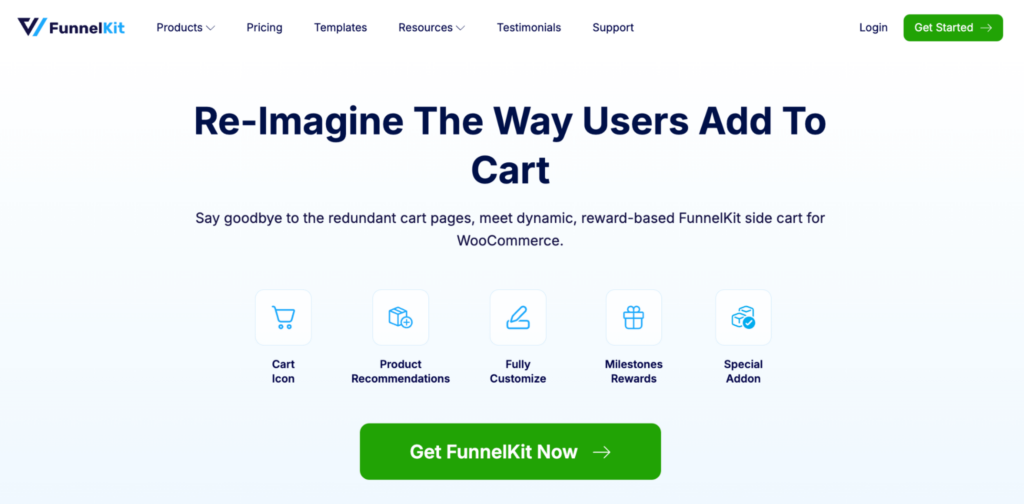
2. FunnelKit Cart for WooCommerce
FunnelKit Cart for WooCommerce is a slide cart that offers in-cart product recommendations (upsells or cross-sells) that users can add directly to their orders without visiting the product page.
Along with adding recommendations, users can update their cart, apply coupons, and proceed directly to checkout, skipping the cart page altogether.
Key features:
- In-cart product recommendations: Add upsells and cross-sells to products and offer them to your shoppers right inside the shopping cart.
- Sleek backend: FunnelKit Cart offers a centralized solution to add cross-sells and upsells without requiring edits to each product page individually.
- Reward system: Offer different rewards like free shipping, discounts, free gifts, etc., when customers reach a certain order total.
Price: FunnelKit Cart has free (lite) and premium versions with advanced capabilities. The premium version includes the Funnel Builder package.
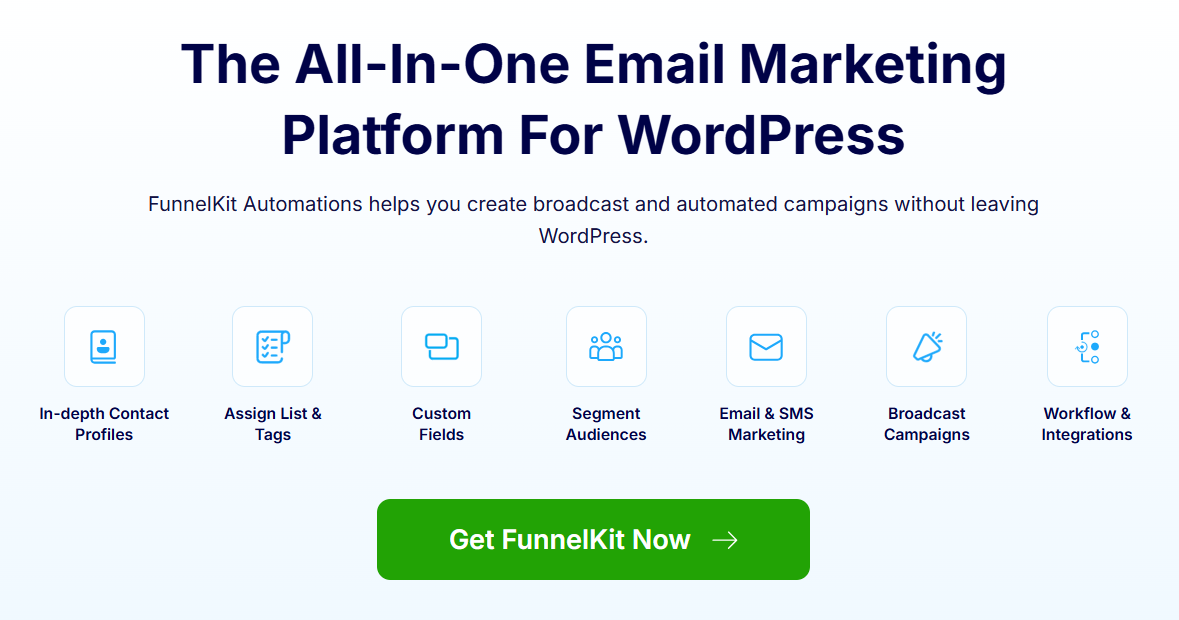
3. FunnelKit Automations
FunnelKit Automations is a marketing automation and broadcast CRM for WordPress and WooCommerce. It’s the perfect solution for email and SMS product recommendations after a purchase.
It’s an all-in-one tool that helps you set up automation to send emails, SMS messages, and email broadcasts. You can also create and share dynamic coupons to encourage customers to make their next purchase.
Features of FunnelKit Automations:
- Product recommendation automations: Set up email workflows to automatically suggest related products, best-sellers, or handpicked items to your customers.
- Prebuilt email templates: Get device-responsive email templates for product recommendations that can be customized with a drag-and-drop email builder.
- Product block: Visual Builders provides a product block that can dynamically add best sellers, related products, a specific category, etc.
- Dynamic coupons: Create personalized, deadline-bound discount coupons that help arouse urgency and drive conversions to your store.
Price: FunnelKit Automations offers both free (lite) and premium versions. The premium version costs $99.50 a year.
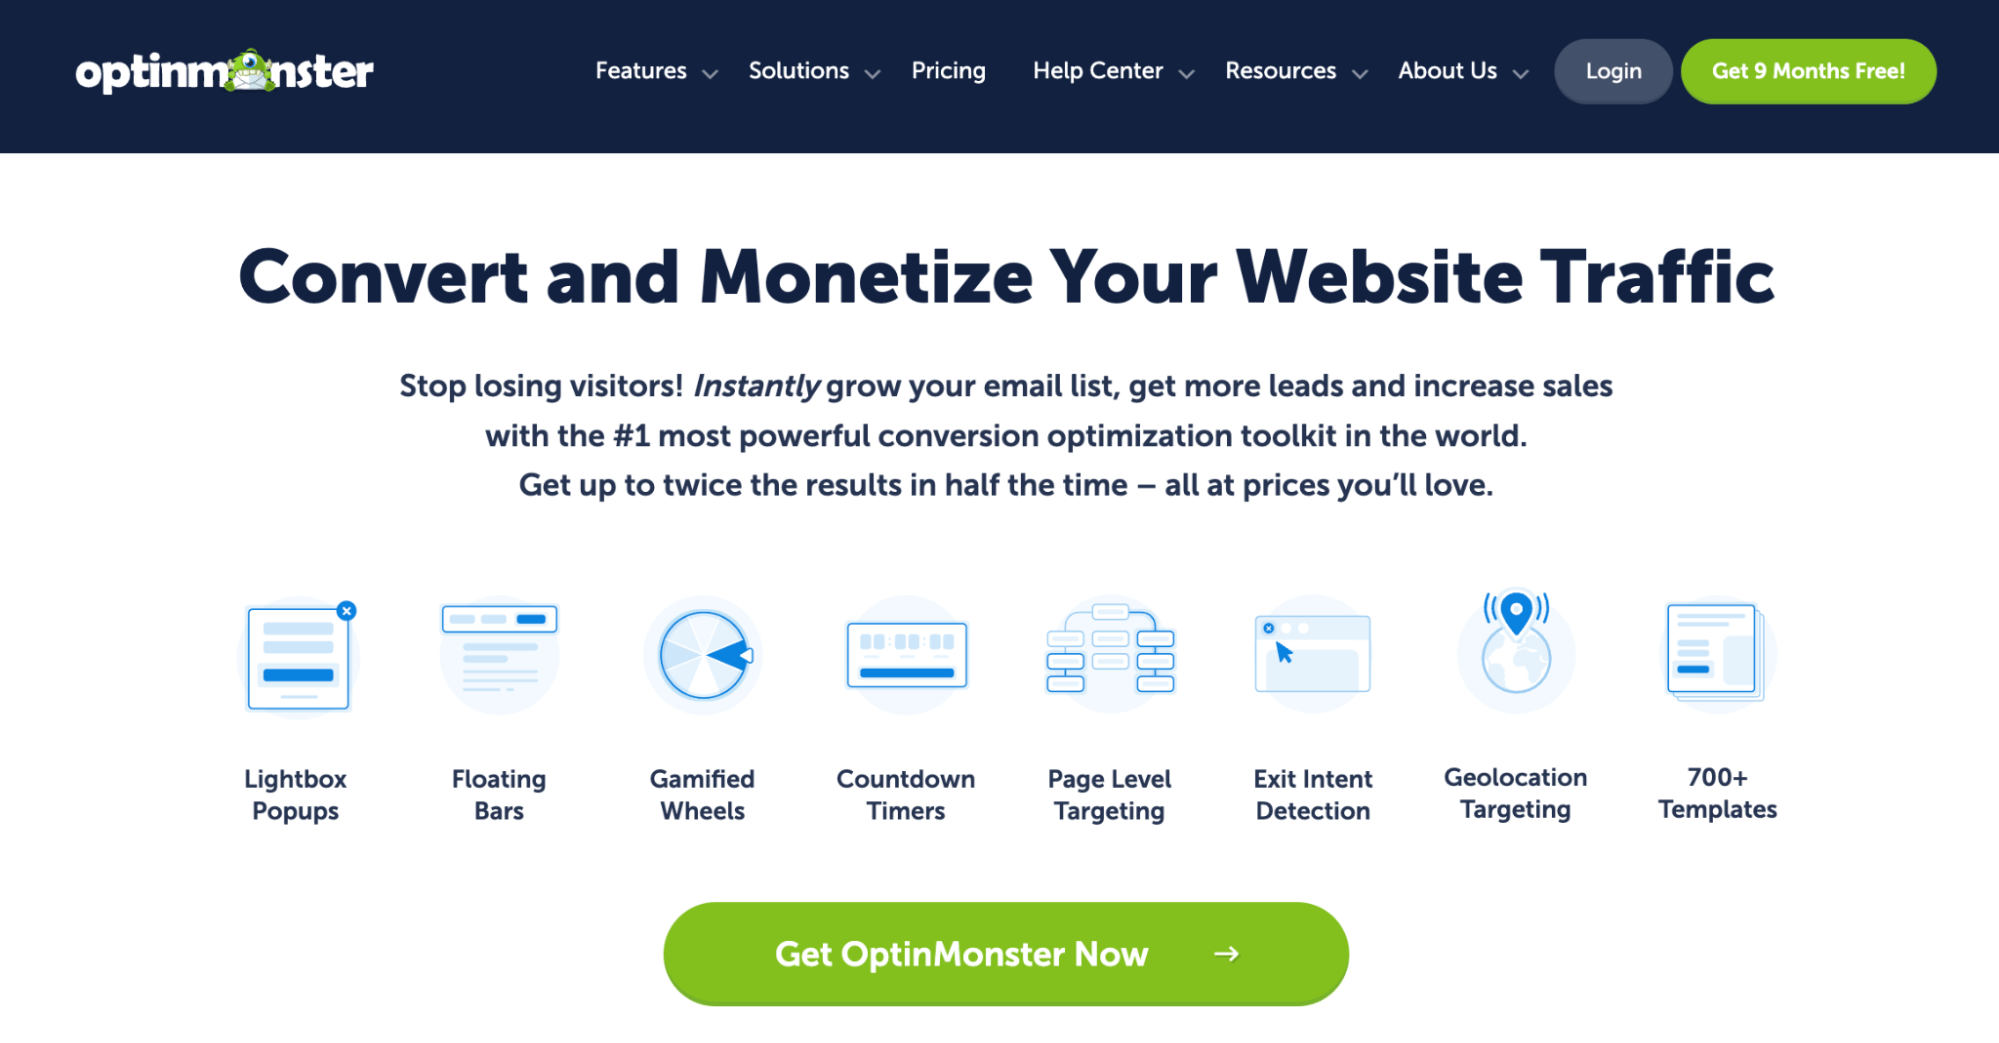
4. OptinMonster
OptinMonster is a lead generation plugin that can also function as advanced product recommendations, offering page-level targeting and exit-intention technology.
It comes with an easy-to-set-up dashboard where you can easily customize the pop-up or slide notification you plan to use for product recommendations.
Here are the key features:
- Product Recommendation Pop-ups: Display targeted pop-ups that suggest relevant products based on what customers are viewing or have already added to their cart.
- Behavioral Targeting: Show personalized product recommendations at the right time, using triggers like exit intent, page scrolling, or time spent on the page.
- Dynamic Content: Automatically display related products, best-sellers, or new arrivals in pop-ups, increasing their visibility and likelihood of being purchased.
- Drag-and-Drop Builder: Easily design visually appealing pop-ups and product recommendation widgets without any coding experience.
- A/B Testing: Run A/B tests to optimize your product recommendation strategies and improve conversion rates.
Price: Starts at $7/month (billed annually), amounting to $84 a year.
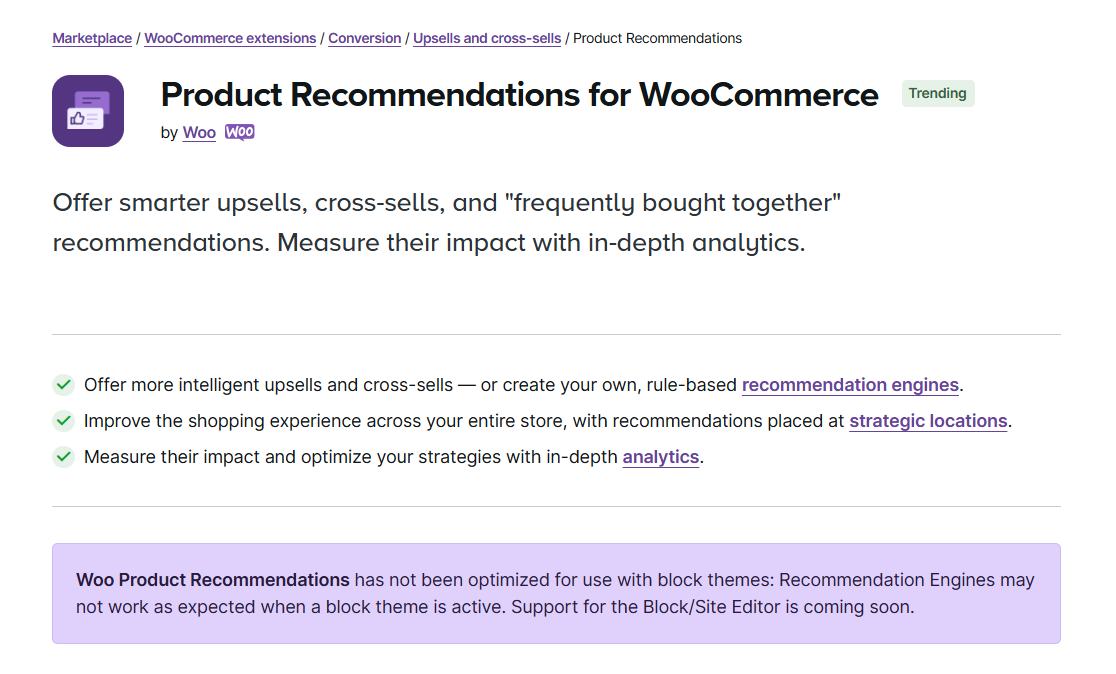
5. Product Recommendations for WooCommerce
This WooCommerce plugin lets you offer smart upsells, cross-sells, and frequently bought-together recommendations.
You can improve the shopping experience by placing item recommendations at strategic locations.
Additionally, you’ll be able to measure their impact and optimize your strategies with in-depth analytics.
Key features:
- Accurate recommendations - Build an intelligent engine that promotes recommendations by discovering meaningful product relationships and patterns.
- Rule-based offers - Tailor the shopping experience across your store to fit your merchandising strategy. Use filters and visibility conditions to match products and customers.
- In-depth analytics - This recommendations plugin for WooCommerce gives access to insightful reports to understand and refine your product recommendation strategies.
Price: The Product Recommendations for the WooCommerce plugin are only available in the premium version, which costs $99 a year.
All the plugins I enlisted are highly useful for recommending products at various stages of a buying journey, maximizing their impact.
In the following section, I will share different use cases. Keep reading…
Method 3: Offer Product Recommendations in the Slide Cart to Boost AOV
Why recommend products on a slide cart?
A WooCommerce slide cart is an excellent replacement for the cart page. It allows users to view their order summary and apply coupons instantly with just one click. This real-time overview ensures that product recommendations based on cart items are super relevant and timely.
With an advanced plugin like FunnelKit Cart, you can enhance the experience by offering milestone-based rewards. This motivates users to add recommended products to their carts to unlock gifts, effortlessly boosting average order value.
I will use FunnelKit Cart (both free and pro) for this method. The pro version of FunnelKit Cart is available with FunnelKit Funnel Builder Plus and above.
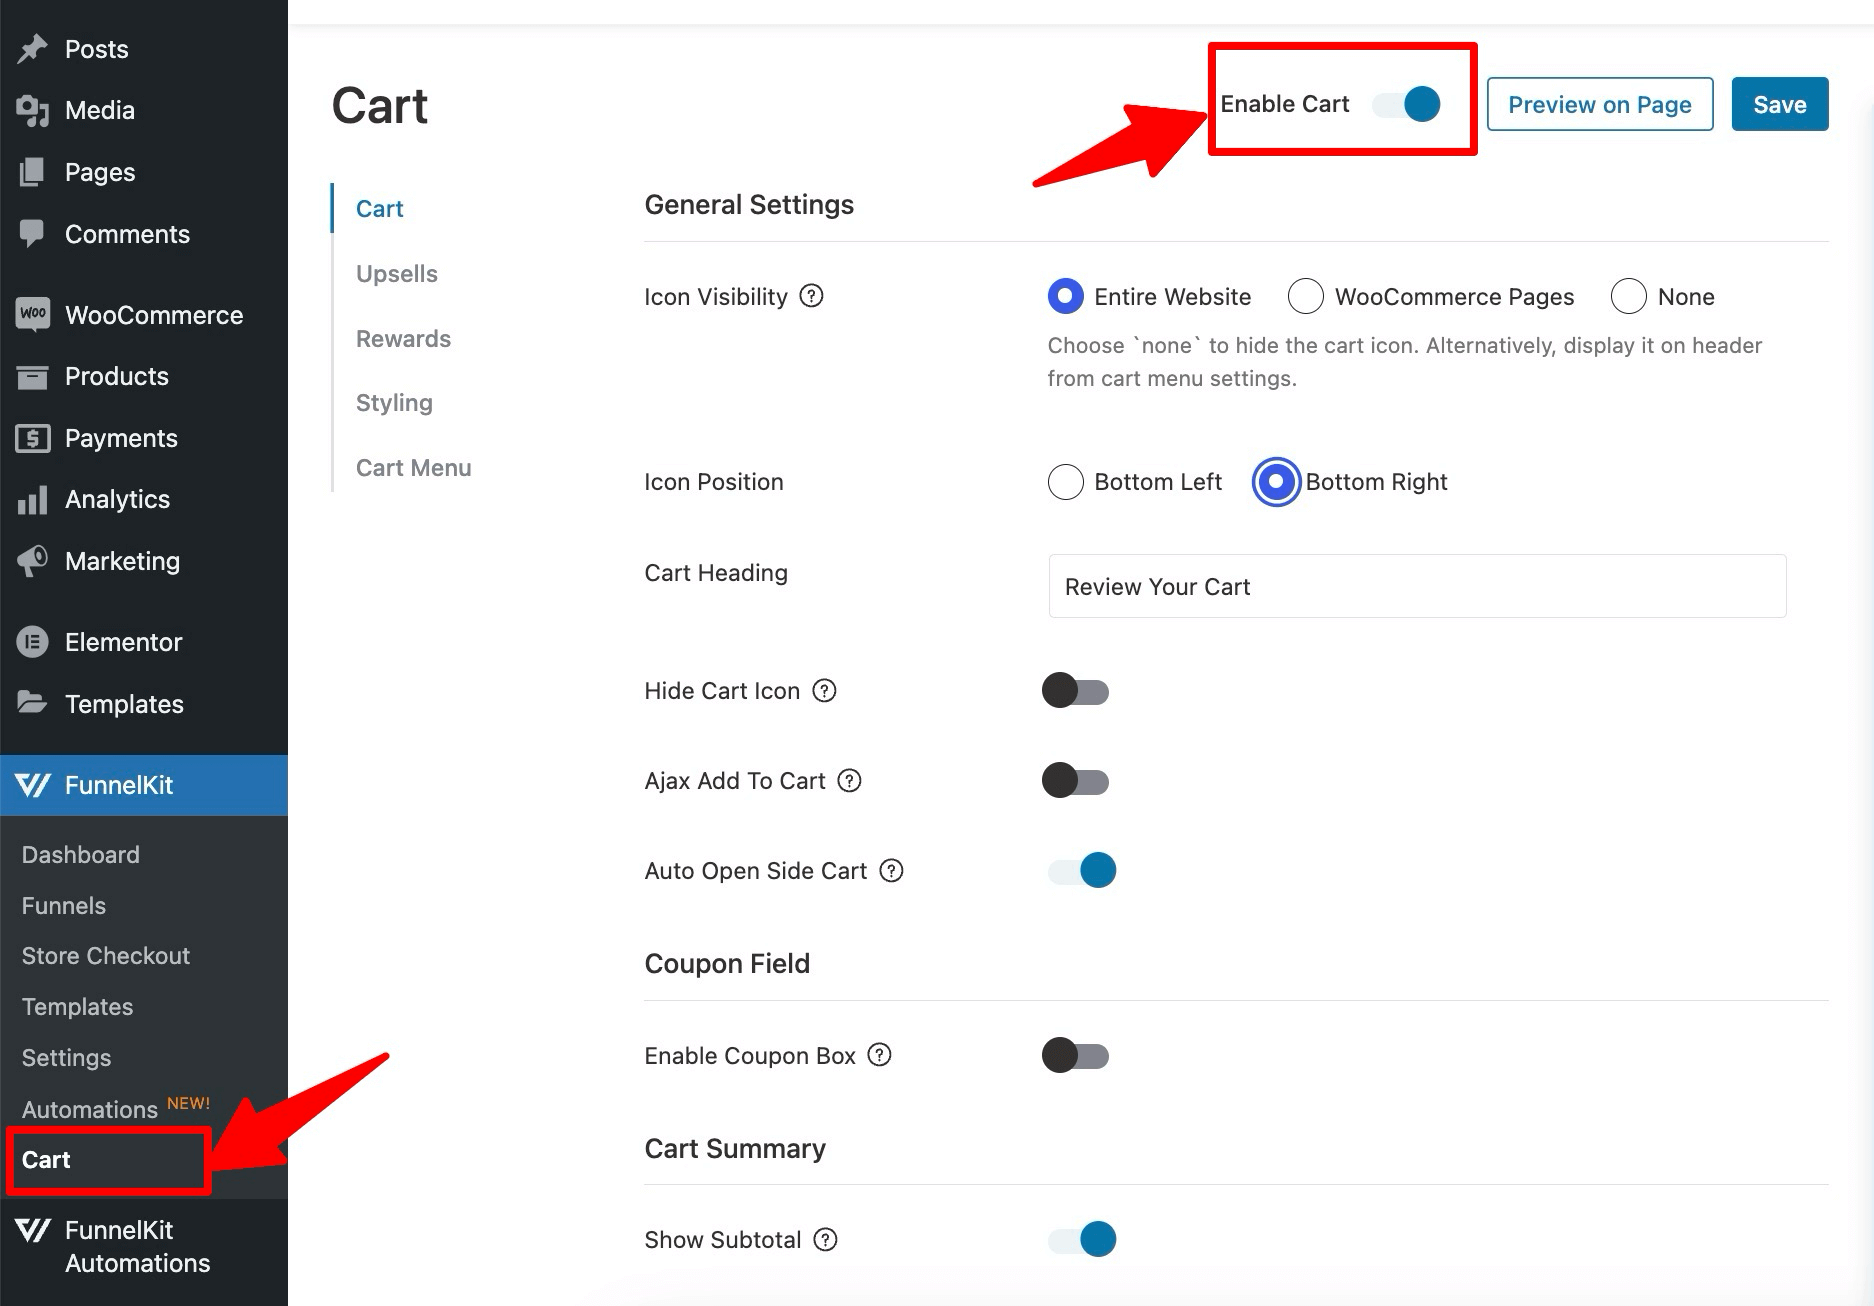
Step 1: Turn on the slide-in cart by FunnelKit
The first step is to enable the Slide-in cart by FunnelKit. To do so, navigate to FunnelKit ⇒ Cart and turn on the “Enable Cart” toggle button.
Step 2: Manage cart upsell settings
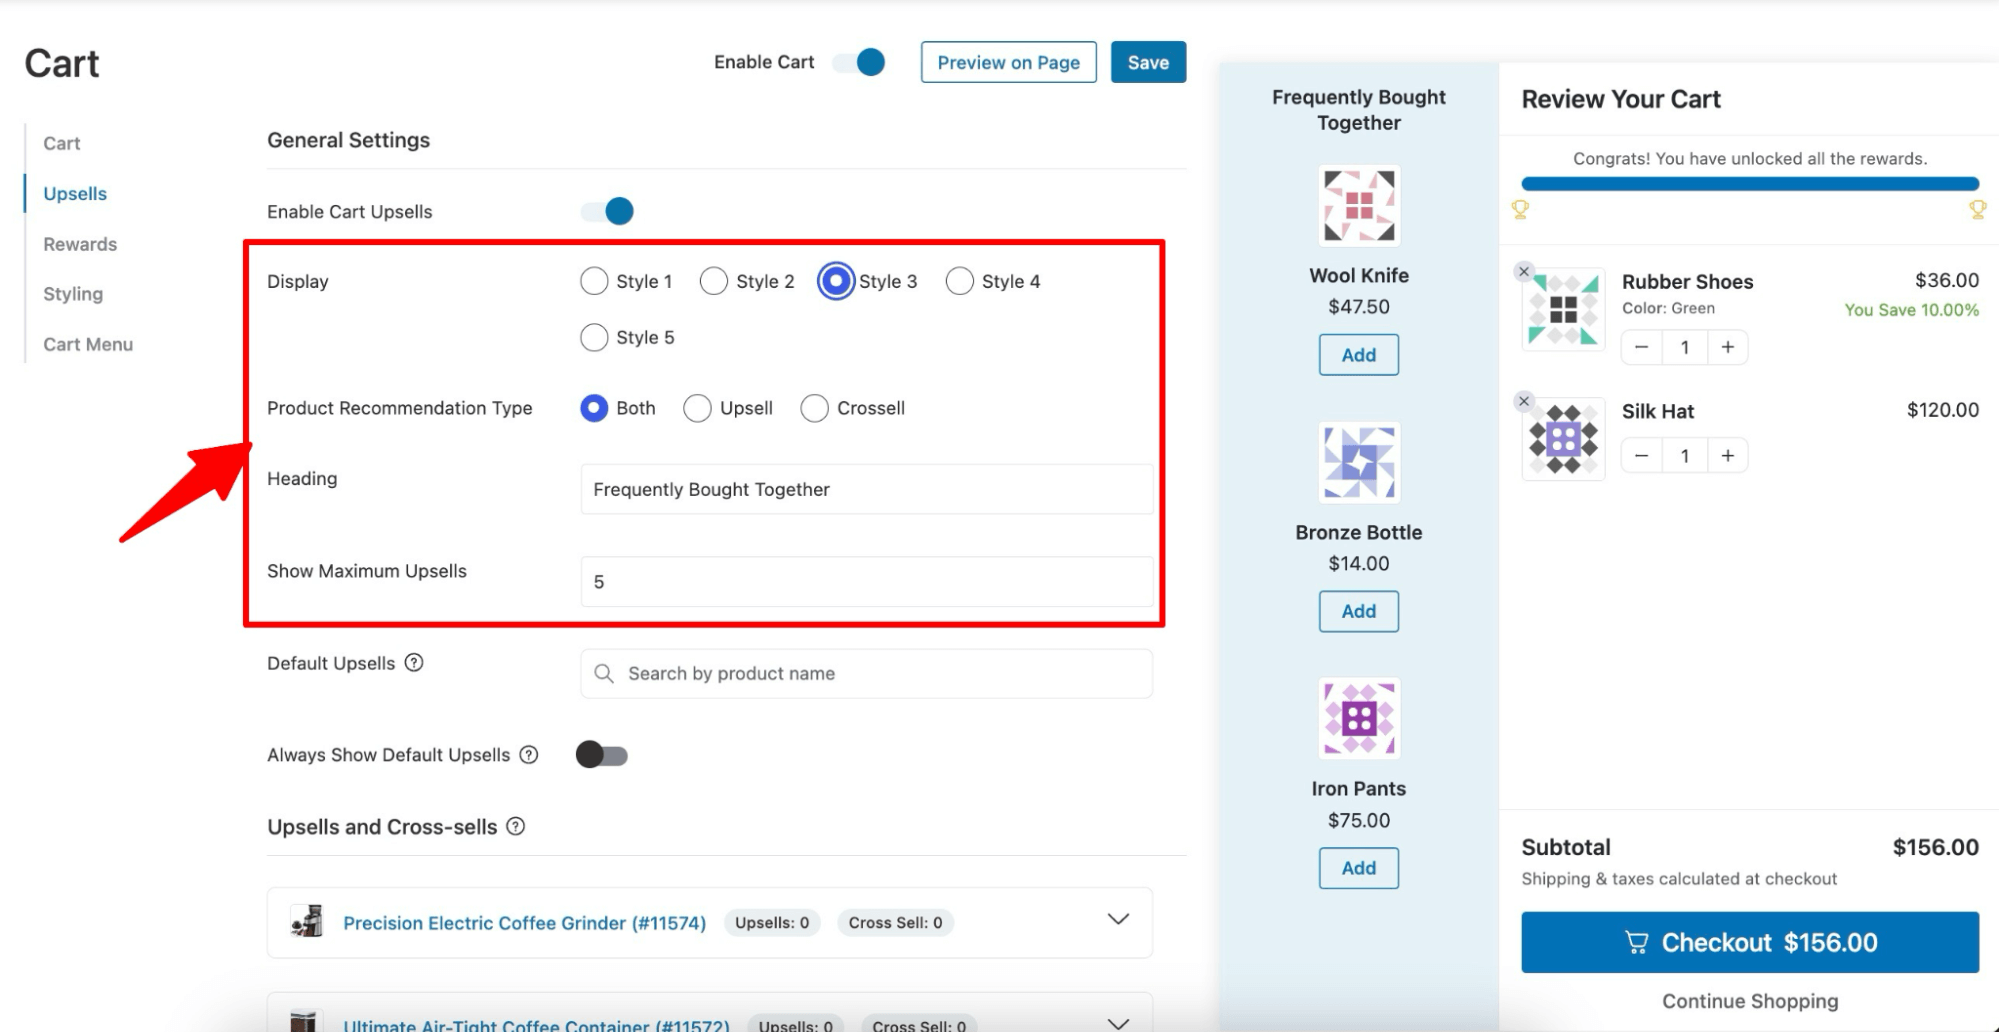
To enable the Upsells option, go to the Upsells tab and turn on the “Enable Cart Upsells” option.
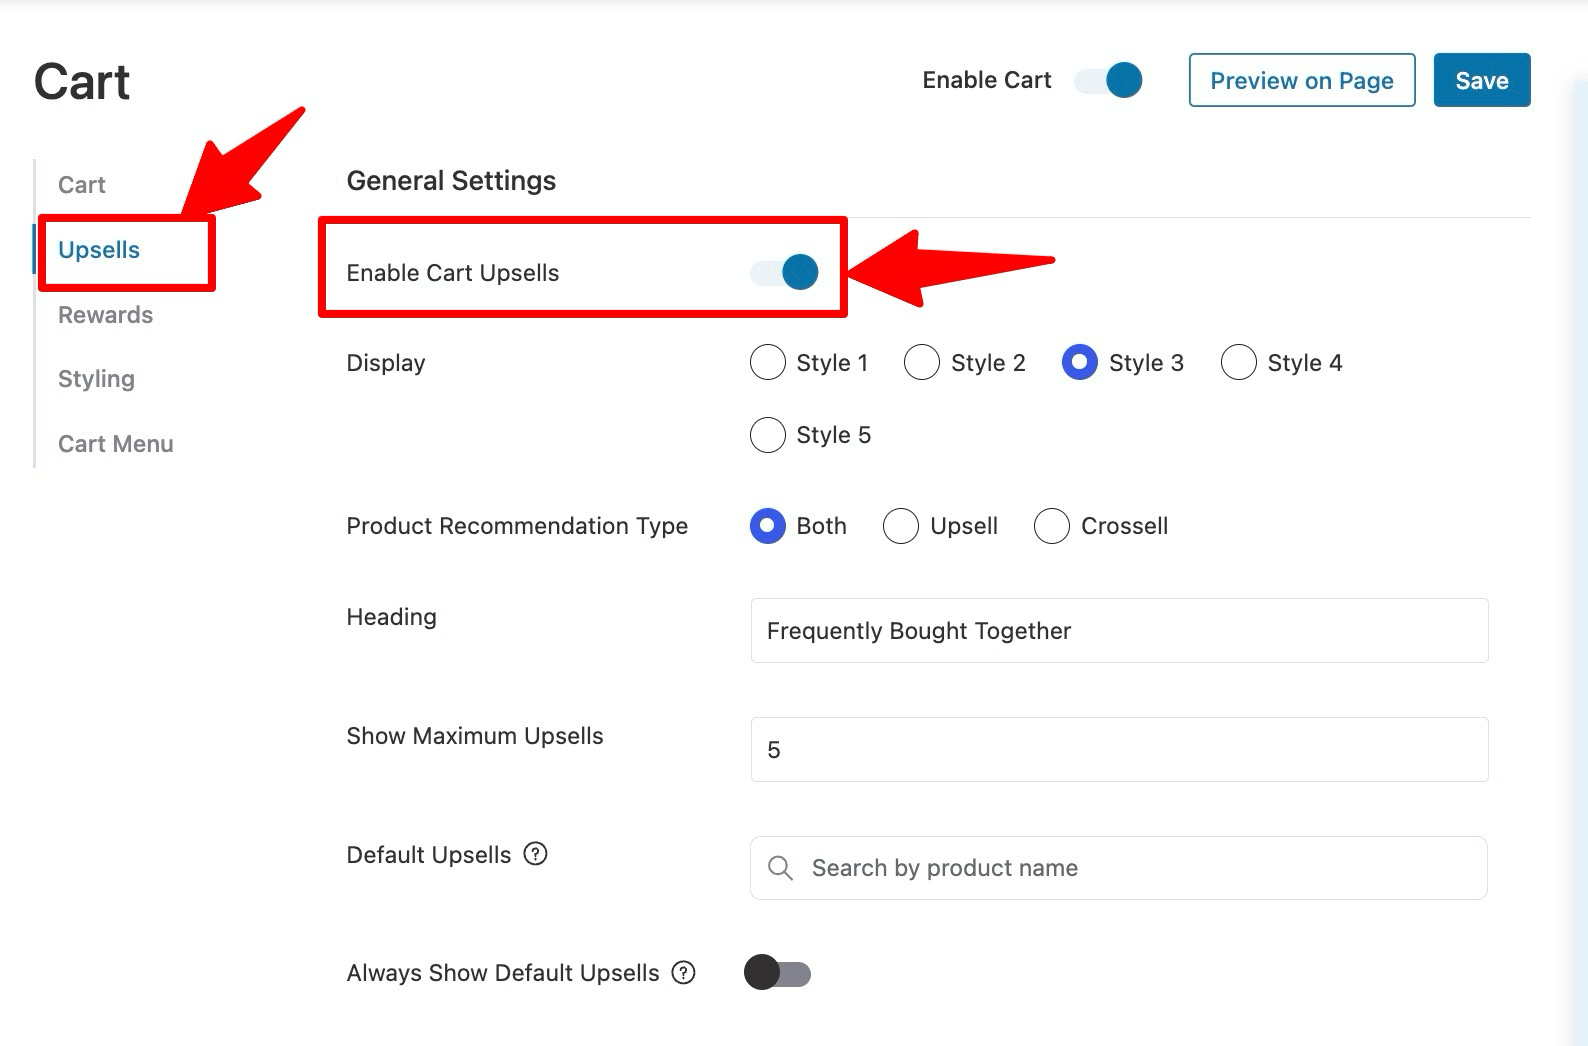
Now, choose the display type. You get 4 options:

After choosing how you want to display your recommended products, customize the following:
- Product Recommendation Type: Recommend product upsells, cross-sells, or both. Experts recommend choosing both.
- Heading: Provide the heading that will show up above the product recommendation section. The default option is "Frequently Bought Together".
- Show Maximum Upsells: Specify the maximum number of products you want to display as upsells
Step 3: Add default upsells
The “Default Upsells” option lets you add items to show up as upsell recommendations in case the existing cart products don’t have any upsell products assigned to them.
You can search products by name and add them to the default upsell in WooCommerce.
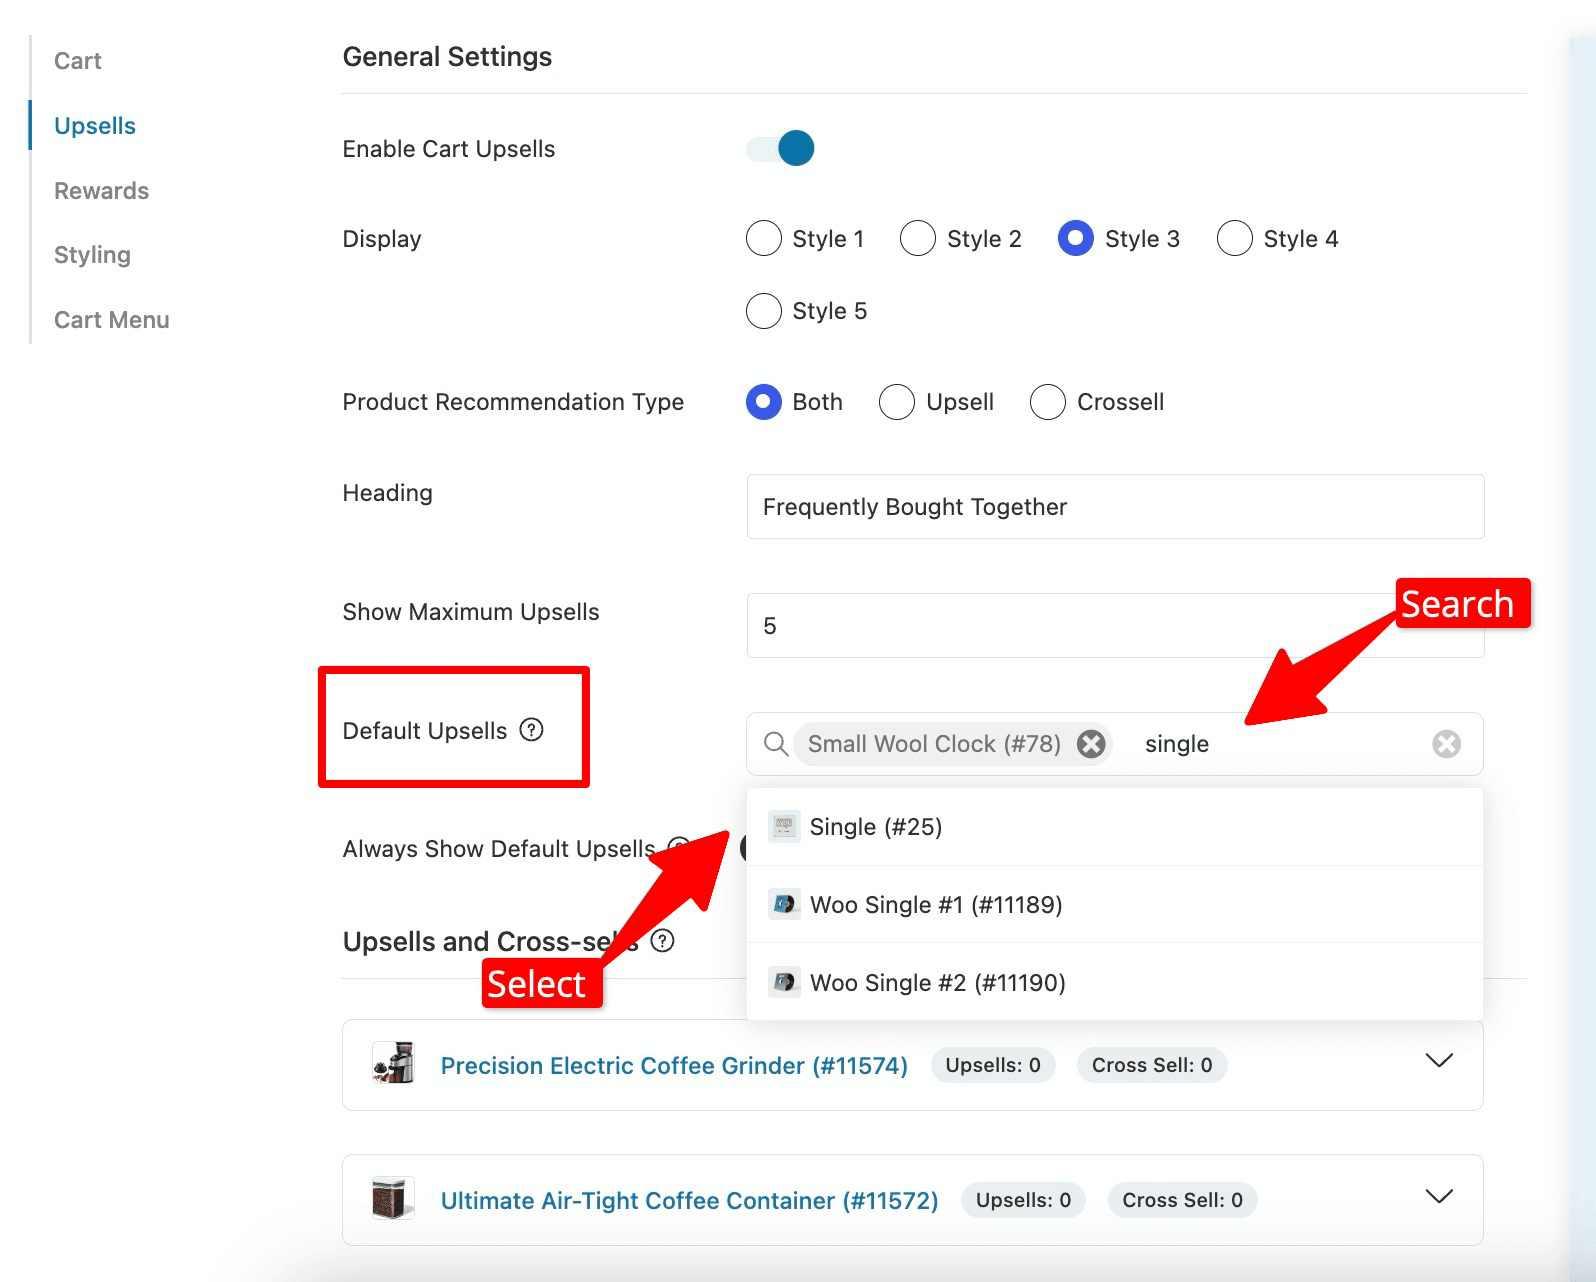
You can add as many upsell products as you want, but the “show maximum upsells” option will limit the number of items on the front end.
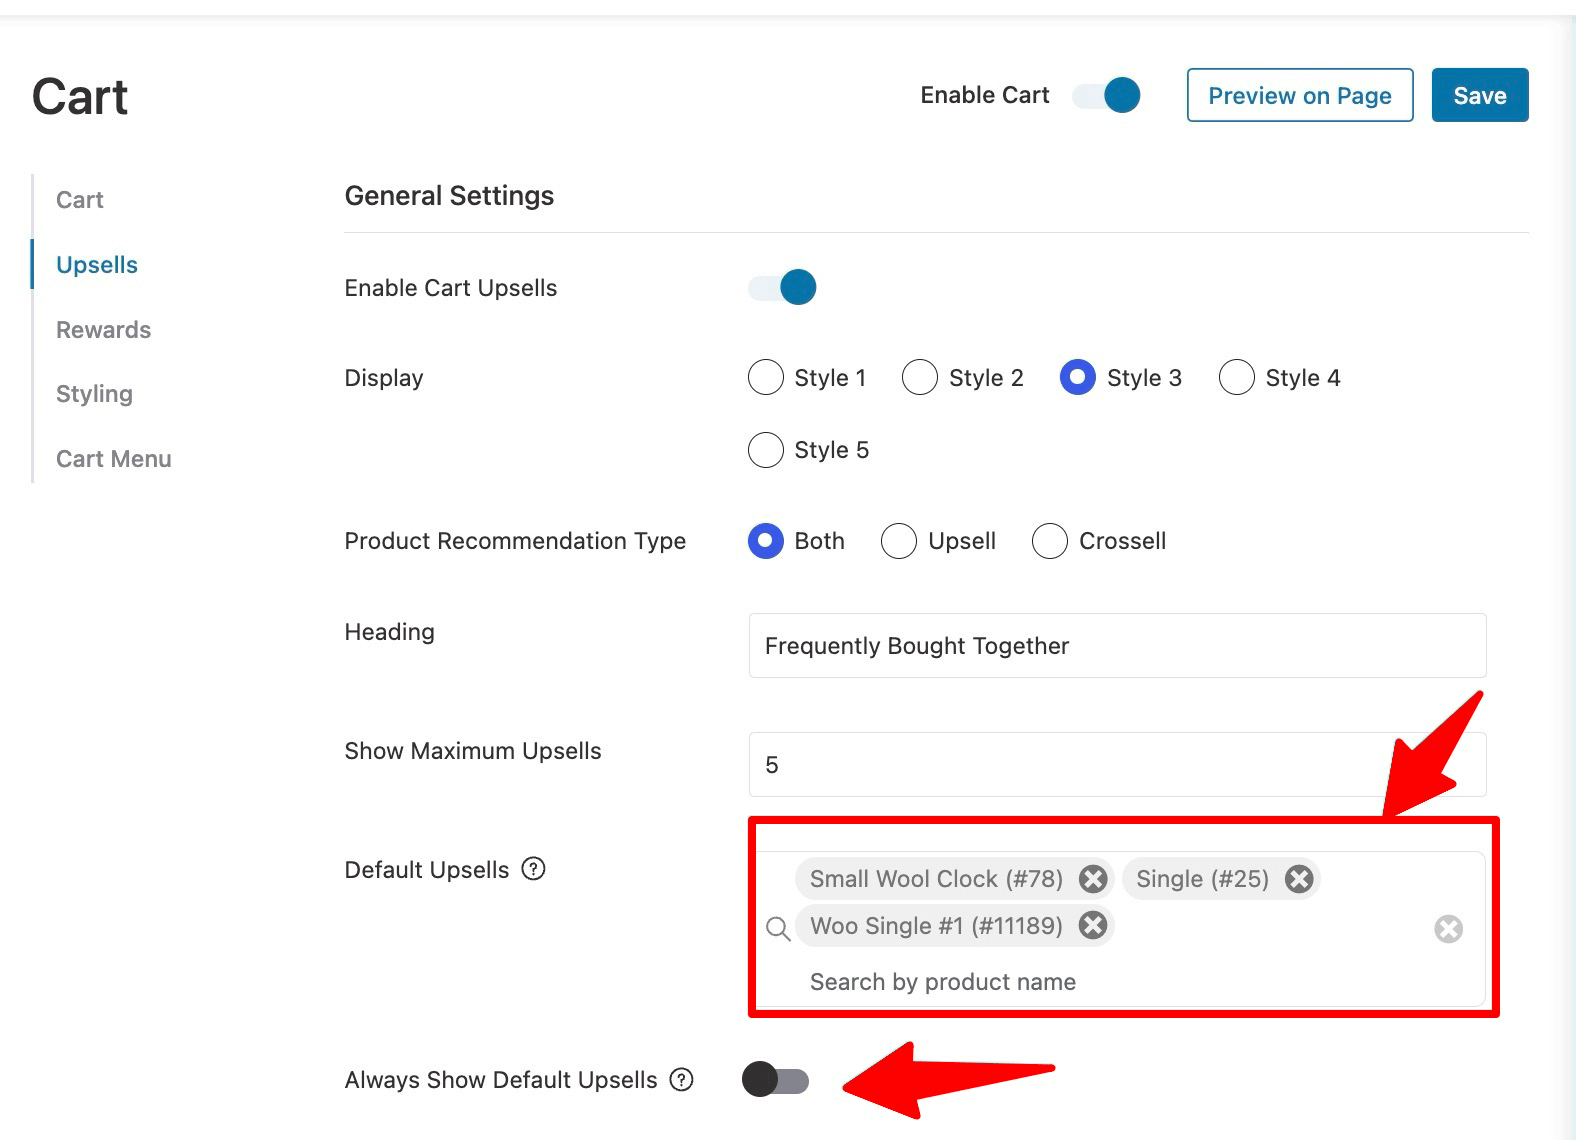
Note: Turn on the “Always Show Default Upsells” option to always recommend the default upsell products.
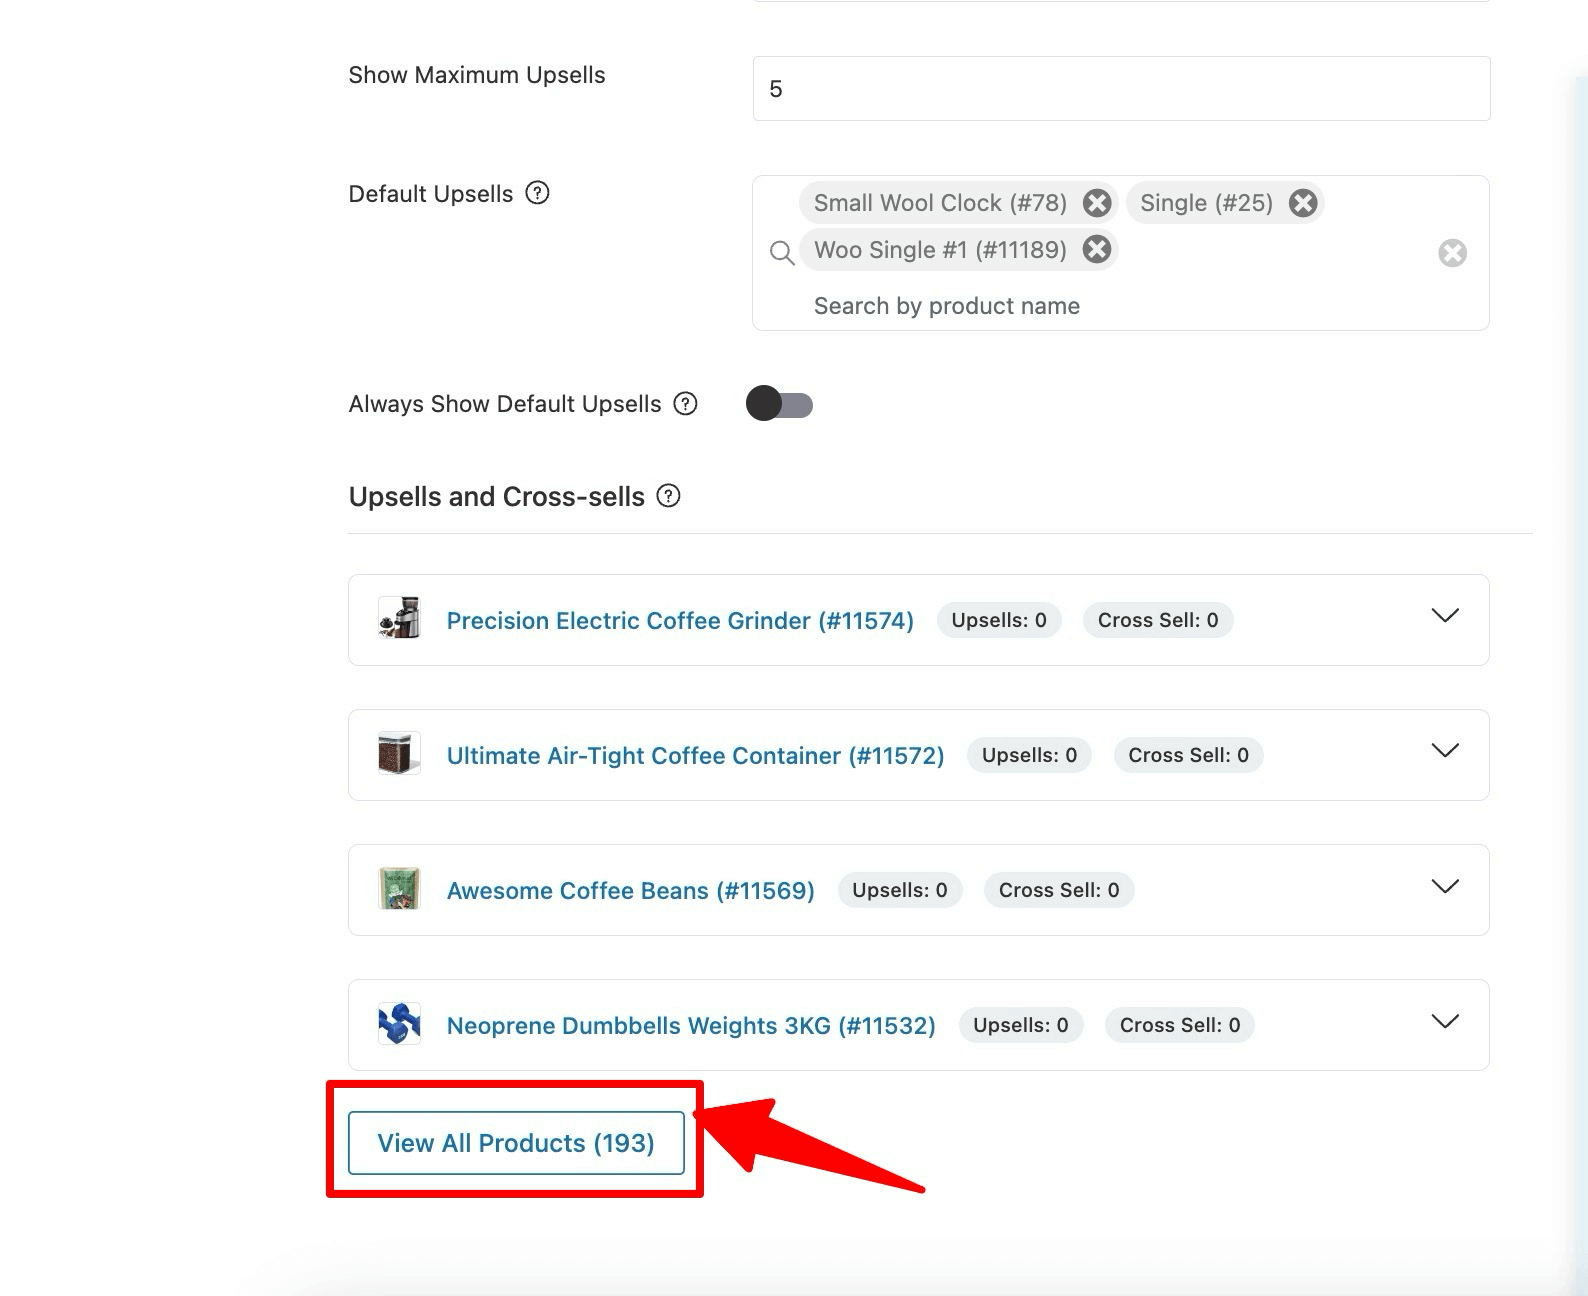
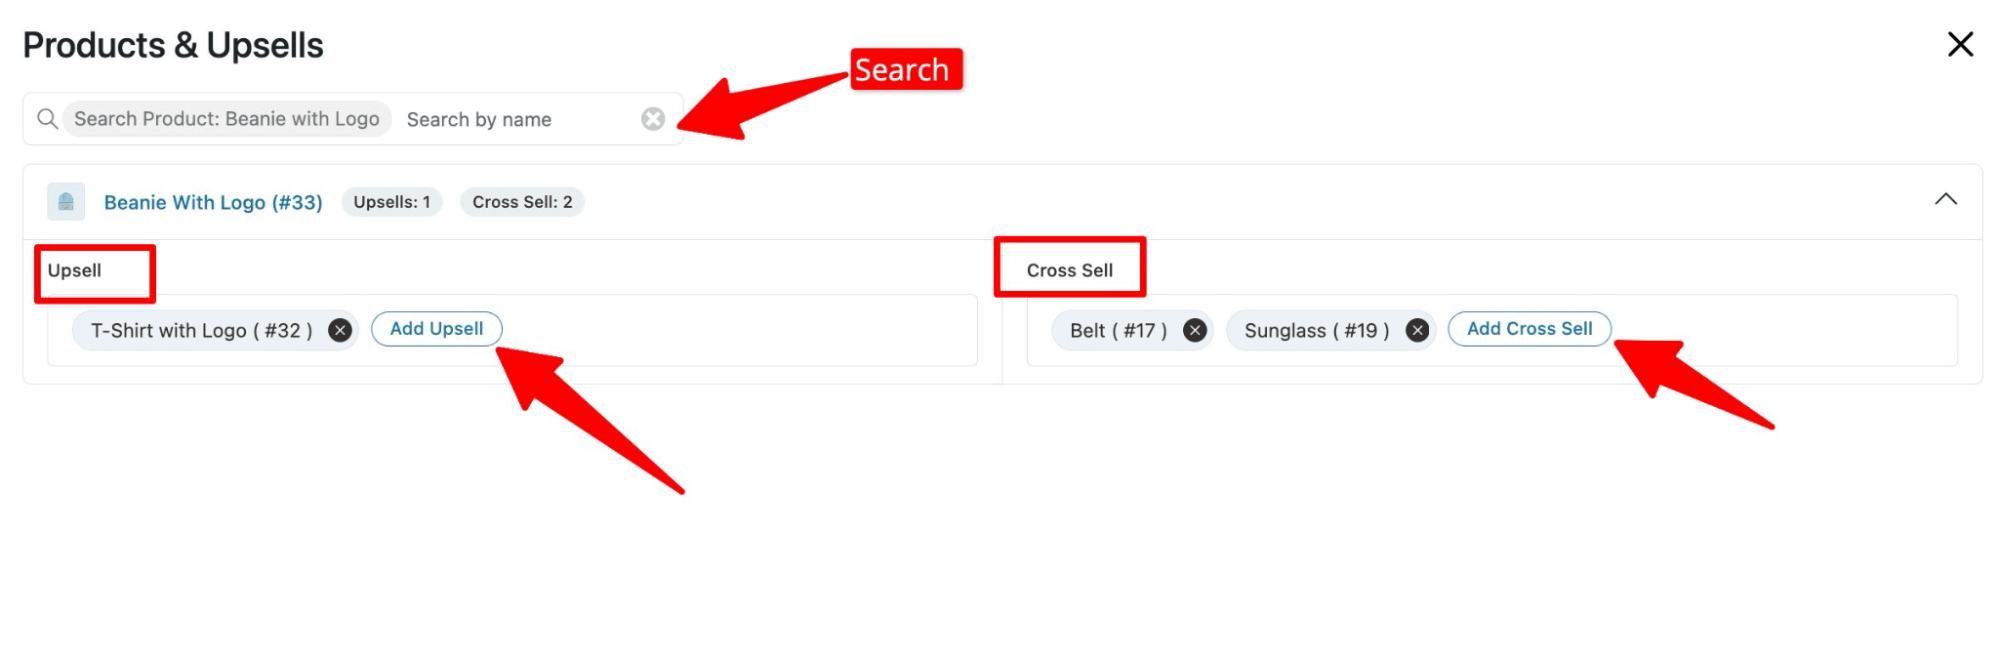
Step 4: Set up individual upsells and cross-sells
Adding upsells and cross-sells directly from the WooCommerce product page can be tedious since you need to edit each product separately.
FunnelKit Cart streamlines this process with a sleek interface that allows you to manage upsells and cross-sells directly from the cart setup page, eliminating the need for back-and-forth. Just click “View All Products” to get started!
Next, you'll see a sleek interface that allows you to scroll through products or use the search bar. Expand the product section to add an upsell. If a product already has upsells or cross-sells assigned, you'll see them here.

To add a new upsell, click “Add Upsell,” search for the product, and select it from the dropdown. Then, click “Add” to confirm.
Follow the same steps to add a cross-sell.
🔔 Note: You can add variable products to upsells and cross-sells, letting buyers choose variations directly from the cart.
Once you've added your product recommendations, click Save to update your changes. You can then click Preview on Page to see how your WooCommerce cart upsell looks in action.
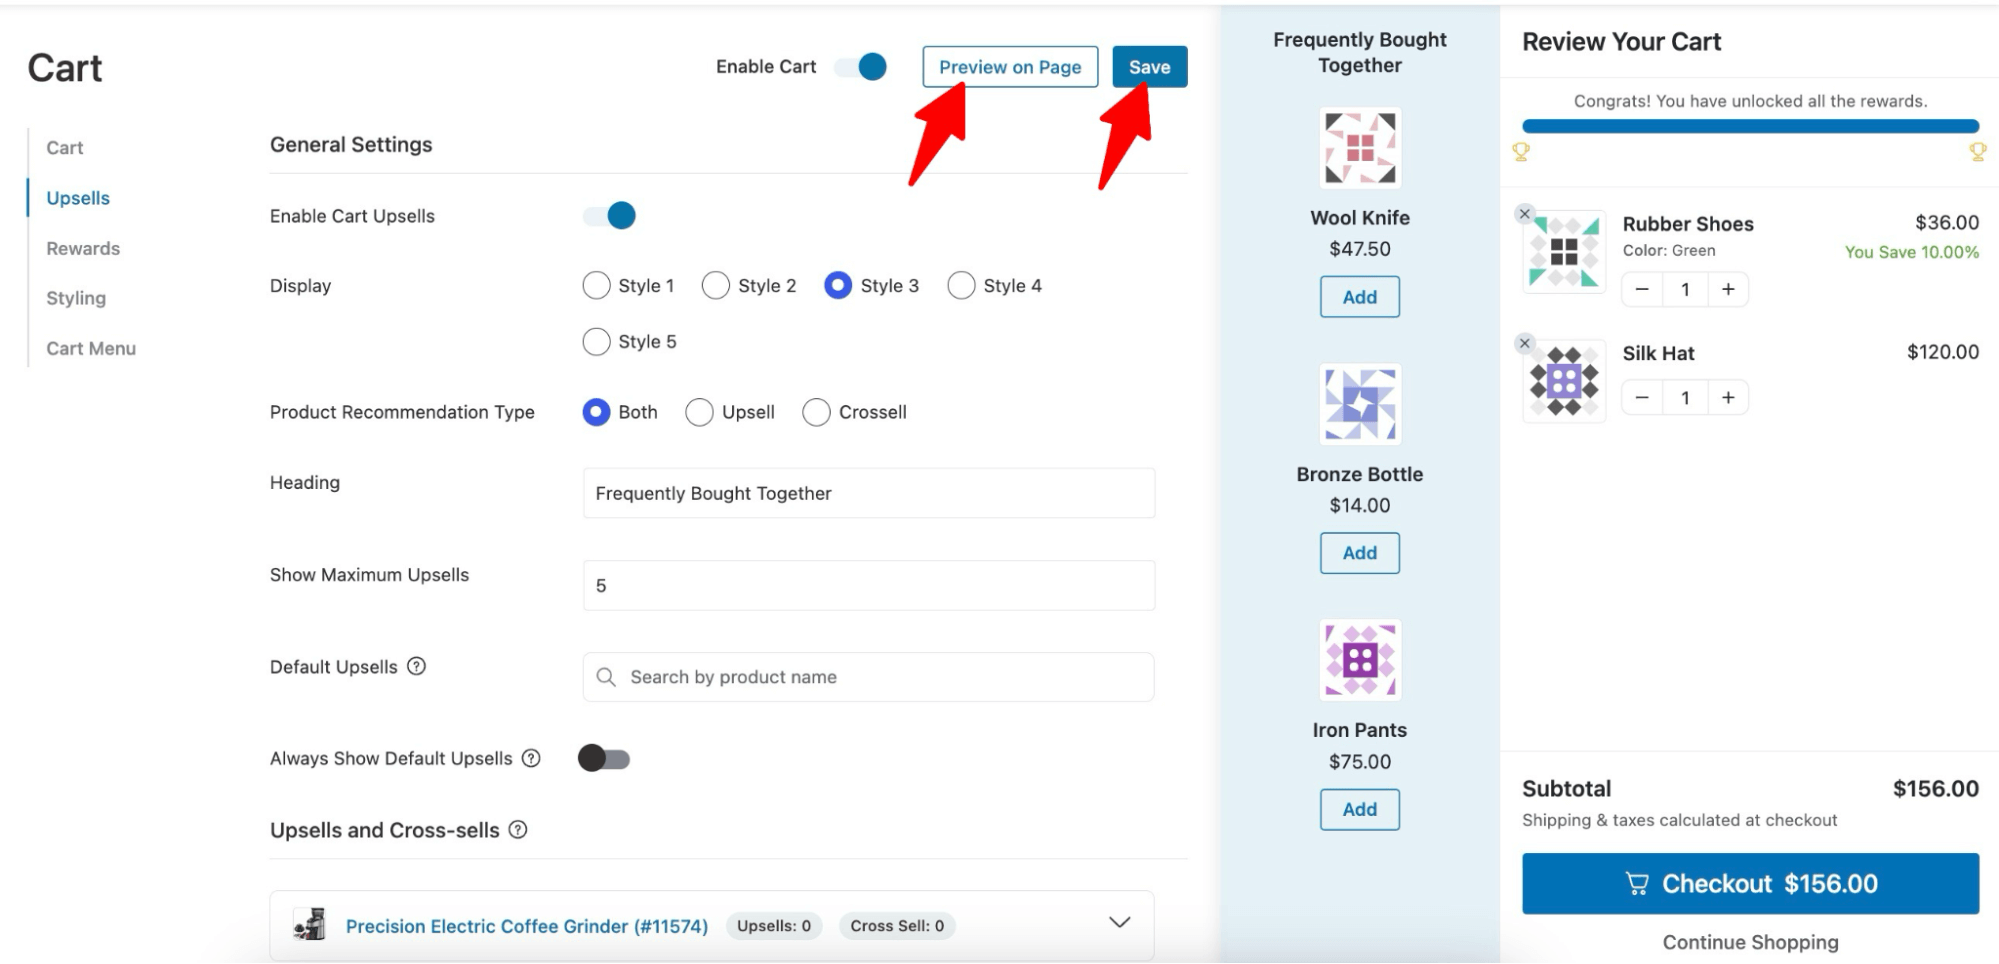
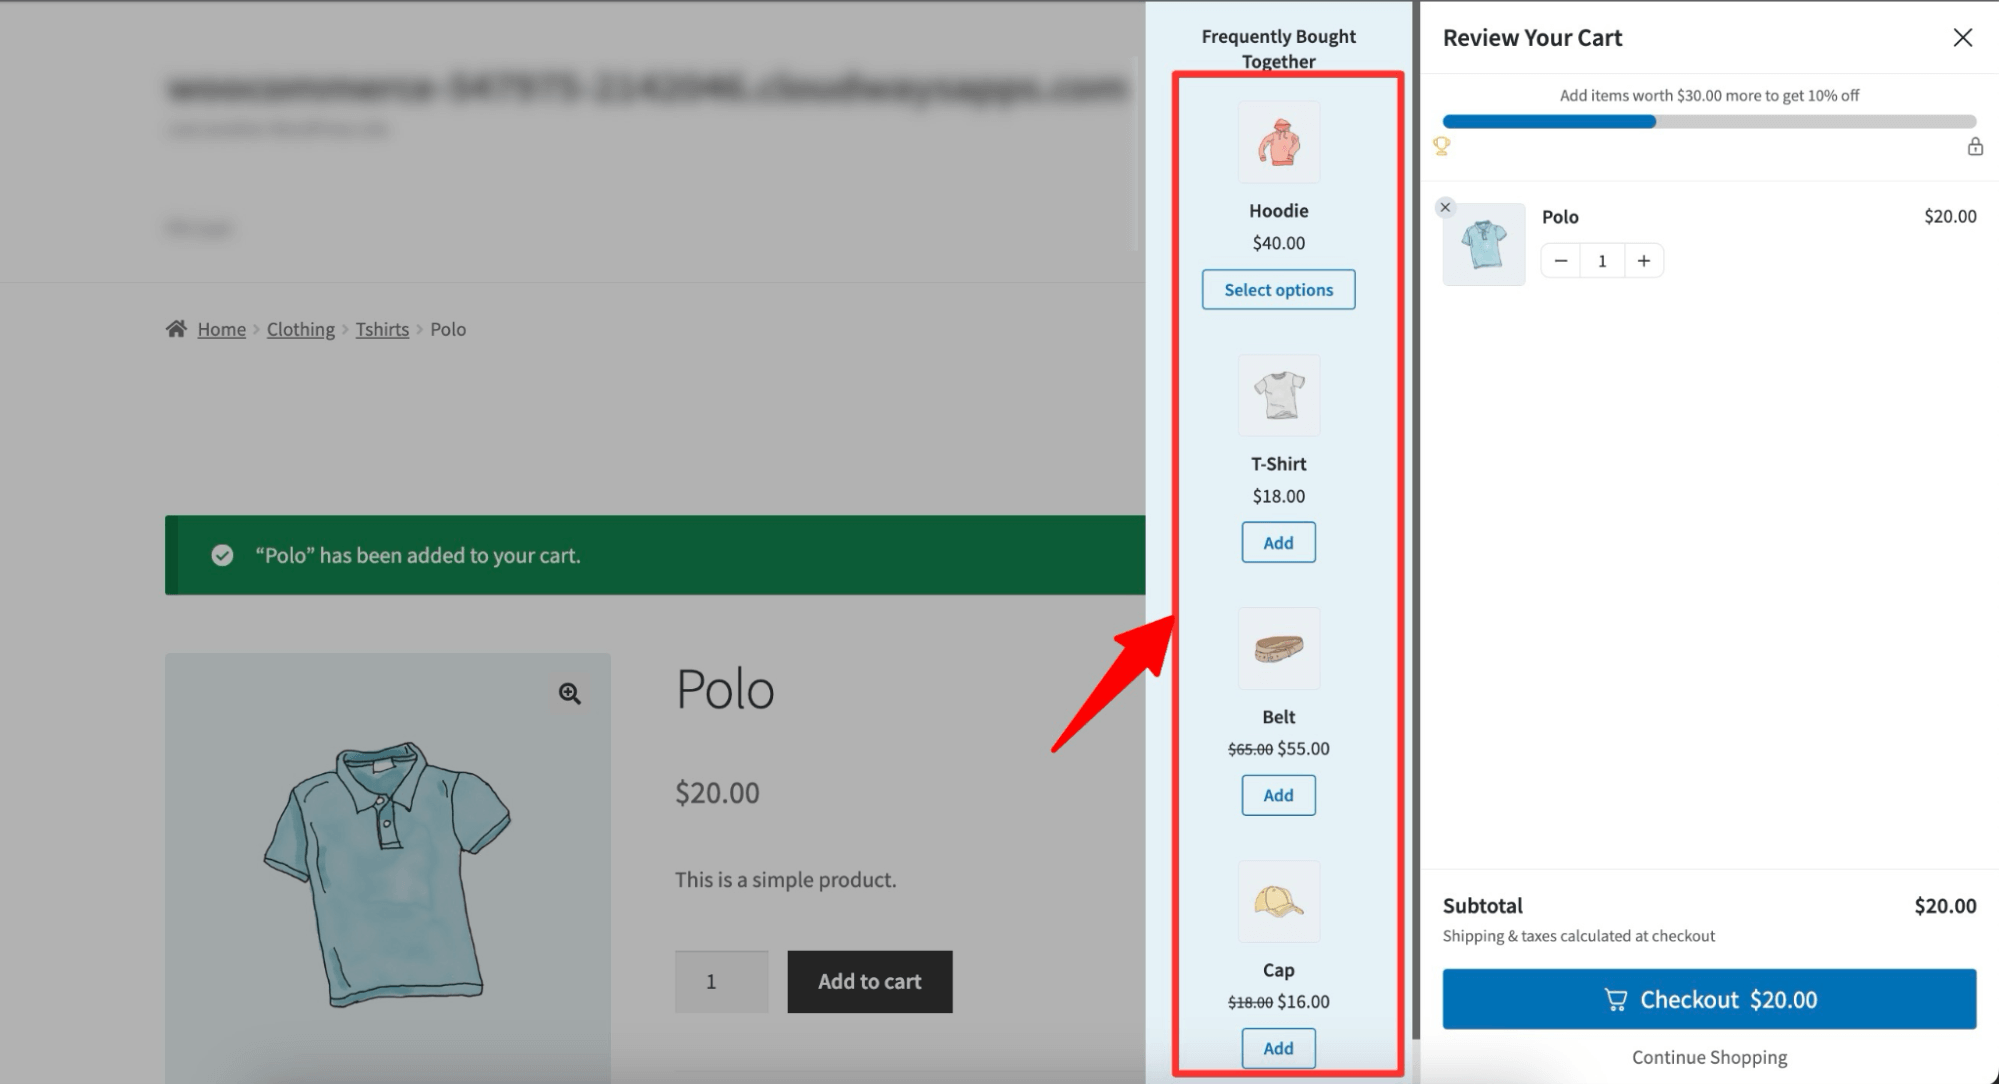
Here is a preview of how the product recommendation in the Woocommerce slide will look:
Method 4: Recommend Complementary Items at Checkout to Capitalize on Buying Intent
Why recommend products on the checkout page?
People have the strongest buying intent right on the checkout page. Offering highly relevant complementary items just before they hit the "Place Order" button can be a powerful way to boost sales.
You can make this easy by presenting product recommendations as order bumps, allowing customers to add them to their cart with just one click, increasing the order value effortlessly.
To recommend products on the WooCommerce checkout page as order bumps, you can use FunnelKit Funnel Builder.
This is a powerful tool for creating sales funnels and offering rule-based pre- and post-purchase recommendations.
You need to install and activate both FunnelKit Funnel Builder (free) and FunnelKit Funnel Builder Pro.
After activating the plugins, follow these steps:
Step 1: Create a store checkout
Firstly, you need to create a store checkout that will replace the default WooCommerce checkout page.
To do so, navigate to FunnelKit ⇒ Store Checkout and click on “Create Store Checkout”.
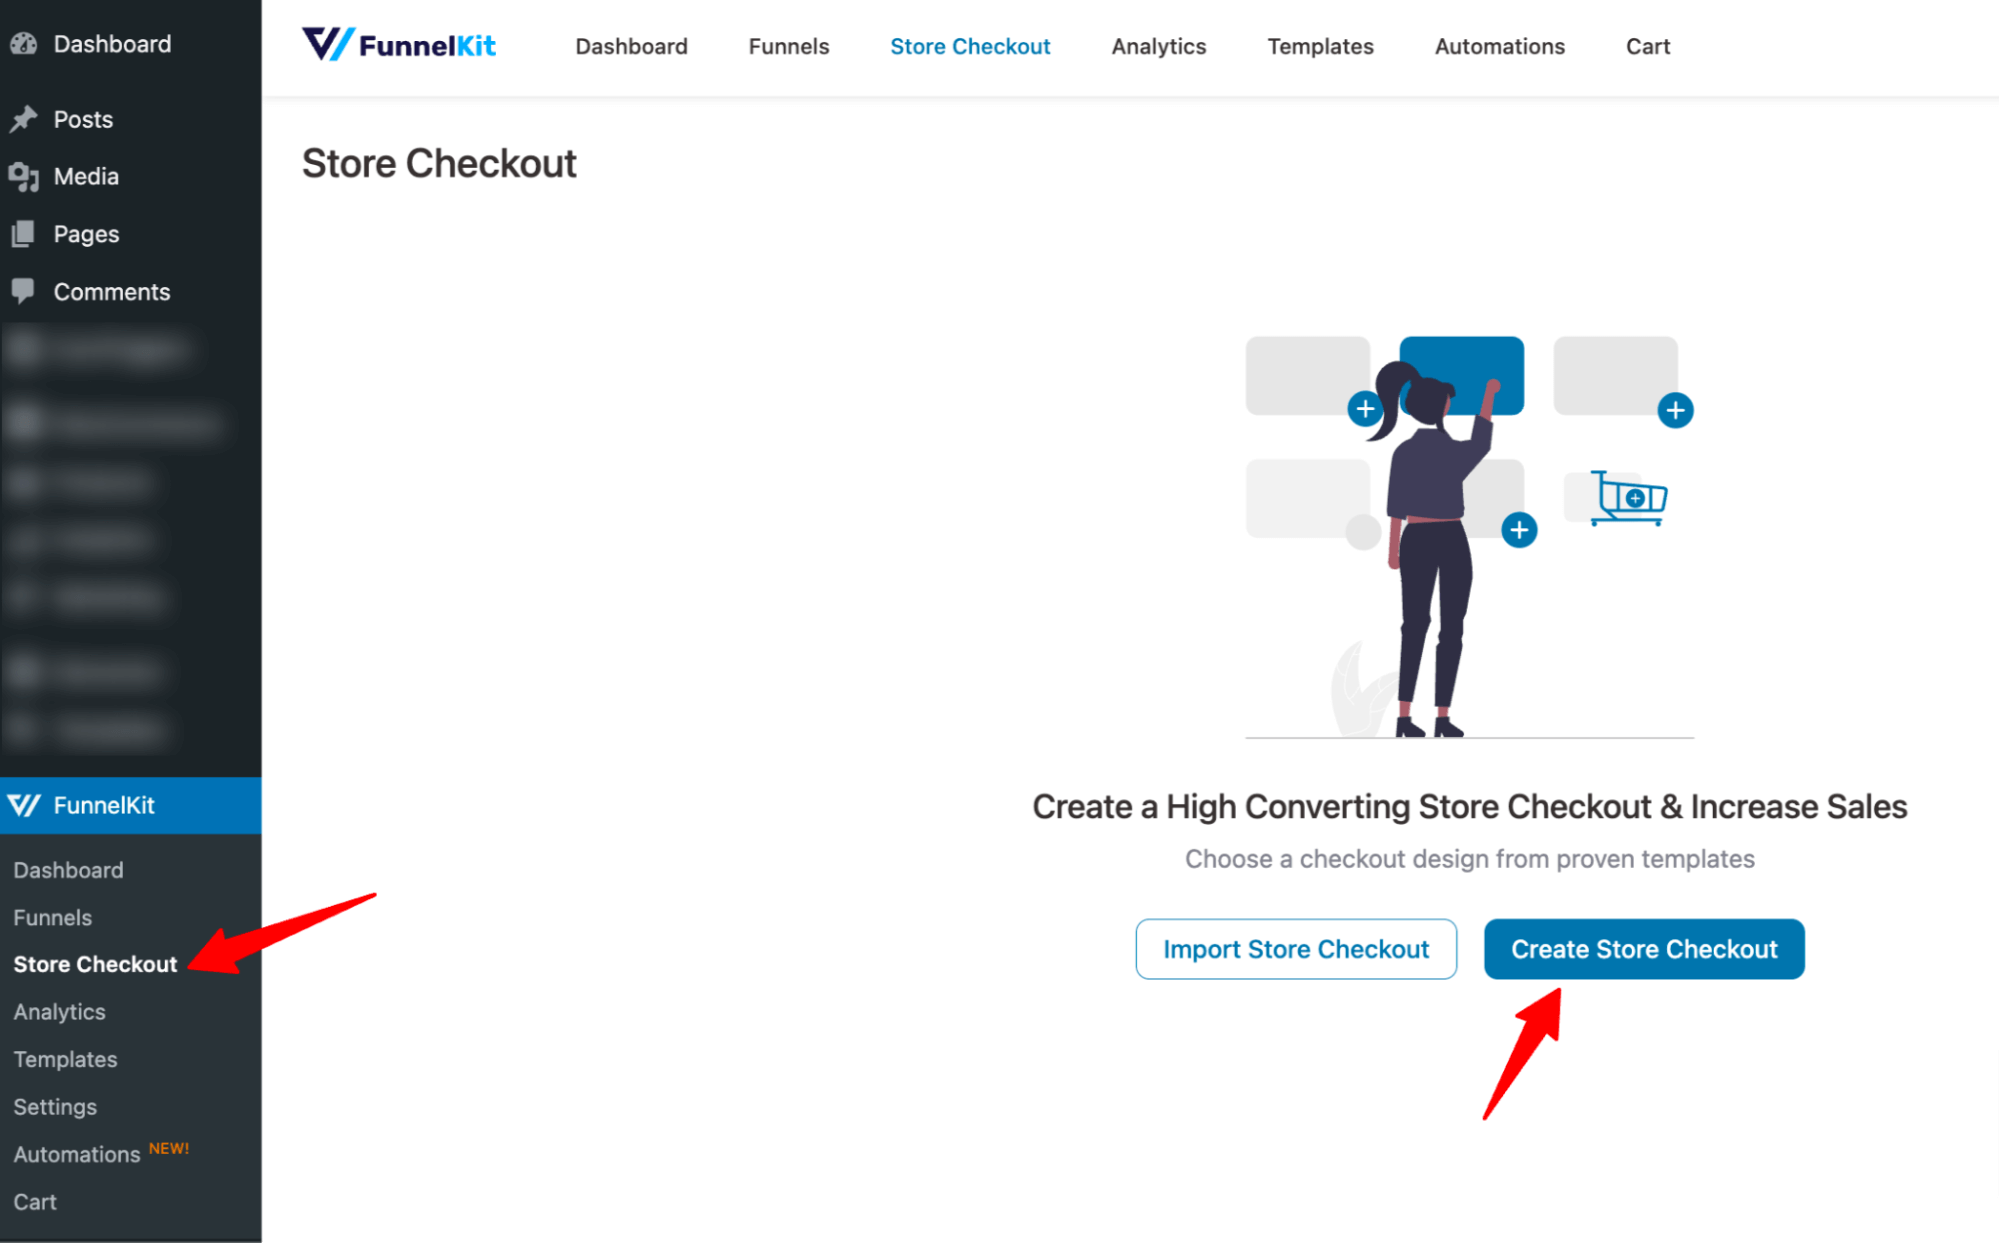
Choose a prebuilt FunnelKit checkout template, preview it, select single-page or multi-page checkout, and then import it as your default store checkout.

This will import a store checkout with three steps: Checkout, One click upsell, and Thank you page.
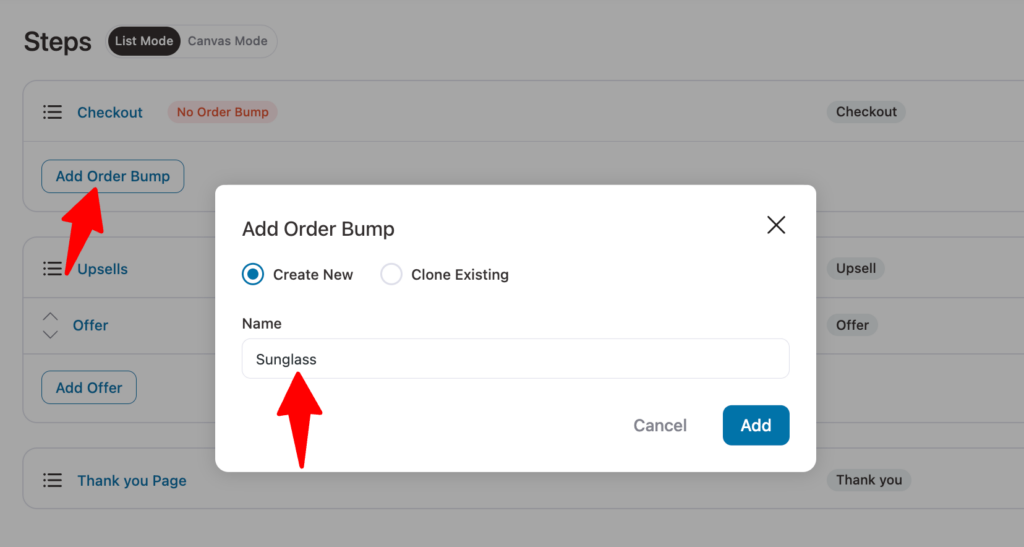
Step 2: Add the order bump offer
On the checkout page, you must add a new step to offer an order bump. To do so, click “Add Order Bump”, provide a title, and click ‘Add.
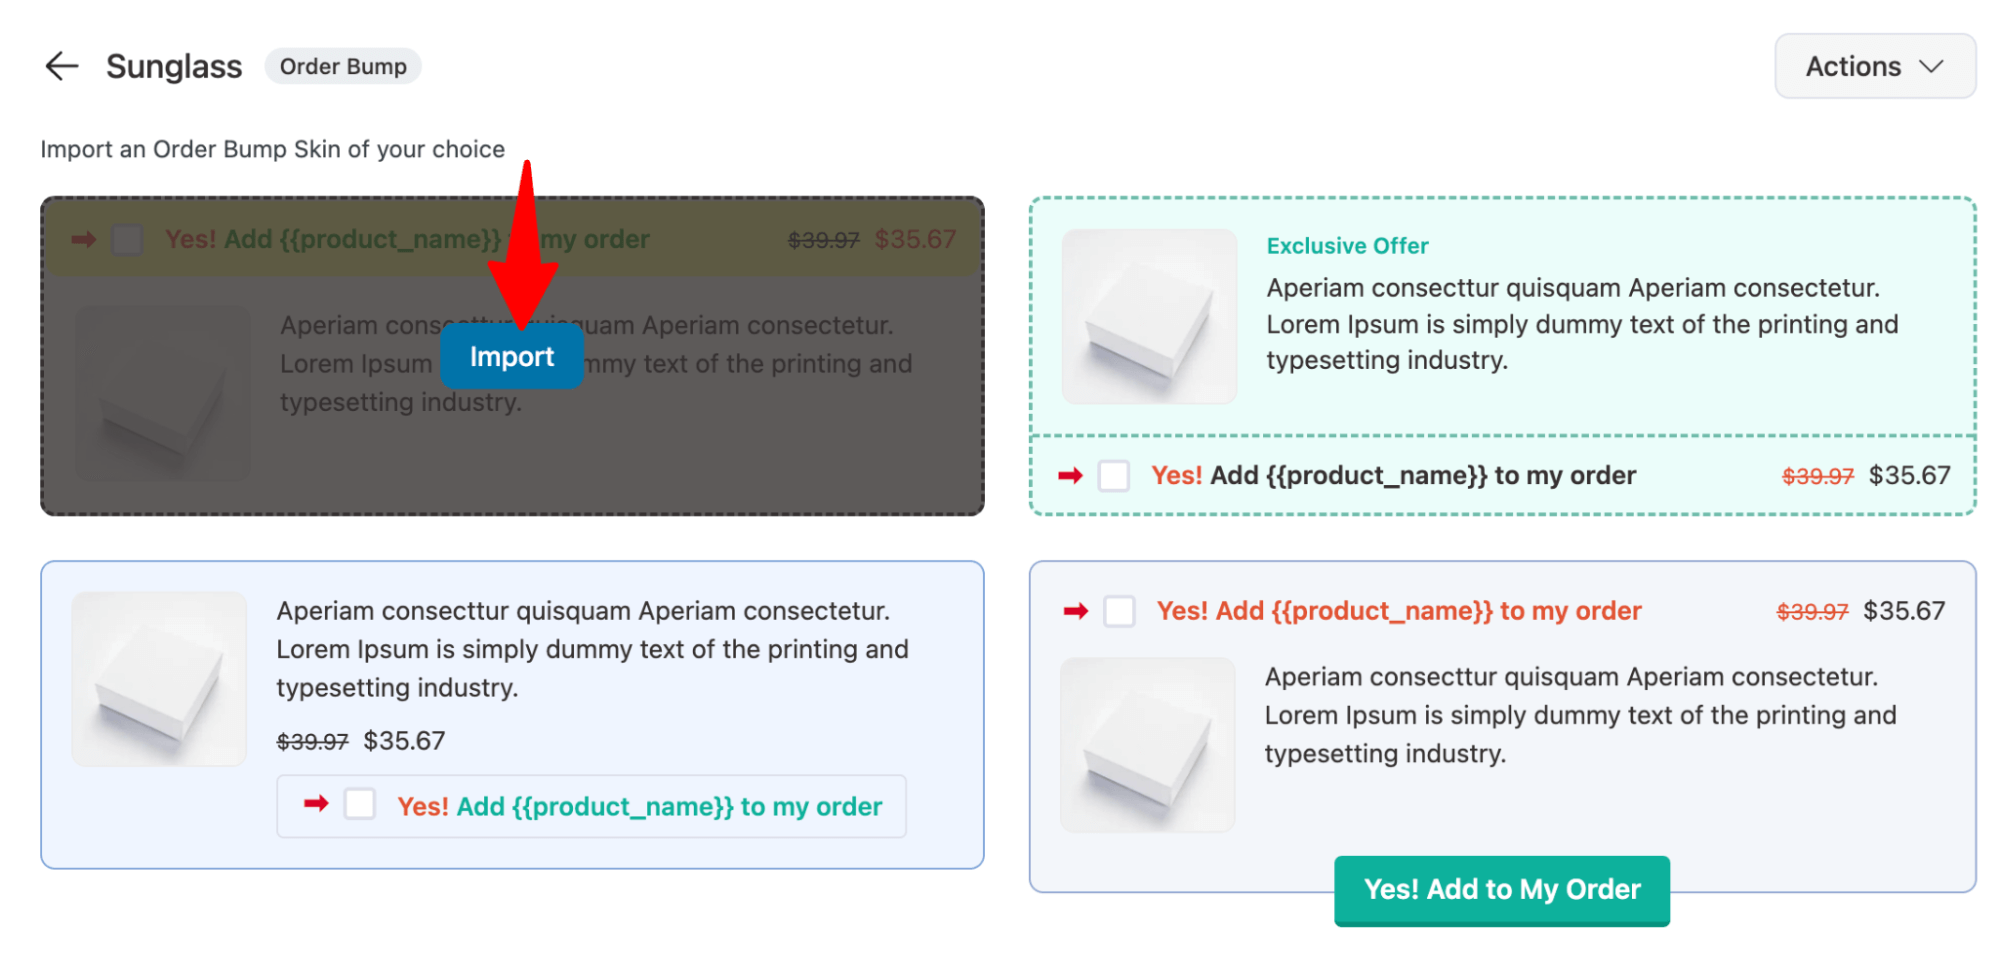
After that, choose an order bump skin. Hover on the skin you like and click on Import.
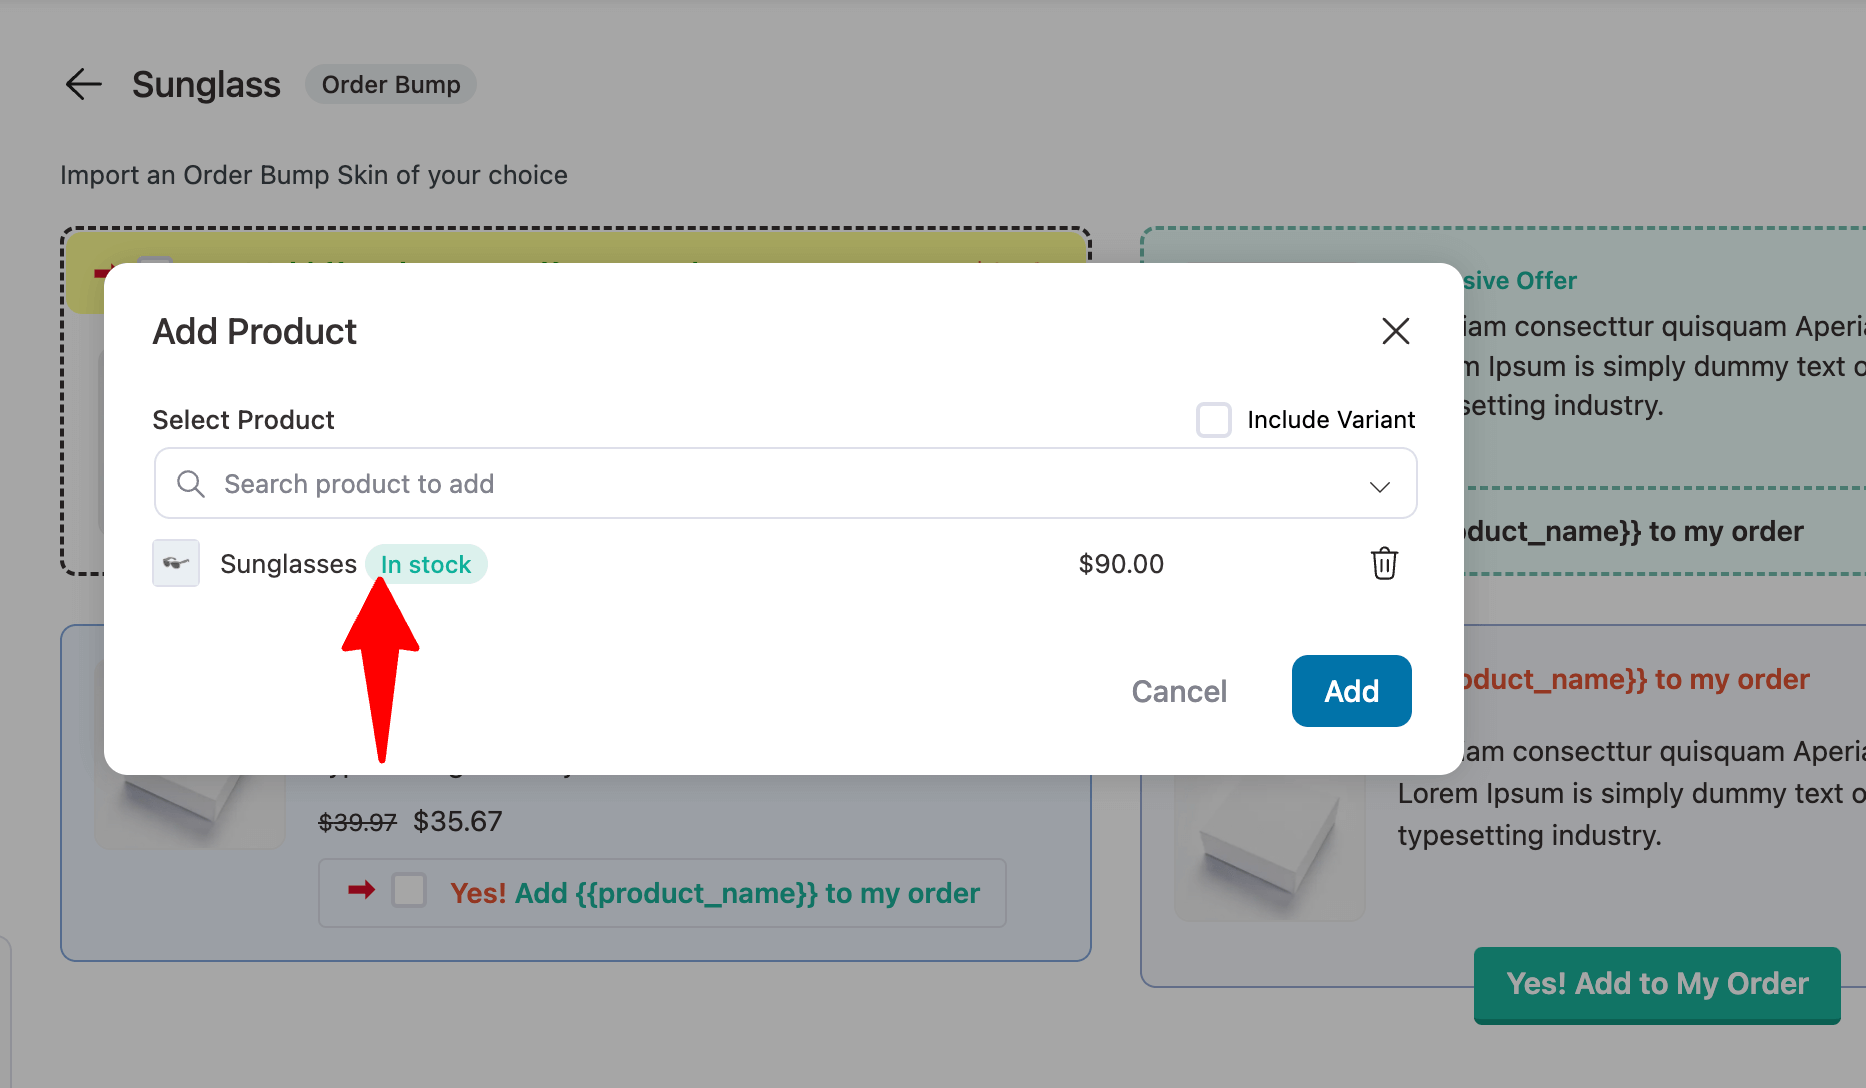
Now, search for the product and click on ‘Add’.
This will add an order bump step to your store checkout funnel.
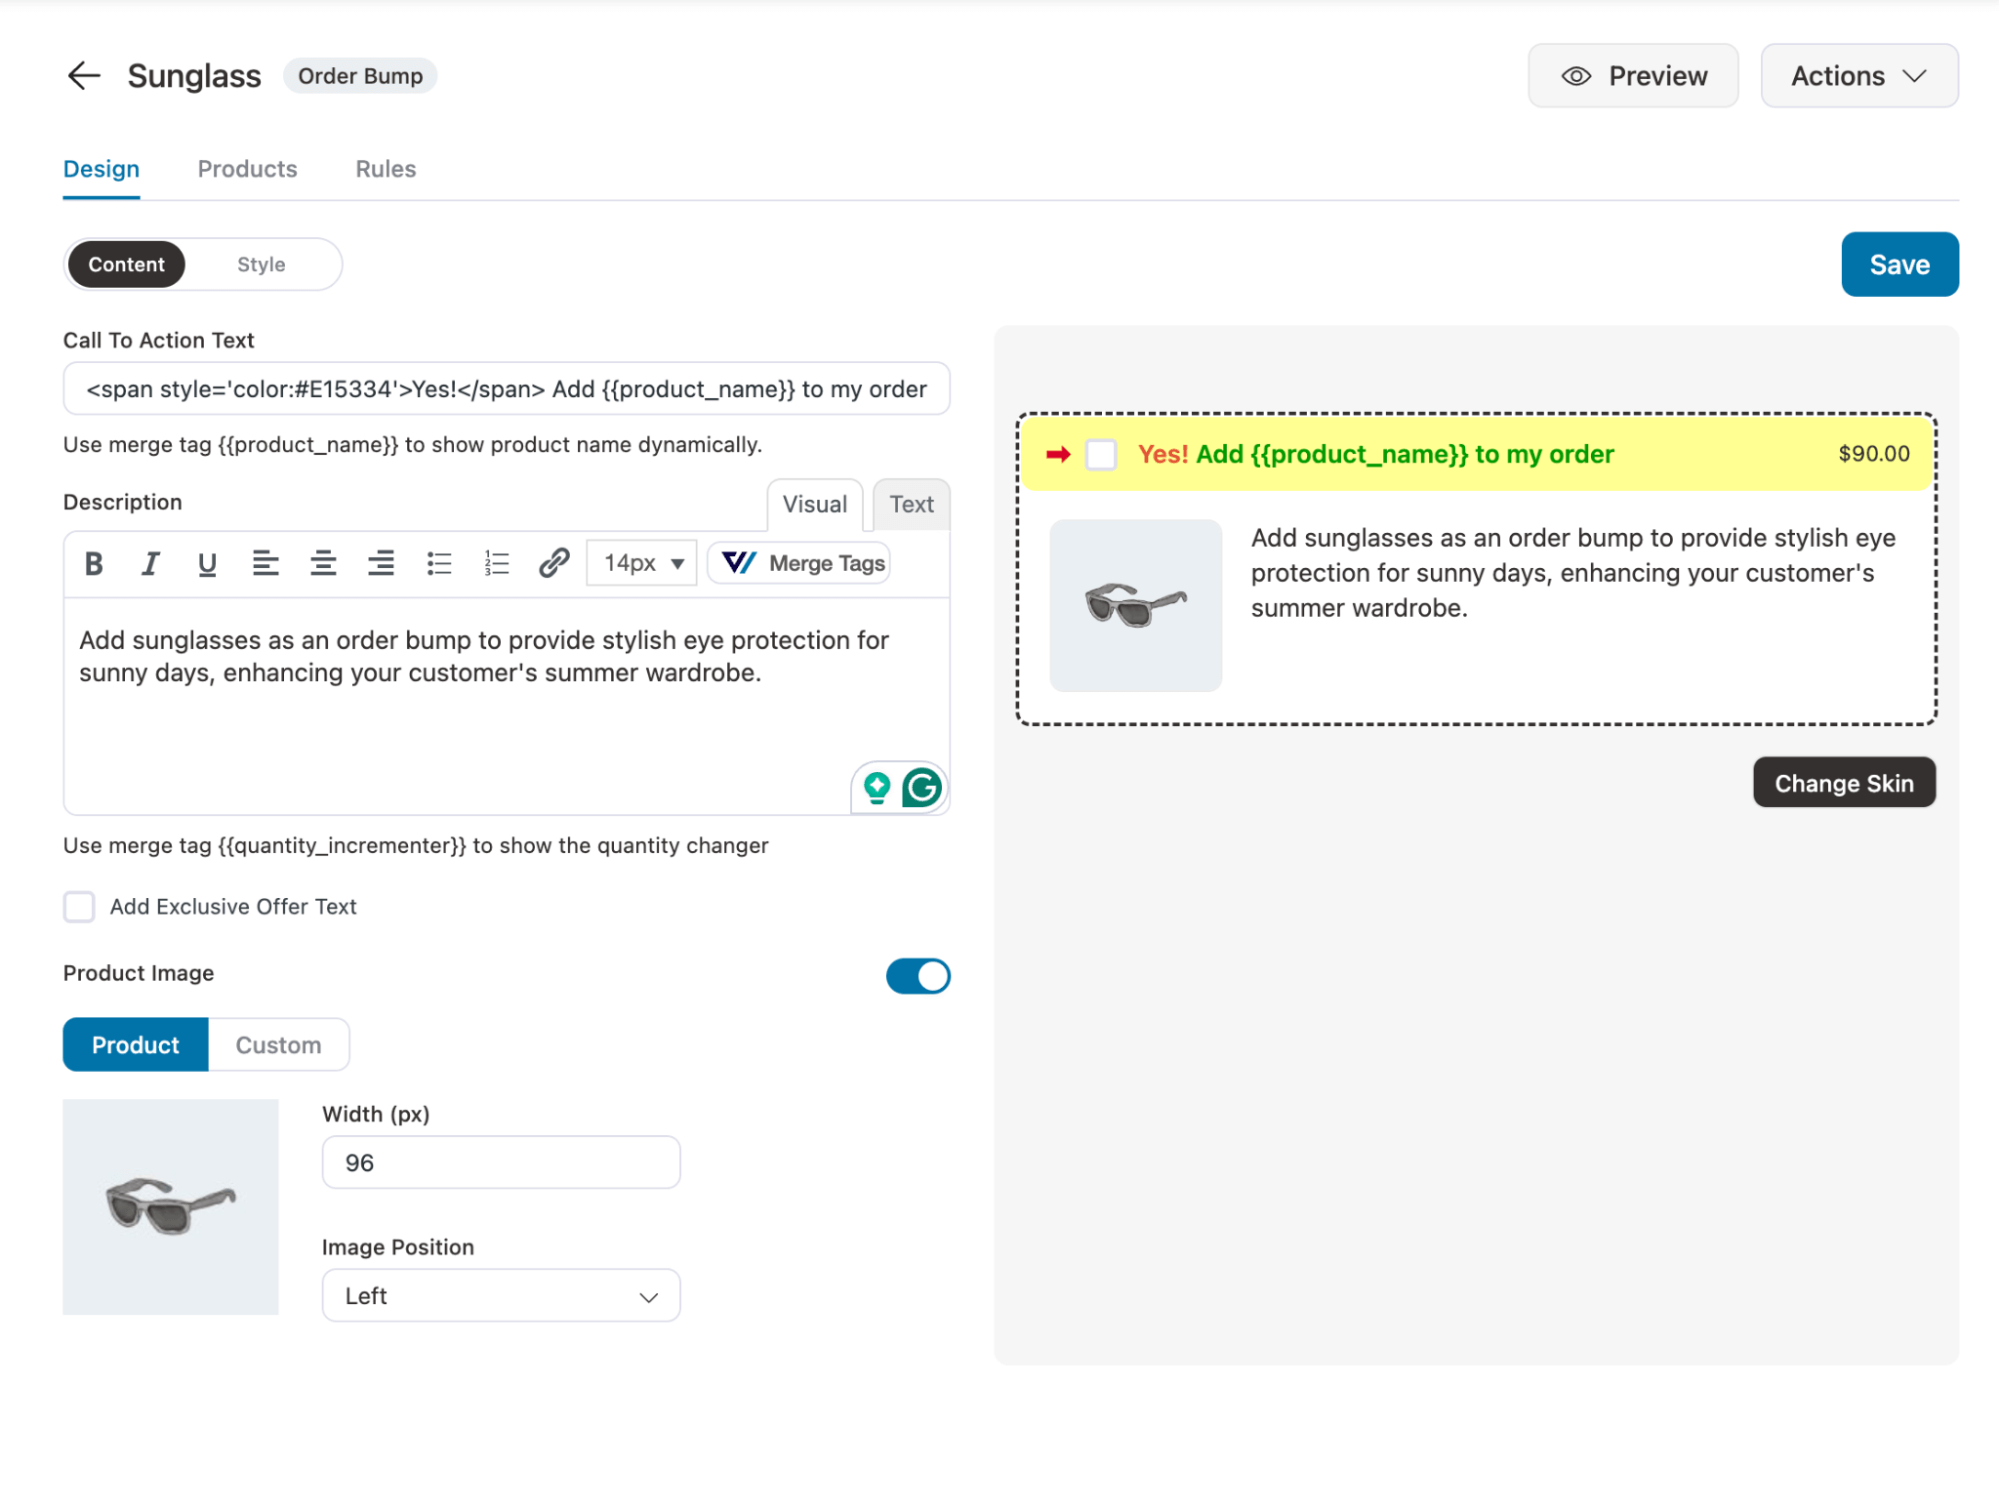
Step 3: Customize the content and style of order bump offers
Set the call-to-action text and description that will show up on the checkout page.
Move to the Style tab. Here, you can choose the position where the order bump will show up on the checkout page.
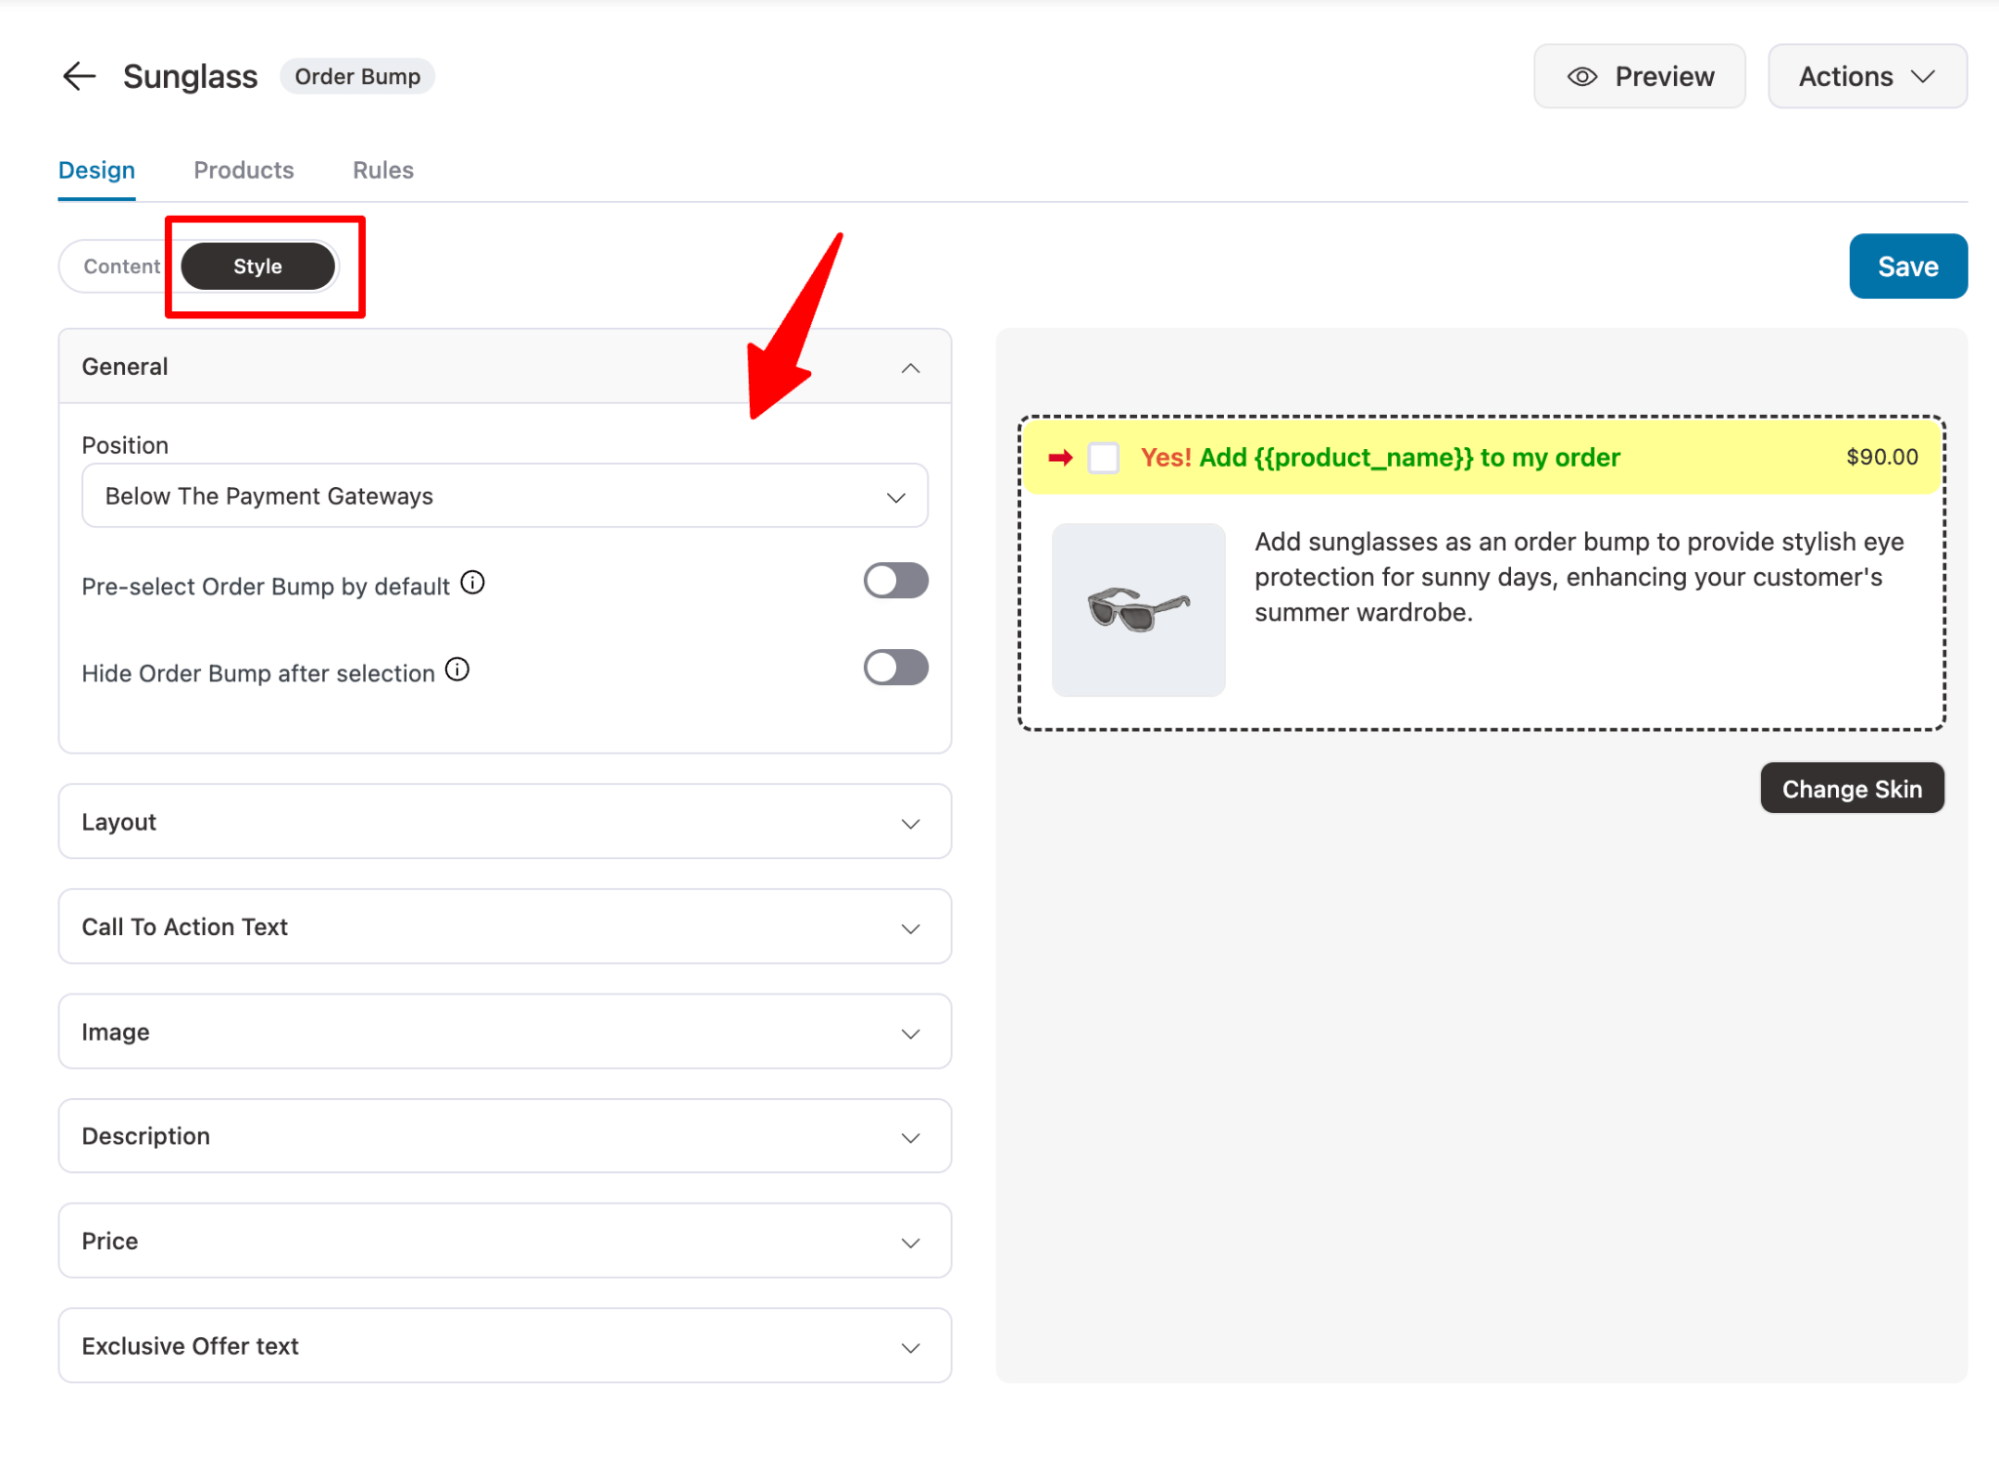
Make sure to click on Save to update the changes.
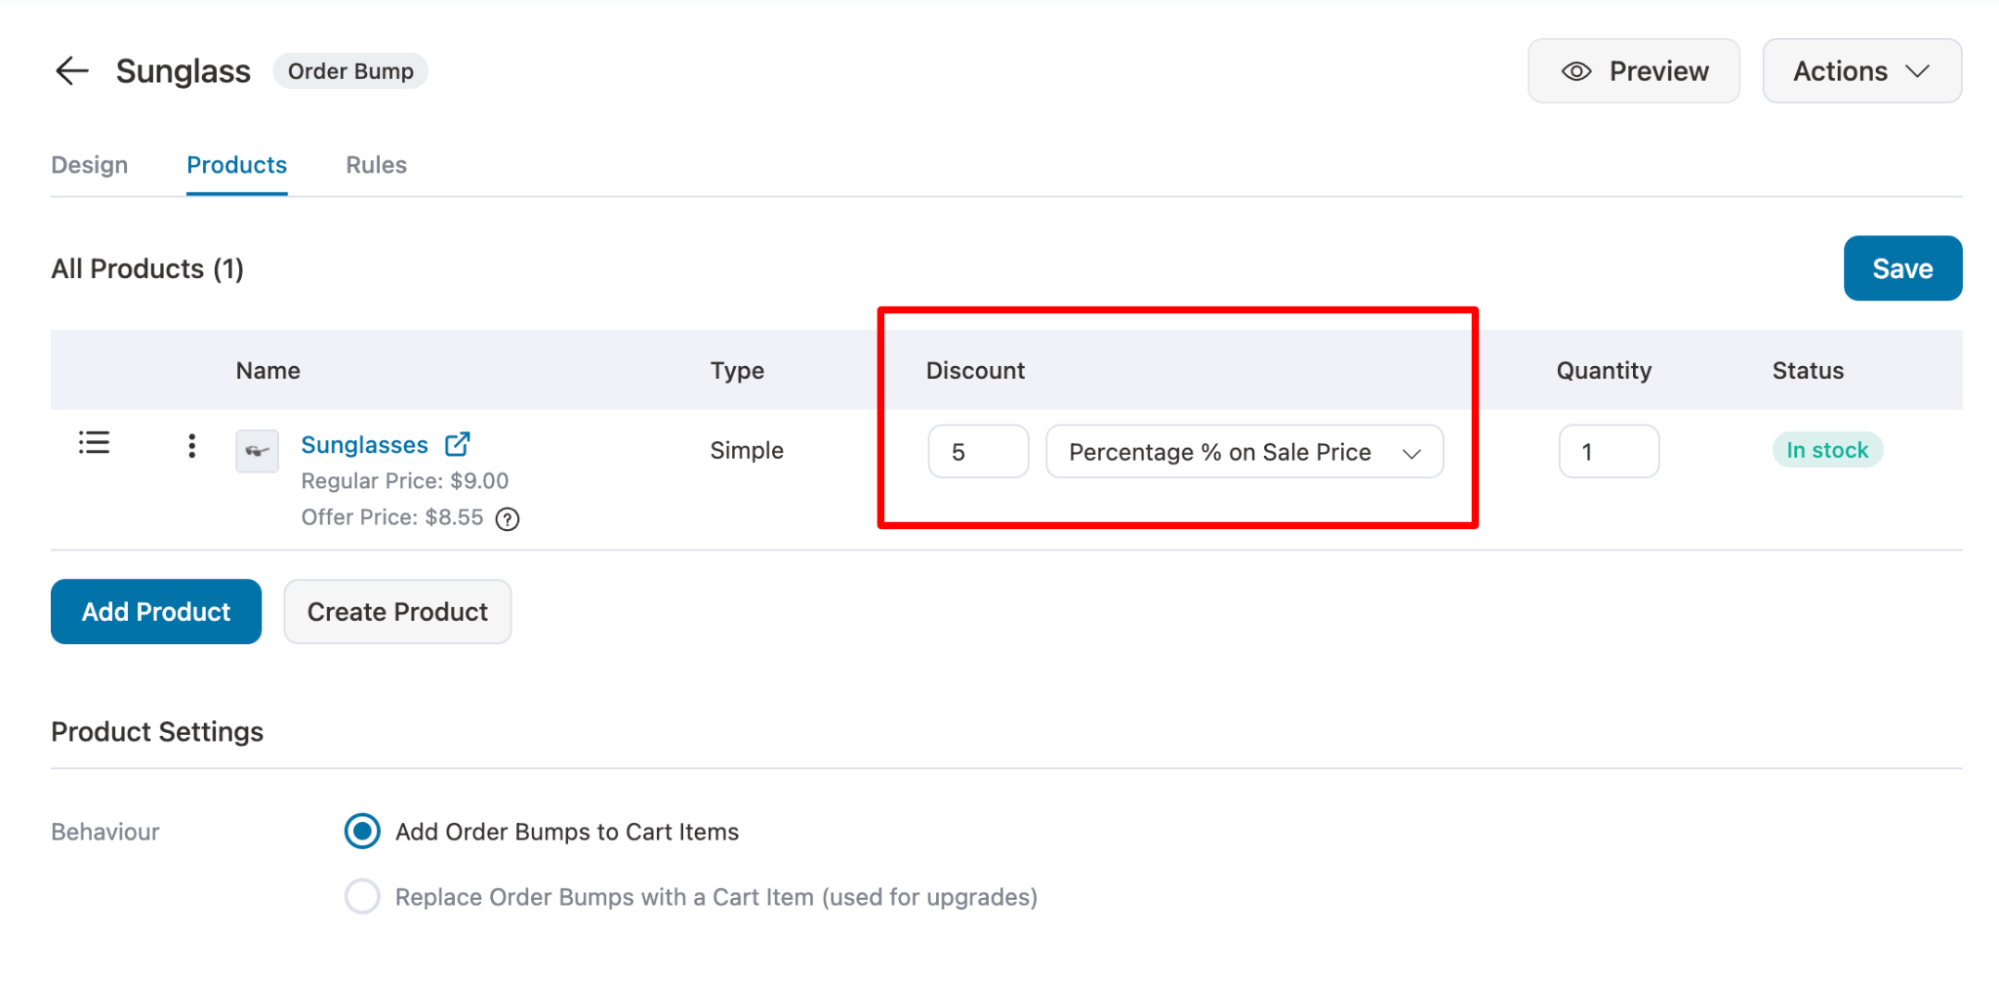
Once you have added the offer, you can discount the order bump and specify a quantity. You can also select the display behavior and placement on the checkout page.
Step 4: Add conditions to offer personalized recommendations
Offering the same order bumps for every order may not always lead to conversions.
To ensure a higher conversion rate for your product recommendations on the checkout page, you must provide relevant order bumps that align with each customer's needs and preferences.
For example, if someone buys from the summer clothing category, you can offer sunglasses as a complementary product that enhances the customer's purchase experience and increases the likelihood of conversion.
To do so, move to the Rules tab and click on “Add Rules”. Next, select the "Cart Category(s)" rule, set the condition to "matches any of," and add the categories.
This will trigger the order bump only if someone buys from the preset category.
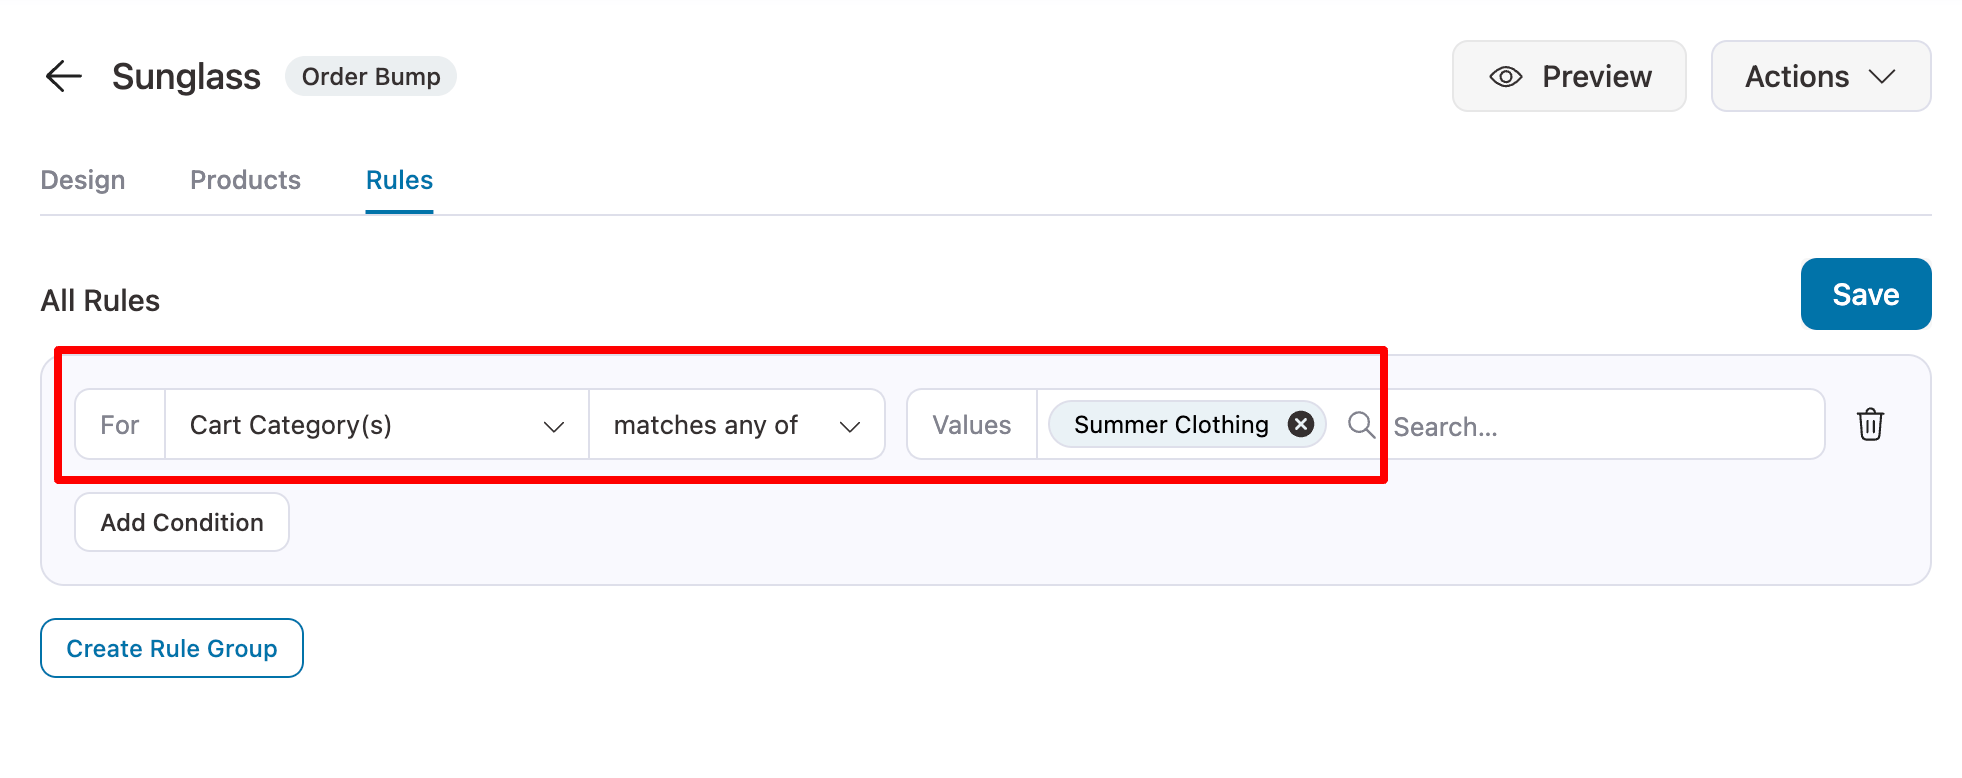
Make sure to click on Save.
Similarly, you can create another order bump; for instance, offer a makeup wipe if someone purchases from the beauty category.
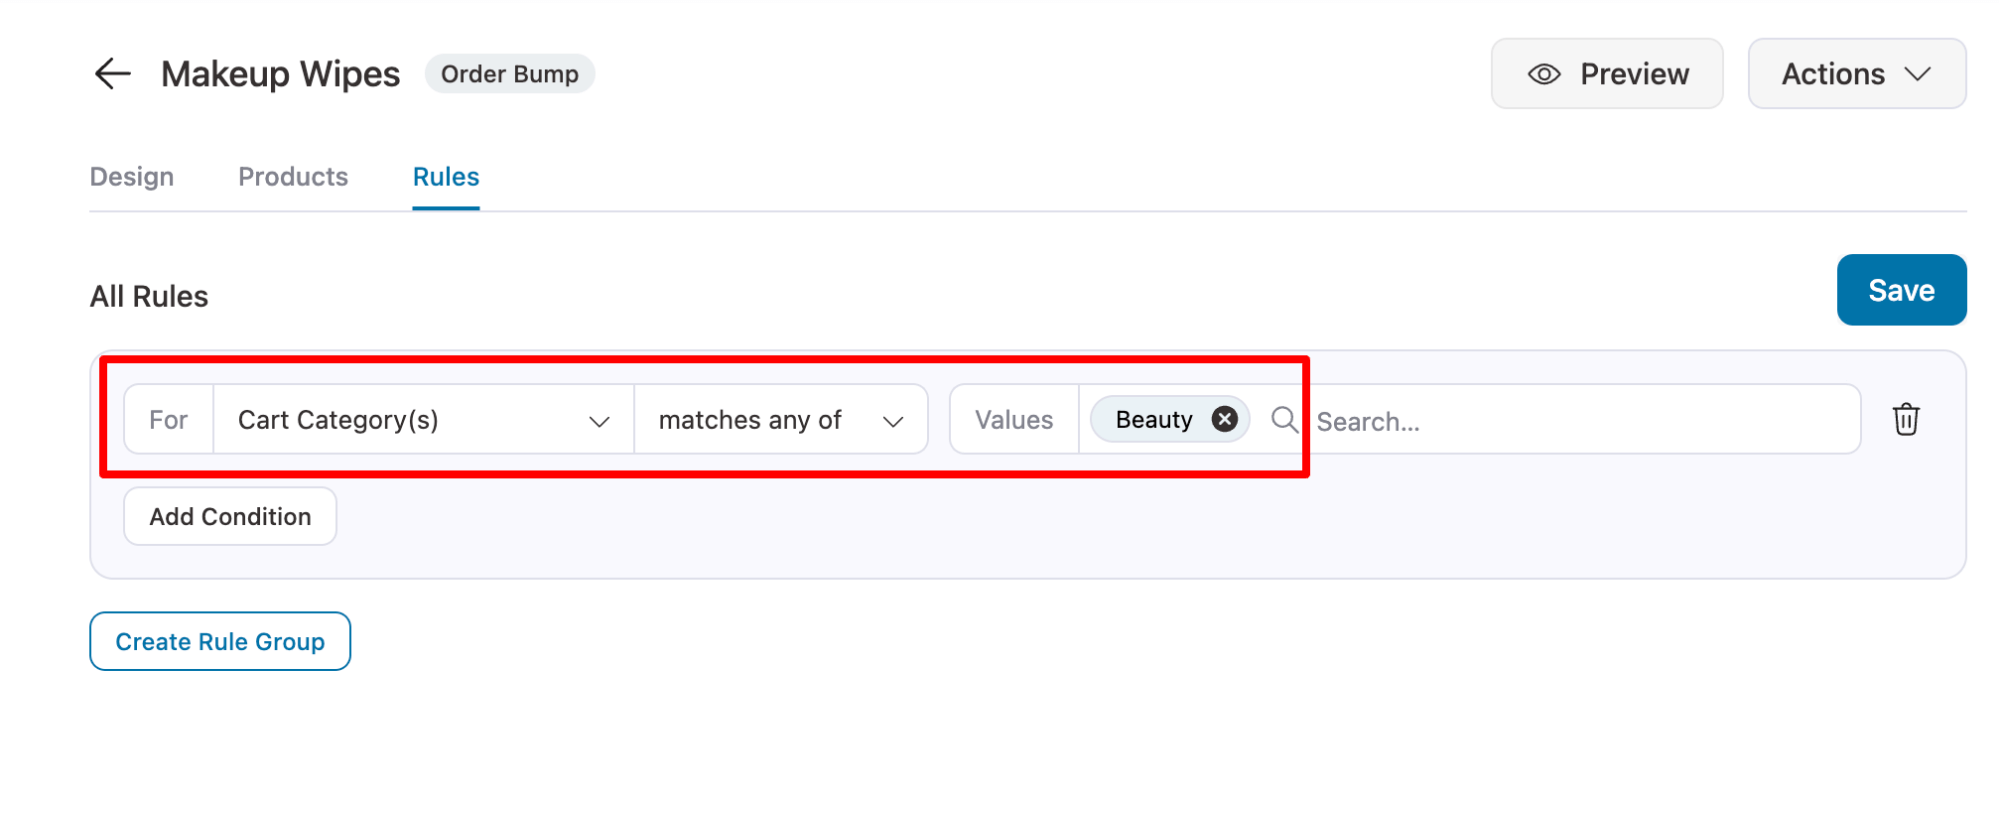
You can add as many order bumps as you want, and to make them more relevant, FunnelKit offers various criteria like cart items, order details, customer history, geography, and more, which you can use to tailor your offers.
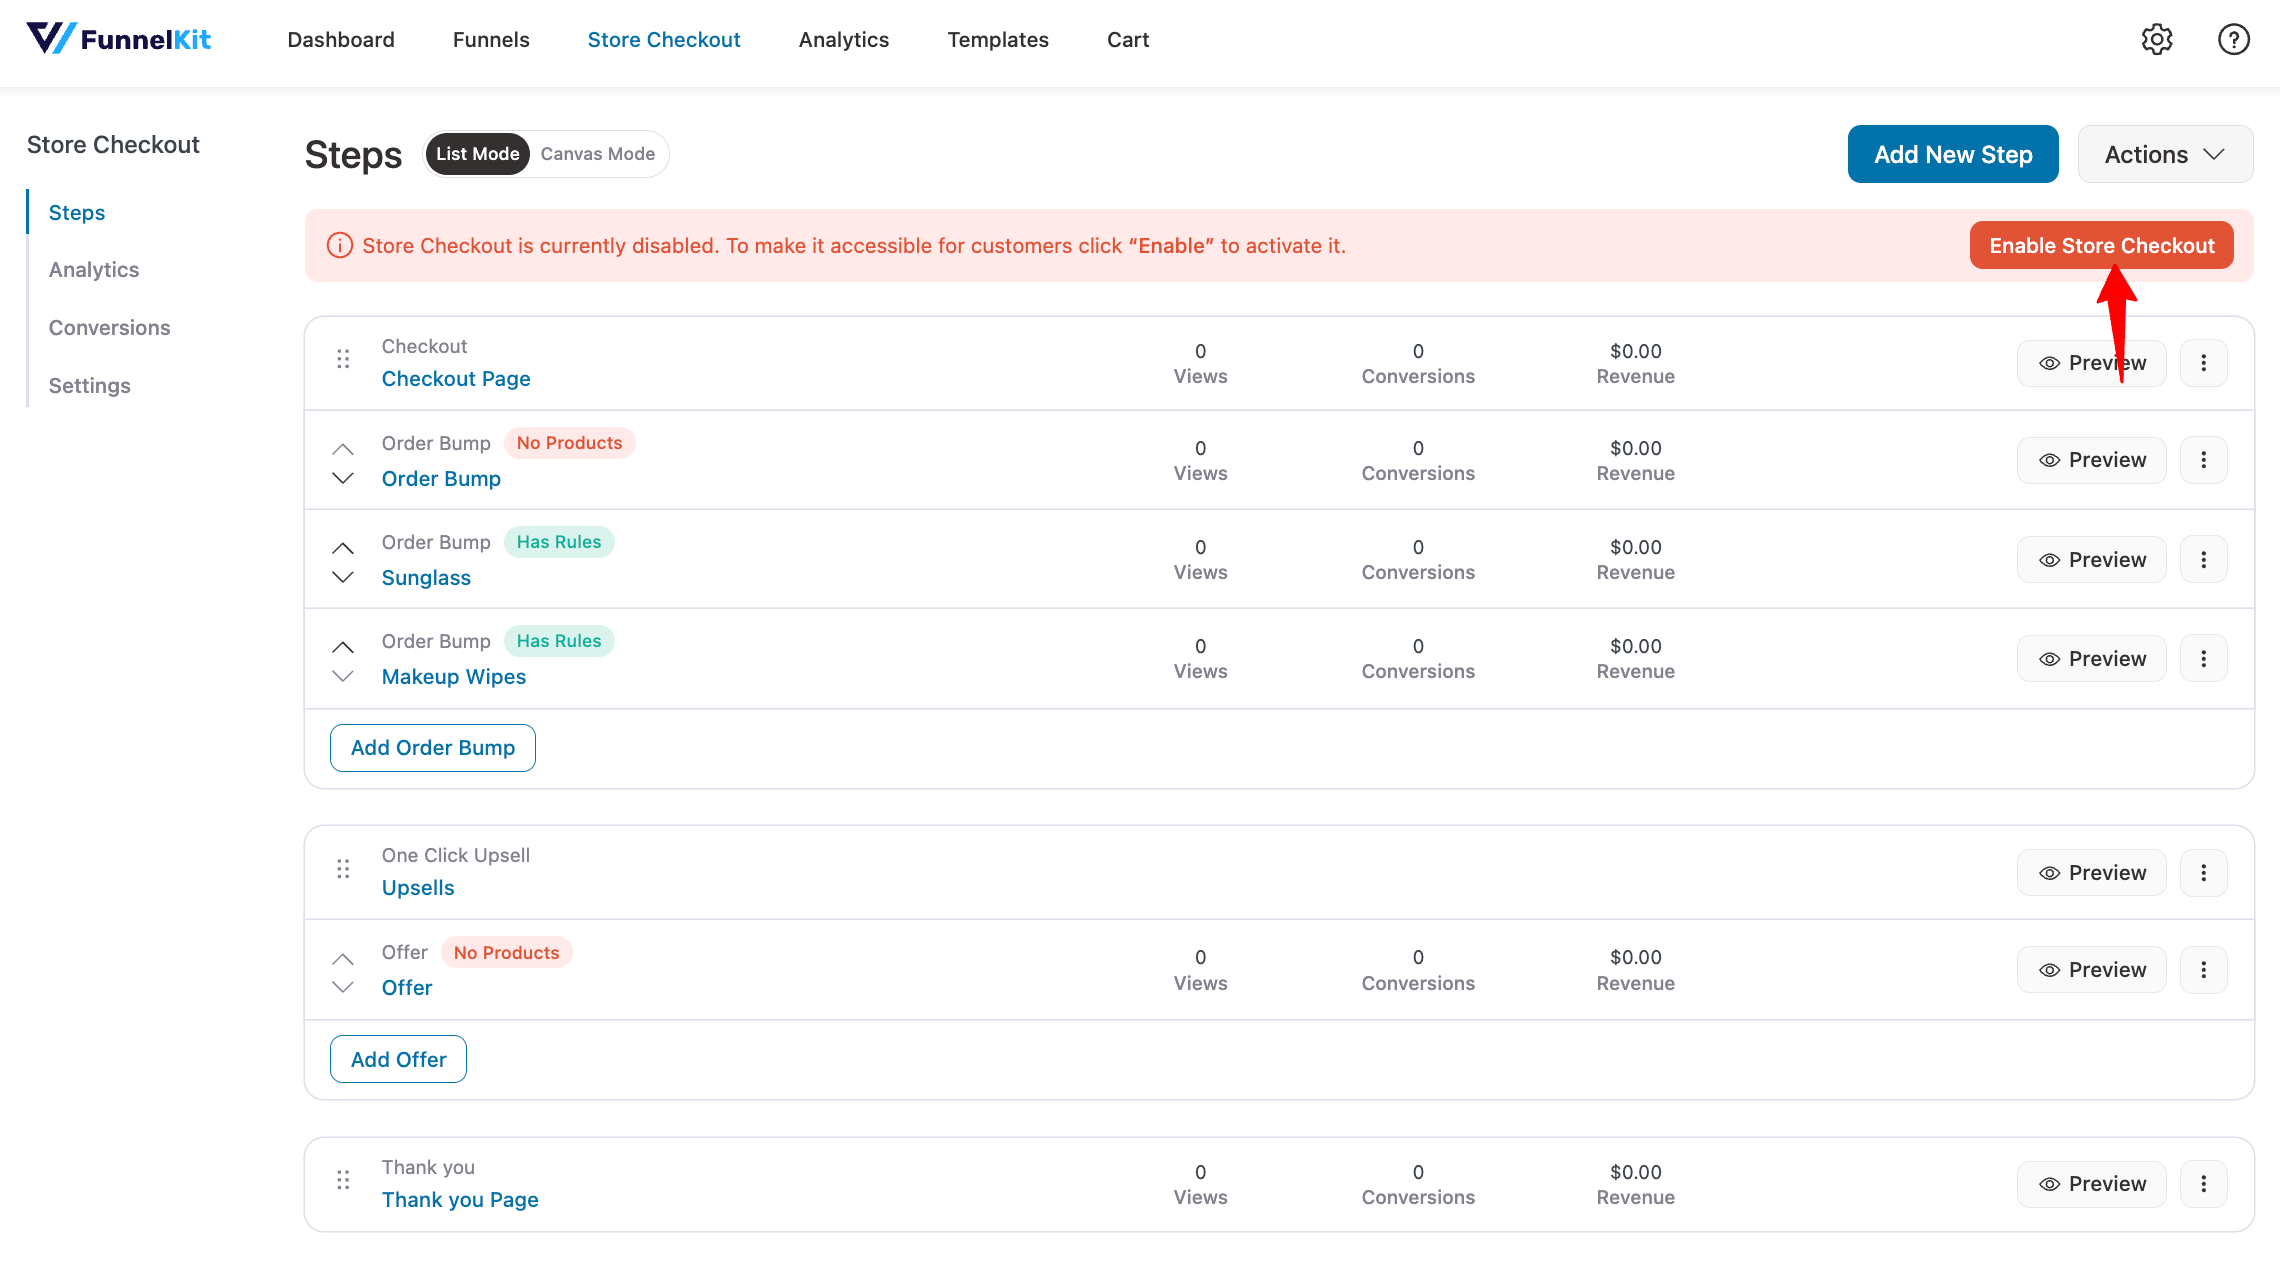
Step 5: Activate the store checkout
After setting up the personalized product recommendations as order bumps, it is time to activate the store checkout.
To do so, enable the “Enable Store Checkout” option.
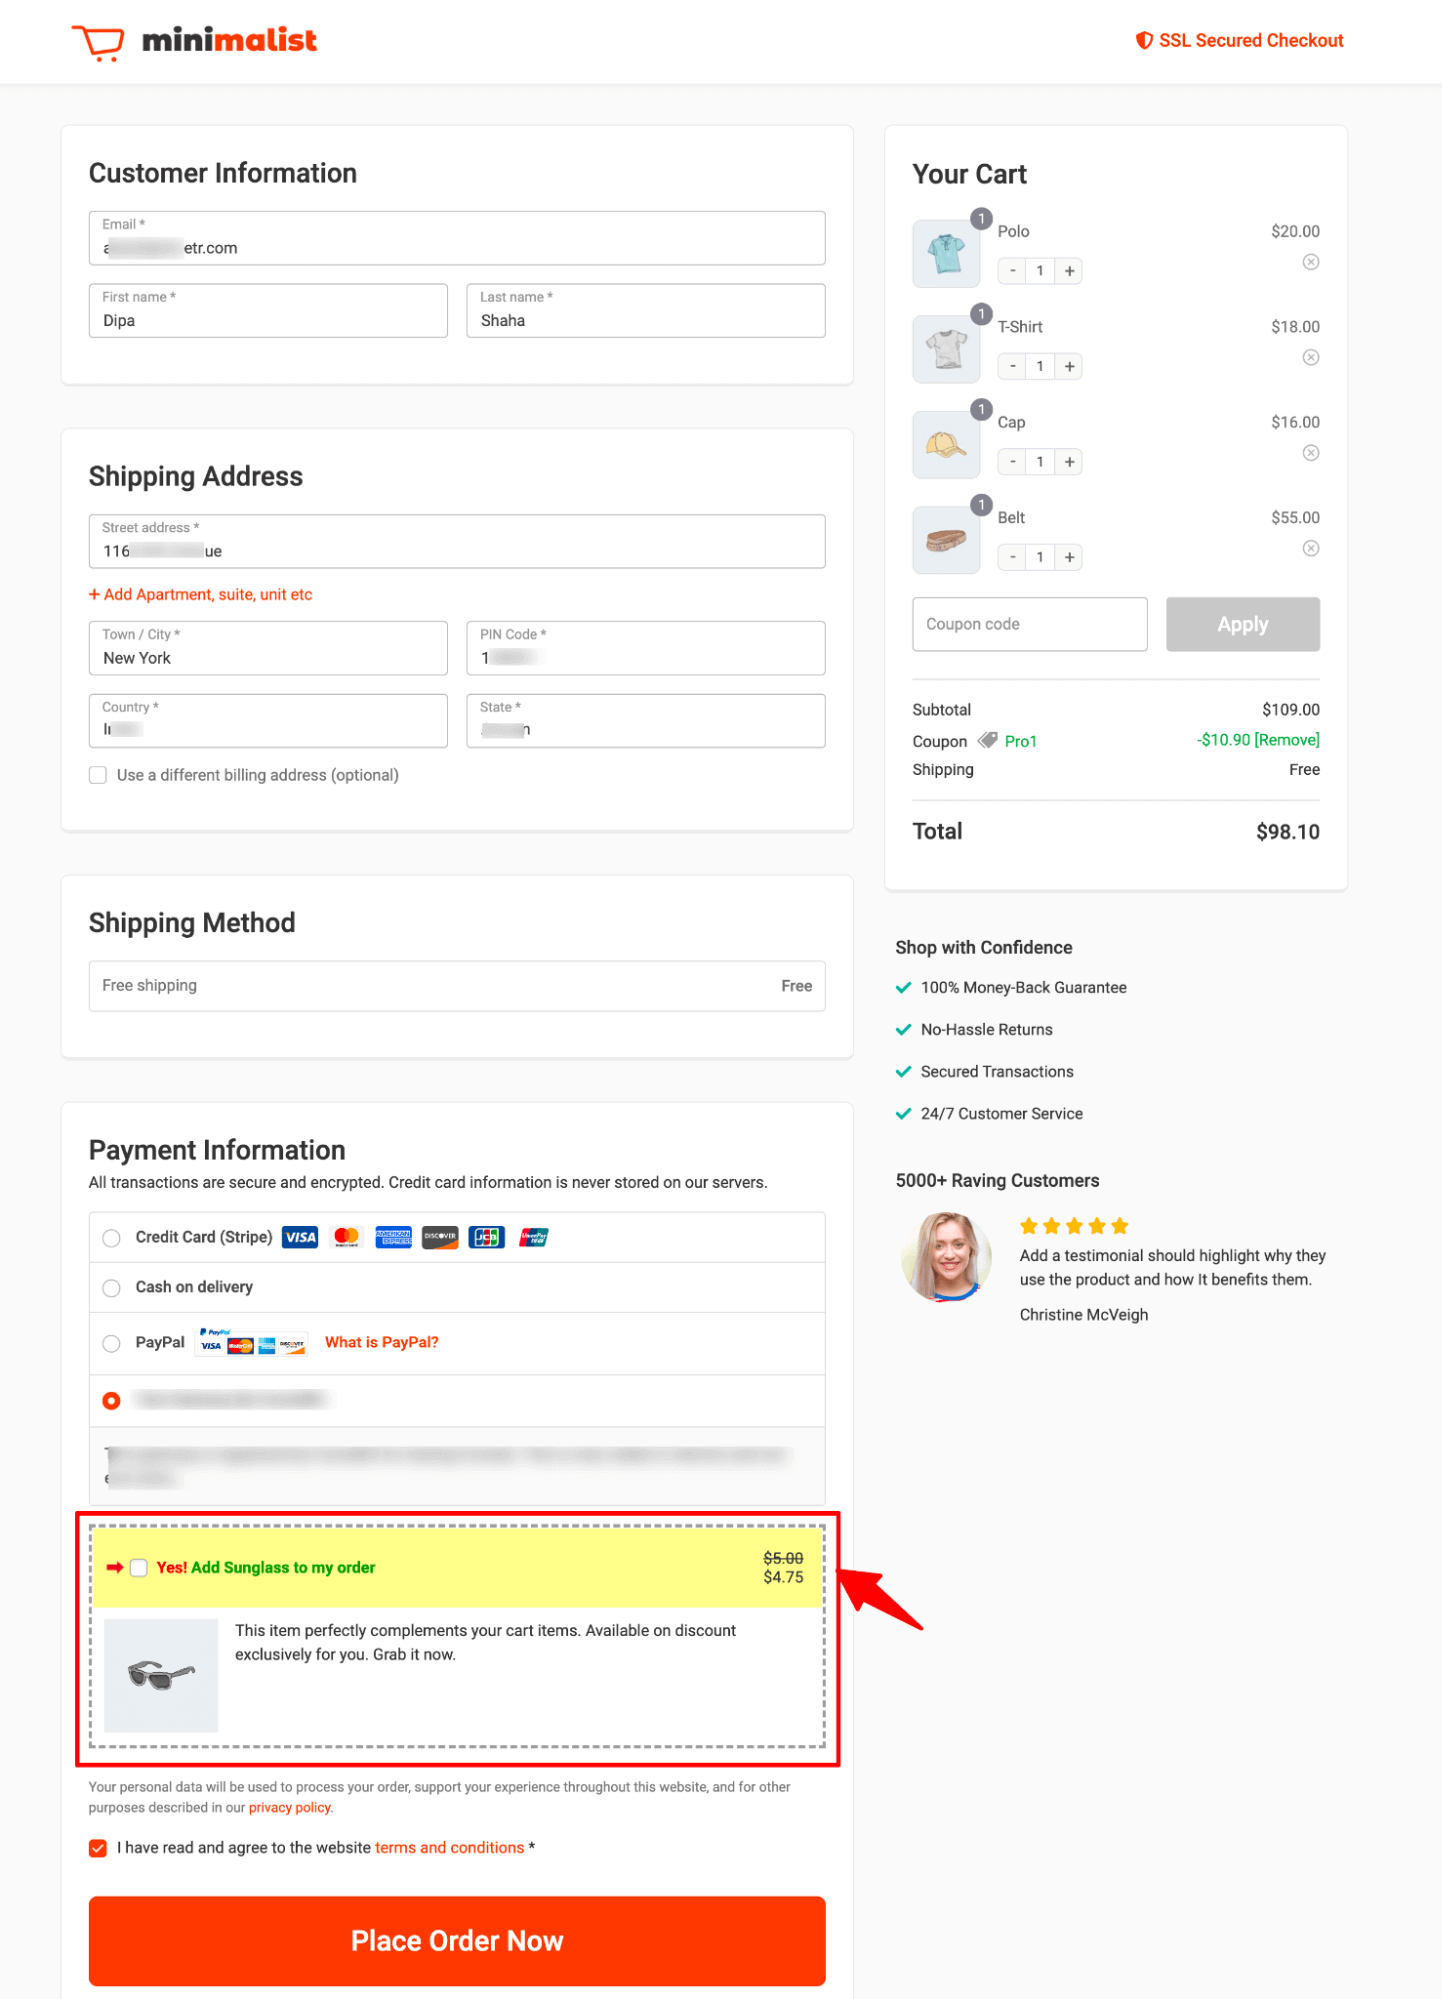
Here is a preview of what an order bump looks like on the checkout page:
Method 5: Offer Upsells Post-Checkout to Capitalize on Buying Momentum and Boost Order Value
Why recommend products right after checkout?
People have the strongest buying intent right on the checkout page. Offering highly relevant complementary items just before they hit the "Place Order" button can be a powerful way to boost sales.
You can make this easy by presenting product recommendations as order bumps, allowing customers to add them to their cart with just one click, increasing the order value effortlessly.
Here is how you can recommend a one-click post-purchase upsell:
Method 1: Add the upsell offer
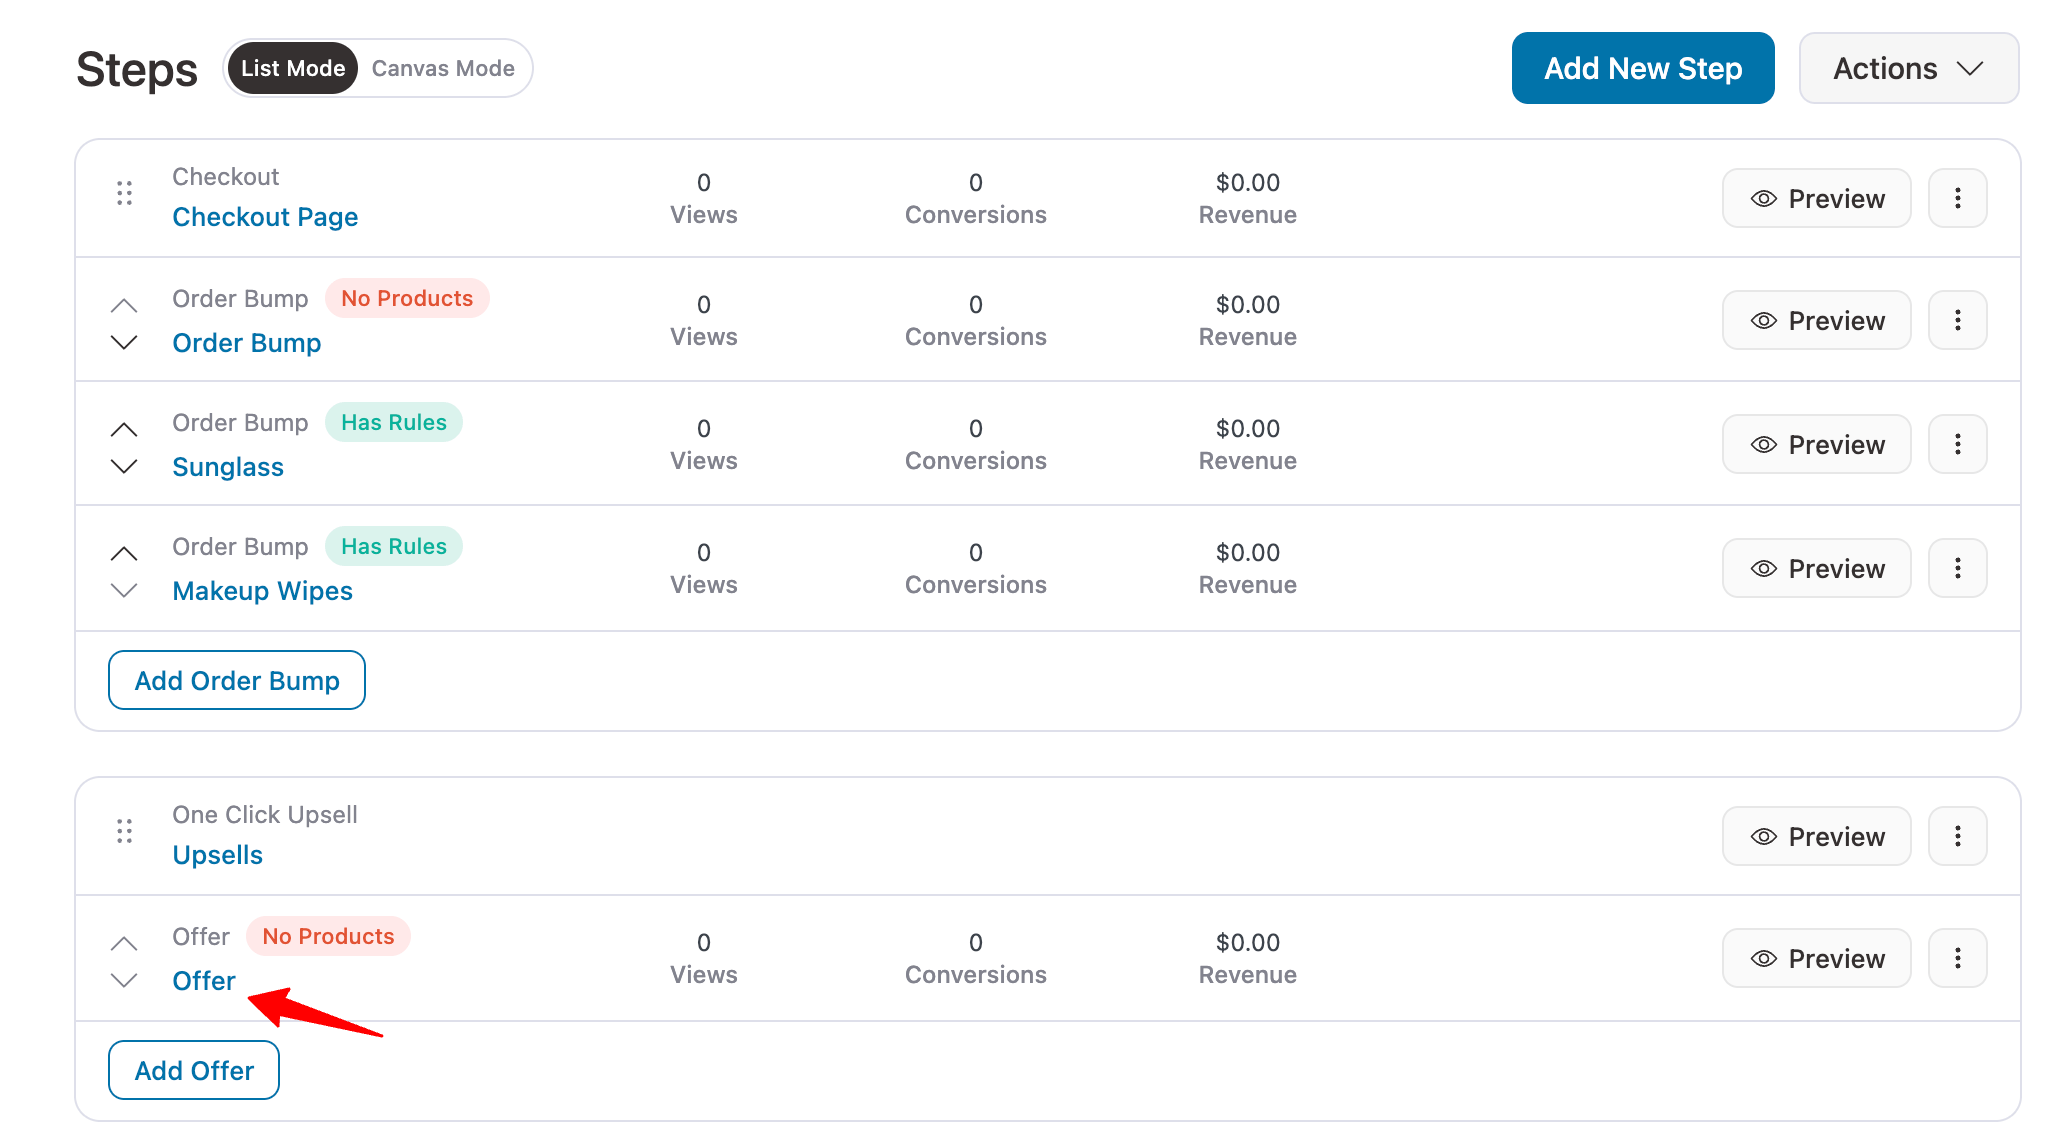
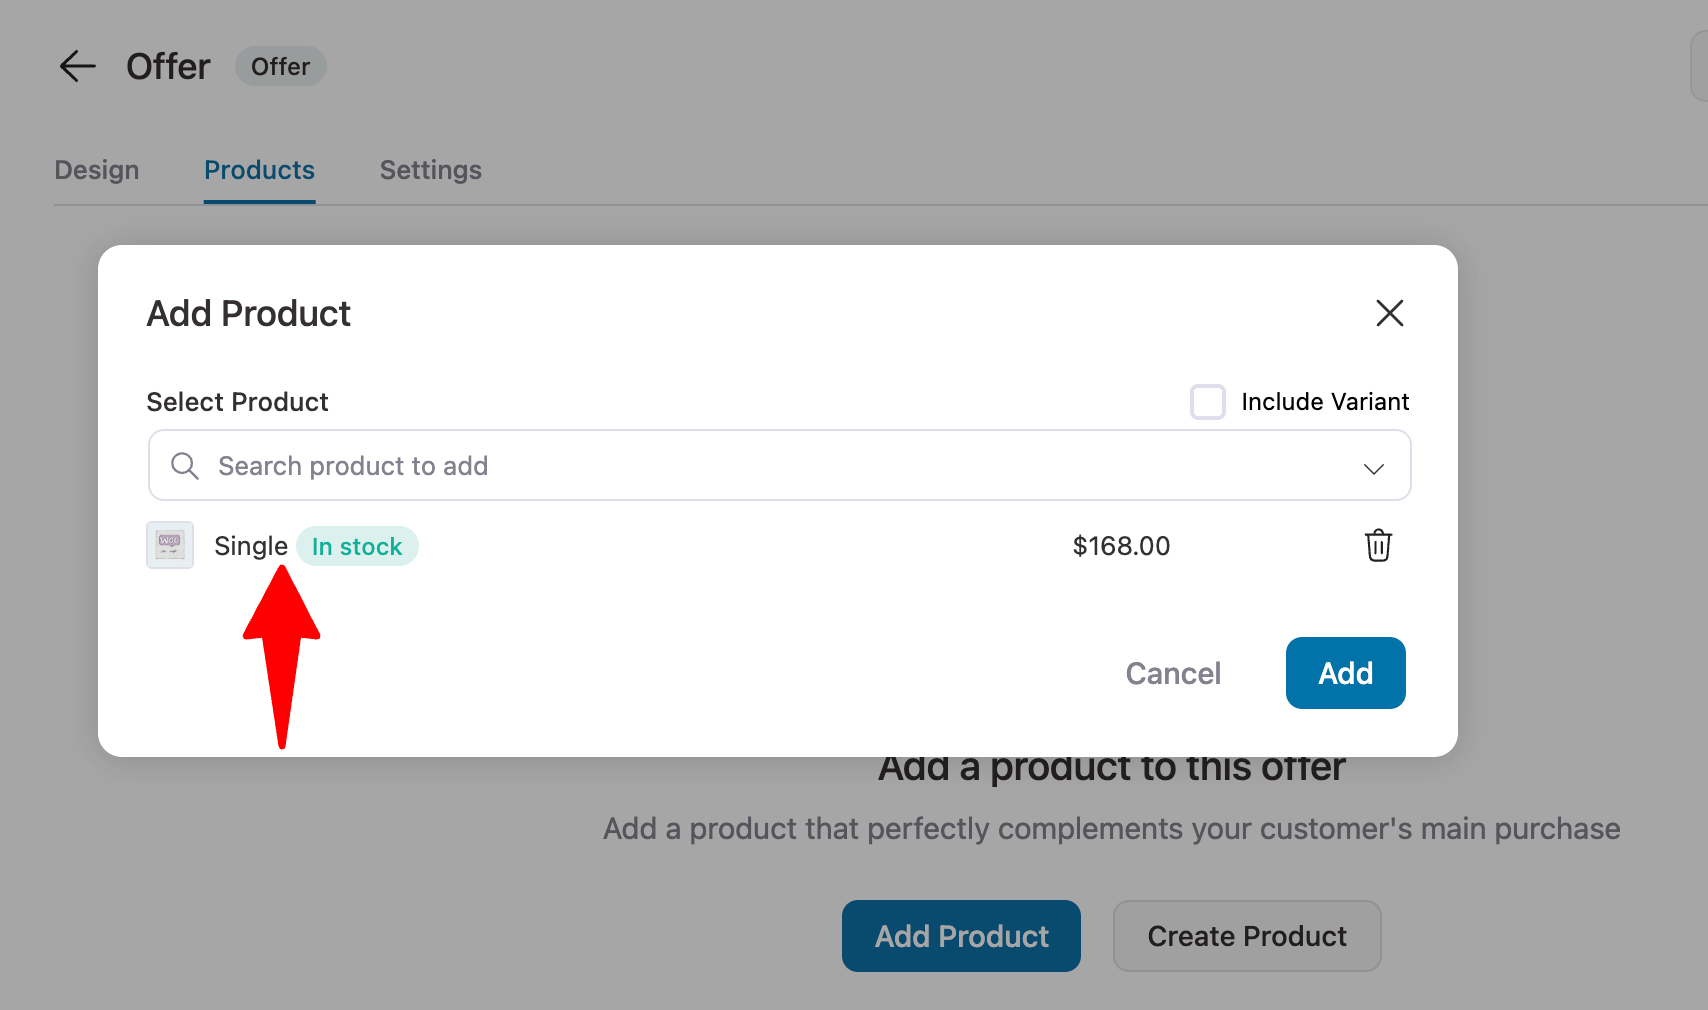
To offer post-purchase one-click upsells on your WooCommerce store, click on the Offer step.
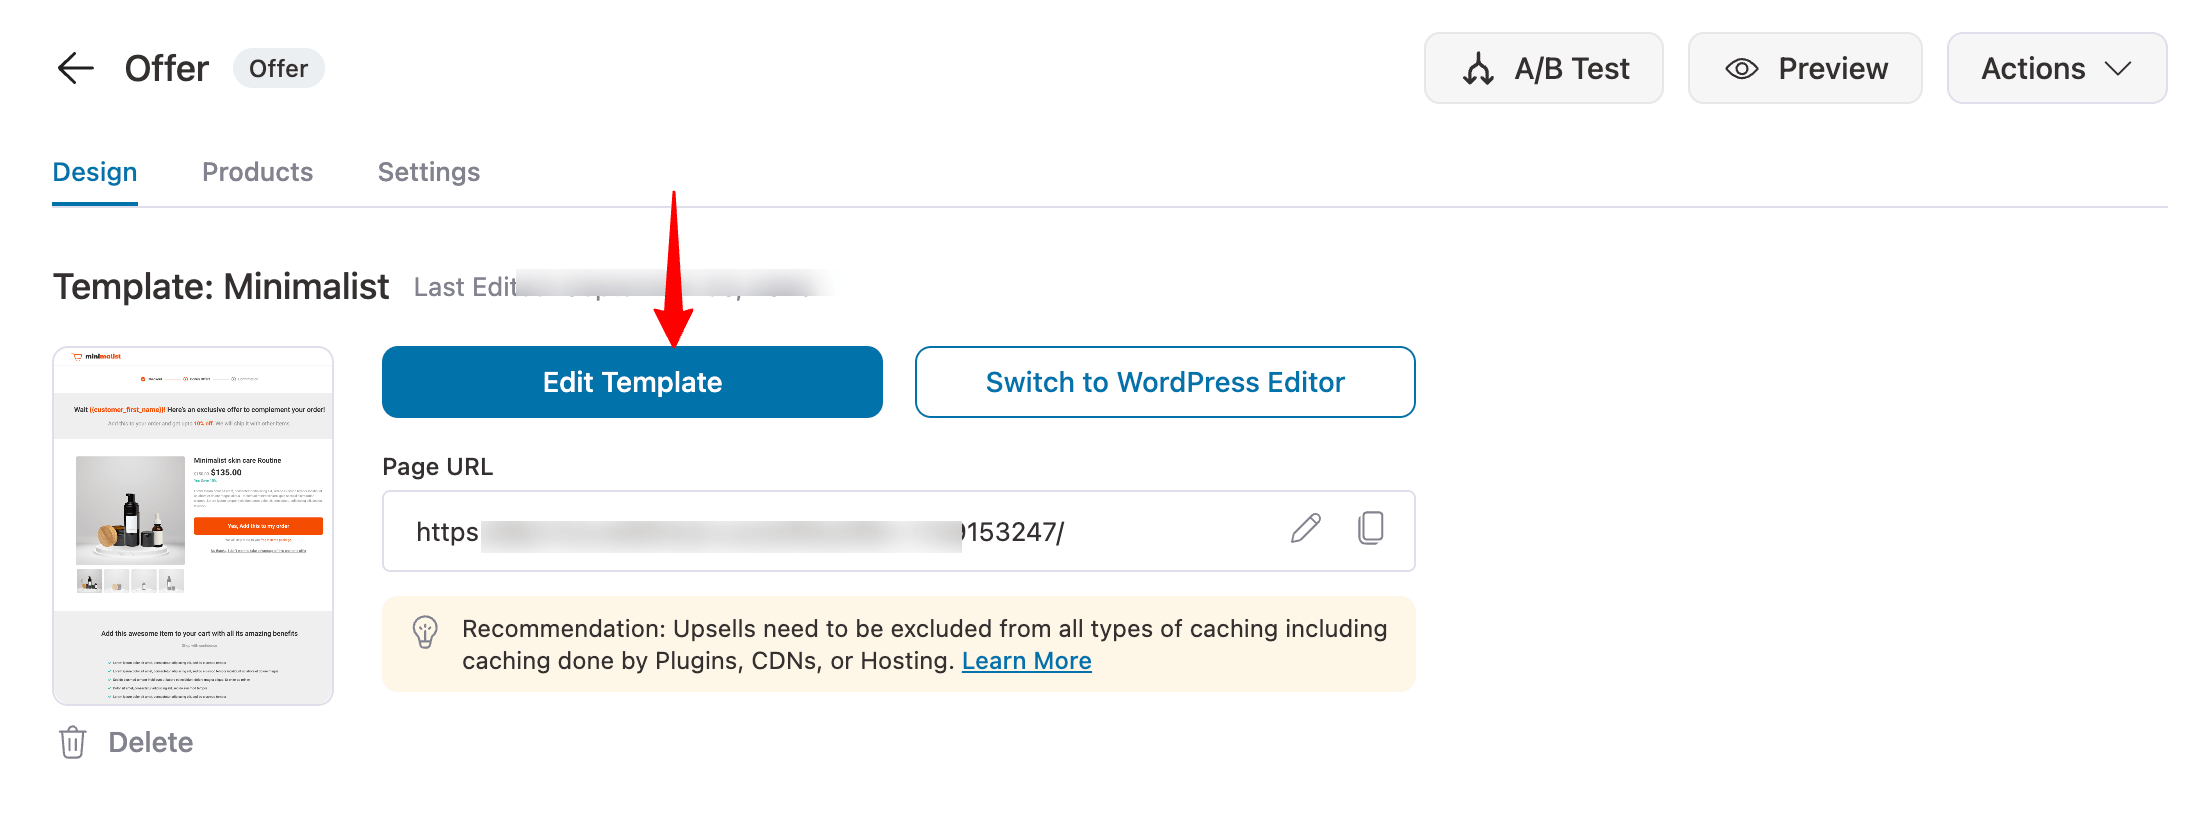
Go to the Products tab, click "Add Product,” search for the product, select it from the dropdown, and click "Add" to set it as an upsell offer.
You can offer discounts on the upsell offer to make it more lucrative and customize the settings.
It's recommended to check the option “Skip this offer if the product(s) exist in parent order”.
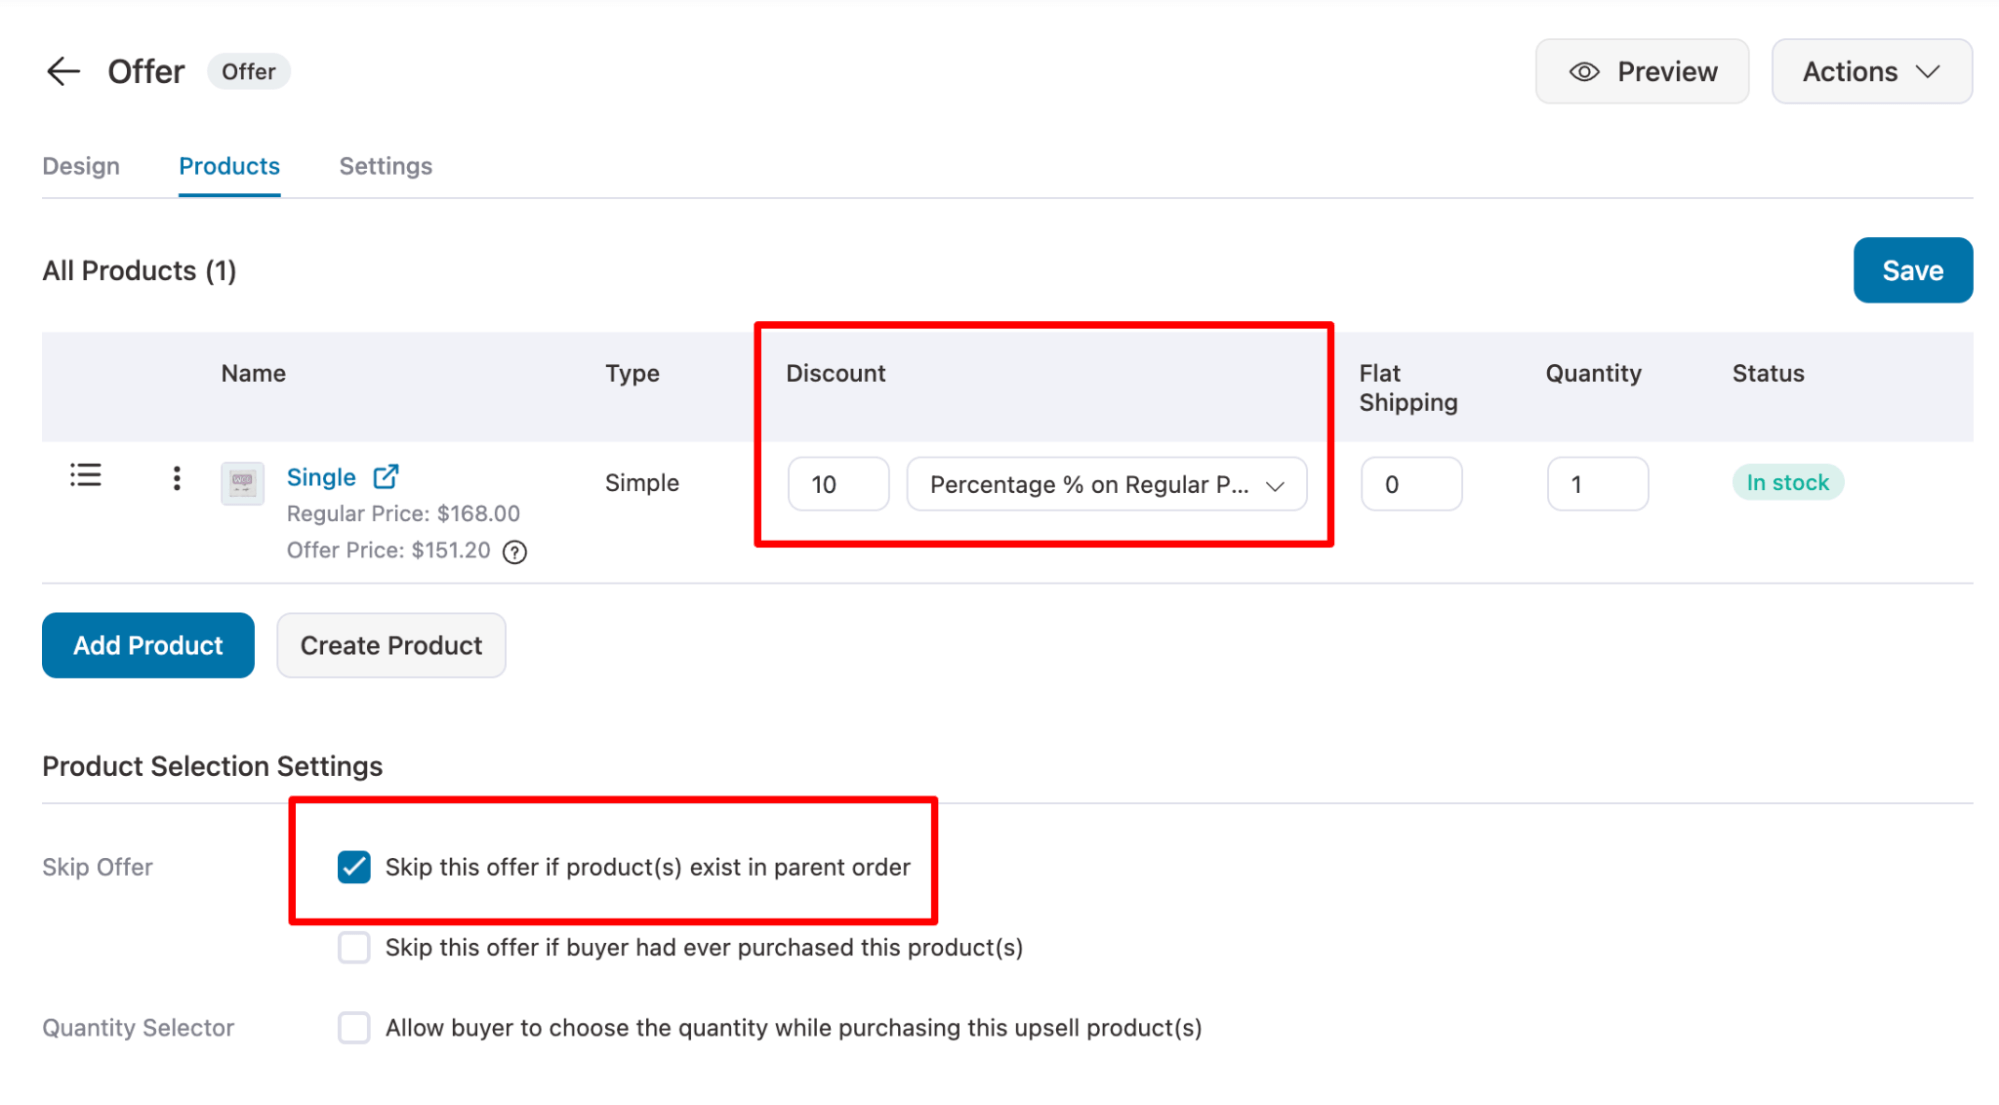
Make sure to click on Save to update.
Method 2: Add conditions to boost upsell conversion
Using conditions ensures your upsell offers are more targeted, leading to higher conversions.
For instance, by applying rules like showing upsells only for orders above a specific value, you make the offer more relevant and likely to be accepted. This way, you’re presenting the right products to the right customers at the right time.
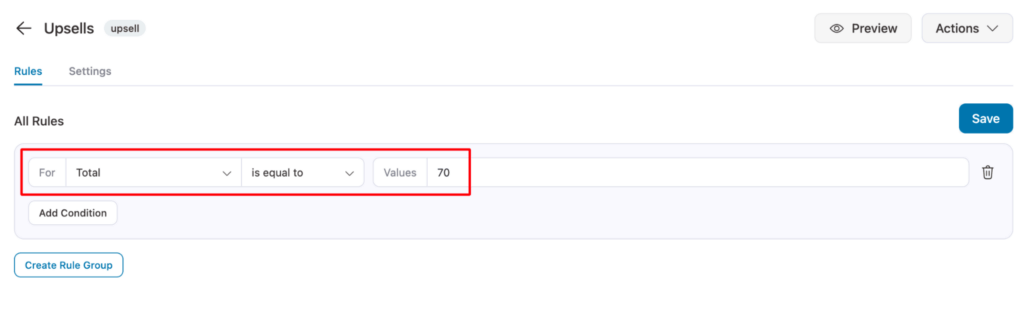
Make sure to click on the 'Save' button when done.
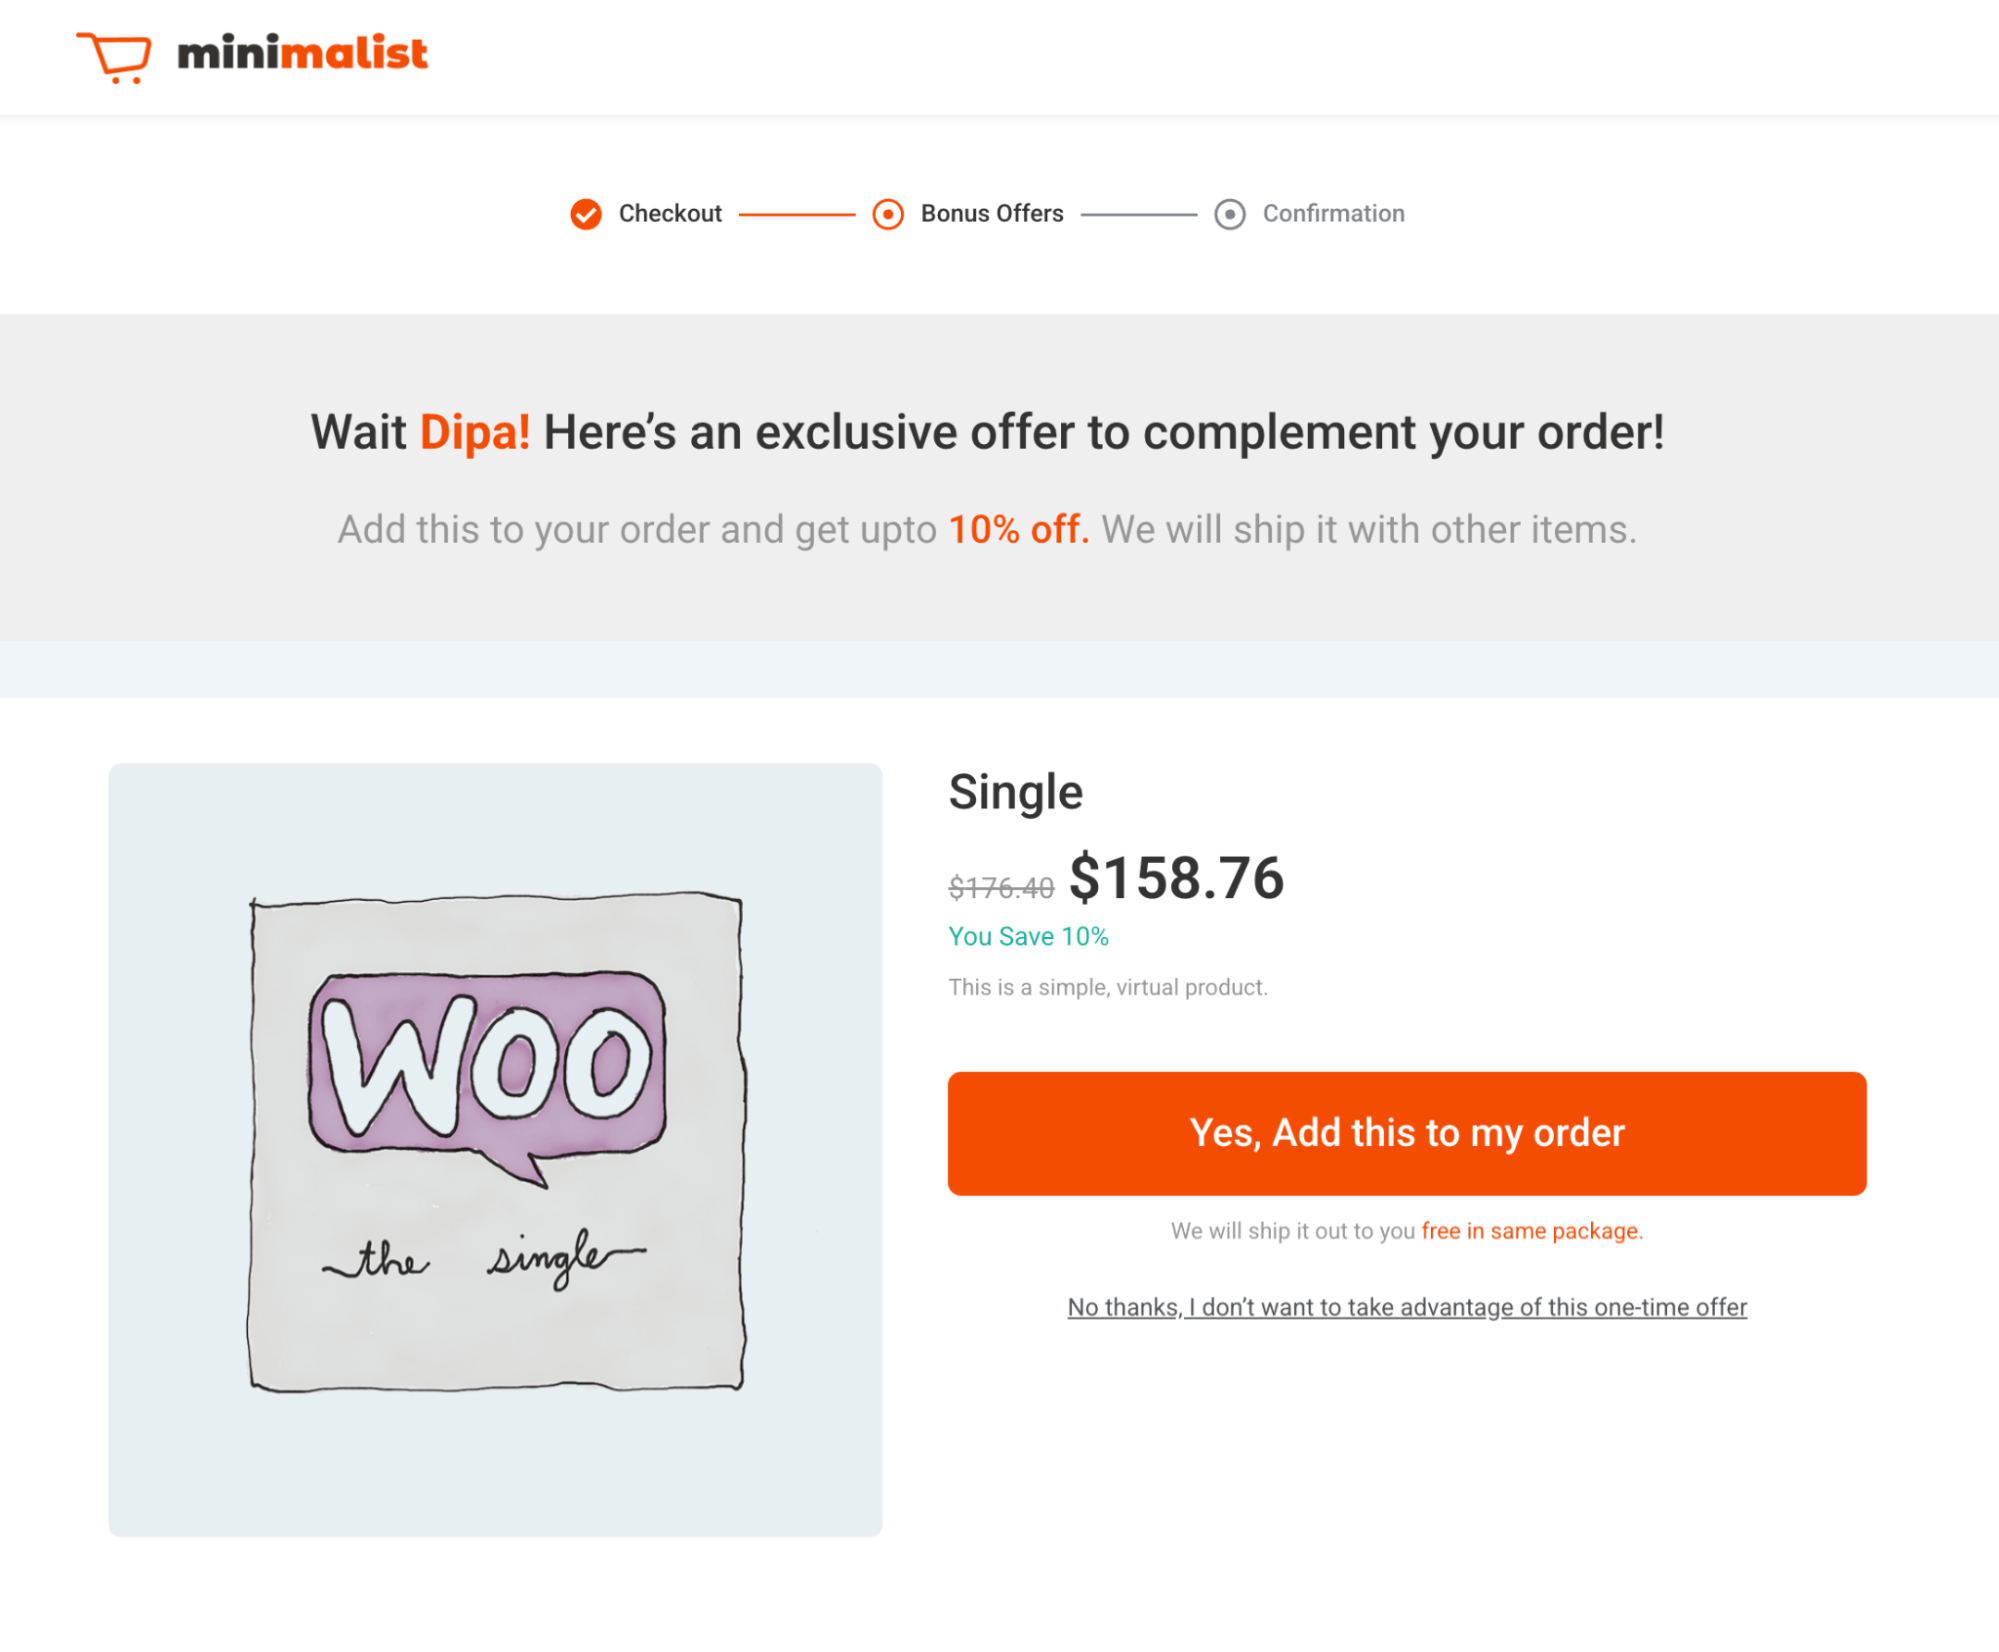
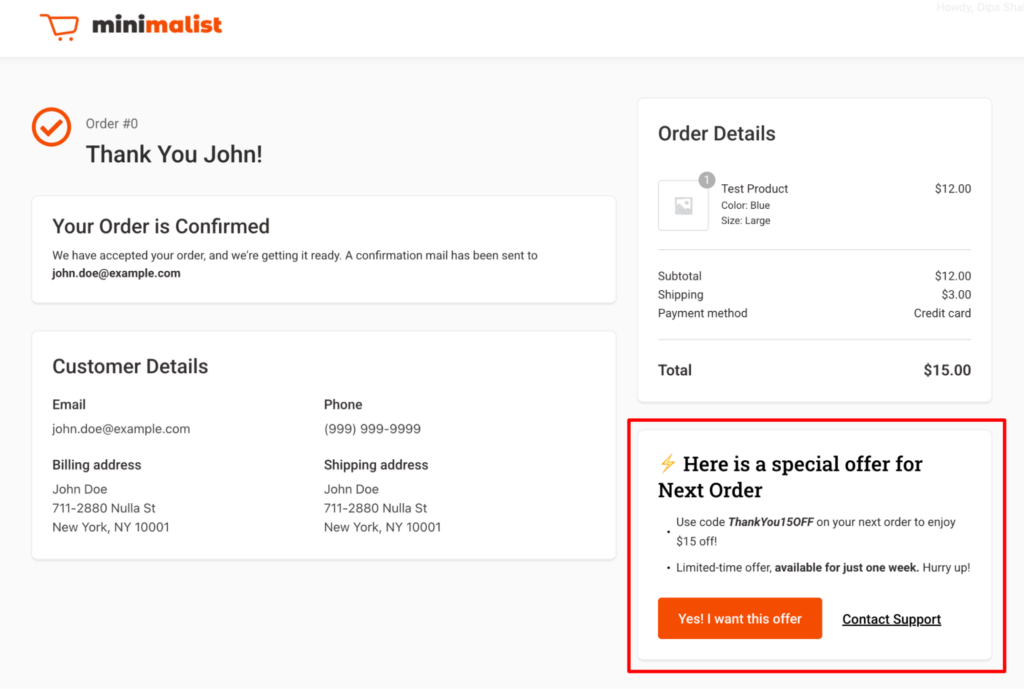
Here is what your upsell template will look like:
Method 6: Recommend Products on Exit Intent Popup to Prevent Losing Customers
Why recommend a product using an exit intent pop-up?
Getting customers to visit your site takes effort, but sometimes they leave without buying. In such cases, you can use exit intent pop-ups to recommend your best sellers or highly rated products, giving them one last nudge before they leave.
To do this, you’ll need to use OptinMonster. Ensure the plugin is installed and activate,d and that you've subscribed to OptinMonster. Then, connect it to your WordPress site to start using it.
Next, follow these steps:
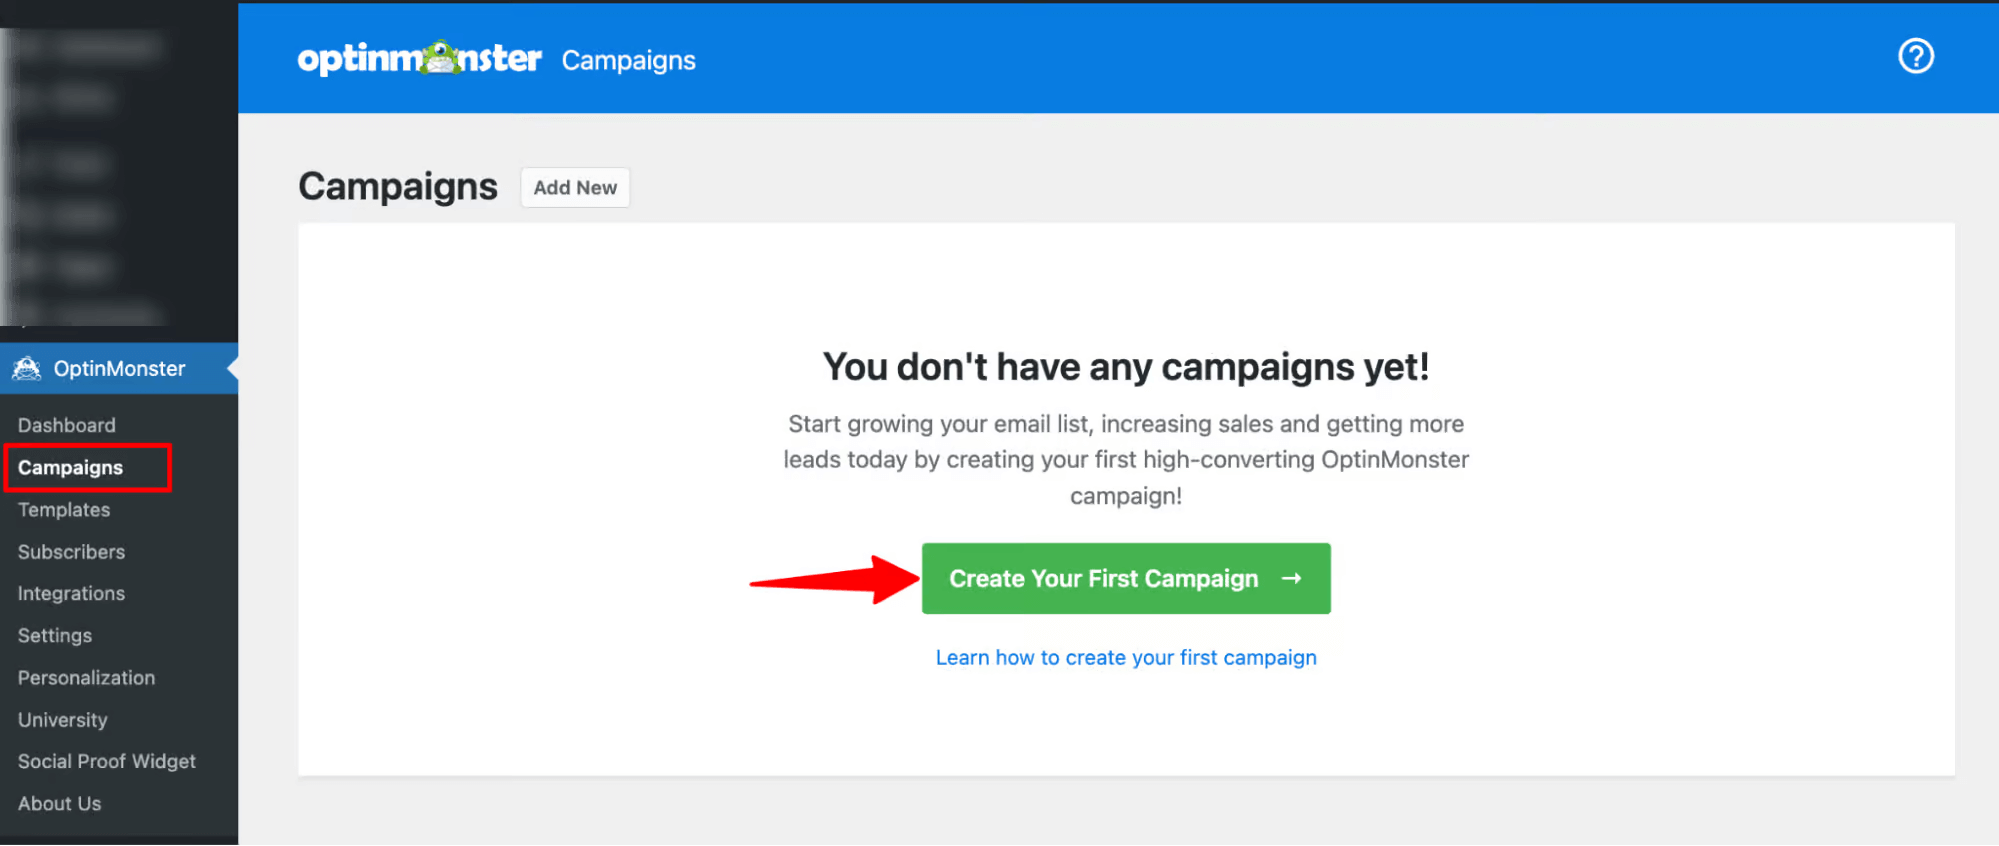
Step 1: Create a campaign
For this, navigate OptinMonster ⇒ Campaigns and click on “Create Your First Campaign.”
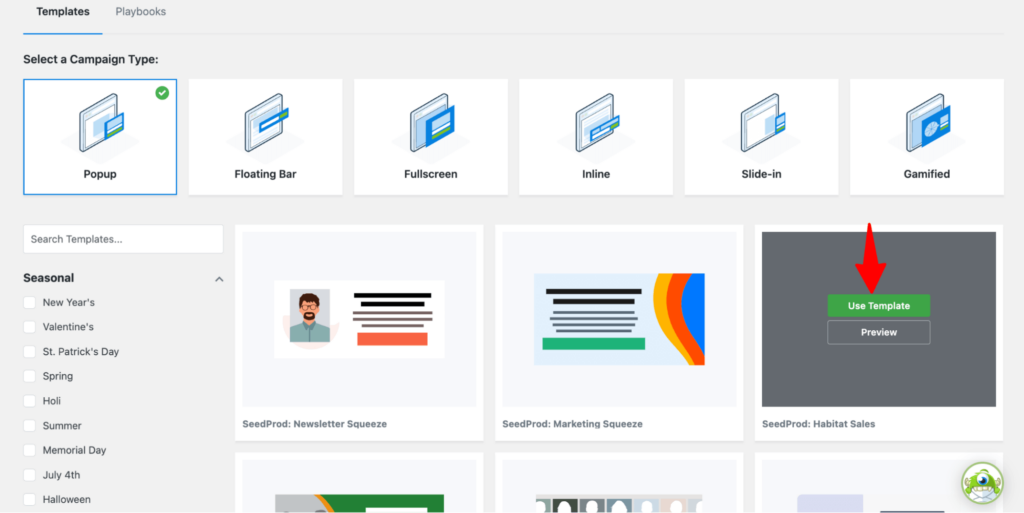
Next, choose a template.
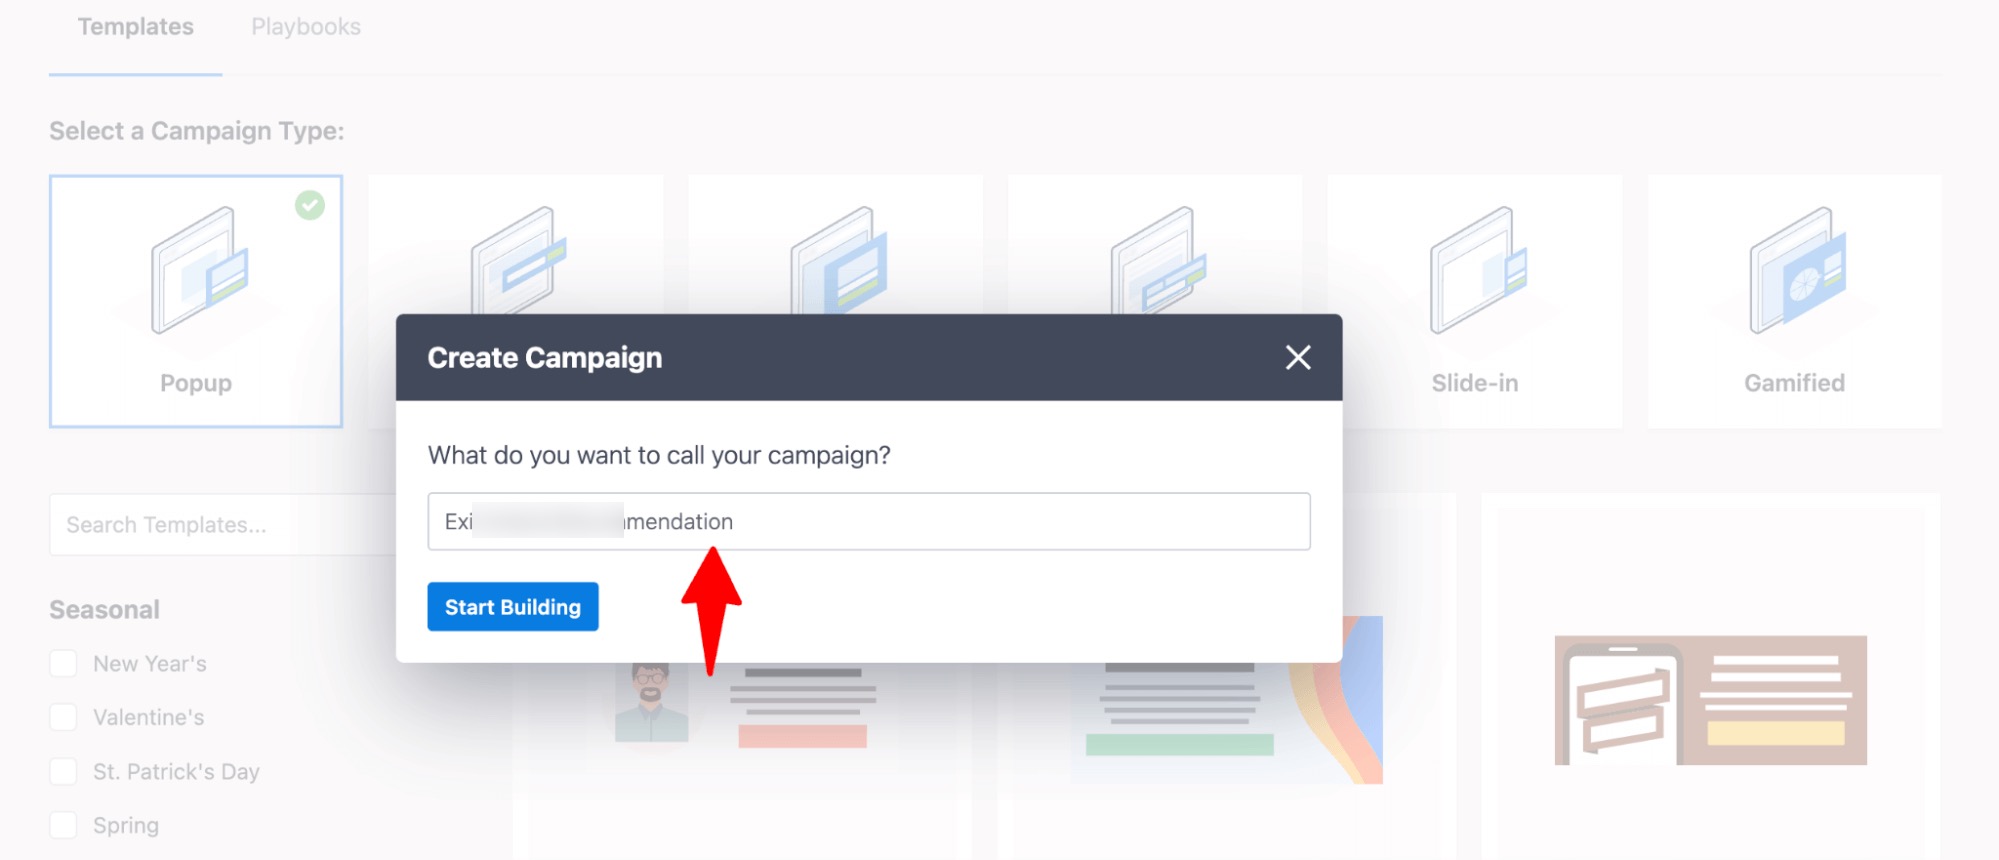
Provide a name and start building your campaign.
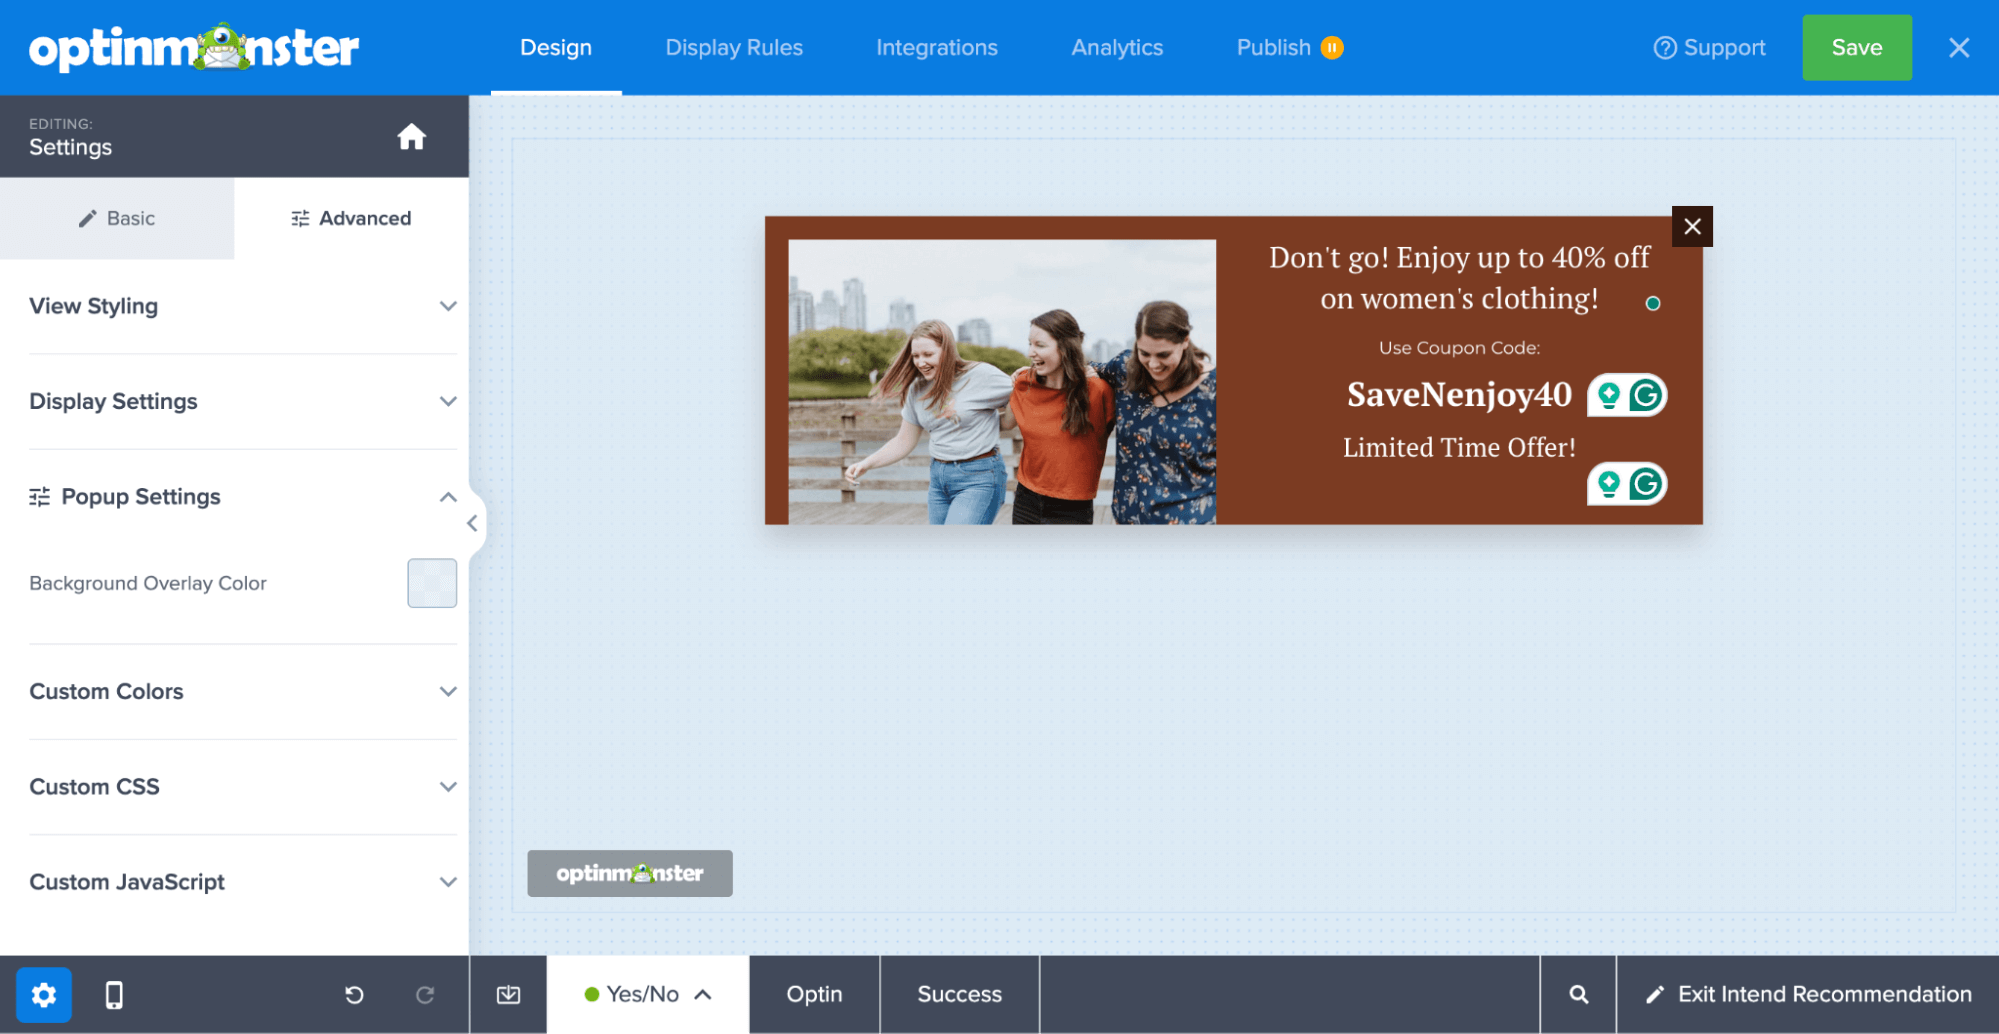
Step 2: Build a pop-up campaign
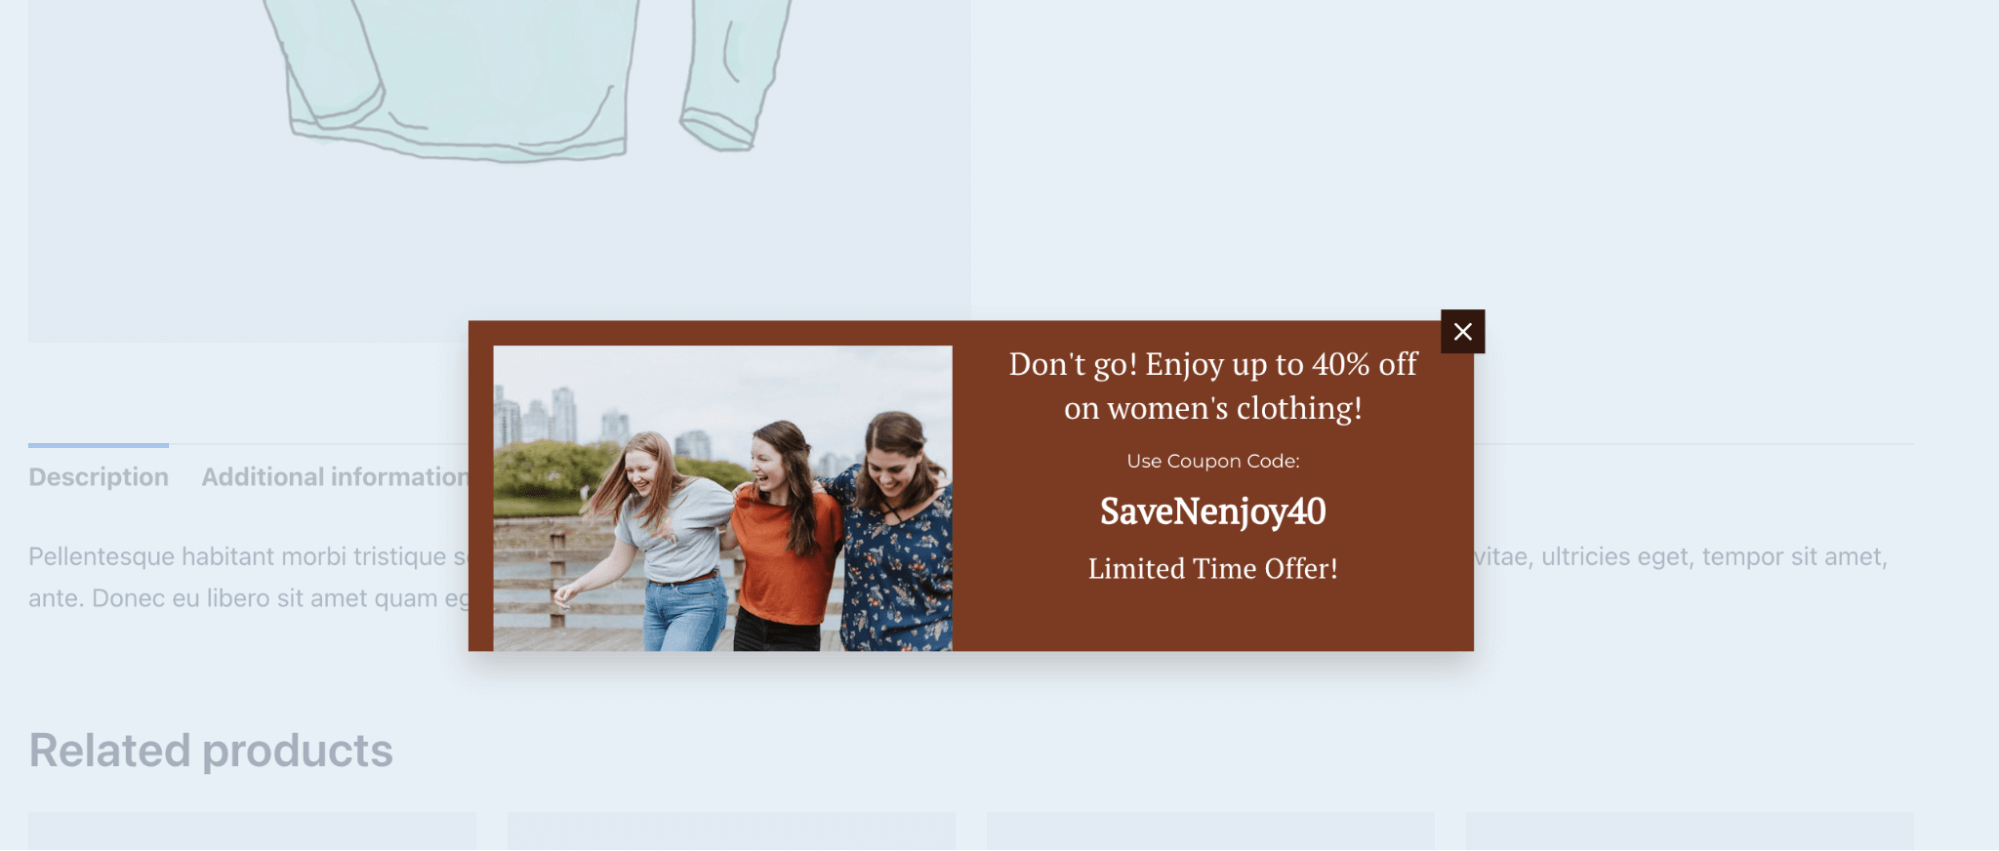
Next, customize your campaign to highlight products that are likely to engage customers. For instance, you could offer a 40% sale on women's clothing and a limited-time discount to seal the deal.
Step 3: Set an exit to intend technology to show the recommendations
Move to the “Display Rules” tab and make sure the Exit Intent trigger is selected.

Step 4: Publish the campaign
Move to the Publish tab, choose the Publish Status as “Publish”, and hit Save.
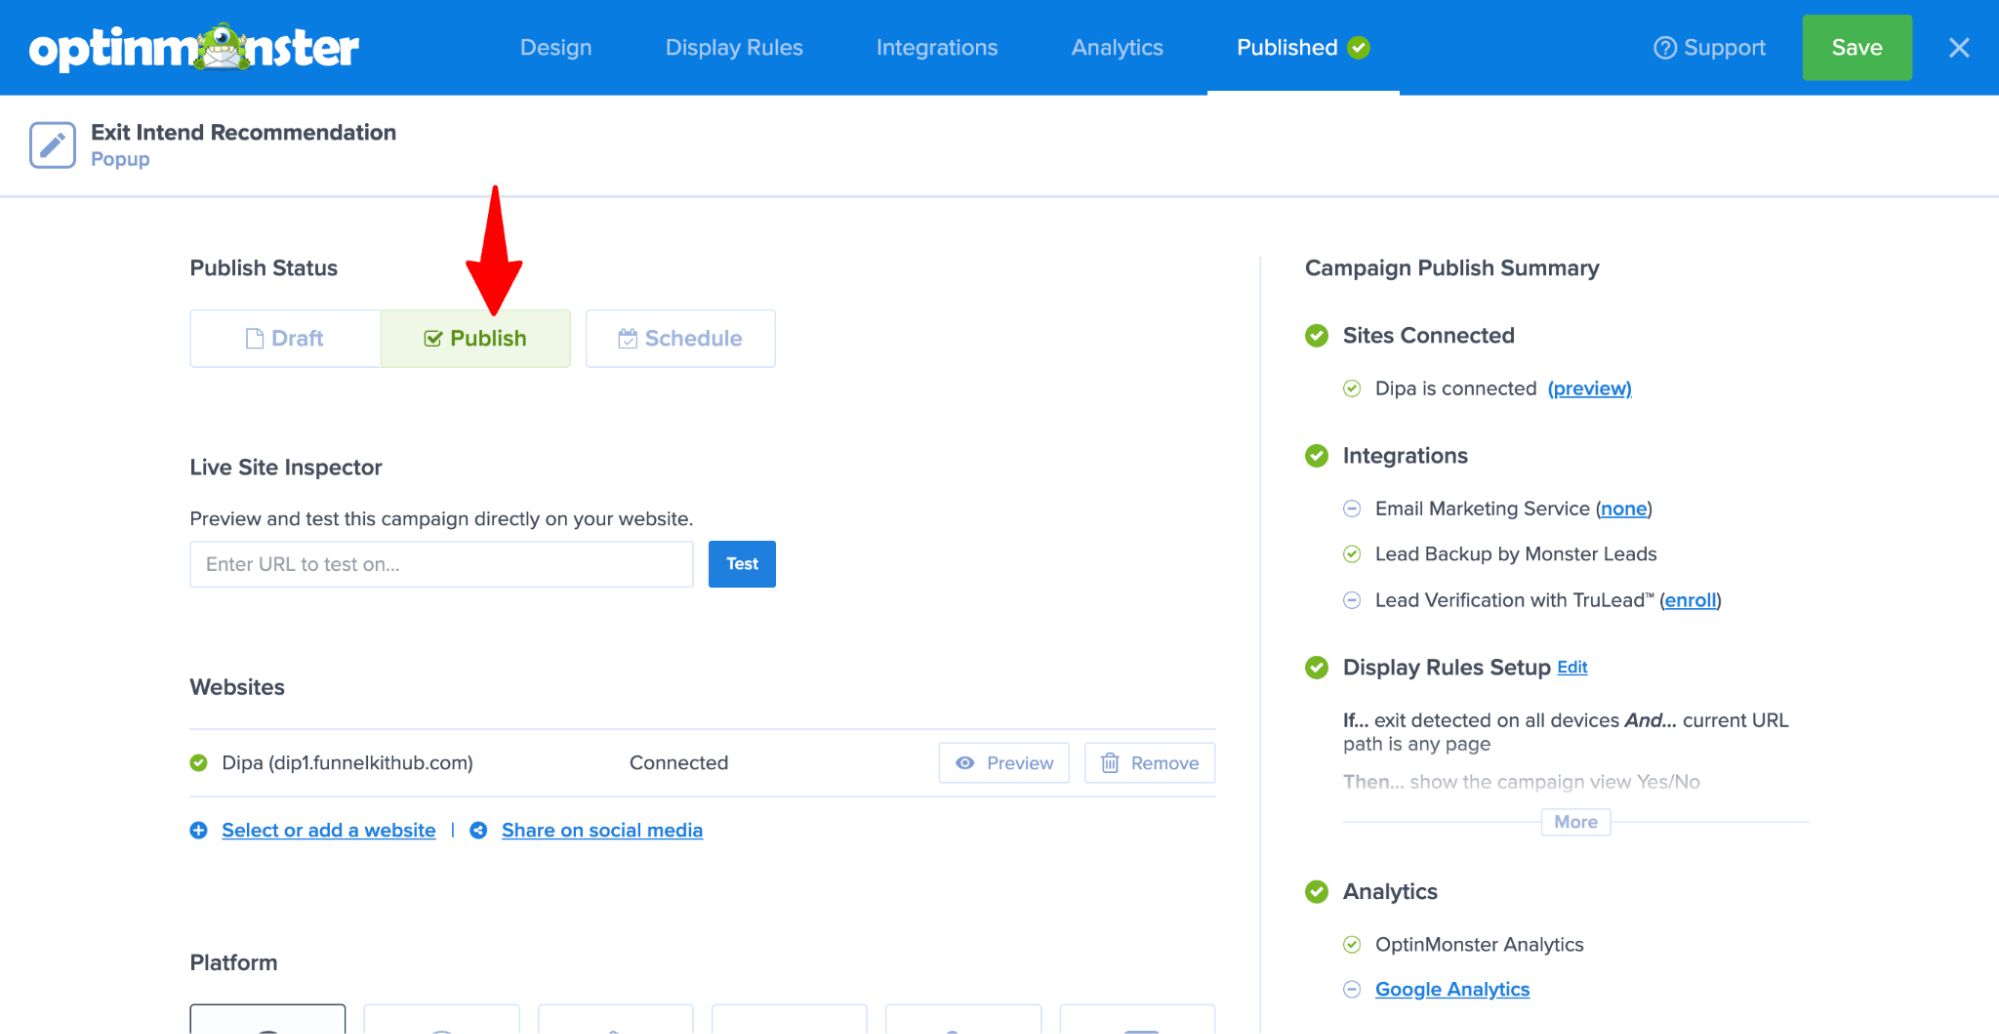
Here is what the pop-up recommendations look like:
Your product recommendation strategies don’t have to stop when users are done shopping in your store.
You can use the power of recommendation even after customers leave your website using email automation.
Move to the next section to find out how to do WooCommerce product recommendations in post-purchase emails.
Method 7: Send Post-Purchase Recommendations Via Email to Leverage Cross-Sell Opportunities
Why offer product recommendations via post-purchase email?
Sending personalized post-purchase email recommendations is an effective strategy to keep customers engaged and prompt repeat purchases through targeted emails.
To offer product recommendations using email automation, let's will use FunnelKit Automations.
Ensure you have installed and activated FunnelKit Automations before moving on to the main process.
Step 1: Create a new automation
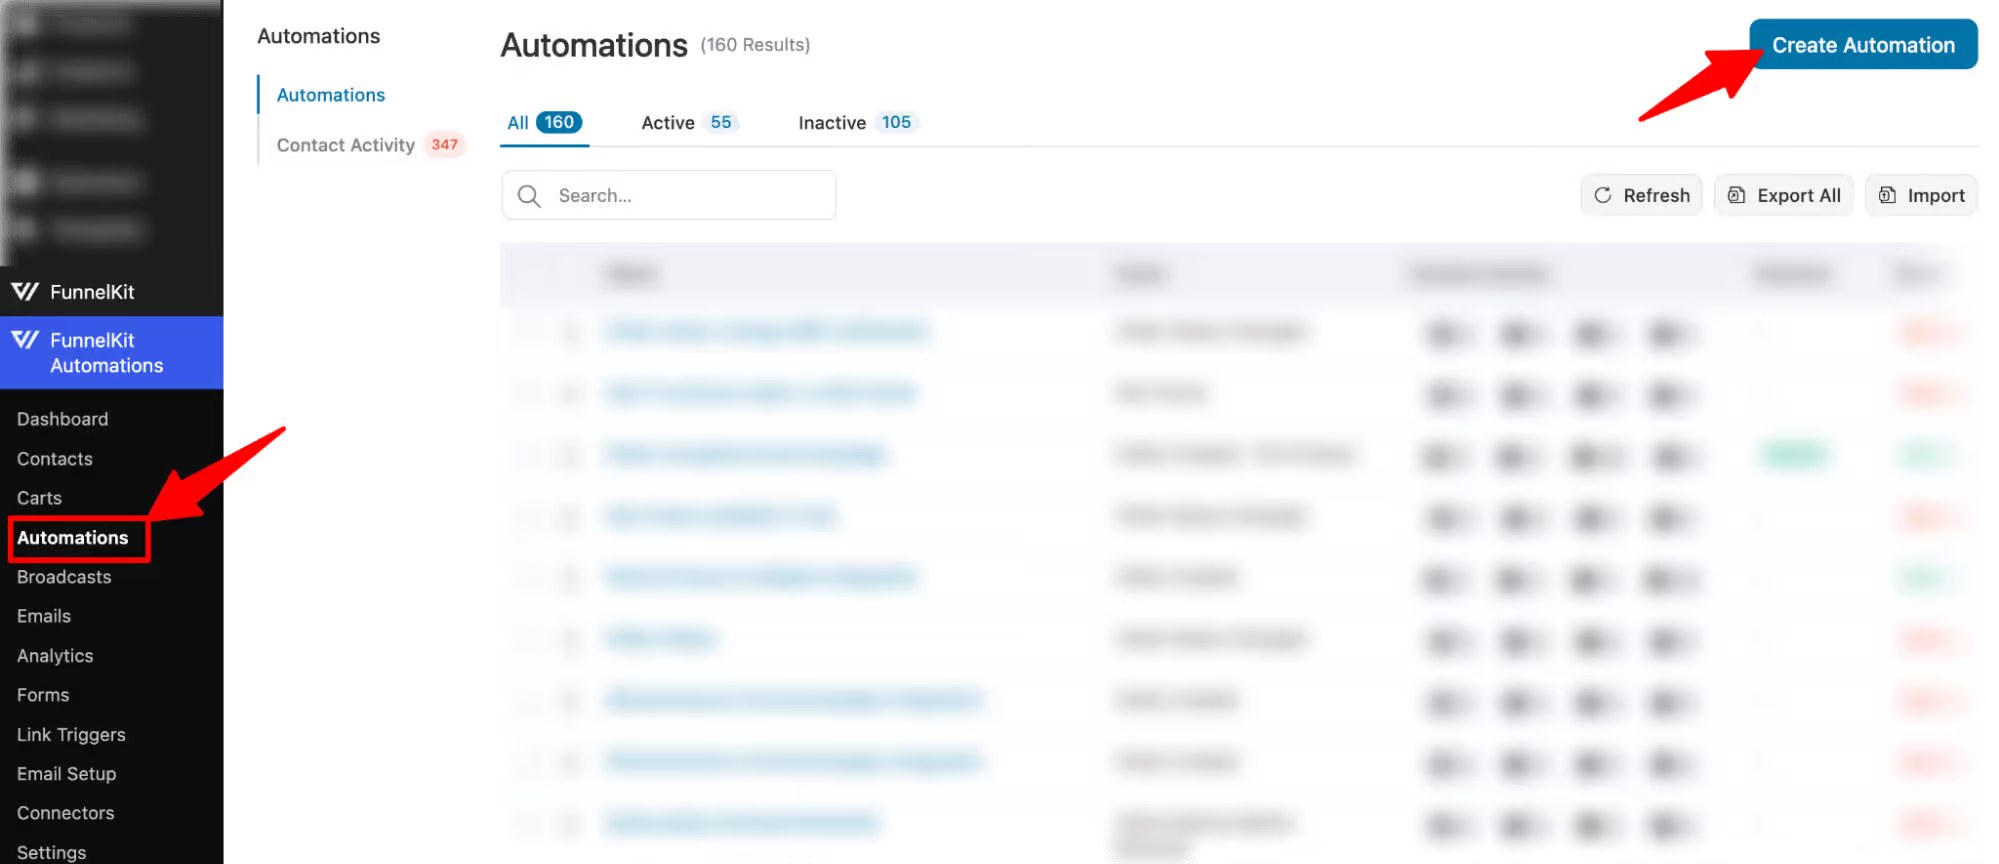
The first step is to create a new automation. For that, navigate to FunnelKit Automations ⇒ Automations and then click on Create New Automation.
Select the blank template, provide a name, and click on Create.
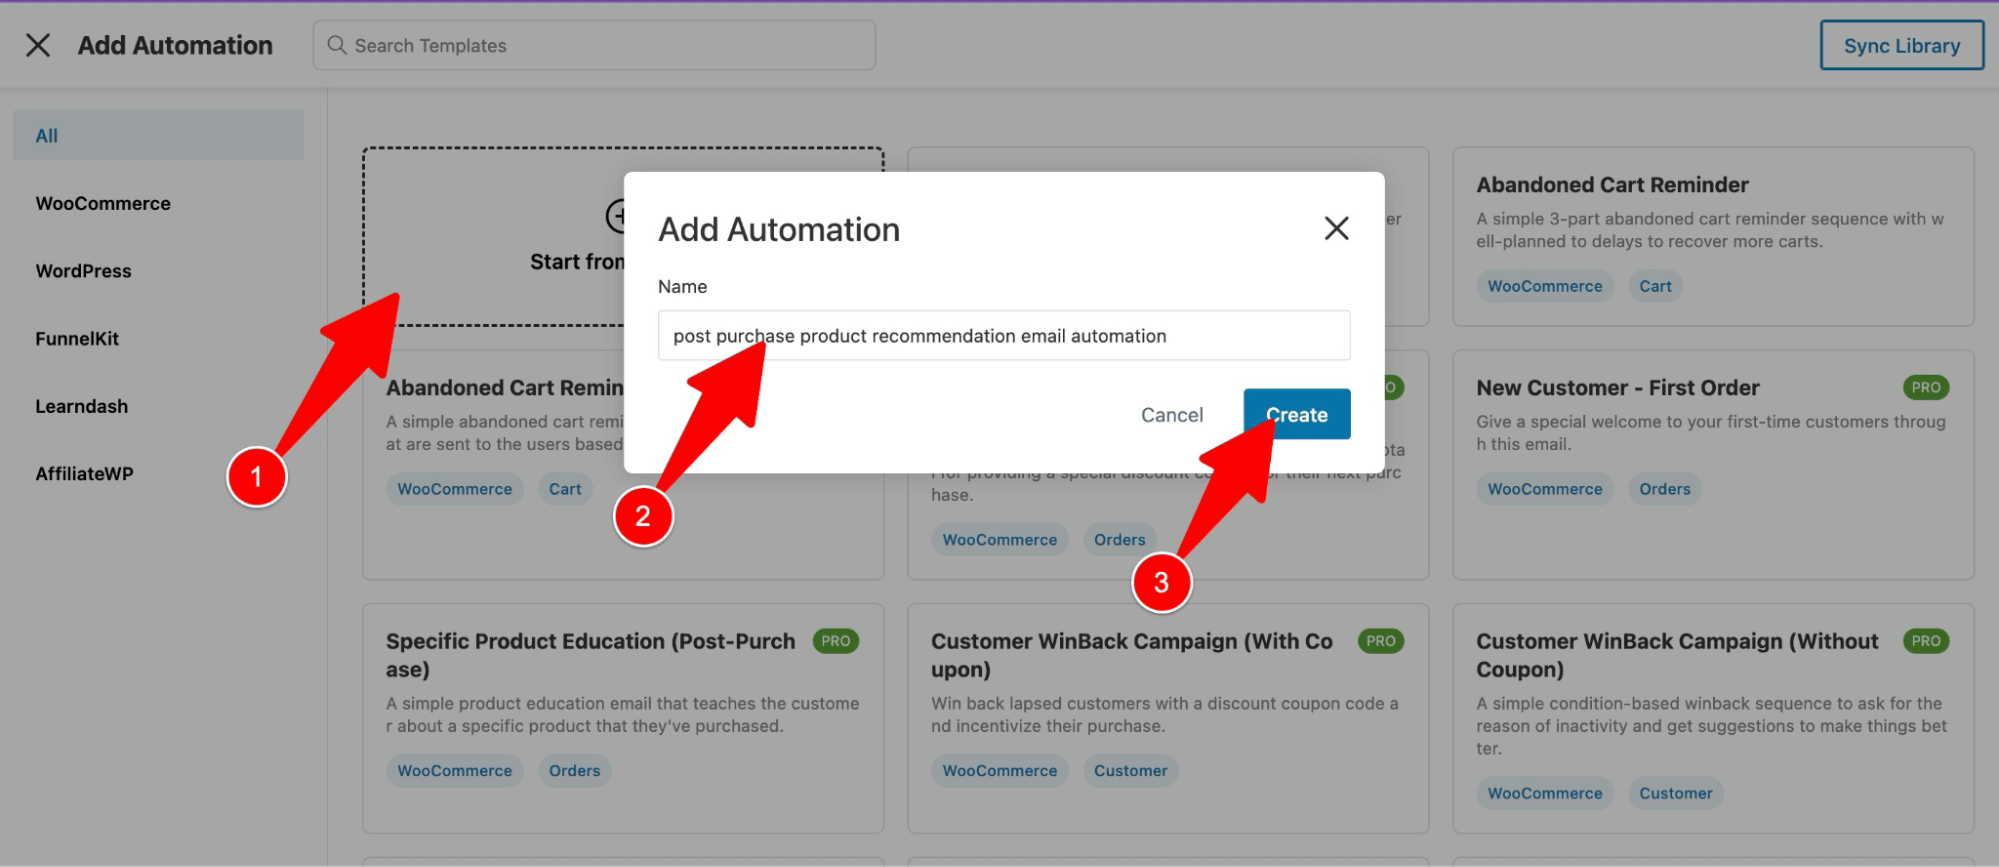
This will add a blank automation to your workspace.
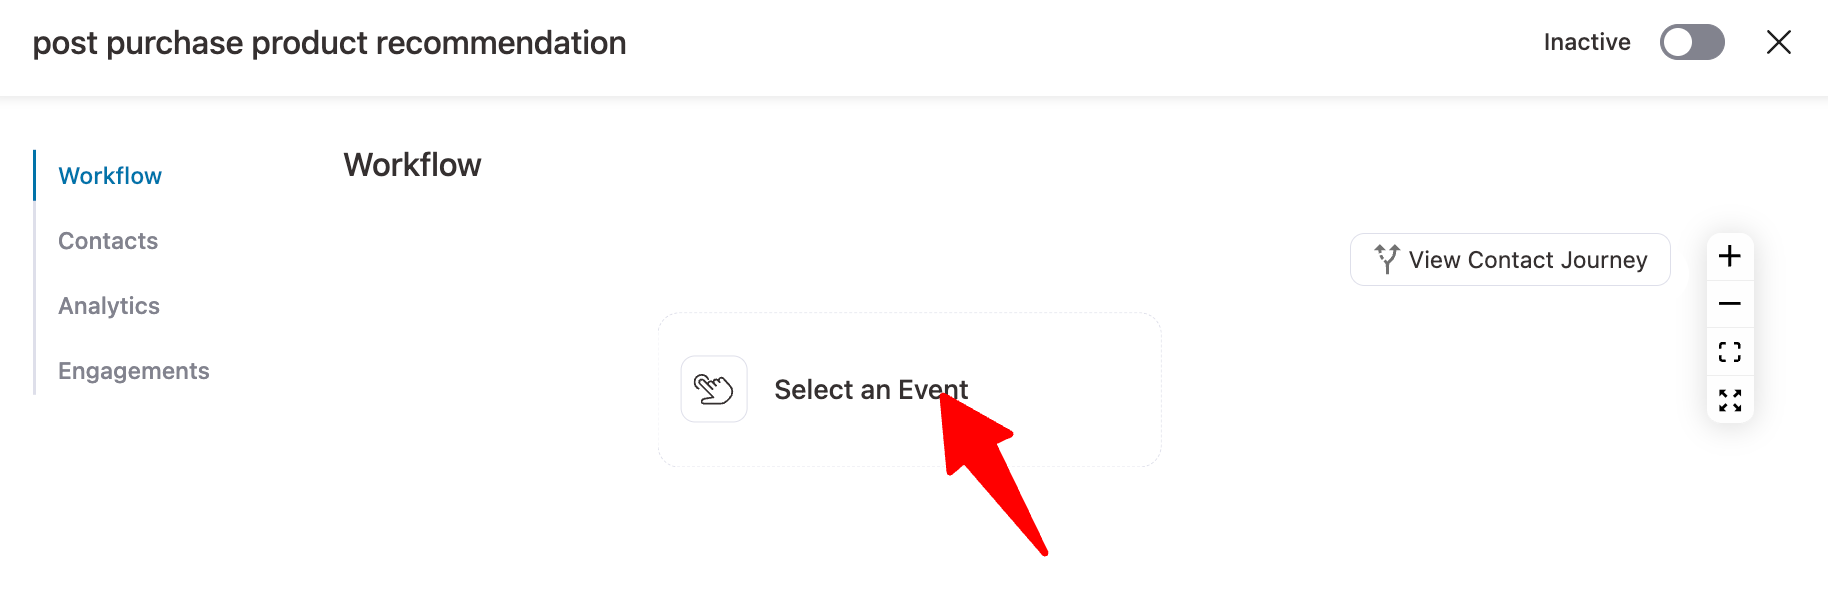
Step 2: Select the order created event
Now, it’s time to select a trigger. To do so, click on the “Select Trigger” option.
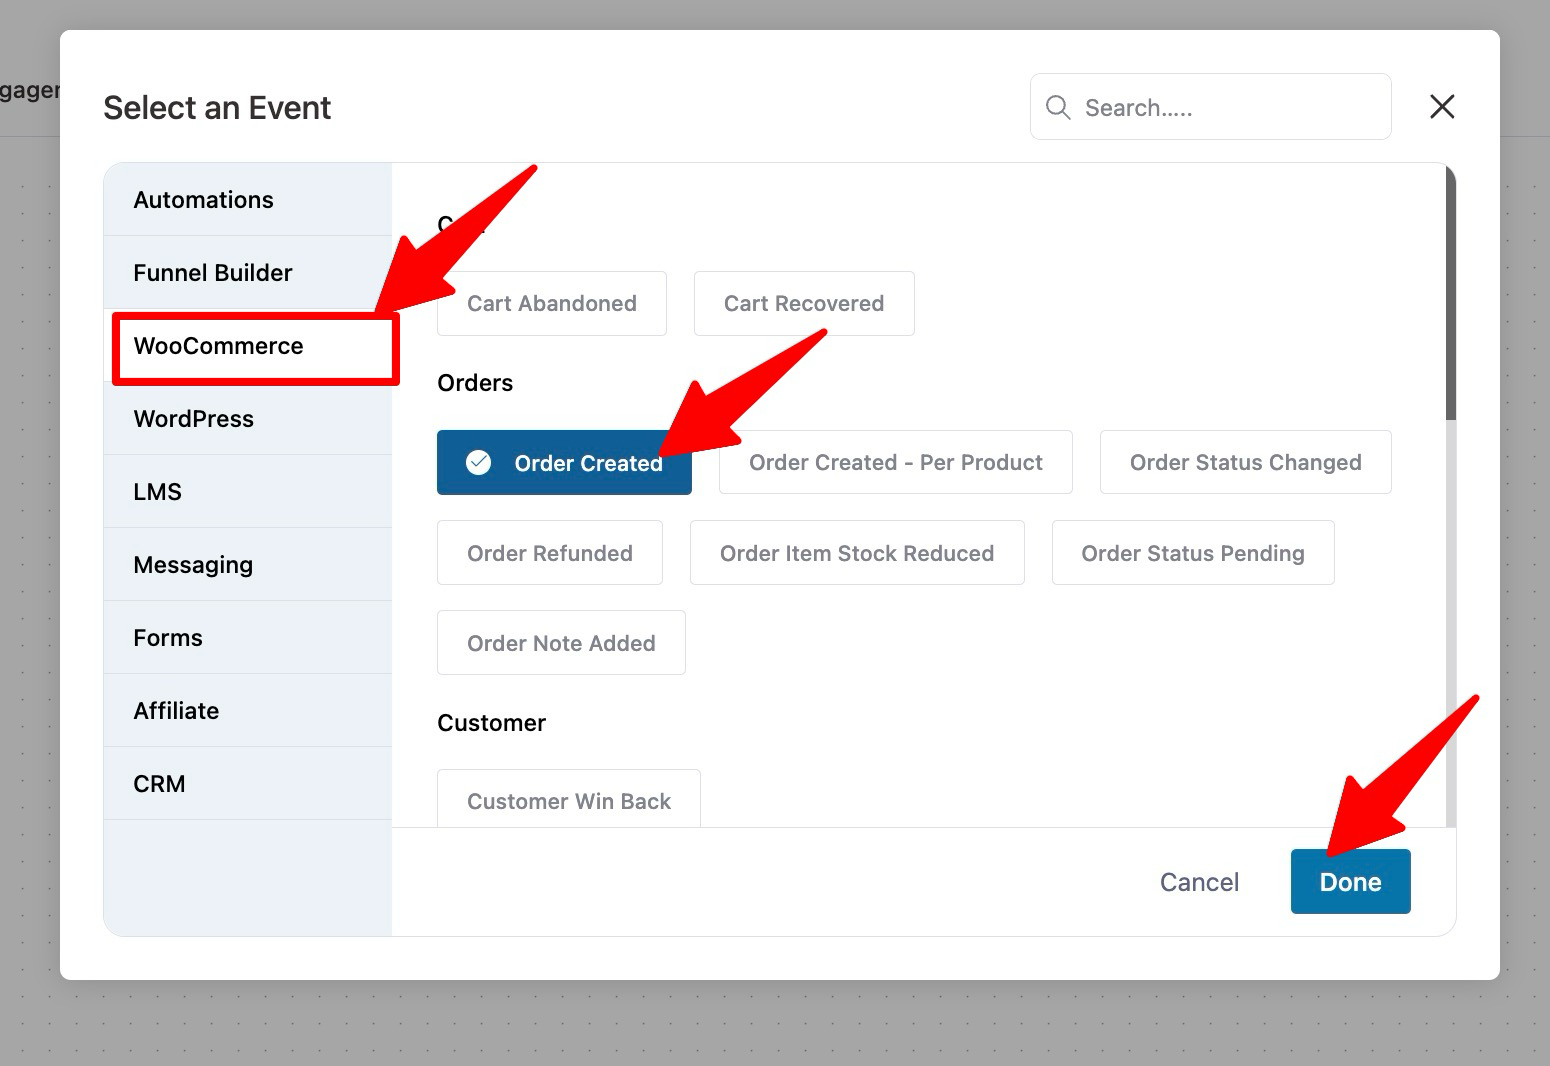
On the WooCommerce tab, select the “Order Created” event. This will trigger this automation once someone orders on your WooCommerce site.
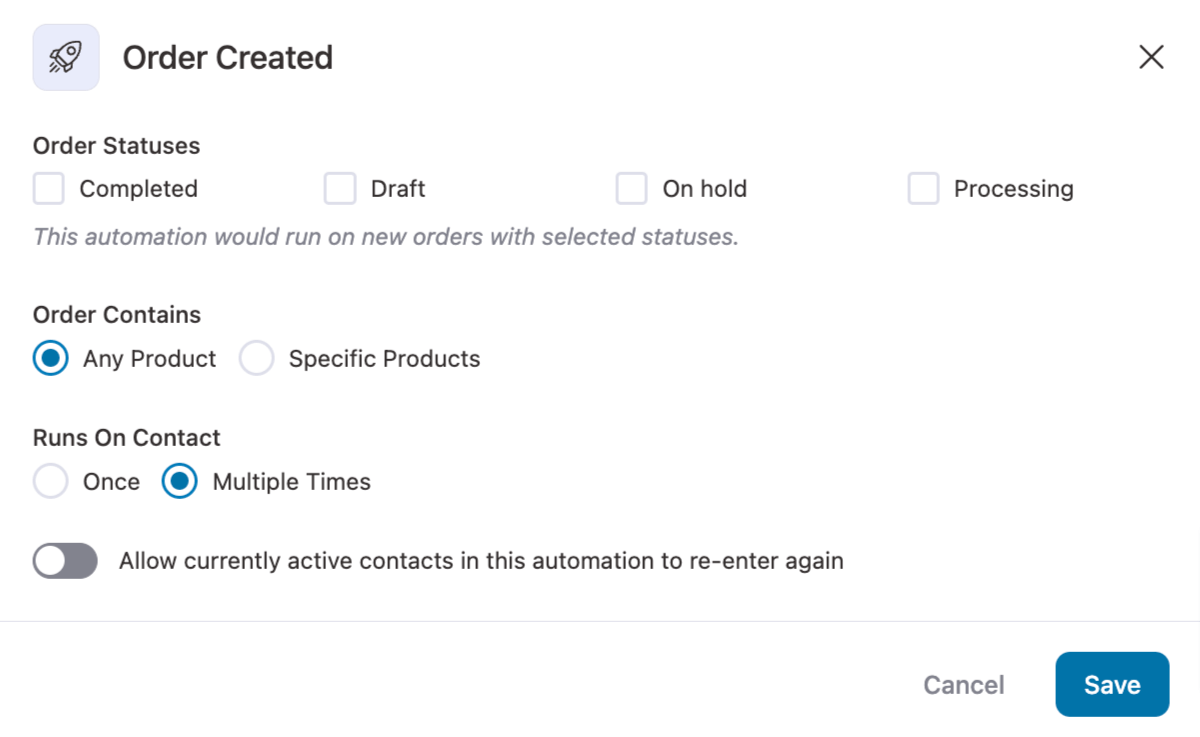
Choose the order statutes for which you want this automation to trigger. Here, let's going with the order completed, as I want to send product recommendations after the previous order is delivered.
Choose "Multiple times" for runs on contact to send recommendations to customers every time they place an order.
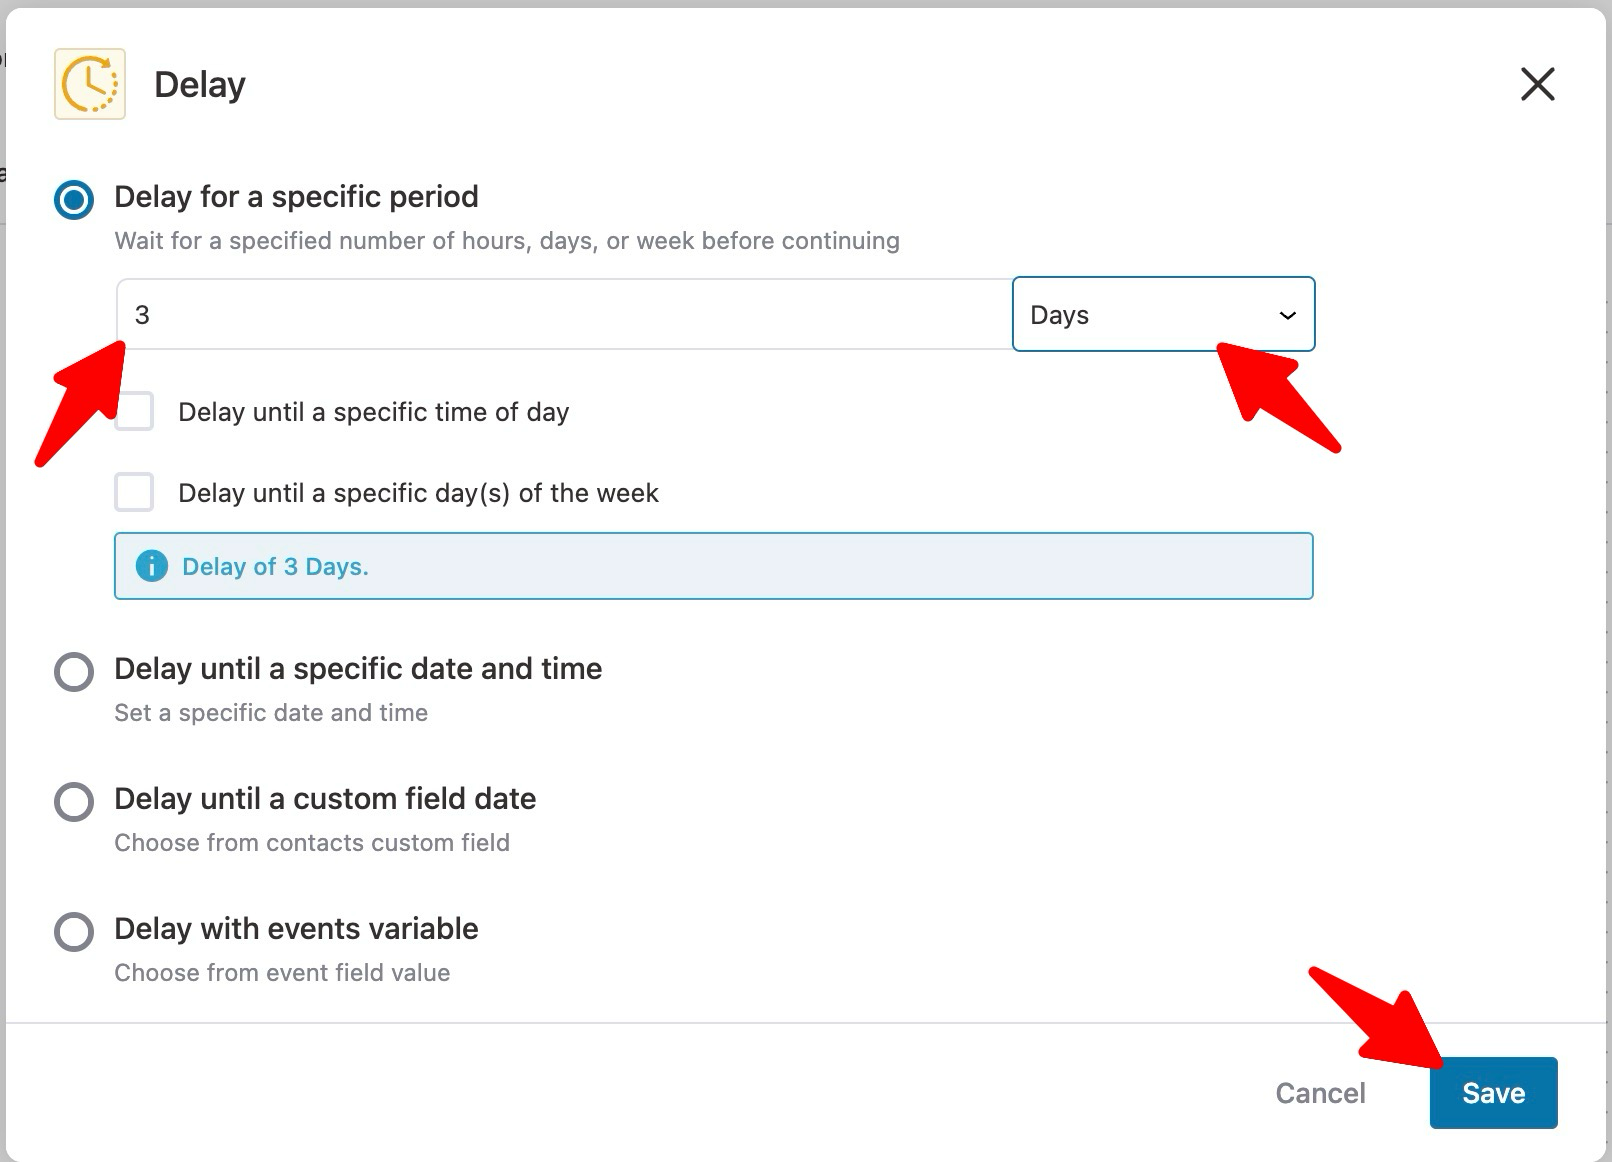
Step 3: Add delay
Now, I will add a delay because you don’t want to overwhelm the user immediately after they place an order. You should recommend their product after a gap of time.
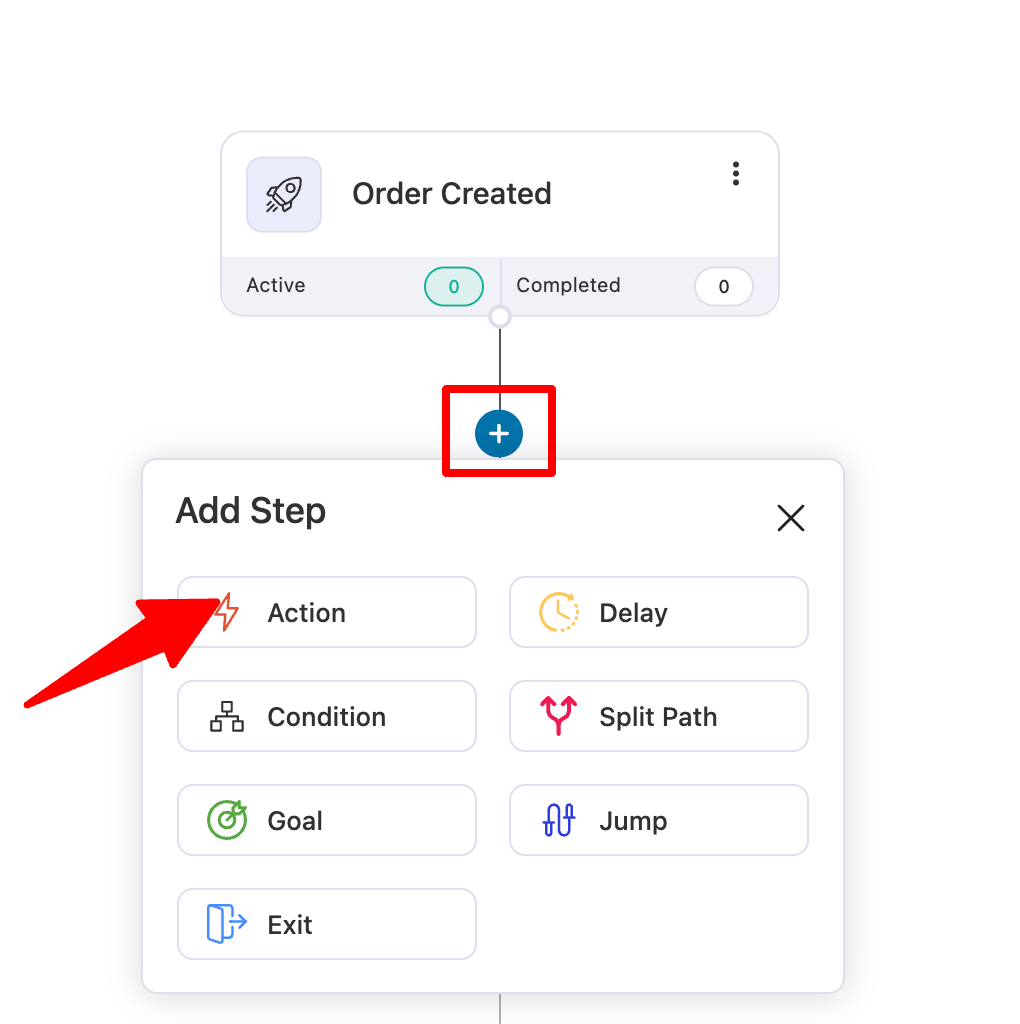
To do so, click the + icon and then select Delay.
After that, add a delay and click on Save changes. I have added a 3-day delay.
Step 4: Add send email action
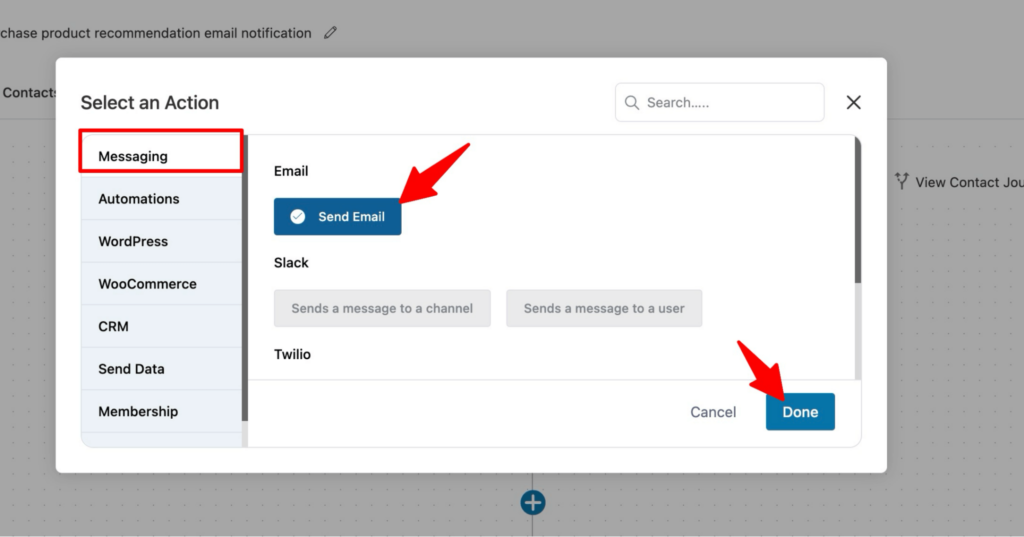
Now, you need to add another action that will send the email. To do so, click on the + icon and then select Action.
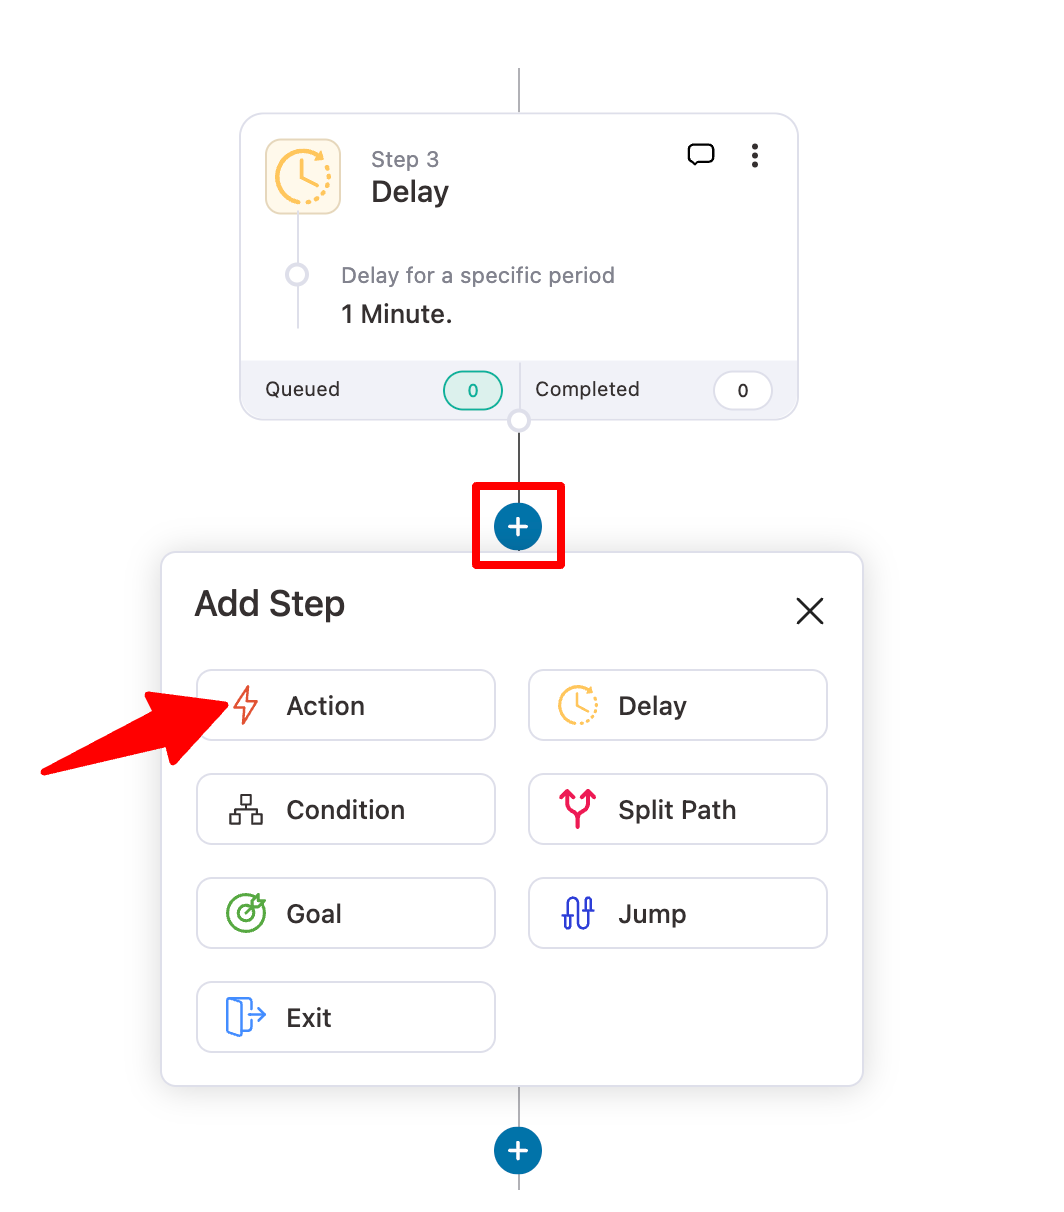
After that, from the Messaging tab, choose the “Send Email” action and click on Done to add the action.
Step 5: Design the product recommendation email
First, provide the email subject and preview text.
You can use merge tags to add dynamic data values like customer names that help personalize your emails.
To add any merge tag, click on {{..}} and search, copy the merge tag, paste it on the email subject line, and preview the text as you need.
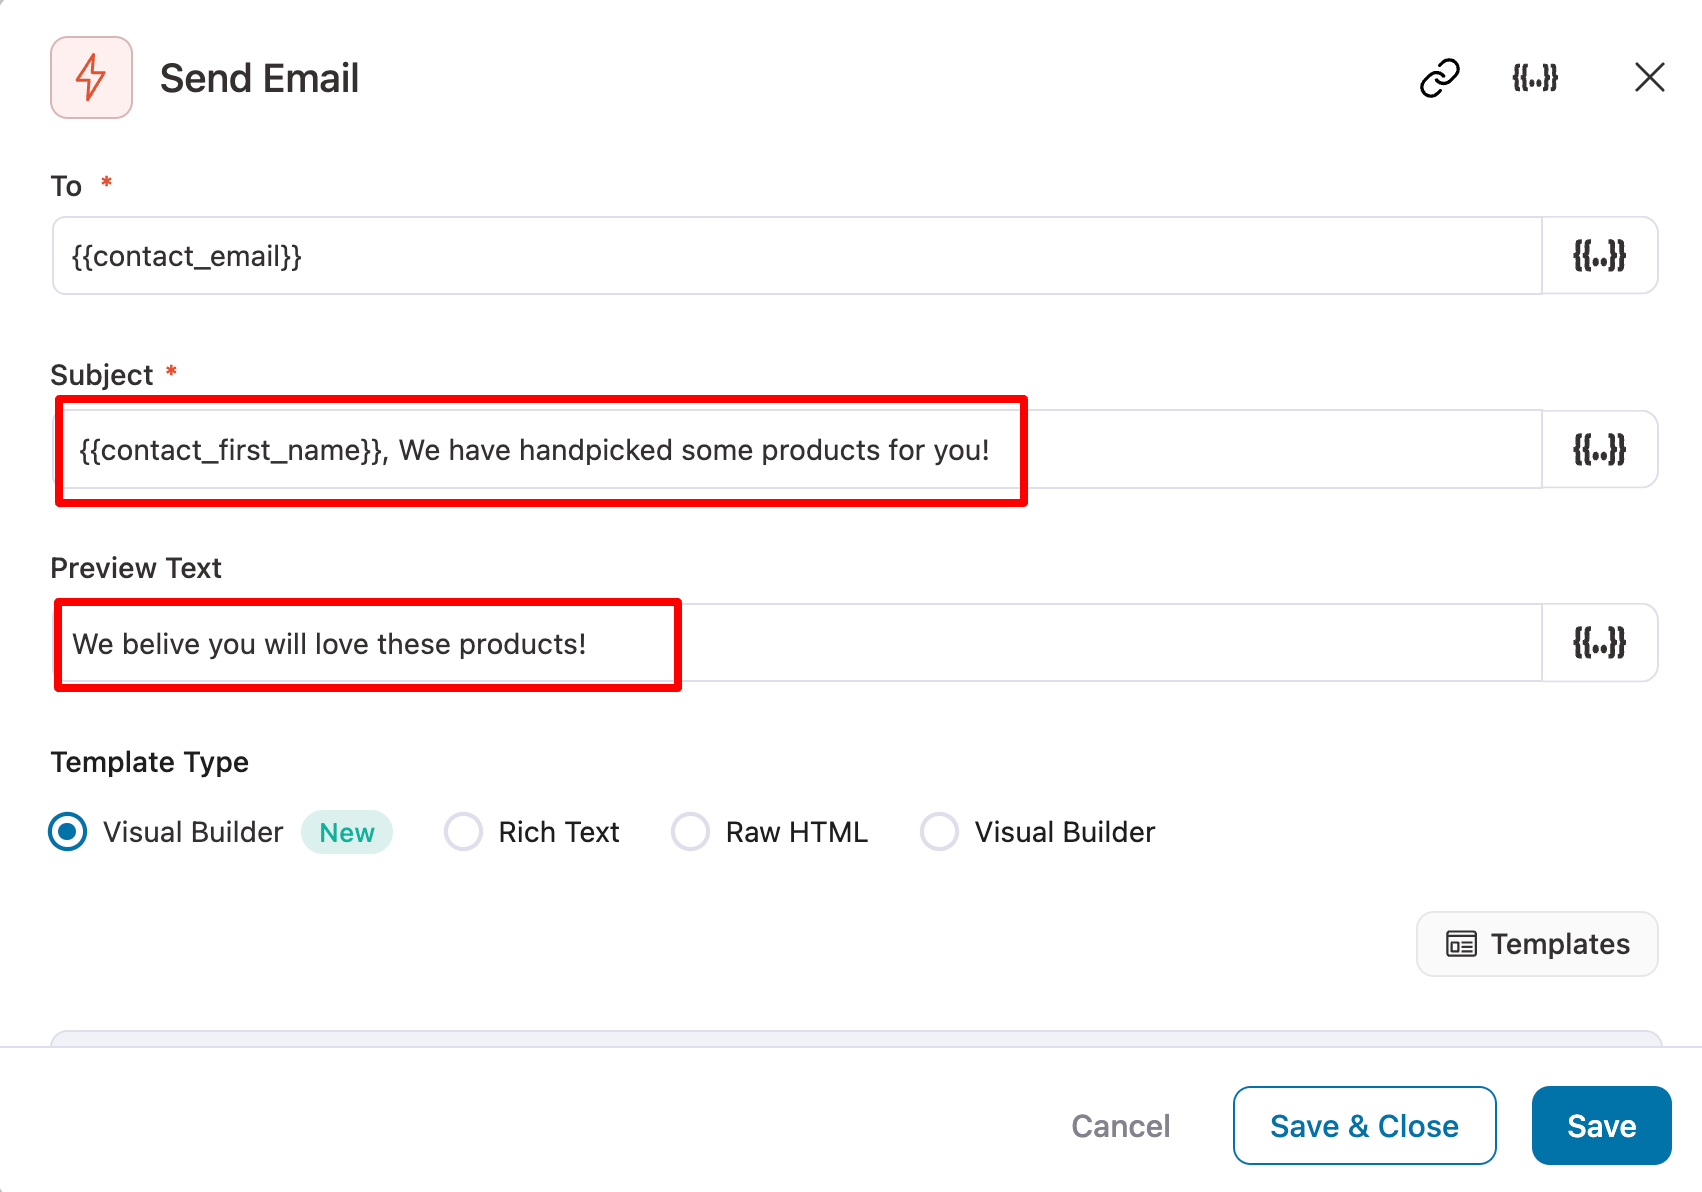
As per the email body, you can design in four ways: Visual Builder (New), Rich Text, Raw HTML, and Visual Builder.
Our experts recommend using Visual Builder (New). For this, choose “Visual Builder (New)” and click ‘Edit’.
After that, you can choose any of the prebuilt templates. Here, I will choose “Cross-Sell Products Template”. For this, hover on the template and click Preview.
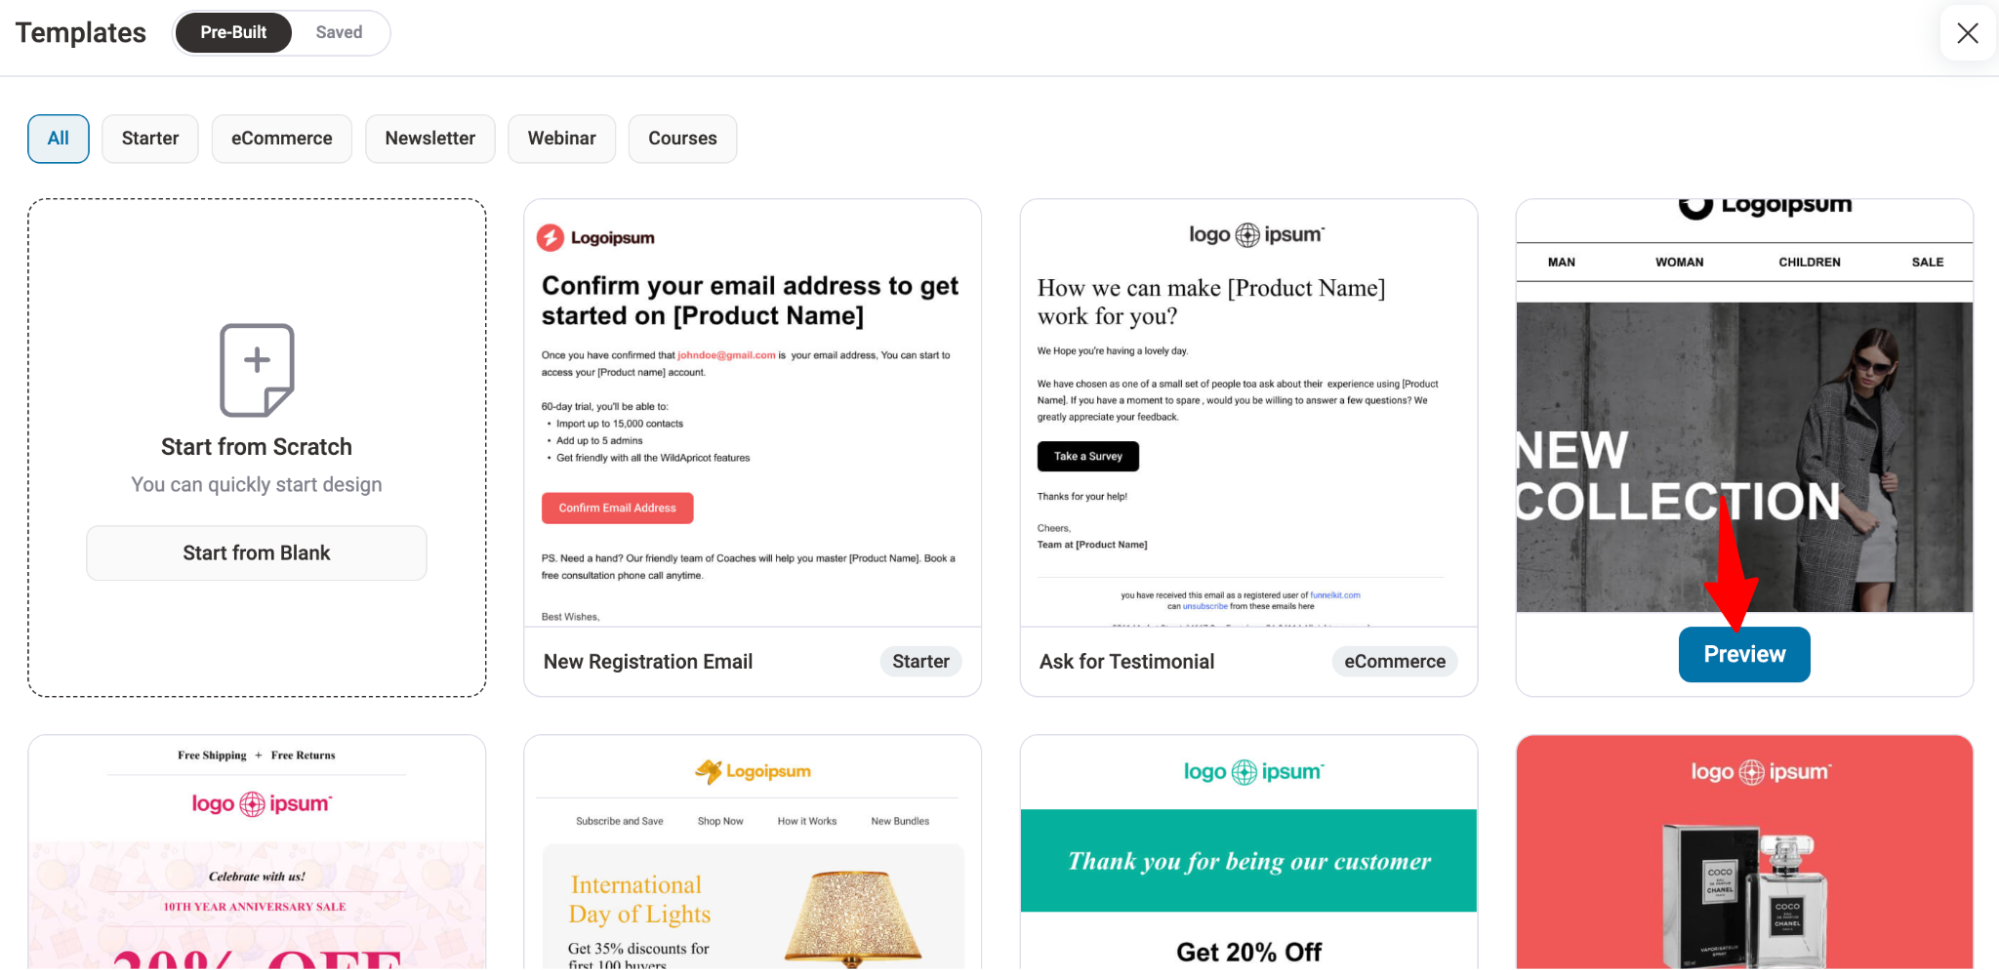
Now, hit “Import This Template” to import.
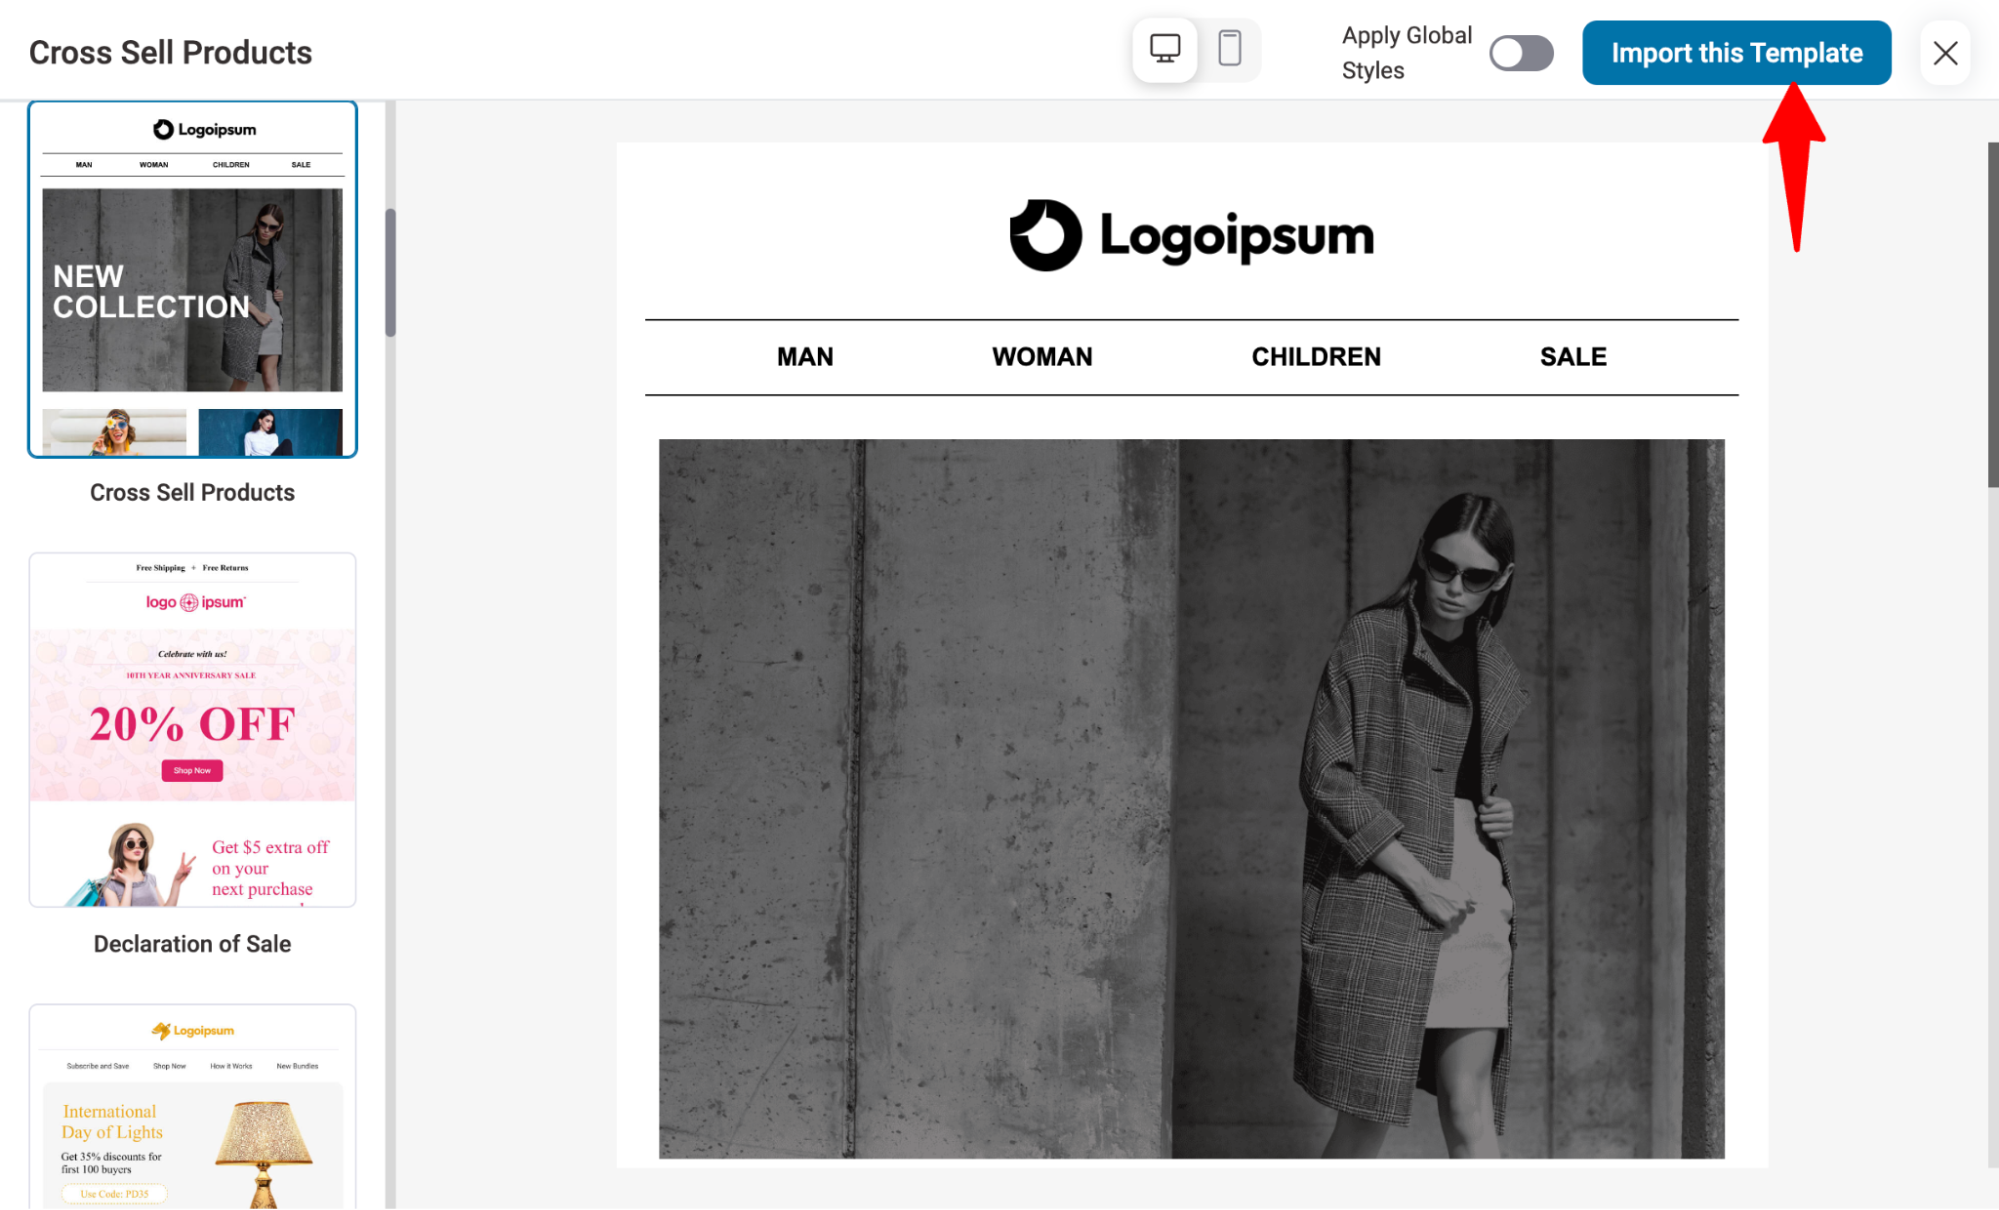
You can customize the template according to your needs, like changing the logo, updating the menu, adding a new banner, etc.
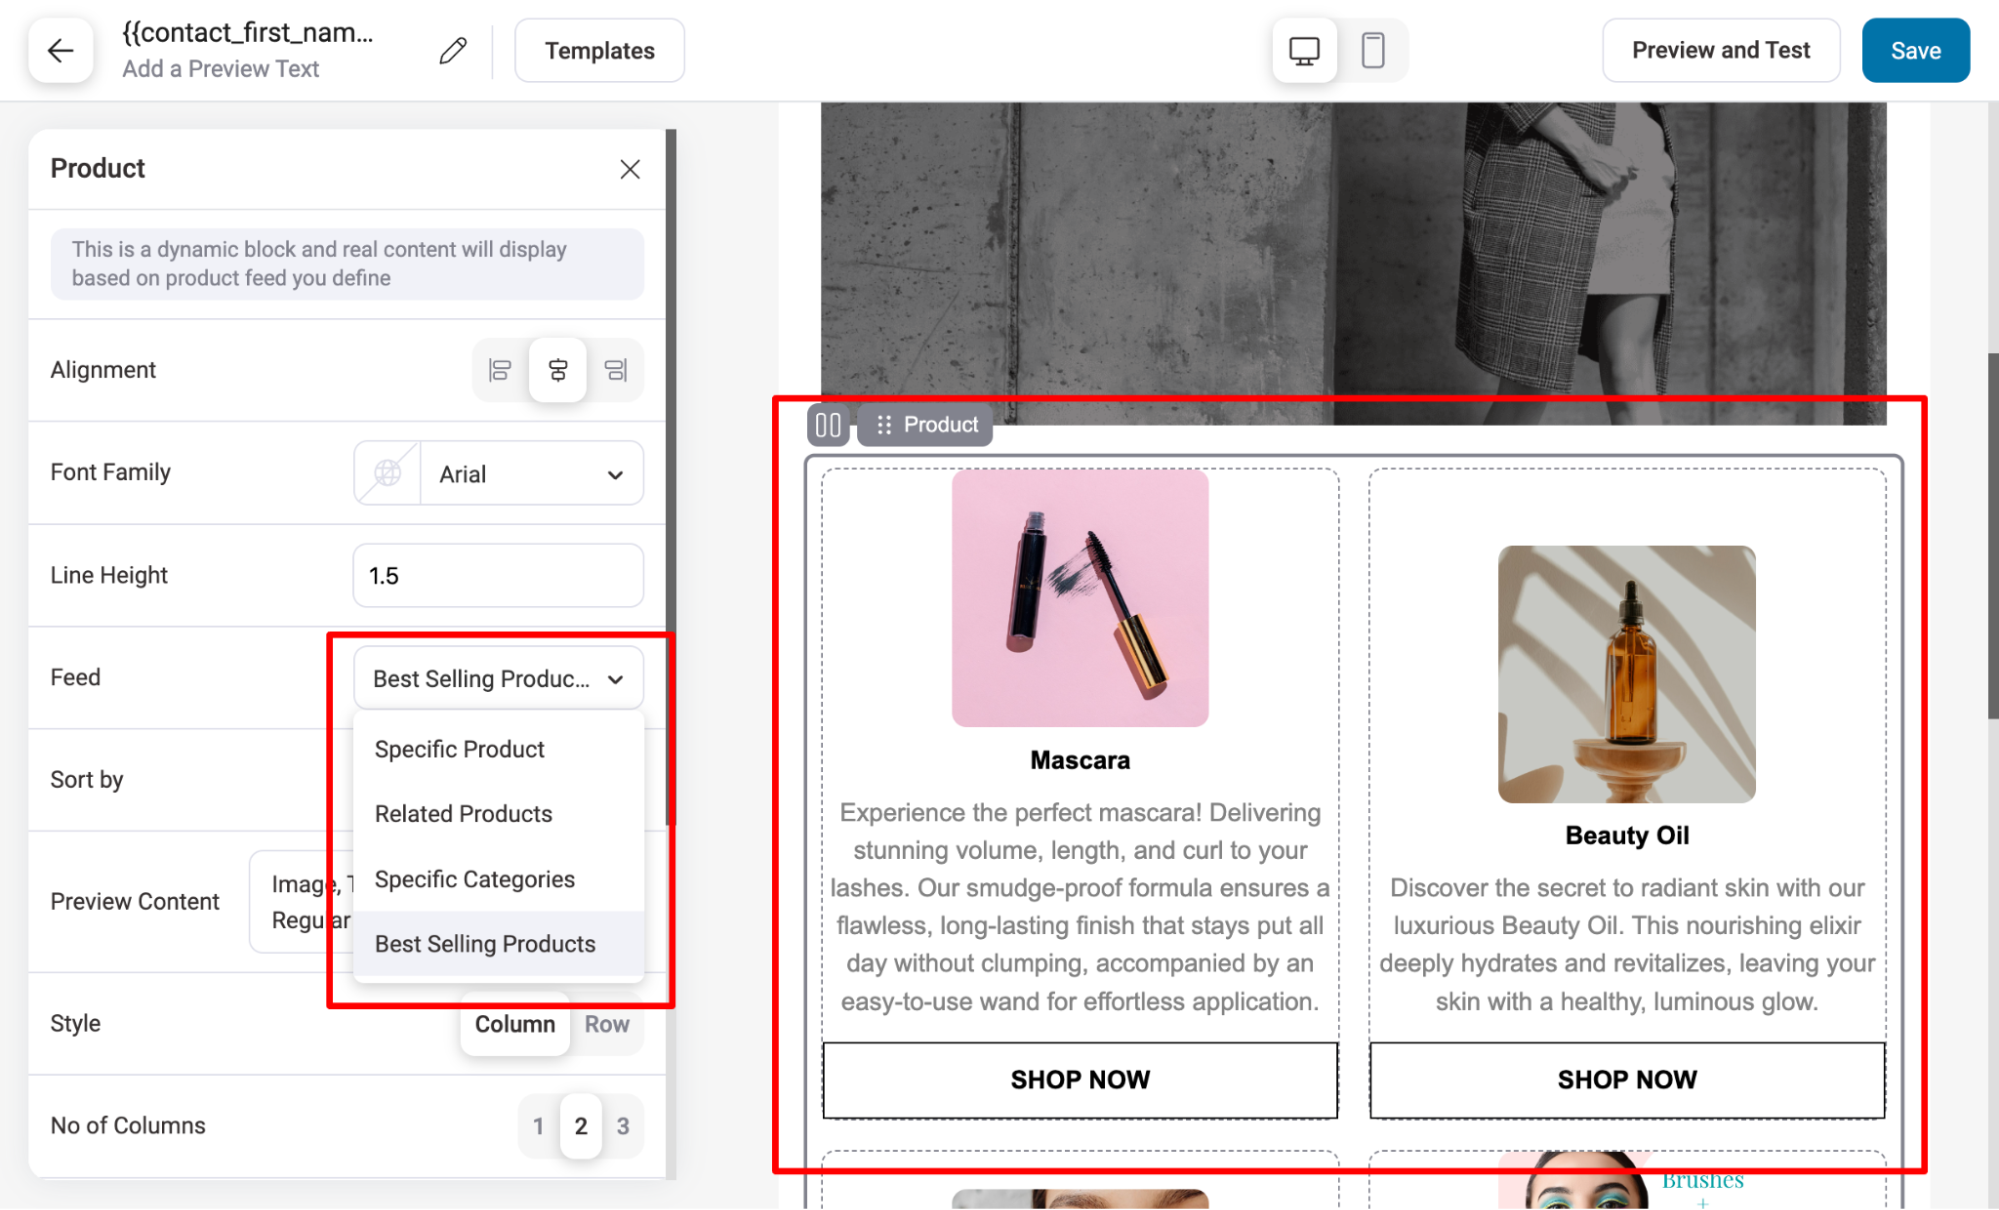
As per the product recommendation section, the template already includes a built-in feature. Here, you can choose whether to share related products (upsell, cross-sell, or both), best-selling products, or specific products if desired.
Depending on the option you select, the email will populate with the corresponding products from your WooCommerce store.
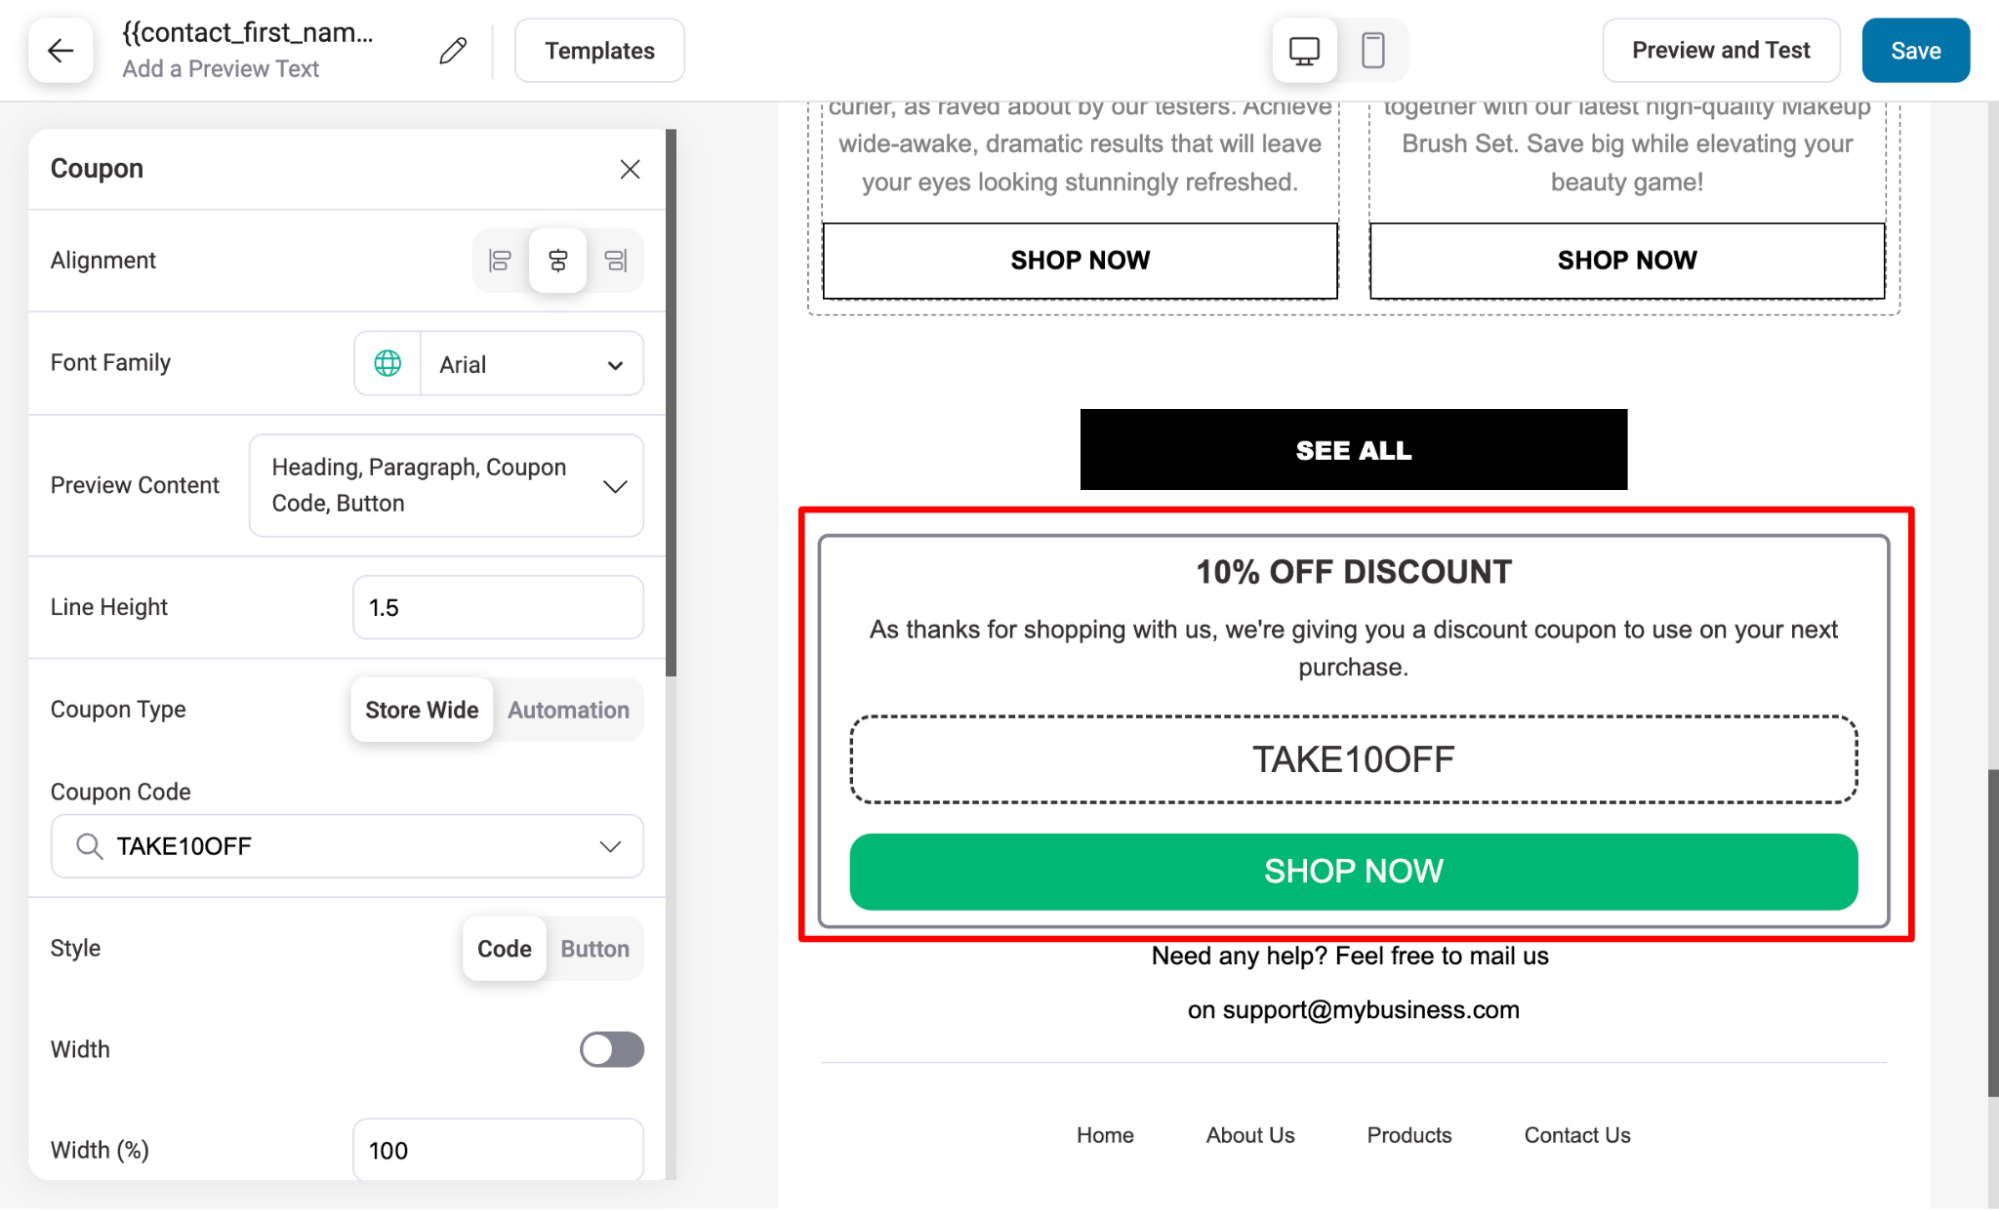
You can also offer a discount coupon in your product recommendation email to incentivize your next purchase. You can easily add a discount section using the Coupon block by FunnelKit Automations.
For more details, read our blog on how to use dynamic coupons in email.
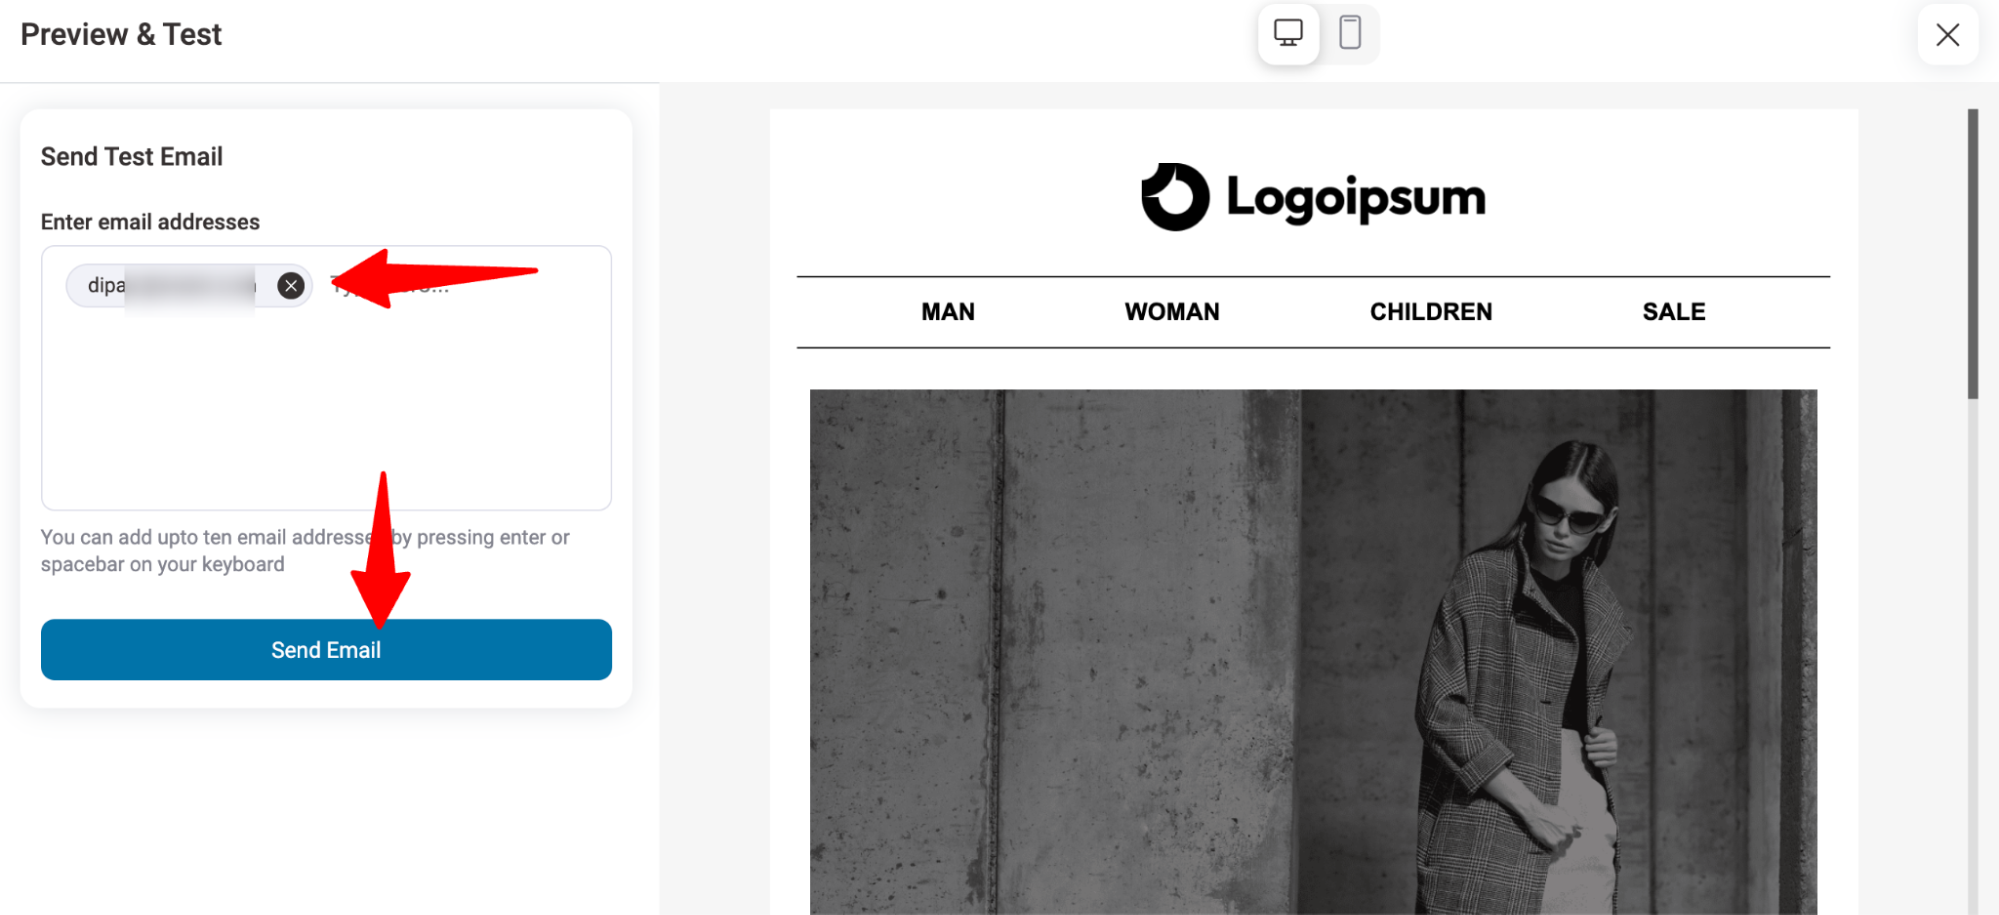
Step 6: Send a test email
Sending a test email allows you to thoroughly review the email's content and layout, ensuring that it appears as intended to your recipients.
To send a test email, click on “Preview and Test”. Then, provide the receipt email and hit “Send Email”.
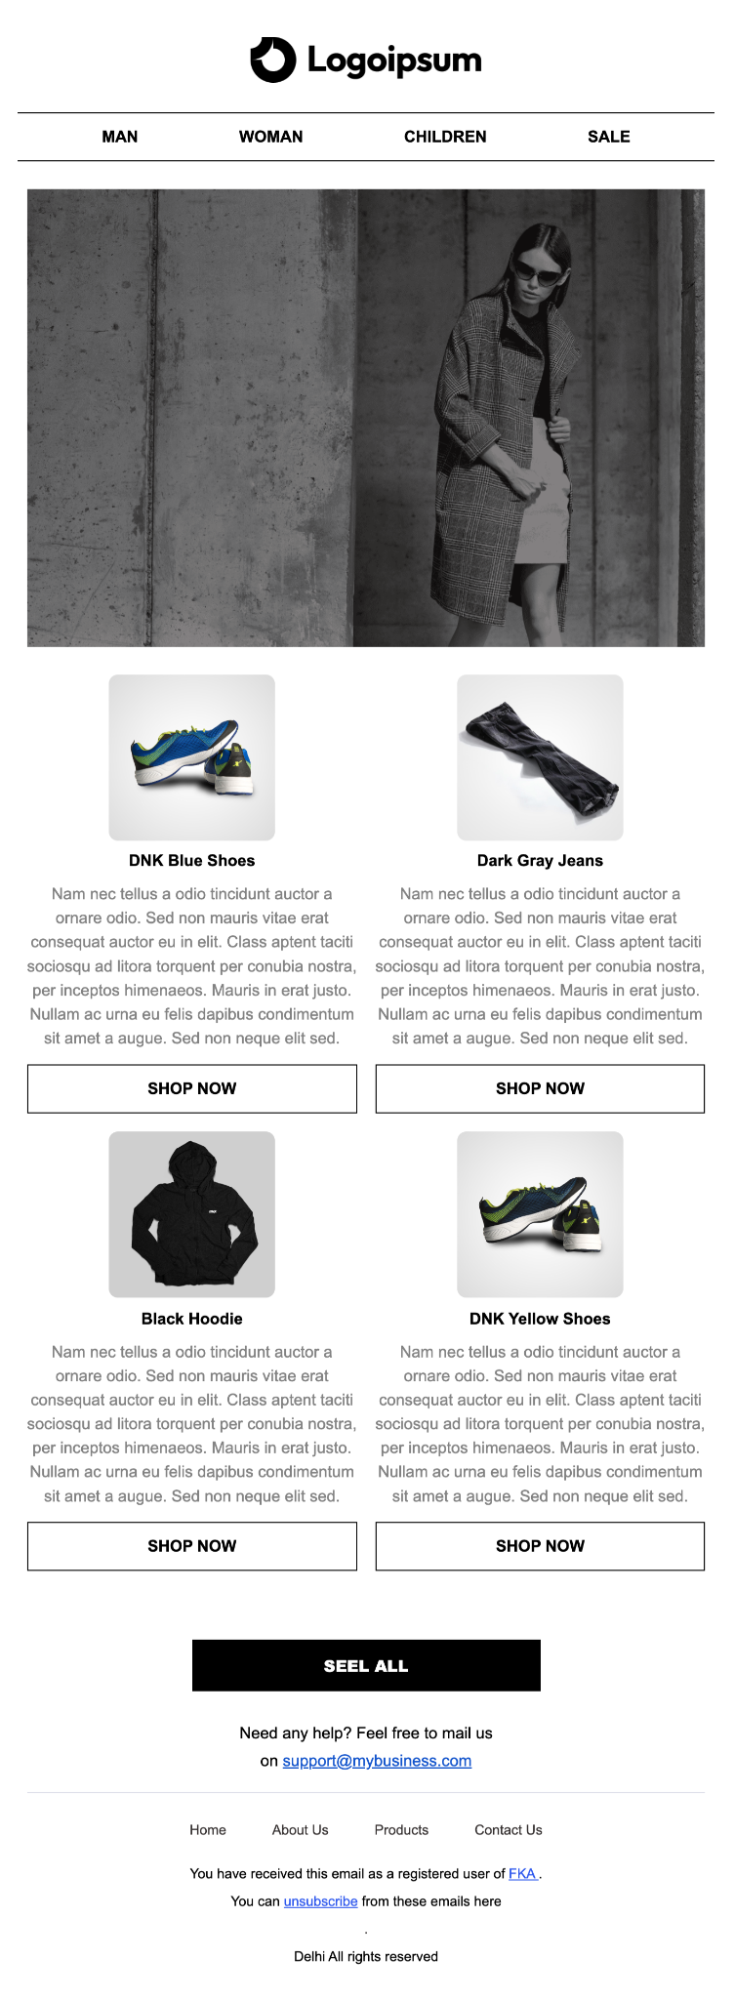
Here is what the email I created looks like :
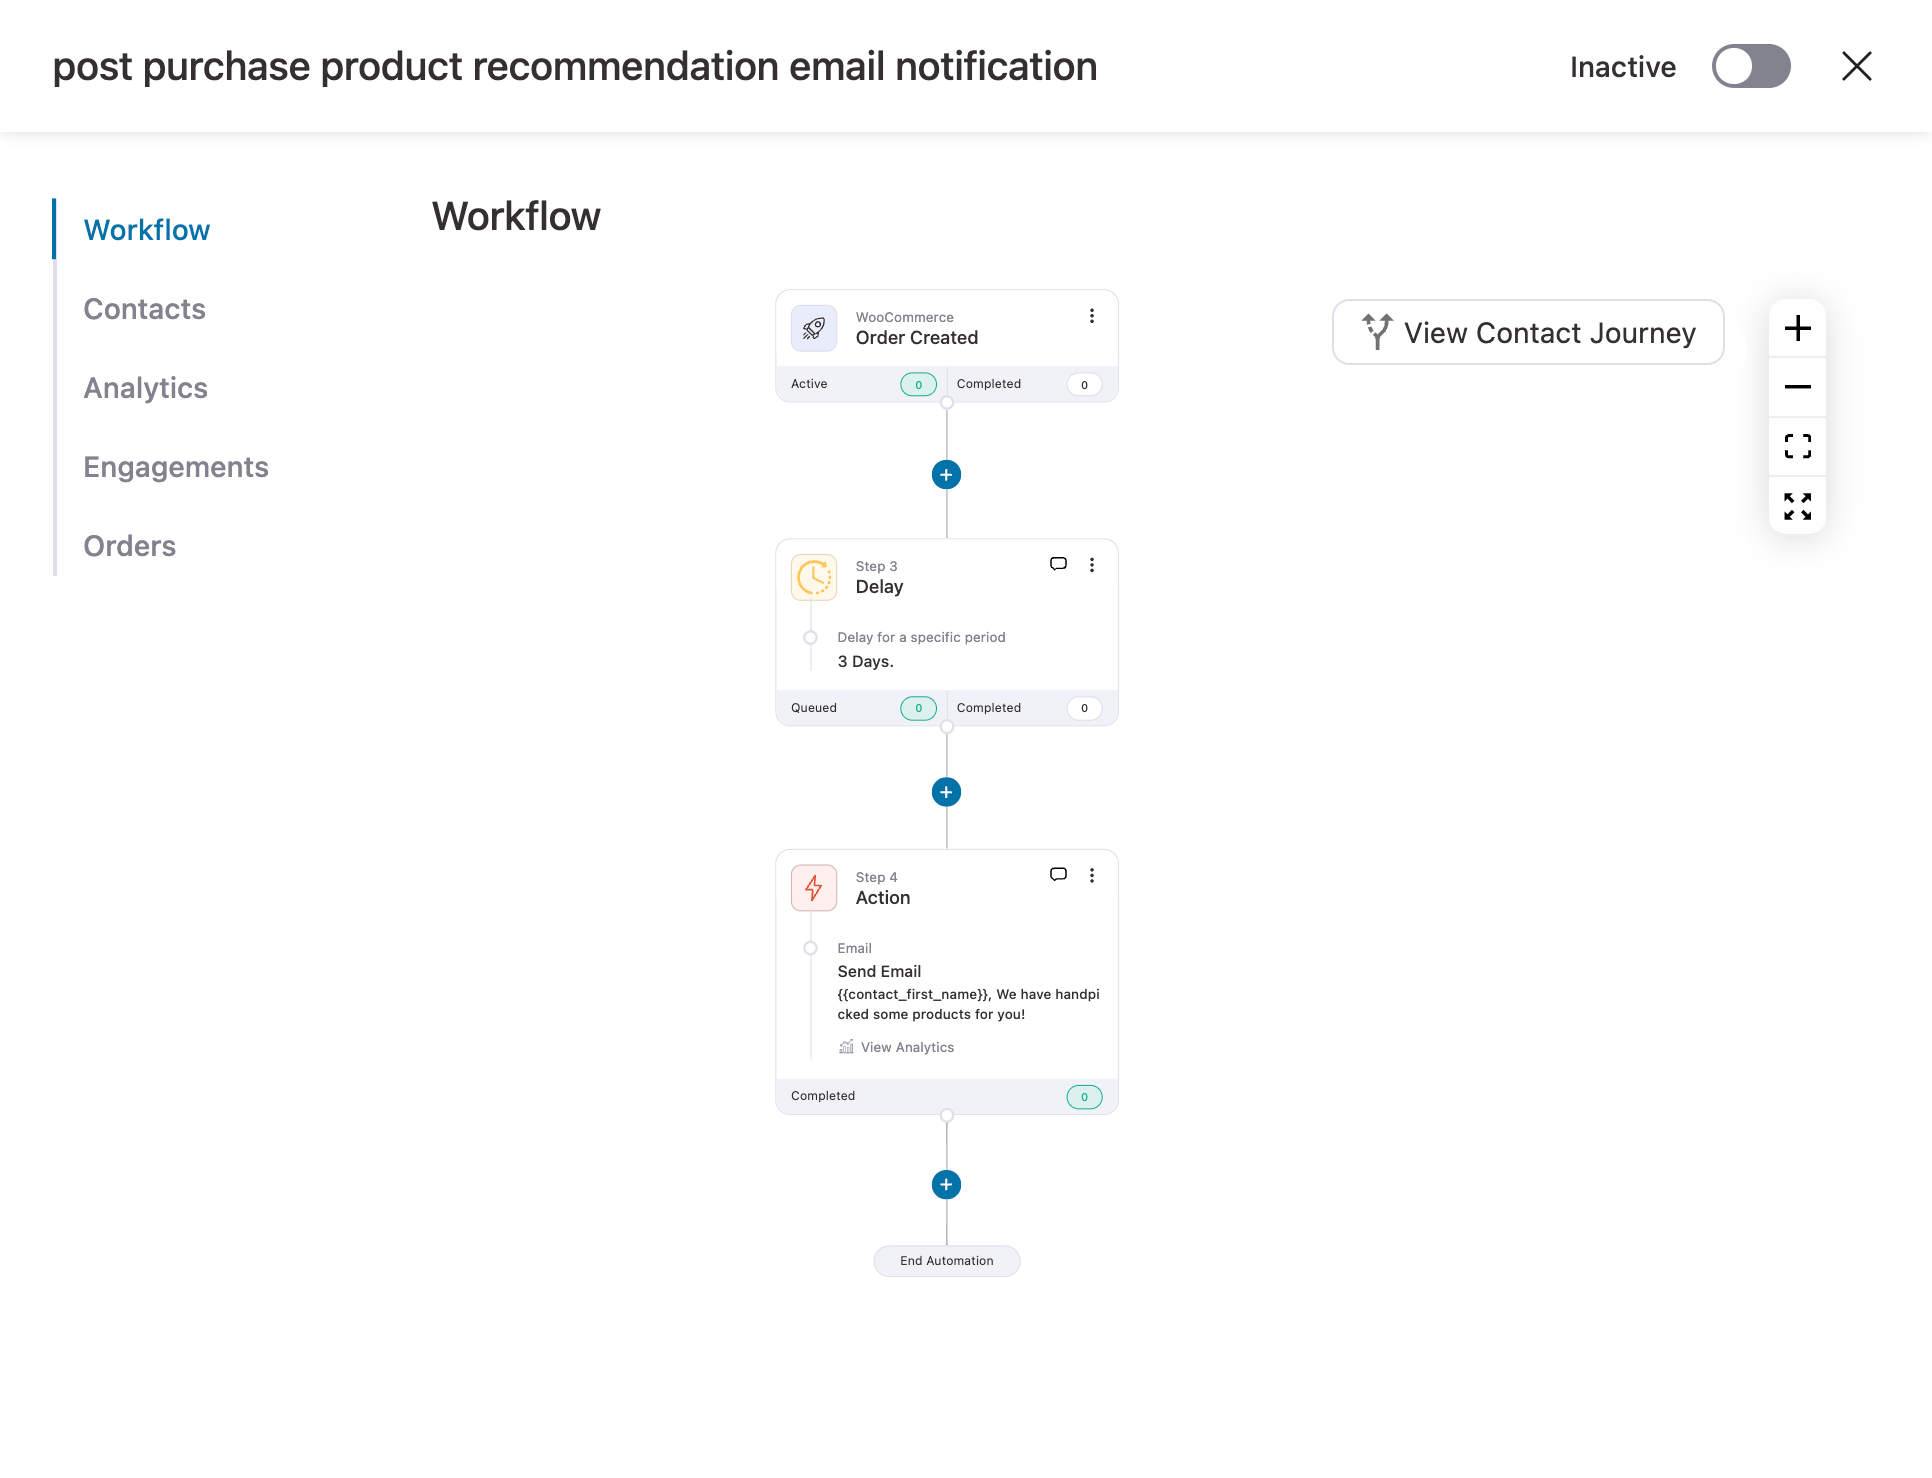
Step 7: Activate the WooCommerce product recommendation automation
Here is what the automation looks like:
The final step is to activate the automation so your users receive emails with WooCommerce product recommendations after the set delay. To do that, return to the automation page and turn on the toggle button at the top right center.
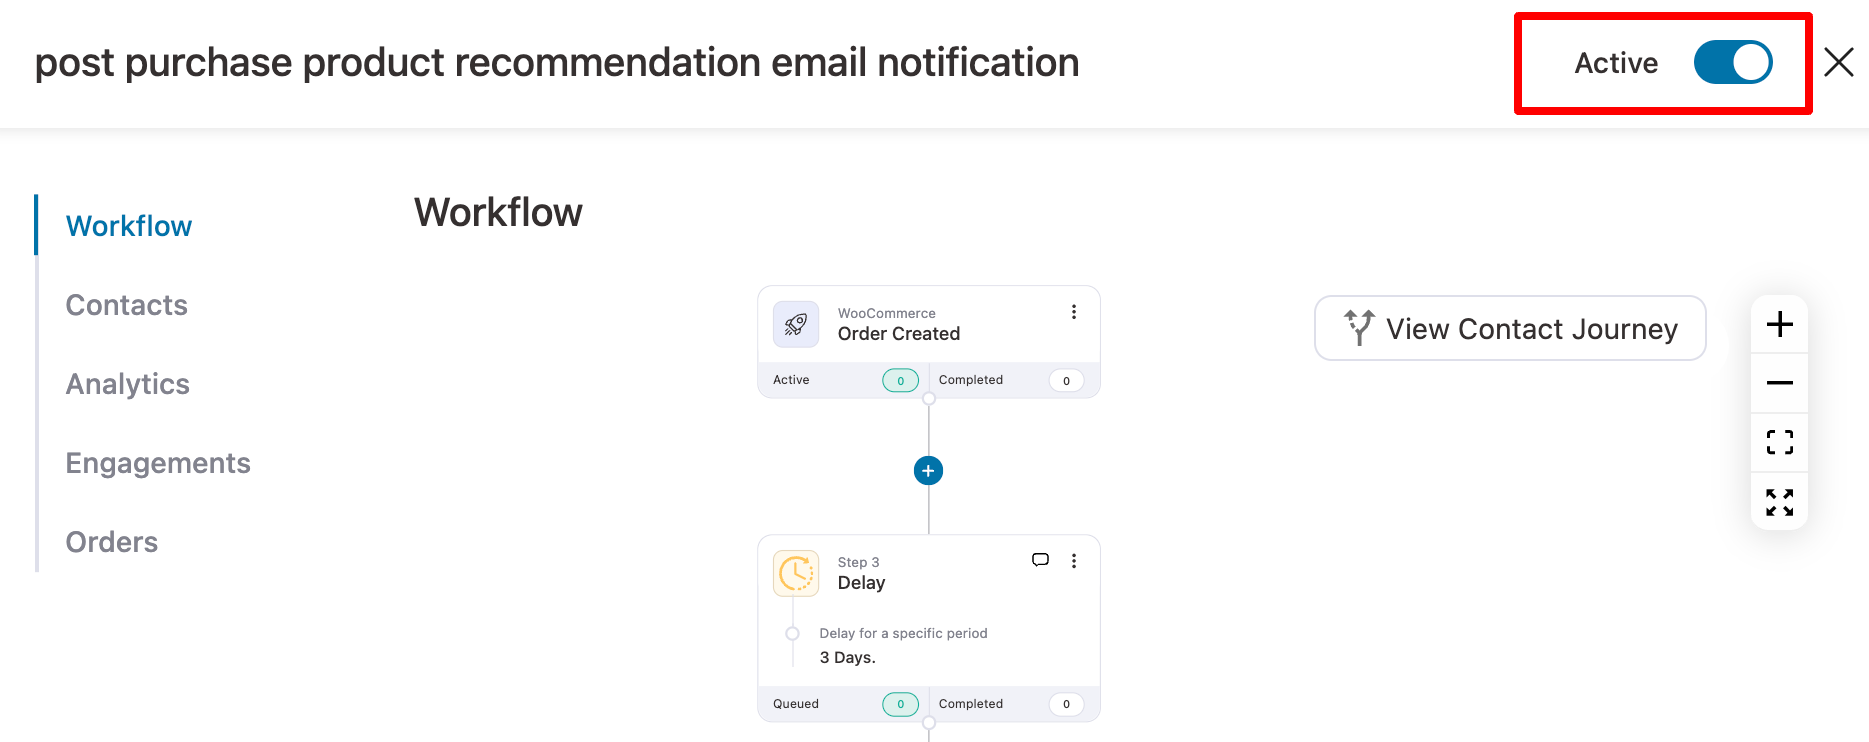
This will make your automation go live.
5 Practical Tips to Maximize Revenue from WooCommerce Product Recommendations
Here are some tips to follow for boosting revenue generated from WooCommerce product recommendations:
- Ensure product recommendations are relevant and useful
Don’t offer the same products to all your customers. Use segmentation to ensure your recommendations are relevant and useful based on their behavior, preferences, and purchase history.
This increases the likelihood of conversions.
- A/B testing your recommendations offers to find out what works
You can conduct A/B tests to experiment with different recommendation strategies, such as order bumps, one-click upsells, and follow-up emails.
This will give you a better idea about what your customers want.
- Ensure product recommendations are engaging and visually appealing
Present your product recommendations in a visually attractive way that grabs attention and invites customers to explore more.
Use clean layouts, high-quality images, and concise copy to make the recommendations stand out. Also, make sure your product recommendations look seamless across all devices.
- Track analytics to monitor performance and improve your strategy
You should keep track of analytics to find out how your product recommendations are performing.
Analyze reports in different matrices such as click rate, conversion rate, revenue generated, average order value, etc.
- Promote product bundles with a "bundle and save" strategy
Offer discounts on product bundles by grouping related items together. This encourages customers to purchase more items at a reduced price, effectively increasing the average order value while driving higher sales overall.
Frequently Asked Questions (FAQs)
If you're offering order bumps and upsells, avoid recommending additional products on the thank you page to prevent overwhelming customers. Instead, offer a discount coupon for their next purchase to encourage repeat business.
You can easily do that with FunnelKit Funnel Builder’s custom thank you page templates.
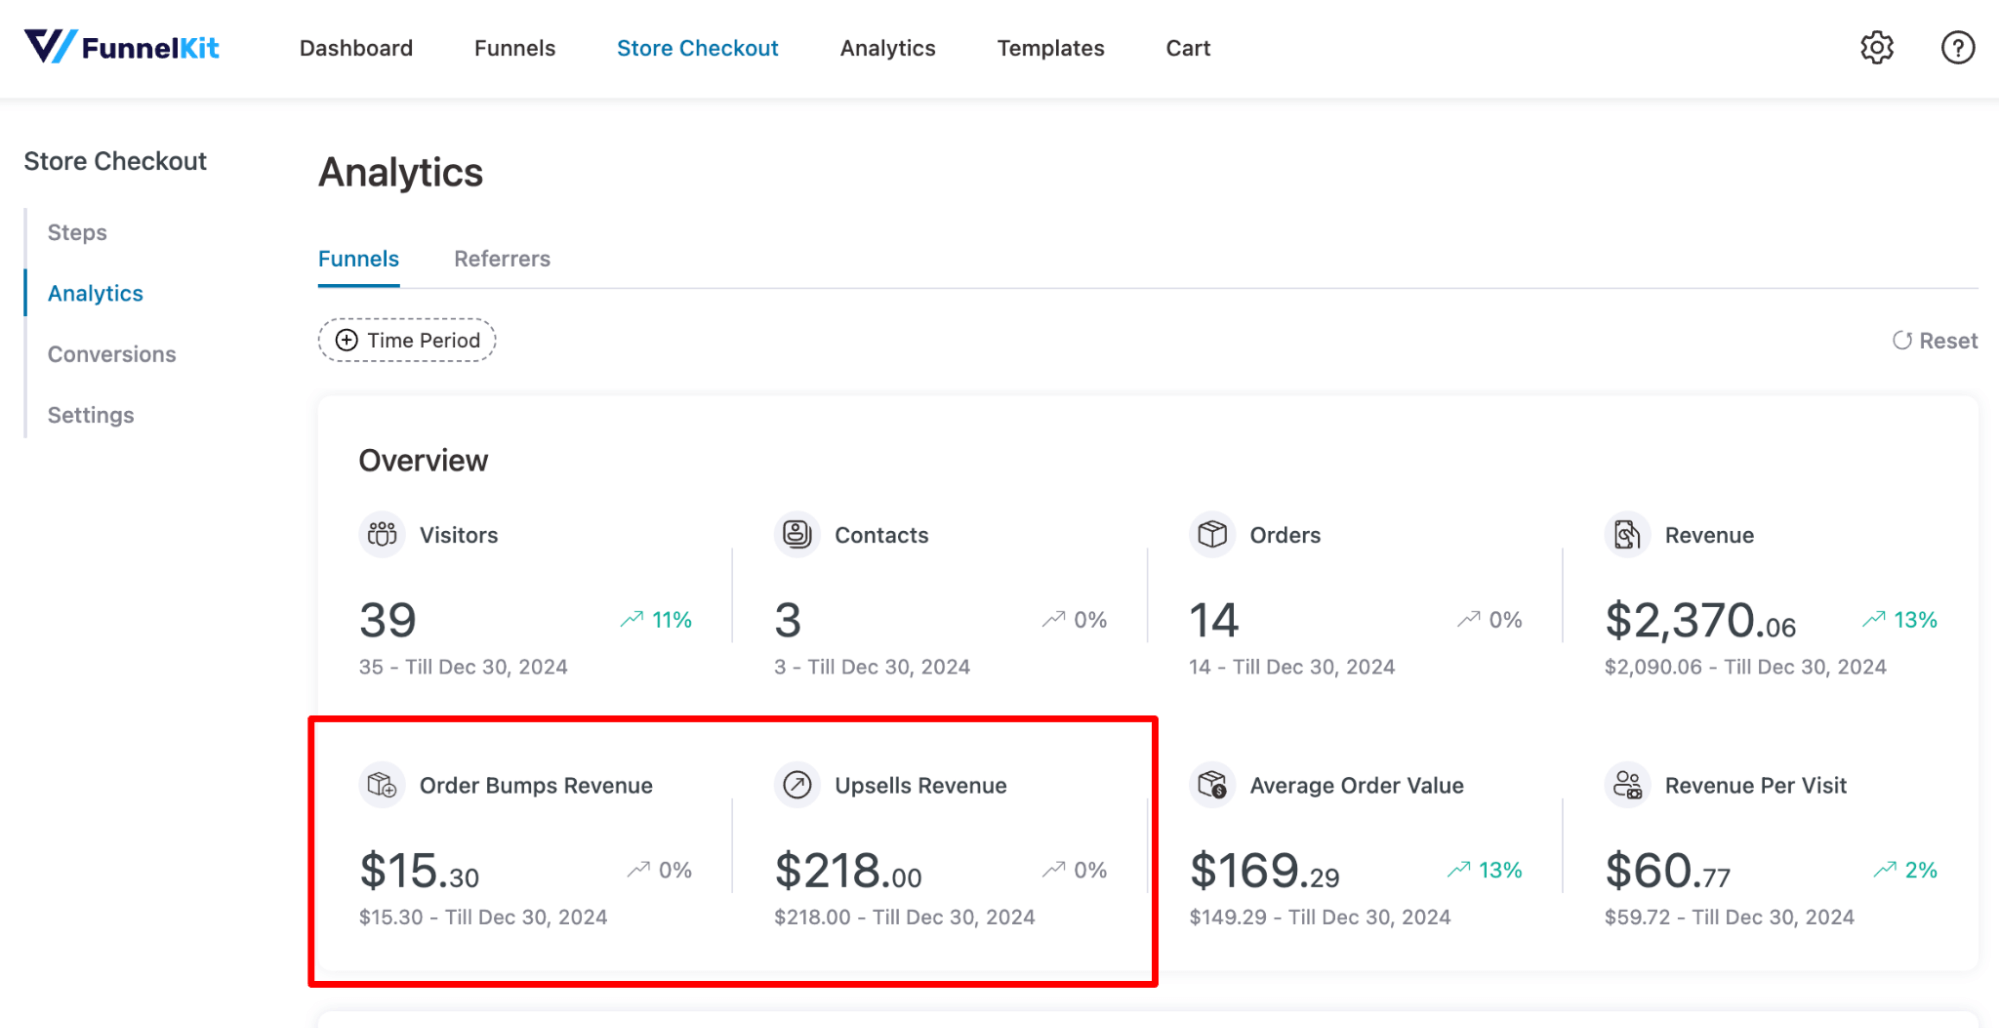
With FunnelKit, you can easily track the revenue generated from order bumps and one-click upsells and filter the data for any specific time period.
Upsells are when you suggest a better version of what the customer is already buying like offering a premium smartwatch instead of the basic one. Cross-sells are complementary products you suggest alongside their purchase, like recommending headphones when they’re buying a smartphone.”
The top plugins for upselling and cross-selling are FunnelKit Funnel Builder, FunnelKit Cart, FunnelKit Automations, OptinMonster, and Product Recommendations for WooCommerce. They help suggest related or premium products to boost sales.
Ready to Boost Sales with Powerful Product Recommendations?
WooCommerce’s default product recommendation options only cover 15-20% of the customer’s journey.
But by implementing the strategies I have discussed, you can effectively drive sales across up to 80% of the shopping process.
With FunnelKit Funnel Builder, you can recommend products at key stages, helping customers find the right items and increase their spending.
This WooCommerce recommendation plugin also provides detailed analytics to measure and optimize your strategies.
FunnelKit Automations further drives sales through email recommendations, even when you're not actively managing them.
Join over 30,000 users who trust FunnelKit to increase both sales and AOV.
Get FunnelKit today and start growing your store’s sales.
Editorial Team
July 7, 2026You’ve built your WooCommerce store, polished your product pages, and invested in marketing, but sales aren’t coming. Visitors browse, some add items to their cart, and most vanish before completing...
Editorial Team
June 25, 2026Sending WooCommerce orders to Google Sheets automatically copies your store's order data into a live spreadsheet. Every time a customer checks out, the order details are added to a new...
Editorial Team
June 24, 2026Discover the best WooCommerce plugins to recover abandoned carts and boost your sales. Losing sales to abandoned carts? It’s more common than you realize. Around 70% of shoppers leave without...


