
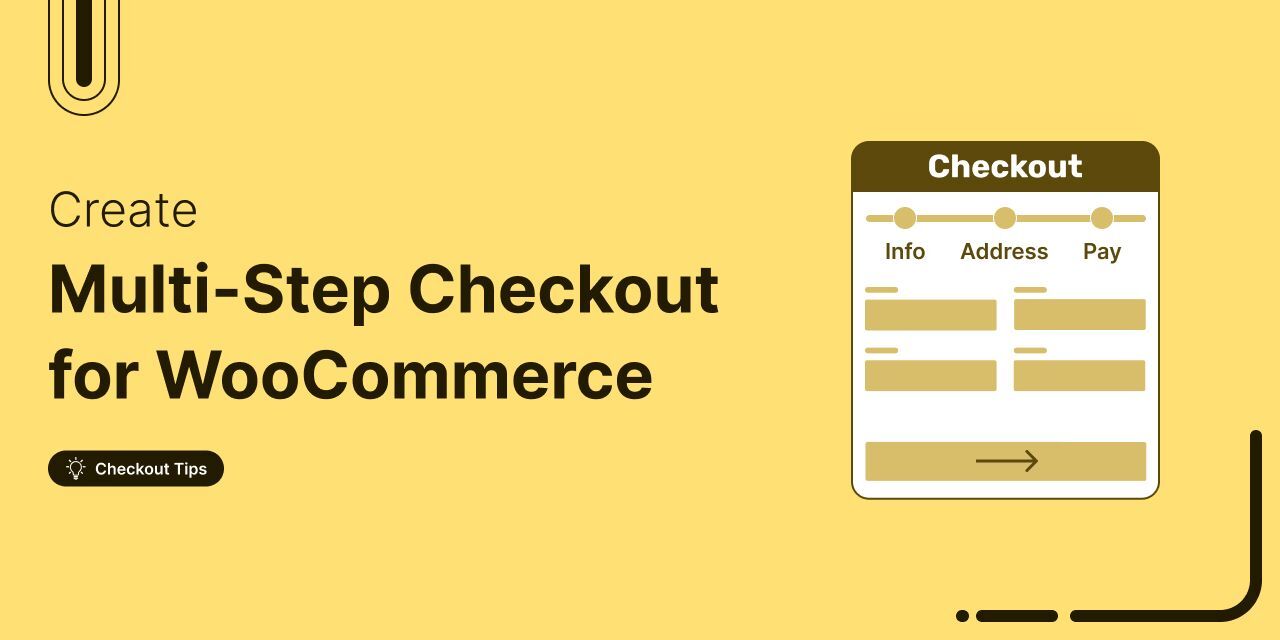
A WooCommerce multistep checkout splits your checkout into short, guided steps, such as contact, shipping, and payment, so customers aren't overwhelmed by one long form.
You can add one with a dedicated plugin in about 10 minutes (no code), or build it manually with custom code if you prefer full control.
In this guide, we'll walk you through the exact setup, comparison of the 7 best plugins, the no-code vs code routes, and proven conversion practices for 2026.
Table of Contents
- 1 What Is a WooCommerce Multistep Checkout?
- 2 How to Create a WooCommerce Multistep Checkout? (No-Code Method)
- 2.1 Step 1: Install and activate the FunnelKit Funnel Builder
- 2.2 Step 2: Create a multistep store checkout in WooCommerce
- 2.3 Step 3: Customize the WooCommerce multistep checkout page design
- 2.4 Step 4: Customize WooCommerce multi-step checkout fields
- 2.5 Step 5: Optimize your WooCommerce checkout page for quick conversions
- 2.6 Step 6: Customize your WooCommerce thank you page
- 3 How to Add a Multistep Checkout Without a Plugin (Custom Code Method)
- 4 Top 7 Best WooCommerce Multistep Checkout Plugins of 2026 (Both Free and Premium)
- 4.1 1. FunnelKit Funnel Builder
- 4.2 2. Multistep Checkout for WooCommerce by ThemeHigh
- 4.3 3. Multistep Checkout for WooCommerce
- 4.4 4. YITH WooCommerce Multistep Checkout
- 4.5 5. WP Multi Step Checkout for WooCommerce by SilkyPress
- 4.6 6. Essential Addons for Elementor (Multistep Checkout)
- 4.7 7. Flux Checkout for WooCommerce
- 5 One-Page Checkout vs Multistep Checkout: Which is Better?
- 6 7 Best Practices for WooCommerce Multistep Checkout to Improve Conversion Rates
- 7 Best WooCommerce Multistep Checkout Templates to Boost Conversions
- 8 Frequently Asked Questions (FAQs)
- 9 Create a Conversion Smashing WooCommerce Multistep Checkout Page
What Is a WooCommerce Multistep Checkout?
A WooCommerce multistep checkout splits the checkout page into clear, sequential steps, typically including contact details, address, and payment.
Instead of showing every field at once, customers progress through one focused section at a time. This keeps the flow clean, reduces distractions, and helps them complete purchases faster.
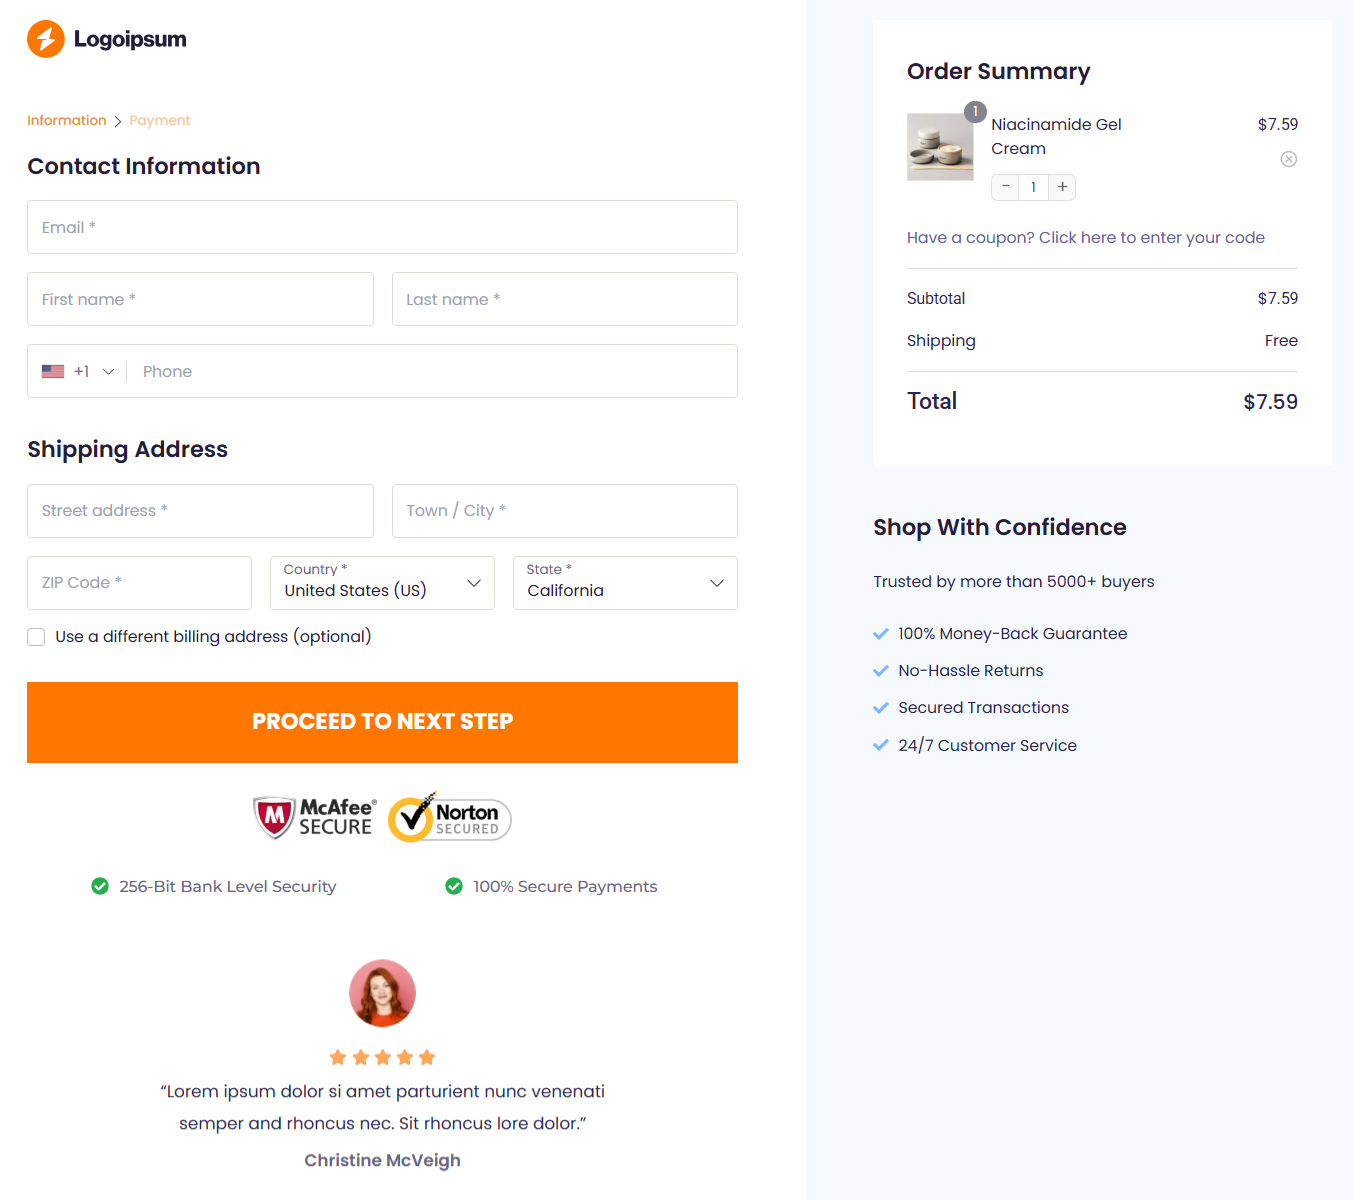
For example, here’s a multistep checkout used by Xero Shoes:
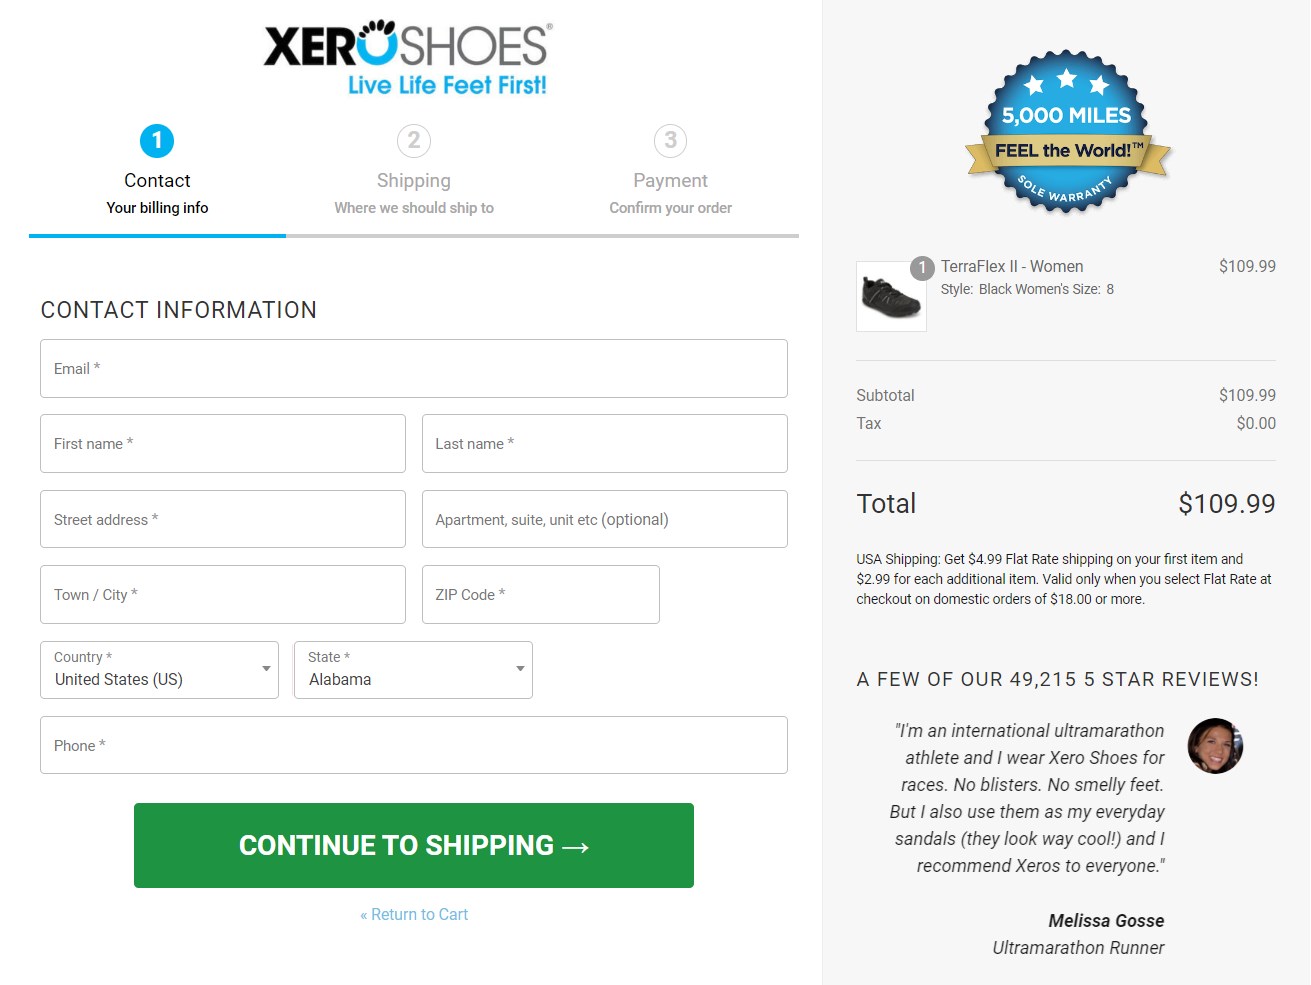
As you can see, this checkout page is divided into three steps:
- Contact information: Shoppers enter their email, first name, and last name
- Shipping details: The user fills in their billing and shipping information.
- Payment step: Customers enter their payment details.
Each step validates inputs before moving forward, minimizing errors and frustration. The result is a frictionless, guided checkout experience that feels intuitive, especially on mobile.
How to Create a WooCommerce Multistep Checkout? (No-Code Method)
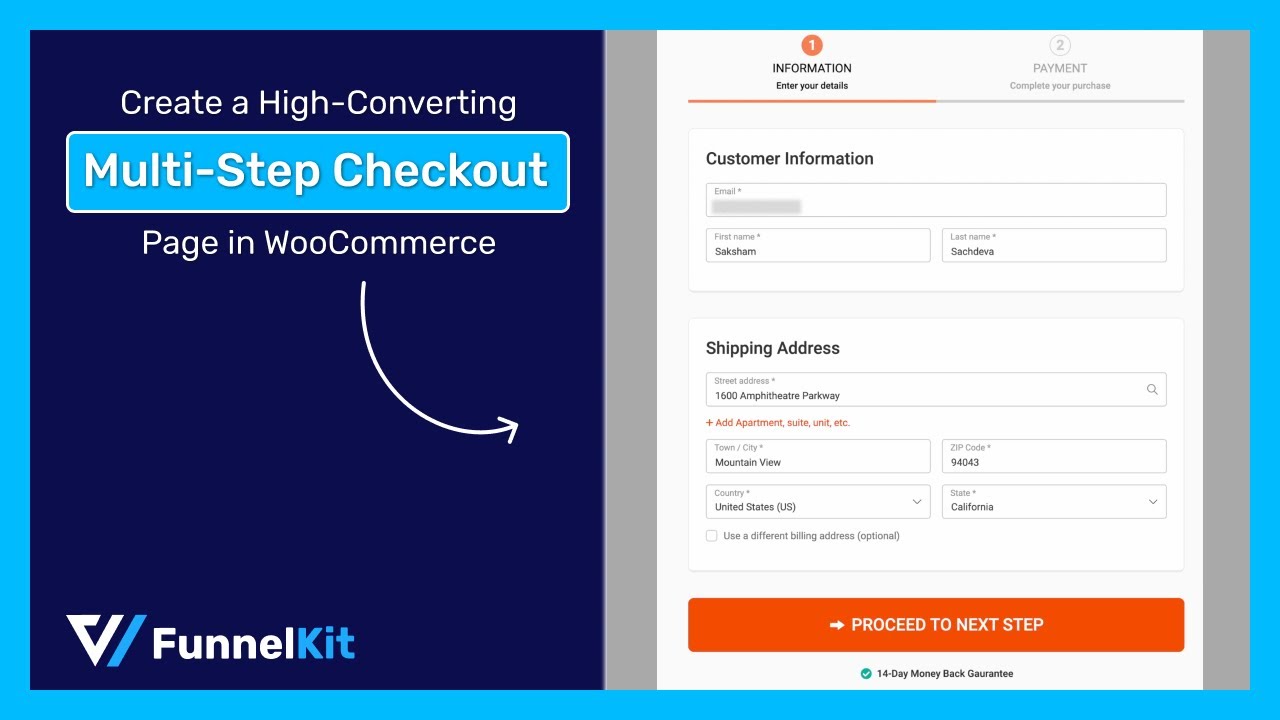
With FunnelKit Funnel Builder, you can easily create and customize both single-page and multistep checkout pages for WooCommerce.
It’s one of the highest-rated WordPress plugins, built to help you set up high-converting sales funnels from opt-in and checkout pages to thank-you pages.
FunnelKit integrates with Elementor, Divi, Bricks, Oxygen, Gutenberg and more. Whether you’re a beginner or a developer looking for a powerful WooCommerce checkout manager, FunnelKit is your go-to tool.
Follow these steps to add a multistep checkout to your store:
Step 1: Install and activate the FunnelKit Funnel Builder
FunnelKit Funnel Builder is available in two versions:
- Lite (free): Create opt-in pages, sales pages, checkouts, and thank-you pages.
- Pro (premium): Unlocks advanced features like multistep checkouts, order bumps, one-click upsells, premium templates, and other powerful checkout optimizations.
See the step-by-step install and activate guide.
Step 2: Create a multistep store checkout in WooCommerce
Go to Store Checkout and click ‘Create Store Checkout’.
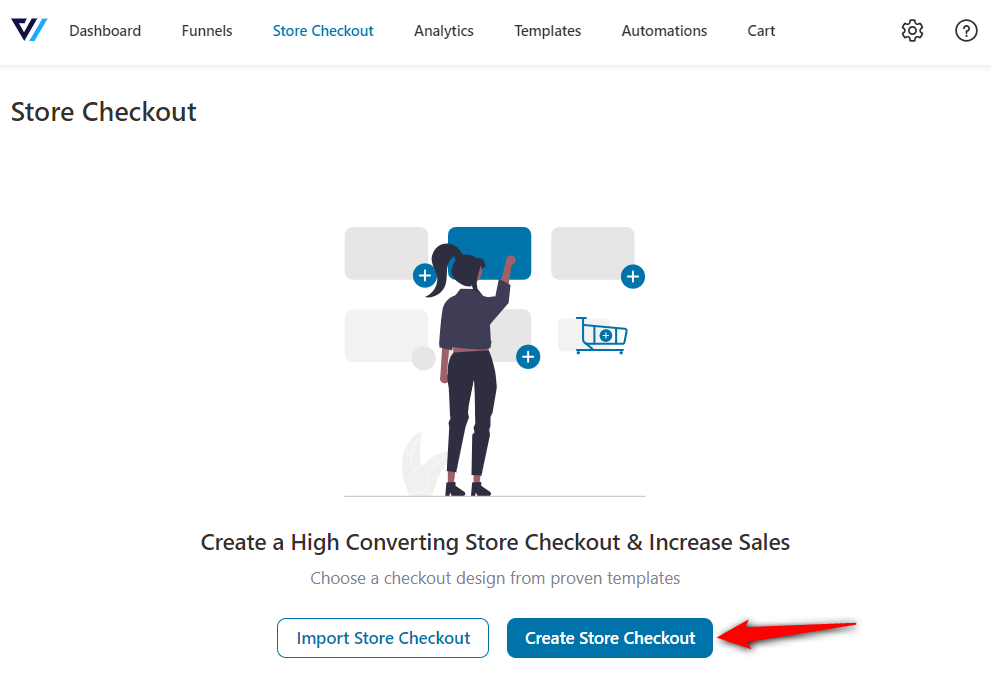
Choose your page builder and preview a template.
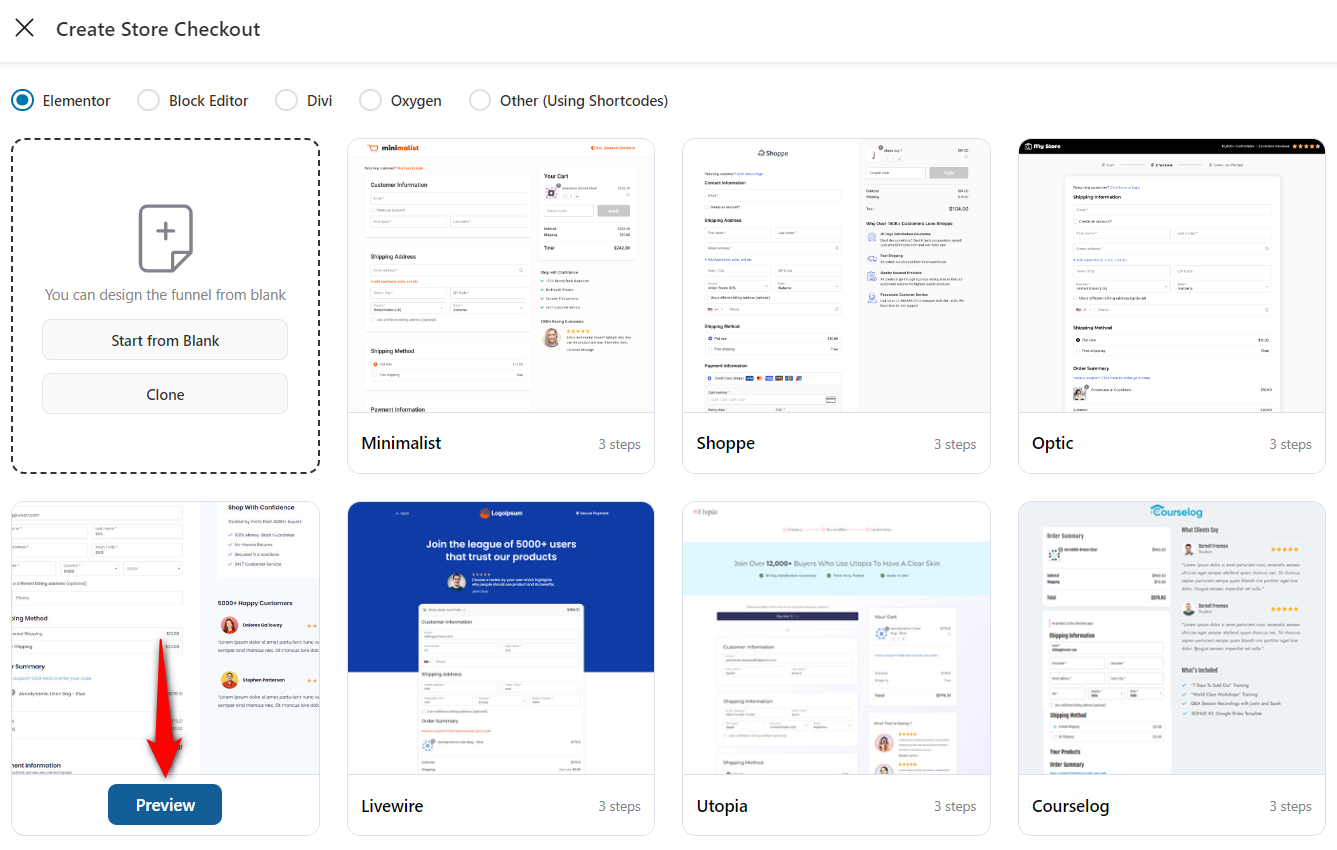
Choose the number of steps: ‘One Step’ for single-page checkout, ‘Two Step’ or ‘Three Step’ for multistep checkout.
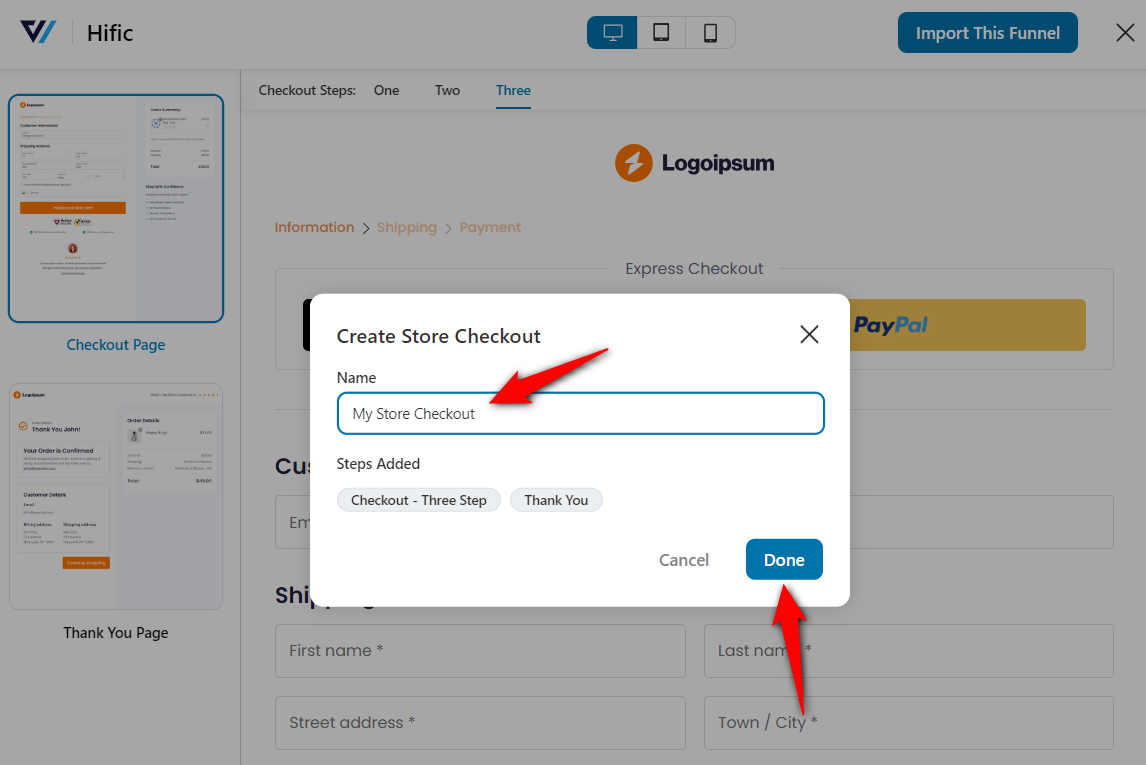
Once done, click on ‘Import This Funnel’, name your store checkout, and hit ‘Done’.
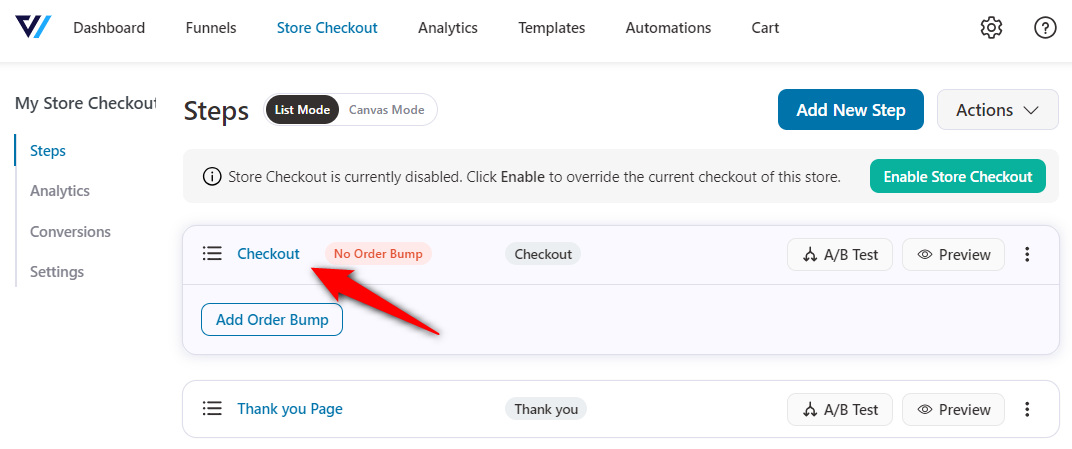
Your store checkout will be successfully created.
Step 3: Customize the WooCommerce multistep checkout page design
Click on the name of your checkout page to start customizing it.
Under the ‘Design’ tab, click ‘Edit Elementor Template’ to launch the editor.
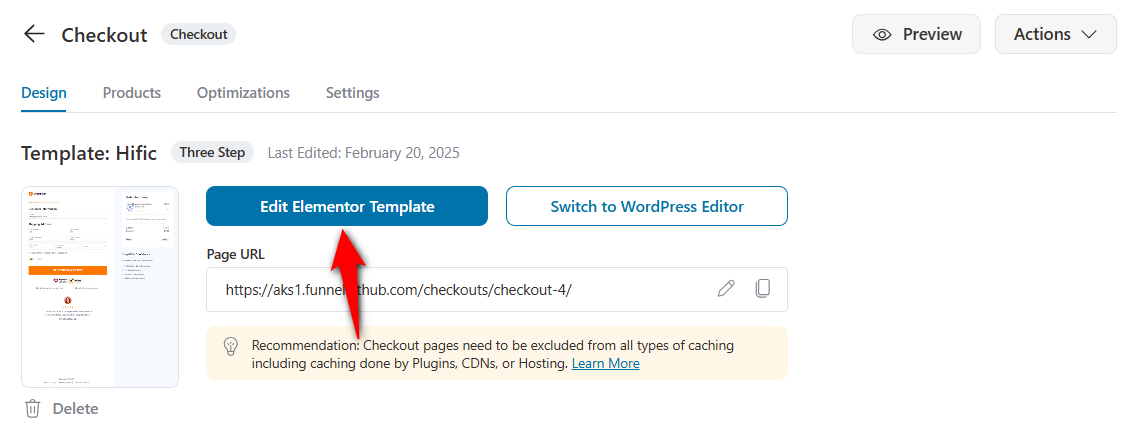
Since we selected Elementor as the page builder, the page will load in the Elementor editor, where you can customize every element.
Business logo
Click the logo to upload your own business image. Adjust its size, alignment, border, and styling options.
Checkout steps or progress indicators
Choose the step layout: Breadcrumbs or Tabs.
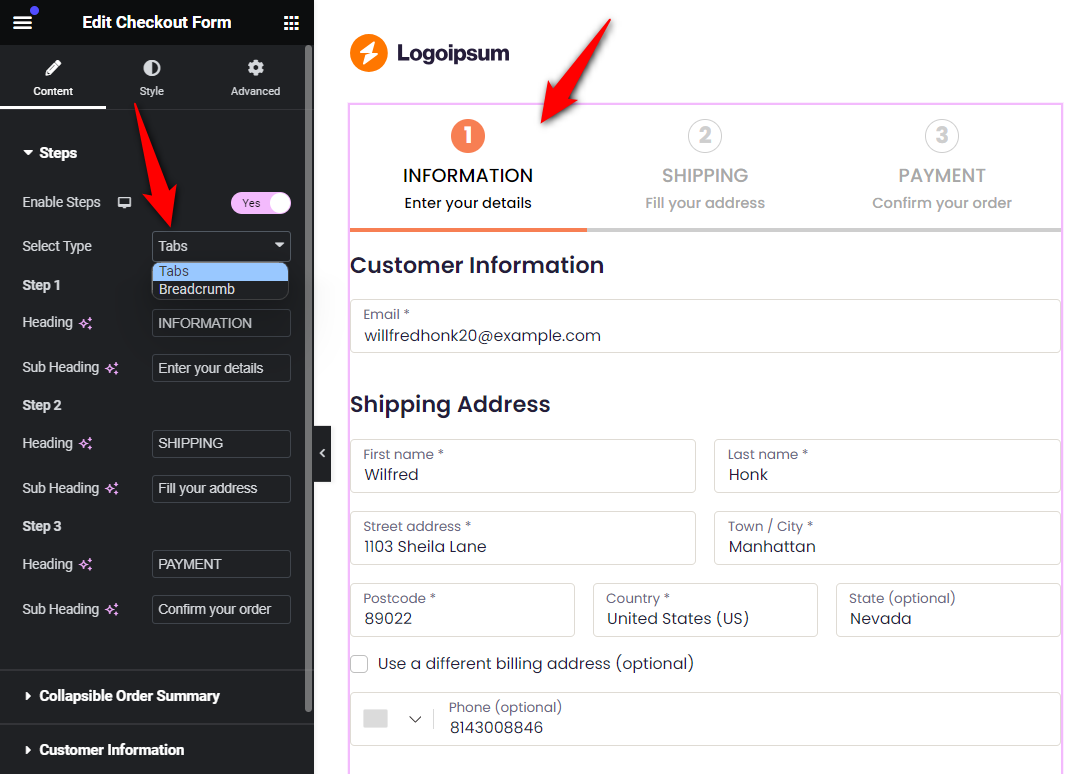
Add clear headings and subheadings for each step.
Customize active/inactive step colors in the Style tab.

This is how you can add a progress bar to the WooCommerce multi-step checkout page.
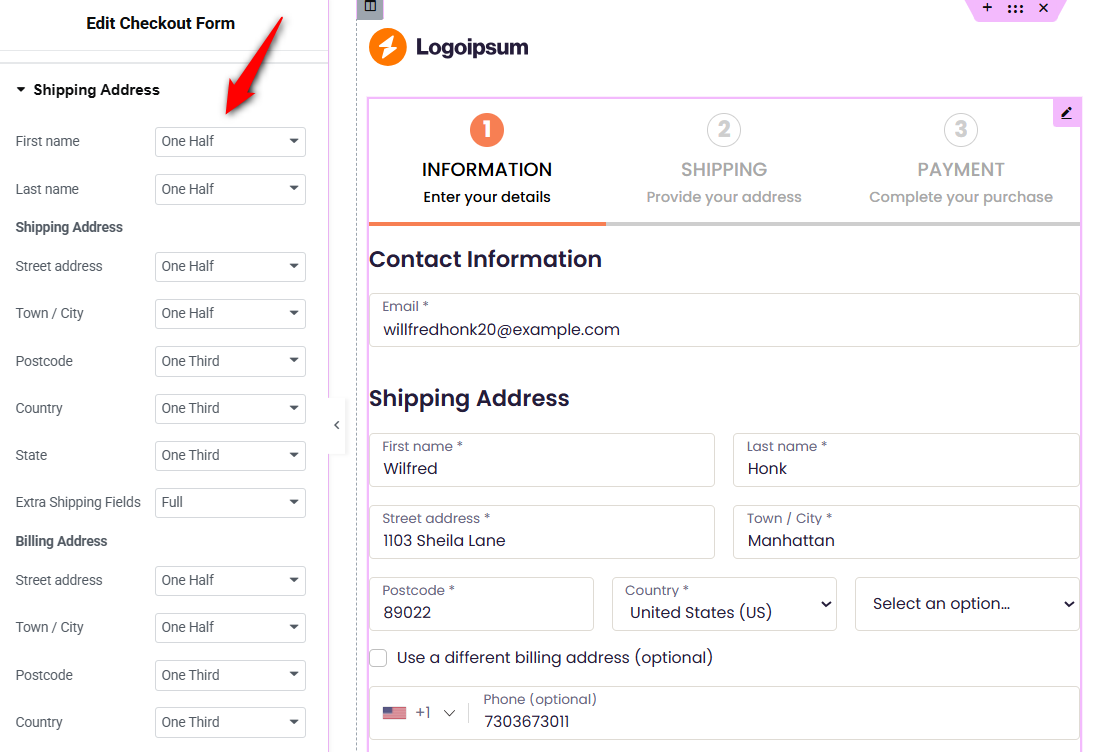
Checkout form field widths
Click on the checkout form and adjust the width of your shipping fields.
You can set the field widths as full, half, one-third, and two-thirds.
Buy now button and trust badges
Style the place order button by changing the text, colors, borders, icons, etc.
Add trust elements, such as testimonials or benefit highlights, if needed.
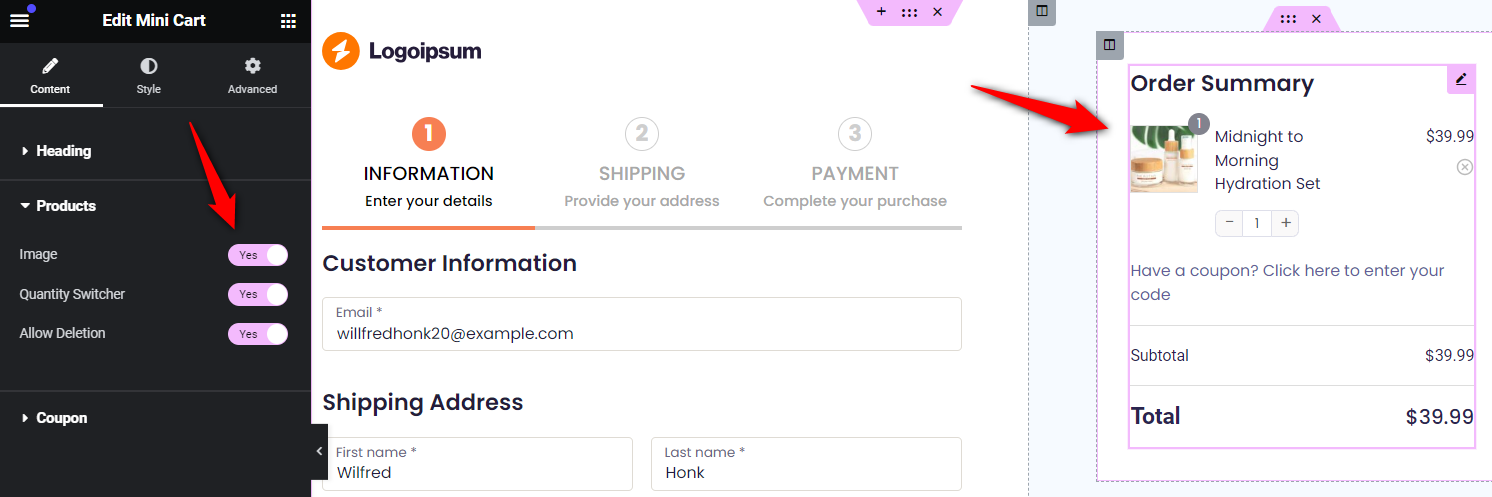
Mini cart or order summary
FunnelKit also offers customization options to edit the mini cart or order summary on your checkout page.
Customize the mini cart by enabling product images, quantity switchers, item deletion, collapsible coupon options, and more.
Save the changes when done by hitting the ‘Publish’ button.
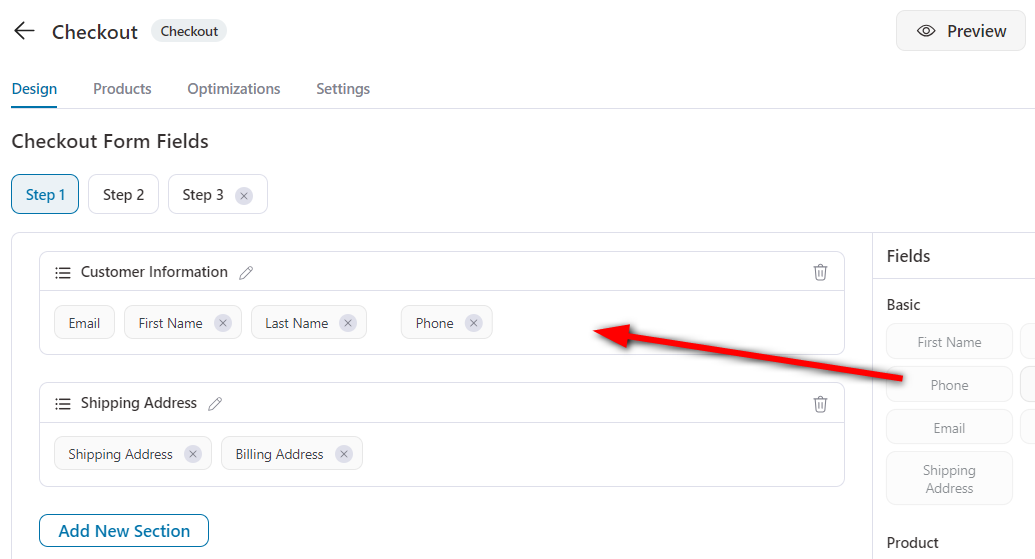
Step 4: Customize WooCommerce multi-step checkout fields
FunnelKit’s drag-and-drop Checkout Field Editor makes it easy to customize your form fields. You can:
- Add custom fields
- Edit existing ones
- Rearrange field order
- Delete unnecessary fields or entire sections
For example, you can move the email field to the top or merge billing and shipping fields into a single section without any coding.
Learn more about the checkout field editor in the FunnelKit Funnel Builder.
Preview the fields across all three checkout steps to ensure everything is organized properly.
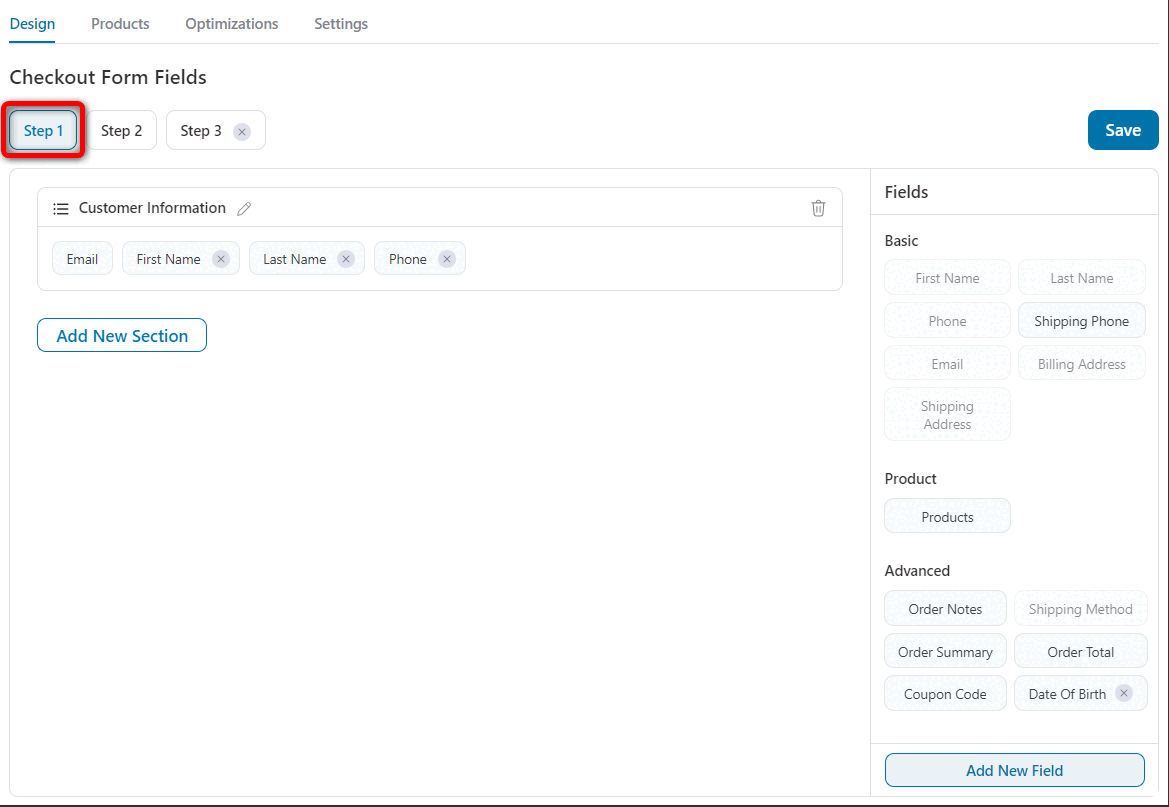
Make sure to save the changes before proceeding to the next tab.
Step 5: Optimize your WooCommerce checkout page for quick conversions
Funnel Builder lets you optimize your checkout pages to speed up the payment process and enhance your customers' shopping experience.
🎥 Watch the mini masterclass for a distraction-free and conversion-optimized checkout page:
Here are some of the optimizations that you can do:
- Express checkout: Offer one-click express payments via Google Pay, Apple Pay, PayPal Express, and more.
- Google address autocomplete: Automatically suggests accurate addresses as users type, reducing checkout time by utilizing the Google Address API.
- Auto-apply coupons: Apply promotional codes automatically when visitors land on your checkout page from campaigns, no manual entry needed.
- Multistep field preview: Allow shoppers to review the details entered at each step to minimize mistakes and improve accuracy.
- Collapsible optional fields: Keep your checkout form clean by hiding non-essential fields under expandable sections.
- Smart login: Offer a seamless login experience with inline or overlay login forms, ideal for returning customers.
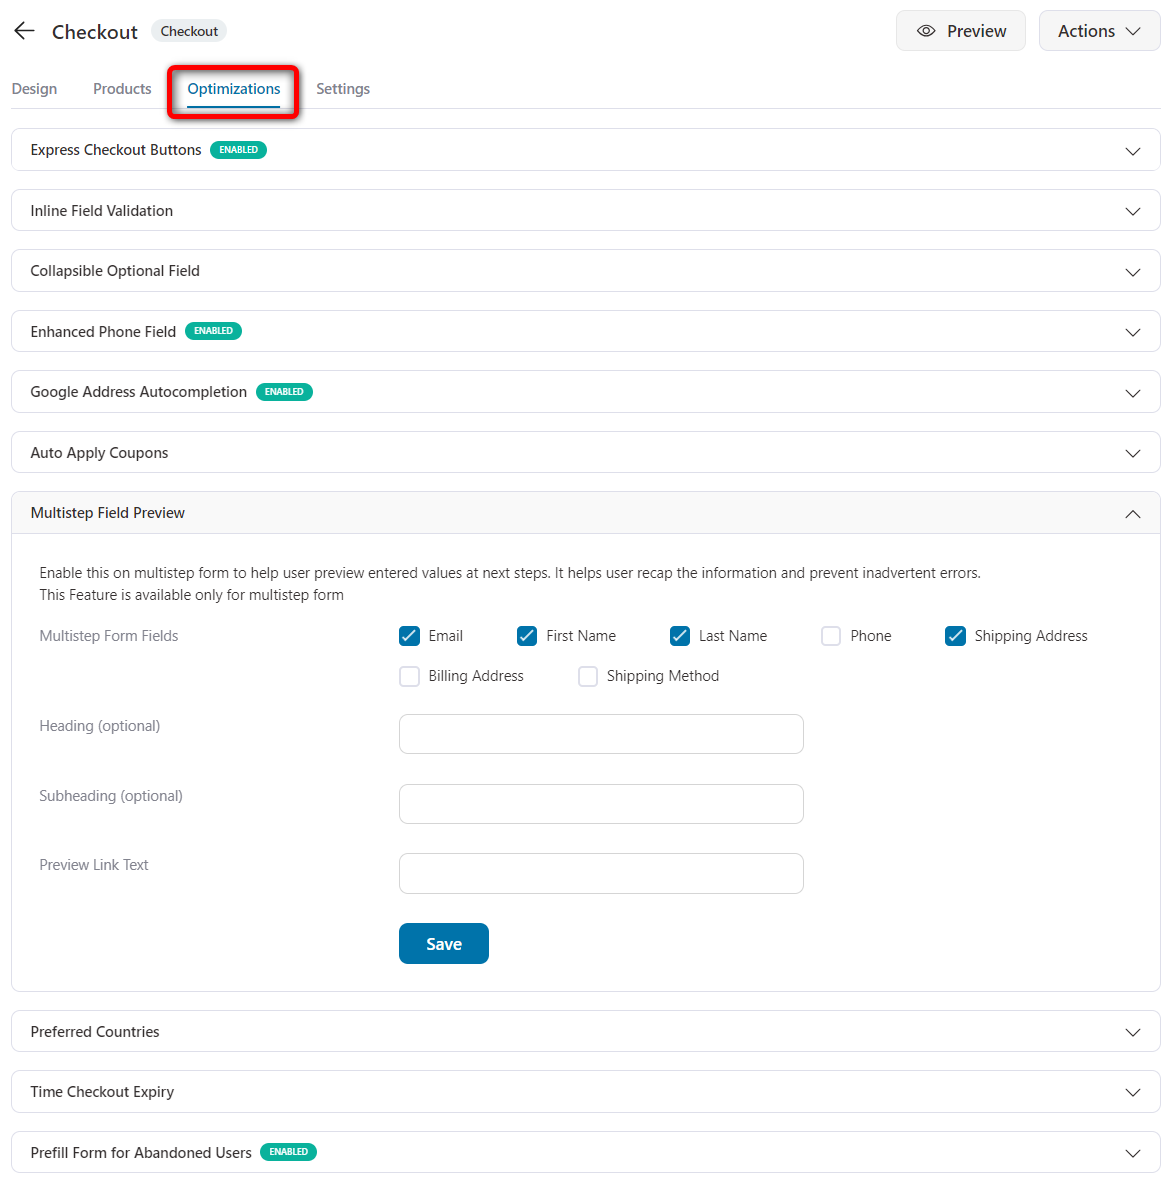
Apart from this, there are many options, such as an enhanced phone field, time checkout expiry, auto-fill state from zip code, and more.
Once done, click on 'Save'.
You can even add order bumps and one-click upsells to help boost the average order value in your store.
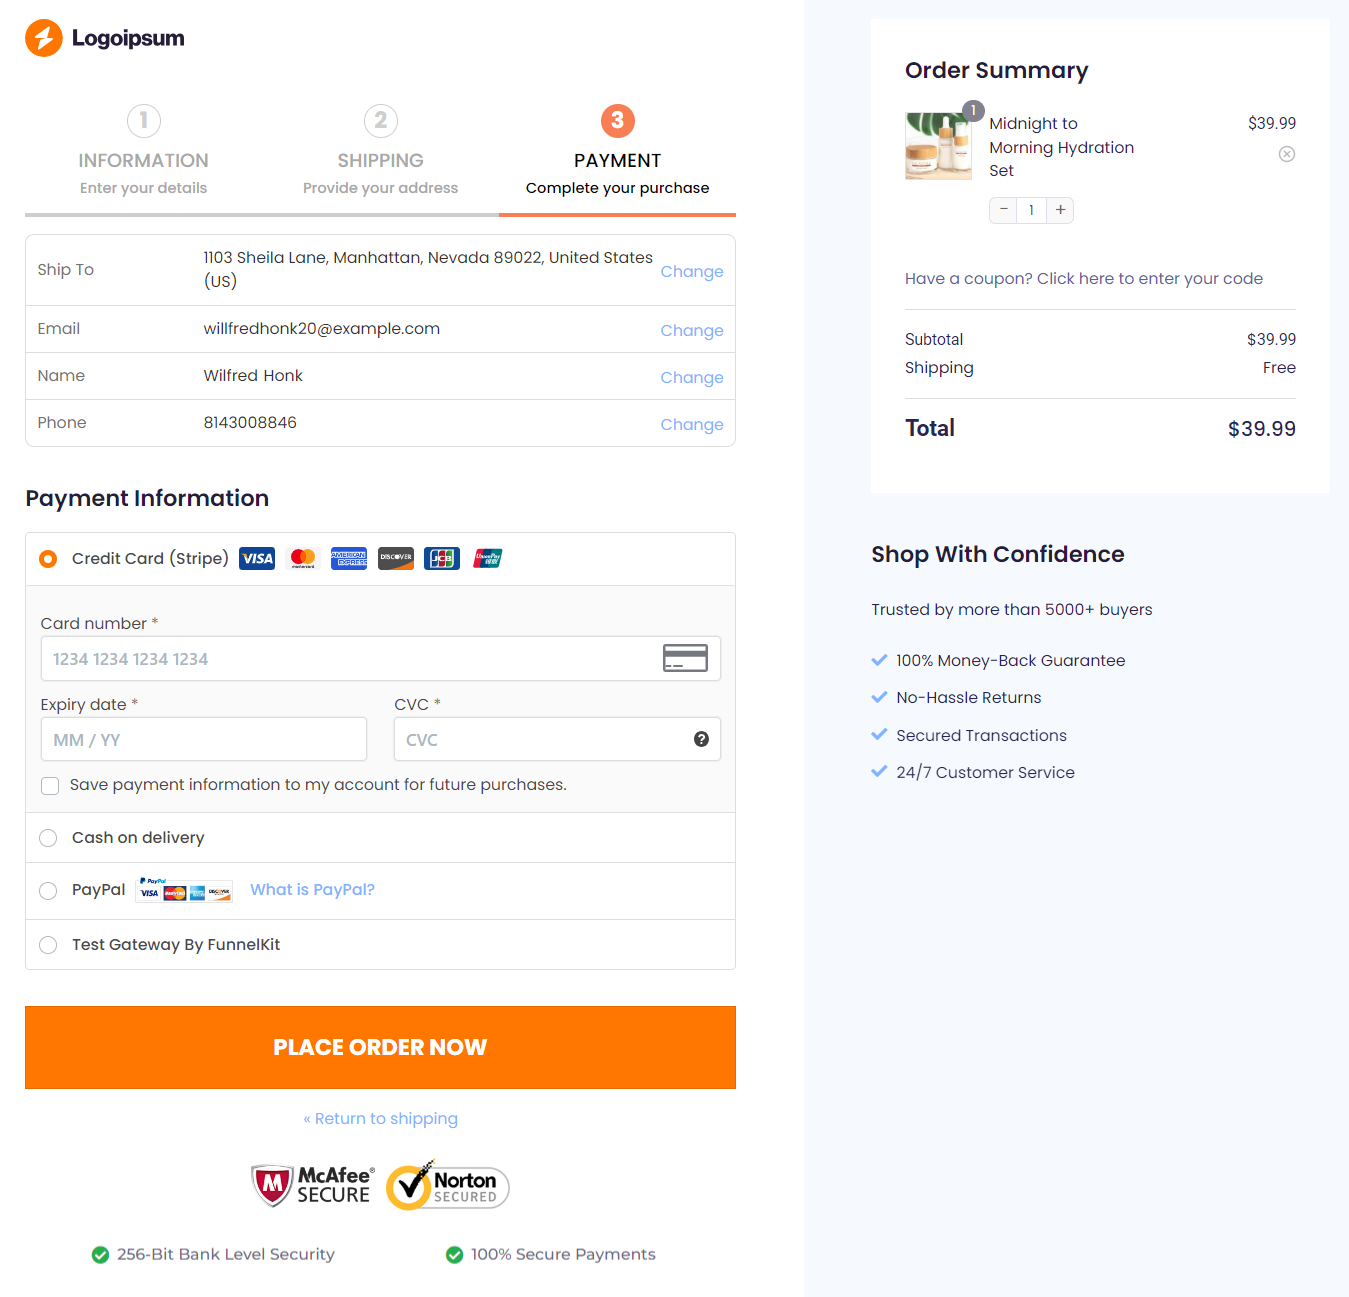
This is what your WooCommerce multistep checkout page will look like:
Step 6: Customize your WooCommerce thank you page
A thank-you page is the final step in your funnel, confirming the order and wrapping up the customer journey.
Modern marketers add more value to their buyers’ journey and keep the conversation going through their thank you pages.
To start customizing your order confirmation page, click on its name in your store's checkout funnel.
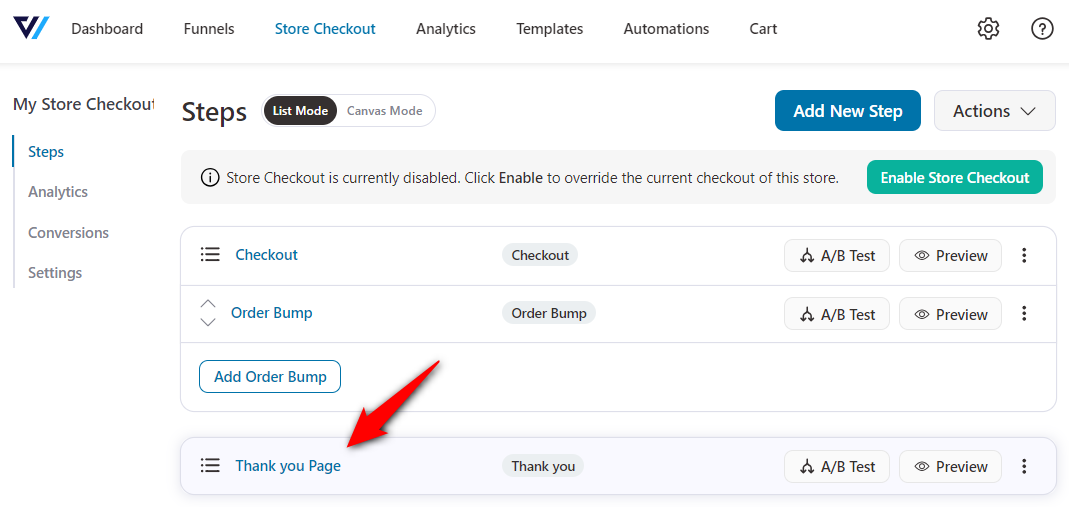
The editing process will remain the same. You can make customizations based on the content, shortcodes, headings, colors, background, and more.
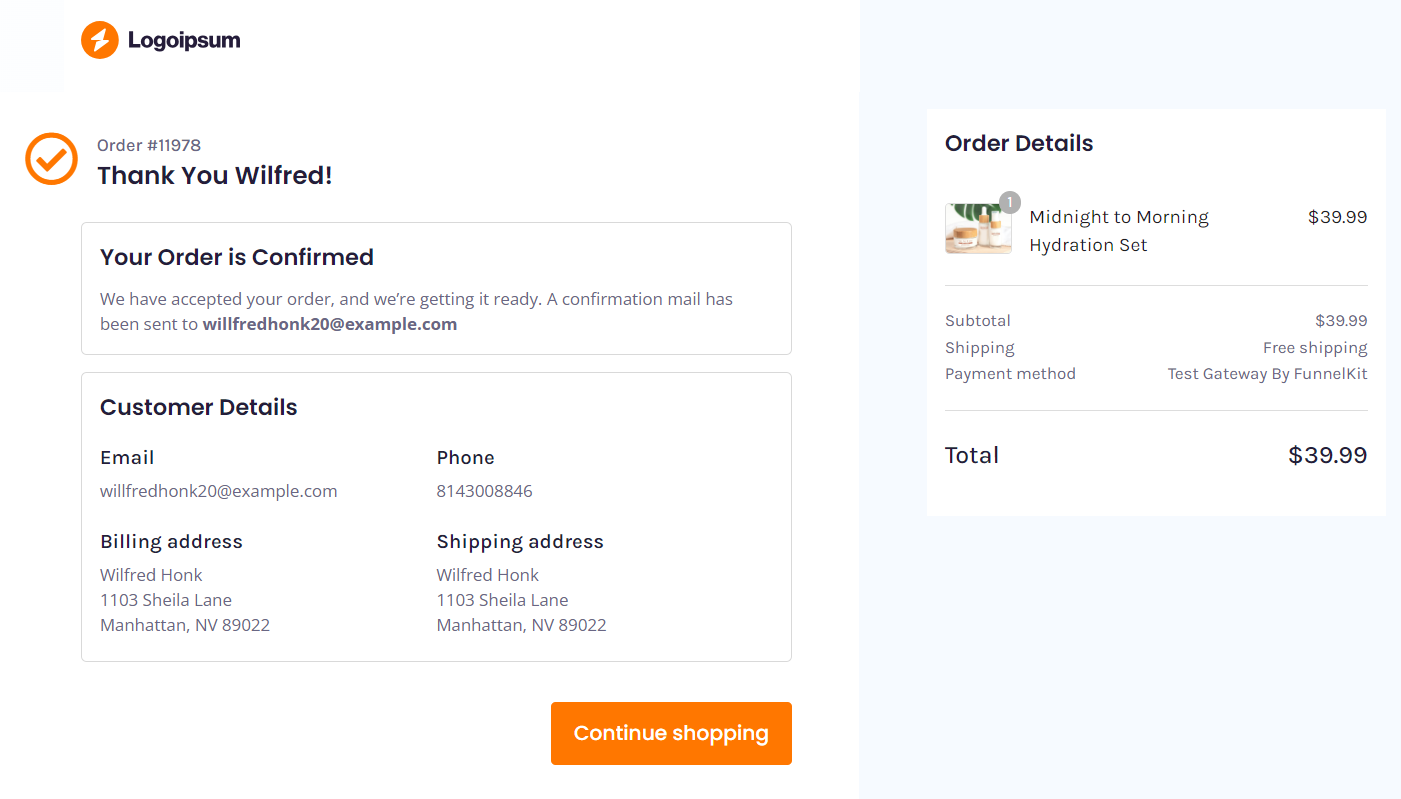
Here’s a preview of your WooCommerce thank you page:
Once done, click 'Enable Store checkout' to make your multistep checkout live.
How to Add a Multistep Checkout Without a Plugin (Custom Code Method)
If you’d rather not use a plugin, you can split the default WooCommerce checkout into steps with custom code.
This is more brittle and harder to maintain than a plugin, but it’s an option for developers who want full control.
- Override the checkout template: Copy form-checkout.php from woocommerce/templates/checkout/ into your-theme/woocommerce/checkout/ so updates don’t overwrite it.
- Wrap the default field groups in step containers: WooCommerce already outputs billing, shipping, and payment in distinct hook sections (woocommerce_checkout_billing, woocommerce_checkout_shipping, woocommerce_checkout_payment). Wrap each in its own <div class="checkout-step">.
- Add Next/Previous navigation with JavaScript: Show one step at a time, toggling visibility with a small script, and run client-side validation before advancing.
- Validate server-side: Always re-validate on submit via woocommerce_checkout_process. Never trust client-side validation alone.
Top 7 Best WooCommerce Multistep Checkout Plugins of 2026 (Both Free and Premium)
We’ve tested the most popular WooCommerce multistep checkout plugins and evaluated them based on ease of use, customization options, smart checkout optimizations, and real-world results.
Here are our top recommendations for 2026:
1. FunnelKit Funnel Builder
FunnelKit Checkout, a module of FunnelKit Funnel Builder, is the highest-rated checkout optimization plugin, trusted by 30,000+ WooCommerce stores.
It offers 20+ mobile-responsive, multistep checkout templates (including two-step and three-step options) with deep customization capabilities
Pros
- Works with every page builder: Elementor, Divi, Bricks, Oxygen, Gutenberg, and many more.
- Smart checkout optimizations: Smart payment buttons, Google address autocomplete, multistep field preview, auto-apply coupons, and more.
- Built-in A/B testing: Split-test every element on your checkout page. View detailed insights and decide which variant is the best.
- Multilingual support: Import templates in your store’s language. With deep integration for WPML and Polylang, you can create and manage different checkout pages for 15+ languages to deliver personalized shopping experiences.
Apart from that, it includes detailed analytics, AOV-boosting offers such as order bumps and one-click upsells, lead-generation funnels, and more.
FunnelKit Checkout is suitable for all types of businesses, including small and high-traffic e-commerce businesses and those handling high order volumes.
Cons
- Limited lifetime pricing plan: The lifetime subscription to FunnelKit’s Funnel Builder is valid only for the Agency plan. It’s not available for individuals on a single-site plan.
Pricing
- FunnelKit Checkout is available in the Funnel Builder package, with a free (lite) and a premium version starting at $99.50 per year. However, if you want to add advanced features, such as order bumps and one-click upsells, you must upgrade to a higher plan.
2. Multistep Checkout for WooCommerce by ThemeHigh
ThemeHigh's plugin converts the default checkout into a multistep flow via a checkout wizard builder.
Pros
- Different checkout layouts: Multistep checkout layouts (horizontal box, accordion, etc.) are available in the premium version.
- Easy customization options: Although there are only a few customization options available, it’s easy to modify the step buttons and the positions and colors of active and inactive steps.
Cons
- No checkout templates or the option to create your own: Multistep Checkout for WooCommerce just splits the default checkout. You don’t get any checkout templates or options to create your own page here.
- Doesn’t allow checkout form field customization: You cannot add, edit, or rearrange any fields with this plugin. For that, you need to install a separate add-on for $49 (for one website).
Pricing
- Multi-Step Checkout for WooCommerce will be available in the free (lite) version. The premium version will cost $39 a year for a single site.
3. Multistep Checkout for WooCommerce
This checkout plugin streamlines your checkout process by breaking it into multiple steps.
Pros
- Different layouts: It offers 5+ different layouts: horizontal box, horizontal arrow, timeline, looped box, vertical arrow, accordion, etc.
- Basic customizations: Customize the next and previous navigation buttons, upload images for step icons, merge billing and shipping steps into a step, and more.
Cons
- Limited edits and modifications: Basic options to set up inside the plugin. You cannot customize the checkout with page builders or add custom templates, checkout form fields, etc.
- Lack of advanced optimizations: The plugin doesn’t offer any smart optimizations, such as enhanced phone fields, multistep field previews, or similar features.
Pricing plan
- It does not offer any free version or demo plan. Its premium plan costs $49 annually.
4. YITH WooCommerce Multistep Checkout
YITH’s plugin is a well-established option that reorganizes the standard checkout into clear progressive steps.
Pros
- Clean step layouts: It offers clean multistep layouts with progress bars.
- Broad YITH ecosystem: It integrates with YITH plugins, helping you create checkout or store design the way you want. It's a reliable, well-maintained codebase.
Cons
- Limited customization:
- Missing advanced conversion features:
Pricing
It costs $69.99/year and does not offer a free version to get started.
5. WP Multi Step Checkout for WooCommerce by SilkyPress
This multi-step checkout plugin from SilkyPress splits the default WooCommerce checkout into simpler steps like login, billing, shipping, and order review, with AJAX validation on each step.
Pros
- Multiple layouts: The plugin includes 14 multistep layouts to match your store's look.
- Step customization: Set separate background and text colors for active and inactive steps, rename step titles, adjust tab position, and add a "Back to Cart" button.
Cons
- Layout-focused customization: Styling is limited to the steps themselves. For full field editing, you'll need to pair it with a separate checkout field editor plugin.
- No page-builder design: You can't build custom checkout templates the way a funnel builder allows.
Pricing
- A free version is available on WordPress.org. Its premium version, which unlocks advanced features and additional customization options, will cost you $89.90/year.
6. Essential Addons for Elementor (Multistep Checkout)
If you build with Elementor, Essential Addons includes an EA Woo Checkout Multisteps widget that can structure your checkout into a multistep flow using its Multi Steps Layout.
Pros
- Native to Elementor: Design your multistep checkout visually inside Elementor, with fully customizable Previous/Next buttons and tabbed steps.
- Part of a broad toolkit: You get 110+ elements alongside the checkout widget, so it's useful if you already run the EA suite.
Cons
- Elementor-only: The widget works exclusively in Elementor, so it's not an option for Divi-, Bricks-, or Gutenberg-first stores.
- One feature among many: Multistep checkout is a single widget, not a dedicated checkout-optimization tool, so the scope for smart optimizations is limited.
Pricing
- A free Lite version is available; the Multi Steps Layout requires Essential Addons Pro, starting at $47.99/year.
7. Flux Checkout for WooCommerce
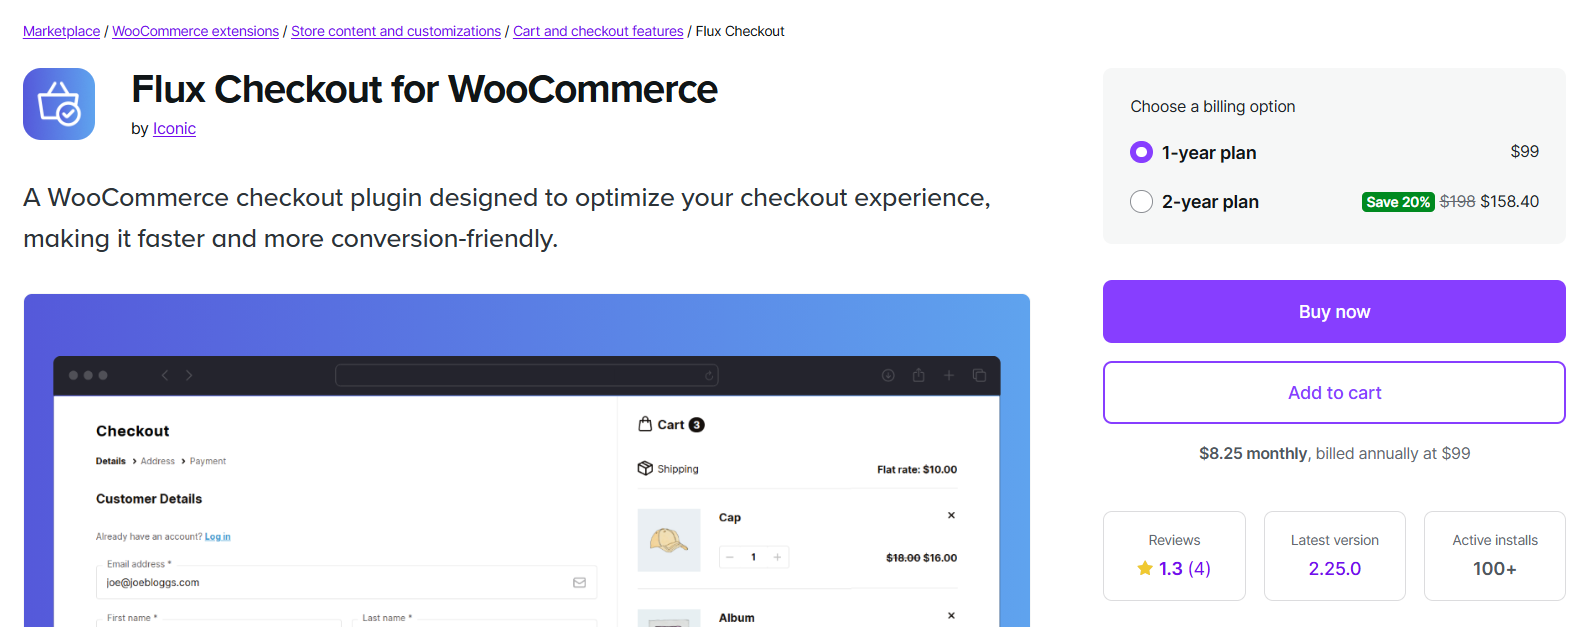
Flux Checkout built by Iconic replaces the default WooCommerce checkout with a clean, mobile-first multistep flow that guides shoppers through details, address, and payment.
Pros
- Fast, mobile-first setup: Delivers a streamlined three-step checkout out of the box, with the layout automatically adjusting for mobile.
- Built-in conveniences: Includes Google address autocomplete, two checkout templates, and easy color/font adjustments, no code needed.
Cons
- Limited design control: You get fewer layout and customization options than a full funnel builder.
- Fewer optimization features: It lacks advanced conversion tools like A/B testing, order bumps, and upsells.
Pricing
- Flux Checkout is a premium plugin starting at $99/year. There's no free version.
One-Page Checkout vs Multistep Checkout: Which is Better?
Still wondering whether to use a single-page or multistep checkout?
Here are some pros and cons of WooCommerce multistep checkout and one page checkout:
| Aspect | Multistep Checkout | One-Page Checkout |
|---|---|---|
| Checkout Experience | Breaks the page into clear, manageable steps. Feels organized and less overwhelming. | Displays all checkout fields on a single page. It's fast but can appear cluttered. |
| Conversions | Performs better for high-ticket or customizable products by building trust gradually. | Great for impulse buys and low-cost items where speed matters most. |
| Page Load Speed | Faster loading per step since fewer elements are loaded at once. | It can load more slowly on mobile if too many scripts or fields appear together. |
| Error Spotting and Reduction | Validates fields step-by-step, minimizing mistakes and cart drop-offs. | Errors can be missed or overlooked, leading to failed submissions. |
| User Focus | Keeps users focused on one stage at a time, reducing distractions. | Users may feel overwhelmed with too much information at once. |
| Mobile Optimization | Excellent for mobile, short steps improve usability and scrolling. | Works well with minimal fields but can feel cramped on small screens. |
| Upsell Opportunities | Works well with minimal fields, but can feel cramped on small screens. | Upsells need to be subtle or appear post-purchase to avoid distractions. |
| Setup and Maintenance | Requires more setup (multi-step templates, field mapping). | Complex checkouts, high-value products, and stores with multiple shipping/payment methods. |
| Best For | Great for impulse buys and low-cost items where speed is most important. | Easier and faster to set up, making it great for quick deployments. |
Both have their pros and cons and the right choice depends on your store’s needs. But there’s a smarter way to decide.
Run an A/B Test
FunnelKit Funnel Builder lets you A/B test your multistep checkout against a single-step version right from your dashboard. No extra plugins or add-ons needed!
Here’s how to do it:
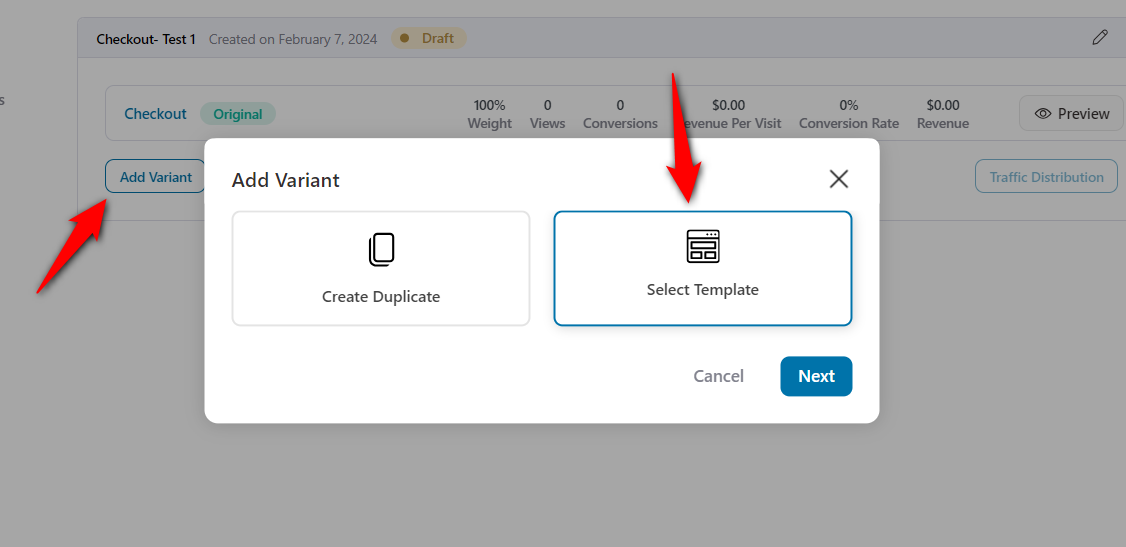
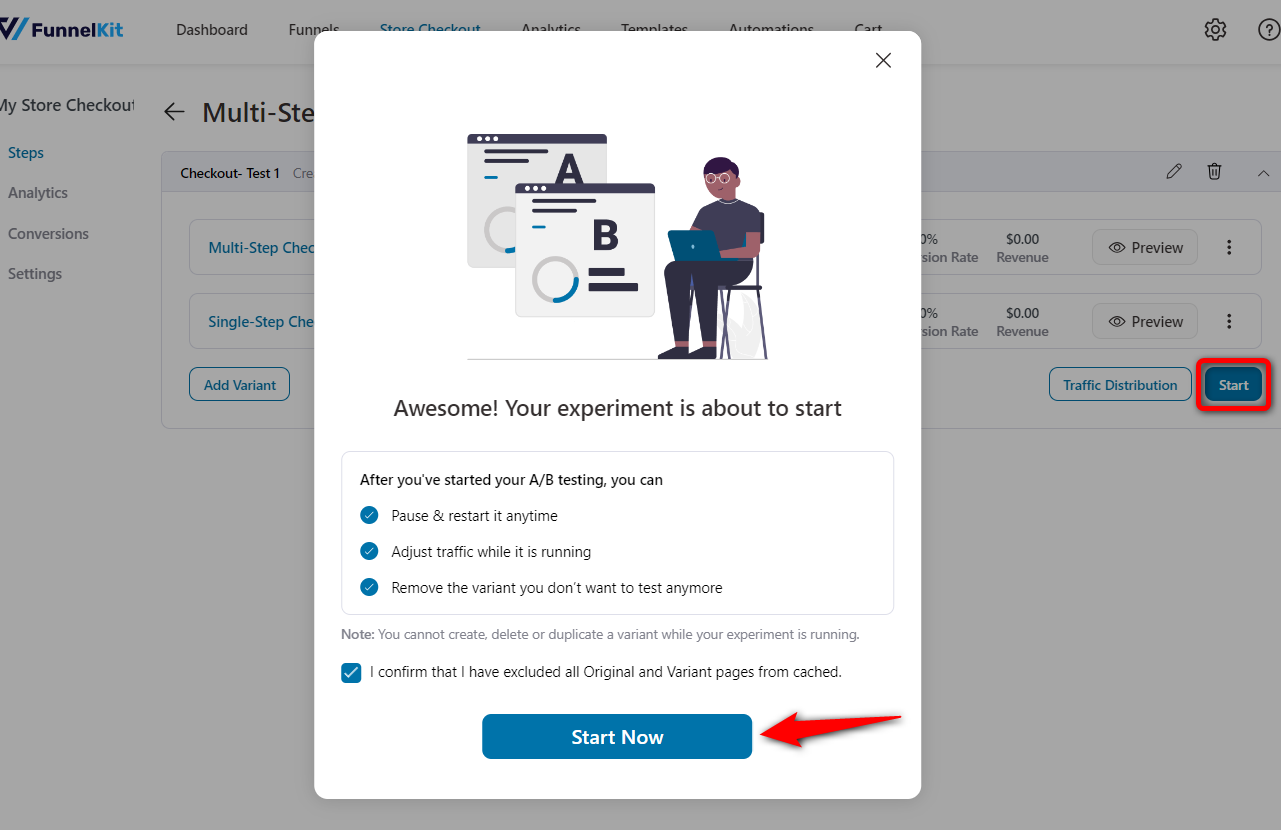
Click “A/B Test” next to your existing multistep checkout funnel.

Click “Create A/B Test” and add a new variant.
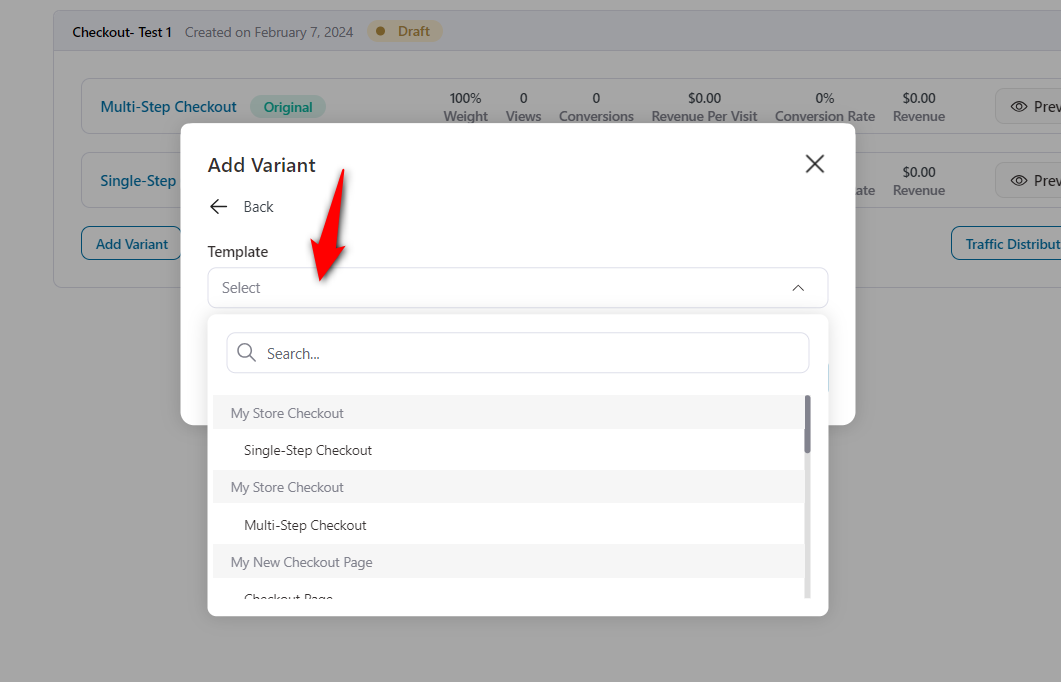
Choose the option to select your single-page checkout template from the other funnel in FunnelKit.
Select the template of your one-page checkout from your funnel.
Go to “Traffic Distribution” and set it to 50/50 between both variants.
Once done, hit 'Confirm'.
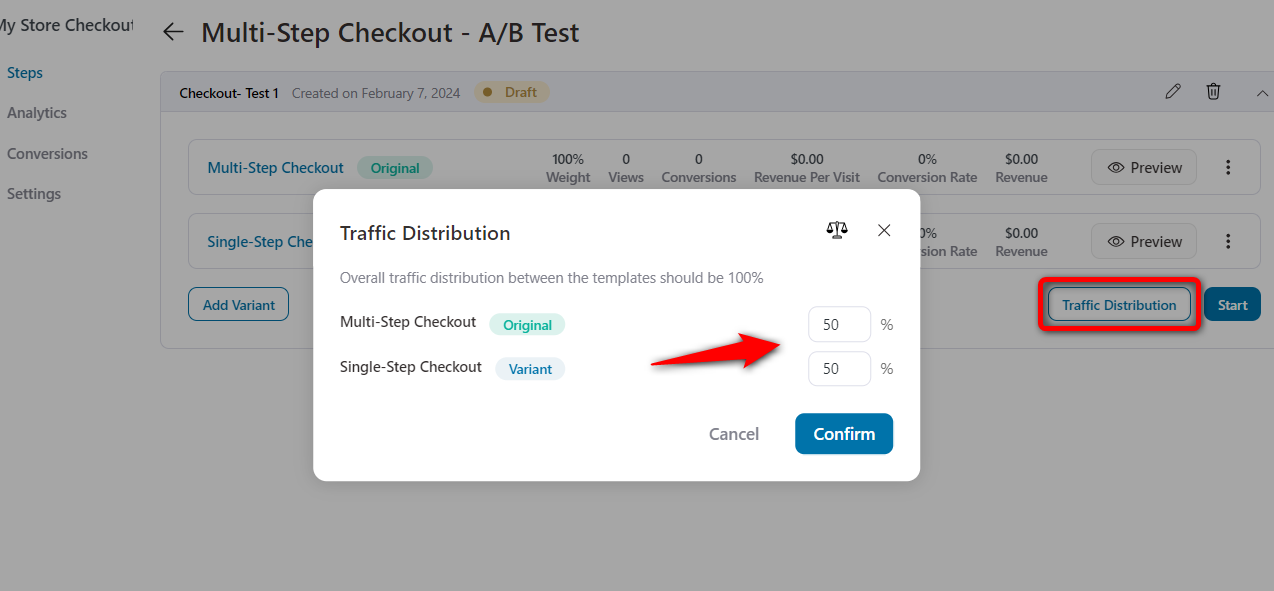
Click on 'Start' to run your A/B test.
Let the A/B tests run and accumulate the analytics.
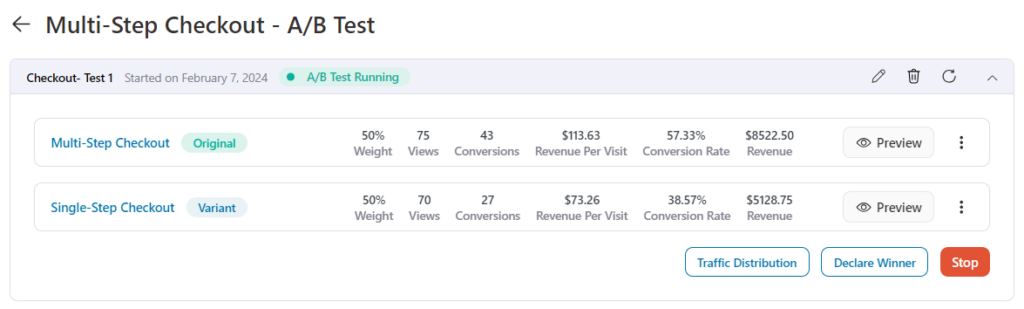
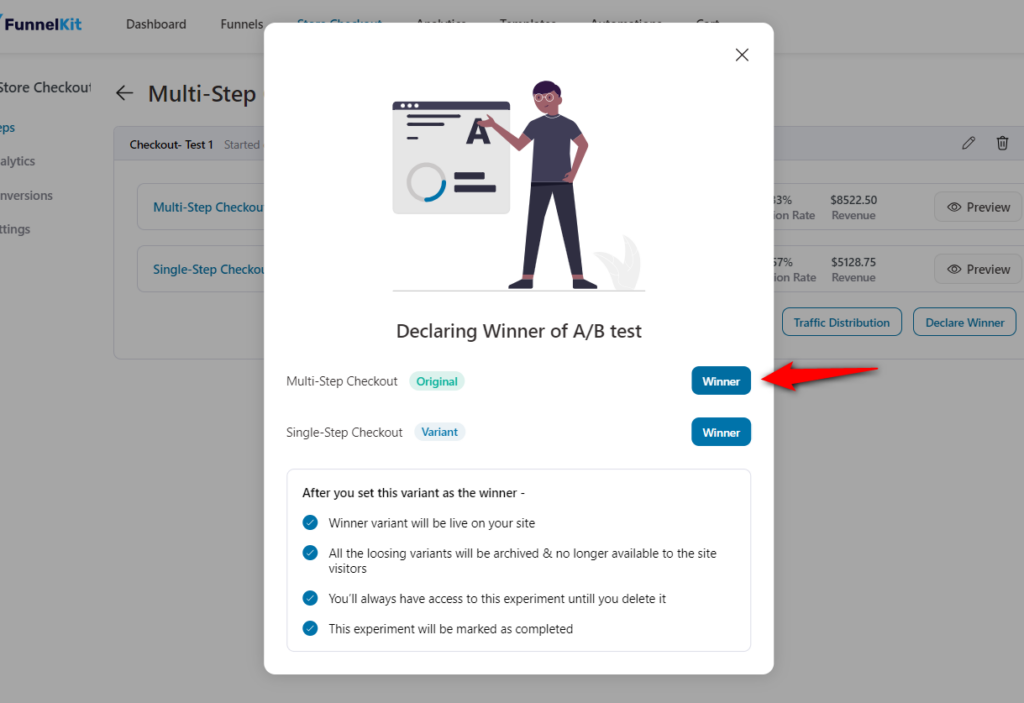
Declare the winner
As you can see, the conversion rate for multi-step checkout is more than single checkout, so we’ll mark this variant as the winner.
That will direct 100% of traffic to your winning variant.
Based on our A/B test with FunnelKit, stores that switched to a multistep checkout saw an average conversion increase of 15 to 21% instantly compared to a single-page checkout, proving the effectiveness of this approach.
But it can be totally different for your store. So it's best to perform A/B test and find out which checkout page is best for you.
7 Best Practices for WooCommerce Multistep Checkout to Improve Conversion Rates
Here are some best practices to follow when setting up multistep checkout in your WooCommerce store:
1. Simplify each step
To reduce friction, keep the number of fields per step to a minimum and ask for only essential information at each checkout step.
The logical grouping of fields (user data, billing or shipping details, and payment information) helps users focus on one task at a time.
FunnelKit lets you add, rearrange, or even remove unnecessary checkout fields that you don’t need.
2. Auto-fill address autocompletion
Enable auto-fill and integrate address autocomplete with the Google Places API.
This reduces typing effort and speeds up the process, making it especially helpful on mobile devices.
Simply paste the Google Maps API key into FunnelKit settings and enable auto-fill address suggestions on the checkout page.
3. Use progress indicators
Include a progress bar or step counter at the top of the checkout page to show customers how many steps remain to complete their order.
This helps reduce anxiety and encourages them to complete the checkout.
FunnelKit’s multistep checkout templates come with built-in progress indicators. You can easily enable or customize them while editing the template using your preferred page builder.
4. Optimize for mobile
Ensure your multistep checkout is fully responsive and optimized for mobile devices.
Mobile users often encounter higher friction during checkout. Therefore, adding large buttons, touch-friendly elements, and a smooth flow is crucial.
5. Implement checkout field validation
Implementing inline field validation in your store’s checkout form ensures that shoppers provide accurate information during checkout.
Proper validation reduces errors, prevents incomplete orders, and improves the user experience.
6. Add trust elements
Reassure users with security badges, money-back guarantees, real testimonials, or reviews.
You can easily add these trust elements to FunnelKit checkout, reducing hesitations and building confidence.
7. Recover abandoned carts
Even with a multi-step checkout, some users may leave mid-way. Set up cart recovery emails or automations to follow up and bring them back.
FunnelKit lets you send automated abandoned cart recovery emails, SMS, push notifications, and more to recover lost sales instantly.
Best WooCommerce Multistep Checkout Templates to Boost Conversions
FunnelKit Funnel Builder comes with pre-designed, conversion-optimized multistep checkout templates that make setup fast and effective.
These templates are fully responsive, mobile-friendly, and designed to reduce friction at every step.
Here are some of the top templates you can use:
- WooCommerce multistep checkout template - Shoppe
The Shoppe template is a clean, Shopify-style multistep checkout with side summary, progress breadcrumbs, and a distraction-free design for seamless conversions.

- Hific multi step checkout template for WooCommerce
The Hific template is a sleek, conversion-focused multistep checkout with bold CTAs, security badges, trust icons, and testimonial highlights that build instant credibility and guide shoppers confidently toward purchase.
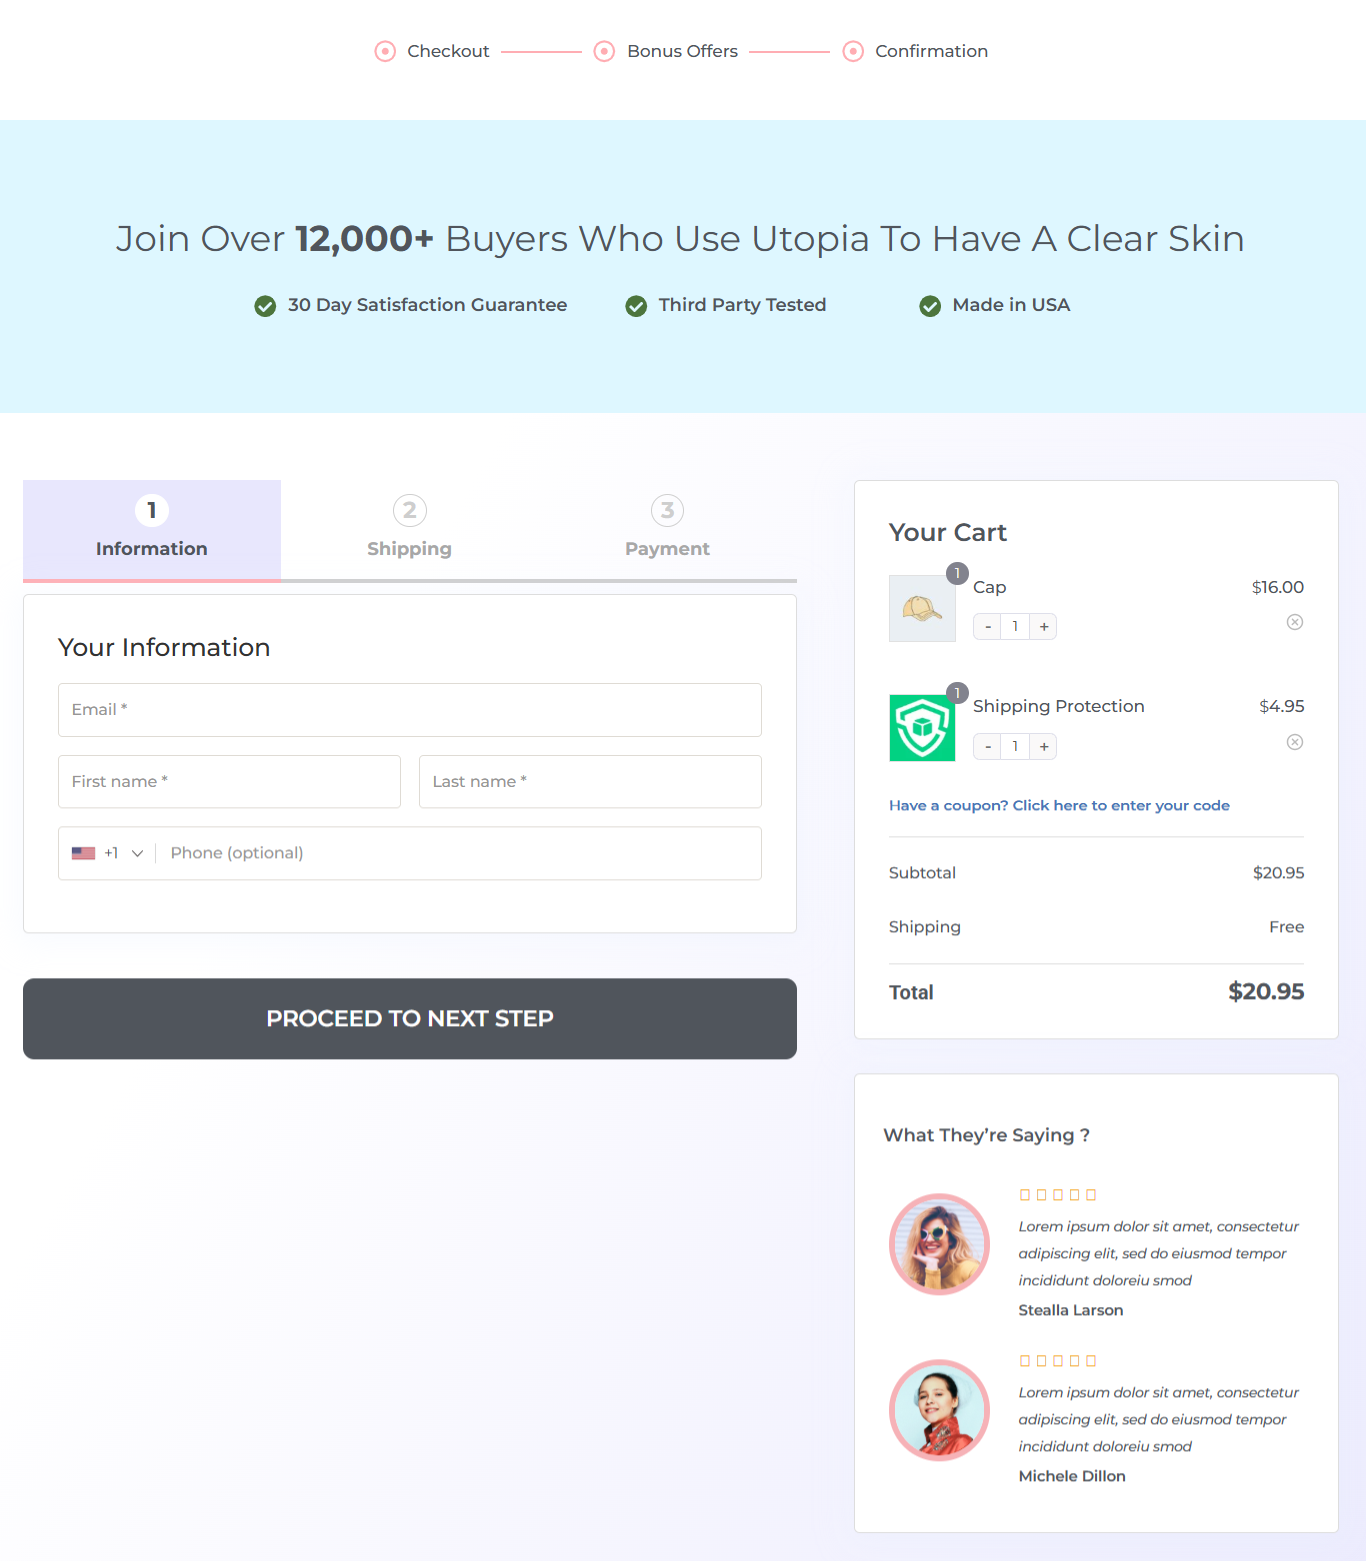
- WooCommerce multistep checkout template - Utopia
The Utopia template is a visually rich multistep checkout that blends strong social proof, step indicators, and a clean design.
It's ideal for beauty and lifestyle brands, it builds trust with testimonials and guarantees while keeping the flow effortless.
Membership Trial Landing Page with Embedded Checkout Form
Here’s a FunnelKit user, Apollonia Ponti, using a two-step checkout form embedded in her Men's Mastery 7-day trial membership landing page:

Apollonia has highlighted well what the user will get once they enroll in her free trial membership plan.
The checkout form looks brilliant with just three basic fields, which will take seconds to fill in information
Frequently Asked Questions (FAQs)
Here, we have answered some frequently asked questions related to the WooCommerce multistep checkout process.
Override form-checkout.php in your theme, wrap WooCommerce’s billing/shipping/payment sections in step containers, and add JavaScript navigation plus server-side validation. A plugin like FunnelKit does the same thing in minutes without the maintenance burden.
It depends on cart complexity. Multistep tends to win for high-value or multi-field orders; single-page can be faster for low-cost impulse buys. A/B test both on your own store.
Setting up a multistep checkout offers several advantages that can significantly improve your store’s conversion rate:
1. Reduces checkout abandonment
About 28% of shoppers abandon their carts due to a long, confusing checkout process. By presenting one step at a time, a multistep checkout feels simpler and helps reduce drop-offs.
2. Minimizes distractions
Each step displays only the fields relevant at that moment, with clear "Next" and "Previous" buttons guiding users through.
3. Improves checkout flow
A step-by-step layout prevents users from feeling overwhelmed. By presenting only essential details at each stage, you create a frictionless path to purchase.
4. Reduces cognitive load
Breaking the process into multiple steps helps users focus on one task at a time, such as entering shipping details or payment information. This makes the checkout feel faster and less stressful.
5. Provides clear progress indicators
Progress indicators reassure users by showing how many steps are left in the purchase process. This transparency builds confidence and encourages completion.
In our A/B tests it lifted completion rates 15–21%, and Baymard’s checkout research supports reducing complexity to cut abandonment. Results vary, so test.
If properly optimized, a multi-step checkout does not impact your site’s performance. Use tools like FunnelKit Funnel Builder to ensure fast and responsive checkout.
Yes, multistep checkout is good for mobile. Its short, single-column steps reduce scrolling and overwhelm, which is exactly what mobile shoppers need.
Yes. FunnelKit works with subscription tools (including Sublium Subscriptions) to keep trial and recurring signups in a guided multistep flow.
The most common causes are caching the checkout page, JavaScript conflicts, theme incompatibility, and AJAX/validation failures. See the troubleshooting section above.
Create a Conversion Smashing WooCommerce Multistep Checkout Page
We’re sure you’re excited to set up highly optimized checkout pages and boost conversions in your store.
By streamlining the process and adding essential elements such as progress indicators, auto-fill address suggestions, and smart payment options, you can reduce friction and encourage more customers to complete their purchases.
With FunnelKit Funnel Builder, you can effortlessly create both single-page and multistep checkouts, giving you full control over your checkout design without coding.
Plus, its deep integration with popular page builders makes customization easier than ever.
Don’t let a clunky checkout cost you sales. Upgrade your WooCommerce store with a high-converting multistep checkout today!
Editorial Team
July 7, 2026Are you looking for WooCommerce checkout optimization hacks to streamline your users' shopping experience? 7 out of 10 shoppers who reach a WooCommerce checkout leave without paying; according to Baymard...
Editorial Team
July 6, 2026A WooCommerce order form lets customers select multiple products, set quantities, and choose variations from a single page instead of visiting individual product pages. There are two ways to add...
Editorial Team
July 6, 2026The Bricks WooCommerce builder is built directly into the Bricks theme. Activate the free WooCommerce plugin, and Bricks unlocks more than 30 store-specific elements plus visual templates for every part...


