
WooCommerce Google Sheets integration lets you automatically send your store's order, product, and customer data to a Google Sheets spreadsheet.
Instead of exporting CSV files manually every time you need to review sales or check inventory, you can set up a live connection that keeps your WooCommerce spreadsheet updated in real time.
It lets you streamline your business revenue management process, analyze your order data and tracking, and so much more efficiently.
In this post, we'll demonstrate how you can set up WooCommerce Google Sheets integration without writing any code in just a few minutes.
Plus, we’ll also look at some powerful use cases that you can start setting up on your website right away.
Why Integrate WooCommerce Google Sheets in WordPress
Google Sheets is a popular spreadsheet application developed by Google. It allows users to create, edit, and collaborate on spreadsheets online.
Integrating Google Sheets with WooCommerce will allow you to connect the two platforms and automate your processes.
Here’s why you should set up WooCommerce Google Sheets integration in your store:
- Data protection
Integrating Google Sheets with WooCommerce allows you to share your store data effortlessly without exposing sensitive information such as admin credentials.
For example, store owners must share the order data with the shipping manager at their warehouse and with affiliates.
- Customization and collaboration
Google Sheets offers a collaborative environment where multiple users can work on the same sheet simultaneously.
This is useful for team members to manage different aspects of the business, such as inventory, marketing, and prices.
- Data analysis and reporting
Google Sheets offers powerful tools for data analysis and reporting.
Google Spreadsheets allows you to sort, filter, or export sales, customer, or product data. It also integrates directly with Google Looker Studio, enabling more in-depth analysis and custom reporting.
- Real-time updates and synchronization
The synchronization between WooCommerce and Google Sheets ensures that your data is always up to date in real time.
This connection facilitates seamless communication between the two platforms regarding product information, inventory, order details, and more.
- Smart integrations
Google Sheets acts as a bridge between WooCommerce and other tools and services. You can use it to facilitate integration with marketing tools, analytics platforms, or business applications.
For example, it integrates with many reporting tools, such as Google Looker Studio, which allows you to create reports on data exported from your online store.
- Export order metadata
If you integrate your WooCommerce store with various WordPress plugins, they may push metadata into orders that isn't accessible elsewhere.
For example, shipment-tracking plugins generate shipping details, and event-manager plugins create event-related details.
However, you can easily push this metadata to Google Sheets.
- Enhanced order tracking
As a store owner, you can export order data directly to Google Sheets with WooCommerce Google Sheets integration.
You can further generate a comprehensive view of sales trends, customer behavior, and other valuable insights, leading to informed decision-making.
- Ease of use
Google Sheets certainly makes it accessible to store owners who may not be familiar with complex data management systems.
It provides a familiar spreadsheet interface for managing and organizing data.
Table of Contents
- 1 WooCommerce Google Sheets: Two Integration Solutions
- 2 How to Set Up WooCommerce Google Sheets Integration? (Step-by-Step Guide)
- 3 9 Must-Have Use Cases for WooCommerce Google Sheets Integration
- 3.1 Use Case #1: Export WooCommerce orders to Google Sheets in real-time
- 3.2 Use Case #2: Update WooCommerce order statuses
- 3.3 Use Case #3: Push WooCommerce customers with their details
- 3.4 Use Case #4: Send abandoned cart data along with recovery URL and phone number
- 3.5 Use Case #5: Push VIP WooCommerce customers based on total spent in your store
- 3.6 Use Case #6: Manage subscription cancellations
- 3.7 Use Case #7: Collect information about new leads
- 3.8 Use Case #8: Export the order meta to Google Sheets
- 3.9 Use Case #9: Export or Import contacts to/from the Google Sheets CSV file
- 4 7 Best Practices to Keep Your WooCommerce Google Sheets Data Accurate and Organized
- 5 Frequently Asked Questions (FAQs)
- 6 Start Syncing Your WooCommerce Store Data to Google Sheets Today!
WooCommerce Google Sheets: Two Integration Solutions
According to our experts’ research, there are two integration plugins that you can use to connect WooCommerce and Google Sheets.
- WooCommerce Google Sheet Connector
- FunnelKit Automations
Let’s look at both the plugins one by one.
WooCommerce Google Sheet Connector
This addon plugin acts as a bridge between your WooCommerce store and Google Sheets.
Pros
- Free plugin: It’s a WordPress plugin that lets you connect Google Sheets to your WooCommerce website.
- Real-time synchronization: It automatically synchronizes your WooCommerce orders to the Google Sheet tabs, including all details and order statuses.
- Premium features (available in the Pro version): You get features such as custom ordering, freeze header settings, managing existing WooCommerce products and users, custom Google API integration, and more.
Cons
- Limited capabilities: The WooCommerce Google Sheet Connector offers limited automation. You can’t set up different event triggers like cart abandonment, winback campaigns, post-purchase workflows, user signup, etc., and collect details about them. In addition, you can’t add any actions or delays to your automated sequences.
- No email or SMS notifications: You cannot notify your customers or admin about your WooCommerce orders or product inventory. It can’t send a simple email or SMS.
- Absence of cart abandonment data: About 7 out of 10 users abandon their carts without completing a purchase. Collecting details about cart abandoners and converting them into customers becomes extremely important. But you can’t do that with this connector addon.
- No conditional workflows: It doesn’t allow rule-based automations to be set up in your store. For example, if you want to list VIP customers who have spent more than $200 in your store, you can’t do that.
FunnelKit Automations
FunnelKit Automations is a game-changing marketing automations and broadcast CRM for WordPress and WooCommerce.
It has been widely used by 20,000+ stores to automate their business processes and interact with their audience effectively.
Pros
- Centralized automation hub: FunnelKit Automations connects with various WordPress plugins, CRMs, third-party tools, and applications to perform certain tasks. You can even send your data to automation tools such as Pabbly, Integrately, Make, and Zapier to set up advanced automated workflows.
- Smart automations: Set up unlimited sequences with smart triggers, actions, and delays to automate your business workflow. You can set up all sorts of automated campaigns for your leads and customers that export or import your WooCommerce data to Google Sheets in real-time.
- Email and SMS notifications: Notify your customers or admins of order updates, product inventory changes, new leads, subscription renewals, or payment failures. This helps you take quick action and interact with your customers to build loyalty and trust.
- Cart abandonment tracking and reporting: Export data on your abandoned shoppers to Google Sheets, or run a cart abandonment campaign to bring them to your store to complete their purchases.
- Import your contacts from sheets: FunnelKit Automations lets you import your contacts from a Google Sheets CSV file. This allows you to better manage your contacts and nurture relationships with them using this WooCommerce CRM.
Cons
- Premium plugin: FunnelKit Automations offers both free (lite) and premium versions. However, you must upgrade to the Pro version to connect your WooCommerce store with Google Sheets. The best part is that it allows you to set up advanced automation use cases without putting any limitations.
We recommend choosing FunnelKit Automations for the possibilities it offers, from WooCommerce and Google Sheets integration to more.
For that, get a copy of FunnelKit Automations from below.
How to Set Up WooCommerce Google Sheets Integration? (Step-by-Step Guide)
Follow the steps below to connect WooCommerce to Google Sheets in your store.
Ensure you’ve installed the FunnelKit Automations plugin on your WordPress website.
Step 1: Go to the Connectors section
To connect WooCommerce to Google Sheets, navigate to the Tools ⇨ Connectors section in FunnelKit Automations.

Step 2: Authorize the connection permission
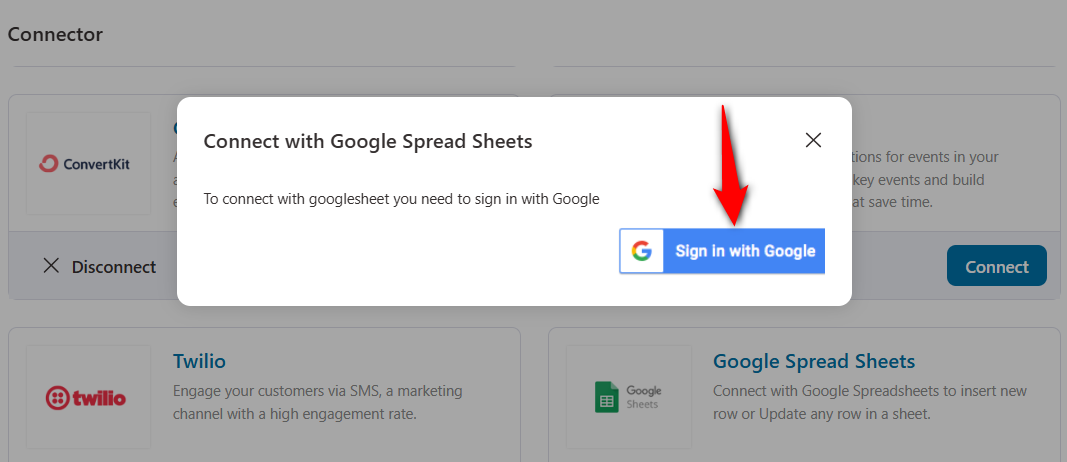
Scroll down and click on the ‘Connect’ button under Google Spread Sheets.

You need to log in with your Google account.
For that, hit the ‘Sign In with Google’ button.
Grant permissions to allow FunnelKit Automations to exchange data with Google Sheets.
To do that, click on ‘Continue’.
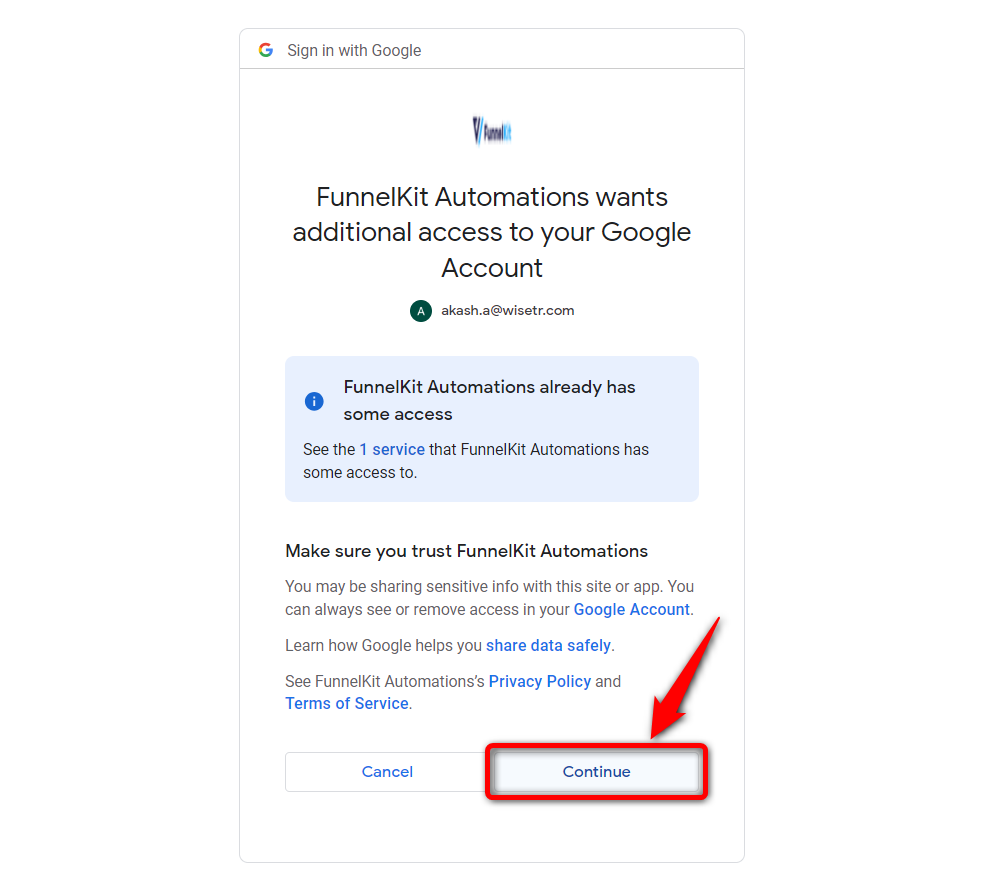
You don’t need to enter any authorization code!
It’ll redirect you to the connectors page after successfully setting up your WooCommerce Google Sheets connection.
This is how you can integrate Google Spreadsheets with WooCommerce in two simple steps.
9 Must-Have Use Cases for WooCommerce Google Sheets Integration
Today, we will show you 9 advanced use cases for this WooCommerce-Google Sheets integration.
These use cases will help you collect and organize your store-related information in a much more useful manner and convert it into visual reports to share with your team members.
Let’s dive into it.
Use Case #1: Export WooCommerce orders to Google Sheets in real-time
This automation will help you analyze all order-related information in one place right after a customer completes a purchase on the WooCommerce checkout page.
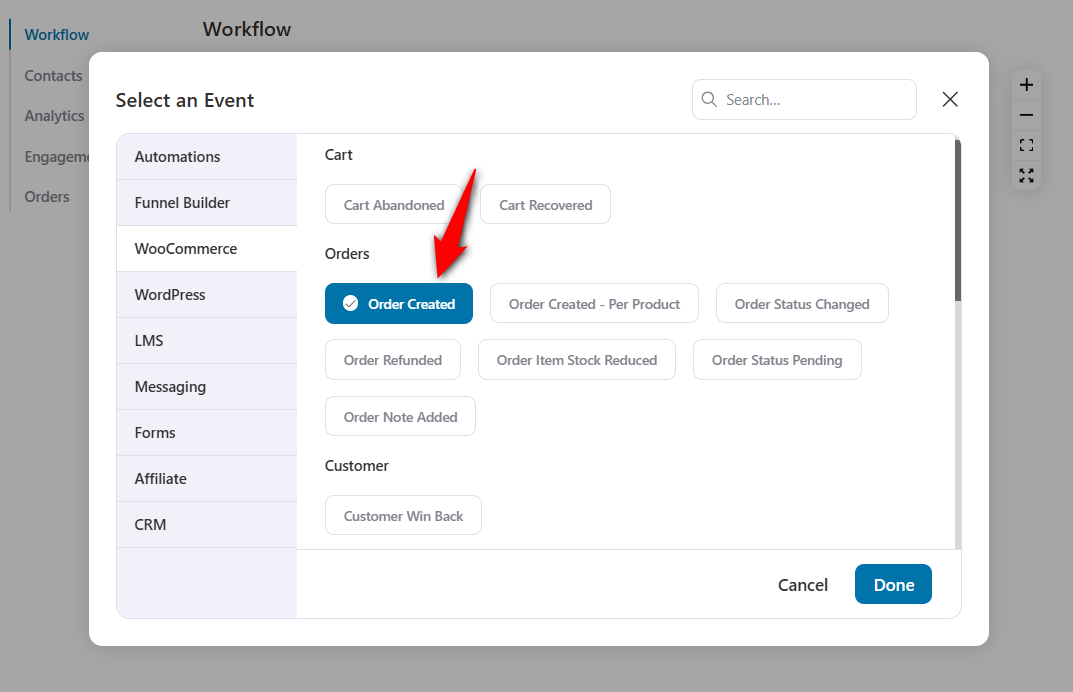
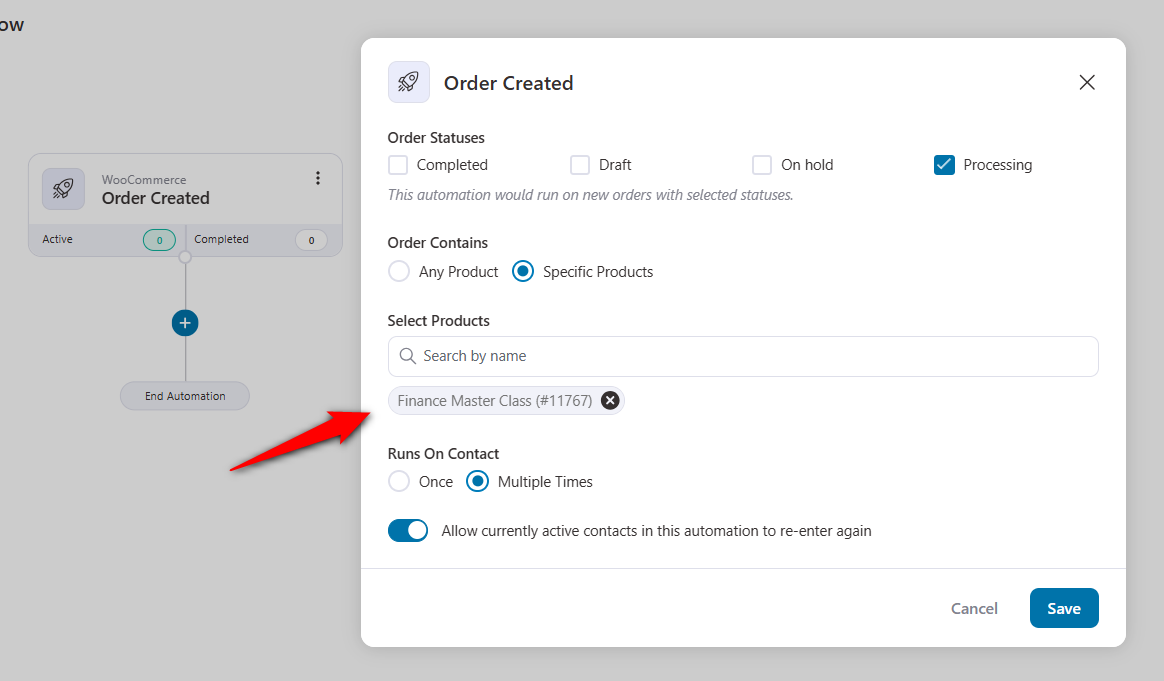
Once you create a new automation, add the ‘Order Created’ event trigger under WooCommerce.
Configure the order settings. This way, you can collect information about only those orders (completed, draft, on hold, or processing) that you want to see.
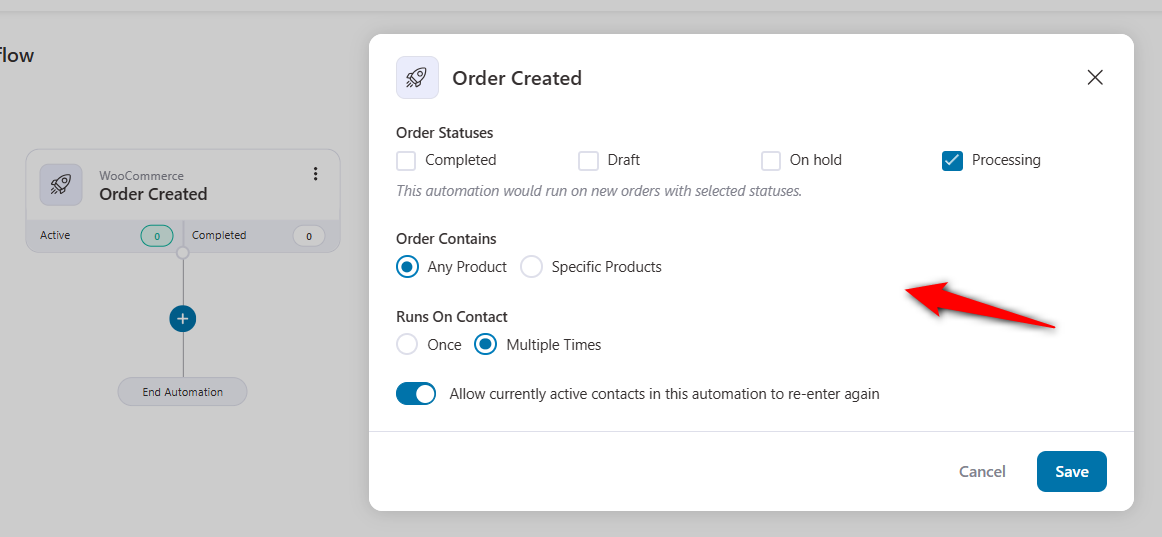
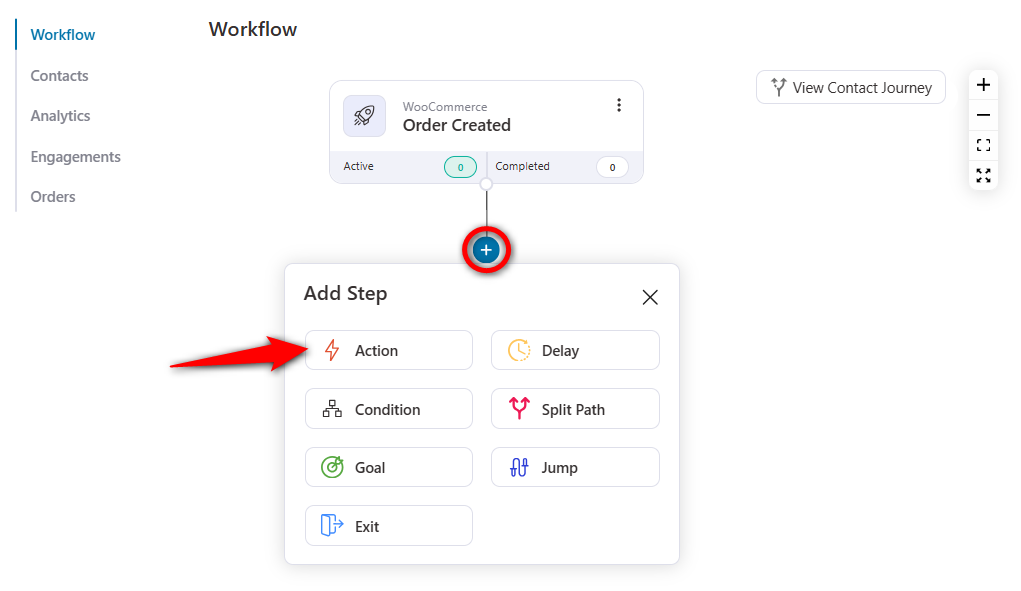
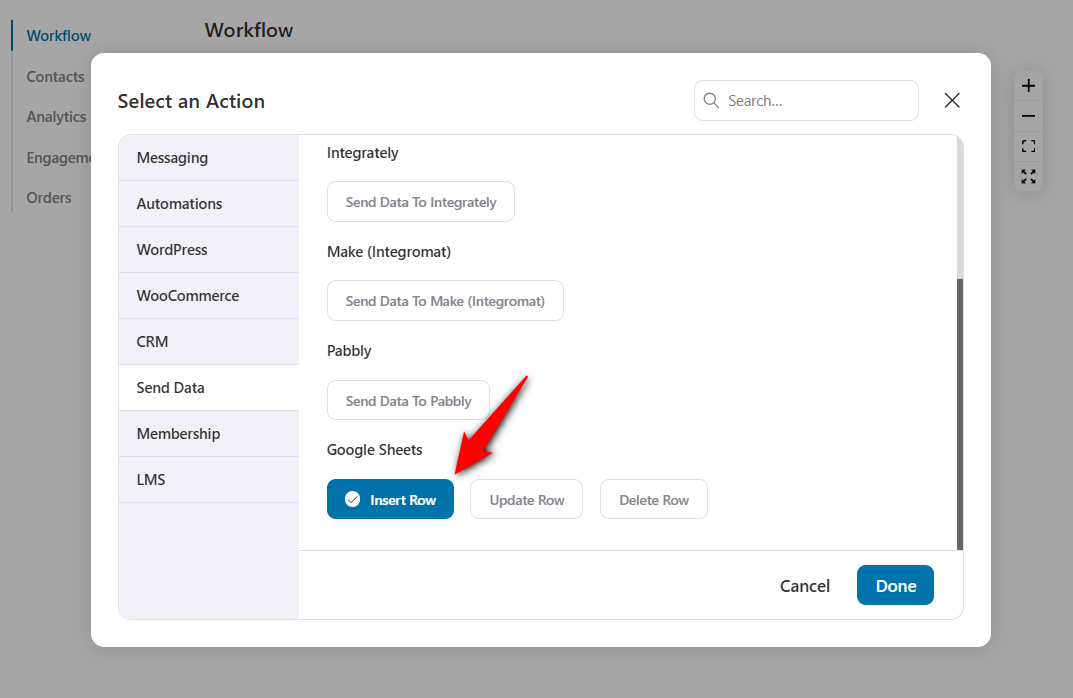
Now, you need to add an Action. This action will be executed whenever somebody places an order.
Click on the plus (+) icon and select ‘Action’.
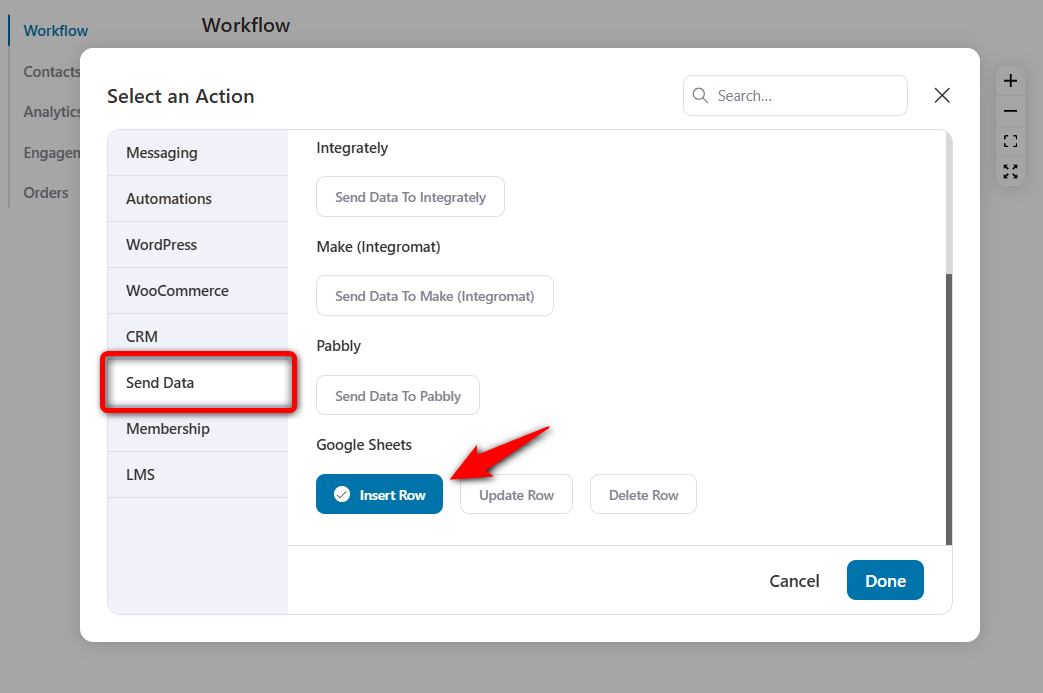
Navigate to the Send Data section and select ‘Insert Row’ under Google Sheets.
Create a spreadsheet on a separate tab and copy the sheet ID as shown below.
Important note: The URL of the spreadsheet is NOT the sheet ID; the ID is part of the URL, as shown below.
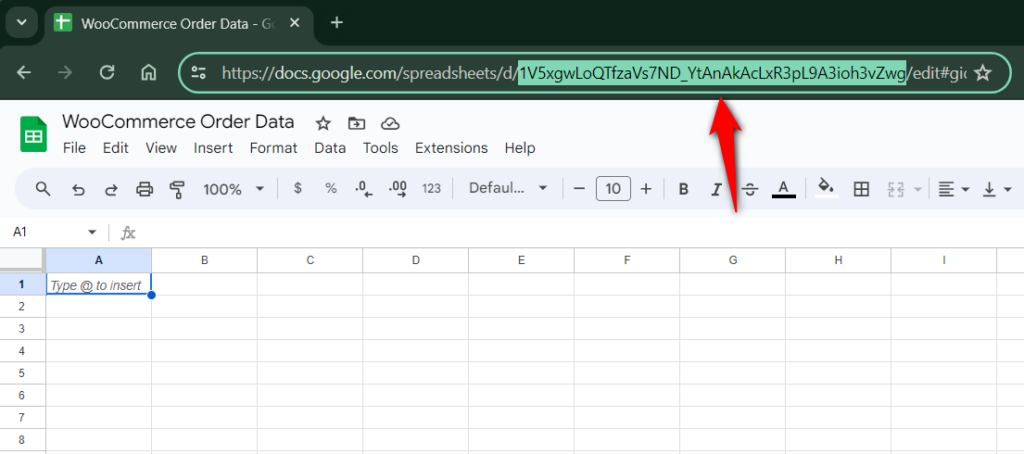
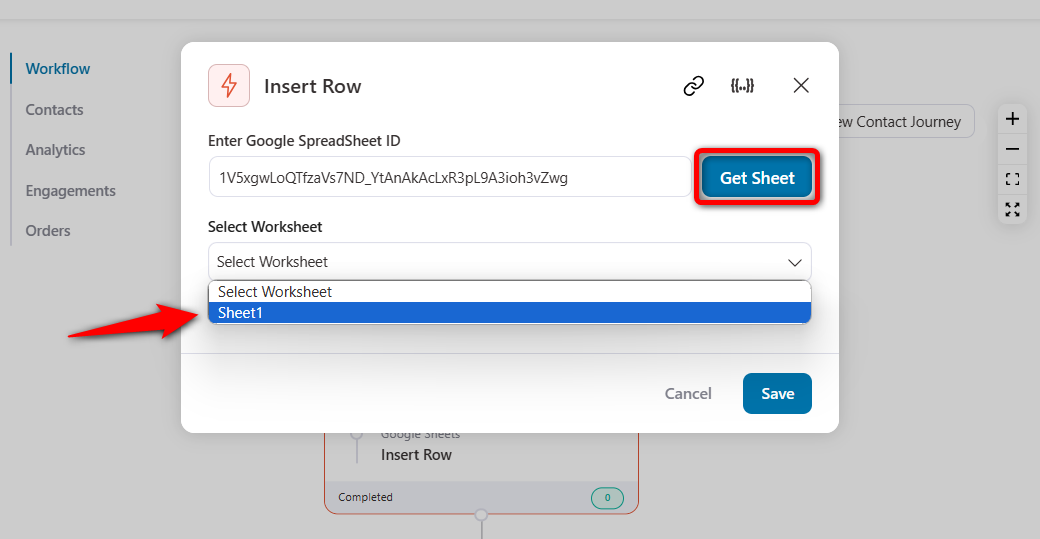
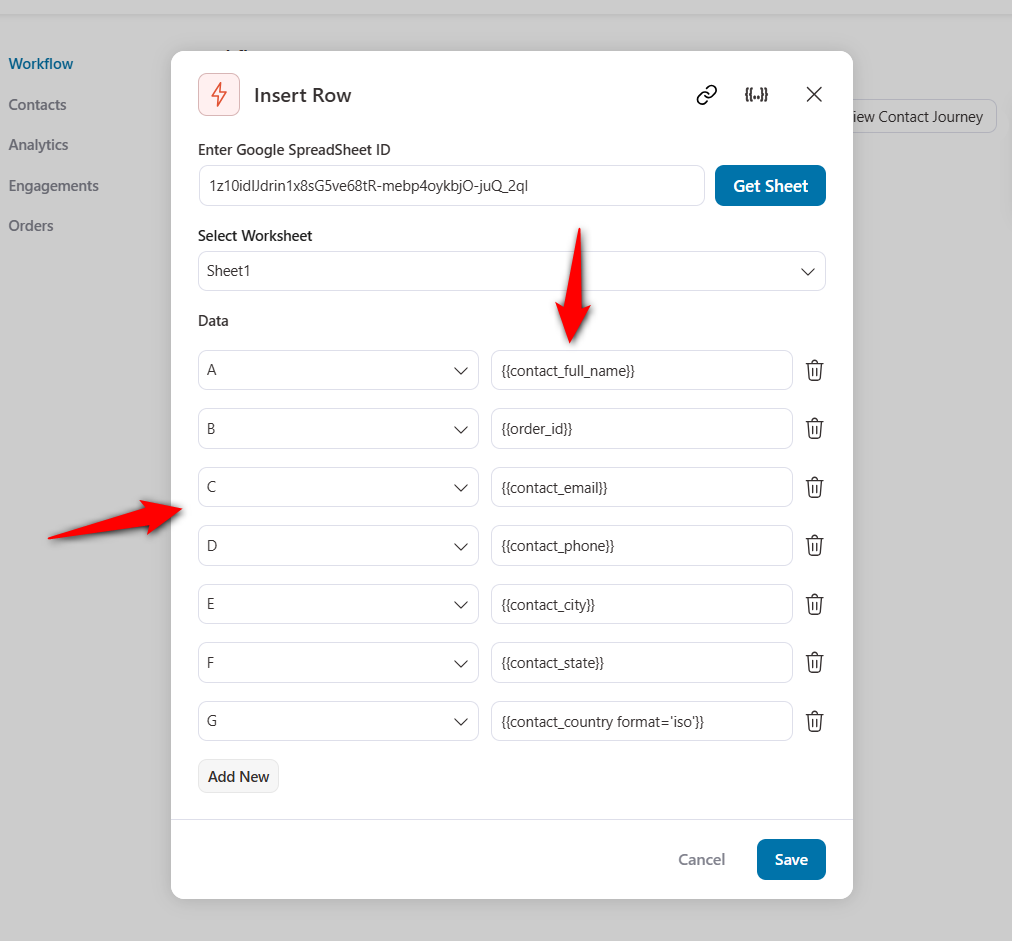
Paste the ID of the spreadsheet into the “Enter Google Spreadsheet ID” space. Click on Get Sheet to sync the spreadsheet.
If you have multiple worksheets, select the one where you want to see the data.
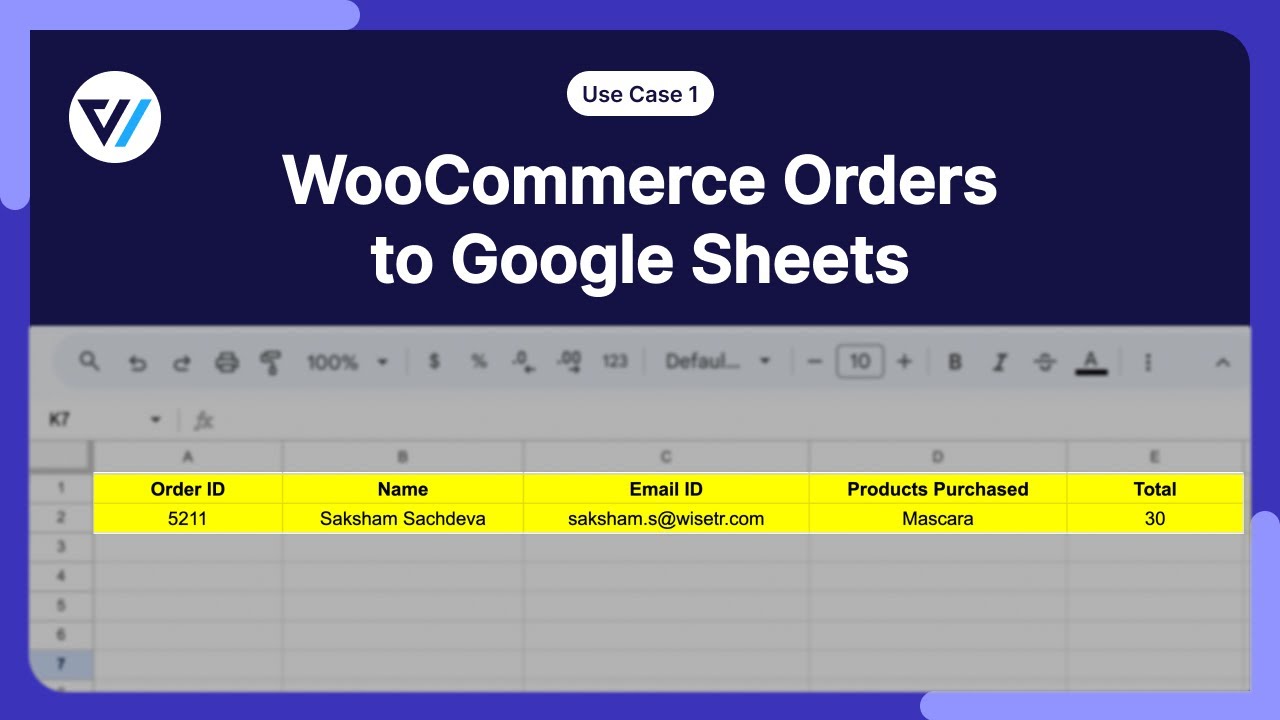
Under the Data section, click on ‘Add New’ and use merge tags to see the information you need.
We need the order ID, the customer’s name, email address, the product purchased, and the order total.
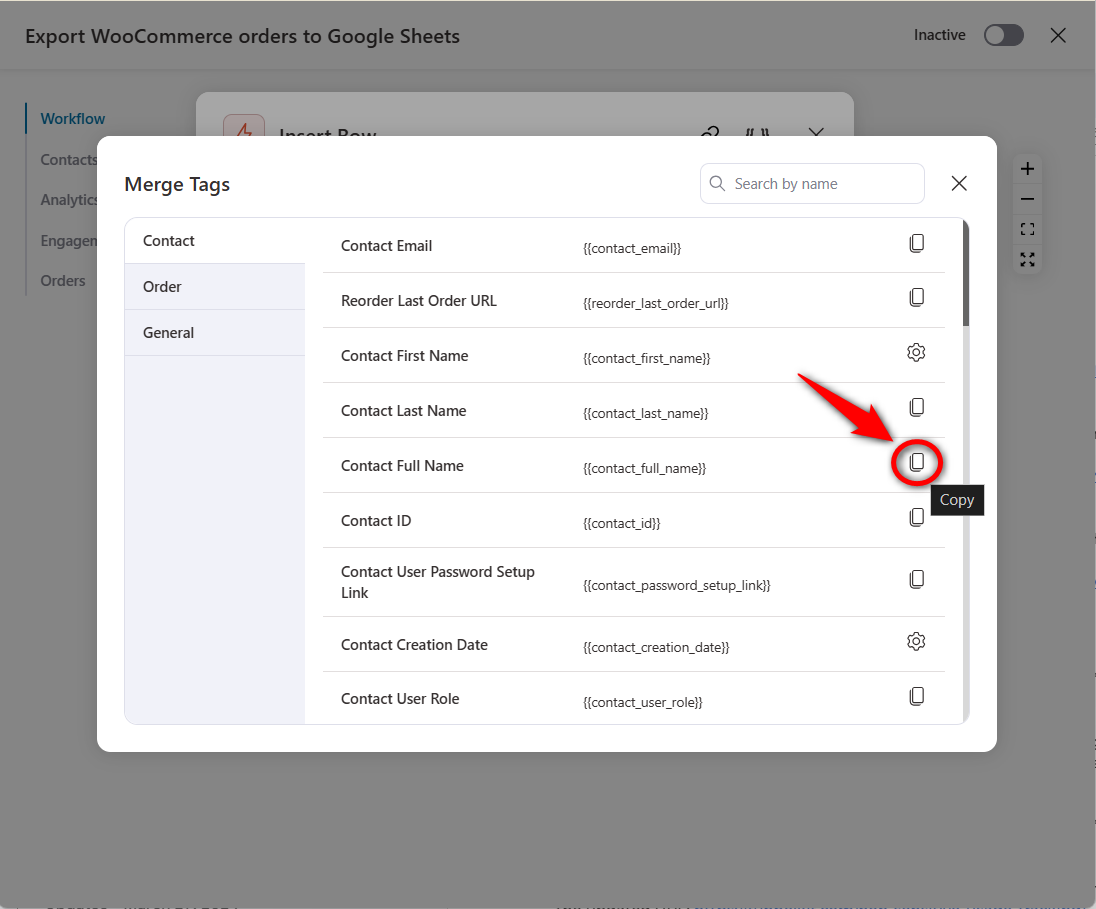
Copy the respective merge tags shown in the picture above and paste them into the data columns.
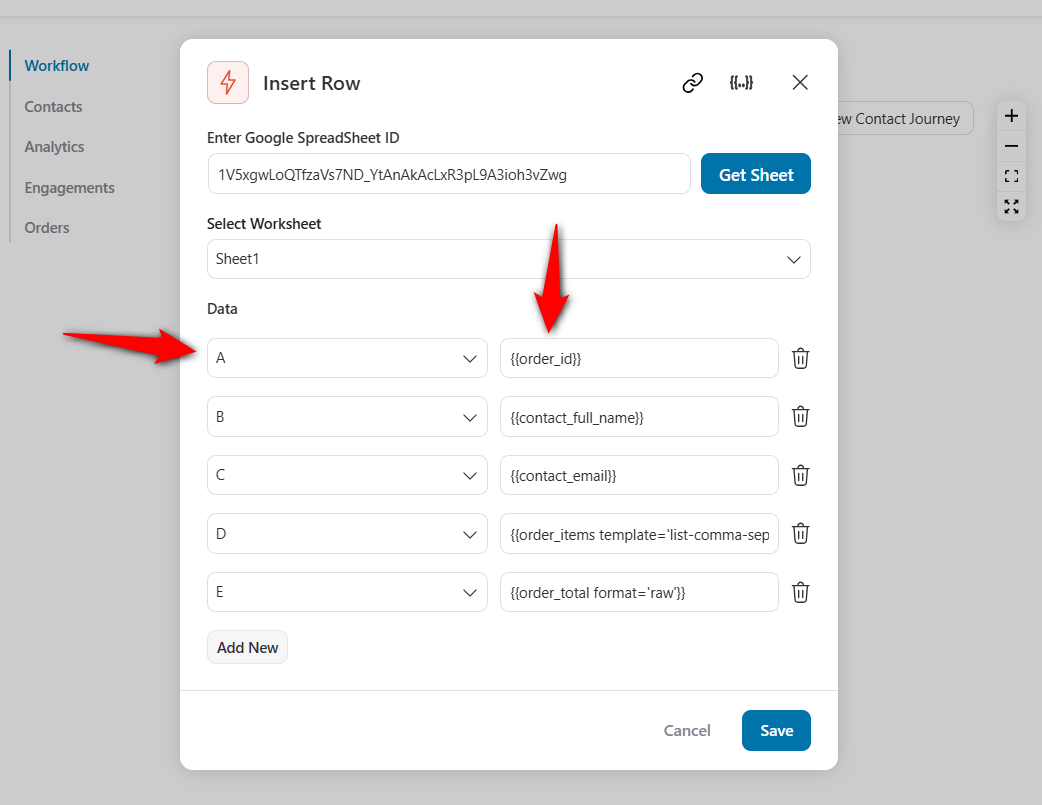
Click on ‘Save’ and your automation is ready.
Place a test order to check the execution of the task.
Now go to Contacts in Automation. Here, you can see a new contact for the order you just placed.

Check the connected spreadsheet. You can see the order-related data in the sheet.
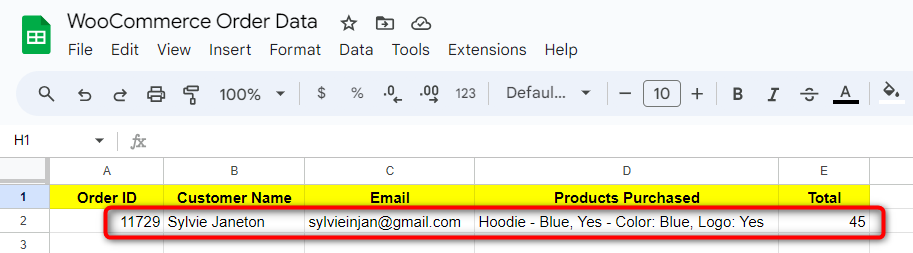
This is a great WooCommerce Google Sheets integration use case that lets you sync order data in real time.
Use Case #2: Update WooCommerce order statuses
WooCommerce order statuses are the distinct stages an order goes through during processing in WooCommerce.
These statuses help store owners track all orders in the fulfillment process and inform customers about the progress of their purchases.
You can automatically update the order statuses with this WooCommerce Google Sheets automation.
First, select the ‘Order Status Changed’ event trigger.
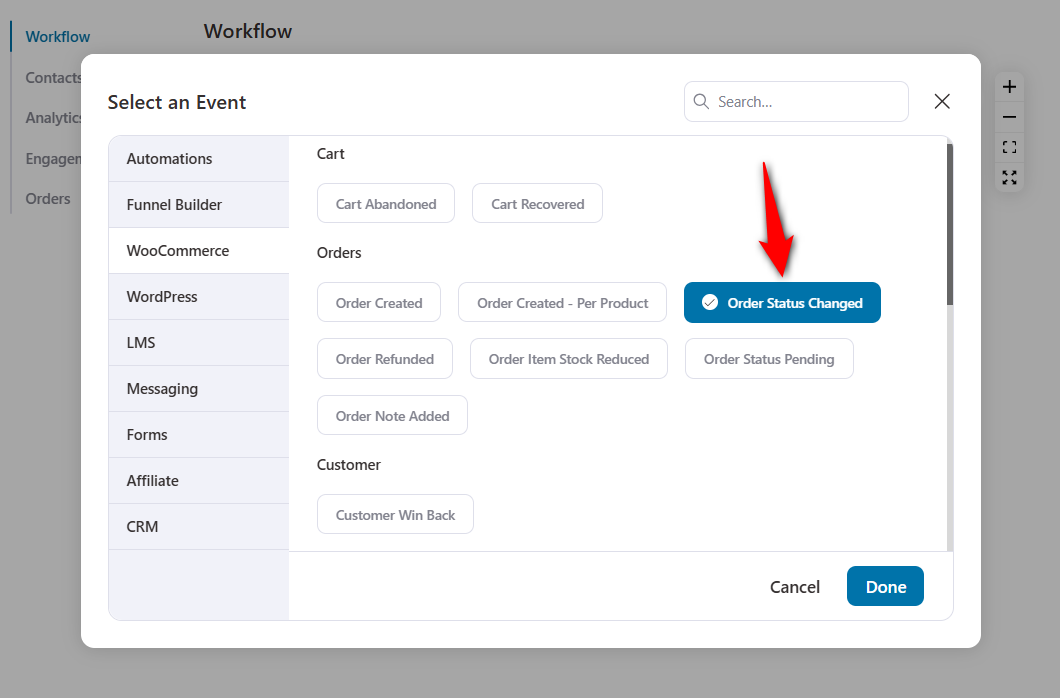
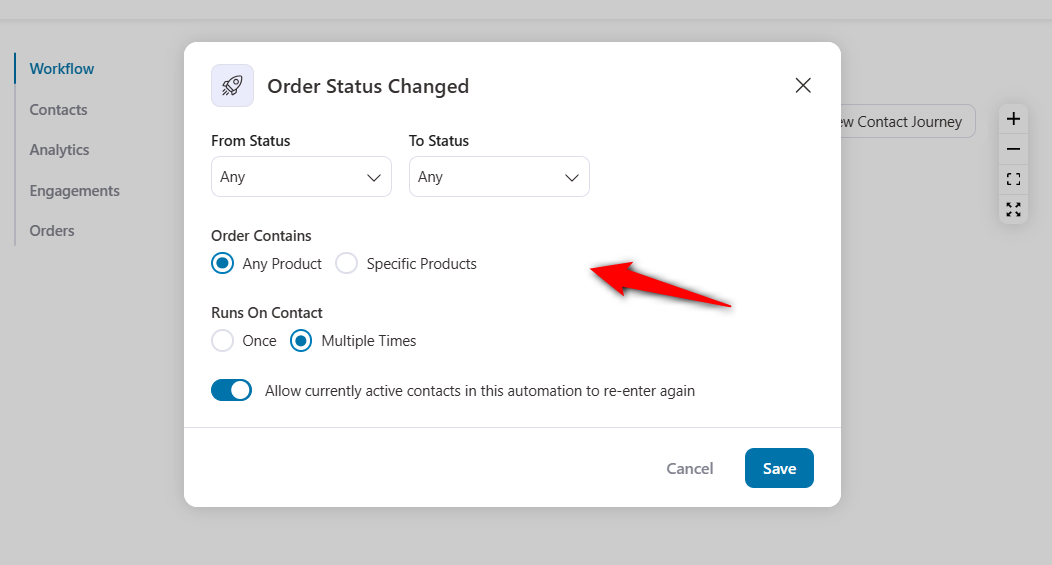
Configure the event by setting both the ‘From Status’ and ‘To Status’ to ‘Any’.
This will trigger the automation in case there is any change in the order status.
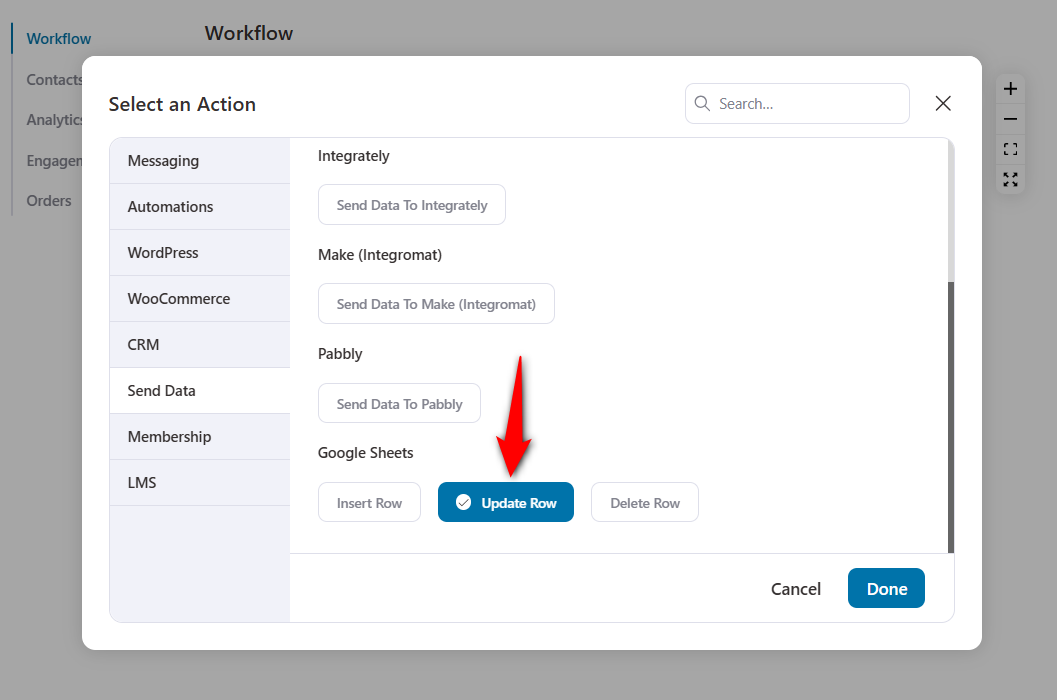
Now, hit the ‘Action’ and choose ‘Update Row’ under Google Sheets.
Enter the Google Spreadsheet ID and specify the sheet.
Next, enter the lookup column.
Please note that the lookup column must contain unique data. It’s best to assign the order ID as the lookup column.
Next, enter the order status column that you want to update.
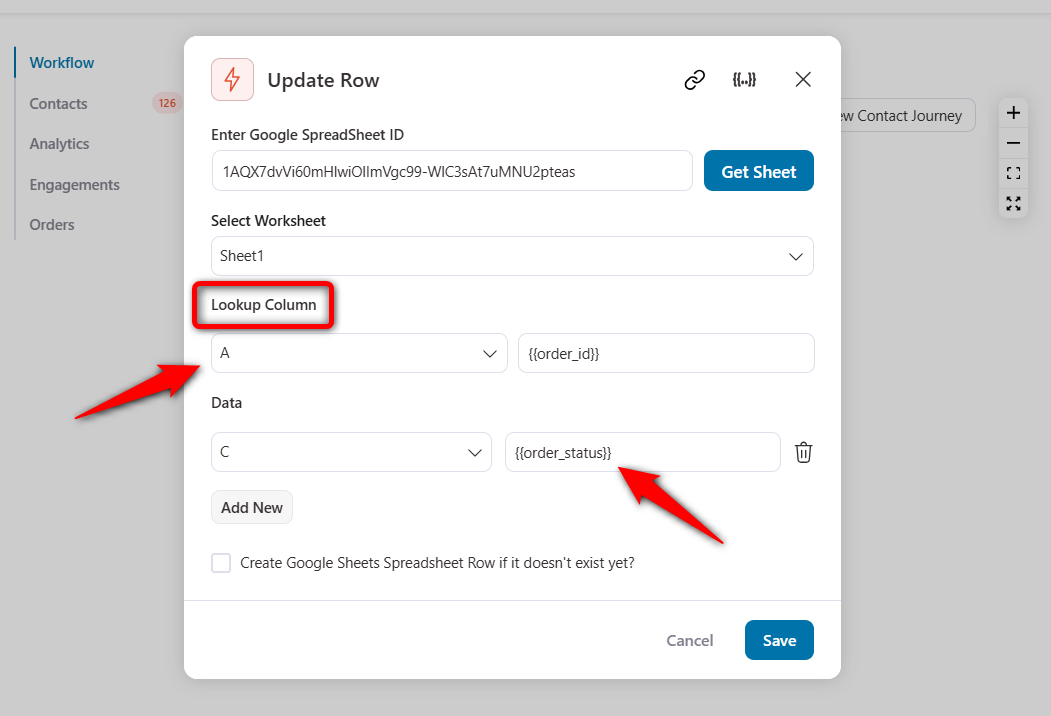
Click on ‘Save’ when done.
Test this automation by updating the status of your WooCommerce order.
We’ve updated this status from ‘Processing’ to ‘Completed’.
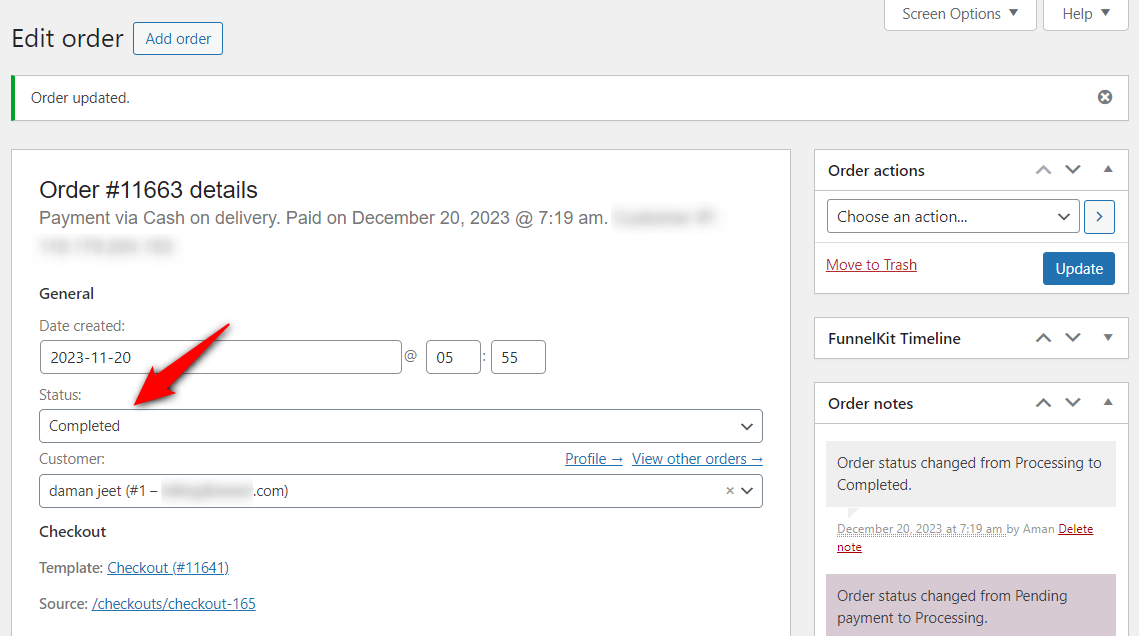
You’ll notice the automation has successfully updated the order status from Processing to Completed in the Google Sheet for this order ID.
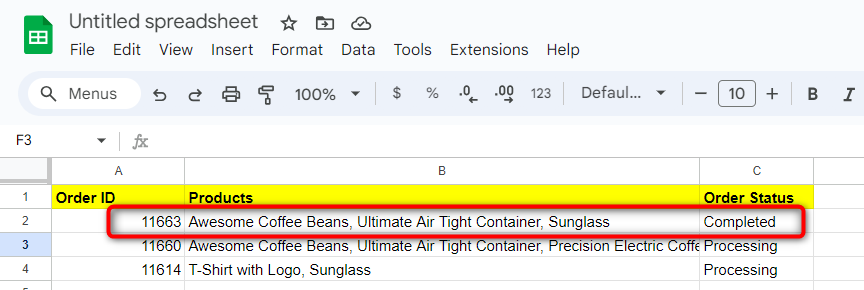
This shows that our WooCommerce Google Sheets automation works successfully.
You can now share this sheet with your shipping or fulfillment manager to easily track and process customers’ orders.
Use Case #3: Push WooCommerce customers with their details
By exporting WooCommerce customer details to Google Sheets, you centralize your customer information in one place.
Having structured data allows you to manage and analyze your customer relationships effectively.
It helps you to tailor marketing strategies and communication quite easily.
To set up this automation, choose the ‘Order Created’ event trigger.
Next, add the ‘Insert Row’ action.
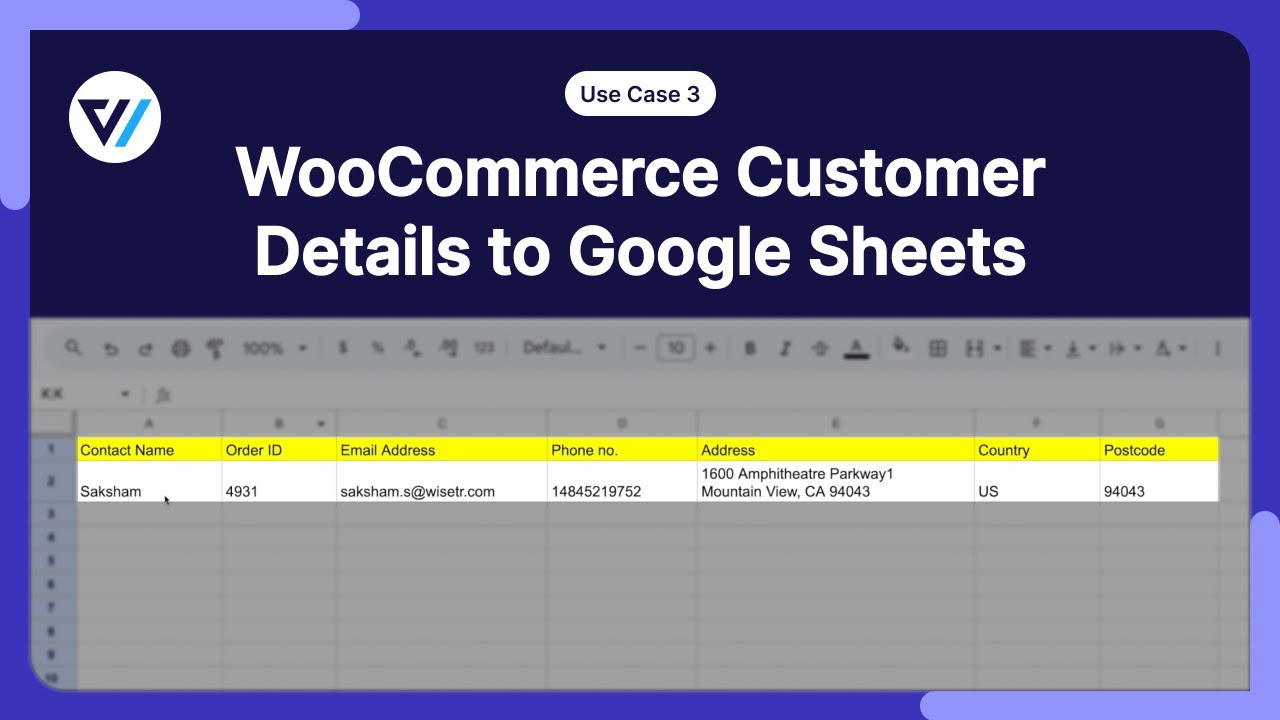
Enter all the customer details you need using merge tags.
As you can see, we’ve entered their name, order ID, email, phone number, address, country, and postal code.
This is how it’ll export all this WooCommerce customer data to Google Sheets.
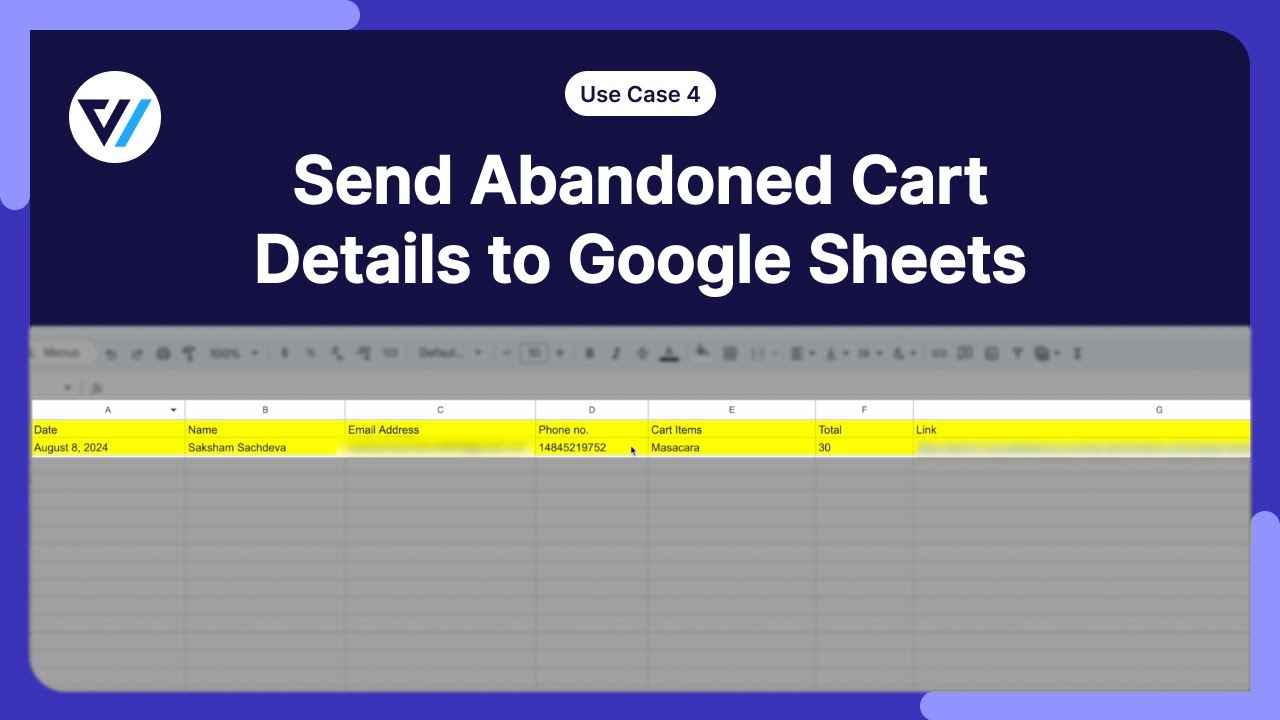
Use Case #4: Send abandoned cart data along with recovery URL and phone number
FunnelKit Automations lets you track abandoned carts.
It has a live cart-capturing feature that allows you to capture details as users enter them on the checkout page.
Once you have the shoppers’ abandoned details, you can send them to Google Sheets and use them in your cart abandonment campaigns.
Add the ‘Cart Abandoned’ event trigger.
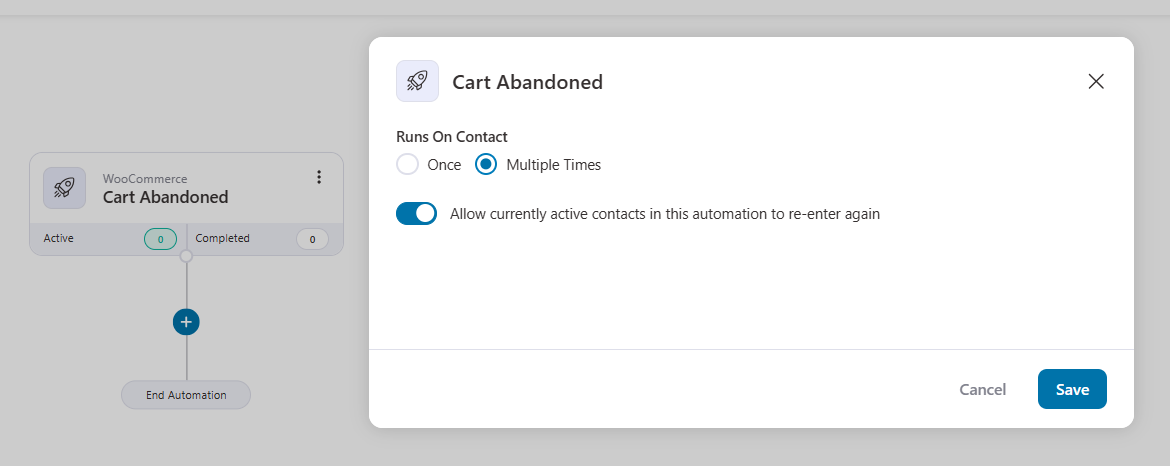
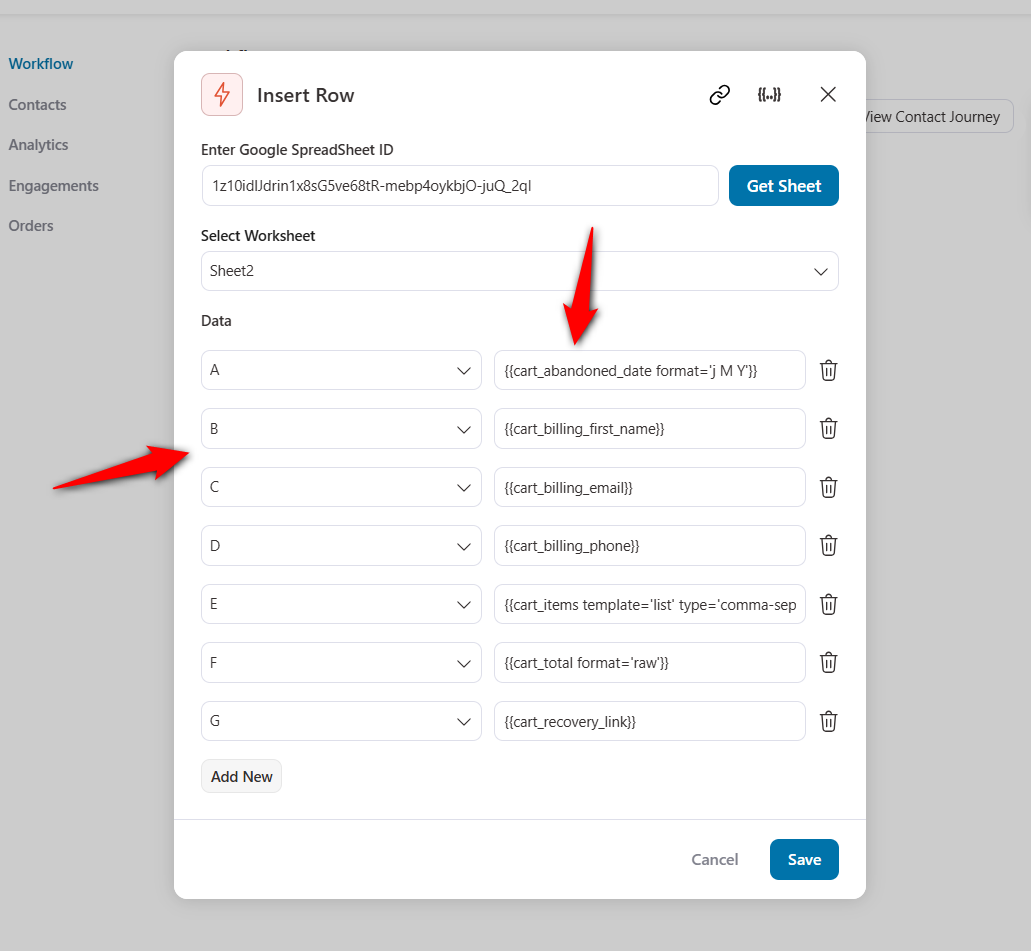
Next, select the ‘Insert Row’ action under Google Spreadsheets.
Assign the cart abandonment details to the selected Google Sheet columns.
As you can see, we’ve entered the following details with the help of merge tags:
- Abandonment date
- Shopper’s name
- Phone number
- Products in the cart
- Order total
- Recovery URL
With all this cart abandonment data in your sheets, you can get useful insights for setting up cart recovery campaigns.
This completes your automation. Let’s now look at our next WooCommerce Google Sheets automation use case.
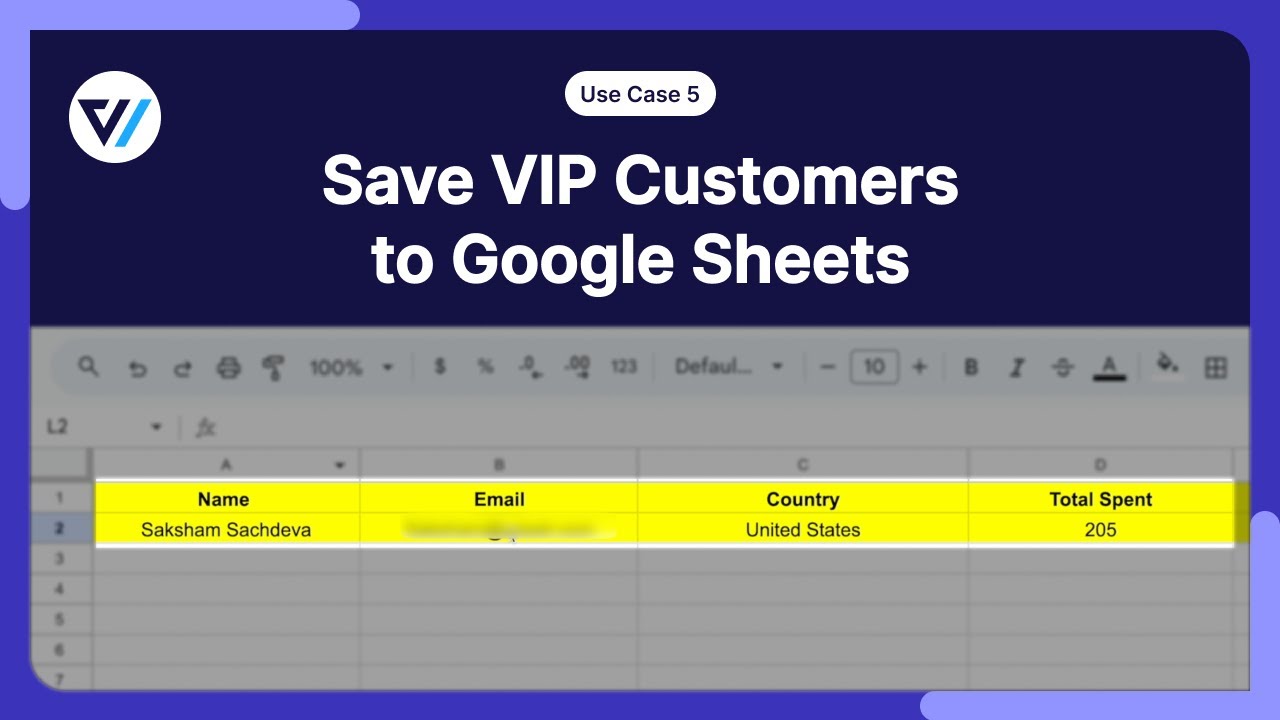
Use Case #5: Push VIP WooCommerce customers based on total spent in your store
Recognizing and treating high-value customers as VIPs helps you appreciate their loyalty and contributes to customer satisfaction.
You can create targeted marketing campaigns that cater to their preferences, leading to increased sales and customer engagement.
This is why you should push your VIP customers to a separate Google Sheet.
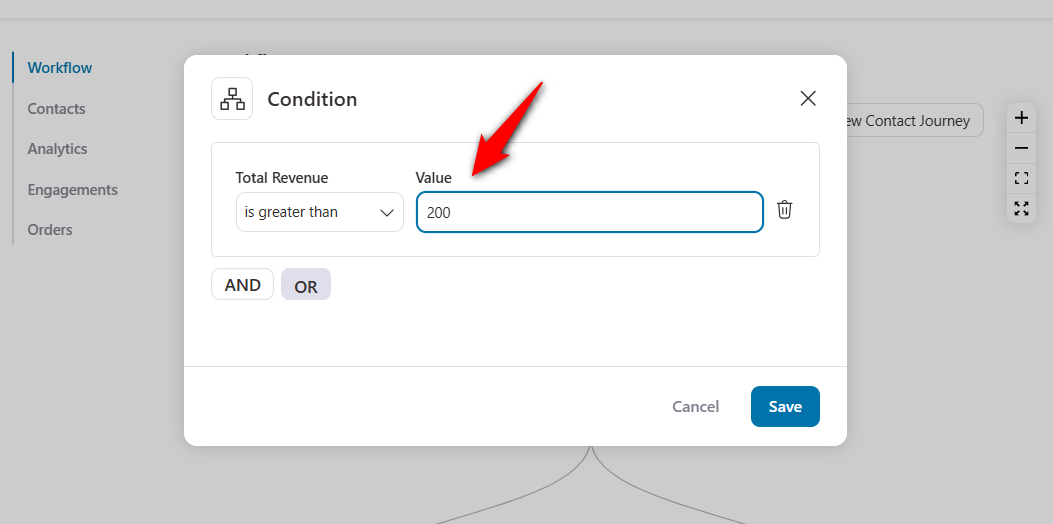
Once you’ve selected the ‘Order Created’ event trigger, choose the condition.
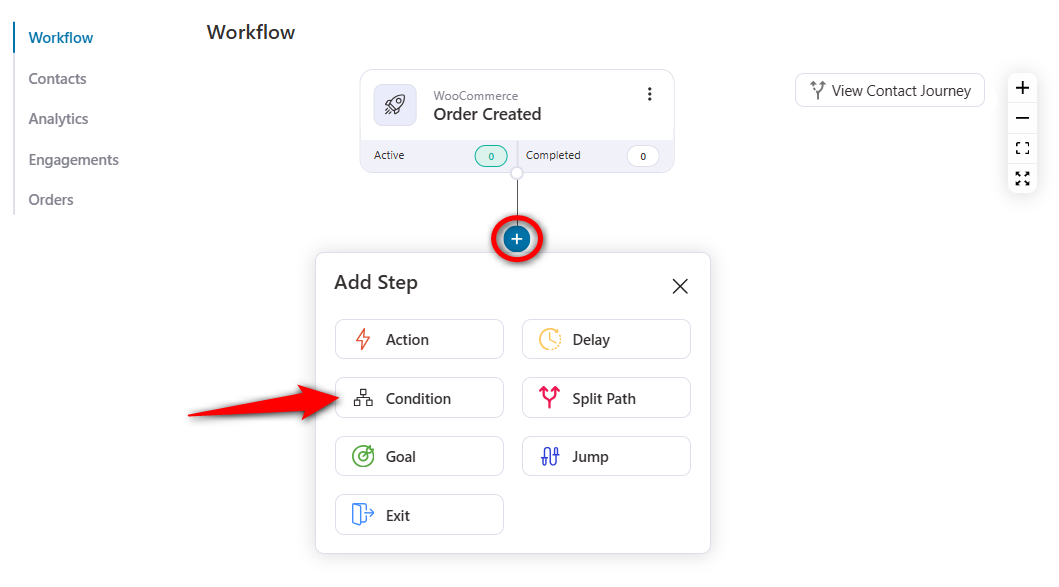
To specify the total amount spent condition, select the ‘Total Revenue’ under WooCommerce.
Set the amount to greater than 200.
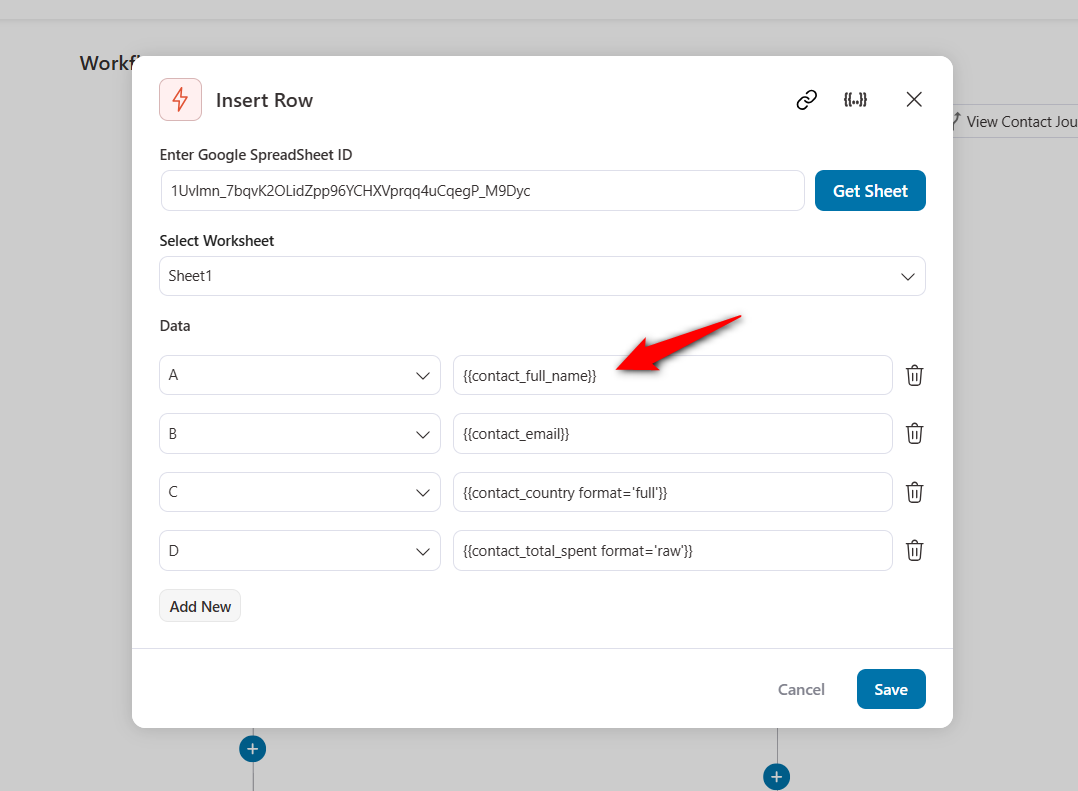
Now we have the condition. Next, add the ‘Insert Row’ action for Google Sheets.
Then, add the following details related to VIP customers with the help of merge tags:
- Name
- Country
- Total money spent
Hit the ‘Save’ button once done.
Turn the automation toggle to ‘Active’.
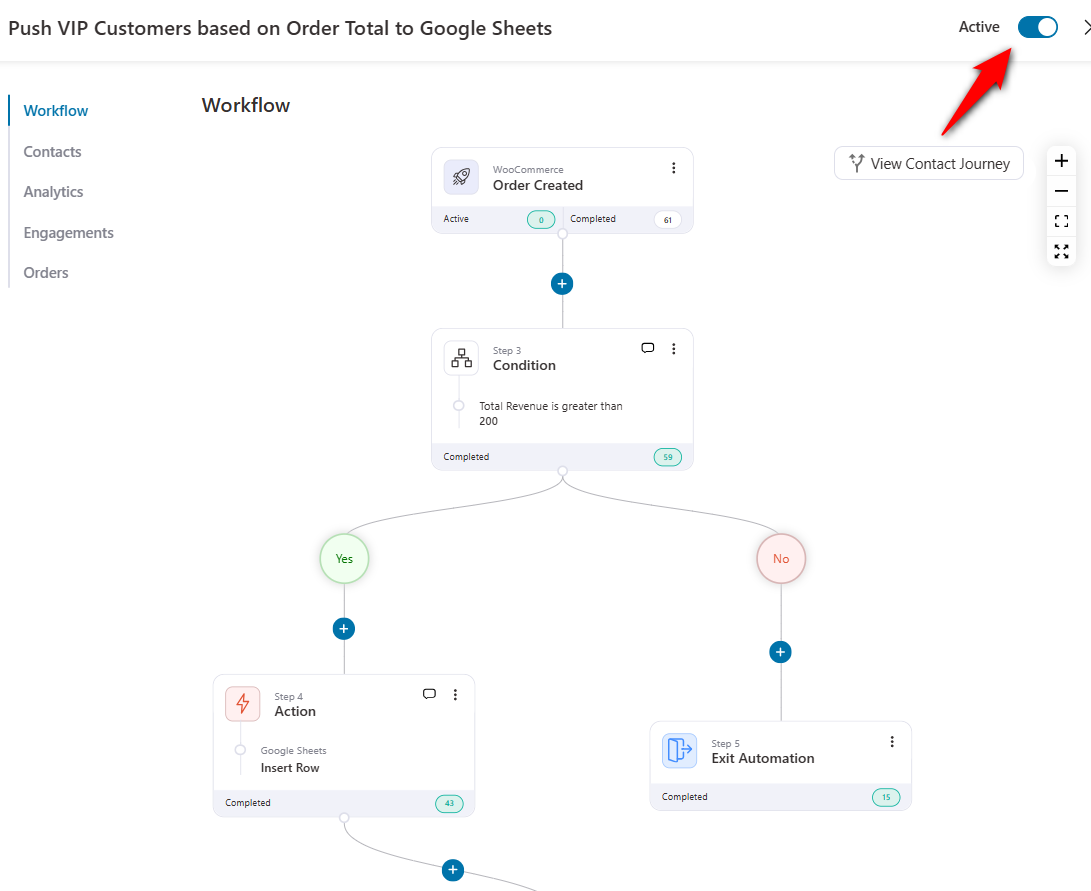
Once a customer places an order, it will check the total amount spent on your store.
If it’s greater than $200, it’ll add them to your VIP list.
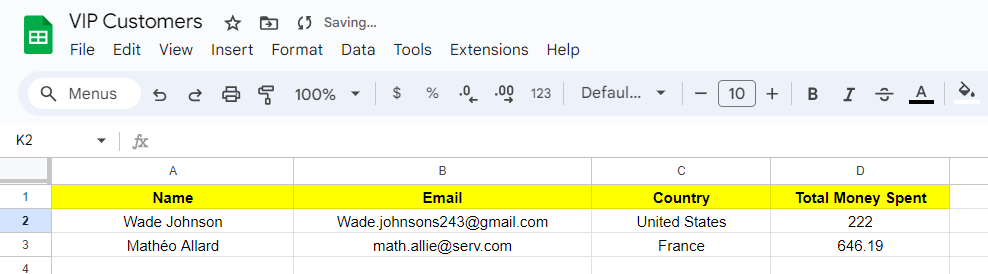
Well done! Your WooCommerce Google Sheets automation successfully works.
Use Case #6: Manage subscription cancellations
If you run a subscription-based WooCommerce store, you know the subscription churn is real.
We have listed various email subscription automations that you can create to prevent churning. The information about how many users canceled recently can help you understand the severity of your store’s churn rate.
So, let’s build a simple automation for this.
Create a new automation and assign a suitable name.
Next, select a trigger: Subscription Status Changed under WooCommerce.
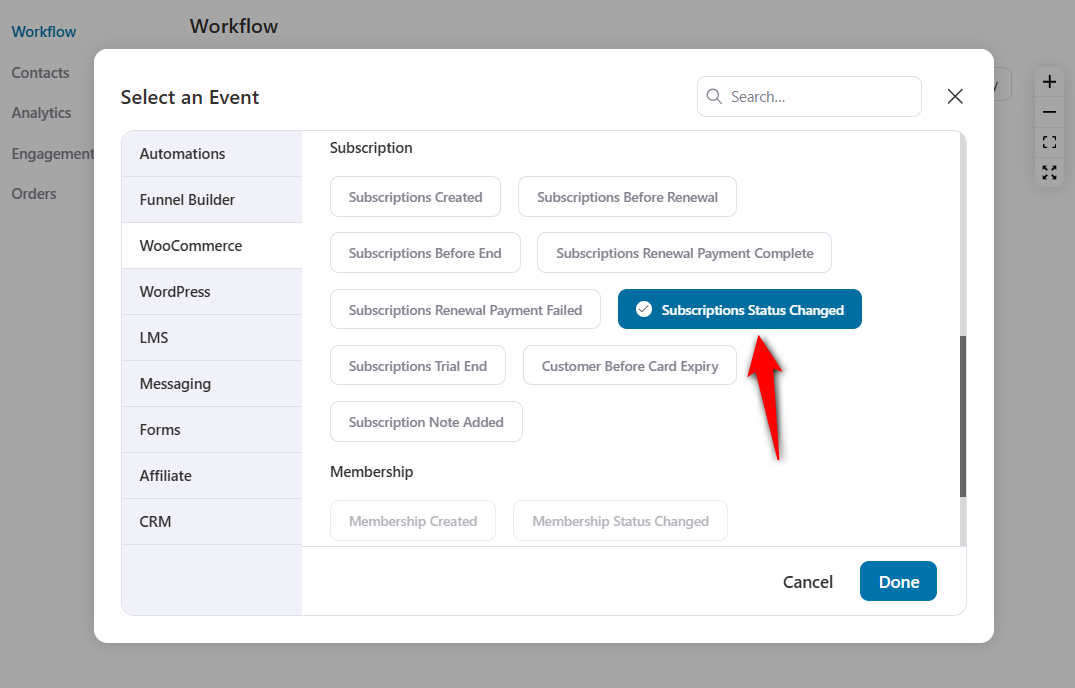
Now, you need to configure the trigger. Click the trigger, then change the subscription status settings as shown below.

Under Send Data, go to Google Sheets and select 'Insert Row'.
Copy the relevant merge tags from the Contact section and WooCommerce Subscriptions section.
You can configure the Subscription Start Date to the format you want. Seeing the subscribers' dates will tell you whether more new or old subscribers are unsubscribing.
Based on the data, you can tweak your current marketing strategies or create a new one.
Paste the relevant merge tags in the data fields and click on ‘Save’.
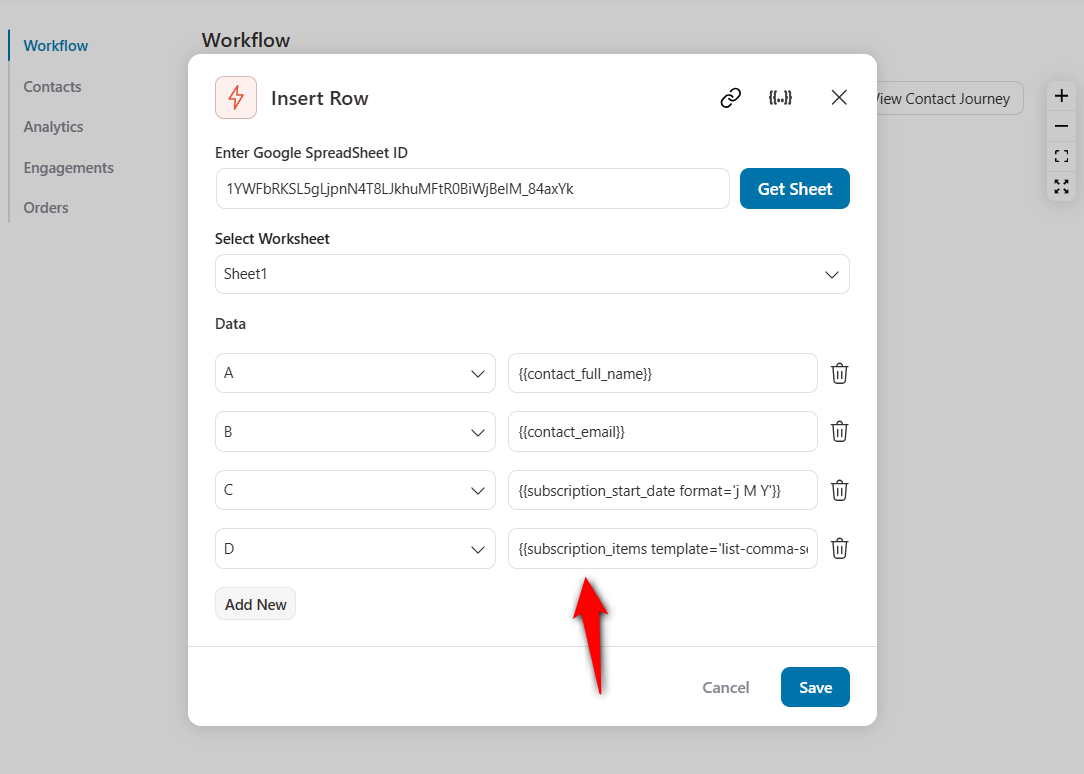
As you can see, we’ll list the subscriber name, their email address, subscription items, and the start date of their plan.
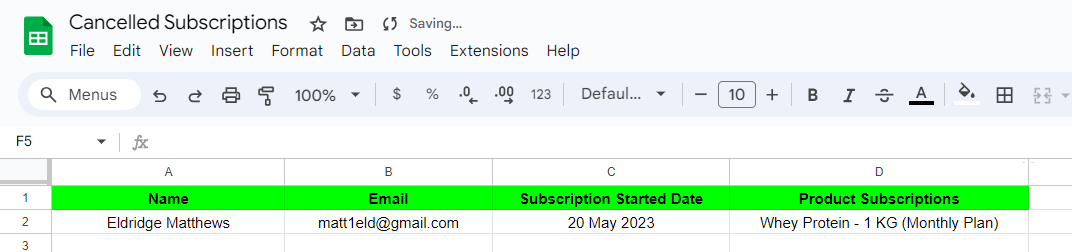
Once done, toggle the WooCommerce Google Sheets automation to active.
Use Case #7: Collect information about new leads
Acquiring new leads is a fundamental aspect of sales and marketing strategies. Businesses invest time and resources to attract, capture, and convert these leads into paying customers.
A simple way to capture leads is to offer them a freebie in exchange for their contact information. All you need to do is create a signup form where they can submit their details.
You can then collect information about new leads in Google Sheets.
To do that, create a signup form with any form builder. FunnelKit Automations is compatible with Elementor Forms, WP Forms, Divi Forms, Formidable Forms, Gravity Forms, Contact Form 7, and more.
Let’s say we’ve created this signup form with Elementor on our website:
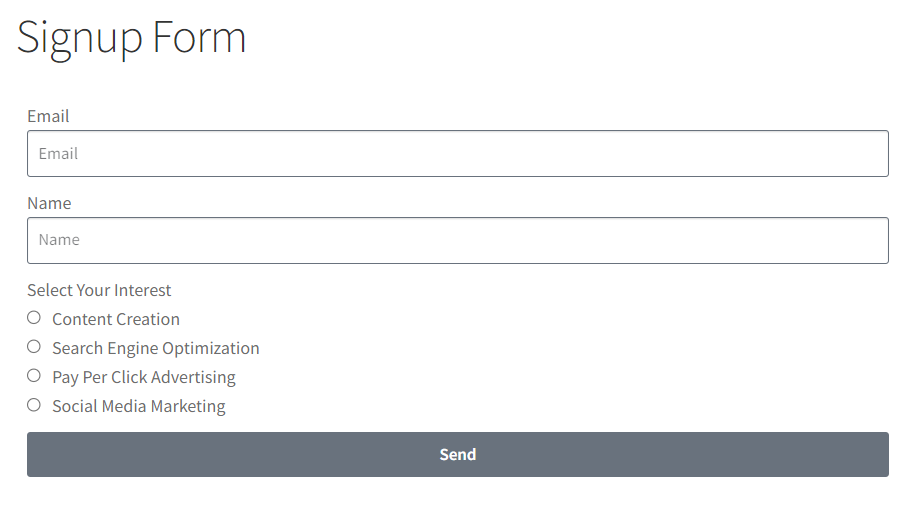
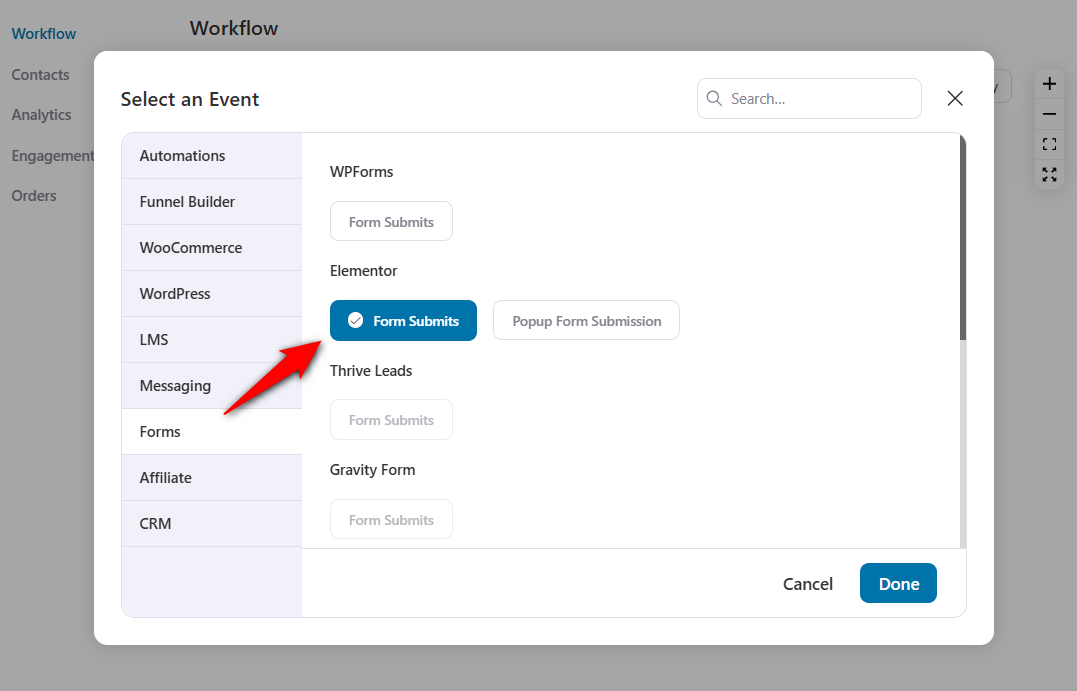
Now, go to automations and select the ‘Form Submits’ event trigger under Elementor Forms.
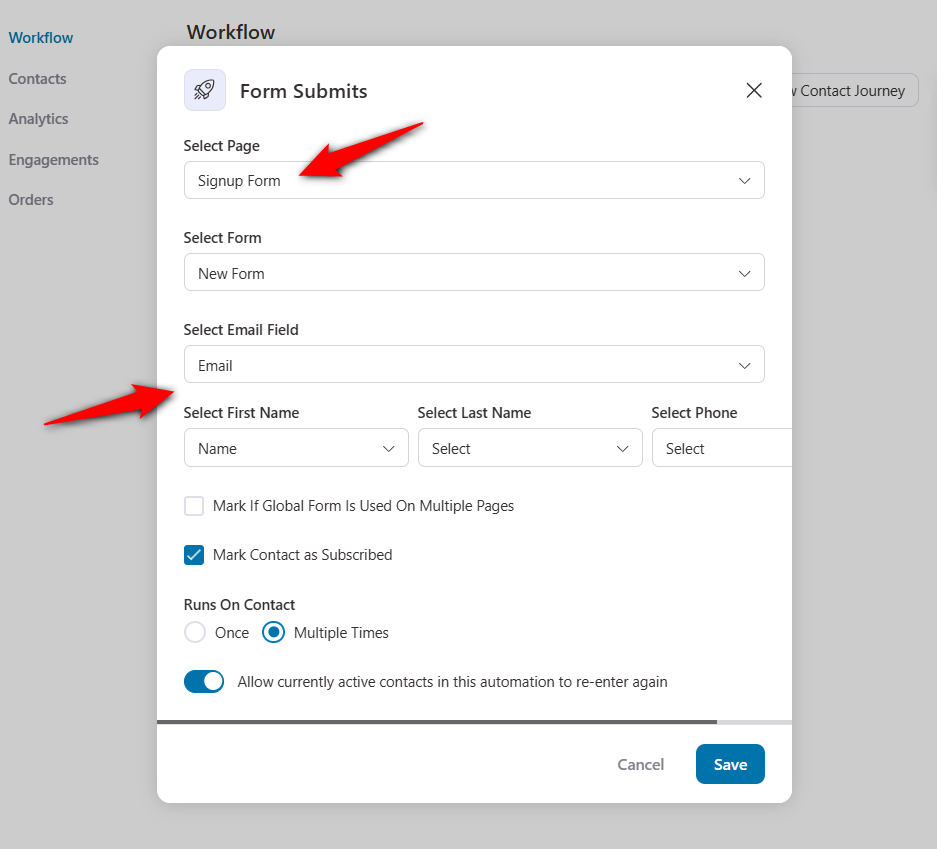
Configure the event and map the basic fields.
This simply means matching the form fields with the corresponding fields in FunnelKit Automations CRM.
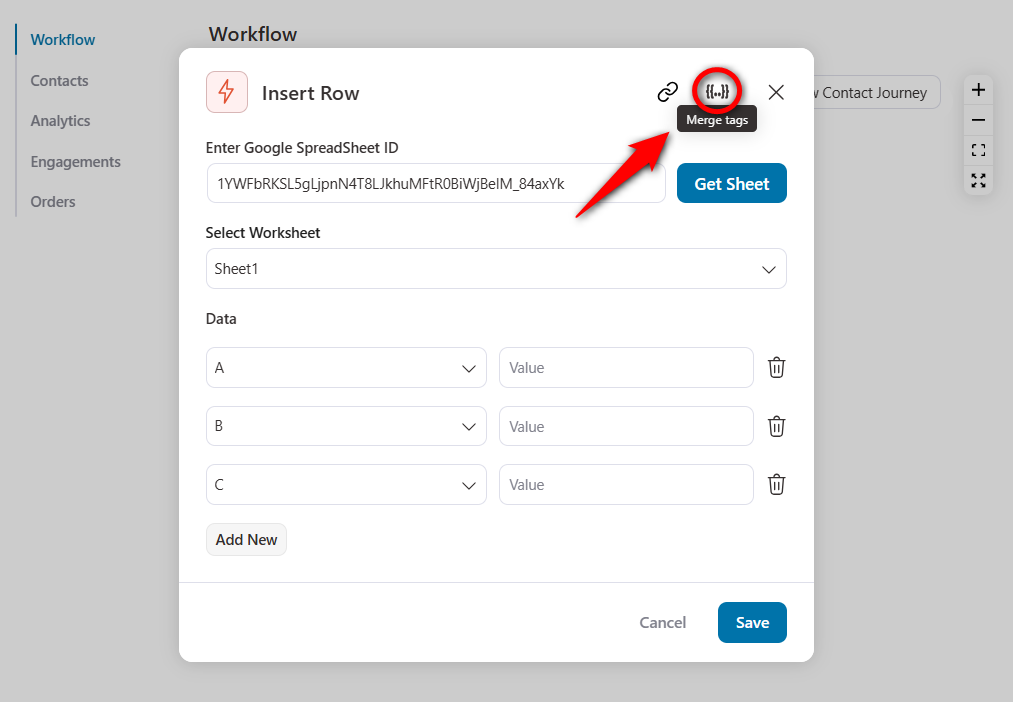
Next, add the ‘Insert Row’ action below the event trigger.
Configure the spreadsheet settings: add the spreadsheet ID and select the worksheet.
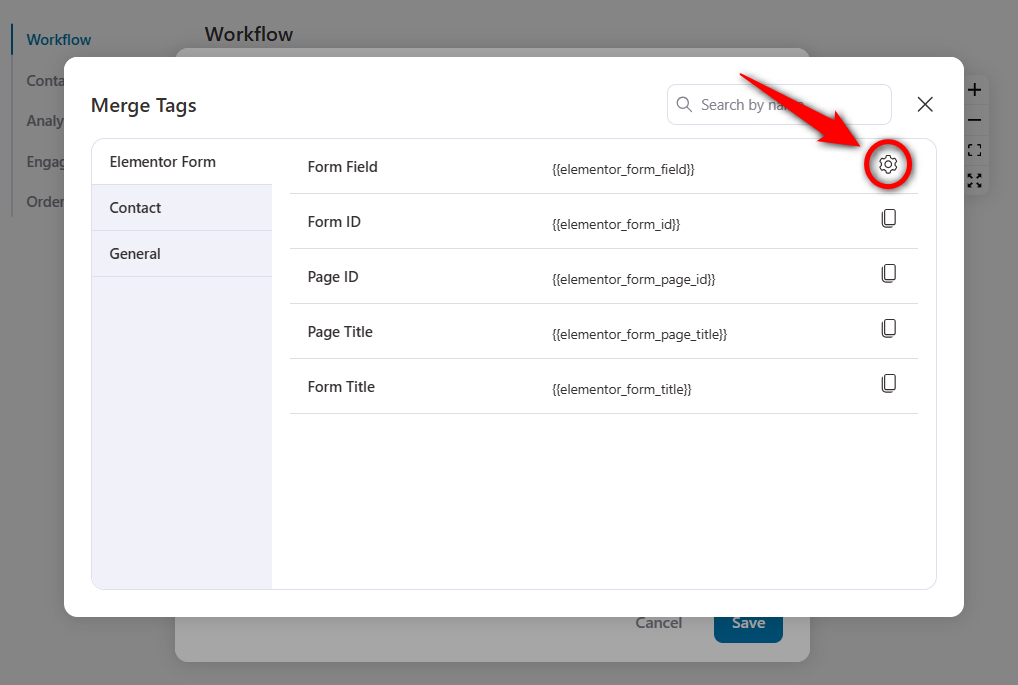
Now, click Add New, then click Merge Tags in the top-right corner.
In the merge tag section, you will see multiple form-related merge tags. Select the ones you want.
Click the gear icon next to Form Field.
Now select a field. We’ll select the Name field first.
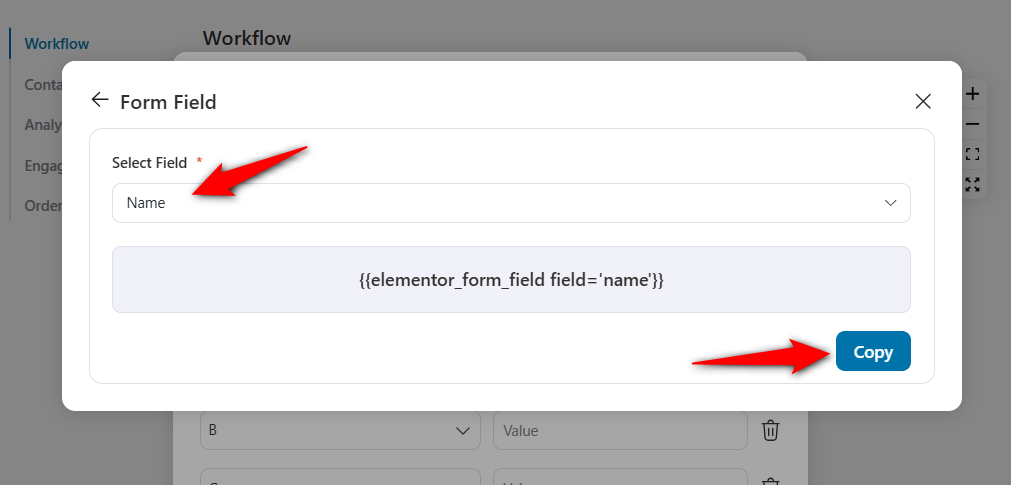
The name merge tag will be generated. Now, copy this merge tag and paste it into the Data field.
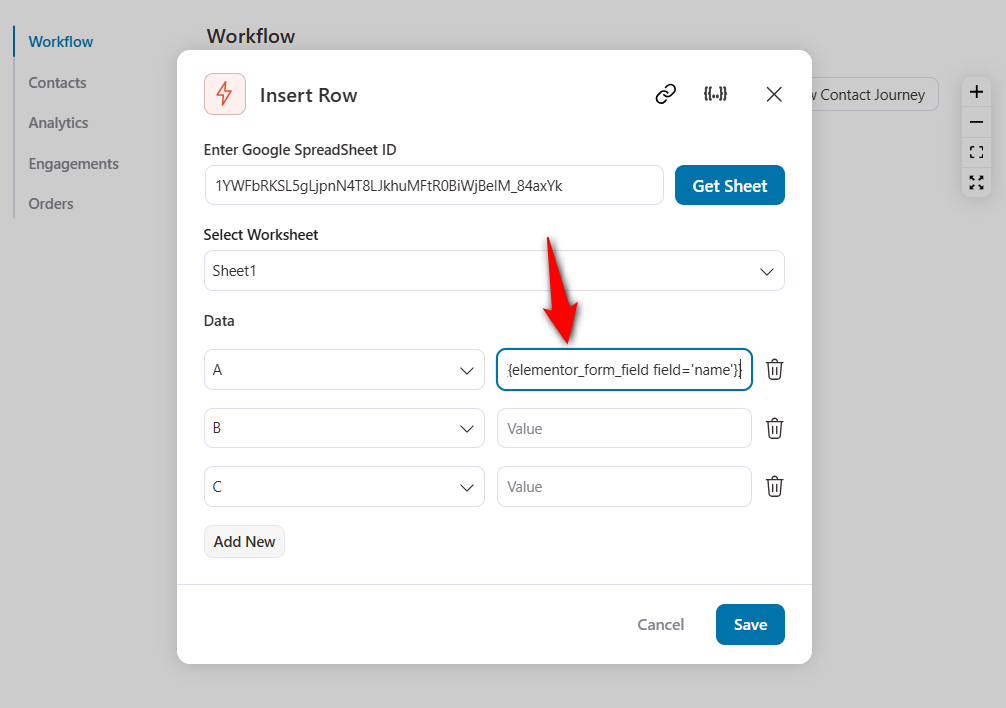
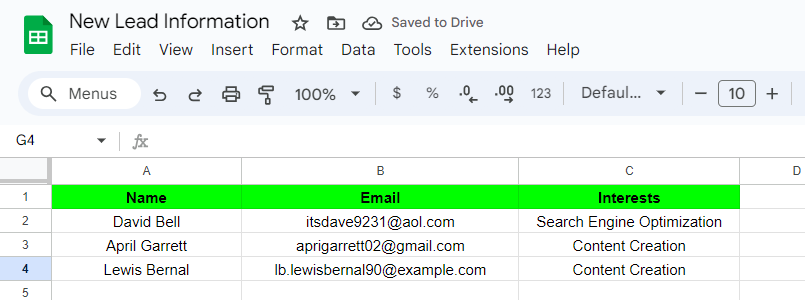
We’ll add the following fields to Google Sheets here:
- Name
- Interest
This will help you send relevant emails or SMS to your leads in future campaigns.
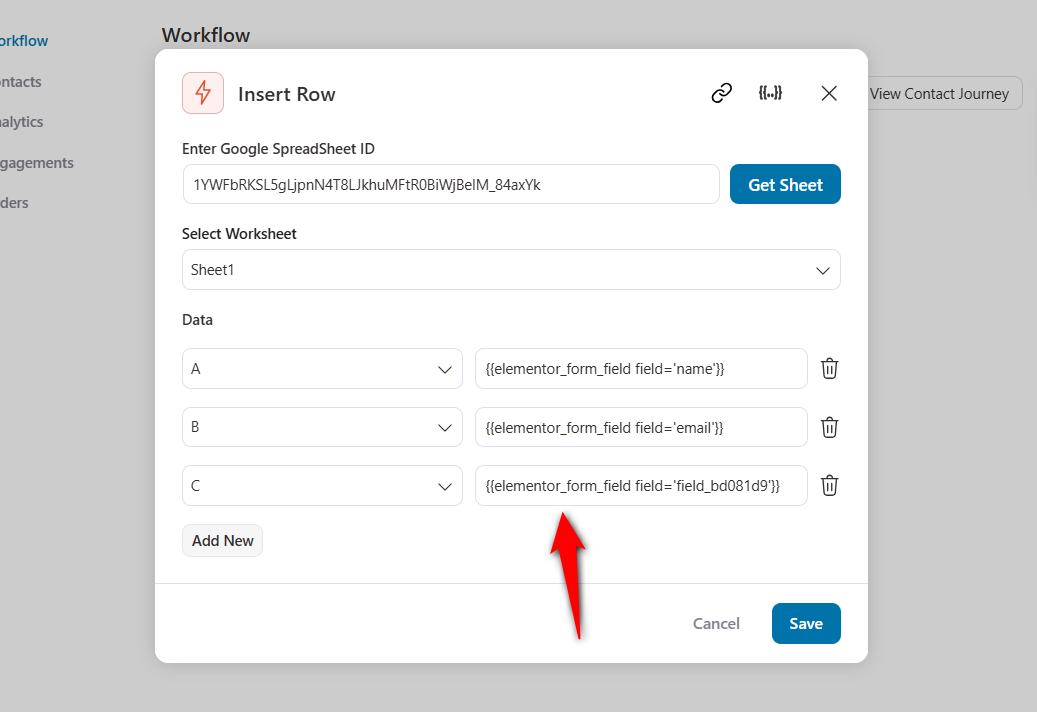
We’ve added the related merge tags in the row.
This WooCommerce Google Sheets integration exports your newly generated leads to spreadsheets.
You’re now ready to interact and nurture relationships with them.
Use Case #8: Export the order meta to Google Sheets
WooCommerce is a flexible eCommerce platform that many store owners use, leveraging plugins and applications to run their businesses.
Many third-party plugins push data into their own order, and this metadata is not accessible elsewhere.
By exporting the order meta to Google Sheets, you unlock the data and make it accessible to other team members.
Let’s say you run an online event or a workshop in your WooCommerce store using an event manager plugin.
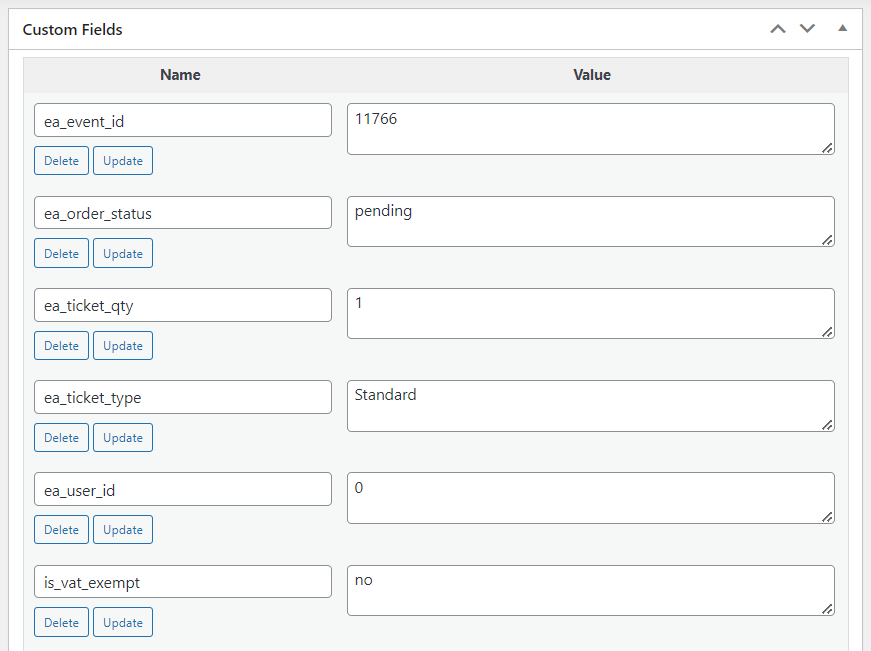
You’ll see different custom fields for that event, like:
- Event ID
- Event order status
- Ticket quantity
- Ticket type, and many more.
Now, you want to export the related order meta of that plugin into your spreadsheets.
Here’s what you need to do:
First, choose the ‘Order Created’ event trigger by assigning the master class as the specific product.
Next, add the ‘Insert Row’ action and configure it.
Here, we’ll use the order data merge tag.
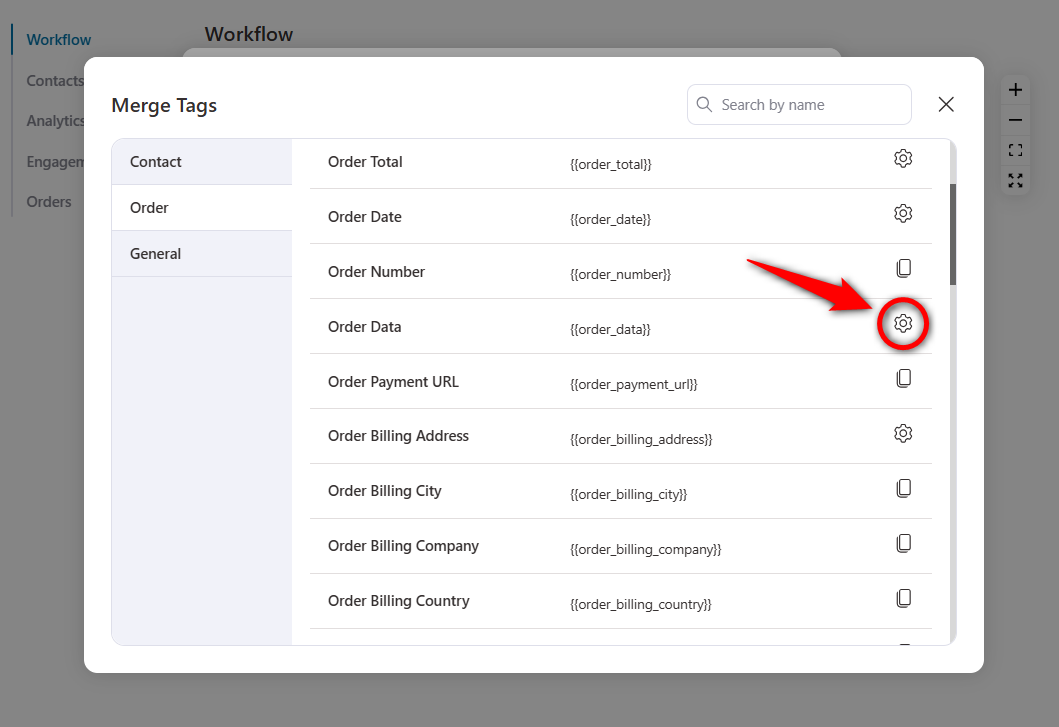
Specify the meta name. For example, the meta name of the Event ID is ‘ea_event_id’.
Copy this merge tag.
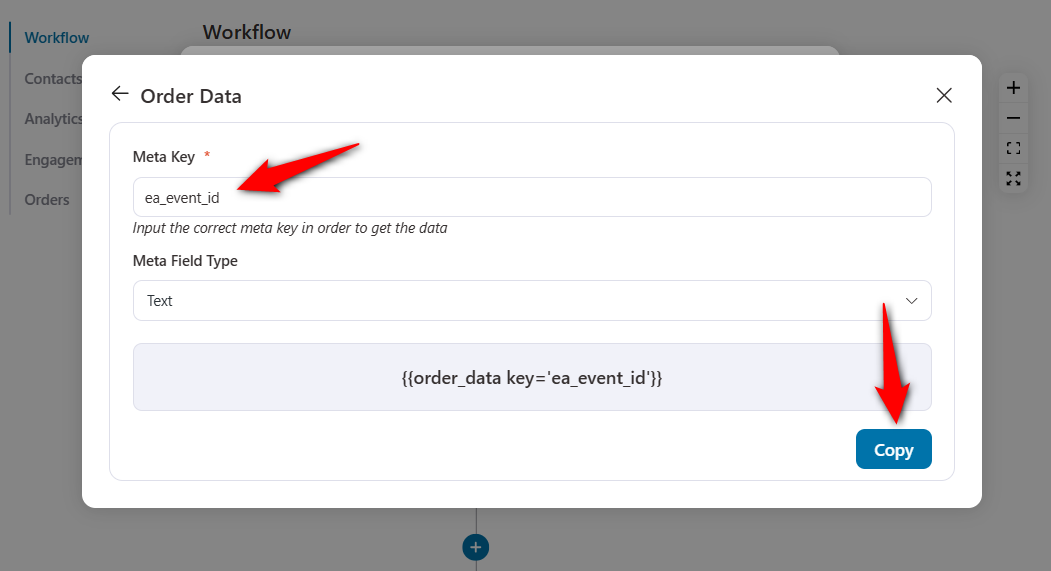
Paste it into the data value field of your Google Sheet.
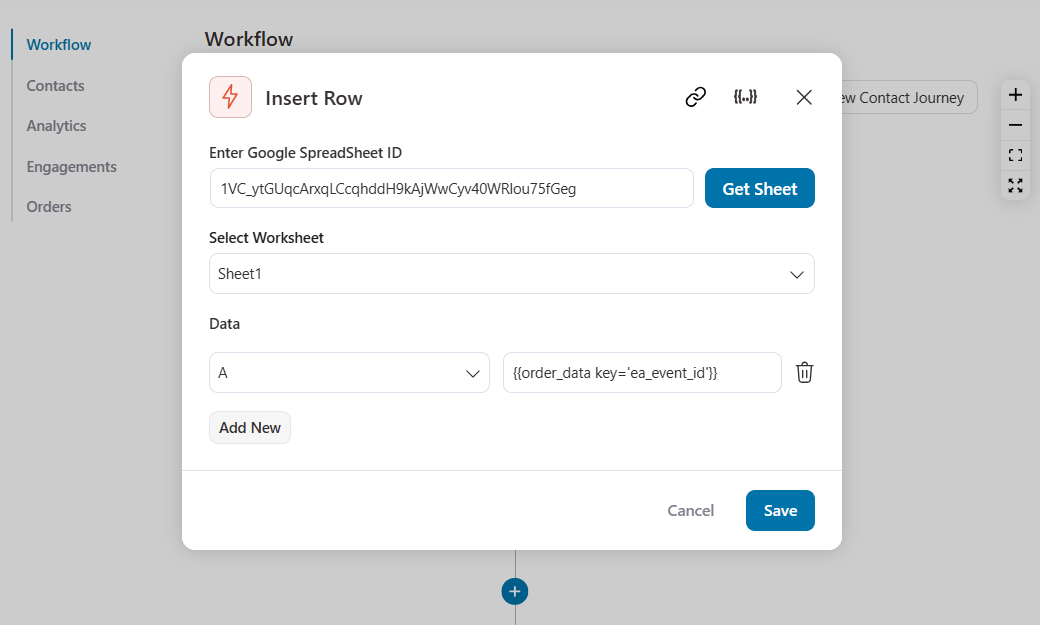
Once you’ve entered everything you need, click on ‘Save’.
This is how you can successfully export WooCommerce order meta to Google Sheets.
Use Case #9: Export or Import contacts to/from the Google Sheets CSV file
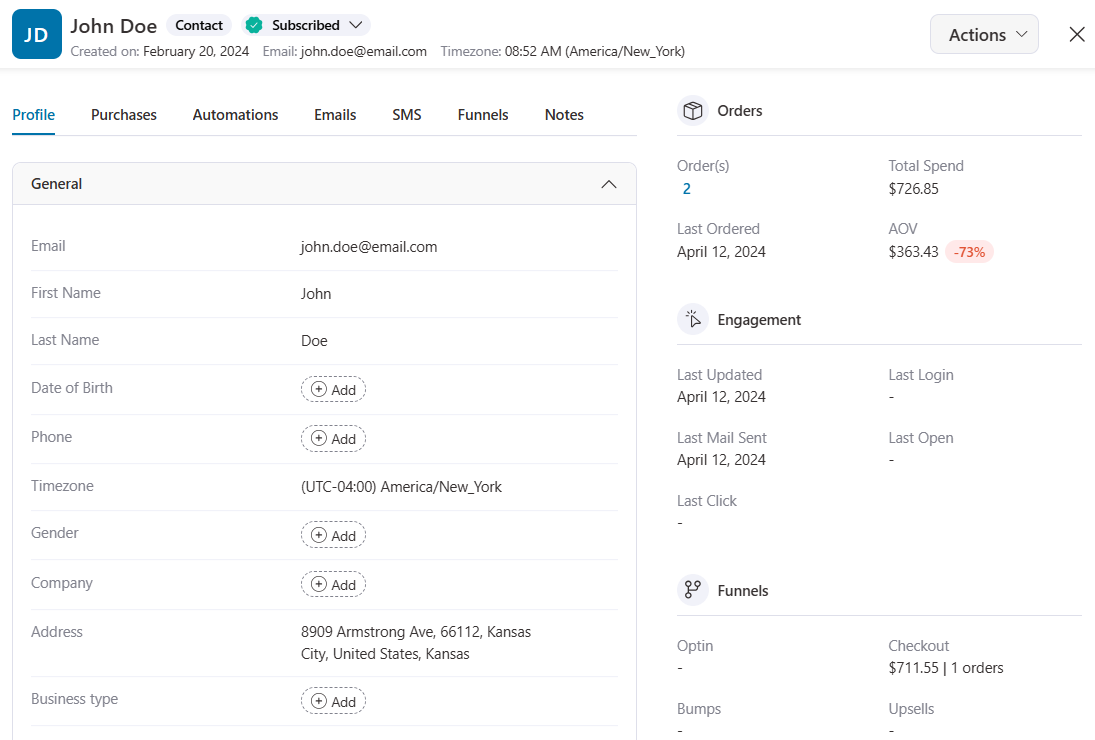
View detailed contact profiles with information related to their purchases, emails or SMS sent to them, automations they were a part of, and more.
This allows you to gain insights and analyze marketing strategies to make them more loyal to your brand.
That’s why importing your contacts works well.
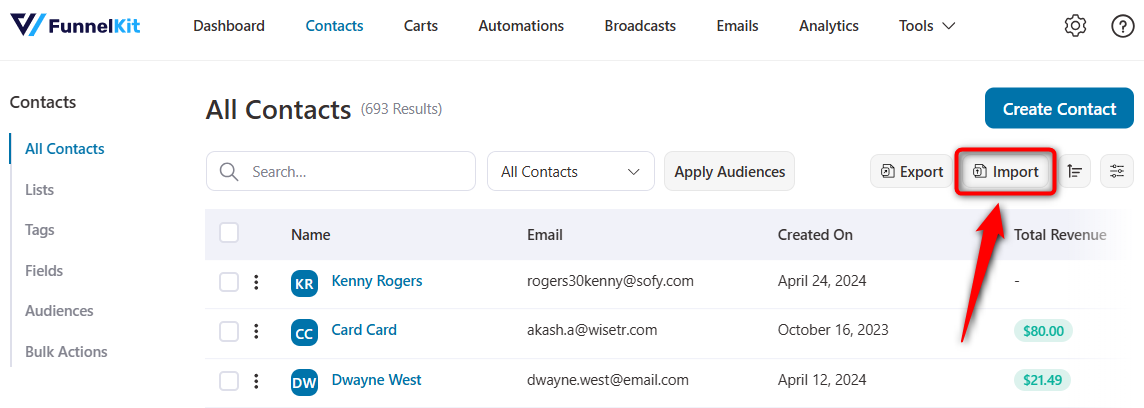
To import your contacts via a Google Sheets CSV file, go to the Contacts section in FunnelKit Automations.
Then, click on the ‘Import’ button.
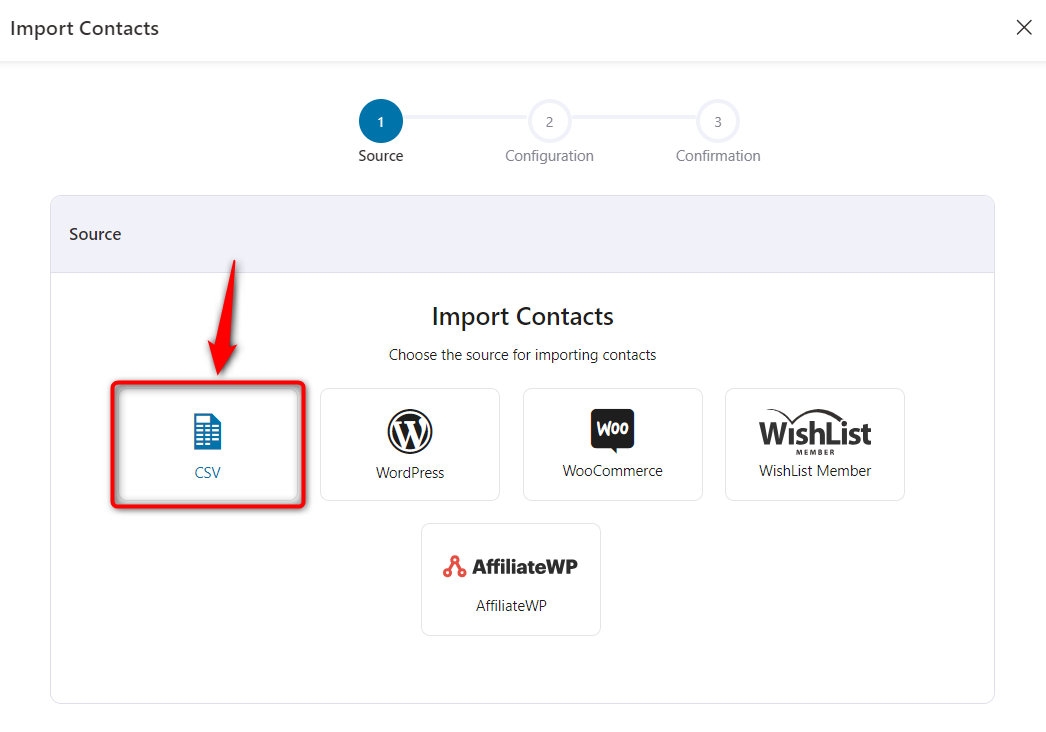
By default, FunnelKit Automations allows you to import your contacts via CSV, WooCommerce, and WordPress.
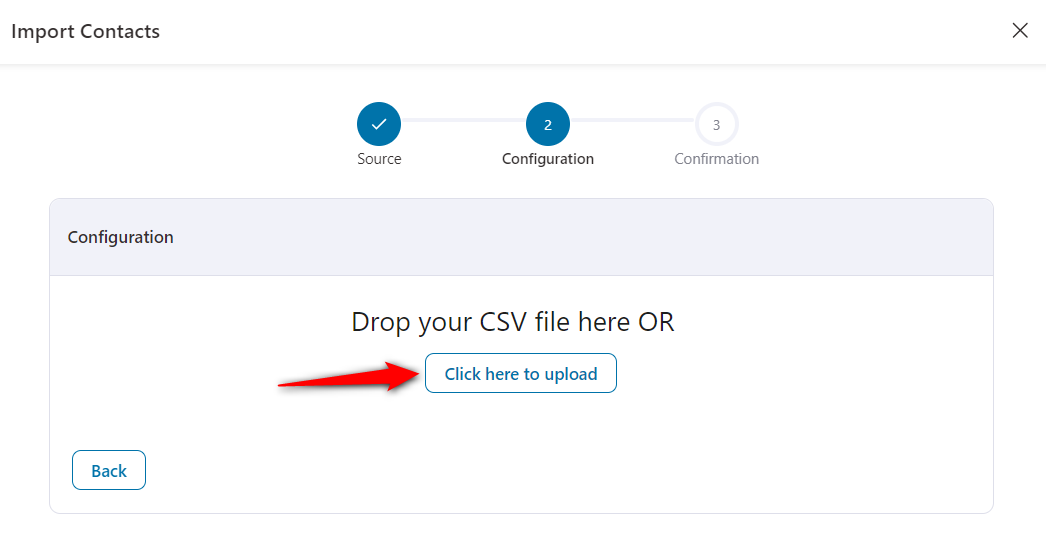
Here, we’ll click on CSV as our source.
Now, upload your Google Sheets CSV file.
Before you upload the CSV file, remember to follow this information:
- Email is a required field for an import.
- Tags should be separated by commas.
- Country codes should be in the form of two-digit ISO codes.
Map the fields of your CSV file with the fields in FunnelKit Automations.
If you don't find a relevant field, feel free to create a custom field to map the data.
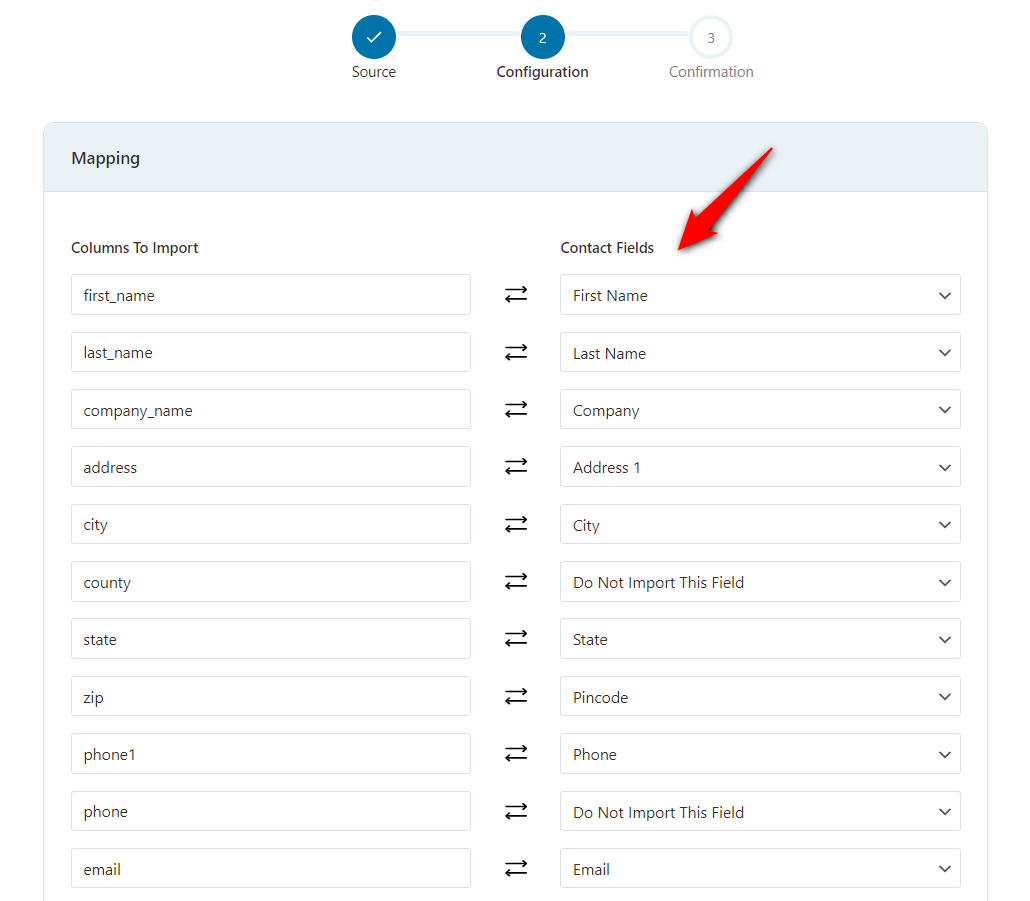
Assign tags, lists, etc., if you want to segment your imported contacts and hit ‘Import’ when done.
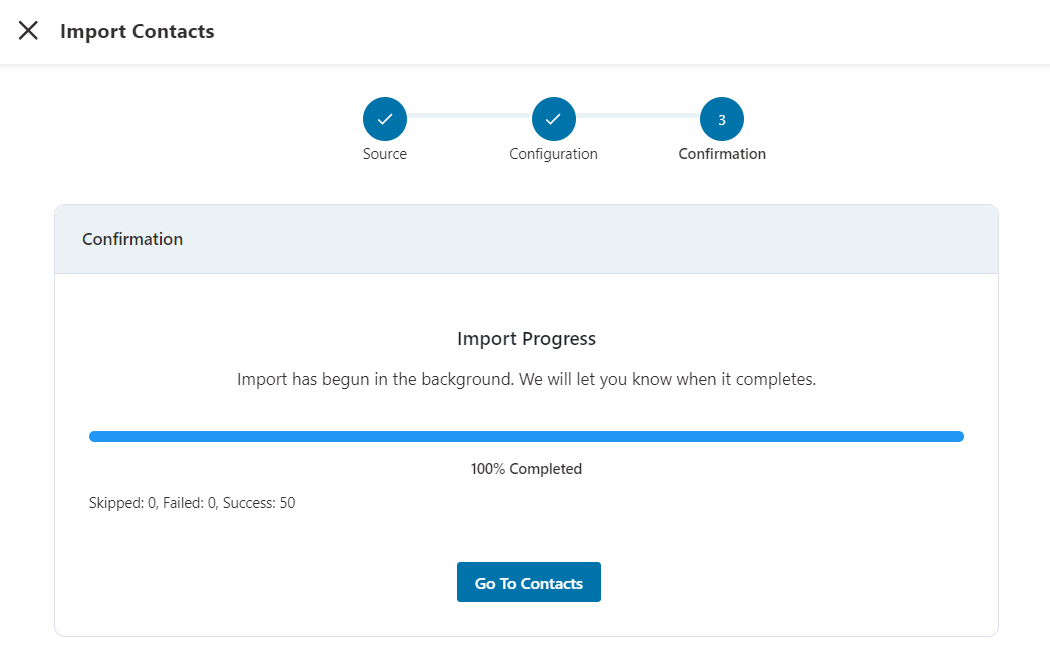
Your contacts will be successfully imported to FunnelKit Automations from the CSV file.
You now have your contacts stored and secured with this WooCommerce Google Sheets integration.
This is the detailed profile view in FunnelKit Automations, where you can get access to everything related to this contact.
In case you want to export your single or bulk contacts to Google Sheets, click on the ‘Export’ button on the Contacts section inside FunnelKit Automations.
These are just the 9 use cases. You can even go beyond and explore unlimited possibilities to be executed on your WooCommerce store!
7 Best Practices to Keep Your WooCommerce Google Sheets Data Accurate and Organized
Here are some effective best practices to get the most from your WooCommerce Spreadsheet integration.
- Use consistent column headers from the start
Define your spreadsheet structure before you activate the automation sync.
Use clear, descriptive column headers such as order ID, customer email, and order total so that each new row lands in the correct column.
Changing headers after data starts flowing can break formulas and create misaligned entries.
- Set up separate sheets for different data types
Keep orders, products, and customers in separate sheets or tabs within the same Google Sheets file. Mixing different WooCommerce data sheets in a single tab makes filtering and reporting difficult.
Most WooCommerce Google Sheets plugins let you specify which sheet or tab receives each type of data.
- Schedule regular data audits
Even with automation, it is important to review your synced data periodically. Check for duplicate entries, missing fields, or formatting inconsistencies at least once a month.
According to Gartner, 59% of organizations do not measure data quality at all, which is one reason errors go unnoticed for so long.
- Limit edit access to the synced spreadsheet
Google Sheets lets you set different permission levels for different users. Keep the synced sheet as “view only” for most team members, and restrict editing rights to one or two administrators.
This prevents accidental overwrites that could corrupt your WooCommerce Google Sheets connection.
- Use Google Sheets’ built-in validation rules
Apply data validation to key columns to catch errors early. For example, set the 'Order Total' column to accept only numbers, or create a dropdown list for order status values.
This adds a second layer of protection even when data is entered automatically.
- Create a backup copy on a regular schedule
Use Google Sheets’ version history or set up an automated backup to Google Drive.
If a sync error pushes bad data into your sheet, you can roll back to a clean version without losing weeks of records.
Archive old data to keep the spreadsheet fast
Google Sheets has a limit of 10 million cells and can slow down significantly with large datasets.
If your store processes high order volumes, move older records to an archive sheet or separate file at the end of each quarter.
This keeps your active WooCommerce spreadsheet responsive and easy to work with.
Frequently Asked Questions (FAQs)
Find answers to the most frequently asked questions related to the WooCommerce Google Sheets connection.
You can integrate WooCommerce with Google Sheets using FunnelKit Automations. All you have to do is click ‘Connect’ under WooCommerce Google Sheet connector and authorize the integration from your Google account.
You can export your WooCommerce orders to Google Sheets in real time. Set up automations and sync your WooCommerce orders to Google Spreadsheets automatically, eliminating the need for manual work.
Yes, you can configure separate Google Sheets for each WooCommerce store by setting up a separate integration for each. This helps you ensure your data is organized and managed independently.
Yes, you can automate the integration between the WooCommerce REST API and the Google Sheets API. However, setting up and maintaining this integration requires good programming knowledge and effort.
That’s why our experts recommend using plugins like FunnelKit Automations, which allows you to set up various integrations with different CRMs and third-party applications with a single click.
Google Sheets has a limit on the number of cells and rows, which can be a constraint for large datasets. Furthermore, advanced data manipulation requires more robust tools, such as Google Cloud BigQuery.
You can export WooCommerce products to Google Sheets using the built-in function. Just specify the columns, products, categories, and custom metadata you want to export to Google Sheets via CSV file. If you want to import any product, upload the CSV file and map the columns of your product data.
You can sync WooCommerce data, including orders, products, customers, coupons, and more information to Google Sheets.
The most common causes include an expired Google API authentication token, incorrect sheet permissions, or a plugin conflict.
Start by re-authenticating your Google account in the plugin settings. Then check that the Google Sheet is shared with the correct Google account and that the plugin has “Editor” access. If you use a caching plugin, clear your site cache and test again.
For webhook-based integrations, verify that your webhook URL is correct and that your server is not blocking outgoing requests. Most sync issues are resolved by re-authenticating or updating the plugin to the latest version.
Google Sheets is the better choice for most WooCommerce store owners because it supports real-time collaboration, cloud access from any device, and automated syncing through plugins and webhooks.
A WooCommerce Excel integration typically involves downloading static files that quickly become outdated. Google Sheets also integrates more easily with automation tools like Zapier, Make, and FunnelKit Automations.
Start Syncing Your WooCommerce Store Data to Google Sheets Today!
The Google Sheets and WooCommerce integration allows you to sync your WooCommerce store data with Google Sheets.
These 9 automated recipes can help you collect data and manage your store more efficiently.
Get on the bandwagon and make your online store management a smooth sail with the most powerful WordPress marketing automation engine - FunnelKit Automations.
See new WooCommerce orders, pull all the data from an embedded form, and perform analysis to make better decisions.
You can do it all!
Editorial Team
July 3, 2026Discover how a canceled order doesn't have to mean a lost customer, and how the right WooCommerce canceled order email can turn it into a second chance. WooCommerce canceled order...
Editorial Team
July 3, 2026Choosing the right WooCommerce HubSpot integration is harder than it looks because HubSpot has no first-party WooCommerce sync and every third-party option handles data differently. Pick the wrong connector and...
Editorial Team
July 1, 2026WooCommerce custom emails per product let you send a different message to customers based on the exact item they buy. To send a different email depending on what someone buys...


