


Discover how to collect birthdates and share personalized birthday coupons automatically in WooCommerce.
Want loyal customers who keep coming back?
WooCommerce birthday coupons let you offer personalized discounts or gifts, making shoppers feel valued and boosting repeat purchases.
In this blog, we will share how to automatically generate dynamic birthday coupons and share them to build lasting customer relationships.
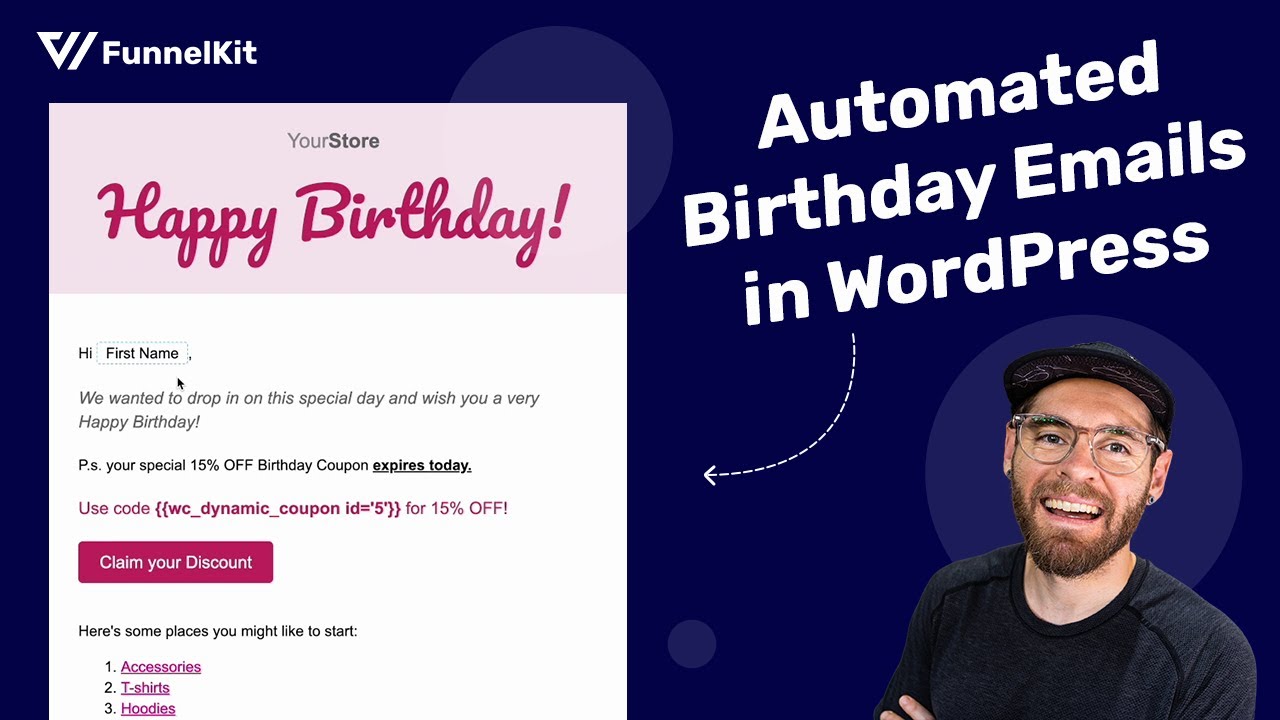
Table of Contents
- 1 What Are WooCommerce Birthday Coupons?
- 2 How to Automatically Create WooCommerce Birthday Coupons and Share With Customers?
- 3 6 Best Practices for Using Birthday Coupons
- 4 How to Prevent Misuse Of WooCommerce Birthday Coupon and Keep It Profitable
- 5 Wrapping Up: Maximizing the Impact of WooCommerce Birthday Coupons
What Are WooCommerce Birthday Coupons?
WooCommerce birthday coupons are special discounts or offers sent to customers on or around their birthdays.
These coupons provide a personalized shopping experience by offering discounts, gifts, or other promotions to celebrate customers' special day.
These WooCommerce coupons are often time-limited, creating a sense of urgency for customers to make a purchase.
Let’s look at the example below!
A WooCommerce store might send an email to a customer a few days before their birthday with the following message:
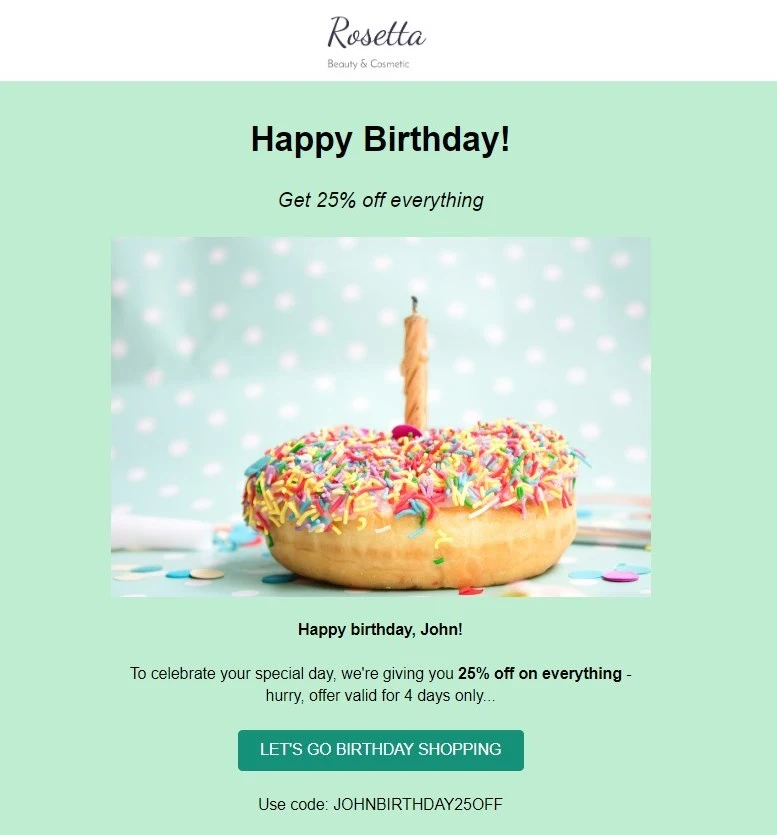
This type of personalized offer with birthday coupons can effectively boost sales, build loyalty, and create emotional connections by making customers feel valued on their special day.
They also drive repeat purchases, word-of-mouth marketing, and increase average order value.

How to Automatically Create WooCommerce Birthday Coupons and Share With Customers?
We will use FunnelKit Automations for this process. This powerful marketing automation solution allows you to seamlessly collect customers' birthdates, automatically generate personalized coupons, and email them out right on or around their birthday.
Before starting, ensure that you have installed and activated both the free and pro versions.
Step 1: Collect birthdate at checkout
You can't send a birthday coupon without a birthdate on file, and this is the part most stores skip because WordPress has no native way to ask for it.
To collect the birthdate field, you need to place the field at checkout.
For this, navigate to FunnelKit Automations > Settings > Birthday Reminder. Next, check the field "Enable Date of Birth Field on WooCommerce Checkout. Choose the field label. You can make the field required if needed.
Next, choose the field-level position; options are: After Billing Details, Before order notes, and After order notes.
You can collect date of birth on the My Account and thank you pages as well.
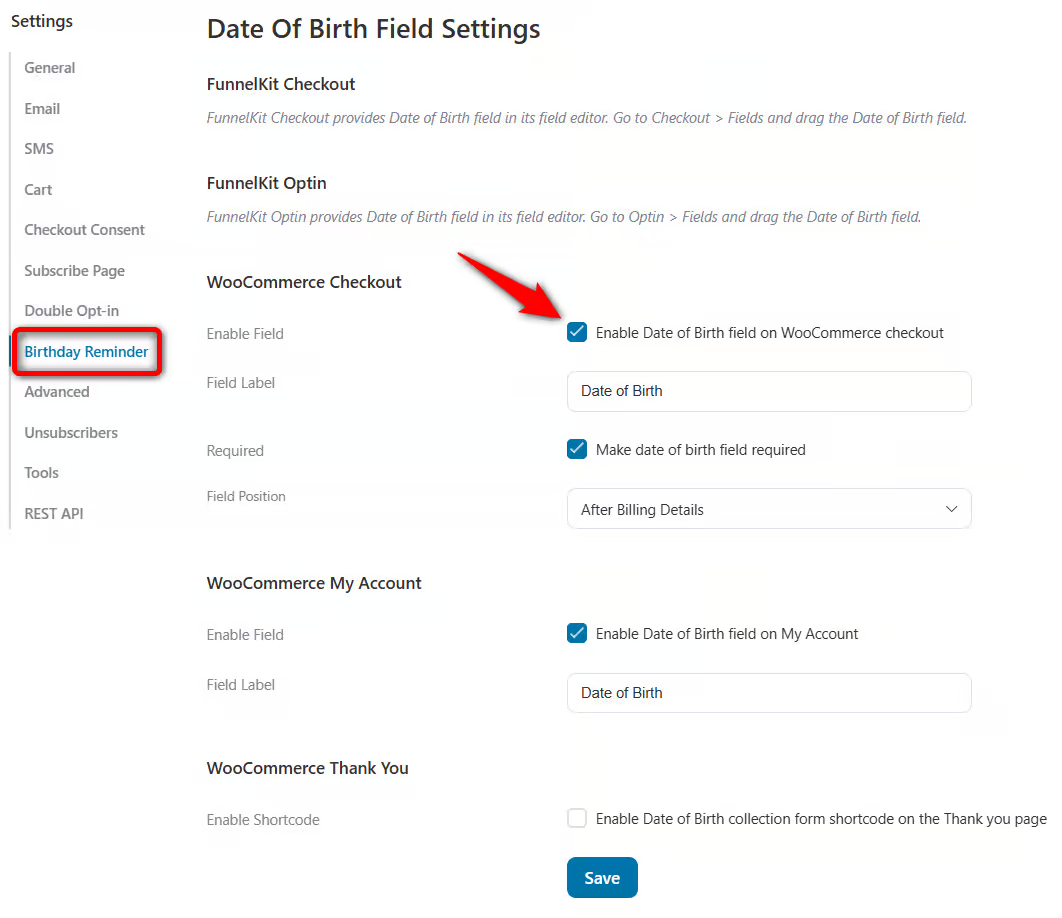
At checkout, customers can enter their date of birth.
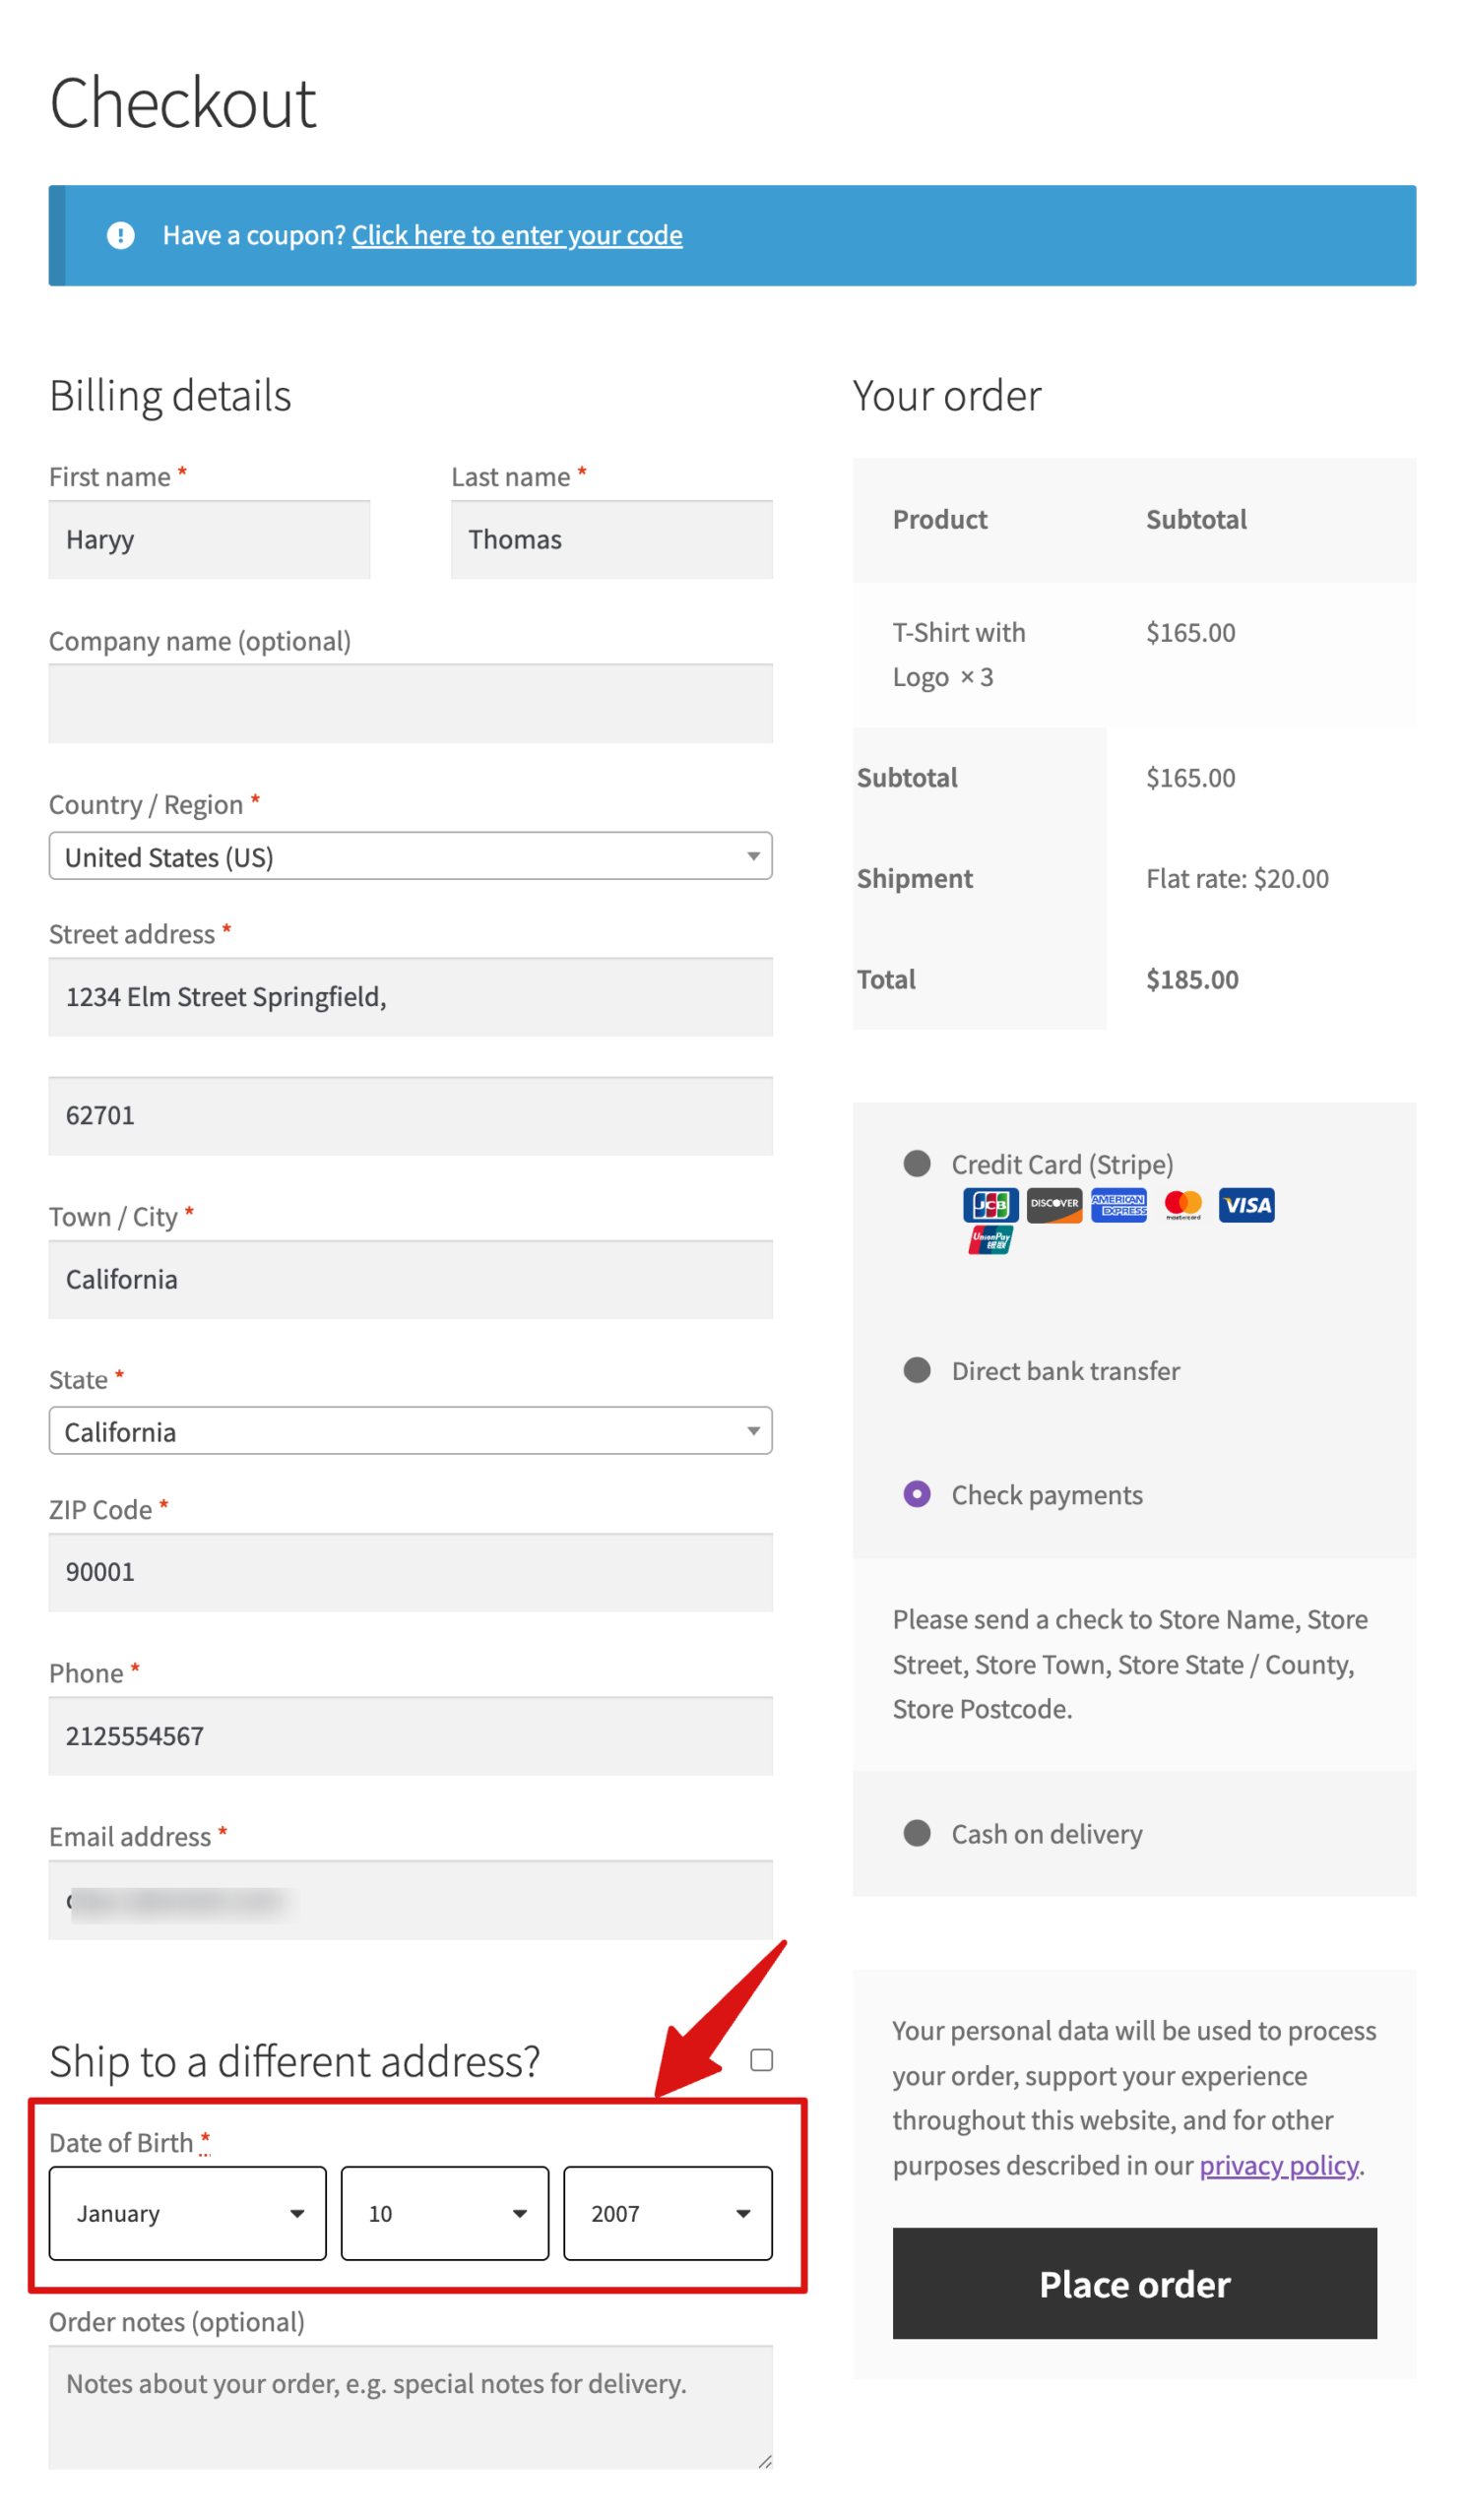
If you want more control over where the birthdate field appears, you can switch to a custom checkout using FunnelKit Funnel Builder.
Using this checkout customizer, you can place the birthdate field anywhere you want. For example, here we created a new section to highlight the field.
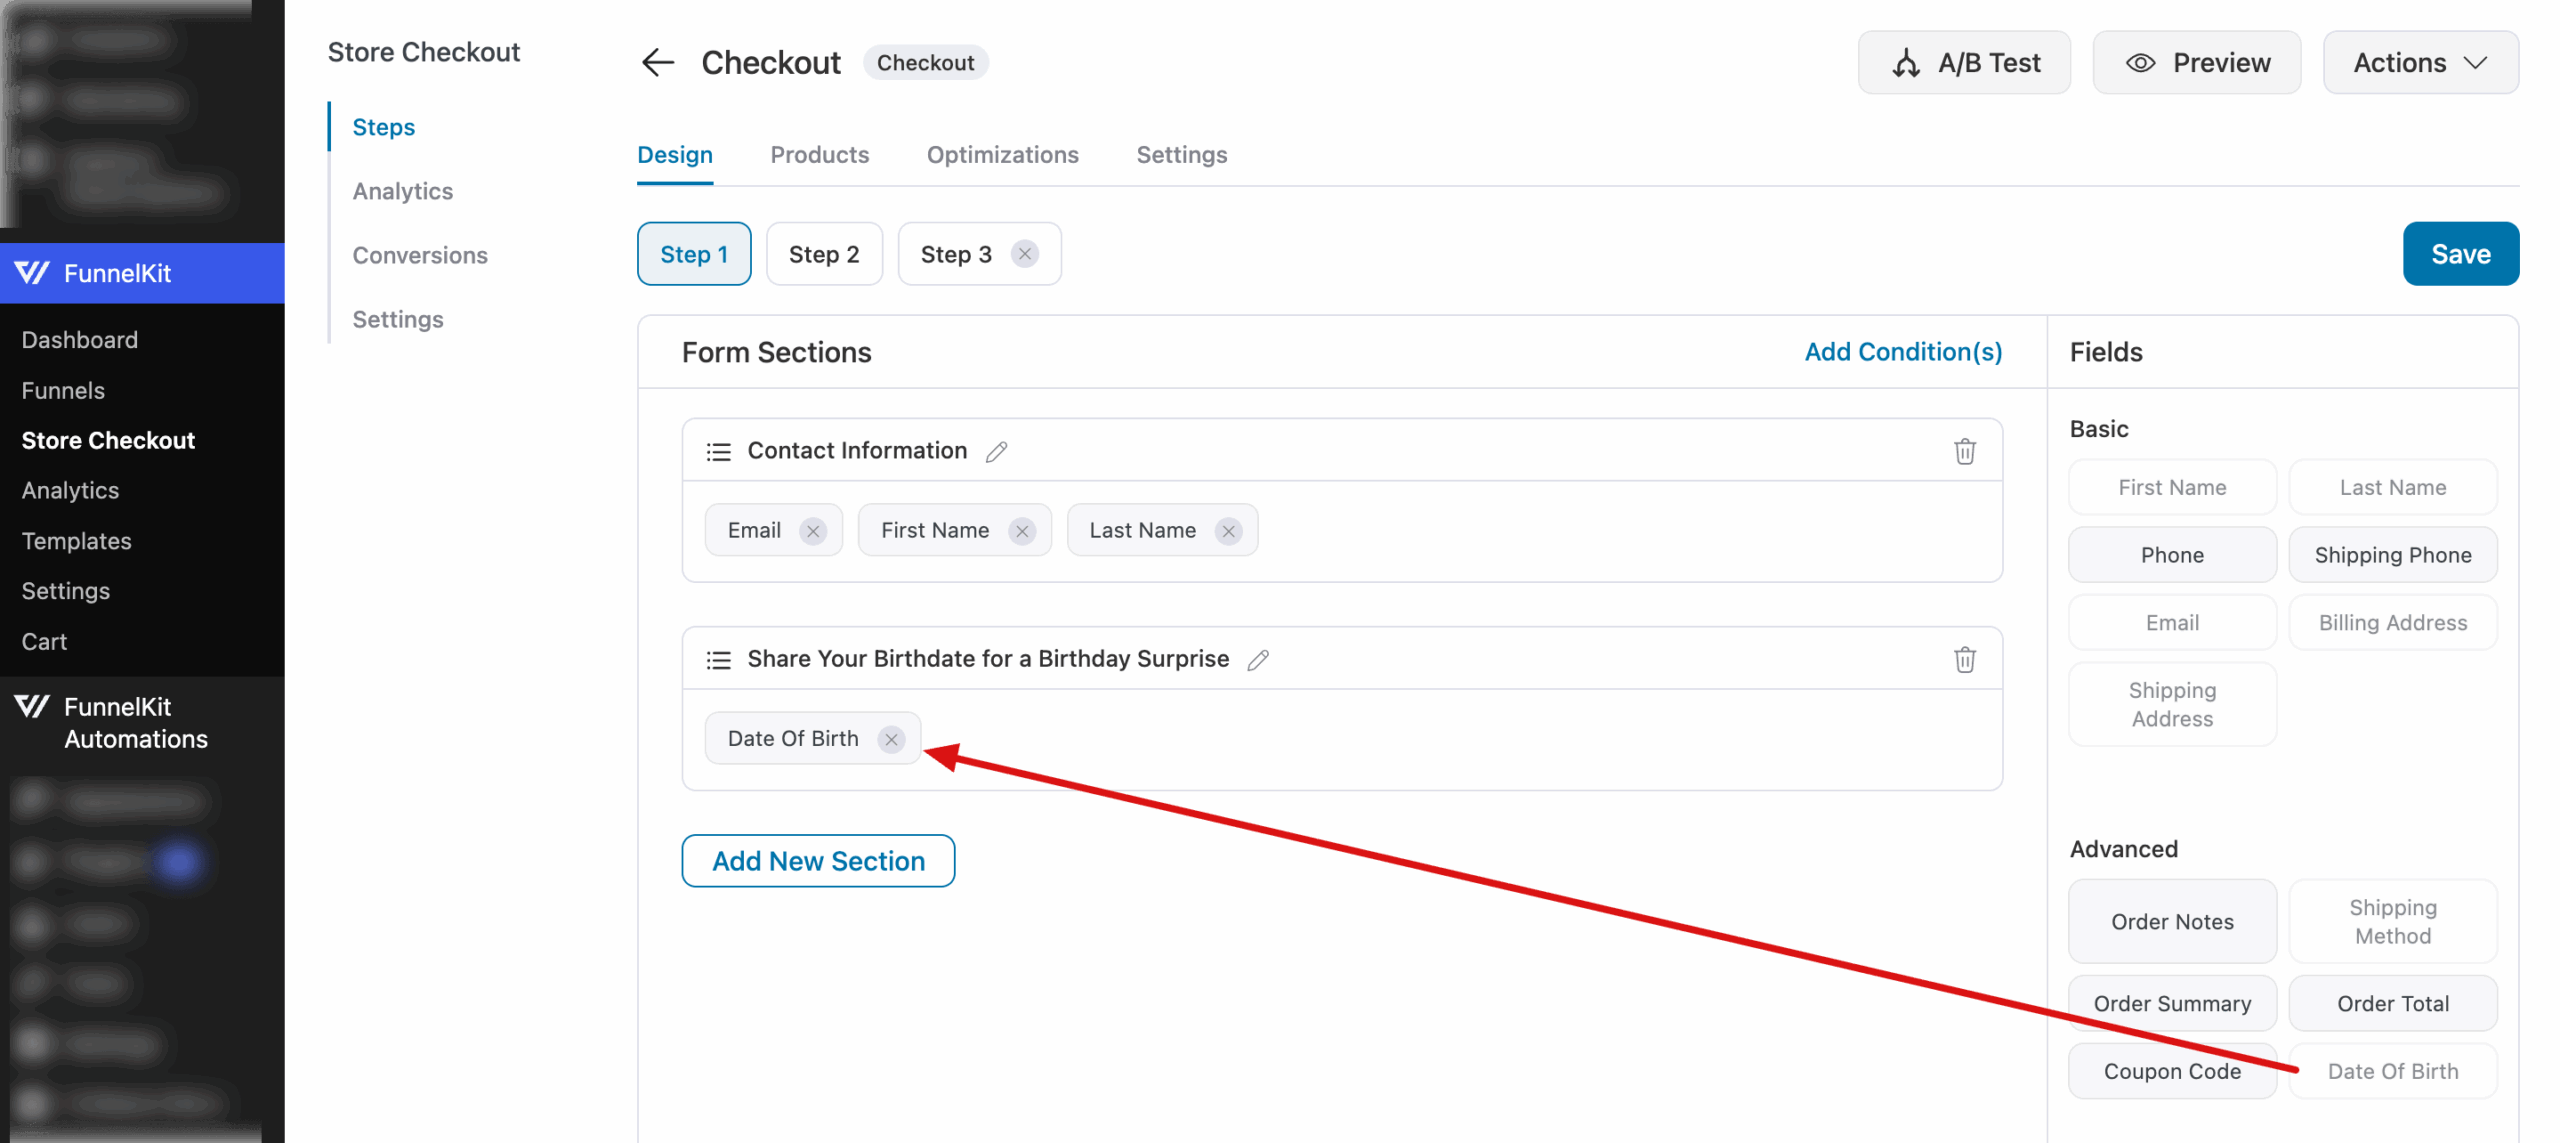
With this customization option, you can make the date-of-birth option more catchy so users provide you with the information.
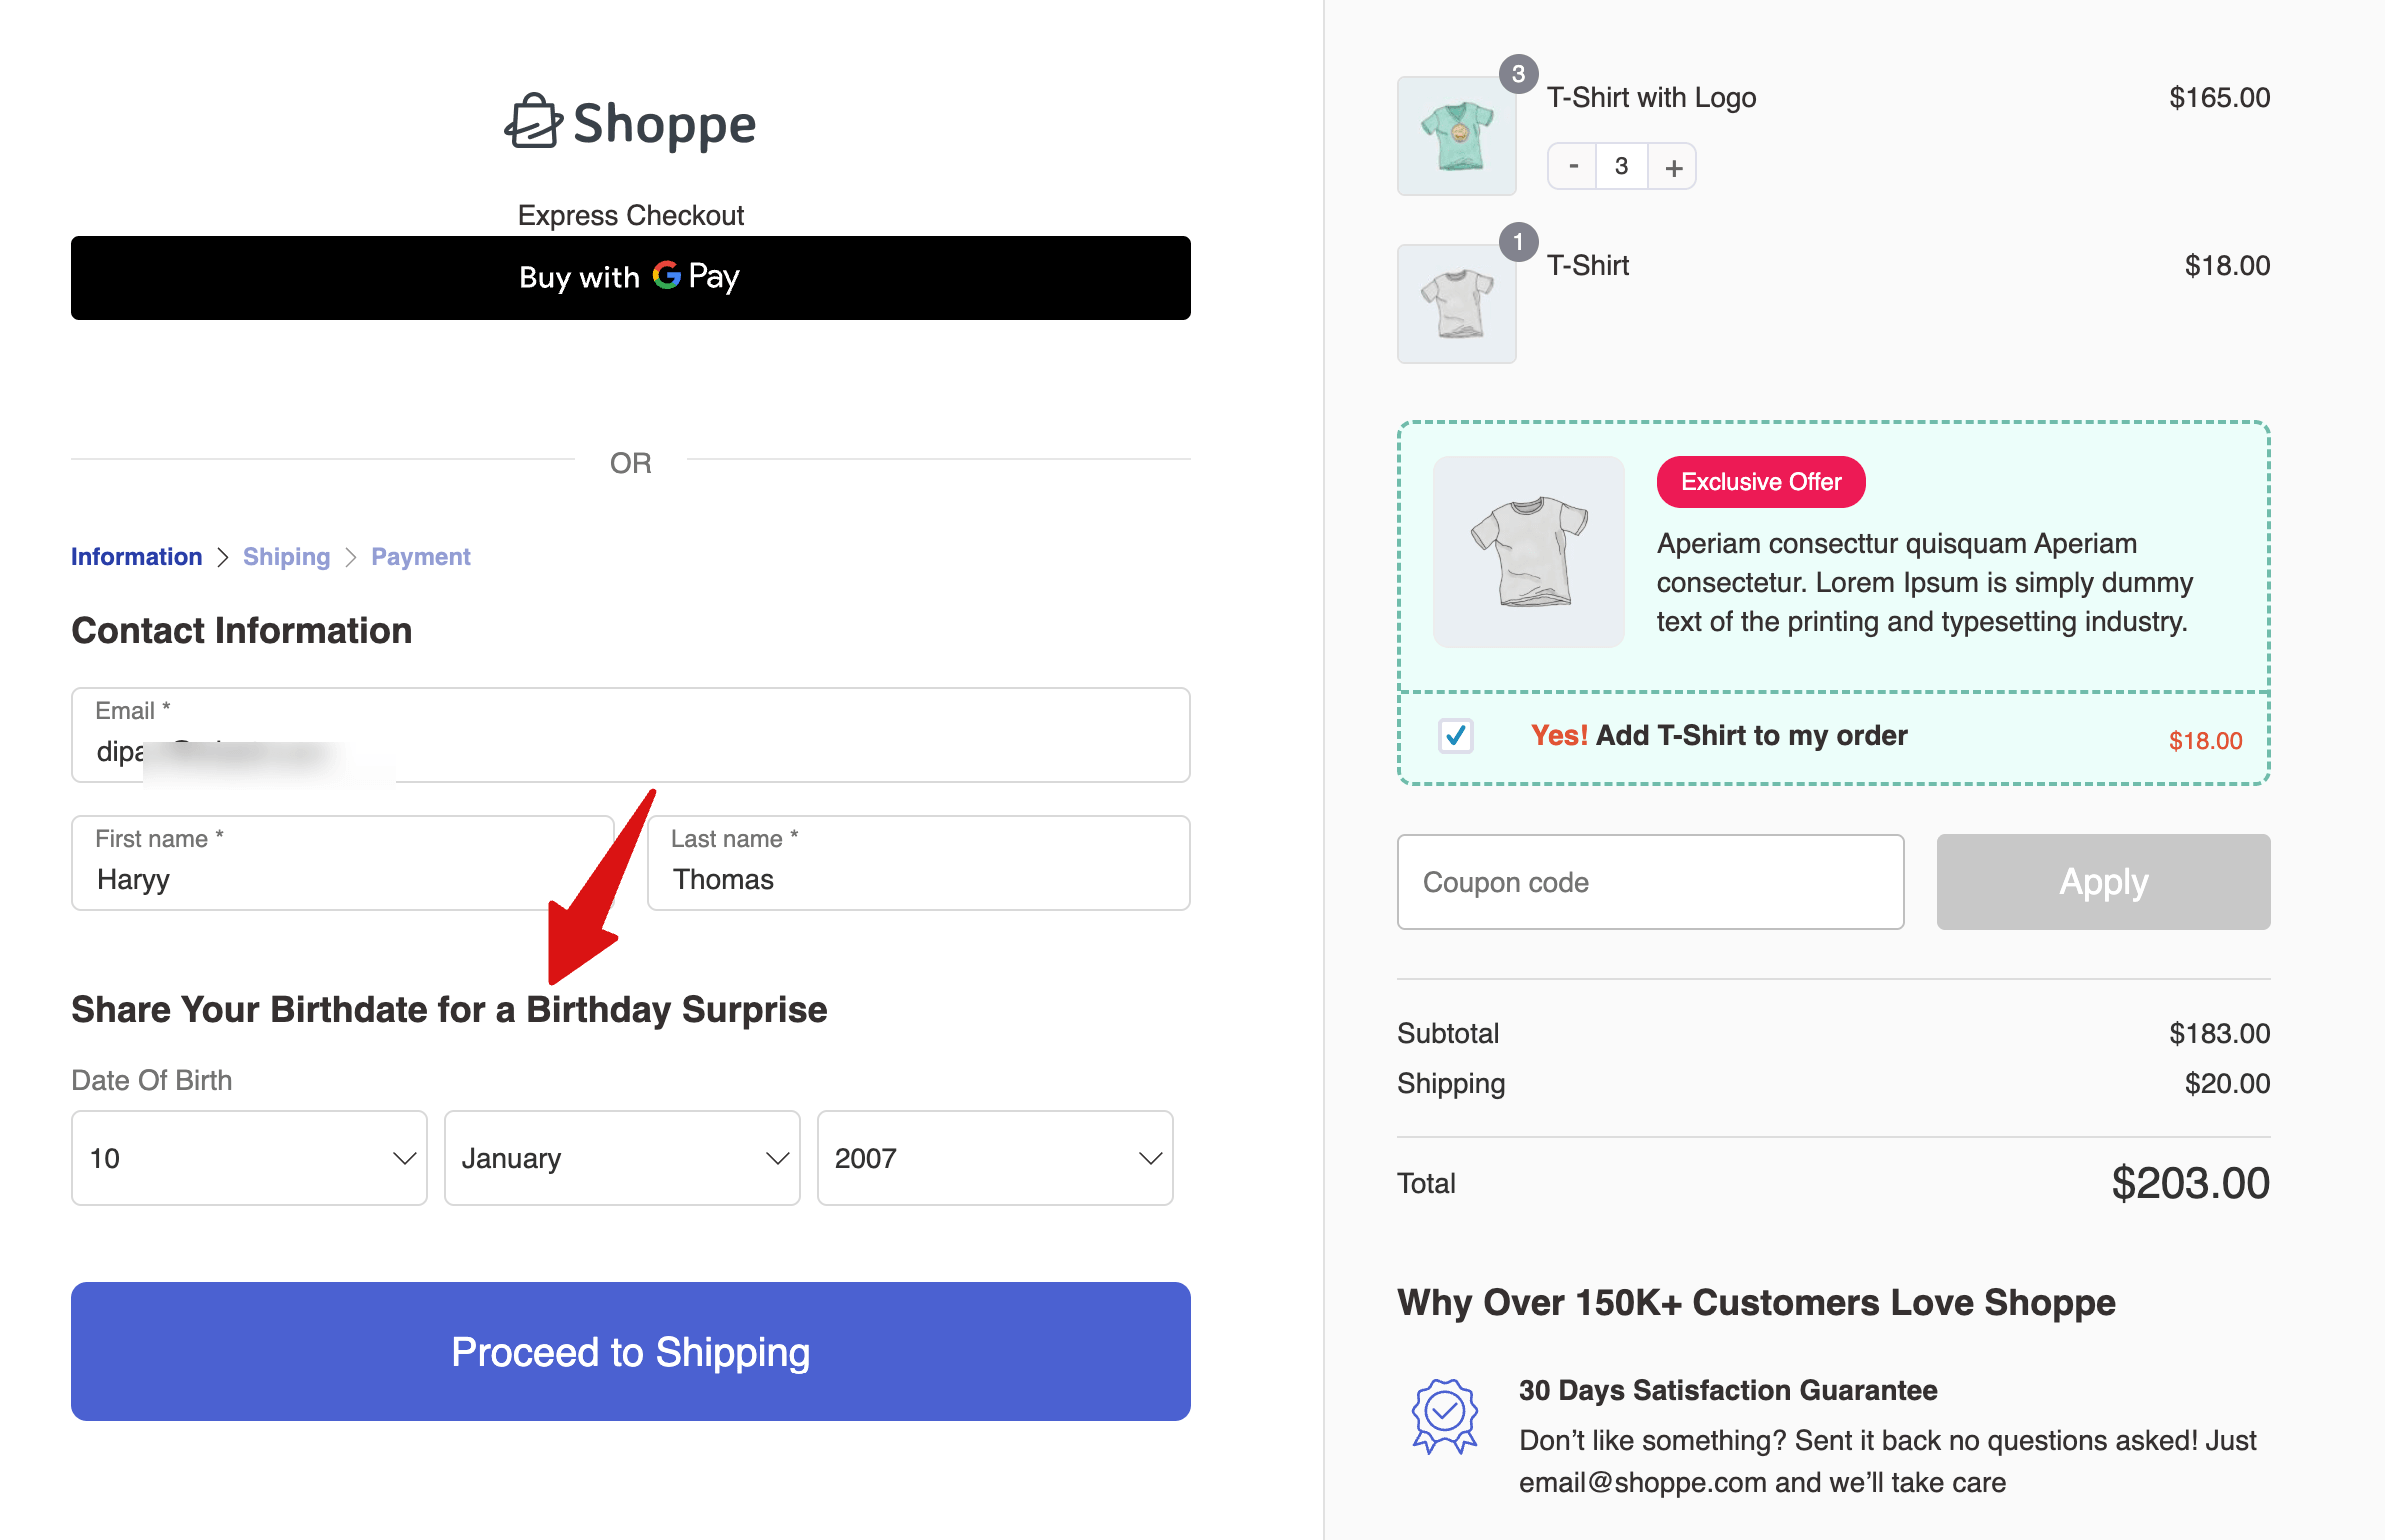
Once a customer provides their birthdate, it is saved to their profile and can be used in your automations, such as sending personalized birthday coupons.
Step 2: Create an automation to send a birthday coupon
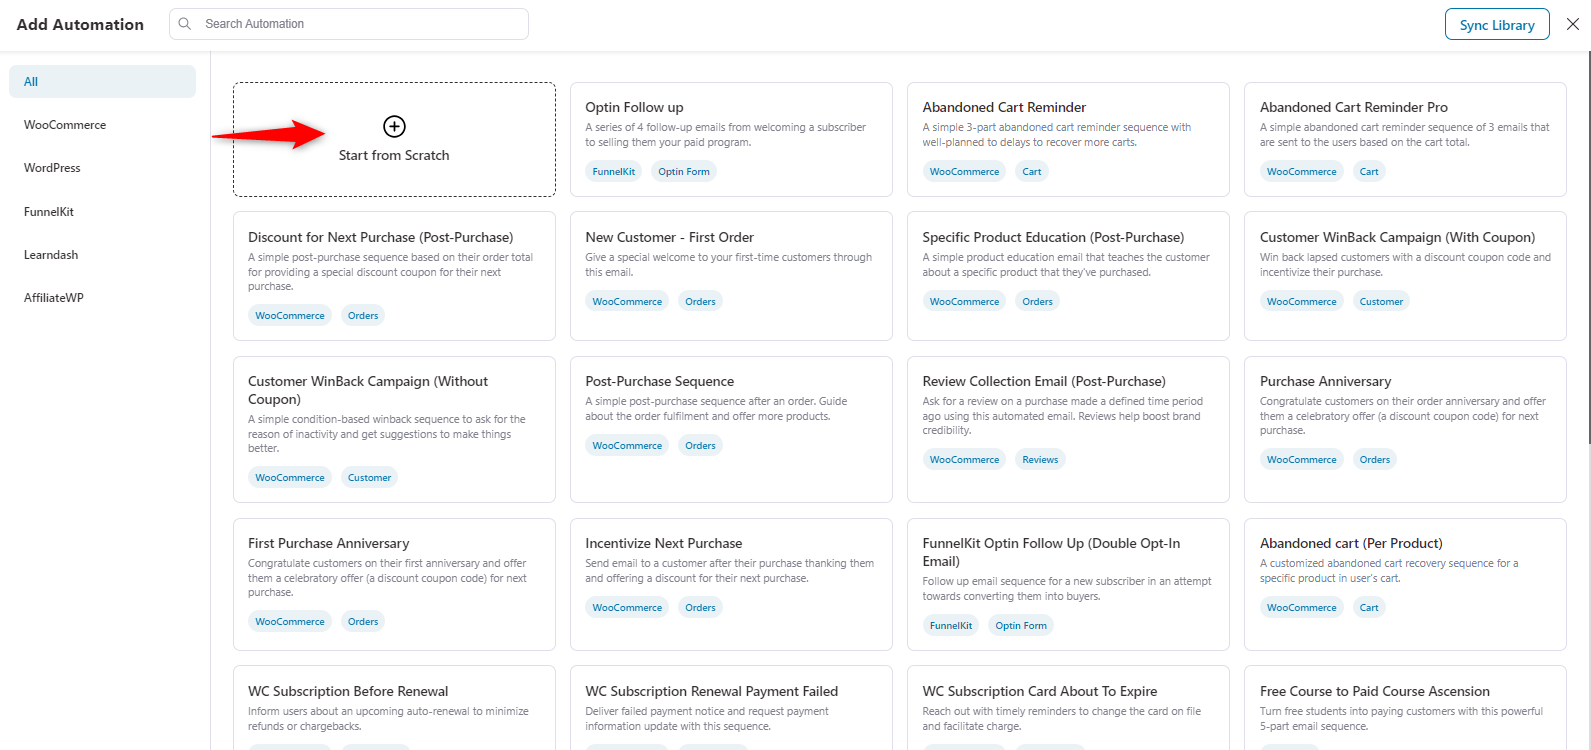
Now, you need to create an automation. To do that, navigate to the FunnelKit Automations page and click the “Create Automation” button.
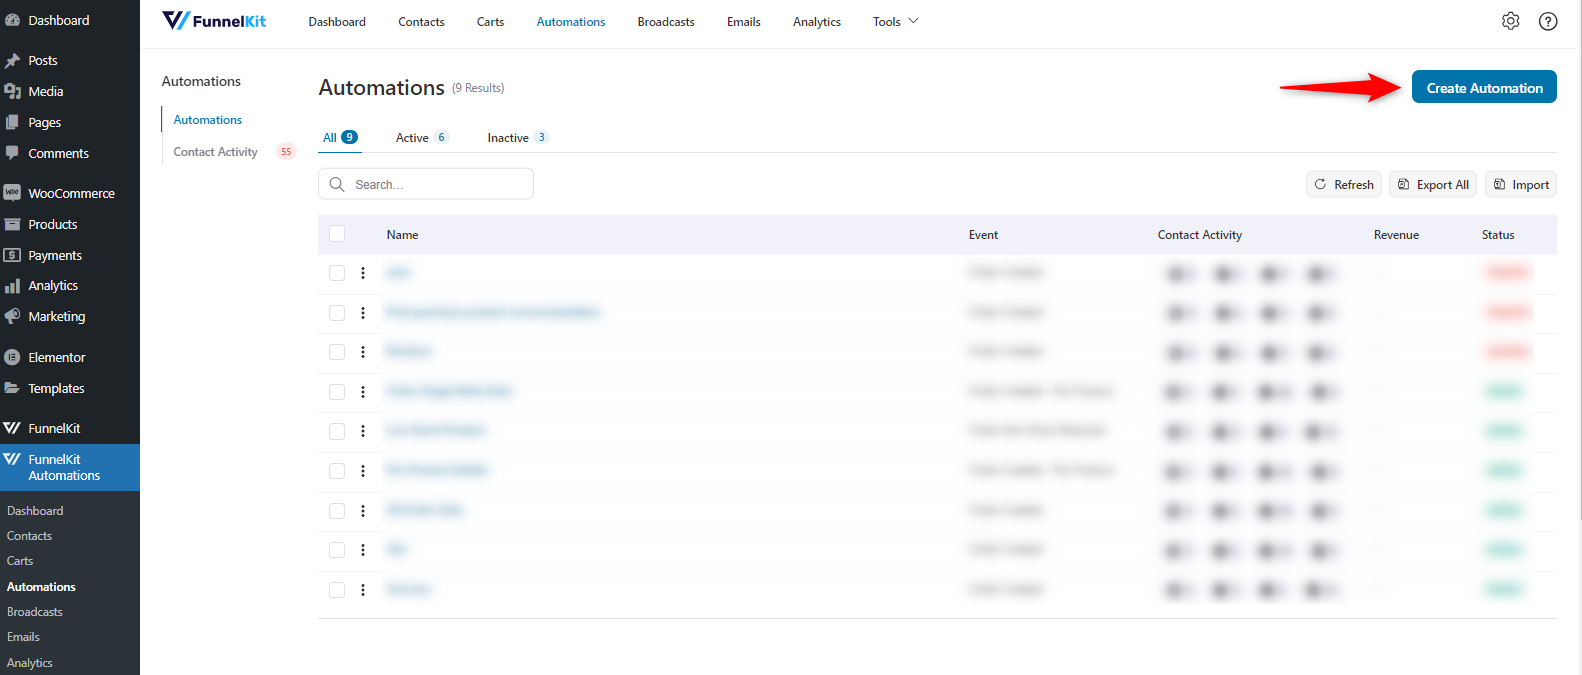
Here you’ll find different recipes for creating different automations. But in this case, we’re starting with the “Scratch”. So click on it.
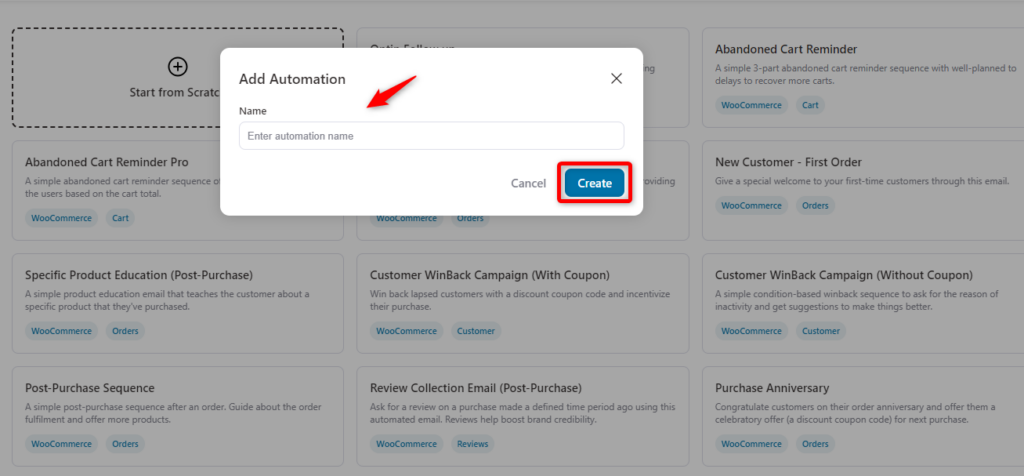
Next, enter the name of the automation. Once you’re done, hit the Create button to continue.
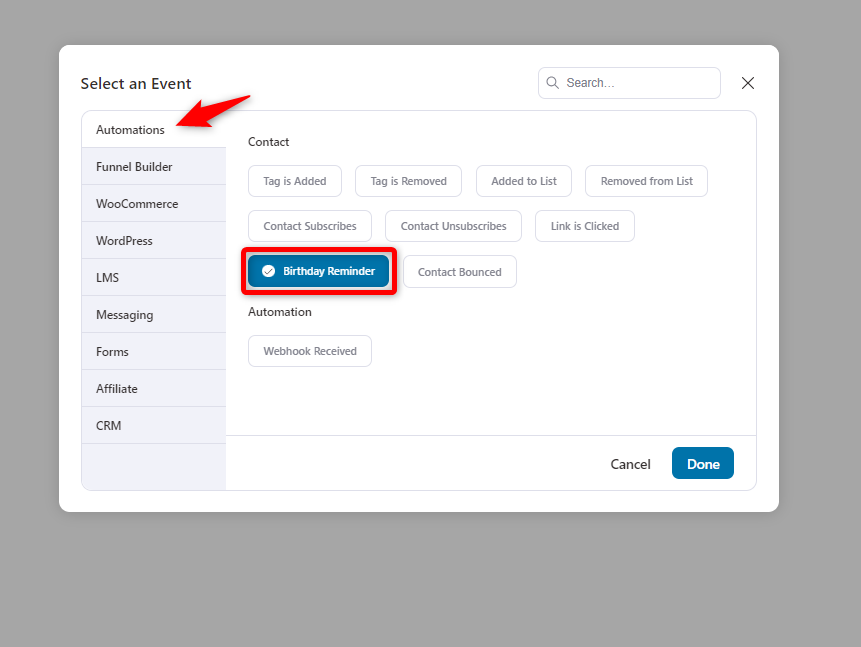
Next, you need to create an event. Click the event, then select “Birthday Reminder” from the Automations tab. Then hit Save.
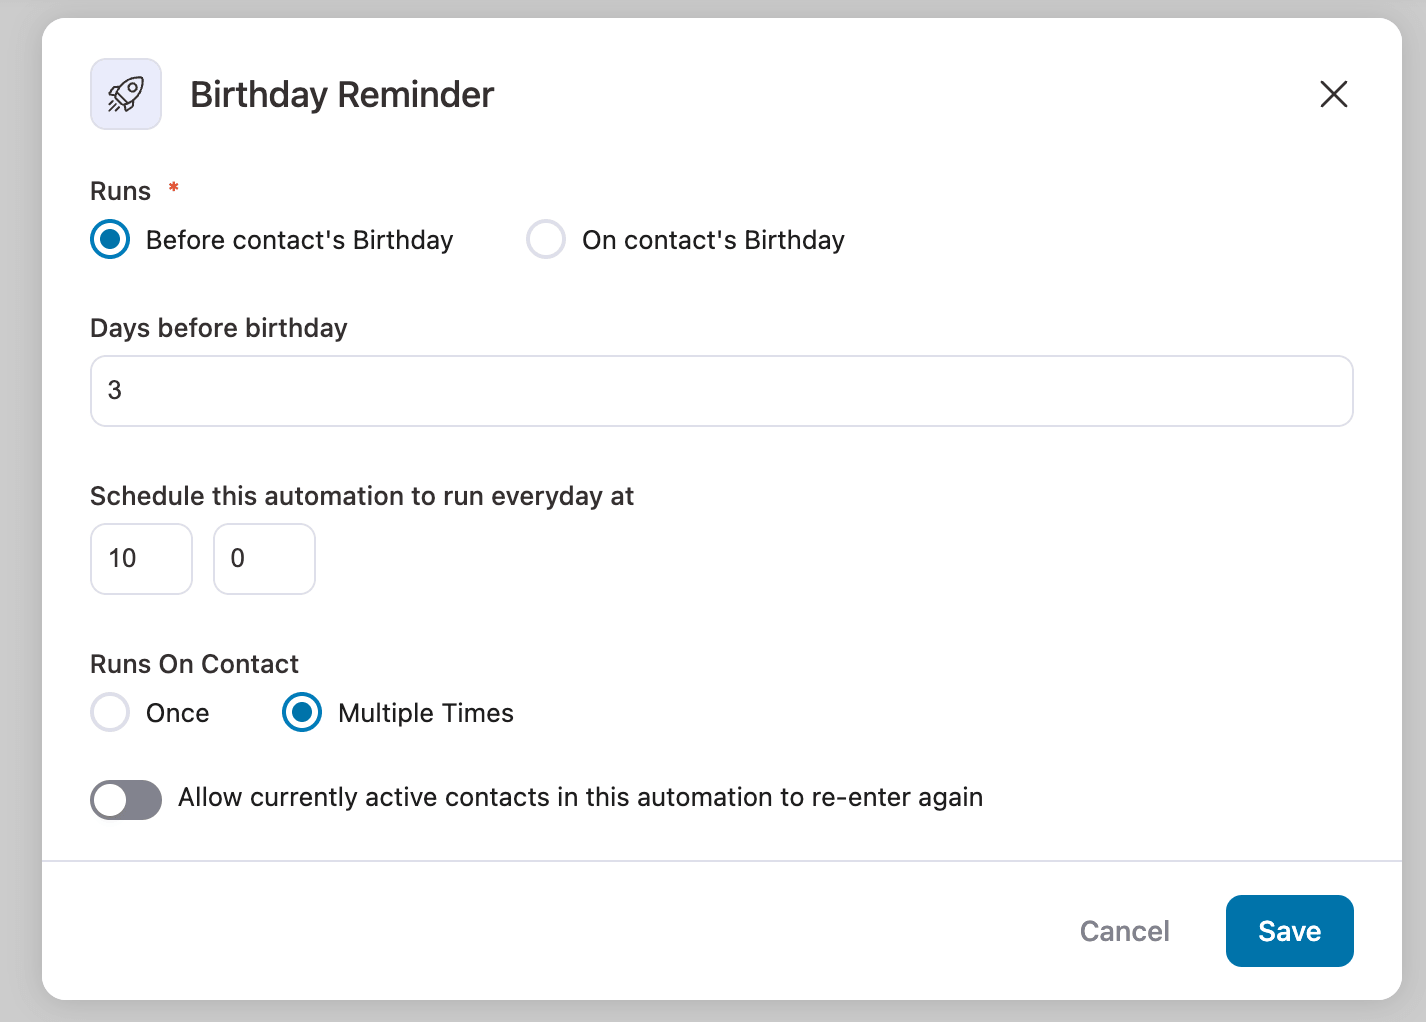
Next, configure the birthday reminder settings.
Let’s configure the birthday reminder to be three days before the recipient’s birthday, at 10:00 AM.
Hit Save when you’re done.
Step 3: Create a dynamic WooCommerce birthday coupon
Now it's time to add a step that will dynamically generate a personalized birthday coupon for the target customers.
Click on the “Plus” icon to create a birthday coupon. To do that, click the “Action” button.
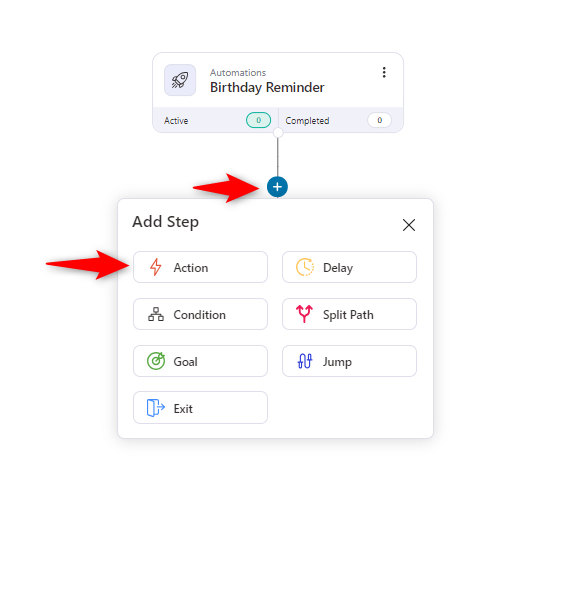
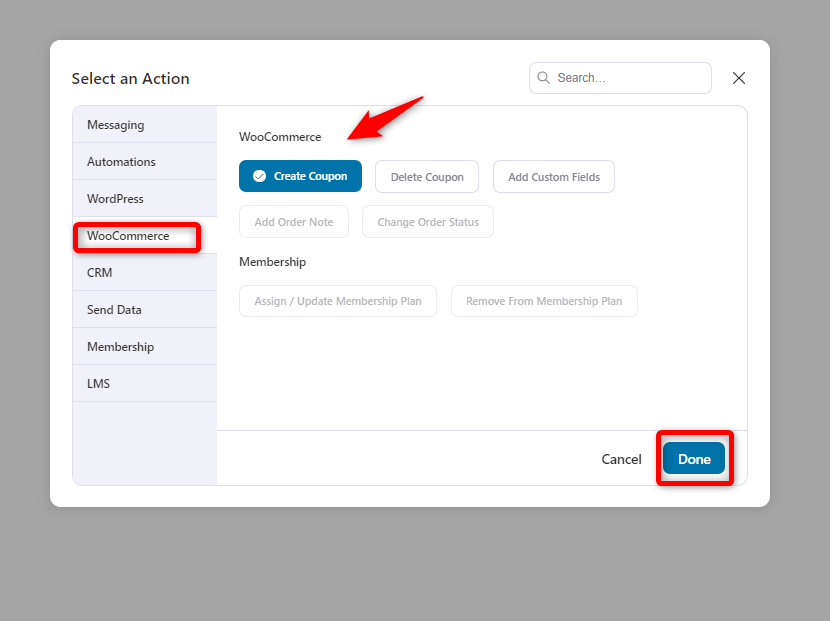
Here you go. Under the WooCommerce section, select “Create Coupon".Then hit Done.
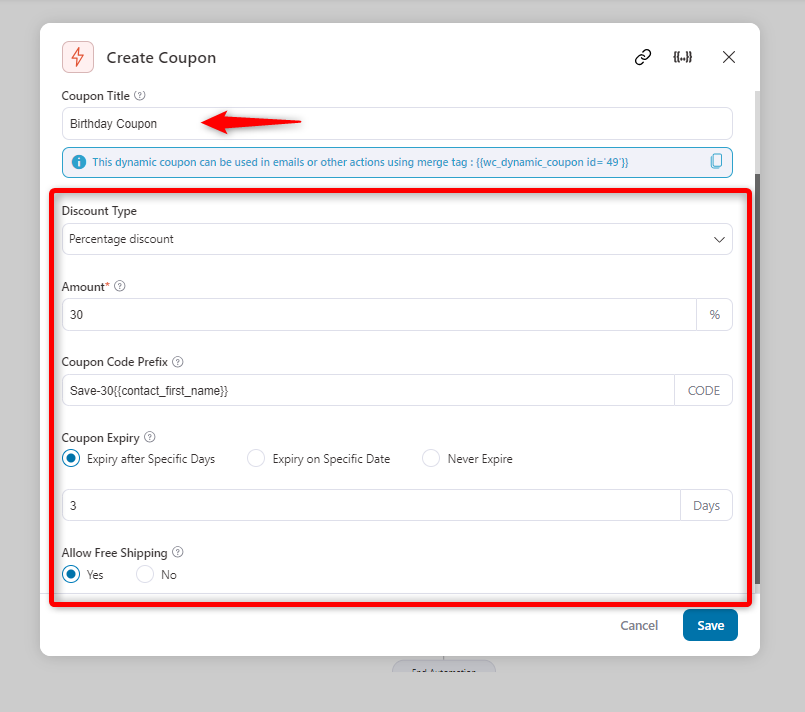
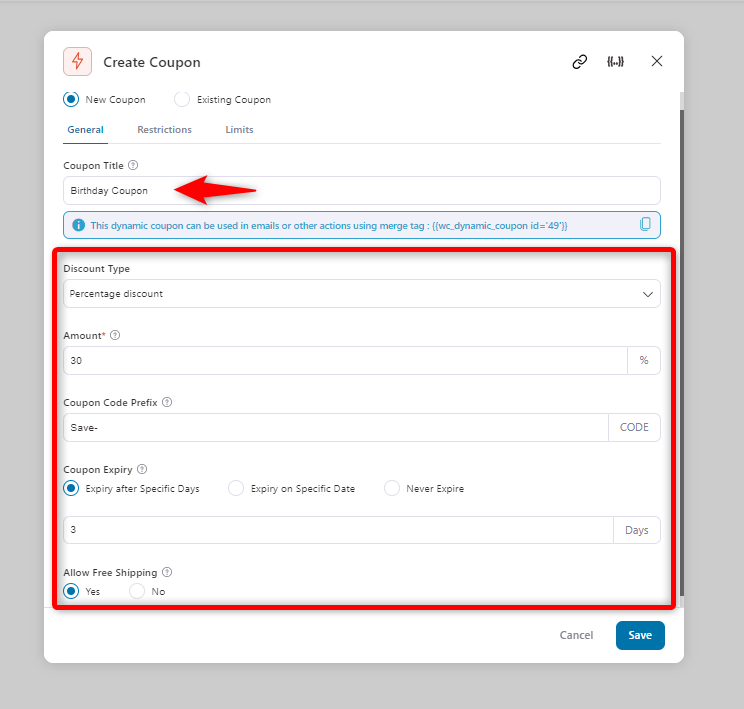
Next, you need to configure the coupon.
- Coupon title: Set to "Birthday Coupon" to define the offer.
- Discount type: A percentage discount is selected at 30%.
- Coupon code prefix: Set a dynamic code with a prefix and the customer’s first name (e.g., "Save-30-John").
- Set the coupon expiry date. We set it 3 days after it's issued.
- Allow free Shipping if you want
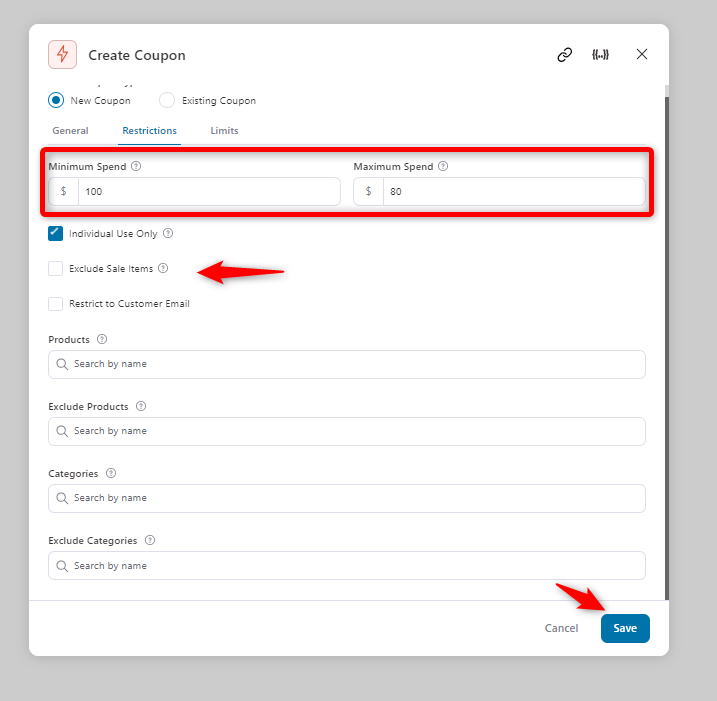
In the Restrictions tab, you can determine some restrictions about the coupon.
- Minimum spend: Set the minimum order total needed for the coupon to be valid. For example, a customer must spend at least $80 for the coupon to apply.
- Maximum spend: Define the maximum order value eligible for the coupon. In this case, the coupon applies to orders up to $100.
- Individual use only: When checked, the coupon can't be combined with other coupons, ensuring it's used exclusively.
- Exclude sale items: Prevents the coupon from applying to products already on sale.
- Restrict to customer email: Limits the coupon's use to specific email addresses, ideal for personalized offers.
- Products: Apply the coupon to specific products by searching and selecting them here.
- Exclude Products: Specify products to exclude from the discount by listing them here.
- Categories: Limit the coupon to specific product categories, such as "clothing" or "accessories."
- Exclude categories: Exclude entire categories from the coupon, such as "Electronics."
Once you’re done, hit Save.
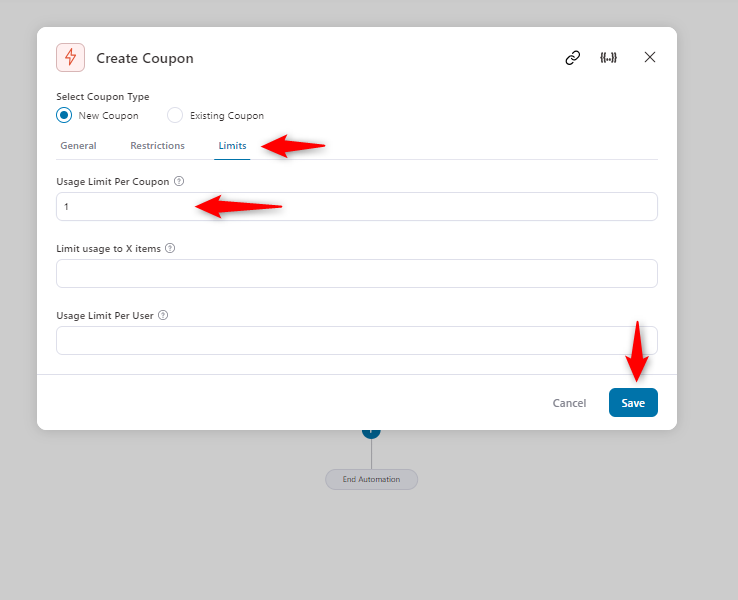
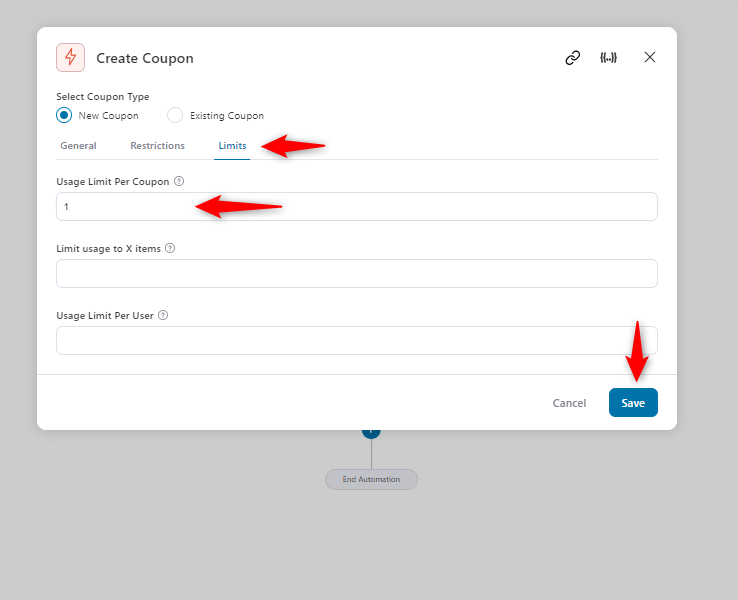
- Usage limit per coupon: This sets the total number of times the coupon can be used. In this case, it’s set to 1, meaning the coupon can only be redeemed once.
- Limit usage to X items: This allows you to limit how many items the coupon can apply to in a single purchase. If left blank, it applies to all eligible items in the cart.
- Usage limit per user: This field controls how many times a single user can use the coupon. If left blank, there’s no limit for each user.
Hit save when you’re done.
Step 4: Design the birthday emails to share the coupon
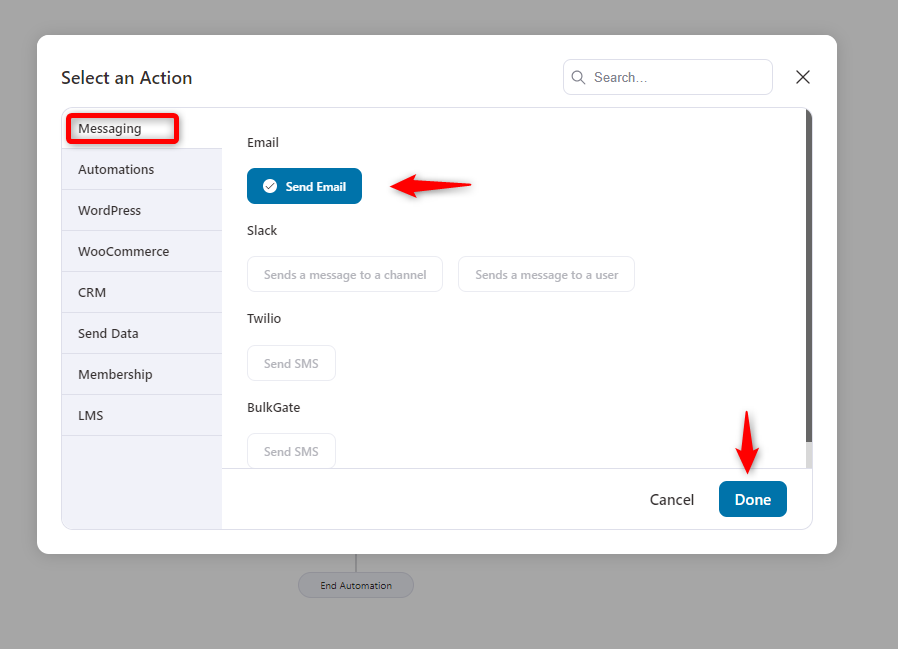
Next, create another action and select “Send Email” under the messaging tab.
Hit done when you’re done.
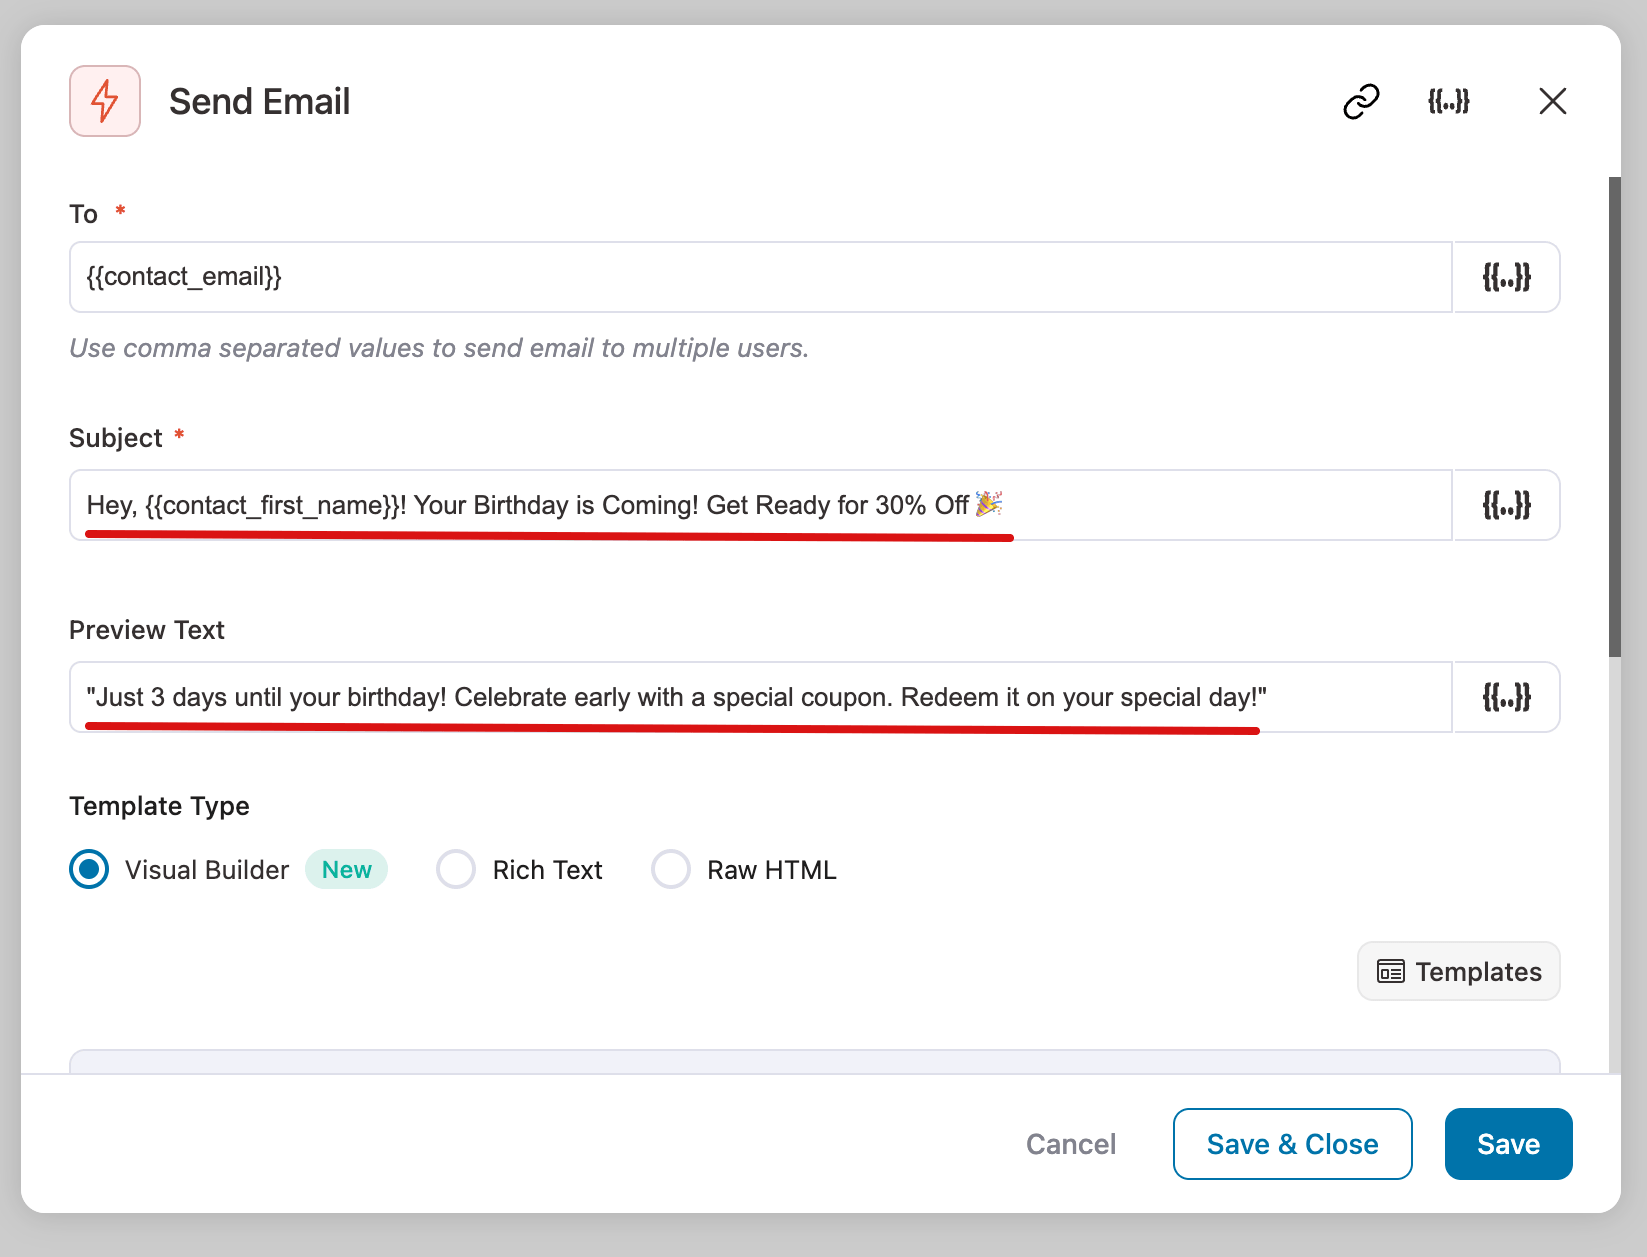
Now, configure some email settings.
Here, add the recipient’s email address, a subject, and preview text. Here you can personalize the email from our merge tag {{..}}.
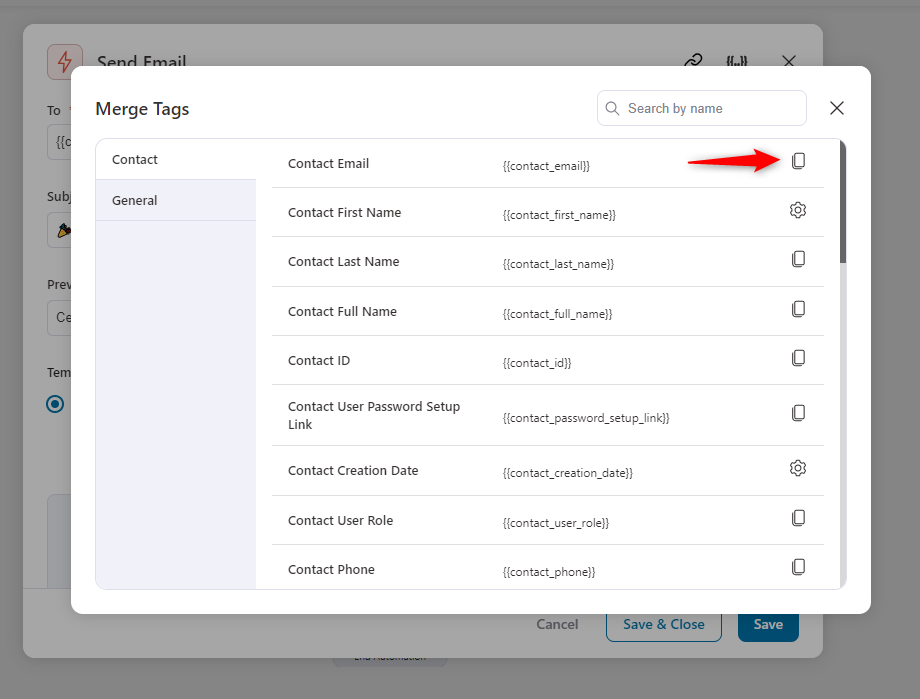
After clicking {{..}}, you can find various tags to use. Just copy and paste where required.
From here, you can find the tags to use.
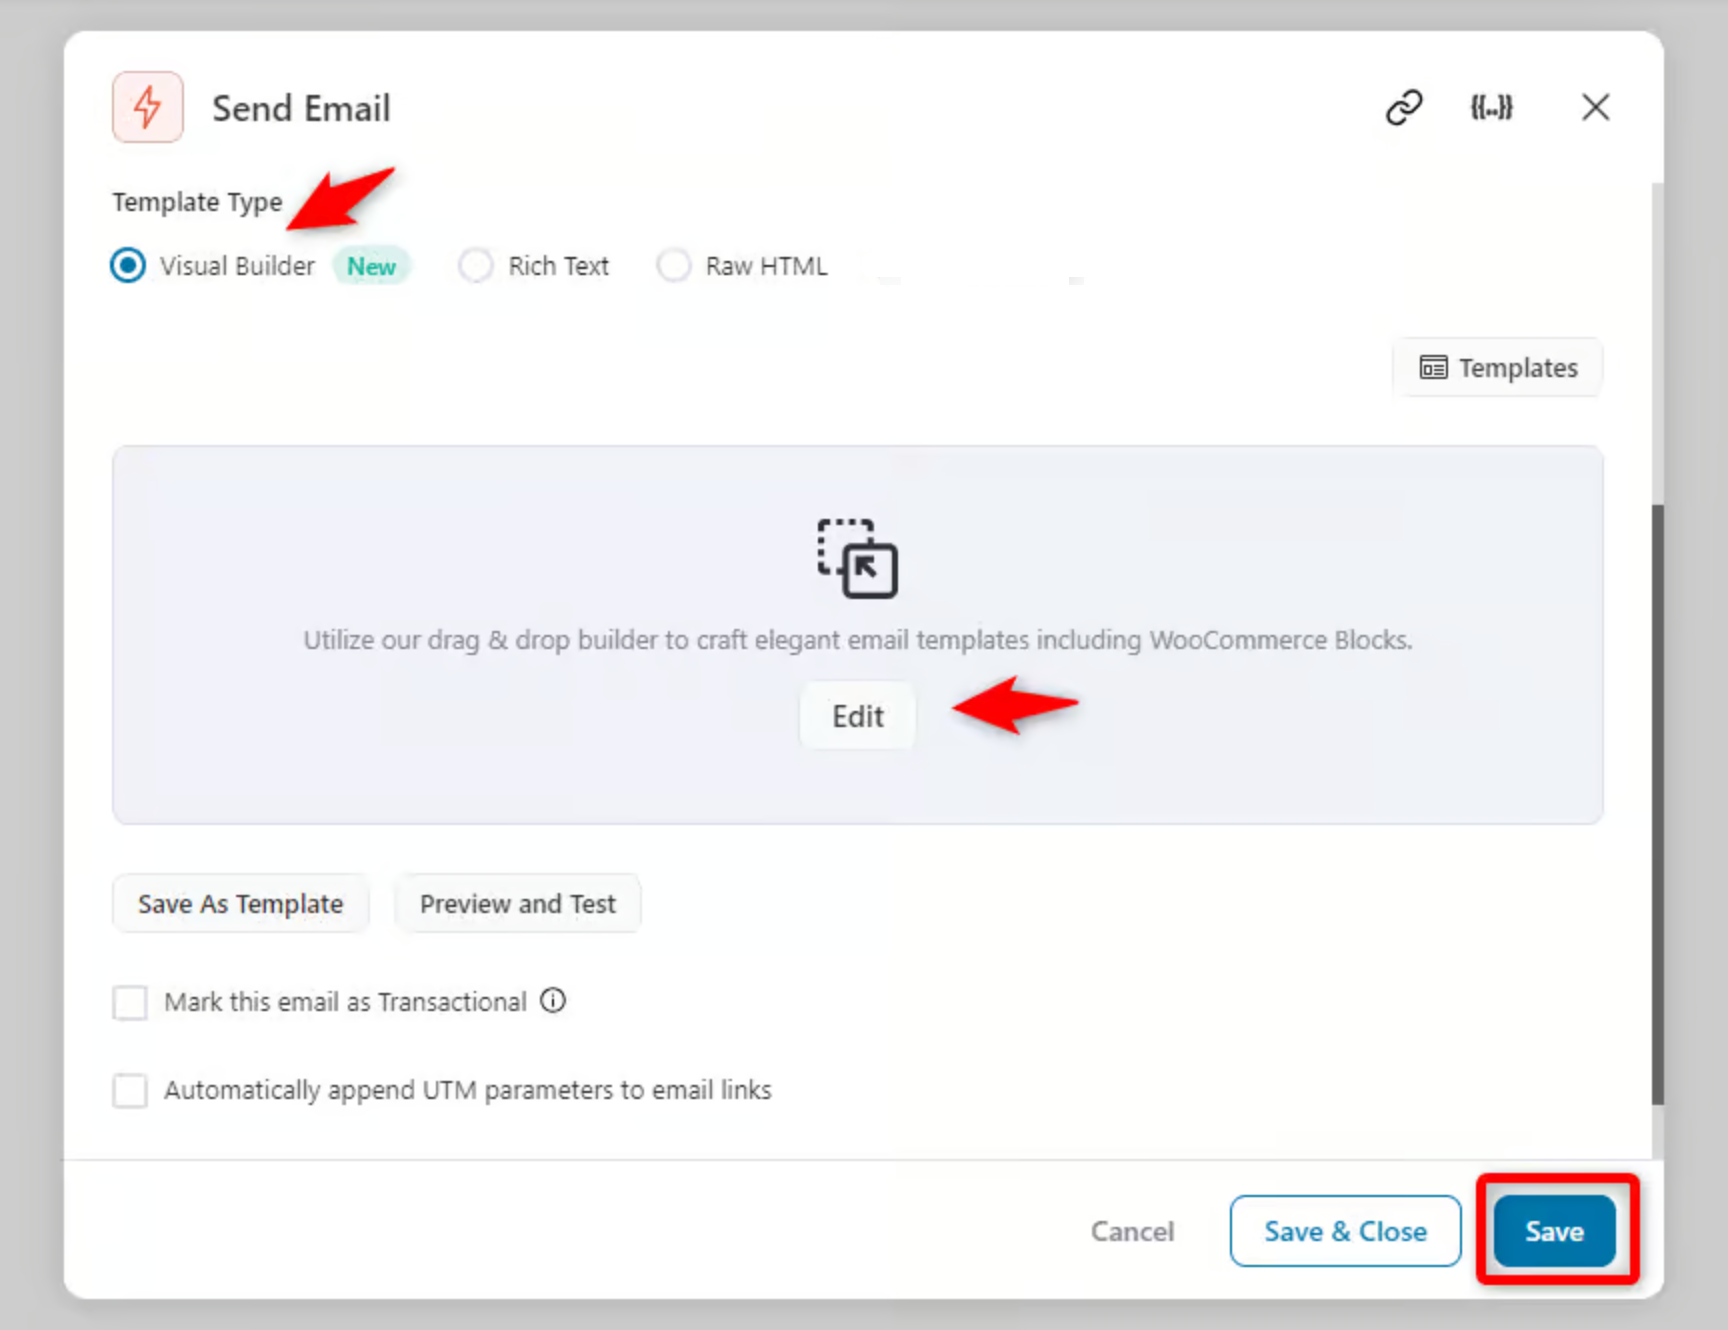
We will use the New Visual Builder to design the Birthday email.
The visual builder lets you create stunning email templates in minutes. Select the visual builder and click on the “Edit” button.
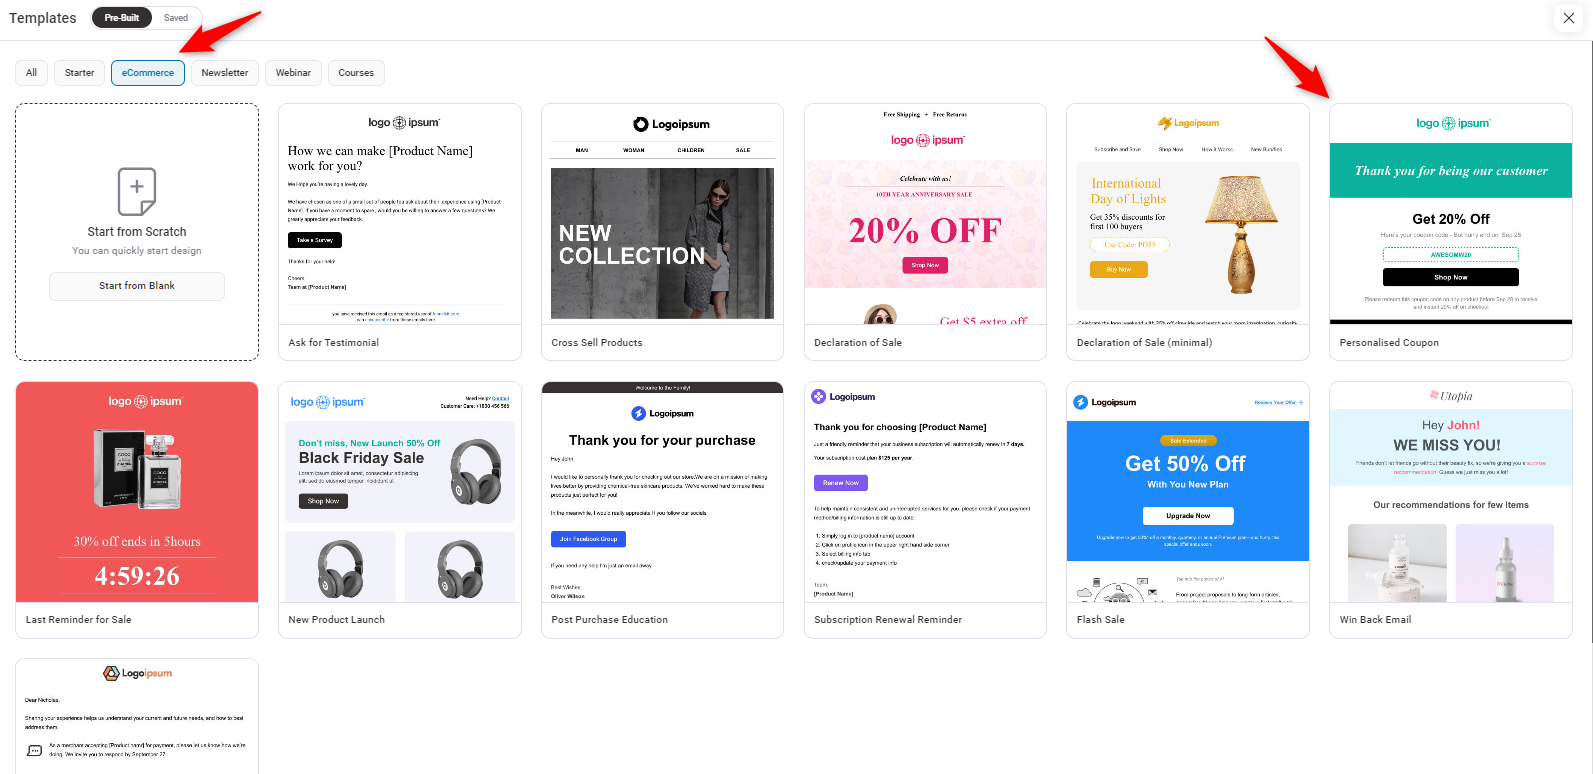
Next, you’ll find various email templates to get started. But here we’re choosing the “Personalized Coupon” template.
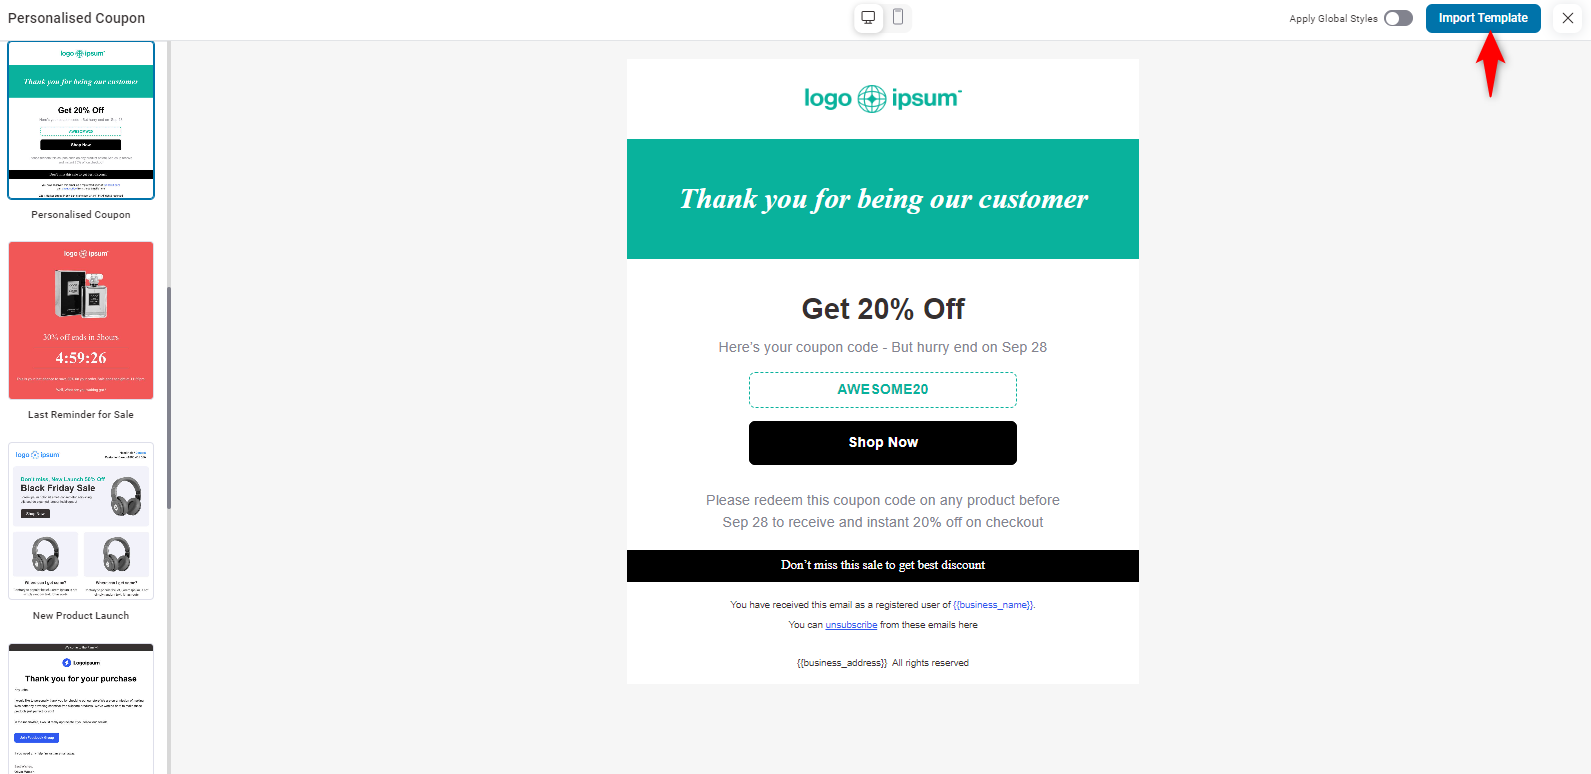
Preview the template, then click the “Import Template” button.
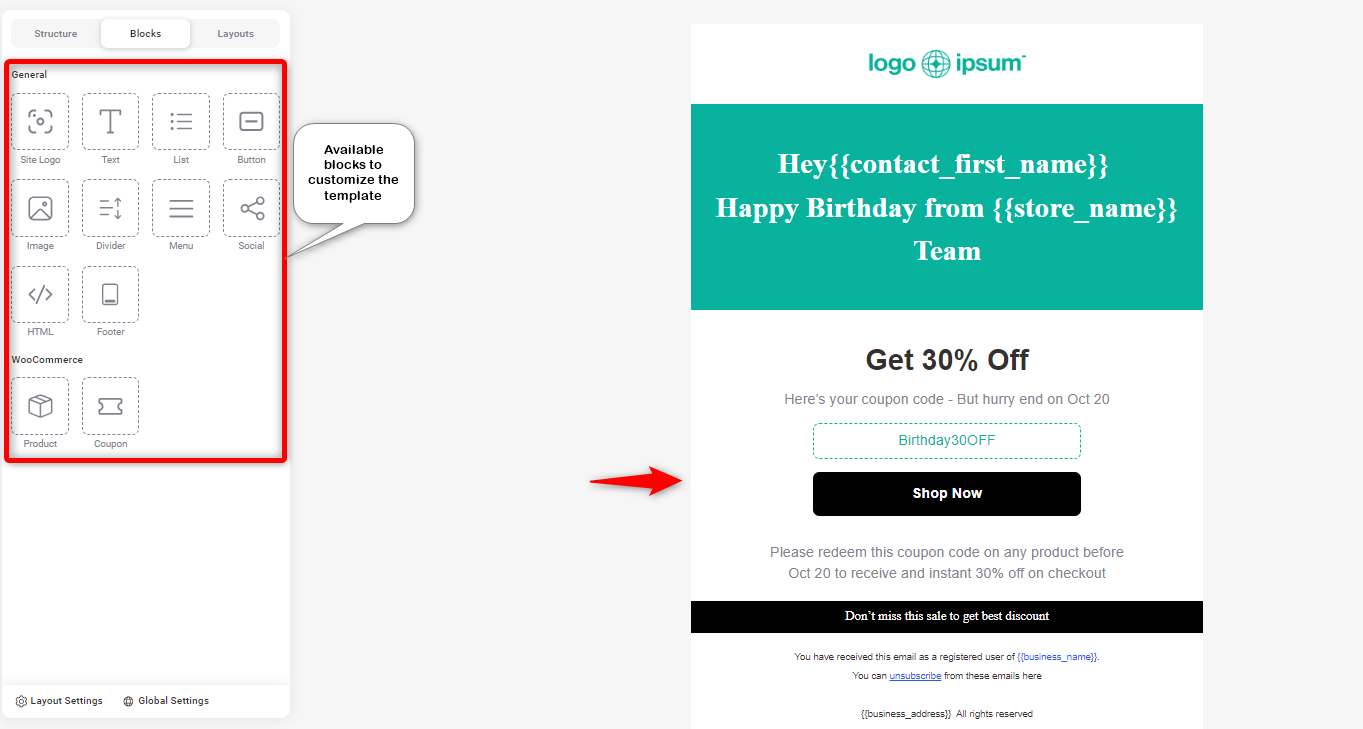
Now, it’s time to customize the email template.
On the left side, you’ll find the blocks to customize the template.
Logo customization
Drag and drop the logo to the preferred place in the template. Usually, it looks smart at the top. So, place it, then customize the logo settings.
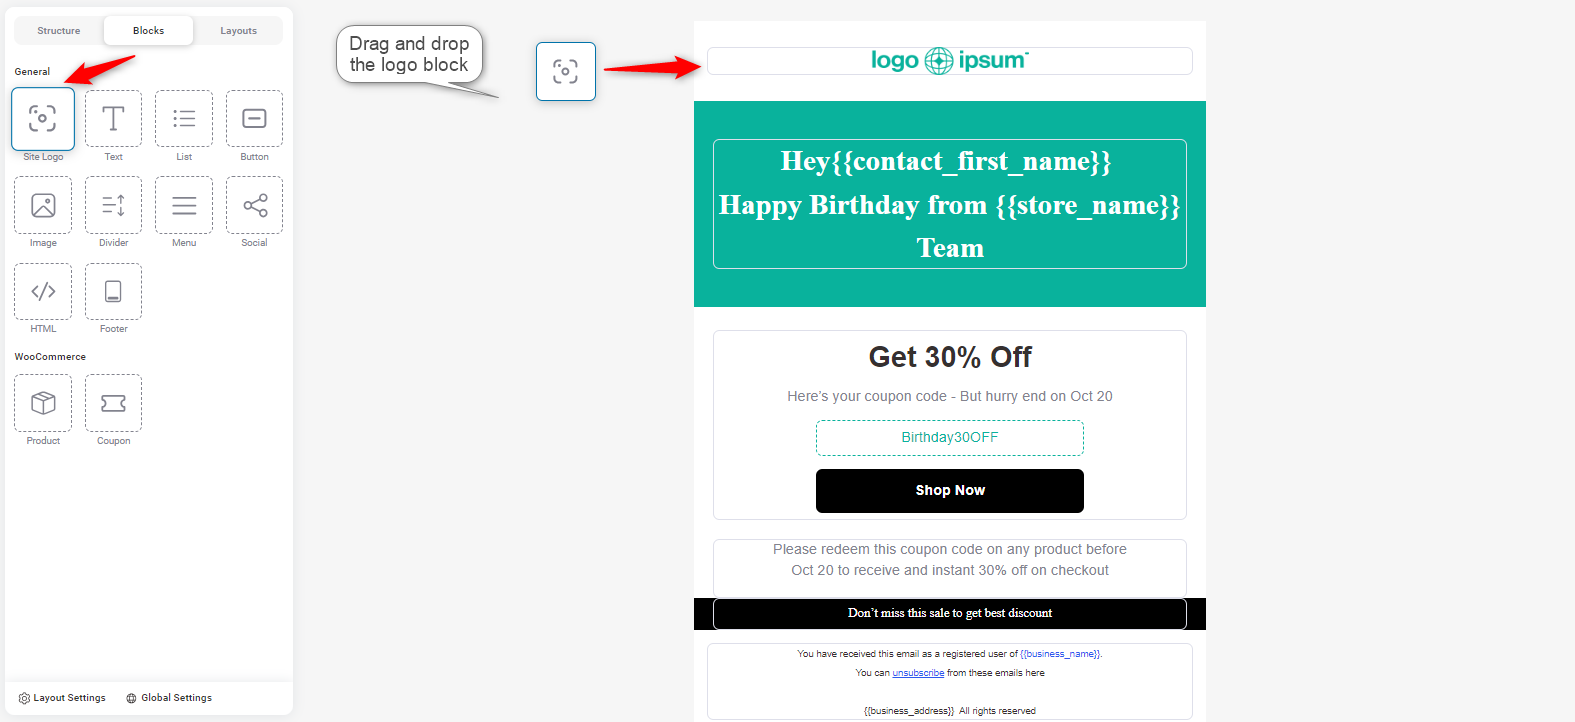
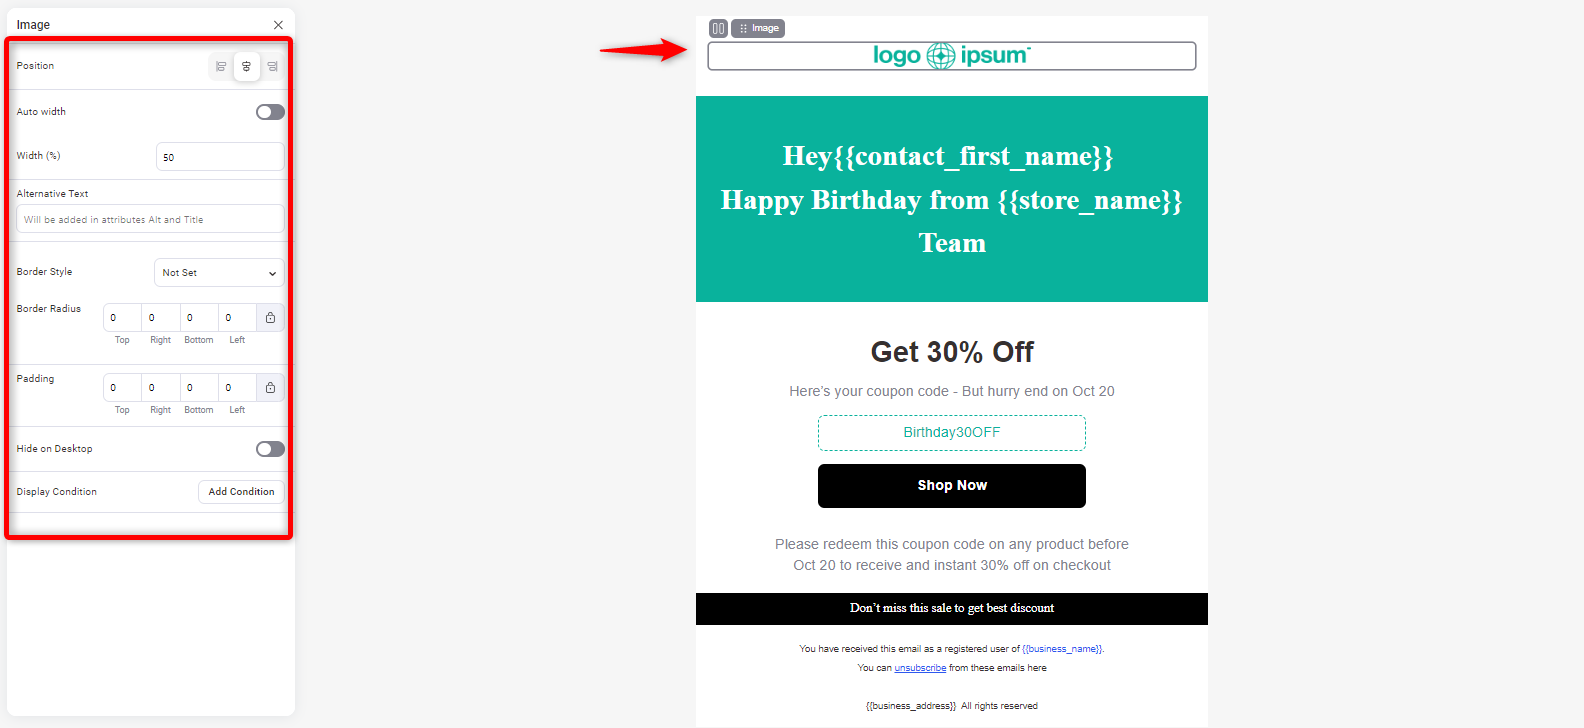
Then click on the logo. You can find the customization options for it.
- Position: Allows you to align the image to the left, center, or right.
- Auto width: Toggles the image to automatically adjust its width.
- Width (%): Sets the image's width as a percentage of the container size.
- Alternative text: Used for accessibility and SEO, this is the text that will appear if the image fails to load.
- Border style & radius: Defines the border style and radius for the image (for rounded corners or straight edges).
- Padding: Sets the space around the image (top, bottom, left, right).
Heading customization
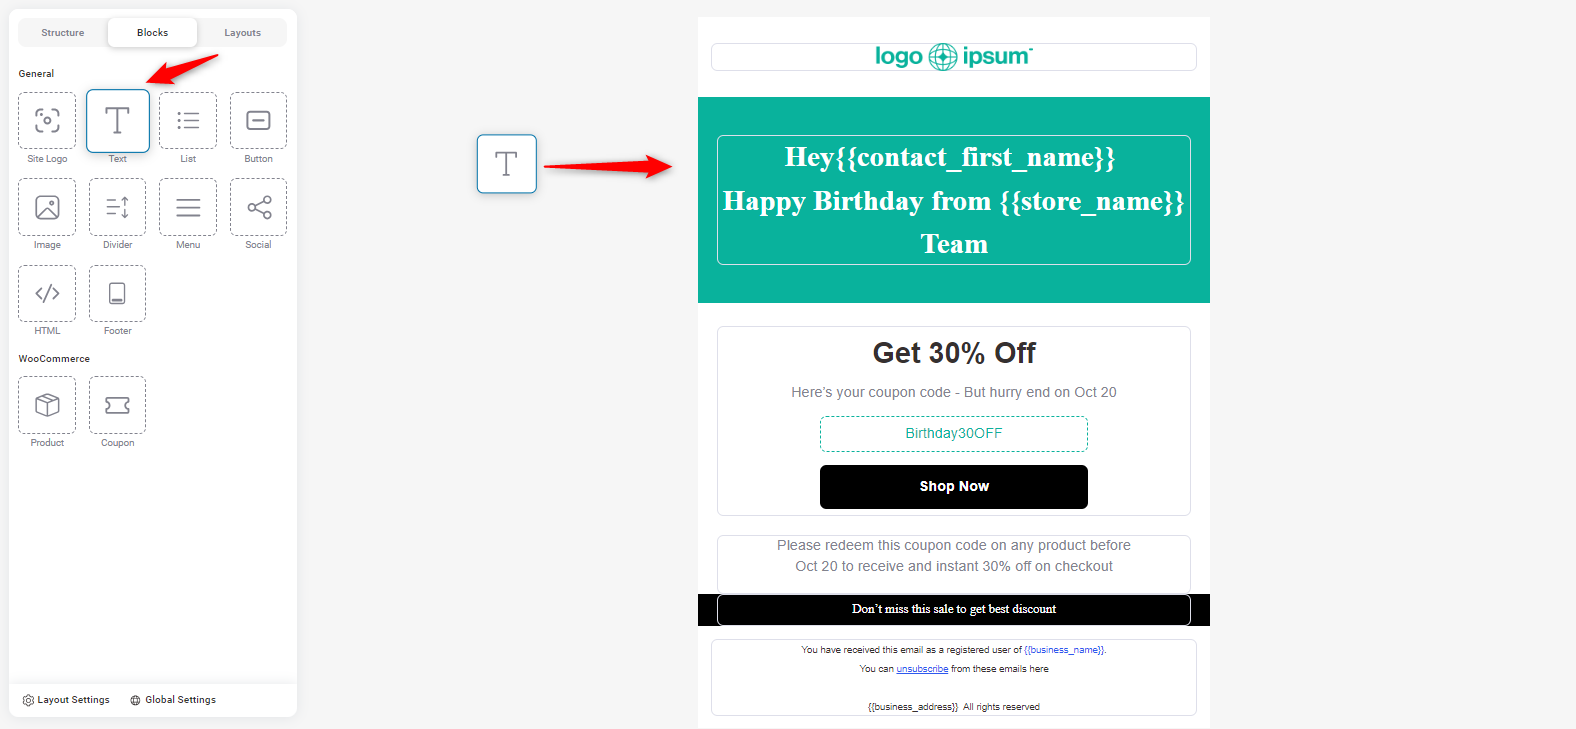
Similarly, add a heading. Just drag and drop the text block to your preferred area.
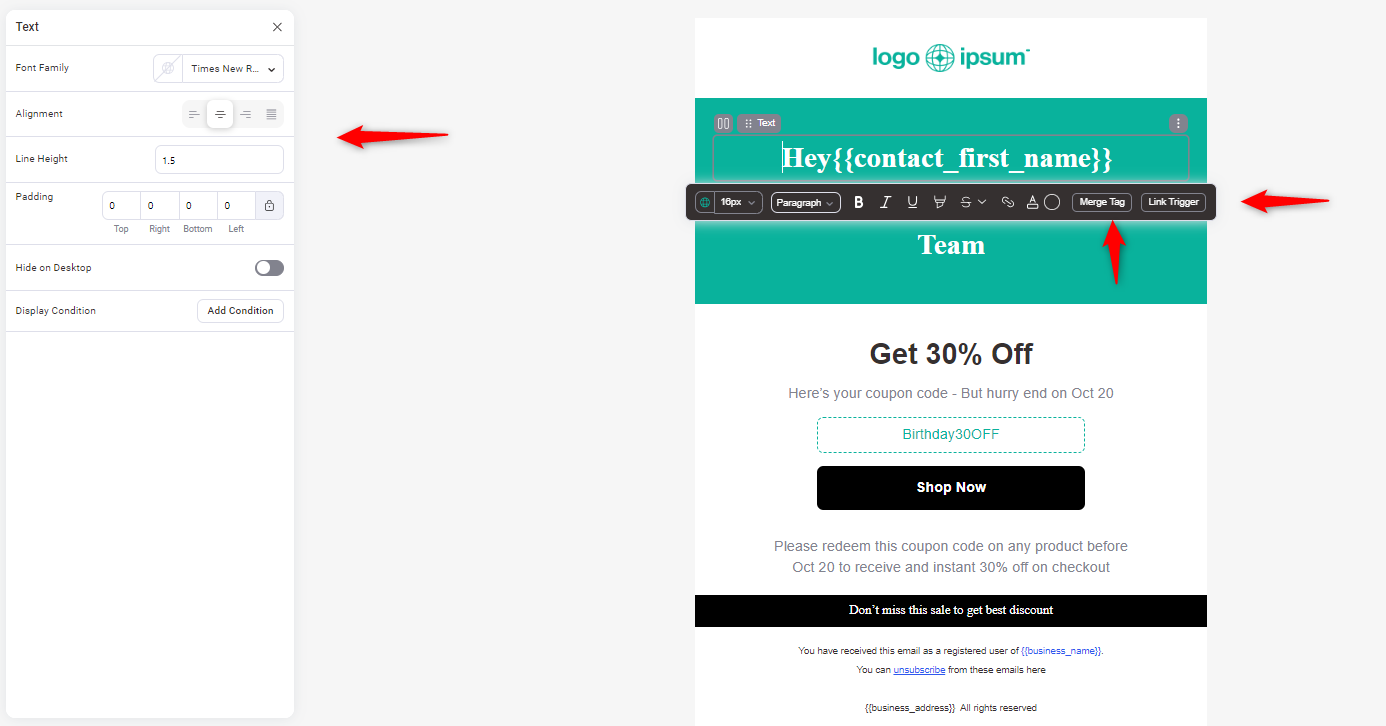
On the left side of the screen, you can configure these.
- Font Family: Allows you to choose the font style (e.g., Times New Roman).
- Alignment: Align the text left, center, or right.
- Line height: Adjust the space between lines of text.
- Padding: Set the padding around the text block (top, right, bottom, left).
In the editor:
- Merge tag: Automatically pulls in personalized data (e.g., {{contact_first_name}} for the first name).
- Link trigger: Create trigger links for actions like tracking or special events.
Customize coupon
Drag the coupon block to your preferred area.
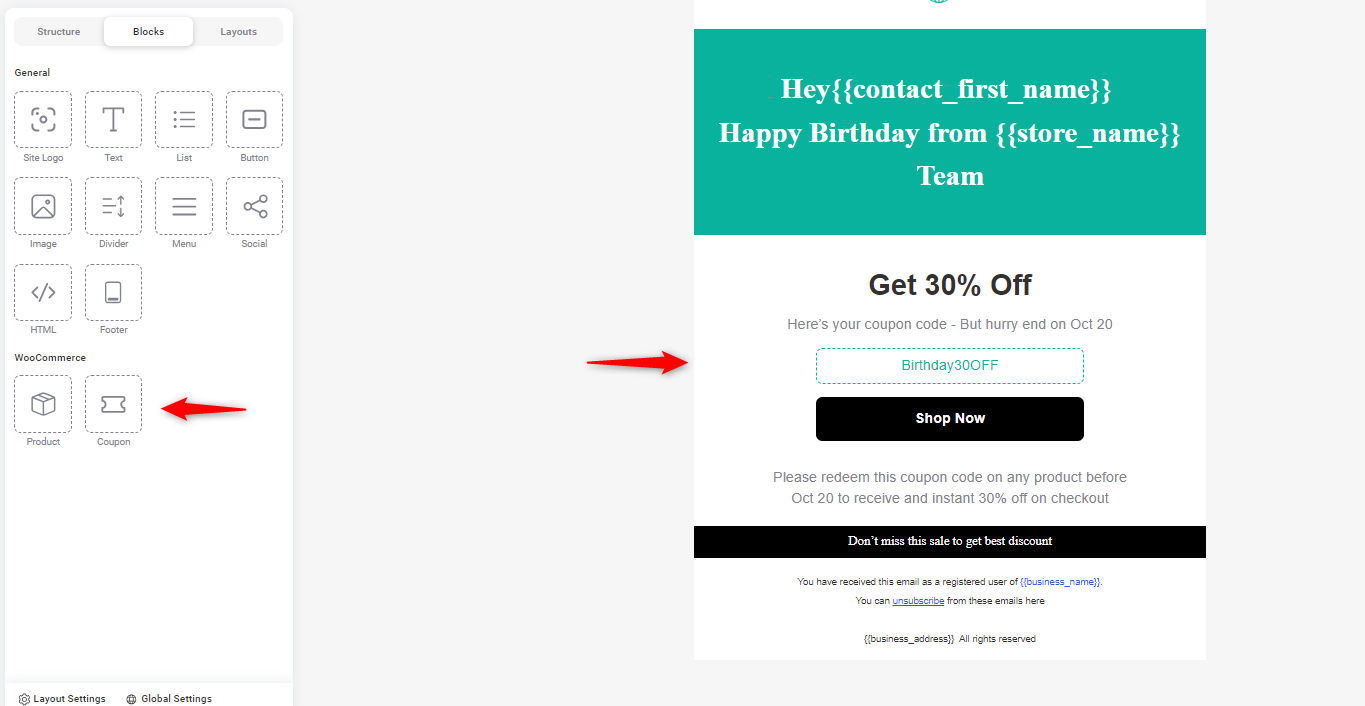
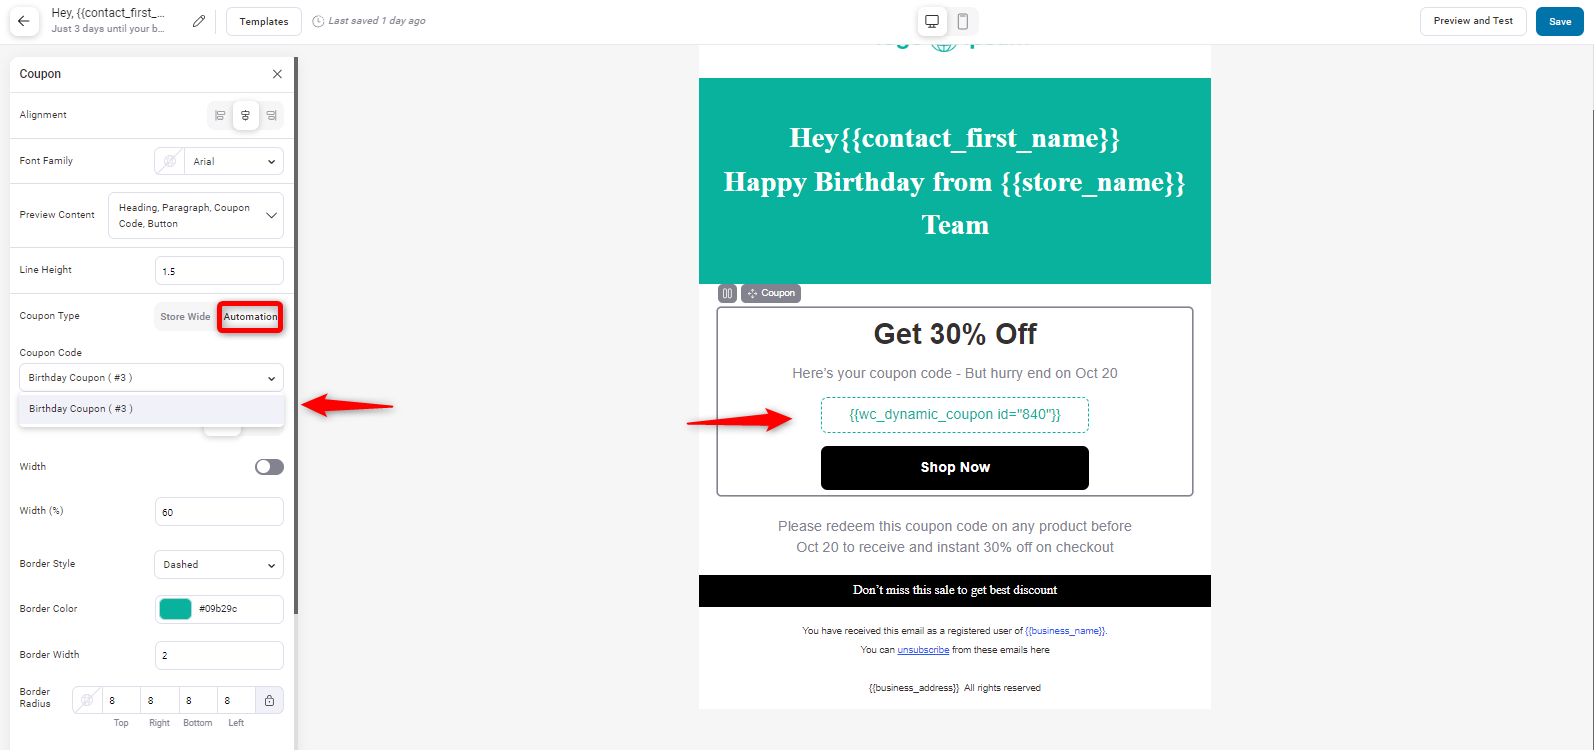
On the left side of the screen, you’ll find these options:
- Alignment: Adjust the position of the coupon (left, center, right).
- Font family: Sets the font style for text within the coupon.
- Preview content: Allows you to choose what elements to display (e.g., heading, coupon code, button).
- Coupon Code: The actual coupon code to be displayed (e.g., Birthday30OFF). From the Automation.
- Style: You can choose to display the coupon as a text code or a clickable button.
- Width: Set the width of the coupon block as a percentage.
- Border style & color: Customize the border's style (e.g., Dashed) and color.
- Border radius: Round the edges of the coupon by adjusting the radius.
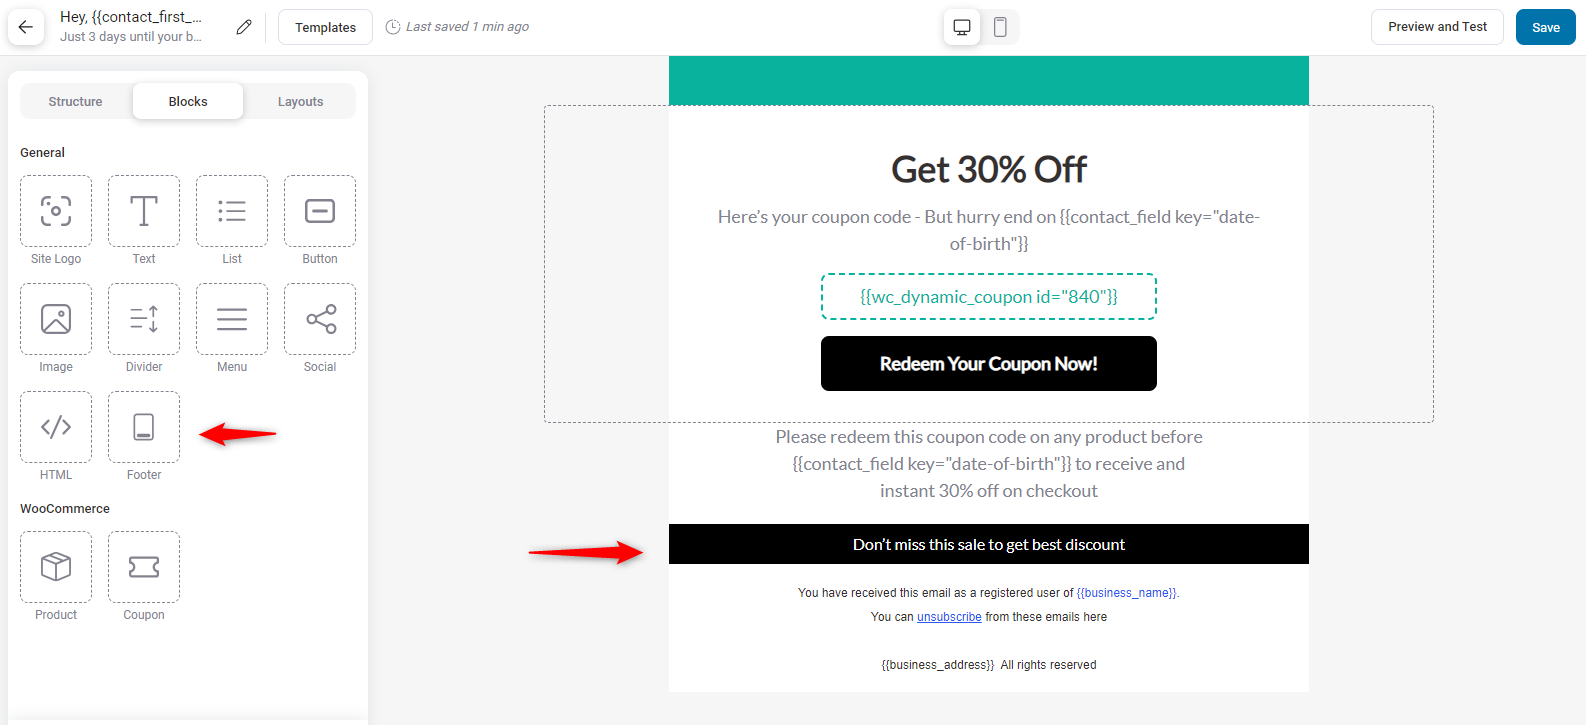
Others
You can add other elements like a footer, social icons, and a note from the store owner.
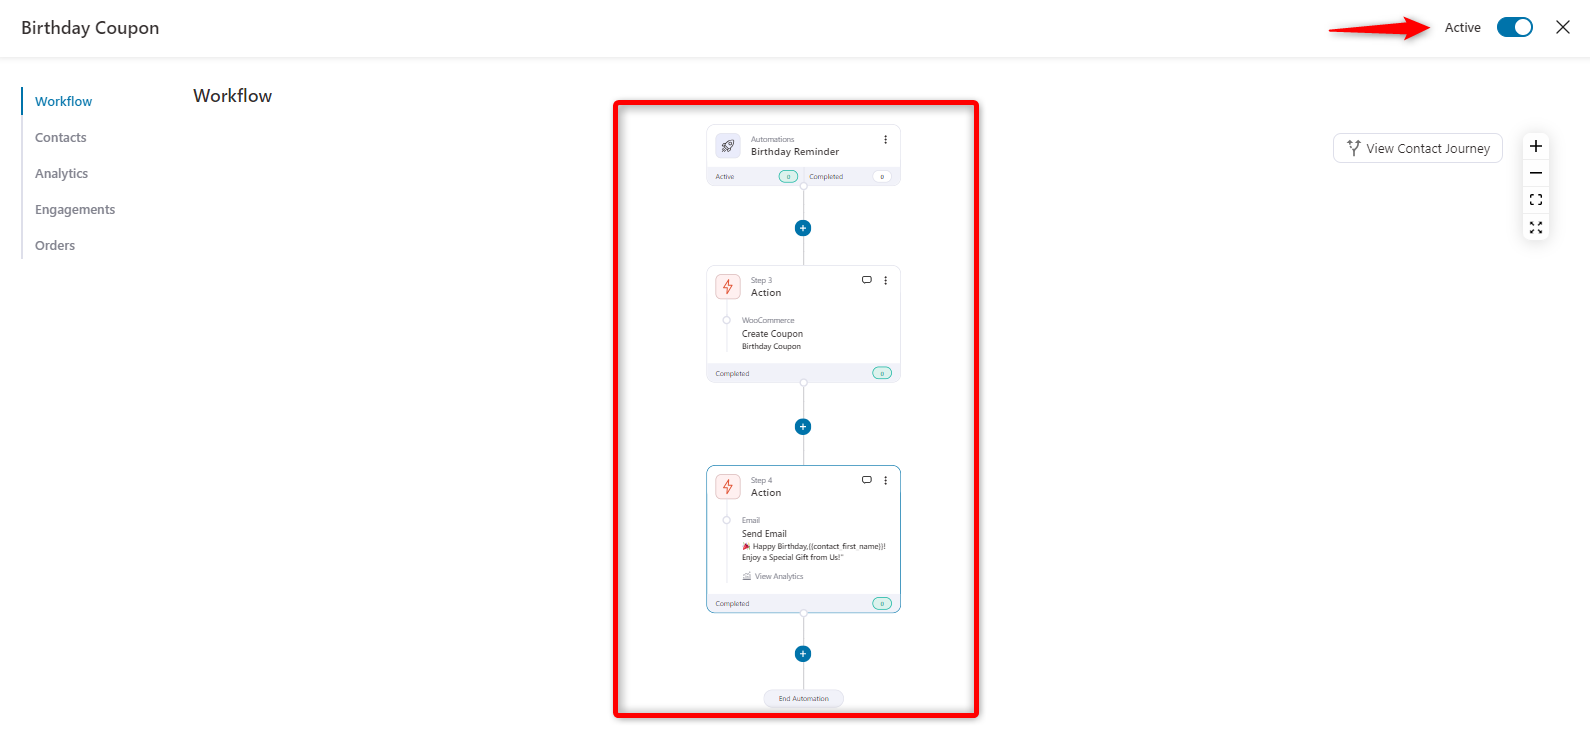
Step 5: Enable the automation
Save on both screens and go back to the previous page. Then enable the automation from here.
Now test the automation to see if it’s working properly. For that, send a test email.
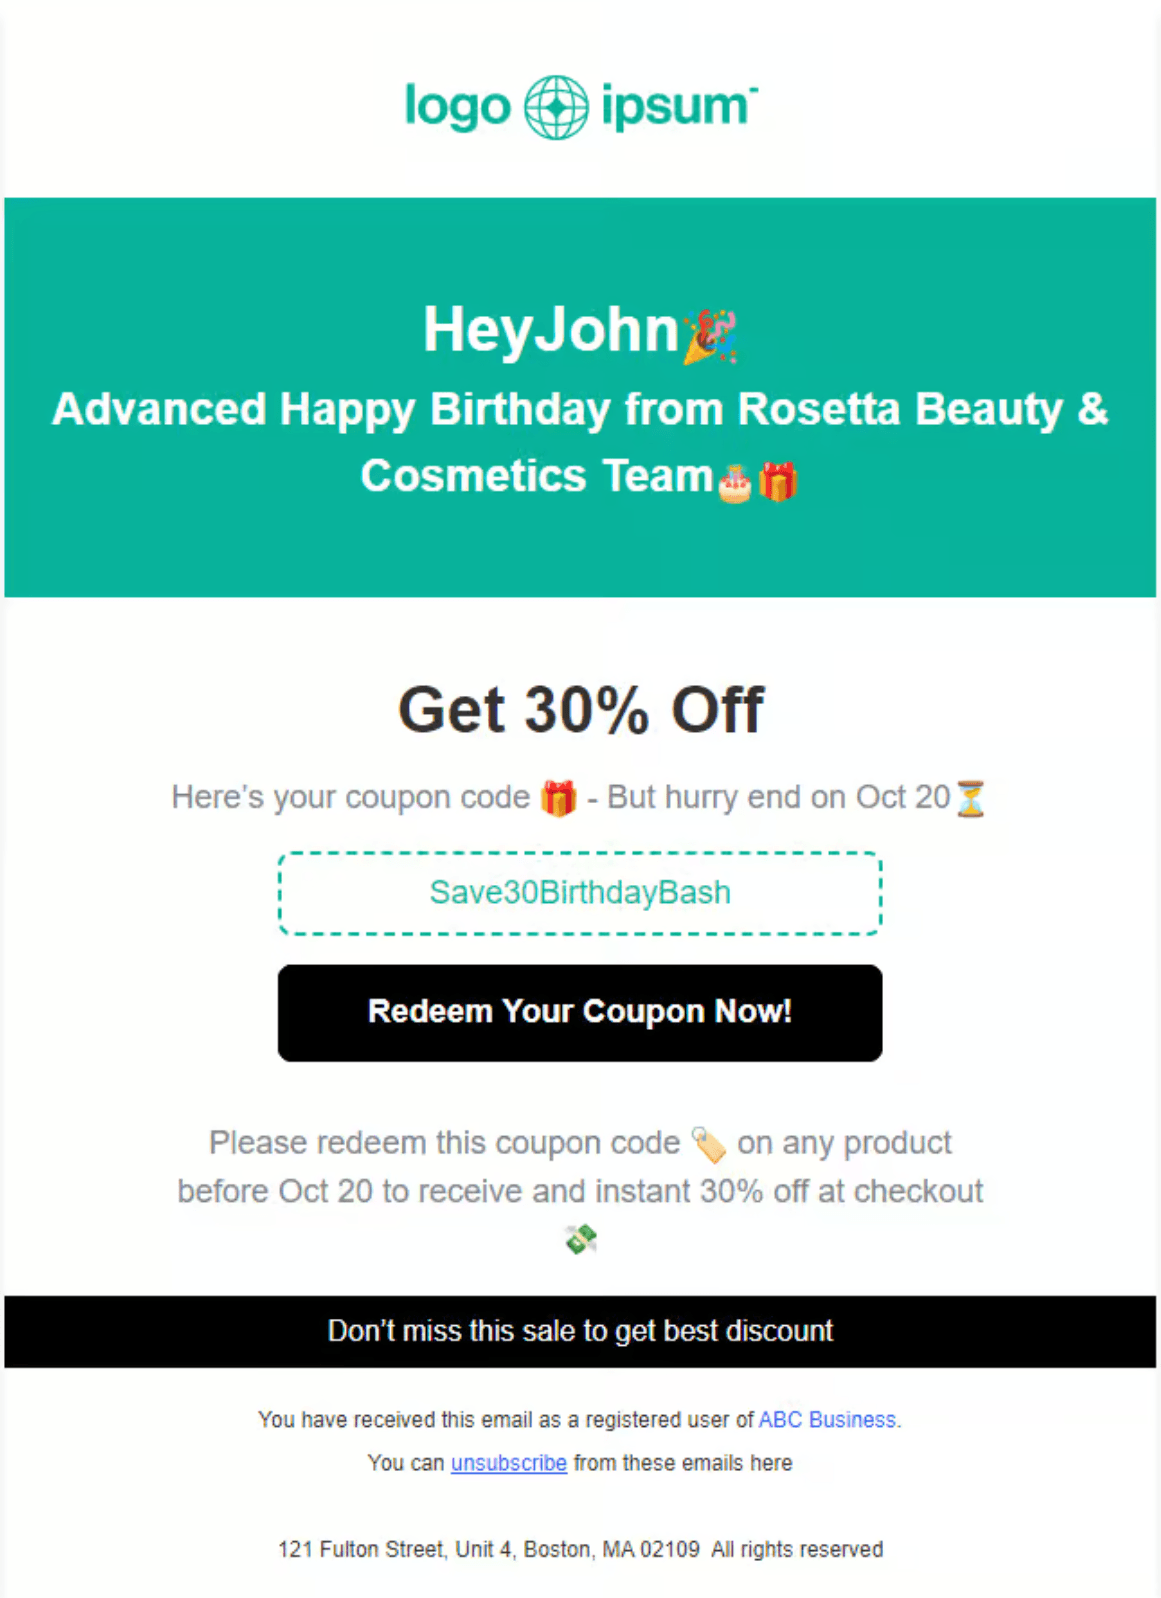
And you can see the email was sent to the recipient's inbox, wishing him a happy birthday with a WooCommerce coupon.
So that’s how you can customize and set up WooCommerce birthday coupons with FunnelKit Automations.
6 Best Practices for Using Birthday Coupons
To get the most out of your WooCommerce birthday coupons, it’s important to implement them effectively.
A well-executed birthday coupon strategy can drive customer loyalty, boost sales, and create lasting connections with your customers.
Here are six best practices to help you maximize the impact of your birthday coupon campaigns:
1. Personalize the message
Make sure your birthday coupon feels special by addressing the customer by name and using a warm, celebratory tone.
Personalization makes the customer feel valued and more likely to engage with the offer..
A personalized message strengthens the emotional impact and enhances the customer’s experience.
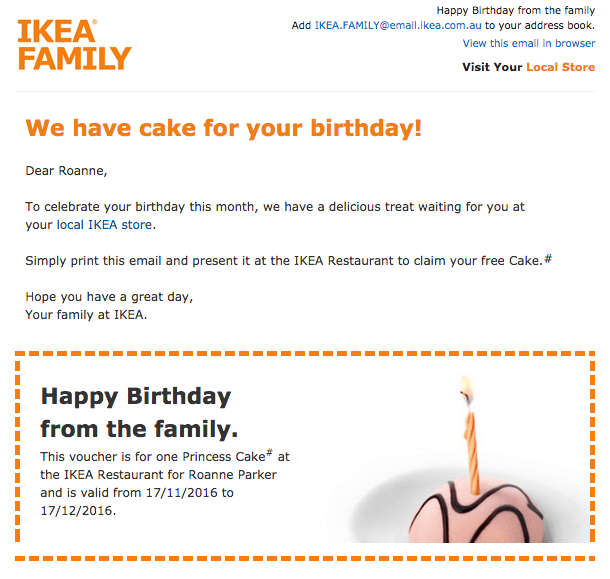
Let’s look at the example for LocalIQ.
2. Set a time limit for urgency
Include a clear expiration date for the birthday coupon, typically valid for a week or a month.
This creates a sense of urgency, motivating customers to use the discount quickly. A time-sensitive offer encourages prompt action and helps increase sales within a defined period.
3. Offer an exclusive discount
Make the birthday coupon feel special by offering a discount or deal more generous than regular promotions.
Exclusive offers, such as a higher percentage off or gift over a certain amount of order total, give customers a strong reason to redeem the coupon and feel appreciated on their special day.
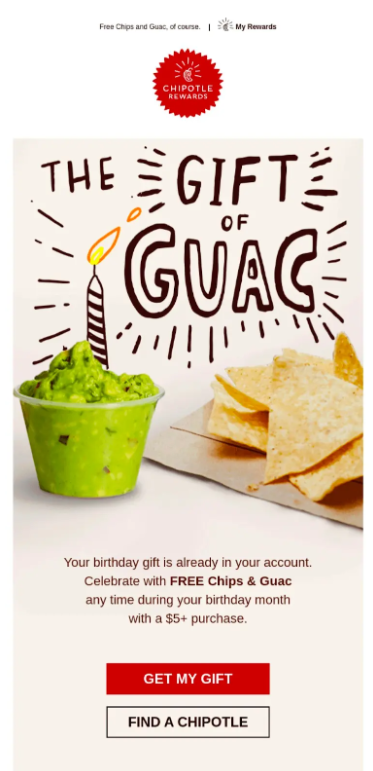
Let’s look at the example of a birthday email offer from Chipotle Rewards. The email features a vibrant, celebratory design to grab attention.
With a playful headline, “The Gift of Guac" offers a personalized birthday reward in the form of free chips and guacamole for the recipient to enjoy during their birthday month with a purchase of $5 or more.
4. Make it simple to redeem
Ensure the process for redeeming the birthday coupon is seamless and easy. Users should get to the offer page with one click or a simple code.
With this simple navigation, you ensure a quality customer experience. Keeping the coupon simple to apply reduces friction and increases the likelihood of conversions.
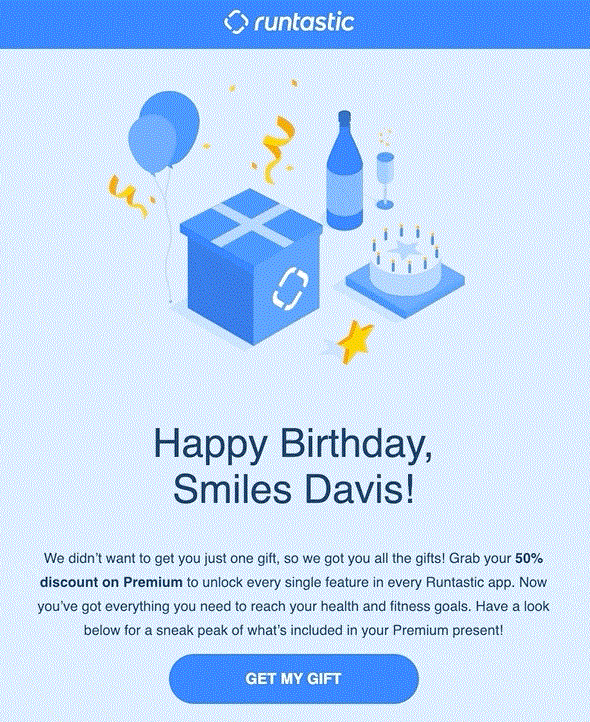
Let’s look at the example from Runtastic. They kept the template simple and placed the CTA button.
This will assist customers in going directly to the cart or offer page to complete their purchase.
5. Offer free shipping
Including free shipping in your birthday email is a great way to make customers feel special.
Who wouldn’t love free shipping as a birthday treat? No one, we guess.
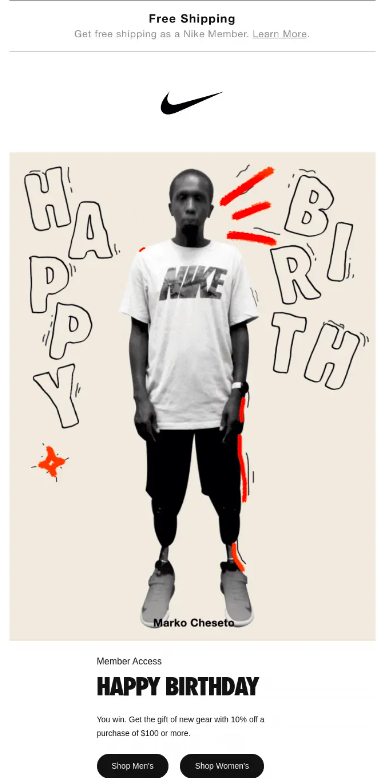
Yes, Nike nails it by combining a birthday offer with free shipping, perfectly catering to its budget-conscious customers.
The email’s design seamlessly matches the birthday celebration vibe, fostering a personal and welcoming connection.
Along with the visually appealing theme, the generous discount makes the offer irresistible, ensuring customers feel special on their big day.
6. Track and optimize the campaign
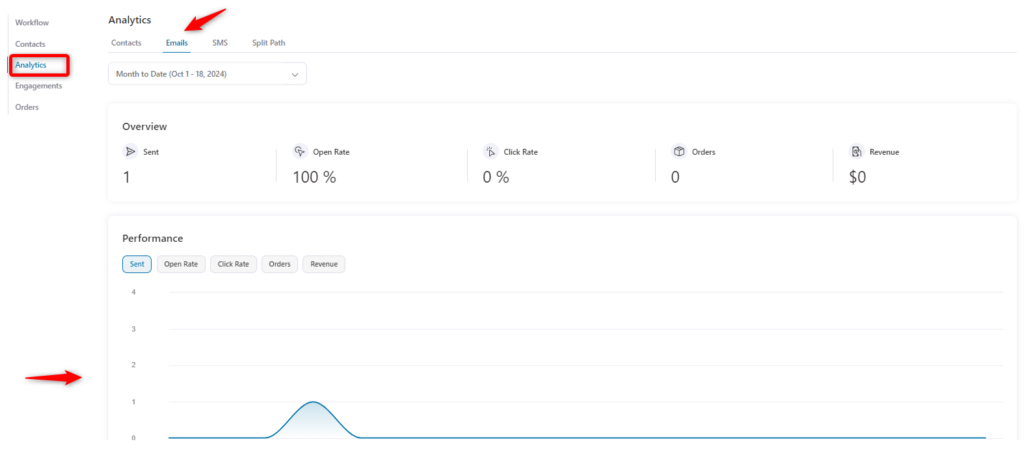
Monitor the performance of your birthday coupon campaigns by tracking metrics like open rates, redemption rates, and average order values.
Use this data to optimize future offers, adjust the discount, or tweak the expiration period to maximize engagement and sales. Continuously refining the campaign ensures better results over time.
How to Prevent Misuse Of WooCommerce Birthday Coupon and Keep It Profitable
A birthday coupon that gets abused stops being a nice gesture and starts being a discount everyone gambles their way into. A few guardrails keep it working as intended.
1. Avoiding coupon misuse
Without proper restrictions, birthday coupons could be abused by customers who create multiple accounts or enter false birthdates just to get repeated discounts.
In the coupon settings, you can determine the coupon usage limit. So one can only use that coupon once.
2. Managing expiry dates and urgency
It’s essential to create urgency with birthday coupons, but managing expiration dates manually can become cumbersome.
Setting dates that are too short may frustrate customers, while setting dates that are too long may reduce the sense of urgency.
You can set expiration rules for your birthday coupons. It ensures they are valid only for a specific period (e.g., one week or one month). This creates the right balance of urgency.
3. Prevent coupon stacking
Don't let overlapping promotions hurt your margins. Since WooCommerce stores often run several deals at once, you need to define exactly how your birthday coupons are used.
You can easily set rules to ensure the birthday discount acts as an exclusive, standalone offer, or let customers pair it with specific promotions.
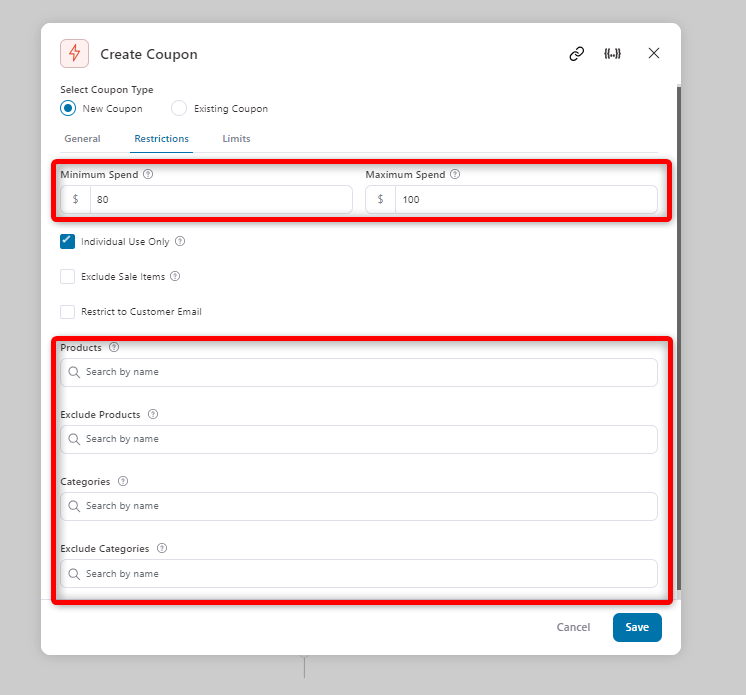
4. Protect your margin with a spend floor
Giving a flat 20% off with zero conditions usually means bargain shoppers will buy your cheapest product, eating up your profits instantly. A better approach? Set a minimum order total.
This keeps the discount safely tucked inside a larger, profitable order instead of draining your lowest-priced item. It’s a simple preventative step that protects your revenue before the sales even start rolling in.
Wrapping Up: Maximizing the Impact of WooCommerce Birthday Coupons
WooCommerce birthday coupons are one of the most amazing ways to boost customer loyalty and improve brand identity.
By offering personalized, timely, and exclusive offers, you can create stronger connections with your customers, making them feel valued and appreciated.
When you automate these campaigns, you not only save time but also ensure that your birthday coupons are delivered seamlessly with 100% impact and minimal effort.
Ready to take your customer loyalty to the next level? Start creating unforgettable birthday campaigns that will keep your customers coming back for more with FunnelKit Automations.
Editorial Team
October 2, 2026A WooCommerce invoice email gives customers a clear record of what they bought, what they paid, and how they paid. WooCommerce can send one out of the box, but only...
Editorial Team
September 29, 2026The WooCommerce subscription reminder email you get by default goes out once per renewal, on the same schedule for every plan you sell. That may be enough for a $15...
Editorial Team
September 24, 2026AutomateWoo gets the job done, but switching away from AutomateWoo is becoming increasingly common among WooCommerce store owners. If you're looking for the best AutomateWoo alternative for your WooCommerce store,...






