
A WooCommerce buy now button lets customers skip the cart page and go straight to checkout with a single click.
The default WooCommerce checkout process adds friction by redirecting users to a redundant cart page.
But a buy now button simplifies the shopping journey from three steps (product page, cart, checkout) to just two or one, which means faster transactions and fewer chances for buyers to change their minds.
In this post, you'll learn what a buy now button is, how to add it in 5 easy ways, and tips to optimize it for more sales.
Whether you're selling a physical product, a subscription, or a digital item, this guide will help you sell smarter.
Table of Contents
- 1 What is a WooCommerce Buy Now Button (And Why You Need One)?
- 2 Method 1: Add a WooCommerce Buy Now Button by Appending a Direct Checkout URL
- 3 Method 2: Create High-Converting WooCommerce Buy Now Buttons with Sales Funnels
- 4 Method 3: Enable WooCommerce Buy Now Button on Shop and Product Pages for Faster Checkout
- 5 Method 4: Boost Sales with a WooCommerce Buy Now Button in a Sliding Shopping Cart
- 6 Method 5: Add a Custom WooCommerce Buy Now Button Using Code Snippets
- 7 Buy Now Button vs. Add to Cart Button: What’s the Difference?
- 8 5 Best Practices to Increase Conversions With Your Buy Now Button
- 9 Frequently Asked Questions Related to WooCommerce Buy Now Button
- 10 Streamline the Checkout Process and Boost Sales Revenue with the WooCommerce Buy Now Button
What is a WooCommerce Buy Now Button (And Why You Need One)?
A WooCommerce Buy Now button is a direct shortcut to checkout, allowing shoppers to purchase instantly without adding items to the cart.
It eliminates extra steps, reduces cart abandonment, and encourages impulse buys by streamlining the entire buying journey.
Instead of navigating the default multi-step WooCommerce flow (product ⇒ cart ⇒ checkout), users can proceed directly from product to payment, resulting in faster checkouts, higher conversions, and a smoother user experience.
It's especially powerful for single products, limited-time offers, and returning customers who want quick, no-fuss purchases.
Why Add a Buy Now Button to Your WooCommerce Store?
Here's why adding a buy now button to your WooCommerce store is your best bet:
- Reduces cart abandonment by removing the cart page step from the purchase process. Fewer steps mean fewer exit points, reducing the chance that a shopper will leave the store.
- Captures impulse buyers who are ready to purchase immediately. The buy now button lets them act on that intent before it fades.
- Speeds up repeat purchases because returning customers already know what they want and don't need a cart page to review their items.
- Improves mobile checkout experience by reducing the number of pages a mobile shopper has to load and navigate, a critical factor on smaller screens and slower connections.
- Increases conversions for single-product stores that benefit the most from a simplified checkout.
Method 1: Add a WooCommerce Buy Now Button by Appending a Direct Checkout URL
One of the quickest ways to create a Buy Now button in WooCommerce is by appending a direct checkout link to your product’s URL.
You need to append the following to your product’s URL:
The ID will be your product’s ID. You can find it in the WooCommerce product catalog on your WordPress menu.
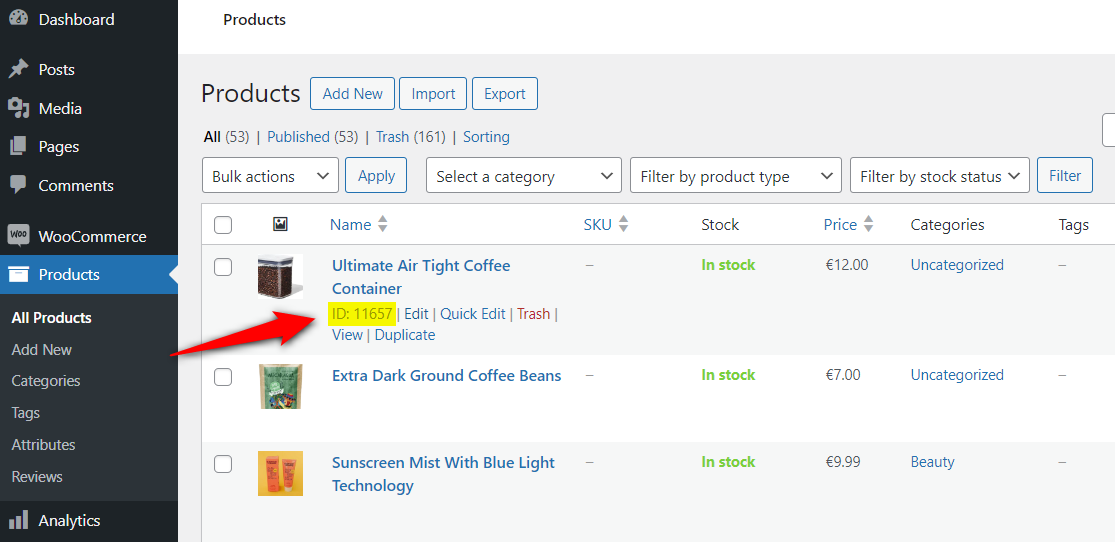
Paste the product ID in the URL, like the one shown below:
Clicking this URL will redirect you to the checkout page, skipping the cart page in your WooCommerce store.
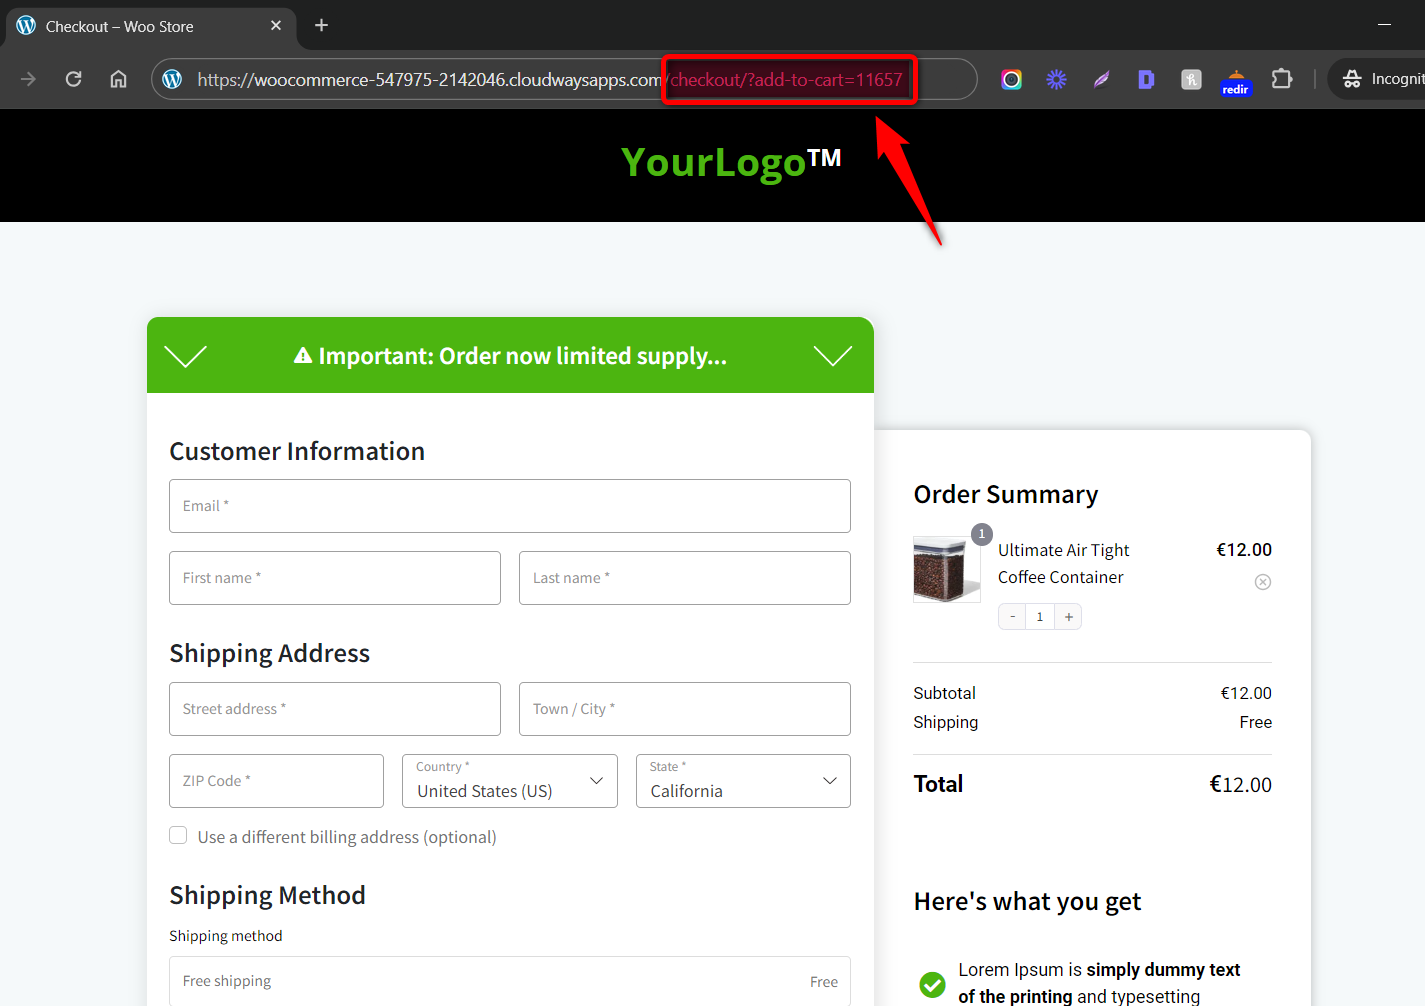
You can embed this URL on your store’s main shop or product pages.
Method 2: Create High-Converting WooCommerce Buy Now Buttons with Sales Funnels
Many businesses place their 'Buy Now' buttons on sales or landing pages. This gives them a sense of control in guiding their visitors’ attention towards the desired action.
In this section, we'll demonstrate how to add a 'Buy Now' button to a sales page using FunnelKit Funnel Builder. It lets you create high-converting sales funnels with custom checkouts, order bumps, and one-click upsells.
Additionally, it provides detailed analytics and A/B testing to optimize performance and increase your store’s average order value.
Let’s install and activate this plugin.
Follow the step-by-step instructions to add a WooCommerce buy now button by creating a dedicated sales funnel.
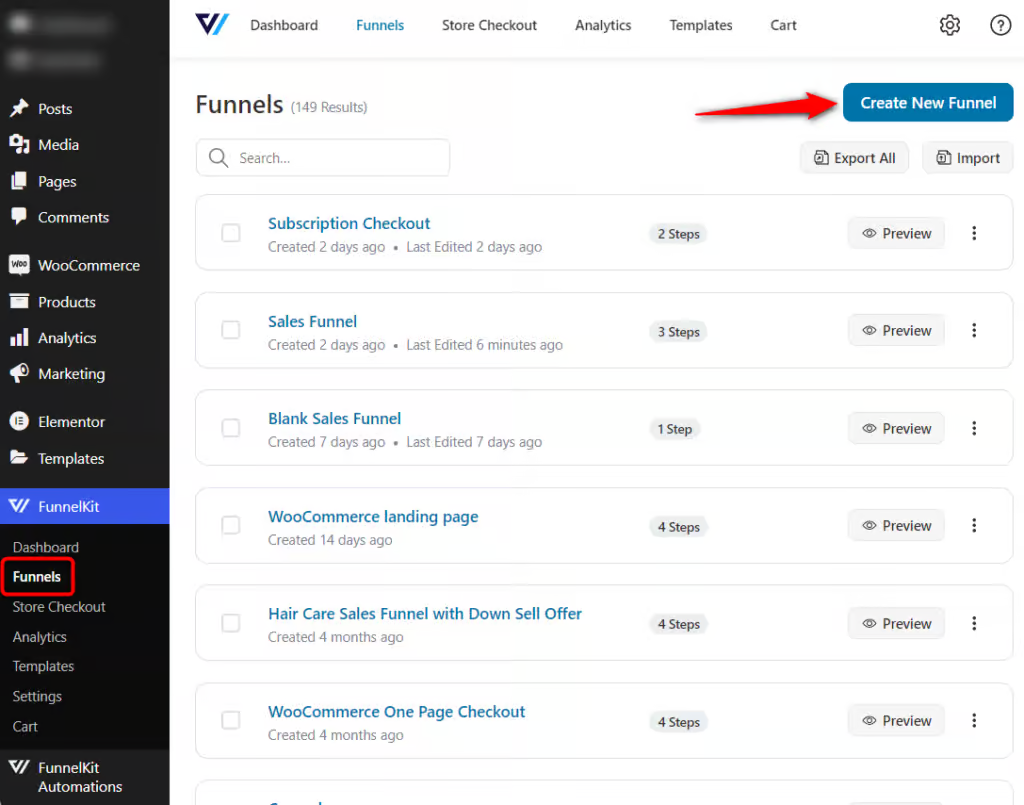
Step 1: Create a new funnel
Navigate to FunnelKit ⇨ Funnels and click on the ‘Create New Funnel’ button.
It’ll take you to the templates page. Browse the sales funnel templates available in FunnelKit, then choose your preferred page builder to customize your pages.
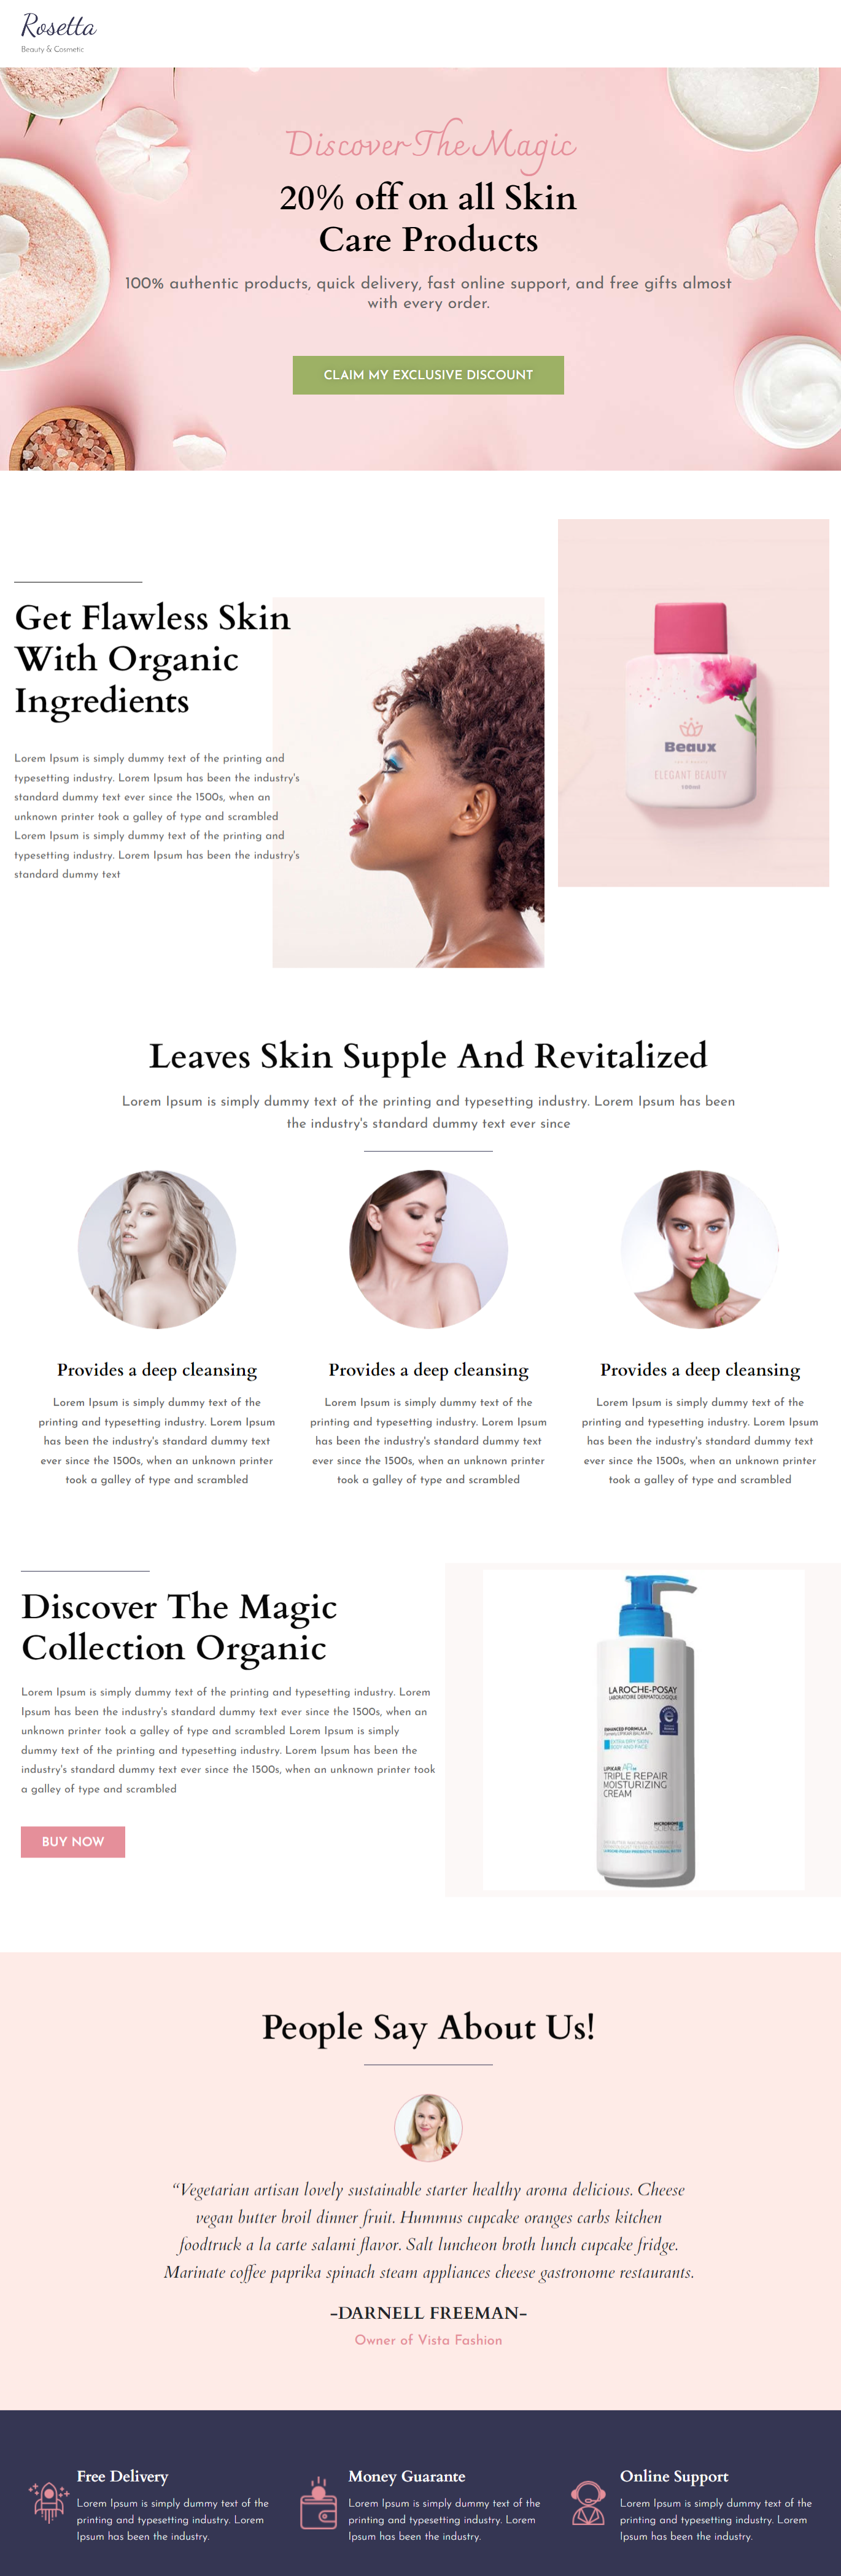
Here, we’ll select the Elementor page builder and click ‘Preview’ on the Rosetta template.

Preview all the pages in your funnel and decide whether you want a one-page or multi-step checkout by selecting the number of steps.
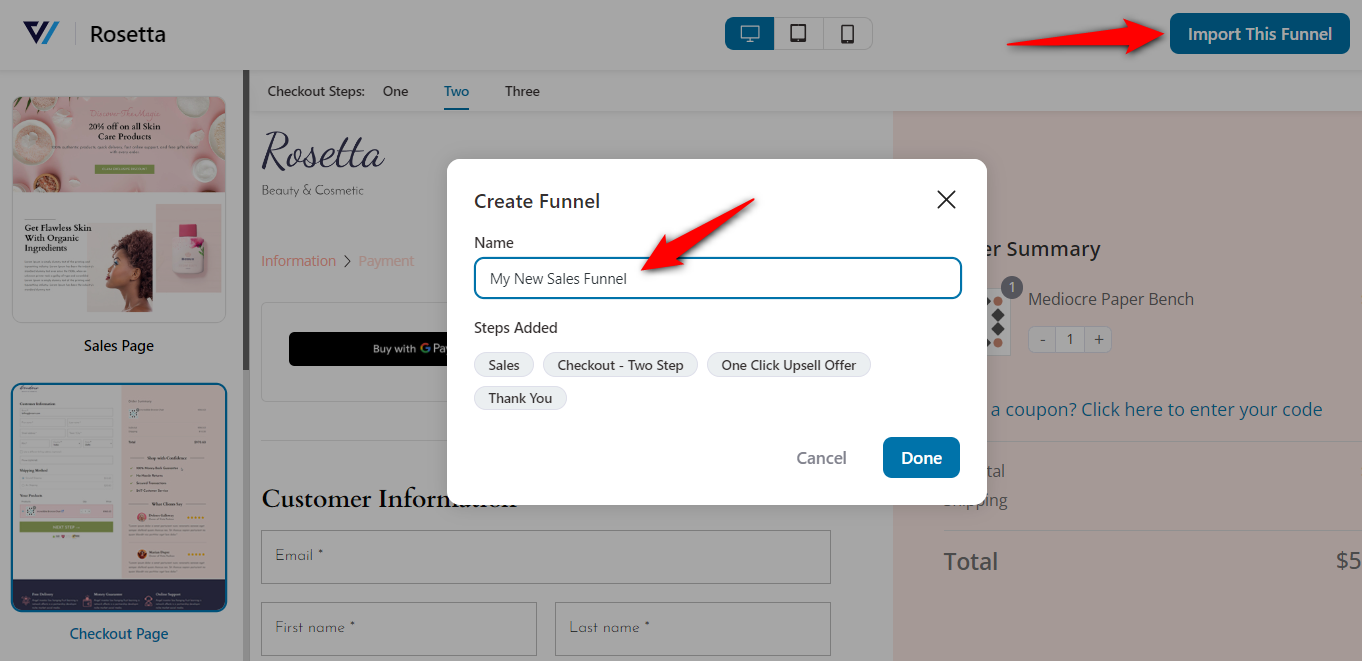
Clicking on ‘Done’ will import this sales funnel to your workspace.
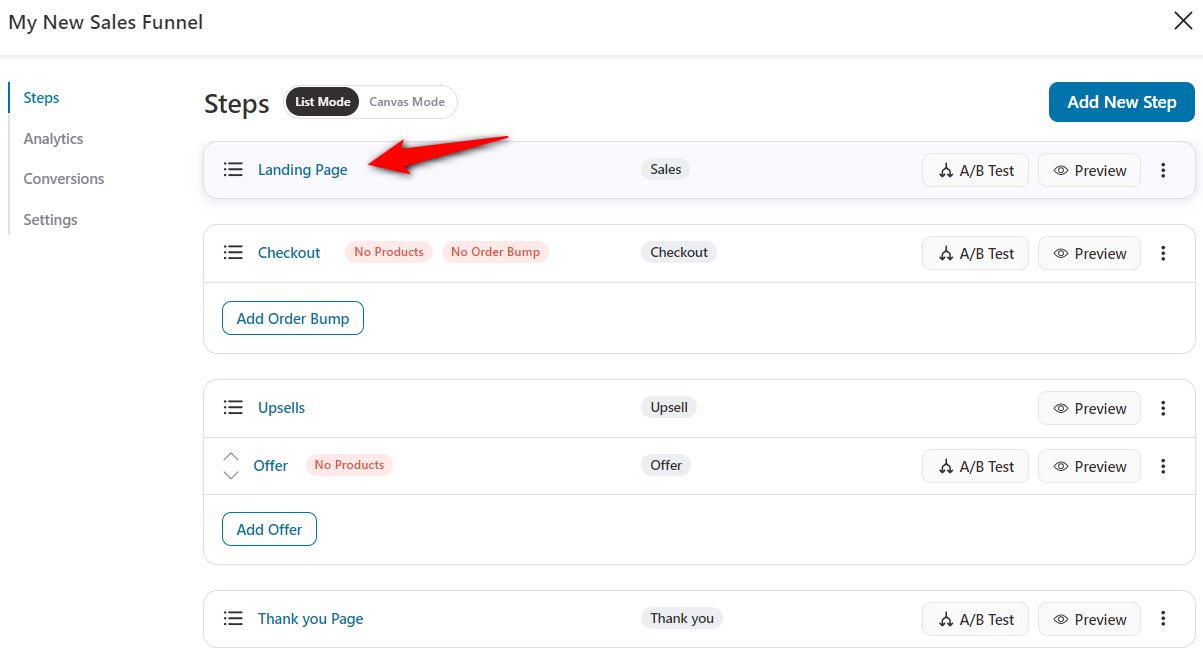
You’ll see a landing page, checkout page, one-click upsell, and thank you page.
Step 2: Edit the sales page template
Next, we’ll add and customize the WooCommerce buy now button to the sales page.
To do so, click on the name of your landing page to start customizing it.
Hit the ‘Edit Template’ button to customize your landing page with your favorite page builder.
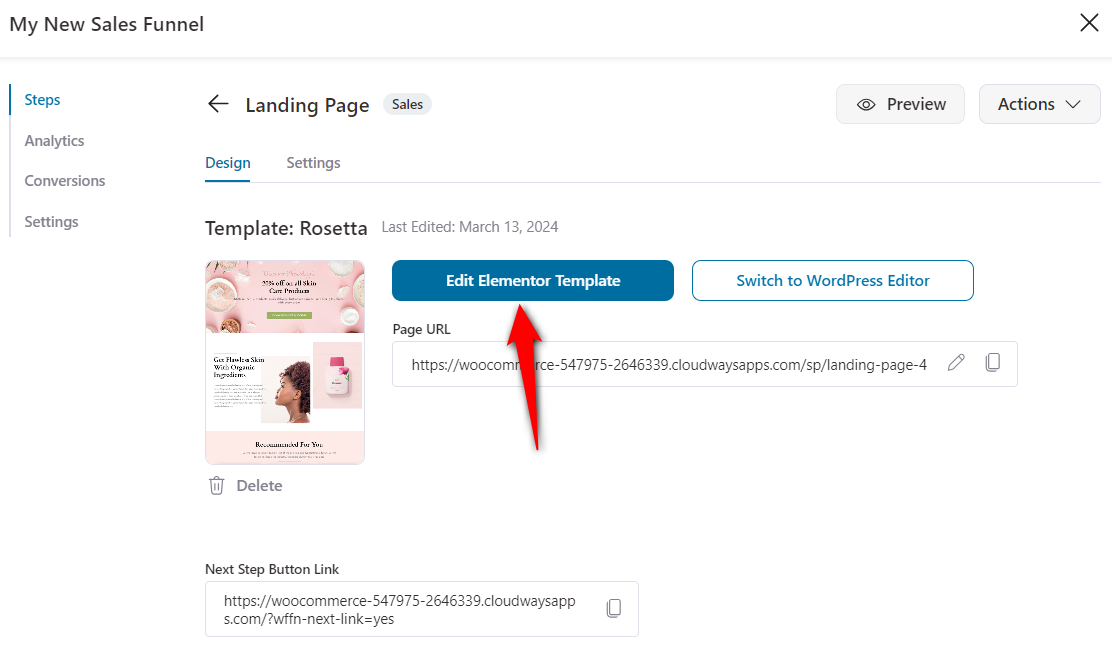
It'll open the landing page in Elementor. You can edit different widgets and customize them the way you want.
Here, we'll edit the buy now button:
- Buy now button text: Write a compelling text for your WooCommerce buy now button
- Button link: Put the next step link, which is the checkout page (it automatically populates it by default)
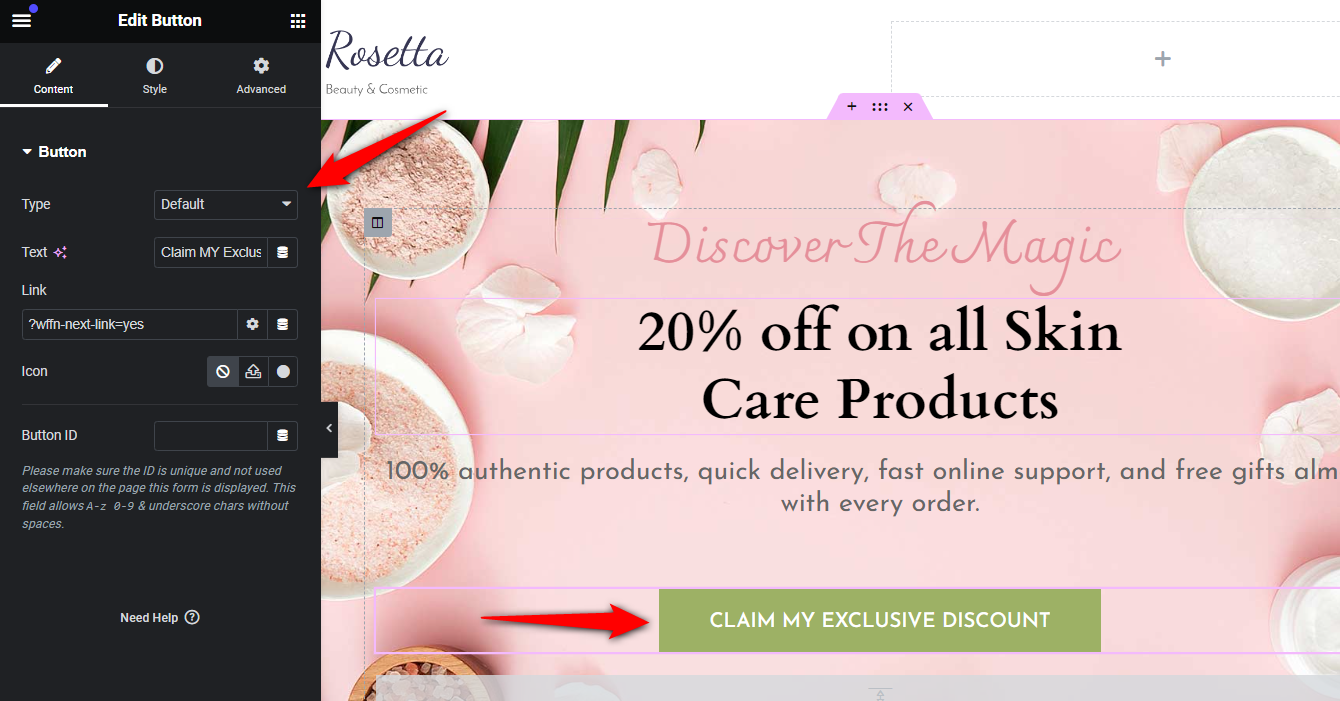
Once done, customize the button’s appearance from the 'Style' tab.
Style the button by editing the typography font, text shadow, text color, background color, box shadow, padding, and more.
Specify one more WooCommerce buy now button at the bottom of the landing page.
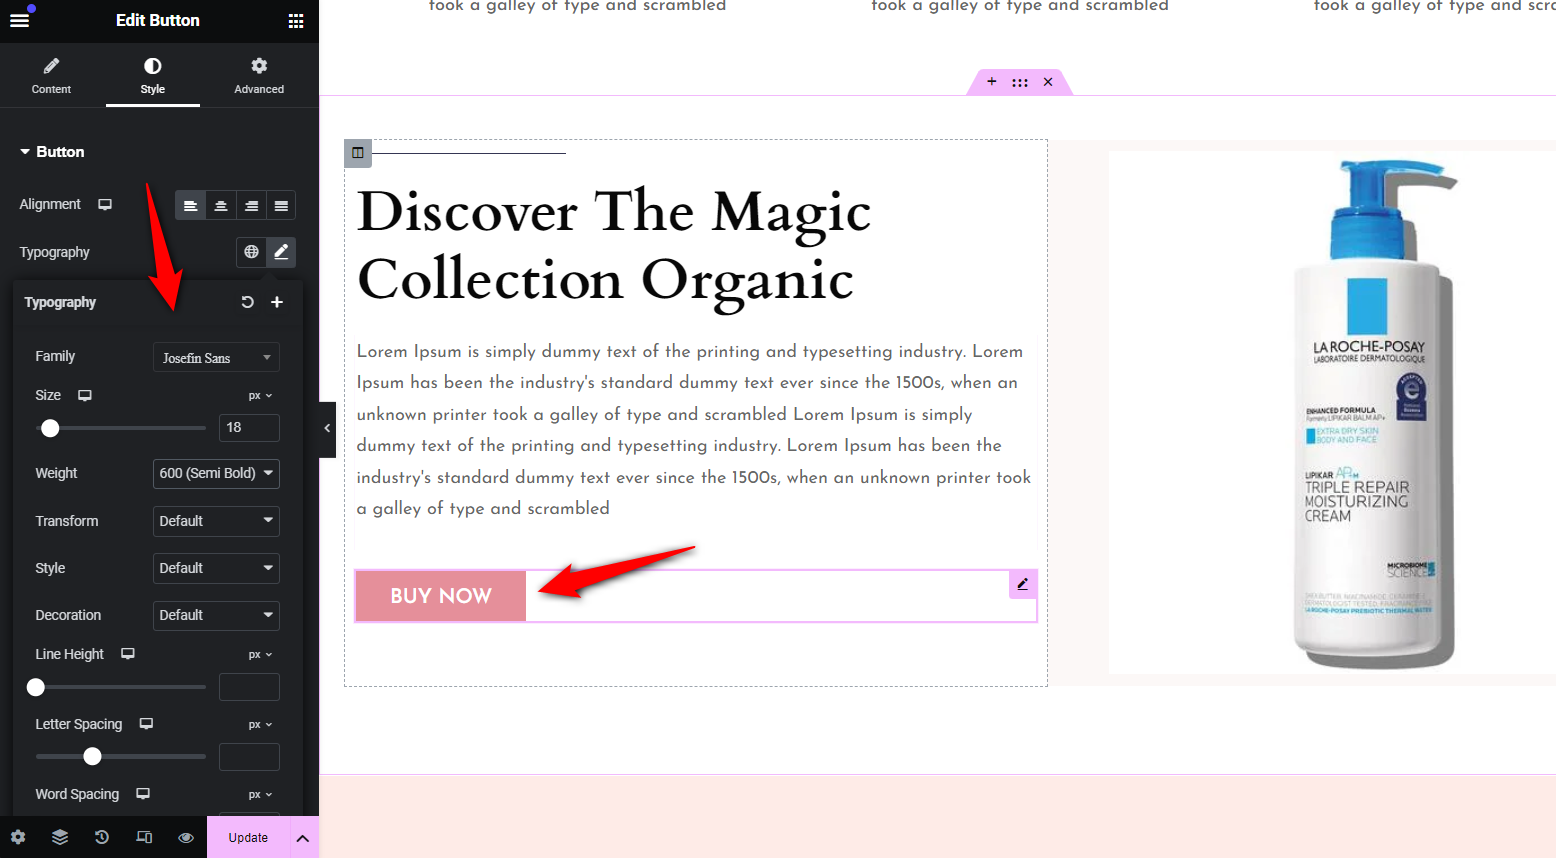
Once done, hit the 'Update' button to save the changes.
This is what your landing page looks like:
When a user clicks on the buy now button, it'll take them to the checkout page (which we’ll configure next).
Step 3: Customize the WooCommerce checkout page
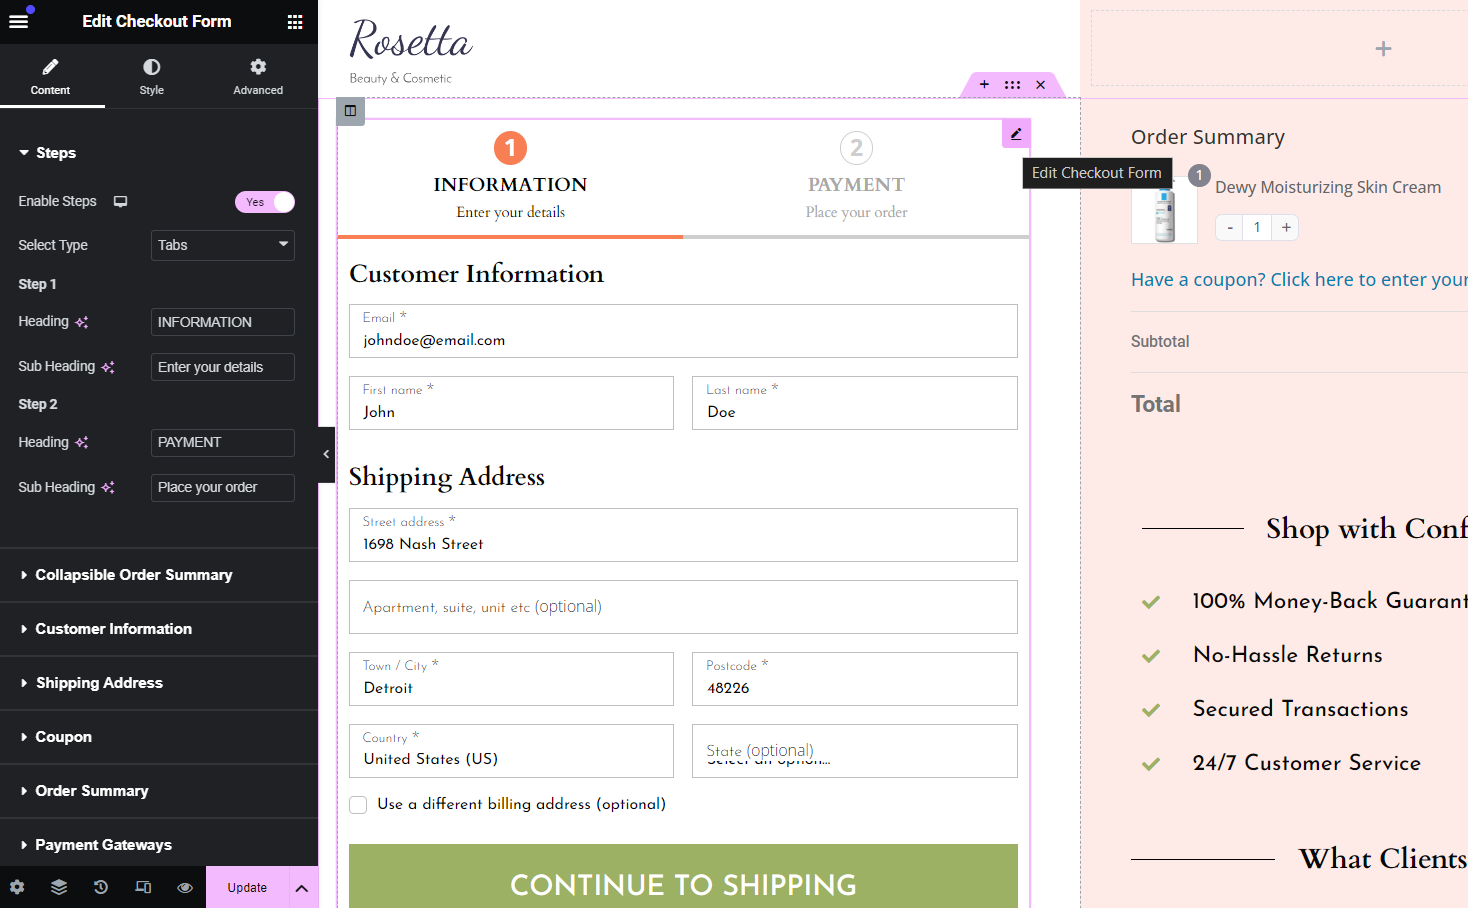
Now, edit the checkout page in your funnel.
You can edit your checkout page template just like we did with the sales page in the previous step.
Edit the text, buttons, background colors, fonts, borders, etc. Customize the WooCommerce checkout button here with colors, borders, text, width, icon, and more.
Let’s now add the featured product to the sales and checkout pages.
This way, when a user clicks the buy now button, they'll be taken to the checkout page with the added product.
Step 4: Add the product to the WooCommerce checkout page
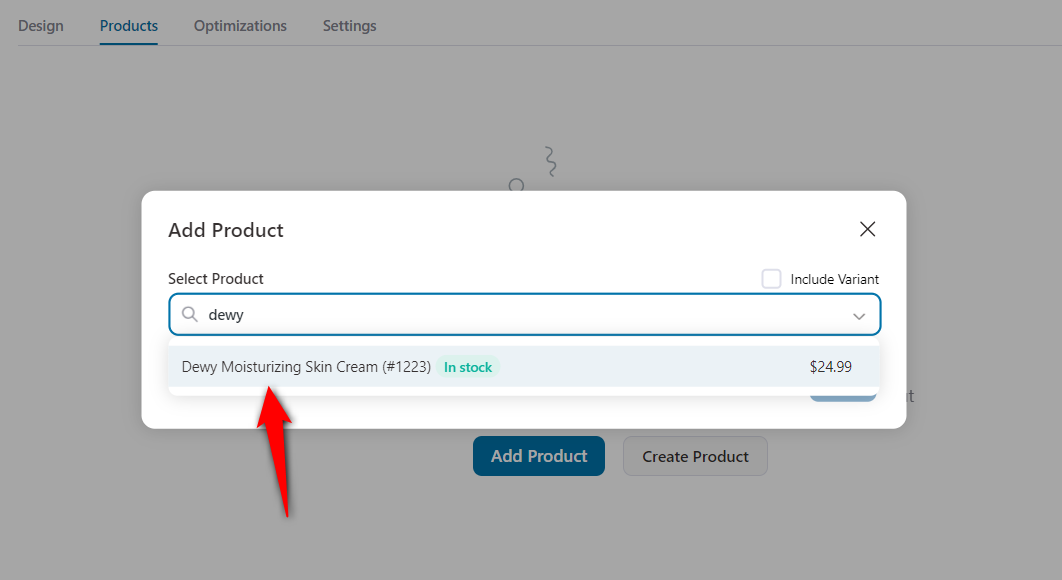
Go to the Products tab and click the 'Add Product' button.
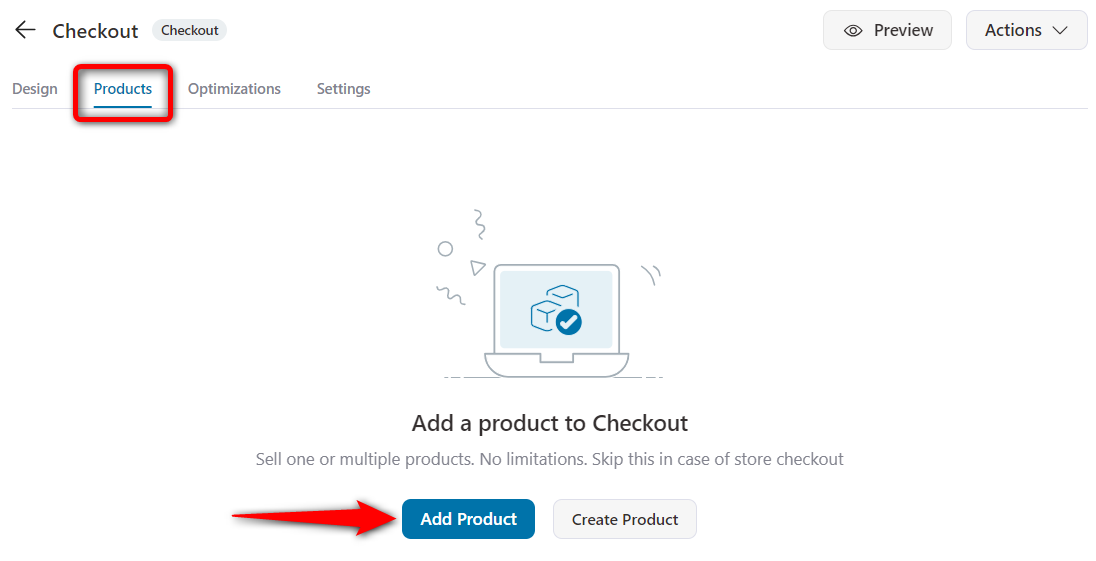
Search for the WooCommerce product you want to add.
You can add one or more products as per your needs.
Specify the discount amount as we’ve mentioned on the landing page (in our case, it's 20%).
You can even configure quantity-based discounts from here.
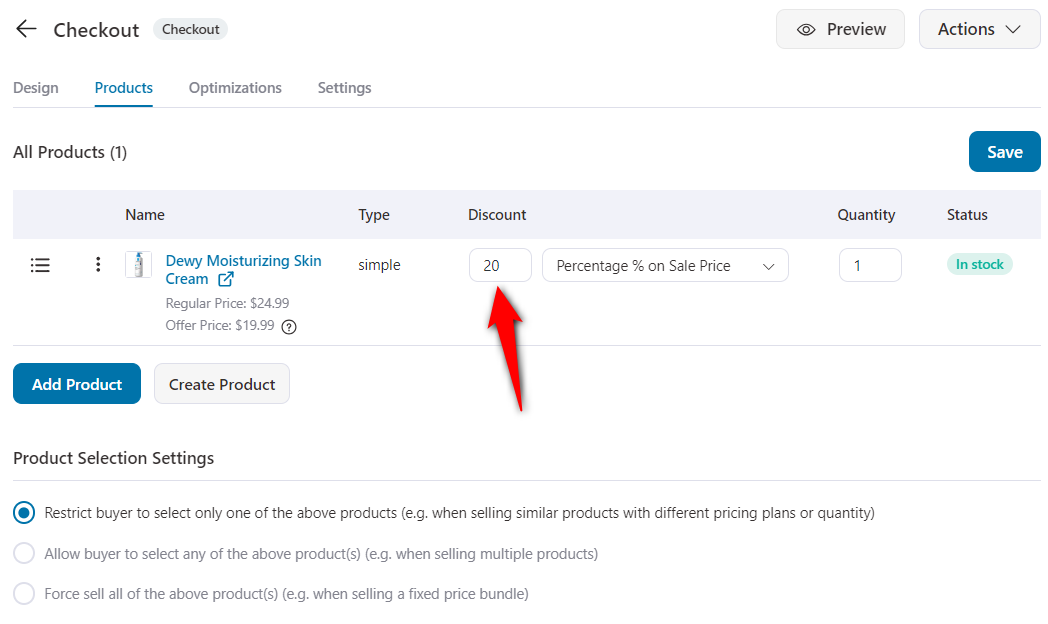
Save the changes when done.
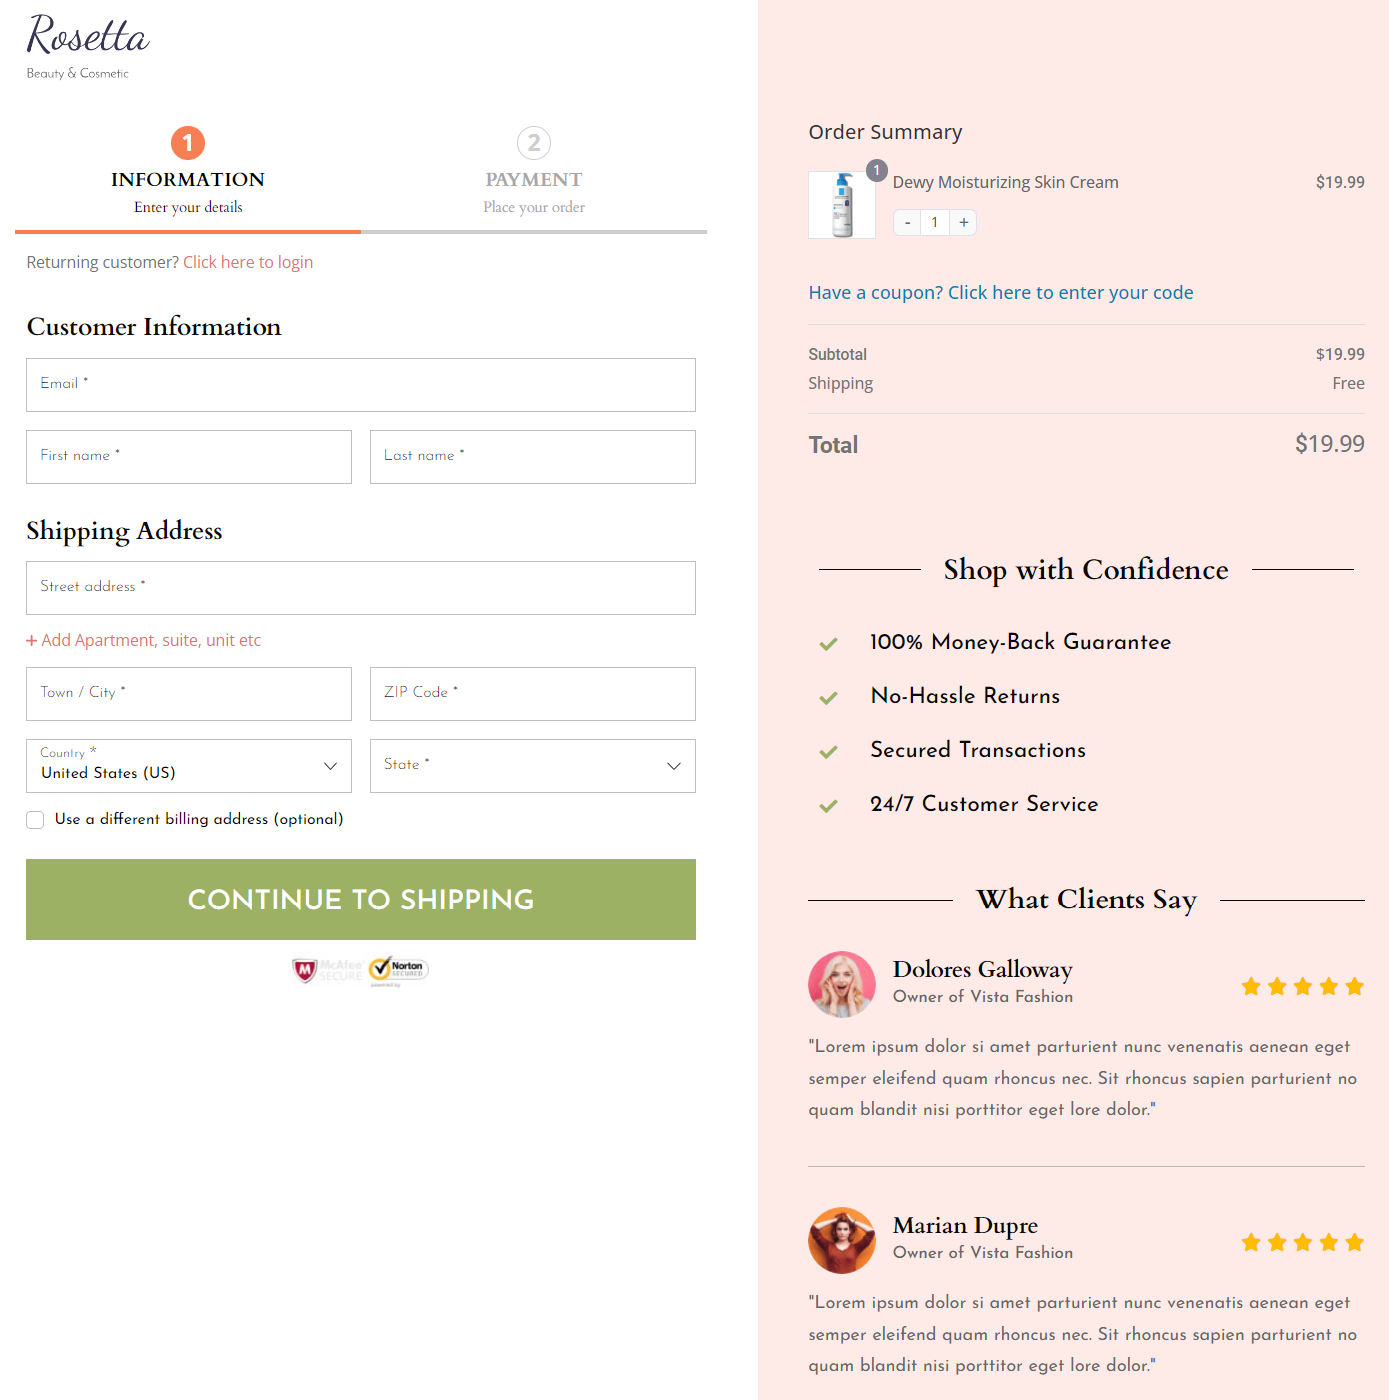
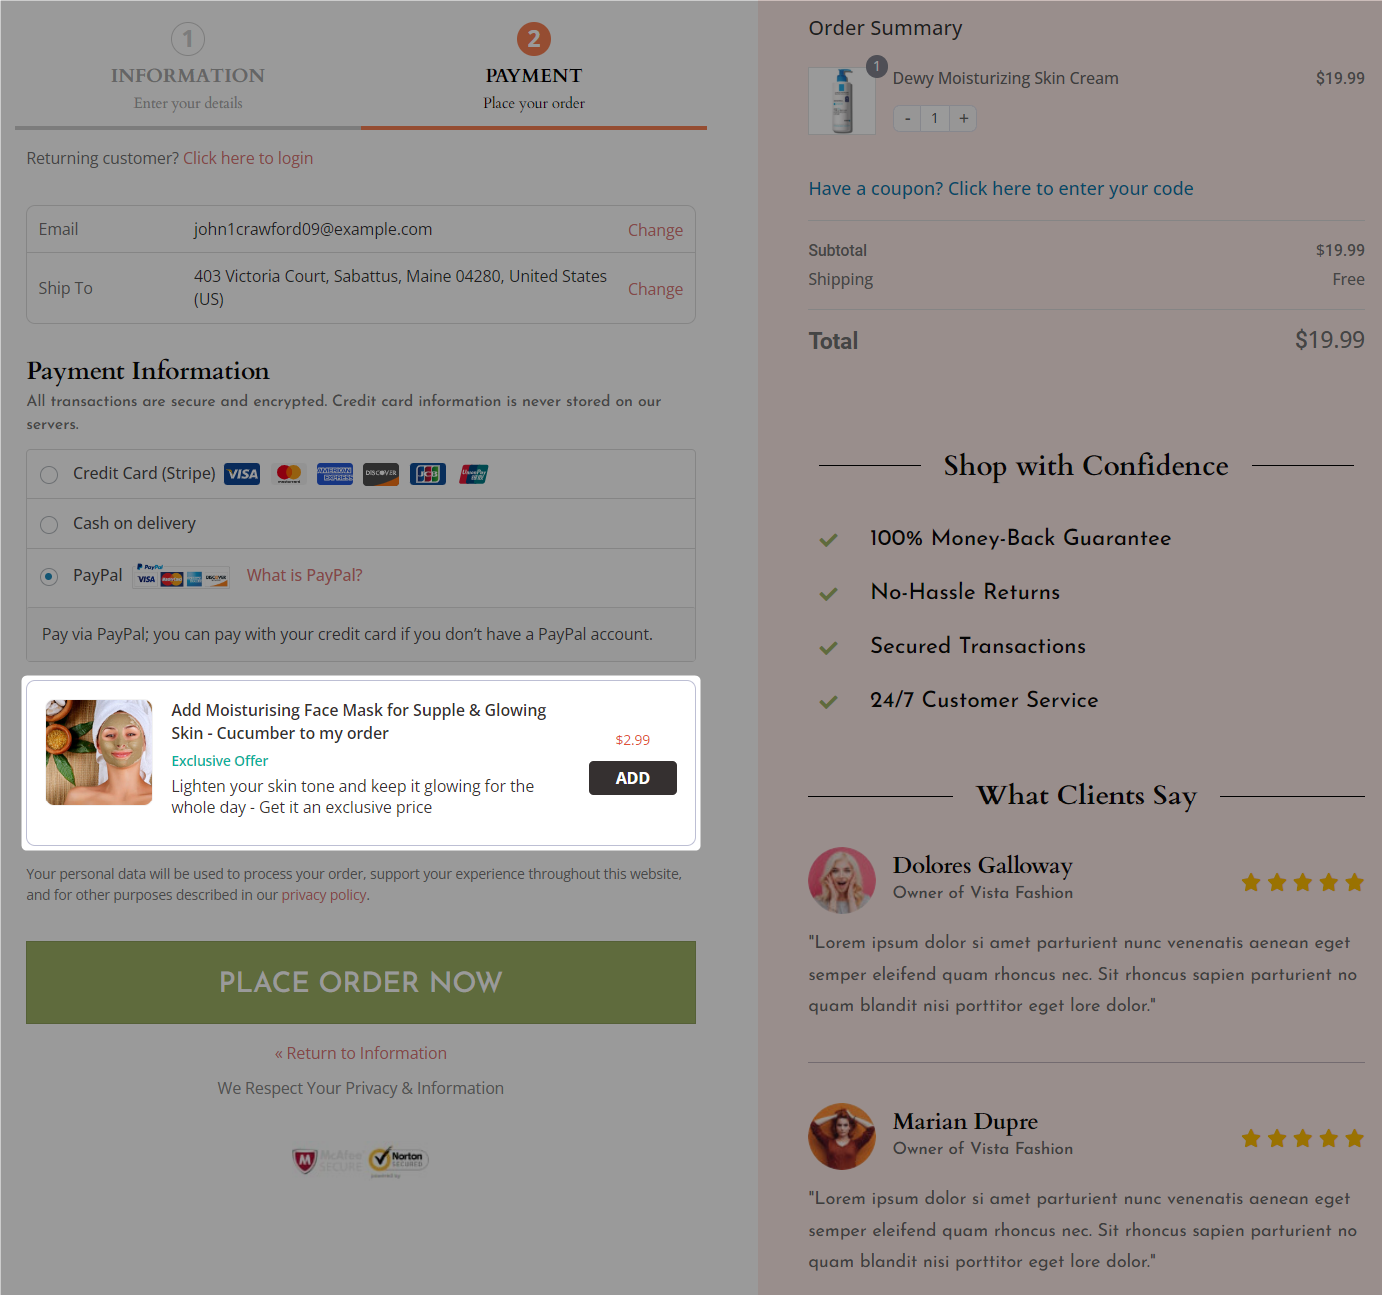
Here’s how your checkout page looks:
You can even offer compelling deals to your customers and boost your store's average order value (see next step).
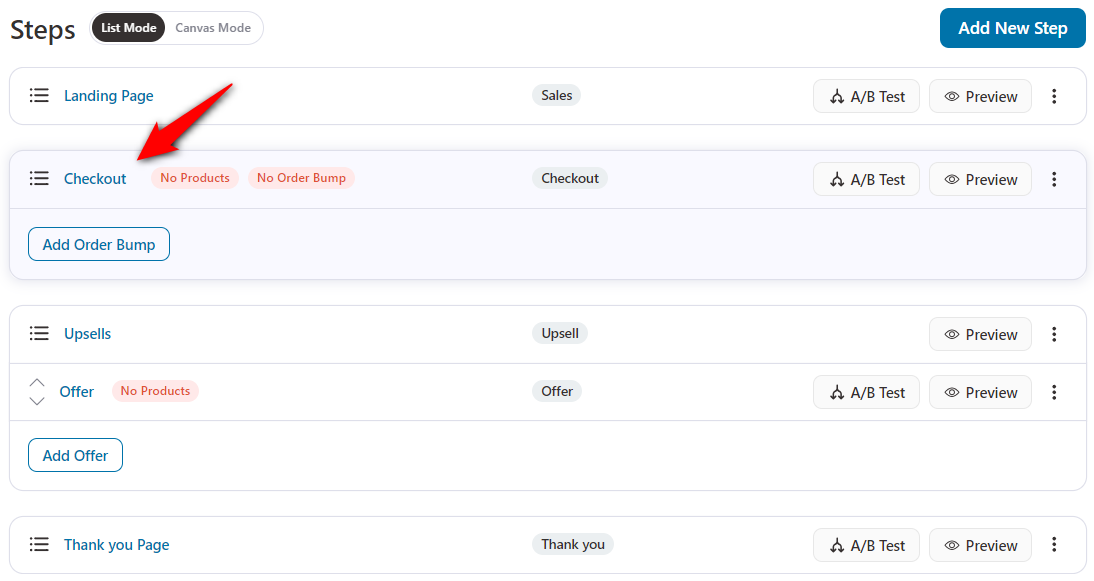
Step 5: Add attractive offers to boost the average order value (optional)
The extra steps that help you increase revenue include: Order bumps and One-click upsells.
Order Bumps are relevant or complementary products aligned with the main purchase. These offers are displayed on the checkout page, allowing customers to add them to their cart with a single click.
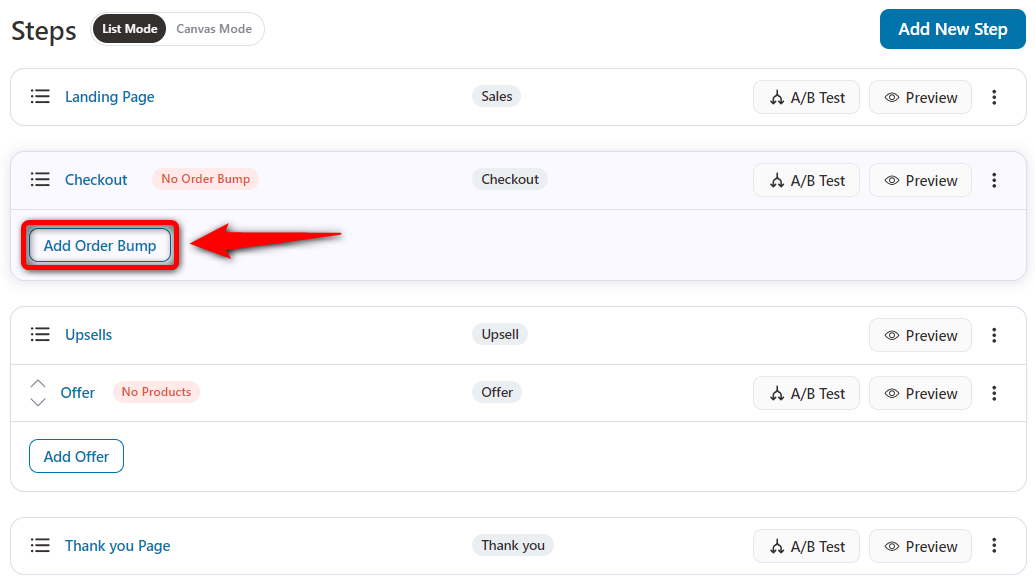
Add single or multiple order bumps and offer discounts on them.
All you have to do is choose the skin, write a compelling copy and you’re done!
Moreover, One-Click Upsells are post-purchase offers that appear immediately after the customer has made a purchase, before the thank-you page.
FunnelKit Funnel Builder allows you to link multiple upsells and downsells, helping to boost order value while guiding shoppers smoothly through checkout with the WooCommerce 'Buy Now' button.
Once the customization is complete, you can copy the sales funnel link and use it as a WooCommerce' Buy Now' button to increase sales in your store with a dedicated sales funnel.
Method 3: Enable WooCommerce Buy Now Button on Shop and Product Pages for Faster Checkout
Adding the buy now button to your WooCommerce shop and product pages helps skip the cart and go directly to the checkout page.
We’ll use FunnelKit Pro’s add-on plugin called CartHopper. It’s a WooCommerce buy now button-free add-on that lets shoppers go to the checkout page after they add items to their cart.
This way, you can skip the cart page and check out seamlessly.
Follow the step-by-step instructions on how to do it:
Step 1: Install and activate the CartHopper add-on
First, install the Buy Now Free CartHopper add-on on your WordPress website.
Download this plugin from the link above.
Step 2: Enable the skip cart feature on product pages
Navigate to FunnelKit ⇨ CartHopper and configure these options:
- SkipCart: Enable the skip cart option for all the products.
- Exclude Product Category (Optional): Specify the product category you want to exclude from the skip cart option.
- Exclude Products (Optional): Specify the names of products you want to exclude from the buy-it-now option.
- Add To Cart Button Text (Optional): Customize your WooCommerce buy now button text on the product page.
- Cart Item Rules: Set up rules to enable the skip cart feature in your WooCommerce store.
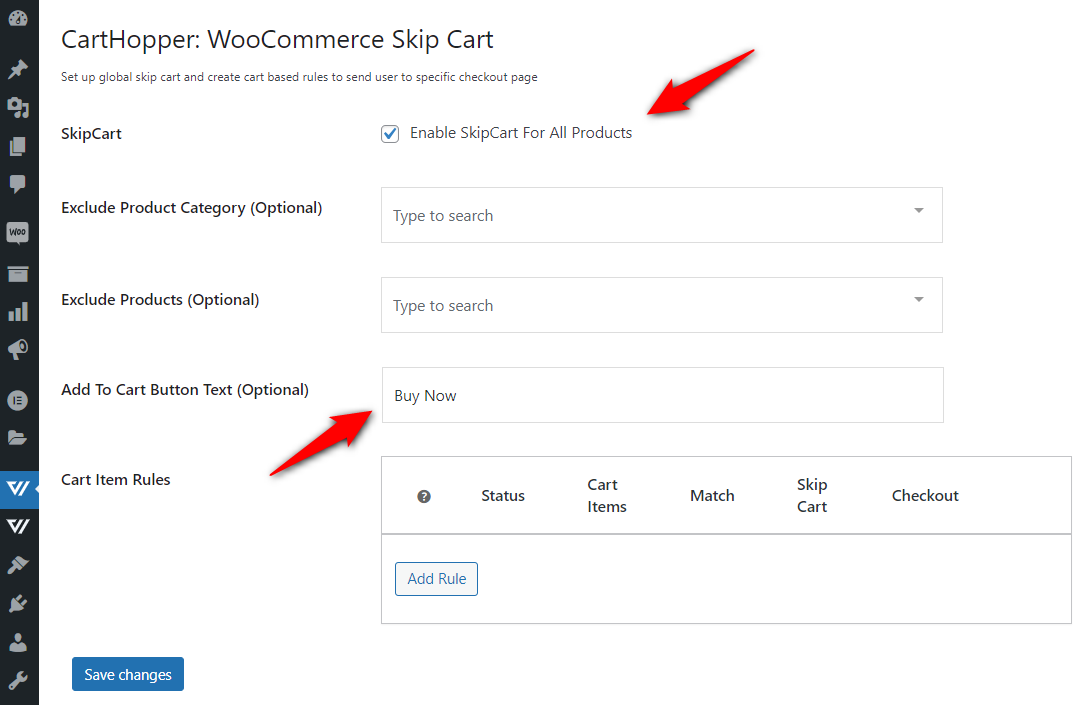
Save the changes when done.
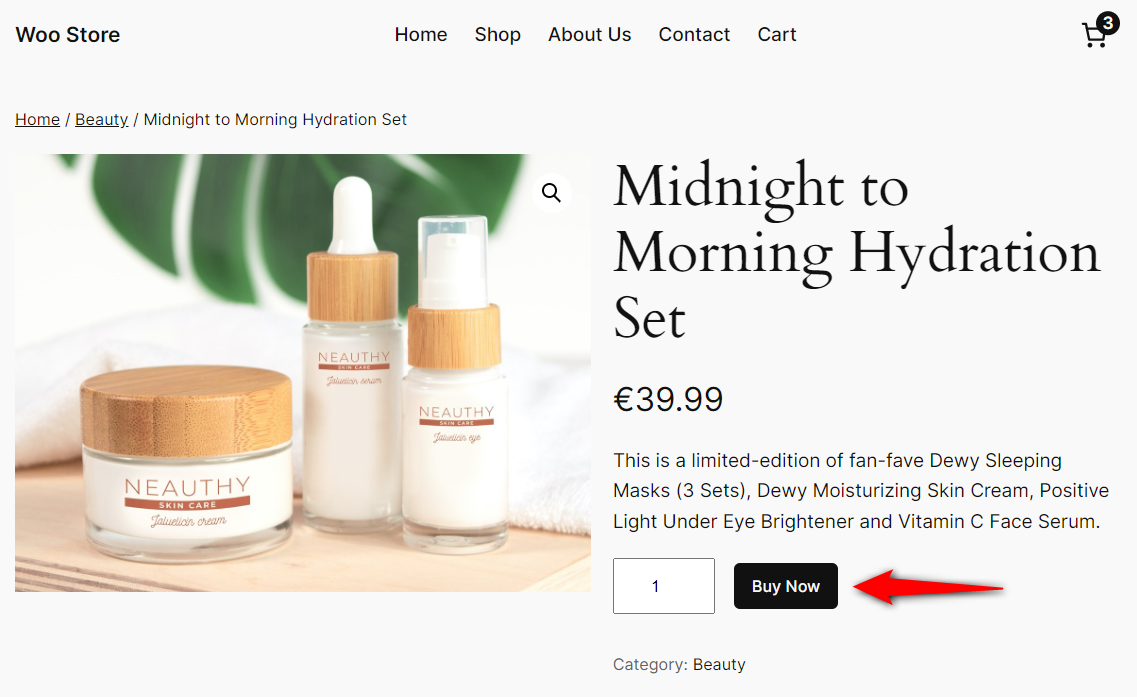
This will enable the WooCommerce buy now button on the product page:
Step 3: Enable the WooCommerce buy now button functionality on the shop or archive page
Now the skip cart option is enabled on product pages, activate the buy now button on the WooCommerce shop or archive pages.
The WooCommerce archive pages use AJAX to load items to the cart, which is why CartHopper will not work here. To do this, disable AJAX from the WooCommerce settings.
Navigate to WooCommerce ⇨ Settings ⇨ Products and disable the following options under the add to Cart Behavior section:
- Redirect to the cart page after successful addition
- Enable AJAX add to cart buttons on archives
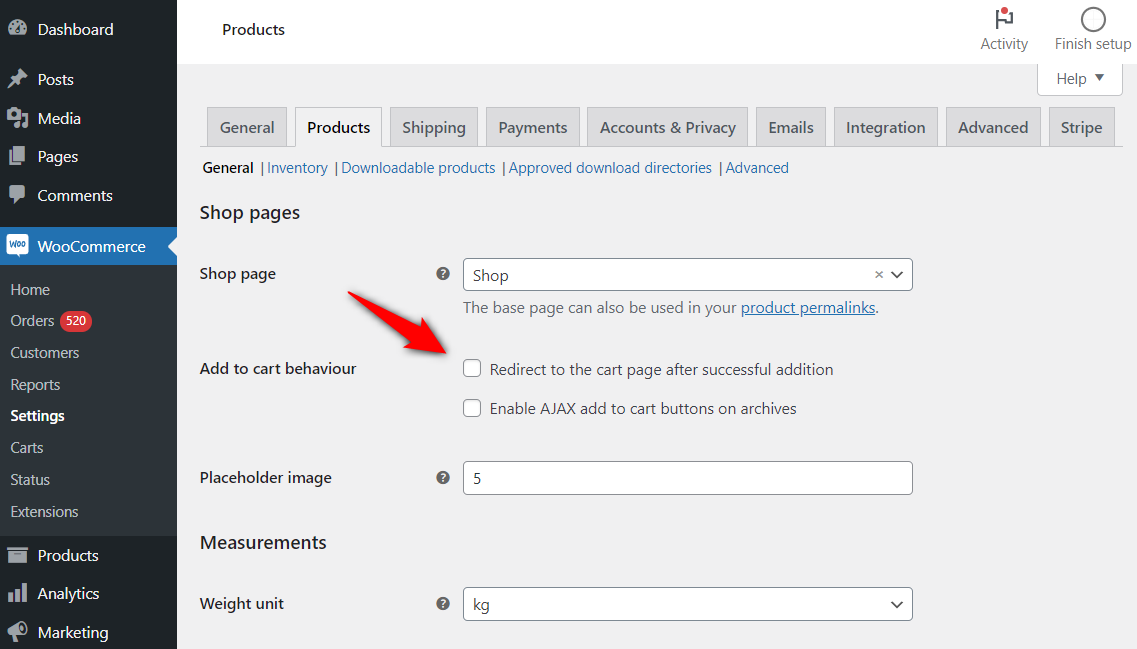
This will help you check out directly from the WooCommerce archive pages.
That’s it! That is how you can add WooCommerce buy now buttons on the shop archive and product pages using FunnelKit’s CartHopper add-on.
You can also use additional plugins to replace the add-to-cart button with a buy now button on WooCommerce product or archive pages.
Method 4: Boost Sales with a WooCommerce Buy Now Button in a Sliding Shopping Cart
You can add a stylish WooCommerce Buy Now button with the free FunnelKit Cart plugin, a popular sliding cart solution used by over 30,000 stores. It offers seamless cart access, easy modifications, and in-cart upsells to boost sales.
So, make sure you install and activate the plugin. You can find the free version on WordPress.org.
Follow the process to add the quick buy button with the WooCommerce side cart:
Step 1: Enable the sliding cart in WooCommerce
Navigate to FunnelKit ⇨ Cart and turn on the toggle to enable the sliding cart in your store.
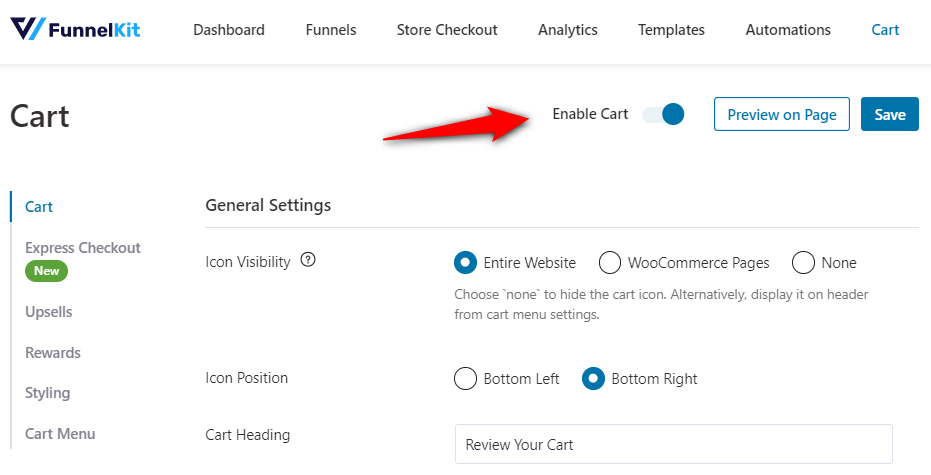
Click on ‘Save’ when done. It’ll enable the side cart in your WooCommerce store. Next you can customize the shopping cart to go with your brand.
Step 2: Customize the WooCommerce buy now button in the sliding cart
On the checkout section, enable the button icon, cart price, continue shopping link, and the behavior.
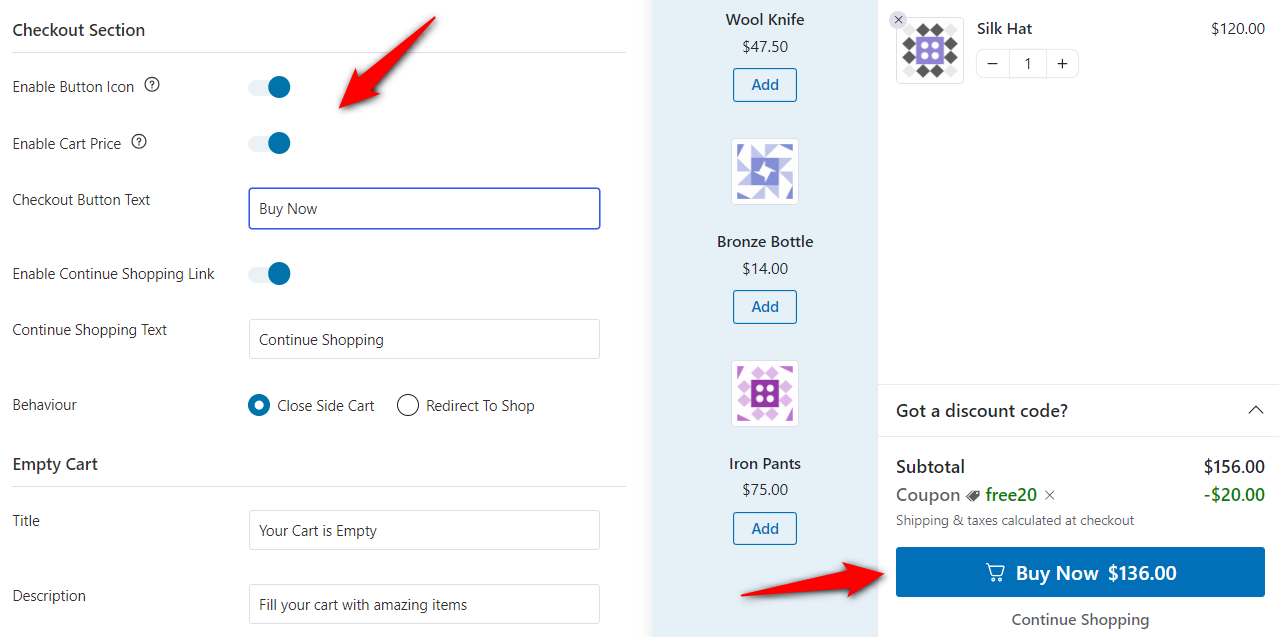
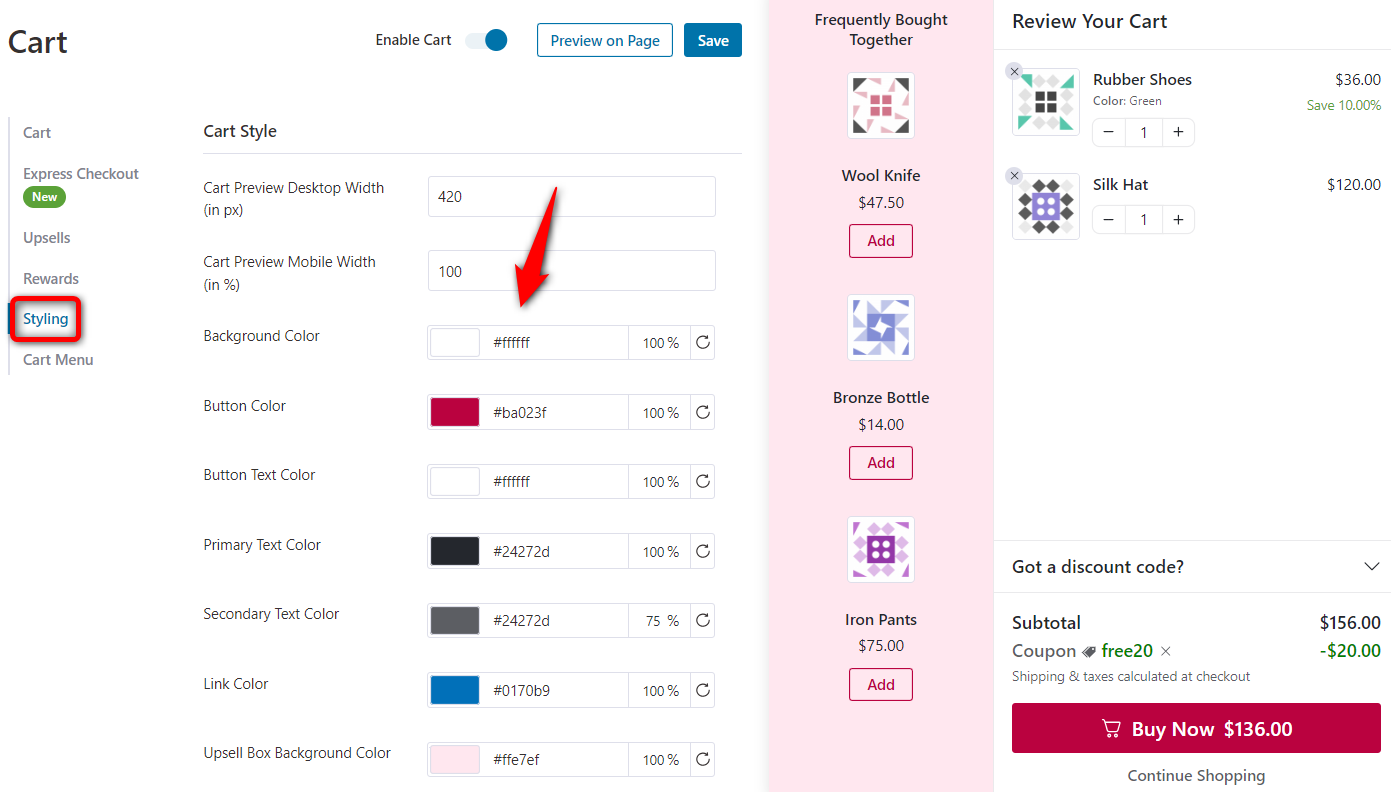
Style the buy now button in WooCommerce from the Styling section.
Customize the button color, button text color, border color, border radius, font family, and more.
Hit the ‘Save’ button when done.
Well done! You’ve successfully set up a modern shopping cart in your store. It’ll help you implement WooCommerce's 'Buy Now' button functionality.
Method 5: Add a Custom WooCommerce Buy Now Button Using Code Snippets
To use this method of using raw code, navigate to Appearance ⇨ Theme File Editor on your WordPress dashboard.
Copy the following code into the theme’s functions.php file:
class WC_Buy_Now_Handler
{
	/**
	 * Constructor - Initialize hooks
	 */
	public function __construct()
	{
		add_action( 'woocommerce_after_add_to_cart_button', array( $this, 'add_buy_now_button_single' ) );
		add_action( 'wp_loaded', array( $this, 'handle_buy_now' ) );
	}

	/**
	 * Add Buy Now button on single product page
	 */
	public function add_buy_now_button_single()
	{
		global $product;

		printf(
			'<button id="sbw_wc-adding-button" type="submit" name="sbw-wc-buy-now" value="%d" class="buy_now_button button alt">%s</button>',
			$product->get_ID(),
			esc_html__( 'Buy Now', 'sbw-wc' )
		);
	}

	/**
	 * Handle Buy Now button click
	 */
	public function handle_buy_now()
	{
		if ( !isset( $_REQUEST['sbw-wc-buy-now'] ) ) {
			return false;
		}

		WC()->cart->empty_cart();

		$product_id = absint( $_REQUEST['sbw-wc-buy-now'] );
		$quantity = isset( $_REQUEST['quantity'] ) ? absint( $_REQUEST['quantity'] ) : 1;

		if ( isset( $_REQUEST['variation_id'] ) ) {
			$variation_id = absint( $_REQUEST['variation_id'] );
			WC()->cart->add_to_cart( $product_id, $quantity, $variation_id );
		} else {
			WC()->cart->add_to_cart( $product_id, $quantity );
		}

		wp_safe_redirect( wc_get_checkout_url() );
		exit;
	}
}

// Initialize the class
new WC_Buy_Now_Handler();
This code adds a dynamic WooCommerce buy now button next to the add to cart button in WooCommerce. Find this button on the product page:
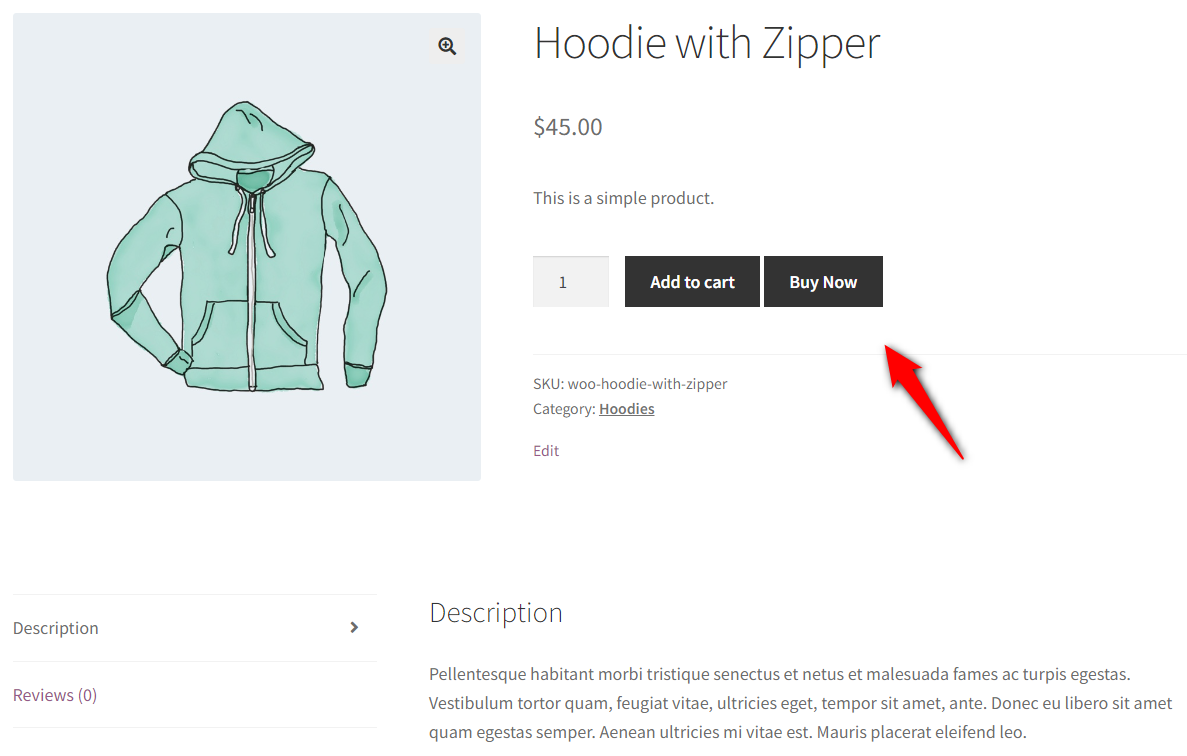
This is how you can add a custom buy now button to WooCommerce using coding.
Buy Now Button vs. Add to Cart Button: What’s the Difference?
The WooCommerce Buy Now button lets shoppers purchase instantly without going through the cart, perfect for quick, impulse buys.
In contrast, the Add to Cart button encourages browsing and building a cart, allowing shoppers to compare and review before checkout.
Buy Now offers a fast, streamlined one-step checkout that boosts conversions by reducing friction. Add to Cart supports upselling and cross-selling opportunities but involves a longer, multi-step purchase process.
Ultimately, Buy Now is ideal for shoppers ready to buy immediately, while Add to Cart suits those who prefer a flexible, detailed shopping experience.
5 Best Practices to Increase Conversions With Your Buy Now Button
Here are some effective tips to boost conversions with the WooCommerce buy now button.
- Use action-oriented button text
Instead of a generalized "Buy Now", test variations like "Get It Now", "Order Instantly", or "Grab This Deal".
Action words create urgency and make the button feel more compelling. Test different labels to see which one drives the highest click-through rate in your store.
- Choose a contrasting button color
Your buy now button should be the most visually prominent element near the product price. Use a color that stands out from your theme’s color palette.
According to UX research, high-contrast buttons consistently outperform buttons that blend into the page design.
- Display both buttons for stores with mixed buying patterns
If your customers sometimes buy single items and sometimes build multi-item orders, show both the Add to Cart and Buy Now buttons.
This gives each shopper the path that best fits their intent without forcing a single behavior on everyone.
- Pair your buy now button with a streamlined checkout page
The buy now button only removes one step. If your checkout page is still cluttered with unnecessary fields, slow-loading scripts, or a confusing layout, customers will abandon it at checkout instead.
Minimize form fields, enable address autocomplete, and offer express payment methods to complete the streamlined experience.
- Add trust signals near the buy now button
Place security badges, money-back guarantee icons, or accepted payment logos close to the buy now button.
Since clicking this button moves customers directly to payment, they need to feel confident about the transaction before they click.
Frequently Asked Questions Related to WooCommerce Buy Now Button
You can add a buy now button in WooCommerce using 5 methods:
1. Appending the URLs or using custom codes without using any plugins
2. Setting up a dedicated sales funnel
3. Redirecting users to checkout with a button using plugins
4. Setting up a sliding shopping cart in WooCommerce
5. Using a custom code snippet
All these methods are listed here in this post.
Yes, dedicated buy now button plugins support variable products. The button stays inactive or hidden until the customer selects product variations (such as size and color). Once a product variation is selected, the buy now button becomes active and redirects to the checkout page. If you are using the custom code method, you will need additional JavaScript to handle variation selection before the redirect.
Yes. Buy now buttons work with any well-coded WooCommerce theme, including popular options like Storefront, Aflavor, Flatsome, OceanWP, GeneratePress, and Kadence.
Most plugins also provide styling options to match the button with your brand colors and design. If you are using a block theme, check that the plugin supports block theme compatibility.
Replacing the Add to Cart button with 'Buy Now' or showing both depends on your store type.
If you sell one product or a few standalone items (such as a digital download, a subscription plan, or a single physical product), replacing the Add to Cart button creates a more focused experience.
If your store has many products that customers often buy together, keep both buttons so shoppers can choose between quick checkout and continued browsing.
You can add a buy now button to a landing page or blog post by using a shortcode or a direct checkout URL. Most buy now button plugins provide a shortcode that you can place in any page, post, or widget area.
If your plugin does not offer shortcodes, create a direct checkout URL (/checkout/?add-to-cart=PRODUCT_ID) and link it to a custom button element in your page builder.
You can customize your WooCommerce button with your favorite page builders. For that, you need to create a sales funnel with landing pages, checkout pages and thank you pages. Create these sales funnels easily within a few minutes.
After creating the sales funnel, edit your landing page in Elementor or another page builder, and customize the buy now button. Change its text, button color, text color, border radius, widths, etc. This solution also answers your ‘How do I change the color of my Buy Now button in WooCommerce?’ query.
By default, the Buy Now button in WooCommerce is already disabled. If you’ve set up this button using one of the methods provided in this post, we recommend you do the following:
- Either remove the custom code (Method-1)
- Delete the dedicated sales funnel (Method-2)
- Deactivate the CartHopper or any additional buy now button plugins (Method-3)
- Disable the sliding cart in your store (Method-4)
- Disable the custom code (Method-5)
This is how you can disable the buy now button in WooCommerce.
Streamline the Checkout Process and Boost Sales Revenue with the WooCommerce Buy Now Button
The WooCommerce buy now button is a powerful tool for increasing conversions and enhancing the user experience on your store.
You can optimize your sales process and drive more revenue by enabling it in your store, customizing its appearance, and leveraging plugins.
With five methods demonstrated in this post, FunnelKit plugins enable you to implement buy-now buttons in three of these methods. And that too without working on any code!
Use the reliable buy now button along with checkout optimization, express payment support, order bumps, and one-click upsells, all of which work together to maximize the revenue from every click.
Editorial Team
June 23, 2026Are you searching for the best WooCommerce plugins to enhance the overall customer experience and boost conversions in your store? Honestly, there are a ton of free and paid WordPress...

Editorial Team
June 18, 2026Want to sell your LearnDash courses through WooCommerce and accept payments seamlessly through gateways like Stripe, PayPal, or Apple Pay? To sell LearnDash courses through WooCommerce, you install the WooCommerce...

Editorial Team
June 17, 2026Looking for the WooCommerce thank you page so you can edit it, but can’t find a page anywhere in your dashboard? You’re not alone. WooCommerce doesn't show this page like...


