
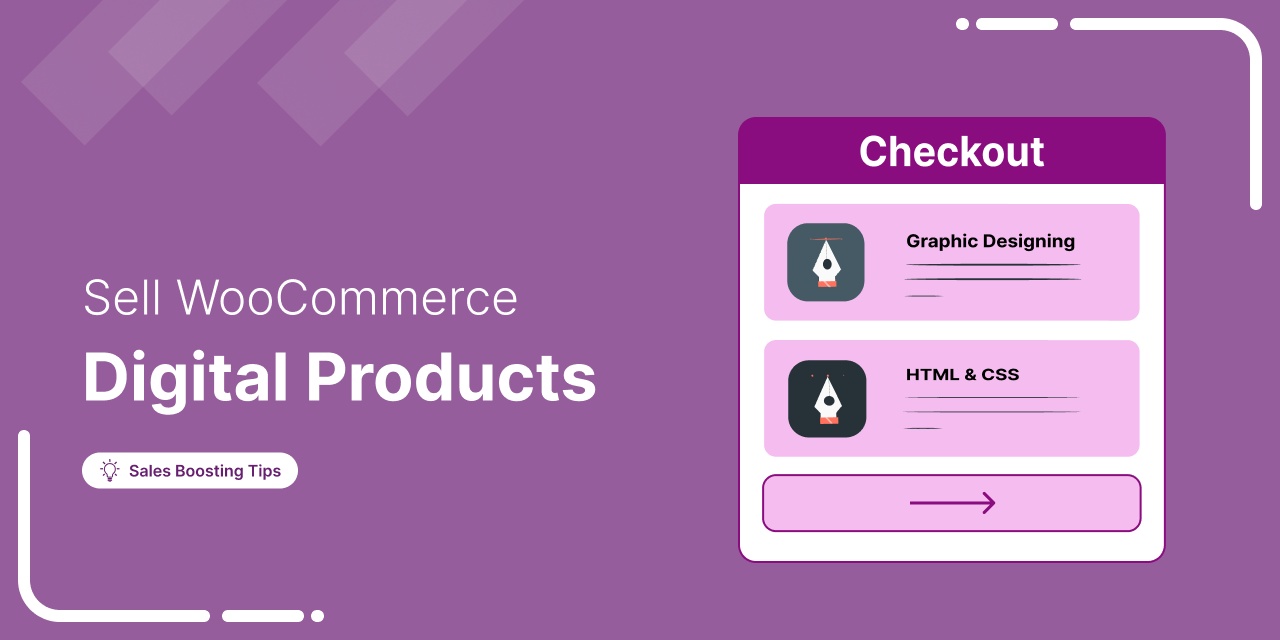
WooCommerce makes it pretty simple to create and sell digital products like eBooks, software, and online courses etc from a single WordPress store.
You don’t need anything complex to get started, and everything stays in one place.
It’s also one of the most widely used eCommerce platforms, powering over 7 million online stores worldwide.
One of the best things about WooCommerce is how flexible it is. You can keep things simple with a basic online store, or improve the buying experience by adding sales funnels that guide customers from viewing a product to making a purchase.
In this guide, we’ll show you how to create digital products in WooCommerce and set up your store in a way that helps increase conversions and generate more sales.
Table of Contents
- 1 What Are WooCommerce Digital Products?
- 2 How To Create Digital Products In WooCommerce
- 3 How to Sell Digital Products With WooCommerce to Get Maximum Revenue
- 4 How Can Customers Access Their Downloads After Buying in WooCommerce?
- 5 5 Tips You Need to Follow to Optimize Selling Digital Products in WooCommerce
- 6 Frequently Asked Questions About Selling WooCommerce Digital Products
- 7 Can I sell both digital and physical products in WooCommerce?
- 8 What are the differences between virtual and downloadable product types on WooCommerce?
- 9 What happens after someone buys a downloadable product?
- 10 Do I need any plugins to sell digital products in WooCommerce?
- 11 Ready to Sell Digital Products in WooCommerce?
What Are WooCommerce Digital Products?
WooCommerce digital products are non-physical items you sell online and deliver digitally rather than shipping anything to the customer.
After purchase, the customer gets instant access either via a download link or through an account in your store.
These can be eBooks, online courses, software, music files, templates, or memberships. In simple terms, anything that doesn’t require packing or physical delivery falls into this category.
In WooCommerce, digital products are usually created using two settings: Virtual and Downloadable.
Virtual Products
Virtual products are items that don’t need shipping or file delivery. They are more like services or access-based offerings. This also includes subscription products, in which users pay for ongoing access rather than receive a physical or downloadable item.
For example:
- Online coaching or consultations
- Memberships or subscriptions
- Online courses
- Service bookings or appointments
In these cases, the customer is not getting a file or a physical product. They are paying for access, time, or a service.
Downloadable Products
Downloadable products are digital files that customers can download after purchase. WooCommerce usually delivers these automatically once payment is complete.
- For example:
- eBooks in PDF format
- Music or audio files
- Software or plugins
- Printable templates or design files
- Digital tickets or vouchers
After purchase, WooCommerce provides a secure download link so customers can access their files right away.
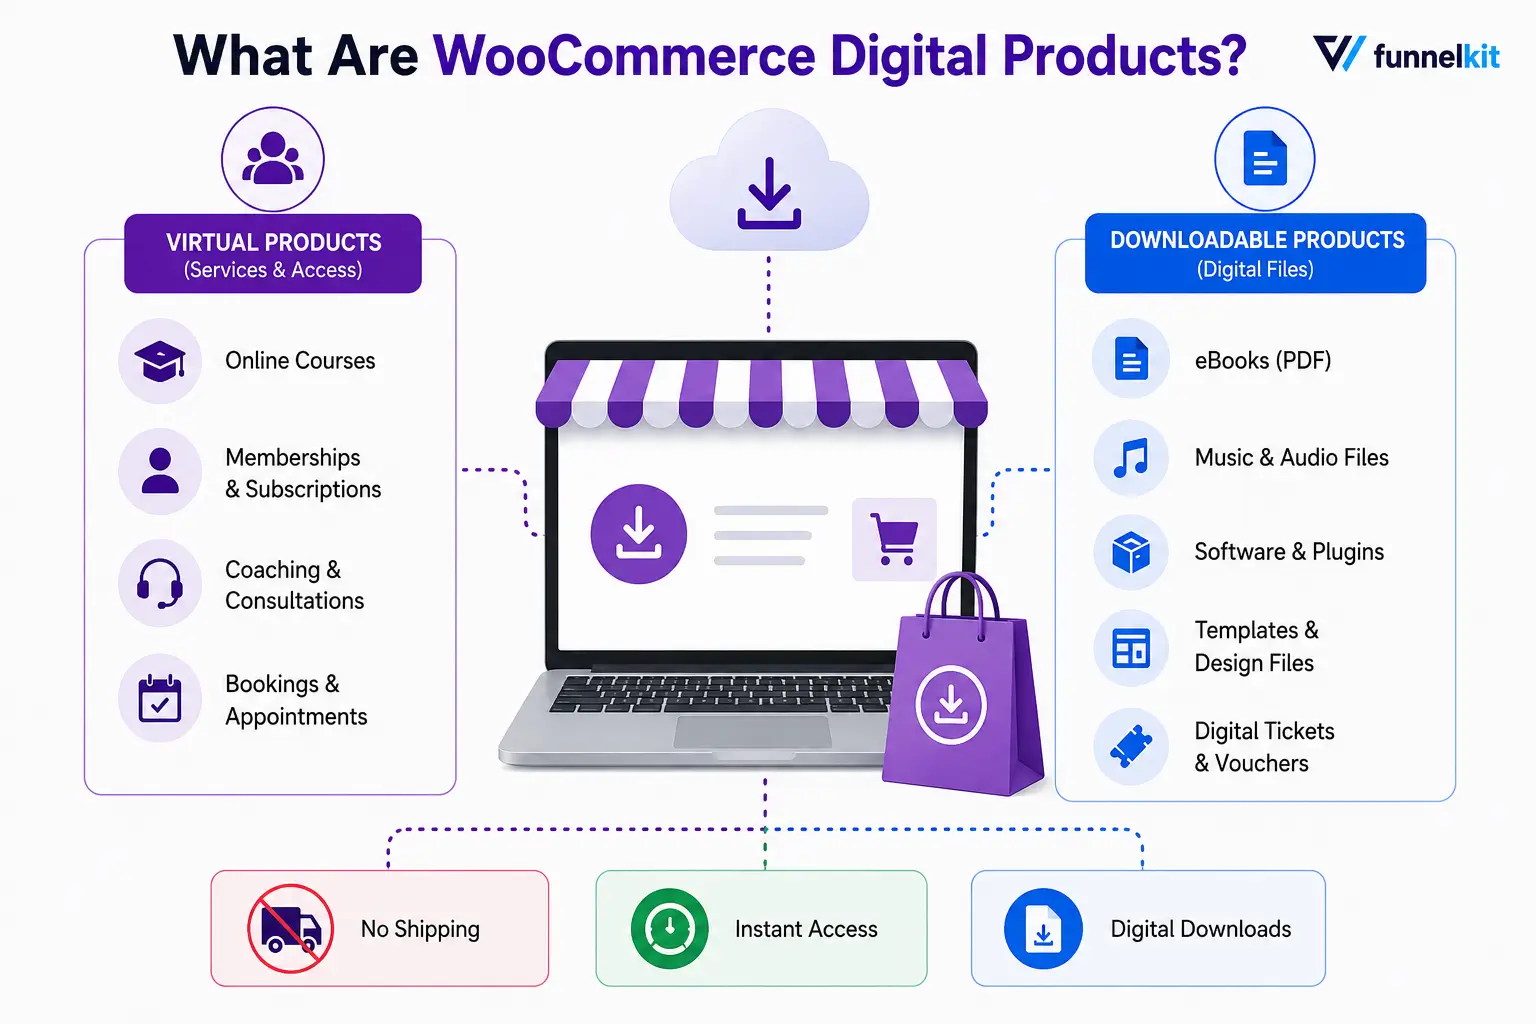
Note: A product can be both virtual and downloadable, meaning it can be downloaded without requiring shipping. For example, software or mobile apps are delivered as downloads only, with no physical shipment.
WooCommerce keeps this simple. No coding is needed.
To simplify:
- If nothing is shipped → mark as Virtual
- If a file is included → mark as Downloadable
- If both apply → enable both
That’s it. You can create both simple and variable types of digital products in WooCommerce. The system automatically handles delivery, access, and download limits in the background.
How To Create Digital Products In WooCommerce
To sell digital products with WordPress and WooCommerce, you first need to create digital products and configure the relevant WooCommerce settings.
Here are the steps you need to follow:
Step 1: Create a digital product
You can create both simple and variable digital products on WooCommerce. Let’s check how you can create both types of digital products.
You need to navigate to All Products ⇒ Add New, then provide the name and description of your digital product.
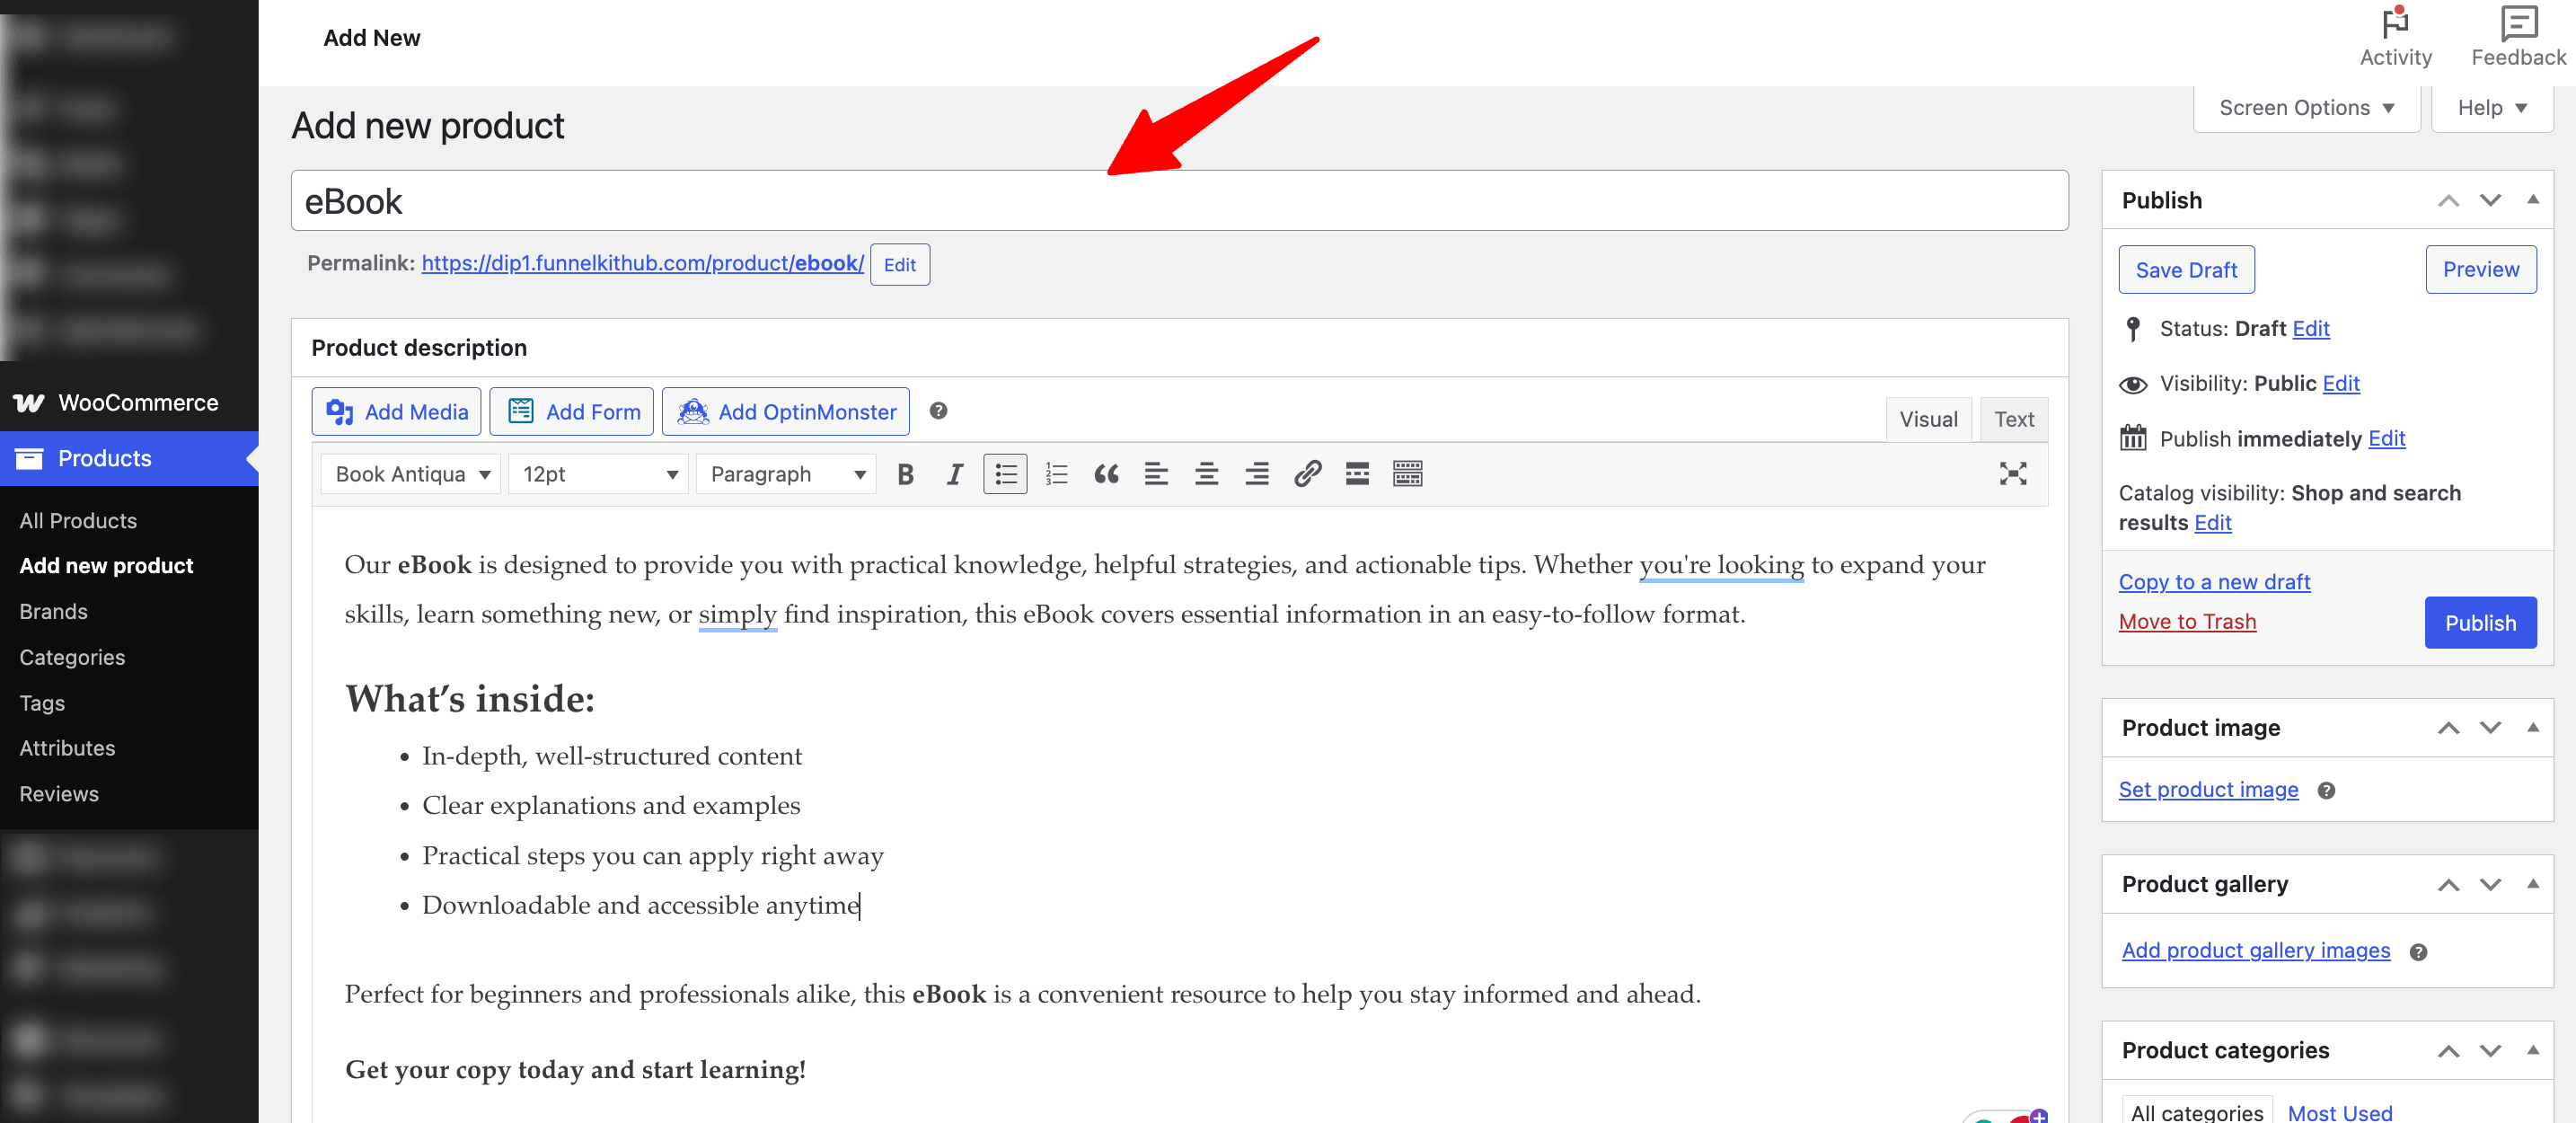
Scroll down to the Product Data section; make sure to choose Simple Product from the drop-down. Also, check both the Virtual and Downloadable checkboxes.
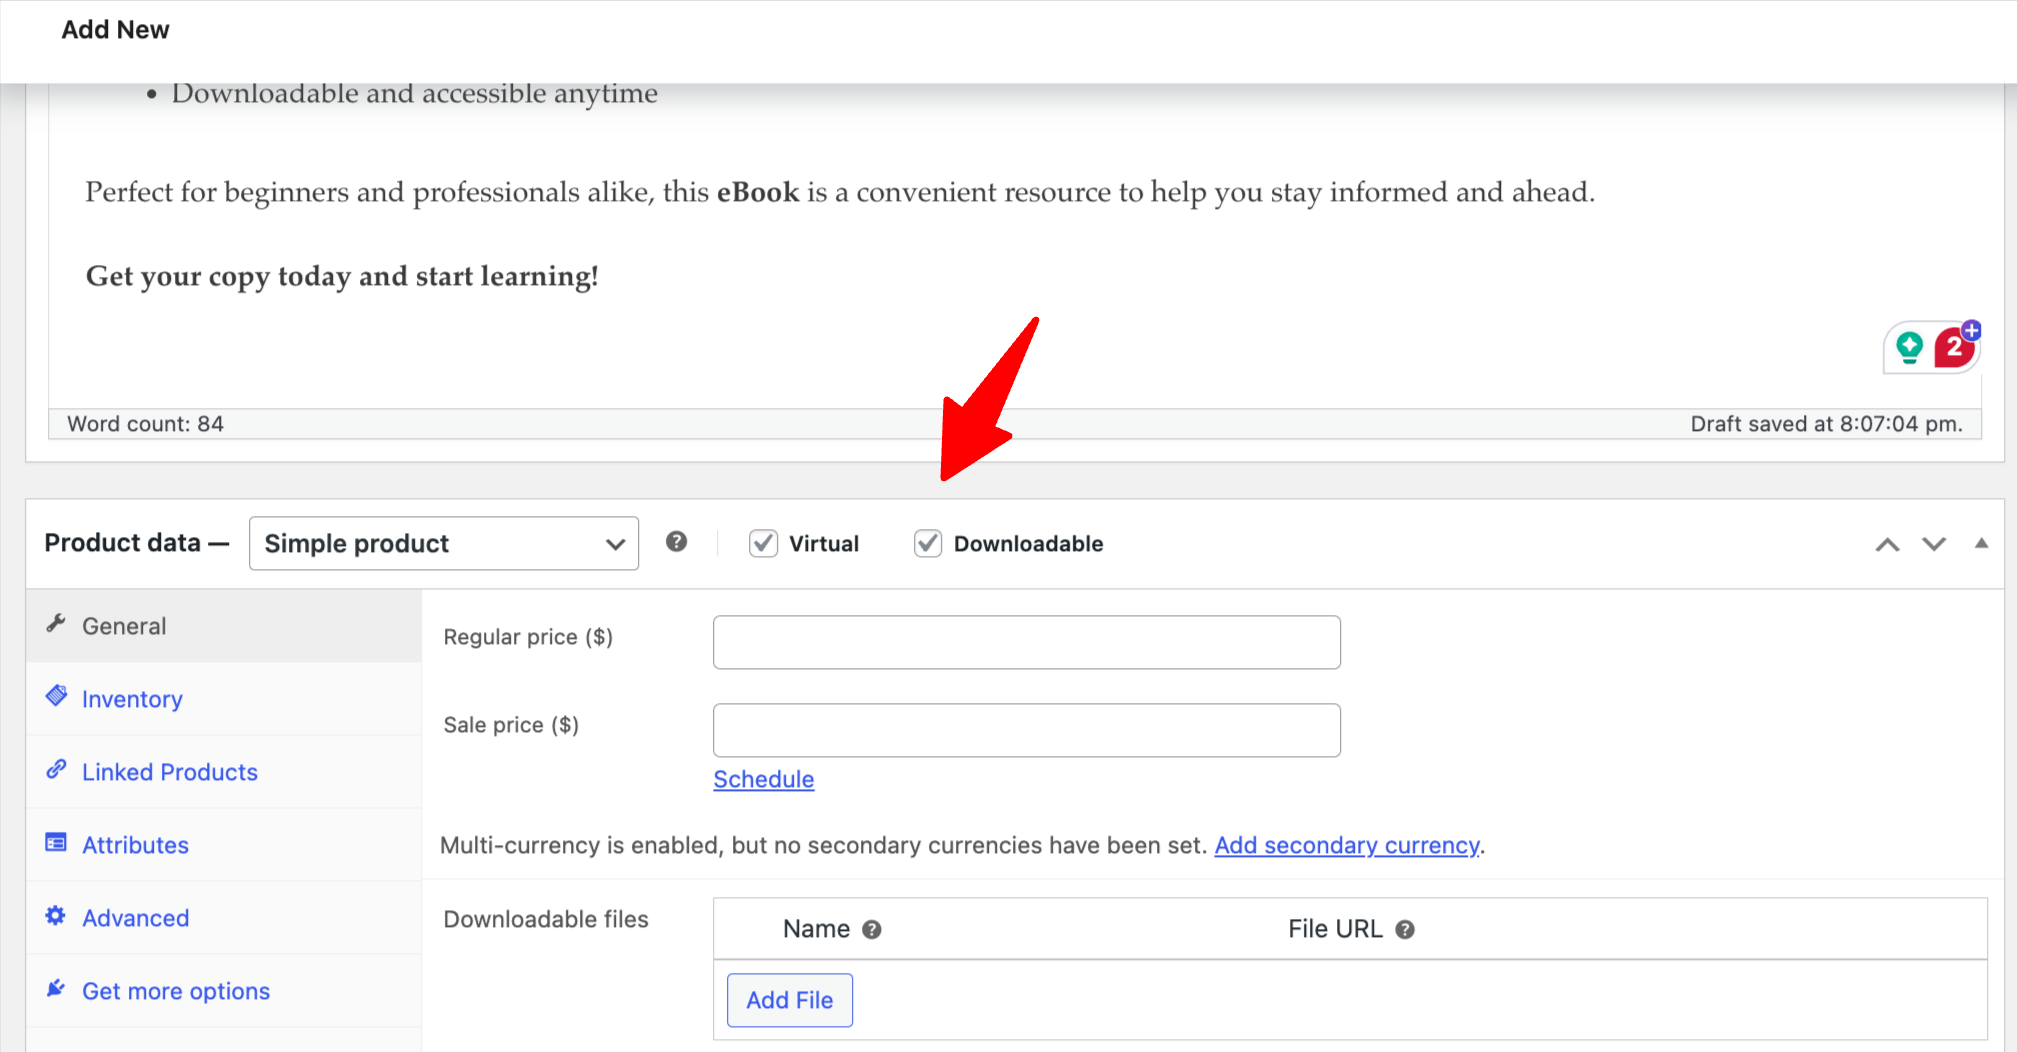
For a downloadable product, you need to upload a product. To do so, click on Add File. Then click on Choose File and upload or choose the product file from the WordPress media library.
You can also set the:
Download Limit: Set the number of times a user can download the file. If you want to offer unlimited re-downloads, leave this field blank.
Download Expiry: You can set the number of days before a download link expires or leave it blank.
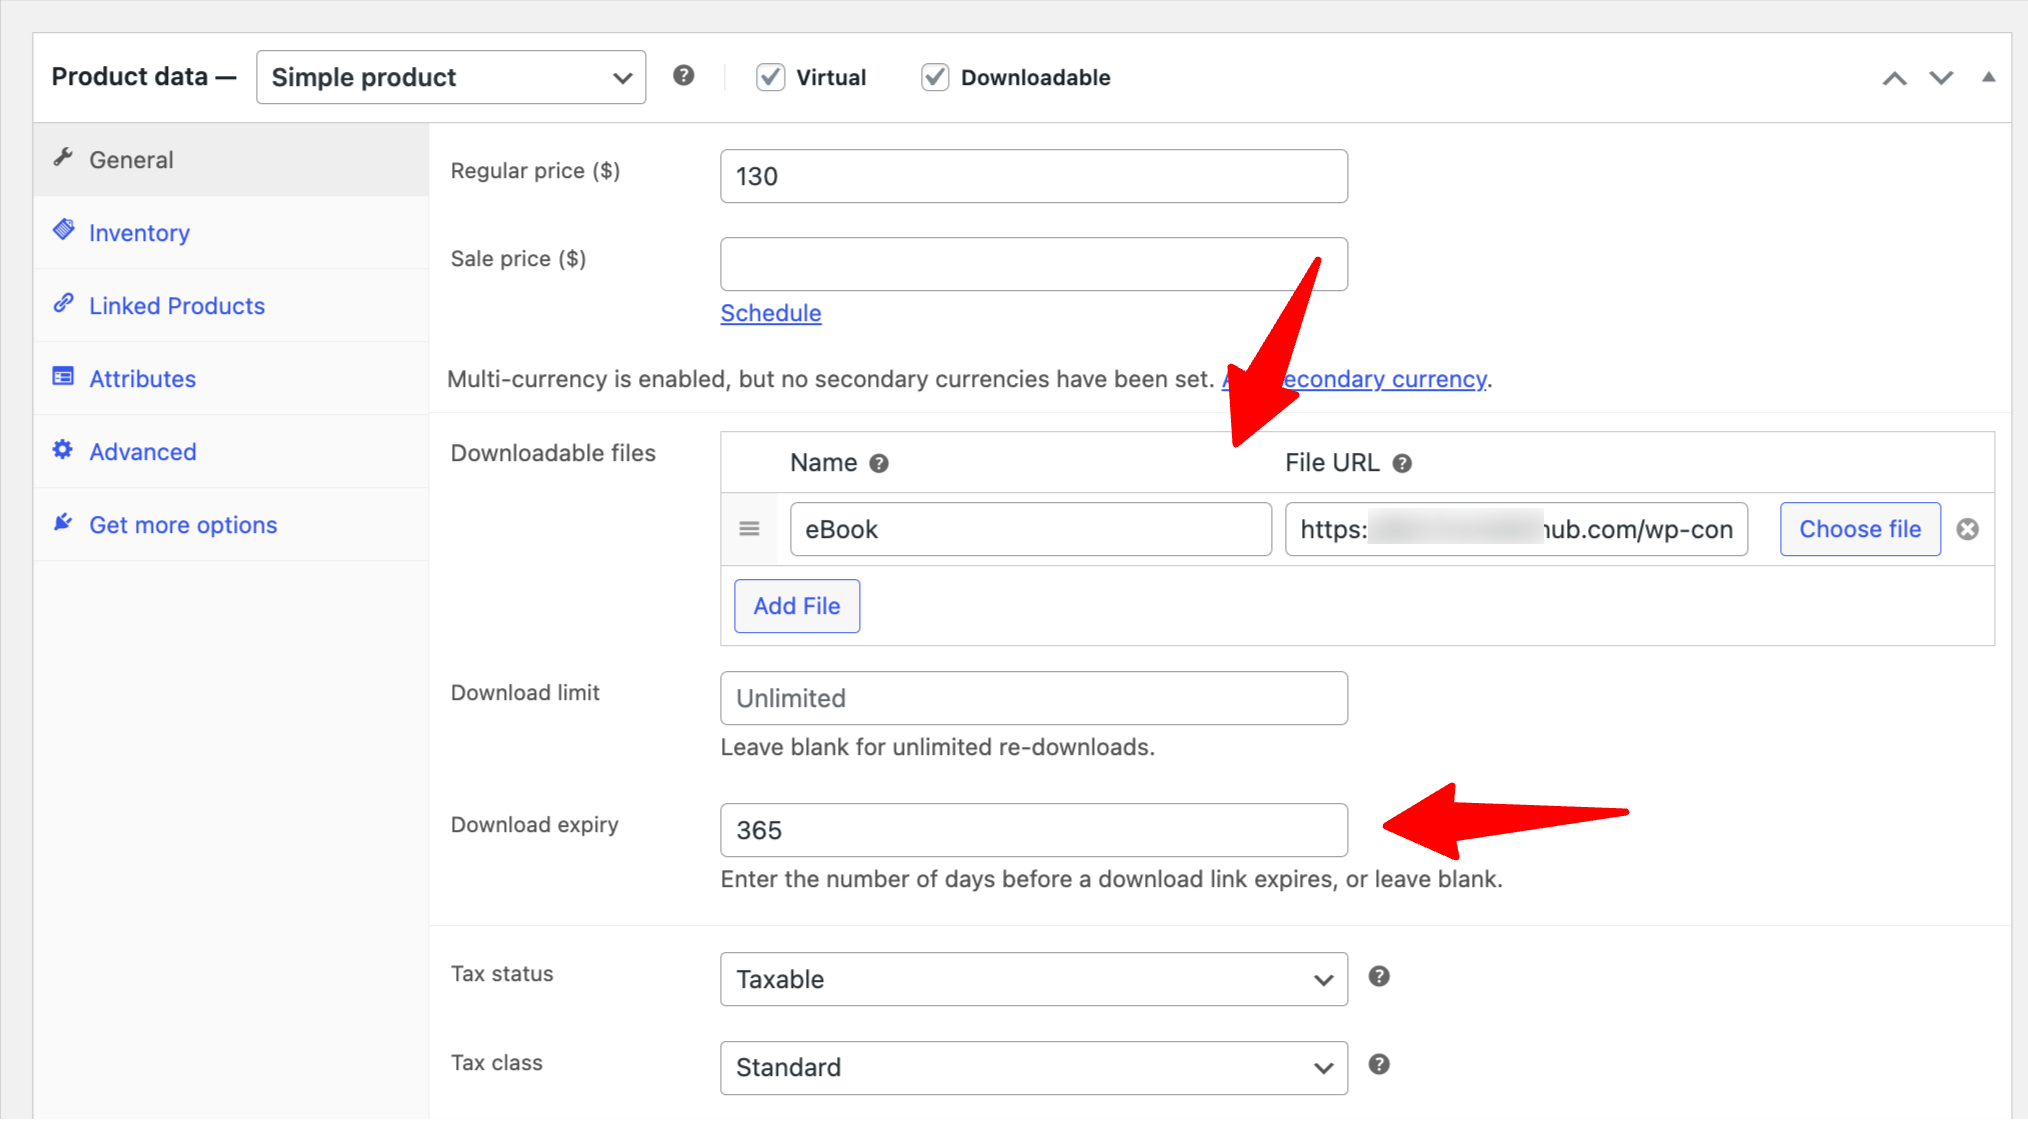
Those mentioned above are digital product-related settings. You need to customize the remaining settings just as you will for simple products.
Once you are done with all the product settings, click on publish to make the product available for public view. Repeat the same process to create as many digital products as you want.
How to configure a variable digital product in WooCommerce
In case you want to create a variable digital product, you need to choose product data as type variable from the dropdown list.
You also need to create attributes to create different versions of the product based on those attributes.
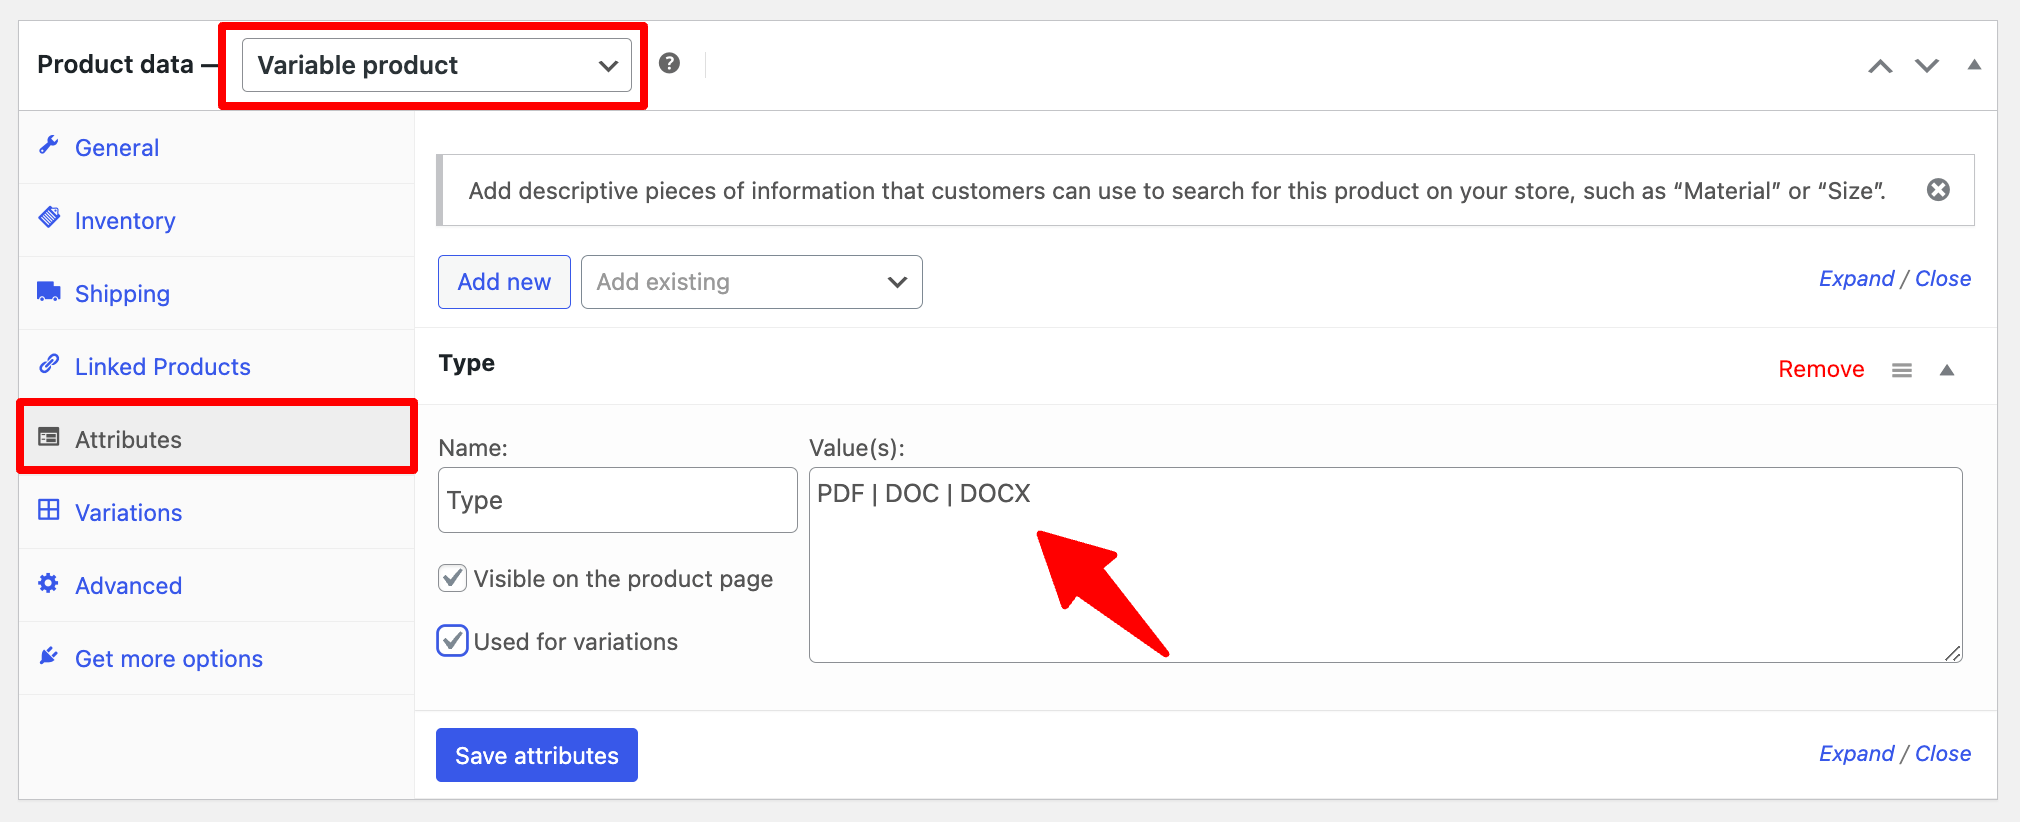
Now move to the Variations tab, and check the Downloadable and Virtual boxes to make these products digital.

Once you have created your product, make sure to publish it.
Now that you know how to create digital products in WooCommerce, let’s move to the next section to find out about the settings that make selling digital products more efficient and secure.
Step 2: Configure WooCommerce for Digital Products
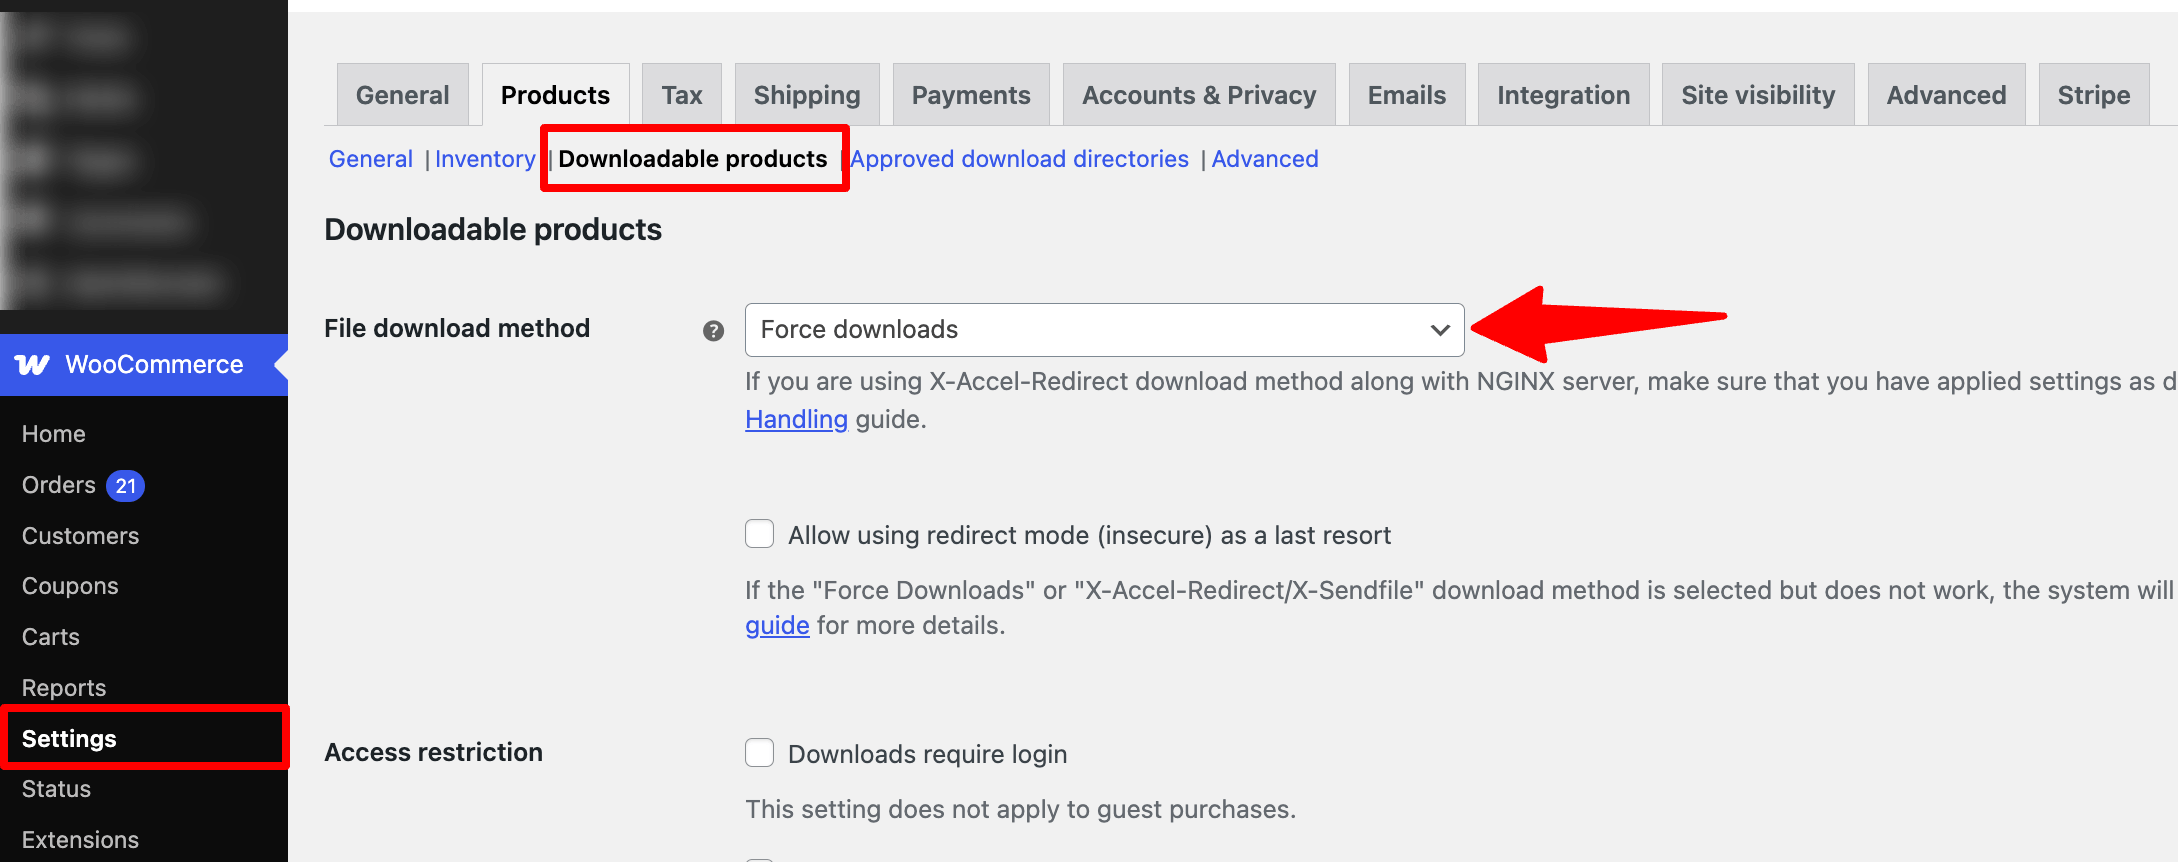
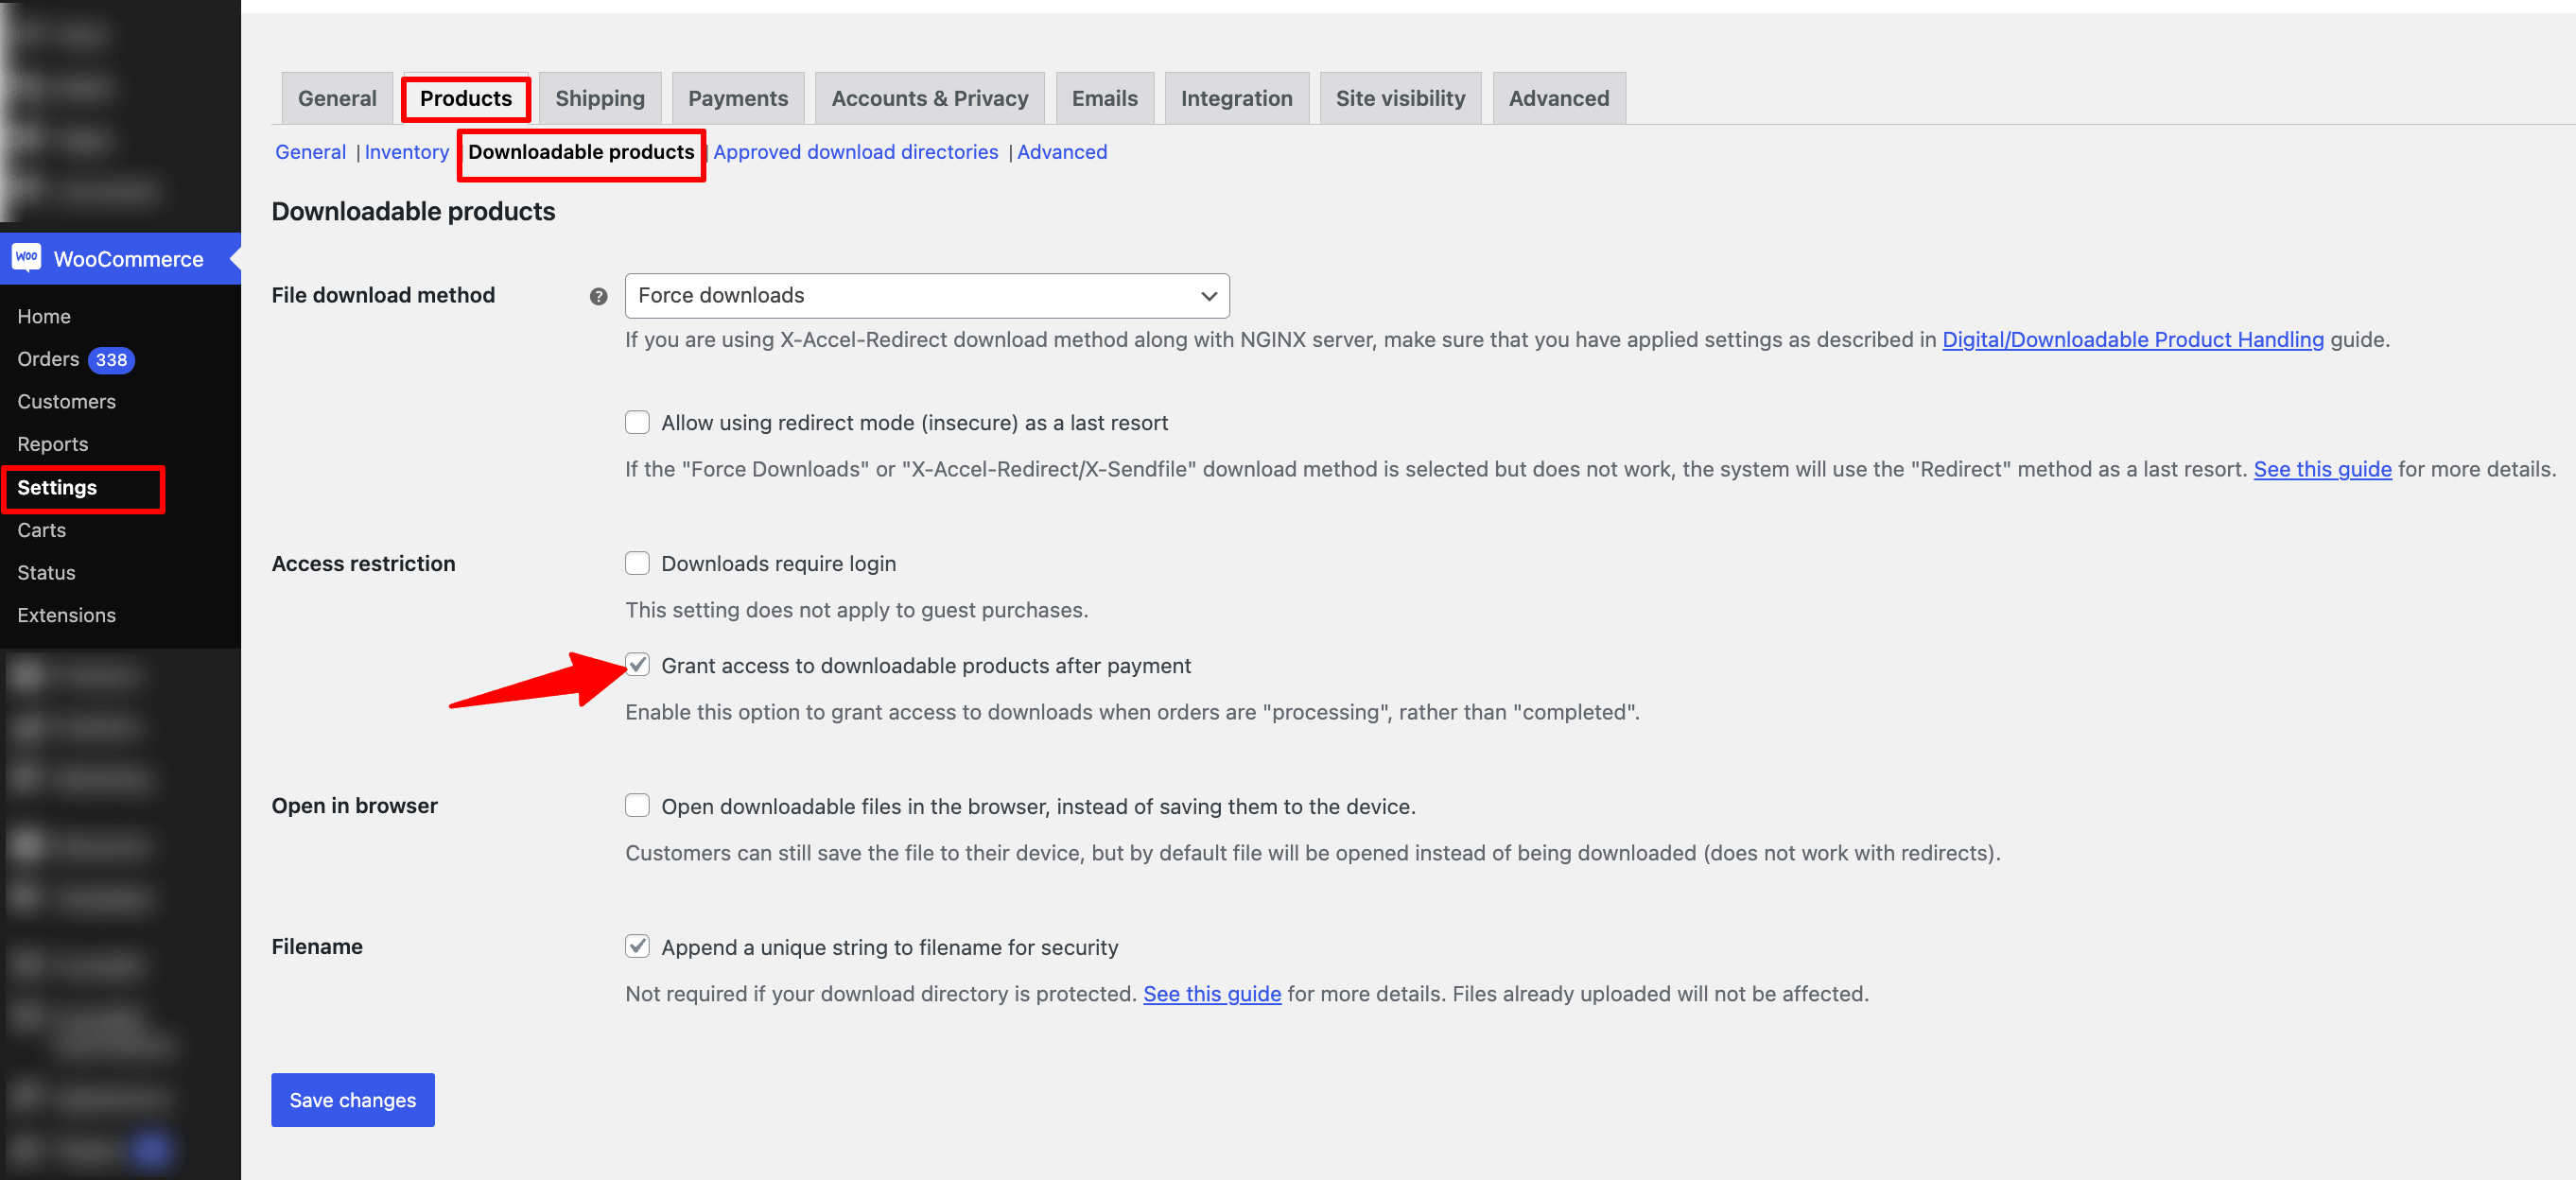
Go to WooCommerce ⇒ Settings ⇒ Products, then open the Downloadable Products tab.
Here you need to set the File Download Method as “Force Downloads.”Both Force downloads or X-Accel-Redirect/X-Sendfile are safe, but Force download is the best option.
This is because, in force download, files are served via PHP, and thus your files are protected from unauthorized sharing.
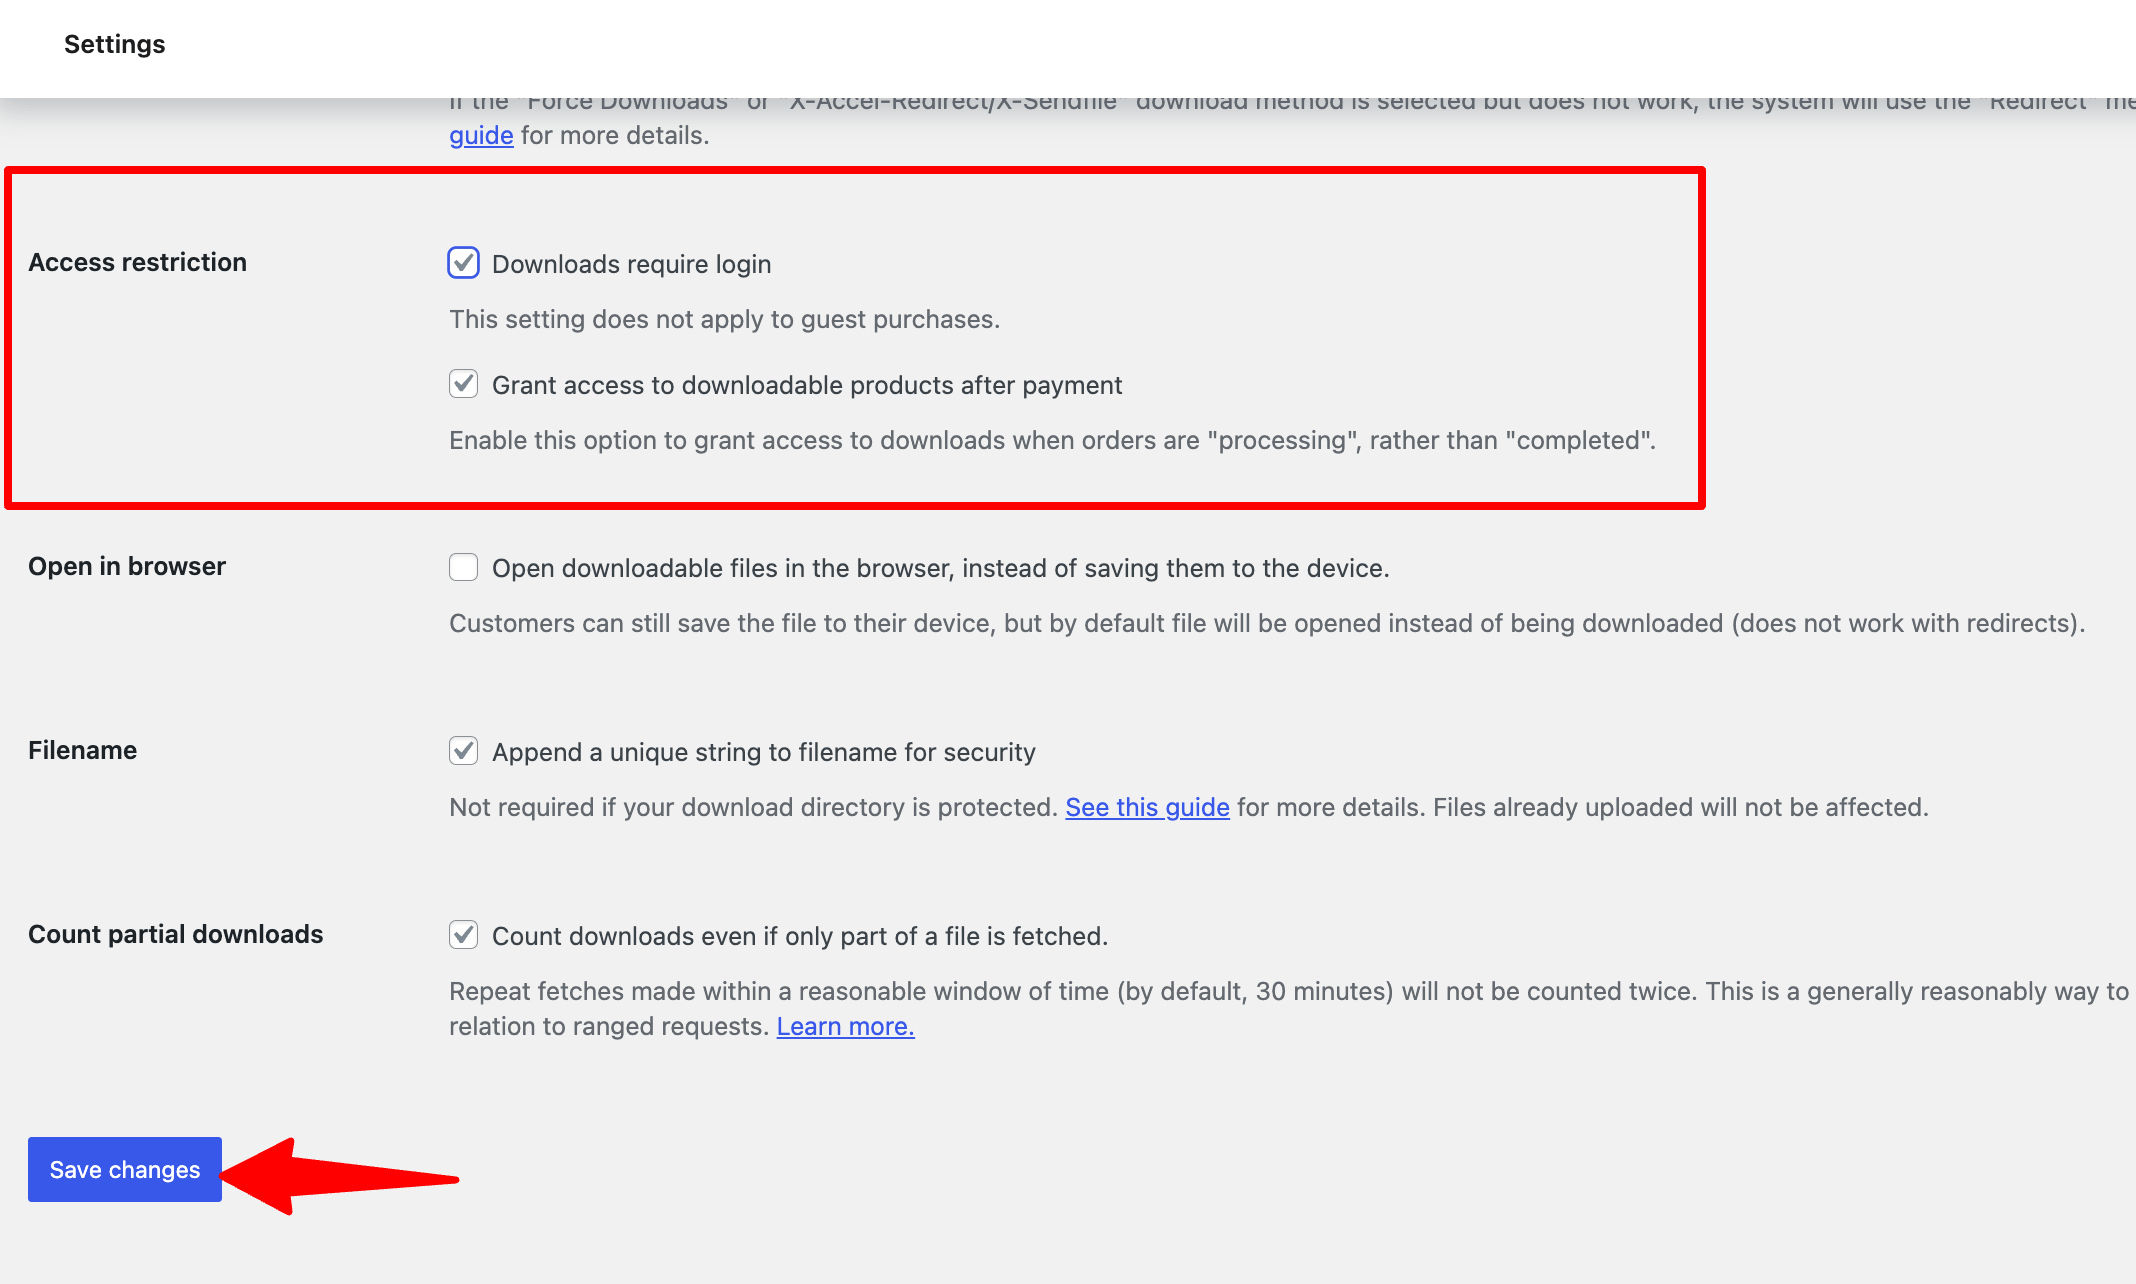
Under Access restrictions, you need to check the Downloads require login option for better security. If you want to enable the user to download the product when the processing starts (after), then check the Grant access to downloadable products.
Click on Save changes to update the settings.
Now you are ready to sell digital goods on WooCommerce. But this is a very basic setup that your competitors use as well.
So, how to get ahead in the competition to sell more products than your competitors? To find out, move to the next section.
How to Sell Digital Products With WooCommerce to Get Maximum Revenue
In this section, we will show you the most efficient way to sell digital products with WooCommerce that'll help you bring conversions and boost your store's revenue.
To make shopping for digital products in WooCommerce a smooth experience for users, we will use the Sales Funnel Builder WordPress plugin, FunnelKit Funnel Builder.
With this popular WooCommerce plugin, you can create and customize different sales pages such as landing pages, checkout pages, thank you pages, and so on.
In addition, you can add an order bump and a one-click upsell to increase your AOV. Furthermore, you can offer discounts on orders, order bumps, and one-click upsells with just a few clicks.
You need to install both FunnelKit Funnel Builder free version and Pro to follow the process shown here.
Step 1: Create a sales funnel and import a pre-built template
FunnelKit Funnel Builder provides multiple pre-built sales funnels that you can import within a few clicks. In this blog, we will use one of those. But first, you need to create a sales funnel.
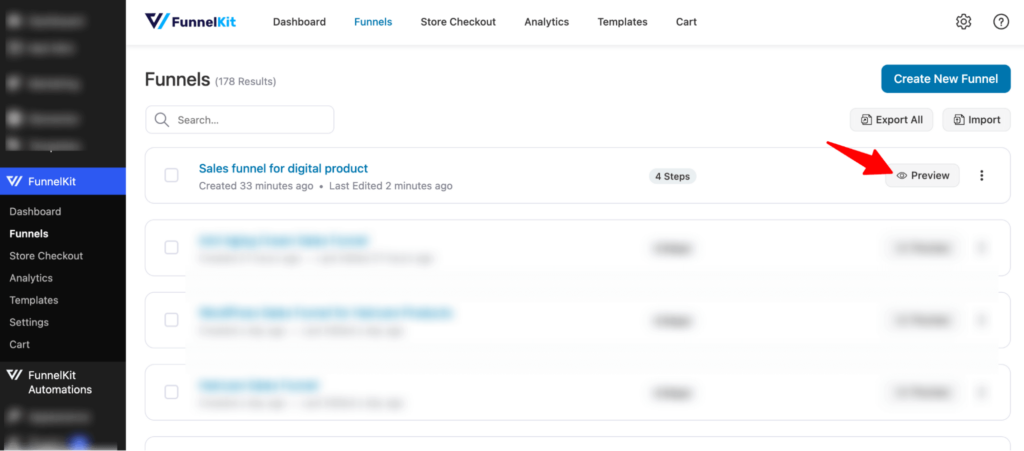
To create a sales funnel, navigate to FunnelKit Funnel Builder ⇒ Funnels and click on Create New Funnel.
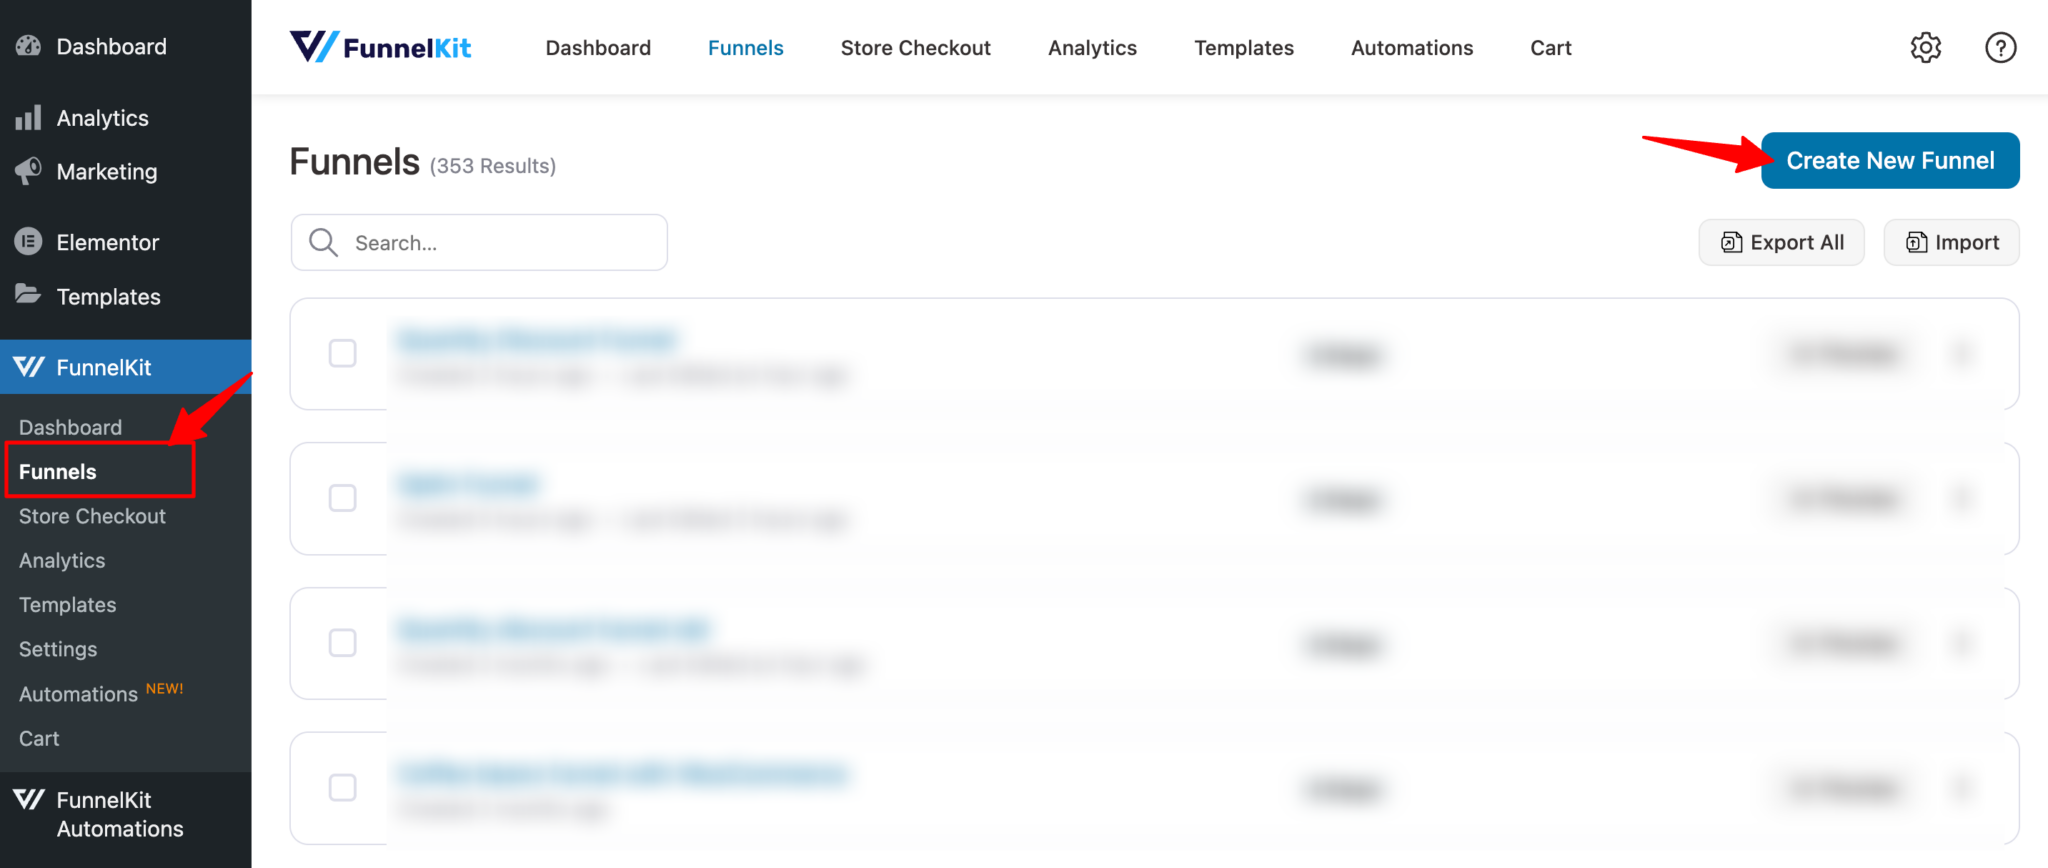
Now you can see all the funnels that FunnelKit Funnel Builder provides. You will also get the option to create your funnels from scratch. But in this blog, we will use a prebuilt template.
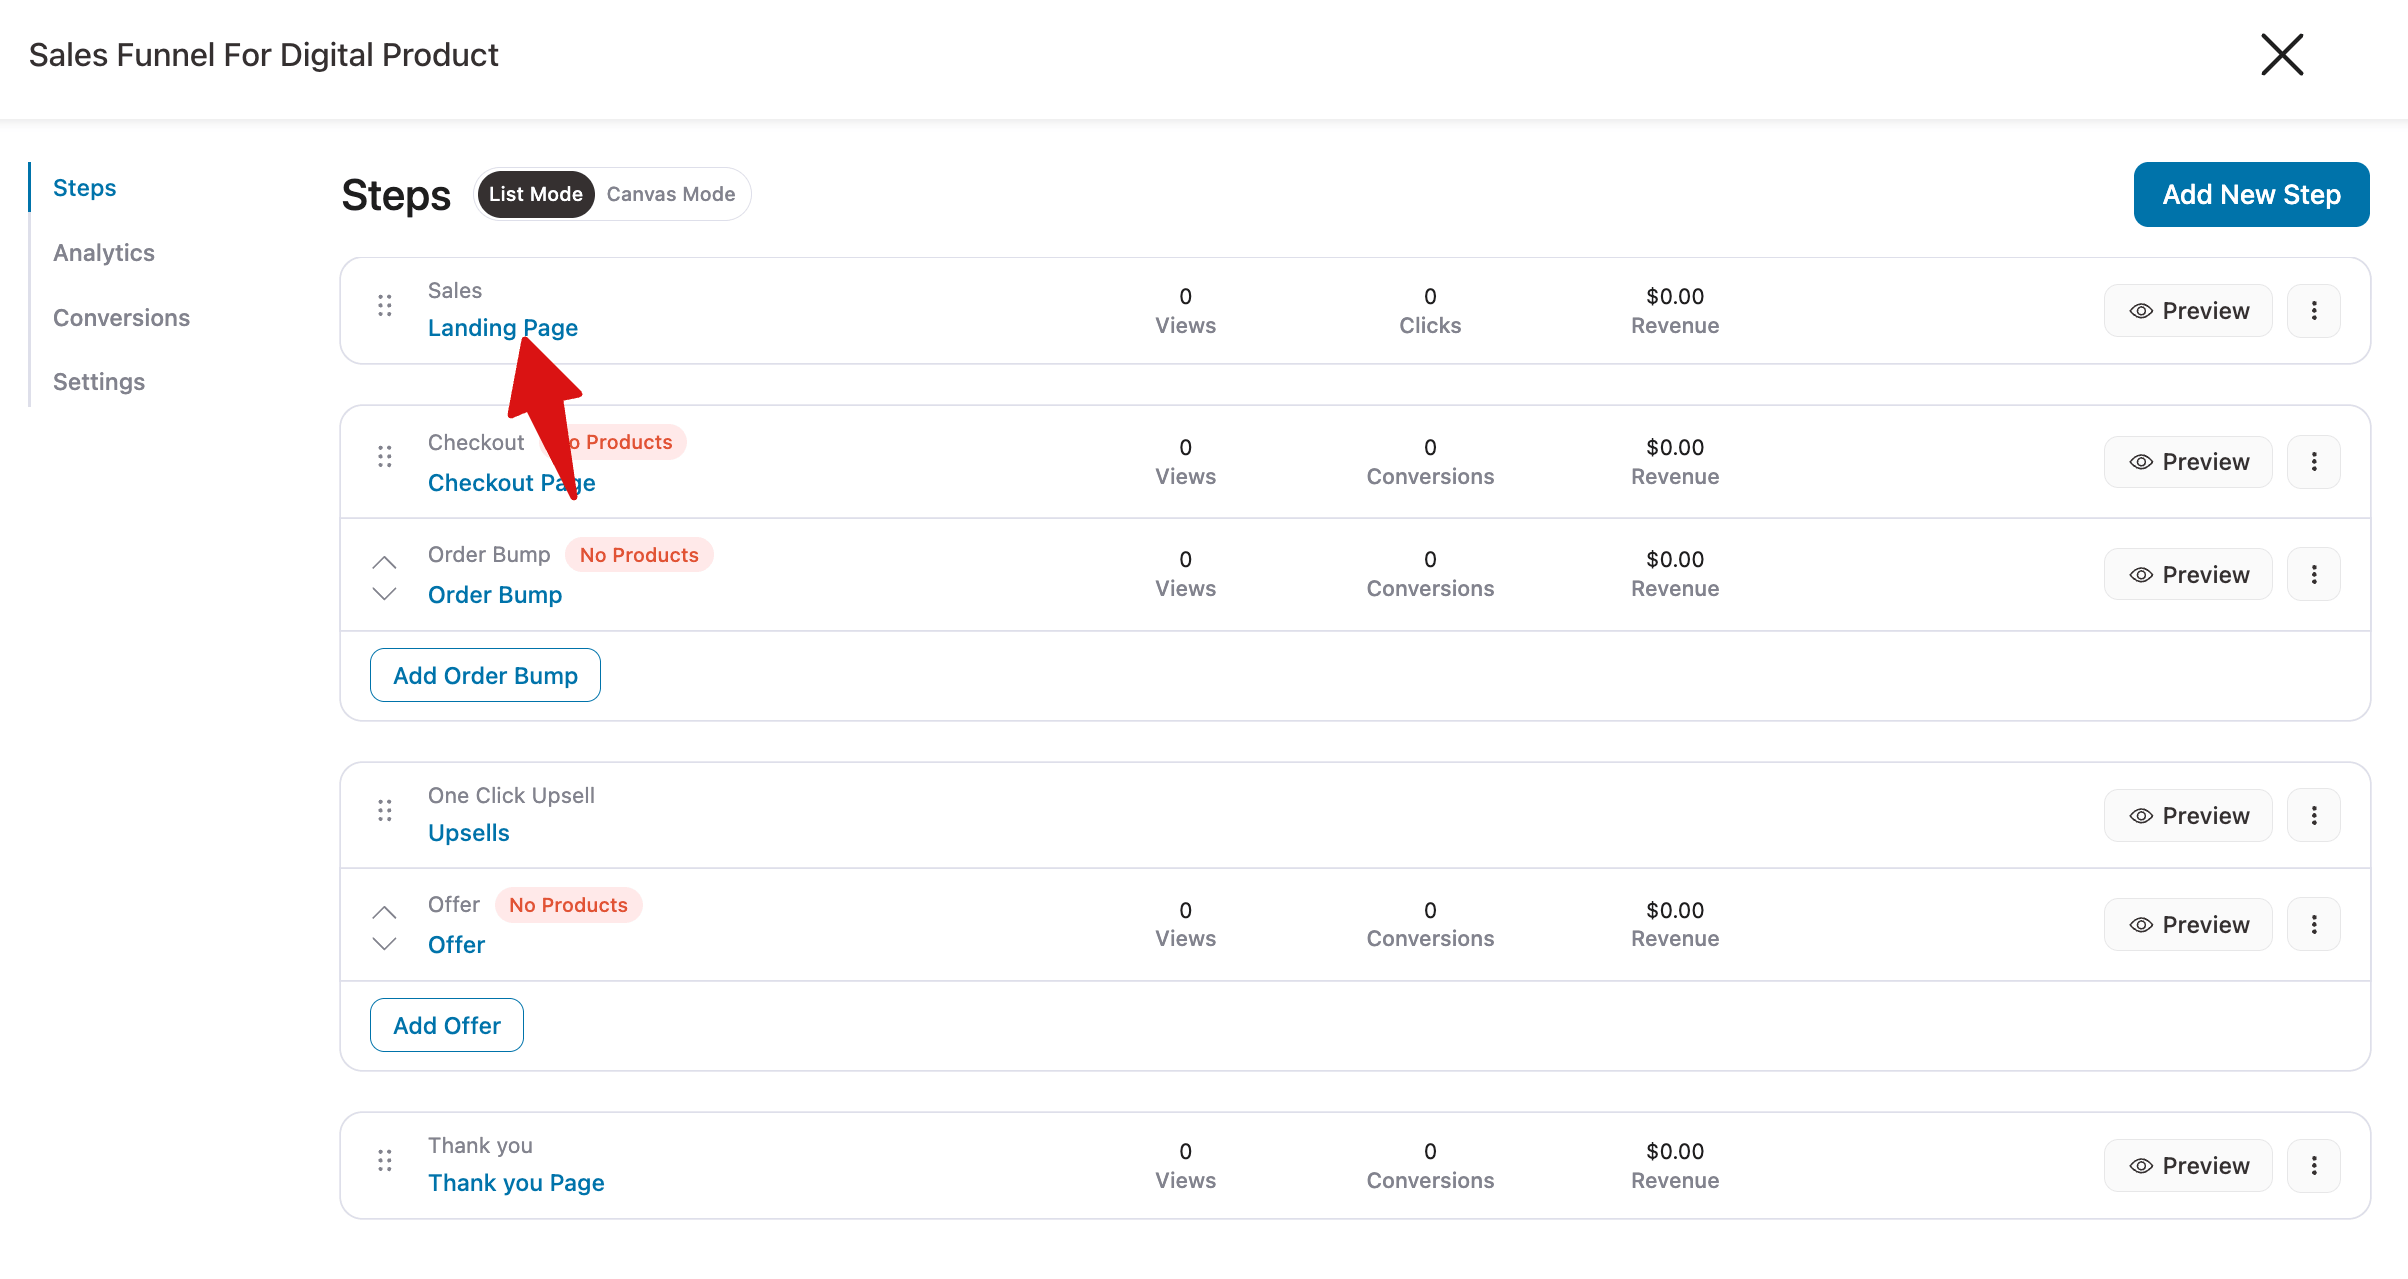
To preview any prebuilt template, click the template. We are going to use the Course Log Sales funnel, which has four steps:
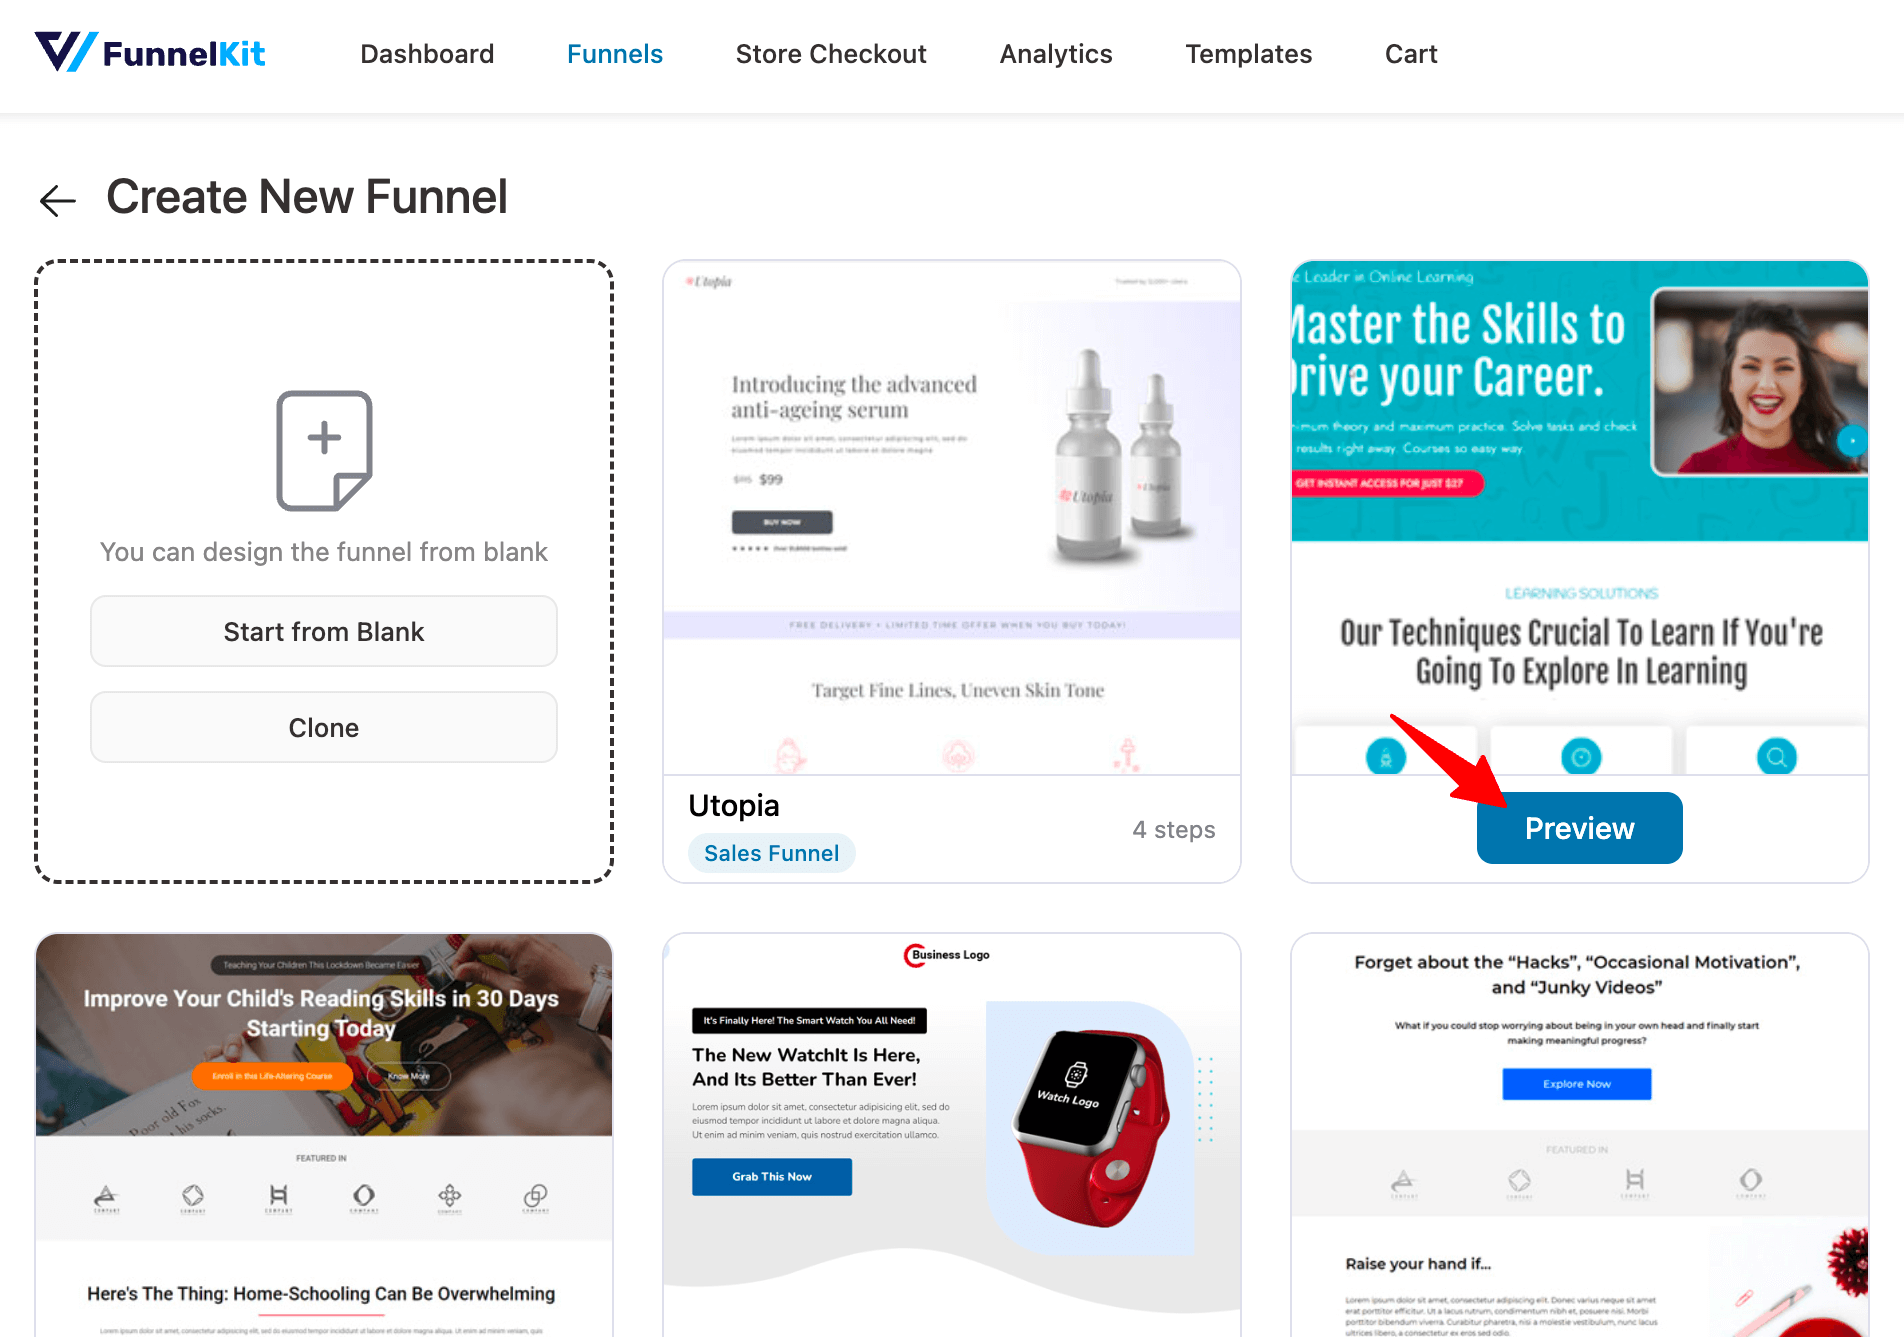
Once you are on the preview page, click on the ‘Import This Funnel’ button to import the 4-step template. Now provide a suitable name for the funnel, then click Done.

Step 2: Customize the landing page templates
Now that your sales funnel is imported, it’s time to customize your funnel pages and make them on-brand. To edit any of the templates, click on the Edit option.
Here, we show how to edit the Landing page.
First, click on the landing page step.
Next, hit the option “Edit Template”.
You can edit the content and also the styles of each section.

Once you make all the changes, click on the Update button to save.
Step 3: Customize the checkout page and add the digital product
Like the landing page, you can customize the checkout page template as well.
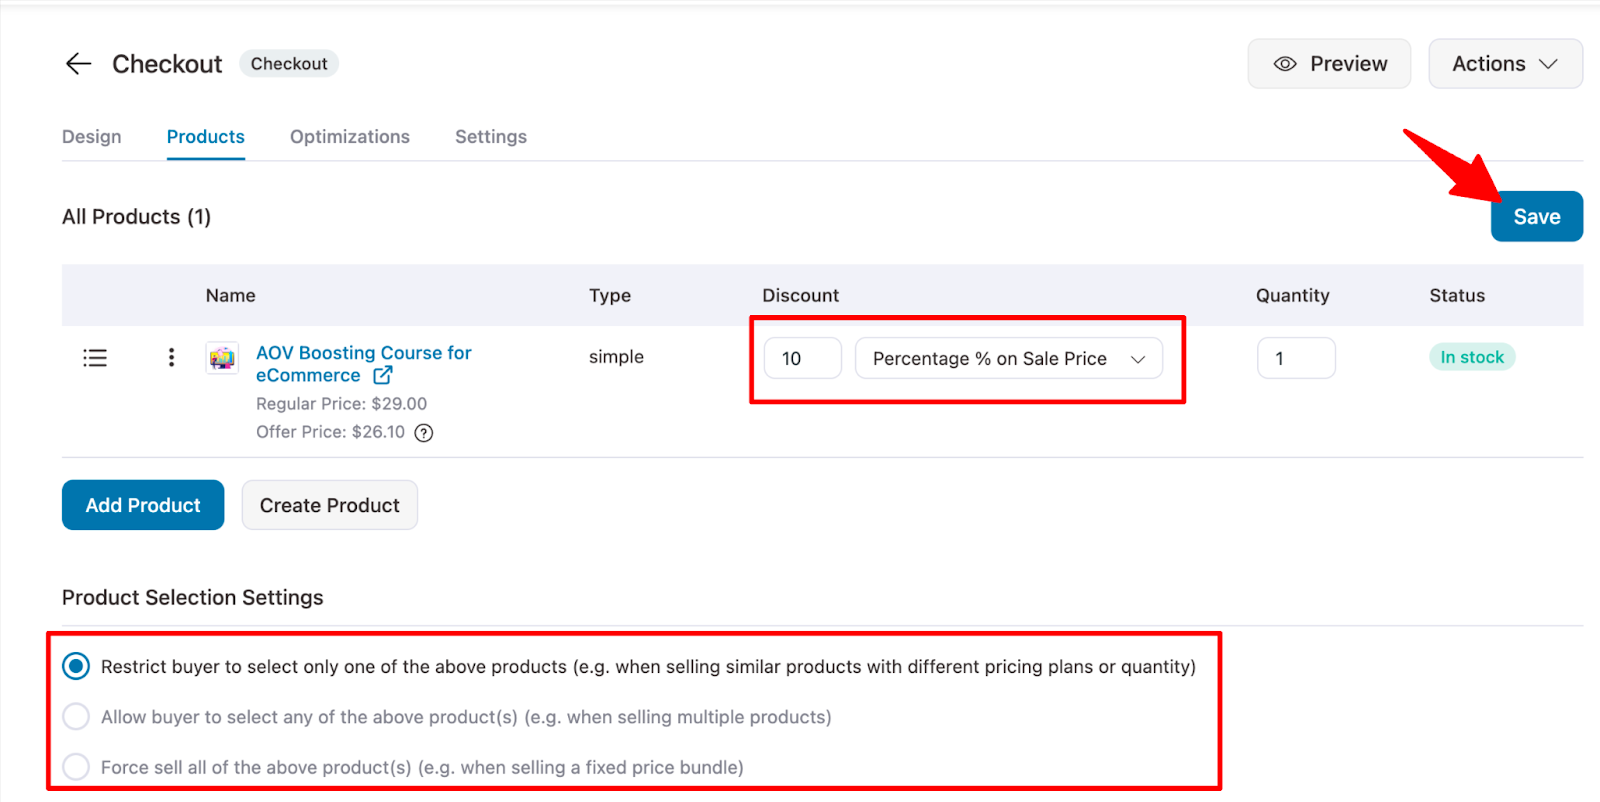
With the WooCommerce checkout template by FunnelKit, you also need to add products and customize them.
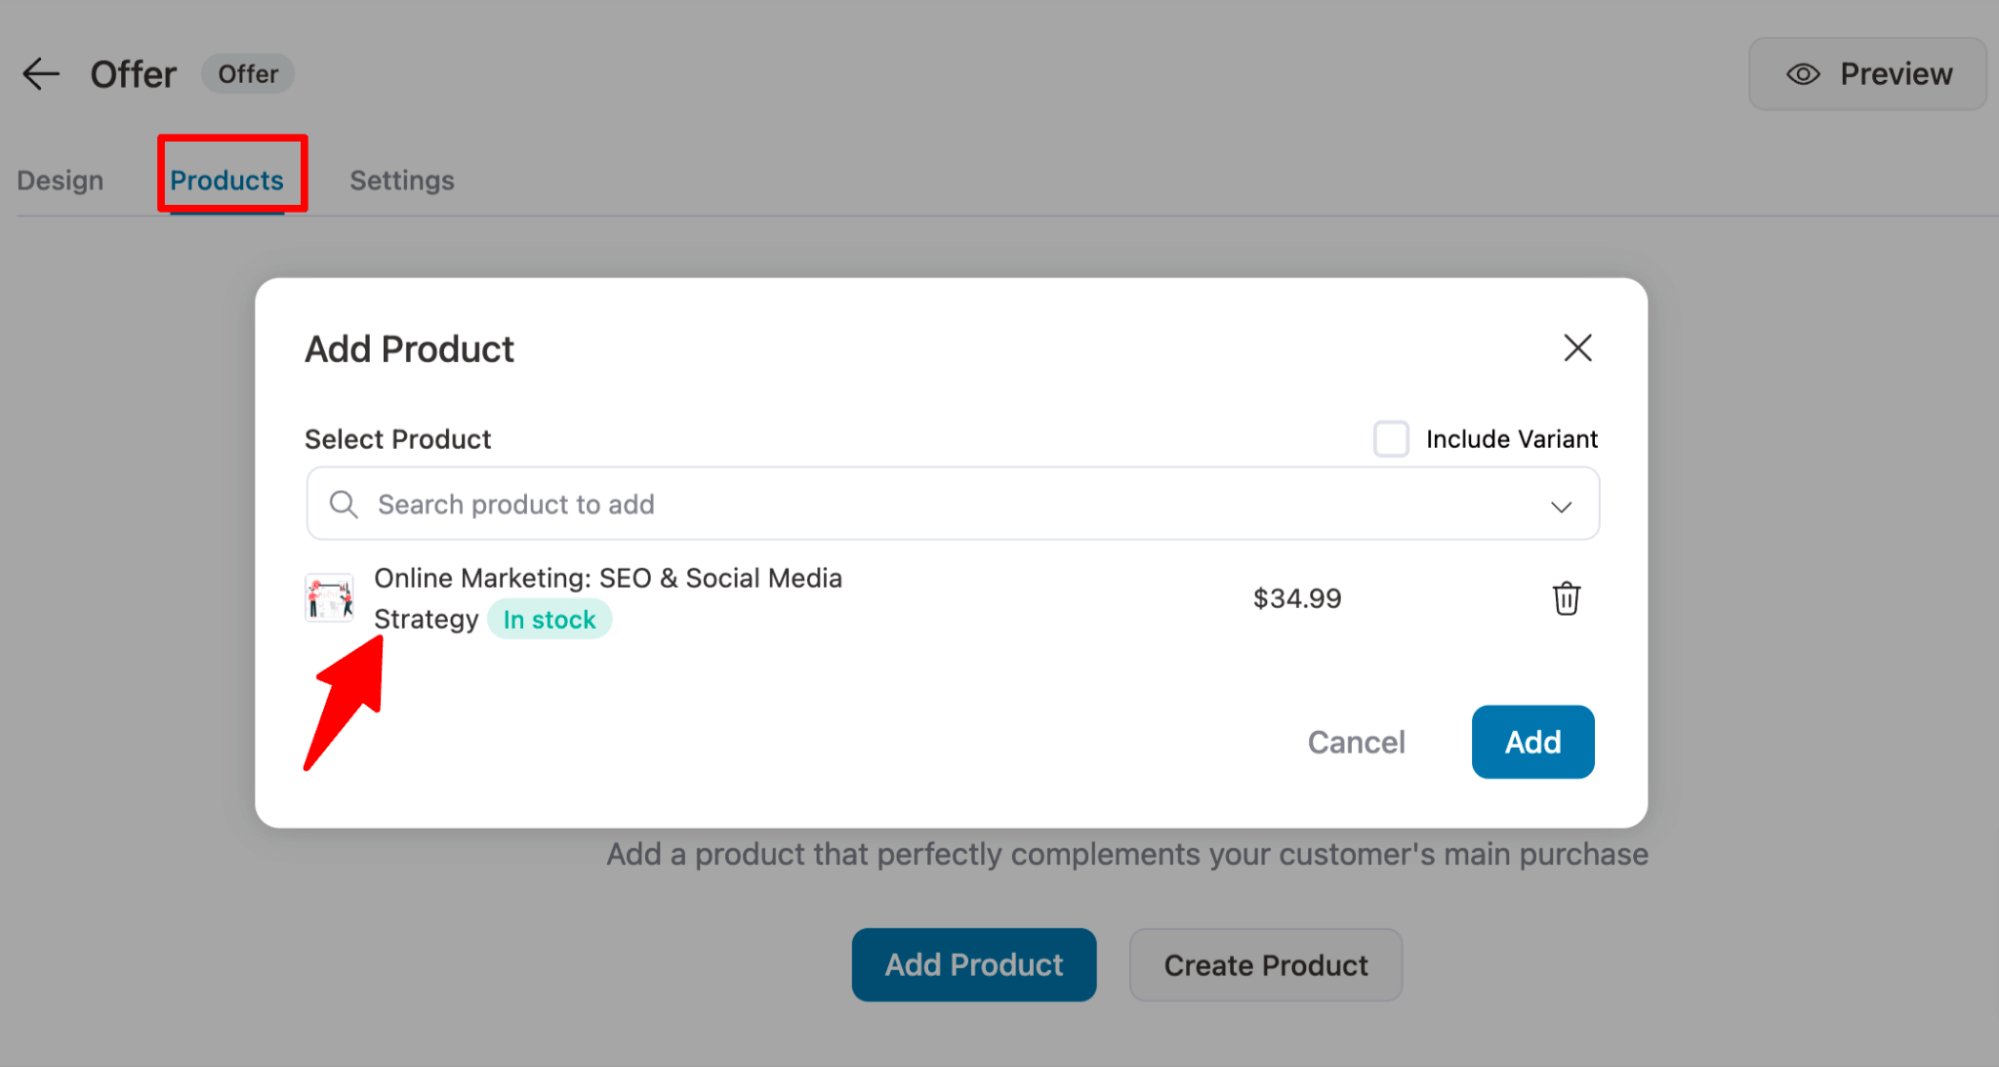
To do so, navigate to the Products tab and click on Add Product. After that, search for and add the product, then click “Add” to complete.

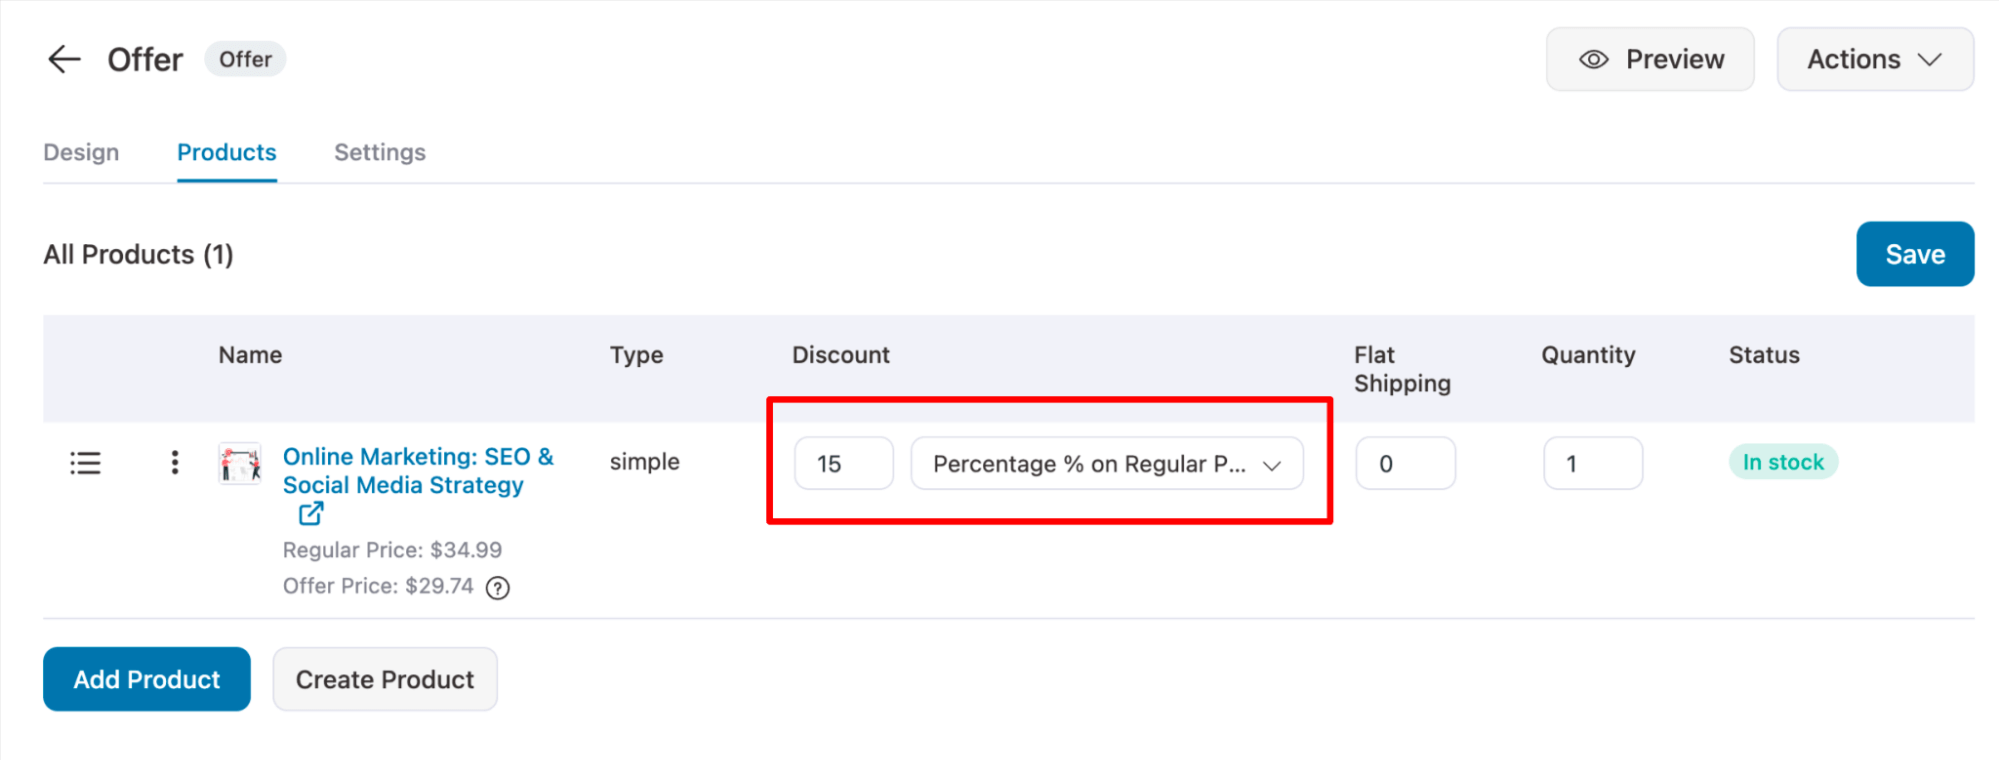
After you add the product, you can offer a discount as an incentive to motivate users to buy it. You can add a discount in percentage, a fixed amount, a percentage on the regular price, and a fixed amount on the regular price.
After adding the discount type and amount, move to the settings.
Under settings, you get three options:
- Restrict buyers to select only one of the above products
- Allow buyers to select any of the above products
- And Force sells all of the above products
We are choosing the first one since we have only one product. The other two settings are for selling multiple products.
Step 4: Add order bump and one click
Adding an order bump on the checkout page can help you raise the average order value of an E-Commerce store.
To add an order bump, click on the ‘Add Order Bump’ button. Then provide a name and click on Add.
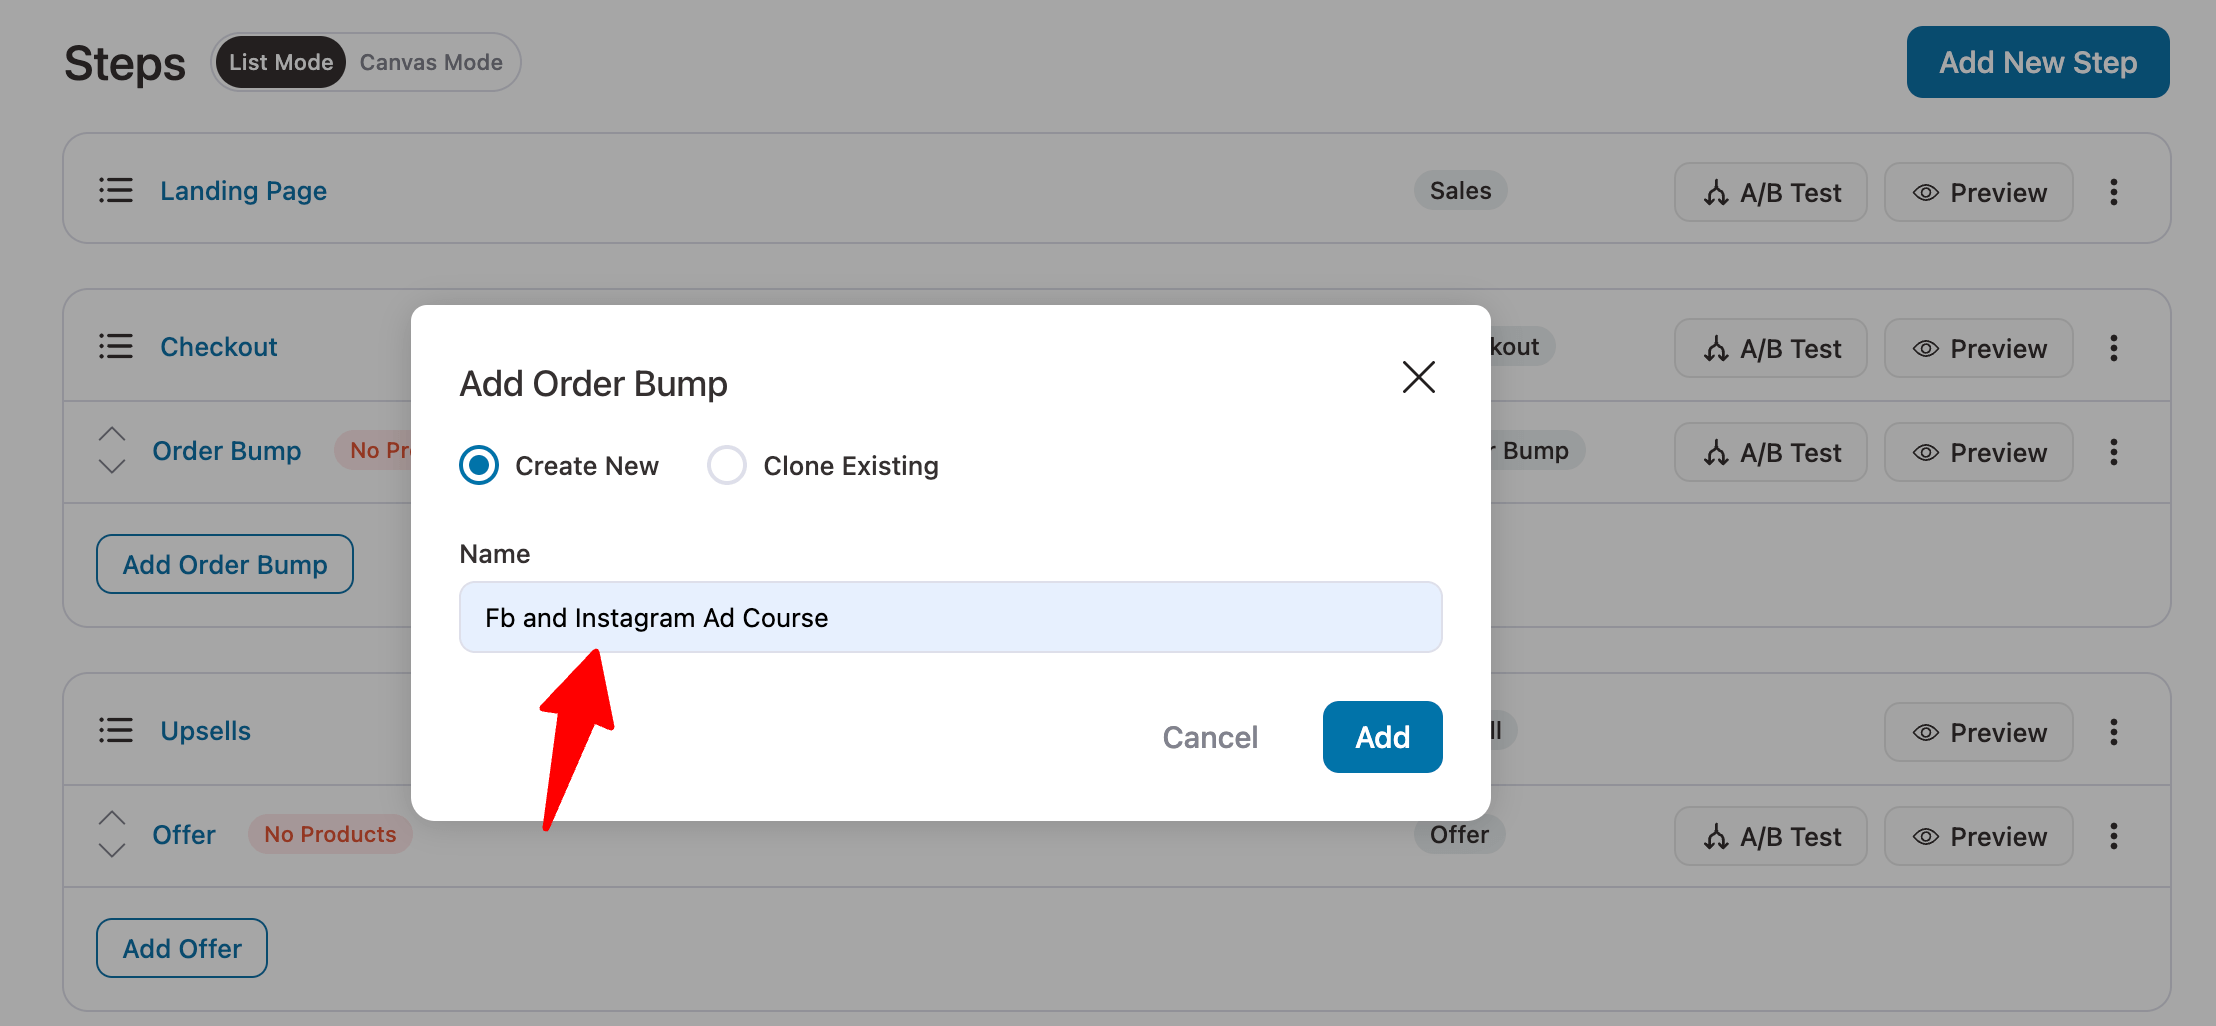
After that, add an order bump skin and choose the product you want to offer as an order bump.
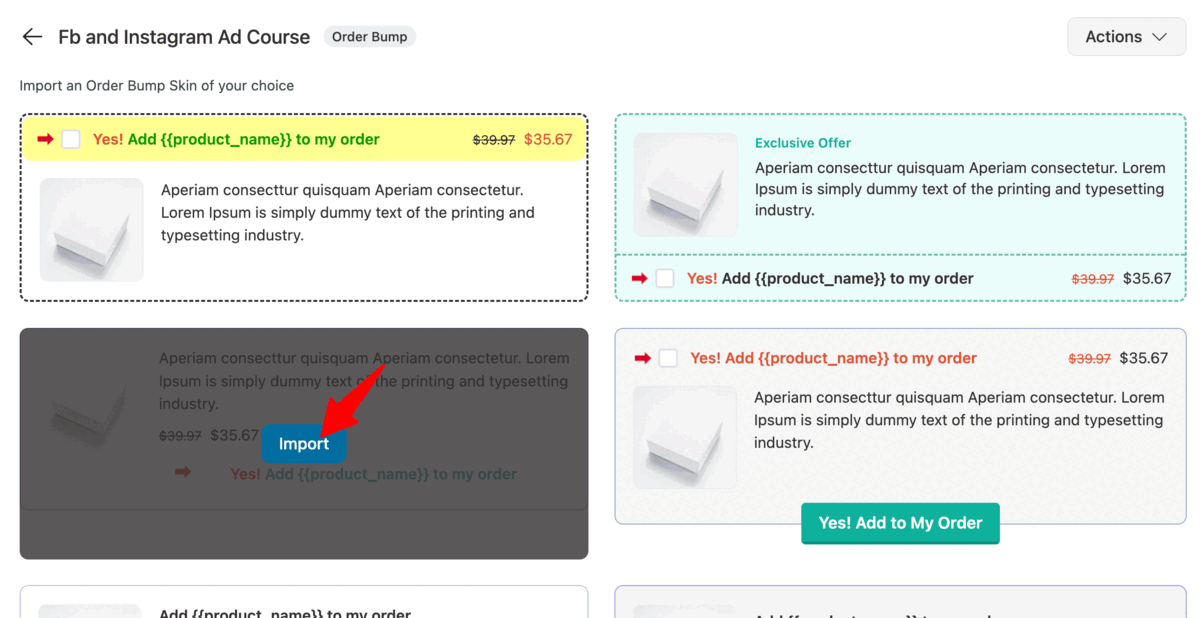
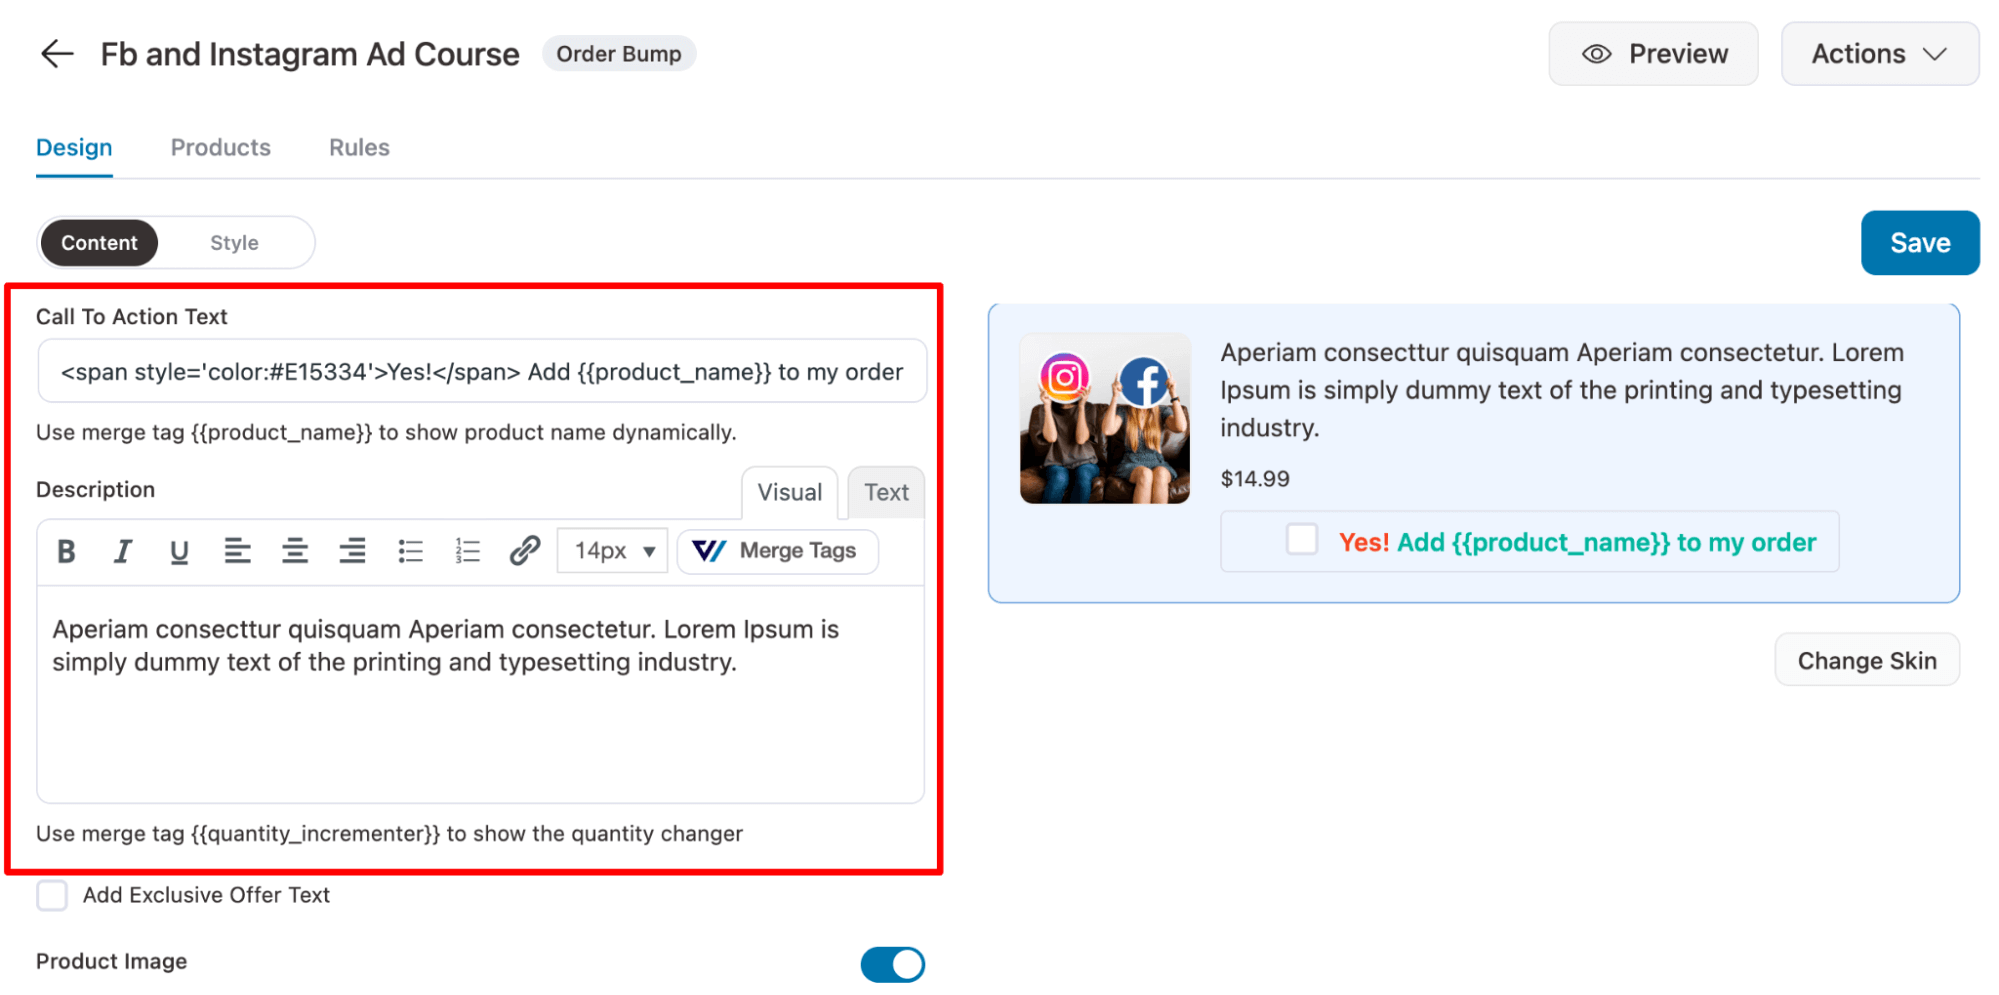
On the Design tab, you can change the call-to-action text, description, image width, and more.
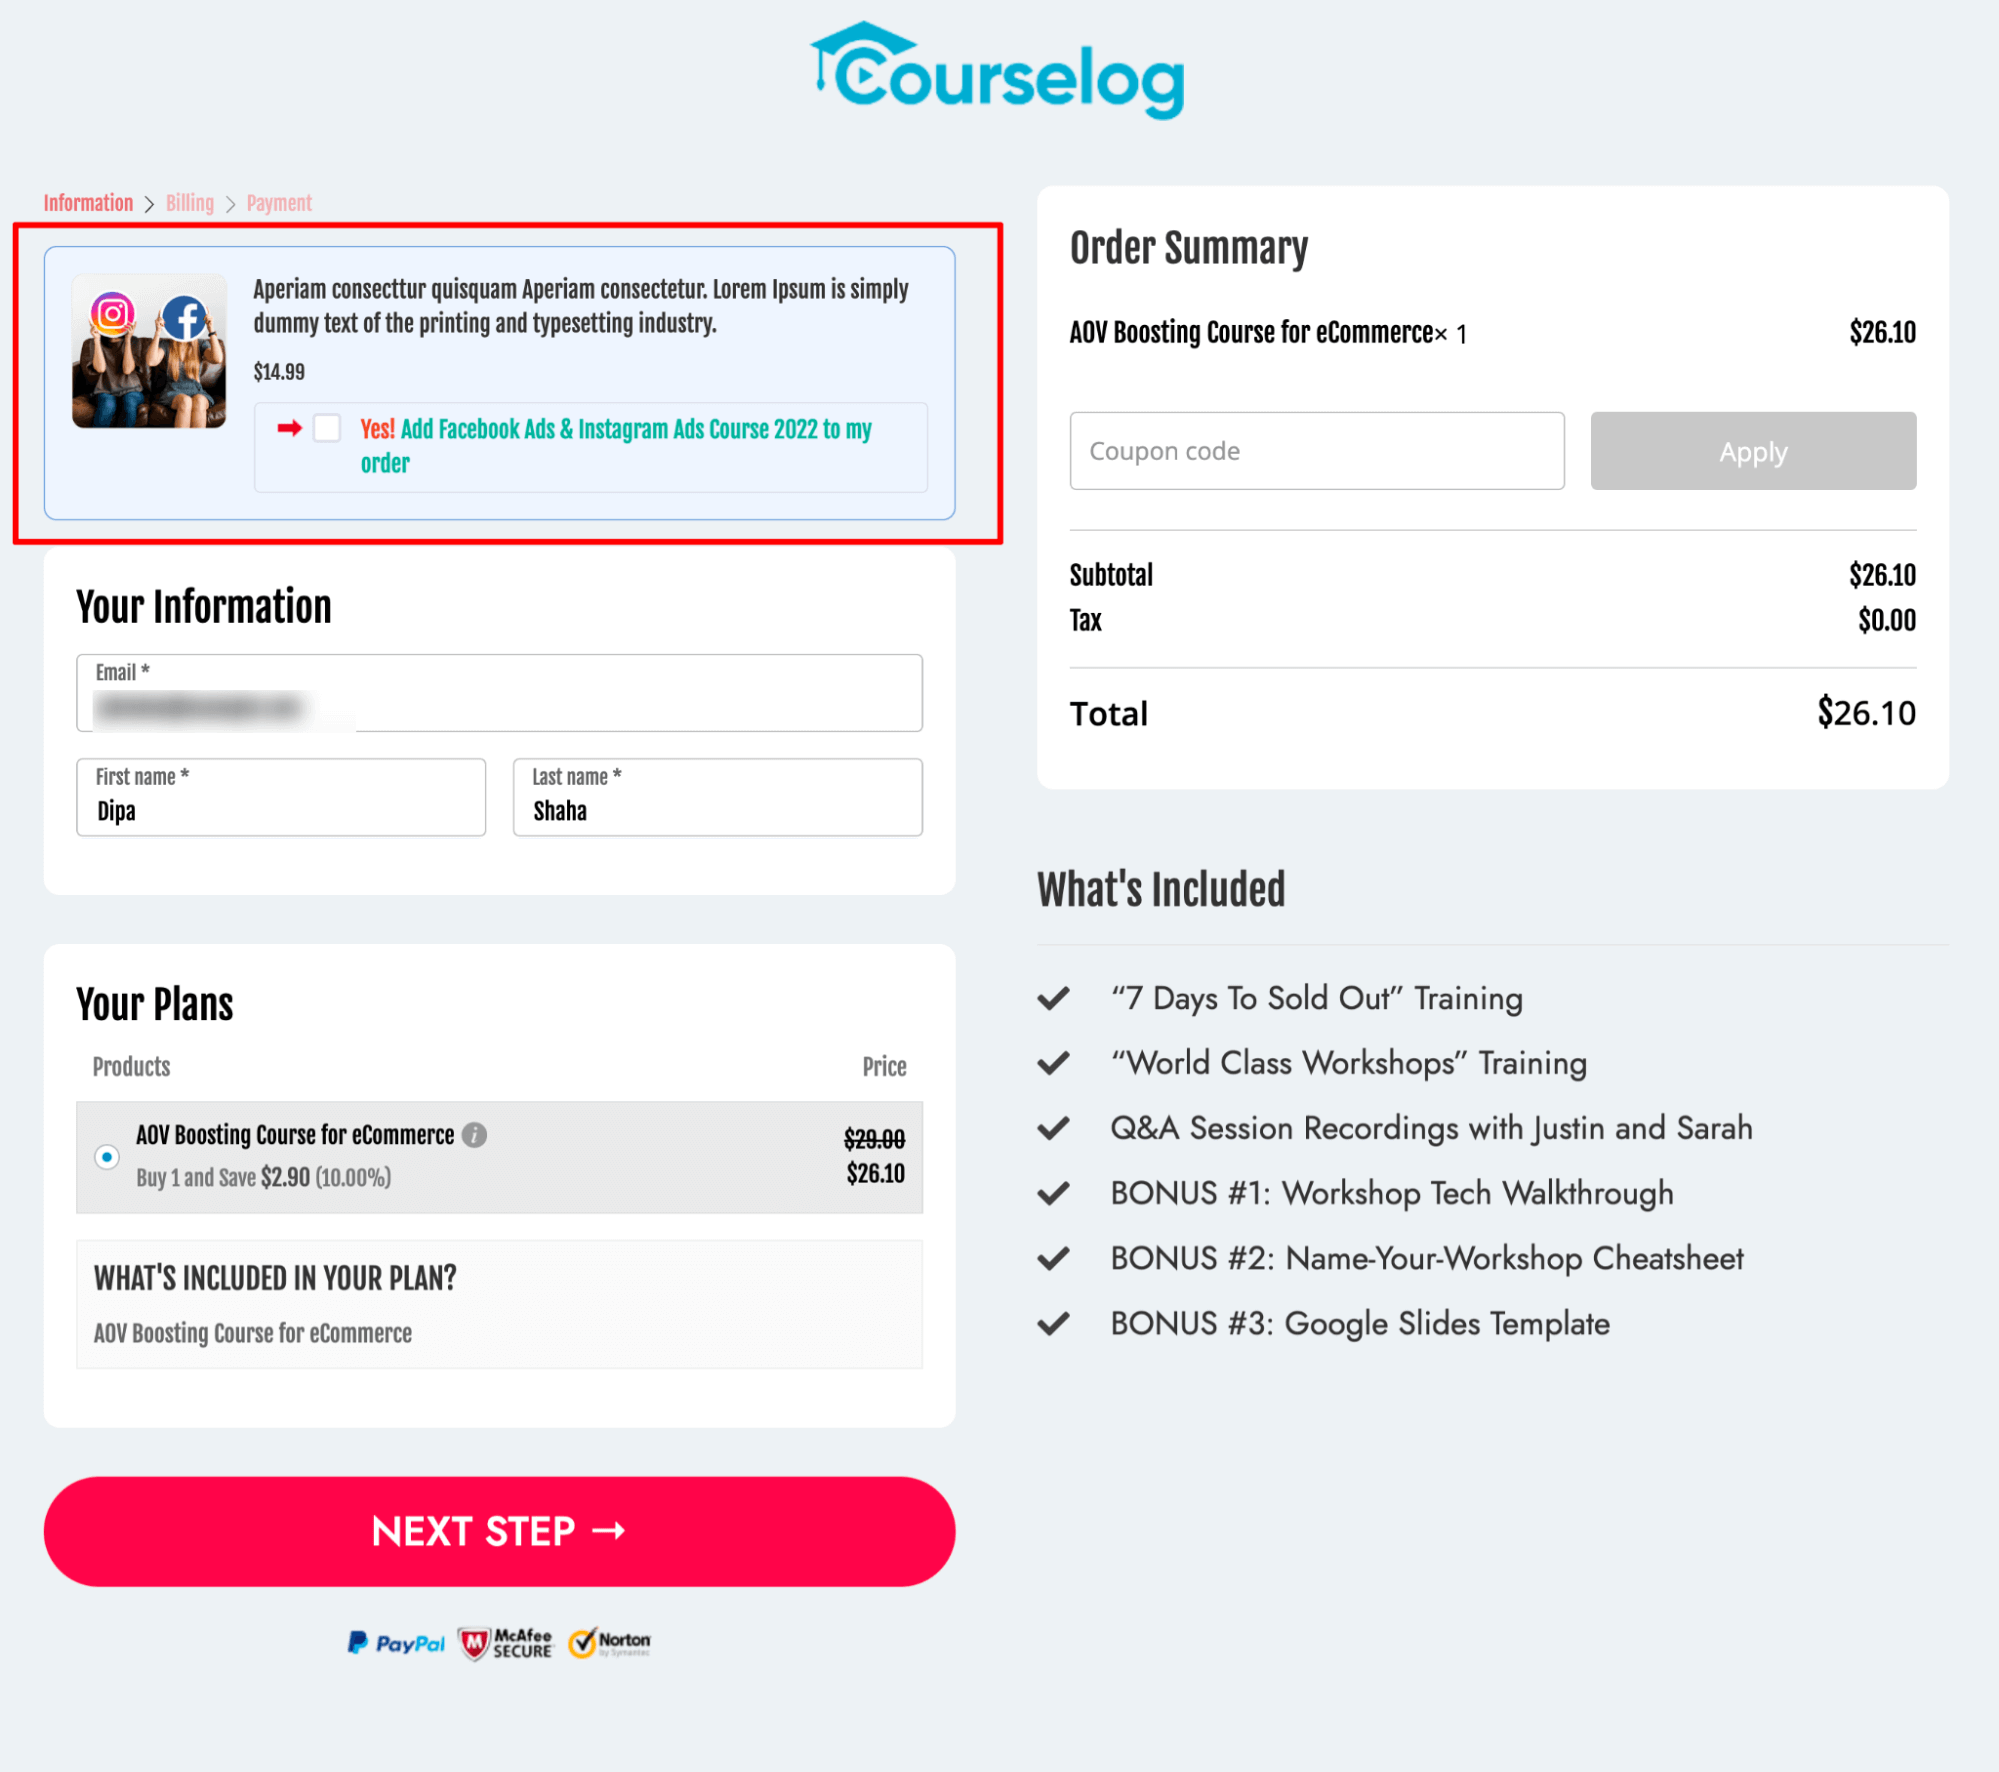
Here is a preview of the checkout page with the order bump offer:
Step 5: Add a one-click upsell to boost AOV
To add upsell products using FunnelKit, click on the Offer step.

You can customize the upsell template like you customized the landing page and checkout page.
To add the upsell offer, move to the Products tab. Search and add the upsell offer.
Configure your products for discounts, shipping prices, and more.
You can sell multiple products as upsells. After you are finished, click on Save to update.
Note: You can also customize the thank-you page.
After you make all the changes and have the final sales funnel ready, you can test the whole process by clicking on the view button.
How Can Customers Access Their Downloads After Buying in WooCommerce?
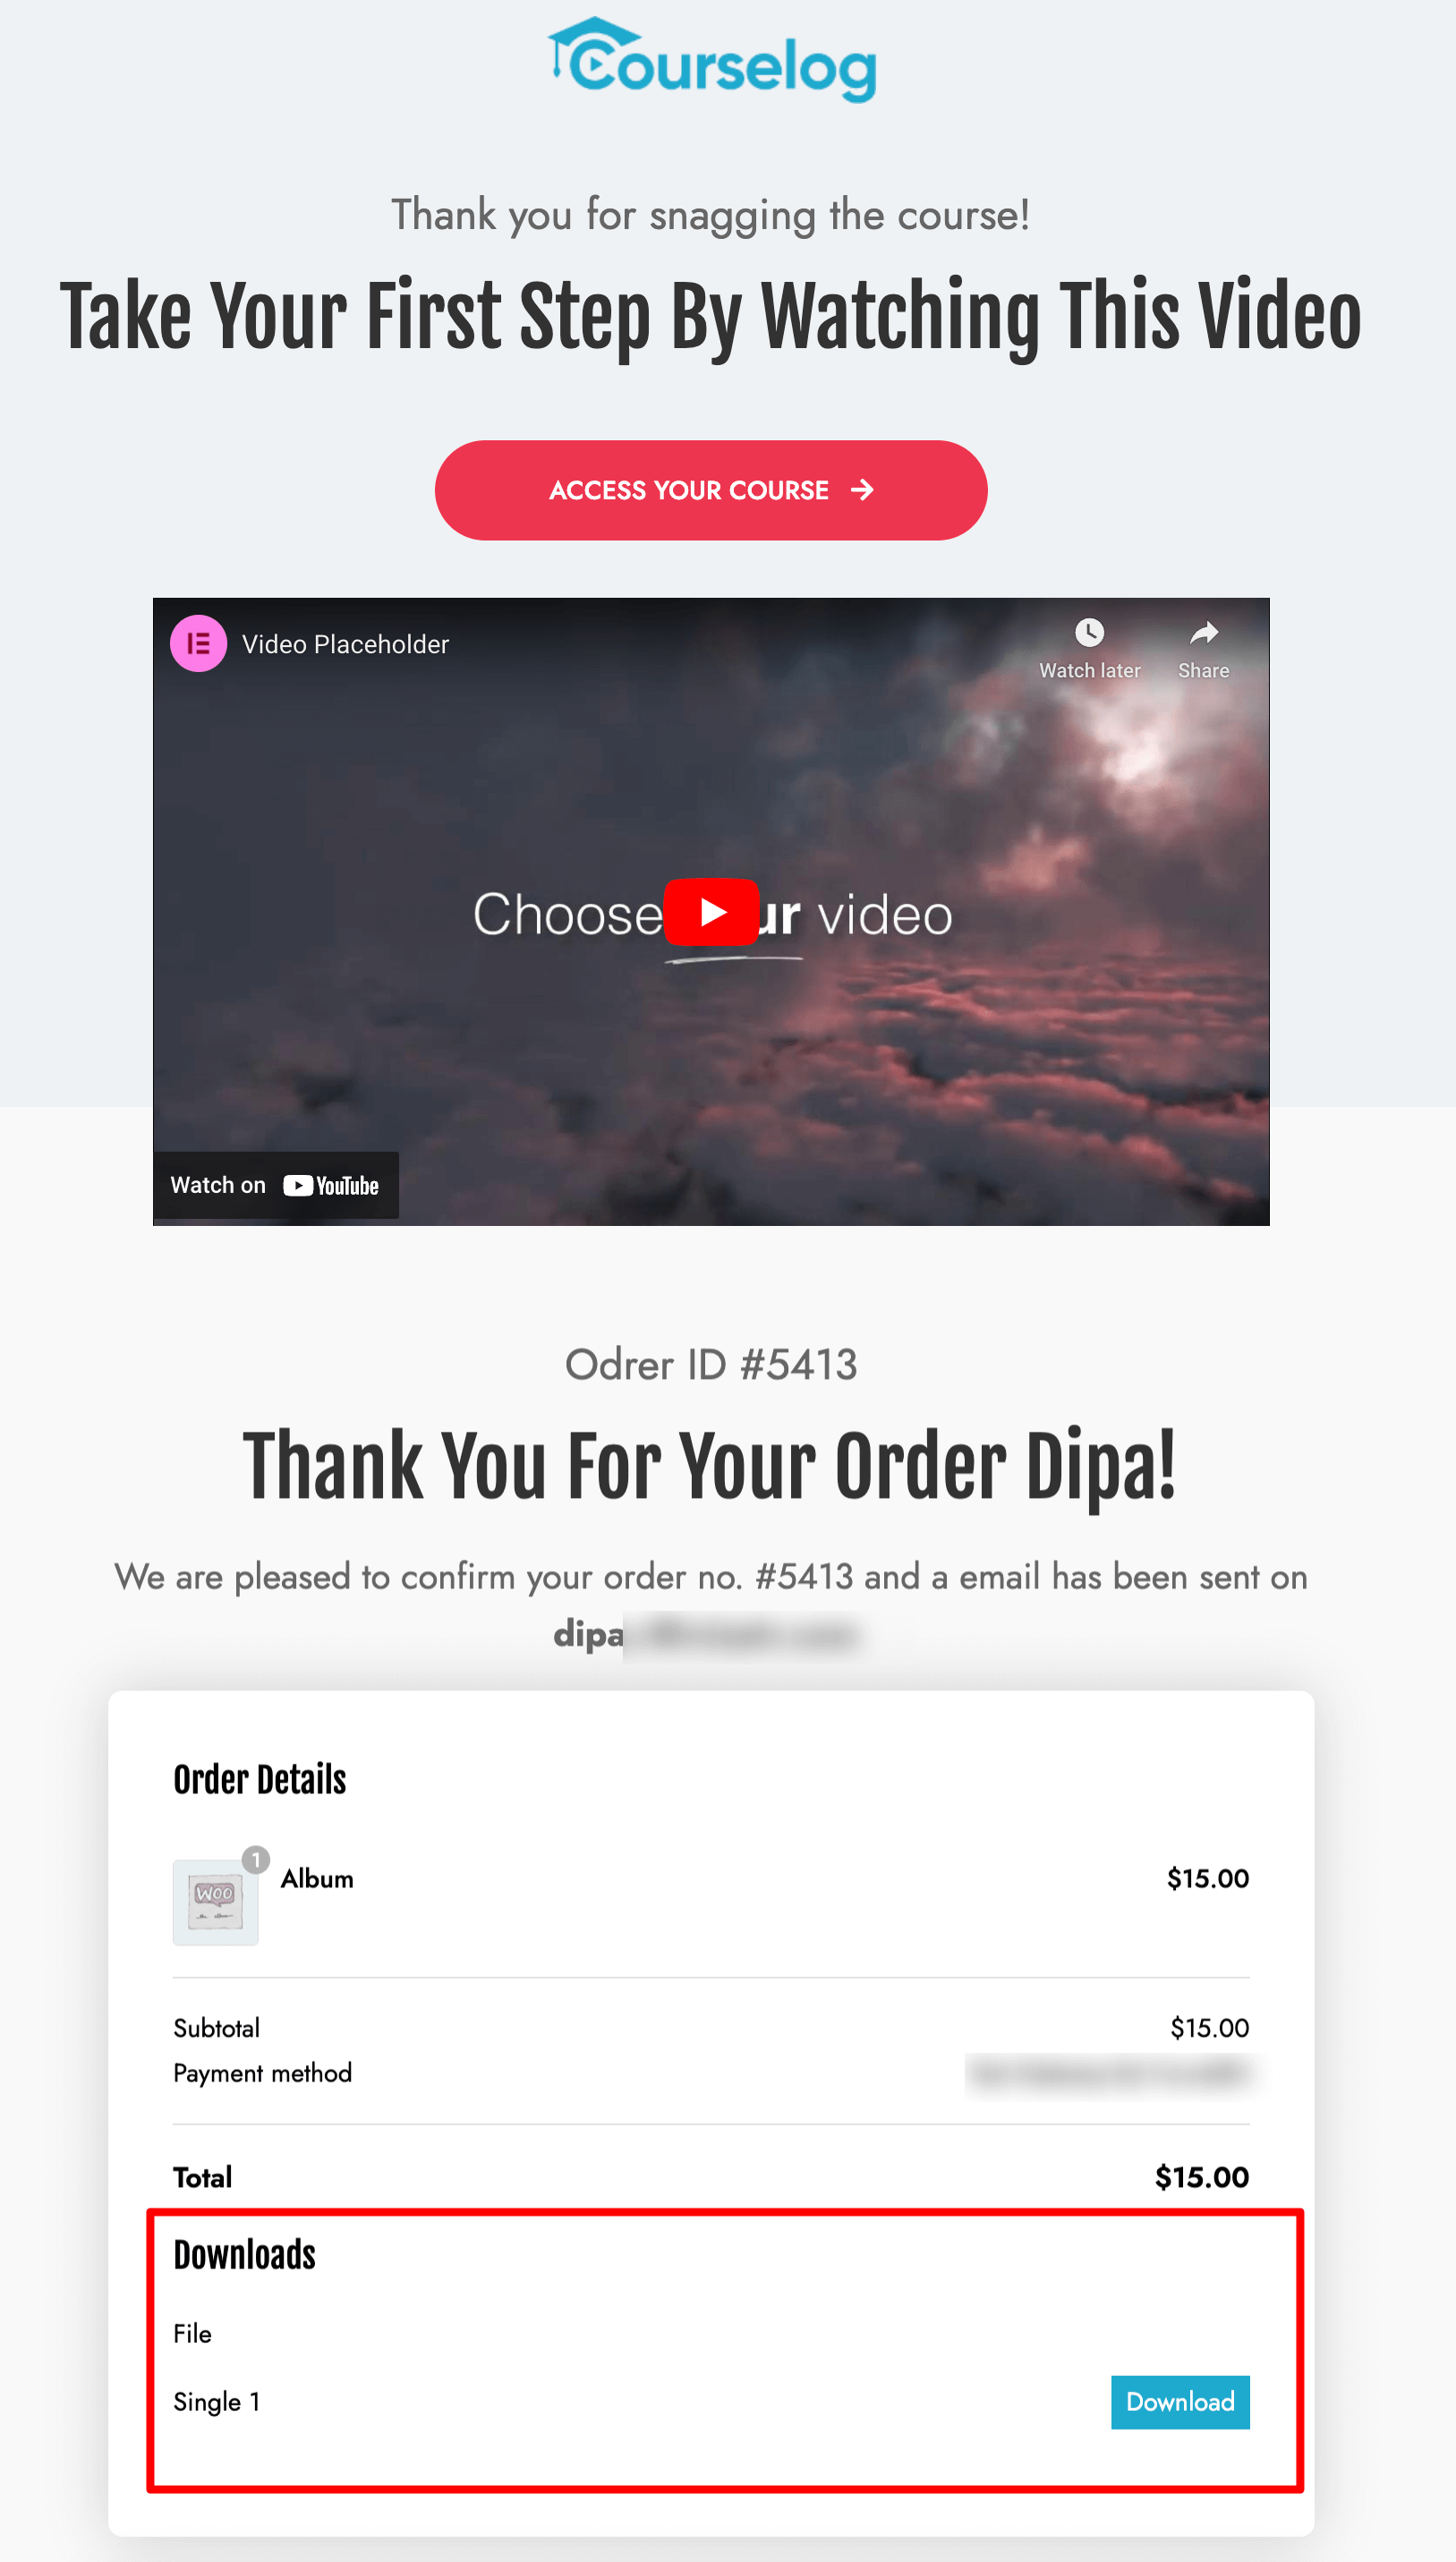
Customers can download products in three ways: from the order confirmation page, the Downloads section in their account, and the order confirmation email.
- Thank you/ Order confirmation page
To ensure customers can access the downloadable product on the Thank You page, navigate to WooCommerce ⇒ Settings ⇒ Products ⇒ Downloadable Products and check the option “Grant access to downloadable products after payment.”
If customers complete the payment via credit card, Google Pay, Apple Pay, etc., they can download the products from the Thank You page.
However, for payment options like cash on delivery or other deferred payment methods, immediate access to the downloadable product on the order confirmation page will not be available.
Here is a preview of how the download options appear on the thank-you page.
- Downloads section from the account
Once the store admin completes the order, users can log in to their accounts and download their digital products from the "Downloads" tab.

- Order confirmation email
WooCommerce, by default, sends an order confirmation email to users after a successful purchase. Customers can download the products using the links on the order confirmation email.
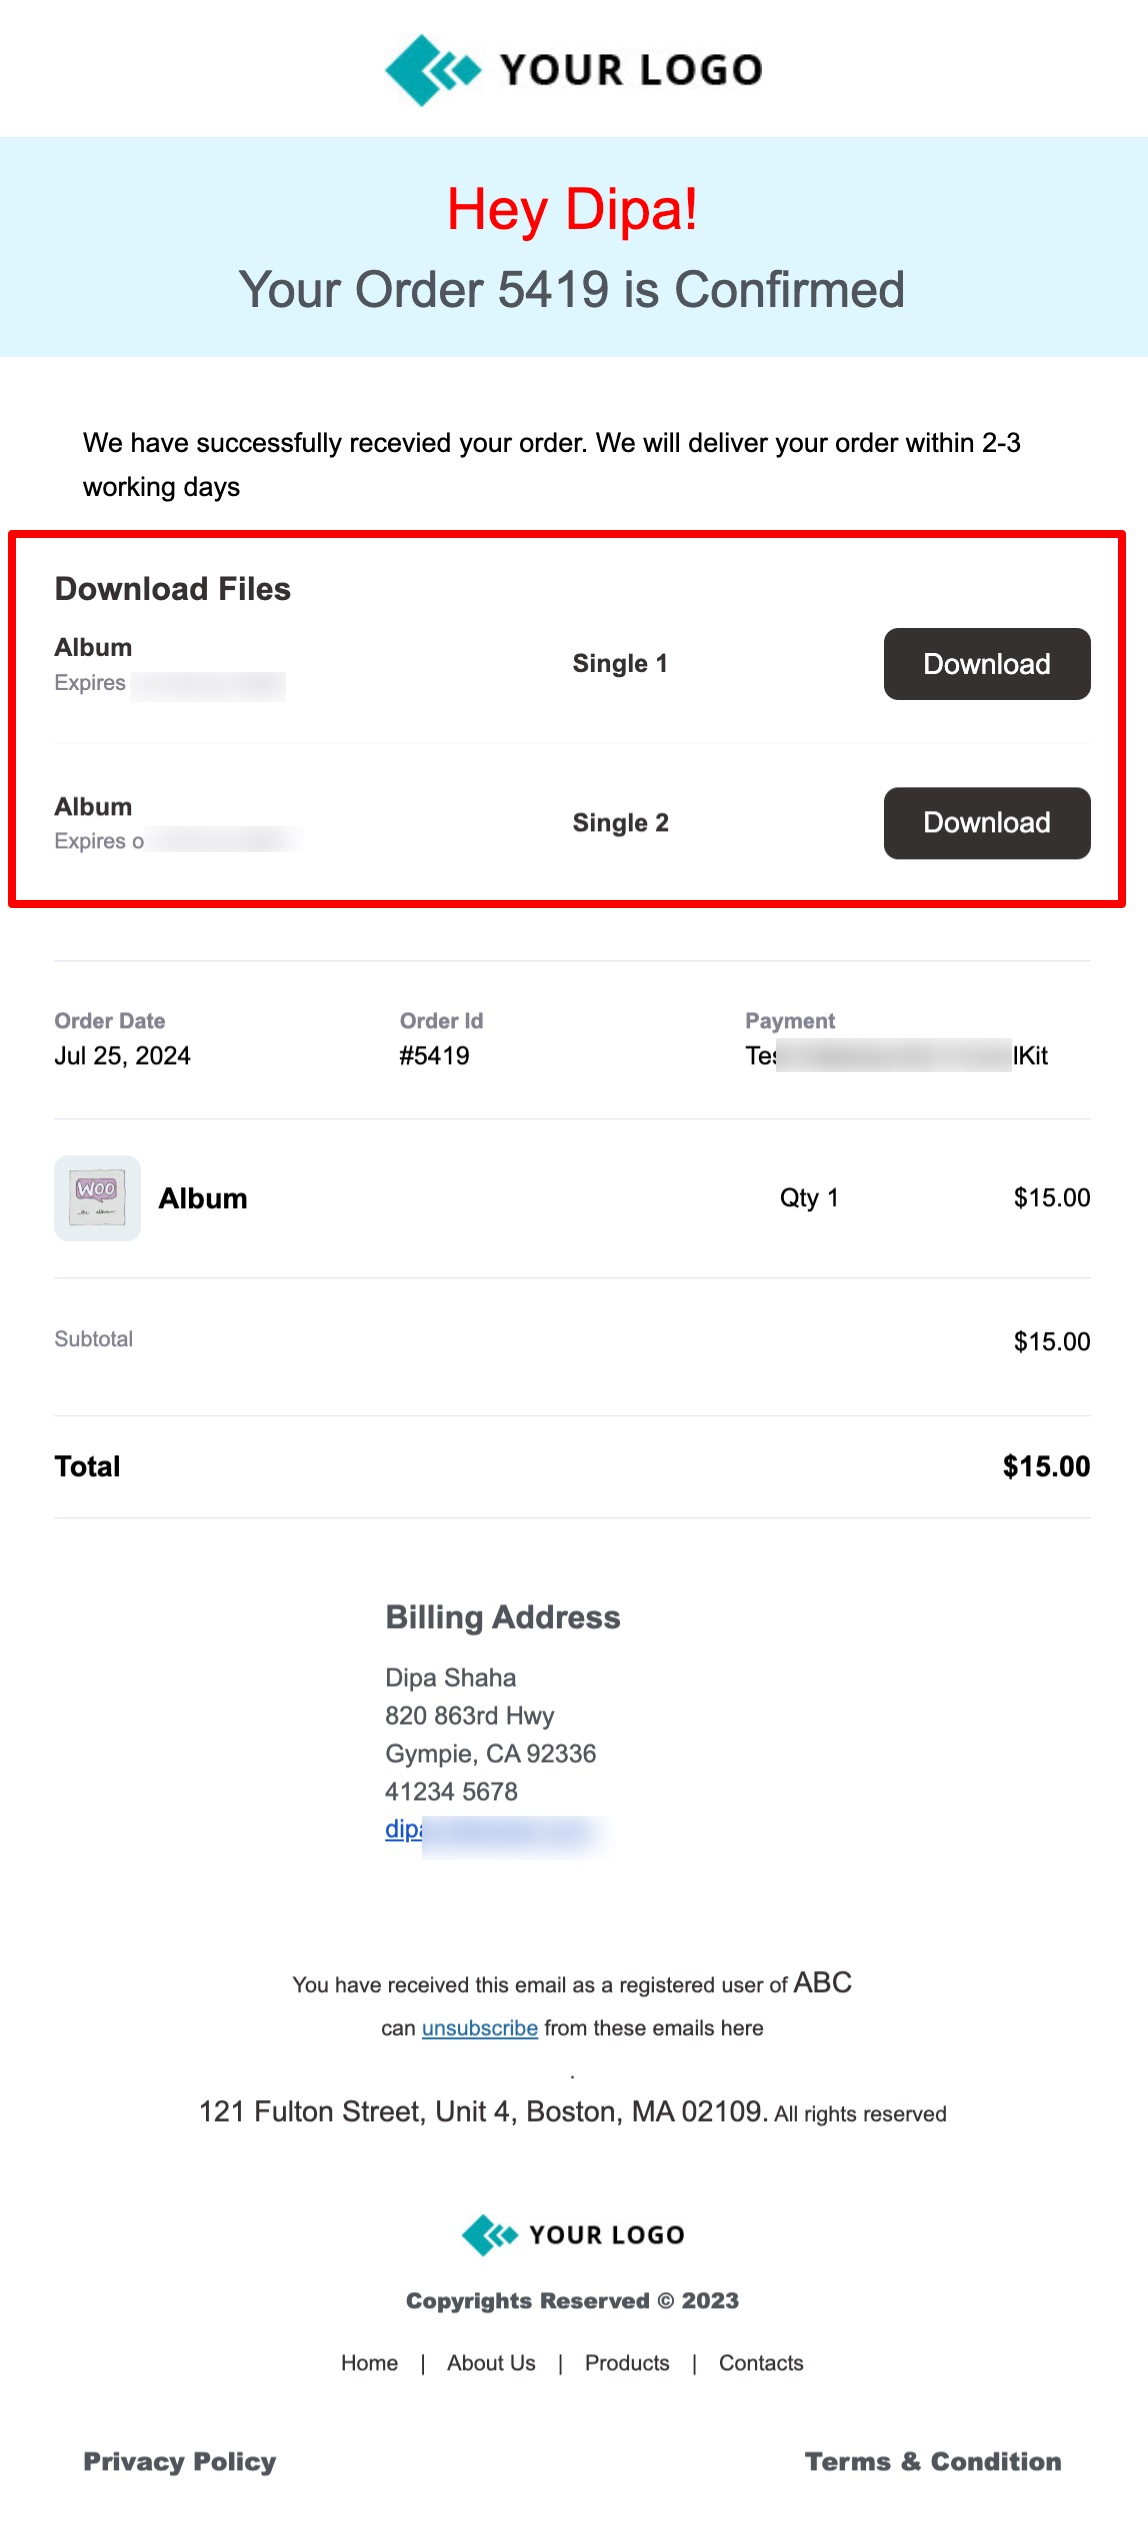
This beautiful email is designed with FunnelKit Automations. For more details, check our blog post on custom order confirmation emails.
5 Tips You Need to Follow to Optimize Selling Digital Products in WooCommerce
Along with using a proper sales funnel,, you can follow the expert-recommended tips mentioned below to optimize the whole process of selling digital goods from your WooCommerce store.
Tip #1: Capture abandoning visitors
More than 60% of users abandon their cart. However, according to stats, you can recover almost 15% of these abandoned carts through perfectly timed email sequences.
With FunnelKit Automations, you can make an email list of those who left their shopping cart in the middle and send them automated emails.
Not only that, but you can also send a conditional email and add a delay between multiple emails.
Sending an automated, personalized email to users who abandoned their cart is super easy with FunnelKit Automations.
Tip #2: Incentivize your audience
Incentivizing shoppers encourages them to make more purchases from your WooCommerce store. As mentioned earlier, offering free shipping is an excellent incentive.
Some other ways to incentivize your customers include offering them a discount on their birthdays or on their purchase anniversaries.
Offering little incentives to customers can yield big benefits and increase customer lifetime value. So, don't just think about short-term benefits; keep the focus on improving customer lifetime value.
Tip #3: Add social proof
Adding social proof is another effective way to increase sales of your WooCommerce store.
When people who have already used your products have positive things to say about your brand, it helps you to gain people's trust. Therefore, they are ready to spend their hard-earned money to buy your products.
You can add social proof to your landing page, checkout page, thank you page, Optin page, and so on. Furthermore, you can also add social proof in the welcome email you send to users after registering to your WordPress site.
Tip #4: Add a few screenshots, video clips, or samples
You can't sell digital products with just words. We are not undermining the importance of compelling product copy, it remains extremely important.
However, people nowadays want a glimpse of the product before they buy it. So, if you want to engage users more with your products, add a clean product image, screenshots, video clips, samples, etc.
For example, if you are selling an online course, you can add the introductory video to the product description so people can check the video quality and what to expect.
Tip #5: Offer AOV boosting offers like order bumps and upsells
Boost your Average Order Value (AOV) by strategically incorporating order bumps and upsells into your sales approach.
You can capitalize on last-minute decisions by offering relevant add-ons as order bumps at checkout. Like order bump, you can also offer post-purchase product recommendations to encourage customers to explore premium relevant items.
Frequently Asked Questions About Selling WooCommerce Digital Products
Got more questions? Have a look at the commonly asked ones with answers:
Can I sell both digital and physical products in WooCommerce?
Yes, WooCommerce allows you to sell both. You can even combine them in one product, where a customer receives a physical item along with a digital download.
What are the differences between virtual and downloadable product types on WooCommerce?
Downloadable products provide files that customers can download after purchase, while virtual products are non-physical items that do not require shipping or file delivery.
What happens after someone buys a downloadable product?
After payment is completed, WooCommerce automatically generates a secure download link that the customer can access from their order page or email.
Do I need any plugins to sell digital products in WooCommerce?
No, you don’t need any extra plugin to sell basic digital products in WooCommerce. It already supports virtual and downloadable products by default.
However, if you want to sell more effectively and increase conversions, you can use additional tools like a sales funnel builder to optimize checkout, upsells, and overall sales flow.
Ready to Sell Digital Products in WooCommerce?
Congratulations! Now, not only do you know how to create digital products in WooCommerce, but also how to sell them.
Moreover, you are aware of the importance of the sales funnel and email marketing in generating more revenue for your eCommerce store.
As mentioned before, you can take the help of FunnelKit Funnel Builder and FunnelKit Funnel Builder Automations to implement a sales funnel as well as an automated email campaign in your WooCommerce store.
Don't waste time hoping a basic WooCommerce setup will bring you your dream AOV or revenue. Try FunnelKit Funnel Builder and FunnelKit Automations Today and achieve your target revenue.
So, are you ready to sell digital products in WooCommerce with a sales funnel and double your return on investment?

Editorial Team
July 7, 2026Are shoppers adding products to their cart and leaving before they buy? According to Baymard Institute research on checkout usability, 18% of shoppers who abandon their cart do so because...
Editorial Team
March 23, 2026Does your WooCommerce store offer enough payment options? If not, you could be losing up to 13% of sales. [According to Baymard]. WooCommerce’s default payment options don’t always meet customer...
Editorial Team
January 27, 2026Imagine a customer makes a purchase, but instead of the order smoothly processing through your system, it gets stuck in “Pending Payment” or “On Hold” indefinitely. You’re checking your settings...


