
Are shoppers adding products to their cart and leaving before they buy?
According to Baymard Institute research on checkout usability, 18% of shoppers who abandon their cart do so because the checkout process feels too long or complicated. A cart page that adds an extra click before checkout is often part of that friction.
WooCommerce direct checkout removes that step. Instead of sending customers from product page to cart page to checkout, it takes them straight from "add to cart" to checkout, cutting one step out of the path to purchase.
This guide covers four ways to set up direct checkout in WooCommerce, from a manual link with no plugin needed to a full checkout funnel with upsells built in. By the end of this post, you'll be able to streamline your checkout, boost average order value (AOV), and reduce cart abandonment in your store.
Table of Contents
- 1 What is WooCommerce Direct Checkout?
- 2 How to Set Up WooCommerce Direct Checkout (4 Easy Methods)
- 3 Method 1: How to Create a WooCommerce Direct Checkout Link Manually Without a Plugin
- 4 Method-2: How to Set Up WooCommerce Direct Checkout with a Free Modern Side Cart
- 5 Method 3: How to Offer Dedicated WooCommerce Direct Checkout Using a Sales Funnel for FREE
- 6 Method 4: How to Enable WooCommerce Direct Checkout Using a Plugin
- 7 10 Best Practices for Implementing WooCommerce Direct Checkout
- 8 Frequently Asked Questions (FAQs)
- 9 How to do direct checkout for WooCommerce?
- 10 How do I turn off cart direct to checkout in WooCommerce?
- 11 Why leverage WooCommerce direct checkout?
- 12 How do I skip the WooCommerce Cart page and redirect to the checkout page using custom code?
- 13 What are the best WooCommerce direct checkout plugins?
- 14 Get Ready to Simplify Purchases with WooCommerce Direct Checkout
What is WooCommerce Direct Checkout?
WooCommerce direct checkout simplifies your store’s buying process by removing unnecessary steps between adding a product to the cart and completing the purchase.
Instead of forcing shoppers through the traditional multi-step flow: Add to Cart ⇨ View Cart ⇨ Checkout, it skips the default cart page entirely and sends shoppers straight to the checkout page.
This streamlined experience helps you:
- Reduce friction in the purchase journey
- Minimize cart abandonment rates
- Increase conversion rates by making checkout faster and easier
In short, WooCommerce direct checkout is all about speeding up the buying process and creating an optimized checkout experience that keeps your customers focused on completing their purchase.
How to Set Up WooCommerce Direct Checkout (4 Easy Methods)
You can set up WooCommerce direct checkout four simple ways. Here are the methods:
- Method 1 (By using add-to-cart URLs, requires no plugin): Best for linking a single product straight to checkout in ads or emails, without installing anything.
- Method 2 (Add a side cart to WooCommerce): Best for stores that want customers to keep reviewing their cart while still skipping the traditional cart page.
- Method 3: Use a dedicated checkout funnel in WooCommerce: Best for stores that want a fully customized checkout with upsells and order bumps built in.
- Method 4: Enable direct checkout using a plugin: Best for stores that want every "Add to Cart" click on the site to go straight to checkout automatically.
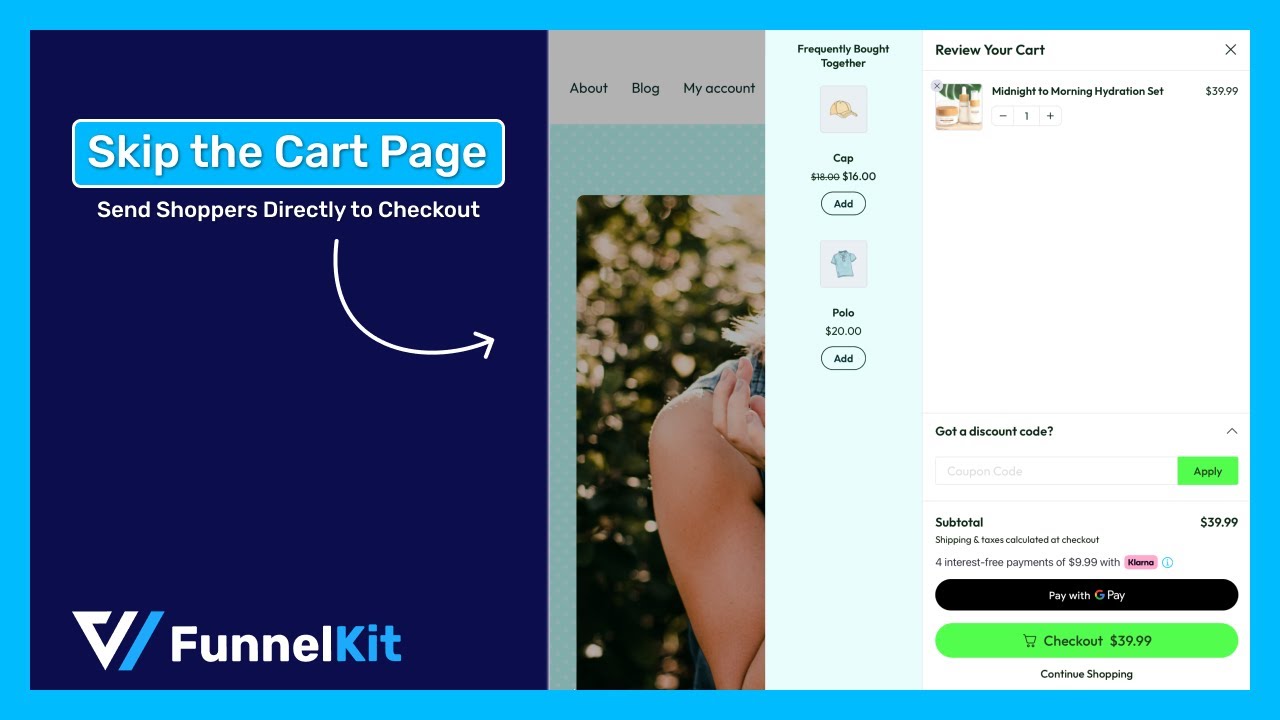
Here's a quick video tutorial to help you skip the cart page using a WooCommerce side cart:
Let’s break down each method step by step.
Method 1: How to Create a WooCommerce Direct Checkout Link Manually Without a Plugin
Adding WooCommerce direct checkout links to different types of products is super easy. All you need to do is collect the product ID.
After that, you need to append the following to your WooCommerce store’s URL:
checkout/?add-to-cart=IDAnd, of course, before you do that, you need to replace the “ID” with the actual ID of your product.
https://www.yourdomain.com/checkout/?add-to-cart=IDHere is an example. You can find the product ID from Product ⇒ All Products. Just hover over any of the products and copy the ID.
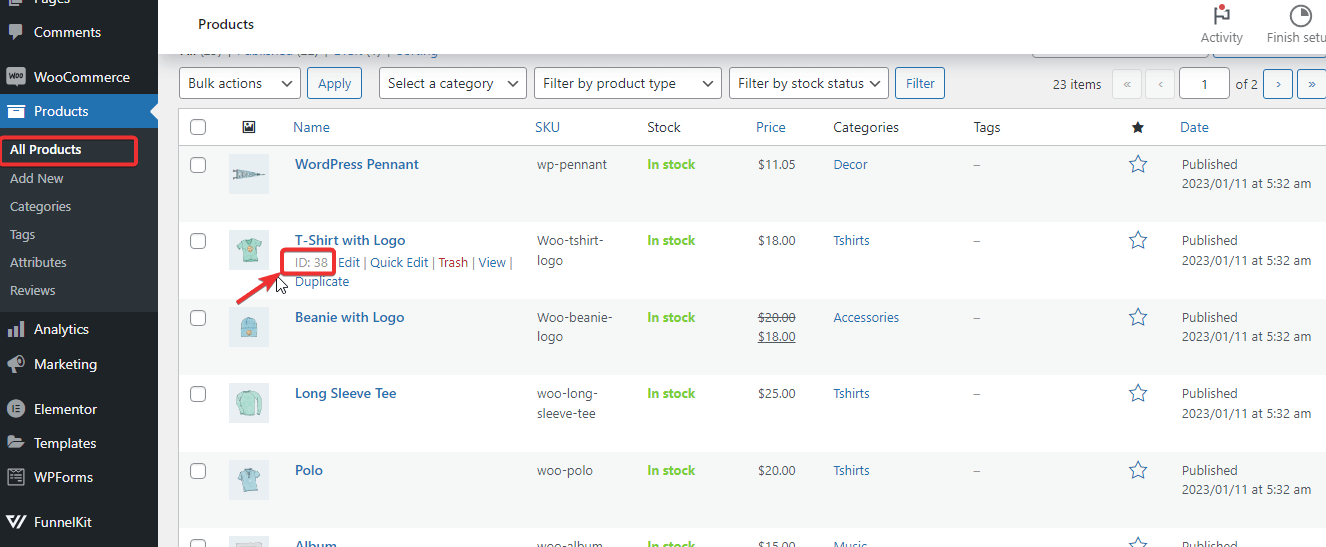
Then paste the ID in the URL like the one shown below:
http://funnelkit.local//checkout/?add-to-cart=3271Now, if you hit this URL, you will be redirected to the checkout page directly, skipping the Cart page.
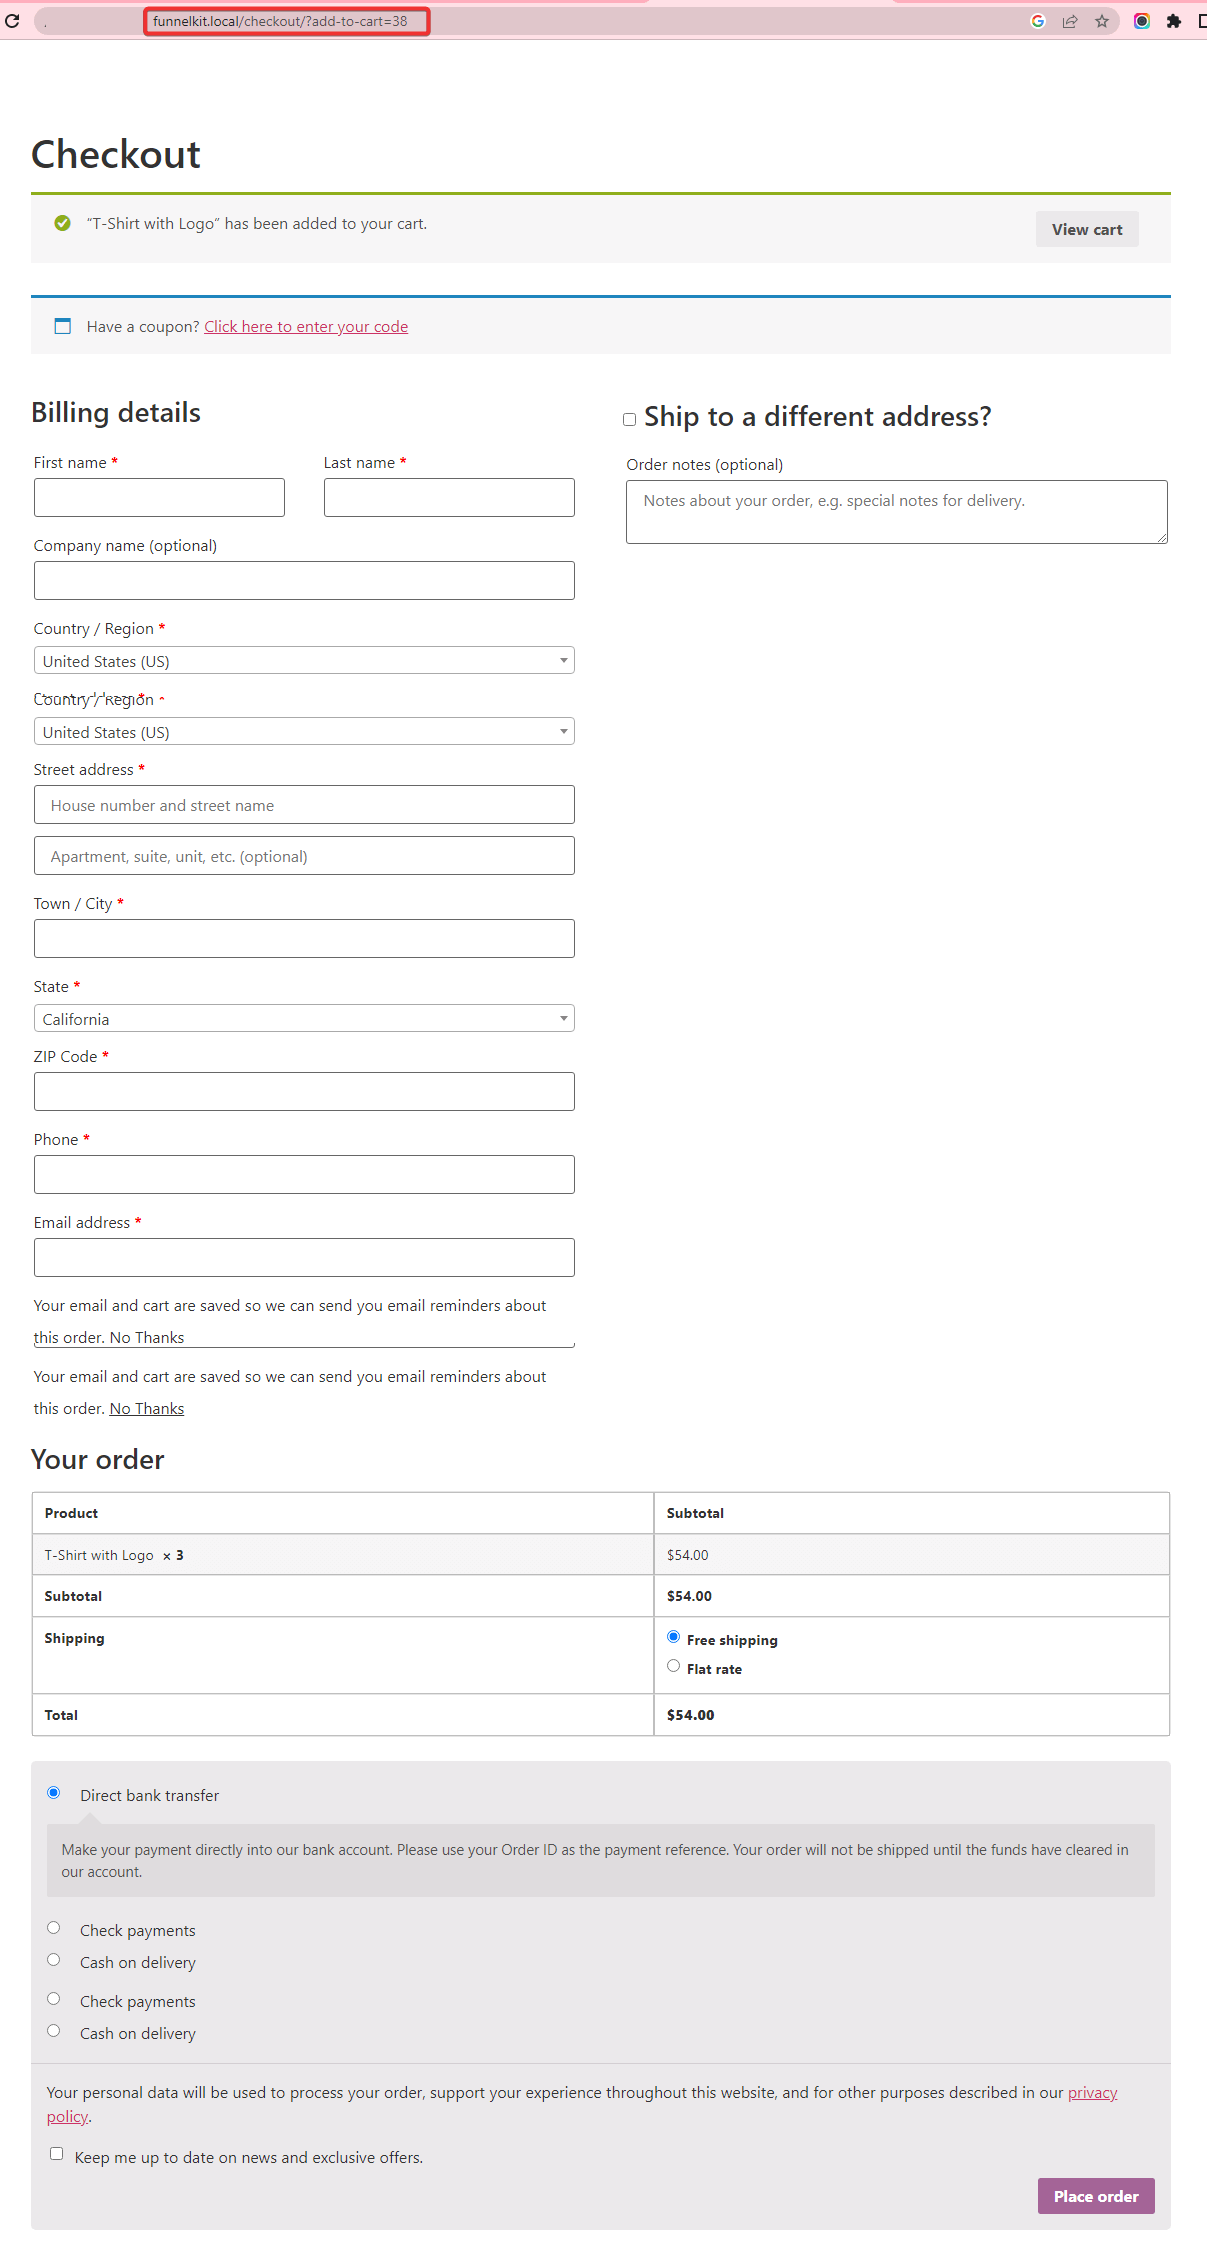
This was easy, wasn't it?
But this way, you can add a direct checkout link to only one product at a time. Plus, there is no way to enhance the average order value of your store.
Let's move to the next section to find out how you can take users directly to the WooCommerce checkout page using a sales funnel and also improve your AOV.
Method-2: How to Set Up WooCommerce Direct Checkout with a Free Modern Side Cart
You can skip the default WooCommerce cart page by enabling a modern side cart in your store.
To do that, FunnelKit Cart for WooCommerce is the only plugin you need.
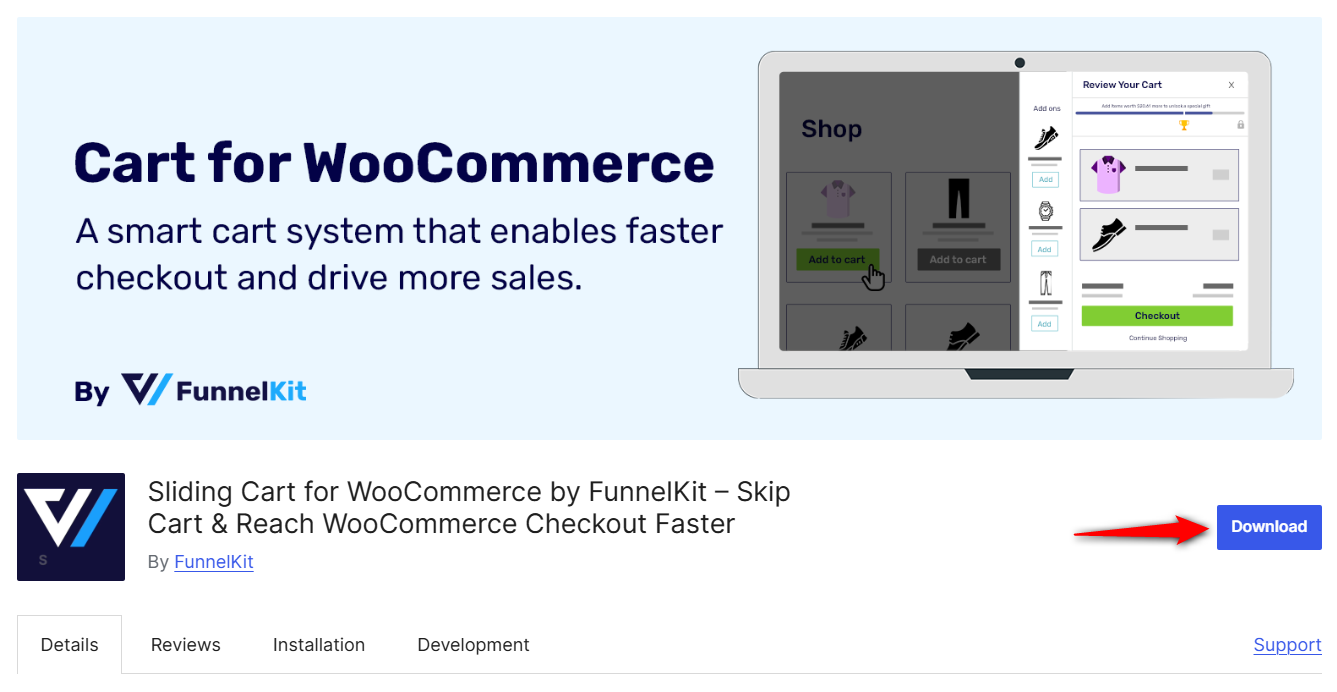
FunnelKit Cart brings a seamless, slide-in add-to-cart experience for your shoppers. It allows them to view, update, and manage cart items and then go straight to checkout, completely skipping the traditional cart page in WooCommerce.

With FunnelKit Cart, you can add smart in-cart upsells and cross-sells and offer rewards and incentives to increase order value.
Please note that the upsells and reward features are part of FunnelKit Cart Pro, available in the FunnelKit Plus plan and above.
Step 1: Install and activate FunnelKit Cart
Download the lite (free) version of FunnelKit Cart for WooCommerce.
Make sure to install and activate it on your website.
Step 2: Enable cart for WooCommerce
Go to FunnelKit ⇨ Cart and toggle the switch ON to enable the sliding cart.
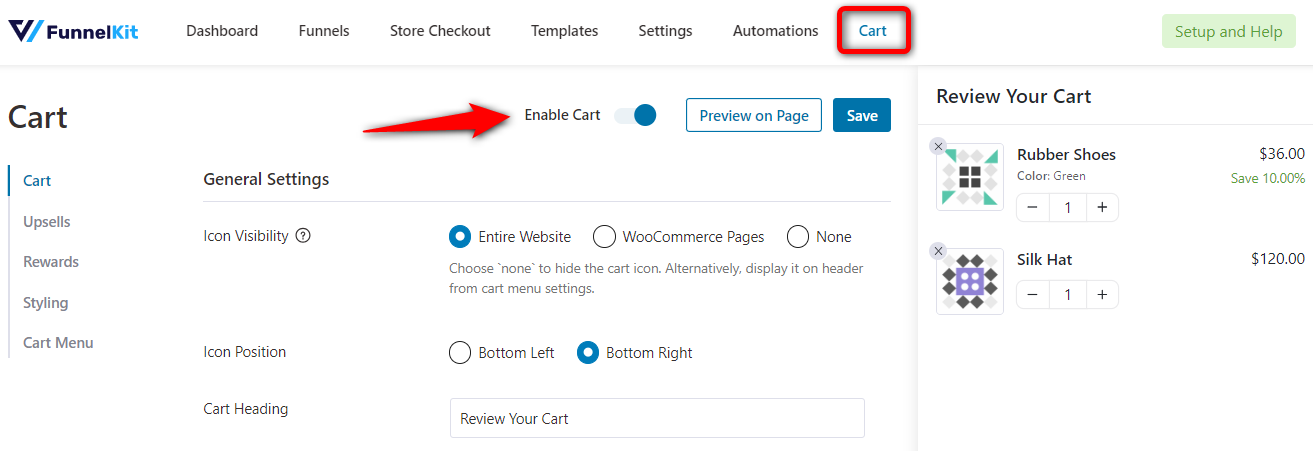
This activates the FunnelKit cart drawer, giving your WooCommerce store an instant side-cart shopping experience.
Step 3: Customize your FunnelKit Cart
Next, customize your sliding cart to match your store’s design and experience.
You can configure multiple settings, such as:
- Cart Icon: Visibility, position, and behavior
- Cart Heading: Customize the cart title
- AJAX Add to Cart: Instantly add products without page reload
- Auto-Open Side Cart: Automatically open the cart when a product is added
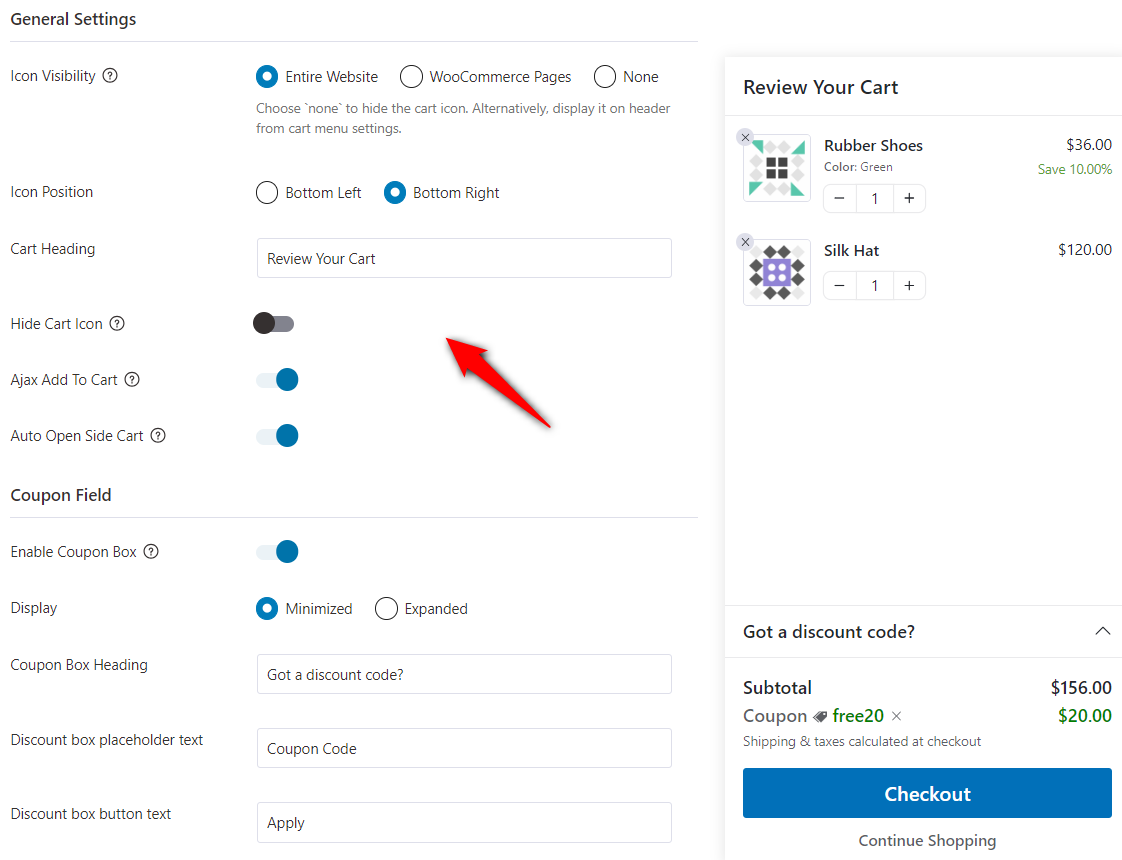
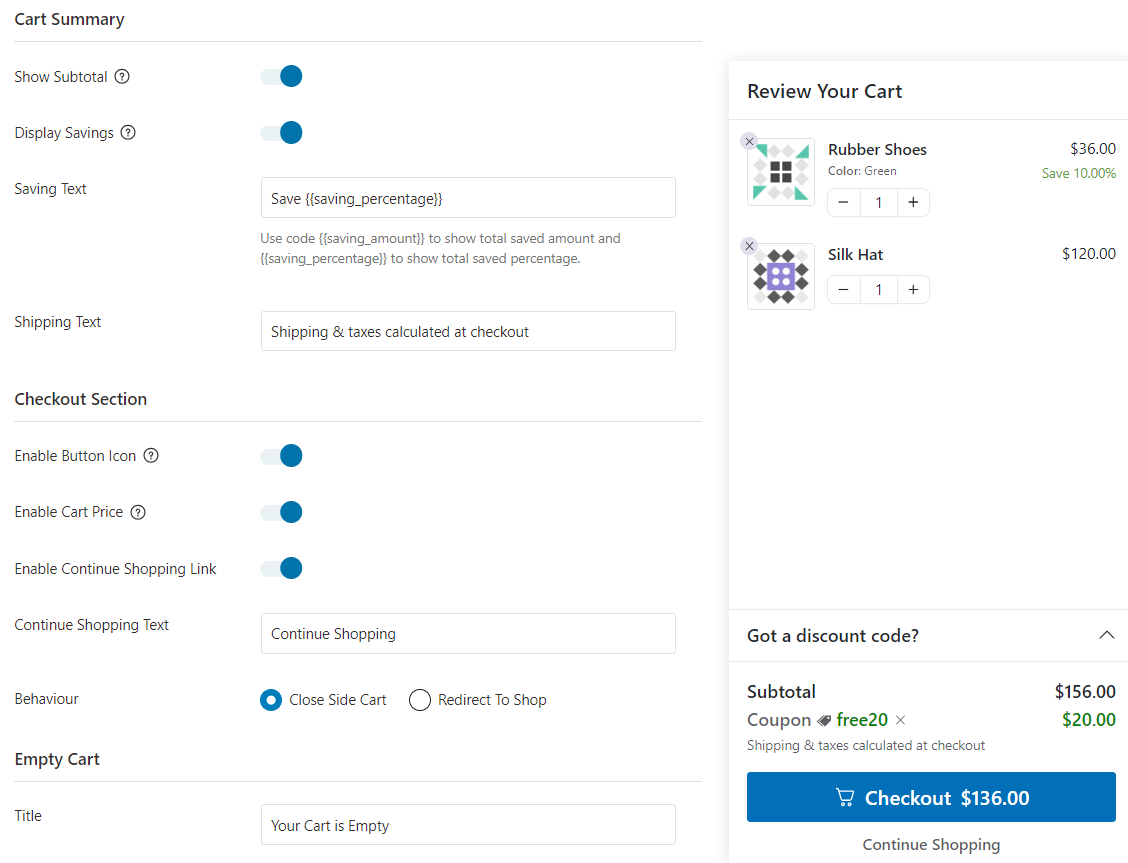
You can also manage different cart sections, including the coupon field, cart summary, checkout section, and more.
Enable or disable these elements based on your store’s flow and display preferences.
Make your cart visually on-brand from the Styling tab.
Customize the button color, text color, cart preview width, animation speed, border color, icon style, and more.
Once done, click ‘Save’ to apply your design updates.
That’s it! You’ve successfully set up a modern, stylish sliding cart in your WooCommerce store using FunnelKit Cart.
Method 3: How to Offer Dedicated WooCommerce Direct Checkout Using a Sales Funnel for FREE
We’ll use FunnelKit Funnel Builder, a powerful sales funnel plugin, to create a dedicated direct WooCommerce checkout for specific products.
This checkout manager plugin lets you build high-converting custom checkout pages for individual products or product groups, streamlining the buying experience.
Track performance in real-time with key metrics like orders placed, revenue generated, average order value (AOV), views, and conversions.
Upgrade to FunnelKit Funnel Builder Pro to unlock advanced features like selling cross-sell in the form of order bumps, one-click upsells, and A/B testing, all designed to maximize revenue and optimize performance.
You can even offer targeted discounts with just a few clicks to drive more sales.
Let’s dive into the setup process.
Step 1: Create a checkout funnel with a free prebuilt template
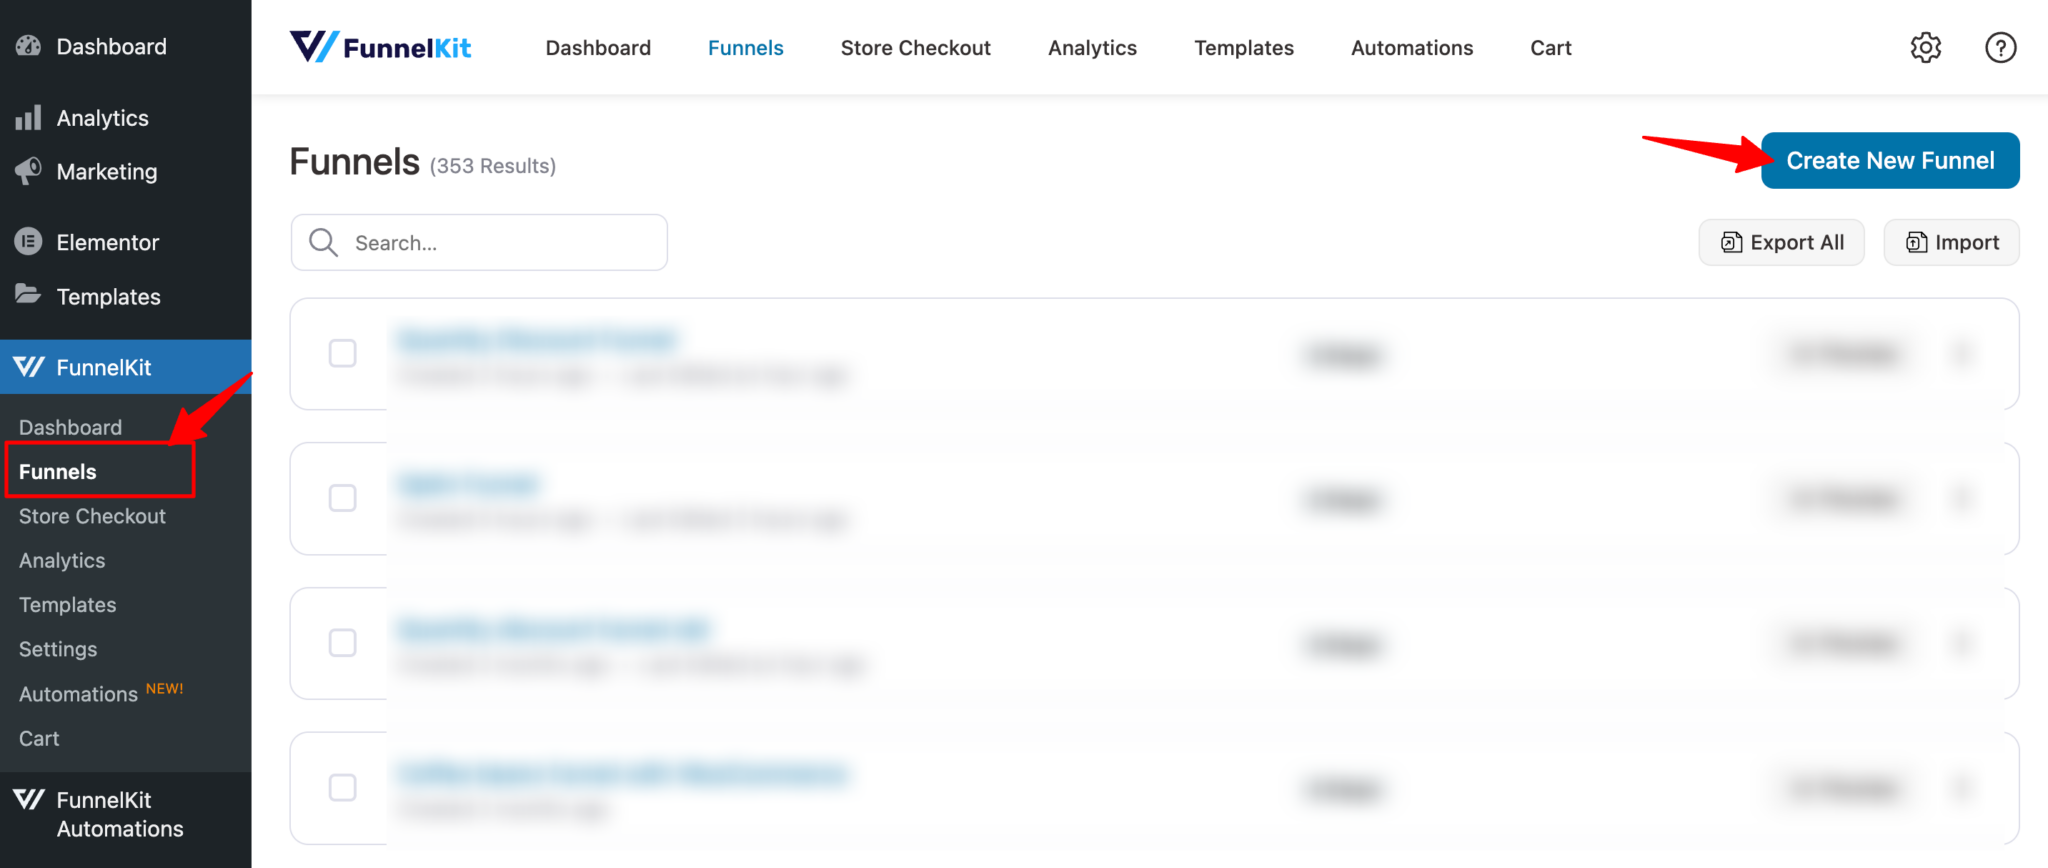
To create a sales funnel, go to FunnelKit ⇒ Funnels and click on ‘Create New Funnel’.
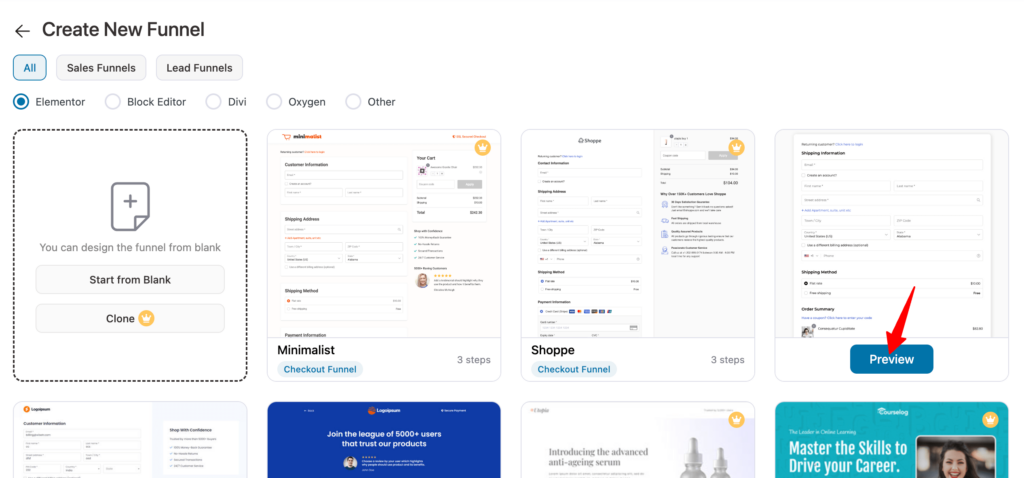
Now, choose the “Checkout” option to see all the prebuilt checkout funnels. To view any of the funnels and select, just hover on it and click on Preview.
Here, we are using an Optic template. You can use this template for free, but for premium features like order bump and one-click upsell, you need to upgrade to FunnelKit Pro.
To view this free checkout template, hover over it and click Preview.
After that, click on “Import This Funnel”, provide a name, and click on Add.
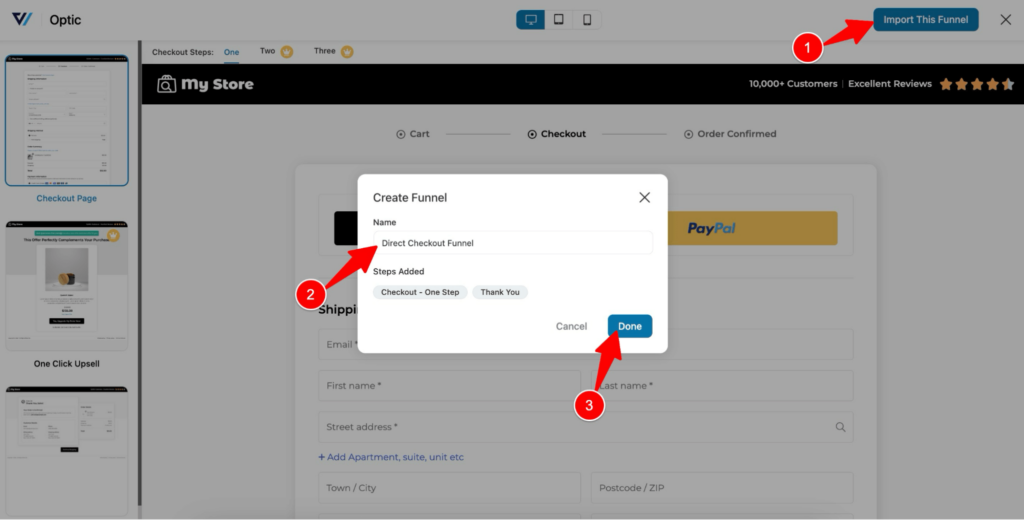
This will import the funnel with three steps: checkout, one-click upsell, and thank you.
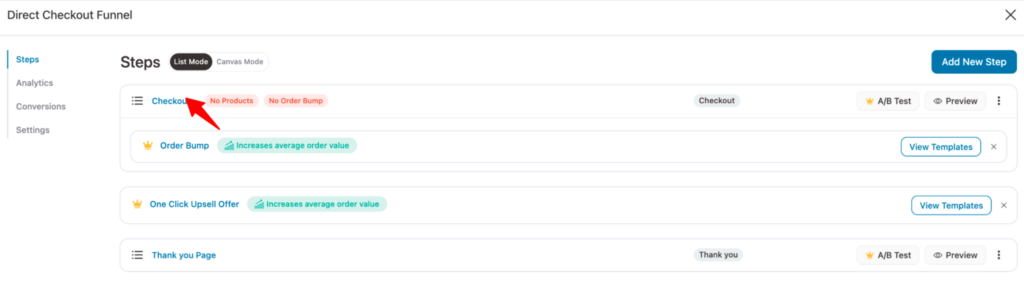
Step 2: Customize the checkout page
To customize the checkout page, click on the checkout step.
Next, click on the ‘Edit Elementor Template’ option to edit the template with the Elementor page builder.
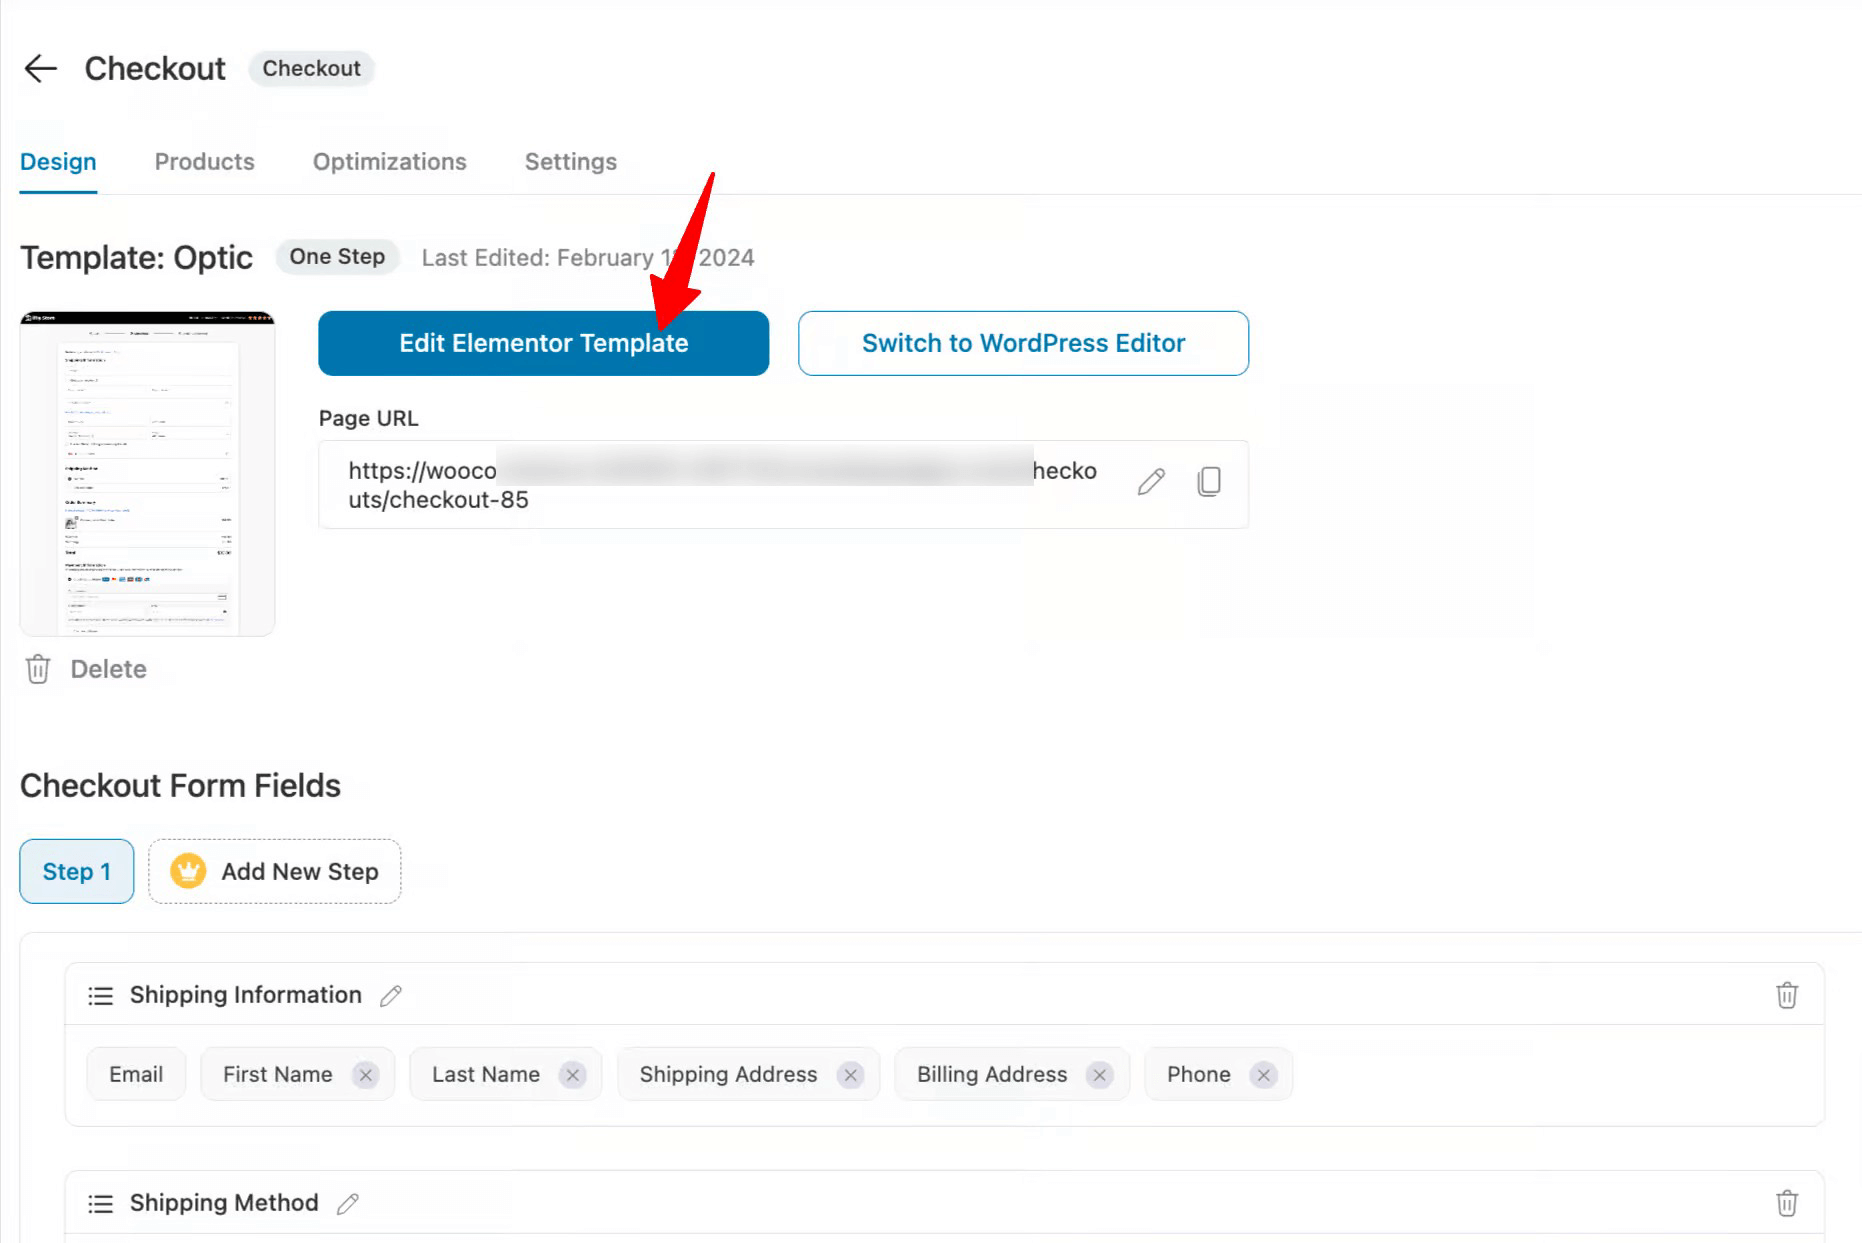
Here, you can customize the checkout page according to your preference. For example, you can turn on the collapsible order summary, which is very helpful for mobile users.
You can customize all the sections and change their content. Just click on a section, and you will find all the options to customize the content on the left side.
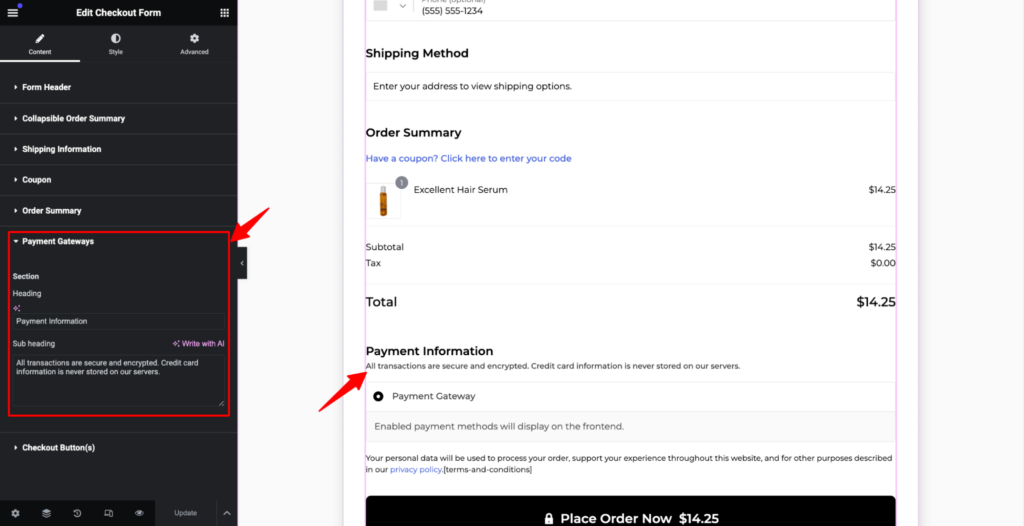
After making the changes, click on the update button below to save.
Step 3: Add products to the checkout page
Move to the products tab. After that, click on “Add Product,” search for a product, select it, and finally click on “Add” to add the product to the checkout page.
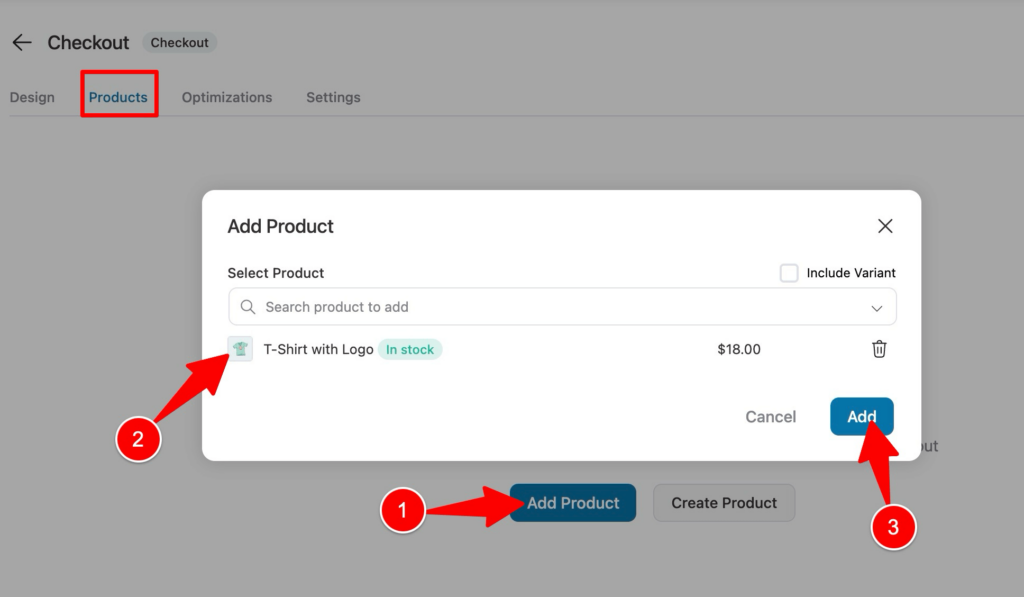
You can add multiple products if you want, and you can offer discounts on them as well. This will increase your chances of getting more sales.
You can select the products that will be added to the cart from the settings. You can set it to:
- Restrict buyers to choose only one of the above products
- Allow the buyer to select any of the above products
- Force sell all of the above products
After making the changes, click on "Save" to update.

We are choosing the third option; all the products will be added to the cart.
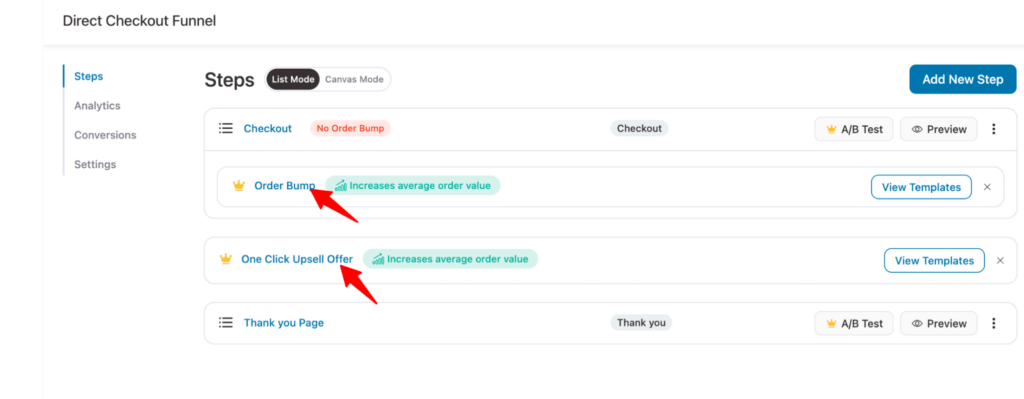
You can further optimize the WooCommerce checkout page to enable quick purchases.
As mentioned earlier, FunnelKit Funnel Builder Pro offers Order bump and one-click upsell features. These two features are highly effective in boosting the average order value of your WooCommerce store.
Step 4: Customize the thank you page to complete
Thank you pages show up the order details of the order the user just places along with a thank you message.
Like the checkout page, you can customize the thank you page with Elementor as well.
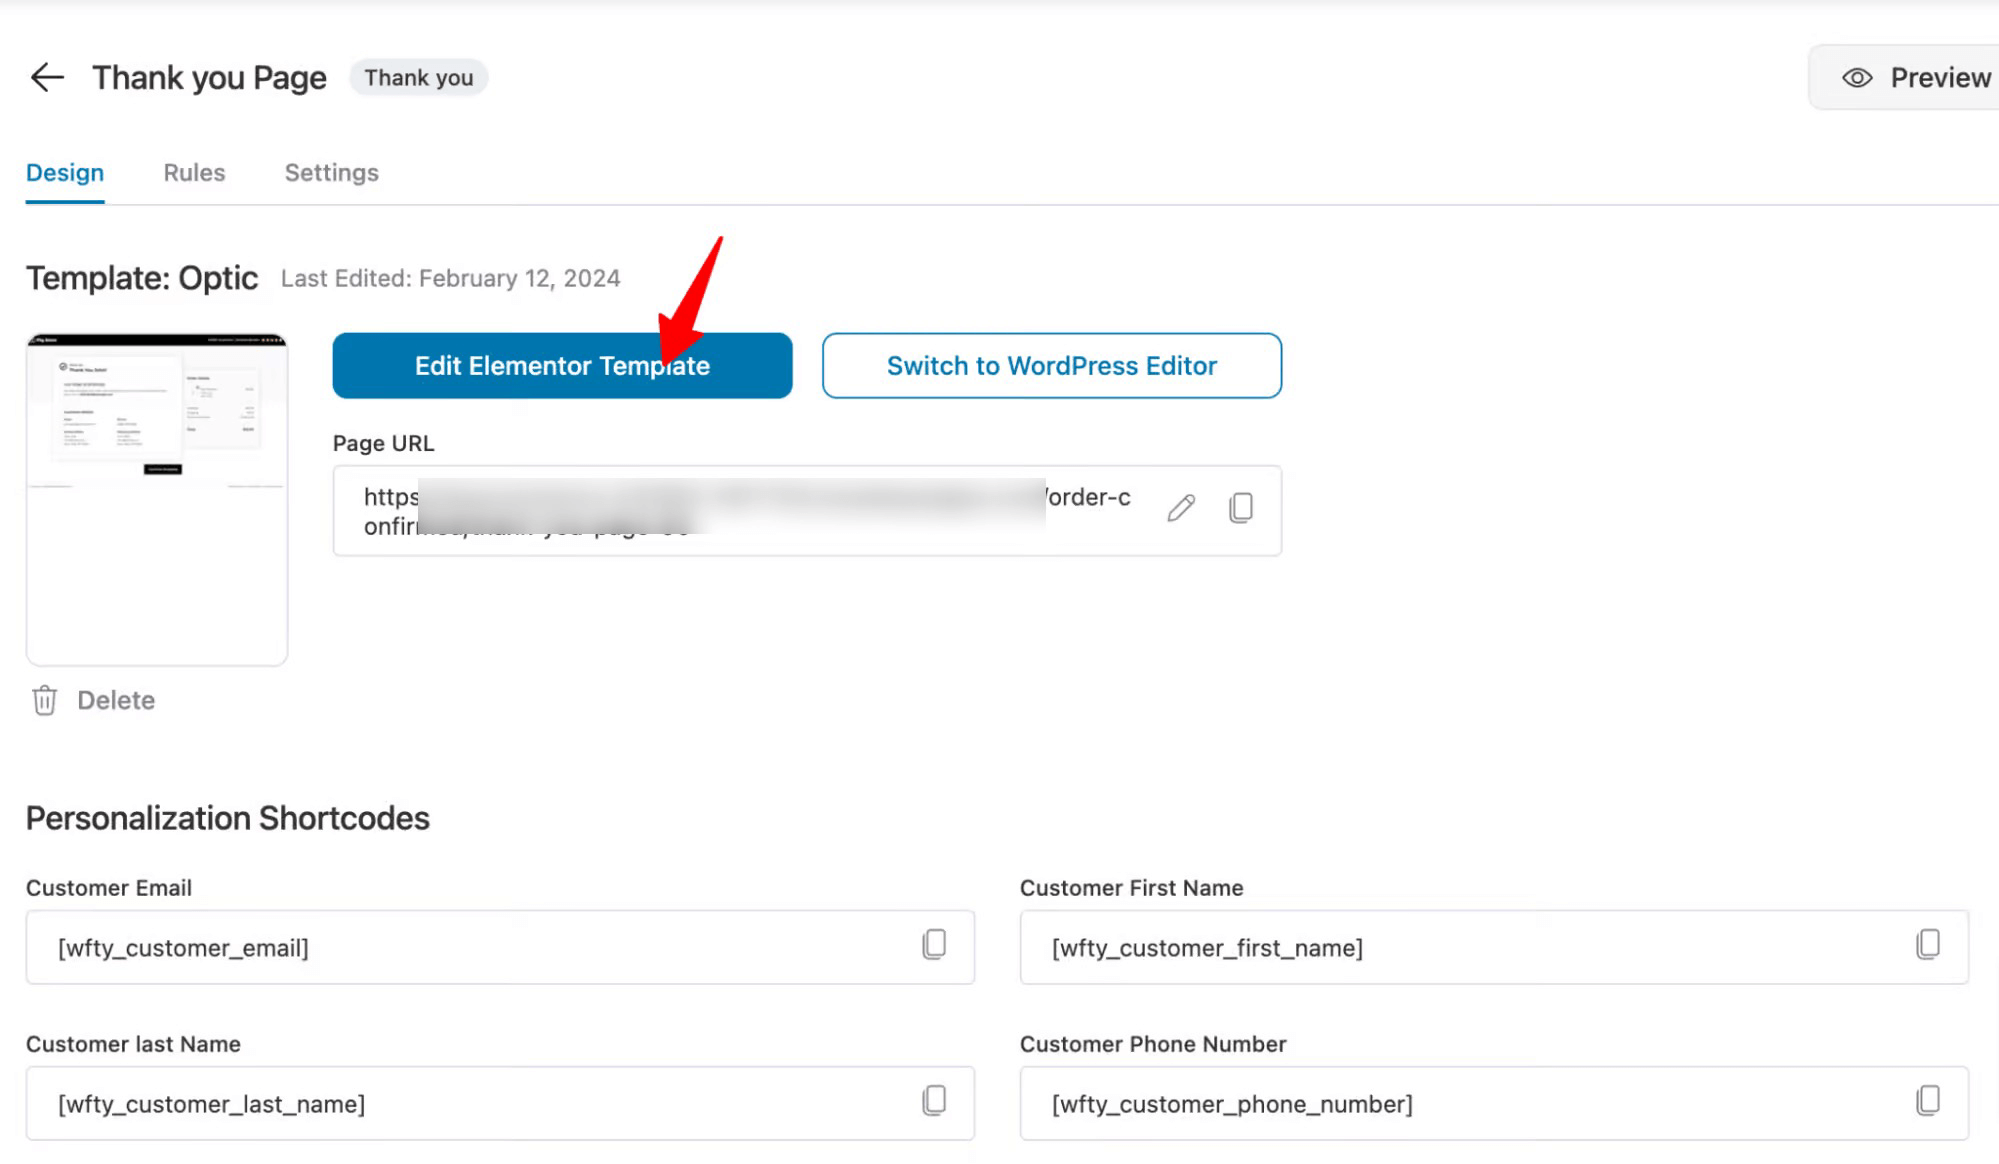
After editing the thank you page, your checkout funnel will be ready.
So far, we have shown you how to offer WooCommerce direct checkout links, which you can promote on various marketing platforms.
But how about skipping the cart page when users add products to the cart from the product page or archive page?
We will cover these in the next section.
Method 4: How to Enable WooCommerce Direct Checkout Using a Plugin
Just follow the steps shown below to allow users to skip the cart page while shopping on your WooCommerce store. Using this method, you can add buy now buttons to the product page.
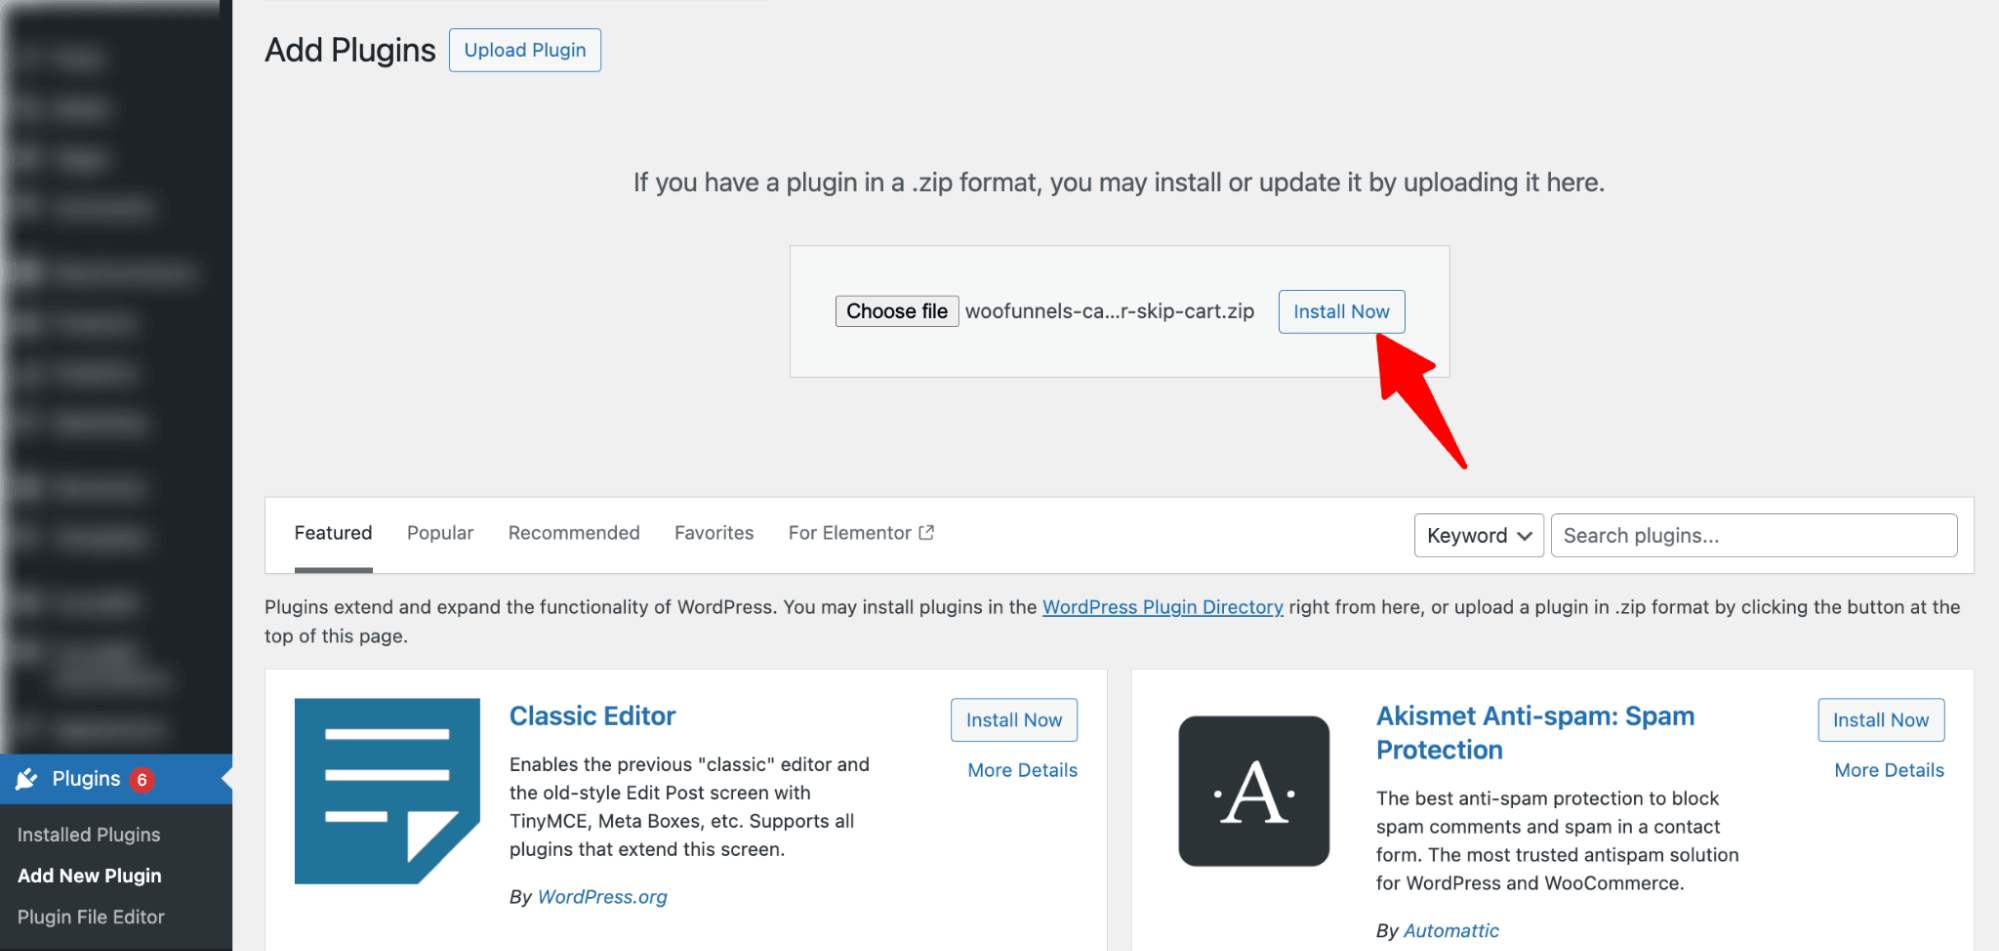
Step 1: Install and activate the CartHopper add-on
The first step is to install and activate the CartHopper plugin by FunnelKit. This WordPress plugin is an add-on to FunnelKit, available with the FunnelKit Pro version.
Step 2: Enable Skip cart for product pages
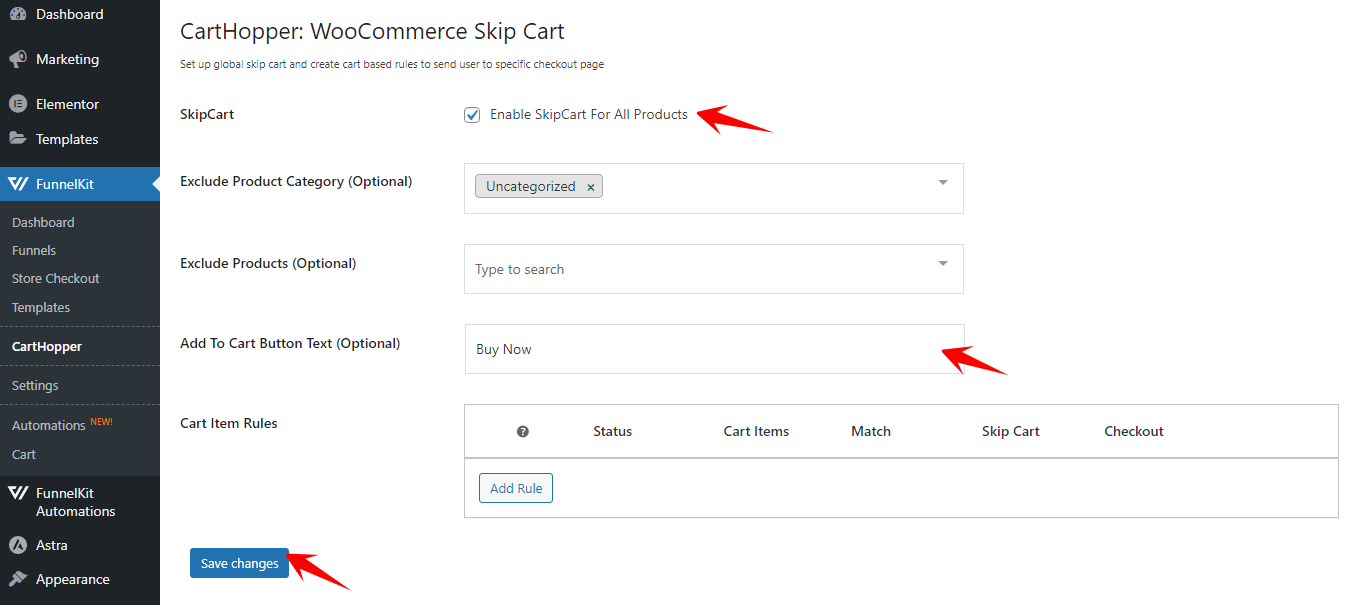
Now navigate to FunnelKit ⇒ CartHopper. Here, you first need to set up the following options:
- SkipCart: check the “Enable SkipCart For All Products” option so users can go to the checkout page directly after clicking the “Add to Cart” button.
- Exclude Product Category (Optional): You can use any category where you don’t want to implement the direct checkout option.
- Exclude Products (Optional): You can exclude any products from this direct checkout process.
- Add To Cart Button Text (Optional): Since this feature will take the users directly to the checkout page, you can change the text of the “Add to Cart” button to “Buy Now” or anything you prefer.
After everything is set up, click on Save Changes to update.
After setting up these features, the Skip Cart Page option will be implemented on your WooCommerce product page, shown below:

Step 3: Enable the skip cart option for archive pages
While the skip page option should be working fine on the product page, you need to do a little more to activate this option on the WooCommerce archive pages.
To disable the Ajax settings, navigate to WooCommerce ⇒ Settings and move to the Product tab. Now, under Add to Cart Behavior, disable both the “Redirect to the cart page after successful addition” and “Enable AJAX add to cart buttons on archives” options.
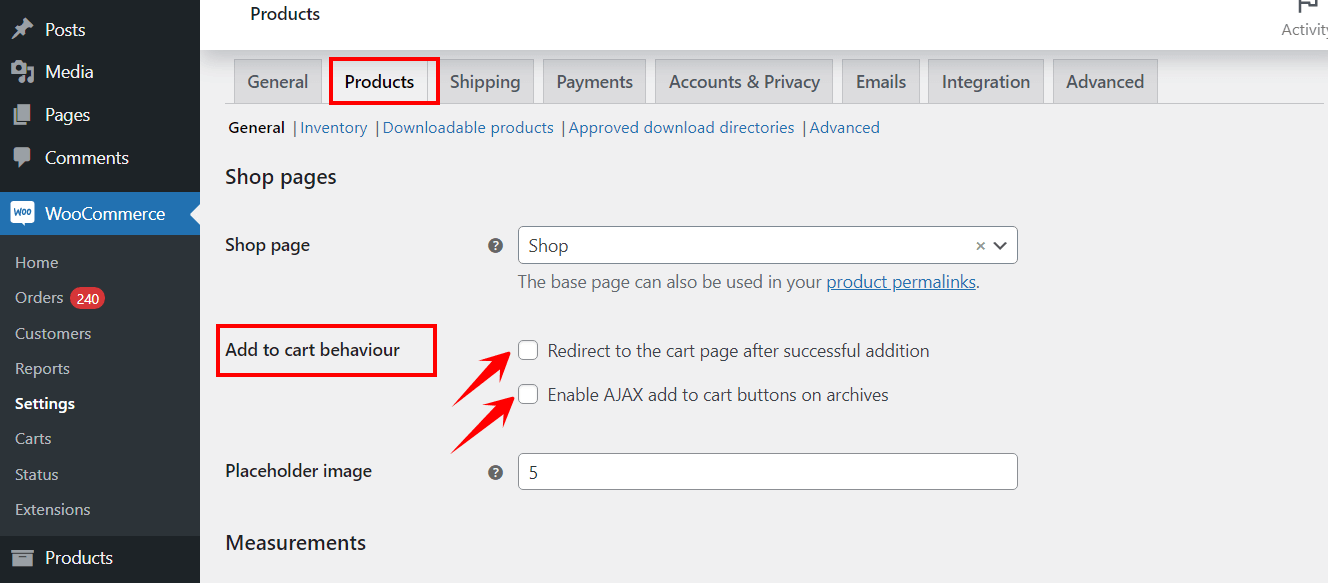
After that, save the changes. Now, if you go to the Archive page and click on Add to Cart for any product, it will take you directly to the WooCommerce checkout page, skipping the cart page.
That is how you can use FunnelKit’s Cart Hopper plugin to skip the cart page and take users directly to the checkout page.
10 Best Practices for Implementing WooCommerce Direct Checkout
Implementing WooCommerce direct checkout can significantly enhance the shopping experience and boost conversion rates.
Here are some best practices to ensure it’s done effectively:
- Create high-converting product pages
Use clear titles, high-quality images, detailed descriptions, and visible “Buy Now” buttons that take users directly to checkout.
- Keep the cart accessible
Allow users to review, update, or add items using a modern sliding cart throughout the buying journey.
- Simplify the checkout form
Minimize required fields, enable autofill, and use inline validation for a smooth, fast user experience.
- Add visual progress indicators
Display clear steps on multi-step checkout pages to reduce drop-offs and guide users to completion.
- Optimize for mobile
Ensure a fully responsive, tap-friendly design with fast load times to keep mobile shoppers engaged.
- Automate recovery emails/SMS
Recover lost sales by sending personalized cart abandonment messages using FunnelKit Automations.
- Track and improve continuously
Monitor key metrics like conversion rate, AOV, and drop-off points to fine-tune your checkout flow.
- Offer multiple express payment options
Enable Apple Pay, Google Pay, and PayPal Express Checkout to let users complete purchases with a single tap. This reduces friction and boosts conversions, especially on mobile.
- Optimize for page speed and performance
Use caching plugins, CDN, and image optimization tools to keep your checkout page lightning-fast. A one-second delay can lead to a 7% drop in conversions.
- Run A/B tests on checkout elements
Experiment with different checkout layouts, CTA button colors, and field placements to find what converts best. FunnelKit Pro’s A/B testing feature makes this easy.
By staying tuned to these performance indicators, you can continuously refine your WooCommerce direct checkout implementation and ensure it remains aligned with user preferences and your business objectives.
Frequently Asked Questions (FAQs)
In this section, we’ve answered some commonly asked questions related to WooCommerce direct checkout.
How to do direct checkout for WooCommerce?
You need FunnelKit Funnel Builder to set up direct checkout in your WooCommerce store. You can create a dedicated sales funnel or offer a beautiful, stylish shopping cart for free. Read the detailed process in this article.
How do I turn off cart direct to checkout in WooCommerce?
You can turn off cart direct to checkout by navigating to WooCommerce settings ⇨ Products. Disable options like redirecting to the cart page, and enable AJAX add-to-cart buttons from the Add-to-Cart behavior.
Why leverage WooCommerce direct checkout?
Nearly 70% of users abandon their carts often due to distractions during a lengthy checkout process, especially on mobile. Using direct checkout in WooCommerce simplifies the flow, keeping users focused and boosting conversions. Here are some benefits of using WooCommerce direct checkout:
1. Simplify the buying process by reducing steps and making checkout faster.
2. Reduce cart abandonment by minimizing friction during checkout.
3. Increase conversion rates with a streamlined and distraction-free flow.
4. Improve user experience with a fast, hassle-free purchase journey.
5. Optimize for mobile by making checkout smooth and easy to navigate.
You don't necessarily have to enable direct checkout only in your online store; you can also use the WooCommerce direct checkout link on various marketing platforms, such as social media ads and email marketing.
How do I skip the WooCommerce Cart page and redirect to the checkout page using custom code?
You can use the custom code to skip the cart page and send users directly to the checkout page:// Redirect to checkout after adding product to cart
add_filter( 'woocommerce_add_to_cart_redirect', 'custom_redirect_to_checkout' );
function custom_redirect_to_checkout() {
return wc_get_checkout_url();
}
What are the best WooCommerce direct checkout plugins?
Picking the right plugin depends on how much control you want over the checkout experience. Here are the top options for setting up direct checkout in WooCommerce:
1. FunnelKit Funnel Builder
Best overall solution for creating high-converting direct checkout pages.
FunnelKit Funnel Builder lets you design custom, distraction-free checkout pages that send users directly to checkout while increasing conversions. You can also add order bumps, one-click upsells, and A/B testing to maximize revenue.
👉 Free + Pro version available.
2. FunnelKit Cart for WooCommerce
Ideal for stores that want a sliding cart experience.
FunnelKit Cart introduces a modern side cart that lets customers review items, apply coupons, and go straight to checkout — skipping the traditional cart page completely. It creates a smooth, Shopify-style buying journey.
👉 Free version available; advanced features in Pro.
3. Direct Checkout for WooCommerce by QuadLayers
Lightweight and easy-to-use plugin.
This plugin lets you remove unnecessary steps during checkout and add quick “Buy Now” buttons on product pages. It’s simple, fast, and ideal for small stores that want to skip the cart without complex setups.
👉 Free plugin on WordPress.org.
4. WooCommerce One Page Checkout
Official WooCommerce extension for direct checkout.
This premium plugin merges product selection and checkout into a single page, reducing friction and improving conversions. It’s reliable but requires a paid license.
👉 Paid plugin from WooCommerce.com.
5. CartHopper by FunnelKit
Perfect for enabling one-click skip cart functionality.
CartHopper adds a direct checkout path by redirecting shoppers from the 'Add to Cart' button straight to checkout, skipping the extra step entirely. You can exclude specific products or categories and rename the button to 'Buy Now.
👉 Available with FunnelKit Pro.
Get Ready to Simplify Purchases with WooCommerce Direct Checkout
WooCommerce direct checkout is one of the simplest yet most effective ways to reduce cart abandonment and speed up the buying process in your store.
By allowing customers to skip unnecessary steps and head straight to checkout, you create a seamless shopping experience that drives higher conversions and boosts your store’s revenue.
Whether you use manual add-to-cart links, a sliding side cart, or a fully optimized checkout funnel, the goal is the same: make it easier for shoppers to buy from you.
If you’re serious about improving conversions, try combining FunnelKit Funnel Builder and FunnelKit Cart.
Together, they give you complete control over your checkout experience, from direct checkout flows and cart optimization to order bumps, upsells, and analytics.
Start simplifying your checkout today and see the difference a frictionless buying journey can make for your WooCommerce store.
Get started with FunnelKit and unlock the fastest checkout experience your customers will love.
Editorial Team
March 23, 2026Does your WooCommerce store offer enough payment options? If not, you could be losing up to 13% of sales. [According to Baymard]. WooCommerce’s default payment options don’t always meet customer...
Editorial Team
January 27, 2026Imagine a customer makes a purchase, but instead of the order smoothly processing through your system, it gets stuck in “Pending Payment” or “On Hold” indefinitely. You’re checking your settings...
Editorial Team
June 25, 2025Discover everything you need to know about WooCommerce caching, how it works, which pages to exclude, and how to configure it for optimal performance. Caching helps speed up your website...


