
Did you know your customers could add products to their cart with just one click?
Yes, it’s possible! With a custom WooCommerce add-to-cart link, you can let customers instantly add products or bundles to their cart, simplifying their shopping experience.
This powerful tool promotes exclusive deals, boosts impulse buys, and drives sales through social media or email campaigns.
Yet, many WooCommerce store owners miss out because they find creating these links challenging.
This blog will show you how to create custom add-to-cart links for your WooCommerce store effortlessly.
It’s time to make shopping easier for your customers and supercharge your conversions!
Let’s begin.
Short on time? Watch the video 👇
Table of Contents
- 1 Default Add to Cart Options in WooCommerce
- 2 What is a Custom WooCommerce Add To Cart Link?
- 3 How to Create a Custom Add to Cart Link Without Any Plugin?
- 4 Troubleshooting Common Issues
- 5 How Do You Create a WooCommerce Add to Cart Link that Adds Multiple Products to the Cart with a Single Click?
- 6 9 Effective Use Cases for WooCommerce Add to Cart Links
- 7 5 Best Practices for Using Add to Cart Links in Your WooCommerce Store
- 8 Frequently Asked Questions (FAQs)
- 9 How to redirect the add to cart page in WooCommerce?
- 10 How do I add a product to a cart in WooCommerce?
- 11 How to Optimize Add-to-Cart URLs Using User Data Insights?
- 12 How to view customers with a specific product in their cart?
- 13 How to view customer carts in WooCommerce?
- 14 Ready to Use WooCommerce Add to Cart Link?
Default Add to Cart Options in WooCommerce
By default, WooCommerce offers an “Add to Cart” button on the product page, which users can click to add products to their cart. The button can also be found in the related product sections.
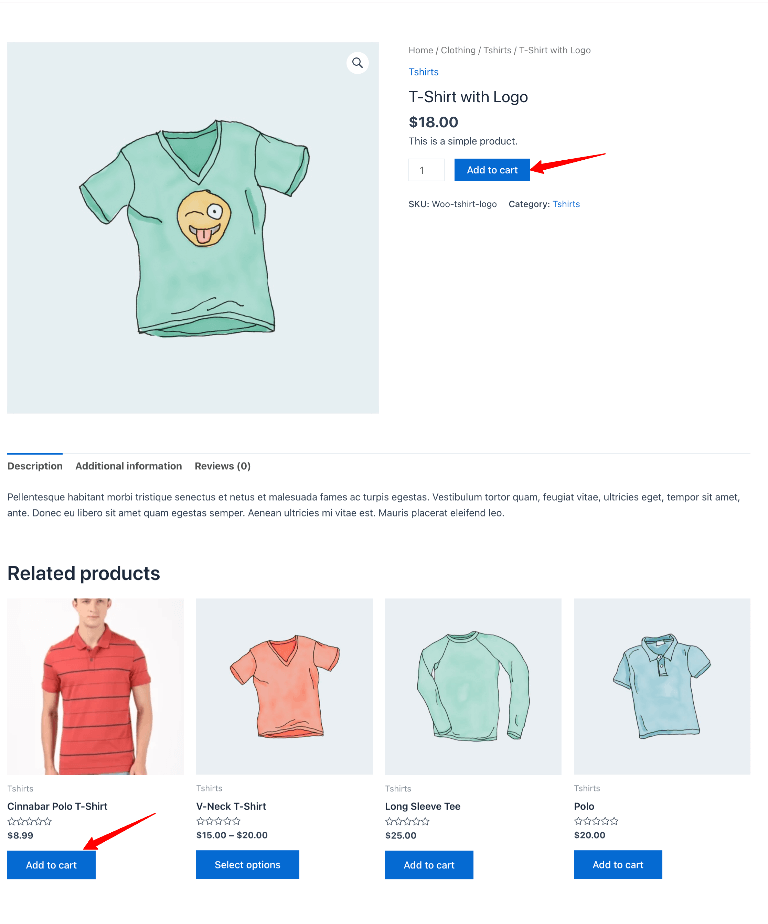
These add-to-cart options are great for any user already on the website who checks the product details to buy.
However, you can’t share these products with people through a link that takes them directly to the cart or checkout page in WooCommerce.
That’s where custom URLs come into play. Move to the next section to find more.
What is a Custom WooCommerce Add To Cart Link?
A custom add-to-cart link in WooCommerce is a specially crafted URL that, when clicked, instantly adds specific products to a user’s shopping cart.
This link is a convenient and efficient way to promote products, particularly in marketing campaigns, automated emails, or on websites.
An add-to-cart WooCommerce link allows you to bypass the need for users to visit a product page and manually click the button.
Instead, they can add items automatically to their cart with a single click on the custom link while they read about the product details.
Here is an example of a custom add-to-cart link in WooCommerce:
Here, ID represents the product ID.
If you want to add a product by specifying a quantity, you can modify the URL accordingly:
How to Create a Custom Add to Cart Link Without Any Plugin?
Here, we will show how to create a custom add-to-cart link for different types of WooCommerce products and redirect it to the cart or checkout page. This is quite easy and does not require any plugins.
Step 1: Find the product ID
Every product has its unique ID number, and we will need this to create a custom add to cart link. Where you find the product ID depends on your product type.
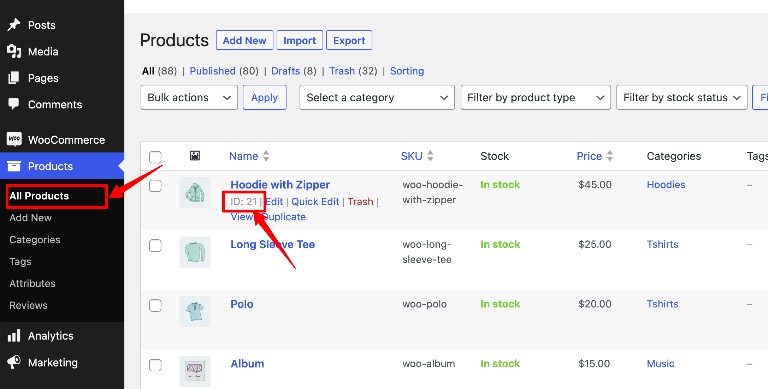
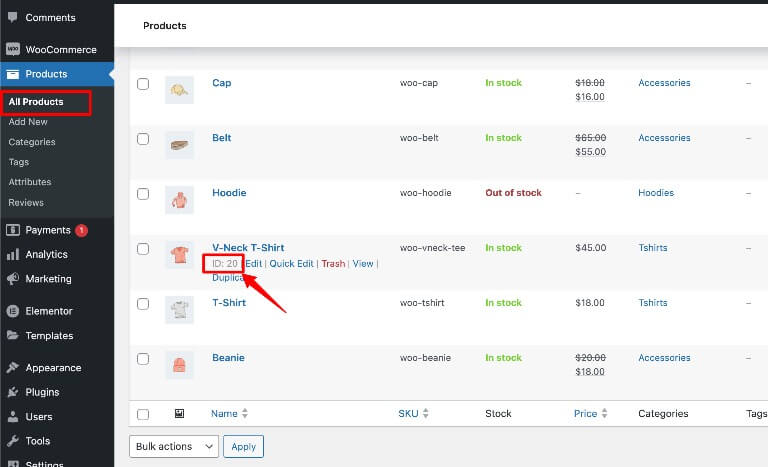
Find ID for simple products
To find the ID for simple products, navigate to Products ⇒ All Products from the WordPress dashboard and hover over the product from which you want to create a link.
You can find the ID here.
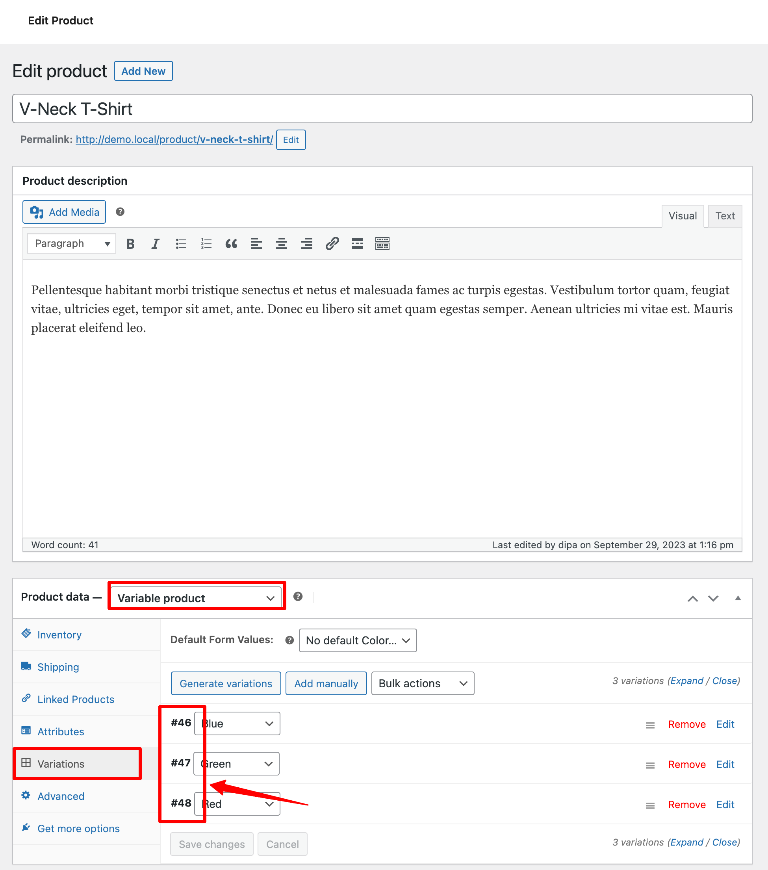
Find ID for variable products
For variable products, you can collect the product ID, variation ID, and all the attribute names with the values.
You will find the variable product ID from Products ⇒ All Products.
For the variation IDs, you can edit the Product, scroll down to the variations tab, and find the ID for all the variable products.
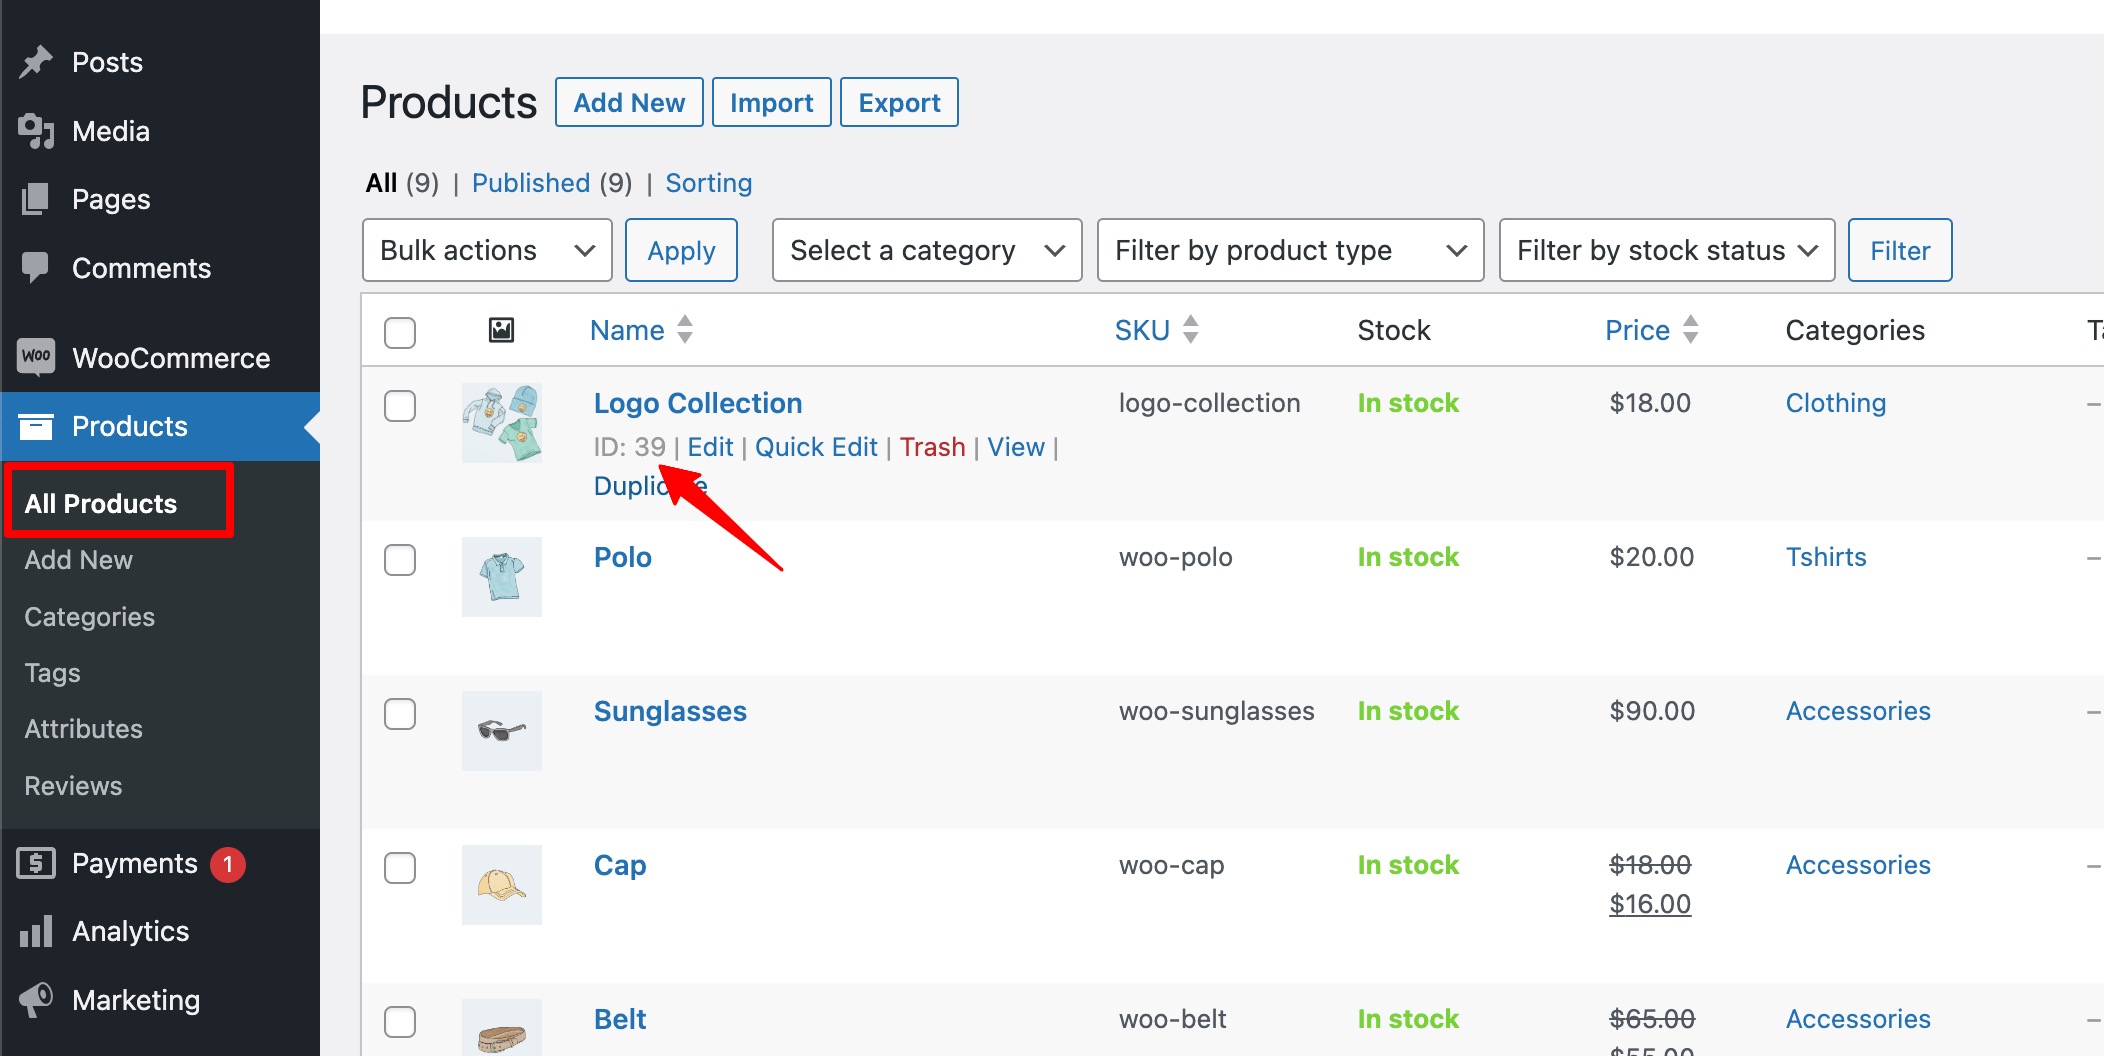
Find ID for grouped products
With grouped products, you need to collect the main group product ID, and since grouped products are a combination of other simple products, you also need to collect those simple product IDs.
Note: You can find the ID for grouped products the same way you can find it for simple products.
You can find the products in the grouped products under the ‘Linked Products’ tab.
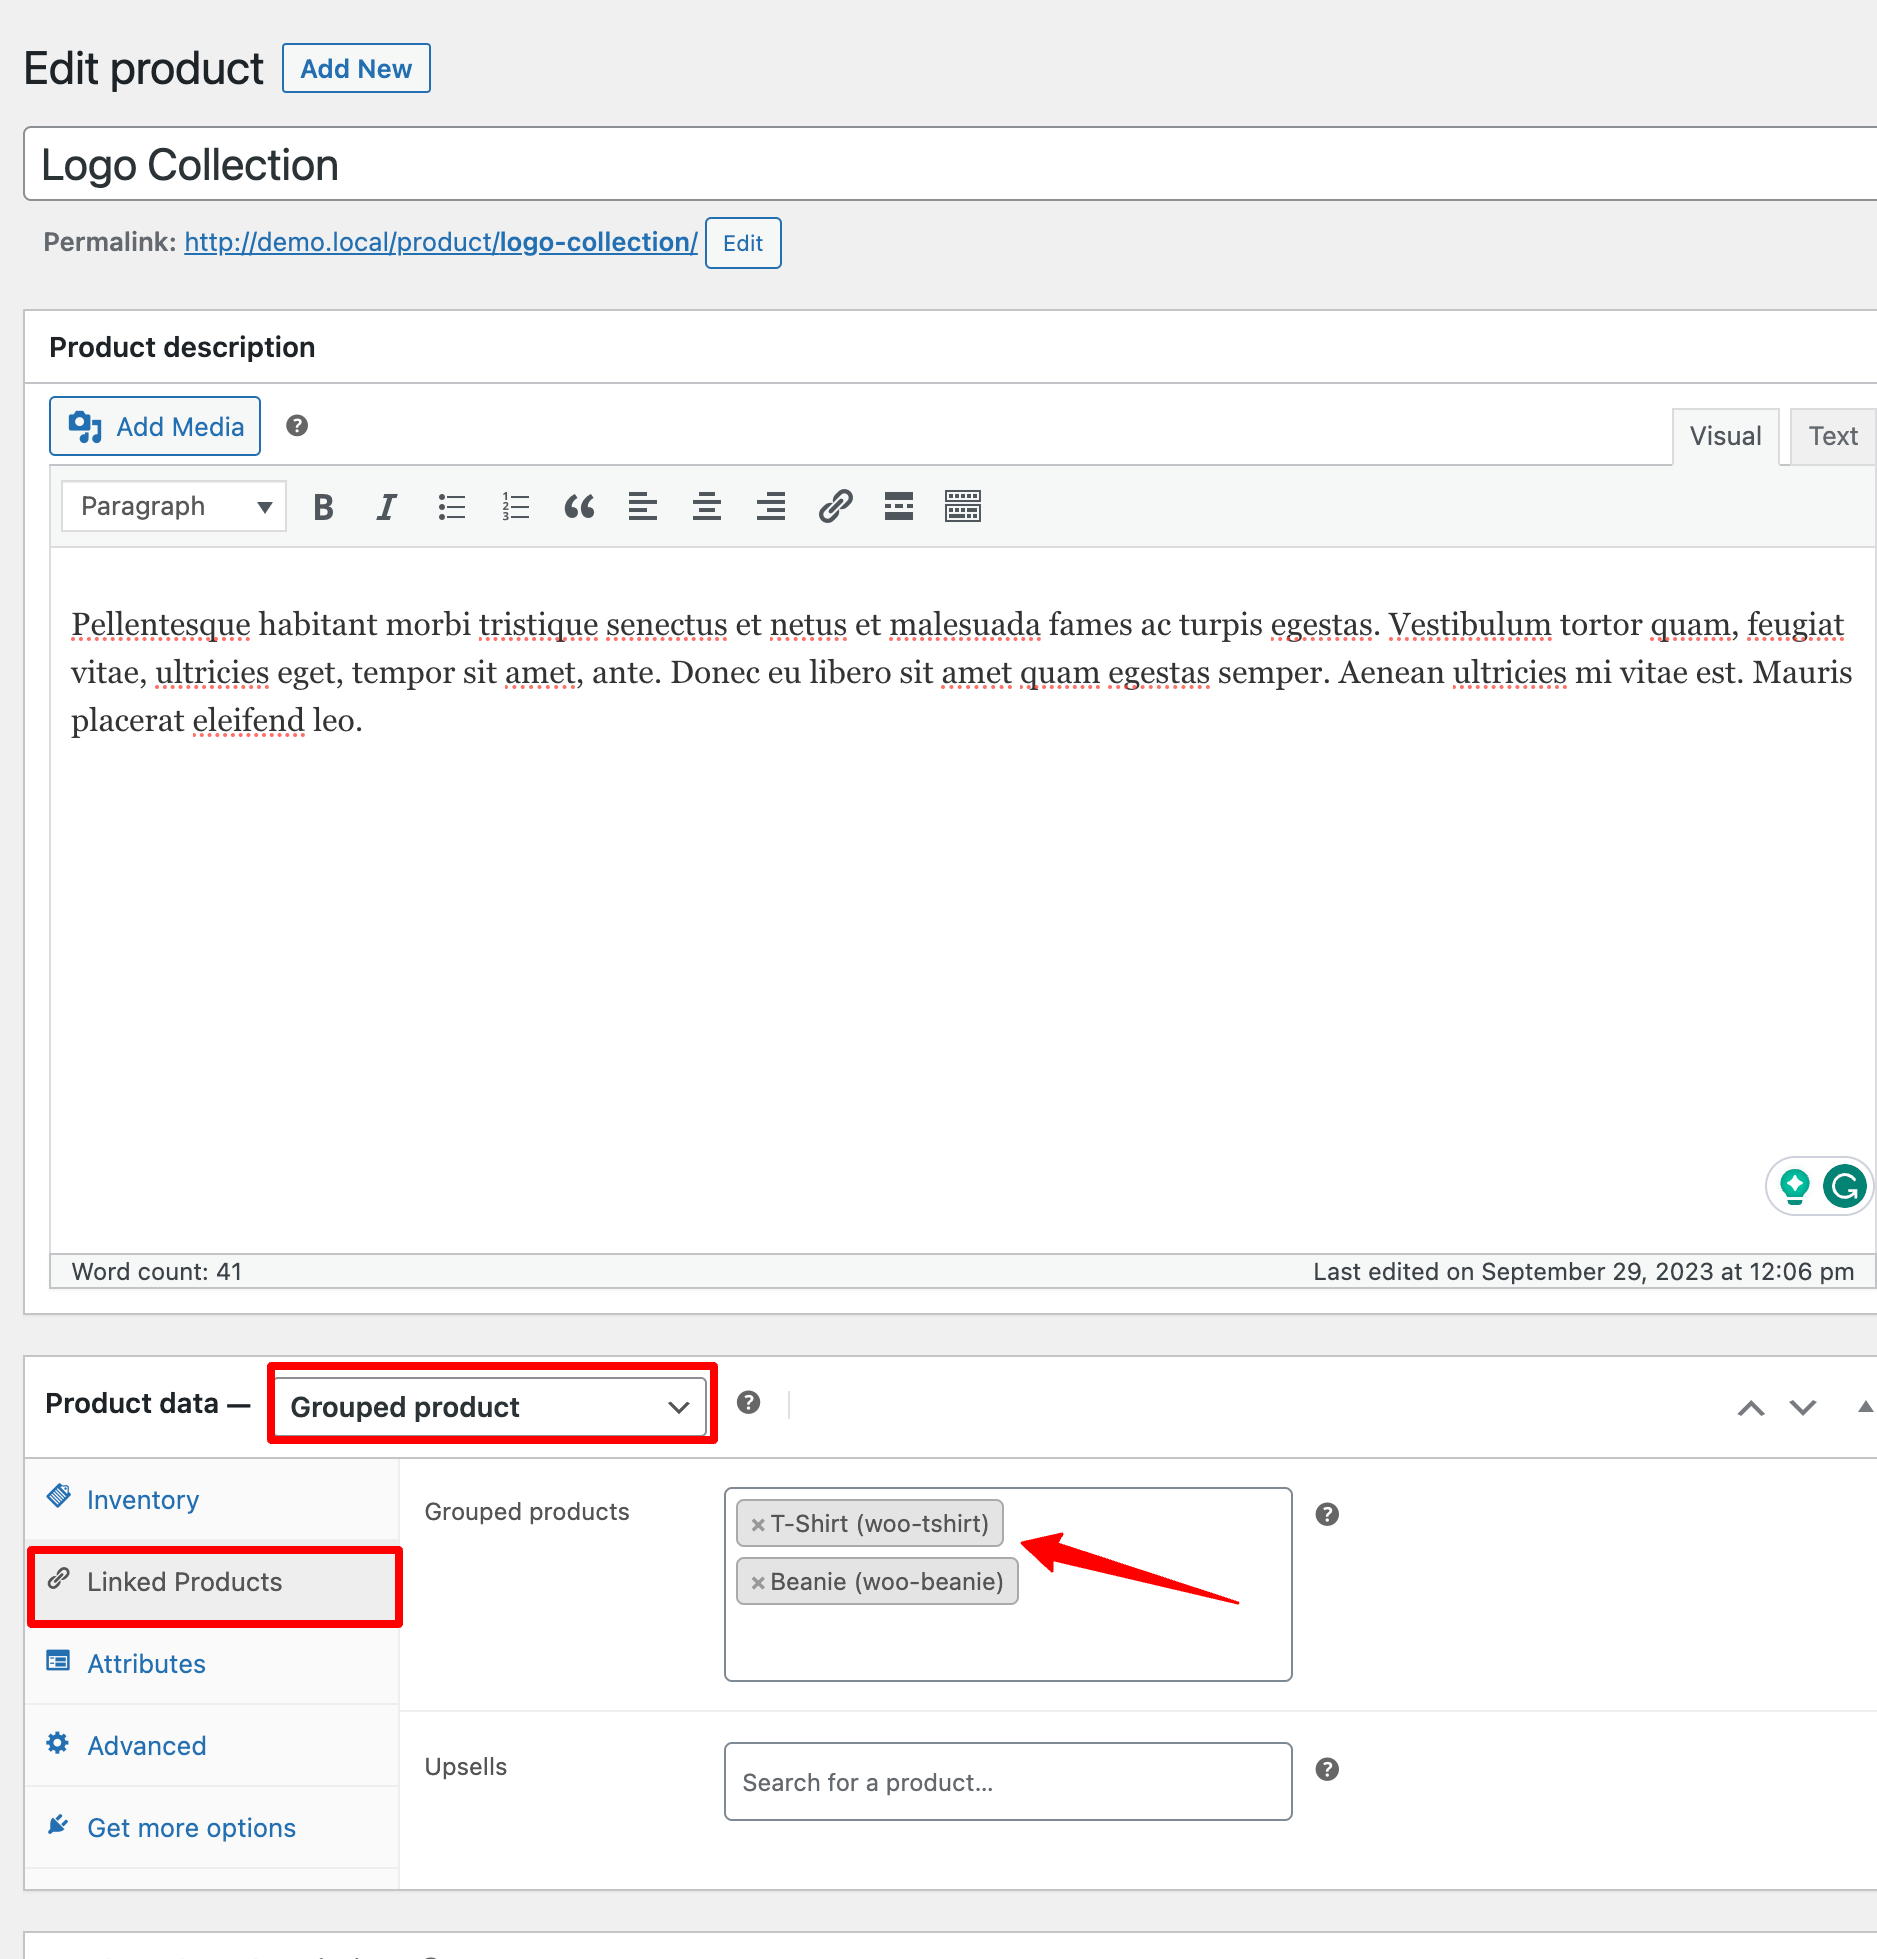
Once you have the necessary IDs, move to the next section.
Step 2: Create a custom WooCommerce add to cart link
First, let’s understand the URL parameters we will use to create a custom add to cart link. Here are the parameters:
- Add-to-cart: WooCommerce uses this parameter to add the product to the cart using the product ID or Variation ID (in case of variable products).
- Quantity: This parameter specifies the quantity of the product that will be added to the cart.
Now, let’s check how you can use these parameters to create custom add to cart links.
Custom add to cart link for simple products
To create the link, append “add-to-cart=ID” to your domain address.
Once you click on the link we will create, you will need to replace the ID with the product ID you want to add to the cart.
Here is how the new URL will look:
Example:
Note: if you don’t specify the product quantity, a single product will be added to the cart.
If you want to specify the quantity, you’ll need to append “&quantity=number” to the above URL.
Here is what WooCommerce Add to Cart link with quantity will look like:
Example:
Custom link for variable products
You can use the variable product ID or the variation ID for the add-to-cart parameter.
Using the main variable product ID
To create a link using product ID, specify the attribute name with values and add the variation ID.
For example, for a variable product ID 20 with a variation ID 46. If you want to create a link that will add a small-sized product in the color blue, your custom URL will be like this:
To specify a quantity, append the “&quantity=number” parameter.
The above URL with quantity 3 will look like this.
Using variation ID
To use a custom add-to-cart link for a variable product using variation ID, you need to use the variation ID as the add-to-cart parameter. Since each variable product with a unique ID already has the attributes assigned to it, you don’t need to specify.
So, if you want to create a custom link for a variable product with ID 20 that has a variation with ID 47, you can use this pattern:
Again, to specify quantity, append “&quantity=number”.
Note: While using the variation ID seems easier, the link with the product ID and specific attributes gives the user more information about the product, which helps with transparency.
Custom link for grouped product
As mentioned earlier, you will need to know the Grouped Product ID and the IDs of the linked products for grouped products.
You must specify the quantity while creating a WooCommerce add to cart link for group products.
Here is the URL format you need to use:
Suppose a grouped product with ID 39 consists of two items: one with ID 15 and another with ID 16.
Then, the grouped product add-to-cart link will be like this:
Hitting the URL above will add the group product with one piece of the first product with ID 15 and two pieces of the item with ID 16.
Step 3: Set the redirection page
If you don’t specify the page, the user will be redirected to the home page after adding the product using the custom link.
Since the product is added, the user should be redirected to the cart or checkout page.
Let’s check how to redirect users to the cart or checkout page.
Redirect to the cart page
If you want to redirect users to the cart page after successfully adding a product, navigate to WooCommerce ⇒ Settings ⇒ Products and check the option ‘Redirect to the cart page after successful addition’.
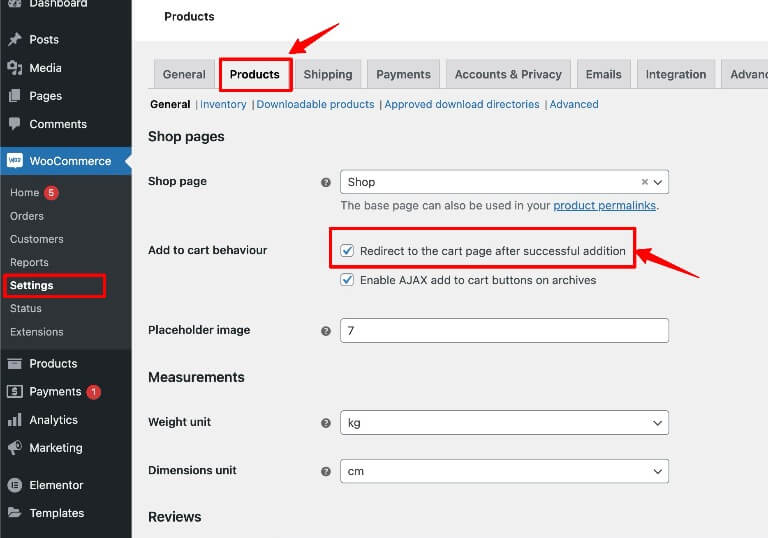
After checking the option, click ‘Save Changes’ to ensure your WooCommerce store will send users directly to the cart page after they add the product by clicking on the custom add to cart link.
Now, let’s check how you can send them directly to the checkout page.
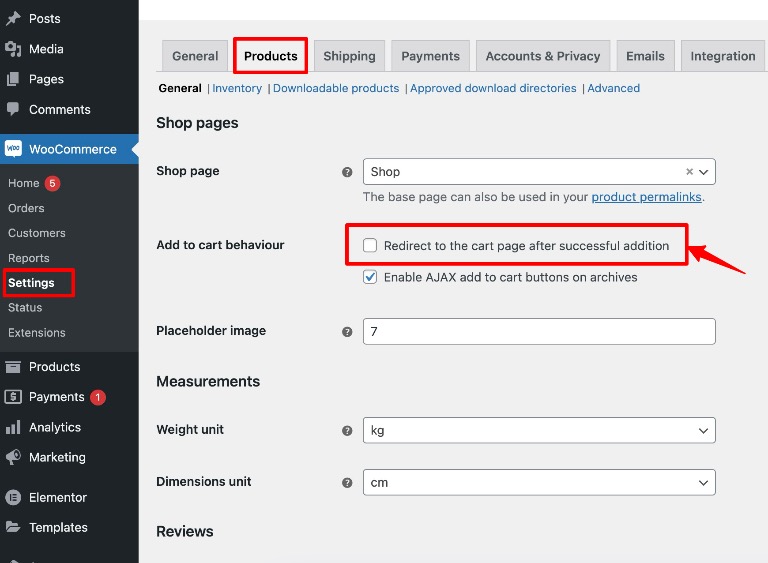
Redirect to the checkout page
To send the users directly to the checkout page, you must ensure the option you checked to send users to the cart page is unchecked.
So navigate to WooCommerce ⇒ Settings ⇒ Products. Ensure you uncheck the option ‘Redirect to the cart page after successful addition.’
Click on ‘Save Changes’ to update.
After that, you must also change the add to cart link. You need to add “/checkout” after your domain and before the add-to-cart parameter.
So it would look something like this.
With quantity
For variable product
For a grouped product
You can redirect to any page, not just the cart and checkout page. For that, you need to follow the steps you would for the checkout page, just replacing “/checkout” with “/your_custom_page/.”
For example, if you want users to redirect to a page named “custom,” your URL will look like this:
This is how easily you can create a WooCommerce add to cart link. However, this process only adds one product to the cart.
Later in this blog, we will show you how to add multiple products to a cart with a single custom add-to-cart link.
Troubleshooting Common Issues
Sometimes, the add to cart link may not work due to some reasons like:
- Incorrect product IDs
Ensure that the product ID included in these add to cart links is accurate. Furthermore, confirm that the product is published and visible in your store.
Hidden or draft products won’t be accessible via the link.
- Conflicts with caching plugins or themes
Implement caching on your WooCommerce website to avoid issues with outdated or cached content that may affect the functionality of add-to-cart URLs.
Also, inspect if there is a theme of plugin conflict. You should disable all plugins except WooCommerce to see if the issue is resolved. If so, you know there is a conflict with the theme or a plugin.
Ensure all plugins you use are compatible with your current WordPress and WooCommerce versions. Sometimes, plugins that haven’t been tested with the latest version of WordPress can throw issues.
If there is a theme conflict, switch to a different default WordPress theme.
- Issues with variable products
When dealing with variable products, ensure the variation ID is correctly included in the URL. Use appropriate attributes when adding variable products to your WooCommerce store.
Always check that the specified version exists and is available for purchase. Issues with stock or visibility settings can prevent variations from being added.
- URL formatting problems
Double-check that the URL structure is correct and follows the proper format.
Check your permalink settings in WooCommerce to ensure they are properly configured and do not cause conflicts with WooCommerce add to cart links.
- User permissions and restrictions
Verify that no restrictions prevent guest users from adding products to their carts.
Check if specific user roles have restricted access to certain products or cart functionalities.
In case of a memory issue, contact your hosting provider to increase the memory to solve this issue.
While you can solve the issue using a custom WooCommerce add-to-cart link, it’s not the most efficient method as you can’t create a link for multiple products.
A custom add-to-cart link that will add multiple products will help you promote many products simultaneously.
Move to the next section to find out how to create a custom link using a sales funnel that will add multiple products to the cart and redirect the user to the checkout page with a single click.
How Do You Create a WooCommerce Add to Cart Link that Adds Multiple Products to the Cart with a Single Click?
We use FunnelKit Funnel Builder to create a WooCommerce add-to-cart link that adds multiple products to the cart with a single click.
This is the most potent funnel builder for WordPress. It allows you to create beautiful sales funnels with landing pages, opt-in pages, checkout pages, thank you pages, one-click upsells, and so on without requiring any coding knowledge.
FunnelKit has many prebuilt templates that you can easily import and use within a few clicks.
You can create a custom link for single or multiple products via a sales funnel, depending on your requirements.
Here, we will show how to create a sales funnel that adds multiple products to a cart and use the funnel link as a WooCommerce add-to-cart link.
Before creating a WooCommerce one-click upsell funnel, let’s install and activate the FunnelKit Funnel Builder.
FunnelKit has two versions: Free and Pro. You need to install both plugins.
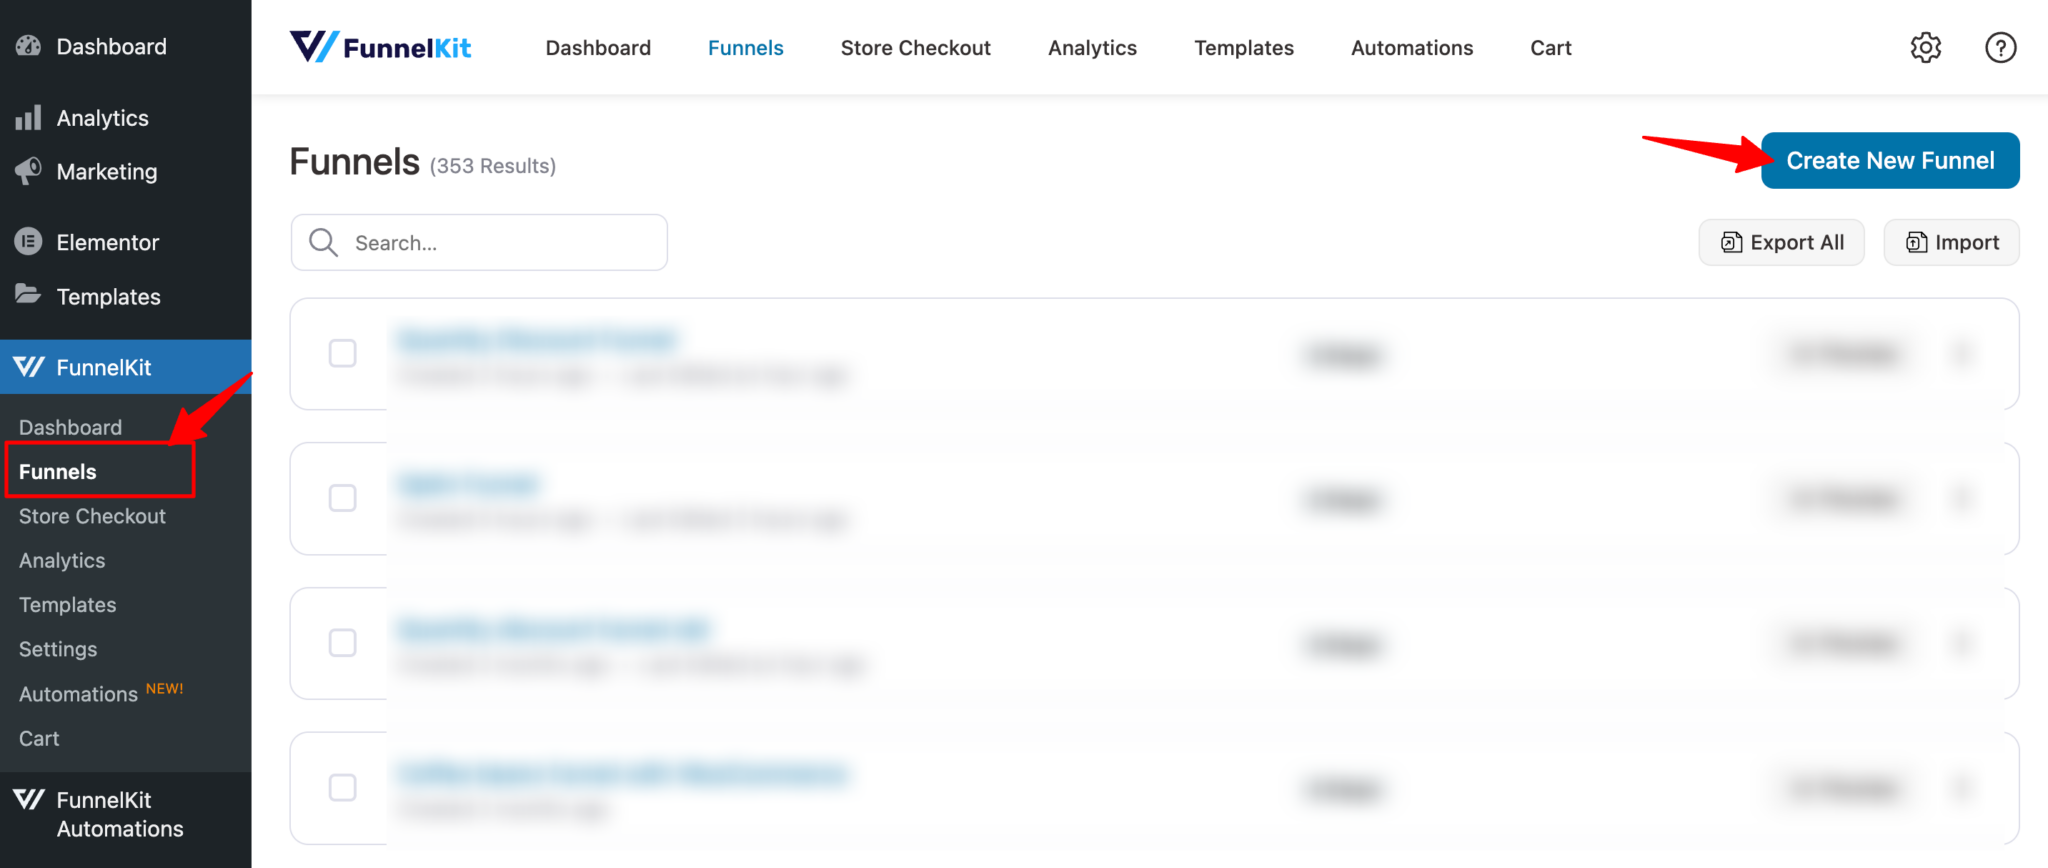
Step 1: Create a sales funnel
First, navigate to FunnelKit ⇒ Funnels from the WordPress admin panel and click the ‘Create New Funnel’ button.
Select “Sales Funnels” as the type. After that, hover over the template you like and click on Preview. Here, we are choosing the Minimalist template.
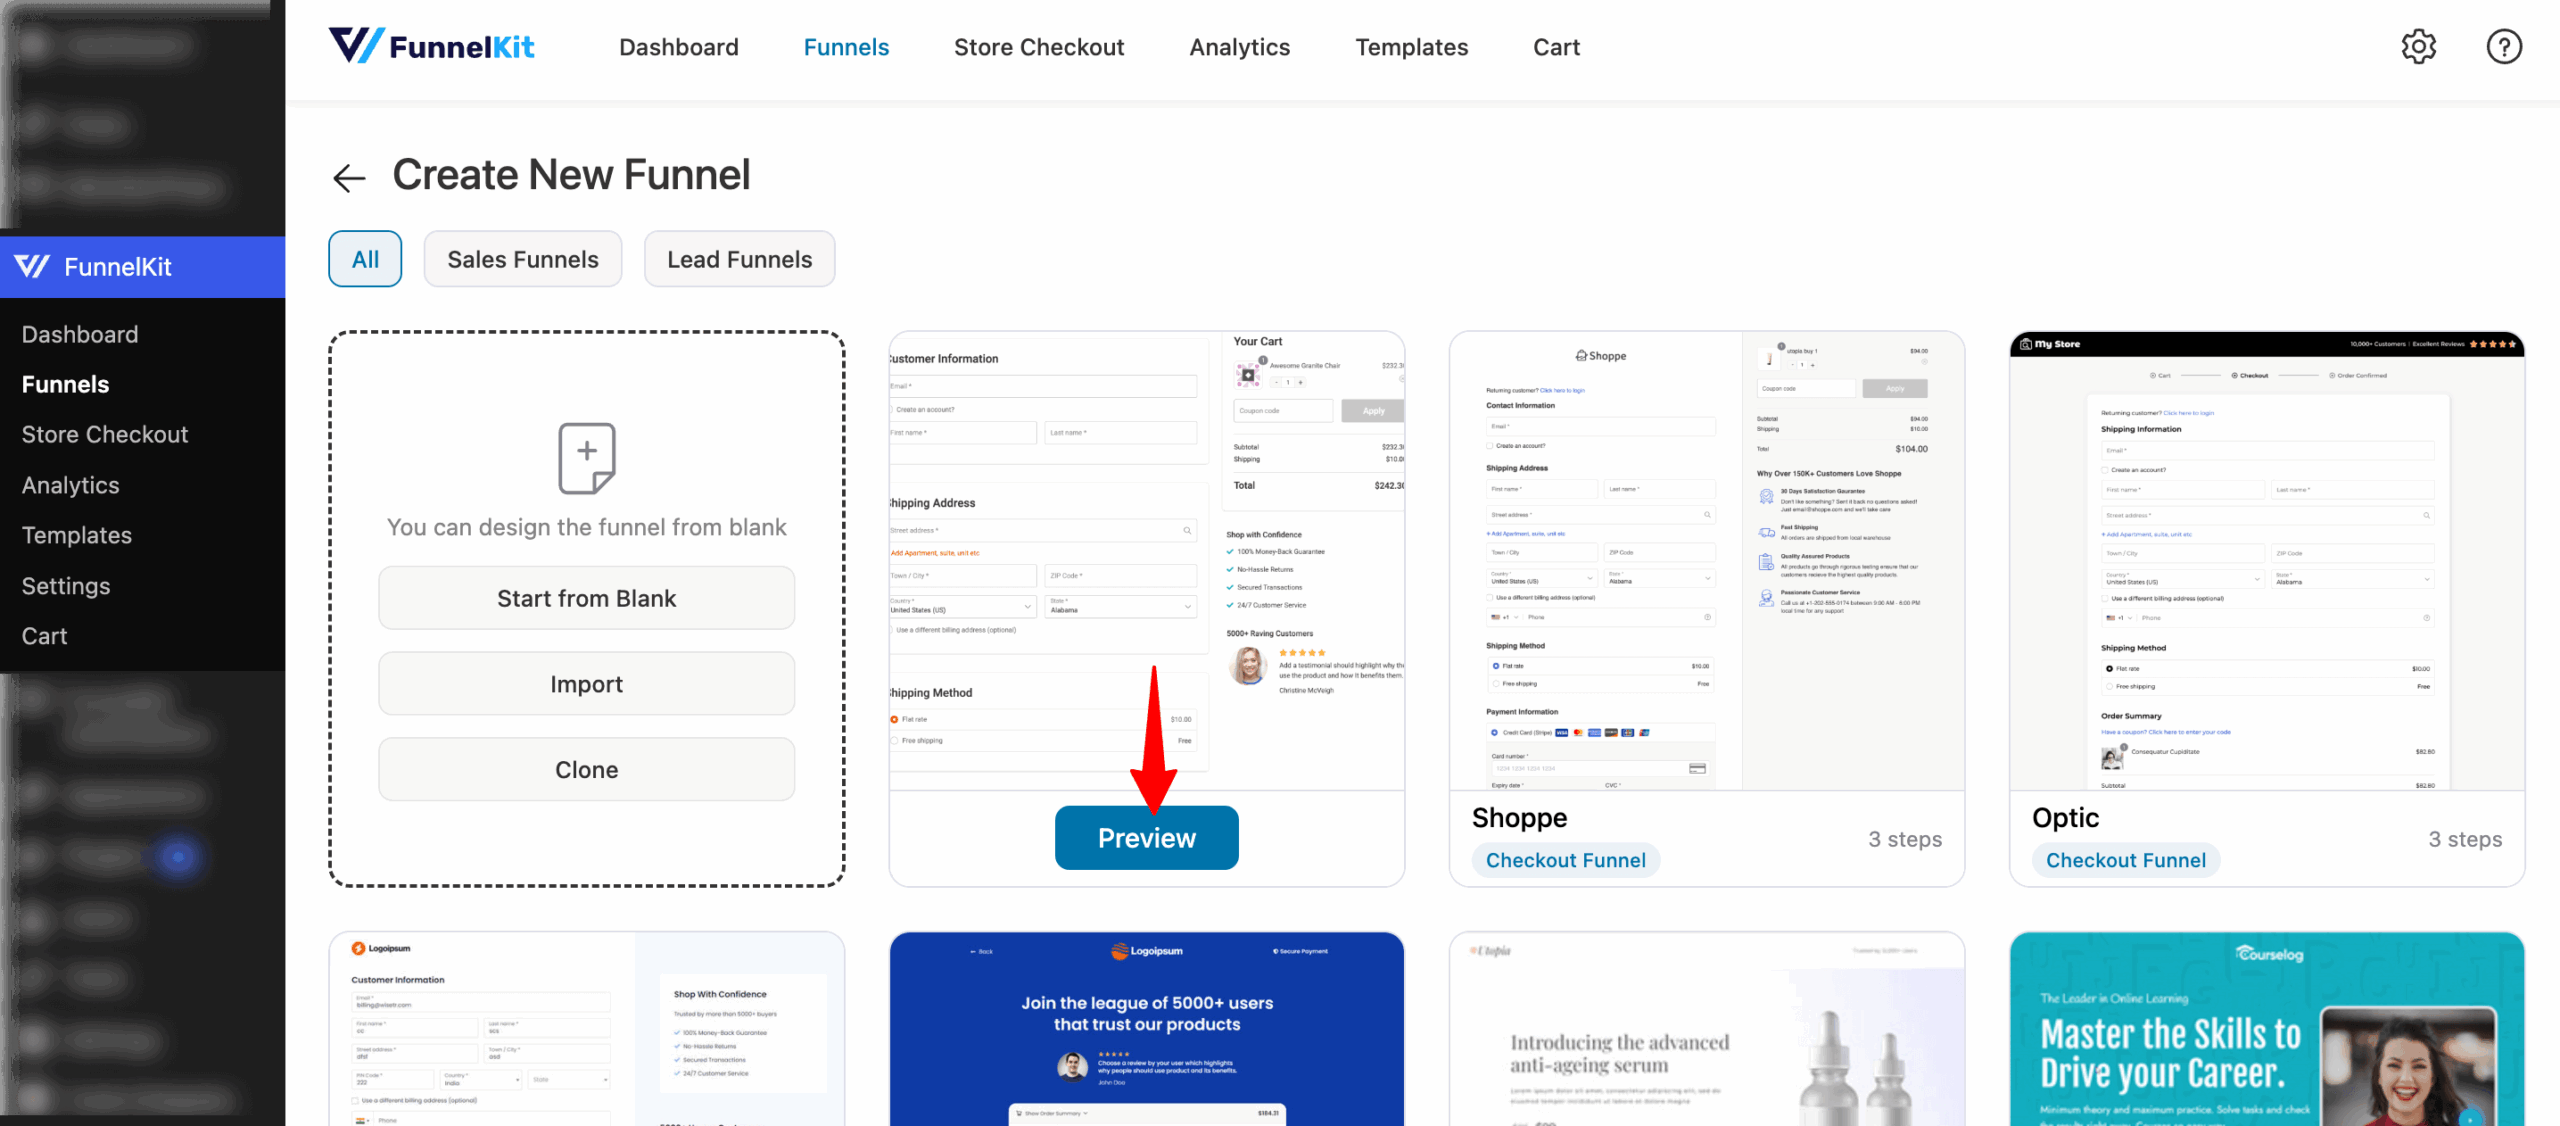
Now choose whether you want a single-page or multi-page checkout. We are going with the simple single-page layout.
To import the template you choose, click “Import This Funnel”, then provide a name and click ‘Add’.
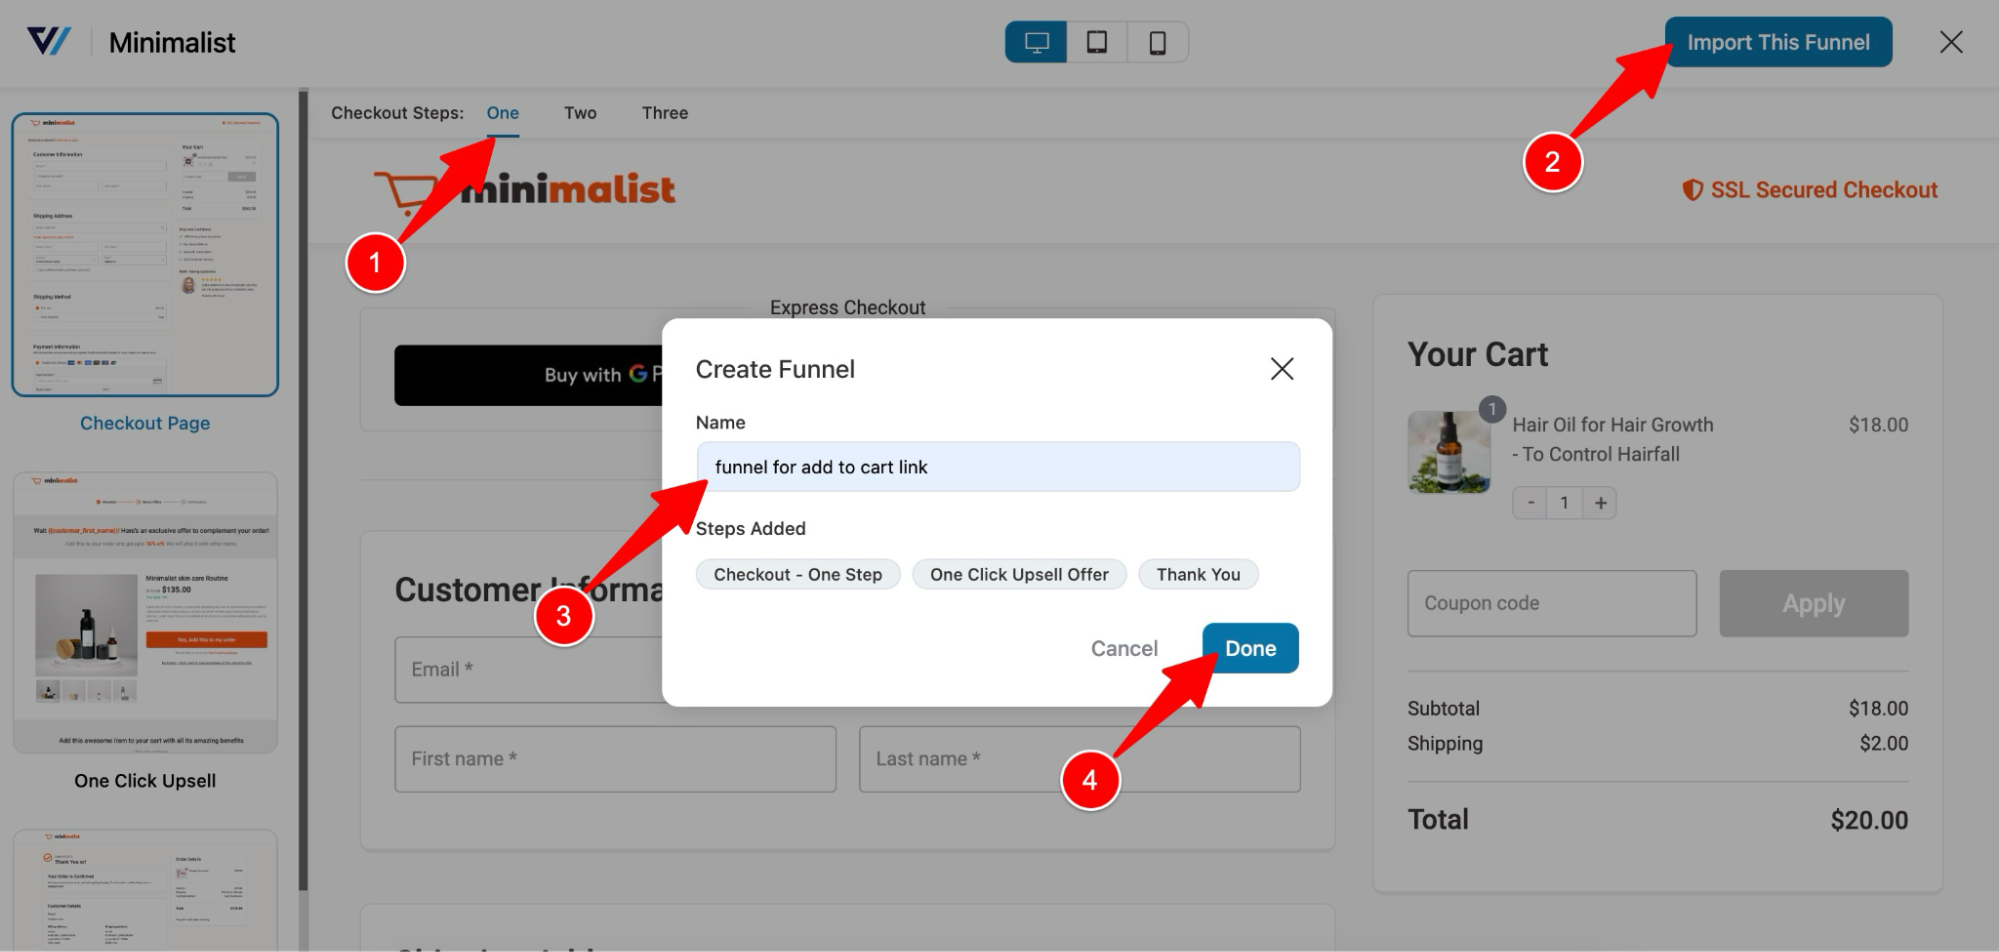
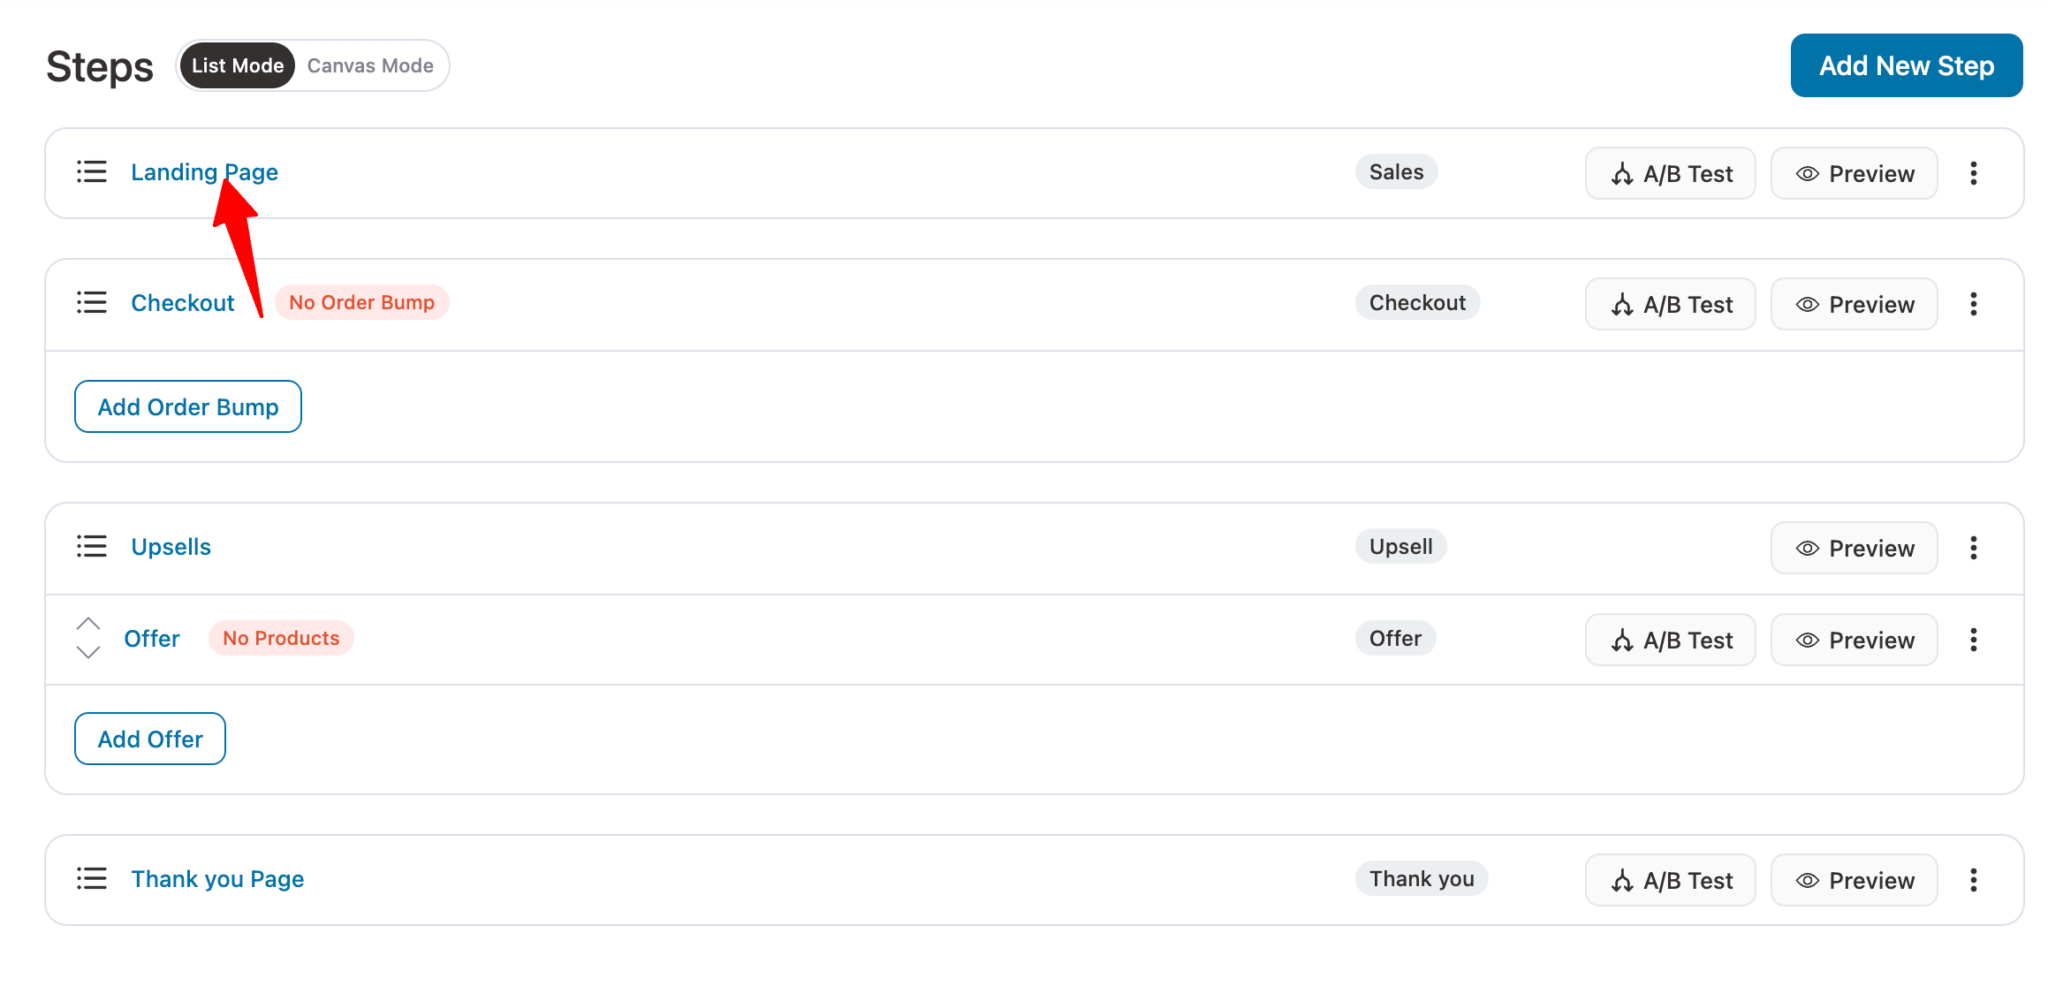
Your sales funnel should be imported with two steps: checkout and thank you page.
Step 2: Customize the checkout page
To customize the checkout page, click on the Checkout step.
You can customize the content and style of the checkout template using Elementor by clicking on the "Edit Elementor Template" button.
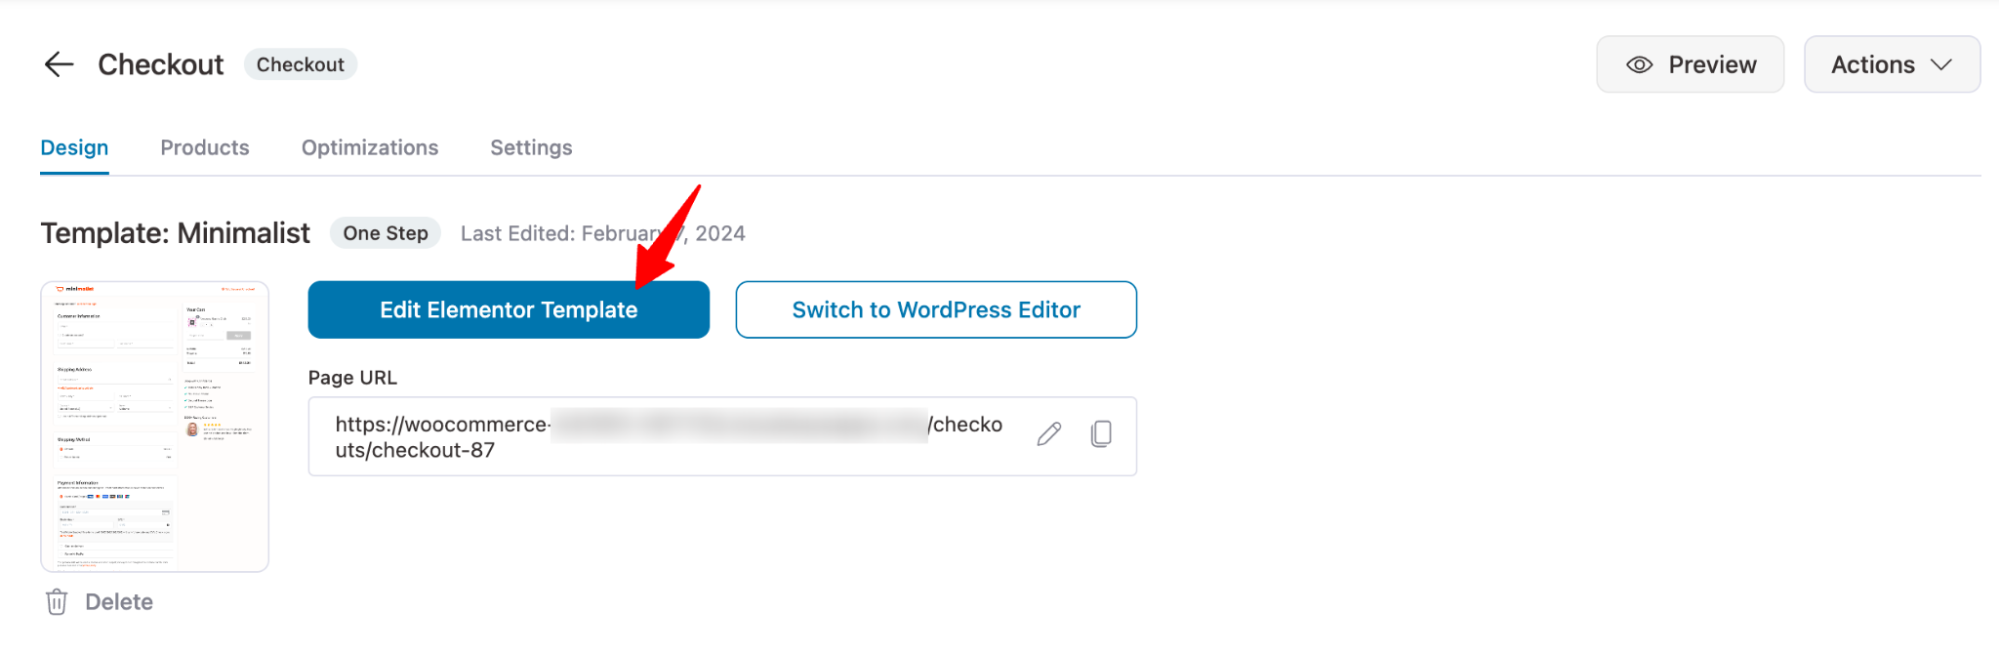
Here, you can customize all the sections of the checkout page.
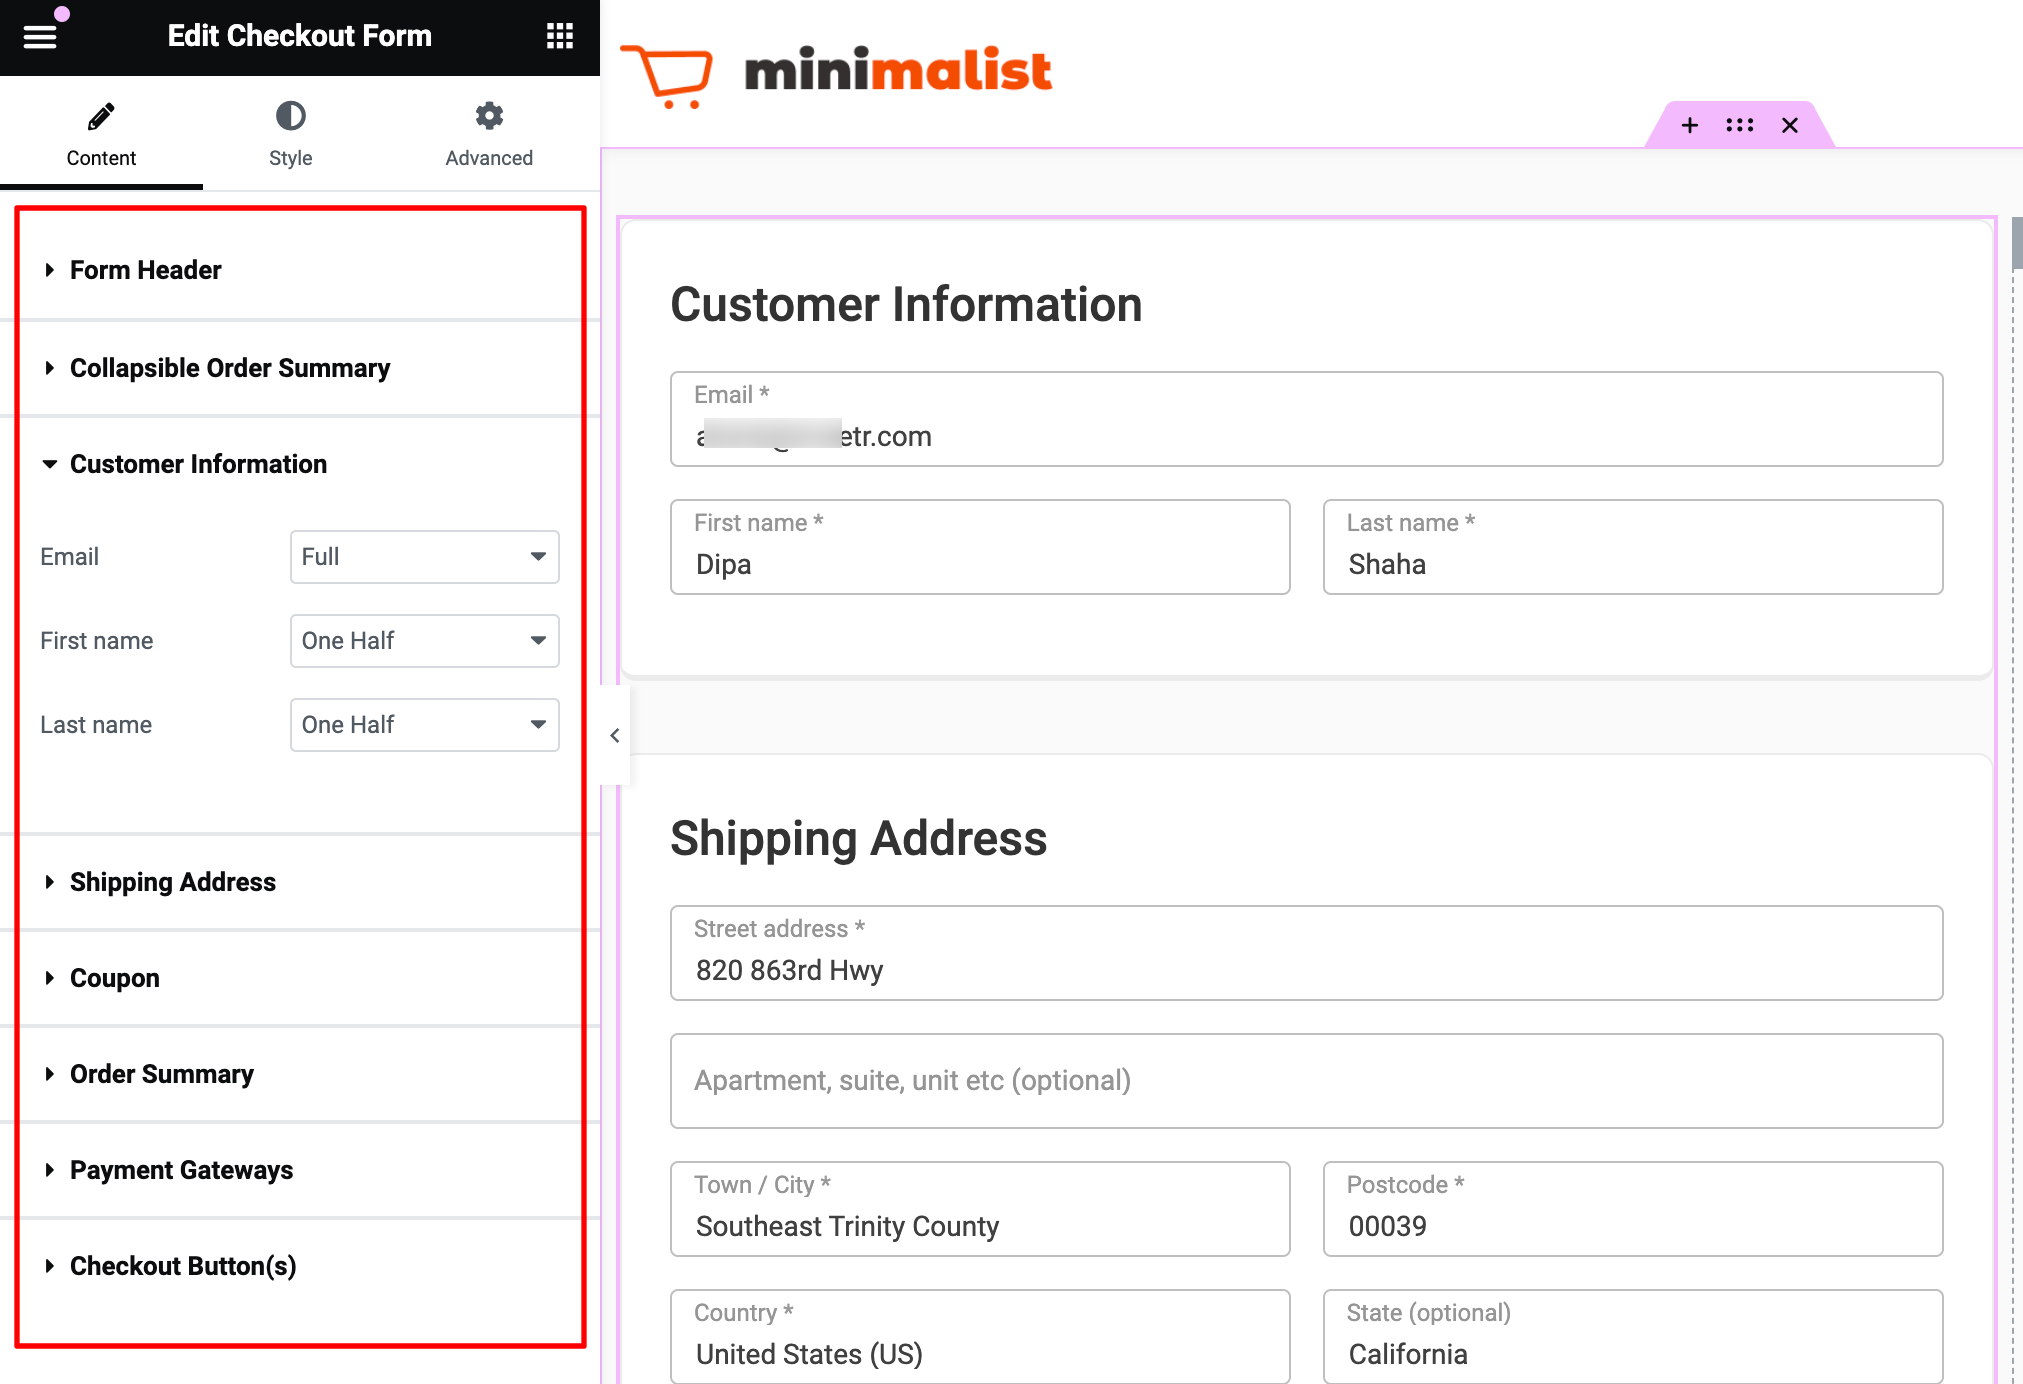
One useful feature available on the checkout page is a WooCommerce mini cart. It allows users to adjust product quantities directly on the checkout page without returning to the cart.
This is especially helpful if you redirect customers straight to checkout after adding a product, as it preserves flexibility and control over the purchase without requiring a separate cart page. FunnelKit provides this functionality through its checkout mini cart.
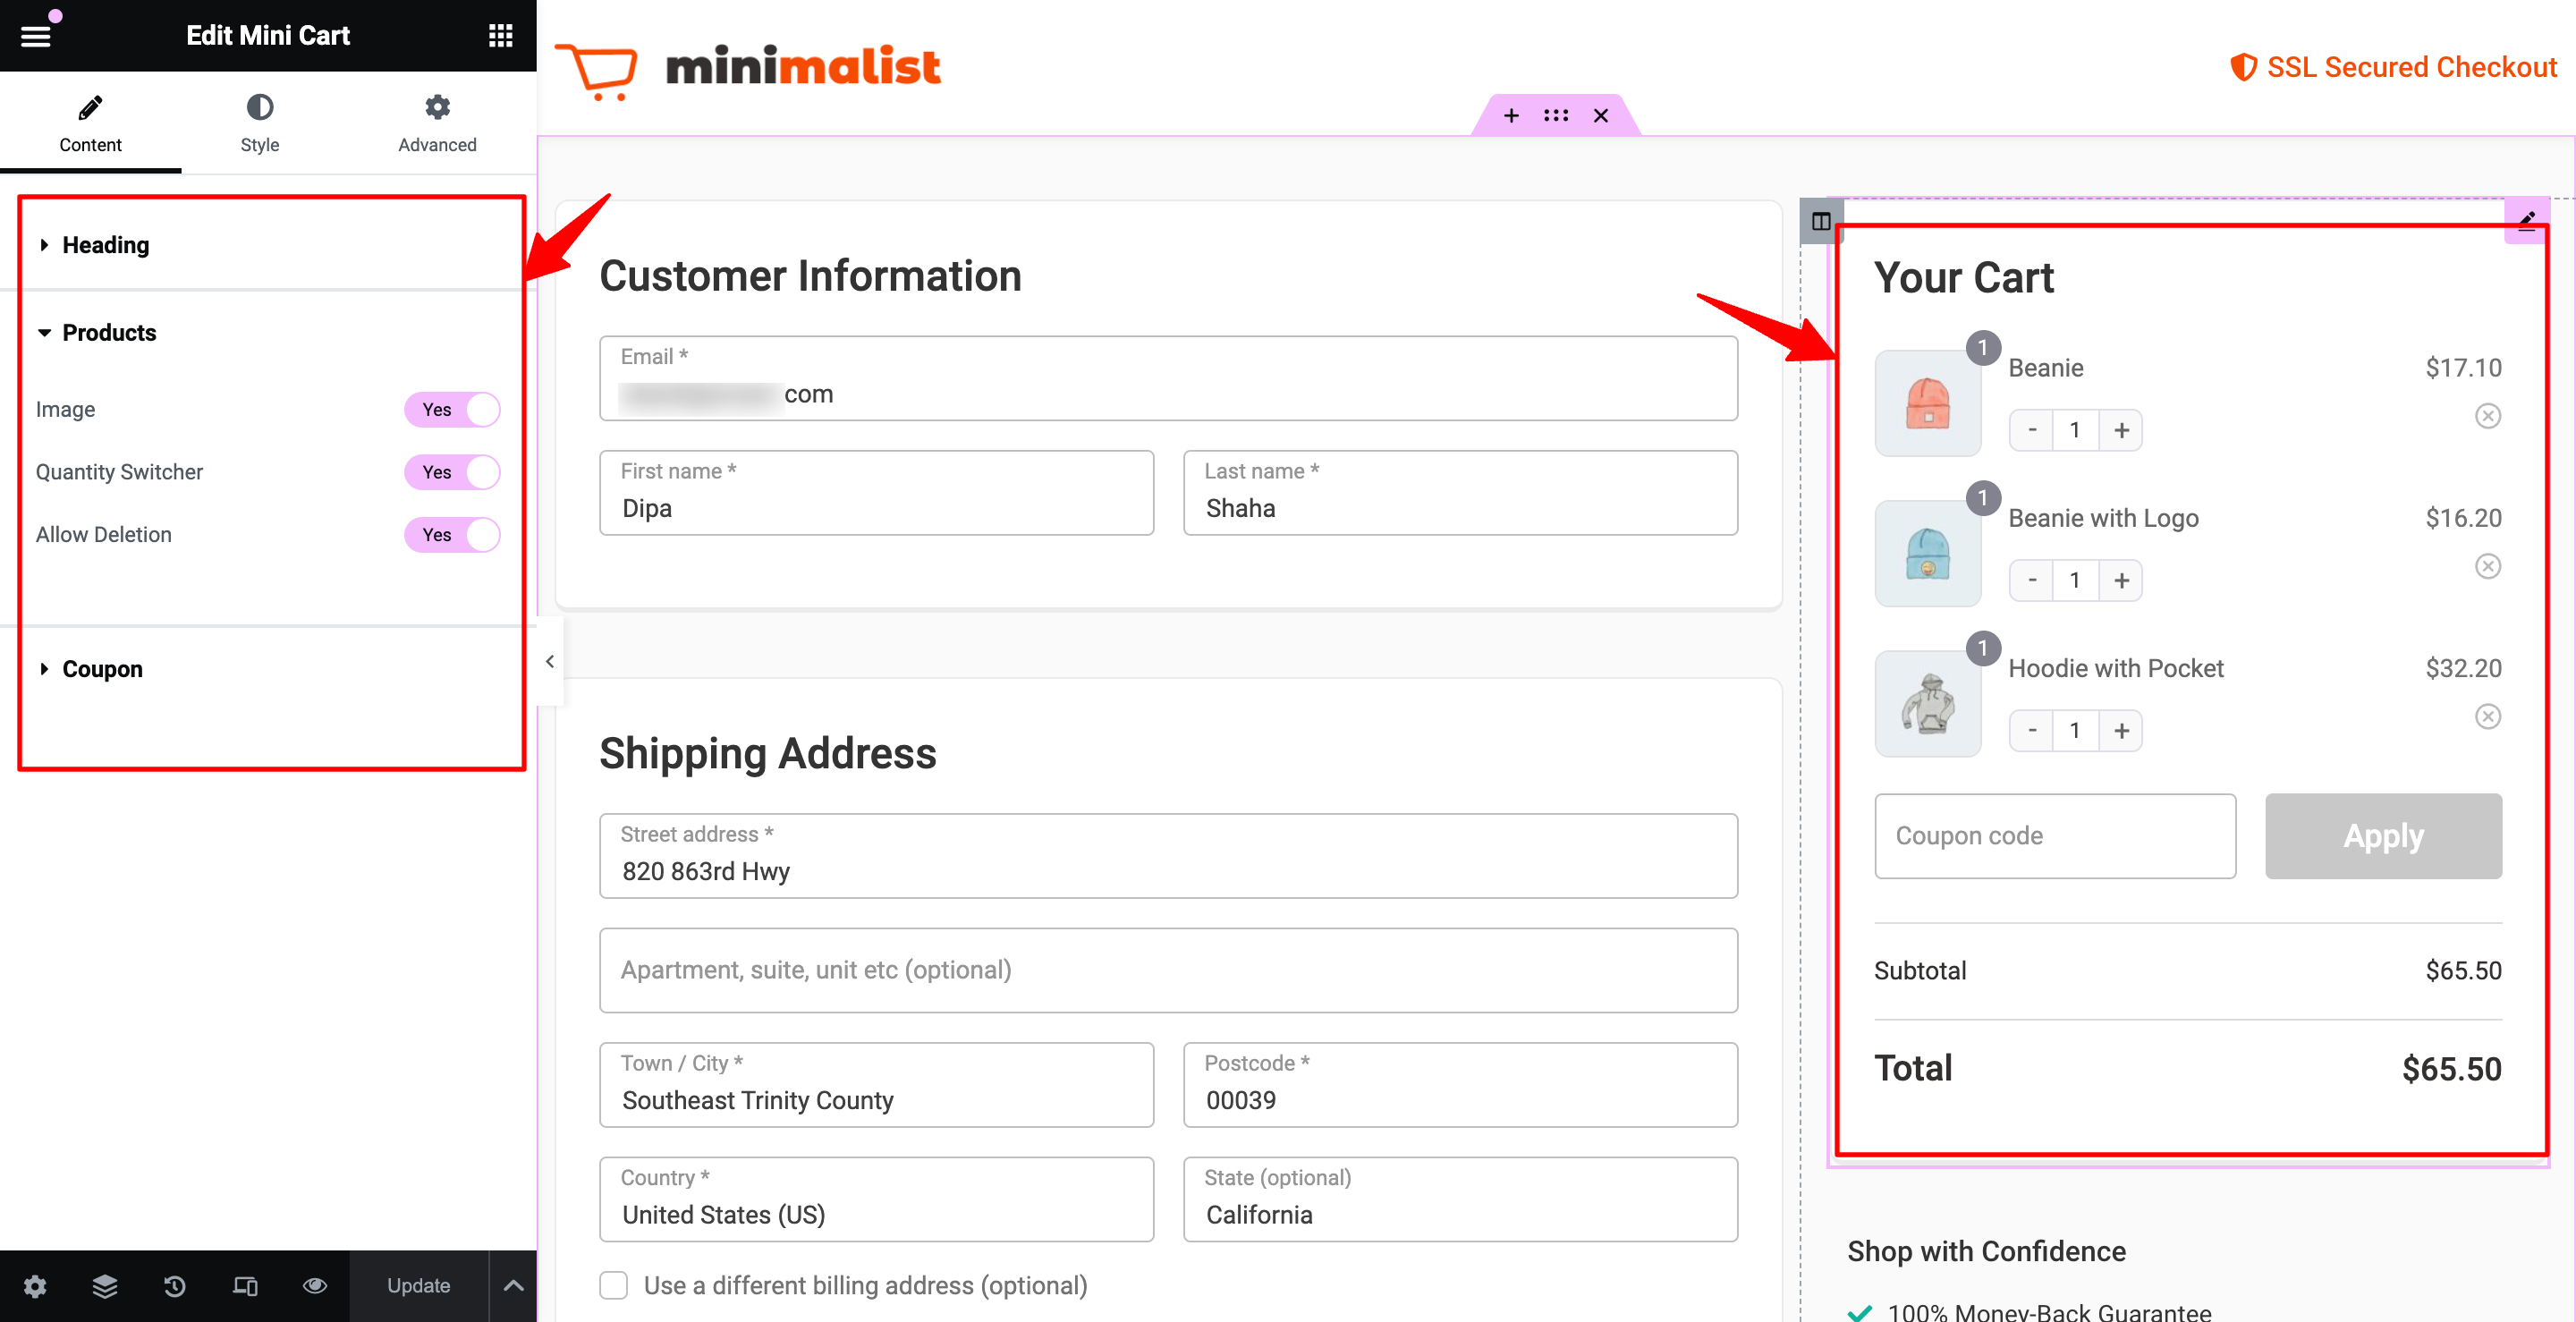
After making the design changes, hit ‘Update’ to save all the changes.
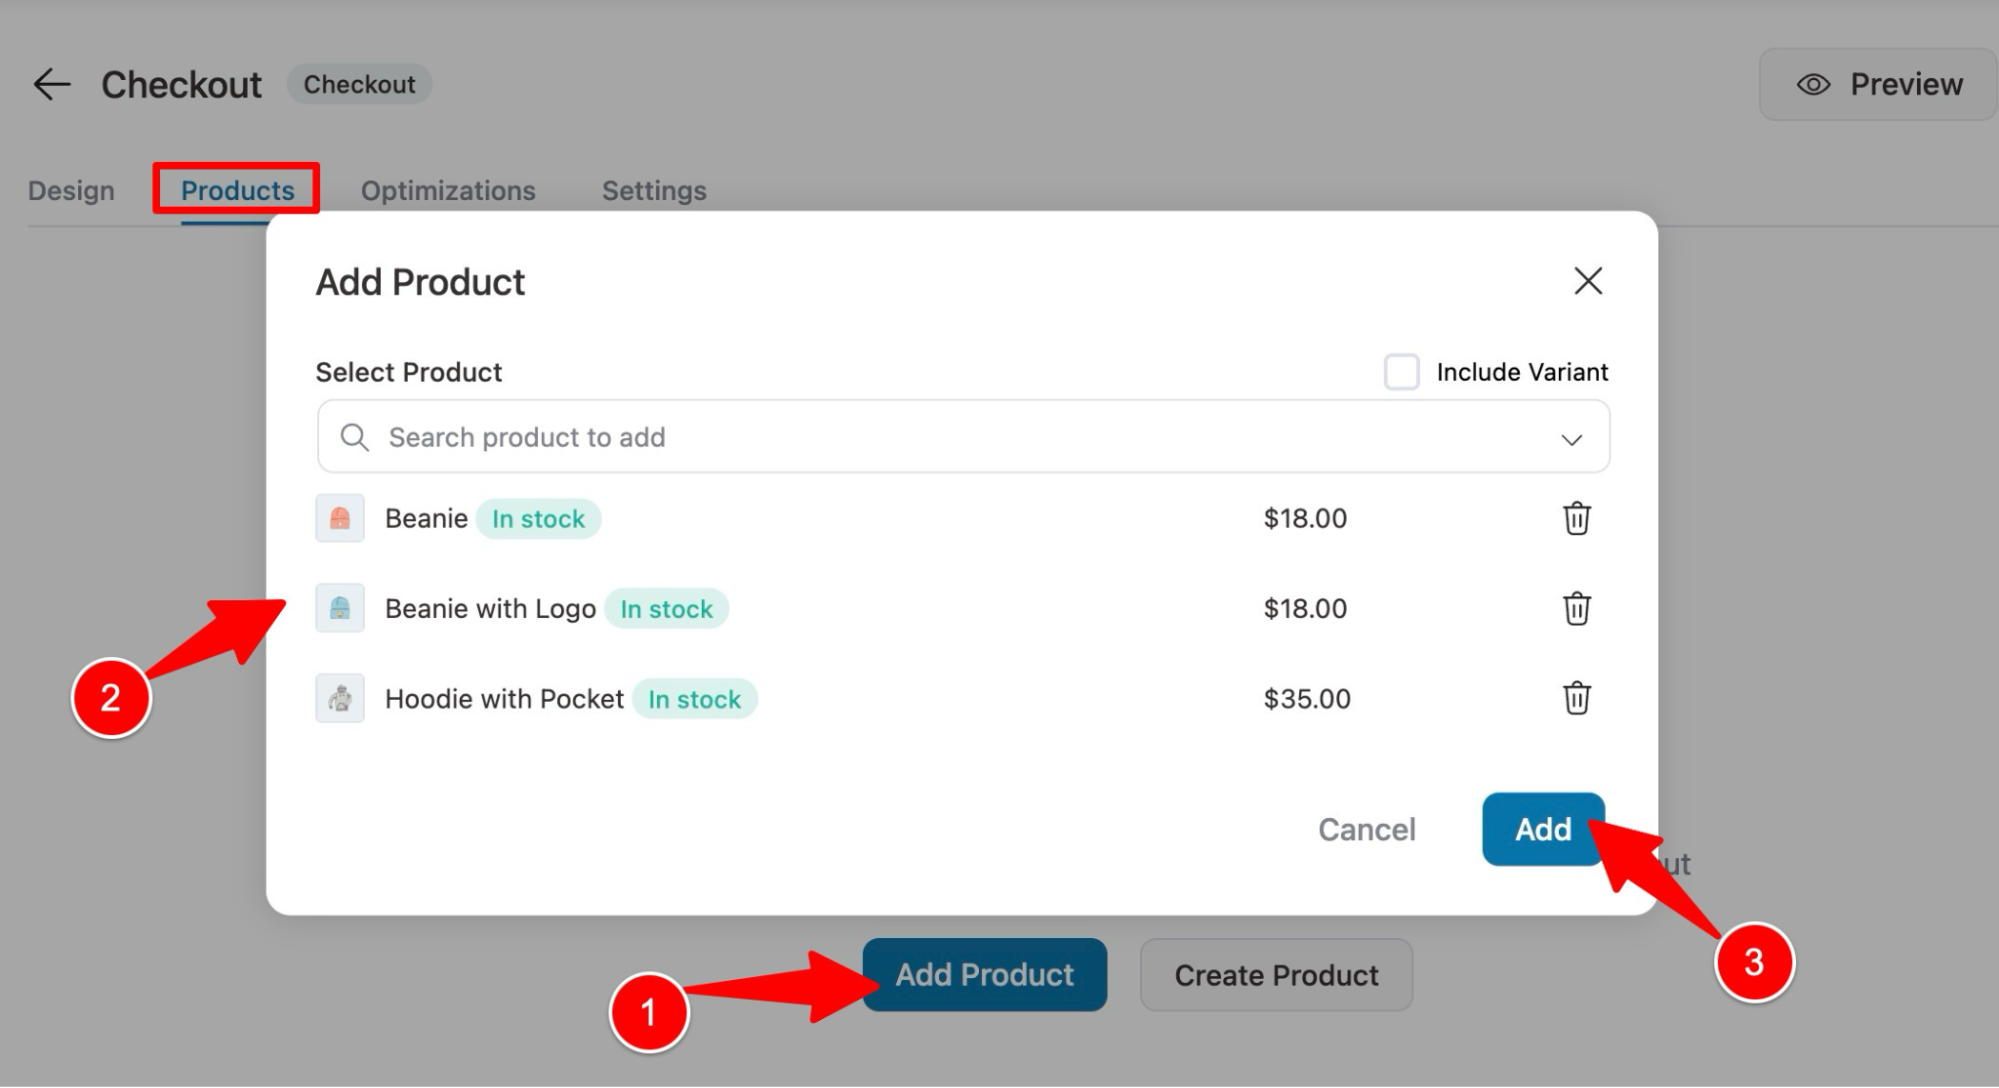
Step 3: Add multiple products to the checkout page
Move to the Products tab and click the ‘Add Product’ button. Then, search for and select the product you want to add to the cart upon clicking the WooCommerce add-to-cart link.
You can add as many products as you need using the same process. Finally, click “Add New” to add the product to the checkout.
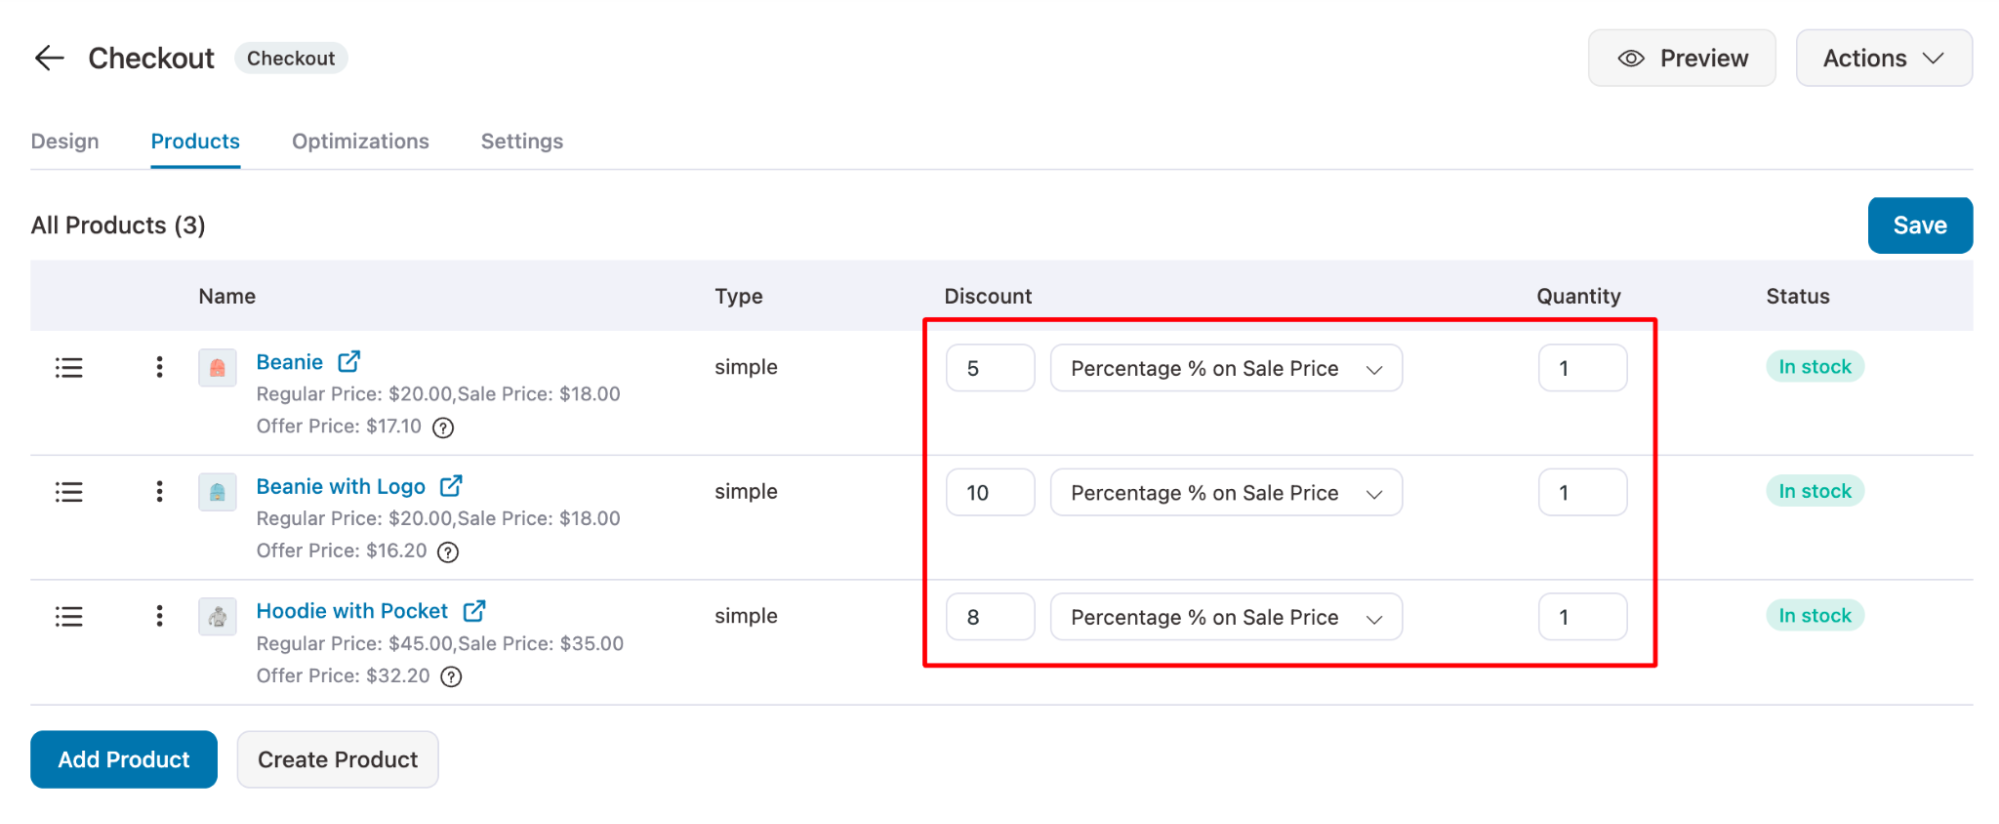
You can offer discounts on the products.
Scroll to the settings section and choose “Force sell all of the above product(s).”
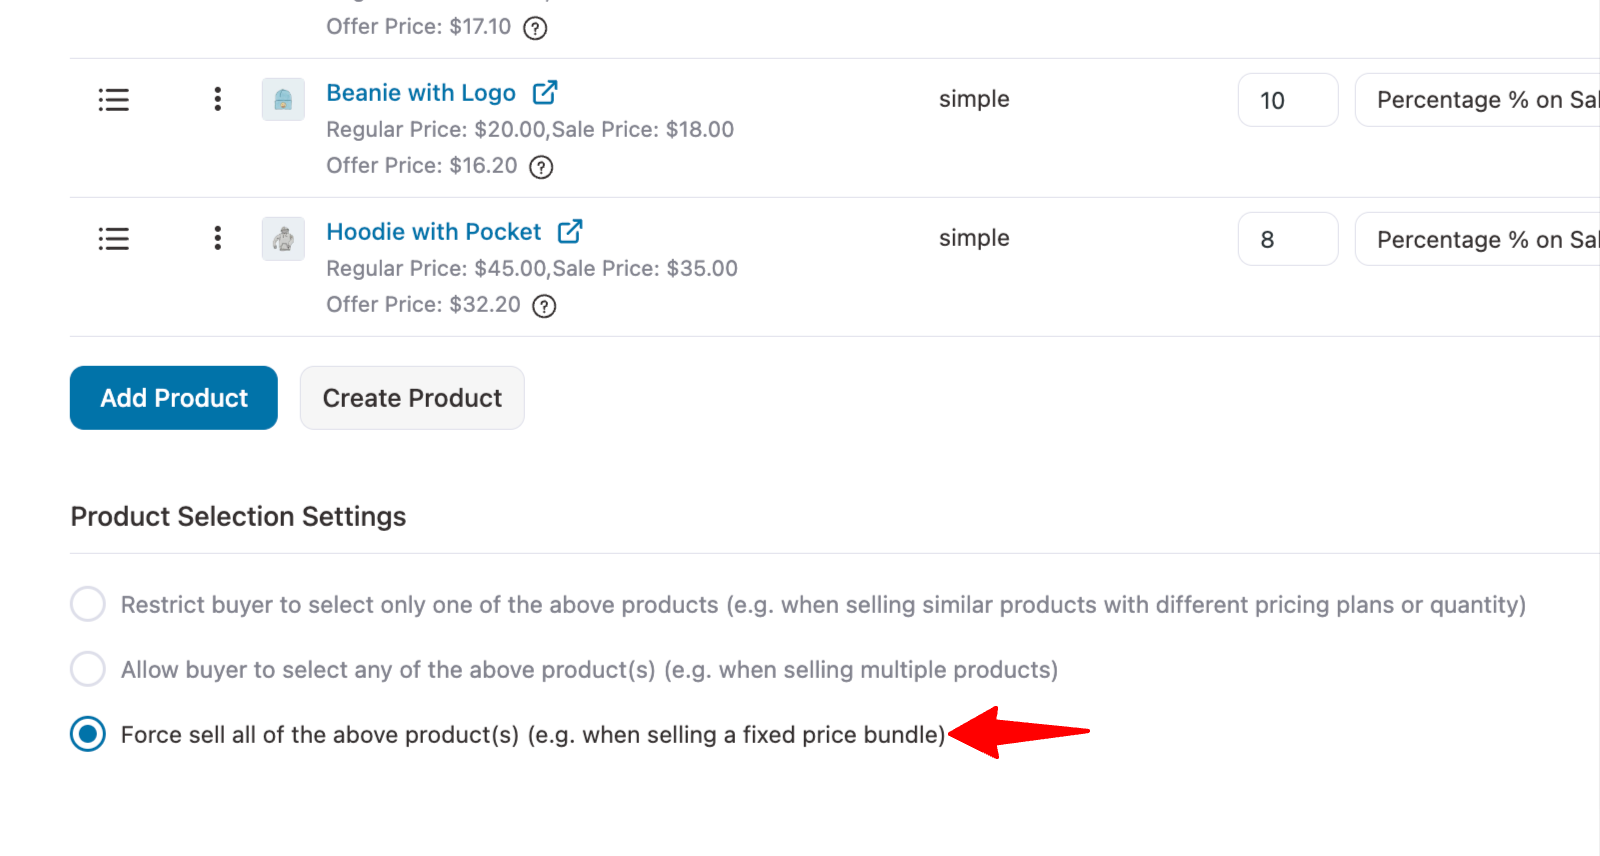
Click on ‘Save Changes’ when done.
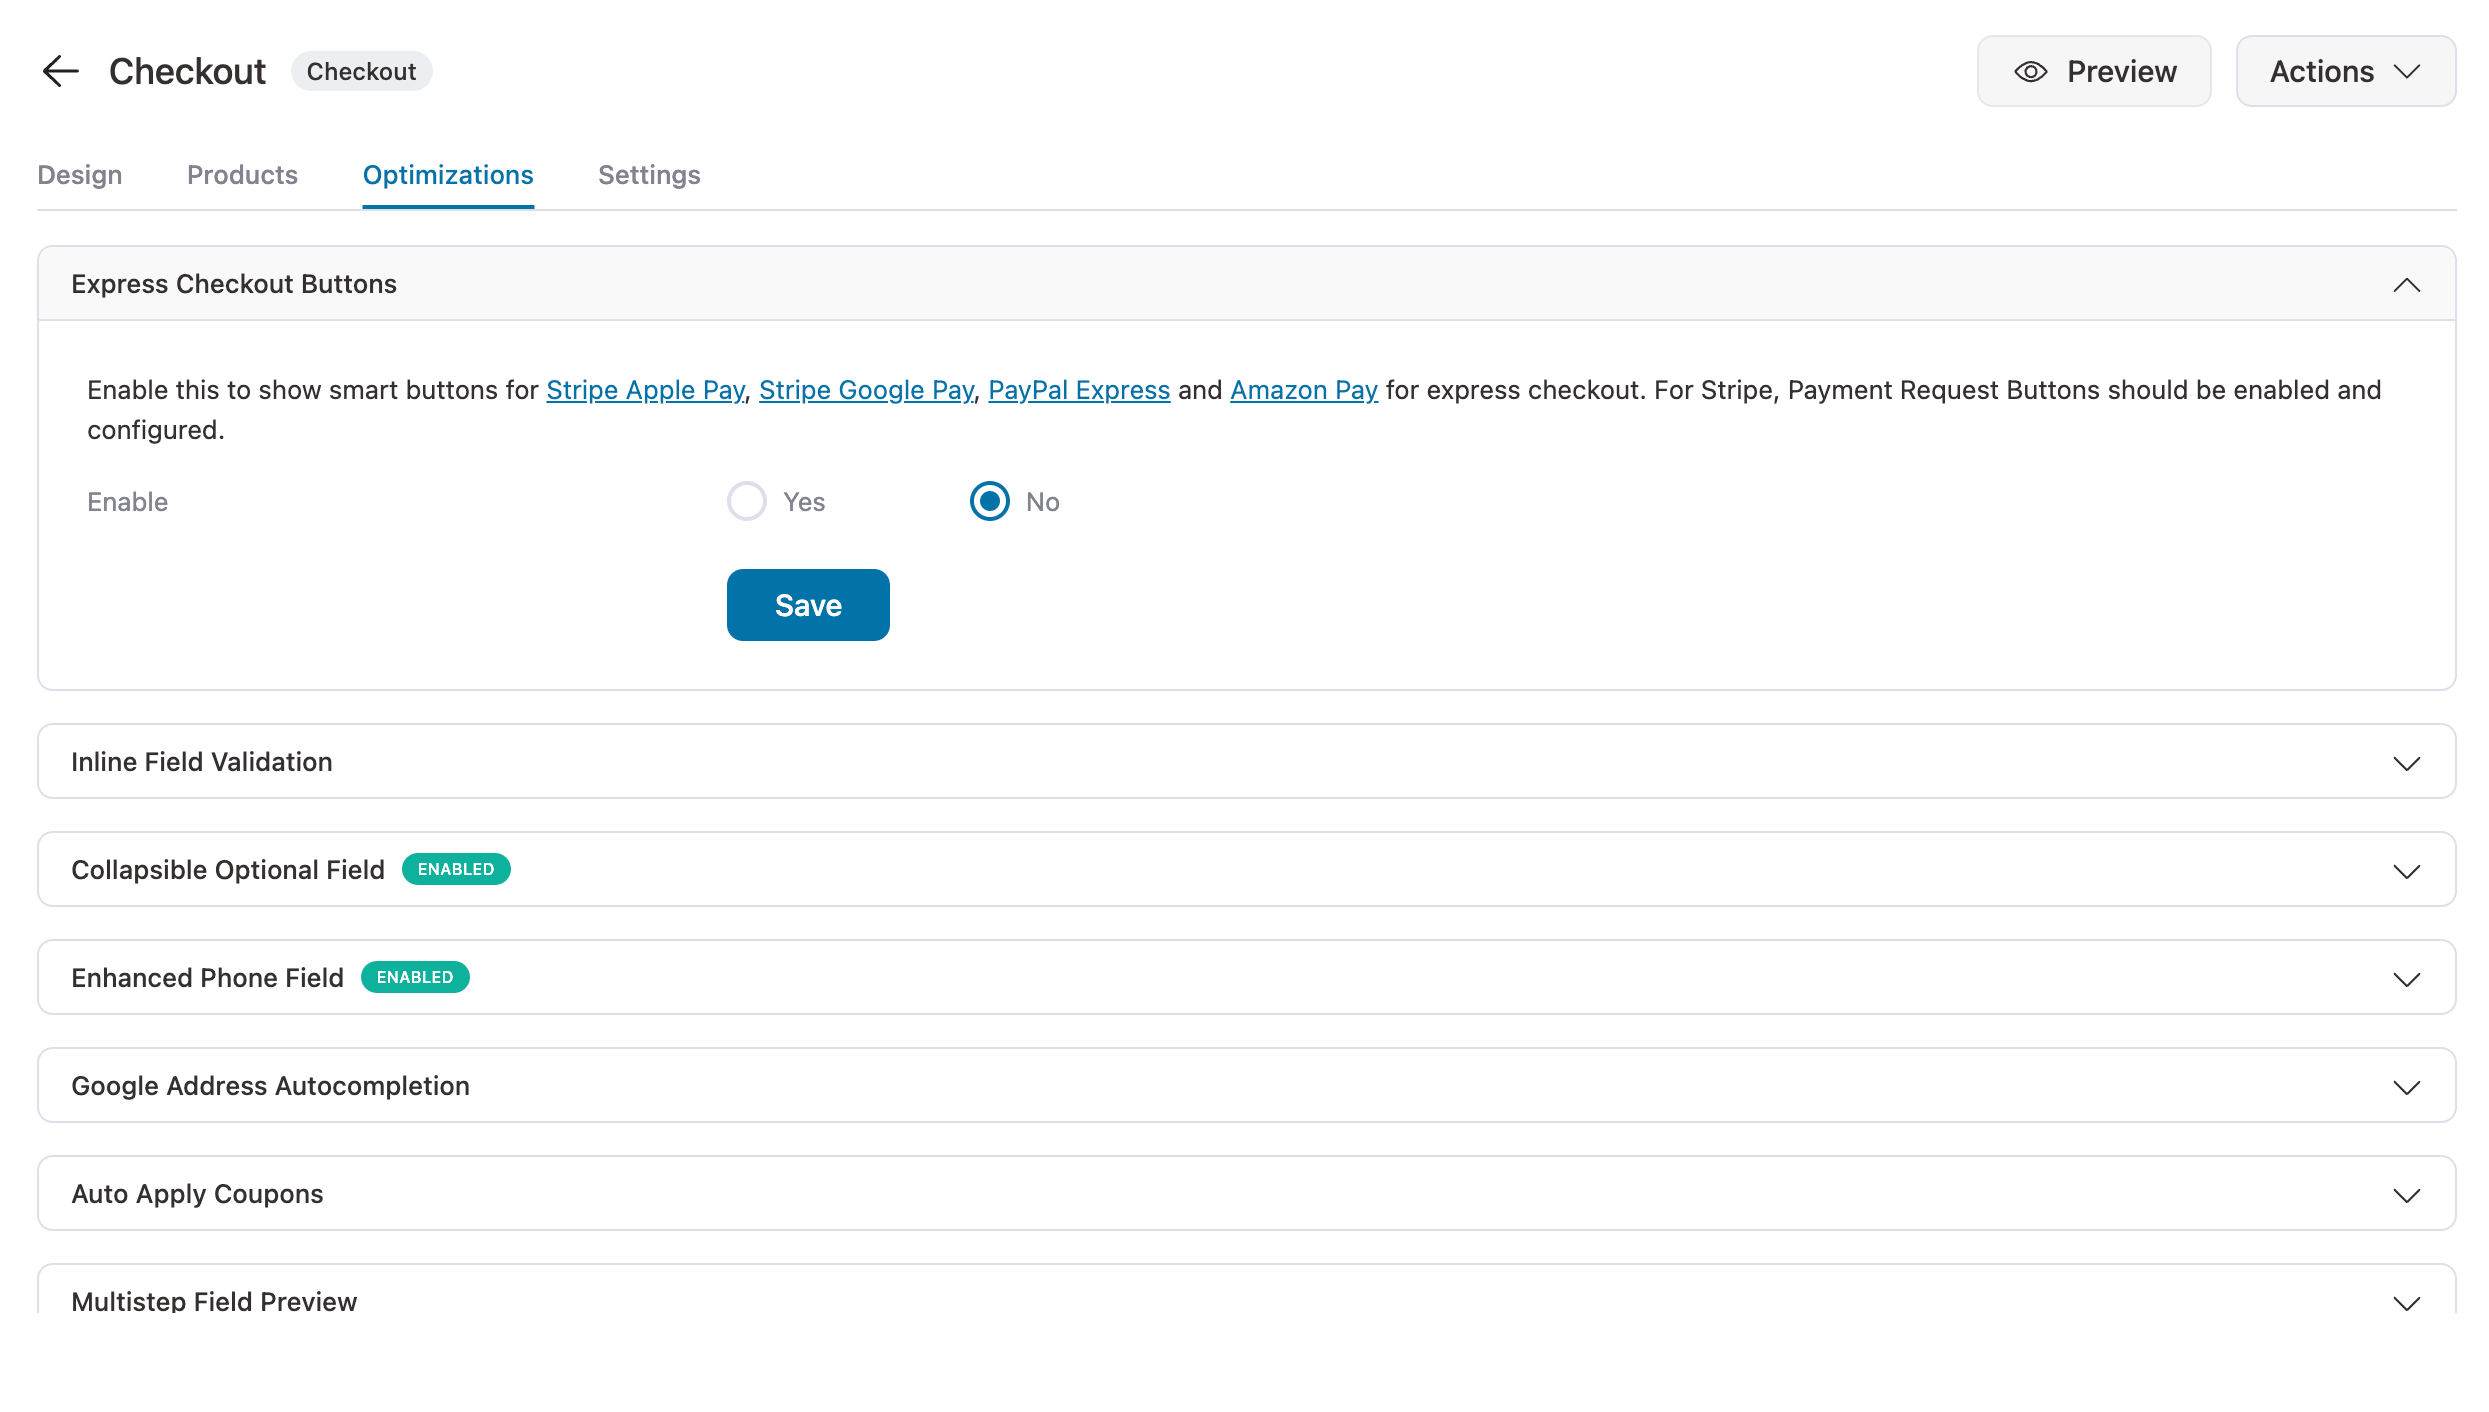
Step 4: Optimize the WooCommerce checkout page
Return to the Design tab and scroll to the "Checkout Form Fields" section. Here, you can rearrange or customize the form fields.
You can add any custom field to the checkout page if you want.

On the Optimizations tab, you can add express checkouts, such as Apple Pay and Google Pay, enable Google Address autocomplete, auto-apply coupons, etc. These will ensure your user experiences a frictionless checkout process.
Step 5: Test the WooCommerce add to cart link
Click on the ‘Preview’ option on the checkout page to access the WooCommerce add to cart link for the products you added.
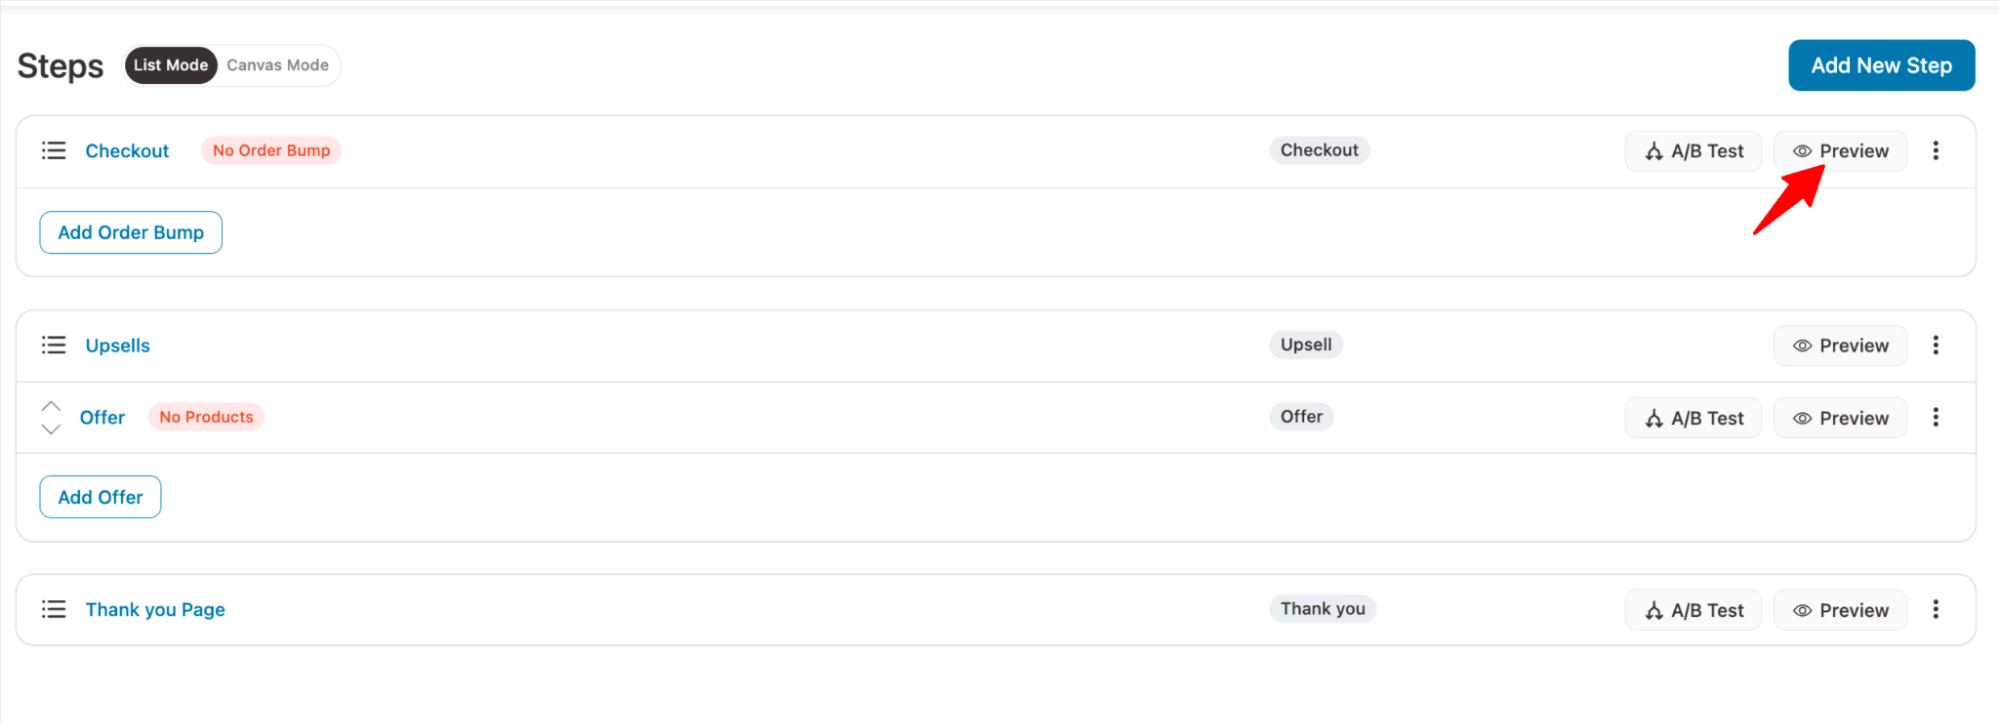
This will open the link in a new tab.
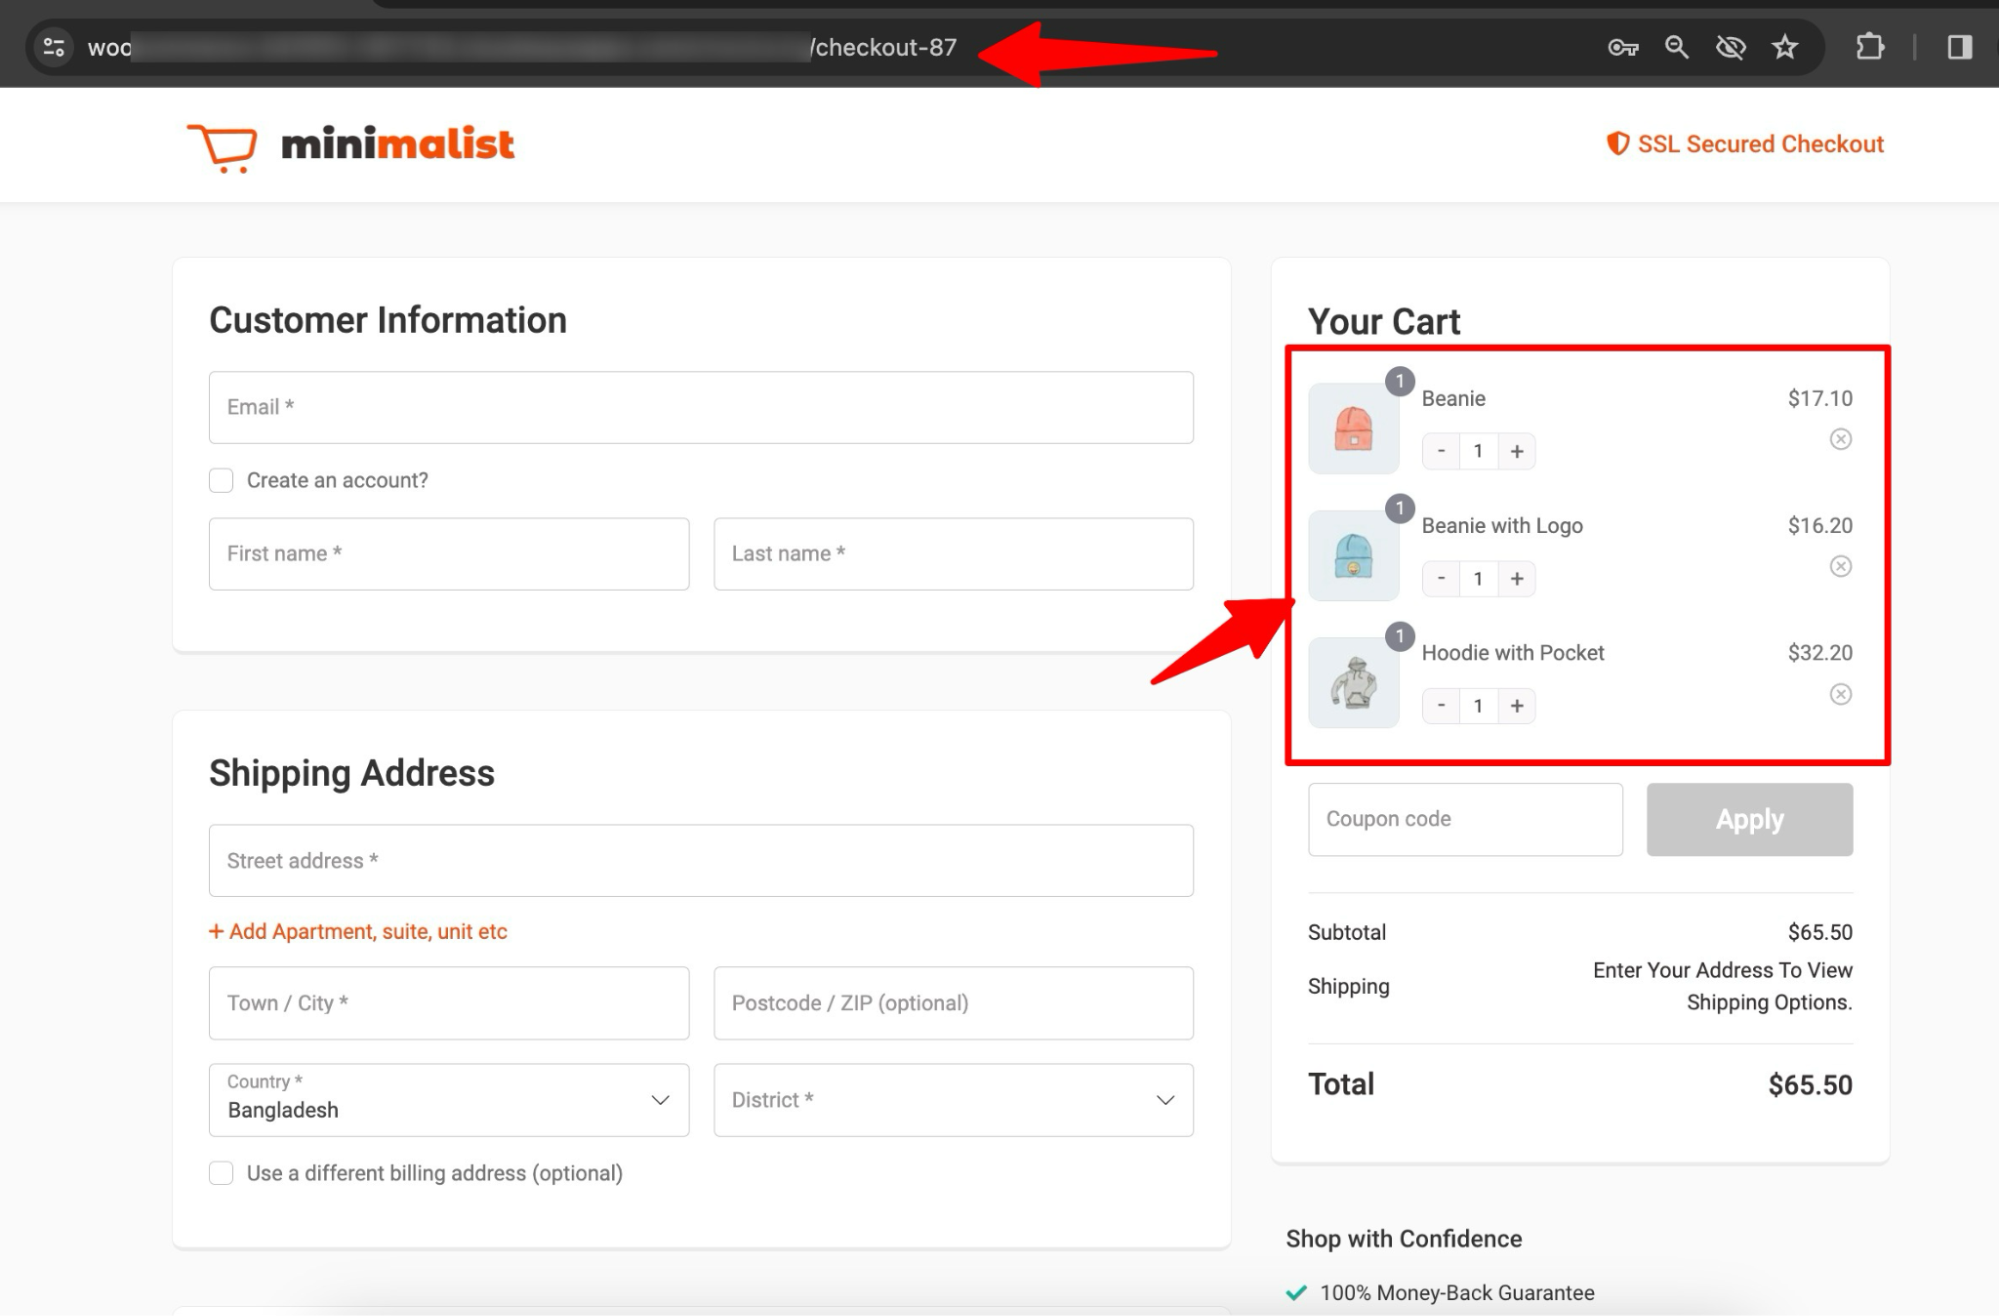
Now you can copy this WooCommerce add to cart link and use it for any promotional campaign.
Whenever the user clicks on the link, the products you added to the checkout will automatically be added to the cart and redirected to the checkout page.
9 Effective Use Cases for WooCommerce Add to Cart Links
WooCommerce add-to-cart links offer incredible flexibility for promoting products and simplifying the shopping experience.
Here are nine powerful use cases:
- Email marketing campaigns
Integrate add-to-cart links into your email campaigns to give recipients a one-click option to add promotional products directly to their cart.
For example, include a link for a featured product in a holiday sale email. This reduces friction, increases convenience, and boosts conversion rates.
- Social media posts
Share add-to-cart links in your social media posts, stories, and ads to promote specific products or bundles.
For instance, post an Instagram story featuring your best-selling product with a swipe-up link that adds the product directly to the cart. This makes it easier for your audience to act instantly, driving higher engagement and sales.
- Affiliate marketing programs
Provide affiliates with WooCommerce add-to-cart links for the products they promote. These links allow affiliates to direct traffic straight to the cart, streamlining the purchase process for customers.
This not only improves the conversion rates for affiliate campaigns but also enhances the overall effectiveness of your partnerships.
- Custom product catalogs or price lists
Include add-to-cart links in online catalogs or price lists, giving customers a seamless way to shop.
For example, embed these links in downloadable PDF catalogs or interactive digital brochures so customers can add products to their cart while browsing. This improves the shopping experience and encourages bulk purchases.
- Website banners and pop-ups
Use add-to-cart links in banners or pop-ups on your website to promote special offers or popular products.
For example, display a pop-up for a limited-time discount with a link that directly adds the product to the cart. This grabs attention and encourages immediate action.
- Limited-time offers and flash sales
Add-to-cart links are perfect for flash sales or exclusive promotions. To create urgency, share these links via email, social media, or website announcements.
For example, include a countdown timer next to an add-to-cart link for a discounted product, motivating customers to act quickly.
- Event promotions
Promote products for special events like holidays, product launches, or webinars using add-to-cart links.
For instance, offer exclusive event merchandise or product bundles with links that make it easy for attendees to purchase them directly.
- Customer support
Streamline the support process by using add-to-cart links in customer communication.
For example, if a customer needs help finding the right replacement part or accessory, send them a direct add-to-cart link for the specific item. This reduces confusion and resolves issues faster, improving customer satisfaction.
- Influencer marketing
Provide influencers with add-to-cart links for the products they promote.
For example, an influencer can share a link in their bio or posts, making it easy for their followers to purchase recommended products. This leverages the influencer’s reach and credibility to drive more sales.
- Campaign tracking
Use custom add-to-cart links with UTM tracking parameters to measure the performance of your marketing campaigns.
For example, track which social media posts or email campaigns generate the most clicks and conversions. This helps you optimize your strategy and maximize ROI.
- Upselling and cross-selling
Encourage customers to buy more by using add-to-cart links for bundles or complementary products. For example, include a link that adds a discounted product bundle to the cart, boosting your average order value.
These are some of the top use cases that can motivate you to implement and apply for your next marketing campaign.
5 Best Practices for Using Add to Cart Links in Your WooCommerce Store
Here, we have shared some best practices to ensure your WooCommerce add-to-cart links are reliable, secure, and effective for driving conversions. At the same time, you can provide a seamless shopping experience for your customers.
Let’s see:
1. Use product IDs for accurate identification
Always use product IDs when creating add-to-cart links to ensure the correct items are added to the cart.
Avoid using SKUs or product names, as these can sometimes cause conflicts or errors, especially if product details change in the future.
2. Properly encode links for variable products
Ensure that all special characters in your add-to-cart links are correctly encoded to avoid errors.
This is particularly important for variable products, where additional parameters like size or color may be included in the URL. Proper encoding ensures these options work smoothly.
3. Test links across devices and browsers
Thoroughly test your add-to-cart links on different devices, including desktops, tablets, and mobile phones, to ensure they work flawlessly.
Also, check the functionality in various browsers like Google Chrome, Safari, Firefox, and Edge. This helps you avoid potential user experience issues and ensures all customers can use the links without frustration.
4. Use SSL for enhanced security
Always use SSL (HTTPS) for your add-to-cart links to secure your customers' data and build trust.
Review and update your links regularly to ensure they remain valid, especially after changing your product catalog or website structure.
5. Provide clear and engaging CTAs
Pair your add-to-cart links with clear and compelling calls to action (CTAs).
For example, use buttons or hyperlinks with phrases like "Add to Cart Now" or "Grab This Deal" to encourage clicks and improve engagement. A well-placed CTA can significantly boost the effectiveness of your links.
Frequently Asked Questions (FAQs)
Find answers to frequently asked questions about the WooCommerce add-to-cart link.
How to redirect the add to cart page in WooCommerce?
Navigate to WooCommerce settings. Under the Products tab, you’ll see the settings for redirecting to the cart page.
Enabling this option will redirect users to the cart page, and disabling it will redirect them to the checkout page when they click on the add-to-cart URL.
How do I add a product to a cart in WooCommerce?
You can add a product to a cart in WooCommerce using two methods. The first method is manually going to the product page through the shop page and clicking the add to cart button.
The next method is to create a custom WooCommerce add to cart link (discussed in this article).
How to Optimize Add-to-Cart URLs Using User Data Insights?
To optimize your add-to-cart URLs, analyze user data to understand customer behavior and preferences.
Here’s how:
Track click data: Use tools like Google Analytics or UTM parameters to monitor the performance of your add-to-cart links. Identify which links have the highest click-through and conversion rates.
Segment your audience: Tailor add-to-cart URLs for specific customer segments. For example, create personalized links for repeat customers, offering them discounts or bundles they are likely to buy.
A/B test links: Experiment with different CTAs, products, or promotions linked to your URLs. Test which combinations perform best and optimize accordingly.
Leverage product recommendations: Use customer purchase history or browsing behavior to create custom add-to-cart links for related or complementary products.
How to view customers with a specific product in their cart?
To view customers with a specific product in their cart, follow these steps:
Use a CRM Plugin: Install a WooCommerce CRM plugin like FunnelKit Automations to manage and monitor customer carts.
Filter by product: In the dashboard, use the advanced filter option to search for a specific product. Then, you’ll get a list of who has purchased that product.
Analyze the data: Then review the customer details, including their name, email, and cart status, to identify potential follow-ups or marketing opportunities.
Leverage insights: Use this information to send targeted emails, such as reminder emails or exclusive discounts, to encourage checkout.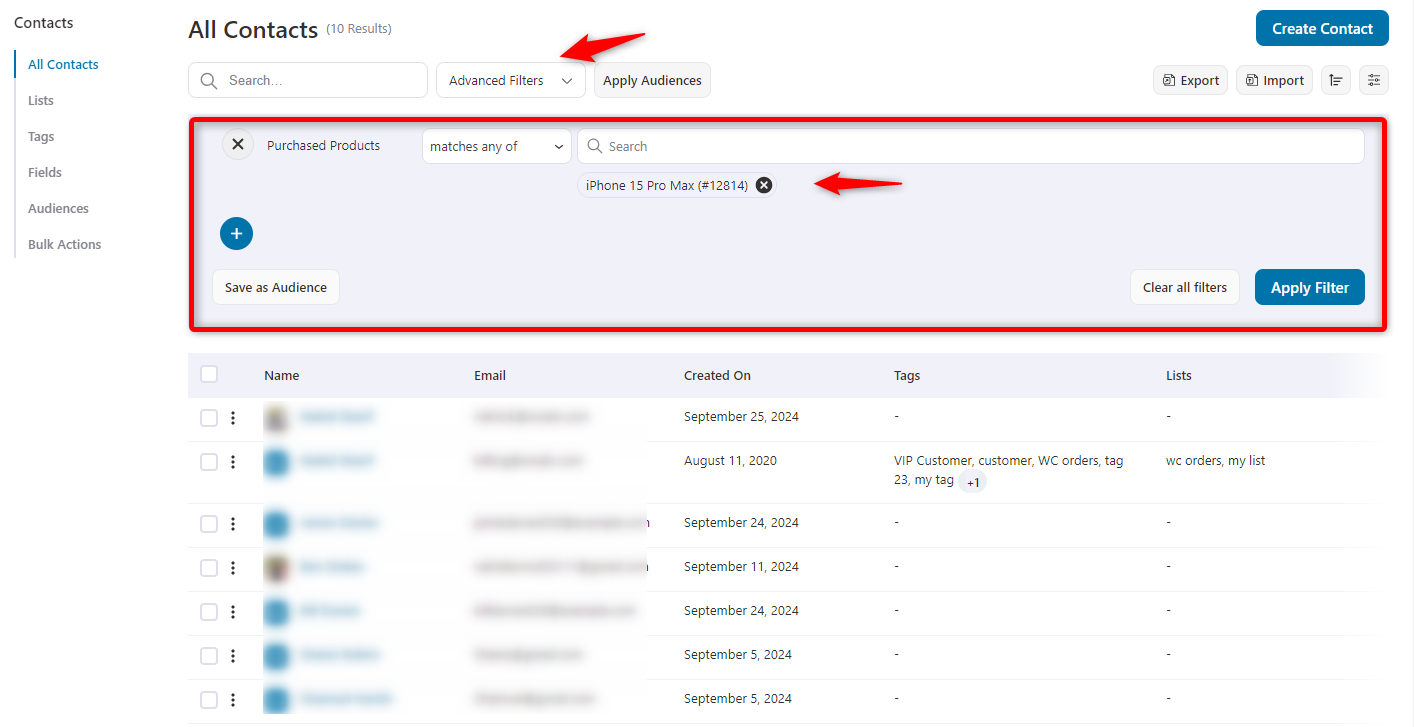
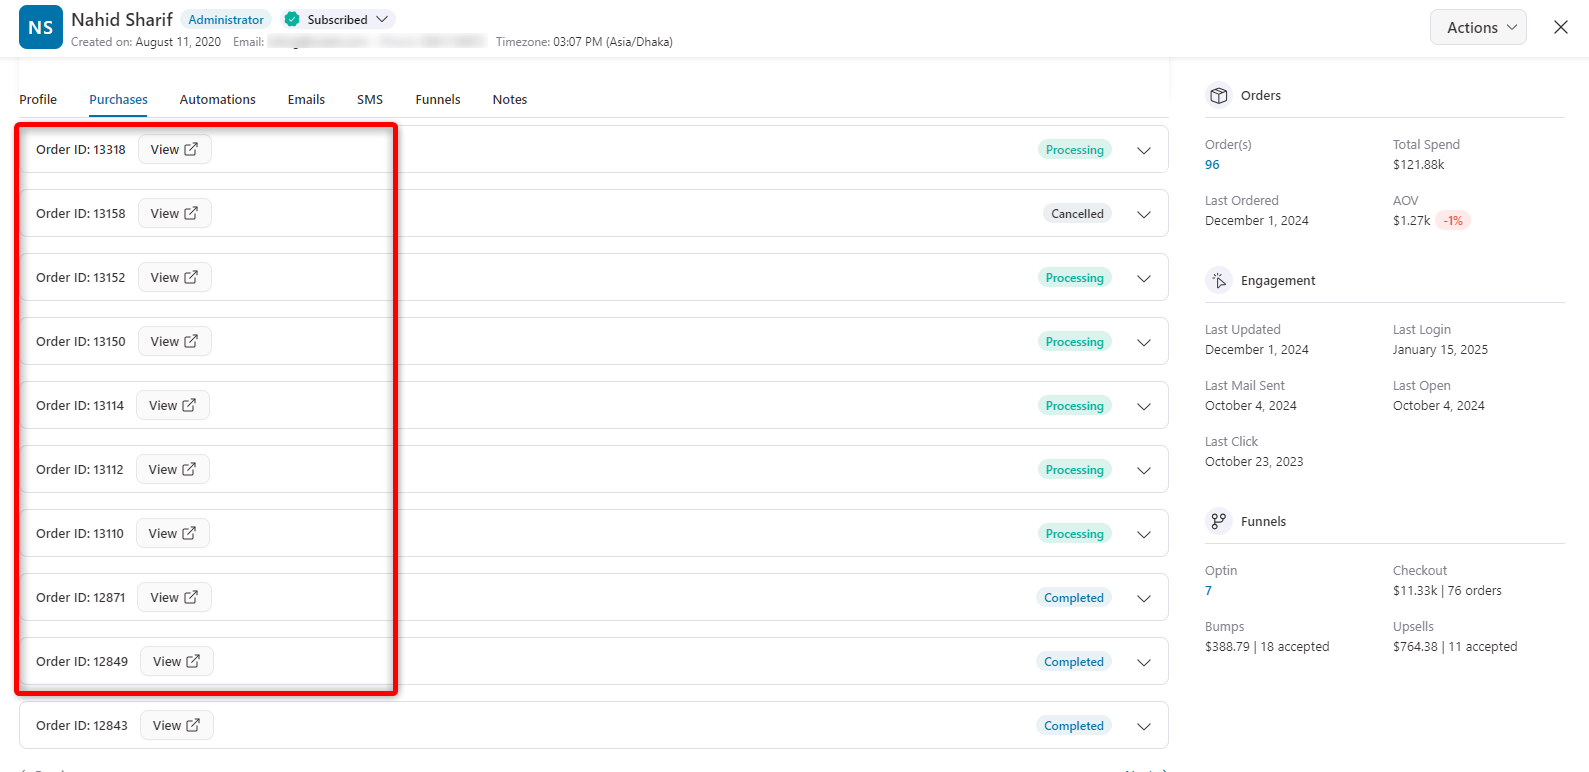
How to view customer carts in WooCommerce?
To view customer carts in WooCommerce, follow these steps:
- Install CRM plugin: WooCommerce doesn’t have a built-in feature for viewing customer carts. Use plugins like FunnelKit Automations to access users’ activities.
- Go to the dashboard and access it. And then find the contacts from the list of FunnelKit Automations.
- Enter into the data: Click on the preferred customer and overview it. And slightly scroll down and you can see the cart details under the purchase tab.
- Take action: Then, depending on the data you need, take actions like sending personalized emails or improving your checkout process for the canceled order.
Ready to Use WooCommerce Add to Cart Link?
The WooCommerce add to cart link is a valuable feature that can boost your sales by offering a seamless way for customers to add products to their cart with a single click.
It's a user-friendly solution that makes customer interactions with your products more effective during promotional campaigns.
Now you know how to create WooCommerce add-to-cart links that add single or multiple products to a cart with a single click.
With FunnelKit Funnel Builder, you can offer users an effective shopping experience by allowing them to update the product quantity on the checkout page.
Moreover, you can use the sales funnel builder to offer order bumps, upsells, and downsell to improve the average order value.
So, don’t waste time. Start using FunnelKit to create a WooCommerce add to cart link today.
Editorial Team
July 7, 2026Are you looking for WooCommerce checkout optimization hacks to streamline your users' shopping experience? 7 out of 10 shoppers who reach a WooCommerce checkout leave without paying; according to Baymard...
Editorial Team
July 6, 2026A WooCommerce order form lets customers select multiple products, set quantities, and choose variations from a single page instead of visiting individual product pages. There are two ways to add...
Editorial Team
July 6, 2026The Bricks WooCommerce builder is built directly into the Bricks theme. Activate the free WooCommerce plugin, and Bricks unlocks more than 30 store-specific elements plus visual templates for every part...


