
Have you ever wondered why some online stores convert like crazy while others struggle to close a sale? A simple reason is checkout optimization.
If your WooCommerce checkout page still looks like every other default setup, you will lose potential buyers.
Shoppers expect a fast, intuitive checkout tailored to their needs. Yet WooCommerce’s default fields often slow things down, ask for irrelevant details, or miss crucial details that could improve fulfillment and the customer experience.
The solution? A WooCommerce checkout field editor lets you take full control, adding, editing, or removing fields that make sense for your business.
In this post, we’ll show you how you can customize the form fields on your WooCommerce checkout page with and without code.
Table of Contents
- 1 Why Customize Your WooCommerce Checkout Fields?
- 2 Method 1: Edit WooCommerce Checkout Fields Without Code
- 3 Method 2: Edit WooCommerce Checkout Fields With Custom Code
- 4 Top 3 Best Checkout Field Editor Plugins for WooCommerce
- 5 What to Add to Your WooCommerce Checkout Fields (By Store Type)
- 6 WooCommerce Checkout Field Editor: Frequently Asked Questions (FAQs)
- 7 Ready to Use the Best WooCommerce Checkout Field Editor to Encourage Quick Purchases?
Why Customize Your WooCommerce Checkout Fields?
A WooCommerce checkout field editor is a tool or WordPress plugin that allows you to customize the form fields on your checkout page.
You can add, remove, rearrange, or modify fields as needed to enhance the user experience and improve conversions.
Instead of editing PHP files in your theme, you get a drag-and-drop interface to manage every field, including billing, shipping, account, and custom sections.
Let’s look at the default WooCommerce checkout page that you may be using right now:
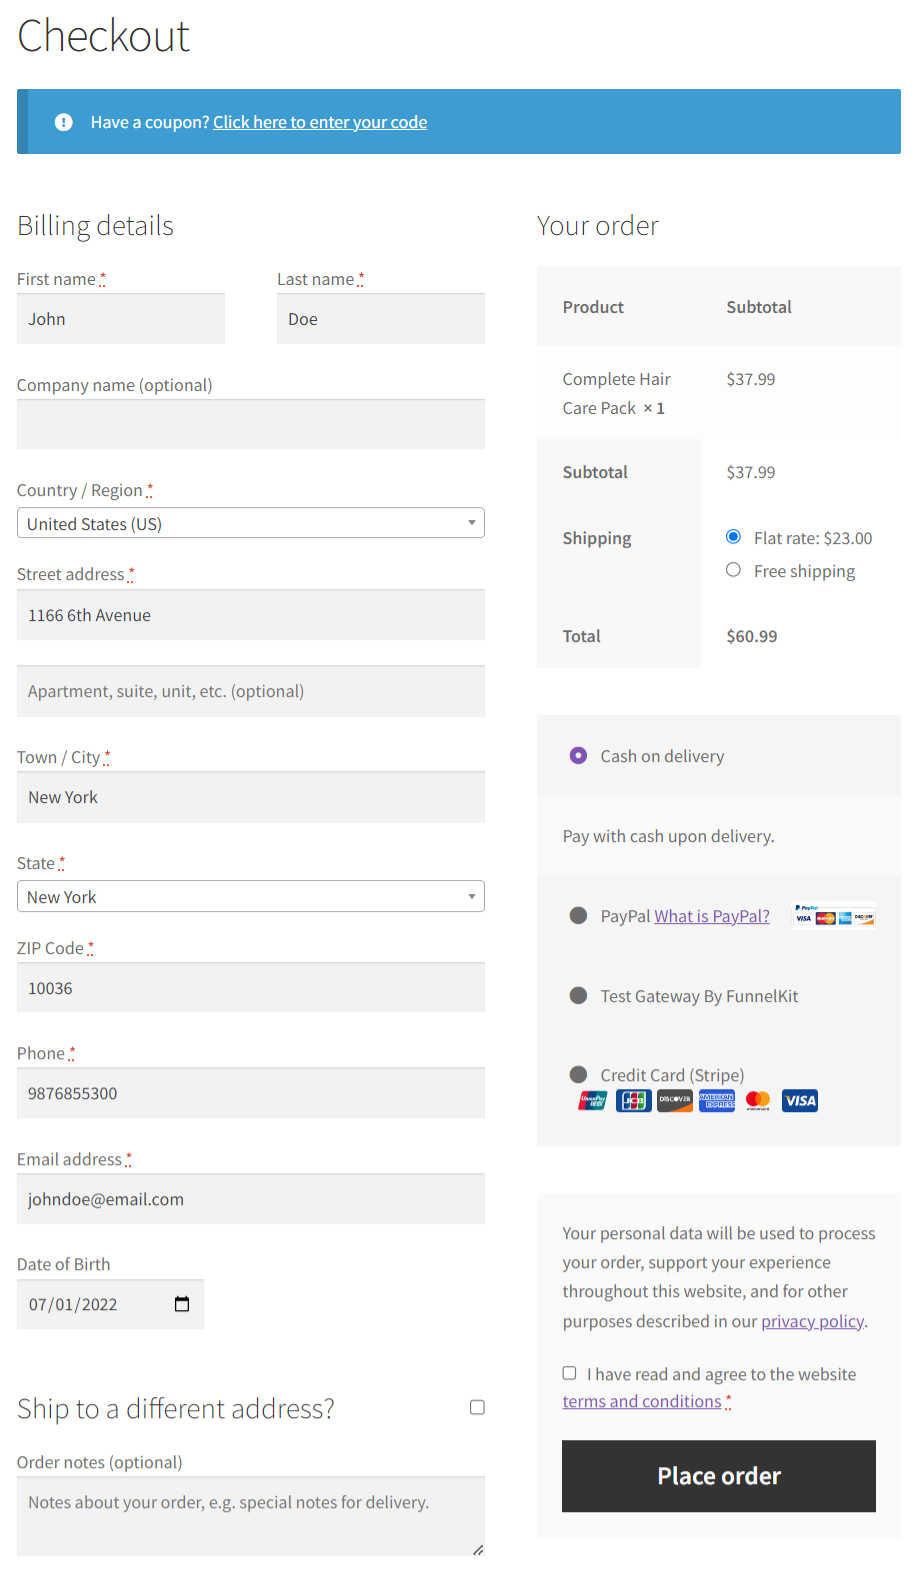
But as you can see, this page is not optimized for conversions. Here's why:
- The email is not the first field
- The form looks long and asks for all the details in one step only
- You cannot modify the item quantity or delete specific items
- The cart item images aren't displayed
- You can't add any custom fields to collect information that your business may require
On the other hand, take a look at this high-converting custom checkout page:
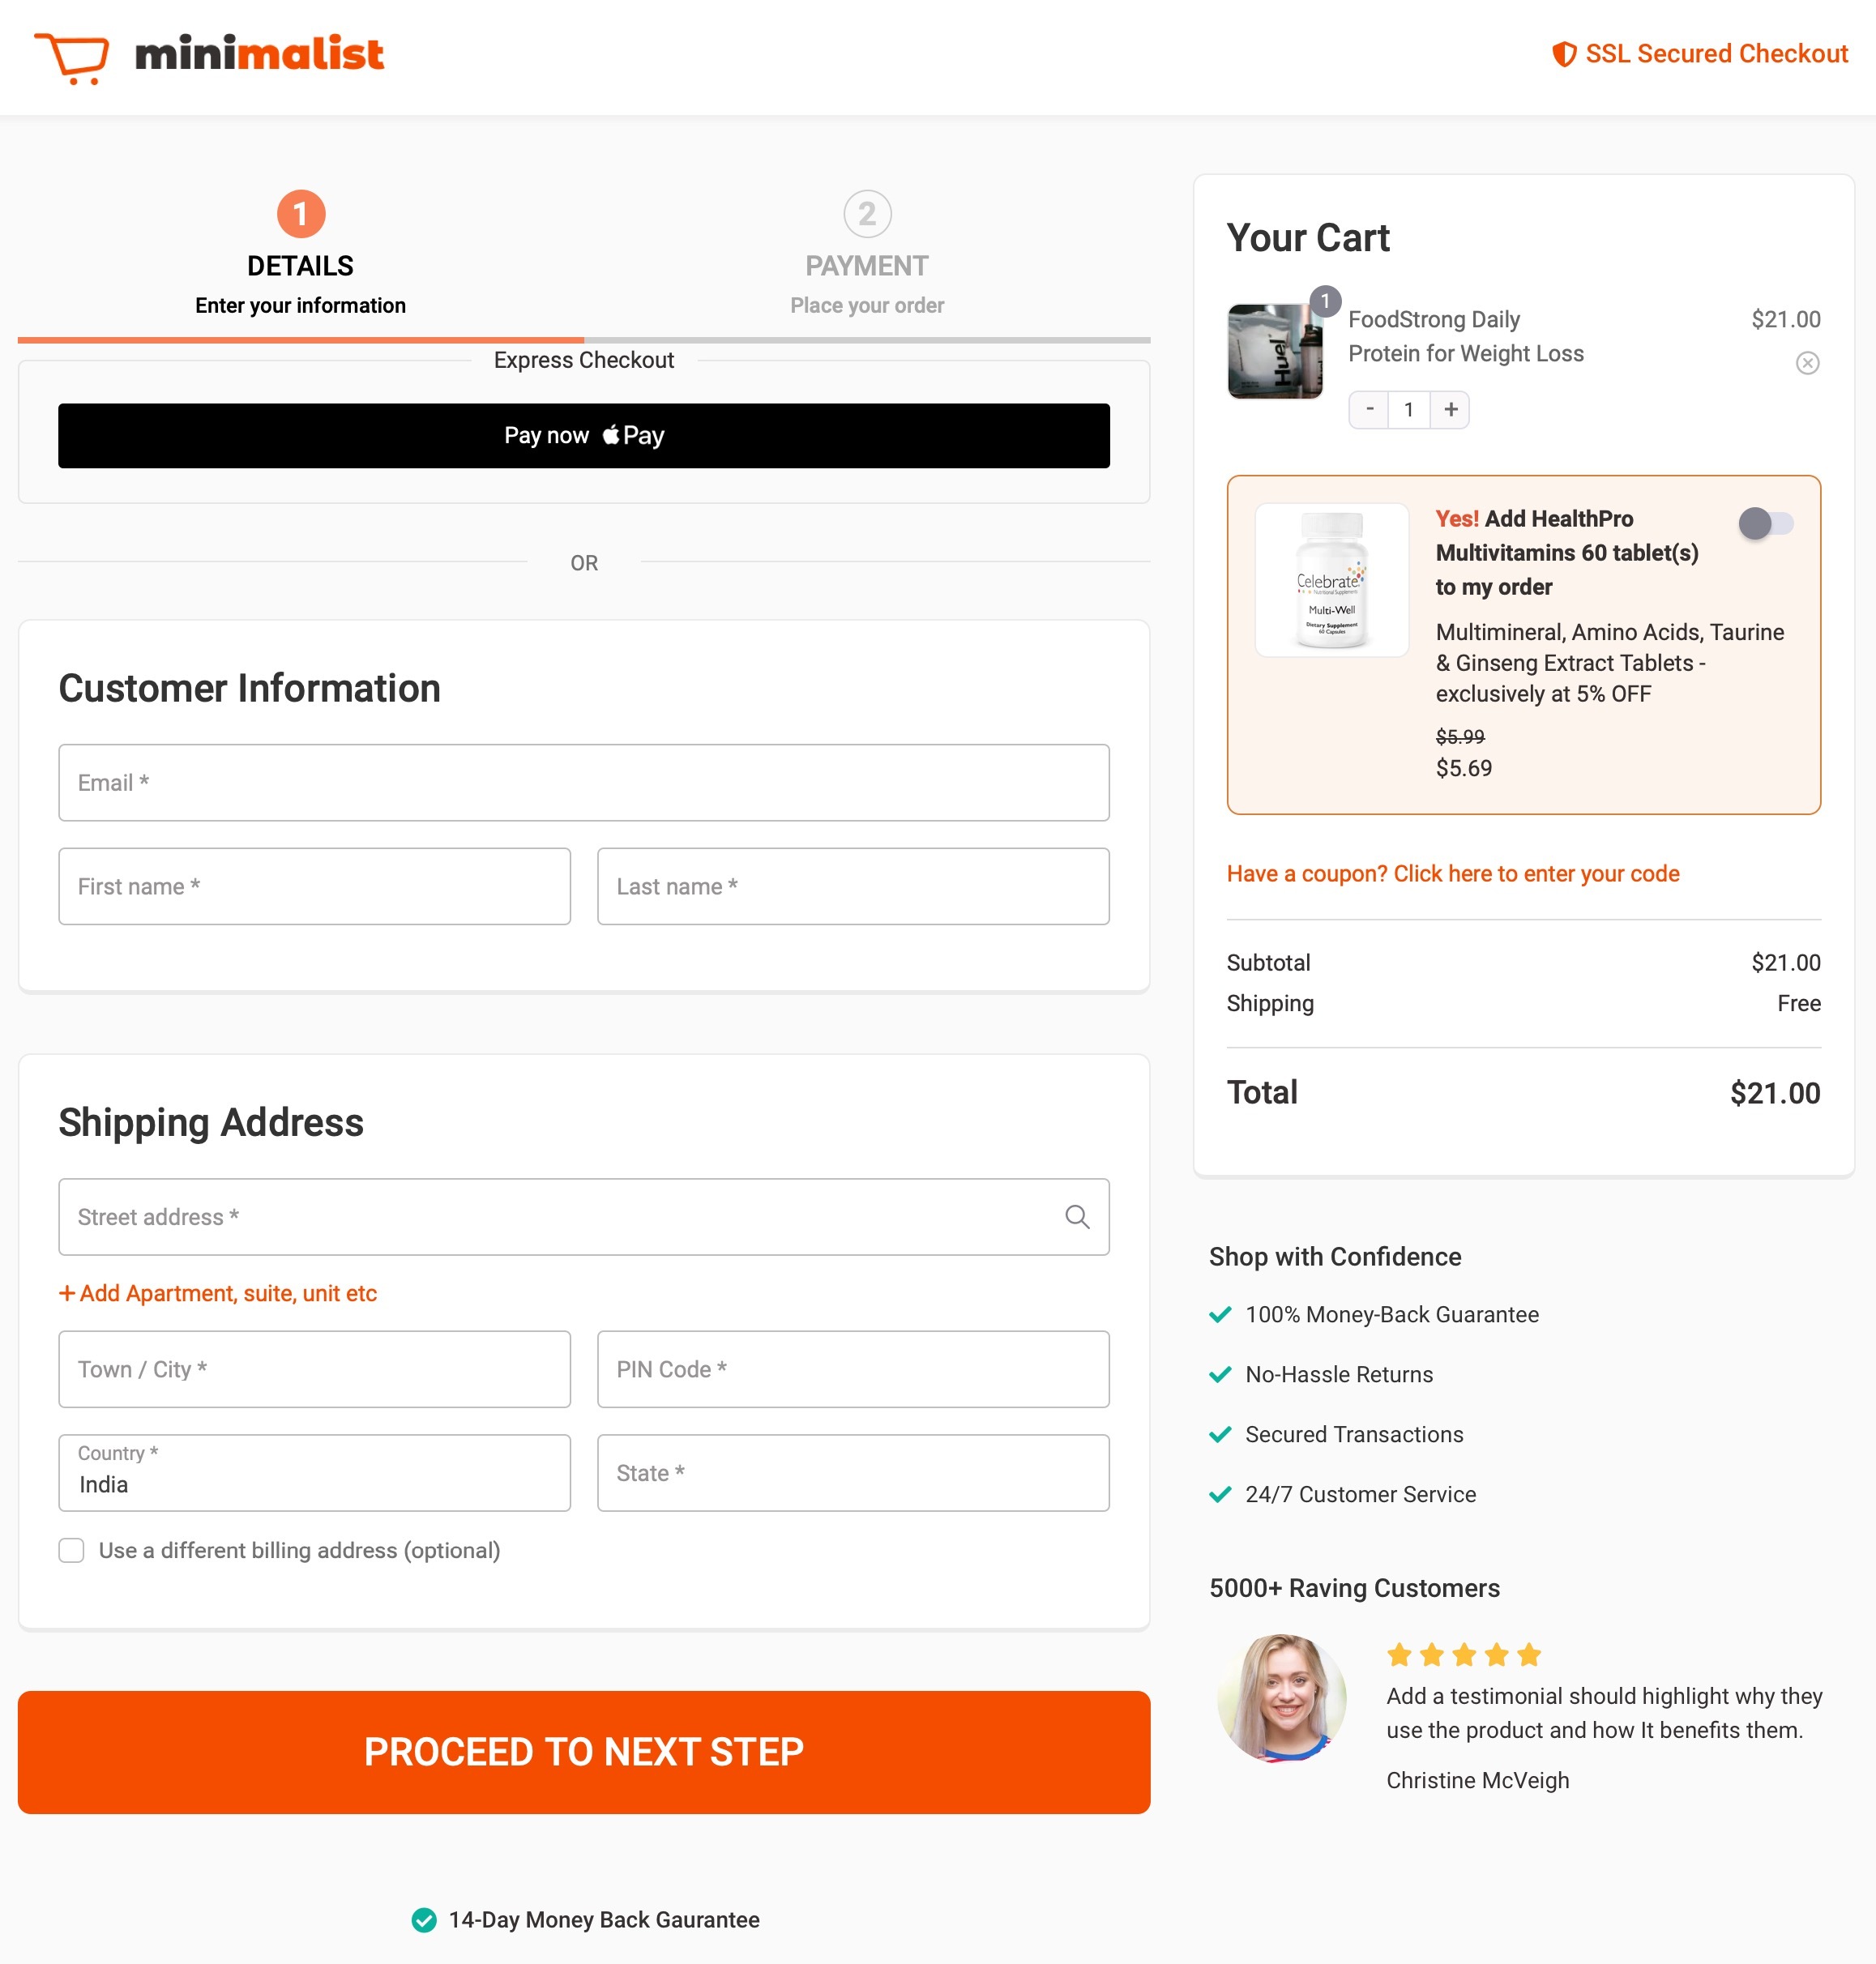
As you can see, it is perfectly optimized for conversions. The following checkout page has:
- Logically arranged form fields: As you can see, important form fields such as email and personal information are placed at the top. This helps you collect emails in real-time.
- Multi-step checkout: The checkout process is split into multiple steps with a progress indicator bar at the top.
- Clear depictions: Item image, name, and quantity, with the total listed properly in a clear manner.
- Separate sections: The shipping address is on the first step, followed by other details on the next step.
- Coupon section: The coupon code field is visible and placed under order details.
- Express checkout: Express one-click pay buttons are right at the top, allowing users to check out faster.
Customizing checkout fields lets you create a flexible, smooth checkout process. This leads to higher conversions.
Method 1: Edit WooCommerce Checkout Fields Without Code
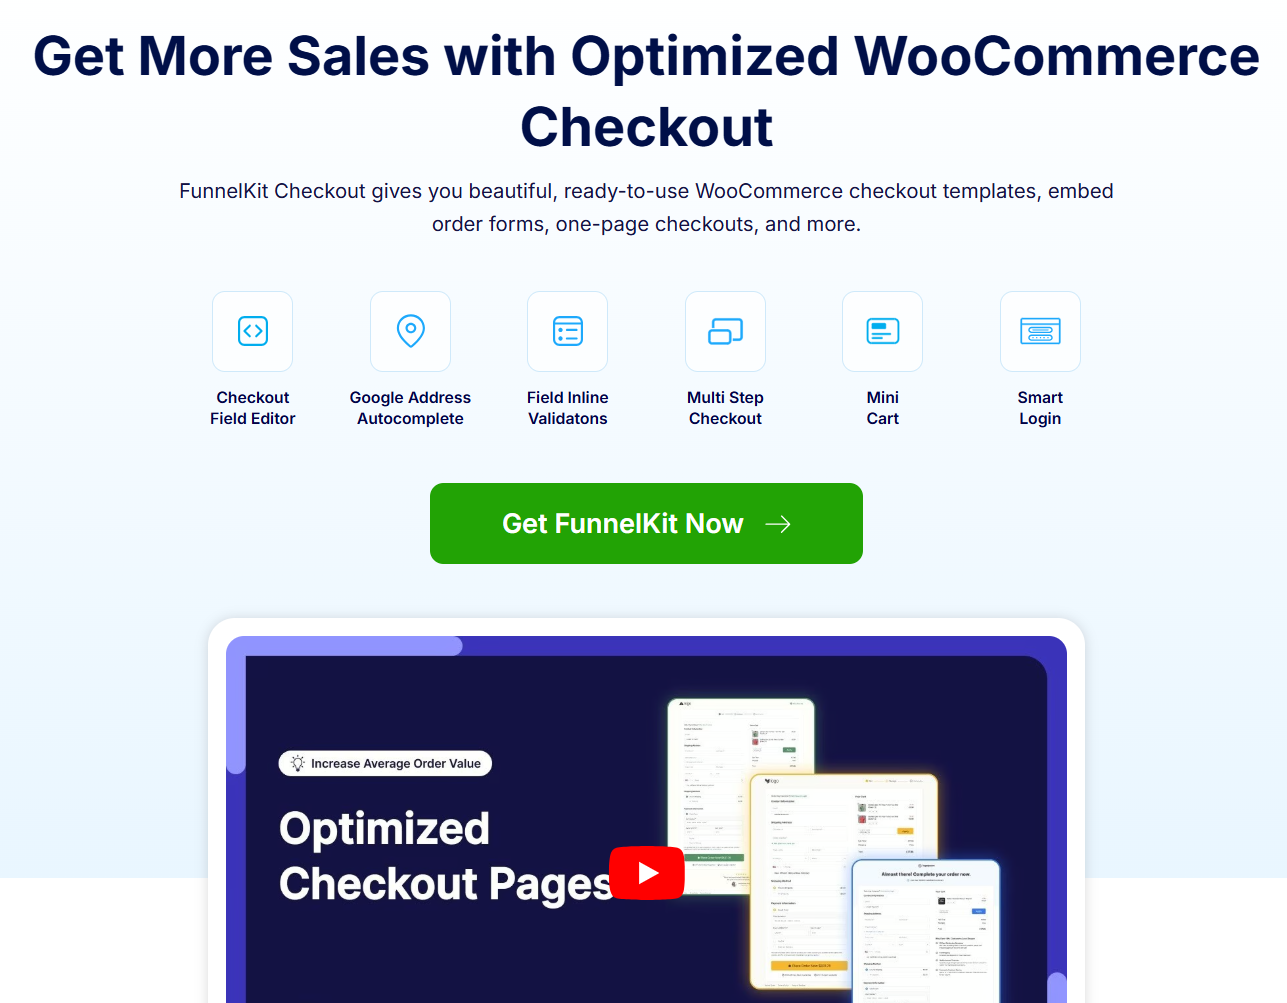
To edit your WooCommerce checkout fields without writing any code, we'll use FunnelKit Funnel Builder.
FunnelKit replaces the default WooCommerce checkout with a fully editable checkout page that includes a visual field editor, custom field support, conditional logic, and field validation rules.
It also works as a complete funnel solution, so you can extend the same checkout with order bumps and one-click upsells later.
First, make sure to install and activate the Funnel Builder plugin.
Next, follow these steps to customize the WooCommerce checkout form fields:
Step 1: Create a sales funnel with a custom checkout page
To start with, you’ll need to add a checkout page.
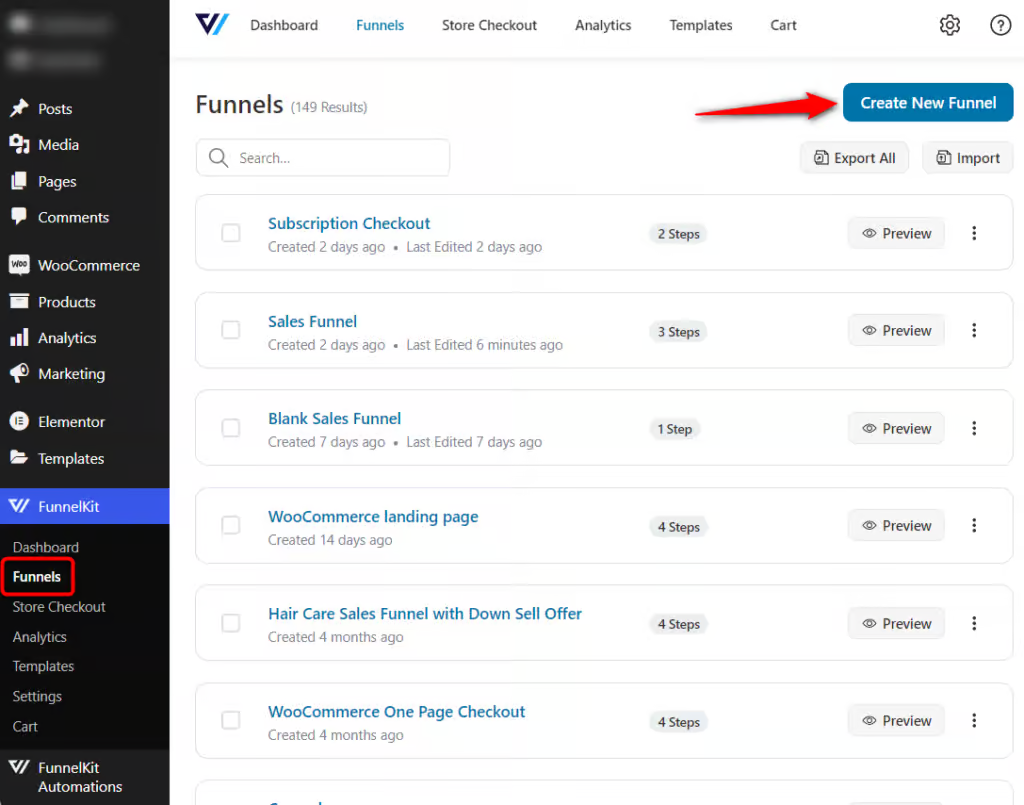
Go to FunnelKit ⇨ Funnels and hit ‘Create New Funnel’.
You’ll be directed to the templates page. Here you can see templates for sales and lead funnels.
Let’s click on the Livewire checkout template here.

Here, you’ll be able to see a full preview of your checkout funnel. Select your checkout steps, click Import This Funnel, and then name your funnel.
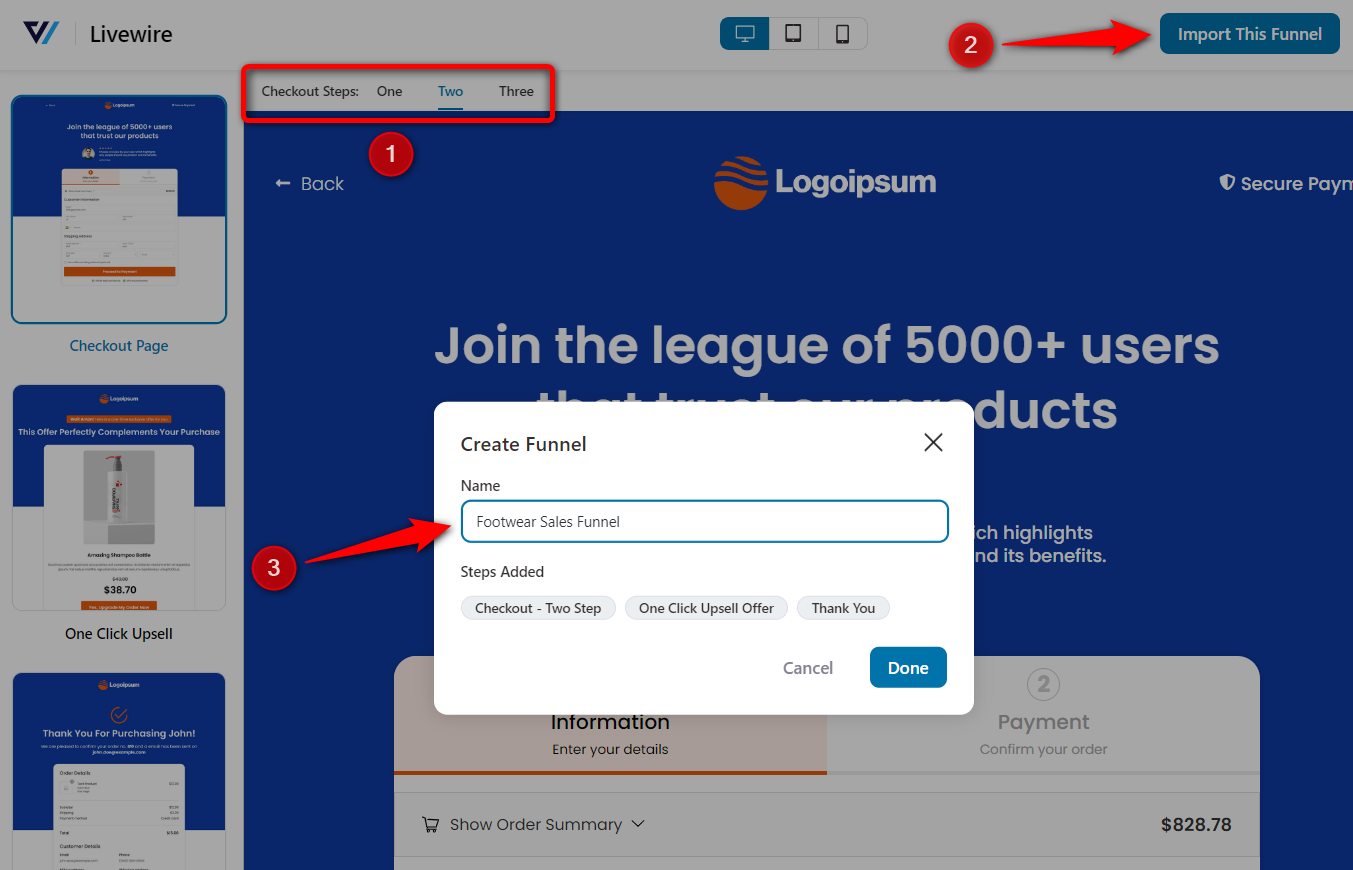
Clicking 'Done' will create this funnel, along with the checkout and thank-you pages.
Step 2: Add new fields to WooCommerce checkout forms
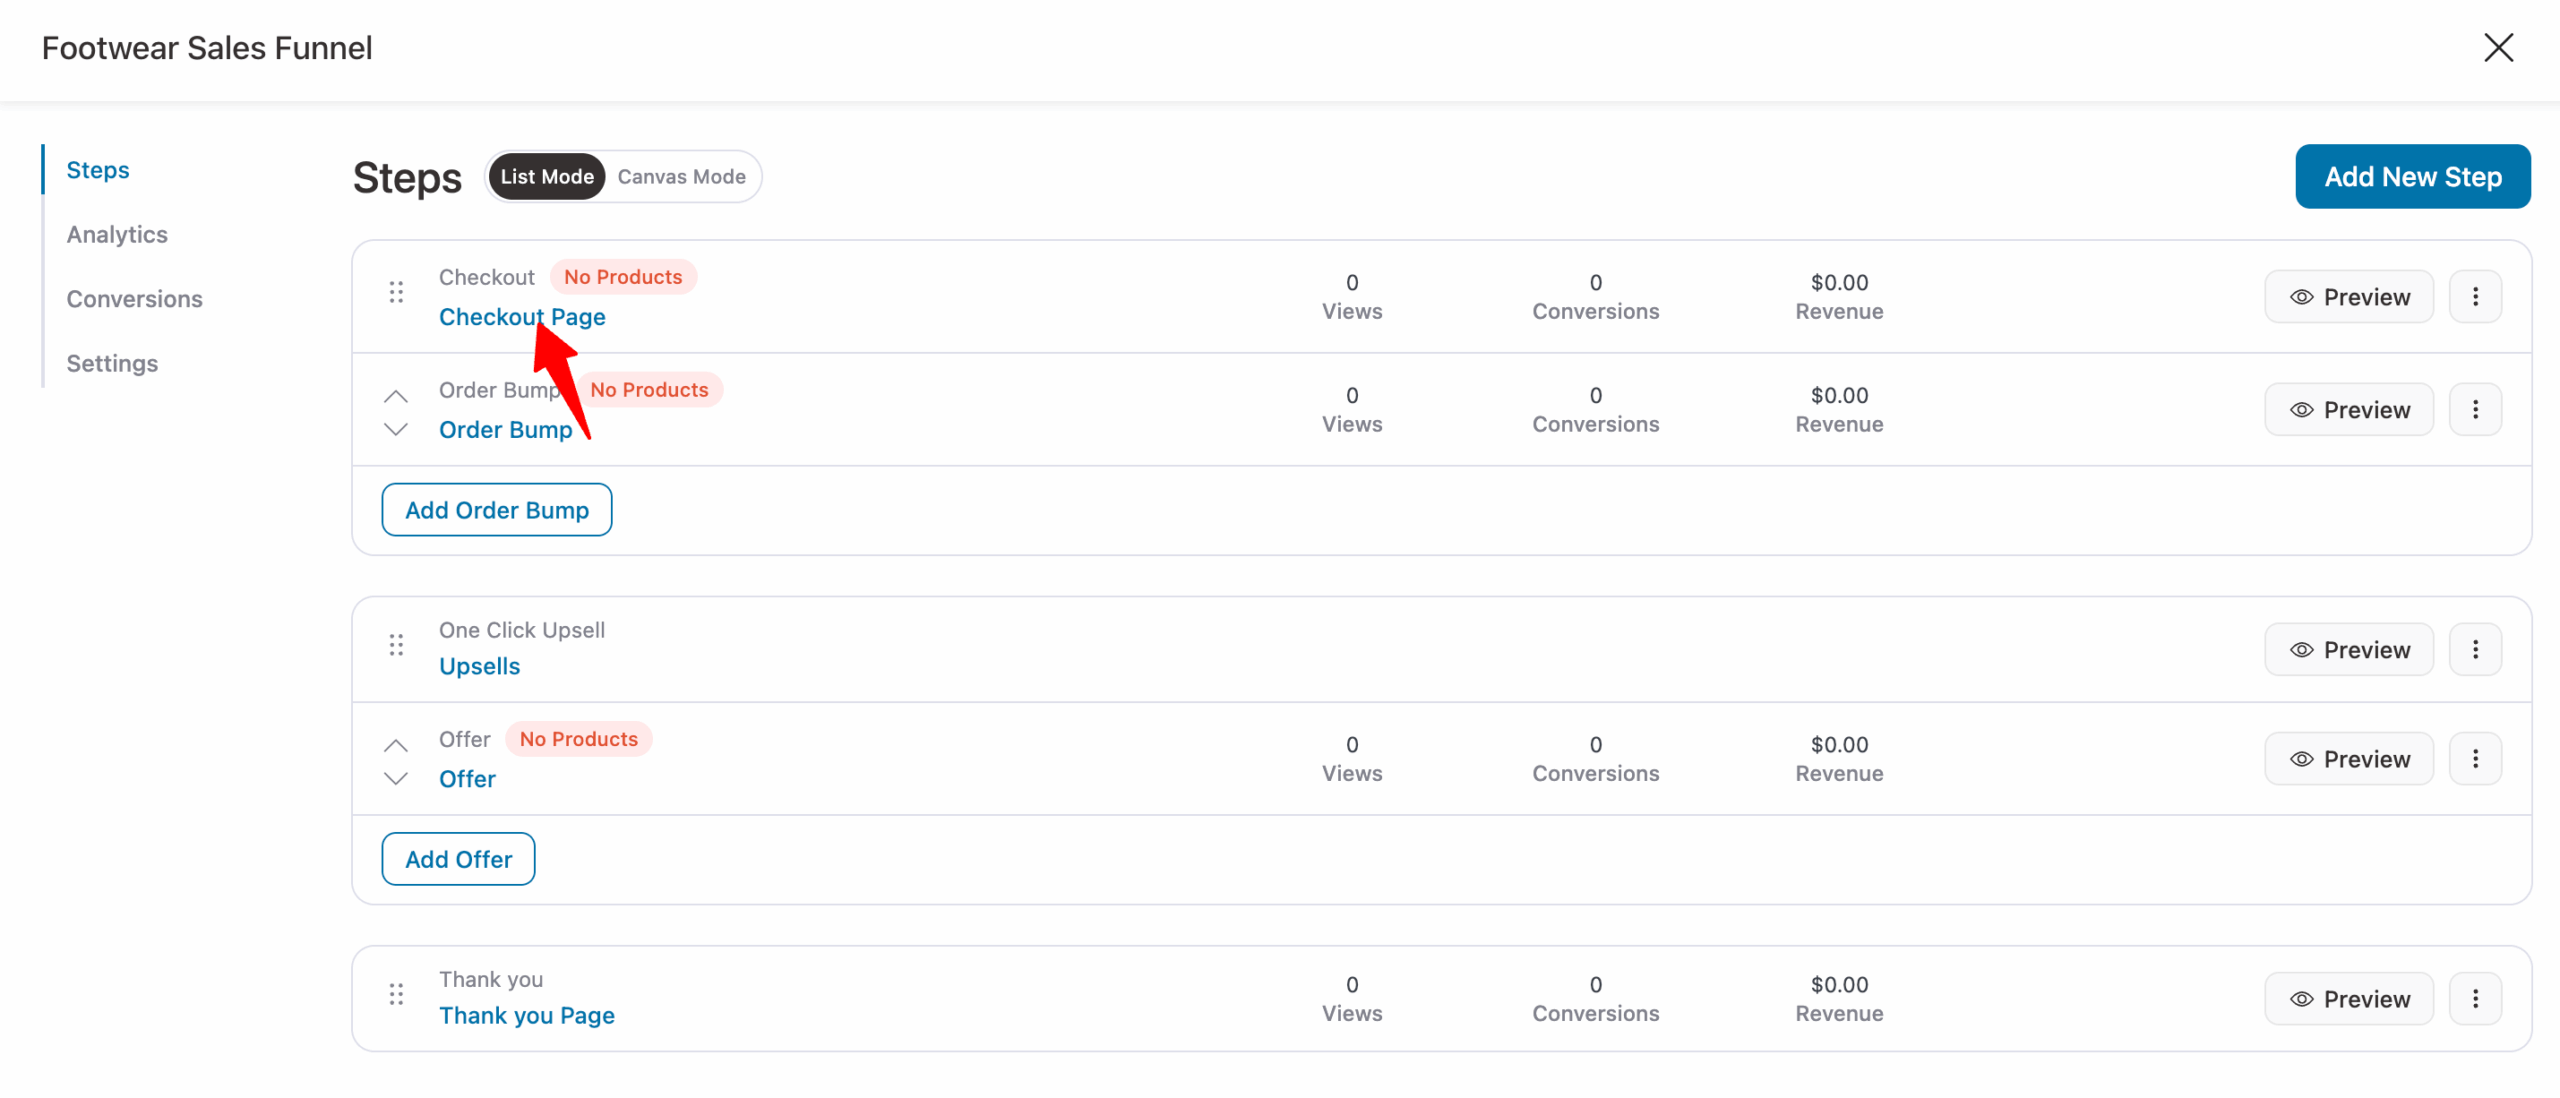
Click on the name of your checkout page to start editing it.
It’ll direct you to the Design tab, where you can customize the checkout page. You can change its design, content, style, and more.
There are many widgets available, such as the Checkout Form and Mini Cart, to set up your checkout page the way you want.
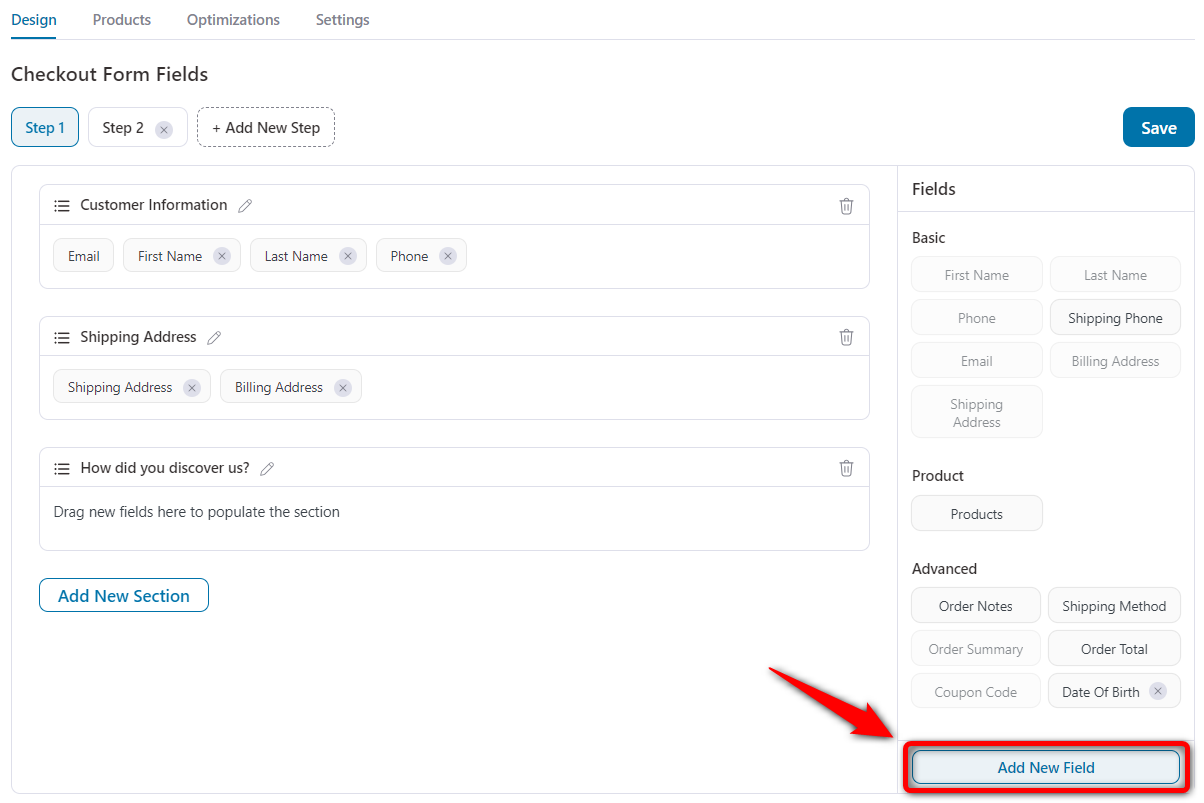
On the Design tab, scroll down to the ‘Checkout Form Fields’ section to witness the real power of FunnelKit’s checkout field editor in WooCommerce.
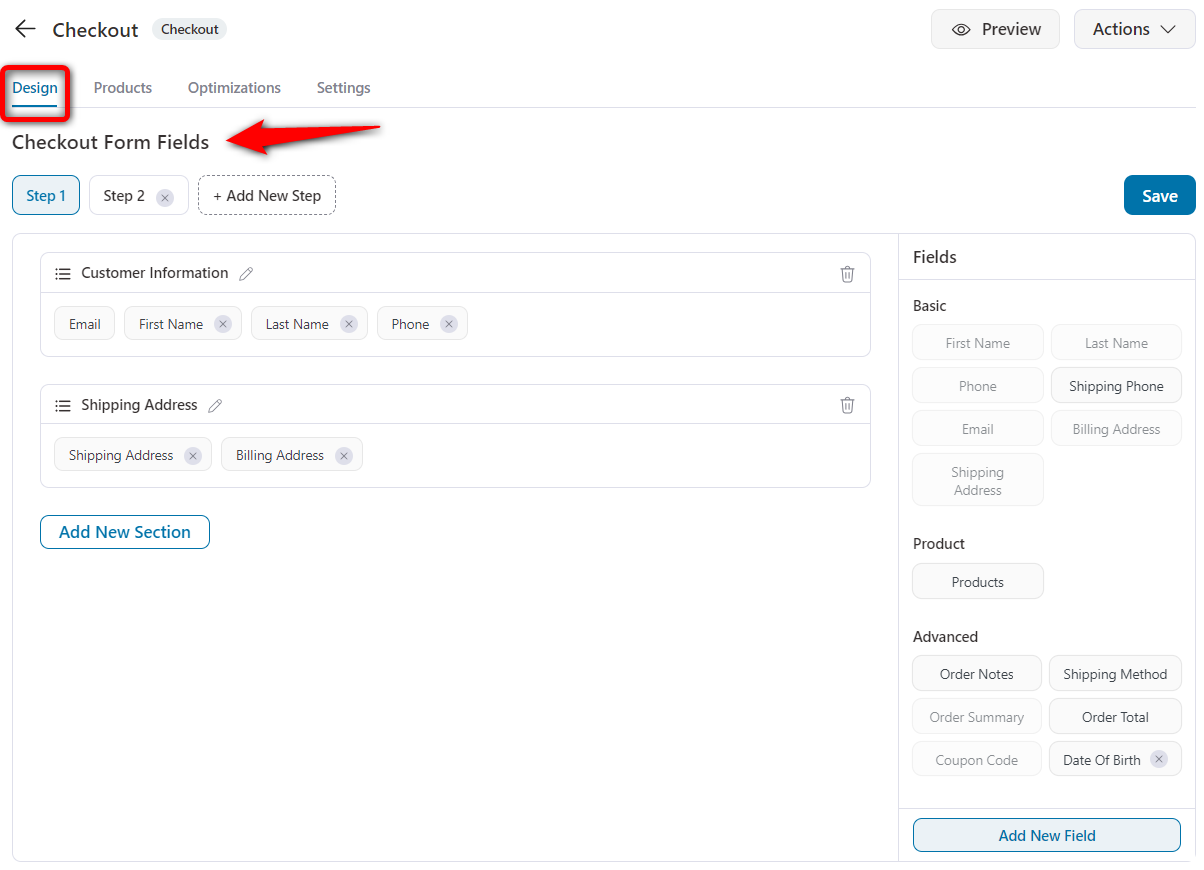
You'll see the steps you’ve selected when importing your checkout funnel, along with default fields.
FunnelKit's WooCommerce checkout field editor gives you complete flexibility to add new steps and rearrange sections, fields, and more.
Add a section to the WooCommerce checkout form
To add a section, click on the Add Section button.
Enter the section name, subheading, and classes for this section.
Clicking on ‘Add Section’ will add the new section to your checkout form.
Add a custom WooCommerce checkout field
FunnelKit’s checkout field editor for WooCommerce lets you add custom fields to your checkout.
Click on the ‘Add New Field’ button to create a new checkout form field.
Our WooCommerce checkout field editor from FunnelKit lets you choose your field type from the drop-down menu.
It can be a single-line text field, a checkbox, a radio button, HTML, a multi-select, a paragraph, a dropdown, a password field, etc.
For example, we have created a radio field with a label, field ID, and radio options to store your customers’ responses.
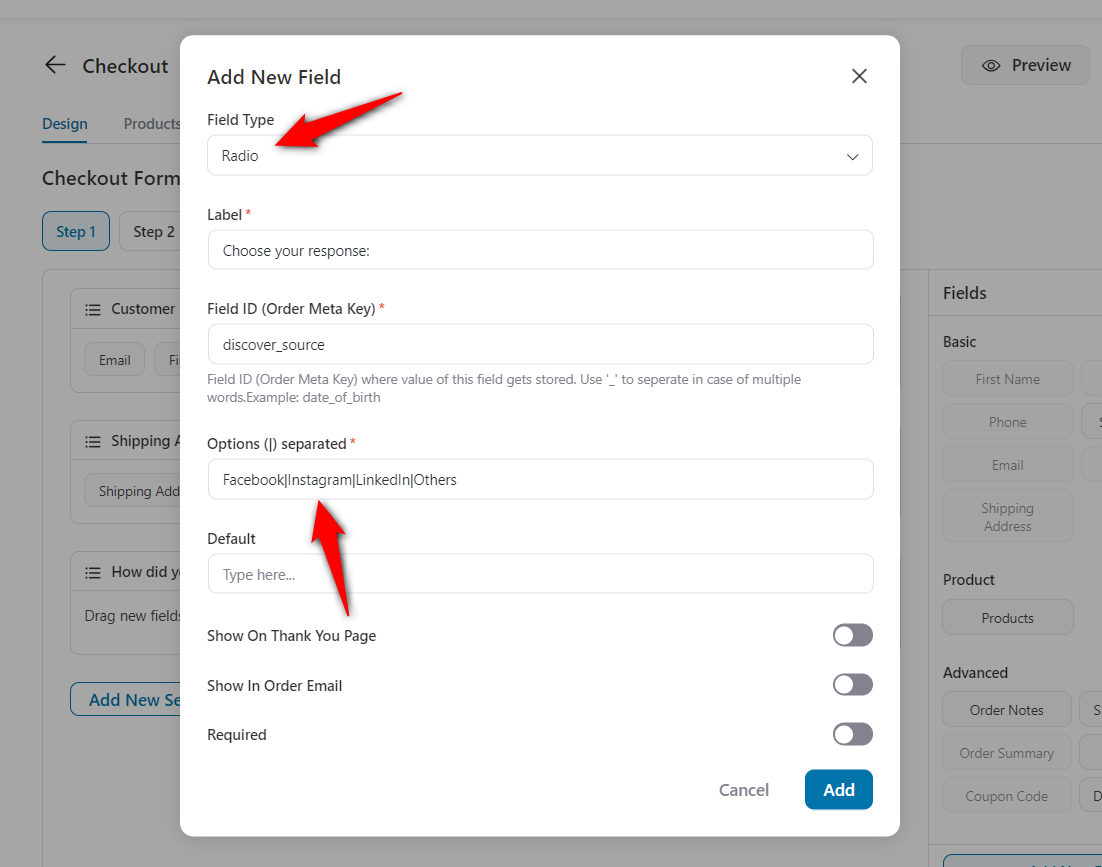
Once done, click on ‘Add’ to create this custom field.
Not only these fields, FunnelKit Funnel Builder integrates with various WordPress plugins to help you set up additional fields on the checkout page:
- EU VAT number
- Donation options
- File uploads
- CAPTCHA
- Terms and conditions
- Additional fees
- Checkout add-ons
Next, drag and drop the custom field you’ve created under the section you want.
Hit ‘Save Changes’ to lock in the changes you made. Click on the ‘View’ button to preview your checkout.
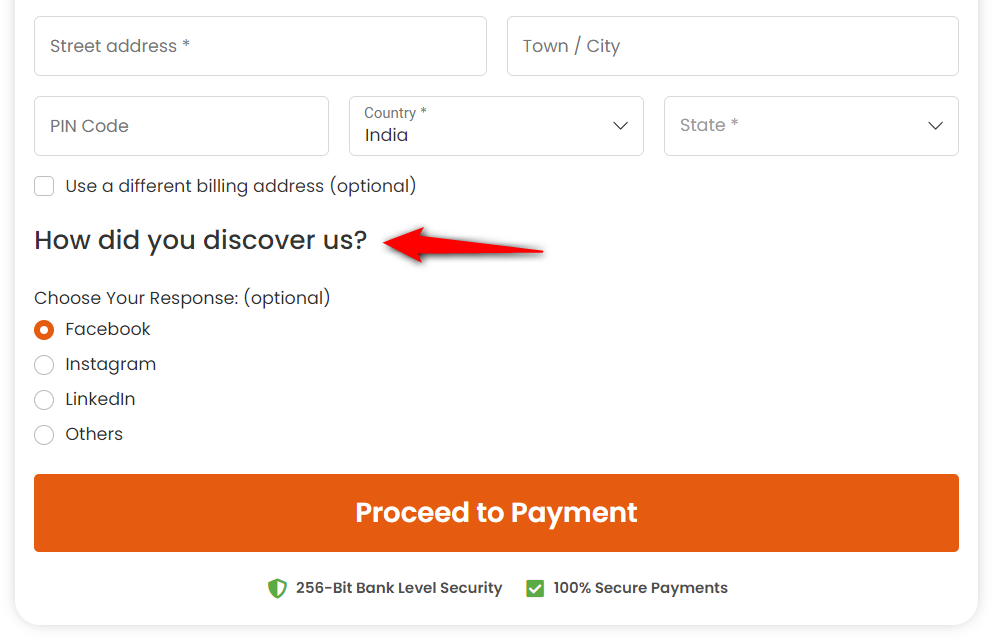
It’ll let you see the changes made on the front end.
Step 3: Customize the WooCommerce checkout fields
FunnelKit Funnel Builder lets you edit and rearrange the fields and sections on your checkout page.
Rearrange the WooCommerce checkout field
All it takes is a simple drag-and-drop. Drag the field or section you want to move and drop it to place it there.
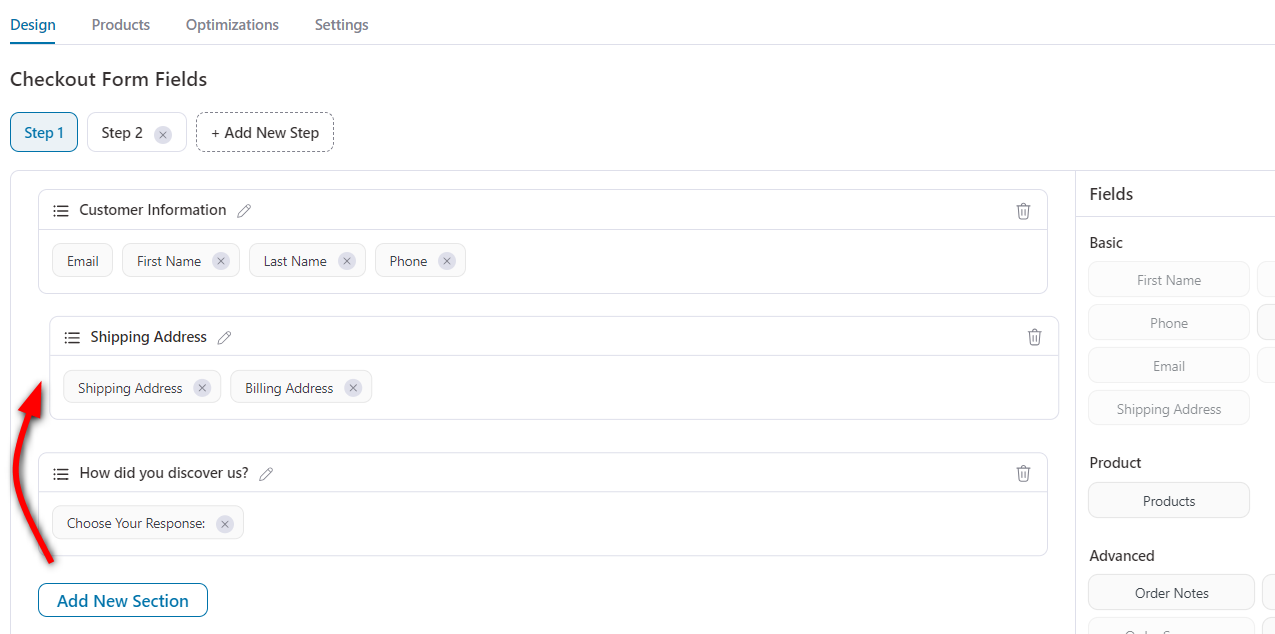
You can effortlessly rearrange your WooCommerce checkout form fields and sections with FunnelKit Checkout.
Here, we have kept the customer's and shipping address information on the first step and the WooCommerce payments field on the last step.
Edit the WooCommerce checkout field
Clicking any field lets you edit that field in your checkout form.
Let’s say you want to edit the email field.
To do so, hover on the field and click to edit.
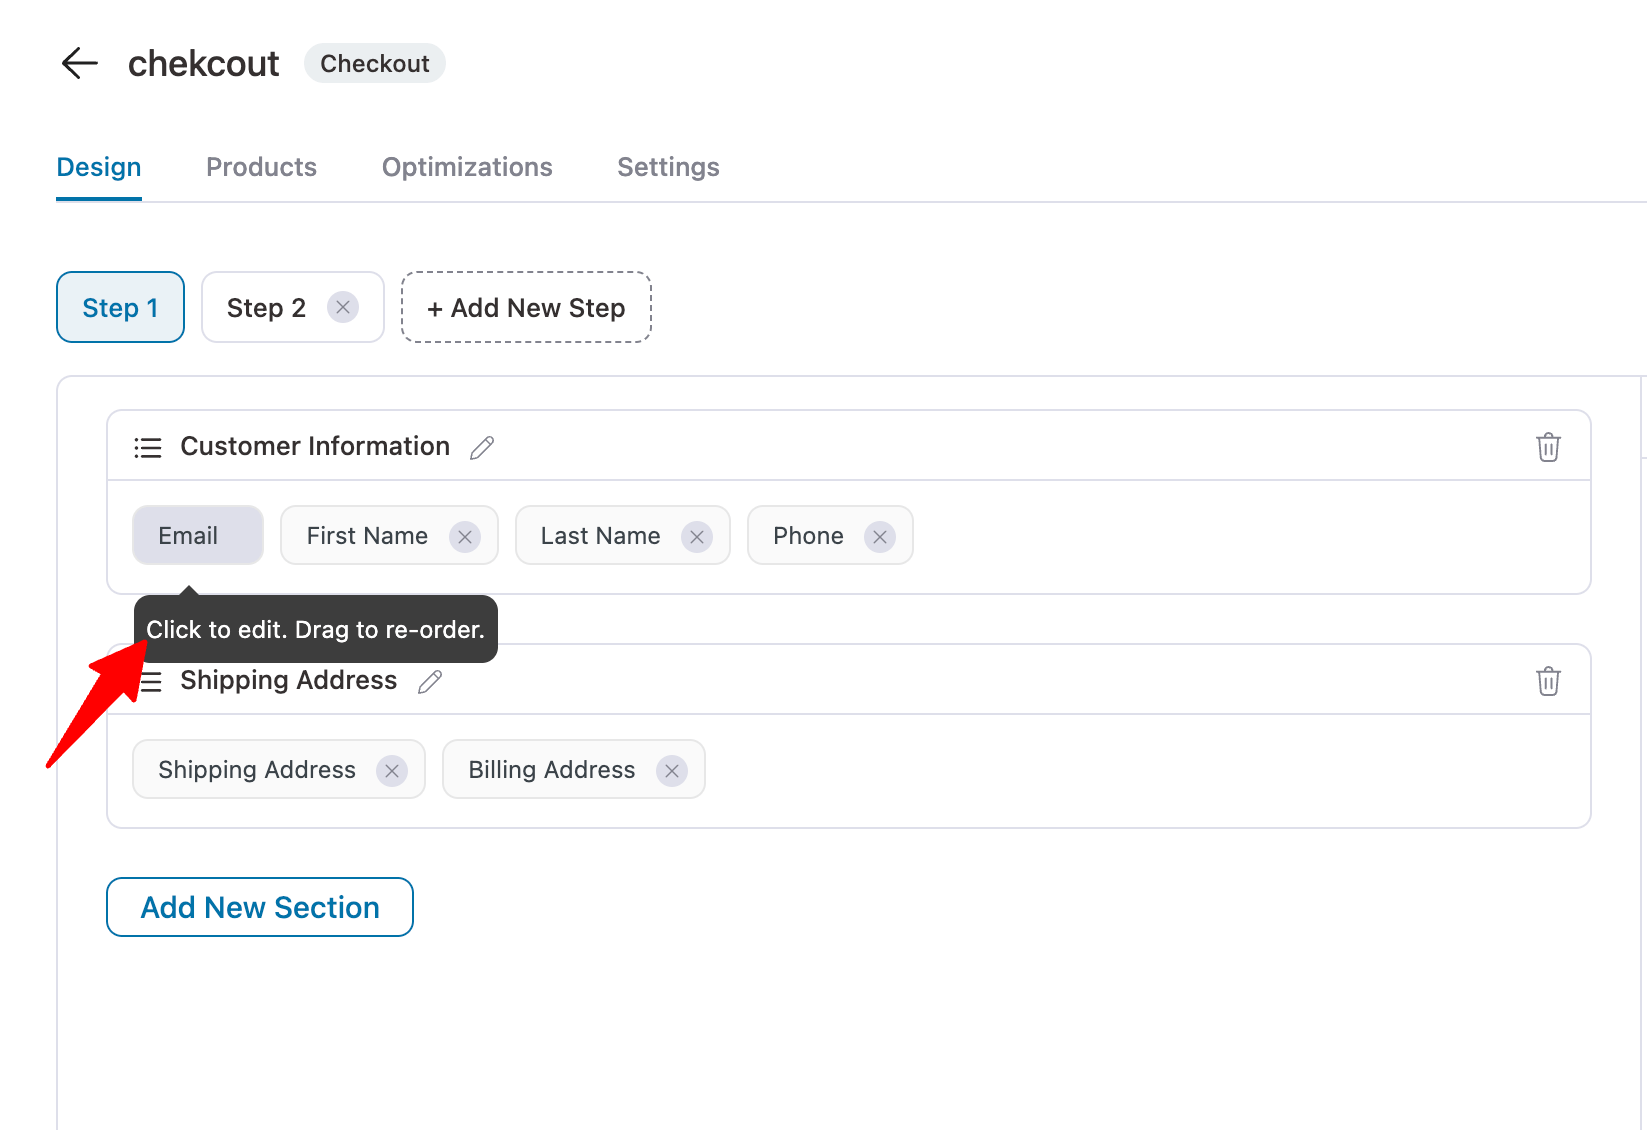
Then you can update the label and placeholder, and choose whether it should be required or optional.
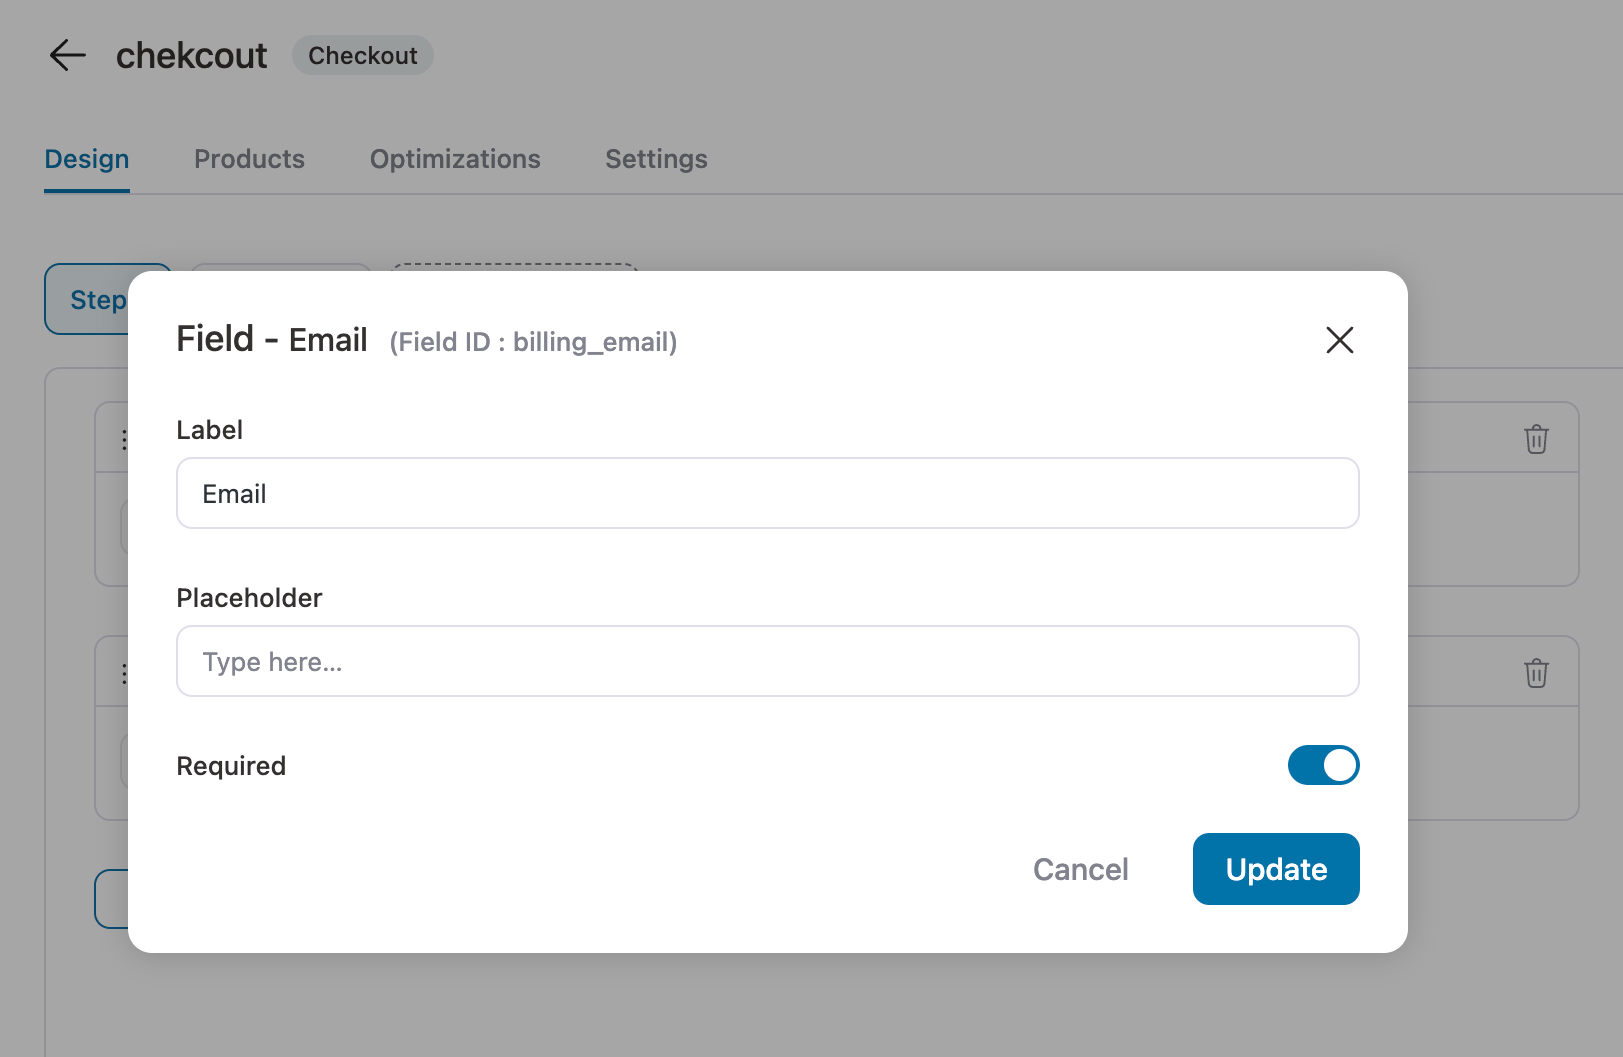
This way, you can edit all the checkout fields.
Step 4: Manage, hide, or delete checkout fields
You have the option to hide, disable, or delete any field as needed.
Hide or disable any checkout field
For instance, if you'd like to remove the company option from the shipping or billing address, simply click the field to edit it, then click the eye button to disable it.
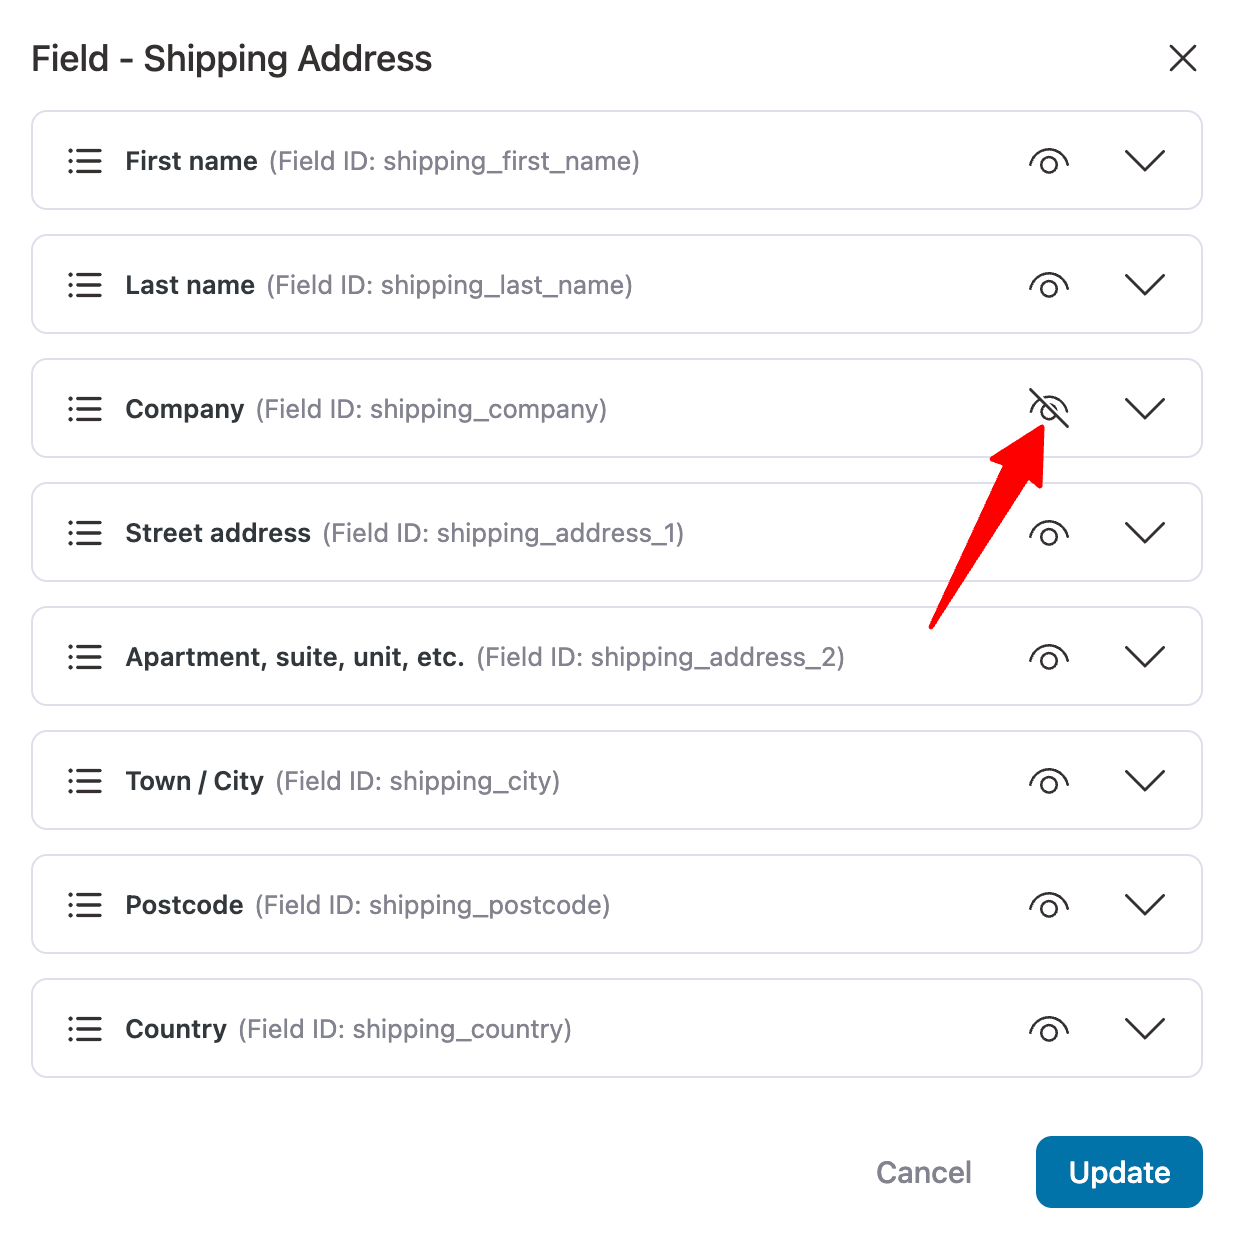
Further, you can enable or disable the “Use a different shipping address” section.
It gives users an option to enter a billing address different from the shipping address.
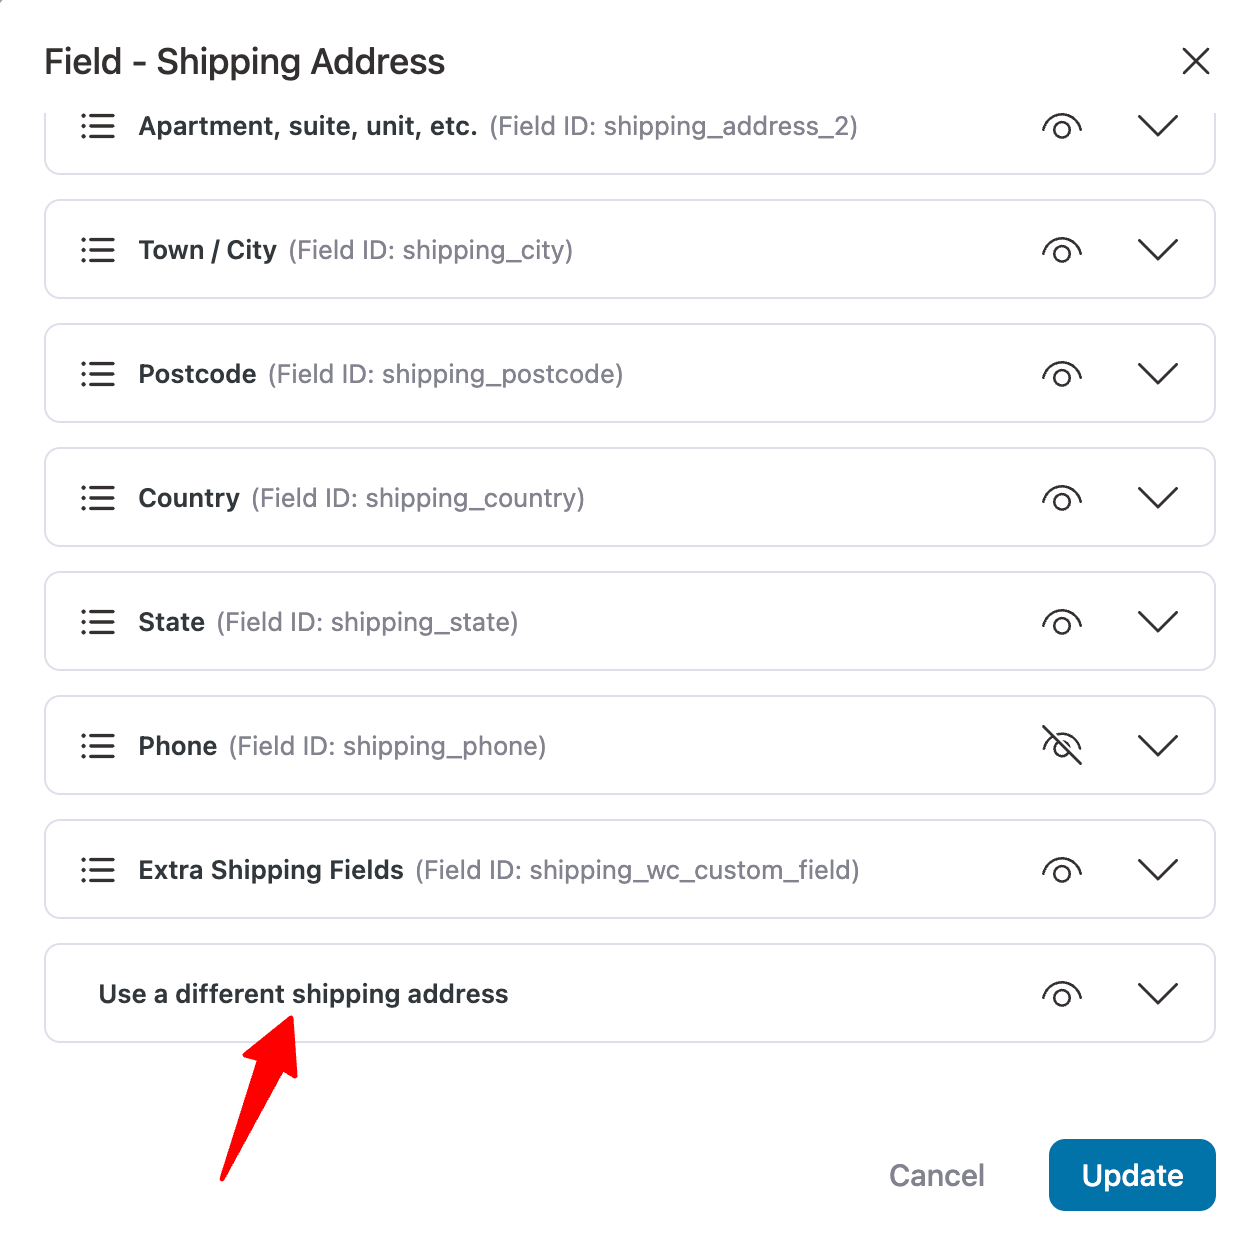
Make sure to hit the 'Update' button when done.
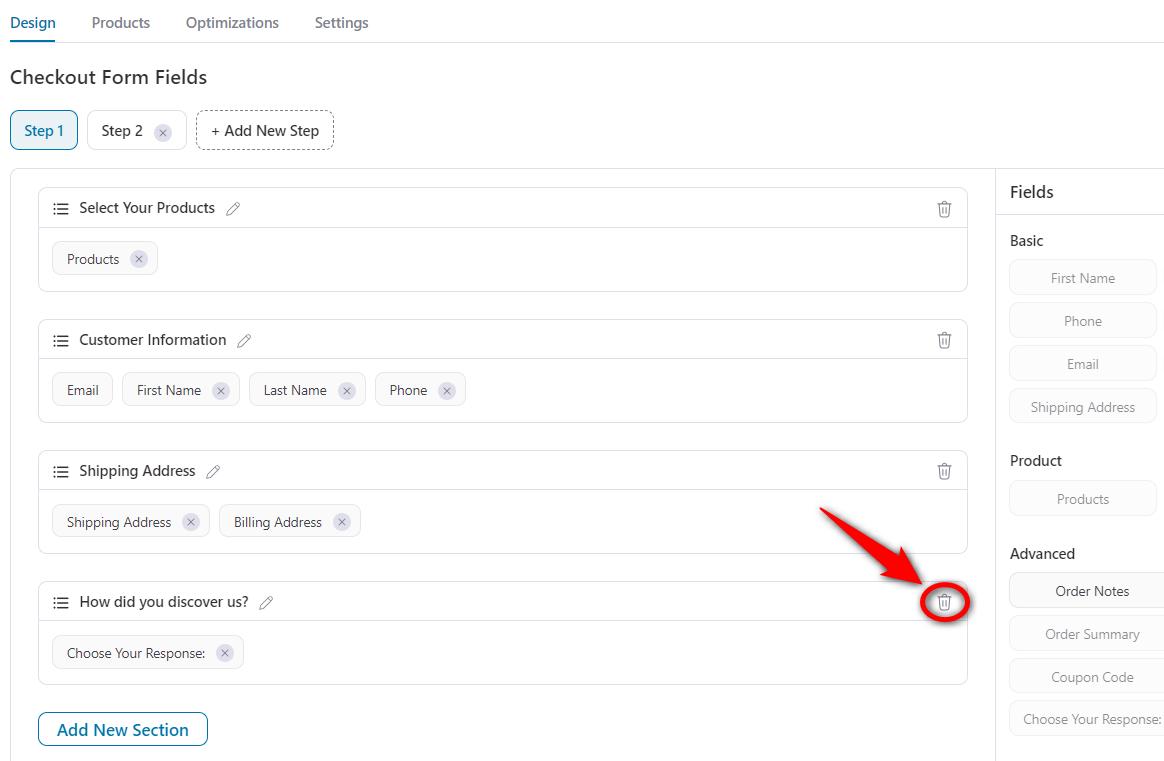
Delete a WooCommerce checkout field
FunnelKit Funnel Builder lets you remove any fields and sections that you don’t want on your checkout page.
To delete a specific section, click on the bin icon:
Furthermore, to remove a specific checkout field, click the cross button next to it.
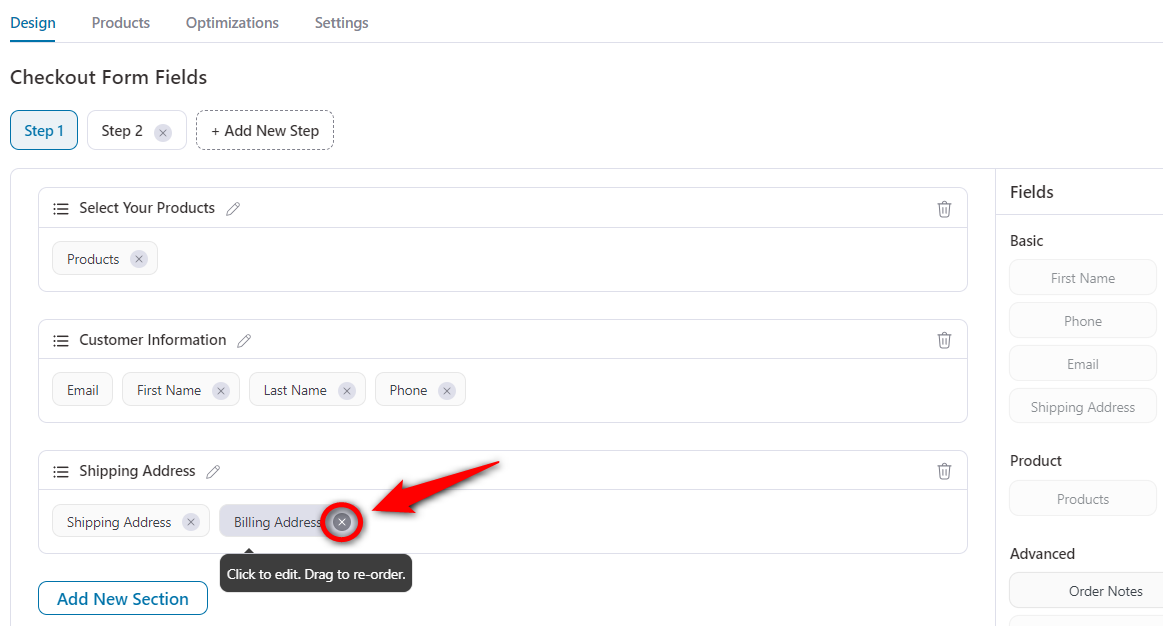
Click on ‘Save’ once you’re done.
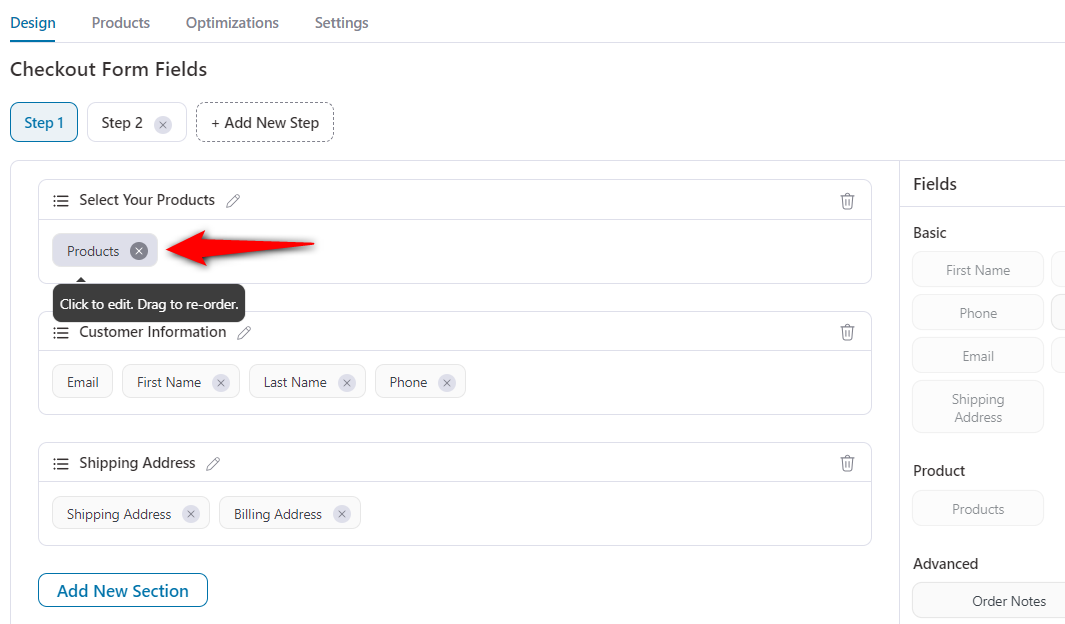
Step 5: Customize product section using the checkout fields editor
Click on the ‘Products’ field to start editing.
We have added variable products to the checkout. It includes one single product and a combo offer.
When customizing this field, you can add a brief description of your offer below the product.
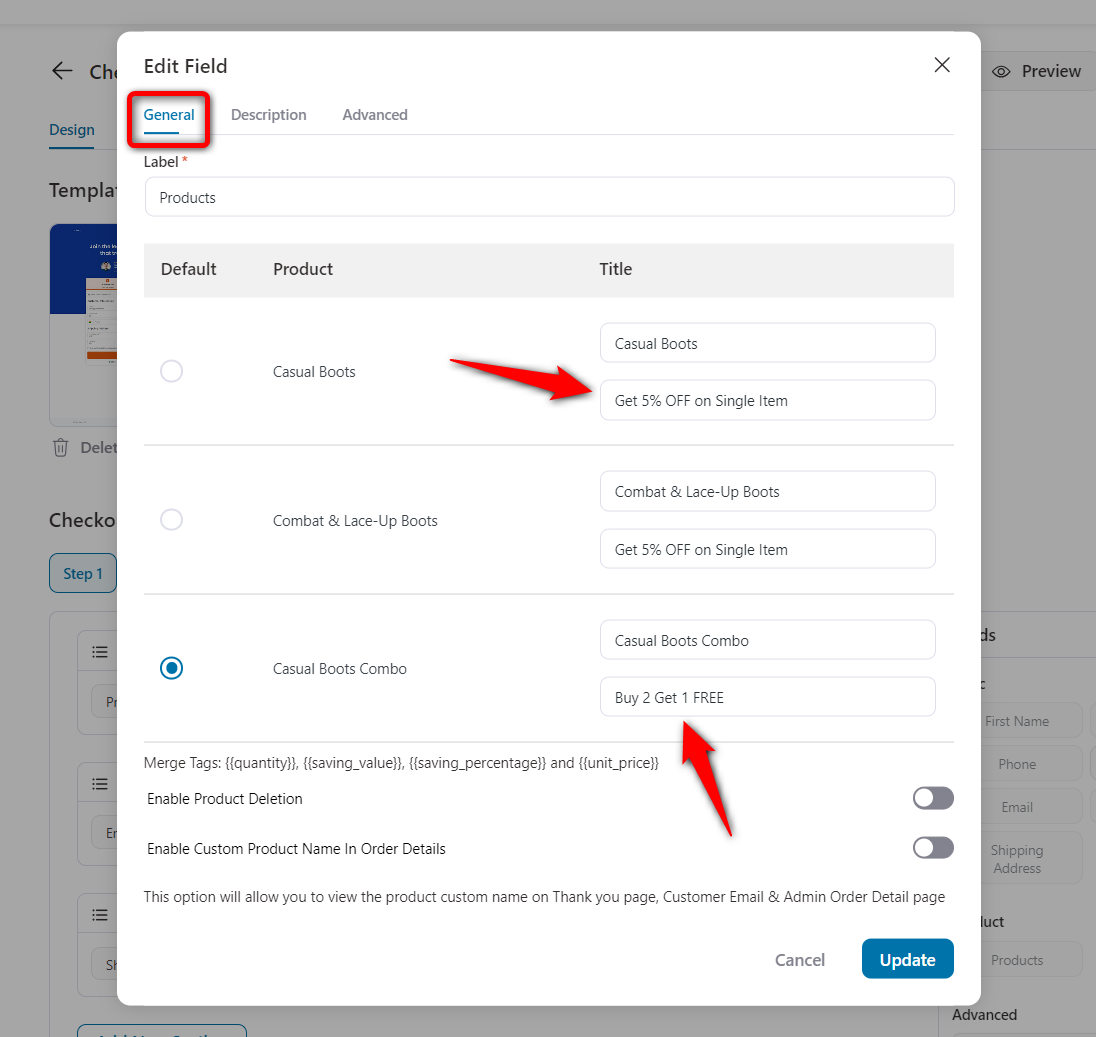
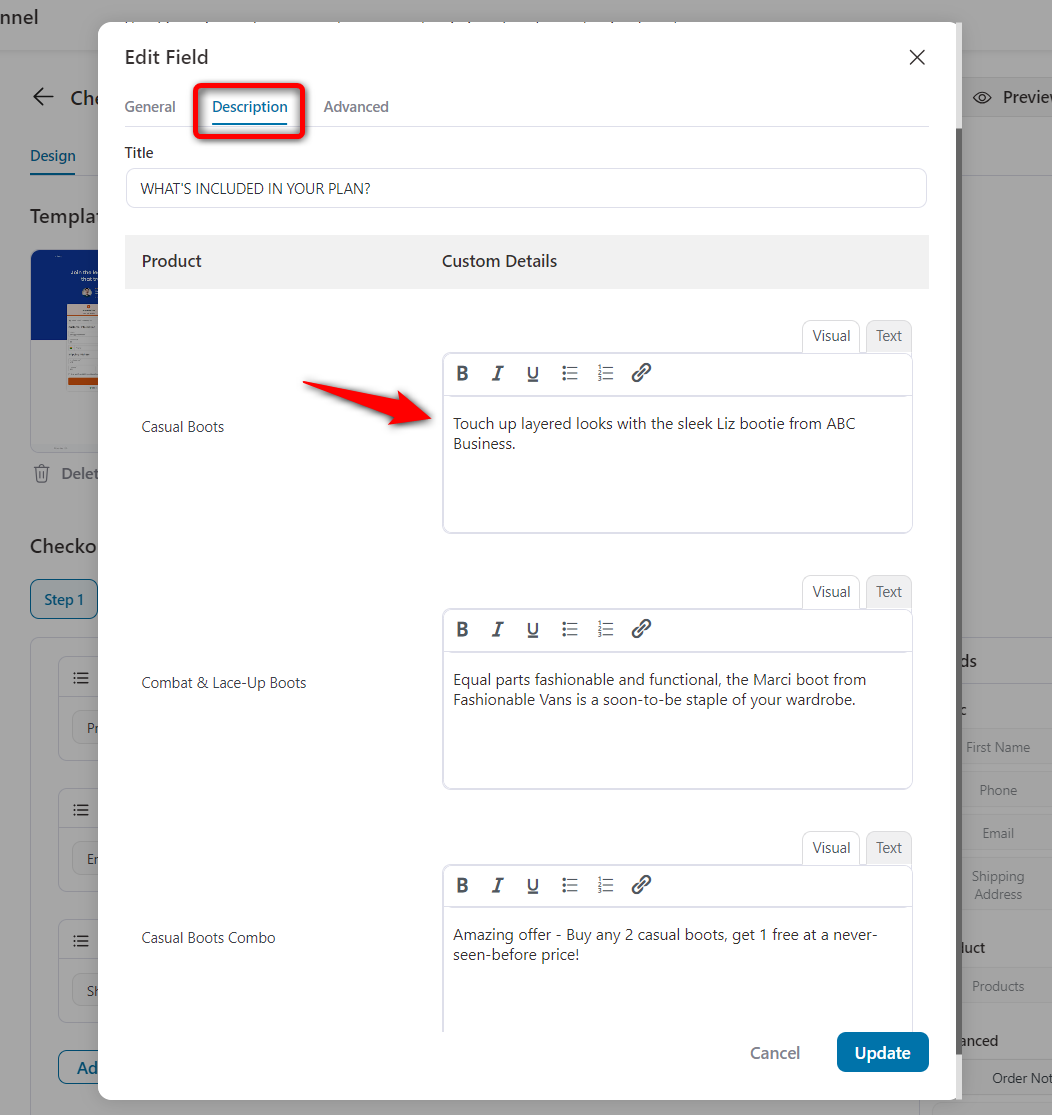
FunnelKit’s WooCommerce checkout field editor lets you write descriptions for your product.
Go to the 'Description' tab and find the product you want.
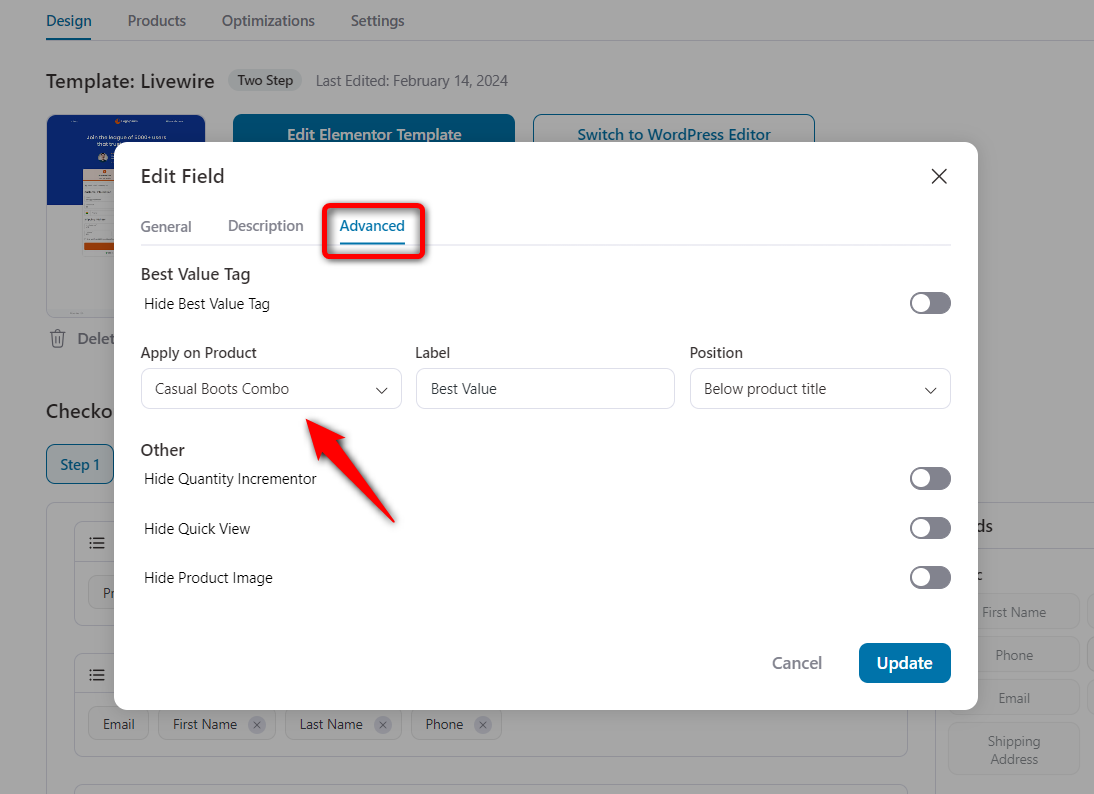
You can even add the 'Best Value' tag to your product on the Advanced tab.
Here’s a quick view of how this looks on your checkout page:
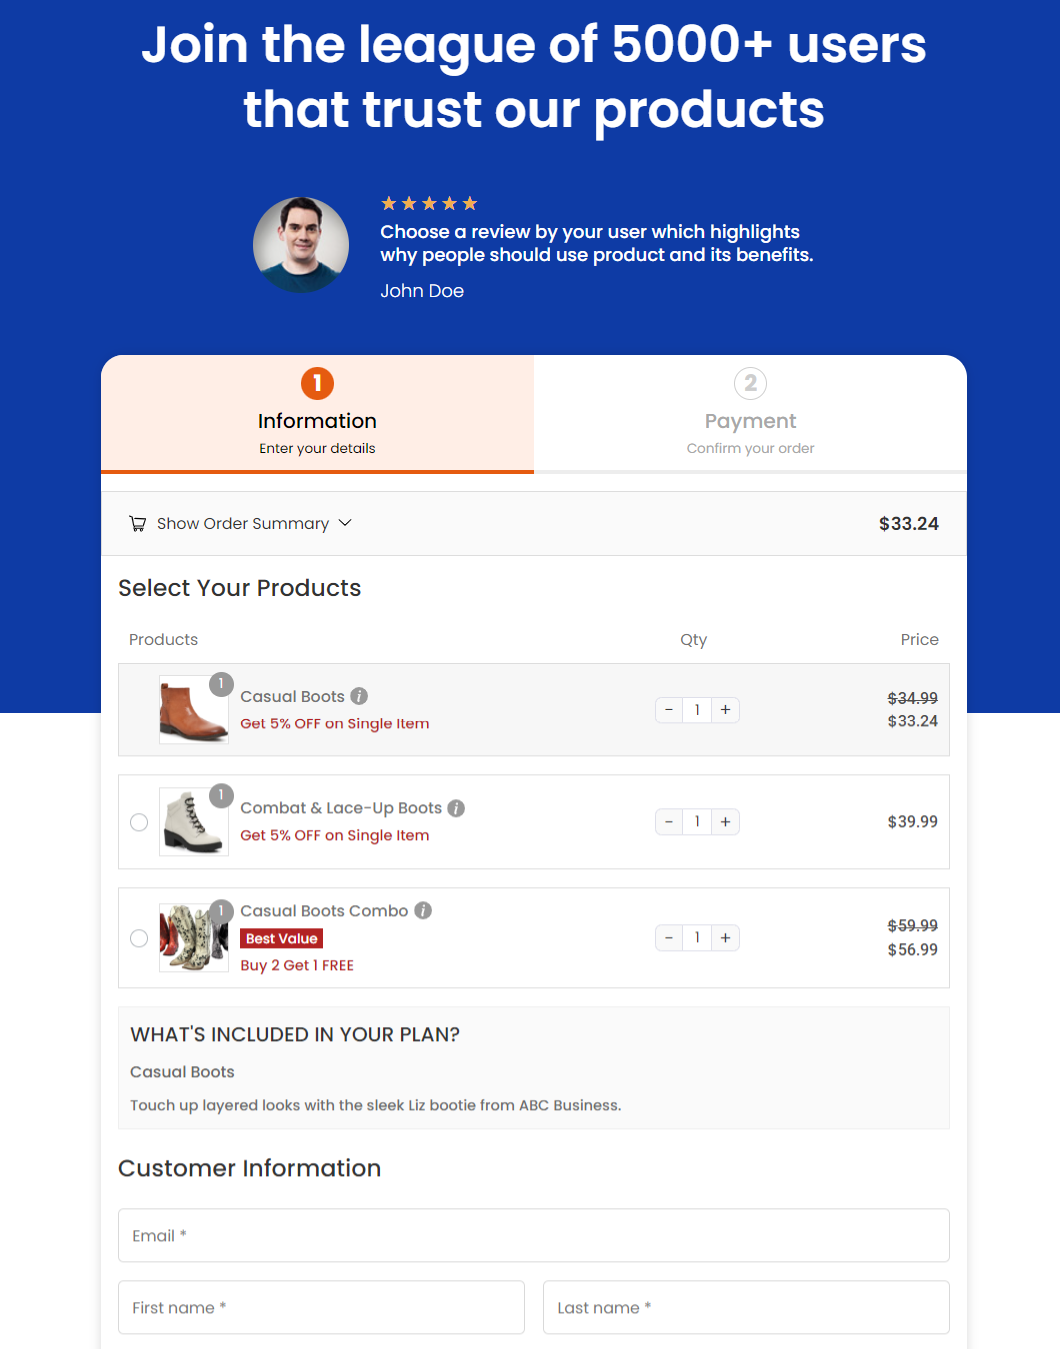
Make sure to save the changes.
This is how you can use FunnelKit’s checkout field editor to customize different sections and fields for a faster checkout process. More importantly, the job is done without coding.
As with the checkout page, you can customize order bumps and one-click upsells to boost order value in your store. And also, customize your thank-you page and keep the conversation going.
Well done! You’ve successfully optimized your checkout page by effectively modifying your WooCommerce checkout fields.
Method 2: Edit WooCommerce Checkout Fields With Custom Code
If you prefer to edit WooCommerce checkout fields without a plugin, you can use WooCommerce's built-in hooks and filters.
This method gives you full control but requires comfort with PHP, and any theme or WooCommerce update can break your code if it is not maintained properly.
The main filter WooCommerce provides is woocommerce_checkout_fields. This filter gives you access to all default fields, letting you modify, add, or remove them.
Example: Remove the Company and Address Line 2 Fields
add_filter( 'woocommerce_checkout_fields', 'remove_checkout_fields' );

function remove_checkout_fields( $fields ) {
    unset( $fields['billing']['billing_company'] );
    unset( $fields['billing']['billing_address_2'] );
    unset( $fields['shipping']['shipping_company'] );
    return $fields;
}
Example: Add a Custom Dropdown Field
add_filter( 'woocommerce_checkout_fields', 'add_custom_dropdown_field' );

function add_custom_dropdown_field( $fields ) {
    $fields['billing']['billing_referral'] = array(
        'type'        => 'select',
        'label'       => __( 'How did you hear about us?', 'woocommerce' ),
        'required'    => true,
        'options'     => array(
            ''          => 'Please select',
            'google'    => 'Google',
            'facebook'  => 'Facebook',
            'friend'    => 'From a friend',
            'other'     => 'Other',
        ),
    );
    return $fields;
}
Example: Save Custom Field Data to the Order
add_action( 'woocommerce_checkout_update_order_meta', 'save_custom_field_data' );

function save_custom_field_data( $order_id ) {
    if ( ! empty( $_POST['billing_referral'] ) ) {
        update_post_meta( $order_id, 'Referral Source', sanitize_text_field( $_POST['billing_referral'] ) );
    }
}
Please note that the woocommerce_checkout_fields filter shown above only works on the classic shortcode checkout.
For the Checkout Block, you need to register additional fields using woocommerce_register_additional_checkout_field() in PHP along with the Store API.
Top 3 Best Checkout Field Editor Plugins for WooCommerce
From all the WooCommerce checkout field editors and managers available, we have shortlisted 3 plugins.
The reason we've chosen these plugins is that we evaluated them on these parameters:
- Ease of use
- Customization without code
- Advanced functionalities for a seamless checkout experience
- Value for money
Let’s explore these plugins.
1. FunnelKit Funnel Builder
FunnelKit Funnel Builder helps you set up optimized sales funnels for your WooCommerce store. You can create high-converting opt-in pages, sales pages, checkout, order bumps, one-click upsells, and even thank-you pages.
Plus, you can use any page builder to set up your sales funnels.
Diving deeper into this WooCommerce checkout manager plugin, you get the ability to modify your checkout fields.
FunnelKit’s checkout field editor for WooCommerce allows you to drag and drop to rearrange sections and fields within sections on the WooCommerce checkout page.
Here are some of the excellent features of its checkout field editor:
- Adding custom fields: Easily add custom fields to your WooCommerce checkout form, with validation. This will help you better understand your customers.
- Rearrange fields and sections: It lets you reorder the fields and sections on your checkout form with drag-and-drop.
- Conditional checkout fields: Apply conditional logic in the WooCommerce checkout form fields so that the right fields get shown to the right shoppers.
- Edit the checkout form fields: Get complete flexibility to edit checkout fields. You can edit any of your checkout form fields, such as billing and shipping address, product field, etc.
- Advanced checkout fields: Use advanced custom fields in your checkout form. These include text areas, radio buttons, checkboxes, HTML, password fields, etc.
You can’t get a more powerful checkout page builder than FunnelKit.
Pricing: FunnelKit Funnel Builder is available in the Lite (free) and Premium versions, starting at $99.50 annually. Its pricing is quite nominal, considering the conversion-worthy features it offers.
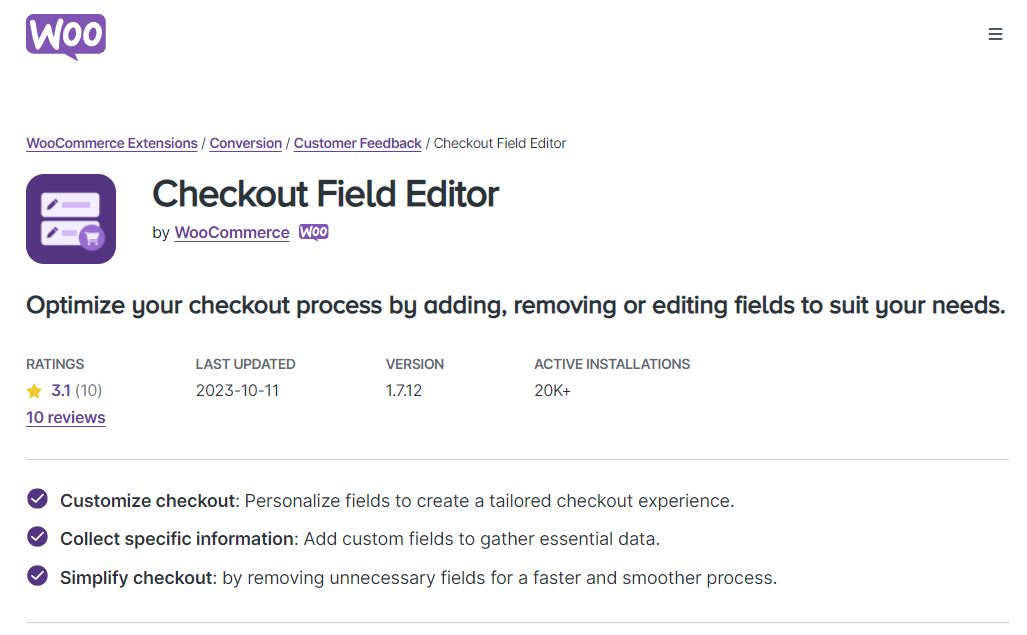
2. Checkout Field Editor for WooCommerce
This checkout plugin lets you optimize your checkout page by adding, editing, or removing fields as needed.
The Checkout Field Editor for WooCommerce lets you add custom fields such as text, select, checkbox, and date picker fields.
The plugin lets you rearrange fields and control your checkout page.
Here are some of its top features:
- Add custom fields: Add custom fields to your checkout form. The Checkout Field Editor by WooCommerce provides a range of fields, including text, radio buttons, checkboxes, date pickers, and more.
- Send custom field data: Send your custom field data to another website/app via Webhooks API. However, it requires custom coding.
- Modify checkout form fields: Edit, reset, and remove them on your checkout page. You can easily modify the text and preferences based on your needs.
It’s a WooCommerce extension plugin that lets you modify the fields on your default WooCommerce checkout page. However, it lacks a modern interface.
Pricing plan: The Checkout Field Editor for WooCommerce doesn’t offer a free or trial version. Its premium version costs $49 a year, which is quite high for the features it offers.
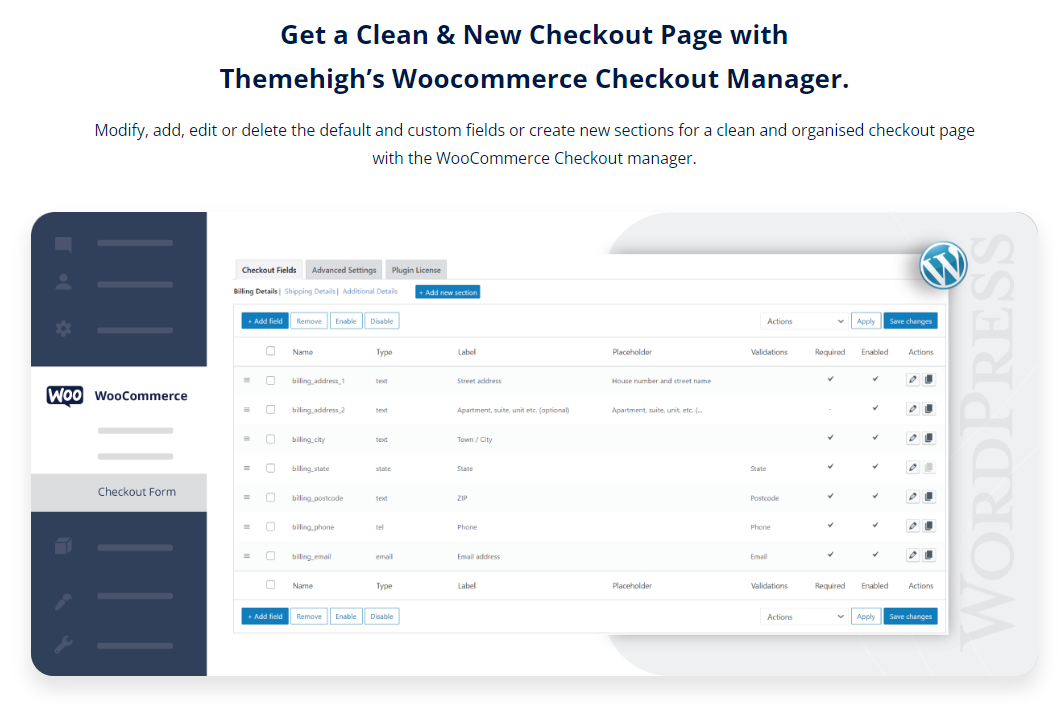
3. Checkout Field Editor (Checkout Manager) for WooCommerce
You can easily customize the checkout form fields with this checkout plugin.
This checkout editor plugin includes various custom fields and allows you to edit, rearrange, and delete existing fields.
Here are some additional features that you get:
- Add custom fields to checkout: Add custom form fields to your checkout, such as password, phone number, radio, text area, etc.
- Set display rules: Configure the condition to display your custom fields on the checkout form.
- Set validations: Set custom validations on your checkout form fields.
It works in modifying the fields of your default checkout page in WooCommerce. However, it lacks an intuitive interface and the ability to set up custom checkout pages.
What to Add to Your WooCommerce Checkout Fields (By Store Type)
Here's what you can add to your WooCommerce checkout fields for different store types
The right custom fields depend on what you sell. Below are the most common field configurations we recommend, grouped by store type.
1. Digital product and software stores
For digital stores, we recommend removing all shipping fields and the company field.
Add a "License Name" text field if you want customers to specify who the license is for. Add a "How Did You Hear About Us?" dropdown for marketing attribution.
Keep the checkout to four or five fields total, including email, first name, last name, country (for tax), and payment.
2. Online course and training platforms
Remove the shipping field entirely. Add an "Age" number field, a "Gender" radio button, a "Dietary Preference" dropdown if the course includes meals, and an optional "Experience Level" dropdown.
For parent-child enrollments, add a textarea for "Participant Name" separate from the billing name.
3. B2B and wholesale stores
Add a "VAT Number" or "Tax ID" text field. Add a "Company Type" dropdown with options like Sole Proprietor, LLC, Corporation, or Non-Profit.
Add a "Purchase Order Number" text field for buyers who need internal tracking.
Use conditional logic to show these fields only when a business country or business customer type is selected.
4. Physical product stores with personalization
Add a "Gift Message" textarea hidden behind an "Is this a gift?" checkbox. Add a "Delivery Instructions" textarea for buildings with access codes or specific drop-off points.
For personalized products, add a file upload field for logos or custom designs, and a text field for engraving or monogram requests.
5. Event ticketing, bookings, and local delivery
Add a date picker for "Preferred Delivery Date" or "Event Date". Add a time picker for narrow delivery windows.
For events, add a "Number of Attendees" number field and an "Attendee Names" textarea. A "Special Requirements" textarea helps capture accessibility needs or dietary restrictions.
6. Subscription and membership stores
Add a "Referral Code" field to track member-get-member programs. Add a "Preferred Delivery Frequency" dropdown if your subscription allows flexible cadence.
For subscription boxes, add preference fields like size, style, or favorite categories to personalize the first shipment.
WooCommerce Checkout Field Editor: Frequently Asked Questions (FAQs)
Find answers to the most common questions related to WooCommerce checkout fields.
The best woocommerce checkout field editor is FunnelKit’s Checkout Field Editor because it lets you add, edit, remove, and reorder checkout fields with a simple drag-and-drop interface. It also supports conditional fields, multi-step checkout layouts, and advanced field types, all without writing code.
Customizing checkout fields in WooCommerce helps streamline the buying process, reduce cart abandonment, collect essential customer data, and improve order fulfillment. It also ensures compliance with legal or business-specific requirements.
You can change the checkout field text in WooCommerce with the help of FunnelKit Funnel Builder. Go to the Fields tab under your checkout page and click on the specific field. Change the label text for your checkout field, then save the changes. This will modify the checkout field text.
You can create advanced custom fields by going to the Fields tab in FunnelKit.
All you have to do is hit the ‘Add Field’ button. Choose Advanced Custom Fields under Field Type. You can select radio buttons, password fields, checkboxes, multi-selects, dropdowns, HTML, and more.
Enter the label and related data, and your advanced custom field is ready to be used.
Yes. With FunnelKit Funnel Builder, you can easily add conditional logic to display the checkout fields dynamically.
Most woocommerce checkout field editor plugins, especially FunnelKit FunnelKit Builder, are compatible with any WooCommerce-ready theme. They override the checkout form independently, so your theme does not limit the customization.
Ready to Use the Best WooCommerce Checkout Field Editor to Encourage Quick Purchases?
Using FunnelKit Funnel Builder, you can set up a faster buying process for your users in no time.
The plugin makes it easy for store owners to modify fields and sections within the checkout process.
Thus, you can use FunnelKit Funnel Builder's WooCommerce checkout field editor to speed up the checkout process.
Plus, with the FunnelKit Funnel Builder, you can create high-converting sales funnels, including opt-ins, checkouts, one-click upsells, and thank-you pages.
It’s a must-have tool for bringing in more sales than ever before!
Are you ready to customize your WooCommerce checkout fields and save your shoppers valuable time?

Editorial Team
July 7, 2026Are you looking for WooCommerce checkout optimization hacks to streamline your users' shopping experience? 7 out of 10 shoppers who reach a WooCommerce checkout leave without paying; according to Baymard...

Editorial Team
July 6, 2026A WooCommerce order form lets customers select multiple products, set quantities, and choose variations from a single page instead of visiting individual product pages. There are two ways to add...
Editorial Team
July 6, 2026The Bricks WooCommerce builder is built directly into the Bricks theme. Activate the free WooCommerce plugin, and Bricks unlocks more than 30 store-specific elements plus visual templates for every part...


