
Removing checkout fields in WooCommerce is one of the fastest ways to simplify your store’s checkout and reduce cart abandonment.
Every extra field you ask customers to fill in adds friction and gives them another reason to leave.
But there's a catch. WooCommerce now ships two different checkouts, the classic shortcode checkout and the newer Checkout Block. The method you need depends on which one your store uses.
A code snippet that works perfectly on the classic checkout often has no effect on the Checkout Block. This is the single most common reason store owners get stuck.
In this guide, we will show you how to remove checkout fields in WooCommerce without any code using a WordPress plugin, with a custom PHP method for the classic checkout, and the correct way to remove fields on the newer Checkout Block.
We will also share which fields are safe to remove and how to fix the fields that refuse to disappear or keep throwing a "required" error.
Quick Answer (The 3 Fastest Methods)
1. No code: Toggle off Company, Address line 2, and Phone directly in the block editor. Or use a checkout manager plugin for better flexibility and remove any checkout field effortlessly.
2. Classic checkout (PHP): Unset fields with the woocommerce_checkout_fields filter in a code-snippets plugin.
3. Checkout Block (PHP): The old woocommerce_checkout_fields filter does not work on the block. Use the woocommerce_get_country_locale filter to hide/optional fields, or a visual field editor for a no-code route.
Table of Contents
- 1 Which WooCommerce Checkout Fields Can You Remove?
- 2 Method 1: Remove Fields with a Visual Field Editor (No Code)
- 2.1 Option A: Use the WooCommerce Theme Customizer (Limited)
- 2.2 Option B: Use WooCommerce Checkout Customizer Plugin (Full Control)
- 2.3 Step 1: Create the store checkout
- 2.4 Step 2: Open the checkout field editor
- 2.5 Step 3: Remove the unnecessary fields from the checkout page
- 2.6 Step 4: Customize the remaining checkout fields
- 3 Method 2: Remove Fields with PHP (Classic or Shortcode Checkout)
- 4 Method 3: Remove Fields on the WooCommerce Checkout Block
- 5 7 Best Practices to Simplify Your WooCommerce Checkout Form
- 6 Removed a Checkout Field, But It’s Still Showing or Still Required? (Troubleshooting & Fix Guide)
- 7 Frequently Asked Questions About Removing Checkout Fields in WooCommerce
- 8 Stop Losing Sales to Unnecessary WooCommerce Checkout Fields!
Which WooCommerce Checkout Fields Can You Remove?
Before jumping into the methods, let's understand exactly which fields WooCommerce allows you to remove and which ones you should keep.
Here is a breakdown of every default checkout field, its field key, and our recommendation for when to remove it:
Billing Fields:
| Field | Field Key | Should You Remove? |
|---|---|---|
| First Name | billing_first_name | No. It's required for order processing |
| Last Name | billing_last_name | No, required for order processing |
| Company Name | billing_company | Yes, safe to remove for online B2C stores |
| Country | billing_country | Only for domestic-only stores |
| Street Address | billing_address_1 | Only for digital product stores |
| Address Line 2 | billing_address_2 | Yes, safe to remove |
| City | billing_city | Only for digital product stores |
| State / County | billing_state | Only for digital product stores |
| Postcode / ZIP | billing_postcode | Only for digital product stores (required by some payment gateways) |
| Phone | billing_phone | Yes, safe to remove unless the field is required for shipping notifications |
| billing_email | No, required for order confirmation |
Shipping Fields:
| Field | Field Key | Should You Remove? |
|---|---|---|
| Shipping Company | shipping_company | Yes, safe to remove |
| Shipping Address 2 | shipping_address_2 | Yes, safe to remove |
Additional Fields:
| Field | Field Key | Should You Remove? |
|---|---|---|
| Order Notes | order_comments | Yes, safe to remove |
The field keys above are used by the classic woocommerce_checkout_fields filter.
On the Checkout Block, address fields are controlled through the country locale system instead (address_1, address_2, city, state, postcode, phone, company), and three fields, including Company, Address 2, and Phone, have their own editor toggles. We've covered it later in this post.
Before you remove a field, ask does my payment gateway need it? Stripe and many card processors use postcode and country to verify addresses (AVS) and detect fraud.
Tax engines (including WooCommerce Tax) need country, state, and postcode to calculate rates. When in doubt, make a field optional rather than removing it and always place one real test order afterward.
Method 1: Remove Fields with a Visual Field Editor (No Code)
There are two no-code approaches to removing checkout fields from your WooCommerce store.
The first uses the built-in WooCommerce Customizer, which is limited but requires no plugin. The second uses a plugin to manage full checkout fields.
Option A: Use the WooCommerce Theme Customizer (Limited)
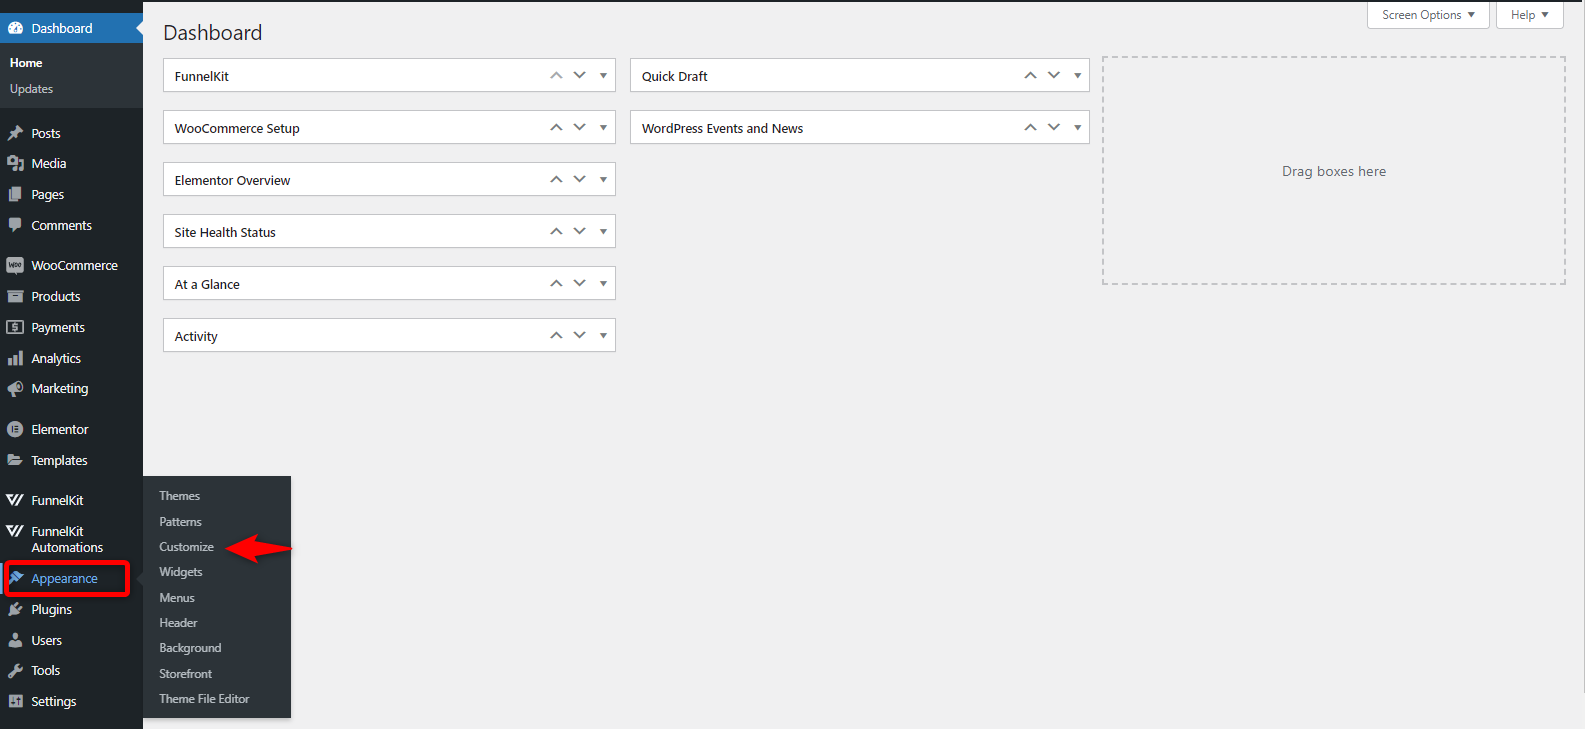
WooCommerce includes a built-in option to hide three specific checkout fields without any code or plugins. Navigate to Appearance > Customize > WooCommerce > Checkout in your WordPress dashboard.
You will see dropdown options for Company name, Address line 2, and Phone. Set each one to 'Hidden' and click Publish.
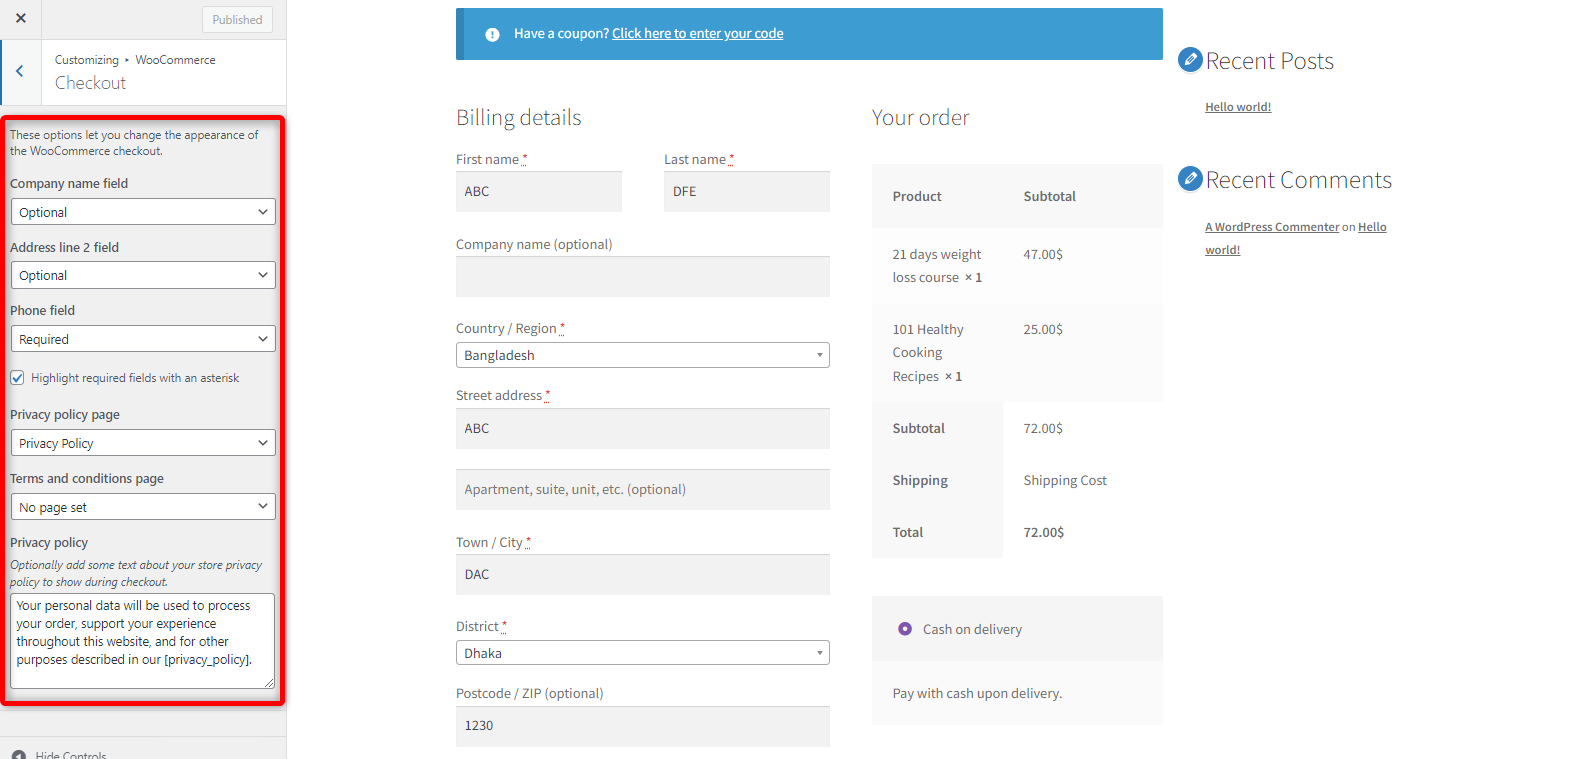
This method is quick, but it only works for those three fields.
You cannot use it to disable or remove other fields, such as order notes, state, city, or postcode. If you need to remove any fields beyond those three, use a plugin or custom code.
There are other checkout field editors for WooCommerce (Themehigh) and Flexible Checkout Fields (WPDesk) that let you add, edit, hide, reorder, and remove fields from a drag-and-drop table.
It also supports both classic and Block checkout (you select the active checkout type above the field table). These are the lowest-friction options for non-developers and the first thing to reach for if you don’t want to touch PHP.
Option B: Use WooCommerce Checkout Customizer Plugin (Full Control)
To remove checkout fields in WooCommerce without writing any code, we will use FunnelKit Funnel Builder.
FunnelKit replaces the default WooCommerce checkout with a fully customizable checkout page where you can add, remove, rearrange, and edit any field using a visual drag-and-drop editor.
It offers a free version that includes checkout page templates and field editing.
The Pro plan starts at $99.50/year and includes advanced features such as multi-step checkout layouts, Google address autocomplete, express checkout buttons, and more.
Follow the step-by-step instructions below to remove checkout fields using FunnelKit Funnel Builder.
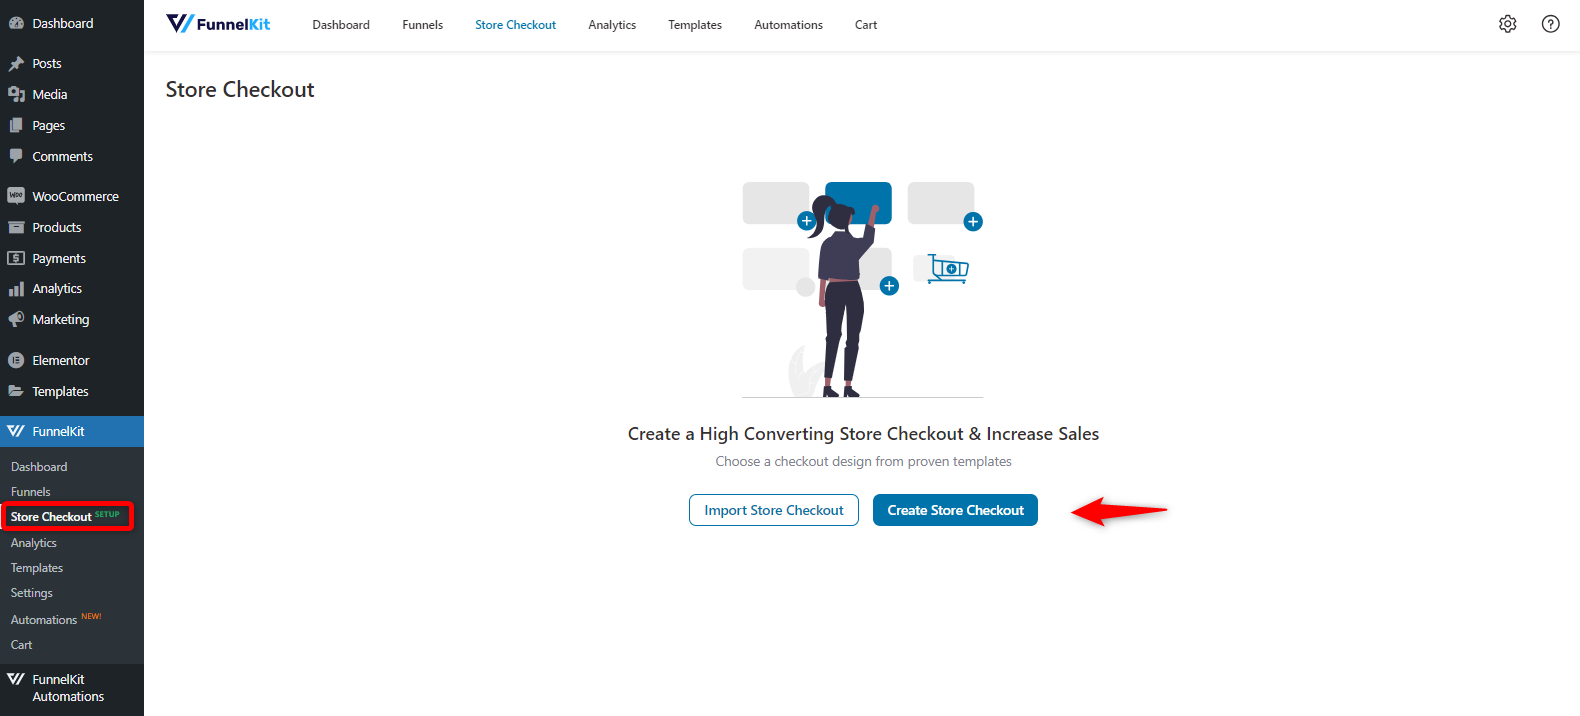
Step 1: Create the store checkout
First, create a store checkout page by navigating to FunnelKit > Store Checkout and clicking on the 'Create Store Checkout' button.
In the next step, choose your page builder and the template for your checkout page.
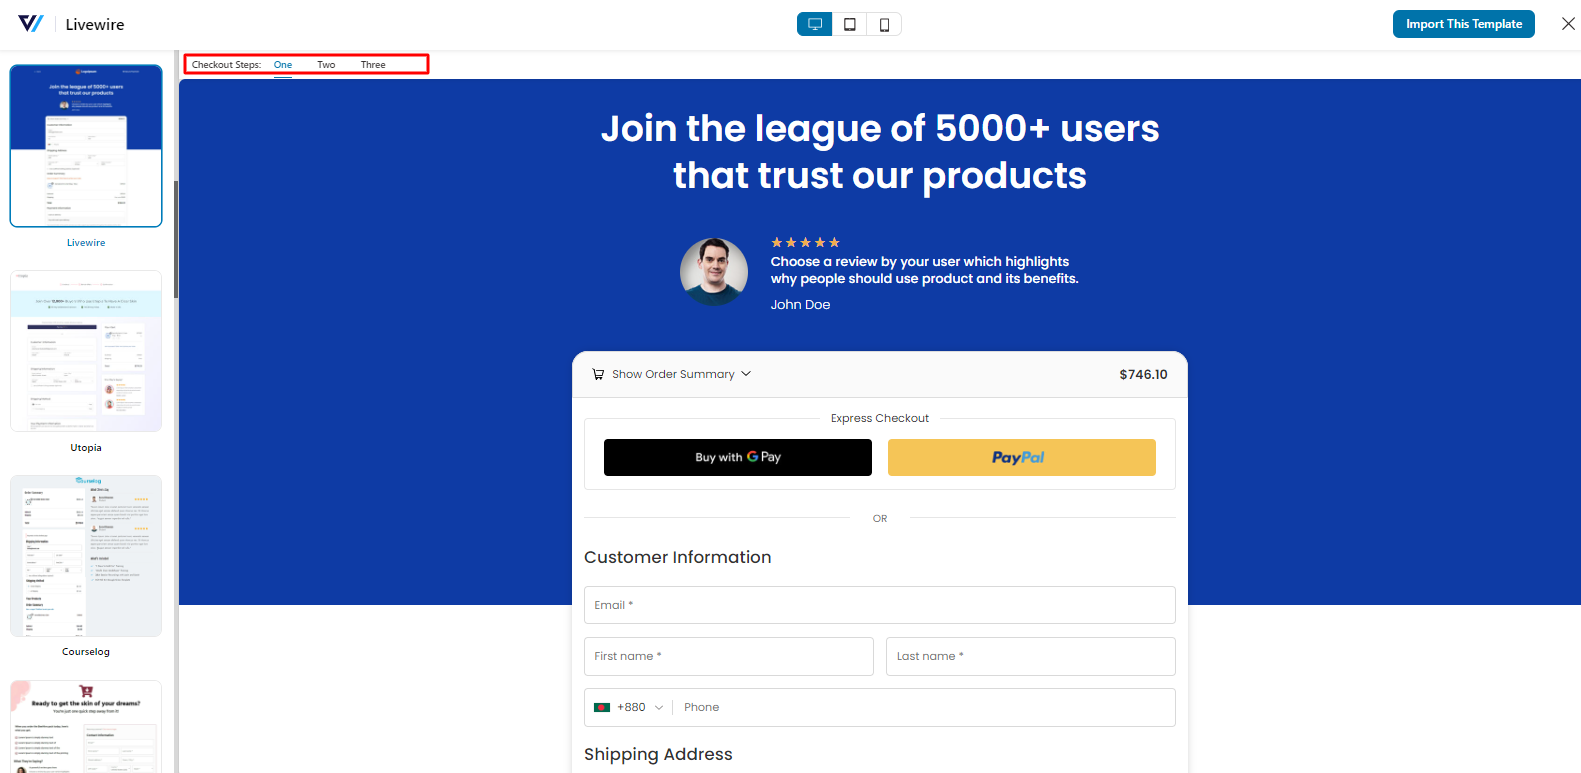
We’re selecting the “LiveWire” template and editing it with Elementor.
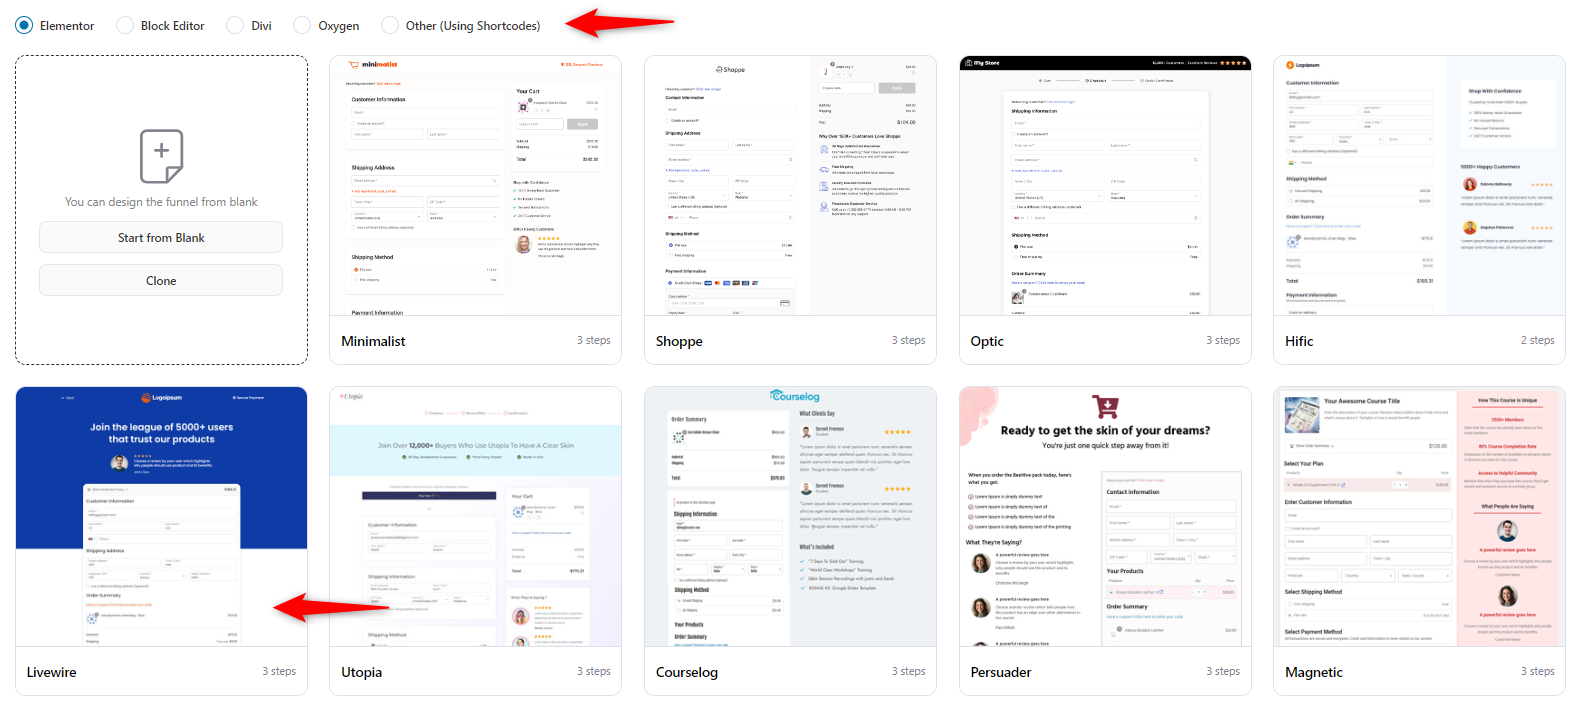
Check the template layout, such as the number of steps you want on your checkout page and the design of the other pages.
After checking, click on the 'Import This Template' button.
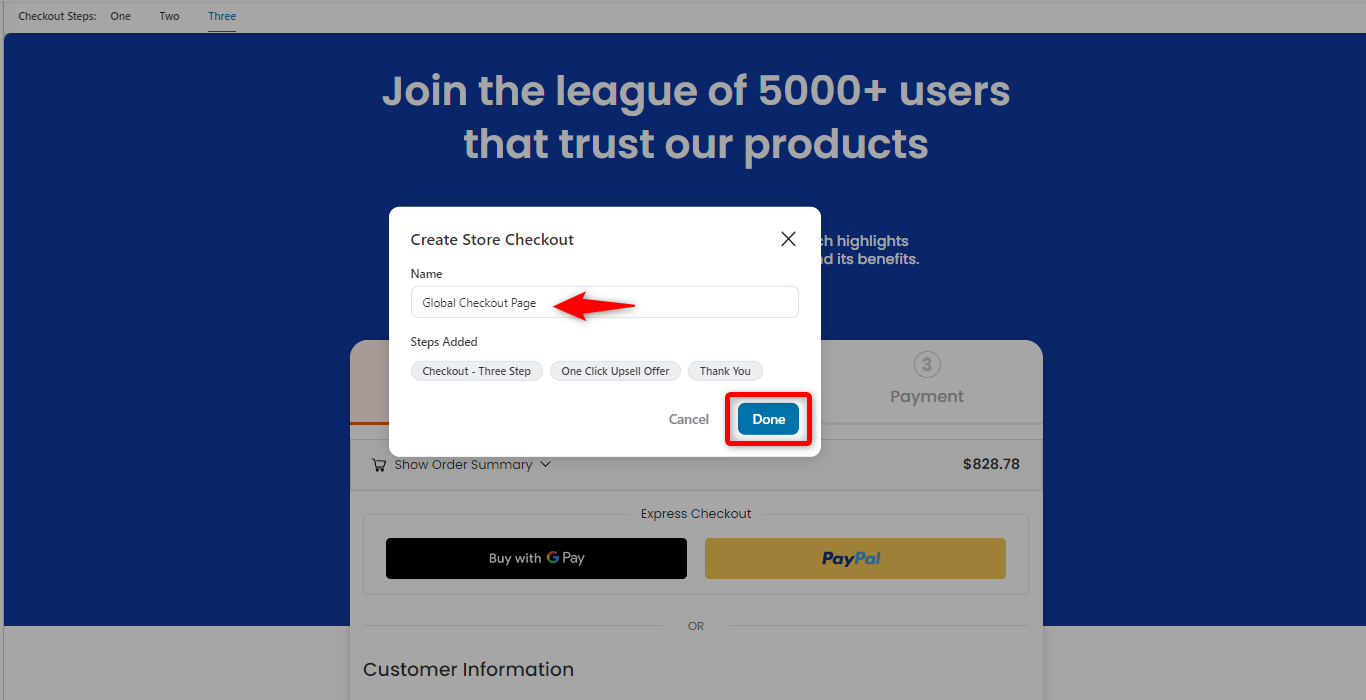
Provide the store checkout template name, then click the 'Done' button.
Step 2: Open the checkout field editor
Click on the checkout page to start customizing it.
Scroll down the Checkout Form Fields.
Choose which fields you want to add or remove from your WooCommerce checkout form.

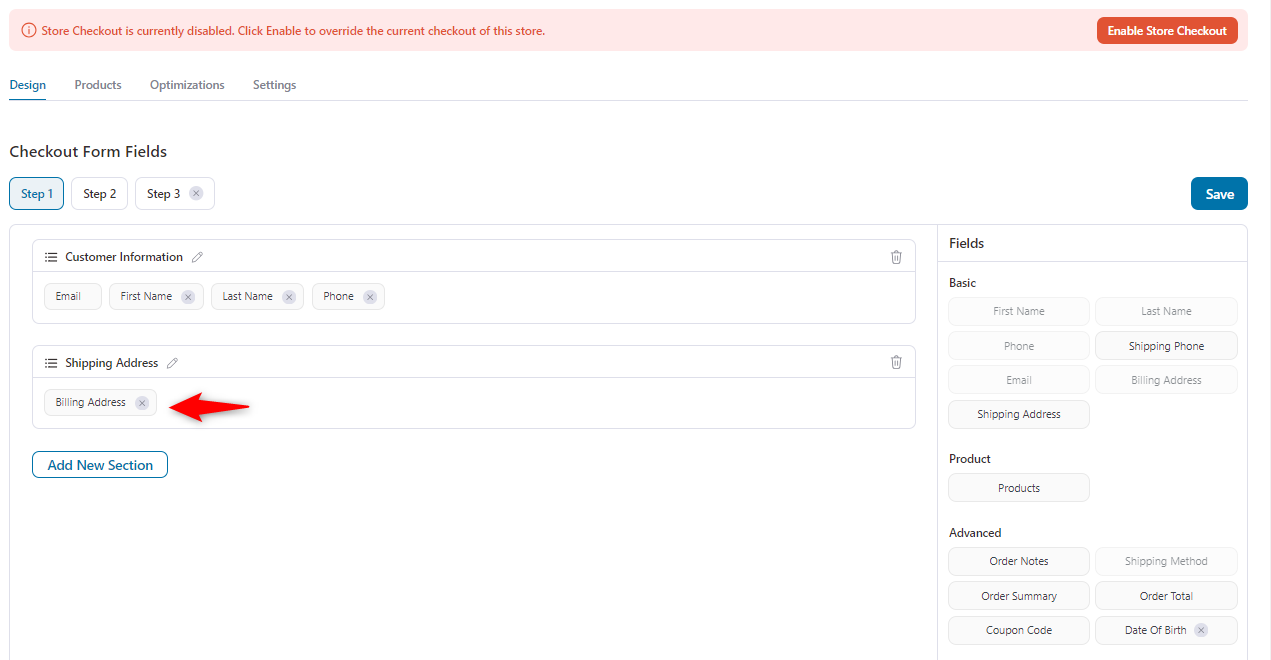
Step 3: Remove the unnecessary fields from the checkout page
From here, you can remove any fields you want. Clicking the cross icon removes a field from the checkout form.
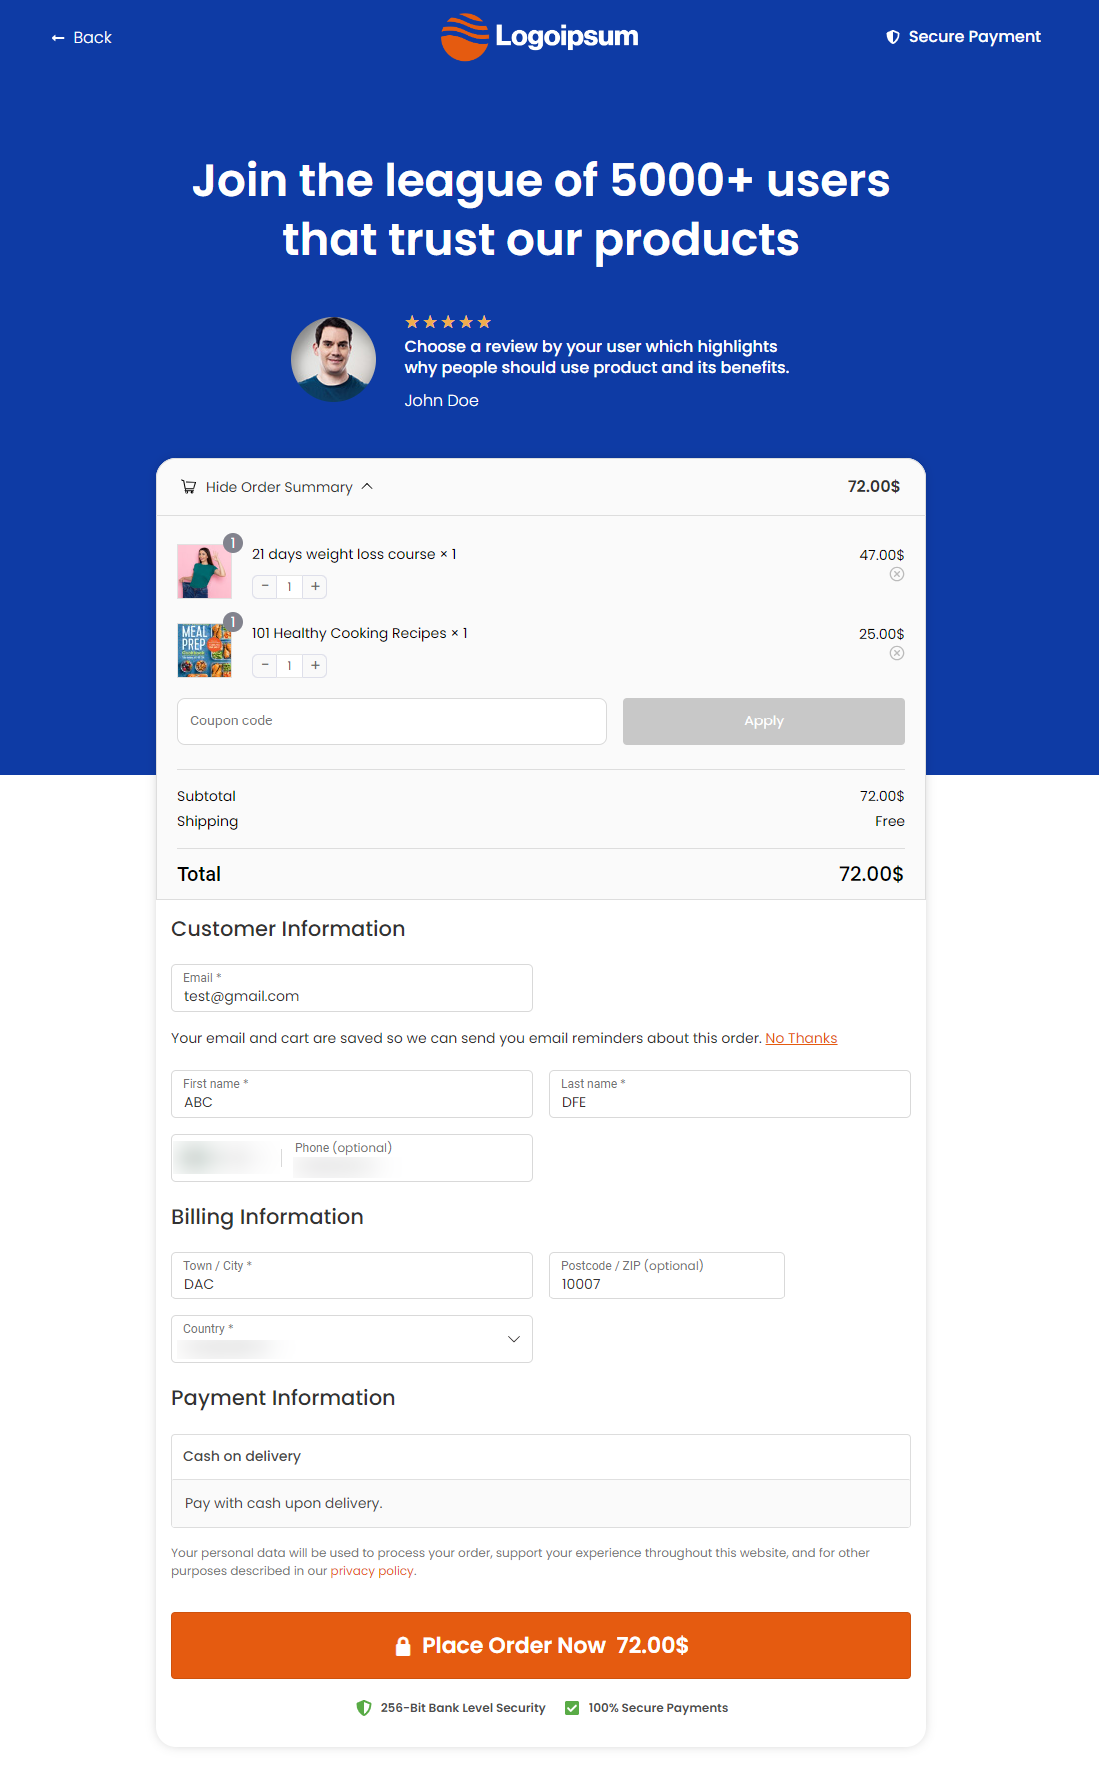
Suppose you sell digital products such as courses and subscriptions, and you want to remove the shipping address field from your checkout form.
To do so, just click on the cross icon.
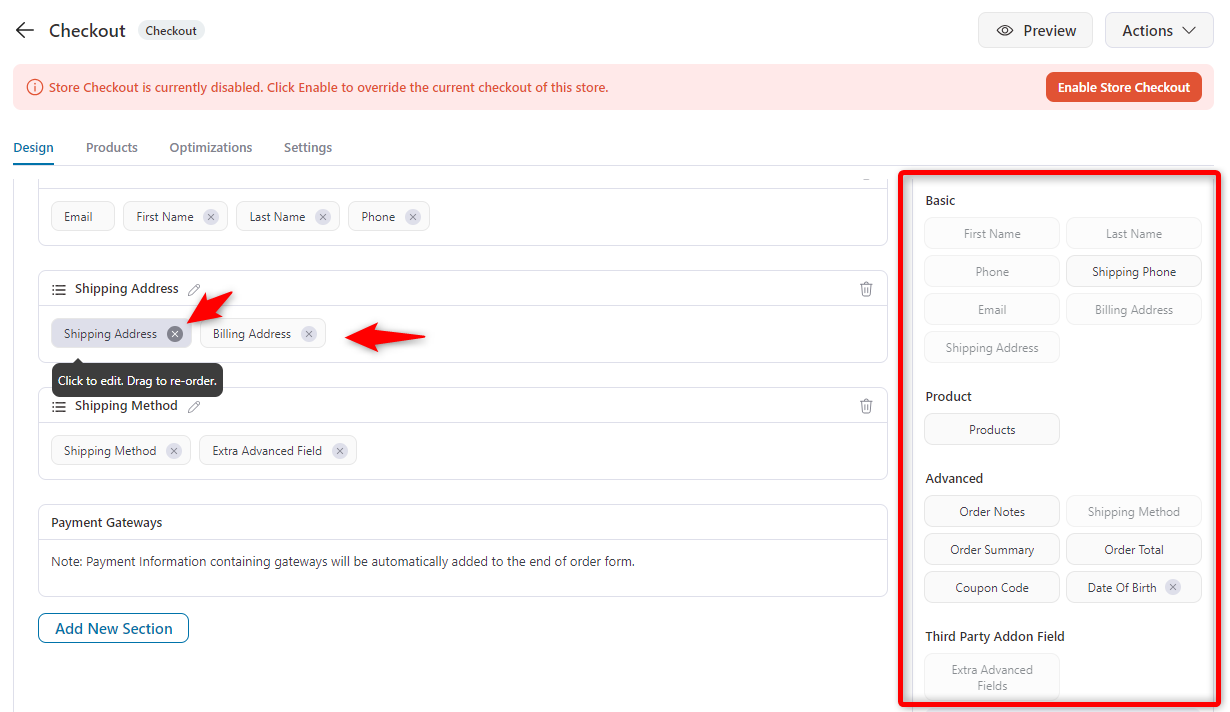
You can see that the shipping address field is removed from our checkout form.
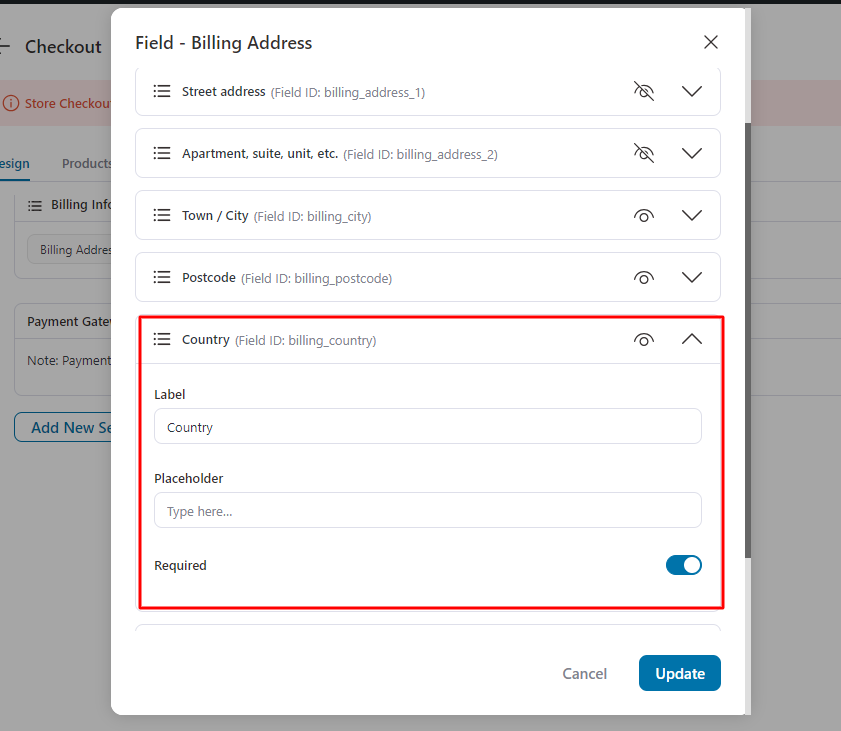
To go one step further, you can remove additional checkout fields if you don’t want them included in the billing address.
To do that, click the billing address, then toggle any fields on or off using the eye icon.
Hit 'Update' once you’re done.
Step 4: Customize the remaining checkout fields
Now, click on the Edit Template button to customize the checkout page.
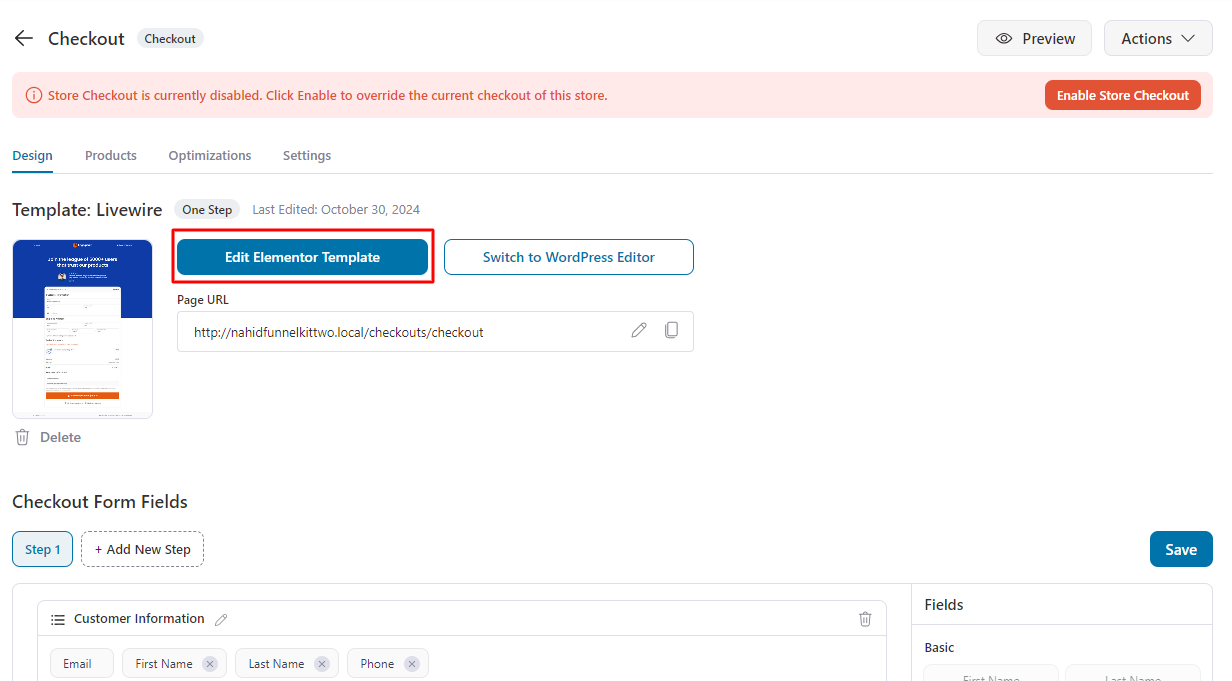
On the Elementor panel, you’ll get editing options for each section.
It means you can only adjust the field size from full to half (one-half).
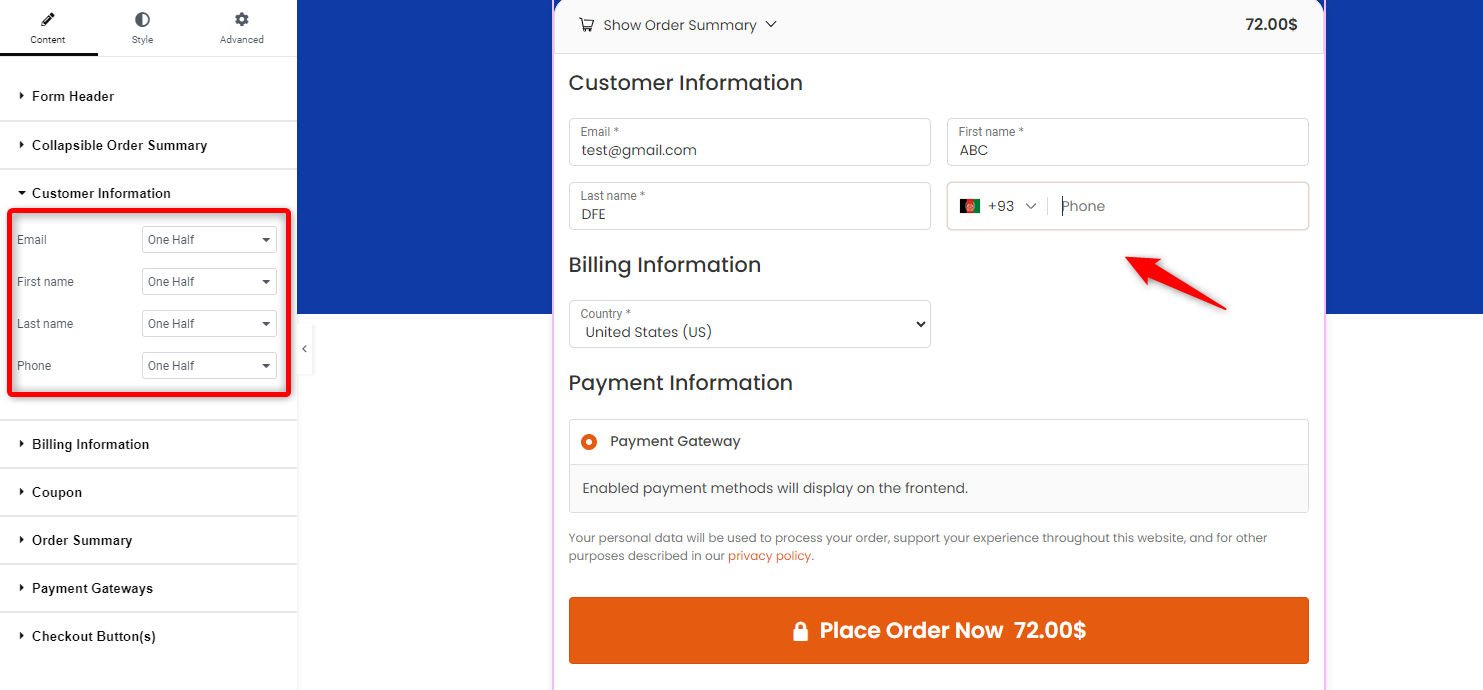
Make sure to save the changes to update your checkout page.
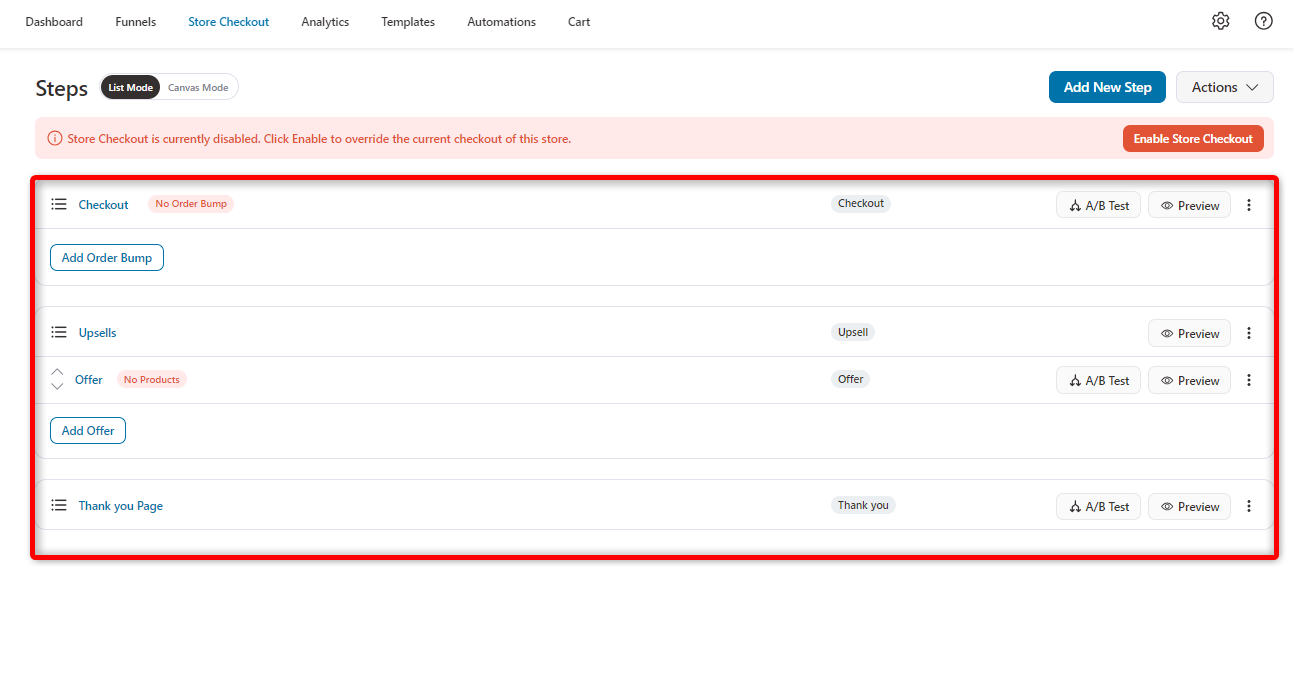
Activate your store checkout by clicking on the 'Enable Store Checkout' button.
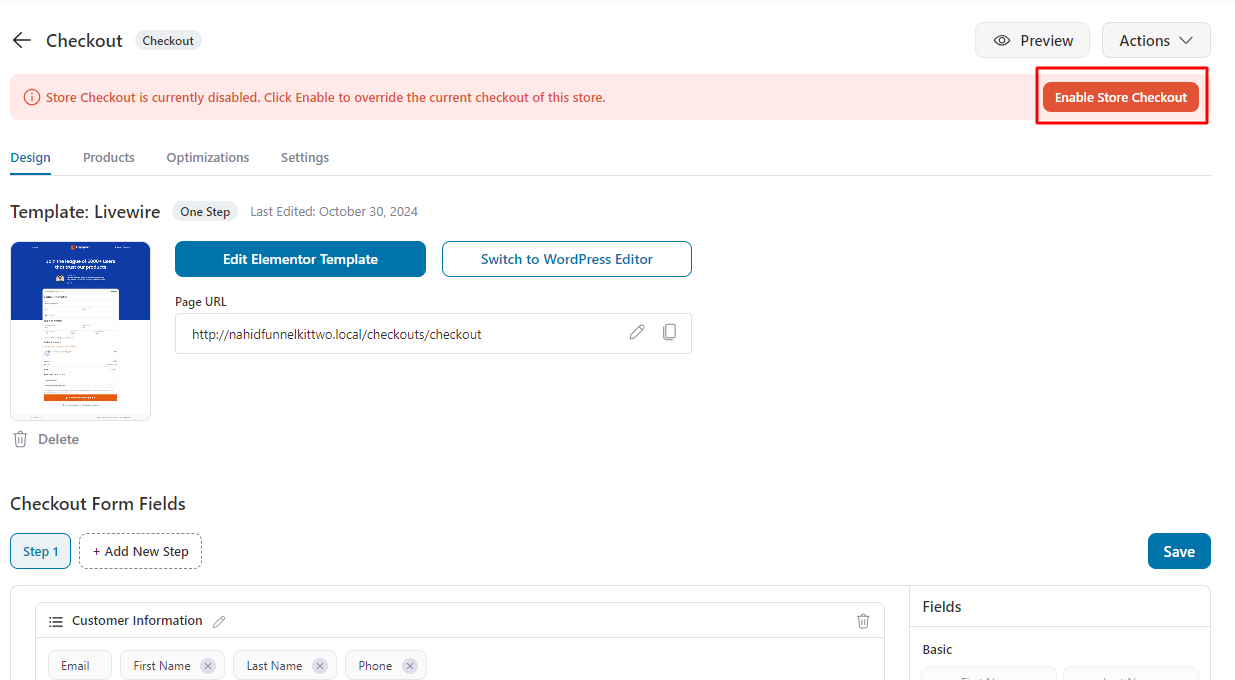
To test, go to any product page, add the item to your cart, proceed to checkout, and place a test order.
Verify that the removed fields no longer appear and that the checkout flow works smoothly from start to finish.
Test on both the desktop and mobile devices. On mobile, confirm that the checkout form fits well on smaller screens and that customers can complete the entire form without excessive scrolling.
Method 2: Remove Fields with PHP (Classic or Shortcode Checkout)
If your checkout uses the [woocommerce_checkout] shortcode, the woocommerce_checkout_fields filter is the standard way to remove fields.
If you prefer to remove checkout fields programmatically, you can use the woocommerce_checkout_fields filter hook.
The safest way is not to edit your parent theme's functions.php because those edits are wiped on the next theme update and a syntax error can lock you out of your site.
Instead, you can install a free code-snippets plugin (such as WPCode or Code Snippets) and add the snippet there, or use a child theme. A snippets plugin survives theme updates and lets you toggle code off instantly if something breaks.
The minimal snippet (and what it does)
This removes the billing phone and company fields from the classic checkout:
add_filter( 'woocommerce_checkout_fields', 'custom_remove_checkout_fields' );

function custom_remove_checkout_fields( $fields ) {
	unset( $fields['billing']['billing_phone'] );
	unset( $fields['billing']['billing_company'] );
	return $fields;
}
WooCommerce passes the full array of checkout fields into the filter; unset() deletes the keys you name, and returning the array tells WooCommerce to render the rest.
To remove a different field, swap in any key from the table above (e.g. $fields['shipping']['shipping_address_2']).
Remove only the order notes (one-liner + heading)
The “Additional information” heading and the order-notes box are controlled separately. Use both lines to remove the field and its heading:
// Removes the "Additional information" heading
add_filter( 'woocommerce_enable_order_notes_field', '__return_false', 9999 );

// Removes the order notes textarea
add_filter( 'woocommerce_checkout_fields', 'custom_remove_order_notes' );
function custom_remove_order_notes( $fields ) {
	unset( $fields['order']['order_comments'] );
	return $fields;
}
The 9999 priority on the first filter matters because themes and other plugins often re-enable the notes field, so running late ensures your change wins.
The priority fix for fields that won't hide
If a removed field still appears on the classic checkout, the most common cause is filter priority: another plugin or your theme re-adds the field after your code runs.
Force your filter to run last by setting a high priority:
add_filter( 'woocommerce_checkout_fields', 'custom_remove_checkout_fields', 9999 );This single change (the 9999) fixes the most common "I removed billing_address_2 / billing_first_name and it’s still there" complaint.
If a field is still required after you make it optional, see the troubleshooting section.
Make a field optional instead of removing it
For fields a gateway or tax engine needs (postcode, phone), keep them but drop the “required” flag so they stop blocking checkout:
add_filter( 'woocommerce_checkout_fields', 'make_phone_optional' );
function make_phone_optional( $fields ) {
	$fields['billing']['billing_phone']['required'] = false;
	return $fields;
}
Method 3: Remove Fields on the WooCommerce Checkout Block
The classic woocommerce_checkout_fields filter does not work on the Checkout Block.
WooCommerce intentionally locked the block's fields behind a curated extensibility path because gateways, tax, and shipping plugins all read those fields.
Here's how to actually remove them.
Option A: Remove address fields with woocommerce_get_country_locale
This example removes shipping/address fields for all countries. Only do this if you sell digital or virtual goods that need no shipping address:
add_filter( 'woocommerce_get_country_locale', function ( $locales ) {
	foreach ( $locales as $country => $locale ) {
		$fields_to_hide = array( 'address_1', 'address_2', 'city', 'state', 'postcode' );
		foreach ( $fields_to_hide as $field ) {
			$locales[ $country ][ $field ]['required'] = false;
			$locales[ $country ][ $field ]['hidden']   = true;
		}
	}
	return $locales;
} );
Important caveats (these trip up most people):
- Address line 2 auto-hides whenever Address line 1 is hidden. You don't need to target it separately, but it's listed above for completeness.
- This applies to every country. If you add a specific country to a per-country version of this loop, WooCommerce has a known quirk: targeting a single country can cause all fields to reappear, so the all-countries loop above is the reliable pattern for now.
- To remove fields for one country only (example, you sell only domestically), target that country's key directly: $locales['US']['postcode']['hidden'] = true;
Option C: Conditionally remove block fields for virtual carts
To strip address fields only when the cart is all-virtual (digital products, no shipping needed) while keeping them for physical orders, add a cart check:
add_filter( 'woocommerce_get_country_locale', function ( $locales ) {
	$cart = WC()->cart;
	if ( ! $cart || ! $cart->needs_shipping() ) {
		foreach ( $locales as $country => $locale ) {
			foreach ( array( 'address_1', 'city', 'state', 'postcode' ) as $field ) {
				$locales[ $country ][ $field ]['required'] = false;
				$locales[ $country ][ $field ]['hidden']   = true;
			}
		}
	}
	return $locales;
} );
needs_shipping() returns false when all items in the cart are virtual, so physical orders retain their full address form.
Pair locale changes with the default locale
If a field stays required after you edit the locale, also update the default locale so no country falls back to the original requirement:
add_filter( 'woocommerce_get_country_locale_default', function ( $locale ) {
	$locale['postcode']['required'] = false;
	return $locale;
} );
7 Best Practices to Simplify Your WooCommerce Checkout Form
Let's look at best practices for striking the right balance by showing only the necessary checkout fields.
1. Only ask for information you will actually use
Before removing or keeping any field, ask yourself whether you need that data to process the order, fulfill shipping, or communicate with the customer.
If a checkout field does not serve a clear purpose, remove it. For example, most B2C stores do not need a company name field.
2. Use optional fields clearly
According to Baymard Institute, only 14% of ecommerce websites explicitly mark both required and optional fields.
When optional fields are unlabeled, customers often assume they are required, which ultimately slows the checkout process.
If a field is truly optional, either label it clearly or remove it altogether to reduce perceived effort.
3. Place the email field at the top of the form
Collecting the email address enables cart recovery workflows. So your number 1 priority should be to place the email field at the top of your checkout form.
If a customer abandons the checkout after entering their email, you can send a follow-up email to bring them back and directly recover lost sales.
4. Test your checkout after every change
Once you remove any unnecessary fields, you should thoroughly test the checkout process to ensure it works and doesn't show any errors.
When mobile checkout has consistently higher abandonment rates than desktop checkout, it's crucial to ensure everything works smoothly on mobile as well.
After removing fields, verify that the form layout looks clean on smaller screens, fields are easy to tap, and the overall flow requires minimal scrolling.
5. Use address autocomplete to reduce the number of visible fields
Instead of removing address fields entirely, consider enabling Google address autocomplete on your checkout page.
This allows shoppers to type a few characters and select their full address from a dropdown, which automatically fills in the city, state, postcode, and country.
Auto-fill address certainly reduces effort by capturing accurate shipping data.
6. Use custom fields only if they genuinely add value
Add custom fields only when they enhance the checkout experience or are essential for order fulfillment.
For example, special delivery instructions could be helpful, but unnecessary questions can slow down the process.
Stick to the checkout fields that serve a clear purpose and avoid adding extra steps.
7. Regularly review and update the checkout fields based on user feedback
Customer feedback is invaluable for fine-tuning your checkout process.
For example, if customers frequently abandon checkout after reaching optional fields such as "Company Name" or "Address Line 2", consider removing or hiding these fields to keep things simple.
Reviewing user interactions helps you identify which fields may be unnecessary, allowing you to adjust and streamline the form to create a smoother experience.
Test the entire checkout flow with both valid and invalid input to catch any issues.
Removed a Checkout Field, But It’s Still Showing or Still Required? (Troubleshooting & Fix Guide)
This is the single most common complaint on Reddit, the WooCommerce.com forums, and WordPress.org and it almost always traces to one of five causes.
Let's work through them in order.
1. Block-vs-classic mismatch (the #1 cause)
If you used the woocommerce_checkout_fields filter and nothing changed, you’re almost certainly on the Checkout Block, where that filter is ignored. Switch to the Method 3 block toggles or the woocommerce_get_country_locale filter.
To confirm which checkout you have, open Pages → Checkout and look for a Checkout block vs. the [woocommerce_checkout] shortcode.
2. Low filter priority
Another plugin or your theme re-adds the field after your code runs. Add a high priority (9999) to your filter so it executes last and the priority gets fixed (demonstrated in the above method).
3. Hidden with CSS but still validating
Hiding a field with display: none removes it visually, but WooCommerce still validates it on the server side, so checkout fails with "this is a required field".
You must either unset it (classic) / set it hidden in the locale (block), or set ['required'] = false. CSS alone is not enough.
4. Theme or plugin conflict
Temporarily switch to a default theme (Storefront or Twenty Twenty-Five) and disable all plugins except WooCommerce, then re-test your snippet.
If it works, reactivate one at a time to find the culprit.
5. Field still required after removal
If you removed a field but the gateway or tax engine still expects it, you may see a silent failure.
For postcode/country specifically, prefer making it optional to remove it (see the optional snippet above), and pair classic-checkout changes with woocommerce_get_country_locale so the country locale matches your field change.
Frequently Asked Questions About Removing Checkout Fields in WooCommerce
You should remove unnecessary checkout fields from your WooCommerce store to simplify the checkout process, which leads to higher conversion rates and a better shopping experience. Here's how:
- A clutter-free checkout reduces distractions and makes it easier for customers to complete their purchase.
- Fewer fields mean a faster checkout process, which helps reduce drop-offs.
- If you're selling digital products, fields like shipping address or company name are often unnecessary.
- A complex checkout is one of the top reasons users abandon carts. A simplified form helps prevent this.
- A clean, intuitive checkout flow keeps customers happy and encourages repeat purchases.
This is one of the most common frustrations reported by WooCommerce users on Reddit and forums. The most likely cause is that your checkout page uses the WooCommerce Checkout Block instead of the classic shortcode. PHP filters such as woocommerce_checkout_fields only work with the shortcode-based checkout ([woocommerce_checkout]).
Try creating a new page, adding the [woocommerce_checkout] shortcode, and setting it as your checkout page under WooCommerce settings.
Another common cause is a theme or plugin conflict that overrides your filter. Temporarily switch to a default theme, such as Storefront, and disable other plugins to isolate the issue.
Never remove fields that are required for payment processing or order fulfillment.
Email is essential for sending order confirmations. First name and last name are needed for the billing address. If you ship physical products, you need at a minimum the street address, city, country, and postcode.
Removing these will cause payment gateway errors or failed deliveries.
You can use display: none; in your CSS to visually hide your checkout fields, but we do not recommend this approach.
Hidden fields still load in the HTML, so they can still trigger validation errors if required. Additionally, they also remain visible in the page source code.
Using PHP or a plugin to remove fields from the WooCommerce checkout is a cleaner, more reliable solution.
Yes, you can add custom fields to the WooCommerce checkout programmatically using the same woocommerce_checkout_fields filter.
Add new fields to the $fields array with properties like type, label, placeholder, required, and priority.
Plugins like FunnelKit and Flexible Checkout Fields make this easier with visual editors that support 14+ custom field types, including text, dropdown, file upload, radio, checkbox, date picker, and multi-select.
If you need to undo your changes, simply remove the code snippet from your functions.php file or deactivate it in your code snippets plugin.
WooCommerce will then automatically restore the default checkout fields on the next page load. This is one of the benefits of using filter hooks rather than editing WooCommerce core files directly.
Yes, if you are using a plugin like FunnelKit that integrates with Elementor, Divi, Bricks, and Gutenberg. Its built-in checkout field editor works independently of the page builder, so you can design your checkout with Elementor and still manage fields through FunnelKit’s drag-and-drop interface.
PHP code snippets work with any page builder.
Beyond all-virtual carts (covered above for the block), here are the most-requested conditional rules for classic checkout.
Remove billing fields when the cart is all digital/virtual:
add_filter( 'woocommerce_checkout_fields', 'remove_fields_for_virtual_cart' );
function remove_fields_for_virtual_cart( $fields ) {
	if ( WC()->cart && ! WC()->cart->needs_shipping() ) {
		unset( $fields['billing']['billing_address_1'] );
		unset( $fields['billing']['billing_city'] );
		unset( $fields['billing']['billing_postcode'] );
	}
	return $fields;
}
Remove a field when a specific product category is in the cart:
add_filter( 'woocommerce_checkout_fields', 'remove_field_for_category' );
function remove_field_for_category( $fields ) {
	if ( WC()->cart ) {
		foreach ( WC()->cart->get_cart() as $item ) {
			if ( has_term( 'downloads', 'product_cat', $item['product_id'] ) ) {
				unset( $fields['billing']['billing_company'] );
				break;
			}
		}
	}
	return $fields;
}
Swap 'downloads' for your category slug. The same pattern works by product ID ($item['product_id'] == 123).
Hiding fields by payment method is best handled client-side, because the gateway is chosen after the address loads. Show/hide with JavaScript on the payment_method_selected event rather than unsetting server-side, so you don’t break validation for the other gateways.
Stop Losing Sales to Unnecessary WooCommerce Checkout Fields!
Removing checkout fields in WooCommerce comes down to one question: block or classic?
On the classic checkout, the woocommerce_checkout_fields filter (with a priority of 9999) does the job. On the Block checkout, reach for the field toggles or the woocommerce_get_country_locale filter instead, and lean on conditional logic for virtual carts.
Whichever route you take, make risky fields optional rather than deleting them, and place one real test order before you call it done.
If you’d rather edit fields visually and rebuild your checkout for conversions at the same time, FunnelKit Funnel Builder gives you a drag-and-drop field editor and prebuilt, optimized checkout templates, no code required.
So why wait? Start streamlining your WooCommerce checkout today for a smoother, more profitable customer journey.

Editorial Team
July 7, 2026Are shoppers adding products to their cart and leaving before they buy? According to Baymard Institute research on checkout usability, 18% of shoppers who abandon their cart do so because...
Editorial Team
July 3, 2026Sometimes, the difference between a visitor leaving and placing an order comes down to something surprisingly small, like a better headline, a cleaner checkout, or a more compelling offer. That's...

Editorial Team
July 1, 2026Are you leaving money on the table by not fully leveraging your customers’ shopping behavior? Many store owners don’t realize that every time a customer adds a product to the...


