


The Bricks WooCommerce builder is built directly into the Bricks theme. Activate the free WooCommerce plugin, and Bricks unlocks more than 30 store-specific elements plus visual templates for every part of your shop.
You can design your product pages, archives, cart, checkout, and account area without a single add-on.
The catch is that most guides only show you half the picture. The native builder handles store design very well. But it does not support conversion features such as sales funnels, multi-step checkouts, order bumps, or one-click upsells.
In this guide, we will show you how to set up WooCommerce with Bricks and build every core store page visually.
We will also cover where the native builder reaches its limits and how to extend your checkout using a WordPress plugin, with no code required.
Watch this video tutorial for designing sales funnels with Bricks:
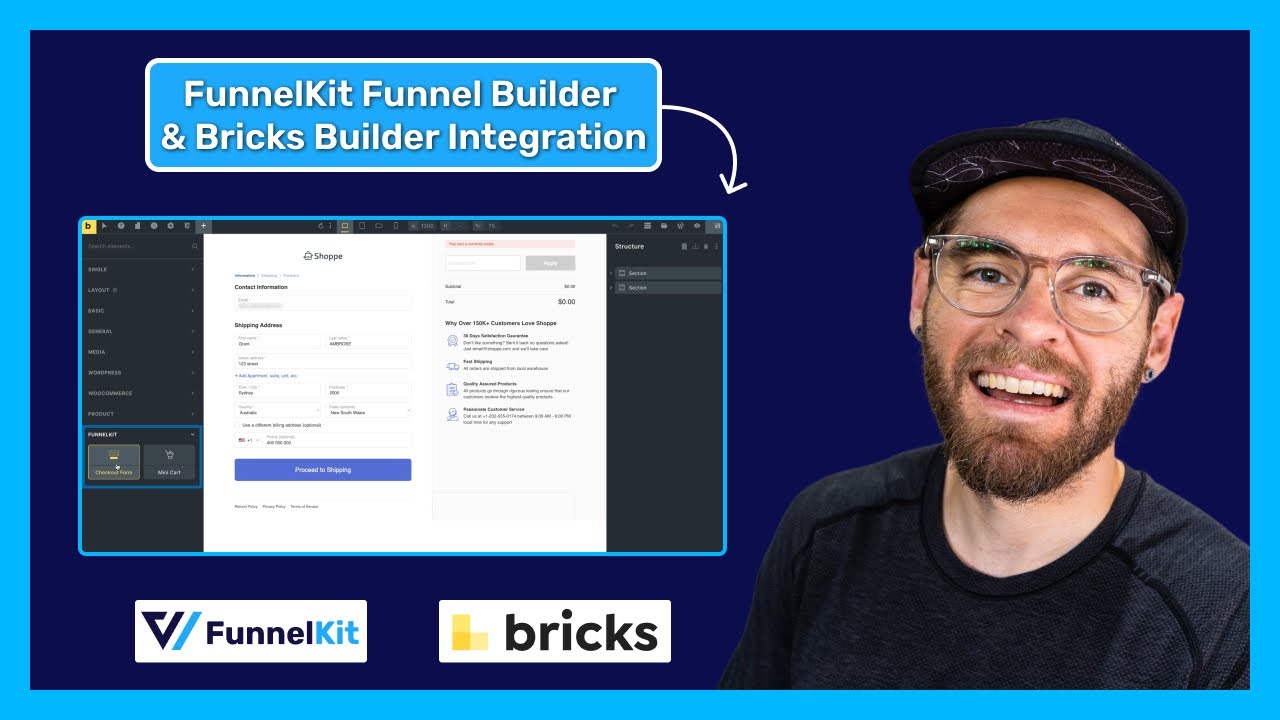
Table of Contents
- 1 What You Can Build With Bricks and WooCommerce?
- 2 What You Get With the Native Bricks WooCommerce Builder?
- 3 How to Set Up WooCommerce With Bricks (No Extra Theme Needed)
- 4 How to Build a Single Product Page in Bricks
- 5 How to Design Your Shop and Product Archive Pages?
- 6 How to Customize the Cart Page in Bricks?
- 7 The Bricks Checkout: What Is Native and Where It Stops
- 8 How to Design Account, Login, and Thank You Pages?
- 9 How to Extend the Bricks WooCommerce Checkout Without Code?
- 9.1 Step 1: Create a sales funnel
- 9.2 Step 2: Customize the WooCommerce sales page with Bricks Builder
- 9.3 Step 3: Edit the design of your checkout page
- 9.4 Step 4: Add a base product to your checkout page
- 9.5 Step 5: Optimize your WooCommerce checkout page
- 9.6 Step 6: Add compelling order bumps to boost AOV
- 9.7 Step 7: Add post-purchase one-click upsells
- 9.8 Step 8: Customize your WooCommerce thank you page
- 9.9 Step 9: Test your Bricks WooCommerce sales funnel
- 10 Bricks Templates and Elements for WooCommerce Sales Funnels
- 11 Get Detailed Analytics for Visitors and Conversions
- 12 Bricks vs Elementor for WooCommerce
- 13 Troubleshooting Bricks and WooCommerce Issues
- 14 Frequently Asked Questions
- 15 Start Selling With the Bricks WooCommerce Builder!
What You Can Build With Bricks and WooCommerce?
| Store Area | Native Bricks Support | Best Use Case | When To Extend It |
|---|---|---|---|
| Shop page | Yes | Product grid, category layout, filters, sorting, pagination | When you need funnel-specific product flows |
| Product archive | Yes | Category, tag, and product listing templates | When archive logic depends on advanced merchandising |
| Single product page | Yes | Product gallery, title, price, stock, rating, tabs, reviews, add to cart | When you need custom product funnels or post-purchase offers |
| Cart page | Yes, using WooCommerce cart shortcode workflow | Cart items, totals, coupon placement, empty cart layout | When you need a side cart, cart rewards, or checkout redirects without page builder support |
| Checkout page | Yes, using WooCommerce checkout shortcode workflow | Billing/shipping form styling and order review layout | When you need multi-step checkout, field editor, order bumps, express checkout layouts, or A/B testing |
| Thank you page | Yes | Order confirmation and order details styling | When you need dynamic next-step offers or post-purchase funnels |
| My account/login | Yes | Login, register, lost password, orders, downloads, addresses, and payment methods | When account pages need custom CRM or membership flows |
What You Get With the Native Bricks WooCommerce Builder?
Bricks has dedicated WooCommerce elements and template workflows for building the storefront visually while still using WooCommerce data, hooks, and template logic.
That matters because a WooCommerce store is not a normal website.
You need templates for product data, archive loops, cart states, checkout states, customer account endpoints, and order confirmation pages.
Bricks gives you visual control over those areas without forcing you to edit PHP templates for every layout
change.
Native Bricks is best for:
- Creating a custom single product page
- Designing shop and category archive pages
- Styling the cart and empty cart pages
- Customizing the visual layout of the checkout page
- Building My Account, login, registration, lost password, and order endpoint layouts
- Styling WooCommerce notices
- Adding dynamic product data such as price, stock, rating, SKU, categories, and related products
- Using WooCommerce template hooks for plugin compatibility
It is strongest at storefront design. It is not designed to replace a full checkout optimization plugin, funnel builder, or post-purchase upsell system.
Therefore, we recommend you use Bricks to build the store experience and a funnel builder tool when you want the checkout and revenue flow to do more than the default WooCommerce flow.
How to Set Up WooCommerce With Bricks (No Extra Theme Needed)
Before creating templates, confirm the basic setup.
Step 1: Install and activate WooCommerce
In your WordPress dashboard, go to Plugins ⇨ Add New, then install WooCommerce. Run the setup wizard to configure your store basics, such as currency, payments, and shipping.
When the wizard suggests picking a new theme, skip that step and keep Bricks active.
Step 2: Review the Bricks WooCommerce settings
Bricks adds a dedicated WooCommerce tab to its settings.
From there, you can control the Sale badge (or show a discount percentage instead), display a New badge for recent products, disable the product gallery zoom and lightbox scripts, and choose how AJAX add-to-cart errors behave.
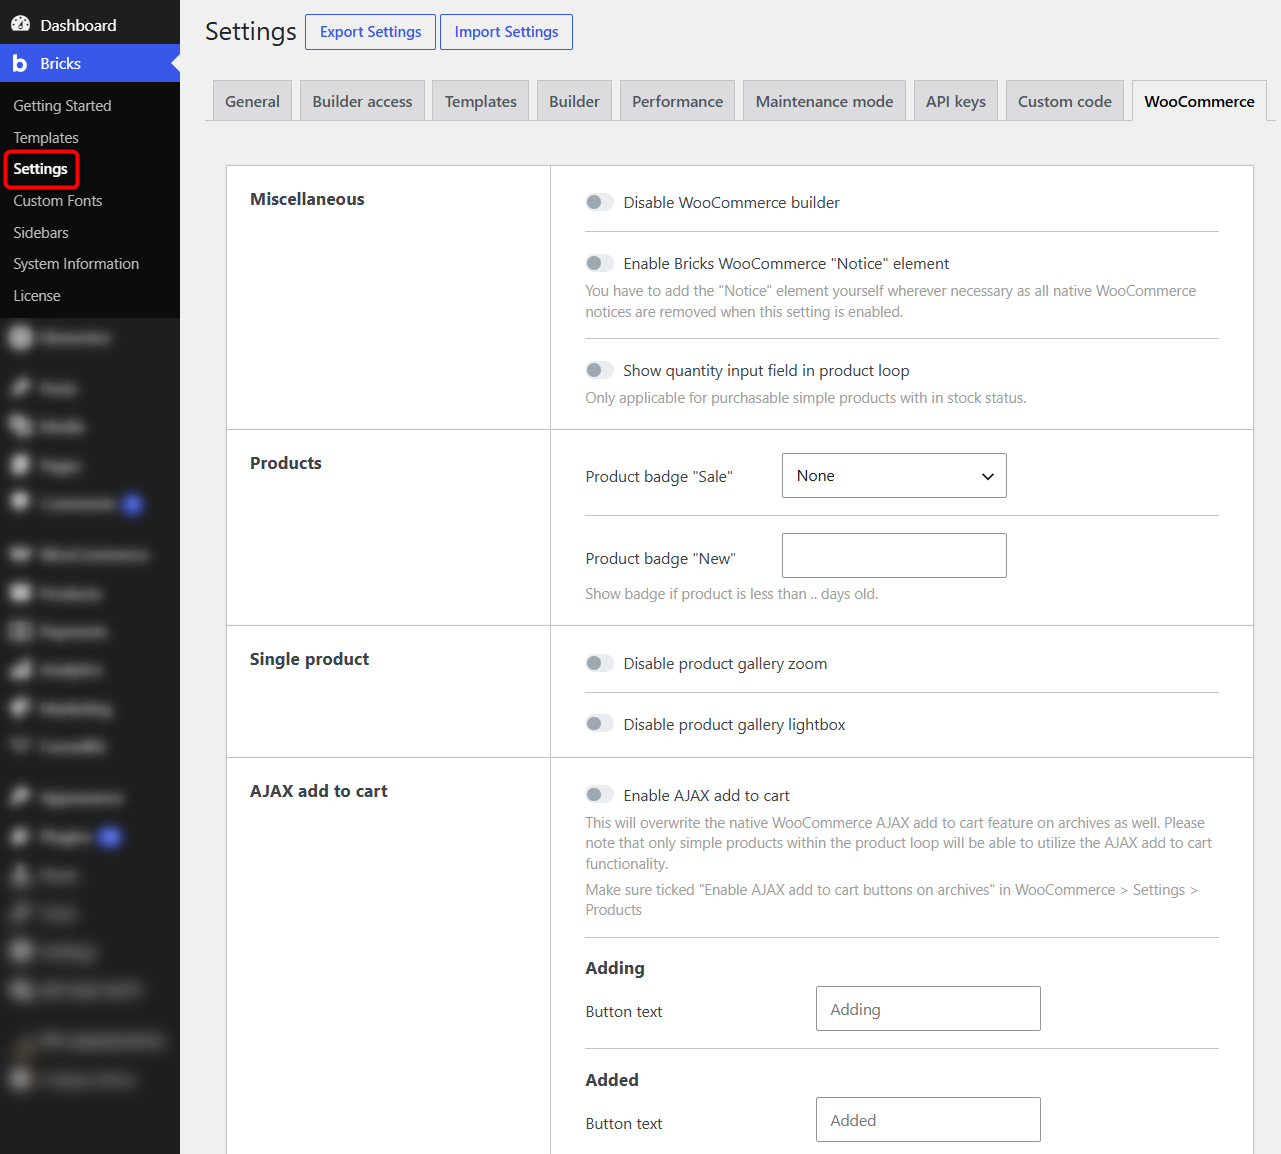
Setting these once saves you from styling the same details on every template.
Step 3: Open the template editor
Go to Bricks, then Templates, and create your first WooCommerce template. Everything in the next sections happens here.
How to Build a Single Product Page in Bricks
Bricks lets you design a single layout, and every product in your store inherits it automatically.
Create a new template, set its type to Single product, and add a template condition targeting all products.
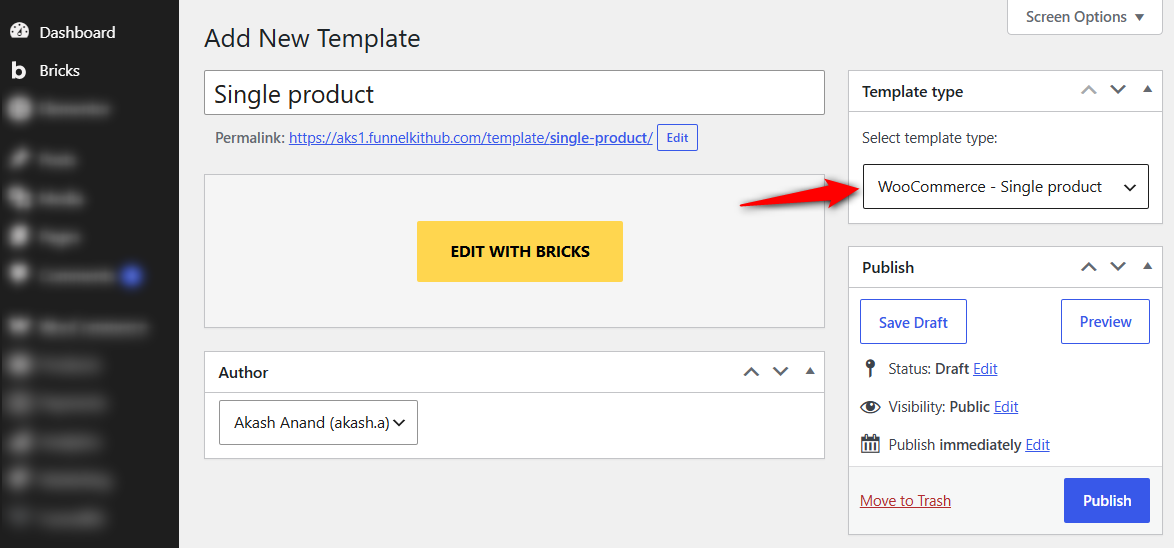
You can also create separate templates for specific categories if certain product lines need a different layout.
Add the product gallery, title, and price
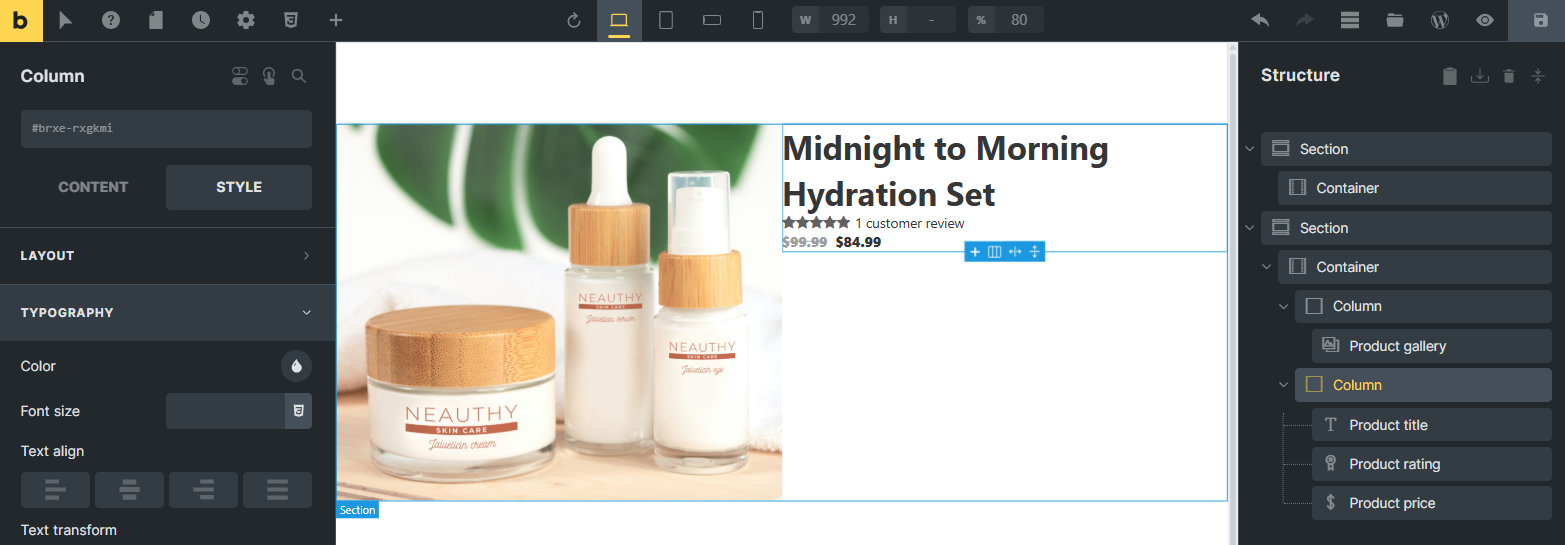
Start with a two-column section. Drop the Product gallery element into the left column. It pulls images straight from each product’s media settings, so there is nothing to connect manually.
In the right column, stack the Product title, Product rating, and Product price elements. These are dynamic, meaning the template shows each product’s own data on the front end.
If you store extra product details in ACF or Metabox fields, pull them in with dynamic data tags right next to the native elements.
Style the add to cart button and variations
Add the add-to-cart element below the price. You control its colors, size, and spacing here, and Bricks lets you manage the styling globally through Theme Styles so every product stays consistent.
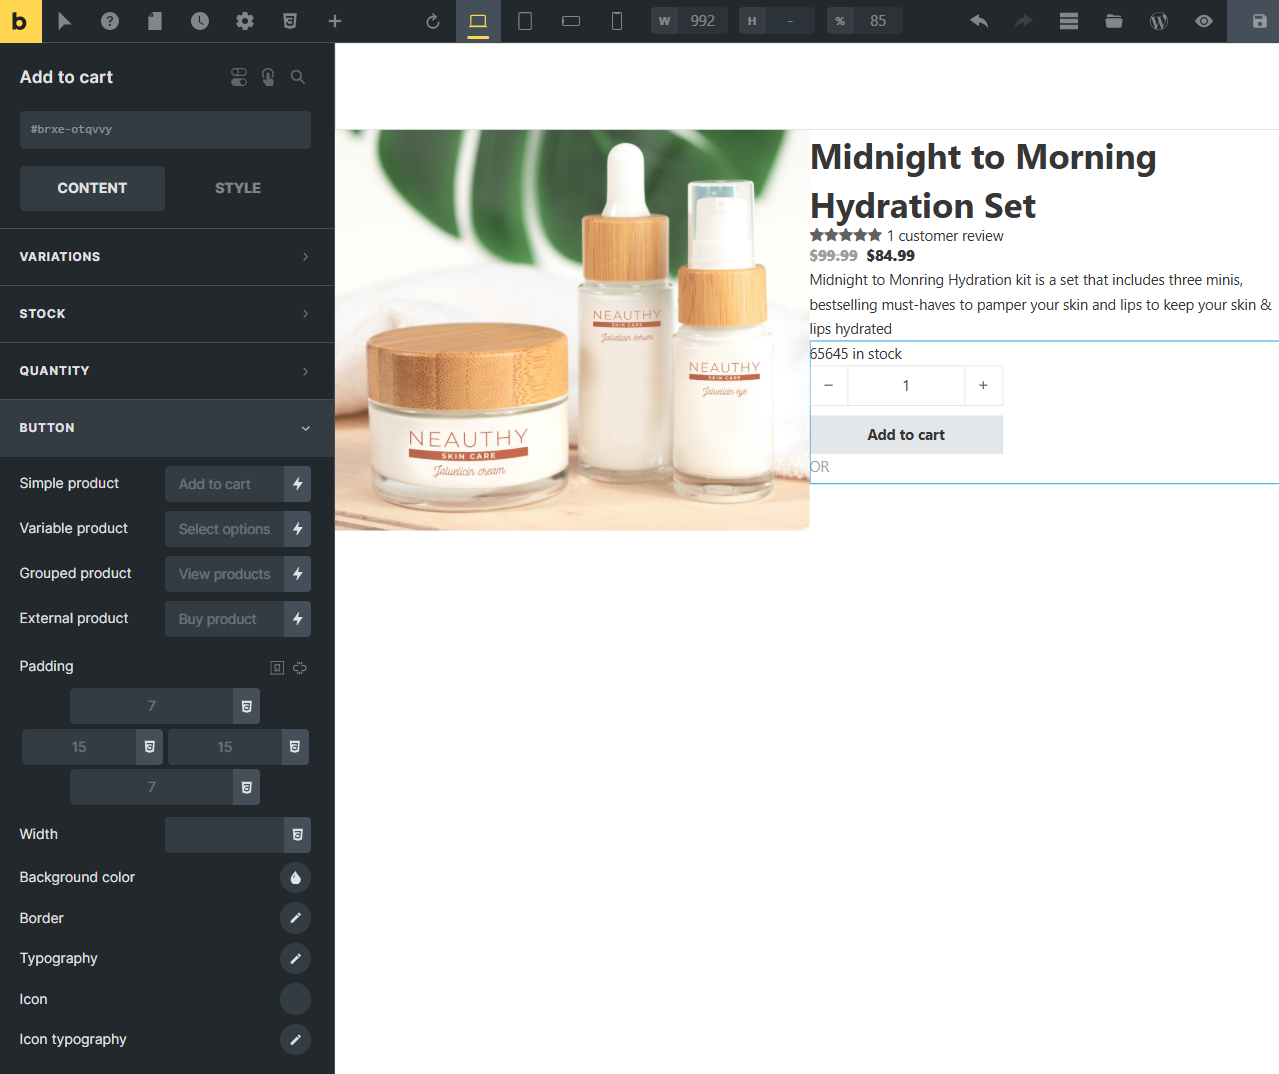
For variable products, enable variation swatches in the Bricks settings.
This converts plain dropdowns into color swatches, image buttons, or text labels, which makes options like size and color far easier to scan.
Show related products with the query loop
Below the main section, add a Products element or a container with a Query Loop set to the product post type.
Filter the query by the current product’s category to surface genuinely related items. The same Query Loop technique powers upsell rows, bestseller sections, and sale grids anywhere on your site.
How to Design Your Shop and Product Archive Pages?
Your shop page and category pages share one template type in Bricks: the Product archive.
Create a Product archive (shop page and category pages) template and add a Products element. Configure the grid columns, spacing, and image ratio, and Bricks handles responsive behavior for you.
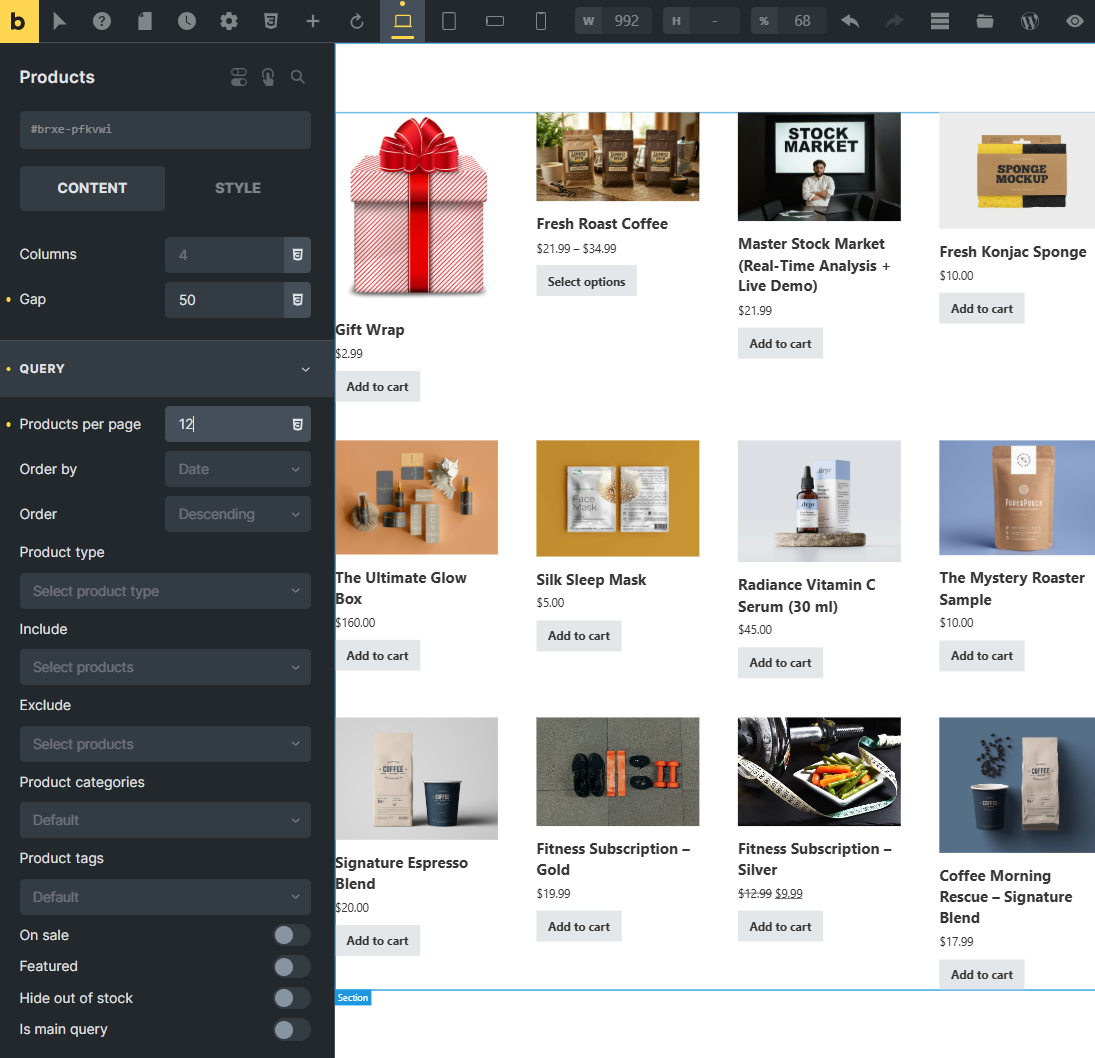
For full layout control, you can instead build the grid yourself with a Query Loop and design each product card from scratch, including hover states and sale badges.
The shop page is technically the archive for the product post type.
To make your archive template cover it, either edit the Shop page directly with Bricks or add a template condition that includes the shop page in your Product archive template.
To help shoppers narrow down large catalogs, add Bricks filter elements for categories, price ranges, and attributes.
Layered filtering keeps visitors on the archive instead of bouncing back to search, which matters most for stores with more than a few dozen products.
How to Customize the Cart Page in Bricks?
There are two ways to control the cart layout, and choosing the right one prevents the most common cart problems in Bricks.
Option 1: Cart template
Create a Bricks template with the Cart type and design it with the cart-specific elements.
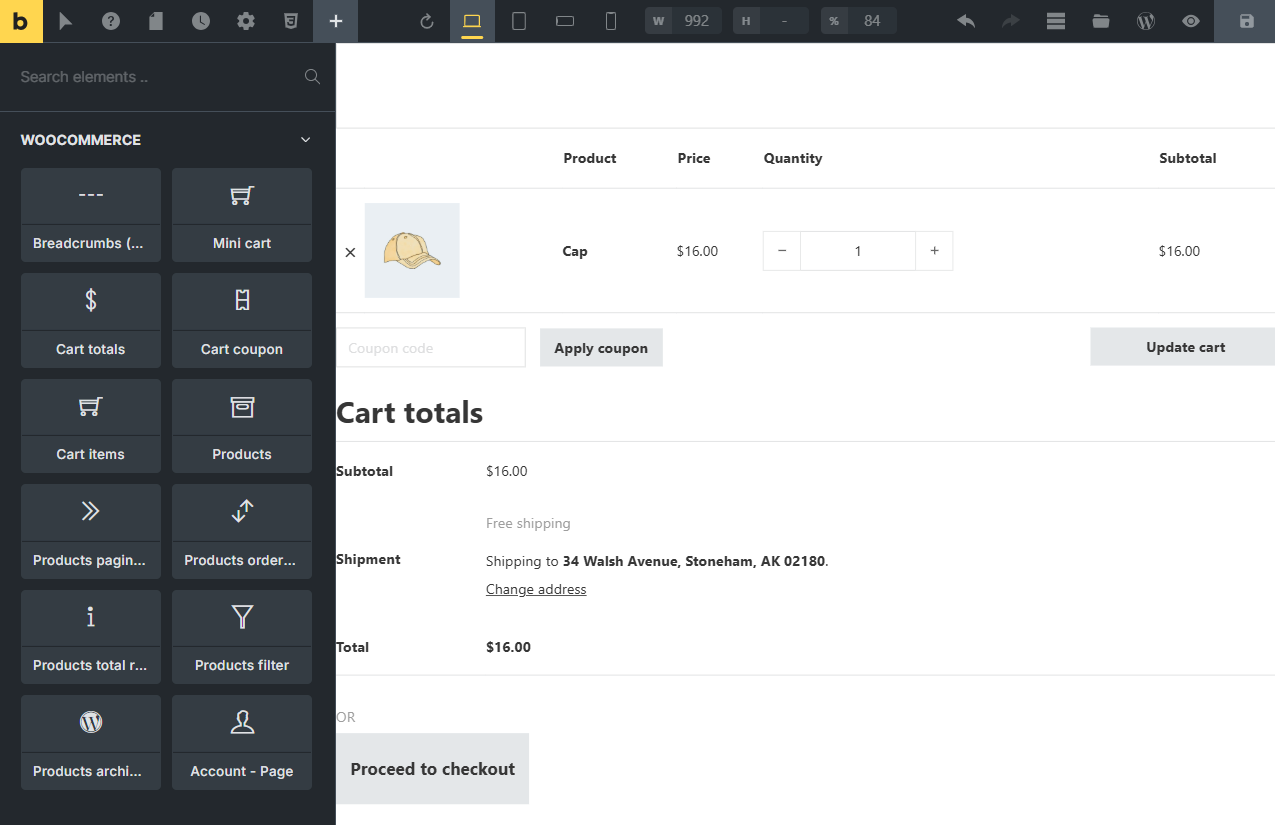
Pair it with an Empty cart template so shoppers with an empty cart see helpful suggestions instead of a dead end.
Option 2: Shortcode method
Edit your existing Cart page with Bricks, remove any default Gutenberg cart blocks, and place a Shortcode element containing [woocommerce_cart].
Bricks Academy recommends the shortcode over the Gutenberg block because the classic shortcode plays reliably with custom templates.
Whichever route you pick, show product thumbnails in the cart table and keep the update and remove controls obvious. Shoppers want visual confirmation of what they are about to buy.
The Bricks Checkout: What Is Native and Where It Stops
The checkout follows the same pattern as the cart. Either build a Checkout template with the checkout-specific elements, or edit the Checkout page, clear out the Gutenberg checkout block, and add a Shortcode element with [woocommerce_checkout].
Bricks gives you real design control.
The Checkout customer details element handles the form area, and optional settings let you place the coupon field and the checkout login form exactly where you want them, rather than where WooCommerce defaults them.
Design control is not the same as conversion control, though.
Community discussions on Reddit describe the native WooCommerce builder as capable of meeting basic shop requirements, and that assessment aligns with what we see specifically in the checkout.
Checkout limitations to know before launch
- Single-step flow: You can restyle the form, but you cannot split it into a multi-step checkout that reduces perceived effort.
- No order bumps: There is no native way to offer a small add-on with a checkbox at checkout.
- No one-click upsells: After payment, the order is done. You cannot show post-purchase offers that charge without re-entering card details.
- No express payment buttons: Apple Pay and Google Pay do not appear at the top of the checkout unless your gateway or another plugin adds them.
- Limited field management: Adding, removing, or reordering checkout fields requires an add-on or custom code, not a built-in editor.
- No A/B testing: You cannot split test two checkout layouts to see which converts better.
These gaps matter because the checkout is where stores bleed revenue. Baymard Institute puts the average cart abandonment rate at just over 70%.
The good news is that you do not need to leave Bricks to fix this. We cover the extension route right after the remaining store pages.
How to Design Account, Login, and Thank You Pages?
Since Bricks 1.9, the builder also covers the customer account area. You can visually design the My Account dashboard along with the login, registration, and lost password screens, so the last unstyled corner of your store finally matches your brand.
Bricks also provides Thank-you and order receipt templates. Use them to restyle the confirmation experience with your logo, order details, and support links.
Keep in mind that these templates are design surfaces.
If you want the thank you page to actively generate revenue with tailored offers, coupons, or cross-sells based on what was purchased, that behavior comes from the plugin we cover next.
How to Extend the Bricks WooCommerce Checkout Without Code?
To add the missing conversion layer to a Bricks WooCommerce checkout without writing code, we will use FunnelKit Funnel Builder.
FunnelKit integrates natively with Bricks, so you can keep designing in the same editor. It ships more than 20 Bricks-ready checkout and funnel templates, along with 17 native Bricks elements for the checkout form, order bumps, and mini cart summaries.
FunnelKit offers a free version that includes optimized checkout templates you can import and customize in Bricks.
The Pro plan starts at $99.50 per year and adds order bumps, one-click upsells, and A/B testing.
Follow the step-by-step instructions below to upgrade your checkout:
Step 1: Create a sales funnel
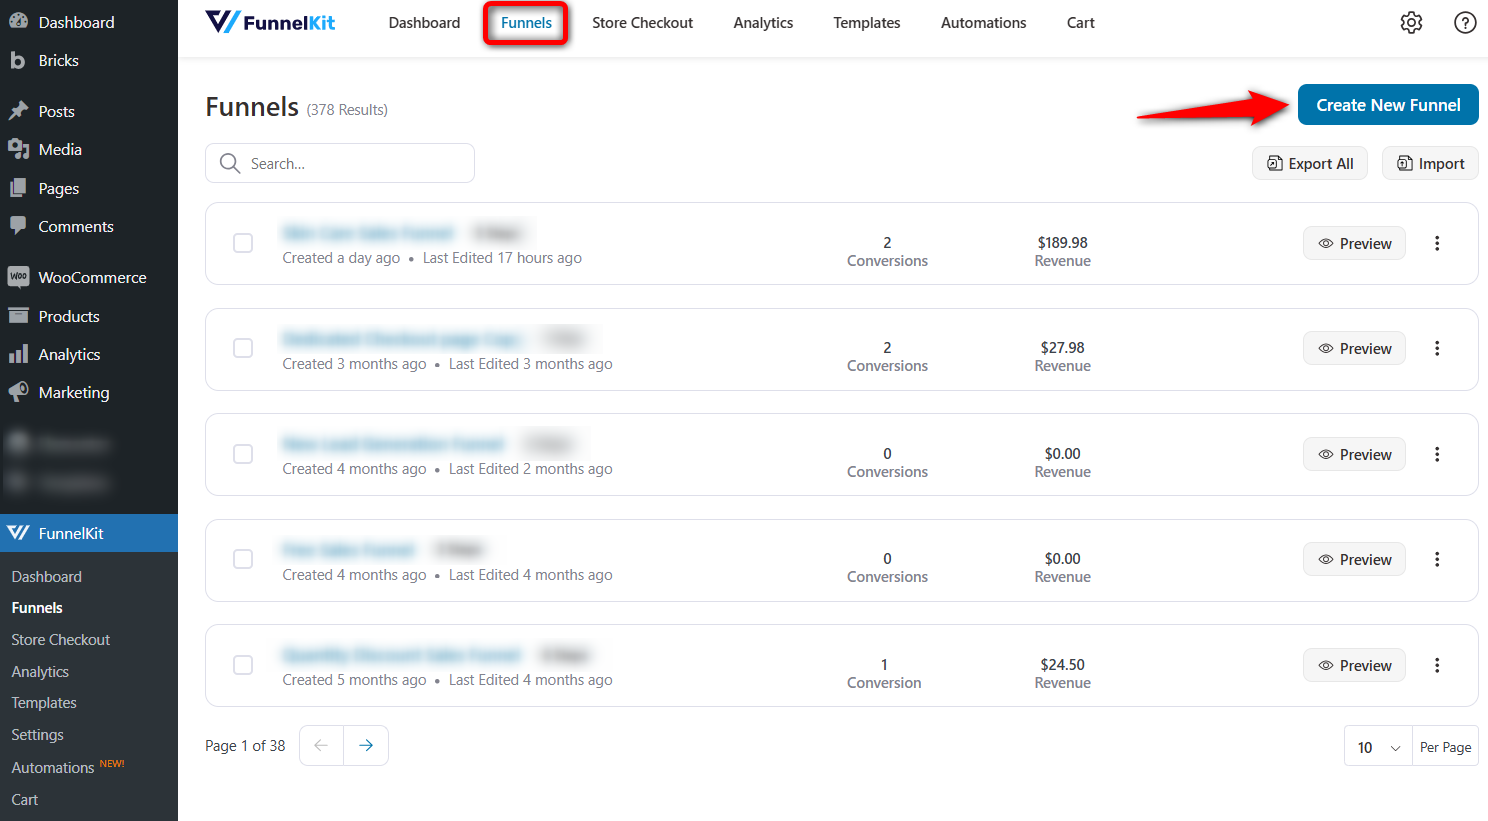
Navigate to FunnelKit ⇨ Funnels from the WordPress dashboard and hit the ‘Create New Funnel’ button.
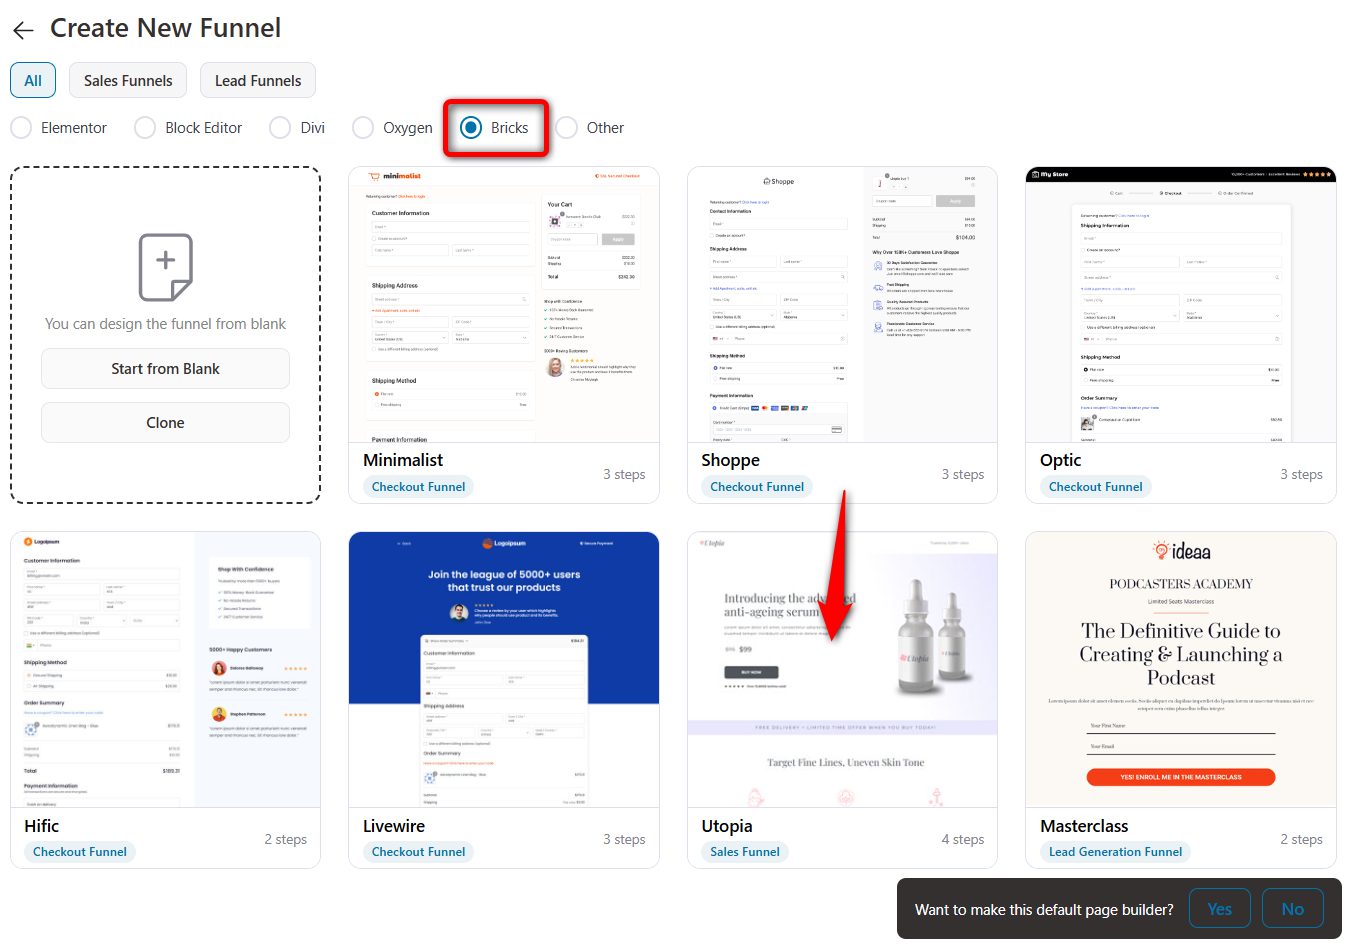
You’ll see a list of pre-built funnel templates. Select ‘Bricks’ as your page builder, then click the template you like.
As an example, we’ll choose the ‘Utopia’ template here. This template has four pages:
On the next screen, you’ll be able to see the full preview of your selected template.
Here, we’ll choose ‘Two Step’ for the checkout page template and hit the ‘Import This Funnel’ button.
Enter the name of your funnel.
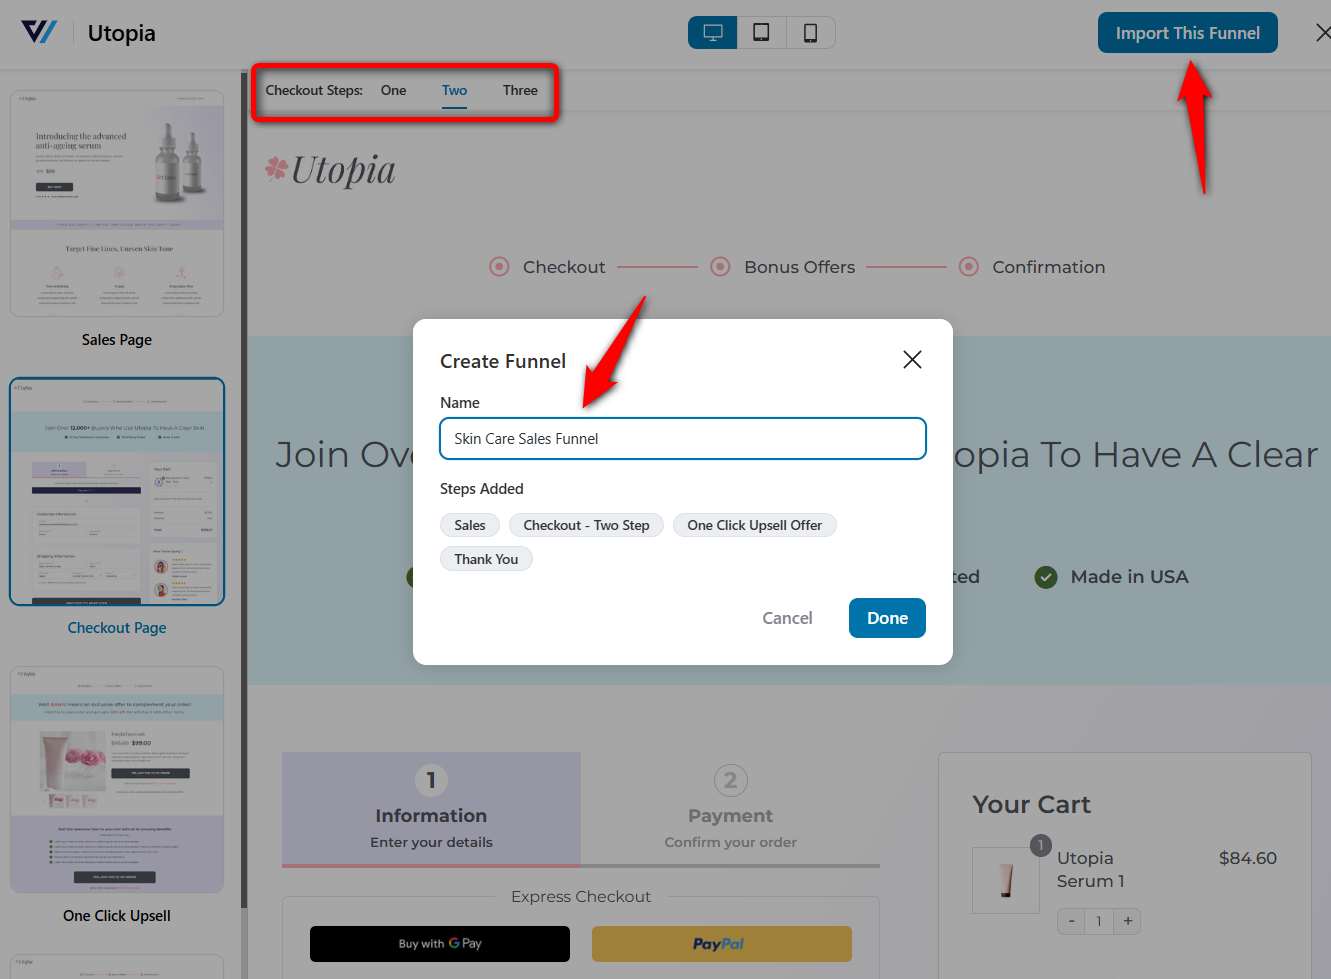
Clicking on ‘Add’ will create the sales funnel with this template.
Step 2: Customize the WooCommerce sales page with Bricks Builder
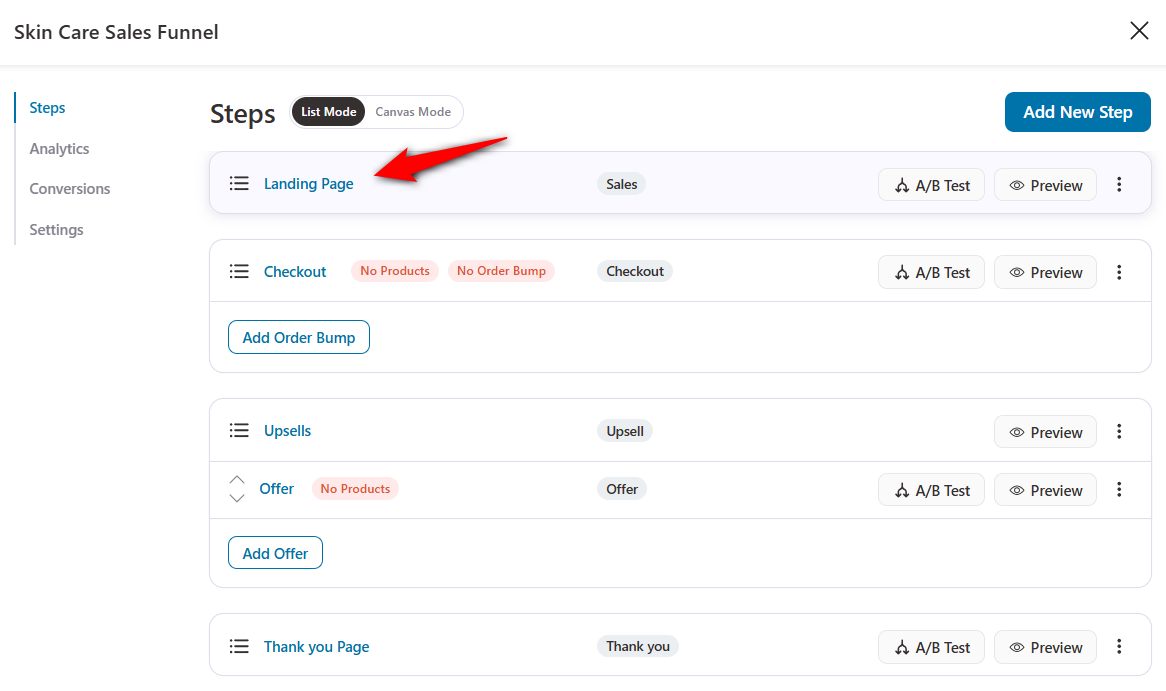
Click on the landing page to start customizing it.
You’ll land on the Design tab. From there, click on the ‘Edit Bricks Template’ button.
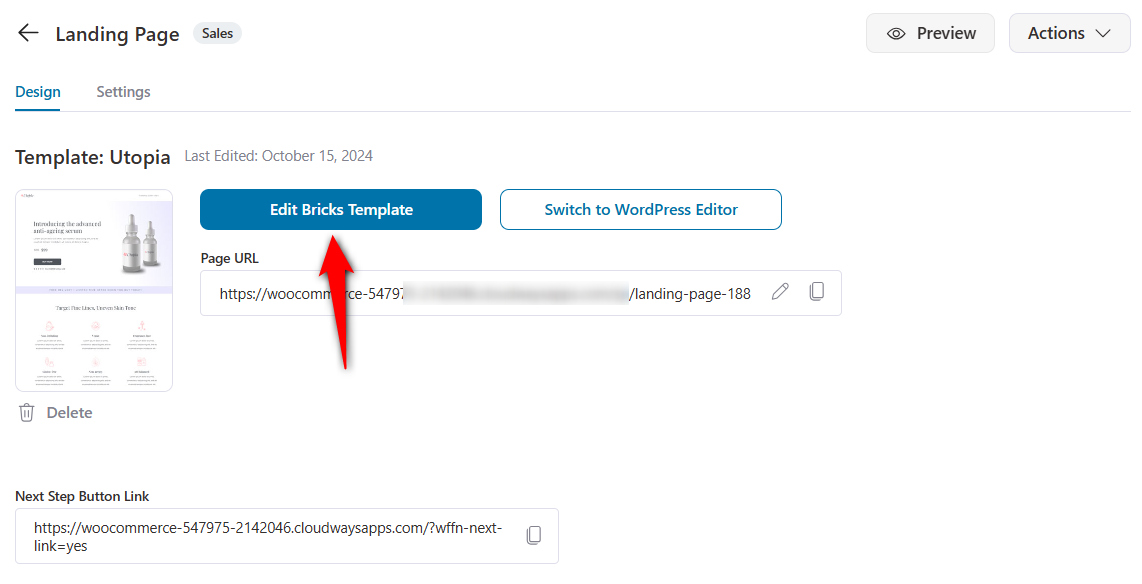
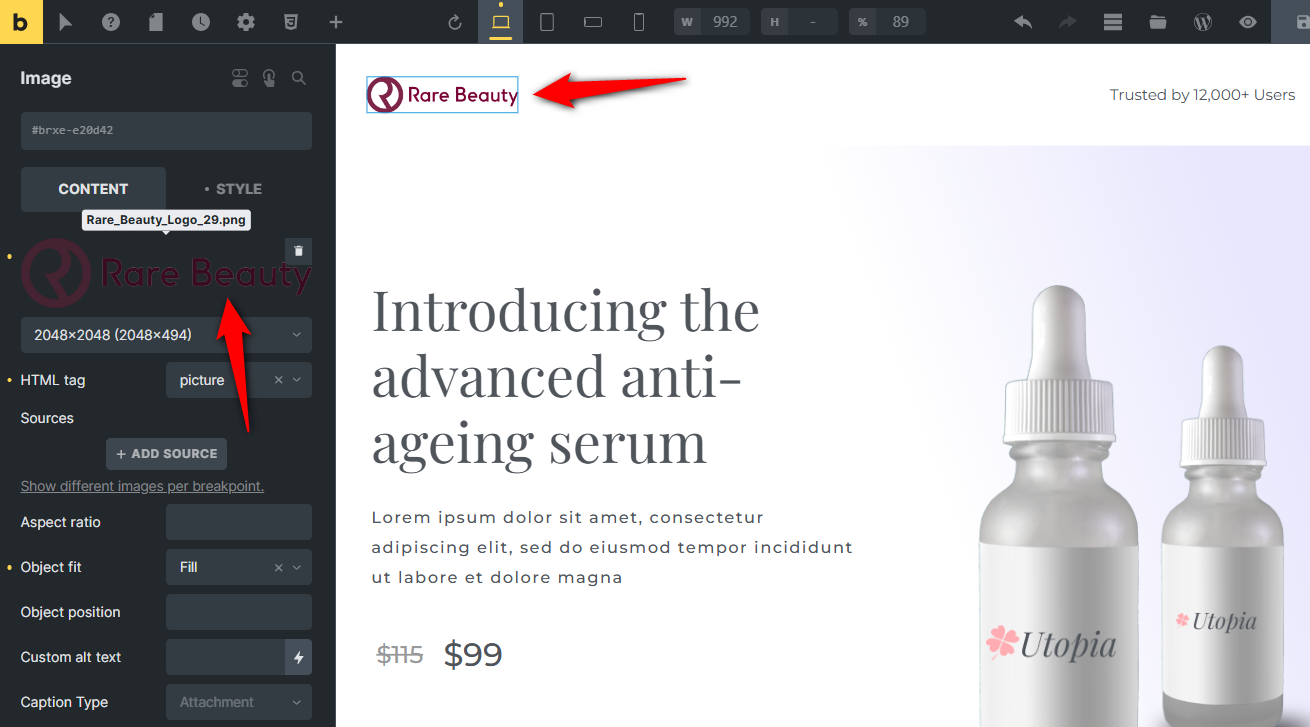
It’ll load your page in Bricks Builder, where you can customize each section.
For starters, update the logo by uploading a new logo from your device or selecting the image from the media library.
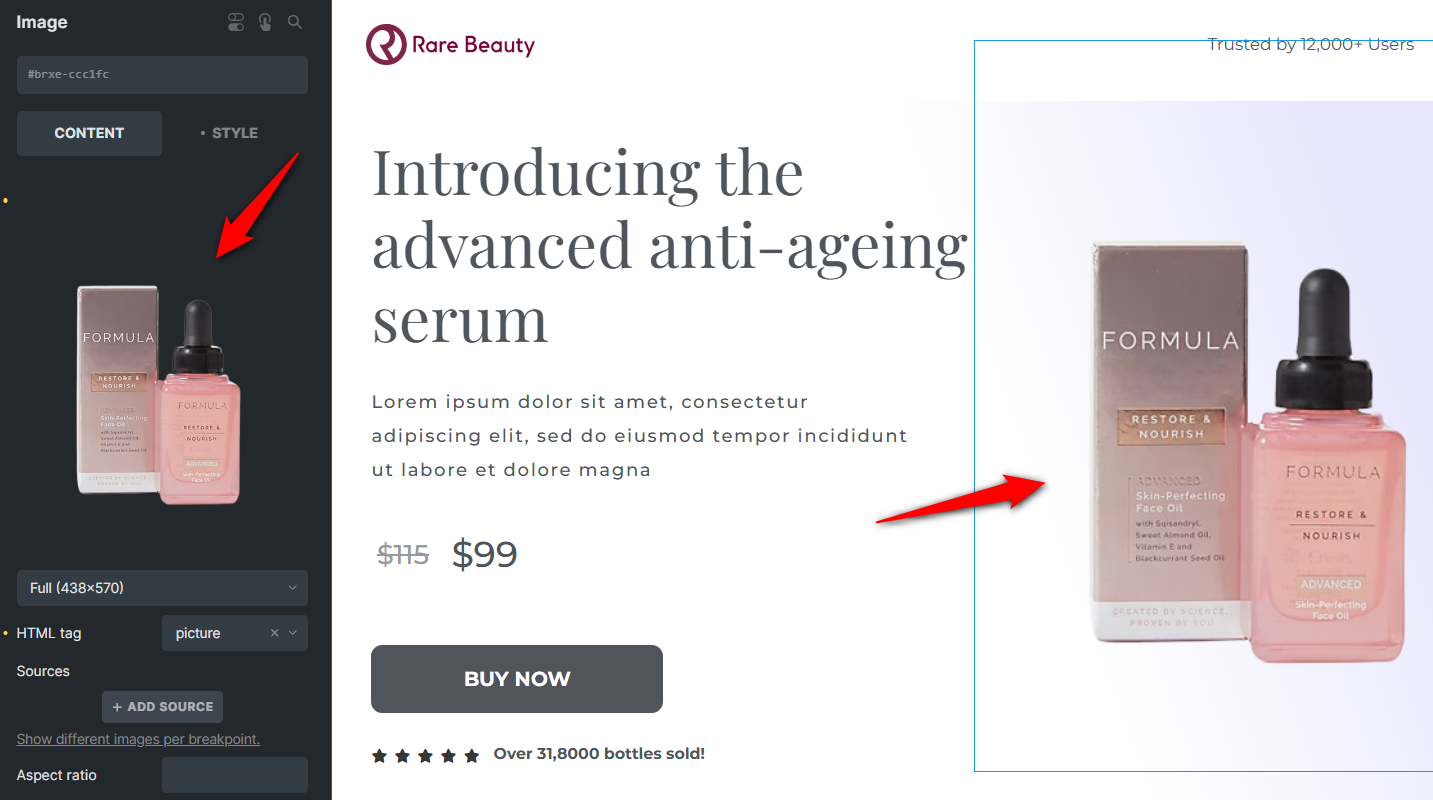
Similarly, update the product image shown on the landing page.
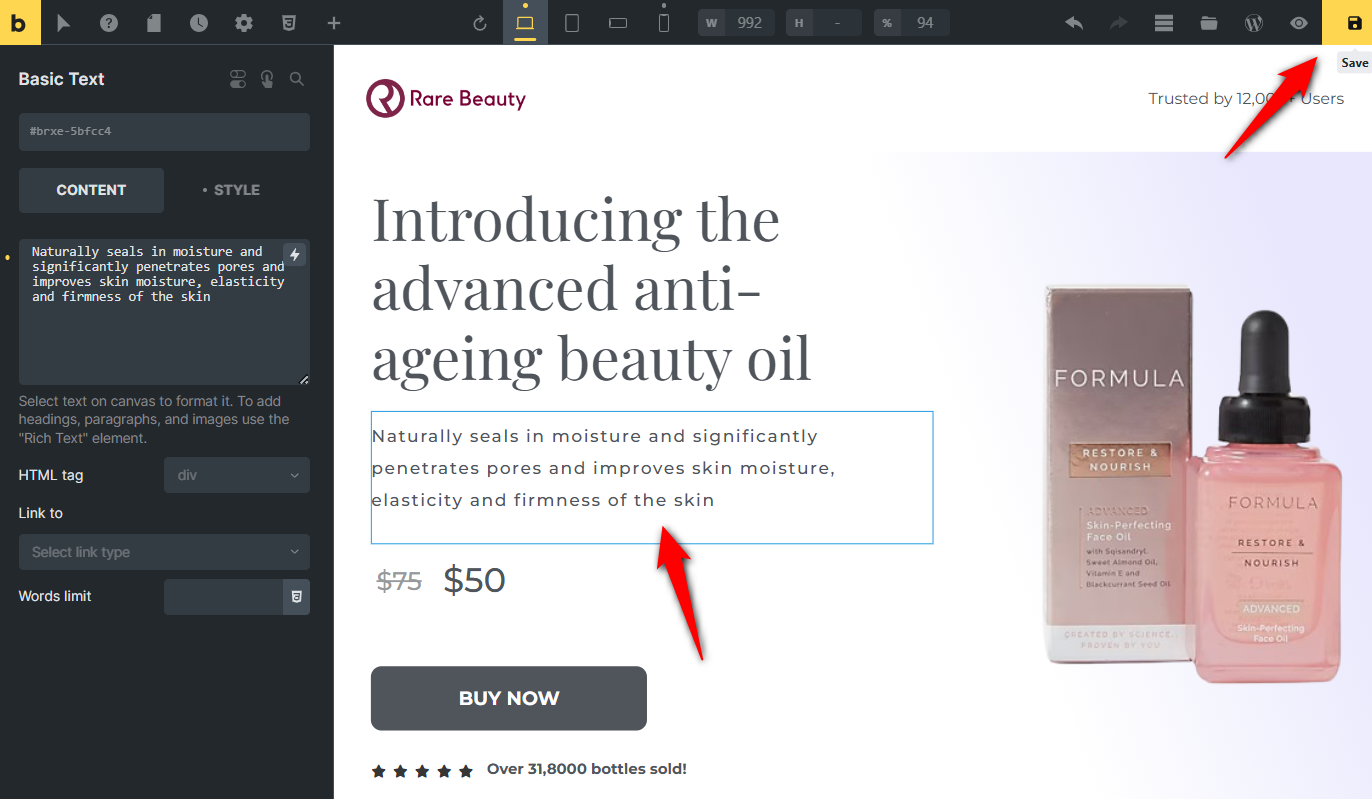
Customize the landing page content to suit your needs.
Click the 'Save' button in the top-right corner to save the updated content when you’re done.
Here is a preview of the landing page:

Step 3: Edit the design of your checkout page
Just like you’ve customized your WooCommerce landing page with Bricks, you can customize the checkout page by clicking on the ‘Edit Bricks Template’ option from the Design tab.
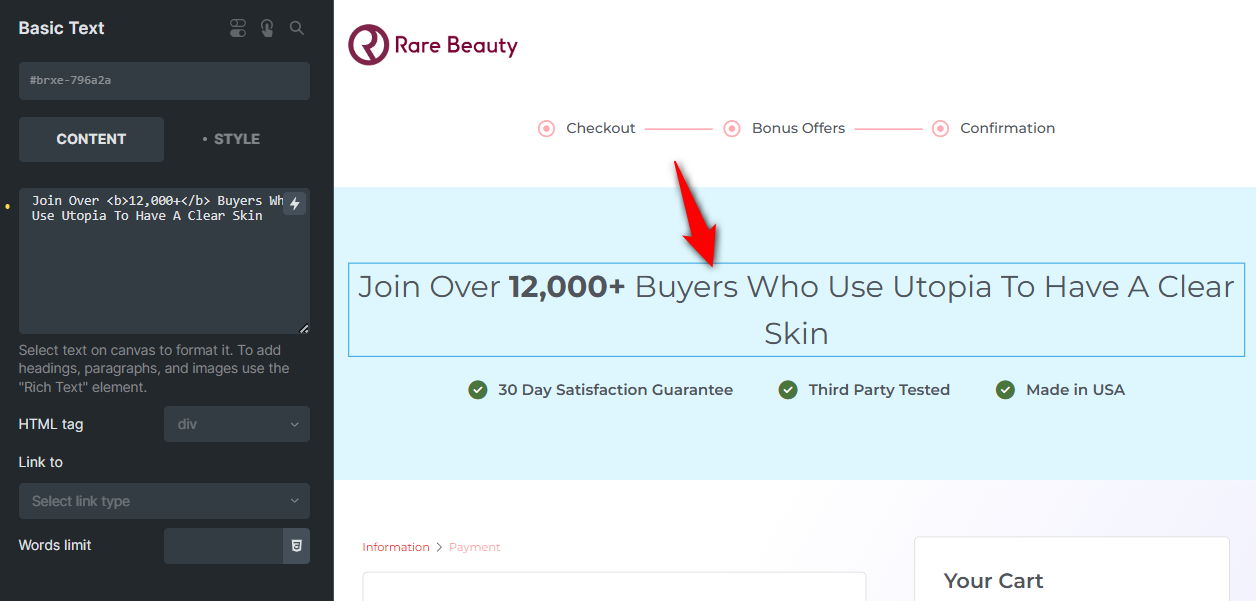
Update the header by clicking on the section and editing its text and lists.
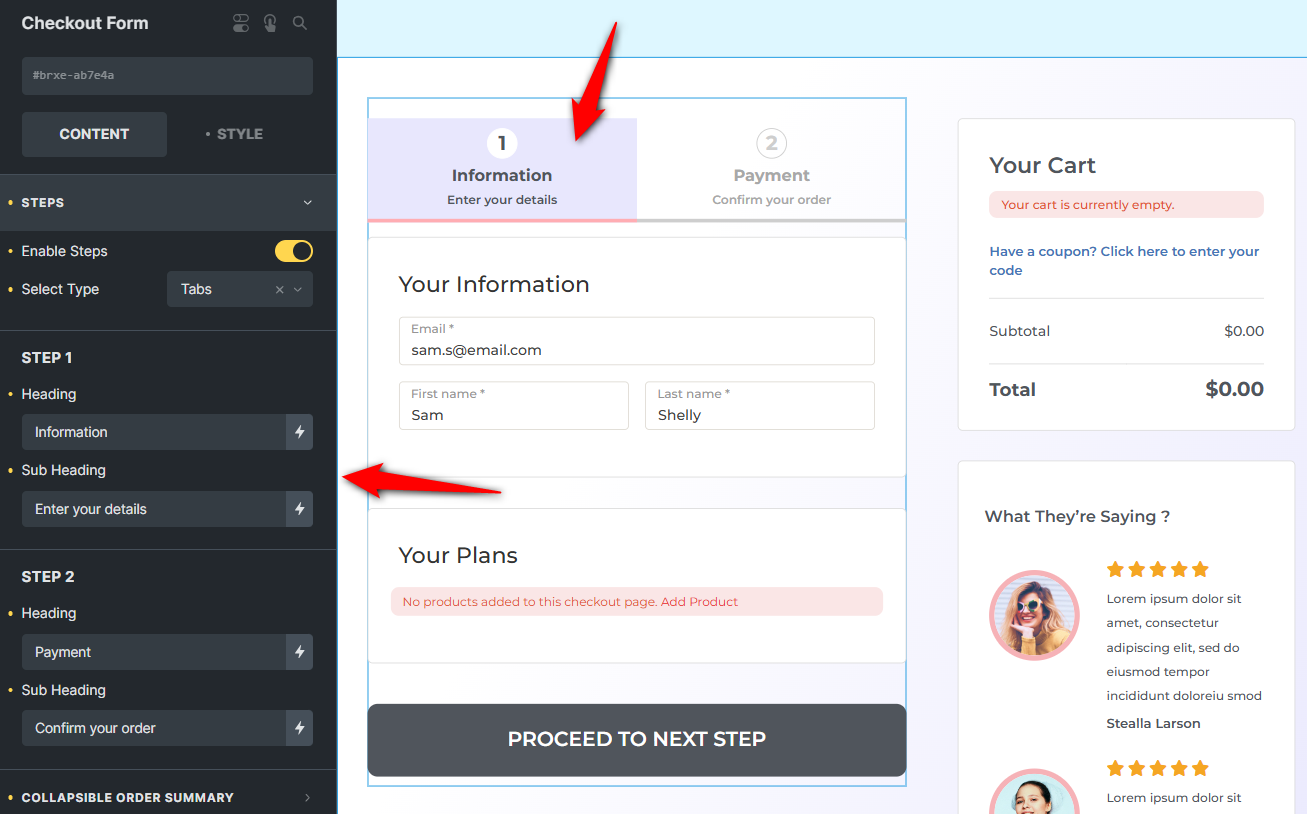
Edit the checkout form by:
- Enabling the checkout form steps and selecting its type to tabs
- Editing the heading and subheadings of the steps
- Customizing the widths of the checkout form fields
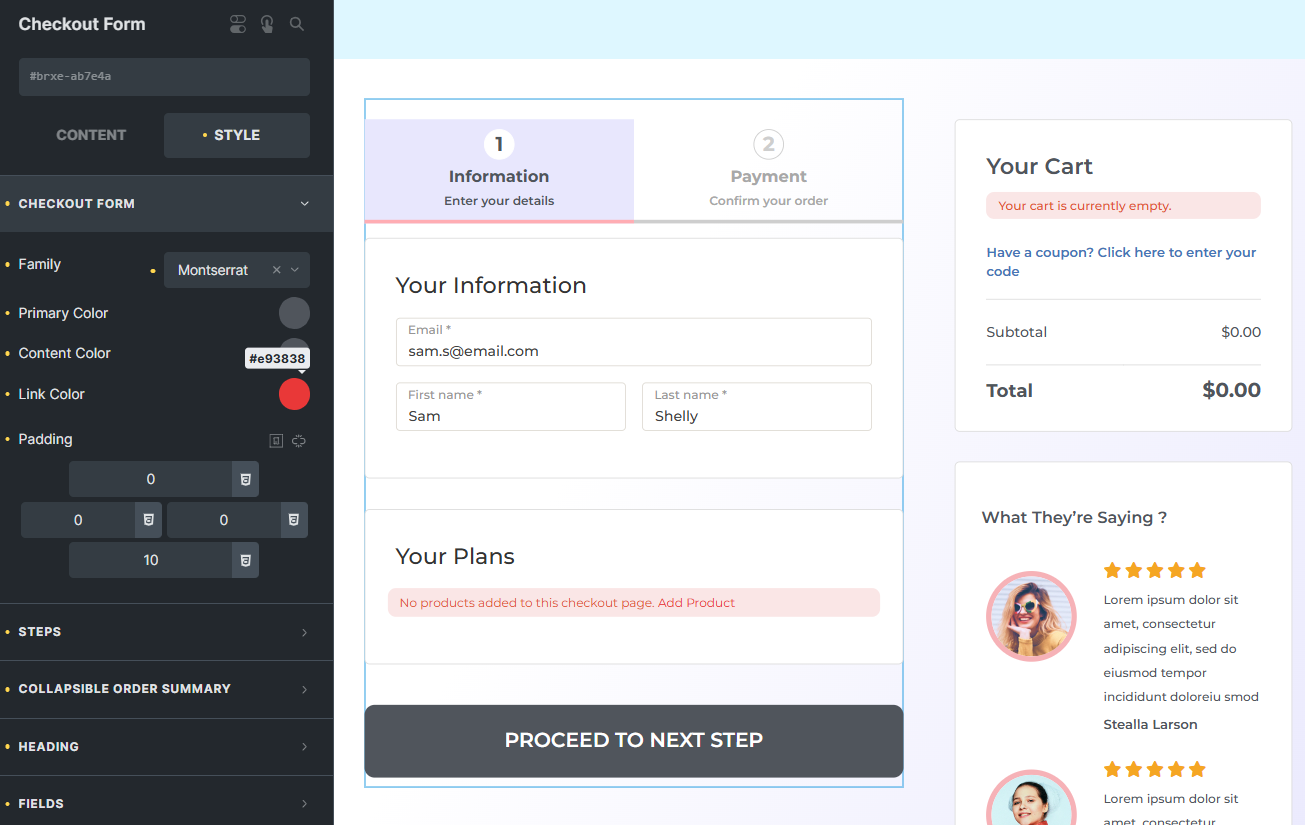
Further on the Style tab, you can customize the colors, padding, typography, margins, etc., for different sections of the checkout form element.
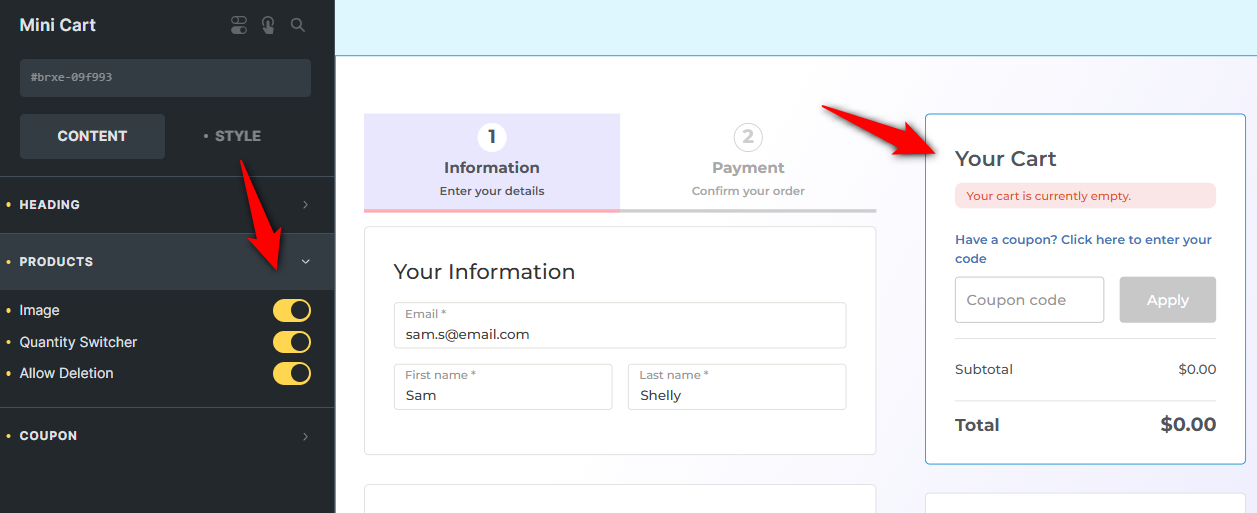
Edit the mini cart element by customizing the heading, product, and coupon sections.
Here, we’ve enabled product images, item deletion, collapsible coupons, and more.
Additionally, you can modify the customer testimonials by putting genuine reviews of your customers to reinforce your brand’s credibility and foster trust in new visitors.
Click on ‘Save’ when done.
Want to customize your WooCommerce checkout page like a pro? Here's the detailed article for you:
Customize WooCommerce Checkout Page without CodeStep 4: Add a base product to your checkout page
Now, you need to add the base product. Once users click the CTA on the landing page to place an order, the order will be added to the checkout.
Since we’ve built the landing page for our ‘beauty oil’ product, adding this product to the checkout page is important.
This will allow users to redirect from the landing page to checkout with the ‘Beauty Oil’ already added to the cart.
To do that, go to the Products tab and click on the ‘Add Products’ button.
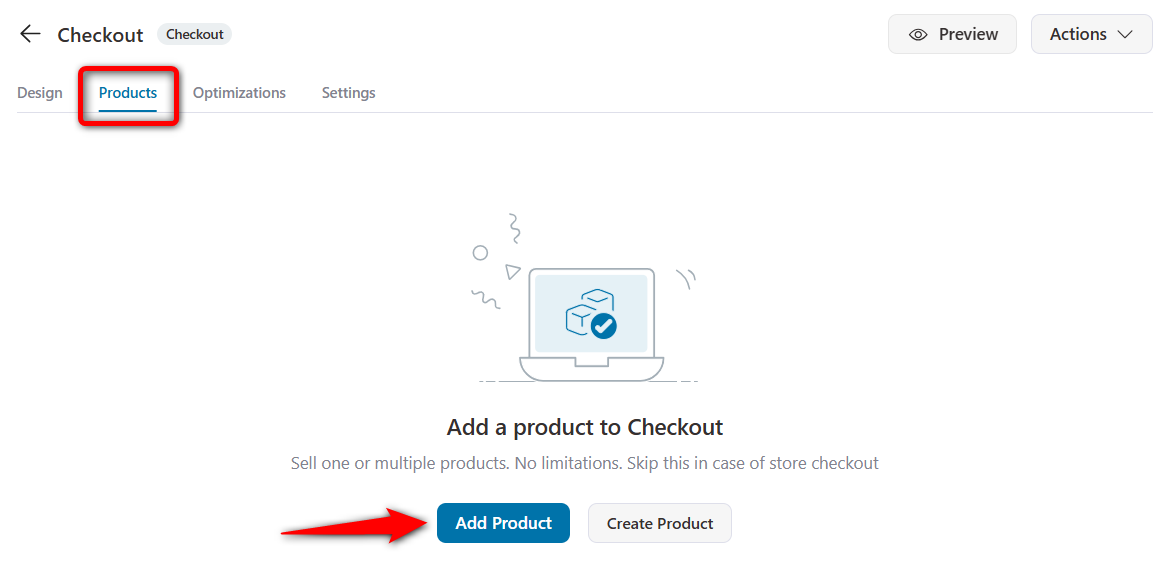
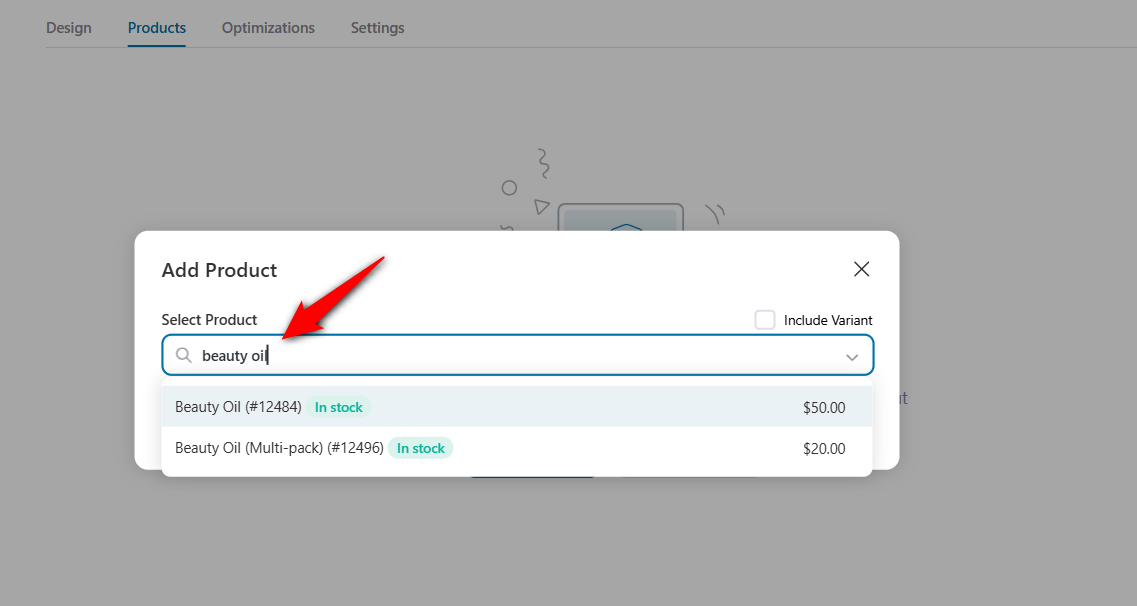
Search for the product, then click its name to add it here.
Your product will be added to the checkout page.
You can offer discounts or set quantity limits for this product here.
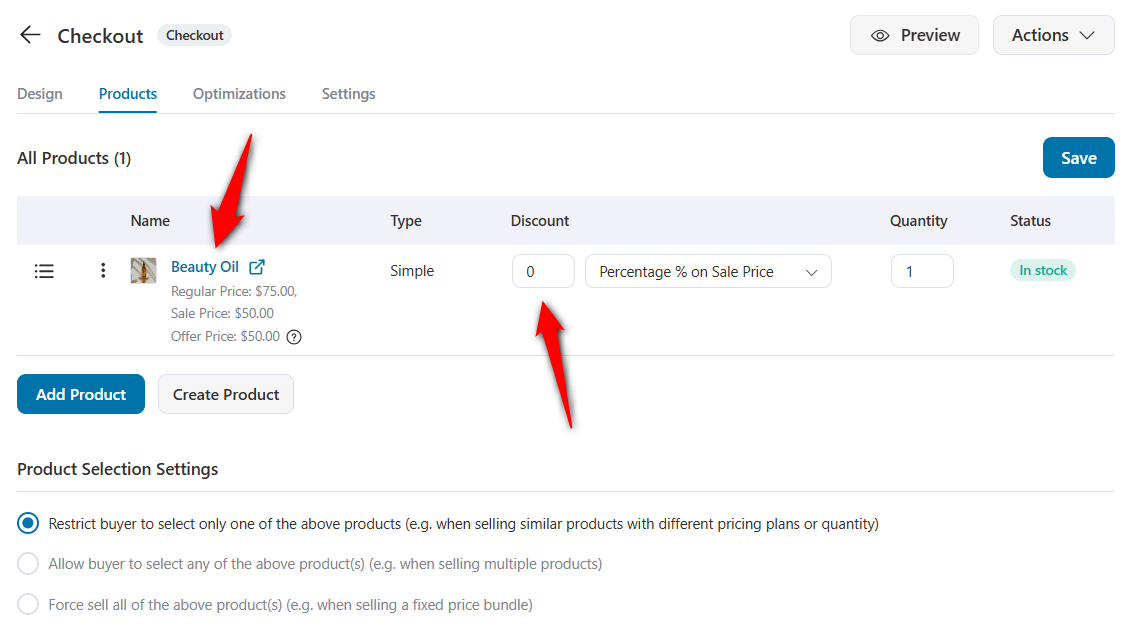
Hit ‘Save’ when done.
Step 5: Optimize your WooCommerce checkout page
FunnelKit lets you optimize your checkout page for quick conversions.
You can customize your checkout fields and make your form concise based on your requirements.
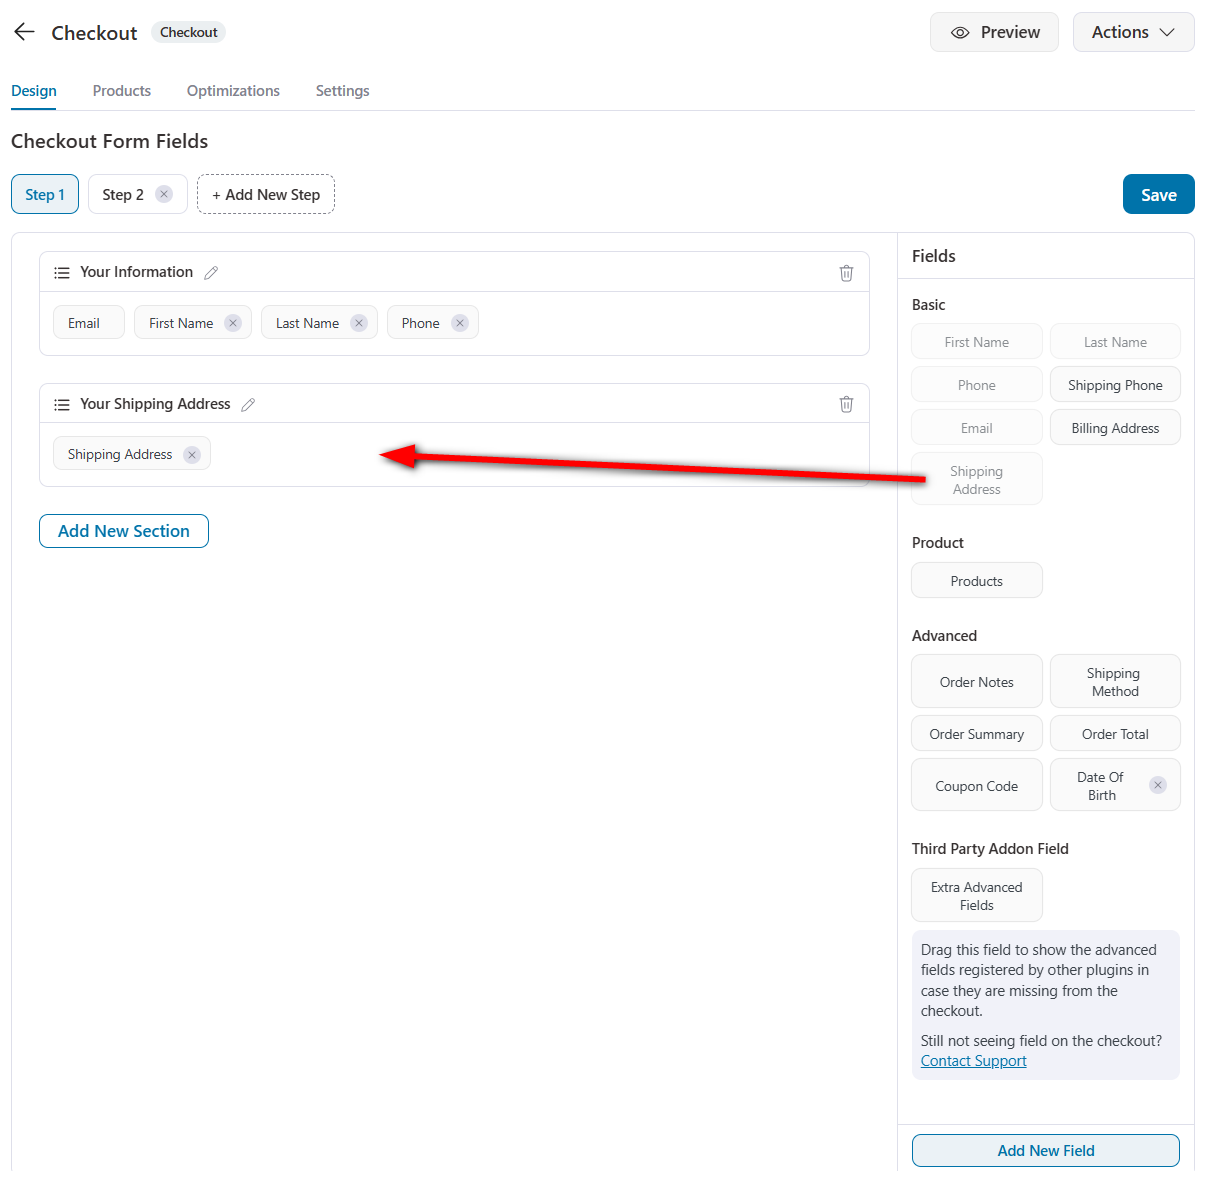
Scroll down to the Design tab, and you’ll see Checkout Form Fields.
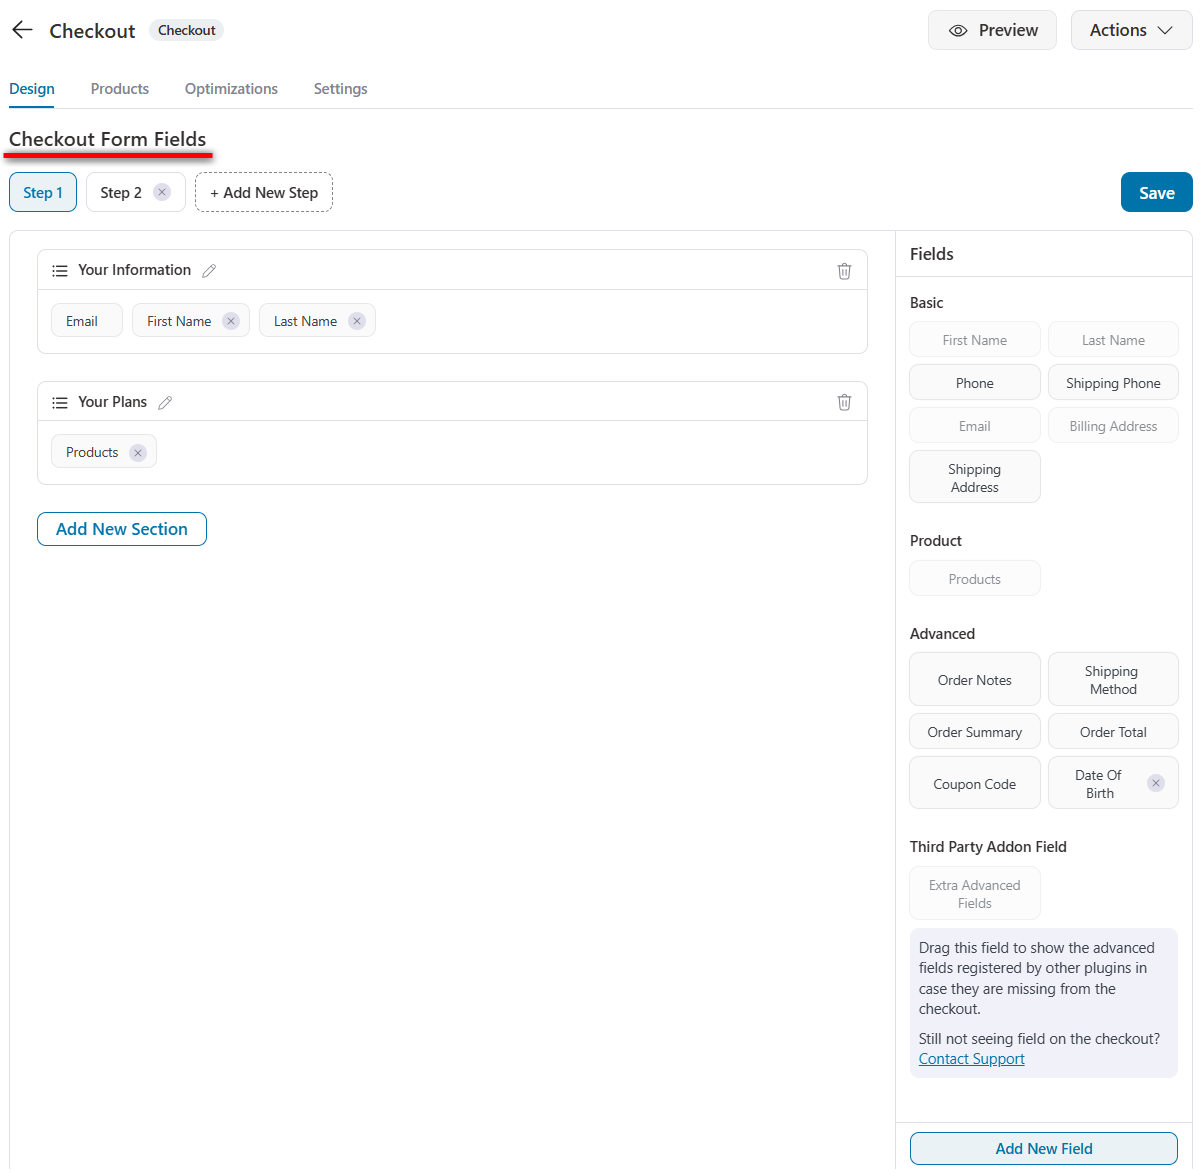
FunnelKit’s checkout field editor lets you modify, rearrange, and delete checkout fields or sections with its simple drag-and-drop feature.
In addition, you can add custom fields to collect additional information from your customers on the checkout page.
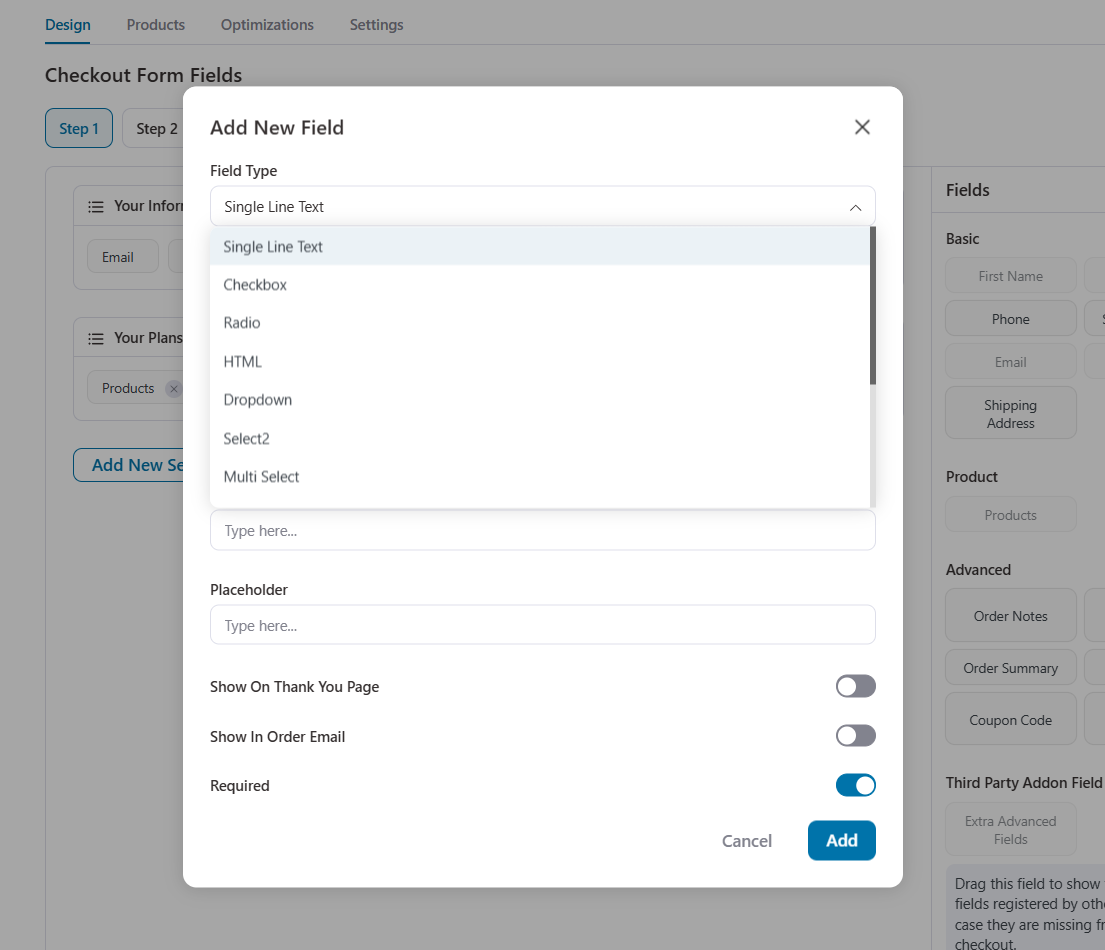
Once you’re done, hit ‘Save’ to lock all your changes.
Furthermore, FunnelKit offers a range of optimization options you can incorporate into your checkout page.
Go to the Optimizations section and enable the options you want on your checkout page.
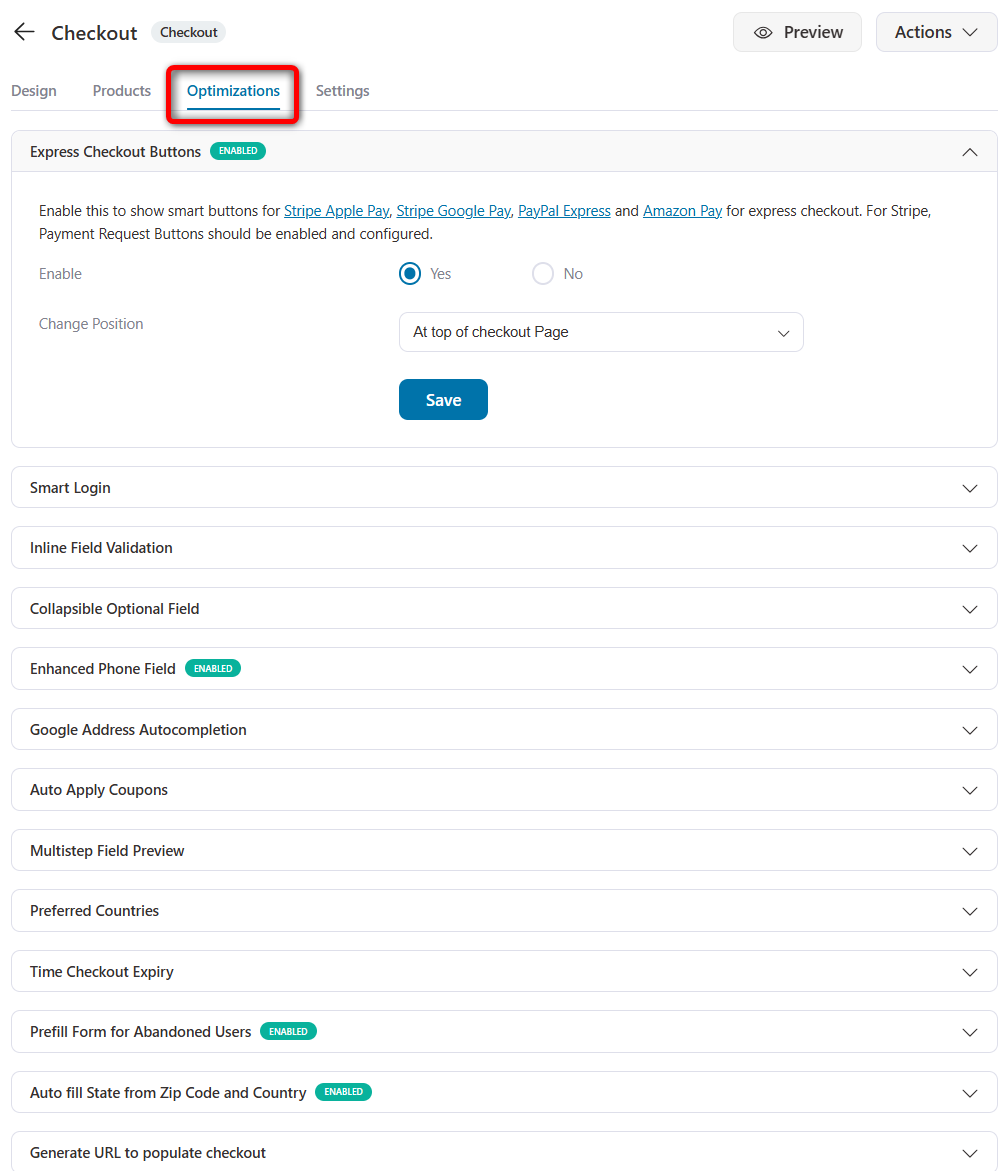
Implement these options:
- Express checkout
- Smart login
- Google Address autocomplete
- Auto-apply coupons
- Enhanced phone field
- Checkout validation
- Multi-step field preview
- Pre-fill form for cart abandonment users
Click on the ‘Save’ button to lock all your changes.
Step 6: Add compelling order bumps to boost AOV
Order bumps are an incredibly effective way to increase average order value (AOV) by offering additional products at the right moment.
FunnelKit Funnel Builder lets you add order bumps in just a few simple steps.
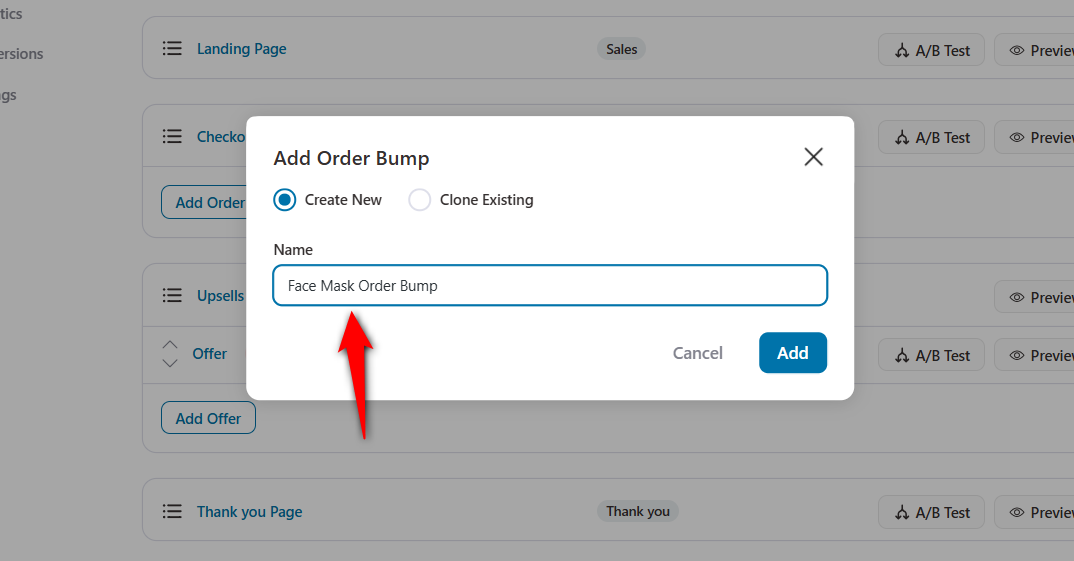
To add an order bump offer, click on the ‘Add Order Bump’ button below the checkout page.
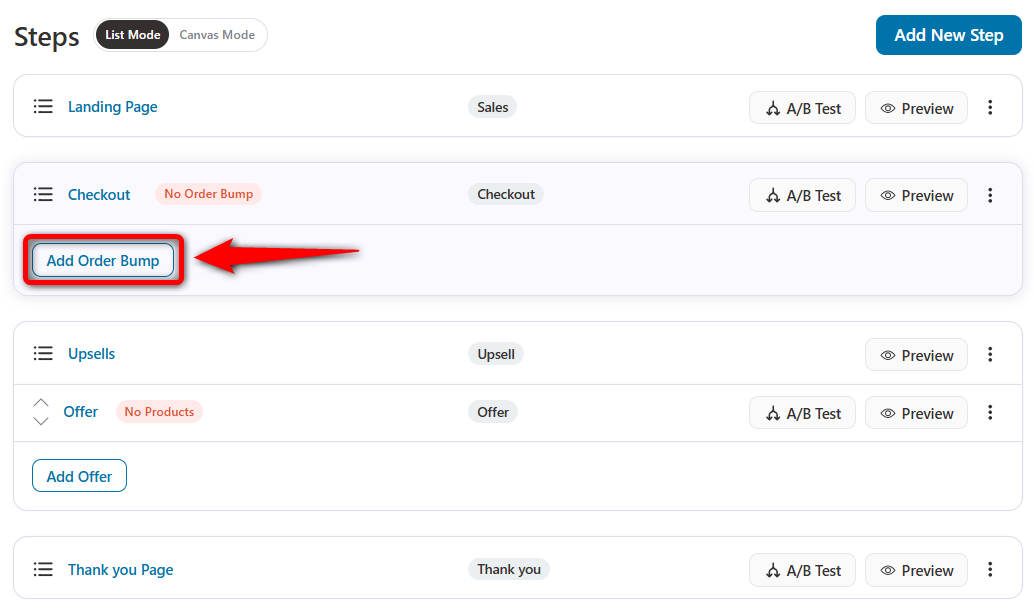
Select ‘Create New’ and name your order bump to add it.
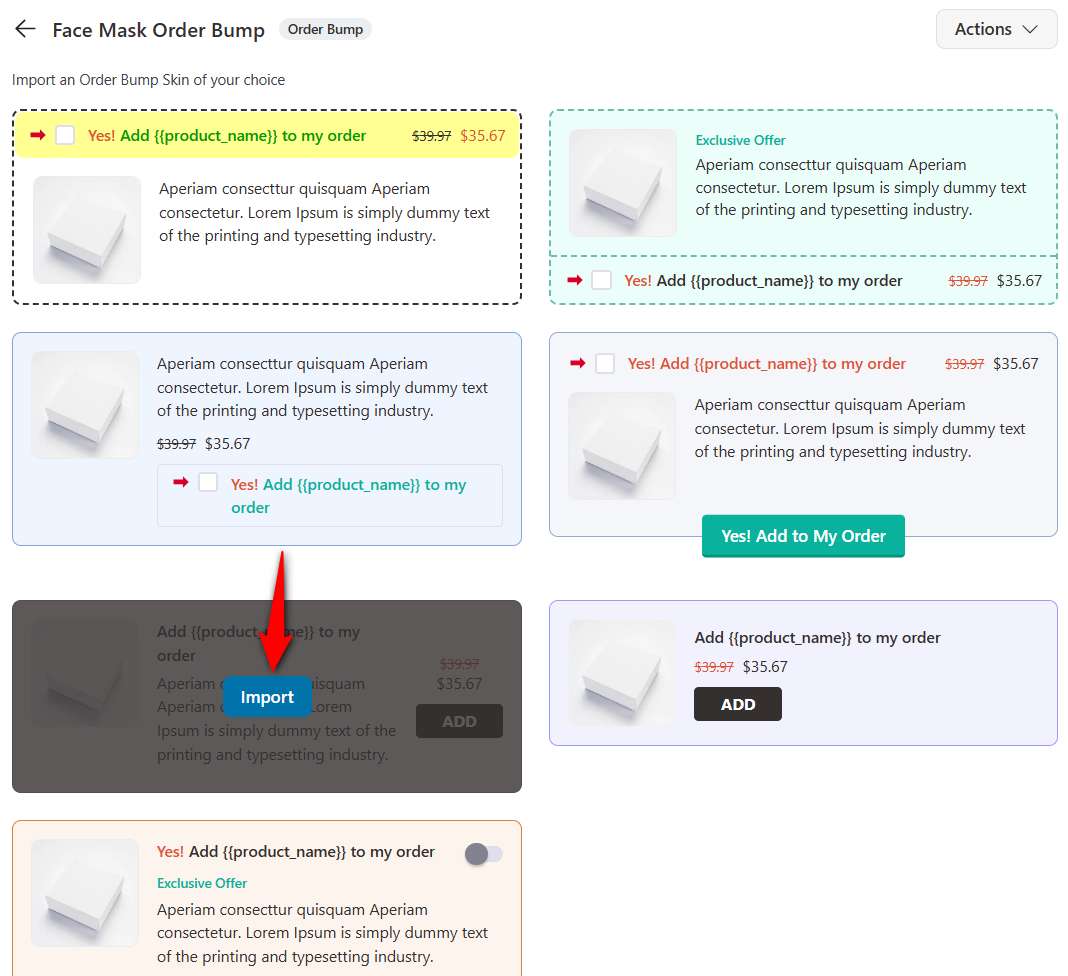
Import the order bump skin that you like.
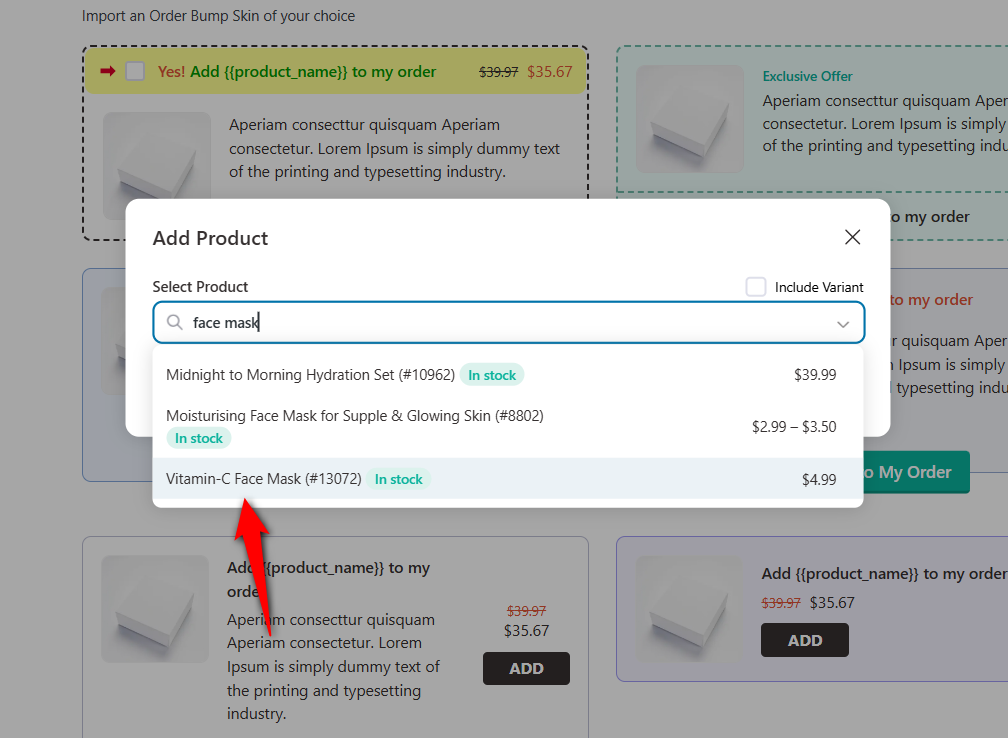
Search for products to add to your order bump. This product should be relevant to your main product.
It supports all kinds of variables, subscriptions, and bundle products.
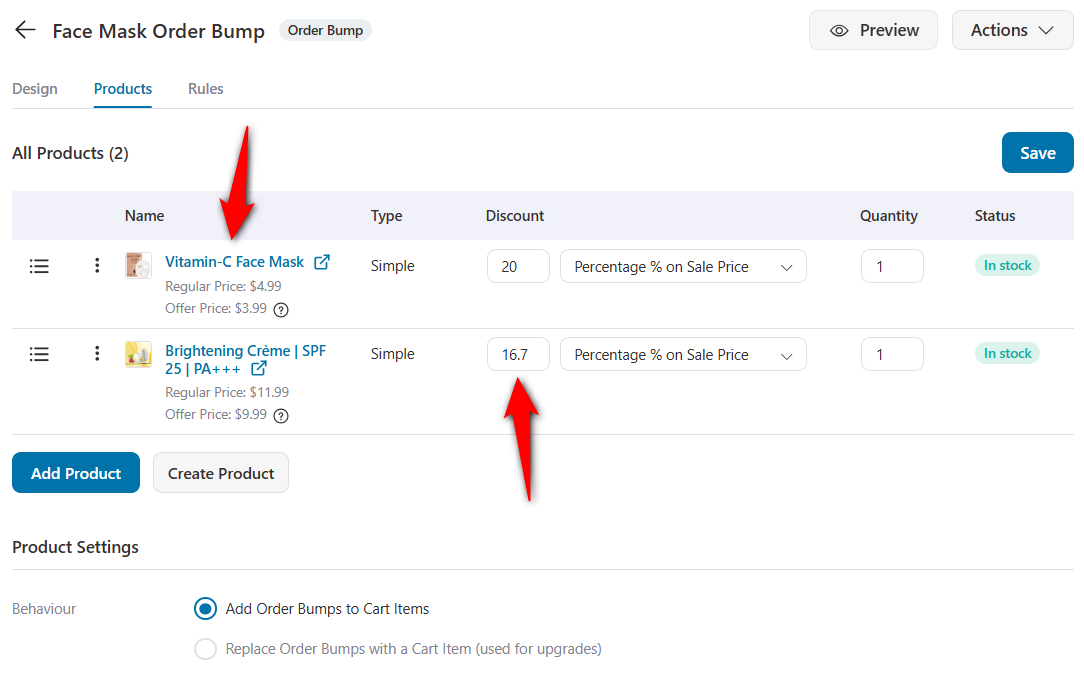
You can add discounts or even set its behavior from the Products tab.
Additionally, you can add multiple products to the order bump to make your primary offer relevant.
Once you’ve added the product as your order bump, go to the Design tab to style your bump offer.
You can change the order bump’s skin, content, and style to make it attractive and on-brand.
Here’s how the checkout page looks with the order bump offers:
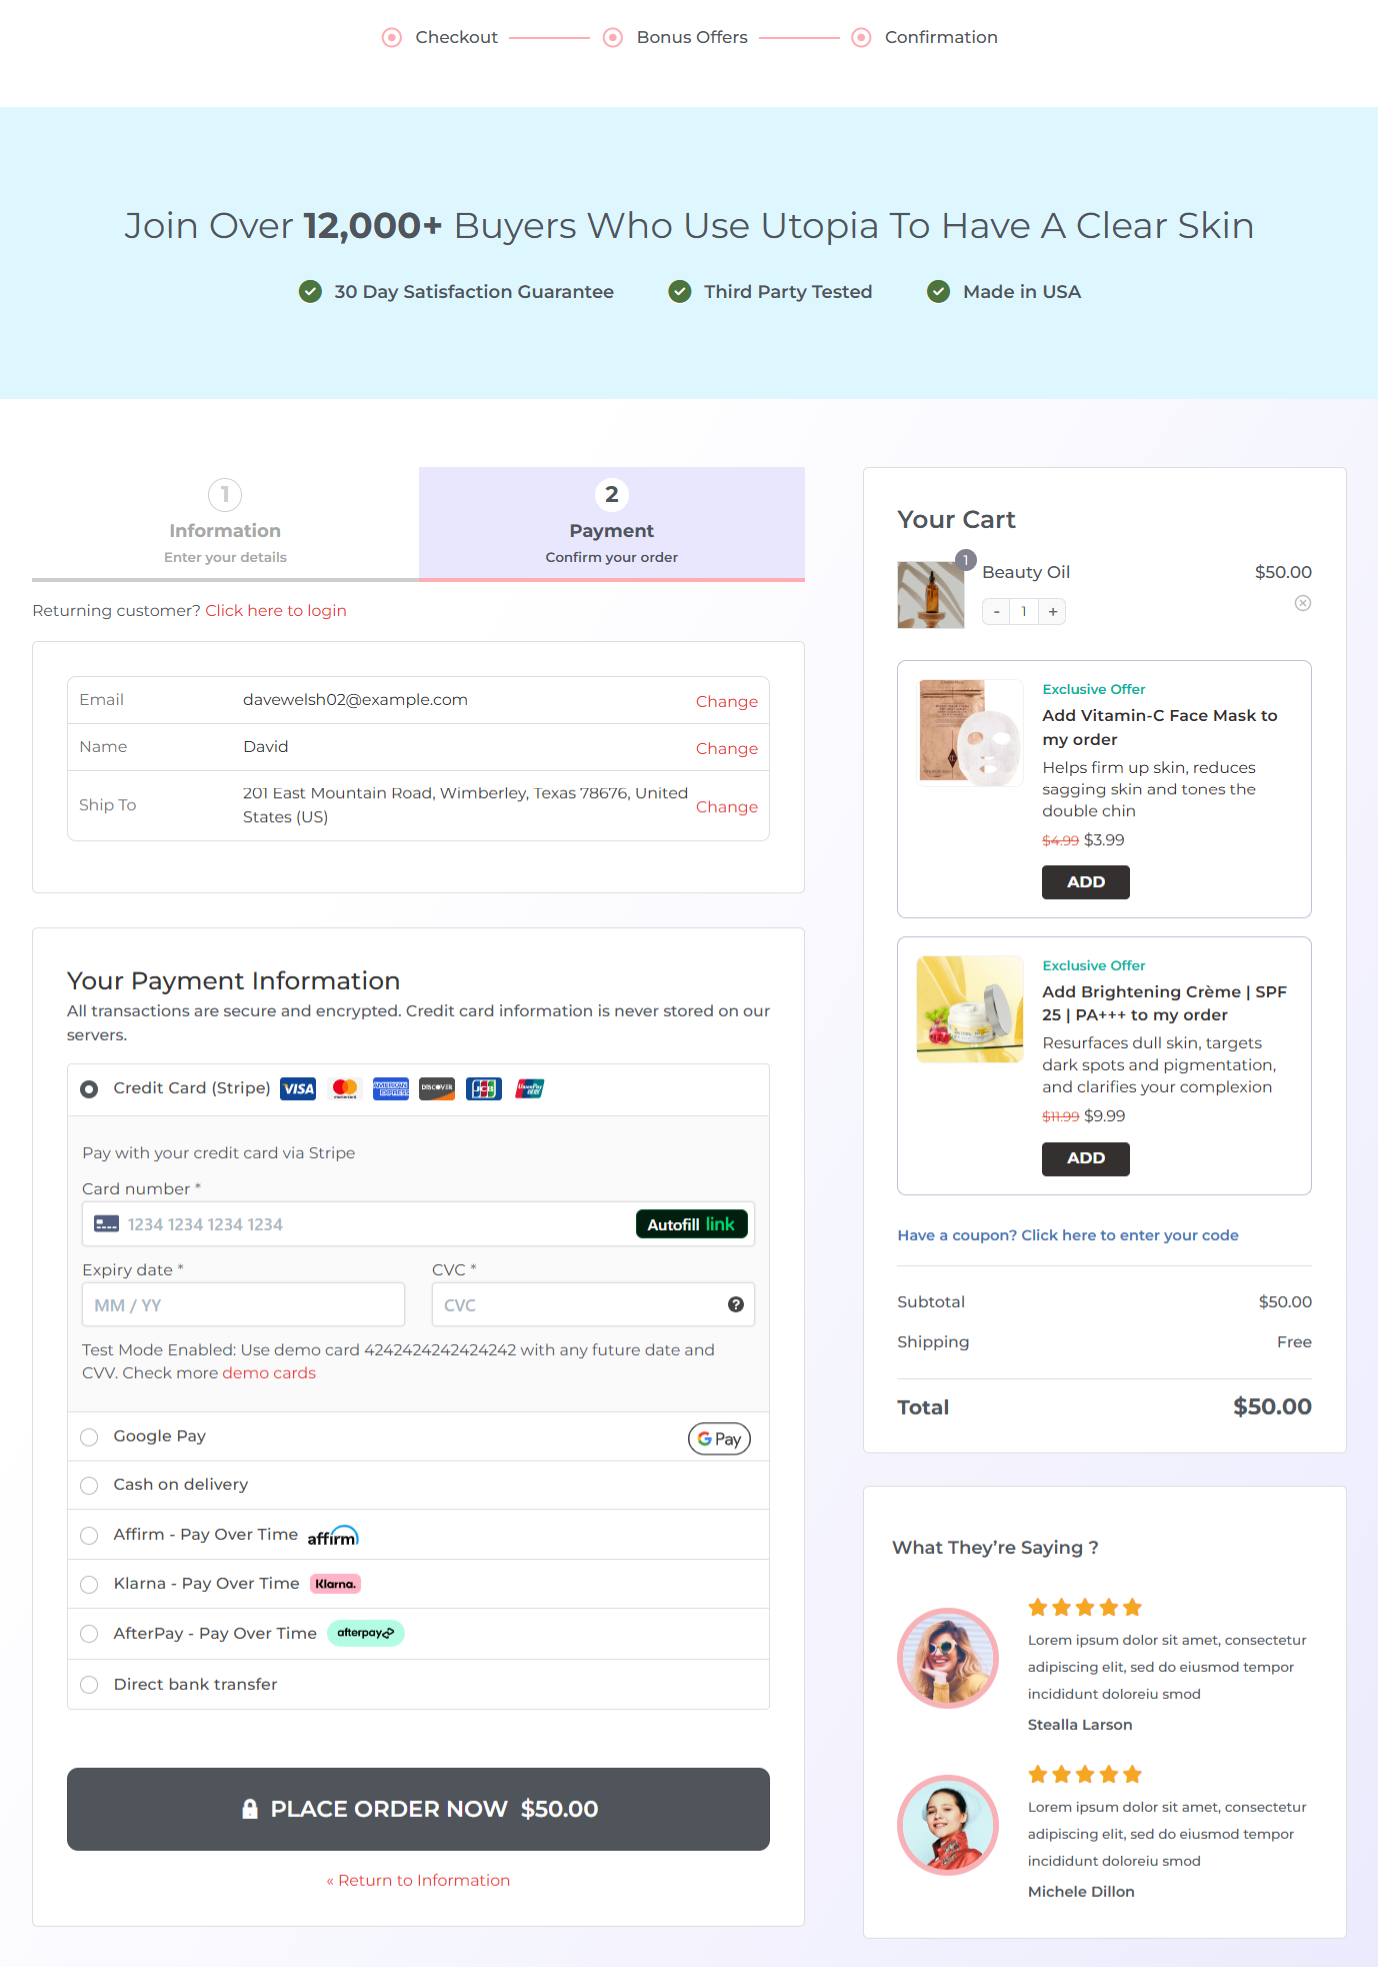
You can even set the conditions to display your order bumps based on the applied rules.
Want to create compelling order bumps for your WooCommerce checkout page? Check out:
Offer WooCommerce Order Bumps on CheckoutStep 7: Add post-purchase one-click upsells
One-click upsells are post-purchase offers that appear after the checkout and before the thank you page to increase the average order value without interrupting the customer’s checkout flow.
As with other pages, click the name of your upsell offer to start customizing it.
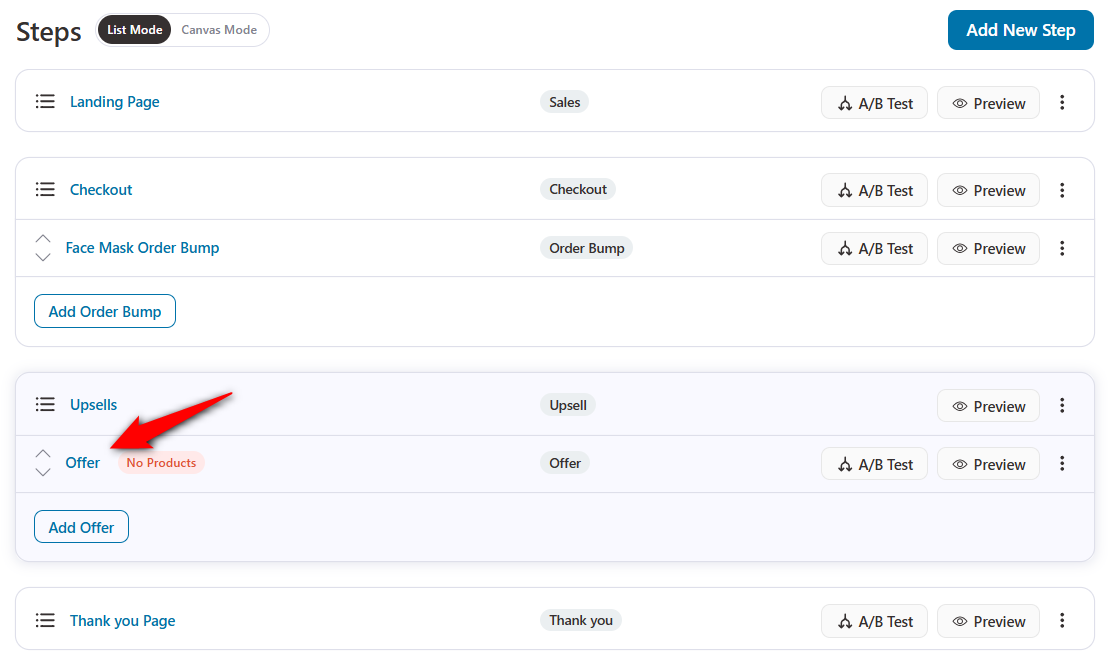
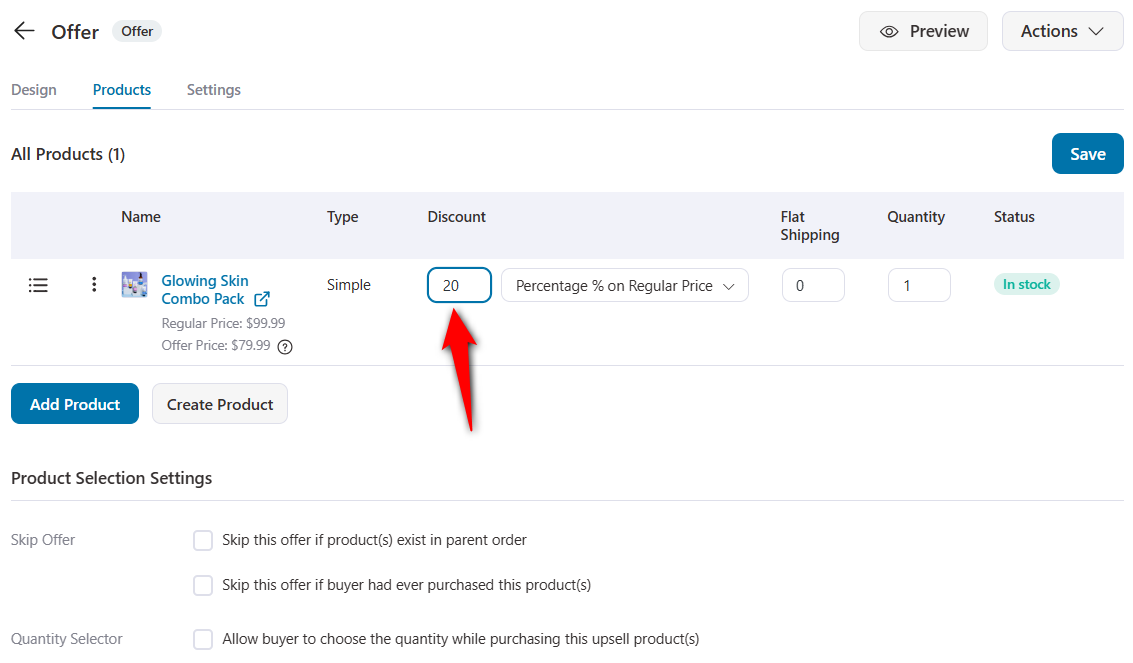
Add the products to the upsell offer from the Products tab.
Choose the product from the search. You also have the option to add item variations such as colors, sizes or types.
Specify the quantity and discounts of the added products.
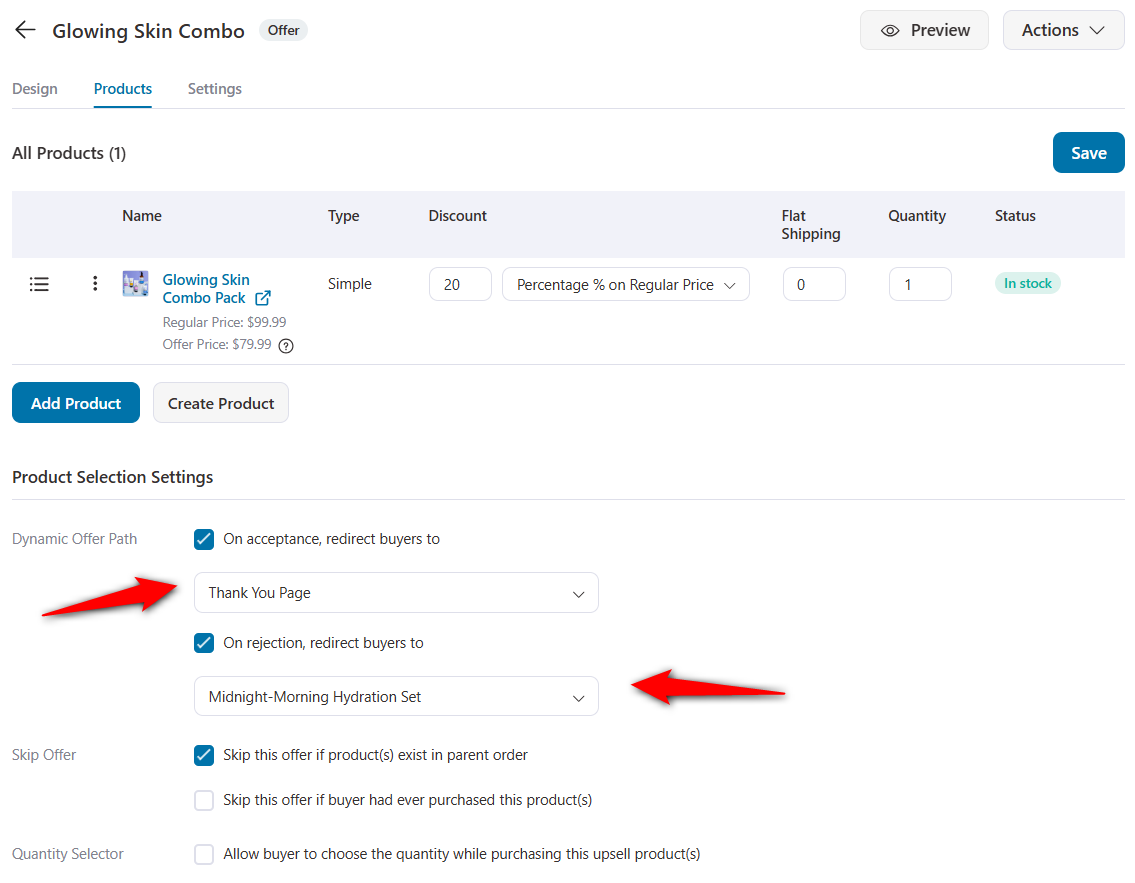
In case of multiple products as your one-click upsell offers, interlink them using the ‘Dynamic Offer Path’ option.
This is how you set up downsells within a sales funnel.
Under the Design tab, you can edit the design of your one-click upsell page like you’ve customized your sales and checkout pages.
You get access to 10 special Bricks elements to personalize the upsell offer page with your favorite page builder.
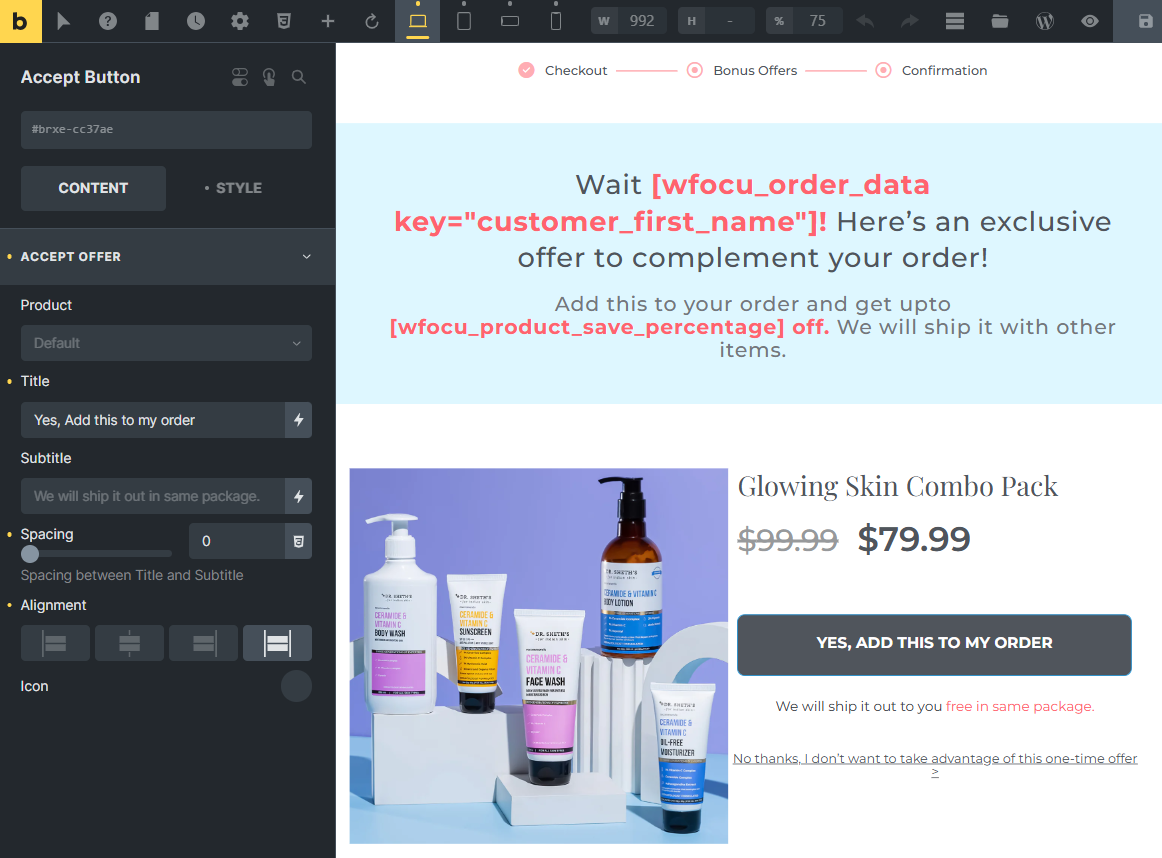
You can apply rules to these offers to determine when a particular upsell offer is displayed to a customer, change offer priority, order behavior, etc., from the settings section.
Save the changes, and your one-click upsell offer is ready to make an impact!
Step 8: Customize your WooCommerce thank you page
After a customer completes a purchase, the thank you page serves as the final touchpoint in their shopping experience.
FunnelKit Funnel Builder lets you customize your Bricks WooCommerce thank you page and leave a lasting impression on your customers.
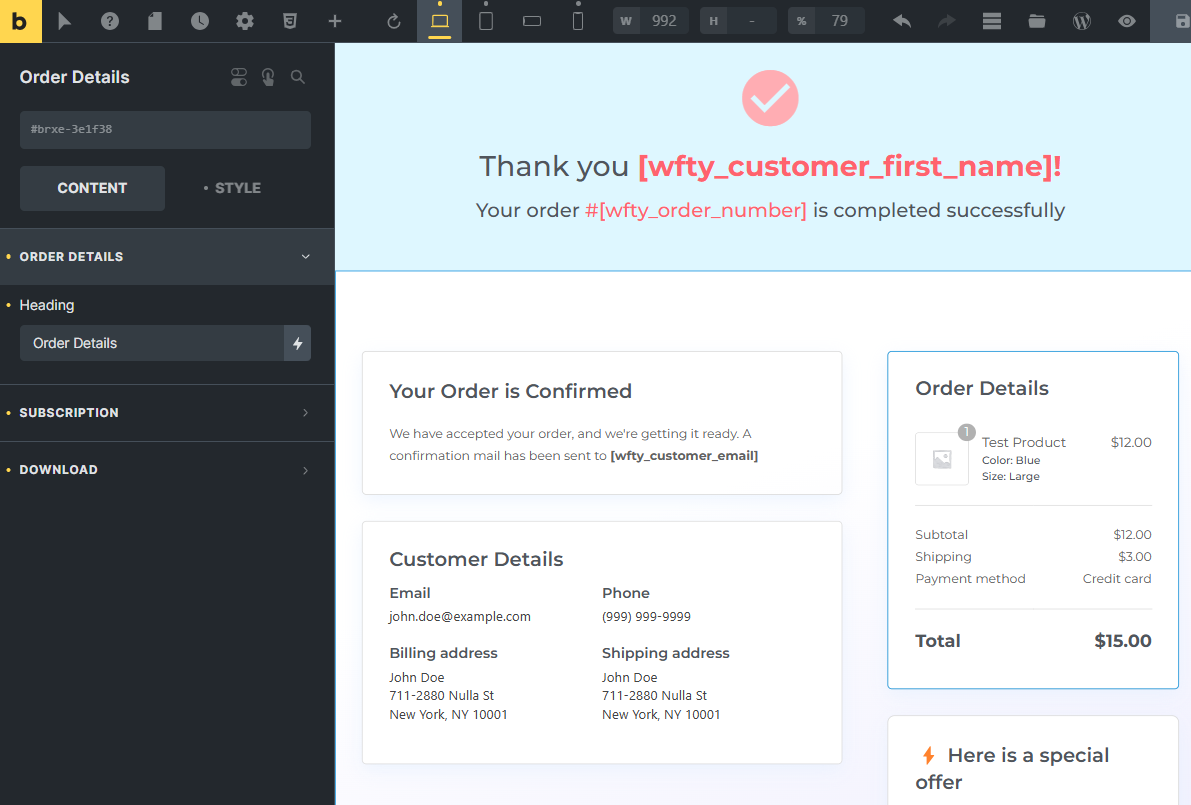
You can dynamically display personalized details to create a welcoming and professional post-purchase experience.
Use thank you page elements developed by FunnelKit in Bricks to provide key details and encourage future sales.
Create visually appealing thank you pages in WooCommerce with this guide:
Create Custom WooCommerce Thank You Pages that Boost Repeat PurchasesStep 9: Test your Bricks WooCommerce sales funnel
Well done! You’ve successfully created your sales funnel! Now, it’s time to test it and ensure that every page is working.
Go back to your funnel and click on the ‘Preview’ button next to your sales page.
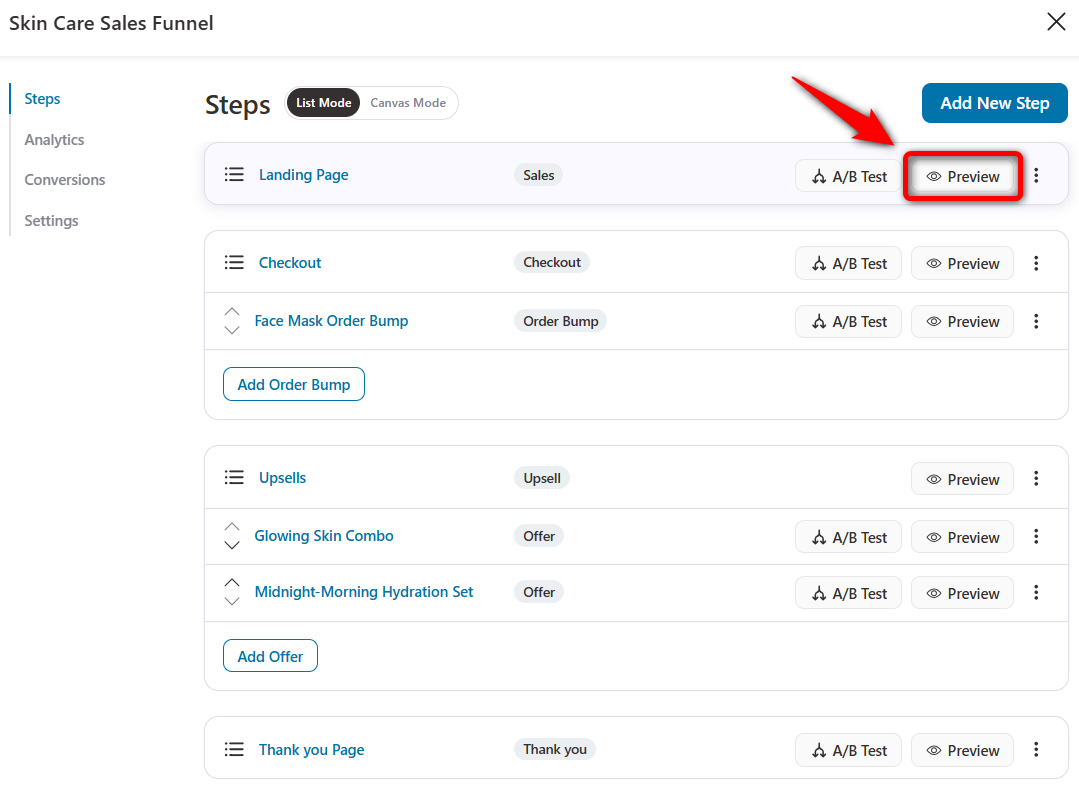
This will open your landing page (the starting step of your sales funnel).
We recommend you test the entire process by making a test payment to see if everything works as you intend.
Bricks Templates and Elements for WooCommerce Sales Funnels
Let's look into the Bricks elements and templates for WooCommerce available inside FunnelKit.
Opt-in pages
Lead capture or opt-in pages are crucial for businesses looking to generate leads and build their email lists. This way, you can later nurture them to convert potential customers into paying clients.
These specialized landing pages are designed to capture visitors’ contact information in exchange for a valuable freebie, such as a free resource, discount, or exclusive content.
You can also rearrange your opt-in form fields using the drag-and-drop functionality and add custom fields.
Lead generation pre-built templates
With FunnelKit, you can build beautiful lead capture pages with Bricks elements using pre-built opt-in page templates.
Browse the template you like and import it with a single click.
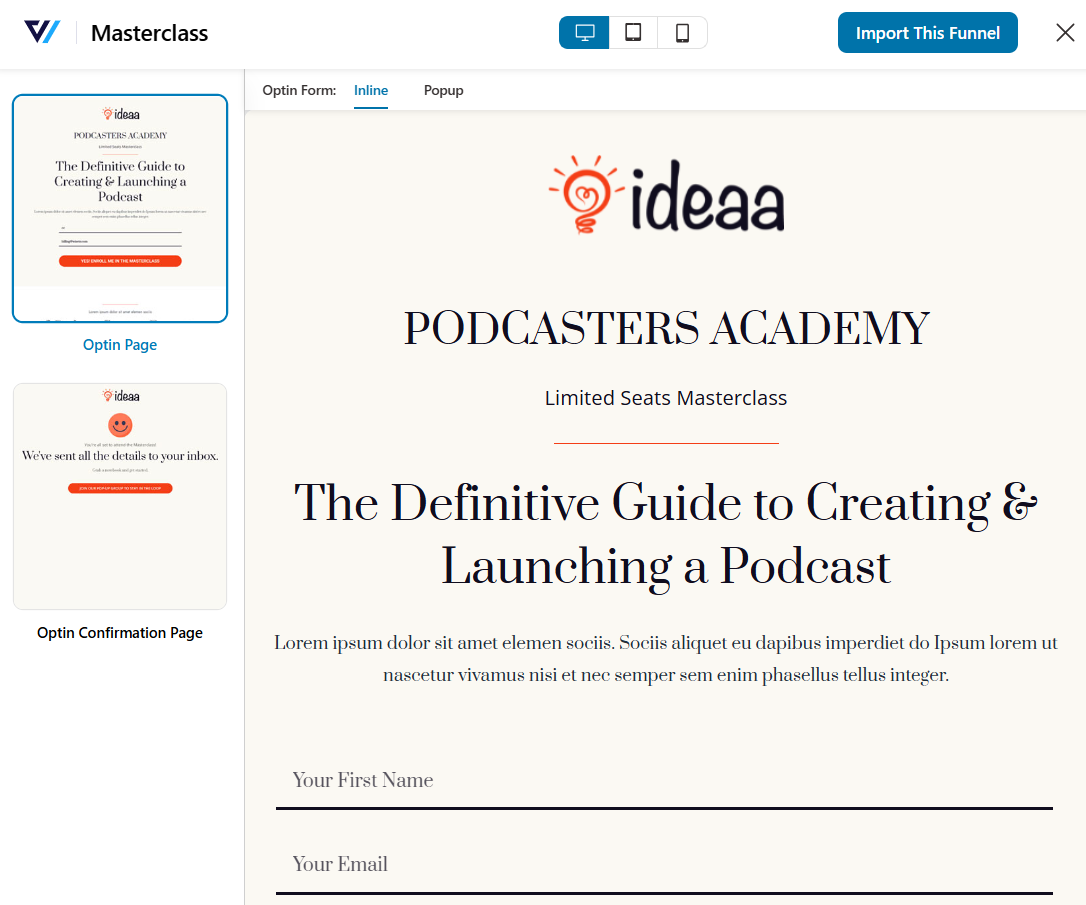
You can capture your leads via an inline or pop-up opt-in form based on your business requirements.
Opt-in page Bricks elements
FunnelKit has developed two Bricks elements for opt-in pages to help you customize your lead capture pages:
- Inline Optin Form
This adds an inline opt-in form element to lead capture pages. This Brick element is embedded directly within the page.
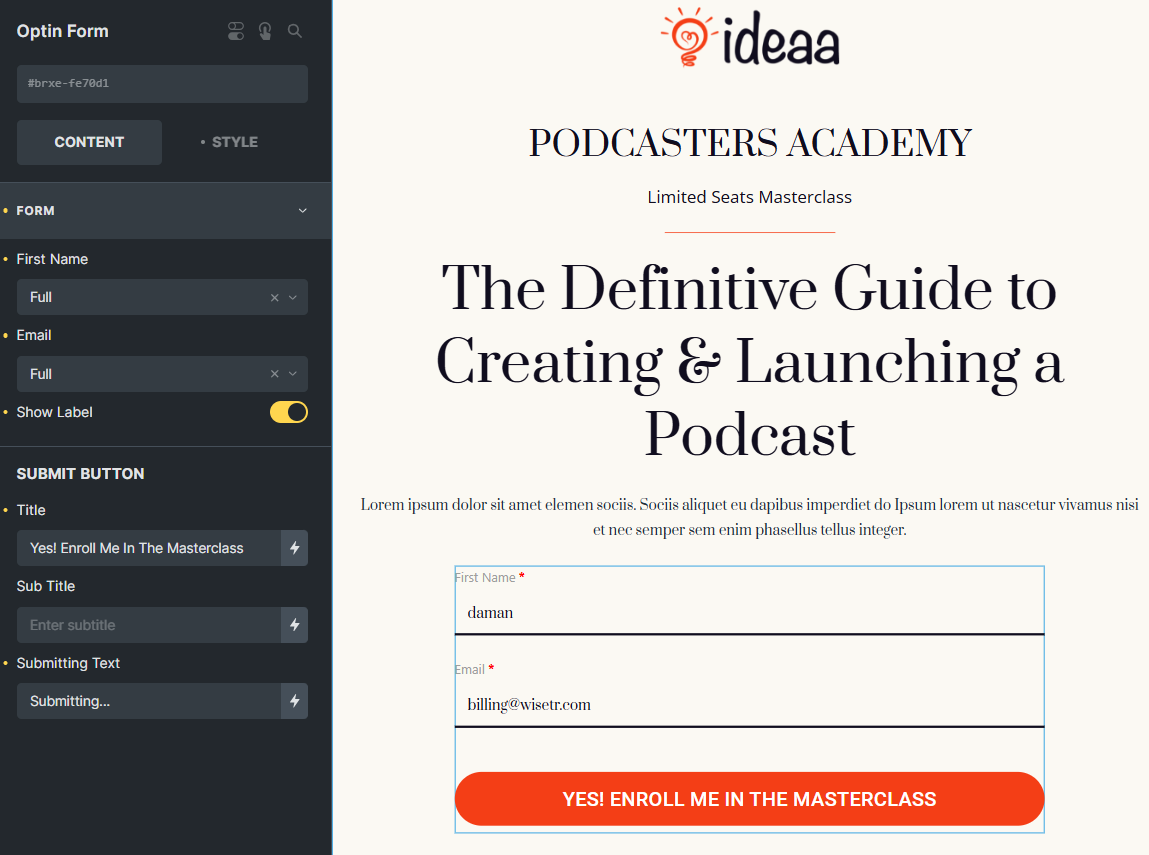
- Popup Optin Form
This adds a pop-up opt-in form element to lead-capture pages.
It appears in a lightbox or modal window that overlays the page content while the user fills out the form.
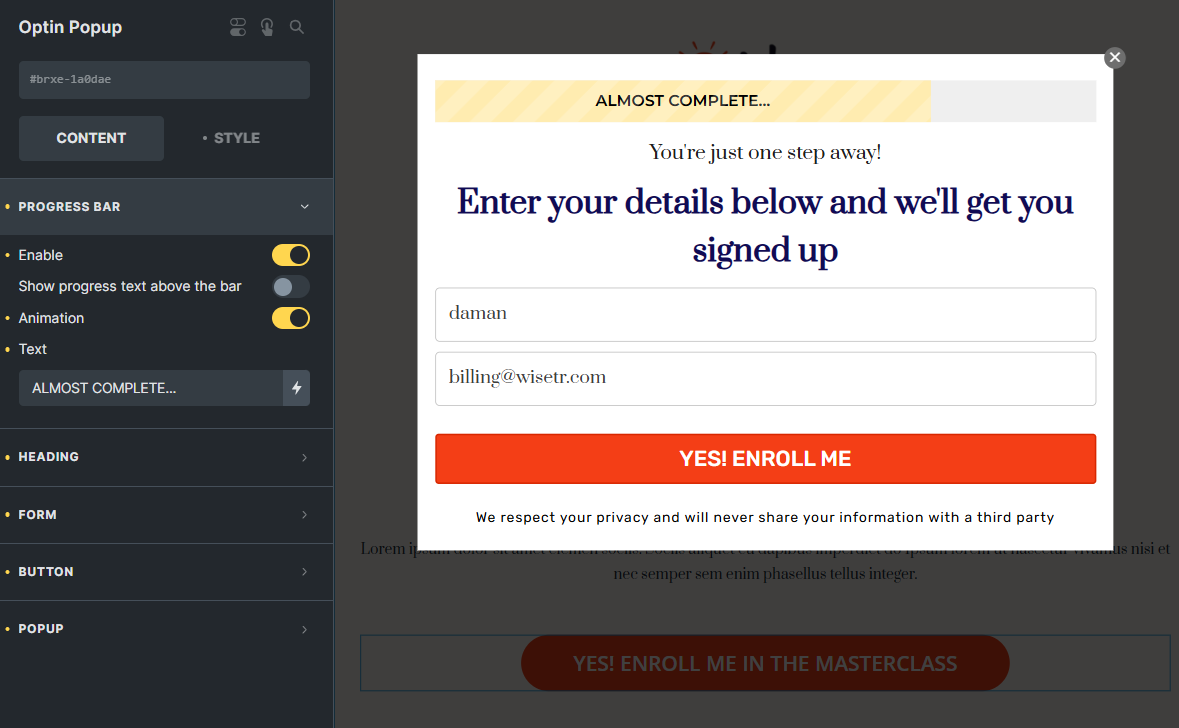
We’ll look at the customization options later in the post.
Sales Pages
The primary objective of the sales page is to persuade visitors to make a purchase or take action, such as signing up for a newsletter, booking a reservation, or buying a product.
For that, your sales pages need to be attractive and compelling.
To build high-converting sales landing pages, FunnelKit offers pre-designed templates for use with Bricks Builder.
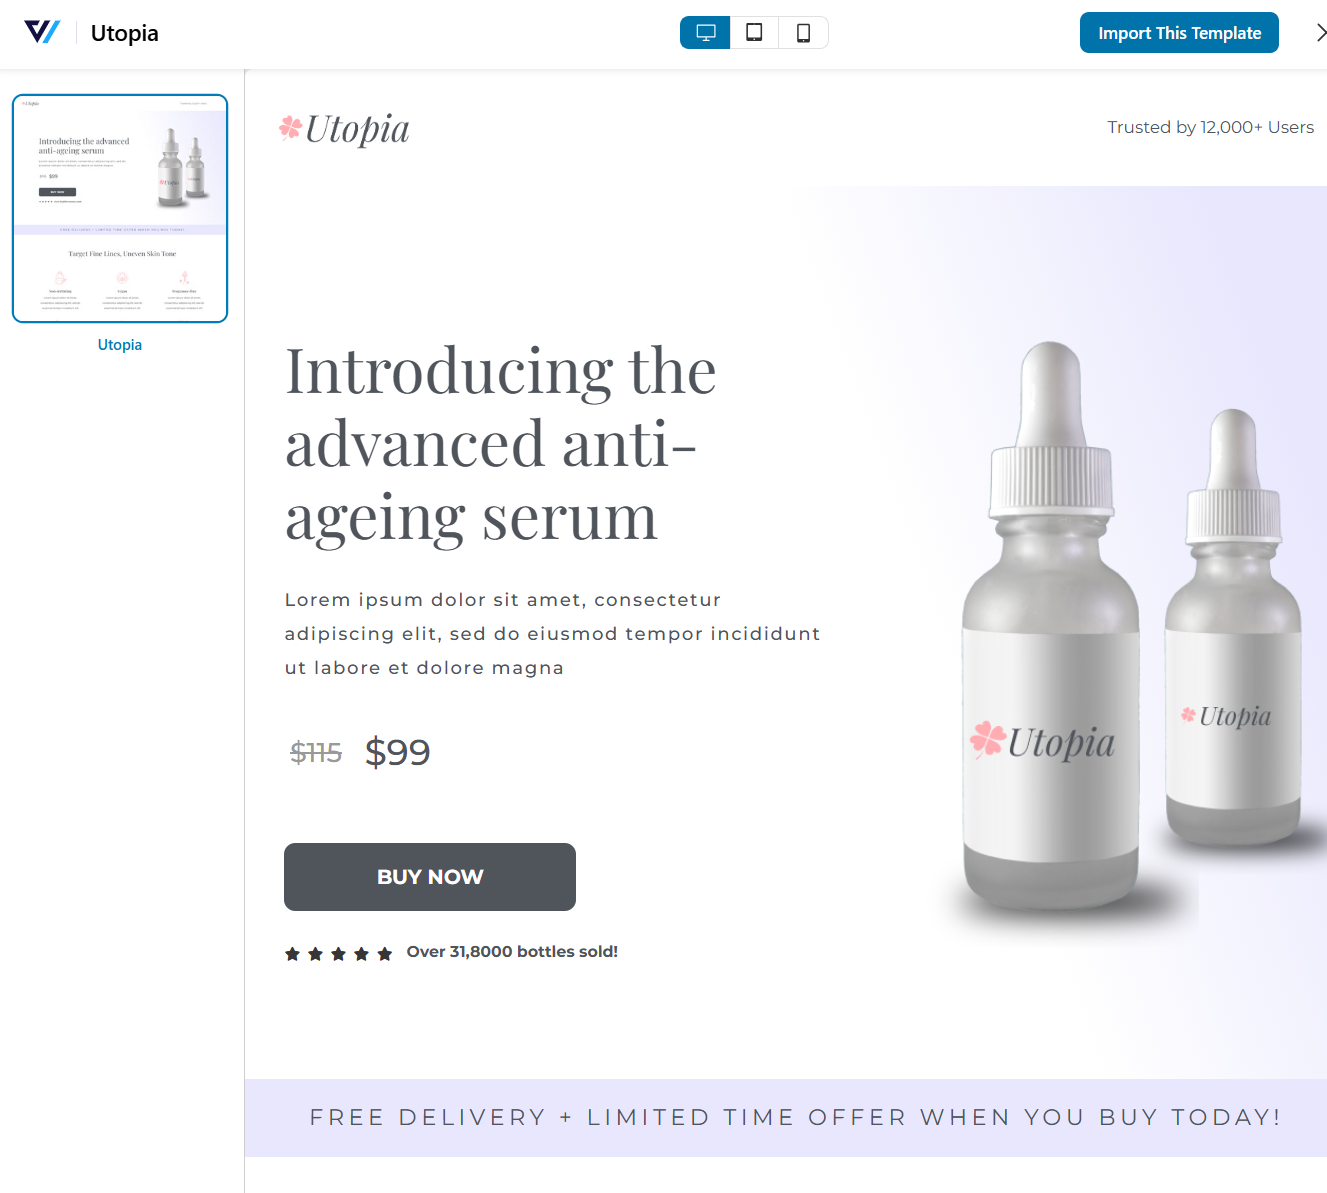
Just import and start customizing these templates with Bricks elements.
Checkout pages
Building WooCommerce checkout pages in Bricks has been a struggle for many. But not anymore!
FunnelKit Funnel Builder offers customization flexibility to create optimized checkout pages with Bricks elements.
You can create one-page, multi-step, Shopify-style checkout, order forms, and more.
Pre-designed templates
Get access to a library of optimized checkout page templates. You can import these templates with a few clicks.
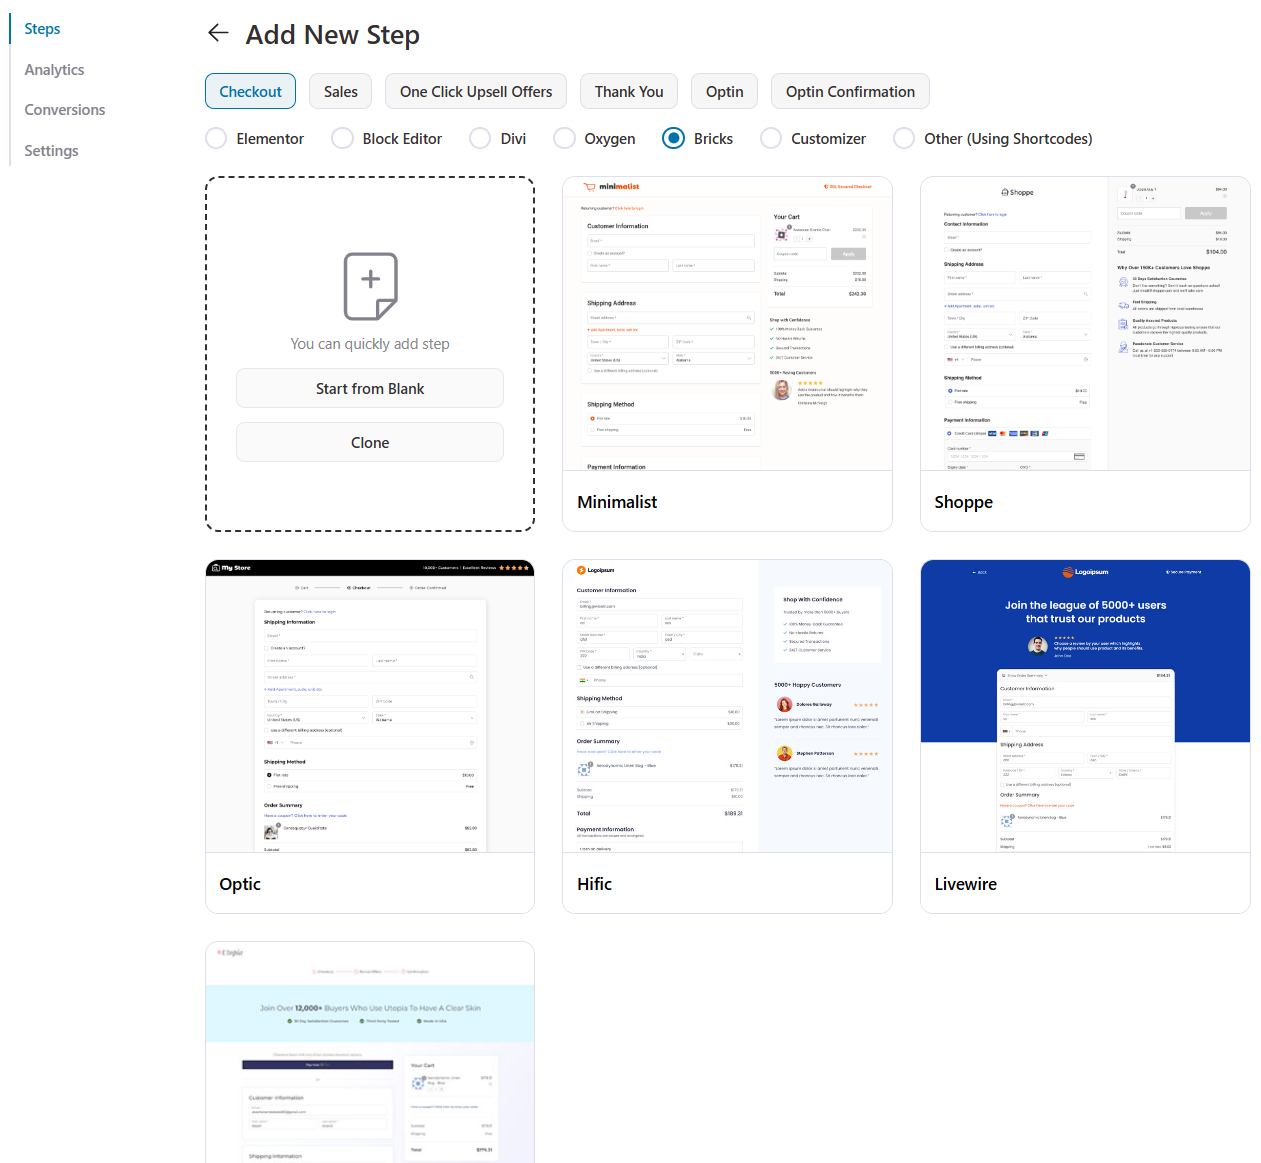
When choosing a template, let’s say Utopia, you can choose the number of steps you want on your checkout page.
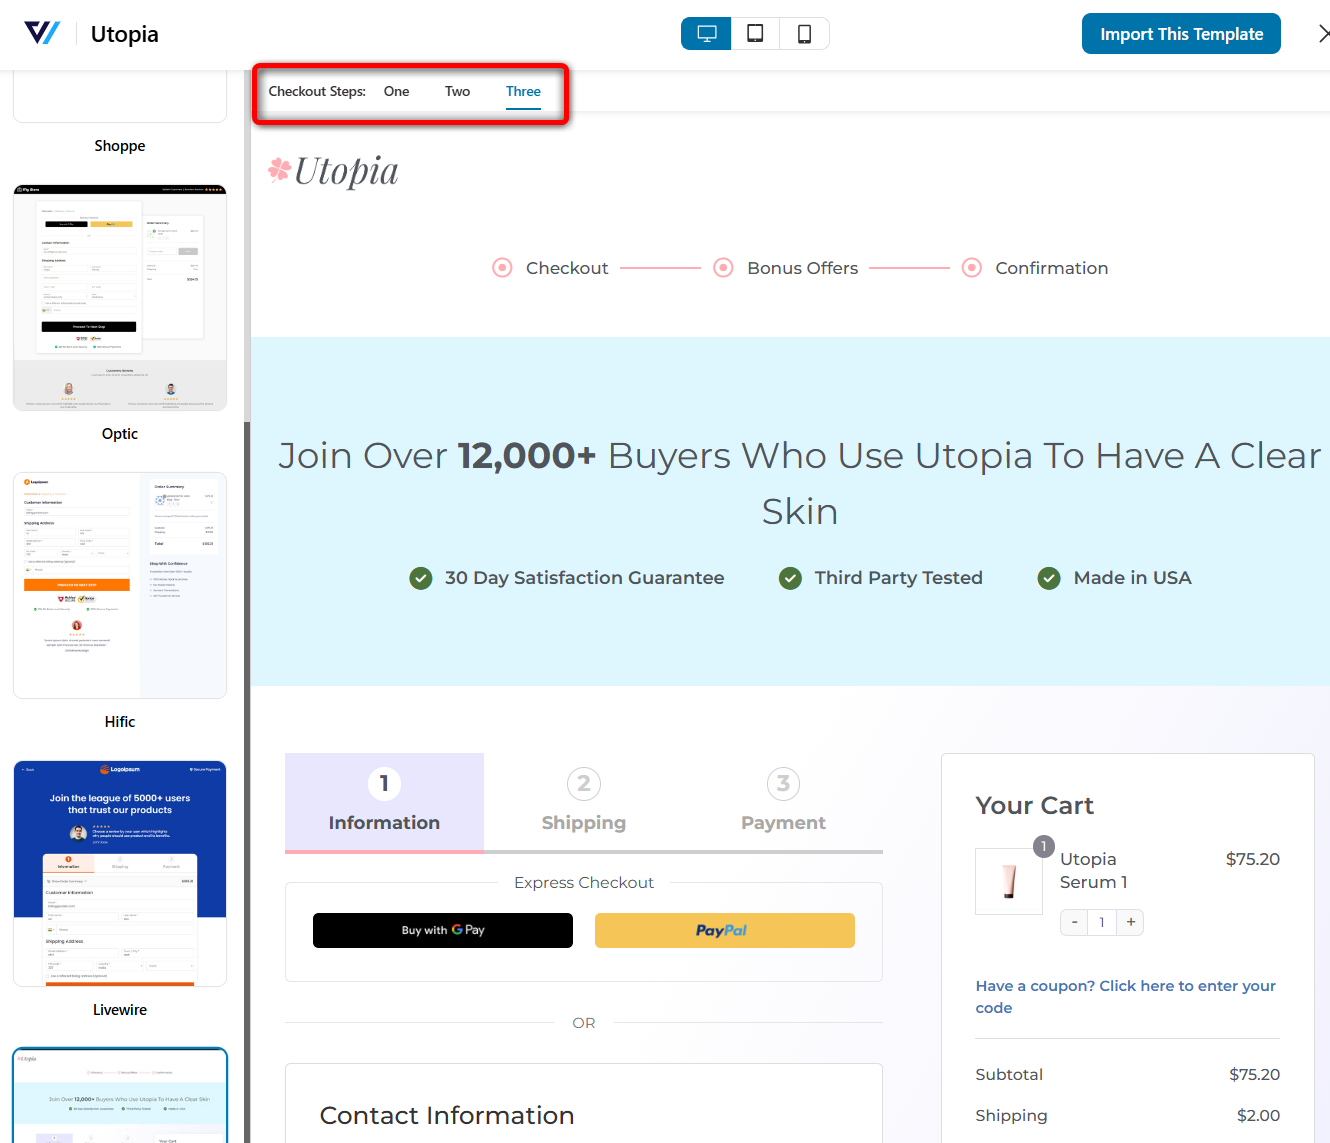
Once done, you can easily import the checkout template.
Bricks elements for checkout pages
FunnelKit Funnel Builder provides two Bricks elements to design attractive checkout pages:
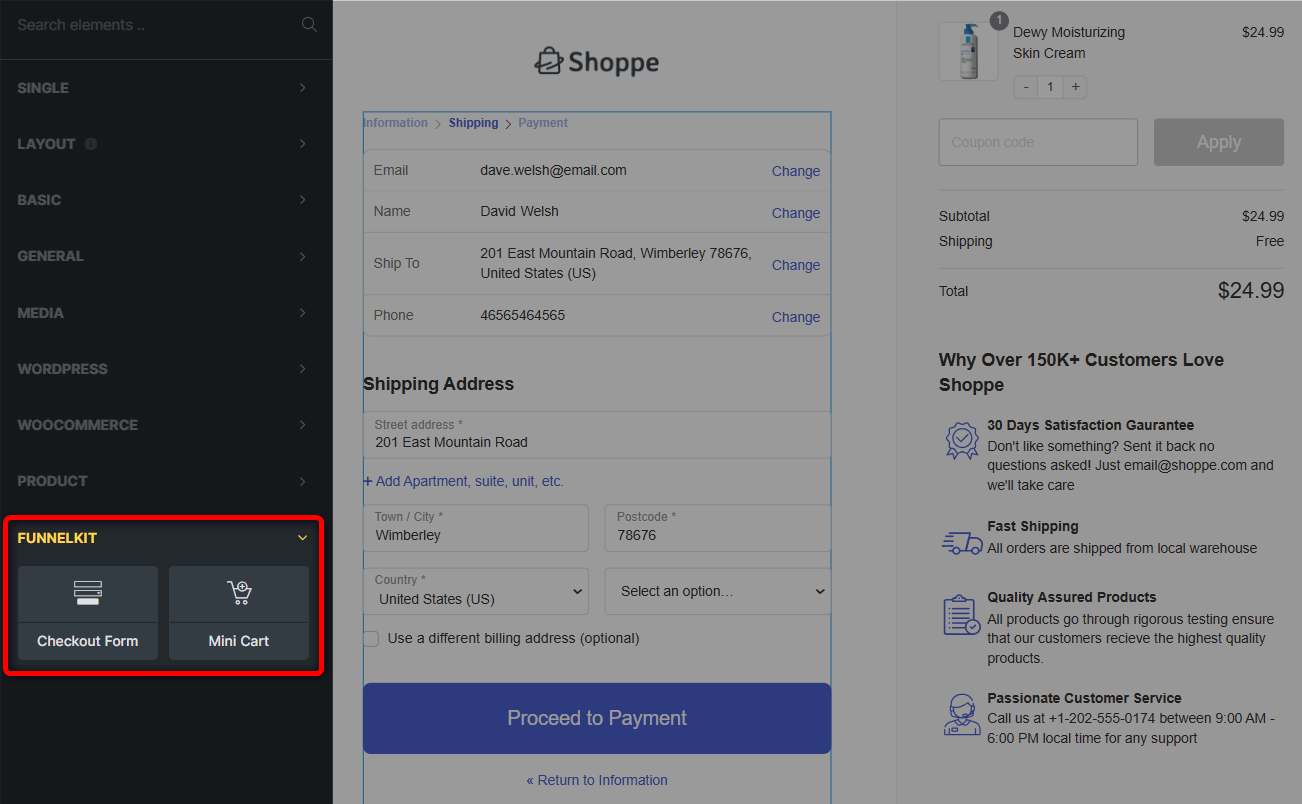
- Checkout Form
The checkout form element for Bricks enables you to customize every part of the WooCommerce checkout page.
You can customize the content and appearance of your checkout form, such as a collapsible order summary, coupon field, and more.
- Mini Cart
The mini cart element provides a real-time view of the products, quantities, prices, shipping fees, etc., in the shopper’s cart.
Users can update the quantity of a cart item or remove any item in this mini cart.
It’s usually placed next to the checkout form on the WooCommerce checkout page.
One-Click Upsells
One-click upsells help increase the store’s average order value (AOV) by offering customers additional products right after they complete their initial purchase.
You can create seamless one-click upsell offers within Bricks Builder, enabling customers to accept an upsell with a single click.
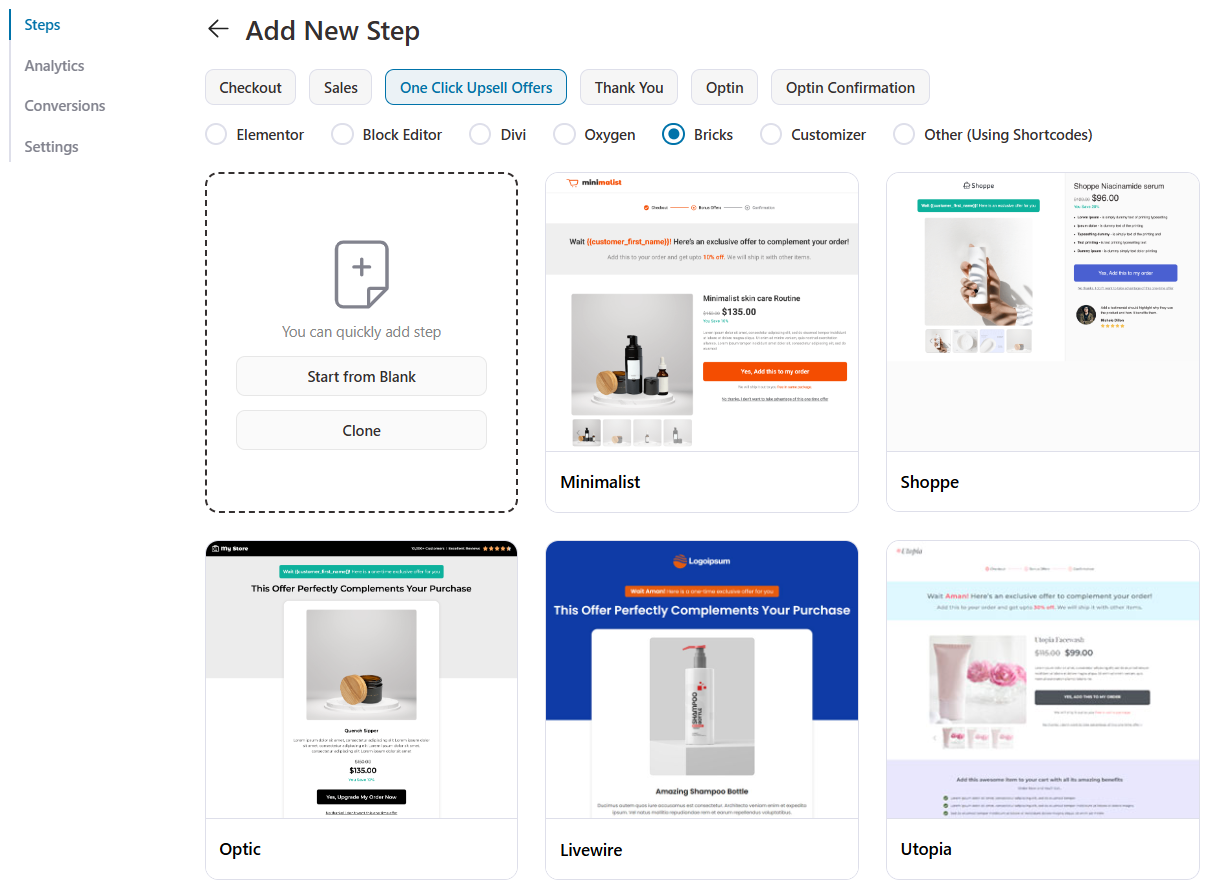
Pre-built templates
There are various Bricks Builder upsell page templates available to you, optimized for all devices.
After importing, you can customize these templates with Bricks elements as you like.
Bricks elements for one-click upsells
You get access to 10 optimized Bricks elements custom-designed for your one-click upsell pages:
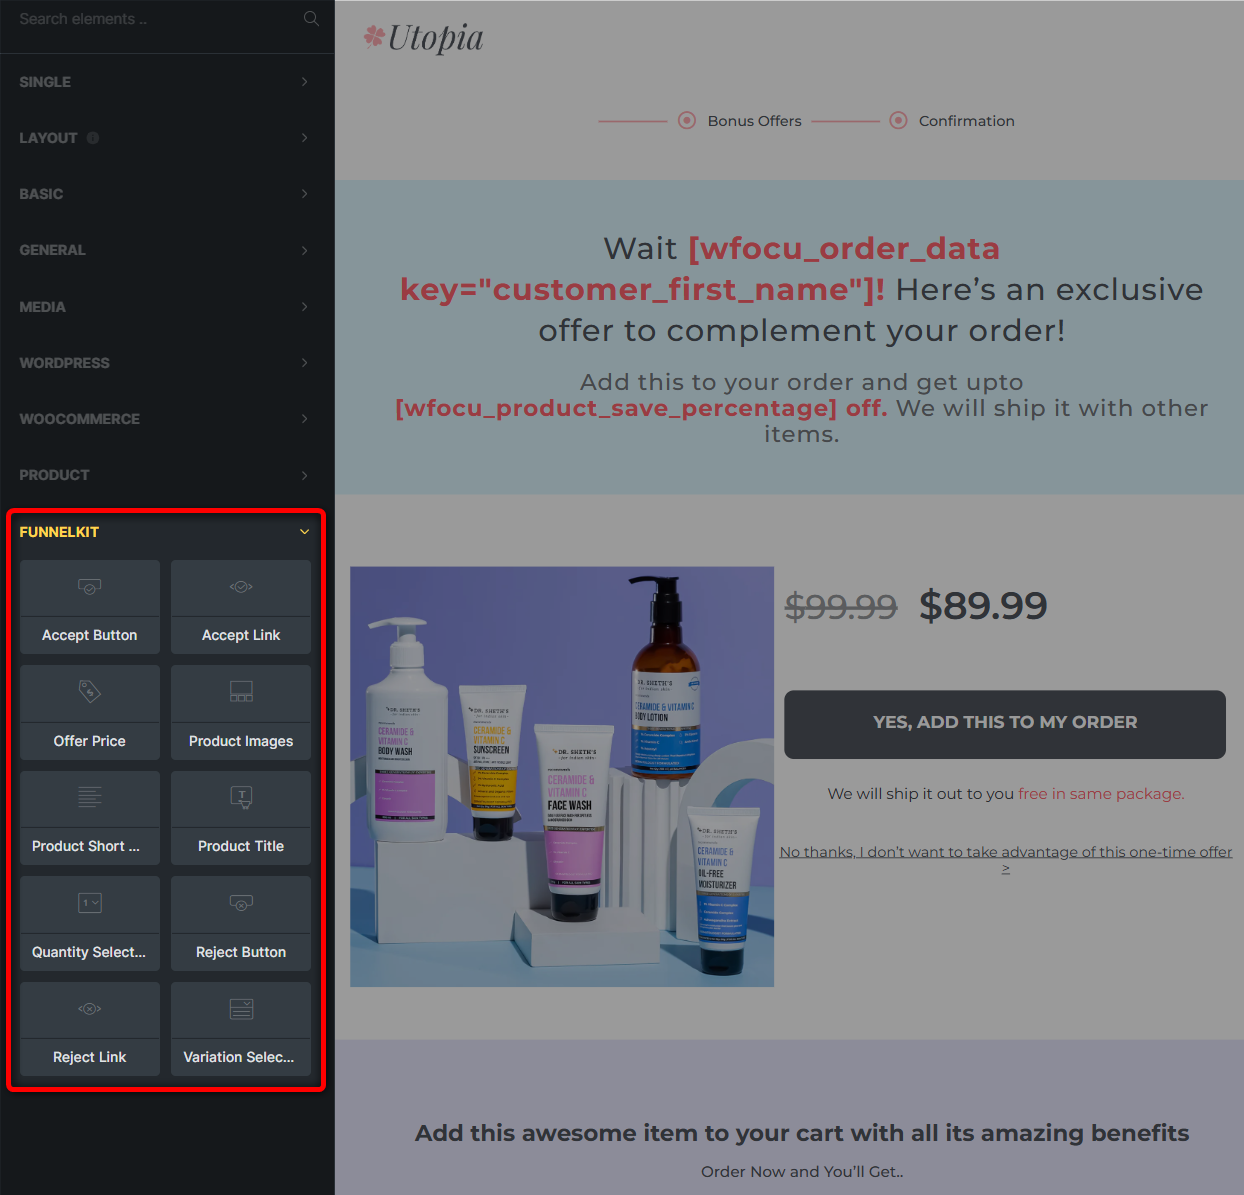
- Accept Button - Instantly accepts the upsell offer with just one click
- Accept Link - Works similarly to the Accept Button but is a text-based link option
- Offer Price - Showcases the price of the one-click upsell product
- Product Images - Visually showcase the upsell product, playing a crucial role in influencing the customer’s buying decision
- Product Short Description - Provide a concise overview of the upsell product, highlighting key features and unique selling points
- Product Title - Display the name of the upsell product
- Quantity Selector - Allows customers to choose the number of upsell items they want to purchase
- Reject Button - Provides customers with an option to decline the one-click upsell offer
- Reject Link - Text-based alternative to the reject button, offering customers a subtle way to decline the offer
- Variation Selector - Allows customers to choose their preferred variations (size, color, or style) before accepting the upsell offer
Using these 10 Bricks elements with FunnelKit Funnel Builder, you can craft a persuasive one-click upsell page that seamlessly fits into your sales funnel.
Thank You Pages
Thank you, or order confirmation page is a vital yet often overlooked component of the sales funnel.
It’s where you reinforce the customer’s decision, encourage future engagement, and drive additional sales.
With FunnelKit’s Bricks WooCommerce integration, you can design beautifully crafted, conversion-optimized thank-you pages that deliver a memorable post-purchase experience.
Pre-designed templates
FunnelKit introduces several Bricks Builder WooCommerce templates to help you design custom thank you pages.
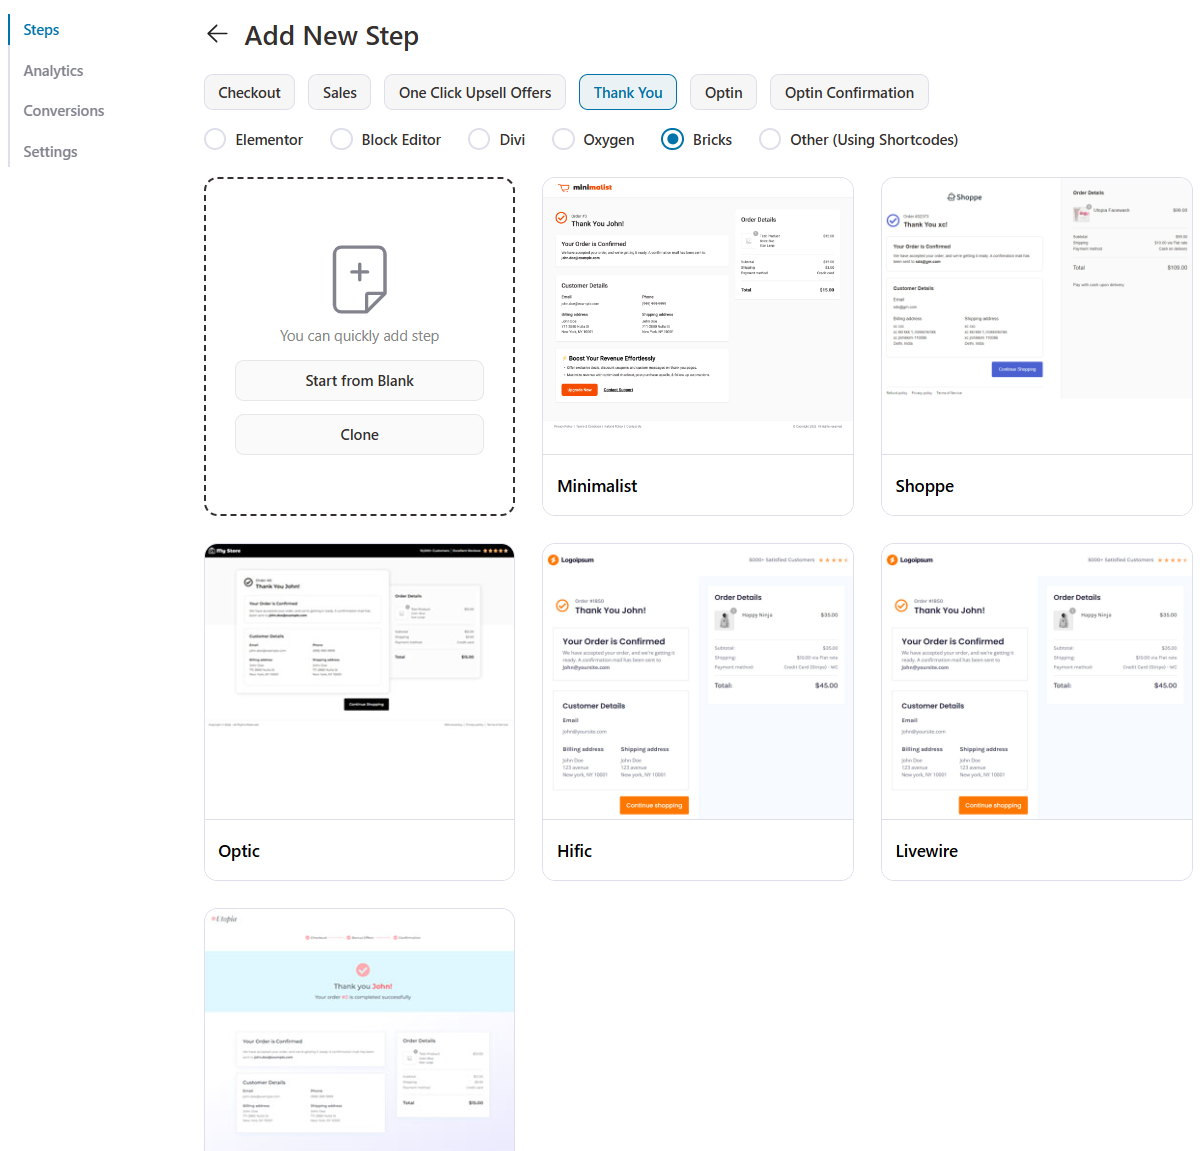
View the page preview and import the template you like.
All the FunnelKit templates are customizable and optimized for desktop, tablet, and mobile devices.
Bricks elements for thank you pages
With FunnelKit Bricks integration, you can create a custom and user-friendly WooCommerce thank you page.
For this, FunnelKit has developed three Bricks elements:
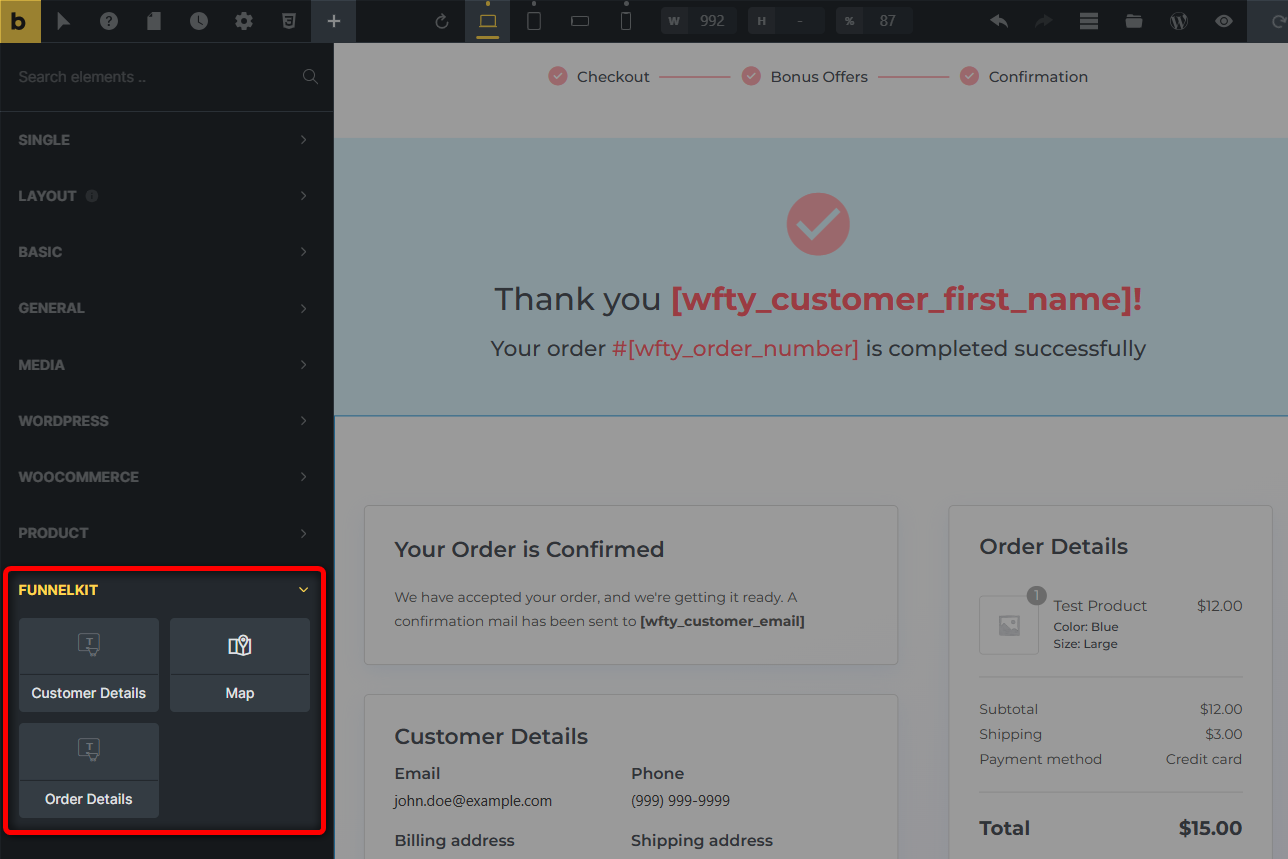
- Customer Details
It displays relevant information about customers who land on the thank you page after making a purchase.
This customer information includes their name, email address, billing/shipping address, phone number, custom field (if applicable), and more.
- Map
This Bricks WooCommerce element provides customers with a visual confirmation of their delivery address location associated with their purchase.
It integrates a map that customers can interact with by zooming in or out to see the accurate location.
This feature is quite helpful as it reassures the customer that the delivery is headed to the correct address.
- Order Details
This element provides customers with a comprehensive order summary, including all the essential details about the products they purchased.
This information includes product name, image, quantity, price, shipping cost, tax, and more.
This helps you design thank-you pages to enhance the post-purchase experience, reinforce customer trust, and ensure customers have all the necessary information about their purchase and delivery.
Get Detailed Analytics for Visitors and Conversions
Now that your sales funnel is ready, it’ll track results for every visit and conversion.
Go to the Analytics section and FunnelKit Funnel Builder lets you see the overview of your sales funnel conversions at a glance.
Here you can see the statistics for visitors, contacts and orders, revenue, order bump revenue, upsells revenue, AOV, and revenue per visit.
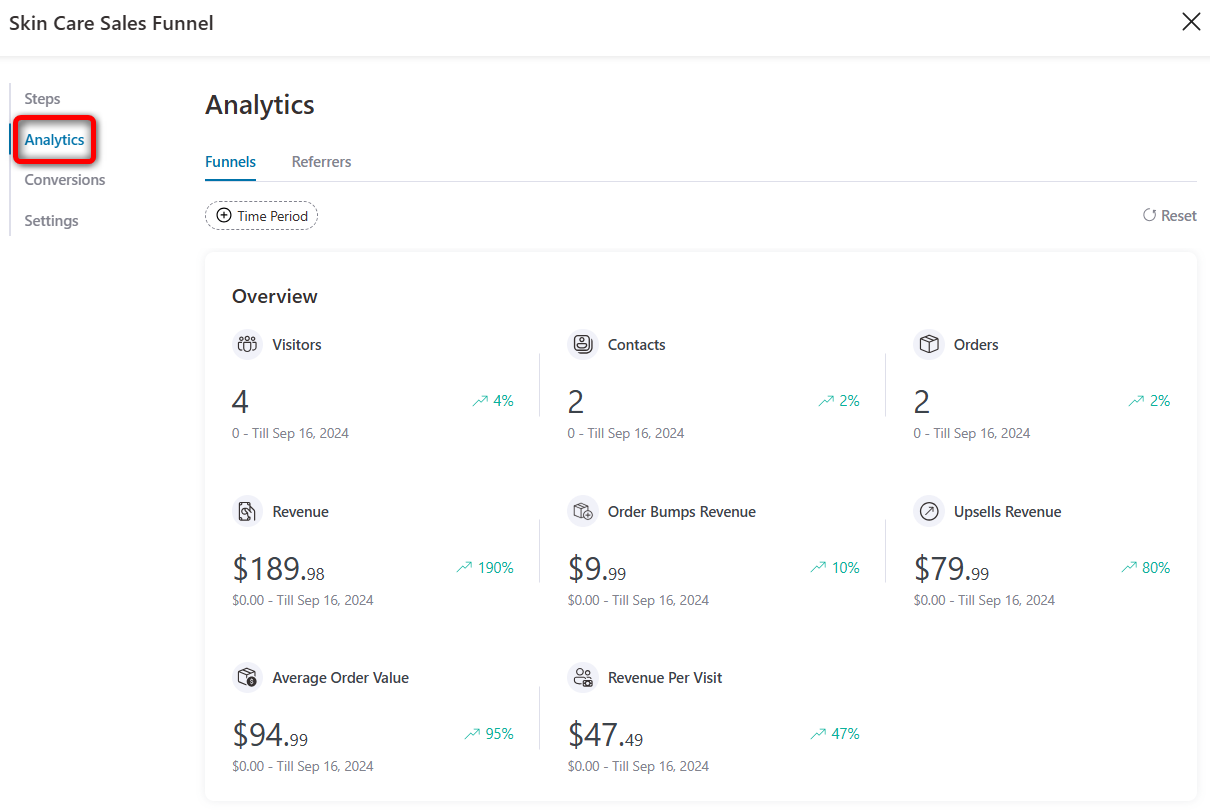
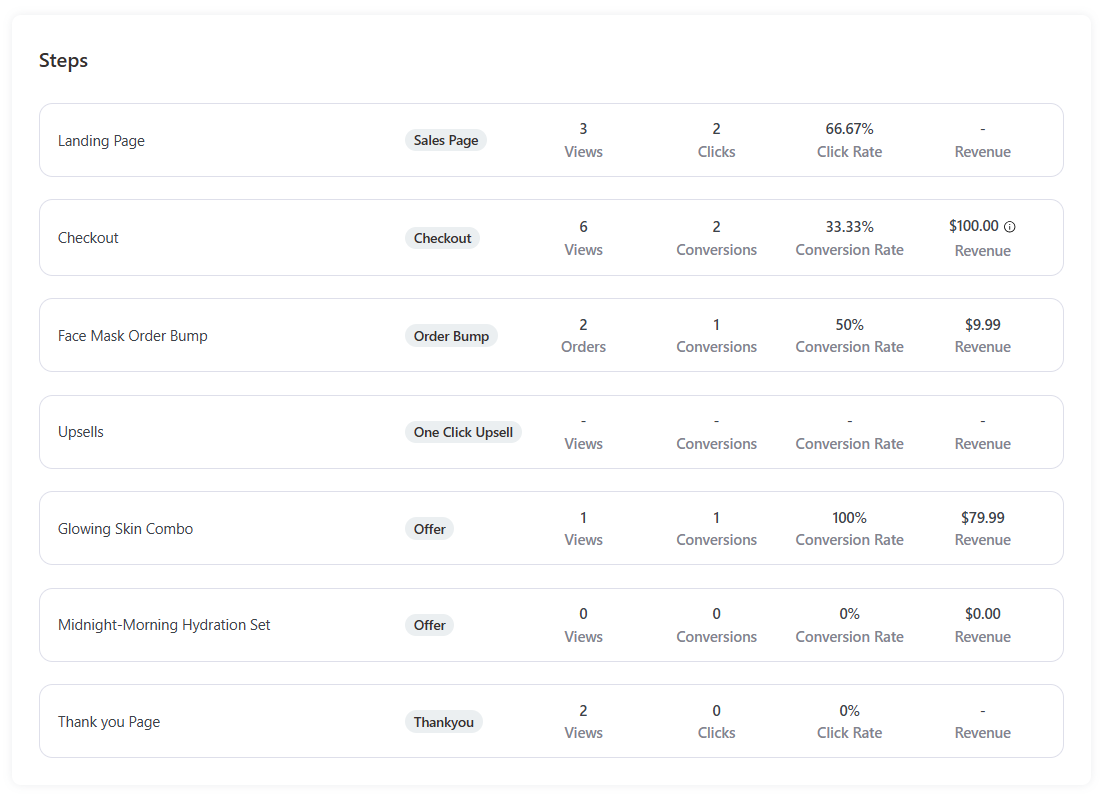
Scroll down, and you’ll see the step-by-step metrics of how each page is performing in the sales funnel.
You get crucial stats such as views, clicks, click-through rate, and conversions.
If you have any A/B tests running in FunnelKit, you’ll see its metrics as well.
Go to the Conversions tab and you’ll see the order details or conversion stats of your customers:
- Order ID
- Customer name
- Customer email
- Phone number
- Order creation date
- Total amount spent
- Referrers
- Device
- UTM campaign
- UTM source
- UTM medium
- Time to convert
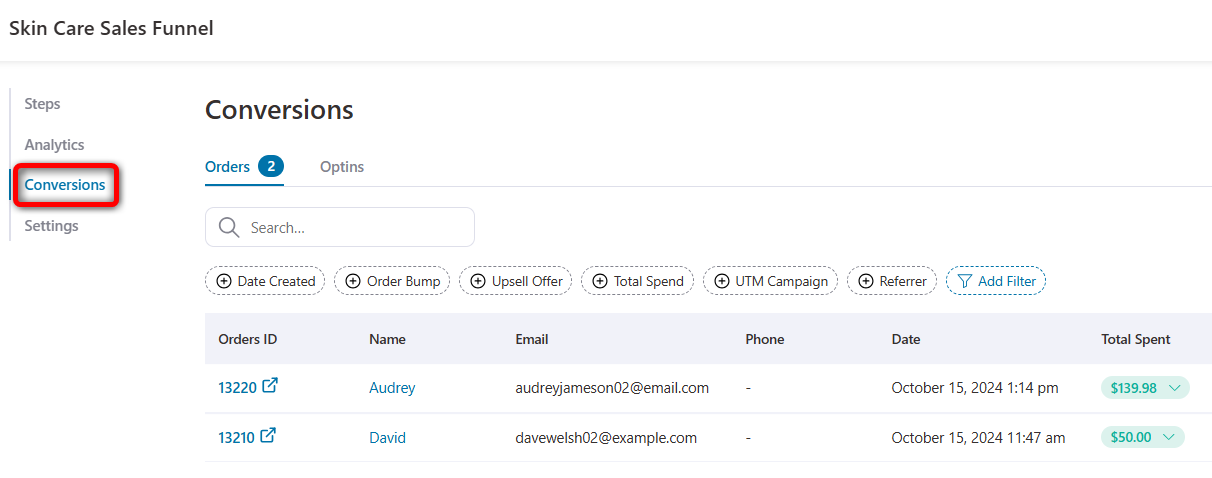
Not just that, it also displays details of your leads inside the Optins section.
This is how FunnelKit shows detailed analytics to help you analyze the performance of your sales funnels.
It allows you to identify key areas for improvement and optimize your funnel strategy to maximize conversions and revenue.
Bricks vs Elementor for WooCommerce
Comparison searches around WooCommerce with Bricks almost always come down to Elementor, so here is the honest breakdown.
| Parameters | Bricks | Elementor Pro |
|---|---|---|
| How it runs | A theme with the builder inside | A plugin that works with most themes |
| Store templates | Full set, including pay, order receipt, and account templates | Product, archive, cart, checkout, and account templates via Theme Builder |
| Code output | Lean markup, minimal wrappers | Heavier markup and more scripts |
| WooCommerce elements | 30+ store-specific elements | A large set of WooCommerce widgets |
| Checkout conversion features | Design only, needs a plugin for bumps and upsells | Design only, needs a plugin for bumps and upsells |
| Ecosystem | Smaller, developer-leaning community | Larger template and add-on marketplace |
The performance difference is the deciding factor for most store owners. Bricks generates clean code that keeps shops fast, while Elementor takes a more resource-heavy approach.
Elementor counters with a bigger ecosystem and a gentler learning curve. If you already use Elementor and your store performs well, switching builders is rarely worth the effort of migrating. If you are starting fresh and speed matters, Bricks is the stronger WooCommerce foundation.
Either way, checkout optimization comes from a dedicated plugin, and FunnelKit supports both builders.
Troubleshooting Bricks and WooCommerce Issues
These five fixes resolve the problems store owners search for most often.
- Product template not applying
Open the template and check its conditions. The template needs an active condition targeting all products, a category, or specific items, and a more specific template can override a general one.
- Checkout or cart page not working
This almost always means a Gutenberg cart or checkout block is still present. Remove the block and use the Shortcode element with [woocommerce_cart] or [woocommerce_checkout] instead.
- Styles not loading on the front end
Regenerate the CSS files from the Bricks settings and clear any caching plugin. Stale-generated CSS is the usual cause after major template edits.
- AJAX add to cart not working
Check the AJAX error behavior in the Bricks WooCommerce settings, then deactivate other cart-related plugins one by one to find the conflict.
- Archive showing no products
Inspect the Query Loop on your archive template. A leftover category filter or a posts-per-page value of zero will silently empty the grid.
Frequently Asked Questions
No, you don't need a separate WooCommerce theme when using Bricks. Bricks is a theme with built-in full WooCommerce support. During the WooCommerce setup wizard, skip the theme suggestion step and keep Bricks active.
Yes, there are ready-made Bricks WooCommerce templates. Bricks supports remote templates, and several community shops sell full WooCommerce layout packs. For the checkout and funnel side, FunnelKit includes more than 20 templates designed specifically for Bricks.
Yes, Bricks keeps standard WooCommerce hooks working. Bricks intentionally preserves WooCommerce’s functionality and hooks, so extensions and payment gateways that depend on them continue to work under your custom templates.
You can place Bricks’ cart elements in your header template to show the cart state. For a sliding side cart with cross-sell prompts, add a dedicated plugin such as the free FunnelKit Sliding Cart alongside Bricks.
No, Bricks does not slow down my WooCommerce store. Bricks generates leaner markup than heavier builders, which is one of the main reasons agencies choose it for ecommerce work.
Yes, you can show ACF or Metabox fields on Bricks product pages. Use dynamic data tags in any text or image element to output custom fields, so specs, ingredients, or size charts render automatically on every product.
Yes, WooCommerce subscription plugins work with Bricks. Because Bricks preserves standard WooCommerce hooks, subscription plugins that follow WooCommerce conventions render their pricing and sign-up options inside your Bricks templates.
Yes, you can customize the Bricks checkout with custom code instead of a plugin. You can adjust fields and layout through WooCommerce hooks and CSS, but it is fragile and prone to breaking with updates. For anything beyond small tweaks, a checkout plugin is safer and faster to maintain.
Start Selling With the Bricks WooCommerce Builder!
We covered the full journey of building WooCommerce with Bricks by activating the native builder, designing your product, archive, cart, checkout, and account templates, and knowing exactly where the built-in checkout stops.
For the conversion layer that native Bricks does not provide, we recommend FunnelKit Funnel Builder.
It adds the optimized checkout, order bumps, and one-click upsells directly inside the Bricks editor you already use.
Why settle for generic templates or bloated page builders? Get FunnelKit and enjoy the power of Bricks WooCommerce integration to fully customize your sales funnels that drive real results.
The best part? You can do it all with ease, whether you’re a developer or a store owner with no coding experience.
Start creating, start customizing, and watch your conversions soar!
Editorial Team
October 9, 2026A downsell gives customers a cheaper option after they turn down your main offer. If you show it too soon, you might convince them to skip the original offer and...
Editorial Team
October 8, 2026WooCommerce guest checkout lets shoppers buy from your store without creating an account. They enter an email, their billing details, and payment, and the order goes through. It's a built-in...
Editorial Team
October 7, 2026WooCommerce upsells are products you recommend in place of the one a shopper is viewing, usually a better or higher-priced version of it. WooCommerce has a built-in upsell field for...






