
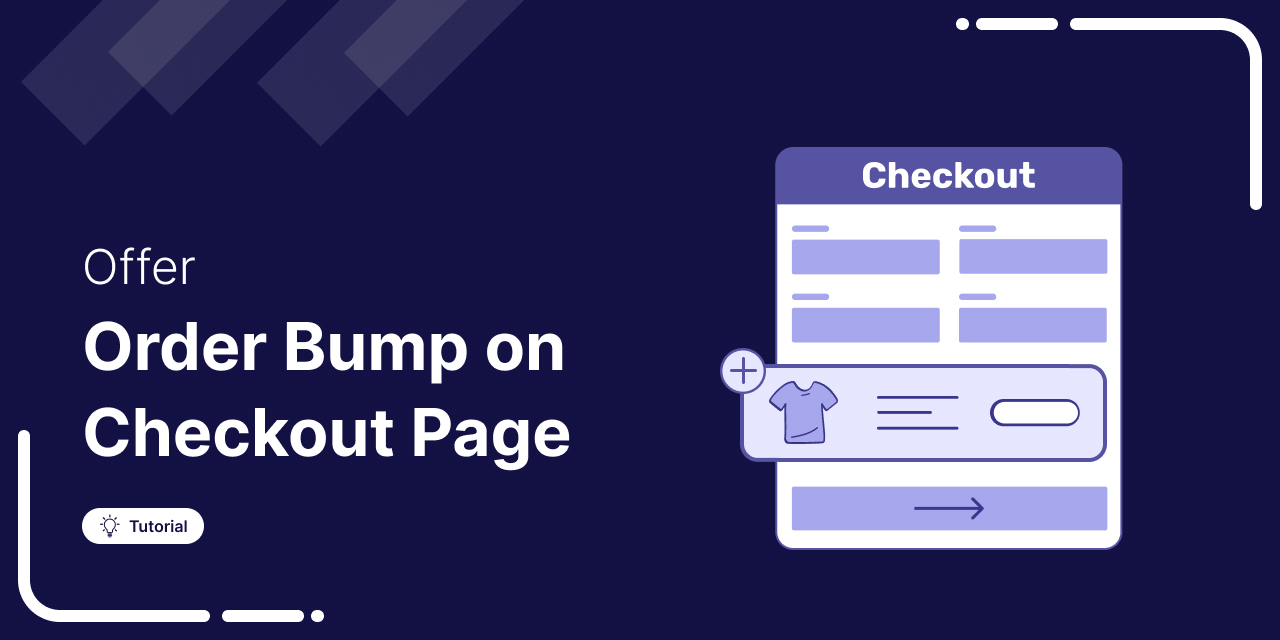
If you run a WooCommerce store and are not using order bumps at checkout, you're leaving money on the table.
Almost all businesses, whether online or offline, use it.
You know that moment when you're ordering at McDonald's, and the waiter casually asks, "Want fries with that?"
You didn't think you needed them, but now you're all in.
That's the genius of the order bump, a strategy so simple, you barely even notice it.
McDonald’s uses it to sell 9 million pounds of fries a day. Yup, you heard that right.
And in eCommerce, order bumps can bump up your AOV by 10% to 30%.
You can also apply the magic of order bump in your WooCommerce store to boost the average order value.
In this blog, we’ll walk you through how to set up WooCommerce order bump in your store and optimize it for maximum conversions and revenue.
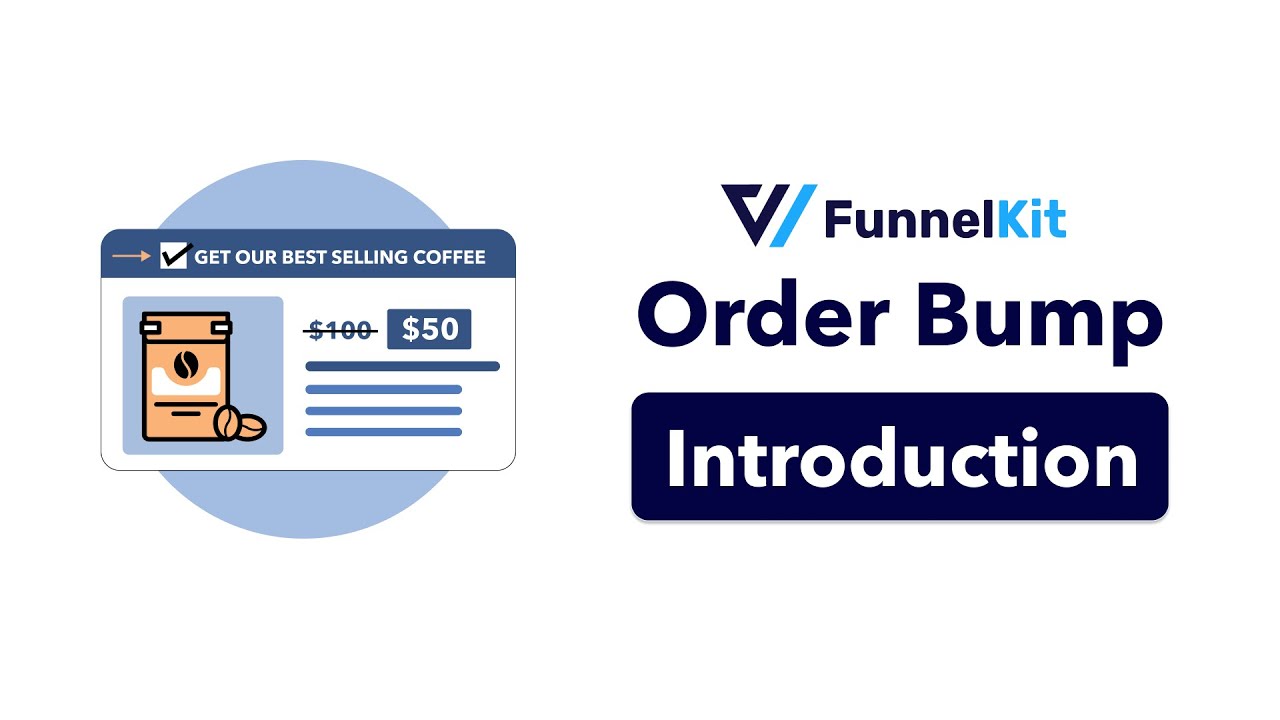
Table of Contents
- 1 What is a WooCommerce Order Bump?
- 2 How to Set Up WooCommerce Order Bump (Step-by-Step)
- 3 Setting Up Order Bump Placement Strategy in WooCommerce
- 4 Tracking, Monitoring and Improving the Order Bump Conversions
- 5 Writing the WooCommerce Order Bump Copy That Converts (The 4G Formula)
- 6 7 Easy Order Bump Ideas to Get a Kickstart
- 7 Inspiring Order Bump Examples From the Experts
- 8 Frequently Asked Questions Related to WooCommerce Order Bumps
- 9 Add WooCommerce Order Bump & Improve Your Store's AOV Today!
What is a WooCommerce Order Bump?
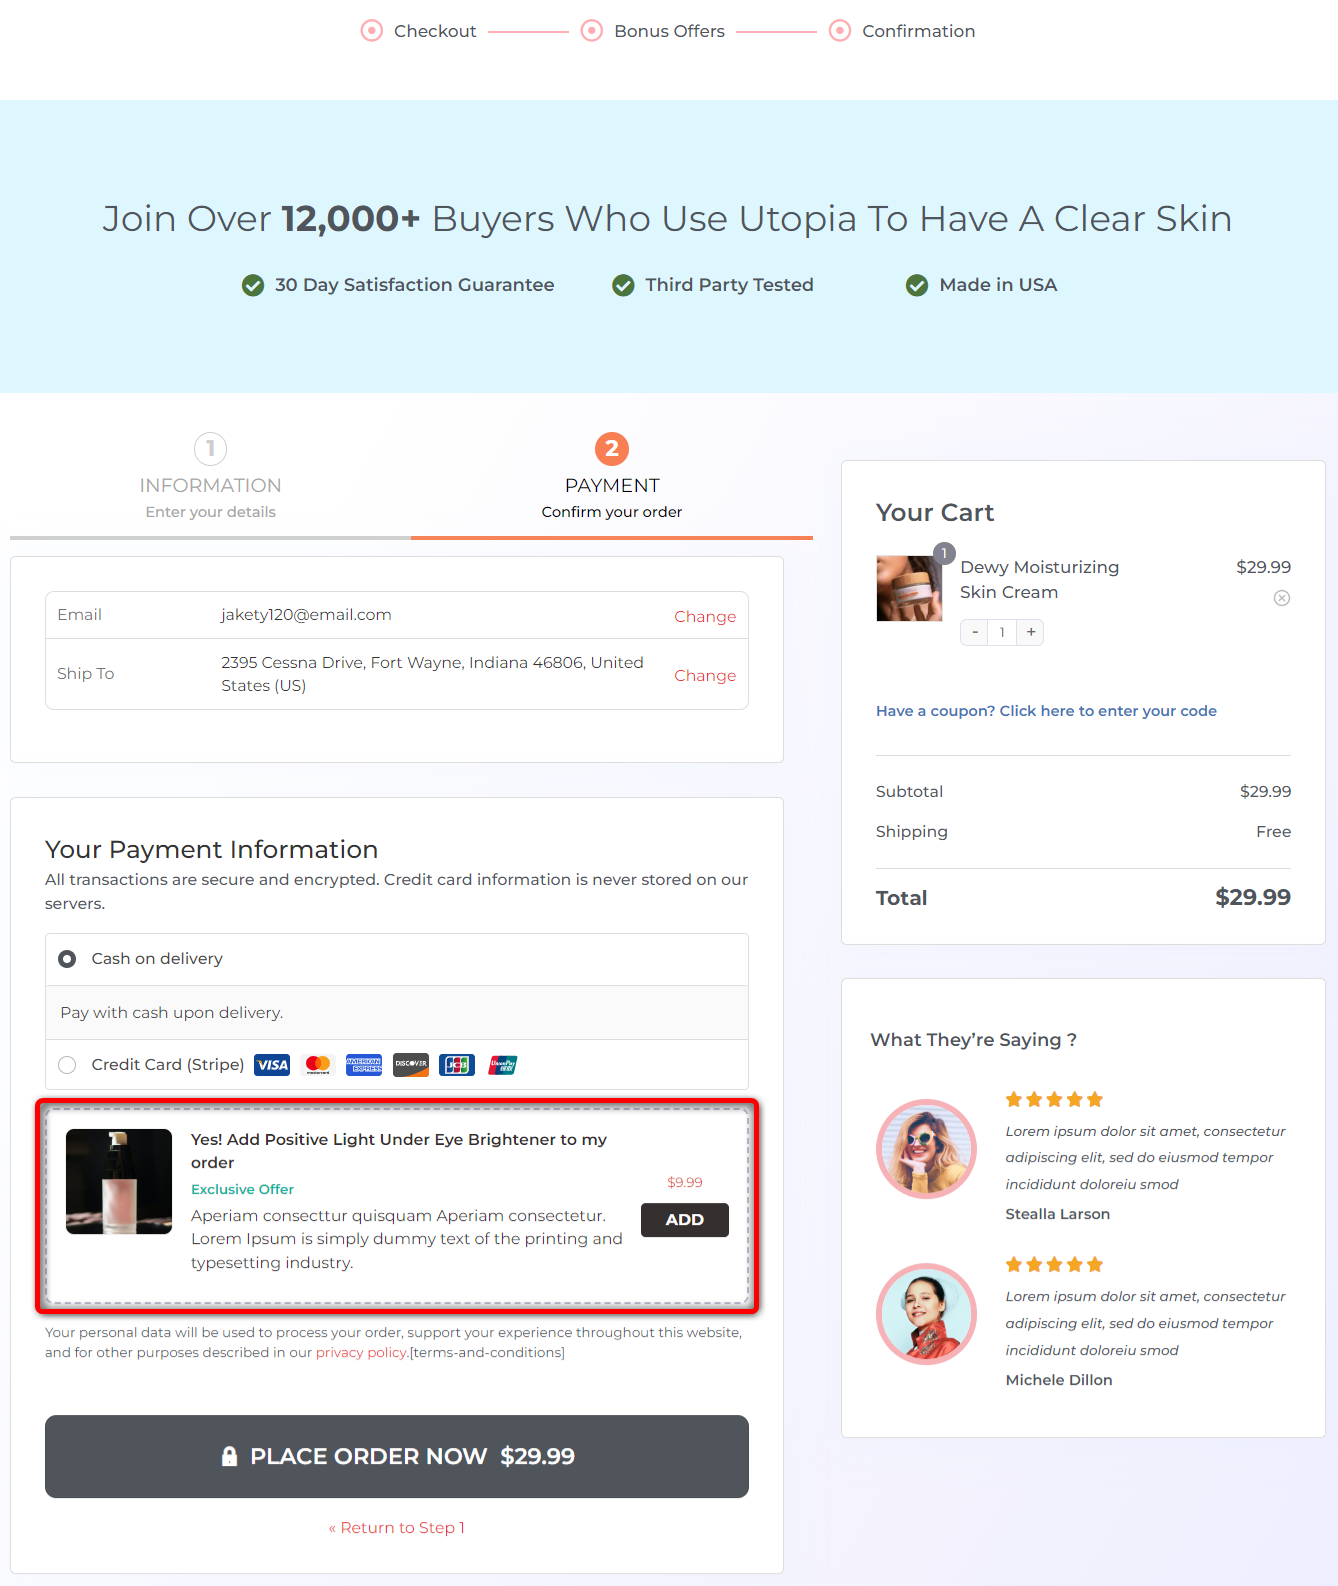
An order bump is a low-cost, one-click add-on at checkout that encourages impulse purchases.
It appears as a checkbox or button near the “place order” option, offering a relevant product that complements the main purchase. This simple strategy increases AOV and drives extra revenue effortlessly.
For instance, offering an under-eye cream to people buying a moisturizer doesn't seem like a push but rather a relevant cross-sell recommendation.
Many business owners prefer to cross-sell items on the product page, but that's not a great strategy.
Shoppers are focused on checkout, making it the perfect spot for an order bump. They’ve mentally committed to their purchase, so a well-placed, relevant add-on feels natural rather than distracting.
This is your chance to offer complementary deals and boost revenue effortlessly.
Real Reasons Why Order Bumps Work and Convert Perfectly
Here are the main reasons why order bumps effectively increase your average order value.
1. Psychology of commitment and consistency
As humans, we like to be consistent with our choices. So if we've made a decision, we like to use it as a reference point to make related choices.
So let's say you bought tickets to an event on "How to speak more confidently in public". Won't you love audio recordings of the event so that you can tune in whenever you want?
For most people who attended the event, this would be a no-brainer.
So the real question is - are you squeezing the most out of every sale or not?
2. Low-dollar offers make for perfect impulse buys
An impulse buy is a brilliant phenomenon that eCommerce store owners can make the most of.
How many times do you think before adding chocolates and gum to your cart in the grocery store?
The decision is fairly spontaneous and doesn't require you to consult anyone. That's why low-dollar order bumps are the easiest to sell.
3. The fear of missing out (FOMO)
Order bumps are usually presented as limited-time offers at a discounted price.
This taps into the psychological concept of FOMO, in which shoppers fear missing out on exclusive deals.
Creating a sense of urgency for the order bump encourages shoppers to take advantage of the offer, as they don’t want to miss out on extra savings or benefits.
How to Set Up WooCommerce Order Bump (Step-by-Step)
To set up an order bump on your WooCommerce checkout page, we'll use the FunnelKit Funnel Builder.
FunnelKit’s Funnel Builder is the ultimate solution for building custom checkout flows and high-converting sales funnels in WordPress.
To set up attractive order bumps, make sure you have installed both the free and pro versions of the Funnel Builder plugin on your website.
This section answers your questions about 'How do I make an order bump?'
Let's look at the step-by-step instructions on how to add an order bump:
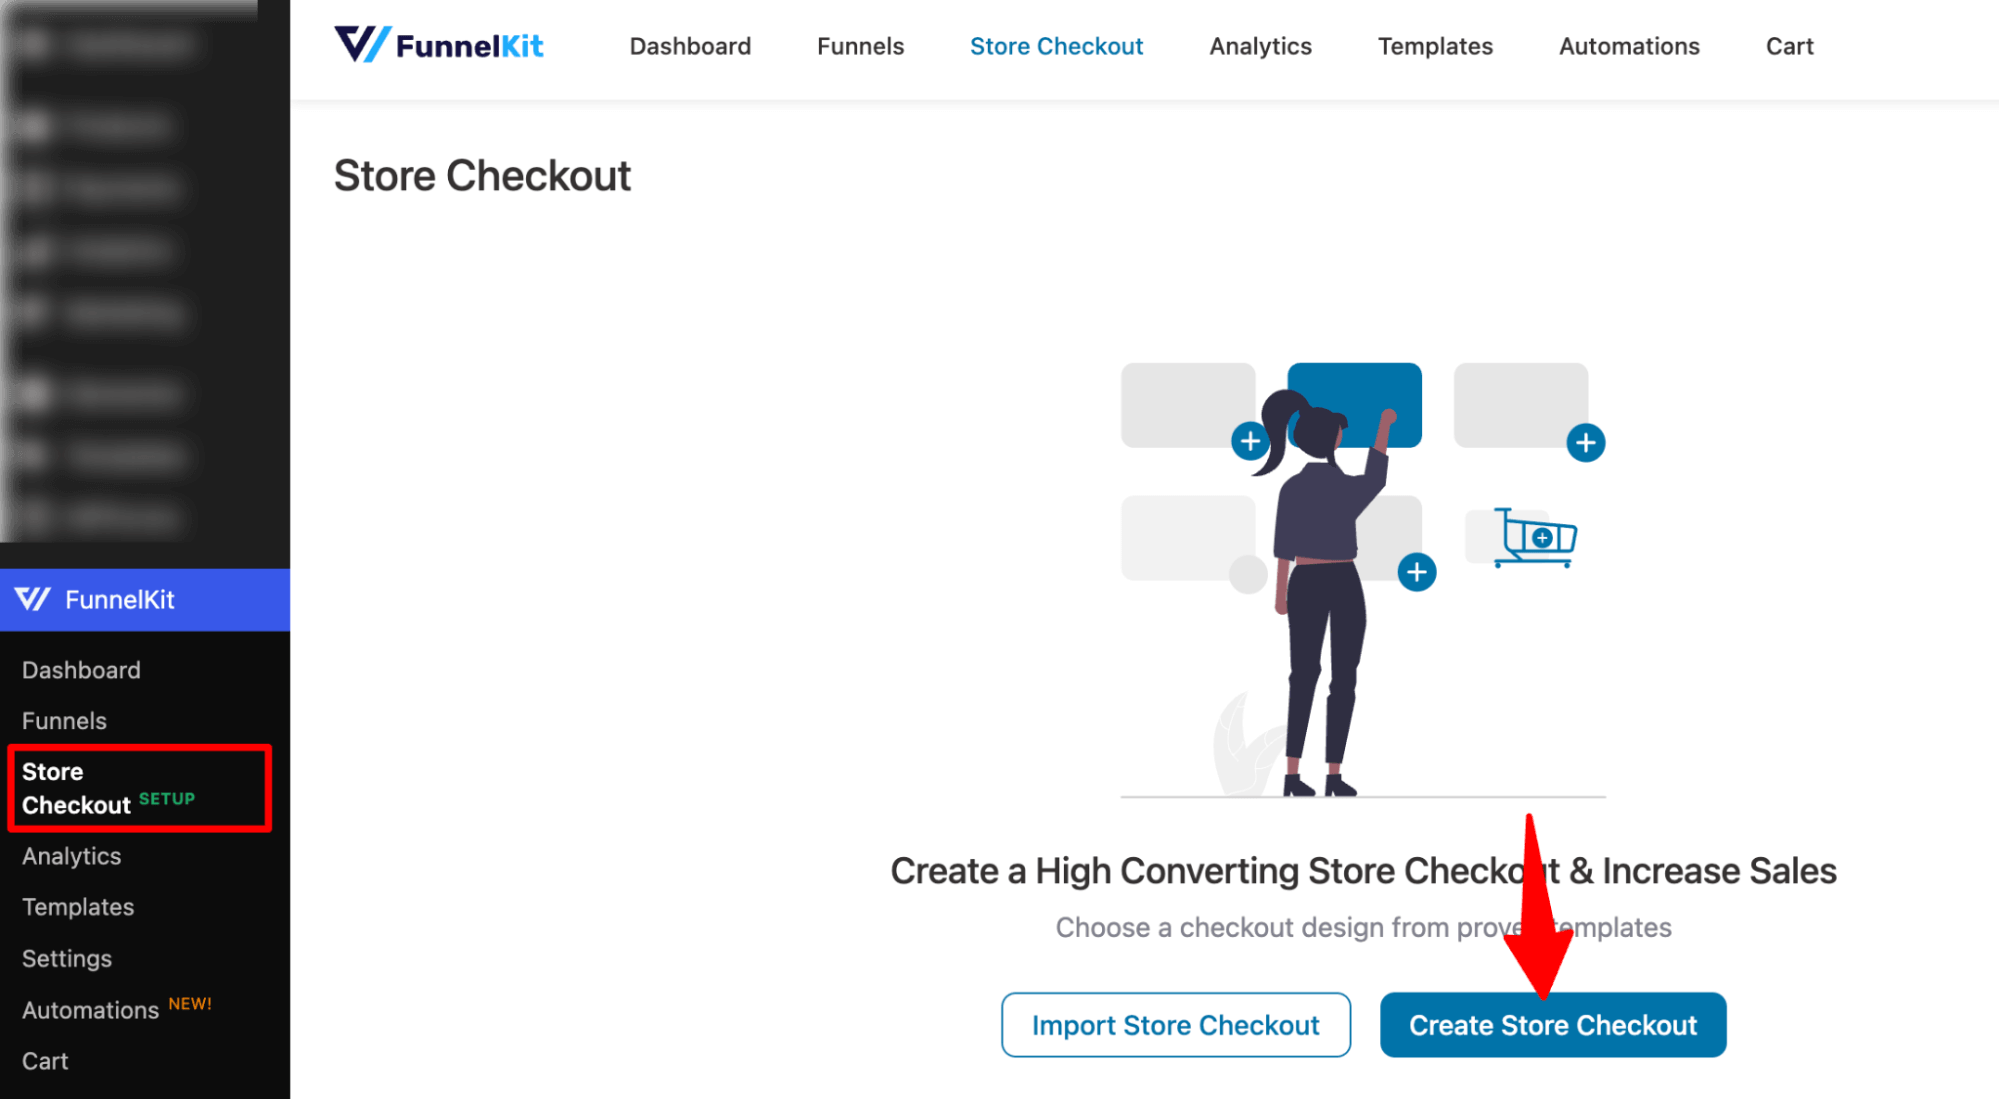
Step 1: Create a store checkout
The first step is to create a custom checkout page that replaces the default WooCommerce checkout page. With a custom checkout, we can easily offer relevant cross-sell product recommendations as an order bump.
To do this, navigate to FunnelKit ⇒ Store Checkout and hit Create Store Checkout.
Select the page builder you want to use for your checkout page, then choose a template.
Select the page builder you want to use for your checkout page, then choose a template.
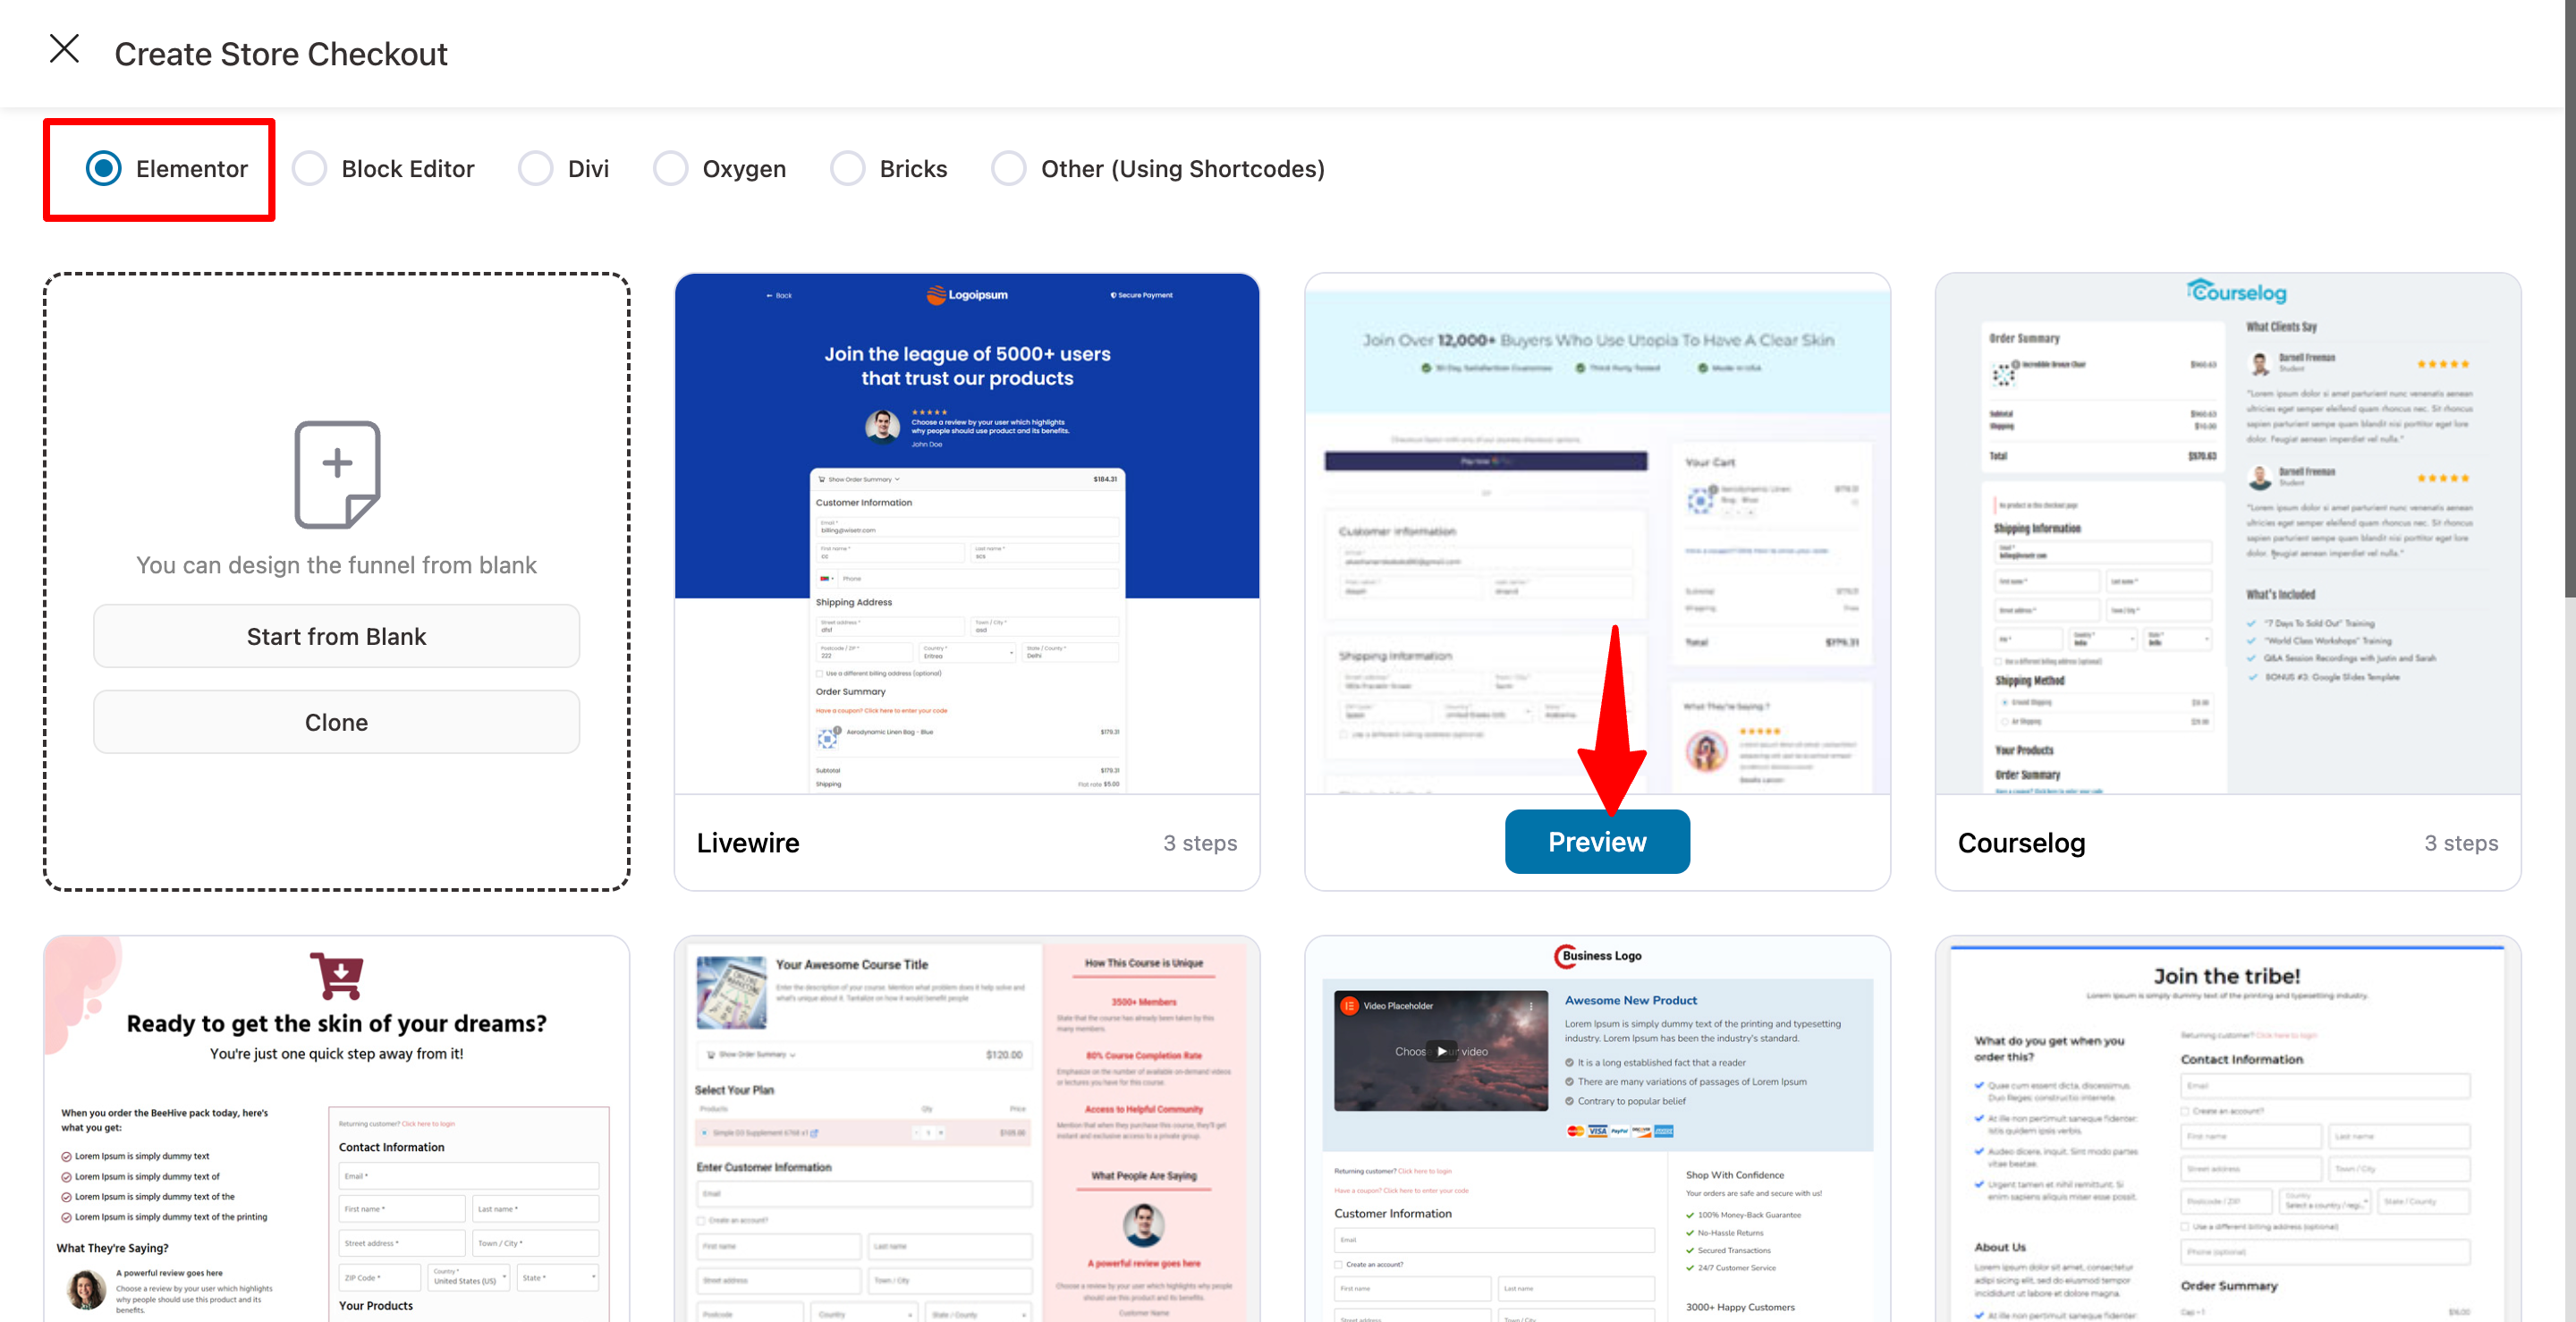
Choose the number of steps you want - one-page checkout or multi-step checkout page.
Then, hit the ‘Import This Funnel’ button, provide a name, and click Done to import.
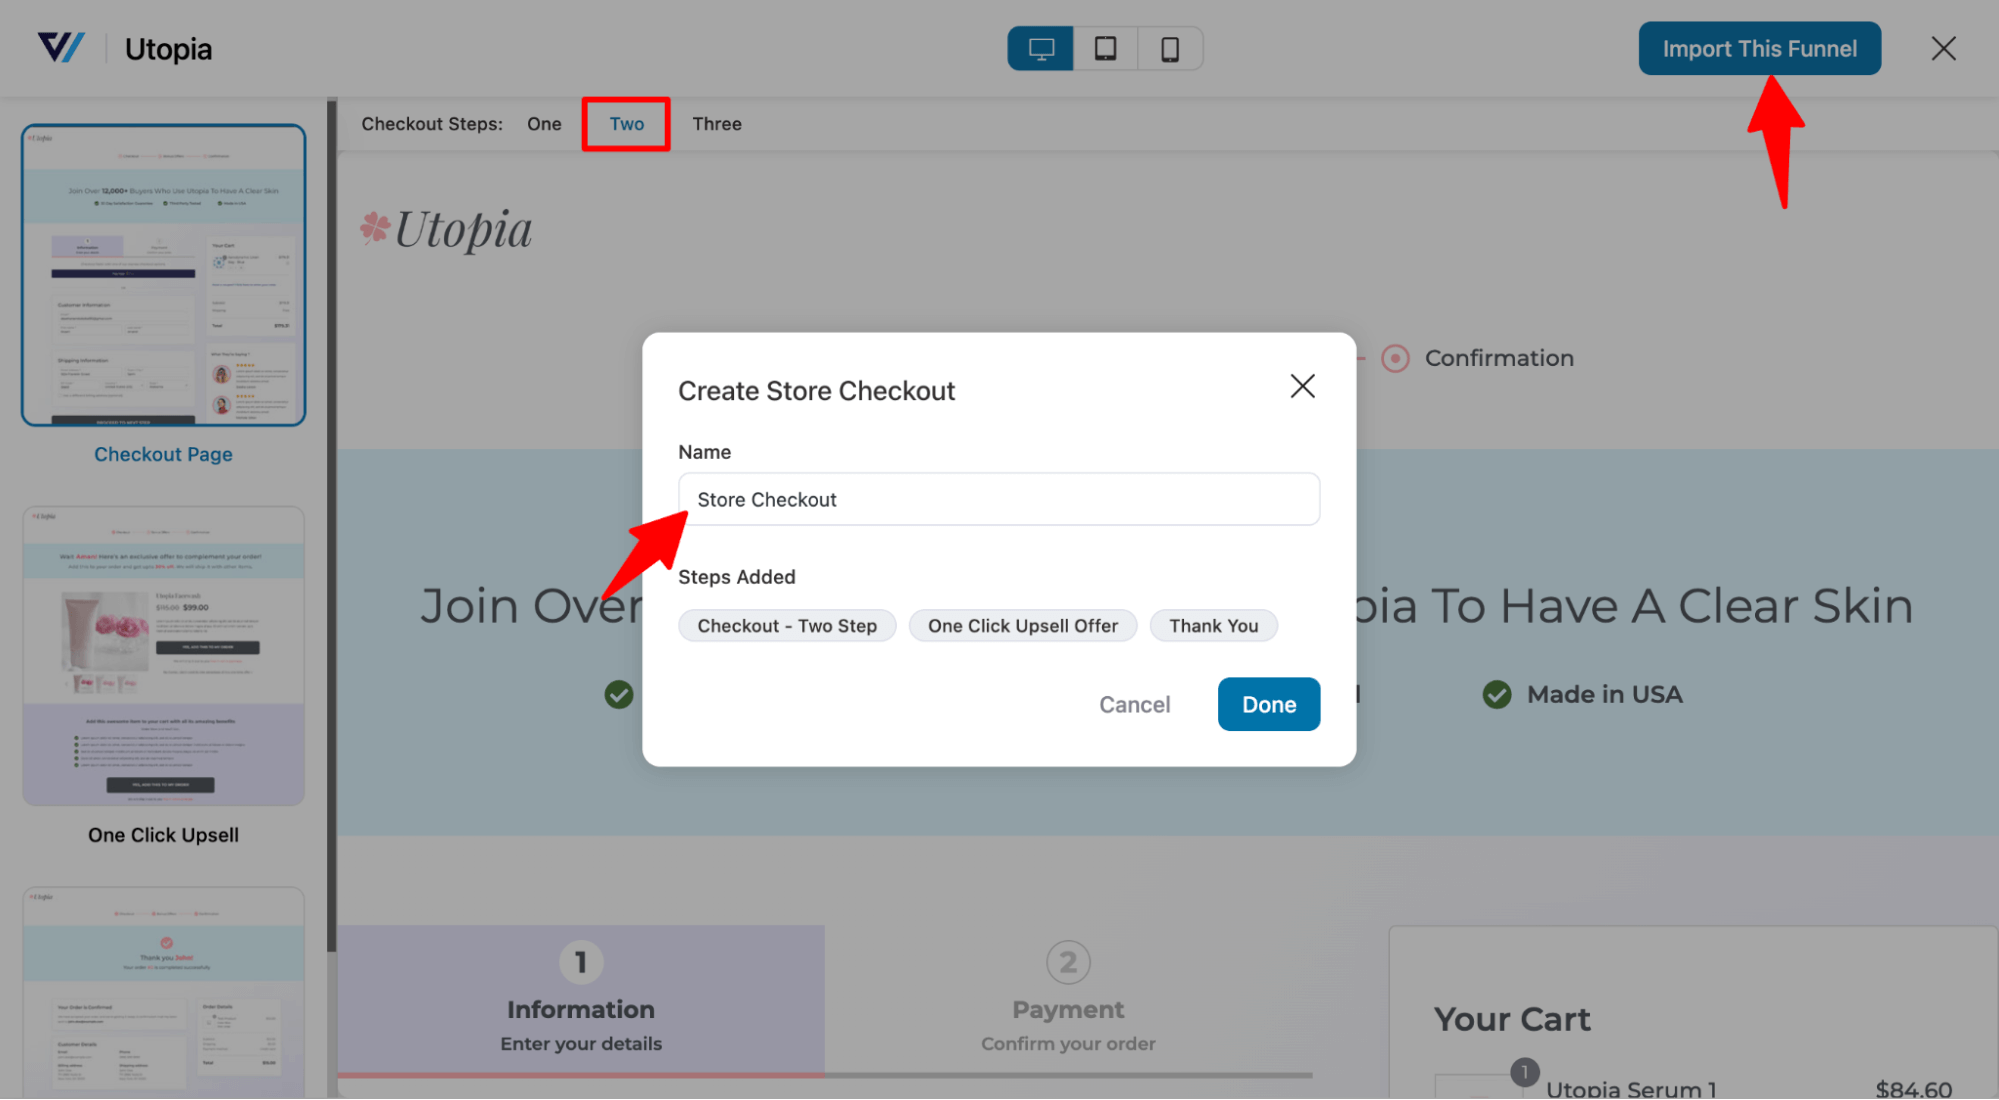
Your store checkout will get imported.
You can customize your checkout page the way you want. All you have to do is click on the checkout page to edit it.
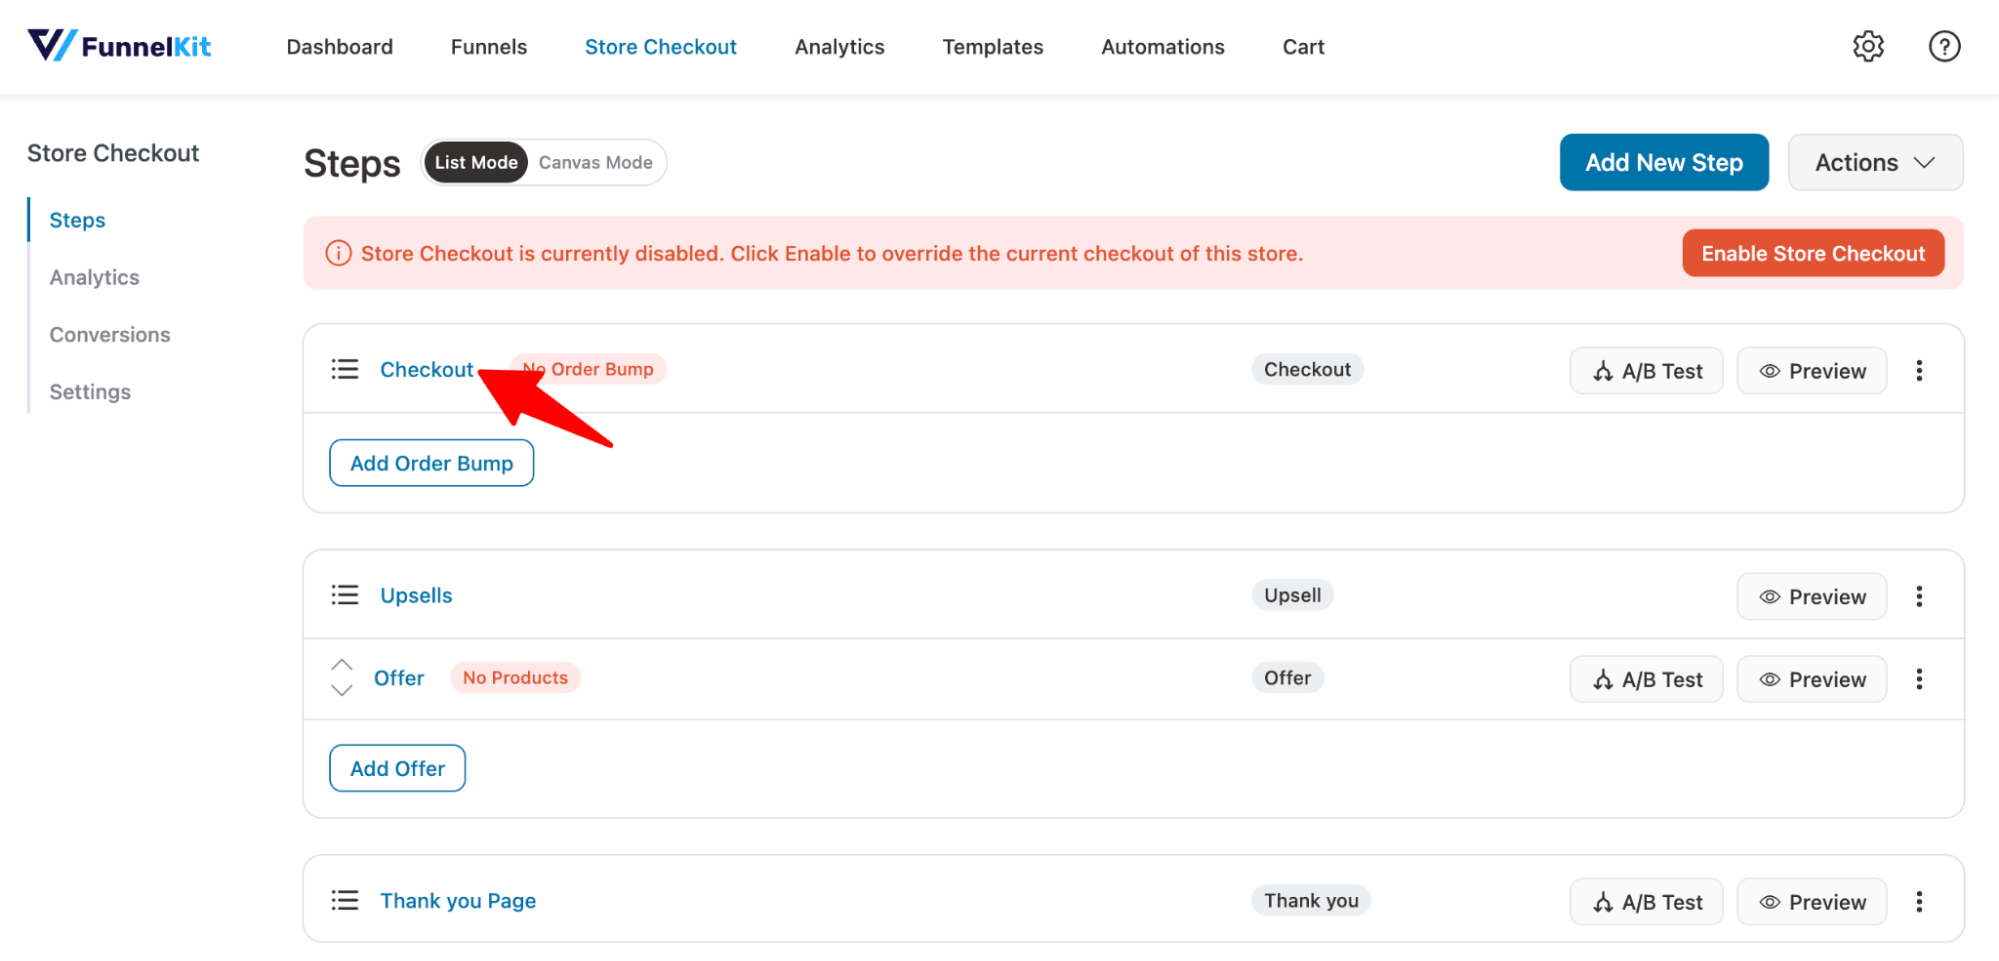
Once the checkout page is ready, let’s create our order bump offer.
Step 2: Add a WooCommerce order bump
Return to the funnel and click the 'Add Order Bump' button below your checkout page.
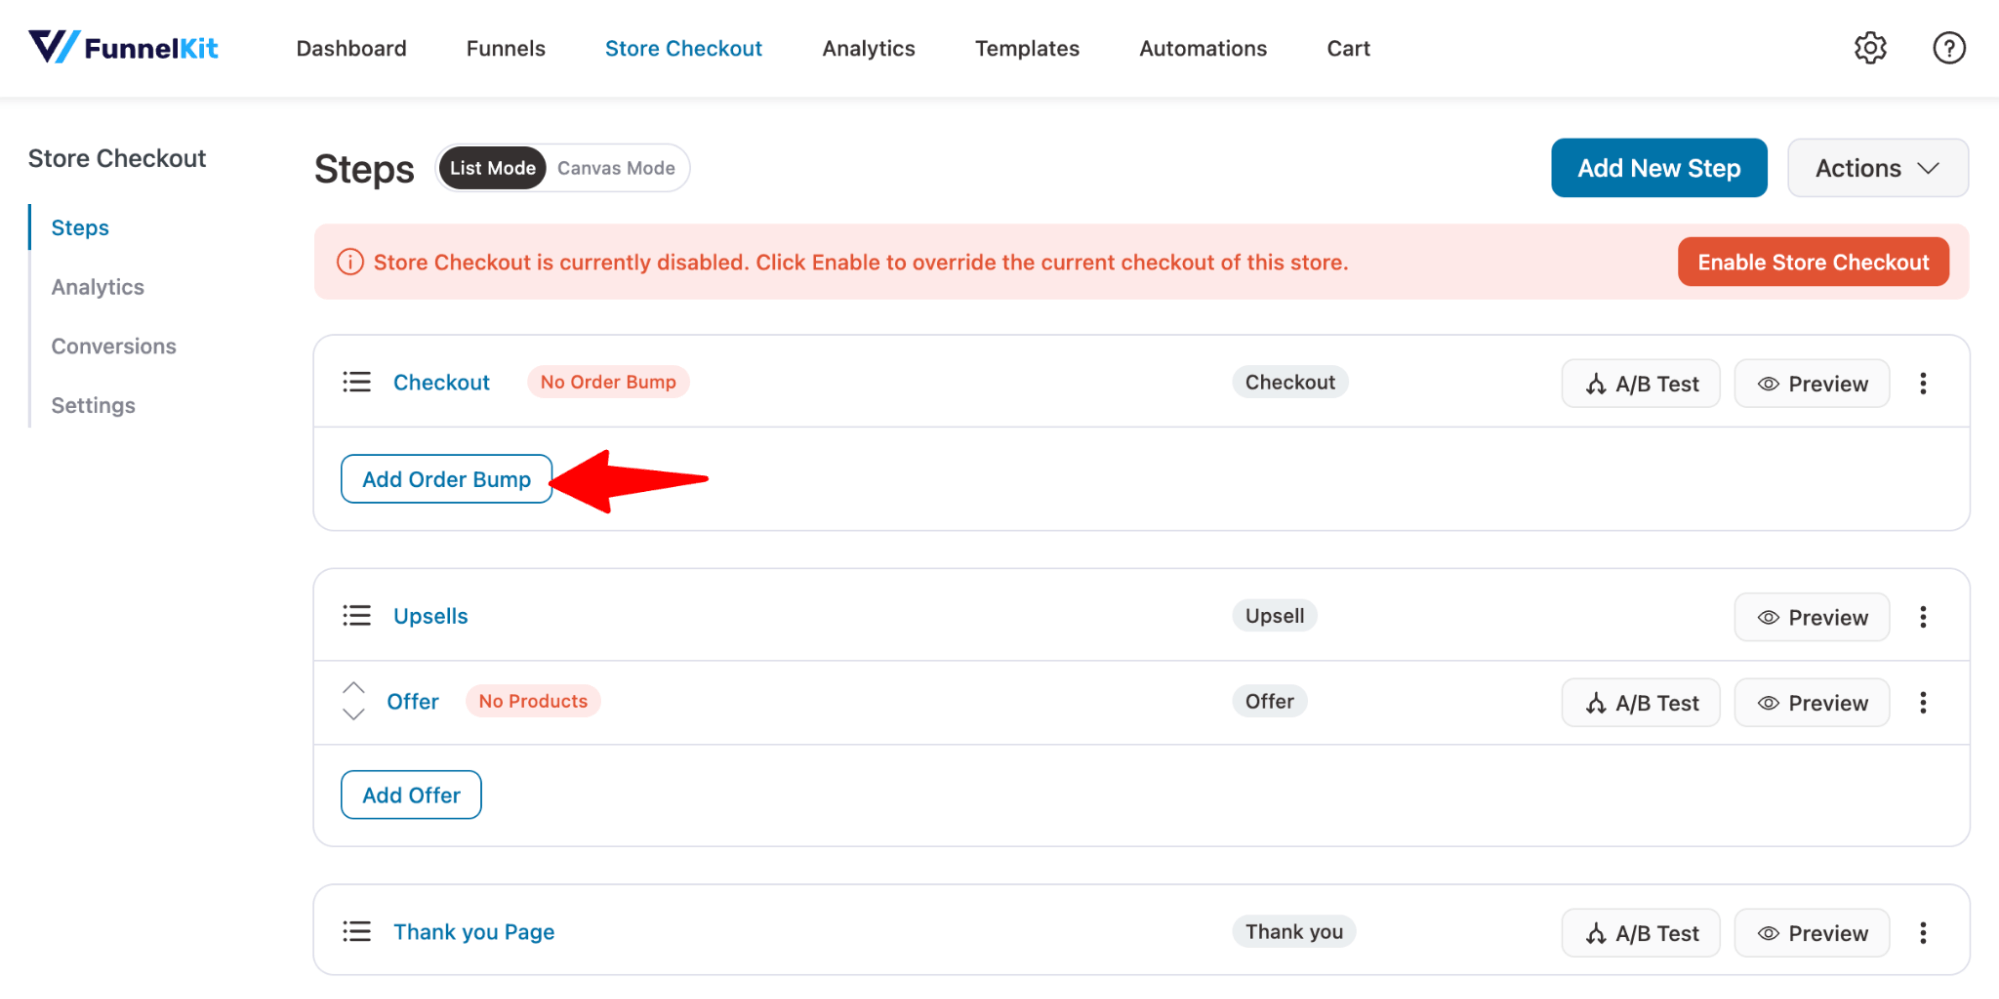
Next, enter the name of your WooCommerce order bump offer.
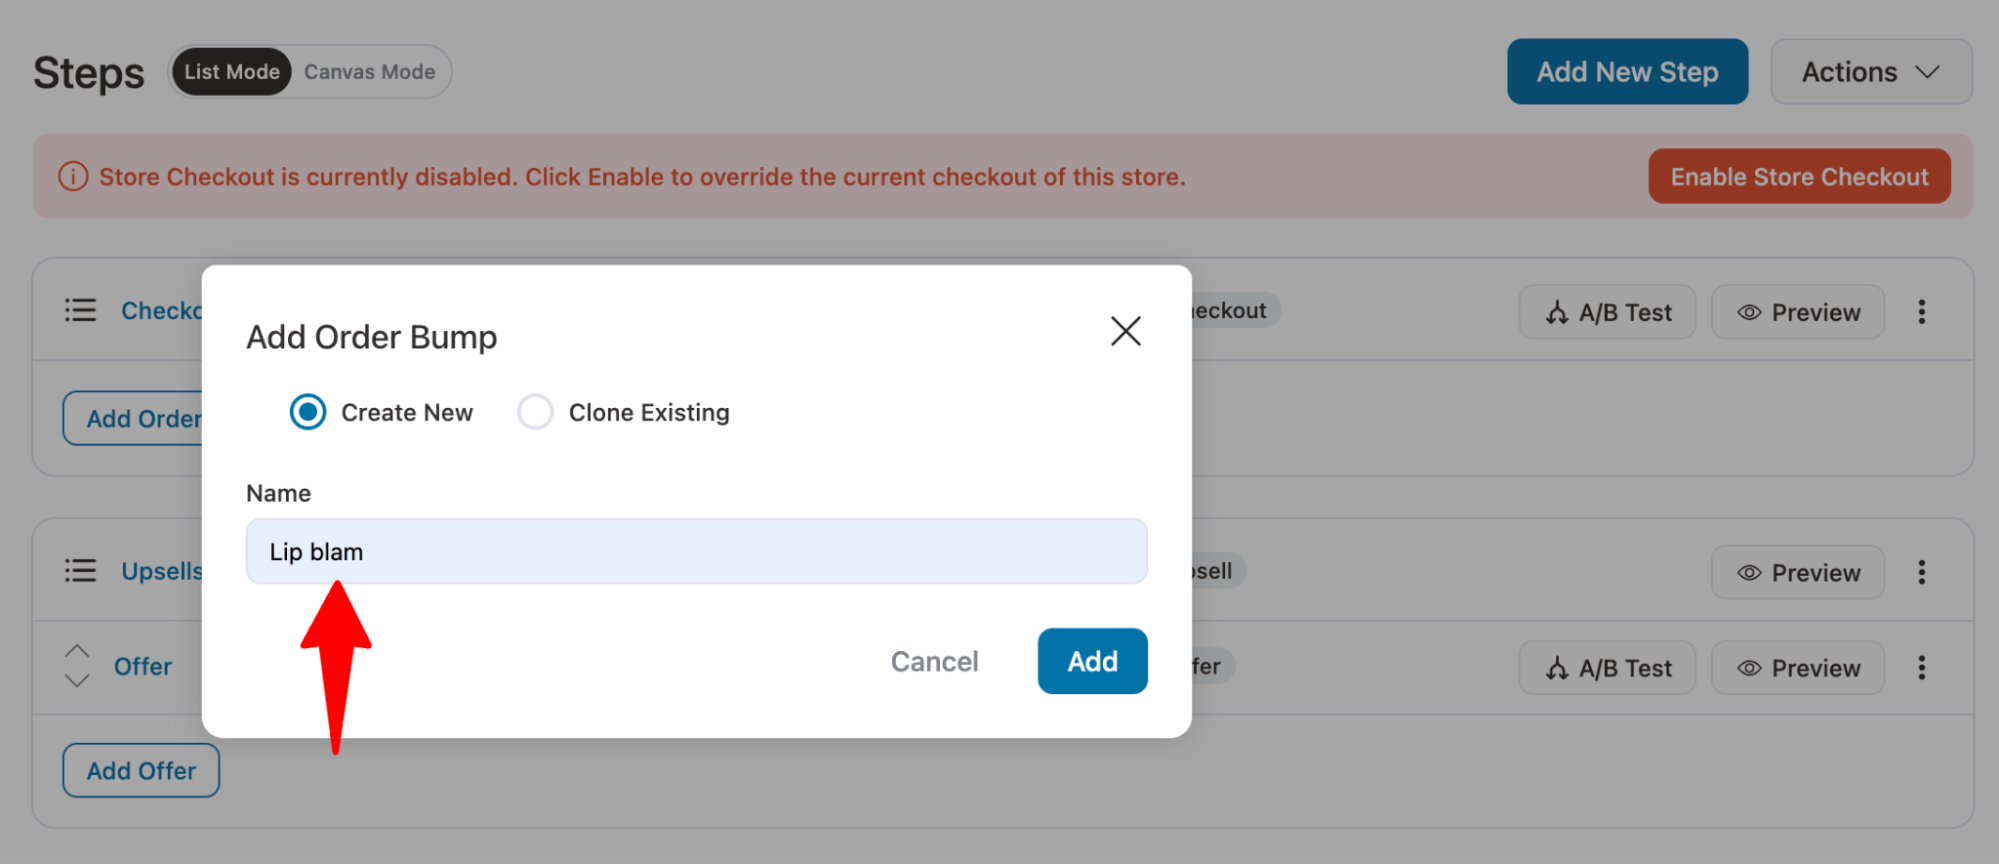
Clicking ‘Add’ will place the newly created order bump on your checkout page in your sales funnel.
Next, choose the order bump skin by clicking on the 'Import' button.
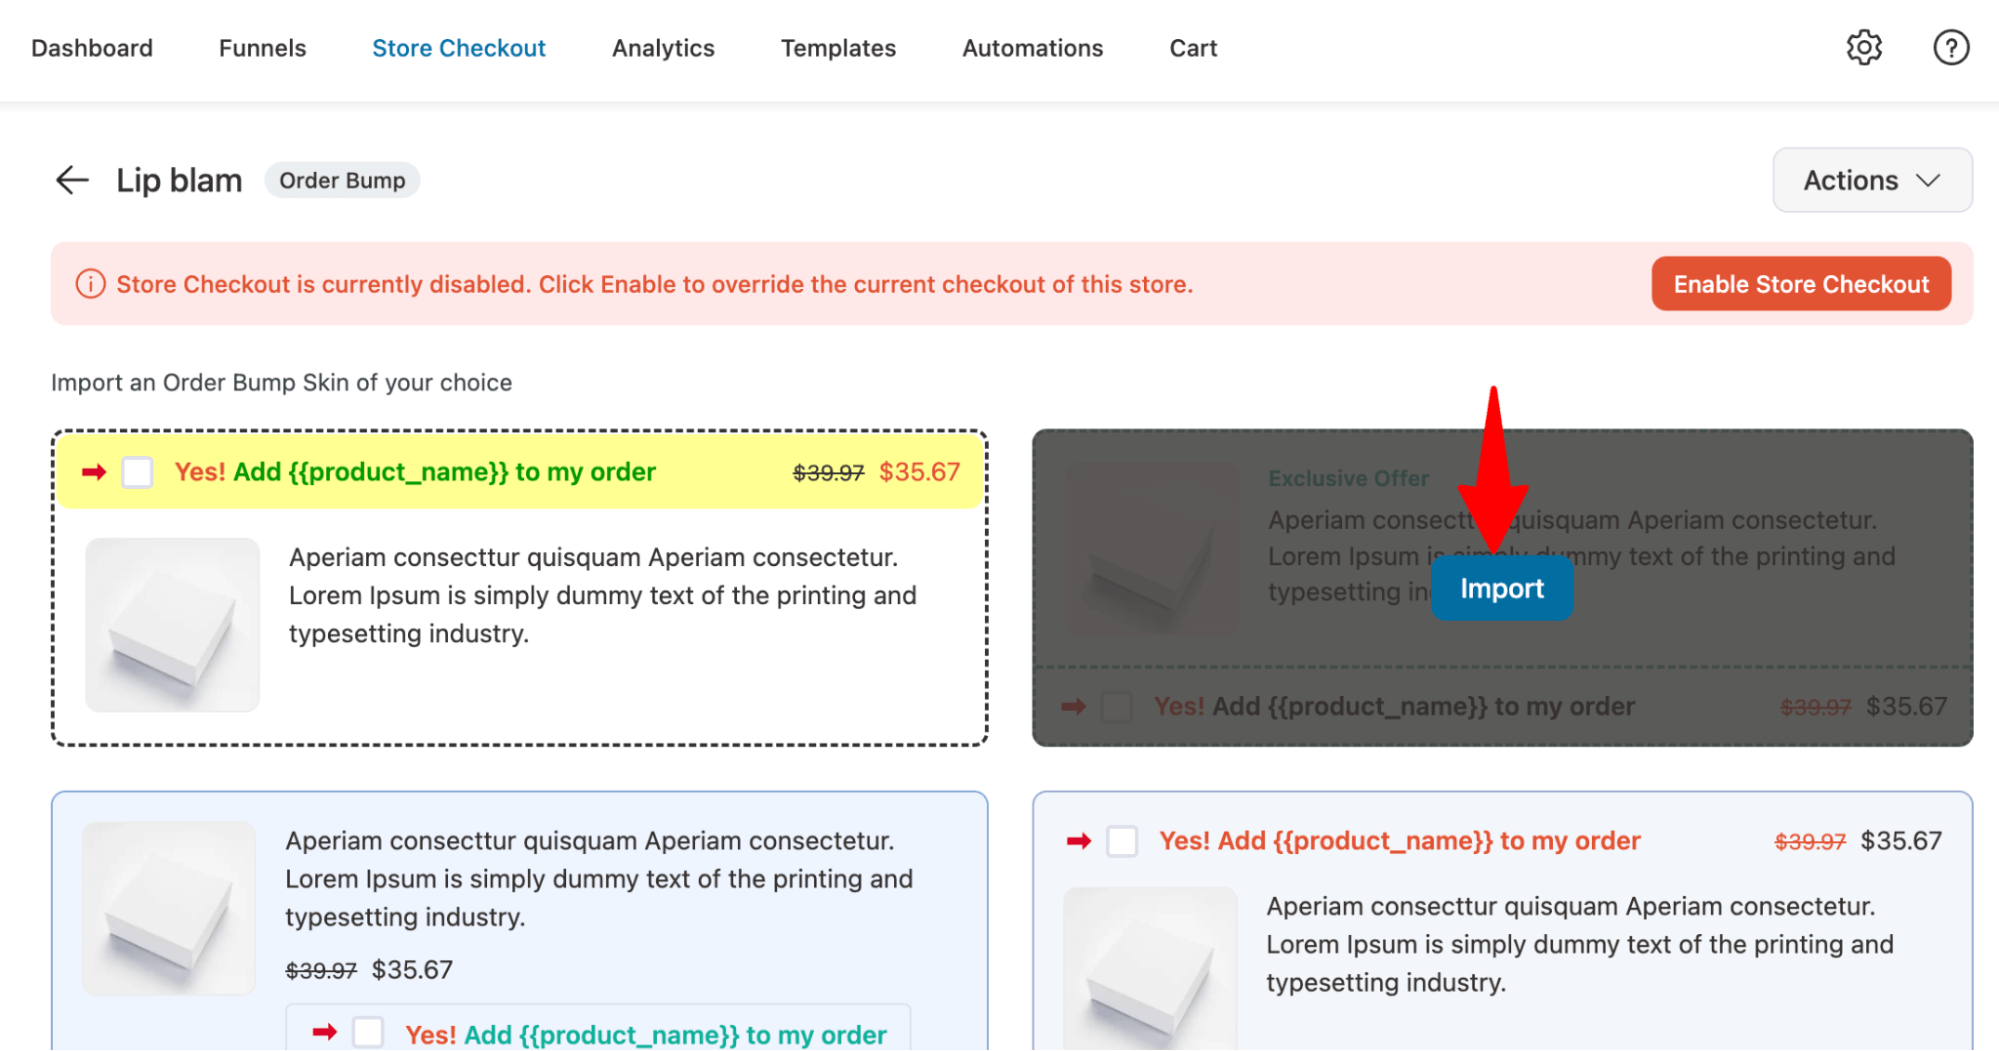
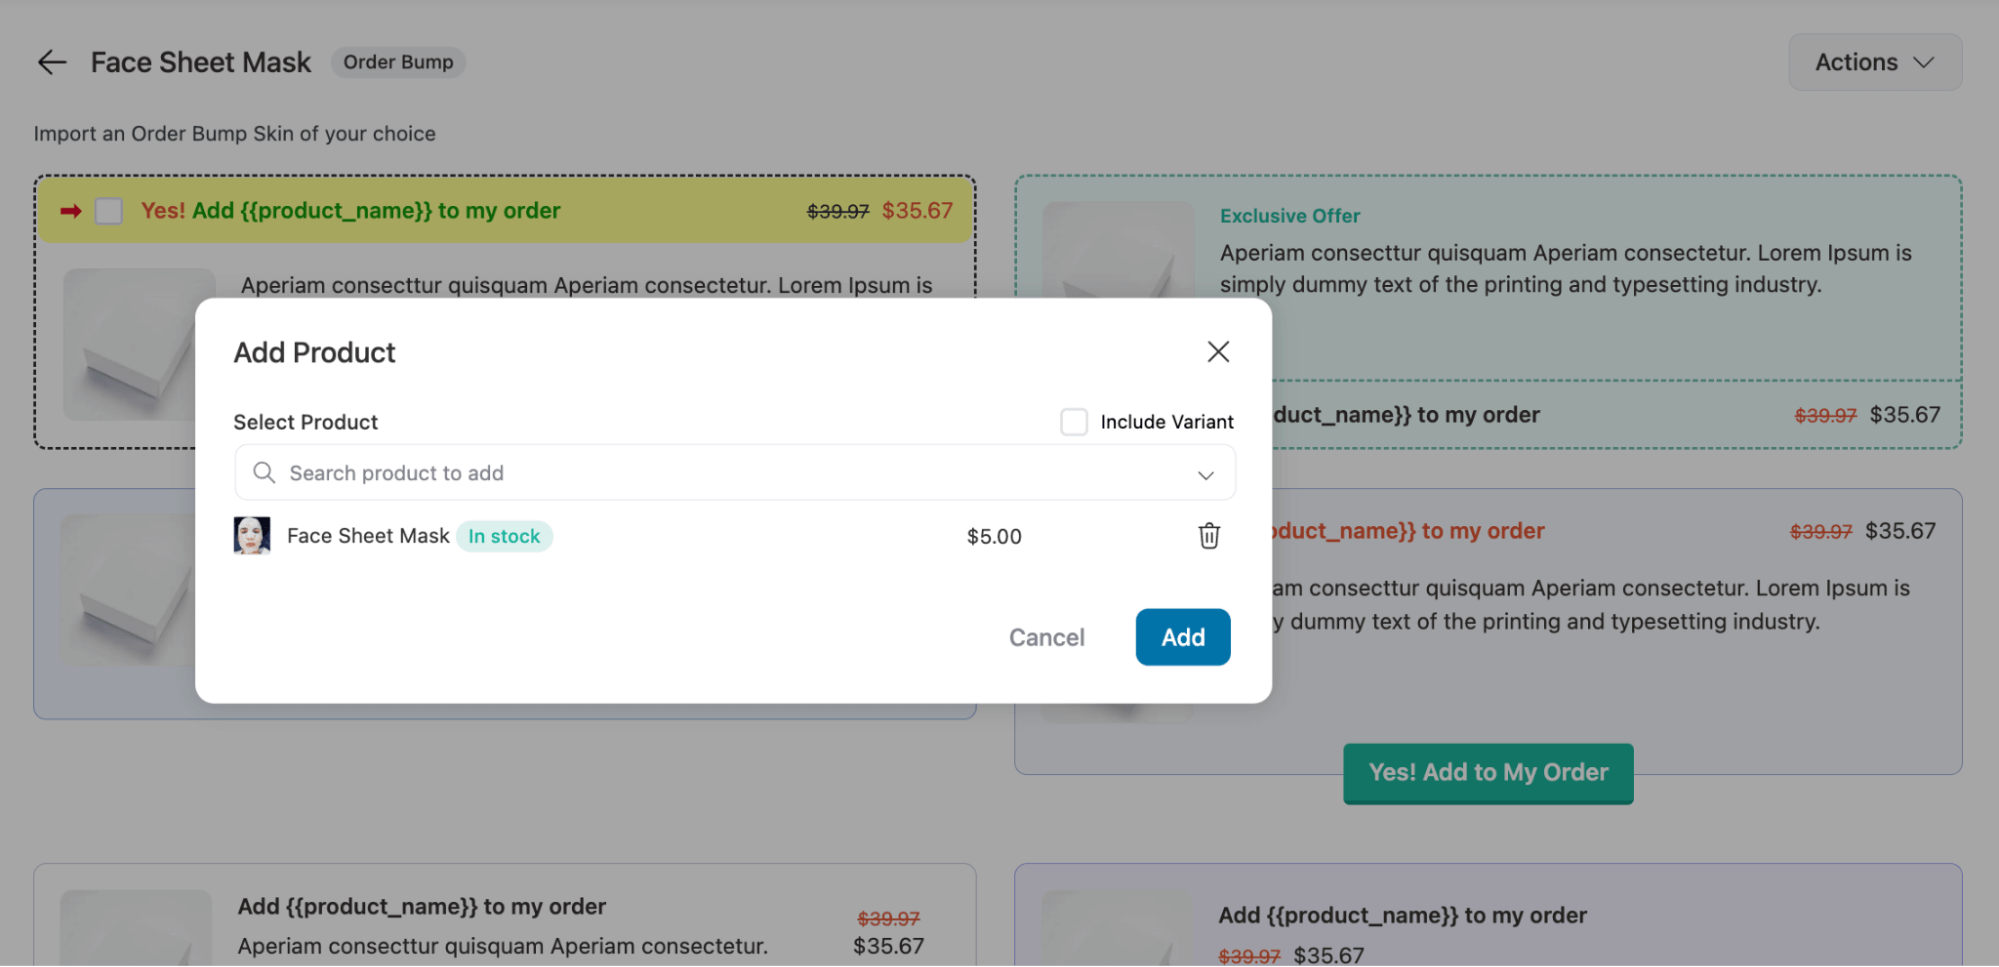
It'll take you to the product selection for your order bump offer.
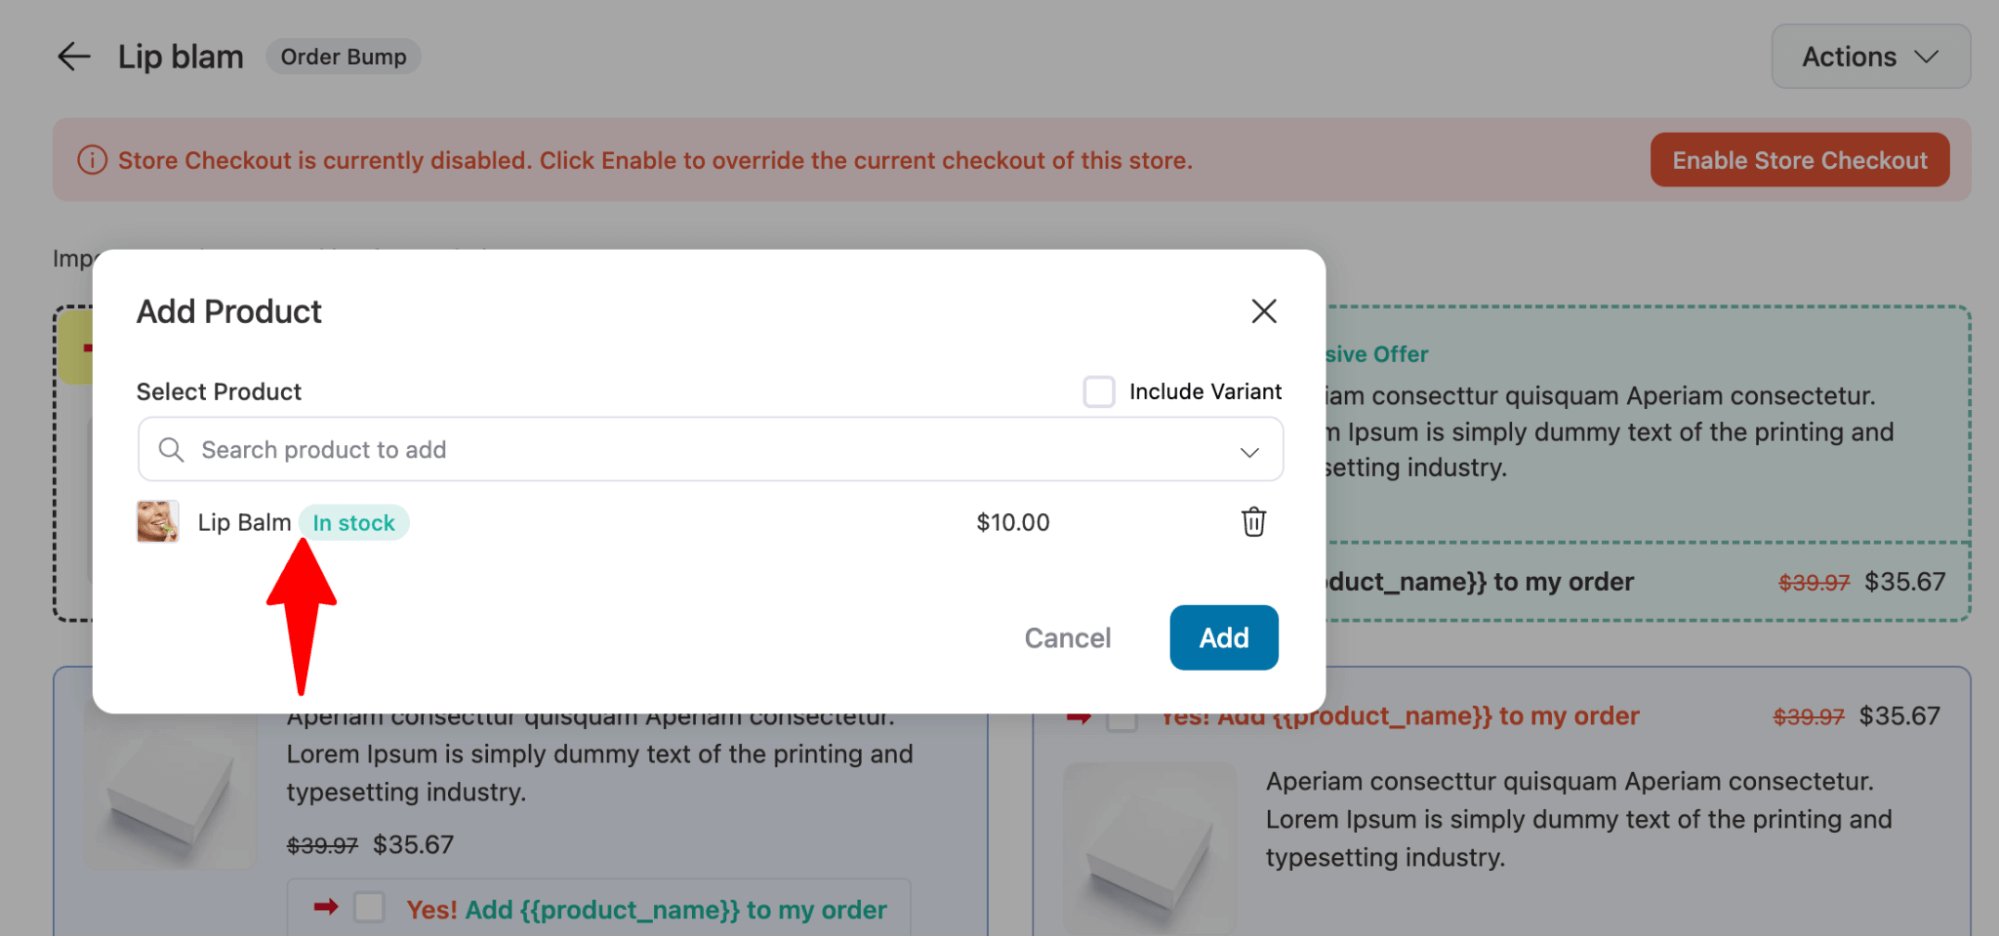
Add an item from your WooCommerce store to offer as an order bump on the Products tab.
Click on ‘Add Products’ and search for the item you want to add. Select it and hit Add.
You can add multiple items or variable products if you want.
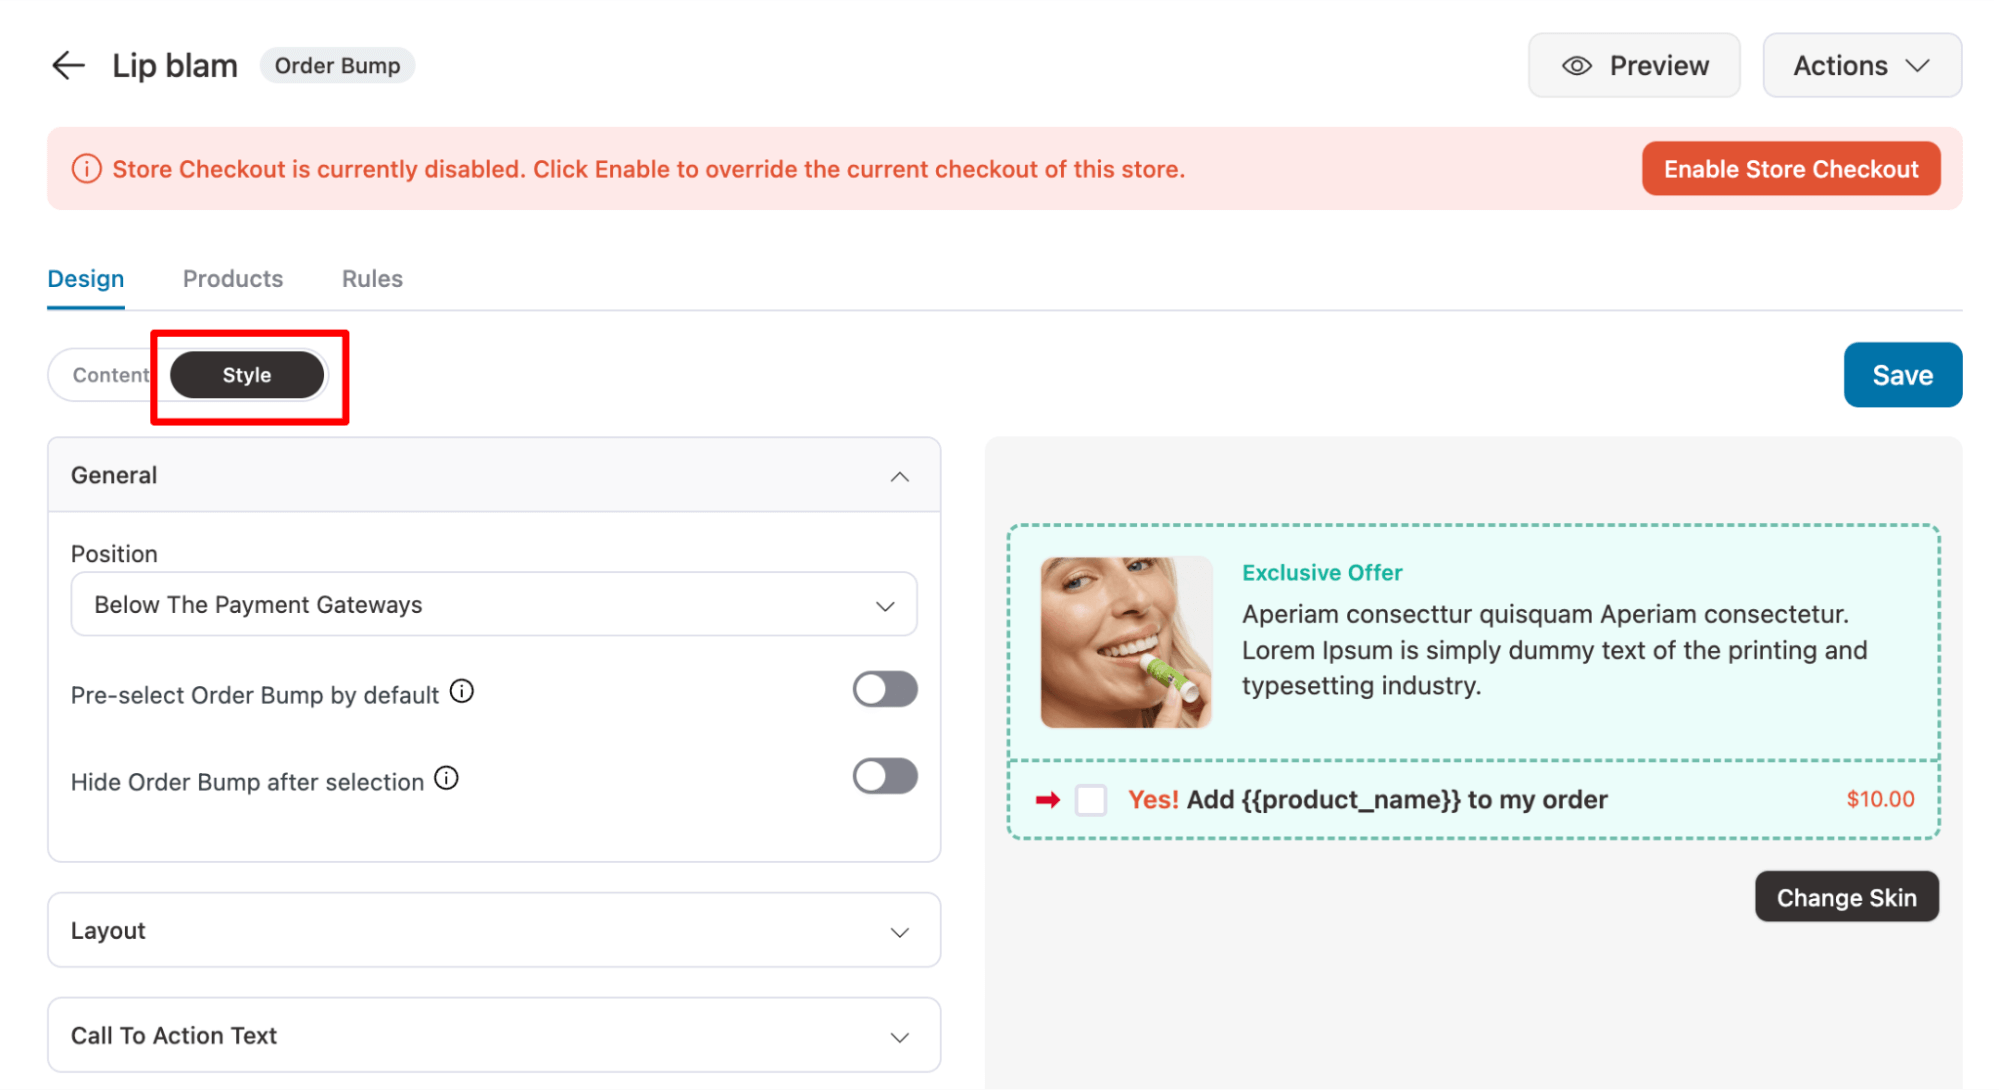
Step 3: Customize the order bump design, placement and copy
Go to the Design tab to select an order bump skin for the offer, then customize its content and style.
Edit the content, such as the title, description, button text, and product image visibility, for each order bump offer.

Customize the design and appearance of your WooCommerce order bumps by going to the ‘Style’ section.
Here, you can set its display position, pre-select your bump offers, and even hide it after selection.
Make sure to press ‘Save’ once done.
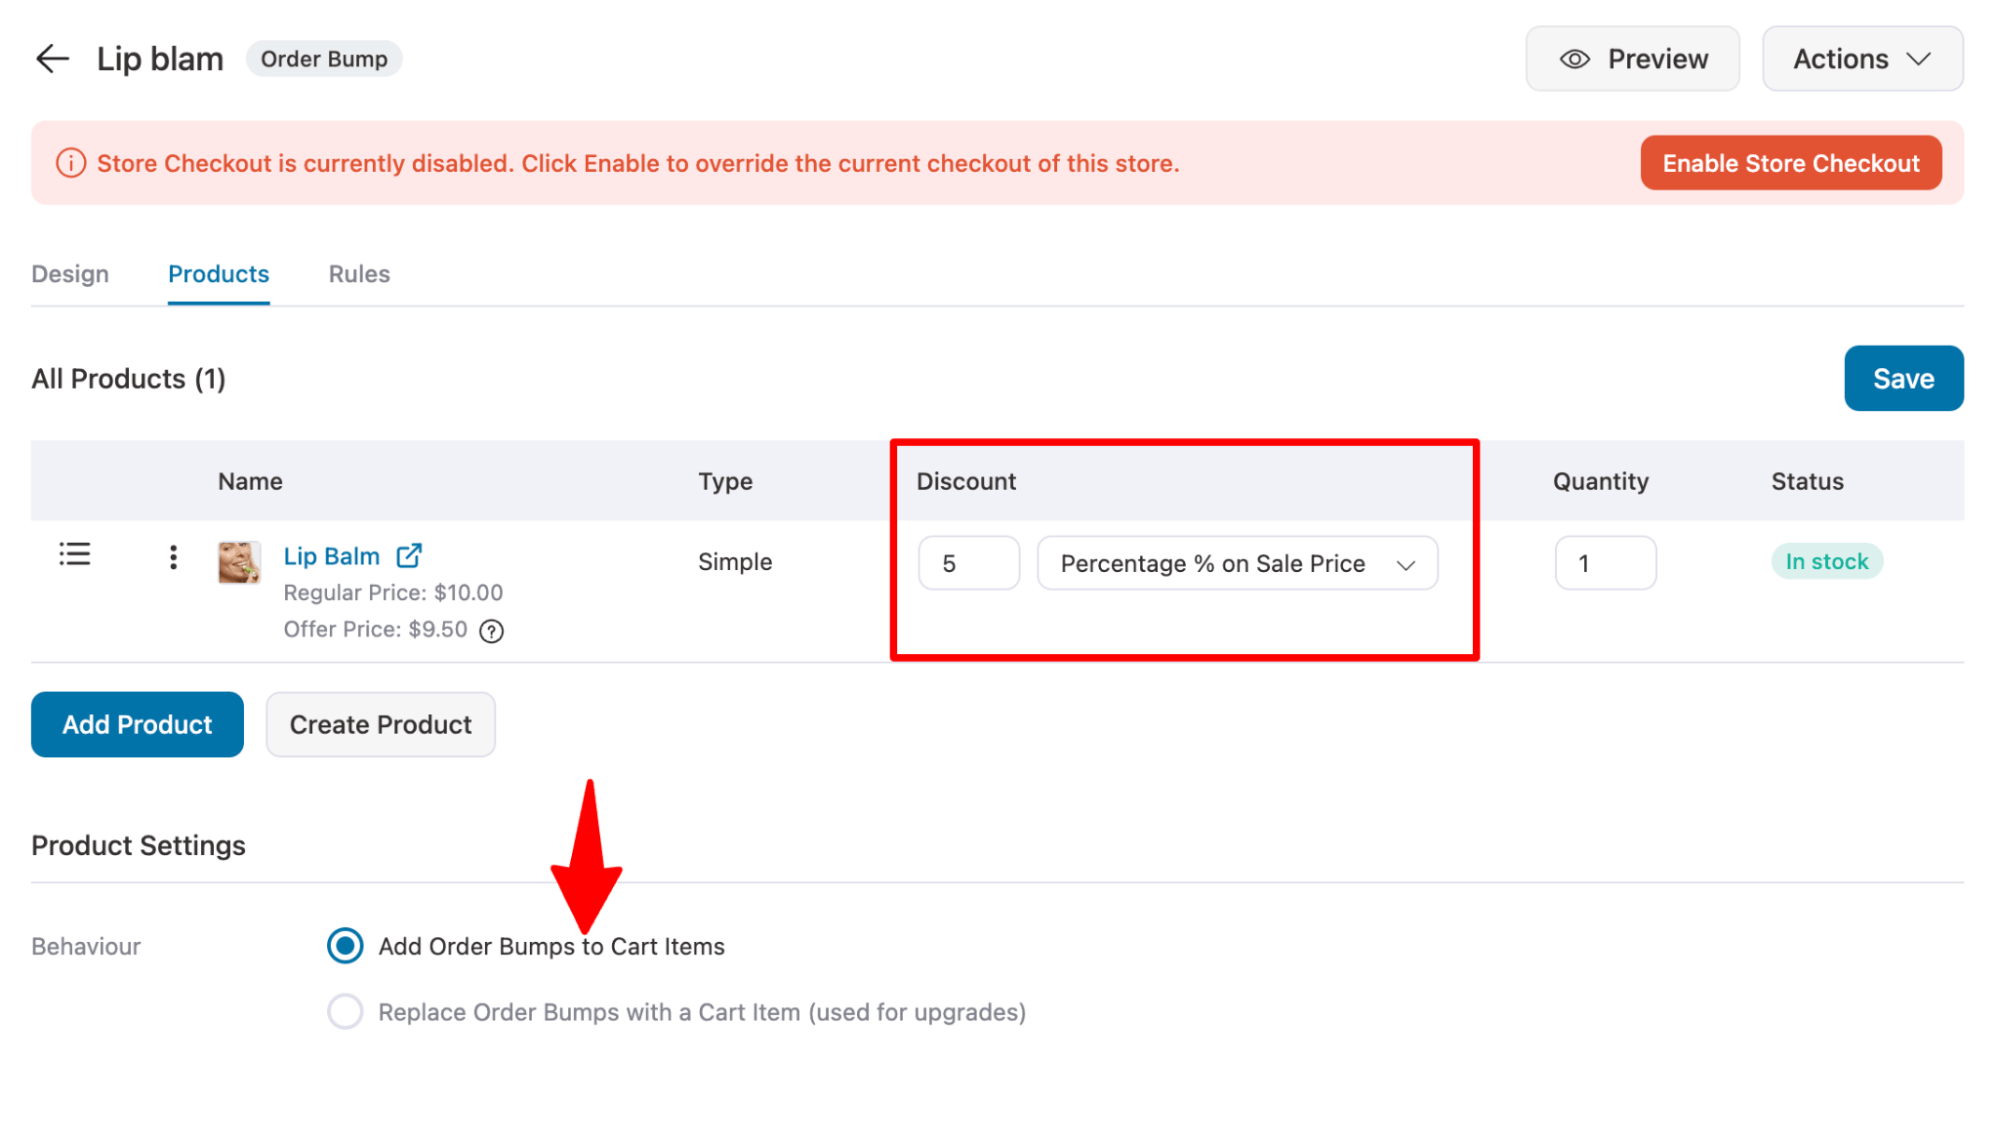
Set discounts and quantity for your bump offer in the Products tab. For complementary products, select ‘Add Order Bumps to Cart Items.’.
Step 4: Configure display rules and targeting
Setting conditions before displaying an order bump ensures your offers stay relevant and drive higher conversions. For example, you can offer certain items if the cart contains products from a specific category.
FunnelKit Funnel Builder allows you to set conditions based on cart details, customer history, location, time, and more. Just pick a condition, set an operator, and define a value.
Our order bump is a lip balm, so we’ll offer it only to users who add skincare items to their cart.
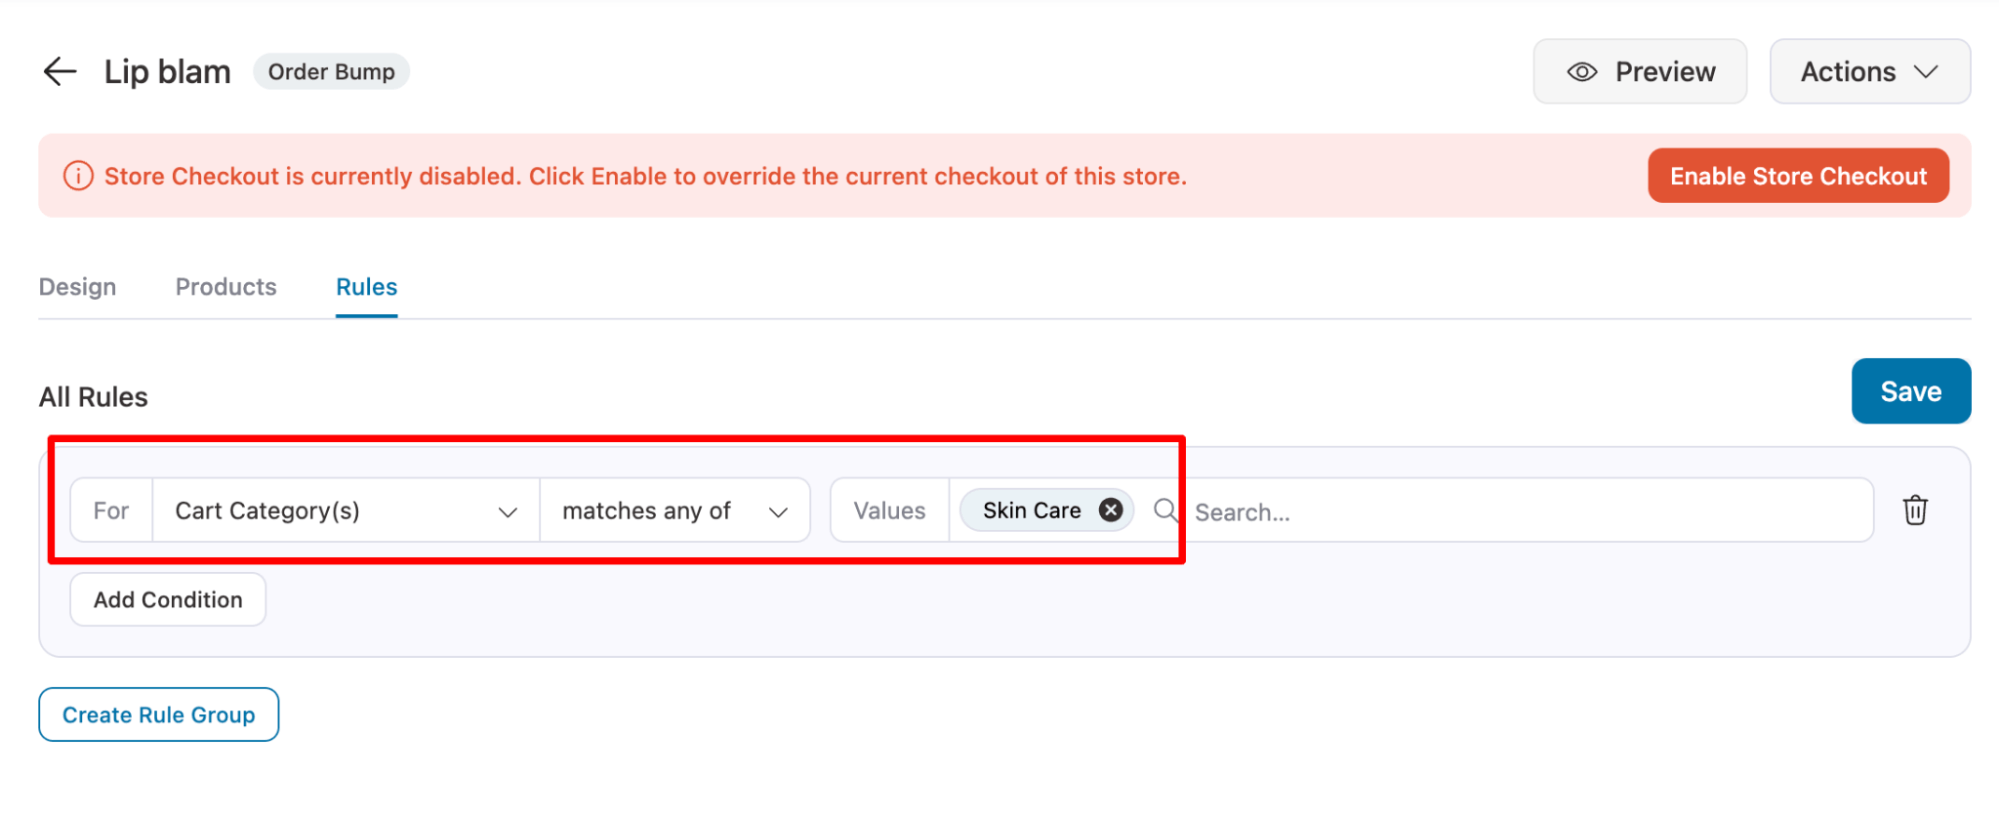
Make sure to save the order bump offer.
Step 5: Activate the store checkout
The last step is to activate the store checkout. To do this, click the “Enable Store Checkout Button.”
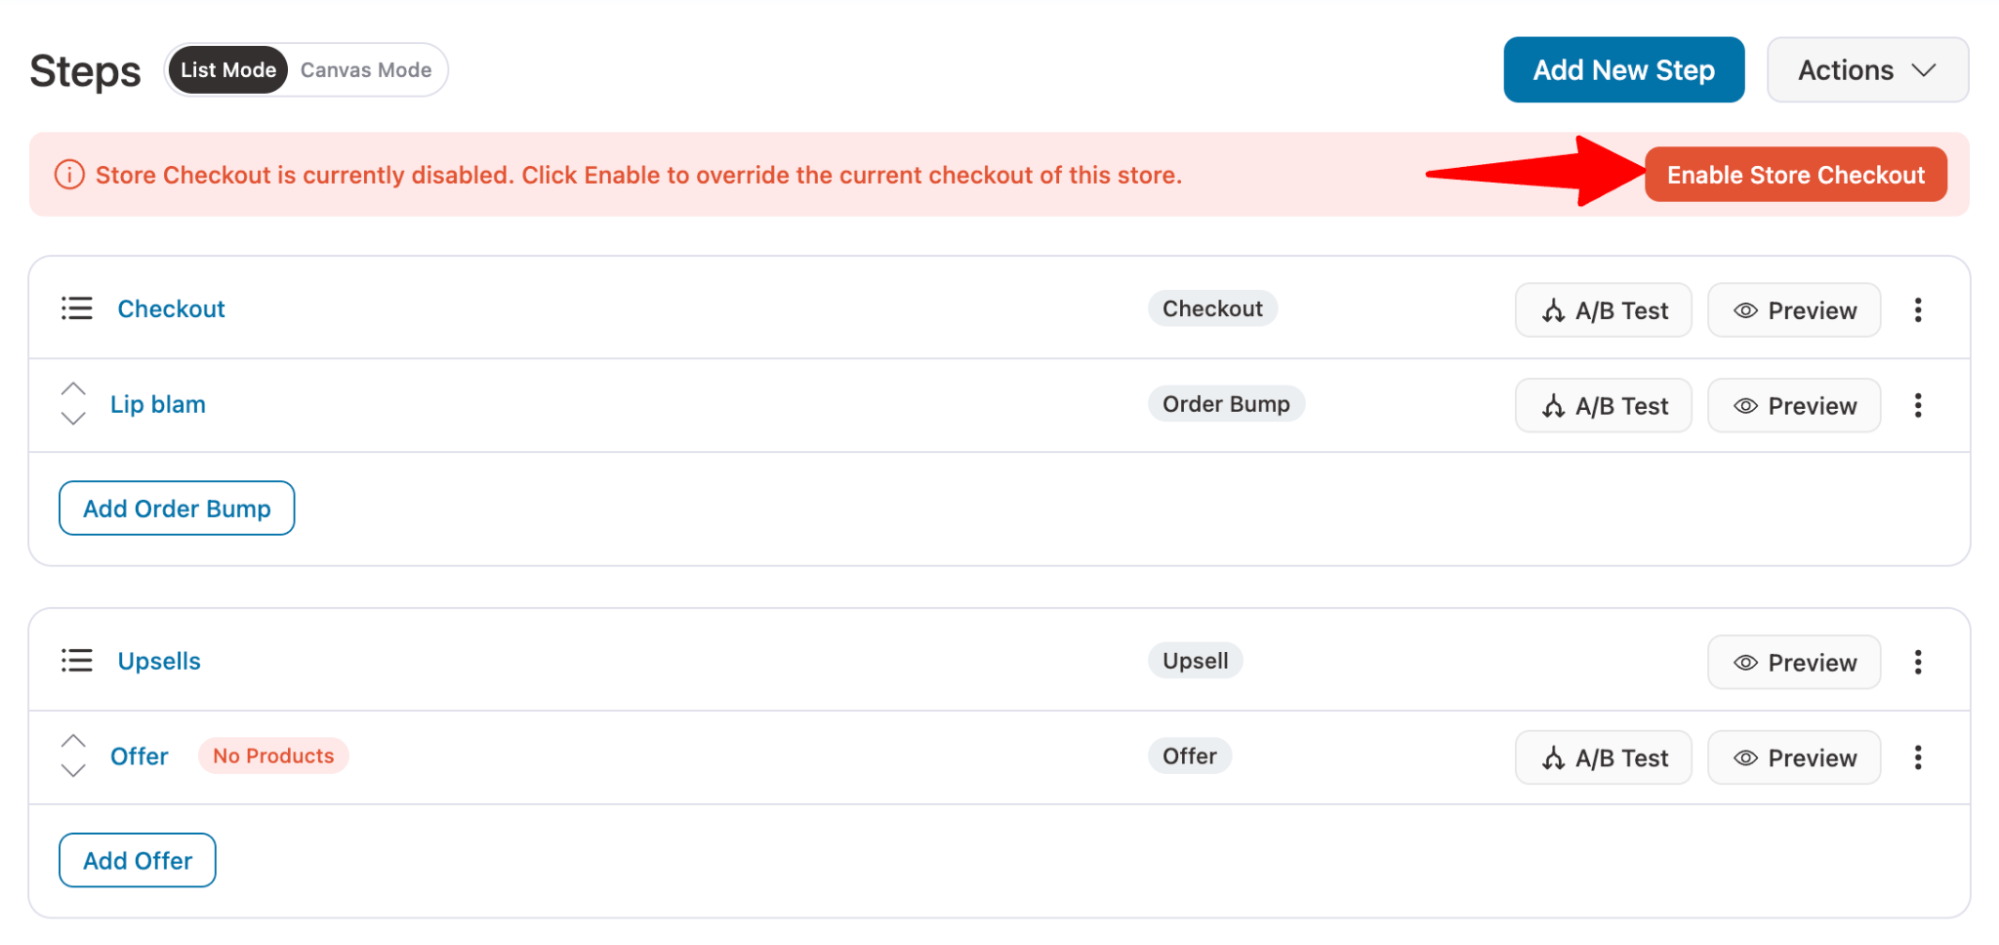
And that is it. Now, when people check out at your store, they will see the order bump offer right on the checkout page, which they can add to their cart with a single click.
Setting Up Order Bump Placement Strategy in WooCommerce
To change the position of any order bump offer on the checkout page, go to that offer and on the Style tab, pick the position.
You can configure eight placement options for your order bump, which include:
- Above the order summary
- Below the order summary
- Above the payment gateways
- Below the payment gateways
- Inside Mini cart
- Above checkout form
- Above Mini cart
- Below Mini cart
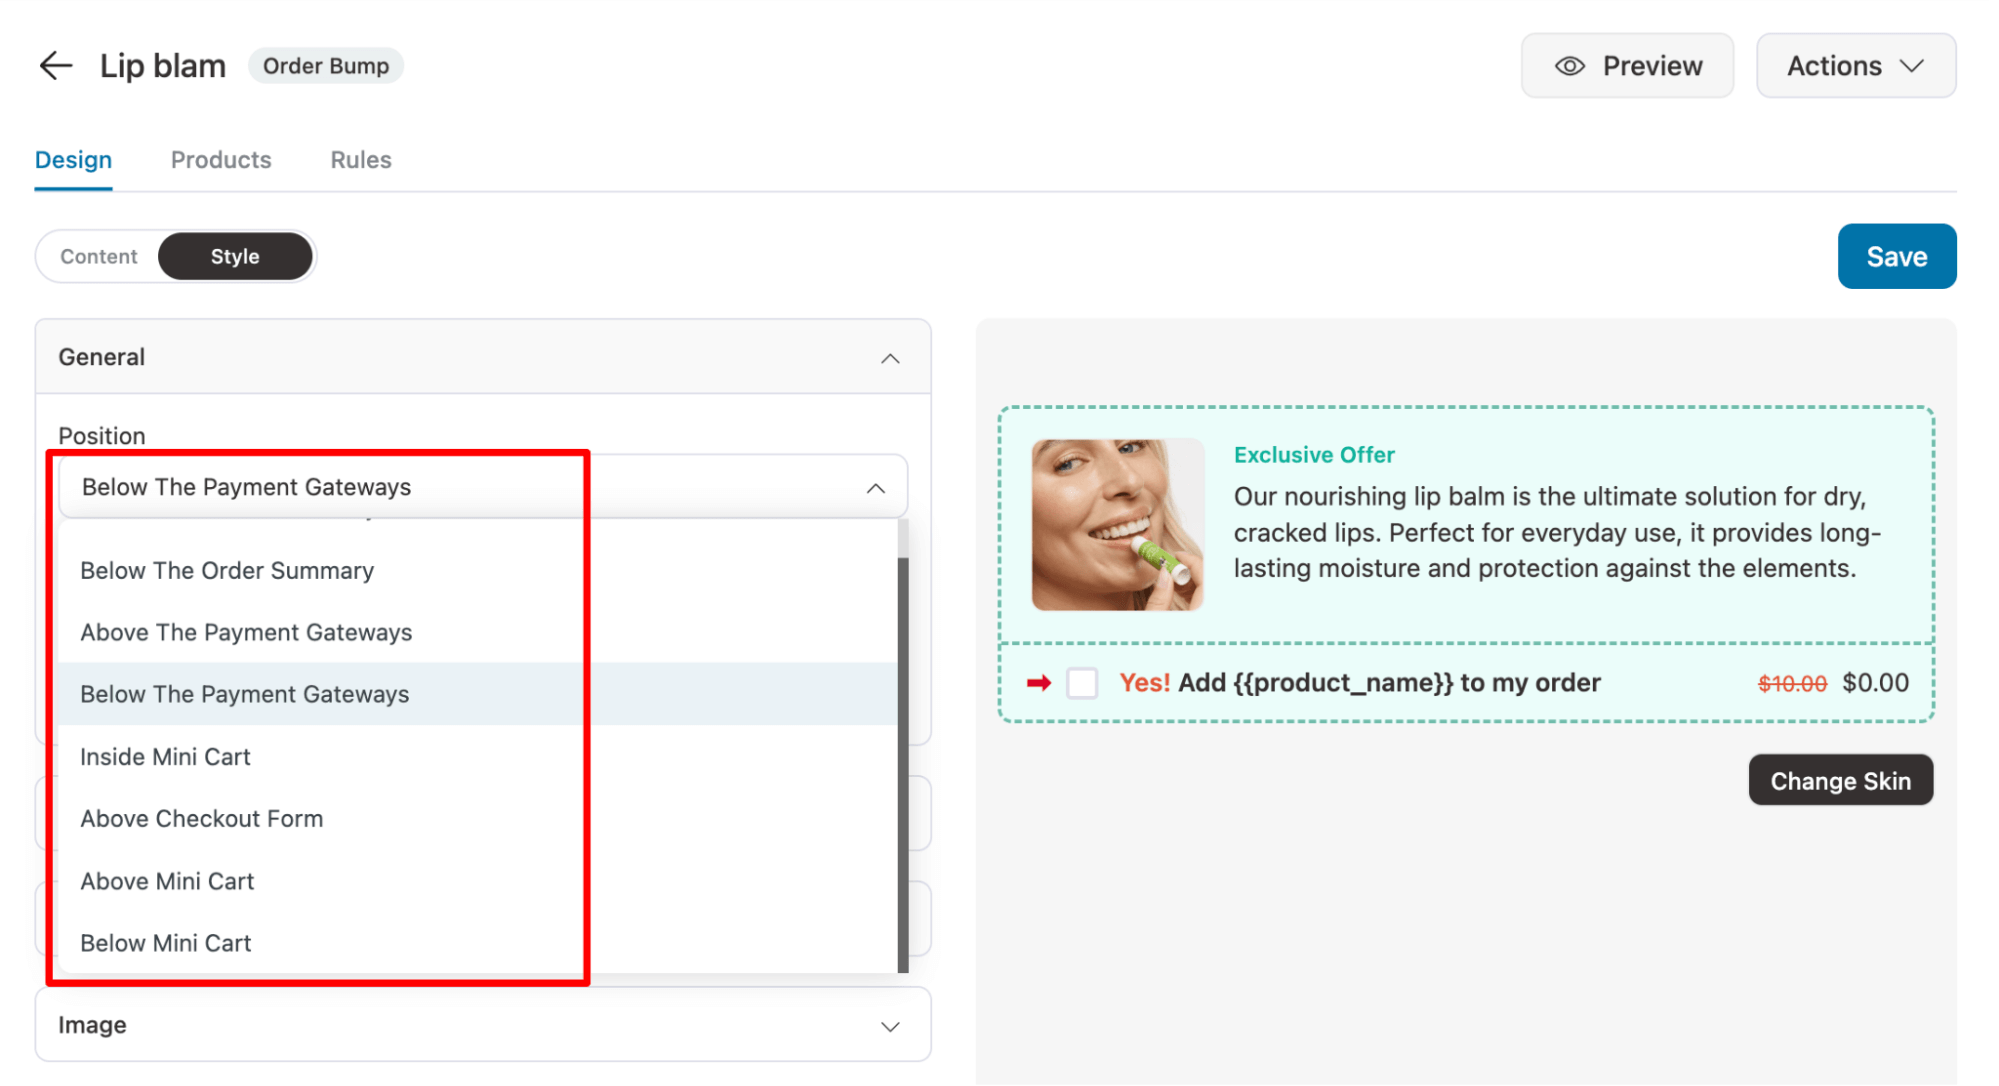
After updating the position, make sure to save the changes.
Remember, you can pick different positions for different order bumps.
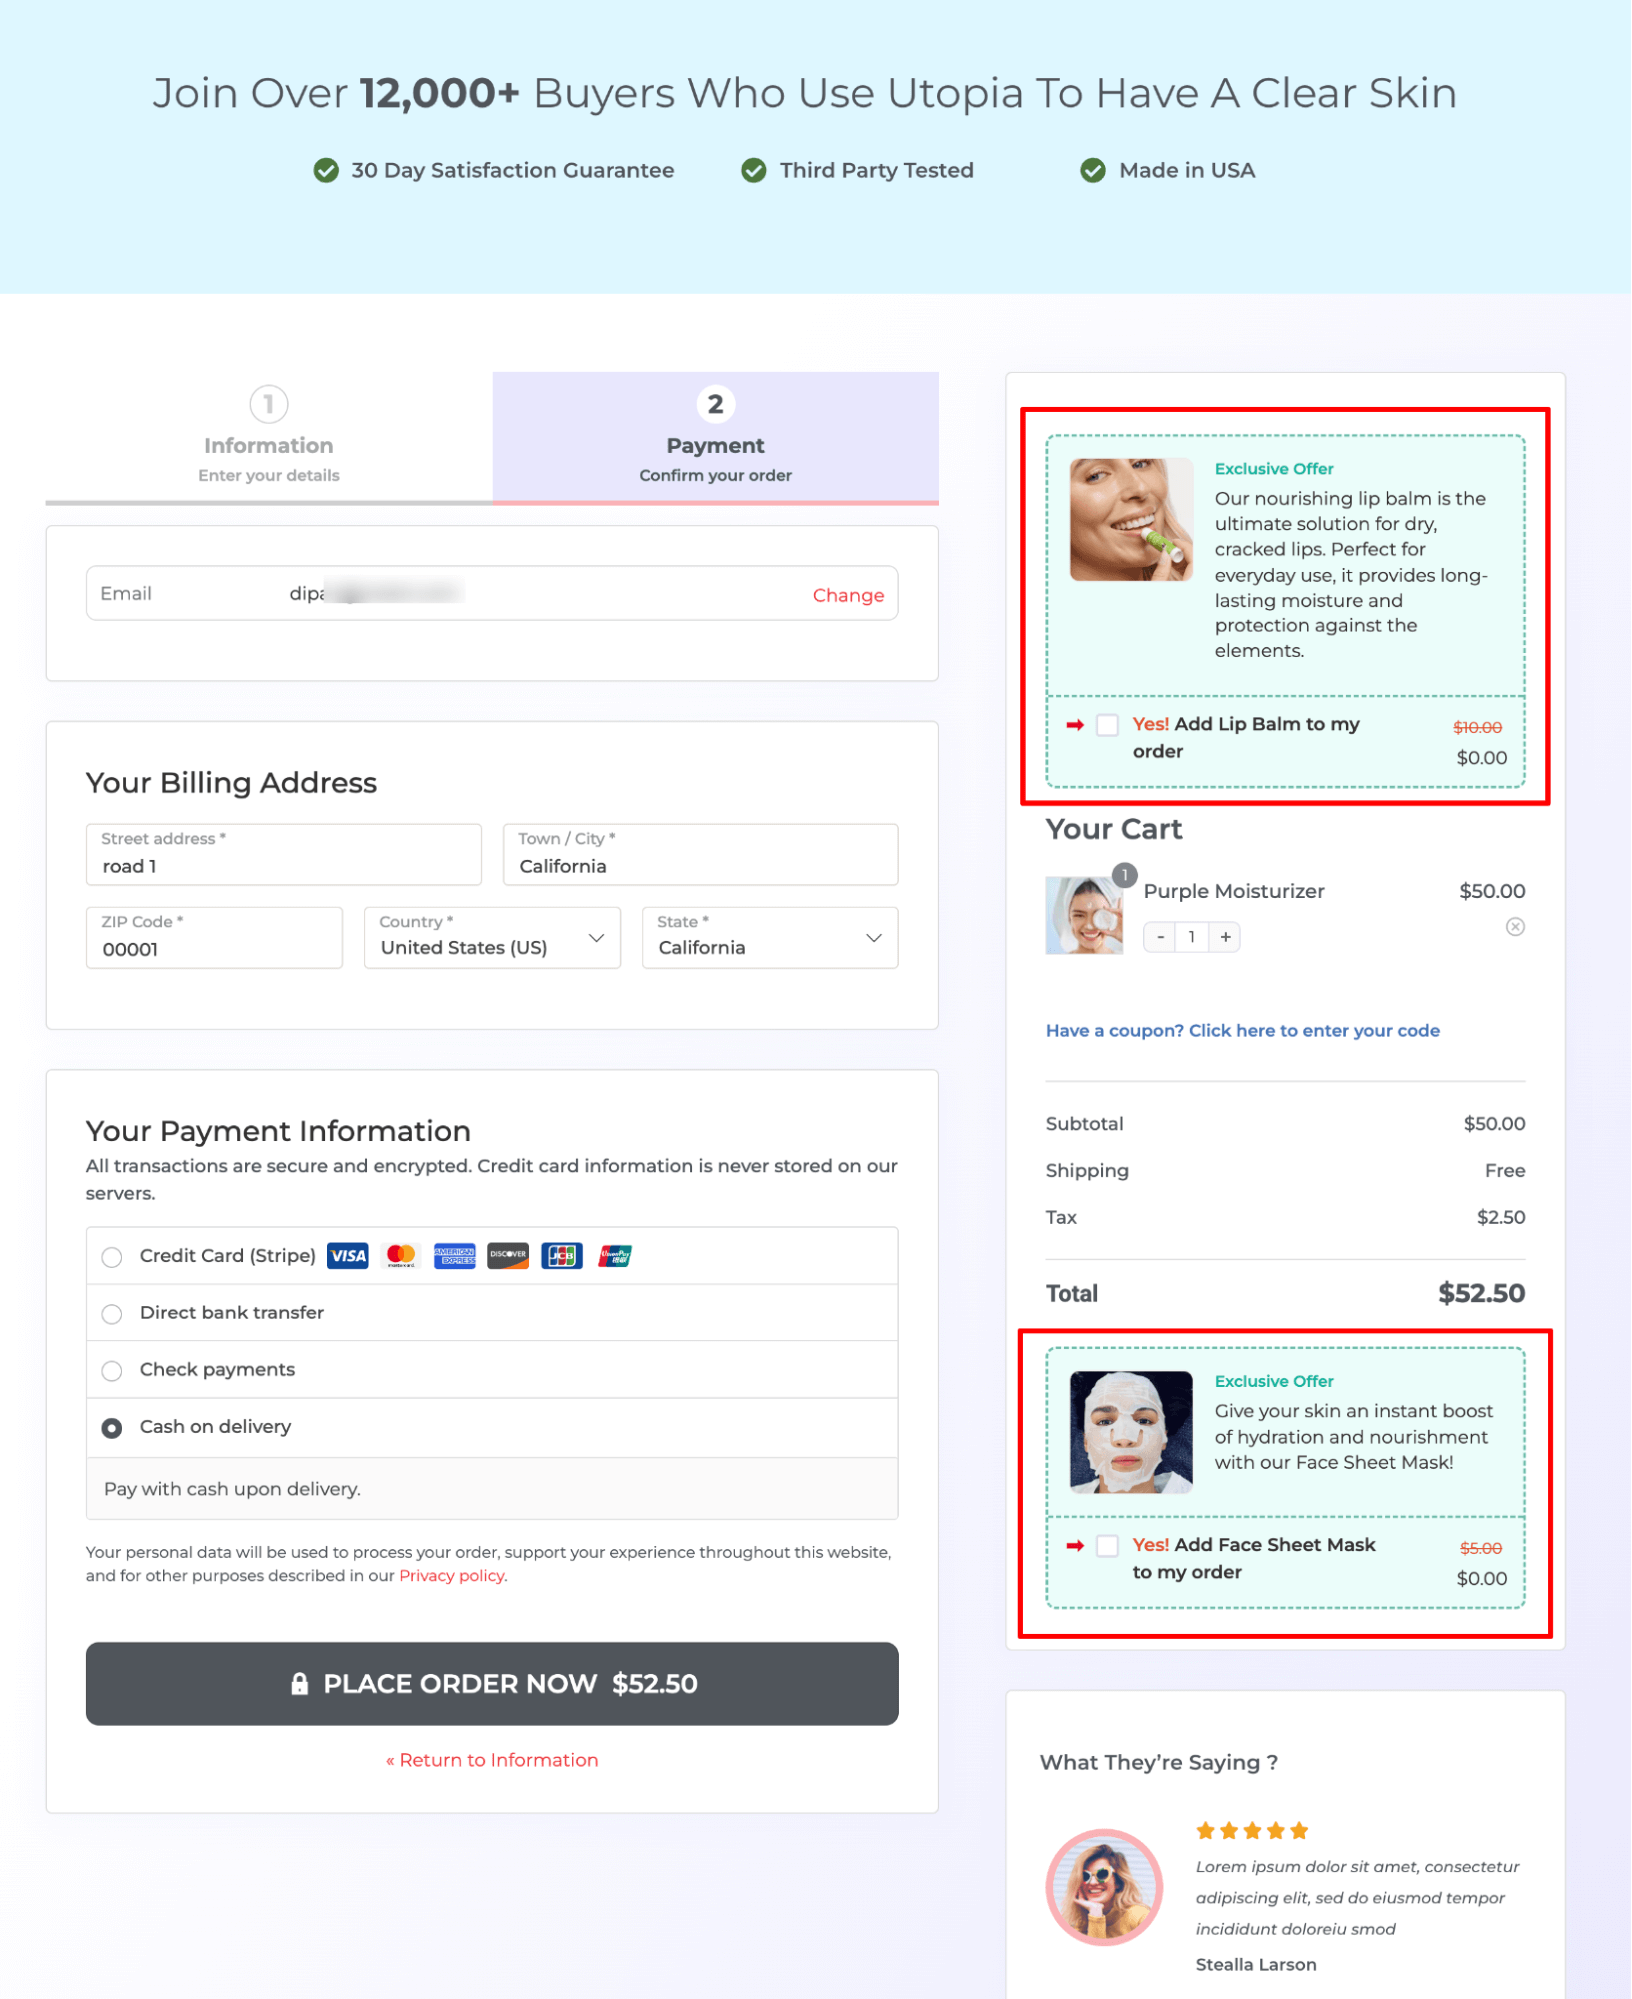
Here we positioned one order bump above the mini cart and another over the mini cart.
Tracking, Monitoring and Improving the Order Bump Conversions
FunnelKit Funnel Builder lets you track and monitor your checkout and order-bump conversions in real time.
To improve the performance of your order bumps, FunnelKit offers you the built-in A/B testing feature.
Let’s look at it one by one.
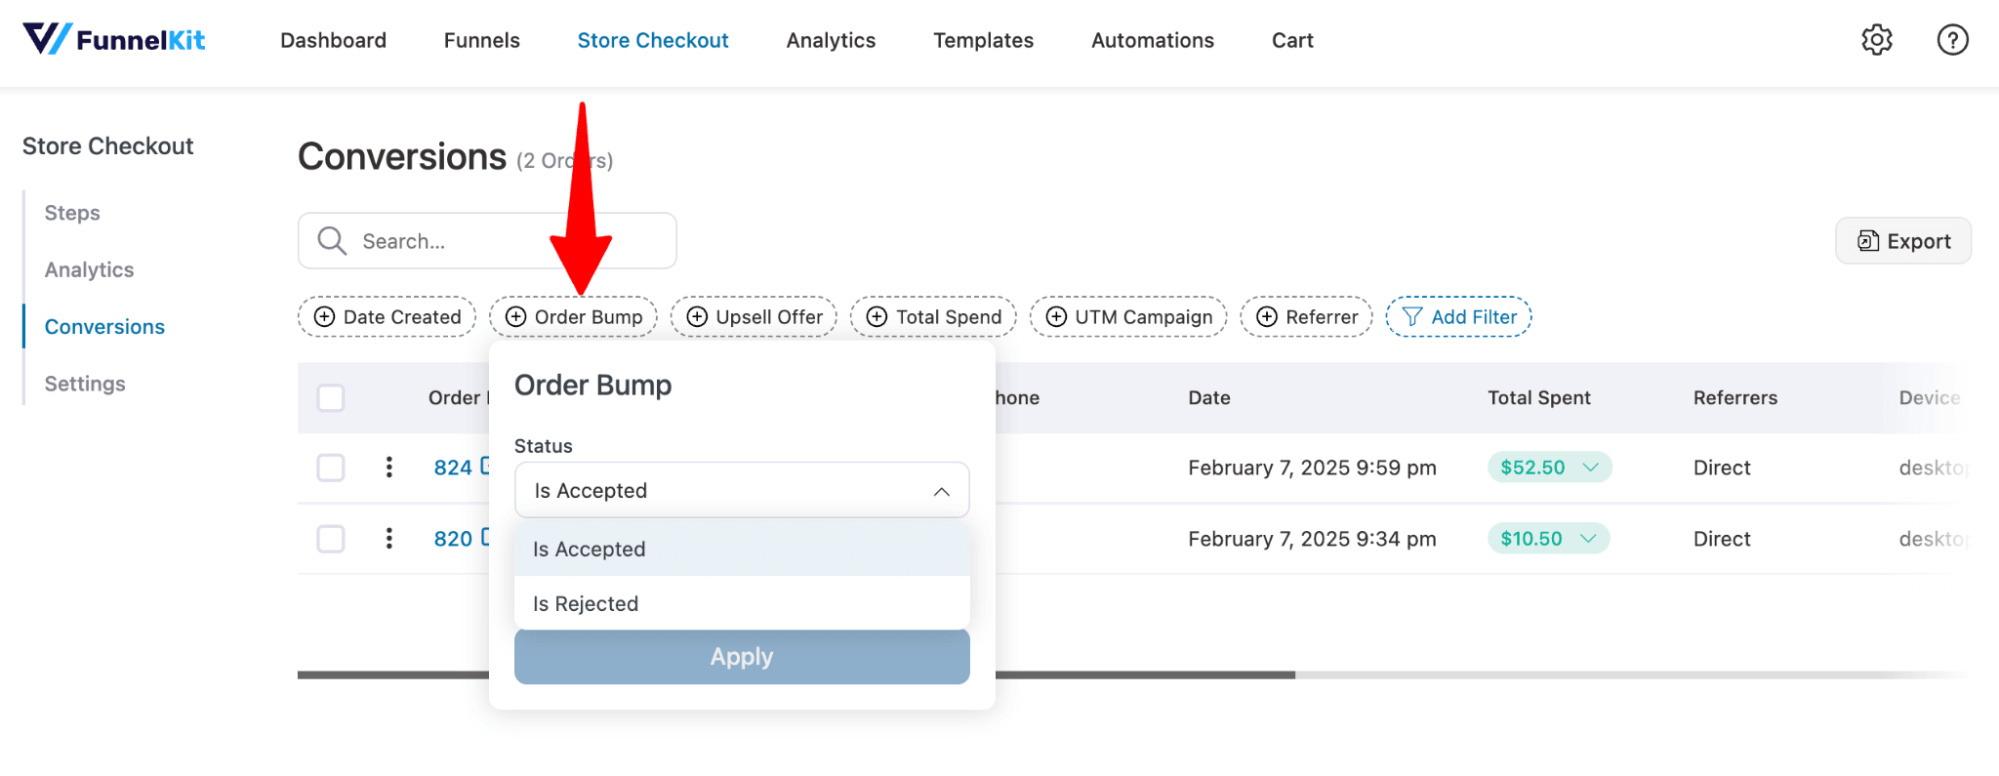
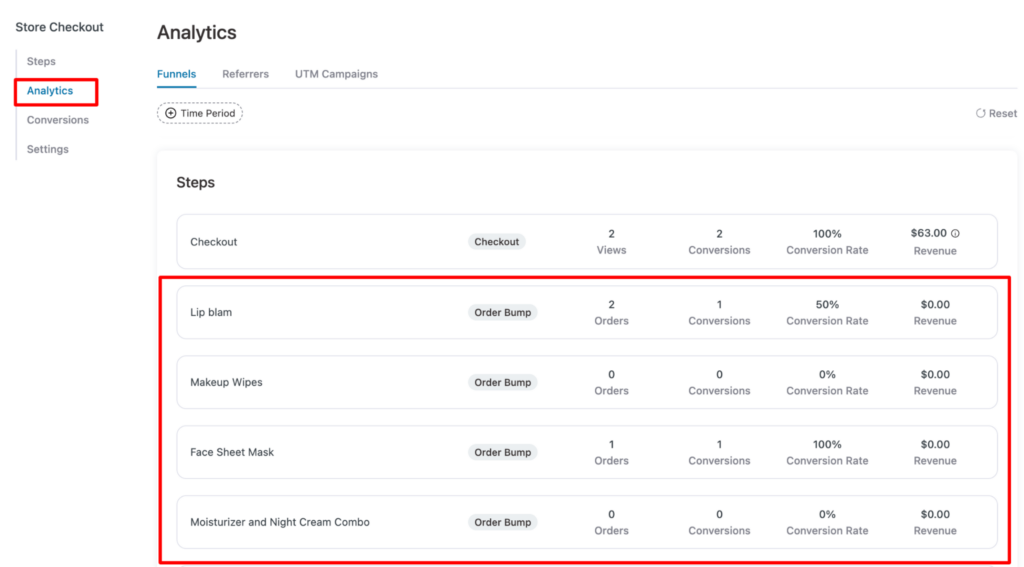
Conversions and analytics
To find out the answer to “how many people accepted my order bump”, move to the Conversion tab and filter the conversion data with Order Bump Accepted.
On the analytics tab, you can find the total revenue generated by order-bump offers.
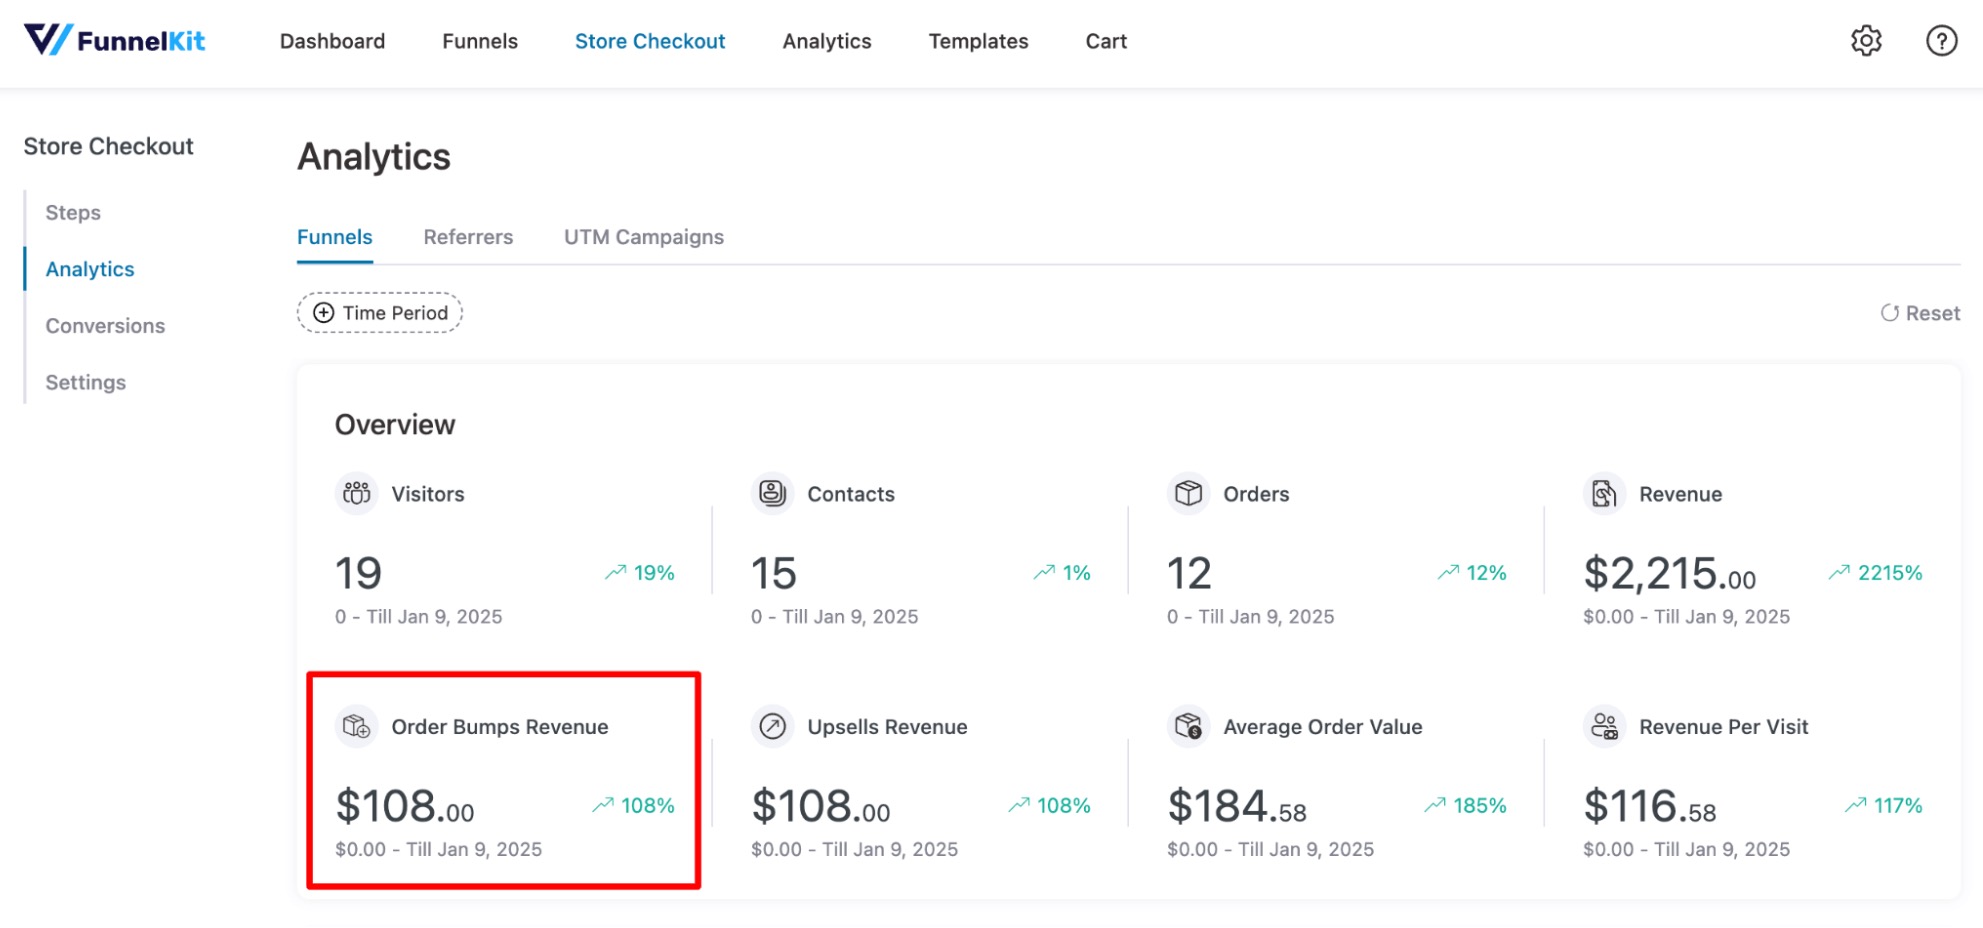
If you scroll down on the same page, you can find data for each order bump offer in the form of orders, conversion, conversion rate, revenue, etc.
A/B test the order bump
FunnelKit allows you to A/B test the funnel and its individual pages.
A/B testing helps you compare multiple versions of a funnel page or attractive offers to determine which one performs better.
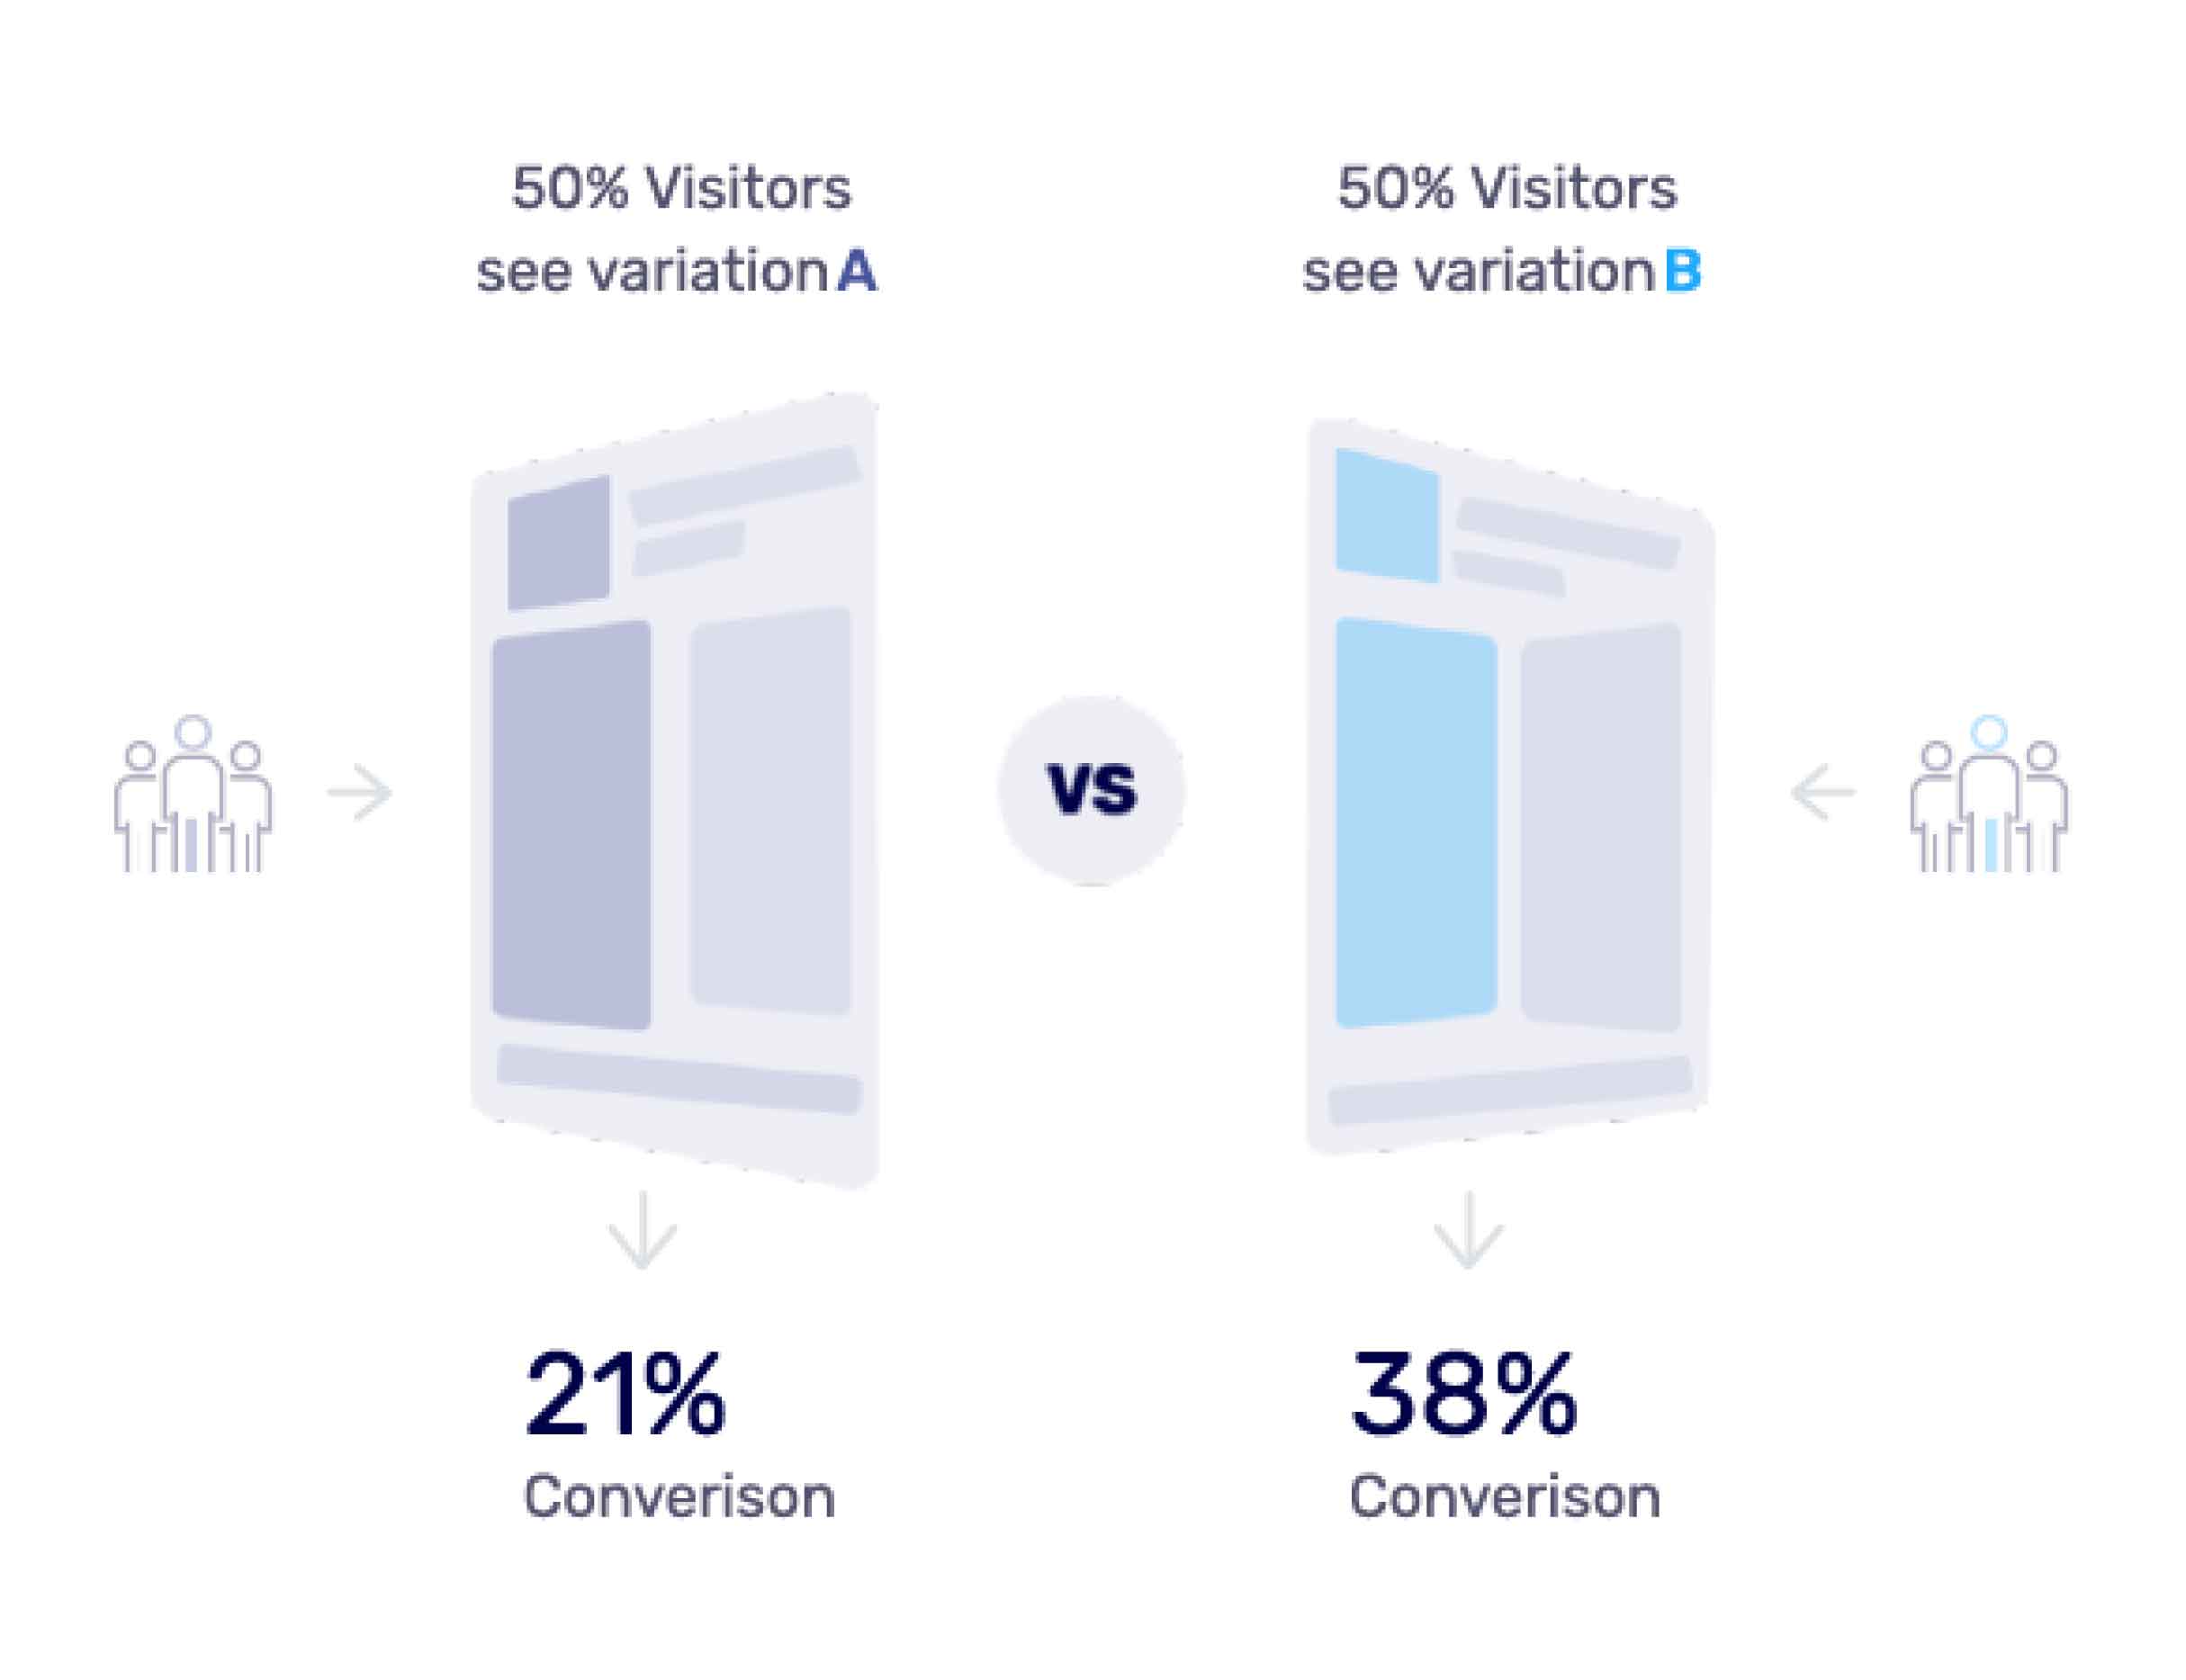
With FunnelKit's A/B testing feature, you can split-test your WooCommerce order bumps:
- Products
- Content
- Offers and Discounts
- Styling
- Bump Positioning
A/B testing takes the guesswork out of the equation, providing you with clear numbers and facts to base your decisions on.
Split your audience percentage-wise, be it 50-50 or 60-40, or anything else.
For example, when testing Order Bumps, you can send half the traffic to Order Bump A and the other half to Order Bump B before making a judgment, which can result in more conversions.
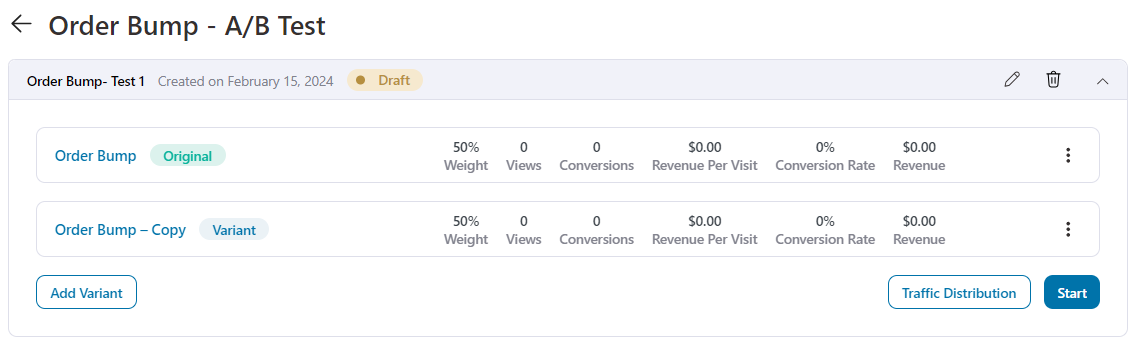
Once you’ve enabled your A/B tests, let them run and gather data for some time.
After you’ve collected enough data, you can declare a winning variant and transfer all the traffic to that variant for maximum conversions.

Writing the WooCommerce Order Bump Copy That Converts (The 4G Formula)
The simple mantra for writing order bump copy is our 4G formula. You can use it to write persuasive order bump copy in literally a few minutes.
Here's the copy we wrote for a client who recorded a 43% conversion rate on the bump:
Here are the four components of it:
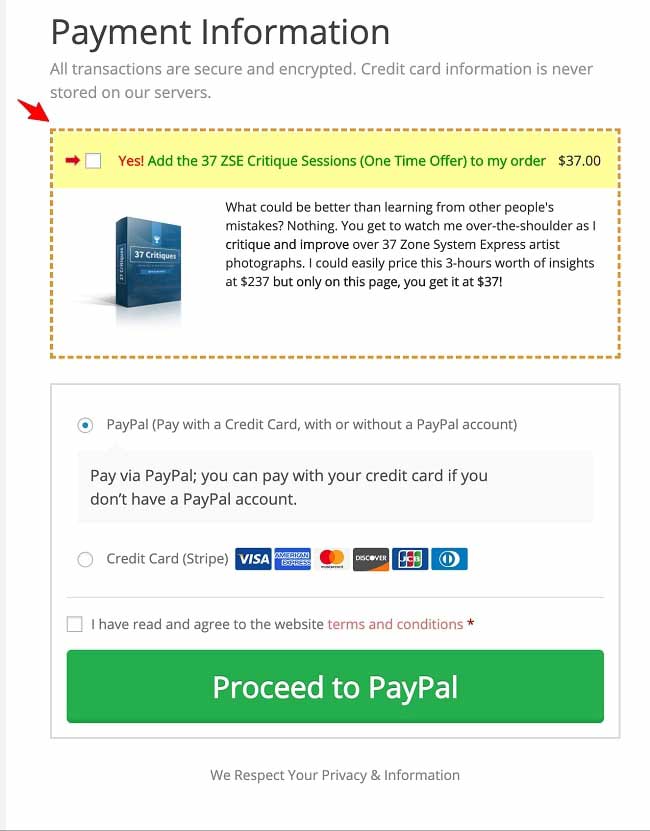
#1: Grab attention
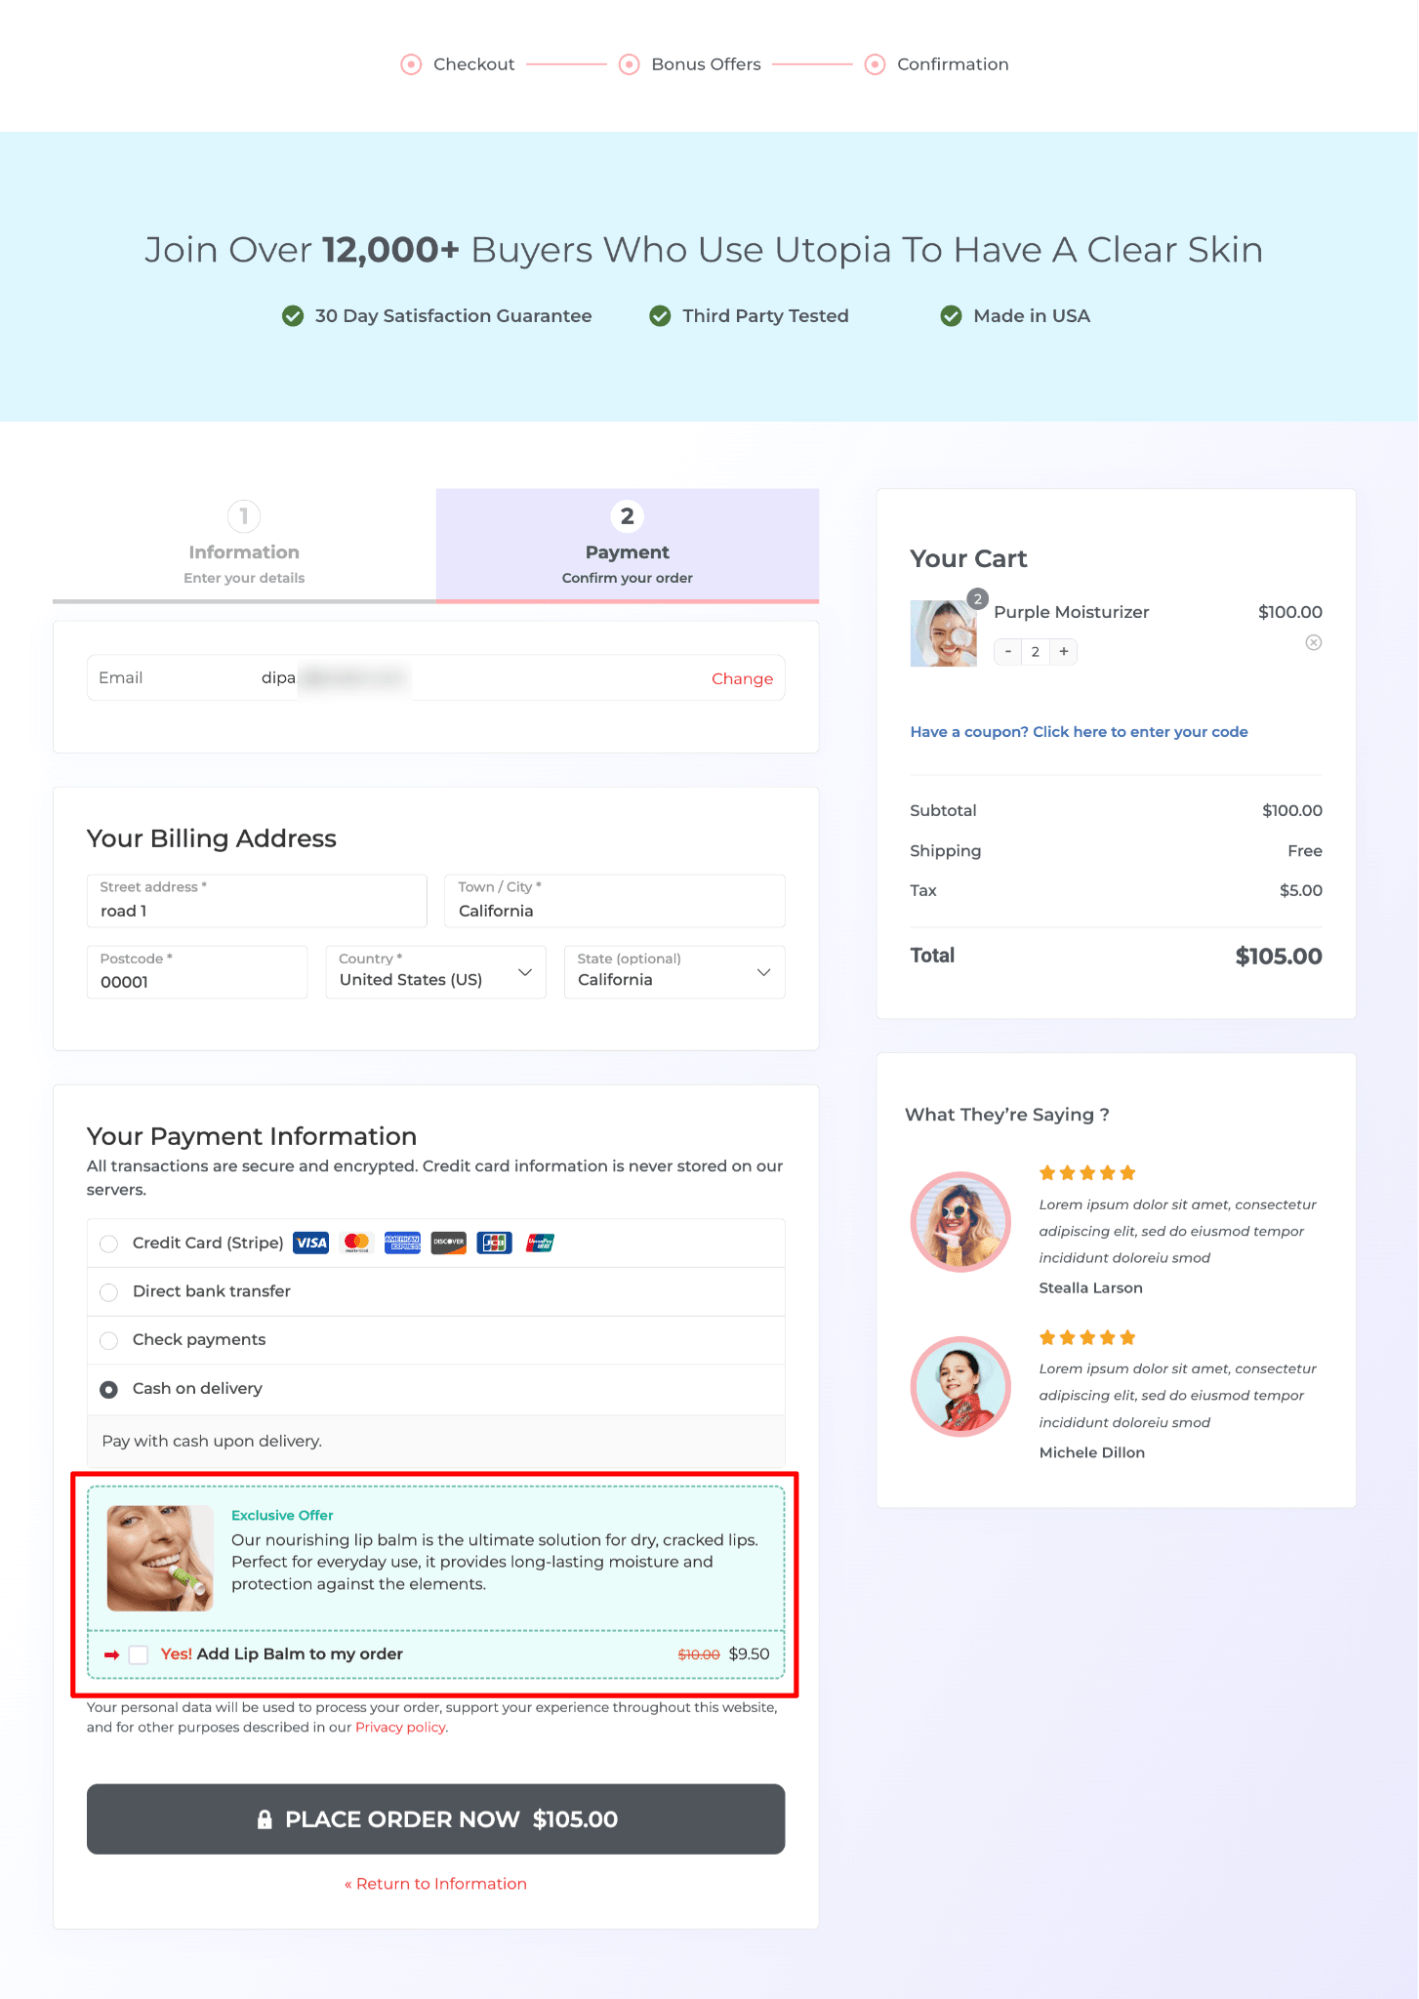
The best way to grab the attention of your prospects is to place the order bump in the right position.
We highly recommend placing your checkout bump offer above the big, bold CTA button, as that's where people are most attentive.
#2: Get a nod
You can do this by asking a rhetorical question. Involve them in your conversation. Don't just share a bunch of facts.
For example, here we say: "What could be better than learning from other people's mistakes?"
#3: Give desirable details
Since you don't have the option to insert a video on order bumps, nor can you insert multiple images, make words your arsenal.
Highlight the details of your offer bump product or service that make it desirable.
For example, here we say, "Watch me, over the shoulder, as I critique and improve..."
#4: Get action
The most powerful way to drive action is to highlight the exclusivity of the offer.
Let them know that the discount you are offering here (on order bumps) is not available elsewhere on the site, and make it a limited-time offer.
Including these components will surely create persuasive order-bump copy that urges users to accept the offer.
7 Easy Order Bump Ideas to Get a Kickstart
Effective order-bump ideas can kick-start your business by increasing average order value and generating additional revenue.
Here are some easy but successful order bump ideas for you:
- Complementary products - Offer items that complement the main purchase. For example, a cleaning kit with leather shoes.
- Subscription-based products - Provide products that need a monthly, bi-monthly, or weekly renewal. For example, a pack of supplements, household supplies, ointments, and other regularly used products.
- Bundle deals - Package complementary items together and offer them at a discount. Bundle deals offered as order bumps encourage shoppers to purchase multiple items at a go.
- Extended warranty - A product warranty or protection plan makes a great order bump. People have an inherent need to protect their purchases; a warranty helps them achieve that goal.
- Fast shipping - Expedited shipping is a no-brainer order bump. No matter what you sell, you can use faster shipping to make your shoppers shell out a few dollars extra. But make sure you deliver fast as promised.
- Limited-edition products - Tell your prospects that supplies are limited or that you've only got 100 of those to sell. Exclusivity is a sale-attracting magnet.
- Exclusive digital content like masterclasses or e-books - If your audience likes to learn through digital products or courses, go ahead and offer more help through a pre-recorded masterclass or audiobook.
Inspiring Order Bump Examples From the Experts
Let's discuss a few order-bump examples you can use.
Example #1: A Video Masterclass
Here's an example from Robin Sharma. He's pitching exclusive access to video recordings of a 2-day live masterclass.
Take a look:

You can also offer exclusive content like this on your website.
Example #2: Free Trial Offer to a Membership Site
This order bump is our absolute favorite.
It's from our client, Wardee from Traditional Cooking School. Here she pitches a free trial offer to her membership site.
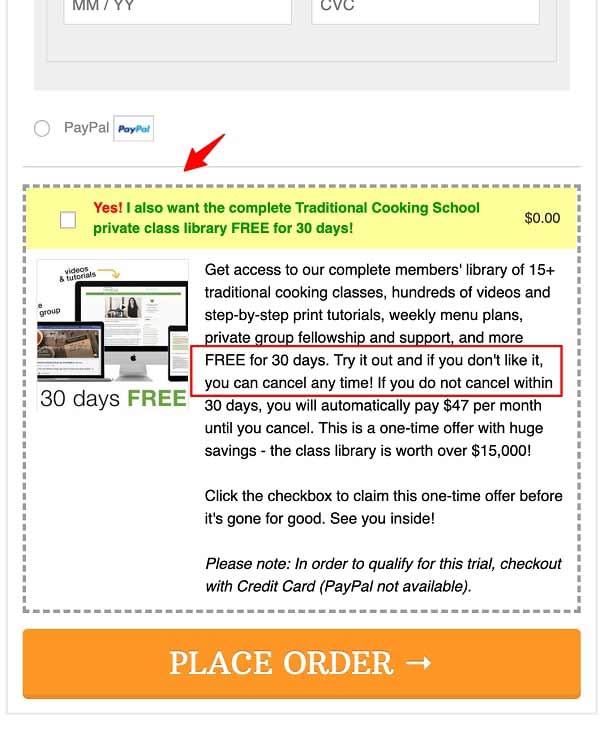
Free stuff always attracts people, so offering a free trial or an additional product at checkout is bound to grab their attention.
Frequently Asked Questions Related to WooCommerce Order Bumps
An order bump appears directly on the checkout page as a small, optional add-on. The customer adds it with a single checkbox or button click without leaving the checkout flow. These are typically low-cost, complementary items. For example, offering a screen protector when someone is buying a phone case.
An upsell encourages the customer to buy a higher-value or premium version of what they are already purchasing. In WooCommerce, upsells traditionally appear on the product page before the customer adds an item to the cart.
A cross-sell suggests related but separate products that complement the main purchase. You can display these cross-sells on the product page, inside the shopping cart, and on the cart page. These are items that go well with what is already in the cart, like recommending a belt with a pair of shoes.
If you have any questions, you can refer to our detailed guide on order bumps vs. one-click upsells.
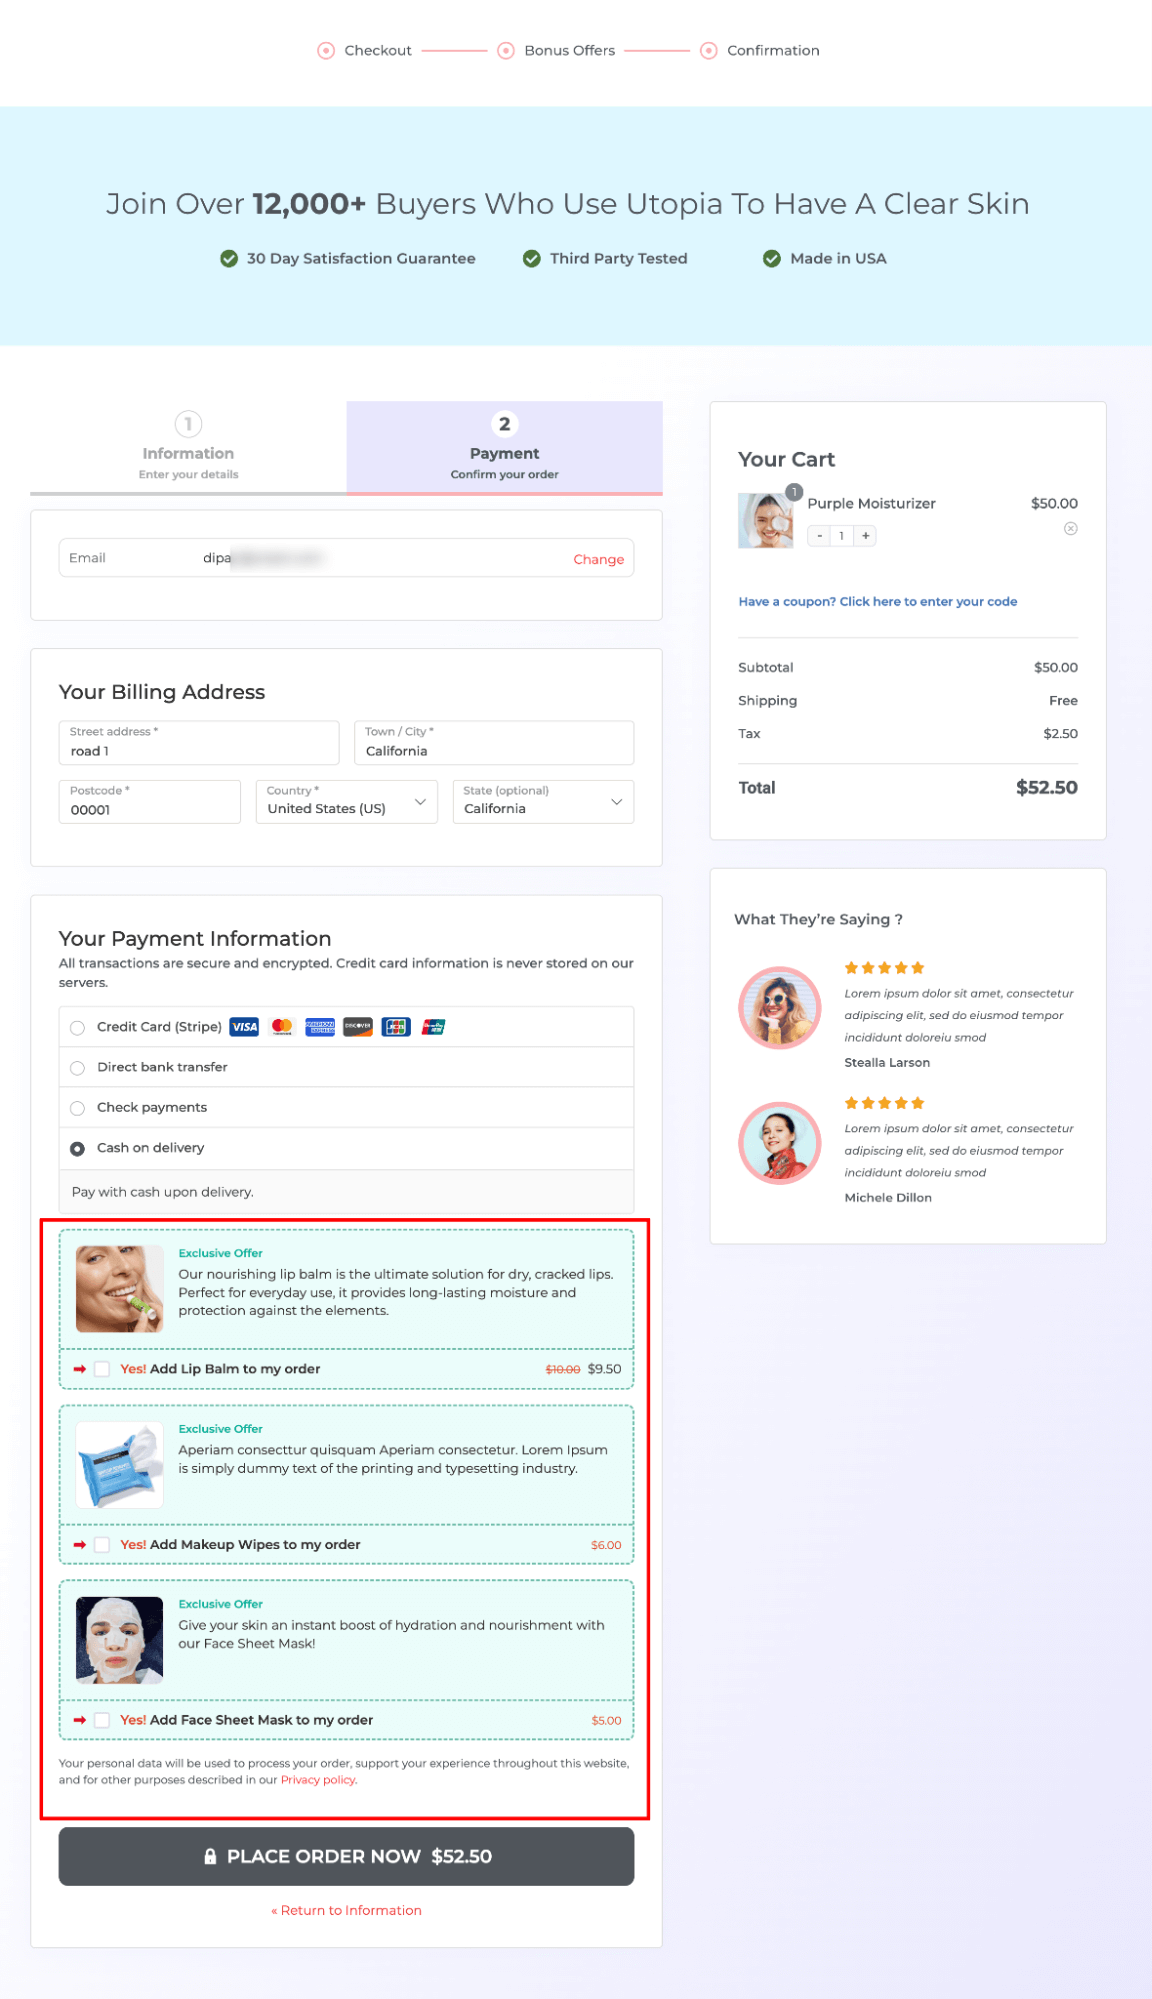
Yes, you can offer multiple order bumps on the WooCommerce checkout page. For instance, alongside lip balm, we can offer face sheet masks, makeup wipes, and more.
To start, hit the Order Bump button, provide a name, and add.
Then, choose a skin, search, and add the product.
Next, customize the content, style, and placement of the checkout page and add discounts if you want.
Follow the same steps to add multiple order bumps. You can easily reorder your order bumps by using the top and bottom arrows next to each add-on offer.
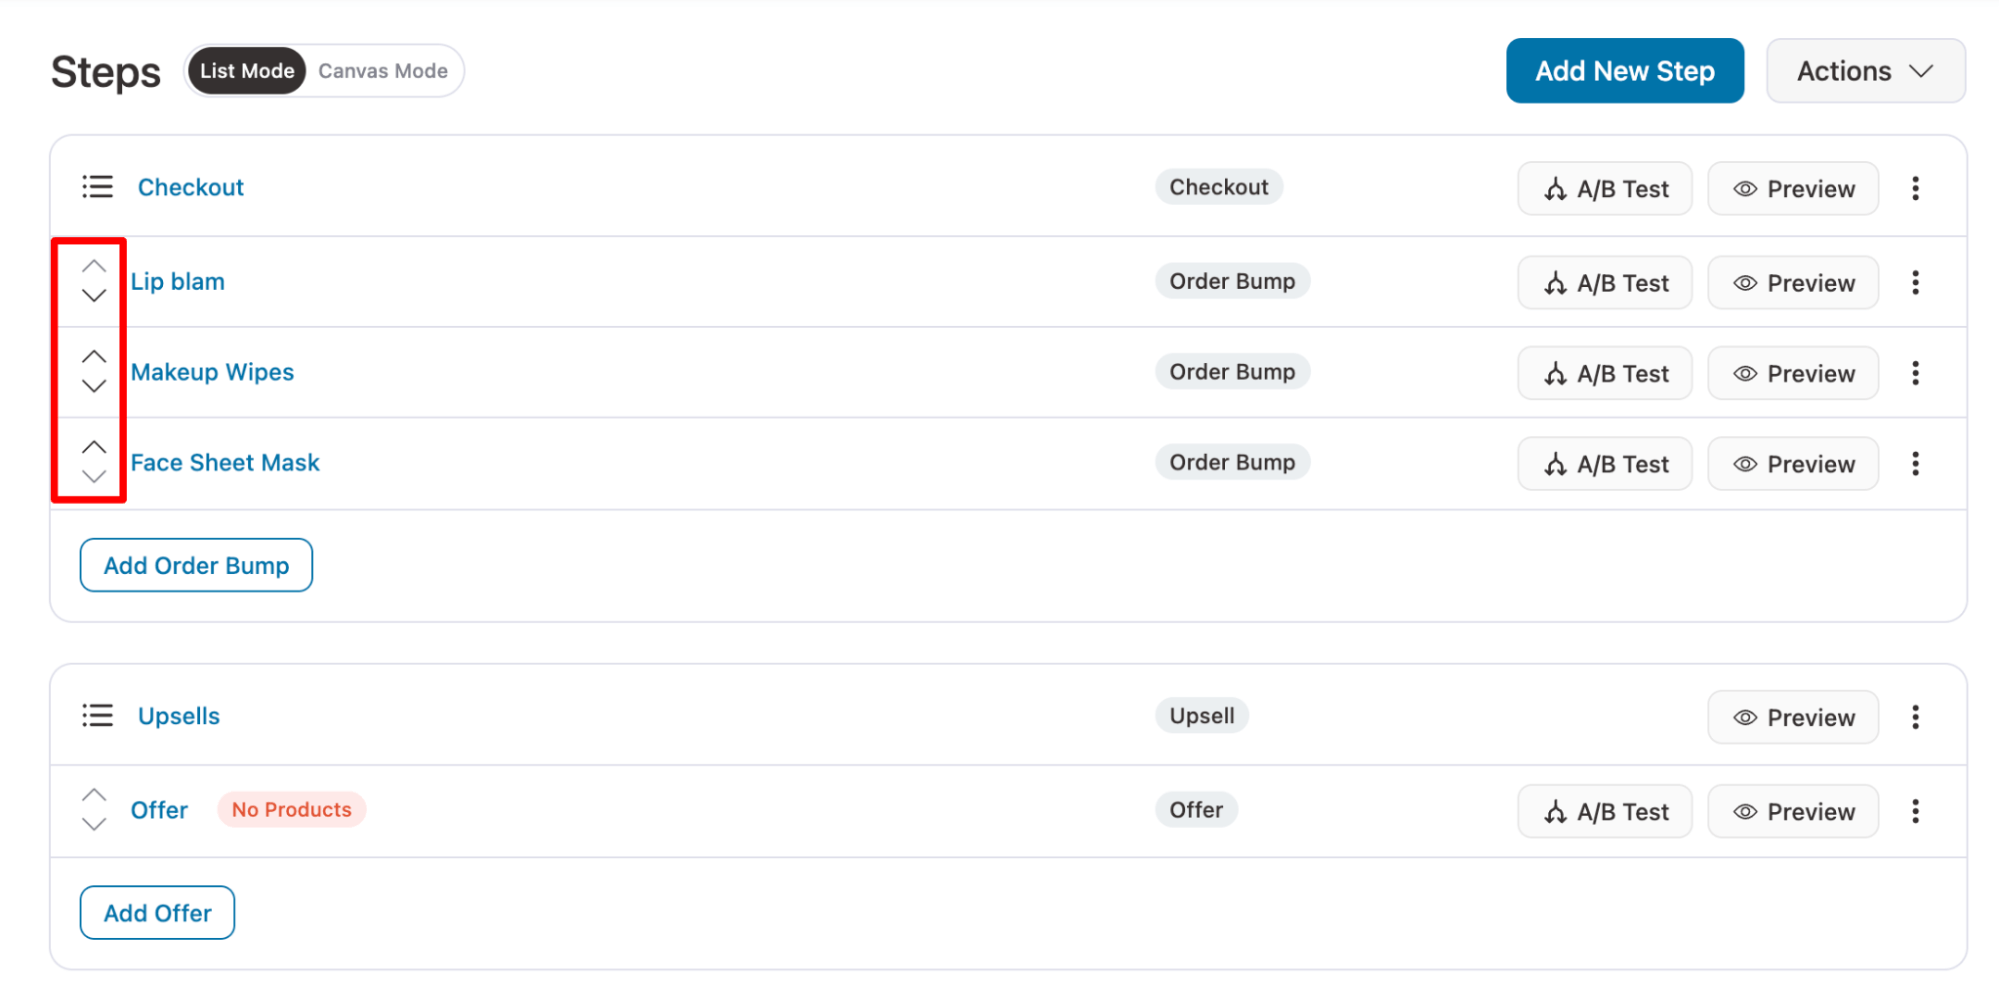
Here is what multiple order bumps look like on the checkout page:
To have the order bump preselected and added to the cart when users land on the checkout page, you need to check just one setting.
Navigate to the order bump, then, on the Style tab, turn on the "Pre-select Order Bump by default" option.
If you want to add the order bump to the cart and hide the order bump section, turn on the 'Hide Order Bump after selection' option as well.
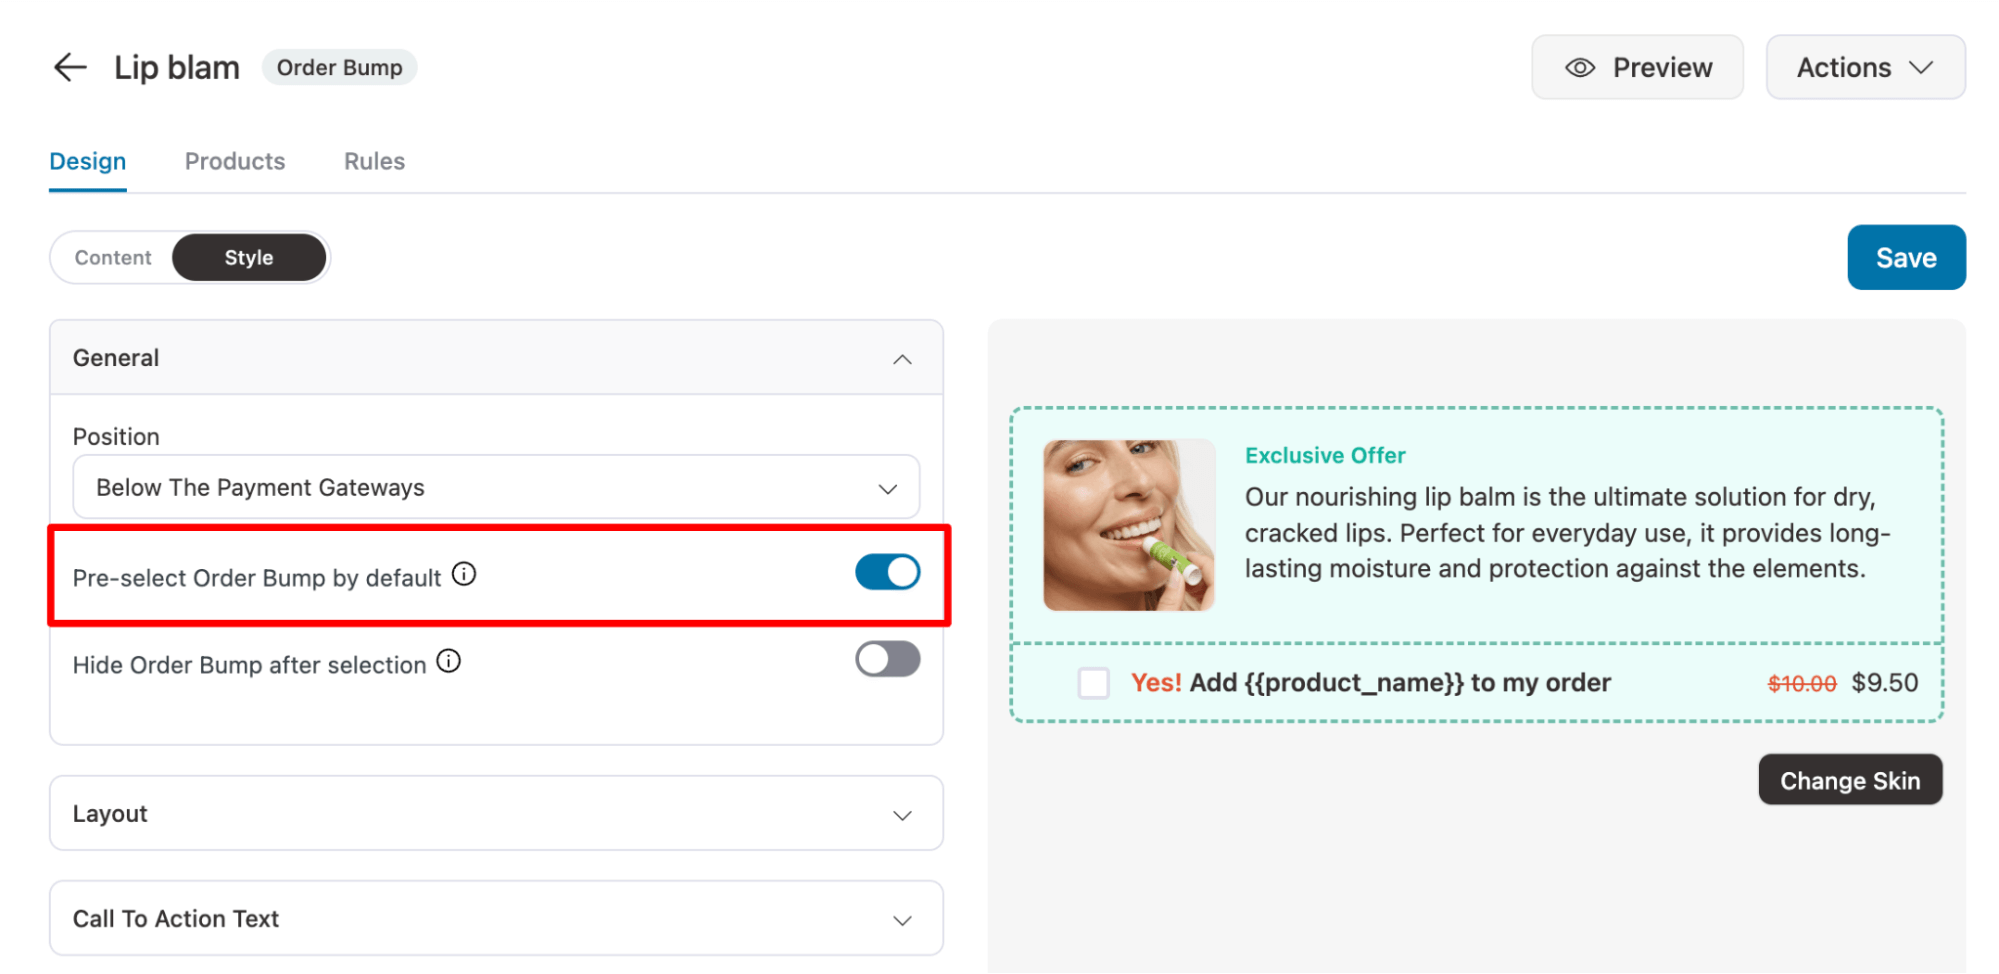
Make sure to save changes. Now, the order bump will be preselected on the checkout page.
You can easily offer order bumps as free gifts in WooCommerce. For this, you can follow the same process as creating an order bump, but make sure you apply a 100% discount.
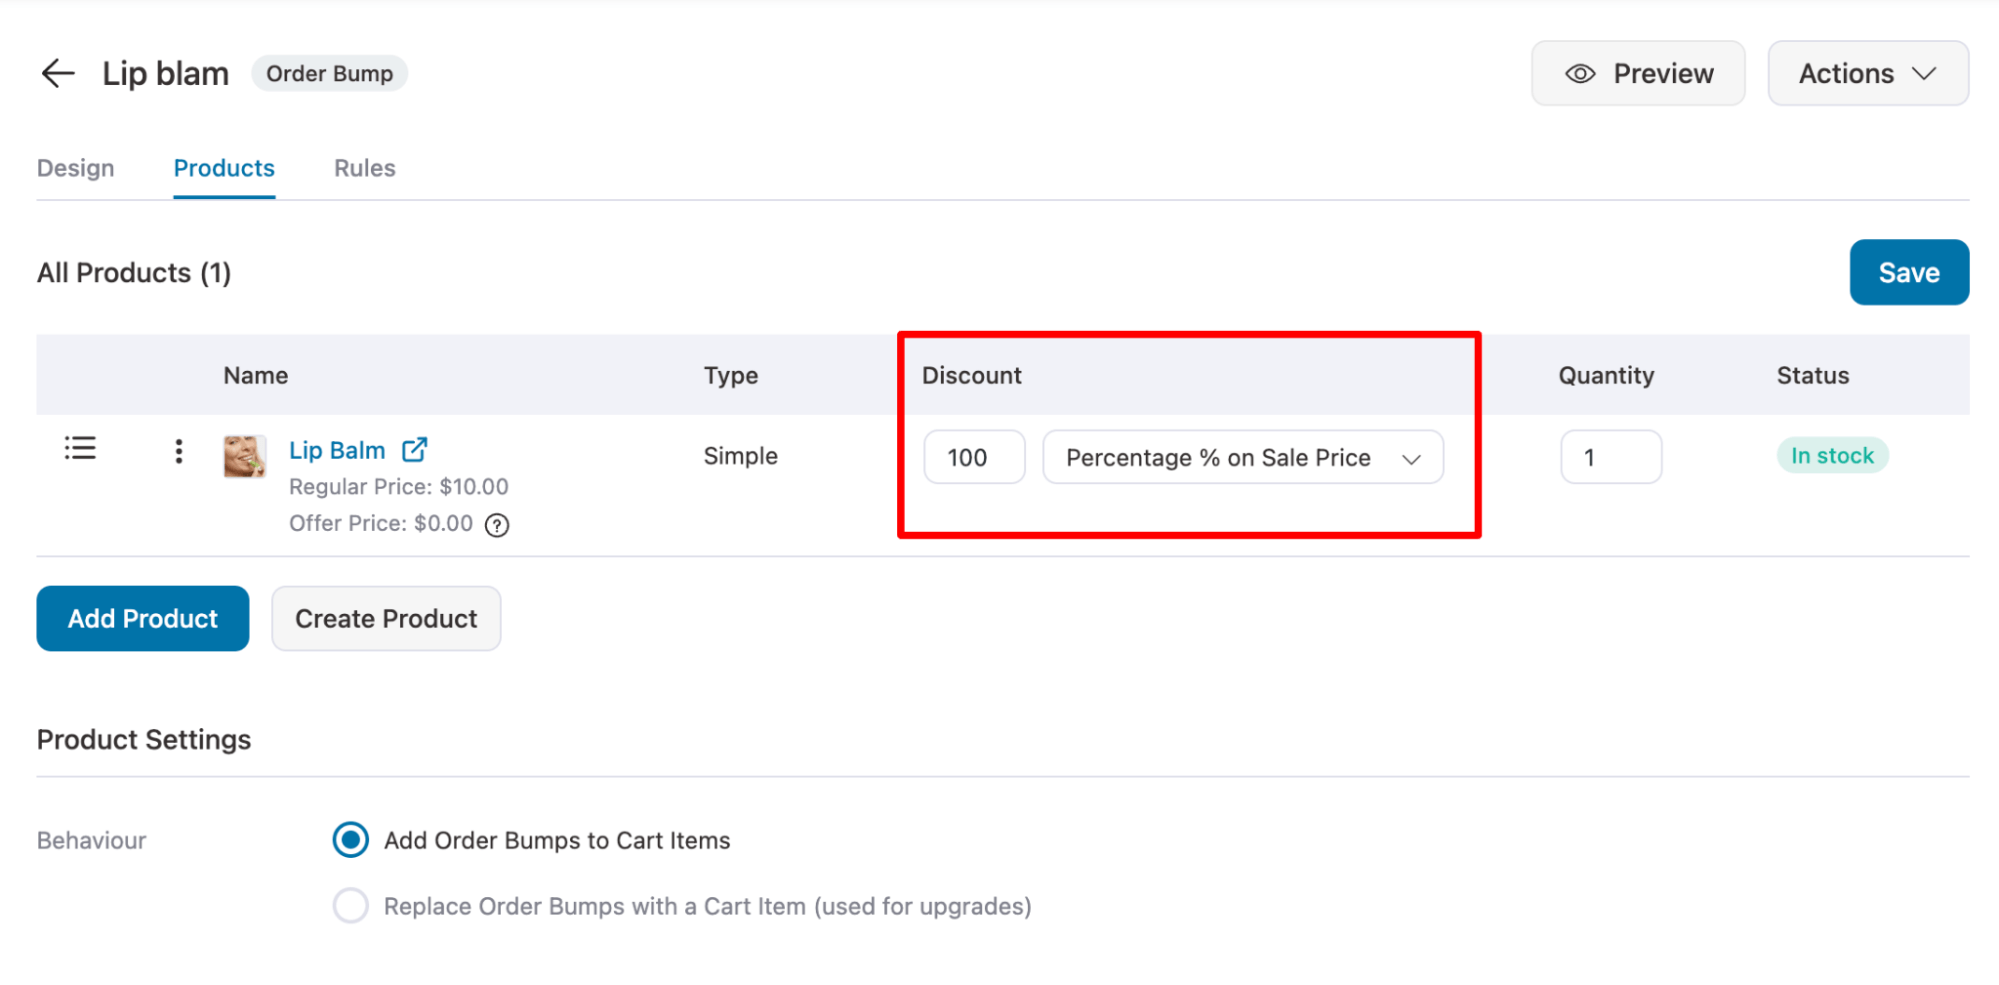
Now, if users try to check out, they will see this offer on the checkout page, but it will be free.
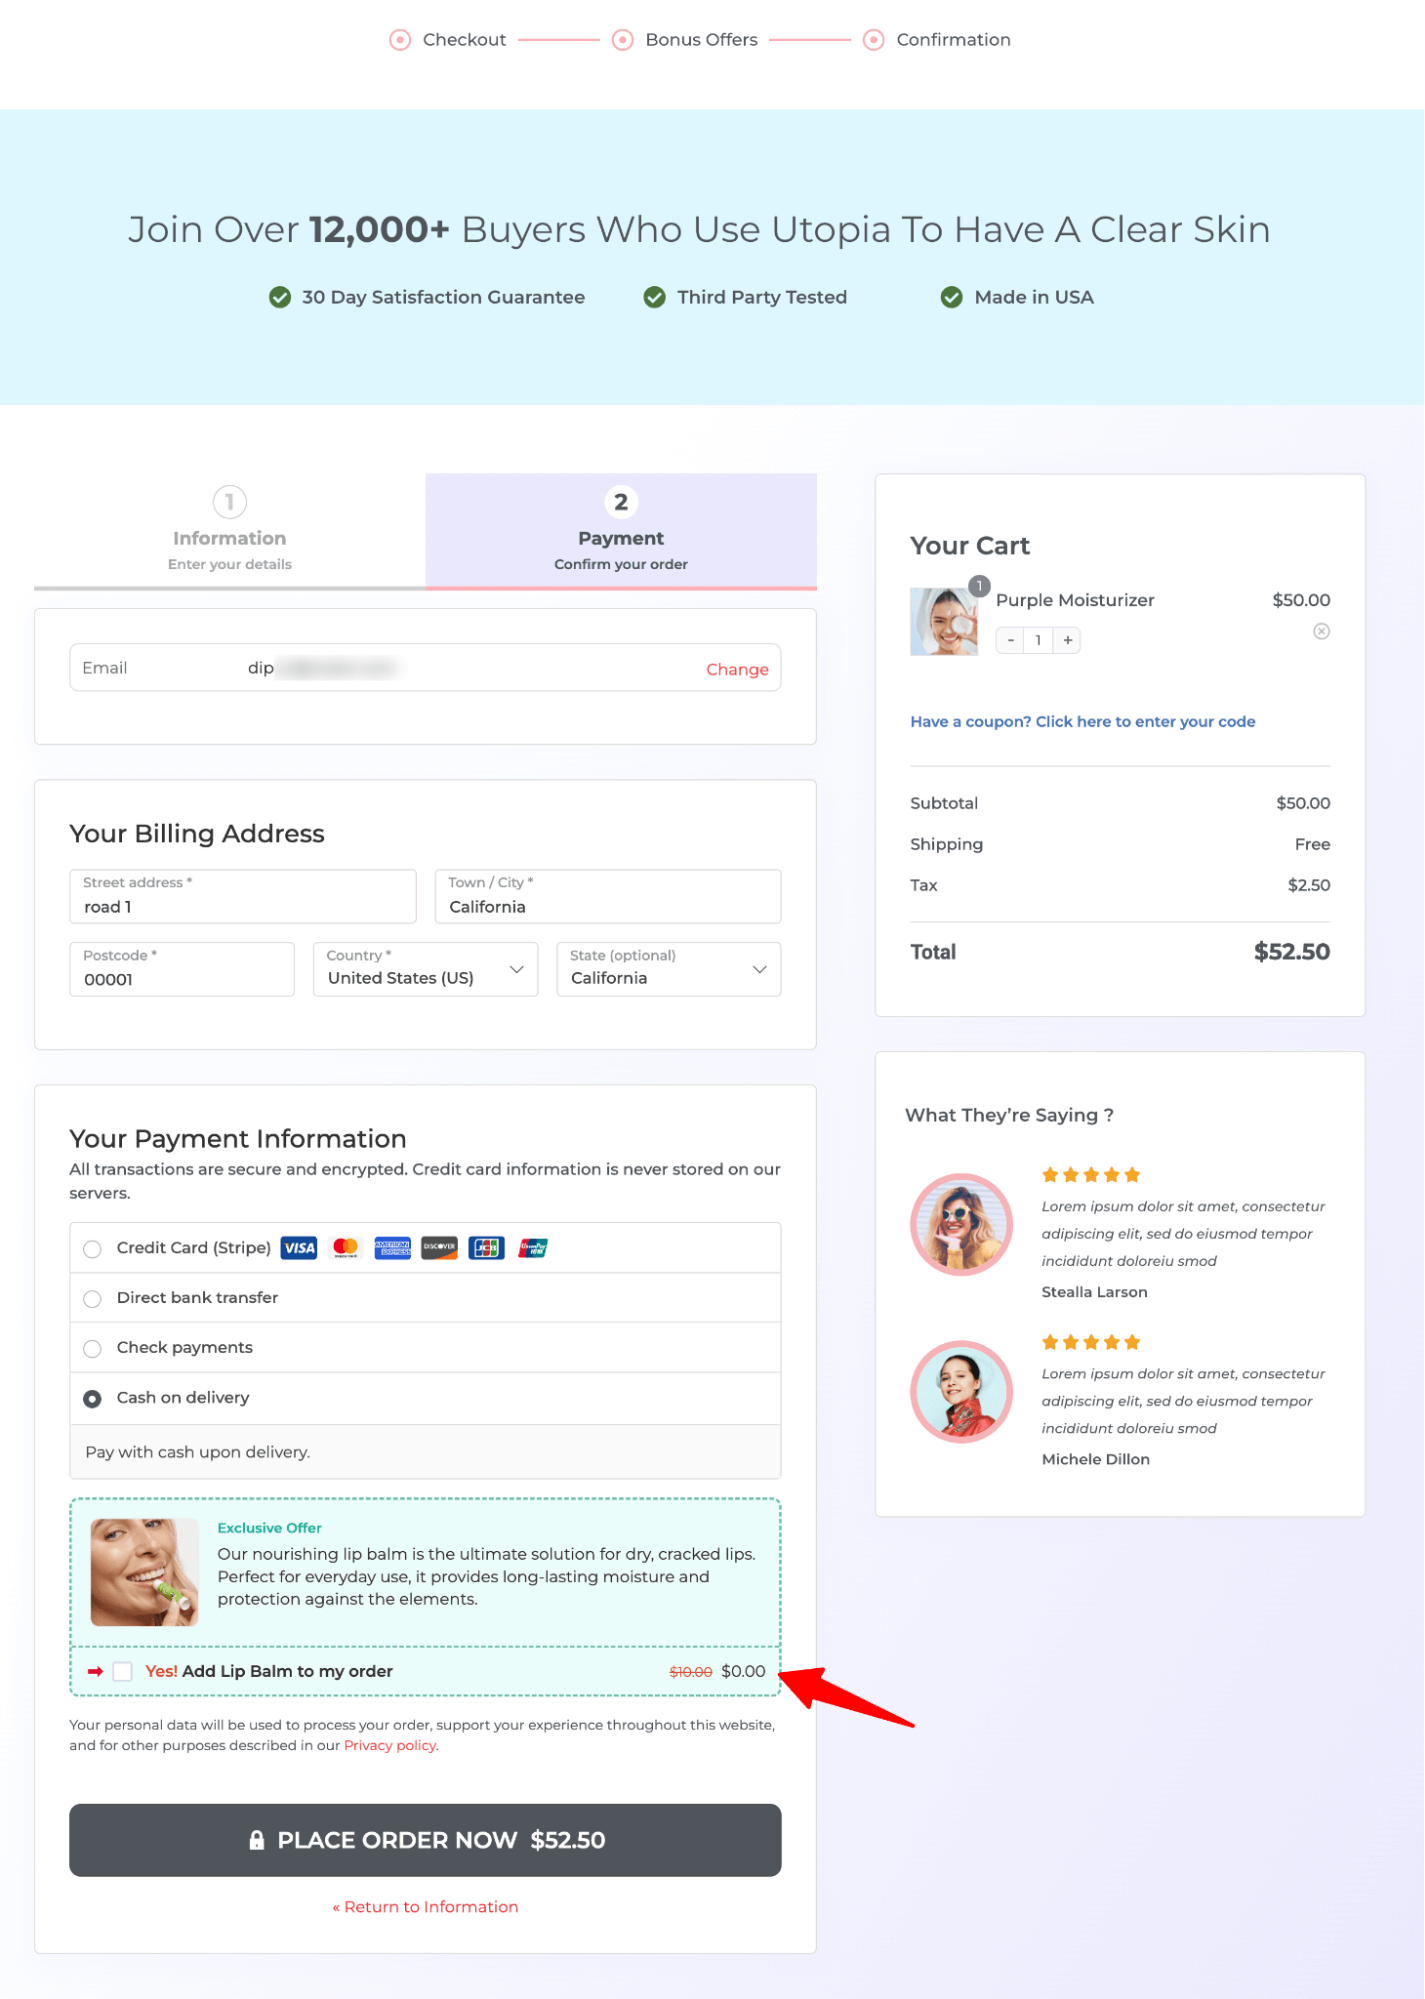
To offer order bumps as free gifts in WooCommerce, follow the same process for creating an order bump, but apply a 100% discount.
Now, if users try to check out, they will see this offer on the checkout page, but it will be free.
You can also read our blog on WooCommerce free gifts.
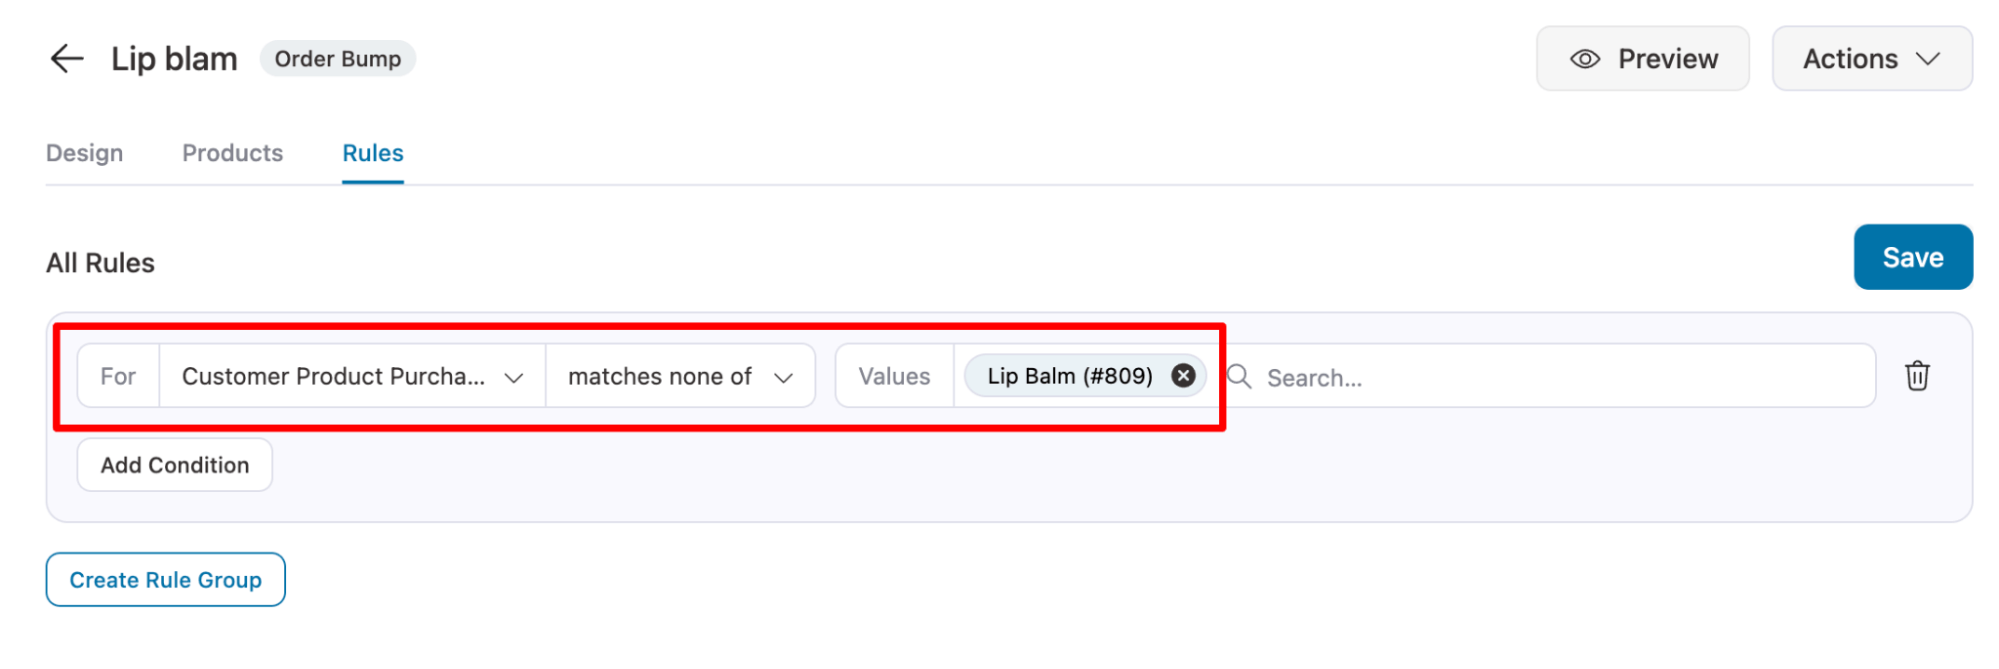
You can skip the order-bump recommendation for customers who have already purchased that item, since it's not useful.
If you want to avoid offering an item that customers have already bought, you can achieve that by applying a simple rule.
Add the 'Customer Product Purchased' condition with the operator 'matches none of', followed by the item.
This condition checks whether the customer has already bought the item, and the order bump will only be offered at checkout if they haven't.
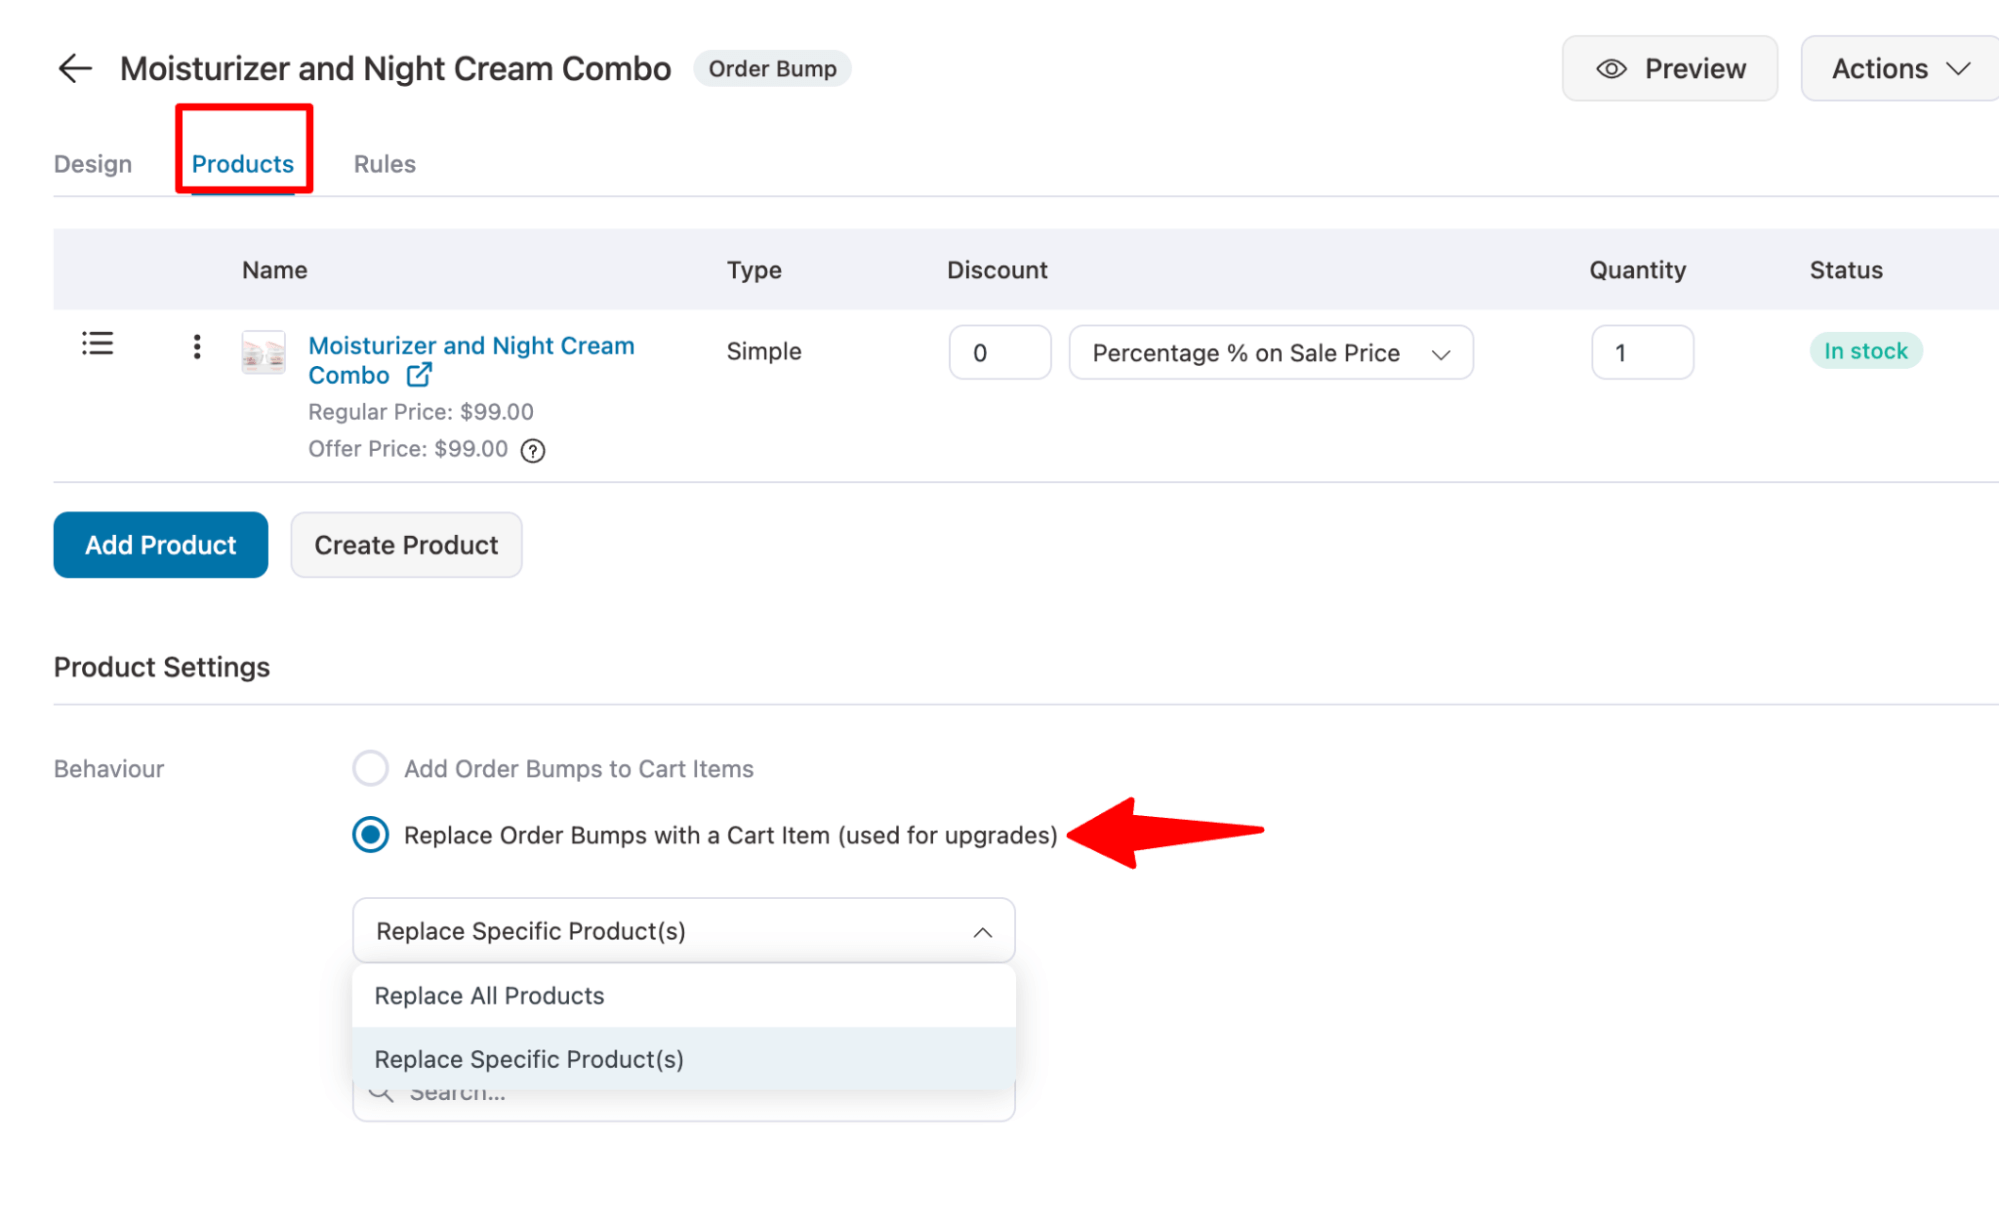
You can replace a cart item with a better or complementary order bump product at checkout. For instance, when someone is buying a moisturizer, you can offer a combo of the moisturizer and a night cream, then replace the order bump with the cart item.
To do this, you need to add the order bump. Then, under Product Settings on the Product tab, select the "Replace Order Bumps with a Cart Item (used for upgrades)" behavior.
Next, you can choose between two options: Replace Specific Products and Replace All Products.
Add WooCommerce Order Bump & Improve Your Store's AOV Today!
Order bumps can help boost your store's average order value and improve returns on ad spend.
But to ensure your order bump converts well, creating an enticing offer is essential.
Start with a low-dollar, no-brainer offer and pitch it using the 4G formula.
Then work your way up, offering much pricier bumps on the main order.
With FunnelKit Funnel Builder, you get all the options to create a perfect offer for your shoppers.
Plus, with its built-in A/B testing and performance tracking, you can measure and continuously improve your sales funnel, including order bump conversions.
You can’t get a better tool than FunnelKit. So why wait?
Get the whole package of the FunnelKit Funnel Builder from the link below:

Editorial Team
July 7, 2026Are shoppers adding products to their cart and leaving before they buy? According to Baymard Institute research on checkout usability, 18% of shoppers who abandon their cart do so because...
Editorial Team
July 7, 2026You’ve built your WooCommerce store, polished your product pages, and invested in marketing, but sales aren’t coming. Visitors browse, some add items to their cart, and most vanish before completing...
Editorial Team
July 3, 2026Discover how a canceled order doesn't have to mean a lost customer, and how the right WooCommerce canceled order email can turn it into a second chance. WooCommerce canceled order...


