


WooCommerce checkout add-ons are the two questions a good florist asks before you pay. Do you want it wrapped, and do you want a card with a message on it? Your checkout page can ask both.
Neither question costs the customer more than a few seconds. Both add to a bill they were already about to settle.
Put gift wrapping on your checkout at $5, have one order in eight take it, and a store doing 400 orders a month has earned an extra $250 without buying a single new visitor.
WooCommerce never asks either question. The default checkout collects an address, a shipping method, and a payment method, then stops.
There is no setting that offers a paid service alongside an order, and no field type that adds a charge when someone ticks a box.
In this guide, we will cover which extras are worth putting on a checkout, how to build one without code, and how to do it with a snippet if you would rather not buy an extension.
We will also cover where checkout add-ons stand with the WooCommerce block checkout, because that is what decides whether your setup survives your next update.
Table of Contents
- 1 What is a Checkout Add-On in WooCommerce?
- 2 How to Add Checkout Add-Ons in WooCommerce Without Code?
- 3 How to Add a Paid Checkout Add-On With a Code Snippet
- 4 Do Checkout Add-Ons Work With the Block Checkout?
- 5 Top 5 Best WooCommerce Checkout Add-On Plugins
- 6 9 Checkout Extras Worth Offering
- 7 6 Best Practices to Follow When Setting Up WooCommerce Checkout Add-ons
- 8 Frequently Asked Questions
- 9 Ready to Add WooCommerce Checkout Add-Ons to Your Store?
What is a Checkout Add-On in WooCommerce?
A checkout add-on is an optional extra a customer attaches to their whole order at the point of payment.
It includes gift wrapping, a delivery tip, rush handling, shipping insurance, and a donation. Most carry a small fee.
All of them are things the customer chooses, not things you add on their behalf.
The word “add-on” gets used for three different mechanics in WooCommerce, and picking the wrong one means rebuilding later.
Here is the difference:
| Parameters | Checkout add-ons | Product add-ons | Order bumps |
|---|---|---|---|
| Where it appears | Checkout page | Product page | Checkout page |
| What it applies to | The whole order | One specific product | The whole order |
| How it is stored | A fee plus order meta | A variation on the line item | A real product line item |
| Inventory tracked | No | Usually | Yes |
| Best for | Gift wrap, tips, rush handling, insurance | Engraving, monogramming, size upgrades | Products you already stock |
| Example | “Add gift wrapping for $5” | “Add engraving to this mug” | “Add the travel case for $12” |
Checkout add-ons attach to the entire order, and the Product Add-Ons extension is the route it recommends when an option only applies to certain items.
If the option belongs to one product, it goes on the product page. If it belongs to the order, it goes on the checkout.
If the thing you are selling is a product you already stock and want to count, use an order bump so it enters the order as a real line item instead of a fee.
How to Add Checkout Add-Ons in WooCommerce Without Code?
Building it on a default WooCommerce checkout means either editing template files or stacking three plugins that each solve a quarter of the problem.
FunnelKit Funnel Builder replaces the checkout page with one you control, then lets you add paid extras as one-click offers and collect the supporting information through a built-in field editor.
One thing worth being precise about is that it decides whether this is the right tool for you.
FunnelKit adds paid extras as real line items, so stock, reporting, and partial refunds all behave normally. It does not attach a price to a form field.
If a fee on a field is specifically what you need, the official Checkout Add-Ons extension or Flexible Checkout Fields PRO do that instead, and we compare both further down.
FunnelKit offers a free version that includes checkout templates and the field editor.
The Pro plan starts at $99.50 per year and adds one-click paid offers, conditional rules, and A/B testing.
We will build one example and carry it through every step.
Swap the product for gift wrapping, insurance, or rush handling with an optional message, shown only on physical orders. The steps will be identical.
Make sure to install and activate the Funnel Builder on your WordPress website.
Step 1: Create a store checkout and import a template
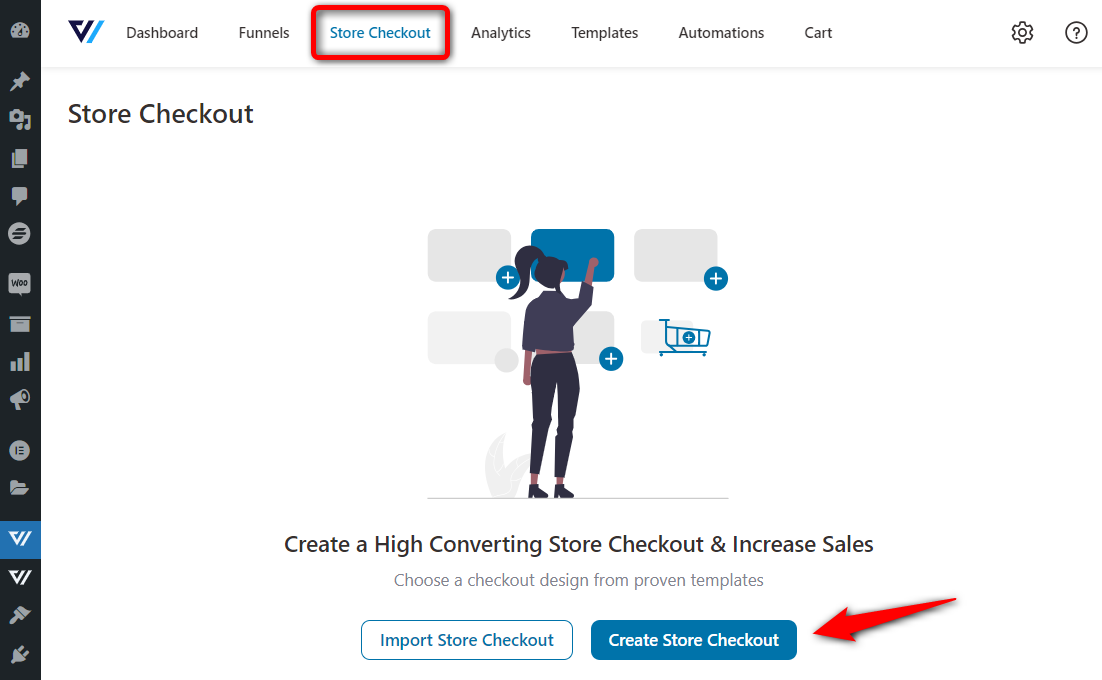
Go to Store Checkout from the FunnelKit dashboard and click on the ‘Create Store Checkout’ button.
A store checkout replaces the default WooCommerce checkout across the whole site, which is what you want when the add-on should be available on every order.
Import one of the prebuilt templates rather than starting from a blank page.
Each one ships as a checkout, an optional post-purchase page, and a thank you page, and all three edit with Elementor, Bricks, Divi, Gutenberg, Oxygen, or others.
Let’s import the Utopia template.

Here, you can take a full preview of your template.
This is a three-page store checkout with a checkout, upsell, and thank you page steps.
Click on ‘Import This Template’ and assign a name to your store checkout.
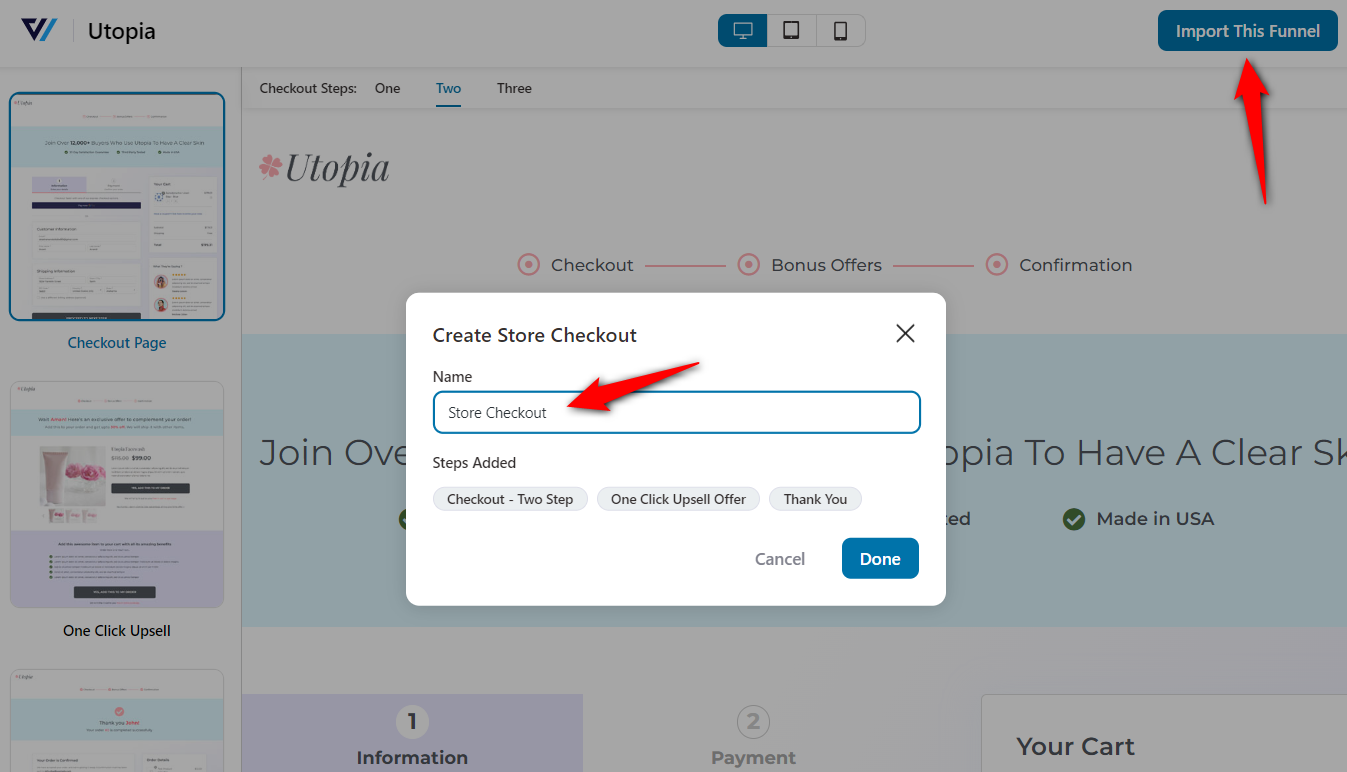
Clicking on ‘Done’ will import your funnel to your workspace.
Step 2: Customize your store checkout
FunnelKit gives you a load of options to customize your WooCommerce checkout pages. You’ll be able to:
- Customize the design of your checkout page
- Add, edit, and rearrange the fields on your checkout form
- Optimize your checkout for a faster buying process like express checkouts, address auto-complete, and more.
Once done, proceed to the next step.
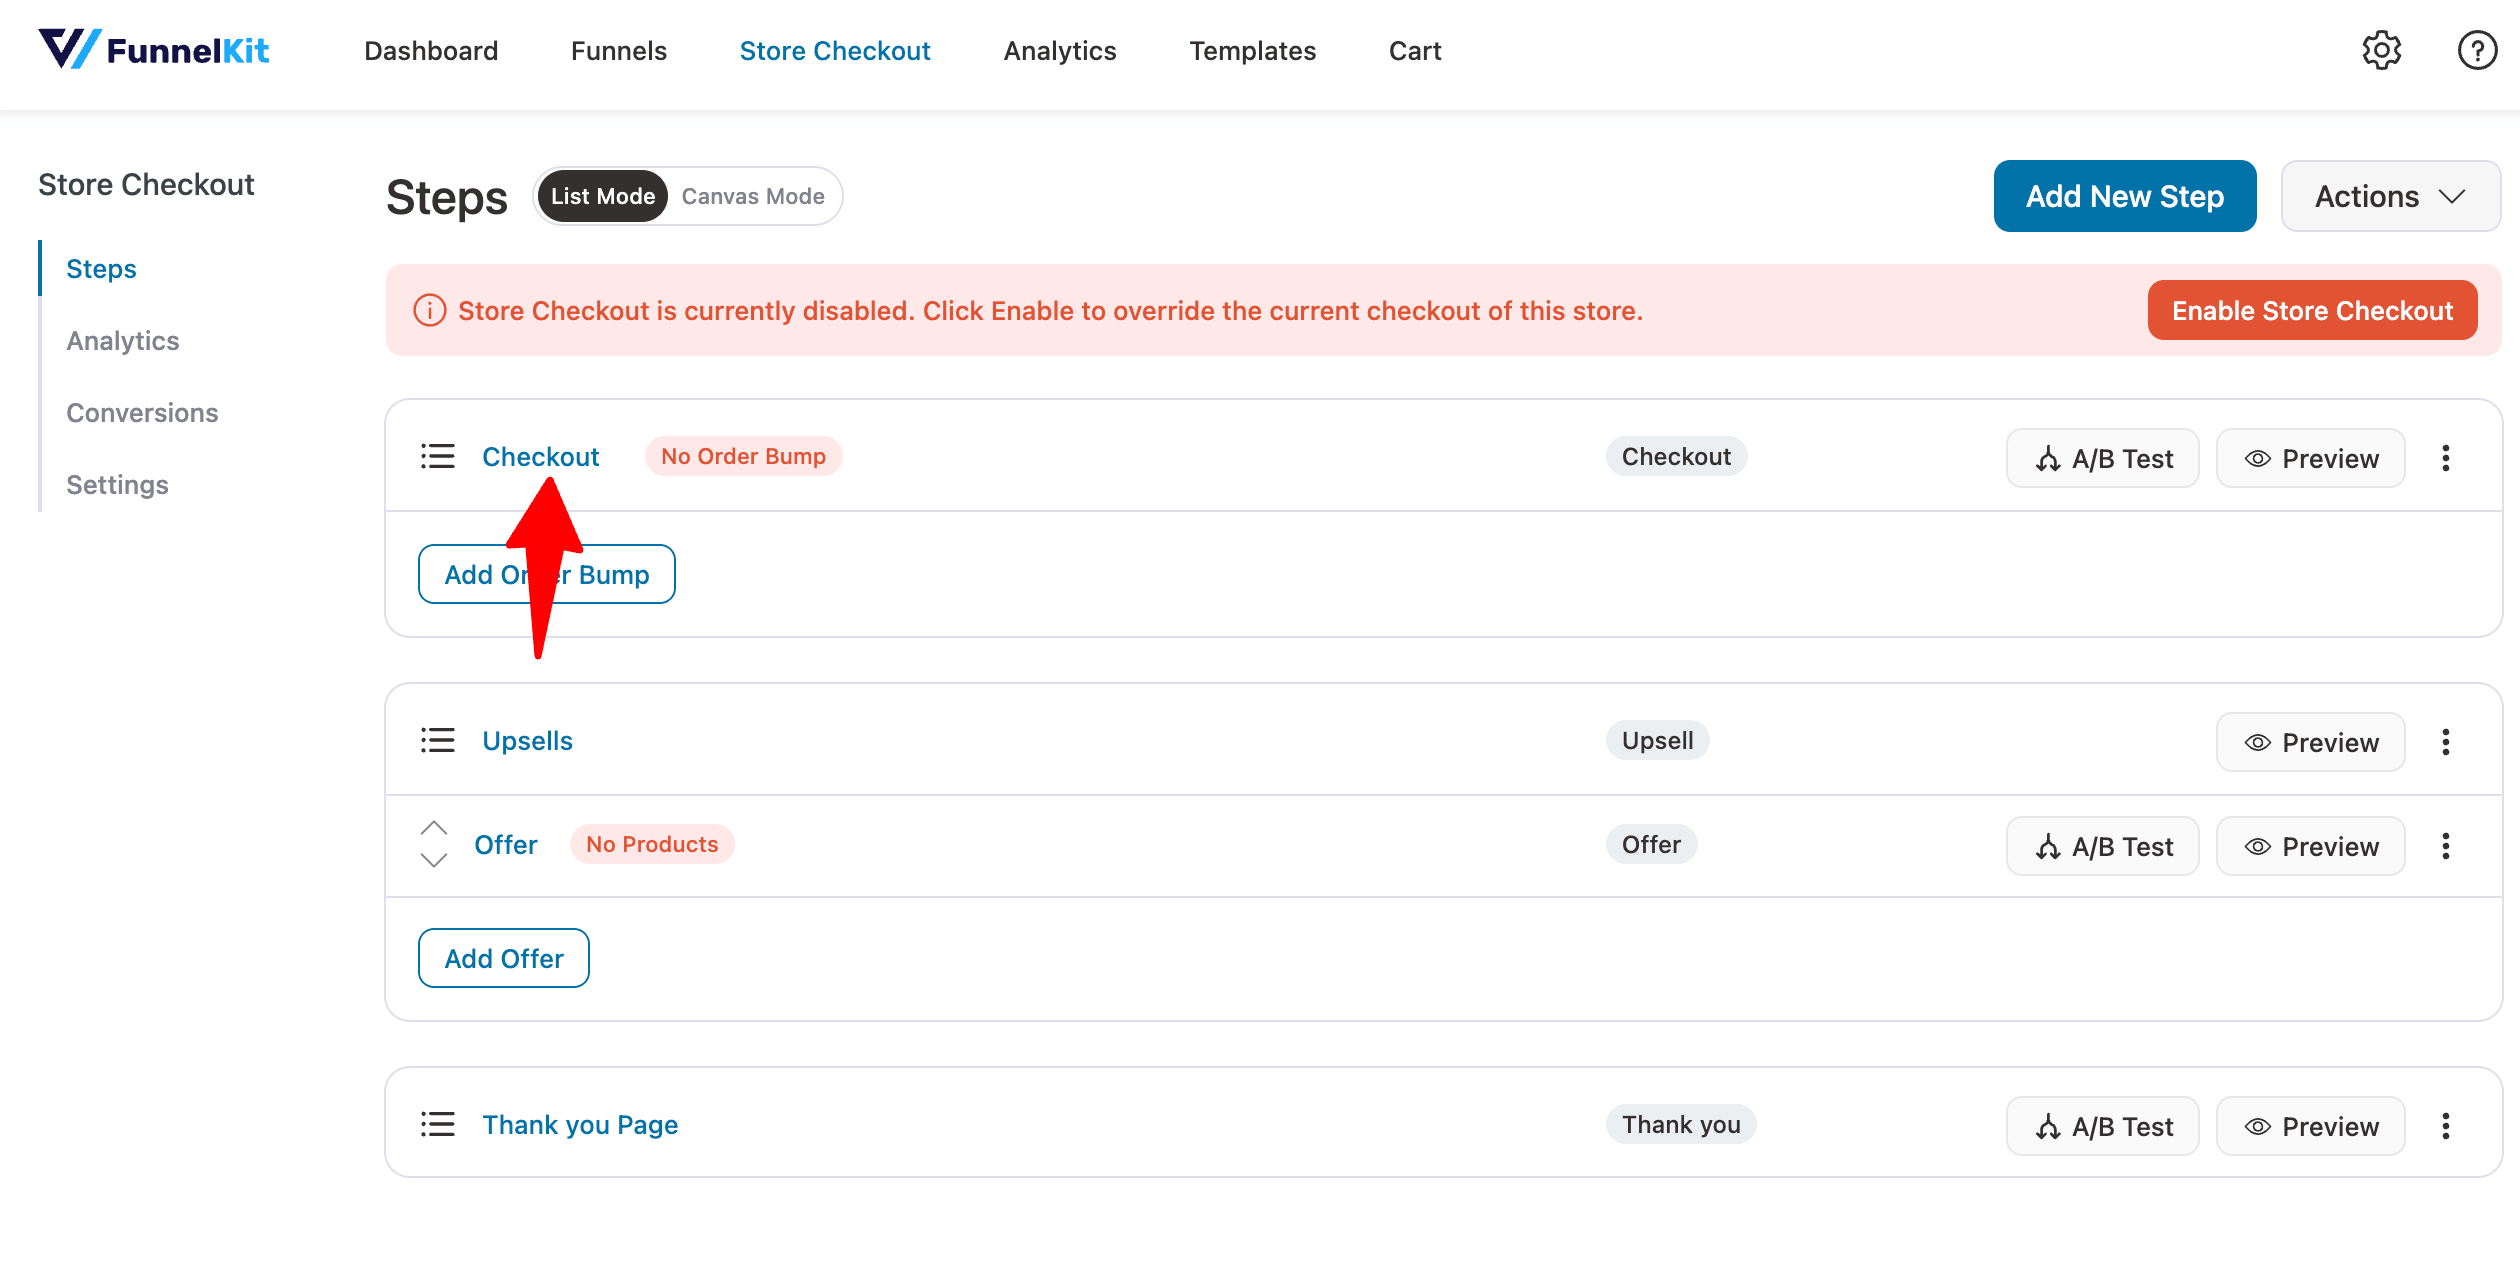
Step 3: Add the paid offer (order bump)
Here, we will add an order bump as our first WooCommerce checkout add-on.
Click on the ‘Add Order Bump’ button under the checkout step and assign a name to it.
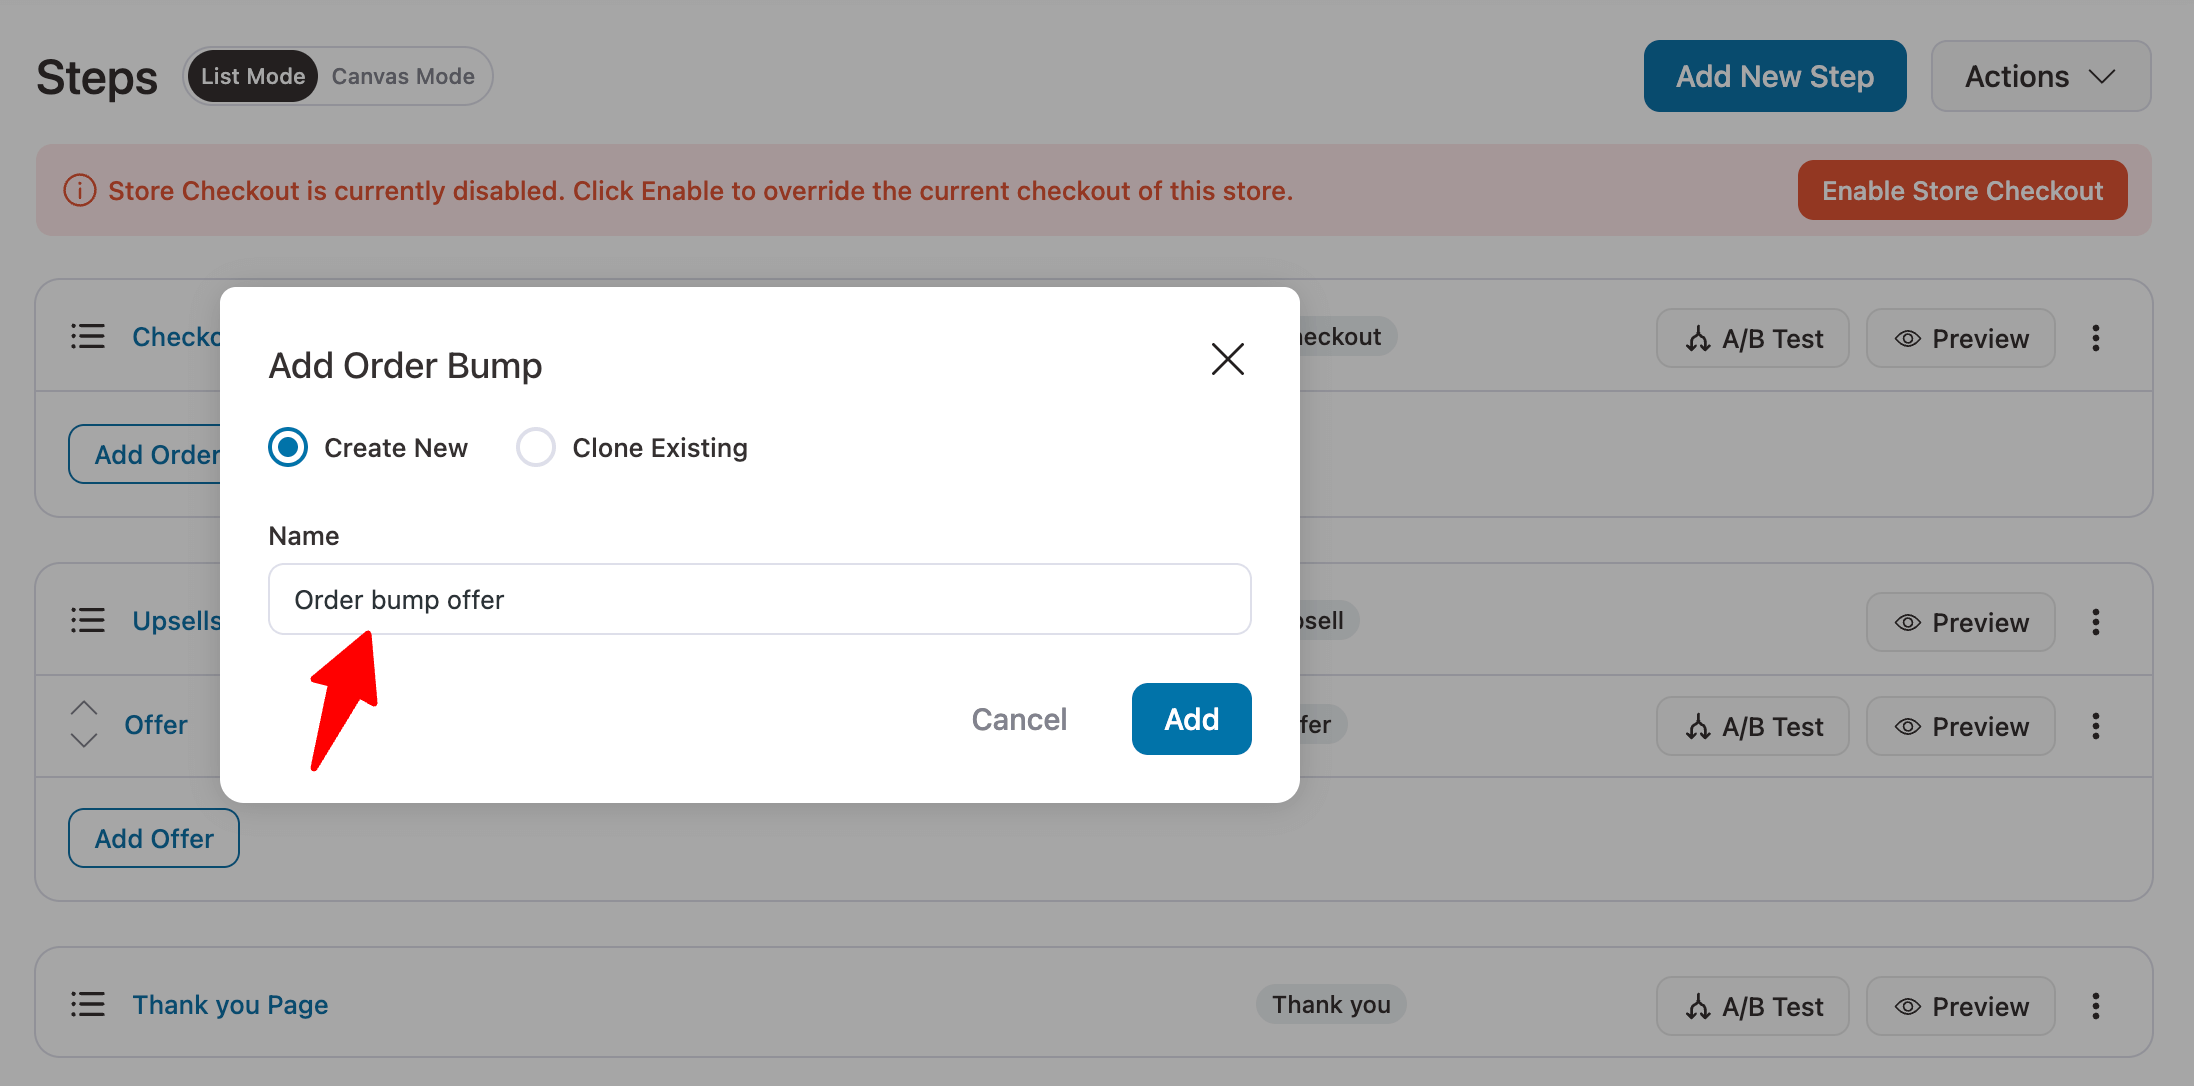
Next, choose the skin for your order bump offer.
FunnelKit has various order bump skins to create presentable offers that look attractive to your shoppers.
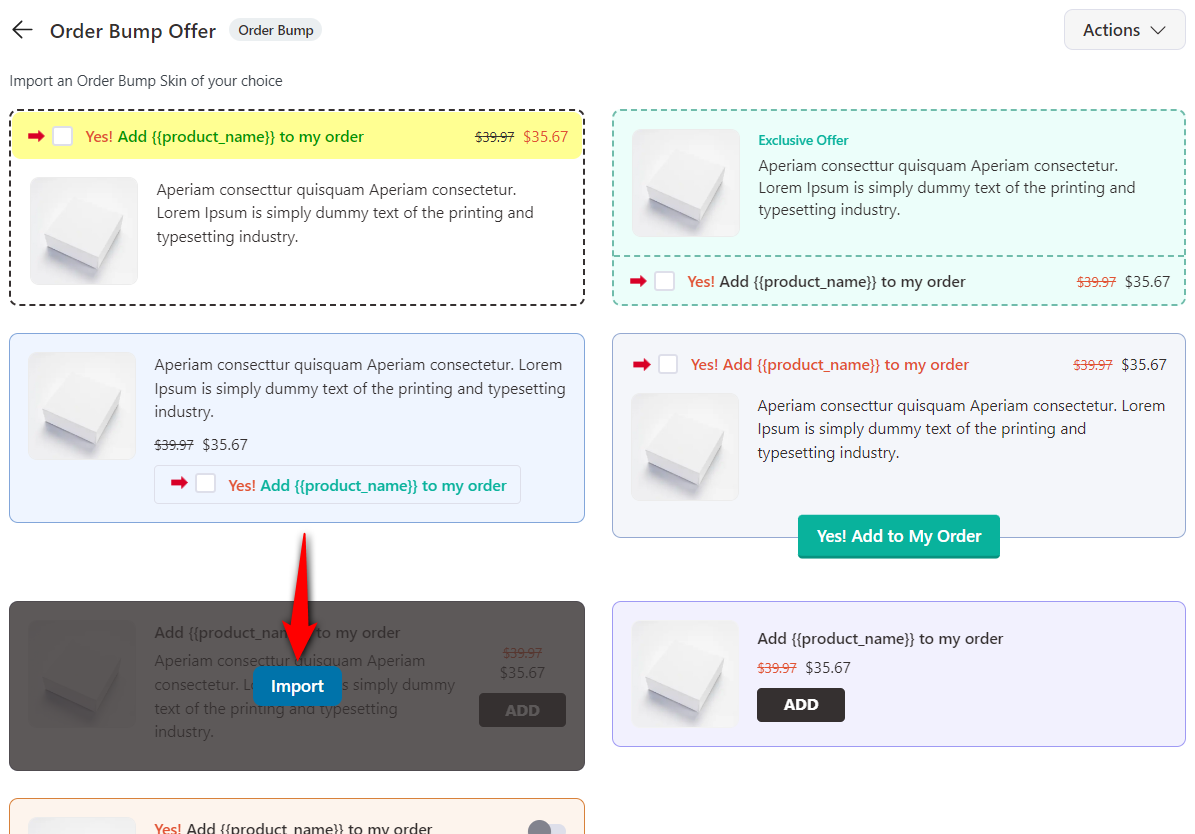
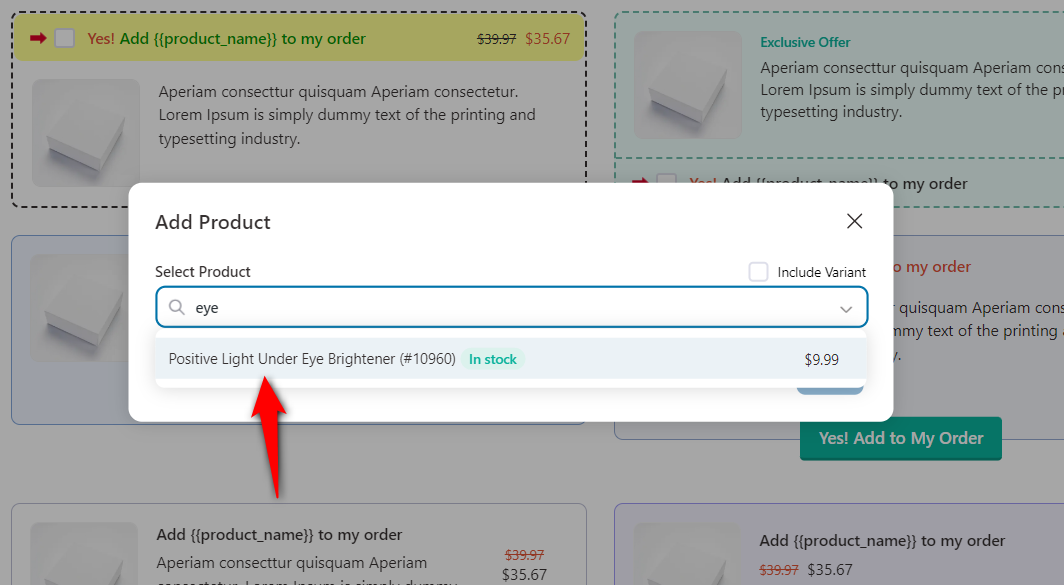
Clicking on 'Import' will let you add products to your order bump offer.
Type in the name of your products and click on it to add the product that you want to add as an order bump.
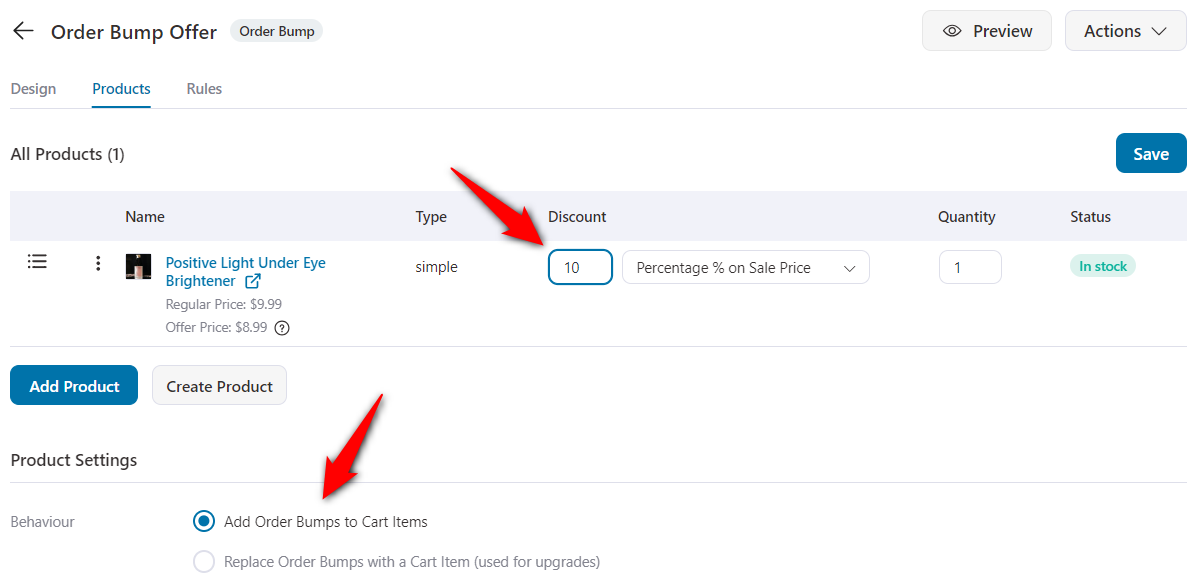
You can offer any discounts or define the quantity of your order bump product under the 'Products' tab. Once done, you can also decide its display position and behavior settings.
We've set it to display the order bump offer below the order summary.
You can further customize the skin of your order bump, add a custom description, change the highlight colors, and make it on-brand from the Content tab.
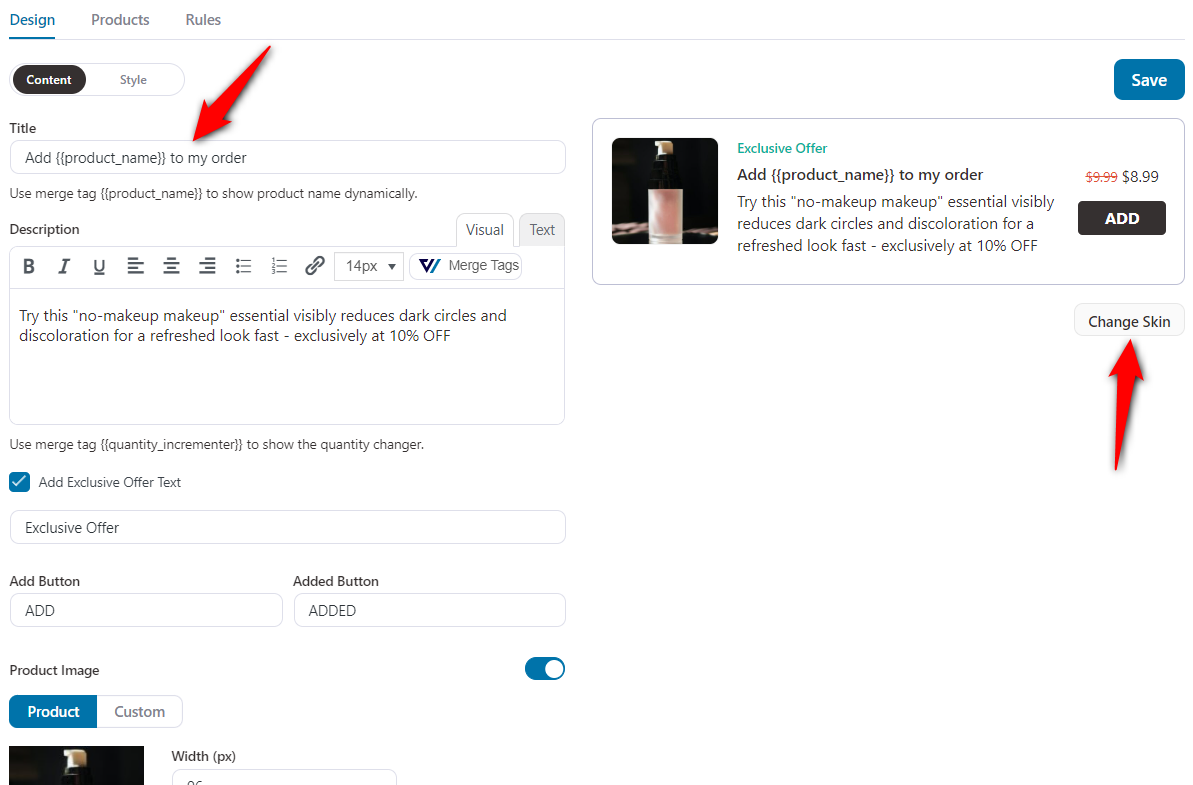
You can import any new skin you want and customize your order bump to look how you want.
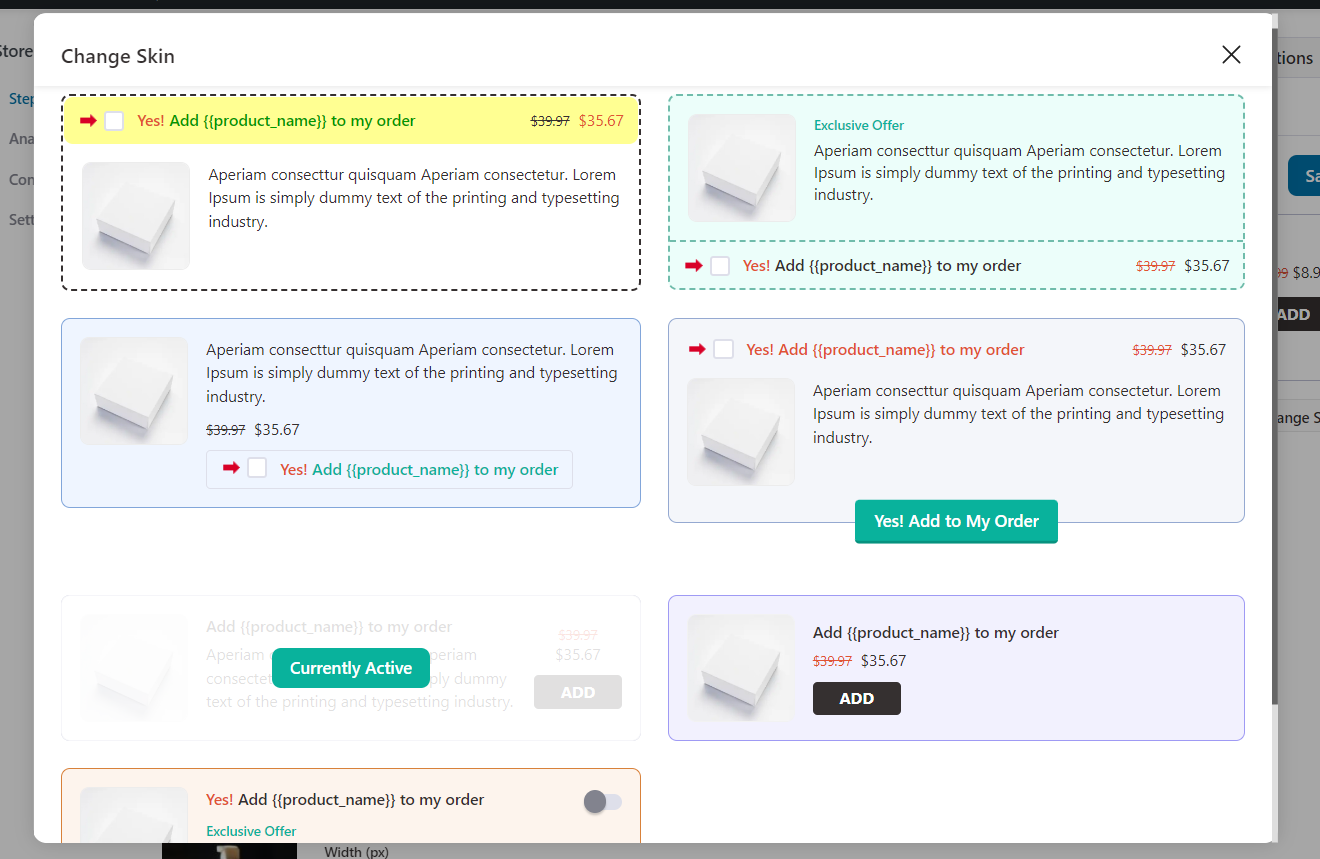
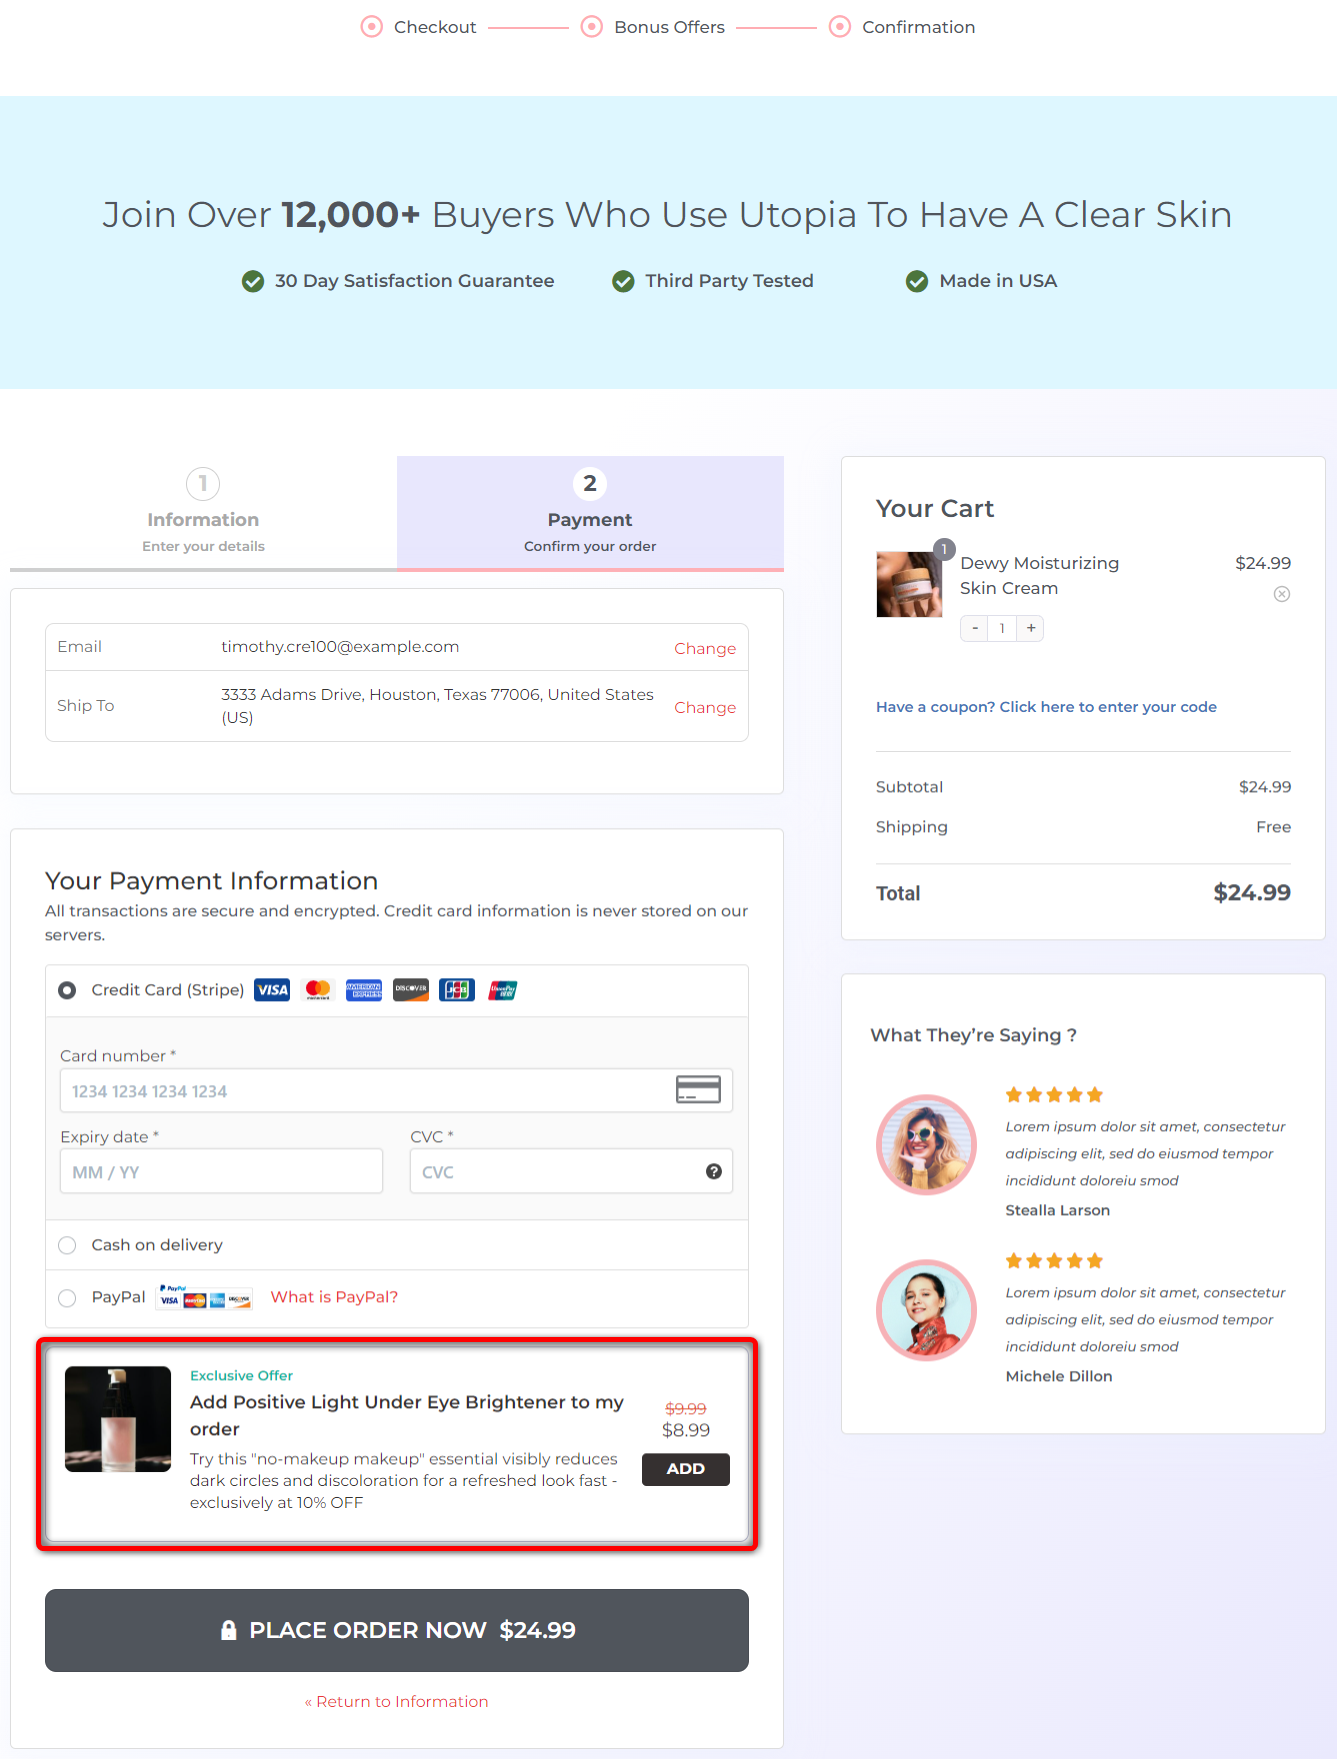
This is how the one-click order bump will be displayed on your checkout page:

Step 4: Set the rule that decides who sees it
Add a conditional rule so your paid offer only appears when there is something relevant inside the cart. For example, gift wrapping will only be available with something physical to wrap.
This gives you the power to target your customers with relevant offers and boost conversions like never before.
Let’s say you have 3 different items to upsell; do you want to present them on 3 separate products?
Or you want to display a particular order bump or upsell only to first-time customers.
You can achieve all these use cases with conditional rules.
Click on the order bump to edit the offer.
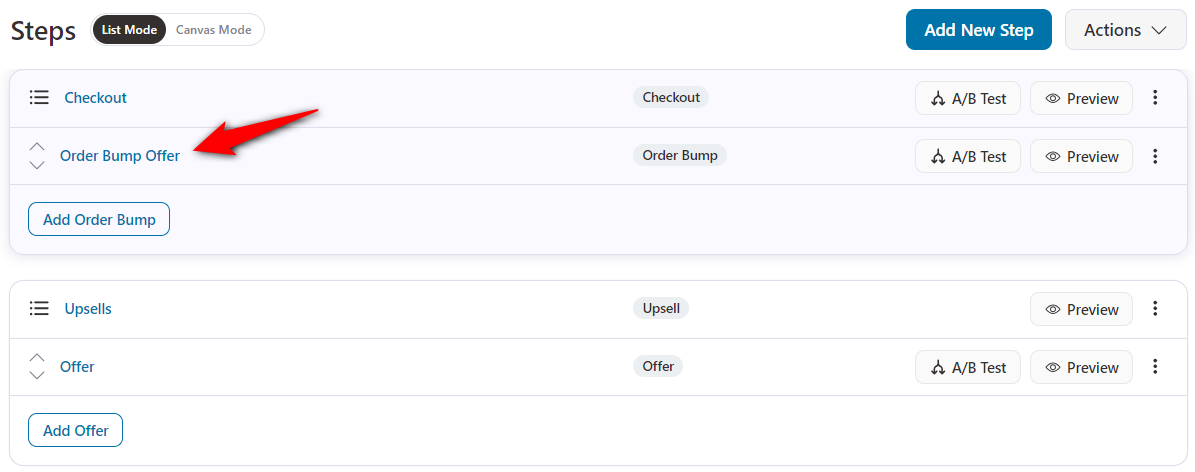
Go to the Rules tab and hit the ‘Add Rules’ button.
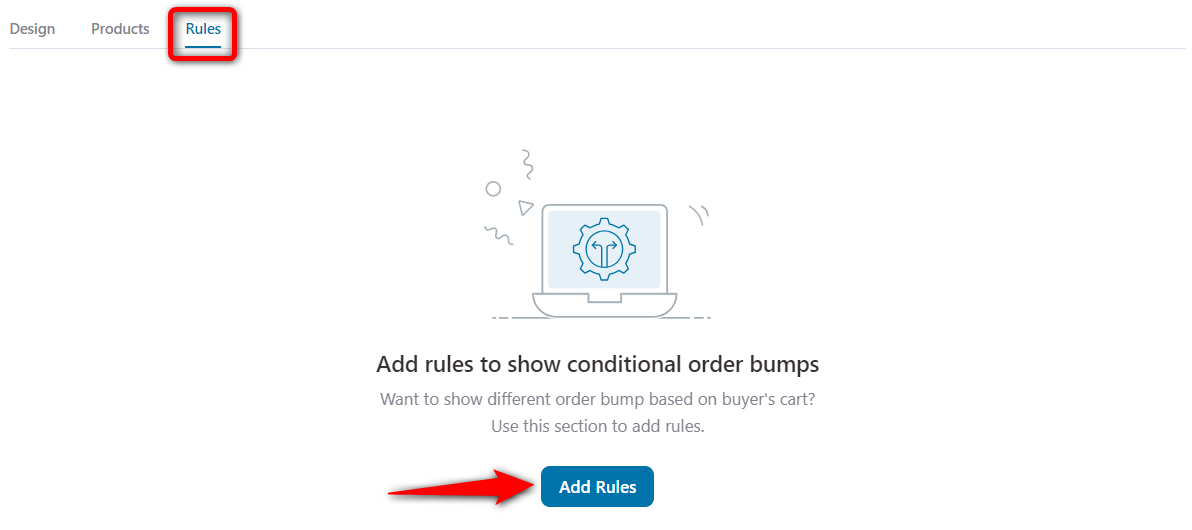
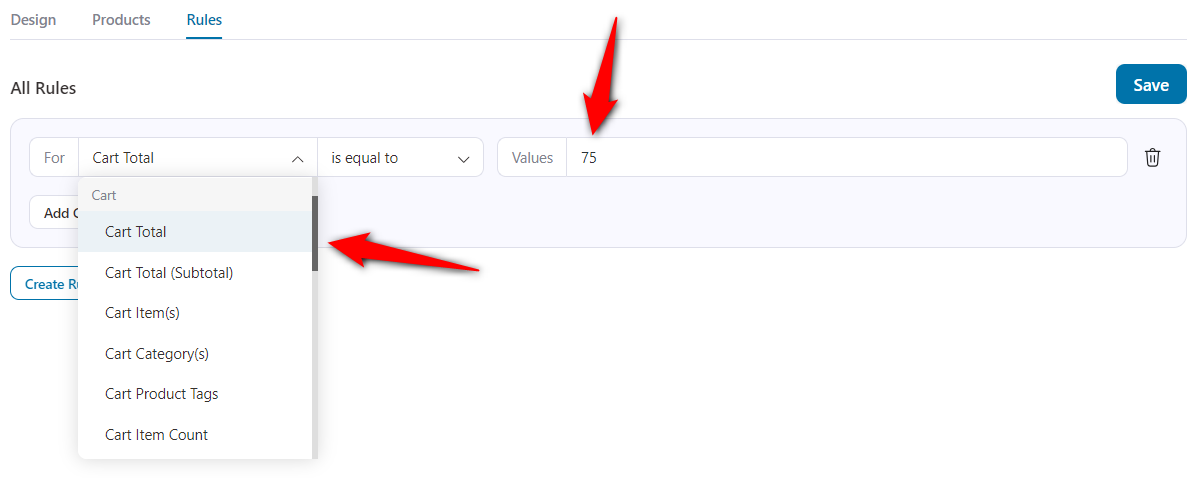
Let’s say you want to display the order bump only if the cart total reaches more than $75.
So, here select the Cart Total rule and set it to greater than 75.
You can even specify cart items or category rule here.
Now, only when the cart's total value reaches more than $75, this order bump offer will be triggered and shown to your users.
Rules also solve the business buyer problem that comes up constantly in the WooCommerce communities, such as showing a company name and VAT field to business customers while hiding both from everyone else.
Conditional display does it without you maintaining two separate checkouts.
Step 5: Enable store checkout and place a test order
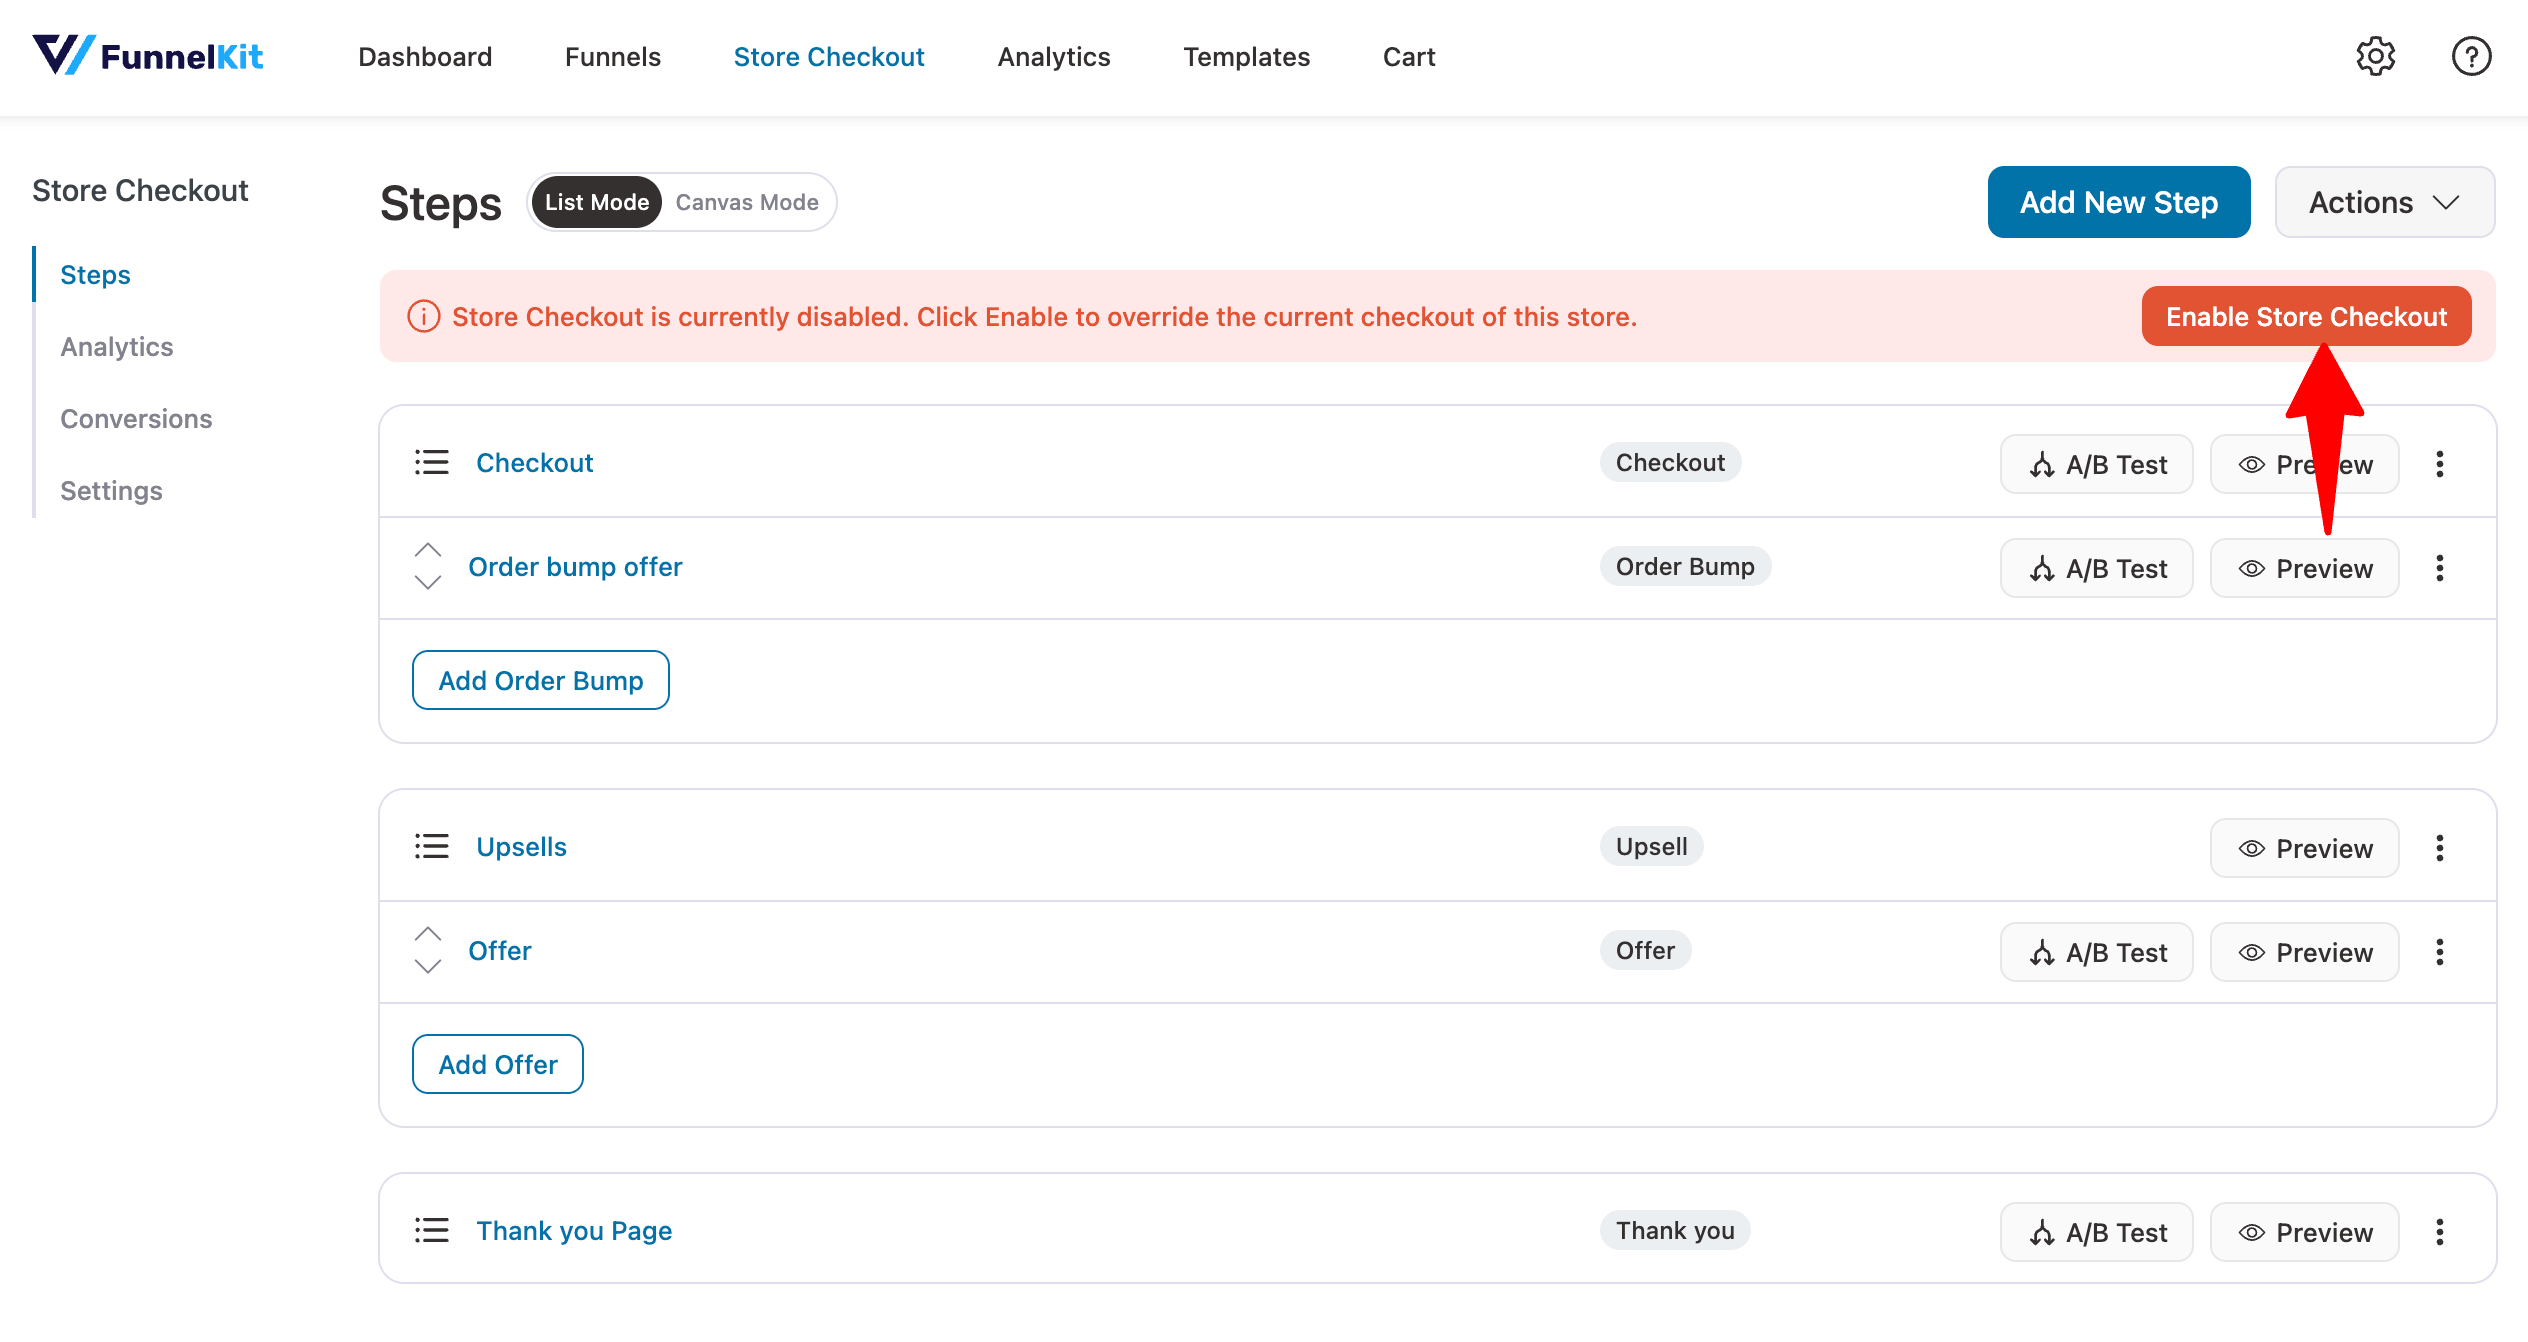
Take your new and modern WooCommerce store checkout live by clicking on the ‘Enable Store Checkout’ button.
Check four things on the finished order.
The add-on offer should appear as its own line on the order summary. The total should update the moment the box is ticked, not on reload.
The selection should be visible on the WooCommerce order screen. And it should appear in the confirmation email.
If any one of the four is missing, the add-on will eventually cause a fulfillment error, and it will be a fulfillment error you cannot reproduce.
Test on mobile as well as desktop because mobile cart abandonment is high compared to desktop.
How to Add a Paid Checkout Add-On With a Code Snippet
If you need exactly one paid option and would rather not buy an extension, a snippet will do it.
The budget objection here is fair.
Store owners asking for advanced checkout options regularly balk at spending $200 on a plugin they will configure once, and for a single gift wrap checkbox, they are right to.
Add this to a child theme’s functions.php or a code snippets plugin, never to a parent theme, and back up first.
Please note that this works on the classic shortcode checkout only.
Add the checkbox:
add_action( 'woocommerce_after_order_notes', 'fk_add_gift_wrap_field' );
function fk_add_gift_wrap_field( $checkout ) {
    woocommerce_form_field( 'gift_wrap', array(
        'type'  => 'checkbox',
        'class' => array( 'form-row-wide' ),
        'label' => __( 'Add gift wrapping for $5.00', 'your-textdomain' ),
    ), $checkout->get_value( 'gift_wrap' ) );
}
Store the choice when the box is ticked:
add_action( 'woocommerce_checkout_update_order_review', 'fk_set_gift_wrap_session' );
function fk_set_gift_wrap_session( $post_data ) {
    parse_str( $post_data, $data );
    WC()->session->set( 'gift_wrap', isset( $data['gift_wrap'] ) ? 1 : 0 );
}
Add the fee to the total:
add_action( 'woocommerce_cart_calculate_fees', 'fk_add_gift_wrap_fee' );
function fk_add_gift_wrap_fee( $cart ) {
    if ( is_admin() && ! defined( 'DOING_AJAX' ) ) {
        return;
    }
    if ( WC()->session->get( 'gift_wrap' ) ) {
        $cart->add_fee( __( 'Gift wrapping', 'your-textdomain' ), 5.00, true );
    }
}
That third argument set to true marks the fee as taxable. Set it to false if the service is not taxed where you sell.
Save it to the order:
add_action( 'woocommerce_checkout_update_order_meta', 'fk_save_gift_wrap' );
function fk_save_gift_wrap( $order_id ) {
    $order = wc_get_order( $order_id );
    $order->update_meta_data( '_gift_wrap', WC()->session->get( 'gift_wrap' ) ? 'yes' : 'no' );
    $order->save();
}
There is one piece that's still missing.
The total will not refresh on its own, so you need a few lines of JavaScript firing jQuery( 'body' ).trigger( 'update_checkout' ); on the checkbox change event.
Skip it and the fee only appears after a page reload, at which point most customers assume the option is broken.
However, there is no conditional logic, so every customer sees the option, whatever is in their cart. There is no reporting, so measuring the take rate means exporting orders.
The fee is not a product, so it never appears in sales reports by item, and partial refunds need to be handled by hand. A second add-on means duplicating all four snippets.
For one option on a classic checkout, it works well. Past that, the maintenance costs more than the plugin.
For the full range of checkout changes worth making, see our guide to customizing the WooCommerce checkout page.
Do Checkout Add-Ons Work With the Block Checkout?
Since WooCommerce 8.3, the cart and checkout blocks have been the default for new stores.
The block checkout does not use the same PHP rendering pipeline as the classic one, which means hooks like woocommerce_after_order_notes never fire.
Anything built on those hooks, including the snippet above, stops working the day a store migrates.
That's why the official Checkout Add-Ons extension doesn't work.
WooCommerce’s own documentation states the extension has not been updated for the blocks and recommends reverting to the cart and checkout shortcodes to keep using it.
SkyVerge’s compatibility page, which tracks its own extensions, has continued to list it as pending for both blocks.
Booster for WooCommerce added checkout custom fields to the block checkout during 2026, with server-side validation and visibility rules.
Builder-based checkouts sidestep the question entirely, because they replace the page rather than extending it.
Whatever you choose, do three things before you commit.
Read the plugin’s own compatibility statement rather than a third-party list.
Place a real test order on staging with the block checkout active.
Confirm the add-on data reaches both the order screen and the confirmation email, because a field that renders but does not save is the failure that costs you money quietly for months.
Top 5 Best WooCommerce Checkout Add-On Plugins
Five plugins cover almost every requirement. They solve different problems, so the choice comes down to whether you need a fee on a field, a product-based offer, or per-product options.
| Plugin | Best for | Fee on a field | Conditional logic | Block checkout | Price |
|---|---|---|---|---|---|
| FunnelKit Funnel Builder | Replacing the checkout and offering paid extras as one-click line items, alongside the field editor, express pay, address autocomplete, and A/B testing. | No, offers are line items | Yes, on cart total, product, category, tags, and customer segment | Yes, uses its own template | Free version, Pro from $99.50 per year |
| Checkout Add-Ons for WooCommerce | The original use case. Eight field types including text, dropdowns, multi selects, radio buttons, checkboxes, and file uploads, with fixed or percentage based costs. Applies add-ons to Subscriptions renewals as well as the first order. | Yes | Yes, on cart subtotal, cart contents, or another add-on’s value | No, shortcode checkout only | Around $79 per year |
| Flexible Checkout Fields PRO | Editing, adding, removing, and reordering checkout fields with a price per field. 17 or more field types, conditional logic across AND and OR condition groups, and field rearranging based on cart contents. 80,000+ active installs on the free version. | Yes | Yes | Partial, check the current release | Free core, PRO from around £59 per year |
| Booster for WooCommerce | Stores that want checkout fees, custom fields, and gateway rules from one plugin with 100+ modules. Added block checkout support for custom fields in 2026. | Yes | Yes | Yes, for supported field types | Free version, paid tiers for advanced modules |
| WooCommerce Product Add-Ons | Per product options rather than order level ones. The right choice for engraving or size upgrades that apply to specific items only. | Yes, per product | Limited | Yes | Paid extension |
What separates FunnelKit from the rest of that list is scope rather than field count.
The others modify the checkout page you have. FunnelKit replaces it, which is why block compatibility stops being a question and why the same tool also covers post-purchase offers and thank you pages.
That breadth is worth having if you were rebuilding the checkout anyway, and it is more than you need if all you want is one gift wrap checkbox on a checkout you already like.
9 Checkout Extras Worth Offering
These are the order-level extras we’d actually build. Each one either carries margin or removes a support ticket, and none of them needs a new product record.
Gift wrapping
A flat fee, usually $3-$6, as a checkbox or as a select if you offer paper choices.
Charge tax on it at the same rate as the goods in most jurisdictions because wrapping materials are usually taxable where the products are.
Push the wrap choice onto the packing slip, not just the order screen, or the warehouse will never see it.
Gift message
Free, text, capped at around 200 characters. The only item here with no revenue attached, and still worth shipping first.
It surfaces gift orders you’d otherwise send out with a pricing invoice inside.
Cap the length in the field settings, or long messages will break your packing slip layout.
Tip or gratuity
Best set up as a percentage of the subtotal with two or three preset options plus a custom amount input.
This is quite standard for food, services, and anything with a delivery driver.
Tips are typically not taxable, so set it to non-taxable and confirm against your local rules, because getting this backward is a real liability.
Rush or priority handling
Charge a flat fee against a same-day dispatch cut-off.
It is not a shipping method because handling is what your warehouse does, shipping is what the carrier does, and selling one as the other creates disputes.
Use a conditional rule to hide the option after your cut-off rather than taking money for a promise you can’t keep.
Delivery date
A date picker, free for standard windows and paid for named-day or weekend slots.
This one only works if the picker is blocked out against your actual fulfillment calendar.
An unrestricted date field that lets someone choose Sunday costs you more in refunds than the fee brings in.
Shipping insurance
One checkbox, priced at 1-3% of order value. Only offer it if you’ll actually honor claims without argument; otherwise, you’ve built a self-insurance fee with a customer-service bill attached.
Price it off the subtotal so it scales with what’s genuinely at risk.
Warranty or protection plan
Sell it as a tiered dropdown, such as 1 year or 2 years, priced as a percentage of the subtotal.
For a single high-value item, the product page converts better because the buyer is still evaluating the purchase.
At the order level, this makes sense when you’re covering a whole basket of equipment.
Donation at checkout
Either a fixed amount or a “name your price” input, always opt-in and never pre-ticked.
Track it separately in your books; it’s pass-through, not revenue, and it will distort your average order value if you leave it mixed in.
See our guide to adding a donation at checkout for the fulfillment side.
File upload or personalization
Artwork, a logo, engraving text attached to the order, with a setup fee.
Order-level upload is right when one file covers the whole job; if each item needs its own, that’s a product-level field.
For the storage and permissions side, see our guide to file uploads at checkout.
6 Best Practices to Follow When Setting Up WooCommerce Checkout Add-ons
Let’s examine some best practices for setting up add-ons for your store.
1. Offer relevant add-ons and never pre-tick them
Make sure to offer add-ons directly tied to the products in the shopper’s cart.
Irrelevant or random suggestions can create confusion and frustration, reducing the chances of a successful checkout upsell.
Beyond the trust damage, EU consumer law prohibits pre-selected boxes for extra payments, and a pre-ticked add-on generates refunds rather than revenue.
2. Limit the choices and focus on quality
Offering too many add-on choices at checkout can overwhelm shoppers and lead to indecision, increasing the chances of cart abandonment.
Present 2-3 highly relevant add-ons that align with the product the customer buys. This helps reduce cognitive load and makes it easier for customers to make quick decisions.
Instead of trying to upsell various products, focus on high-quality items that will benefit your customers and business the most.
3. Optimize the add-ons for mobile devices
With more people shopping on their mobile devices, your checkout page must be optimized for smaller screens.
Use a mobile-responsive design that adapts to various screen sizes. The add-ons should be visible, easy to tap, and not cluttered on mobile devices.
FunnelKit Funnel Builder lets you customize your checkout pages for mobile and other devices. You can make changes and see the responsiveness for different devices in real time.
4. Set a clear pricing structure
Transparency is crucial when pricing your WooCommerce checkout add-ons. Unexpected costs or hidden fees at checkout are one of the main reasons for cart abandonment.
That’s why you should always clearly display the cost of each checkout addon option next to its description.
If you’re offering multiple add-ons, assign the pricing of each item by line so the shopper knows exactly how much they’re paying for each additional option.
Fees and line items are taxed differently in WooCommerce, and a mismatch surfaces as a reconciliation problem months later.
5. A/B test different pricing strategies
Different pricing models work for different products and audiences, so it’s crucial to experiment with your checkout add-ons to find the optimal strategy.
FunnelKit Funnel Builder lets you A/B test different pricing strategies, such as configuring discounts or offering a free trial. Compare the results to see which approach boosts your conversion rates.
Use psychological pricing to create a sense of urgency or added value, such as pricing an item for $9.99 instead of $10.
6. Add limited-time offers
Create urgency around your WooCommerce checkout add-ons by offering limited-time deals or exclusive discounts available only at checkout.
Frequently Asked Questions
Yes, with limits. Flexible Checkout Fields and Booster both have free versions that add custom checkout fields, and FunnelKit’s free version includes the field editor.
Attaching a price to a field is a premium feature in all three, so the free route covers collecting information and the snippet above covers charging for it.
The block checkout is the most common cause, because plugins built on classic checkout hooks render nothing there.
After that, check whether a conditional rule is excluding the current cart, clear page and object caching, and switch to a default theme briefly to rule out a template override.
You can use Advanced Coupons to create attractive BOGO deals and offer them to your shoppers as add-ons on your WooCommerce checkout page.
Yes, with conditional logic. Add a field asking whether the customer is buying as a business, then set company name, VAT number, and invoice fields to appear only when that option is selected.
FunnelKit, Flexible Checkout Fields PRO, and the official extension all support rules like this.
The [woocommerce_checkout] shortcode renders the classic checkout, which is what most add-on plugins need in order to work.
Stores already on the block checkout can revert by swapping the checkout block for that shortcode, though this gives up the block checkout’s performance gains.
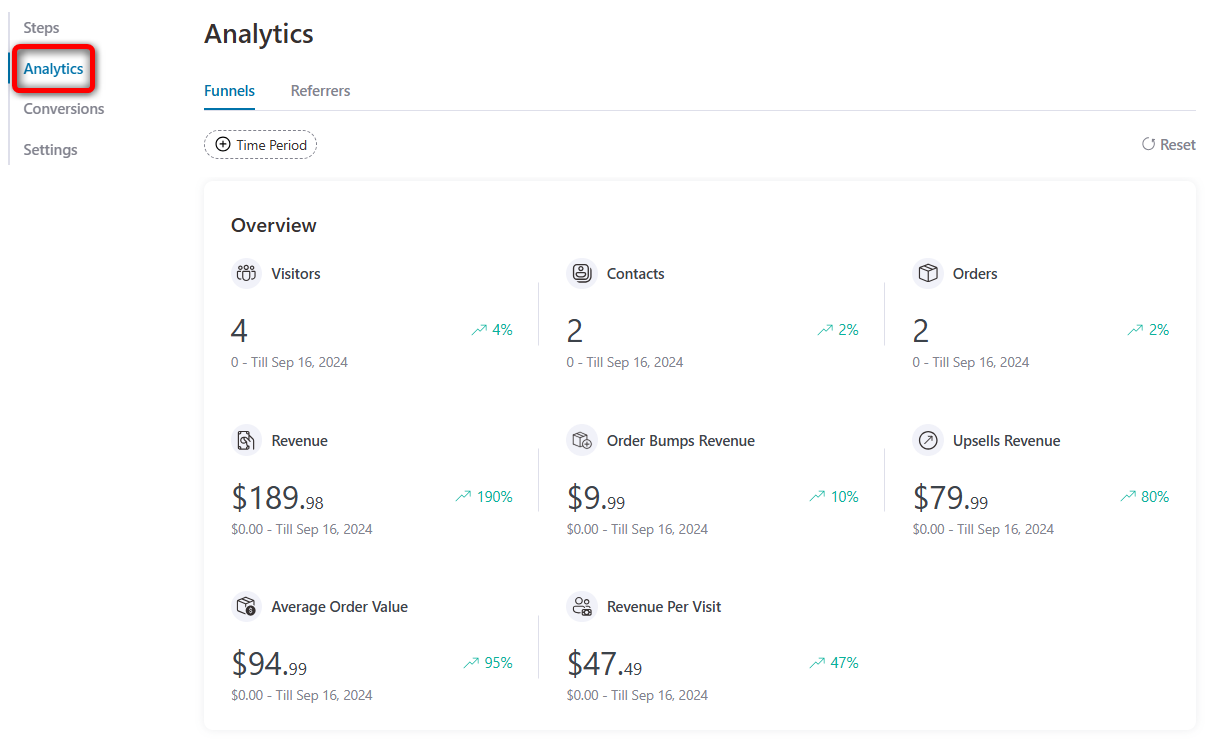
You can track sales from checkout add-ons in WooCommerce with FunnelKit Funnel Builder.
Go to the Analytics section, and you’ll see a complete overview of order bump revenue, one-click upsell revenue, average order value, orders placed, revenue generated, and more.
In addition, you’ll see a detailed breakdown of the different steps in the store checkout funnel with views, clicks, click rate, and conversions.
You can use FunnelKit Funnel Builder to offer post-purchase upsells and downsells to your customers.
All you need to do is import and customize a template, add a product, offer a discount, and you’re ready to go!
Ready to Add WooCommerce Checkout Add-Ons to Your Store?
Out of different add-ons, we’d start with the gift message every time: free, ten minutes, and the highest opt-in rate on the list precisely because it costs the buyer nothing.
This tells you fast whether your customers engage with checkout extras at all. Then add one paid extra behind it.
The arithmetic is unglamorous, and that’s the point.
A $4 wrap fee taken by one order in twenty, on a store doing a thousand orders a month, is $200.
Nobody rebuilds a business on $200, but it arrives every month for a checkbox you configured once, and stacked next to a delivery-date option and a rush fee, it stops being a rounding error.
Order-level extras compound quietly, which is exactly why most stores never get around to them.
FunnelKit Funnel Builder handles the checkout page, the paid offers, and the rules that decide who sees them, so none of it depends on which checkout WooCommerce ships next.
These checkout add-ons will surely help boost your sales, enhance customer satisfaction, and build long-term customer trust.
Don’t leave money on the table. Start leveraging WooCommerce checkout add-ons today and transform your checkout process into a high-converting revenue engine.
Editorial Team
October 9, 2026A downsell gives customers a cheaper option after they turn down your main offer. If you show it too soon, you might convince them to skip the original offer and...
Editorial Team
October 8, 2026WooCommerce guest checkout lets shoppers buy from your store without creating an account. They enter an email, their billing details, and payment, and the order goes through. It's a built-in...
Editorial Team
October 7, 2026WooCommerce upsells are products you recommend in place of the one a shopper is viewing, usually a better or higher-priced version of it. WooCommerce has a built-in upsell field for...






