


WooCommerce buy now pay later lets your customers split a purchase into smaller payments while you still get paid in full upfront.
To offer buy now pay later, you connect a payment gateway (Stripe, WooPayments, or PayPal) and enable Klarna, Affirm, or Afterpay at WooCommerce checkout. That part takes minutes.
The harder question is which provider to enable and what it actually costs you.
Merchant fees typically range from 3-8% per sale, and the right choice depends on your average order value and where your customers live.
In this guide, we've compared every major provider side by side and walk you through the exact setup for each route.
We'll also show you how to run installment payments natively, so you can offer pay-over-time without handing a cut to a third party on every order.
By the end of this post, you will know exactly which method fits your store and how to switch it on today.
Table of Contents
- 1 What Pay Later Means For a WooCommerce Store?
- 2 How Does a Buy Now, Pay Later Transaction Actually Flow?
- 3 BNPL Methods Compared
- 4 Method 1: Add Buy Now Pay Later to WooCommerce (Payment Gateways)
- 5 Other Ways to Enable Pay Later (PayPal Pay Later)
- 6 Method 2: Offer Buy Now Pay Later with Native Installment Plans
- 7 6 Best Practices to Convert More Shoppers With Pay Later
- 8 Frequently Asked Questions (FAQs)
- 9 Set Up WooCommerce Buy Now Pay Later Payments and Boost Sales in Your Store!
What Pay Later Means For a WooCommerce Store?
Buy now, pay later (BNPL) lets a shopper split a purchase into interest-free installments, usually four payments over six weeks or monthly plans for larger carts.
A provider such as Klarna, Affirm, or Afterpay pays you in full upfront, then collects from the customer over time and absorbs the credit and fraud risk.
For most store owners, "pay later" actually means two different things in WooCommerce, and which one you want determines which method you should set up.
- Third-party BNPL: Klarna, Affirm, Afterpay, or PayPal finance the customer. You get paid immediately, minus a fee, and the provider handles collection, chargebacks, and defaults.
- Merchant-run installments: You are the lender. The customer pays you directly in scheduled parts through your own gateway, with no BNPL provider and no per-sale financing fee. This is ideal for coaching, courses, high-ticket digital products, and anywhere you want to keep the full margin.
Most stores end up using a third-party provider for everyday carts and native installations for premium offers, where the fee would eat too much of the margin.
How Does a Buy Now, Pay Later Transaction Actually Flow?
The two methods look similar to the shopper but operate very differently behind the scenes, and that difference determines who takes the risk and who keeps the margin.
| Step | Third-Party BNPL (Klarna, Affirm, Afterpay or PayPal) | Native Installments (Sublium) |
|---|---|---|
| 1. Checkout | The shopper selects a pay-later option. The provider runs an instant credit check and approves or declines in seconds. | The shopper chooses your installment plan (for example, 3 payments of $200). No external credit check, no approval step; you set the terms. |
| 2. First payment or payout | You receive the full order amount upfront, minus the merchant fee, exactly like a card sale. | Your gateway charges the first installment now. You are paid in installments, not upfront, so the full balance is paid over the schedule. |
| 3. Repayment | The customer repays the provider on a schedule (typically 4 payments over 6 weeks, or monthly for larger carts). The provider chases late payments and absorbs any default. | Your gateway automatically charges the remaining installments to the customer's card until the balance is cleared. You handle any failed payment with automated retries and reminders. |
| Who takes the risk | The provider. It guarantees your payment and eats fraud and defaults, which is what the 3-8% fee is about. | You do. There is no financing fee, but if a card fails midway through delivery, you already delivered, so this suits digital goods, courses, and services where access can be paused. |
BNPL Methods Compared
Every provider boosts conversions and order value, but they differ sharply in fees, cart size limits, and the countries they serve.
Enabling the wrong one for your store means either paying more than you need to or offering an option your customers cannot actually use. Here is the side-by-side for WooCommerce merchants.
| Provider | Merchant fee (US) | Cart range | Plan types | Countries |
|---|---|---|---|---|
| Klarna | ~3.29 to 5.99% + $0.30 (high-volume rates negotiable) | Small to mid carts | Pay in 4, Pay in 30 days, monthly financing up to ~24 months | US, UK, EU, and 45+ markets (strongest in Europe) |
| Affirm | ~5.99% + $0.30 | $35 to $30,000 | Pay in 4 plus monthly plans up to 36 months | US, Canada |
| Afterpay | ~4 to 6% + $0.30 | Up to ~$2,000 | Pay in 4 (interest-free, every 2 weeks) | US, Canada, UK, Australia, New Zealand (same-country only) |
| PayPal Pay Later | No extra BNPL fee, folded into the standard rate (~3.49% + $0.49) | Pay in 4: $30 to $1,500 · Pay Monthly: $199 to $10,000 | Pay in 4 and Pay Monthly (6/12/24 months) | US, UK, Canada, Australia, France, Germany, Italy, Spain |
| Sublium Subscriptions | No financing fee; you only pay your normal gateway rate (~2.9% + $0.30) | Any price you set | Your own installment plans (3, 4, 6+ payments over days/weeks/months) | Anywhere your gateway operates |
Sezzle and Zip also offer pay-in-4 and are worth testing if you want a lower-cost alternative or broader approval for thinner-credit shoppers.
Which method should you pick?
The single biggest factor is your average order value. Below roughly $150, shoppers respond to pay-in-4 and the affordability reframe is smaller, so a low-friction pay-in-4 provider wins.
Above that, or on genuinely expensive items, longer monthly financing does the heavy lifting.
Here's a quick decision guide:
- AOV under ~$150, apparel or beauty: Go for Afterpay or Klarna. Shoppers here respond well to pay-in-4, and Klarna doubles as a marketing channel through its shopping app, which can send new customers your way.
- AOV over ~$150 or high-ticket: Choose Affirm. It finances carts up to $30,000 with terms of up to 36 months and never charges customers a late fee, which is a real trust signal for expensive orders.
- Mostly European or multi-country: Select Klarna, by a wide margin. It is the strongest BNPL option across Europe and covers far more markets than the others.
- Already running PayPal: Switch on Pay Later. There is no additional BNPL fee, and millions of existing PayPal users can activate it at checkout without creating a new account.
- Courses, coaching, or high-ticket digital products, or you want to keep the full margin: Skip the providers and run native installments with Sublium Subscriptions. You pay no financing fee because you are the lender, and it is the only option here that also works for subscriptions.
You can run multiple providers at the same time, and plenty of stores do.
Leading with one primary option and offering a second as a backup improves your approval coverage, since a shopper declined by one provider may still be approved by another.
Method 1: Add Buy Now Pay Later to WooCommerce (Payment Gateways)
In this method, we'll use FunnelKit Stripe Gateway for WooCommerce to add pay-later options to WooCommerce without writing any code.
It connects your store to Stripe and lets you switch on Klarna, Affirm, and Afterpay together, then display pay-later messaging across your product, cart, and checkout pages.
Here's a quick video tutorial on setting up buy now pay later methods in WooCommerce:
Follow the steps below:
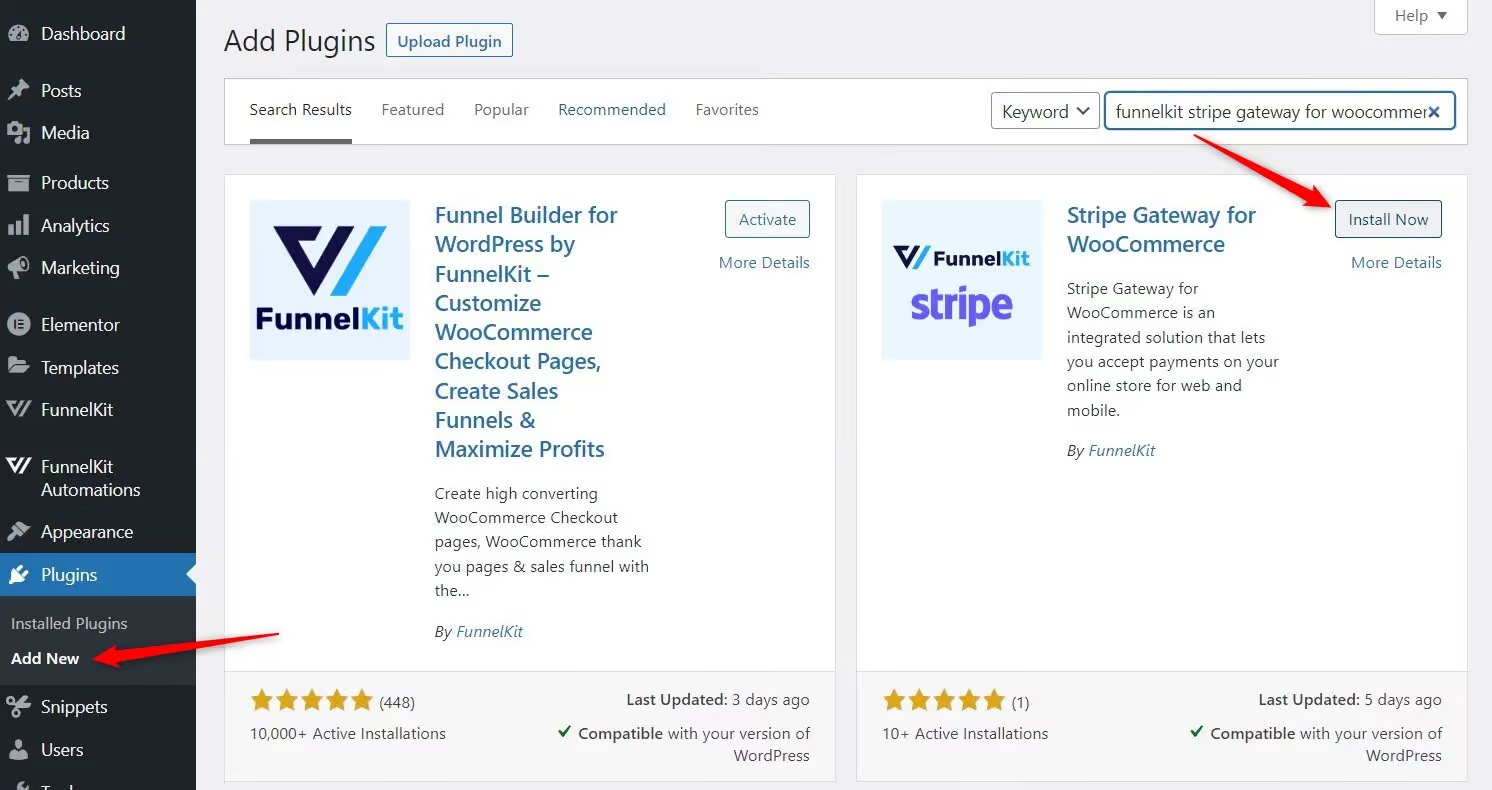
Step 1: Install and activate the WooCommerce Stripe Gateway plugin
Navigate to Plugins ⇨ Add New Plugin on your WordPress dashboard and search for 'FunnelKit Stripe Gateway for WooCommerce'.
Install and activate the plugin as shown in the screenshot below:
Step 2: Connect your Stripe account to WooCommerce
After installing the Stripe gateway plugin, click on the ‘Start Onboarding Wizard’ button.
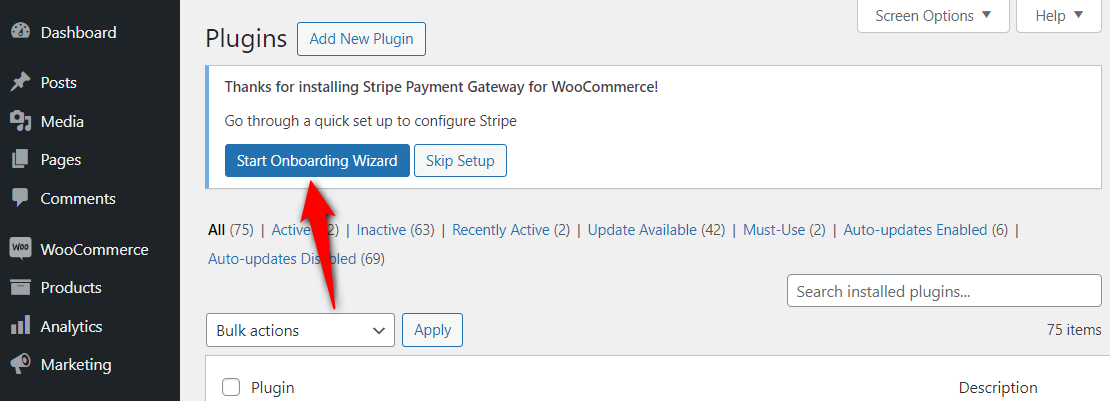
It’ll direct you to the WooCommerce - Stripe connection process.
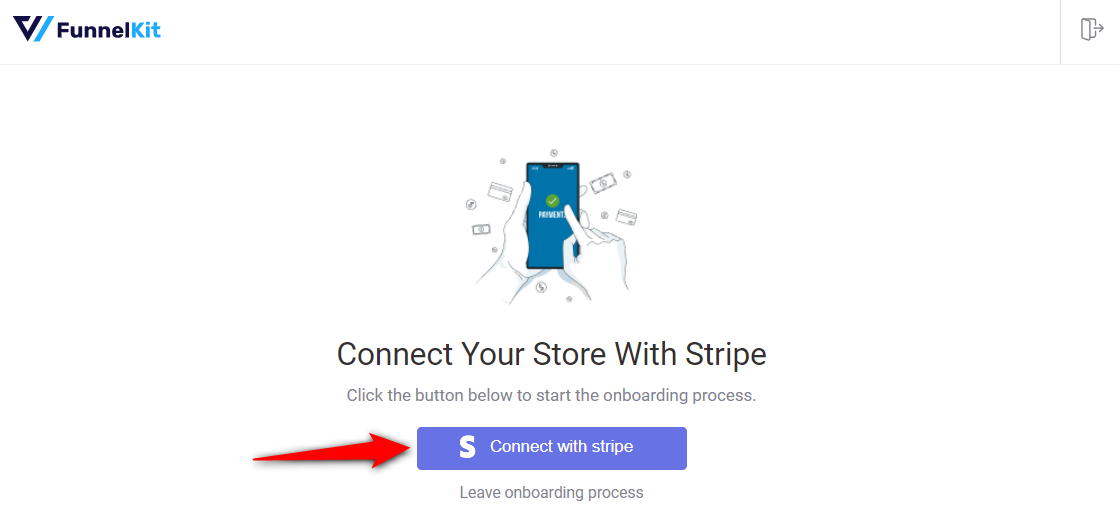
Here, hit the ‘Connect with Stripe’ button.
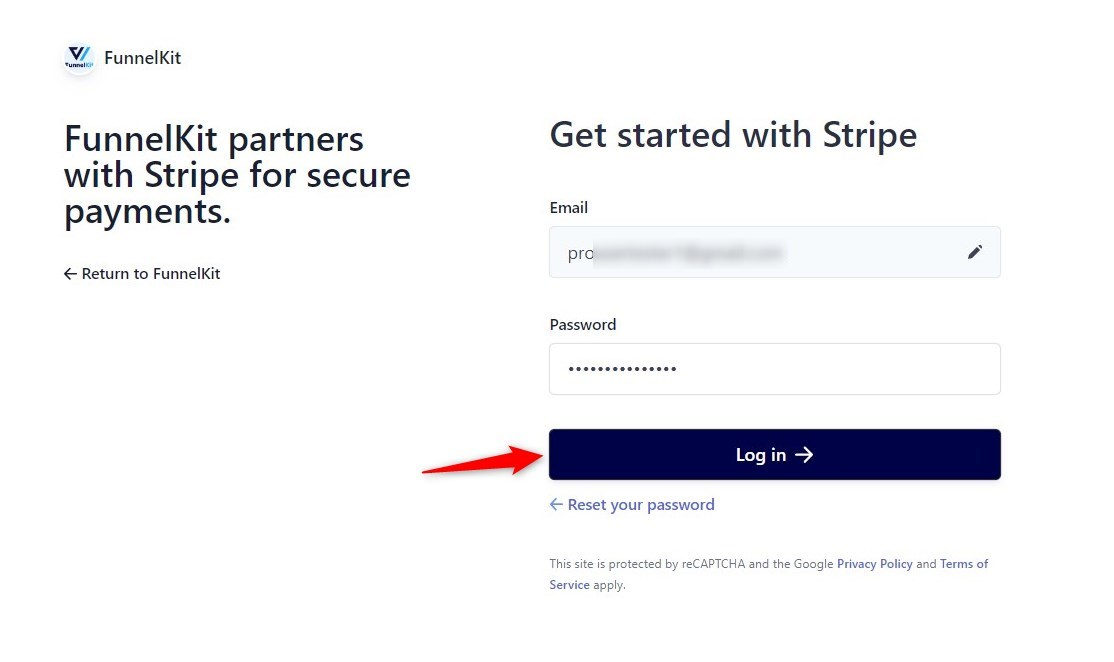
Sign in to your Stripe account with your login credentials, including your email address and password.
Verify your authorization by entering the 6-digit verification code sent to your registered phone number.
Confirm your Stripe account by selecting it and clicking on ‘Connect’.
- Enabling the payment gateways
Enable your preferred BNPL payment gateways, such as Affirm, Klarna, or Afterpay, from here.
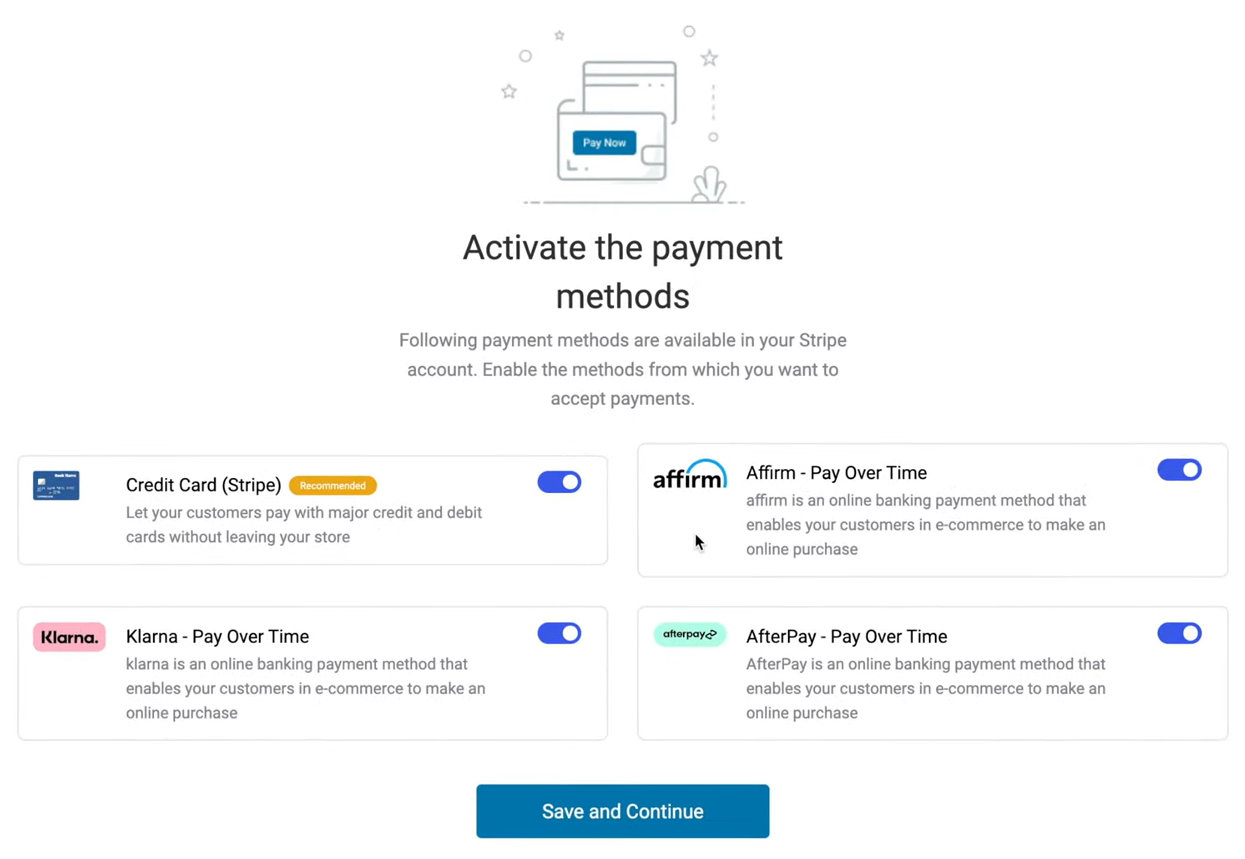

- Setting up your webhook
The Stripe gateway plugin automatically activates your webhooks to capture various events. For that, hit ‘Setup Webhook Now’.
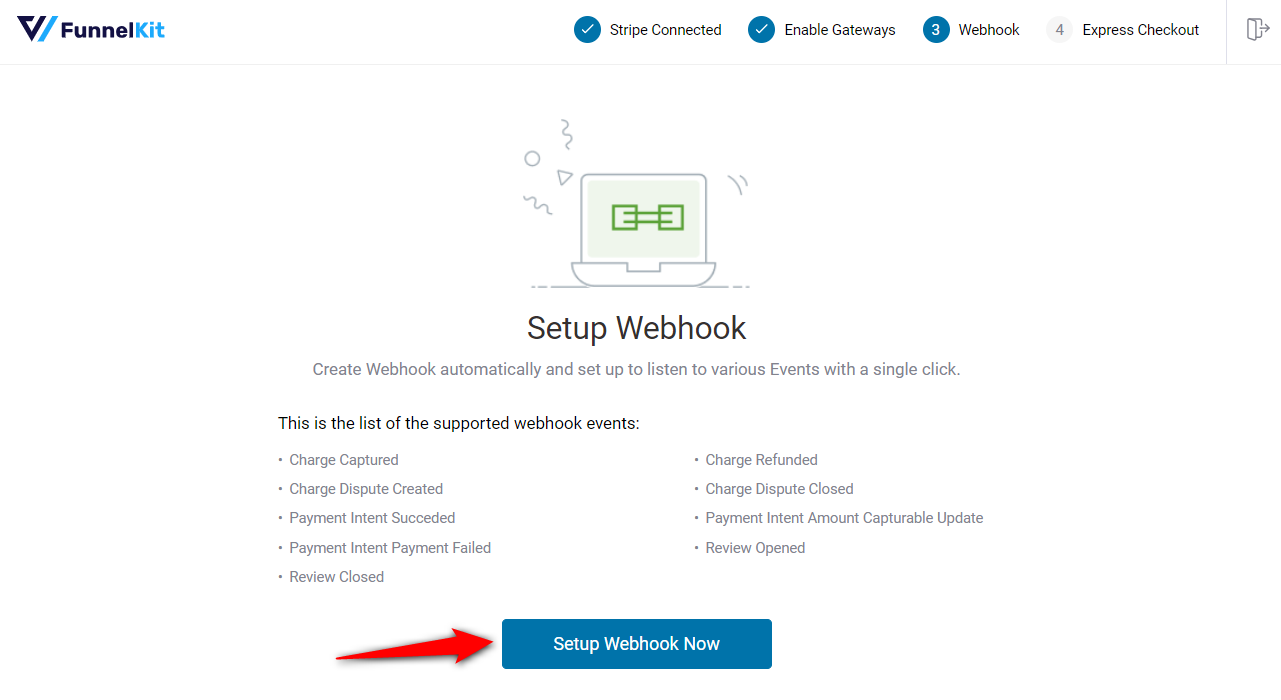
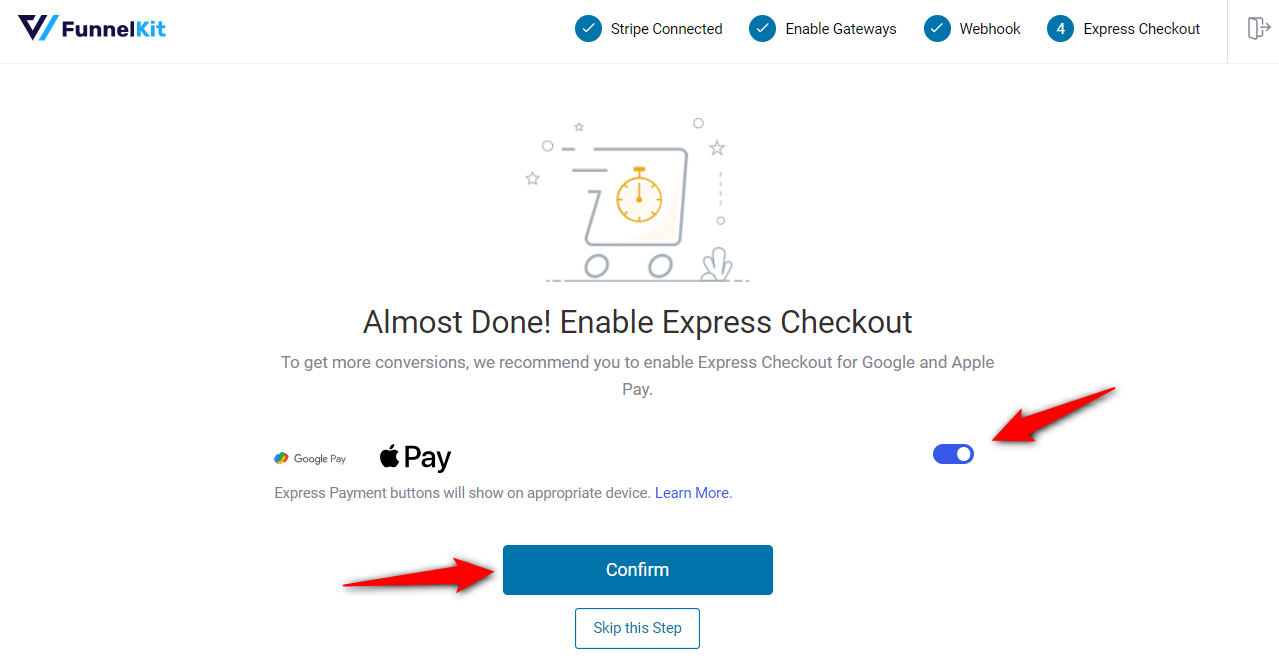
- Enabling the express checkout option
Turn on the toggle to enable express checkout payments such as Google Pay and Apple Pay.
- Activating the live/test mode
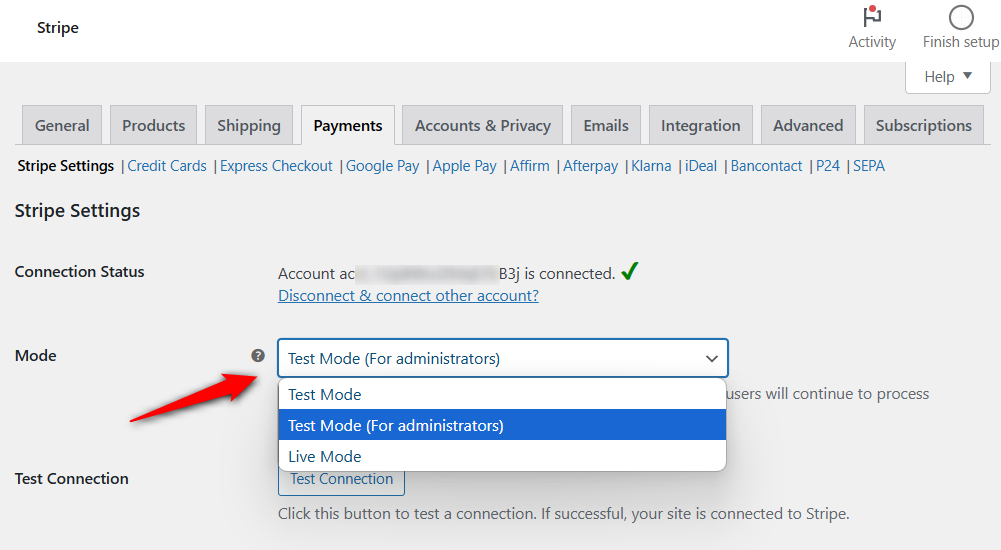
Confirm whether you want to run live, test, or admin-only test mode on your WooCommerce store.
This will successfully connect your Stripe account with your WooCommerce store.
Step 3: Enable the WooCommerce Buy Now Pay Later payment gateway
Navigate to the WooCommerce Settings ⇨ Payments section. Scroll down and you’ll find Affirm, Klarna and AfterPay.
Hit the ‘Manage’ button next to it.
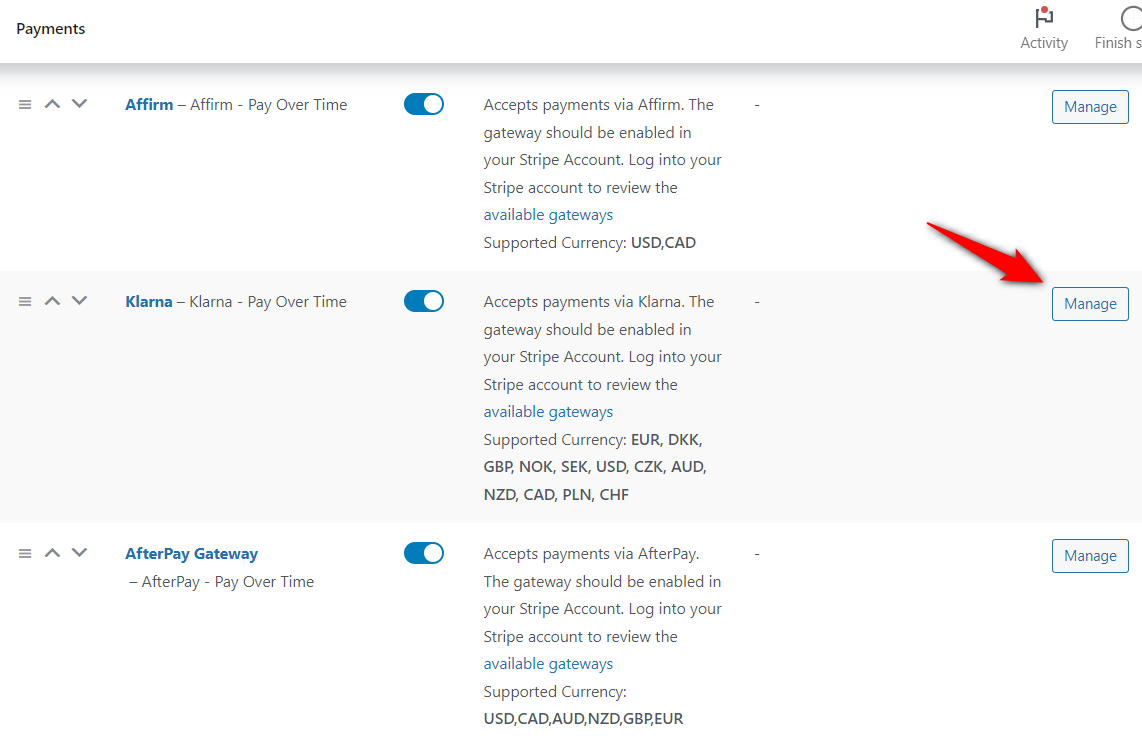
Next, check the option next to 'Enable Klarna'.
Please note that these options are the same for all the available WooCommerce BNPL payment gateways.
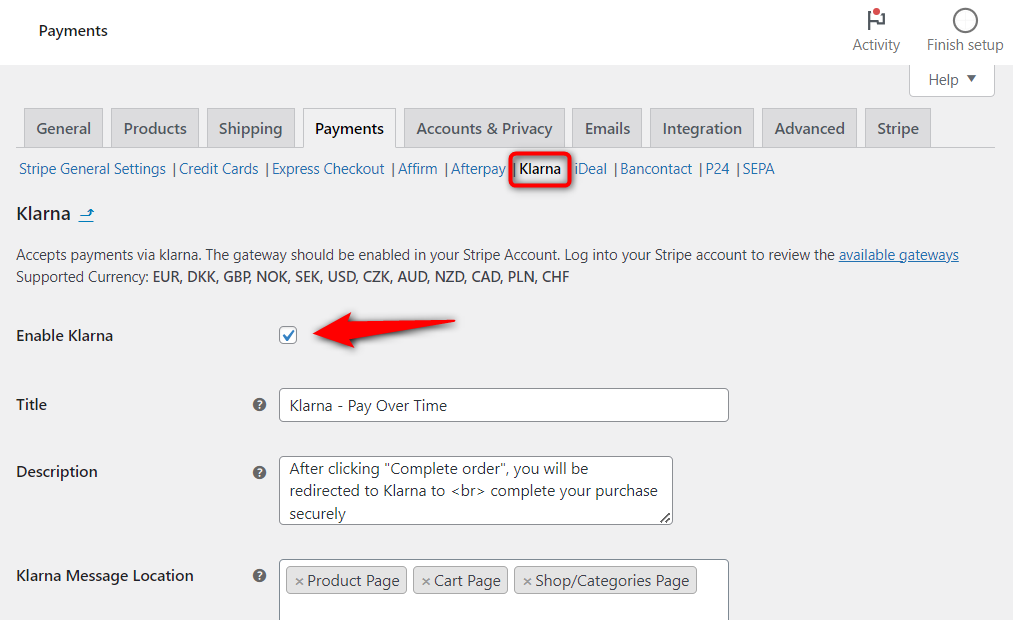
This will enable Klarna in your WooCommerce store.
Do the same for all Buy Now Pay Later payment options as needed.
Step 4: Configure pay-later title and messaging where shoppers decide
Configure your Klarna BNPL payment gateway from the following options:
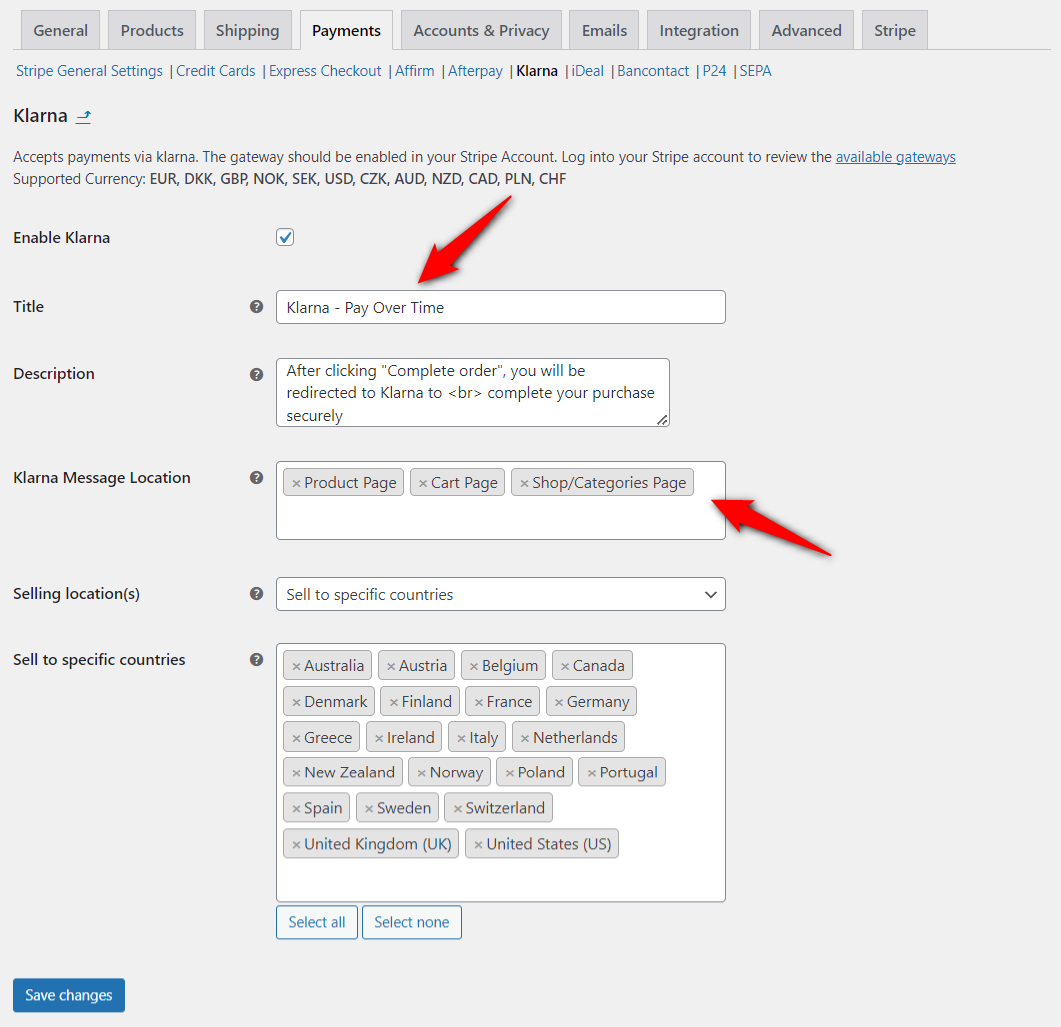
- Title - Enter the title of your WooCommerce BNPL payment method.
- Description - Write the description text that appears below the title of the Klarna payment option on the checkout page.
- Affirm/Klarna/Afterpay message location - Show the BNPL message location to different pages in your store, such as product pages, cart page, category pages, etc.
- Selling location(s) - Set this payment option to include selling locations. By default, this option is set to sell to specific countries (recommended for BNPL payments).
- Sell to specific countries - List the countries where you want to offer the particular BNPL payment method. Please note that Klarna, Affirm, and Afterpay - all these gateways serve specific countries. We recommend that you not change the default countries listed here.
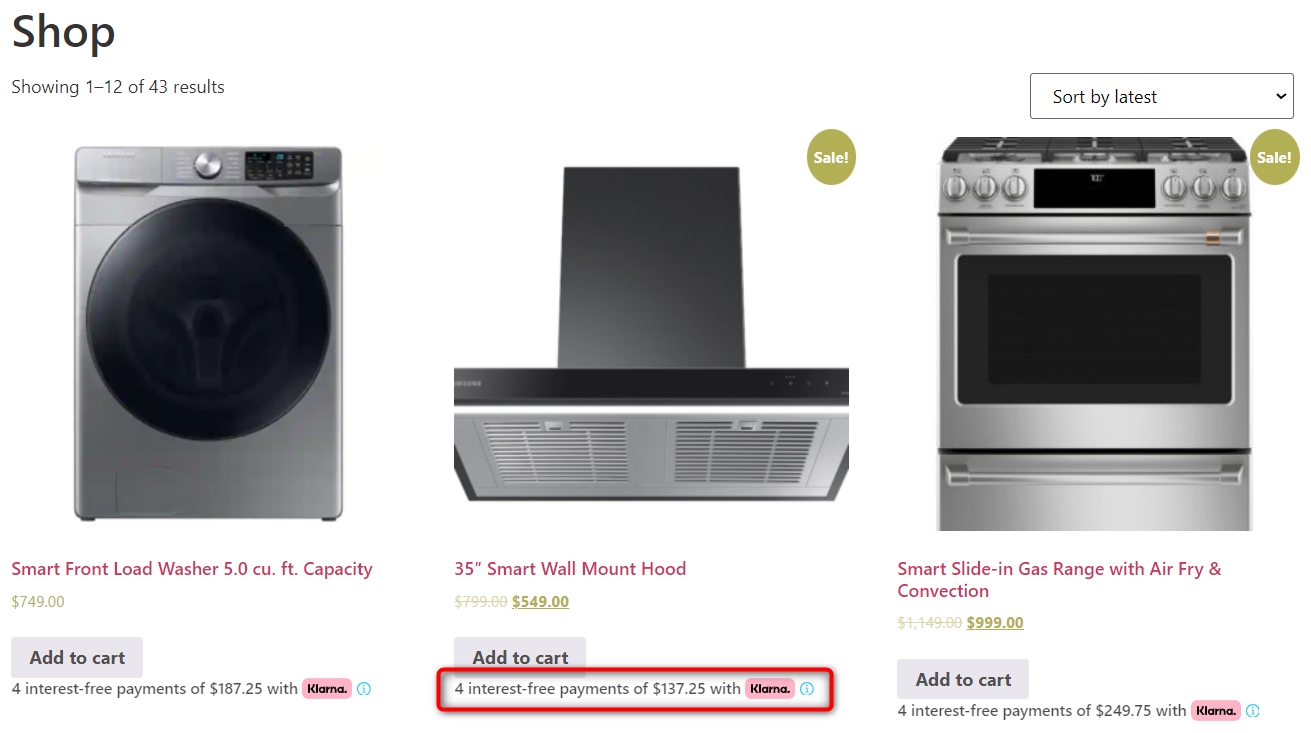
This is how the Klarna payment message appears on the shop or category page:
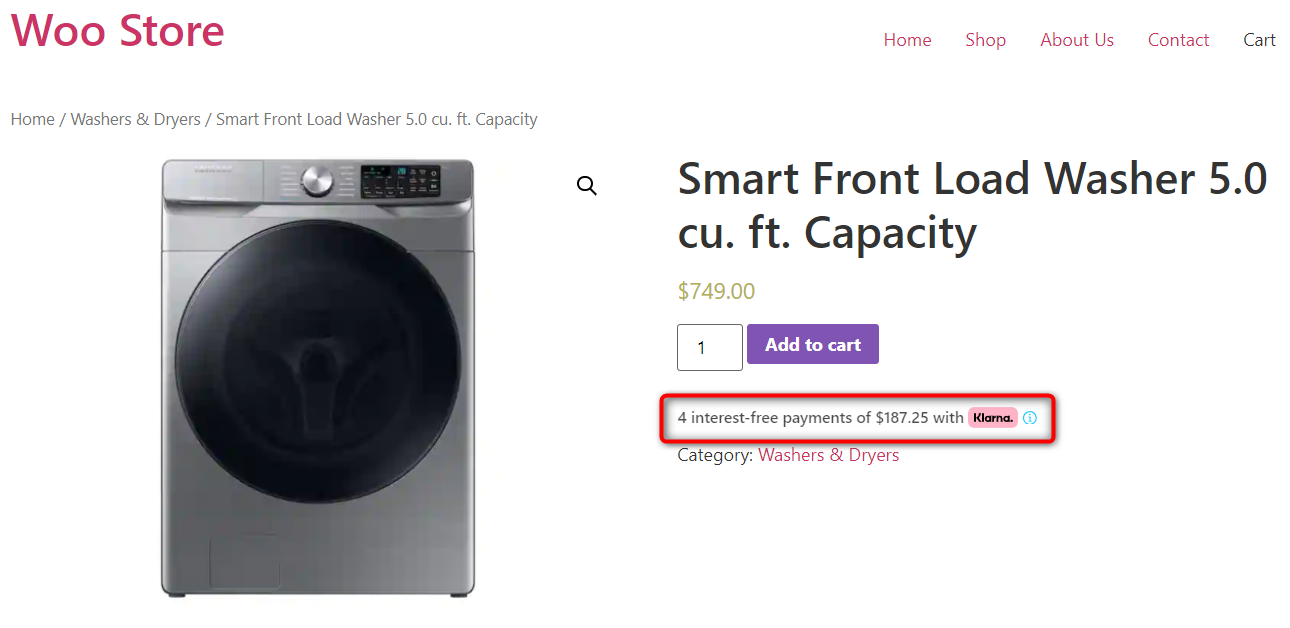
On the product’s page:
Inside the shopping cart:
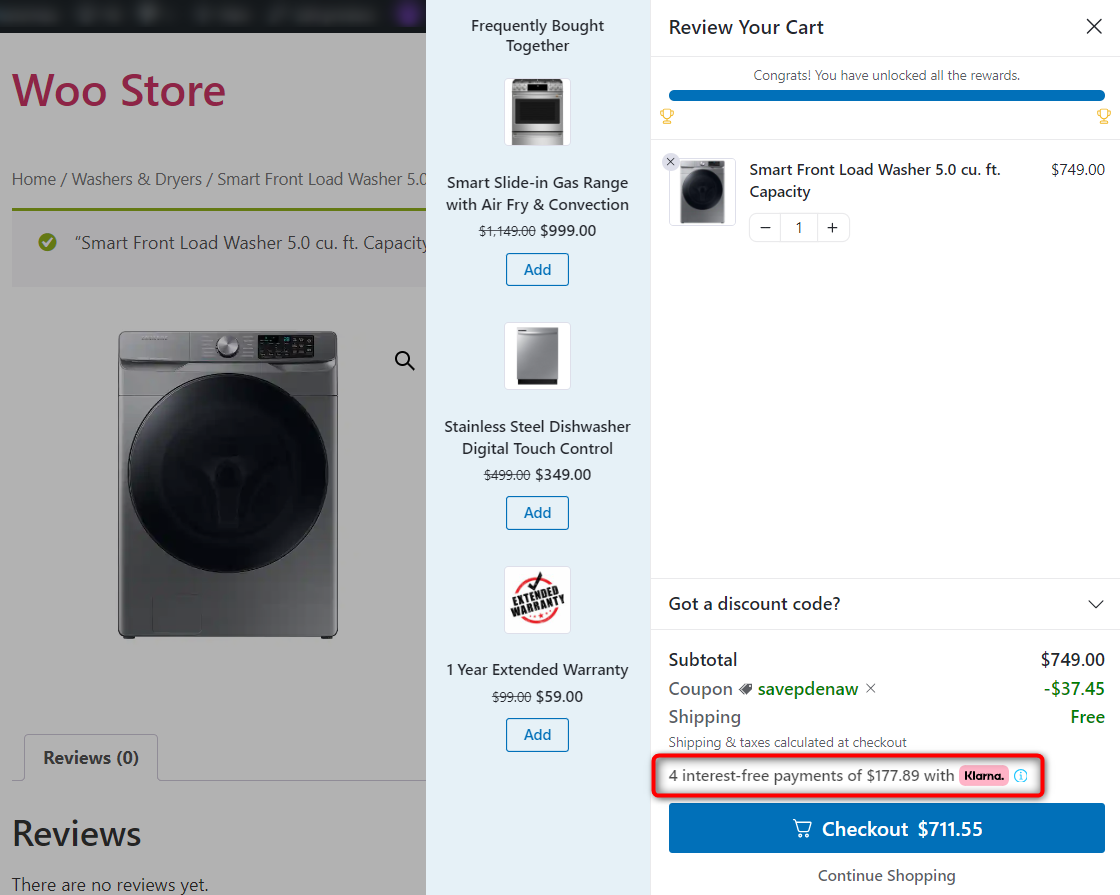
You can skip the default redundant cart page and go straight to checkout.
Witness the FunnelKit Cart’s sliding shopping cart, offer upsells inside the cart and provide cart discounts.
Put your website in the ‘Test’ or 'Admin only test' mode from WooCommerce payment settings to test the Buy Now Pay Later payment method.
Now go to your store and add an item to your shopping cart and head over to the checkout page.
Click on any of the BNPL payment options and hit the place order button.
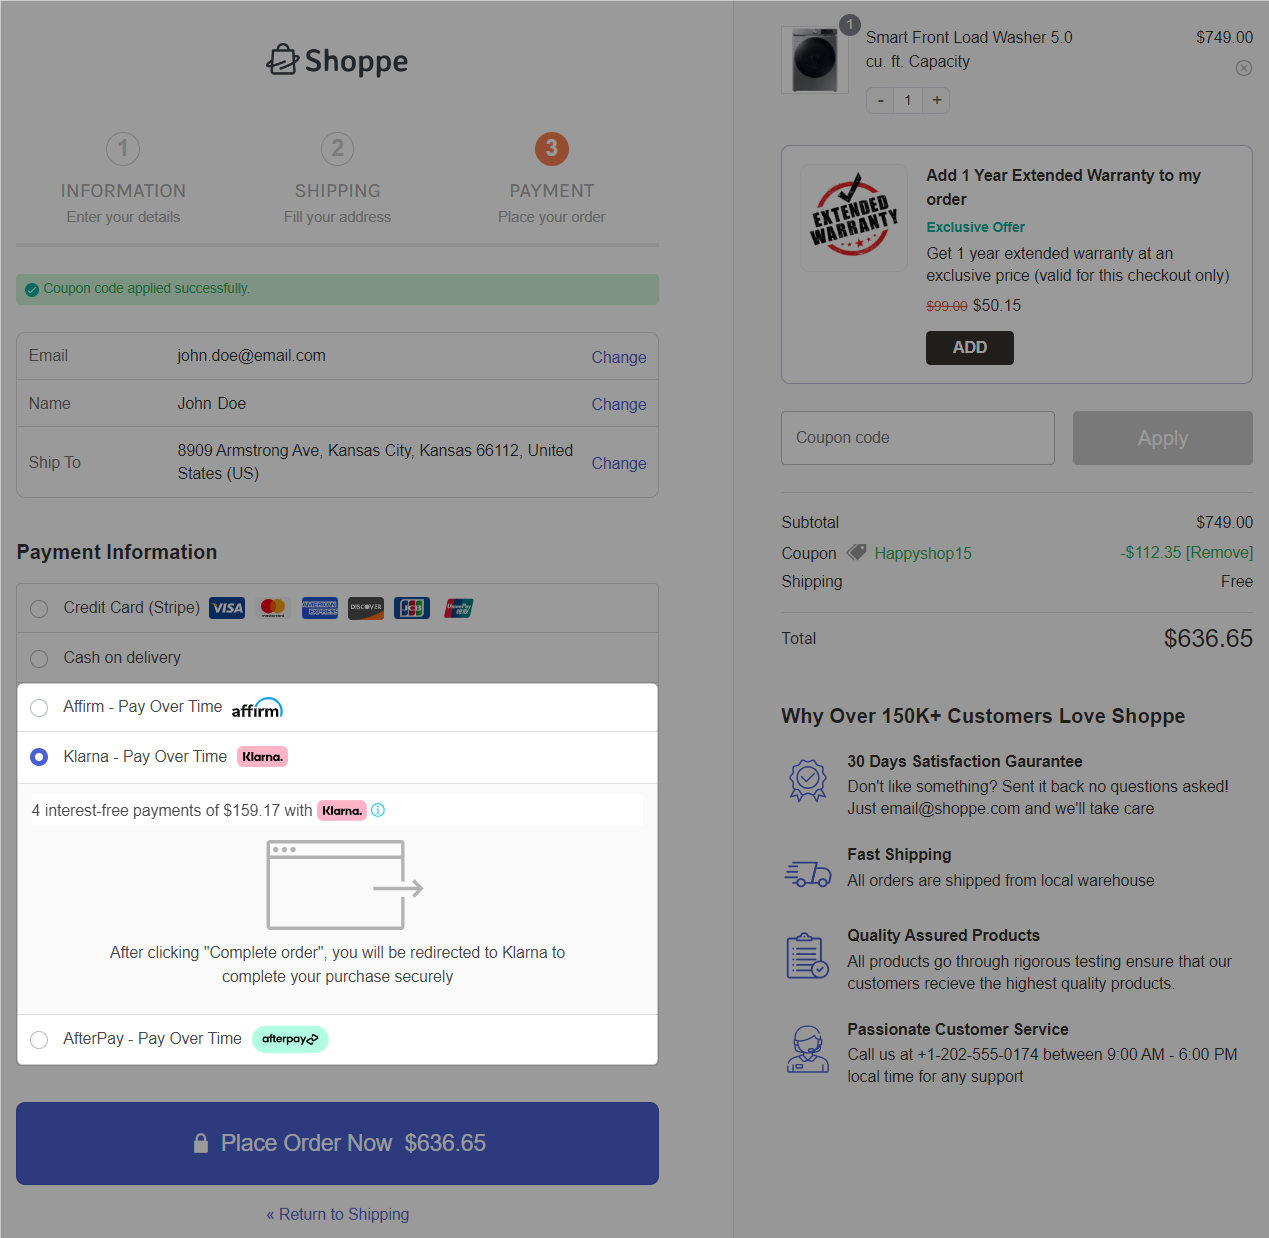
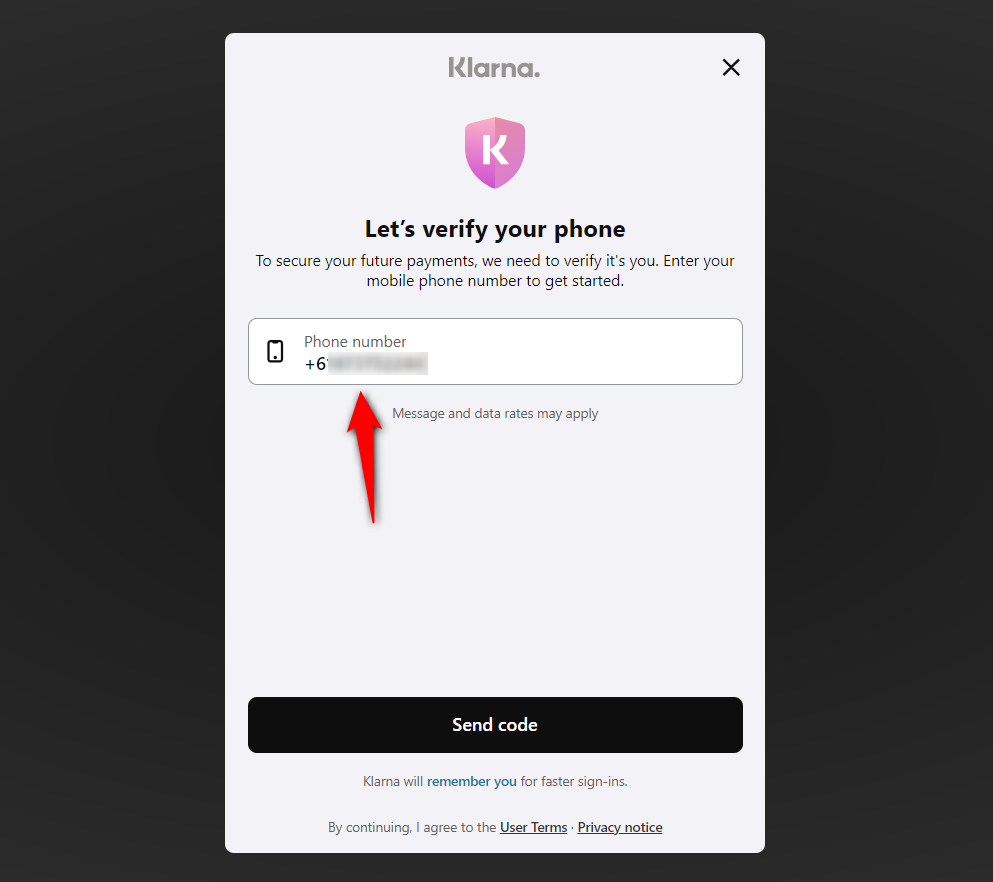
It’ll take you to a pop-up window where you can check your BNPL loan eligibility or purchasing power.
Enter your phone number and verify it by entering the 6-digit verification code.
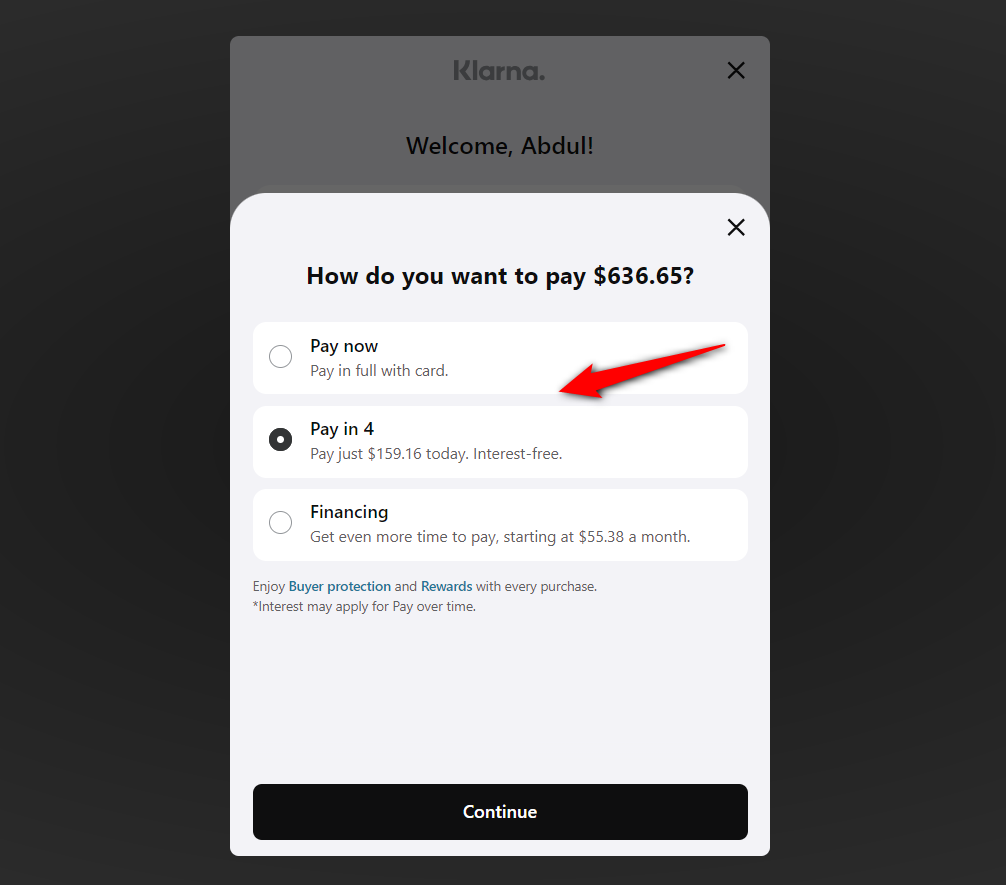
Now, we can choose a payment plan from the available options.
Once you’ve selected the payment plan, it’ll explain the payments that shoppers need to make.
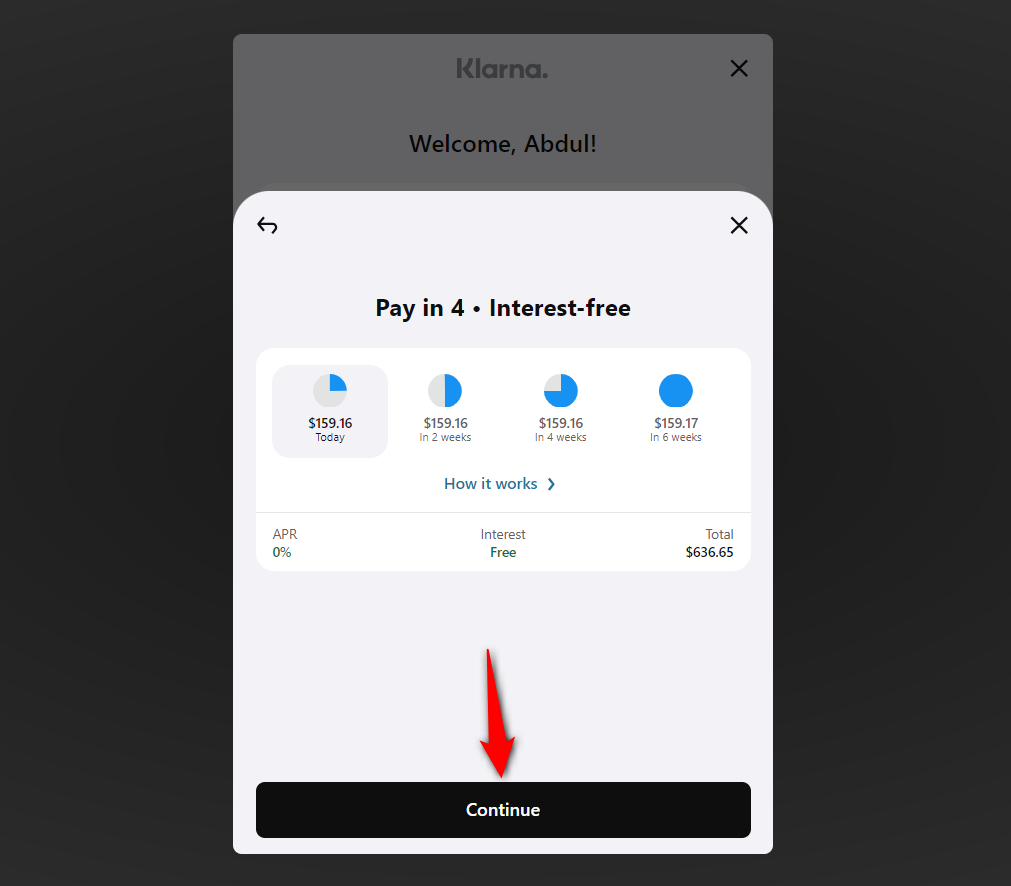
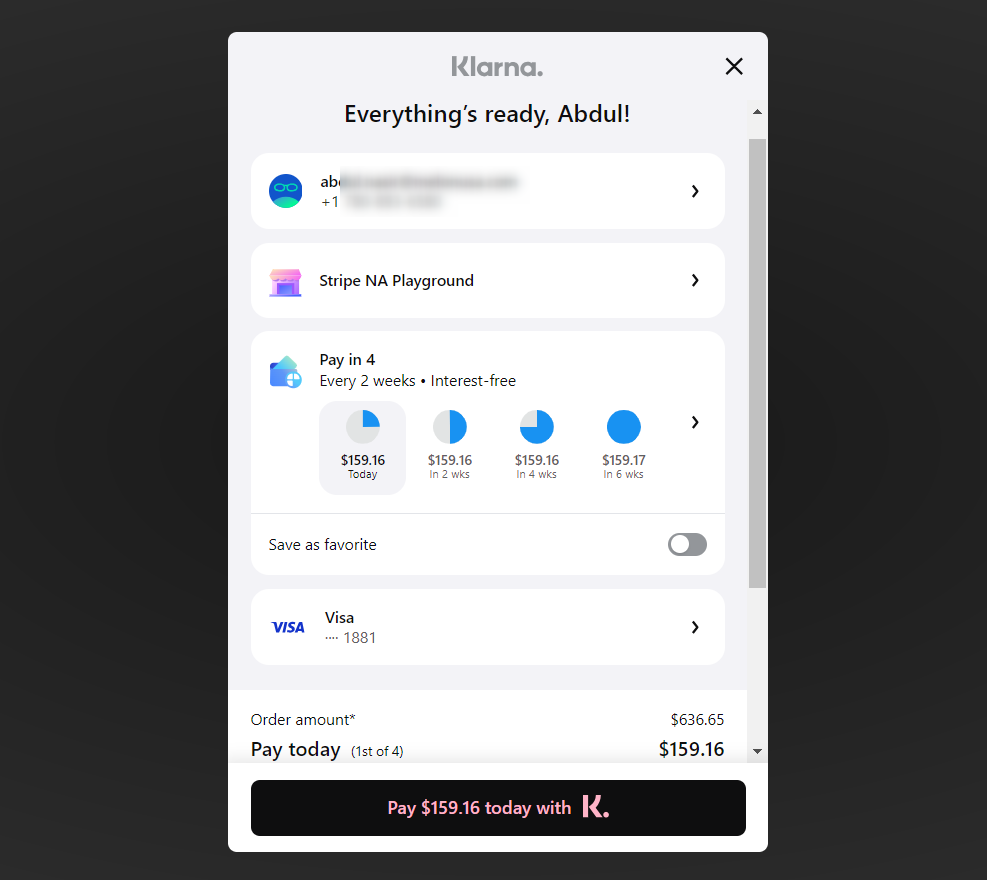
Now, you can review your payment schedule in the final step - this is the amount you’ll have to pay over the coming months.
Once done, hit the ‘Pay today with Klarna’ button to place your order.
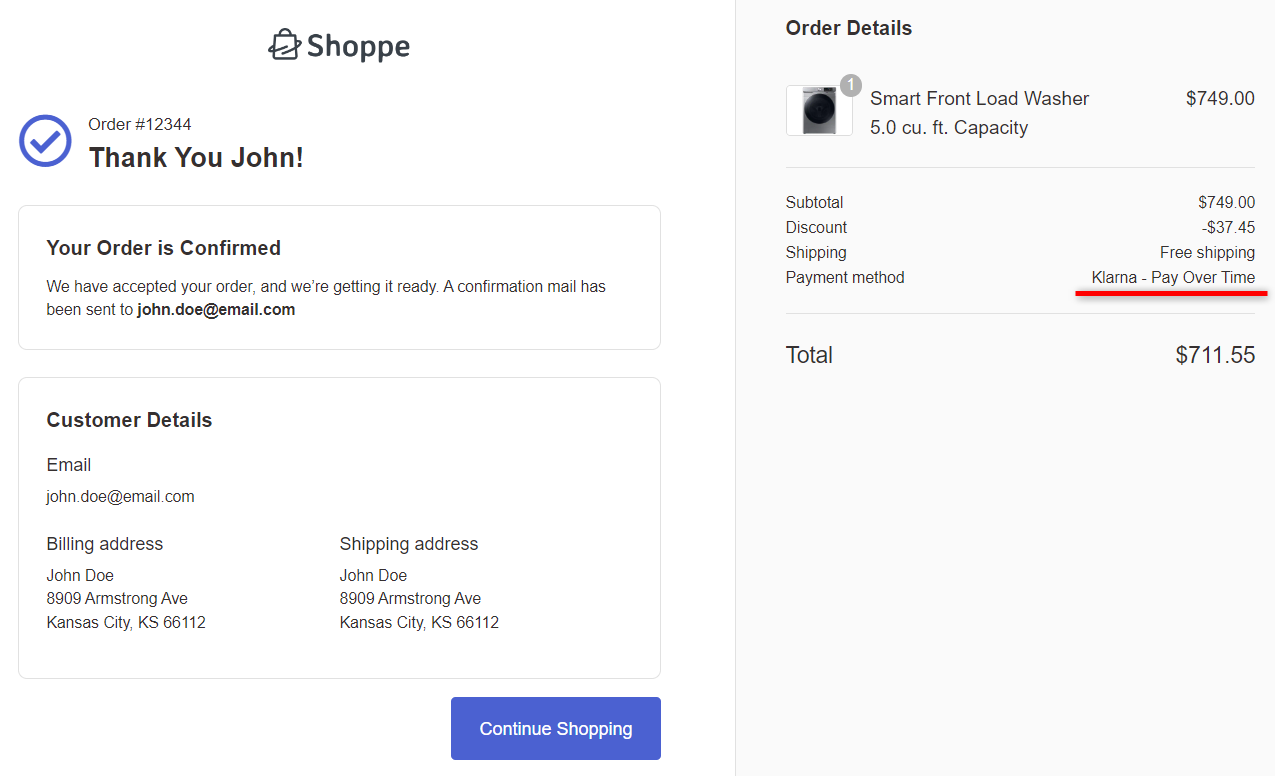
This will place your order and direct you to the thank you page with your complete order confirmation details.
This is how you can test the Buy Now Pay Later payment method in WooCommerce.
Other Ways to Enable Pay Later (PayPal Pay Later)
If PayPal is already a big part of your checkout, its Pay Later option is the quickest add.
Install the WooCommerce PayPal Payments plugin, open its settings, and select the Pay Later tab.
From there, you can enable Pay Later messaging and the Pay Later button, and choose which pages they appear on.
For eligible US buyers, this offers Pay in 4 for smaller purchases and Pay Monthly for larger ones, at no extra cost beyond standard PayPal fees.
For a broader look at every option and how they stack up, see our guide to the best WooCommerce payment gateways and how to offer multiple payment gateways in your store.
Method 2: Offer Buy Now Pay Later with Native Installment Plans
If you do not want a BNPL provider in the middle with no per-sale financing fee, no third-party credit check, and full control of the payment schedule, choose this method.
This method is merchant-run installment plans, where the customer pays you in fixed installments, and your own gateway (Stripe, PayPal, or Square) charges each installment automatically on schedule.
The key mental shift is to see yourself as the lender. There is no Klarna or Affirm taking a cut, no external approval, and no lending partner fee.
A $600 course can be sold as three monthly payments of $200, which Sublium collects automatically until the balance is cleared.
That is a very different economic model from third-party BNPL, and for the right products it is dramatically cheaper.
Sublium Subscriptions handles this natively. Make sure to install and activate this plugin.
Here is how to set up an installment plan:
Step 1: Create an installment plan
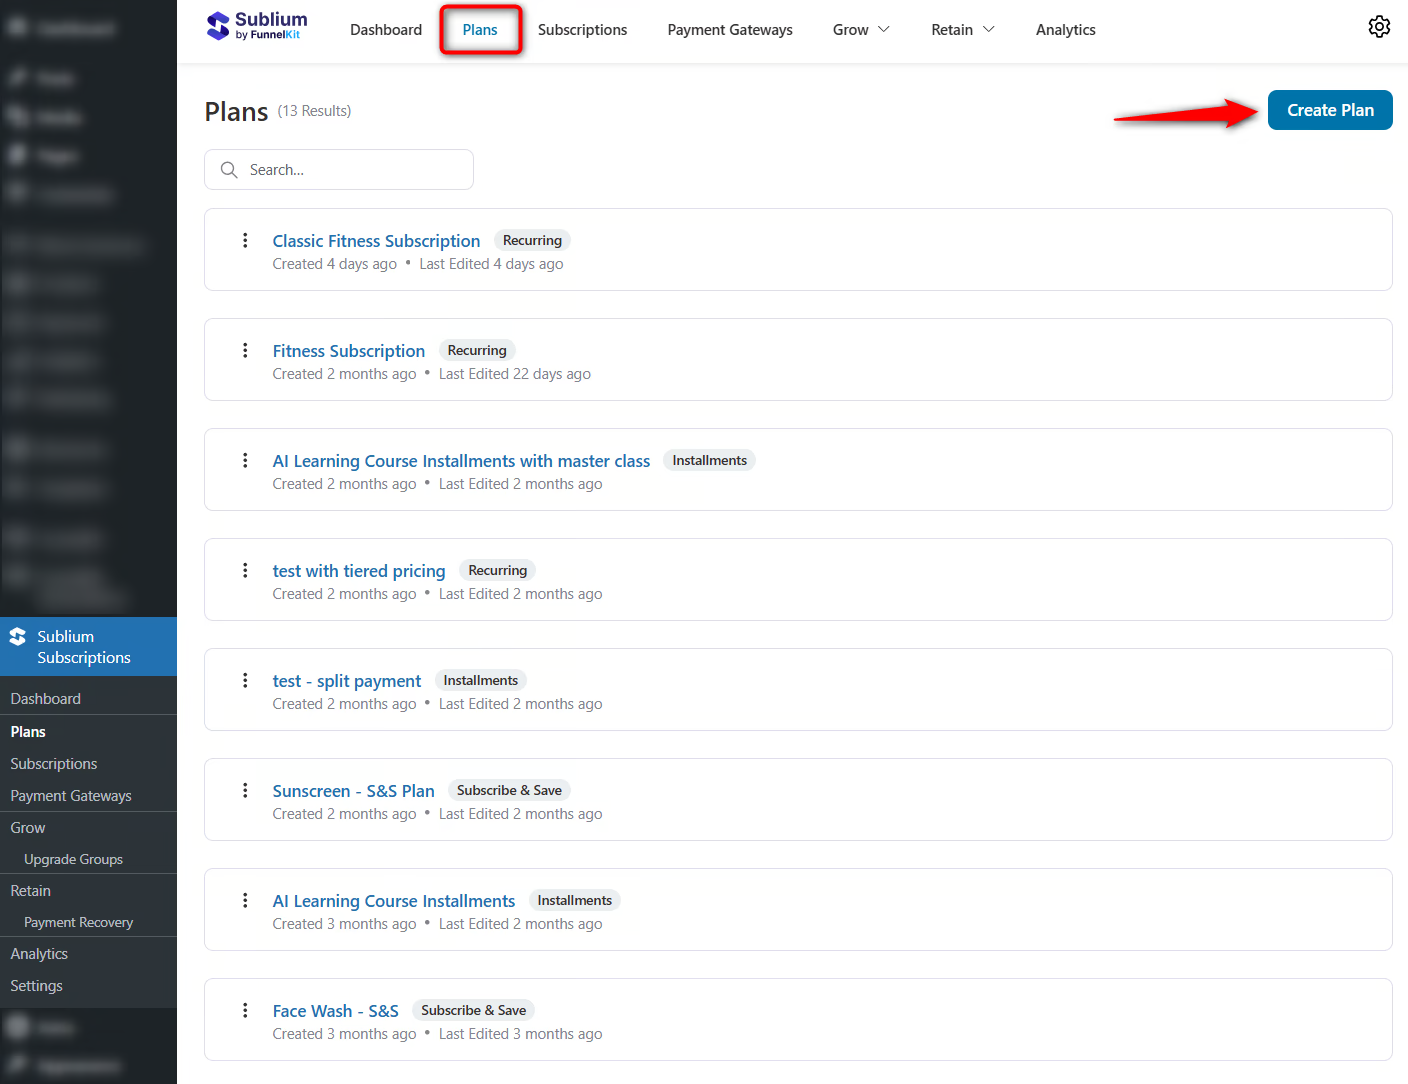
Go to Sublium Subscriptions ⇨ Plans and click on the 'Create Plan' button.
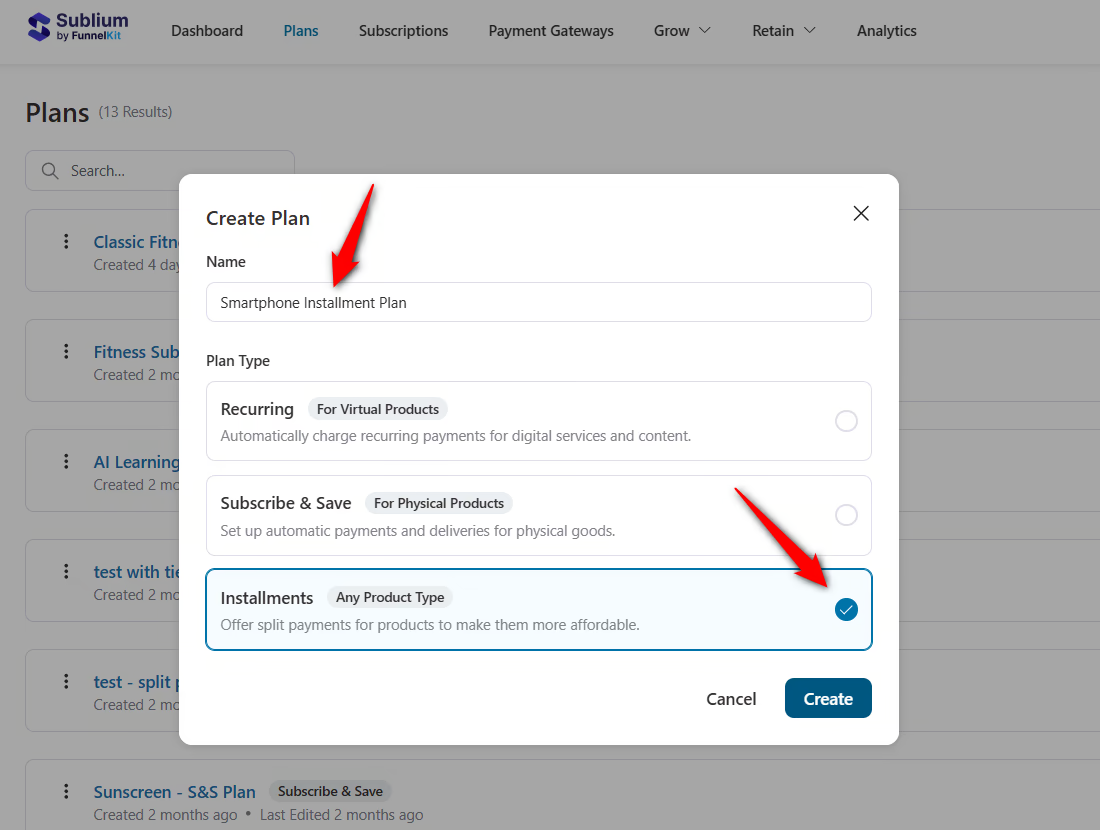
Enter your plan name, select Installments as the plan type, and hit 'Create'.
Step 2: Configure your installment plan
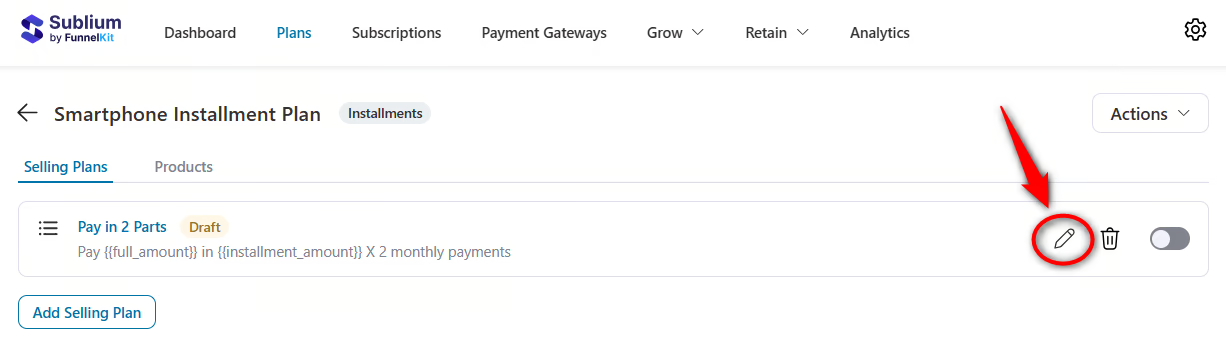
Click on the pencil icon to edit your payment plan in WooCommerce.
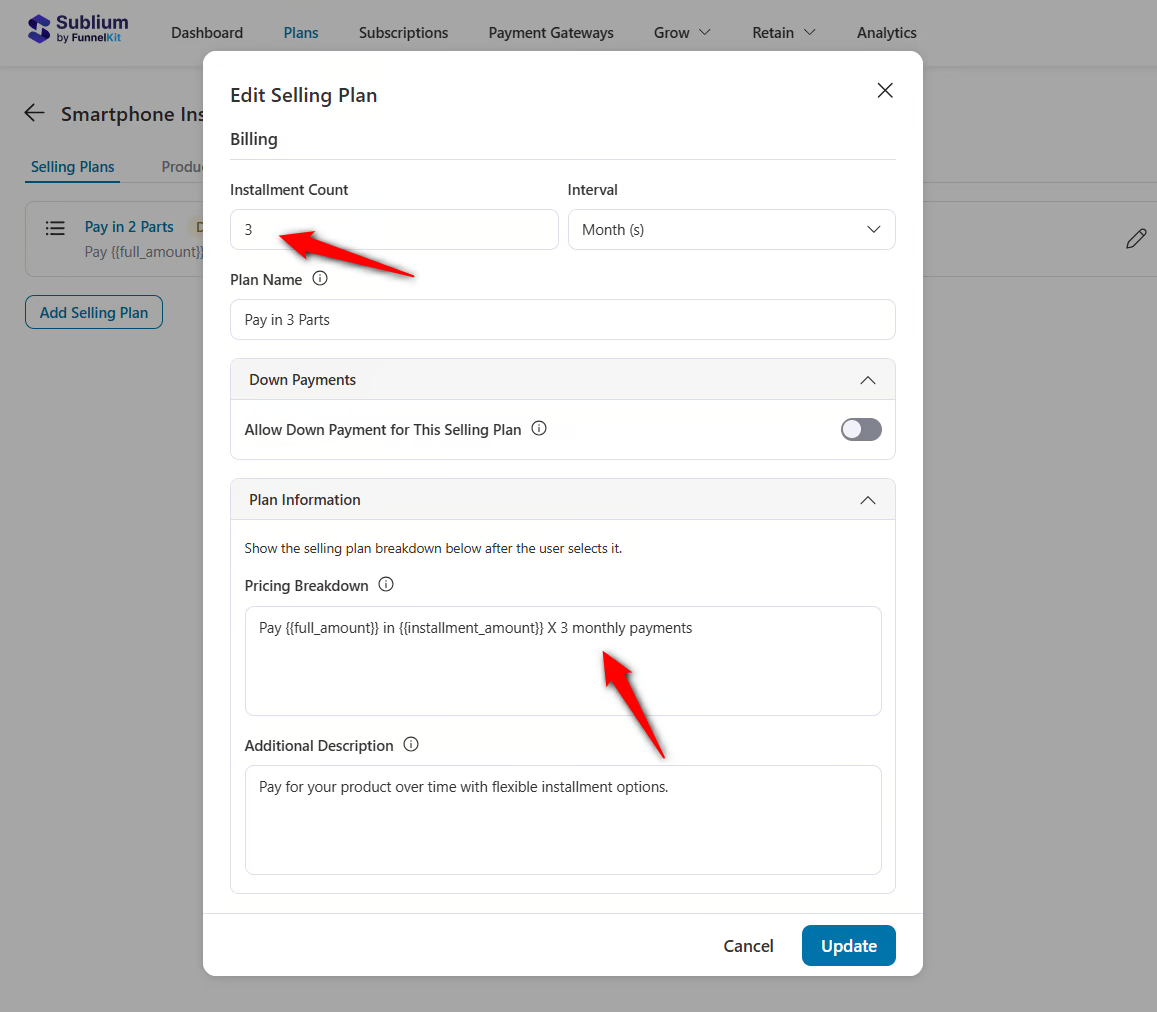
Configure the installment plan options:
- Installment Count: Number of payments the customer will make for a purchase (e.g., 3)
- Interval: The time between each payment (e.g., 1 month).
- Plan Name: Give your plan a clear, descriptive name, such as "3-Month Payment Plan".
- Down Payments: Enter an optional upfront amount if you want your customer to pay a portion immediately.
- Plan Information: Use this field to describe the plan details for your customers, such as "Pay in 3 easy monthly installments of $166, no interest".
You can offer multiple installment plans (e.g., 6-month or 12-month).
Step 3: Assign a product to your installment plan
Click on the 'Add Product' button from the Products tab.
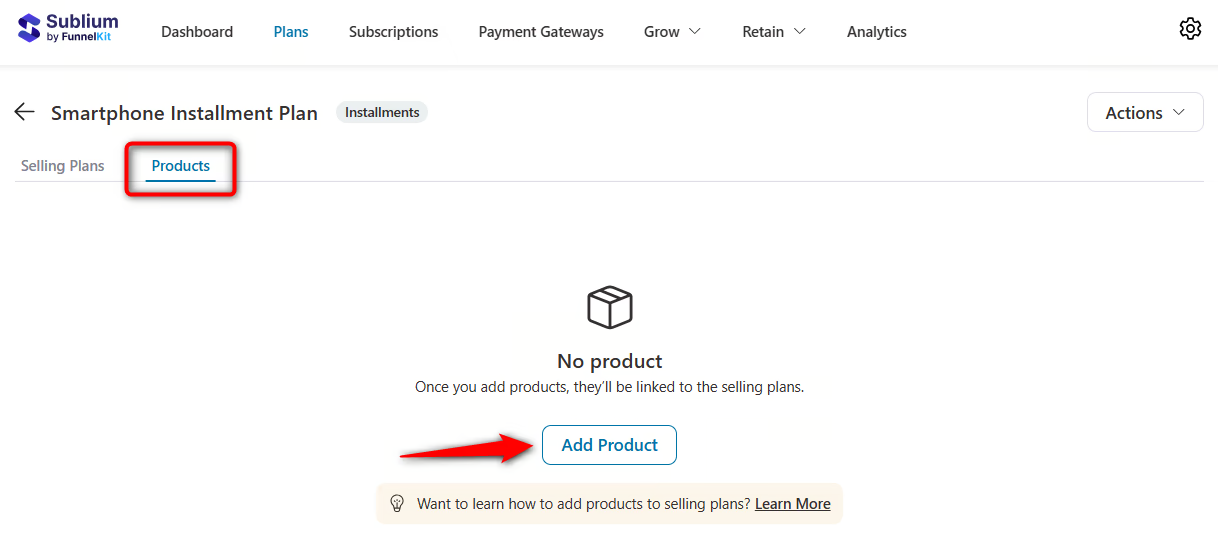
Select your product by entering its name or from the category.
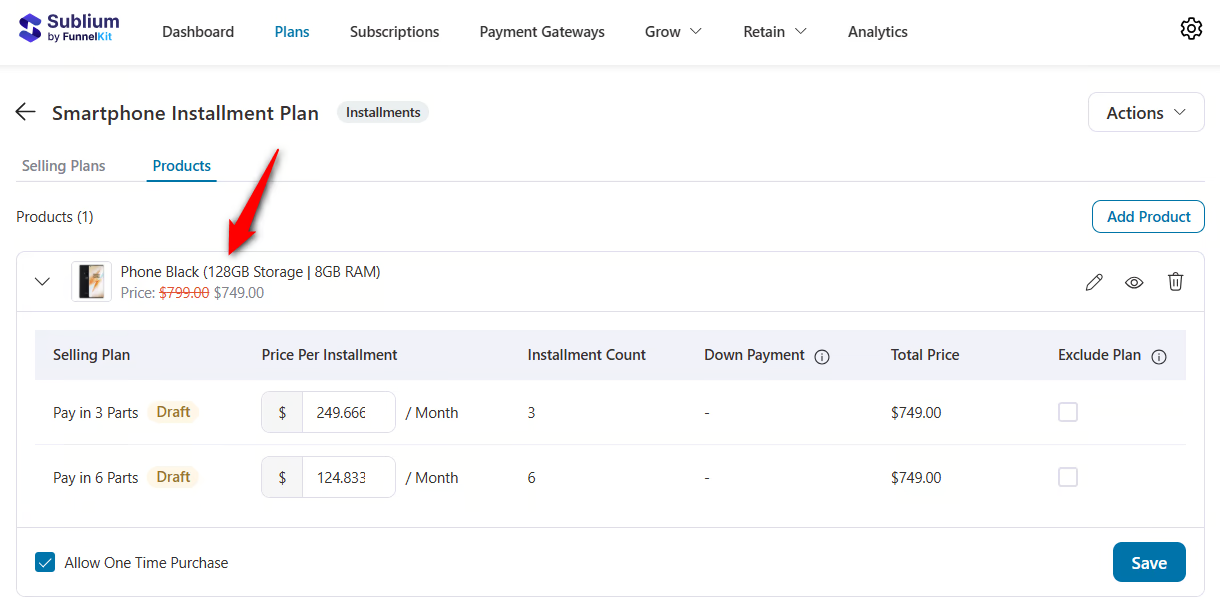
Plus, you can allow a one-time purchase of the product.
Click on ‘Save’ when done.
Step 4: Activate and test your installment plan
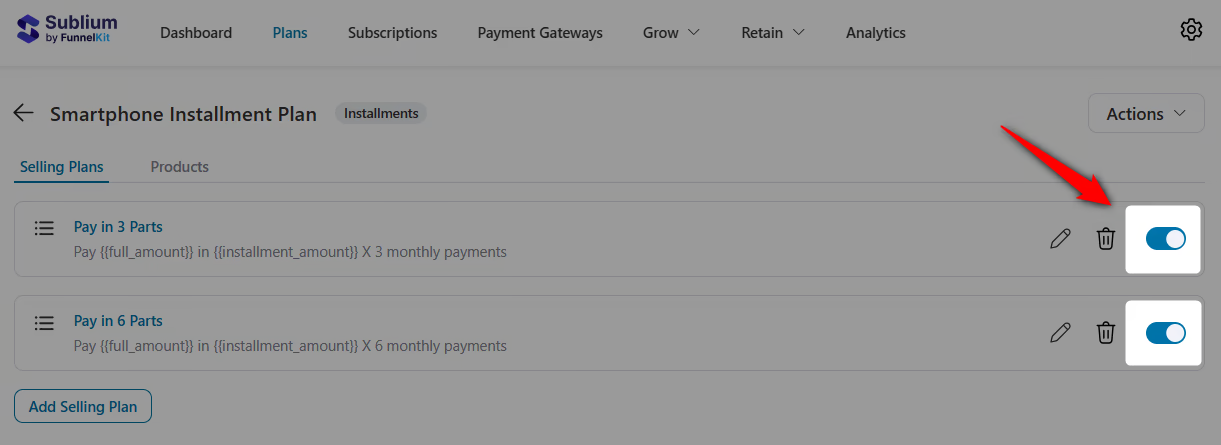
Activate all your installment plans in Sublium by turning their toggles:
Go to the product page and there you’ll see all the buy now pay later options:
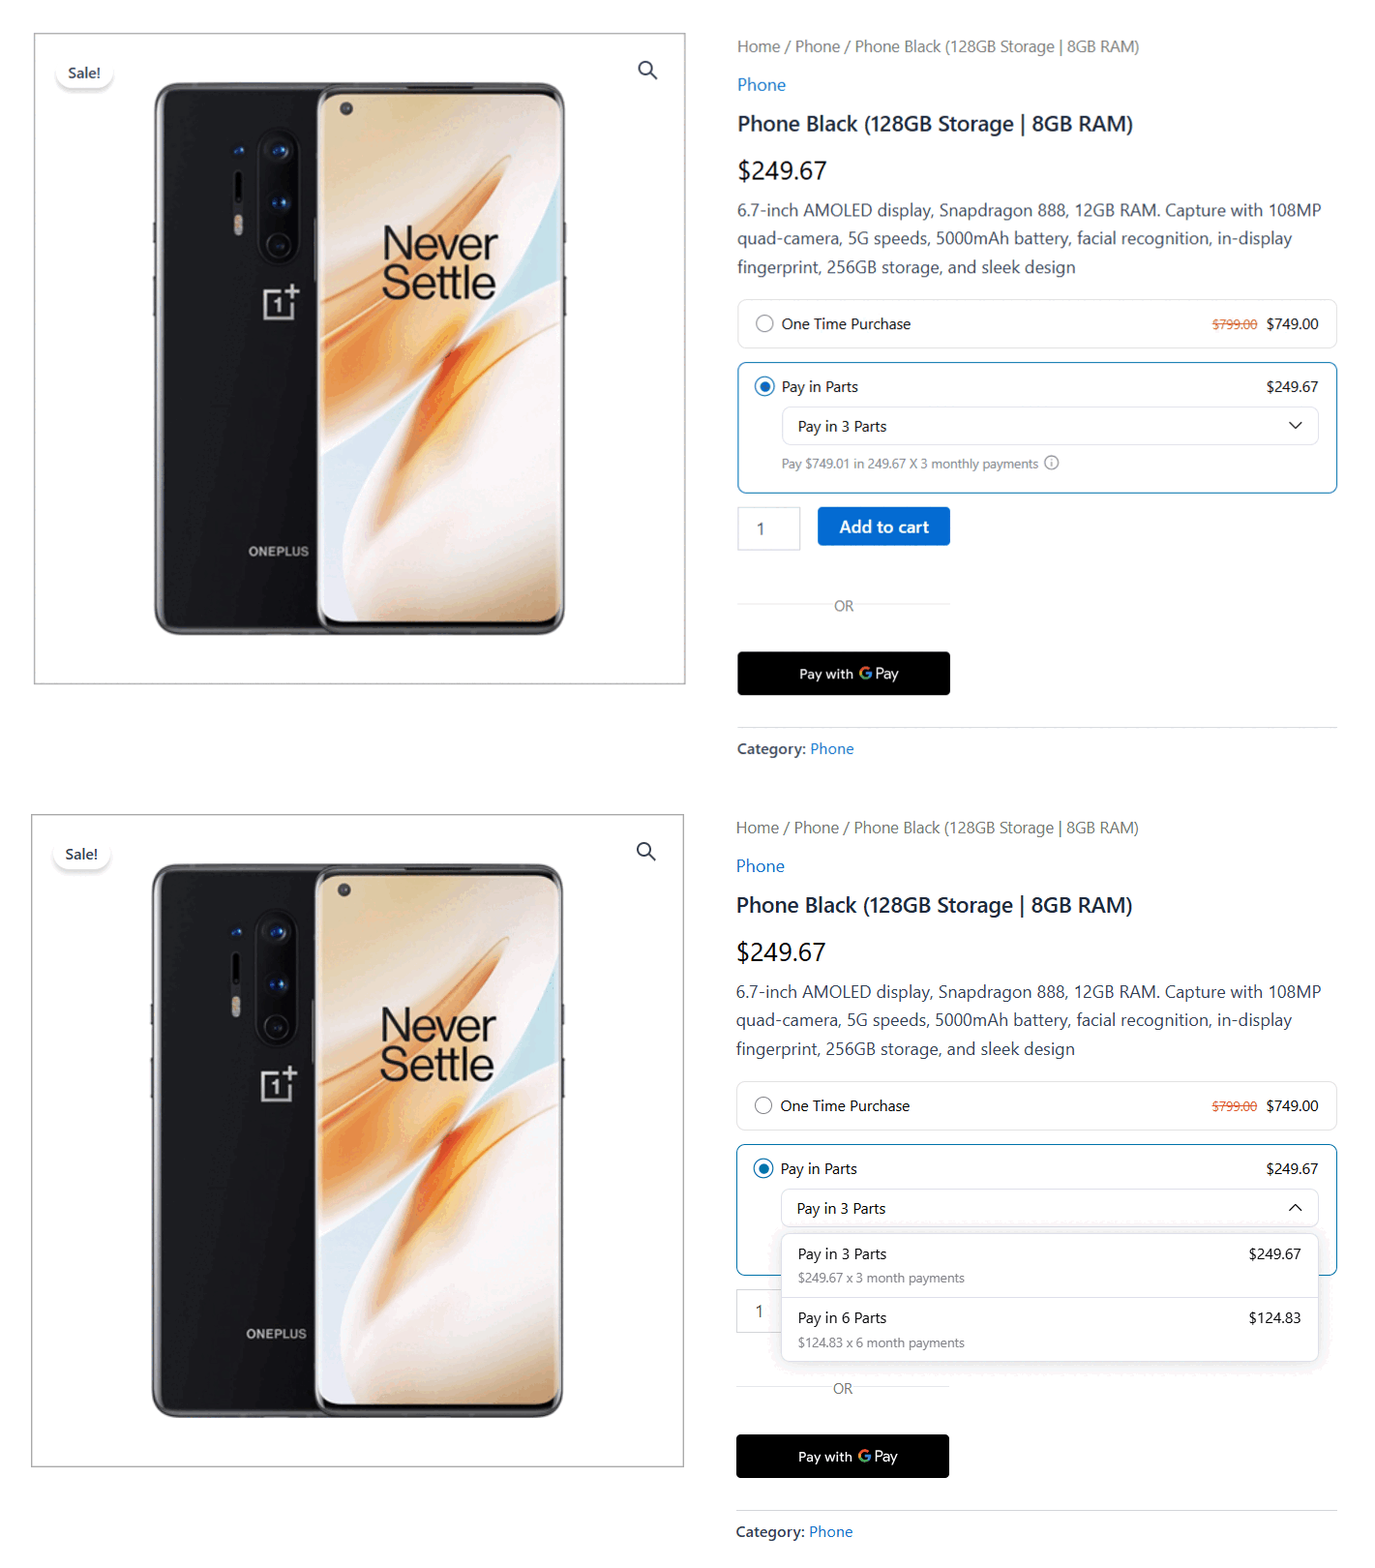
Select your preferred installment plan and add the product to the shopping cart.
Head to the checkout page to see all the details of your installment plan and payment options.
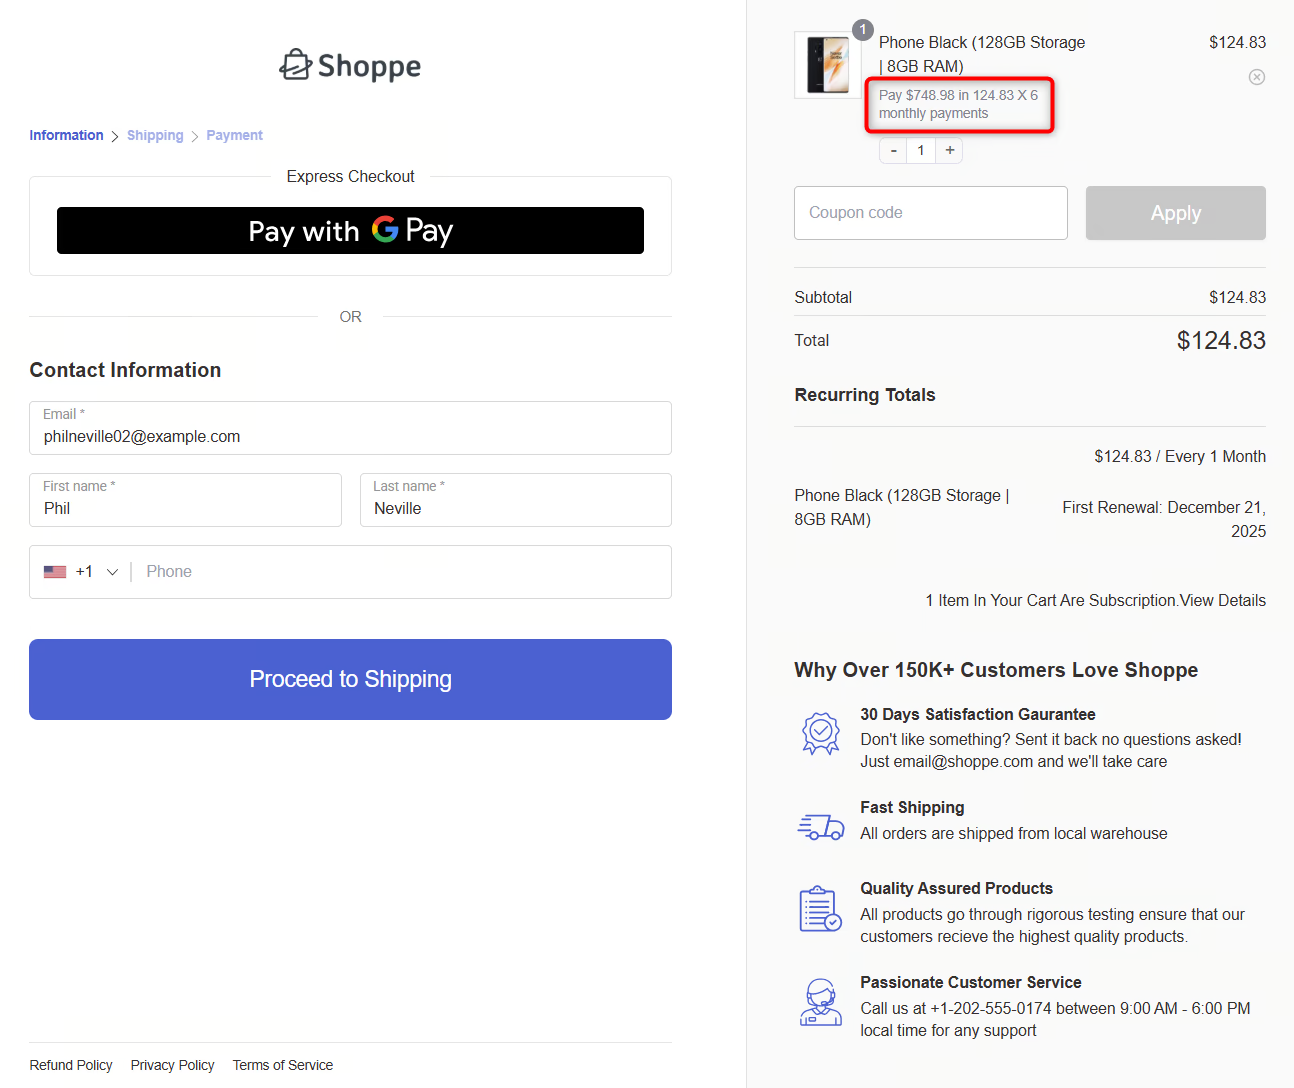
Place a test order and it’ll process your payment automatically.
Sublium works natively with simple, variable, and digital products, so there are no workarounds.
It gives buyers a self-service portal where they can view their schedule, pay off the remaining balance early, or update their card, which reduces support tickets.
If a payment fails partway through, its automated dunning retries the charge and emails the customer to fix their billing details.
And because it runs on your existing gateway, the money flows straight to you, with no financing intermediary involved.
With installments, you deliver before the full balance is collected, so if a customer’s card fails midway, you have already handed over the product.
That risk is smallest on digital goods, courses, coaching, and services, where access can be paused if a payment lapses.
For those categories, native installments are the cleanest way to lower the price barrier on a premium offer without discounting it or paying a provider on every sale.
6 Best Practices to Convert More Shoppers With Pay Later
These are strategy tips that go beyond the setup steps above. They are where most stores leave money on the table.
- Match the provider to your average order value
Use Affirm for high-ticket carts and monthly plans, and pay-in-four providers like Afterpay or Klarna for smaller everyday purchases. Offering the wrong plan type for your prices lowers approval and uptake.
- Set smart minimum and maximum order thresholds
Restricting BNPL to orders above a sensible floor keeps the percentage fee proportionate and steers big-ticket buyers toward installment plans. It also reduces disputes on tiny orders.
- Keep the checkout itself fast and focused
A slow or cluttered checkout kills the conversion gains BNPL creates. A conversion-optimized WooCommerce checkout with fewer fields and express pay compounds the lift from pay later.
- Optimize the mobile experience first
Most pay-later shoppers are on their phones, and BNPL plan selectors are prone to breaking on small screens. Test the full flow on mobile and confirm the messaging renders cleanly.
- Do not stack too many providers
Three BNPL logos at checkout can create decision paralysis and dilute each one’s approval data. Pick one or two that cover your customers and lead with them.
- Watch your effective fee and renegotiate at volume
Track what BNPL actually costs you as a percentage of revenue each month. Once volume grows, ask providers for lower rates, since they are willing to negotiate with established merchants.

Frequently Asked Questions (FAQs)
- Increased sales: Attract more customers by offering the ability to spread payments over time. This makes the purchase affordable and accessible, particularly for larger-ticket items.
- Improved conversion rates: Significantly reduce cart abandonment and increase conversions because customers are more likely to place their orders when they have the option to pay later.
- Enhanced customer experience: Understand and cater to your customers’ preferences for flexible payment methods. This allows you to enhance your customers’ overall shopping experience and satisfaction.
- Competitive advantage: Helps differentiate your store from competitors and attract customers who actively seek flexible payment solutions to buy their favorite products.
- Increased order value: Encourages customers to buy additional items or upgrade to high-value products. Since they can spread out the cost over time, it leads to a higher average order value in your online store.
- Expanded customer base: Appeals to shoppers who have financial constraints making upfront purchases but are willing to pay later. This helps expand your customer base while increasing sales.
- Reduced risk of payment fraud: It combines advanced technology, strict security measures, and collaboration with merchants to reduce the risk of payment fraud and provide a secure shopping experience for customers.
Pay-later fees are meaningfully higher than card processing. For context, a standard card sale on Stripe costs about 2.9% + $0.30. Here is what pay-later providers charge on top of that baseline.
| Provider | Typical merchant fee | Cost on a $100 order |
|---|---|---|
| Klarna | 3.29 to 5.99% + $0.30 | ~$3.59 to $6.29 |
| Affirm | ~5.99% + $0.30 | ~$6.29 |
| Afterpay | ~4 to 6% + $0.30 | ~$4.30 to $6.30 |
| PayPal Pay Later | No BNPL surcharge (standard ~3.49% + $0.49) | ~$3.98 |
| Sublium (native installments) | No financing fee, just your gateway rate (~2.9% + $0.30) | ~$3.20 |
The provider pays you in full upfront, covers fraud, handles chargebacks and disputes, and absorbs the loss if the customer never pays. That is genuine risk transfer, not just a payment rail.
High-volume merchants, roughly $5 million or more in annual revenue, can negotiate rates down. Klarna, for example, drops toward 3.29% for large sellers.
Whether the fee pays for itself depends on your average order value and product type.
Afterpay merchants see about a 22% lift in cart conversions and a 40% lift in order value, while Affirm reports roughly a 70% lift in cart size.
Those figures are strongest for higher-AOV, considered purchases such as furniture, electronics, and courses, where affordability is the genuine barrier to buying.
For low-AOV impulse buys under $50, the hesitation is rarely about money, so the fee often outweighs any lift. In that case, fix the product page before adding BNPL.
The only way to skip the fee entirely is not to use a provider at all.
With native installments (Sublium, Method 2 above), you charge the customer in parts through your own gateway, so the only cost is your normal ~2.9% + $0.30 processing rate, the same as any card sale.
You give up the provider’s guaranteed payment and default protection in exchange, which is why native installments fit digital products and services where you can pause access if a payment fails, while third-party BNPL fits physical goods you ship before you are paid in full.
Yes. When a shopper reaches a BNPL option through a wallet like Google Pay or Apple Pay, the transaction is still processed through your gateway, so your standard processing fee applies to that sale. The wallet is just the entry point, not a way to shift the merchant fee onto the customer.
Yes, you can offer buy now, pay later without a credit check or third party. A native installment setup lets you split a purchase into scheduled payments directly from your store, with no third-party underwriting and no per-order provider fee.
Tools like Sublium handle this for WooCommerce, which is ideal for high-ticket items and recurring products.
No, you cannot surcharge or pass BNPL fees to customers. Provider terms typically prohibit surcharging specifically for their pay-later method.
Instead, price the cost into your products, negotiate a lower rate at scale, or use native merchant-run installments, which carry no third-party financing fee to pass on.
Affirm is usually the strongest choice for expensive products. It supports carts up to around $30,000 with longer monthly terms and no customer late fees, which builds trust on large purchases. Pay-in-four providers are better suited to smaller carts.
No, you cannot add buy now, pay later with custom code because it's not practical. BNPL requires a live connection to a provider's approval and settlement system, which a code snippet cannot replicate safely. A gateway or dedicated plugin is the reliable way to enable it.
Third-party BNPL is for one-time purchases only. Stripe, Affirm, Afterpay, Klarna, and PayPal all block it on recurring products. For a pay-over-time experience on subscriptions or high-ticket recurring items, use native installment billing instead.
Yes. The FunnelKit Stripe Gateway is free to install and enables Klarna, Affirm, and Afterpay through Stripe. PayPal Gateway is also free for pay later options. Keep in mind the providers still charge their standard merchant transaction fees on each sale.
Set Up WooCommerce Buy Now Pay Later Payments and Boost Sales in Your Store!
Switching on pay-later in WooCommerce is easy and choosing the right method is where the money is.
Match the provider to your average order value and the countries you sell to, budget the 3-8% fee against a real conversion and order-value lift, and pick the setup route (Stripe, WooPayments, or PayPal) that matches the gateway you already use.
And if you would rather not pay a provider on every sale, native installments through Sublium let you offer the same flexibility on your own terms, with no financing fee and full control of the schedule.
Set up the payment method first, then pair it with a conversion-optimized checkout so that pay-later shoppers actually complete the purchase.
Ready to add flexible payments and a checkout built to convert them? Get started with FunnelKit.
Editorial Team
October 1, 2026Want to drive more sales and customer loyalty with WooCommerce coupons? From simple percentage discounts to auto-applied deals, free gifts, and personalized offers, coupons give shoppers a reason to buy...
Editorial Team
October 1, 2026A WooCommerce flash sale works because it puts a deadline in front of shoppers. A discount that ends tonight gets a decision today. One that runs for months gets saved...
Editorial Team
September 30, 2026WooCommerce BOGO deals give shoppers a free or discounted item when they buy a qualifying product. The classic version is buy one, get one free, where the shopper gets a...






