
Adding Afterpay to your WooCommerce store can instantly make shopping easier for your customers and boost your overall sales performance.
Afterpay is a Buy Now, Pay Later (BNPL) payment option that lets shoppers purchase products and pay in interest-free installments.
According to Stripe, stores using Afterpay see up to a 40% increase in average order value, while Afterpay users shop 50% more frequently than regular customers.
You can integrate the Afterpay payment gateway in your WooCommerce store in just a few minutes without any coding.
In this guide, you’ll learn how to set up WooCommerce Afterpay and start offering your customers more flexible payment options.

Table of Contents
- 1 What Is Afterpay (Clearpay) & Where It’s Supported?
- 2 How Does Afterpay Work?
- 3 Essentials to Set Up WooCommerce Afterpay Payment Method in Your Store
- 4 How to Set Up and Configure WooCommerce Afterpay Payments in Your Store?
- 5 Testing the WooCommerce Afterpay Payments in Your Store
- 6 Bonus Tip: Boost Conversions with Multiple Payment Gateways
- 7 Optimize Your WooCommerce Afterpay Checkout for Higher Conversions
- 8 Frequently Asked Questions About WooCommerce Afterpay
- 9 Ready to Offer WooCommerce Afterpay in your store?
What Is Afterpay (Clearpay) & Where It’s Supported?
AfPay is a popular Buy Now, Pay Later (BNPL) service that allows shoppers to purchase products instantly and pay for them over time through flexible installment plans.
Founded in 2014 in Sydney, Australia, Afterpay has quickly grown into one of the world’s leading fintech payment solutions, making online shopping more convenient and interest-free when payments are made on time.
Afterpay offers two simple payment options for customers:
1. Pay in 4 (Interest-Free):
Split your total purchase into four equal, interest-free payments, automatically billed every two weeks.
2. Monthly Installments (6 or 12 Months):
Choose an extended payment plan with interest for higher-value purchases. (Currently available only in the United States.)
Afterpay is supported for WooCommerce merchants and shoppers in the following countries:
- Australia
- New Zealand
- United States
- Canada
- United Kingdom
🔔 Note: In the United Kingdom, Afterpay operates under the name Clearpay.
How Does Afterpay Work?
Afterpay provides an easy and convenient way for shoppers to pay in installments. Here’s how an Afterpay payment works:
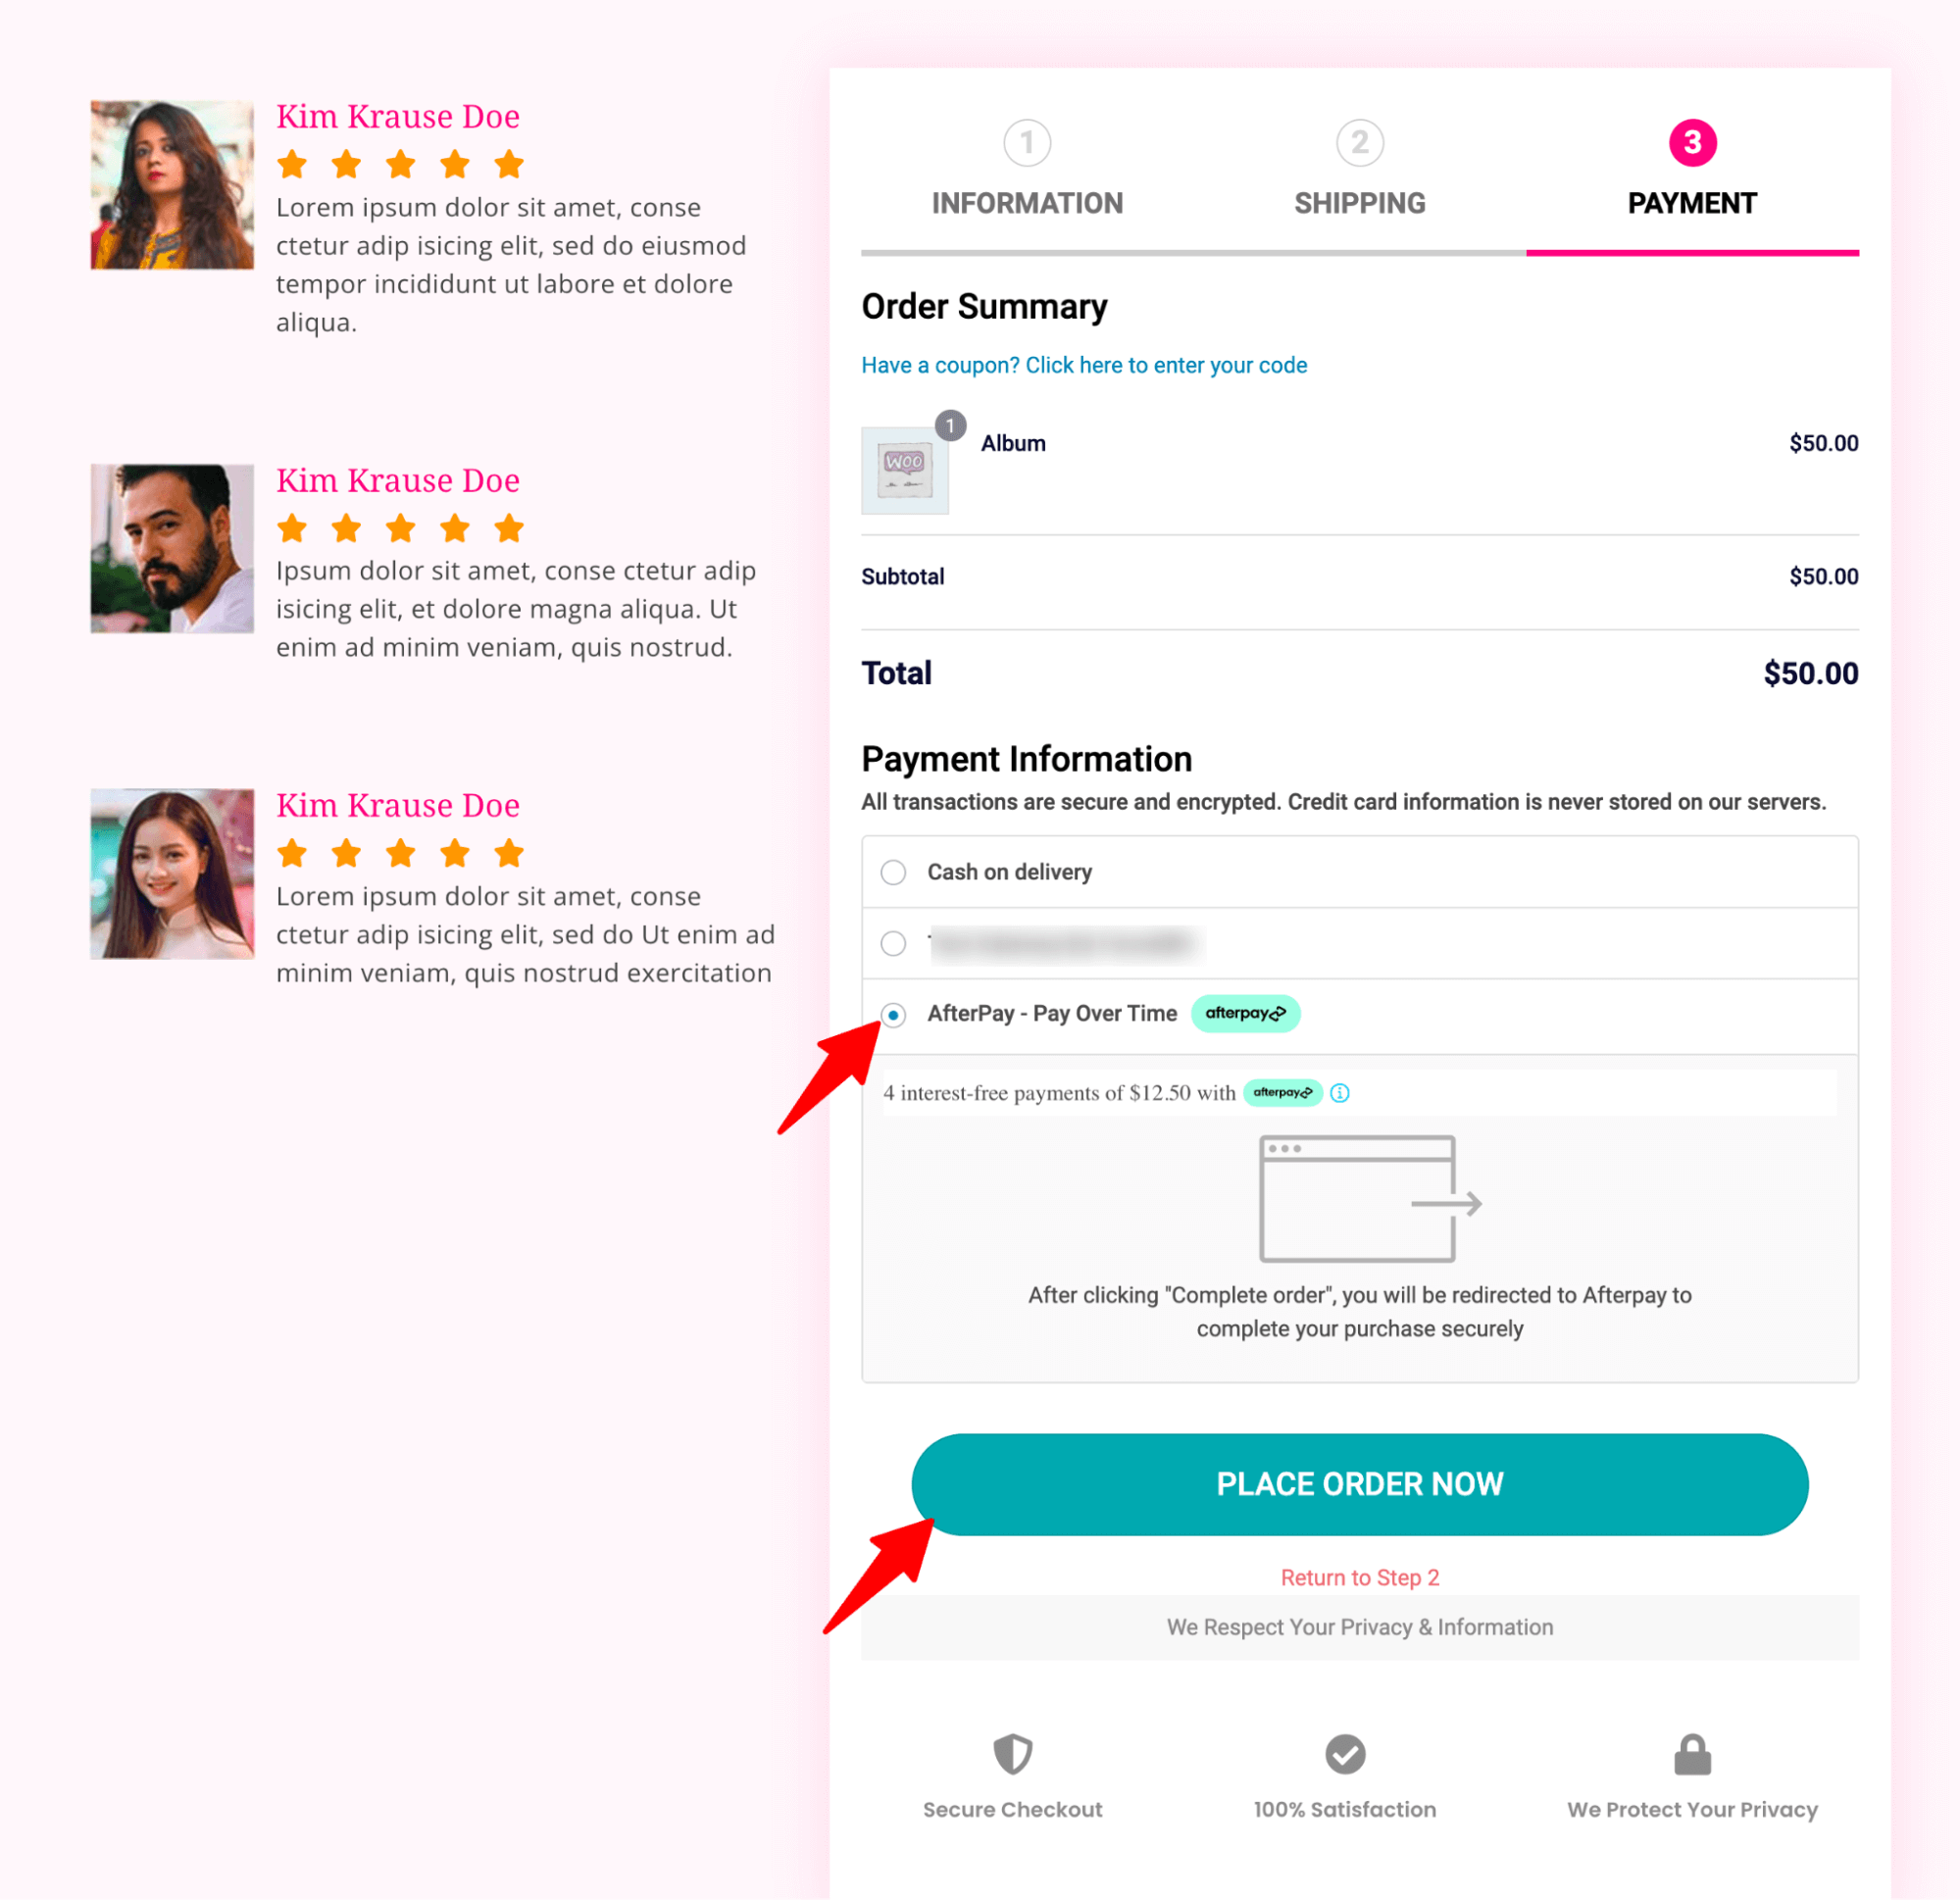
Step 1: Select the Afterpay payment option at checkout
Shoppers can place an order as usual and choose Afterpay at the checkout on their favorite online store.
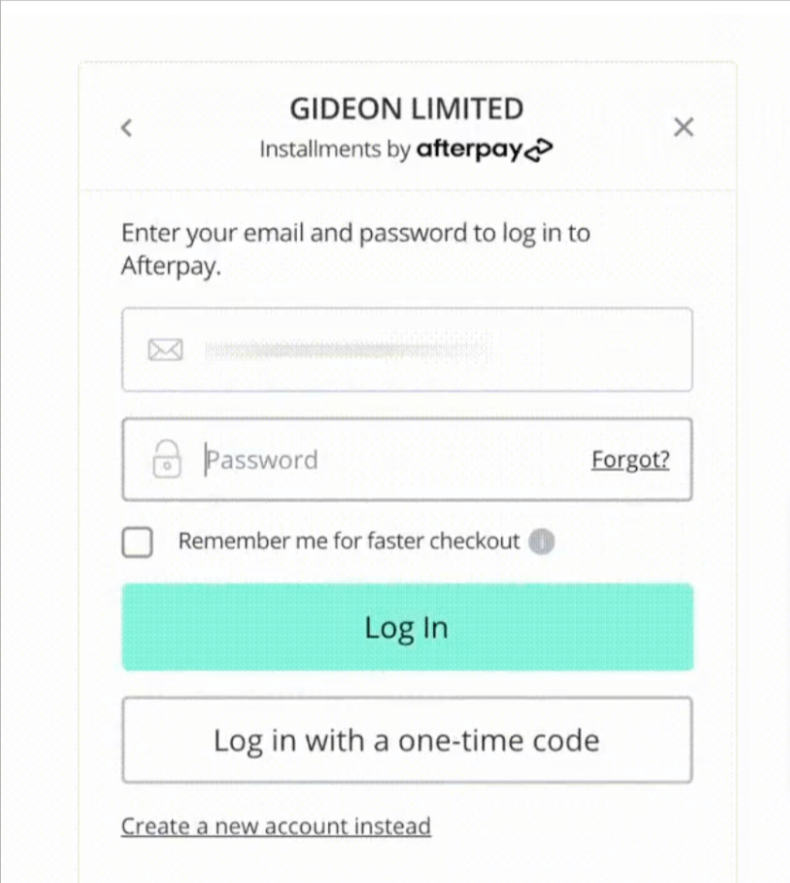
Step 2: Create an Afterpay account or log in
Next, shoppers are prompted to sign up for Afterpay. If they already have an account, they can simply log in.
Step 3: Get Approval from Afterpay
After logging in to the Afterpay account, users go through a verification and approval process. Afterpay typically provides instant approval to users.
While Afterpay doesn't check credit history, it considers other factors, such as:
- Sufficient funds on the card
- The amount you have to pay
- Duration of Afterpay usage
- Value of the order being placed
- Number of open orders, etc
Step 4: Make payment in installments
After the approval, users can make their first installment, which is typically 25% of the total amount.
For instance, if a product costs $50, users can pay in four installments of $12.50 each.
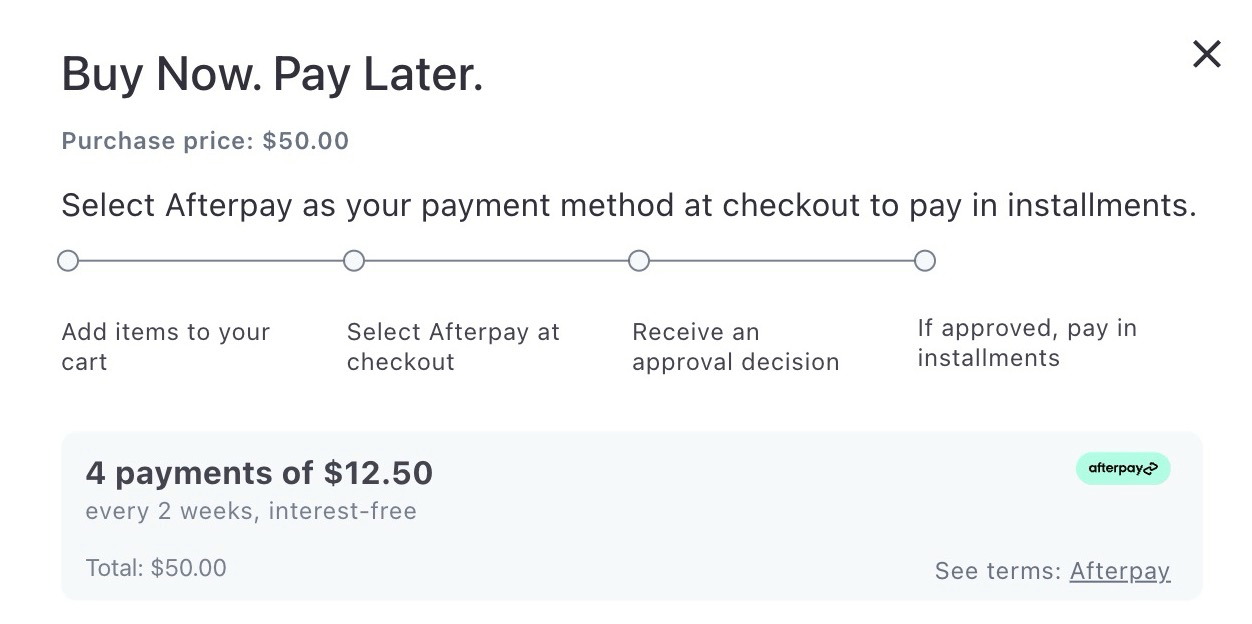
Afterpay calculates the installment automatically and reminds users of the due payment amount.
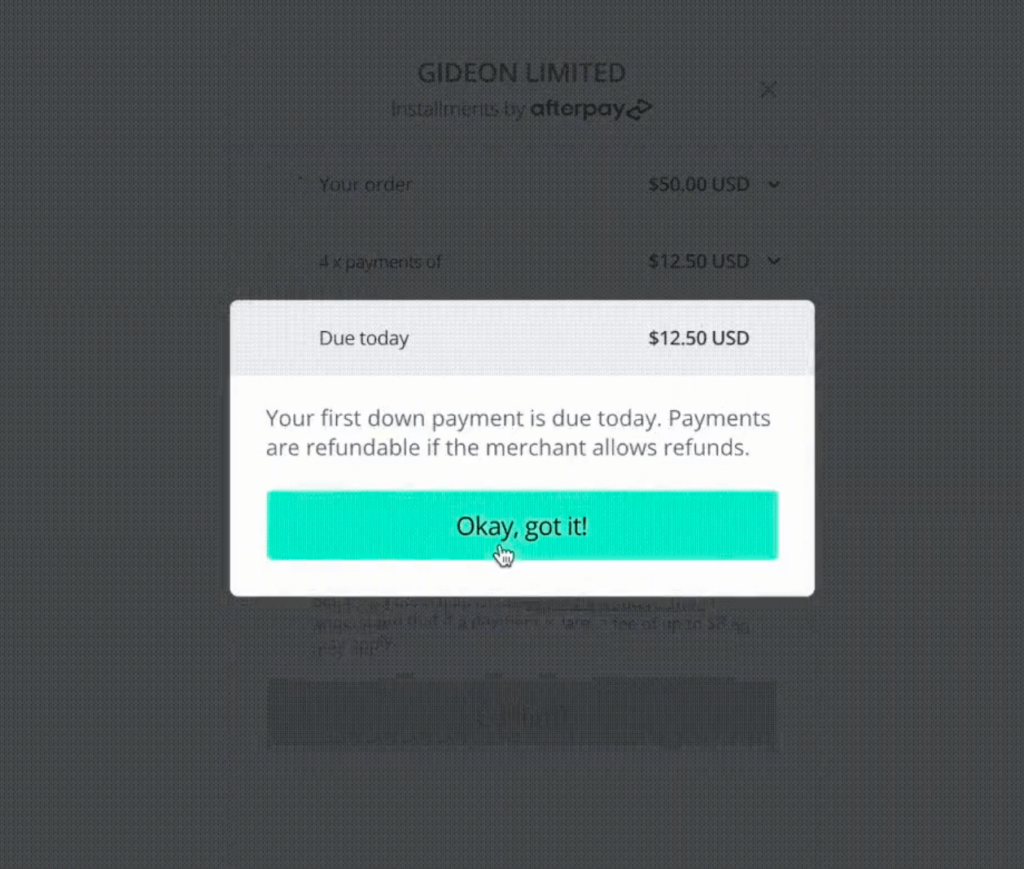
Next, users choose their payment card and confirm the payment to place the order.
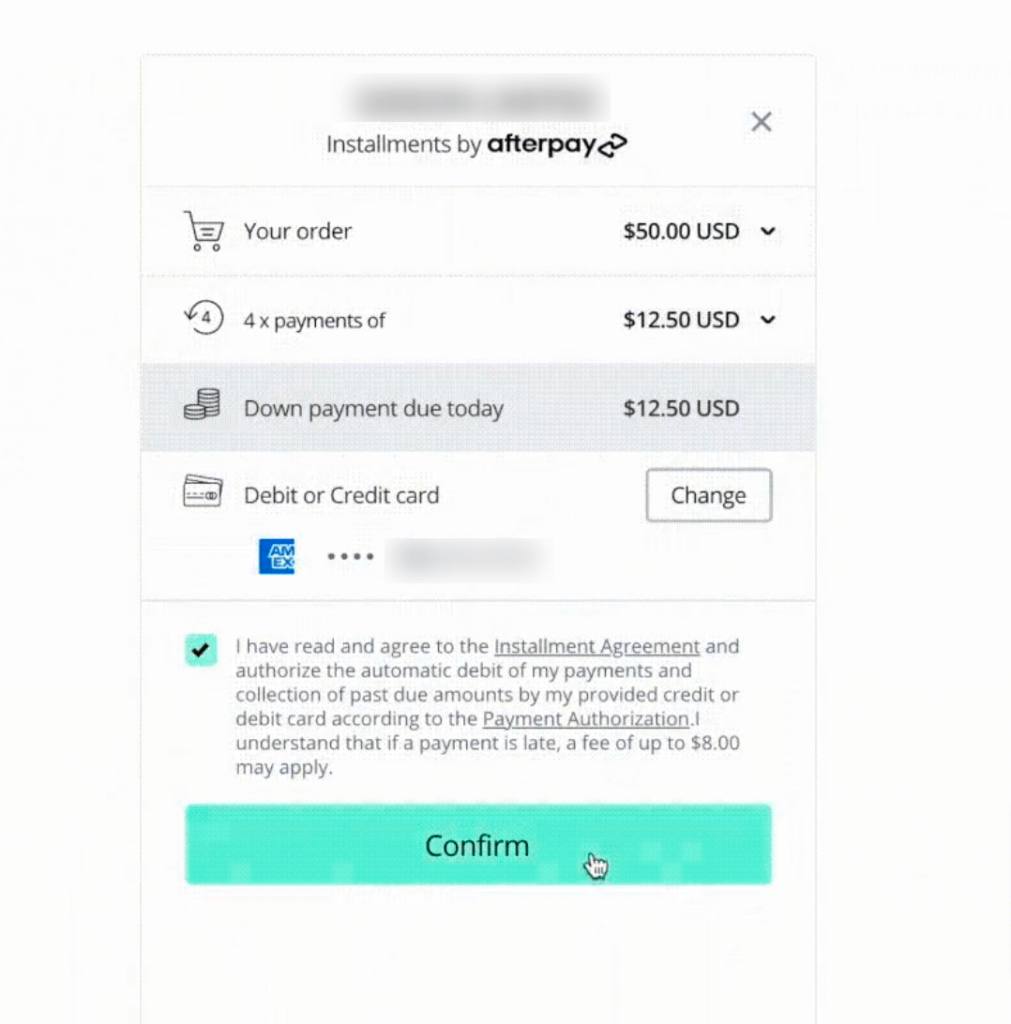
Step 5: Pay overtime to complete the purchase
Once a shopper completes their order, Afterpay pays the merchant upfront while the shopper pays over time. If a user misses a payment, Afterpay applies a late fee.
Why Should You Accept WooCommerce Afterpay Payments in Your Store?
Adding the WooCommerce Afterpay payment gateway to your store can result in numerous benefits for both merchants and customers, opening up new opportunities for seamless transactions.
Let’s explore the positive results you can achieve by offering Afterpay payments in your WooCommerce store.
- Expand your customer base with an enhanced shopping experience
By accepting WooCommerce Afterpay payments, you appeal to a broader audience, especially those who may prefer the flexibility of paying in installments. This inclusivity can attract new customers to your store.
- Increase sales and conversions by offering Buy Now Pay Later
As mentioned earlier, people tend to buy more when a website offers Buy Now Pay Later options. By integrating WooCommerce Afterpay, you can increase your sales and conversions.
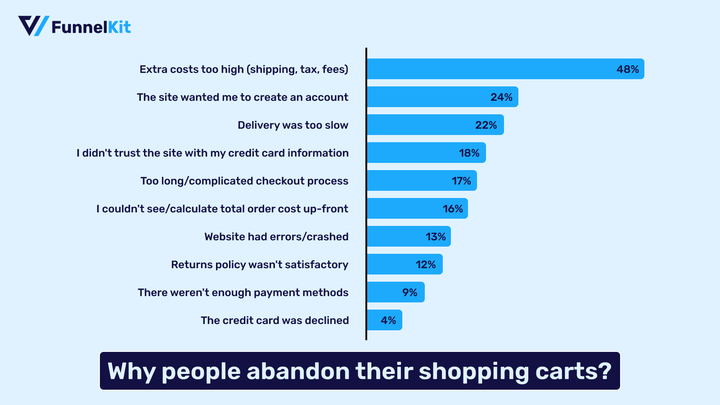
- Reduce abandoned carts by offering flexible payments
About 9% of online shoppers abandon their carts because they can’t find their preferred payment method. Offering Afterpay to pay later can help reduce this abandoned cart rate.
- Stay ahead of your competitors
Analysts project that BNPL services will account for 12% of total global ecommerce spend on physical goods by 2025. Adopting flexible payment options such as Afterpay could be a savvy strategy to position your business for future success and outpace competitors.
Essentials to Set Up WooCommerce Afterpay Payment Method in Your Store
Before you set up Afterpay in your WooCommerce store, make sure you have the following things ready.
🔔 Note: You need a properly installed and configured WooCommerce store to integrate Afterpay payments.
You can get help from this Woo document guide to set up your WooCommerce store.
1. A Stripe account
Stripe is a widely used payment processing platform that allows businesses to accept and manage payments online.
We will use Stripe to integrate Afterpay with WooCommerce because Stripe is PCI DSS Level 1 certified and uses real-time machine learning to protect businesses from fraudsters.
You need to set up your Stripe account to start collecting payments in your store.
Setting up Stripe is free, but they charge a small amount for each transaction. Their pricing structure varies by country.
2. Activate Afterpay in your Stripe account
Please note that you should activate Afterpay on your Stripe account. To do this, navigate to Settings ⇒ Payment Methods from the Stripe dashboard and edit the associated account.
Next, under the "Buy Now Pay Later" payment options, activate the Afterpay option.
3. Stripe Gateway for WooCommerce plugin
FunnelKit’s Stripe Gateway for WooCommerce offers you a powerful integration solution that lets you accept online payments in your store.
It’s one of the best WooCommerce Stripe gateway plugins that offers a simple, secure, and quick way to collect payments on the web and mobile.
Stripe Gateway for WooCommerce is compatible with credit and debit card payments through Stripe such as Visa, Mastercard, American Express, JCB, Diners Club, and more.
Plus, it further integrates with express payment options like Google Pay and Apple Pay, as well as BNPL gateways such as Affirm, Klarna, and Afterpay.
Furthermore, it also supports local payments like SEPA, P24, iDEAL, Bancontact, and more.
This Stripe Gateway plugin is compatible with WooCommerce checkout pages and one-click upsells for seamless order placement and processing.
4. A valid SSL certificate
An SSL certificate helps authenticate your website and encrypts the data transmitted between a user’s web browser and your website’s server.
Your WooCommerce store should have a valid and active SSL certificate.
It helps authenticate the identity of your website and encrypts the data transmitted between a user’s web browser and your website’s server.
5. Ensure your store currency is compatible with Afterpay's supported currencies
Afterpay supports a few currencies, including USD, CAD, GBP, AUD, and NZD. Make sure your WooCommerce Store currency is set to one of these.
Once you have all the essentials in place, proceed to the next section to learn how to add Afterpay to WooCommerce.
How to Set Up and Configure WooCommerce Afterpay Payments in Your Store?
The first step of integrating Afterpay with WooCommerce is to connect the WooCommerce store with Stripe using the Stripe Payment Gateway plugin.
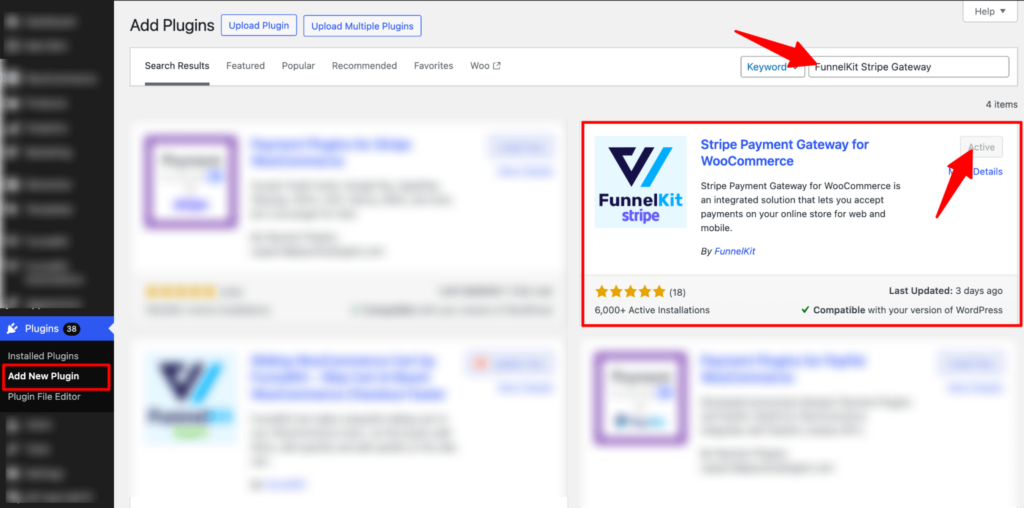
Step 1: Install the Stripe Gateway for WooCommerce plugin
From the WordPress dashboard, navigate to Plugins ⇒ Add New Plugin and search for “FunnelKit Stripe Gateway”.
After that, install and activate the plugin on your WooCommerce store.
Now, connect your Stripe account to the WooCommerce store.
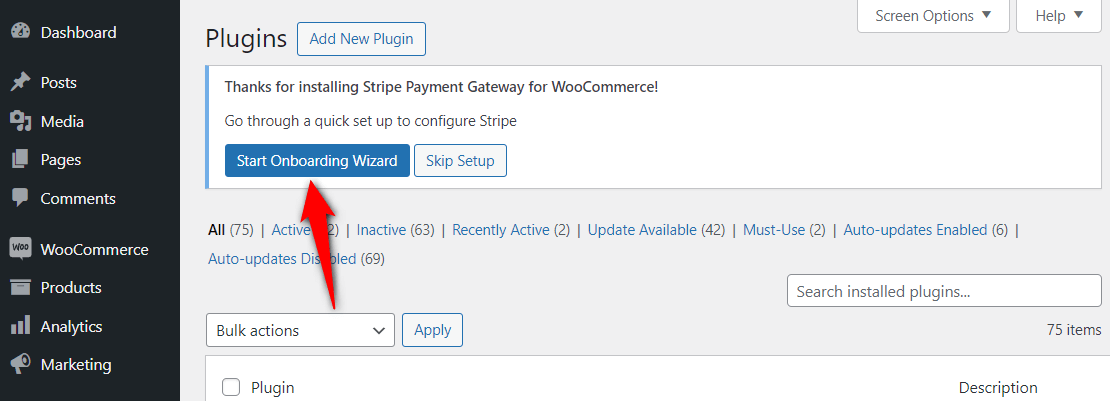
Step 2: Configure your Stripe account
Once you’ve activated this WooCommerce Afterpay plugin, you’ll see a notification to configure your Stripe account.
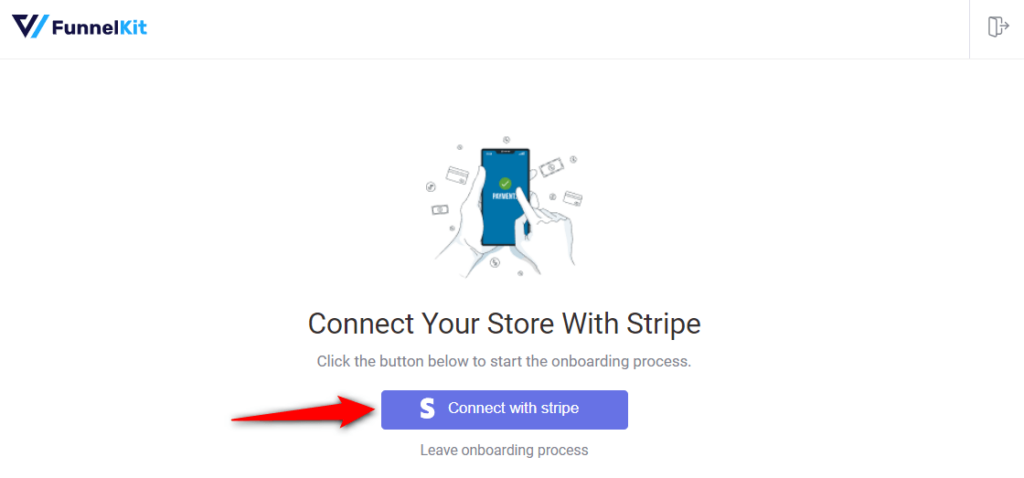
Click on the ‘Start Onboarding Wizard’ button to start the setup and configuration process.
It’ll take you to a new window. Hit the “Connect with Stripe’ button.
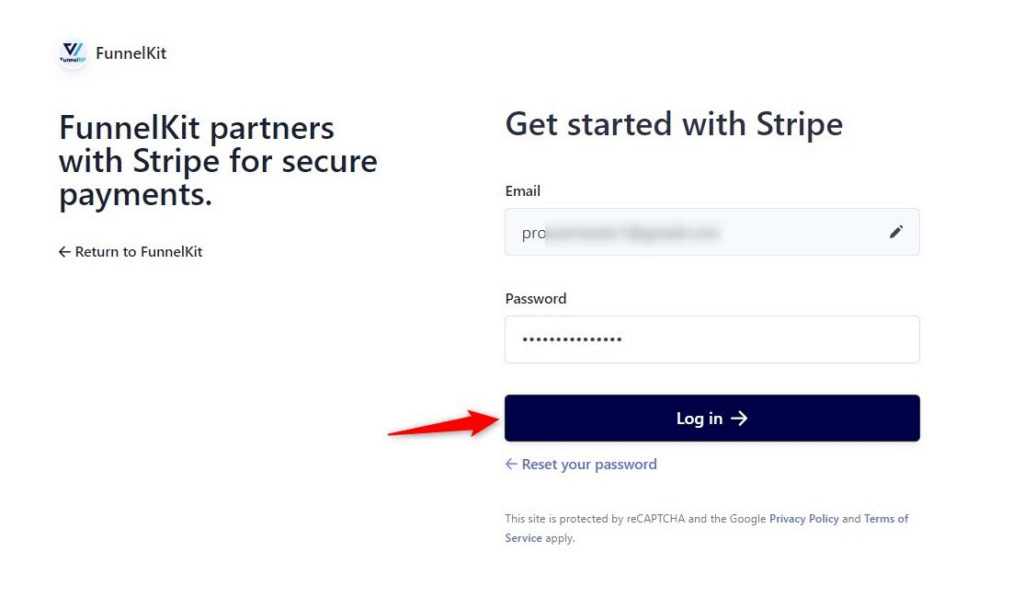
You’ll now see the Stripe account authorization page.
Log in to your Stripe account using your registered email address and password.
Verify your Stripe account with a 6-digit OTP sent to your registered email or phone number.
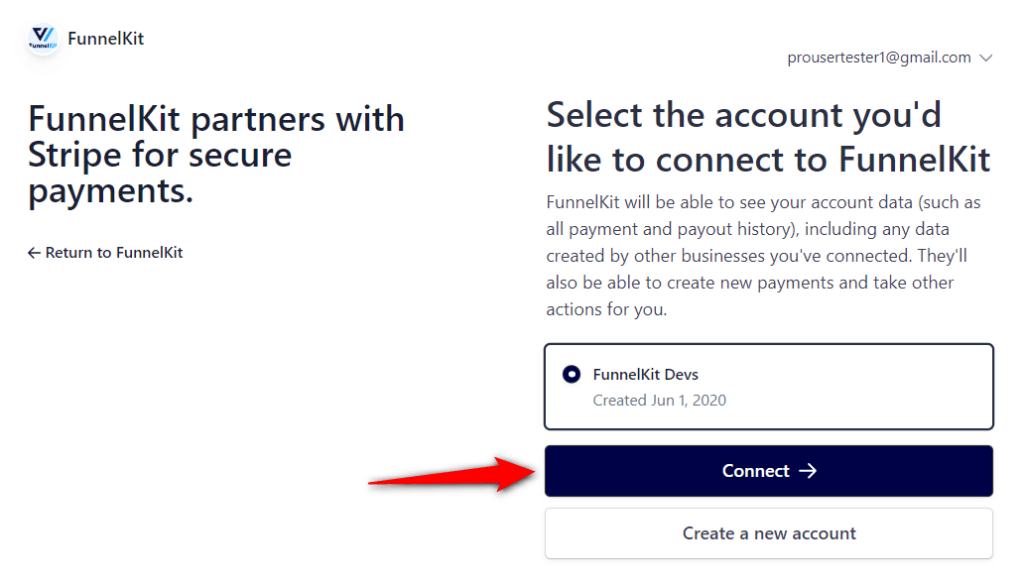
Select the Stripe account you want to use for your WooCommerce Afterpay integration.
Once done, click Connect.
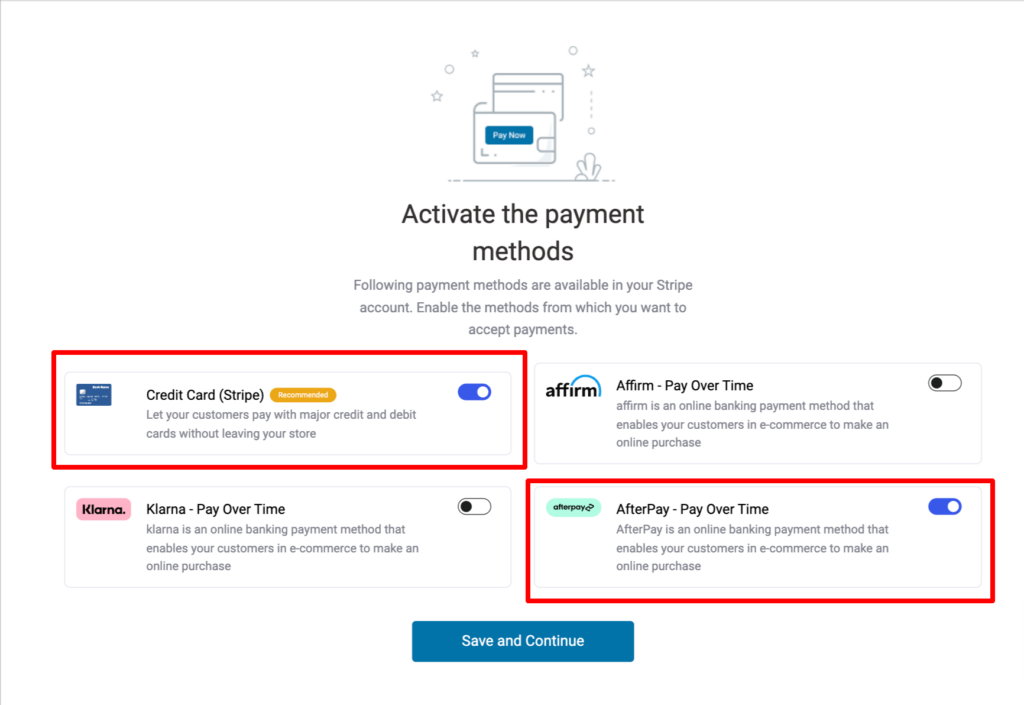
- Enable the payment gateways
On the next screen, you will see all the available payment gateways. Make sure to hit the toggle to the Afterpay payment button.
Here, we’ll enable both the Credit Card (Stripe) and Afterpay payment gateway. After that, click on ‘Save and Continue’.
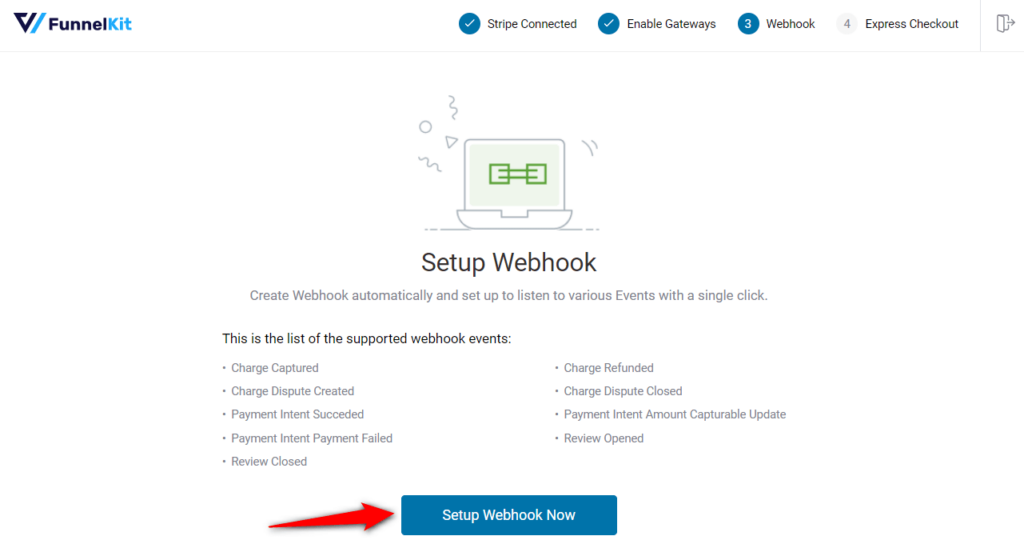
- Set up webhooks
This Stripe payment gateway will automatically set up webhooks.
Hit the ‘Setup Webhook Now’ button and move to the next screen.
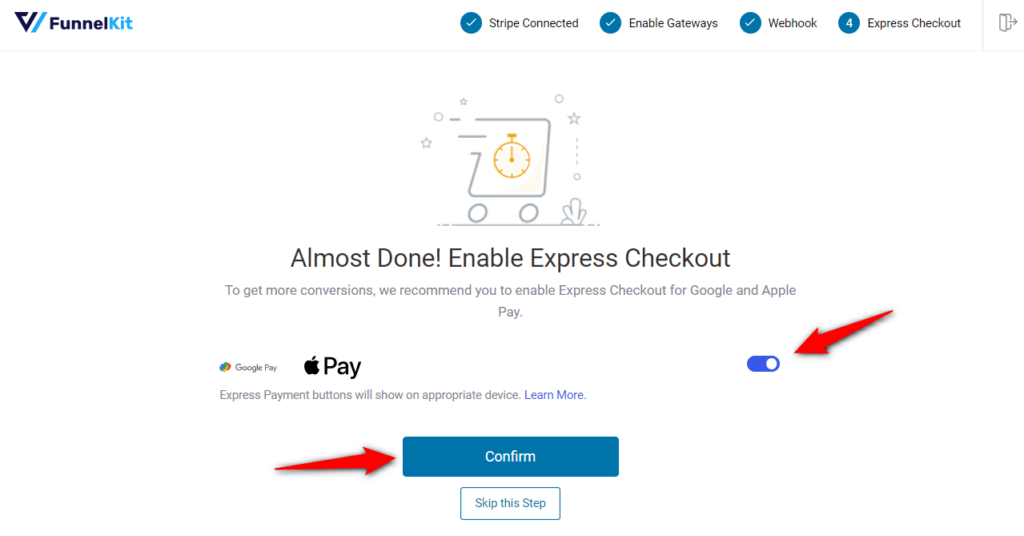
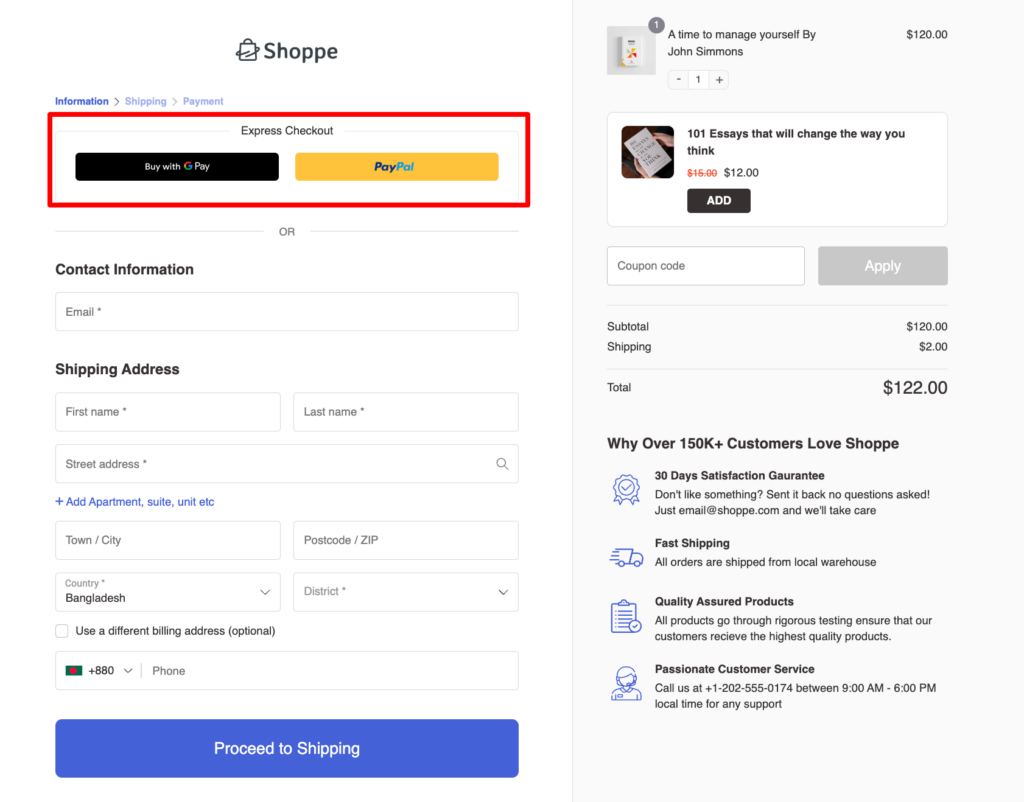
- Enable Express Checkouts
The plugin will prompt you to enable express checkout buttons such as Apple Pay and Google Pay.
This way, you can incorporate one-click checkouts in your WooCommerce store.
You’re all set! Make sure to activate the test mode and first configure the WooCommerce Stripe Afterpay payment mode.
- Enable Stripe Test Mode
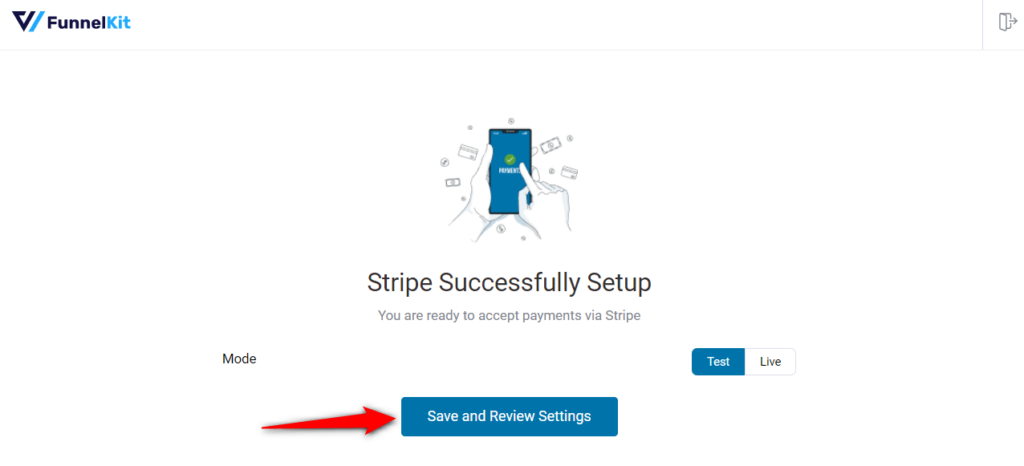
Clicking on ‘Save and Review Settings’ will automatically fetch all your Stripe account details into your WooCommerce store:
- Stripe connection ID and status
- Webhook ID and URL
- Live and test webhook secret key
- Debug log URL
That’s it! Your Stripe account is now successfully connected and configured in your WooCommerce store.
Step 3: Enable the Afterpay payment gateway in your WooCommerce store
Navigate to WooCommerce ⇒ Settings ⇒ Payments.
Under the Payments tab, scroll down and click on ‘Manage’ next to AfterPay Gateway – AfterPay - Pay Over Time.

Now, check the option next to ‘Enable Afterpay Payments’.

This will enable Afterpay in your WooCommerce store.
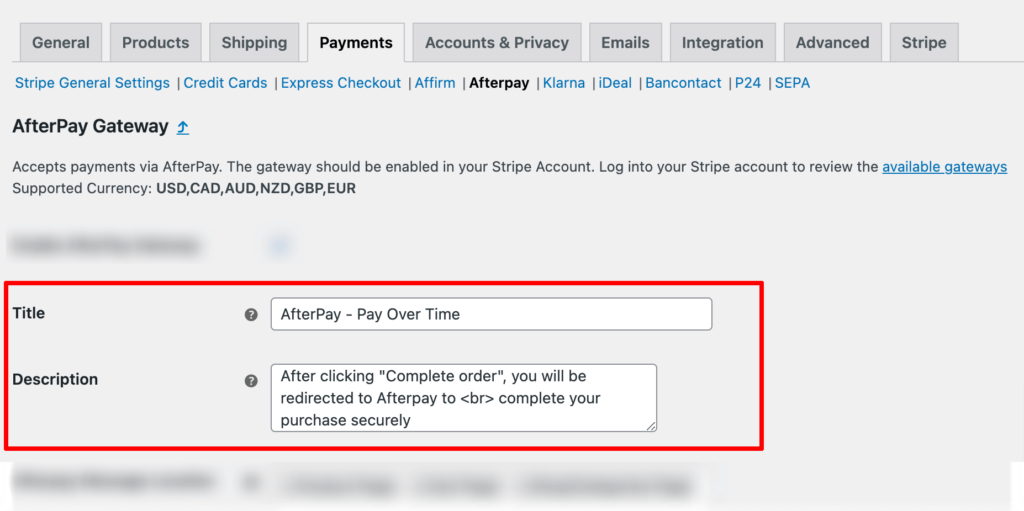
Step 4: Configure the WooCommerce Afterpay payment option in your store
Now configure the rest of the settings of Afterpay payment, such as:
- Title: Provide a title for this payment gateway.
- Description: The description text appears below the title of the Afterpay payment method on the checkout page.
- Afterpay Message Location: Afterpay payment shows a default message. You can choose to display this message on the Product page, Cart page, and Shop/Categories page.
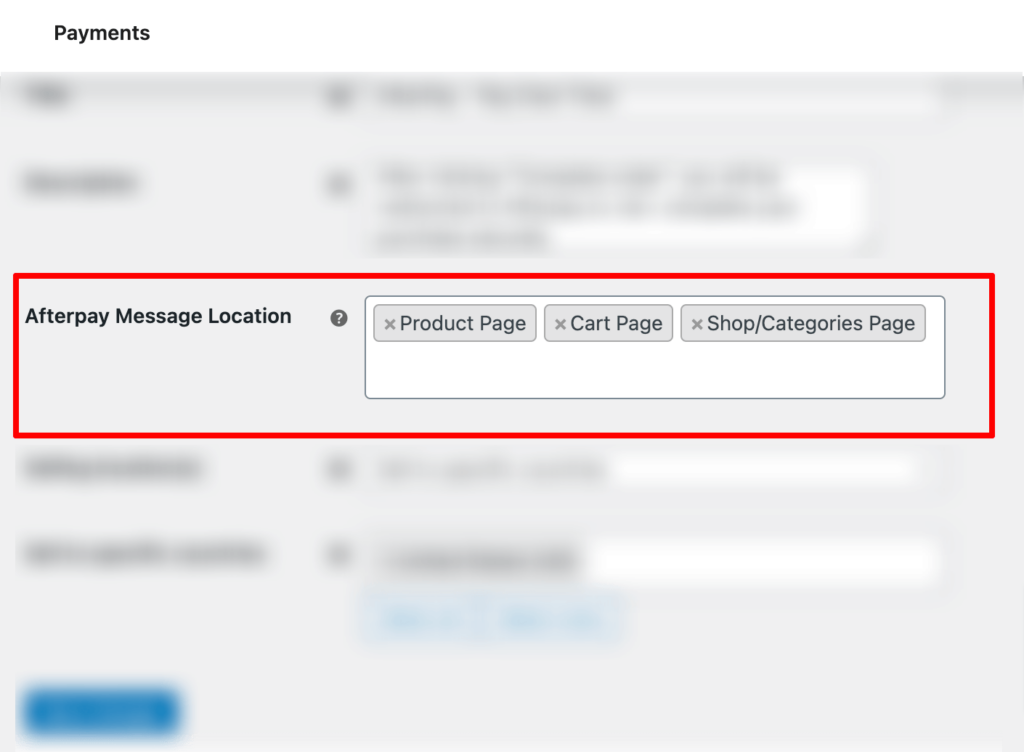
Note: Afterpay calculates the installment amount dynamically and displays it on the product page, cart page, and category page
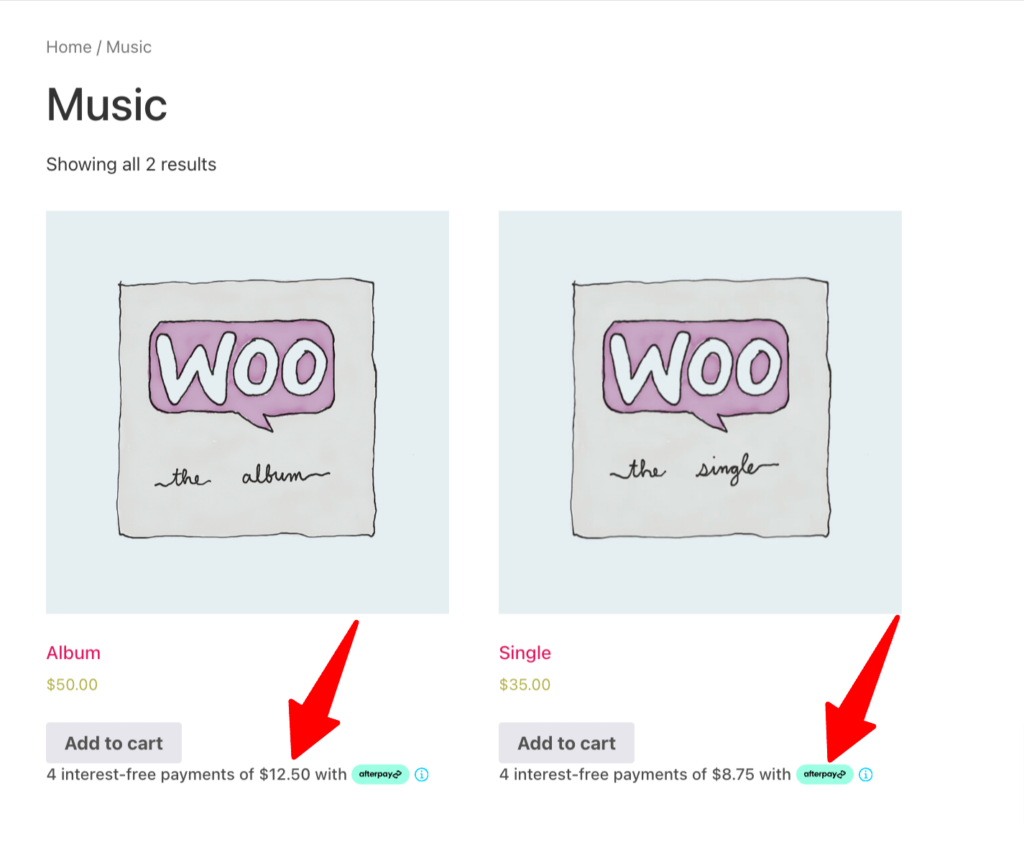
Here is how it will show up on the product page:

Have a look at how it will look at the shop/category page:
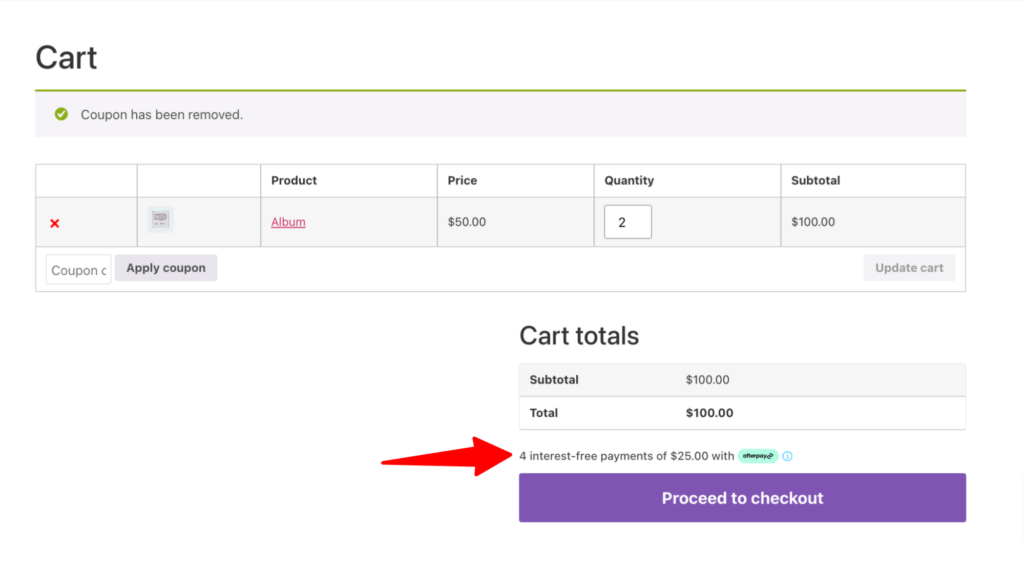
Here is what it will like on the cart page:
And finally, how will look on the checkout page with the custom description:

- Selling location and selling to specific countries: Afterpay by default can be used to sell to a few specified countries, among the countries you can choose the country where you want to sell.
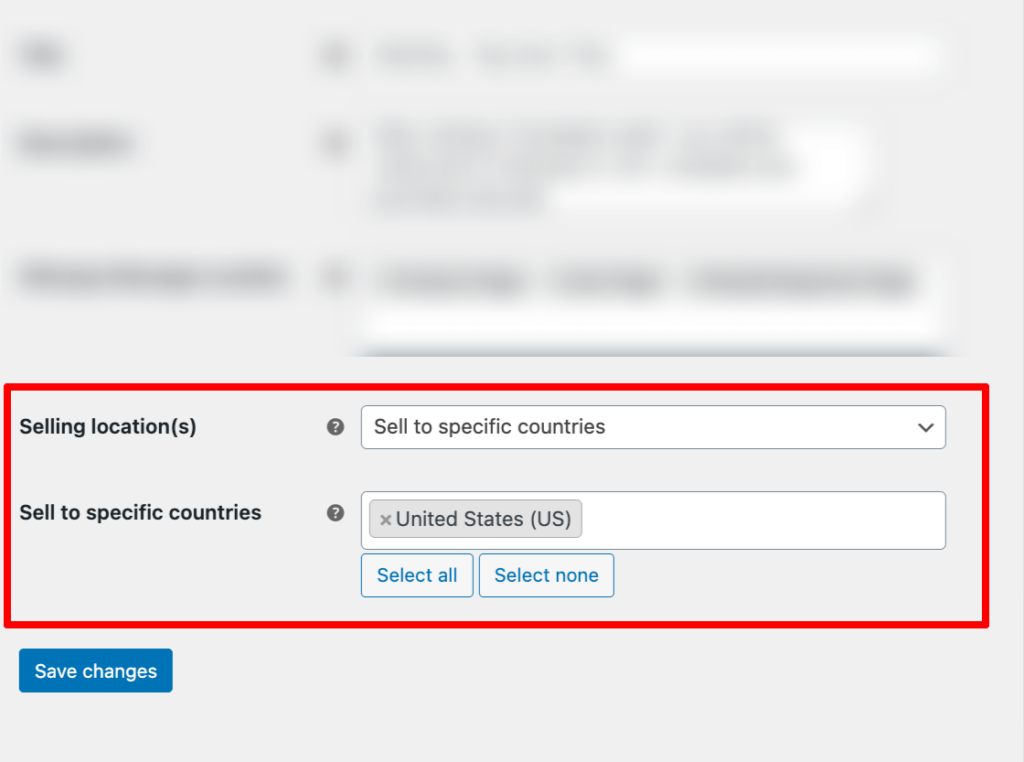
After that, click on “Save changes” to update your configurations.
It’s always a good practice to test if the WooCommerce Afterpay payment option works properly before making it available for customers.
Move to the next section to find out how to test WooCommerce Afterpay payments.
Testing the WooCommerce Afterpay Payments in Your Store
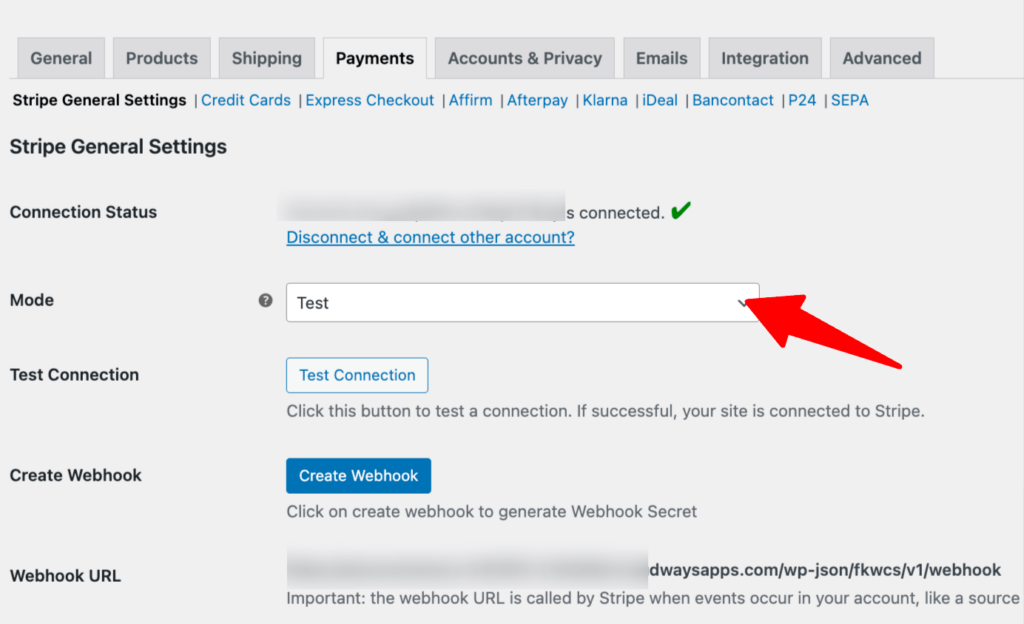
To test the WooCommerce Afterpay payment method, put your website in the ‘Test’ mode by going to WooCommerce payment settings.
For that, navigate to WooCommerce ⇒ Settings ⇒ Payment and click on “Manage” next to AfterPay Gateway – AfterPay - Pay Over Time.
On the “Stripe General Settings” tab, set the Mode to test.
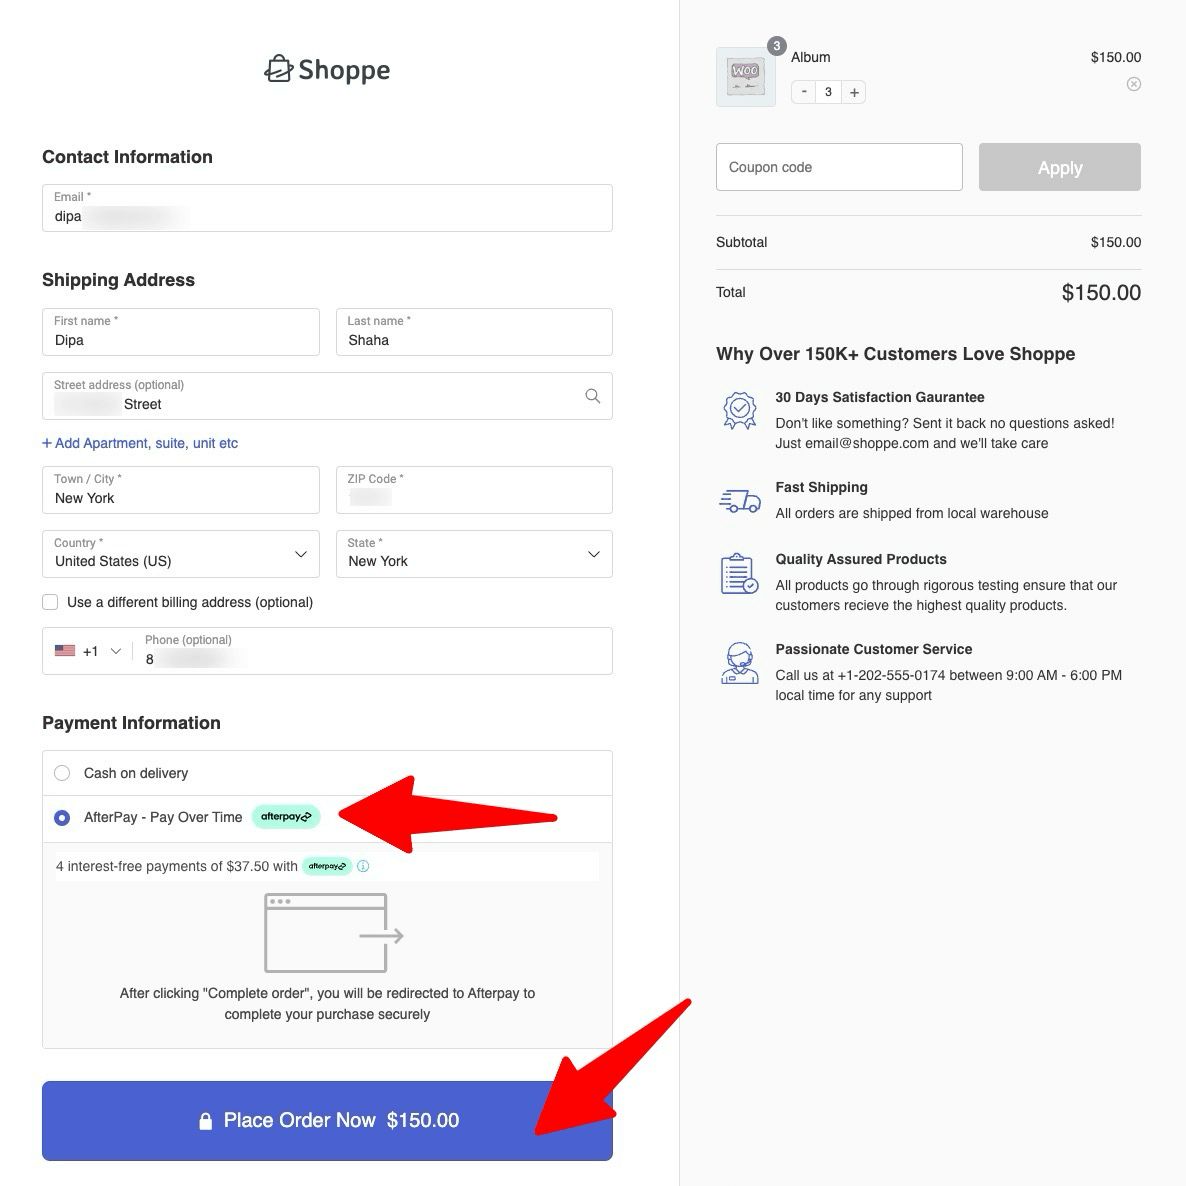
After that, add any product to your cart, and on the checkout page, choose the option “Afterpay - Pay Over Time Afterpay” to checkout.
After that, you will get two options: Authorize text payment and Fail test payment.
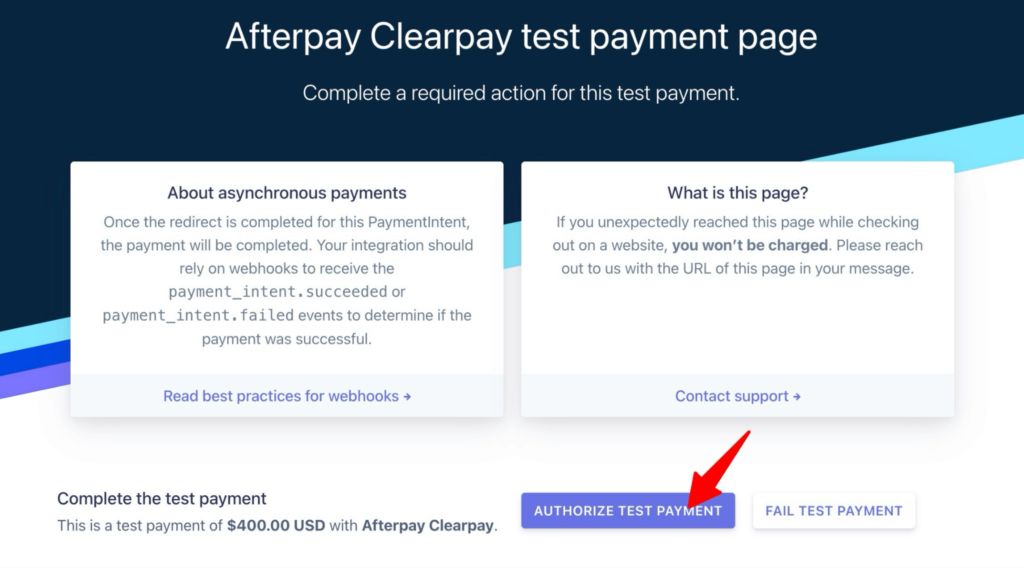
If you choose to authorize test payment, you will be redirected to the thank you page.
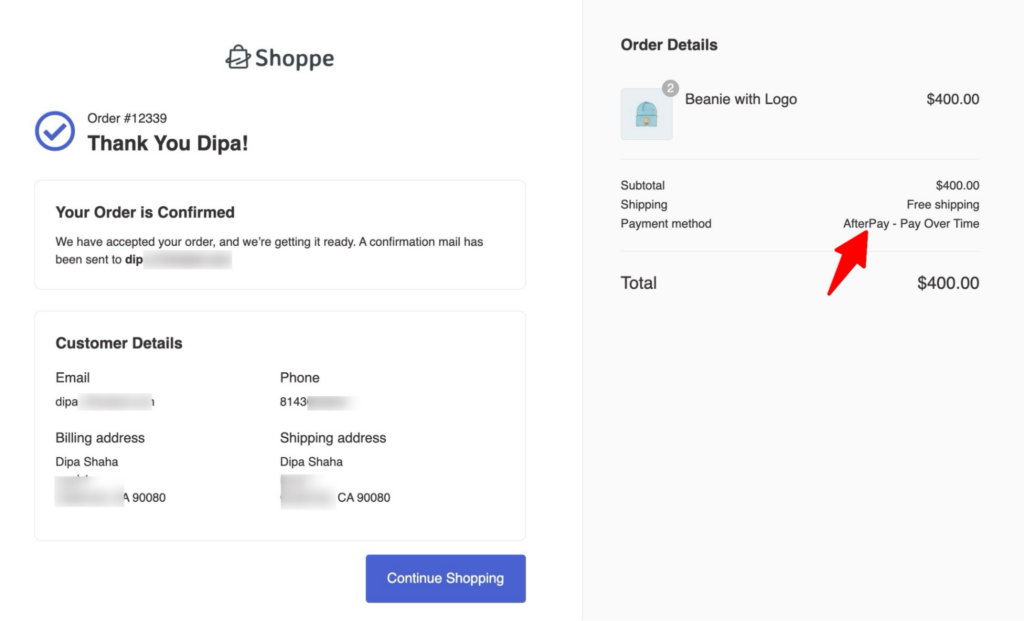
That’s how easily you can test the WooCommerce Afterpay gateway.
Bonus Tip: Boost Conversions with Multiple Payment Gateways
Offering multiple payment options can help increase the chances of conversions by providing customers with flexibility and convenience when paying for their favorite products.
Different customers may prefer different payment gateways based on their location, financial conditions, and personal preferences.
You can offer:
- Credit and debit cards
- Express checkouts like Apple Pay, Google Pay, and more
- Local payment methods like SEPA, P24, iDEAL, Bancontact, etc.
- Buy now and pay later, such as Affirm, Klarna, Afterpay, etc.
With FunnelKit Funnel Builder and Afterpay payments, you can offer all the types of payment gateways mentioned.
Furthermore, you can enable other payment options such as:
- PayPal Standard and PayPal Express
- Cash on delivery, Check Payments, or BACS (Bank Transfer)
Our experts recommend researching popular payment methods in the countries you serve and gathering feedback from your customers. This will help you determine the payment options they are comfortable with.
Once you have this data, enabling those payment gateways will surely help increase conversions in your WooCommerce store.
Optimize Your WooCommerce Afterpay Checkout for Higher Conversions
While the Buy Now, Pay Later option by Afterpay for WooCommerce is undoubtedly enticing for attracting more customers, a seamless and conversion-optimized checkout process is essential to ensure users successfully complete their purchases.
According to the Baymard Institute, 28% of people abandon carts because of the long and complicated checkout process.
You can reduce this rate by using FunnelKit Funnel Builder and offering your customers streamlined multi-step checkout processes.
FunnelKit Funnel Builder is a game-changer for over 30,000 WooCommerce users, revolutionizing their checkout process with a seamless shopping experience that keeps customers coming back for more.
FunnelKit Funnel Builder comes with various prebuilt checkout page templates that you can import and use with just a few clicks.
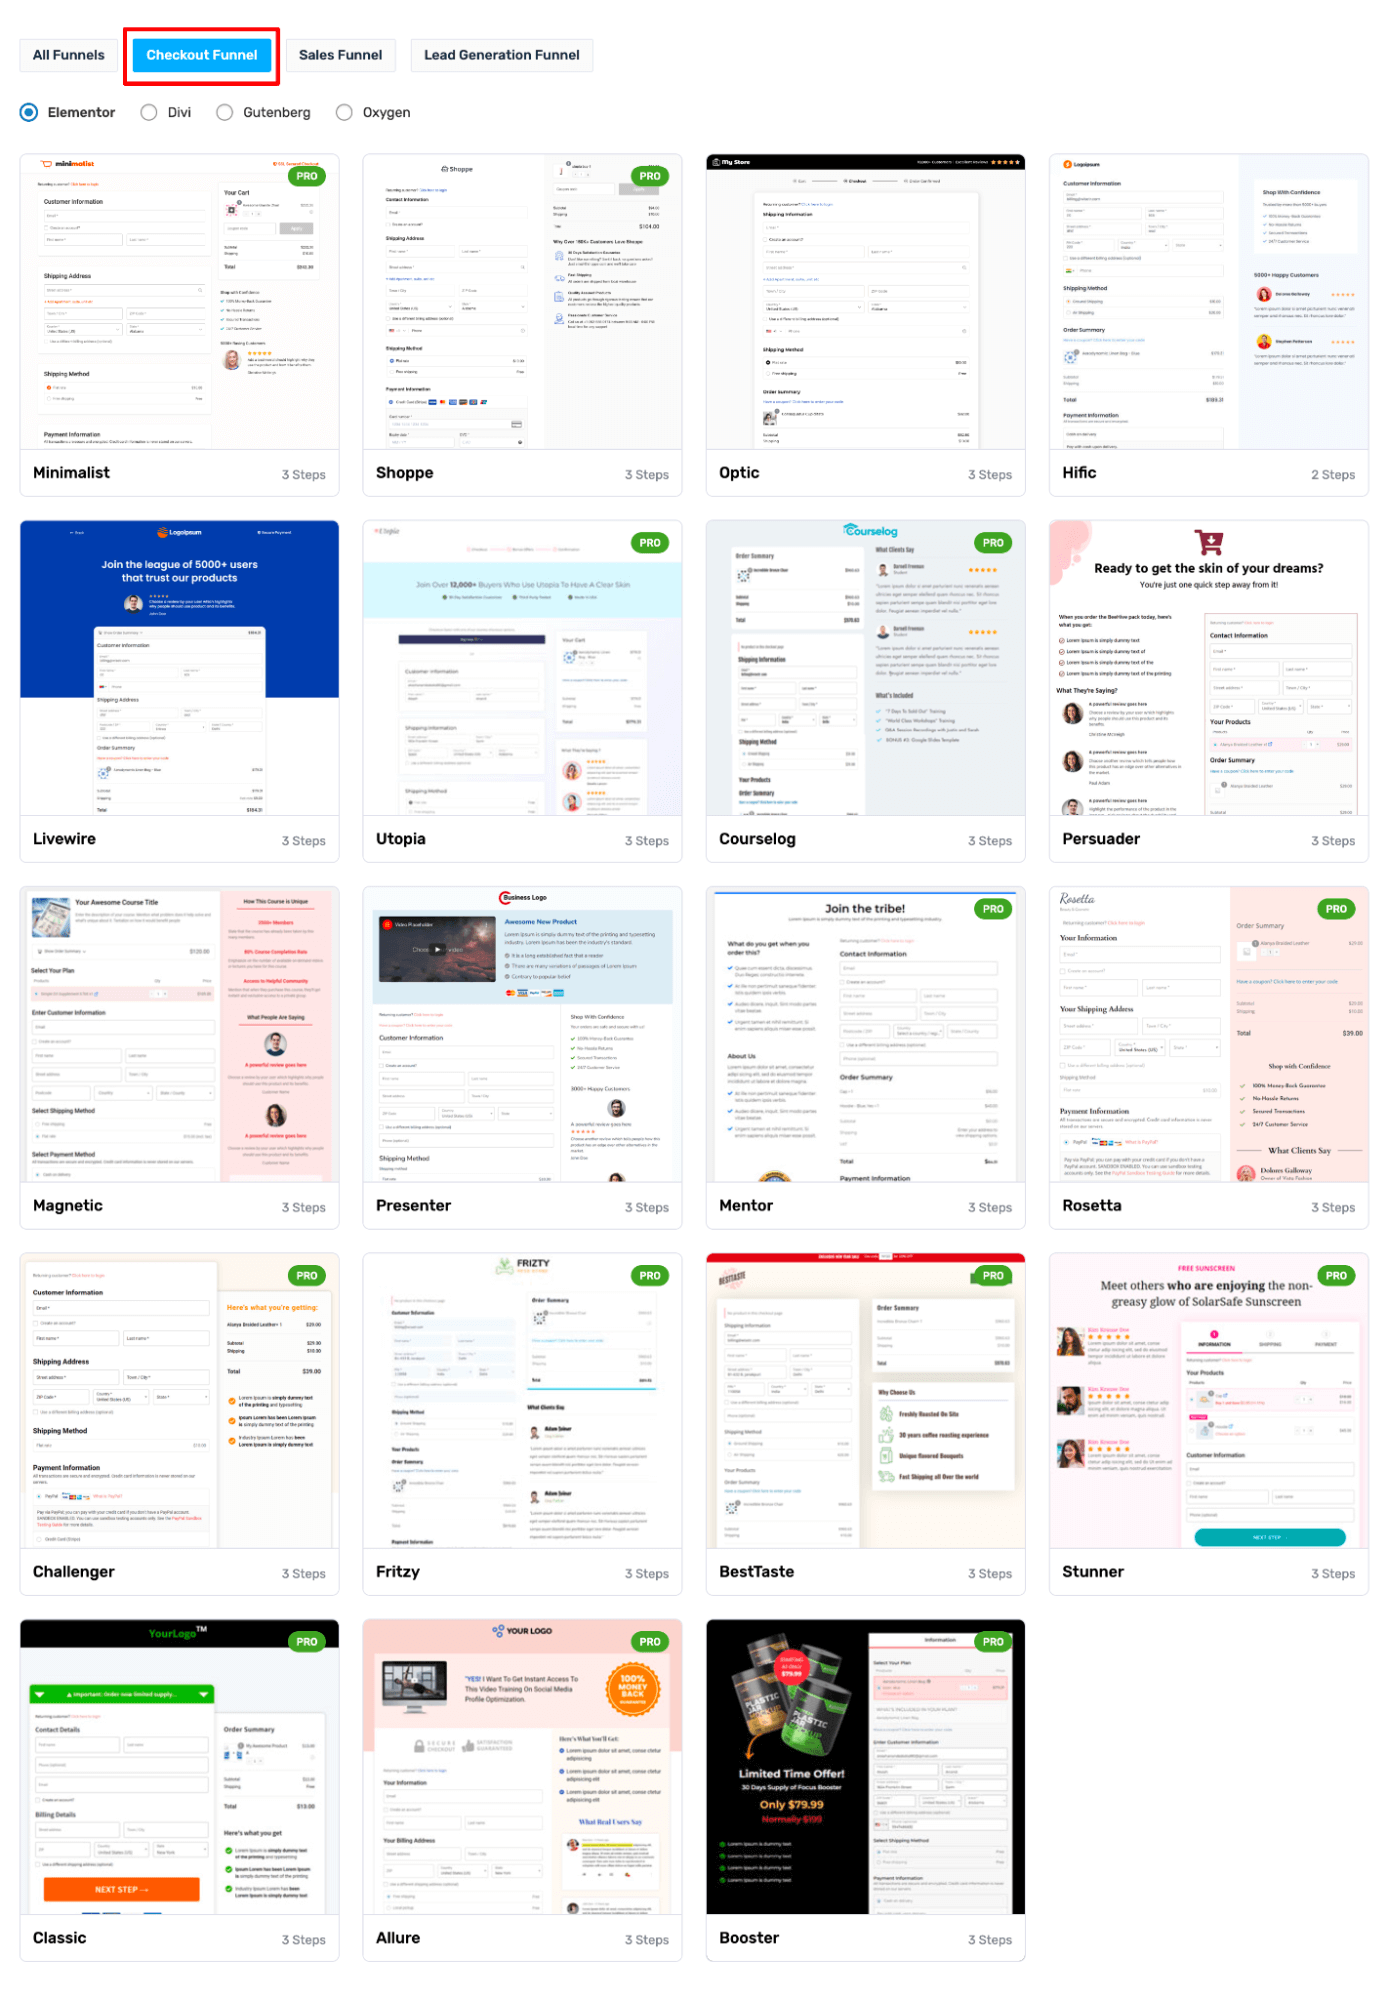
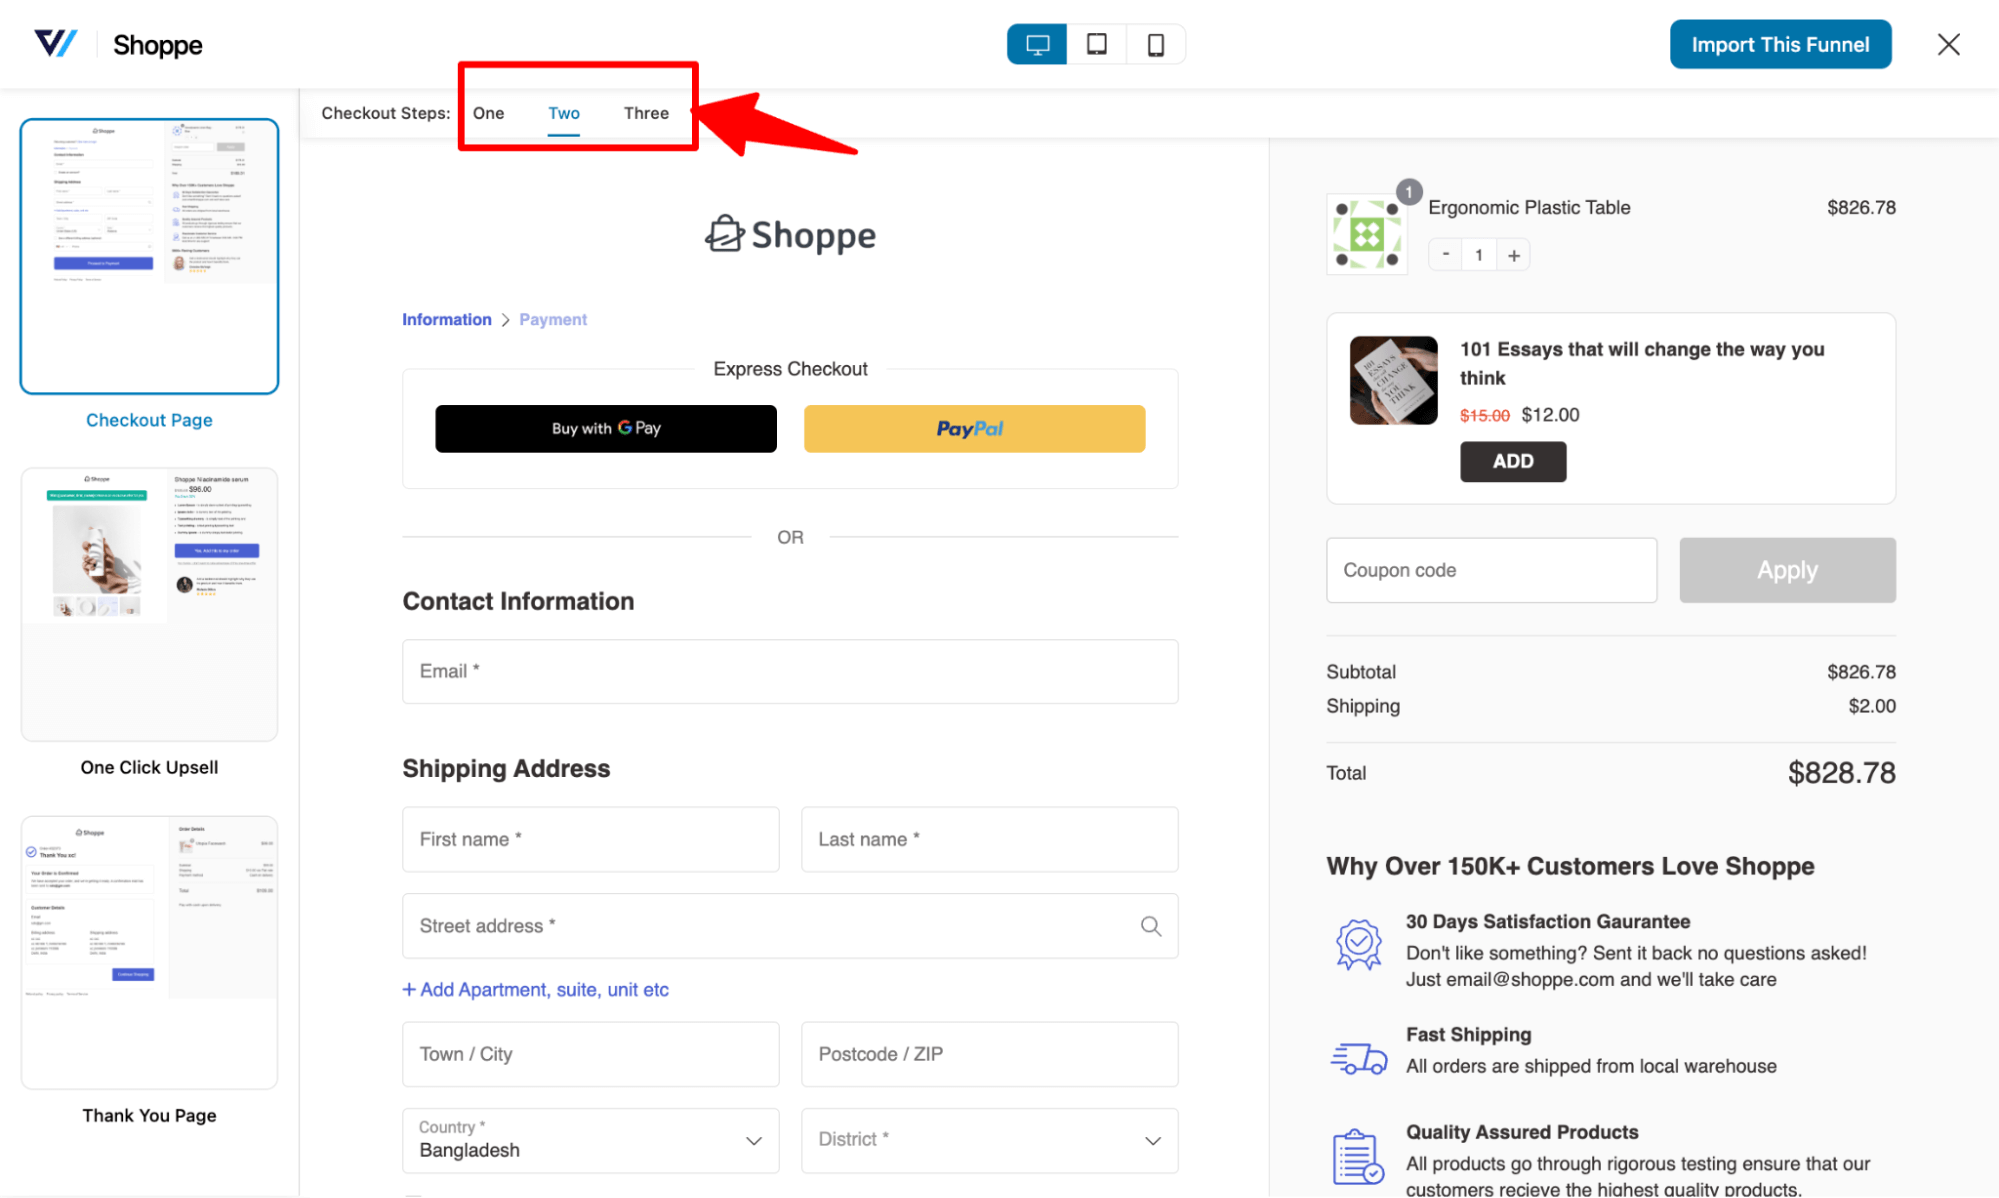
You can choose the number of steps you want your checkout page to have.
FunnelKit Funnel Builder doesn't just offer a multi-step checkout. it also provides a range of ready-to-use features designed to create a seamless and conversion-friendly checkout experience for your customers. These features include:
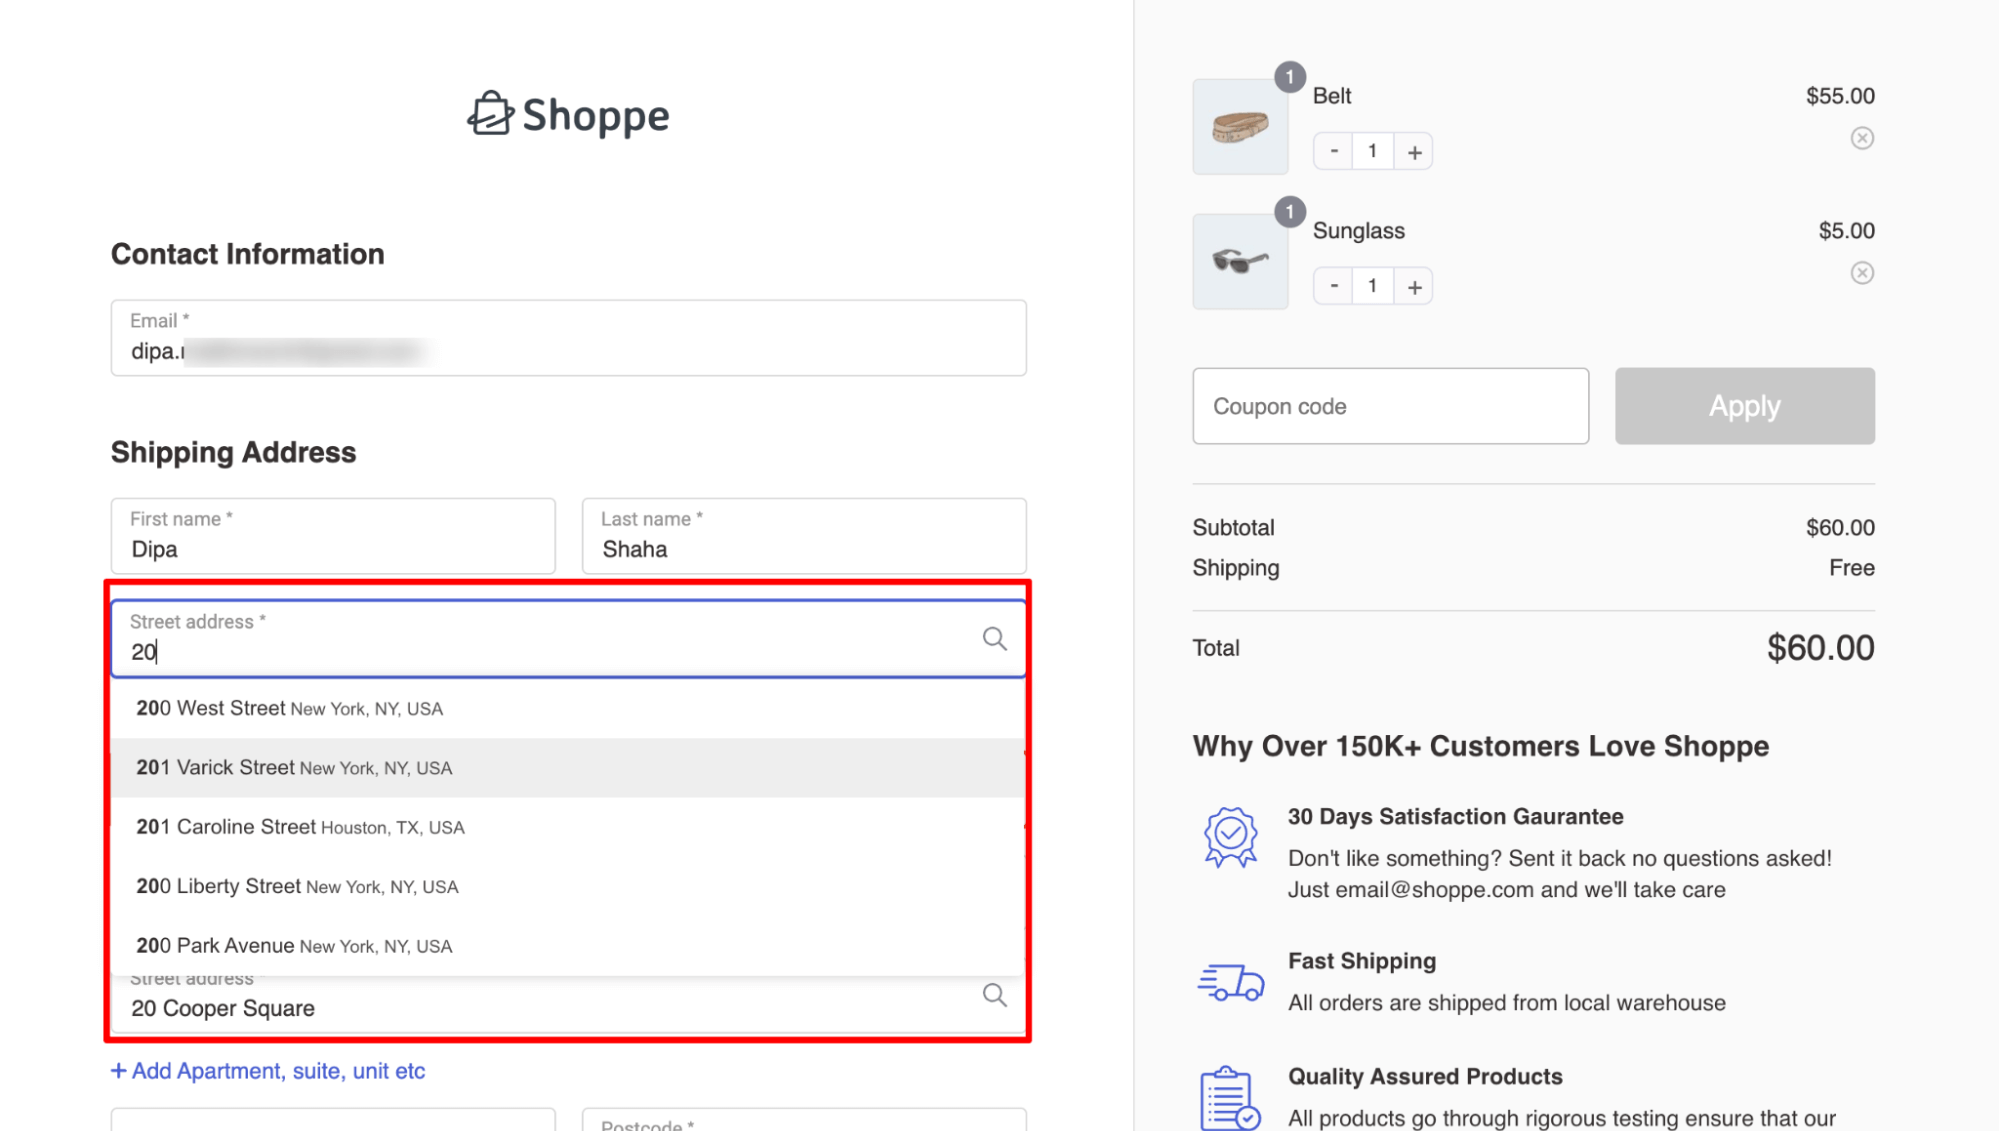
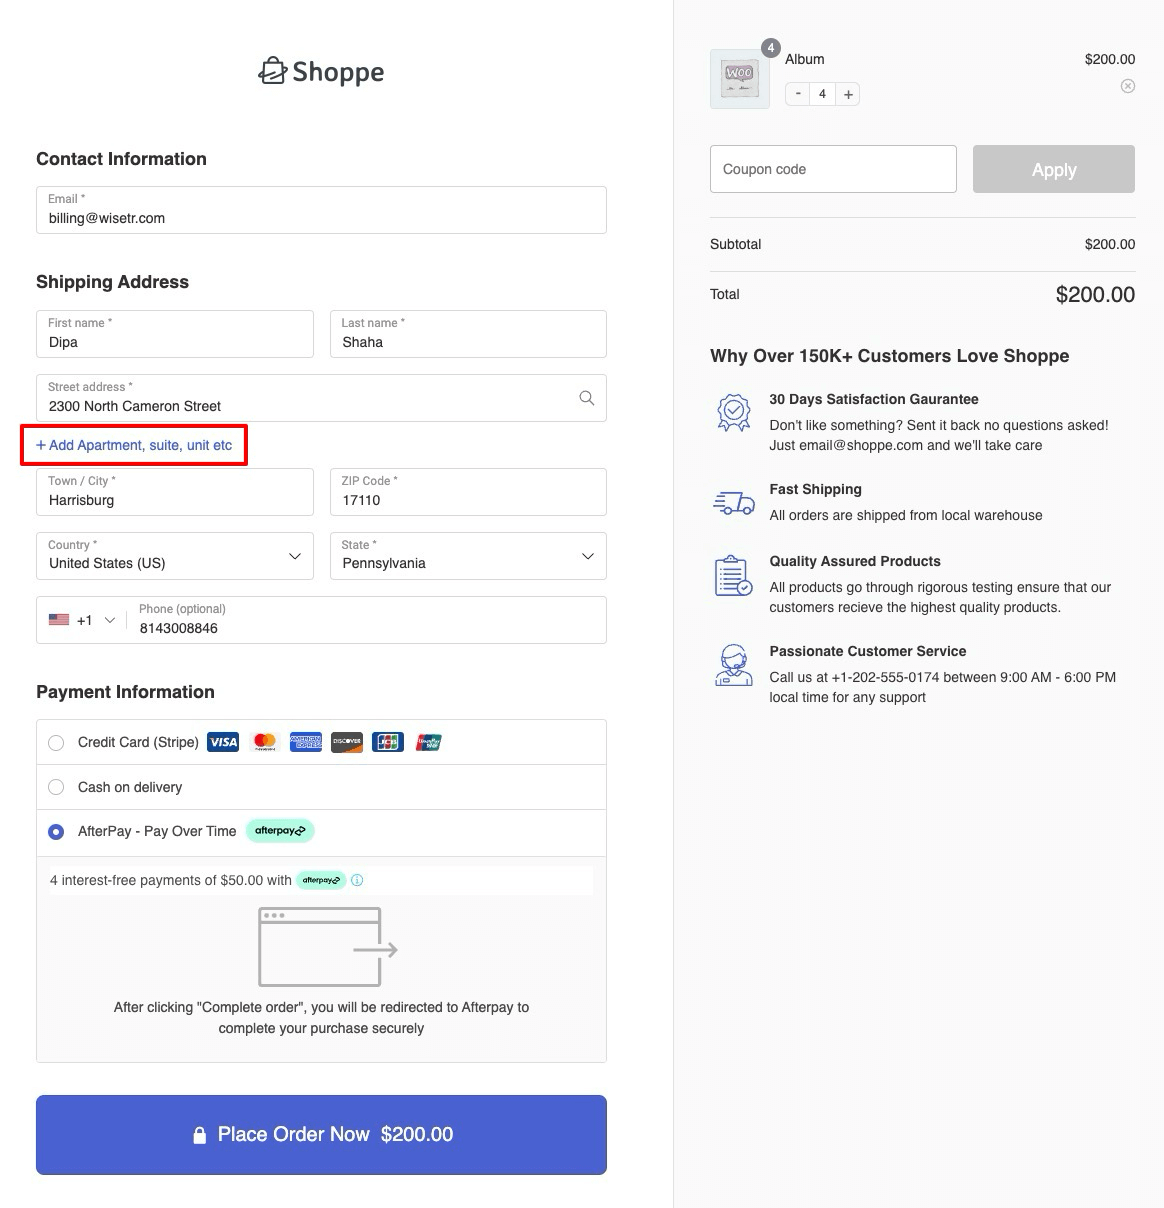
- Google address autocomplete: This feature automatically fills in users’ complete addresses as they begin entering their information, including street address, city, zip code, state, and country fields. With this feature, you can reduce address-related errors during checkout by 20%.
- Express checkout option: Utilizing express checkout enables you to provide users with a one-click buying option, enhancing convenience and encouraging them to finalize their purchase quickly. You can easily offer express checkout buttons like Google Pay and Apple Pay at checkout with FunnelKit.
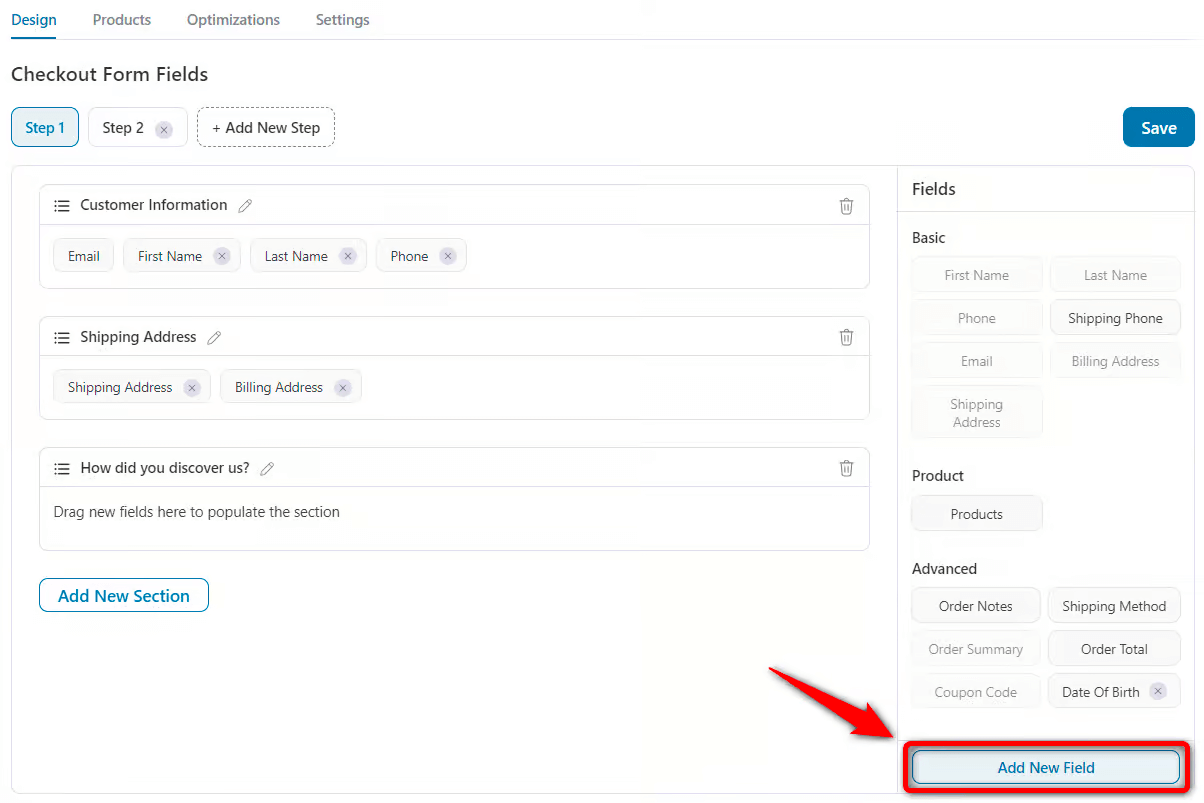
- Advanced checkout form field editor: Add, edit, and rearrange the form fields on the WooCommerce checkout page based on your requirements, allowing for seamless customization with a simple drag-and-drop feature.
- Collapsible optional fields: Make optional fields collapsible to make the checkout process seem shorter.
- Product recommendations to boost AOV: FunnelKit Funnel Builder offers seamless pre-purchase product recommendations, like order bumps, enhancing the shopping experience and boosting sales with a single click.
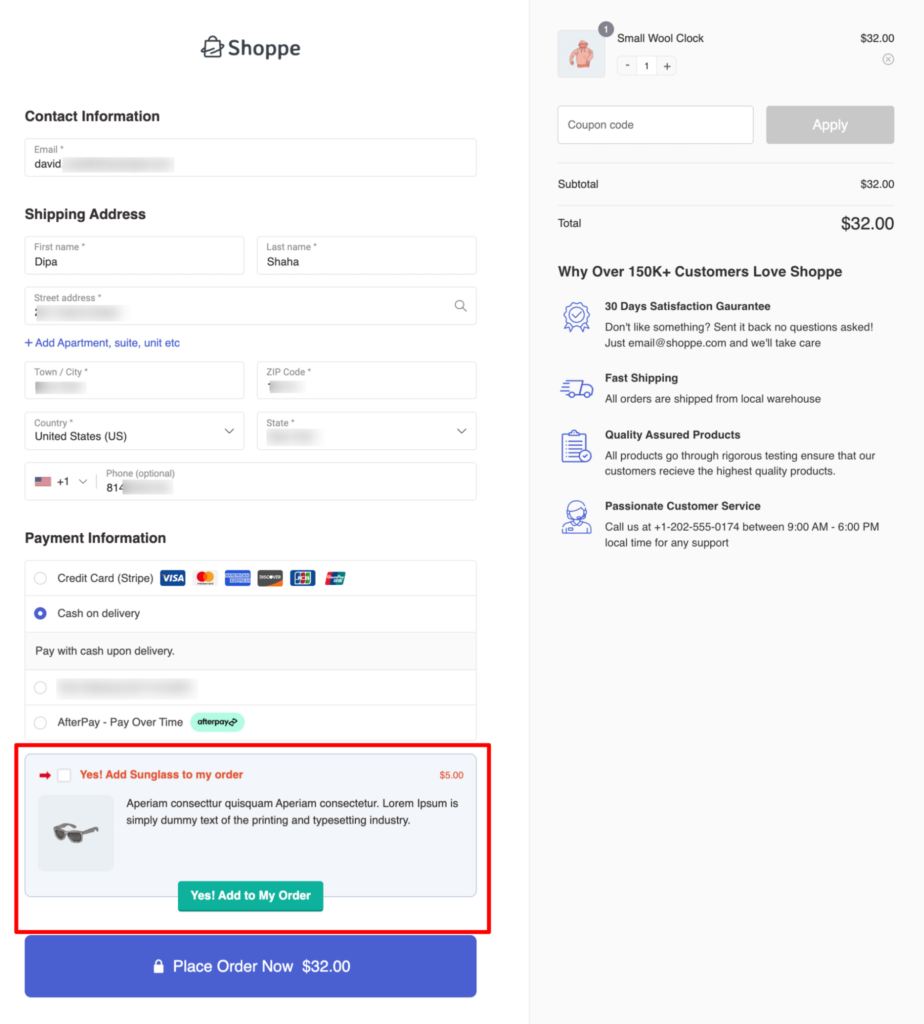
Note: Along with an order bump on the checkout page, you can also offer post-purchase one-click upsells to boost order value using FunnelKit.
Displaying the Afterpay option clearly on your product and checkout pages can increase buyer confidence. Combine it with FunnelKit’s optimized checkout templates to reduce friction and maximize your store’s conversion rates.
Frequently Asked Questions About WooCommerce Afterpay
Have a look at some of the frequently asked questions about WooCommerce Afterpay with the answer:
Yes, you can use Afterpay with WooCommerce through the Stripe Gateway Plugin for WooCommerce by FunnelKit.
If Afterpay is not displaying on the product page, it may be due to the Afterpay Message Location settings. Make sure to set the Afterpay Message Location on the Product page so that Afterpay will appear correctly on the product page.
Yes, WordPress allows store owners to offer Afterpay. To integrate Afterpay with WordPress, you need WooCommerce as an eCommerce platform and a WooCommerce Afterpay plugin, such as the Stripe Gateway Plugin for WooCommerce.
To display Afterpay on the product page, ensure the Afterpay Message Location is set to the Product page.
Afterpay and Clearpay are the same company but have different names. Afterpay is known as Clearpay in the UK, while it remains popular as Afterpay elsewhere.
Yes, Clearpay and Afterpay are the same company. In the UK, it's referred to as Clearpay, so if you have Afterpay, you can use Clearpay.
Yes, Clearpay and Afterpay are the same company, known by different names in different regions. Clearpay is predominantly used in the UK, while it refers to Afterpay elsewhere.
Afterpay accepts credit and debit cards from Mastercard and Visa issued in the customer's country of residence. Additionally, it also accepts digital forms of payment, such as Apple Pay and Google Pay.
Afterpay supports currencies like USD, CAD, GBP, AUD, or NZD.
An additional 1.5% fee is charged for international transactions, and a 1% fee is charged if currency conversion is required.
Pay-in-4 splits into four interest-free payments. Pay Monthly (US) offers 3/6/12/24-month plans based on eligibility and order value. Availability varies.
Ready to Offer WooCommerce Afterpay in your store?
Offering users the option to buy now and pay later is an effective strategy to attract new customers and foster repeat purchases. With Afterpay, you don't have to worry about collecting money from customers as Afterpay pays the full payment upfront to merchants.
This way, you benefit from increased conversions by providing a convenient buy now, pay later option for customers to purchase their desired products.
Furthermore, by incorporating FunnelKit's conversion-optimized checkout, you can further maximize your conversion rates.
Additionally, leveraging pre- and post-purchase offers such as order bumps and one-click upsells can enhance your store's average order value.
So why wait? Start offering the WooCommerce Afterpay payment option today and elevate your store’s conversion potential!
Get FunnelKit Funnel Builder to optimize conversions even further.
More WooCommerce Guides
- How to Test Stripe Payments in WooCommerce
- How to Set Up WooCommerce Affirm Payments
- How to Set Up WooCommerce Klarna Payments
- How to Accept WooCommerce SEPA Direct Debit Payments

Editorial Team
July 6, 2026Stripe is one of the most trusted payment gateways worldwide, powering over 3.5 million websites globally. With 90% of U.S. adults having made a purchase from businesses that use Stripe...
Editorial Team
July 1, 2026WooCommerce buy now pay later lets your customers split a purchase into smaller payments while you still get paid in full upfront. To offer buy now pay later, you connect...

Editorial Team
June 25, 2026Choosing the right payment gateway is one of the most important decisions for your WooCommerce store because it directly affects your sales, cash flow, and customer trust. I learned this...


