
Do you want to accept Affirm payments in your WooCommerce store?
In today’s E-commerce landscape, offering flexible payment solutions is paramount to staying ahead of the competition.
With WooCommerce Affirm payments, you can empower your customers with the freedom to Buy Now and Pay Later (BNPL).
In this post, we’ll demonstrate the step-by-step process of how you can set up the WooCommerce Affirm payment method in your store.
Check out our video tutorial to set up BNPL payments in WooCommerce:

Click on the button below to get all the tools you need to grow your WooCommerce business.
Table of Contents
- 1 What is Affirm?
- 2 How Does Affirm Work?
- 3 Why Should You Accept WooCommerce Affirm Payments in Your Store?
- 4 Essentials to Set Up WooCommerce Affirm Payment Method in Your Store
- 5 How to Set Up and Configure WooCommerce Affirm Payments in Your Store?
- 6 Testing the WooCommerce Affirm Payments in Your Store
- 7 Enhance Your WooCommerce Affirm Buying Experience with Beautiful Custom Checkout Pages
- 8 Bonus Tip: Offer Multiple Payment Gateways to Increase the Chances of Conversions
- 9 Frequently Asked Questions (FAQs)
- 10 Are You Ready to Accept Affirm Payments in Your WooCommerce Store?
What is Affirm?
Affirm is one of the largest buy now, pay later lenders that operates in the United States and Canada, offering payment plans for online and in-store purchases.
Also known as a point-of-sale installment loan, BNPL allows shoppers to pay for purchases over time, with the option of 4 interest-free payments every two weeks or monthly installment plans.
Affirm offers payments at 0-36% APR based on the shopper’s credit, allowing customers to afford the things they want without creating unmanageable debt.
The global BNPL market size is expected to reach $530+ billion by 2024. That’s a CAGR of 56% from 2021 to 2024. By 2030, it is forecasted to reach $3 trillion.
Affirm payment gateway is quite convenient and allows customers to make purchases and pay for them over time, usually with no interest.
Thus, having Affirm set up in your WooCommerce store is a great way to increase conversions, generate remarkable sales, and foster customer loyalty.
How Does Affirm Work?
Affirm provides a payment alternative to traditional credit cards. Plus, unlike other Buy Now Pay Later services, it allows shoppers to choose a payment option that suits their budget.
When a shopper proceeds to buy an item, there is a payment option to spread out their payments via Affirm on the checkout page. Upon clicking on it, the user has to undergo a quick application process to determine their eligibility.
Once approved, they can choose from two options - ‘4 interest-free payments every two weeks’ or ‘monthly payments (interest rate depends on the shopper’s credit)’.
Affirm then pays the full purchase amount upfront to the merchant, and the customer repays Affirm over time as per the payment schedule cycle.
Here’s how you can place your WooCommerce orders with the Affirm payment gateway:
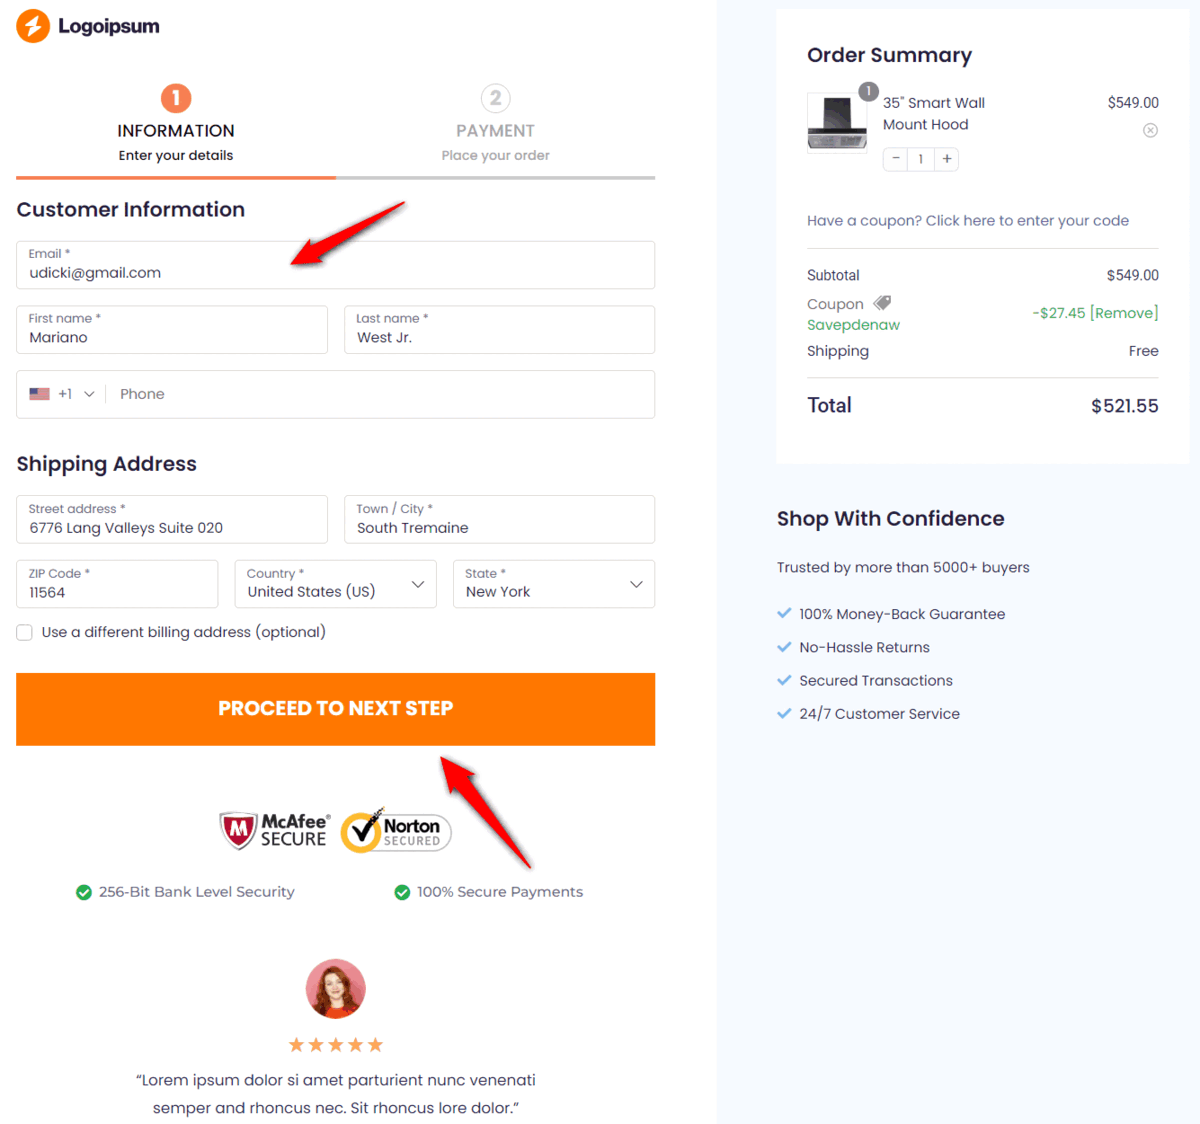
Easy, right?
Why Should You Accept WooCommerce Affirm Payments in Your Store?
Affirm started as a payment alternative to traditional credit cards because, typically, credit cards leave users with huge interest rates to pay off, which is inconvenient, to say the least.
The average U.S. household has a credit card debt of $6000+.
That’s why Affirm started operating as an interest-free, no-hidden-fee Buy Now Pay Later (BNPL) payment scheme.
It’s more flexible, transparent, and convenient compared to credit cards.
Incorporating the Affirm payment gateway into your WooCommerce store opens up a myriad of opportunities for you and your customers. In fact, merchants have seen a 20% increase in conversion rates and an 85% boost in their store’s average order value with Affirm.
Let’s look at some of the key benefits associated with WooCommerce and Affirm integration:
- Enhancing customer experience with a streamlined checkout flow
WooCommerce Affirm integration helps you streamline the checkout process of your online store.
By offering transparent financing options at checkout, you can minimize friction and provide a seamless purchasing experience for your customers.
- Boosting conversion rates with flexible payment options
WooCommerce Affirm payments offer your customers flexible payment plans tailored to their needs. By catering to diverse customer needs, you are expanding your customer base and fostering their loyalty to your brand.
- Maximizing your store revenue by increasing sales
Integrating Affirm payments into your WooCommerce store can help increase conversion rates, reduce cart abandonment, and generate more revenue.
It is because you allow them to make large-valued purchases by dividing payments into smaller installments spread over time.
This practice will not only boost your sales but also stimulate repeat business.
Essentials to Set Up WooCommerce Affirm Payment Method in Your Store
Before we head over to set up the WooCommerce Affirm integration, these are some of the essential plugins you need in your store.
1. A WooCommerce store
WooCommerce is one of the most popular eCommerce platforms built for WordPress. It powers more than 5 million websites in the world.
Explore this WooCommerce document guide to set up your online store with ease.
2. A Stripe account
Stripe is a widely used payment processing platform that allows businesses to accept and manage payments online. Setting up Stripe is free, but they charge you a small amount for each transaction. Their pricing structure varies based on different countries.
So, next, you need to set up your Stripe account to start collecting payments in your store.
3. Stripe Gateway for WooCommerce plugin
Stripe Gateway for WooCommerce by FunnelKit offers you a powerful integration solution that lets you accept online payments in your store.
It’s one of the best WooCommerce Stripe gateway plugins, offering a simple, secure, and quick way to collect payments on the web and mobile.
Stripe Gateway for WooCommerce is compatible with credit and debit card payments through Stripe, such as Visa, Mastercard, American Express, JCB, Diners Club, and more.
It even integrates with express payment options such as Google Pay and Apple Pay and BNPL gateways such as Affirm, Klarna, and Afterpay.
Furthermore, it also supports local payments like SEPA, P24, iDEAL, Bancontact, and more.
This Stripe Gateway plugin is compatible with WooCommerce checkout pages and one-click upsells for seamless order placement and processing.
4. A valid SSL certificate
An SSL certificate helps authenticate your website and encrypts the data transmitted between a user’s web browser and your website’s server.
Your WooCommerce store should have a valid and active SSL certificate.
5. Your store currency should be USD or CAD
You must have the currency set to USD or CAD in your WooCommerce store.
6. Customer’s address should be in the U.S. or Canada
Since Affirm mainly operates in the United States and Canada, it shows Affirm's BNPL payment method to customers residing in or shipping to those two countries only.
How to Set Up and Configure WooCommerce Affirm Payments in Your Store?
Now that the essentials are in place, let’s connect your WooCommerce store with Stripe using the Stripe Payment Gateway plugin.
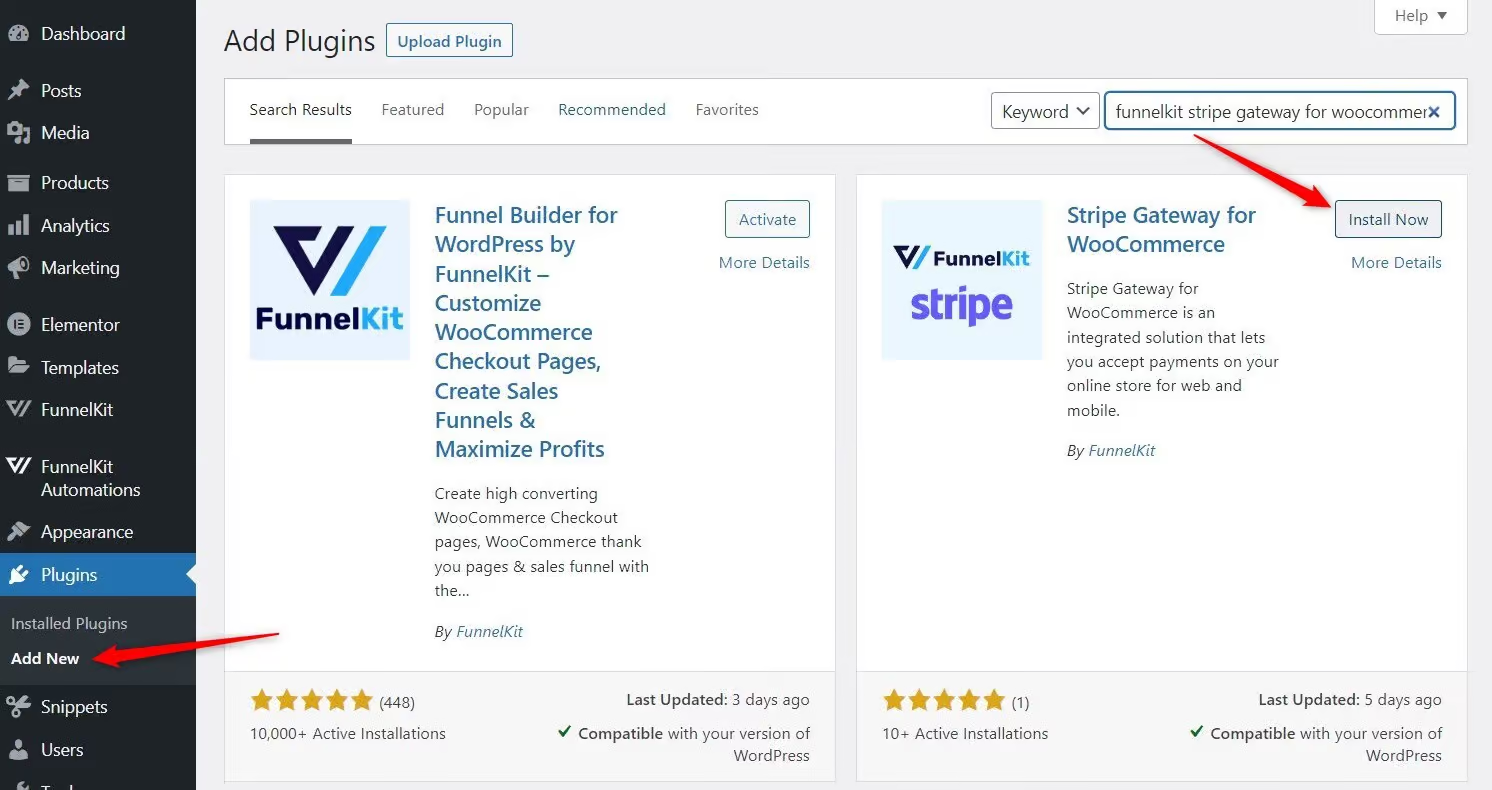
Step 1: Install the Stripe Gateway for WooCommerce plugin
Go to your WordPress dashboard and search for “FunnelKit Stripe Gateway”.
Once you locate it, install and activate the plugin on your website.
Now, connect your Stripe account to the WooCommerce store.
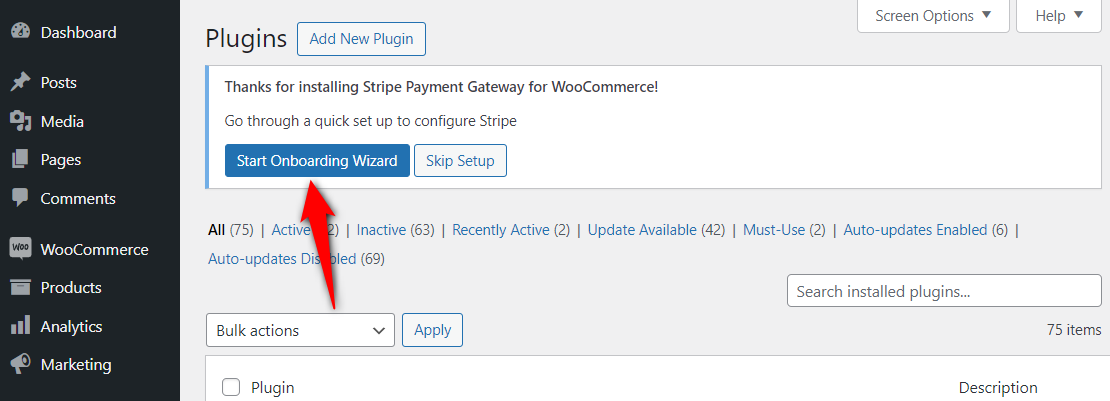
Step 2: Configure your Stripe account
Once the plugin is activated, a notification will appear to configure your Stripe account.
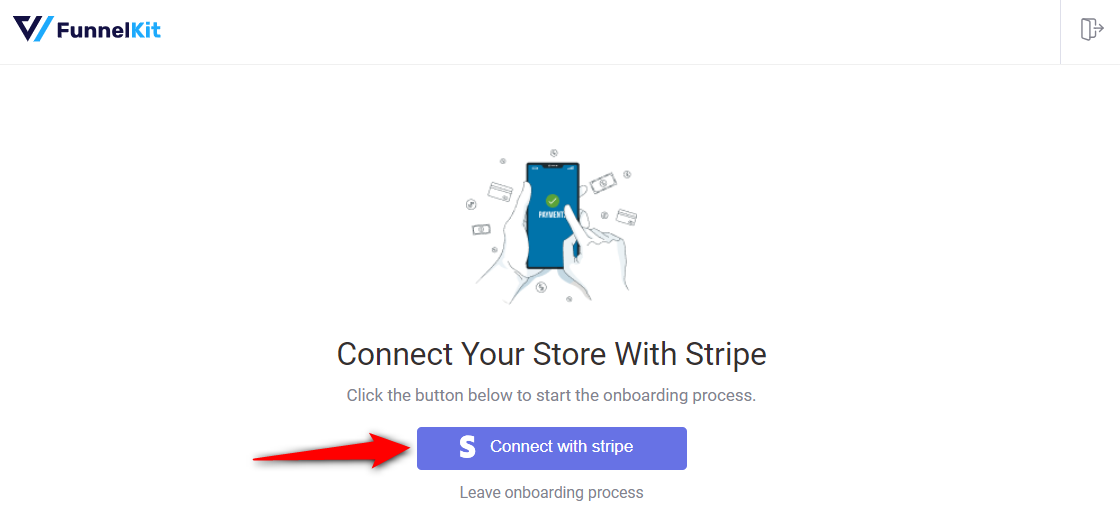
Click the ‘Start Onboarding Wizard’ button to start the setup and configuration process.
A new window will open. Hit the ‘Connect with Stripe’ button.
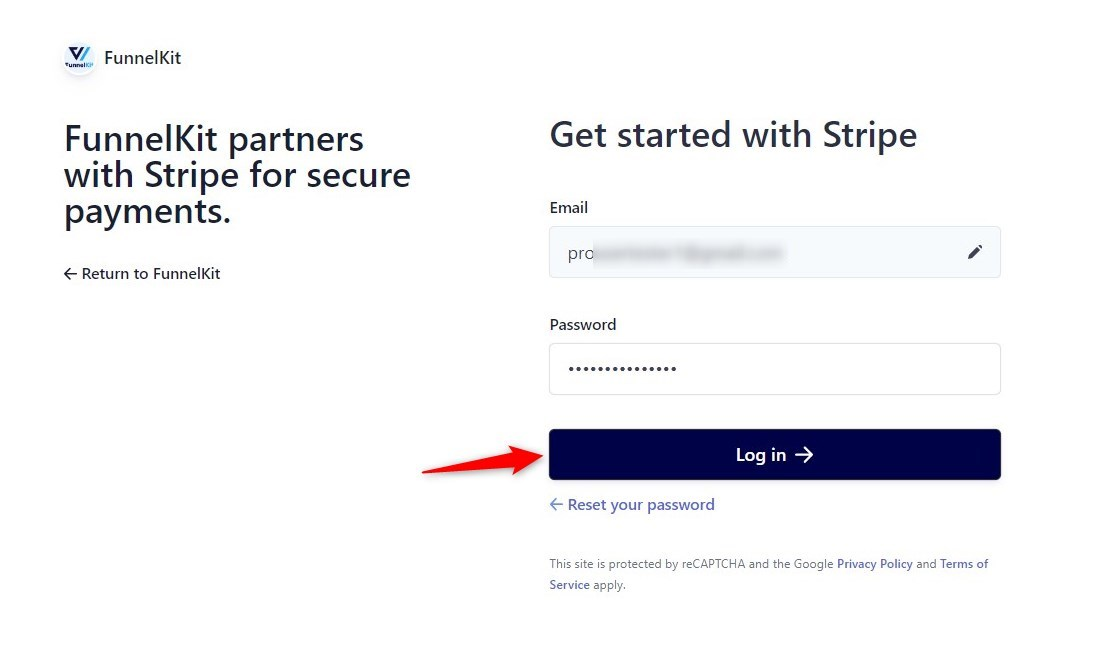
You’ll now see the Stripe account authorization page.
Log in to your Stripe account by entering your registered email address and password.
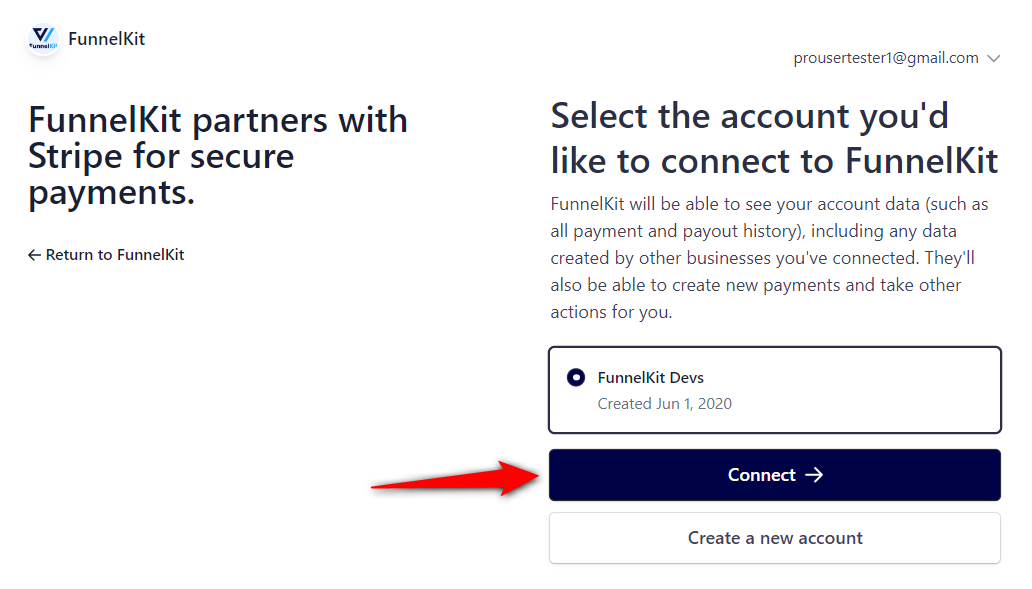
Next, you’ll need to verify your Stripe account with a 6-digit OTP sent to your registered email or phone number.
Then, select the Stripe account you want to use for your WooCommerce Affirm integration.
Once done, click Connect.
Enable the payment gateways
On the next screen, you will see all the available payment gateways. Hit the toggle next to Affirm payment buttons.
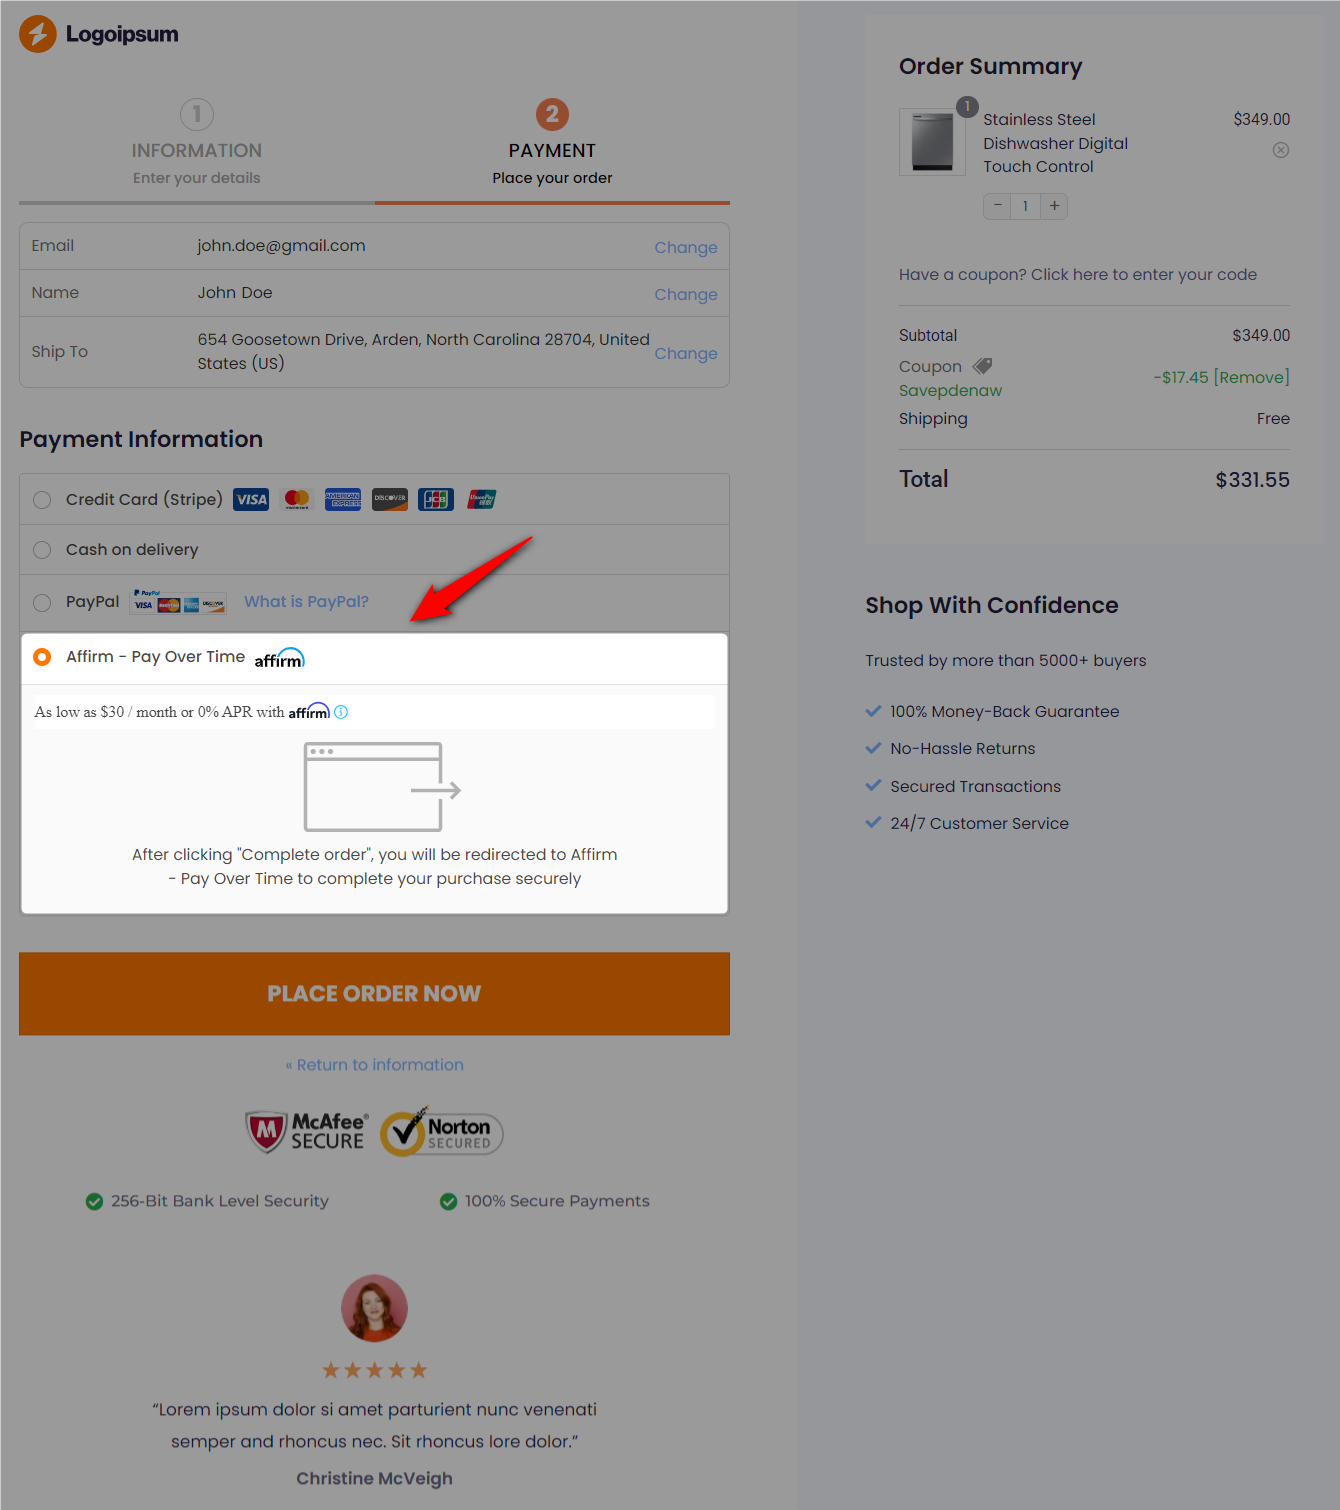
Here, we’ll select both the Credit Card (Stripe) and Affirm payment gateway.

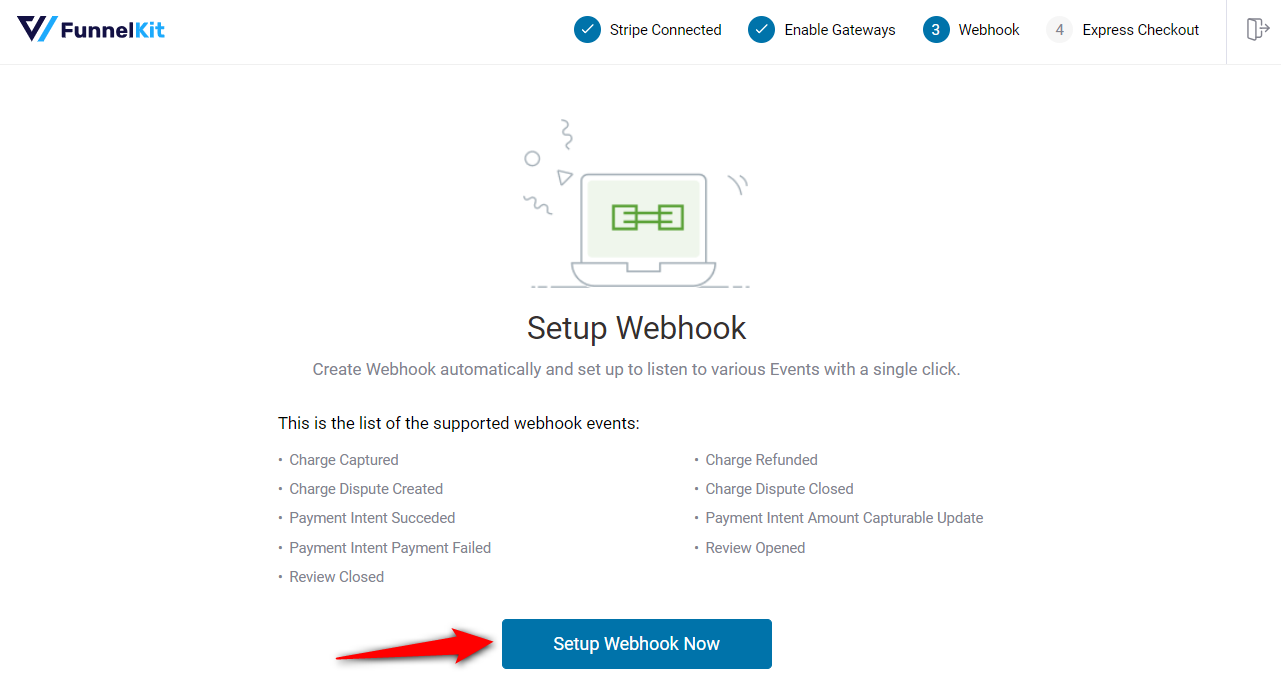
Set up webhook
This Stripe payment gateway will automatically set up webhooks.
Hit the ‘Setup Webhook Now’ button and move to the next screen.
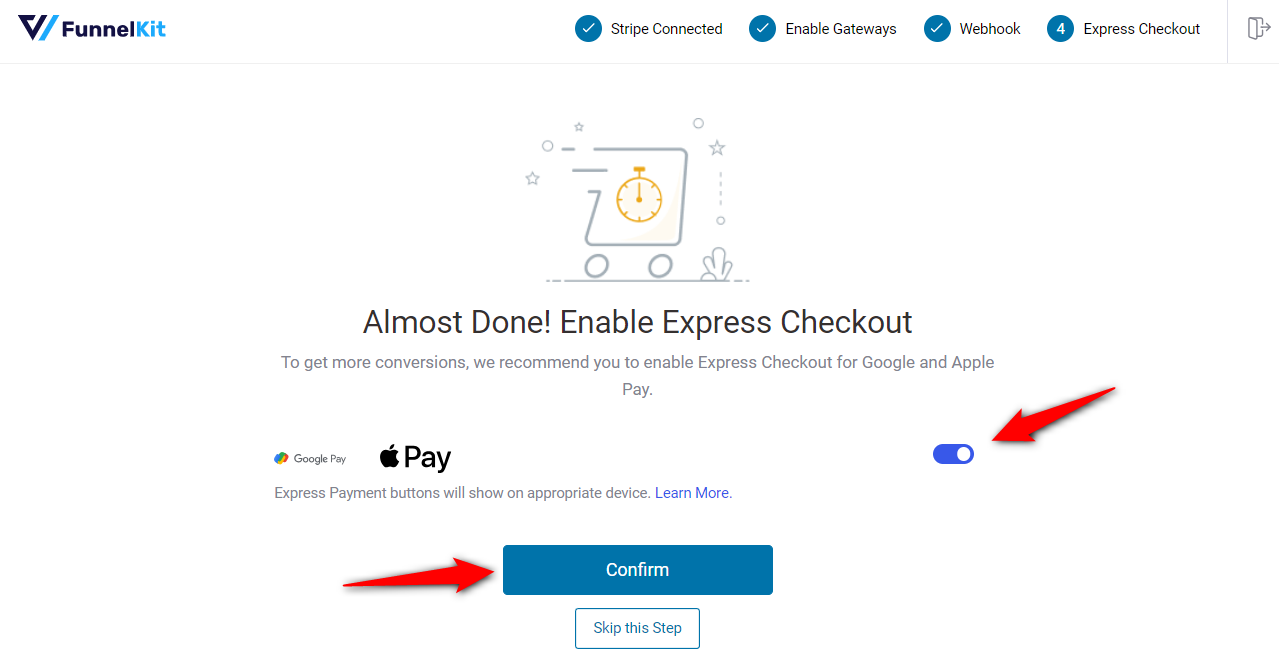
Enable Express Checkouts
The plugin will prompt you to enable express checkout buttons such as Apple Pay and Google Pay.
This way, you can incorporate one-click checkouts in your WooCommerce store.
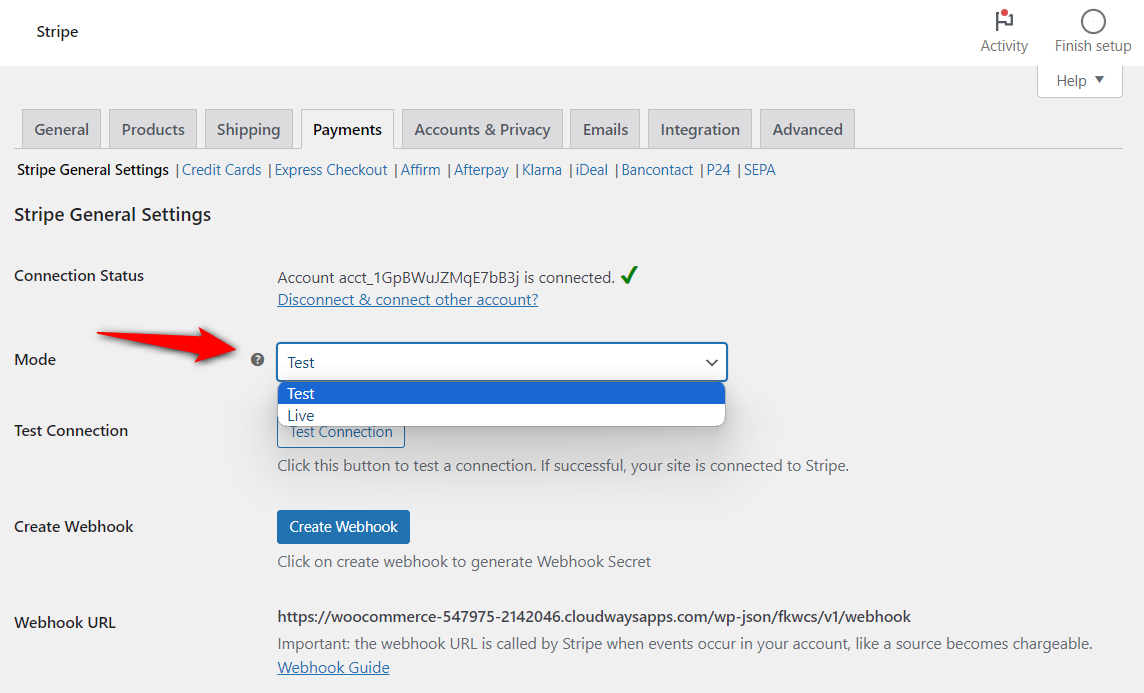
You’re all set! Make sure to activate the test mode and first configure the WooCommerce Stripe Affirm payment mode.
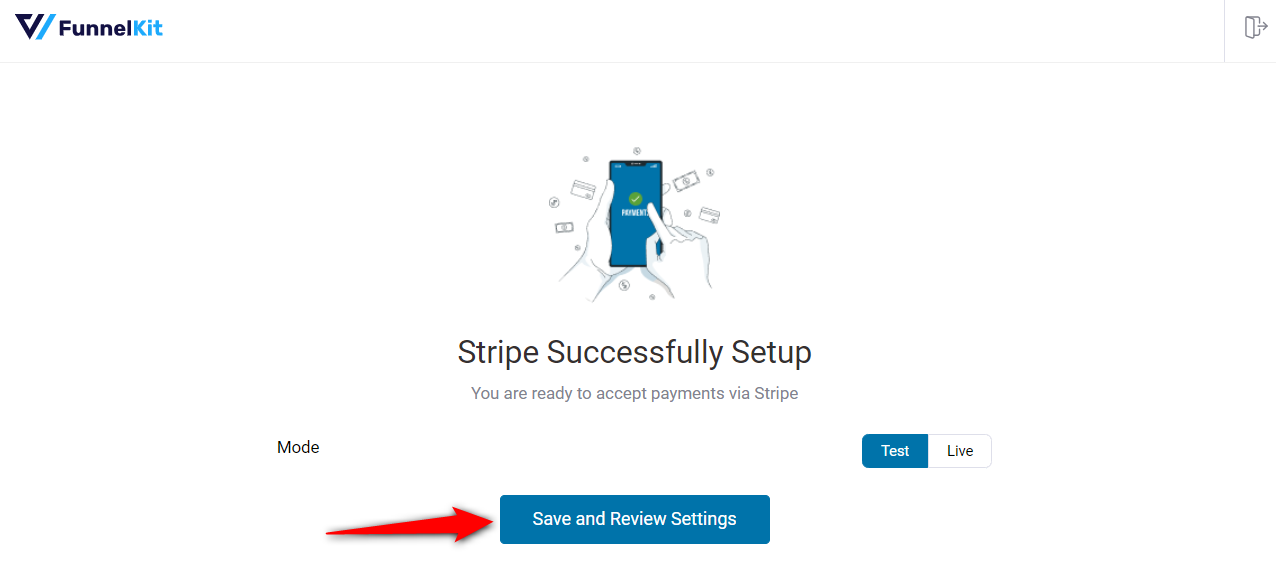
Clicking on ‘Save and Review Settings’ will automatically fetch all your Stripe account details into your WooCommerce store:
- Stripe connection ID and status
- Webhook ID and URL
- Live and test webhook secret key
- Debug log URL
And that’s it!
Your Stripe account is now successfully connected and configured in your WooCommerce store.
Step 3. Enable the Affirm payment gateway in your WooCommerce store
Navigate to WooCommerce ⇨ Settings ⇨ Payments.

Under the Payments tab, scroll down and click on ‘Manage’ next to Affirm - Pay Over Time.
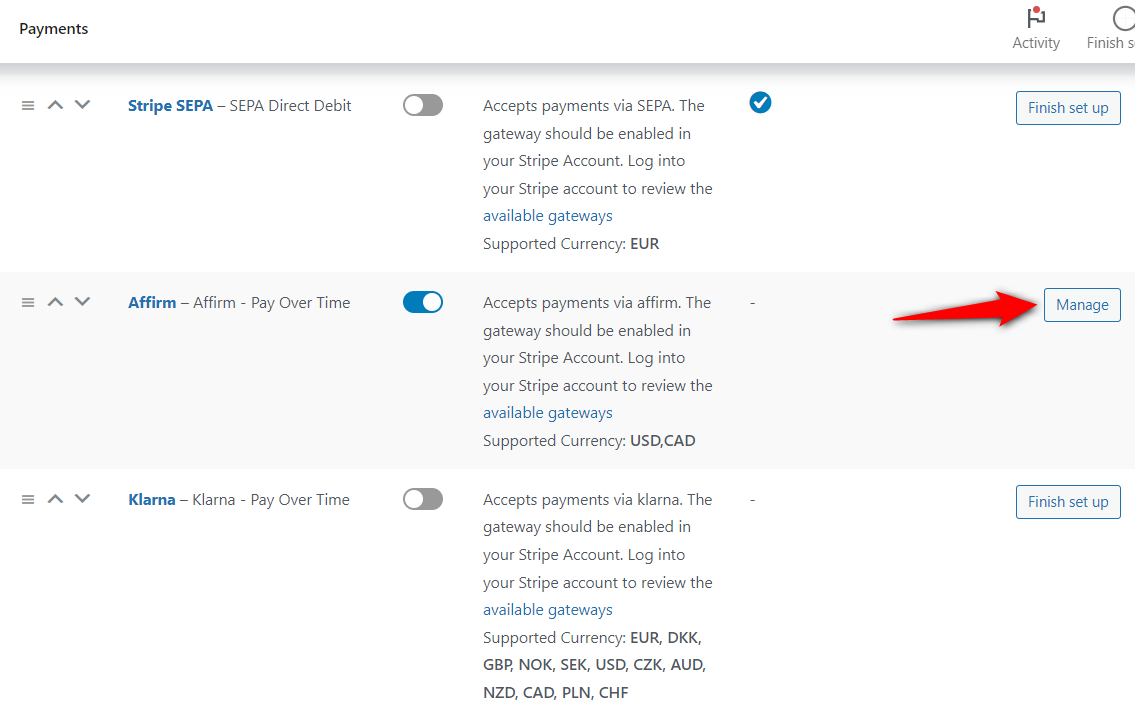
Now, click the checkbox next to ‘Enable Affirm Payments’.
This will enable Affirm on your WooCommerce store.
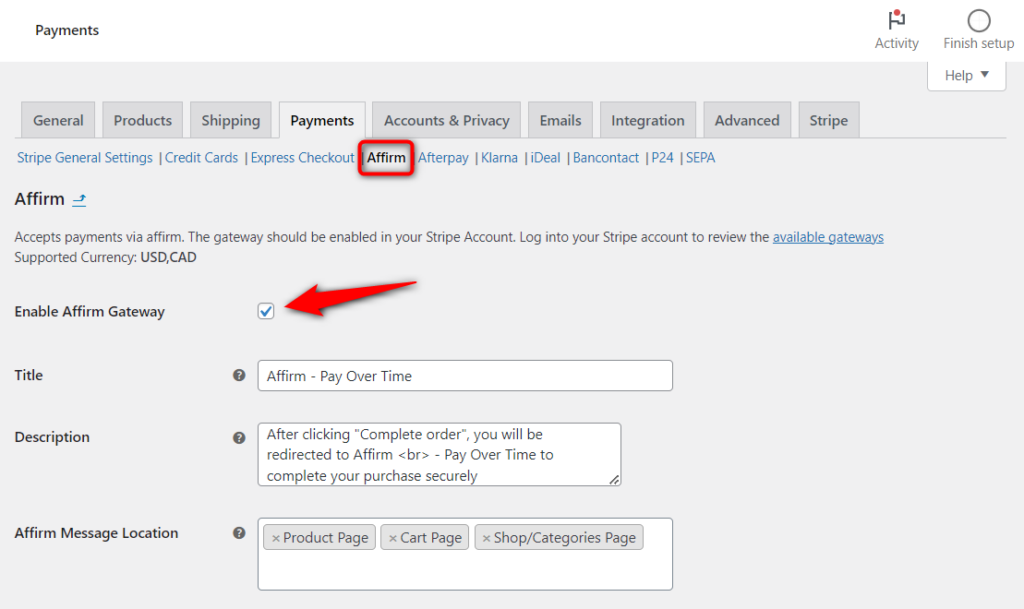
Step 4. Configure the WooCommerce Affirm payment option in your store
Customize the Affirm payment gateway from the following options:
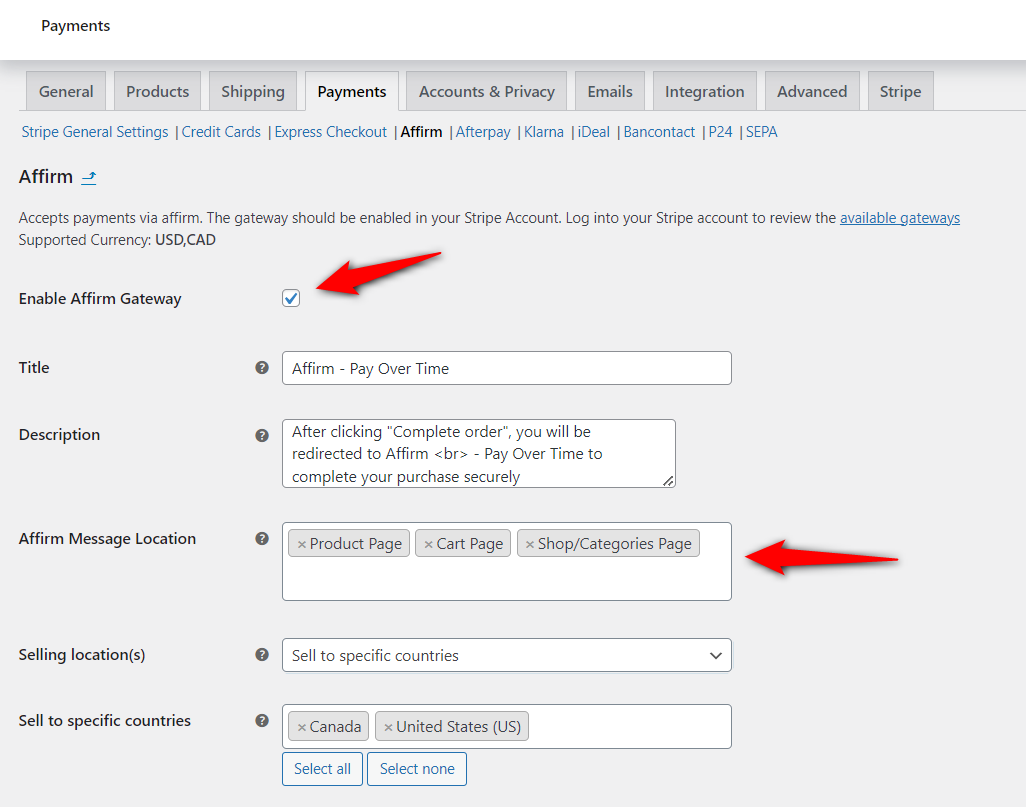
- Title - Add the title of the Affirm payment method shown on the checkout page.
- Description - The description text that appears below the title of the Affirm payment method on the checkout page.
- Selling location and selling to specific countries - By default, Affirm is configured to sell to specific countries - the United States and Canada. We recommend not to change it.
- Order button text - The text on the place order button when this payment method is selected on the WooCommerce checkout page.
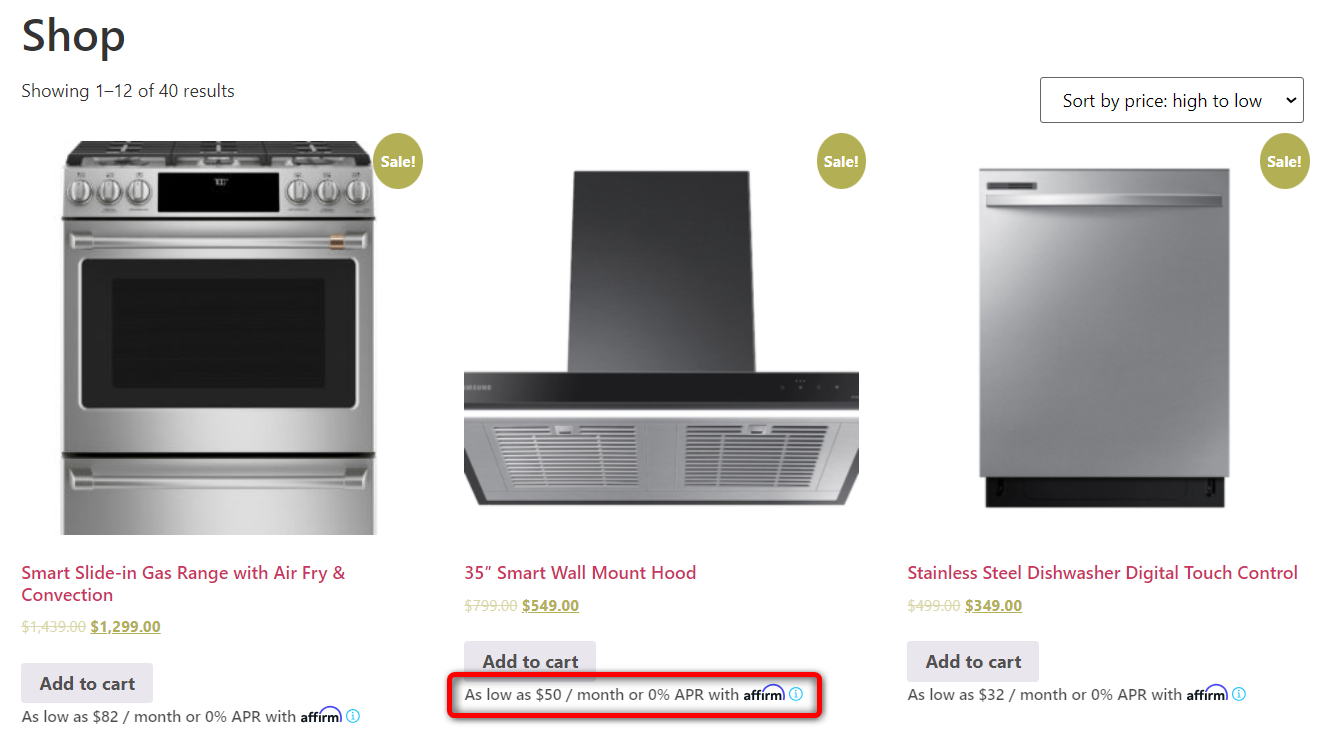
- Affirm message location - Affirm payment mode comes with a message. Specify the web pages where you want to display the WooCommerce Affirm payment message to provide convenience to your shoppers.
You can set the message location to the product page, cart page, checkout page, and more.
For example, this is the Affirm message on the shop or category page:
Or on the WooCommerce product page:

Check the Affirm payment message on the FunnelKit’s sliding cart.
FunnelKit Cart replaces your default WooCommerce cart page with a beautiful, dynamic sliding shopping cart in your store.
You can even offer upsells and set up rewards inside the shopping cart to encourage shoppers to purchase more.
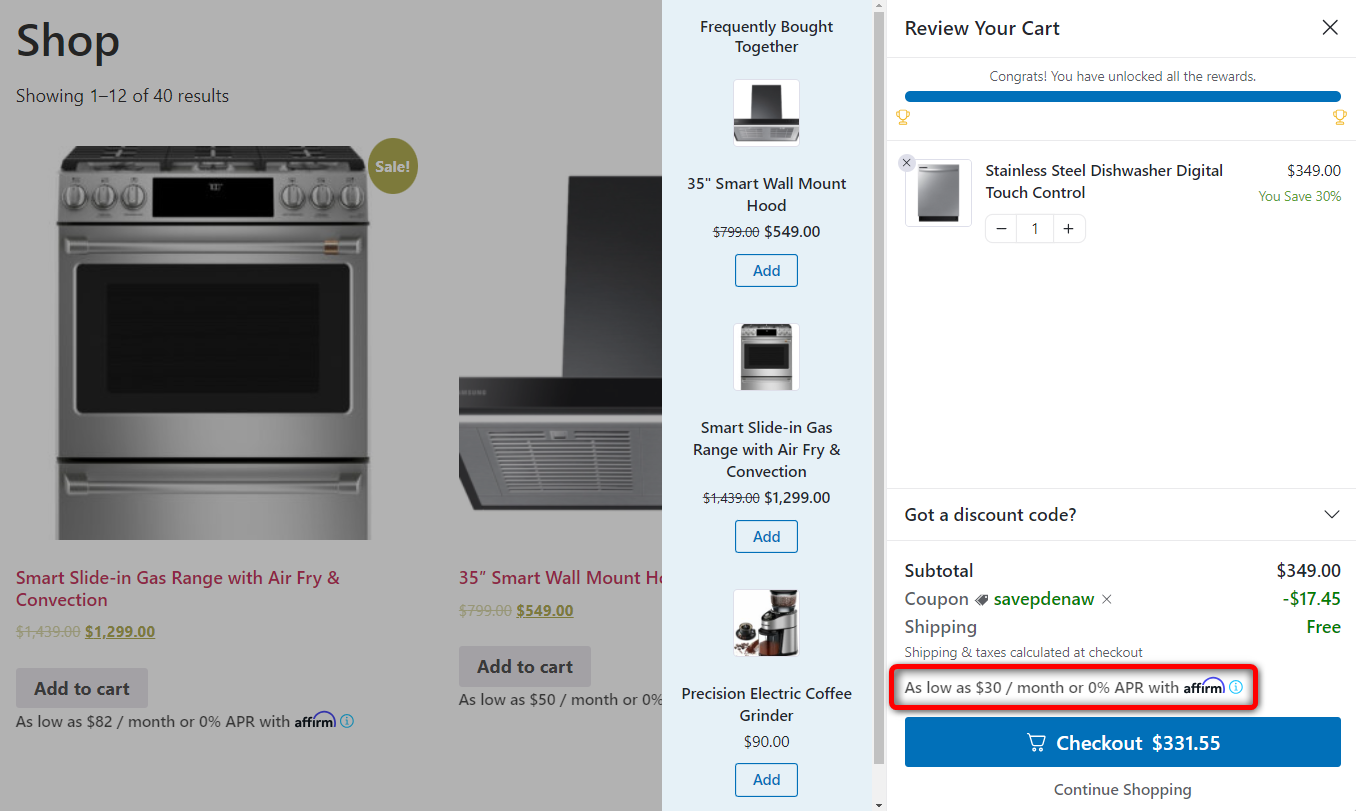
Affirm dynamically calculates the monthly prices or installment plans at the message locations you specified in your store.
Hit the ‘Save changes’ button when done.
Well done! You just set up and configured the WooCommerce Affirm payment gateway in your store.
Testing the WooCommerce Affirm Payments in Your Store
To test the WooCommerce Affirm payment method, put your website in the ‘Test’ mode from the WooCommerce payment settings.
Now, go to your store on to the product page. Then, add the item to your shopping cart and head over to the checkout page:
Click on Affirm and hit the ‘Place Order Now’ button.
It’ll take you to a pop-up window to check your Affirm loan eligibility or purchasing power.
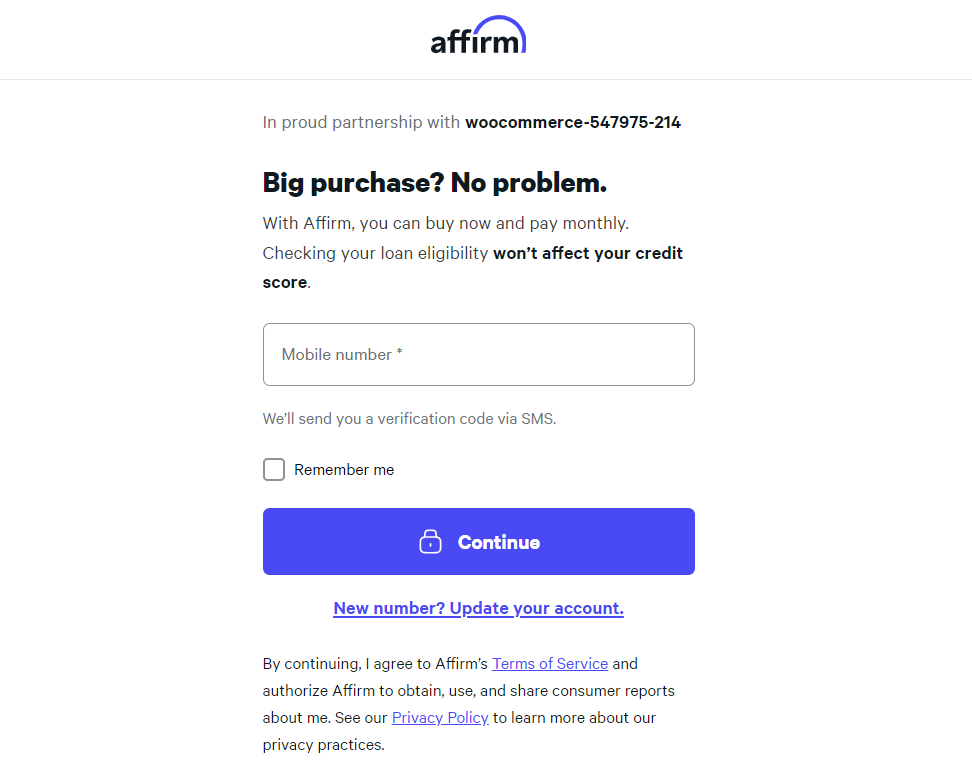
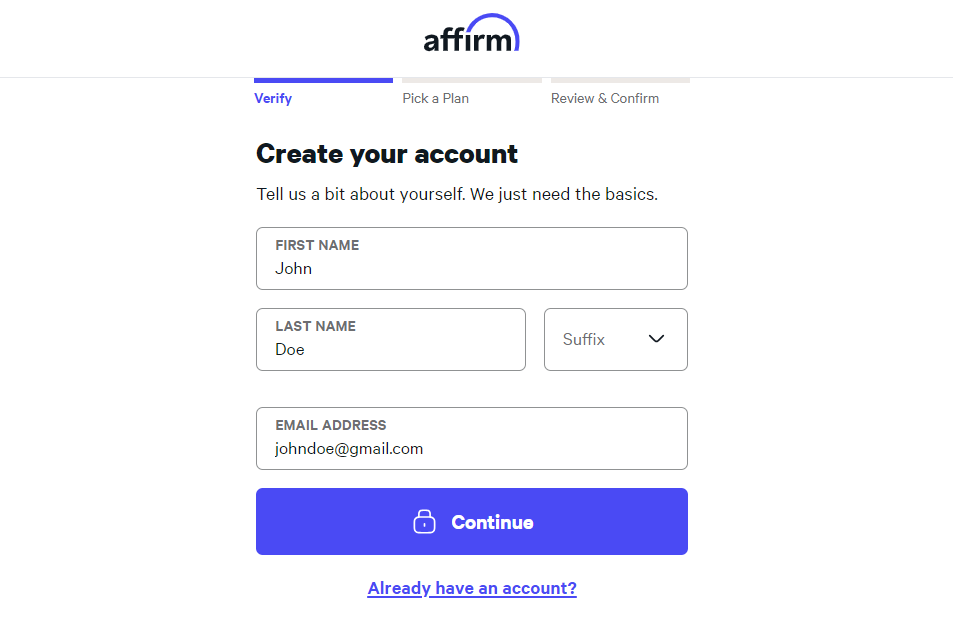
It’ll then ask you to verify your details. Make sure to follow the process as instructed.
Once approved, you’ll need to choose a payment plan from the available options. These payment plans are offered based on your eligibility:
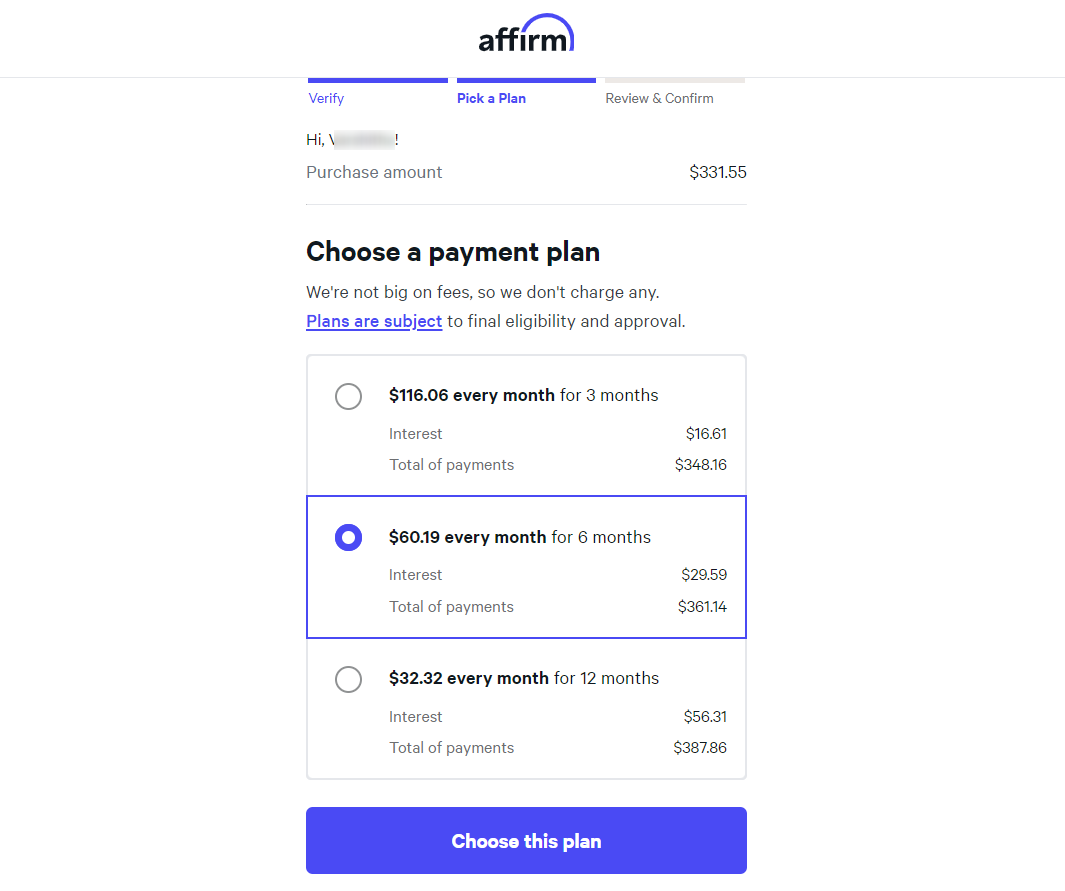
Once done, you can review the payments you’ll need to make over the upcoming months and finally confirm the choice to place your order.
You can even enable the autopay option in your bank account from here:
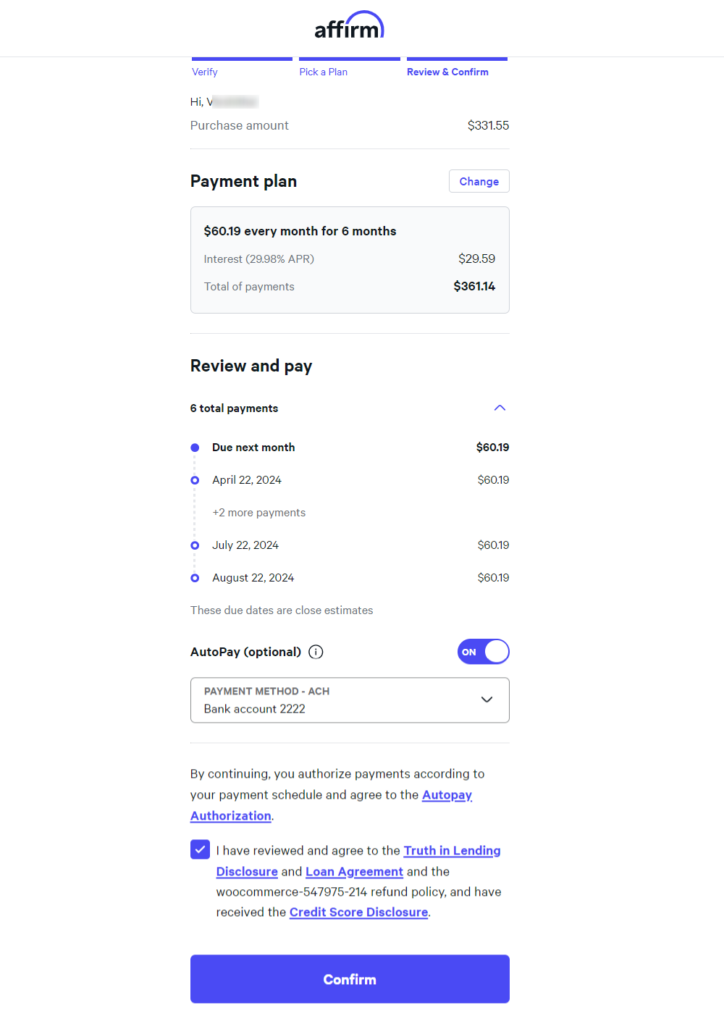
Clicking on ‘Confirm’ will place your order and you’ll be directed to the thank you page.
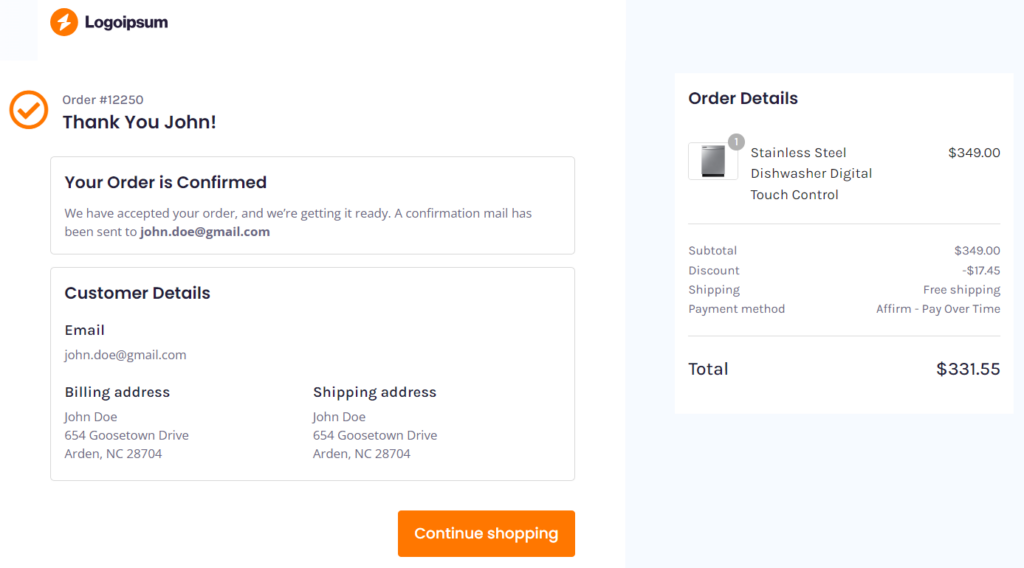
This is how you can test WooCommerce Affirm payments in your store.
After testing the transaction, change the mode to ‘Live’, and you’ll be able to collect online payments via Affirm on your WooCommerce store.
Enhance Your WooCommerce Affirm Buying Experience with Beautiful Custom Checkout Pages
The default WooCommerce checkout page is quite monotonous and focuses only on completing the sale.
It may work for beginners, but it doesn’t include any high-converting elements or AOV-boosting offers to amp up your sales.
What if you could create beautiful, pre-designed checkout pages that are optimized for conversions?
Yes, import them with a single click and customize them with any page builder of your choice without any coding!
Sounds good?
You can create such beautiful checkouts with the FunnelKit Funnel Builder.

It has a multi-step checkout process with simplified checkout form fields and includes a mini cart section, testimonials, an order bump offer, and more!
Optimizing your checkout page with techniques such as auto-fill address suggestions, auto-apply coupons, and more can reduce cart abandonment.
Some other class-apart features of these checkout pages are:
- Beautiful templates - You get access to a wide array of beautiful, pre-designed templates for all the pages, including checkouts, landing, upsells, and thank you pages. Further, you can customize these templates with your favorite page builders just the way you want.
- Advanced checkout form field editor - Add, edit, and rearrange form fields on the WooCommerce checkout page. Use a simple drag-and-drop feature to customize your checkout form fields seamlessly.
- Google address autocompletion - This feature automatically enters users’ complete addresses on selection once they start entering their addresses. It automatically fills up the entire street address, city, zip code, state, and country fields.
- Product recommendations - Add product recommendations throughout the shopping journey to boost the average order value (AOV) in your store. You can add product upsells inside the shopping cart, on the checkout page, after the checkout page, and even in emails.
That’s not all! These templates are optimized for all devices, ensuring a frictionless checkout experience for all your shoppers.
Bonus Tip: Offer Multiple Payment Gateways to Increase the Chances of Conversions
Offering multiple payment options can help increase conversion rates by providing customers with the flexibility and convenience to pay for their favorite products.
You can offer payment options like:
- Credit and debit cards
- Express checkouts like Apple Pay, Google Pay, and more
- Local payment methods like SEPA, iDEAL, P24, Bancontact, etc.
- Buy now and pay later, such as Klarna, Afterpay, Affirm, etc.
You can easily enable these payment modes with the Stripe Gateway for WooCommerce plugin that we discussed above.
Furthermore, you can even enable other payment options such as:
- PayPal Standard and PayPal Express
- Cash on delivery or Check Payments or BACS (Bank Transfer)
Our experts recommend you look for popular payment methods in the country you serve and closely listen to your customers. It will surely help you find out the payment options they are comfortable with.
Once you have all the data, enabling those payment gateways will definitely aid in increasing conversions in your WooCommerce store.
Frequently Asked Questions (FAQs)
In this section, our experts have answered some commonly asked questions related to WooCommerce Affirm payments.
1. Does Affirm work with WooCommerce?
Yes, Affirm works with WooCommerce and offers a flexible payment plan for shoppers to buy now and pay later (BNPL). This allows customers to make high-value purchases and pay interest-free installments over time.
2. How do I add Affirm to WordPress? Or how do I install Affirm on WooCommerce?
Yes, you can effortlessly add Affirm to WordPress and WooCommerce. You just need to install Stripe Gateway for WooCommerce and connect the Stripe account to your store.
Once you’ve configured the Stripe account into your store, enable the Affirm payment in your WordPress website from the WooCommerce payment settings. Once done, the Affirm payment method will appear on your checkout page.
3. What payment gateway does WooCommerce use?
WooCommerce is an open-source E-commerce platform that supports over 135 currencies worldwide. Some popular payment gateways that WooCommerce has include Stripe, PayPal, Square, Authorize.net, and many more.
4. How do I add payment methods to WooCommerce?
You can add different payment methods to WooCommerce by installing WordPress plugins. With the Stripe gateway for WooCommerce, you can add credit and debit cards, express checkout buttons, local payment options, and more.
The PayPal plugin provides you with PayPal Express and PayPal checkout options.
5. Are there any transaction fees associated with using Stripe and Affirm?
Yes, online sales cost businesses 2.9% + 30 cents per transaction. However, Stripe and Affirm do not charge monthly or yearly fees. There is an additional 1% fee for international and currency conversion transactions.
6. Can customers use WooCommerce Affirm payments for all purchases?
Customers can use WooCommerce Affirm payments for all purchases subject to eligibility requirements. Furthermore, certain eligible products are only valid under the Affirm BNPL scheme.
7. Which countries is Affirm popular in?
Affirm provides pay-over-time solutions to shoppers from various countries. This payment method is quite popular in the United States of America (USA) and Canada.
If you have any other questions, feel free to contact our Support Team anytime, and we’ll be happy to help you out.
Are You Ready to Accept Affirm Payments in Your WooCommerce Store?
In this competitive environment of e-commerce, offering flexible payment options such as buy now pay later (BNPL) is the key to generating more sales.
By integrating Affirm into your WooCommerce store, you can provide the opportunity for your shoppers to make larger purchases and pay them over time.
This way, you can elevate your buying process, boost conversions, and maximize your store’s revenue.
Furthermore, you can add Affirm to your beautiful custom checkout pages and witness its impact!
So why wait?
Witness the exponential growth in your business with the FunnelKit Funnel Builder.

Editorial Team
July 6, 2026Stripe is one of the most trusted payment gateways worldwide, powering over 3.5 million websites globally. With 90% of U.S. adults having made a purchase from businesses that use Stripe...

Editorial Team
July 1, 2026WooCommerce buy now pay later lets your customers split a purchase into smaller payments while you still get paid in full upfront. To offer buy now pay later, you connect...

Editorial Team
June 25, 2026Choosing the right payment gateway is one of the most important decisions for your WooCommerce store because it directly affects your sales, cash flow, and customer trust. I learned this...


