

A global checkout is the final stage in the buying journey, where customers review their orders, enter payment details, and complete their purchases.
However, WooCommerce’s default checkout isn’t designed for conversions. It lacks key features such as product images, testimonials, and trust badges, which build trust and improve the shopping experience.
A custom global checkout page offers a streamlined, mobile-friendly experience. It allows customers to adjust orders easily and boosts conversions with powerful features.
In my 8 years of experience auditing thousands of WooCommerce stores, I've learned that a "one-size-fits-all" checkout is a conversion killer.
In this guide, I'll show you exactly how to engineer a friction-free, high-converting global checkout page for your WooCommerce store that builds trust and captures revenue effortlessly.
Table of Contents
- 1 9 Key Elements of a Powerful Global Checkout Page
- 2 The Current State: WooCommerce Default Checkout Limitations
- 3 How to Transform Your WooCommerce Global Checkout for Higher Conversions?
- 4 How to Create and Customize a Global Checkout Page (Step-by-Step)
- 5 How to Increase Your Checkout Page’s AOV By Adding Offers
- 6 Global Single-Step vs Multi-Step Checkout: Which One is Better?
- 7 Frequently Asked Questions (FAQs) Related to WooCommerce Global Checkout
- 8 Does FunnelKit work with my payment gateway?
- 9 Can I use different checkouts for different products?
- 10 How do I ensure my checkout is GDPR/privacy compliant?
- 11 Can I revert to the default WooCommerce checkout if needed?
- 12 Ready to Transform Your Default WooCommerce Checkout to a High-Converting Global Checkout with FunnelKit?
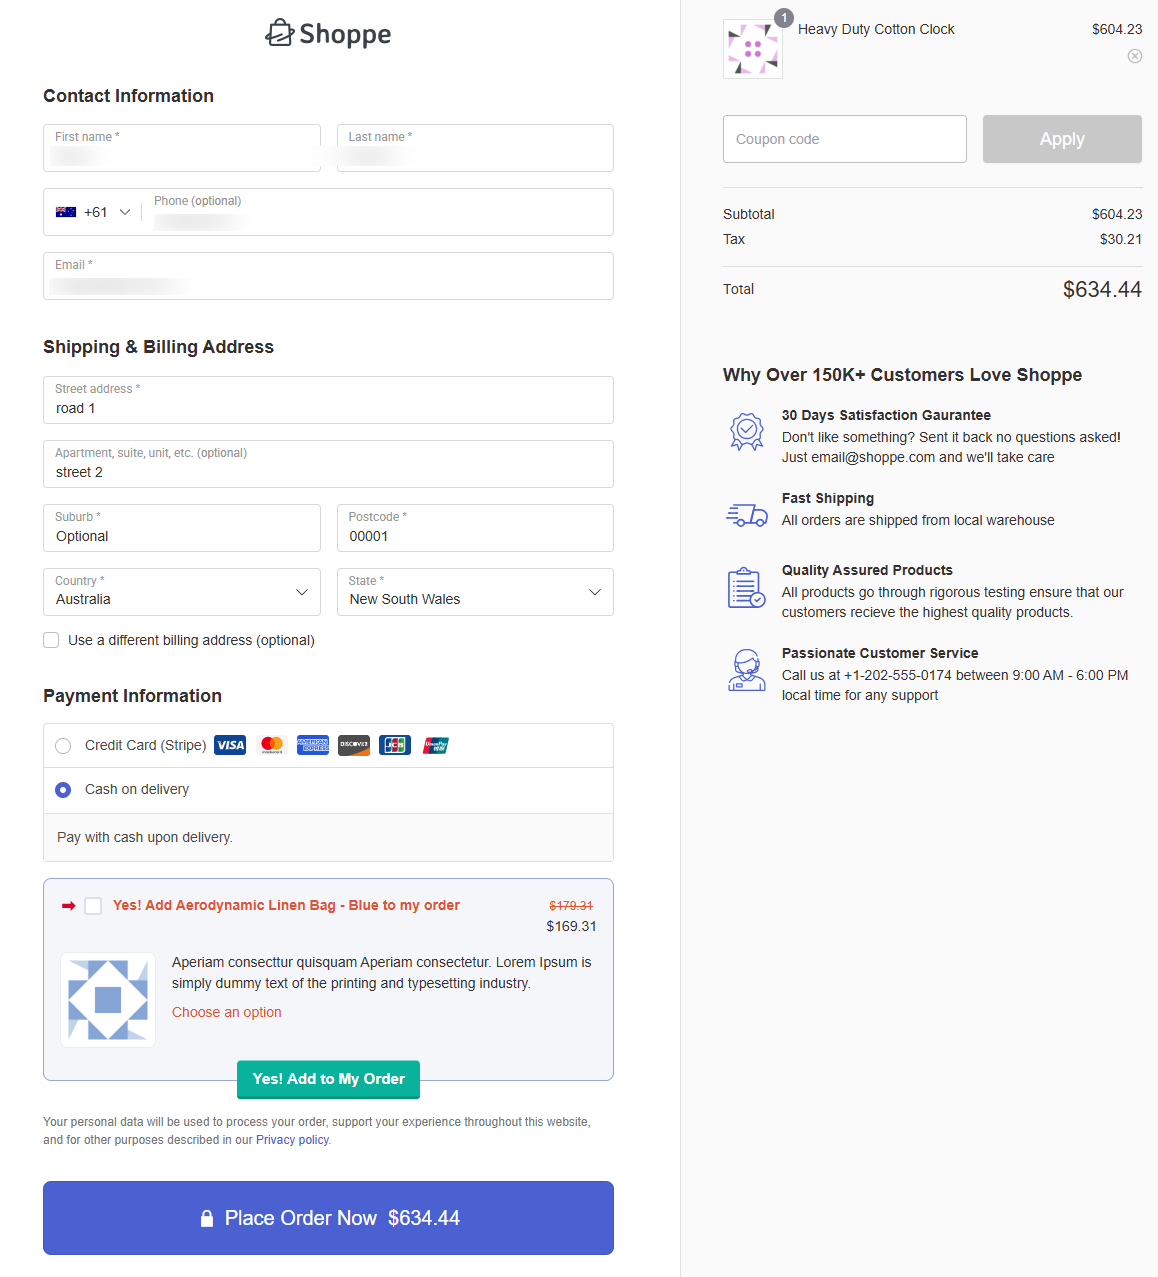
9 Key Elements of a Powerful Global Checkout Page
A good checkout page ensures a smooth, simple experience with no complexity. It should be easy to navigate, from adding products to the cart to placing an order.
This will simplify the process, reduce friction, increase conversions, and boost sales.
Let’s get into detail:
- Clear product images:
Customers can see what they are buying, reducing uncertainty and boosting confidence. A visual confirmation helps prevent order mistakes and builds trust.
- Minimalist design
A clean, distraction-free layout ensures a smooth and fast checkout experience. A clutter-free page keeps customers focused on completing their purchases.
- Easy order management
Shoppers can easily adjust quantities, remove items, or update their carts. This gives customers control, which prevents frustration and encourages order completion.
- Order summary
A clear breakdown of items, prices, and totals helps customers review their purchases. A collapsible summary keeps the page tidy while allowing quick reference.
- Short form fields
Only essential details are required, making checkout quick and effortless. Fewer fields reduce friction, especially for mobile users.
- Flexible payment options
Customers can choose from credit cards, PayPal, Apple Pay, and other preferred methods. Offering flexible payment options reduces drop-offs and increases conversions.
- A visible coupon code field
A placed coupon box lets users apply discounts without frustration. Hidden or difficult-to-find coupons can lead to abandoned carts.
- Order bumps
Brilliant upsell offers allow customers to add relevant products with one click. Well-placed order bumps can significantly increase average order value.
- A clear place order button
A bold, action-driven button makes completing the purchase simple and intuitive. A well-designed button with compelling text can boost final conversions.
The Current State: WooCommerce Default Checkout Limitations
Here’s a preview of WooCommerce’s default checkout page:
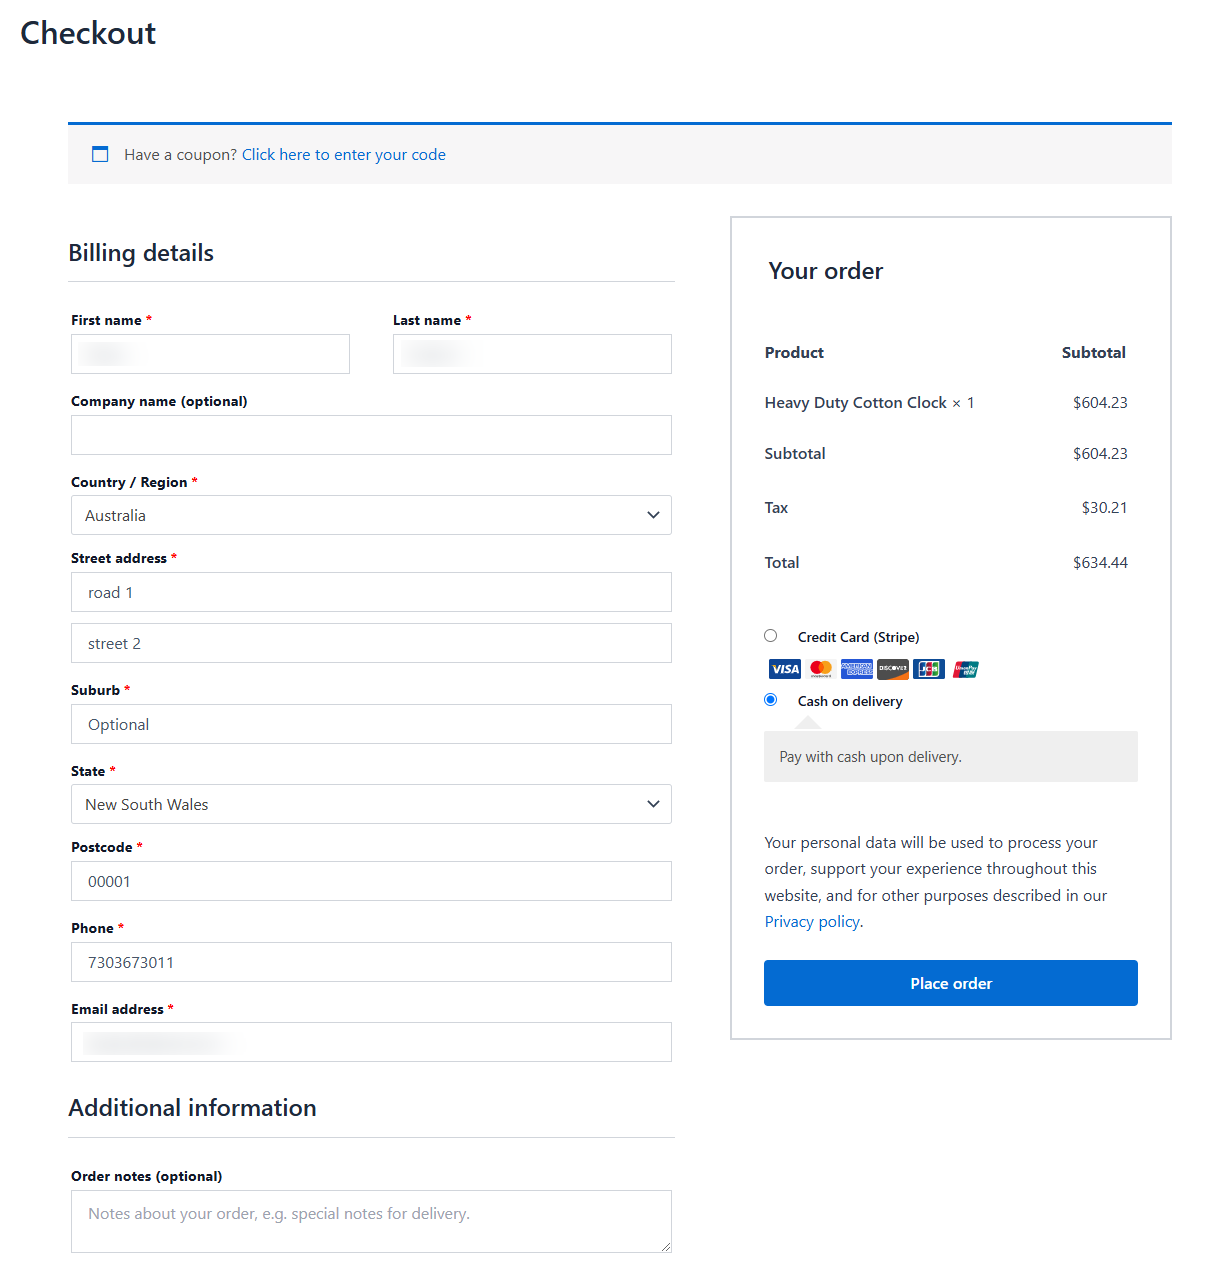
As you review these key elements, you’ll quickly identify what the default WooCommerce checkout lacks and why it isn’t built for conversions.
- The overall design is very basic.
- There is no option to add a logo.
- There are some unnecessary checkout forms, such as the company name and suburb.
- The product image is not visible.
- The coupon field is in an awkward position.
- Form fields are so long (only single-page checkouts allowed).
- And there is no option to change the default place order button.
These are the limitations of a default WooCommerce checkout page. If you want more sales and conversions, it needs to be customized.
No worries. We’ll show you how you can do that in the next section.
How to Transform Your WooCommerce Global Checkout for Higher Conversions?
Customizing your global checkout page for your WooCommerce store is easy with FunnelKit Funnel Builder. It is the leading sales funnel builder for WordPress.
It allows you to create high-converting pages for your sales funnels, such as opt-in and opt-in confirmation pages, sales pages, checkouts, one-click upsells or downsells, thank you pages, and more.
Not just that, here are a few reasons why FunnelKit is our answer to creating a global checkout in WooCommerce:
- Pre-built optimized templates: FunnelKit offers a wide array of template libraries to help you create checkouts and high-converting sales funnels for your products. These templates are highly customizable and optimized for different devices.
- Compatibility with all page builders: You can customize and design your funnel pages, including checkouts, with any page builder you want. It deeply integrates with Elementor, Divi, Oxygen, Bricks, and Gutenberg. You can use shortcodes with other page builders.
- Trending checkout styles: FunnelKit lets you design one-page checkouts, multi-step checkout pages, sales pages with embedded order forms, Shopify-style checkouts, and more.
- Order bumps: You can add order bumps at checkout. These one-click offers let customers quickly add low-cost items to their carts, increasing the average order value (AOV) without disrupting their purchase flow.
- One-click upsell: You can display one-click upsell offers during checkout. A separate section lets you customize the upsell design to suggest higher-value items.
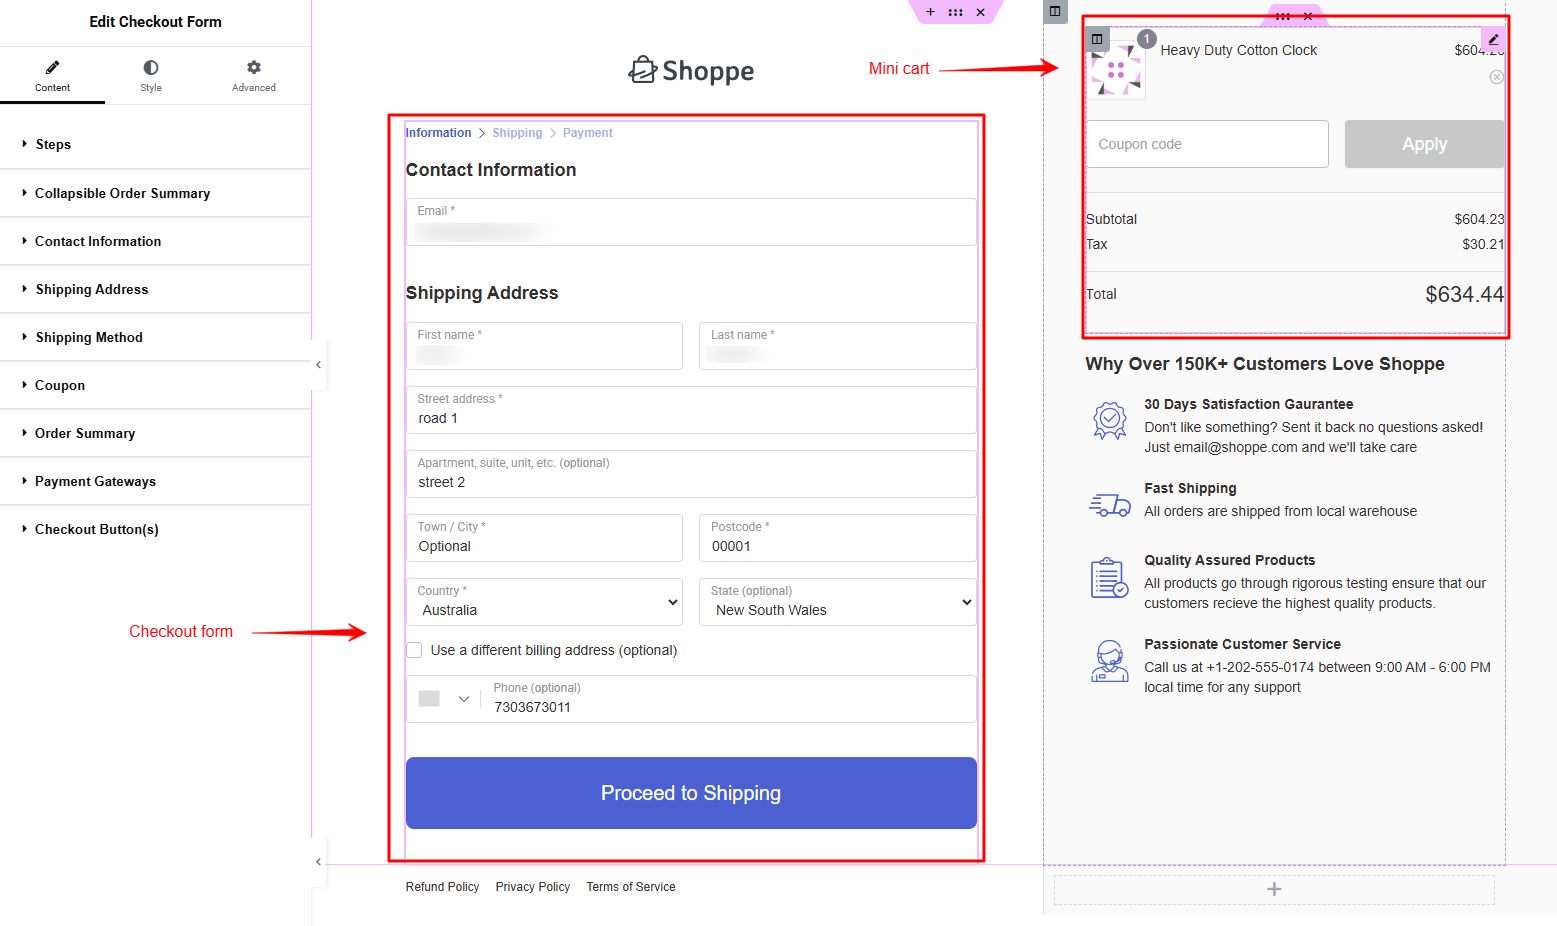
- Mini cart: This feature streamlines the shopping experience by allowing users to view and update their order items anywhere on the website without moving to the cart page.
- Built-in A/B testing: Its built-in A/B testing feature lets you split-test your checkout pages by creating multiple variations. Once you test them, you can declare a winner by analyzing the results and transferring future traffic to that variant.
- Detailed analytics: FunnelKit goes deep, providing step-by-step metrics for each page. It lets you see how people interact with your funnels in real-time, including views, conversions, revenue, orders placed, and more.
How to Create and Customize a Global Checkout Page (Step-by-Step)
Now it’s time to create a high-converting checkout page. To do so, we’ll be using FunnelKit Funnel Builder.
Please note: FunnelKit’s Funnel Builder has a free (lite) and a premium version. Here, we’ll use the Pro version to create our store checkout.
👉 Watch this mini masterclass to create a high-converting WooCommerce checkout page with 20 proven tips from experts:
👉 Refer to this guide on installing and activating the FunnelKit Funnel Builder on your WordPress website.
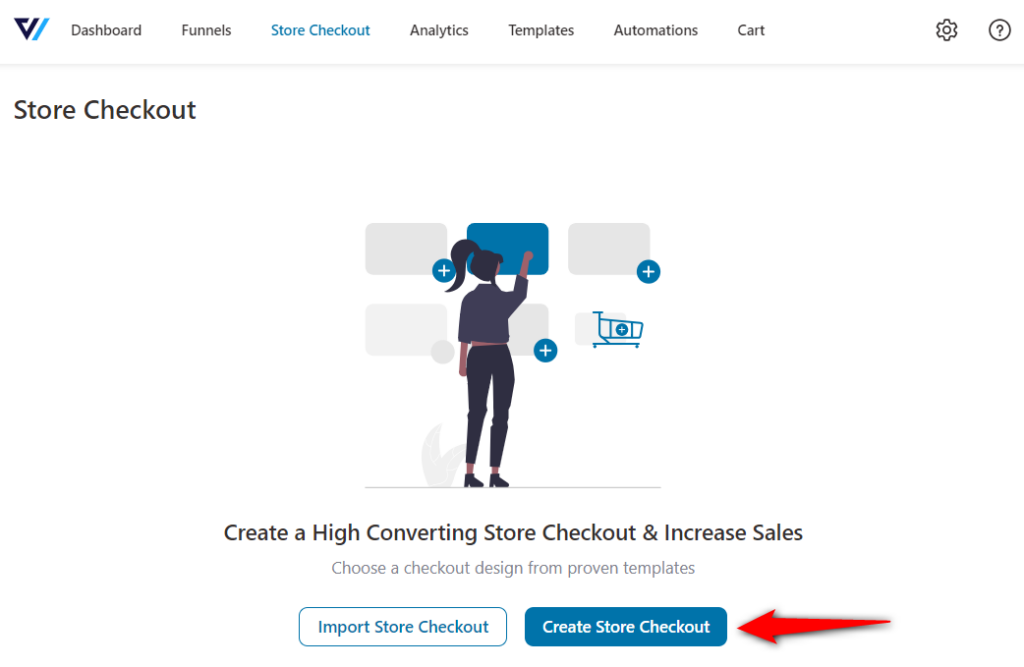
Step 1: Create a store checkout page
First, go to FunnelKit ⇨ Store Checkout from the WordPress dashboard.
Then, click the ‘Create Store Checkout’ button.
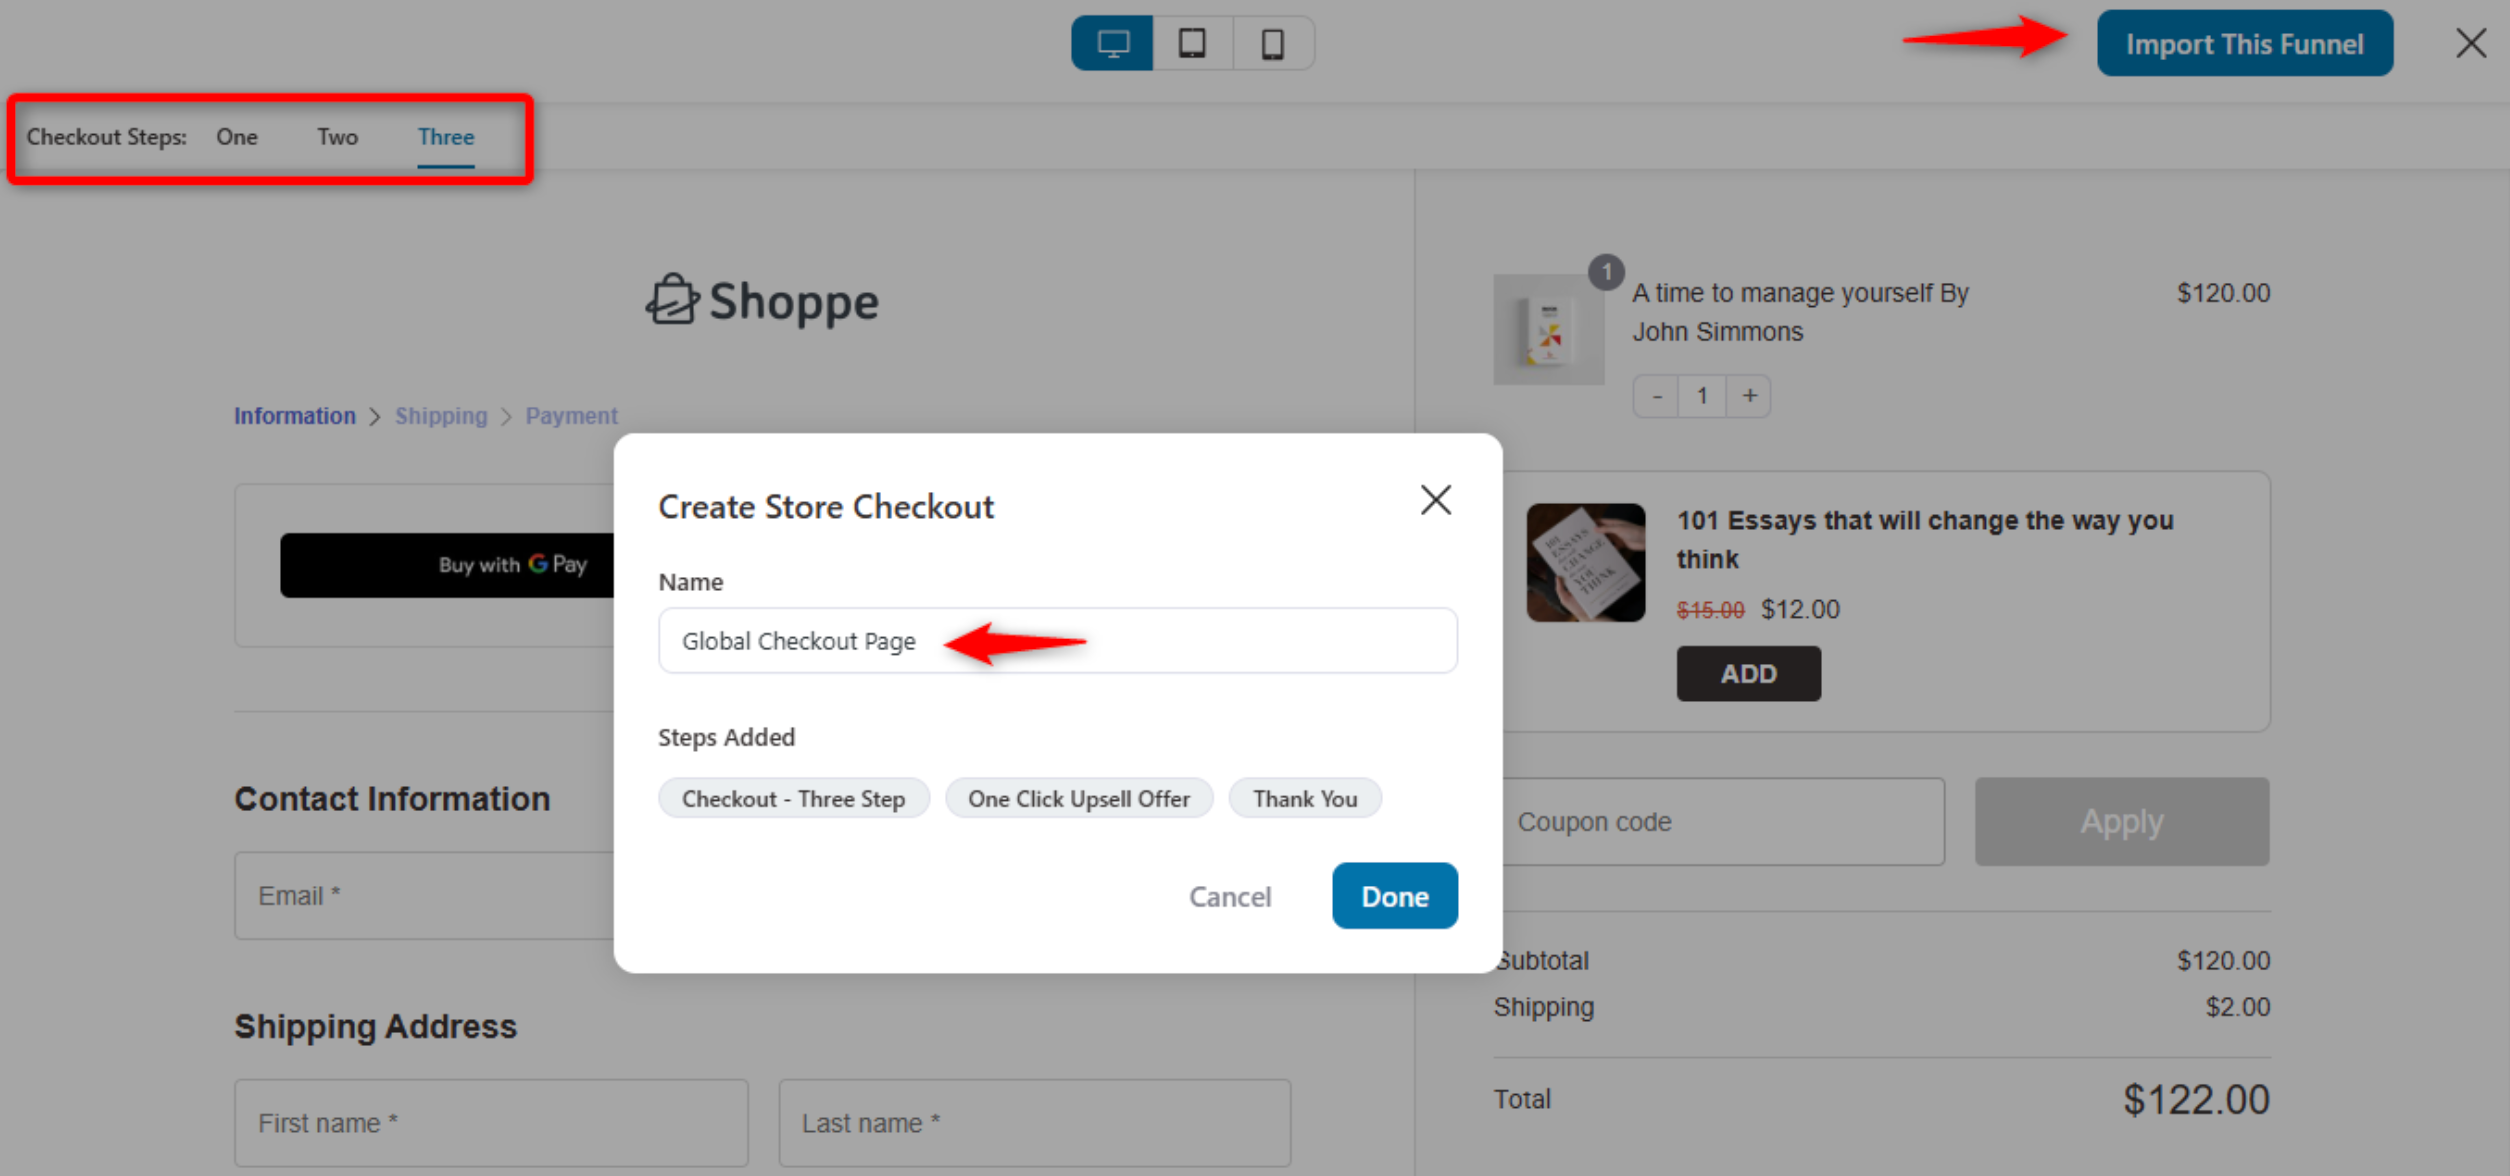
You'll be directed to import your global checkout templates.
Please note that the 2-step template will import two pages: a Checkout and a Thank You page, while the 3-step template will import an additional One-Click Upsell page.
As mentioned, Funnel Builder integrates with popular page-building tools such as Elementor, Divi, Oxygen, Bricks, and Gutenberg.
If you want to use other page builders, such as Thrive, Beaver, or others, choose Others and create it using shortcodes.
Select the page builder and the template you want to import.
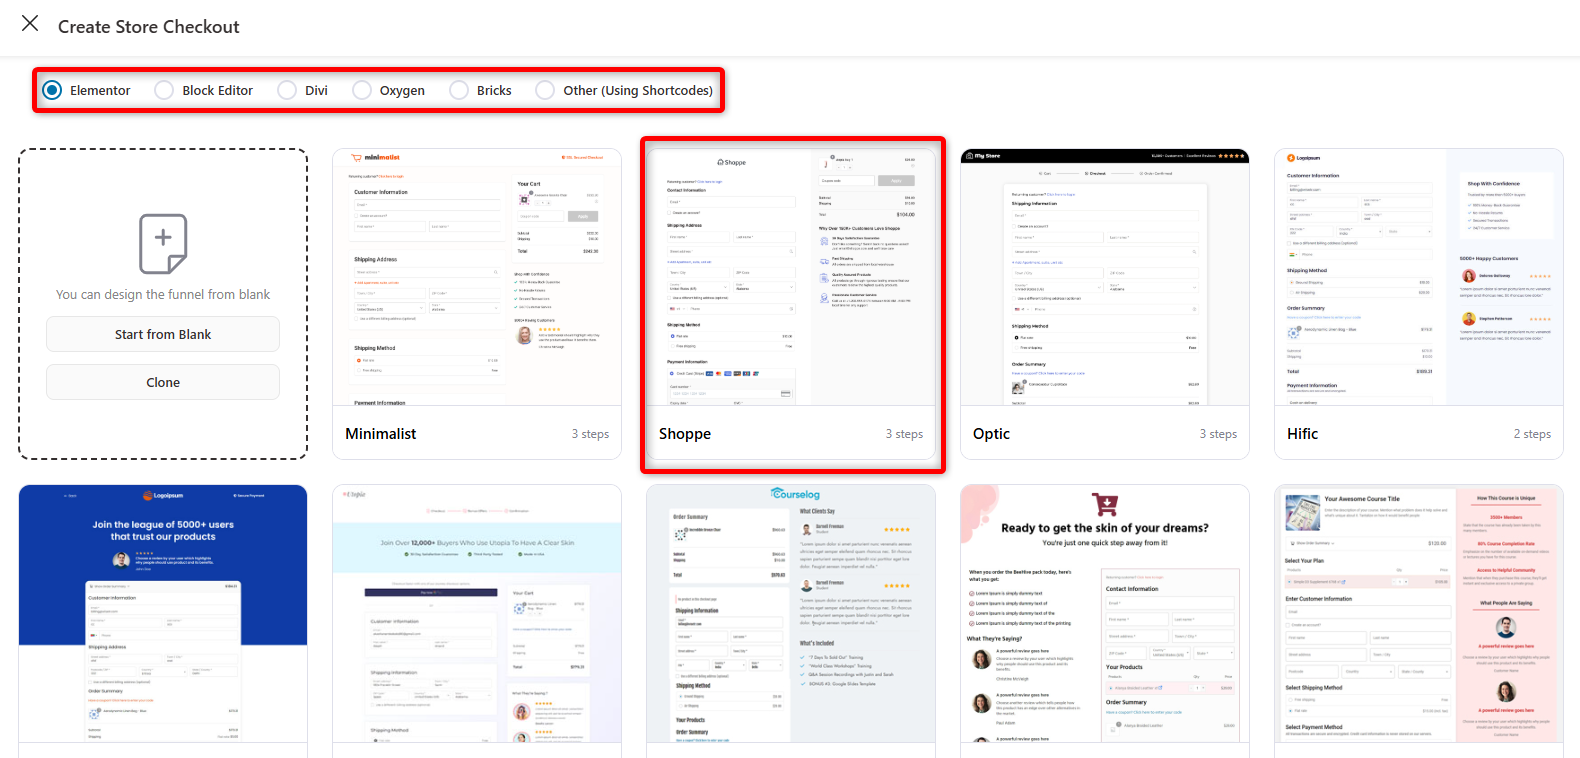
Next, select the number of steps you want on your global checkout page and import the template.
Then, name your store checkout. Clicking on ‘Done’ will import your store checkout.
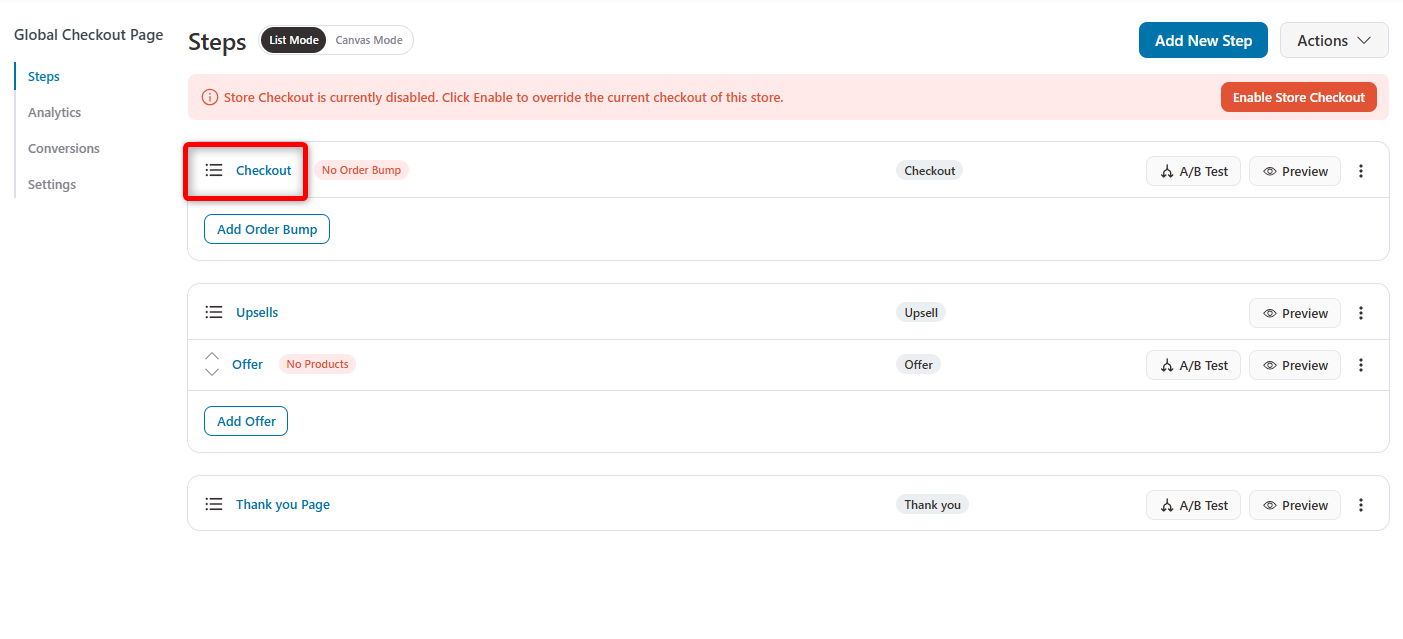
Step 2: Customize your WooCommerce global checkout page
Now, we will customize the look and feel of our store checkout.
Hit 'Edit' next to your checkout page.
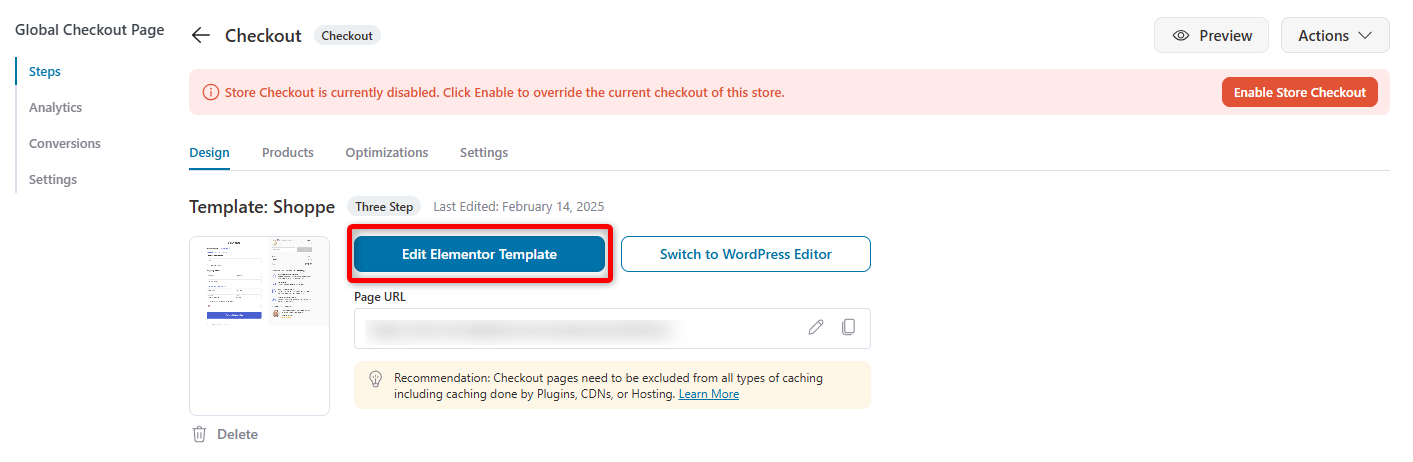
On the Design tab, click the ‘Edit Elementor Template’ button to customize the page with Elementor.
FunnelKit offers two custom-built widgets with Elementor to optimize your checkout pages: Checkout Form and Mini Cart.
You can design the page as you want. Adjust the form field widths, enable the progress bar at the top, and more.
👉 Here is a guide on customizing the WooCommerce checkout page design with FunnelKit and Elementor.
Step 3: Customize the WooCommerce checkout form fields
You can add or delete any of the default checkout form fields.
FunnelKit’s built-in checkout field editor allows you to add custom fields, edit, rearrange, and delete any field or section on your checkout form.
Go to the Design tab to rearrange the fields and sections. You can drag and drop them around the page.
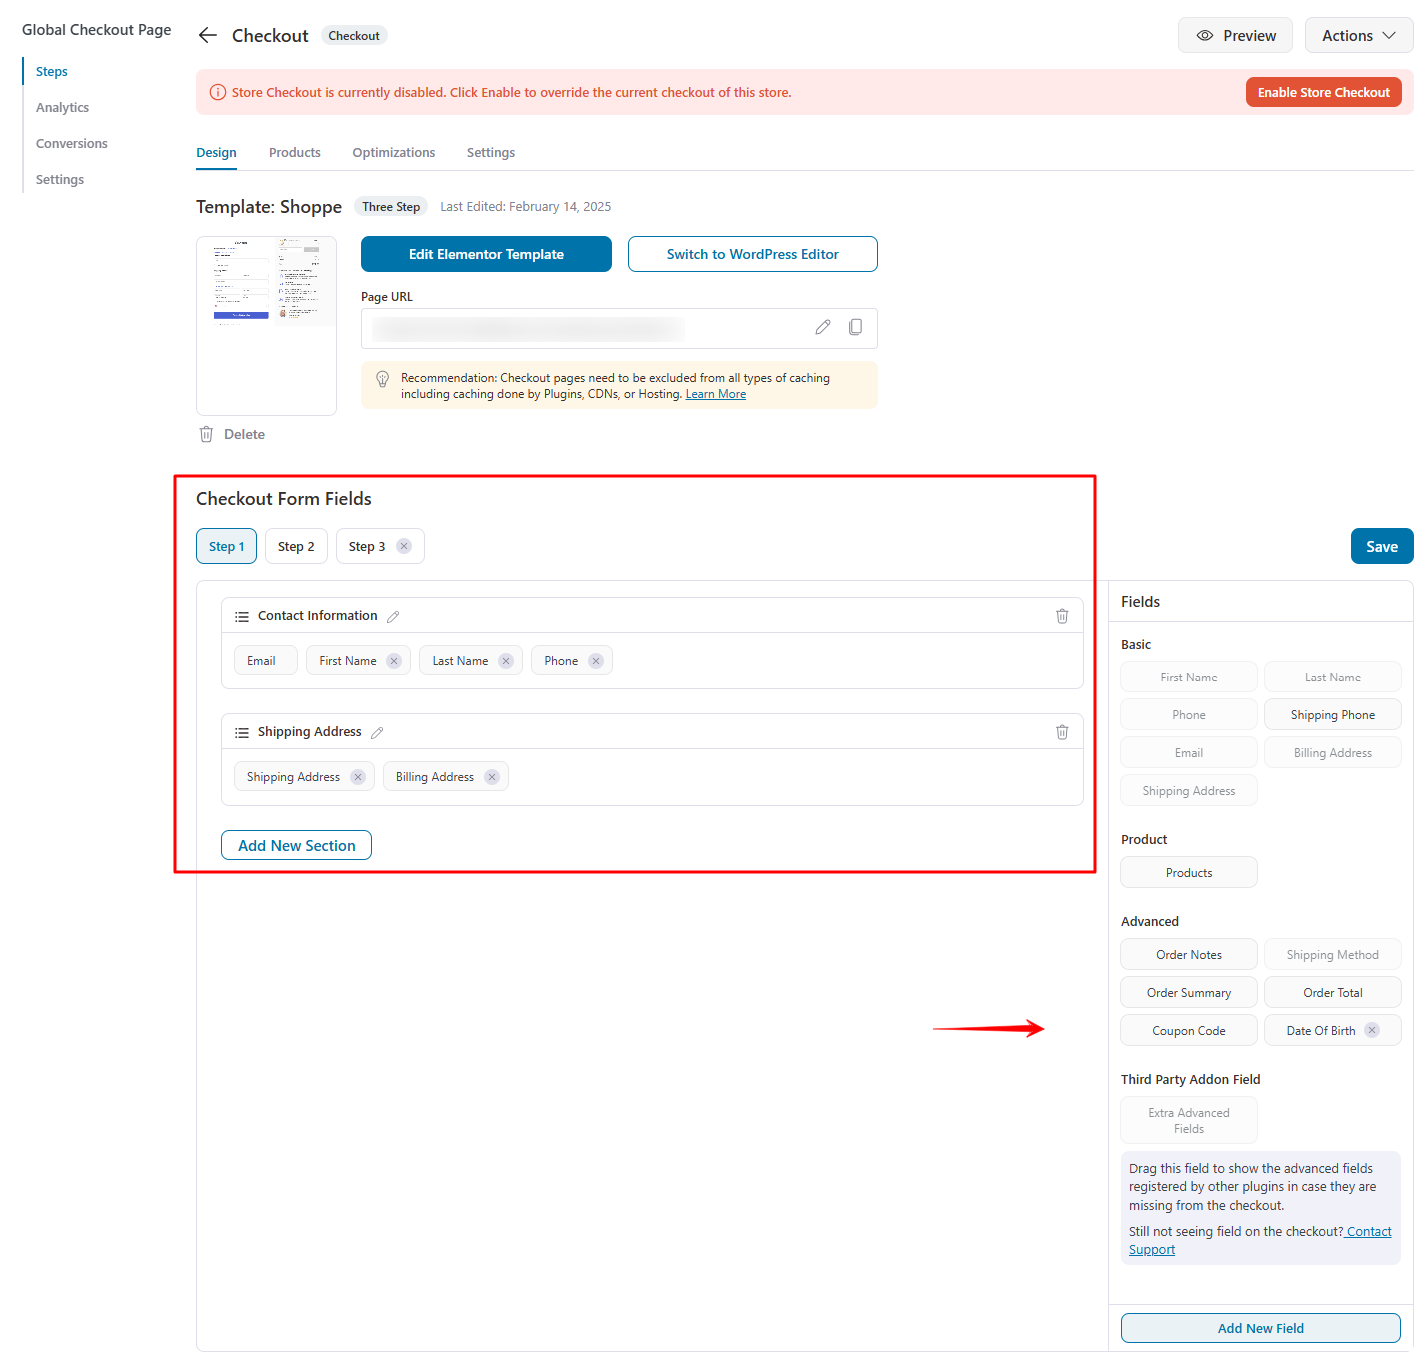
Once you’re happy with the structure of the global checkout form, click on 'Save'.
👉 Refer to our detailed post on customizing the WooCommerce checkout form fields with FunnelKit’s built-in editor.
Step 4: Optimize your custom WooCommerce checkout page
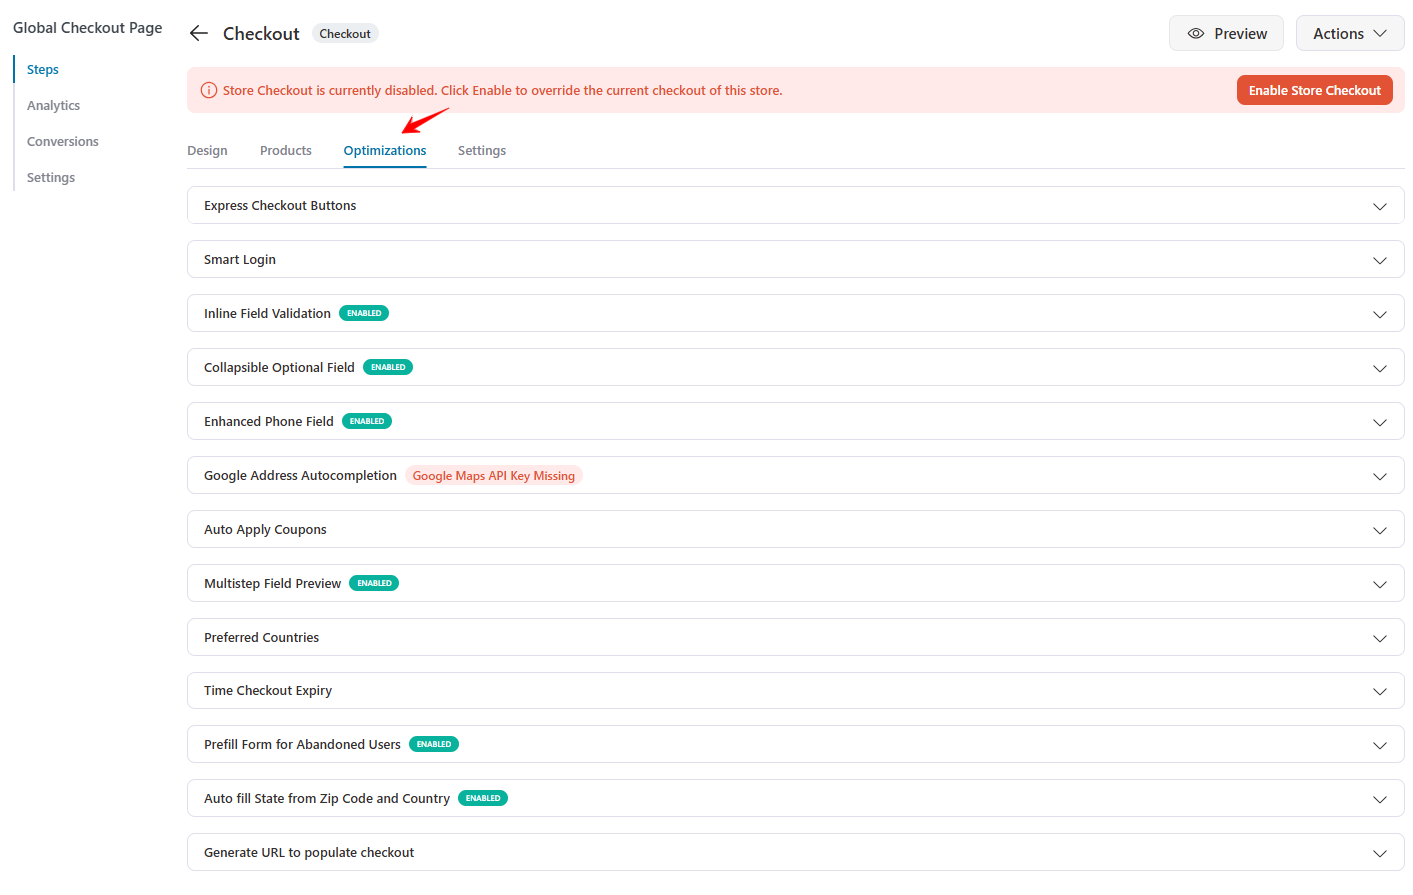
Optimizing your checkout form would ensure a smoother checkout experience for your customers.
Add checkout page optimizations, such as Google Address Autocomplete, Auto Apply Coupon, Enhanced Phone Field, and Express Checkout buttons like Apple Pay and Google Pay.
First, click on the Optimization tab.
👉 Recommended read: Here is the 25 optimizations guide for your WooCommerce checkout page
Enable all the optimizations you wish to add to your checkout page and click ‘Save Changes’ when done.
Once you're done with your global checkout page, you can customize the design of your thank you page as well.
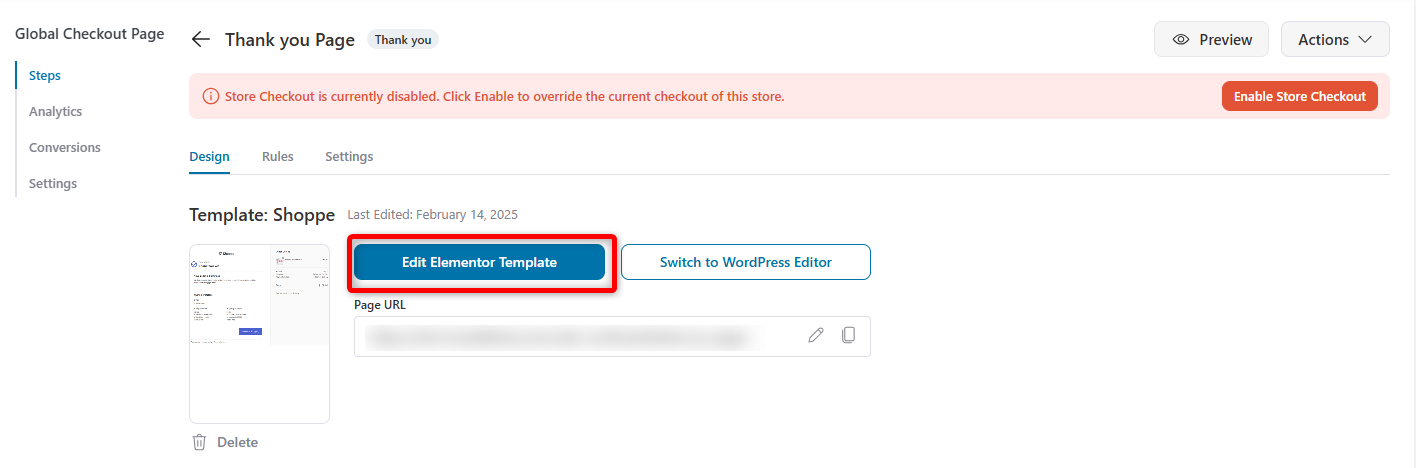
👉 You can check out our guide on customizing the thank you page here.
Step 5: Activate your global checkout page
Now, activate your store checkout. Go back to your funnel, then turn the toggle to enable it.
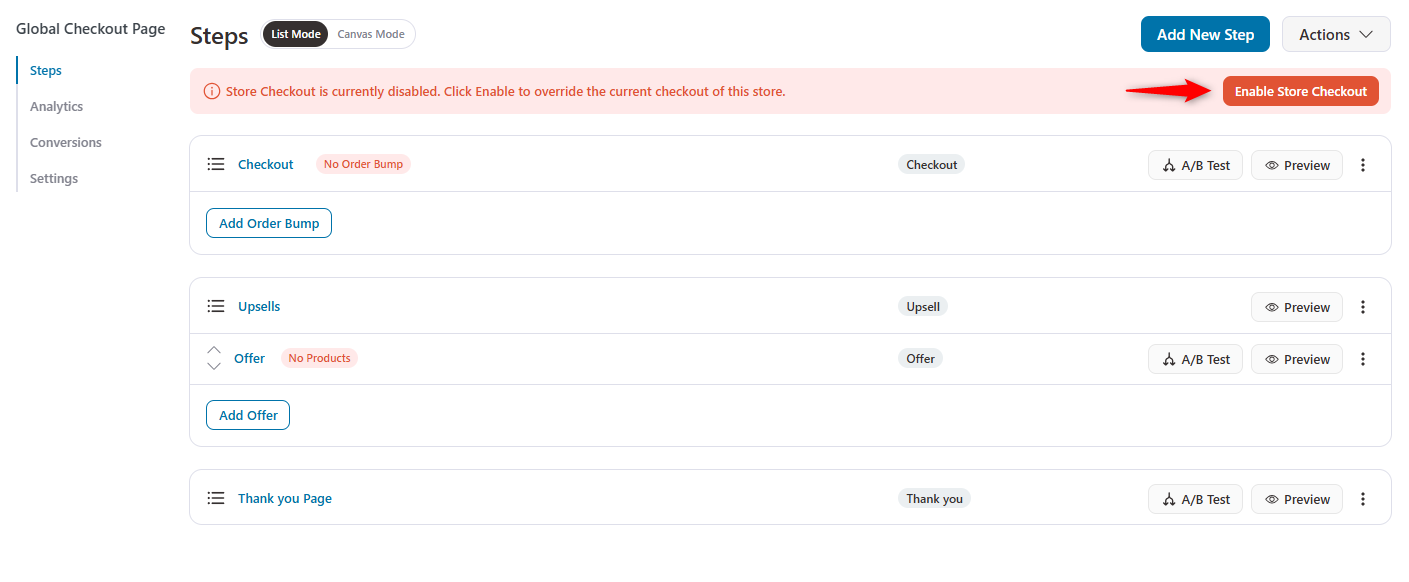
That's it! You have successfully created your store checkout or global funnel with the FunnelKit Funnel Builder.
How to Increase Your Checkout Page’s AOV By Adding Offers
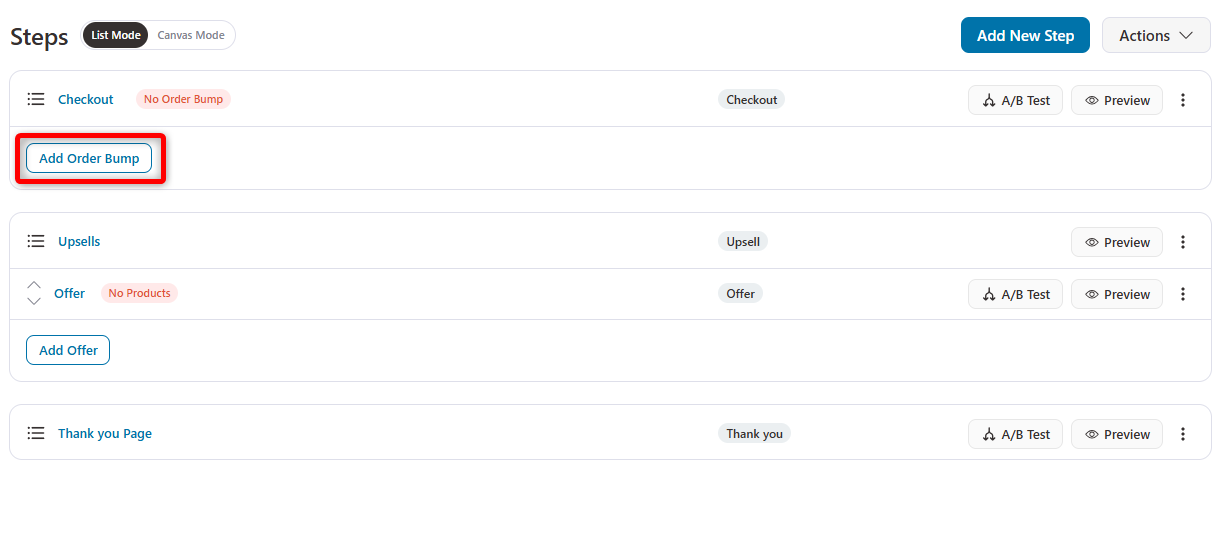
With FunnelKit, you can add multiple complementary offers, such as Order Bumps and One-Click Upsells, to help increase AOV on every purchase.
Pre-checkout offers (Order bumps)
An order bump is an offer presented on the checkout page. It is often a low-dollar impulse purchase that doesn't require a lot of explanation.
You can add more than one order bump on the same checkout page. Customers can add whichever bump they like to their cart by clicking the checkbox.
Adding order bumps with FunnelKit is relatively easy. To do so, click ‘Add Order Bump’ next to the step on your checkout page and name it.
Next, choose the order bump skin and click on 'Import'.
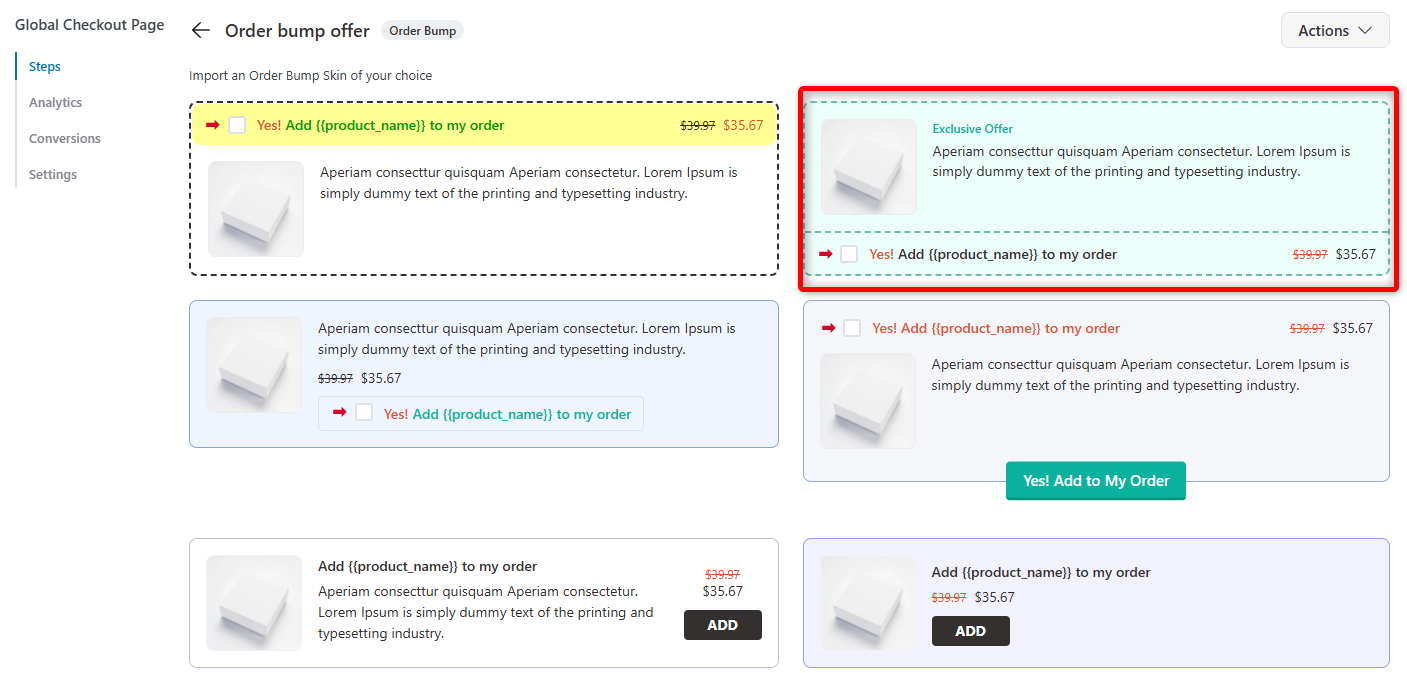
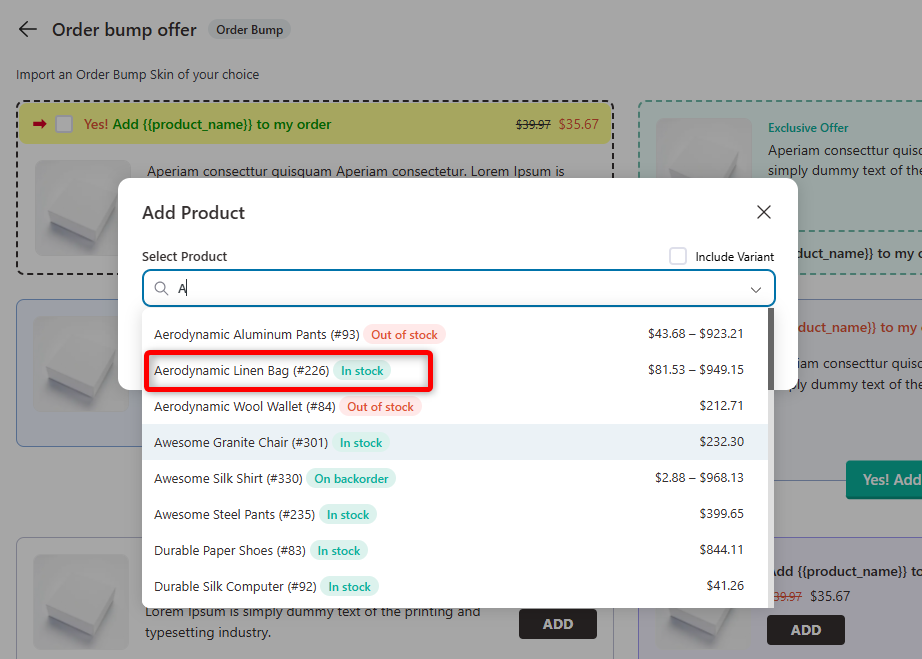
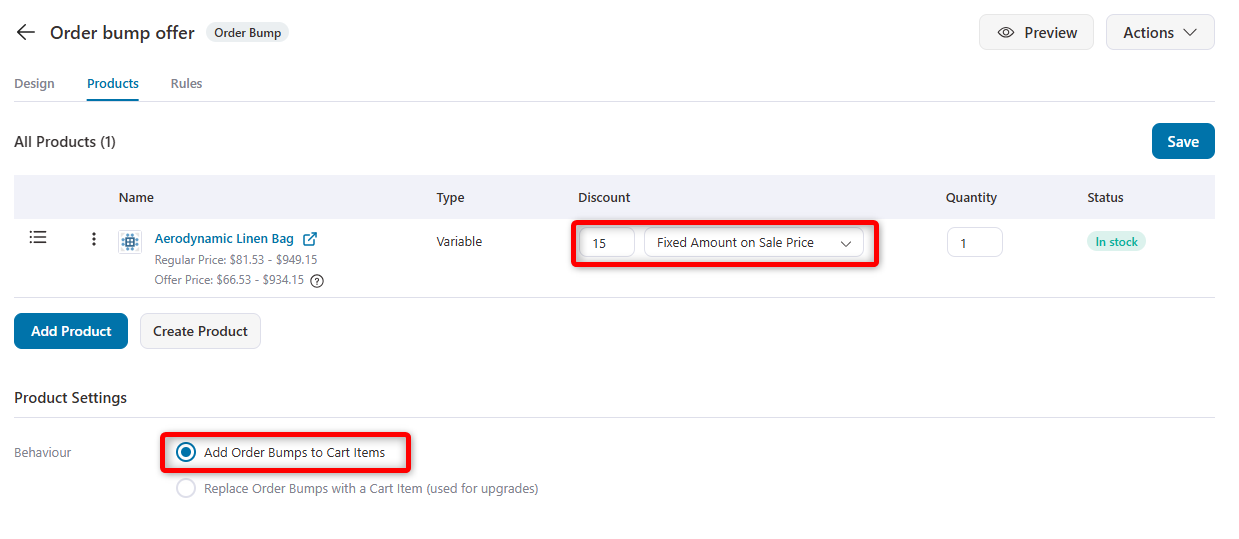
After that, add offers by adding the products to your order bump. Just search for the products and add them as your order bump offers.
Here, you can customize the content, style, text, color, position, and other aspects of the order bump banner on the design tab.
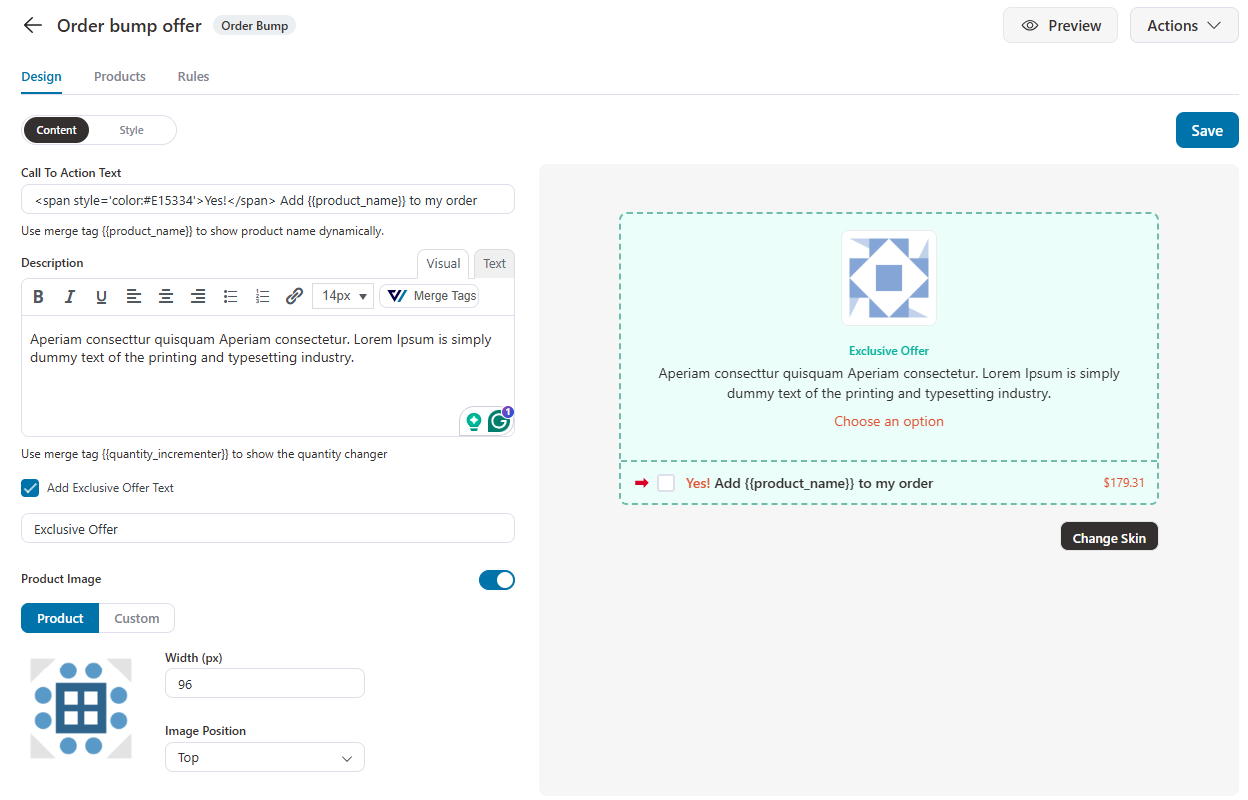
You can even order discounts or change the quantities to create a compelling order bump for your shoppers. You can also configure the order bump behavior and its display position.
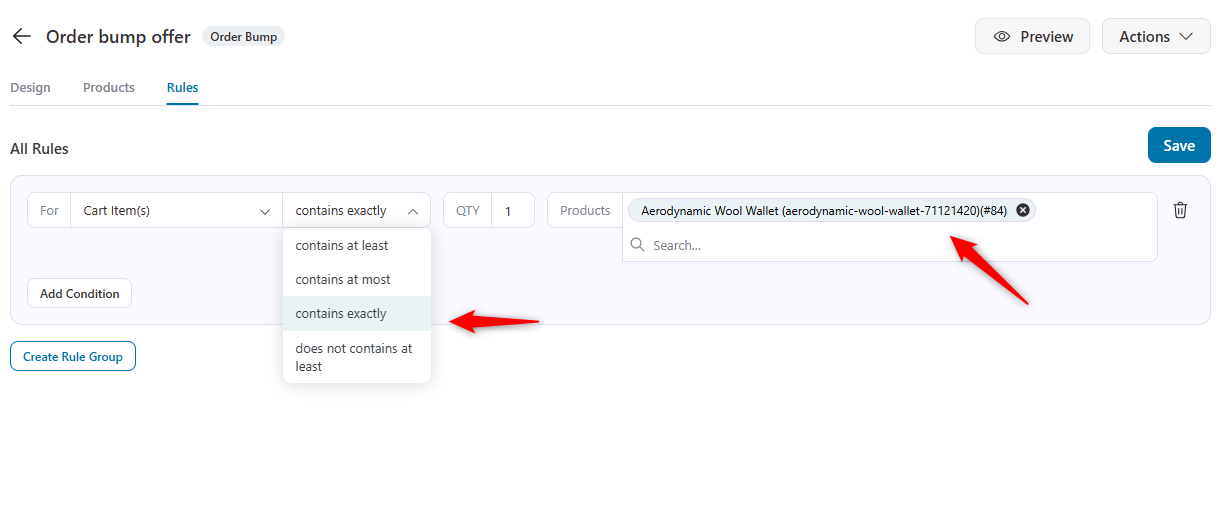
In the case of global checkouts, you can add rules to trigger your order bumps.
You can define when a particular order bump is shown on the checkout page, whether based on the order total, a specific product added to the cart, or something else.
This ensures that the additional offers align with the products being purchased.
You do this by going to the Rules tab and setting the conditions as you want.
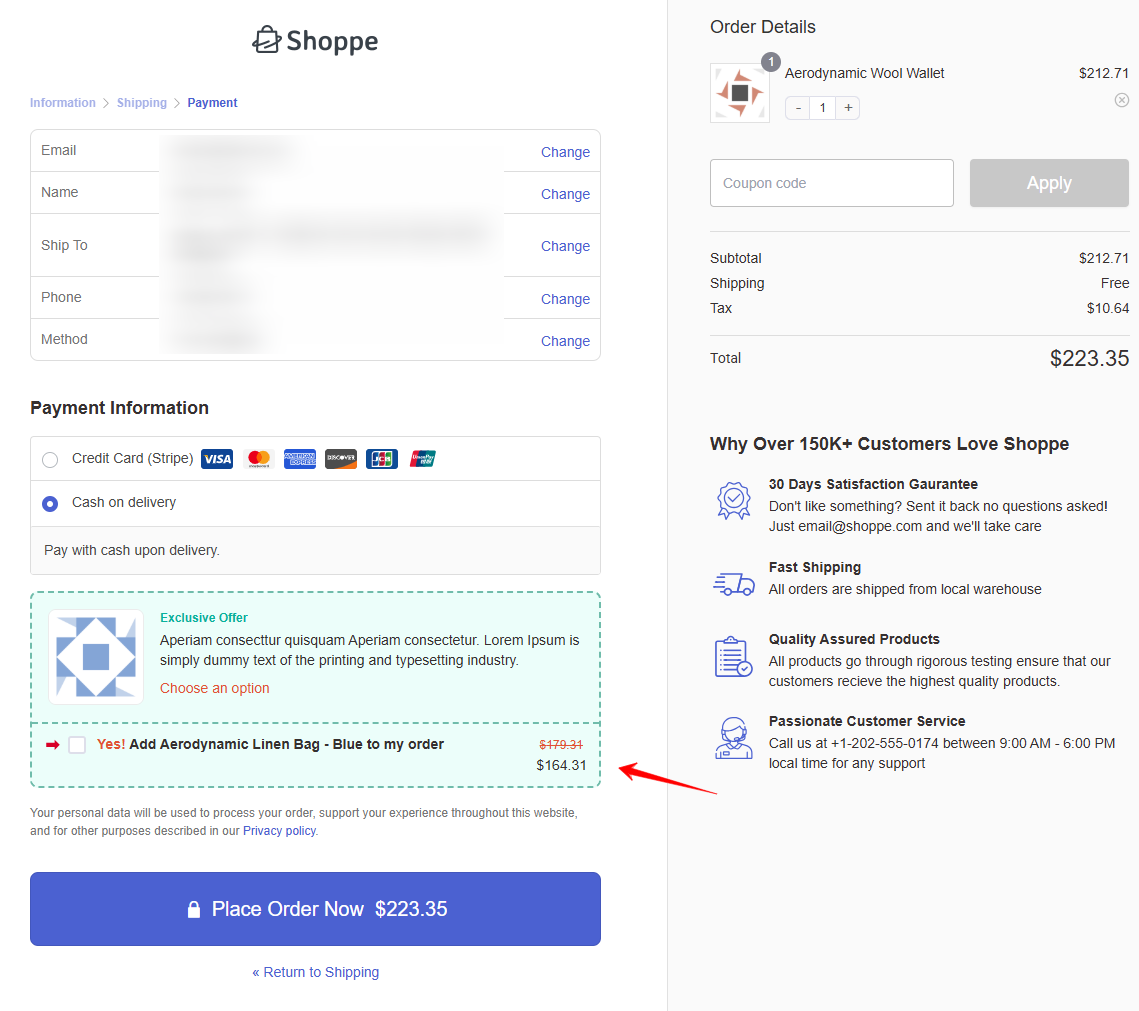
Let’s say you want to show a particular order bump only when shoppers add items of specific products to their cart; you can do that easily here:
This is how simple it is to set up attractive order bumps on your global checkout:
👉 Check out our detailed post on setting up order bumps on your checkout page.
Post-purchase offers (One-click upsells)
One-click Upsells are the offers a customer sees after making the payment and before landing on the Thank You Page.
Users can accept the offers on these pages with just one click. They don't even need to enter their payment details again.
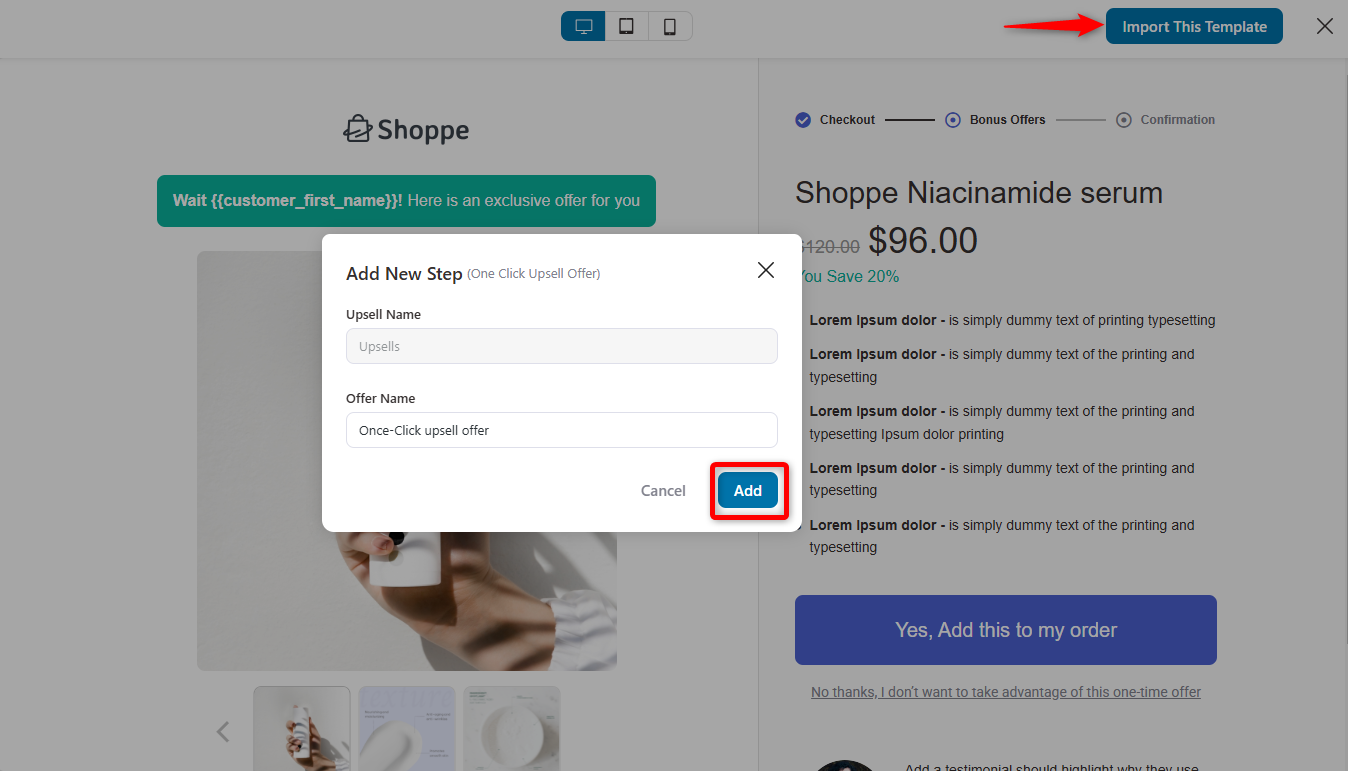
Add one-click upsells as a new step to your global checkout funnel. Return to the store checkout page and click 'Add Offer'.
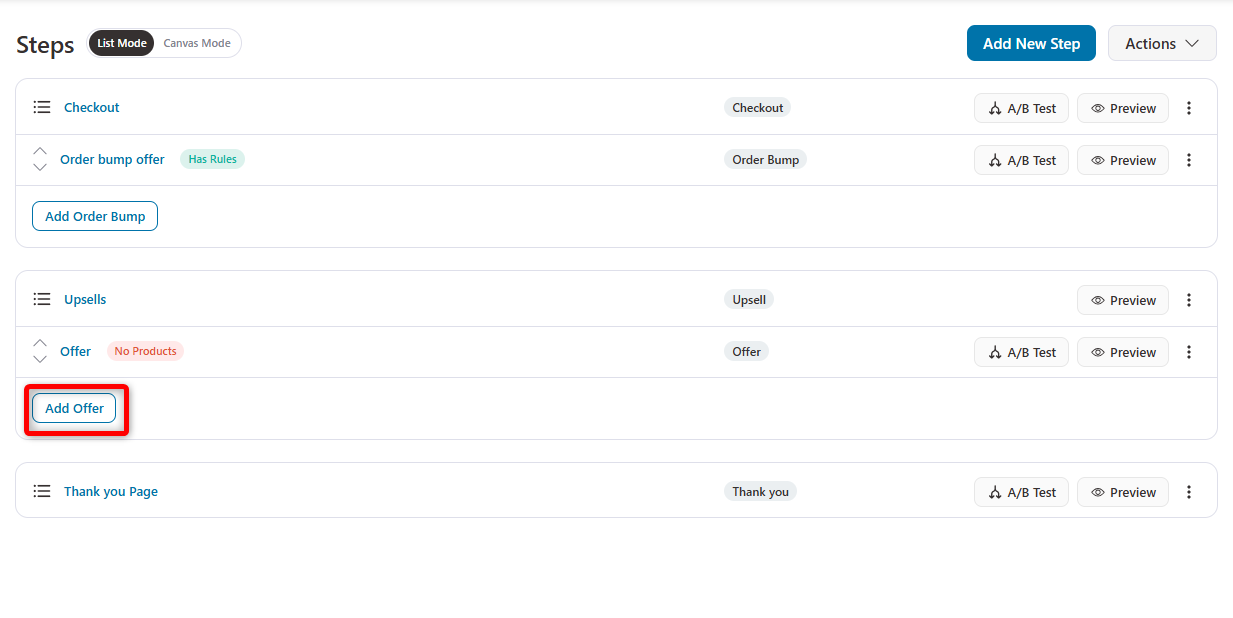
Just import any template like you did when importing your checkout funnel.
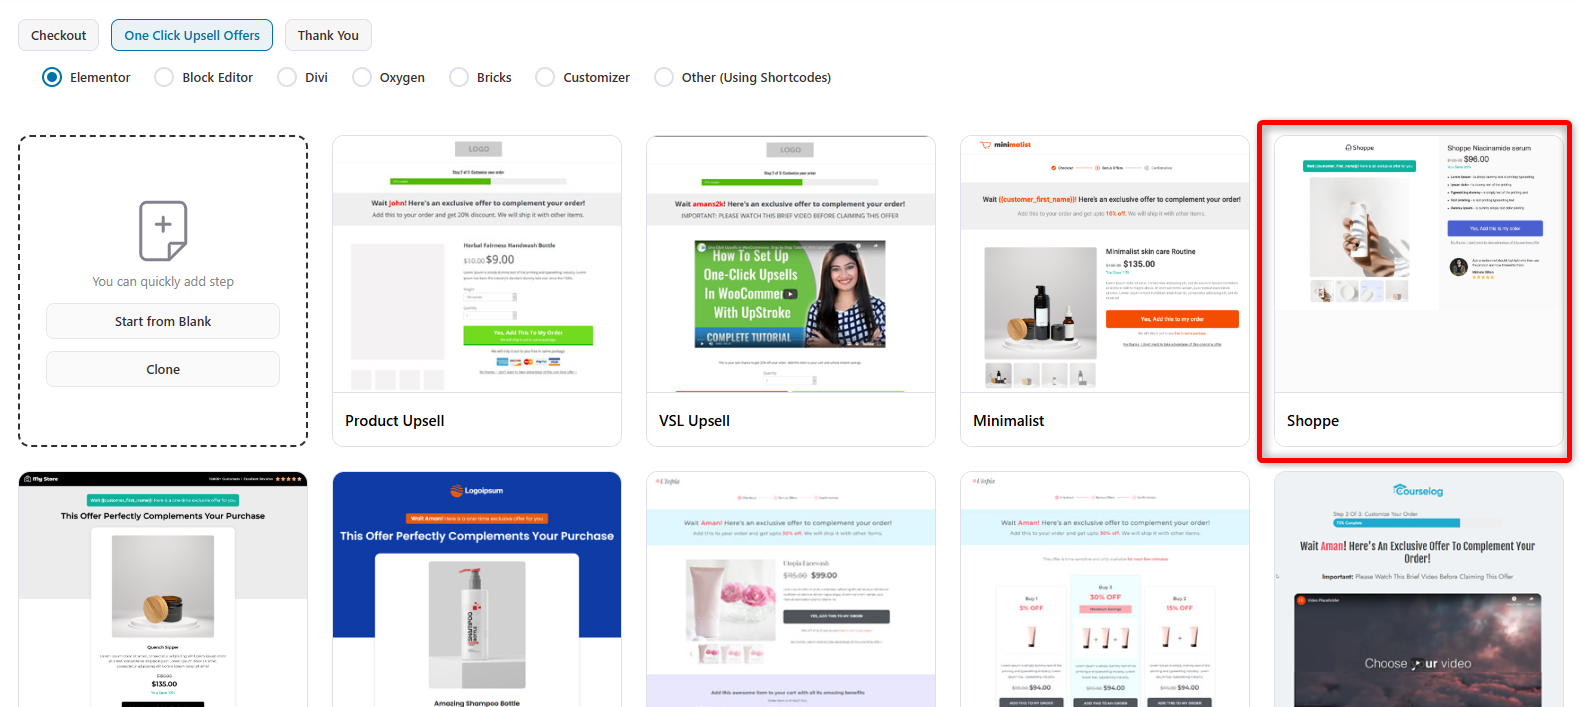
Once you’ve named your step, it’ll get added to your funnel.
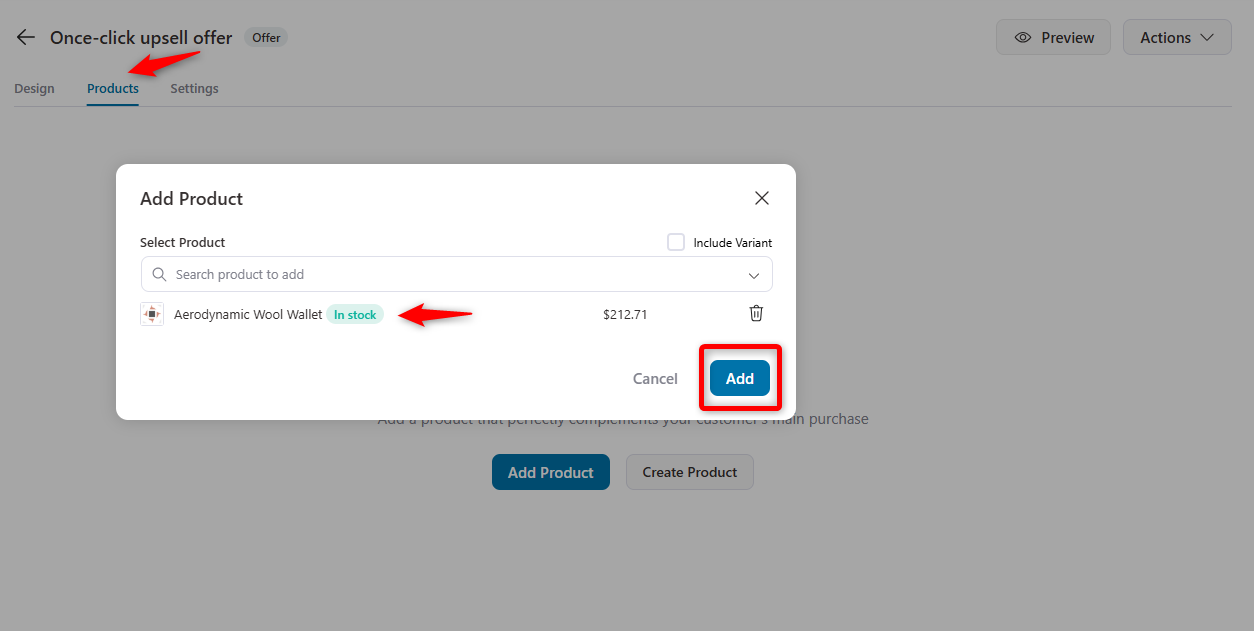
You can now add products as your upsells, as you did with order bumps.
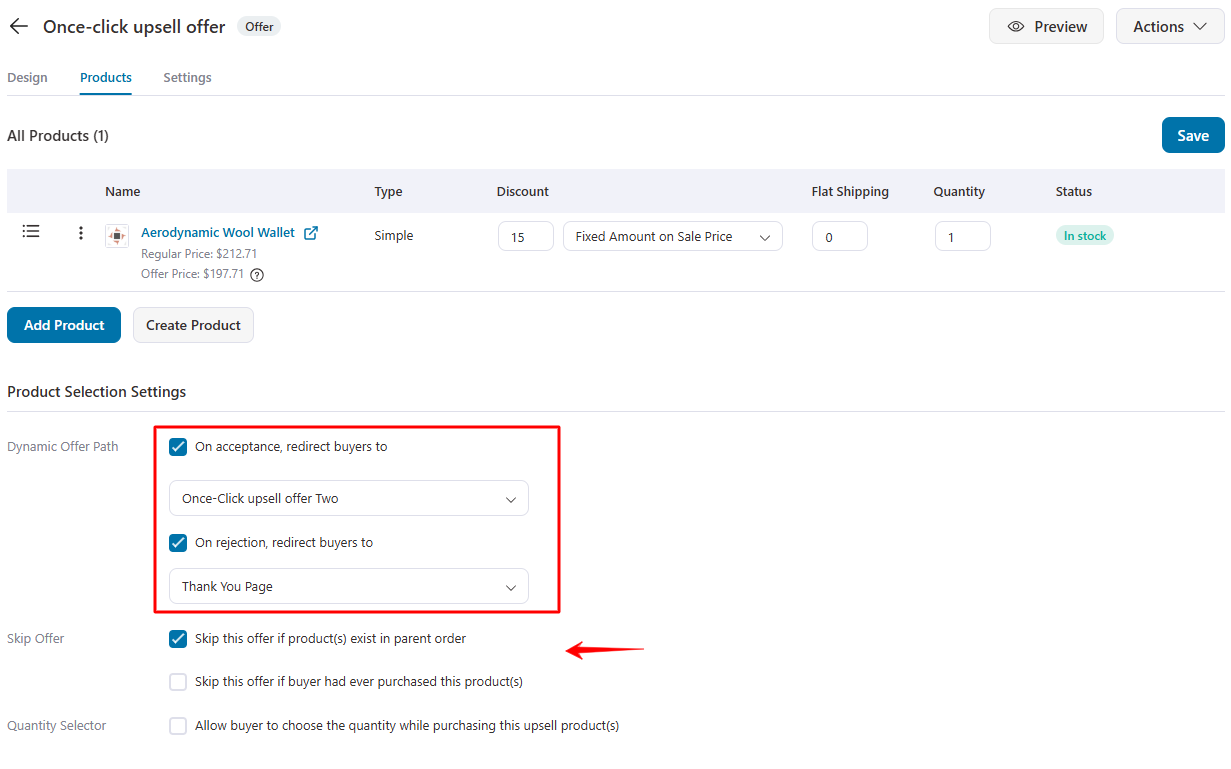
Set the upsell condition: if users accept the offer, move to the 2nd offer. And if they reject it, they will be taken to the thank-you page. Also, turn on the option if the upsell offer product is in the main cart item.
You can set rules to trigger your one-click upsells in your global checkout.
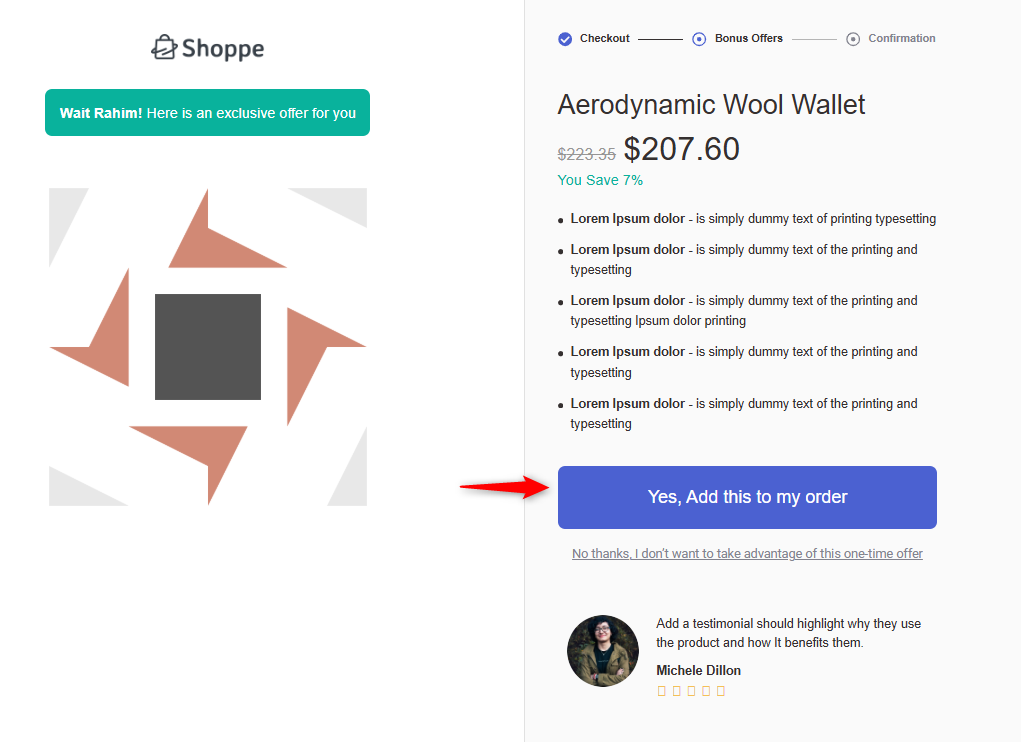
Here is the preview of the one-click upsell offer.
👉 Want us to demonstrate the entire process? Check out our detailed post on setting up one-click upsells here.
Global Single-Step vs Multi-Step Checkout: Which One is Better?
Is a single-step global checkout better than a multi-step one?
This question is part of an age-old debate.
The answer to this question depends on your online store’s requirements. Choosing either checkout has its advantages and disadvantages.
- A single-step checkout has all the required information for users to scan at a glance. A multi-step checkout breaks down the information into digestible chunks, making it easier for shoppers to navigate.
- If you’re selling digital products, one-page checkouts are better simply because there are quite a few form fields. You don’t need the user's shipping method and address.
A multi-step checkout may convert higher for physical products. However, our experts recommend A/B testing different elements on your global checkout page to determine which performs best for your store.
FunnelKit has a built-in A/B testing feature that lets you A/B test your single-step and multi-step checkouts. This way, you’ll be better positioned to declare your winning variant and improve your conversions.
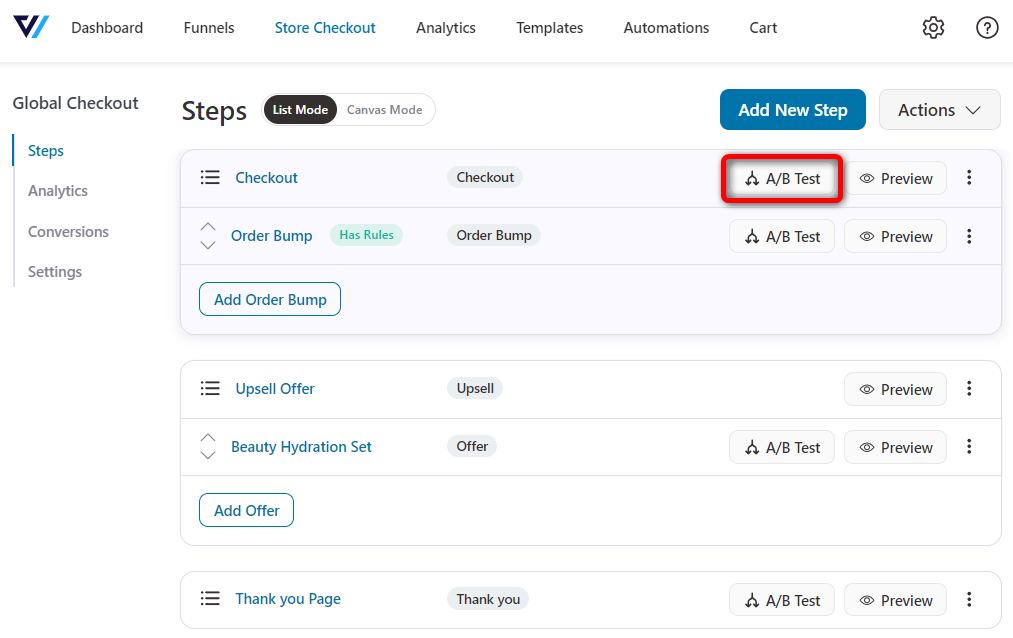
You can find this option under each step in your sales funnel:
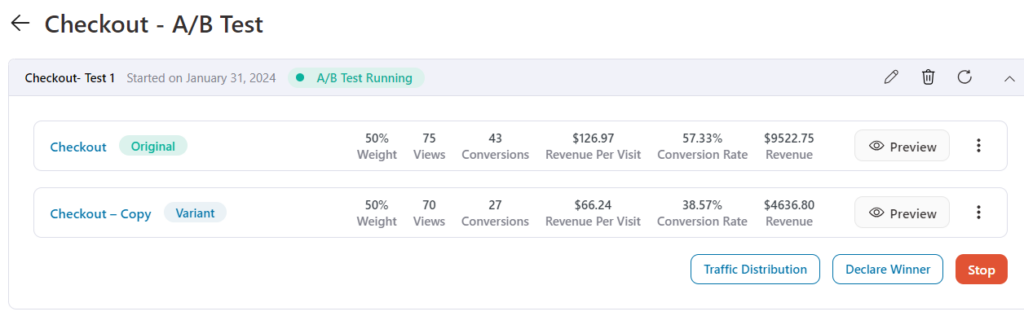
Create two variants of your checkout page, i.e., single-step and multi-step checkouts. You can allocate 50-50% traffic to each variant and run your A/B test.
You’ll be able to see the real-time data of how your A/B test is performing. Once you have enough data, you can declare a winner, and it’ll transfer 100% of the future traffic to your winning variant.
👉 Learn the complete A/B testing process to test your single-step and multi-step checkout pages here.
Frequently Asked Questions (FAQs) Related to WooCommerce Global Checkout
Does FunnelKit work with my payment gateway?
FunnelKit is gateway-agnostic and works with any WooCommerce-compatible payment gateway. I've successfully implemented it with Stripe, PayPal, Square, Authorize.net, and dozens of regional gateways. The key is ensuring your gateway plugin is WooCommerce-compatible first.
Can I use different checkouts for different products?
Yes, though this requires FunnelKit's product-specific funnel feature rather than the global checkout feature discussed in this guide. You can create separate funnels for different products/categories and assign them individually. This is useful for very diverse catalogs.
How do I ensure my checkout is GDPR/privacy compliant?
FunnelKit itself doesn't create compliance issues; it simply customizes the WooCommerce checkout you already have. However, ensure you:
1. Include a privacy policy acceptance checkbox if required in your jurisdiction
2. Disclose any data sharing with payment processors
3. Implement proper consent for marketing emails.
Review WooCommerce's GDPR features and consult legal counsel for your specific requirements.
Can I revert to the default WooCommerce checkout if needed?
Absolutely. Simply toggle off the "Active" switch in FunnelKit → Store Checkout, and your site immediately reverts to default WooCommerce checkout. This makes testing risk-free. Additionally, FunnelKit automatically falls back to the default checkout if technical issues occur, preventing lost sales during troubleshooting.
Ready to Transform Your Default WooCommerce Checkout to a High-Converting Global Checkout with FunnelKit?
A custom, high-converting global checkout can be a game-changer for your business. It reassures customers and simplifies the purchasing process, allowing them to complete their orders without hassle.
We’ve shown how to design and apply a checkout page globally to all products. With every sale, you can add upsell and cross-sell offers to boost your average order value (AOV).
FunnelKit Funnel Builder allows you to easily create and customize checkout pages for a smooth, efficient buying experience.
You can access customizable templates, a checkout form field editor, optimization tools, and more features to build a high-converting global checkout.
FunnelKit is the perfect plugin for your WooCommerce store.
Start with the foundation outlined in Steps 1-5, implement the nine essential elements, add strategic offers, and commit to the monthly optimization workflow.
Within 90 days, you should see measurable improvements in both conversion rates and average order value.
More importantly, you'll have established a systematic process for continuous improvement that compounds over time.
Editorial Team
July 7, 2026Are you looking for WooCommerce checkout optimization hacks to streamline your users' shopping experience? 7 out of 10 shoppers who reach a WooCommerce checkout leave without paying; according to Baymard...
Editorial Team
July 6, 2026A WooCommerce order form lets customers select multiple products, set quantities, and choose variations from a single page instead of visiting individual product pages. There are two ways to add...
Editorial Team
July 6, 2026The Bricks WooCommerce builder is built directly into the Bricks theme. Activate the free WooCommerce plugin, and Bricks unlocks more than 30 store-specific elements plus visual templates for every part...


