
The checkout page is the final step in the purchase process where customers enter their billing details, choose a shipping method, and submit payment.
A well-designed WooCommerce checkout with Elementor can reduce abandonment and increase conversions. While a poorly designed one drives customers away right before they buy.
The problem is that the default WooCommerce checkout page is rigid and difficult to customize. It relies on a PHP template file that loads your theme’s standard layout.
Making meaningful changes to form fields, layout, or the checkout flow typically requires overriding WooCommerce template files or writing custom PHP code.
But if you use Elementor as your page builder, expect drag-and-drop control over the checkout design, just like you have on every other page.
In this guide, we will show you how to create a fully customized WooCommerce checkout page with Elementor, without any code.
We will also share research-backed best practices to reduce checkout abandonment.
Here's a complete tutorial if you prefer watching videos over reading:

Why Customize Your WooCommerce Checkout Page With Elementor
The default WooCommerce checkout isn’t designed to allow maximum conversions.
It often includes unnecessary fields, places the email input too late, and lacks essential features, such as order modifications at checkout.
These elements create visual clutter and give customers reasons to click away from the purchase, resulting in cart abandonment and lost sales.
Customizing the checkout page using Elementor gives you control over the design, layout, form fields, and overall checkout experience so you can directly address the reasons shoppers leave.
- The average checkout contains 23.48 form elements, but an ideal flow needs only 12 to 14. A custom checkout lets you strip unnecessary fields and simplify the form.
- Aligning your checkout with your brand's visual identity is crucial. Customizing your WooCommerce checkout with Elementor lets you edit the colors and fonts and add your brand’s logo to reinforce brand recognition and trust.
- Add conversion elements such as order bumps (last-minute checkout offers) and trust badges, such as security icons, customer testimonials, and guarantees, to increase buyer confidence and average order value without friction.
- Add express payment options, such as Apple Pay and Google Pay, so returning customers can skip the form entirely and pay in a single tap. GPay Official case studies show that Google Pay helped increase conversions by 27% and 20x, respectively, for brands like LARQ and SpotHero.
- Enable multi-step checkout with a progress indicator to guide shoppers through the purchase journey. Alternatively, a single-page checkout keeps everything visible on one screen, which works well for digital products.
Table of Contents
- 1 WooCommerce & Elementor: The Perfect Duo to Design Your WooCommerce Checkout Pages
- 2 How to Customize the WooCommerce Checkout Page with Elementor
- 3 Attractive WooCommerce Elementor Checkout Templates
- 4 7 Best Practices to Boost Conversions of WooCommerce Elementor Checkout Pages
- 5 Frequently Asked Questions on WooCommerce Elementor Checkout Page
- 6 Build a High-Converting WooCommerce Checkout Page with Elementor Today!
WooCommerce & Elementor: The Perfect Duo to Design Your WooCommerce Checkout Pages
WooCommerce has maximum extensibility, and Elementor is great with design options and ease of building.
Elementor offers many options for customizing WooCommerce pages, including product, shop, and cart pages.
However, Elementor’s checkout widget offers limited functionalities if you want to design a high-converting custom checkout page.
What Elementor’s checkout widget cannot do:
- Add, remove, or rearrange checkout form fields (you can only edit labels and placeholders for the fields that WooCommerce already provides)
- Create a multi-step checkout layout with tabs or a progress bar
- Add express payment methods such as Apple Pay, Google Pay, or PayPal Express
- Add order bump offers or product recommendations on the checkout page
- Enable address autocomplete to speed up buying
- Add a mini cart or editable cart summary within the checkout
- Run A/B tests between different checkout layouts or designs
- Create a distraction-free checkout that removes the site header and footer from the page (this depends on your theme, not the widget)
To do all this without any limitations, you can use the FunnelKit Funnel Builder.
FunnelKit is the most powerful funnel builder for WordPress. It lets you build funnels, including opt-in pages, sales pages, checkouts, order bumps, upsell offers, and thank-you pages.
It also leverages WooCommerce and Elementor by featuring checkout widgets that help you create high-converting checkout pages.
Checkout Form Elementor Widget
FunnelKit’s checkout form widget for Elementor allows you to drag and drop the WooCommerce checkout form anywhere you like on the screen.
This form is fully customizable. Take a look:
The 'Style' section on the left-hand panel lets you change borders, colors, field width, and more.
You can even change the text and colors of the checkout CTA button.
You can change the colors of the button, its text, sub-text, button icon, and more.
There's also the option to make the order summary collapsible for mobile devices. So, it will expand only when the user taps or clicks on it (we’ll look at it in detail later in this post).
Mini Cart Elementor Widget
The mini cart widget is another drag-and-drop Elementor widget built to display a mini cart on the checkout page.
Here, shoppers can see all items in their carts and their respective quantities.
Moreover, the buyer can even adjust the quantity of the product, add or delete an item and recover accidentally deleted items.
This gives your users complete control over their purchase experience on the WooCommerce Elementor checkout page.
Plus, you can change headings, products, coupon code sections, and more.
We’ll examine the customization options later in this post when we edit our WooCommerce checkout page with Elementor.
In addition to making all the functional adjustments to the mini cart, you can change the colors, typography, border type, width, and more in the Style section.
How to Customize the WooCommerce Checkout Page with Elementor
To build a fully customized WooCommerce checkout page in Elementor with multi-step layouts, field editing, express checkout, and conversion elements, we'll use FunnelKit Funnel Builder.
FunnelKit offers a free version that includes Elementor-compatible checkout page templates you can import and customize.
The Pro plan adds one-click upsells, order bumps, A/B testing, and advanced field editing. Get a copy of FunnelKit’s Funnel Builder here.
Make sure to install and activate the Funnel Builder plugin on your WordPress website.
Follow the step-by-step instructions to customize the WooCommerce checkout page with Elementor.
Step 1: Create a store checkout
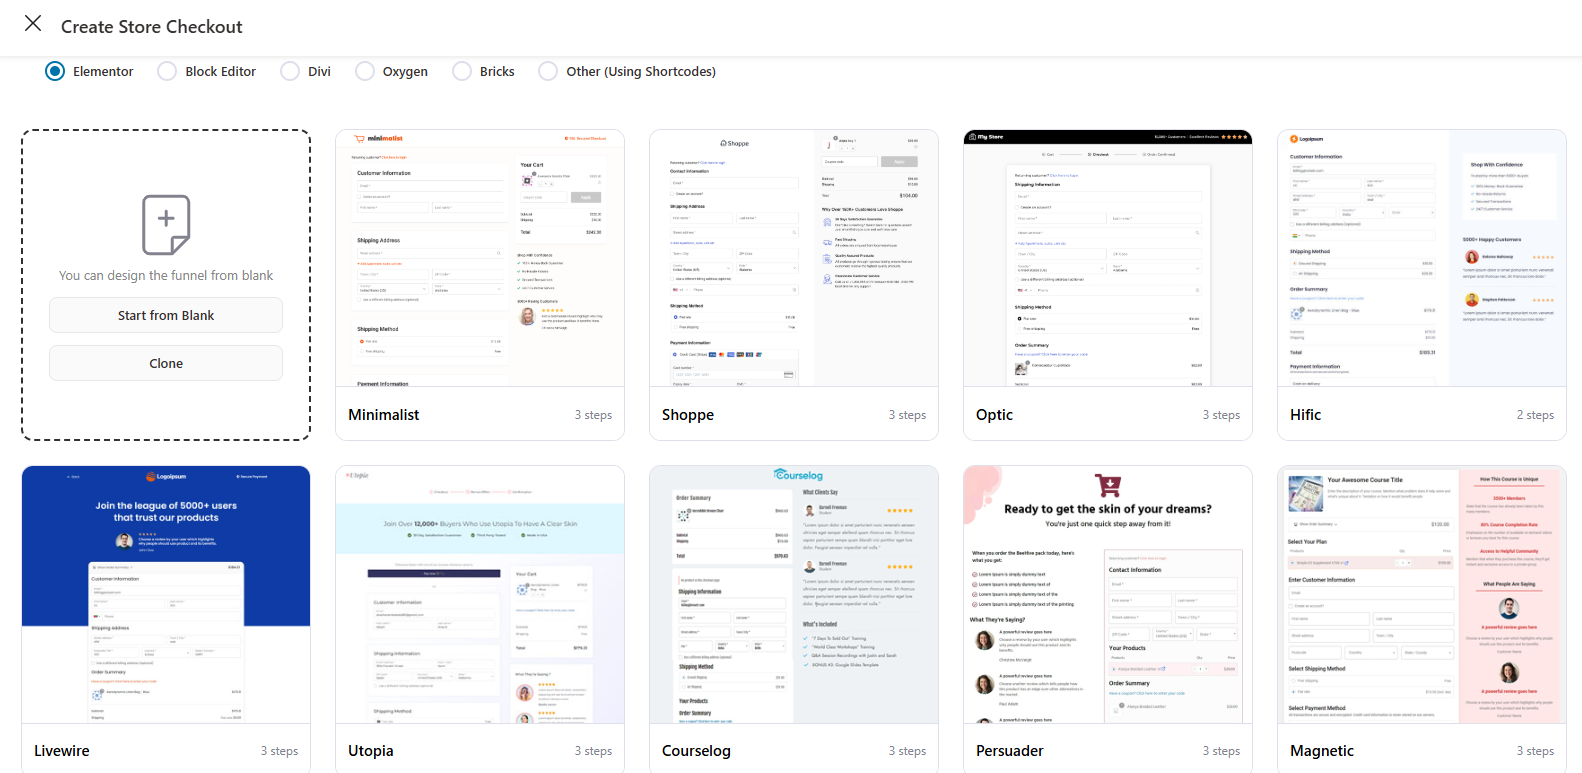
Go to FunnelKit ⇨ Store Checkout and click the ‘Create Store Checkout’ button.
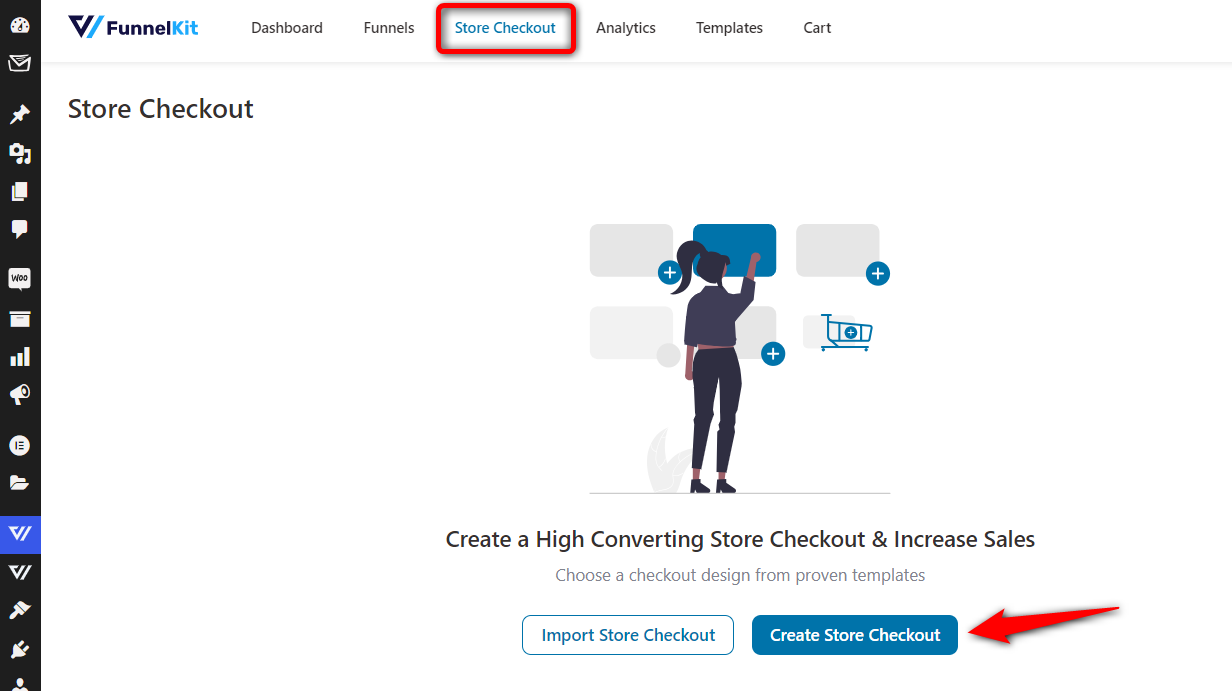
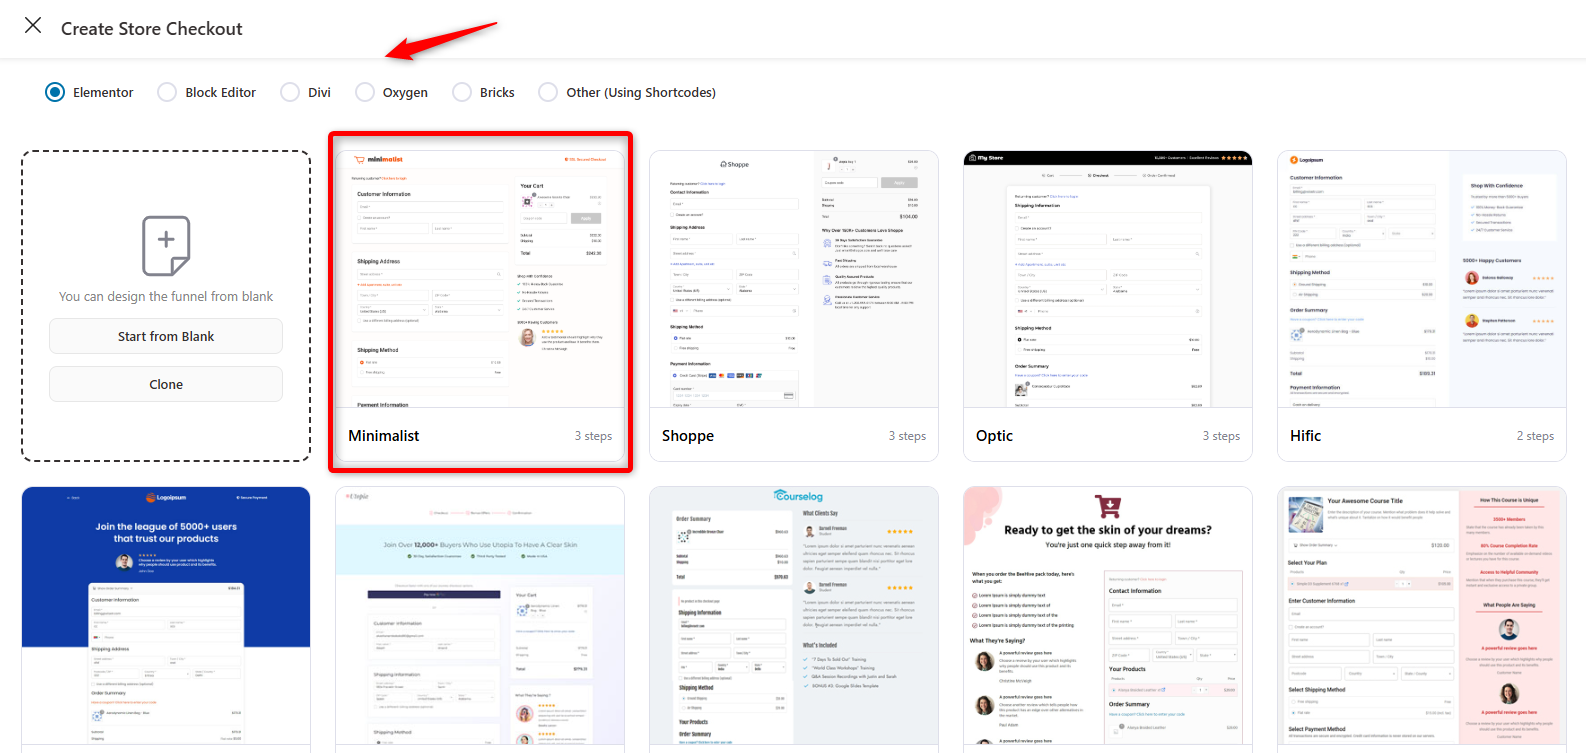
You’ll get directed to the templates page.
In addition to Elementor, FunnelKit integrates with various page builders, including Bricks, Divi, Oxygen, Gutenberg, and others, via WooCommerce checkout shortcodes.
If you like any template, click ‘Preview’ next to it.
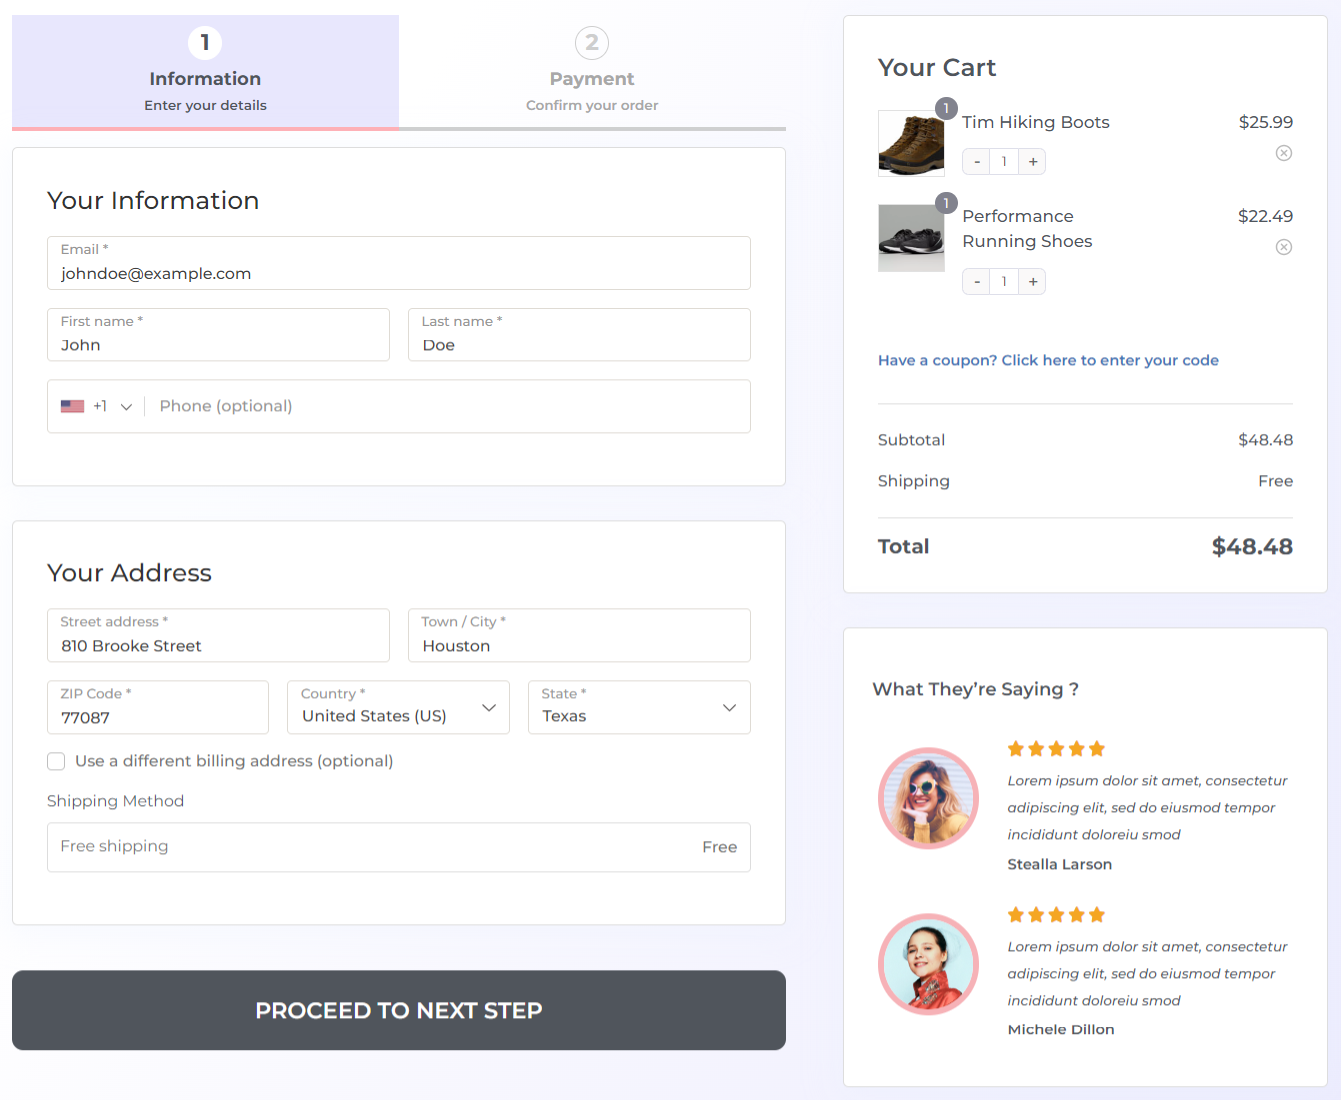
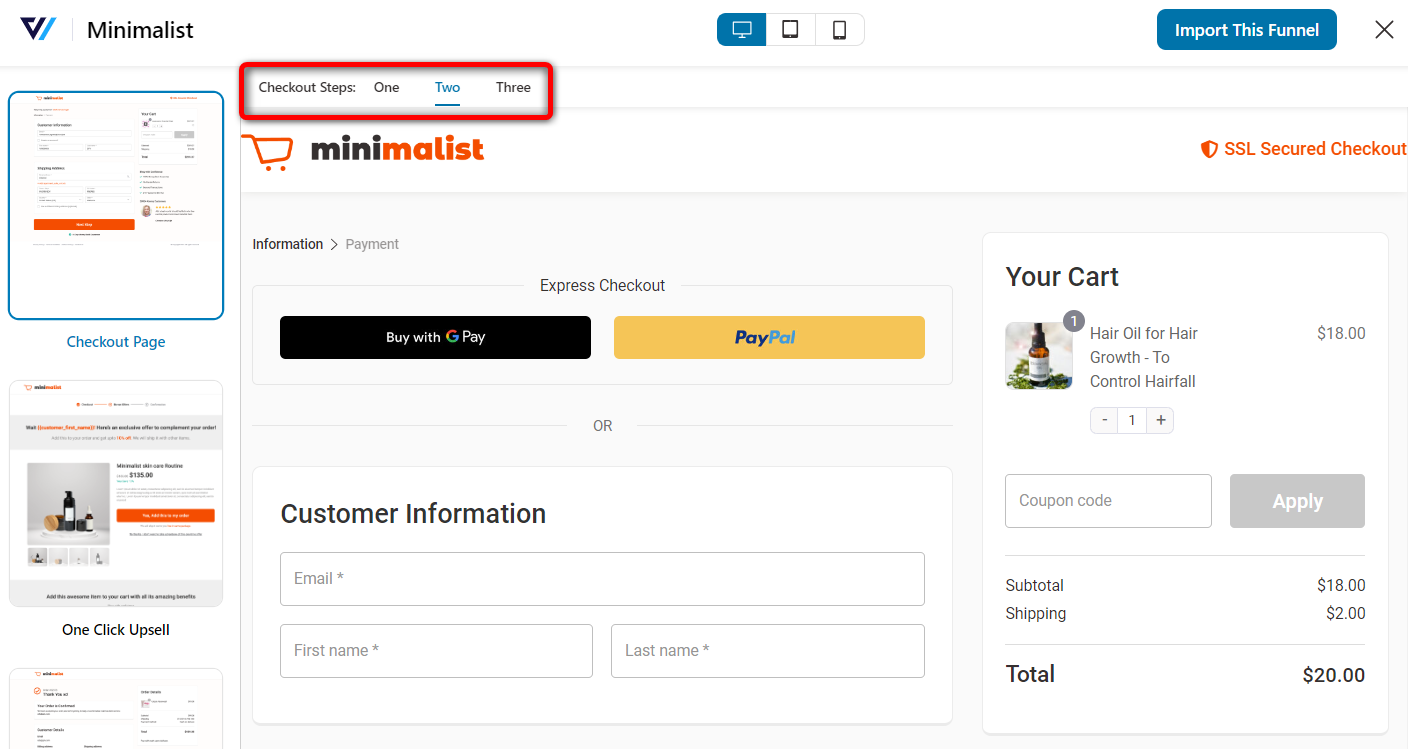
You’ll be able to take the full preview of this template here. Choose the number of steps for your checkout page layout: one-step or multi-step (two or three steps).
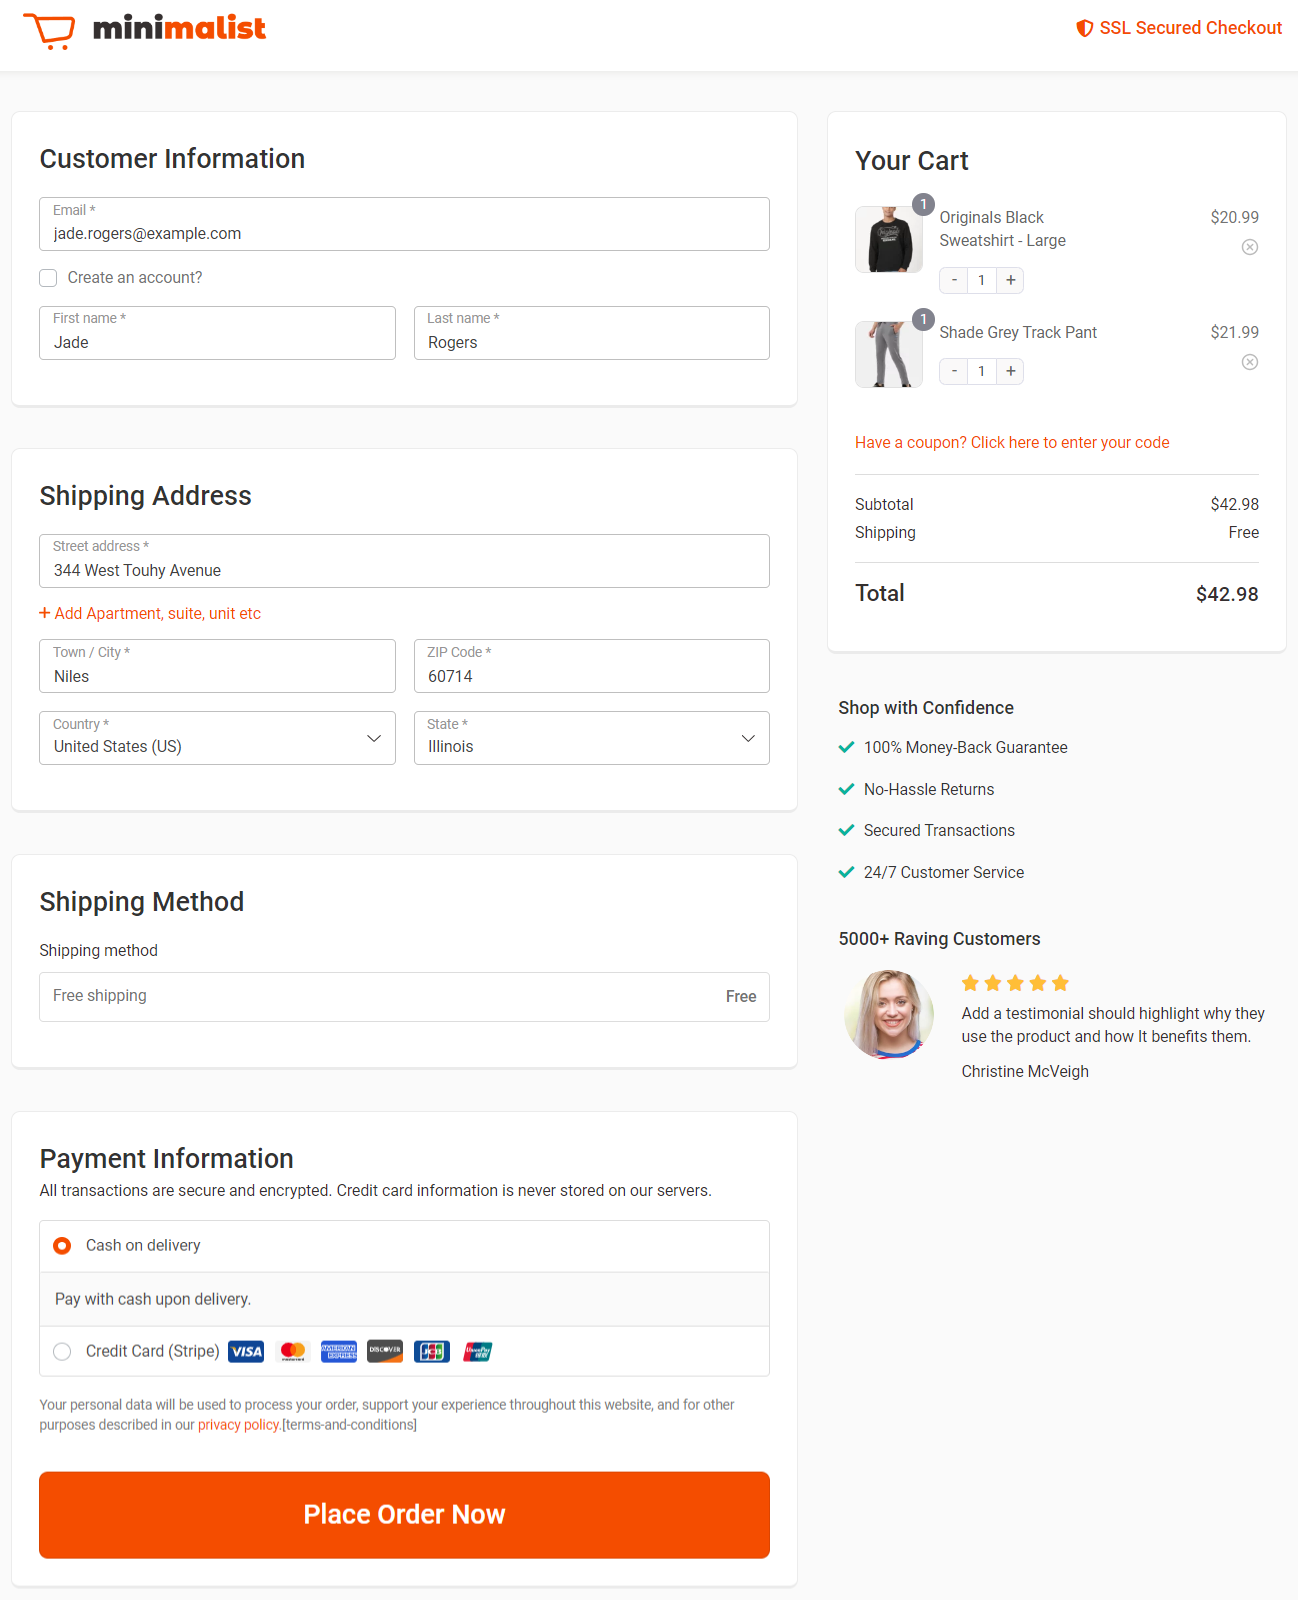
We will import the two-step Minimalist template for our WooCommerce Elementor checkout page here.
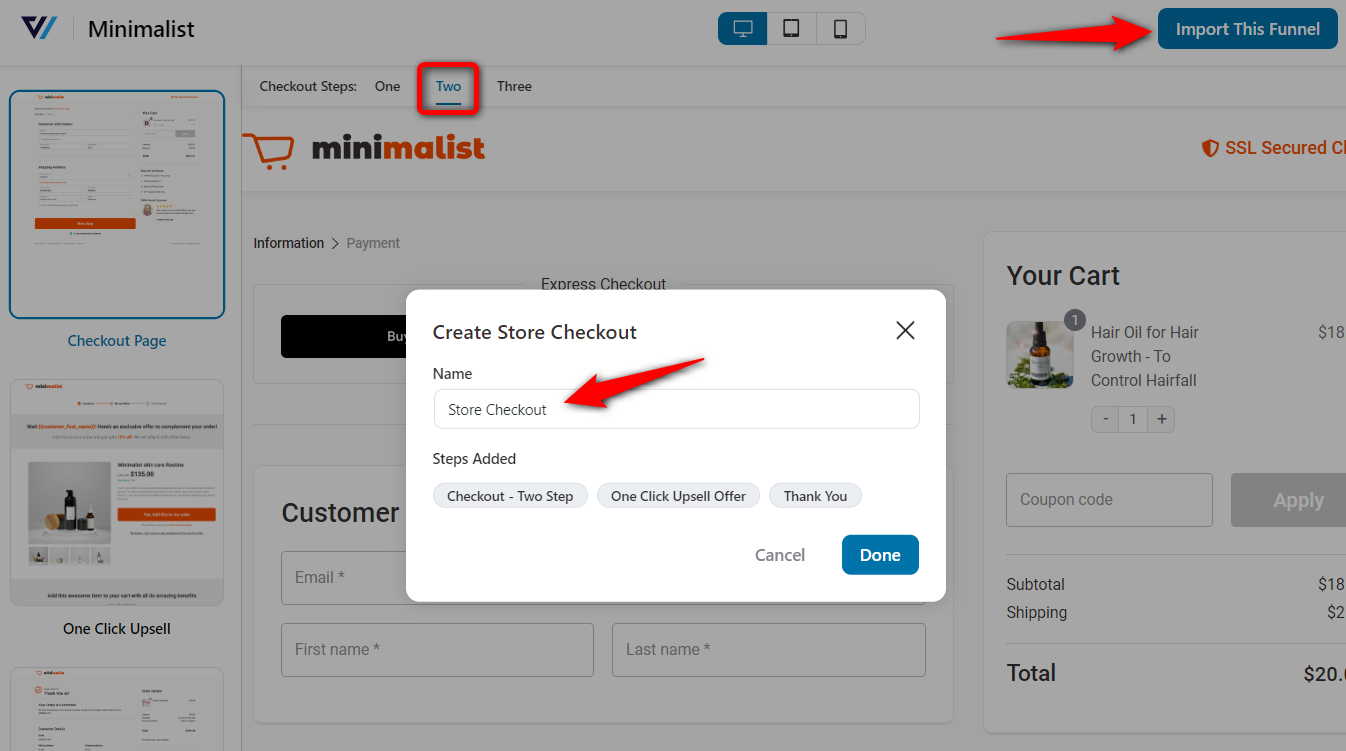
Clicking on ‘Done’ will import your store checkout.
Step 2: Customize the design of your WooCommerce Elementor checkout page
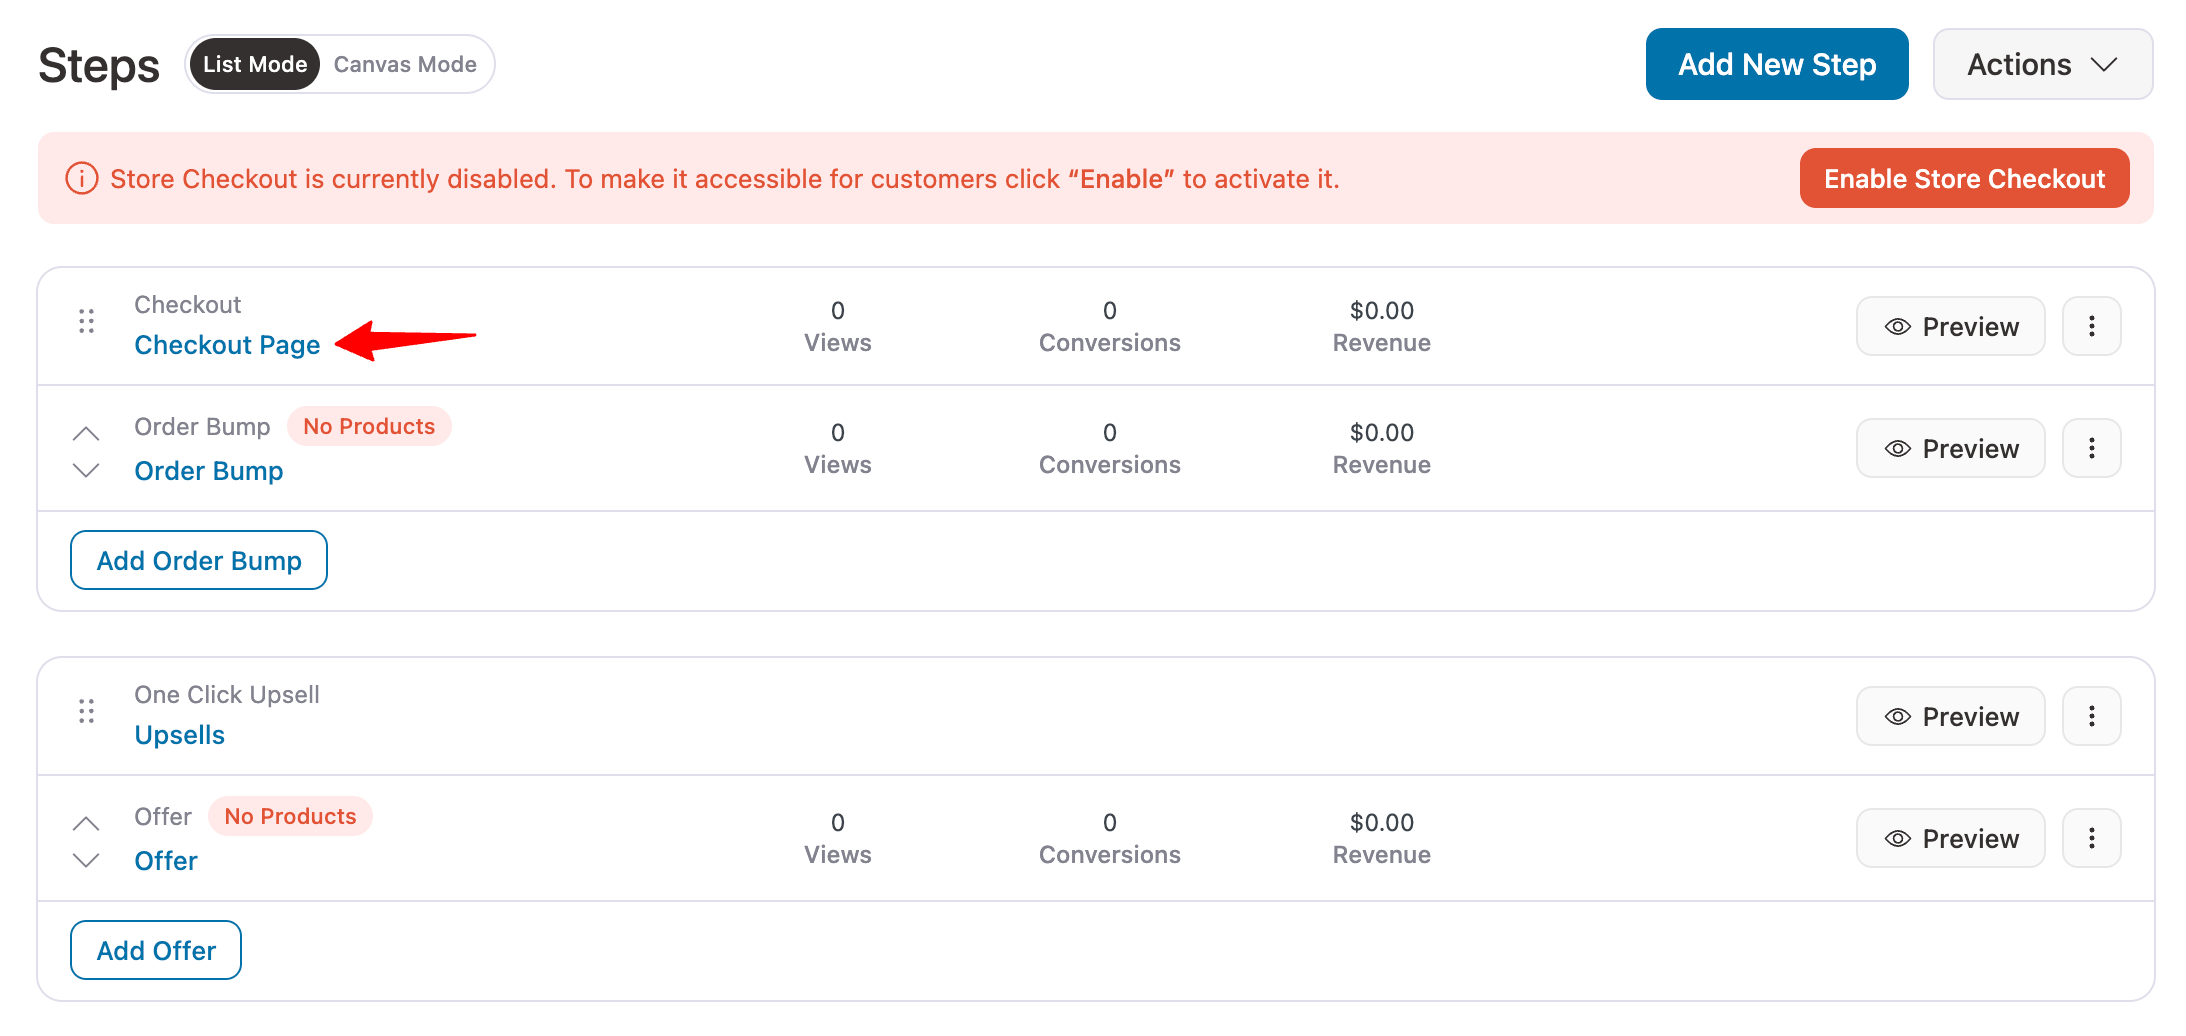
Click on the page to start editing your WooCommerce checkout with Elementor.
You'll get inside the Checkout customization area.
On the Design tab, click ‘Edit Template’ to start customizing your WooCommerce checkout page with Elementor.
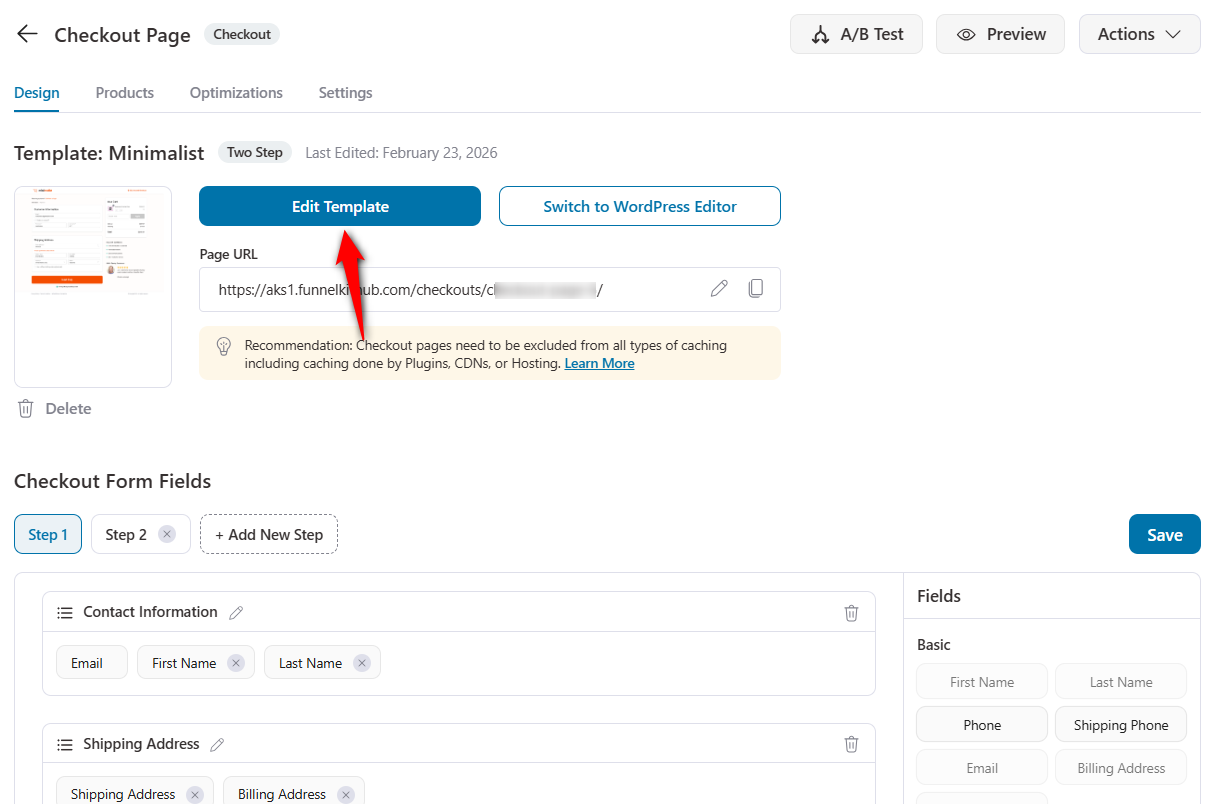
This page will load in Elementor.
You can now start customizing your checkout page using different Elementor widgets.
Business logo
Start by changing the icon on your checkout page. To do this, click on the icon and upload a new image from the URL or media.
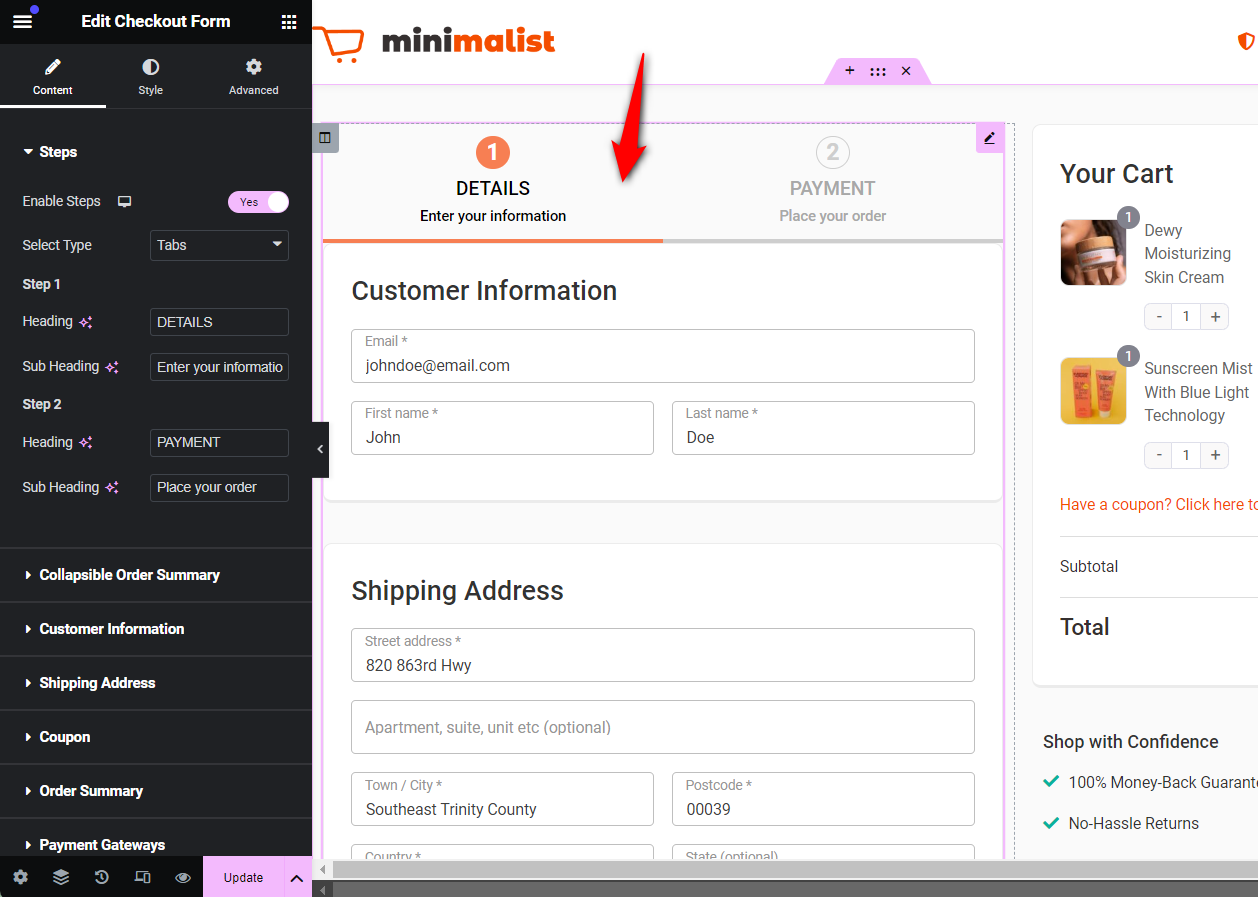
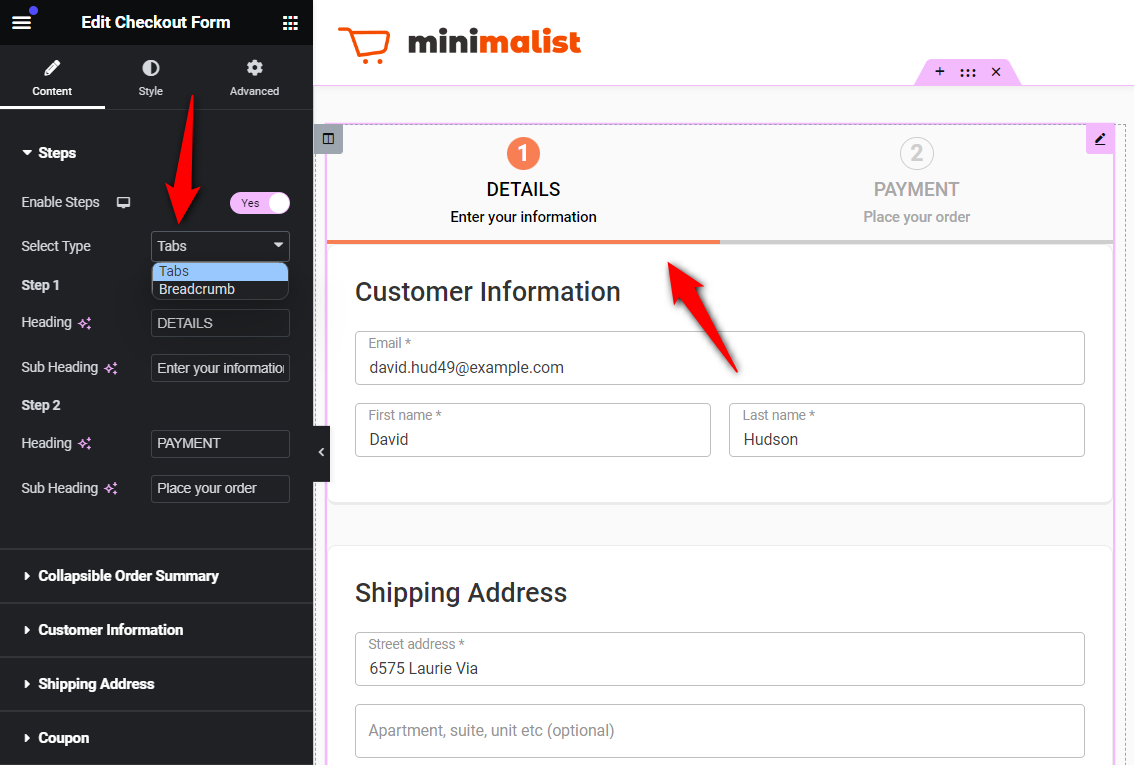
Progress bar
You can enable the steps and format them as a breadcrumb or in tabs.
Here, you’ll also find the option to modify the titles of your checkout step:
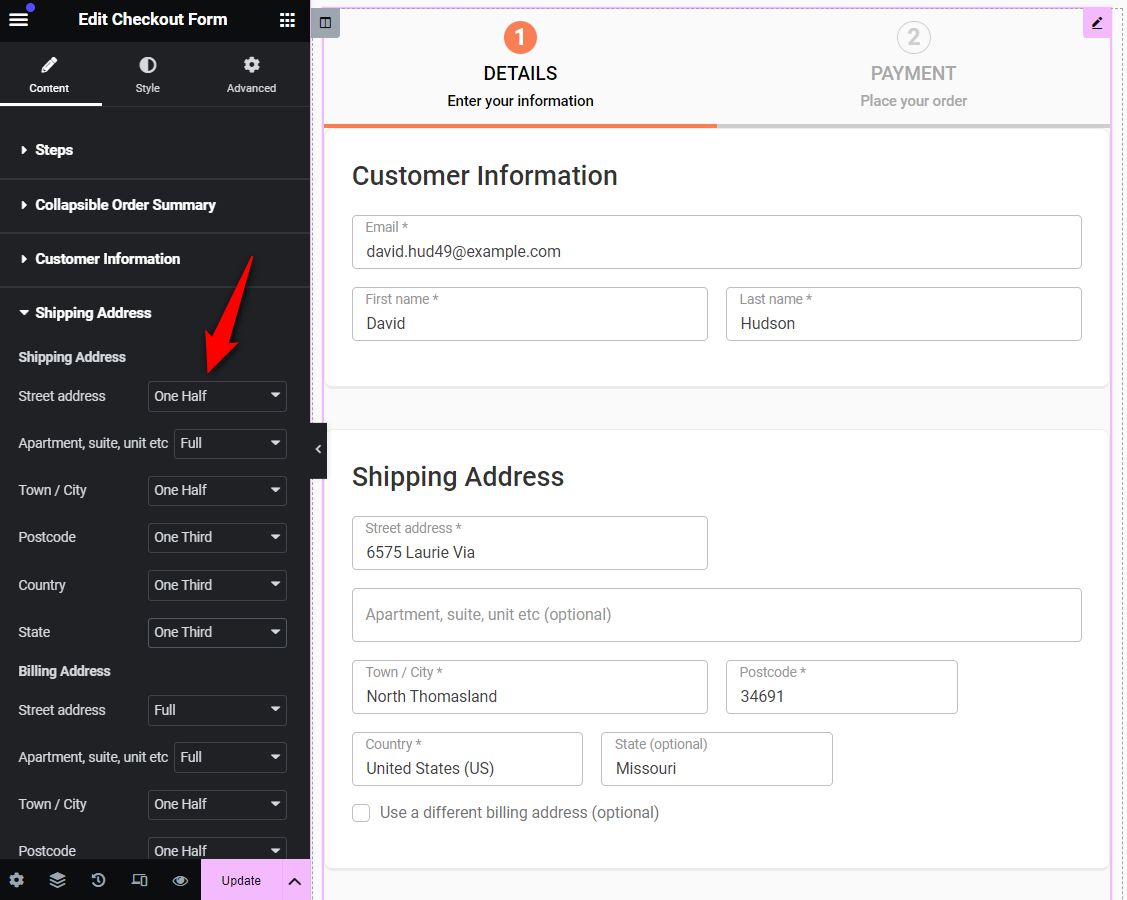
Shipping address field widths
Next, adjust the field widths of your checkout form.
Go to the ‘Customer Information’ or ‘Shipping Address’ section. You'll find options to adjust the widths of your shipping and billing address fields to full, one-half, one-third, or two-thirds.
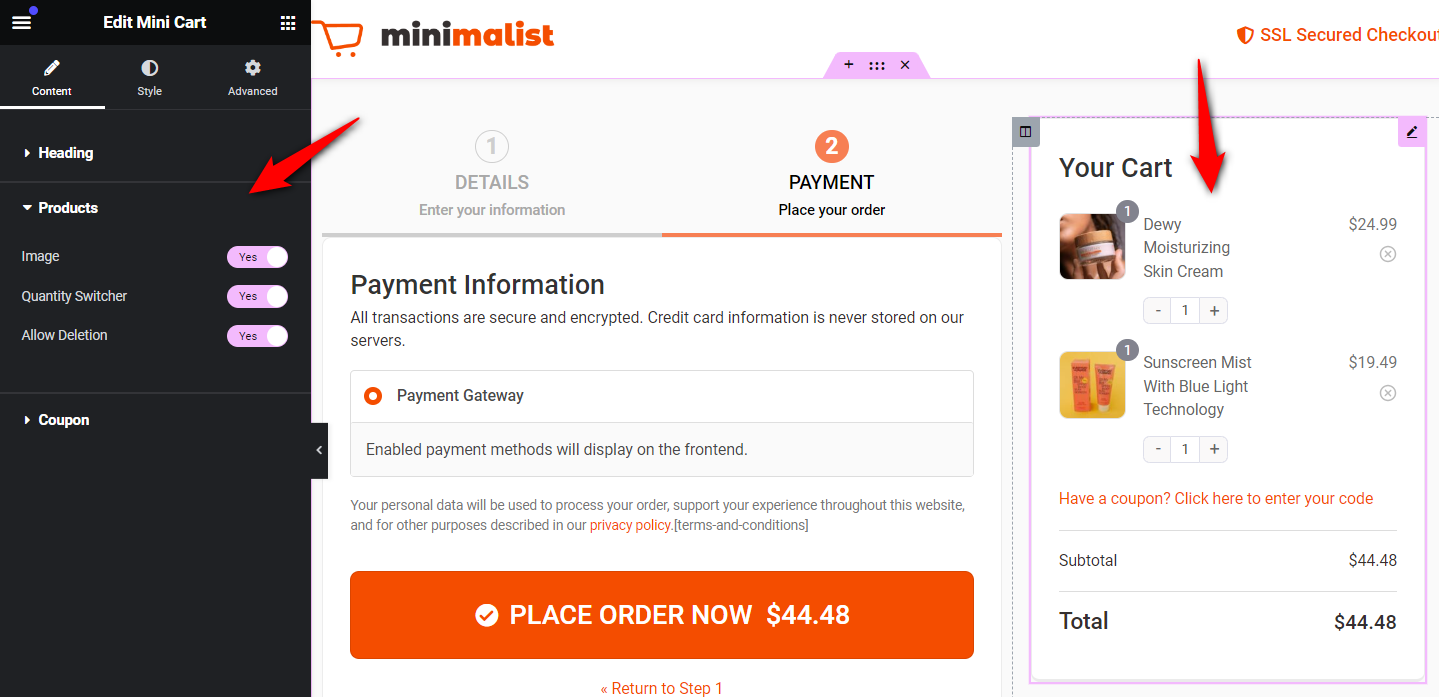
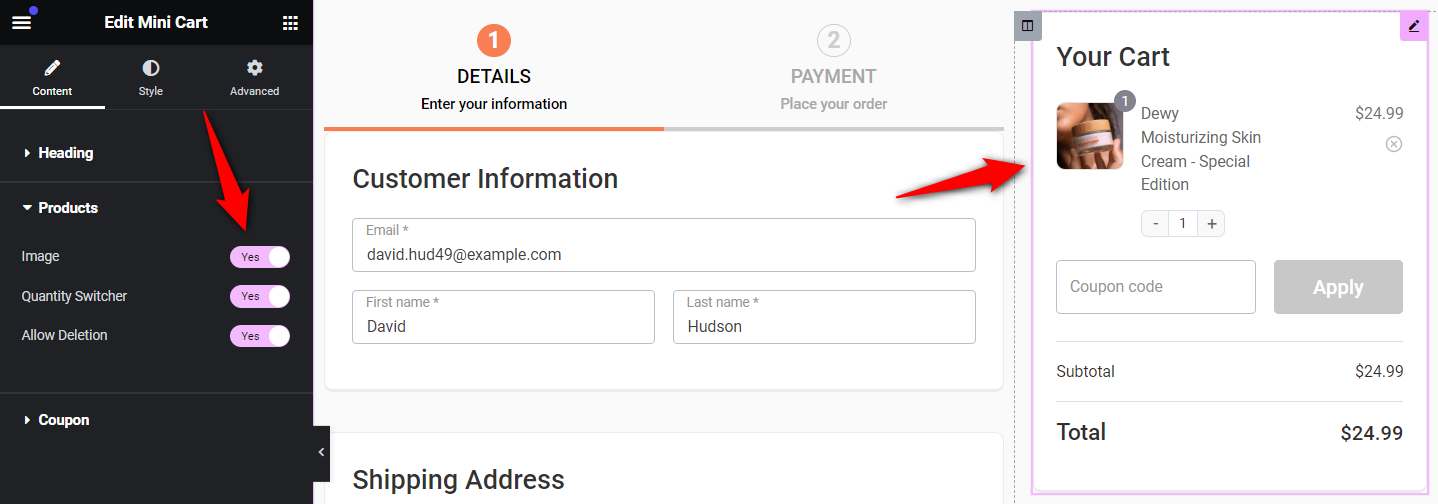
Mini cart section
Customize the cart section on the WooCommerce Elementor checkout page by clicking on the mini cart widget.
Next, enable the product’s images and quantity switcher and allow deletion if you want your shoppers to be able to modify their cart items.
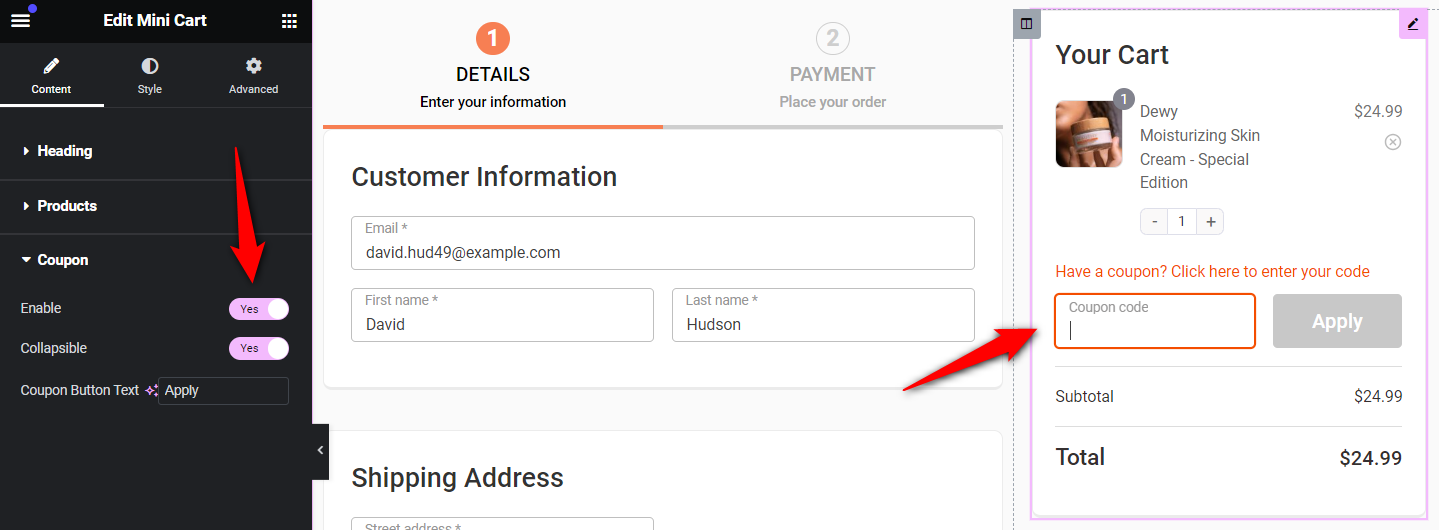
Coupon section
You can enable or disable the coupon field at the checkout and make it collapsible.
You can even change the coupon text using the button.
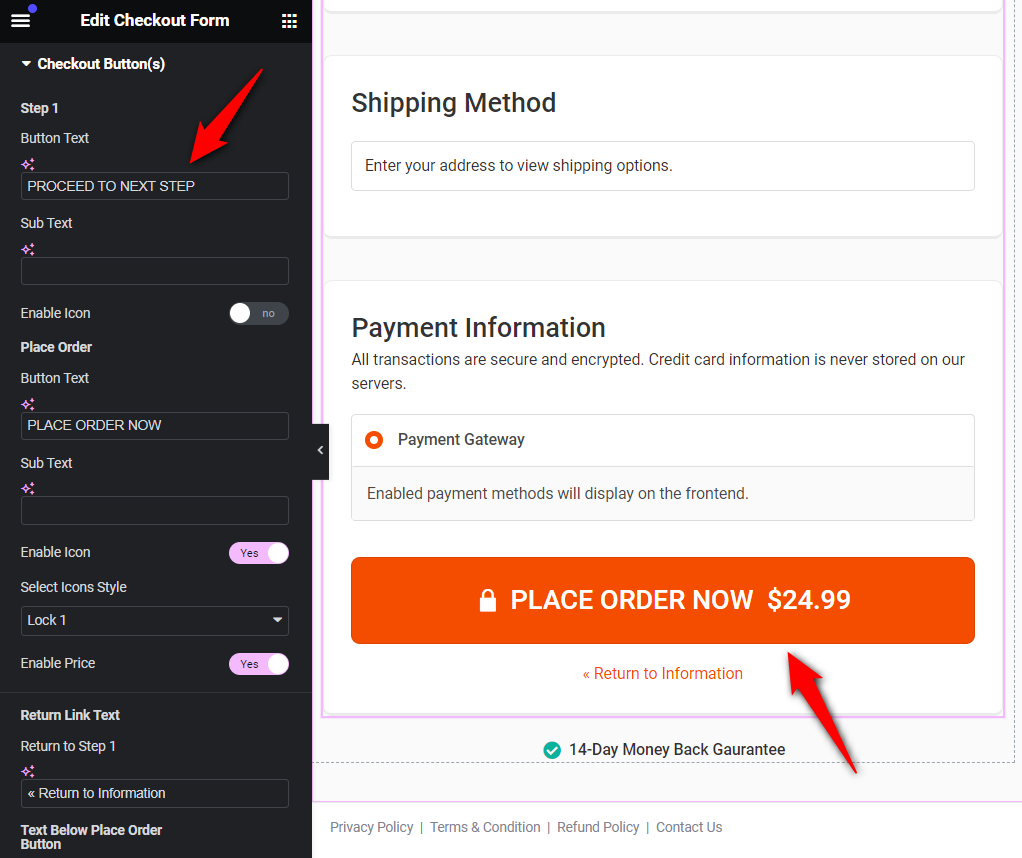
Checkout button
Under the ‘Content’ tab, update the checkout button's text and subtext, and enable the icon and price.
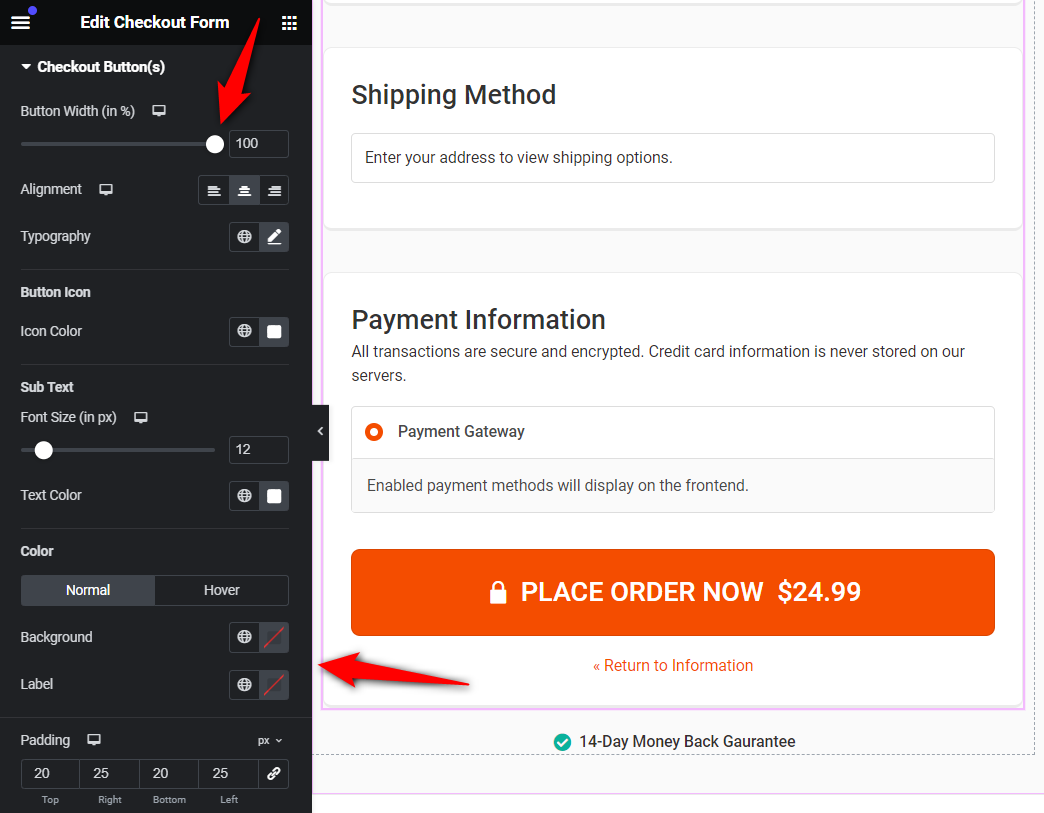
Elementor's extensive styling options let you customize the button to match your brand colors.
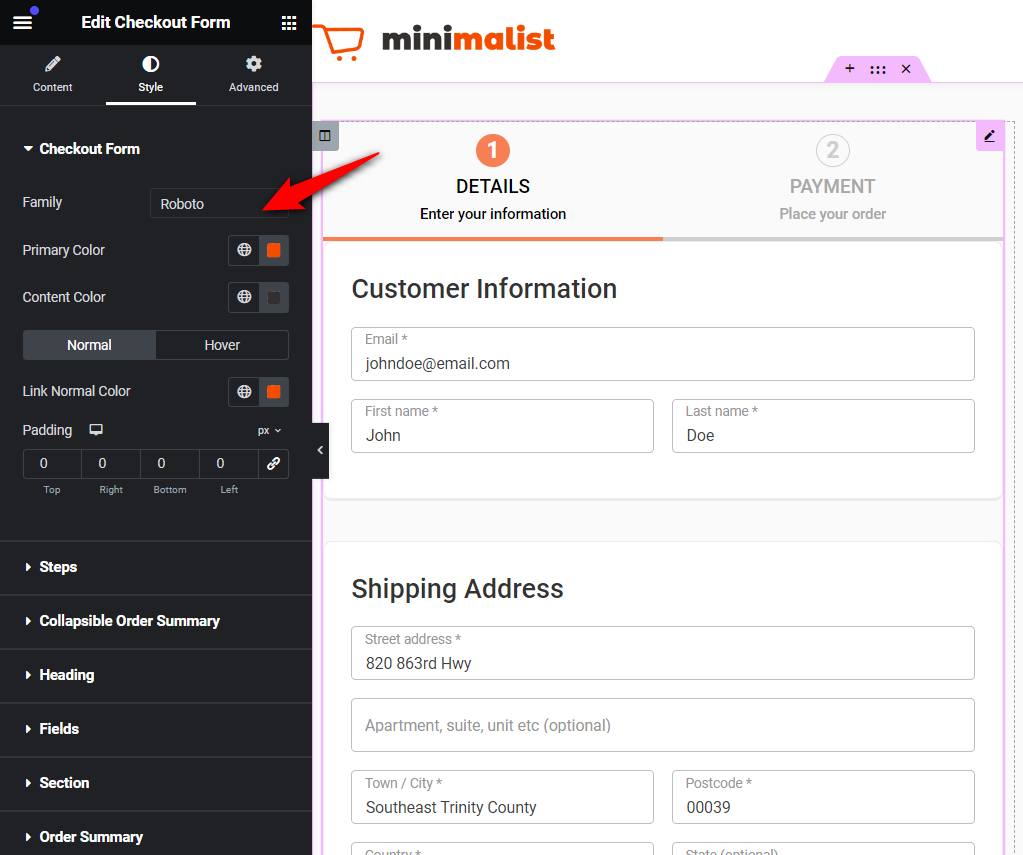
Under the ‘Style’ tab, you can customize the typography of your checkout button, including the font family, font color, icon color, button color, padding, margin, and more.
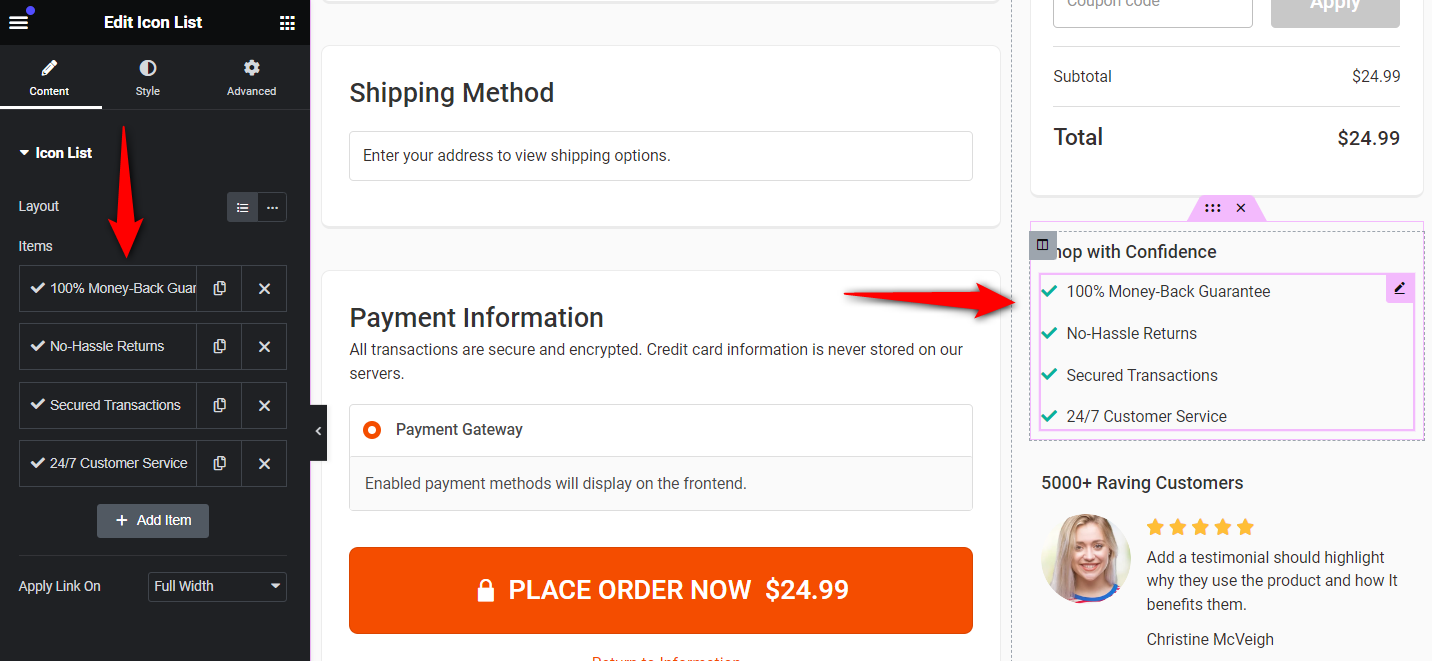
Assurance and testimonials
Change the text on the assurance and testimonials element of your WooCommerce Elementor checkout page.
All you need to do is click on the element and change its text from the left-hand side menu of this Elementor widget.
Hit 'Publish' to save the design changes of your WooCommerce Elementor checkout page.
Step 3: Customize the WooCommerce checkout form
While you can customize anything from the widget's settings in Elementor, you cannot add, edit, remove, or reorder the checkout form fields.
As an eCommerce store owner, we're pretty sure you want that ability, too.
You may want to re-order the form fields within the shipping/billing section or remove them when unnecessary.
This could be the case if you're selling only digital products. You can even add custom fields to your checkout form.
Here are a few of its highlights:
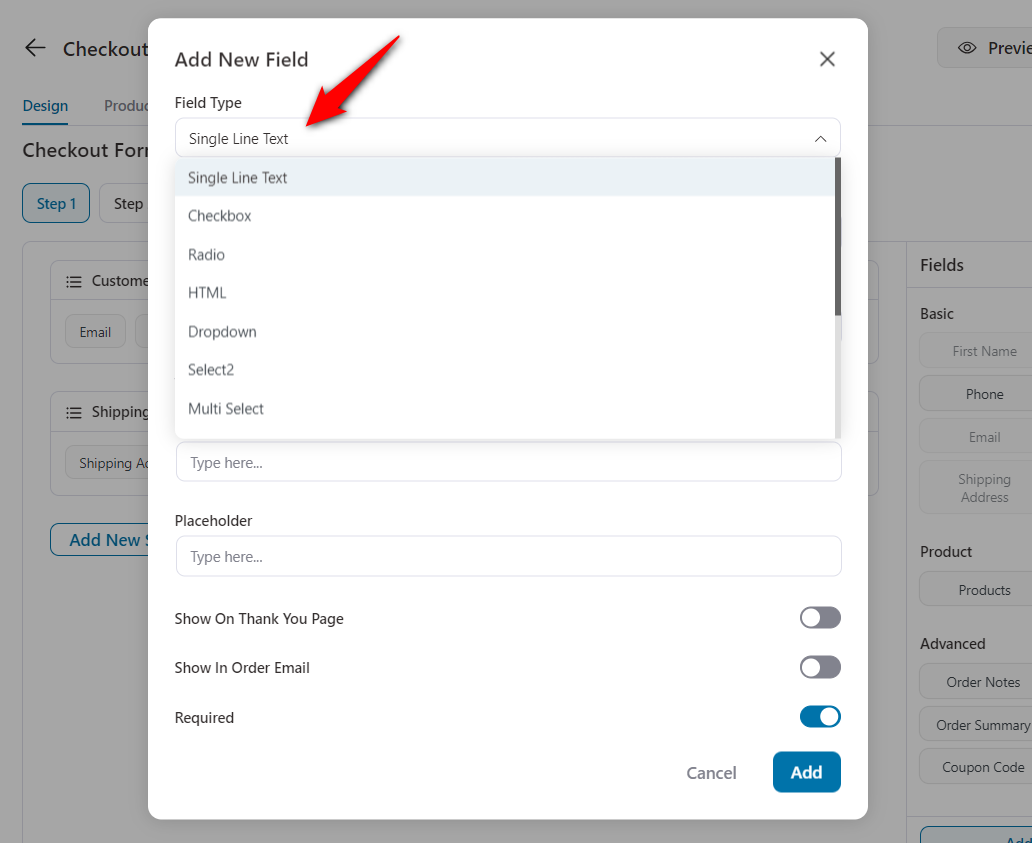
- Add new checkout form fields - Choose from text, checkbox, radio, HTML, and more.
- Edit existing fields - Customize the names, labels, and placeholders of checkout form fields.
- Re-order the form fields - Place the email at the top or re-arrange the checkout form sections and fields within them.
You can do it from the Design tab and scroll down to 'Checkout Form Fields'.
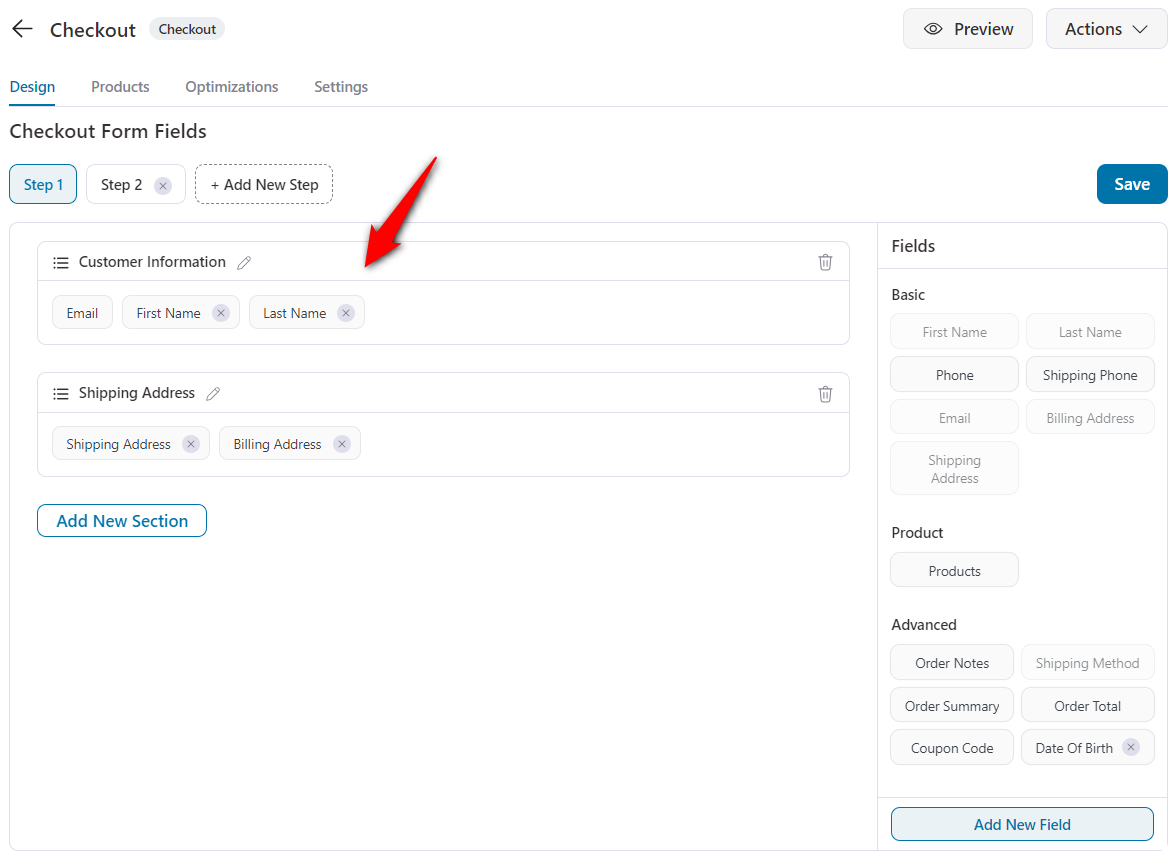
You can add new sections and rearrange them. Then, you can add, remove, or edit the fields within these sections.
To add a new field, hit the option in the right-hand panel. Here's a list of field types you can choose from:
Click on ‘Save Changes’ to lock in all the changes.
Check out our detailed post on customizing WooCommerce checkout form fields.
Step 4: Optimize your WooCommerce checkout page
Streamlining your checkout page to quick conversions should be your number 1 priority.
That’s why FunnelKit offers various optimization options on the checkout page.
Some of them include:
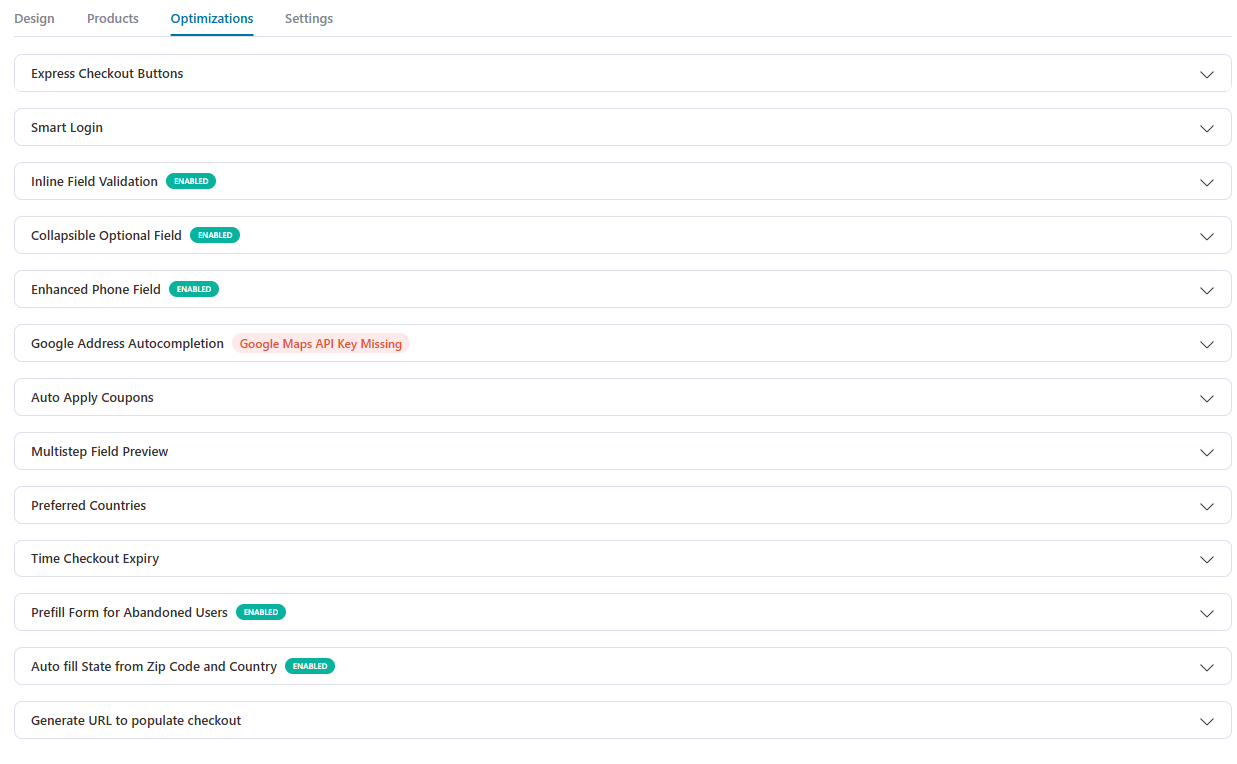
- Express payments - Enable one-click express payment options like Google Pay and Apple Pay.
- Google address auto-completion - Enable address auto-suggestions as users start typing in the address field.
- Auto-apply coupons - Enter the coupon code and have it automatically applied to incentivize your shoppers to purchase.
- Multi-step field preview - Skip back to the previous step and show a preview of the fields your users entered on the next step.
And so many options.
Go to the Optimizations tab and enable the necessary ones on your checkout page.
👉 Check out the complete checkout page optimizations here in this post.
Step 5: Add attractive order bump offers to your checkout page
Offering attractive order bumps on the checkout page helps boost the average order value in your WooCommerce store.
That’s why you should always offer complementary items to the shoppers on the checkout page.
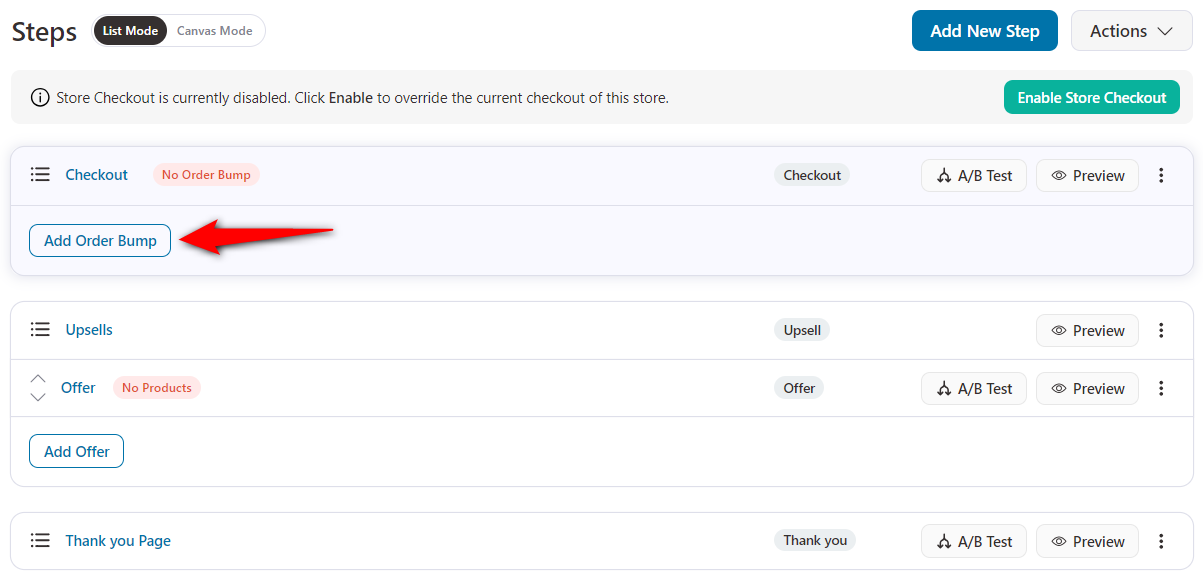
Return to your funnel and click ‘Add Order Bump’ below your checkout page.
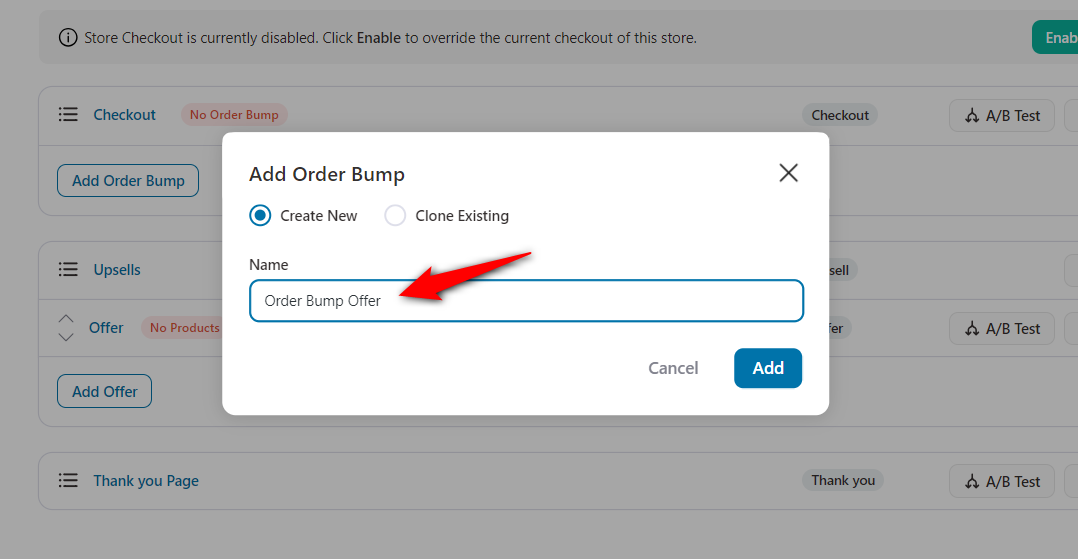
Next, enter the name of your order bump.
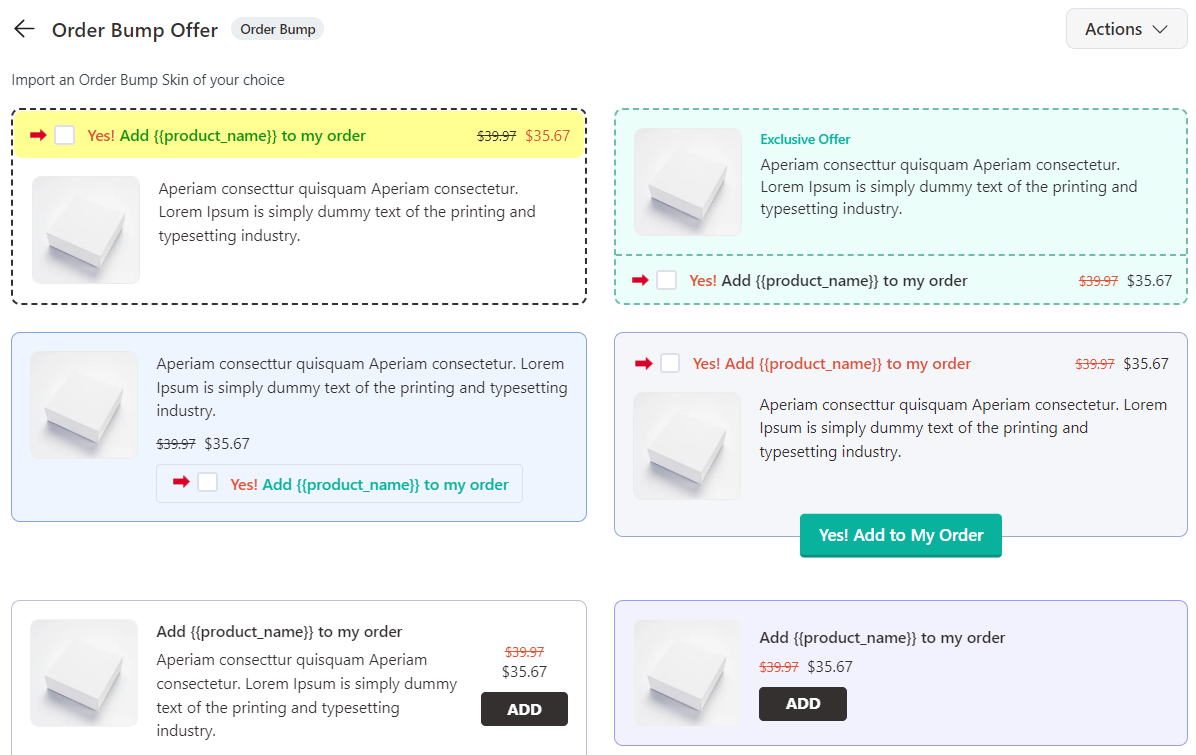
Next, choose the design of your order bump offer.
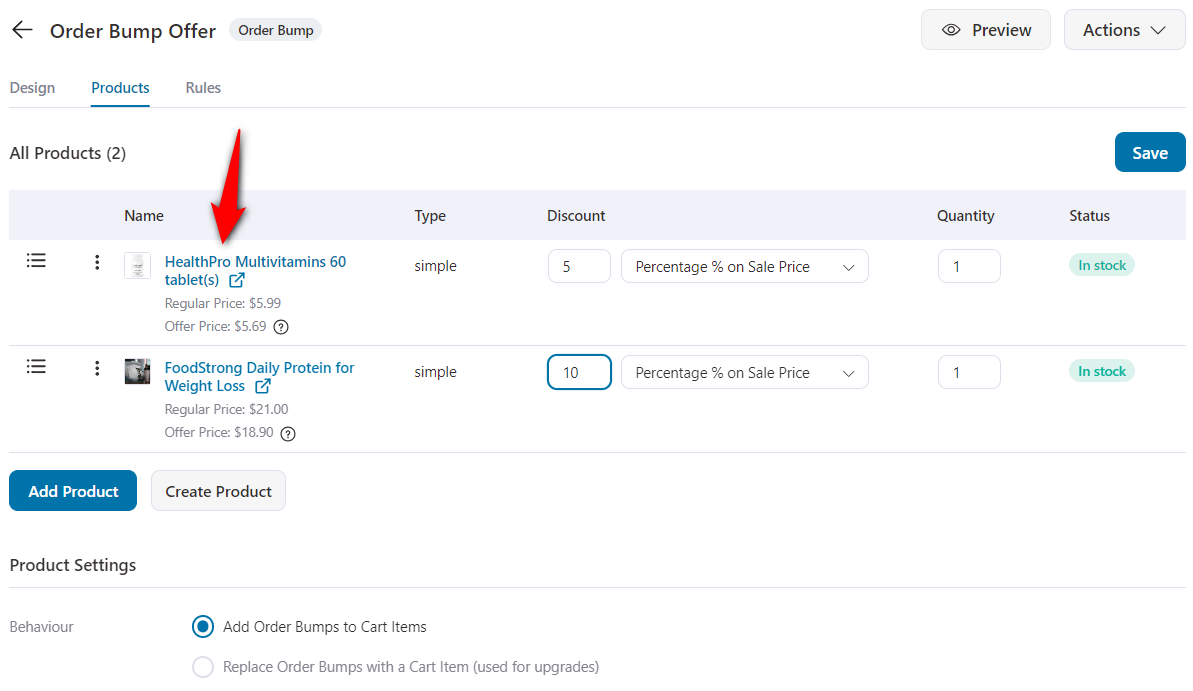
Now, add the items to your order bumps by clicking on ‘Add Products’ on the Products tab.
Feel free to add multiple items here. Once you’ve added your order bumps, you can offer discounts, change quantities, and more in the 'Products' tab.
👉 We have a dedicated post to customize your order bumps' design, copy and style.
You can even add rules to your order bumps that appear only at your store checkout. Thus, setting up rules to offer a relevant and complementary product is quite a smart strategy.
Since you're designing a global checkout, these rules can regulate the bumps on the checkout page.
To do that, go to the Rules tab.
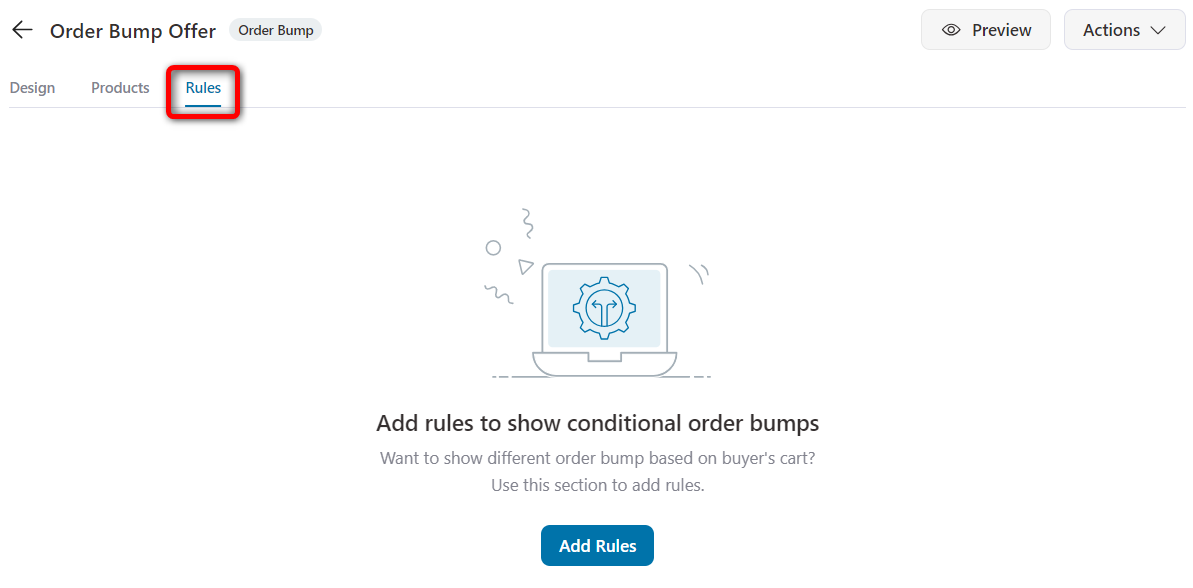
Next, add the rules for your order bumps.
For example, we’ve added the ‘Health’ cart category as a rule to trigger the order bump.
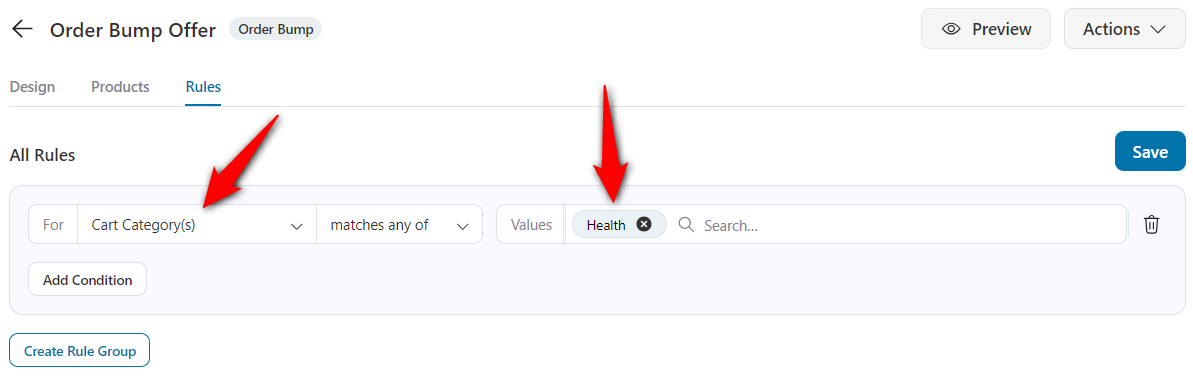
Now, these products will appear as order bumps when a shopper adds an item from the Health category to their WooCommerce cart.
This way, you can add relevant product recommendations on the WooCommerce store checkout page.
Once you’ve saved all your changes, go back to the funnel.
Click on the 'Enable Store Checkout' button to activate.
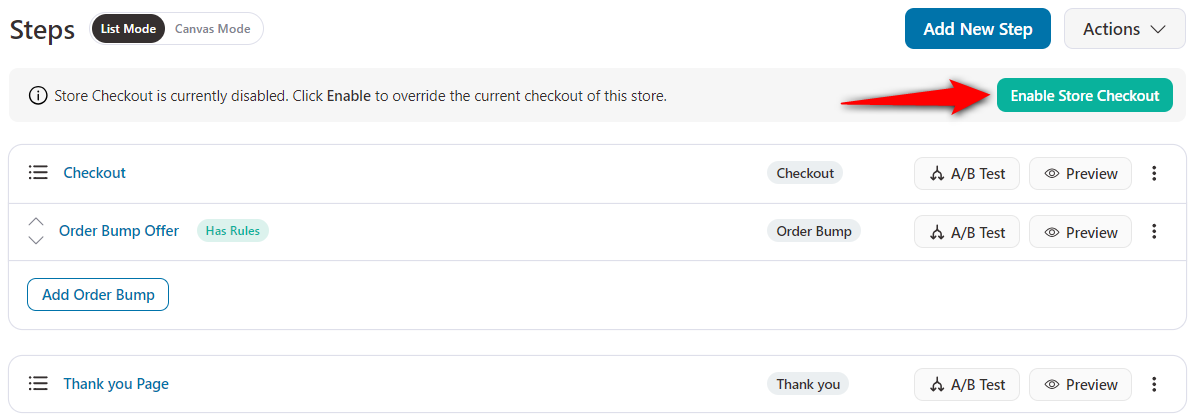
This will activate the store checkout and replace the default WooCommerce checkout page.
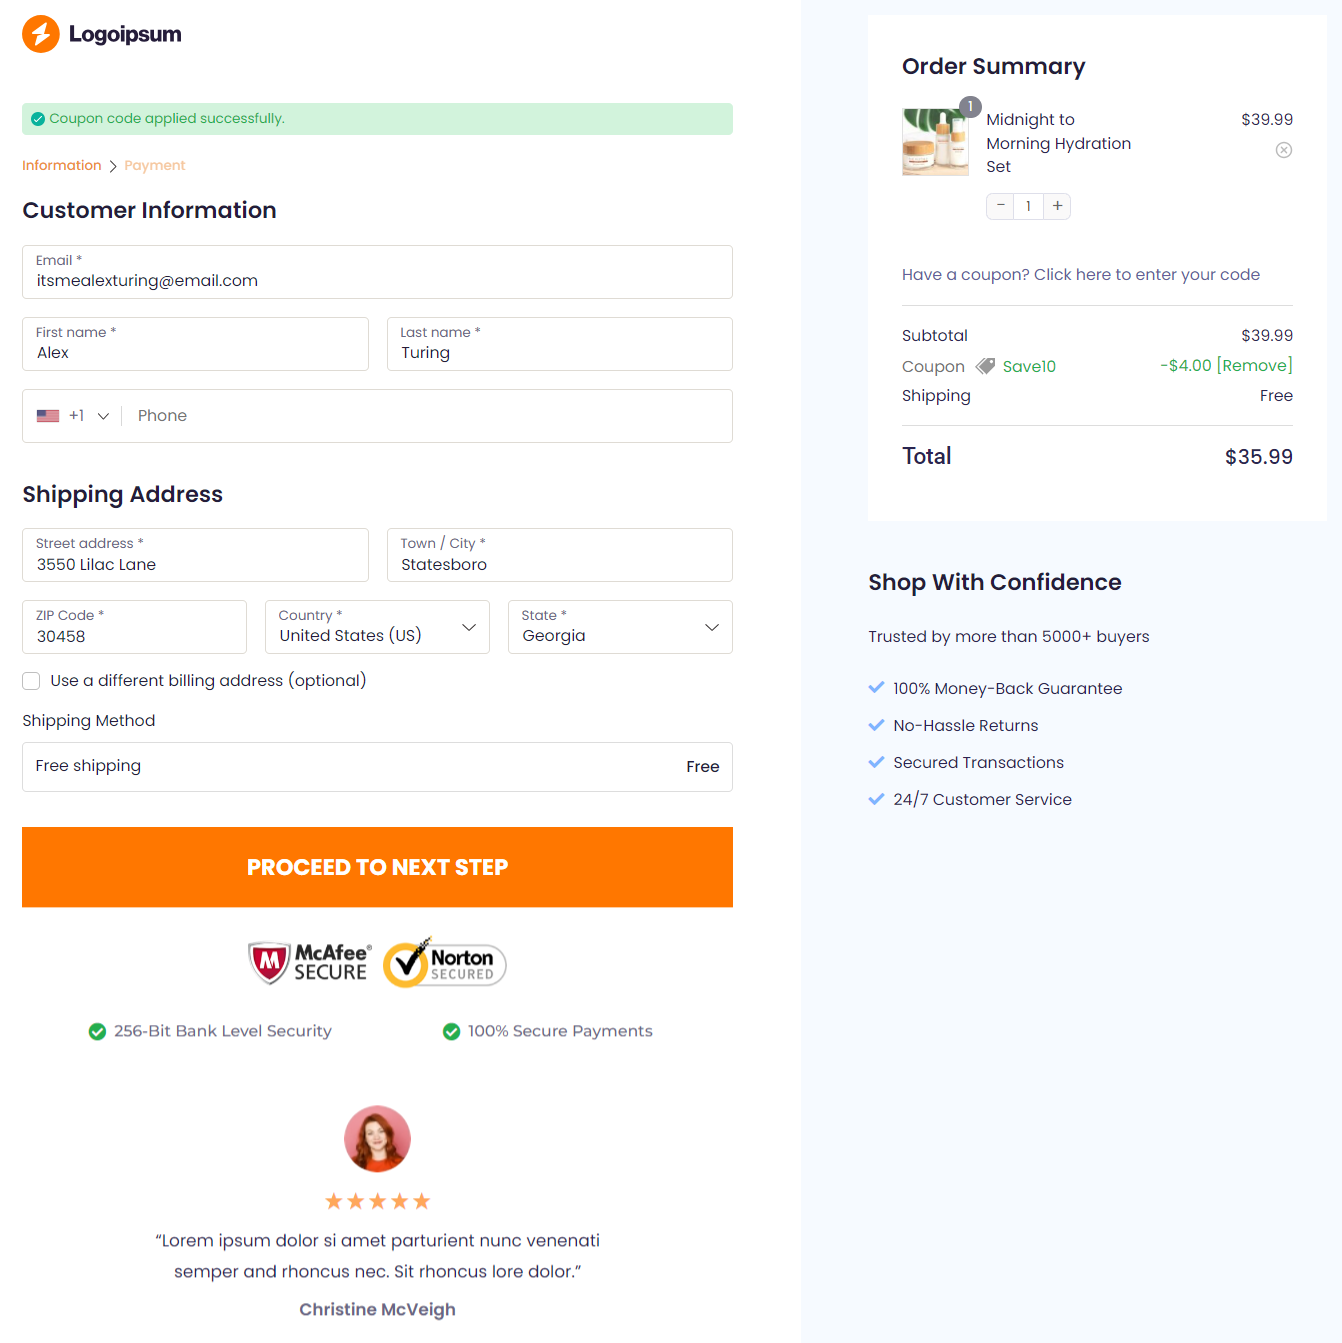
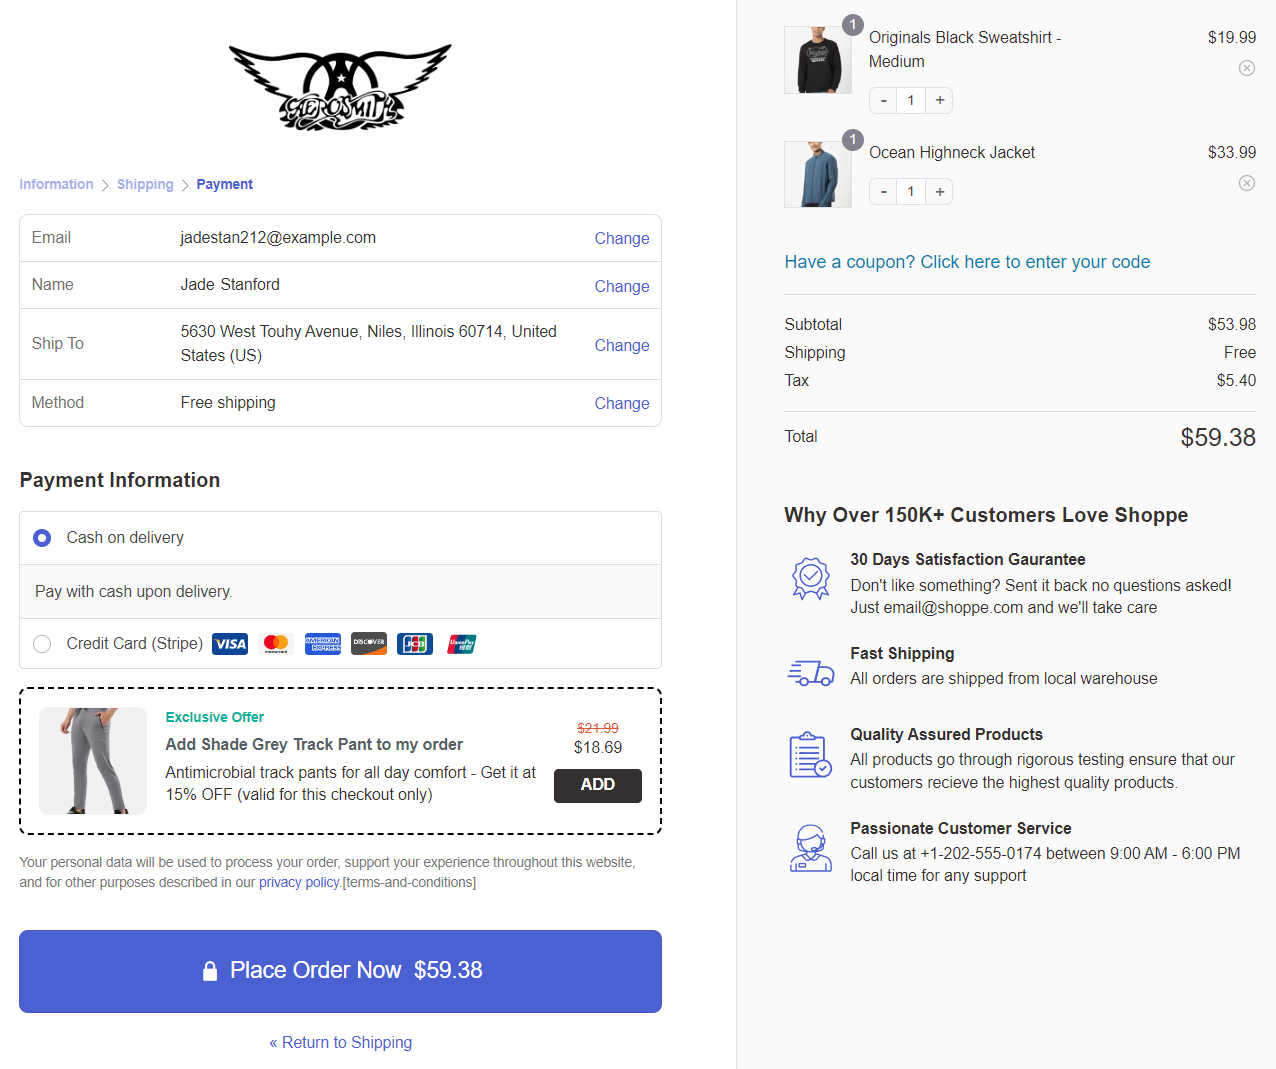
Here’s what the store checkout page looks like:
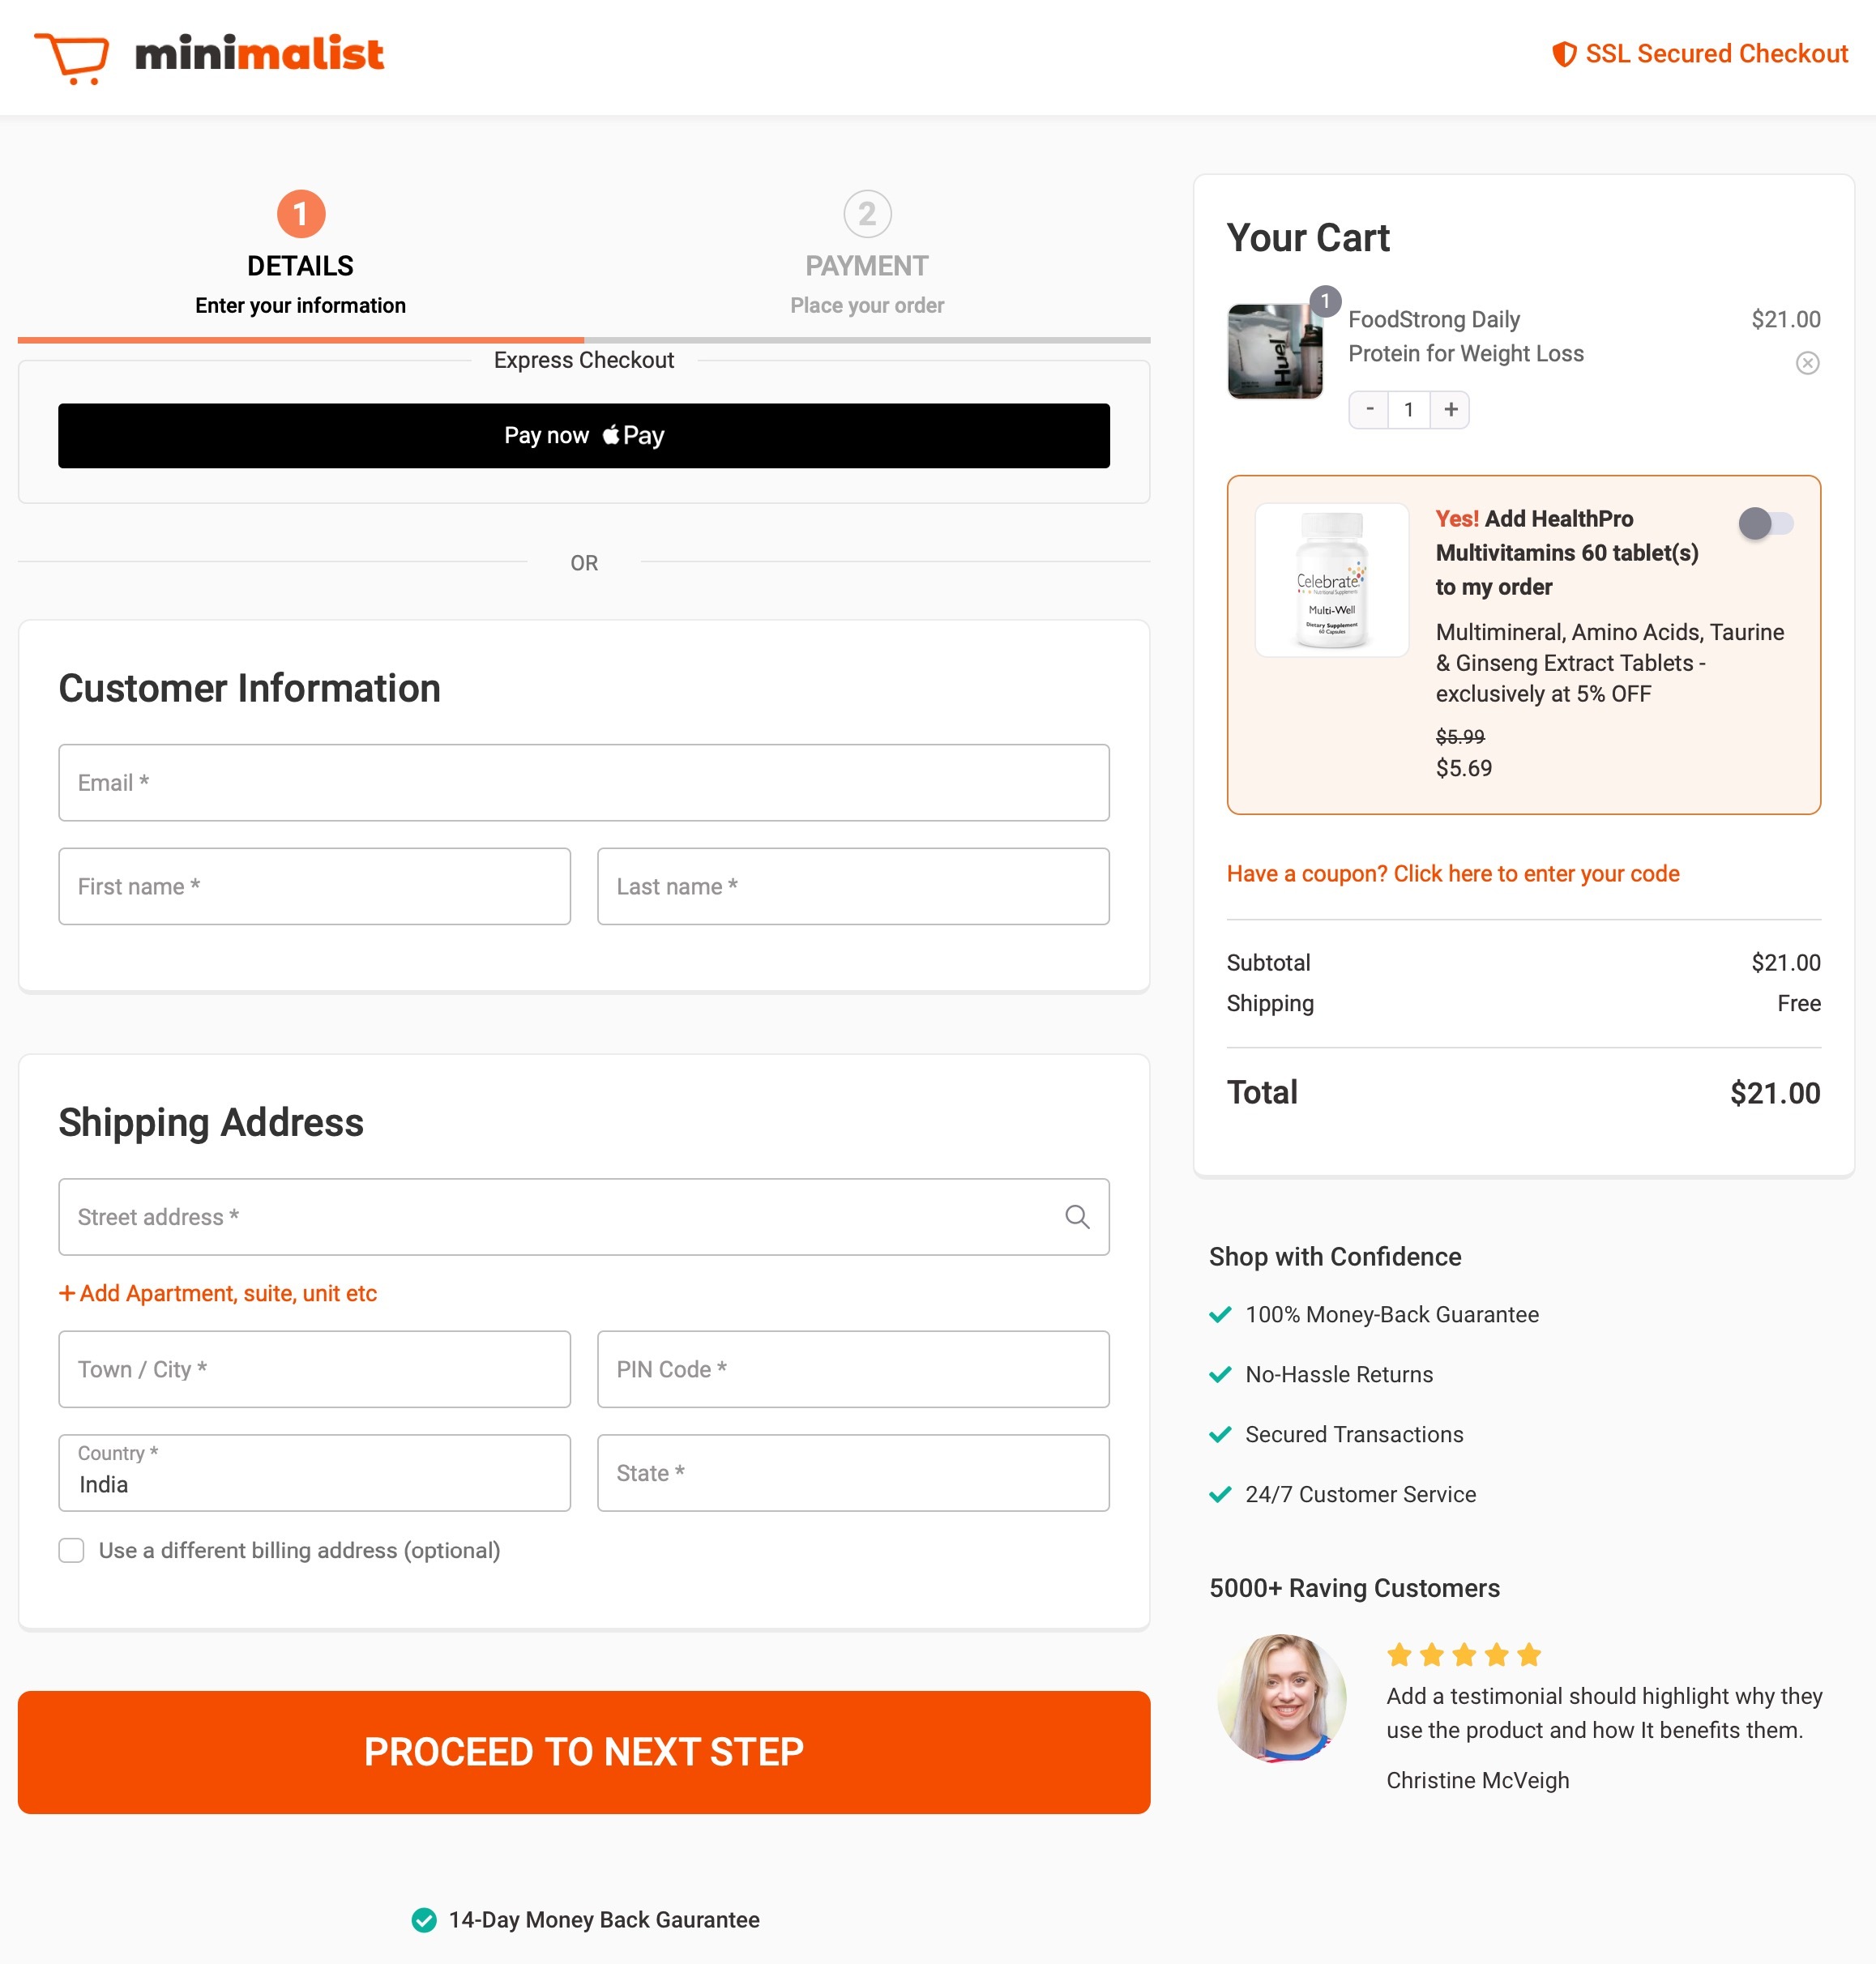
Well done! You have successfully created your WooCommerce checkout with Elementor and FunnelKit.
Attractive WooCommerce Elementor Checkout Templates
In addition to the drag-and-drop widgets, you can create your custom checkout page from the various pre-built Elementor templates.
These templates available in FunnelKit are highly customizable and optimized for all devices.
These templates are built using widgets we have explained above and serve different requirements, such as setting up all kinds of checkouts:
Global or store checkout
A global checkout is a standard store checkout page that a shopper visits after adding items to the cart and proceeds to buy them.
Such a type of checkout is crucial for businesses that sell multi-category products.
One-step checkout
A one-step checkout page lets shoppers view their product selection, enter their information, and make payments on a single page.
Such checkouts are usually popular among digital product sellers because of the lesser form fields.
Multi-step checkout
A multi-step checkout breaks the checkout process into steps, allowing users to place their orders without feeling overwhelmed.
Such checkouts are important for physical product sellers, as they have multiple fields for customers to fill out.
Embedded order forms
An order form is a checkout layout that lets you select items and make payments to complete the purchase.
Order forms usually display products from a specific category, encouraging shoppers to place bulk orders.

Shopify-style checkout
If you love the charm and usefulness of Shopify checkouts and want them in your WooCommerce store, you can do so with FunnelKit.
Import the Shopify-style checkout template and customize it the way you want.
Each of these Elementor checkout templates is available in one-step, two-step, and three-step formats.
This means you can pick a template you like, import it with a single click, and use it for your purposes.
You'll save a lot of time in the process. Not only that, you don't need to learn how to design or hire a designer to help you create a page that looks slick and converts.
You must be relieved.
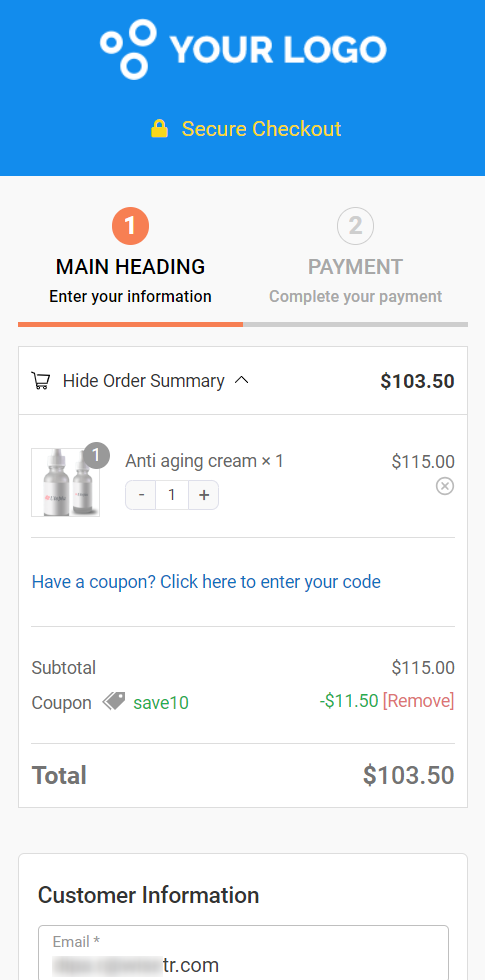
The best part is that every template is mobile-friendly. For example, here’s how the collapsible order summary works on a mobile device:
With these new widgets and pre-built checkout templates, FunnelKit makes it easy to design your WooCommerce checkout page with Elementor.
Just style your checkout page however you want.
7 Best Practices to Boost Conversions of WooCommerce Elementor Checkout Pages
Boosting conversions on WooCommerce checkout pages is important to maximize sales for your online store.
Here are 7 best practices to help enhance your store’s conversion rates and streamline its buying process:
1. Simplify the checkout process
Ensure that your checkout process is easy, intuitive and streamlined. Try to minimize any unnecessary steps or fields that could cause confusion or friction.
You can implement autofill addresses, express payments, etc. The easier the checkout process, the higher your WooCommerce store's conversion rate.
2. Display trust and security signals
Build shoppers' trust by displaying trust badges and security seals on the WooCommerce Elementor checkout page.
Include popular trust seals like SSL certificates, payment security badges, and payment gateway logos. This will demonstrate to users that your store is a secure environment where they can shop.
Encourage customers to leave reviews after purchase and demonstrate positive feedback to reassure potential buyers. Social proof helps build trust and credibility for your products and WooCommerce business.
3. Optimize for mobile devices
Mobile users drive a majority of traffic to eCommerce stores. Therefore, optimizing your WooCommerce store helps deliver a seamless experience across different screen sizes and devices.
Ensure that your checkout is responsive, loads quickly, and has a user-friendly interface on mobile devices.
4. Offer multiple payment methods
Your WooCommerce store should cater to your diverse customer base by offering multiple payment options.
In addition to credit and debit cards, consider integrating with express checkouts and local payment methods. A Stripe payment gateway plugin for WooCommerce can help you set up multiple payment methods.
5. Enable guest checkout and make account creation optional
A significant number of shoppers abandon checkout when required to create an account.
That's why you should allow guests to complete their purchase with just an email address. If you want customers to create accounts, offer it as an optional step or a simple checkbox at checkout that says, "Create an account for faster checkout next time".
6. Display order summary throughout the checkout process
On a two-column desktop layout, keep the order review section sticky so customers can see what they are buying while filling in form fields.
On a multi-step checkout, include a collapsible order summary at the top of each step.
Hiding the order total until the final step creates uncertainty and increases the chance of abandonment.
7. A/B test different checkout layouts and elements
Small changes, such as switching from a single-page to a multi-step checkout, changing the button color or text, repositioning the coupon field, or adding an order bump, can have a measurable impact on conversion rates.
Therefore, it's crucial to A/B test one variable at a time and let the data guide your decisions.
You can even measure which variant performed better and declare the winner.
Frequently Asked Questions on WooCommerce Elementor Checkout Page
We have answered some of the most commonly asked questions related to customizing the checkout page with Elementor:
There are two approaches. First, you can use Elementor Pro's built-in Checkout Widget. Open your WooCommerce checkout page in Elementor, delete the [woocommerce_checkout] shortcode, and drag in the Checkout Widget. This gives you styling control over labels, colors, typography, and layout.
Second, you can use a dedicated checkout plugin like FunnelKit that provides Elementor-compatible checkout templates and widgets with multi-step layouts, a full field editor, express payment buttons, and conversion features. FunnelKit’s approach replaces the default WooCommerce checkout with a highly optimized page rather than styling the existing one.
Yes, you can use Elementor with WooCommerce to customize your online store's shop page and product page for free. With FunnelKit, you can even customize the checkout page using Elementor for free.
This issue is typically caused by a theme or plugin conflict. Elementor’s Checkout widget works best with the Hello theme, which has minimal built-in styling. If you use a different WordPress theme, especially one with heavy WooCommerce styling of its own, the theme's CSS may override or conflict with the Elementor widget’s design.
To troubleshoot, temporarily switch to the Hello theme and check if the issue resolves.
Also, check that you are not running two plugins that both try to control the WooCommerce checkout page at the same time, as this can cause duplicate forms, broken layouts, or missing fields. If you are using a block theme, Elementor’s WooCommerce widgets may have compatibility limitations compared to classic themes.
Yes, WooCommerce provides different action and filter hooks that allow developers to customize the checkout page using PHP in the functions.php file or a custom plugin. You can use hooks like woocommerce_before_checkout_form, woocommerce_after_order_review, and woocommerce_checkout_fields to add custom content, reorder sections, insert trust badges, or modify the form layout.
However, this approach requires PHP coding knowledge, lacks a visual editor, and can break when WooCommerce or your theme updates. For most store owners, a checkout customizer plugin is a faster and more maintainable approach.
You can enable the test gateway and test your store checkout view and purchase transactions in your WooCommerce store.
To enable test payments, go to FunnelKit Settings ⇨ One Click Upsells. Enable the Test Gateway By FunnelKit from there.
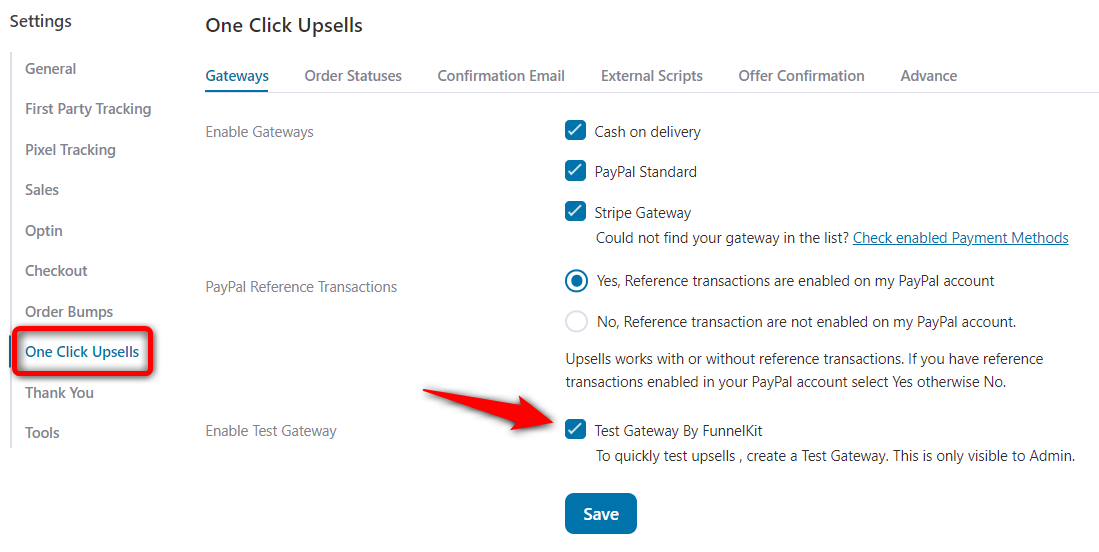
Then test-purchase an item from your store by going to the checkout flow and selecting Test Gateway by FunnelKit on the checkout page.
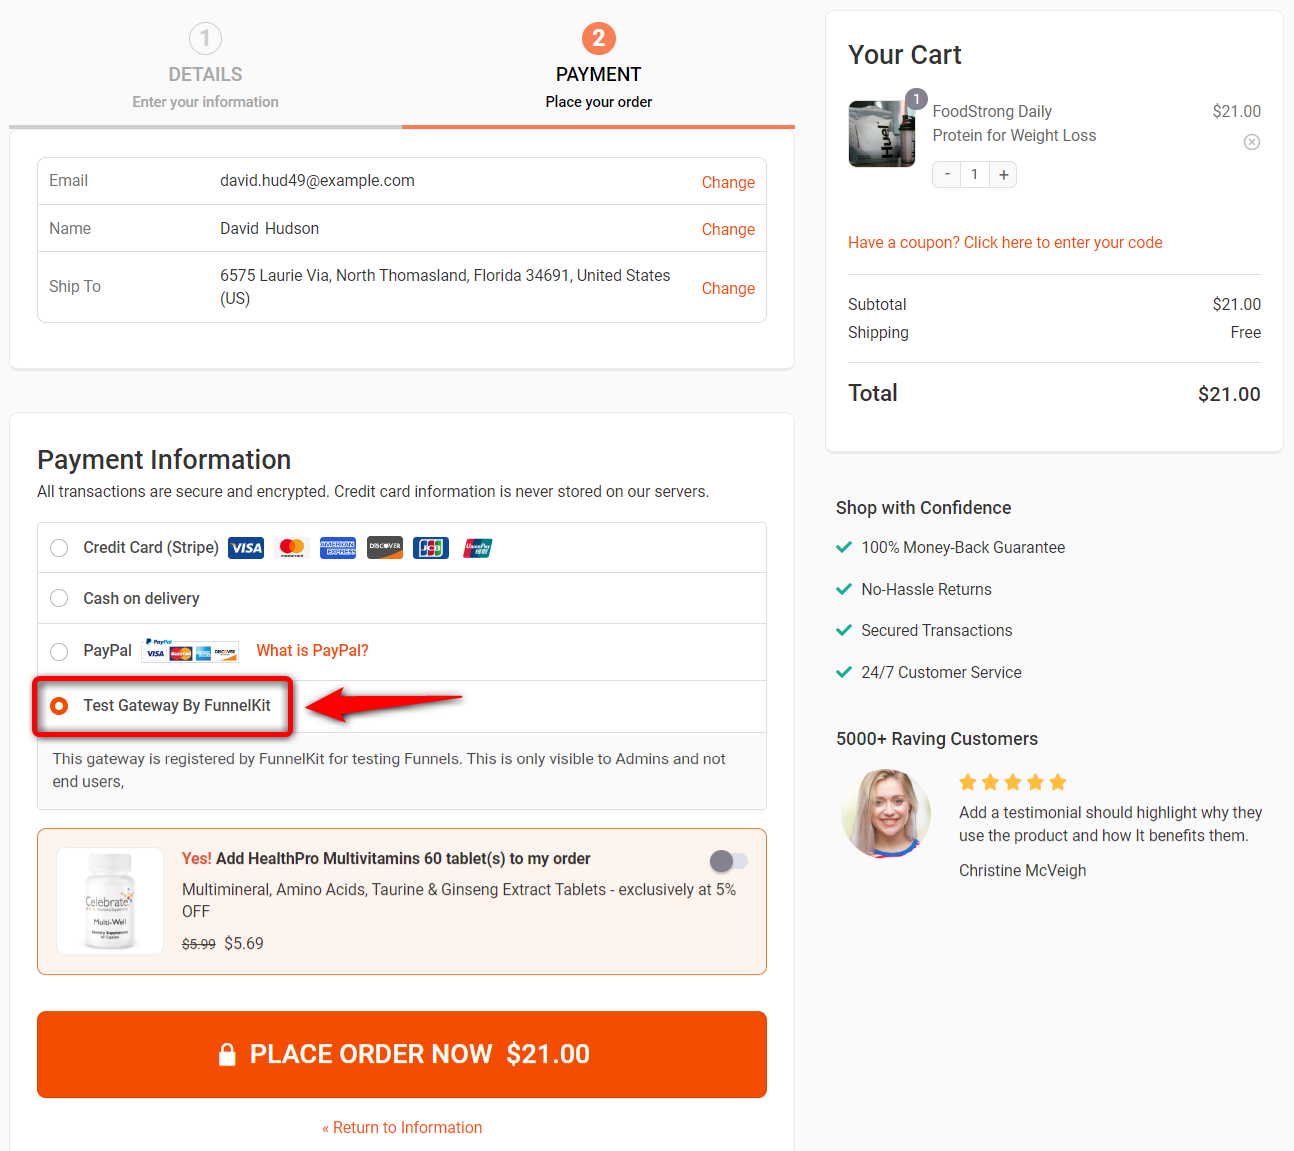
This allows you to test your checkout process by completing a test transaction in your WooCommerce store.
Yes. Elementor's Checkout widget works with any payment gateway that WooCommerce supports, since the payment processing is handled by WooCommerce, not by Elementor.
FunnelKit also works with all WooCommerce-compatible gateways, including Stripe, PayPal, Square, Authorize.net, and Braintree. If you want to display express payment buttons (Apple Pay and Google Pay through Stripe, or PayPal Express), FunnelKit supports these directly on the checkout page.
The native Elementor Checkout Widget does not support integration with the express payment button.
Yes. FunnelKit includes a wide library of pre-designed Elementor checkout page templates you can import with one click.
The free version offers several templates for a one-page checkout layout. You do not need to download template files manually or import them separately. The templates are available directly from within the FunnelKit plugin interface when you create a new checkout funnel.
Elementor Pro users can also find some checkout page templates in the Elementor template library, but these are limited to basic layouts without checkout-specific conversion features.
Build a High-Converting WooCommerce Checkout Page with Elementor Today!
Customizing your WooCommerce checkout page is essential to drive conversions and boost user experience.
Since the checkout page is the final and most critical step in the sales process, relying on a basic template can lead to lost sales.
We have explored how to customize a WooCommerce checkout page using Elementor. We have also covered essential widgets that enhance design flexibility and FunnelKit’s pre-built Elementor checkout templates.
Beyond design, implementing key optimizations such as multi-step layouts, a full form field editor, express payment integration, order bumps, one-click upsells, and A/B testing can significantly improve conversion rates.
Now, it’s time to take action. Start your journey with FunnelKit and make a high-converting checkout page today.

Editorial Team
June 25, 2026Are you looking to create an effective WordPress lead-generation system that produces highly qualified leads? Generating a consistent stream of qualified leads is the most effective way to drive sales...

Editorial Team
June 24, 2026There are three reliable ways to connect WooCommerce to Google Analytics 4: the official Google Analytics for WooCommerce plugin, Google Tag Manager via GTM4WP, or FunnelKit's built-in pixel tracking. The...
Editorial Team
June 24, 2026Finding a WordPress sales funnel builder that actually works is harder than it looks. Most plugins on the market do one or two things well and quietly skip the rest....


