Looking to boost your WooCommerce store’s revenue without overwhelming your customers?
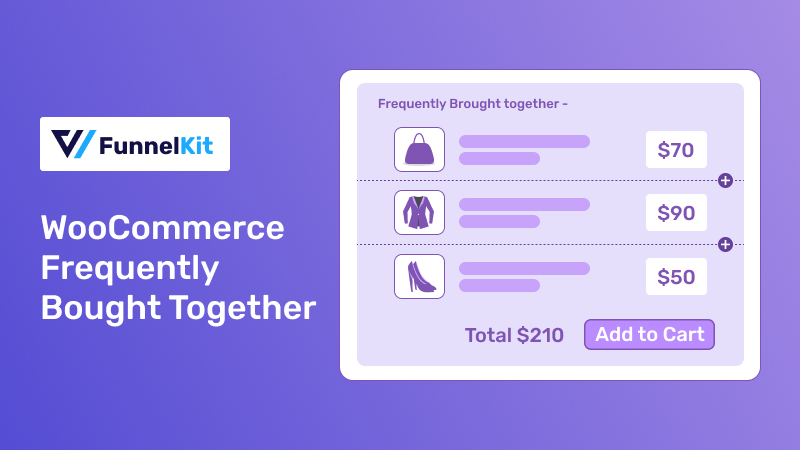
The WooCommerce frequently bought-together feature can be helpful. It's a smart, subtle way to boost sales by suggesting complementary products that customers are likely to buy together.
It's a simple nudge that can instantly raise your average order value, transforming a single purchase into a bundle.
In this step-by-step guide, we’ll show you exactly how to set up the frequently bought together feature in your store to boost sales.
So, if you’re ready to make your WooCommerce store work smarter, let’s dive in!
Contents [hide]
In simple terms, WooCommerce frequently bought together suggests complementary products that customers typically purchase along with the main item you're viewing or have added to your cart about to purchase.
Imagine you're shopping online for a laptop. Just below the product, you see a suggestion: "Customers who bought this laptop also purchased a laptop case, mouse, and keyboard".
That’s the "Frequently Bought Together" feature in action.
It's like giving your shoppers a helpful nudge, saying, "If you're buying this, you might also want to consider these related products".
For more clarity, let’s look at another example.
Suppose you’re running a WooCommerce store that sells cameras. The feature might automatically recommend items like a camera bag, memory card, and extra batteries. Other customers commonly buy these useful items together with the camera.
In short, it helps increase sales by offering relevant, valuable products to your customers, not random suggestions.
To set this up in WooCommerce, you can use plugins that let you either manually select products or automatically suggest them based on past customer behavior.
Simple, effective, and a smart way to grow your store’s sales!
You already know the basics of frequently bought together offers. Now, if you’re considering adding this cool WooCommerce feature to your store, it’s important to understand why it’s a game changer.
Knowing the advantages can help you set it up effectively and maximize its potential.
So, let’s dive in and see how this simple yet powerful sales strategy can boost your WooCommerce store!
1. Increases average order value (AOV)
When customers see complementary products right on the product page, they’re more likely to add those extra items to their cart. Instead of buying just one product, they might pick up a few.
For example, if a customer buys a camera, they might also add a camera bag and memory card. This increases the total amount spent, boosting your store's average order value without requiring much effort.
2. Enhances customer convenience
It simplifies the shopping experience by allowing customers to find everything they need in one place. They don't have to browse your site to look for related products.
Instead, they can quickly add everything they need to their cart with just a few clicks.
It’s like offering a one-stop solution, saving them time and effort.
3. Boosts customer satisfaction
By suggesting items that go hand-in-hand with their purchase, you're helping customers get the most out of their shopping experience.
For instance, offering a screen protector and case with a phone purchase not only improves their shopping journey but also ensures they have everything they need, leaving them more satisfied with their purchase.
4. Creates more upsell opportunities
Frequently bought together isn't just for cross-selling; it can also function as a subtle upsell strategy.
For example, you can suggest premium accessories, like a high-end phone case or top-tier camera lens, next to the primary product.
This gives customers a chance to upgrade their purchase without feeling pressured, increasing your overall revenue.
5. Leverage buying patterns to maximize sales opportunities
The best part of this feature is that it’s data-driven. It can pull information from previous purchases or allow you to manually bundle products that work well together.
This ensures the recommendations are highly relevant, giving your store a higher chance of converting those suggestions into sales.
Now, are you ready to boost your WooCommerce sales with the frequently bought together feature? Great choice!
This simple yet powerful tactic can help you increase your store’s average order value by offering complementary products that your customers might need.
For the tutorial, we’ll walk you through six different methods to set up the frequently bought together feature in WooCommerce.
Here are the six methods:
Make sure to install and activate these plugins on your WordPress site.
Let’s dive in and set this up so you can start seeing the benefits immediately!
To create a frequently bought together offer on the WooCommerce product page, navigate to your store's product page.
Then, look for a product that you want to add to the offering.
In our case, we’ll be targeting the iPhone 15 Pro Max. In your case, you can select any product that you want to like.
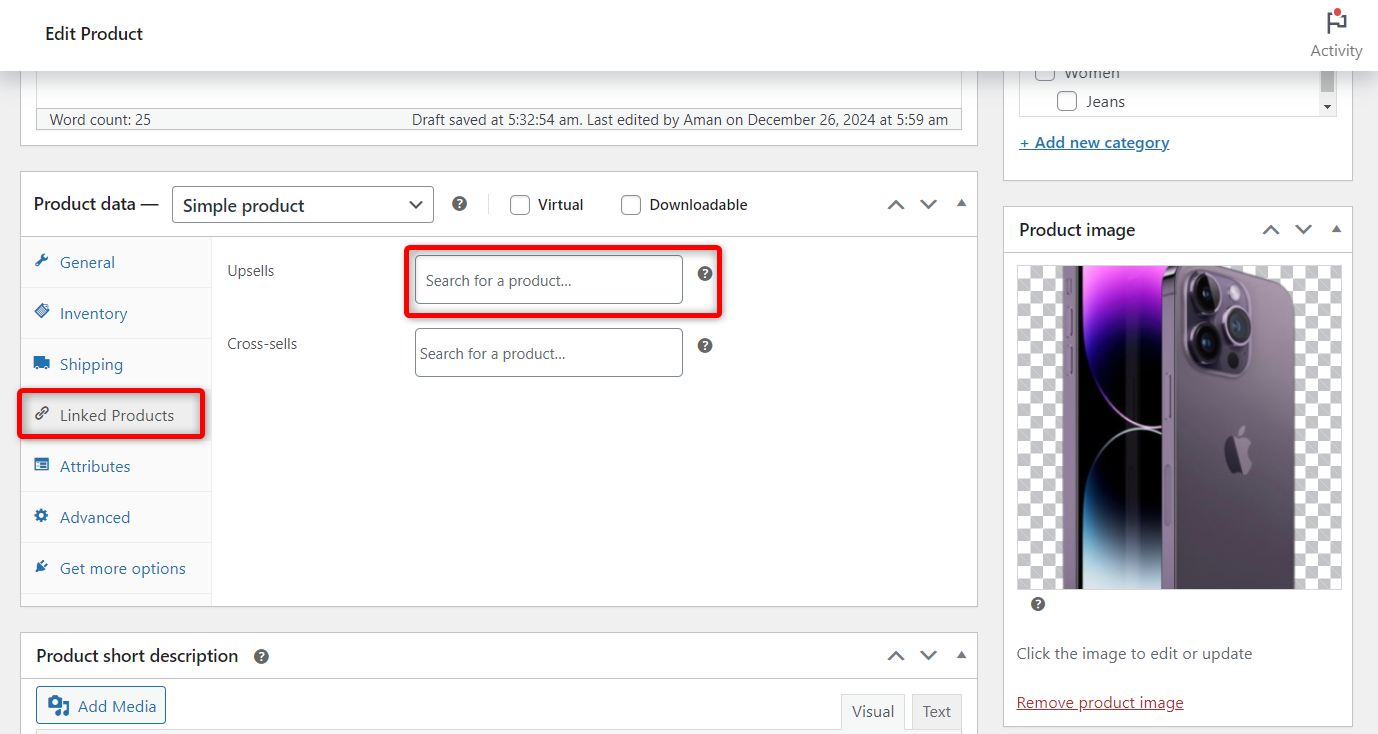
Then, enter the product customization section and move to the “Linked Product” tab.
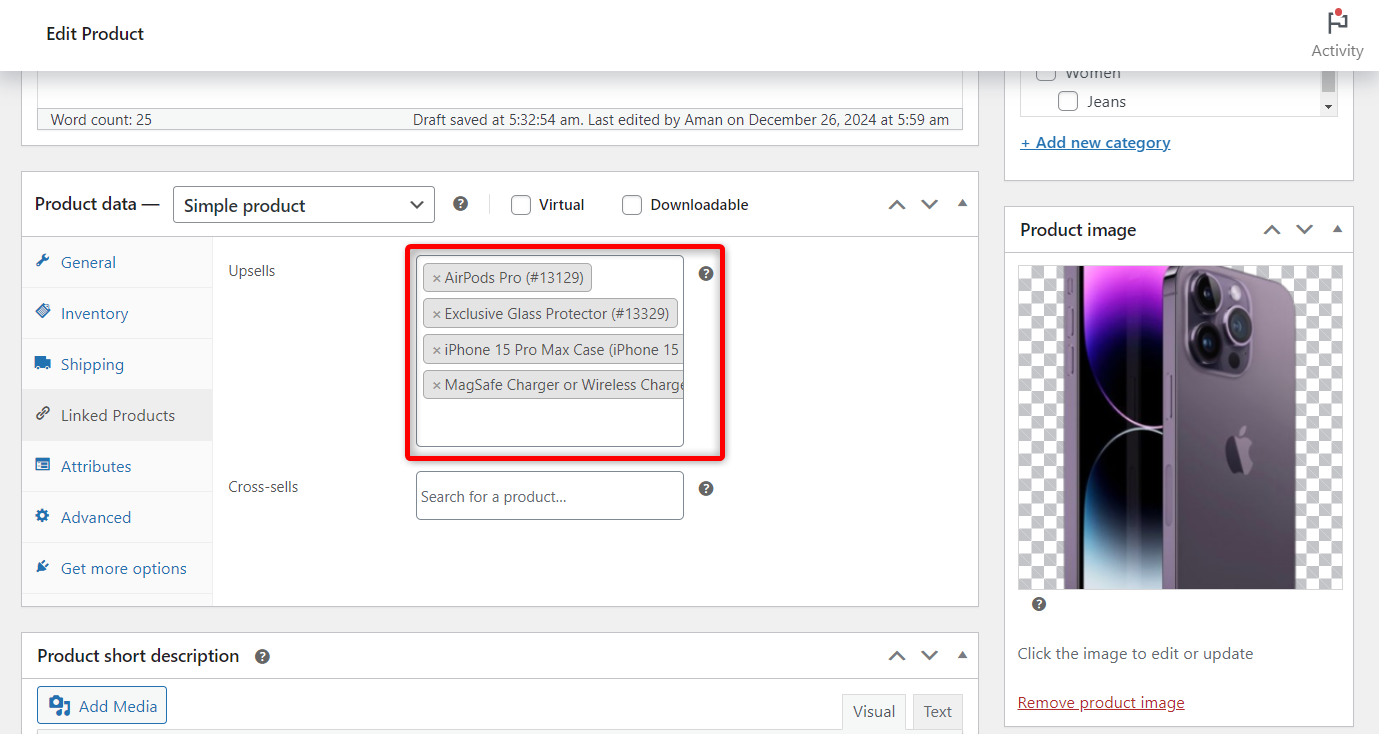
In the upsells field, search for the product that you want to offer as a “frequently bought together”.
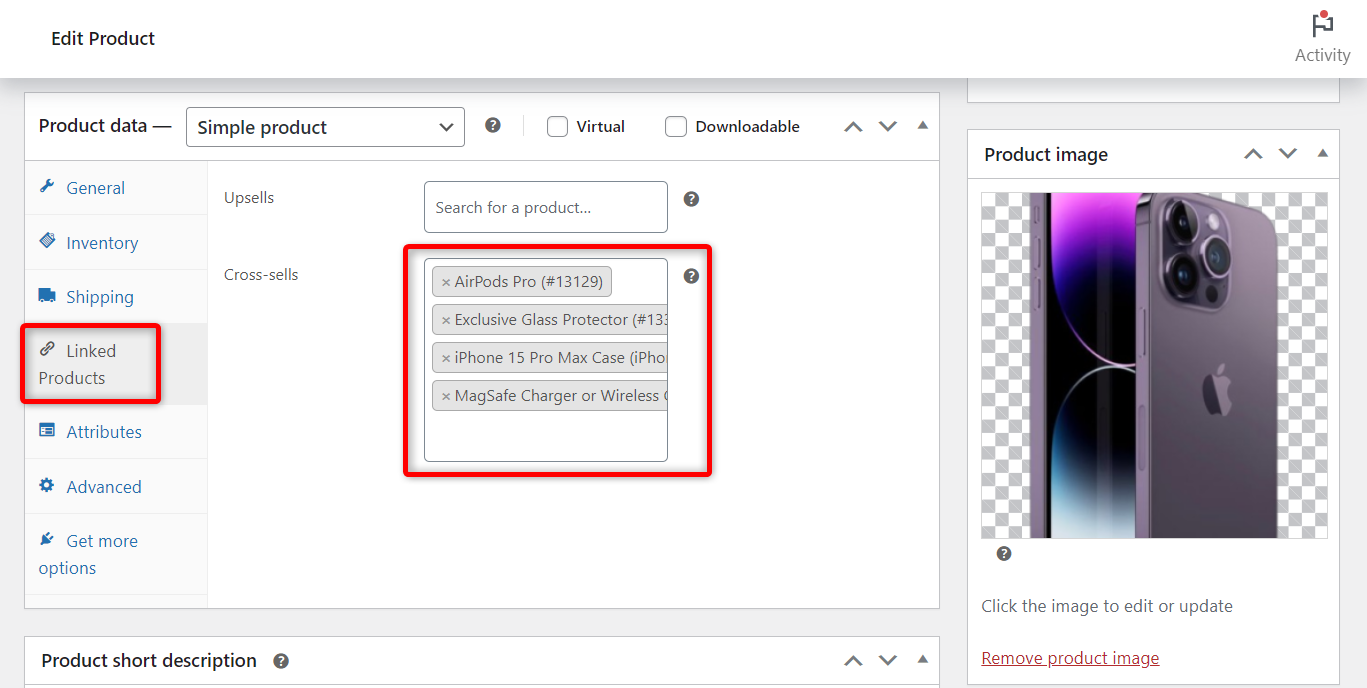
Now as a part of the offer, we’re going to add AirPods or Wireless Earbuds, MagSafe Charger or Wireless Charger, iPhone 15 Pro Max Case, and Exclusive Glass Protector as part of the offer.
Once done with adding products, hit the “Update” button.
Now open the product page to see if it’s working or not. You can see the selected products appearing on the product page as a frequently bought together offer.
So, using the default settings, you can offer FBT or frequently purchased products in your WooCommerce store.
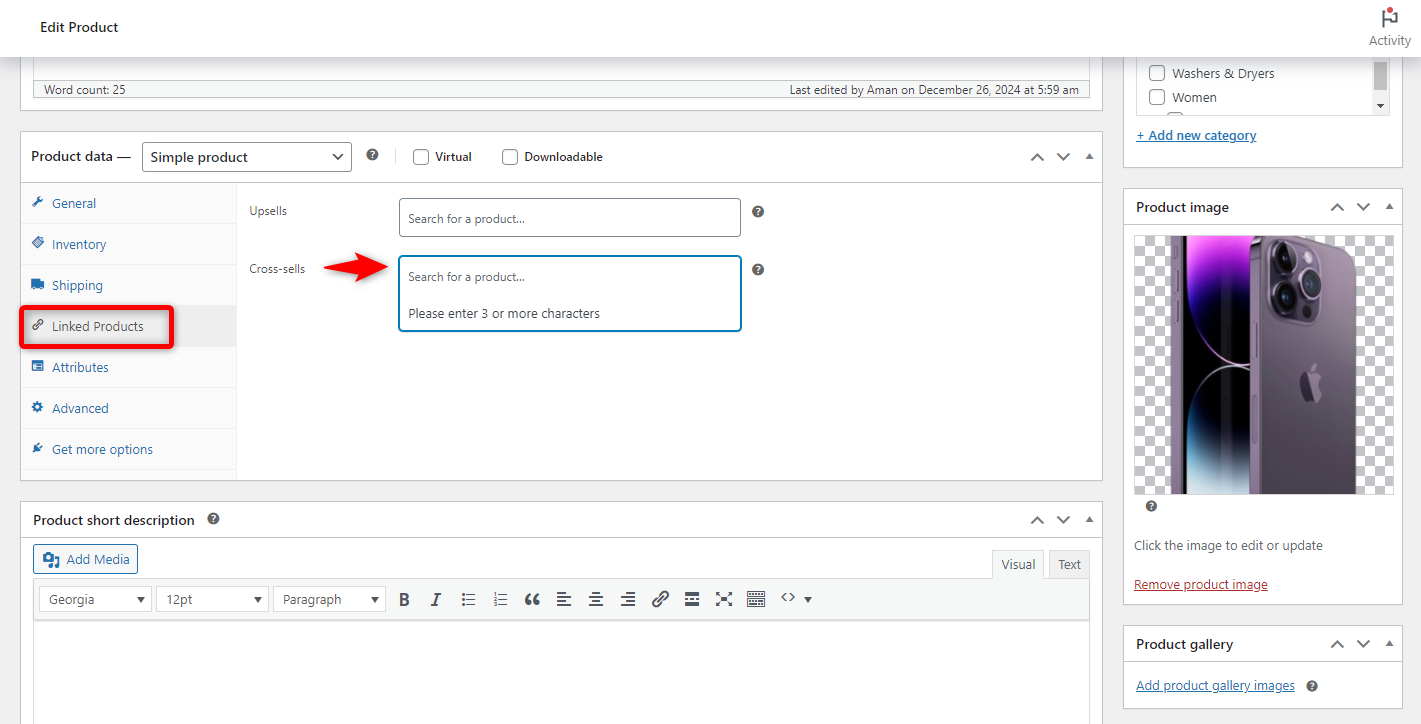
The process here is also similar to the previous one. Simply scroll down on the product customization page and add the related products in the "Cross-sell" section.
Here, instead of adding the products manually, add them through the “Choose products for me”.
Yes, we have successfully added the products.
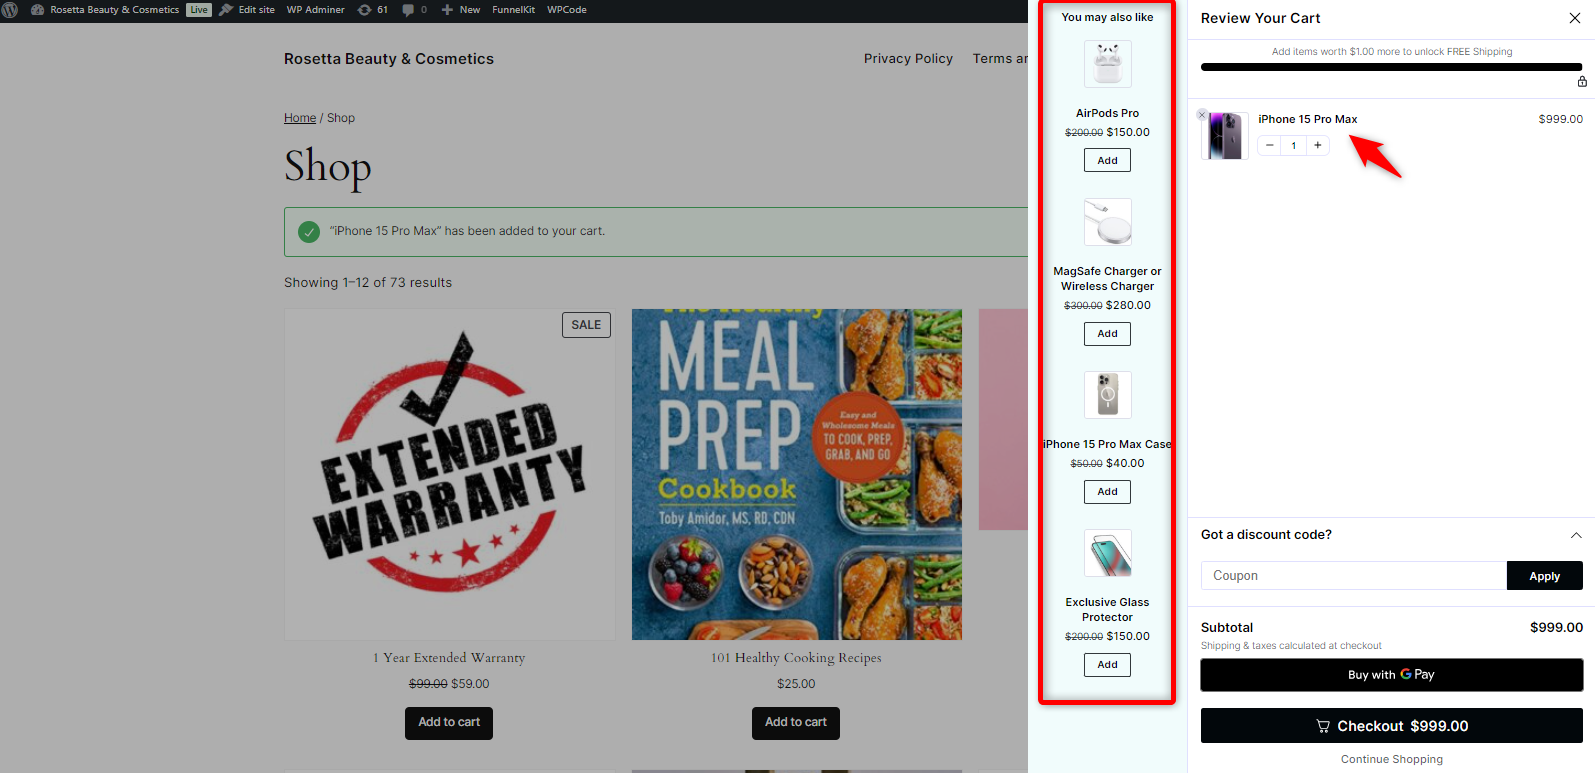
Now if the users add the iPhone 15 Pro Max to their cart, the other products will appear as a frequently bought together offer.
Here's how to set up the WooCommerce frequently bought together feature on the cart page:
Use the FunnelKit Funnel Builder to display the frequently bought-together offer inside the shopping cart.
The FunnelKit Cart, which is part of the FunnelKit Funnel Builder package, improves the WooCommerce shopping cart experience.
It allows you to add upsells, cross-sells, and frequently bought together offers directly within the cart, helping to boost average order value with minimal effort.
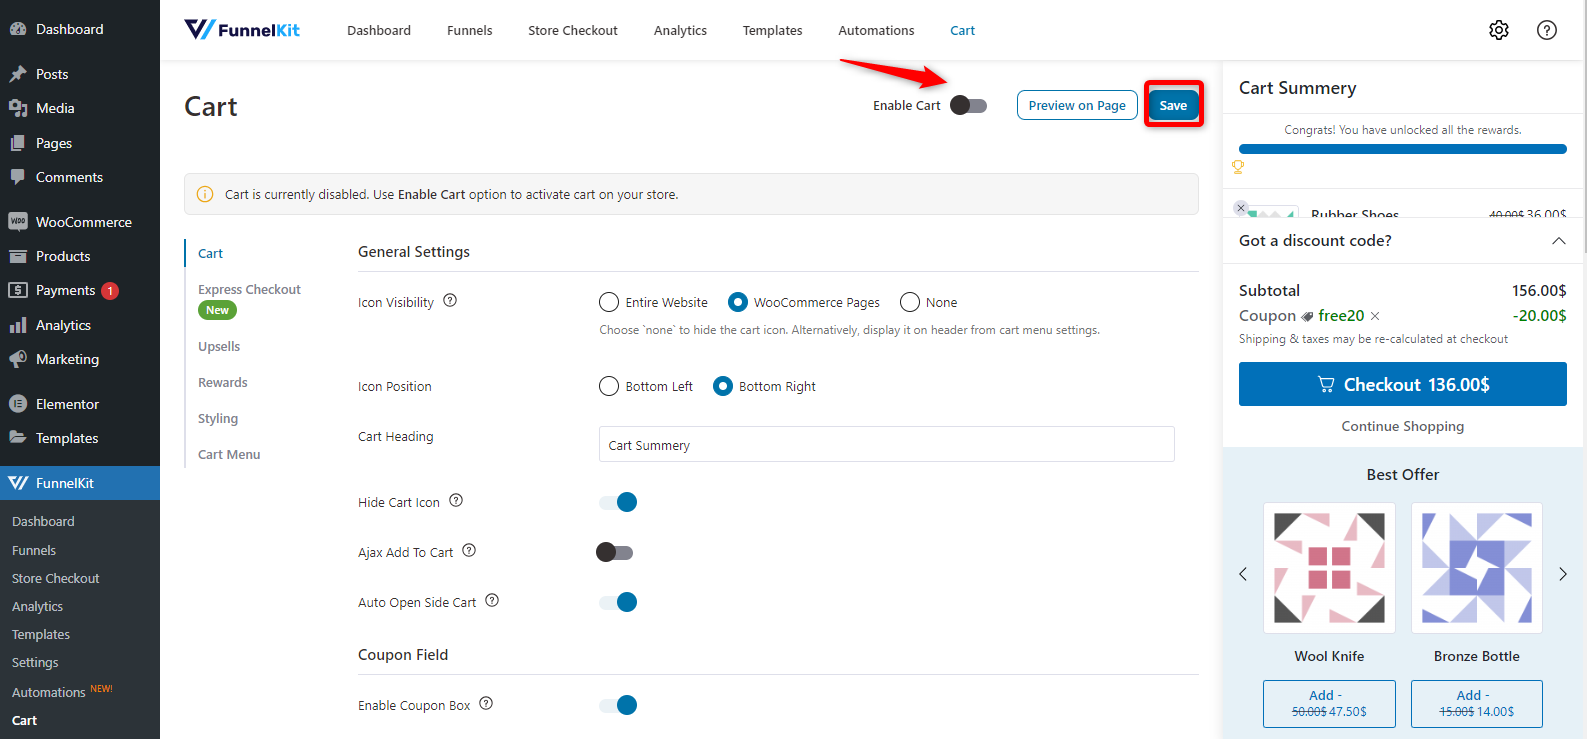
To activate the FunnelKit Cart, navigate to the FunnelKit > Cart section.
From here, just toggle the button and enable the FunnelKit Cart.
Now tap on the “Upsells” section. Here you can select how the upsell or frequently bought together offer will look like.
For a better understanding of how the FunnelKit Cart works, check out the video right away.
For a better understanding of how the FunnelKit Cart works, check out the video right away:
Get Started with FunnelKitNow, search for the product you want to include in the frequently bought together offer. Proceed to incorporate the products as upsells by conducting a search here.
Click on the "Add" button and then select "Save".
Once your users add the product to their cart, the offer will automatically appear on the cart page.
So this is how you can easily showcase your frequently bought together offer in WooCommerce using the FunnelKit Cart plugin.
Now it’s time to show how to set and configure the frequently bought together offer on the checkout page using FunnelKit Funnel Builder.
FunnelKit Funnel Builder is a powerful tool that lets you create optimized sales funnels, checkout pages, and upsell offers in WooCommerce.
By creating personalized, high-converting shopping experiences tailored to your customer's needs, you can boost conversions and average order value.
Note: If you want to get a full guide on how to create a store checkout page with FunnelKit Funnel Builder, check out the resource here.
If you want to get a full guide on how to create a store checkout page with FunnelKit Funnel Builder, check out the resource here:
Create Store Checkout PageFirst, navigate to the FunnelKit and then the Store Checkout page. You'll find the option to create an order bump there.
Click on it.
We’ll be using the “Order Bump” feature to showcase the bought together product offer on the checkout page:
Learn MorePlease provide your order bump's name. Press "Add".
Next, choose the template that you want to use.
Once you select your preferred option, the system will prompt you to include the product.
Add the products to the order bump and hit "Add.”.
Now, on the next page, you can design the order bump banner.
You can individually design, moderate, or update text, color, position, and other stuff to make your offering more engaging and attractive.
Also, in the style tab, you can design and customize your order bump banner. For example, layout, CTA, buttons, description, pricing, etc.
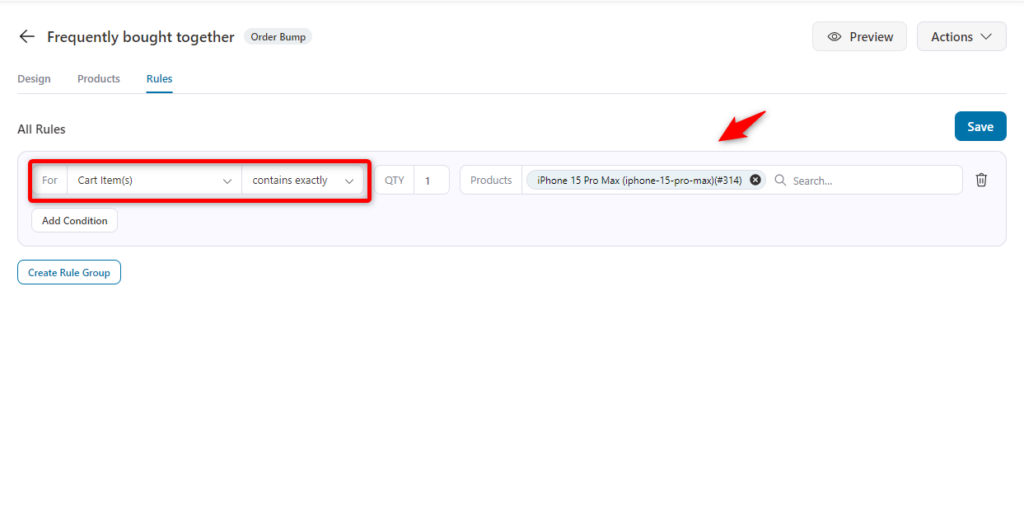
Now, move to the rules page and add the product to which you want to apply your order bump rules.
Select the items in your cart that precisely match the product you've added. Hit save.
A customer can add the "iPhone 15 Pro Max" to their cart. These will appear on the checkout page.
However, you can learn more about order bumps, like how to customize and set up for better outcomes.
So this is how you can showcase bought together products on the checkout page in WooCommerce using the order bump feature of FunnelKit Funnel Builder.
You can create post-purchase upsells with FunnelKit Funnel Builder to increase your AOV (average order value). The process is straightforward and simple.
These post-purchase upsells rely on payment tokenization. With just a single click, customers can accept additional offers instantly.
They can seamlessly add upsell items to their purchase without re-entering any payment details, ensuring a quick and frictionless process.
Just on the store checkout page under the upsells section, click on “Add offer”.
Then you need to choose a template for showcasing your upsells. Choose one that fits and has a clean appearance.
Once you’re happy, click on the “Import This Template” button.
Give the name of your upsell. Press the "add" button.
Next, on the customization page, navigate to the product page and select the product for your upsell offer. You can add more products to a single upsell.
Additionally, establish the rules as illustrated below.
The thank you page will appear if the user accepts the upsell. But if they reject the offer, they will get the second offer as a downsell.
In the same manner, incorporate the second upsell offer.
Also, add rules so that you can apply the upsell rules to your targeted product.
In our case, we’ll choose “iPhone 15 Pro Max”.
Now, choose the product you want to add exclusively to the cart. Additionally, provide the name of the product. Once you've finished, hit save.
Now if your users purchase the product and move to the thank you page, they will get the bought together offer.
According to the rules, if the customer accepts the offers, the second offer will appear on the screen as a downsell.
Here are the final “order details” that users will find on the thank you page.
This is how you can create post-purchase upsells to showcase your offer as a frequently bought together product in WooCommerce.
For this part, we’ll use FunnelKit Automations. This powerful marketing automation tool is designed to work seamlessly with WooCommerce.
It helps you automate your customer communication, such as follow-ups, abandoned cart reminders, and upsell offers, to drive more sales.
With its user-friendly workflow builder, you can create personalized automations that keep your customers engaged and increase your store’s revenue effortlessly.
To create an email campaign for offering a bought-together deal with FunnelKit Automations, click on “Create Automation”.
Then go with the “Start from scratch”. Ensure to include the name of your automation.
Next, select an event. Under WooCommerce, select the order created for the event and hit done.
Determine when you want to send the email notification. Run this automation multiple times for any products while processing the order, then hit save.
Now set the conditions from the plus “+” icon.
Click on the "Add new condition" option and select "Order Product".
Then, select the exact matches and search for your product here. Add it here and save it.
Learn more about setting conditions in your automation using FunnelKit Automations:
Learn MoreNow, add a delay in the same way.
Enter the desired time to send the email after making the purchase. You can send it in minutes, hours, days, weeks, and months. Hit save.
In this case, we selected 5 hours after creating an order.
Similarly, add an action to trigger the email. Under the messaging tab, select “Send Email”. You've successfully completed it.
Provide the email that you want to send. You can choose it from the “merge tag” icon {{..}}.
Also, provide a subject line and preview text for your email.
Now it’s time to customize the email. For that, we're going to use FunnelKit Automations' visual builder.
Click on the “Edit” button.
Choose the template that you want to use.
Once you've determined that, click on the "Import Template" button.
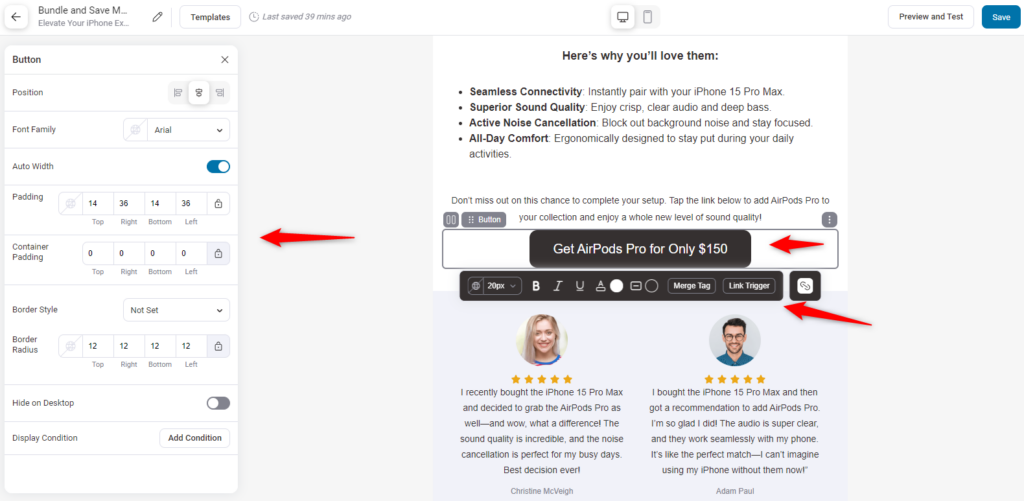
Now, customize the template depending on your needs and requirements.
From the left side, you’ll get editing options like text, image, buttons, social icons, etc. to make your template appealing.
Upload an image of your product. Additionally, it is important to include a detailed description of your product.
Another intriguing feature is the ability to easily add other products to your email body.
Just select the widget and drag it over here.
Now expand the settings and you can configure the setup of how you want to display your other products in the email body.
Similarly, perform additional tasks according to your requirements to improve the template's engagement and profitability.
Once finished, click "Save.".
Check out the guide to learn how to customize an email template with ease:
Checkout NowHere’s the entire automation:
Once you've completed everything on your end, remember to activate the automation.
So if the user creates an order, the product recommendation will look like this one.
This is how you can use the email campaign to send frequently purchased products together.
Setting up the frequently bought together feature in your WooCommerce store is a fantastic way to boost sales and improve your customers' shopping experience.
To maximize the benefits of this strategy, you must tailor it to your store's needs and customers' buying habits.
Here are some best practices to follow when implementing frequently purchased items in WooCommerce to ensure you're maximizing its potential.
Don’t just pair random items together. Think about what makes sense for your customers. For example, if you’re selling a phone, suggest a glass protector, air buds, or charger that is helpful.
Your goal is to create a natural pairing that feels like a no-brainer for the buyer. The more relevant the suggestions, the more likely customers are to add those extra items to their cart.
Whenever possible, utilize data to inform your frequently purchased bundles. Examine past purchase histories to identify frequently purchased products.
If your plugin allows, enable automatic suggestions based on real data to keep recommendations accurate and up-to-date. This data-driven approach makes your offers more relevant and increases the chances of conversion.
People love a favorable deal. Offering a small discount when buying products together can be a great incentive.
For example, if someone buys a laptop and adds a mouse and keyboard, offer a 10% discount on the bundle.
This not only encourages customers to buy more but also gives them the feeling they’re getting extra value.
Your frequently bought together section should be easy to see but not overwhelming. Make sure it’s visually appealing, with clear images and concise descriptions.
Avoid clutter—keep it simple so customers can quickly understand the benefits of buying the additional items without feeling bombarded by too many options.
Setting up your frequently bought together feature isn’t a one-and-done deal. Monitor its performance closely.
Test different combinations of products, change up the layout, or try different pricing strategies. Use A/B testing to see which setups convert better.
Regular tweaks help you find what works best for your audience.
Don’t limit frequently bought together suggestions to product pages. Integrate them with other parts of the customer journey, such as the shopping cart or checkout pages.
This keeps relevant product suggestions in front of your customers at crucial decision-making moments, increasing the likelihood they’ll add those items to their purchase.
Setting up WooCommerce frequently bought together is a smart, easy way to boost your store’s revenue while enhancing your customers’ shopping experience.
By suggesting products that make sense together, you’re doing more than just upselling—you’re adding real value, saving your customers time, and making their choices easier.
With FunnelKit Funnel Builder and FunnelKit Automations, setting it all up is a breeze.
Now that you’ve got the step-by-step guide, dive in and experiment.
Play around, see what resonates with your audience, and watch your average order value and customer satisfaction increase.
Keep it relevant and helpful, and remember that when your customers win, your store wins too.
Happy selling!