
Utilizing the power of the WooCommerce sales funnel can boost your online sales and revenue.
That means a product page that builds desire, an in-cart upsell, a checkout with an order bump, post-purchase one-click upsells, and an email sequence that brings buyers back.
Most people who visit your store will not make a purchase on their first visit.
A sales funnel gives them a clear path from browsing to purchasing, and it increases the amount each customer spends along the way.
But this is the exact gap in the default WooCommerce flow. It gives you a product page, a cart, and a checkout, but it does not connect them into a guided journey with upsells and offers.
That is the job of a sales funnel.
In this guide, we will show you how to build a WooCommerce sales funnel using a WordPress plugin, with no code required.
We will explain how the funnel stages work, help you drive traffic into the funnel, compare the best funnel plugins, walk you through the full build step by step, and show you how to measure and recover sales after a visitor leaves.
Jump straight to the method of building your sales funnel for WooCommerce
Table of Contents
- 1 What is a WooCommerce Sales Funnel?
- 2 How a WooCommerce Funnel Differs From a Regular Sales Funnel?
- 3 How To Build a WooCommerce Sales Funnel?
- 3.1 Step 1: Activate and set in-cart upsell recommendations
- 3.2 Step 2: Create a store checkout
- 3.3 Step 3: Customize the checkout template
- 3.4 Step 4: Add order bump offers to the checkout page
- 3.5 Step 5: Add one-click upsell
- 3.6 Step 6: Customize the thank you page
- 3.7 Step 7: Enable the store checkout
- 4 Best WooCommerce Sales Funnel Plugins (2026)
- 5 When and How to Create a WooCommerce Sales Funnel for a Single Product?
- 6 How to Measure Your Funnel: Metrics and Benchmarks
- 7 How to Recover Abandoned WooCommerce Funnels?
- 8 How to Keep the Funnel Going After Customers Leave?
- 9 Frequently Asked Questions
- 10 Why should I build a WooCommerce sales funnel?
- 11 Can I build a WooCommerce sales funnel for free?
- 12 How much does a WooCommerce sales funnel cost?
- 13 What’s the difference between an order bump and one-click upsell?
- 14 What metrics should I track?
- 15 What are common funnel mistakes and how can I avoid them?
- 16 Ready to Build Your WooCommerce Sales Funnel?
What is a WooCommerce Sales Funnel?
A WooCommerce sales funnel is the step-by-step path a shopper follows from first discovering a product to completing a purchase.
It guides visitors through awareness, interest, desire, and action. Along the way, it uses order bumps and one-click upsells to increase the average order value of each sale.
Every sales funnel is built on four stages. Understanding them makes the rest of this guide easier to follow.
- Awareness: Potential customers discover your store through social media, search engines, or email marketing.
- Interest: After capturing their attention, you aim to pique their interest. This involves providing compelling content and showcasing product features on the product page to keep visitors engaged and interested in your offer.
- Desire: Once you have their interest, the next step is to create "Desire". You do this by demonstrating the value and benefits of your products, emphasizing their uniqueness, and addressing potential customers' specific needs and wants with proper copy and media files.
- Action: The final stage is "Action", where visitors take the desired action, which in WooCommerce is making a purchase. You want to make this step as easy and frictionless as possible by offering a smooth checkout process and a variety of payment options. You may consider offering a discount to incentivize users to complete their purchase.

How a WooCommerce Funnel Differs From a Regular Sales Funnel?
A basic sales funnel ends when the customer buys one product.
A WooCommerce sales funnel follows the same four stages, but it keeps going. It encourages each buyer to add more to their order and then nurtures them into repeat purchases.
Here is the path a well-built WooCommerce funnel follows:
- Product page: The shopper lands on a compelling product page designed to build desire (learn more about the product).
- In-cart upsell: When they add the product, a sliding mini cart suggests a relevant upsell or cross-sell they can add with one click. From the mini cart, they can go straight to checkout and skip the default cart page.
- Checkout page with an order bump: On the checkout page, you offer a relevant, low-cost add-on that the customer can accept with one click.
- Post-purchase one-click upsells: Right after checkout, you offer a higher-value product. The customer can buy it in one click without re-entering payment details.
- Order confirmation page: The order confirmation page shows a clear summary of what they bought.
- Post-purchase email: Follow-up emails nurture the relationship and bring customers back for repeat orders.
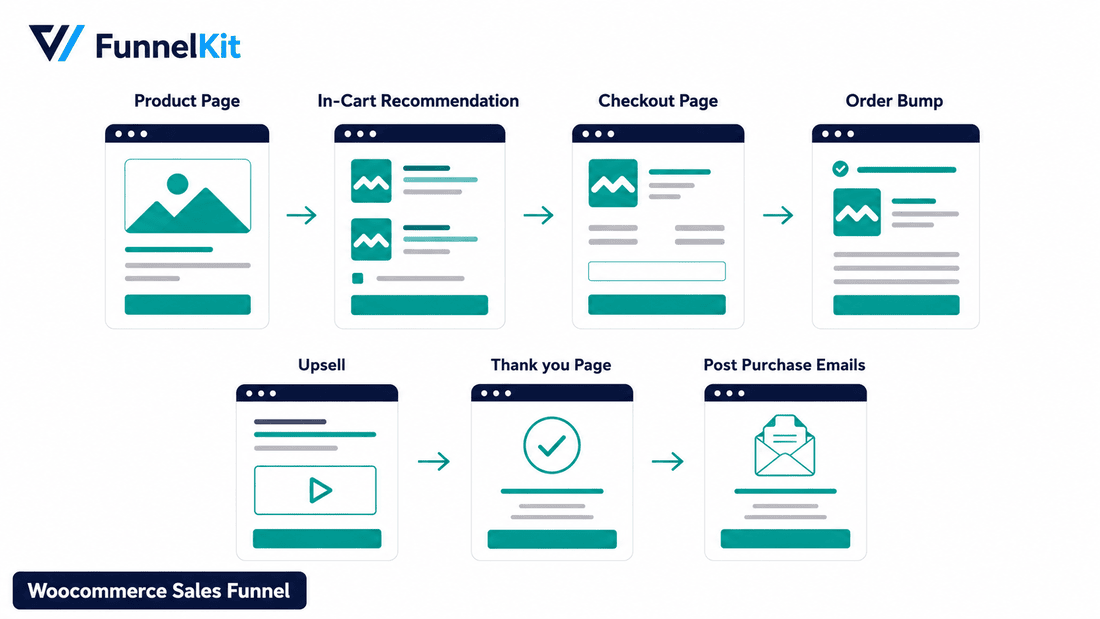
The extra steps are what separate a funnel that makes one sale from one that grows your average order value and customer lifetime value.
How To Build a WooCommerce Sales Funnel?
Here we’ll build a global WooCommerce sales funnel that takes shoppers through every stage, from in-cart upsell to post-purchase follow-up, to maximize order value.
To follow along, install and activate both FunnelKit Funnel Builder (free) and FunnelKit Funnel Builder Pro.
To add the in-cart recommendation step, you’ll need the FunnelKit Funnel Builder Plus package or above, which includes the premium FunnelKit Cart features.
You can refer to the installation documentation if you need it.
Step 1: Activate and set in-cart upsell recommendations
To offer in-cart product recommendations after users add a product to their cart, you need to activate the mini cart and also set up upsells.
Navigate to FunnelKit ⇒ Cart and turn on the 'Enable Cart' option.
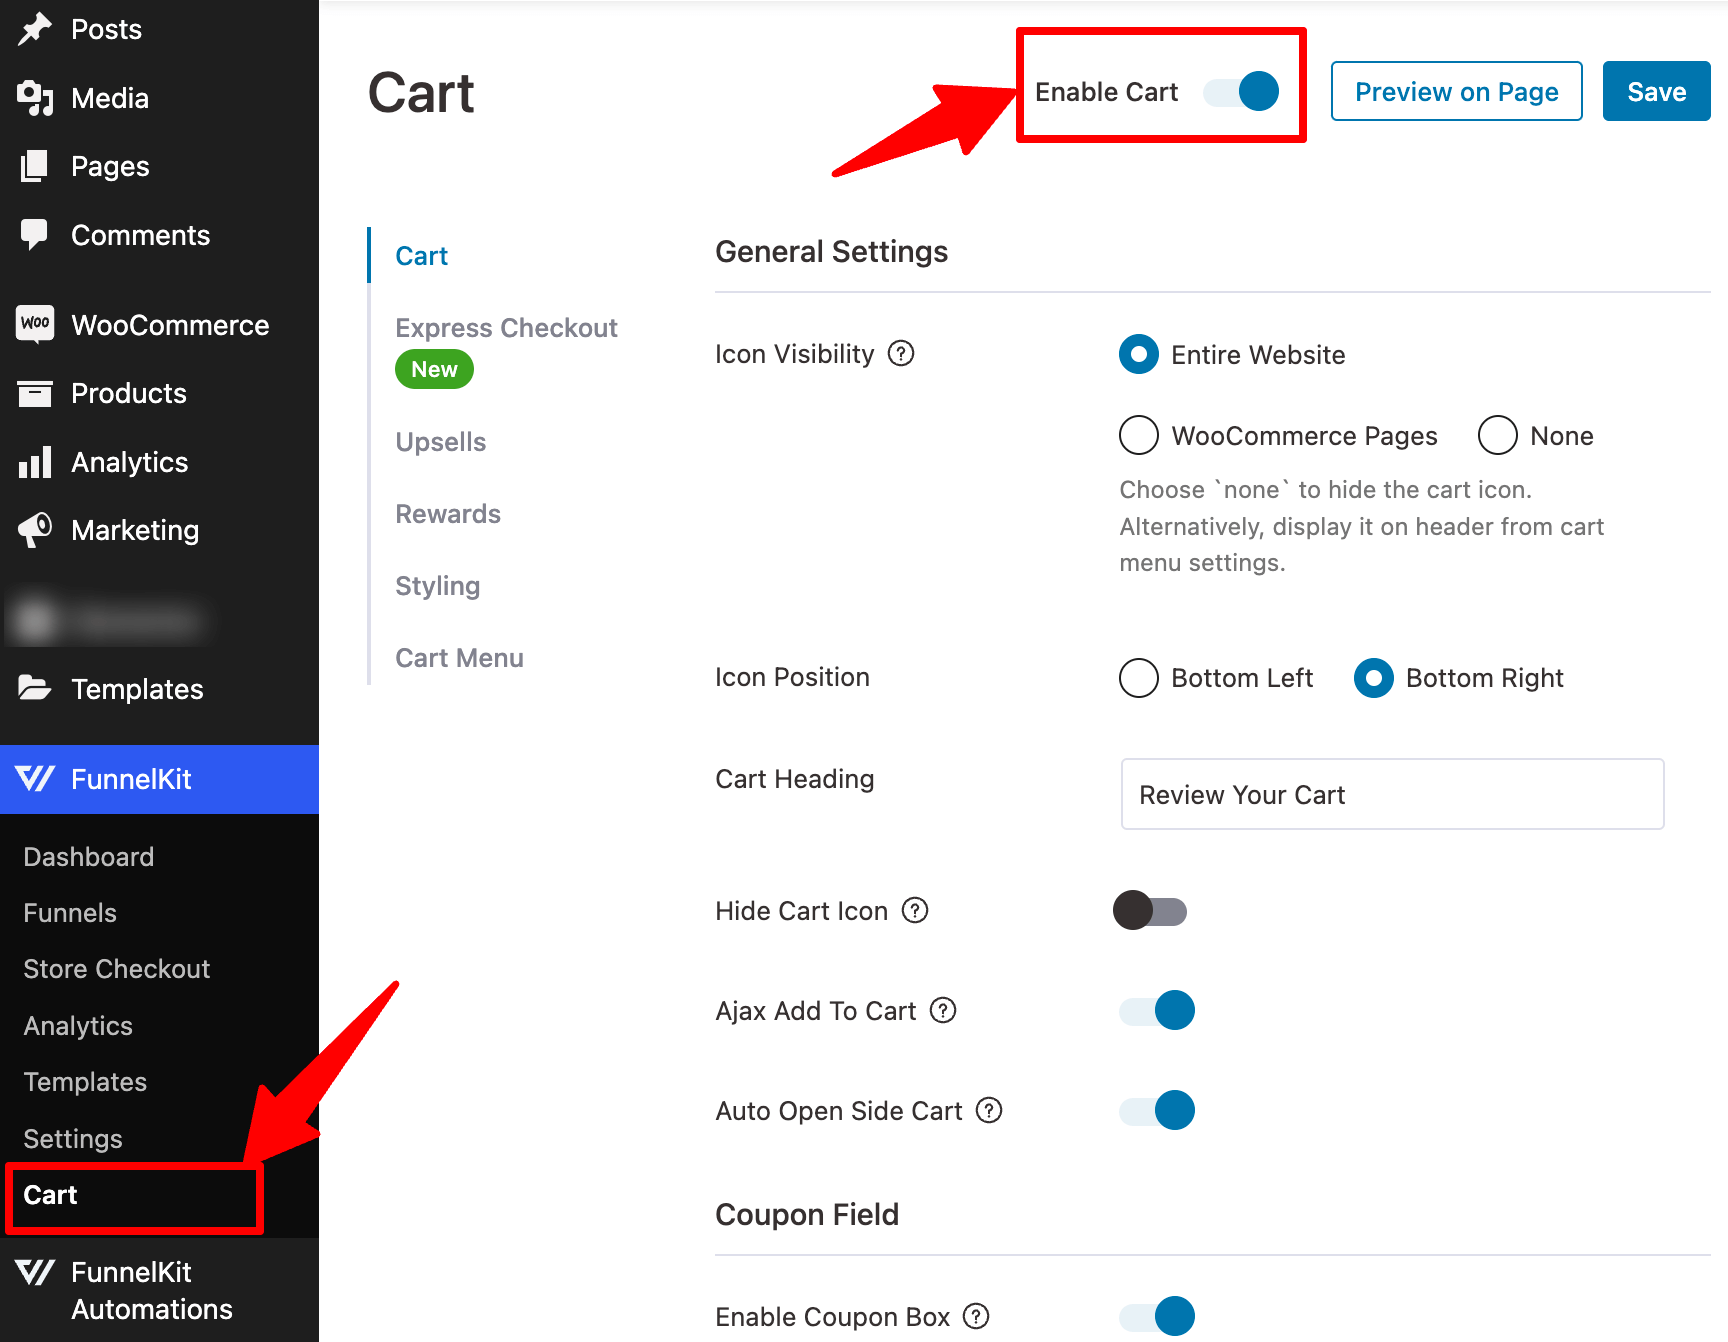
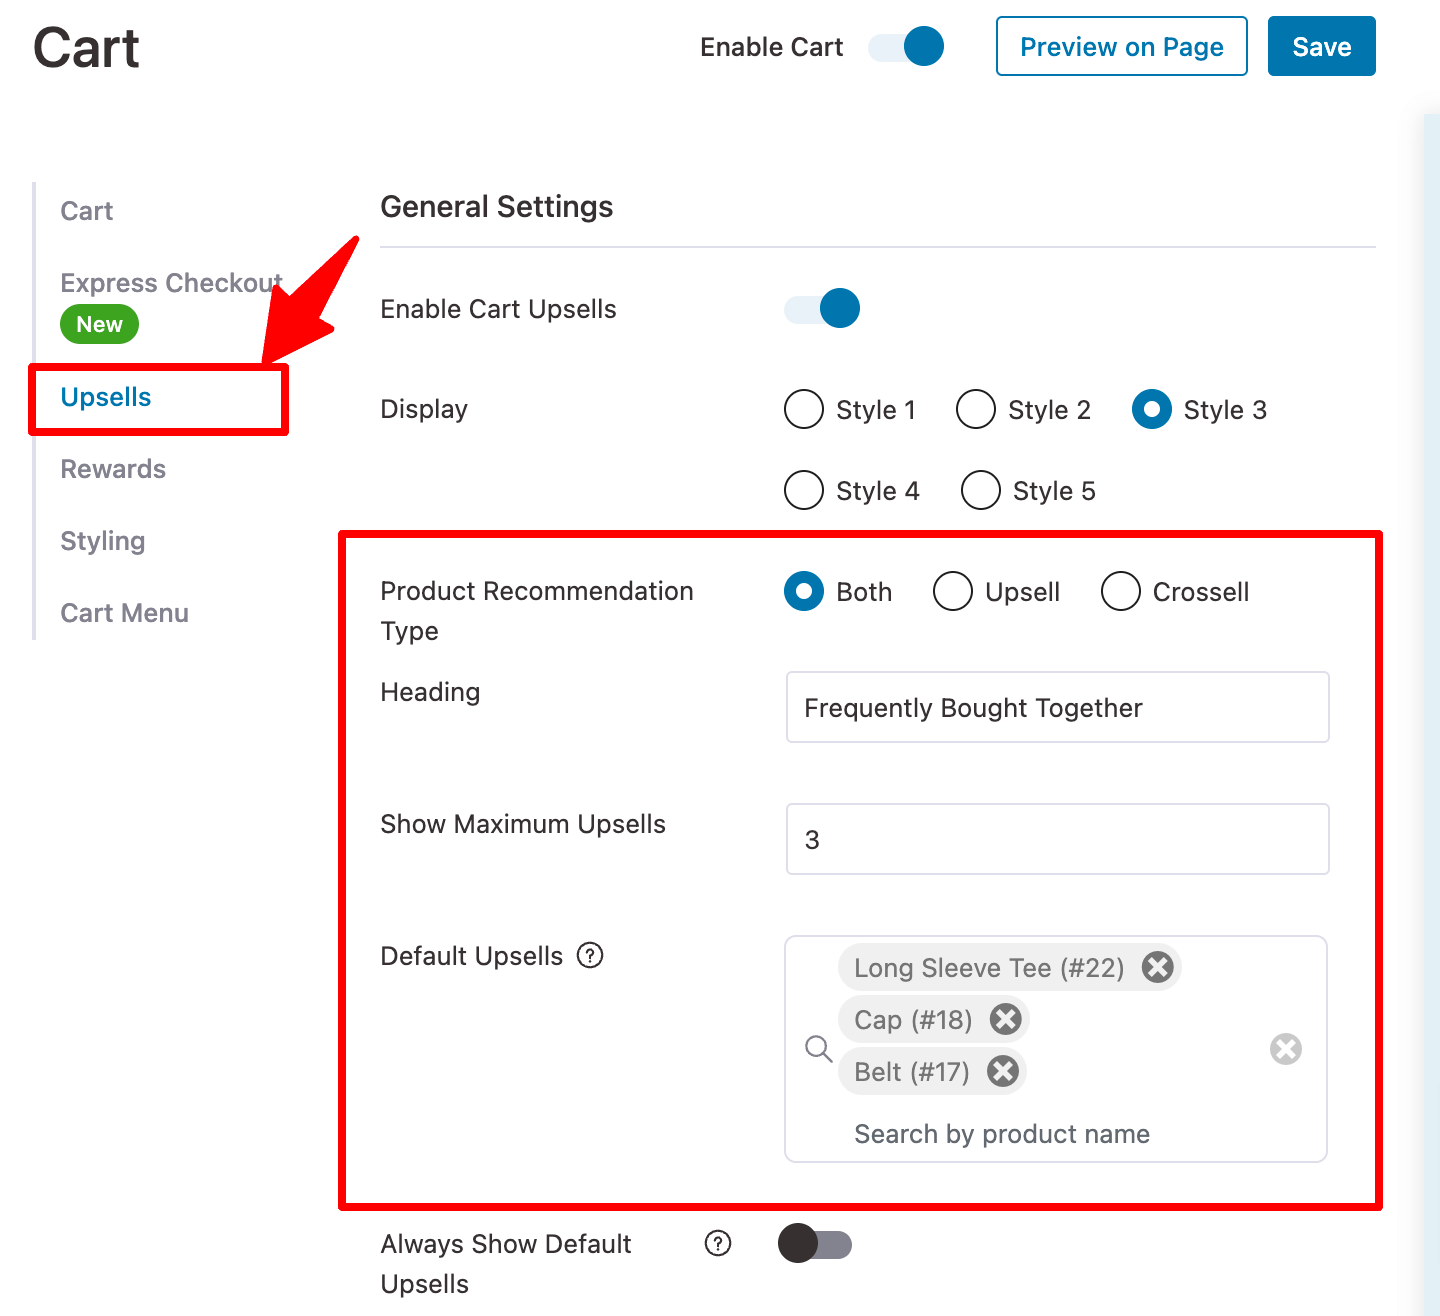
Move to the Upsells tab to set up the product recommendations.
FunnelKit Cart shows assigned upsell or cross-sell products for each product, and you can set default recommendations for any product that doesn’t have its own.
Here you can choose whether you want to recommend cross-sell products, upsell, or both.
You can set how many product recommendations to show and set up default upsell products in case any product doesn’t have upsells assigned to it.
One unique yet useful feature of FunnelKit Cart is its sleek interface.
You can assign upsell and cross-sell products directly in the plugin settings, without editing every single product separately.
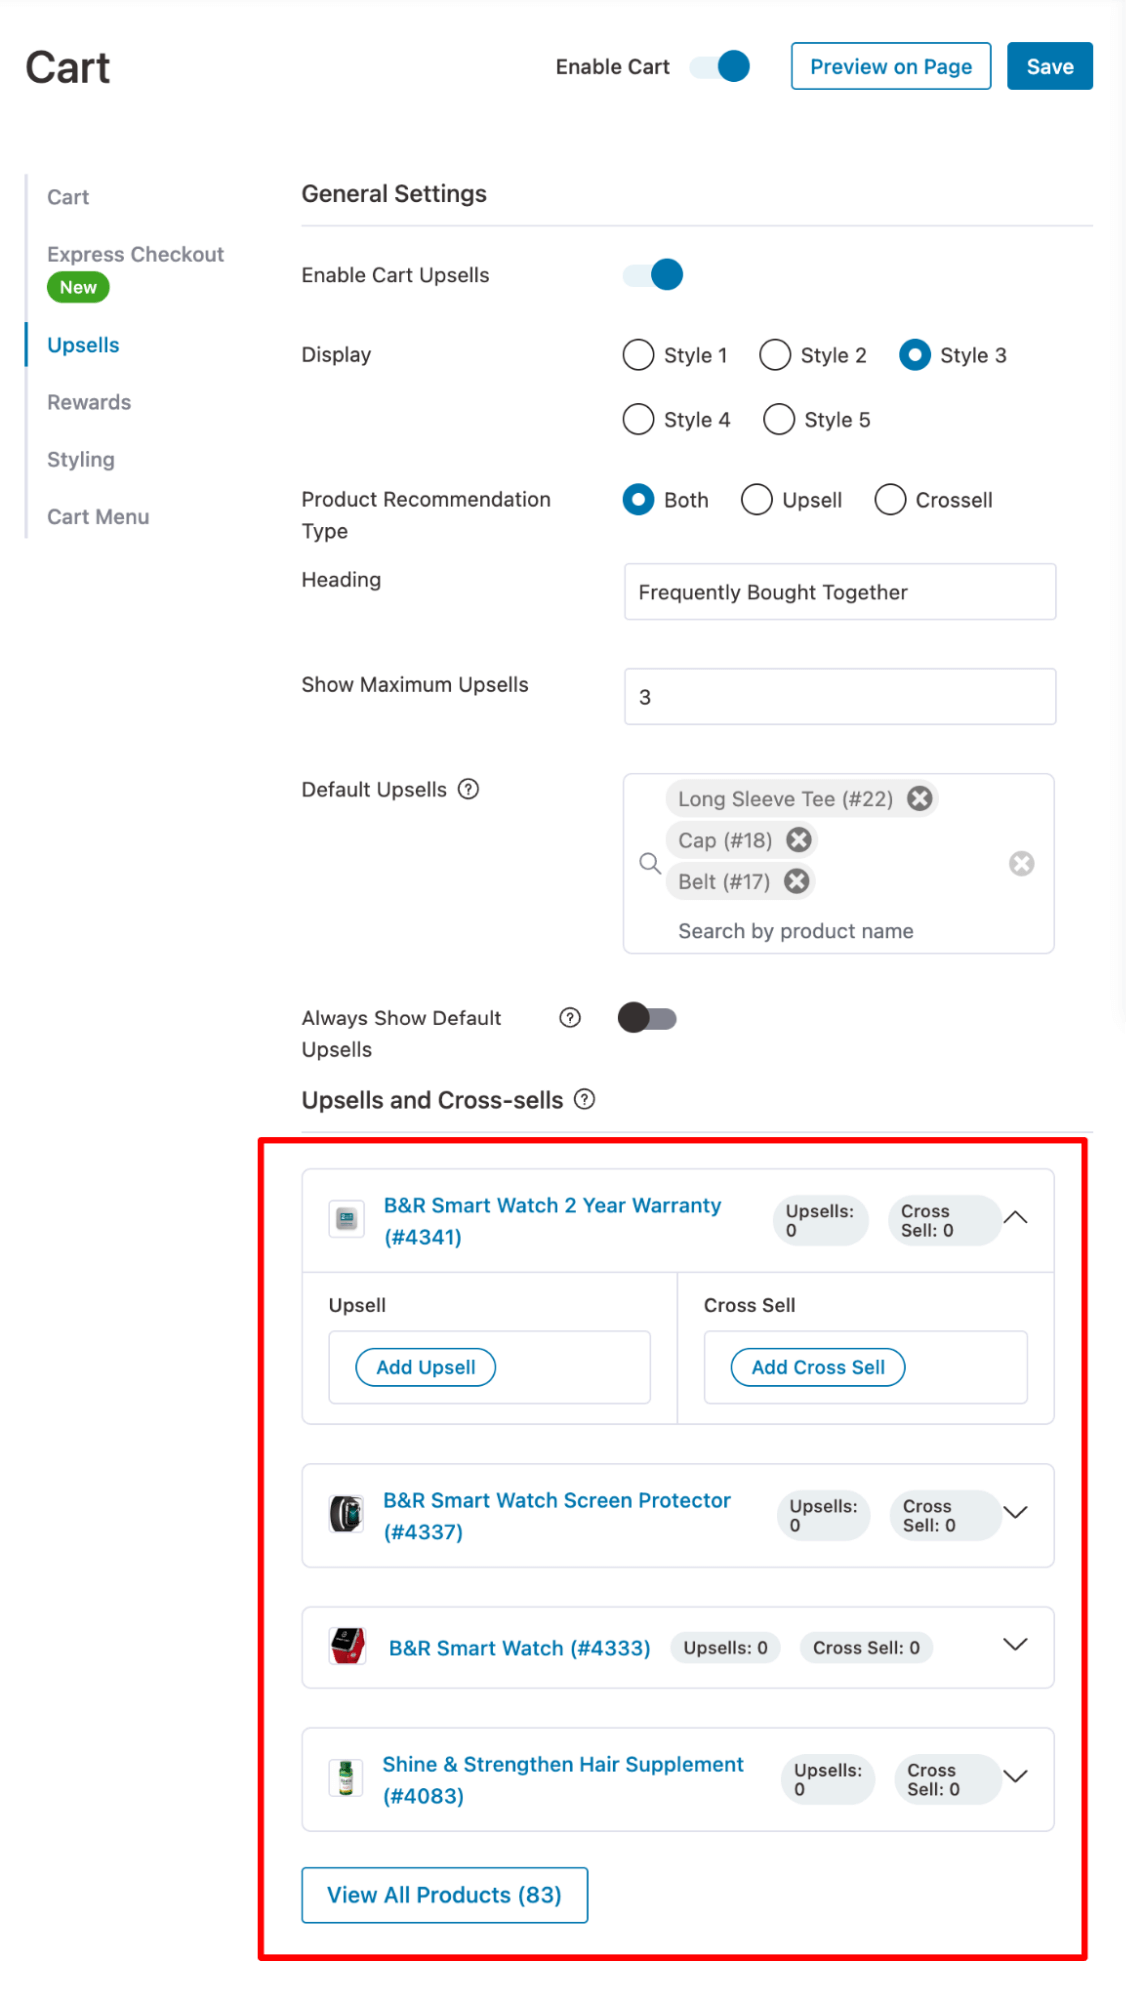
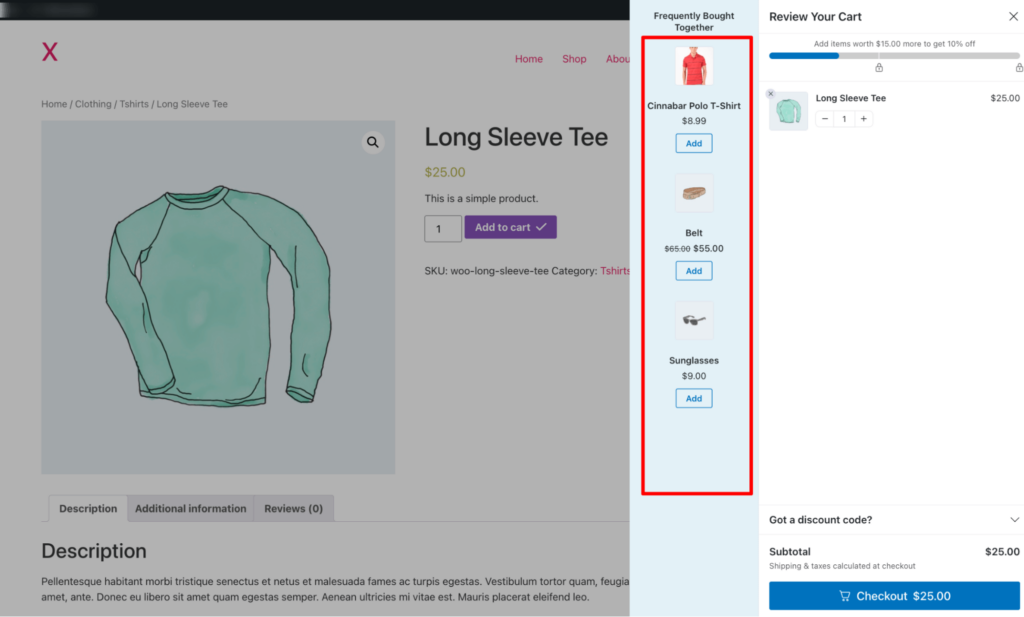
For a round-neck t-shirt, for example, you might offer a polo as an upsell and a belt or sunglasses as cross-sells.
Shoppers add items with a single click and can jump straight to checkout.
For more details, you can check this video below as well 👇
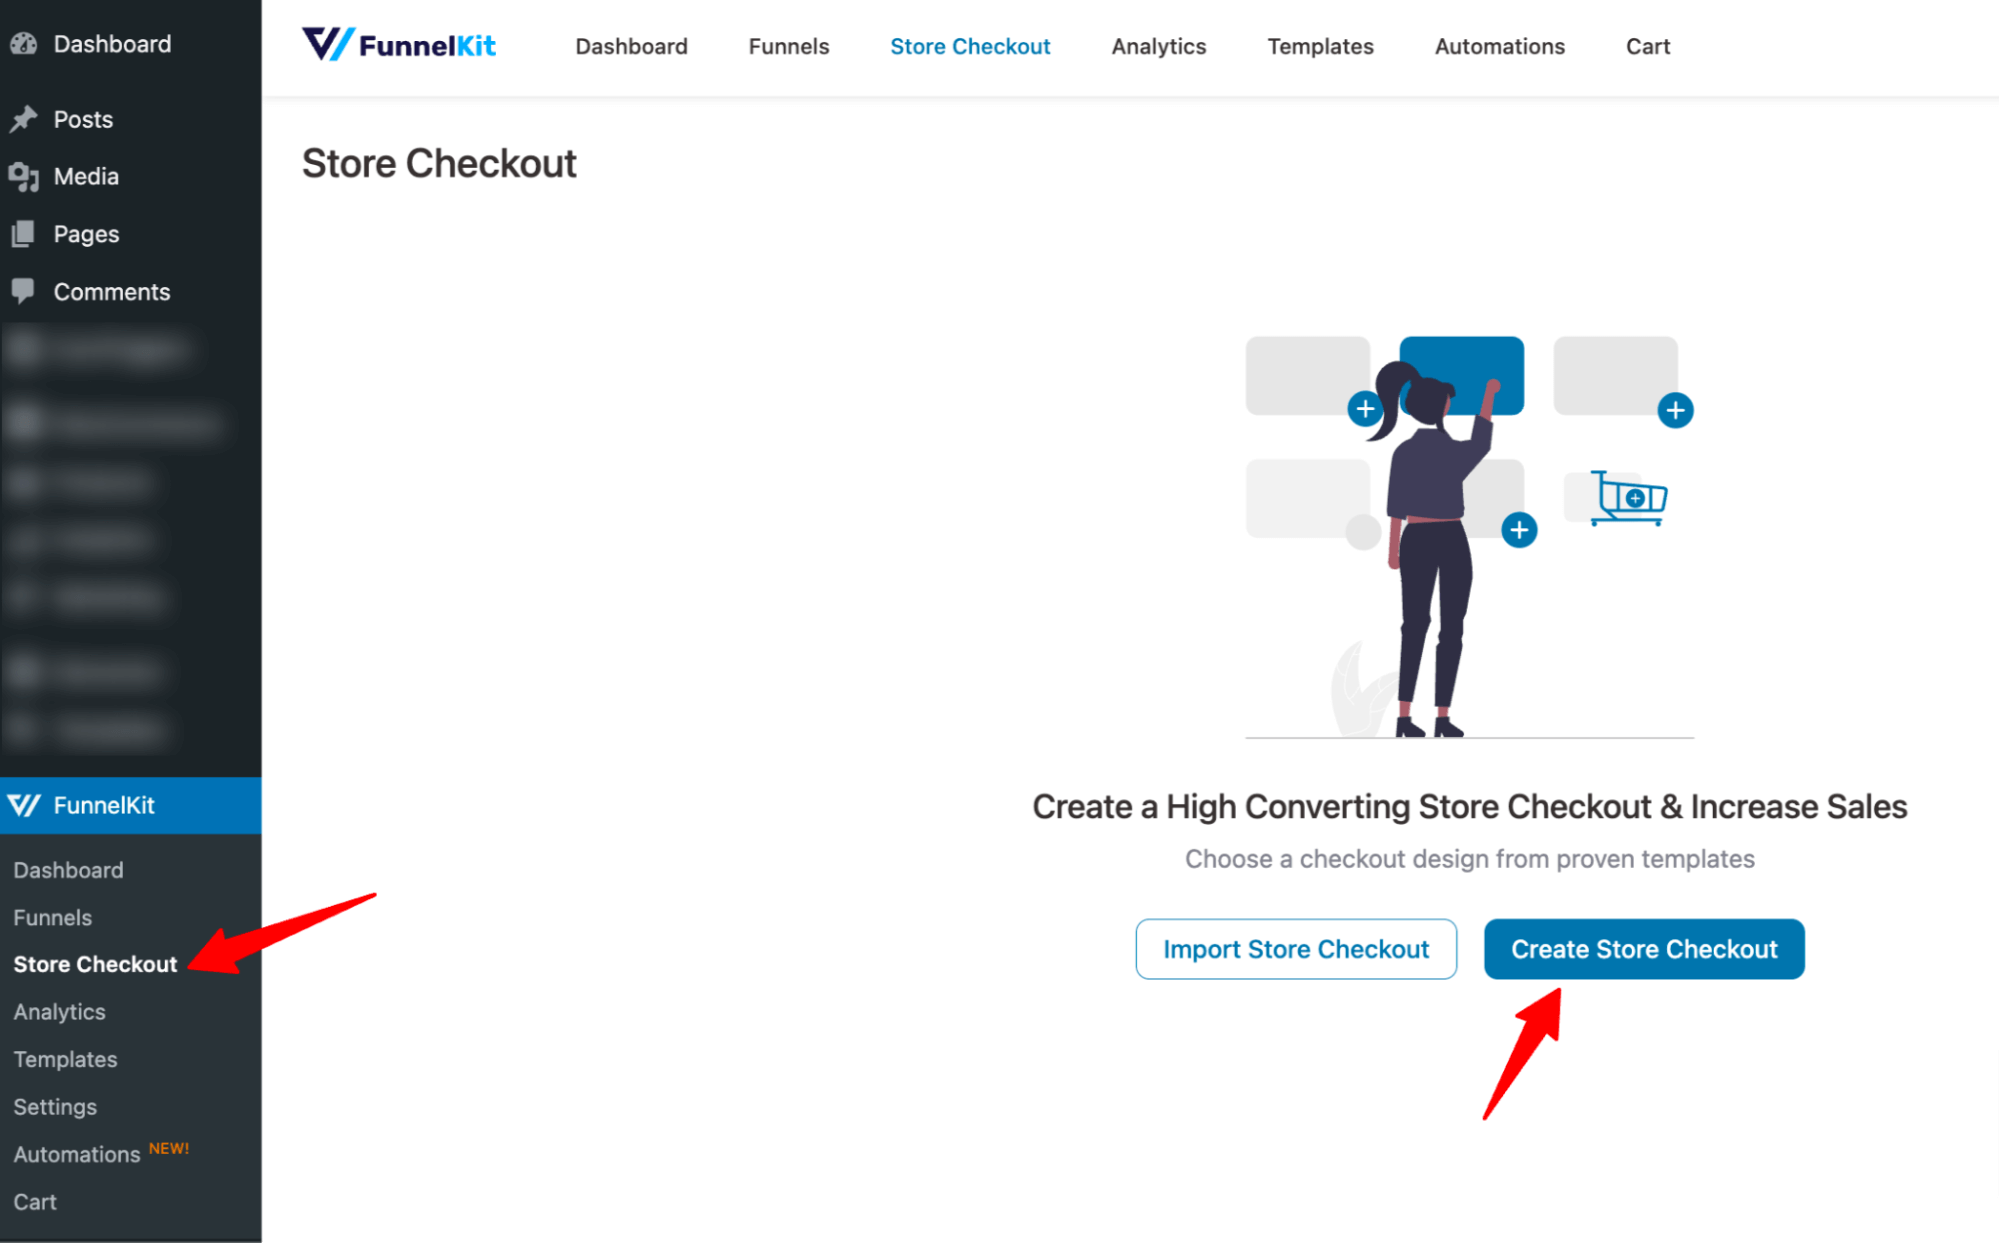
Step 2: Create a store checkout
To create the rest of the steps of the WooCommerce sales funnel from checkout to thank you, we need to create a store checkout that will replace the default WooCommerce checkout page.
For that, navigate to FunnelKit ⇒ Store Checkout and click on the ‘Create Store Checkout’ button.
Choose your favorite page builder and select a prebuilt template.
We'll use the Elementor page builder here.
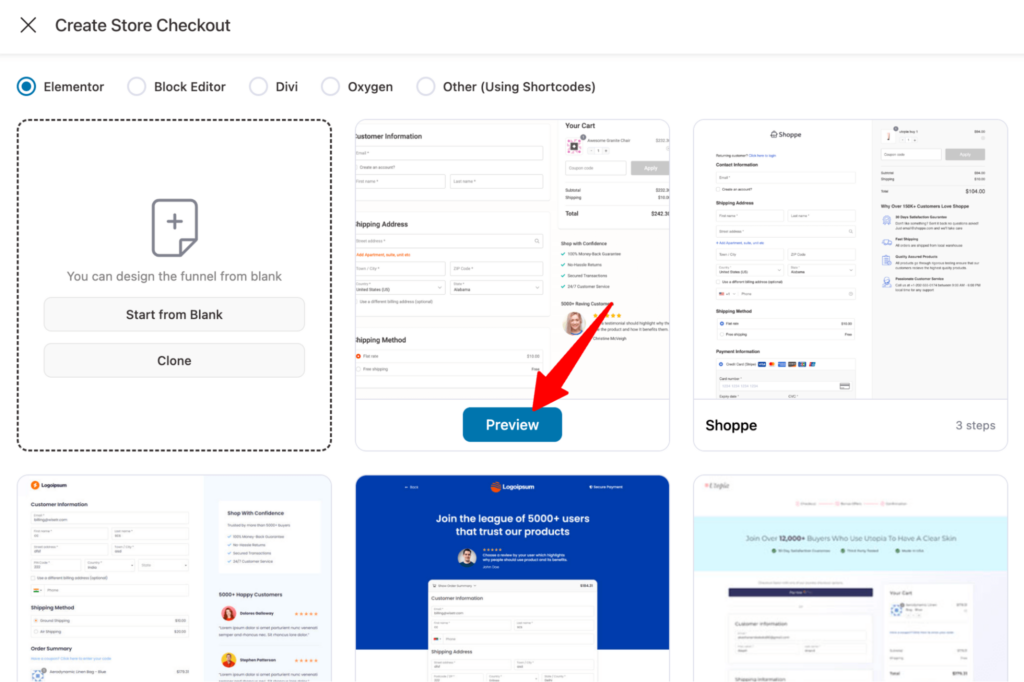
Now, choose whether you want a single-page checkout or a multi-page checkout.
After that, click on 'Import This Funnel', provide a name, and click on Done to import this funnel as your default checkout.
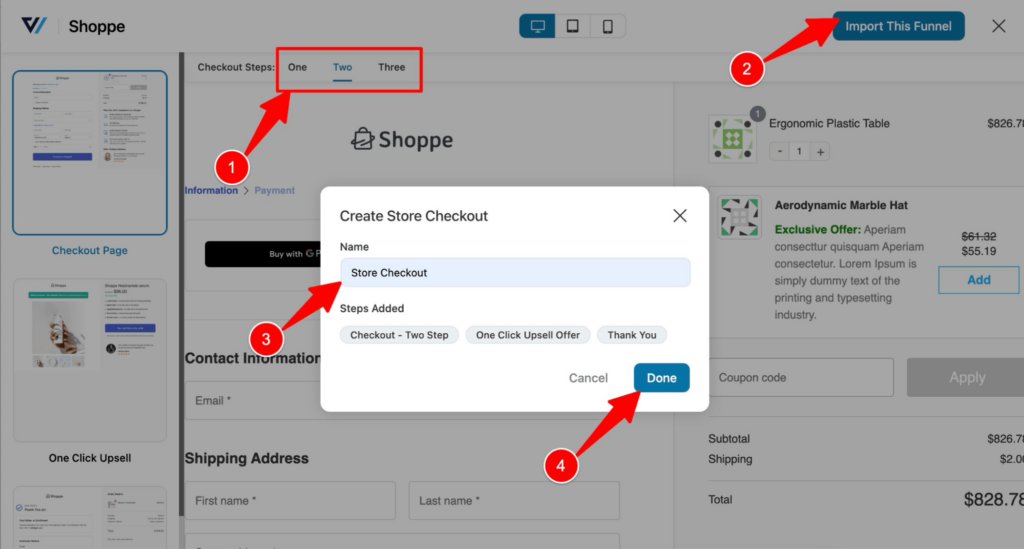
This imports a three-step funnel: checkout, one-click upsell, and thank-you page.
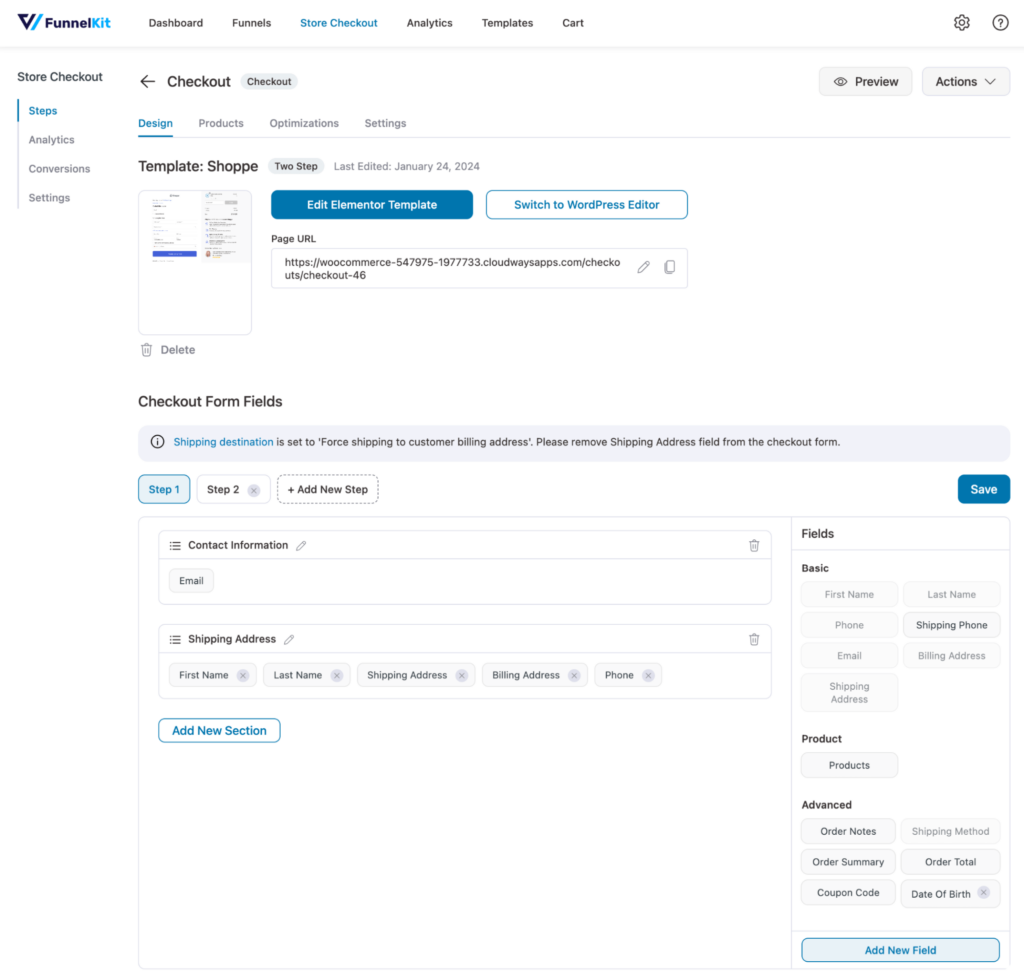
Step 3: Customize the checkout template
Click on the checkout step to edit it.
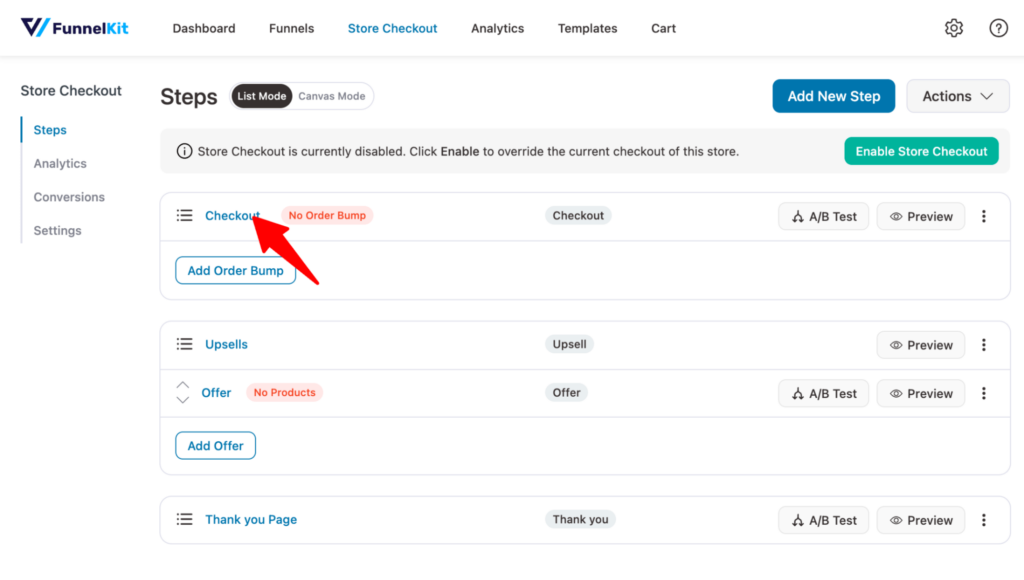
Now, you can click on the “Edit Template” button to customize the content and style of the checkout page.
Scroll down to the Checkout Form Fields section, where you can edit the checkout fields. You can reorganize the field and add, edit, or delete any fields and sections within the checkout form as needed.
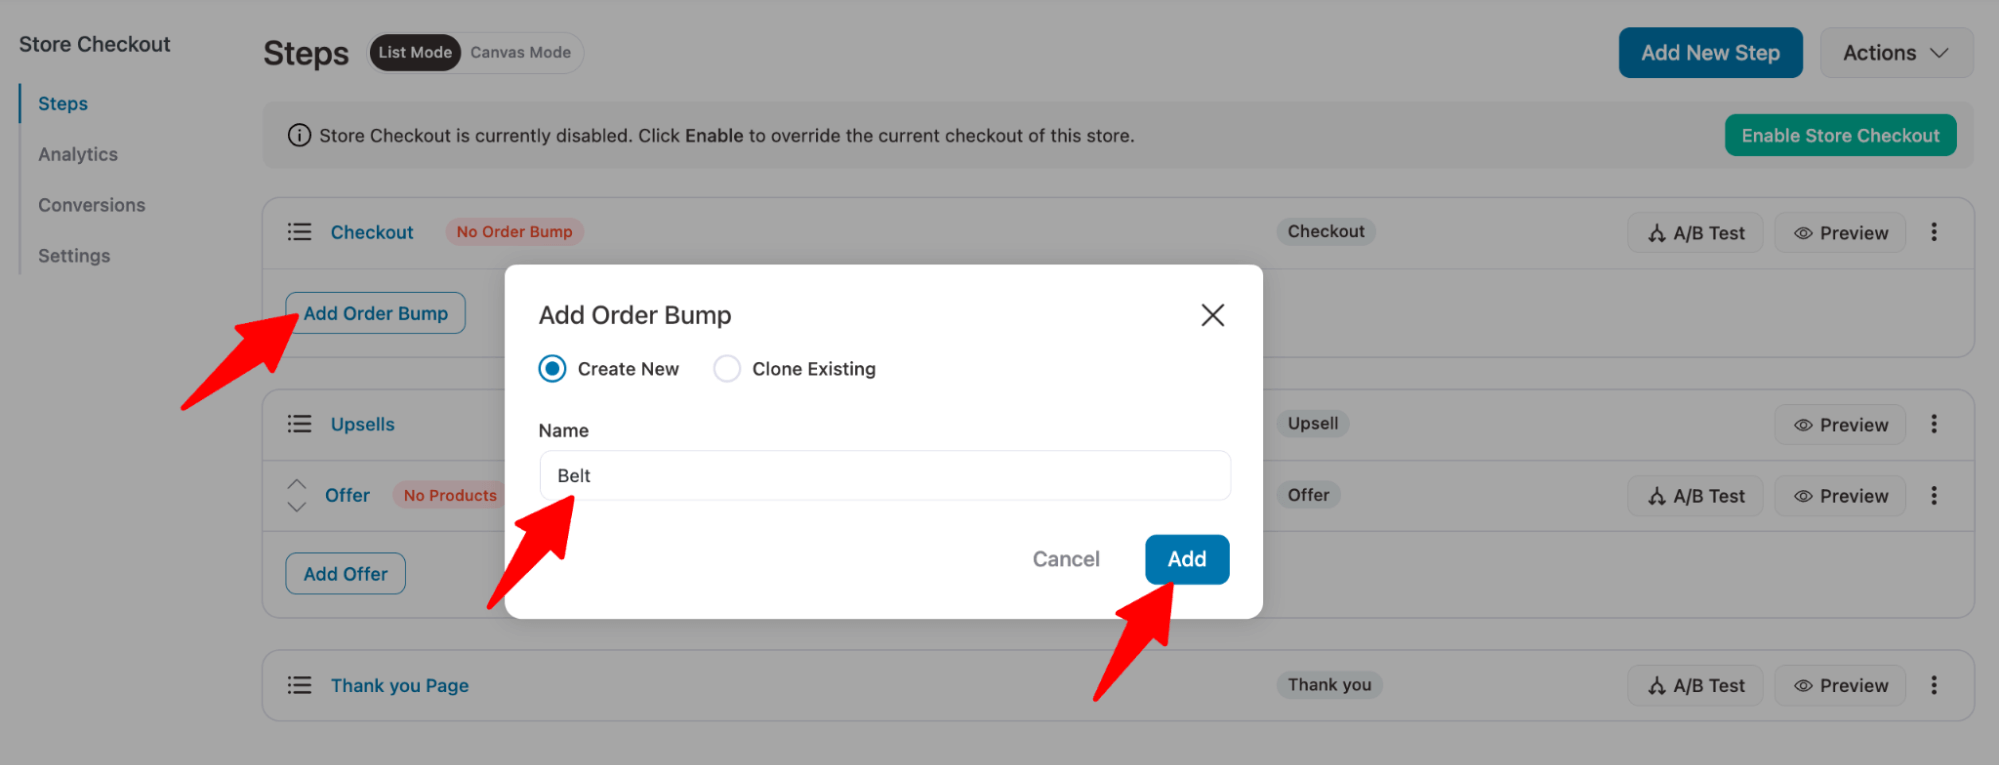
Step 4: Add order bump offers to the checkout page
To add an order bump offer, return to the store checkout page and click 'Add Order Bump'. After that, provide a name and click on Add.
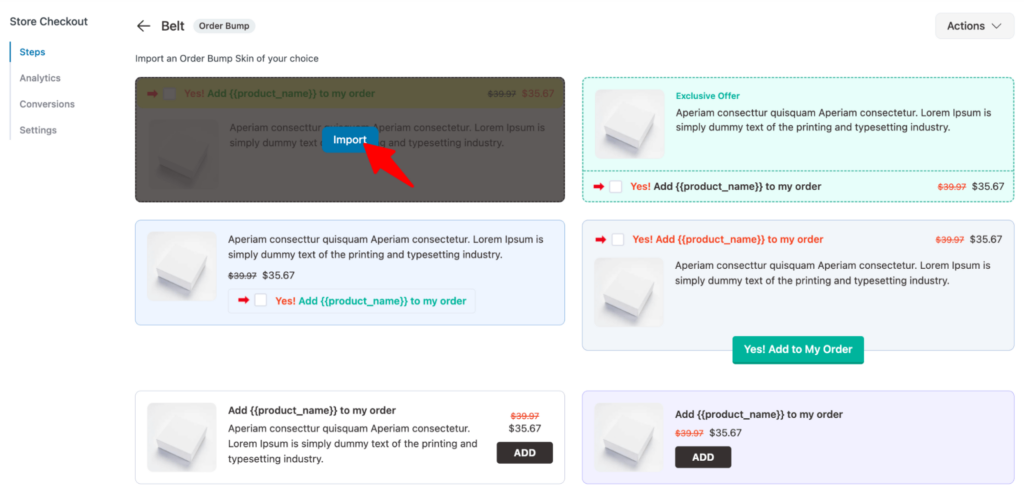
Now you will see different order bump skins. To import the one you like, hover over it and click 'Import'.
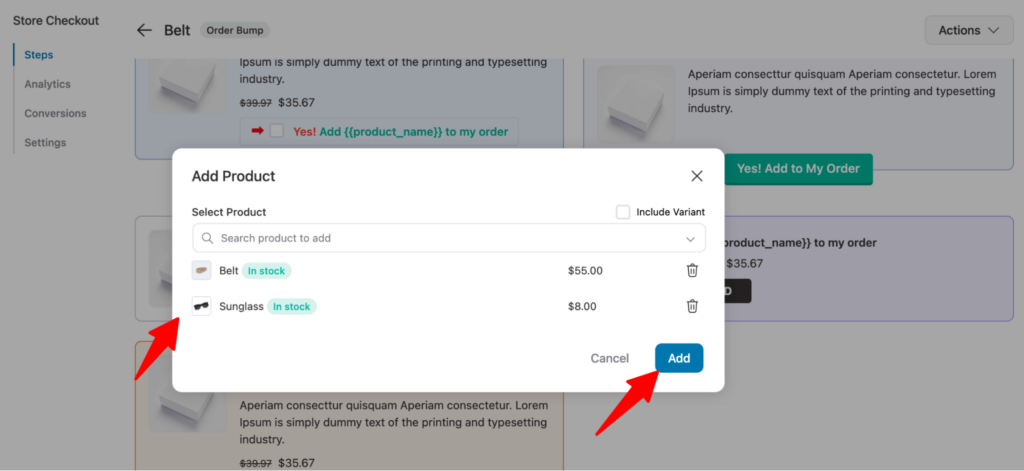
Search for the product and add an order bump. You can offer multiple products as order bumps here. After that, click on Add.
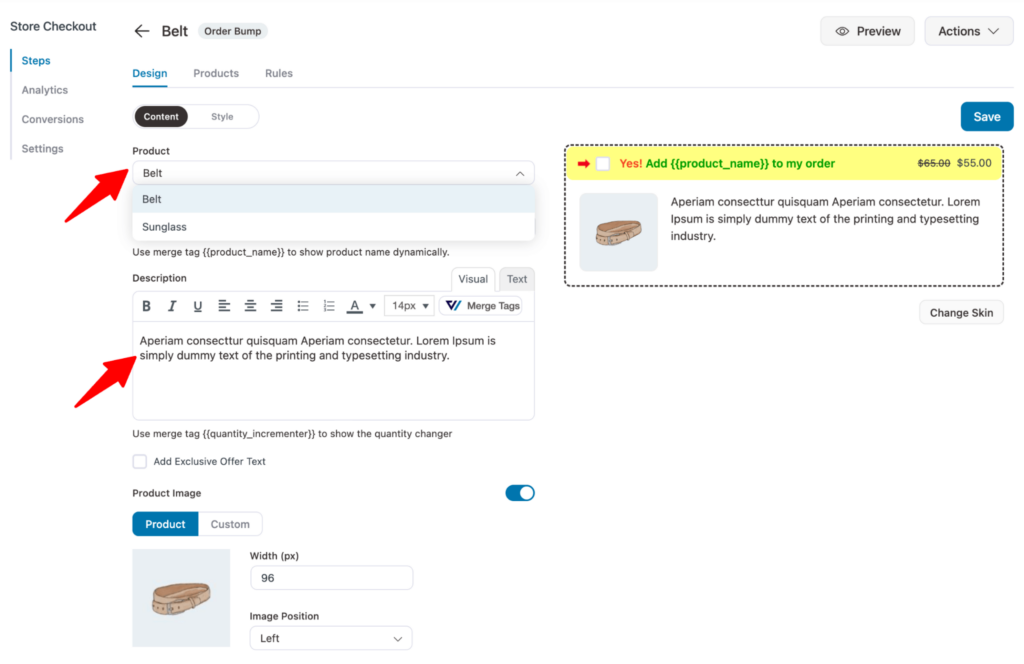
Choose the product, then add the product description, exclusive text, and image size. You can add custom images as well.
Click on 'Save' to update.
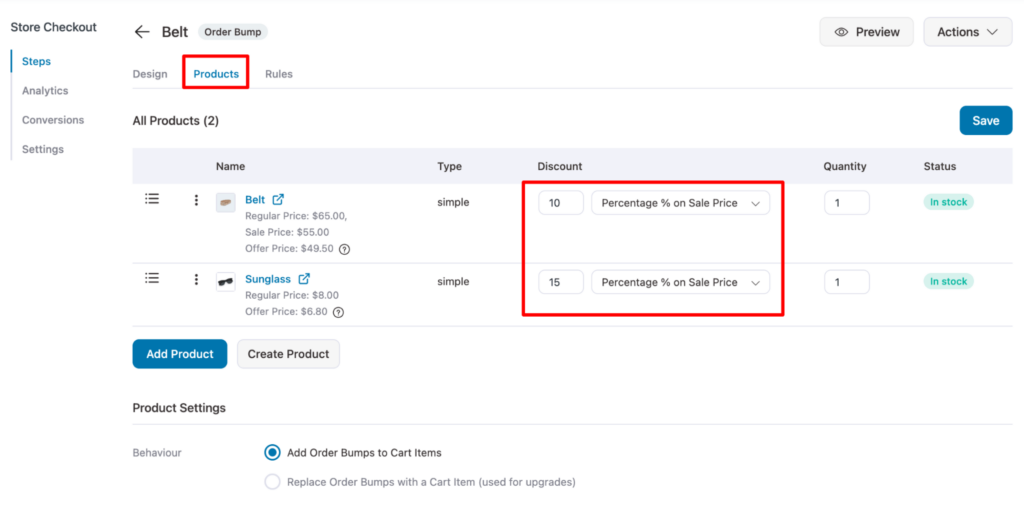
On the Products tab, you can offer discounts on the order bump offers.
Currently, this order bump will show to each shopper who comes to the checkout to make a purchase.
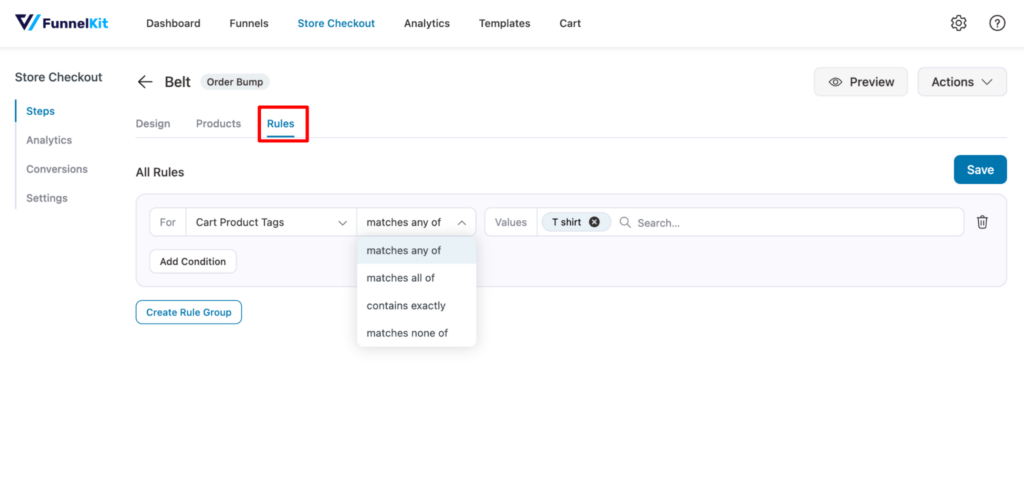
To keep offers relevant, set up display rules. For that, open the Rules tab set conditions based on Cart Total, Cart Category, Cart Item Count, User Role, Cart Product Tags, or 20+ rules.
For example, offer a t-shirt-related bump only when the cart contains the “t-shirt” tag.
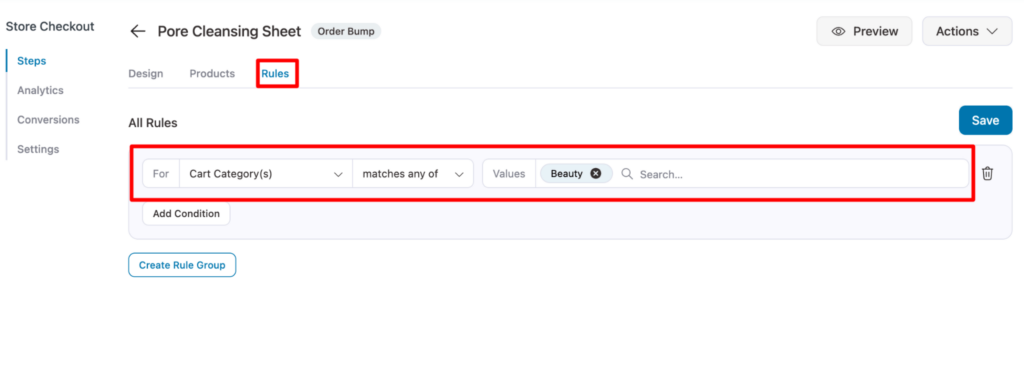
You can add as many conditional bumps as you need.
For instance, if you sell skincare like face wash, scrubbers, etc., along with clothing, you can add another order bump, like a Pore Cleansing Sheet, that will only be offered if users purchase any products from the beauty category.
For more ideas, check out our WooCommerce order bump guide.
Here is a preview of the multi-step checkout page with order bumps:
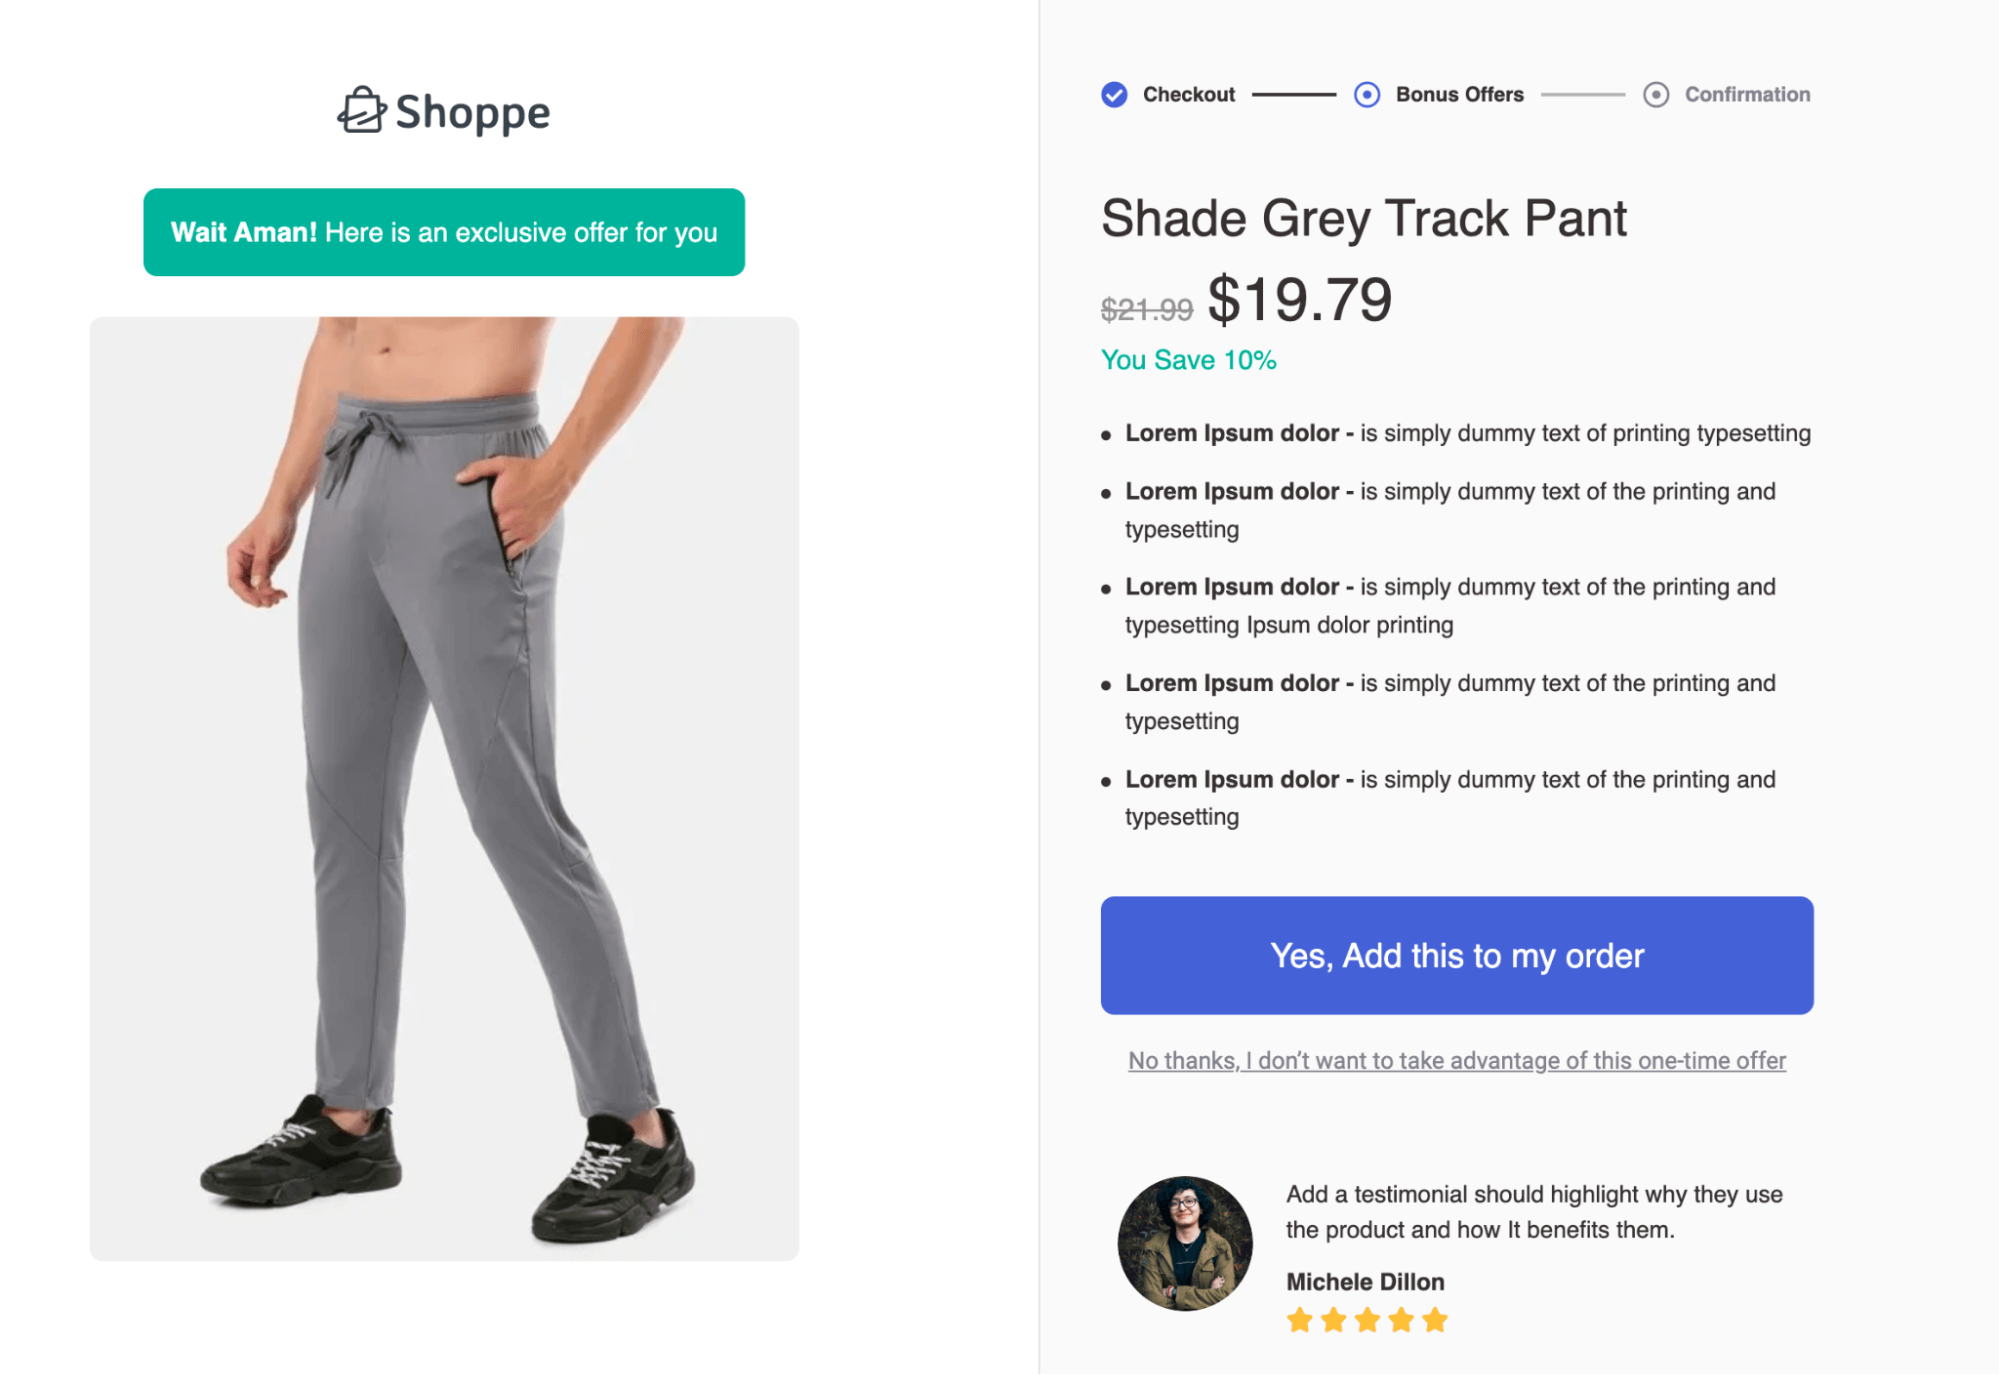
Step 5: Add one-click upsell
When you import the template, it also imports a one-click upsell offer. All you need to do is edit that and add the product you want to offer.
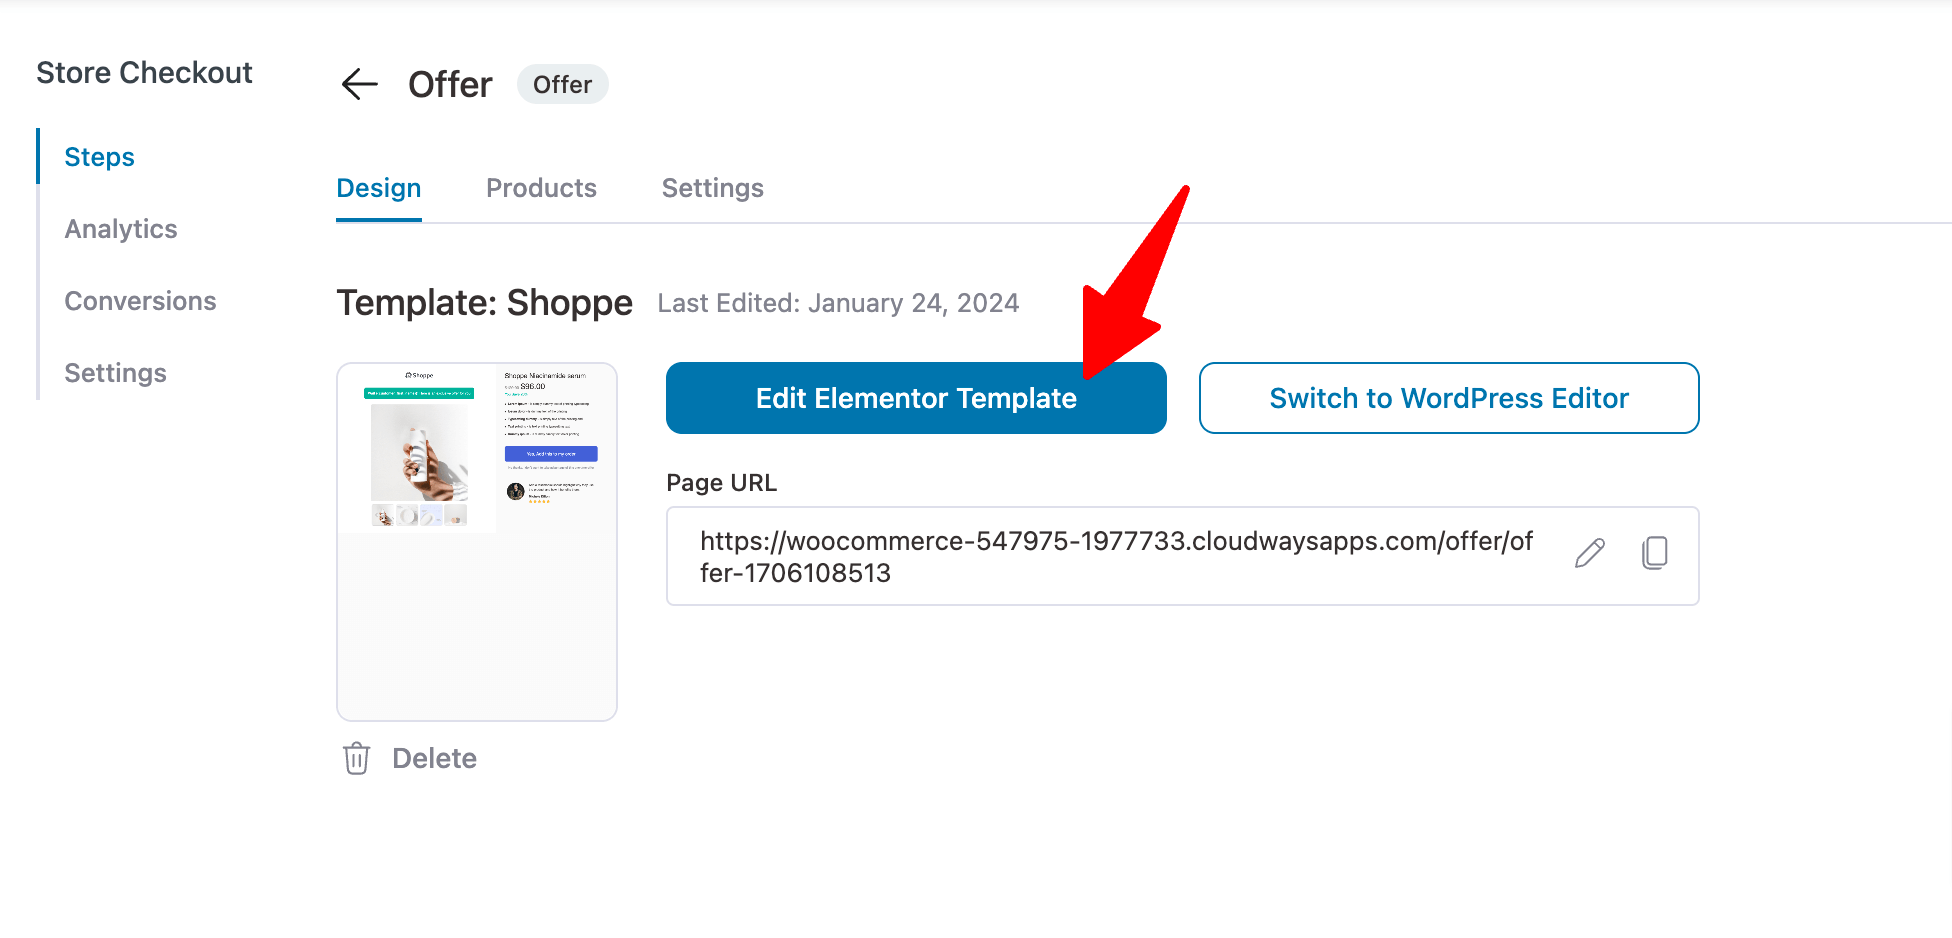
First, click on the existing Offer.

You will land on the Design tab; here, you can click 'Edit Template' to customize the design and content of the upsell template.
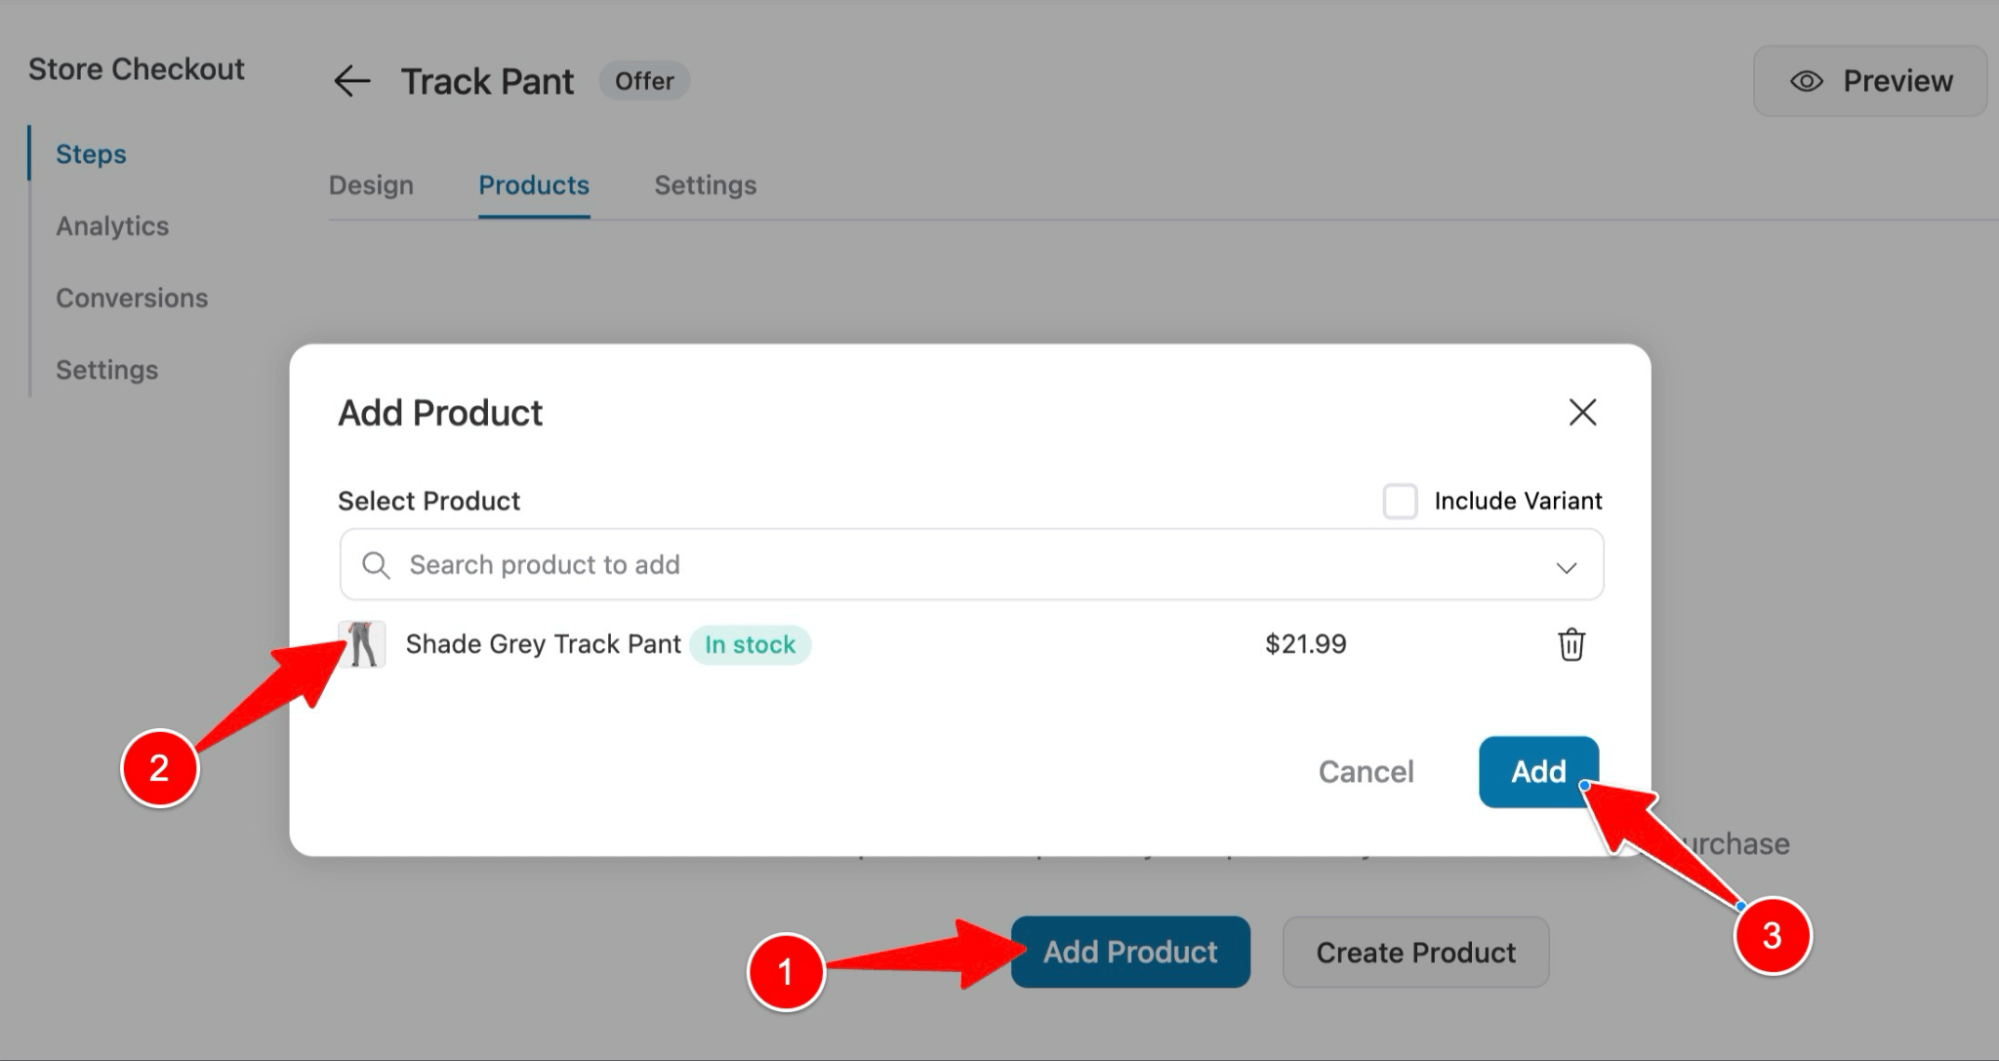
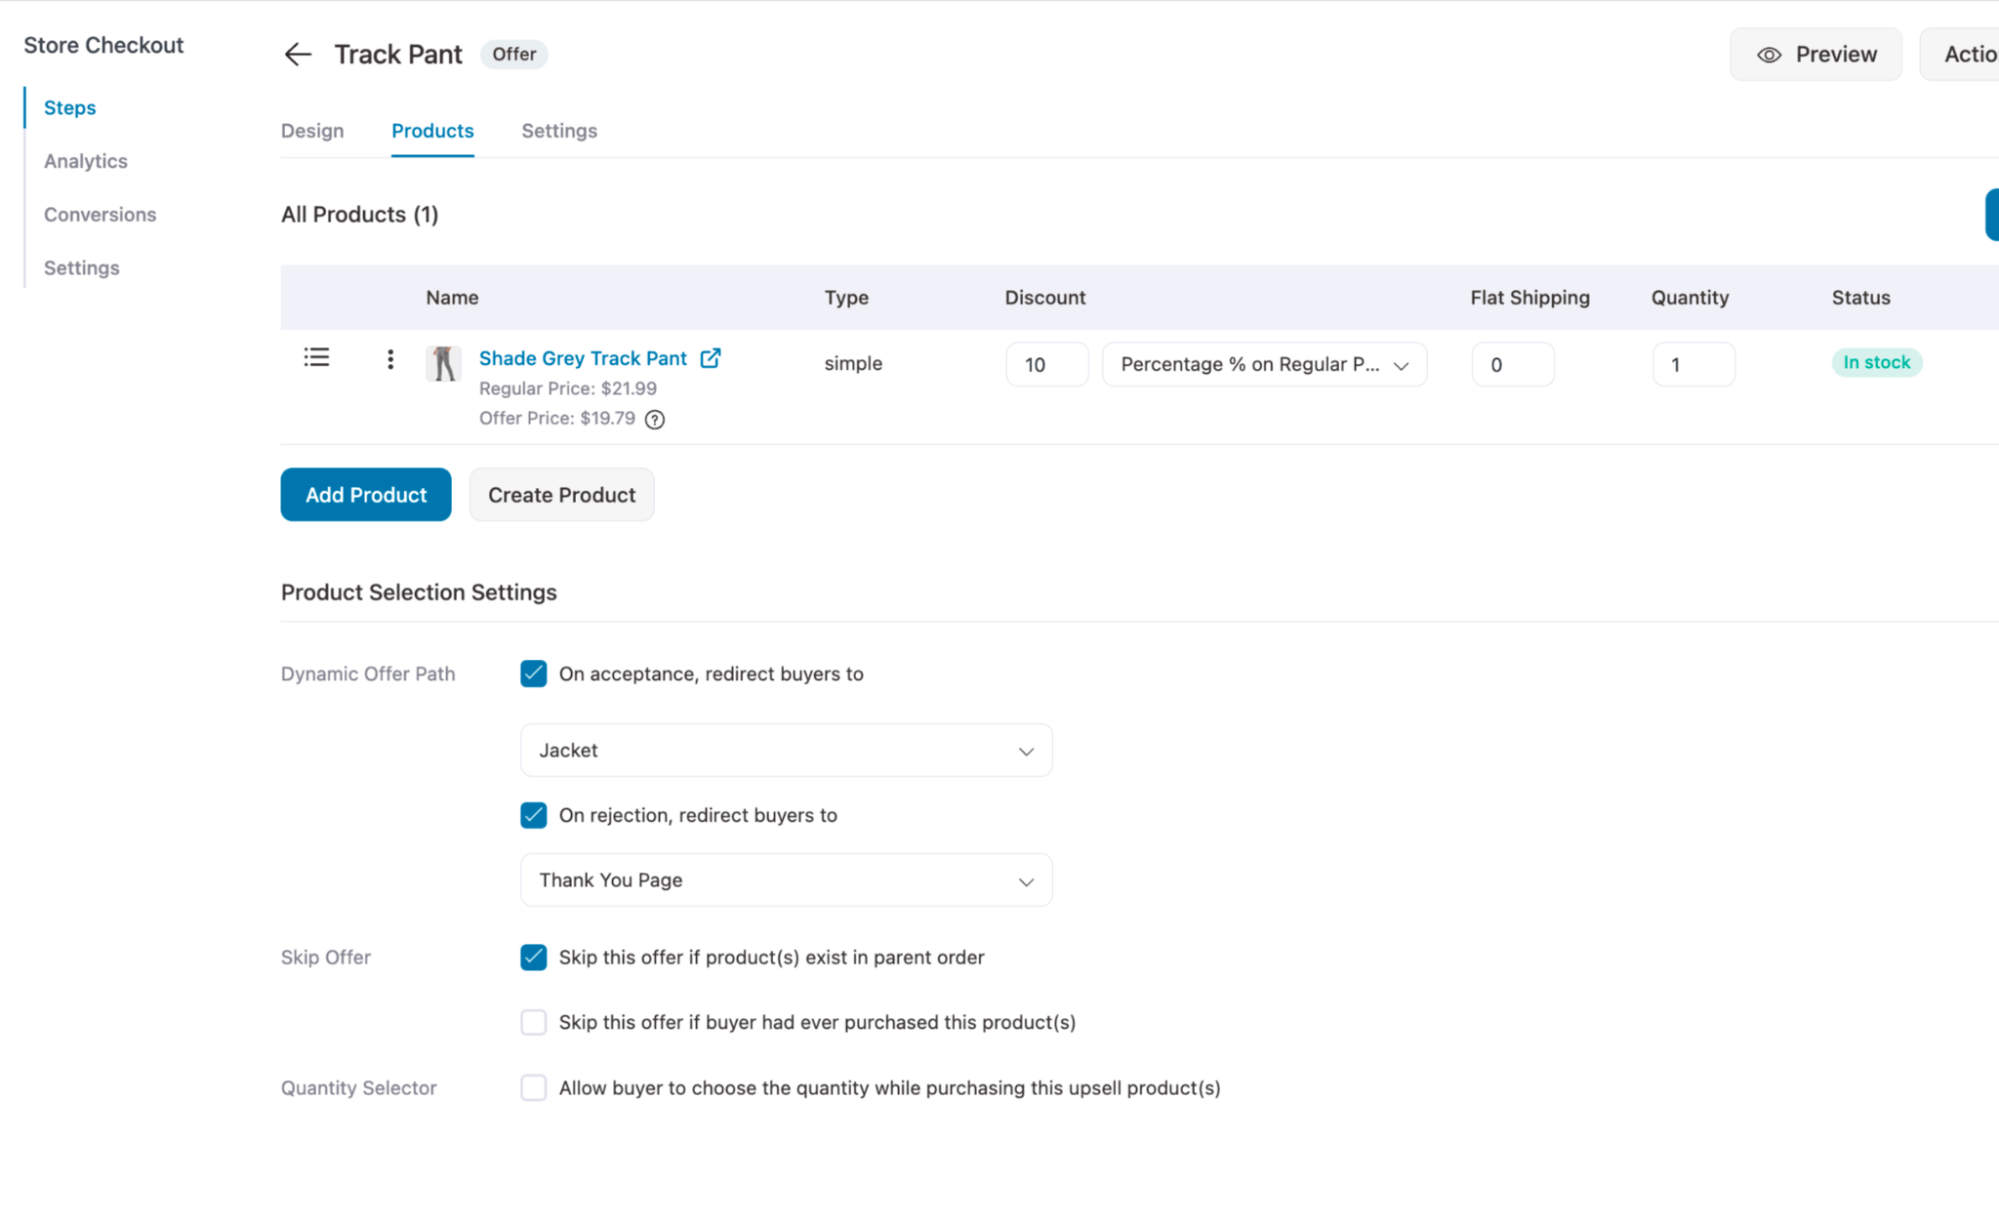
Move to the “Products” tab. Here you can add the upsell offer. For that, click on “Add Product”, search for and add a product, and click on Add.
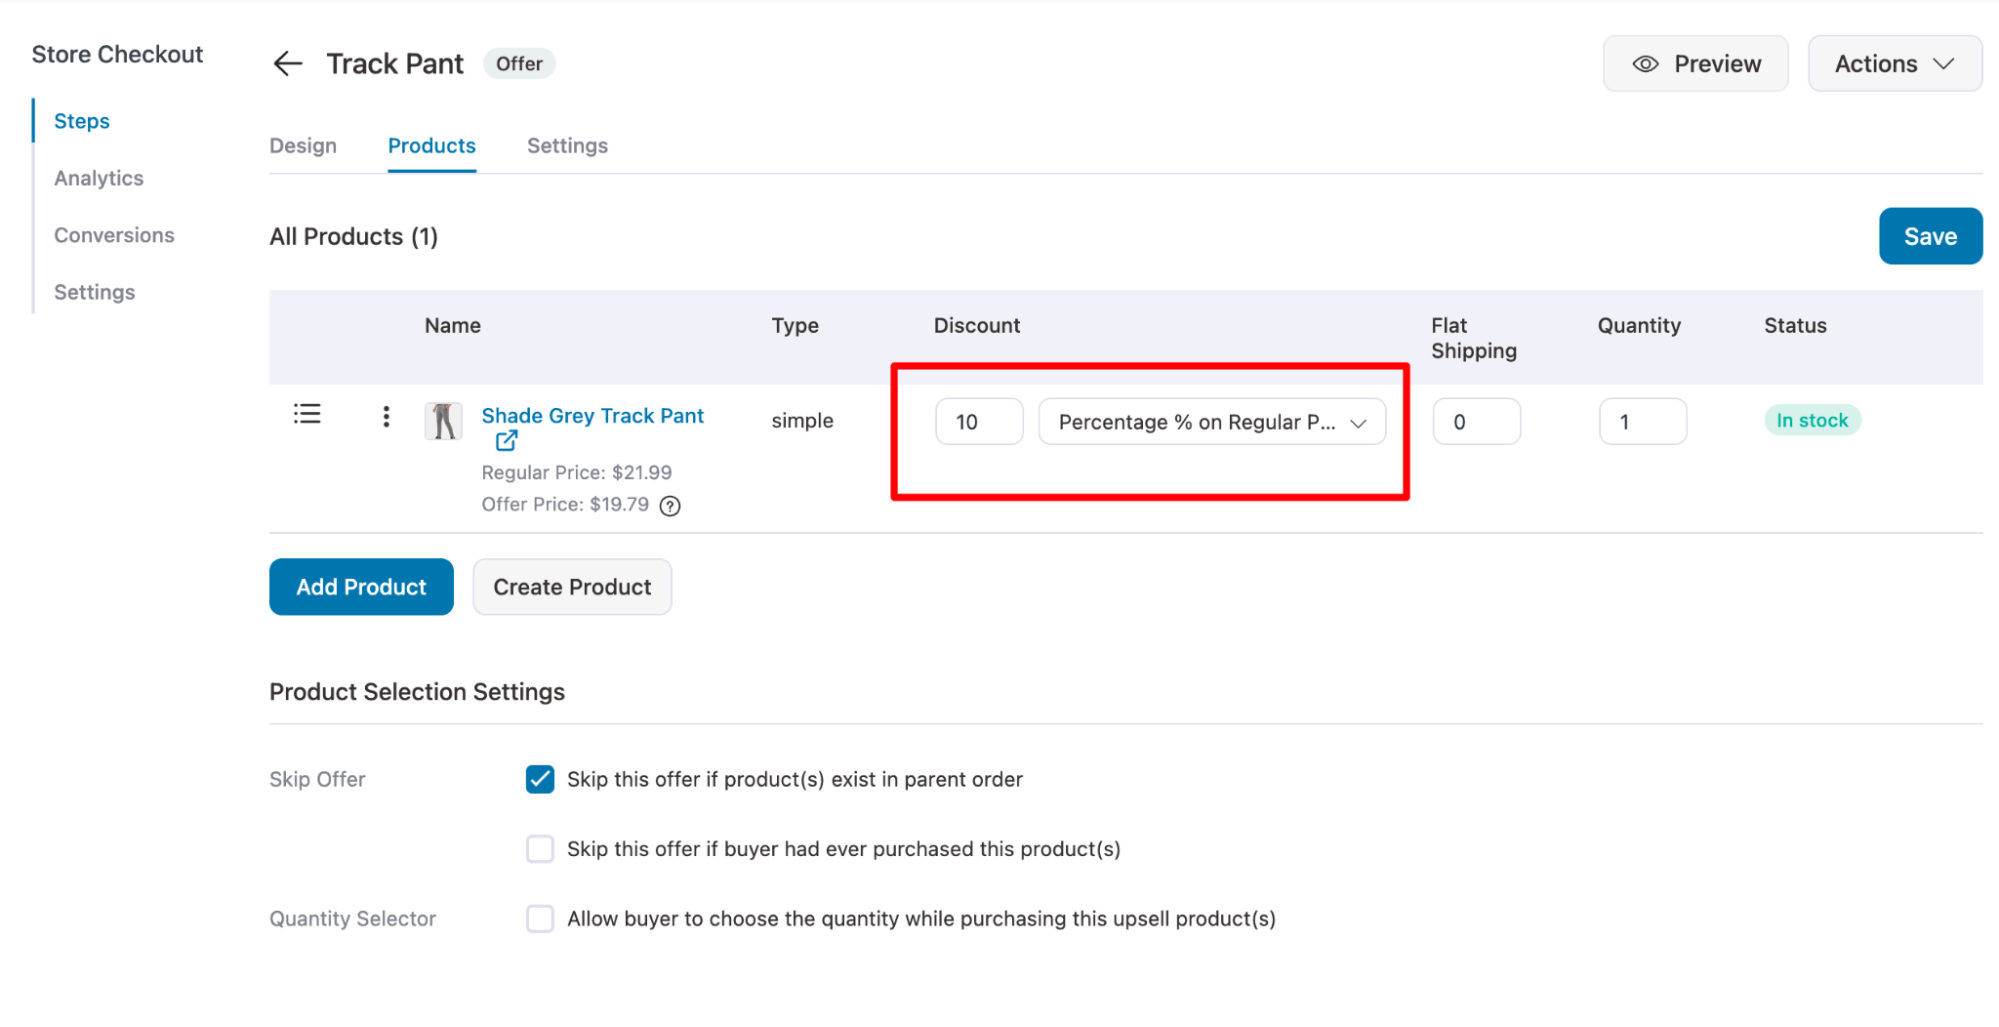
Note: You can click on the upsell offer name and change it for convenience. Here, we have renamed the offer to "track pants" to match the product we are offering.
You can now add a discount to the offer as well. After that, on the “Product Selection Settings”, you can set different settings like:
- Skip Offer: Check these options so the store won’t show this upsell offer to users if the product already exists in the order or if they've already purchased it.
- Quantity Selector: You can check this option to allow users to select quantity as well.
Make sure to click on Save to update the settings.
You can offer multiple upsell offers as well. On the sales page, drag and drop to reorder. Here we have added another upsell named Jacket.
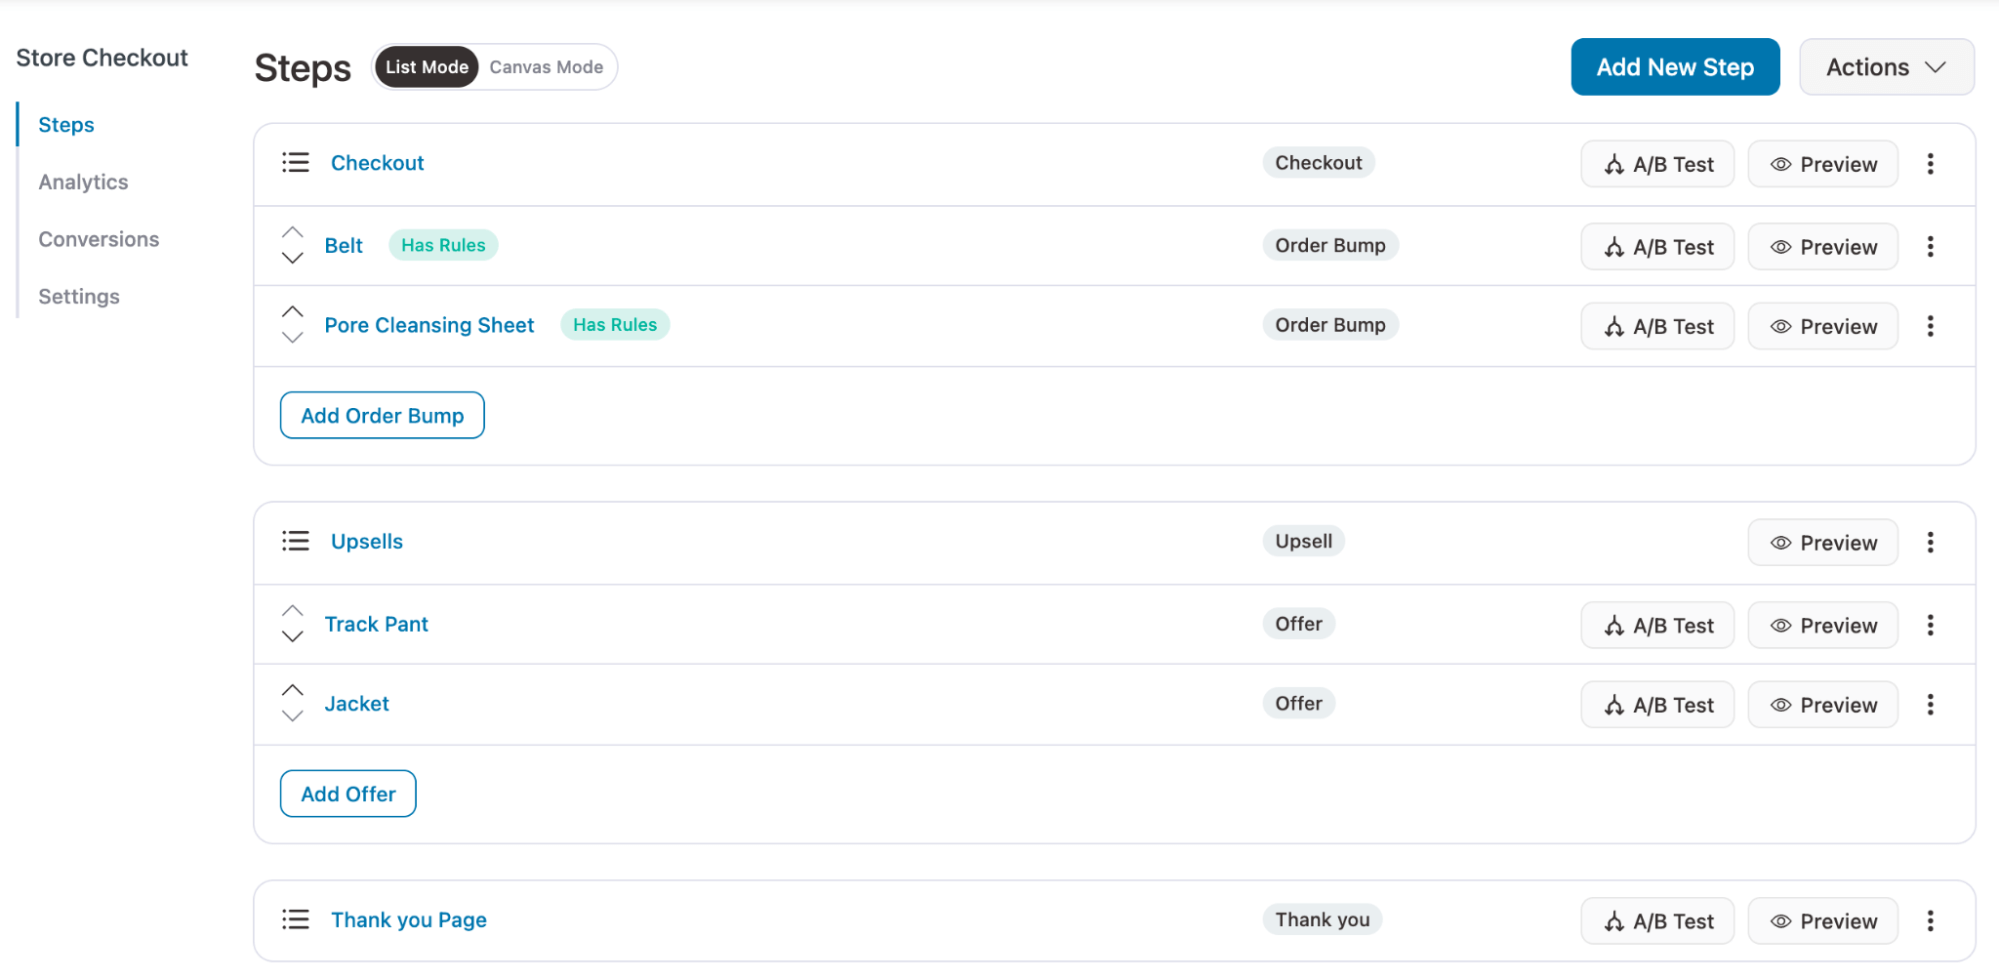
Once you add multiple upsells, the top-placed upsells will include additional product-related settings, such as Dynamic Offer Path, so the system knows what to do if users reject/ accept the first order.
Here, for On Acceptance, we will redirect buyers to the next upsell offer, Jacket, and in case they reject, they will be redirected to the thank you page. This is how upsells and downsells work.
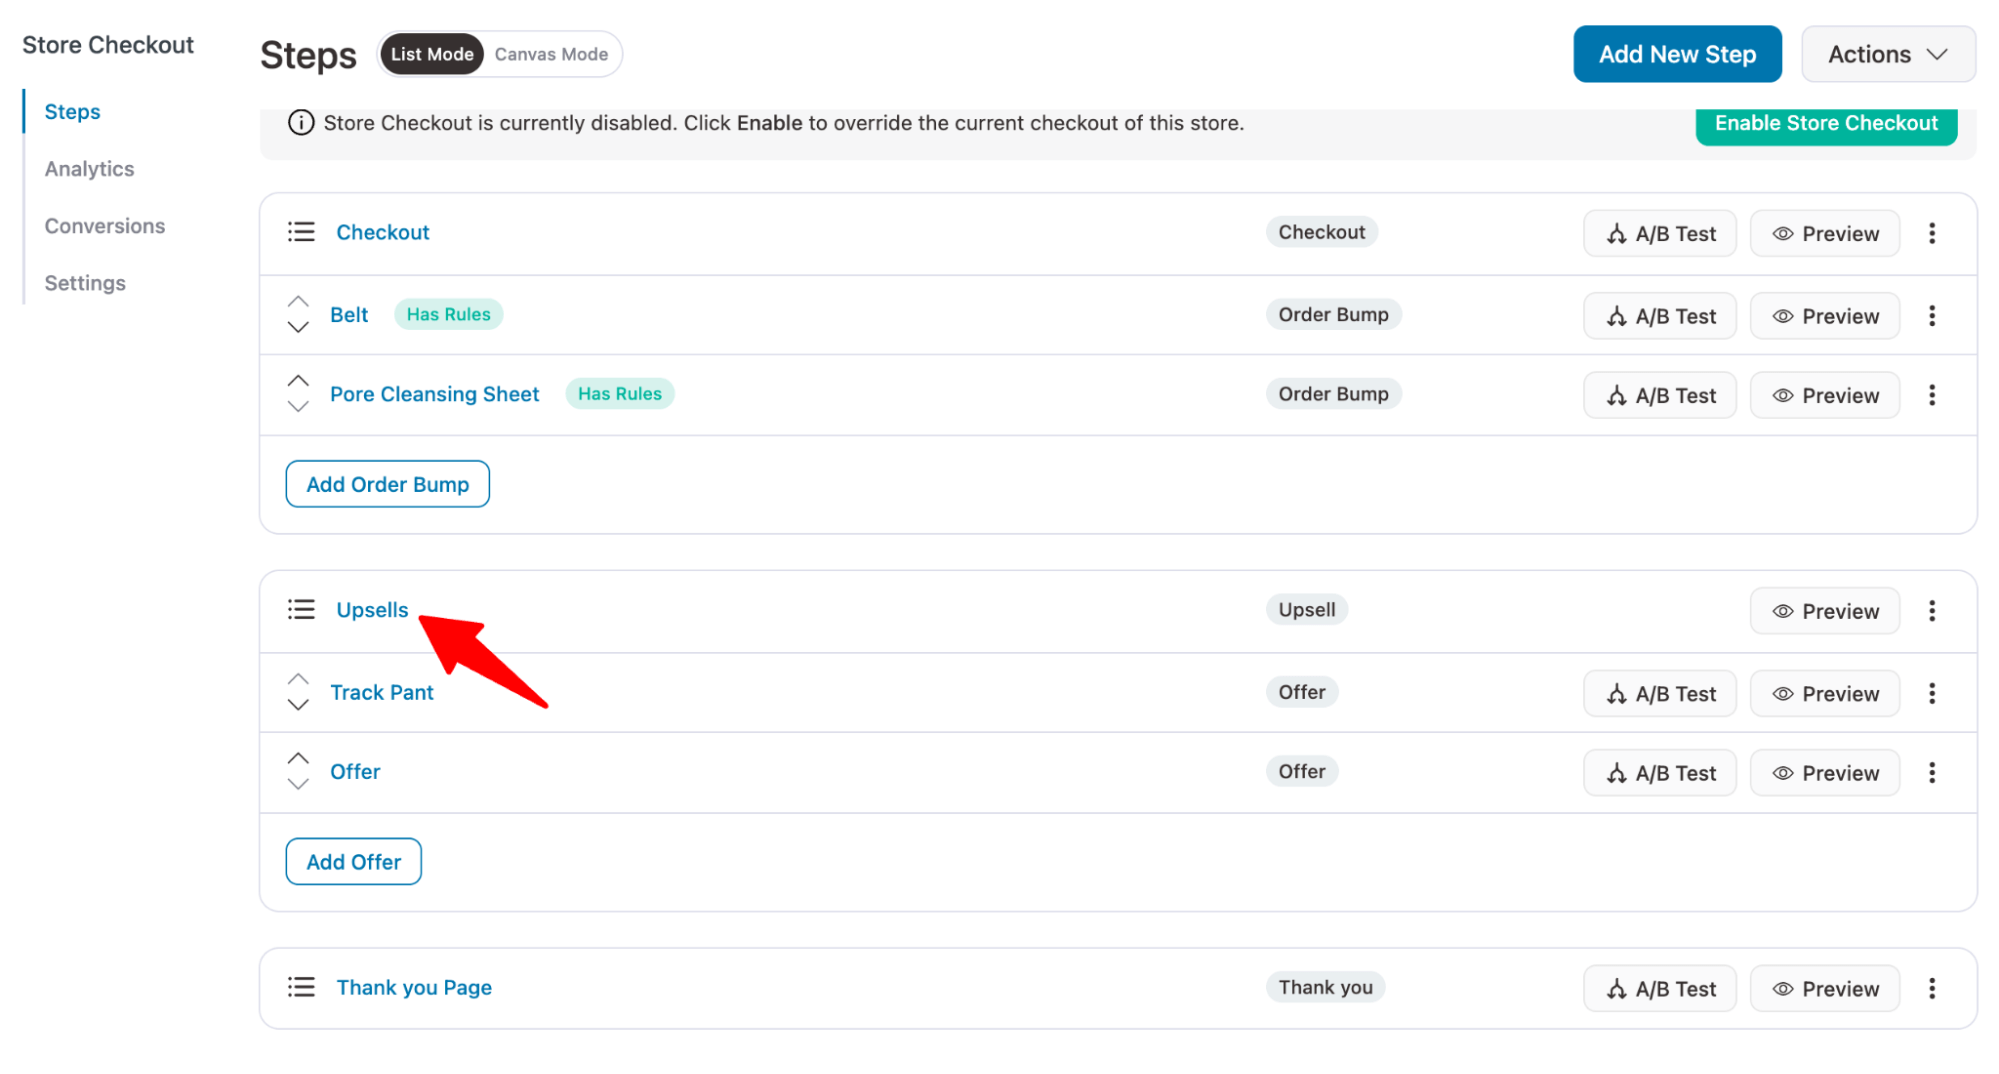
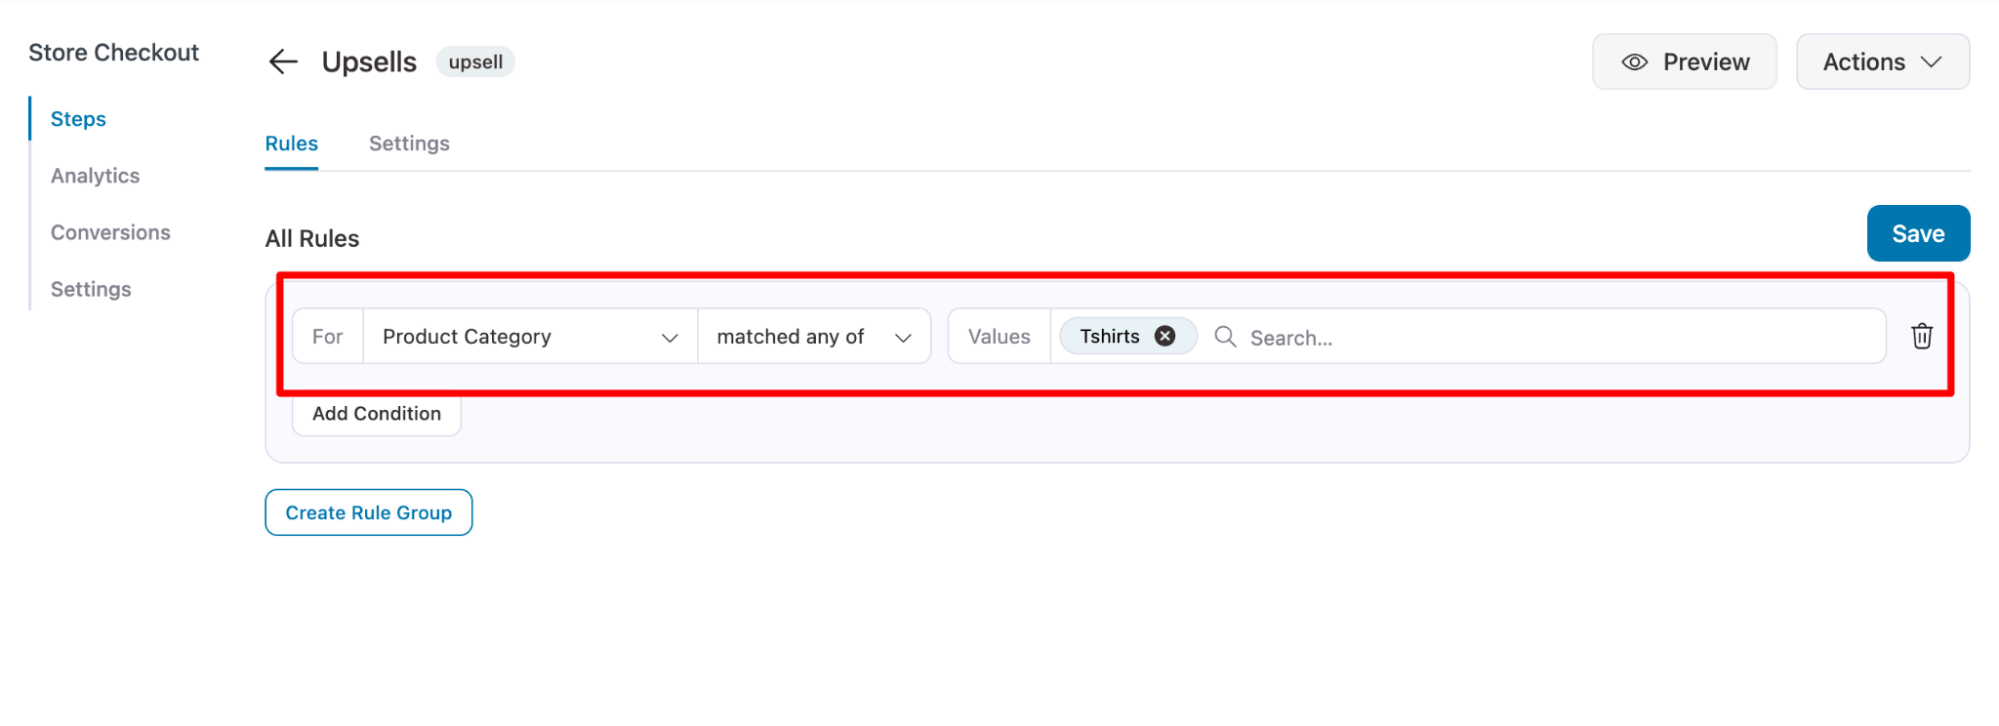
Again, like Order bump, we need to set rules on which upsell to offer for which base product to maintain relevancy. For this, come back and click on the Upsell step.
Here you can set the different rules. For instance, if the base product is from the “Tshirts” category then this upsell offer (track pants and Jacket) will be shown to them.
Here is what one of the one-click upsell offer looks like:
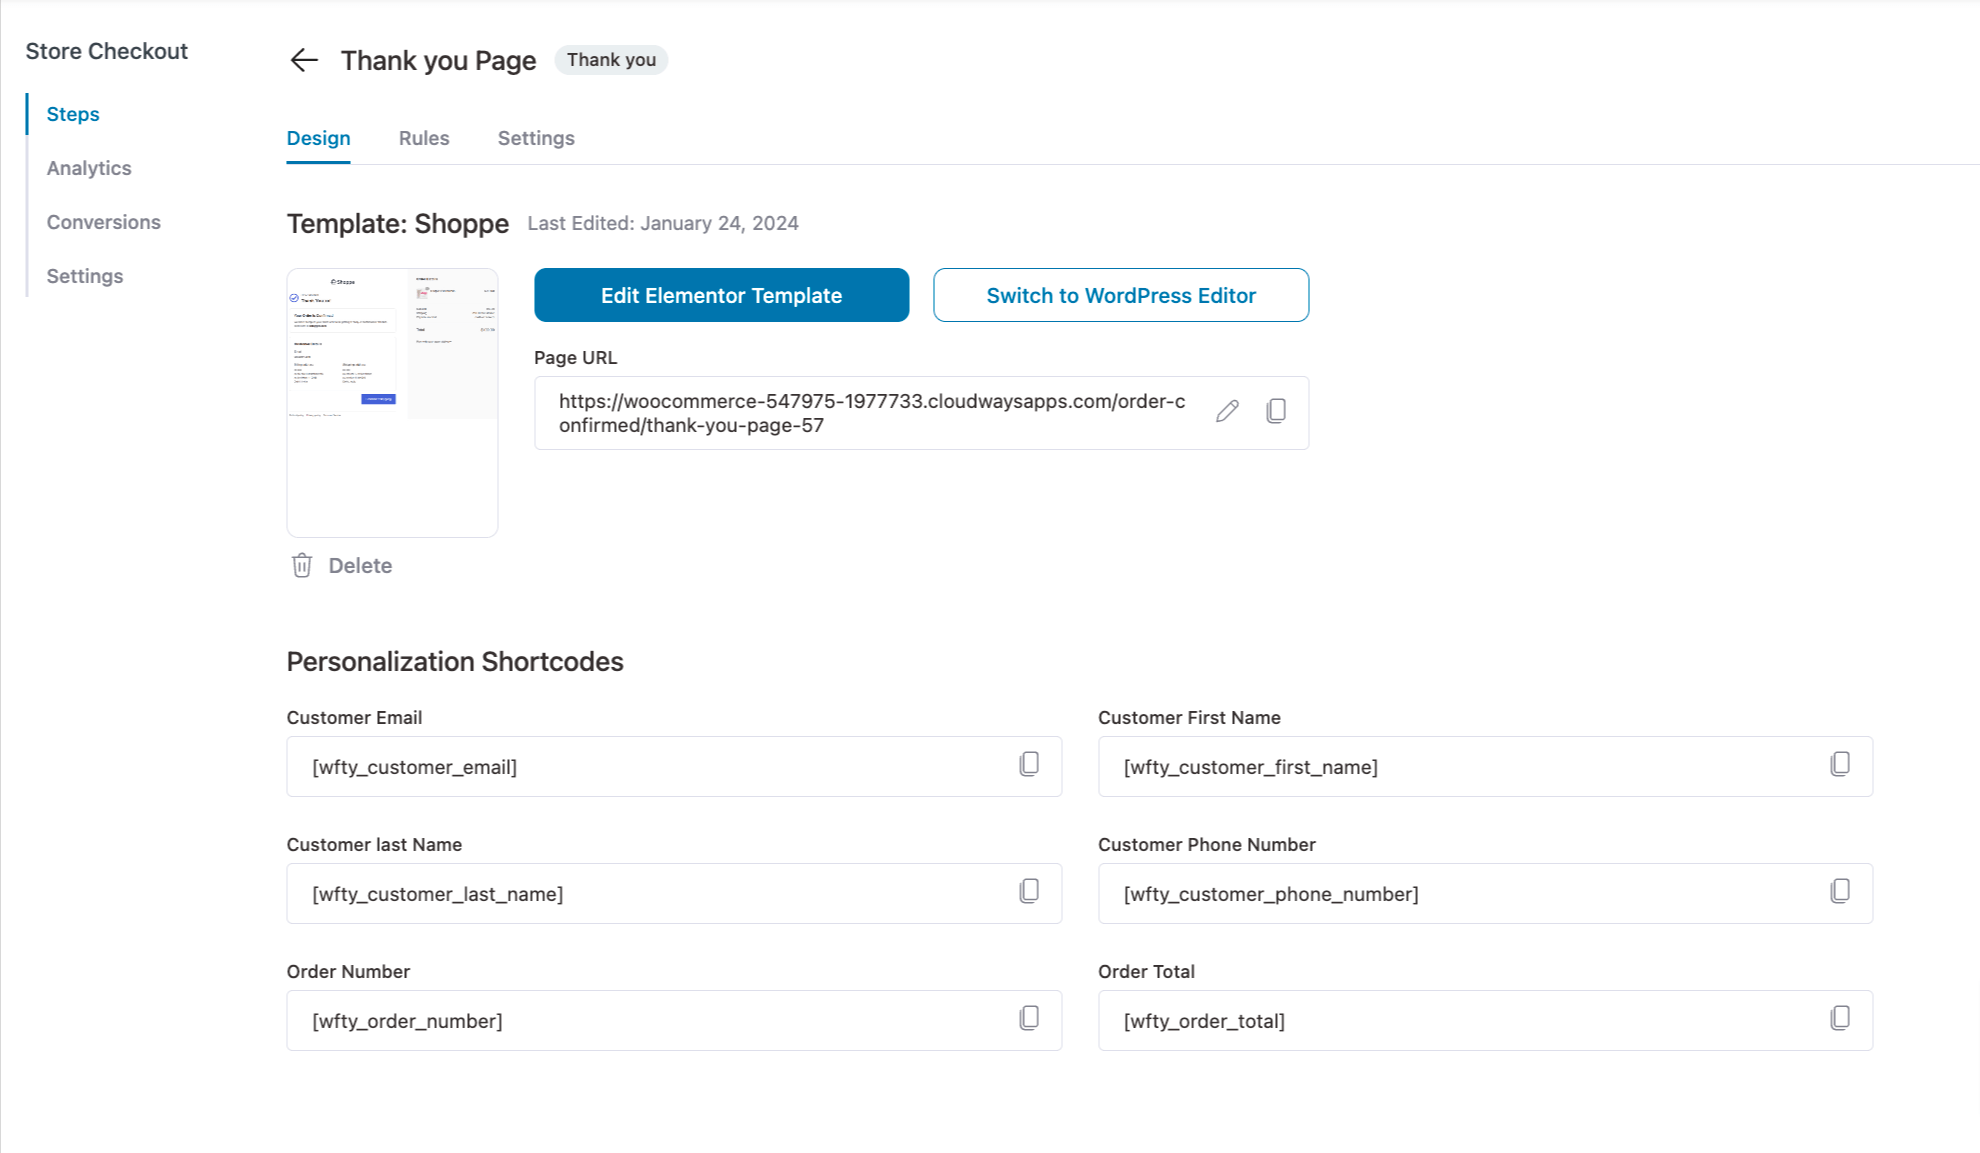
Step 6: Customize the thank you page
Like the other pages, you can customize the thank you page as well.
Here is a preview of the thank you page:
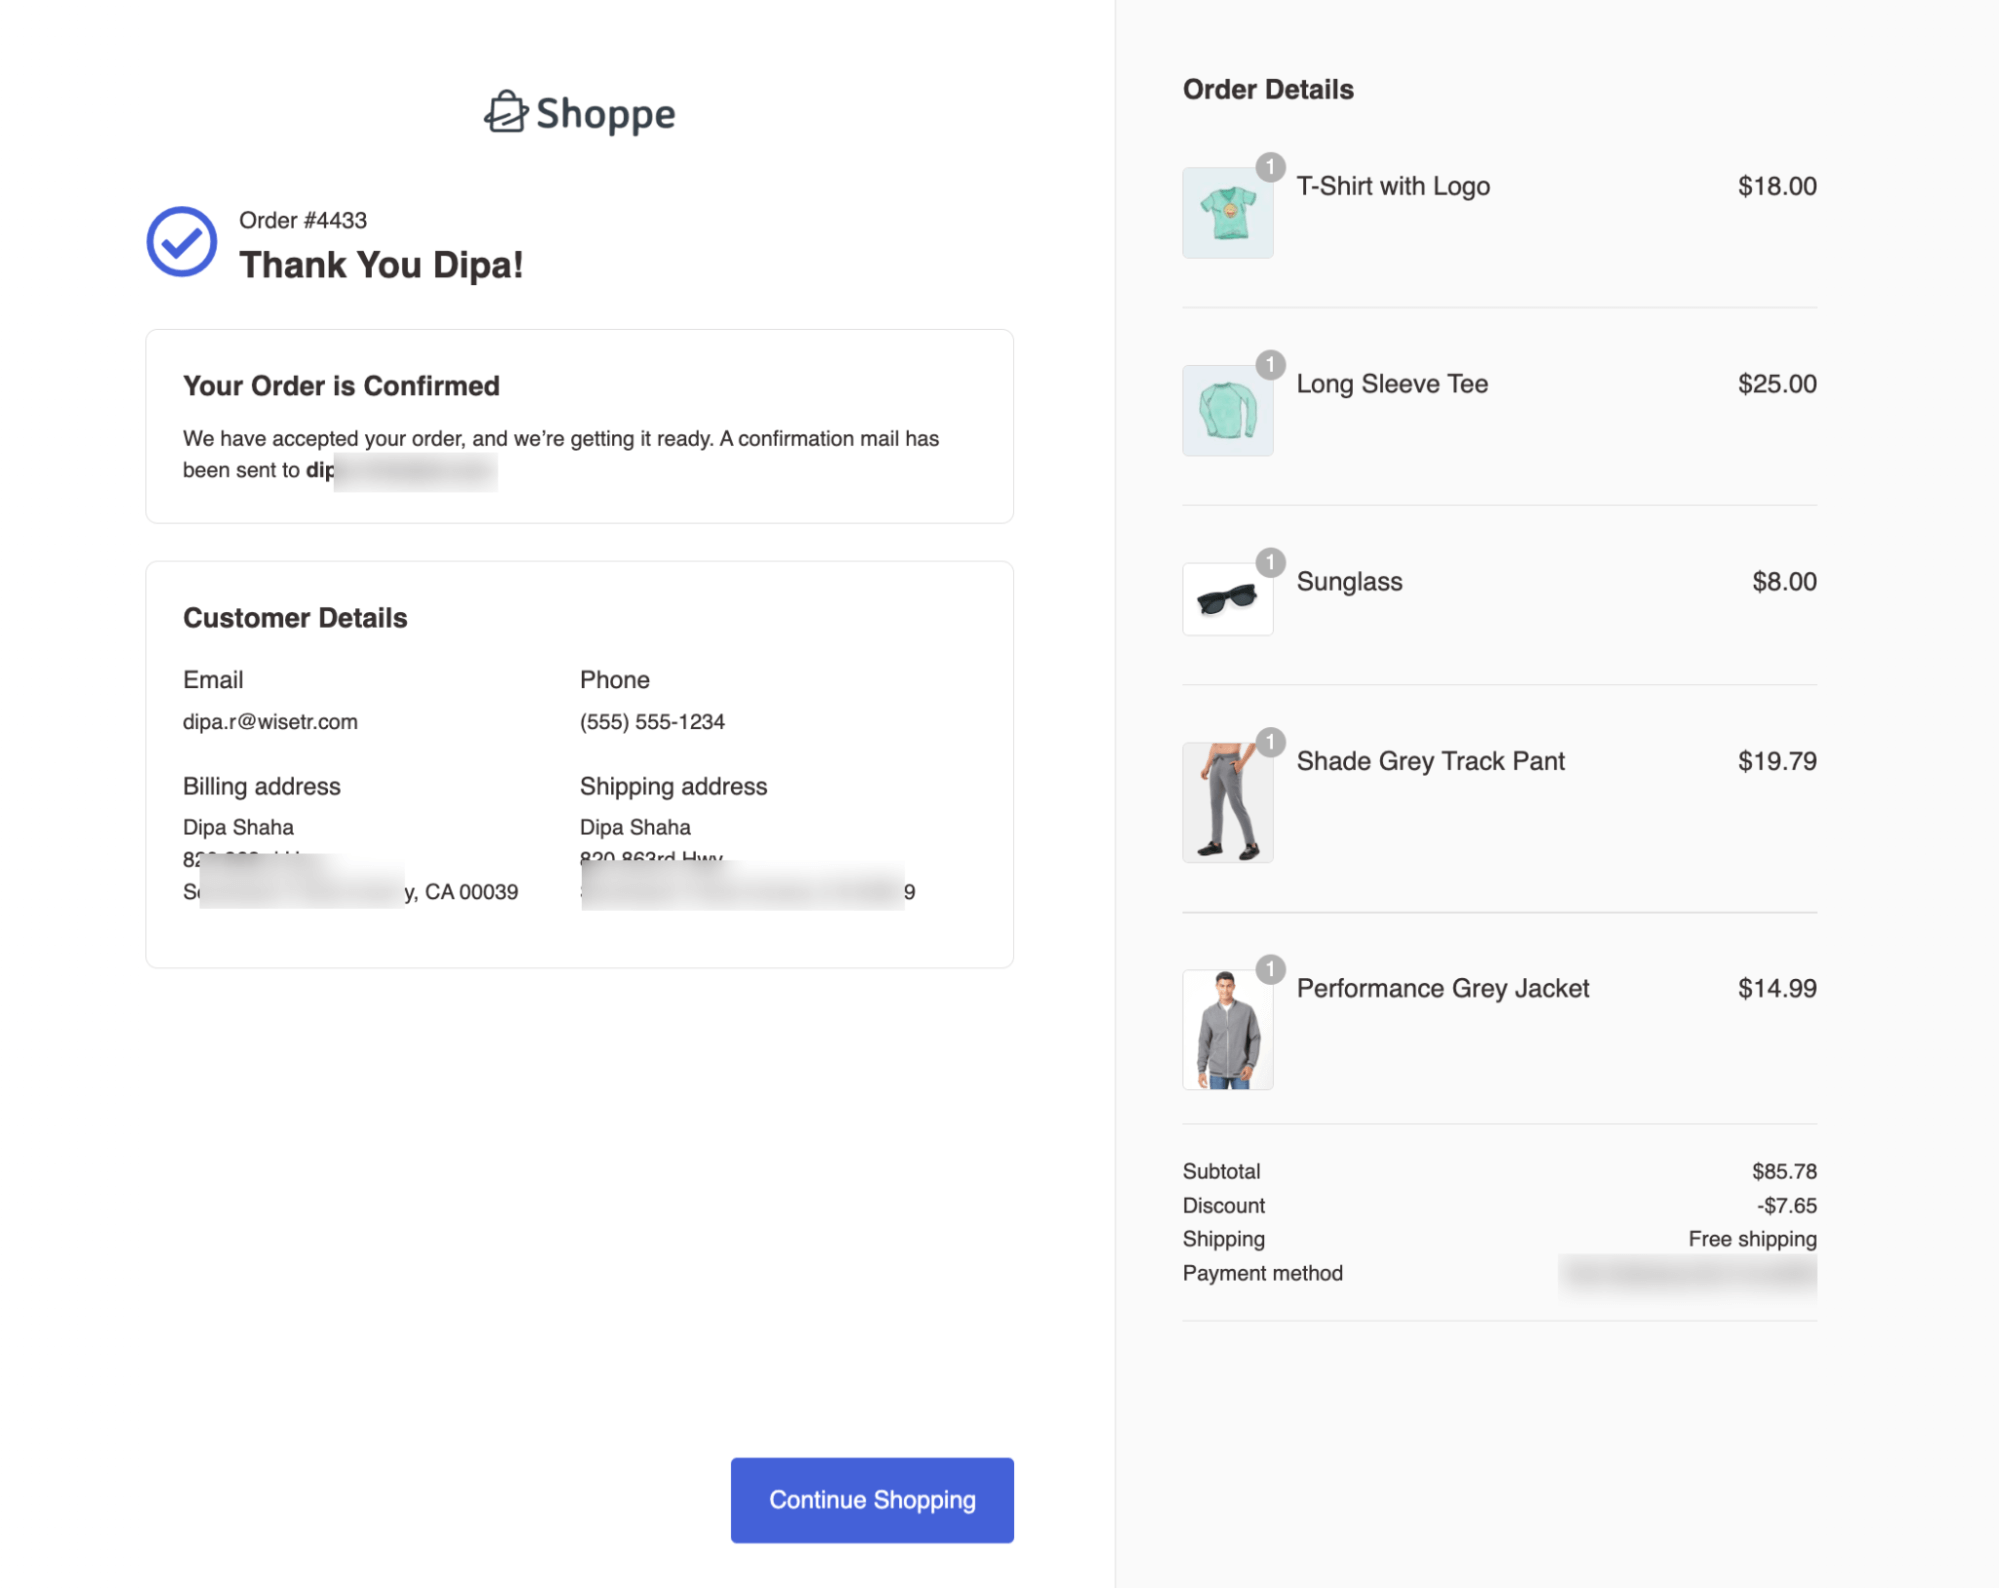
Note: You can see the power of the WooCommerce sales funnel in the screenshot above. Users can land on a product page worth $18.00 and end up purchasing products totaling $85.78, almost 5x more times.
Step 7: Enable the store checkout
The last step is to enable store checkout. To do that, click the 'Enable Store Checkout' button.
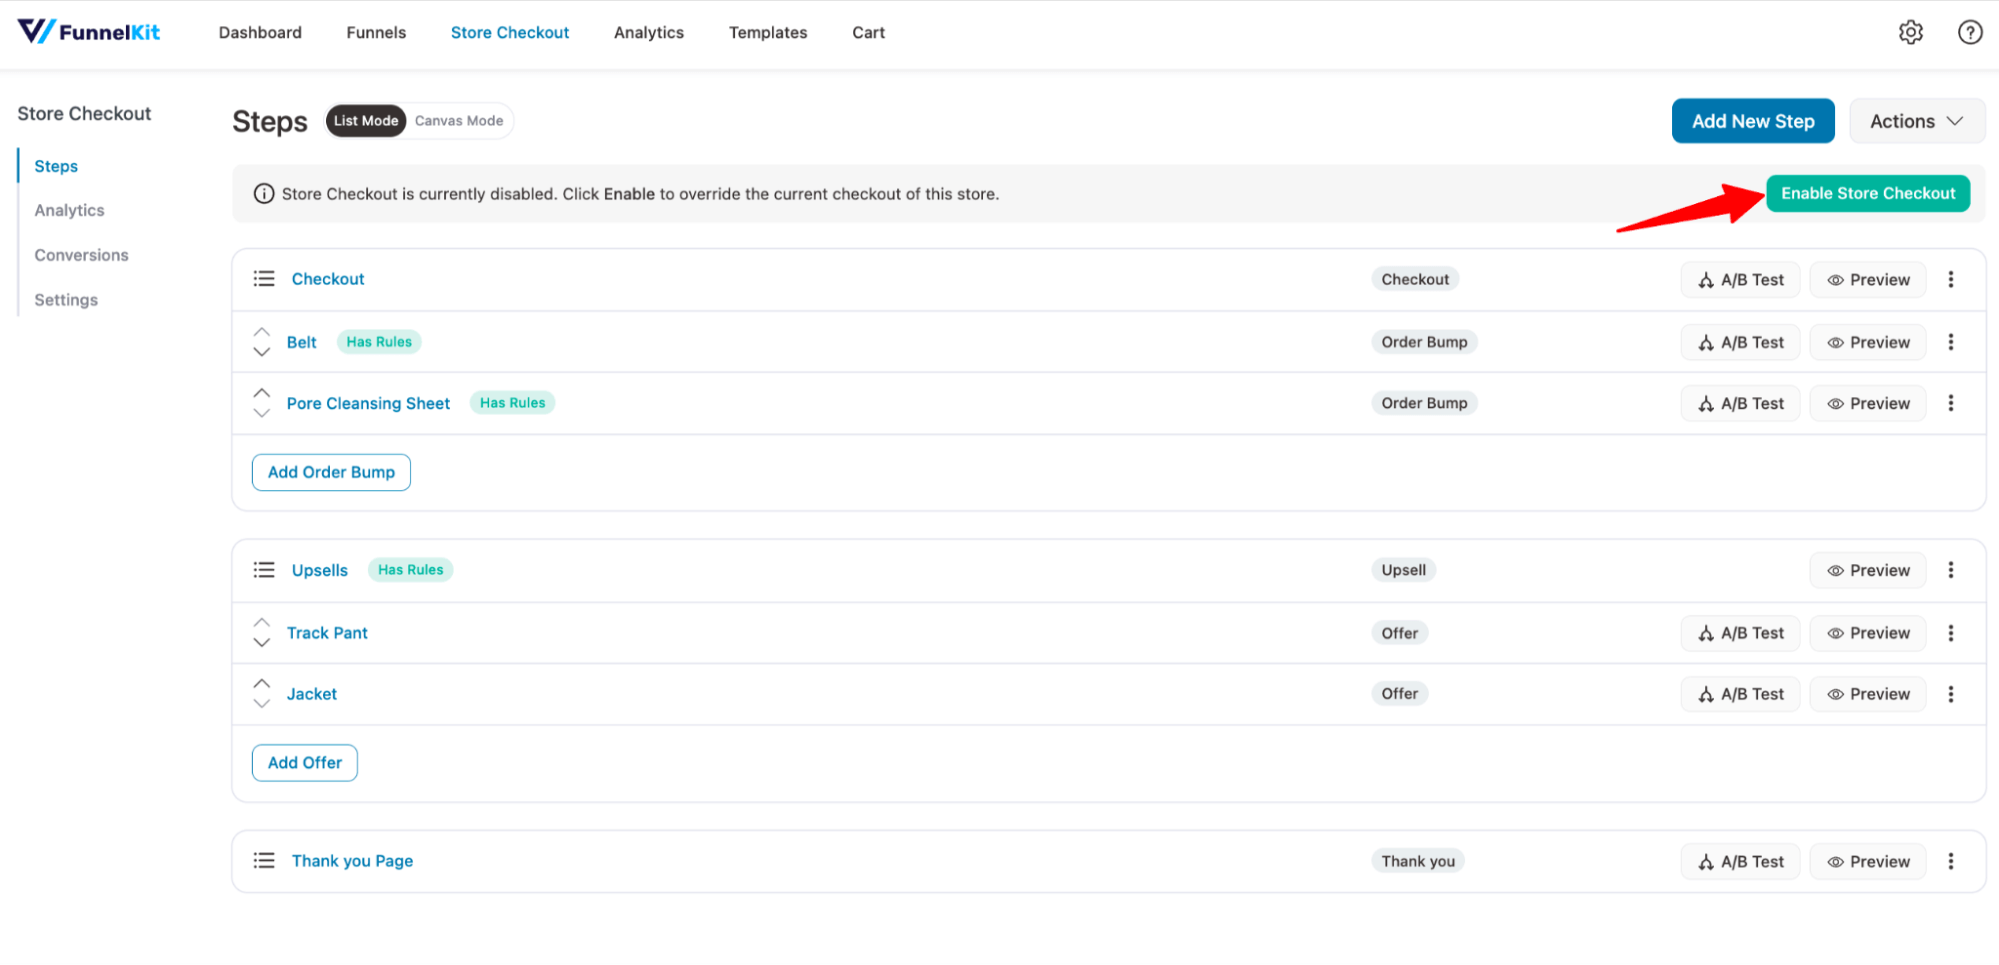
Now, your WooCommerce sales funnel is ready!
Best WooCommerce Sales Funnel Plugins (2026)
Several plugins can build a sales funnel in WooCommerce. The right one depends on whether you also want marketing automation, an in-cart upsell experience, and built-in analytics, or just the core funnel pages. Here is an honest comparison of the leading options.
| Plugin | Best for | Key funnel features | Pricing model |
|---|---|---|---|
| FunnelKit Funnel Builder | Stores that want funnels plus automation in one ecosystem | Optimized checkout, order bumps, one-click upsells and downsells, sliding cart with in-cart upsells, A/B testing, funnel analytics. It also includes FunnelKit Cart for a side cart and FunnelKit Automations for complete marketing automations and CRM. | Free version available. Pro starts at $99.50/year. |
| FunnelKit Automations | Simple, focused funnel building without automation | Lead capturing, abandoned cart recovery, welcome and post-purchase email and SMS communication. | Free version available. Premium plugin starts at $199/year. |
| SeedProd | Landing-page-first stores that want fast page building | Drag-and-drop landing and checkout pages with WooCommerce blocks and a strong template library. | Free version available. For checkout block customization, it'll cost $239.60/year (Elite plan). |
| Thrive Suite | Marketers who want a broad conversion toolkit | Conversion-focused landing page templates, opt-in tools, and a visual editor across multiple plugins. | Costs 299/year. |
Let's explore them one by one.
1. FunnelKit Funnel Builder
FunnelKit Funnel Builder is the ultimate solution for creating beautiful sales funnels in WooCommerce.
It’s considered one of the best WooCommerce sales funnel plugins because of its intuitive user interface and extensive functionality that helps you boost sales.
Along with a sales funnel, you can create a stunning global checkout and offer a frictionless process for your users. Moreover, you can create opt-in lead generation funnels, too.
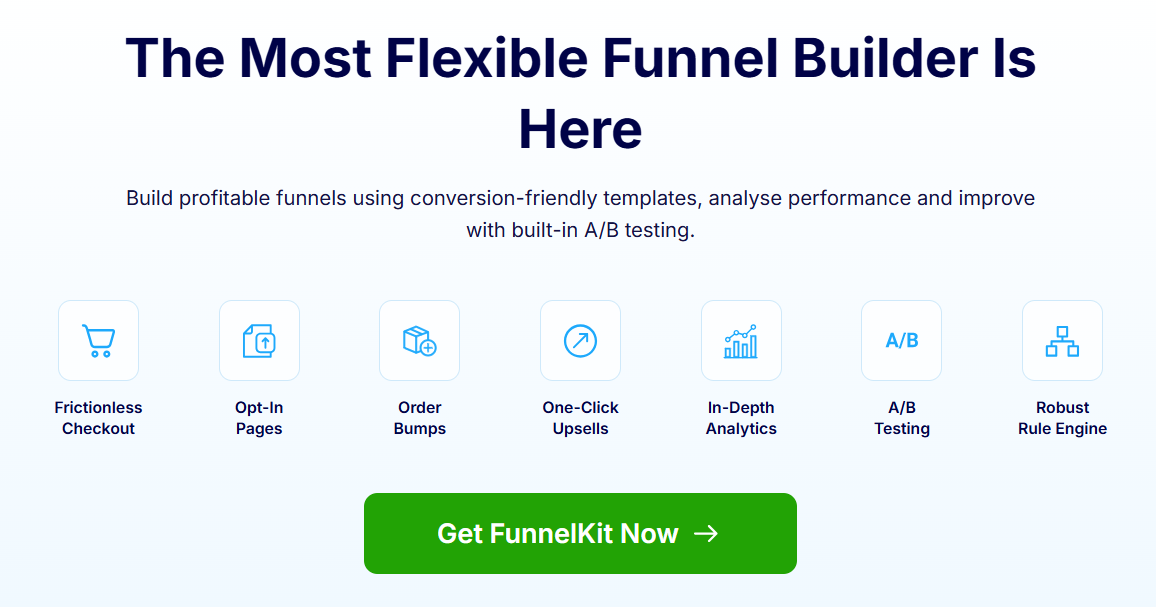
Here are some of the main features:
- Ready-to-use templates: FunnelKit comes with many prebuilt sales funnel templates that you can import and use with a few clicks. You can create a landing page, opt-in page, checkout page, thank you page, and so on.
- Multi-step checkouts: With FunnelKit, you can create multi-step checkouts for both global and product-specific checkout pages. If you want, you can also create a shopify style checkout.
- AOV-boosting feature: To increase the average order value, you can offer an order bump on the checkout page and post-purchase upsells and downsells.
- Integration with page builders: This WooCommerce sales funnel plugin is compatible with popular page builders like Elementor, Divi, Gutenberg, Oxygen, etc. You can create a sales funnel from scratch using any other page builders too.
- Express checkout: You can offer express checkout with a single-click payment option through methods like Google and Apple Pay.
- WooCommerce mini cart: You can add a mini cart on the checkout field so users can easily modify their cart items before placing an order without going to the cart page. You can also add a WooCommerce side cart where users can apply coupon codes.
- Cart Abandonment Tracking: You can track abandoned carts and use users’ emails for email marketing to recover lost carts.
- A/B testing: With FunnelKit, you can A/B test all the sales funnel pages and improve them for better conversions.
- In-depth analysis: You get an in-depth analysis of each funnel built with FunnelKit. You can view the number of visits, total revenue, revenue per visit, and more for each funnel separately.
Price: You can use FunnelKit Funnel Builder for free with limited features. The pro version starts at $99.50/year. With a Plus package or above, you get access to the sliding mini cart.
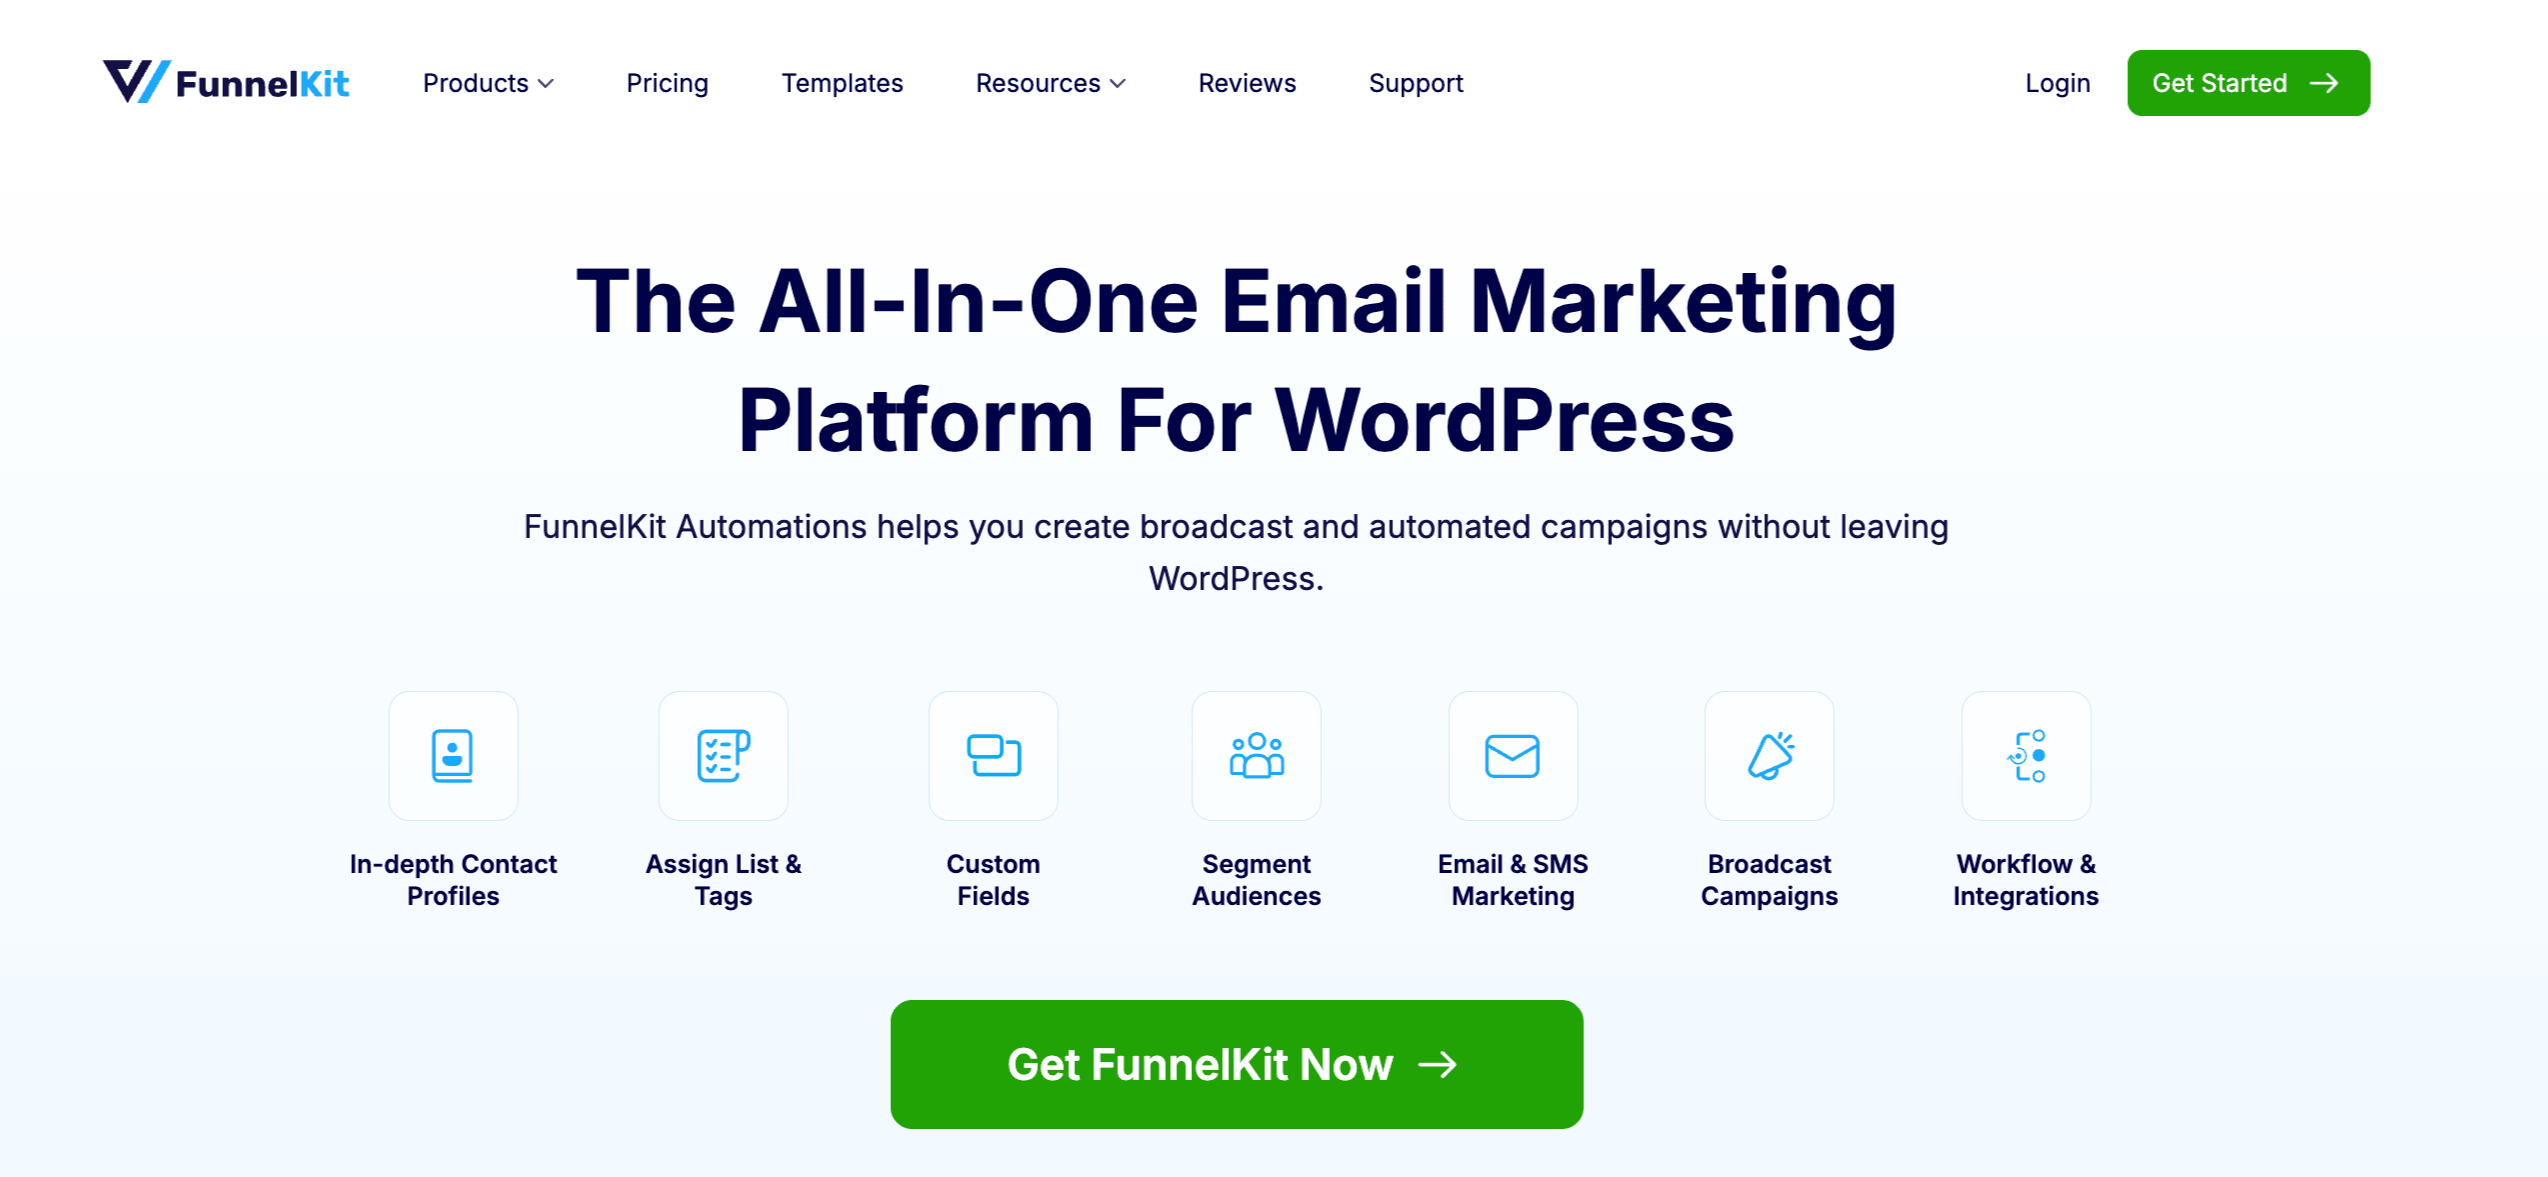
2. FunnelKit Automations
FunnelKit Automations is the best solution for collecting leads and nurturing your audience with pre- and post-purchase emails.
Basically, if you want your WooCommerce users to convert through an email marketing funnel, then this plugin should be your number one choice.
Here are some of the key features:
- Automated campaigns: With FunnelKit automations, you can automate your email campaign so it runs even when you are away. So, if someone optin, you can send them a series of email drip campaigns to convince them to make their first purchase on autopilot.
- Prebuilt recipes: You get a wide range of email autoresponders that you can import and use in a few clicks. Some prebuilt recipes include post-purchase sequences, abandoned cart campaigns, win-back campaigns, etc.
- Visual email builder: Funnelkit Automations has a built-in visual drag-and-drop email builder that lets you create beautiful, customized emails by dragging and dropping elements.
- Personalized email: FunnelKit has a merge tag feature that lets you send personalized emails using dynamic customer information. You can also send personalized discount coupon codes.
- Segmentation: You can segment your email list by users’ demographics or purchase history, then send them super-relevant content.
- In-depth Analytics: You get in-depth analytics from active contacts, completed contacts, orders, revenue, AOV, etc.
Price: You can get started with FunnelKit Automations for free. The pro version starts from $99.50/year.
3. SeedProd
SeedProd is one of the most popular drag-and-drop landing page and website builders for WordPress.
It's best known for building fast, conversion-focused pages, and it excels at the front of your funnel, where you capture attention and collect leads before a shopper ever reaches checkout.
Along with landing pages, you can build opt-in pages, sales pages, squeeze pages, etc., and even custom WooCommerce product, cart, and checkout pages on higher plans.

Here are some of the main features:
- Drag-and-drop builder: SeedProd's visual builder includes 80+ blocks, such as headlines, buttons, countdown timers, pricing tables, testimonials, and opt-in forms, and it loads noticeably faster than heavier builders.
- Templates and sections: You get 300+ professionally designed templates plus ready-made page sections (headers, FAQs, CTAs, and more) you can add with a single click.
- WooCommerce blocks: On higher plans, SeedProd offers custom WooCommerce blocks so you can build product-focused landing pages and custom cart and checkout pages without a developer.
- Lead capture and email integrations: You can grow your list with built-in opt-in blocks and connect to Mailchimp, ActiveCampaign, ConvertKit, Constant Contact, and 10+ other email tools.
- Built-in stock images: A library of 2M+ stock photos is built right into the editor, so you don't have to leave the page.
Price: SeedProd Lite is free with the core builder and coming-soon pages. Paid plans start at around $39.50/year for the Basic tier (1 site), with Plus, Pro, and Elite tiers ($239.60/year) unlocking full website kits, the theme builder, email integrations, and WooCommerce features.
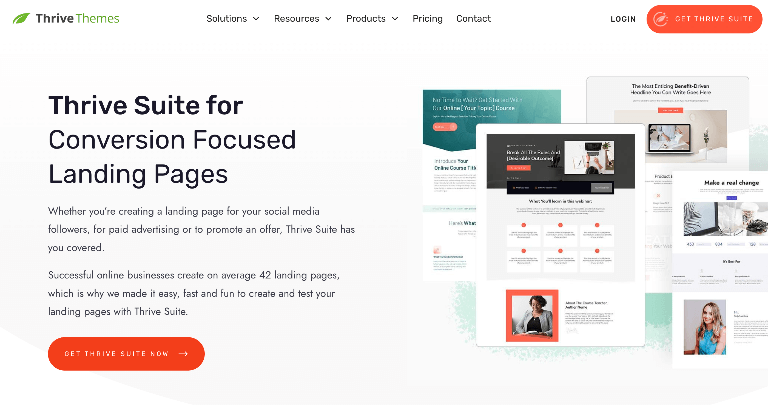
4. Thrive Suite
Thrive Suite is an all-in-one conversion toolkit for WordPress that bundles plugins for building websites, landing pages, sales funnels, email lists, and online courses.
It's built around conversion optimization, so it's a strong fit if you want a single membership covering page building, list building, testimonials, scarcity campaigns, and more, rather than a dedicated WooCommerce checkout funnel tool.
Here are the key features:
- Thrive Architect: A visual drag-and-drop page builder with conversion-focused elements for creating landing pages, sales pages, and full layouts that work with any WordPress theme.
- Thrive Theme Builder: A complete theme builder with plug-and-play companion themes (Shapeshift, Ommi, and Kwik) so you can design your whole site visually.
- Thrive Optimize: A/B testing for your landing pages directly from the WordPress dashboard so you can test and improve conversions.
- Thrive Leads: A dedicated list-building plugin to create opt-in forms, pop-ups, and lead-capture campaigns to grow your email list.
- Mobile optimization: All templates and blocks available in Thrive Suite are optimized for various devices.
Price: Thrive Suite starts at around $299/year (or about $99 billed quarterly) for use on up to 5 sites, and includes all 8 Thrive plugins plus the Theme Builder.
Which Should You Choose?
If you want one tool to run the entire funnel and your post-purchase email automation, FunnelKit is the most complete pick because it has two plugins, Funnel Builder and Automations.
If you only need landing pages and lead capture, SeedProd is the budget option, but you’ll still need a checkout-funnel tool alongside it.
Thrive Suite gives the most plugins for landing pages and lead capture, and customizes the default WooCommerce checkout page.
When and How to Create a WooCommerce Sales Funnel for a Single Product?
So you should build WooCommerce Sales Funnels for your store and add all the relevant Upsells along the path described above.
Now, there may come a time when you have a newly launched product, a specific product with a special discount for a specific segment of your customers, or you are running a highly targeted Facebook ad that talks about a specific product.
In such situations, you should create a separate sales funnel for each product that directs visitors to a custom-made product landing page rather than the default product page. Because It makes sense to create a landing page and make them land on a dedicated page and pitch only specific products.
However, the remaining steps remain quite similar.
The process of creating a WooCommerce sales funnel for a single product is similar to creating a global checkout. You just need to create a separate funnel for each product.
Not just physical products; they can do so for digital products, too.
How to Measure Your Funnel: Metrics and Benchmarks
Building the funnel is half the job. Knowing whether it’s working is the other half.
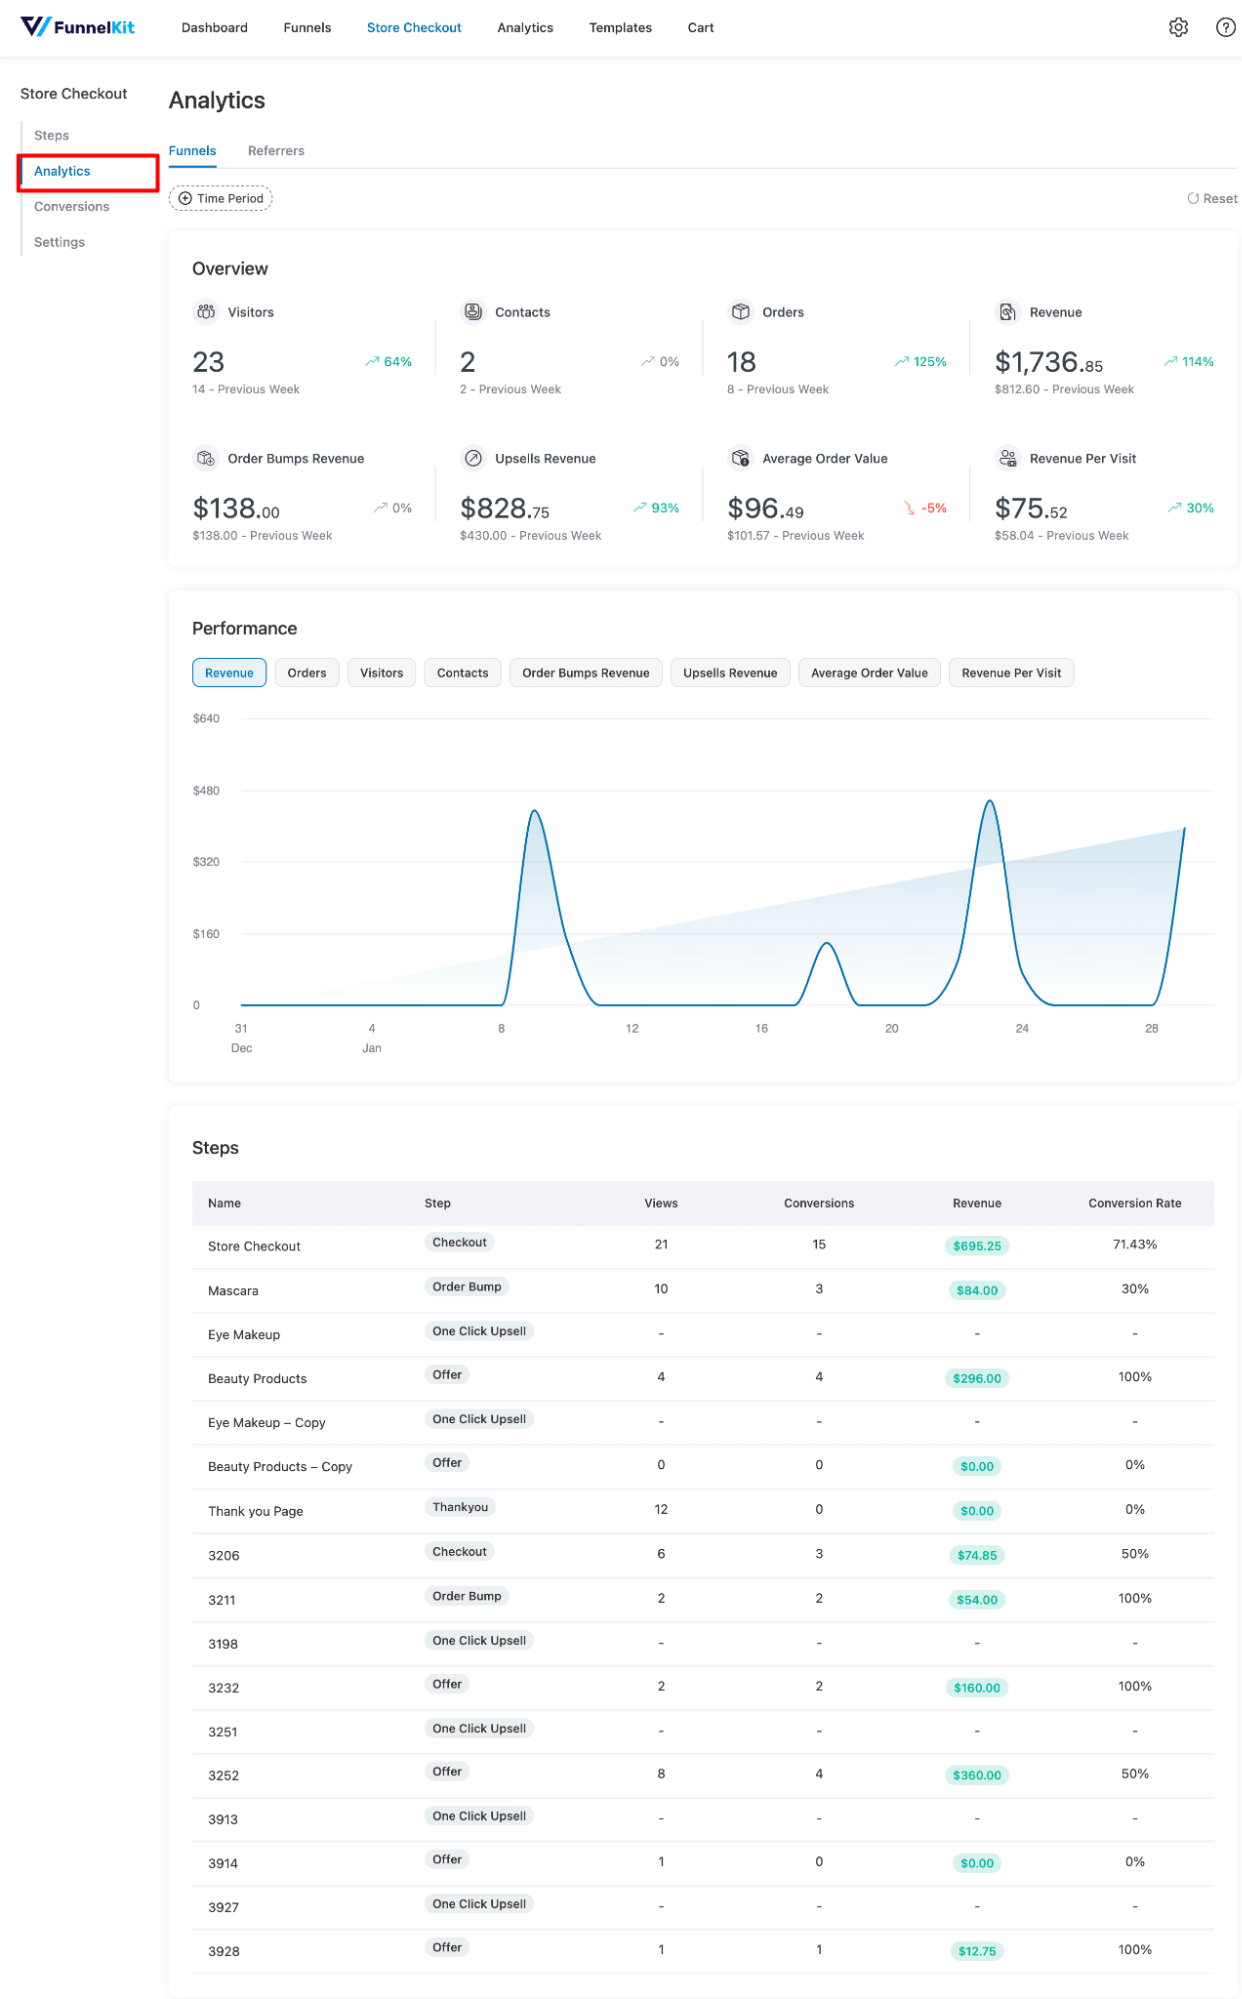
In FunnelKit, go to Store Checkout ⇒ Analytics (or use Canvas mode) to see visitors, contacts, orders, revenue, order-bump revenue, upsell revenue, average order value, and revenue per visit for the whole funnel or step by step.
Note: By default, FunnelKit shows data from the beginning to the current date. You can change the time period to see specific data for a specific timeframe.
If you scroll a little, you will find all the data in the form of a graph. Below that, you can also find the different data like views, conversions, conversion rate, and revenue for each step.
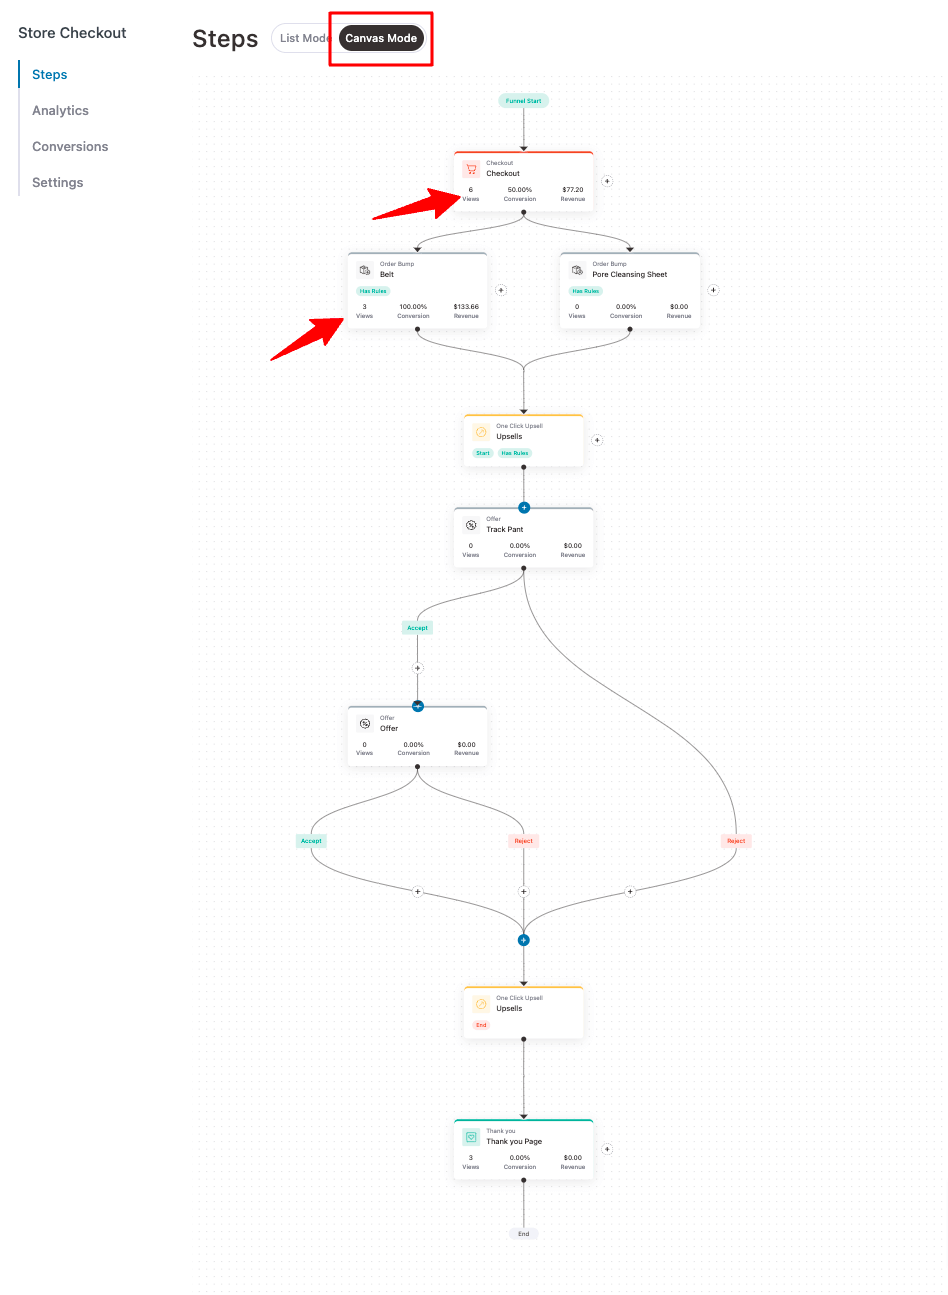
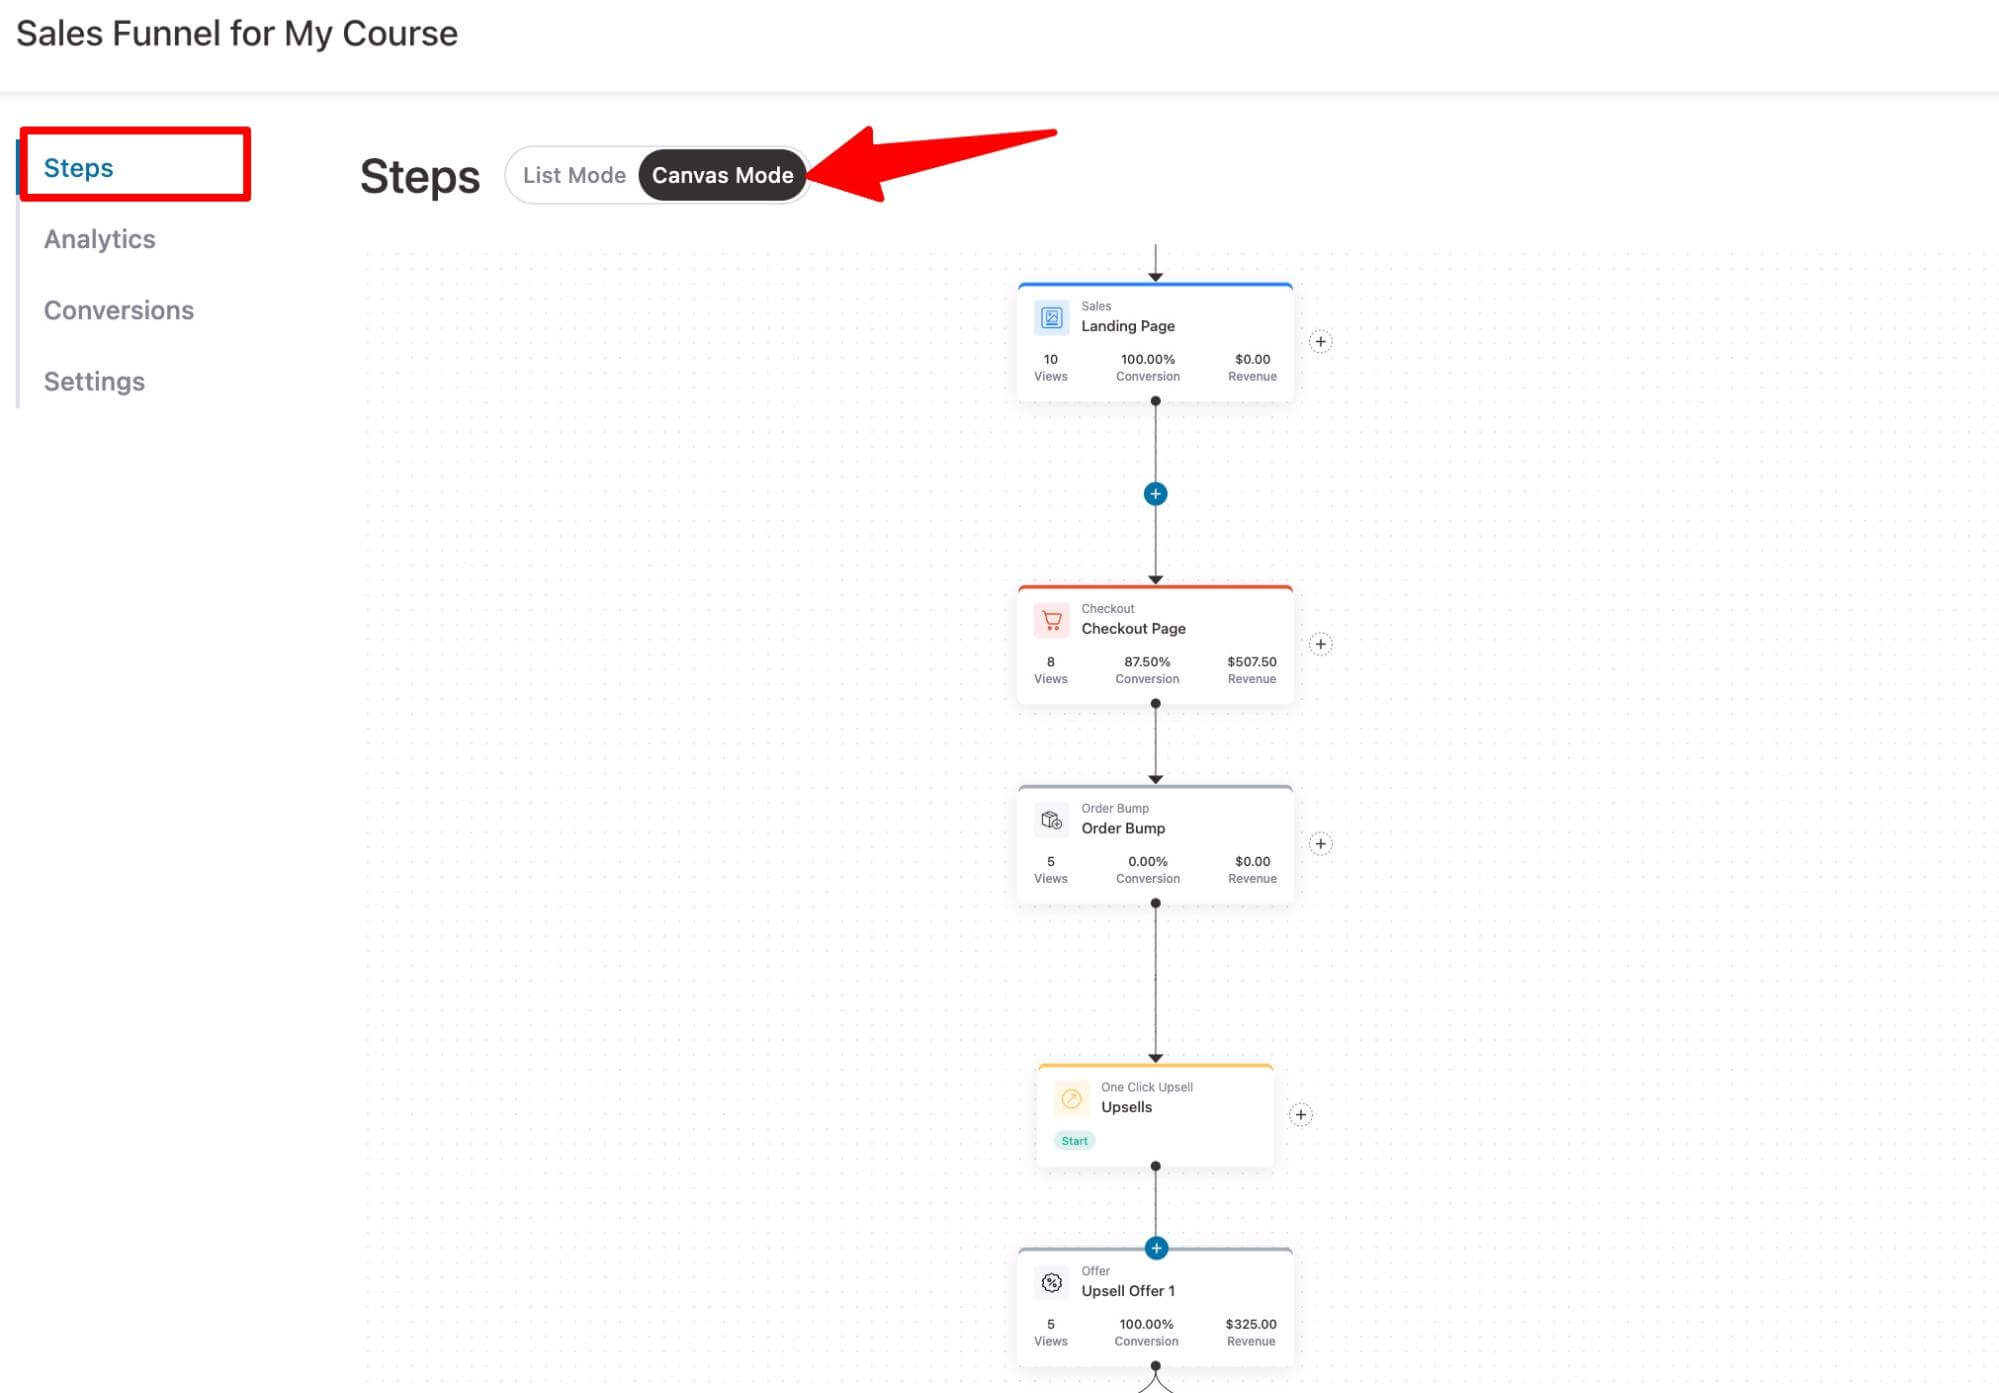
Another way to check how different steps in your WooCommerce sales funnel are performing is to use the new Canvas mode in FunnelKit Funnel Builder.
For that, go to the Canvas tab on the funnel page. Here, you can check out views, conversion, and revenue for each step.
📈Check the performance of the individual sales funnel
To check the performance of each sales funnel, go to that funnel and then open the Analytics tab.
Here, as with the Global funnel analytics, you can see performance in the form of data and graphs.

In the sales funnel, you can also go to the steps tab and switch to Canvas mode to see inline analytics for each step of the funnel.
How to Recover Abandoned WooCommerce Funnels?
Not everyone who enters your funnel will convert, as abandonment rates are near 70%. The good news is that a shopper who added to the cart and left is far from a lost cause.
To recover them, first capture their email and cart details, then trigger a follow-up sequence.
Install and activate FunnelKit Automations, enable cart tracking, and set your wait period, cool-off period, and lost-cart window.
Then build an automation that sends reminder emails at staggered intervals and consider a time-limited discount in a later email to nudge fence-sitters.
You can send multiple emails after different intervals. In addition, you can offer a limited-time discount if they complete the order successfully, motivating them to come back and make the purchase.

Because recovery effectiveness drops the longer you wait, send the first email quickly (within roughly an hour) and follow up over the next day or two. For the full setup, see our guide on WooCommerce abandoned cart emails.
How to Keep the Funnel Going After Customers Leave?
A purchase is the start of the next funnel. Repeat customers spend several times more than first-time buyers, so post-purchase email is where much of the funnel profit actually lives.
Once users make a purchase, you need to send post-purchase follow-up emails to ensure a positive shopping experience and build a strong customer relationship. So, make sure you send:
- Order confirmation email
- Shipment tracking email
- And other WooCommerce follow-up emails, such as product education emails.
These create a good experience that makes buyers want to return.
Then layer in repeat-purchase campaigns with FunnelKit Automations:
- Send emails to users who made a purchase but didn’t offer the upsell
It can happen that someone enters your WooCommerce sales funnel and places an order, but they don't accept the upsell offer.
For such cases, FunnelKit Automation offers event triggers, such as one-click upsells that are rejected.
You can use this trigger to email users who rejected the upsell with a better offer or a discount to bring them back and make a repeat purchase.

- Promote new and popular products
Based on their purchase history, you can email users about the new collection in the same category they last bought from.
You can also share the popular products from the same category to encourage them to make another purchase.
- Re-engage inactive customers
You can bring back customers who have been inactive for a long period of time with a winback campaign.
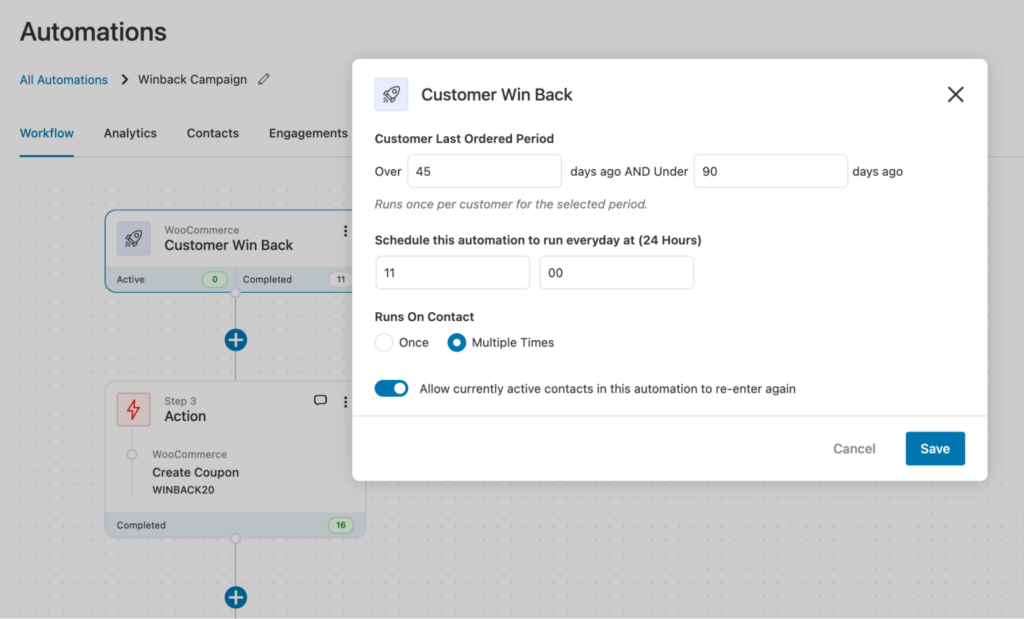
To learn how to run winback automation with FunnelKit Automations, read our blog on “WooCommerce winback campaign”.
- Send a purchase anniversary email
You can send a one-month purchase anniversary email to customers to remind them about their last purchase. This can make users want more products.
These are some of the strategies we mentioned. With FunnelKit Automations, you can implement any promotional automated email and SMS notifications to keep your customers in the loop and encourage more purchases.
Frequently Asked Questions
Why should I build a WooCommerce sales funnel?
A funnel exists to win back as much of that lost intent as possible, and to earn more from the shoppers who do convert. Here is what a WooCommerce sales funnel does for your store:
- Reaches the right customers. You can run different funnels for different audiences, so an email visitor and an ad visitor each see the offer that fits them.
- Improves the shopping experience. A guided path reduces confusion and helps shoppers move smoothly toward a purchase.
- Grows revenue, not just sales. By nurturing customers and following up, you turn one-time buyers into repeat buyers.
- Increases average order value. Order bumps, upsells, and cross-sells lift the value of each order without new traffic.
- Recovers lost carts. Paired with automation, the funnel brings back shoppers who left before paying.
Can I build a WooCommerce sales funnel for free?
Yes, you can build WooCommerce sales funnels for free to a point. FunnelKit and SeedProd both offer free versions that let you build basic funnels. Advanced features such as order bumps, one-click upsells, A/B testing, and in-cart recommendations generally require a paid FunnelKit plan.
How much does a WooCommerce sales funnel cost?
The funnel-builder plugin itself typically starts around $99-$129/year for paid tiers (SeedProd is cheaper but lacks checkout features), with higher tiers unlocking upsells, automation, and multi-site use. Factor in renewal rates, which are usually higher than the introductory price.
What’s the difference between an order bump and one-click upsell?
An order bump appears before payment on the checkout page and is accepted with a checkbox, best for cheap, complementary add-ons. A one-click upsell appears after payment with the card already on file, best for higher-value upgrades, accepted with a single tap.
What metrics should I track?
Average order value, AOV lift from upsells, order-bump take rate, one-click upsell acceptance rate, cart abandonment rate, and abandoned-cart recovery rate measured per funnel step, not just in aggregate.
What are common funnel mistakes and how can I avoid them?
Even a well-built funnel underperforms when these mistakes creep in. Watch for them:
- A bloated checkout: Every extra form field and distraction raises abandonment. Strip the checkout to the essentials and remove navigation that pulls shoppers away.
- Surprise costs at checkout: Unexpected shipping or fees are the single most cited reason shoppers abandon. Show all costs upfront.
- Irrelevant offers: A generic bump or upsell shown to everyone hurts the experience and conversion. Use conditional rules so offers match what’s actually in the cart.
- Wrong offer in the wrong place: A high-priced item as a pre-payment order bump kills conversion; a cheap add-on wastes the post-purchase slot. (See the placement rule above.)
- Requiring payment re-entry on the upsell: The whole point of a one-click post-purchase upsell is the card-on-file, single-tap "yes". Remove that and conversion collapses.
- No abandoned-cart recovery: Leaving 70% of carts unworked is the biggest unforced error in ecommerce. Always have a recovery sequence running.
- Stopping at the sale: No post-purchase emails means no repeat business. The follow-up sequence is where lifetime value compounds.
- Never testing: A funnel is never “done.” A/B test your pages, offers, and prices and let the data guide refinements.
Ready to Build Your WooCommerce Sales Funnel?
A WooCommerce sales funnel turns a flat product-to-checkout path into a guided journey that converts more shoppers, raises average order value, and keeps buyers coming back.
You’ve seen the stages, an honest comparison of the leading plugins, the exact 7-step build, the benchmarks that tell you it’s working, and the mistakes to avoid.
The strategy isn’t one-size-fits-all. It rewards continuous monitoring, testing, and refinement.
FunnelKit is the most potent WooCommerce sales funnel builder that allows you to create, optimize, monitor, and refine your sales funnel effortlessly.
Plus, with FunnelKit Automations, you can continue to make sales even after users leave your WooCommerce store.
Start with the build above, measure each step against the benchmarks, and A/B test your way to a funnel that fits your audience.
Editorial Team
July 30, 2026Are you taking advantage of WooCommerce quantity discounts in your store? WooCommerce quantity discount is the concept of setting innovative pricing strategies by offering discounts on bulk items. Offering quantity...
Editorial Team
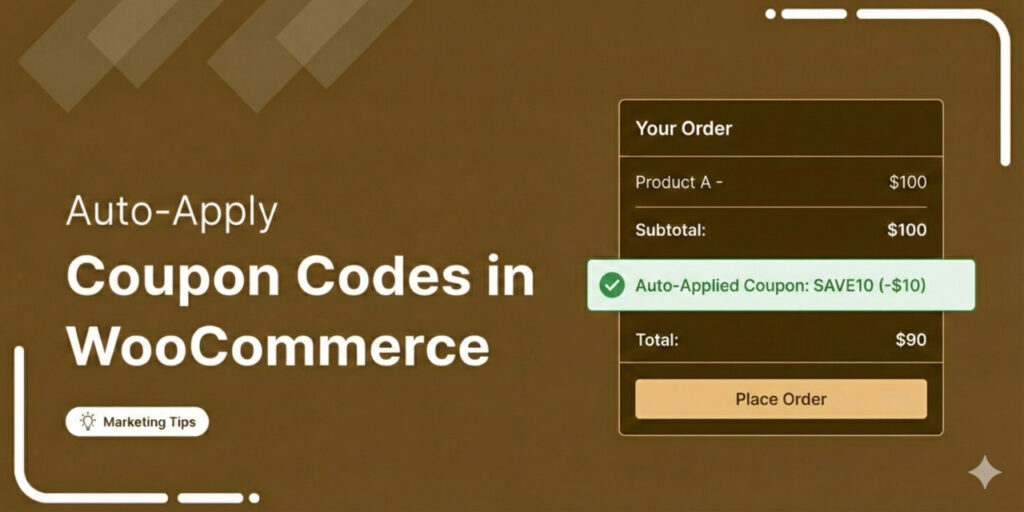
July 30, 2026A WooCommerce auto apply coupon adds a discount to your customer's cart without them needing to type or paste a coupon code. It works the way a supermarket loyalty card...
Editorial Team
July 27, 2026WooCommerce subscription upsell can help boost your revenue through subscription-based sales. Moreover, subscription-based products allow you to add predictability to your revenue. You can sell physical and digital products and...


