

Are you looking to integrate WooCommerce P24, also known as Przelewy24 payments, into your online store using Stripe?
If you run a business in Poland, it’s important to know that Bank transfers account for 30% of online payments in Poland, and Przelewy24 provides a way for customers to pay with over 165 banks.
So, if you want to increase your sales by providing users with a convenient way to make online payments, you should integrate WooCommerce P24 into your store.
And what better way to do this than using Stripe for the integration of Przelewy24 and WooCommerce, right?
In this blog, we will share more details about Przelewy24 payments and how to add WooCommerce P24 to your store using Stripe.
Table of Contents
- 1 What is P24 (Przelewy24) payments?
- 2 How Does WooCommerce P24 or Przelewy24 Payment Work?
- 3 Why Should You Offer P24, aka Prezelewzy24, in Your WooCommerce Store?
- 4 Essentials to Set Up WooCommerce P24 aka Przelewy24 Payment Method Using Stripe in Your Store
- 5 How to Set Up and Configure WooCommerce P24 Payments in Your Store?
- 6 Testing the WooCommerce P24 Payments in Your Store
- 7 Bonus Tip: Boost Conversions with Multiple Payment Gateways
- 8 Enhance the WooCommerce P24 Payment Experience with Conversion-Optimized Checkout Pages!
- 9 Frequently Asked Questions About WooCommerce P24
- 10 Offer WooCommerce P24 or Przelewy24 Payment for an Enhanced Shopping Experience and Increased Sales!
What is P24 (Przelewy24) payments?
P24, also known as Przelewy24, is a popular online payment method in Poland. This local Polish method enables customers to make payments directly from their bank accounts in real-time, facilitating secure and convenient transactions for online purchases.
P24 supports over 165 banks in Poland, allowing customers to complete payments without the need for credit or debit cards.
It's widely used by e-commerce websites and businesses to cater to Polish customers and expand their payment options.
🔔 Note: For Przelewy24 to work in your WooCommerce store, the store currency needs to be EUR or PLN.
How Does WooCommerce P24 or Przelewy24 Payment Work?
Buying with WooCommerce P24 is super easy for shoppers. Now, let's see how it works when you pay with Przelewy24 in a WooCommerce store:
Step 1: Customer selects Przelewy24 at checkout
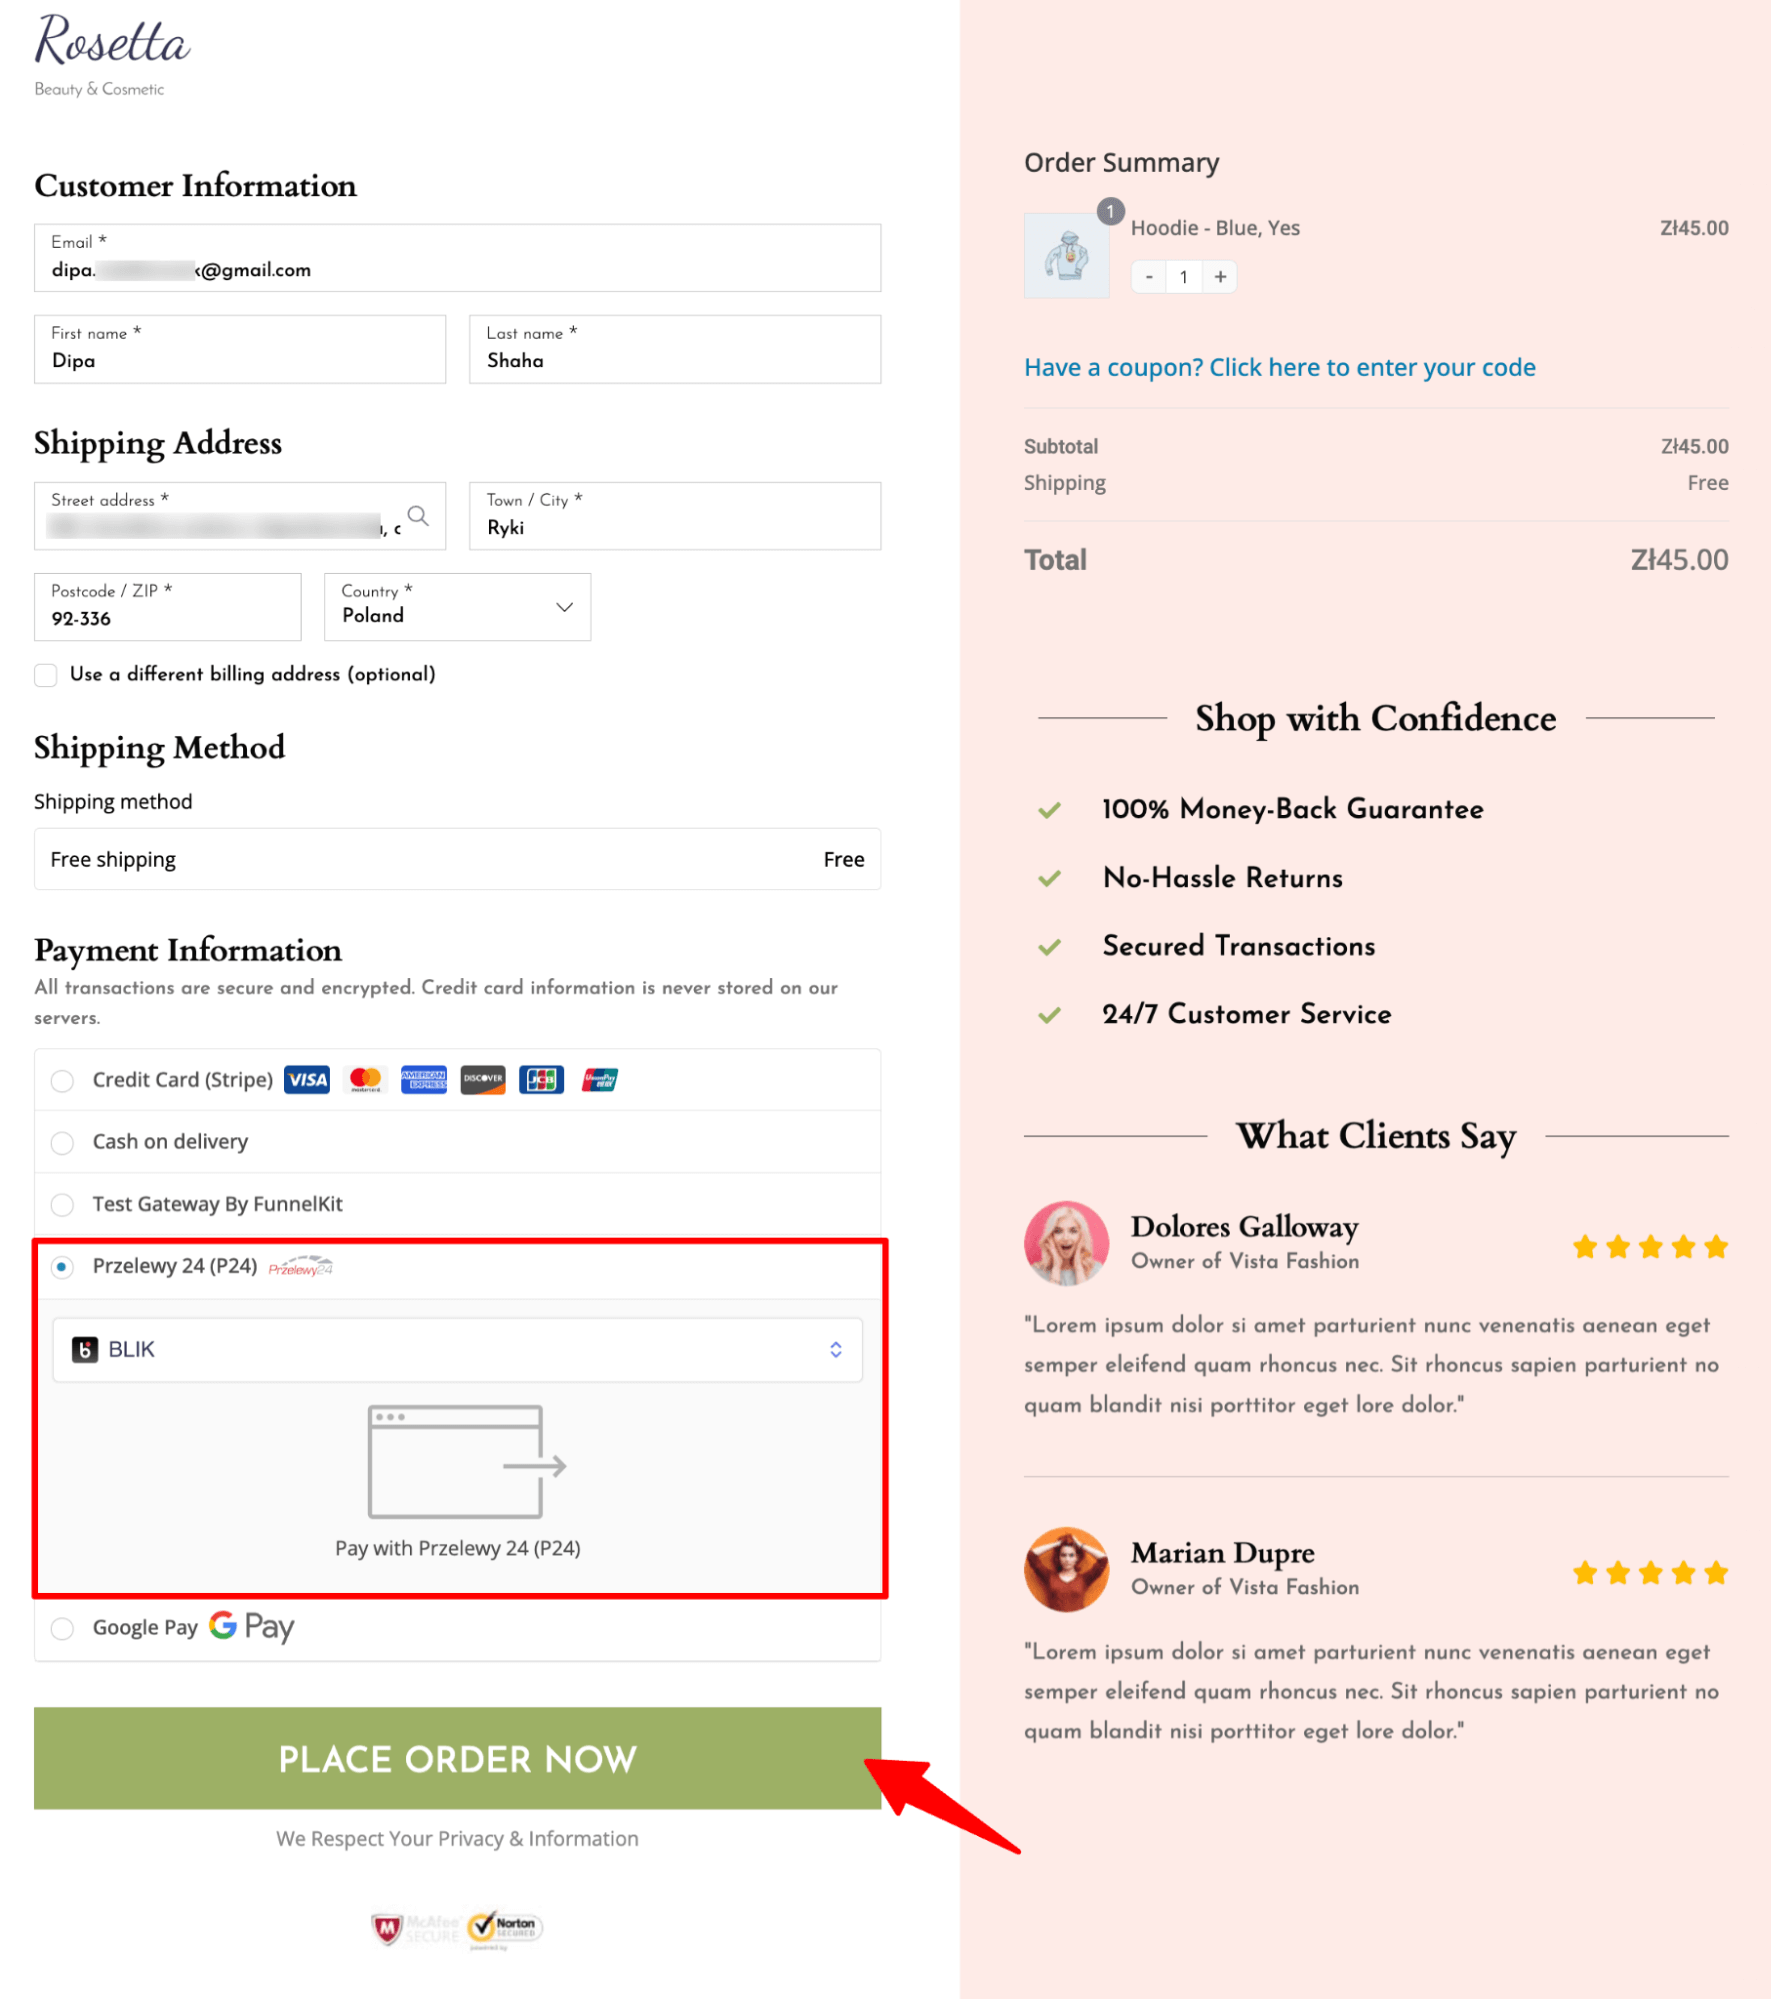
During checkout, the customer must select Przelewy24 as their payment method and choose the preferred bank.
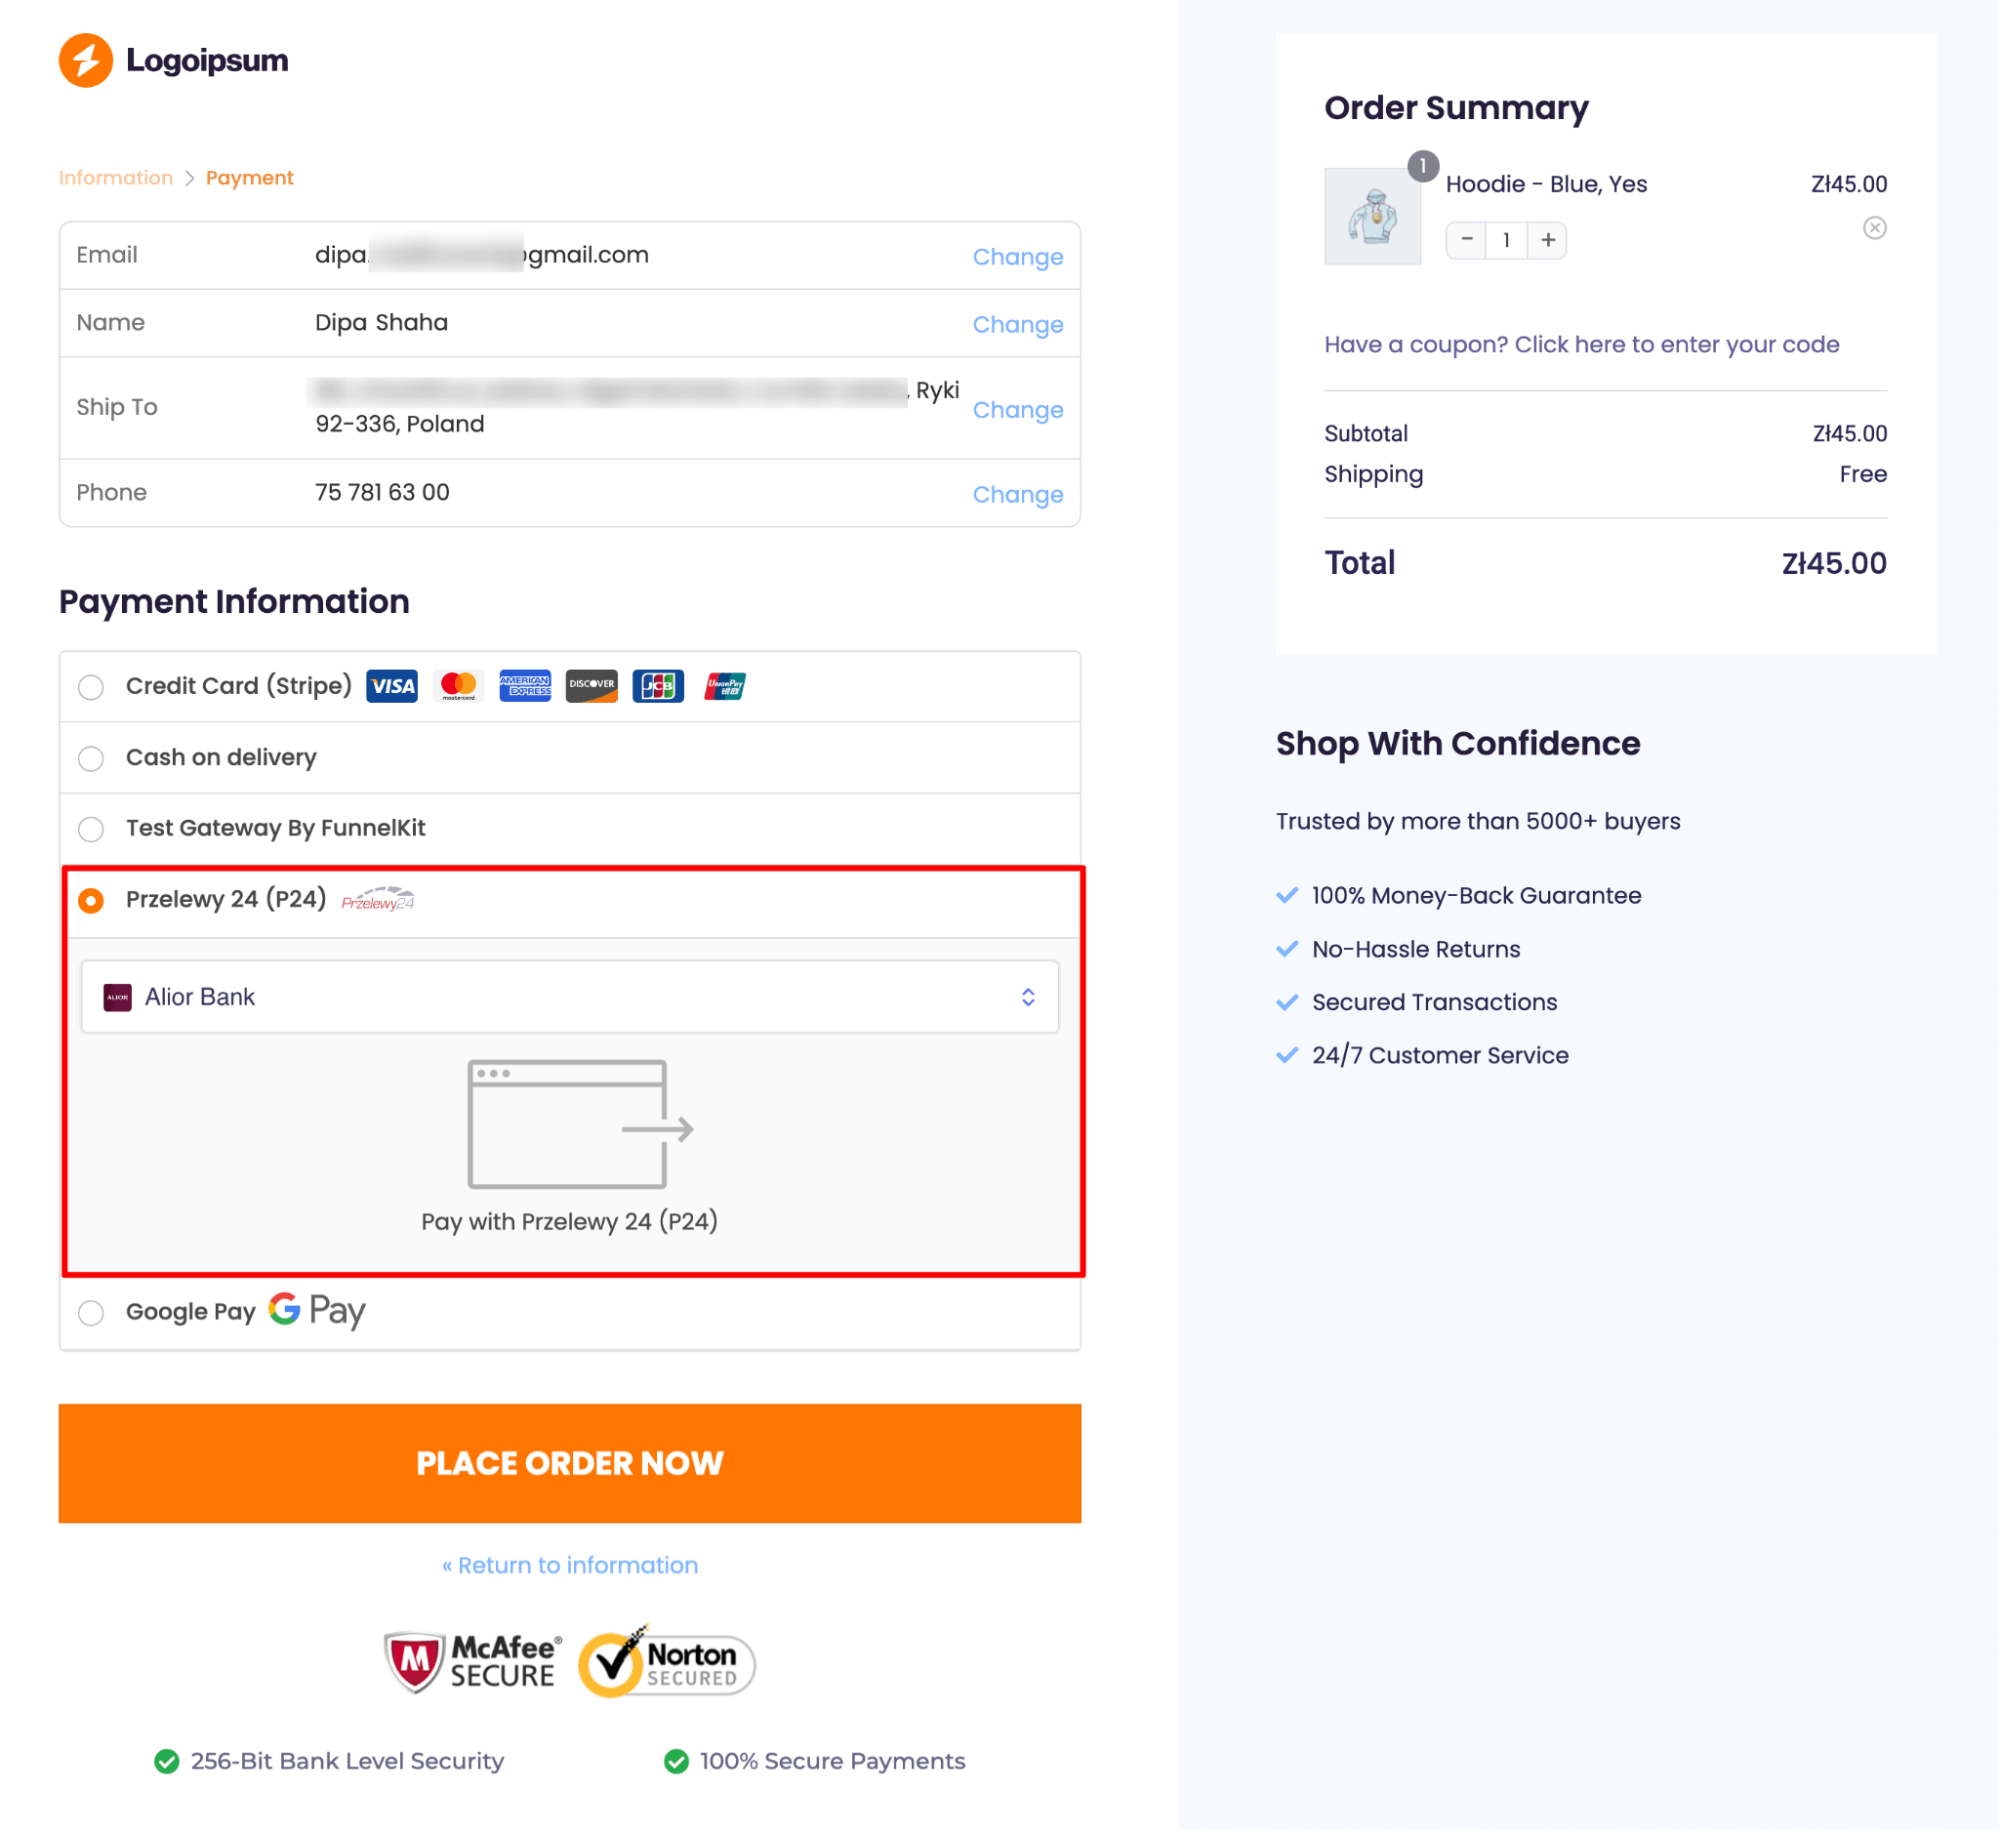
🔔 Note: The multi-step checkout above is built using the Hific template of FunnelKit Funnel Builder.
Step 2: Customer enters their account credentials
After selecting the bank, customers are redirected to the Przelewy24 platform, where they must securely input their bank account credentials.
Step 3: Customer completes the authorization process
Customers finalize the payment authorization process on the Przelewy24 platform.
Step 4: Customer is notified that the payment is complete
Upon successful transaction completion, customers receive notification that their payment has been processed.
Step 5: Customer returns to the WooCommerce site for order confirmation
Customers can then return to the business's website to confirm payment and complete the transaction.
Why Should You Offer P24, aka Prezelewzy24, in Your WooCommerce Store?
If your online business is based in Poland, you must offer WooCommerce P24. Here are some of the reasons why:
- Cater to the Polish market: Przelewy24 is dominant in Poland's payment landscape. Integrating this option opens your business to a lucrative market segment, potentially driving substantial customer acquisition and sales growth.
- Streamline checkout process: P24 facilitates seamless transactions directly from customers' bank accounts, optimizing the checkout process. This enhanced efficiency often translates to higher conversion rates and increased transaction completions, bolstering overall revenue.
- Elevate customer satisfaction: Providing a range of payment options, including P24, enhances the shopping experience and customer satisfaction. Satisfied customers are more likely to become repeat buyers, fostering long-term business success.
- Establish competitive advantage: Offering P24 payments positions your business as forward-thinking and customer-focused. This competitive edge can attract discerning customers and bolster your reputation, ultimately leading to sustained profitability and growth.
Essentials to Set Up WooCommerce P24 aka Przelewy24 Payment Method Using Stripe in Your Store
Before we move to the process how to integrate P24 with WooCommerce, you must have WooCommerce installed and configured properly on your WordPress site.
🔔 You can get help from this Woo document guide to set up your WooCommerce store.
1. A Stripe account
Stripe is a widely-used platform for processing online payments and managing transactions.
We've opted for Stripe to merge P24 with WooCommerce primarily because of its robust security measures. Stripe has the highest security certification (PCI DSS Level 1) and uses smart technology to stop real-time fraud, giving excellent security.
You’ll need to set up your Stripe account to start collecting payments in your store.
Setting up Stripe is free. They only charge a small fee for each transaction.
2. Stripe Gateway for WooCommerce plugin
FunnelKit’s Stripe Gateway for WooCommerce is the ultimate WooCommerce Stripe gateway plugin. It offers a straightforward, secure, and speedy method of linking Stripe with WooCommerce and collecting payments on the web and mobile.
Stripe Gateway for WooCommerce is compatible with credit and debit card payments through Stripe, such as Visa, Mastercard, American Express, JCB, Diners Club, and more.
Additionally, it integrates with express payment options such as Google Pay and Apple Pay and BNPL gateways such as Affirm, Klarna, Afterpay, and P24.
Moreover, it supports local payment methods like SEPA, P24, iDEAL, Bancontact, and more.
4. A valid SSL certificate
An SSL certificate verifies your website's identity and encrypts data exchanged between a user's web browser and your server.
Ensure your WooCommerce store has an active SSL certificate to verify your website's identity and encrypt data between users' browsers and your server.
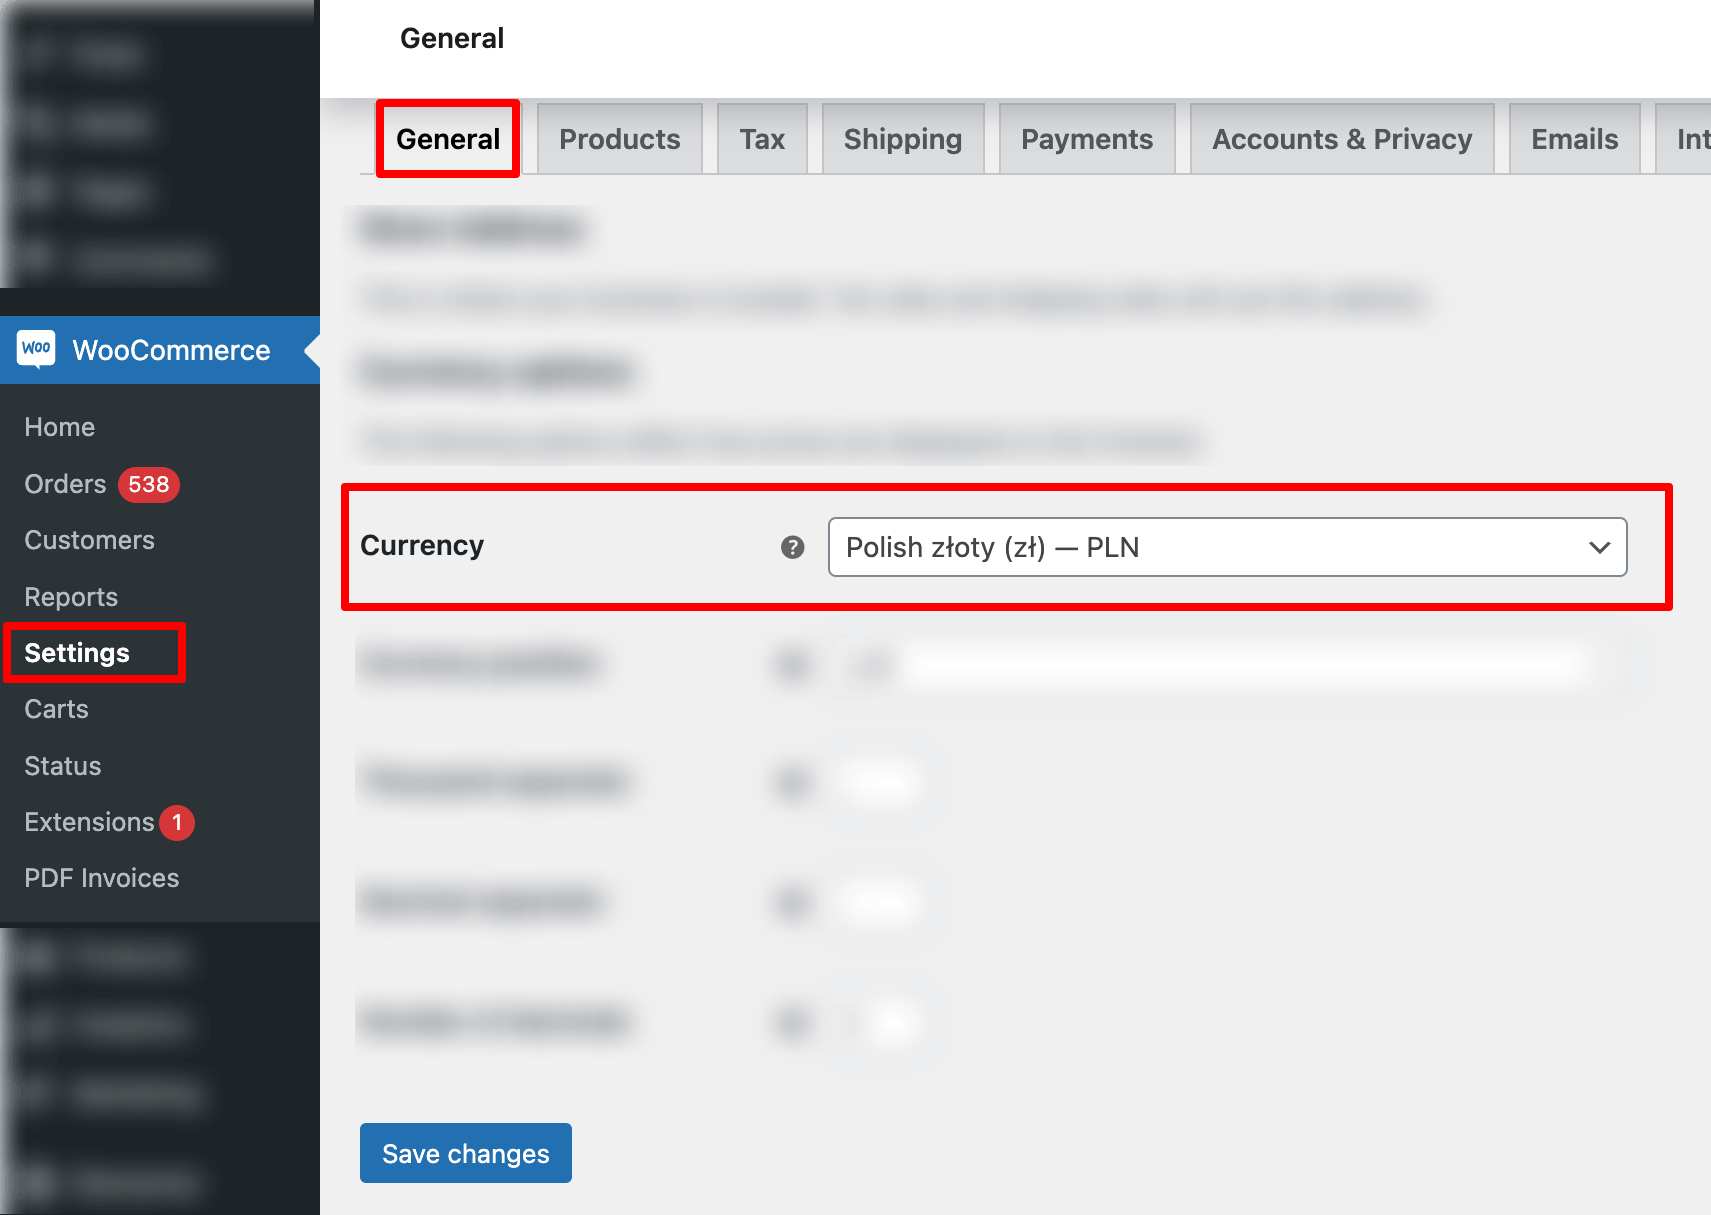
5. Ensure your store currency is set to EUR
P24 supports EUR or PLN. Therefore, ensure your WooCommerce store currency is set to EUR or PLN.
To set the Store Currency, go to WooCommerce ⇒ Settings ⇒ General and Set the Currency.
How to Set Up and Configure WooCommerce P24 Payments in Your Store?
The first step of integrating P24 with WooCommerce is to connect the WooCommerce store with Stripe using the Stripe Payment Gateway plugin.
Step 1: Install the Stripe Gateway for WooCommerce plugin
From the WordPress dashboard, go to Plugins ⇒ Add New Plugin and search for “FunnelKit Stripe Gateway”.
Once you find the plugin, install and activate it on your site.

Now, connect your Stripe account to the WooCommerce store.
Step 2: Configure your Stripe account
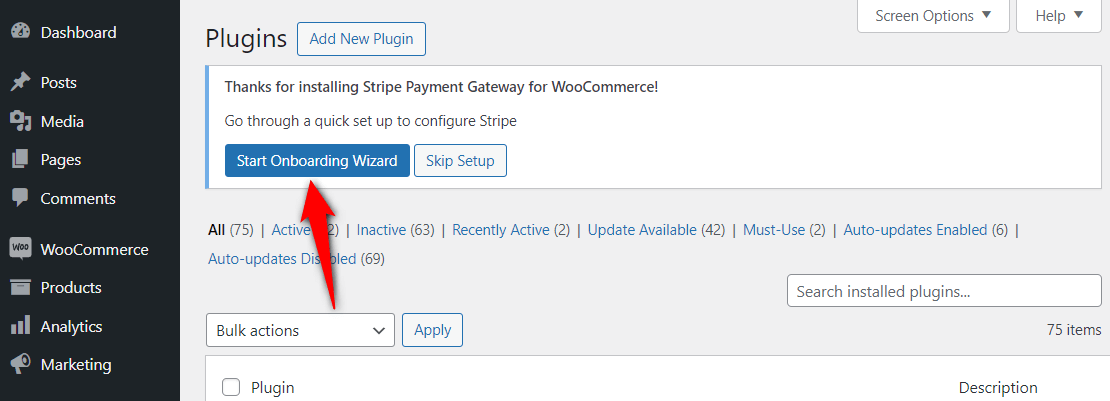
After activating the plugin, you will receive a notification to configure your Stripe account.
Click on the ‘Start Onboarding Wizard’ button to start the setup and configuration process.
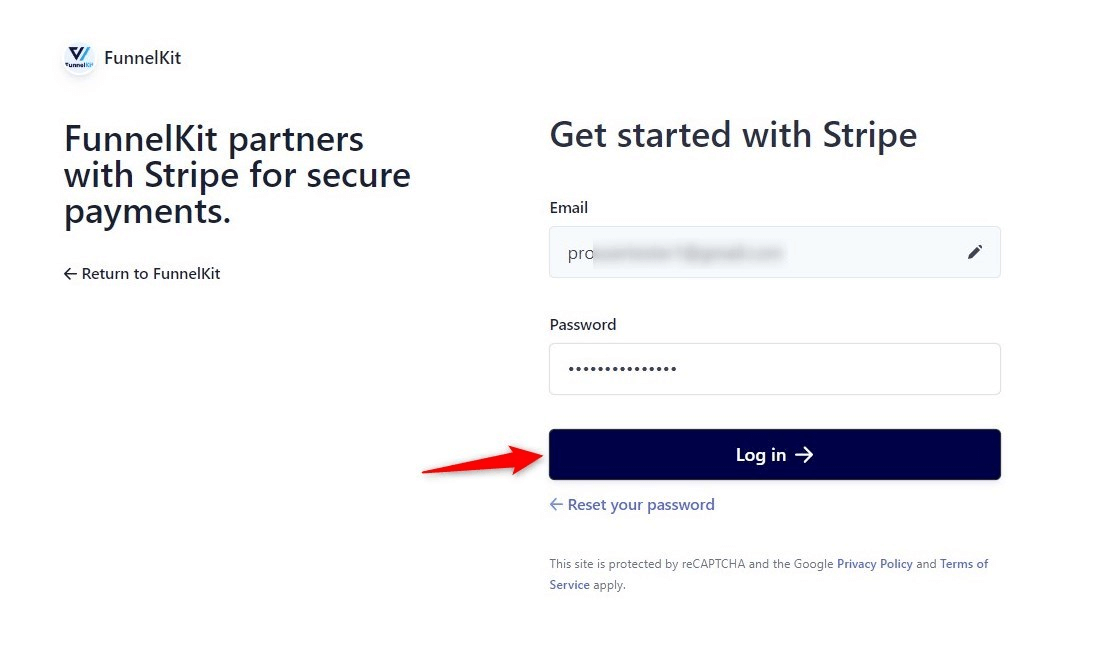
It’ll take you to a new window. Click the “Connect with Stripe’ button.

You’ll now see the Stripe account authorization page.
Log in to your Stripe account by entering your login credentials (your registered email address and password).
Next, verify your Stripe account with a 6-digit verification code sent to your registered email or phone number.
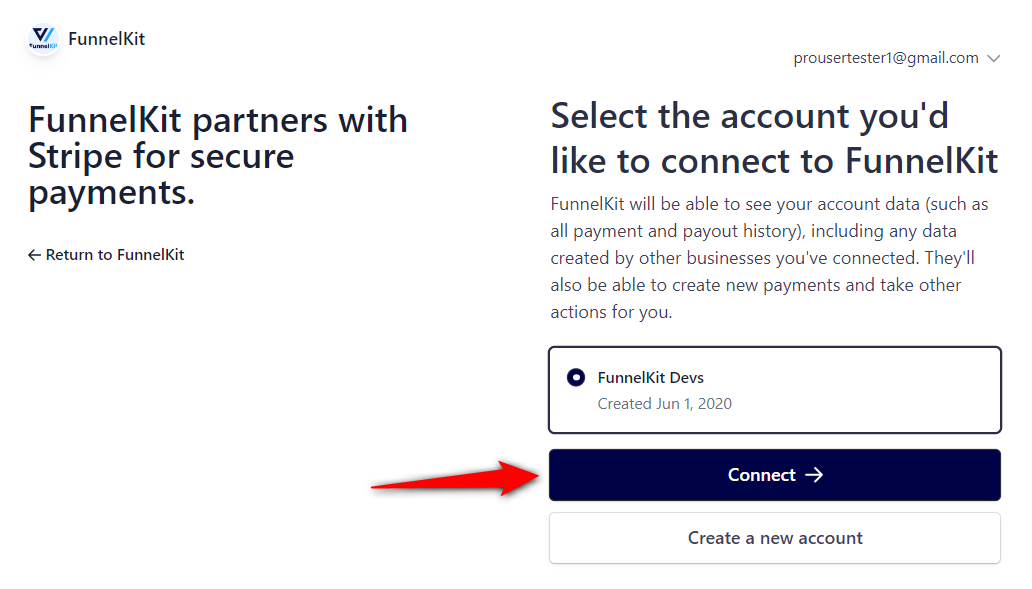
Select the Stripe account you want to use for your WooCommerce P24 integration.
Once done, click Connect.
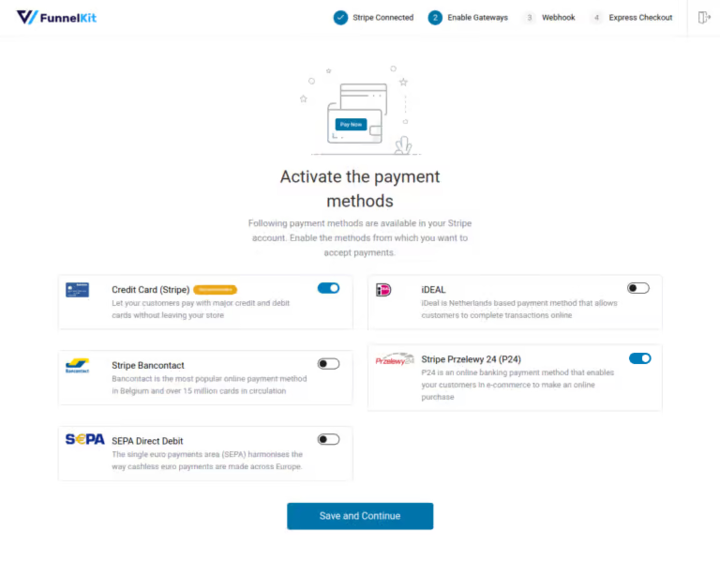
Enable the payment gateways
On the next screen, you will see all the available payment gateways.
Here, you can enable the payment gateway you want to enable and click on “Save and Continue”. Make sure to activate "Stripe Przelewy24(P24)".
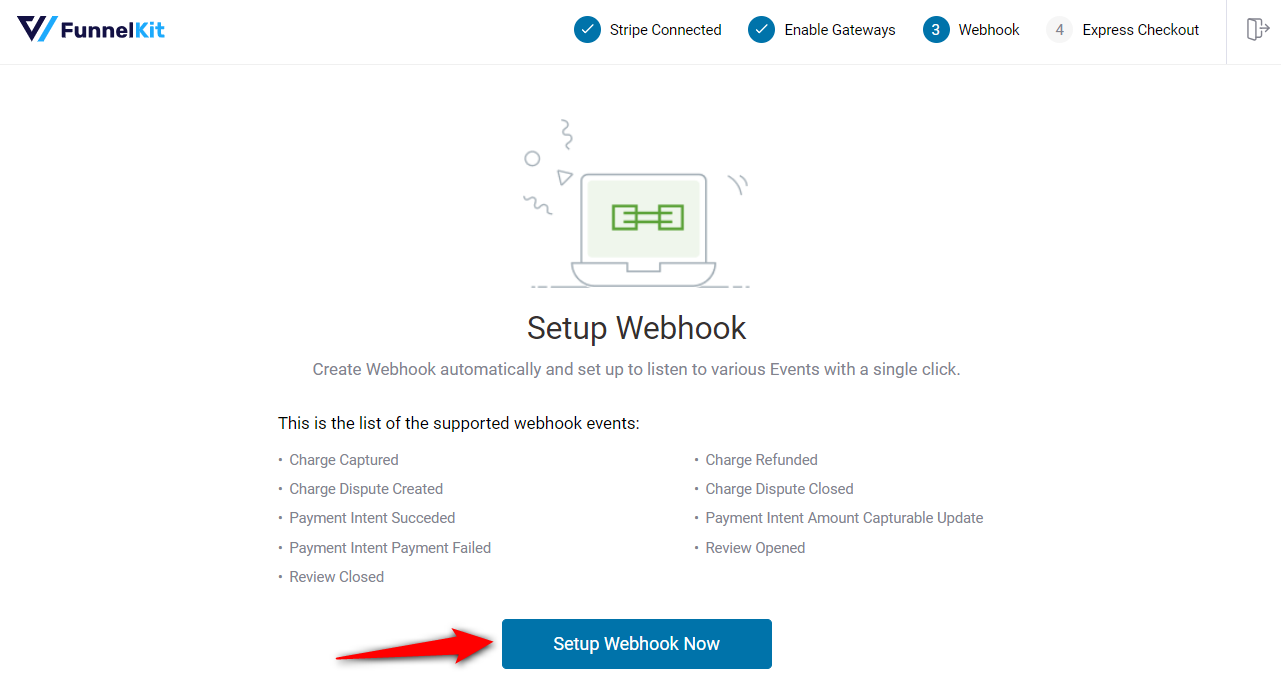
Set up webhooks
This Stripe payment gateway will automatically set up webhooks.
Click the ‘Setup Webhook Now’ button and move to the next screen.
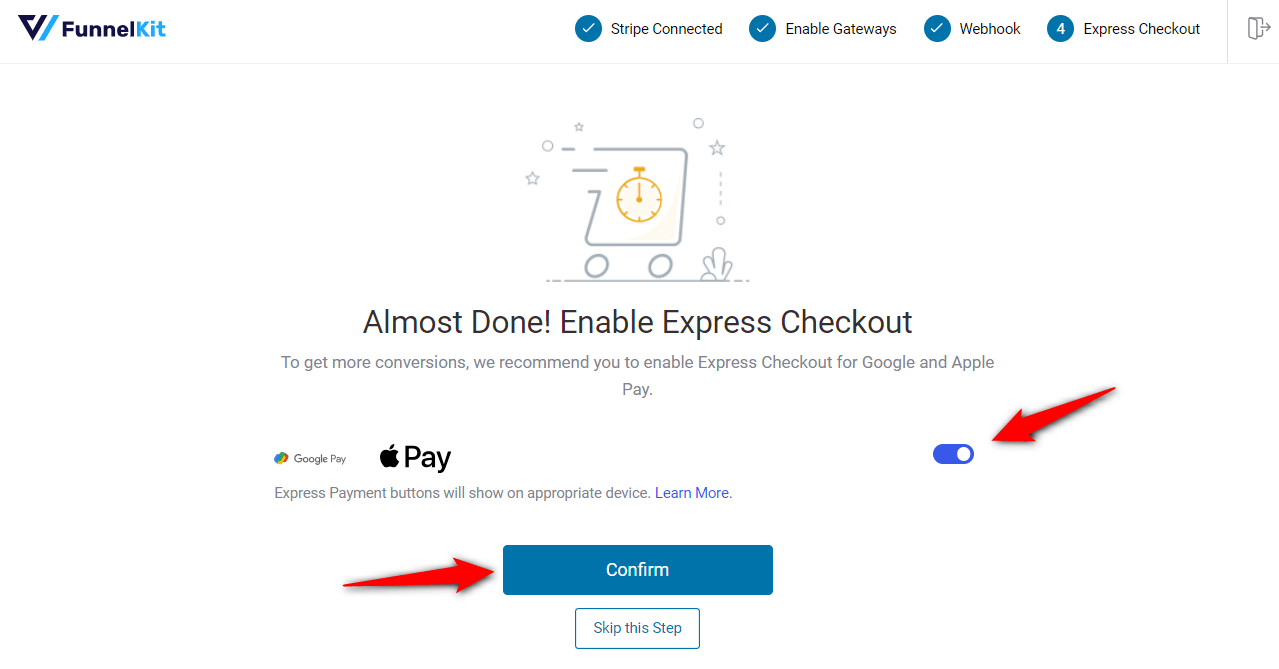
Enable Express Checkouts
The plugin will prompt you to enable express checkout buttons such as Apple Pay and Google Pay.
This way, you can incorporate one-click checkouts in your WooCommerce store.
You’re all set! Make sure to activate the test mode and first configure the WooCommerce Stripe P24 payment mode.
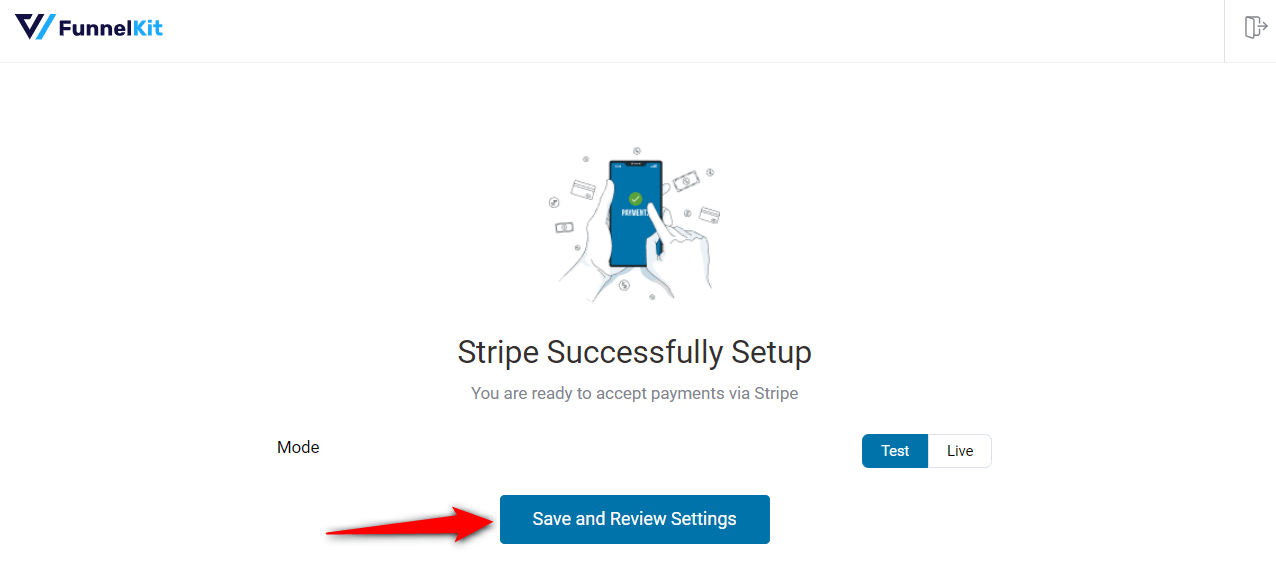
Clicking on ‘Save and Review Settings’ will automatically fetch all your Stripe account details into your WooCommerce store:
- Stripe connection ID and status
- Webhook ID and URL
- Live and test webhook secret key
- Debug log URL
That’s it! Your Stripe account is now successfully connected and configured in your WooCommerce store.
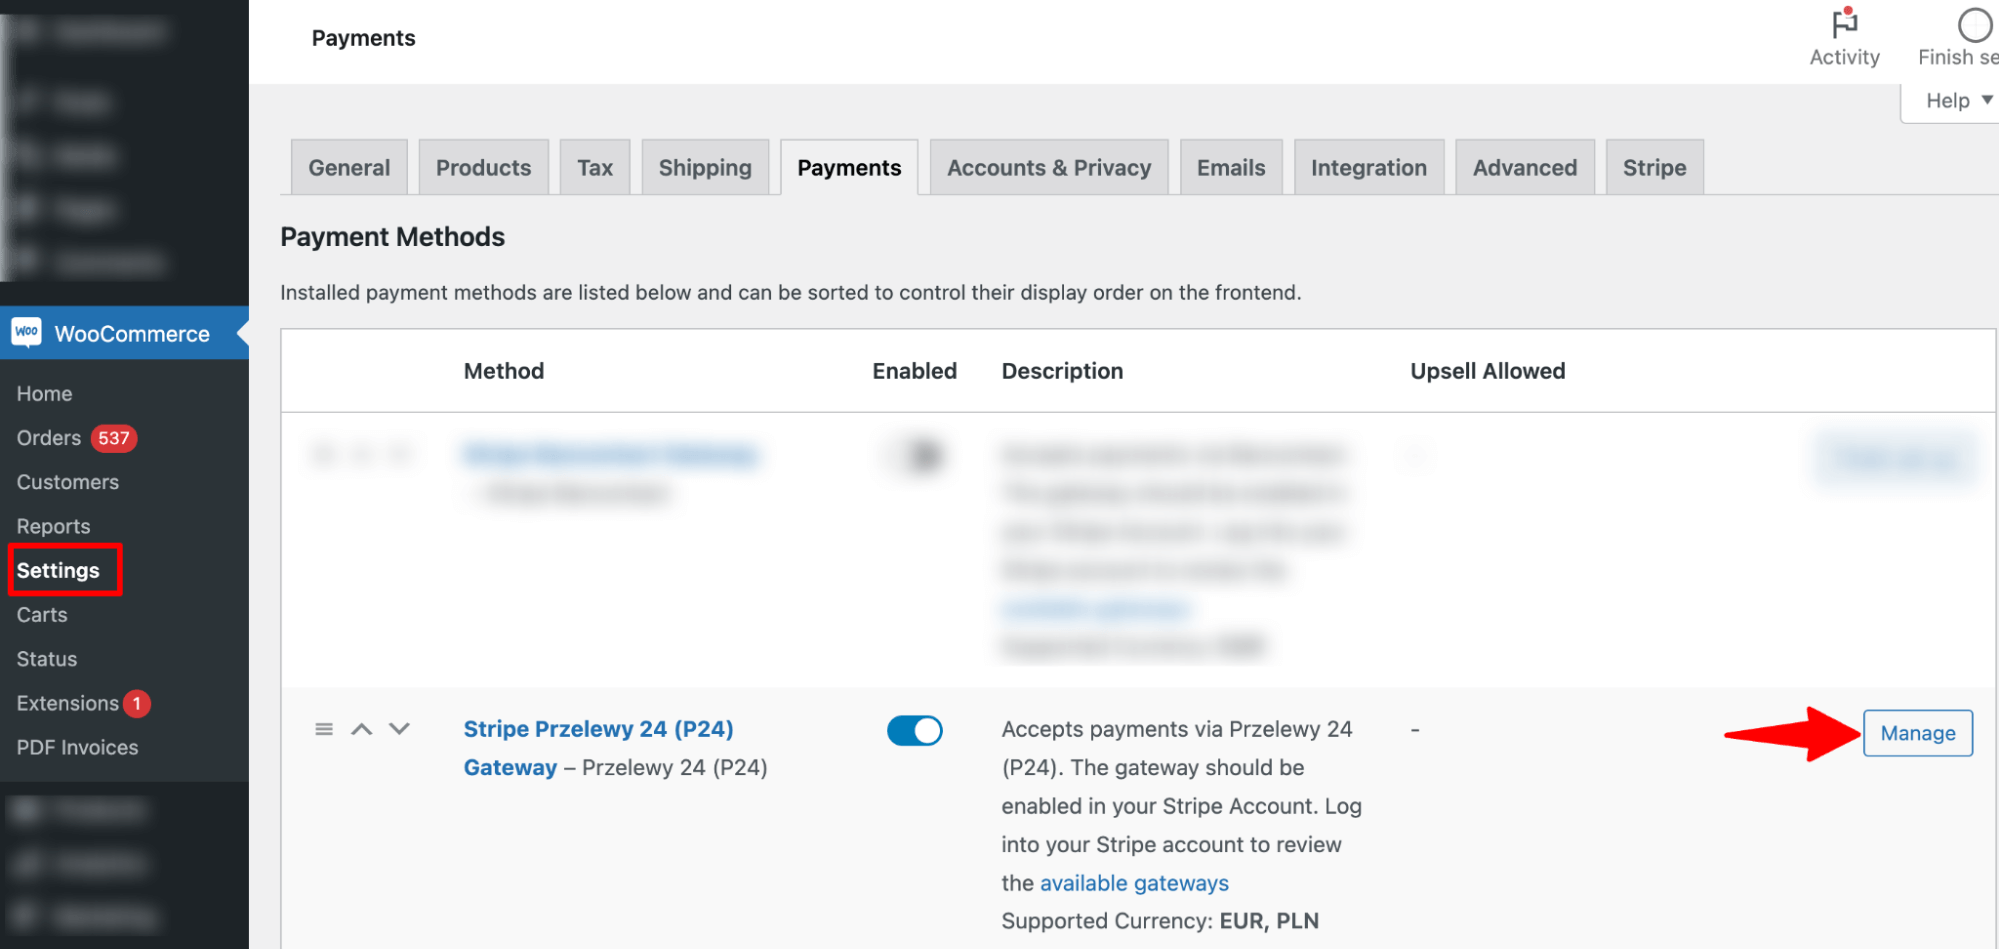
Step 3: Enable the Stripe Przelewy24 (P24) Gateway in your WooCommerce store
Navigate to WooCommerce ⇒ Settings ⇒ Payments. Under the Payments tab, scroll down and click on "Manage" next to “Stripe Przelewy24 (P24) Gateway – Przelewy24 (P24)”.
Now, check the option next to ‘Enable Stripe Przelewy24 (P24) Gateway’.
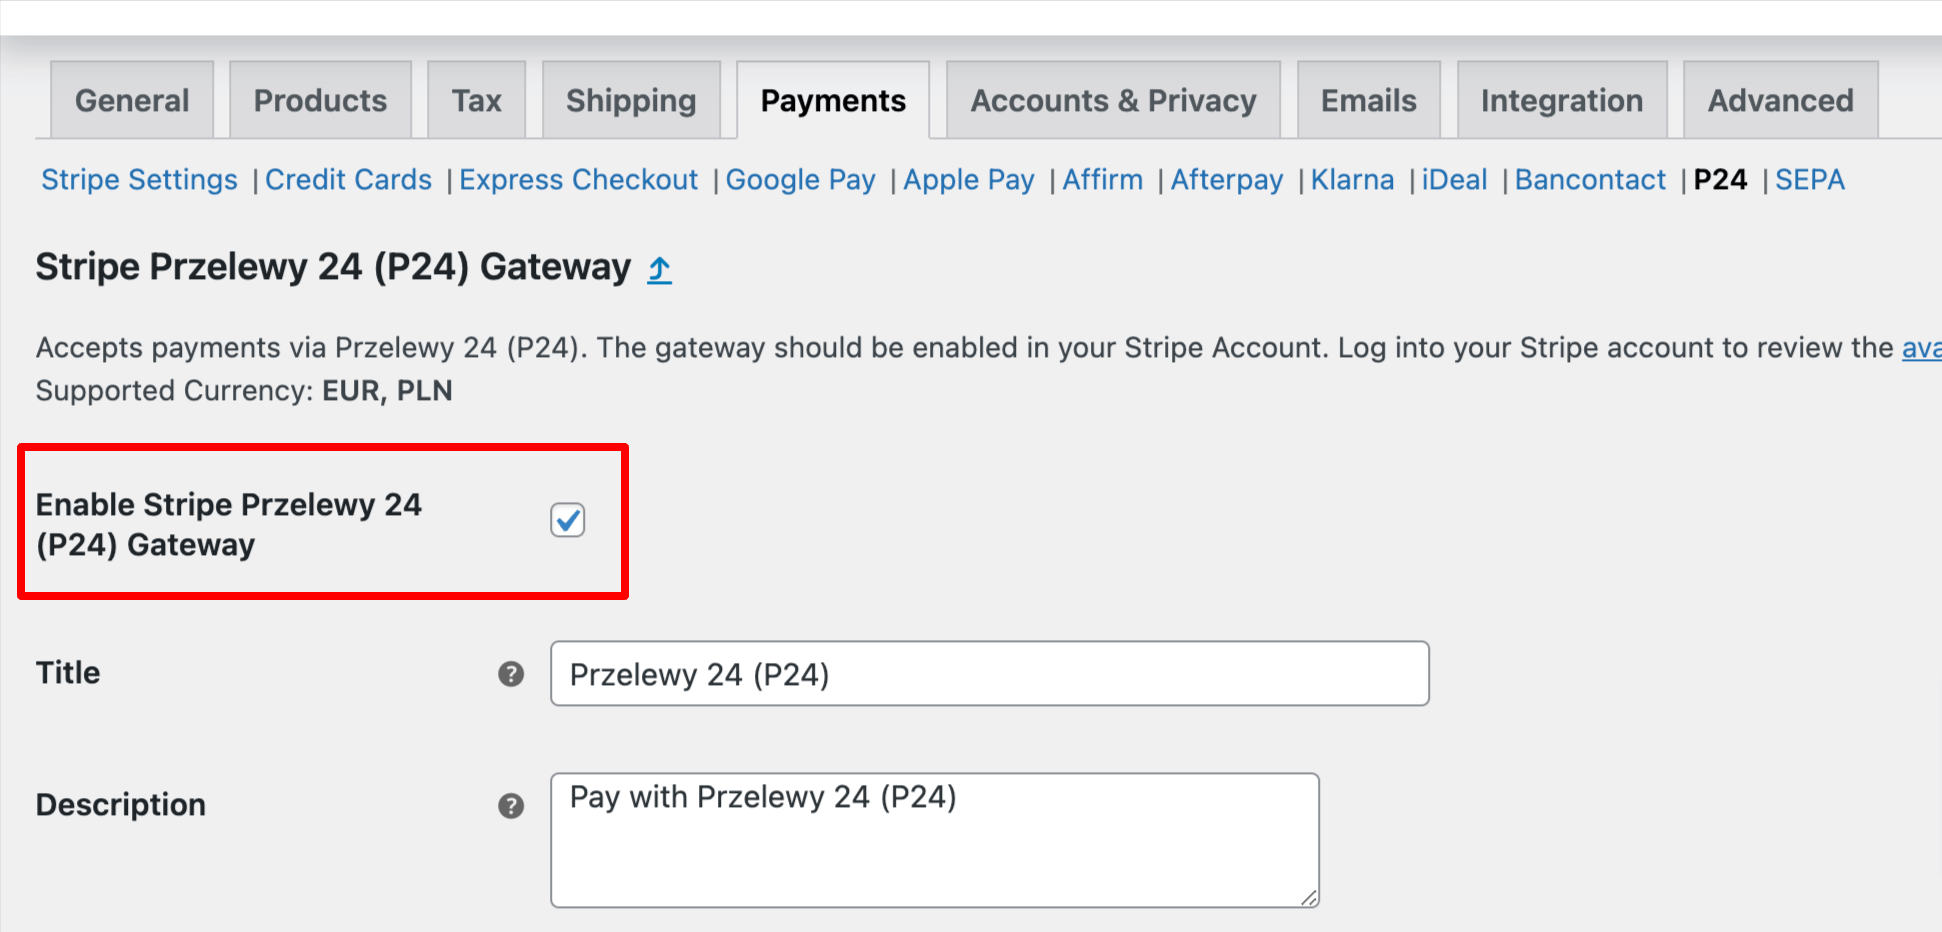
This will enable the Stripe Przelewy24 (P24) gateway in your WooCommerce store.
Step 4: Configure the WooCommerce Przelewy24 (P24) payment option in your store
Now configure the rest of the settings of WooCommerce Przelewy 24, such as
- Title: Provide a title.
- Description: The description text appears below the title of the Klarna payment method on the checkout page.
Selling location(s): Select the selling location. If you select the option “Sell to specific countries”, you need to select the specific country, Poland.
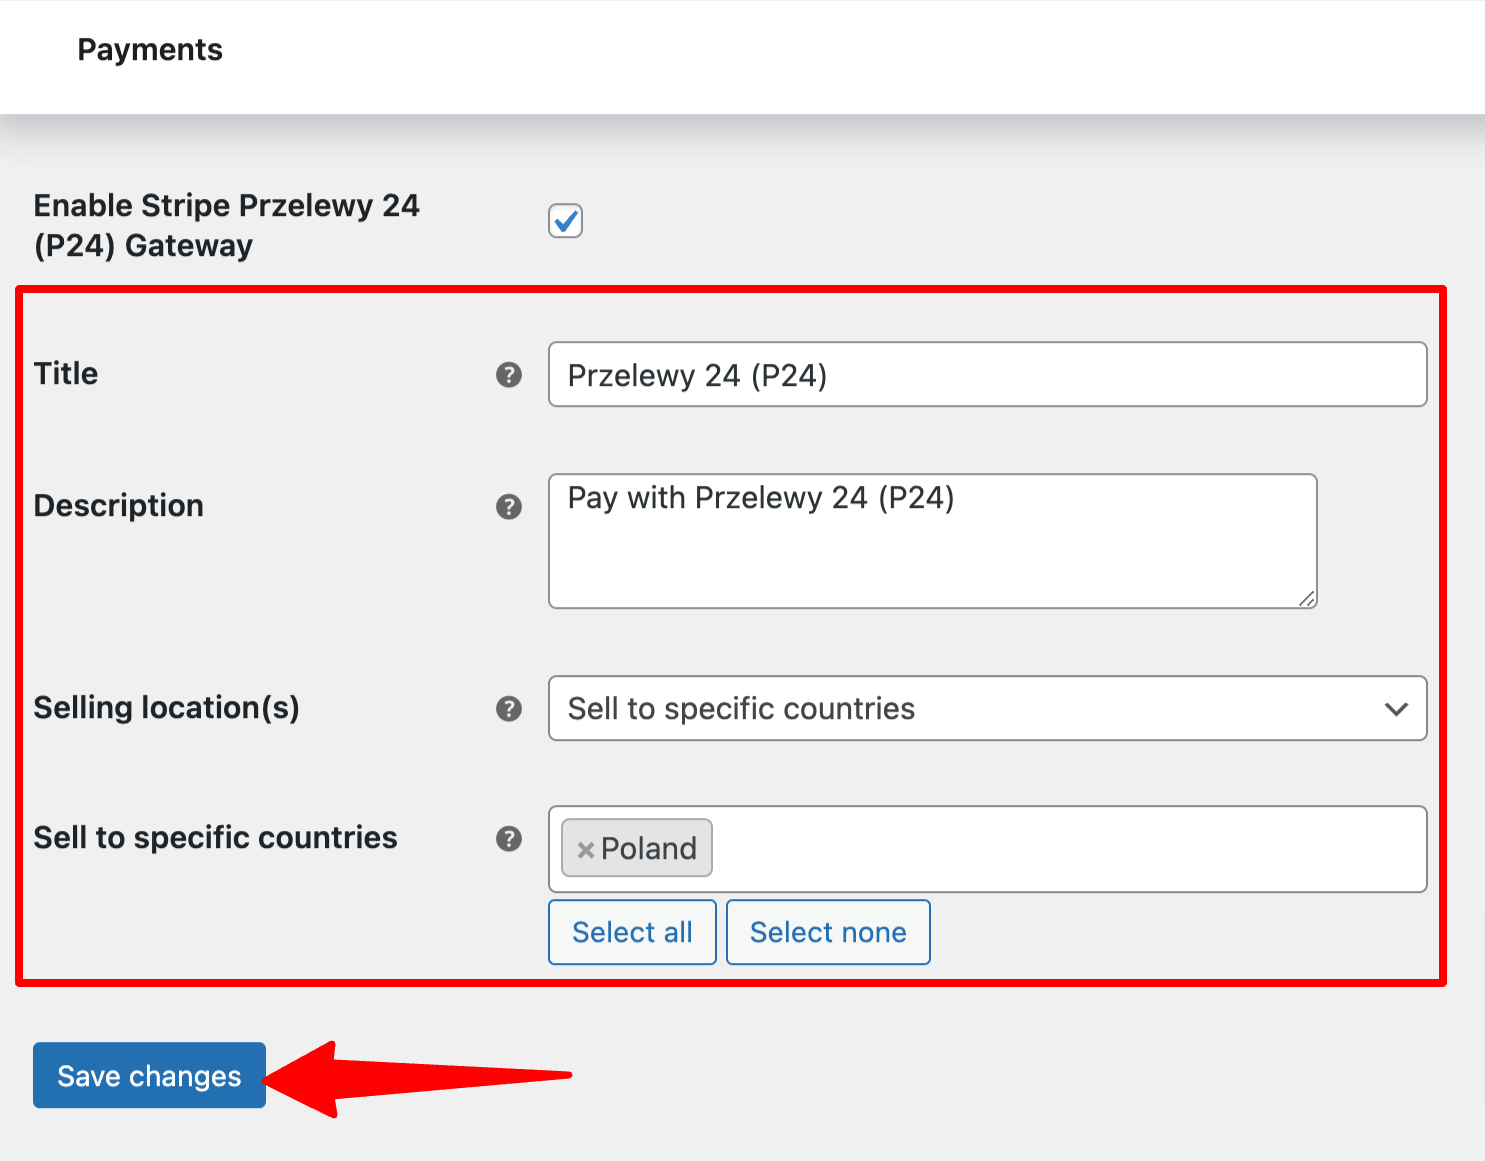
Save the changes when done.
Testing the WooCommerce P24 Payments in Your Store
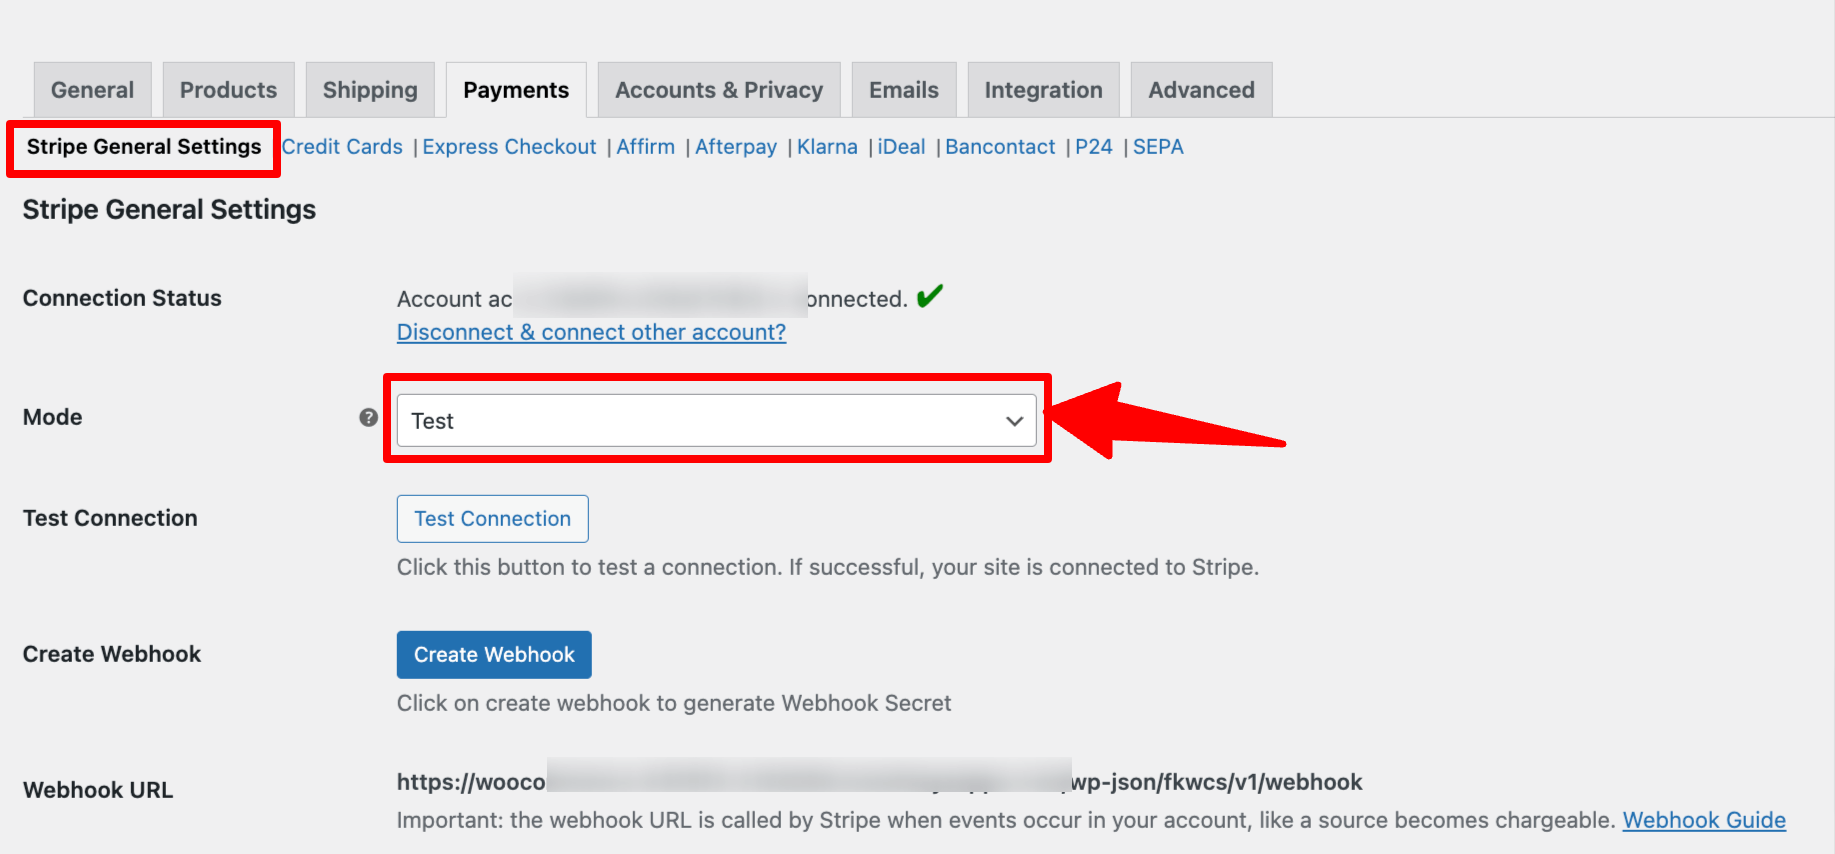
To test the WooCommerce Przelewy 24 payment method, put your website in the ‘Test’ mode by going to WooCommerce payment settings.
To do so, navigate to WooCommerce ⇒ Settings ⇒ Payment and click on “Manage” next to Stripe Przelewy 24 (P24) Gateway – Przelewy 24 (P24).
Set the Mode to ' Test ' from the “Stripe General Settings” tab.
After that, add any product to your cart, and on the checkout page, choose the option “ Przelewy 24 (P24) ” to checkout. Then, choose your preferred bank and place the order.
After that, you will get two options: Authorize text payment and Fail test payment.
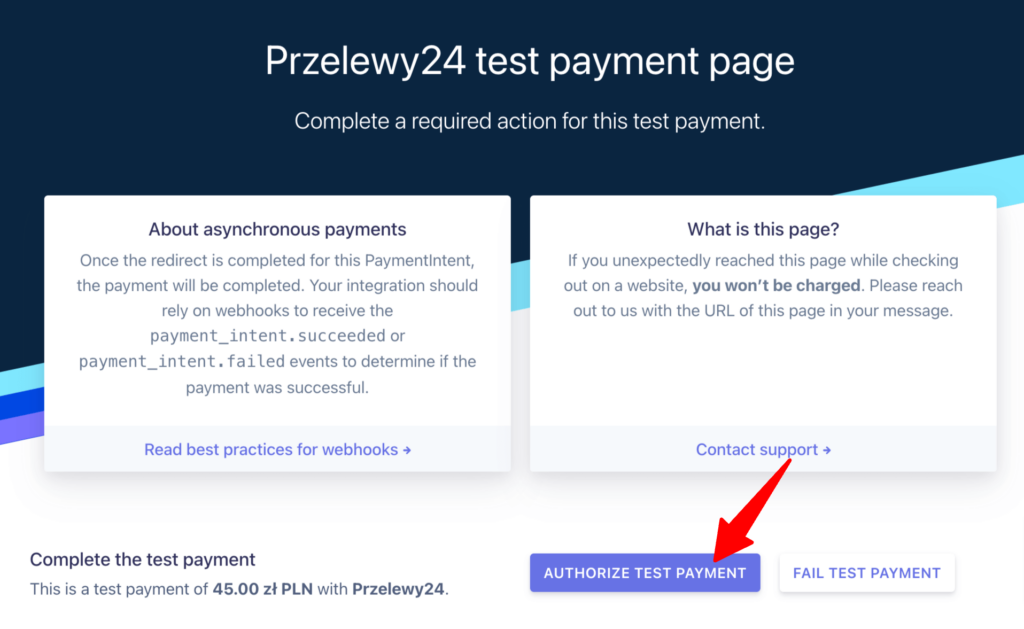
If you authorize the test payment, you’ll be redirected to the thank you page.
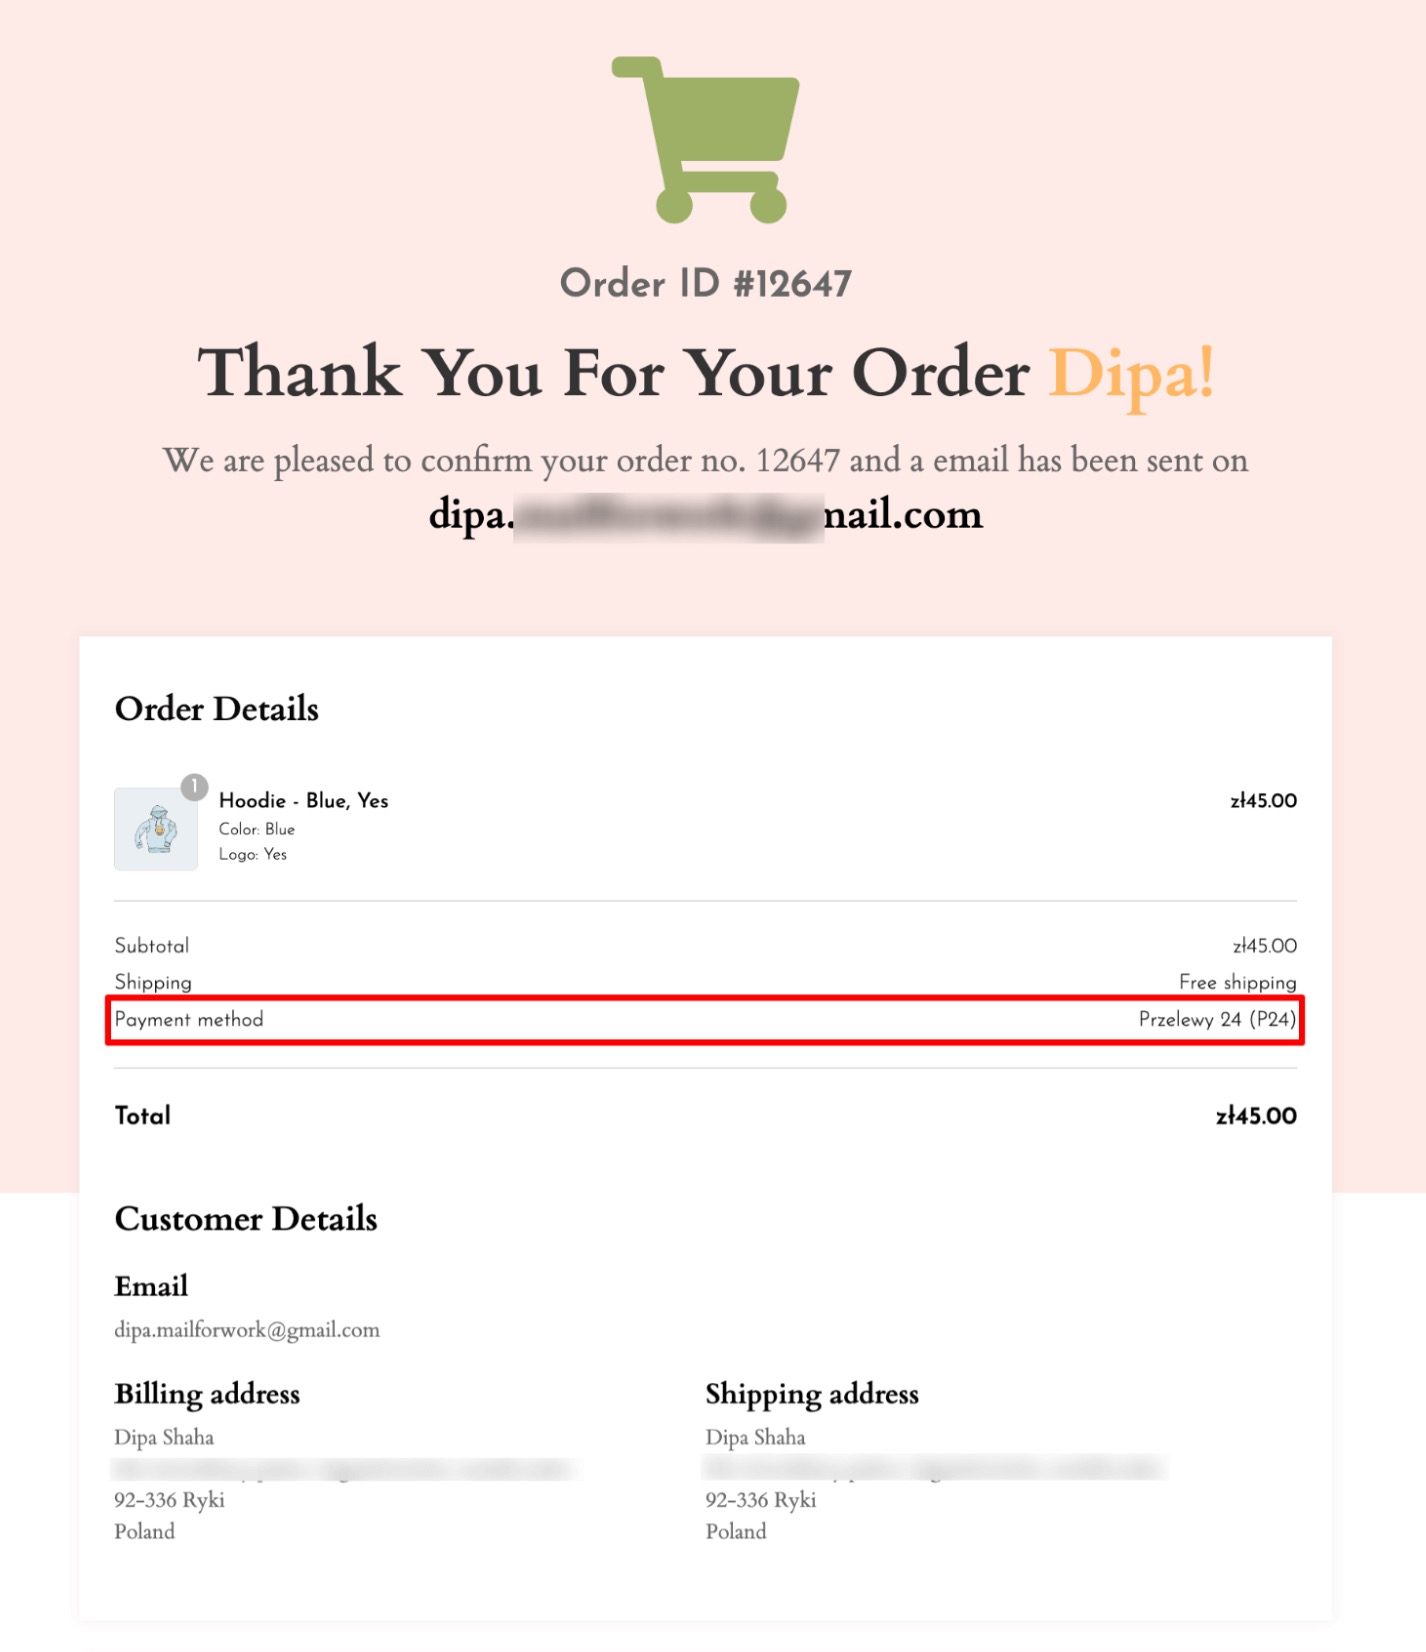
That’s how easily you can test the WooCommerce P24 payment gateway.
Bonus Tip: Boost Conversions with Multiple Payment Gateways
Offering multiple payment options can significantly increase conversion rates by providing customers with flexibility and convenience when purchasing their favorite products.
Customers may prefer different payment gateways based on their location, financial conditions, and personal preferences.
You can offer various payment options, including
- Credit and debit cards
- Express checkouts like Apple Pay, Google Pay, and more
- Buy now pay later payment options.
With FunnelKit Funnel Builder, along with P24 payments, you can offer all the mentioned types of payment gateways.
Furthermore, you can enable other payment options such as:
- PayPal Standard and PayPal Express
- Cash on delivery, Check Payments, or BACS (Bank Transfer)
Our experts recommend conducting research on popular payment methods in the countries you serve and gathering feedback from your customers. This will help you determine the payment options they are comfortable with.
Once you have this data, enabling those payment gateways will surely help increase conversions in your WooCommerce store.
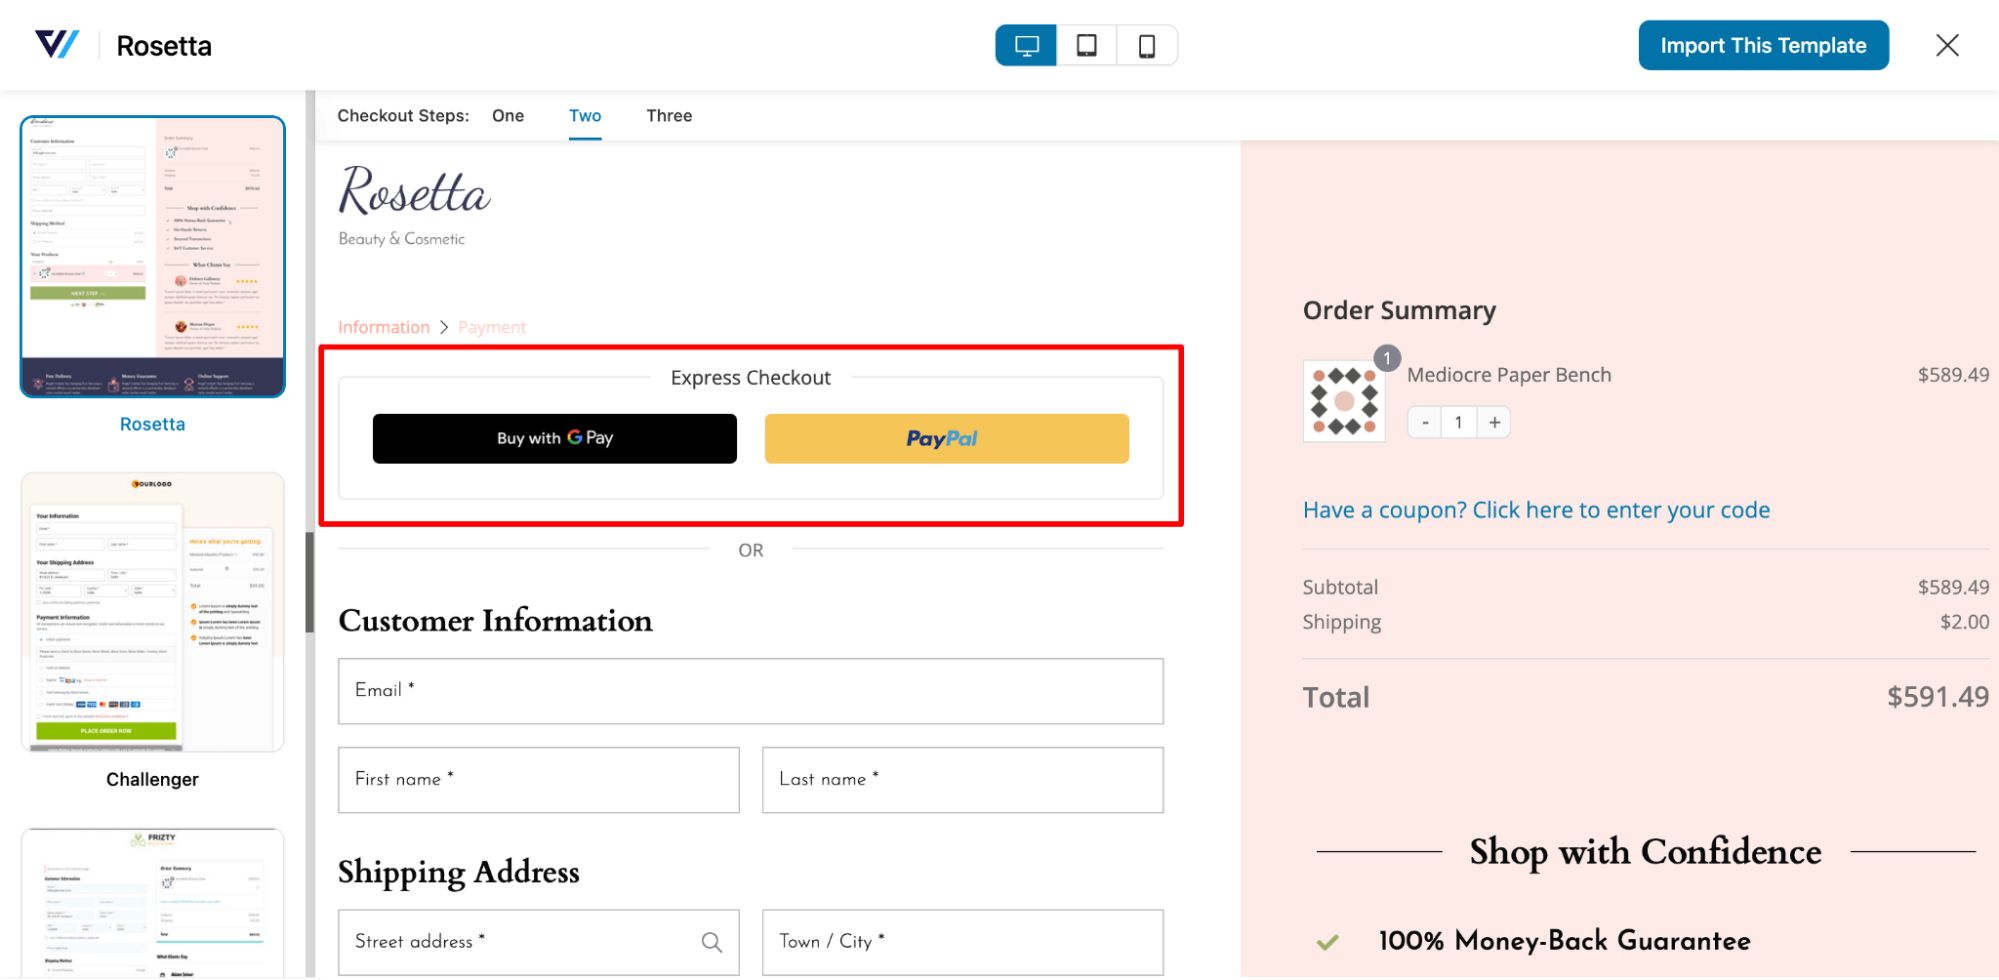
Enhance the WooCommerce P24 Payment Experience with Conversion-Optimized Checkout Pages!
Przelewy24( P24) undoubtedly provides customers with convenience through its payment gateway. However, optimizing the checkout page with additional options is crucial for ensuring a smooth journey from browsing to completing a purchase.
A streamlined checkout not only improves user experience but also boosts conversion rates, leading to increased revenue and fostering lasting customer loyalty.
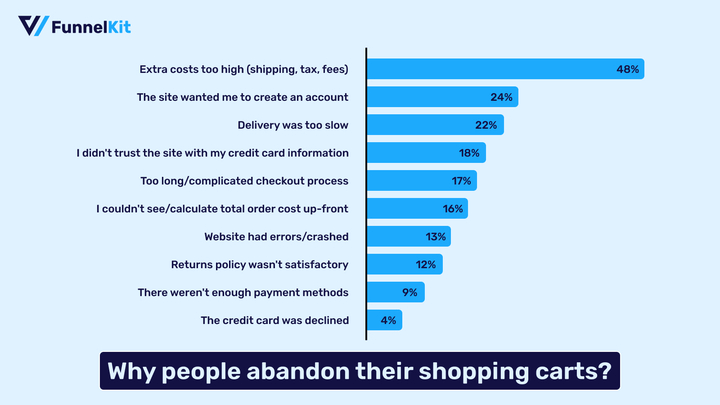
According to the Baymard Institute, 28% of shoppers abandon their carts because the checkout process is lengthy and complex.
FunnelKit Funnel Builder offers the perfect solution to decrease abandoned cart rates by swapping out the default lengthy WooCommerce checkout page with a streamlined multi-step alternative.
Trusted by over 20,000 WooCommerce users, this sales funnel plugin revolutionizes the checkout process, delivering a seamless shopping experience that encourages repeat purchases.
FunnelKit Funnel Builder comes with various prebuilt checkout page templates that you can import and use with just a few clicks.
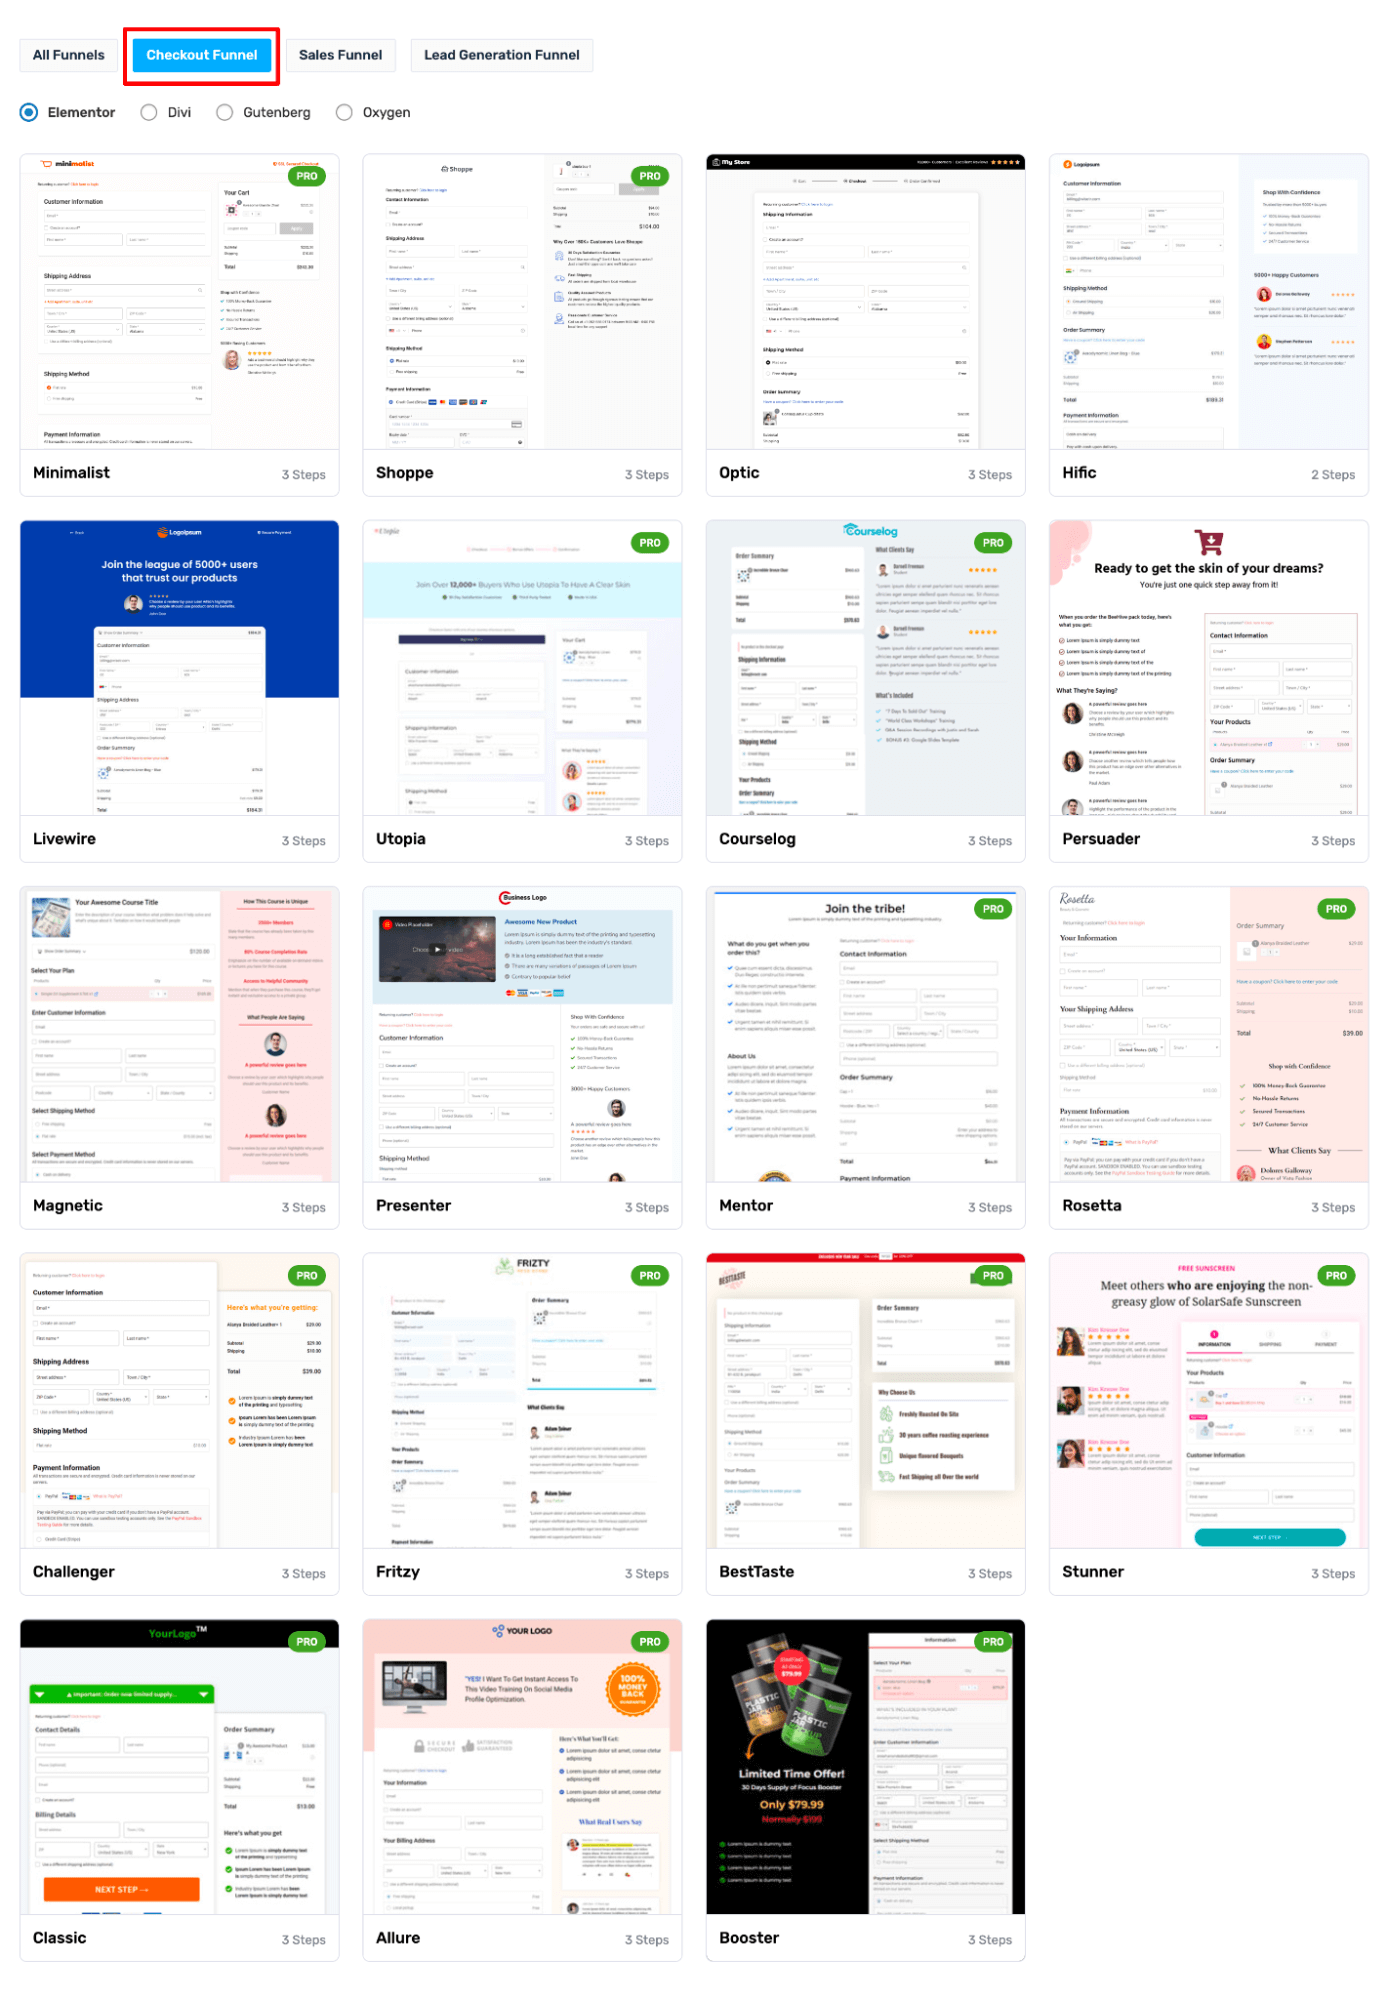
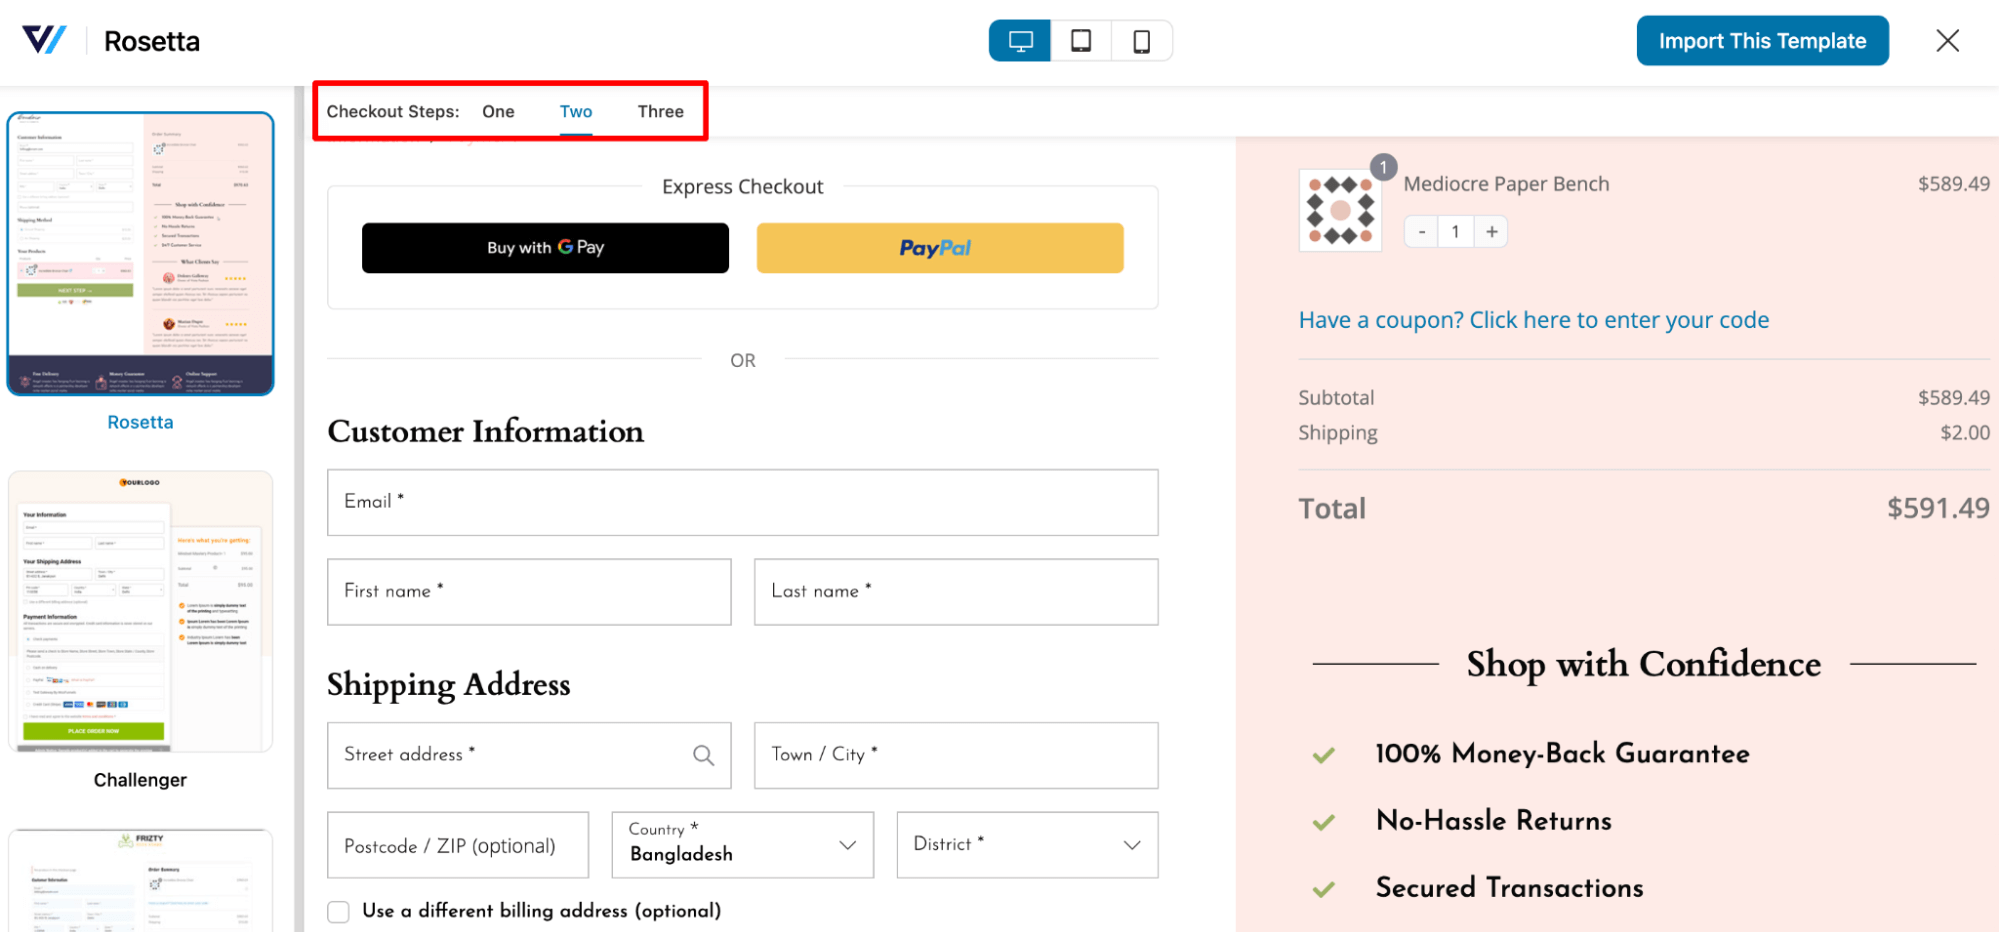
You can choose the number of steps (single or multi-step) you want your checkout page to have.
Note: Plus, you can style your pages like shopify checkout or order forms.
FunnelKit Funnel Builder offers more than just a multi-step checkout. It provides a range of pre-built features designed to create a seamless and conversion-friendly checkout experience for your customers. These features include:
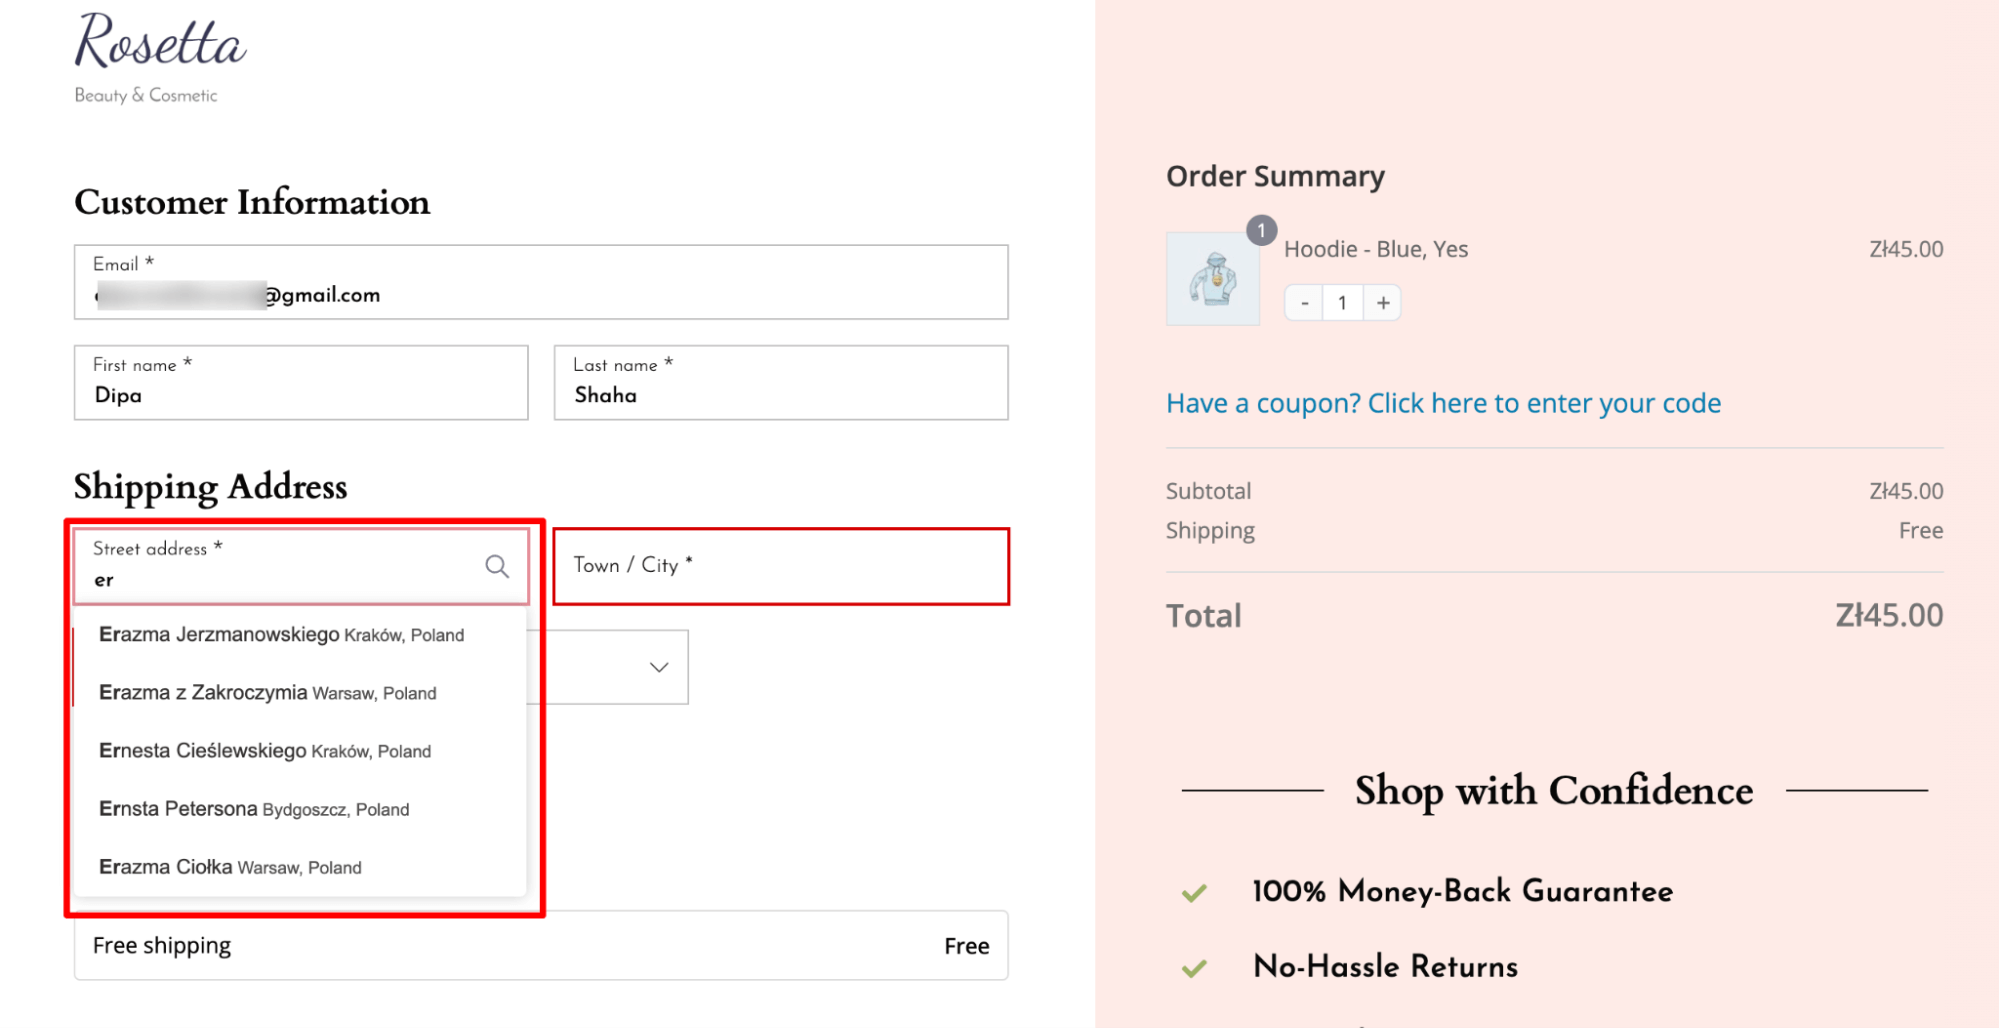
- Google Address autocomplete: Google Address Autocomplete is a feature that instantly fills in users' addresses on the checkout page as soon as they start typing their information. It covers fields such as street address, city, zip code, state, and country, minimizing errors and streamlining the checkout process.
👉 For more details, check our blog on WooCommerce Google Address autocomplete.
- Express checkout option: Integrating express checkout options like Google Pay and Apple Pay through FunnelKit enables you to offer users a one-click buying experience, improving convenience and prompting quicker purchase finalization.
👉 For more details, read the blog on WooCommerce express checkout.
- Advanced checkout form field editor: Add, edit, and rearrange the form fields on the WooCommerce checkout page based on your requirements, allowing for seamless customization with a simple drag-and-drop feature.
🔔 For more details, read the blog on the checkout field editor.

- Collapsible optional fields: Make optional fields collapsible to make the checkout process seem shorter and less complicated.
👉 For more details, read the blog on WooCommerce auto-apply coupon.

- Product recommendations to boost AOV: With FunnelKit Funnel Builder, you can offer relevant pre-purchase product recommendations, such as order bumps on the checkout page. Customers can add the order bump item to their cart with just a single click, increasing sales and heightened satisfaction.
👉 For more details, read the blog on WooCommerce order bump.

🔔Note: Along with order bumps on the checkout page, you can also offer post-purchase one-click upsells to boost order value using FunnelKit.
FunnelKit Funnel Builder seamlessly pairs with the WooCommerce Stripe plugin, enabling effortless integration of beautiful checkout pages with P24 WooCommerce payments.
This combination delivers the best shopping experience for users while simultaneously boosting sales.
Frequently Asked Questions About WooCommerce P24
Have a look at some frequently asked questions about WooCommerce P24 payment, along with their answers:
- Which countries accept P24 for Przelewy24 payments?
Przelewy24 payments are primarily accepted in Poland.
- Which banks support P24 or Przelewy24 payments?
Over 165 banks in Poland support P24, including Alior Bank, Bank Millenium, Bank Nowy BFG S.A., Bank PEKAO S.A, BLIK and Bank spółdzielczy, among others.
- How do I add P24 or Przelewy24 payments to my WooCommerce website?
You can add P24 or Przelewy24 payments to your WooCommerce website for free using the Stripe Gateway for WooCommerce by FunnelKit.
- Does P24 or Przelewy24 payments work with WordPress?
Yes, P24 or Przelewy24 payments work with WordPress. However, you need to install an eCommerce platform like WooCommerce to make P24 work with WordPress.
- What's the deadline for requesting a refund on Przelewy24 payments?
Refunds for payments made through Przelewy24 can only be requested within 180 days from the original charge date. After this period, refund requests are no longer possible.
Offer WooCommerce P24 or Przelewy24 Payment for an Enhanced Shopping Experience and Increased Sales!
Offering bank transfers makes online shopping super convenient for users, and integrating WooCommerce P24 into your online store simplifies the bank transfer process for customers.
For online businesses catering to Poland-based customers, offering WooCommerce P24 is mandatory to ensure a good shopping experience by providing safe bank transfers.
Thanks to the WooCommerce Stripe gateway by FunnelKit, you can easily offer WooCommerce P24 on your online store.
Offering woocommerce p24 won't be enough if your checkout page isn't convincing and optimized to ensure a smooth shopping experience. You can use Funnelkit Funnel Builder to create high-converting checkout pages.
So, don’t lose more clients due to a lack of convenient bank transfer options; offer WooCommerce P24 on your store now!

Editorial Team
July 6, 2026Stripe is one of the most trusted payment gateways worldwide, powering over 3.5 million websites globally. With 90% of U.S. adults having made a purchase from businesses that use Stripe...

Editorial Team
July 1, 2026WooCommerce buy now pay later lets your customers split a purchase into smaller payments while you still get paid in full upfront. To offer buy now pay later, you connect...

Editorial Team
June 25, 2026Choosing the right payment gateway is one of the most important decisions for your WooCommerce store because it directly affects your sales, cash flow, and customer trust. I learned this...


