
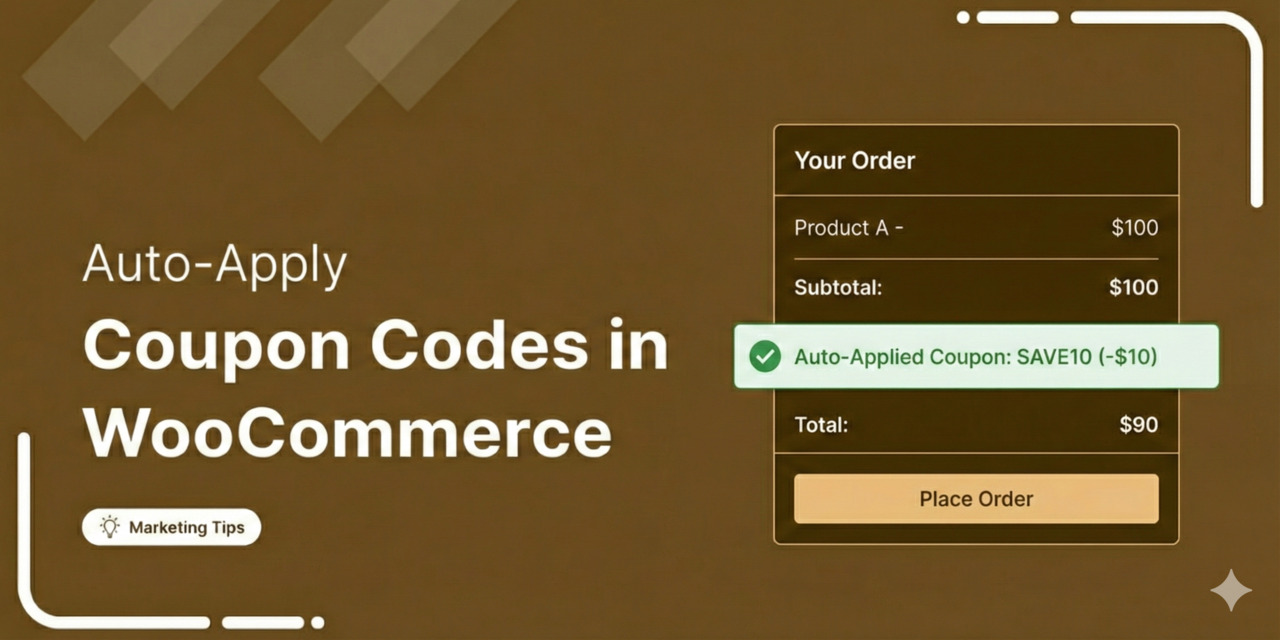
A WooCommerce auto apply coupon adds a discount to your customer's cart without them needing to type or paste a coupon code.
Instead of relying on manual entry, the coupon triggers when certain conditions are met, such as a minimum cart total, a specific product in the cart, or even a customer's user role.
38% of shoppers admit they’ve spent more than planned after discovering a discount coupon. [Source: Credit Donkey]
If you’re looking to increase sales and boost your average order value, offering discount coupons is a proven strategy.
But you can take it up a notch with auto-apply coupons.
These automatically applied coupons simplify the shopping experience, making it seamless for customers to enjoy discounts and increasing the likelihood that they will complete their purchases.
But the catch is WooCommerce doesn't offer this out of the box. You can create coupons, but there's no option to apply them automatically.
In this post, we'll walk you through four easy ways to auto-apply coupon codes in WooCommerce without any coding knowledge.
Why Offer Auto-Apply Coupons in WooCommerce
Offering auto-apply coupons helps ensure customer satisfaction, which in turn leads to fewer abandoned carts.
Additionally, it helps:
- Reduce cart abandonment at checkout because shoppers have no reason to leave and search for coupon codes
- Eliminate the frustration caused by manual coupon code entry
- Ensure a seamless checkout experience by removing one manual step from checkout
- Run targeted promotions without sharing coupon codes publicly
- Increase average order value with conditional discount coupons, for instance, set 10% discount on orders above $75 and watch how many $60 carts suddenly add a $20 item
Table of Contents
- 1 How to Create a Discount Coupon in WooCommerce?
- 2 Method 1: Auto Apply Coupon on WooCommerce Checkout Page
- 3 Method 2: Automatically Apply a Coupon For the Minimum Cart Value on a Sliding Cart
- 4 Method 3: How to Create Auto Apply Coupon URL in WooCommerce
- 5 Method 4: Share Auto-Applied Coupon URL via Email to Recover Abandoned Carts
- 6 5 Best Practices to Get More Conversions With Auto Apply Coupons
- 7 WooCommerce Auto Apply Coupon: Frequently Asked Questions (FAQs)
- 8 Start Converting More Shoppers With WooCommerce Auto Apply Coupons!
How to Create a Discount Coupon in WooCommerce?
Here are the steps to create a discount coupon using WooCommerce's default options, which can later be auto-applied to the cart or checkout.
Creating a discount coupon
To create a coupon code from the WordPress dashboard, go to Marketing ⇒ Coupons and click on 'Add new coupon'.
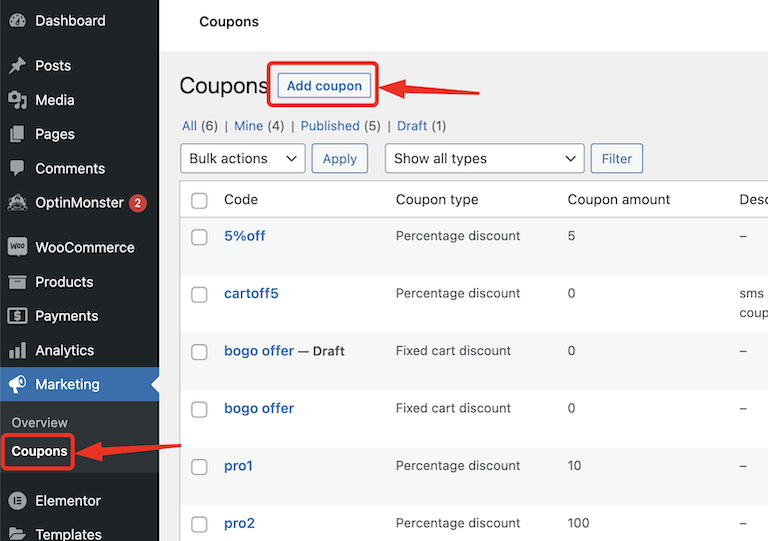
First, set up the coupon code. Enter a custom coupon name or generate a random marketing coupon code by clicking the “Generate Coupon Code” button.
After that, provide a description (optional).
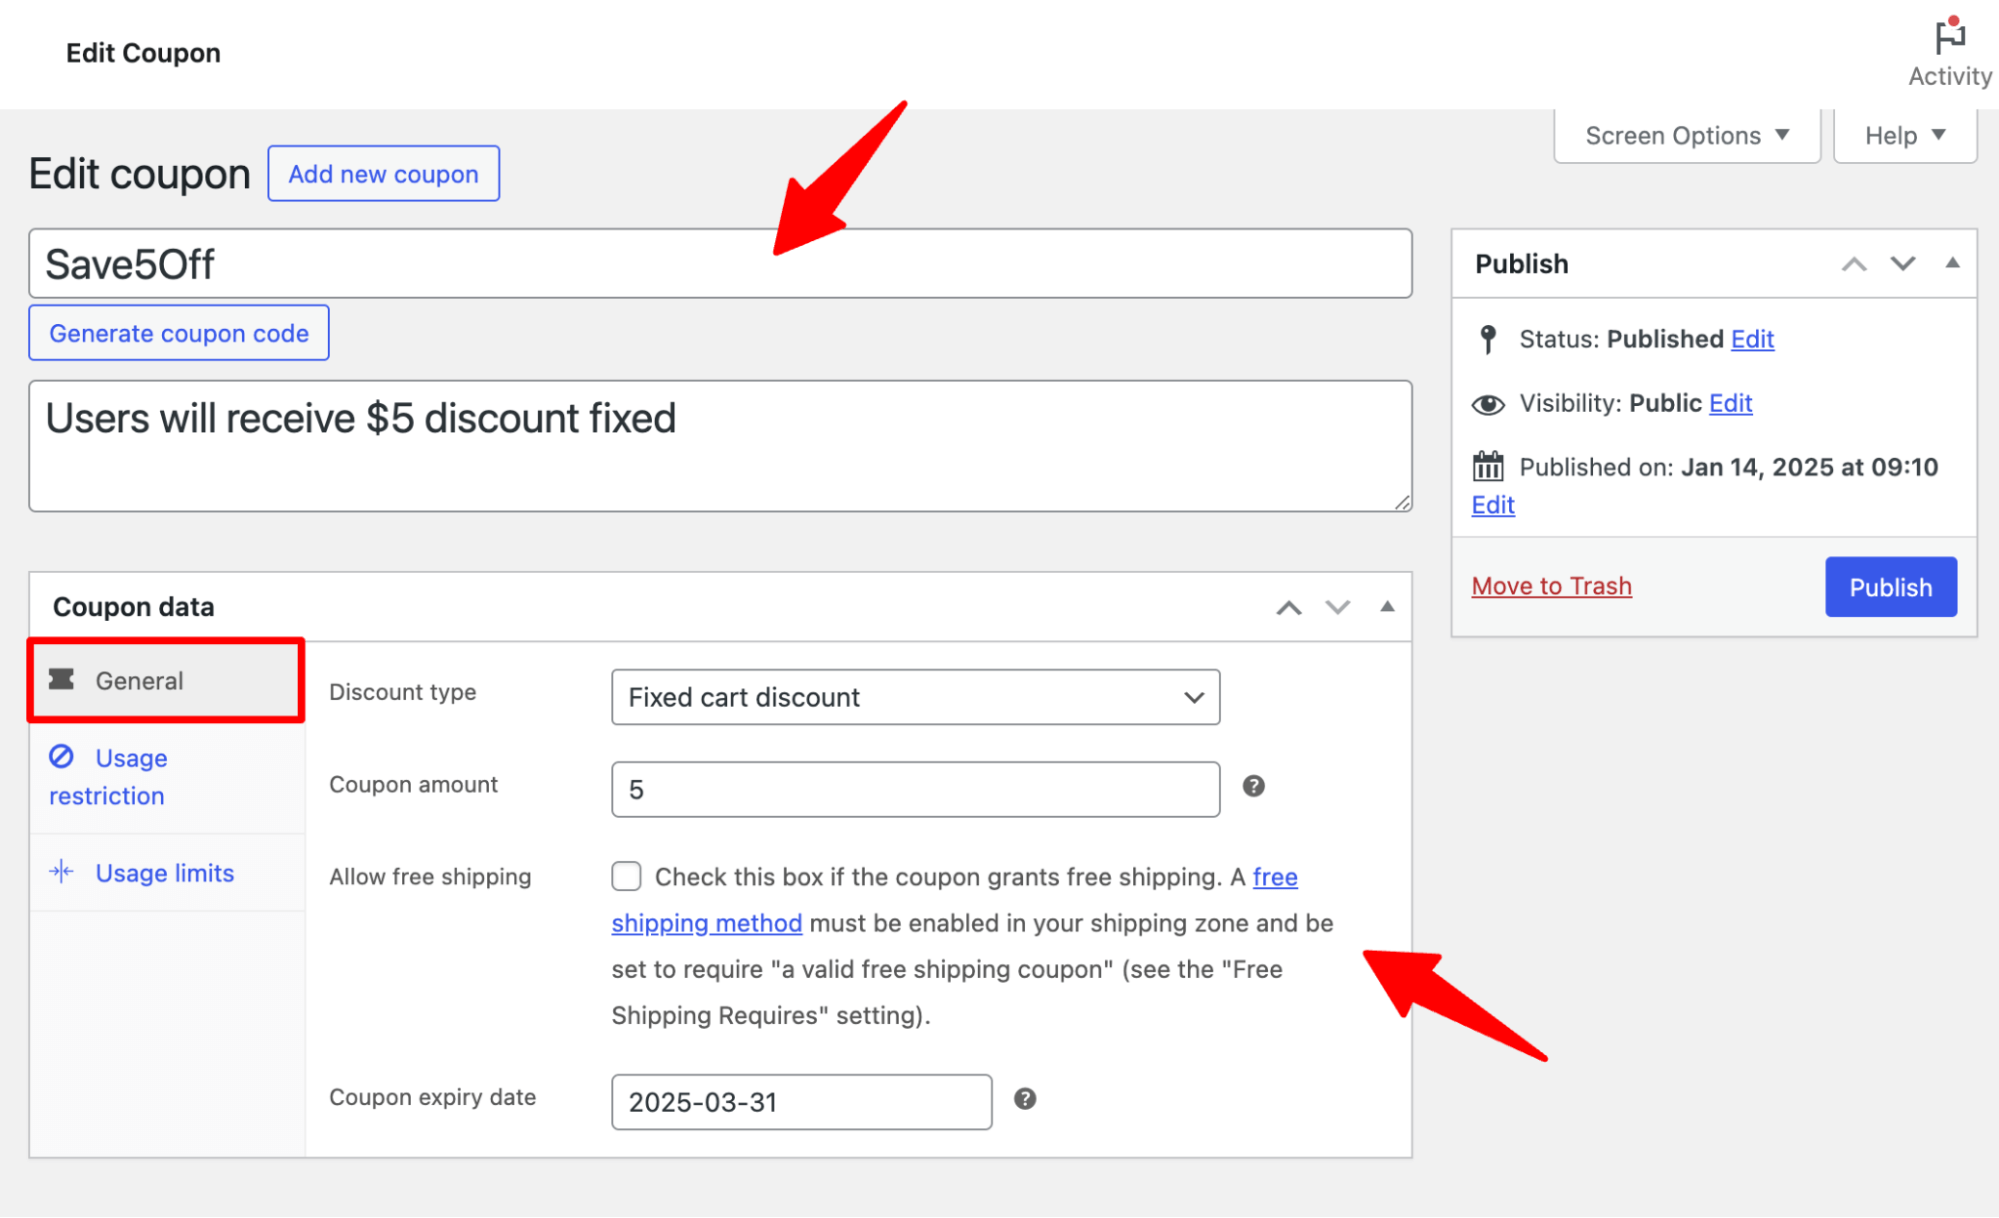
In the coupon data section, on the General tab, you can set the following options:
- Discount type
- Coupon amount
- Allow free shipping
- Coupon expiry date
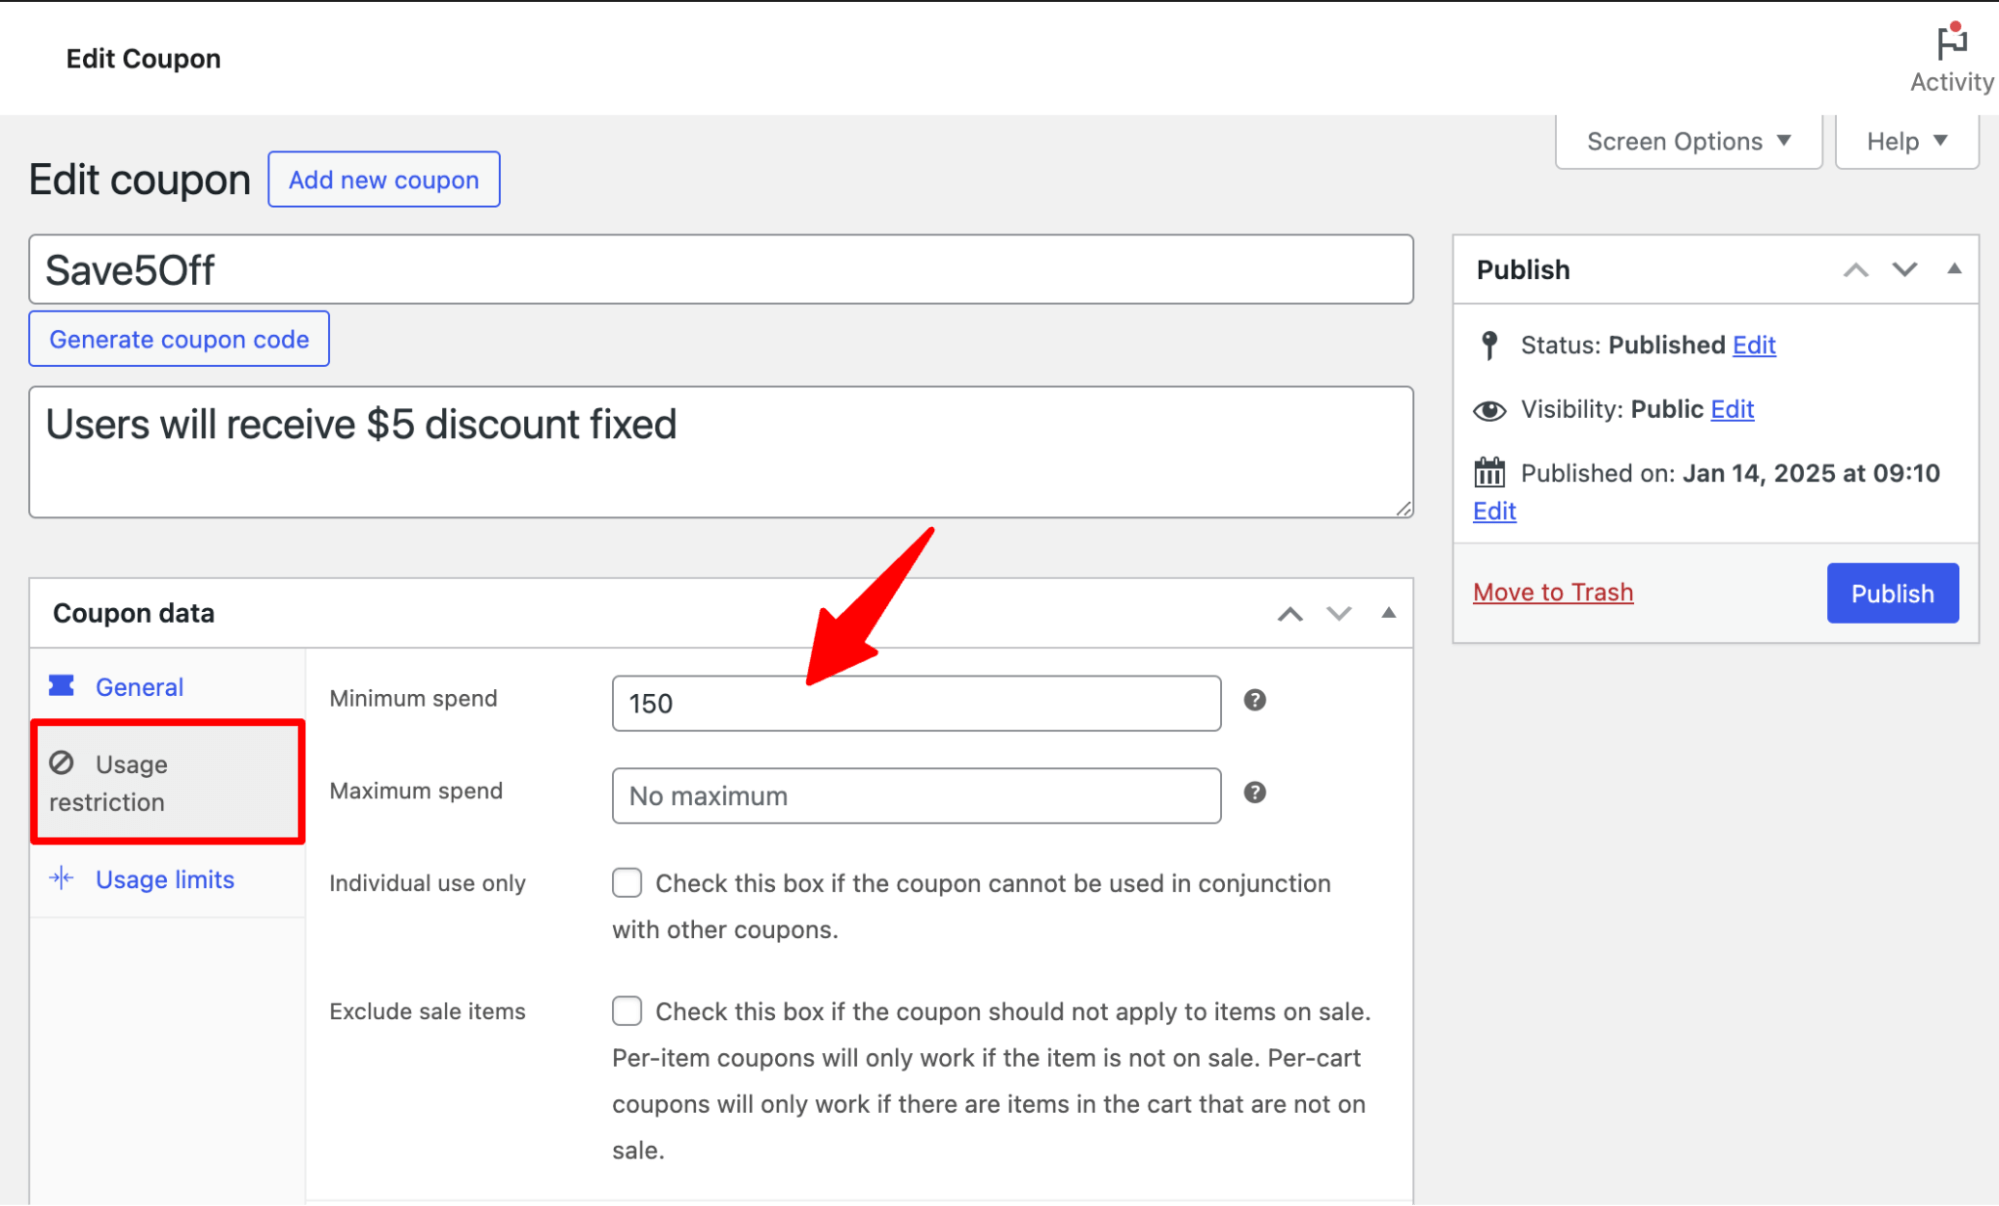
Setting the coupon usage restrictions and limits
You can find additional settings on the usage restriction and usage limits tab. For example, set a minimum spend.
Adding a minimum spending limit encourages more sales when it comes to applying coupons.
If you want to restrict auto-apply coupons to orders that include specific products or products from specific categories, you can do so in the Usage Restrictions tab.
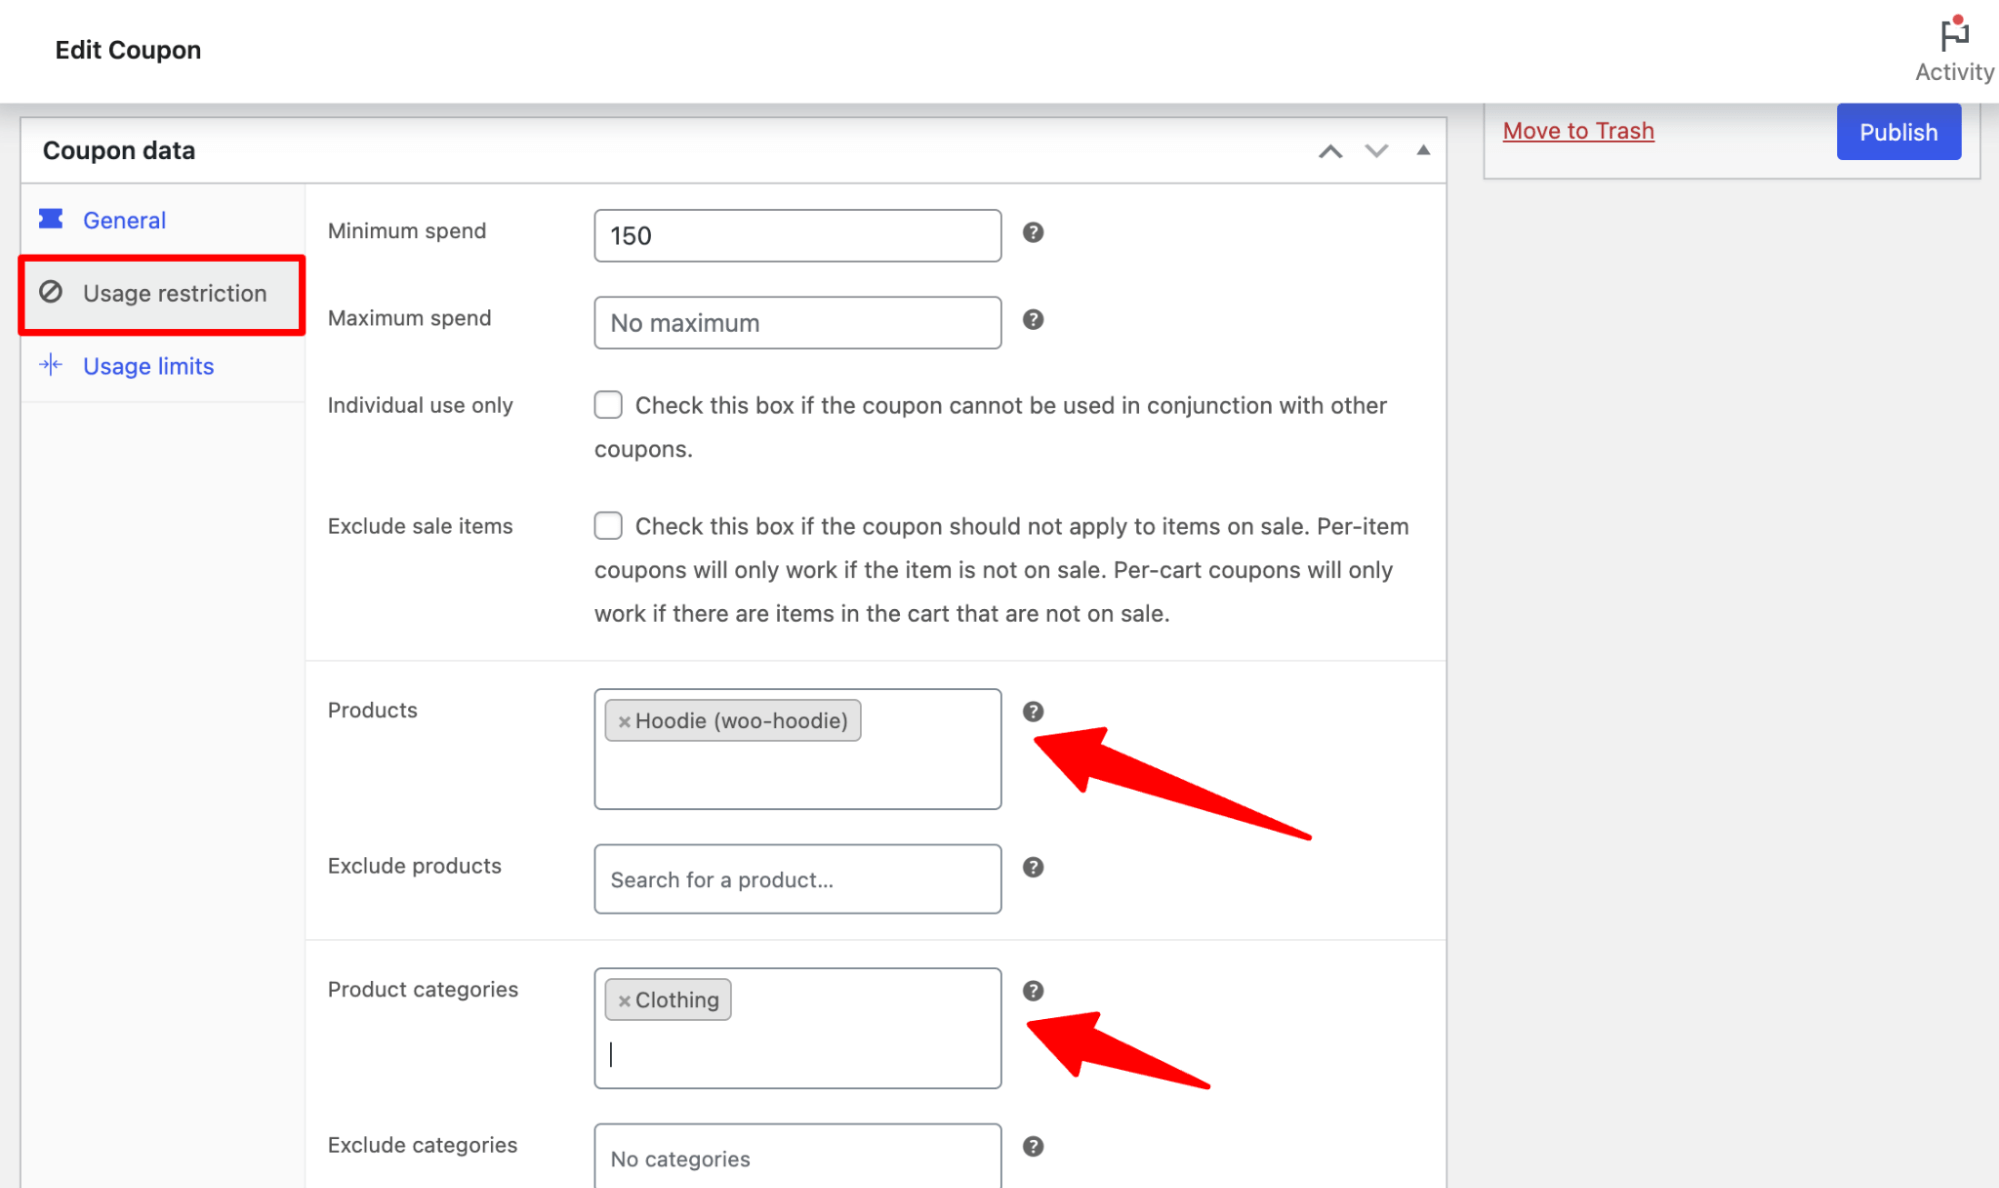
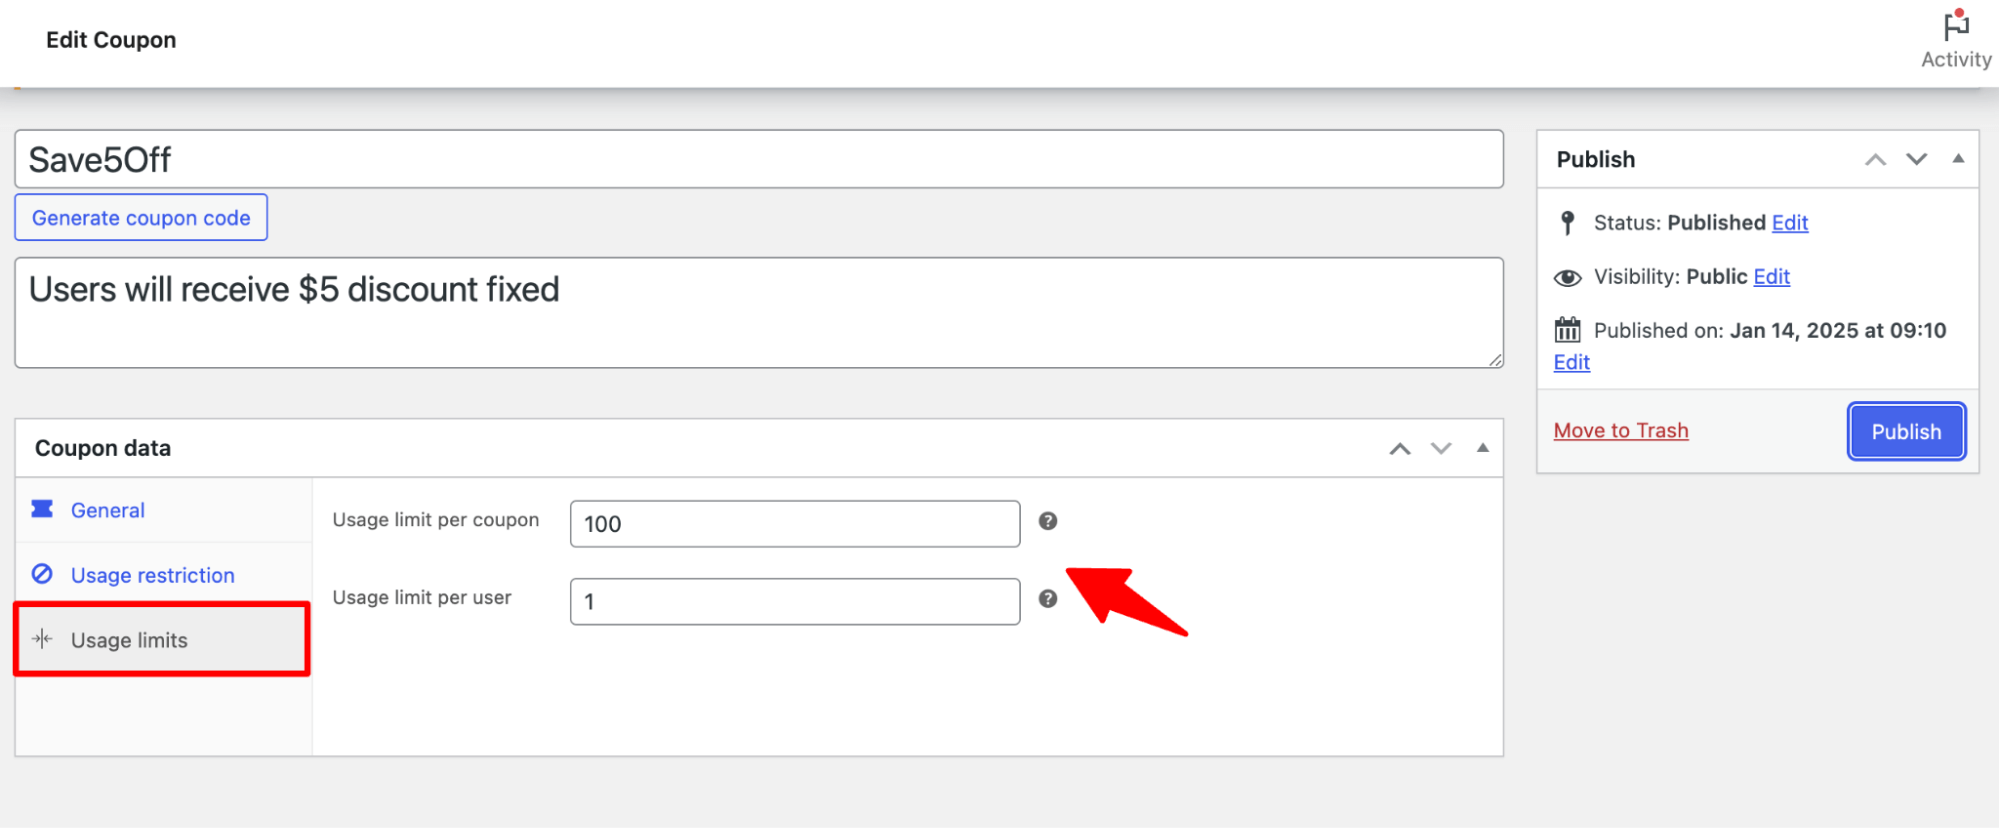
On the Usage Limits tab, you can set the number of times a customer can use a coupon and the number of times a coupon can be used.
Setting usage restrictions can be highly beneficial if you want to run campaigns like discounts for only the first, let's say, 100 users.
After setting up, click on 'Publish' to save the coupon code and make it usable.

Now that you have generated the coupon code, let’s look at how to auto-apply a coupon in WooCommerce based on the cart total in the next sections.
👉 For more details, you can read our blog on "WooCommerce coupons".
Method 1: Auto Apply Coupon on WooCommerce Checkout Page

This section will show you how to use FunnelKit Funnel Builder to offer auto-apply coupons on the checkout page.
Here, we will explain how you can offer auto-applied coupons to everyone, both without any conditions and with conditions such as minimum order requirements and use restrictions.
Before we move to the primary process, you need to install and activate FunnelKit Funnel Builder.
Follow these steps.
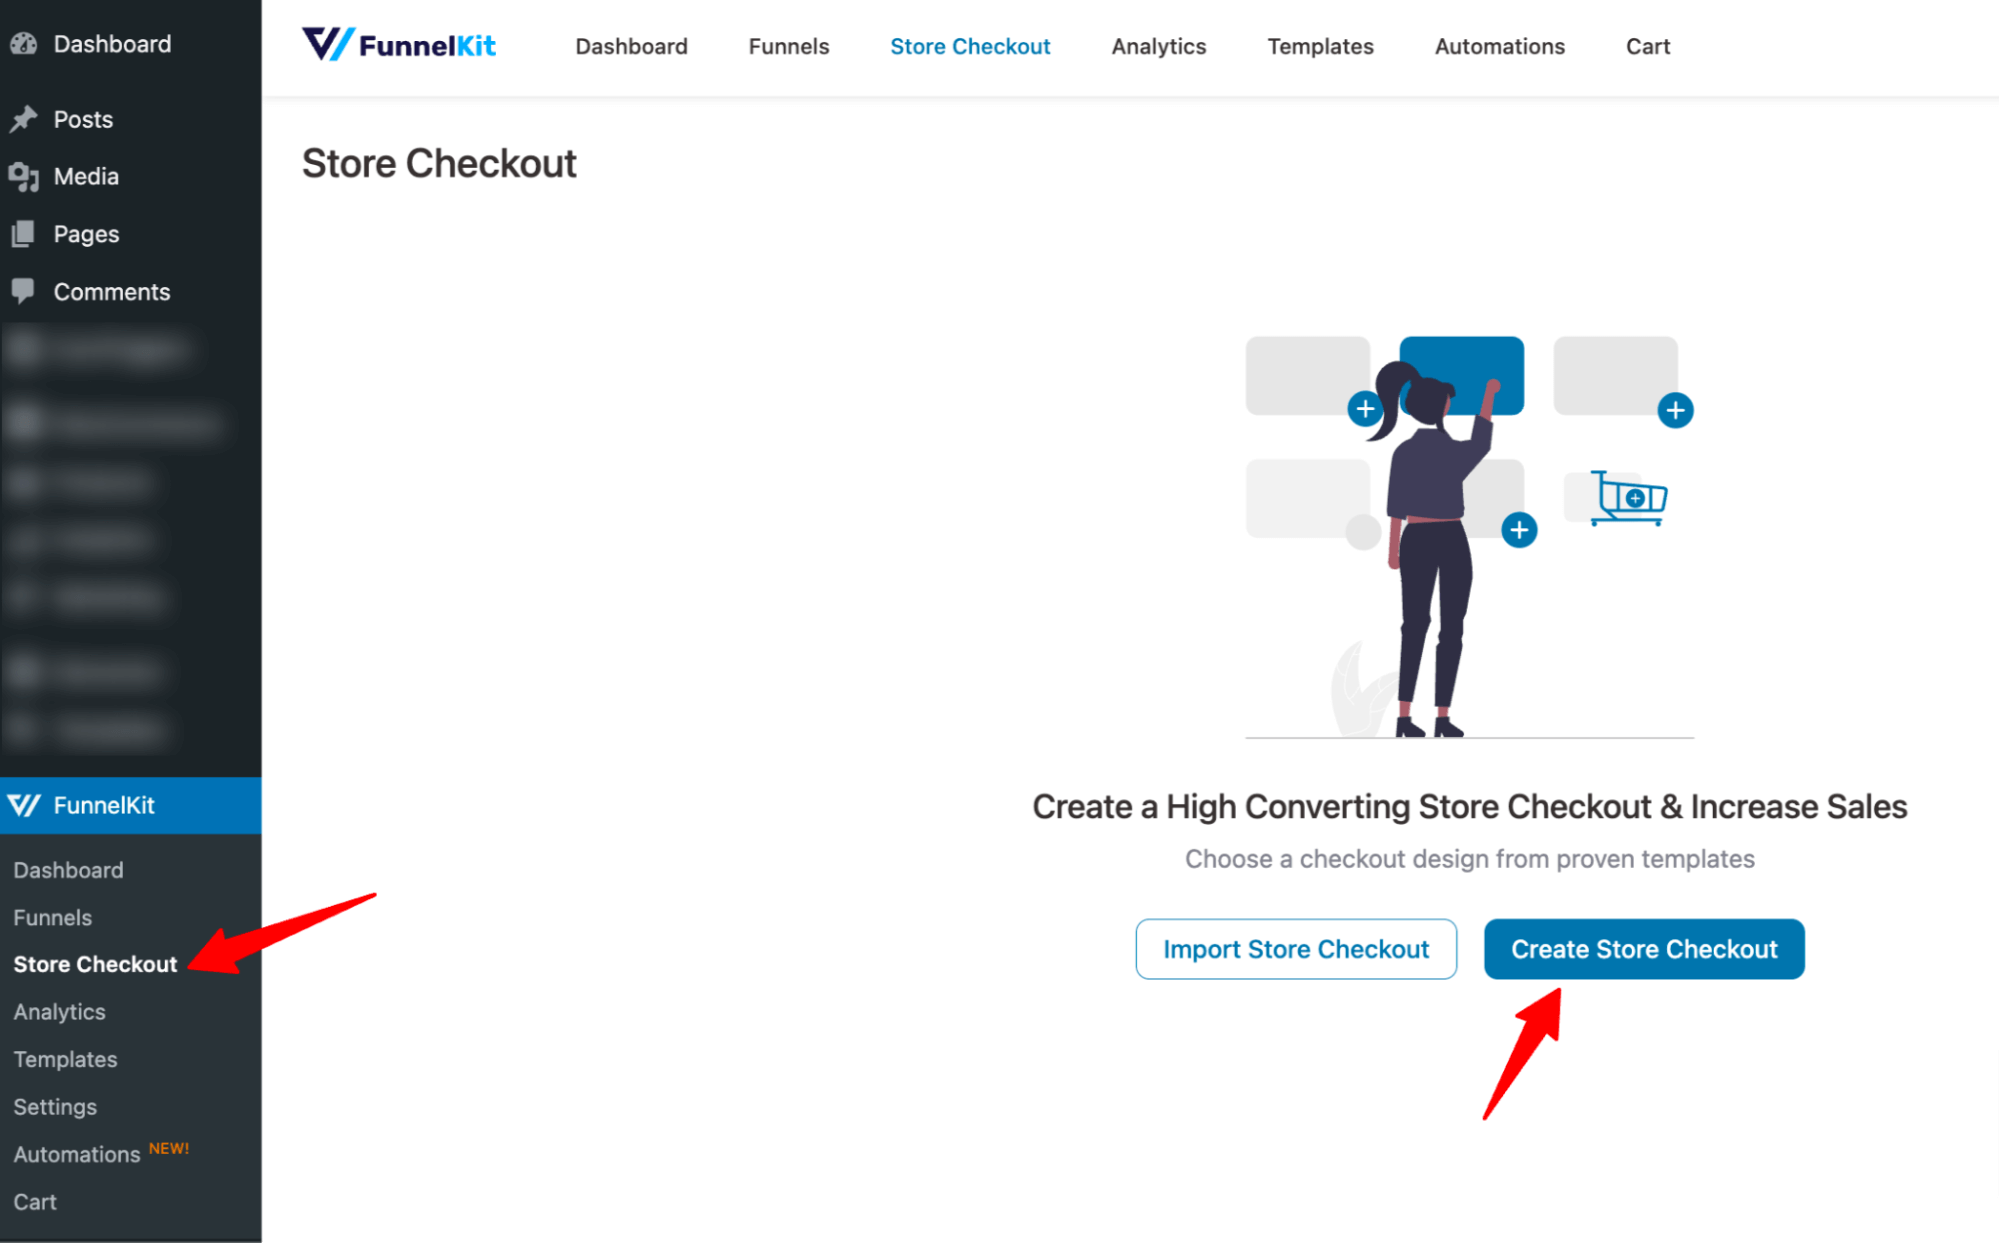
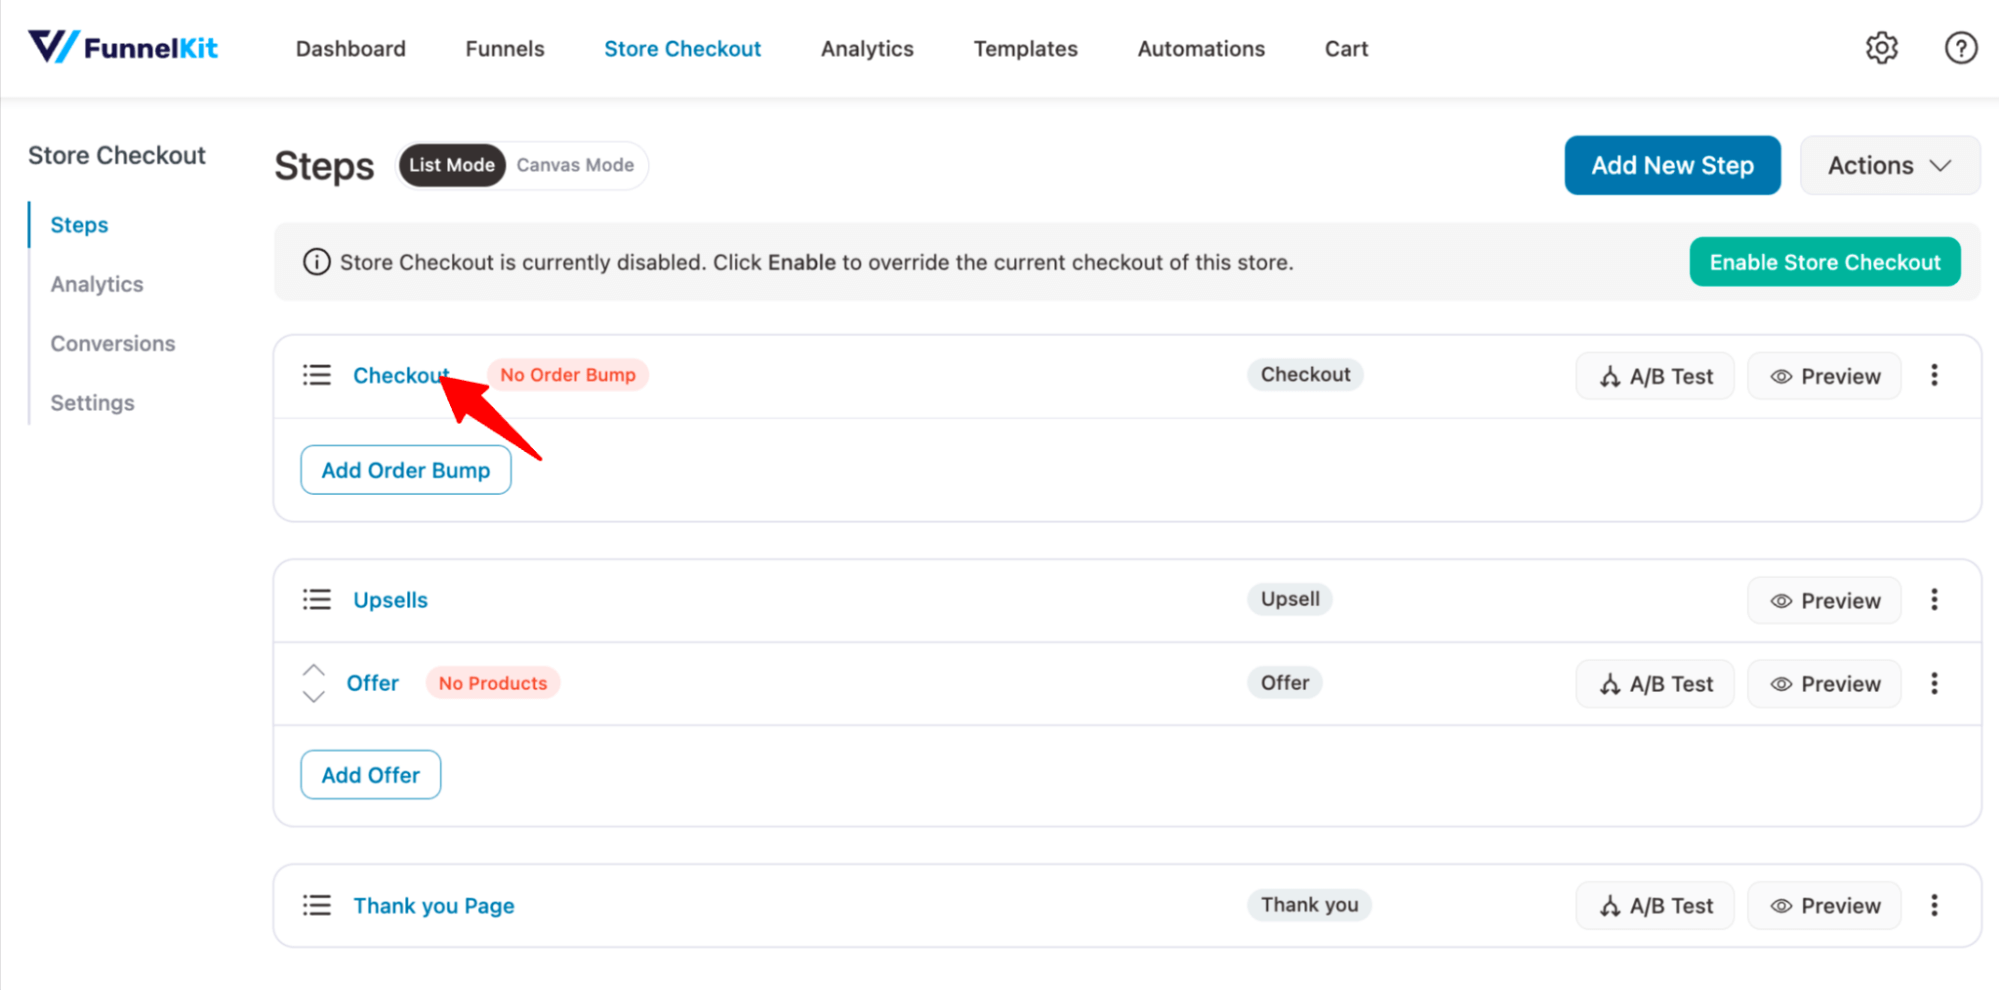
Step 1: Add a store checkout
We will create a custom or global store checkout to replace the default WooCommerce checkout page.
To create a new store checkout, navigate to FunnelKit ⇒ Store Checkout and click on 'Create Store Checkout'.
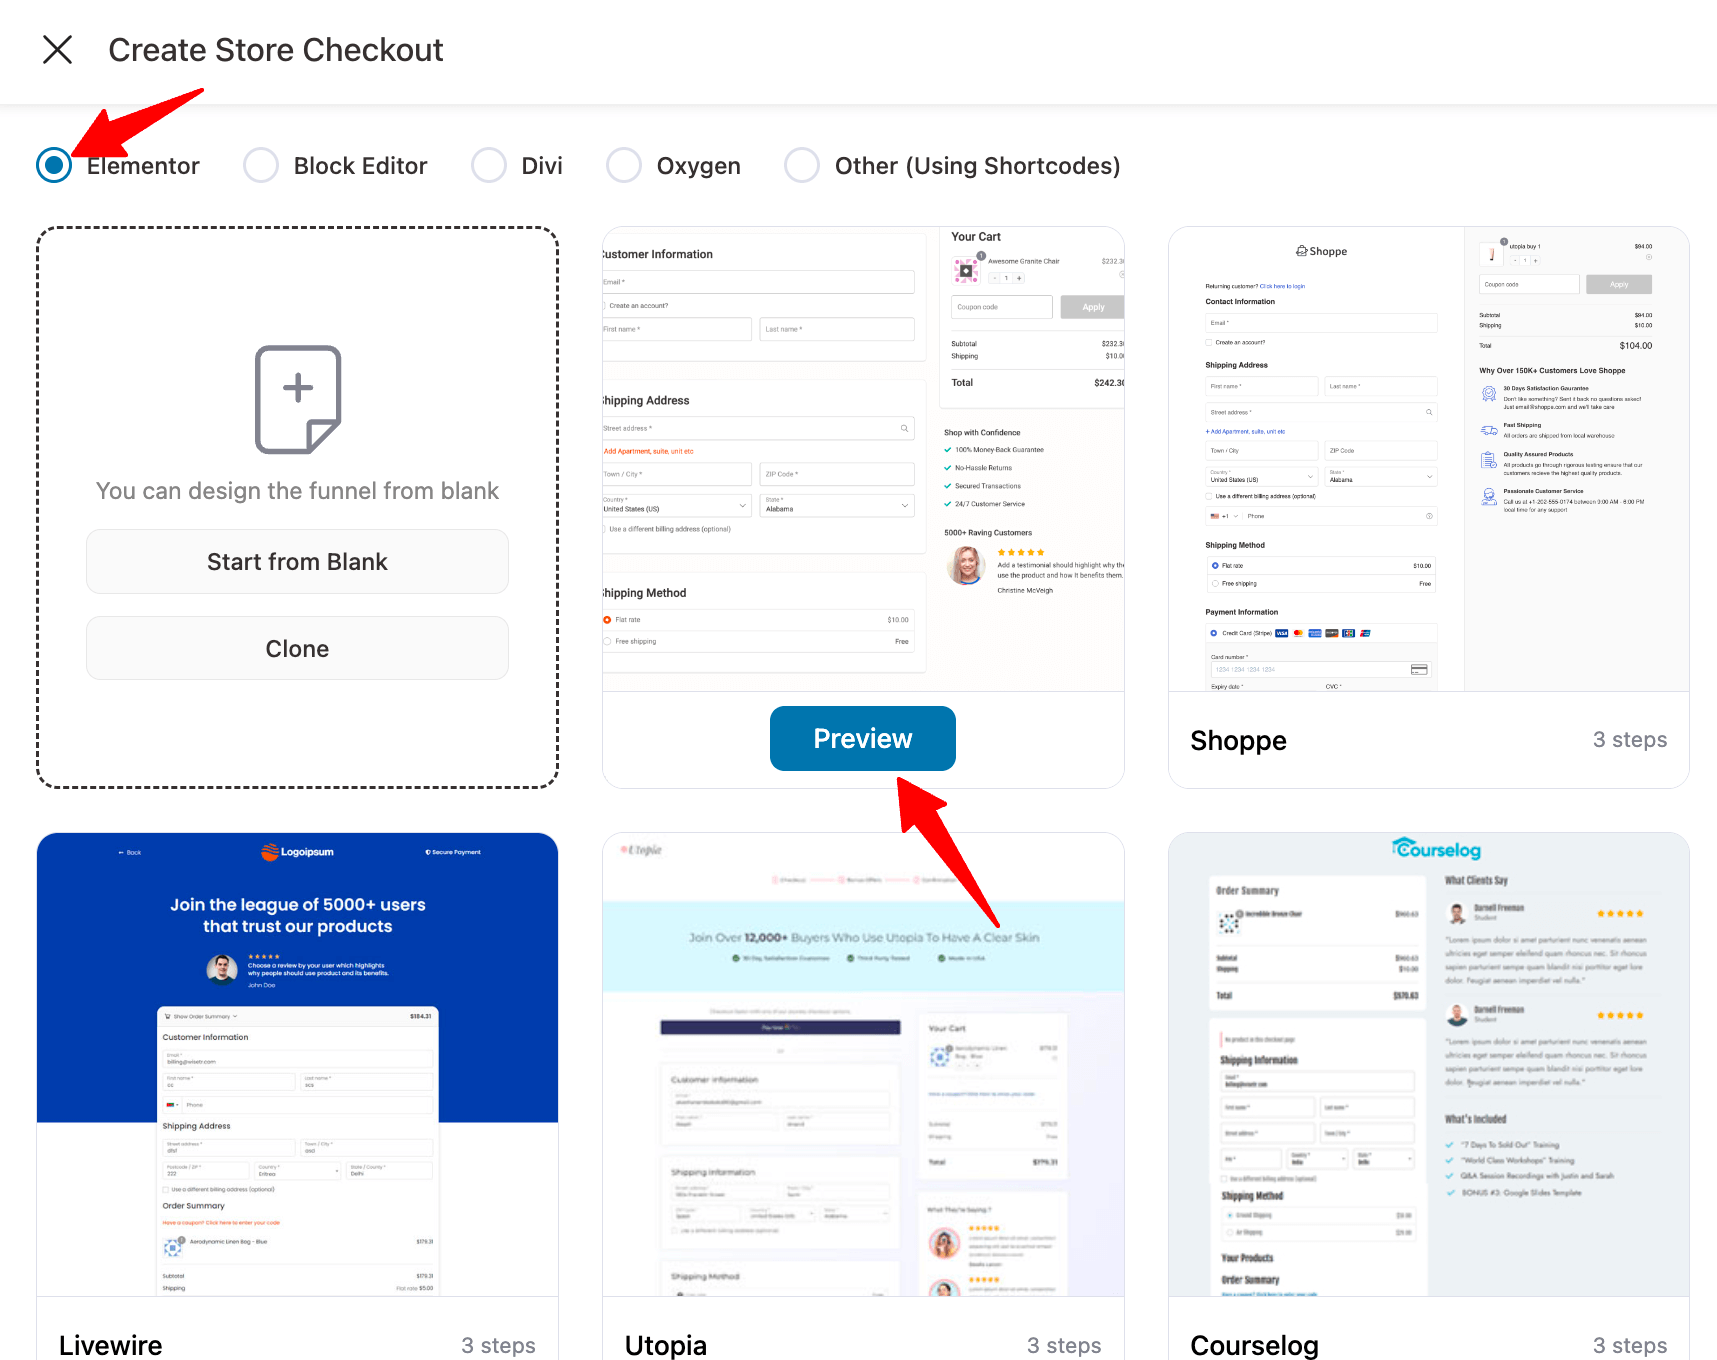
You should now see a new window with all the prebuilt templates from FunnelKit. Choose your favorite page builder and hover over the template you like.
To preview the template pages, hover and click on the 'Preview' button.
Here, we are going with the Elementor page builder and the “Minimalist” template. This template has three steps: checkout, one-click upsell, and thank you page.
Before you can import this template, decide whether you want a single-page checkout or multi-page checkout.
Here, we're going with the simple single-page layout.
To import the template you choose, click on 'Import This Funnel', provide a name and click on Done.

This will add the newly created store checkout.
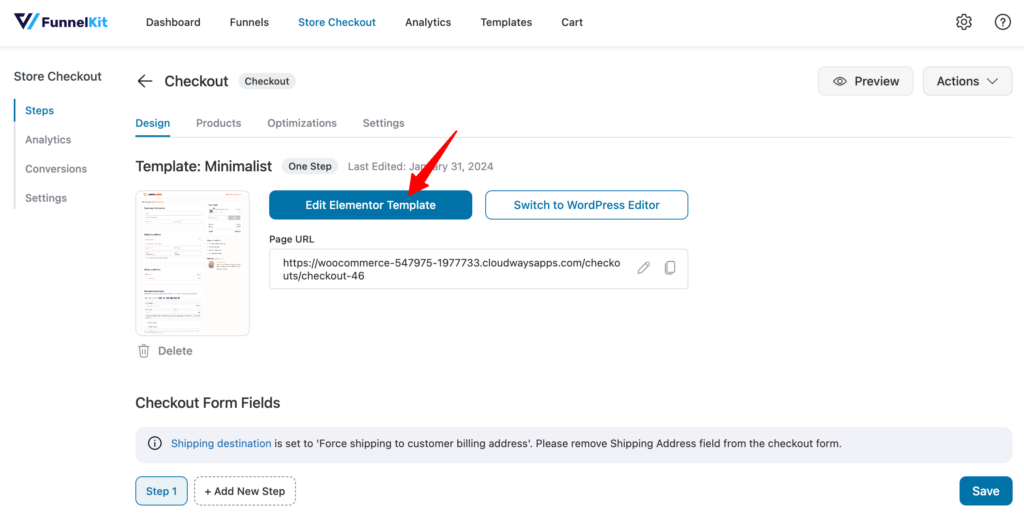
Step 2: Customize the checkout page
Click on the checkout page to start customizing it.
On the Design tab, you can customize the design of your checkout page template.
For more details, check our post on customizing the WooCommerce checkout page.
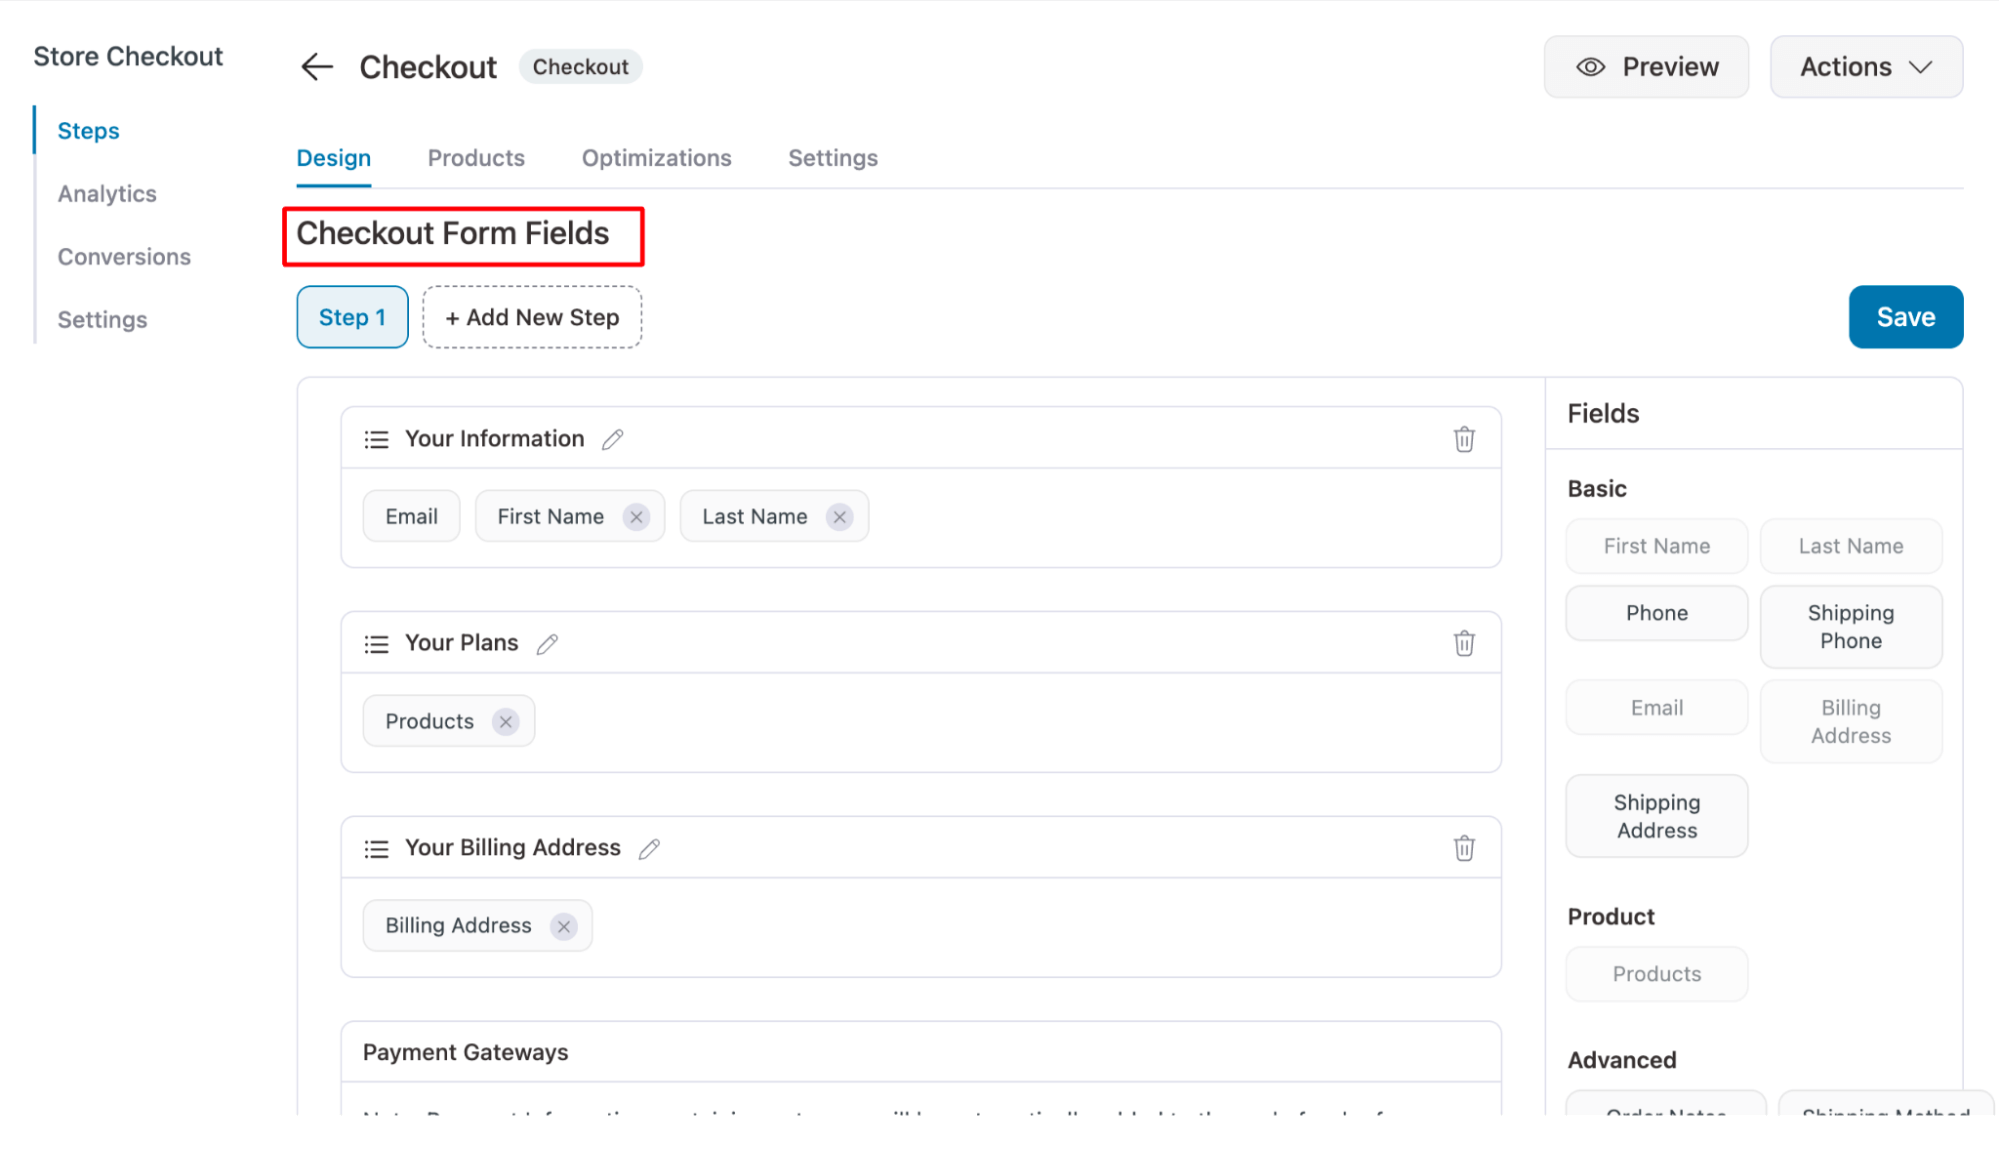
Scroll down to the Checkout Form Fields. Here, you can add custom fields, edit, rearrange, or even remove unnecessary checkout form fields.
For more details, refer to our WooCommerce Checkout Field Editor post.
Step 3: Enable the auto-apply coupon option
To enable the WooCommerce auto-apply coupon feature, move to the Optimizations tab.
Under Auto Apply Coupons, click on 'Yes” to enable auto-apply coupons on the WooCommerce checkout page.
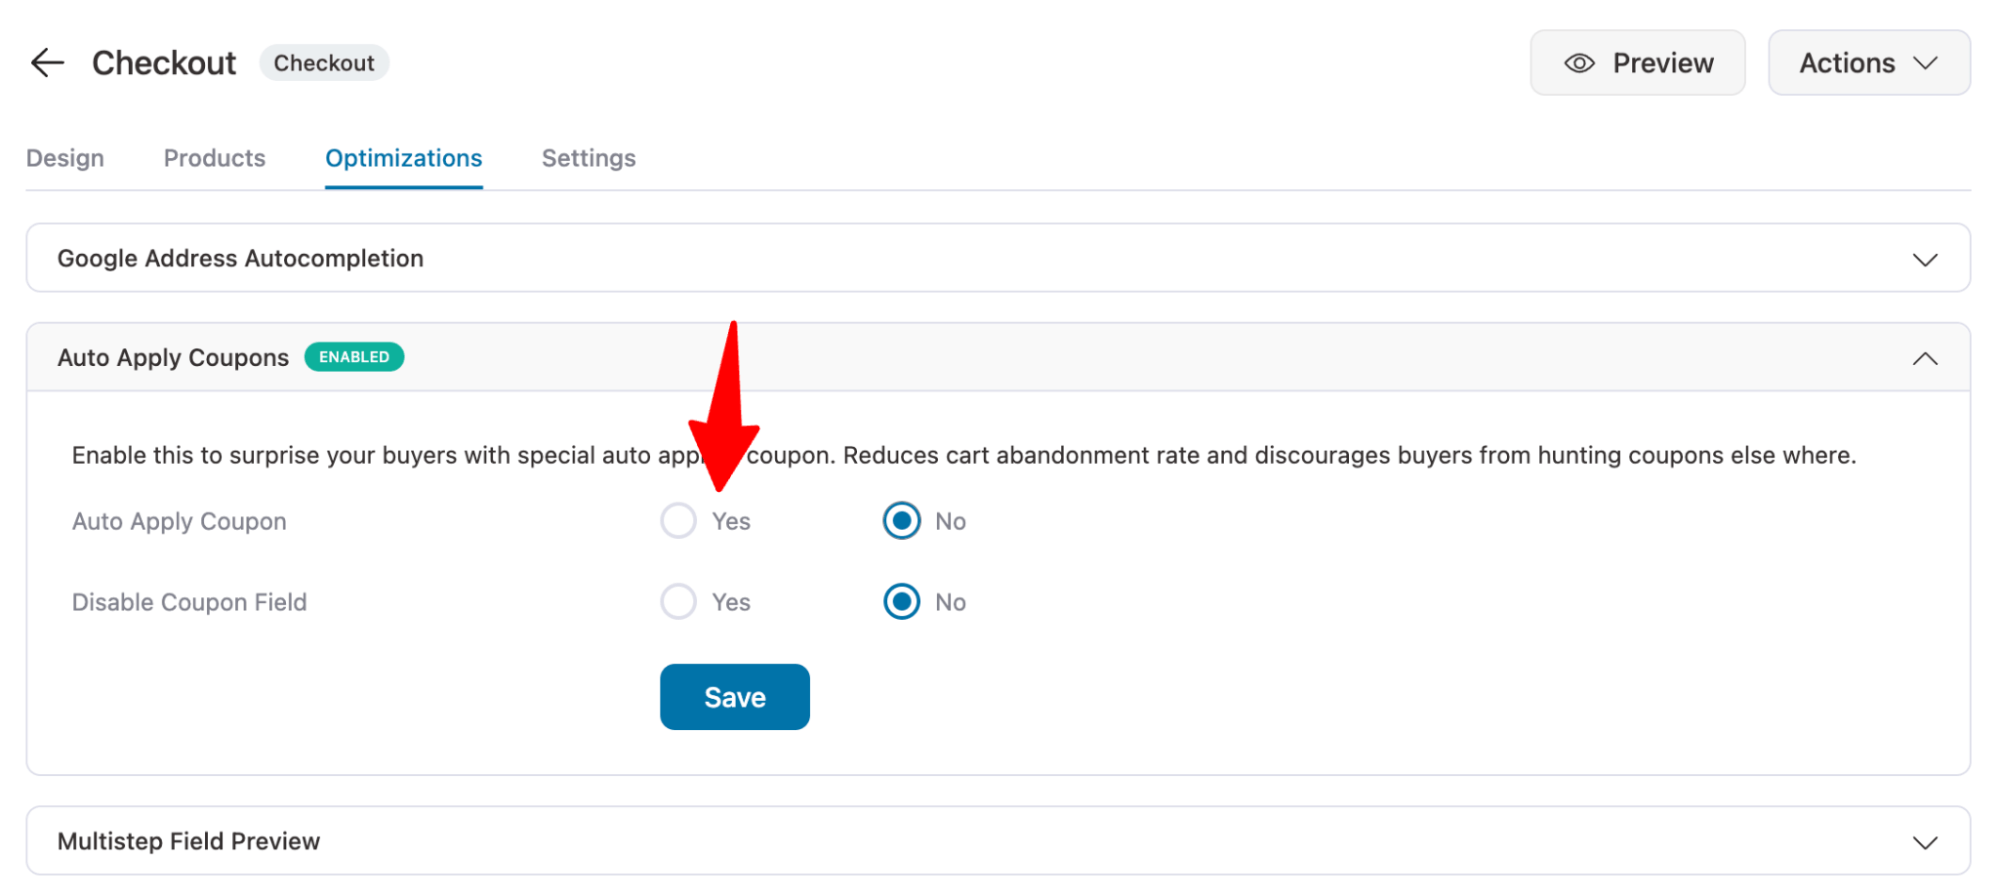
Now, add the coupon code you want to auto-apply.
Make sure you've already created the coupon we shared earlier in this blog. Add conditions to the coupon code based on your requirements, such as a minimum order total or usage restrictions.
Once you have the coupon ready, enter the coupon code. You can deactivate the coupon field so that users don’t have to enter a coupon code manually.
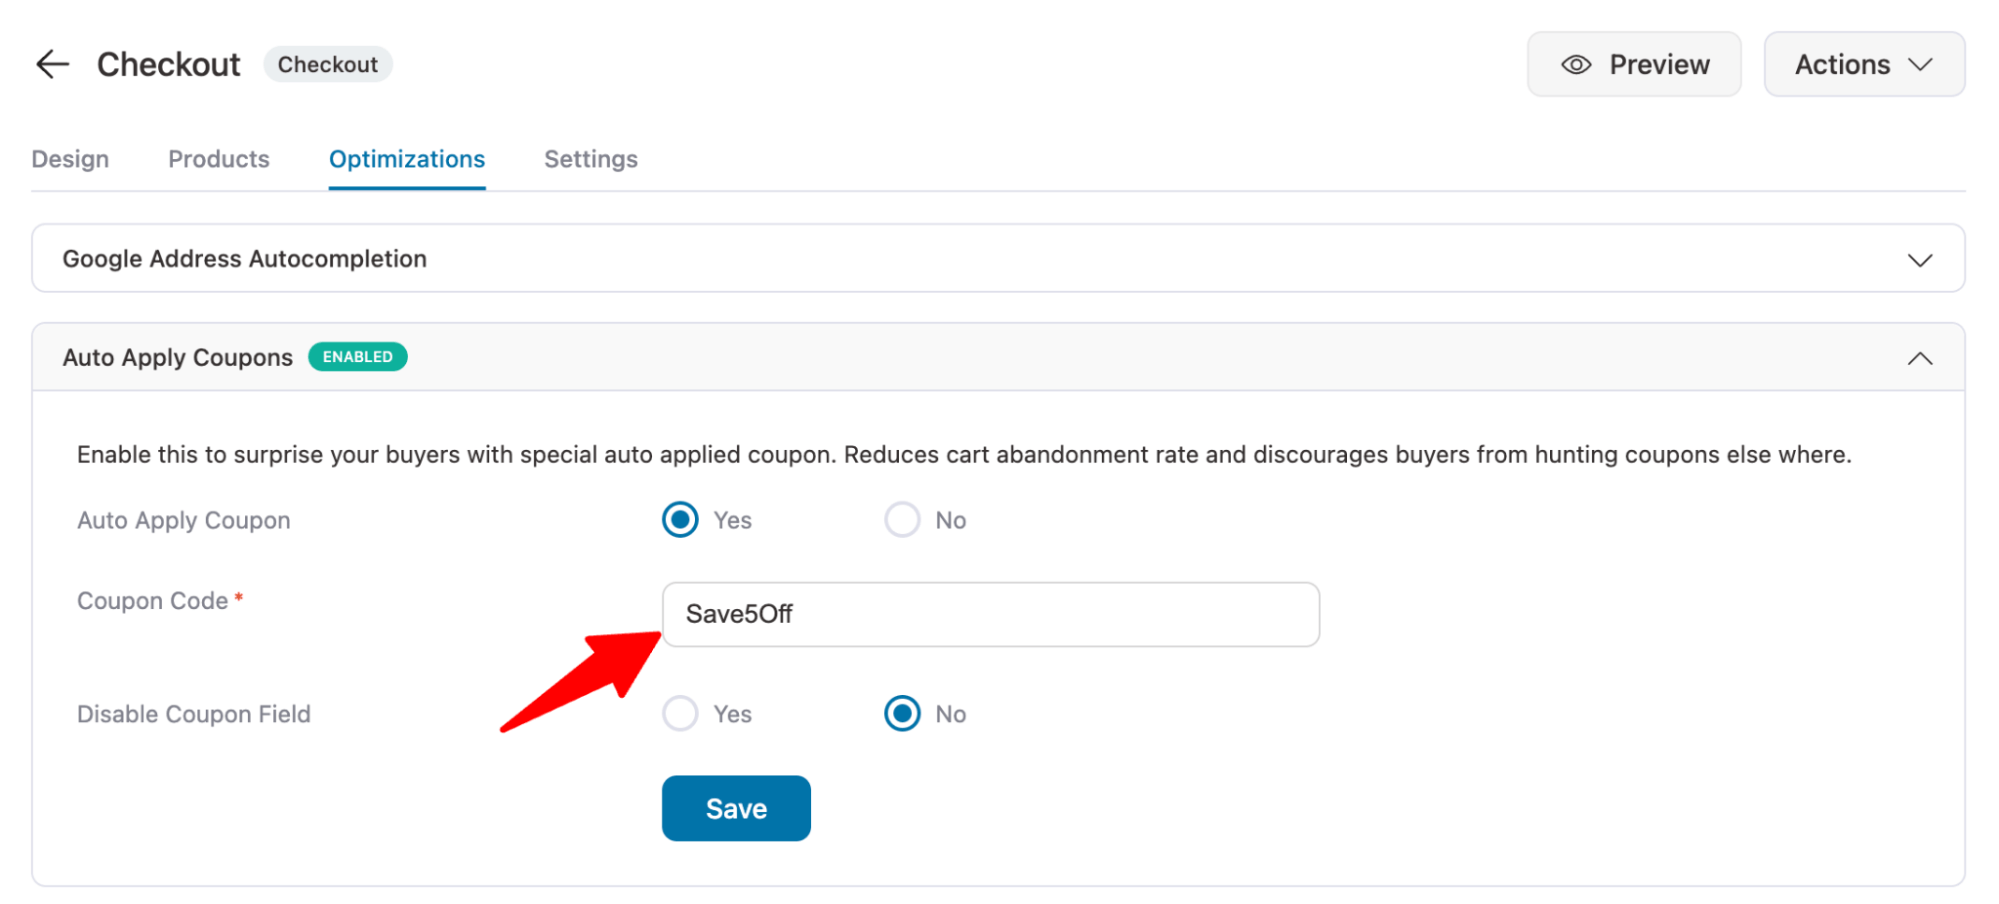
After that, click on “Save” to update the options.
Please note that you can return at any time and remove/disable the auto-apply coupon code from here.
Along with auto-apply coupons, you can also optimize your checkout page with express payment options (Google Pay and Apple Pay), enable Google address auto-complete, and an enhanced phone field.
Step 5: Enable store checkout
The last step is to activate the store checkout. To do this, click the “Enable Store Checkout” button.
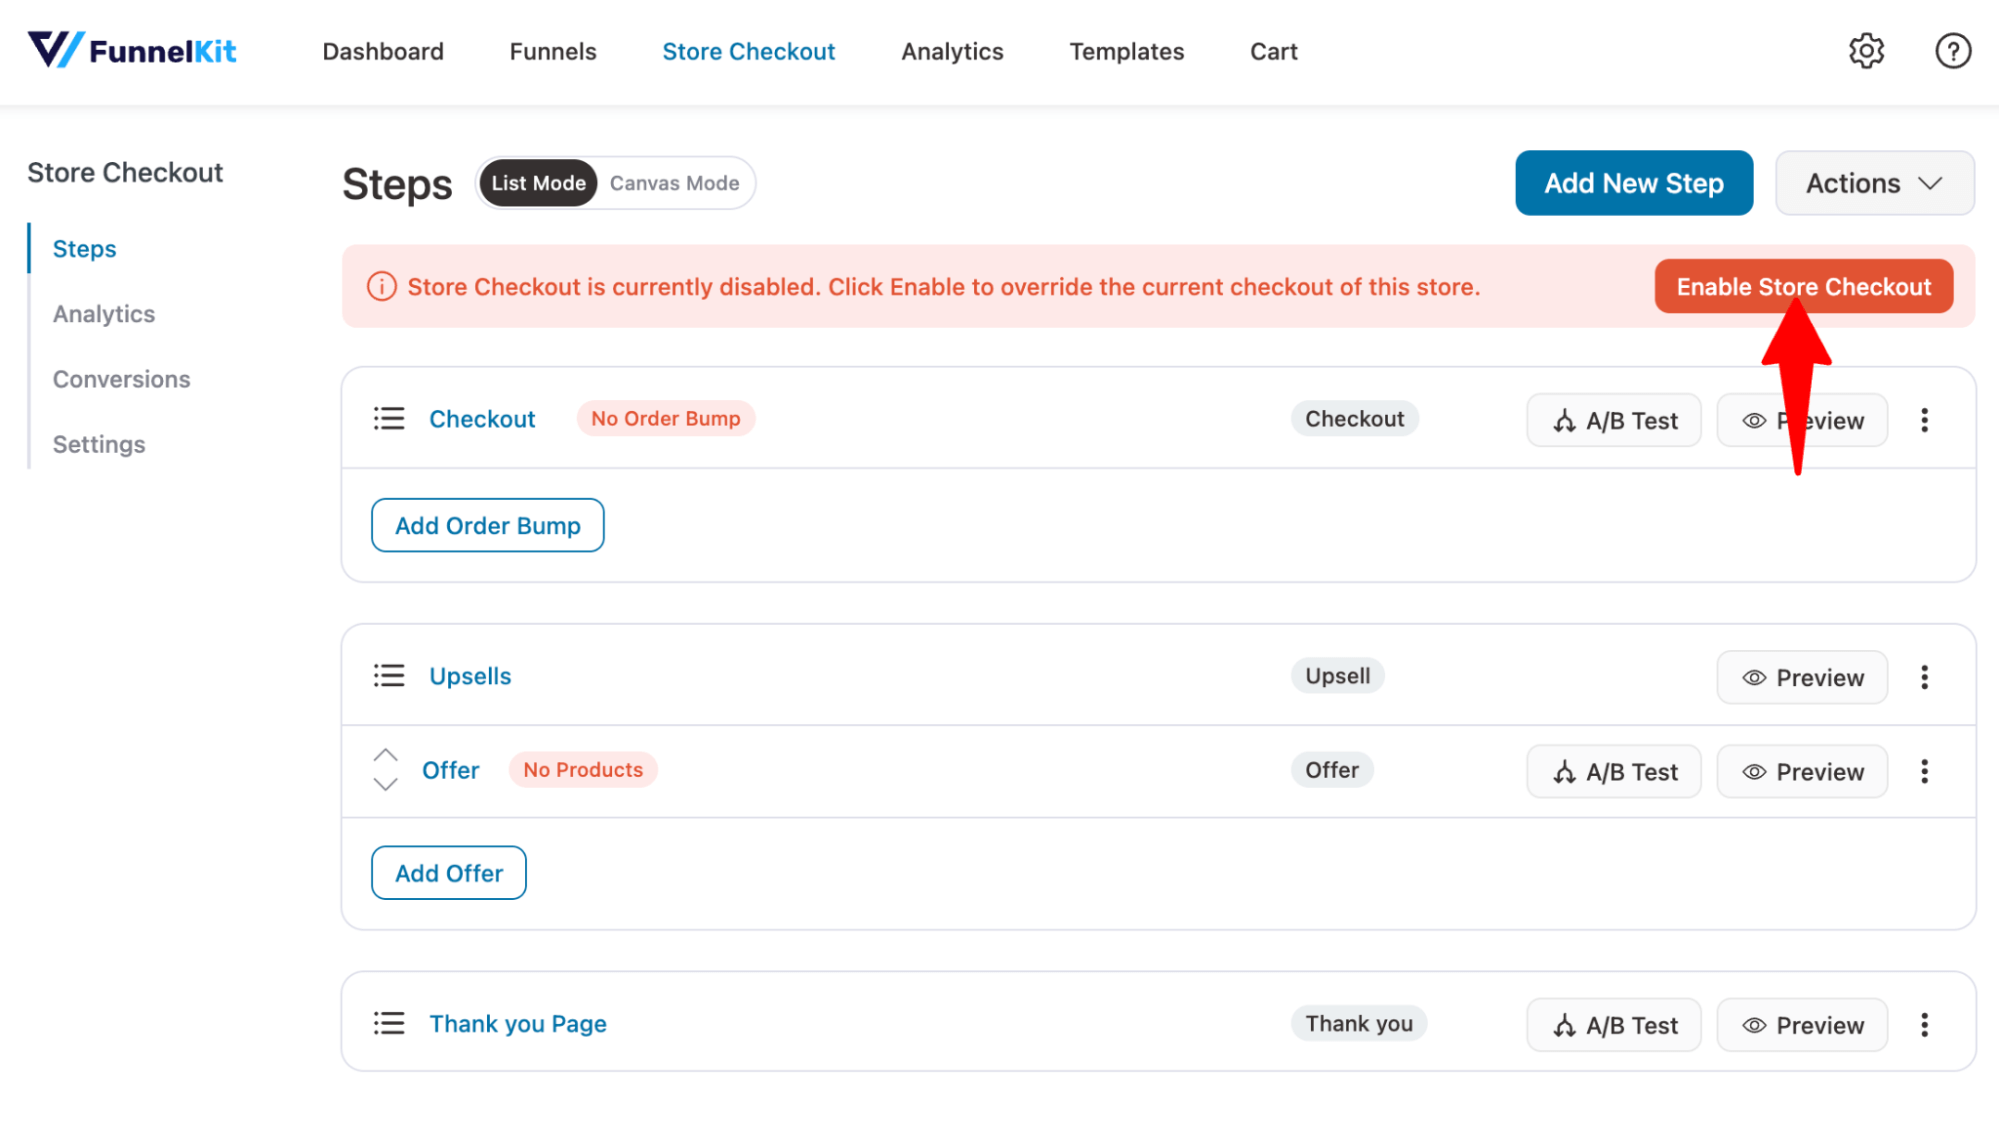
This will ensure your store's checkout page with the auto-apply coupon feature is live.
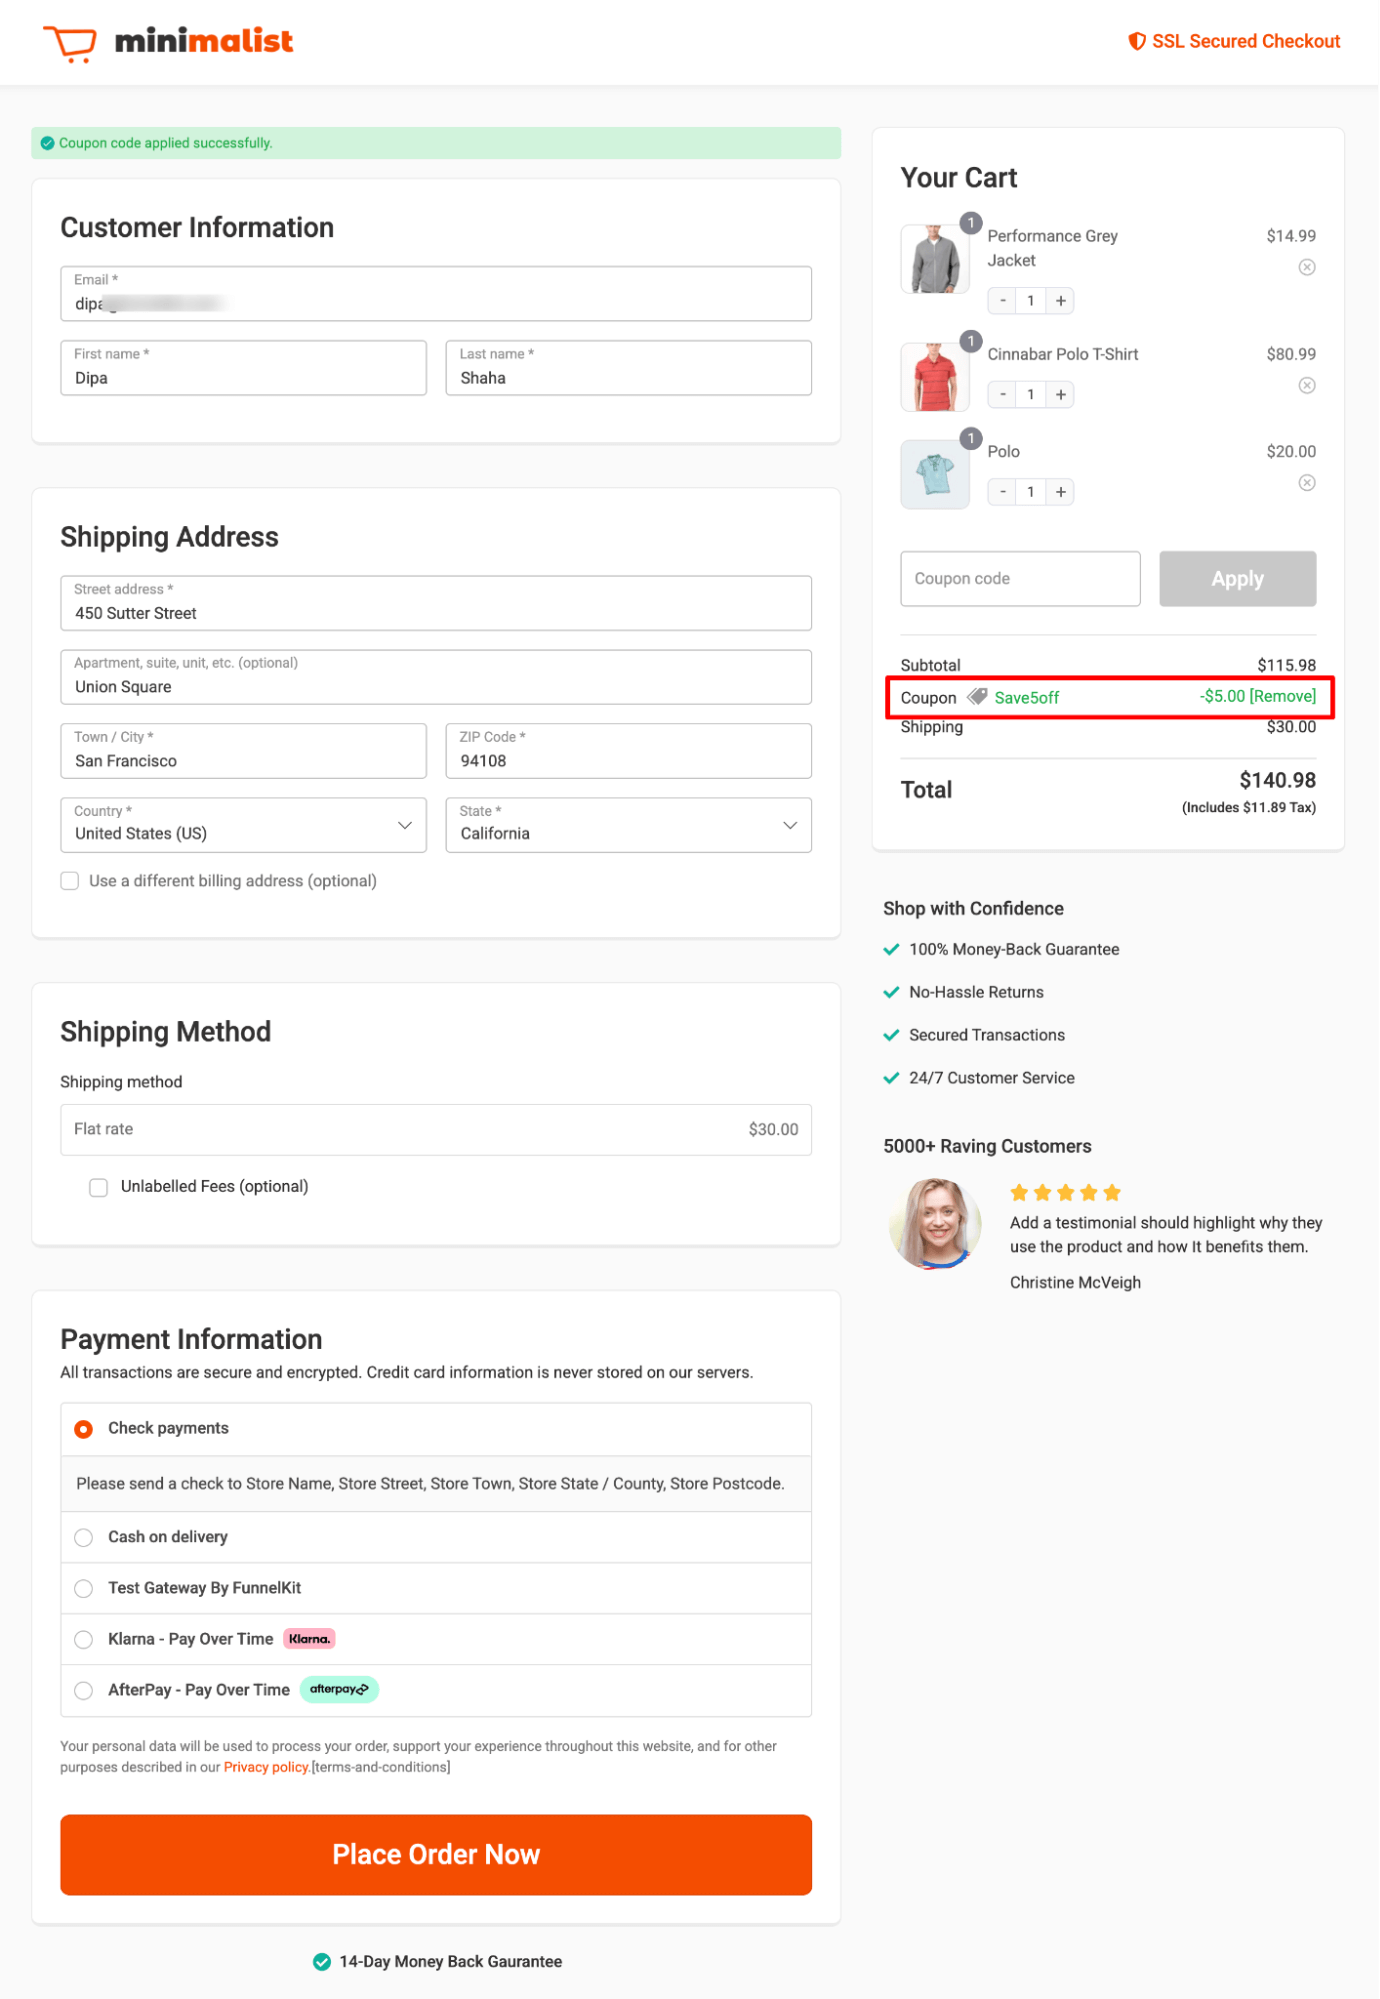
To test the process, add some products to the cart and head on to the checkout page.
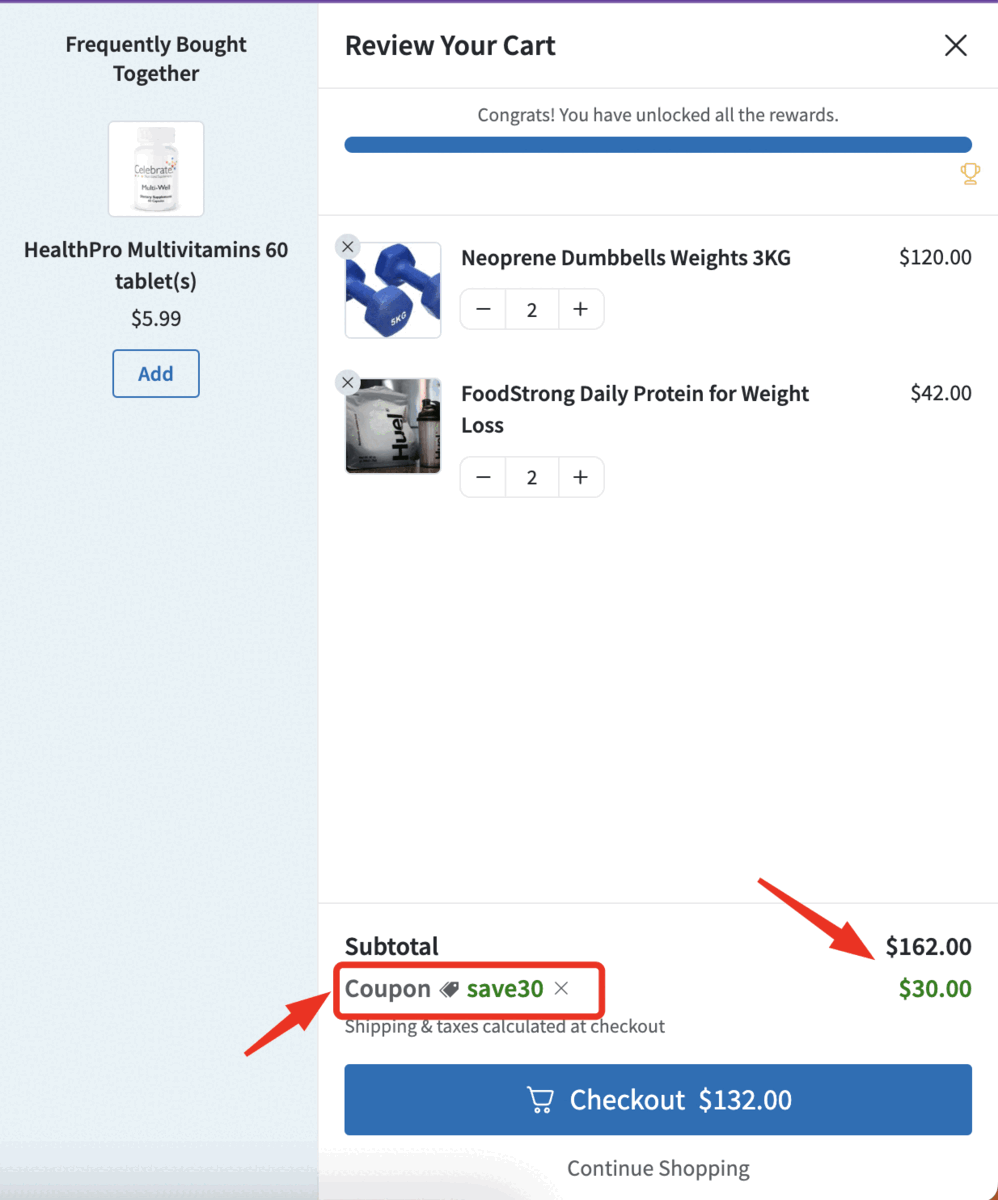
Based on the coupon you set, it will be automatically applied when the conditions are met.
Here, we set a coupon code that requires a total of $150 for an order, and the cart items must be from the clothing category.
As with the checkout page, you can customize your one-click upsell and thank-you pages as well.
This was all about how to offer WooCommerce auto-apply coupons on the checkout page with different conditions.
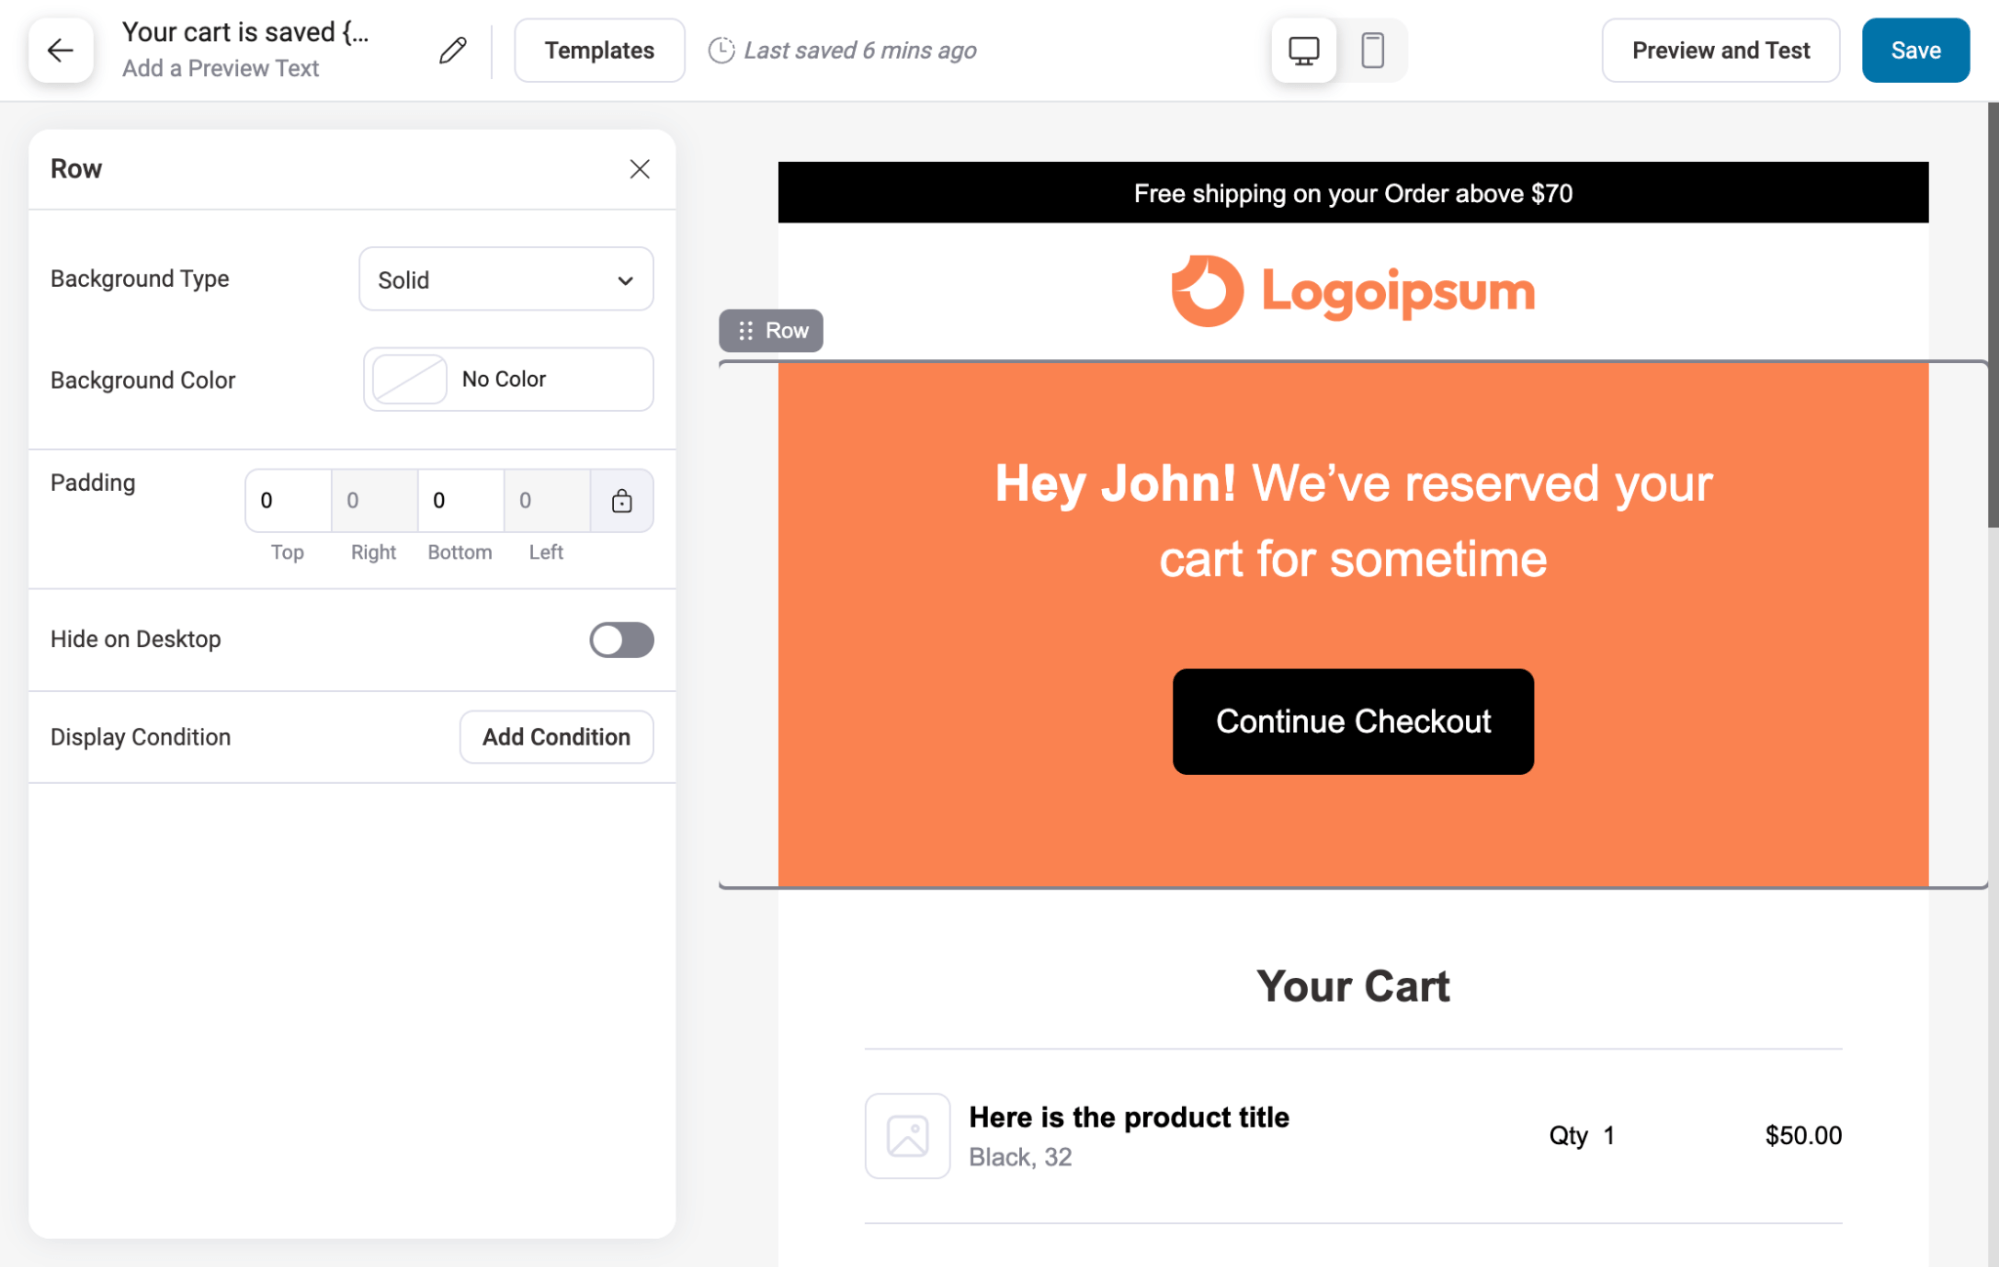
Method 2: Automatically Apply a Coupon For the Minimum Cart Value on a Sliding Cart
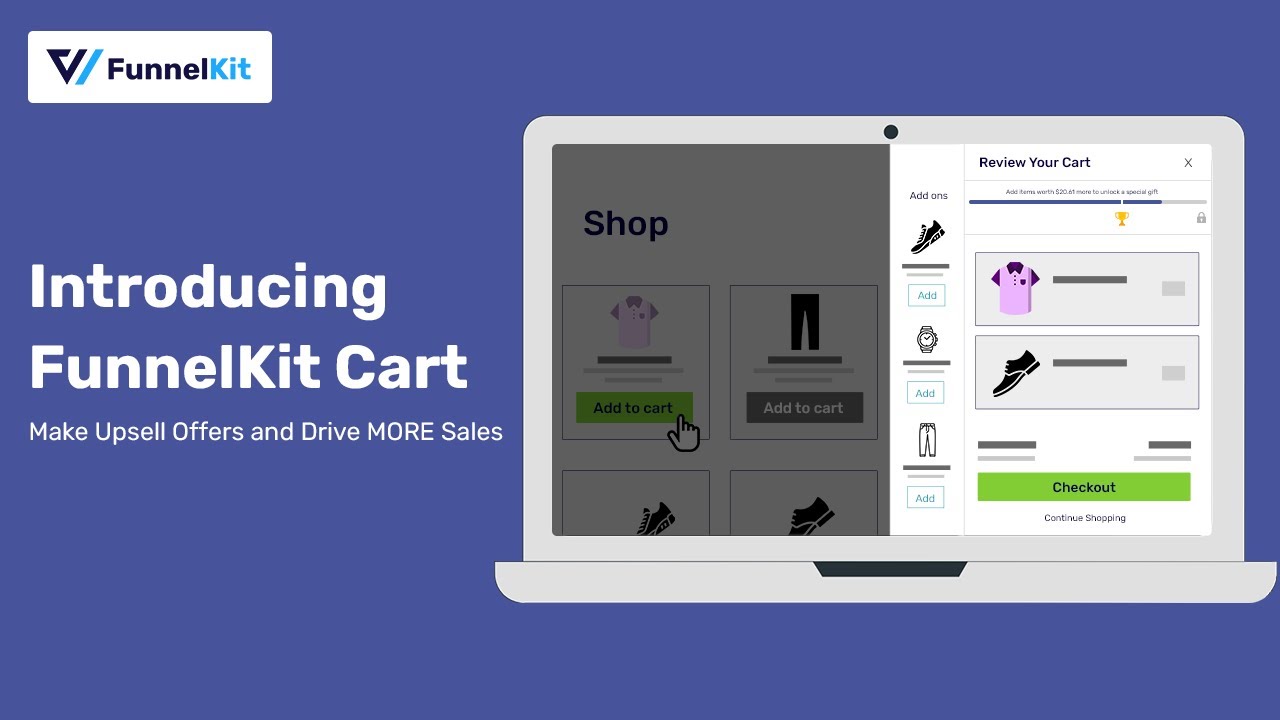
Boost your store’s average order value by setting a minimum purchase threshold with FunnelKit Cart.
Its in-cart recommendations offer relevant products, while the reward system shows users how much more to add and lets them shop directly from the cart.
Here's a quick preview:
To offer an auto-apply coupon when the minimum spend is met, install and activate FunnelKit Cart.
The premium version is included in FunnelKit Plus and above plans. Once activated, you're all set!
Step 1: Enable the mini cart option
First, you need to enable the mini cart option. To do that, go to FunnelKit ⇒ Cart and turn on the “Enable Cart" toggle button.
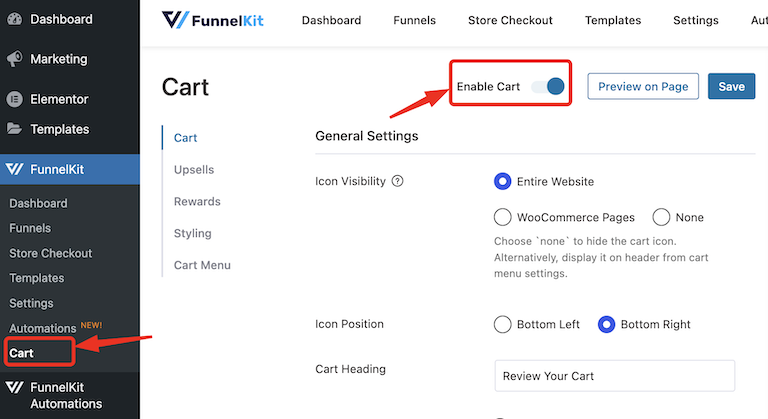
After enabling the slide-in cart, you can choose the cart icon display and positioning inside your WooCommerce store.
Watch this video below:
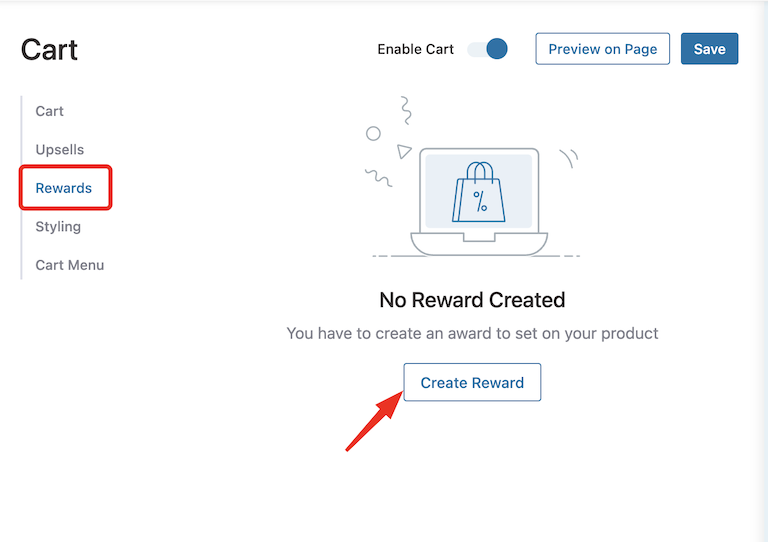
Step 2: Add auto-apply coupon
FunnelKit Cart’s smart rewards feature offers three reward types to boost order value based on different conditions.
Here, we will show you how to offer a discount coupon and ensure it’s auto-applied to the mini cart.
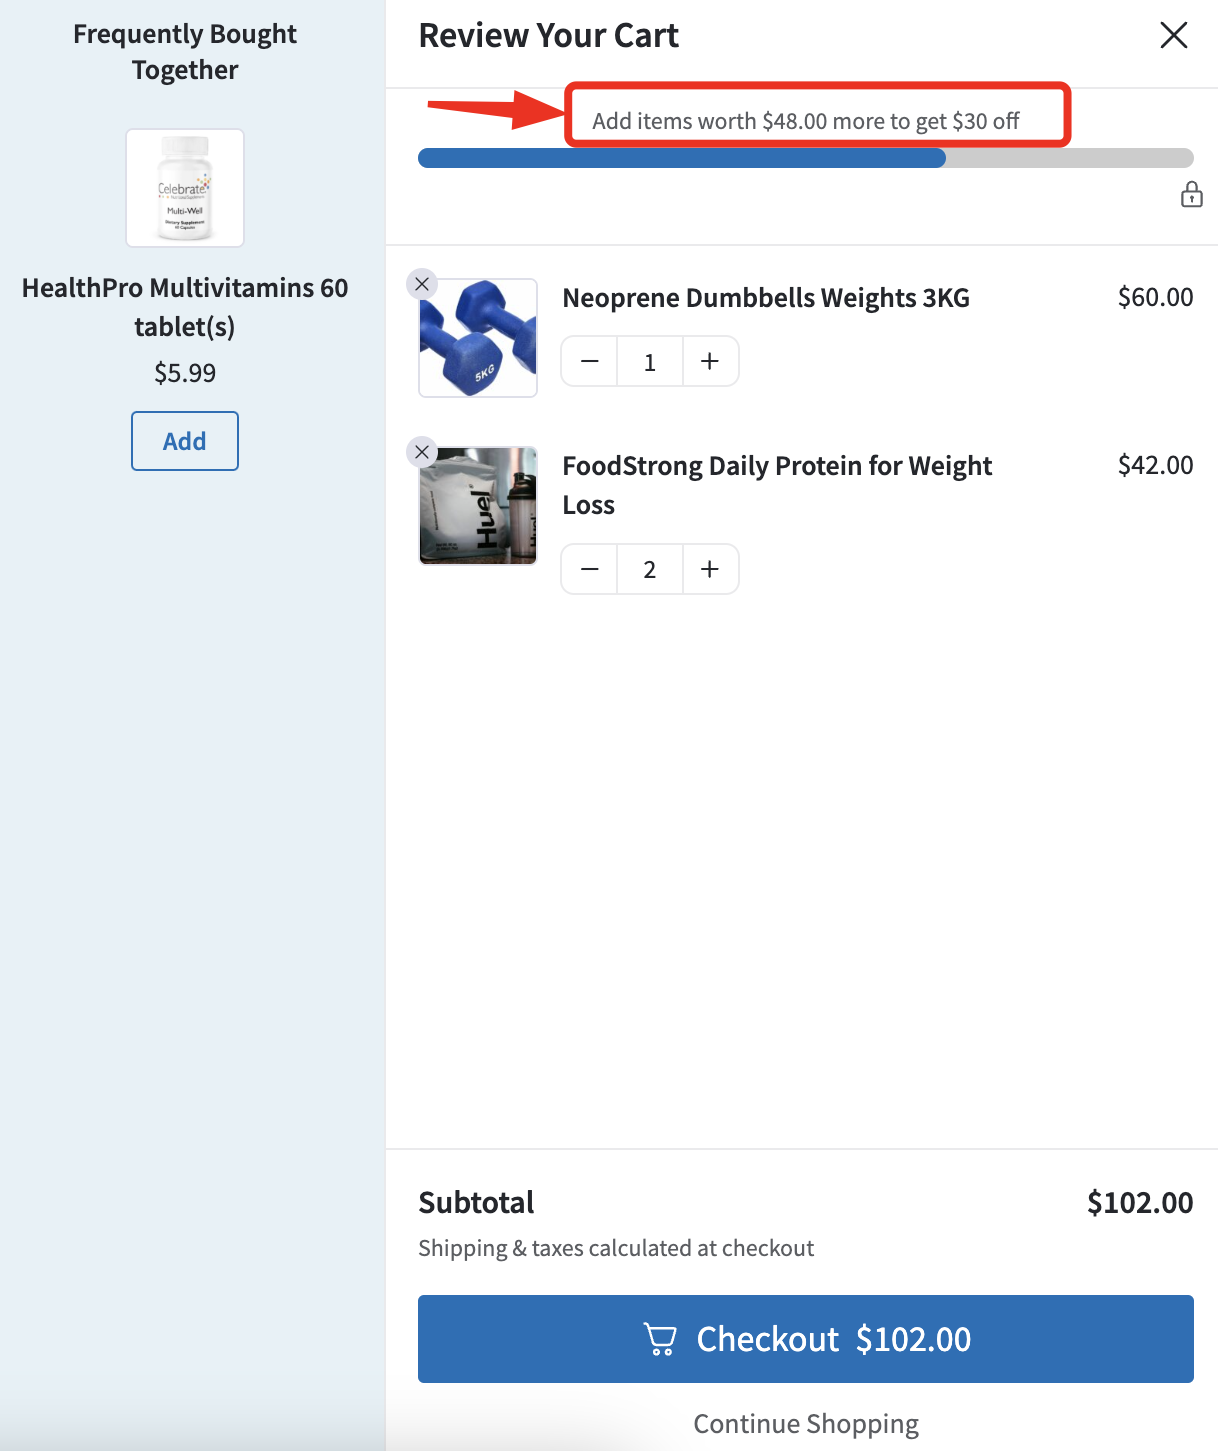
To do so, move to the Rewards tab and click on “Create Reward.”
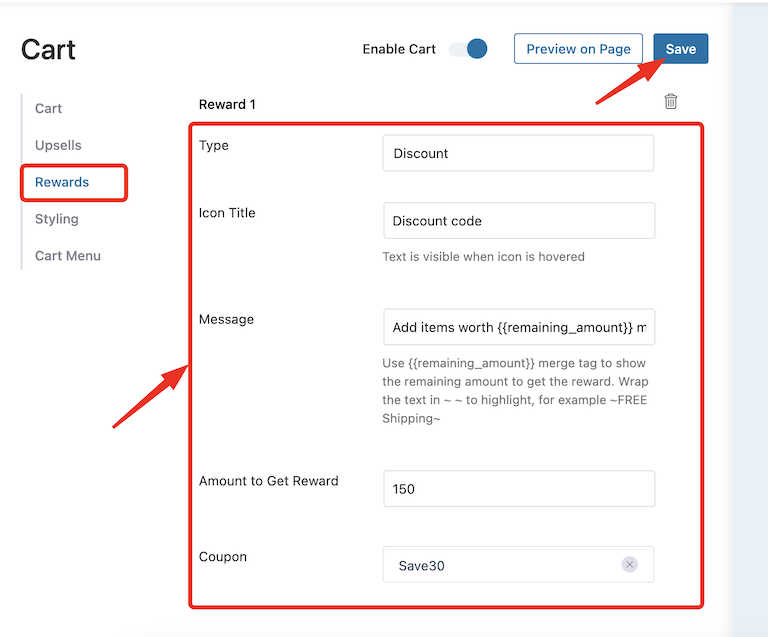
Now, to set up an auto apply discount coupon, customize the following options:
- Type: Create three types of discounts: Free shipping, discount, and free gift. Let's choose Discount.
- Icon Title: Provide the discount title that appears when someone hovers over the icon.
- Message: Enter the message that will be shown on the top shopping bar. You can use the merge tag {{remaining_amount}} to display the remaining amount required to receive the reward. For example, we have added the message "Add items worth {{remaining_amount}} more to get $30 OFF" as our discount is meant to provide $30 OFF on orders worth $150 or above.
- Amount to Get Reward: Enter the minimum amount one must spend to receive the reward. This is important for calculating the message that will appear in the cart. In our case, it’s $150.
- Coupon: Enter the coupon code you want to automatically apply to the mini cart.
After setting up all the options, click on Save to update.
For more details on setting up other types of rewards, check our post that guides you step by step.
Step 3: Test the auto-apply discount
To test whether the discount reward applies under the conditions you applied, go to the storefront and add the product to your mini cart.
With our condition and coupon code, users will enjoy $30 OFF orders of $150 or more.
This is how easily you can set WooCommerce auto-apply coupons in a mini cart.
Method 3: How to Create Auto Apply Coupon URL in WooCommerce
Applying coupons at checkout or on the cart page enhances customer convenience. However, for specific marketing campaigns, such as social media or email promotions, you might require an auto-apply coupon URL.
With these URLs, customers can simply click the link to be directed to the checkout page, complete with pre-populated products and an automatically applied coupon.
With FunnelKit Funnel Builder, you can easily create an auto-apply coupon URL.
With these two things sorted, go to the Optimization tab of your store checkout step and scroll down to the “Generate URL to Populate Checkout” optimization feature.
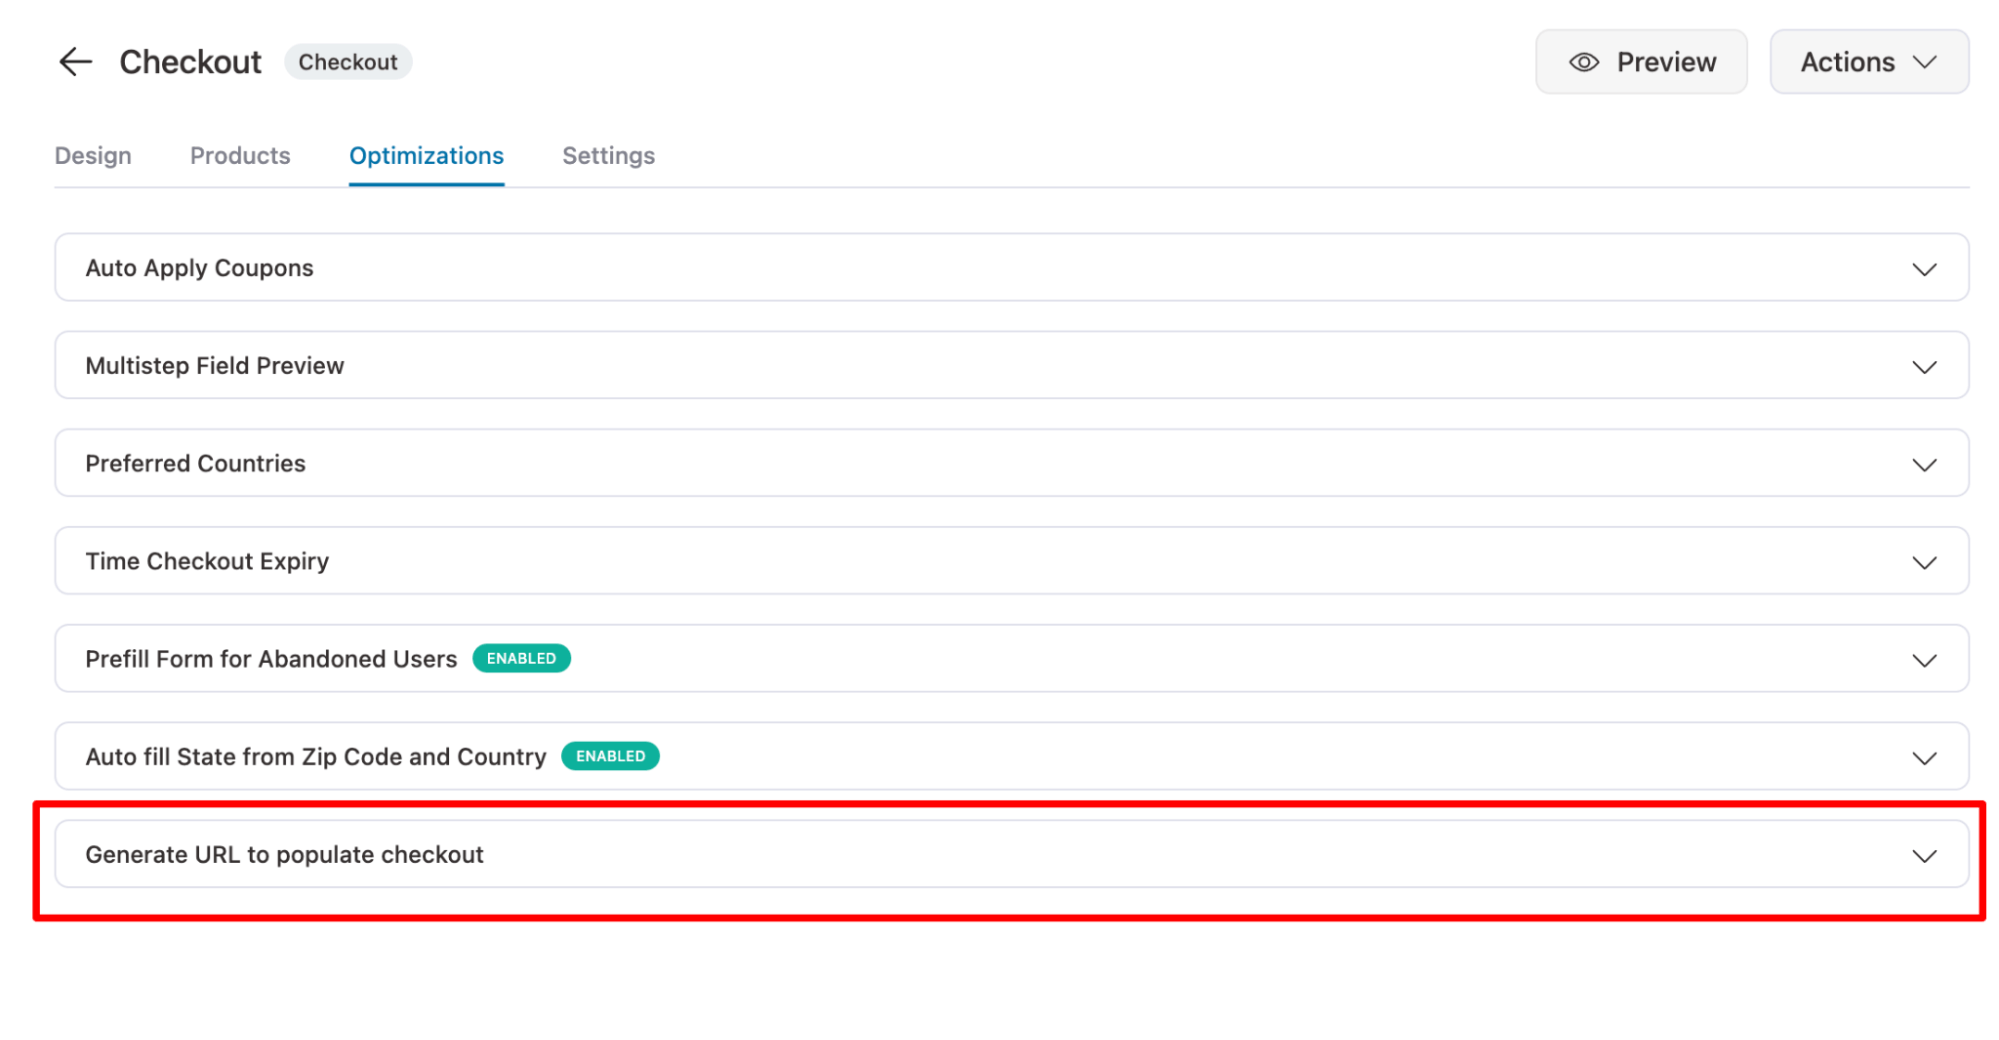
Now expand this section and set the following parameters:
- Product: Add the product ID you want to add to checkout when this URL is hit. If you want to add multiple products, enter comma-separated product IDs.
- Quantity: Enter the item quantity here. Again, for multiple products, add the quantity using a comma. Make sure the quantity and product ID sequence match.
- Coupons: Add the coupon that will be applied automatically. Here, you can add multiple coupons as well.
- Email Service: Enter the email service you prefer in case you want to share this coupon URL via email.
- Checkout URL: Here, you will find the final auto-apply coupon URL for specific products and their quantity
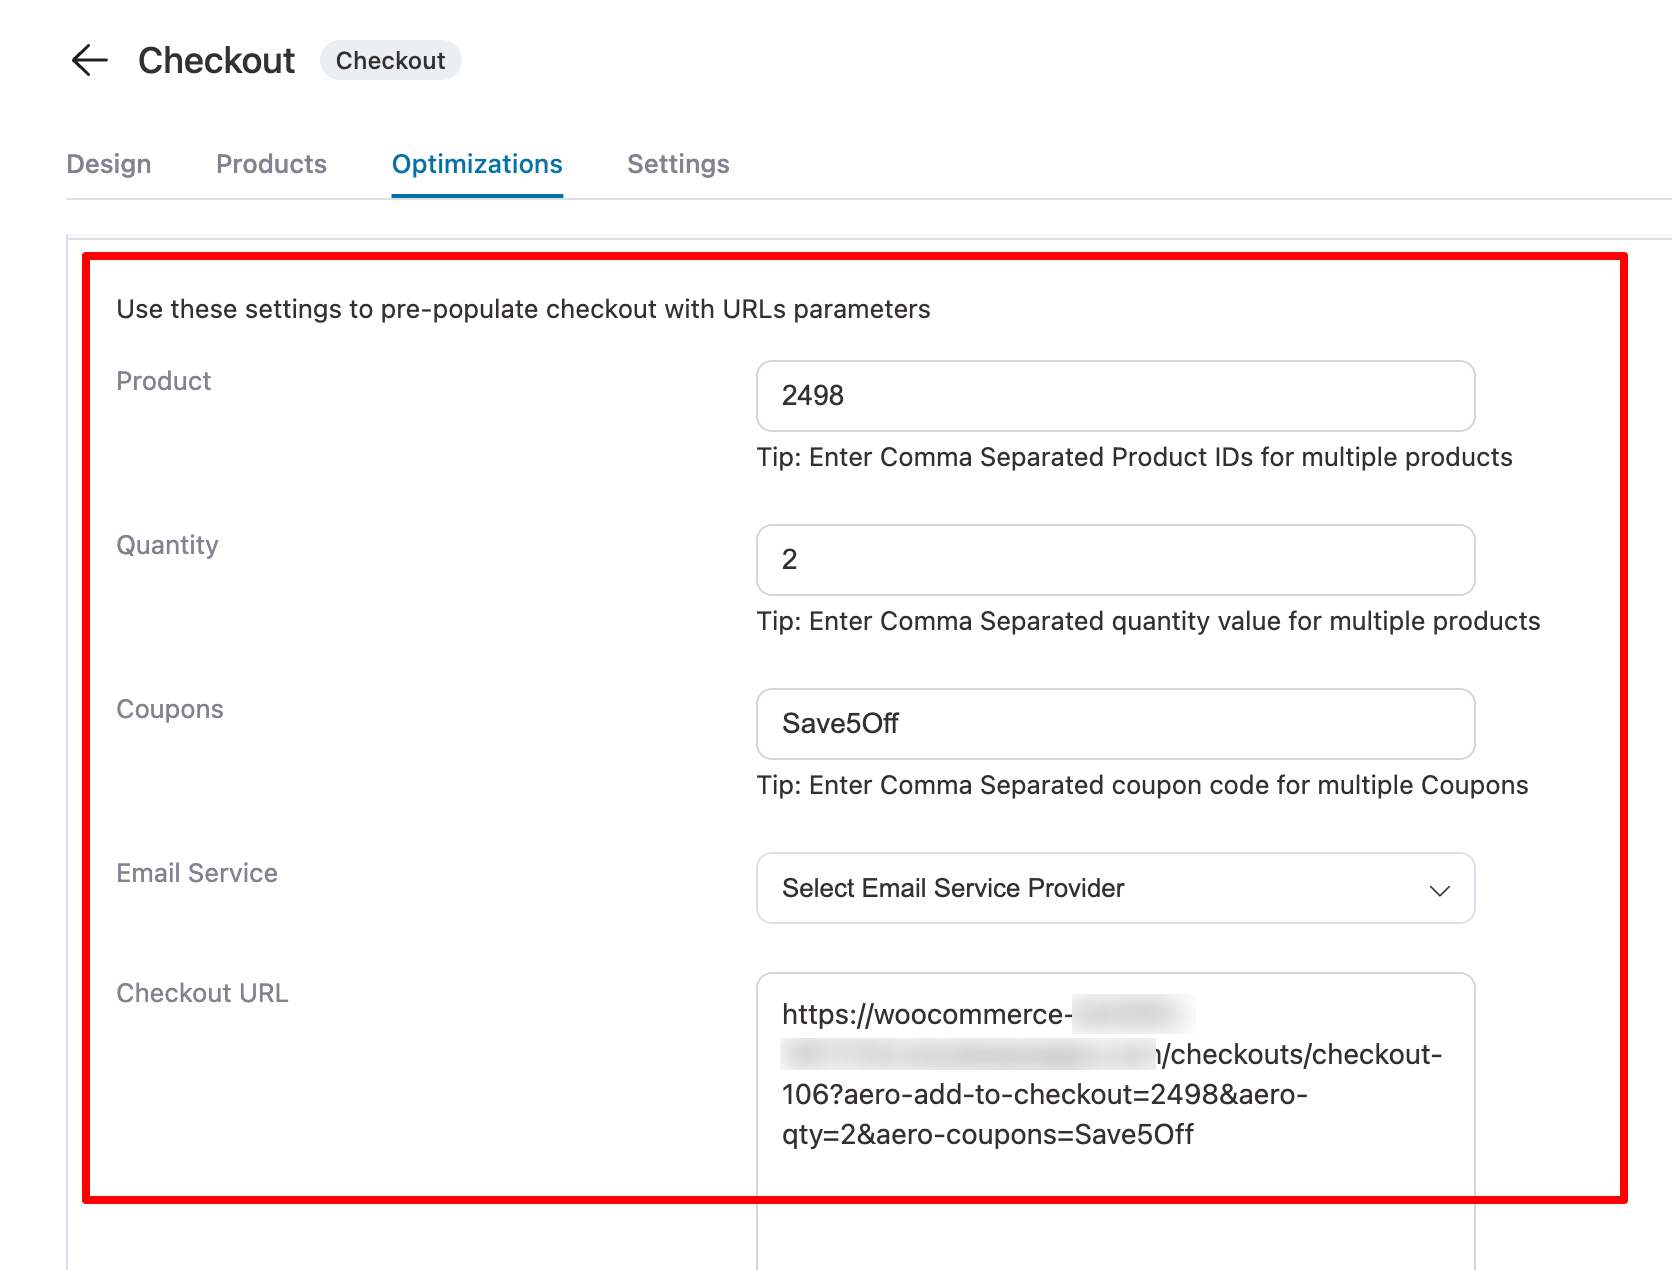
Now, make sure to save the URL you just created.
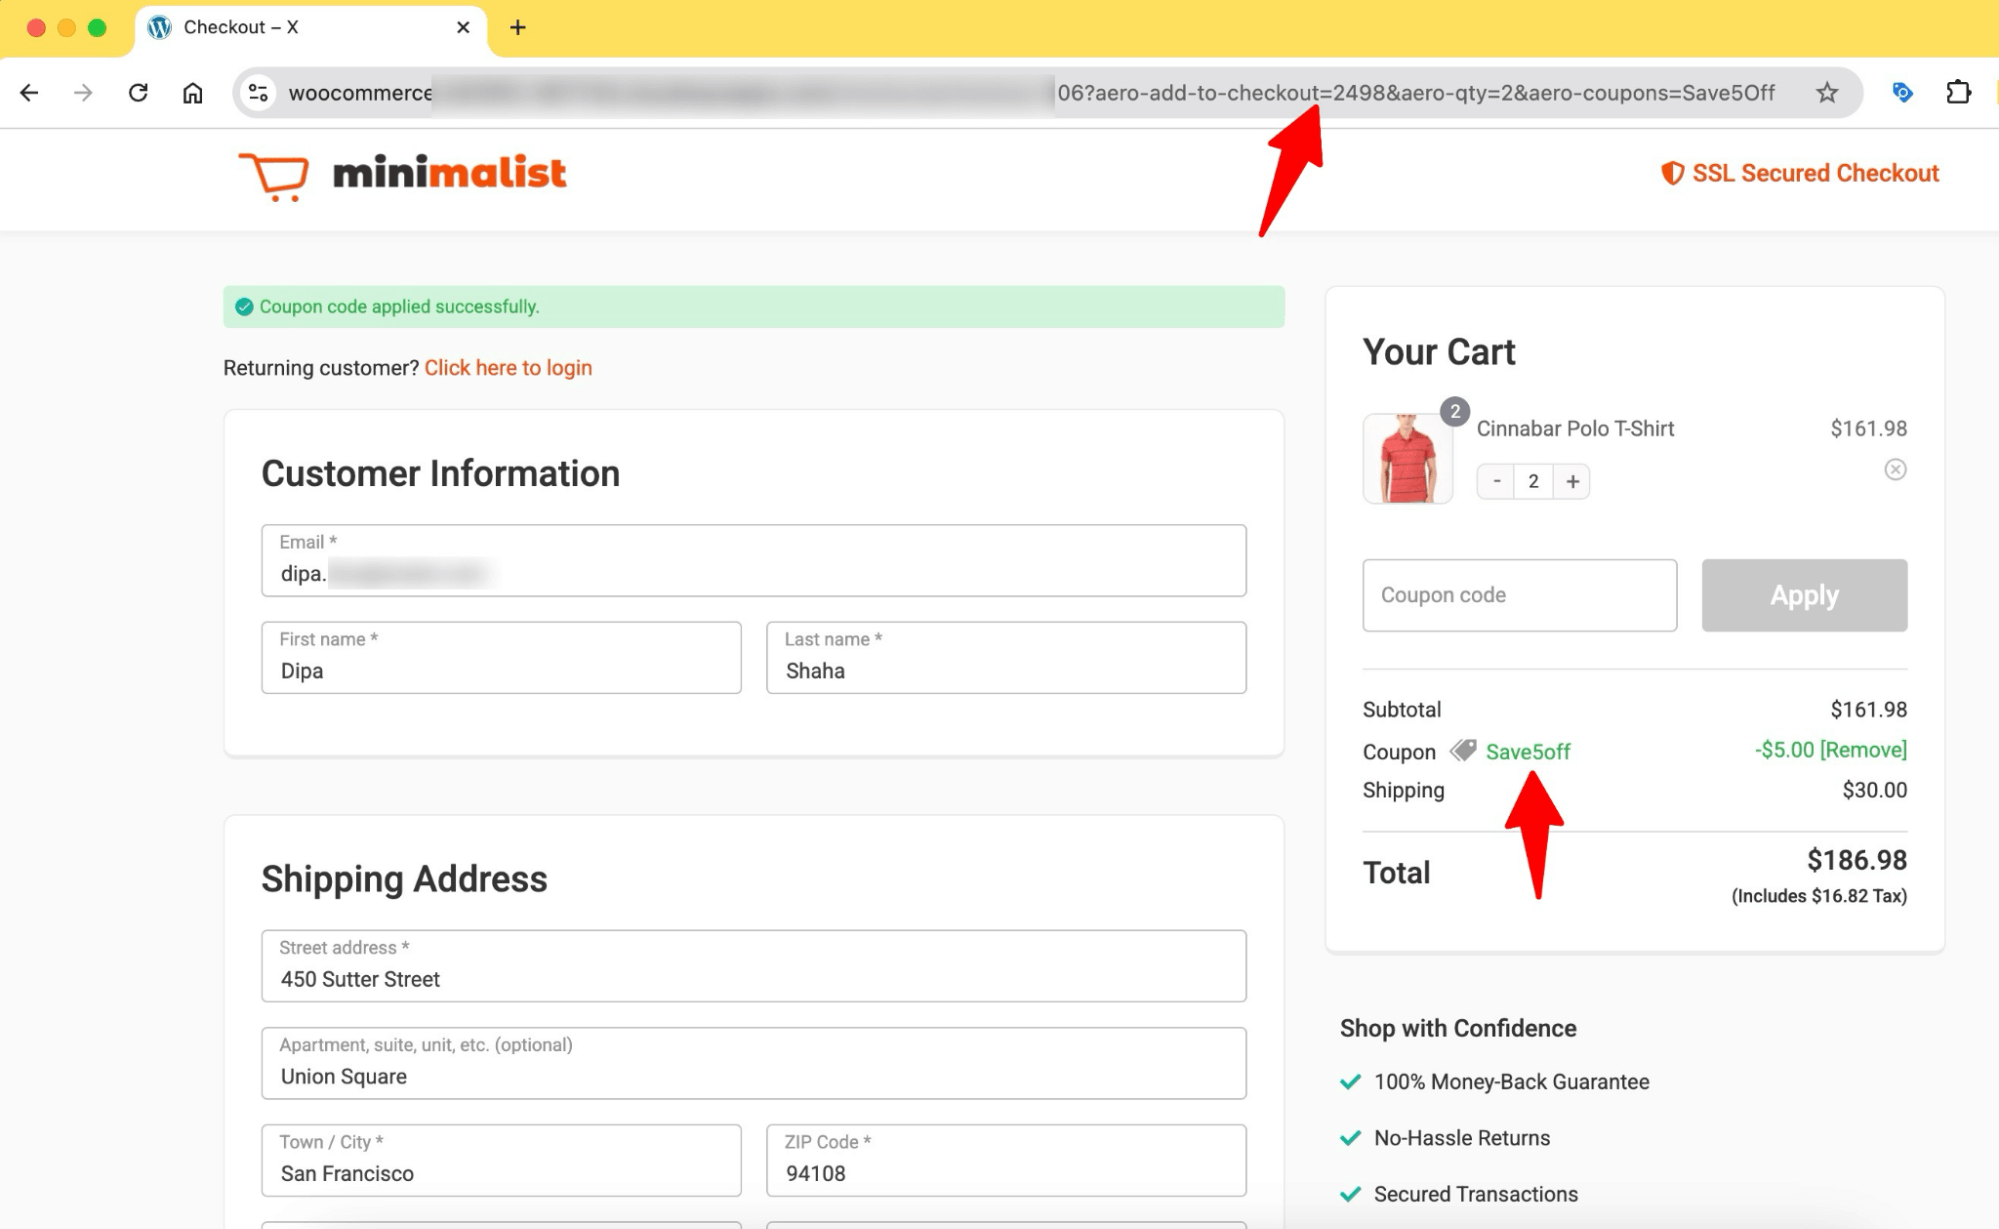
To test the auto-apply coupon URL, open it in your browser to confirm that the correct product, quantity, and coupon are automatically applied to your cart.
Method 4: Share Auto-Applied Coupon URL via Email to Recover Abandoned Carts
In a recent survey, 80% of shoppers said they sign up for emails only to get discounts.
With these statistics in mind, offering a discount incentive can help recover a significant portion of abandoned carts and encourage customers to complete their purchase.
An effective way of recovering carts is to offer an auto-applied coupon URL. This way, when users click the URL, they are redirected to the checkout page with the discount auto-applied.
Let’s see how you can do this using our step-by-step guide.
To follow these steps, you must install and activate FunnelKit Automations, one of the most powerful WooCommerce email marketing automation and CRM.
Step 1: Enable cart tracking
Firstly, enable abandoned cart tracking. To do so, go to FunnelKit Automations ⇒ Settings.
Check the “Enable Cart Tracking” option on the Cart tab. This will activate the cart track.
You can also set other options, such as Wait Period, Cool Off Period, and Lost Cart (days). For more details, check our documentation on “Enable Cart Tracking”.
Don’t forget to click on Save Changes after enabling the cart.
Step 2: Add new automation
The next step is to create a new automation. For that, navigate to FunnelKit Automations ⇒ Automations and then click on ‘Create New Automation’.
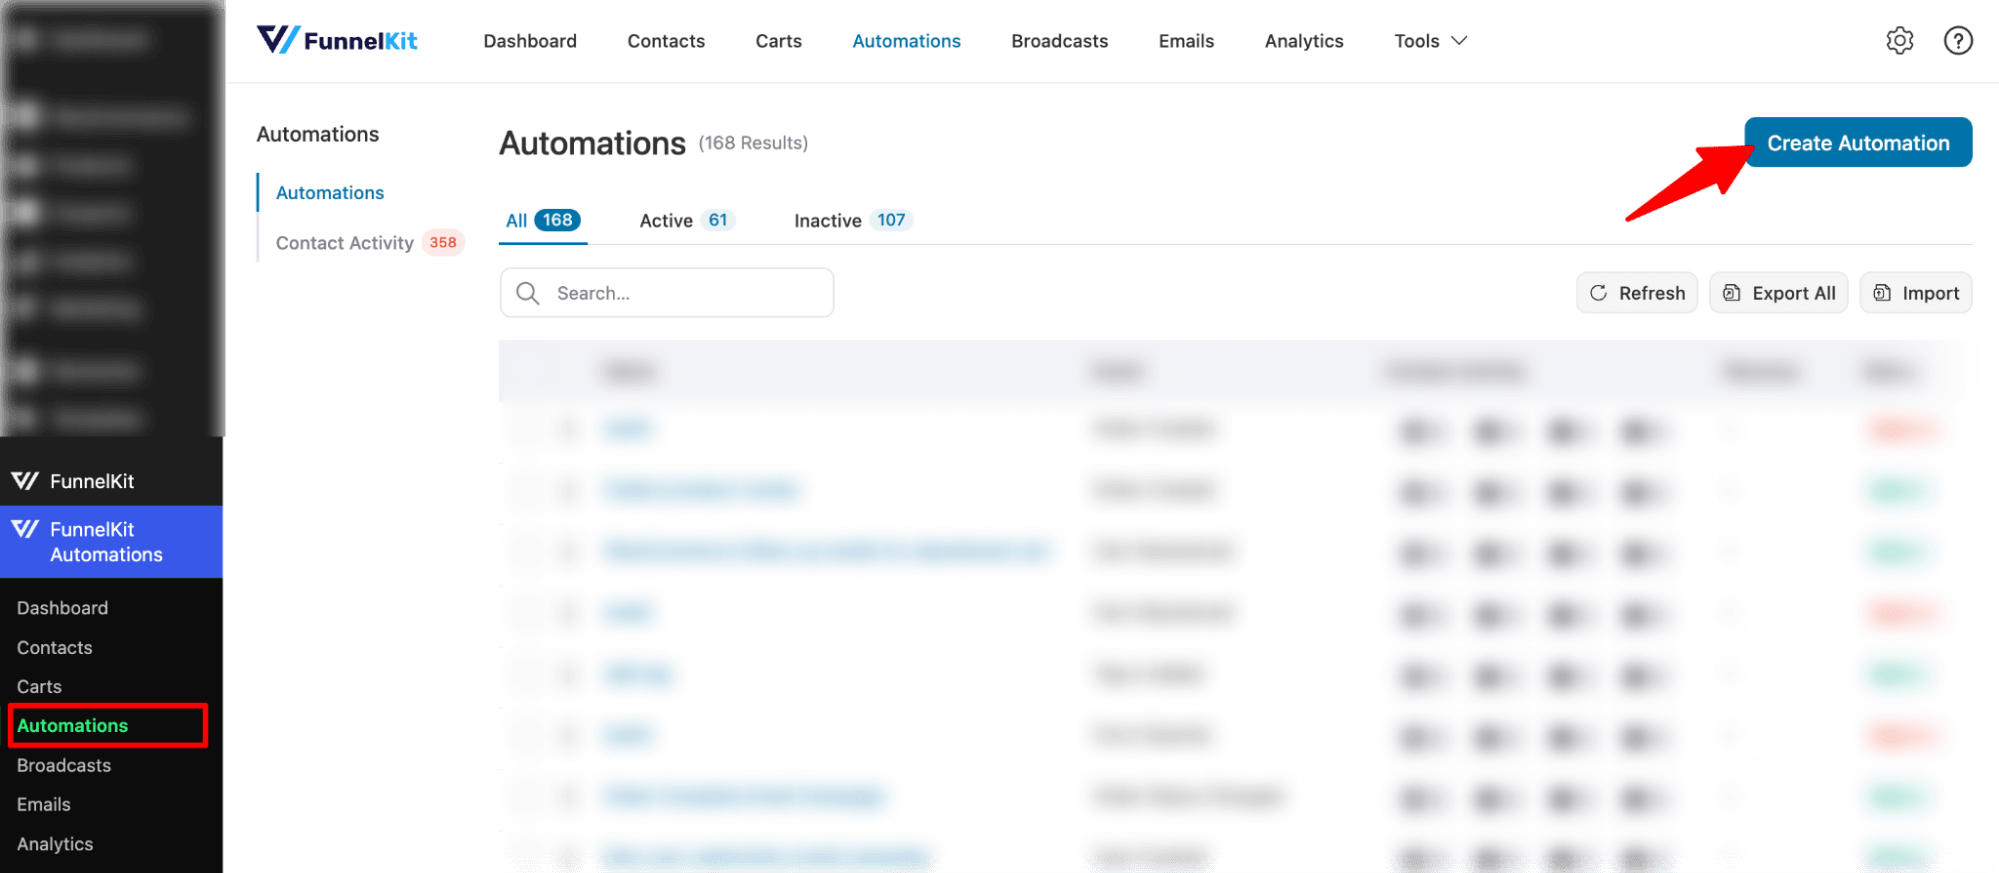
Now, you can see all the pre-built templates by FunnelKit Automations. Here, we will choose the Abandoned cart reminder template.
To do that, click the template.
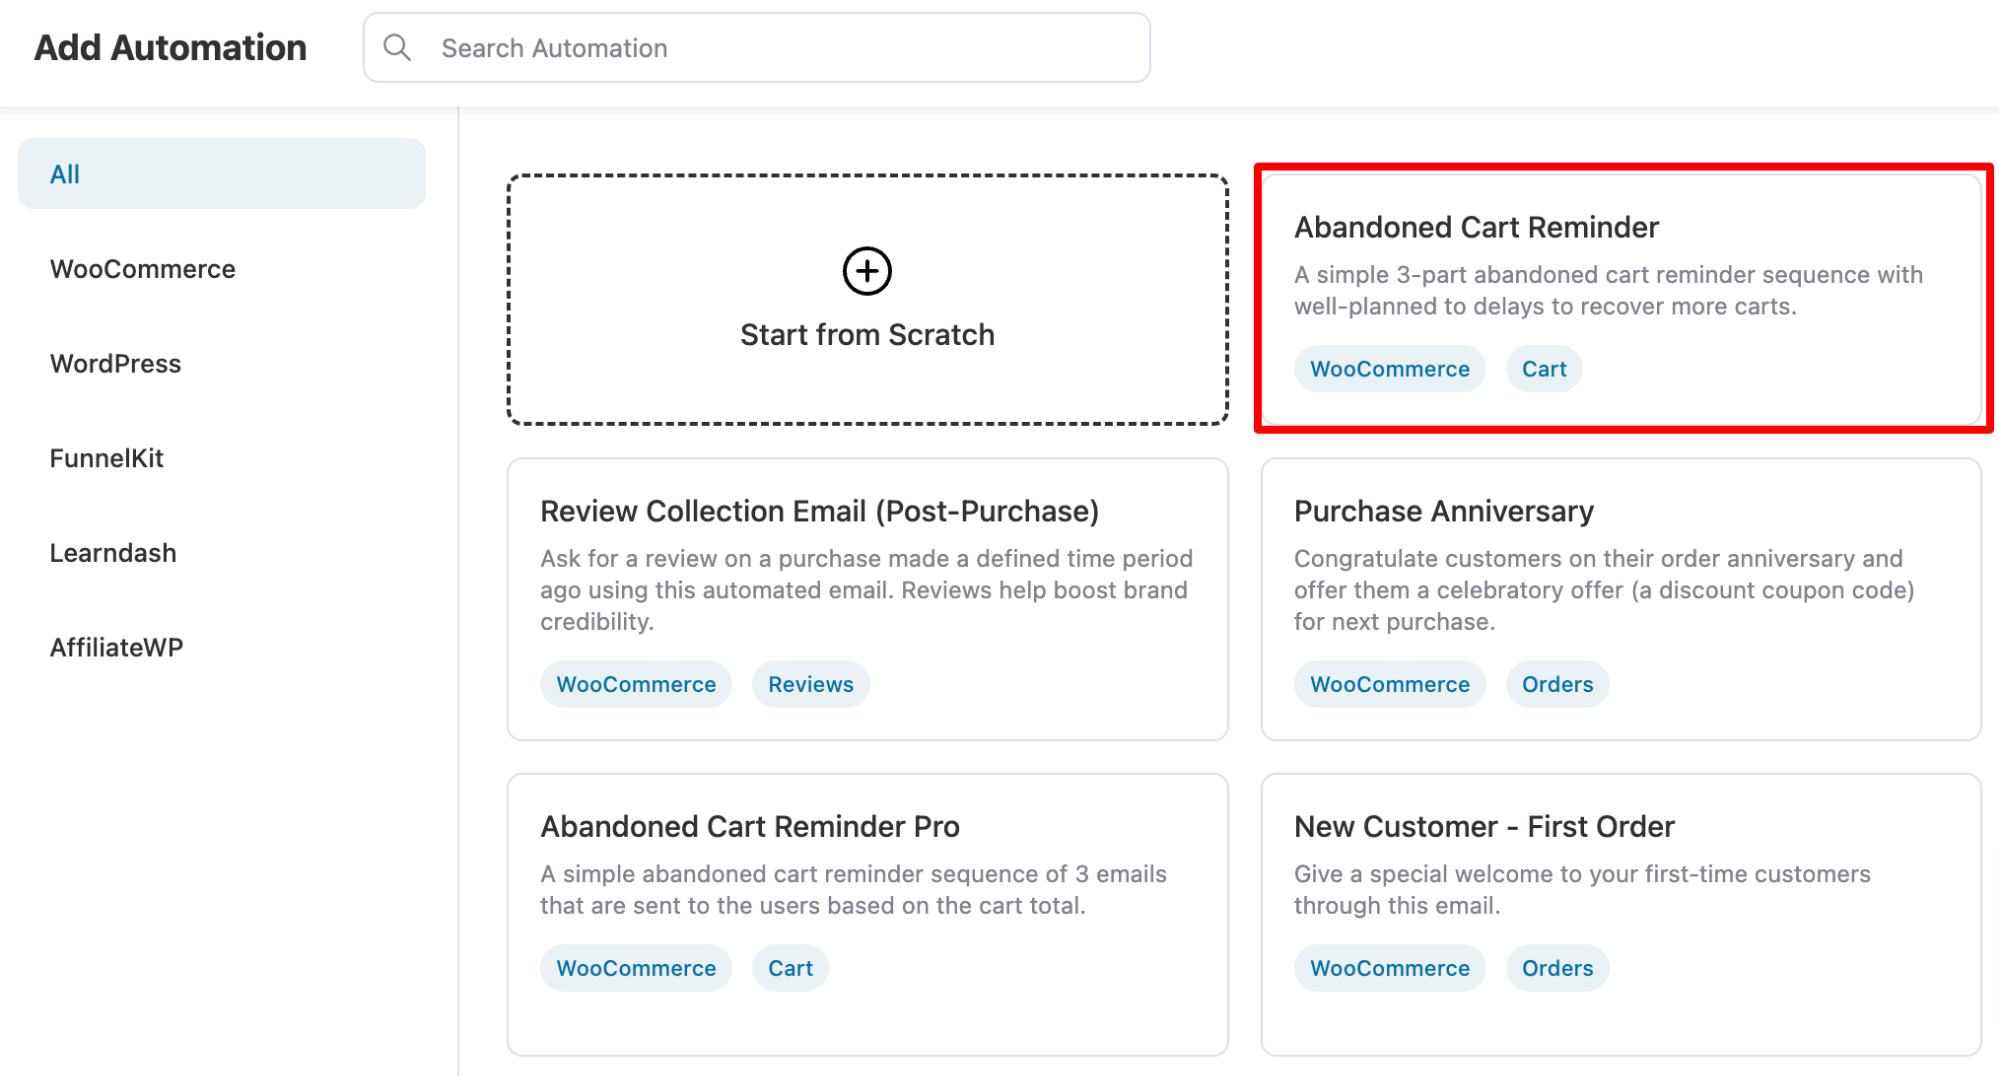
To import this prebuilt template, click on “Import,” provide a name and click on Create.
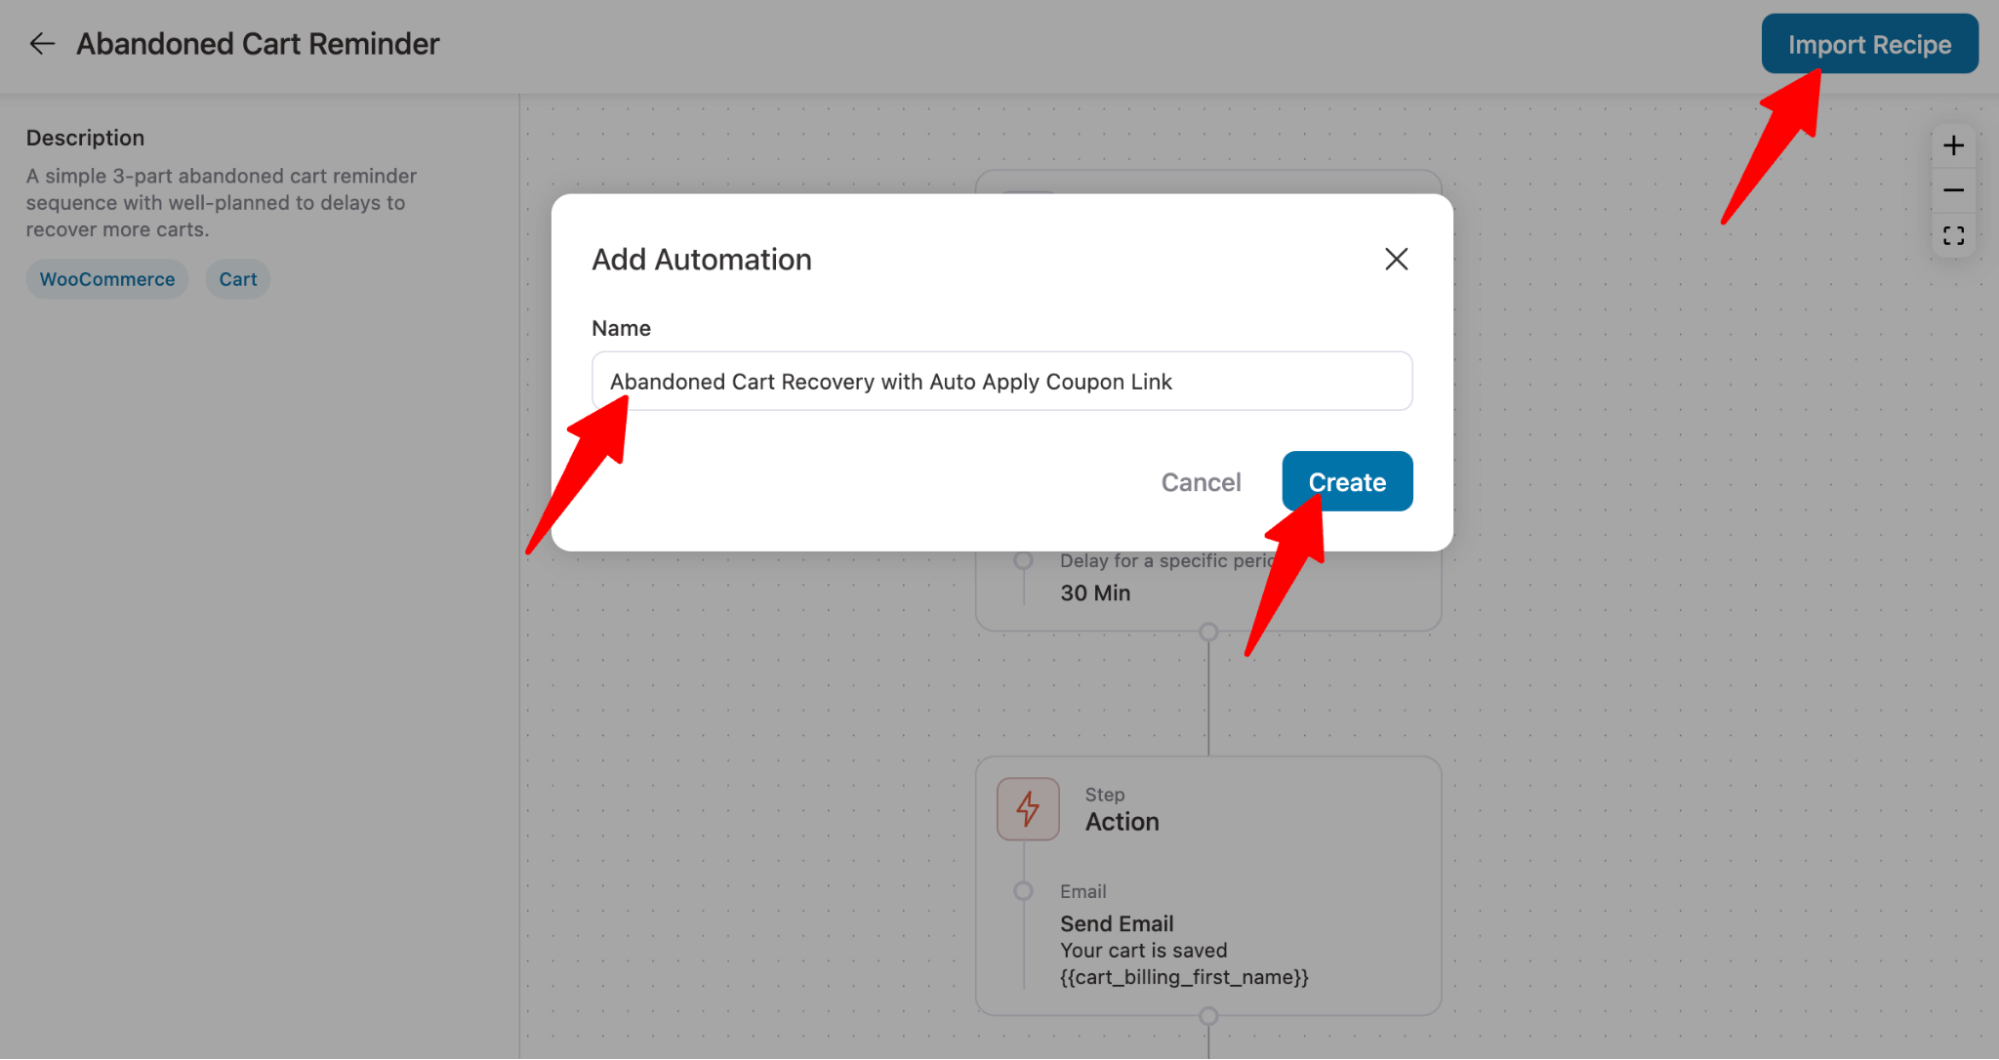
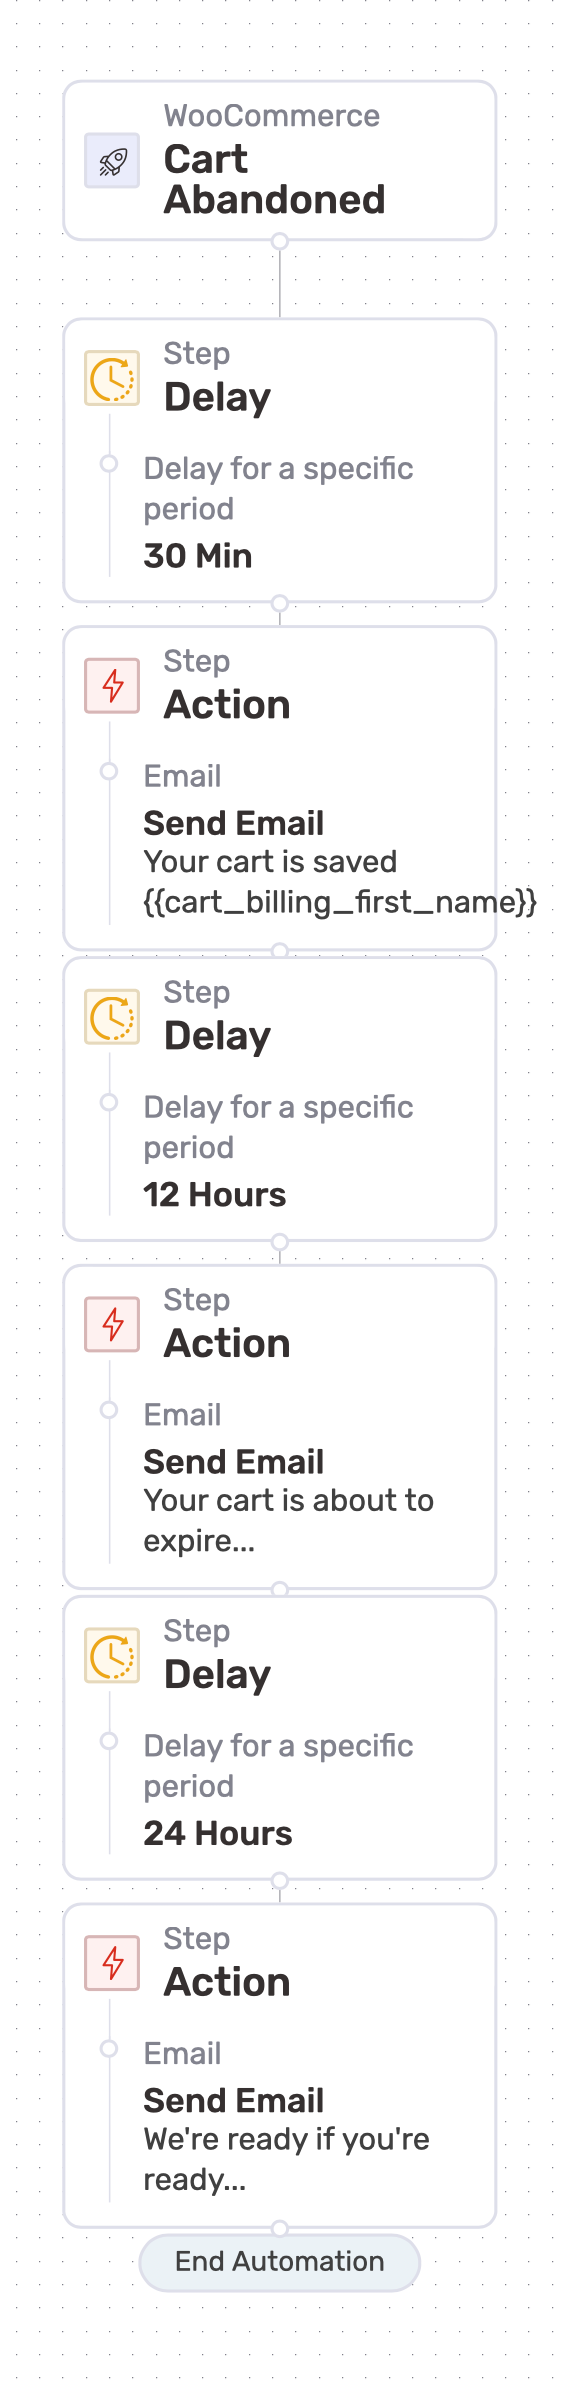
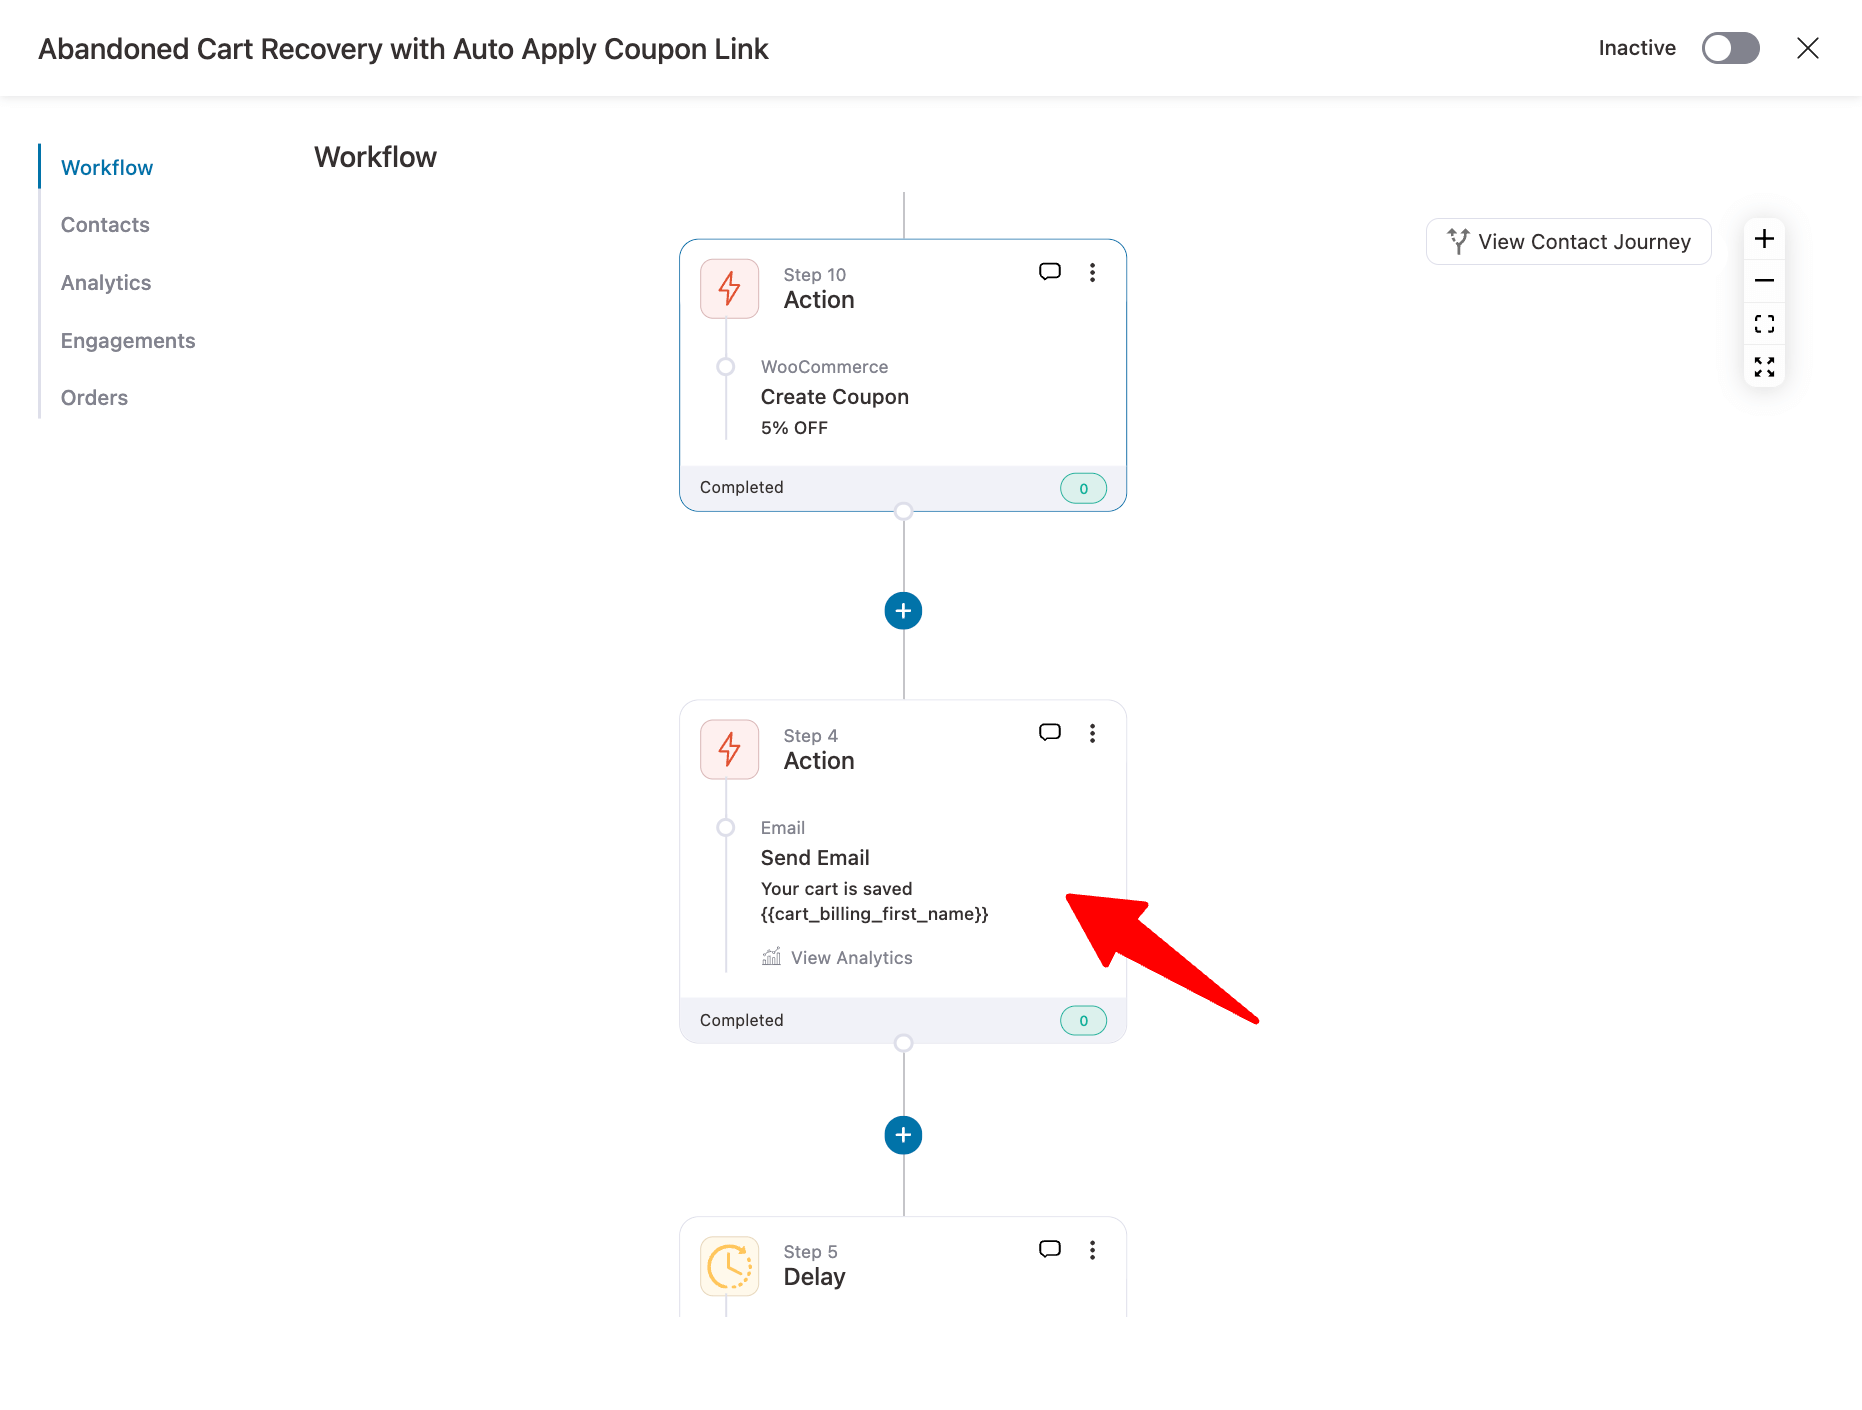
This will add automation that sends three reminder emails to users to encourage them to return and complete the order.
With FunnelKit Automations, you can use both static coupons and dynamic coupons. If you want to use a static coupon, skip the next step.
Step 3: Create a dynamic coupon (optional)
We need to create a coupon before we can add an auto-apply coupon URL to the email body. To do that, we need to add a new step that will create a dynamic coupon.
We will send the coupon code URL with the first email, so we need to add an event before that. After the first delay, click on the + icon and choose Action.
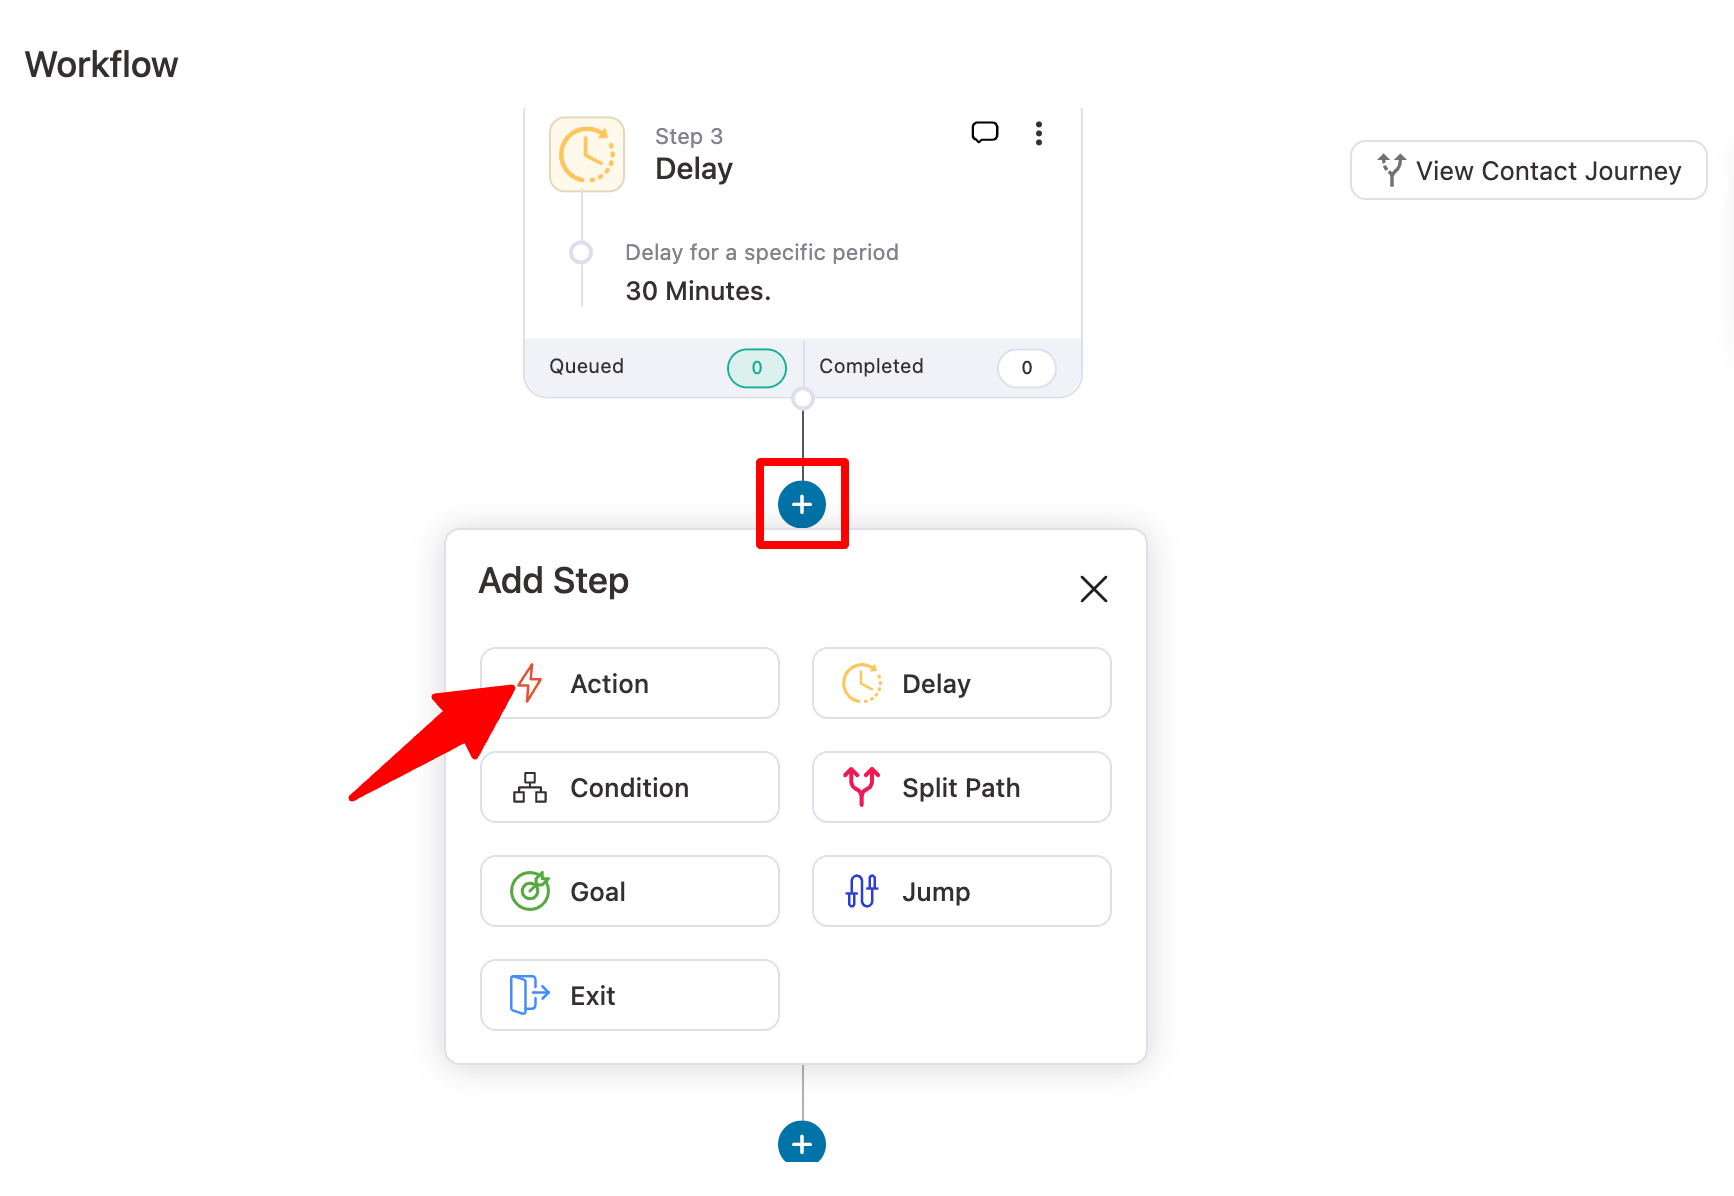
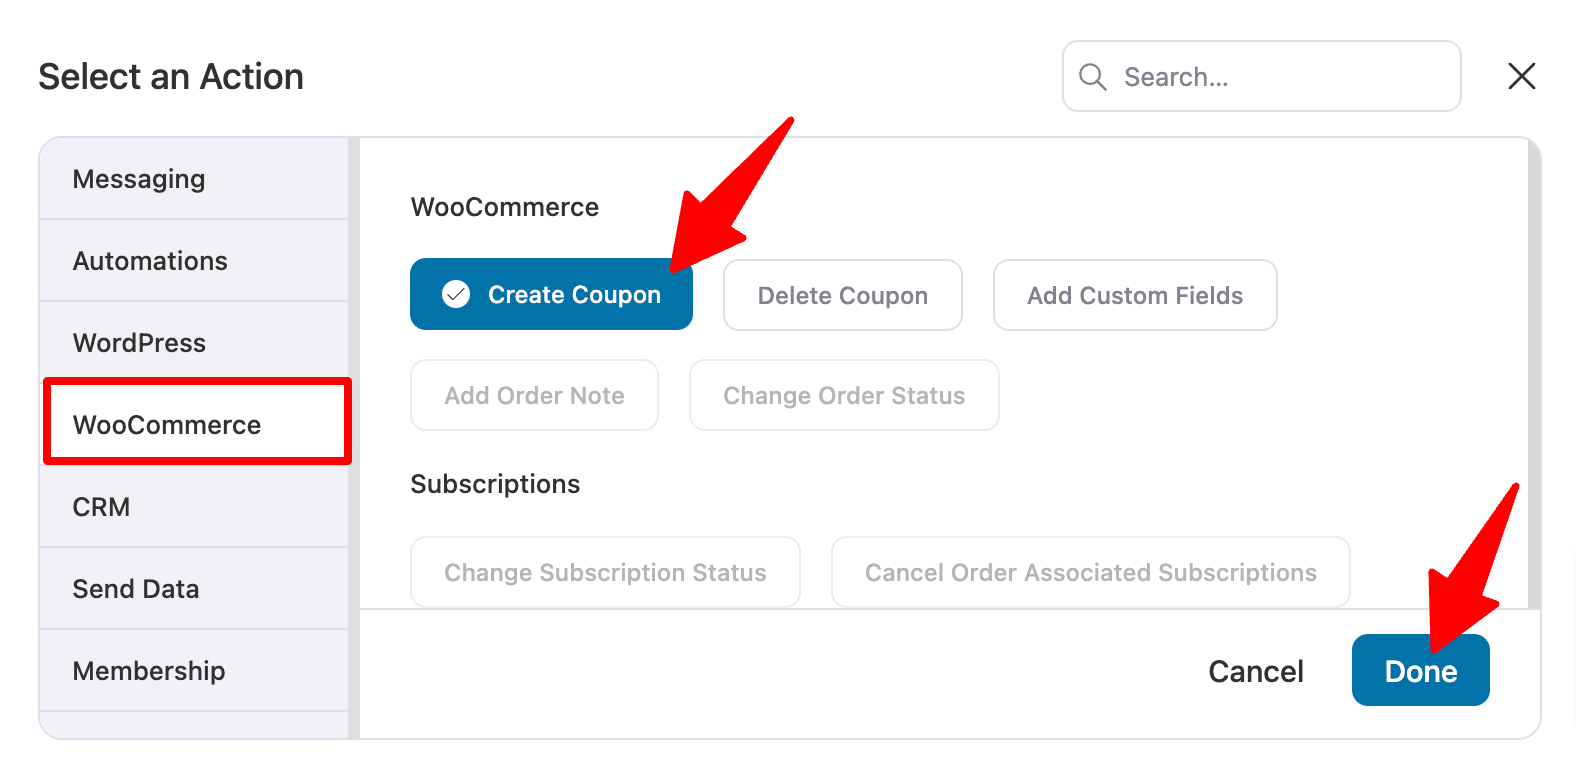
Move to the WooCommerce tab, choose Create Coupon, and click on Done.
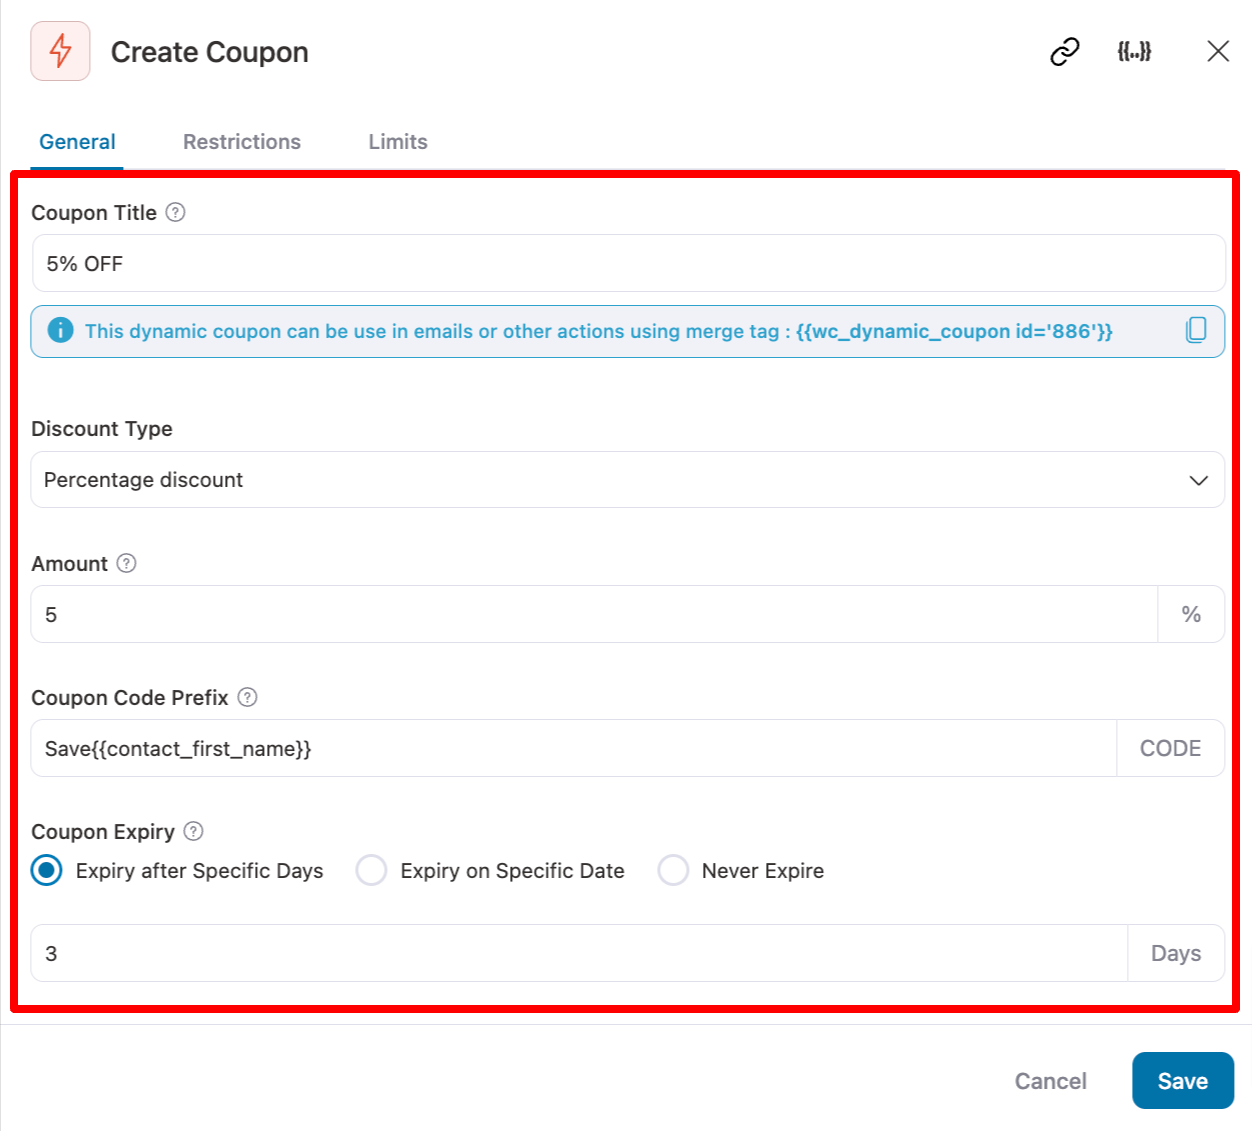
Now provide the coupon title, discount type, amount coupon code prefix, etc., and click on ‘Save’ to save the discount coupon code. For more details, read our documentation on personalized coupon codes.
Step 4: Add the auto-apply coupon code URL in the email body
Now, we will add the coupon code URL in the first email. To do so, click on the first email step.
You can design your email using four methods: Visual Builder (New), Rich Text, Raw HTML, and Visual Builder.
Here, we will share how to add an auto-apply coupon using Rich Text (default email) and Visual Builder (new).
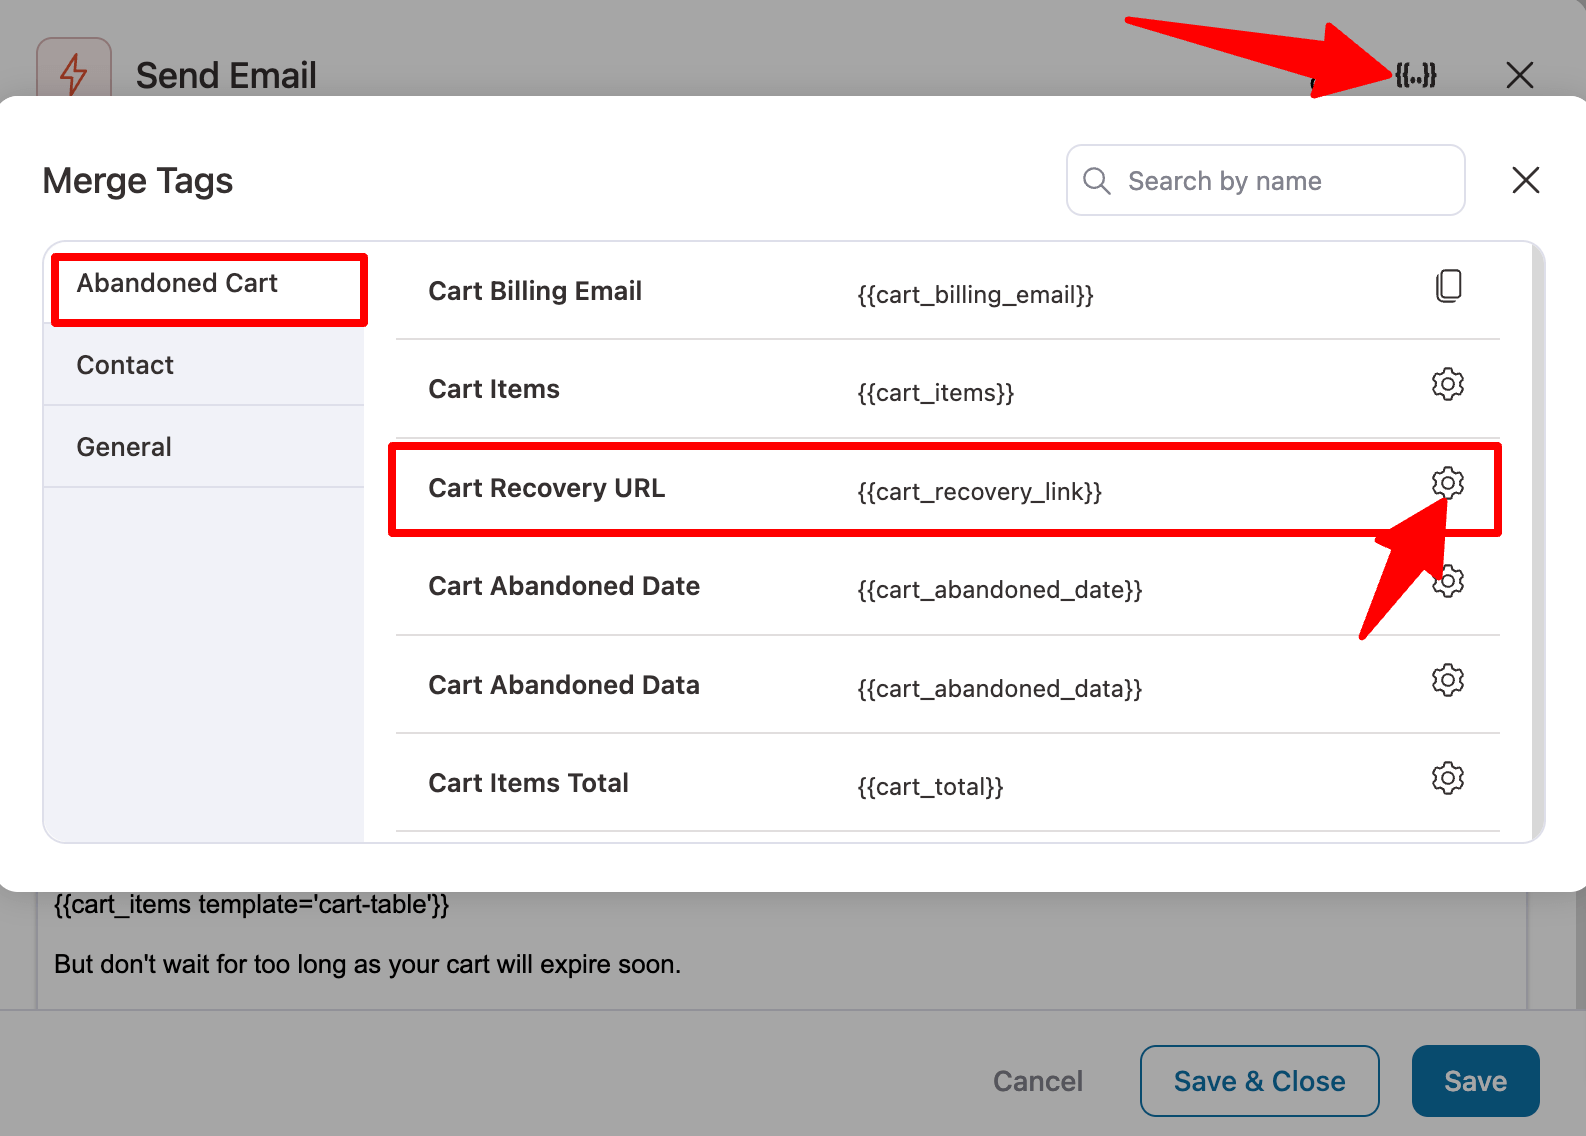
By default, the abandoned cart recipe comes with a text-based email template. To add an auto-apple coupon URL, click the {{..}} merge tag icon. Then, look for the Cart Recovery URL merge tag and click on the ⚙️icon.
After that, you can choose whether you want to use a static coupon or a dynamic coupon.
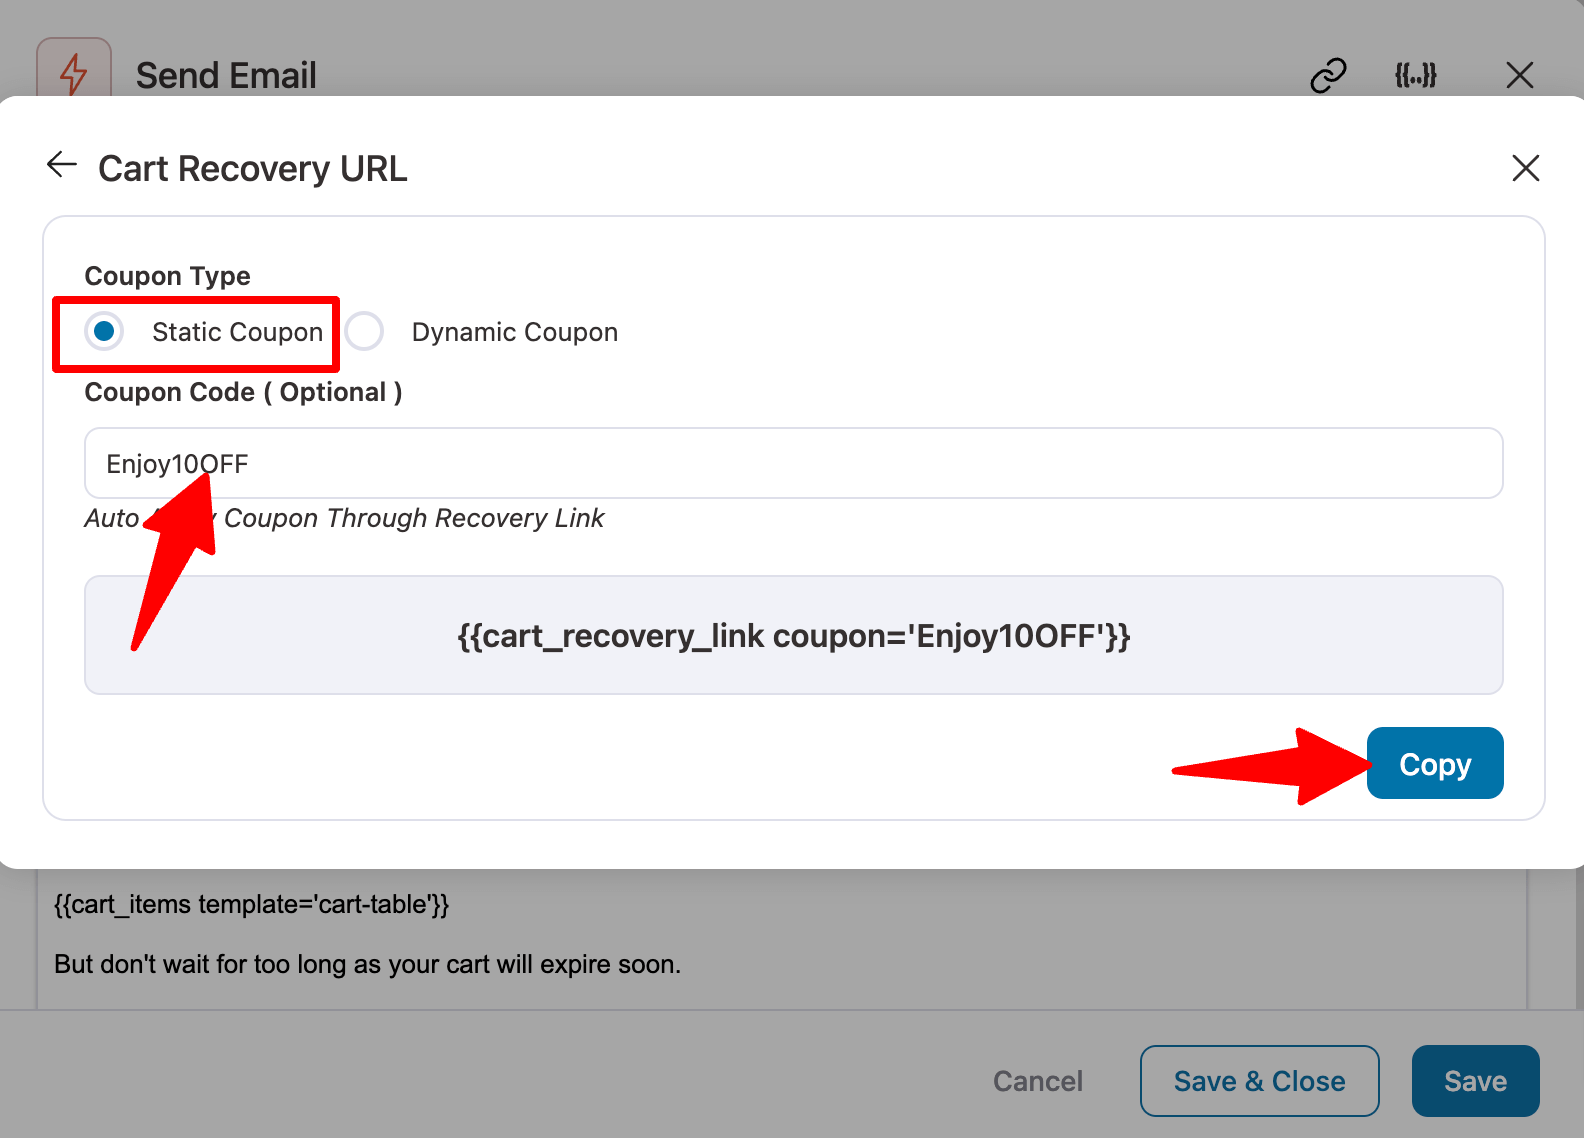
Use a static coupon
Select the coupon type as Static Coupon, then enter the coupon you want to use. This will generate a dynamic link that takes users directly to the checkout page.
Click on “Copy” to copy the link.
Use a dynamic coupon
Choose the coupon type as a dynamic coupon, and select the coupon code you created in the previous step from the drop-down. This will generate a dynamic link that takes users directly to the checkout page.
Click on “Copy” to copy the link.

Here, we are going with a dynamic coupon.
You can now add the link as a URL or in an anchor text in your email body.
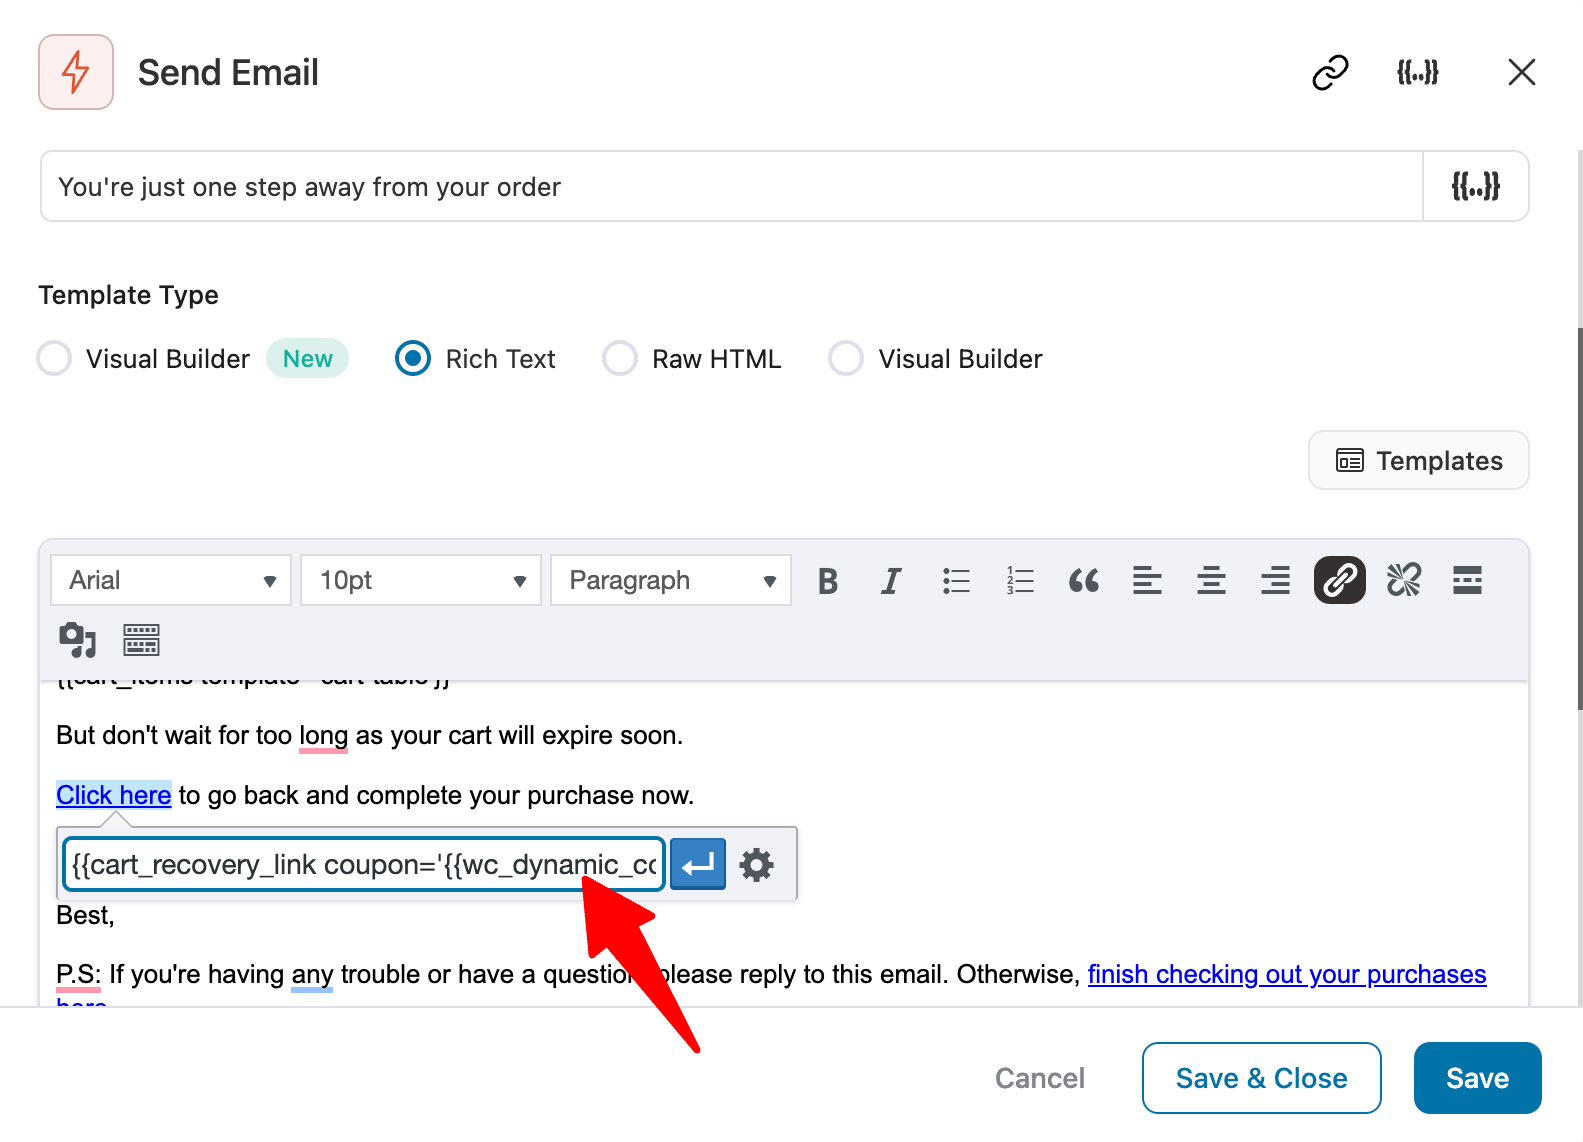
After adding the cart recovery link with the applied coupon code, save the email.
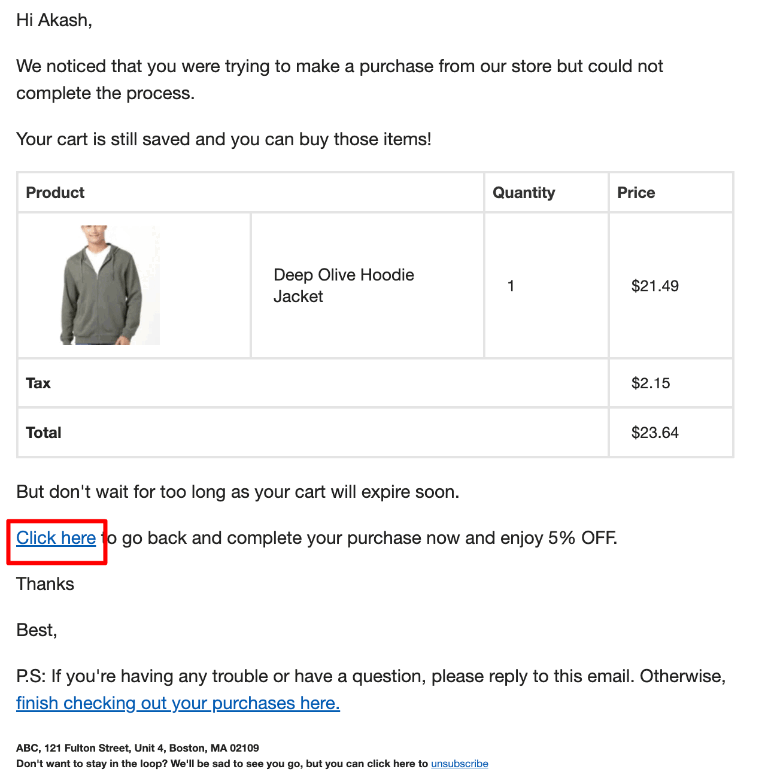
Here is a preview of the email with the auto-apply coupon Woocommerce URL. The coupon is applied automatically at checkout.
Step 5: Add auto-apply coupon link using cart link block (optional)
Our experts highly recommend using the Visual Builder(New), as it offers many ready-to-use prebuilt email templates.
Note: If you use Visual Builder (New), you can skip the above step of customizing the email text built with rich text.
Here, we are importing the Abandoned Cart template.
Now, you can customize the email template according to your preference.
The Visual Builder includes a "Cart Link" block that adds a cart recovery URL to a CTA. This URL directs users to the website where their cart items have already been added.
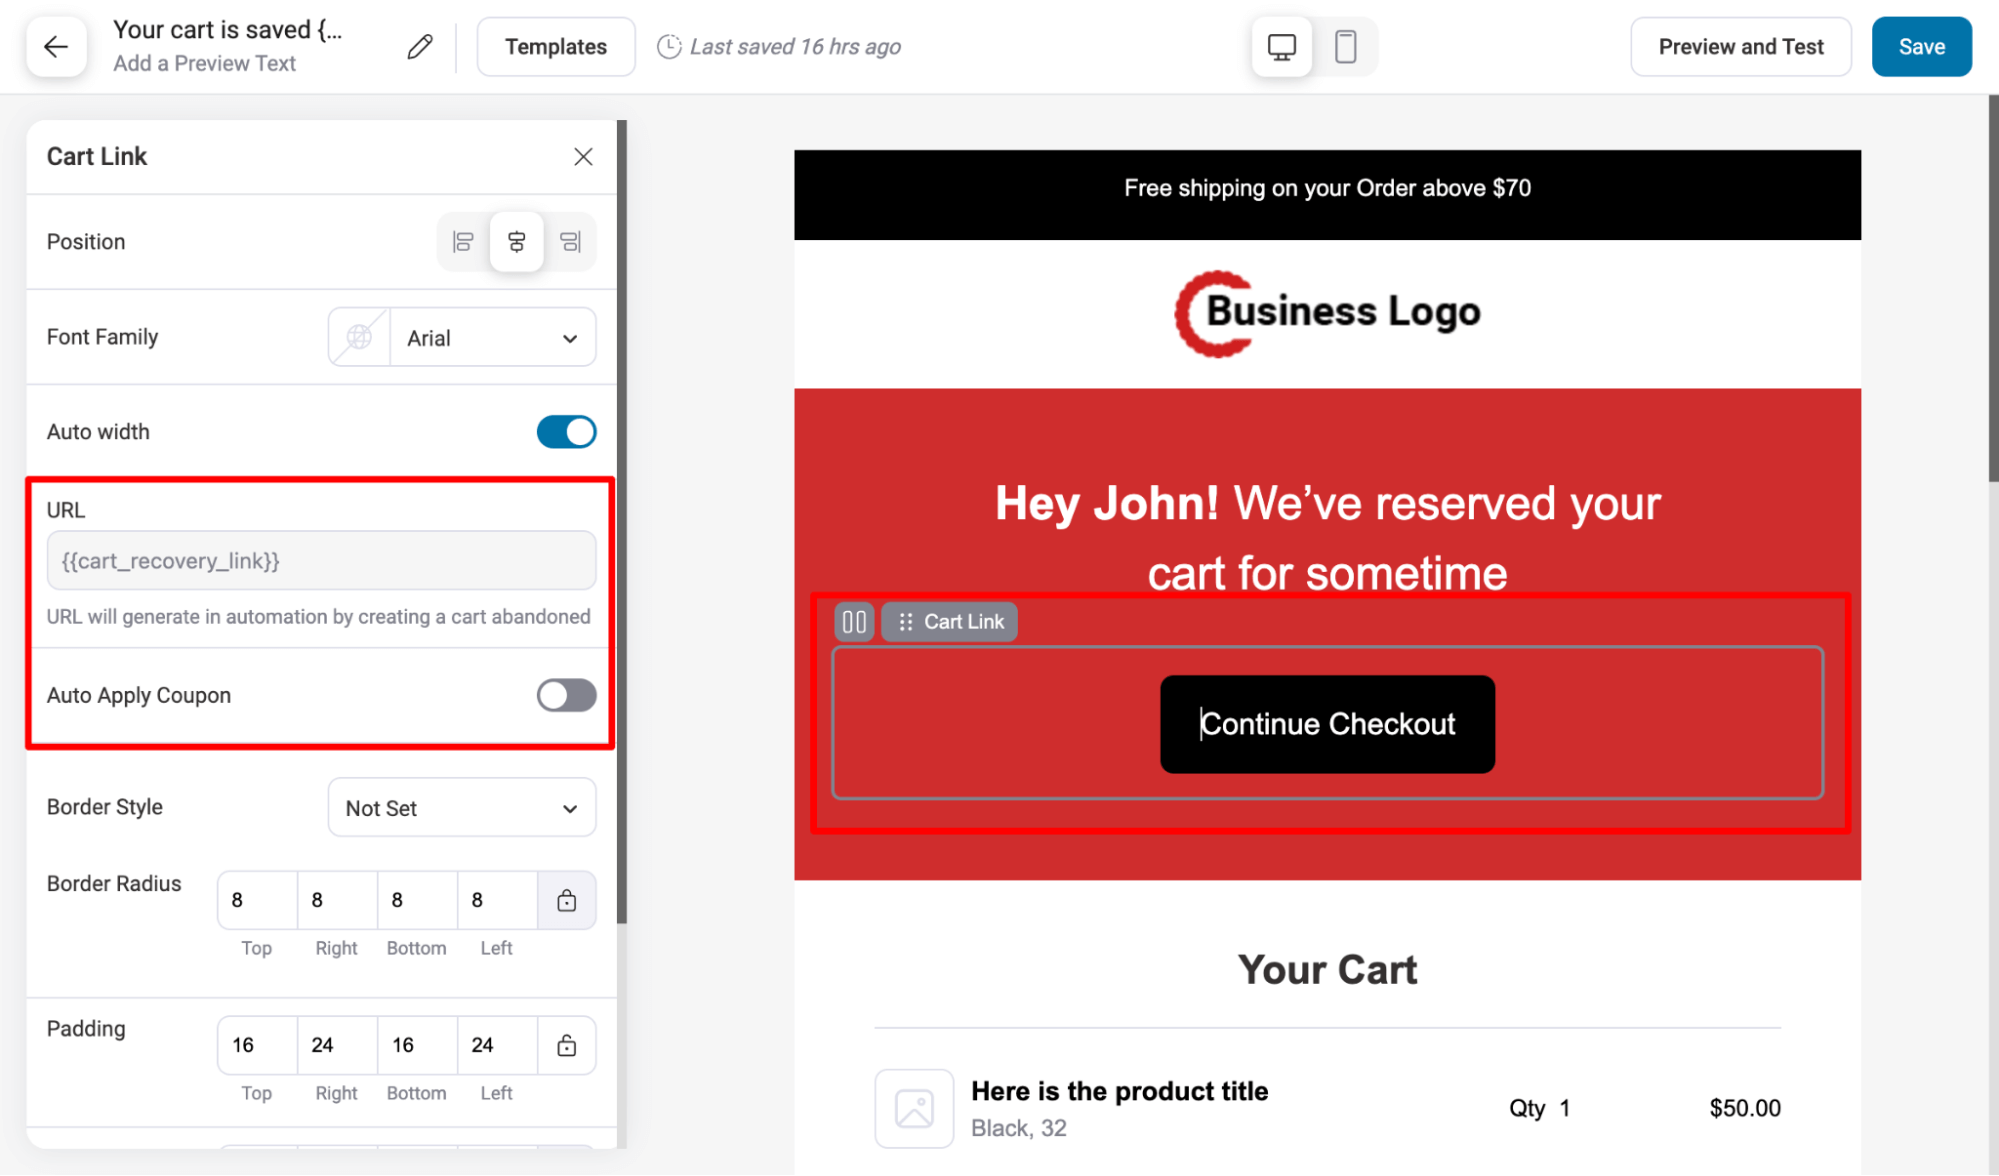
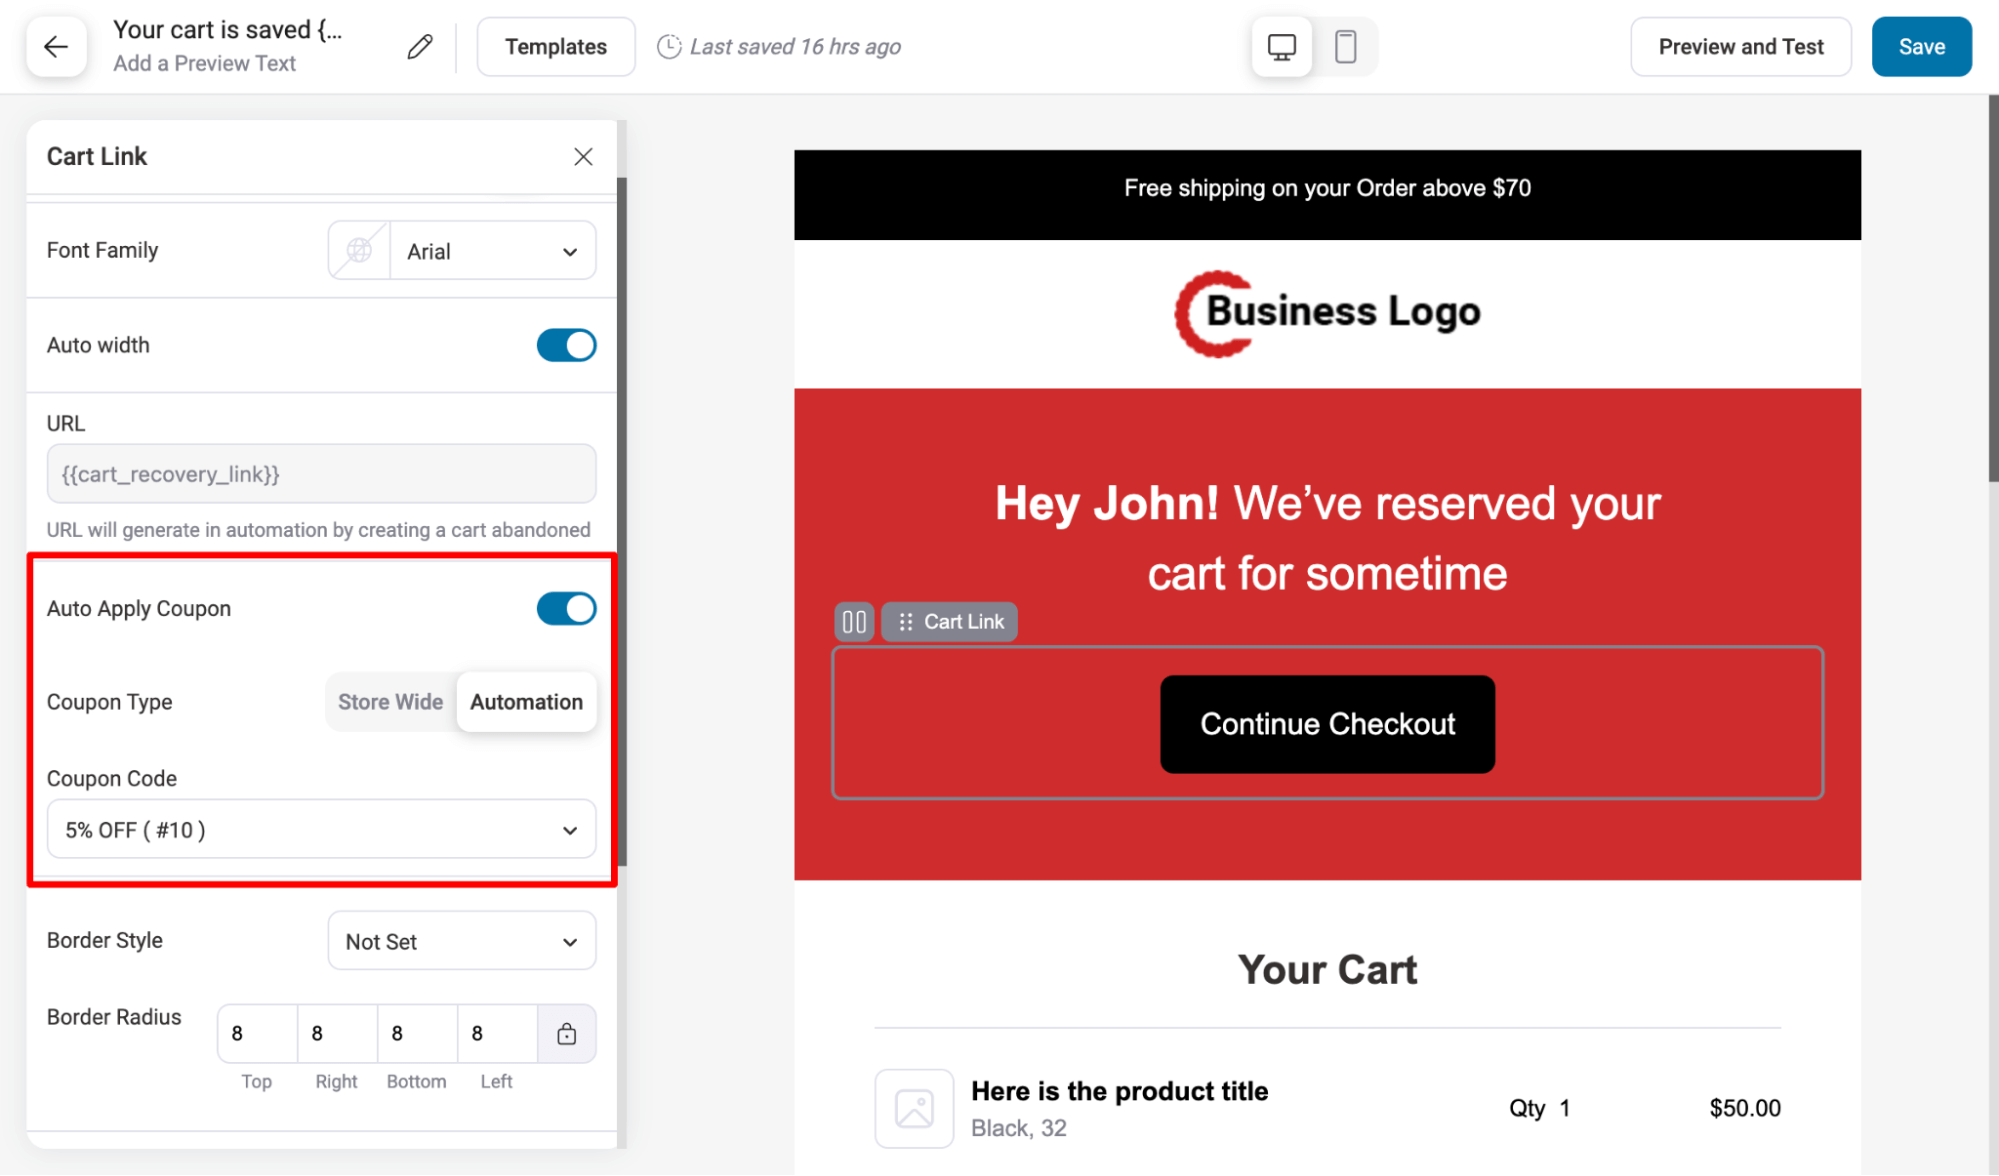
To ensure the coupon is automatically applied when users click the CTA, enable "Auto Apply Coupon" and input the generated coupon code. Depending on your preference, you can insert the code manually or dynamically. In this case, we are using an automatically generated coupon.
For this, choose the Coupon type “Automation” and select the coupon you created in the previous step.
Save the email after adding the auto-apply coupon URL and making the customizations.
You can add this link to the other emails, like the first email.
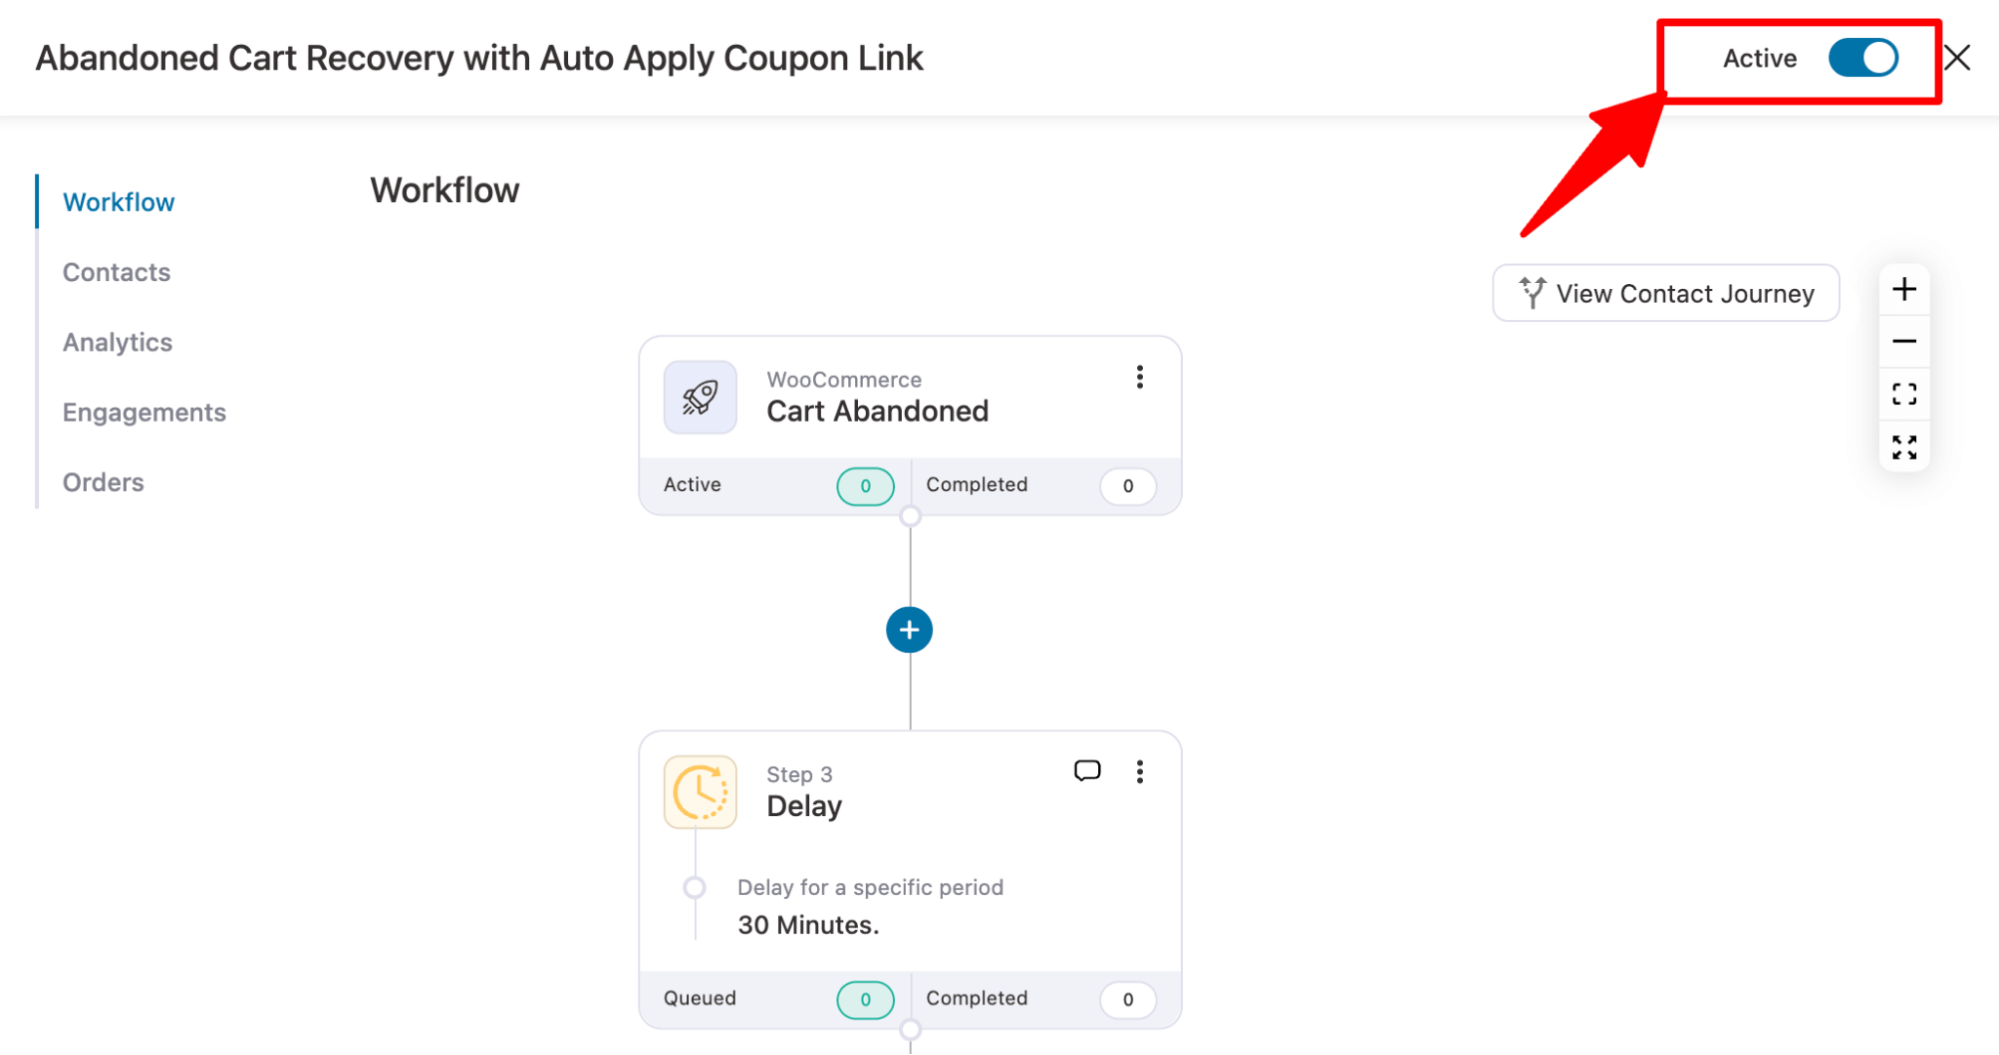
Lastly, to make your auto coupon automation go live, turn on the toggle button.
And that’s it. Your automation to send abandoned cart emails with auto apply coupon WooCommerce URL is ready.
Note: You can include an auto-apply coupon link in all your post-purchase emails using the same process with FunnelKit Funnel Builder.
5 Best Practices to Get More Conversions With Auto Apply Coupons
Let's get to proven tips to increase conversions with auto-applied coupons.
1. Set clear rules to protect your profit margins
Auto apply coupons trigger automatically. If you forget to set conditions, every customer gets the discount on every order.
So, it's important to always set a minimum spend, product restriction, or user role requirement. Once that's done, check your coupon usage stats in the first 24 hours after launch.
2. Avoid stacking multiple auto-apply coupons
If more than one auto apply coupon matches the same cart, your shoppers can get 20% off instead of 10%.
Therefore, use the “Individual use only” setting to prevent this, or make sure your cart conditions don’t overlap, or the auto-apply option has only one coupon.
3. A/B test your discount triggers and amounts
Not all discount triggers perform equally. A $50 minimum spend at 10% off might drive more revenue than a $30 minimum at 15% off.
Track coupon performance through checkout analytics in FunnelKit by going through orders generated, average order value with and without the discount.
4. Use auto apply for free shipping thresholds
A common and effective use case is offering free shipping once the cart reaches a certain total.
This is effective because extra costs, such as shipping fees, are the top reason shoppers abandon their carts.
Therefore, paring a free shipping coupon with auto apply removes this friction entirely.
5. Schedule auto apply coupons for flash sales
You set up a flash sale, auto-apply a coupon, and forget about it. A few days after your sale, people are still getting 25% off!
Set a start and end date so the auto-apply coupon activates and expires automatically.
WooCommerce Auto Apply Coupon: Frequently Asked Questions (FAQs)
To schedule a coupon in WooCommerce, you need to use a top coupon plugin. There, you just have to set the start and expiry dates when creating or editing the coupon.
The default WooCommerce coupon features do not include an auto-apply option. You can add this functionality by using a PHP snippet to automatically apply a coupon when certain cart conditions are met.
This method does not require a plugin, but it requires you to add the following code to your theme's functions.php file or use a code snippets plugin.
This snippet automatically applies a coupon called "COUPON10" when the cart subtotal exceeds $50:
Yes, with the Advanced Coupons plugin, you can use cart conditions to check a customer's order history. Set a condition requiring the customer to have no previous orders. When a new customer adds products to their cart, the coupon will apply automatically. Returning customers will not see the discount.
WooCommerce checks all active auto apply coupons during cart calculation. It then evaluates each coupon's usage restrictions and cart conditions against the current cart contents.
If a coupon's conditions are met, it is applied. If multiple auto-apply coupons qualify, they all apply unless one has the "Individual use only" setting enabled. In that case, WooCommerce applies only the first matching individual-use coupon.
Create a new coupon with the discount type set to "Fixed cart discount" at $0 and check the "Allow free shipping" box.
Then set your cart condition (such as a $75 minimum subtotal) and enable auto apply.
Once done, configure a WooCommerce shipping zone with the "Free shipping" method that requires a valid free shipping coupon.
Yes, as long as the coupon is configured to support subscription products, as in that the subscription products are not excluded from using this coupon.
With default WooCommerce settings, you can’t auto-apply gift cards or store credits. However, with additional plugins, you can do that.
Start Converting More Shoppers With WooCommerce Auto Apply Coupons!
Enhancing your WooCommerce shopping experience is a breeze with auto-apply coupons. This not only streamlines the checkout process but also has the potential to significantly boost your sales.
While some prefer the 'WooCommerce apply coupon programmatically' approach, the non-coding method offers more control over where and how to use auto-apply coupons.
With FunnelKit, you go beyond coupons, creating sales funnels and offering additional offers like order bumps and upsells to boost revenue.
Start with FunnelKit today and transform your WooCommerce store into a sales powerhouse!
Editorial Team
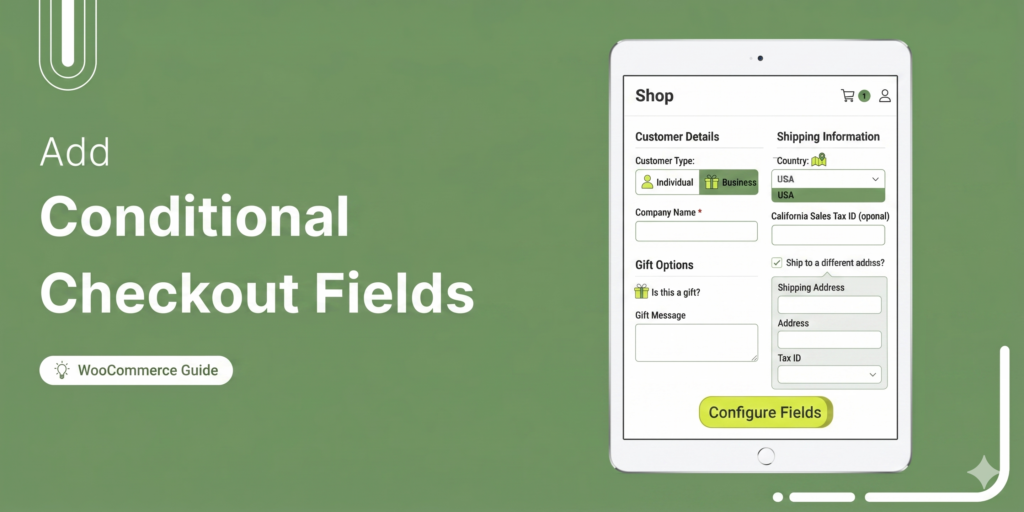
April 17, 2026Stop treating every buyer the same. WooCommerce conditional checkout fields dynamically hide or display specific form fields based on customer input, cart contents, and more. If you ask a digital...
Editorial Team
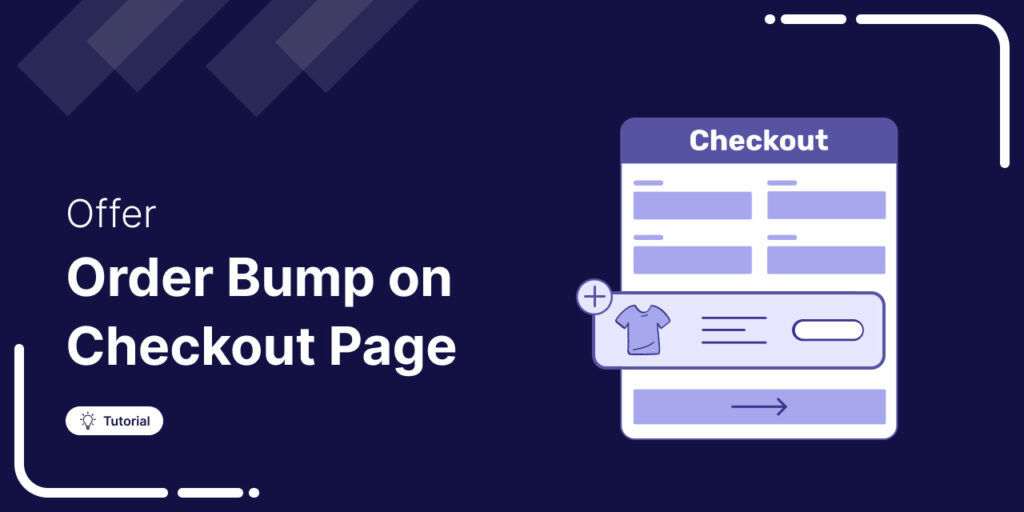
April 14, 2026If you run a WooCommerce store and are not using order bumps at checkout, you're leaving money on the table. Almost all businesses, whether online or offline, use it. You...
Editorial Team
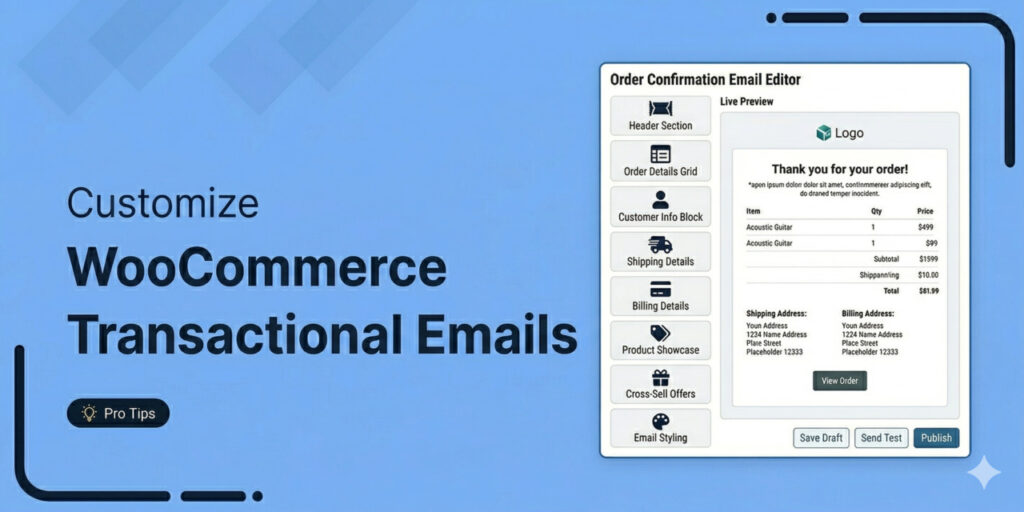
April 9, 2026WooCommerce transactional emails are the automated messages your store sends after a customer takes an action. This includes shipping updates, password resets, and welcome notices. Open rates for these alerts...


