
![How to Send Custom WordPress New User Registration Emails [No Code Guide]](https://funnelkit.com/wp-content/uploads/2024/04/How-to-Send-Custom-New-User-Registration-Email-in-WordPress-FunnelKit-.jpg)
When a user registers on your WordPress site, the platform automatically sends a WordPress new user registration email to confirm their account.
However, this default email only contains basic information like login details and lacks personalization, which makes it feel generic and disconnected from your brand.
Leaving the default email unchanged can lead to disengagement, as users often overlook it.
By customizing your WordPress new user registration email, you can warmly greet users, provide helpful links, and guide them to take their first steps on your site, boosting engagement.
In this guide, we’ll show you how to personalize your WordPress new user registration email and replace the default one. No coding required.
Table of Contents
- 1 What is the Default WordPress New User Registration Email?
- 2 Why You Should Customize the WordPress New User Registration Email
- 3 How to Disable the Default WordPress New User Registration Email
- 4 How to Send a Custom WordPress New User Registration Email
- 4.1 Step 1: Add new automation
- 4.2 Step 2: Add the ‘User Created’ Trigger
- 4.3 Step 3: Set a send email action for new registration
- 4.4 Step 4: Design the custom WordPress registration email
- 4.5 Step 5: Send a test email
- 4.6 Step 5: Activate the automation to send a welcome email to newly registered users
- 5 How to Send a Custom New Registration Email To WooCommerce Users
- 6 5 Tips to Build Brand Loyalty With Your New Users
- 7 More Questions About WordPress New User Registration Emails
- 8 Are You Ready to Send Your WordPress New User Registration Emails?
What is the Default WordPress New User Registration Email?
WordPress's new user registration email is the email that the Content Management System sends by default to every user who registers on a website.
Usually, the email contains a simple text asking the user to set the password.
You can see a sample of the default WordPress new user registration email below:
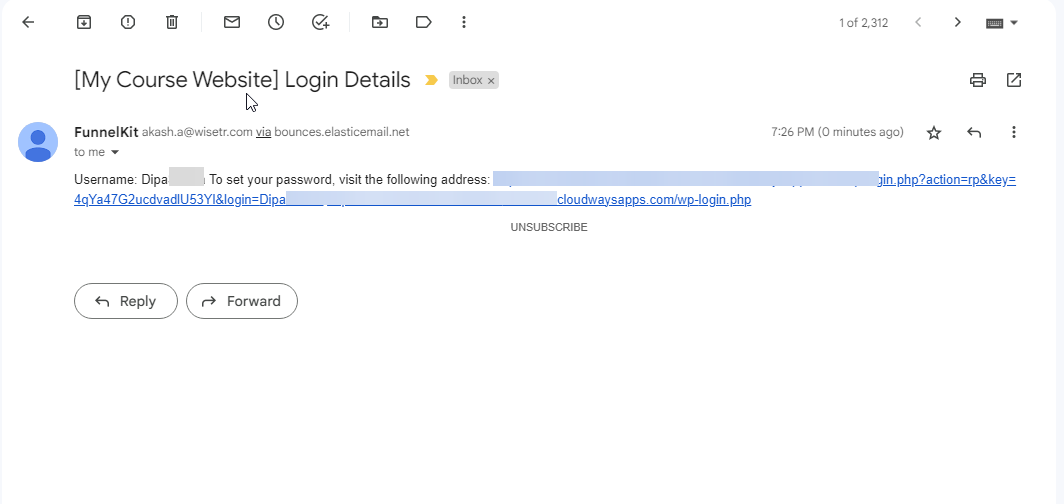
As you can see, it’s a generic email asking users to do what’s required.
But it's not the only email you would want to send to your users. After all, they just signed up to become a user and would expect a warm welcome. And not a generic robomail.
Did you know that almost 70% of users expect to receive a welcome email after registering or subscribing to a site?
Well, they certainly don’t expect to receive a bland email from their favorite brand. That’s why you should send a personalized welcome email to users when they register on your site.
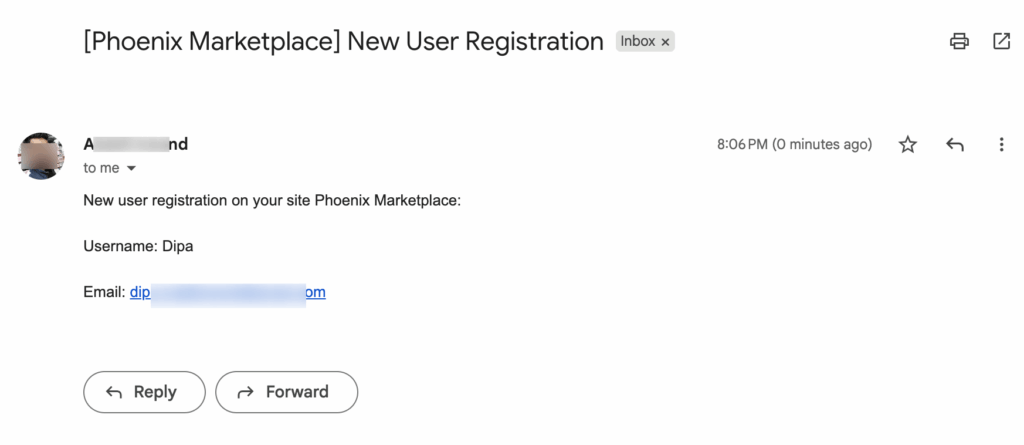
Does WordPress Send a New User Registration Email Notification to the Admin?
Yes, it does. Along with sending an email to the registered customer, WordPress automatically sends a simple email notification to the site admin containing the new user’s username and email address.
Here is what a default admin notification for a new user looks like:
Why You Should Customize the WordPress New User Registration Email
Stand out from the crowd
More than 300 billion emails are sent worldwide each day. And on average, a person deals with 120+ emails (sent and received combined).
So, you can understand how tight the competition is! Well, you can beat this competition and stand out from the crowd by customizing your emails. And a great start would be by sending a custom welcome email to new WordPress users of your website.
Welcome emails have better open rate
Welcome emails usually have a 91.43% open rate, which indicates that if you want to improve user engagement with your brand, then you must send them a personalized email.
This is your opportunity to get users more engaged and interested in your brand and product. You can do this by incorporating the right content in the WordPress new user email that you send out.
Hold the attention of users
Users are 42% more likely to read a welcome email than an average email. It’s because the welcome email is the first email they receive from the brand they signed up for, and it appeals way more than the daily promotional emails.
You can use users' interests in a welcome email to hold their attention for longer. To do so, you must give them a reason to invest time in your brand, which you can do perfectly with a custom welcome email.
Better revenue generation
Newly subscribed users are highly active in the first 48 hours of subscribing. And that makes it the perfect time to push them to make a purchase and generate more revenue.
For example, you can send a welcome email offering them 20% OFF on their first purchase, which will encourage them to buy your product instantly and thus help you generate more revenue.
Build loyalty
A welcome email is also a great way to gain users' trust in your brand and build loyalty. You can do that by sharing your social media accounts or customer reviews on your email as a symbol of social proof to gain trust.
Now you know how crucial it is to send a customized welcome email to a new user.
How to Disable the Default WordPress New User Registration Email
Before we can start creating and sending custom new-user emails in WordPress, we need to disable the default email. Otherwise, users will receive two emails, resulting in a bad user experience.
To disable the default new user email, you need to add a custom code snippet.
Here is the code snippet.
<?php

/**
 * This will unhook user registeration emails
 */
add_filter( 'init', function () {
	remove_action( 'network_site_new_created_user', 'wp_send_new_user_notifications' );
	remove_action( 'network_site_users_created_user', 'wp_send_new_user_notifications' );
	remove_action( 'network_user_new_created_user', 'wp_send_new_user_notifications' );
	remove_action( 'register_new_user', 'wp_send_new_user_notifications' );
	remove_action( 'edit_user_created_user', 'wp_send_new_user_notifications' );
} );
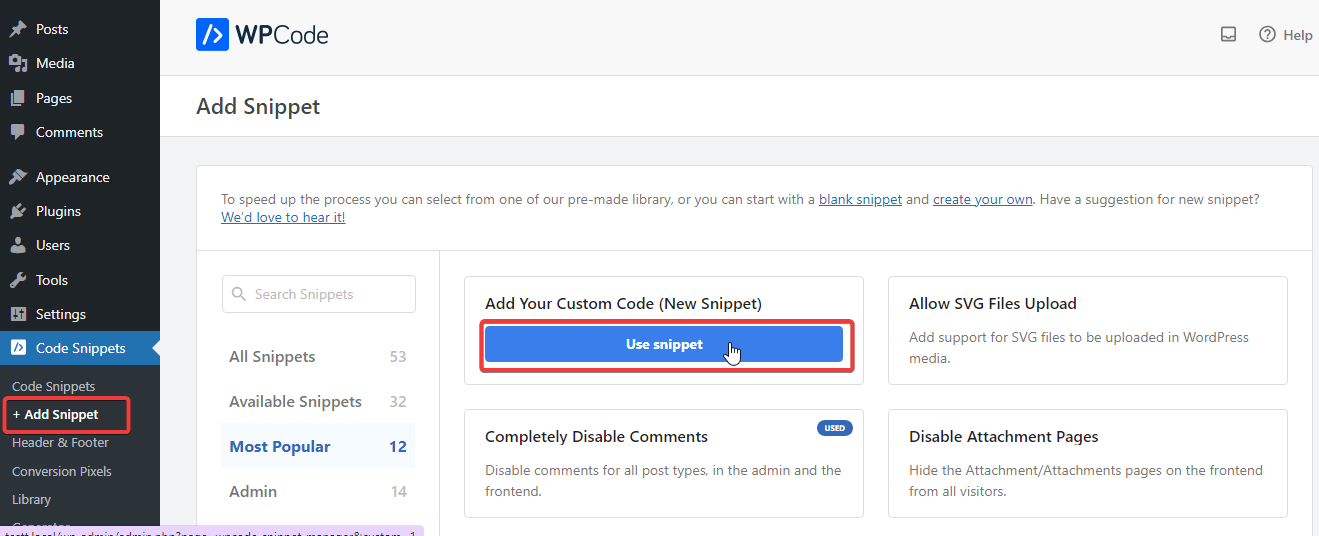
To add this snippet, you need to install a plugin. You need to install and activate WPCode – Insert Headers and Footers.
Now, from the WordPress dashboard, navigate to Code Snippets ⇒ + Add Snippets, then hover on “Add Your Custom Code (New Snippet)” and click on the “Use Snippet” option.
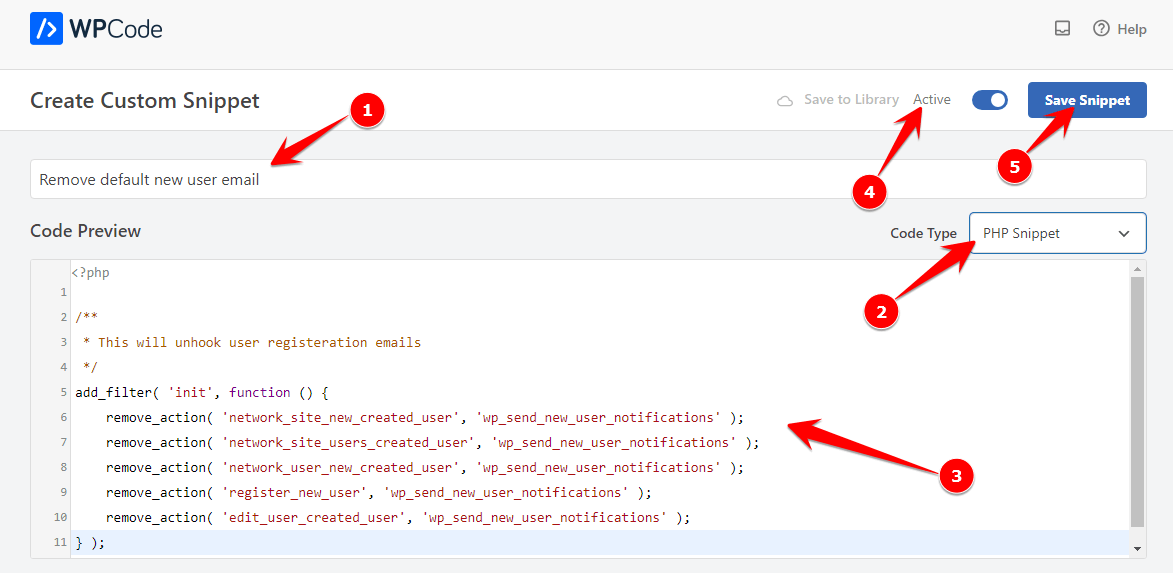
Now, provide a name, select Code type as PHP Snippet, paste the code in the Code Preview Box, activate the snippet, and click Save Snippet.
This will prevent WordPress from sending the default email. However, if you use WooCommerce with WordPress, then you need to do the following as well:
Navigate to WooCommerce ⇒ Settings ⇒ Emails. Then click on the Manage option for New Account.
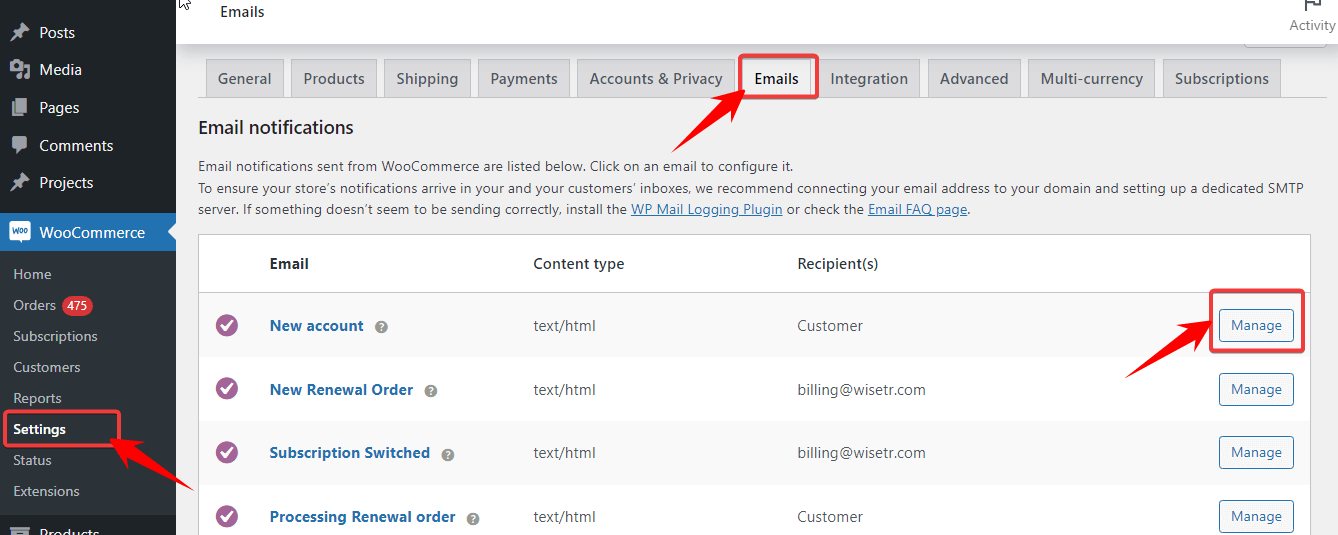
Here, you need to uncheck the “Enable this email notification” option. After that, click on Save Changes.
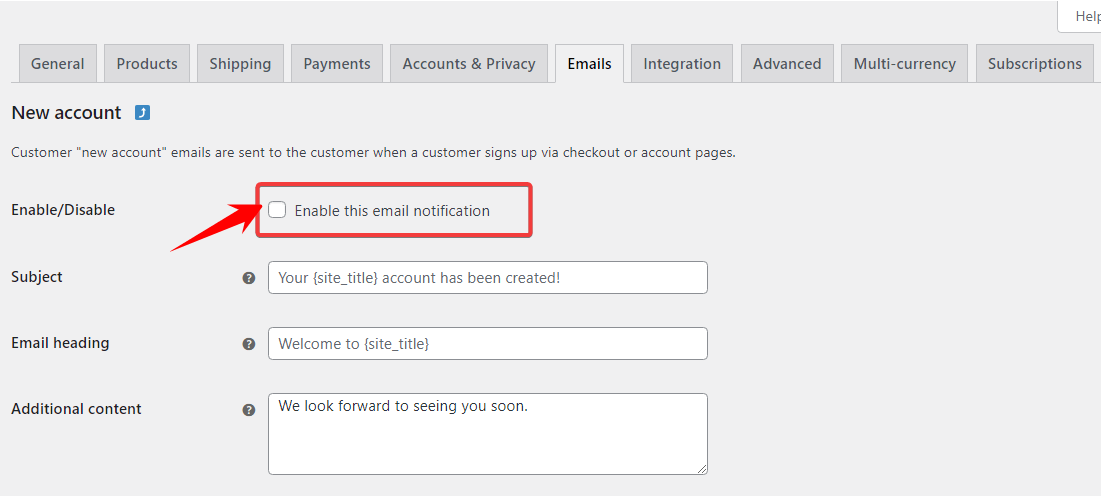
This should disable the new account email from your WooCommerce site.
Now, let's see how you can set up a custom new-user registration email.
How to Send a Custom WordPress New User Registration Email
For this process, we will use FunnelKit Automations, an all-in-one email marketing platform for WordPress.
This WordPress plugin empowers you to write customized emails and automate email campaigns from the WordPress dashboard.
First, let's install and activate FunnelKit Automations.
After activating the plugin, follow the step-by-step process to send a WordPress new user registration email:
Step 1: Add new automation
The next step is to create an automation system, which you will use to send a custom WordPress new user registration email.
For that, navigate to FunnelKit Automations ⇒ Automations and then click on Create Automation.
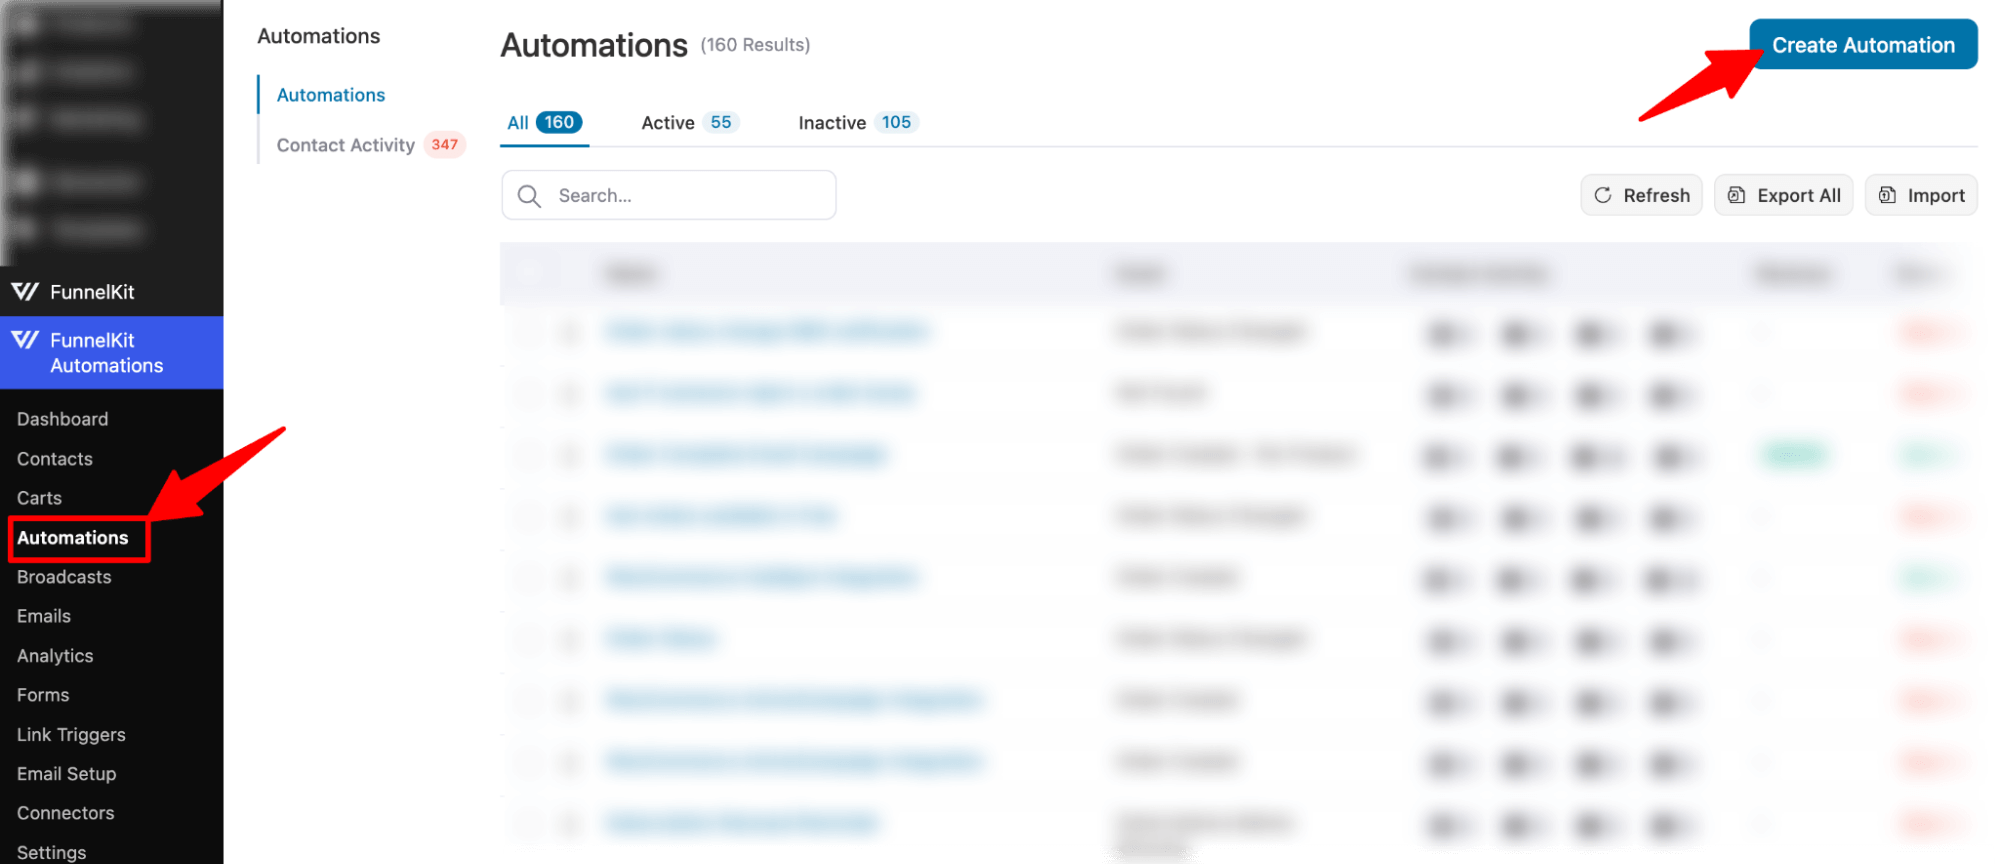
We are not going to use any new user registration automation recipe; rather, we will build one from scratch. So, click on the "Start From Scratch" option, provide a name, and click on Create.

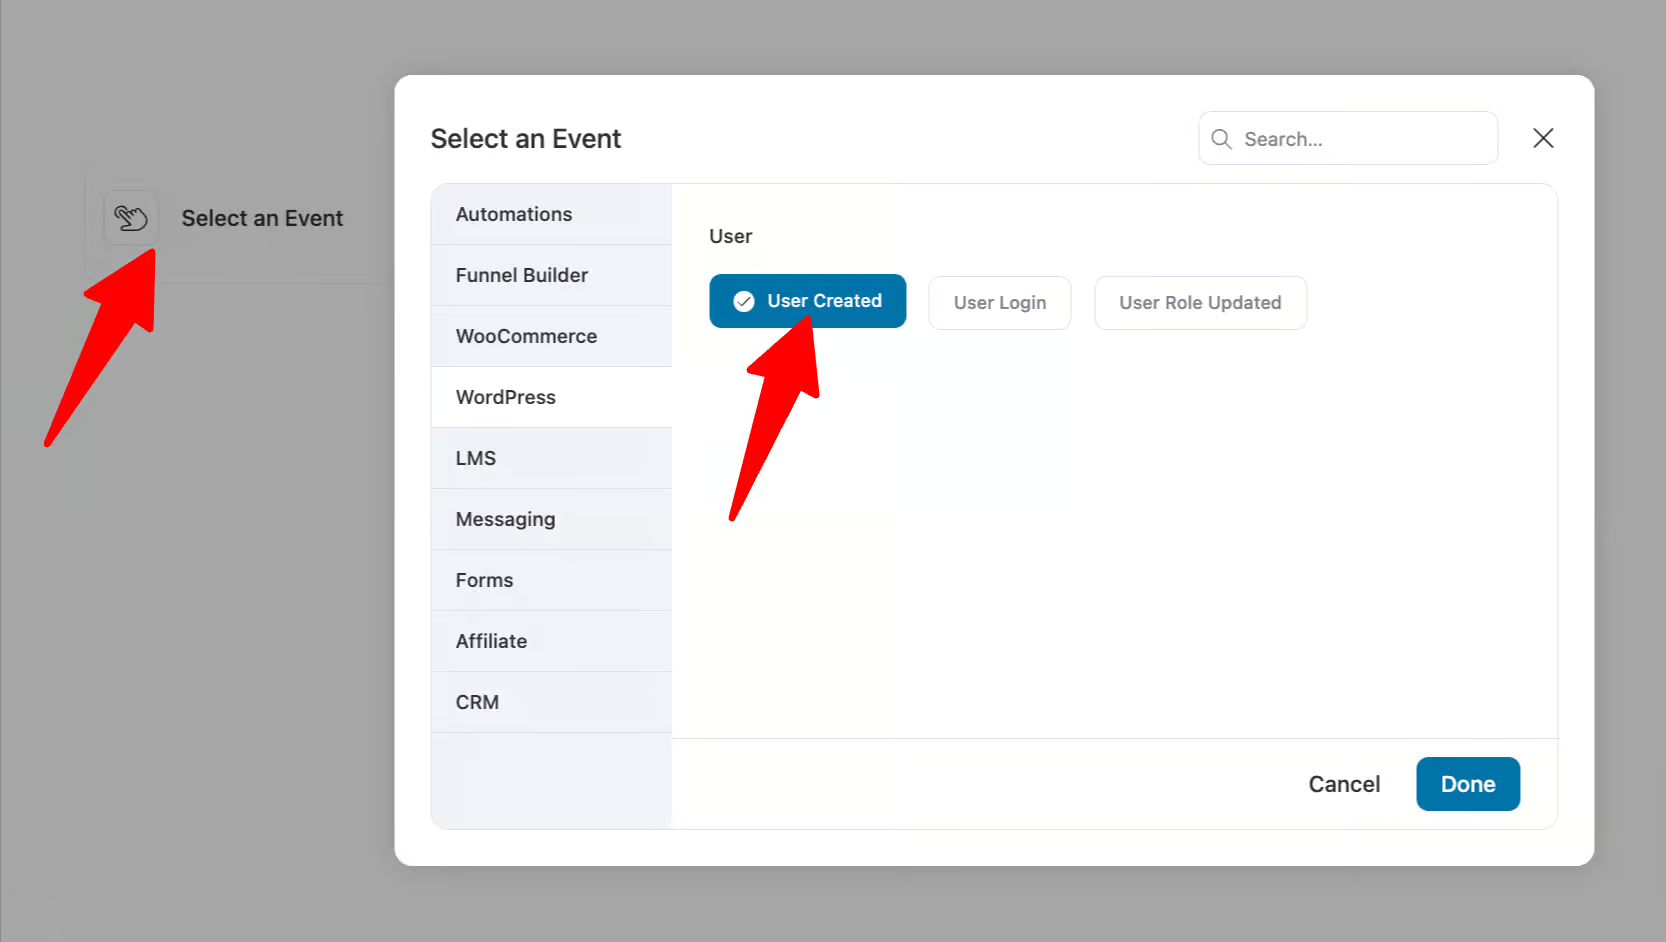
Step 2: Add the ‘User Created’ Trigger
Now, click on Select an Event to choose an event, and under the WordPress menu, select "User Created", and then click on Done.
🔔 Note: A trigger is an event after the completion of which an action will take place. The User Created trigger represents the event of new registration on a WordPress site.
Step 3: Set a send email action for new registration
Before you can create the email, you need to add an Action. To do so, click on the ‘+’ icon and choose Action.
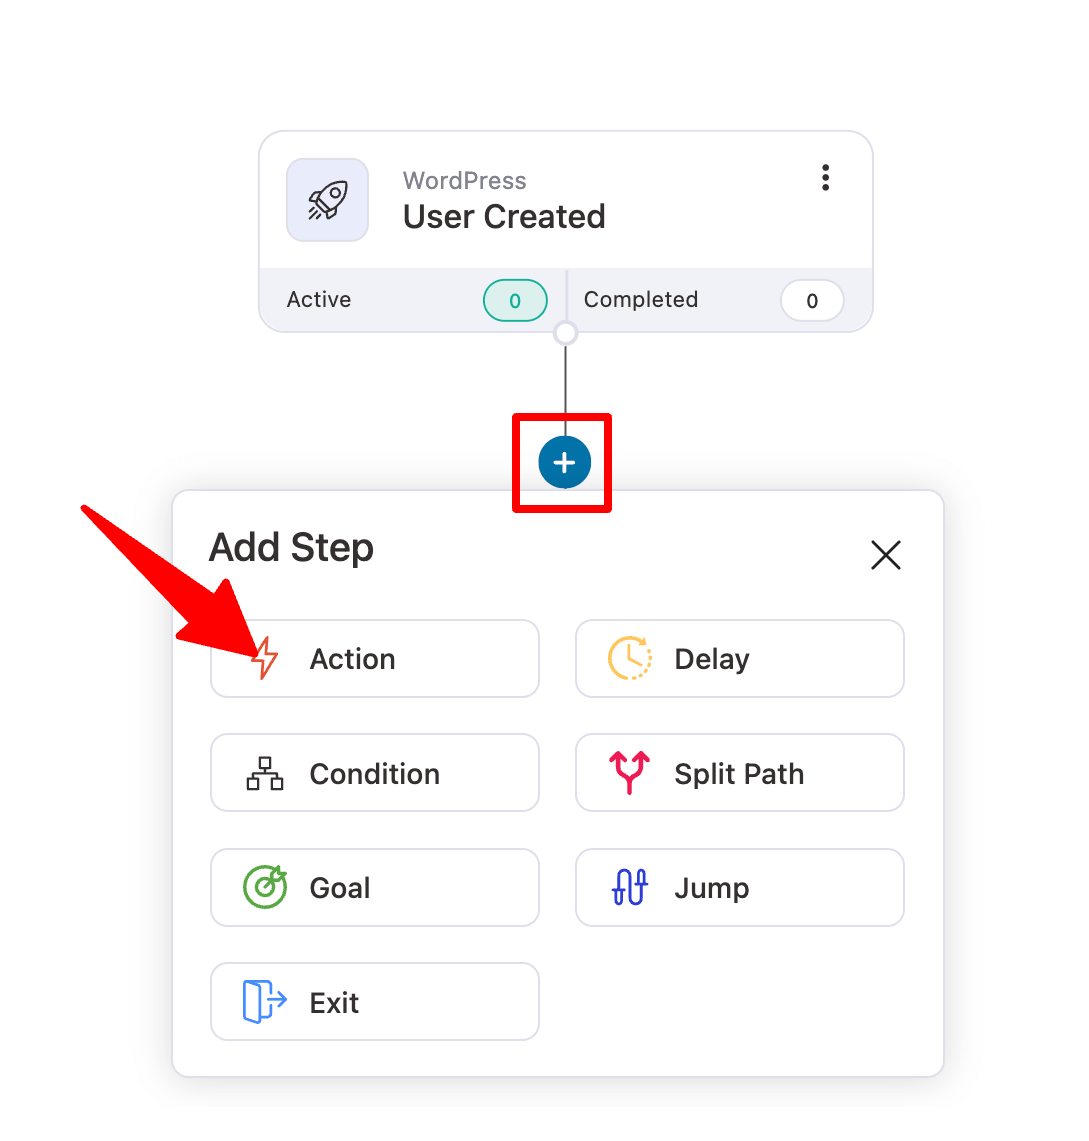
Now choose the ‘Send Email’ option in the Messaging section and click on Done.
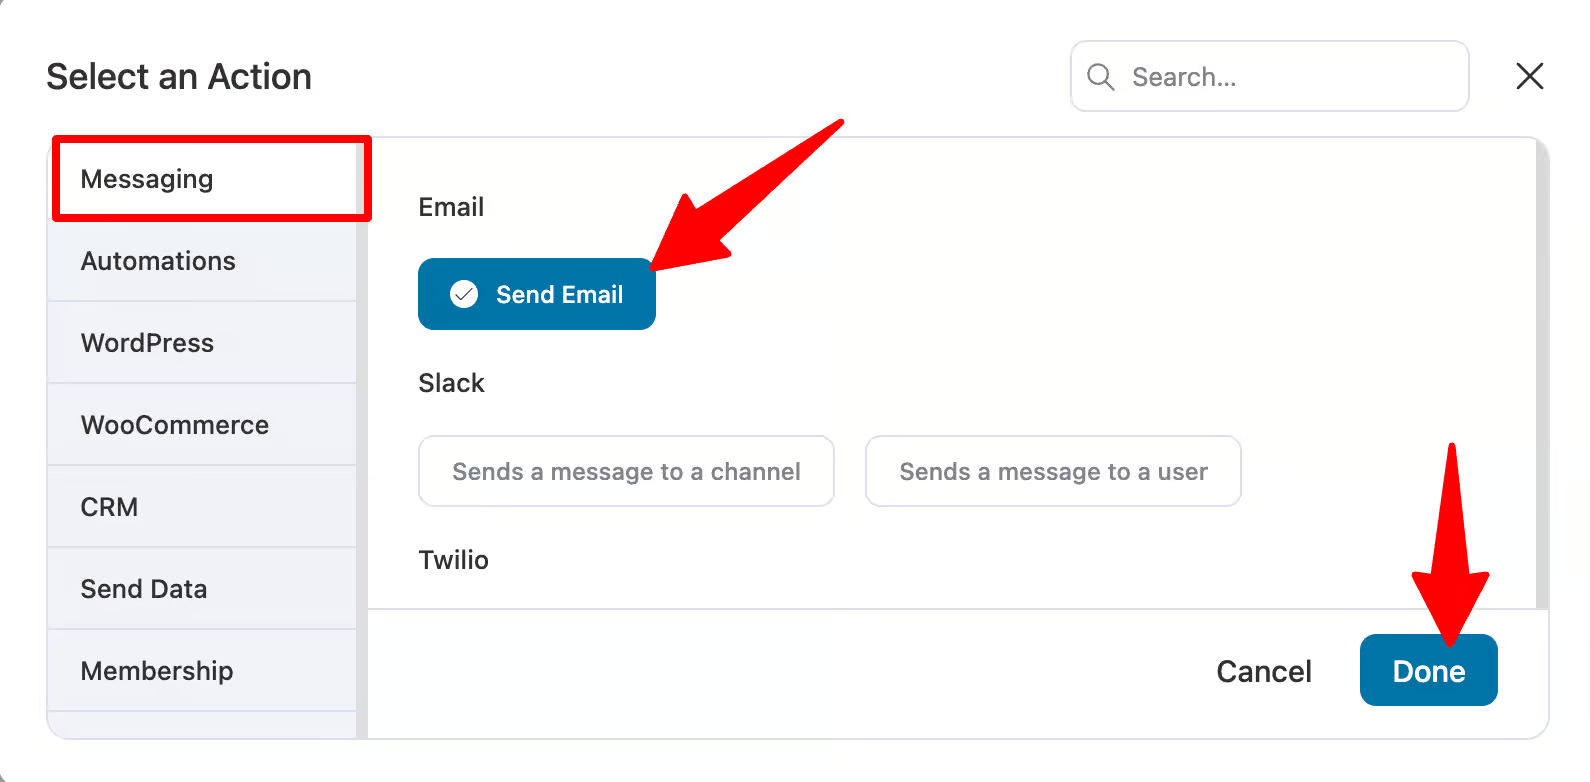
This will set up your WordPress new user registration email - let’s customize it further.
Step 4: Design the custom WordPress registration email
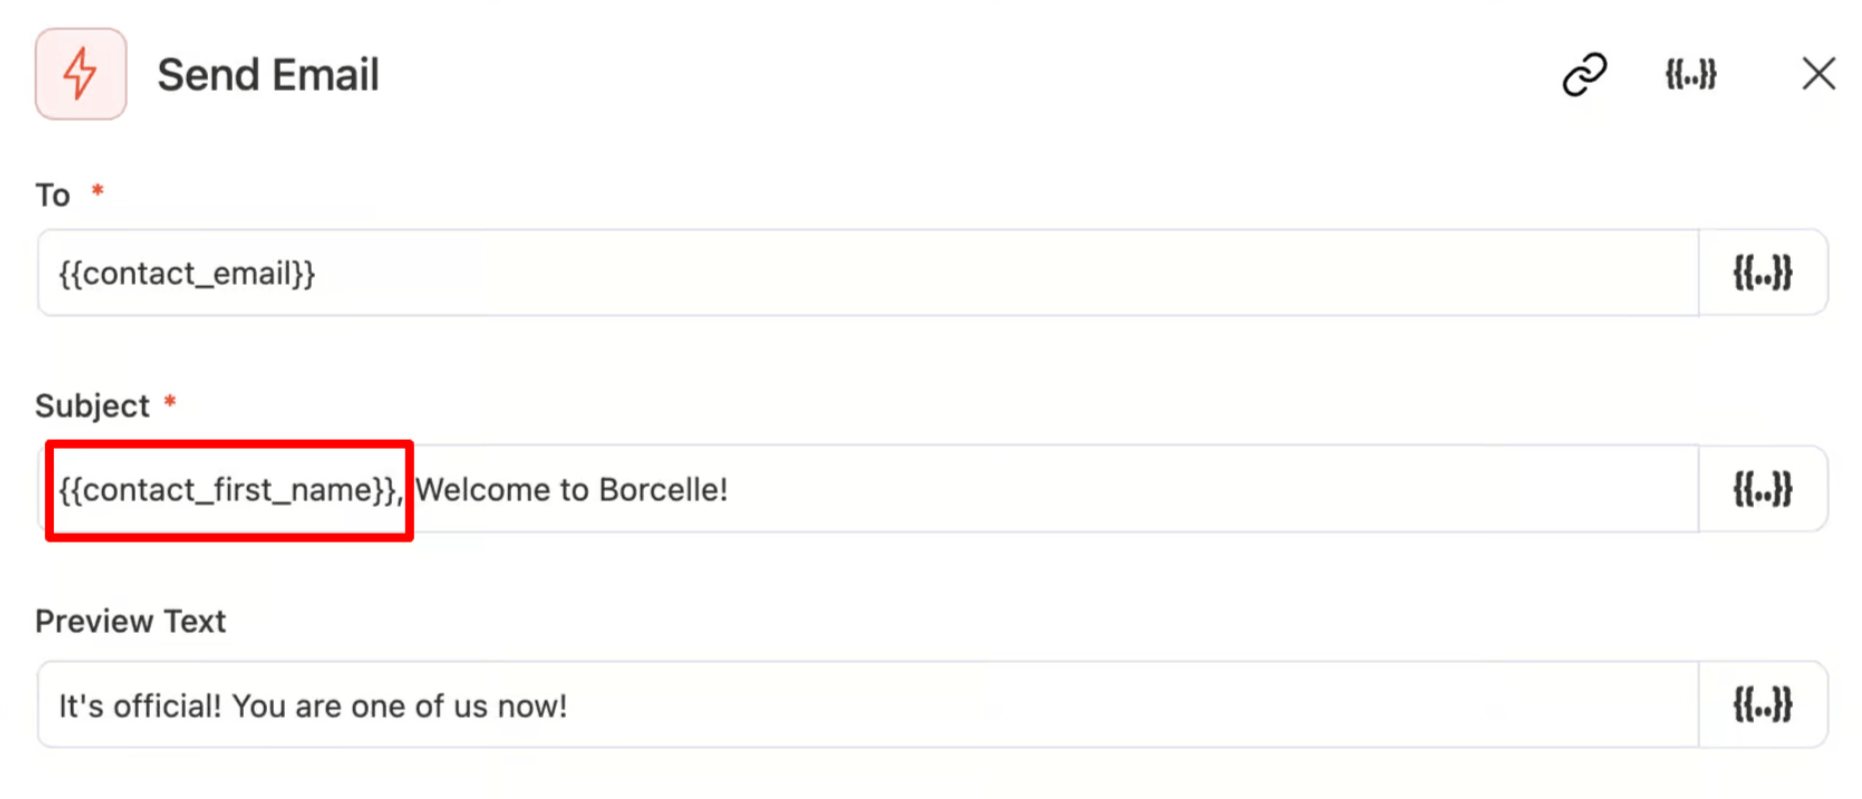
Now, you should see a window with a beginner-friendly email customizer by FunnelKit Automations. Here, you can customize the Email Subject, Preview Text, Body, and other options.
Putting the same subject line or body text for everyone without personalization is not the most efficient way to go.
To make your customers feel like the email was specifically meant for them, it’s a good idea to incorporate customer information in the email content.
Well, to begin, you can address the customer by their name because who doesn't love their name, right?
To personalize email content, FunnelKit Automations offers a Merge Tag.
You can click on the {{..}} Icons to access the merge tag. Look for the merge tag, copy the tag, and simply paste it where you want to add the subject line, preview text, or email body.
Here, we have added the name in the subject line to personalize the email.
Now, let's check how you can customize the email body using FunnelKit Automations.
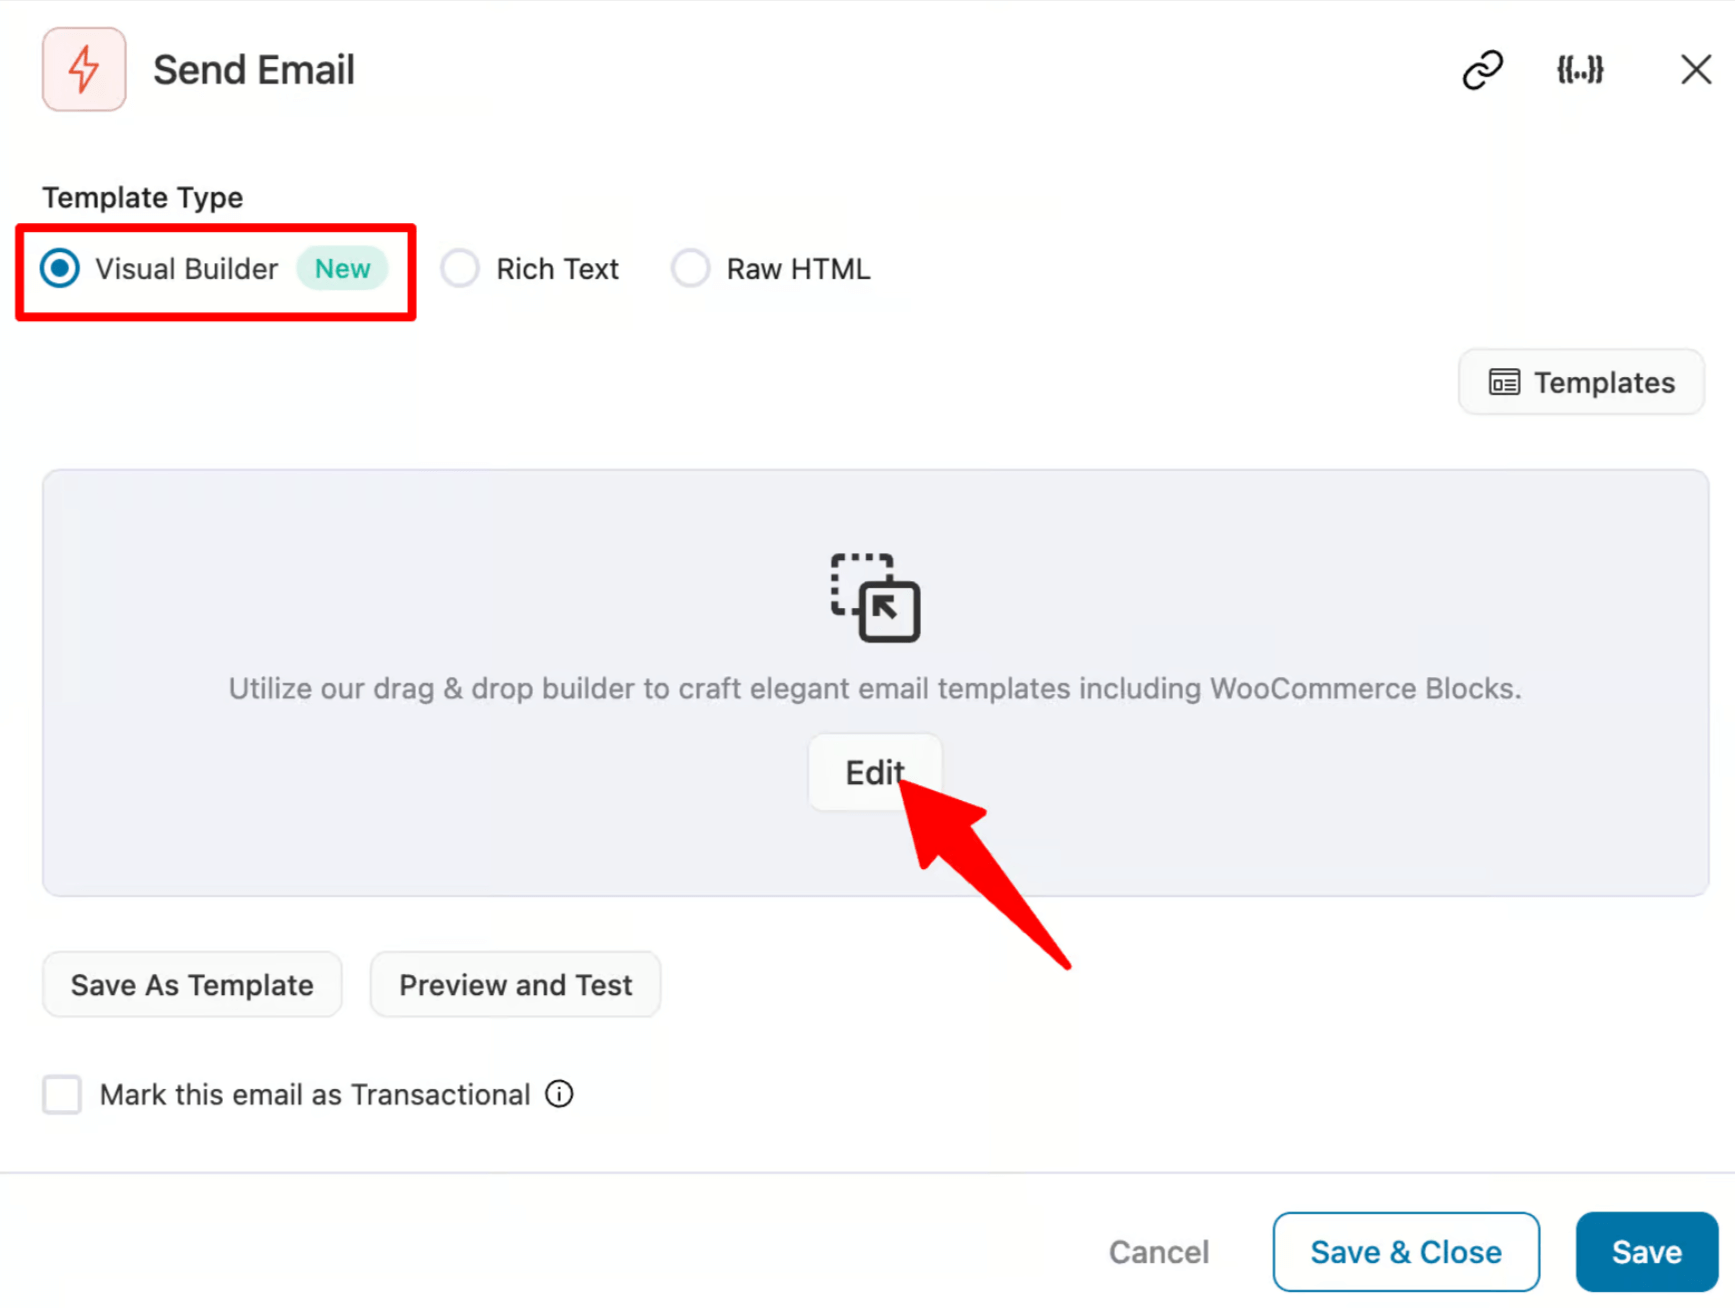
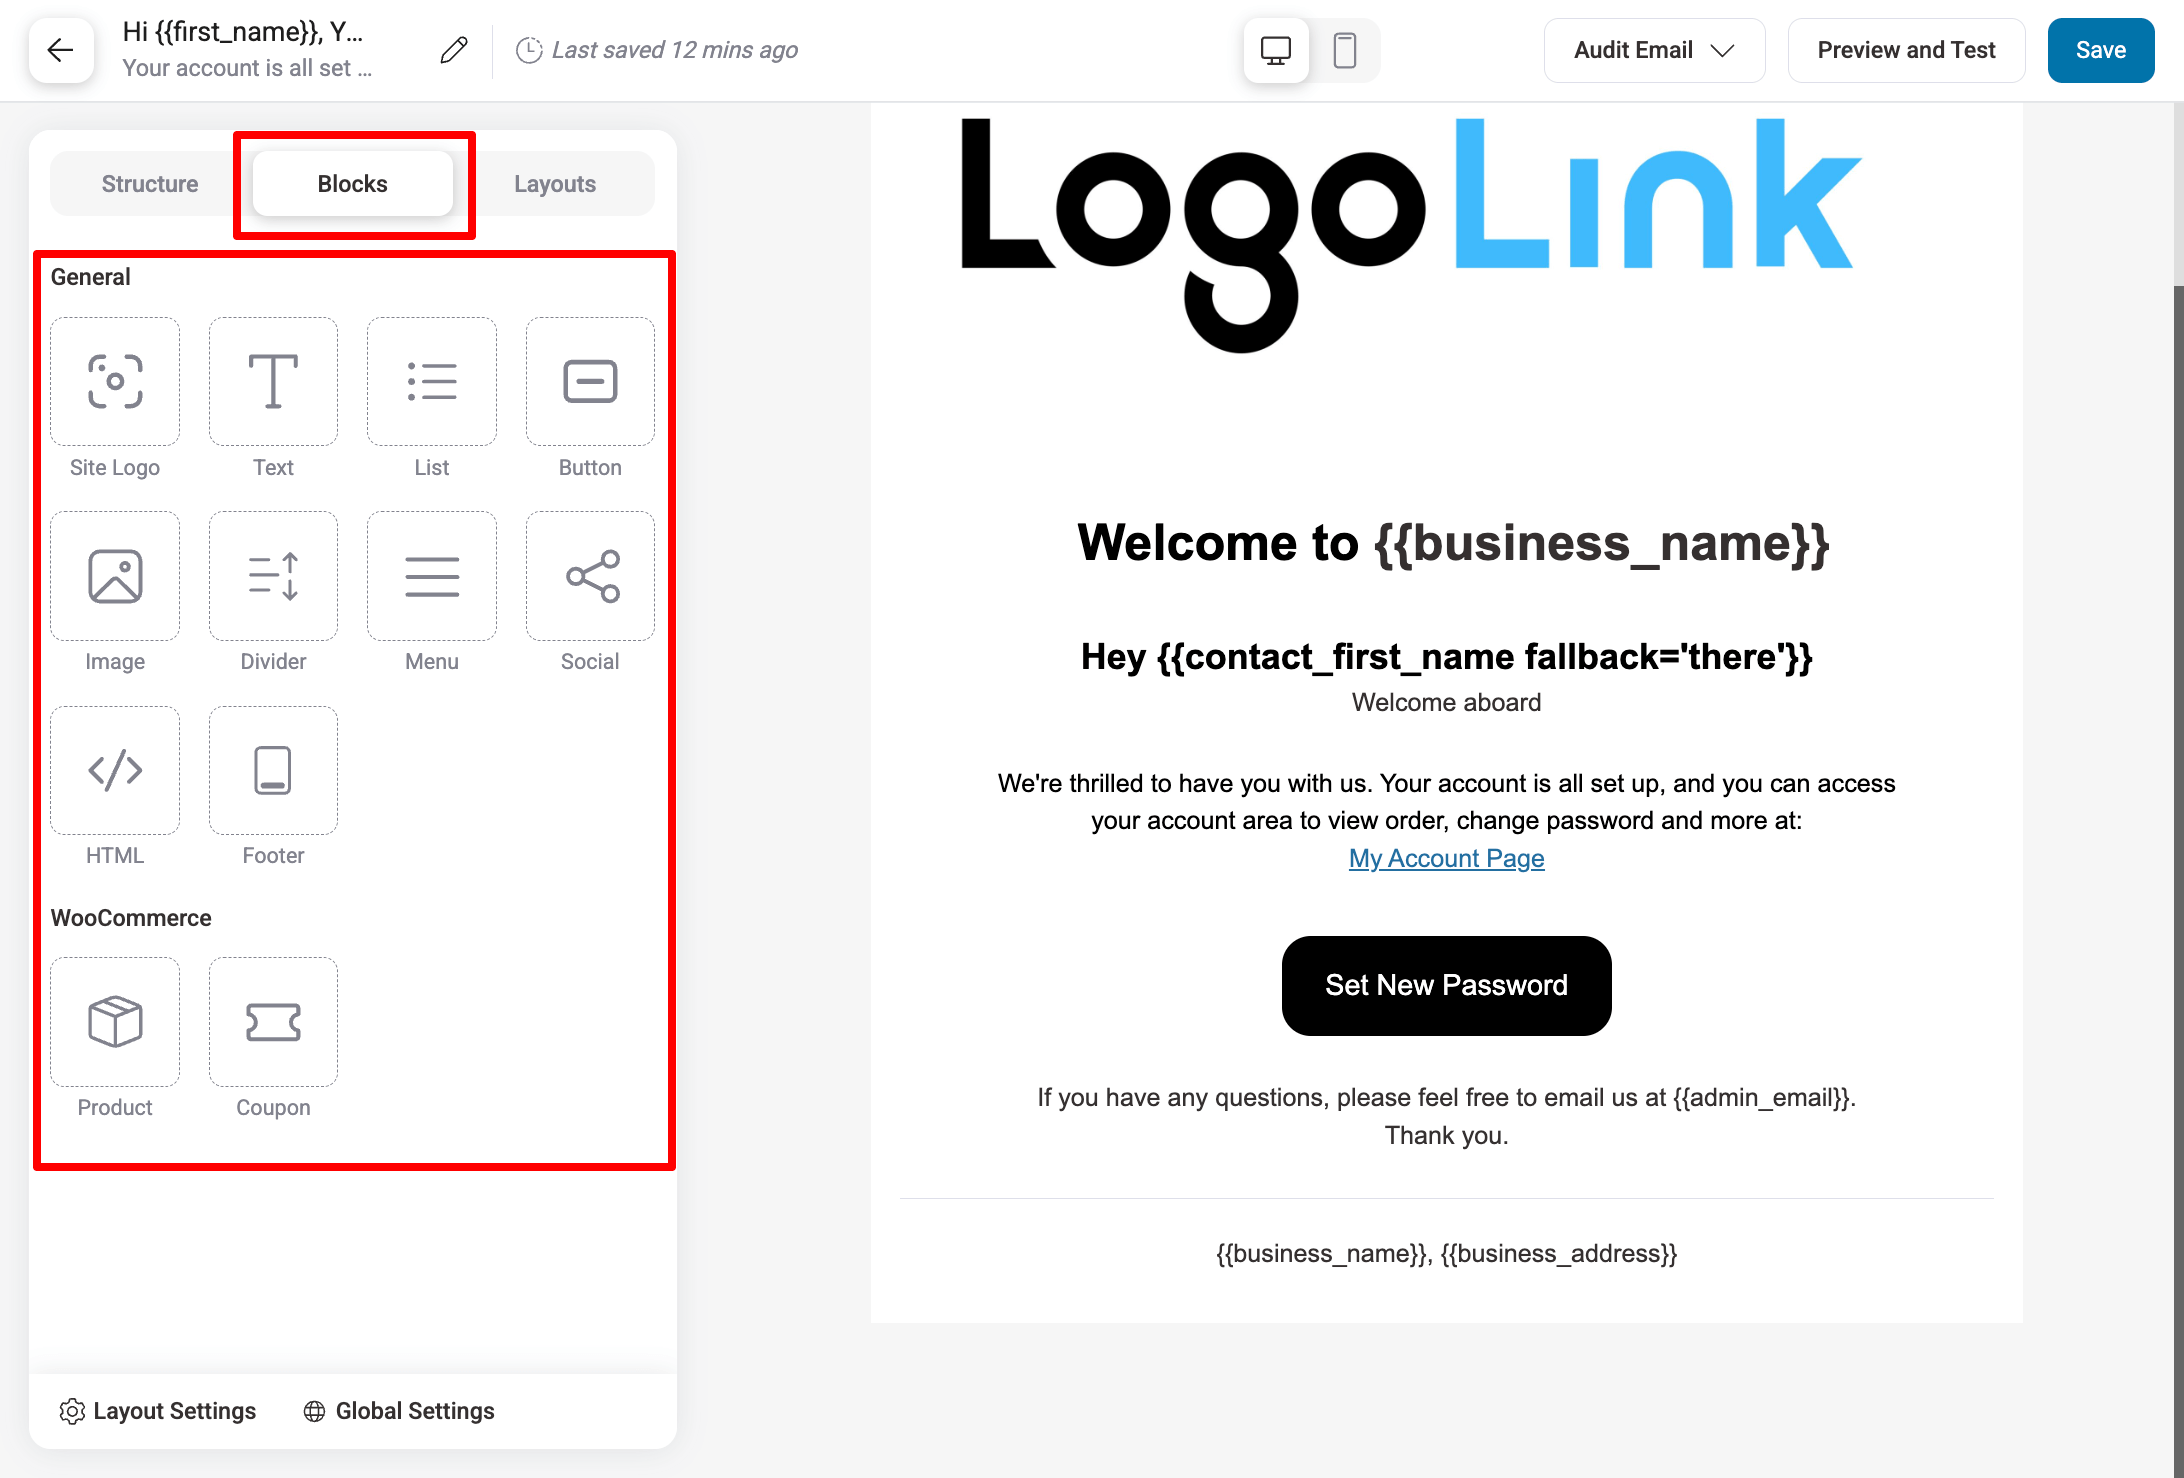
FunnelKit Automation offers you four ways to create your WordPress New User Registration email template:
- Visual Builder (New): This is the latest and most advanced email builder FunnelKit Automations offers. This new builder has many prebuilt templates you can import, customize, and use within a few moments.
- Rich Text: With rich text, you can just write your email like you would in any rich text editor. You can style your text, add links, and much more.
- Raw HTML: Use the Raw HTML option to create the email using HTML code. And for the styling, you need to use CSS. However, we don’t recommend this option unless you are an HTML and CSS pro.
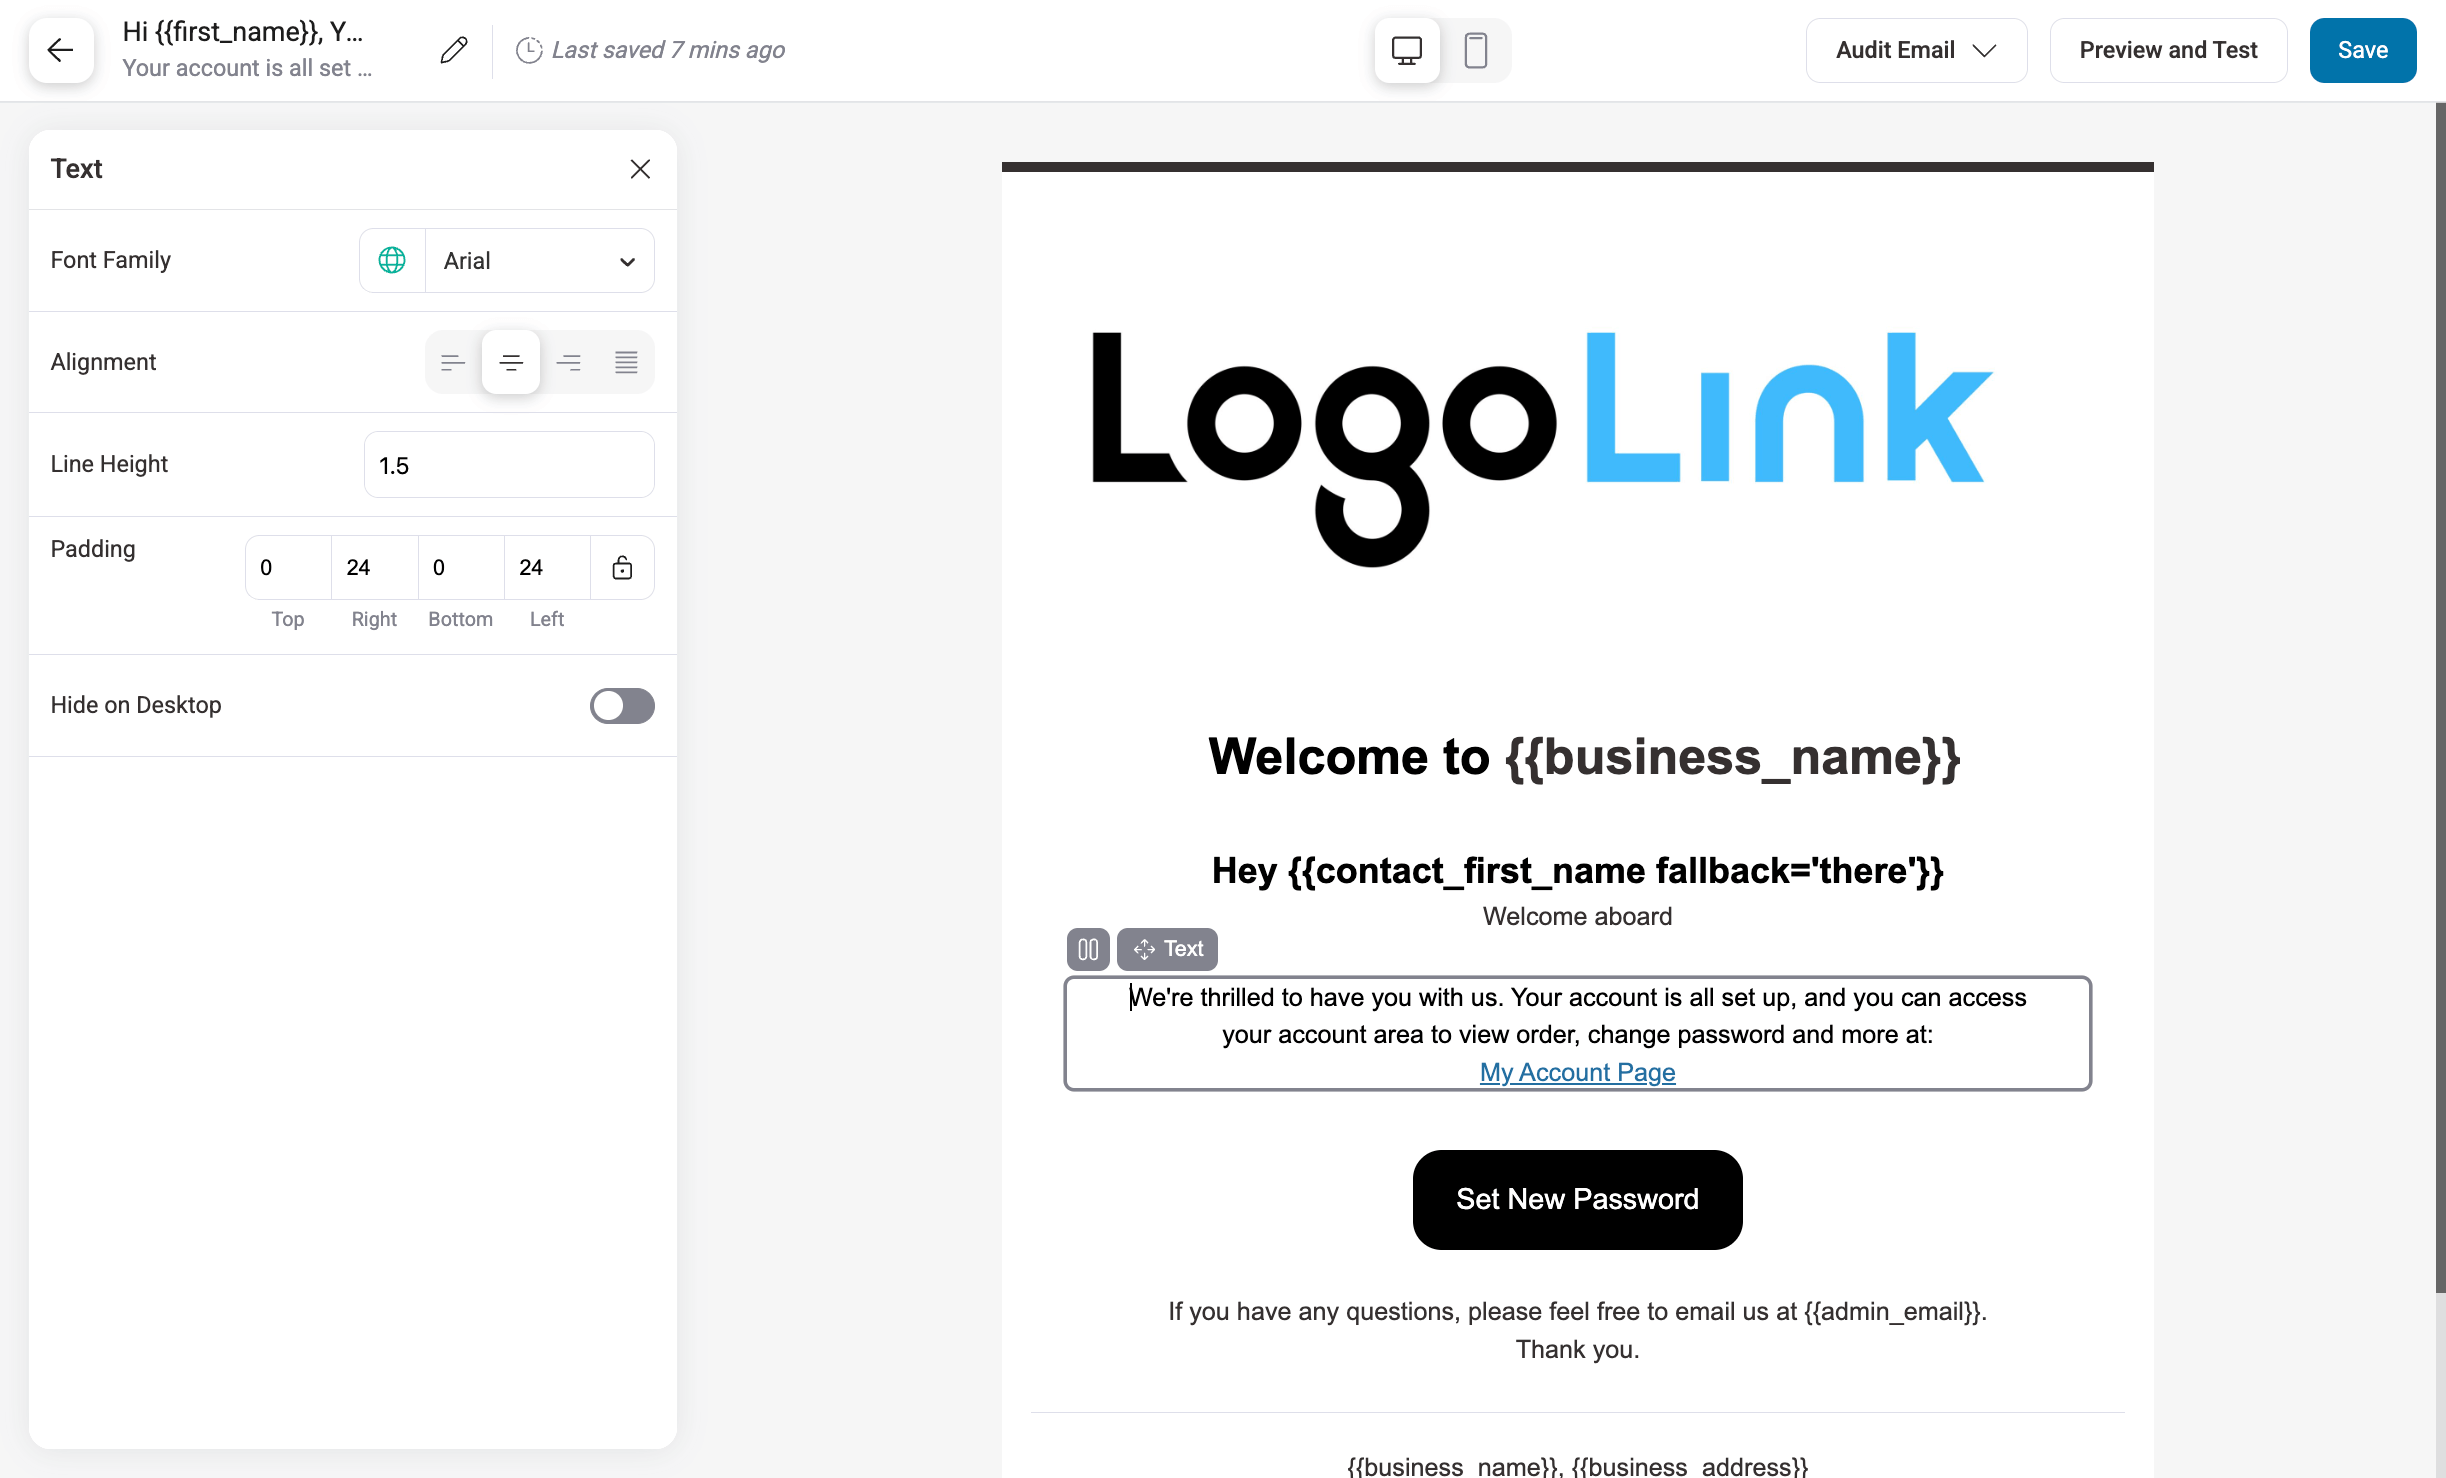
To use the Visual Builder (New), you need to choose Visual Builder as the template type and then click on Edit to launch the editor.
Now you will find many prebuilt email template. You can import any of these and customize them according to your needs.
Here, we will import the New Registration Email template. To do this, hover over the template and click on Preview.
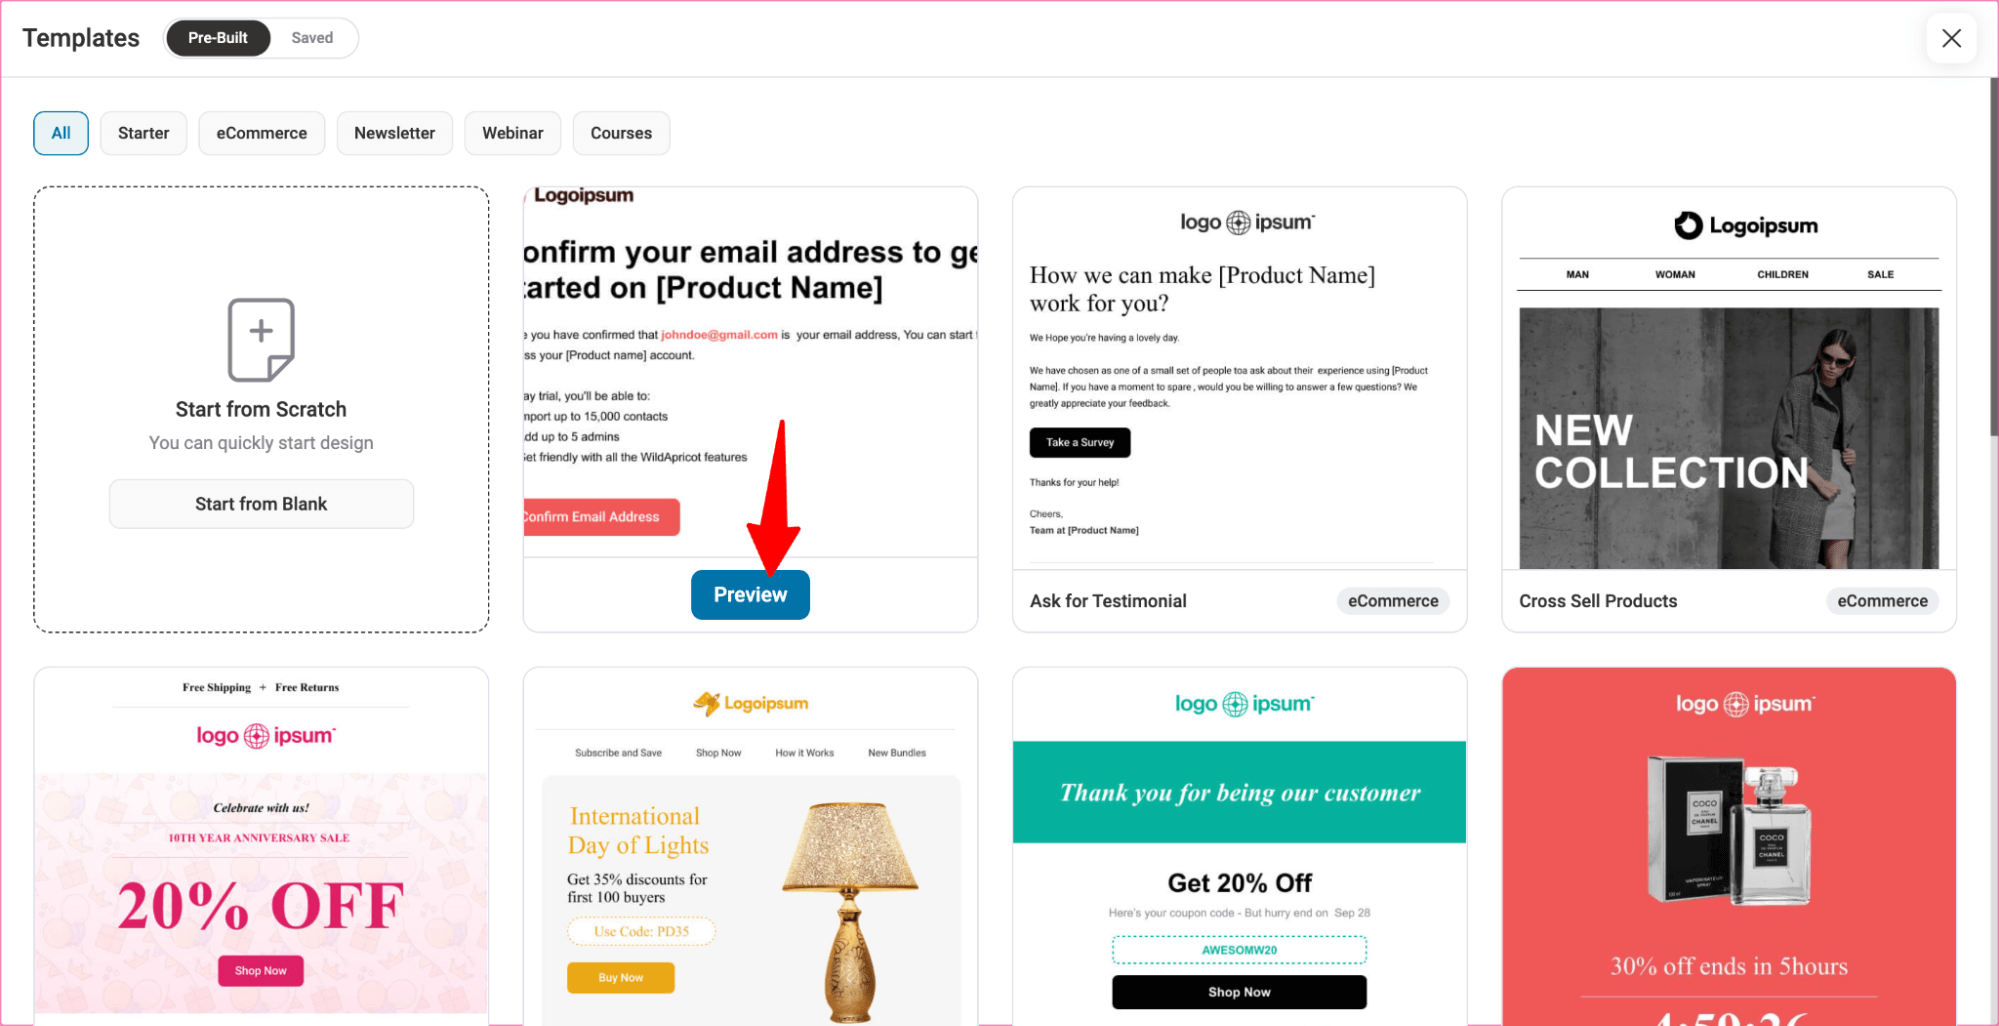
Now, to import, click on the Import This Template button.
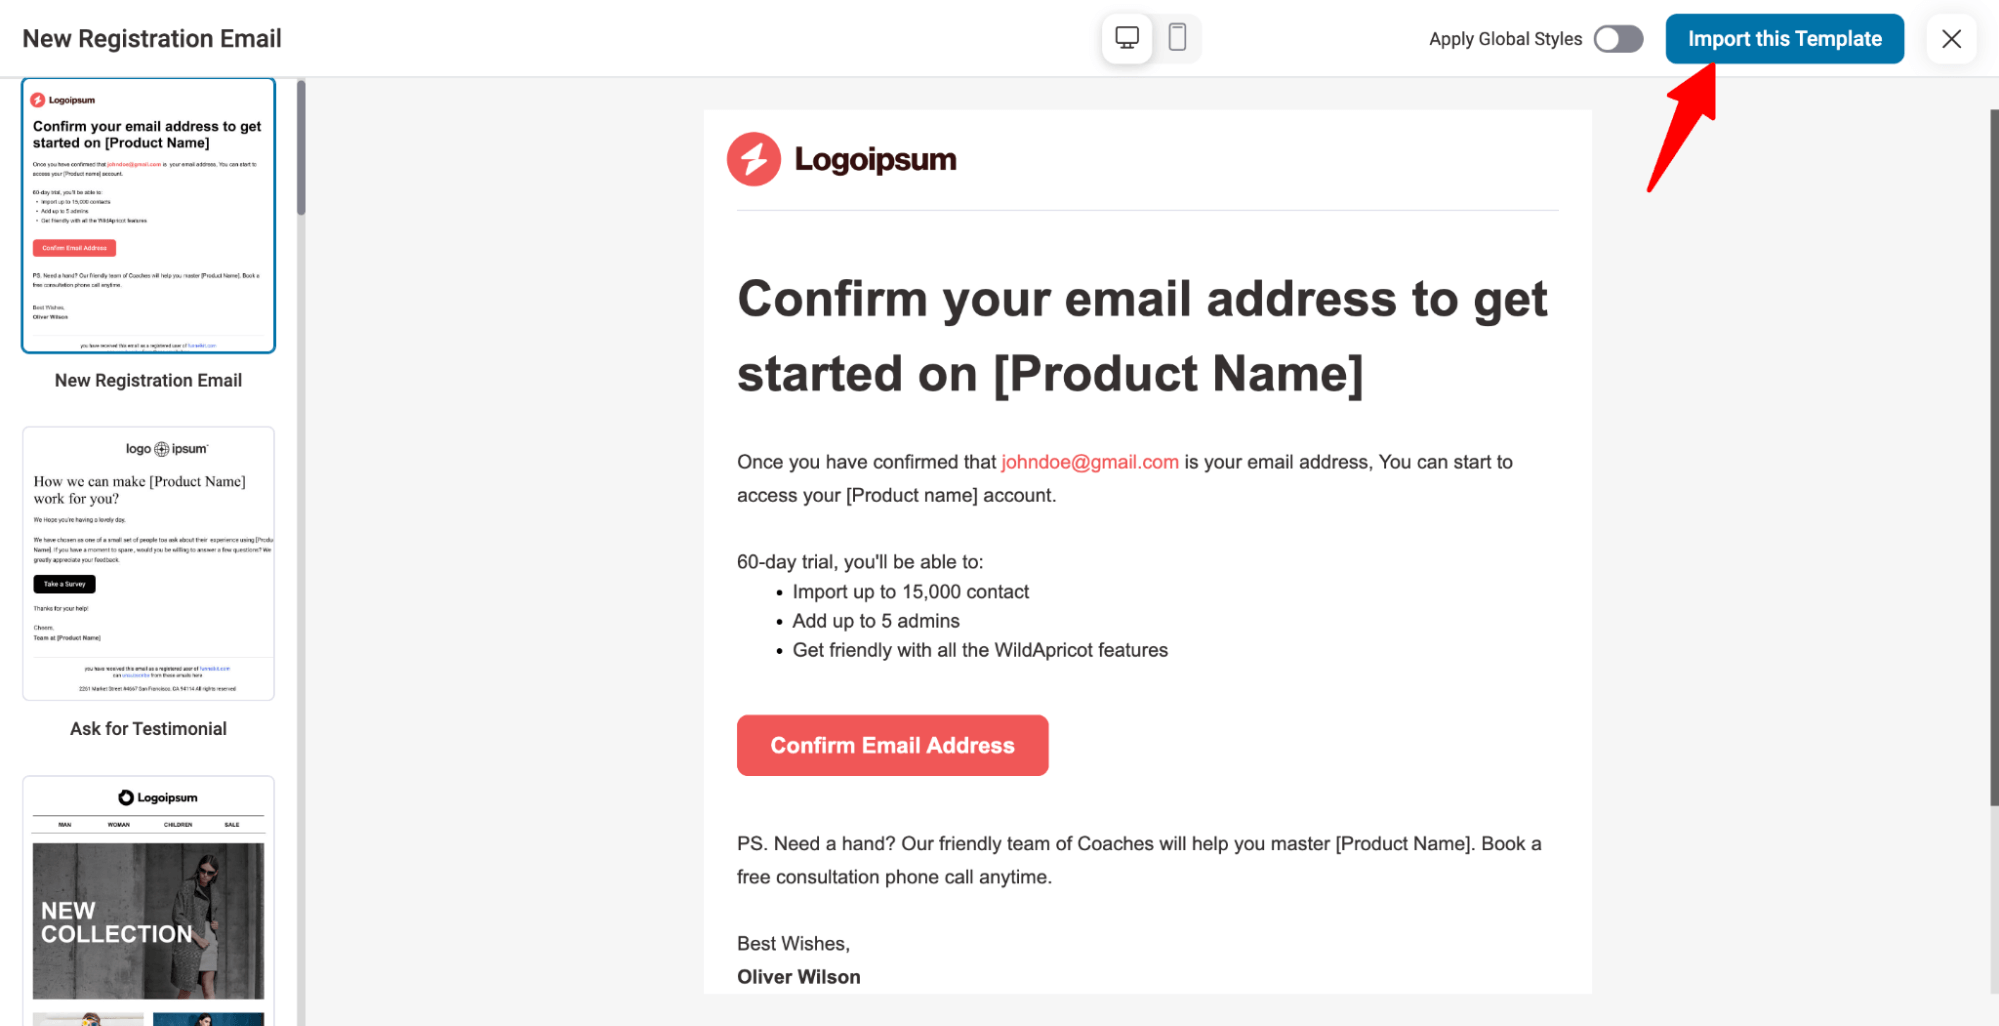
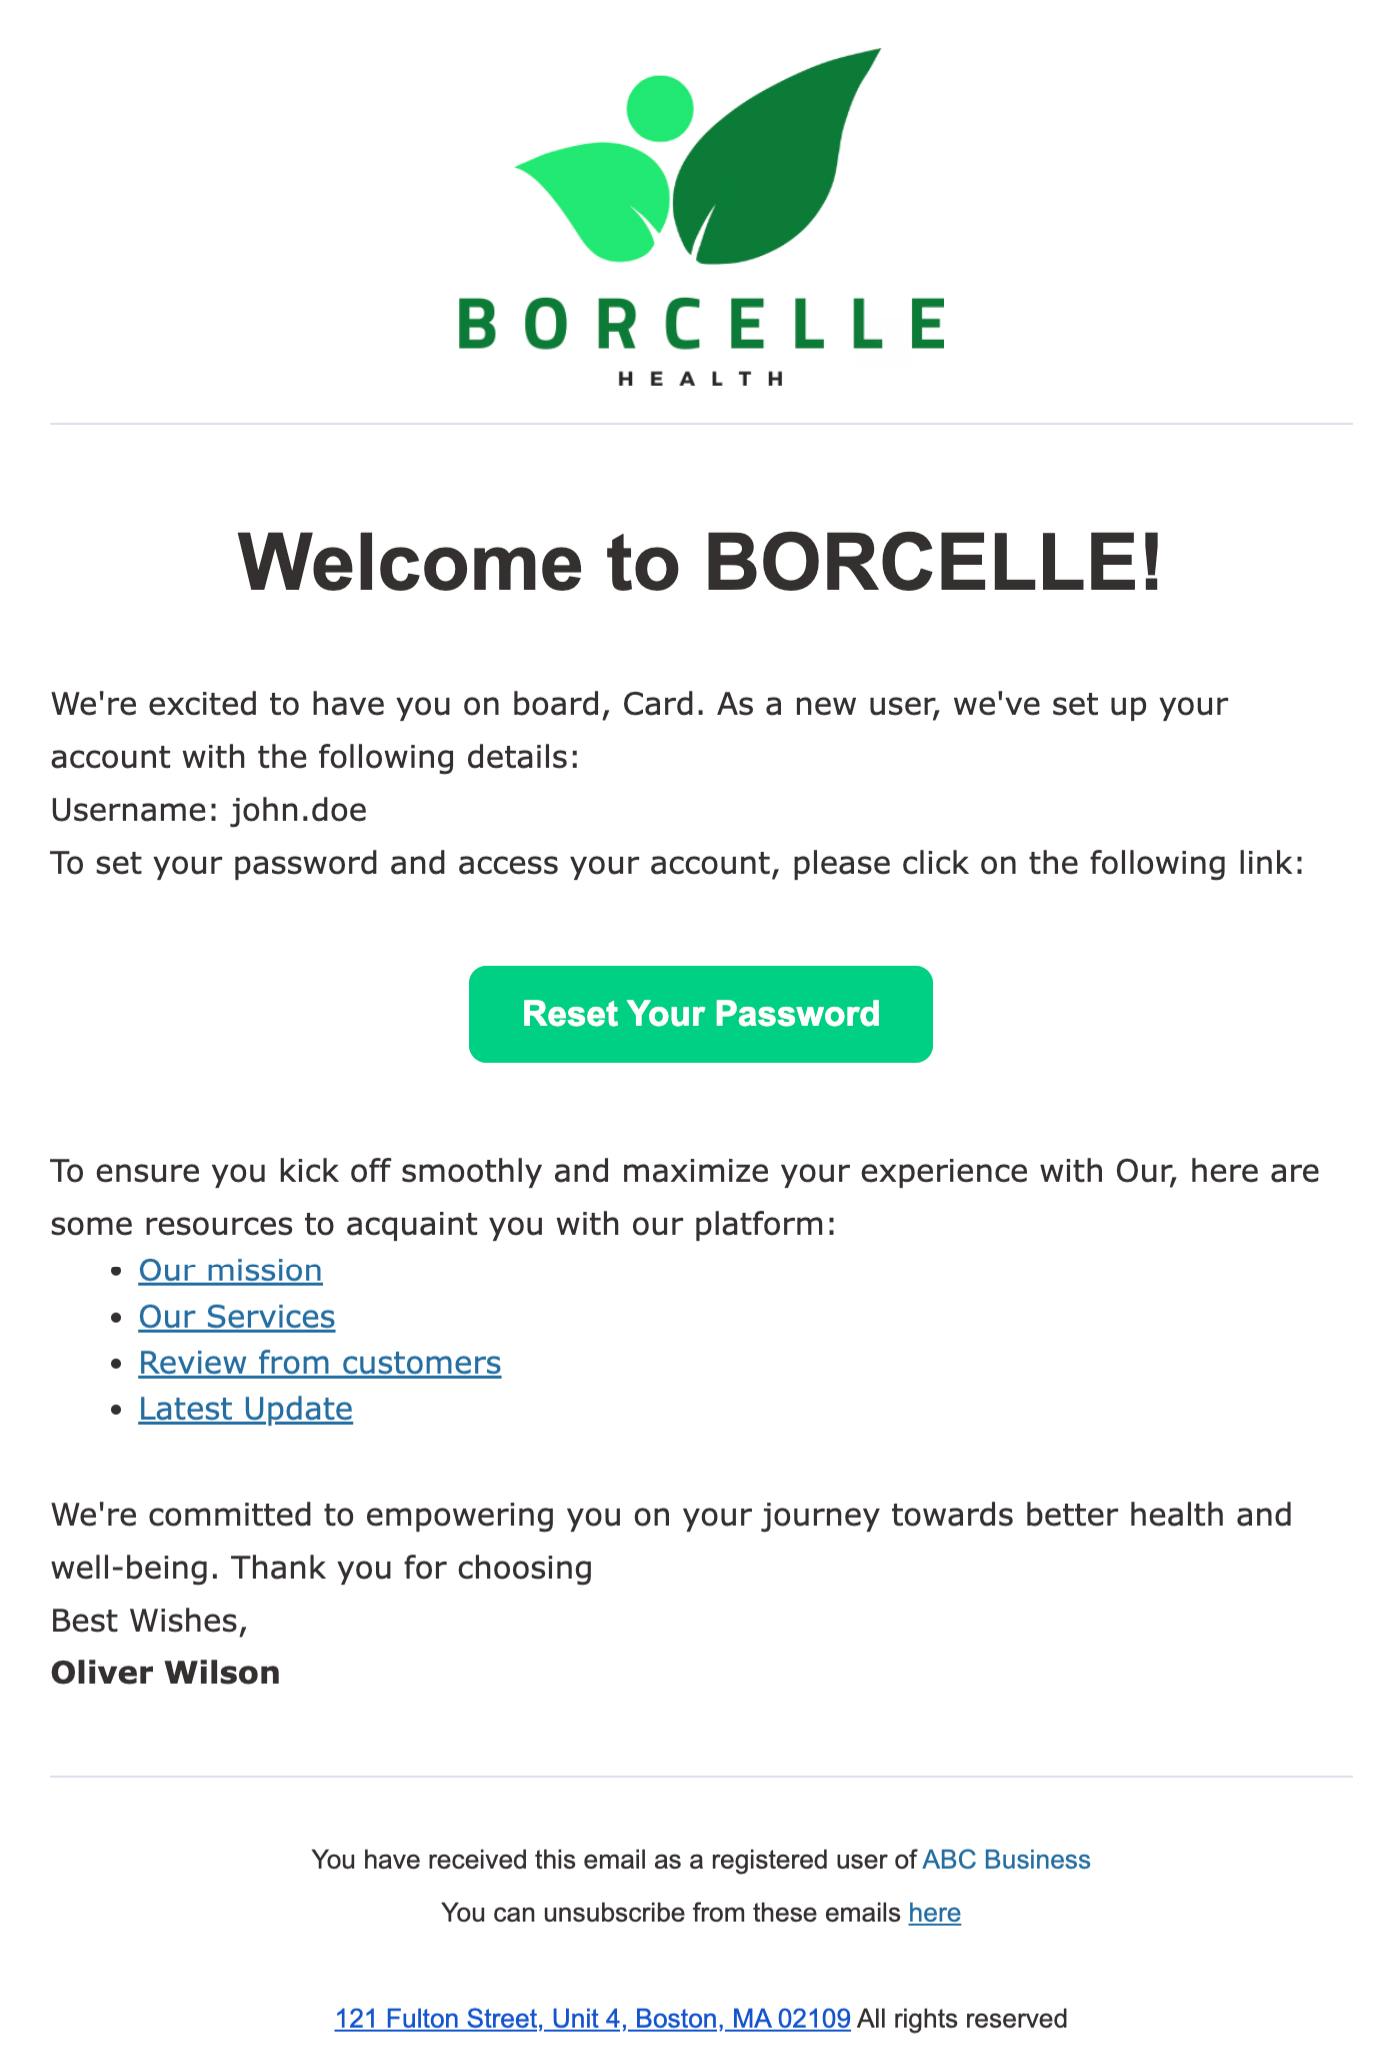
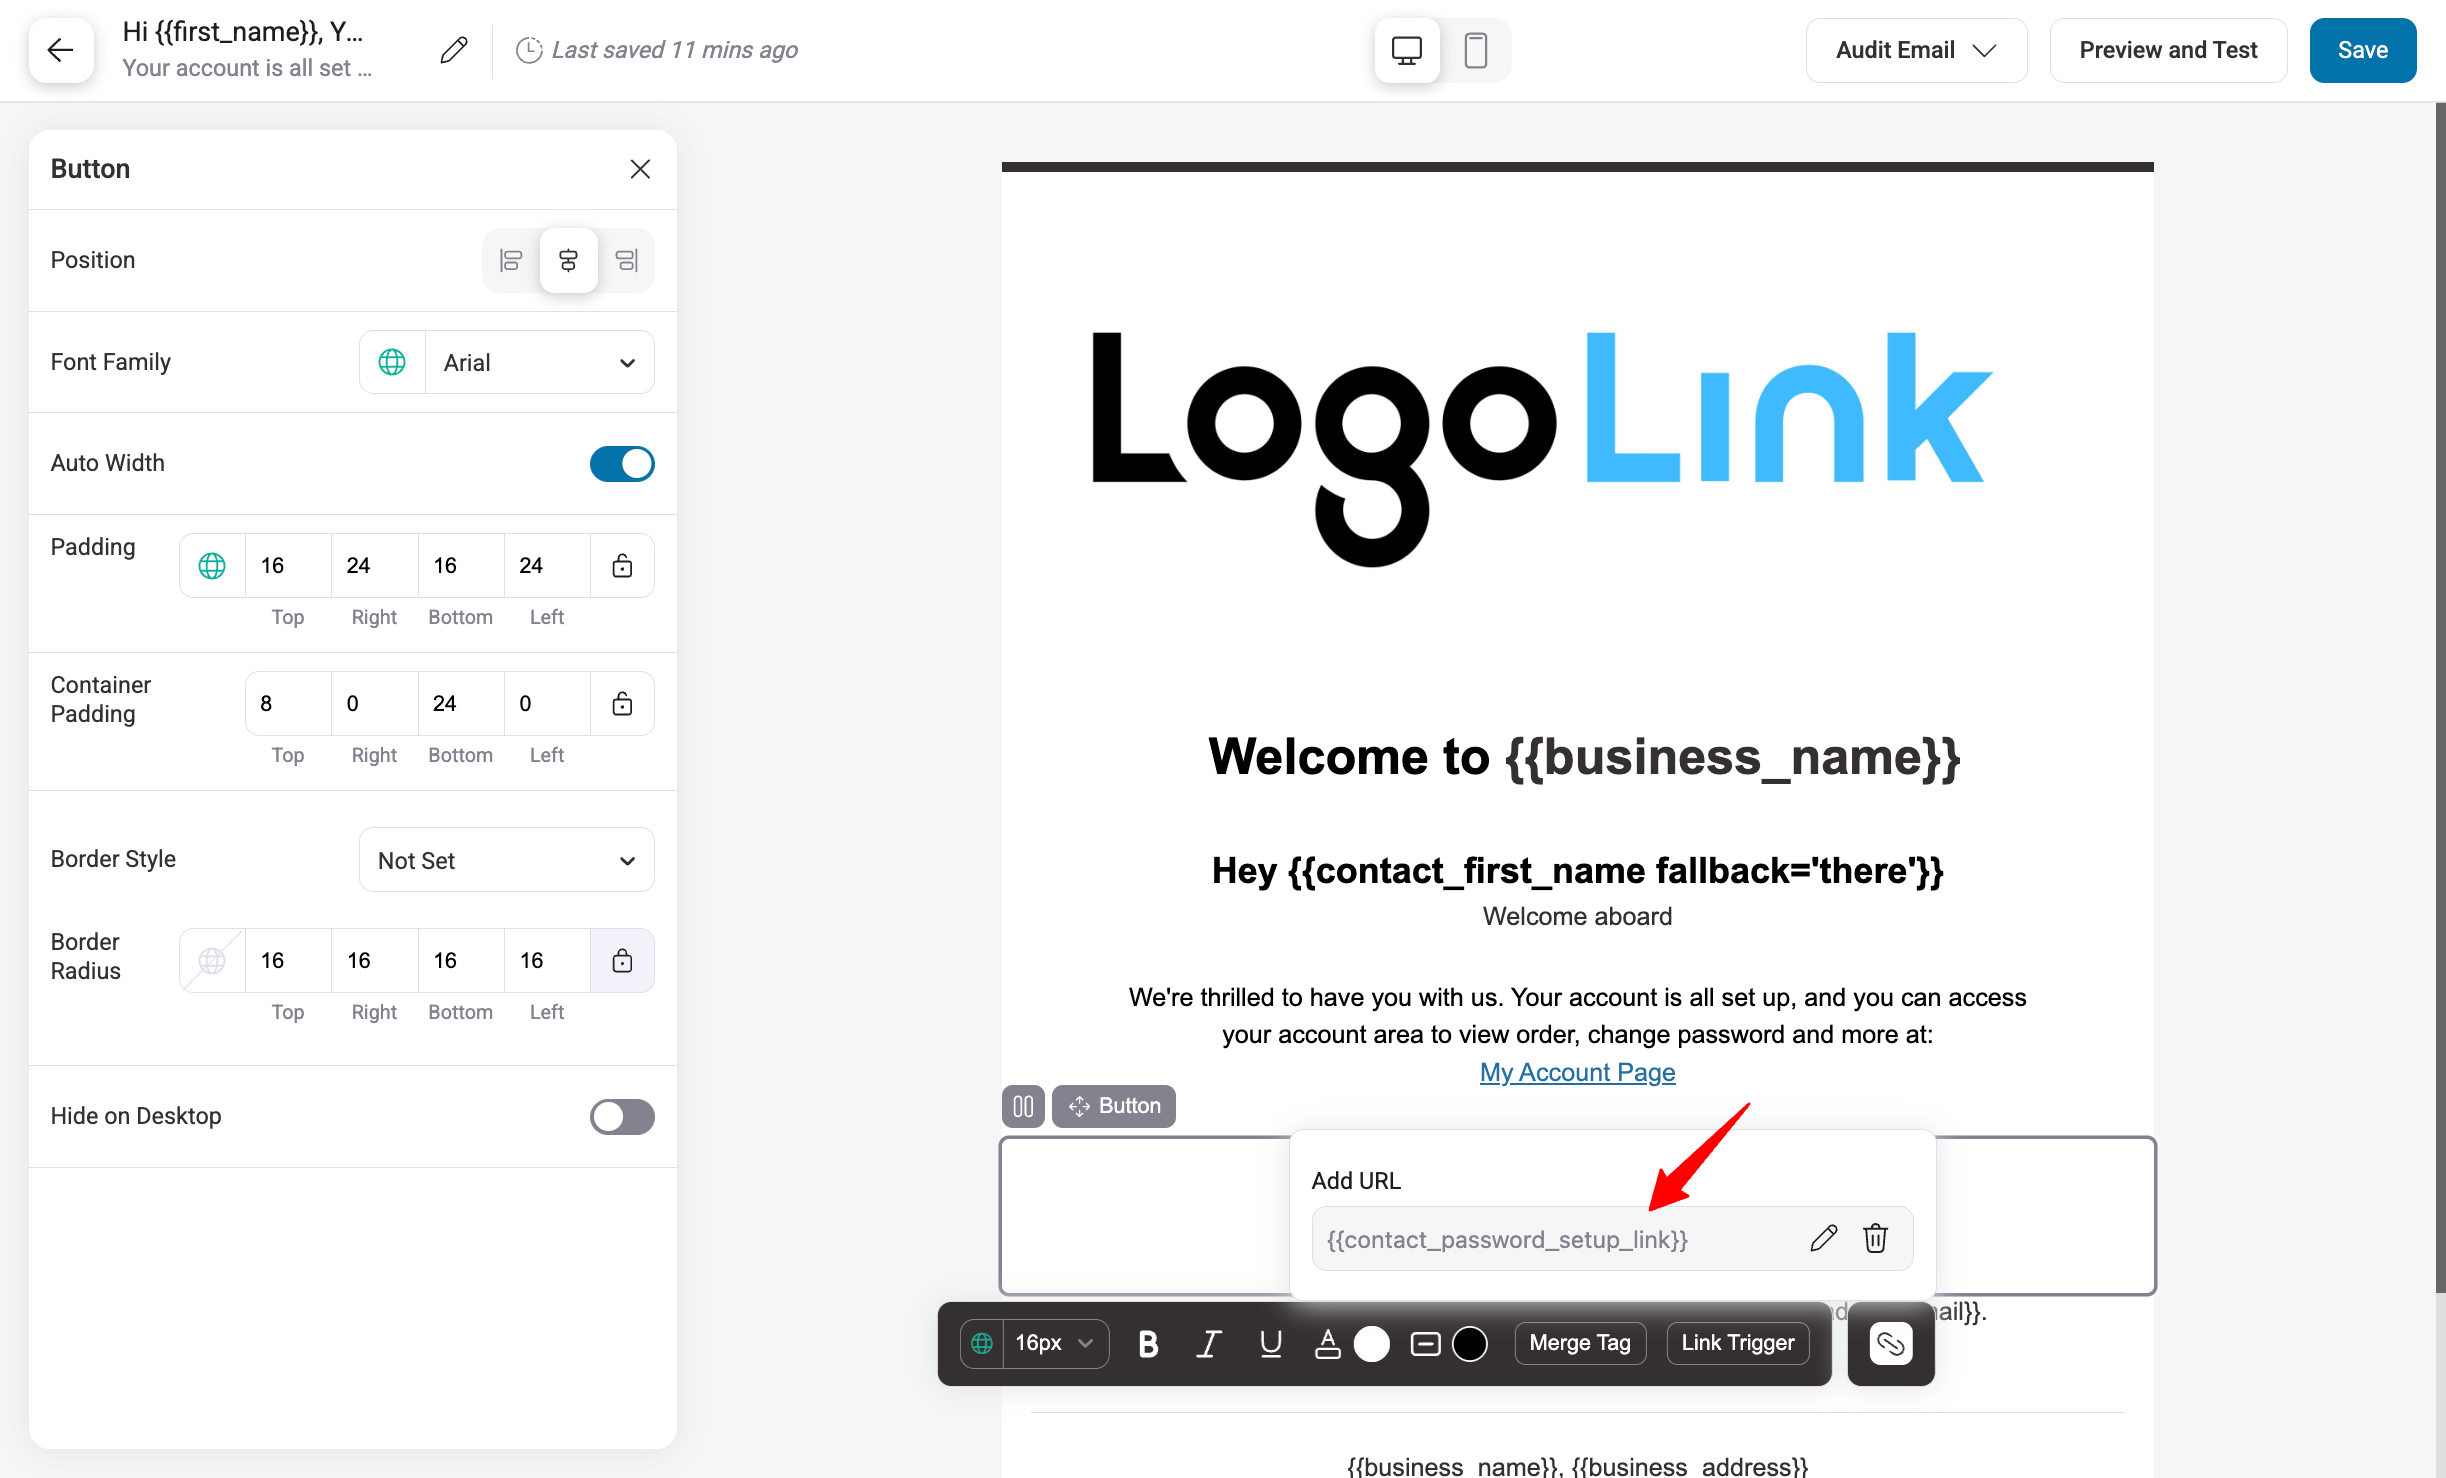
After importing, you can customize the email template. Here we have updated the company logo, updated the content, and changed the CTA color.
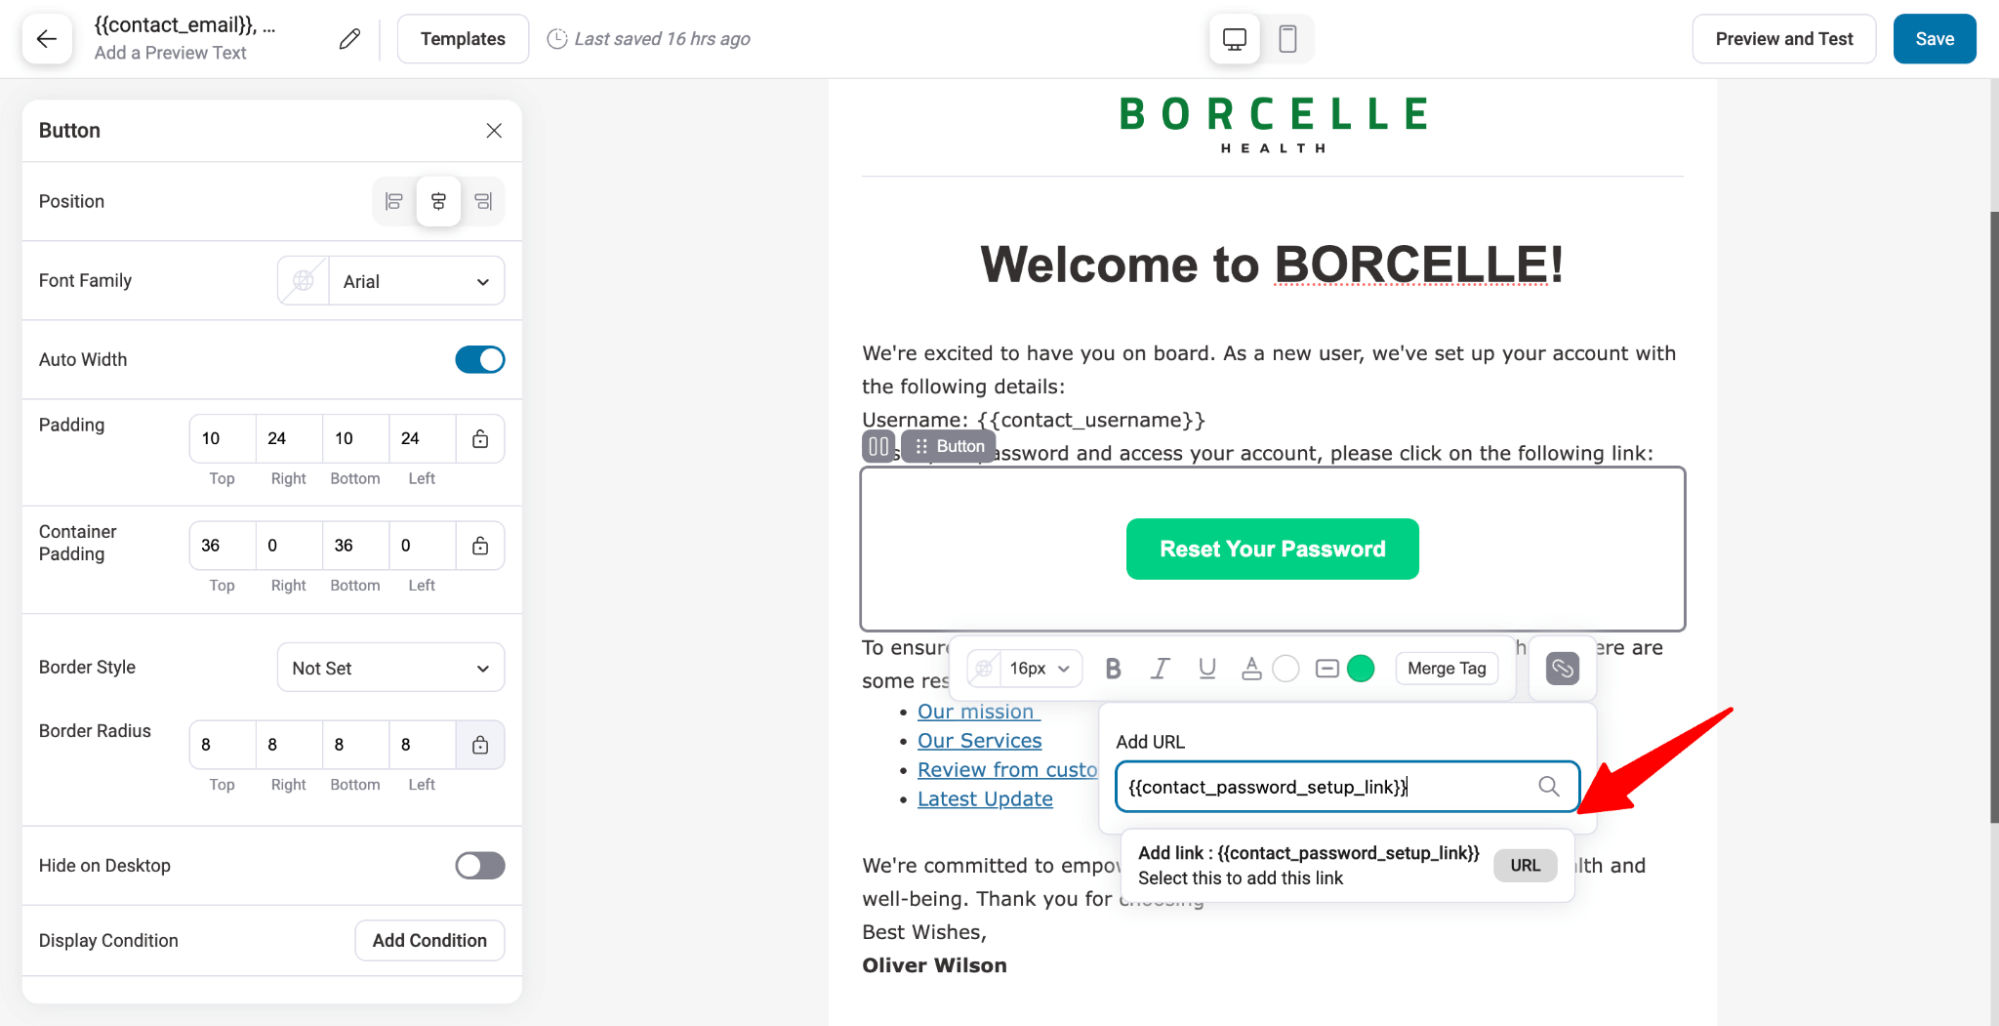
To display the user name, use the merge tag {{contact_username}}, and for the password set-up link, use the merge tag {{contact_password_setup_link}}.
We have linked the {{contact_password_setup_link}} to the “Reset Your Password” CTA, so users who click on this go to the link to update the password.
🔔 Note: The visual builder (New) is only available with FunnelKit Automations Pro. So if you want to create your WordPress new user registration email using a drag and drop builder, then make sure you have installed and activated FunnelKit Automations Pro.
Once you are done writing your welcome email, click on Save to update the email.
Step 5: Send a test email
It’s always a good practice to send a test email to ensure everything is looking good and working in your email.
With FunnelKit Automations, you can send test emails easily. Just enter the email to which you want to send the test email, then click on Send Test Email.
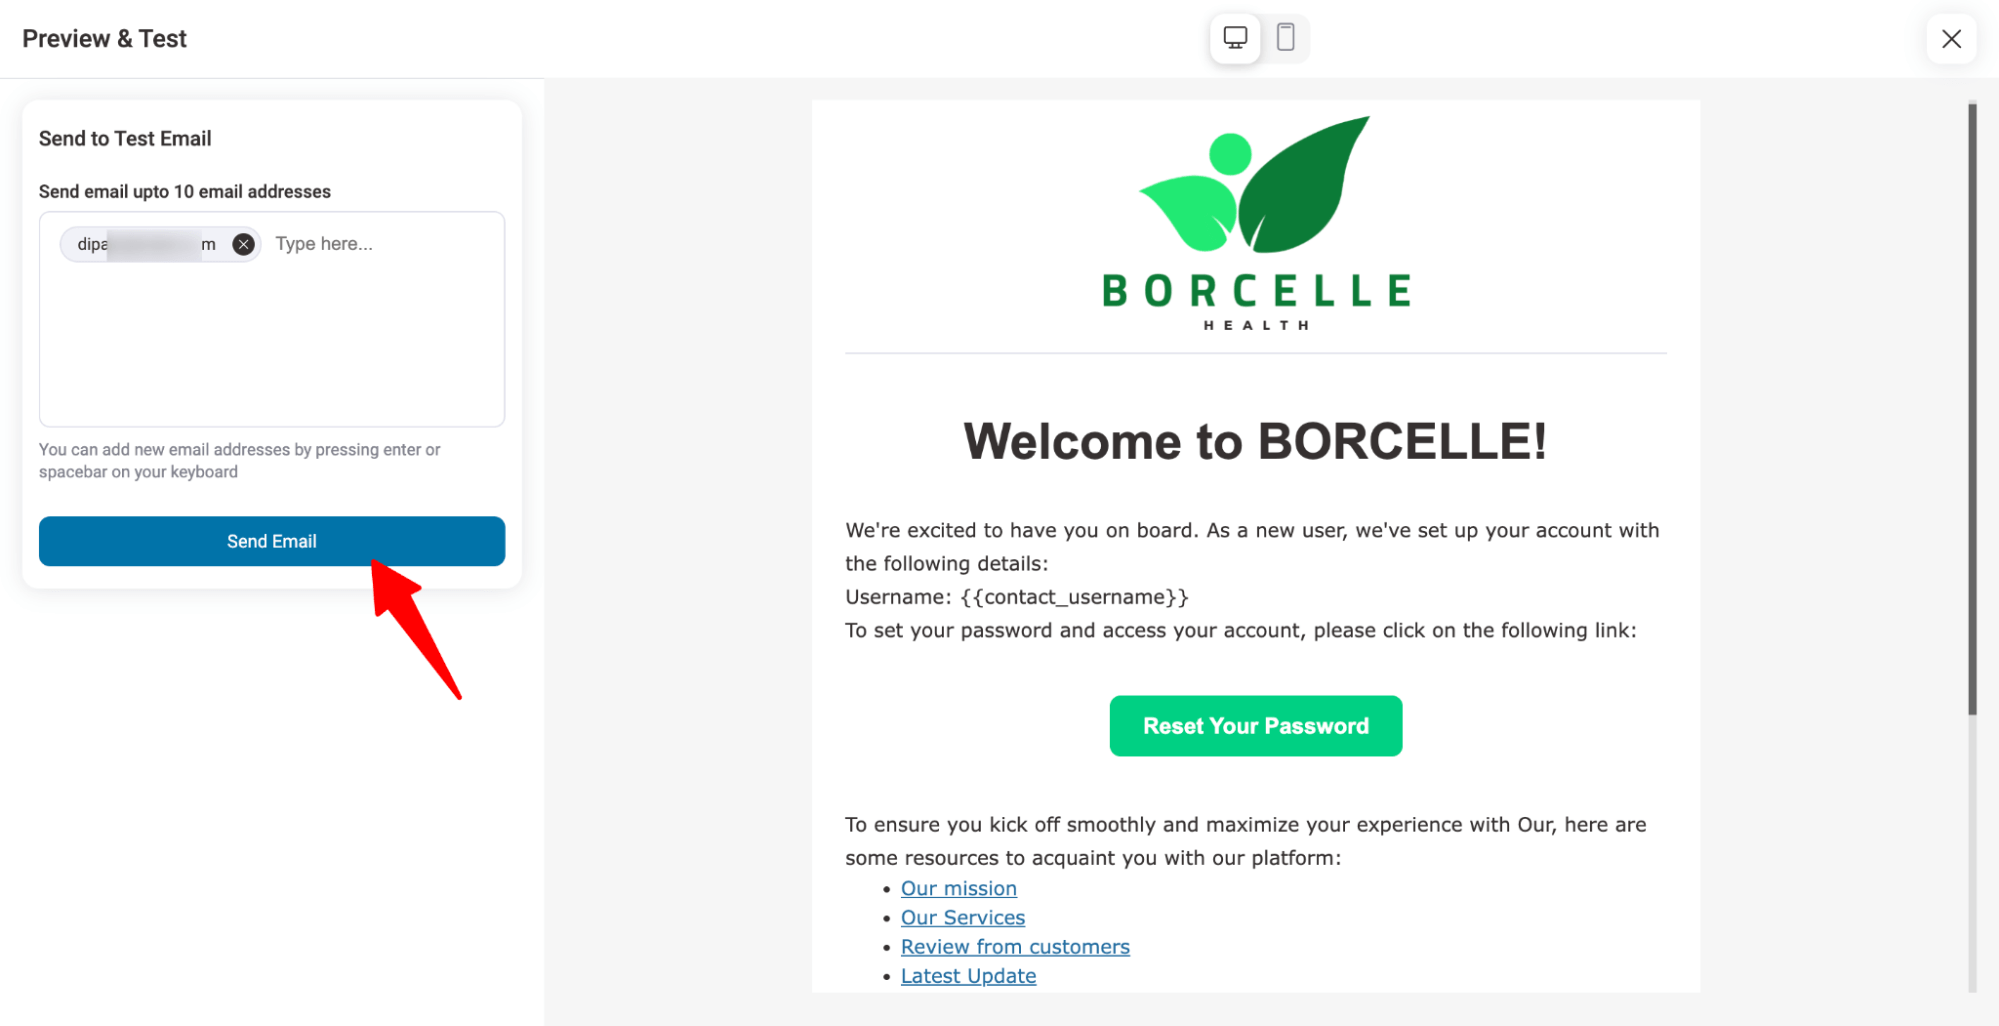
Here is a preview of the email we created:
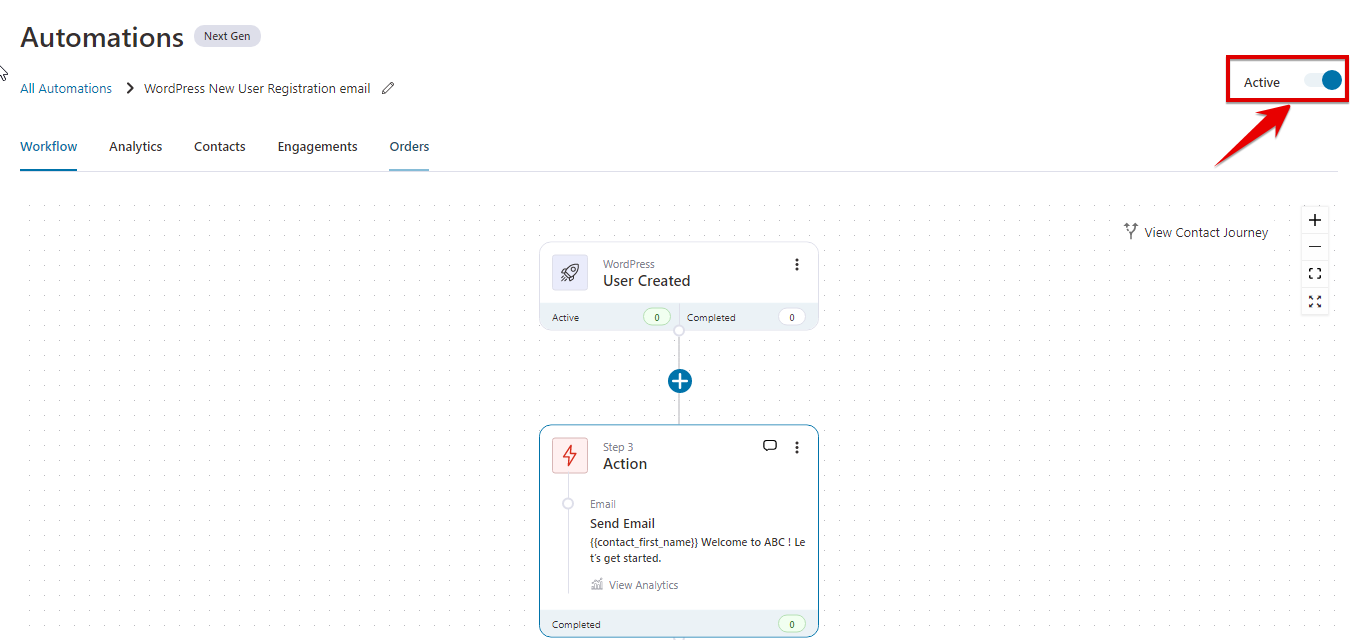
Step 5: Activate the automation to send a welcome email to newly registered users
If you are happy with how the test email turned out, it’s time to activate the automation you created so that every new user receives this email as their WordPress new user registration email.
However, if you are not happy, then you can make the necessary changes to your email and send another test email to check the result.
Once you are happy, close the visual editor, then on the Automation workflow page, turn on the Active toggle to activate the automation workflow.
That’s it! Now your new customers will get the personalized email and not just the boring email that WordPress sends by default.
This is how you can send custom WordPress registration emails to new users.
How to Send a Custom New Registration Email To WooCommerce Users
If you use WooCommerce with WordPress, FunnelKit Automations offers an easier way to send customized new user registration emails.
This feature is simple to design since it comes with a prebuilt template, and you can enable or disable it with just a single click.
Note: This email will be sent to users when they sign up via the checkout page or account pages.
Here are the steps you need to follow :
Step 1: Go to the New Registration Email
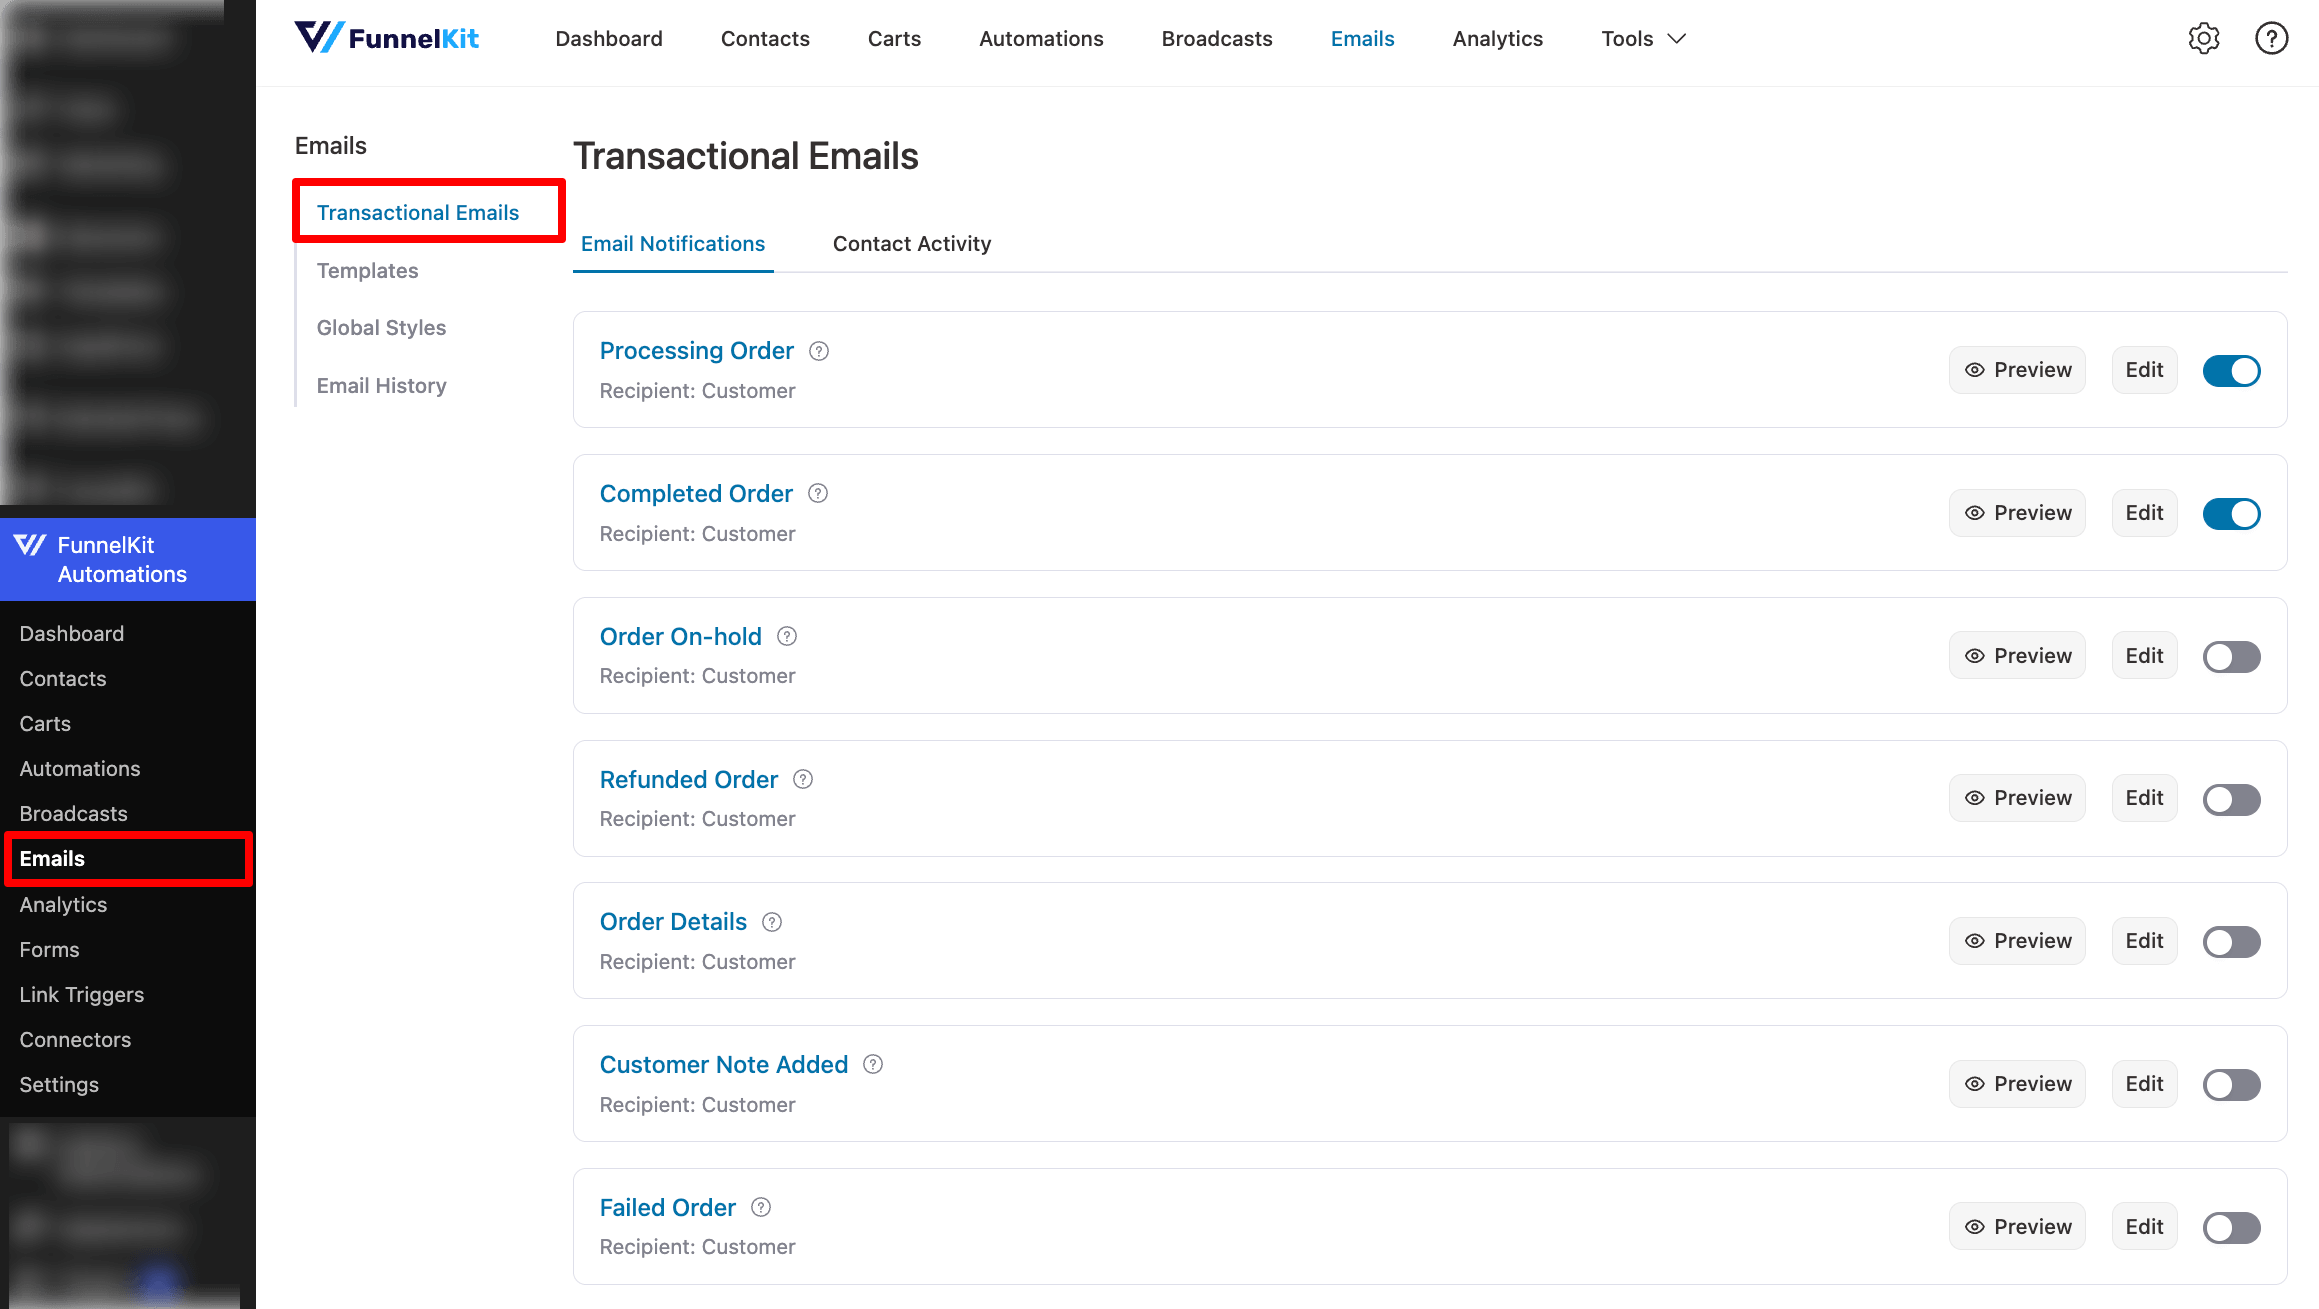
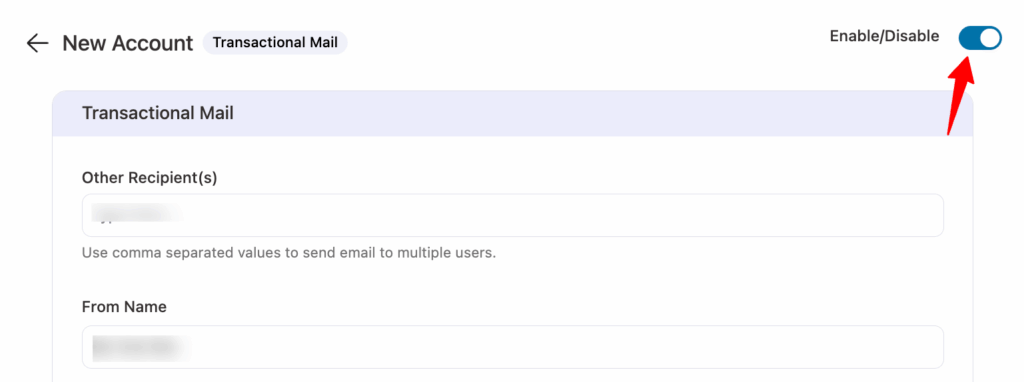
Navigate to FunnelKit Automations ⇒ Emails, and click on the Transactional Emails tab.
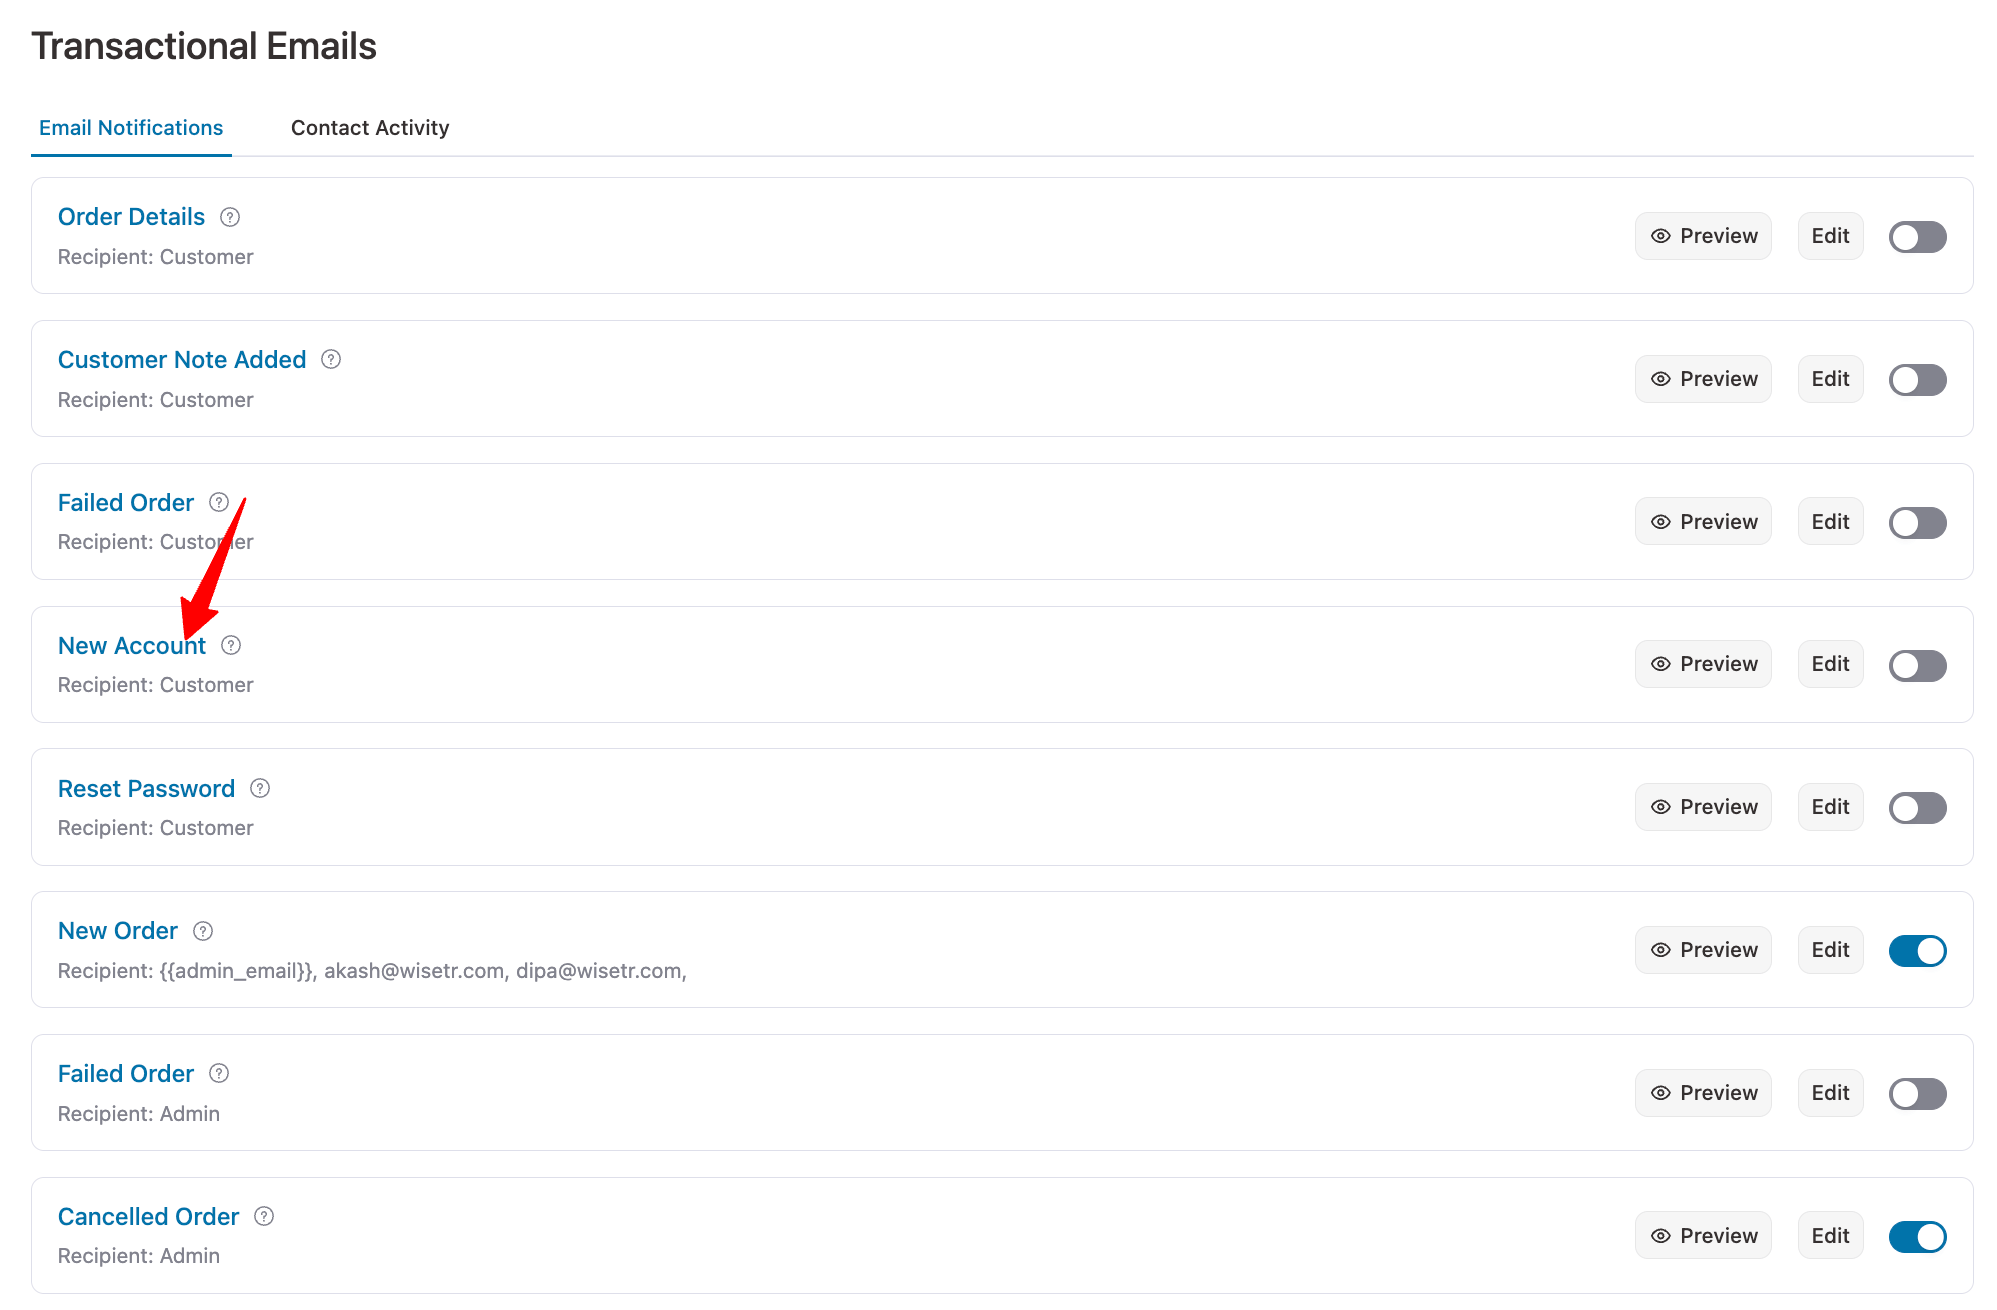
Here, you’ll find 12 prebuilt transactional email automations, including the New Account email that WooCommerce users receive upon registration.
Step 2: Design the WooCommerce new account email
Now, to start customizing the email, click on the Click on the “New Account” Email.
The email is automatically sent to customers. But if you want, you can add an additional receipt. Also, set the From Name, From Email, and Reply-To Email.
Next, let’s customize the subject line and preview text.
You can use the Merge tag feature of FunnelKit Automations to personalize the email subject line, preview text, and email body.
To add any merge tag, click on the “{{..}}” icon, then search for the tag you want to use and click on the Copy Icon to add it to your email.
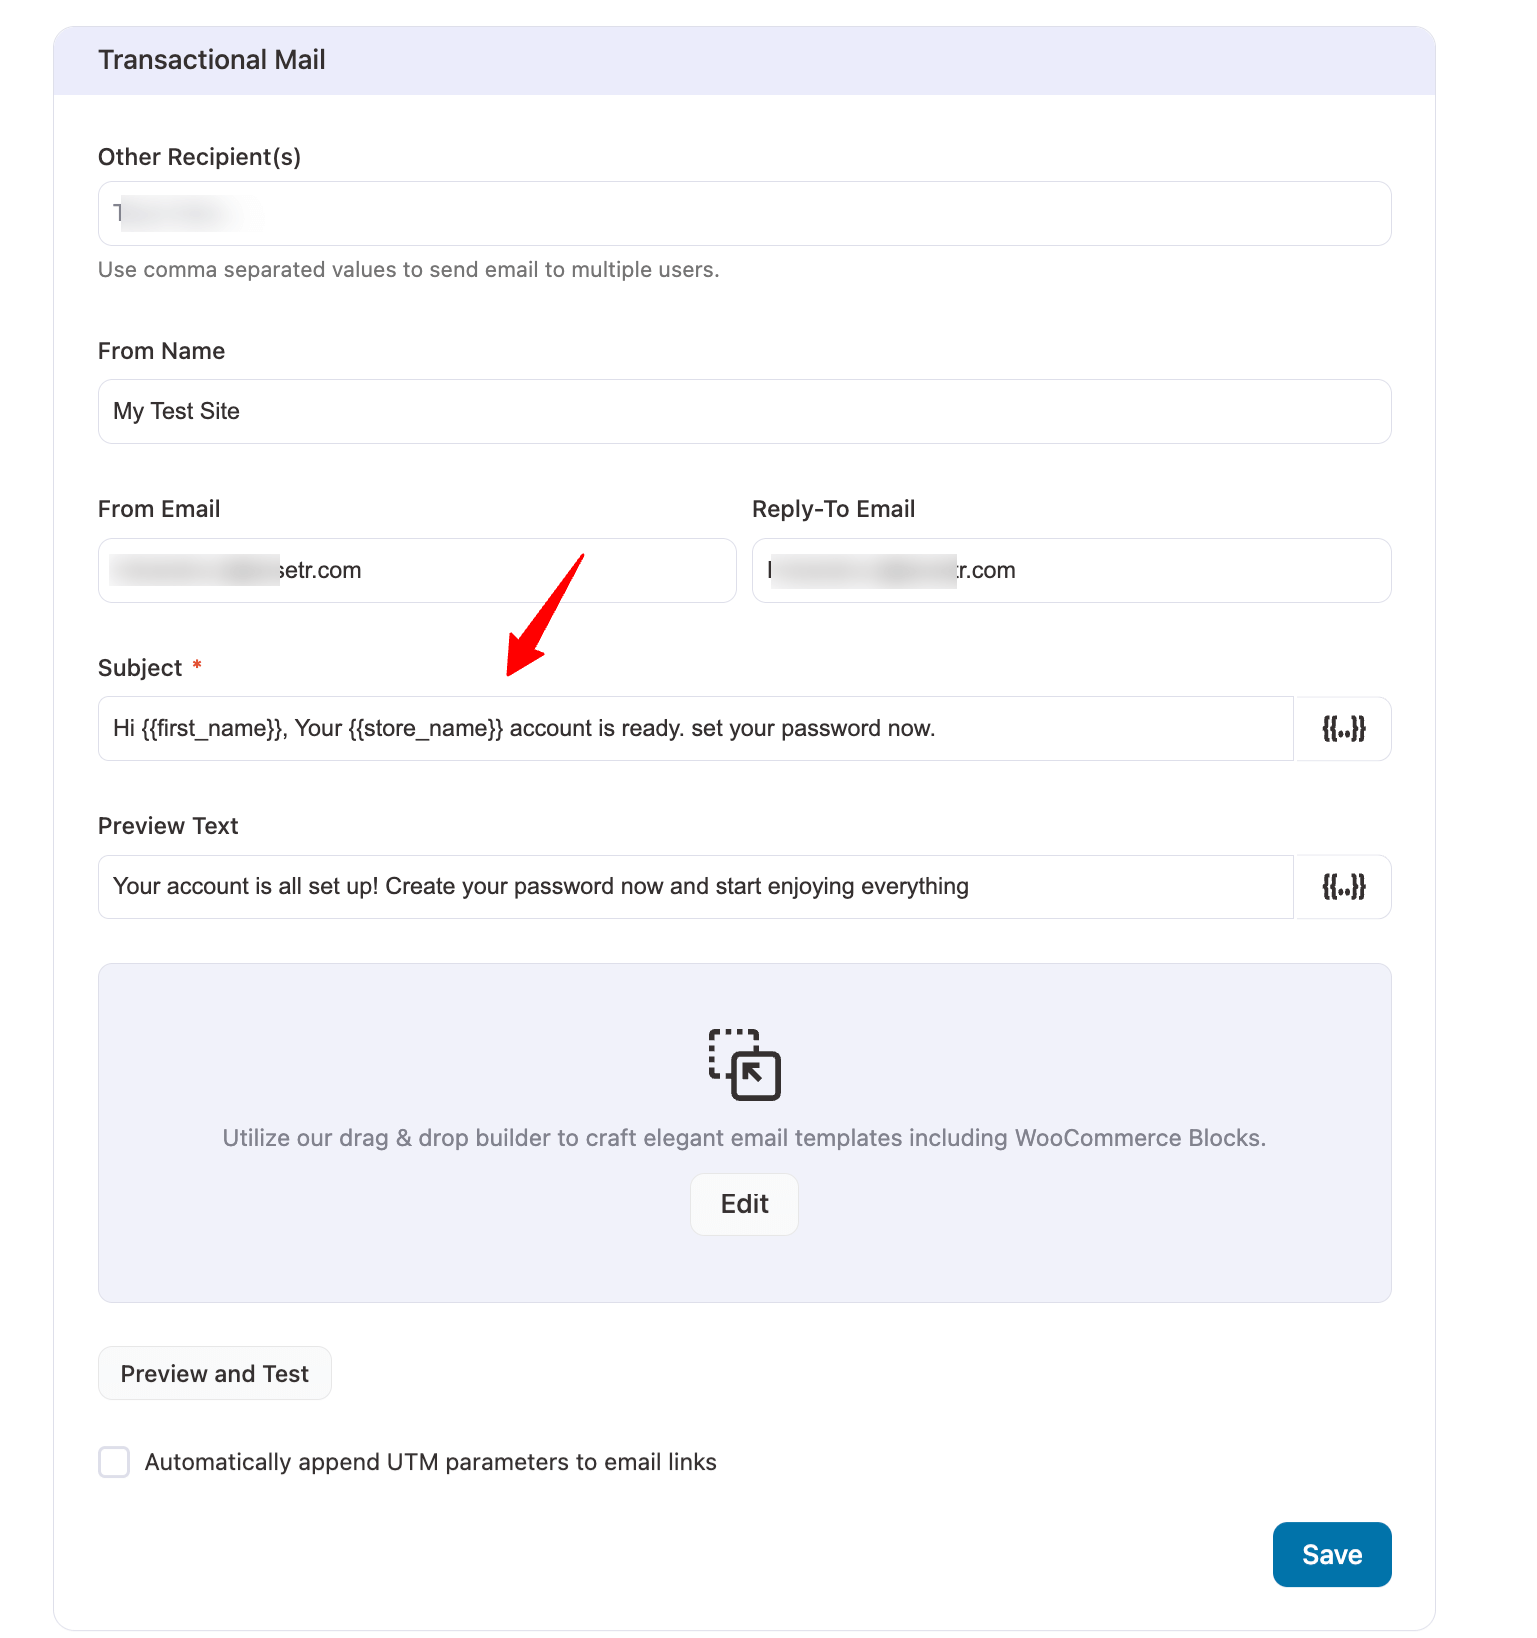
Next, hit Edit to start customizing the email body content with a drag-and-drop email builder.
Here you can change the logo, the body text, CTA style, everything.
The “My Account” page link and Set New Password button already include built-in merge tags, so users are automatically directed to the correct pages. You don’t need to manually add any links.
Along with customizing the new content, you can also add new content by dragging and dropping different blocks, such as text, image, social media links, etc.
After making your changes, click “Save” to update the email.
Step 3: Activate the WooCommerce new user registration email
Finally, make sure to turn on the toggle to enable the custom WooCommerce emails for new account creation.
5 Tips to Build Brand Loyalty With Your New Users
Brand loyalty helps you to retain customers over a long period of time. As you attract new customers, consider the following tips to foster brand loyalty:
1. Send follow-up emails
A follow-up email after a welcome email will go a long way. It shows the user that you care. For instance, you could send out a series of emails explaining your goods or services so it’s easier for them to get to know your brand better.
Always remember to keep a gap between your two emails. You don’t want to bombard your users with 5 emails at one time. You can use the Delay feature in FunnelKit Automations to set a delay between two emails.
2. Include auto-login
Always a good practice to include a link for users to Auto-login. This makes the login process frictionless, even if they forget their password.
So, whether you ask users to check out the premium content you offer, sign up for a course, or perform any other action that requires users to log in to your WordPress site, make sure you include an auto login.
3. Data-driven tweaks
Analyzing existing data, such as open rate, click rate, etc., of the welcome email is crucial because data tells you what needs to be improved. For example, if you find the open rate to be a little lower than your expectation, then you can tweak the subject line or preview text.
FunnelKit offers inline analytics where you can check the sent emails, open rate, click rate, etc., from the workflow for each sent email event. In addition, you also get in-depth analysis for your email campaigns.
4. Show gratitude
Showing gratitude to users for choosing to trust your brand and embark on a journey with you is a tried-and-true way to build a strong relationship with them. You can express your gratitude by providing a discount code in subsequent follow-up emails.
You can also send personalized coupon codes for your WooCommerce users to boost your revenue.
With FunnelKit Automations, you can create coupons from the workflow dashboard itself and also append customer information to the coupon code to personalize it.
5. Add a reply-to email
Always include a reply email address so that users can contact you directly. While emails are automated, they should not appear to be robo mails.
The ability to respond to you personally makes your users feel special. Furthermore, you will have one-on-one communication with your audience and will be able to receive useful feedback.
You can follow the tips above to utilize WordPress's new user email to successfully build brand loyalty with your customers.
More Questions About WordPress New User Registration Emails
Got some more questions? Here are the commonly asked questions about the new registration email notification in WordPress
Yes, it does. WordPress automatically sends a simple email notification to the site admin containing the new user’s username and email address.
The new user registration email for the admin is automatically enabled in WooCommerce. This email is sent whenever a new user registers on the site.
In WooCommerce, there are essential email notifications for new accounts, which include:
- New Account Email: Sent to the user upon registration, containing their login details and instructions for account setup. It’s automatically enabled by WooCommerce.
- Admin Notification: WordPress sends an admin notification email whenever a new user registers on the site. This is a system email informing the site owner or admin about the new registration.
You can customize these emails, especially the customer-facing one, to provide a more personalized experience for the new users.
If your WordPress user registration email is not being sent, try the following fixes:
- Check Email Settings: Ensure the email notifications are enabled in the WordPress admin under "Settings" > "General".
- Use an SMTP Plugin: WordPress by default uses PHP mail(), which may not always work due to server restrictions. Using an SMTP plugin like WP Mail SMTP ensures emails are sent reliably.
- Check Spam Folder: Sometimes emails are marked as spam by email providers. Instruct users to check their spam/junk folder.
- Test Email Functionality: You can send a test email from the WordPress dashboard to verify if the email function is working.
- Check for Plugin Conflicts: Deactivate plugins one by one to see if a plugin conflict is preventing email delivery.
- Contact Hosting Provider: If the issue persists, contact your hosting provider to ensure the mail server is configured properly.
A good WooCommerce welcome email should include:
- A greeting with the user’s name.
- A link to log in and set up their password.
- A brief overview of your store or products.
- A call to action (CTA) to encourage the first purchase.
- Any relevant information such as social media links, promotions, or discounts.
Are You Ready to Send Your WordPress New User Registration Emails?
As they say, first impressions last for a long time. Your welcome email will set the first impression your customers will form about the brand. Therefore, your welcome email must leave a good impression.
As you have seen in the blog, FunnelKit Automations has all the right features you will need to ensure your welcome emails leave a spectacular first impression.
You can custom-build your welcome email in various ways and automate the whole process with minimal effort.
So, not just the first welcome email, you can also manage follow-up emails with FunnelKit Automations Pro. And for that, you can also leverage prebuilt recipes such as Review Collection Email, Customer Winback Campaign (with coupon), Abandoned Cart Reminder, order confirmation email, First Purchase Anniversary, and many more.
These prebuilt recipes are ready to use; all you need to do is import them and do a little bit of customization to fit your brand, and then you will be good to go.
Are you ready to make your first impression that will last forever?
More WooCommerce Resources
- How to Offer a First Order Discount in WooCommerce
- How to Use Triggered Emails to Generate 4x More Revenue
- How to Set Up First Order Discount in WooCommerce
- How to Set Up WordPress SMTP to Ensure Email Deliverability
Editorial Team
July 3, 2026Discover how a canceled order doesn't have to mean a lost customer, and how the right WooCommerce canceled order email can turn it into a second chance. WooCommerce canceled order...

Editorial Team
July 3, 2026Choosing the right WooCommerce HubSpot integration is harder than it looks because HubSpot has no first-party WooCommerce sync and every third-party option handles data differently. Pick the wrong connector and...
Editorial Team
July 1, 2026WooCommerce custom emails per product let you send a different message to customers based on the exact item they buy. To send a different email depending on what someone buys...


