
Want to customize WooCommerce emails that actually get opened?
WooCommerce's default emails get sent, but that's about it. There's no branding, no layout, just plain text that looks identical to every other WooCommerce store on the internet.
If you're trying to build customer relationships or just get people to open the next email, that's a problem worth fixing.
Email is still one of the highest-ROI channels in ecommerce. Campaign Monitor reports personalized email open rates of 29%, with click-through rates of 41%. Generic transactional emails leave most of that on the table.
In this guide, you're going to learn exactly three ways to fix it, and you can pick based on how much control you want and whether you're comfortable touching code.
Table of Contents
- 1 TL;DR: The 3 Ways to Customize WooCommerce Emails
- 2 Types of Default WooCommerce Emails
- 3 Method 1: Customize WooCommerce Emails With the Built-In Editor (Default Settings, No Code)
- 4 Method 2: Customize WooCommerce Emails With a Plugin (No-Code, Full Control)
- 5 Method 3: Customize WooCommerce Emails with Code (Template Override and Hooks)
- 6 Marketing and Automated Emails Beyond Transactional
- 7 Deliverability Tip: Make Sure Your Customized Emails Reach the Inbox
- 8 Frequently Asked Questions
- 9 Ready to Customize WooCommerce Emails?
TL;DR: The 3 Ways to Customize WooCommerce Emails
| Method | Best for | Coding needed | Control |
|---|---|---|---|
| 1. Native block editor | Quick branding (logo, colors, layout) for free | None | Basic-medium |
| 2. A customizer plugin | Full drag-and-drop design + per-email control | None | High |
| 3. Editing template files (code) | Developers who want total control | Yes (PHP/HTML) | Total |
Pick Method 1 if you just want your logo, brand colors, and a cleaner layout. It ships with WooCommerce and costs nothing.
Pick Method 2 if you want a drag-and-drop design, custom blocks, and to style individual emails without code.
Pick Method 3 if you're a developer who needs to override the actual template markup and hook in custom data.
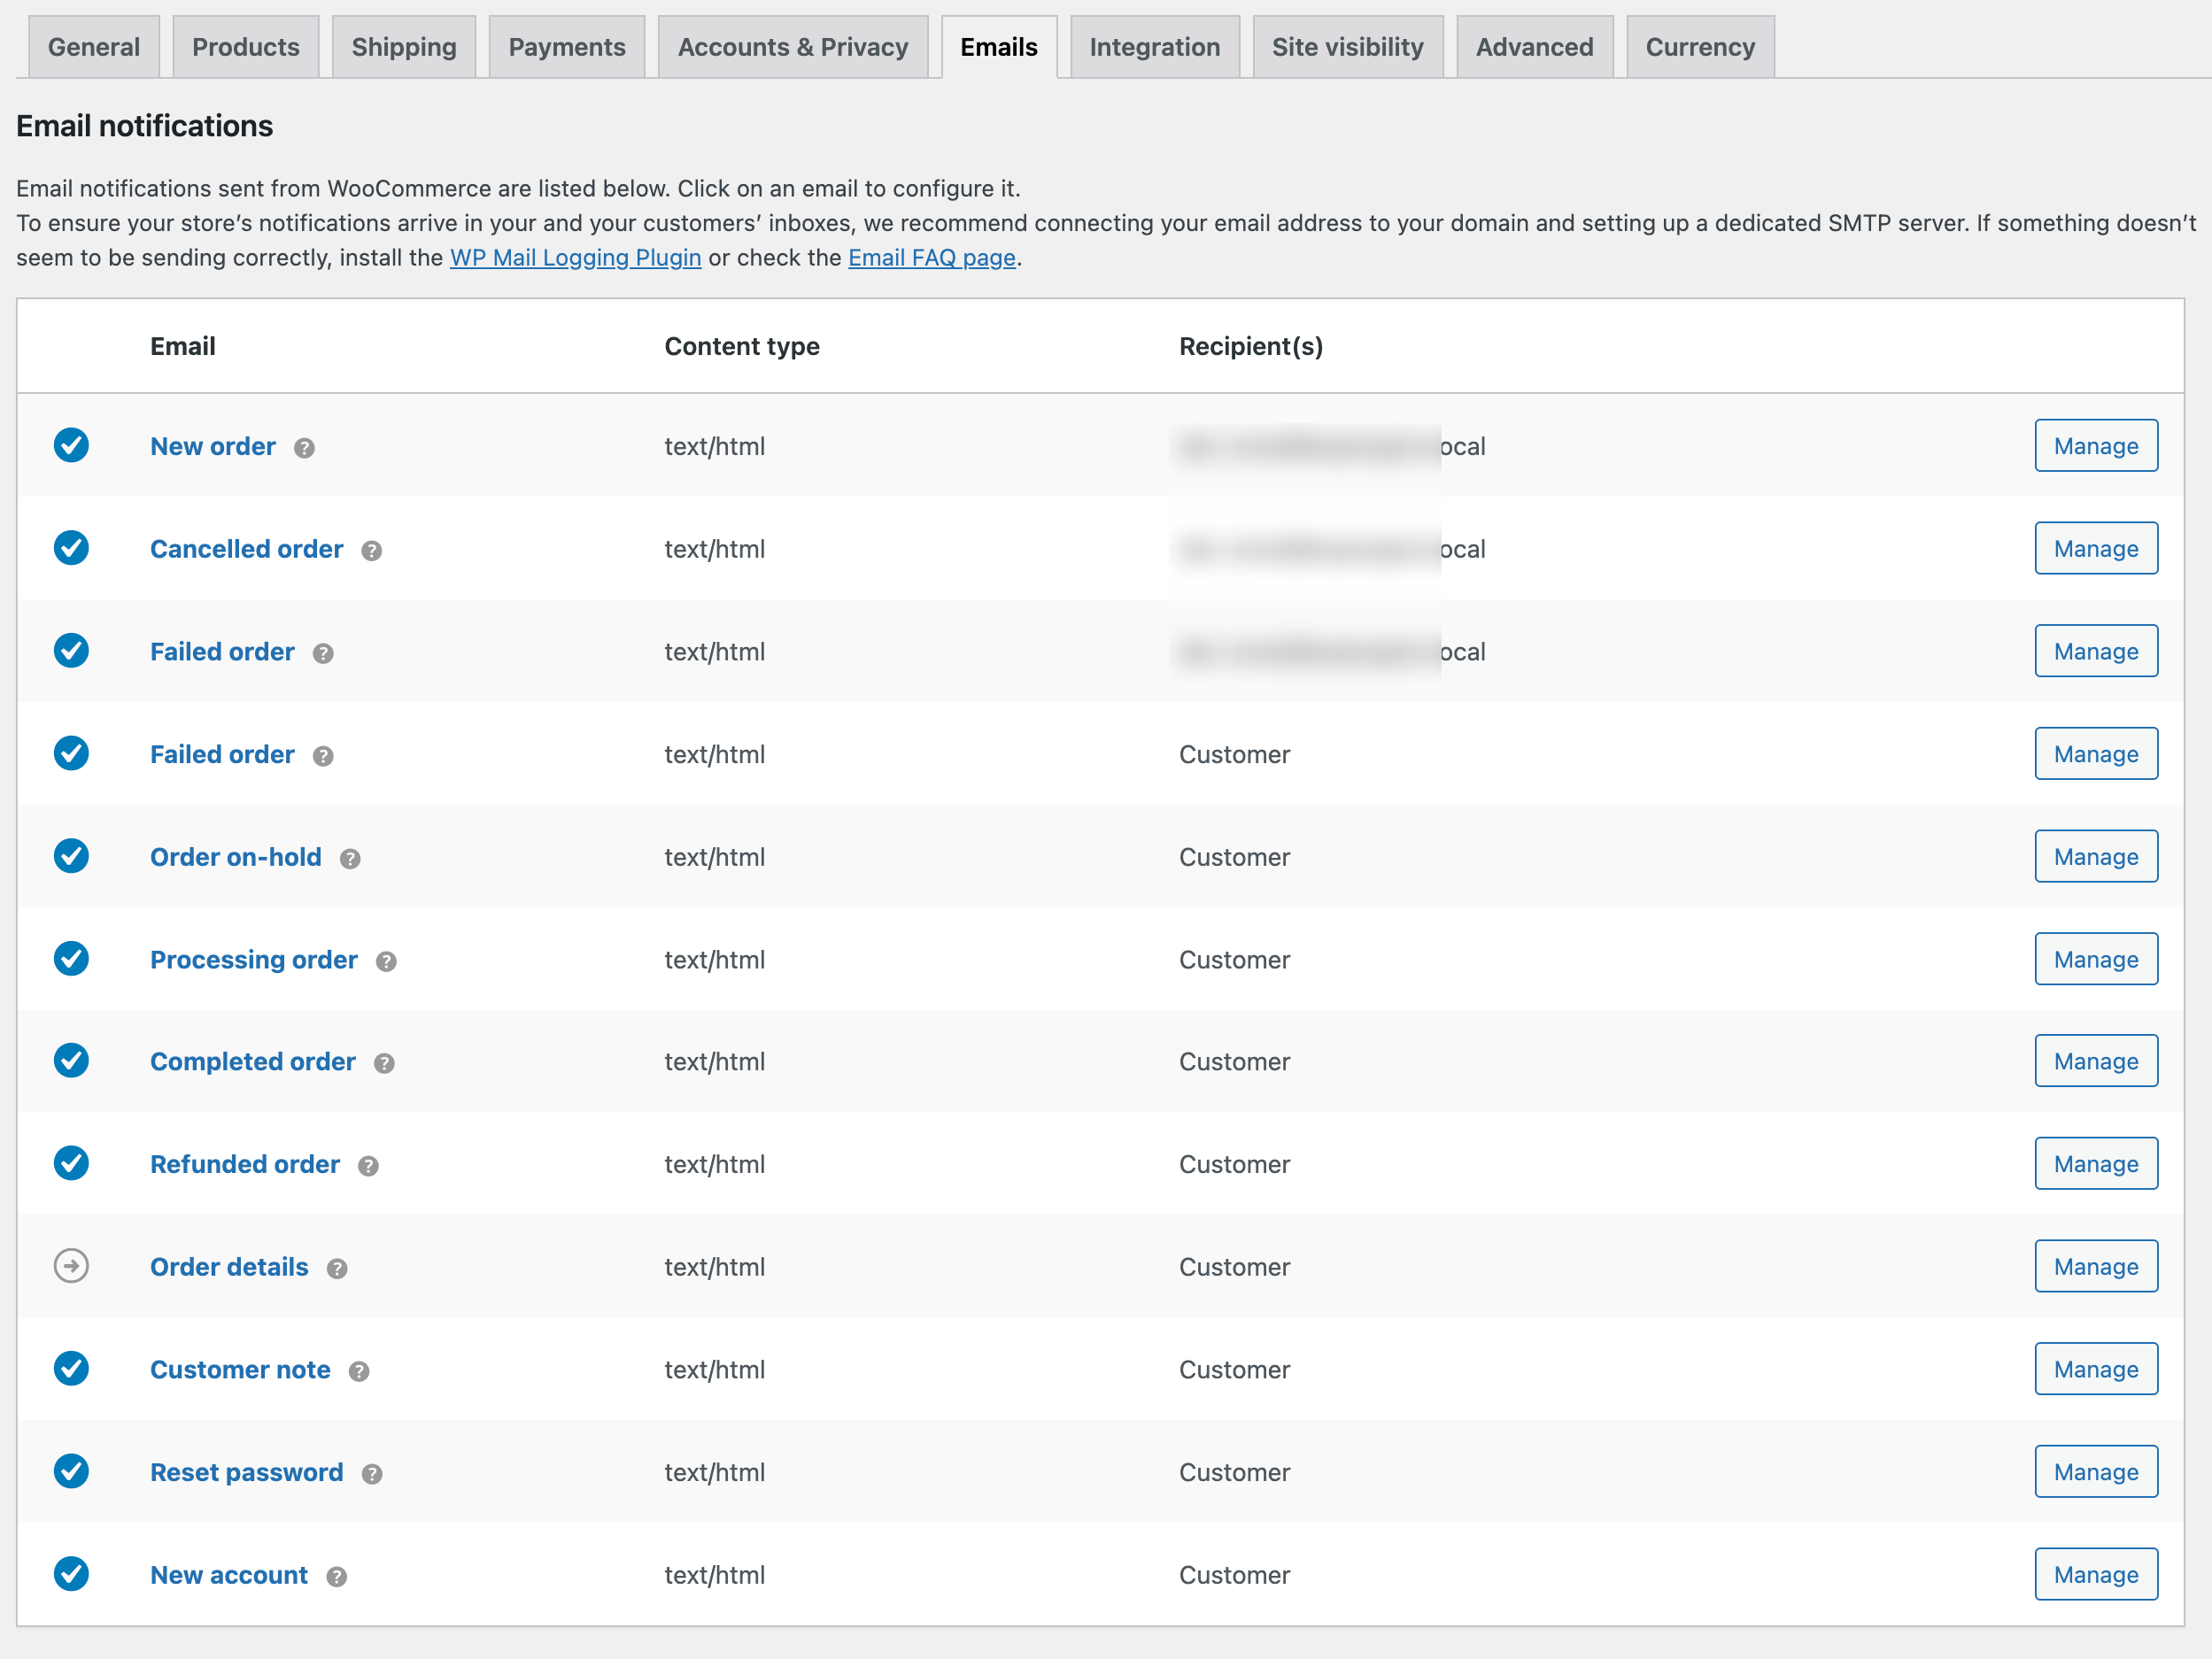
Types of Default WooCommerce Emails
WooCommerce, by default, sends a set of automated transactional emails triggered by order events.
Some emails are sent to the admin to notify them of store activity, and others are sent to customers to inform them about their orders.
Here are the default WooCommerce emails:
- New order: WooCommerce sends this email to notify the store admin when a new order is placed. You can add the admin email that will receive the email.
- Canceled order: This email is sent to the chosen admin email when orders previously processed or held are marked as canceled.
- Failed order (Admin): This email is sent to the chosen admin email when orders previously processed or held are marked as failed.
- Failed order (Customer): This email is sent to customers informing them of a failed order.
- Order on hold: This email is sent to customers when an order status is placed on hold from Pending. On hold means there is a temporary pause in order processing.
- Processing order: This email is sent to customers when the payment is completed with the order details.
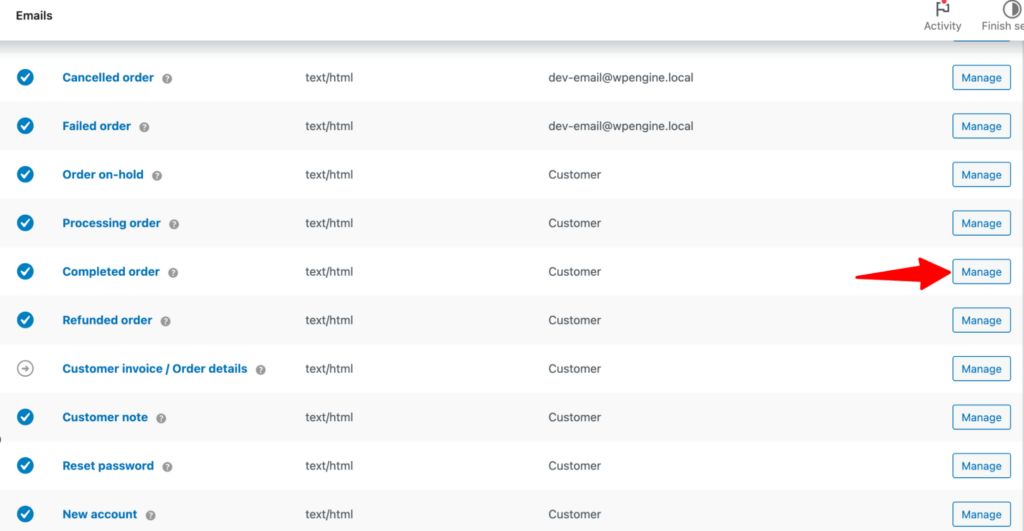
- Completed order: This email is sent to customers with order details when the order ships.
- Refunded order: This email is sent to customers to inform them that their order has been refunded.
- Customer invoice / Order details: This email is sent to customers with order details and payment links. Users can use the payment link to complete payment.
- Customer note: This email notifies customers if the store owner adds a note to the order.
- Reset password: This email is sent to customers with a reset link when they request a password reset.
- New account: Customers will receive this email when creating a new WooCommerce store account.
You’ll find them all under WooCommerce → Settings → Emails. Each one can be enabled, disabled, and edited individually.
Method 1: Customize WooCommerce Emails With the Built-In Editor (Default Settings, No Code)
Here are the simple steps to customize the content and style of WooCommerce emails.
Step 1: Navigate to email settings
From the WordPress dashboard, navigate to WooCommerce ⇒ Settings. Then, move to the “Emails” tab.
Here, you will see all the emails WooCommerce sends by default.
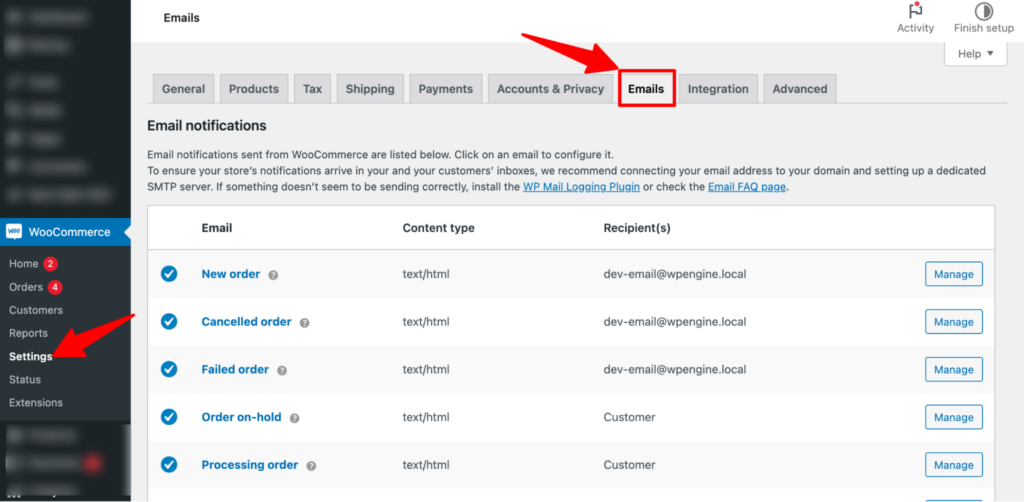
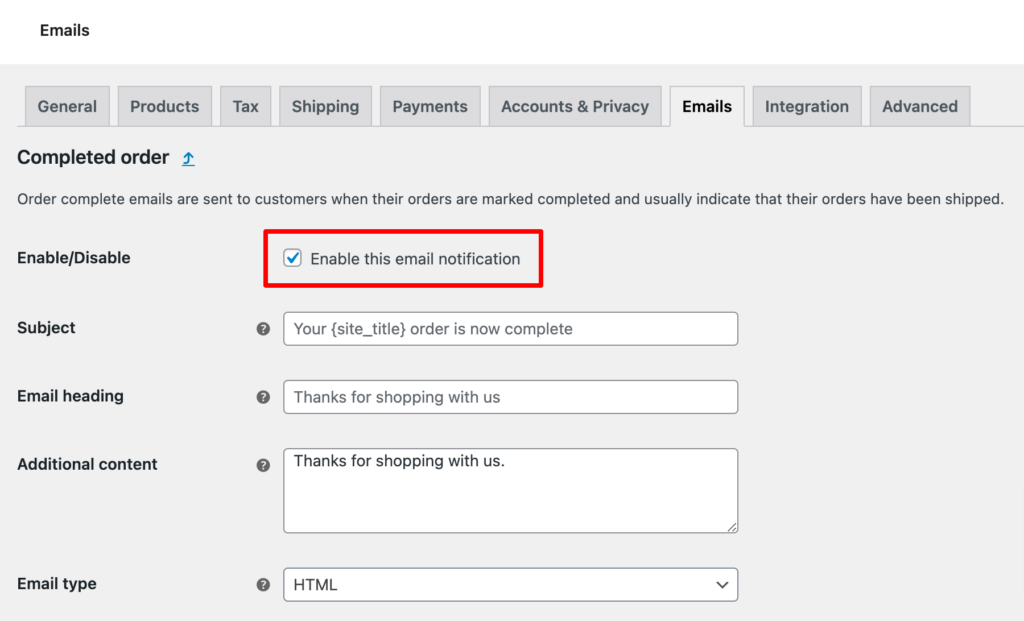
Step 2: Enable email notification
Now, you need to make sure email notifications are enabled for each email you want WooCommerce to send.
To turn on any email notifications, click the “Manage” option next to it.
For example, we will show the process for the “Completed Order” notification that is sent to users when a product is processed and shipped.
Now, make sure you check the “ Enable this email notification” option.
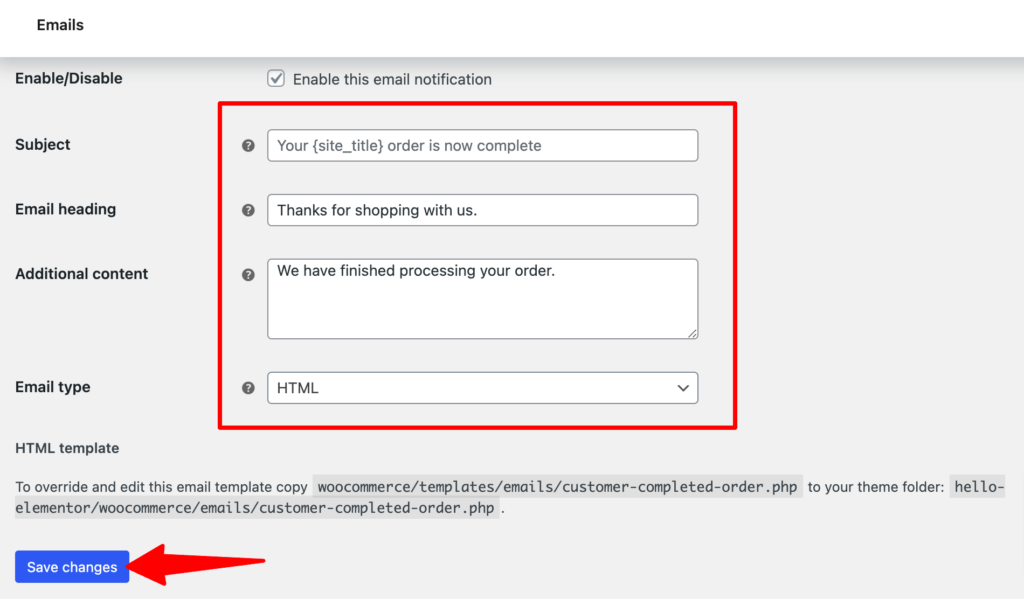
Step 3: Customize email content
After enabling the email notification option, you can customize the following:
- Subject: Set the email subject line here. You can use {site_title} to dynamically print the store name on the subject line.
- Email heading: Provide the email heading here.
- Additional content: If you want to add any additional content, you can add it to the field.
- Email type: Choose an email type such as HTML, Plain Text, or Multipart.
Make sure to click on “Save Changes” to update the custom content.
Repeat Steps 2 and 3 to customize each email type in WooCommerce.
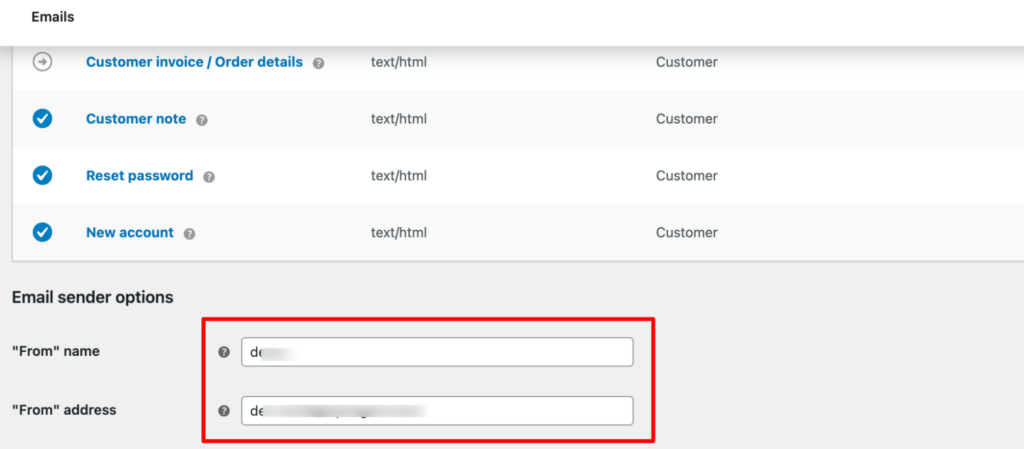
Step 4: Set email sender options
Come back to the email templates page and scroll down a bit to set the email sender options:
- "From" name: Set the name you want to show as the sender.
- "From" address: The email address from which emails will be sent.
Step 5: Customize email template style
Scroll down a little further to customize the following style settings:
- Logo - Upload and display your store logo in the email header.
- Logo Width (px) - Adjust the size of your logo in pixels.
- Header Alignment - Choose the position of the logo in the header (left, center, or right).
- Font Family - Select the font style used in your email content.
- Footer Text - Customize the text shown at the bottom of the email using dynamic placeholders.
- Color Palette (Sync with Theme) - Automatically match email colors with your website theme.
- Accent Color - Set the highlight color for buttons, links, and key elements.
- Email Background - Define the background color of the overall email area.
- Content Background - Set the background color of the main email content section.
- Heading & Text - Choose the color for headings and primary text.
- Secondary Text - Set the color for less important or supporting text.
Note: On the right side, you can select an email template to preview it live on desktop and mobile devices. You can also send test emails to see how it will appear in the inbox.
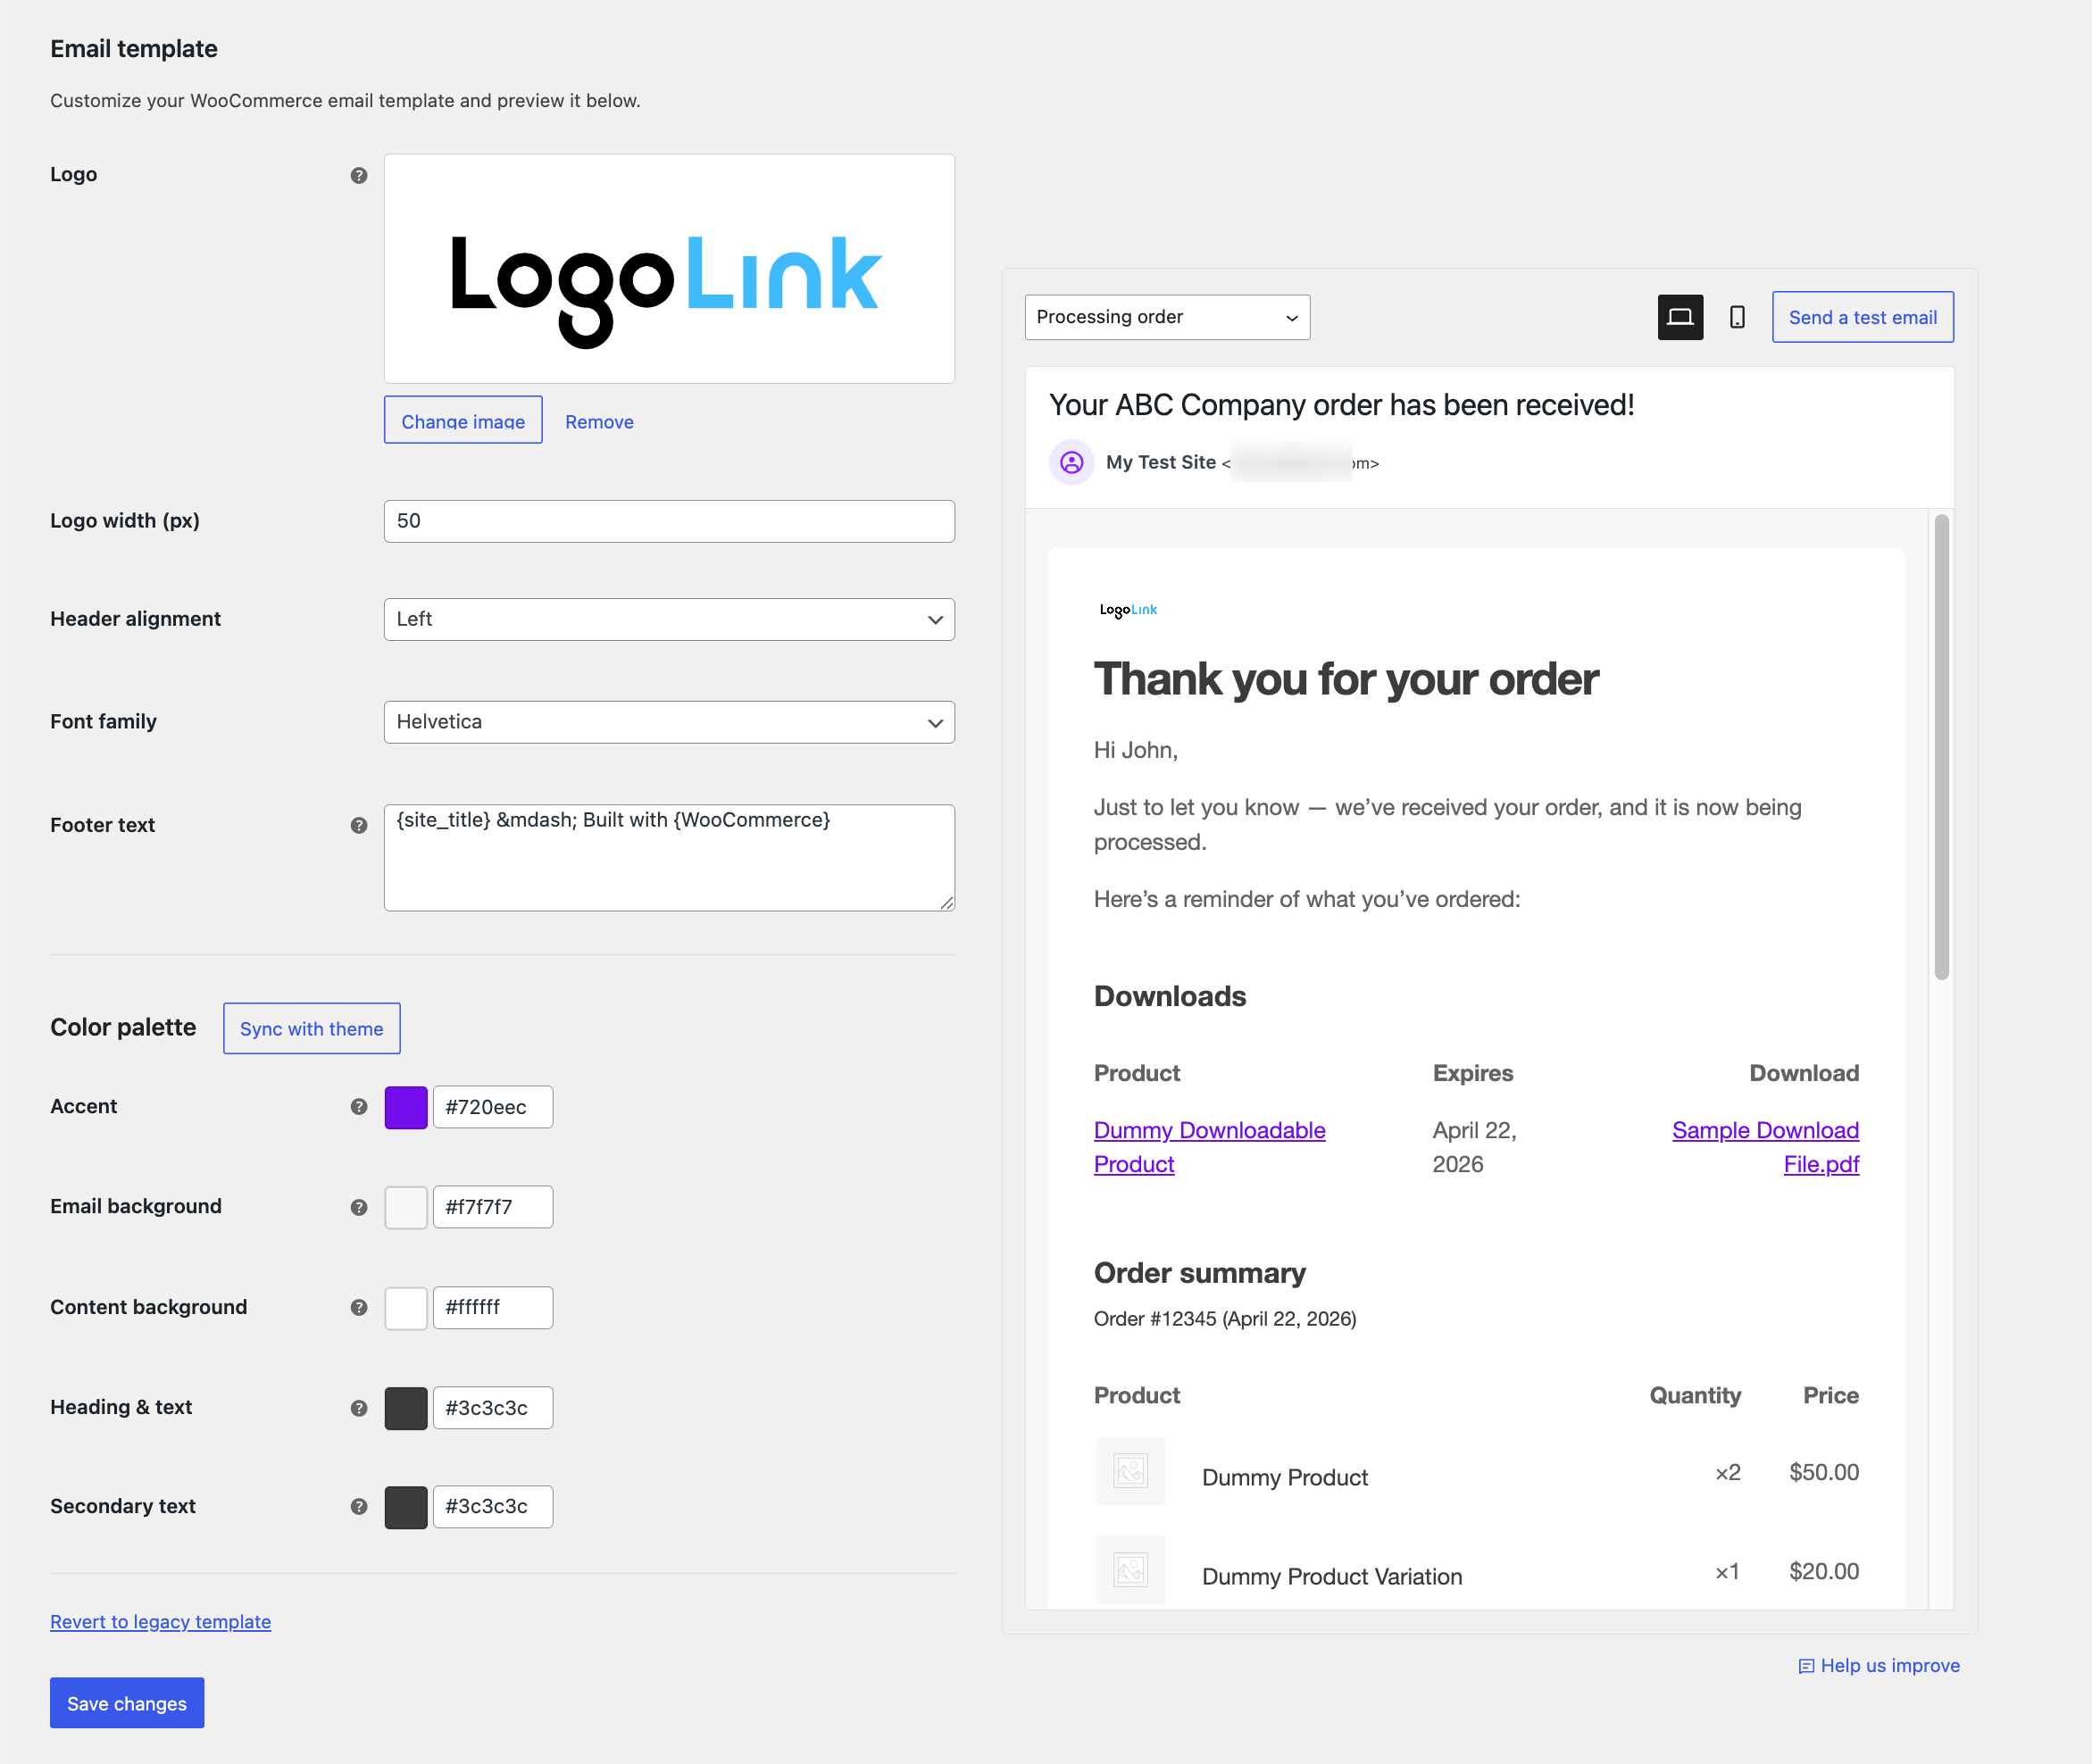
Finally, click on 'Save changes' to update the WooCommerce email customizations.
That’s enough to take a store from system notification to on-brand in a few minutes. The native editor stops working with deeply custom layouts, reusable design blocks (featured products, cross-sells), and styling each email type with entirely different designs.
That's where a plugin comes in.
Method 2: Customize WooCommerce Emails With a Plugin (No-Code, Full Control)
A customizer plugin gives you drag-and-drop design, WooCommerce-specific blocks (order summary, products, coupons), reusable templates, and per-email styling without code.
This is the route most store owners land on once they outgrow the native editor.
Which plugin should you use?
The right choice comes down to the type of styling or marketing emails you need.
The most popular customizers (Kadence, YayMail, and VillaTheme’s Email Customizer) are purely design tools. They just make your transactional emails look good, and a free one is plenty if branding is all you need.
The plugin, like FunnelKit Automations, also handles automated marketing (abandoned cart, post-purchase, win-back) and transactional emails, using a drag-and-drop visual builder within the same plugin.
For this guide, the walkthrough below shows the general method using FunnelKit Automations; the steps look similar in most visual builders.
It's available in both free and pro versions. Get it by clicking on the link below:
Install and activate FunnelKit Automations on your WordPress website.
Watch the video below to learn how to customize WooCommerce email templates using FunnelKit Automations 👇
Follow the process below.
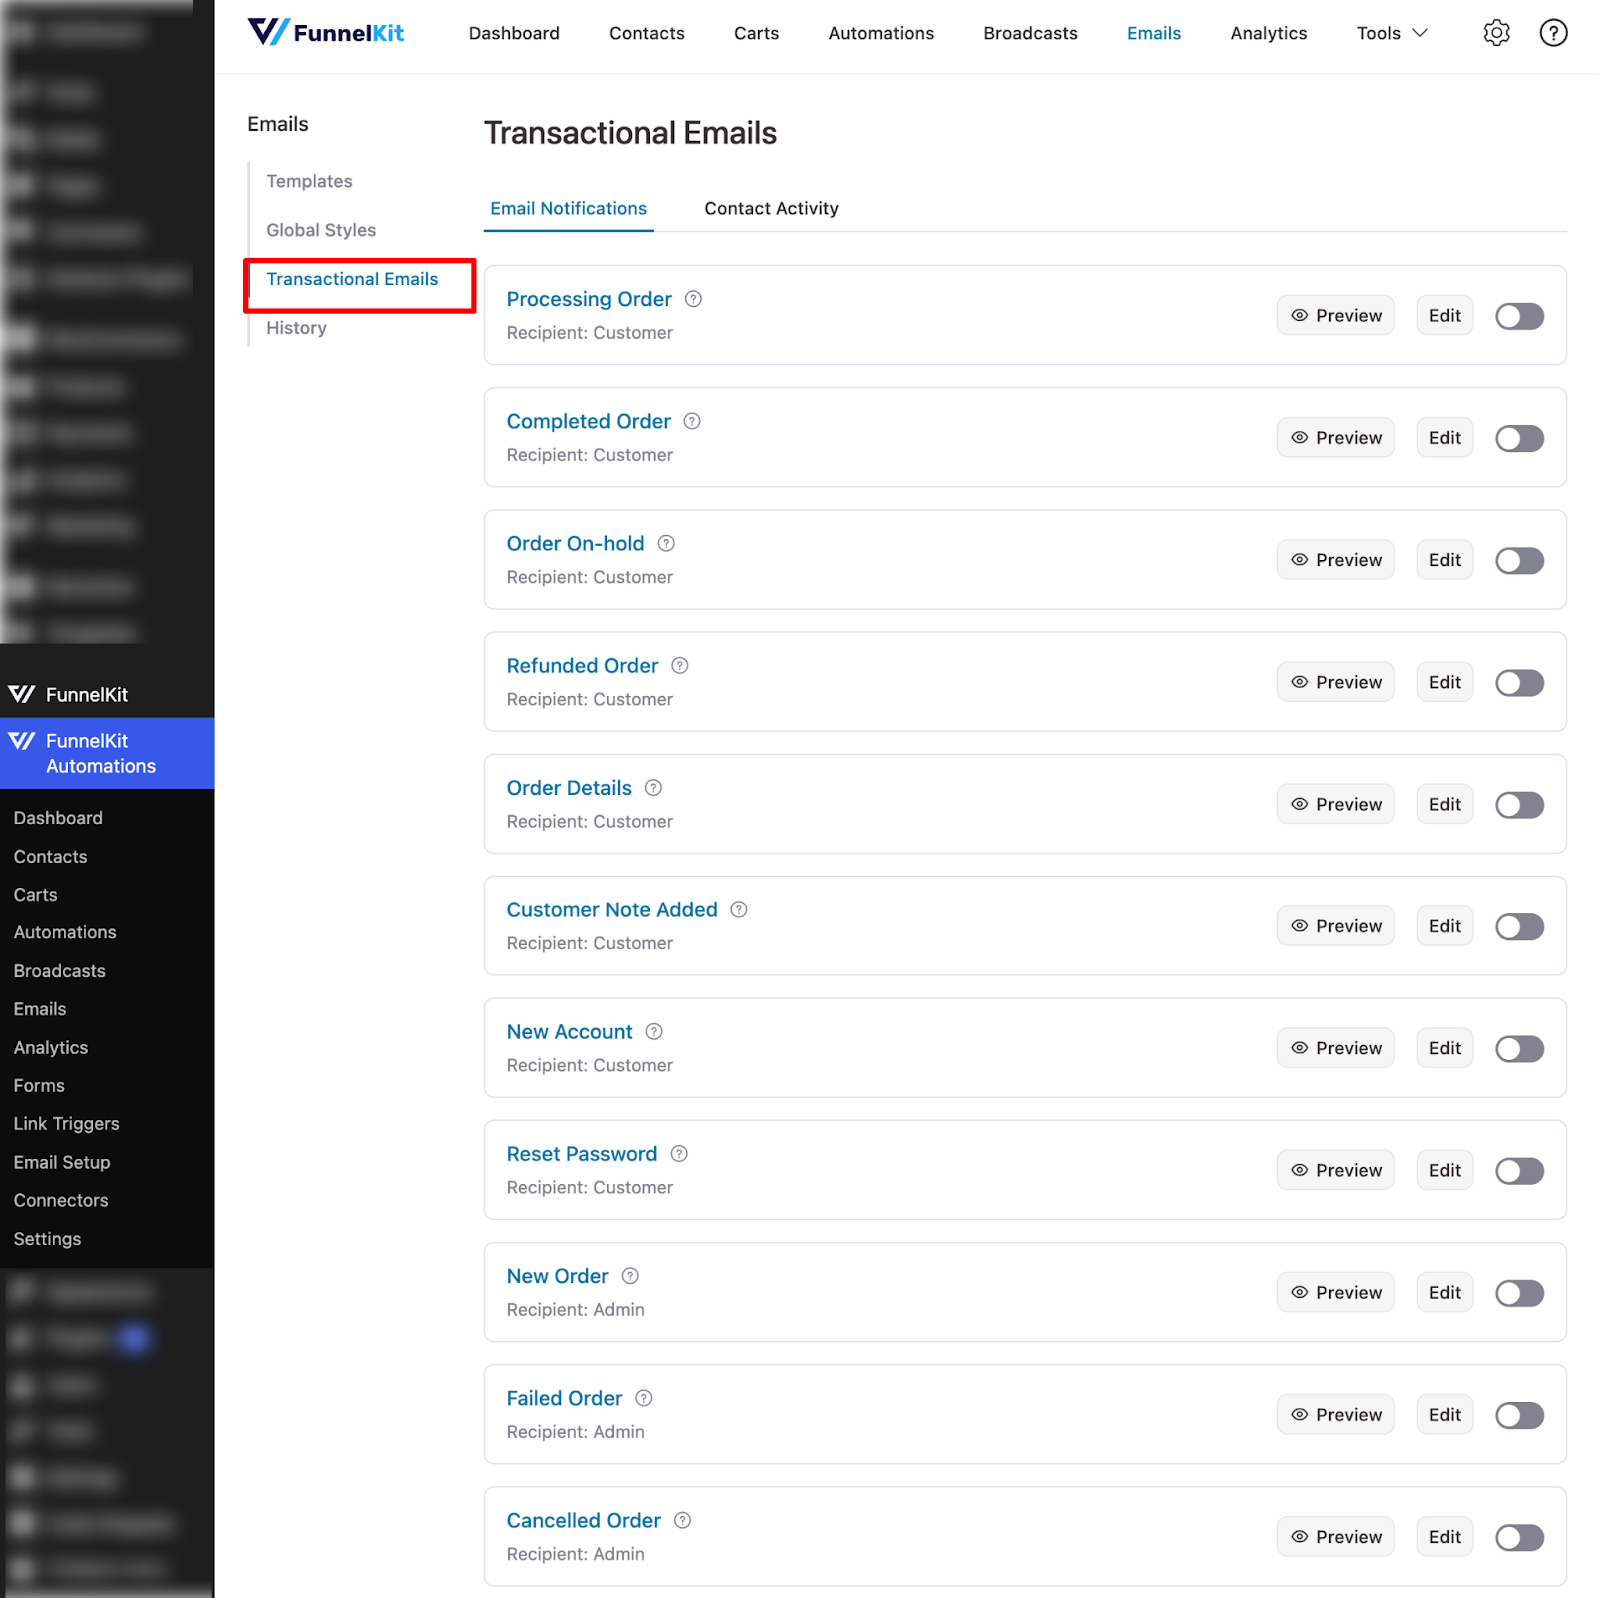
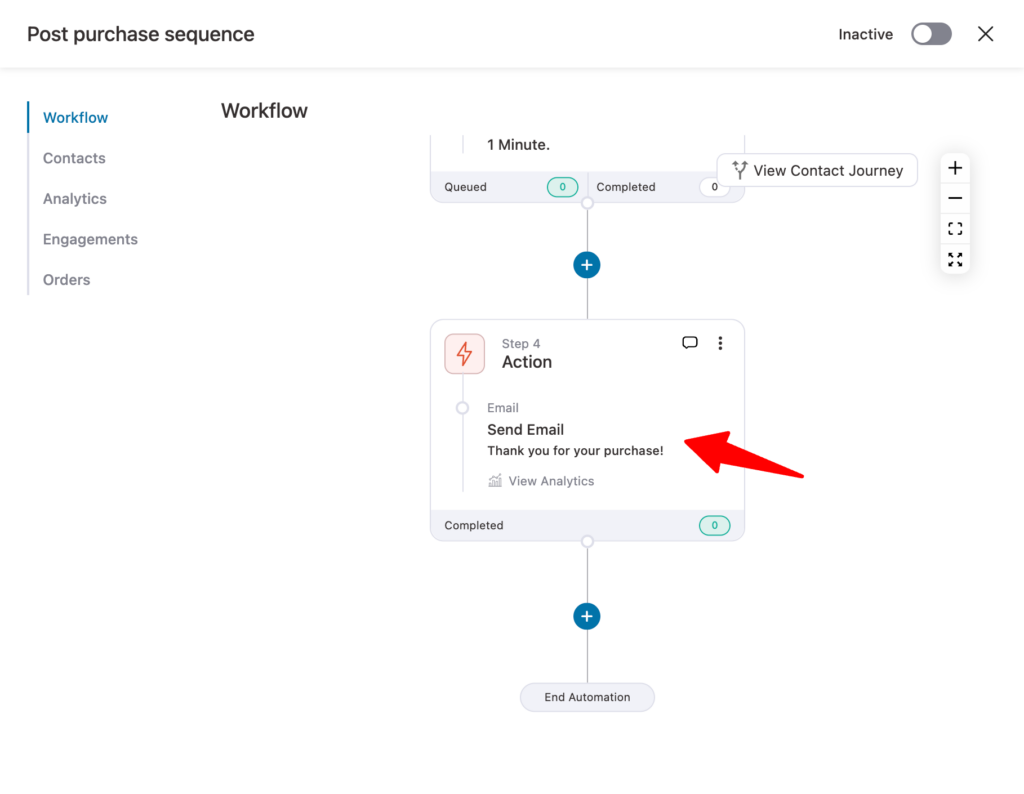
Step 1: Navigate to transactional emails
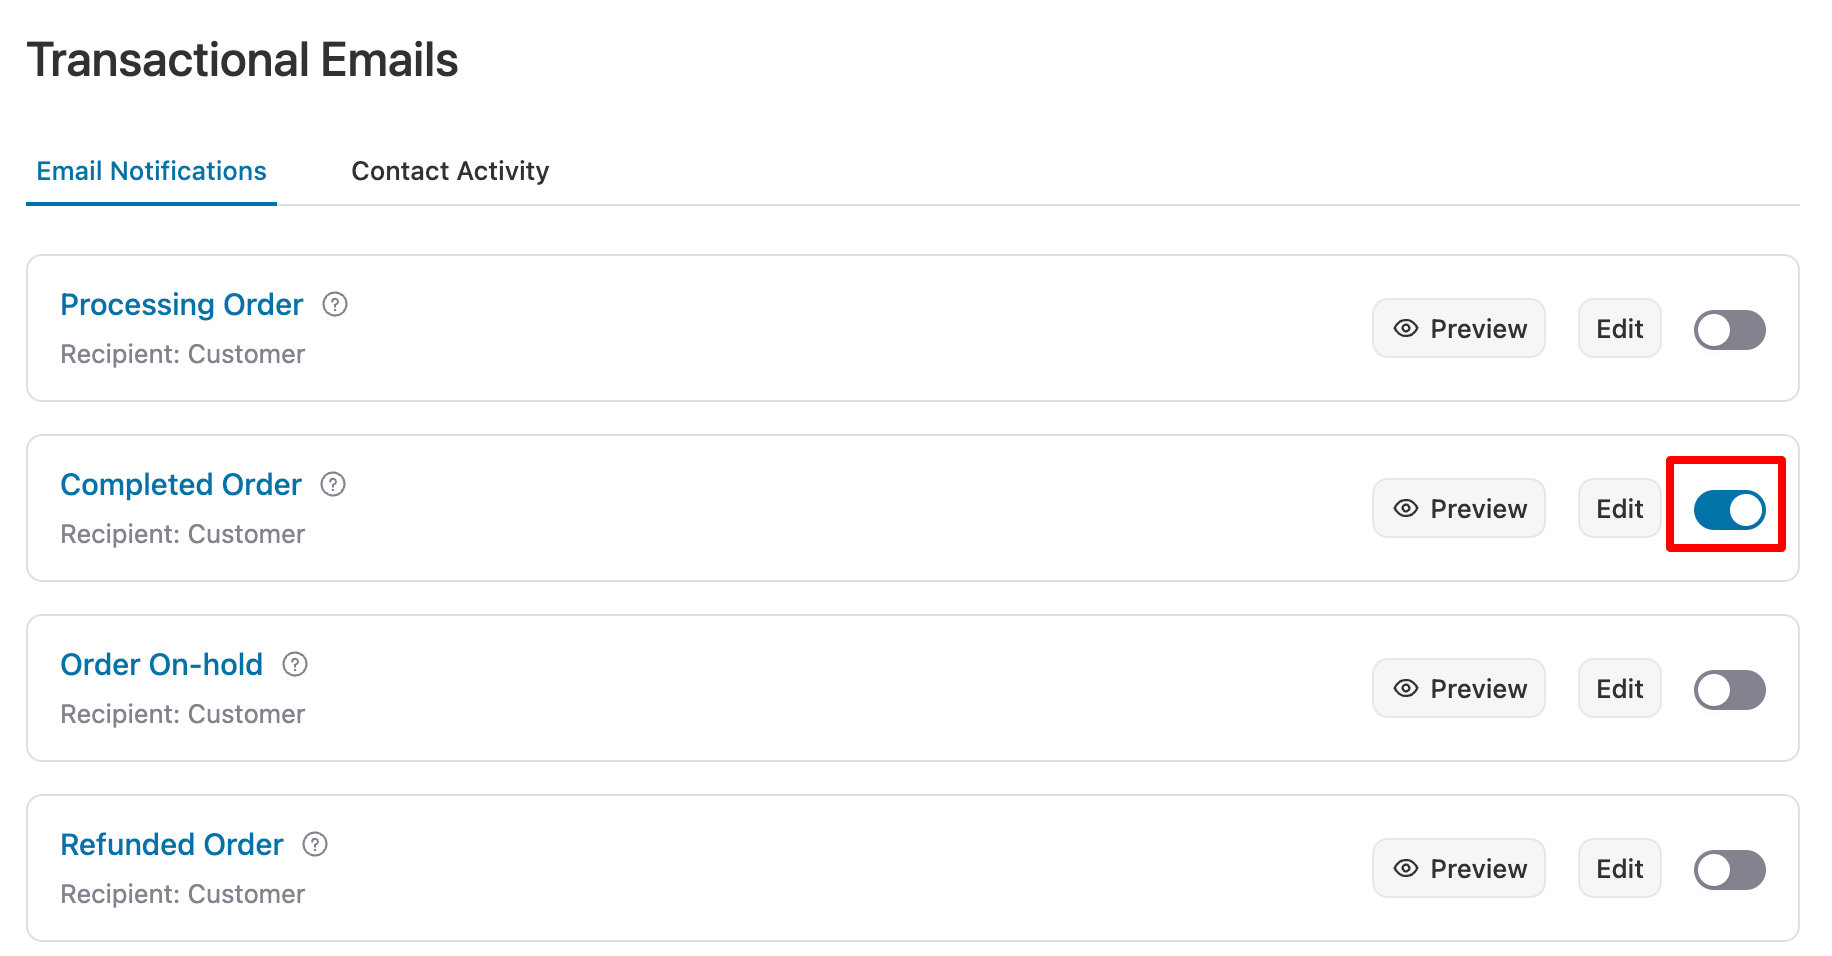
You can find all the transactional emails if you navigate to FunnelKit Automations ⇒ Emails and click on the Transactional Emails tab.
Step 2: Customize the WooCommerce email subject line and preview the text
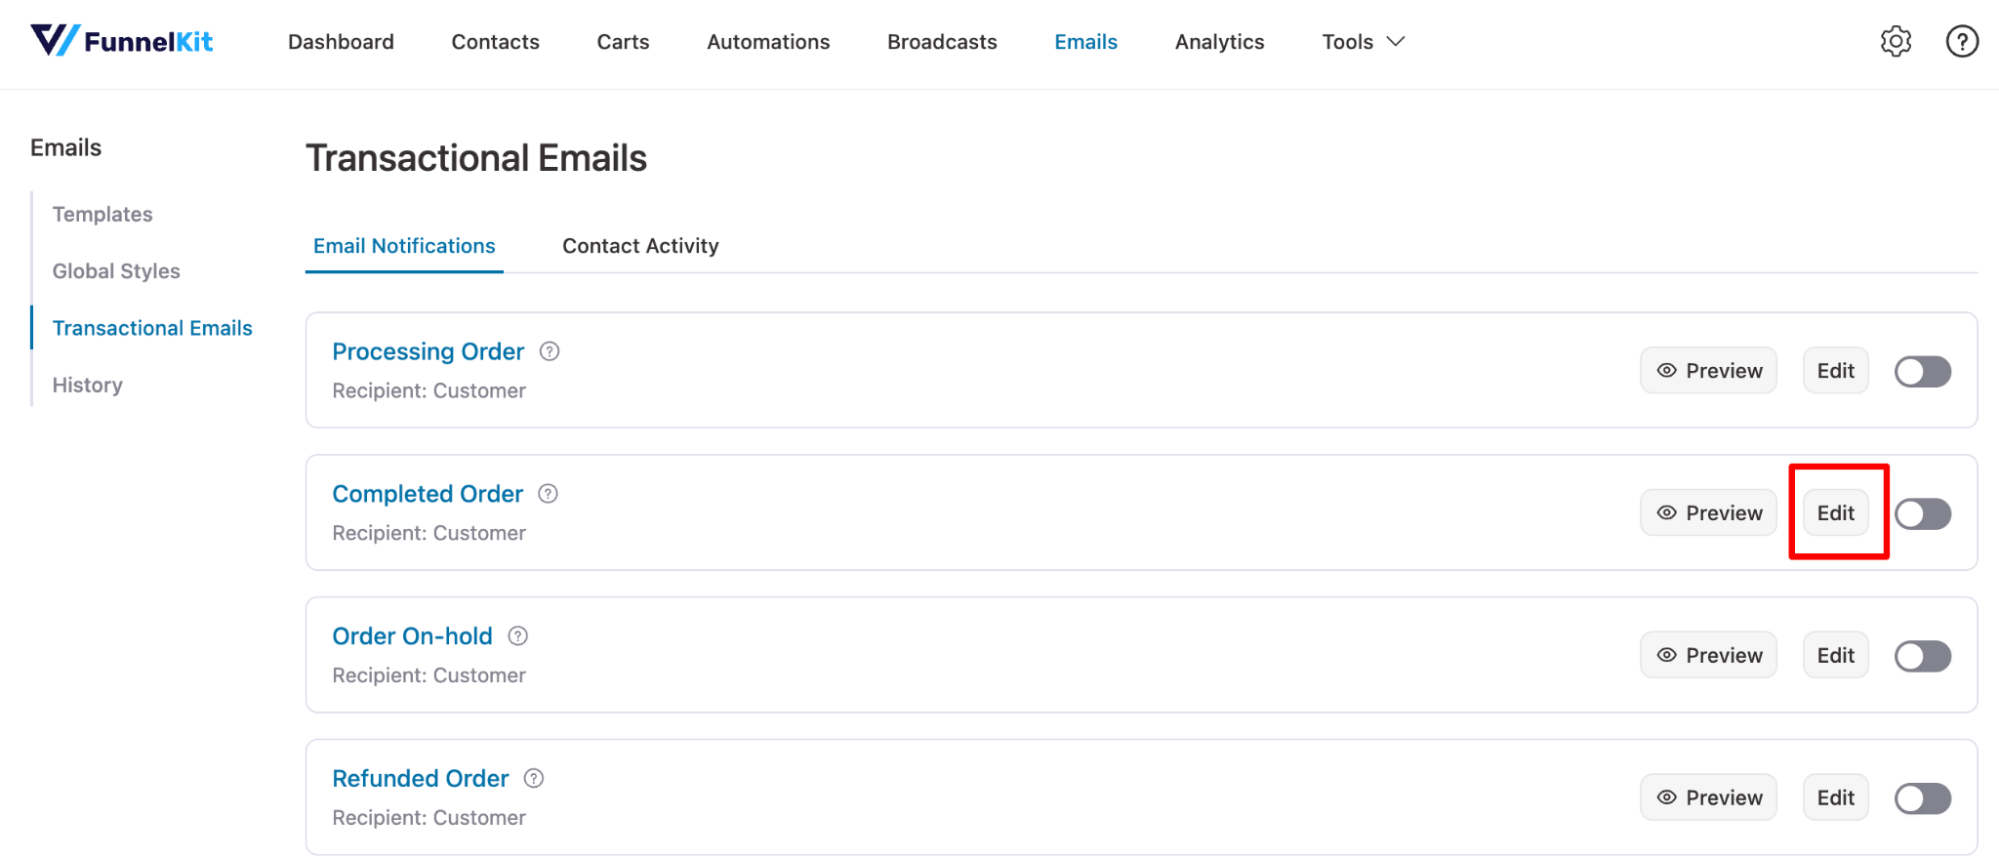
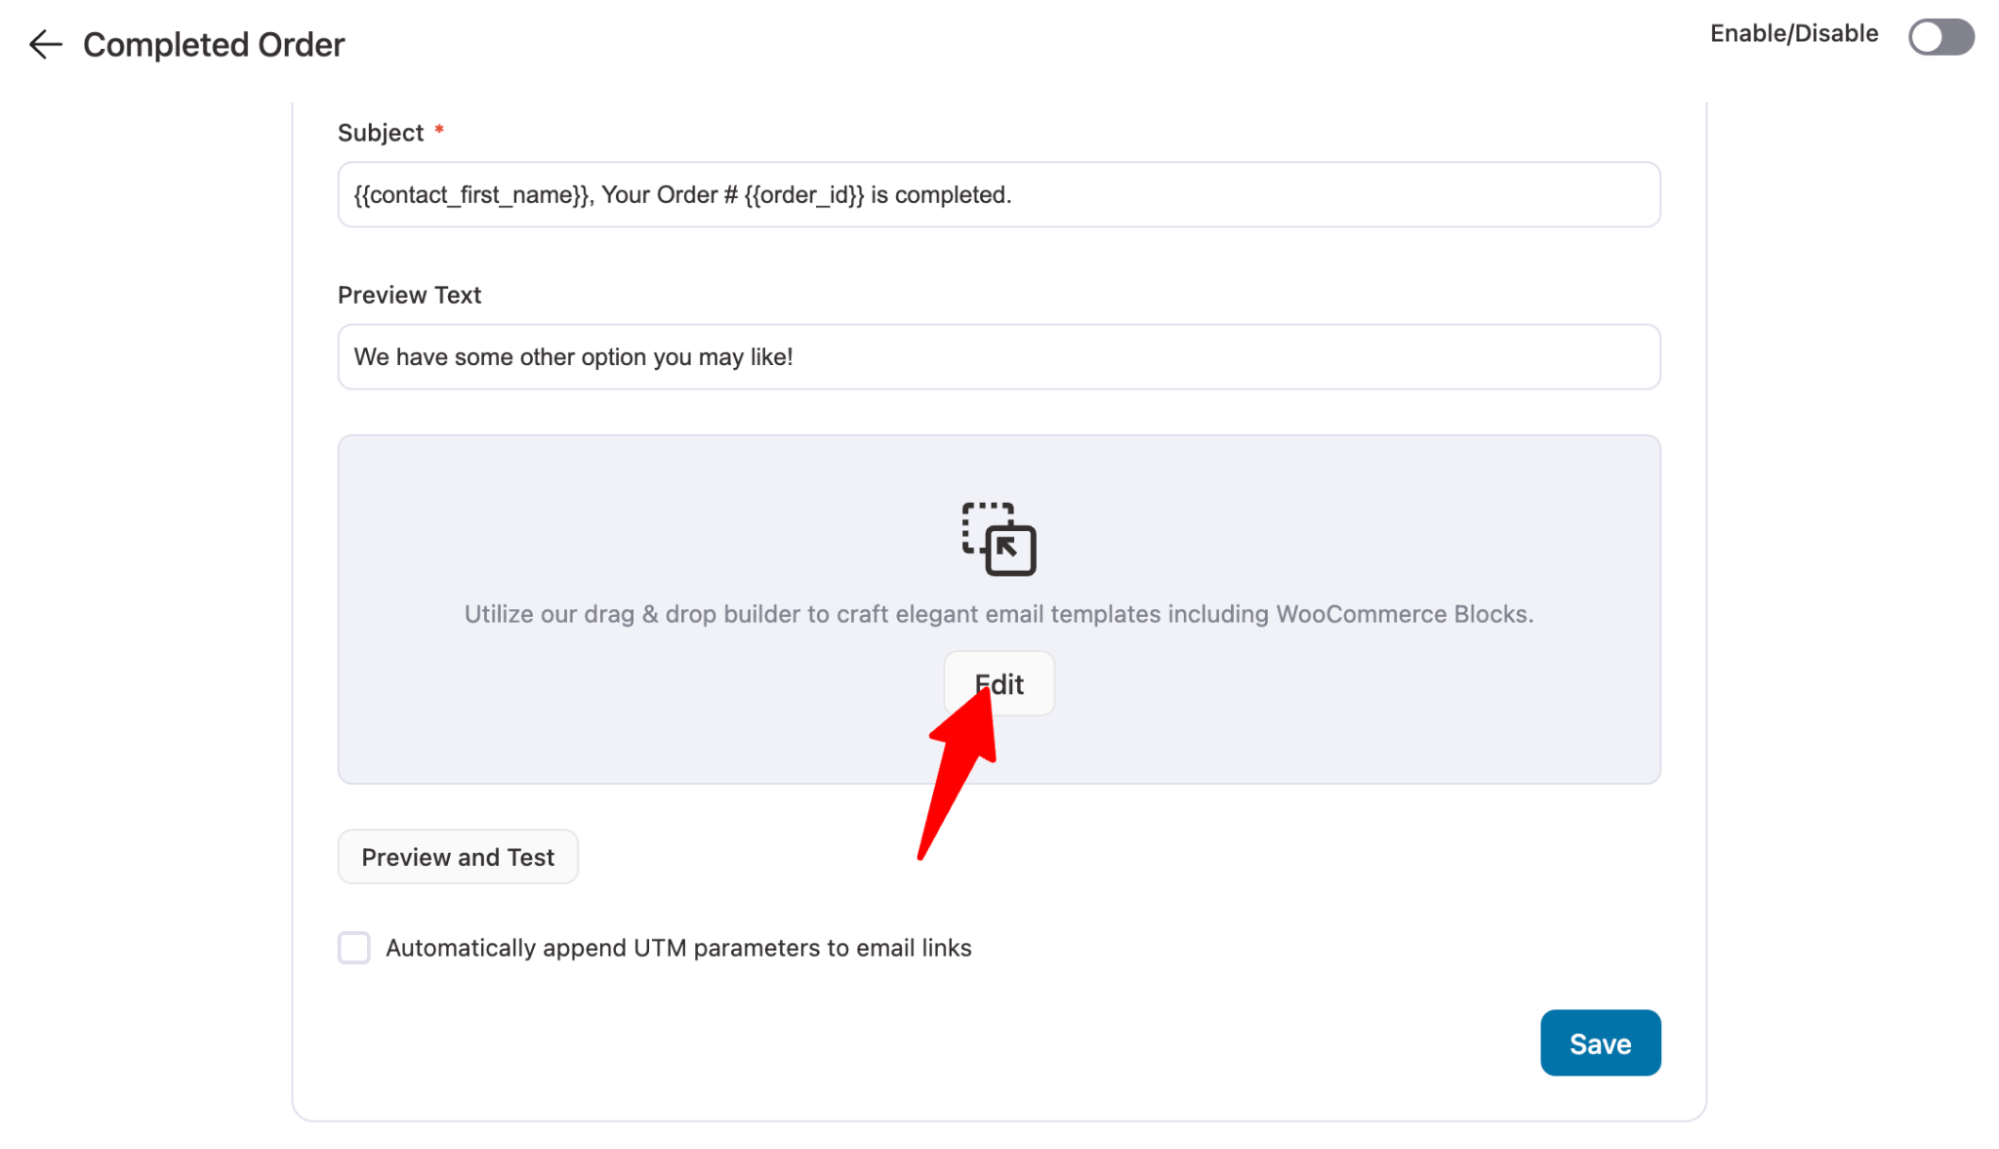
Just to show the process, we will share how to customize the 'Completed Order' email.
Now, to edit the completed order emails, hit the Edit button.
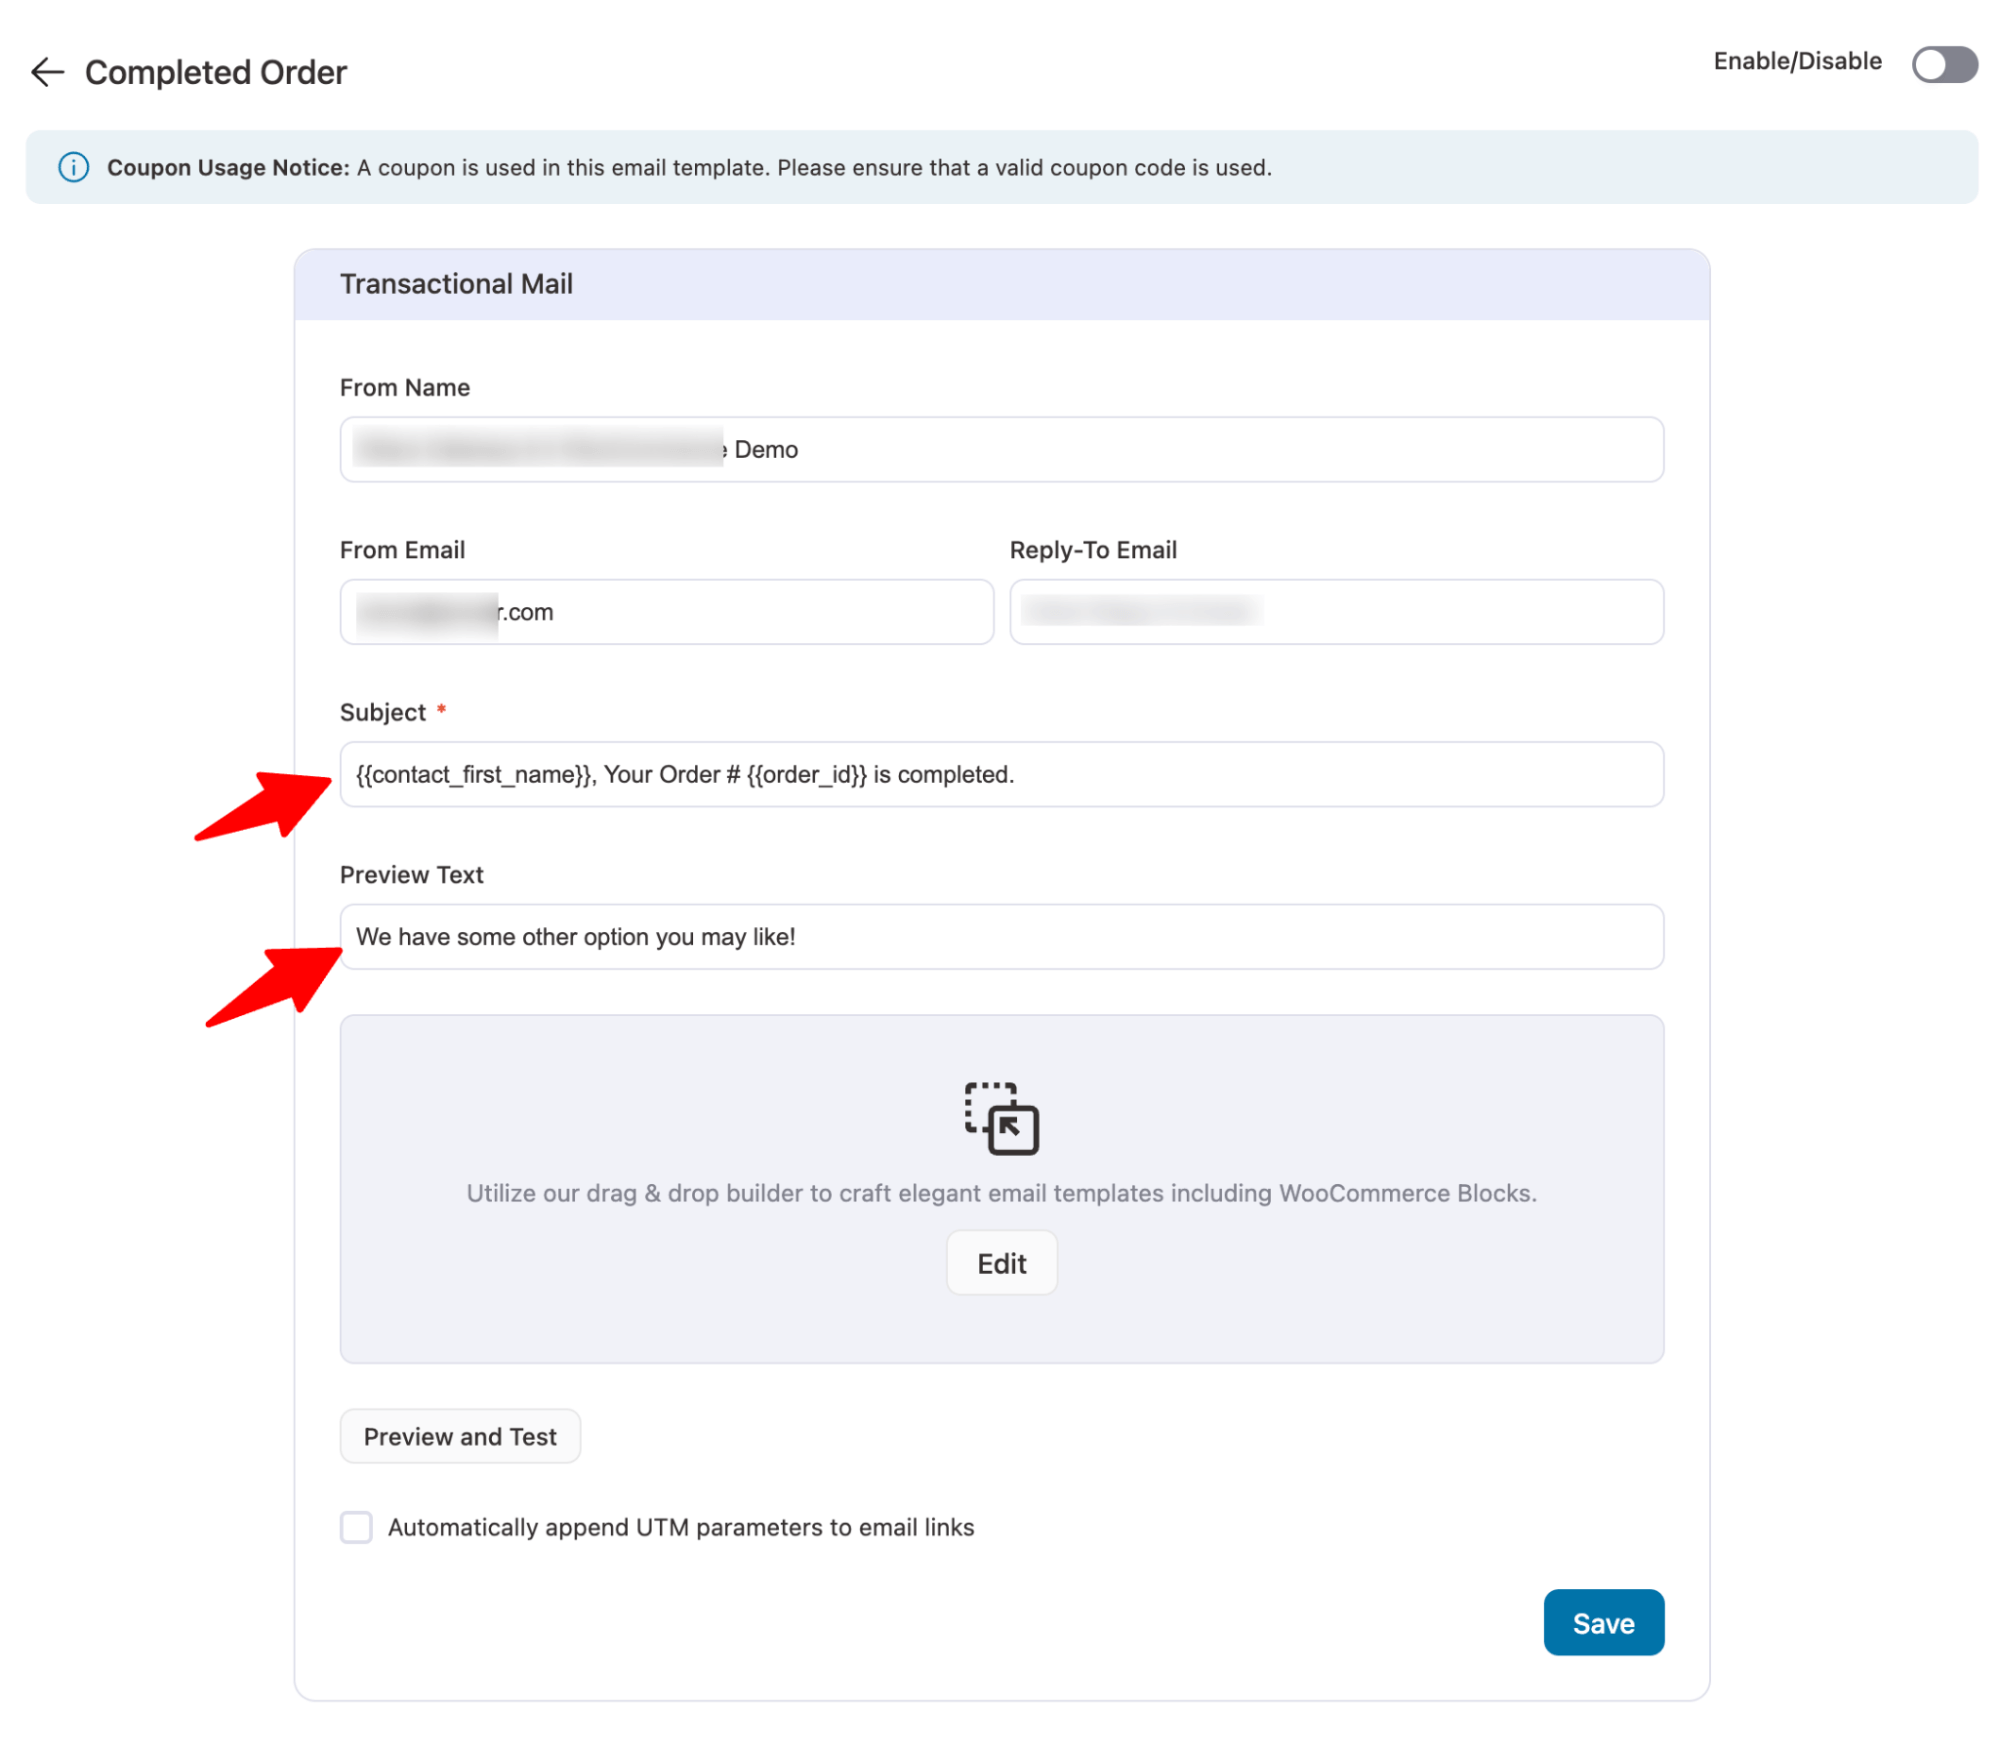
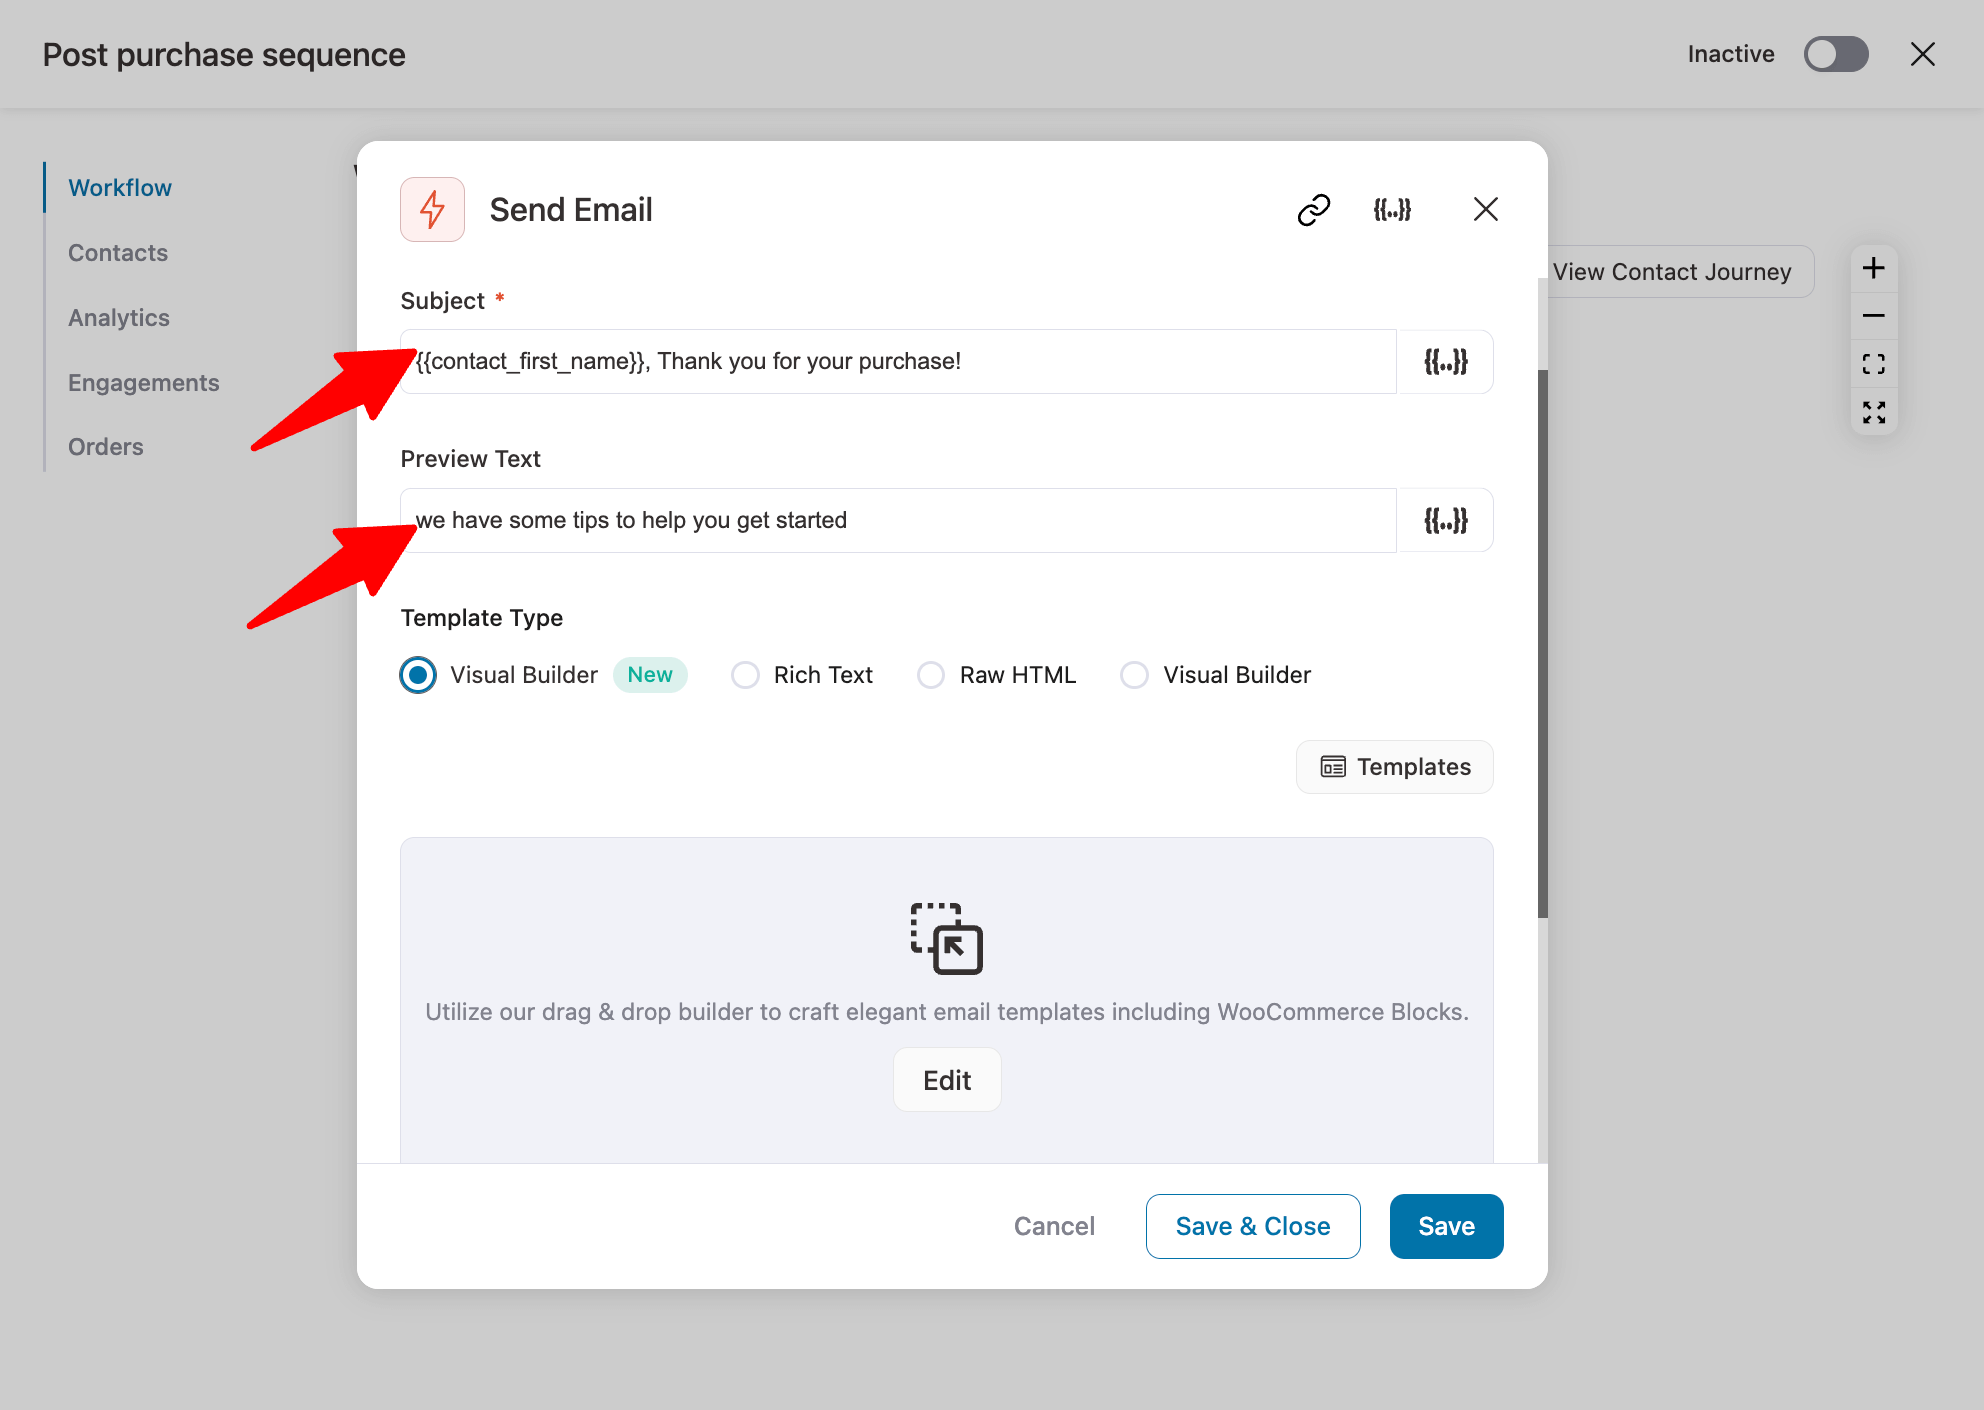
Now, you can add a custom subject line and preview text. Use merge tags to add dynamic information like order ID, customer name, etc.
Here, set the From name, From Email, Reply to Email, along with Subject Text and Preview Text.
For the subject and preview text, use merge tags to add personalized information, such as the customer's name and order ID.
Step 3: Customize the email body content
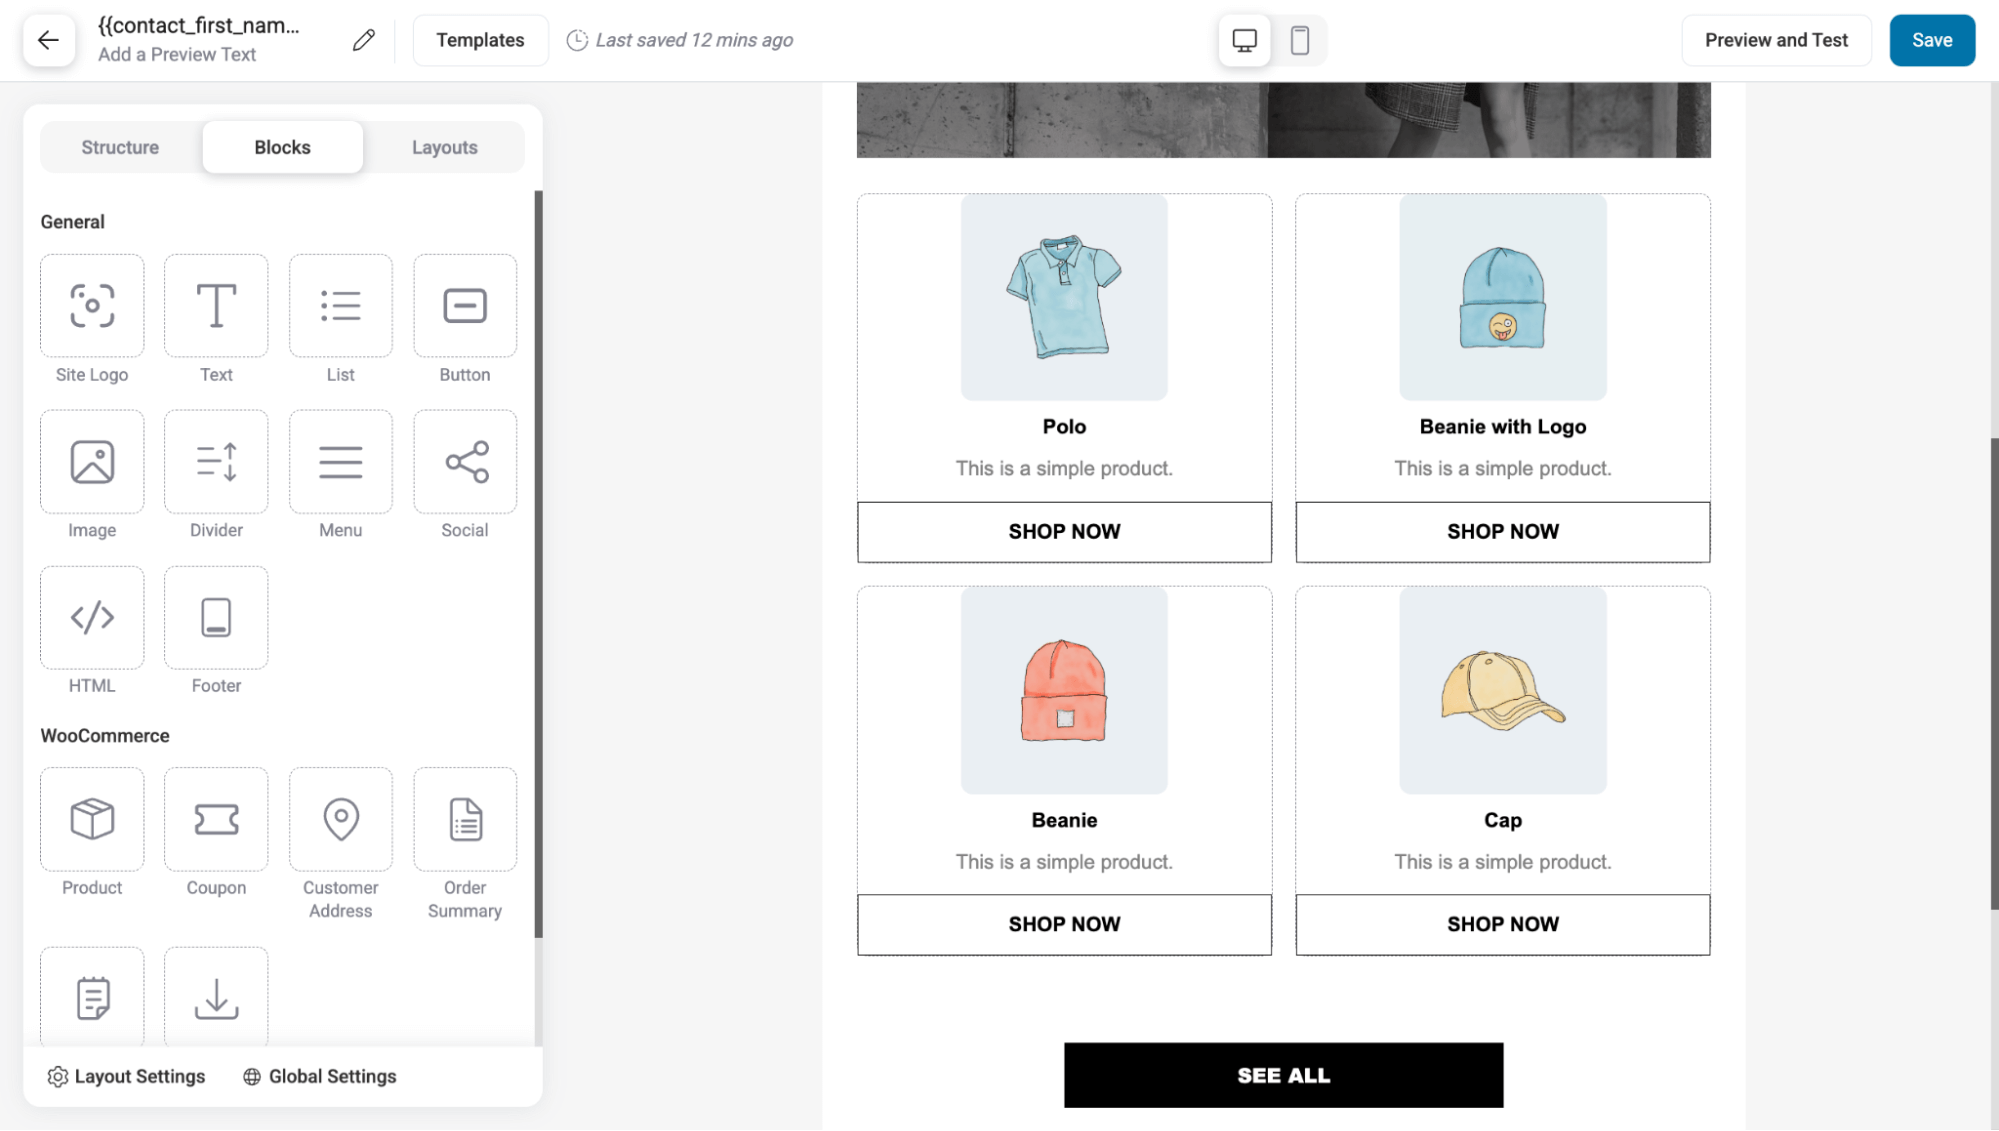
Now, hit the Edit option to design your email with an intuitive visual builder.
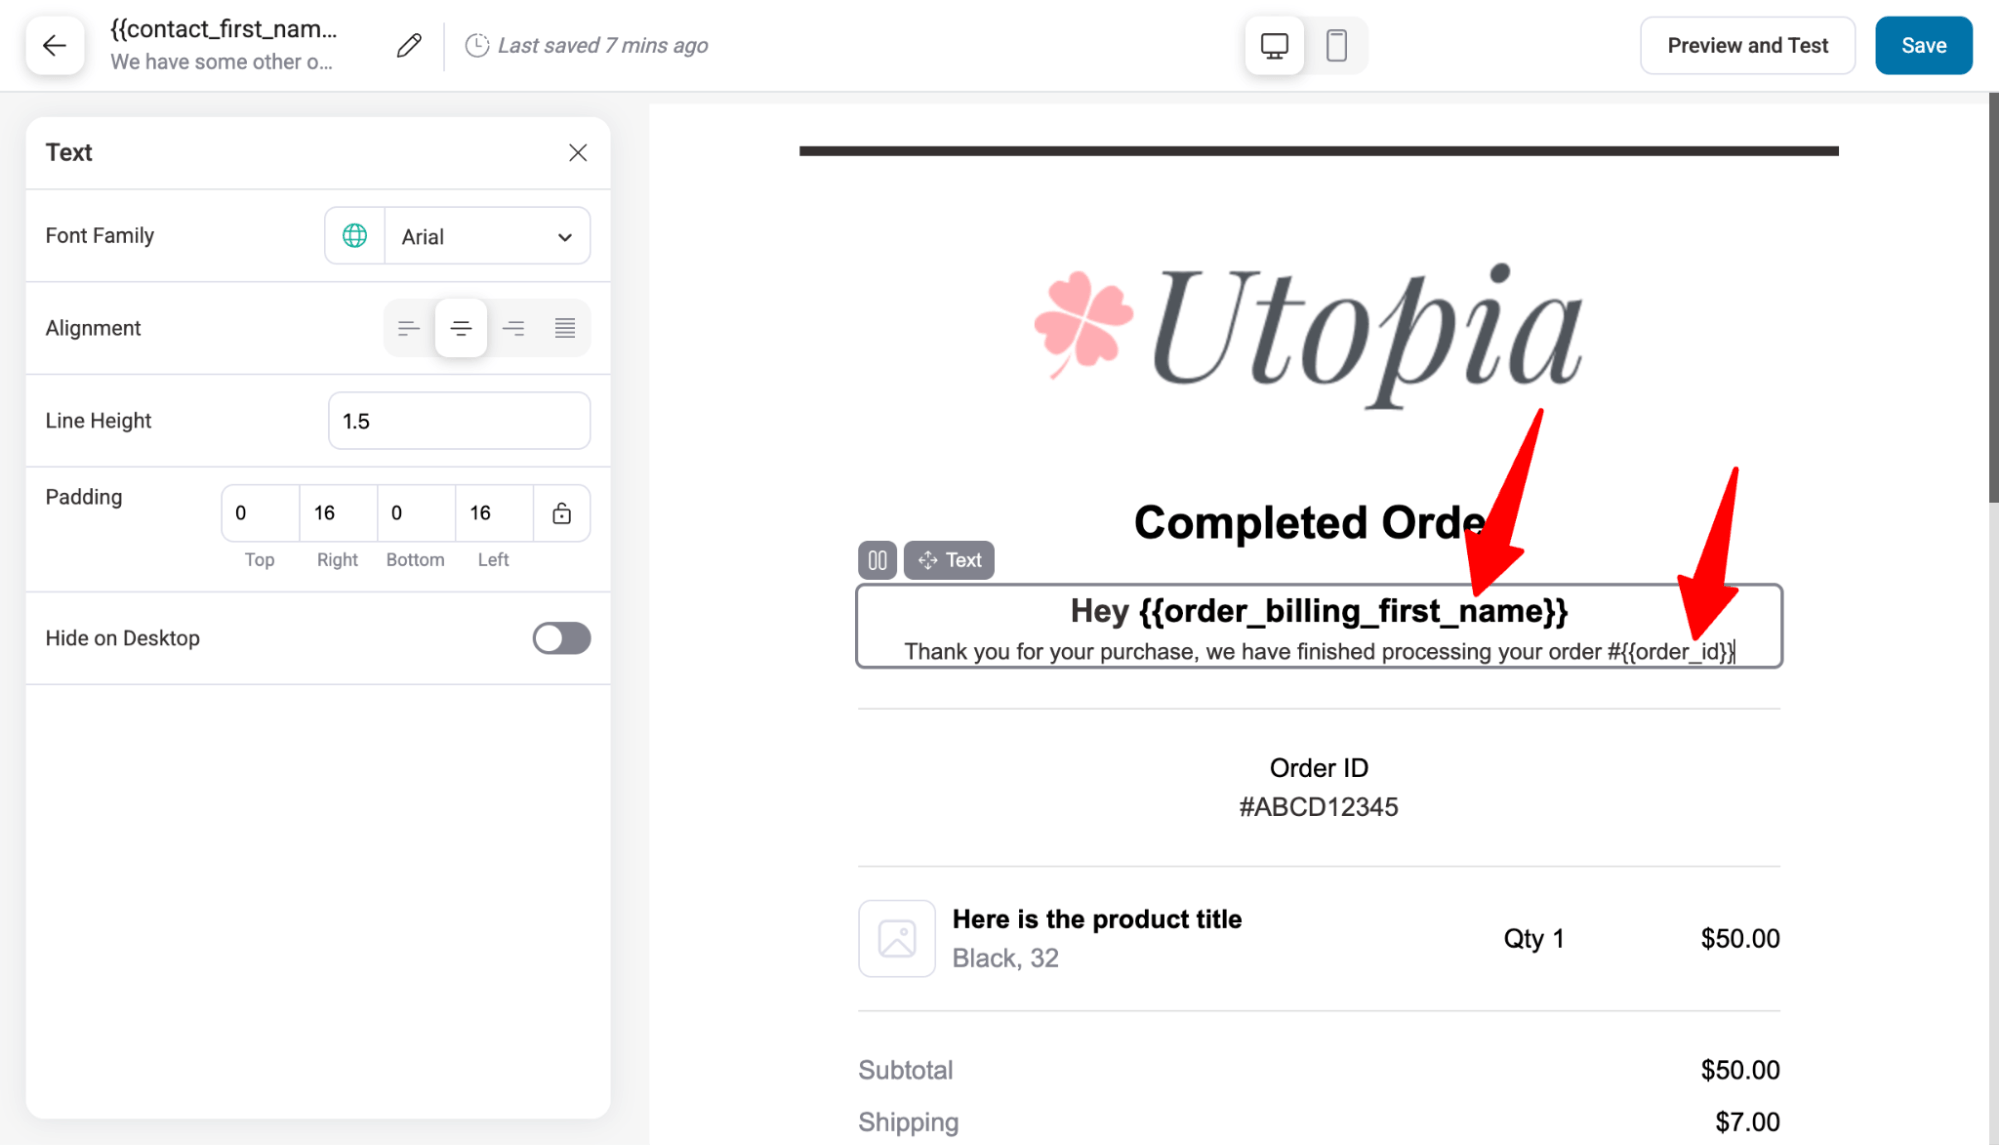
You will find a prebuilt email template. You can customize each existing section, delete any you don't like, or add a new section if required.
Update the logo.
Then, the messaging. To add dynamic content, hit the merge tag button.

On a pop-up, you can find different merge tags related to order, customer, and some general.
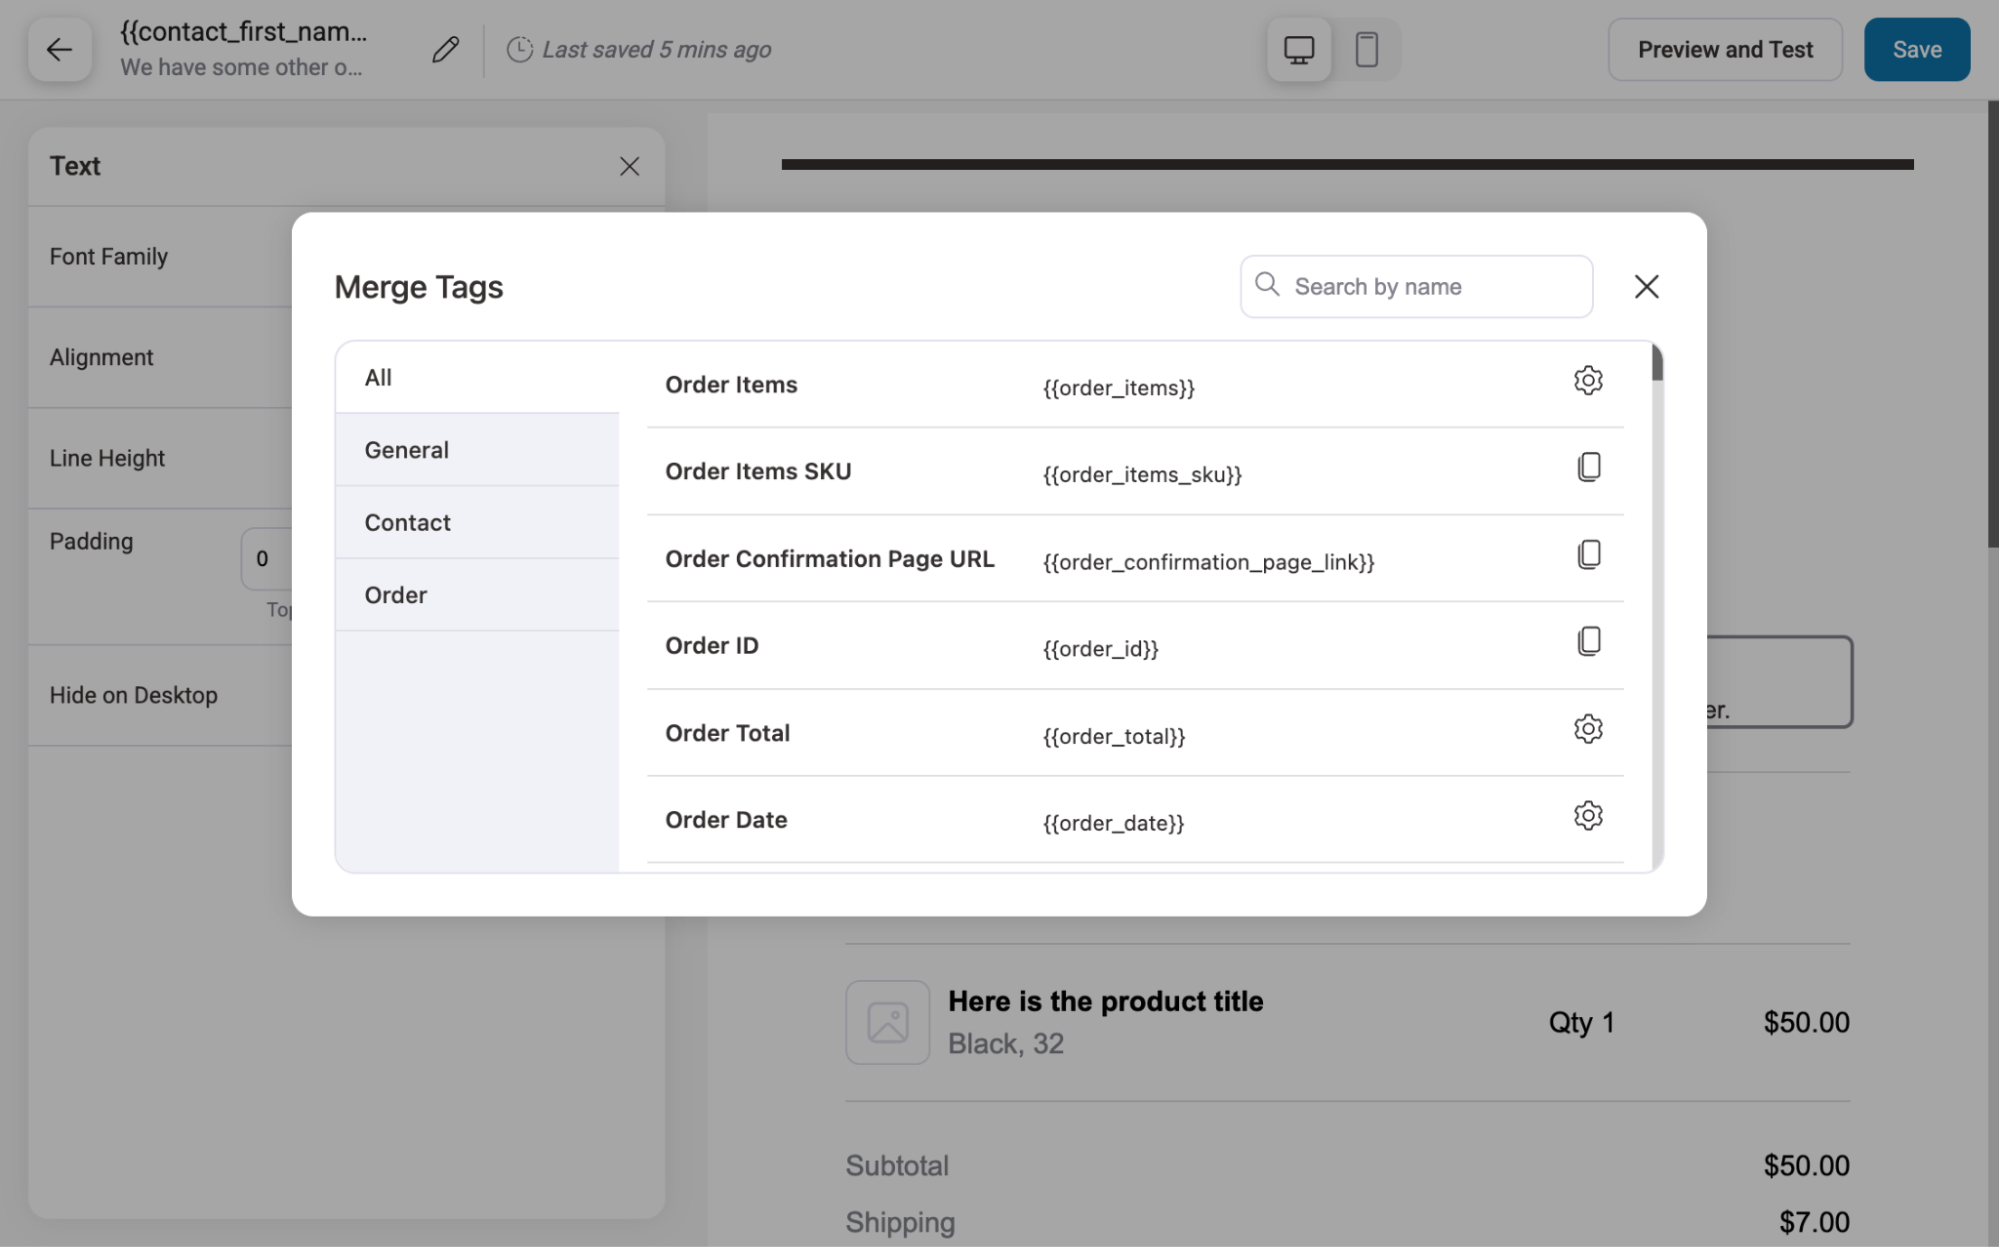
To use any of the information, simply copy the merge tag and paste it into the email body.
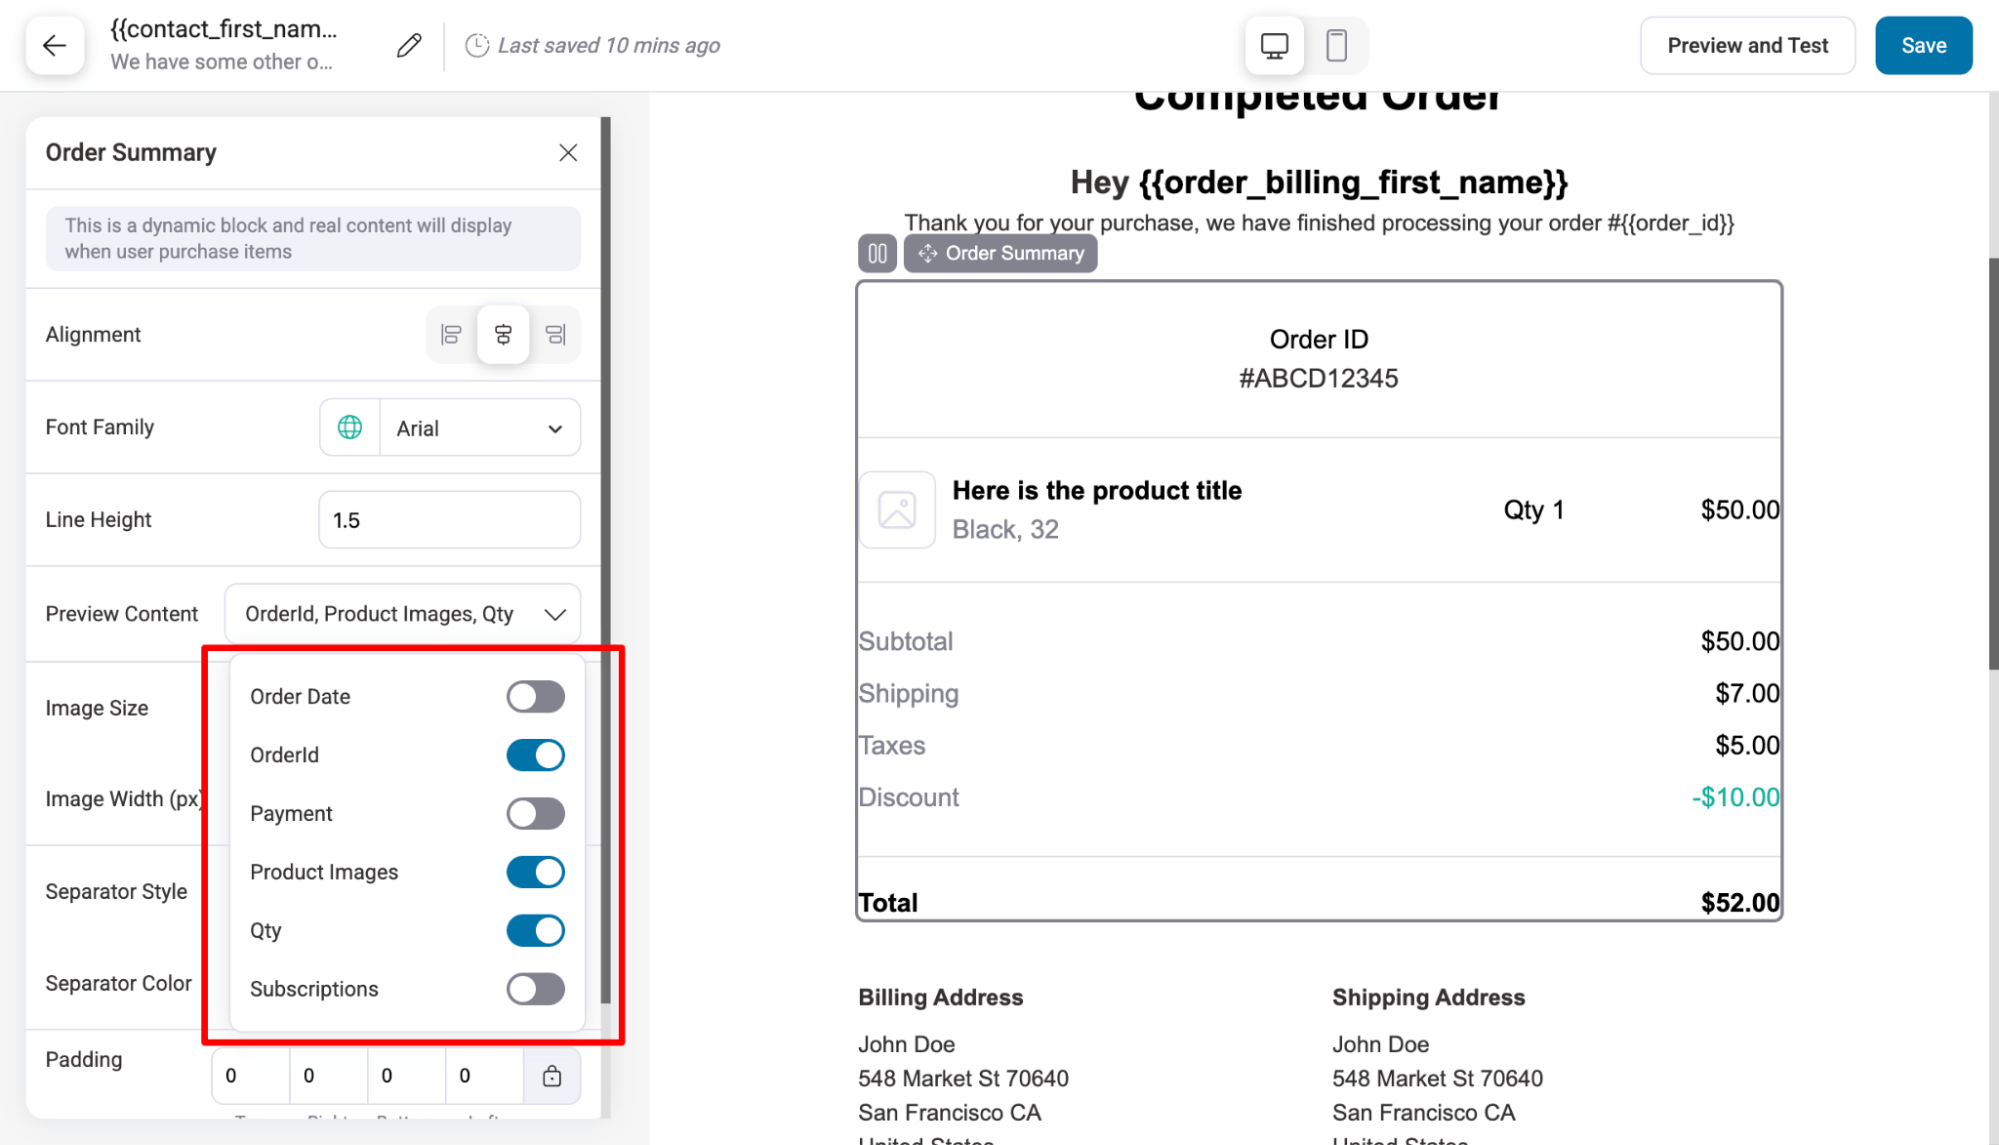
Next, you will find an order summary section that includes the order ID, product details, shipping details, taxes, discounts, and the total.
On the left side, you can customize the section's appearance with alignment, font family, line height, preview content, image size, etc.
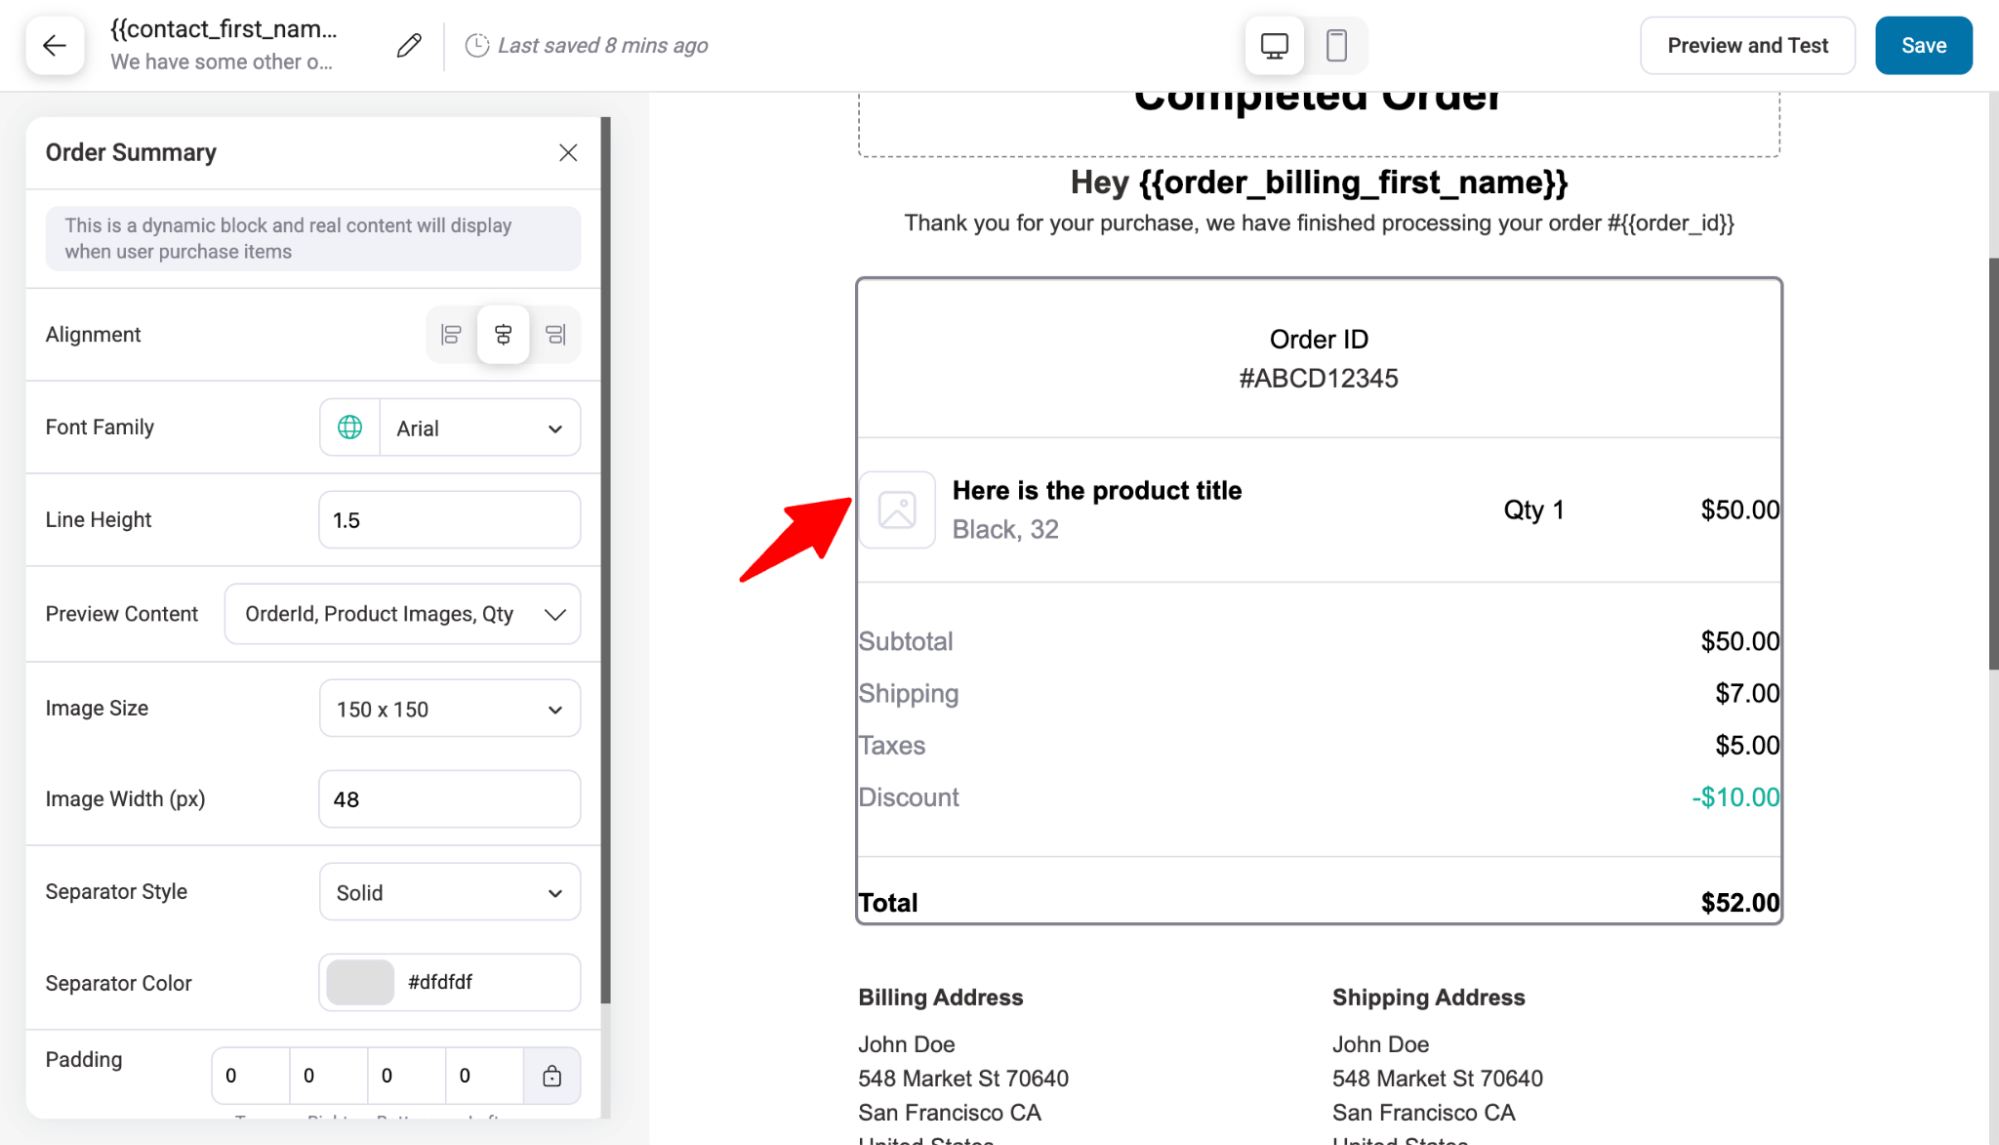
In the product preview section, you can show/hide details such as Order ID, Payment, Product Images, Qty, and Subscription.
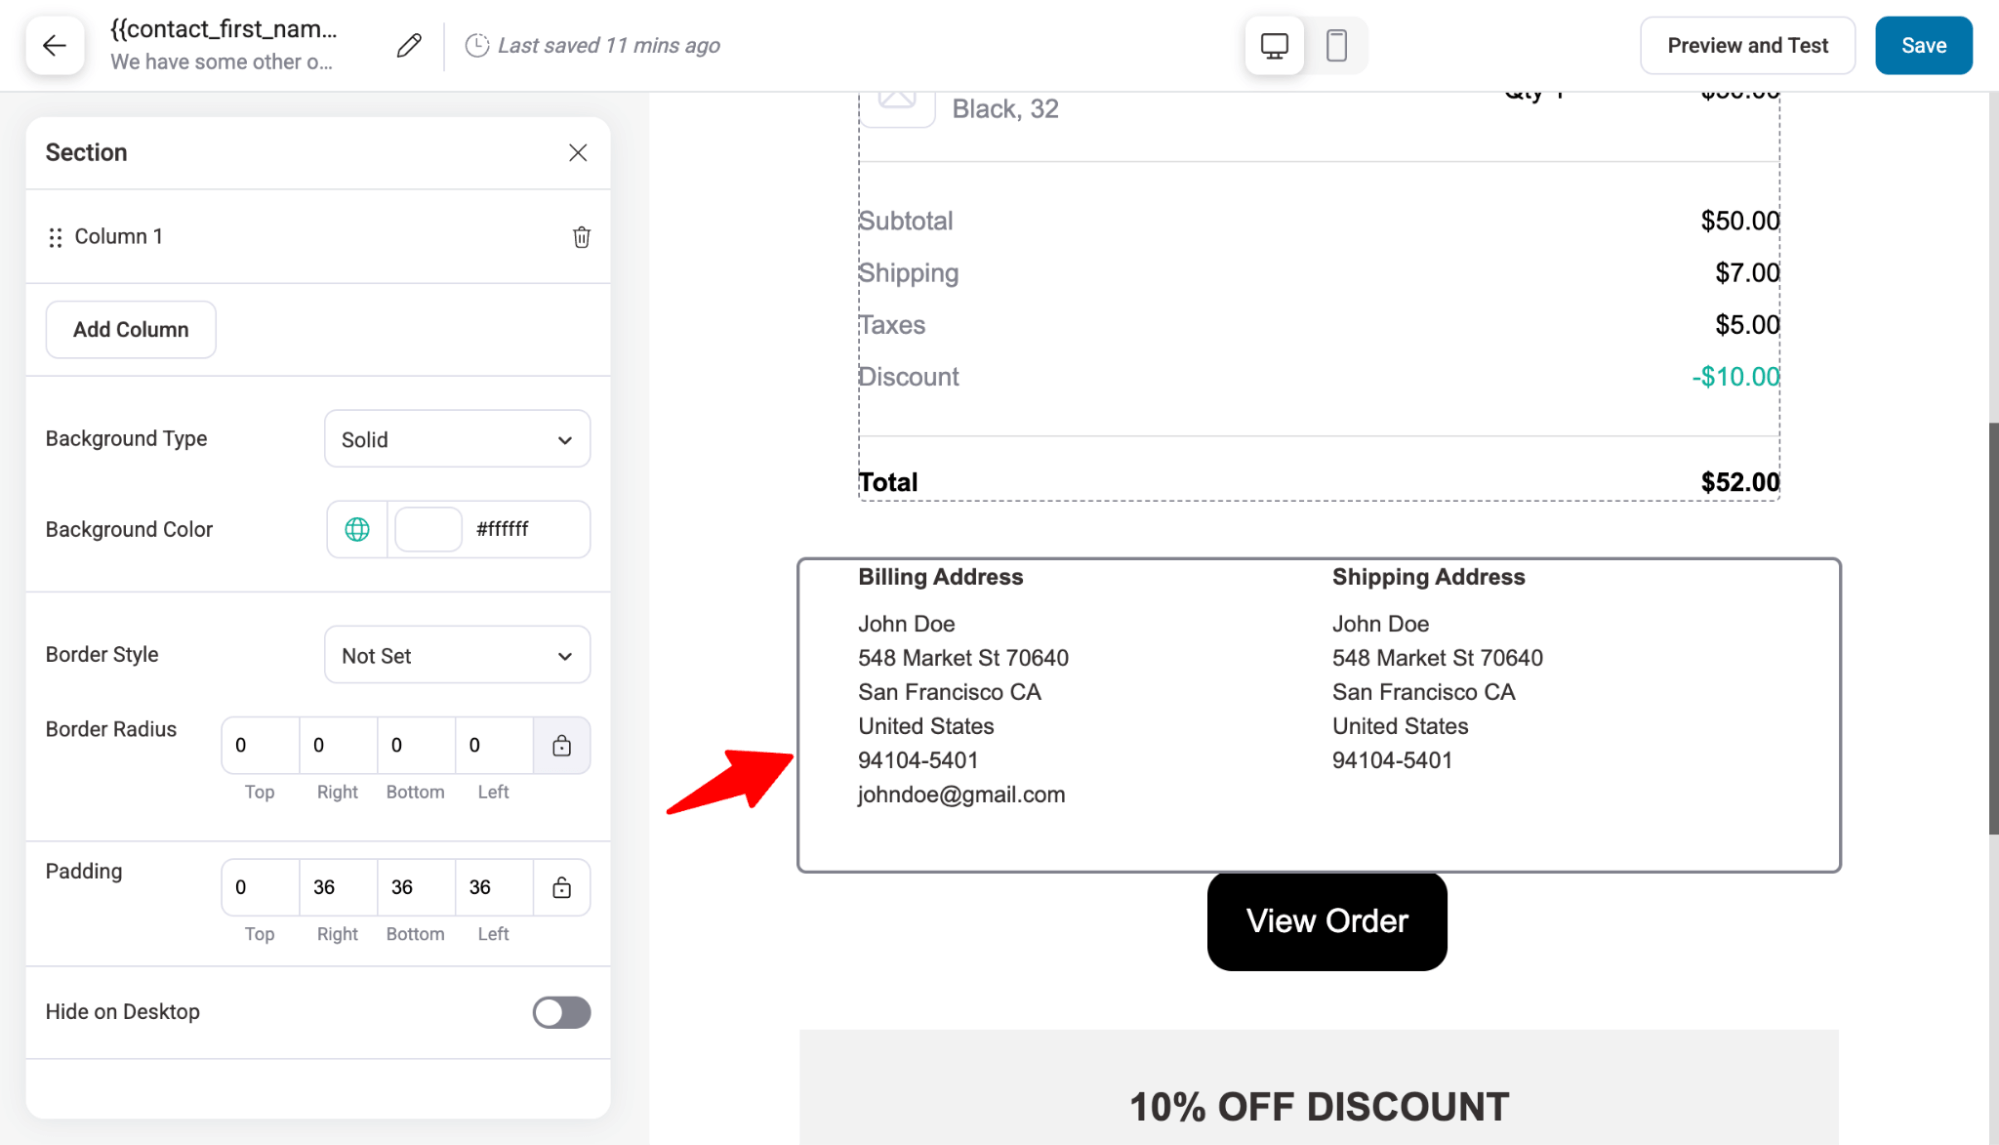
Next, you can change the billing and shipping address section.
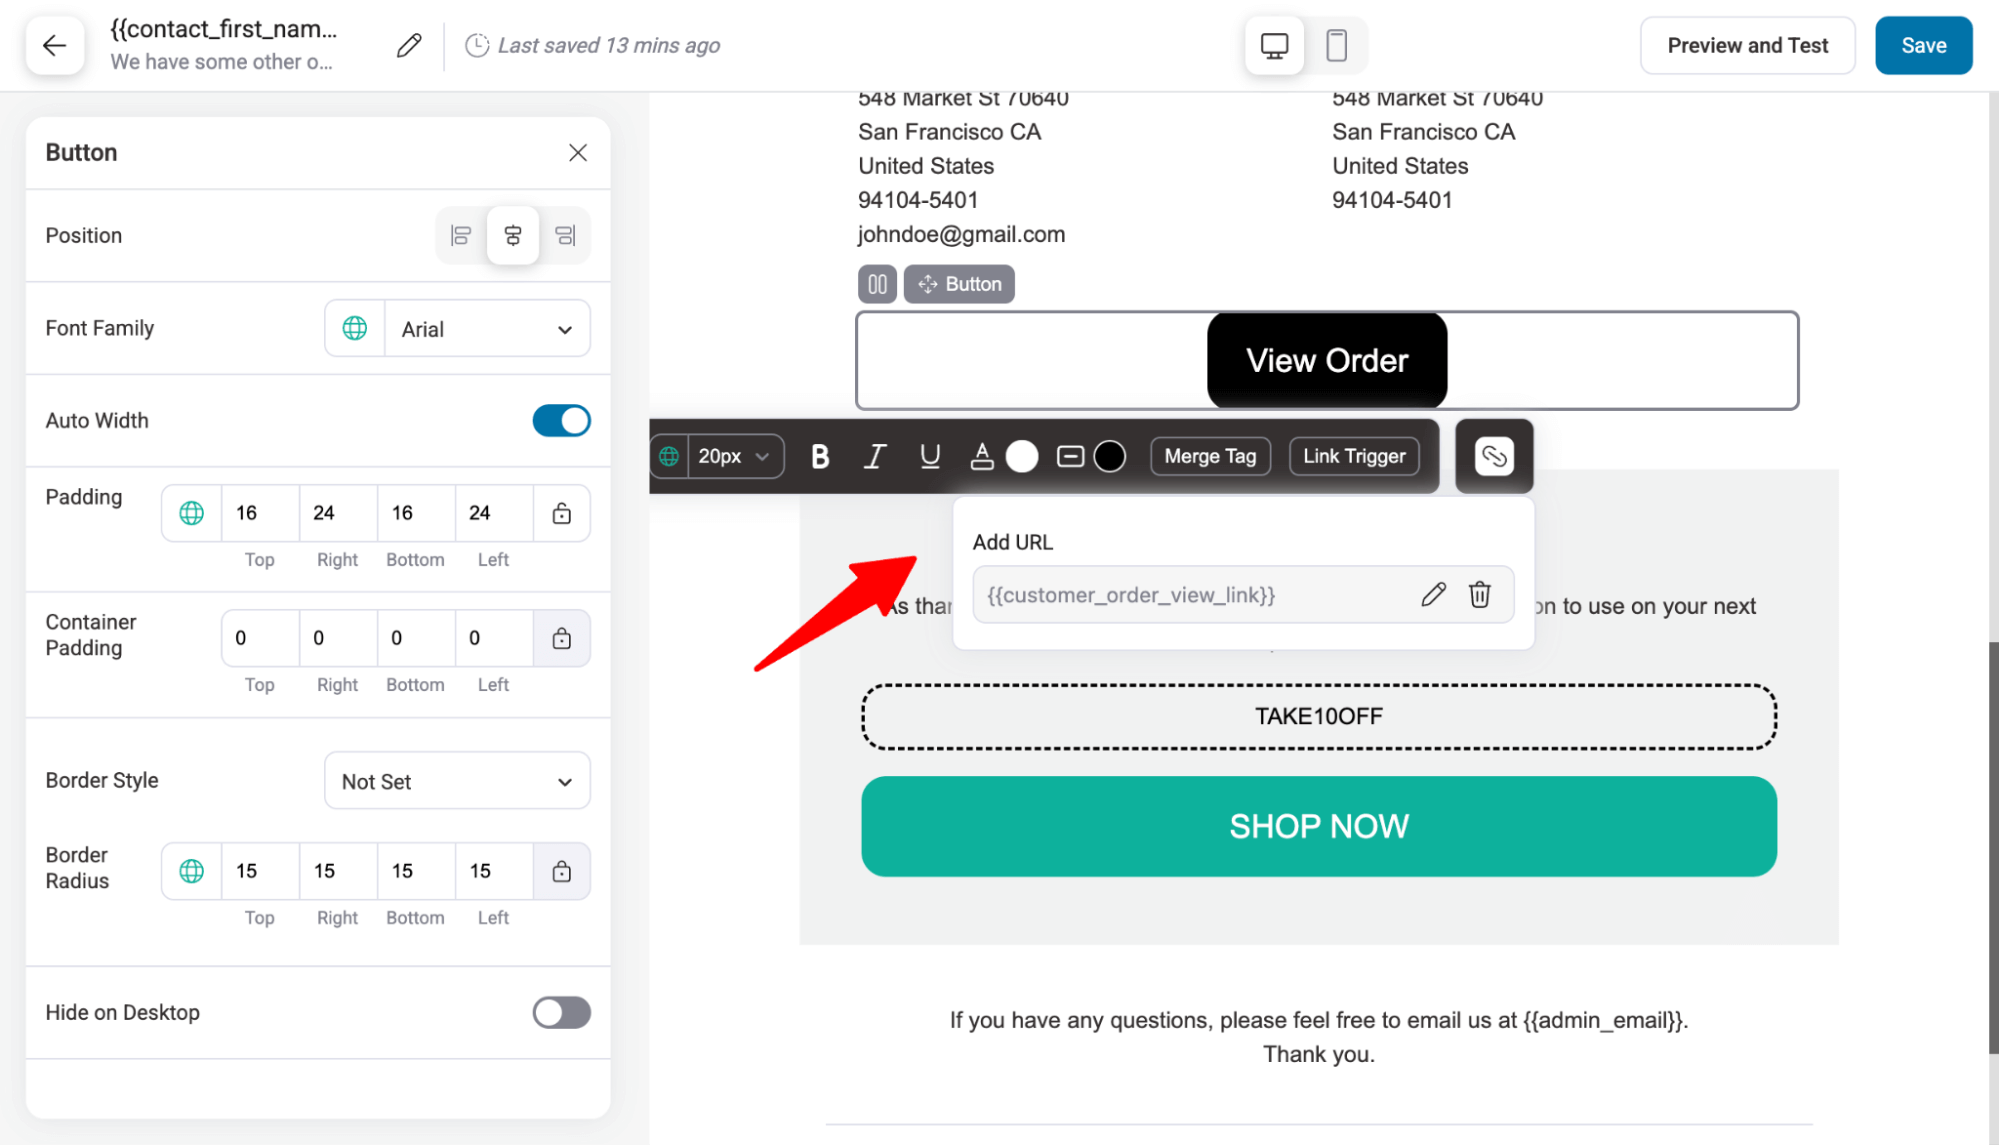
Moving on to the View Order button, which already has a merge tag link, {{customer_order_view_link}}, that takes users to the order details page.
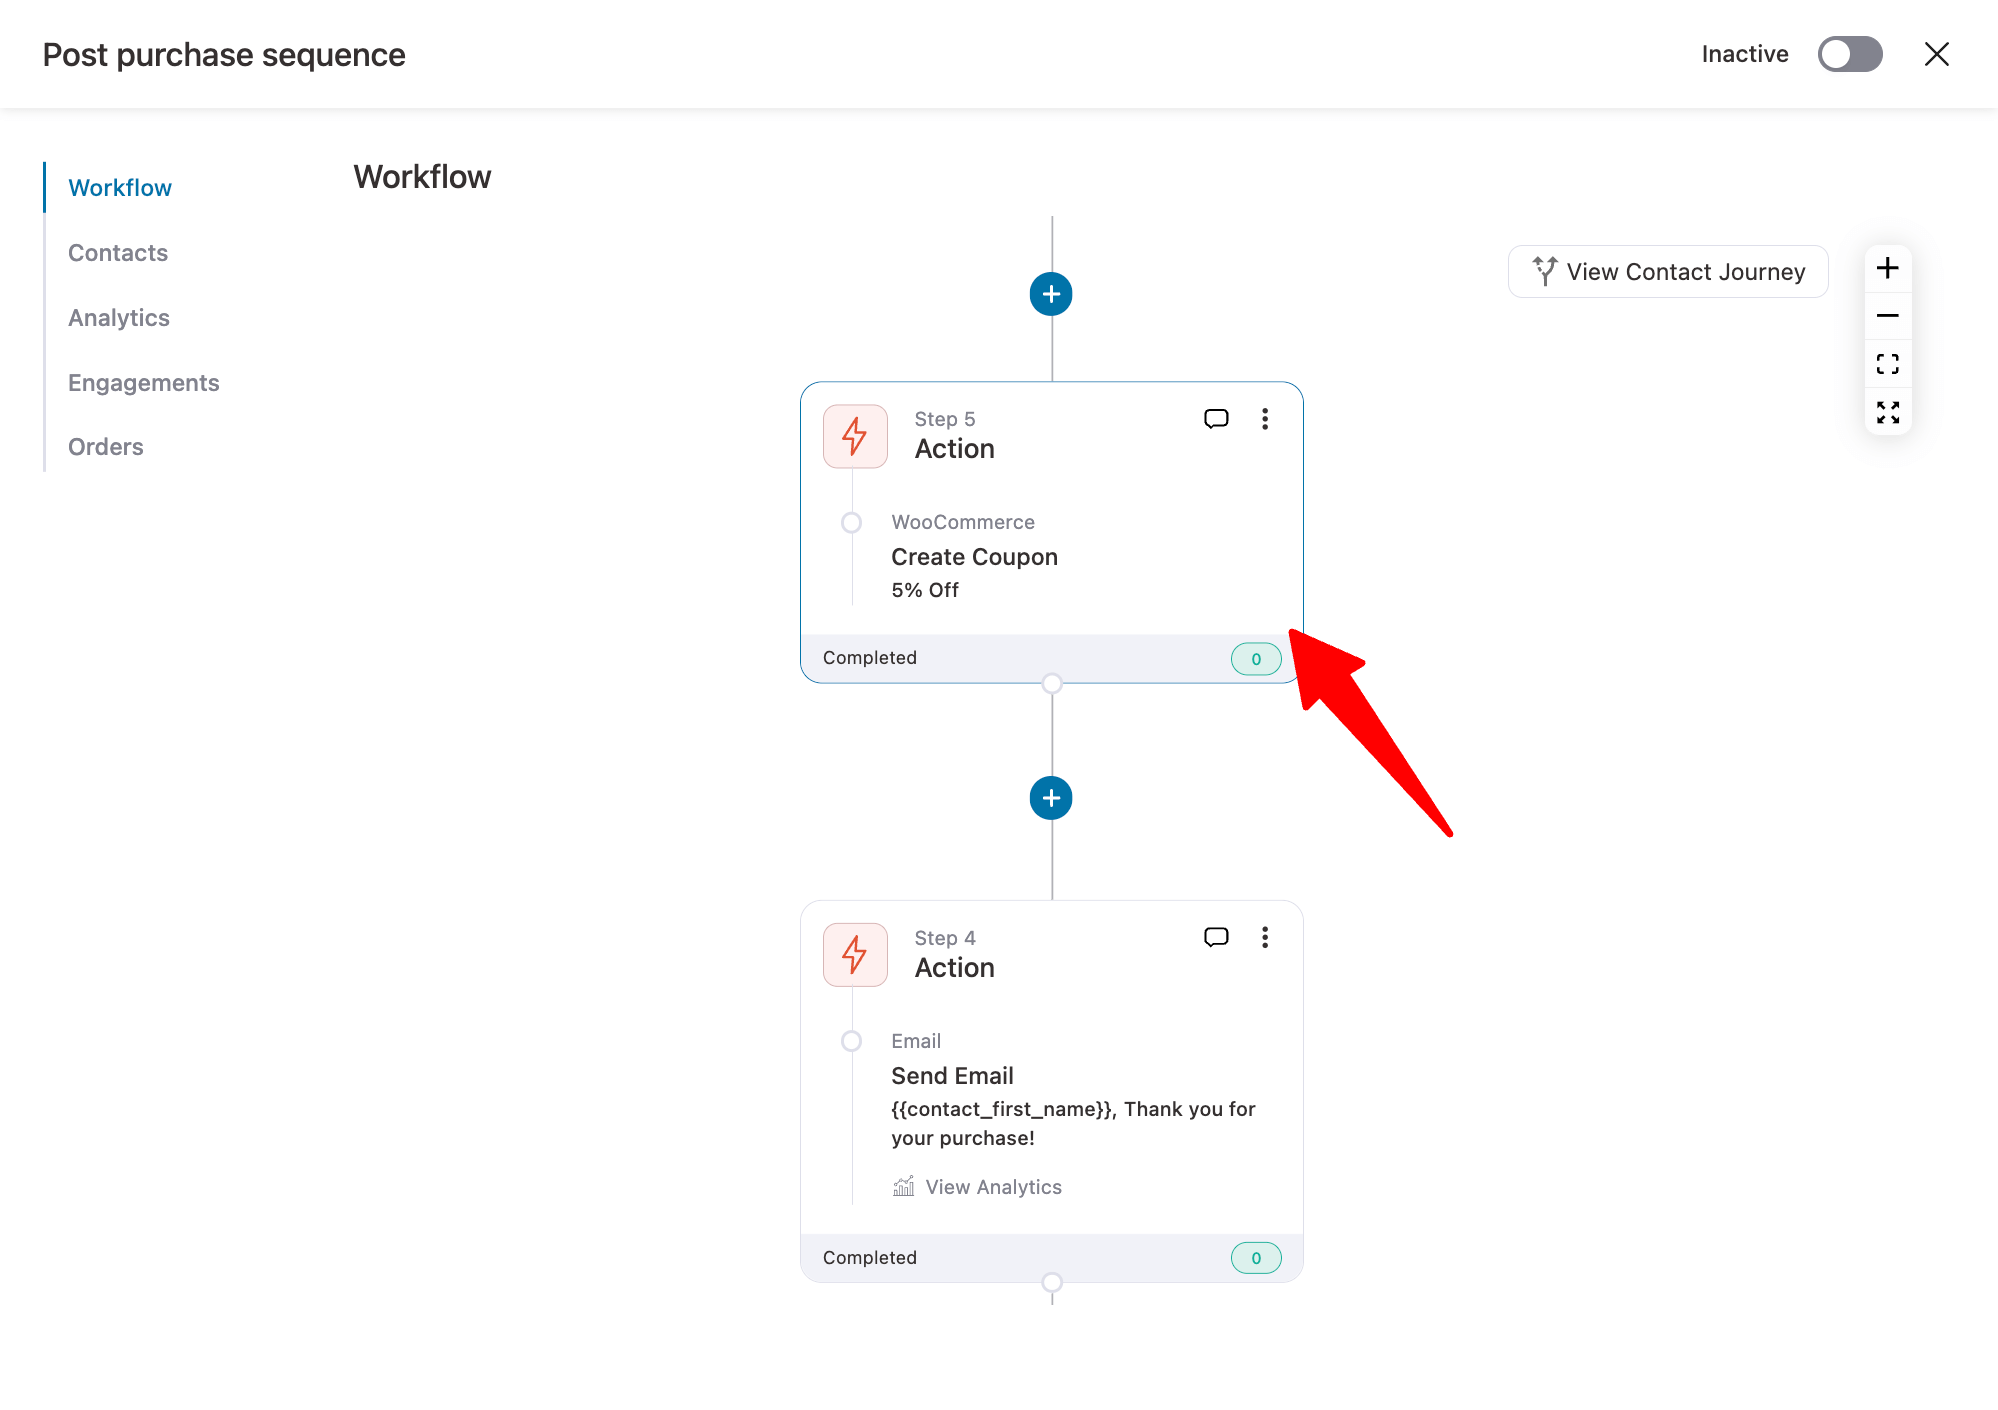
Lastly, we have a coupon section which is to secure the next purchase. You can customize the content and style.
For the coupon code, you can search for and add any existing store coupon code.
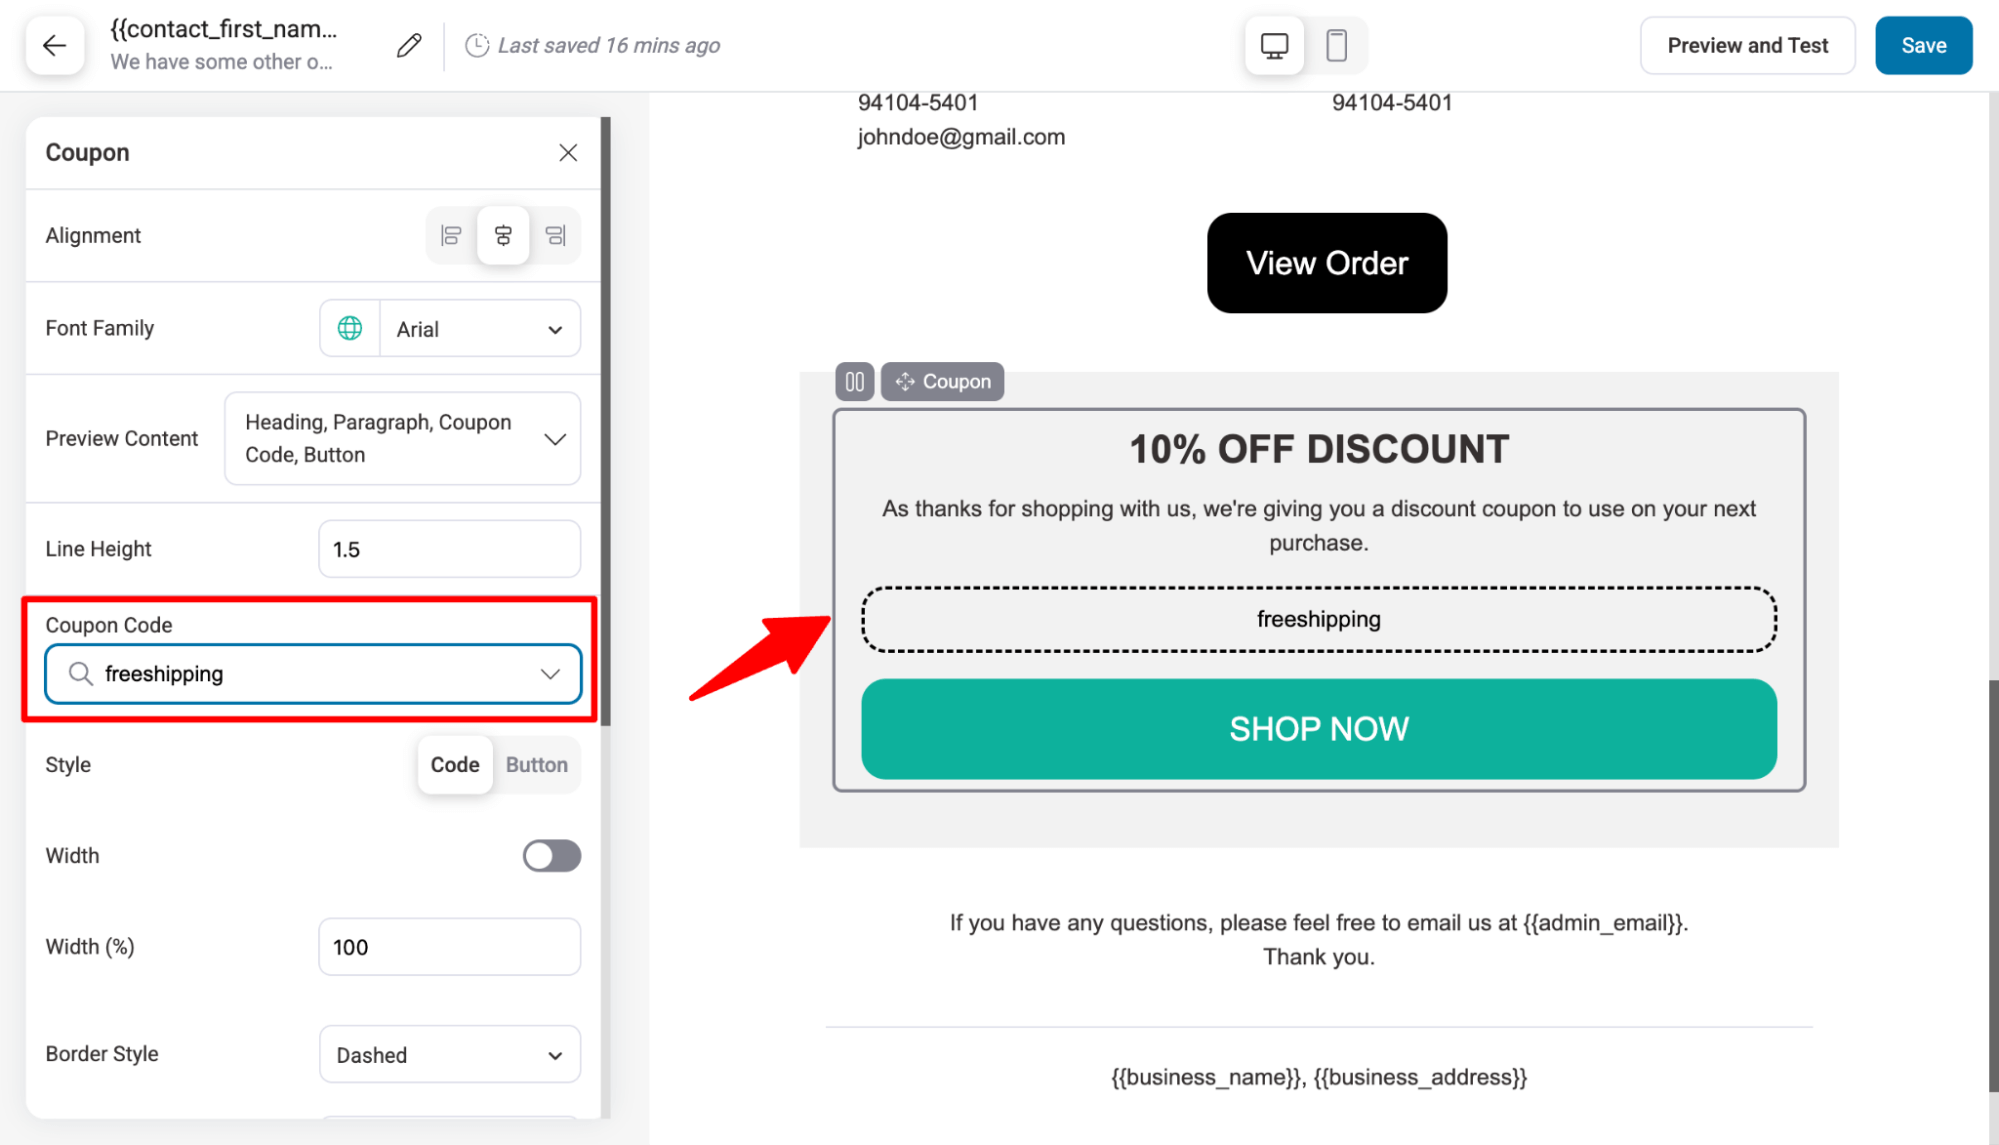
You can remove this section if you want to.
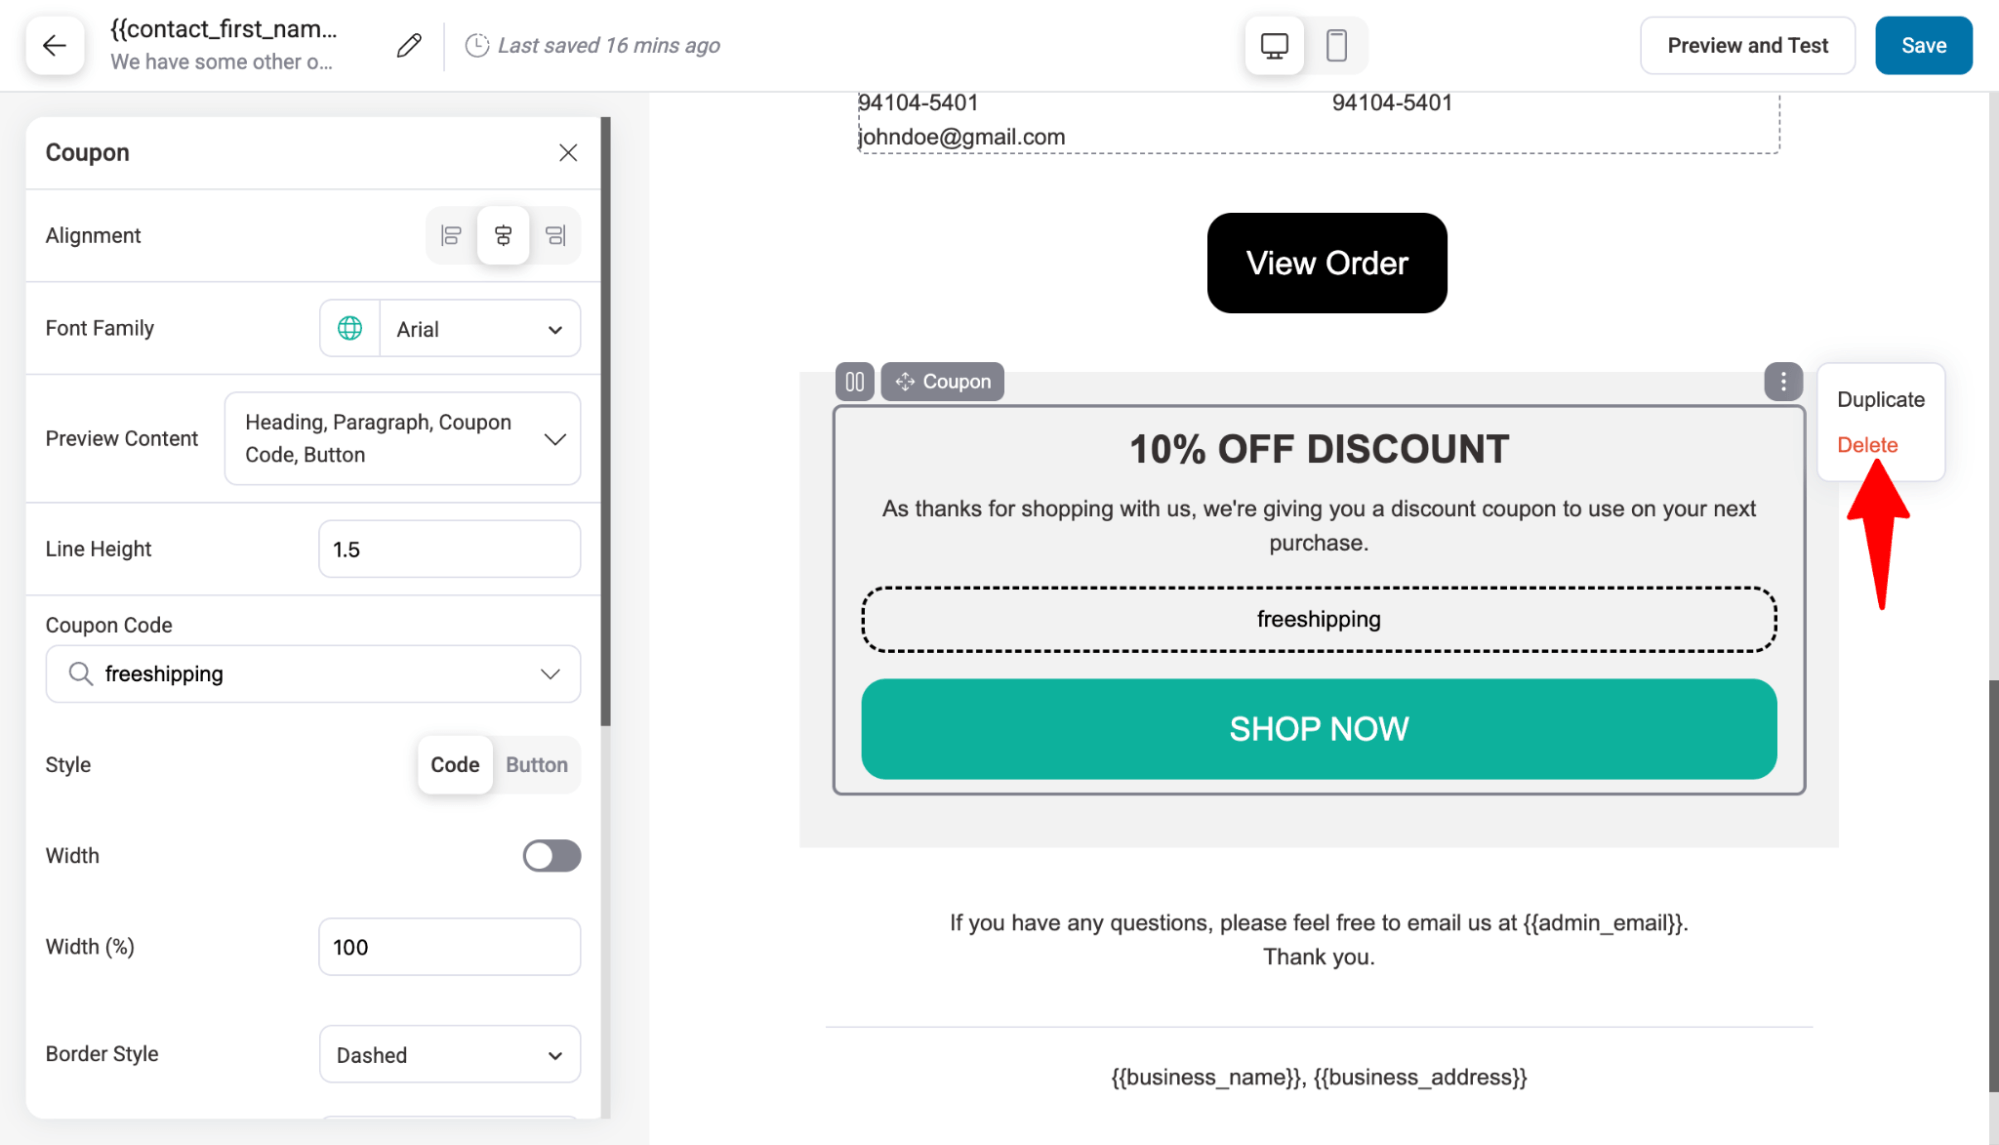
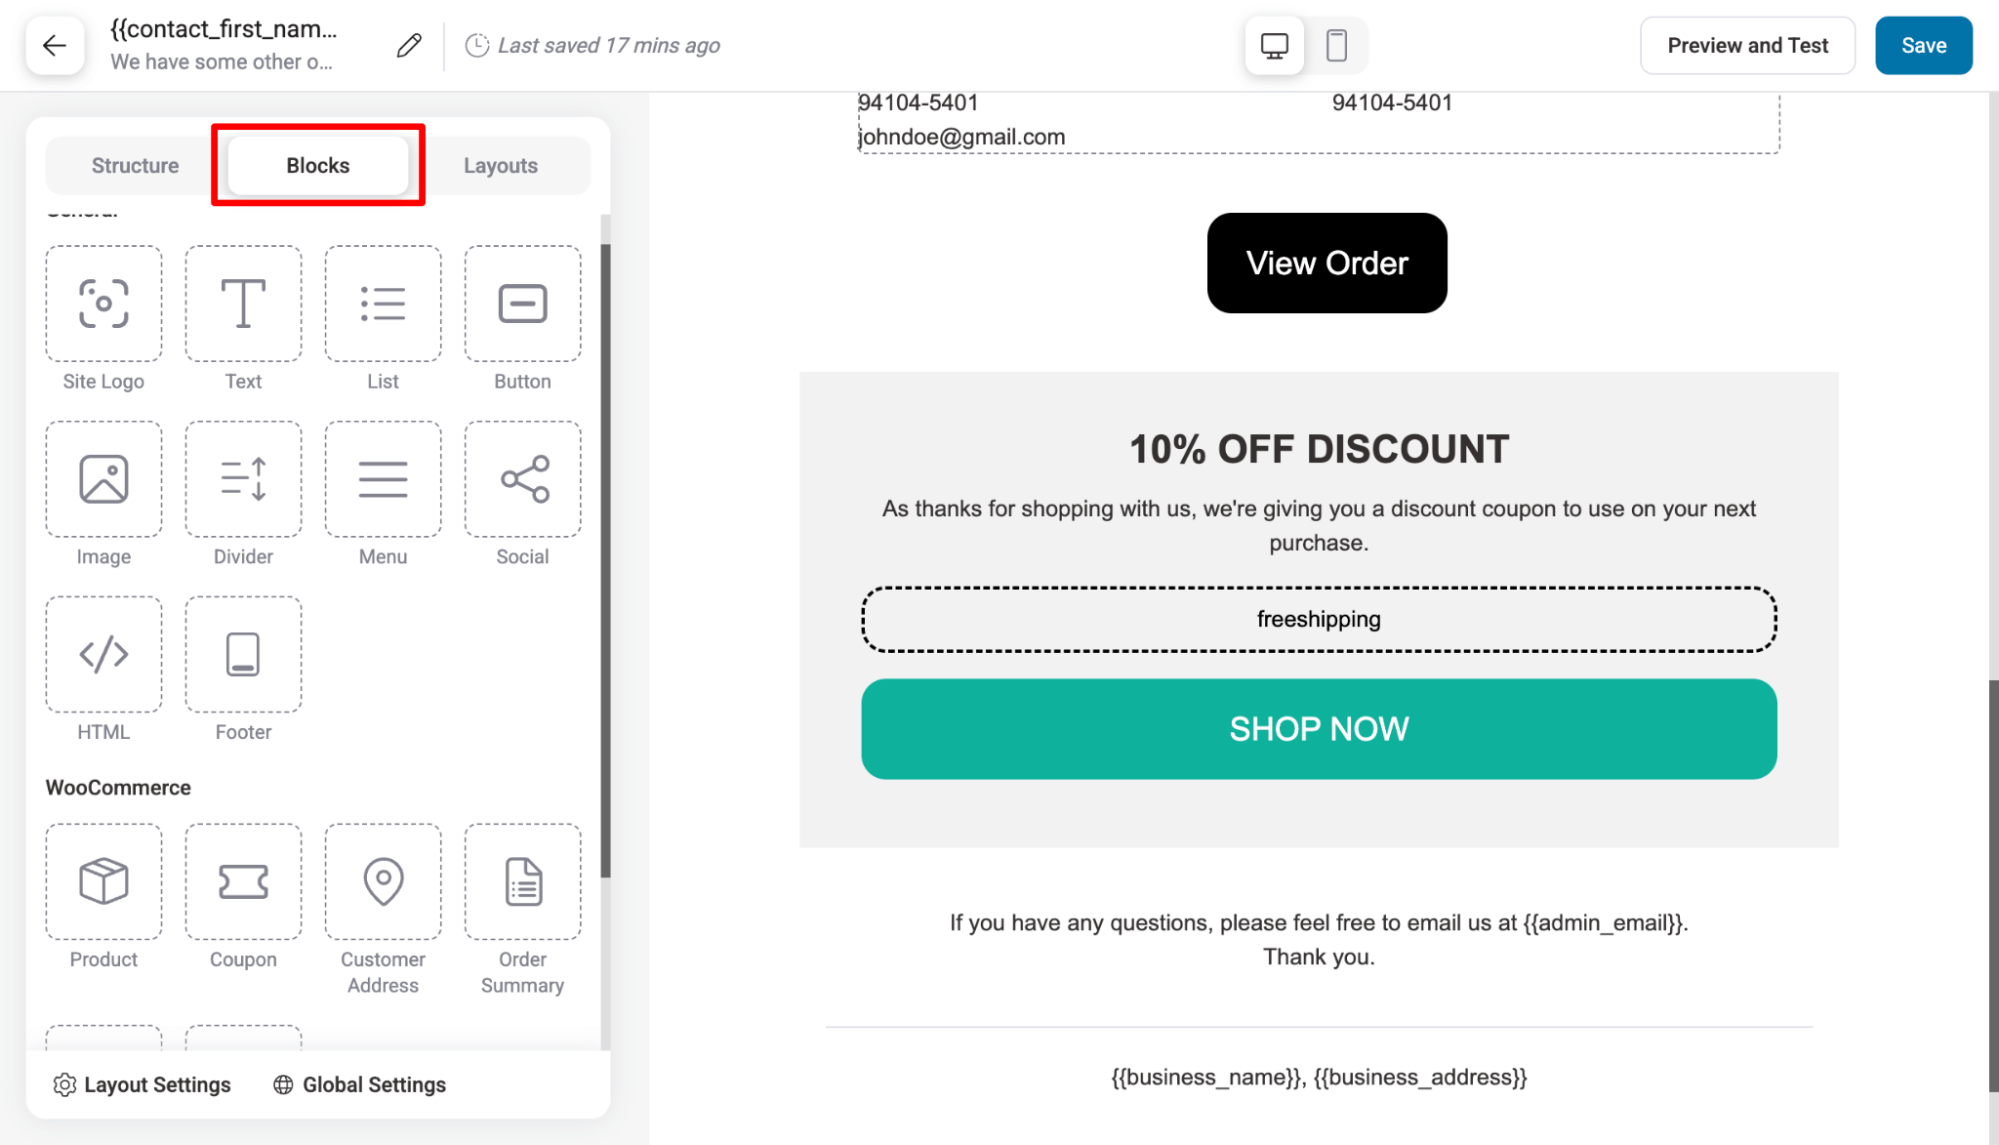
If you want to add additional content to this template, you can do so using Blocks like Text, List, Image, Product, etc.
After making the changes, hit 'Save' to update.
Step 4: Preview and audit
Now, hit Preview and test to see what the final email looks like. You can also check how it looks on the mobile view.
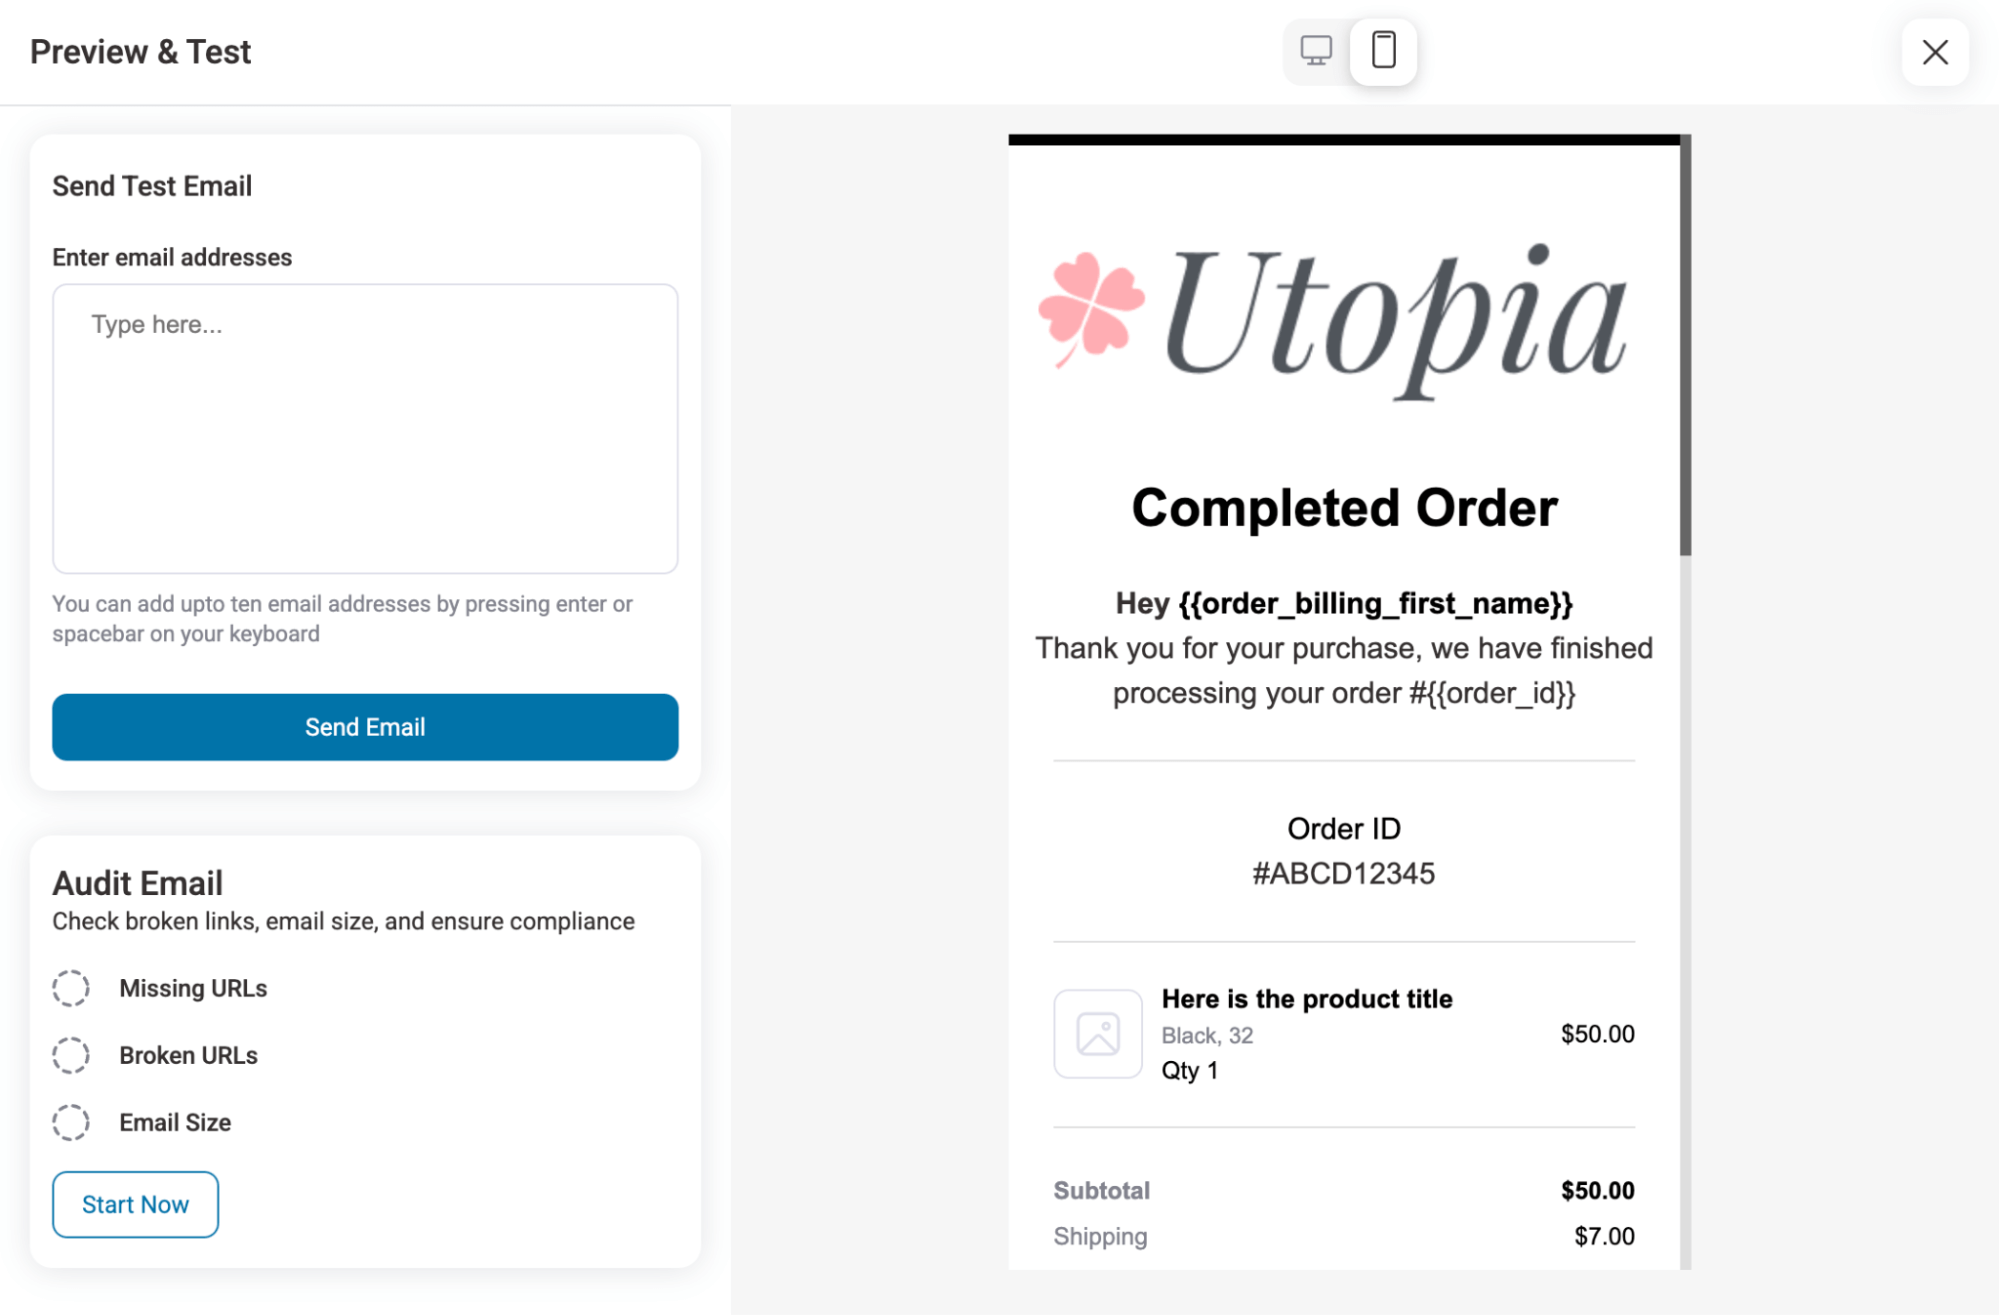
Experts recommend running an audit to ensure your email complies with all rules and is optimized for a good customer experience.
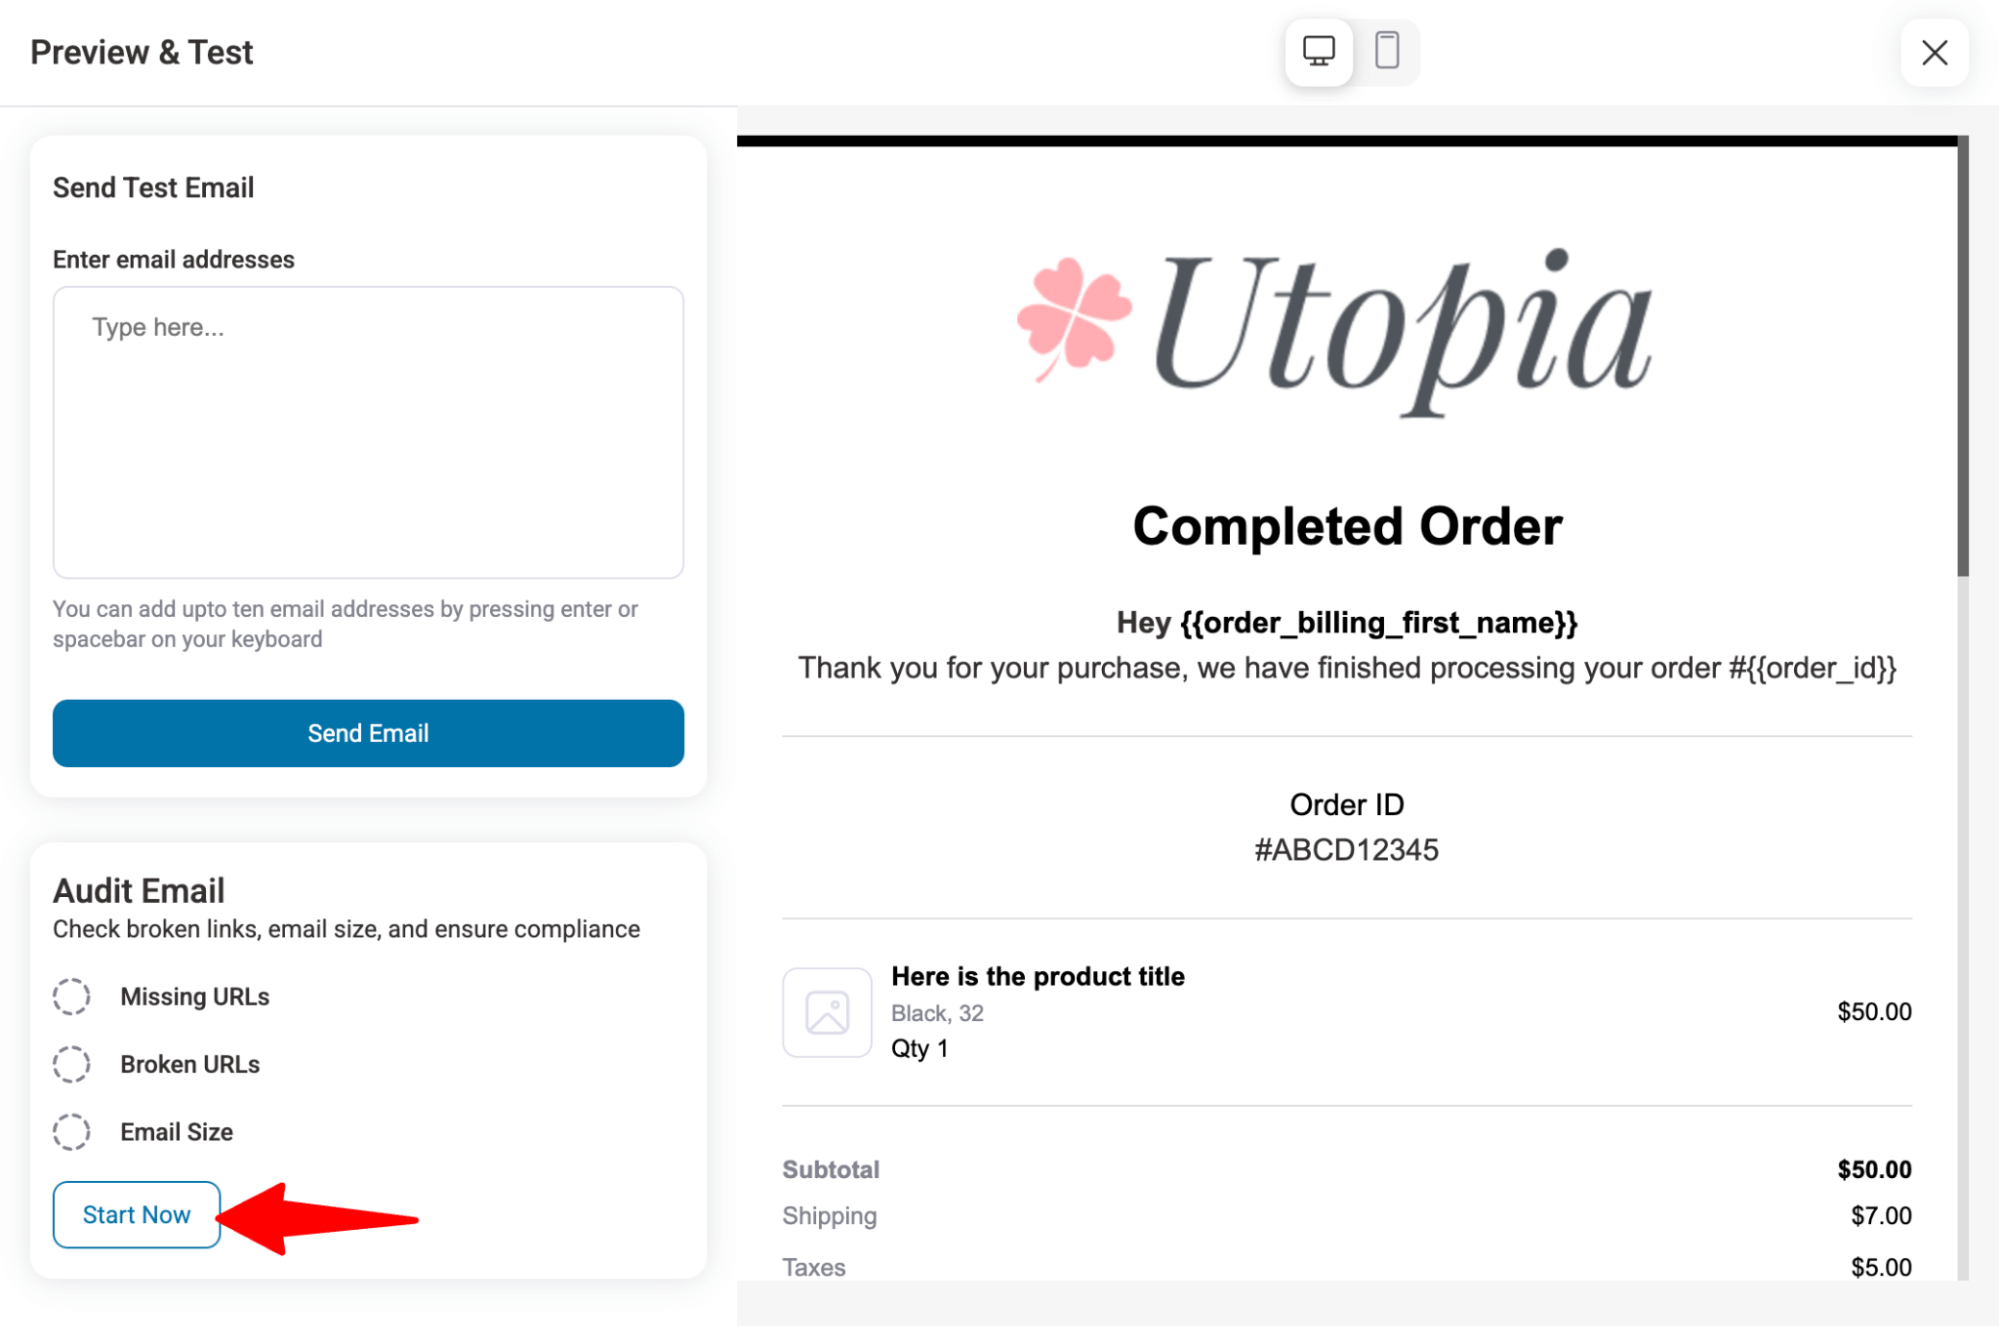
For this, hit the 'Start Now' button under Audit Email.
This will check for broken links and email size, and ensure compliance. If the report shows any issues, fix them.
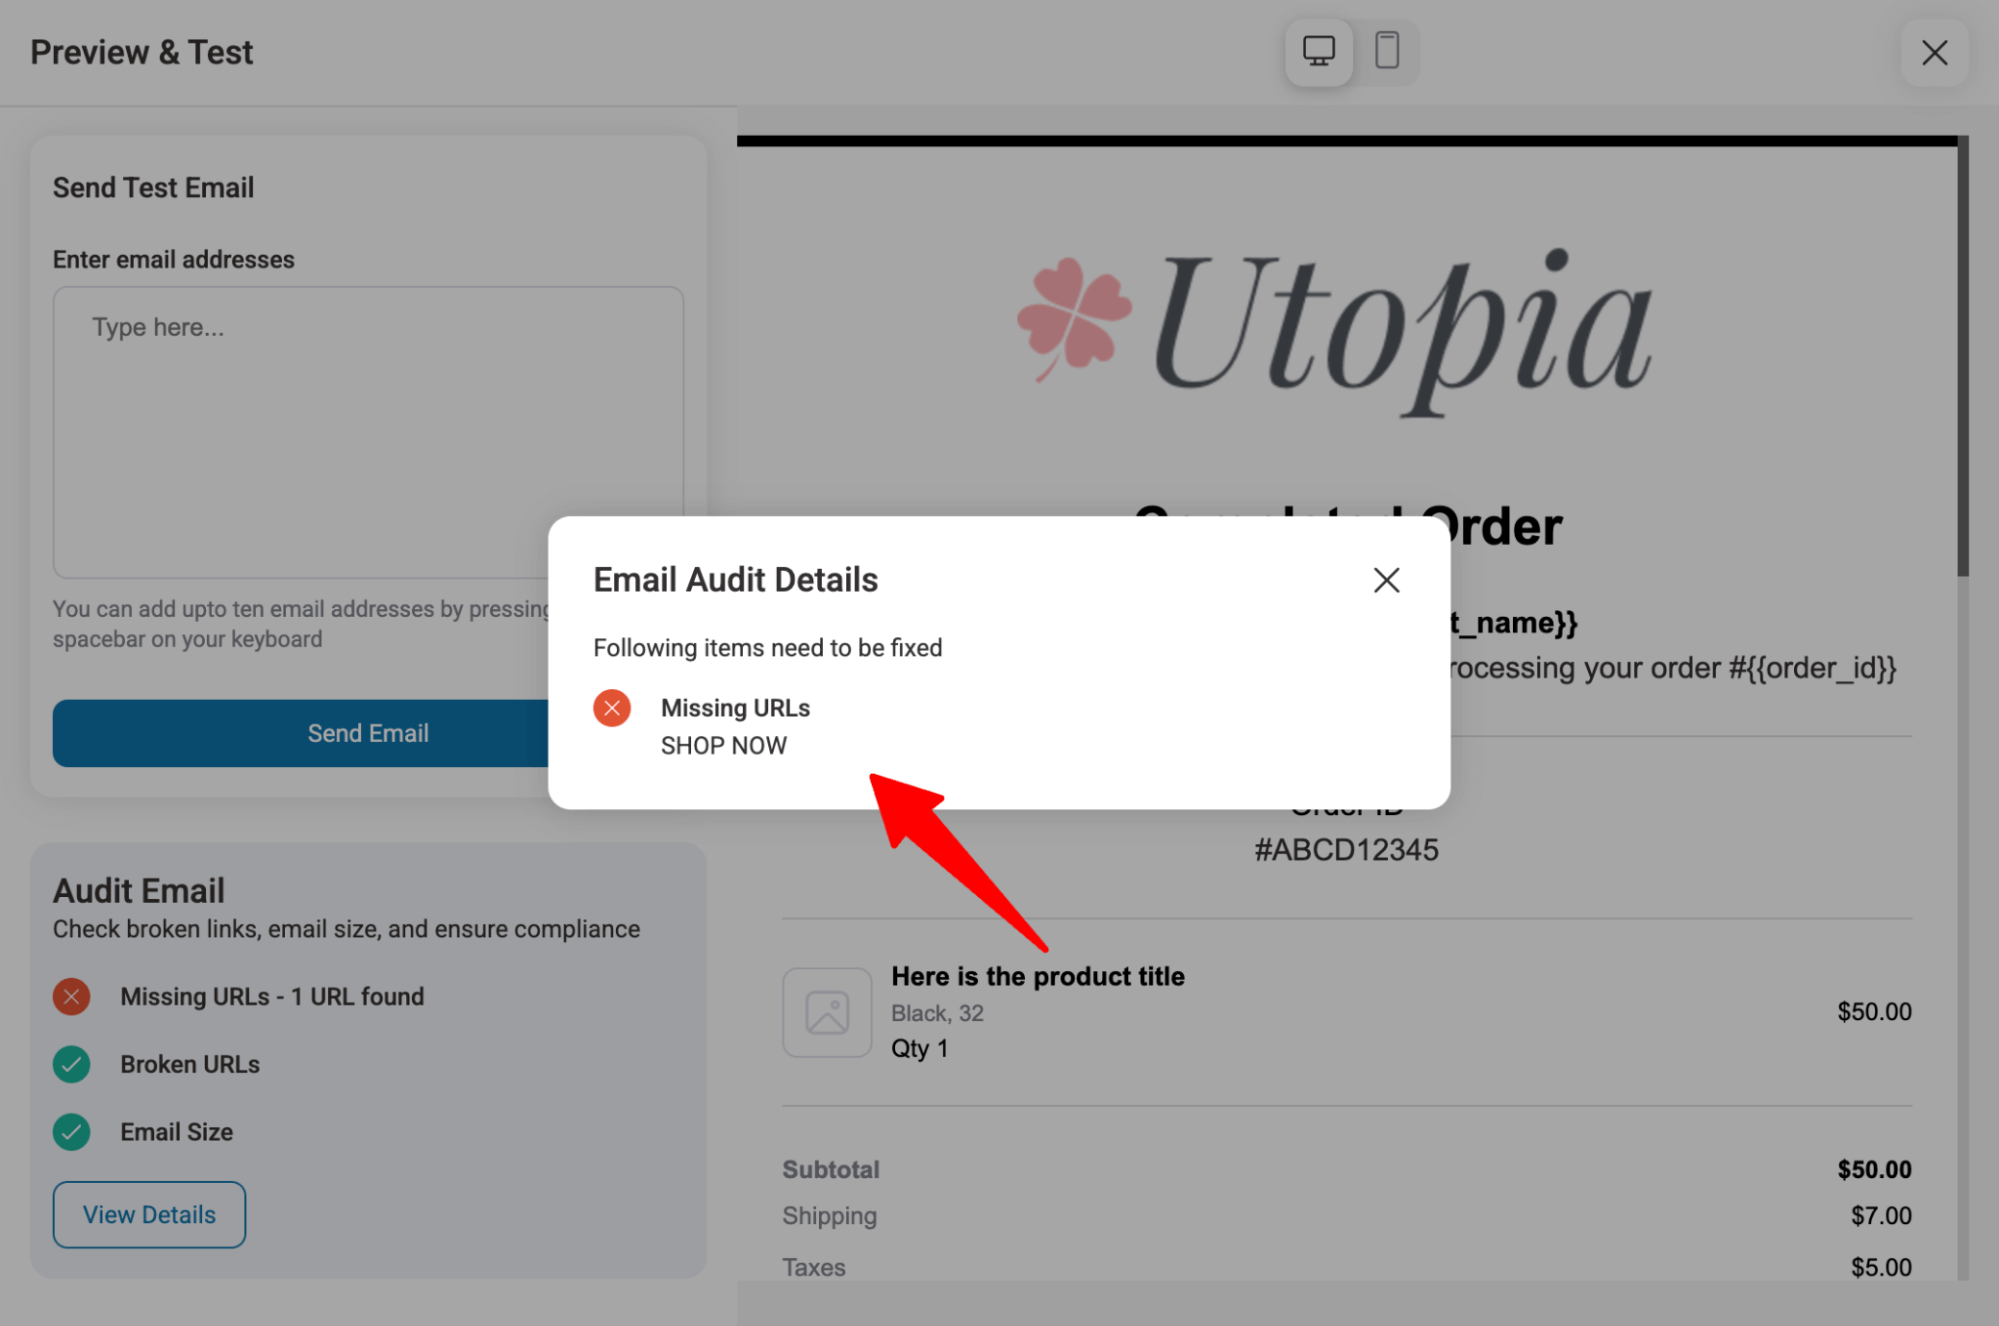
After fixing the issues, you can send a test email to see how it will look in the user’s inbox.
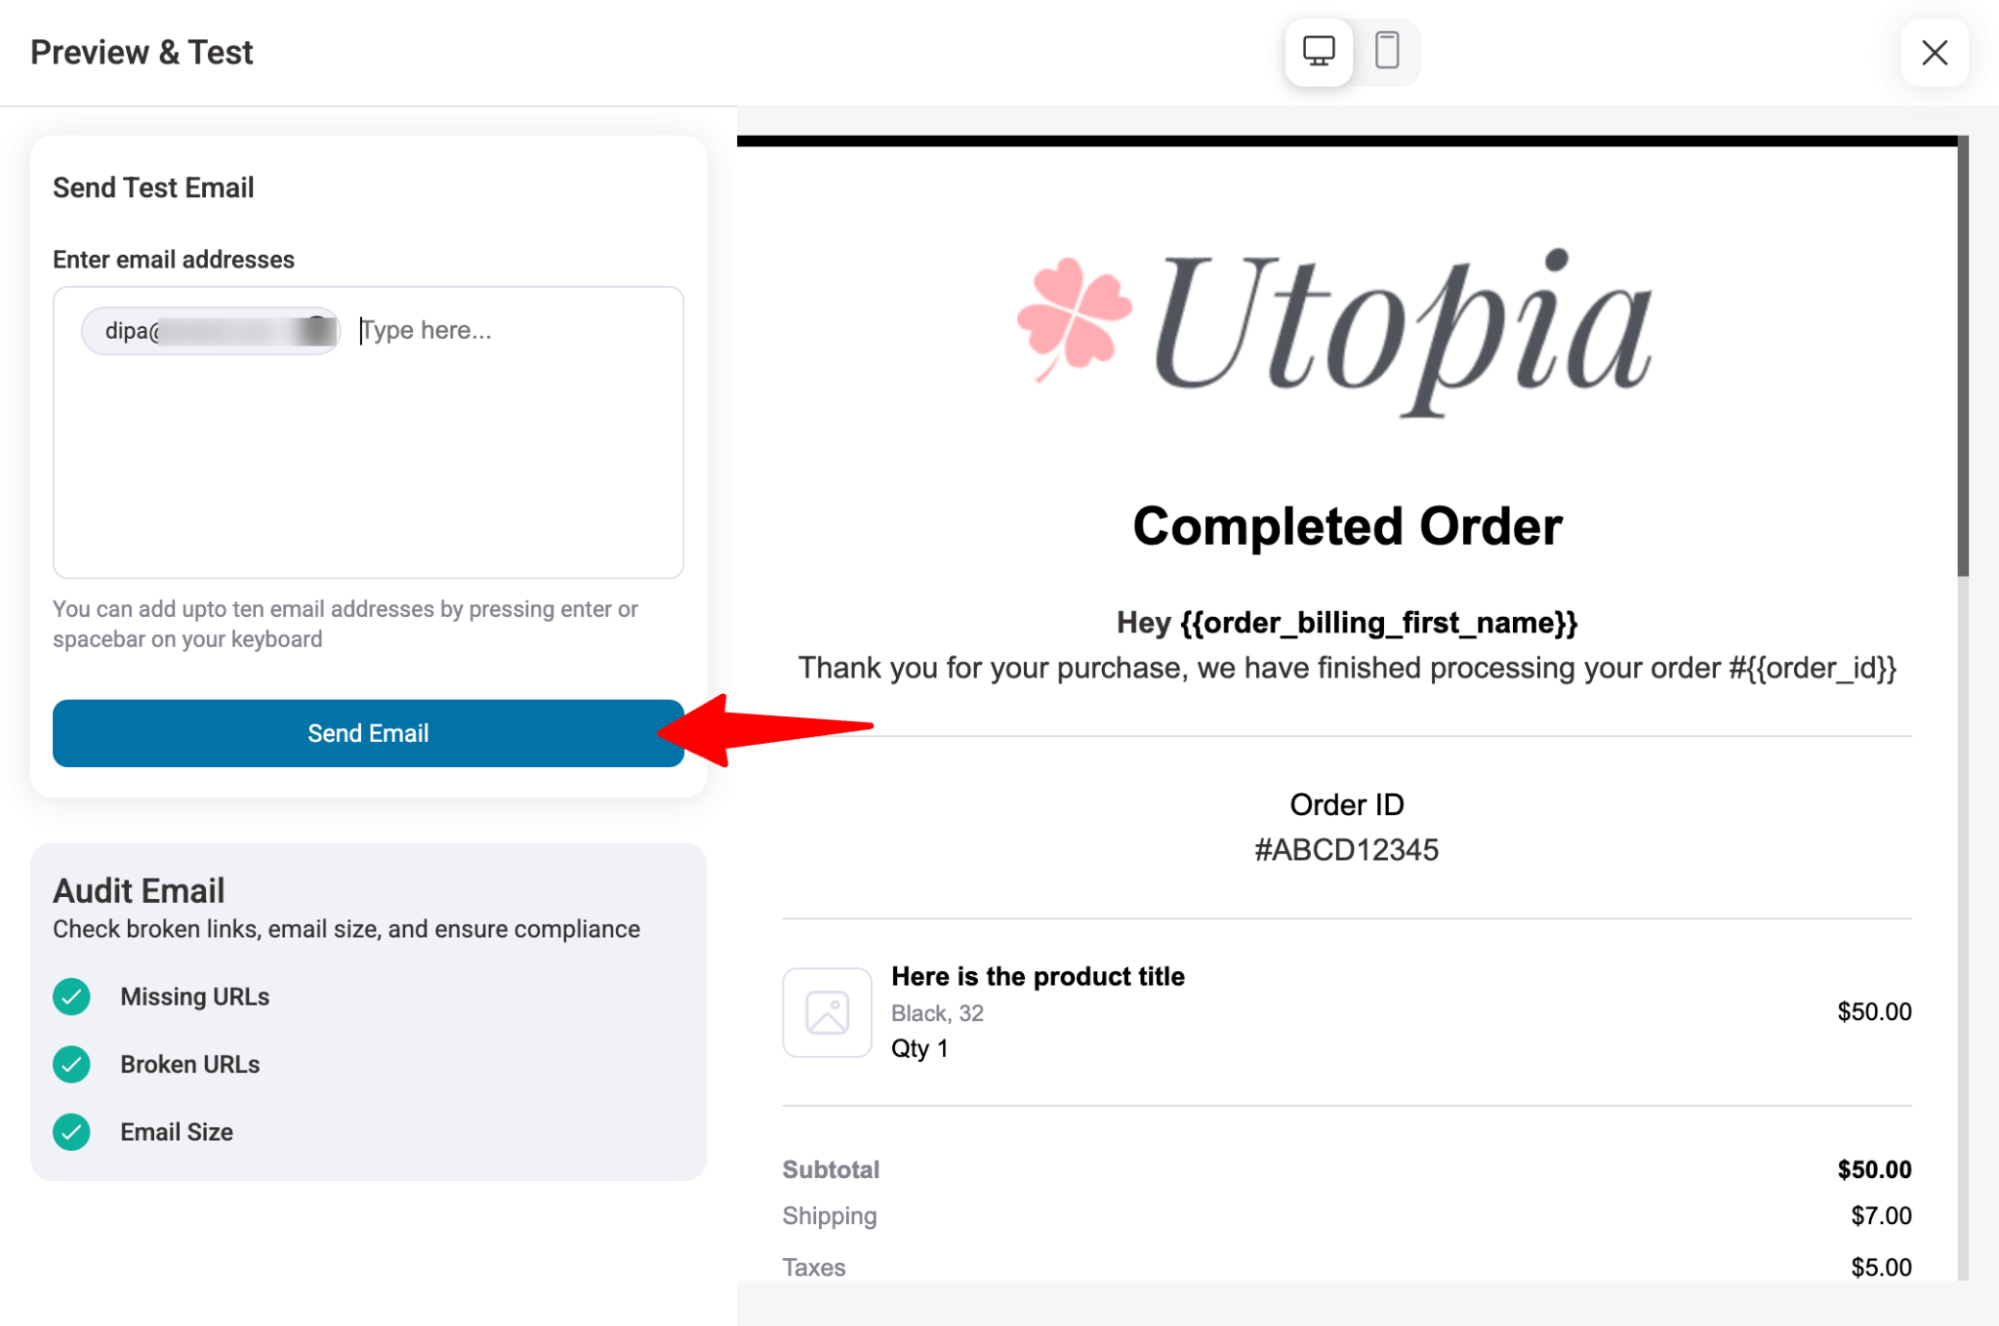
Step 5: Activate your email
Once you are happy, enable this email by turning on the email toggle.
This is how you can customize default transactional emails in WooCommerce.
Method 3: Customize WooCommerce Emails with Code (Template Override and Hooks)
If you're comfortable with PHP, editing the template files and hooks gives you total control. Custom HTML structure, conditional content per email type, and styling, without exposing the visual editor.
Always use a child theme because any edits in the parent theme will get wiped on the next theme update.
Also, test on staging first and keep a backup. WooCommerce updates its templates periodically, so overridden files can fall out of date and need re-syncing.
If you're not confident with PHP, using Method 1 (built-in editor) or Method 2 (a plugin) will get you 90% of the way without the maintenance burden.
WooCommerce 9.8 (April 2025) introduced a block-based email editor that's now switched on by default for new stores.
The code in this section governs WooCommerce's classic email templates, the long-standing rendering path most existing and upgraded stores still run.
If your store uses the new block editor, you'll design those emails visually inside it instead, and template overrides apply only to the classic path.
The content hooks below (woocommerce_email_before_order_table, etc.) still fire in both cases. Not sure which you're on? Check WooCommerce → Settings → Emails, a live block-style preview panel means you're on the new editor.
Where WooCommerce email templates live
The default email templates ship inside the plugin:
wp-content/plugins/woocommerce/templates/emails/The files you'll care about most:
- email-header.php / email-footer.php: The wrapper around every email
- email-styles.php: The inline CSS for all emails
- customer-completed-order.php: The "order shipped/completed" email
- customer-processing-order.php: The "we got your order" email
- customer-invoice.php: The invoice / order-details email
- admin-new-order.php: The new-order notification you receive
- customer-on-hold-order.php, customer-refunded-order.php, customer-note.php, and the rest, named to match each order status
Never edit these files in place. Your changes will be lost with the next WooCommerce update.
Step 1: Override email templates in your child theme
The safe way to edit a template is to copy it into your child theme, where updates can't overwrite it. WooCommerce mirrors the plugin's folder structure, except for the /templates/ part.
- Easy way (recommended)
Go to WooCommerce → Settings → Emails, click Manage on the email you want, and use the "Copy file to theme" button.
WooCommerce drops the file into the correct child-theme path for you, so you don't risk a typo in the folder name (the #1 reason overrides silently fail).
- Manual way
Copy the file from the plugin into your child theme like this, note how /templates/ is removed:
FROM: wp-content/plugins/woocommerce/templates/emails/customer-completed-order.php
TO: wp-content/themes/your-child-theme/woocommerce/emails/customer-completed-order.php
Now edit the copy in your child theme. The copied file overrides the default, and your changes survive plugin updates.
If your edits aren't showing up, 95% of the time, the folder path is wrong. It must be exactly your-child-theme/woocommerce/emails/.
Step 2: Restyle every email with email-styles.php
To change colors, fonts, spacing, or button styles across all your emails at once, override the stylesheet.
Copy email-styles.php into your-child-theme/woocommerce/emails/, then edit the CSS.
For example, to restyle the main button and content background:
.button {
    background-color: #131144 !important;
    border-radius: 8px !important;
}
#body_content {
    background-color: #f7f7f7;
}
Prefer not to maintain a whole template file? Inject the same CSS with a filter in your child theme's functions.php instead:
add_filter( 'woocommerce_email_styles', 'custom_woo_email_styles', 10, 2 );
function custom_woo_email_styles( $css, $email = null ) {
    $css .= '
        .button { background-color: #131144 !important; border-radius: 8px !important; }
        #body_content { background-color: #f7f7f7; }
    ';
    return $css;
}
Step 3: Add content with hooks (no template editing required)
The cleanest approach is to inject content at predefined spots without copying or maintaining template files, so there's nothing to re-sync when WooCommerce updates.
Every snippet goes in your child theme's functions.php.
This example adds a discount code to the completed-order email only:
add_action( 'woocommerce_email_before_order_table', 'add_completed_order_coupon', 20, 4 );
function add_completed_order_coupon( $order, $sent_to_admin, $plain_text, $email ) {
    // Target one specific email by its ID
    if ( $email->id === 'customer_completed_order' ) {
        echo '<p style="margin:0 0 16px;">Thanks for your order! Here\'s 10% off your next one: <strong>THANKS10</strong></p>';
    }
}
The most useful WooCommerce email hooks and where they output:
| Hook | Type | Where it fires |
|---|---|---|
| woocommerce_email_header | Action | Top of every email, under the header/logo |
| woocommerce_email_footer | Action | Bottom of every email |
| woocommerce_email_before_order_table | Action | Above the order summary table |
| woocommerce_email_after_order_table | Action | Below the order summary table |
| woocommerce_email_order_meta | Action | In the order meta block |
| woocommerce_email_customer_details | Action | In the customer/address details block |
| woocommerce_email_footer_text | Filter | Replaces the footer text |
Hooks let you add content; they can't change text that's already in the template. To rewrite existing wording, override the template (Step 1) or, for subject lines and headings, use the filters below.
Step 4: Customize subject lines and headings with filters
WooCommerce exposes a subject and heading filter for every email, keyed to the email's ID (customer_completed_order, customer_processing_order, customer_invoice, new_order, and so on).
To rewrite the completed order subject and heading:
// Custom subject line
add_filter( 'woocommerce_email_subject_customer_completed_order', 'custom_completed_subject', 10, 2 );
function custom_completed_subject( $subject, $order ) {
    return sprintf( 'Your order #%s is on its way 🚚', $order->get_order_number() );
}

// Custom heading
add_filter( 'woocommerce_email_heading_customer_completed_order', 'custom_completed_heading', 10, 2 );
function custom_completed_heading( $heading, $order ) {
    return 'Thanks, ' . $order->get_billing_first_name() . '! Your order shipped';
}
Swap customer_completed_order for any other email ID to target a different message.
For a deeper reference on every available hook and filter, see our full guide on WooCommerce email hooks.
Marketing and Automated Emails Beyond Transactional
Transactional emails are triggered by orders. Marketing/automated emails, such as abandoned cart recovery, post-purchase follow-ups, win-back, review requests, and broadcasts, are a separate layer that drives repeat revenue.
The native editor and pure styling plugins don't send these; you need an automation tool.
This is the job FunnelKit Automations does alongside transactional design, without per-subscriber pricing.
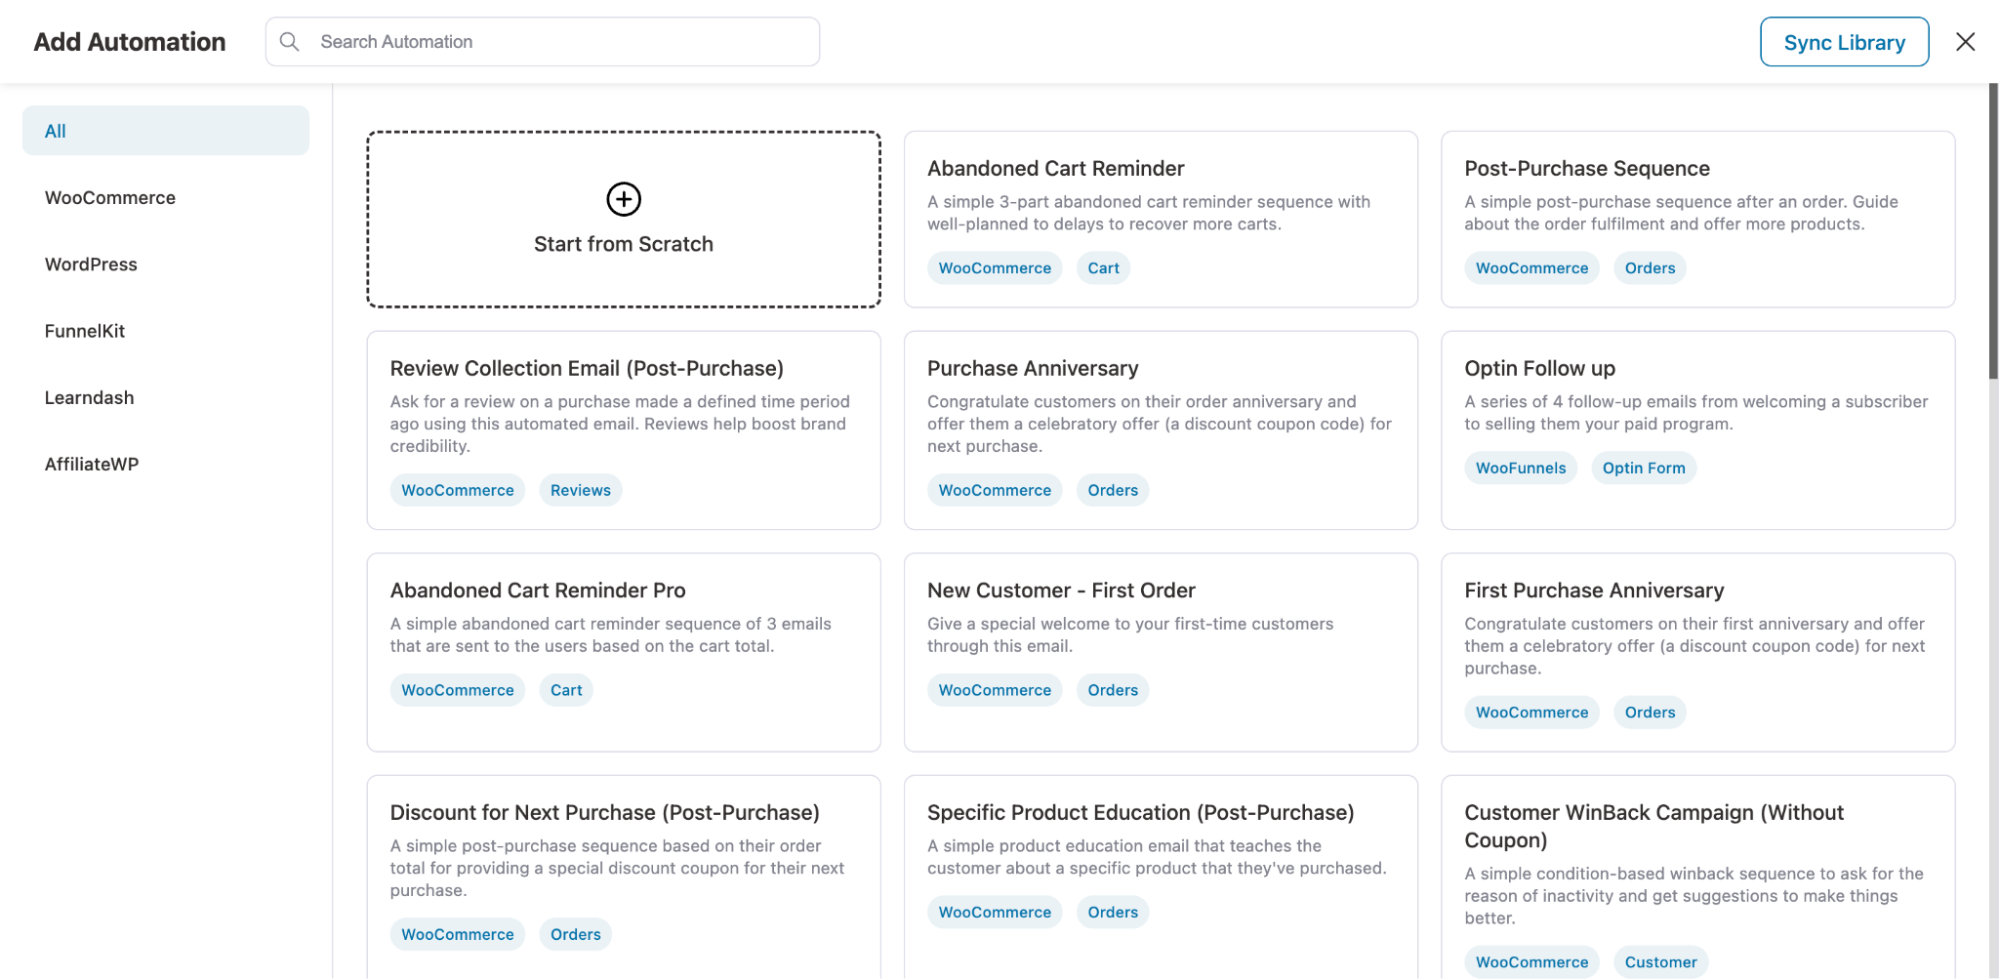
To do this, just create an automation from scratch or import a pre-designed recipe with one click.
To customize the email, you need to edit the send email action
Next, you can customize the subject line and preview text. Then, choose the type of template you want to use.
Import your pre-designed email template.

Customize your email with drag-and-drop content blocks.
In your marketing emails, you can also add dynamic coupon codes. For this, add a coupon action to generate a dynamic coupon.
As you will share the coupon code via email, add the create coupon action before sending the email.
Once done, activate the automation to send custom WooCommerce marketing emails.
That’s how you can customize WooCommerce emails for different purposes and send them automatically to grow your business.
To learn how to set up different marketing email automation campaigns to send customized emails, check our blogs on
- Customize abandoned cart recovery email
- Customize winback emails
- Customize customer review collection email
- Customize welcome email
- Customize subscription reminder emails
Deliverability Tip: Make Sure Your Customized Emails Reach the Inbox
Sending WooCommerce emails directly from WordPress can lead to deliverability issues because it relies on the PHP mail() function, which many web hosts must configure properly.
This can result in WooCommerce emails not reaching recipients or being delivered to spam.
However, using an SMTP service like WP Mail SMTP can solve this problem. It ensures emails reach customers' inboxes and integrates with mailers like Sendinblue, Amazon SES, Microsoft Outlook, Gmail, and FunnelKit Automations.
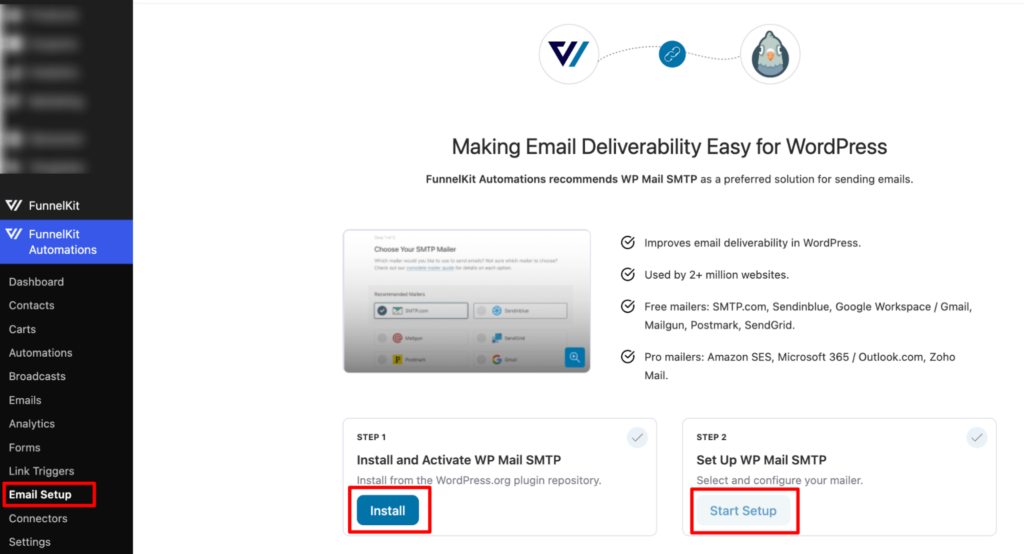
To connect WP Mail SMTP with FunnelKit Automations, navigate to FunnelKit Automation» Email Setu from your WordPress dashboard.
After that, click the ‘Install’ button to install and activate WP Mail SMTP. Once installed, click the ‘Start Setup’ button and follow the instructions to configure the plugin.
For more details, see the guide on fixing the WooCommerce email-not-sending issue.
Frequently Asked Questions
You can customize emails without plugins in two ways. The free, no-code route is the native block email editor (WooCommerce 9.8+) under Settings → Emails, where you can set your logo, colors, and layout. The developer route is overriding the template files in your child theme (Method 3 above).
WordPress's own emails (new user, password reset, comment notifications) are controlled separately. Use the wp_mail filters to change the sender name/address and content type, or an SMTP/email-template plugin that styles all wp_mail output, not just WooCommerce's.
The default emails look bland and lack any personality or brand representation. If you customize WooCommerce emails, you can reap numerous advantages and enhance your overall user experience:
- Brand consistency: Personalized emails allow you to integrate your business logo, specific colors, preferred fonts, etc, in the email template.
- Improved personalized communication: Include customer names, purchase details, and tailored messages that resonate with their preferences. This level of customization creates a more engaging and individualized experience for each customer.
- Higher engagement rates: According to SmarterHQ, 72% of consumers prefer personalized messaging and actively engage with it. Personalized emails lead to higher engagement metrics, including higher open and click-through rates than non-personalized emails.
- Promotional opportunities: Customized emails provide the perfect platform to promote new products, special offers, or exclusive deals. This can drive sales and encourage repeat business from your customer base.
- Improved sales with repeat customers: According to Twilio Segment, 60% of consumers are more likely to become repeat buyers after a personalized shopping experience with a retailer. Moreover, according to Campaign Monitor, implementing personalization strategies can result in a remarkable 760% increase in email revenue. When done properly, email personalization can help you boost sales.
Yes. The native email settings under Settings → Emails let you upload a header image/logo and set base, background, and text colors with a live preview, no code or plugin required.
WooCommerce doesn't offer the option to add custom fields to your WooCommerce email templates by default. However, with the addition of FunnelKit Automations, you can add custom fields to your WooCommerce emails. You can also add dynamic, personalized coupon products directly from your store for product recommendations and more.
For basic branding, Decorator (WebToffee) is a strong, free, no-code choices that use the native WordPress Customizer. For drag-and-drop template building, the free versions of Email Customizer for WooCommerce are a good starting point.
Use the live preview in the native editor or your plugin, then the Send test email option to fire a real message to your own inbox. Always test across Gmail, Outlook, and Apple Mail on both desktop and mobile.
Ready to Customize WooCommerce Emails?
WooCommerce emails are not only essential for customer communication but also an opportunity to establish your brand and increase sales.
However, you need the ability to customize WooCommerce emails to achieve optimal results.
With the right plugin, like FunnelKit Automations, you can entirely transform the appearance of WooCommerce emails using simple drag-and-drop technology. Moreover, customization becomes a breeze.
The best part is that your customer communication is no longer confined to default transactional emails.
With FunnelKit Automations, you can bring back people who abandoned their carts, revive inactive customers who haven't shopped in your store for a while, and so much more.
So, get ready to customize WooCommerce emails and elevate your communication to maximize sales.
Editorial Team
July 6, 2026Discover how to collect birthdates and share personalized birthday coupons automatically in WooCommerce. Want loyal customers who keep coming back? WooCommerce birthday coupons let you offer personalized discounts or gifts,...
Editorial Team
June 29, 2026Discover why sending the same email to everyone can hurt engagement and how WooCommerce conditional emails help you deliver personalized messages for better results. Not every customer should get the...
Editorial Team
June 25, 2026There are two things most people get wrong about the WooCommerce order confirmation email. First, they don't realize it's the Processing order email they need to switch on and not...


