


Sending a broadcast email sounds simple until your first campaign ends up in spam.
Think of a store manager picking up the PA mic and saying, "Attention shoppers, everything in aisle four is 20% off for the next hour".
Everyone hears the same message at the same time, and suddenly there's a crowd in aisle four.
A broadcast email works much the same way. You write one message and send it to your entire email list, or to a specific segment, at the same time.
For example, send an early-access offer to 4,000 past customers. If 1.5% buy with an average order value of $85, that single email brings in $5,100.
Writing the email is the easy part. Getting it into inboxes is where things get trickier.
Gmail, Yahoo, and Outlook expect senders to authenticate their emails and make unsubscribing easy.
If you skip these basics, your campaign may struggle to reach the people you sent it to.
In this guide, we'll show you how to send a broadcast email from start to finish, including the checks to run before sending and how to build the whole thing in WordPress with a plugin, without writing any code.
Short on time? Watch the video below:
Table of Contents
- 1 What is a Broadcast Email?
- 2 Before You Hit Send: 4 Checks That Keep You Out of Spam
- 3 How to Send Broadcast Emails From WordPress
- 4 After You Send: What to Watch and What to Change Next Time
- 5 5 Broadcast Campaign Ideas That Work For Online Stores
- 6 Best Broadcast Email Tools Compared
- 7 Frequently Asked Questions (FAQs)
- 8 Ready to Send Your First Broadcast From WordPress?
What is a Broadcast Email?
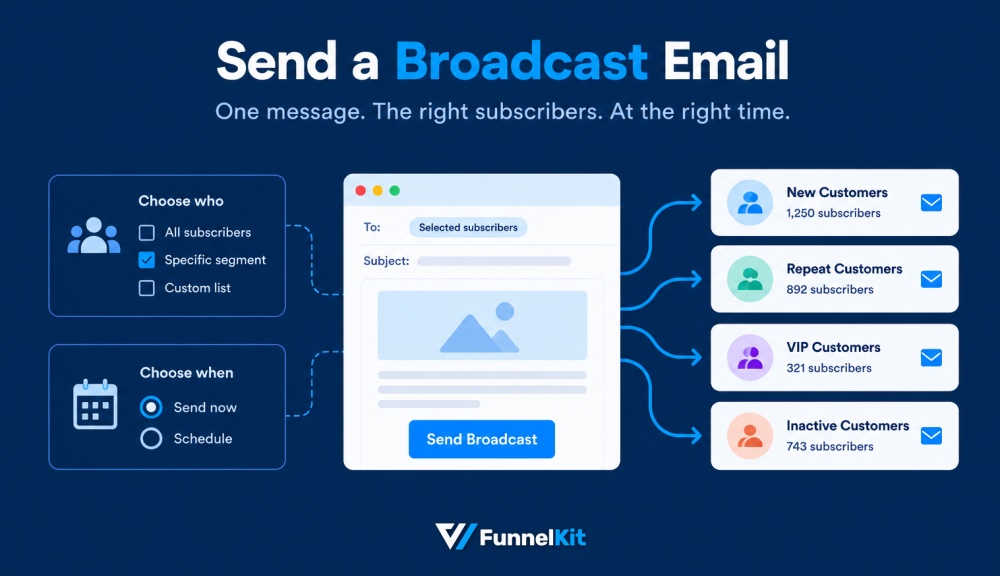
A broadcast email is one message sent to a group of subscribers at the same time. You choose who gets it and when it goes out.
An automated email works differently. It sends itself when a subscriber does something, such as leaving items in their cart.
You’ll also see broadcasts called mass emails, bulk emails, or email blasts. An email blast usually means the message went to your entire list without any segmentation.
Broadcasts also account for a large share of ecommerce email revenue.
According to Omnisend's 2026 eCommerce report, automated emails made up just 2% of sends but generated 30% of email revenue.
In other words, automations earn more per email, while scheduled campaigns such as broadcasts bring in more revenue overall.
Here's how a broadcast compares with the other types of emails your store might send:
| Email type | What triggers it | Example | Marketing consent needed? |
|---|---|---|---|
| Broadcast | You, manually or on a schedule | Flash sale announcement | Yes |
| Newsletter | You, on a regular schedule (it’s a type of broadcast) | Monthly store roundup | Yes |
| Automated (drip or autoresponder) | Something the subscriber does, or a date | Welcome series, abandoned cart | Yes, for marketing flows |
| Transactional | A purchase or account event | Order confirmation, password reset | No, as long as it sticks to the service message |
The two types work best as a pair. Announce the sale with a broadcast, then let an automation follow up with anyone who clicked but didn’t buy.
For the automated side, see our guide to automated email campaigns.
Before You Hit Send: 4 Checks That Keep You Out of Spam
Many broadcast email problems happen before you write the email.
Run these four checks before your first send, and repeat them before a major seasonal campaign.
Only email people who opted in
Send promotional emails only to people who agreed to receive them.
Buying an email list, or importing old CRM contacts and treating them as subscribers, is a fast way to damage your sender reputation.
Sometimes you need to contact every customer, such as for a product recall or a company name change. Keep those messages strictly about the notice and leave the promotions out.
Also check the rules that apply where you sell. In the US, for example, the FTC has a CAN-SPAM compliance guide.
Authenticate your domain with SPF, DKIM, and DMARC
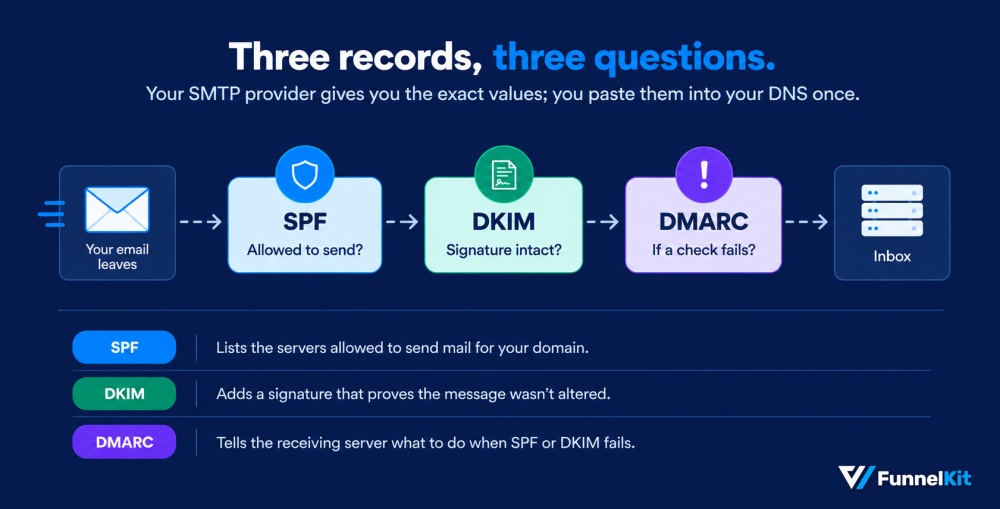
Inbox providers use three DNS records to check whether an email is actually coming from your domain:
- SPF lists the servers that are allowed to send email for your domain.
- DKIM adds a digital signature that helps verify the message.
- DMARC tells the receiving server what to do when an email fails those checks.
If you send at higher volumes, authentication is no longer something you can skip:
- Gmail: If you send 5,000 or more messages a day to Gmail addresses, Google requires email authentication, low spam rates, and an easy way to unsubscribe. Since November 2025, Google has been enforcing these requirements more strictly, including temporary and permanent rejections.
- Outlook: Microsoft uses the same 5,000-messages-a-day threshold and requires SPF, DKIM, and DMARC for high-volume senders. Non-compliant messages can first go to Junk and may eventually be rejected.
Sending fewer than 5,000 a day? Set these records up anyway. Google asks every sender to use at least SPF or DKIM, and most sending services ask you to add all three during setup.

Your email marketing platform or SMTP provider will give you the exact DNS records you need to add.
Note: If you're sending from WordPress, see our guide to setting up SMTP in WordPress.
Clean your list before a big send
Before sending to a large list, remove hard bounces, duplicate contacts, and obvious email address typos.
If you haven't emailed the list in months, run it through an email verification service first. Old lists can contain inactive addresses and spam traps.
If you're sending to an older list, start with your most engaged subscribers instead of mailing everyone at once. Expand the send once the first results look healthy.
Know your sending limits
If you've been emailing customers straight from Gmail or Outlook, these caps are why that stops working once your list grows.
Personal and business inboxes have daily limits, while email marketing platforms and SMTP services set limits based on your plan.
| Sending from | Daily limit | Recipients per message |
|---|---|---|
| Personal Gmail | 500 recipients | 500 |
| Google Workspace | 2,000 messages (1,500 with mail merge) | 2,000 total, up to 500 external |
| Microsoft 365 (Outlook) | 10,000 recipients | 500 by default |
| Email marketing tool or SMTP service | Set by your plan | Set by your plan |
Google publishes its Gmail and Workspace limits, and Microsoft documents its Exchange Online limits.
Microsoft is also rolling out a separate cap of 2,000 external recipients in any 24-hour period, starting with new and trial accounts.
That's why the build below sends through an SMTP service. Your inbox cap stops mattering, and your SMTP plan sets the limit instead.
How to Send Broadcast Emails From WordPress
If your customers live in WooCommerce, sending through an outside tool like Mailchimp means exporting and syncing that data before every campaign.
The list is out of date the moment the export finishes, and the other tool only knows what you synced.
Sending from WordPress removes that friction. We'll use FunnelKit Automations, which runs broadcasts from inside your dashboard:
- Live store data: Filter contacts by what they bought and when, straight from your WooCommerce orders.
- Store blocks in the email: Drop real products and coupon codes into the design.
- Revenue reporting: See the orders and revenue each broadcast earned, next to opens and clicks.
- Smart sending: Test subject lines on a small sample, then automatically send the winner to everyone else.
The trade-off is that you connect your own SMTP service, so you handle the delivery setup. Step 1 covers it.
Broadcasts are included in the Pro version. It also includes an innovative sending option that improves the effectiveness of A/B testing broadcasts.
Make sure to install and activate FunnelKit Automations (both free and premium).
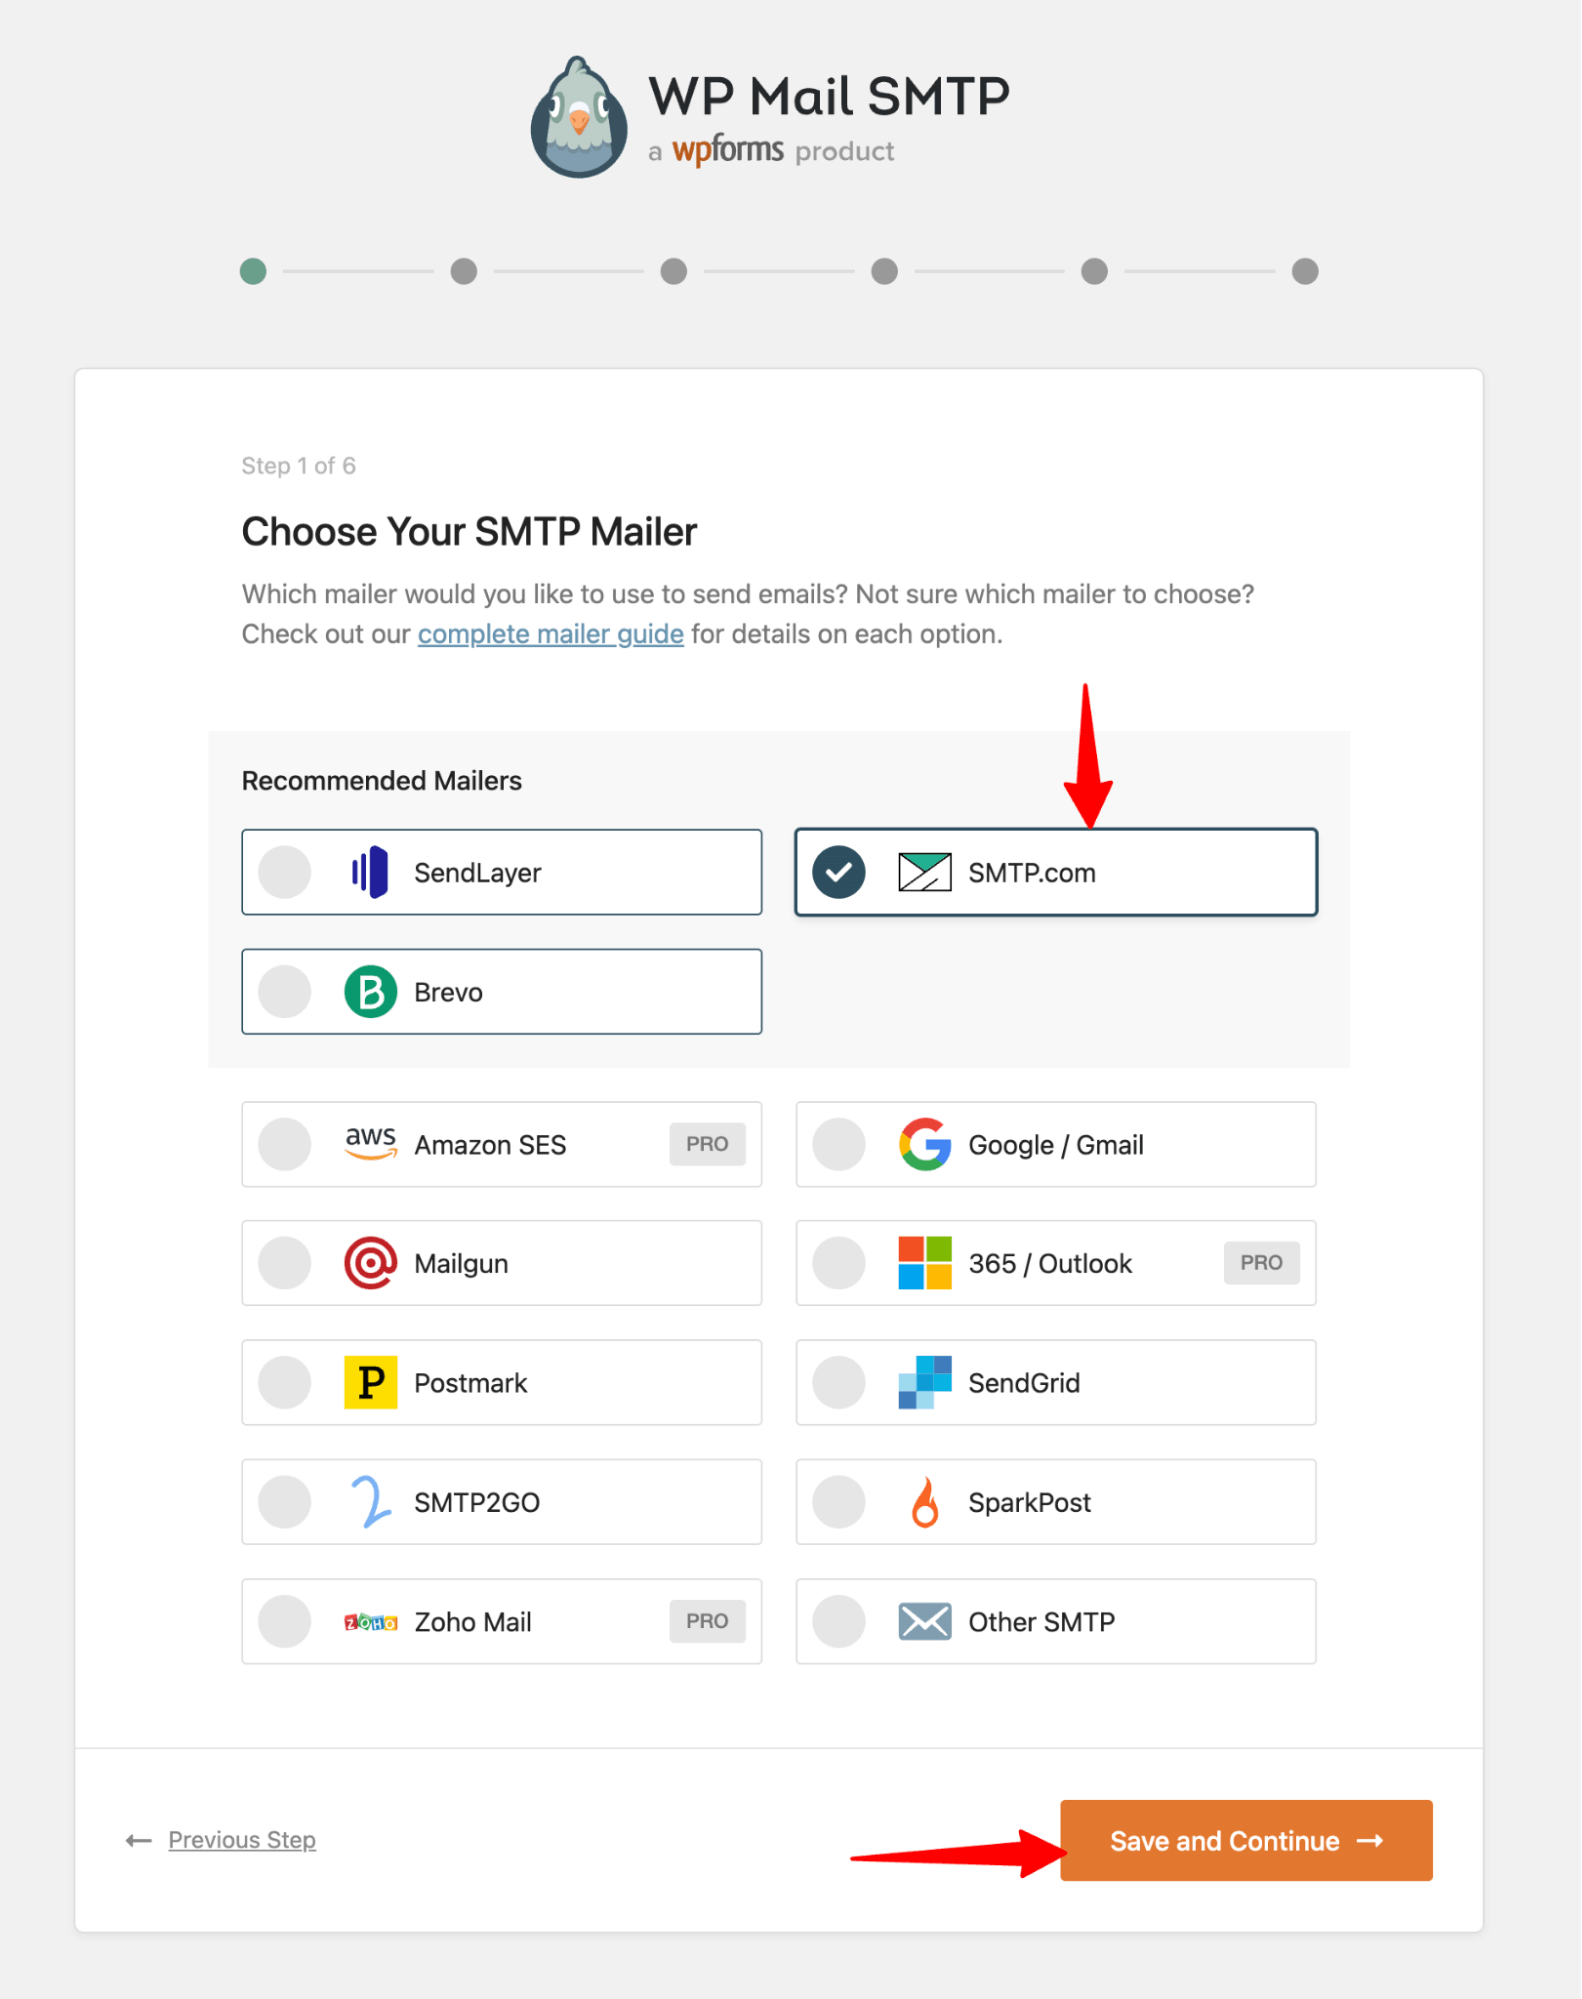
Step 1: Connect an SMTP service
First, make sure SMTP is set up on your site before you send your first broadcast. It's an easy step to miss, and it has a huge impact on whether your emails land in the inbox or the spam folder.
We recommend WP Mail SMTP with an email provider like SendLayer, Brevo, Amazon SES, or Google Workspace.
As part of the setup, add your domain's SPF, DKIM, and DMARC records so email providers can verify your messages.
Also check that your SMTP plan covers the volume you’re about to send.
Step 2: Create the broadcast and pick its type
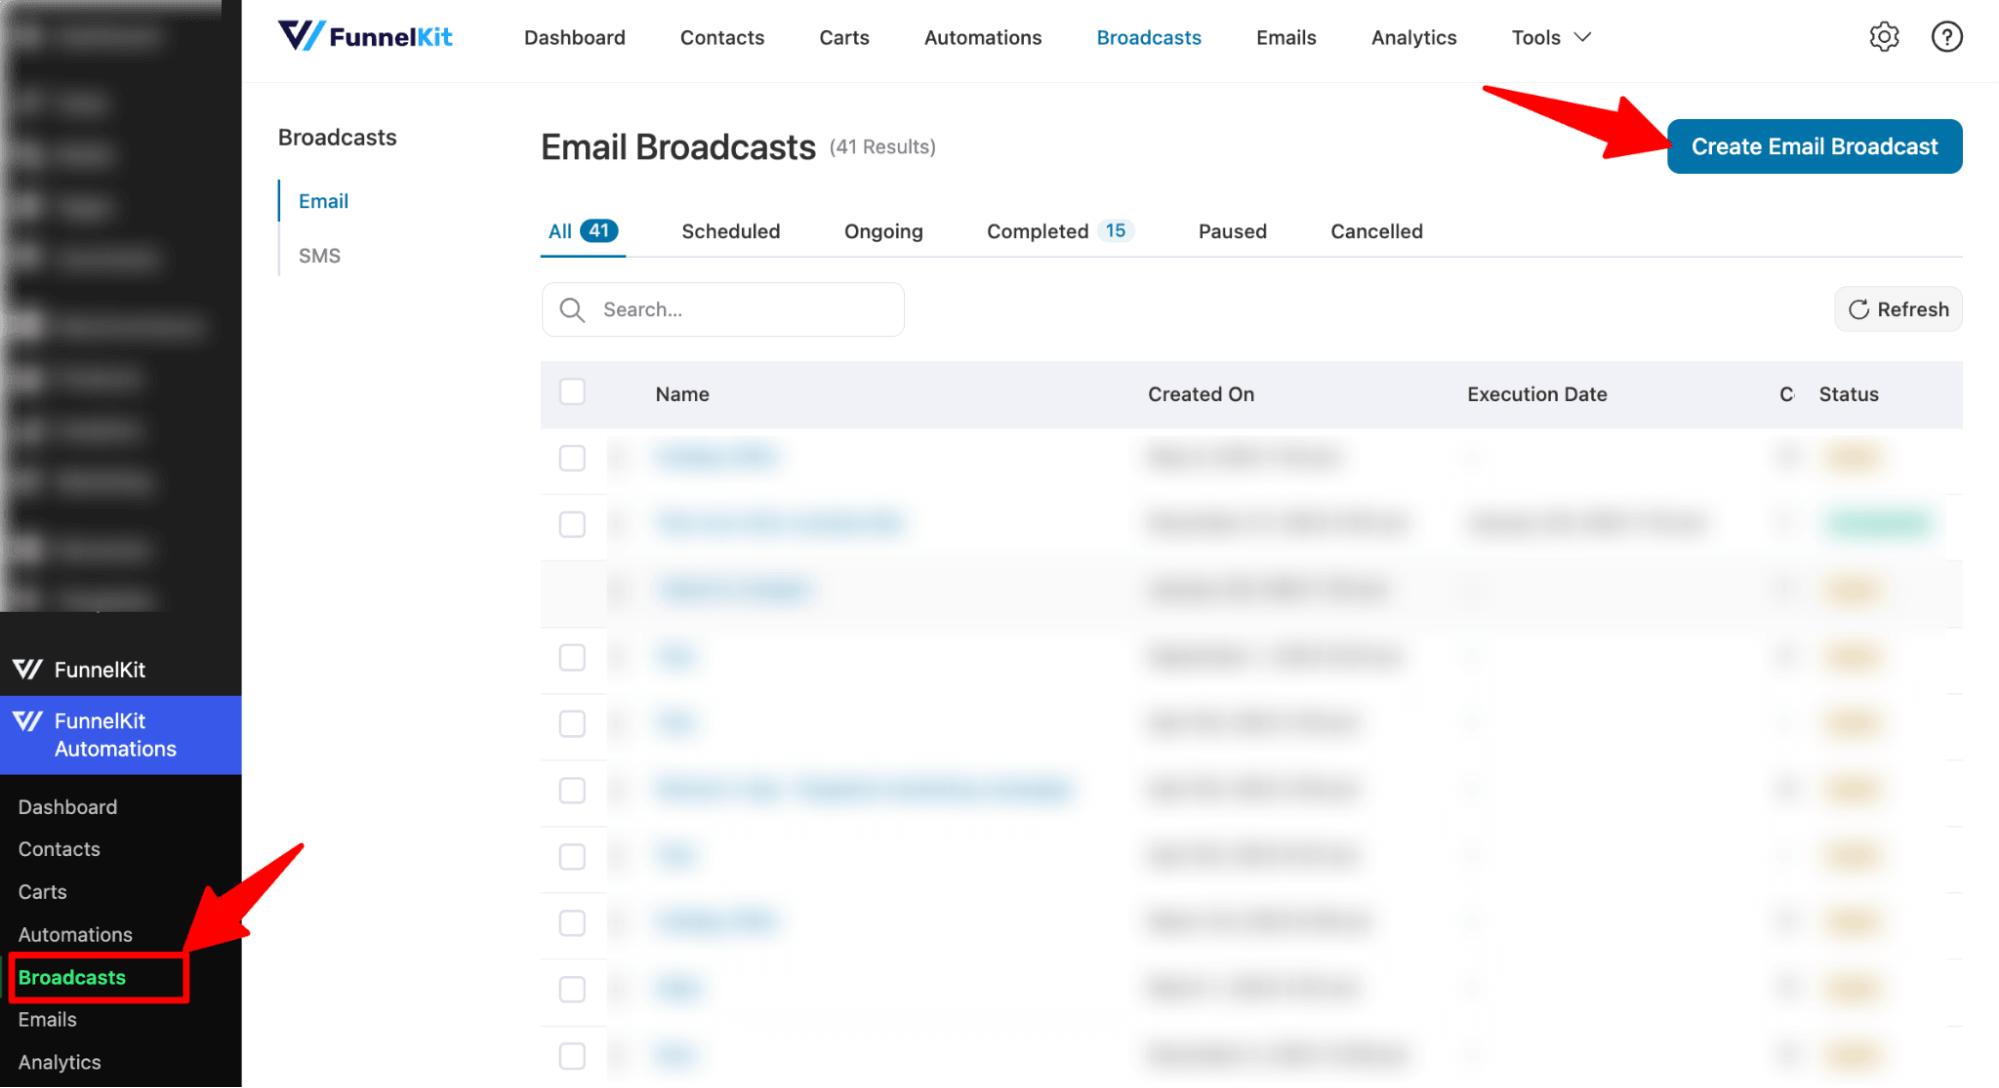
Hover over FunnelKit Automations from the WordPress dashboard and click on Broadcast.
Then click 'Create Email Broadcast' to create a new email broadcast.
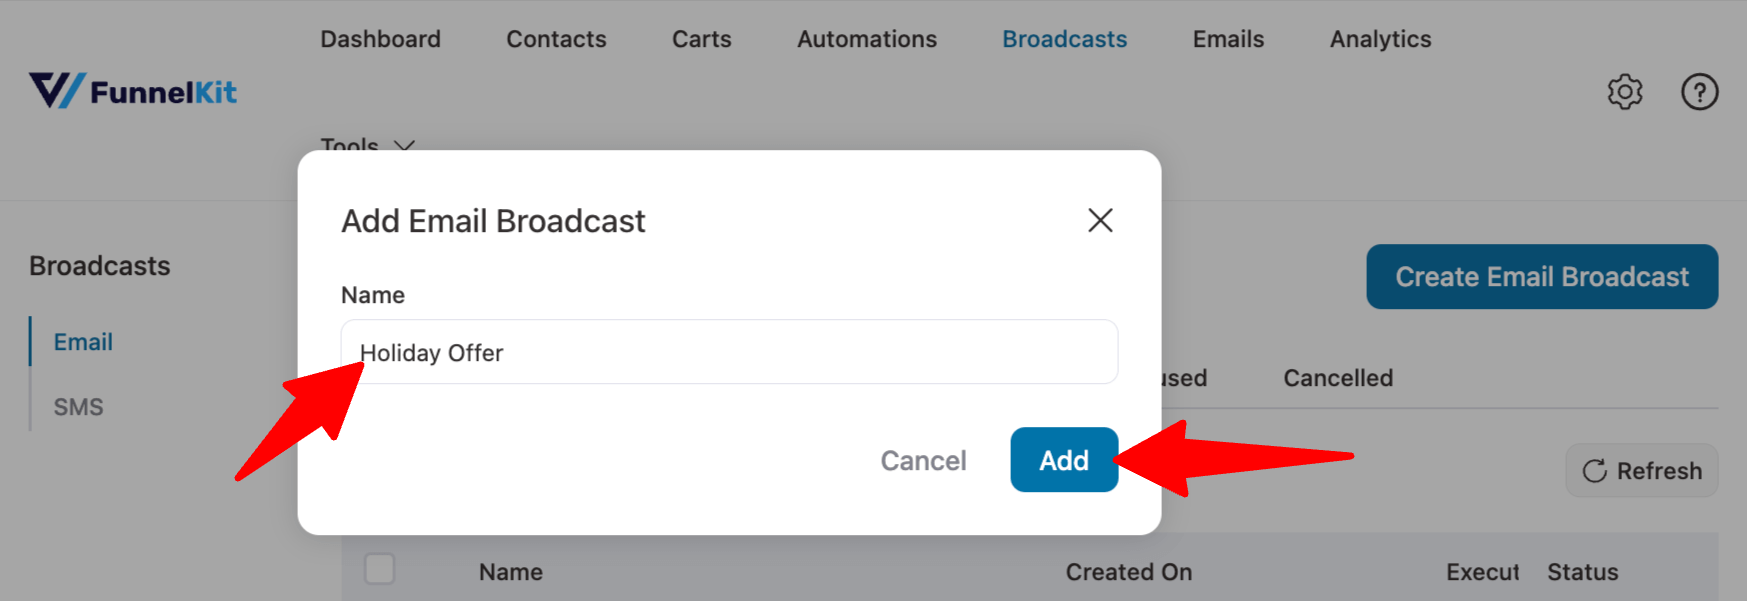
Then enter a name and click Add. That creates the broadcast.
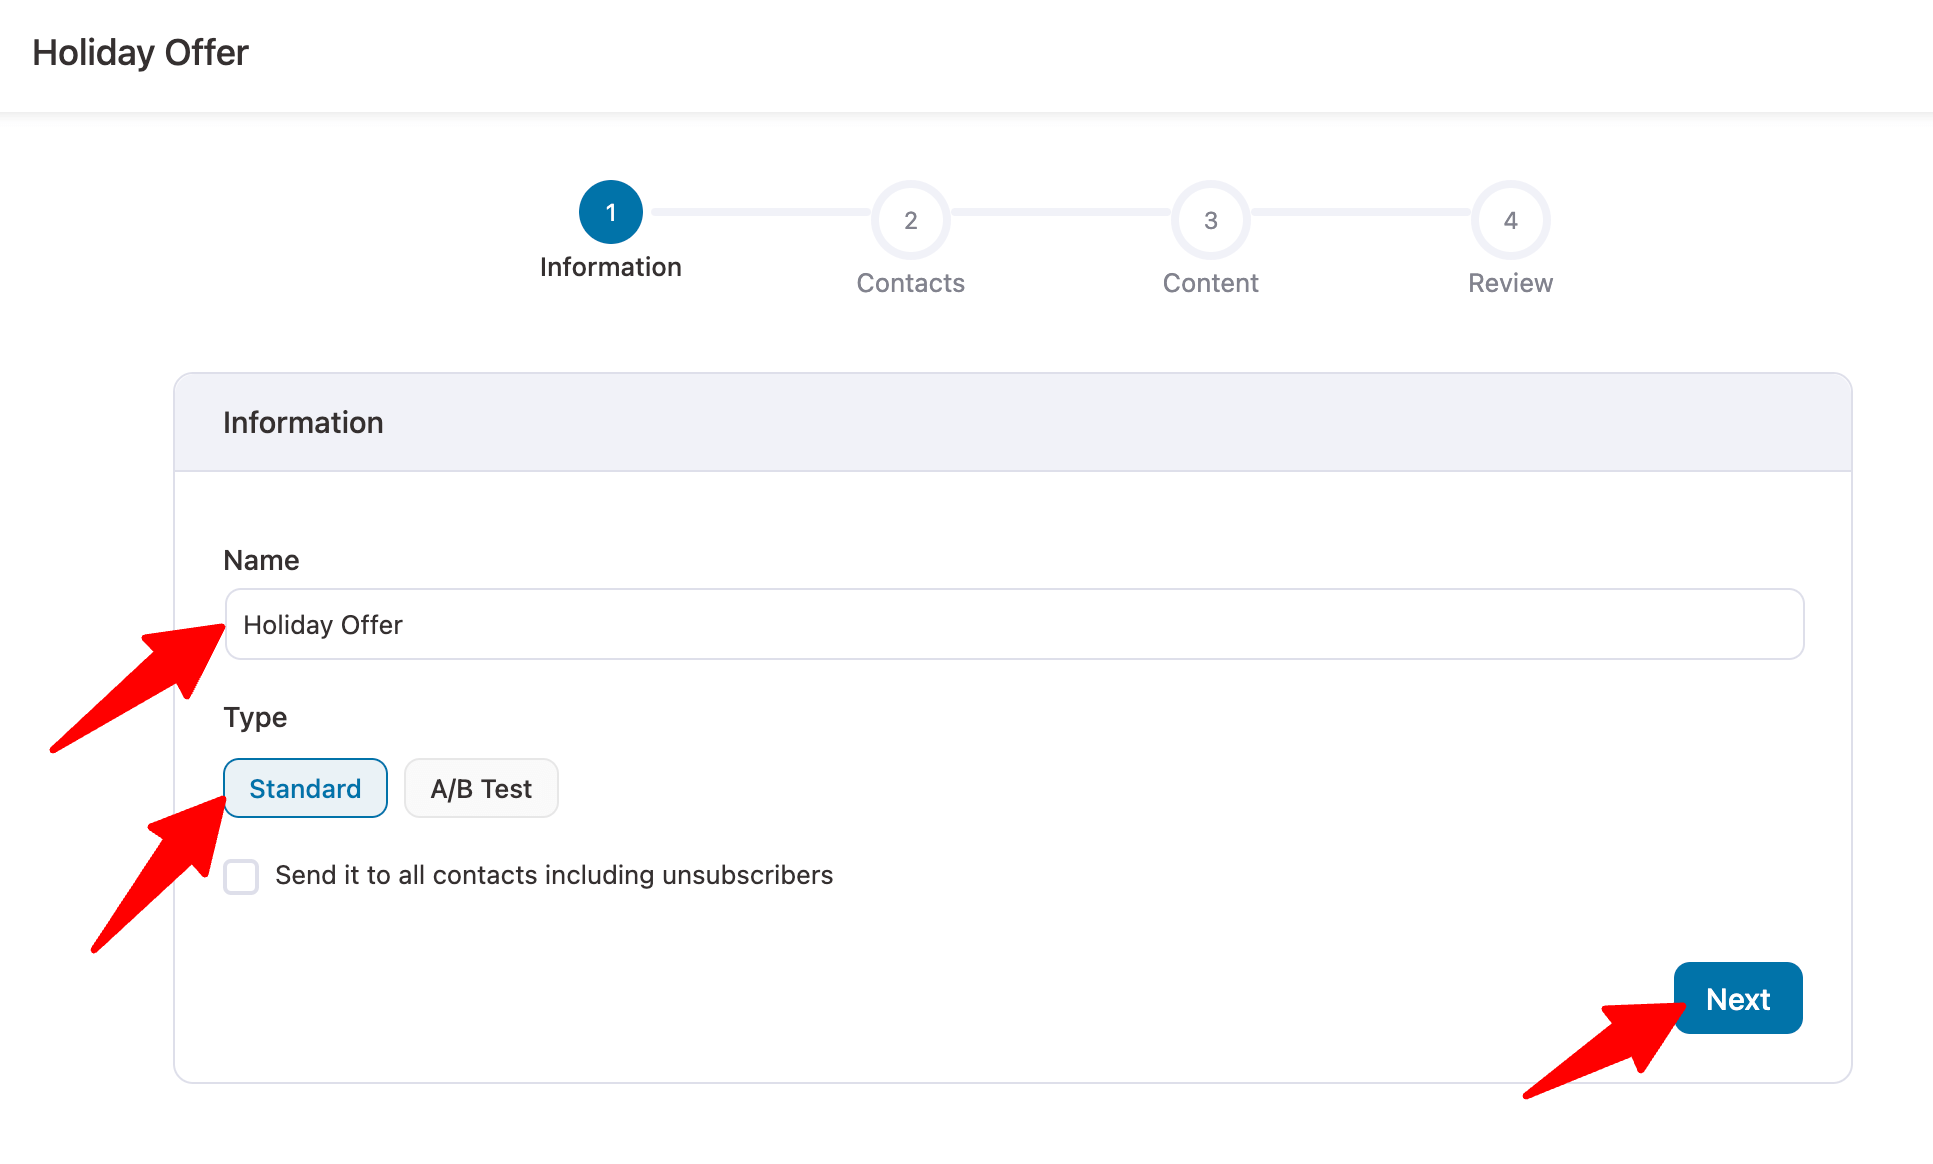
Next, choose the email type:
- Standard sends one version of the email to every selected contact.
- A/B Test lets you create multiple versions and see which works better. We'll use this for Smart Sending later.
The same screen also has a setting to include unsubscribed contacts. Keep it off for our sale.
Switch it on only for genuine service notices, like a policy change or a security alert, and never for a promotion.
Step 3: Filter the audience
Click on the + icon to add a filter.
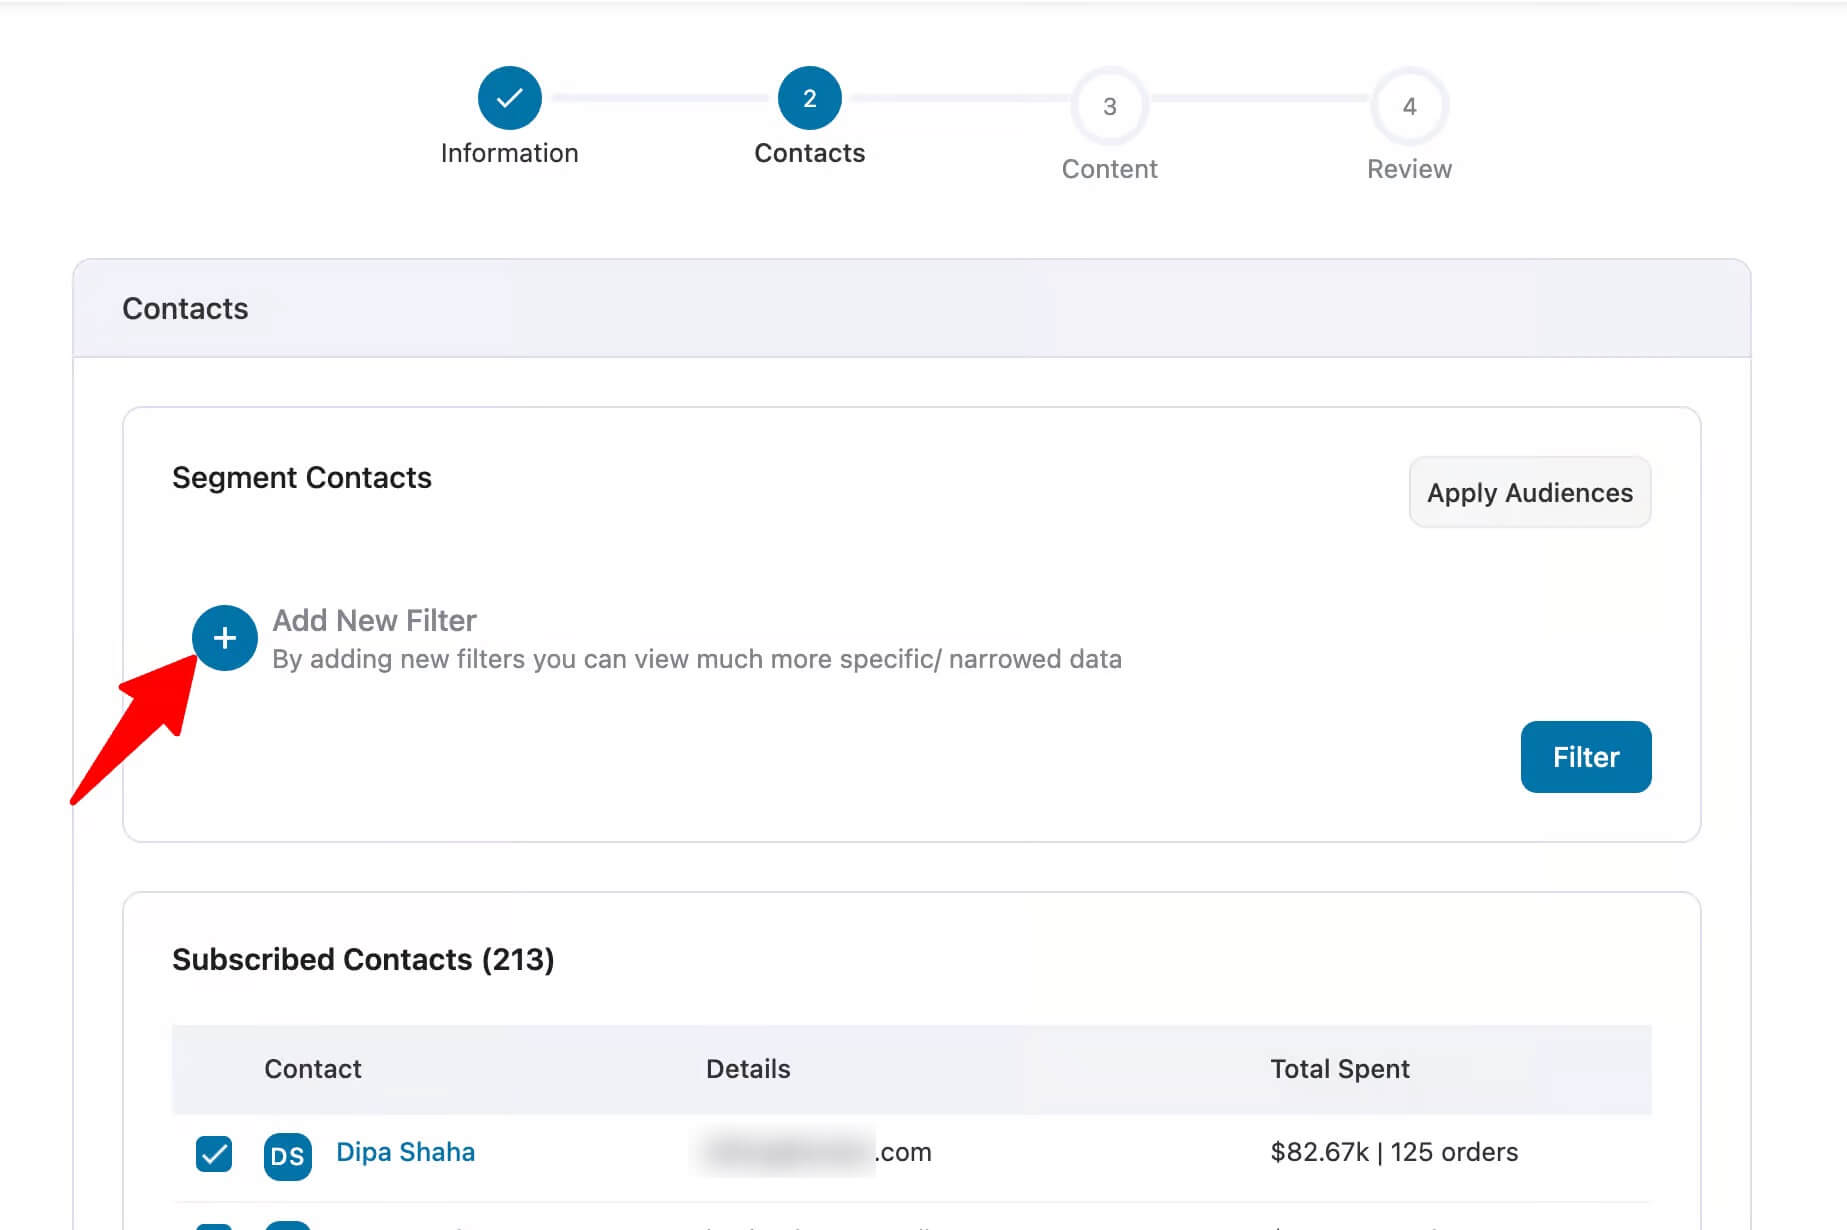
You can segment based on Segments, Contact Details, Users, Custom Fields, WooCommerce, etc.

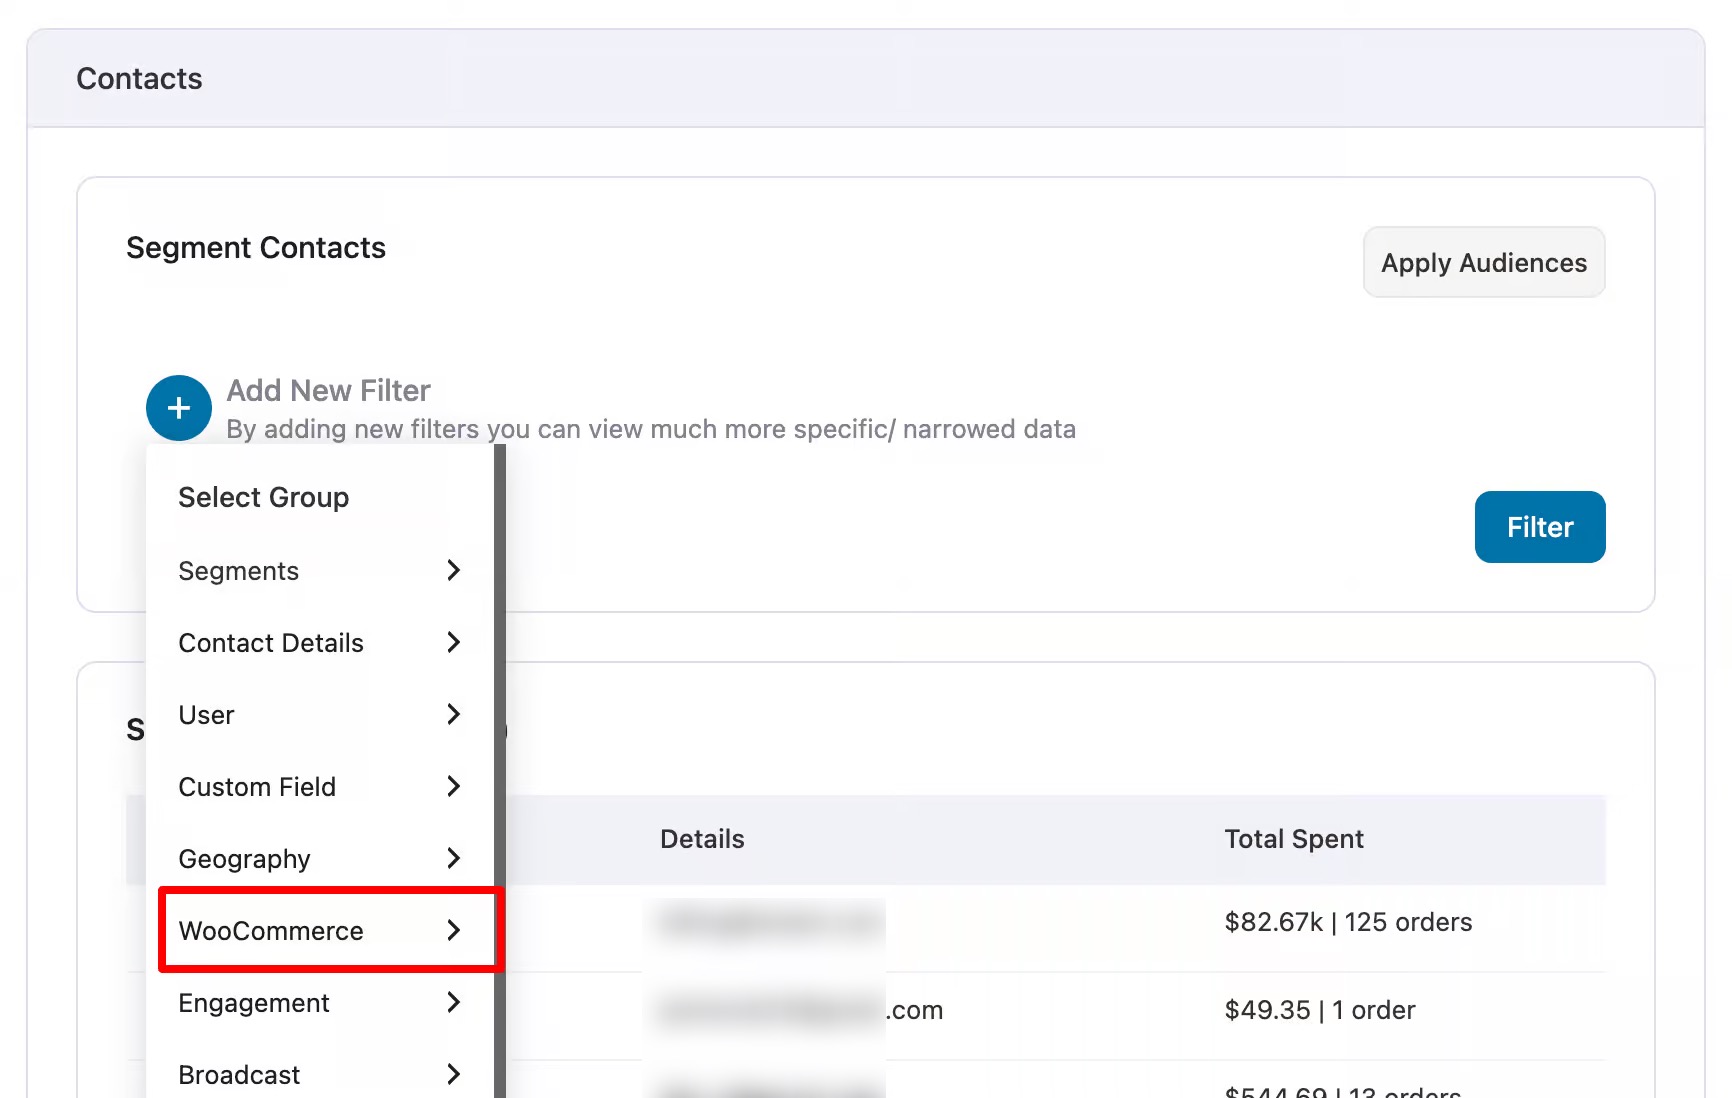
We only want customers who bought in the past year, so choose WooCommerce.
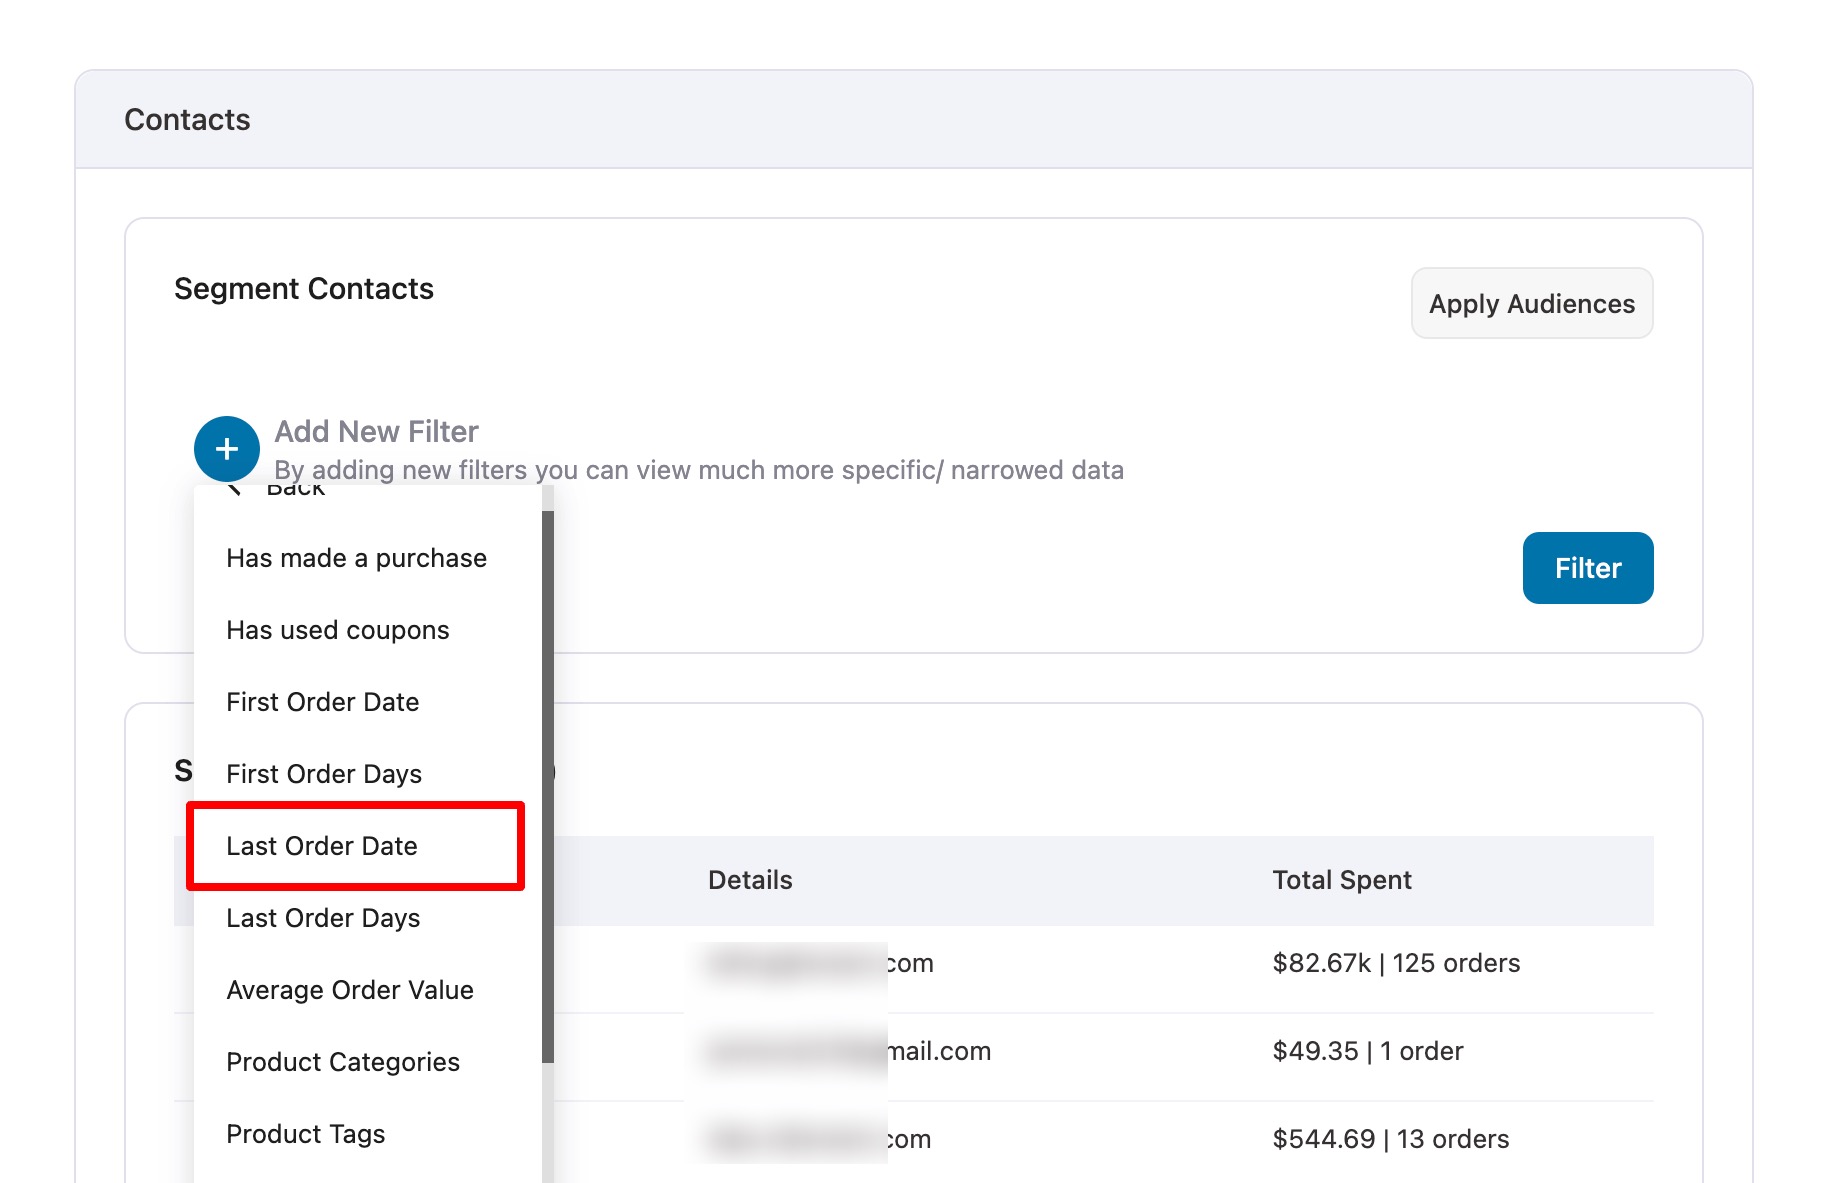
Next, click on the 'Last Order Date' option.
You can filter by last order date in three ways: Over, In the past, and In the period.
Select "In the past" and enter 365 days. Then click Filter.
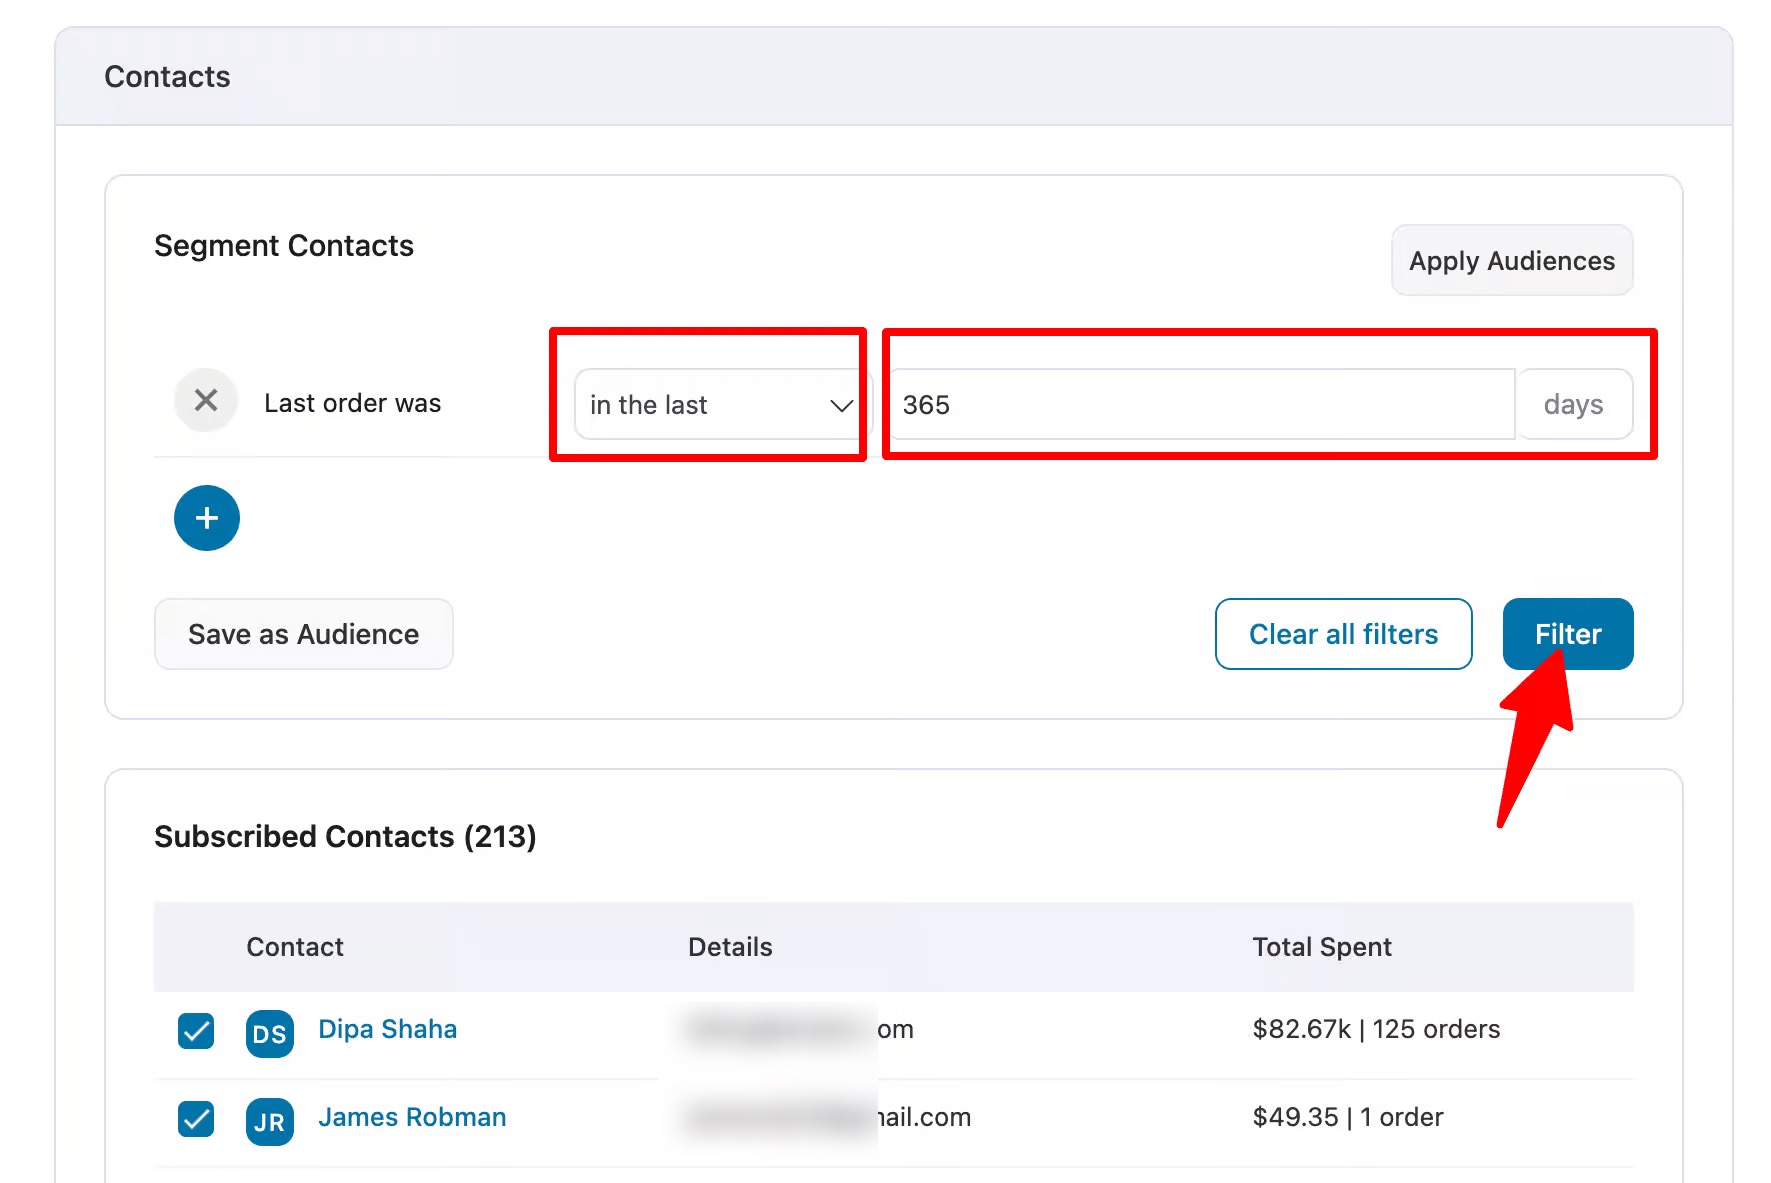
Now you should see a list of audiences that fulfill the filter you set. Click on 'Next' to go to the next step.
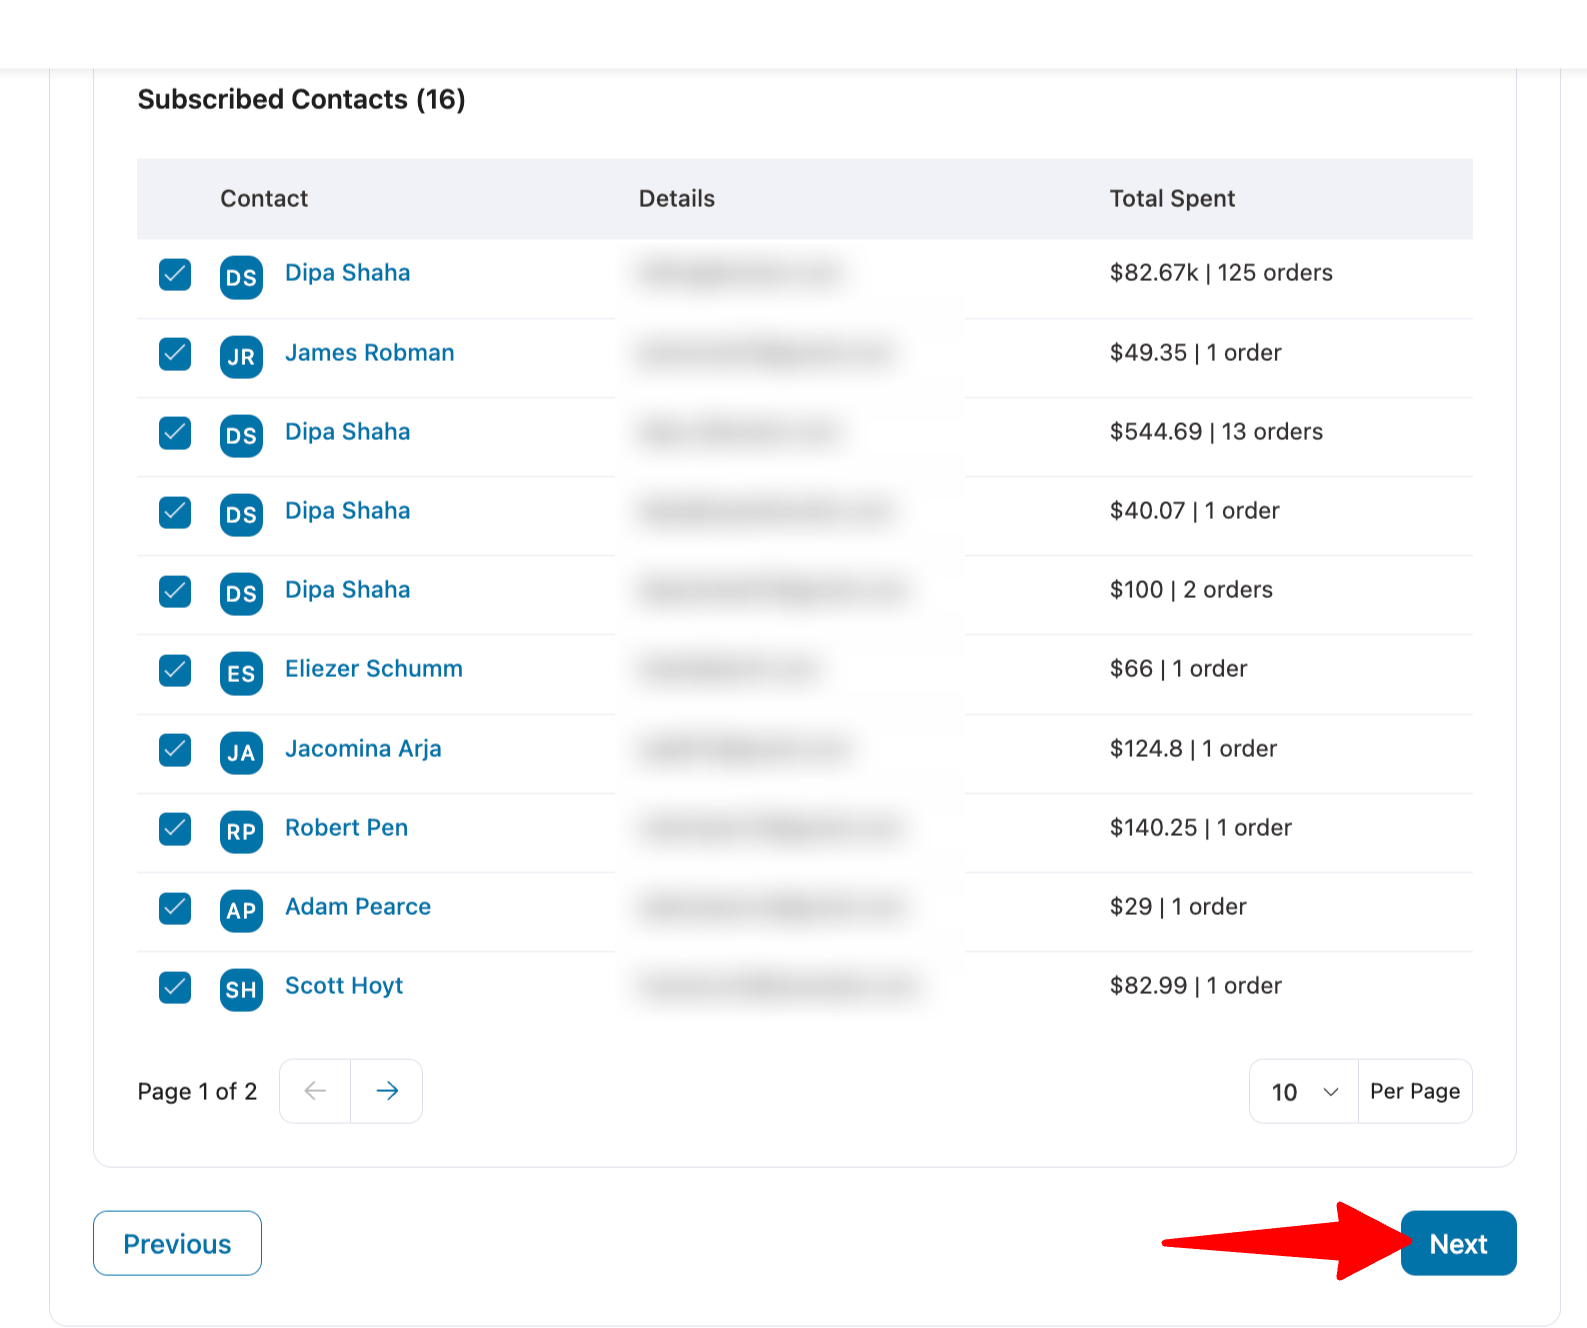
Want to target by how much people spend instead? See our guide to sending personalized bulk emails to high-spend customers.
Step 4: Design the email with coupon and product blocks
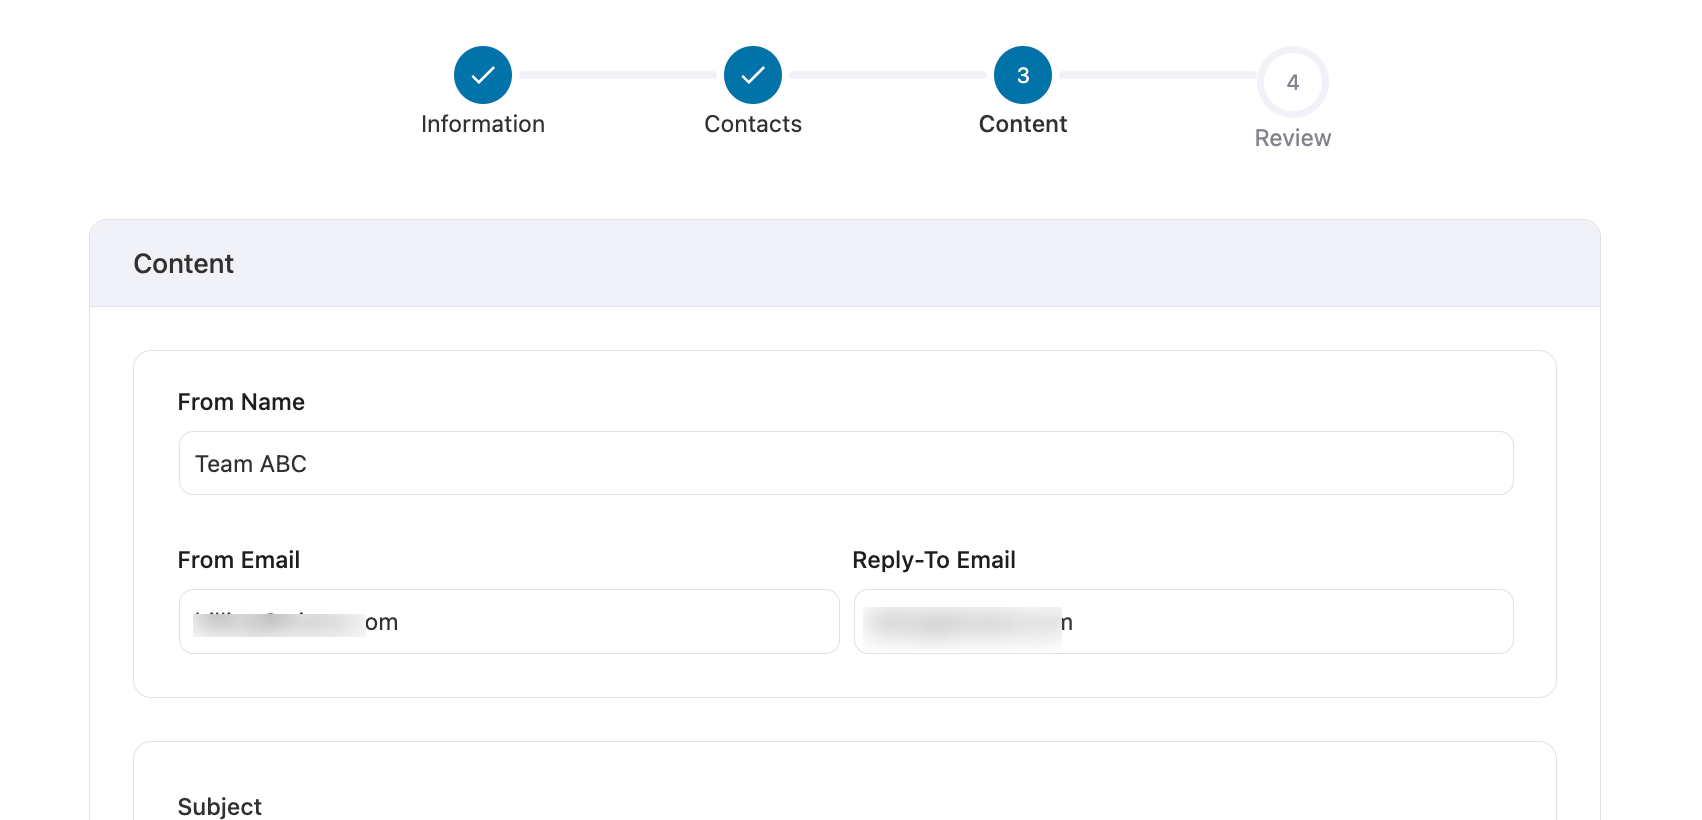
Start with the sender details:
- From Name: The name subscribers see, usually your store name.
- From Email: An address on your authenticated domain.
- Reply-To Email: An inbox someone actually checks.
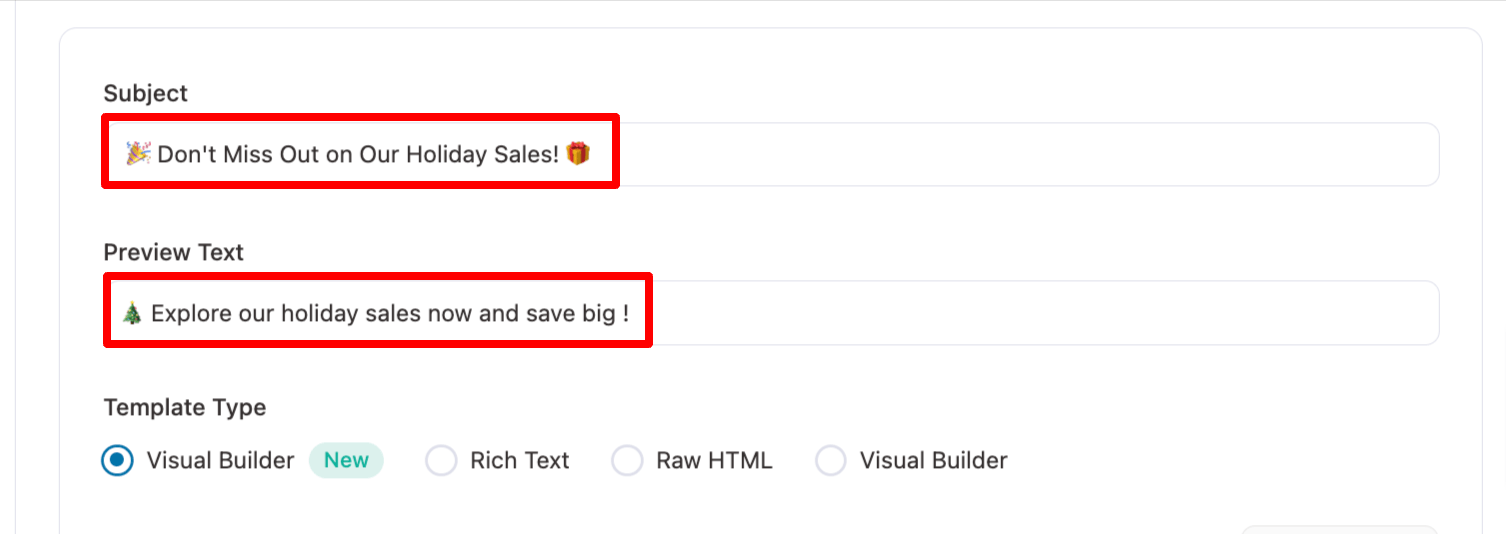
Then write the subject line and preview text. Keep the subject specific and short enough to read on a phone.
For our sale:
- Subject: "Don't miss out on our Holiday Sales!"
- Preview text: "Explore our holiday sales now and save big!"
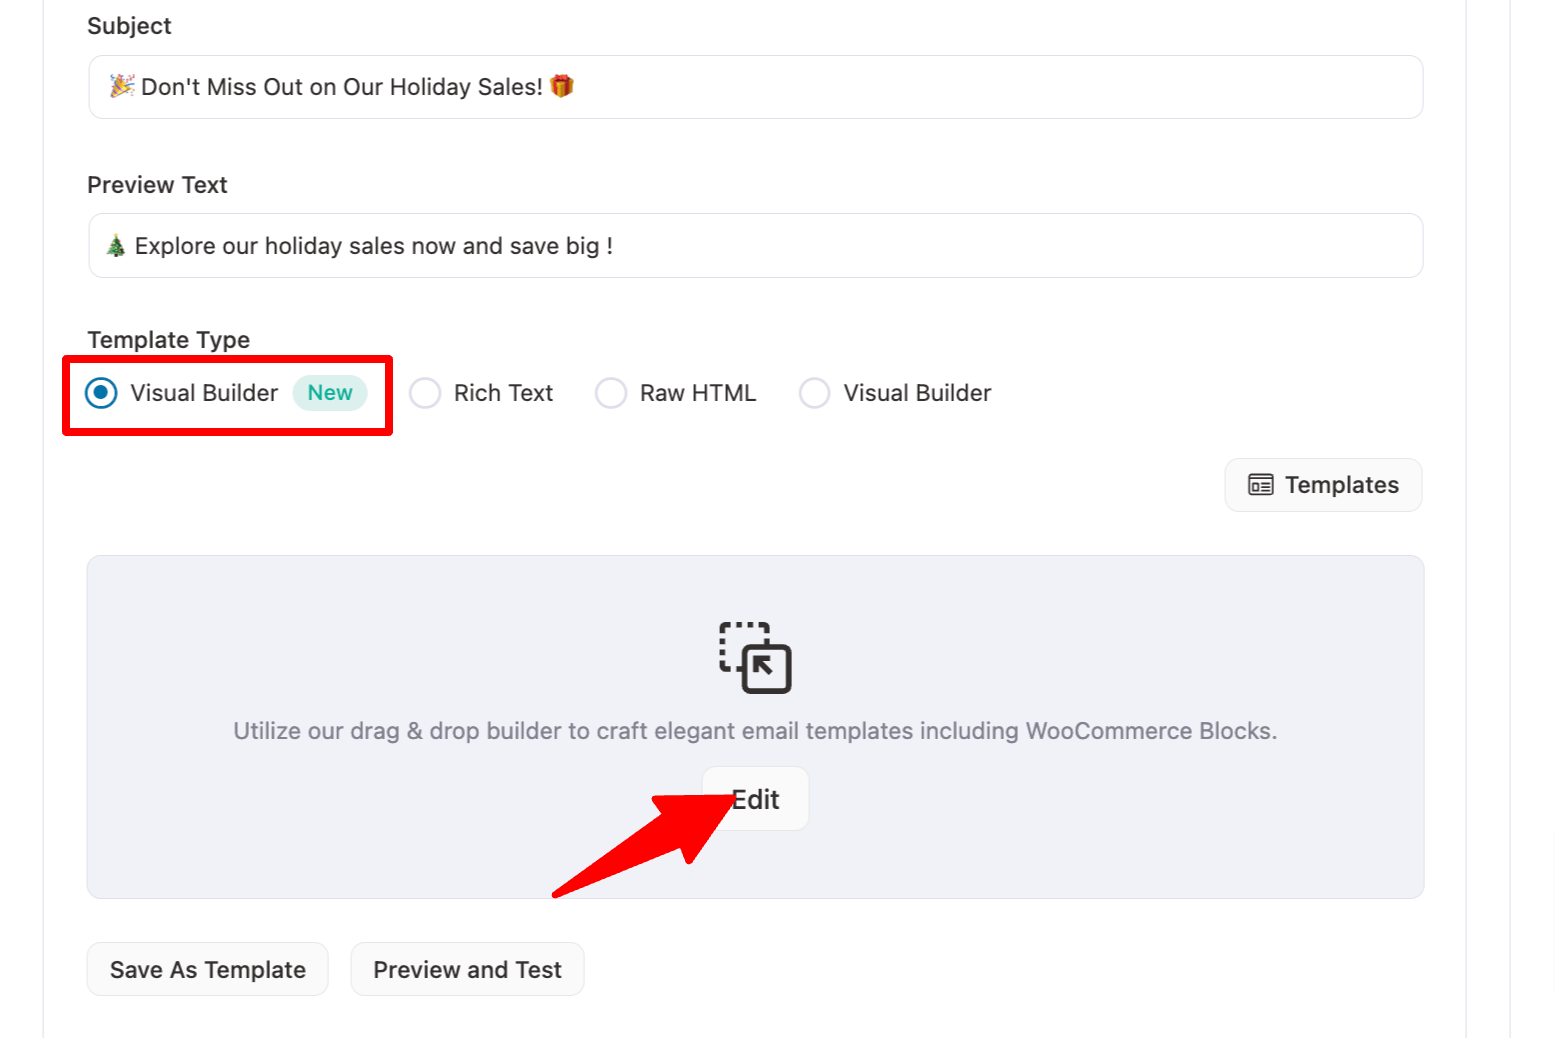
To design the email, choose Visual Builder (New).
You’ll see a set of prebuilt templates. Hover over Declaration of Sale, click Preview, and import it.
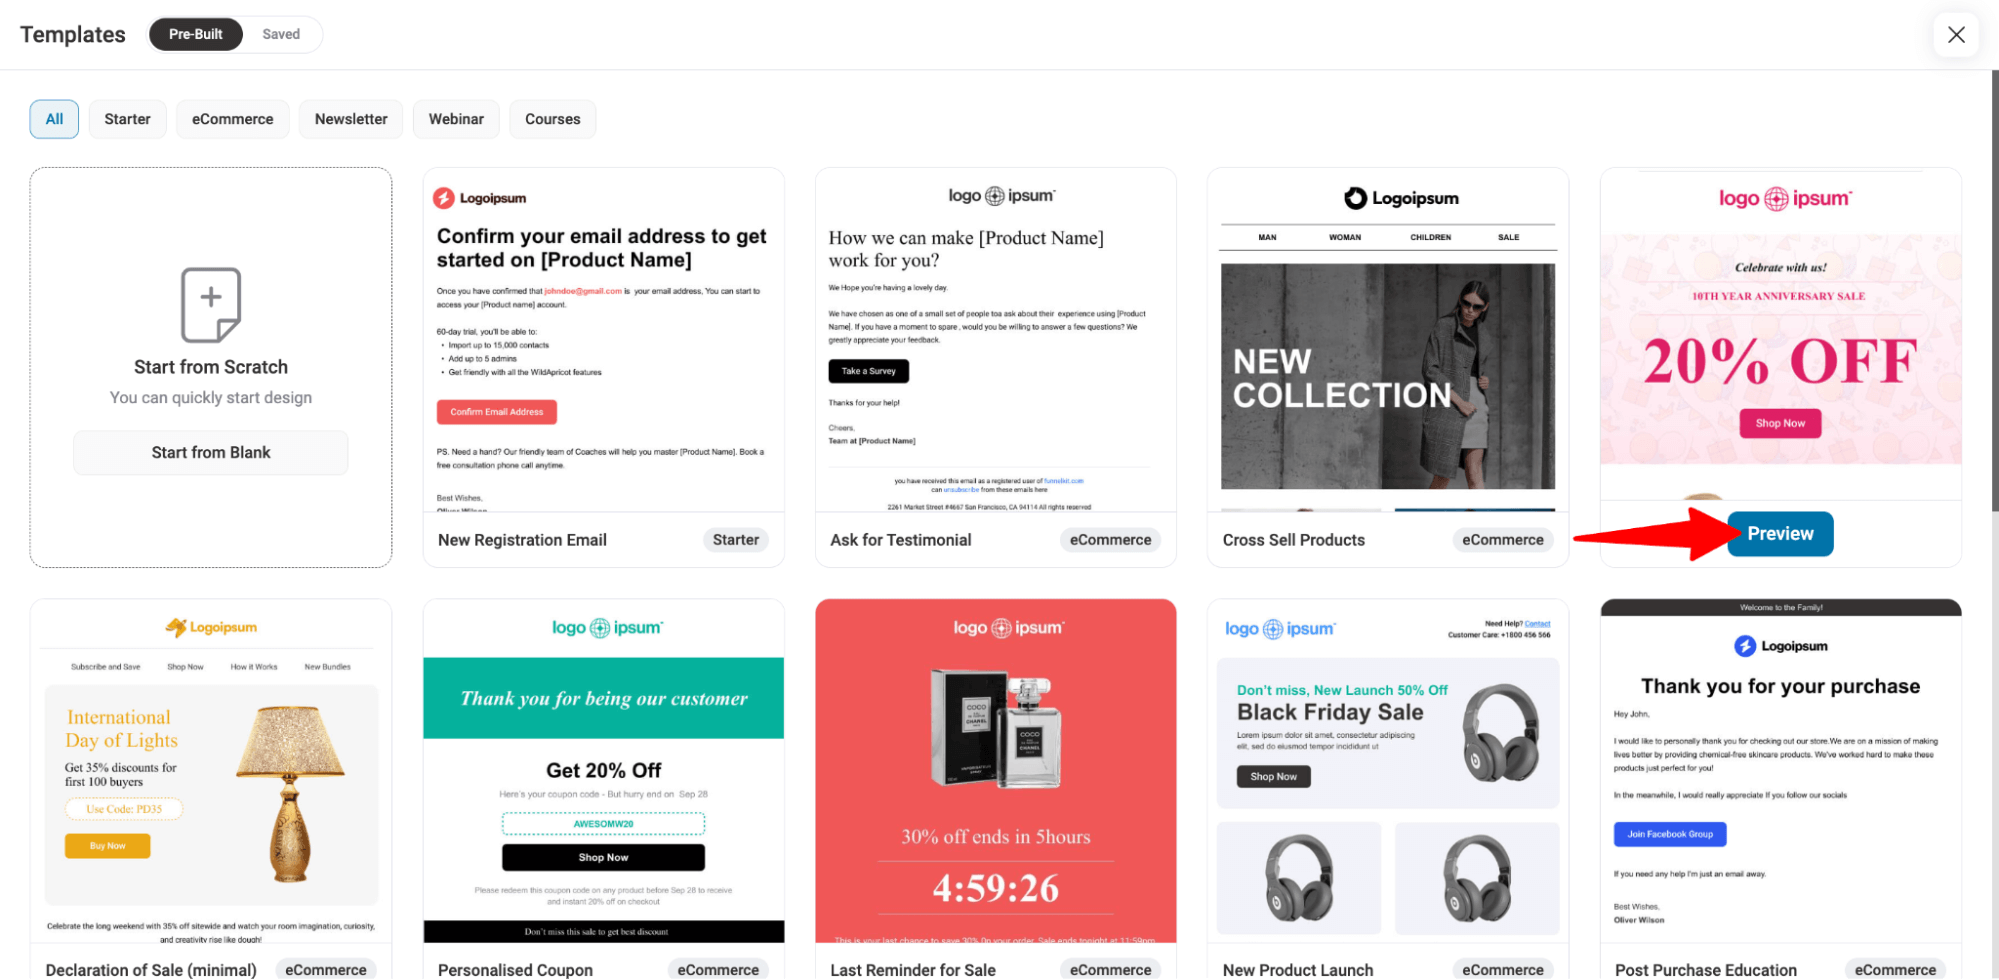
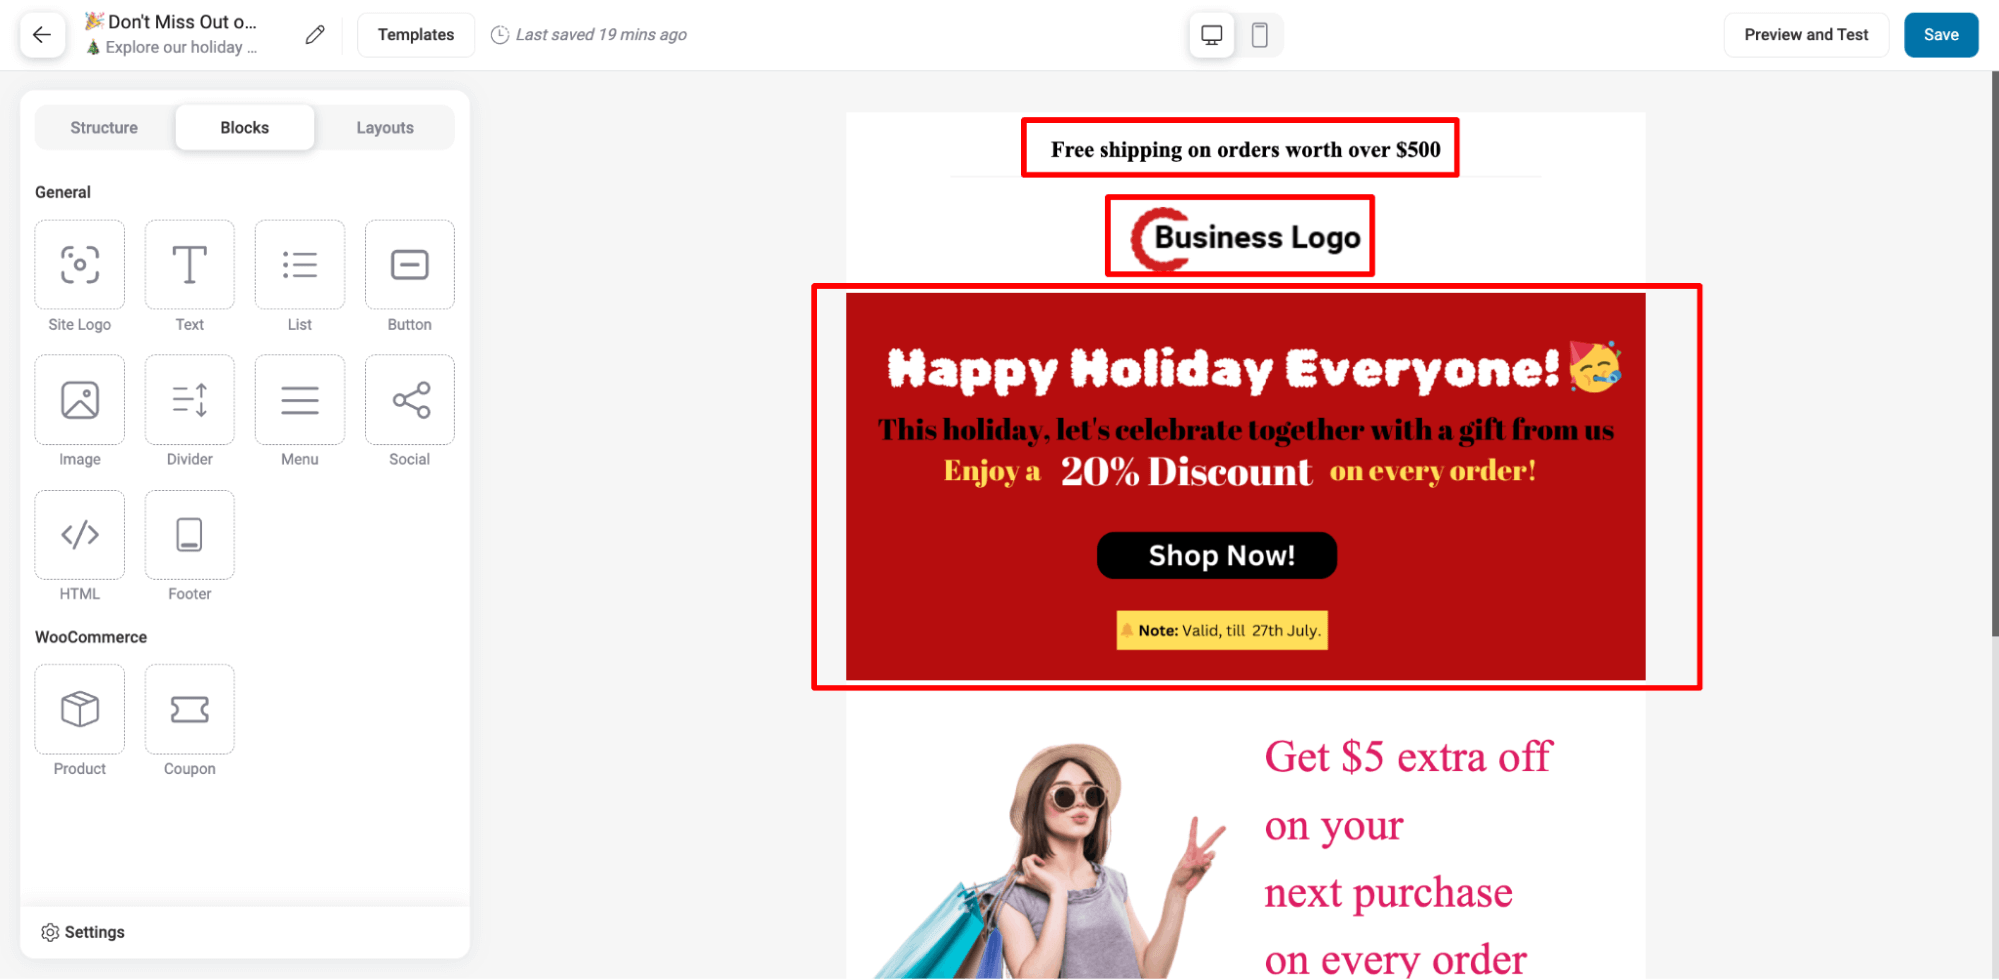
Once it’s imported, customize it for your brand and your offer.
Here, we replaced the free-shipping text at the top with our offer and swapped in our own banner.
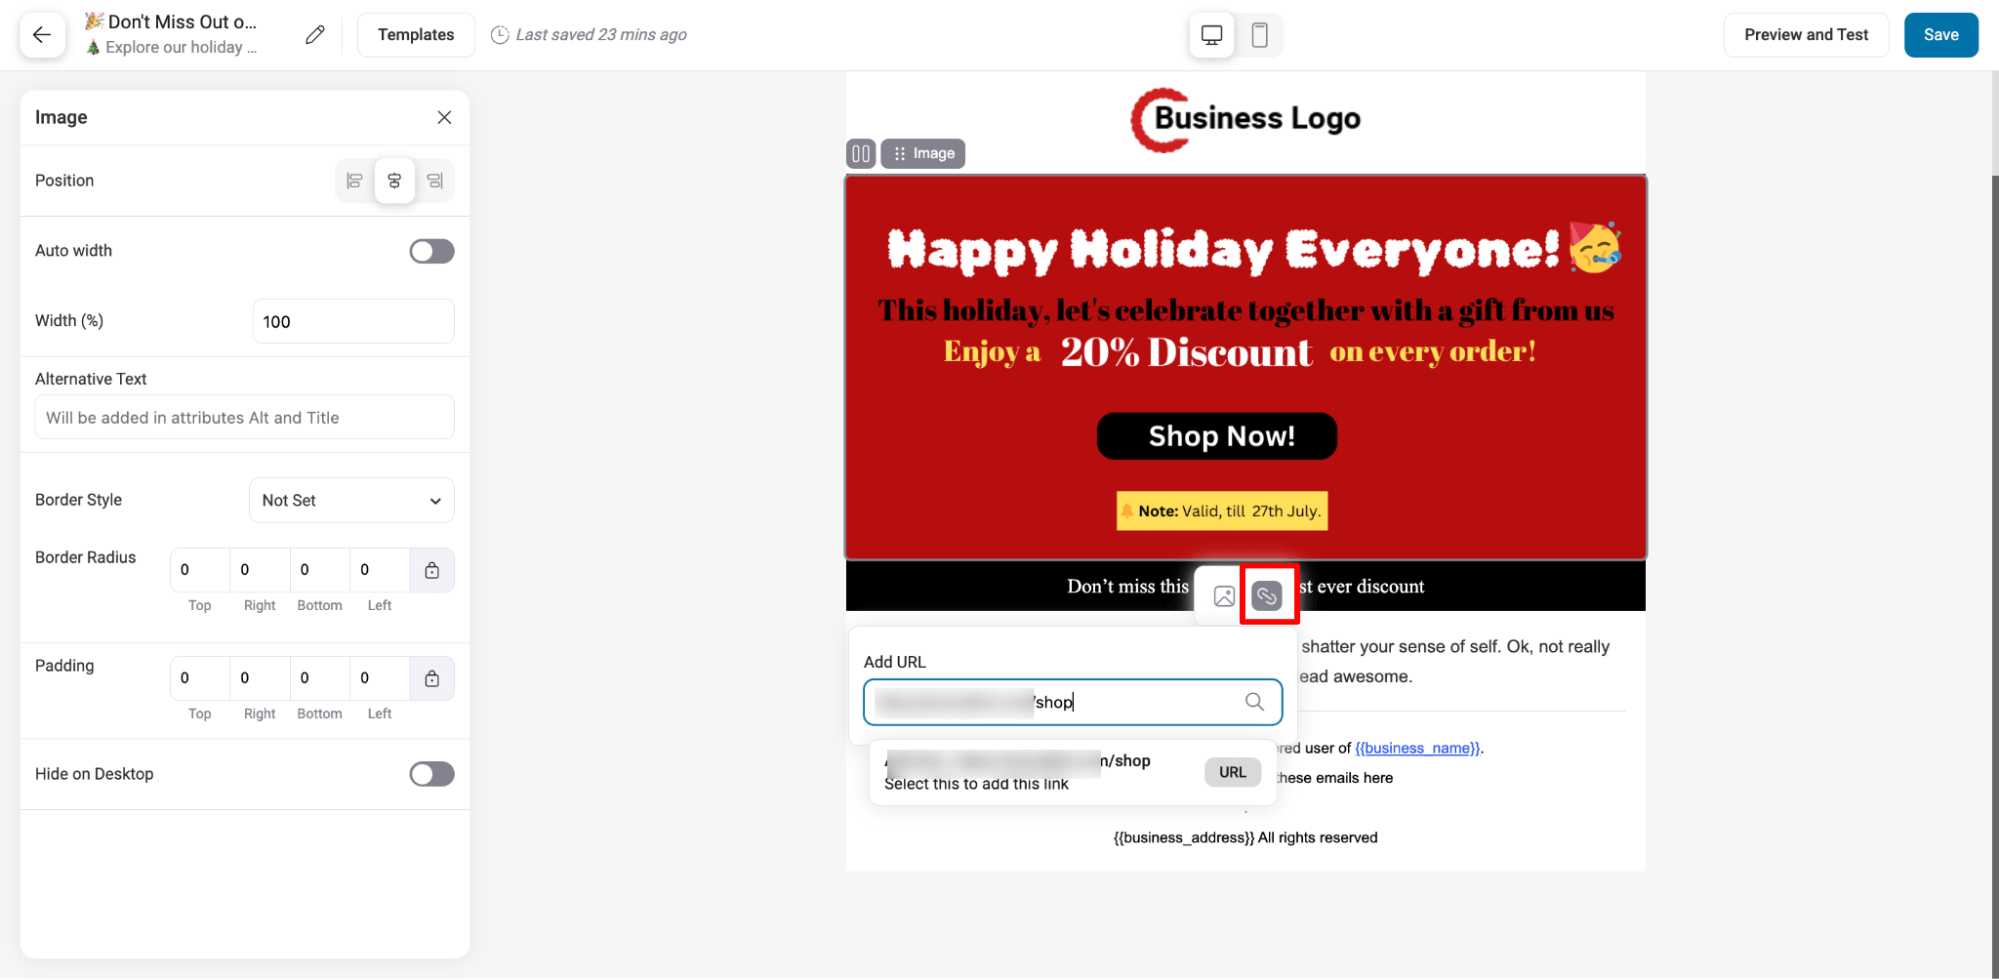
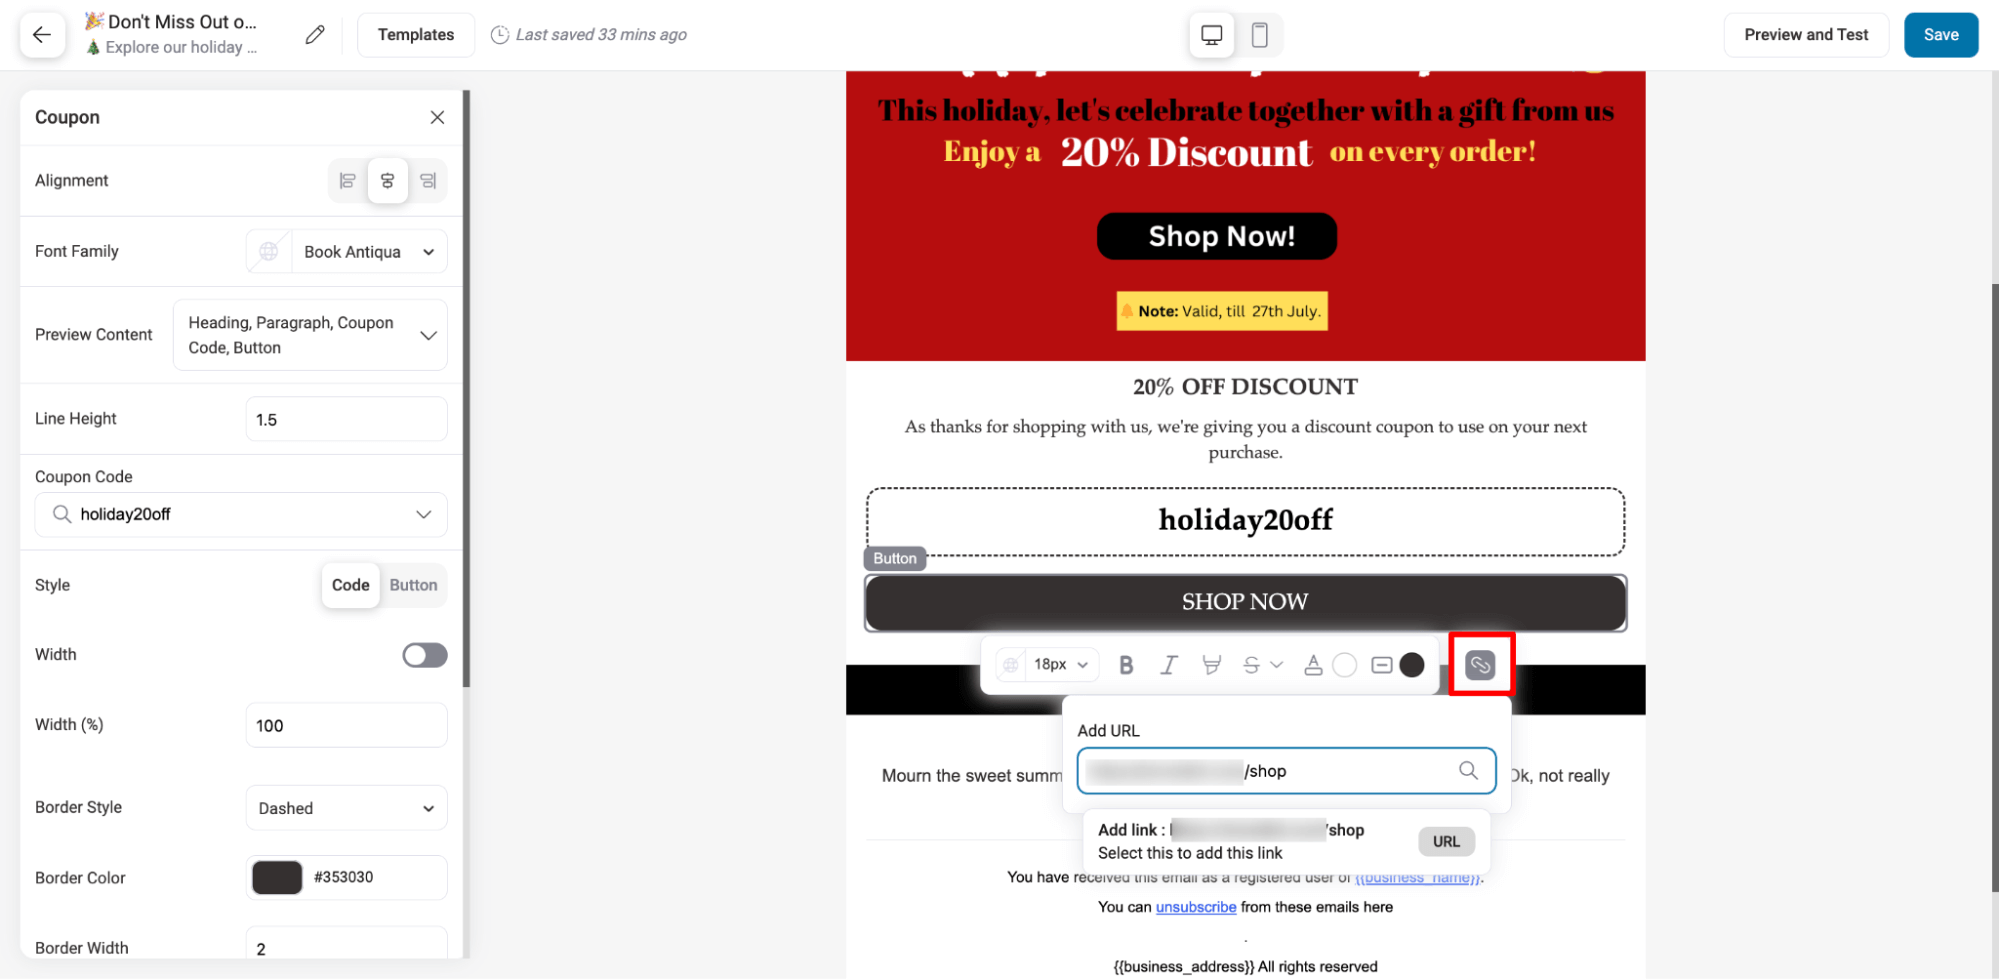
Link the banner to your shop page, so anyone who clicks it lands in your store.
Next, add the coupon code. Delete the template's existing section and drag in the WooCommerce coupon block, which is built to make a discount code stand out.
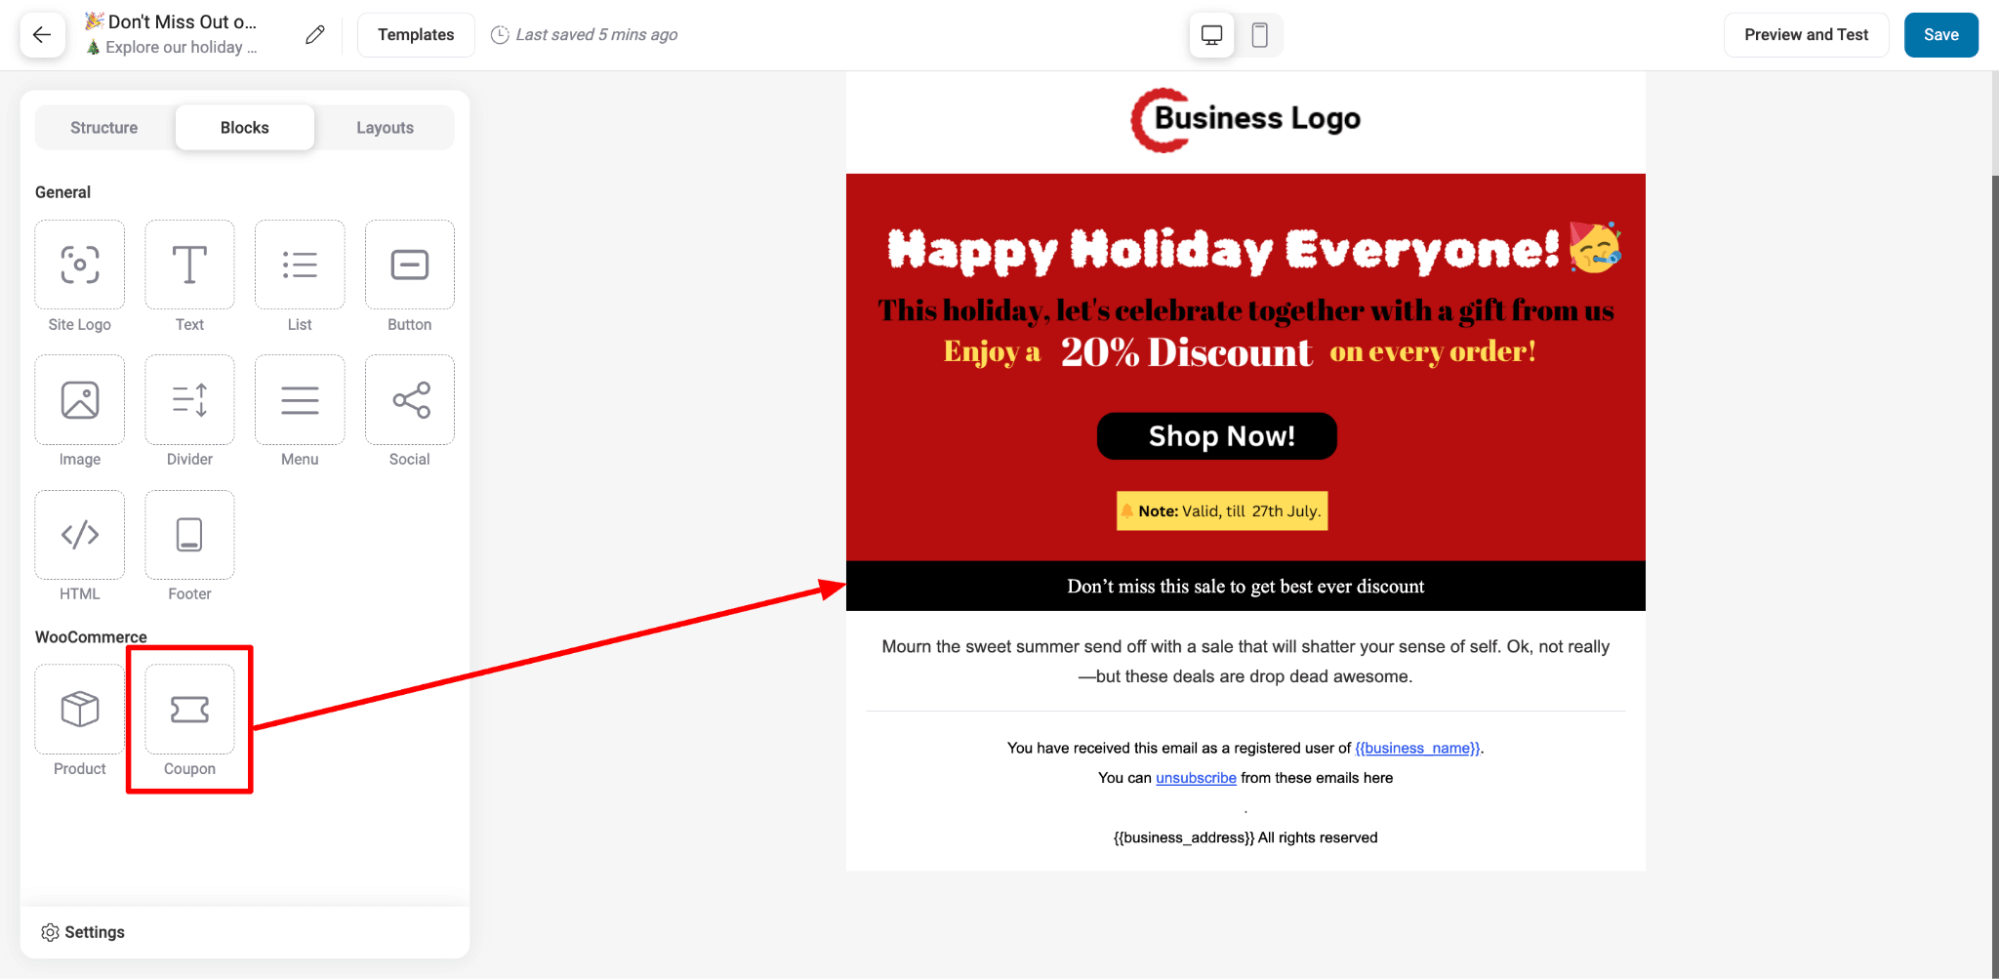
Select the coupon on the left, then update the block text to match the offer.
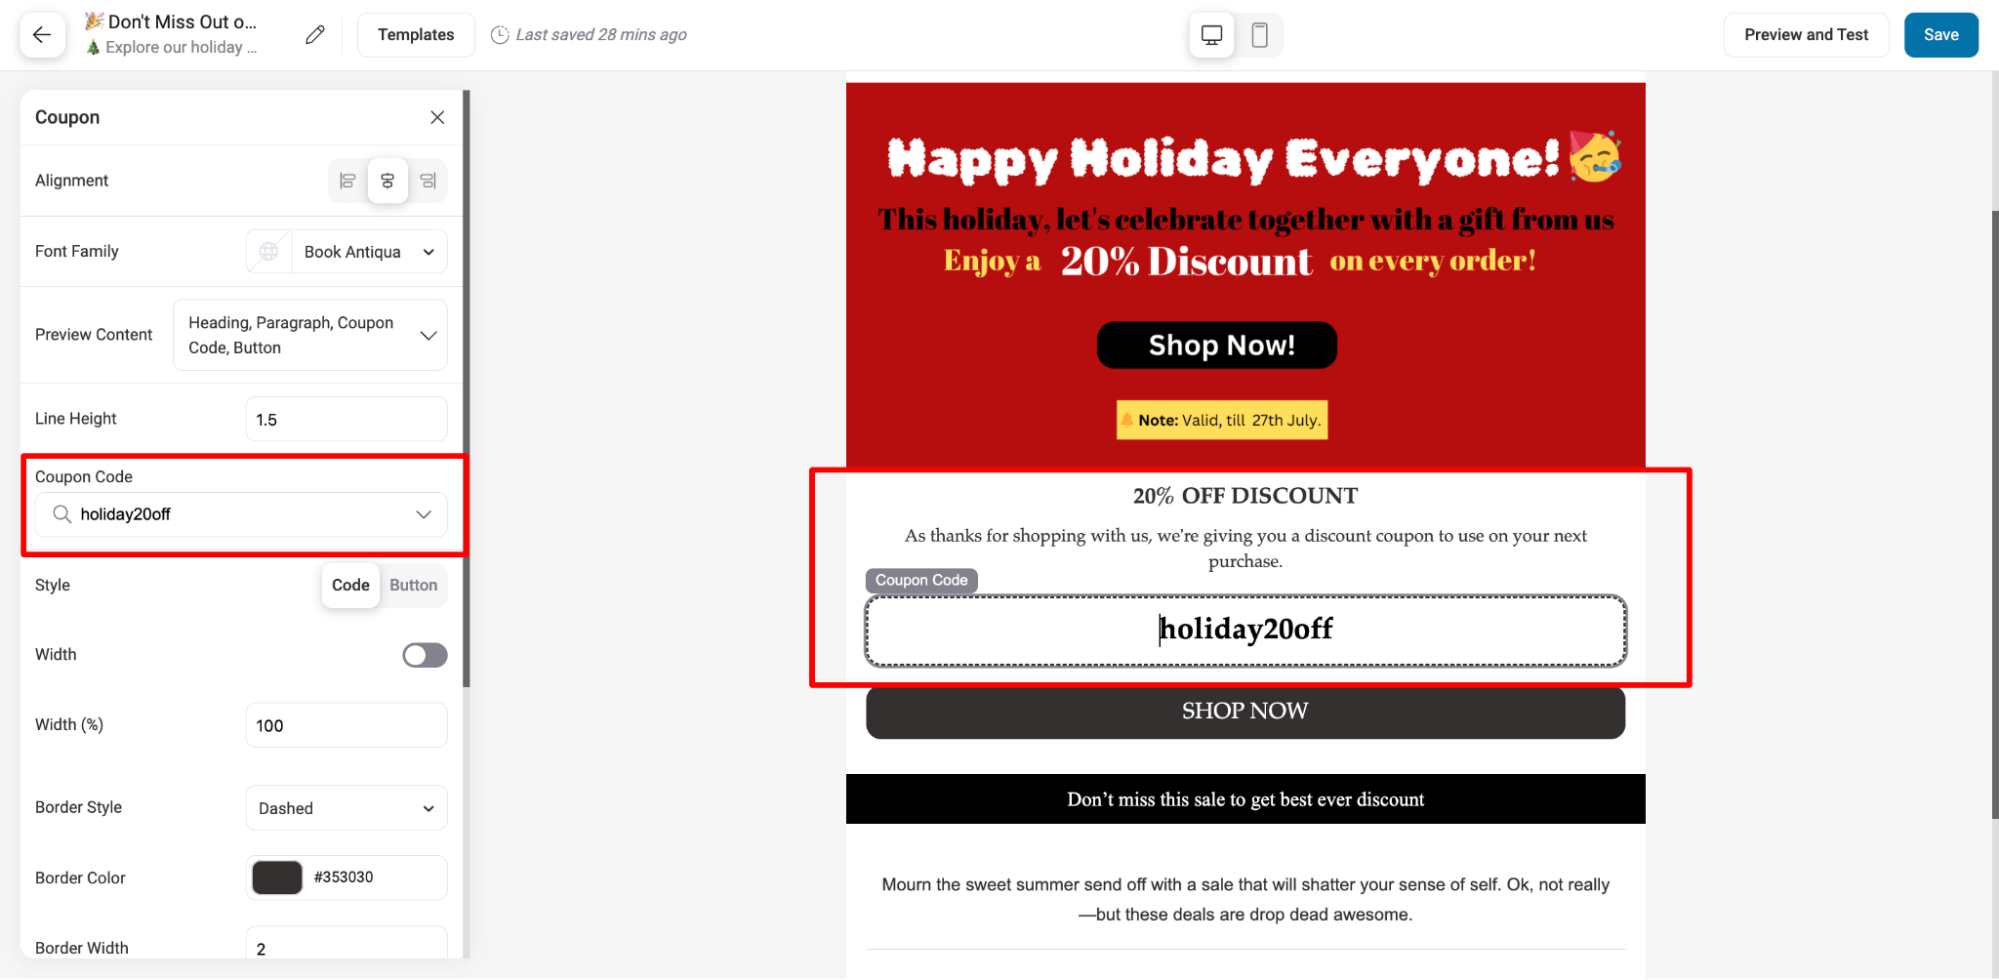
Link the coupon block's Shop Now button to your shop page too.
Note: Want a unique code for each customer instead of one shared code? See our guide to dynamic, personalized coupons.
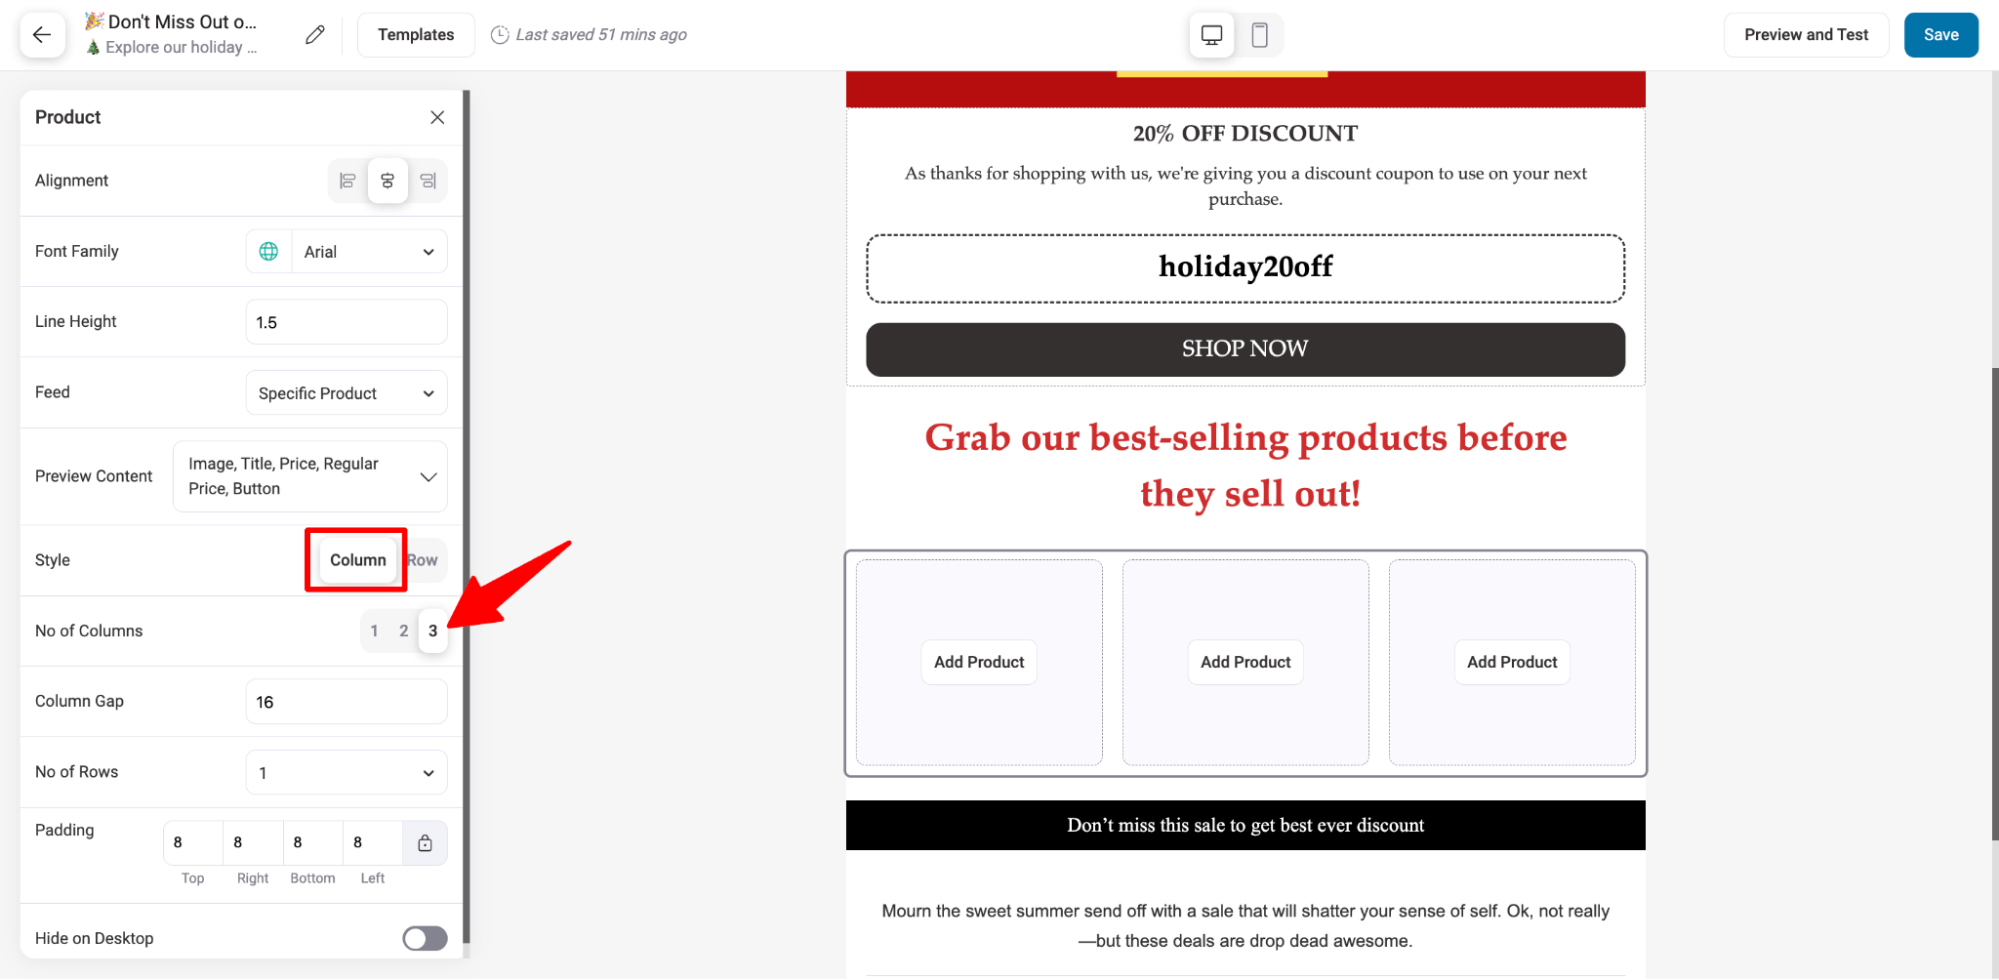
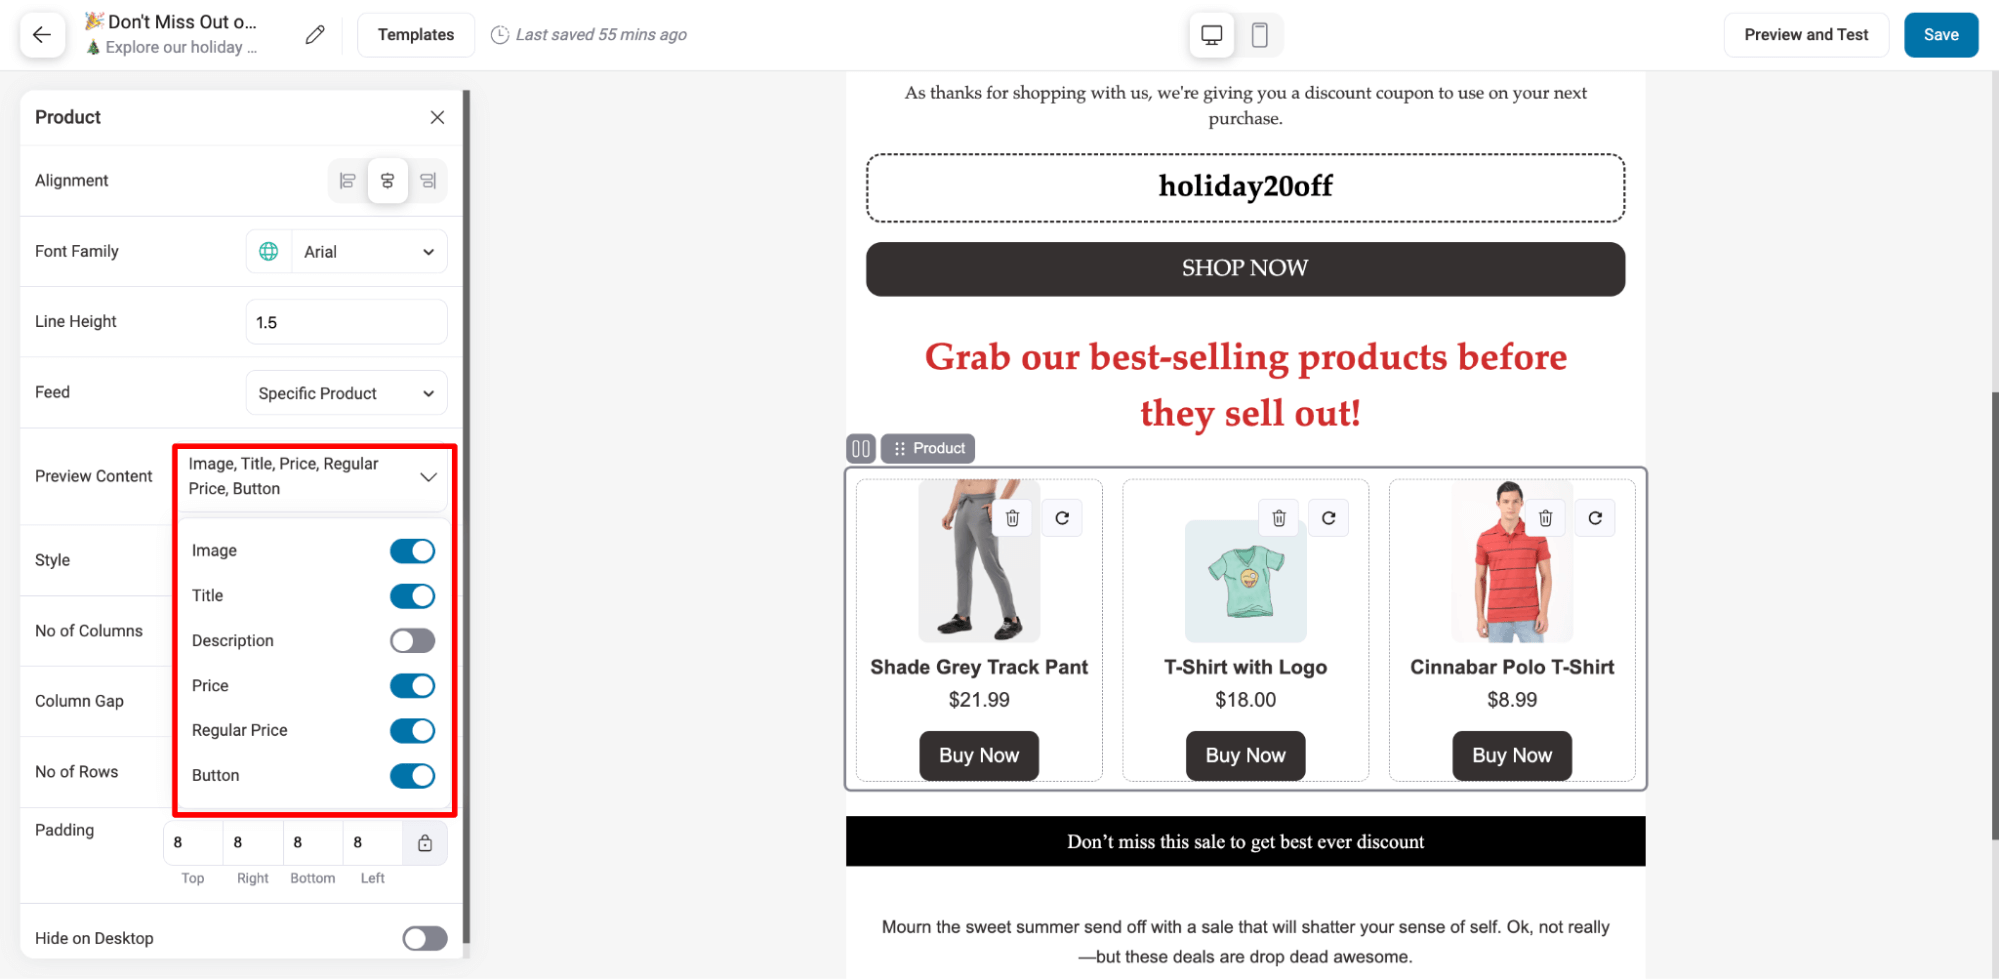
Now add a best-sellers section, so customers have something to click before they even reach the store. The product block pulls products straight from your WooCommerce catalog.
Choose how many product columns you want. We're going with 3.
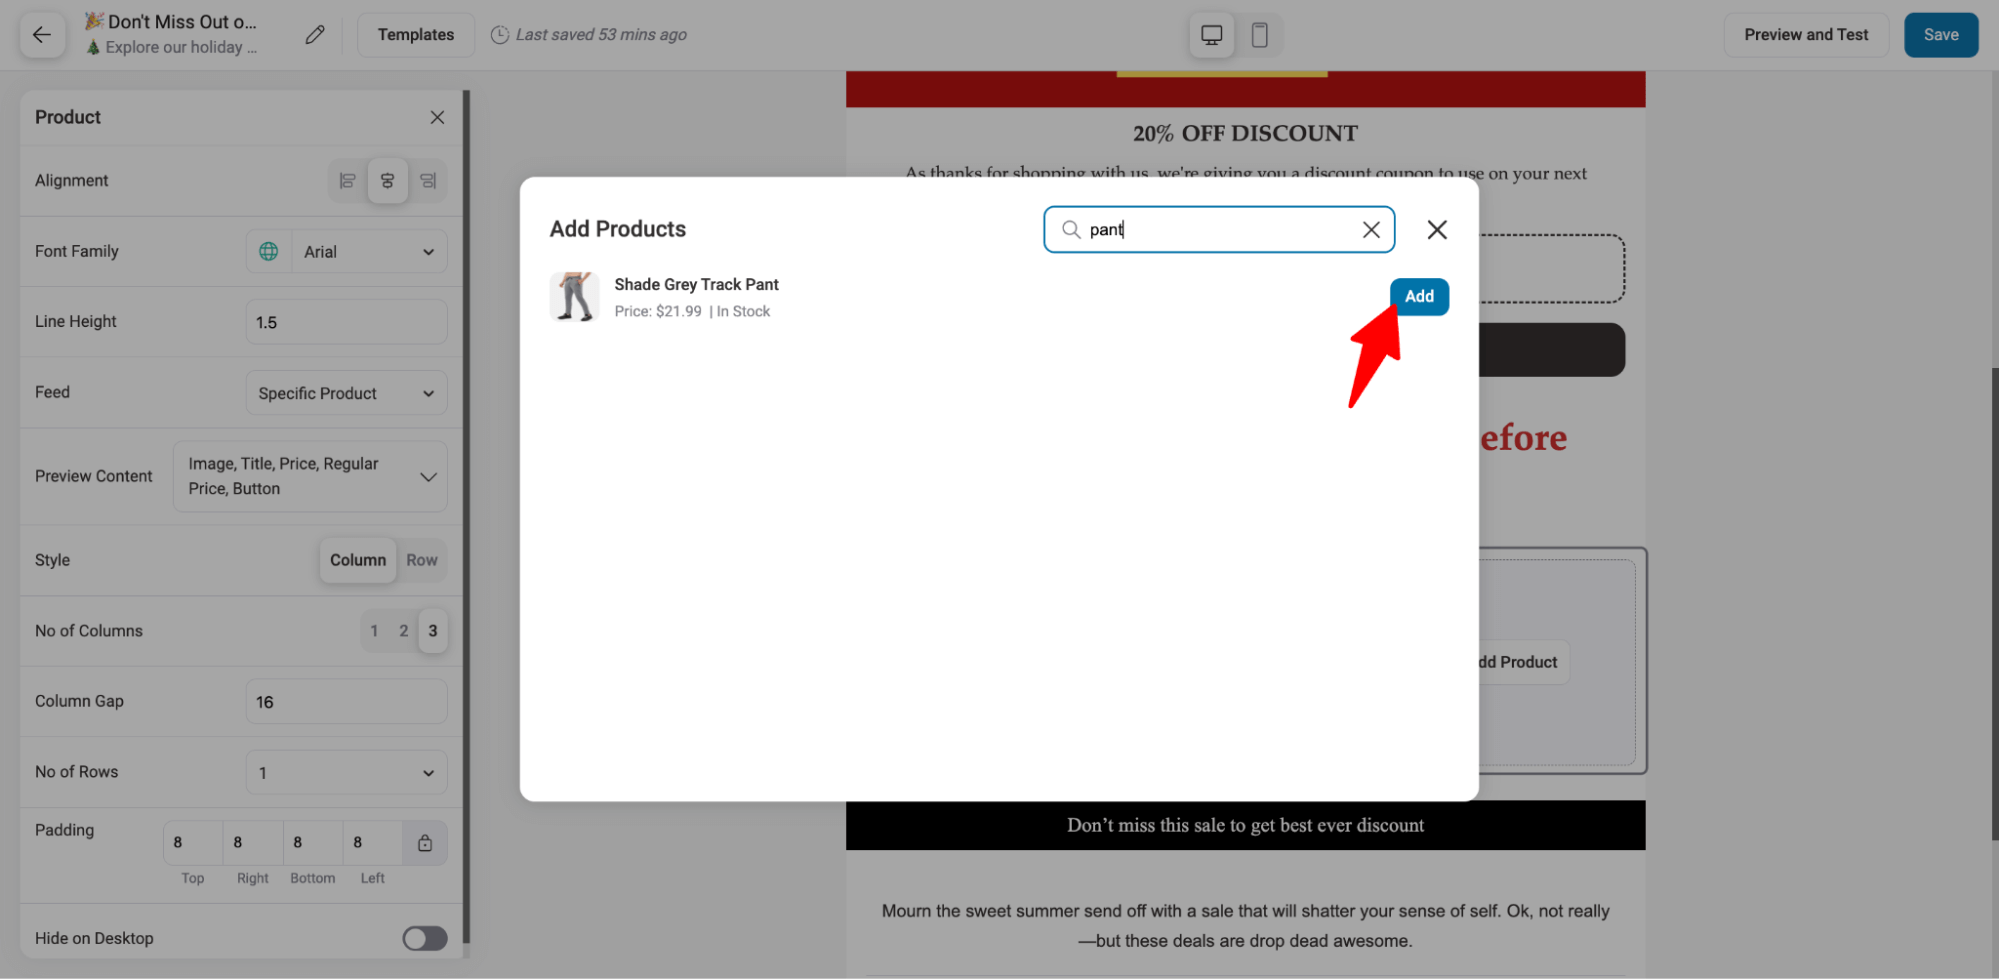
Search for each product and add it.
By default, each product shows its image, title, price, and a Buy Now button that links to that product.
You can hide any of these if you don't need them.
When the design is done, click Save Changes.
Then run the email audit. It flags broken links, missing links, and missing unsubscribe tags, so fix anything it finds before you move on.
Step 5: Test and send or schedule your email broadcast
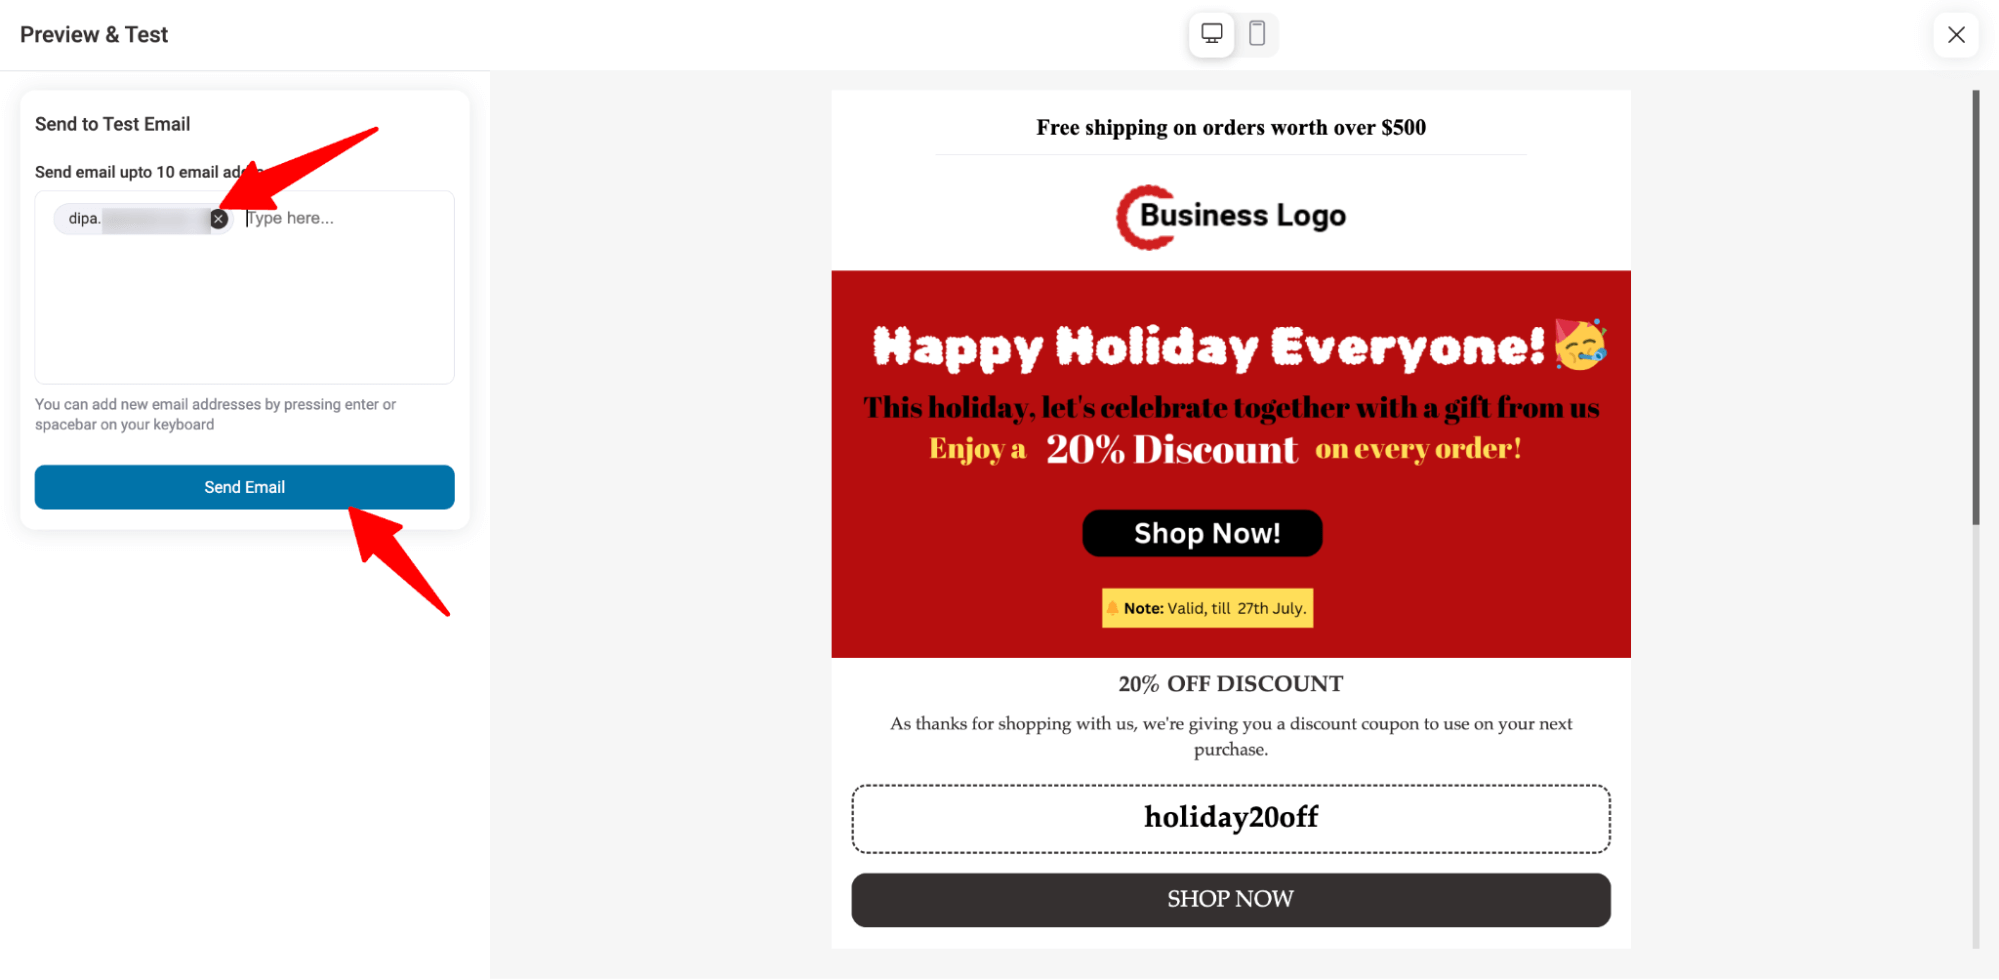
Click Preview and Test to send a test email and see how it looks in a real inbox.
Open it on your phone as well, and click the banner, the coupon button, and each product.
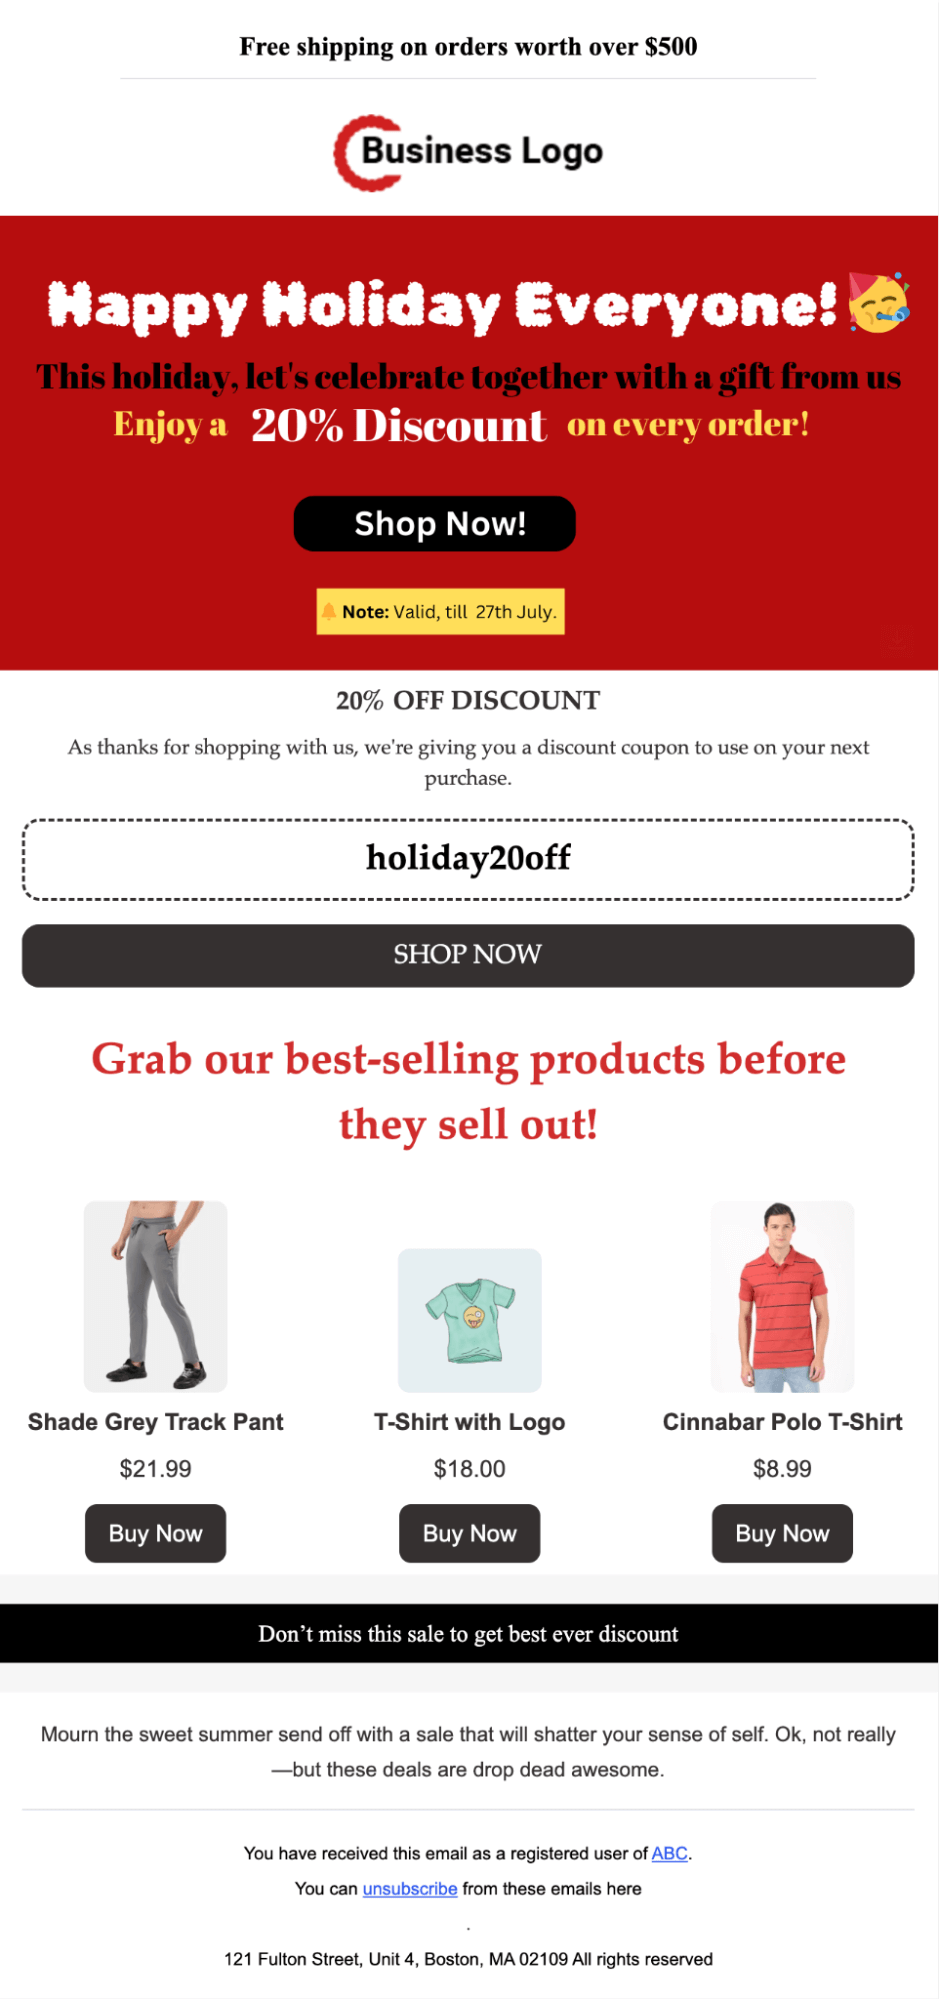
Here's how our email looks in the inbox:
Before the real send, place a test order on a staging site with the coupon applied, so you know the code works at checkout. A broken coupon halfway through a 48-hour sale is an expensive way to find a typo.
Click Next to move on.
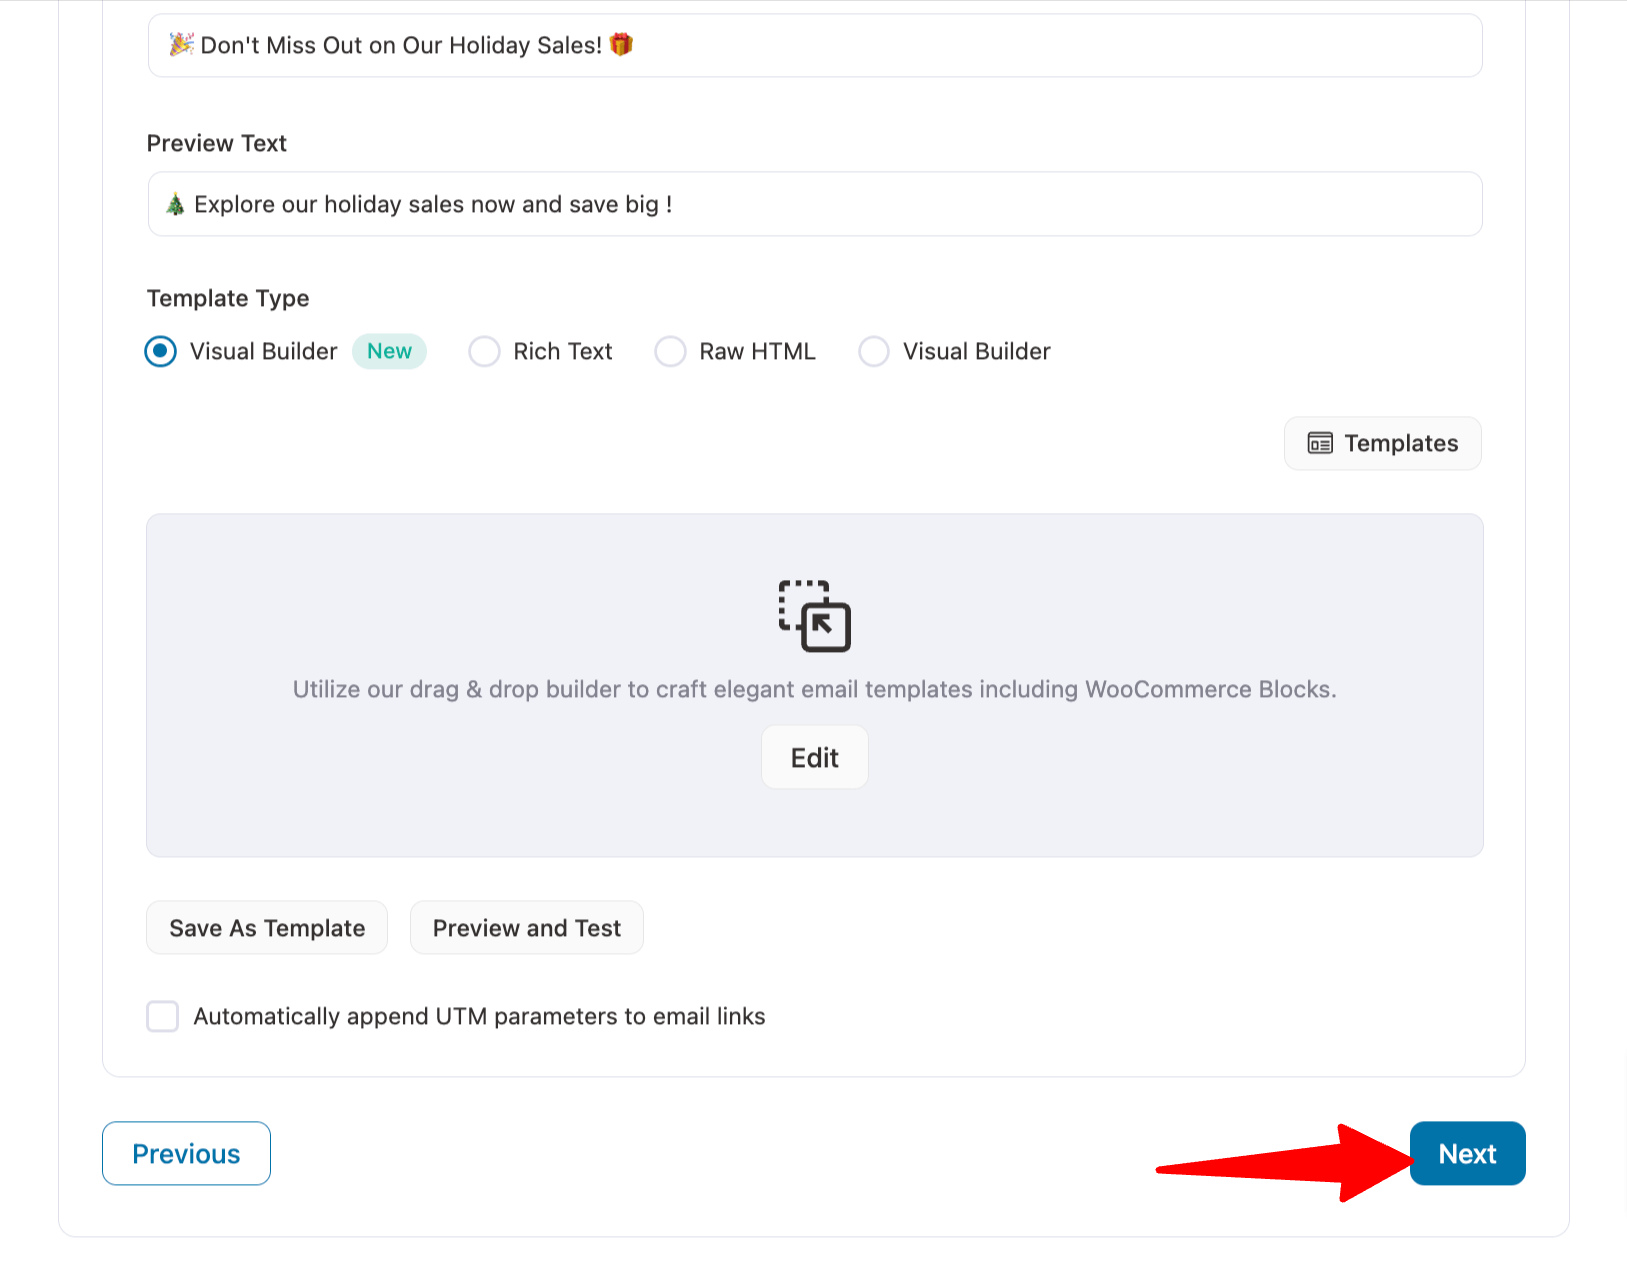
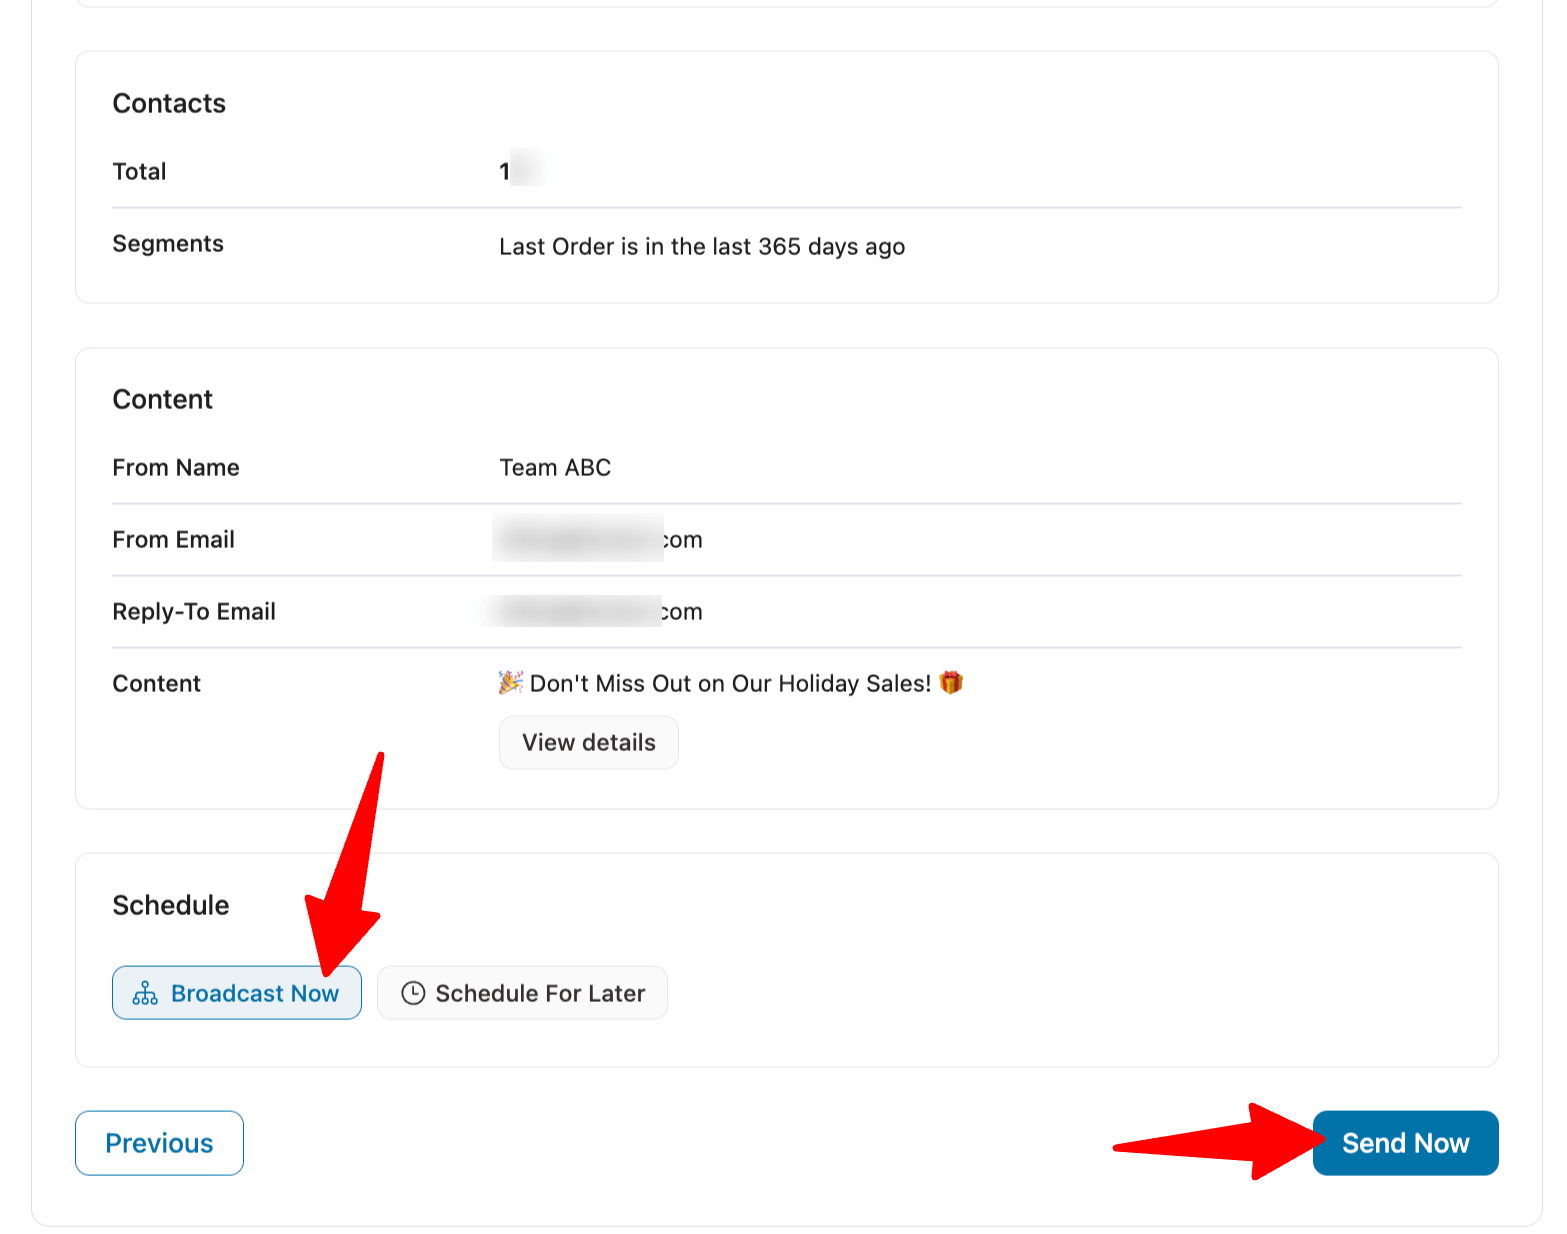
You'll see a campaign summary. If anything looks off, go back and change it.
Then choose when it goes out:
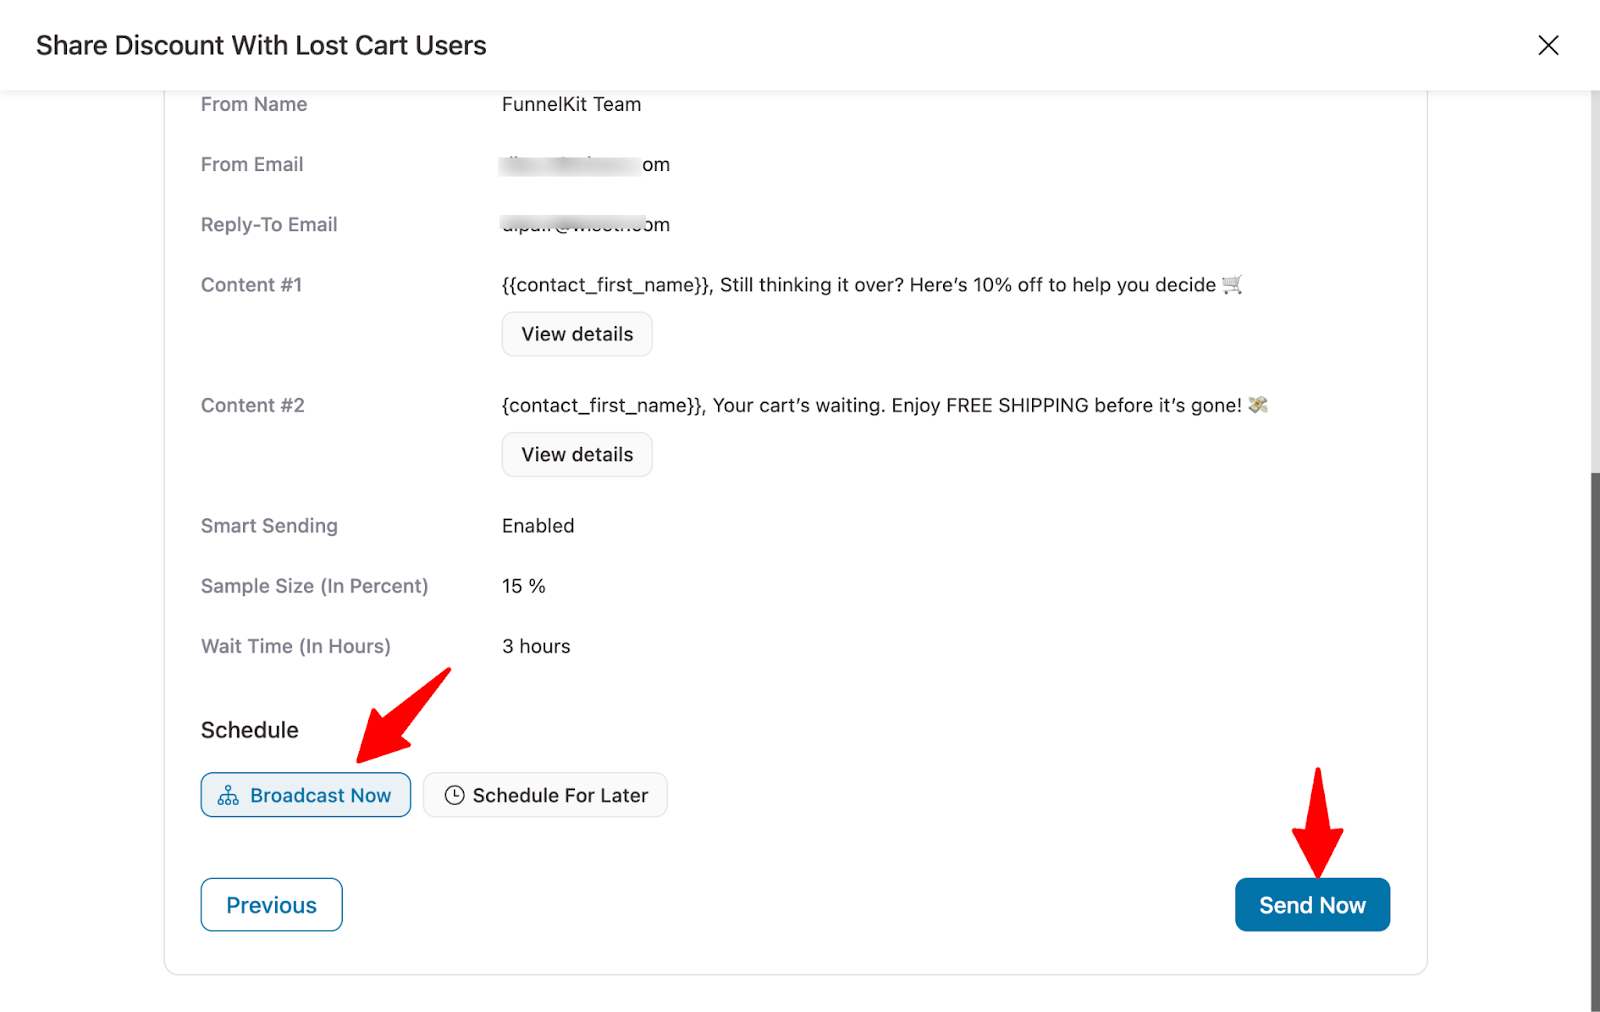
- Send it now: click Broadcast Now, then Send Now.
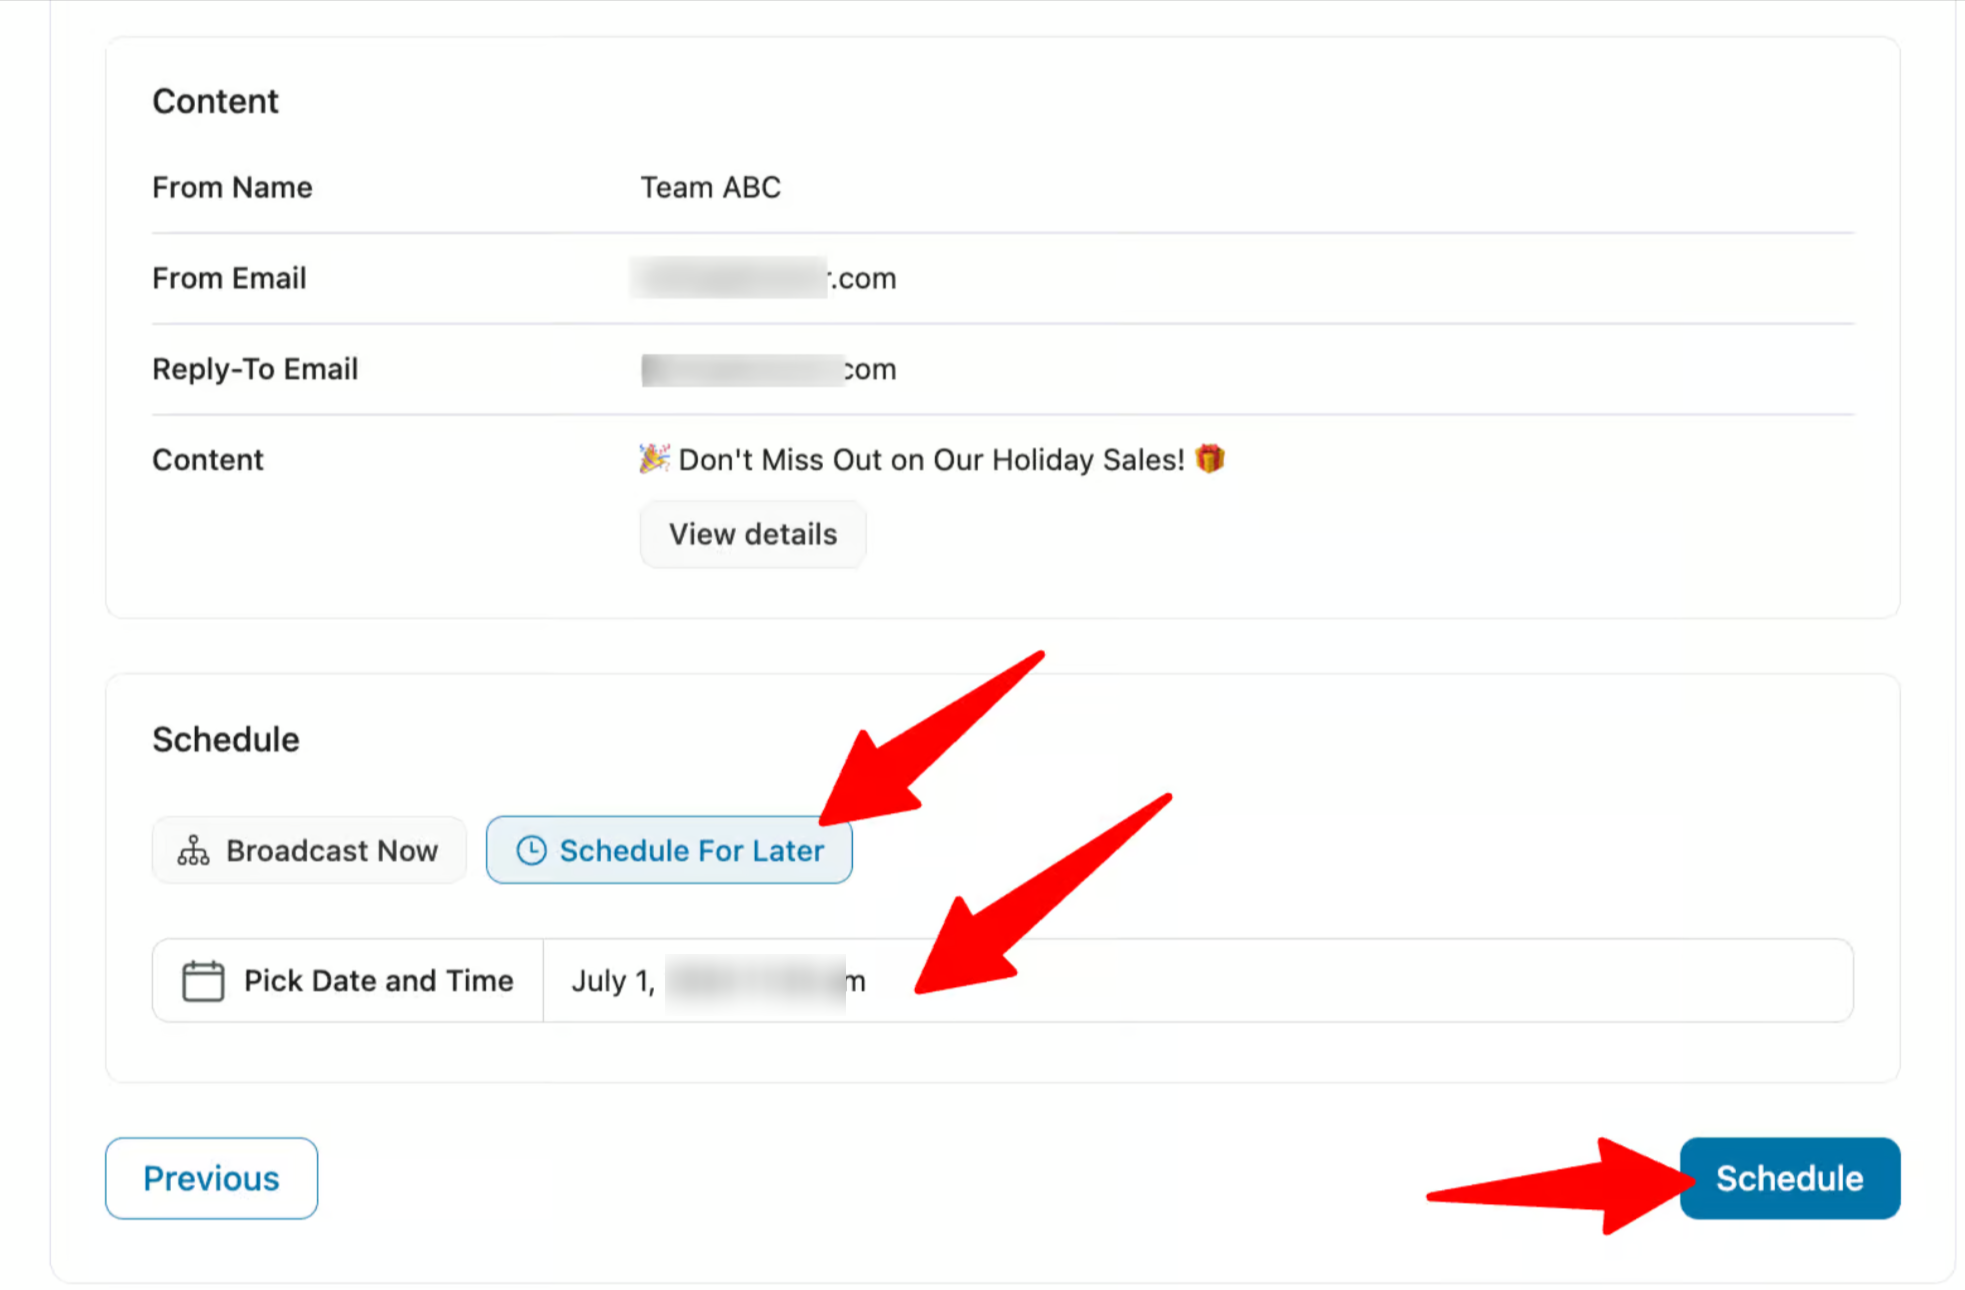
- Schedule it: click Schedule For Later, pick the date and time, then click Send Now. The button label stays the same, but the email waits until the time you chose. For a 48-hour sale, schedule it for the first morning so customers get the full window.
To schedule it later, choose a date and time, then hit 'Schedule'.
And that's it. Your broadcast goes out to the chosen audience on time.
After it goes out, open the campaign's analytics to track opens, clicks, orders, and revenue.
If your email service starts failing partway through, the plugin steps in. It pauses sending after 10 emails fail in a row and shows you your provider's error.
Fix the SMTP problem, and you can pick up where you left off.
Split-test the subject line with smart sending
With 4,000 people on the list, there's enough volume to test two subject lines. Choose A/B Test back in Step 1 and write two versions:
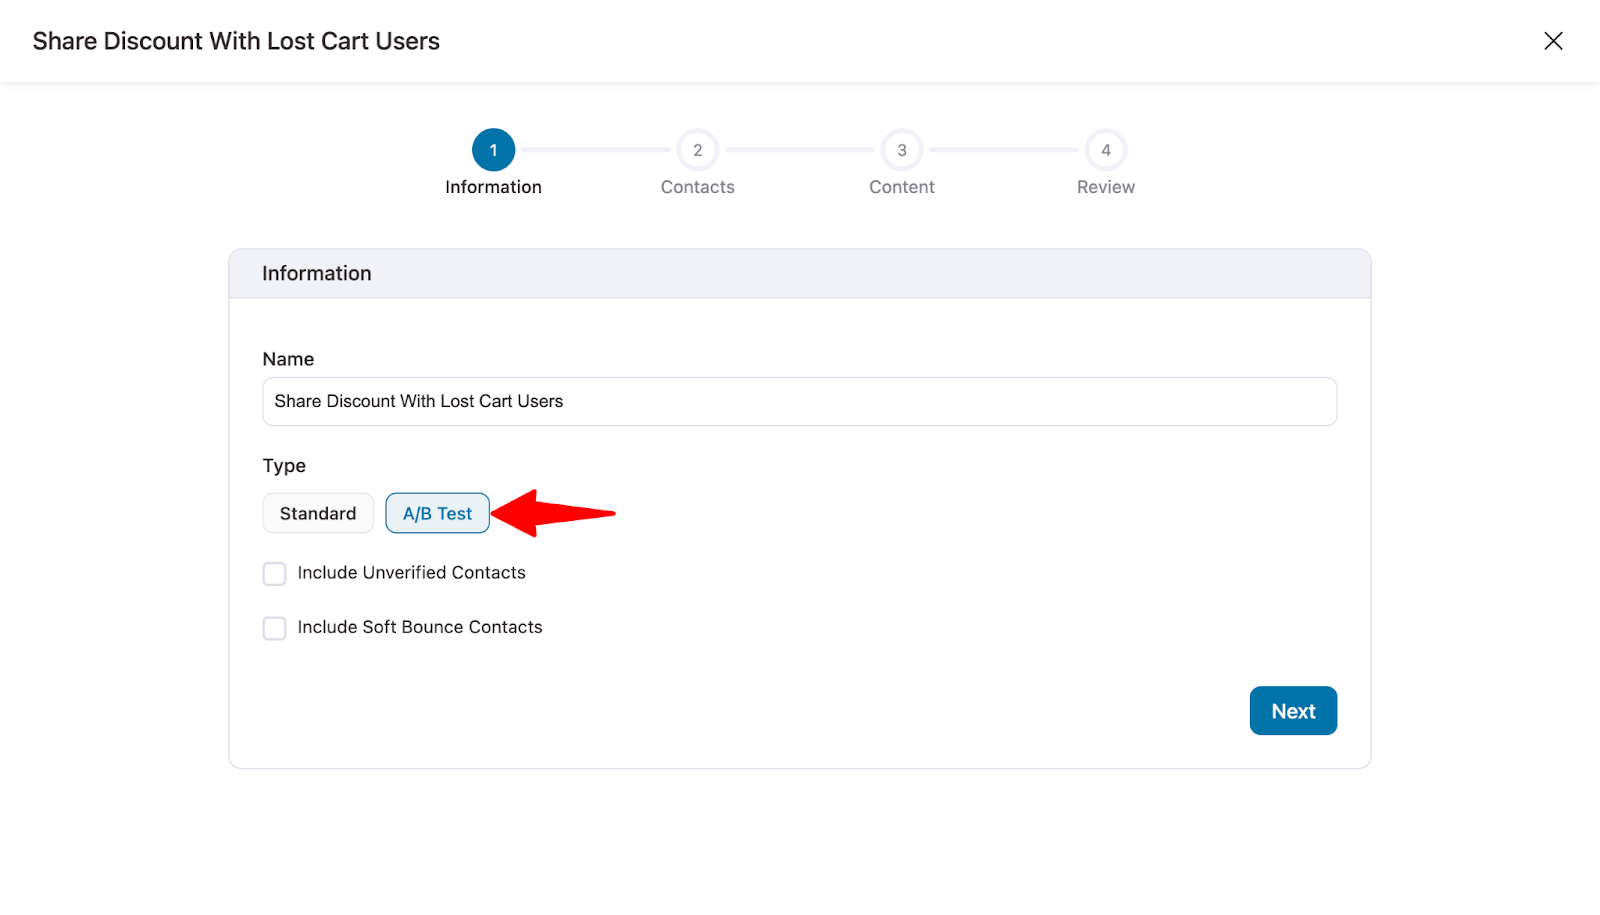
Then select your audience and create the variants. Besides the subject line, you can vary the preview text or the content to see what resonates.
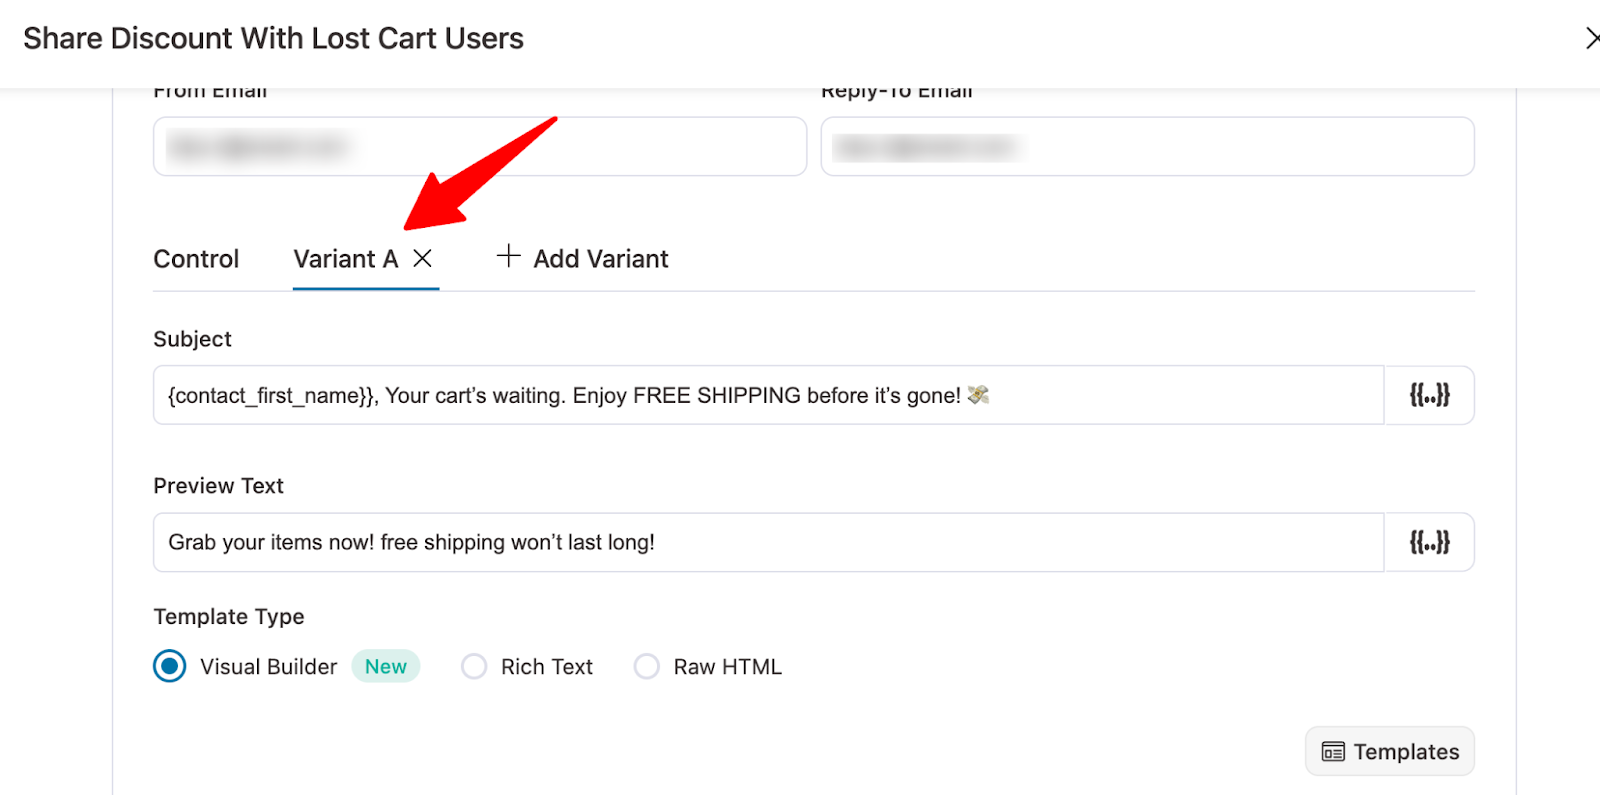
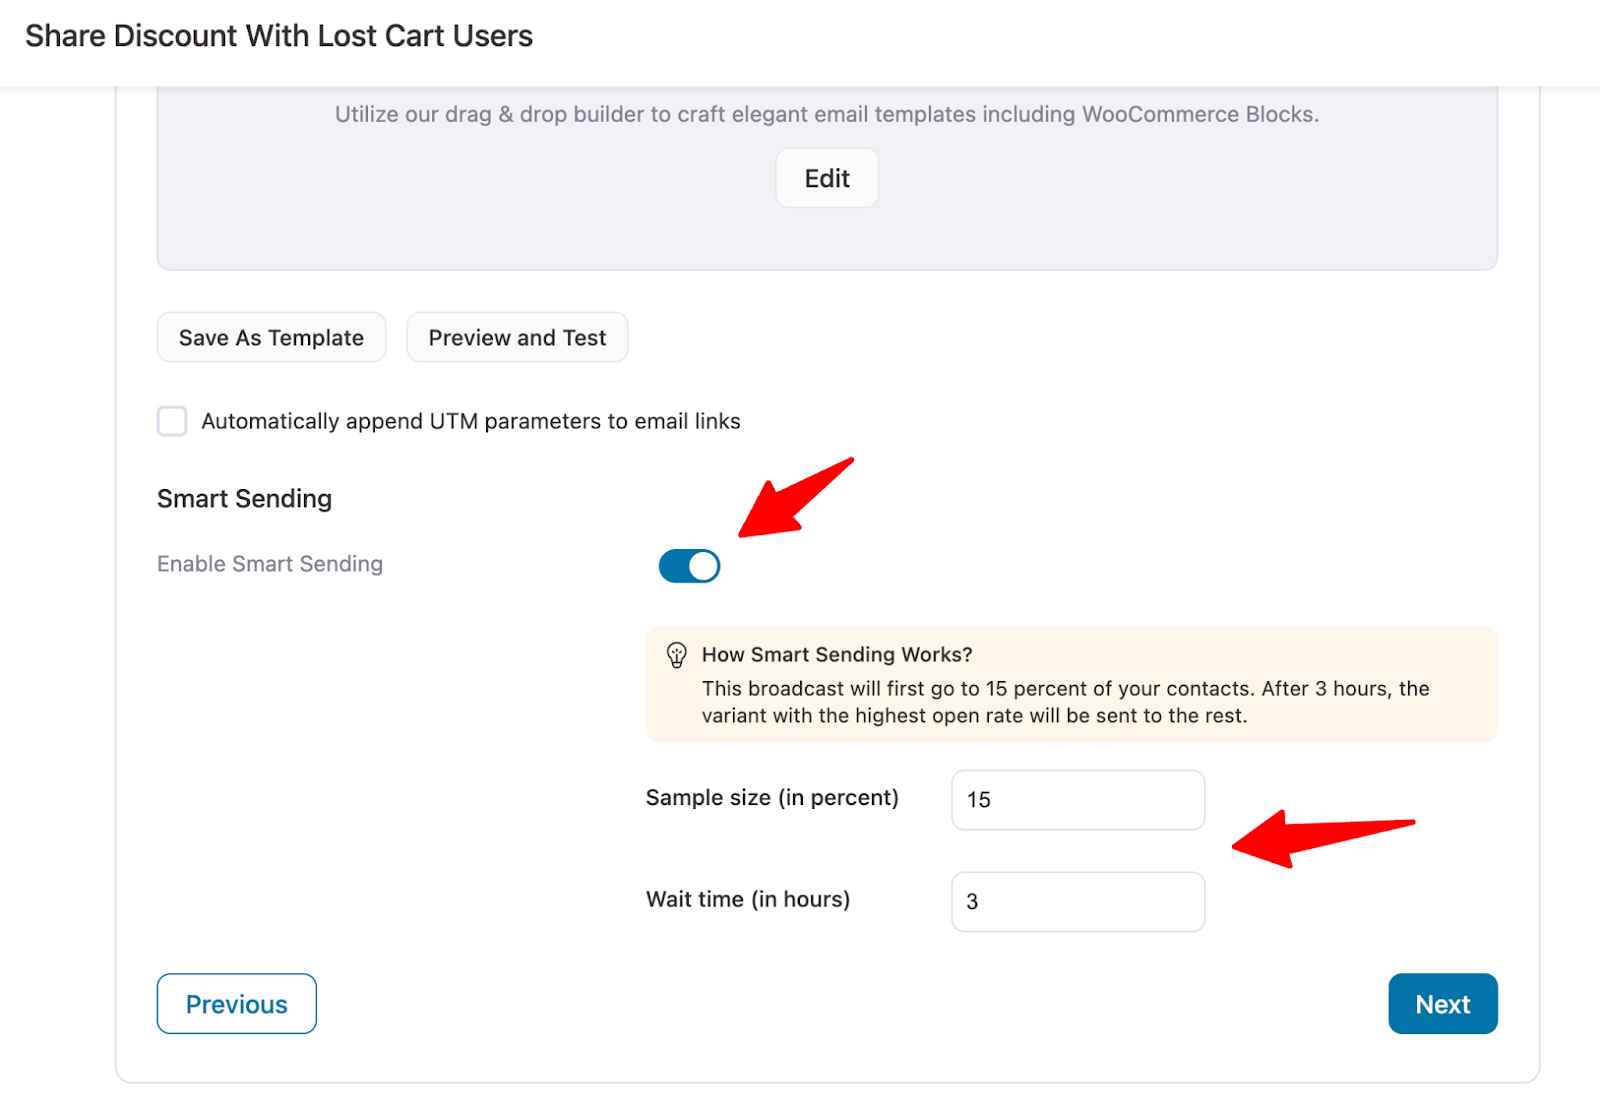
Switching on Smart Sending is super easy. Set a 15% sample and a three-hour wait:
- The first 600 contacts get the email, split evenly at 300 per version.
- Three hours later, the winning subject line goes out to the other 3,400.
- When the campaign finishes, the Smart Sending stats show which version won.
Finally, send the broadcast right away or schedule it for later.
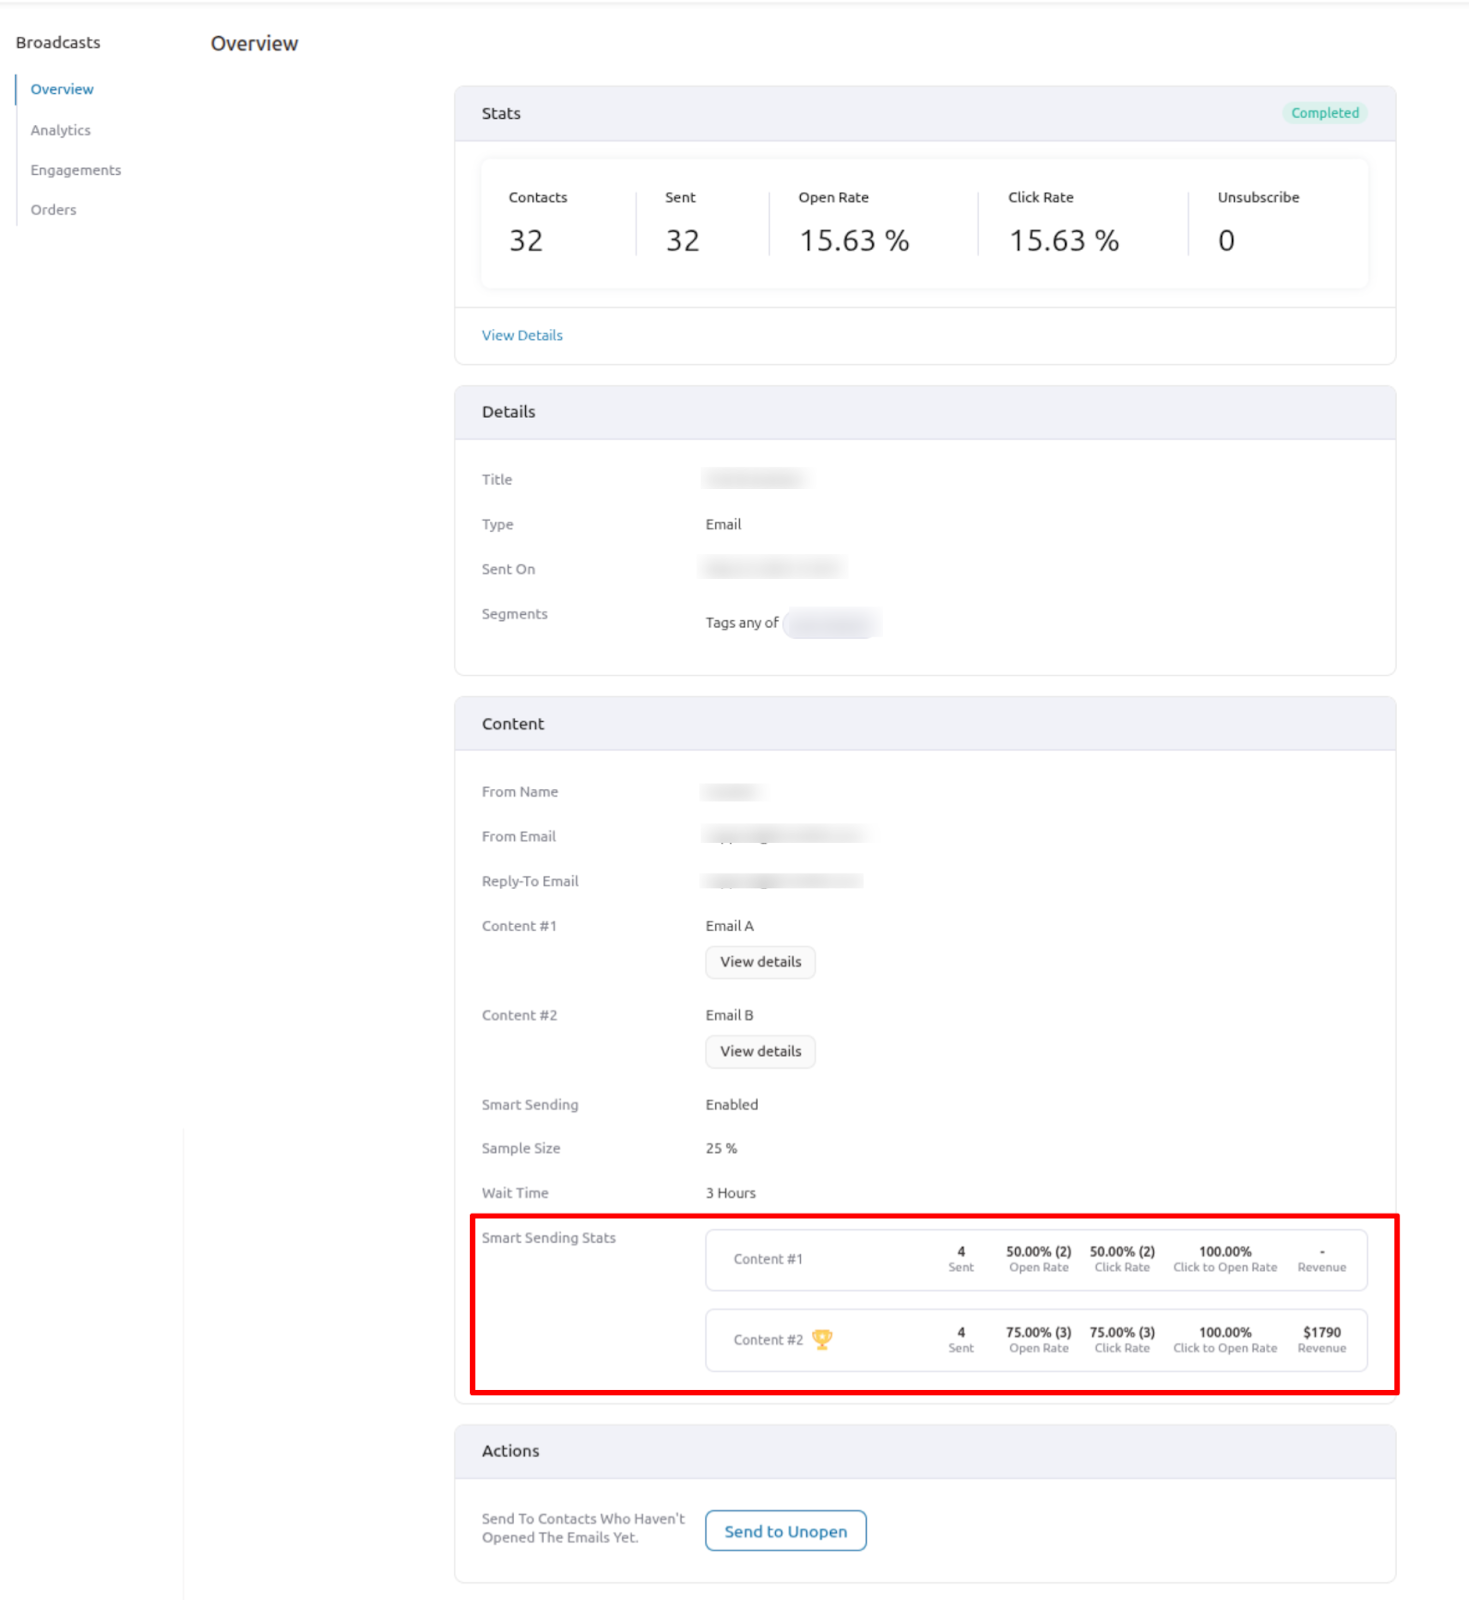
Once the broadcast is complete, go to Overview ⇨ Content ⇨ Smart Sending Stats to see emails sent, open rate, click rate, and revenue.
The winning variation is clearly marked.
This is how you A/B test broadcast emails right from your WordPress dashboard.
After You Send: What to Watch and What to Change Next Time
Give your campaign a day or two, then look at the results. Compare them against your own past campaigns rather than an industry-wide benchmark.
If this is your first broadcast, its numbers become the baseline for the next one.
| Metric | What it tells you | What to change if it disappoints |
|---|---|---|
| Open rate | How well the subject line and sender name work | Try new subject lines. Treat opens as a rough guide, since Apple Mail Privacy Protection inflates them |
| Click rate | How strong the offer and button are | Cut back to one offer and move the button higher |
| Orders and revenue | Whether the email paid off | Tighten the audience or sharpen the offer |
| Unsubscribe rate | Whether the email felt relevant, and how often you’re sending | Segment more closely or send less often |
| Spam complaint rate | Whether people wanted it | Stay under 0.1% and well away from 0.3% |
| Bounce rate | How healthy your list is | Remove hard bounces and verify older lists |
For Gmail recipients, keep an eye on your domain reputation in Google Postmaster Tools, the free dashboard from the pre-send checks.
A few simple habits make the next broadcast better than the last:
- Follow up with people who clicked: Someone who clicked the coupon CTA button but didn't buy is already interested. Send them an automated reminder before the 48-hour offer ends.
- Resend to non-openers once: Wait a day or two, change the subject line, and try again. One resend is usually enough.
- Warm up before peak season: Increase your sending volume gradually in the weeks leading up to Black Friday. Going from a few hundred emails to tens of thousands overnight is a bad idea.
- Retire cold contacts: Many senders remove subscribers who haven't opened an email in 90 to 180 days. A smaller list of people who actually engage is more useful than a large list that ignores you.
- Keep your From name consistent: Subscribers get used to seeing the same sender name in their inbox. Changing it can make your emails look unfamiliar and increase the chance of a spam complaint.
- Use your own timing data: Your customers' past engagement tells you more about when to send than a generic "best time to send an email" article.
5 Broadcast Campaign Ideas That Work For Online Stores
Decide what you want the campaign to do. These five broadcast email ideas cover most of the campaigns an online store needs.
1. VIP early access
Give your best customers a head start on a sale, maybe 24 hours before everyone else.
It makes the offer feel exclusive without requiring a bigger discount, and it lets you get some orders in before the main sale begins.
Sample subject: "You're in early: Black Friday prices are live for 48 hours"
2. Sales and holiday promotions
Keep these emails focused. Tell people what's on sale, when the offer ends, and give them one clear button to shop.
It's also worth leaving out customers who ordered in the past week.
They just paid full price, so sending them a discount right away can create an awkward refund conversation.
Sample subject: "20% off grinders ends Sunday at midnight"
3. Product launches for past buyers
Start with customers who already bought something related to the new product.
Show them how the new item works with what they already own.
For example, a kettle launch sent to people who bought a grinder is likely to be more relevant than the same email sent to your entire list.
Sample subject: "Made for the grinder you already love"
4. The monthly newsletter
Consistency matters more than trying to make every newsletter a huge event.
EmailToolTester's analysis of Litmus data found that brands sending 5 to 8 emails a month earned the highest return, averaging $48 for every dollar spent.
A monthly newsletter also gives customers a reason to hear from you between purchases.
Share new products, useful content, seasonal updates, or anything else worth opening.
Sample subject: "October at [Store]: new beans, plus our dial-in guide"
5. Service updates
Shipping cut-offs, policy changes, and planned downtime are worth sending as straightforward broadcast emails.
Keep the message focused on the update and skip the sales pitch.
Simple formatting makes it clear that the email is a notice, not another promotion.
Sample subject: "Holiday shipping cut-offs for your region"
Best Broadcast Email Tools Compared
Most of these tools can handle a broadcast email.
The bigger question is where your customer data lives and how easily you can use it to build an audience.
| Tool | Where you manage it | Free plan | Segmentation | A/B testing | Best for |
|---|---|---|---|---|---|
| FunnelKit Automations | WordPress dashboard | Yes (unlimited emails and unlimited contacts) | WooCommerce purchase data, engagement, custom fields | Yes, with Smart Sending | WooCommerce stores that want email inside WordPress |
| MailPoet | WordPress dashboard | Yes (up to 500 subscribers and 5,000 emails/month) | Lists, tags, purchasing behavior, custom fields | No | WordPress sites that want simple newsletters |
| Mailchimp | Its own dashboard | Yes (up to 250 contacts and 500 emails/month or 250 emails/day) | Tags, segments, prebuilt segments | Yes | General email marketing across platforms |
| Kit | Its own dashboard | Yes (up to 10,000 subscribers) | Tags and filters | Yes, for subject lines and content | Creators and newsletter-first businesses |
| Brevo | Its own dashboard | Yes (up to 300 emails/day and 2,000 contacts) | Lists and segments | Yes | Businesses that want email and SMS in one place |
| HubSpot | Its own dashboard | Yes (up to 2,000 emails/month) | Lists and CRM properties | Yes | Teams already using HubSpot CRM |
For a WooCommerce store, order data is usually the most useful starting point for segmentation.
FunnelKit Automations reads that data straight from your store, so you can build audiences like "customers who ordered this year but not this week" without exporting anything to another platform.
The same data powers the product blocks in your emails.
The trade-off is that you need to set up your own SMTP or email delivery service.
Note: For more options, see our guide to WordPress newsletter plugins.
Frequently Asked Questions (FAQs)
A broadcast is a one-time send you trigger yourself, usually for something time-sensitive like a sale.
An autoresponder fires automatically when a contact does something, like a welcome email after signup.
Not if each one is relevant and they arrive on a steady schedule. People get annoyed when the whole list gets offers that don't fit them, or when emails show up far more often than they expected.
Segment every promotional campaign and remove unsubscribes right away. Then watch your unsubscribe rate after each send.
Not for marketing. Past customers can still get service messages, like order updates or notices you're legally required to send, as long as they're not promotional.
Anything with an offer needs their consent first.
Only for genuine non-marketing messages, like a policy change or a security notice. FunnelKit has a standard option that includes unsubscribed and unverified contacts for exactly those cases. For promotions, leave them out. That keeps you compliant and protects your sender reputation.
Sending platforms pause a campaign when too many emails bounce or fail, to protect your domain.
In FunnelKit Automations, a broadcast pauses after 10 failed sends in a row, and the error message tells you why. Fix the SMTP or authentication issue, then resume.
Yes, for anything more than a handful of emails. WordPress can send mail on its own, but that mail isn't properly authenticated, and large sends tend to end up in spam.
Set up SMTP before your first campaign, not after the first one fails.
A marketing subdomain like news.yourstore.com can keep your marketing reputation apart from everyday business email. It won't cover up bad habits, though.
Spam filters judge the email itself, so sending to people who never signed up will still hurt you, no matter what domain you use.
Yes, if your platform supports SMS and people gave you separate permission to text them.
FunnelKit Automations sends SMS broadcasts through Twilio or BulkGate.
Keep the message short and link to the same sales page as the email.
Ready to Send Your First Broadcast From WordPress?
A broadcast email is one of the simplest ways to turn an existing customer list into sales.
If that list only hears from you when someone places an order, you're missing plenty of opportunities to bring customers back.
Once your permissions, authentication, and sending setup are in place, each campaign becomes easier to run.
What makes them work isn't sending more emails. It's sending messages that people actually want to open.
That means targeting the right subscribers, trying different subject lines or content, and making sure your emails are delivered properly.
And FunnelKit Automations makes this job even more efficient. With this WordPress email broadcast plugin, you can segment your audience, design emails with the visual builder, and A/B test them.
You also get a 360-degree overview of contacts, including contact information, purchase history, and website engagement.
So, are you ready to use FunnelKit Automations to send beautiful broadcast emails without any hassle?
Editorial Team
September 4, 2026Struggling with WordPress emails landing in spam or not reaching users at all? Password resets, order notifications, and customer updates are essential, but the default WordPress email system is not...
Editorial Team
August 11, 2026Best WooCommerce marketing plugins can make the difference between a store that just exists and one that consistently generates sales. Even if your products are great, they won’t sell if...
Editorial Team
November 27, 2025Black Friday and Cyber Monday are the most anticipated events for WordPress users. It’s the perfect time to grab the WordPress plugins you’ve been eyeing at discounted prices. In this...






