
Sending WooCommerce order notification emails is essential for keeping your customers informed and reassured whenever they place, process, complete, cancel, or receive a refund for an order.
WooCommerce handles these emails with a built-in notification system that covers the entire order lifecycle.
But the default setup has many limitations, including limited customization, emails landing in spam folders, no mobile alerts, and no visibility into their impact.
In this blog, we'll cover how to customize your order emails to fit your brand and goals, set up SMTP, send them to multiple recipients, and more.
Watch our quick video tutorial:
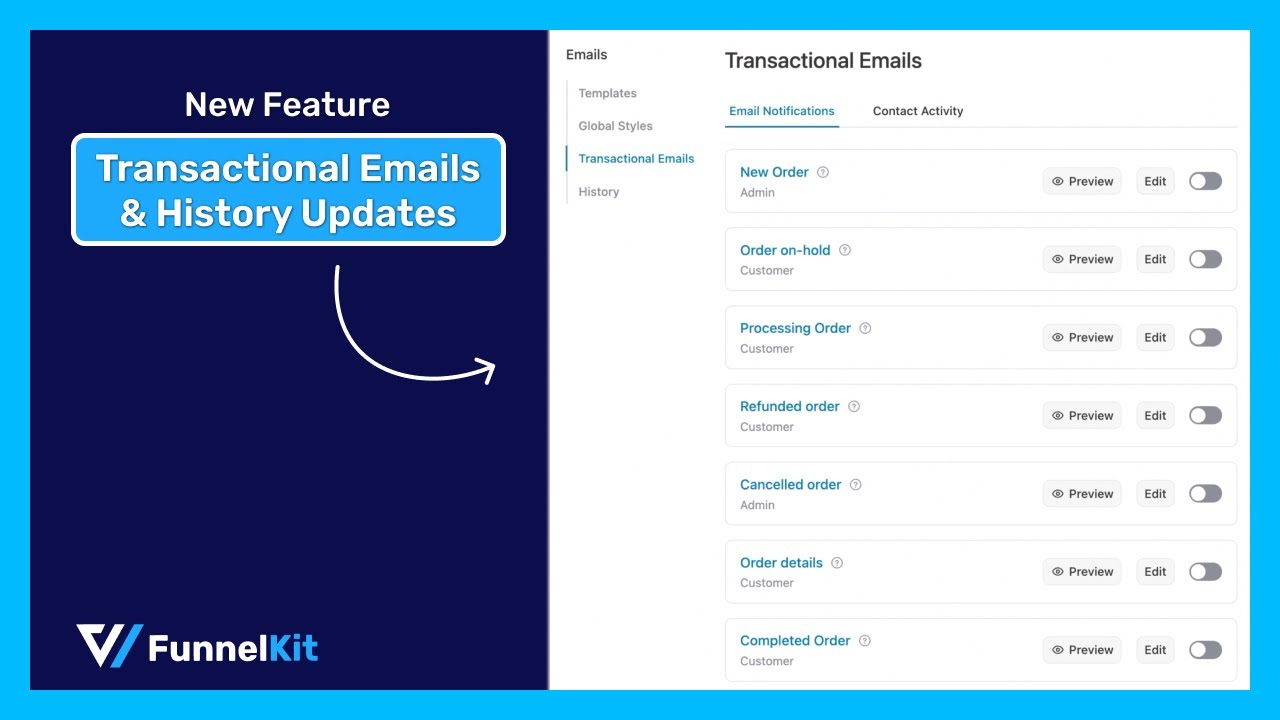
Table of Contents
- 1 WooCommerce Order Notification Emails Explained
- 2 Method 1: Configure WooCommerce Order Notification Email (Default Settings)
- 3 Method 2: Send Custom WooCommerce Order Notification Emails with Visual Builder
- 4 How to Send Custom Order Notifications For Different Products and Categories?
- 5 8 Best Practices to Improve the Performance of WooCommerce Order Notification Emails
- 6 Frequently Asked Questions (FAQs)
- 7 Set Up Your WooCommerce Order Notification Emails the Right Way!
WooCommerce Order Notification Emails Explained
For every new order, WooCommerce provides options to send specific order notification emails to both the admin and the customer.
Here’s a list of the default WooCommerce order notification emails:
Admin notifications
These emails are sent to the store admin or staff to keep them informed about order status and to help with order management.
- New Order: Sent to the admin when a new order is placed
- Canceled Order: Sent to the admin when an order is canceled
- Failed Order: Sent to the admin when an order payment fails
These are often called order notification emails because they notify the store about important order events. They are internal alerts and not sent to customers.
Customer notifications
These emails are sent to customers and are part of the transactional flow between the store and buyer. They confirm or update the customer about their purchase or account.
- Order On-Hold: Sent to the customer when the order is placed on hold
- Processing Order: Sent to the customer when payment is received and the order is processed
- Completed Order: Sent to the customer when the order is marked complete
- Refunded Order: Sent to the customer when the order is refunded (full or partial)
- Customer Invoice / Order Details: Sent to the customer with a payment link
- Customer Note: Sent when a note is added to the customer’s order
- Reset Password: Sent when the customer requests a password reset
- New Account: Sent to the customer when a new account is created
These are called transactional emails because they directly relate to a specific transaction or customer action and are crucial for communication and trust.
To ensure WooCommerce sends all the above new-order emails, make sure they are enabled and configured correctly.
Method 1: Configure WooCommerce Order Notification Email (Default Settings)
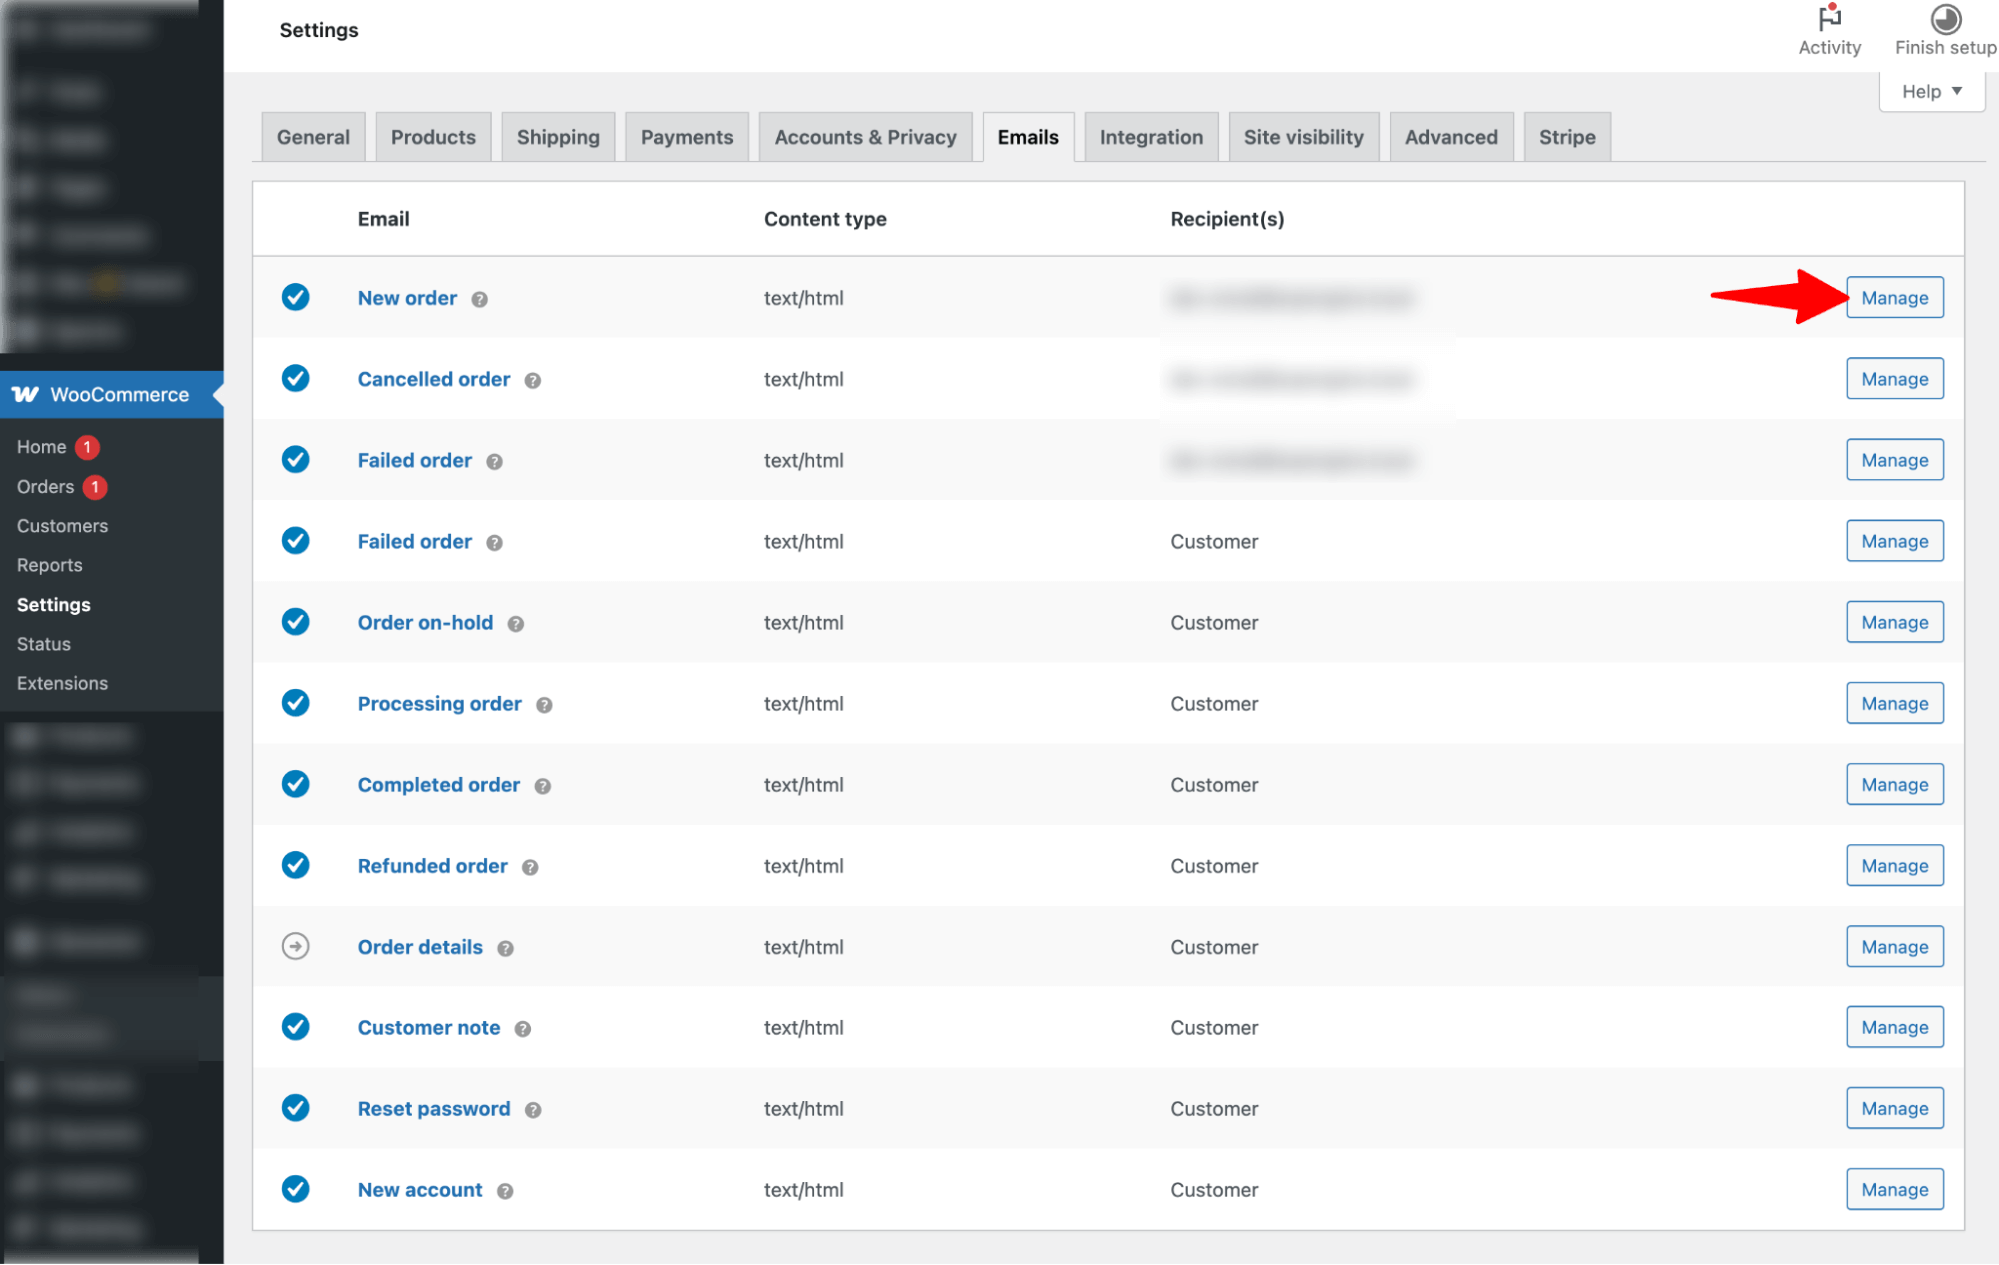
Go to WooCommerce ⇒ Settings ⇒ Emails to view all default WooCommerce email notifications.
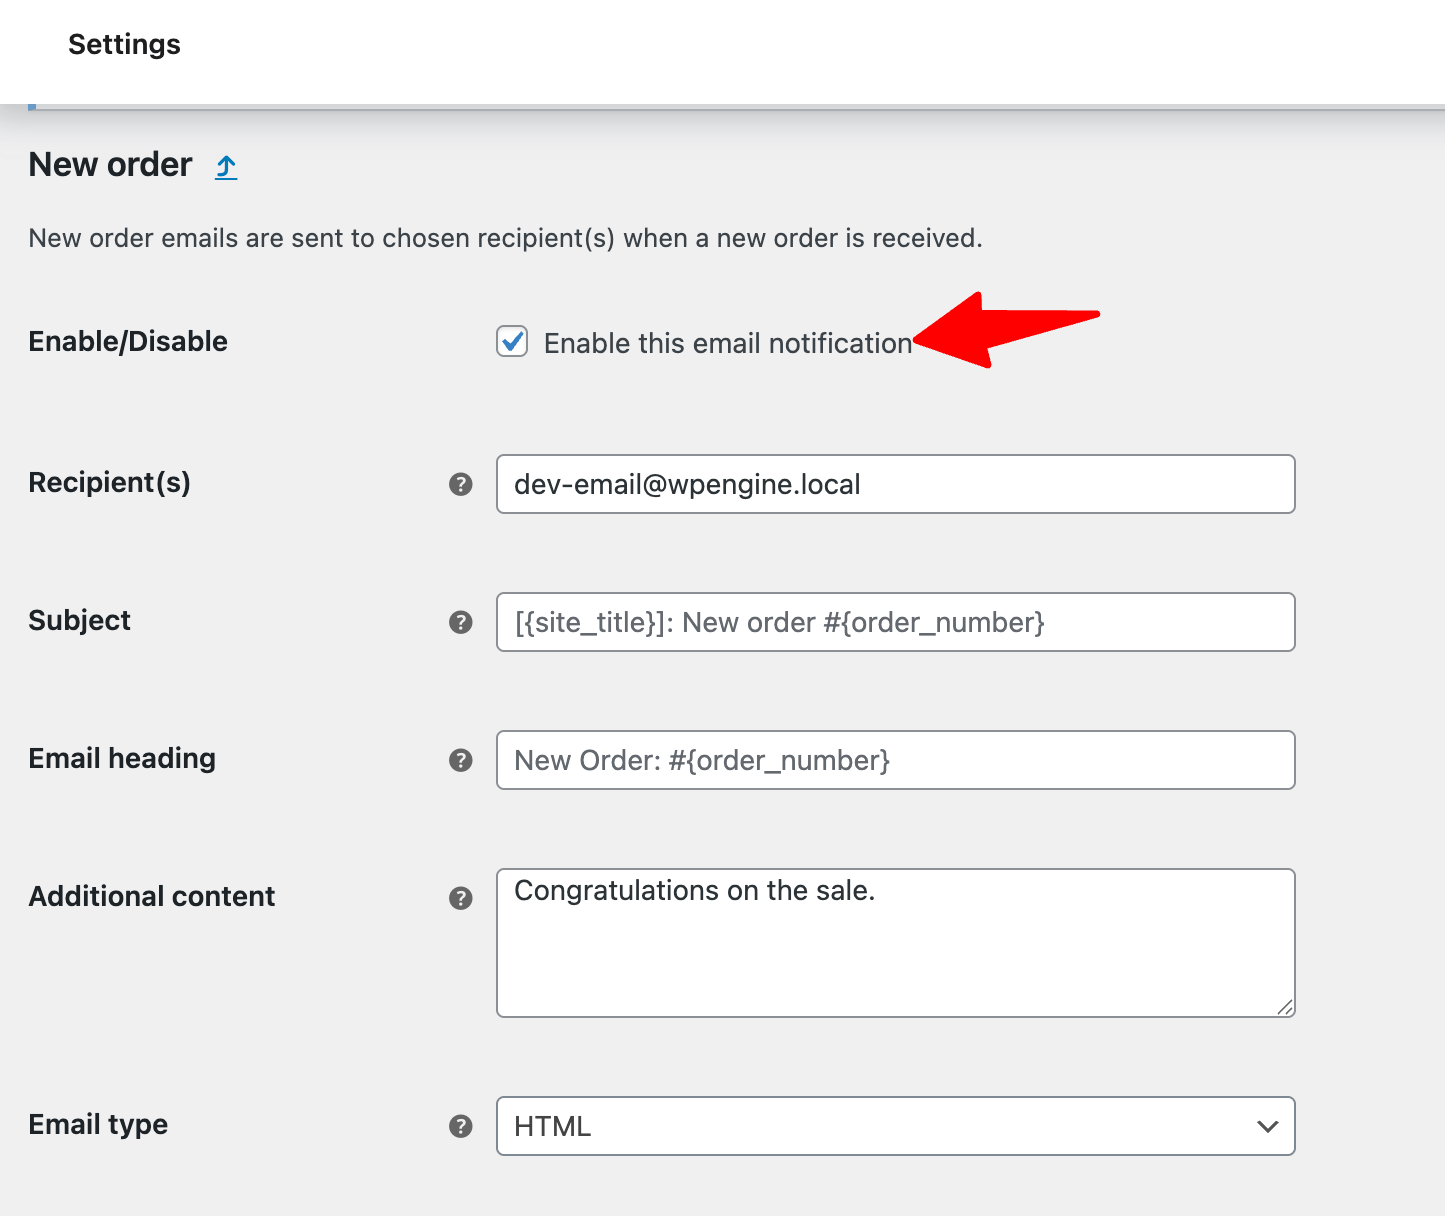
Click 'Manage' next to any email (e.g., New Order) and ensure it's enabled to send notifications.
Check 'Enable this email notification' to activate the email, then customize the subject, heading, extra content, and email type.
Finally, click 'Save Changes' to apply your updates.
Here is the final preview of the order notification email for new order confirmation:
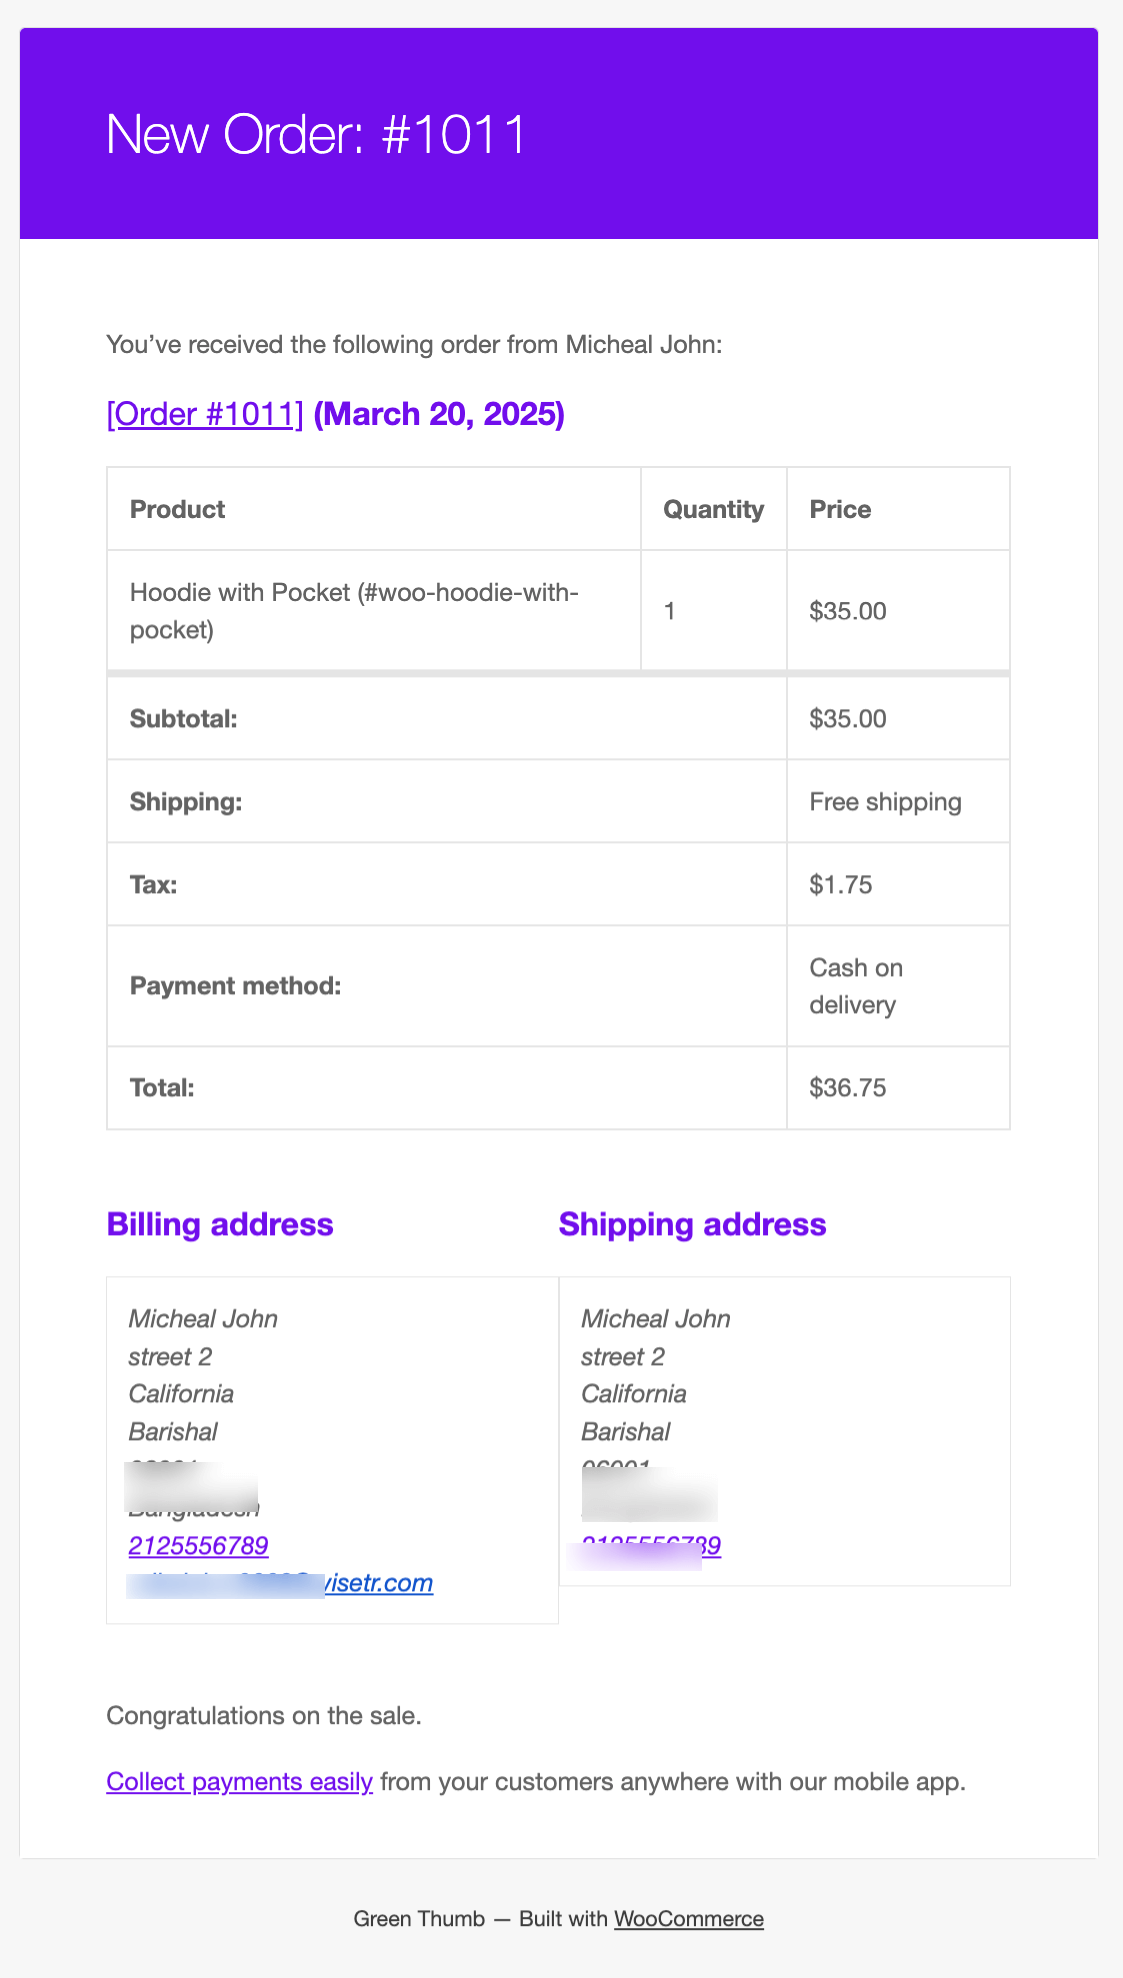
As you can see, the notification is basic and offers little flexibility. For greater flexibility, you need to rely on a WooCommerce order notification email plugin.
Method 2: Send Custom WooCommerce Order Notification Emails with Visual Builder
In this section, we'll demonstrate the step-by-step process to send custom order emails in WooCommerce.
We will use FunnelKit Automations, a comprehensive email marketing solution that lets you send custom email notifications, track orders and conversions for each campaign, and more.
Before we begin, get a copy of FunnelKit Automations and install it on your WordPress website.
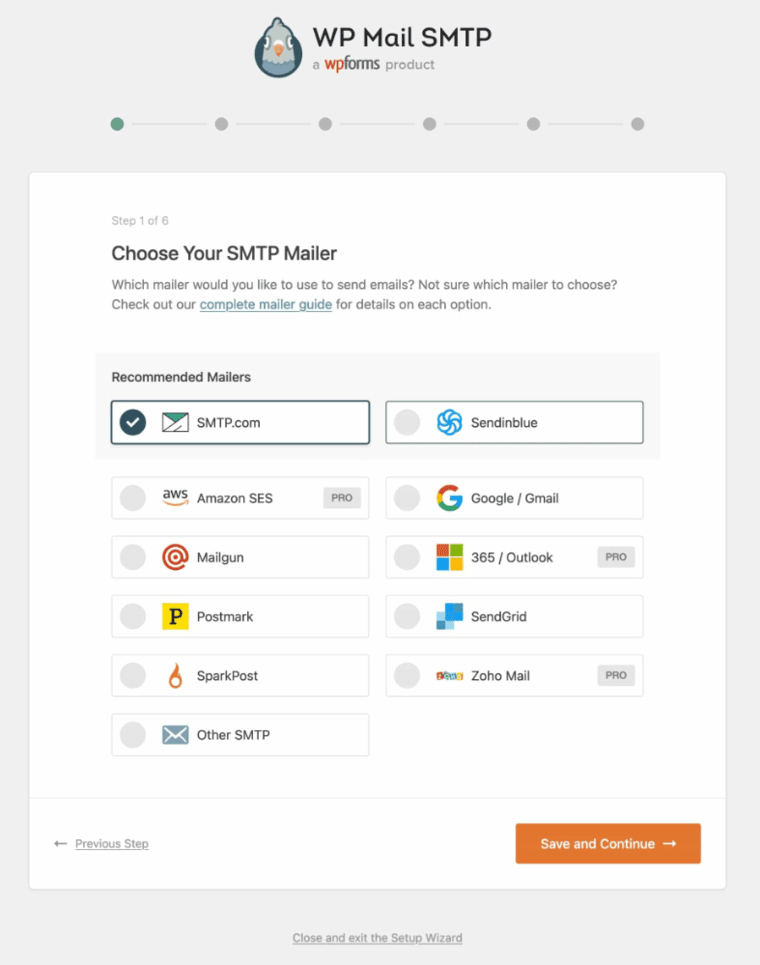
Step 1: Install and configure the SMTP plugin on your website
The first step is to configure SMTP to ensure maximum email deliverability. For this, you need to install and activate WP Mail SMTP. And configure it with your choice of SMTP provider.
For details, check our guide on setting up SMTP in WordPress.
Step 2: Customize order notification email
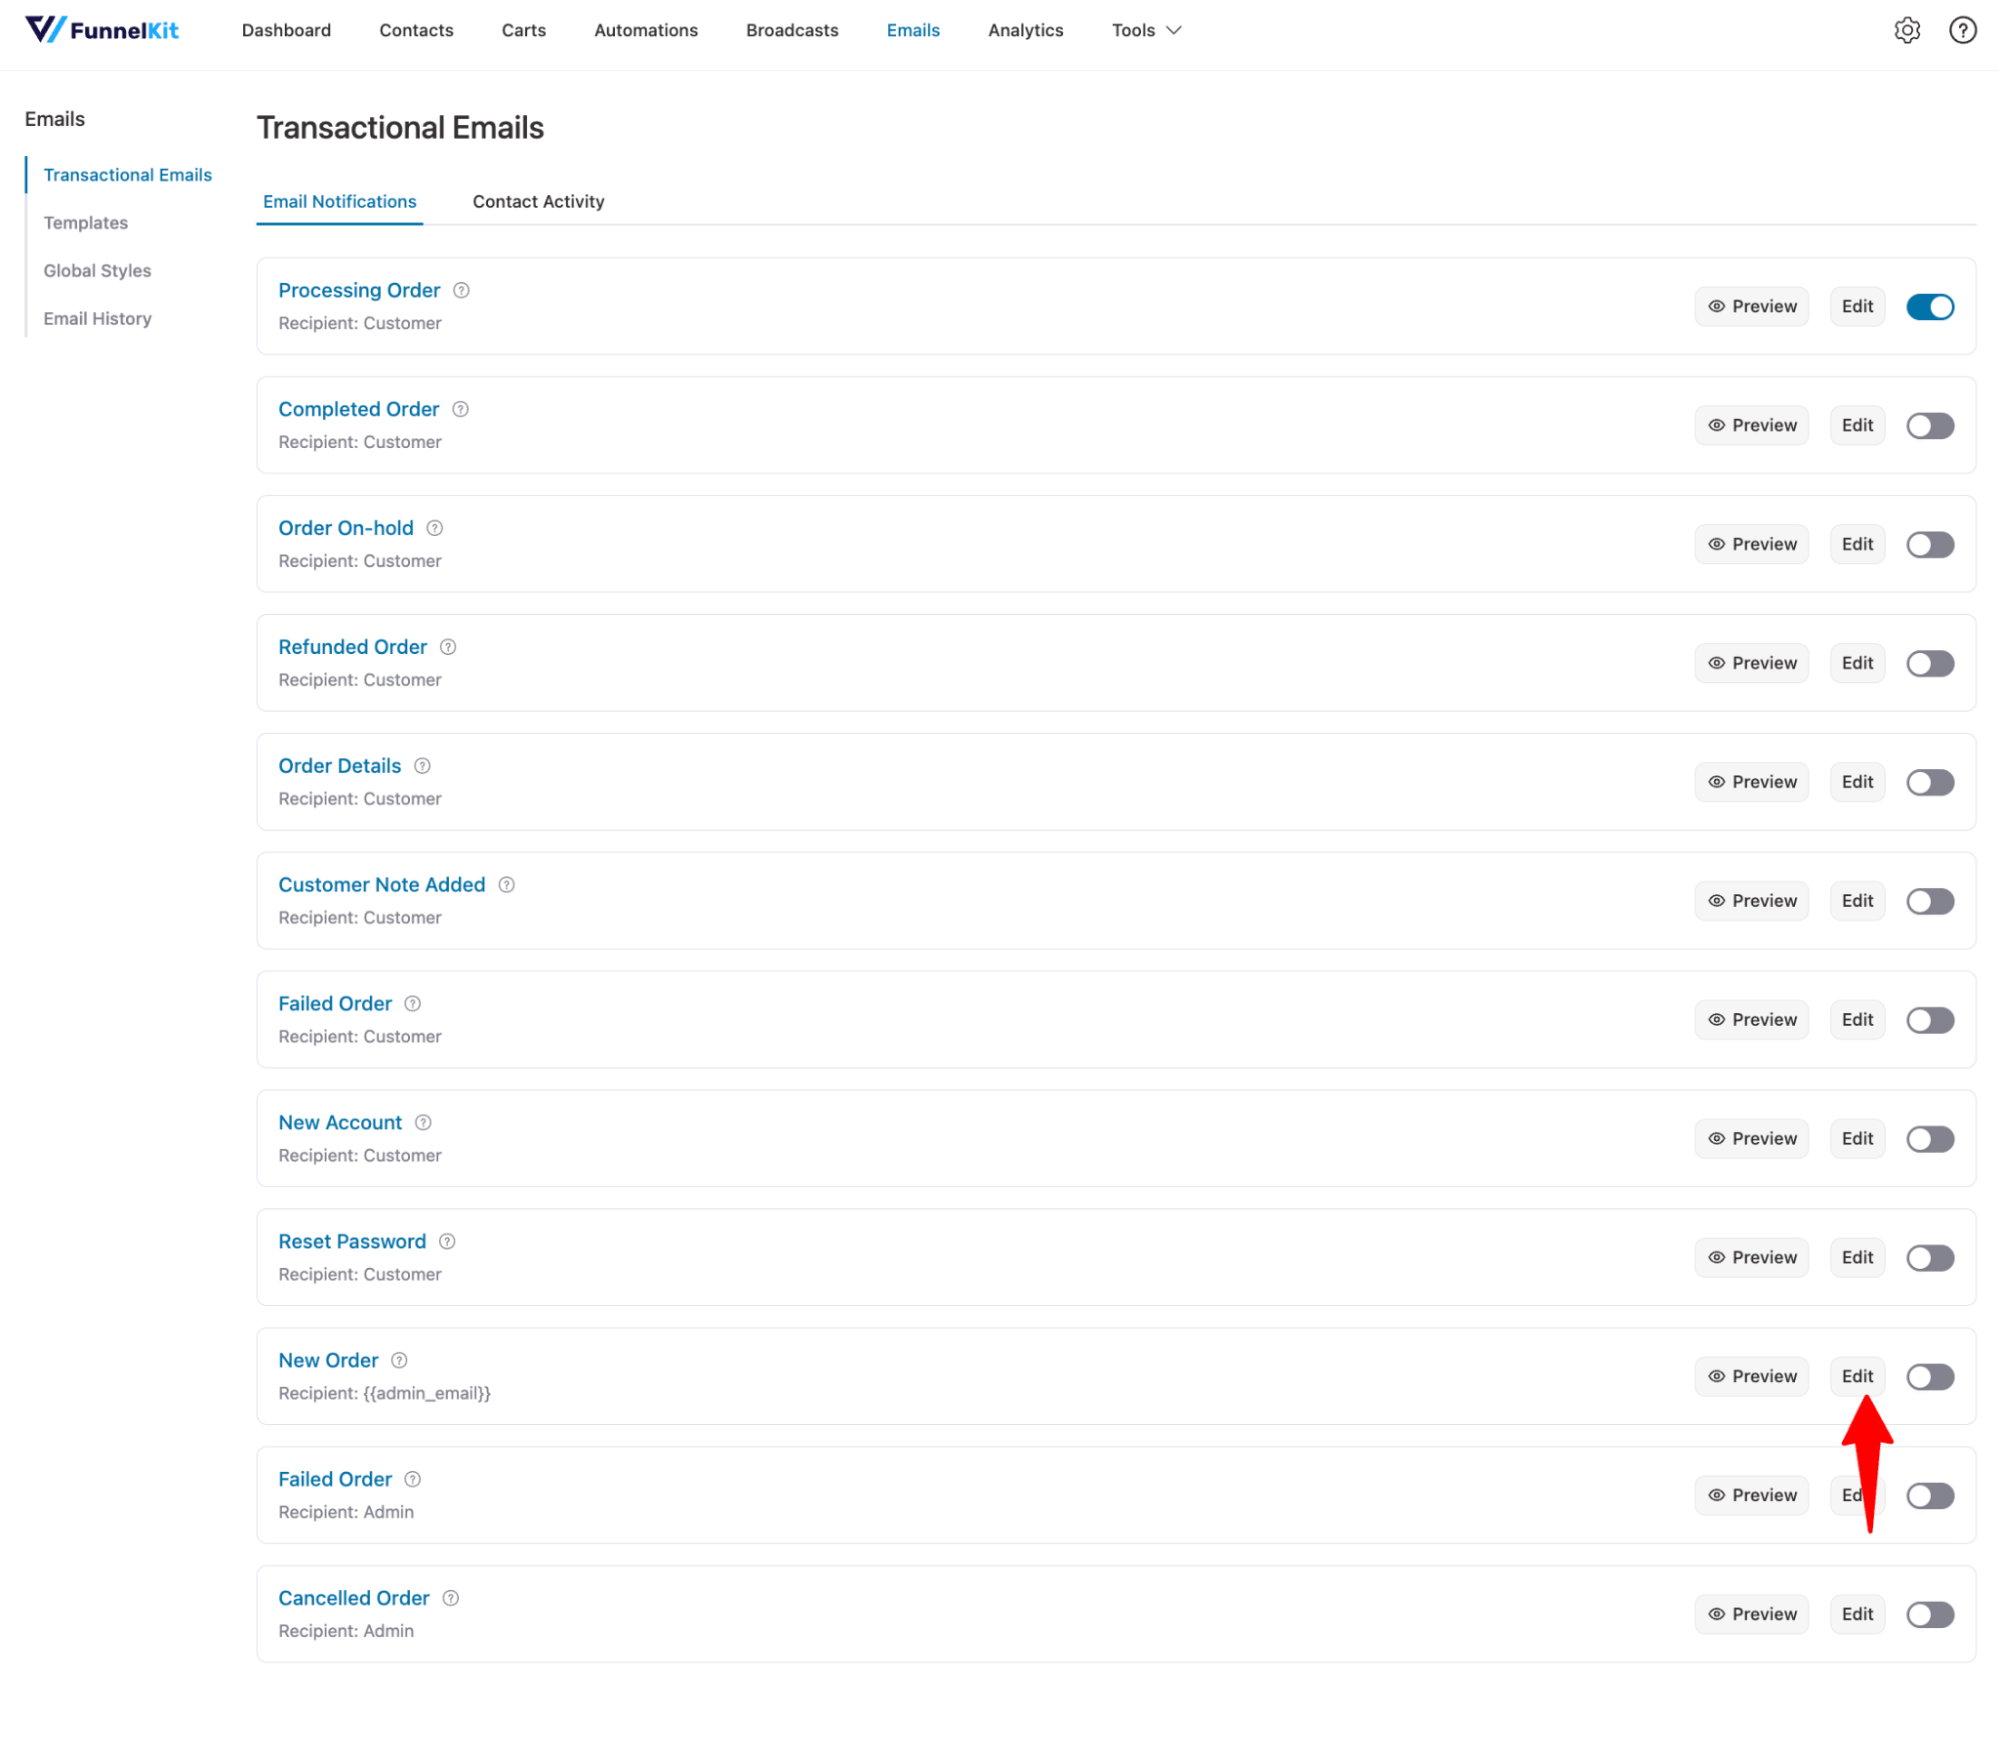
Navigate to FunnelKit Automations ⇒ Emails and click on the ‘Transactional Emails’ section. Here, you can customize all admin notifications and customer transactional emails.
The process of customizing each email notification is the same.
Just hit the 'Edit' option for the email notification you want to customize. For instance, here we are going with New Order.
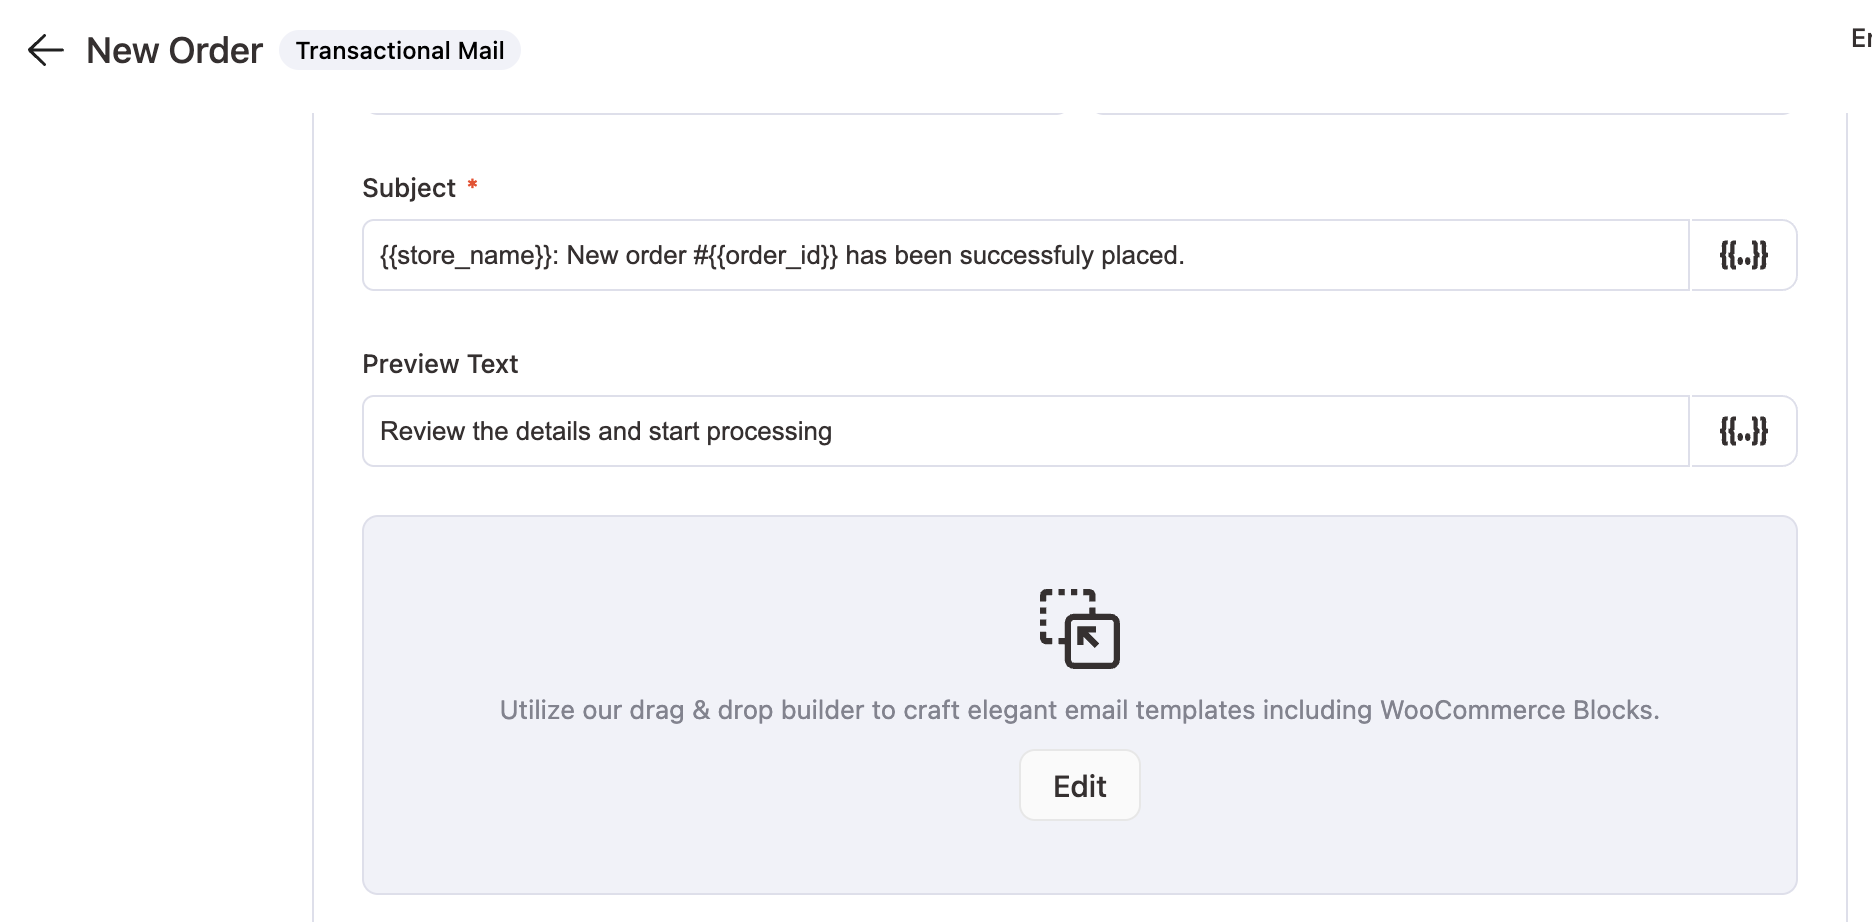
Next, it’s time to add the receipts. The default is the admin email, but you can easily add multiple recipients to your new-order notifications here. Just separate the emails with a comma.
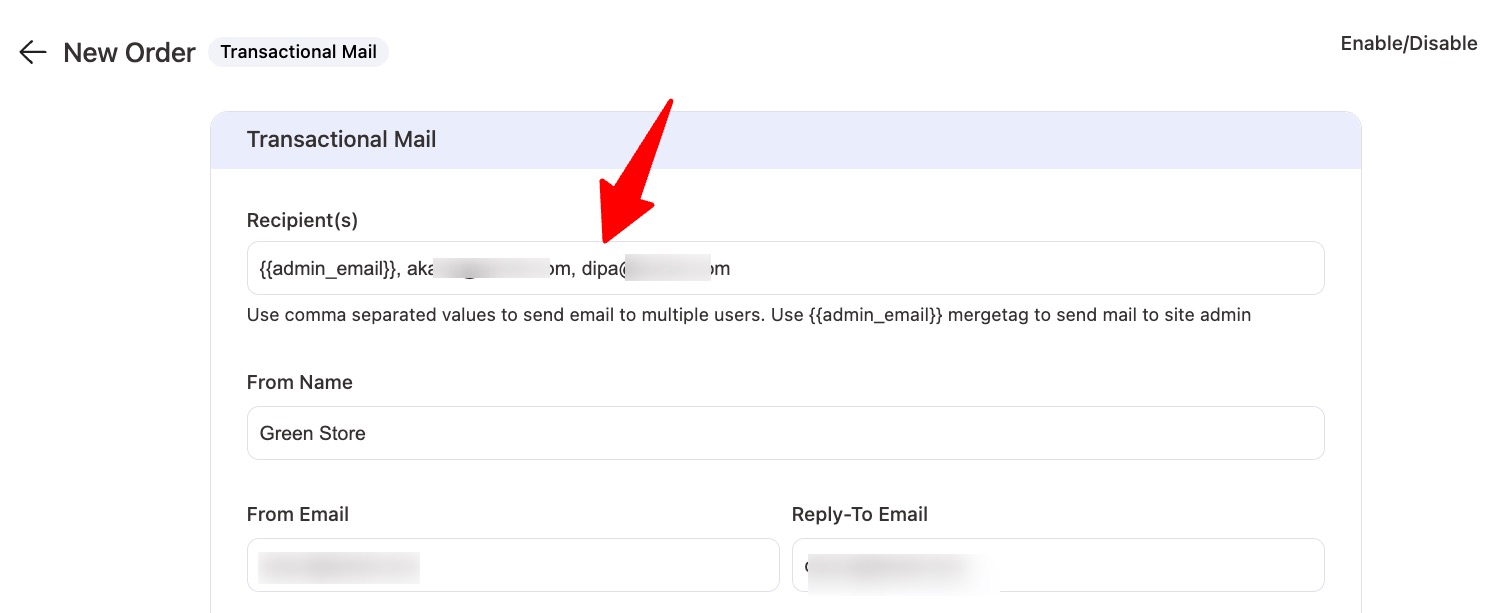
Next, enter the email subject line and preview text.
It's always best practice to include the order ID in the subject line, which you can do using the merge tag feature.
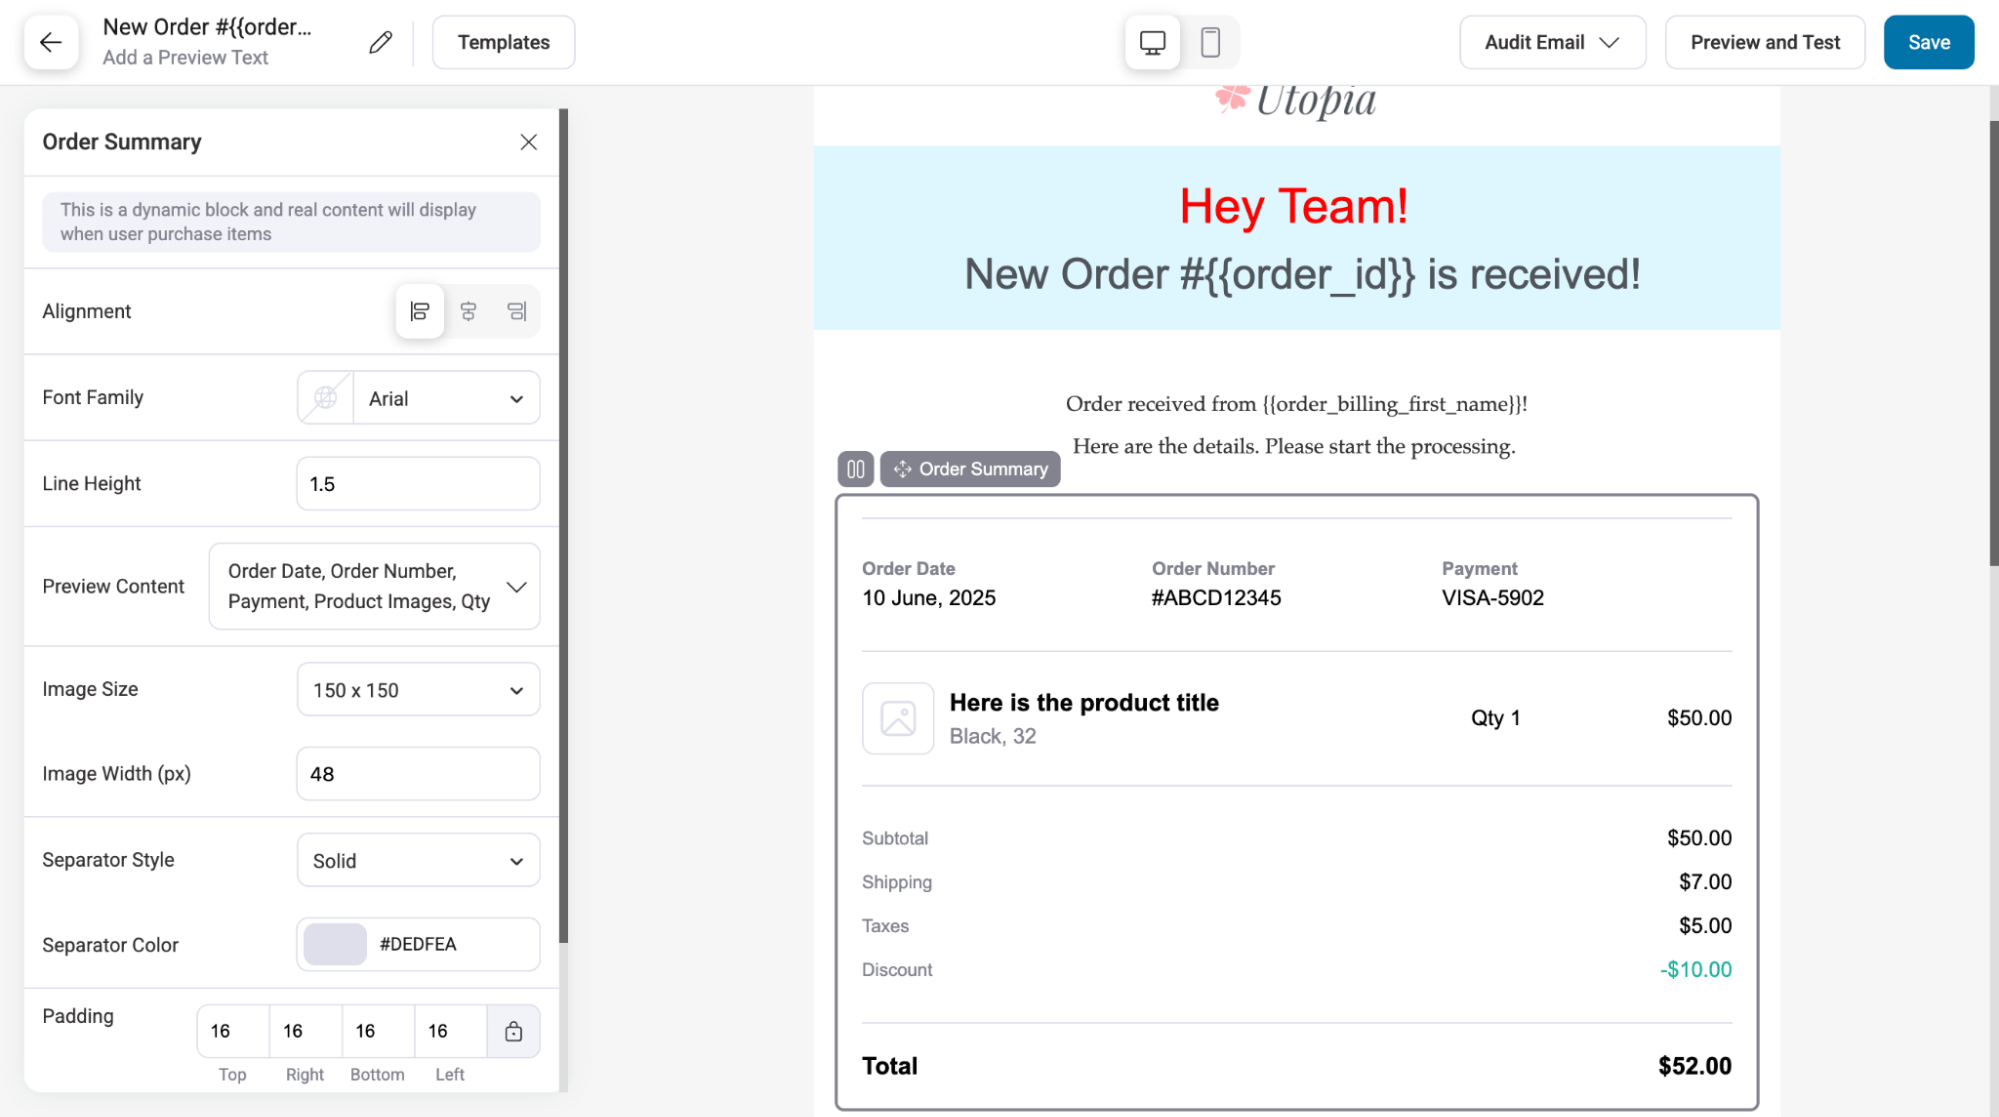
Step 3: Design your email with the visual builder
Next, to start customizing the design, hit the Edit option.
This built-in drag-and-drop visual editor lets you customize pre-designed email templates.
The prebuilt template uses various WooCommerce blocks, including the order summary, which displays all order details, shipping and billing addresses, and a call-to-action (CTA).
You can customize each section, from the logo to the heading to the order summary to the CTA, according to your preferences.
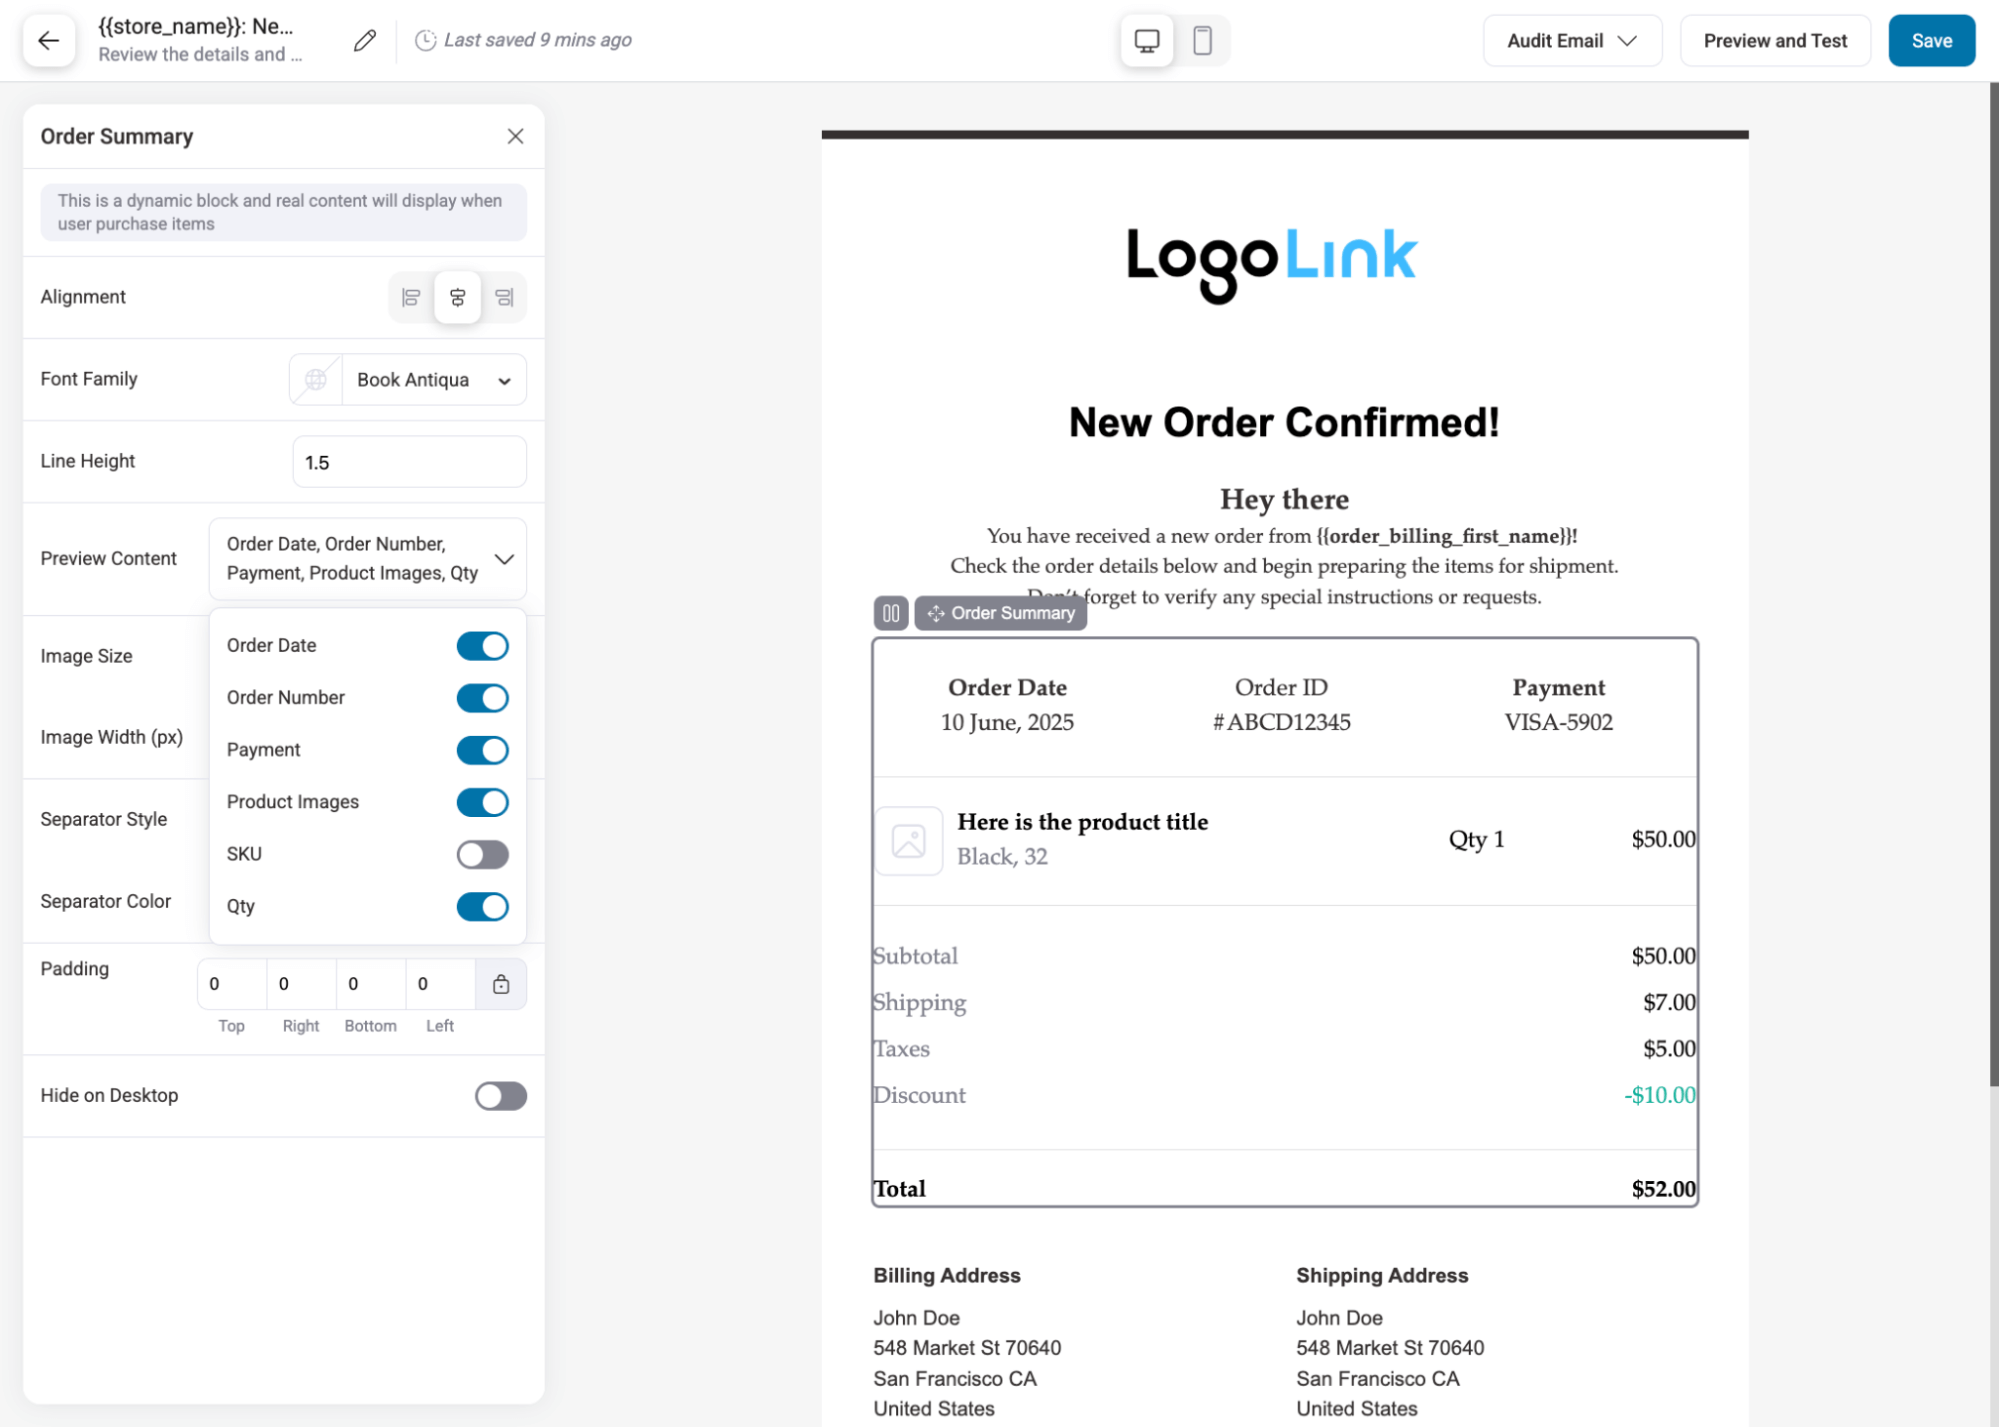
Once you’re done with the email design, make sure to save changes.
Similarly, you can customize the design of customer order notifications. Here is how you can customize order confirmation notifications for customers.

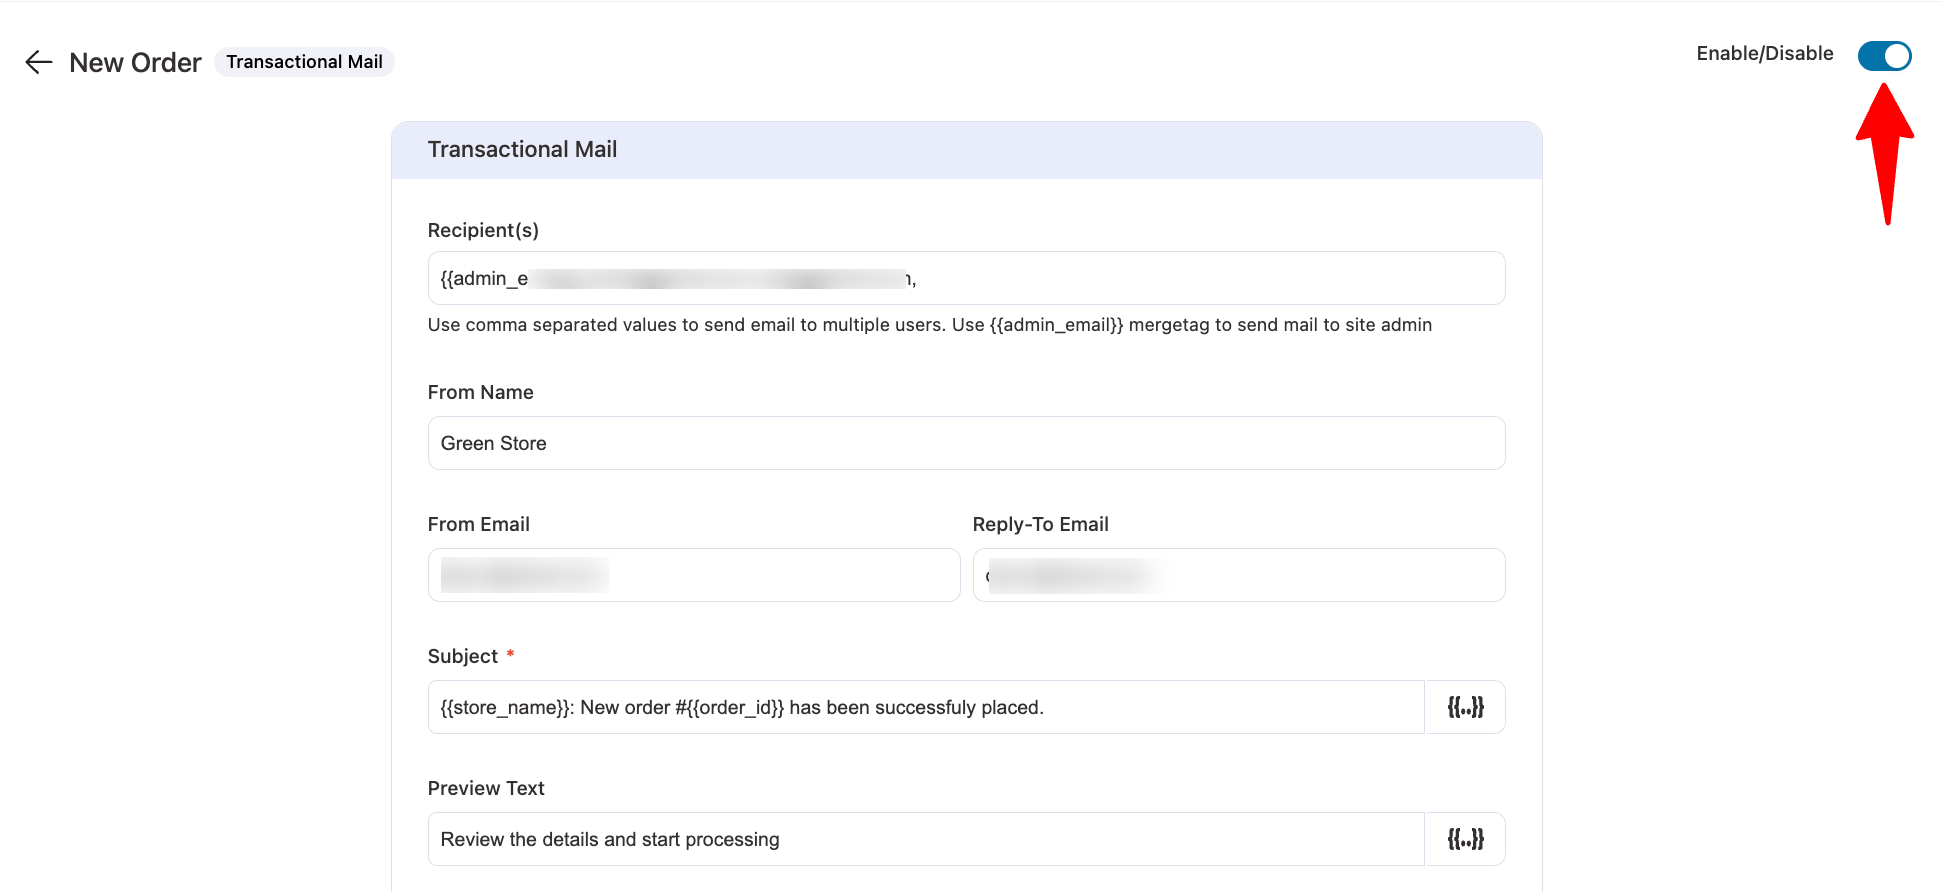
Step 4: Activate your order email
Once everything is done, toggle this email to ‘Active’. This will activate your order notification email on your website.
Well done! This is how you can create and send a custom order notification email in WooCommerce.
However, this email is sent to all added recipients, regardless of the products or categories in the order. If you want to send order notifications for different products and categories, move to the next section.
How to Send Custom Order Notifications For Different Products and Categories?
Many stores sell products from different suppliers but use one checkout. By default, WooCommerce sends the same order email to everyone, no matter what’s ordered.
This can be a problem if different people need to handle different products or categories. For example, the person managing Clothing shouldn't get emails about electronics.
To fix this, you need a way to send an order notification email to the right person based on the product or category in the order. This helps avoid confusion and speeds up fulfillment.
You can easily do that with FunnelKit Automations. Just follow these steps:
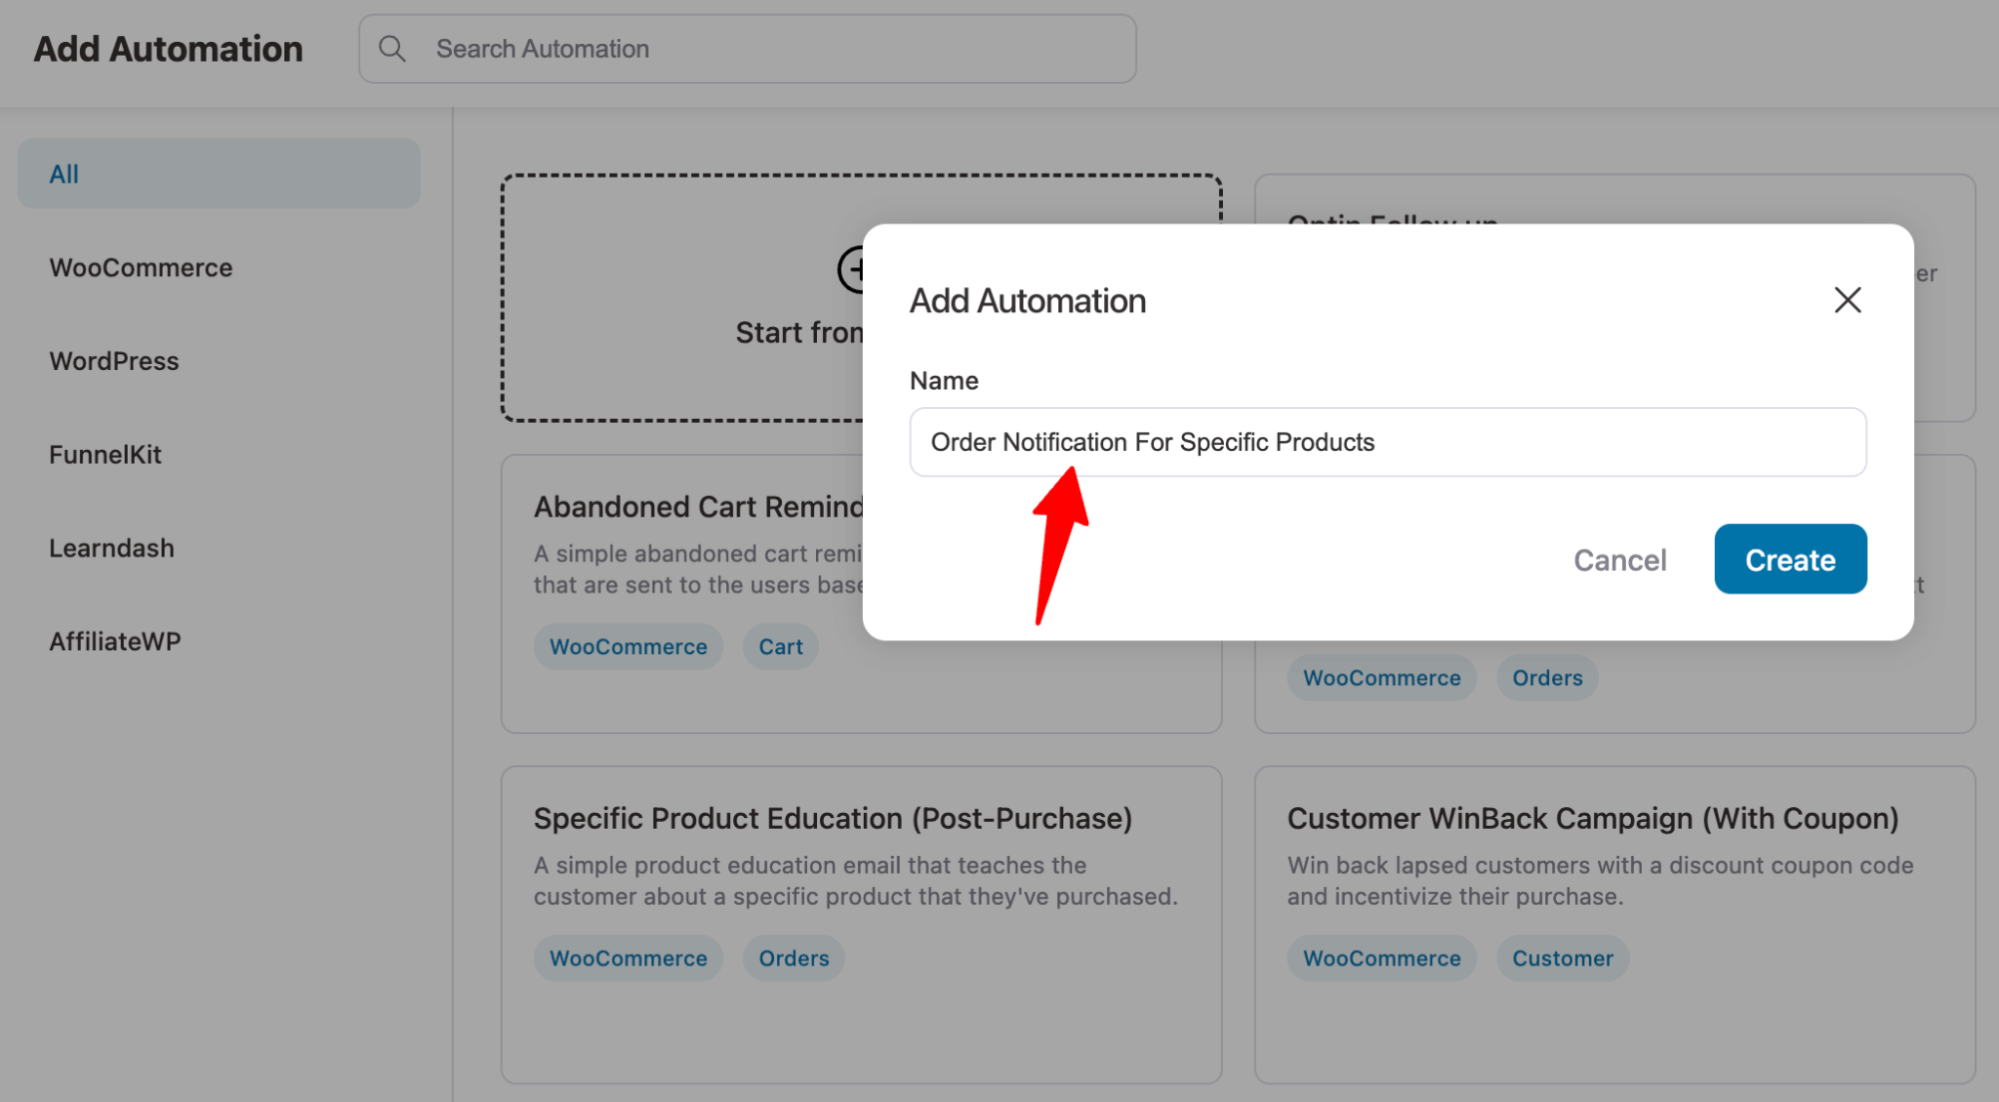
Step 1: Create an email notification automation
Navigate to FunnelKit Automations ⇒ Automations and then click on ‘Create New Automation’.
FunnelKit Automations provides various pre-built automation recipes. Here, we will create one from scratch.
Step 2: Configure failed order event
Next, we need to create and add the trigger for the failed order. For this, hit the “Select an event”.
Next, select the 'Order Created' event under WooCommerce.
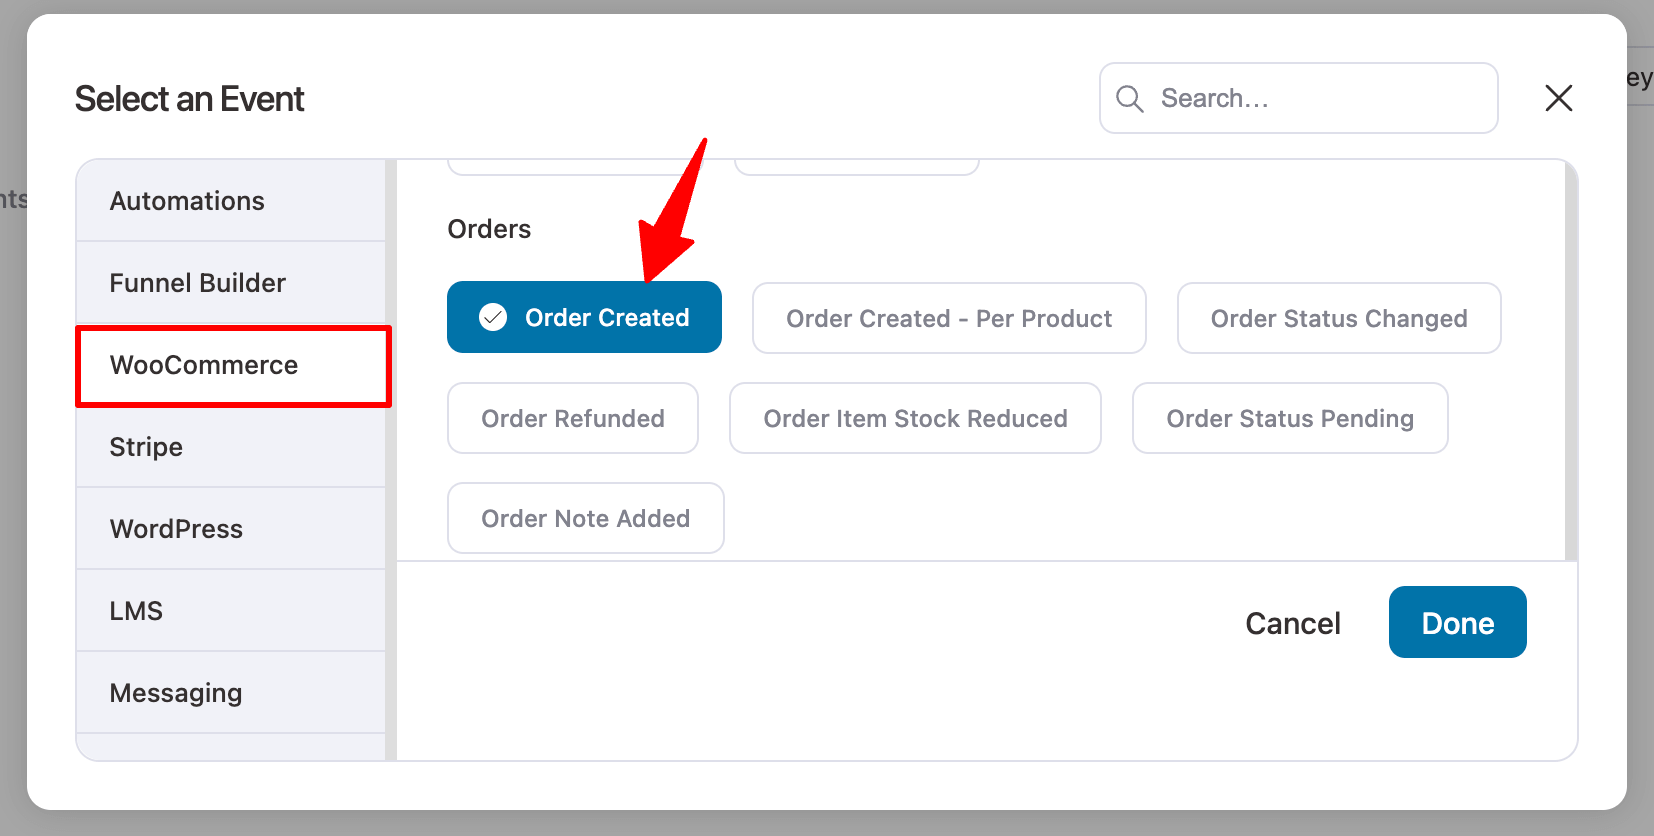
Now it’s time to configure it. Select the Order Statuses for which you want to send the email notification.
Note: To send email notifications for specific products, follow step 3, and for categories, follow step 4.
Step 3: Select the products that should trigger order notifications.
Select “Specific Products” for Order Contains. Now, search and add the products for which you want to send an order notification email.
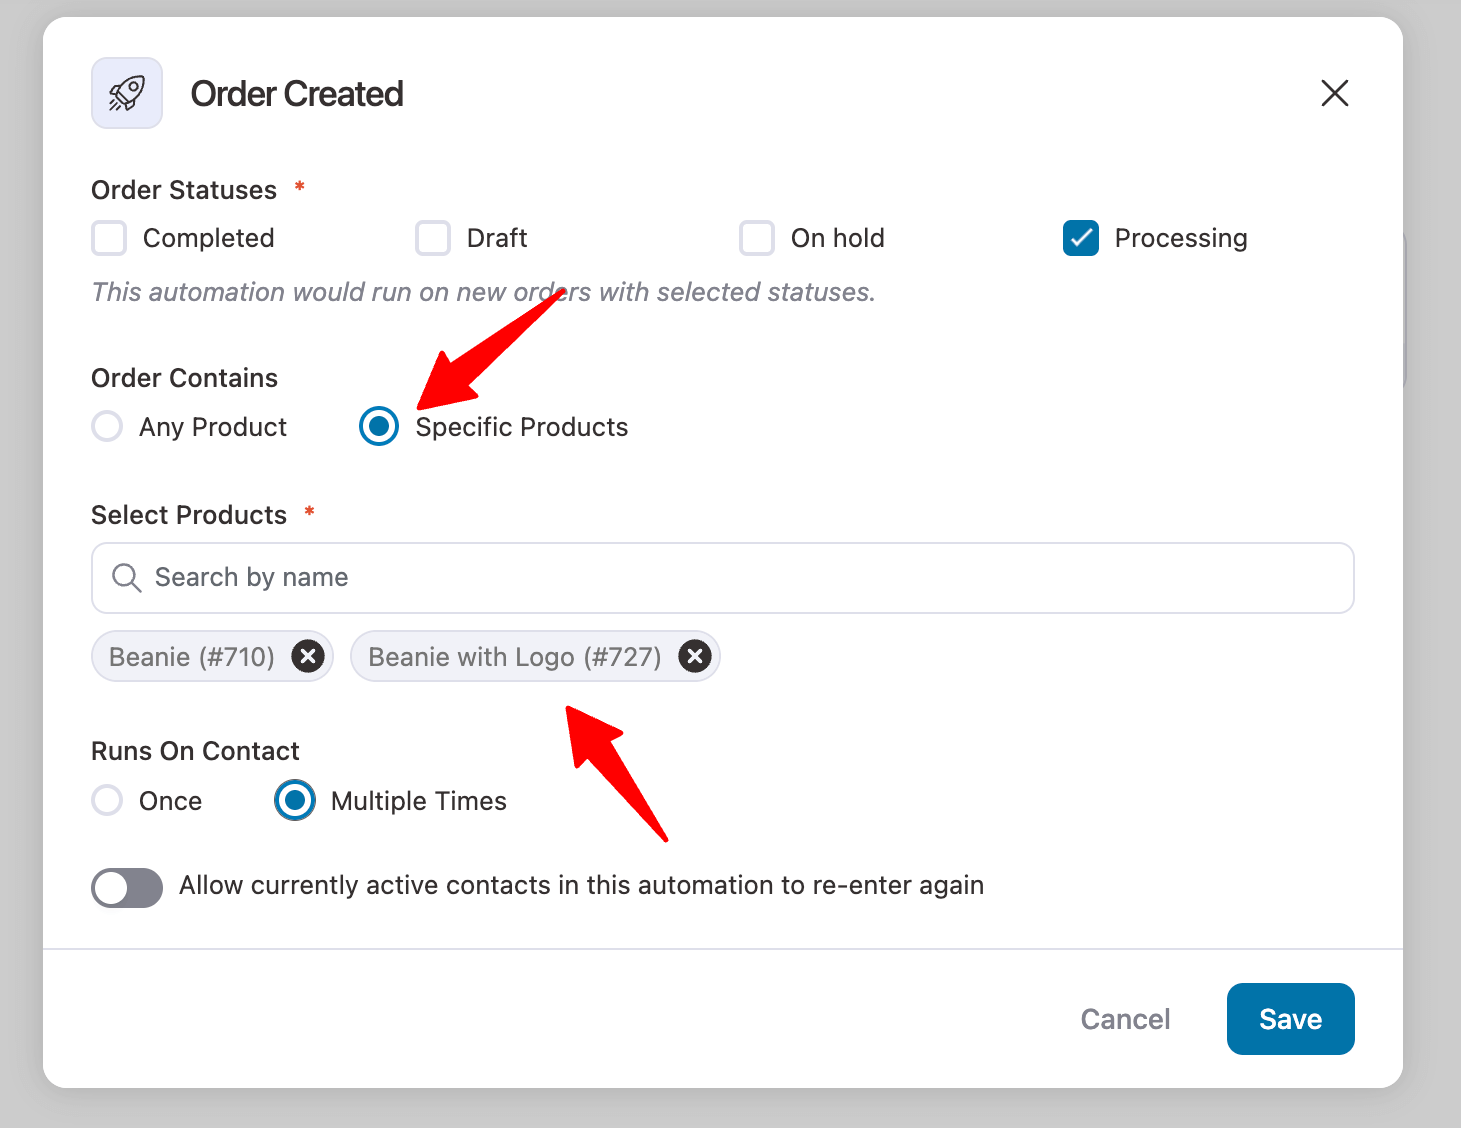
Make sure it's run on contact multiple times and hit Save.
Step 4: Set up notifications to be triggered for specific product categories
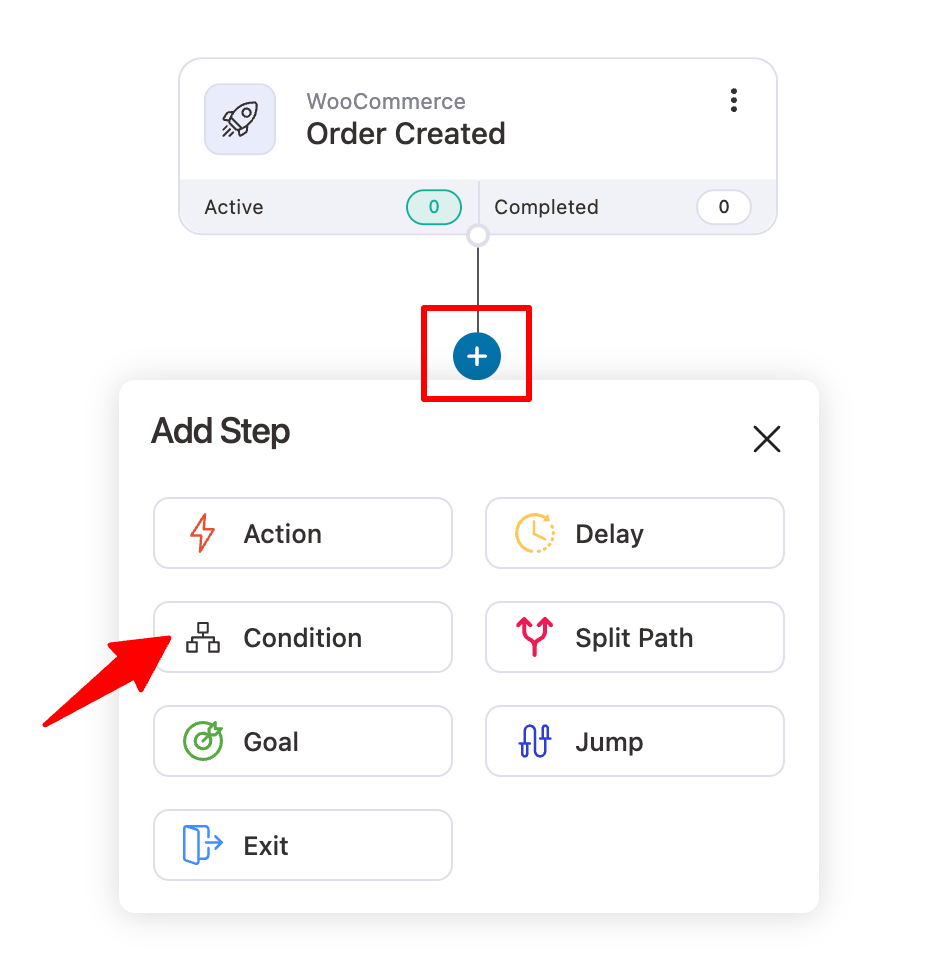
Now, to send the email notification to certain categories, use a condition.
To add a condition, hit + then select condition.
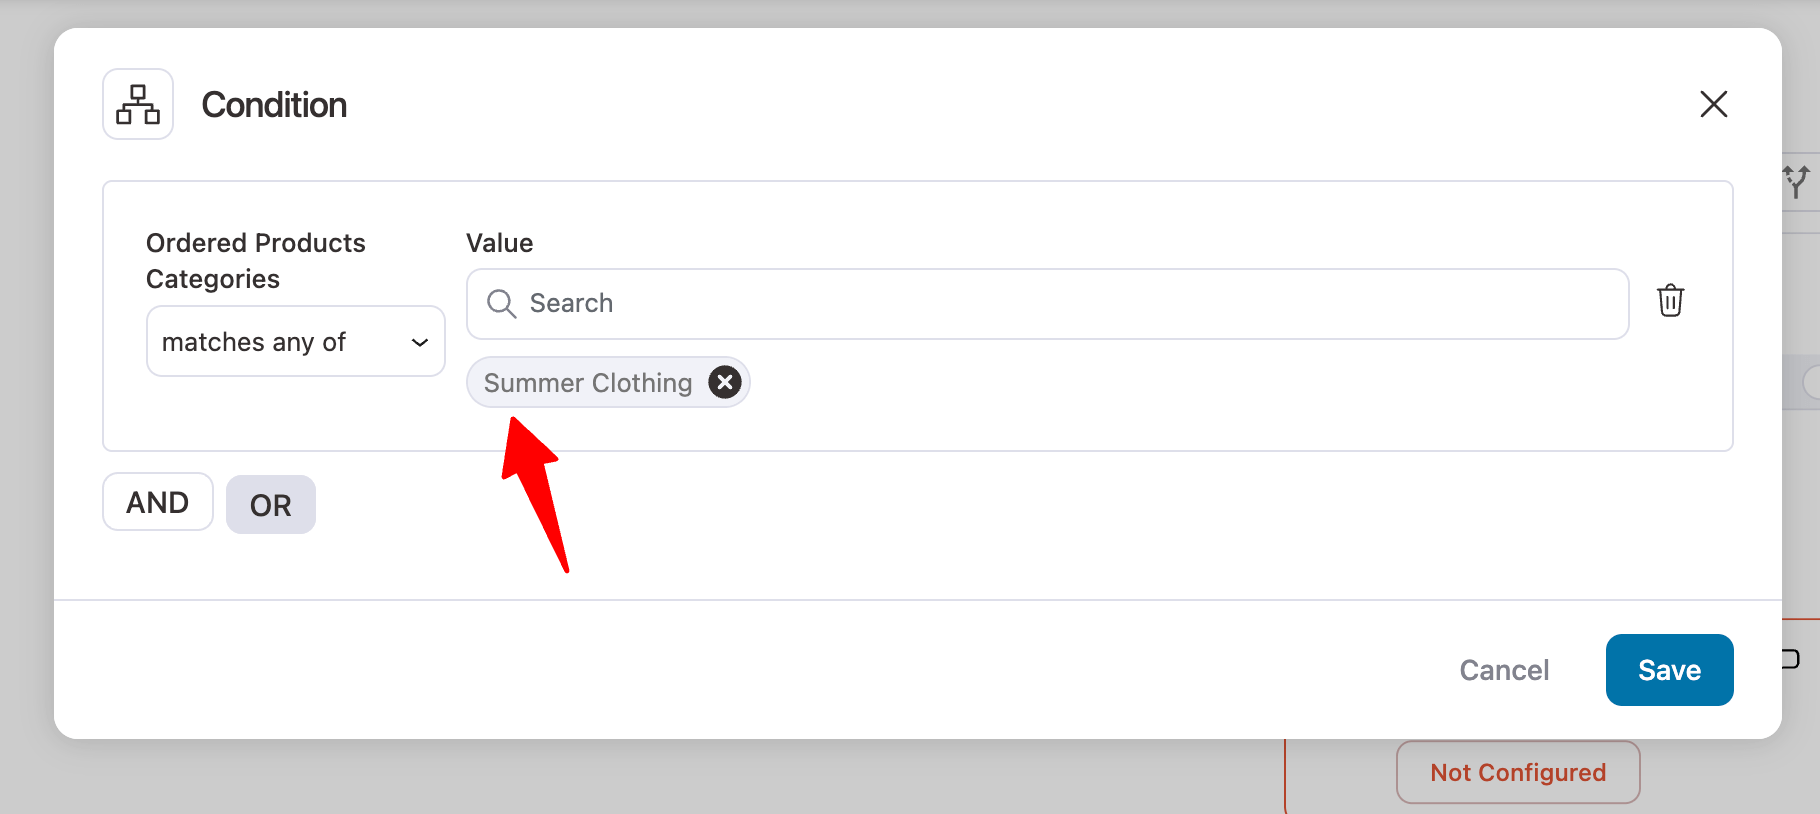
Next, set the condition to "Ordered Products Categories matches" and add the categories you want. You can add multiple categories here.
Step 5: Configure the email notification
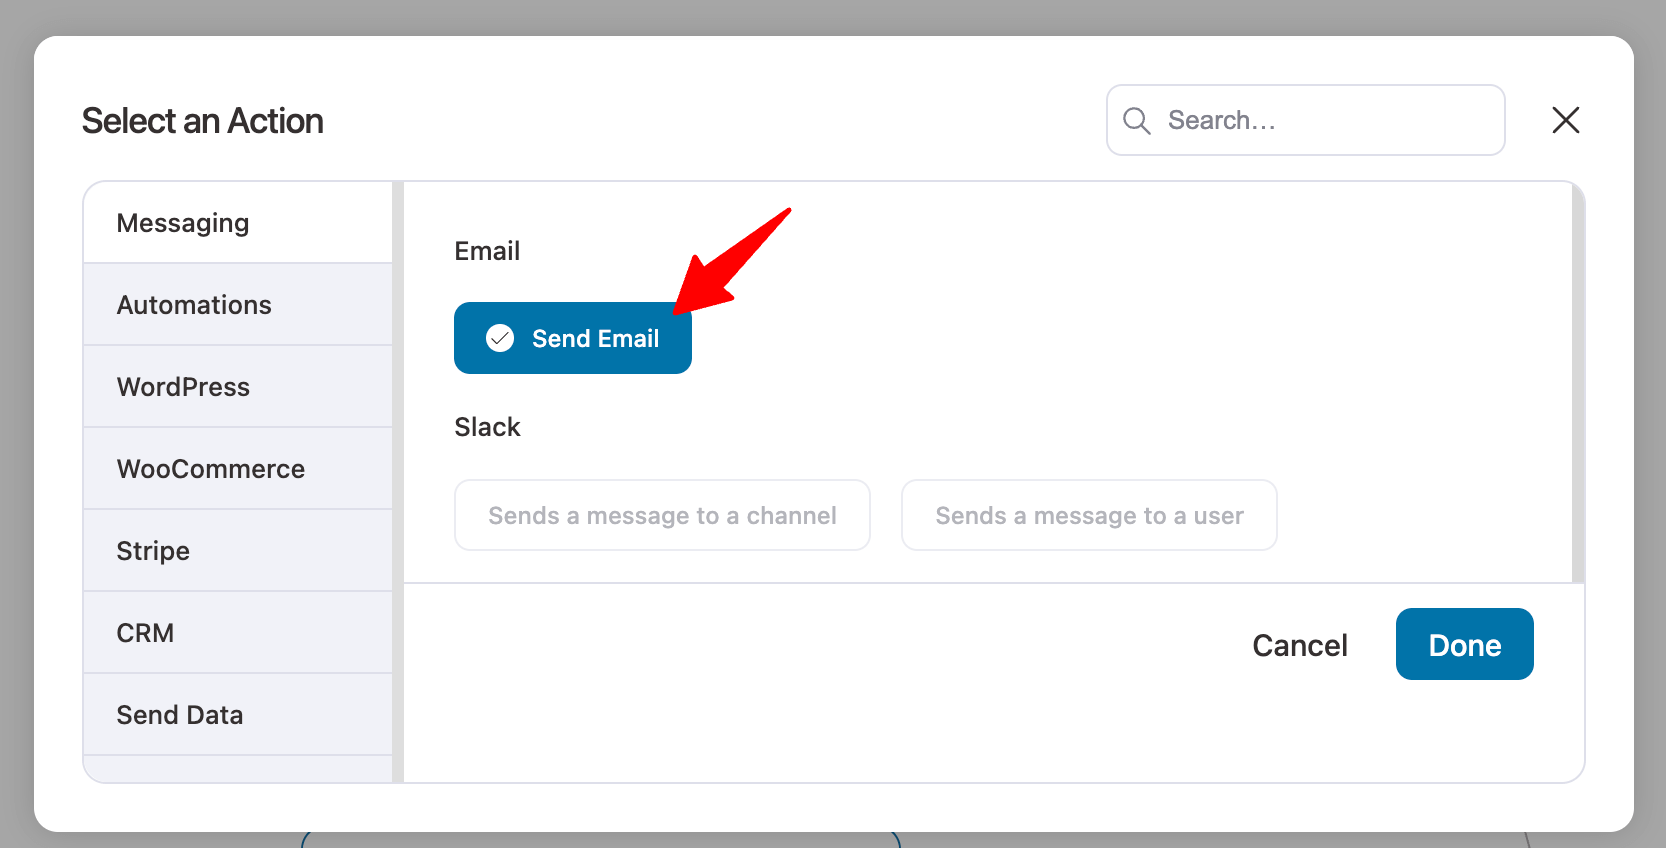
Now, when the condition is met, set an action.
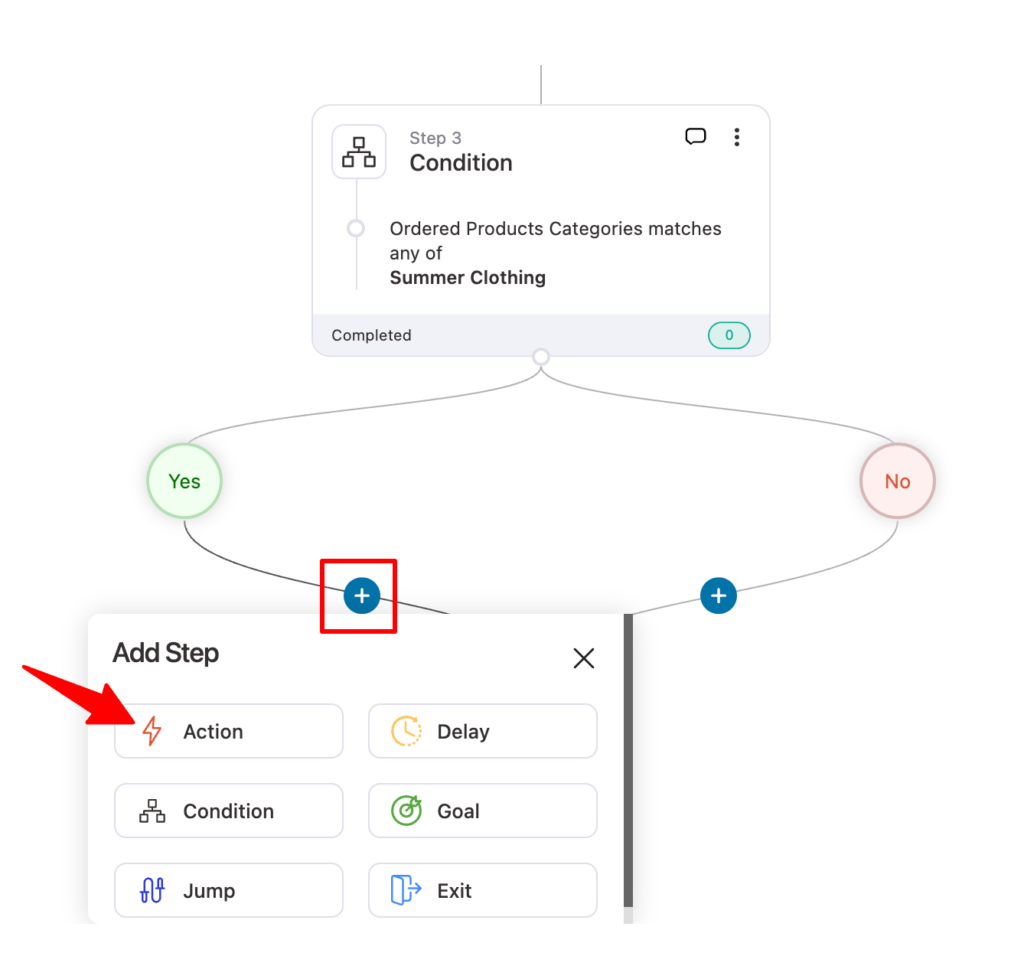
Choose the action Send Email.
Next, add the receipt emails. Use {{admin_email}} to dynamically add the admin email. For others, you can type the email address. In case of multiple emails, use a comma as a separator.
Set the Subject Line and Preview text as well. For dynamic value, use merge tags like {{order_id}} for order ID.
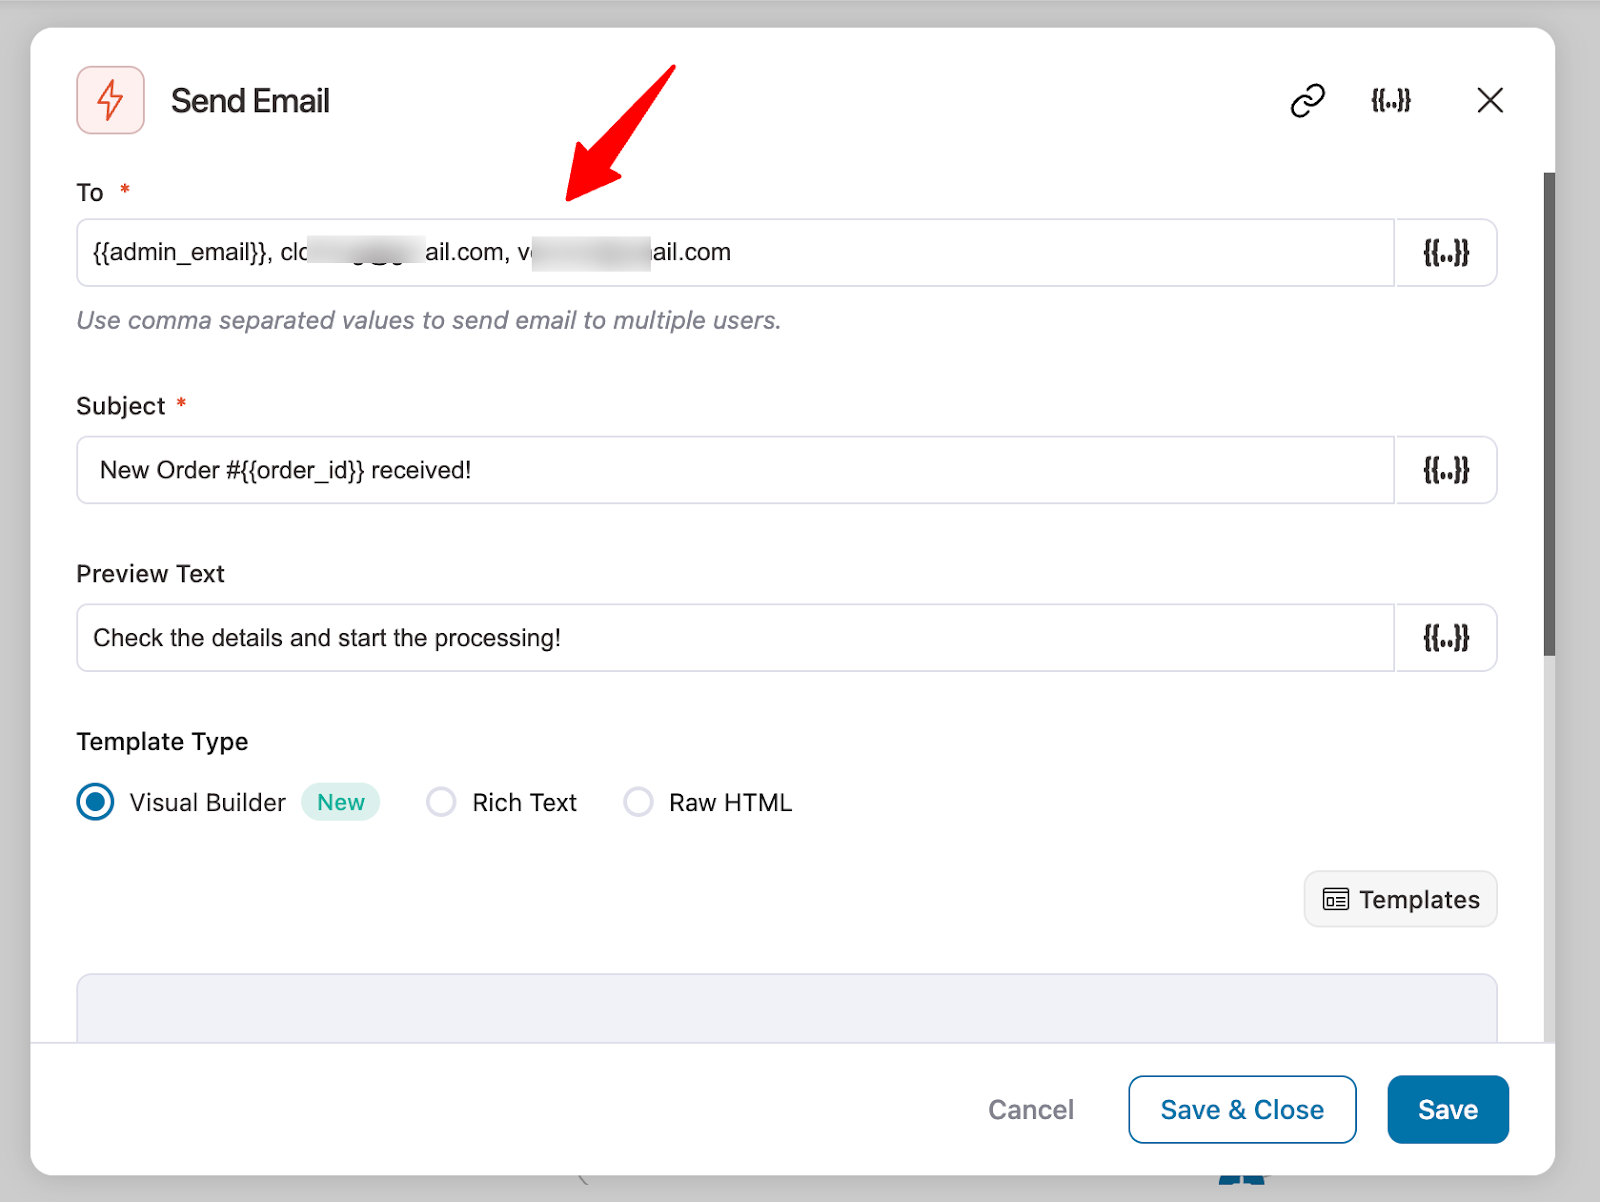
To design the email, experts recommend using New Visual Builder. Select that and hit Edit.
It comes with two prebuilt templates for order notification. Select the template you like.
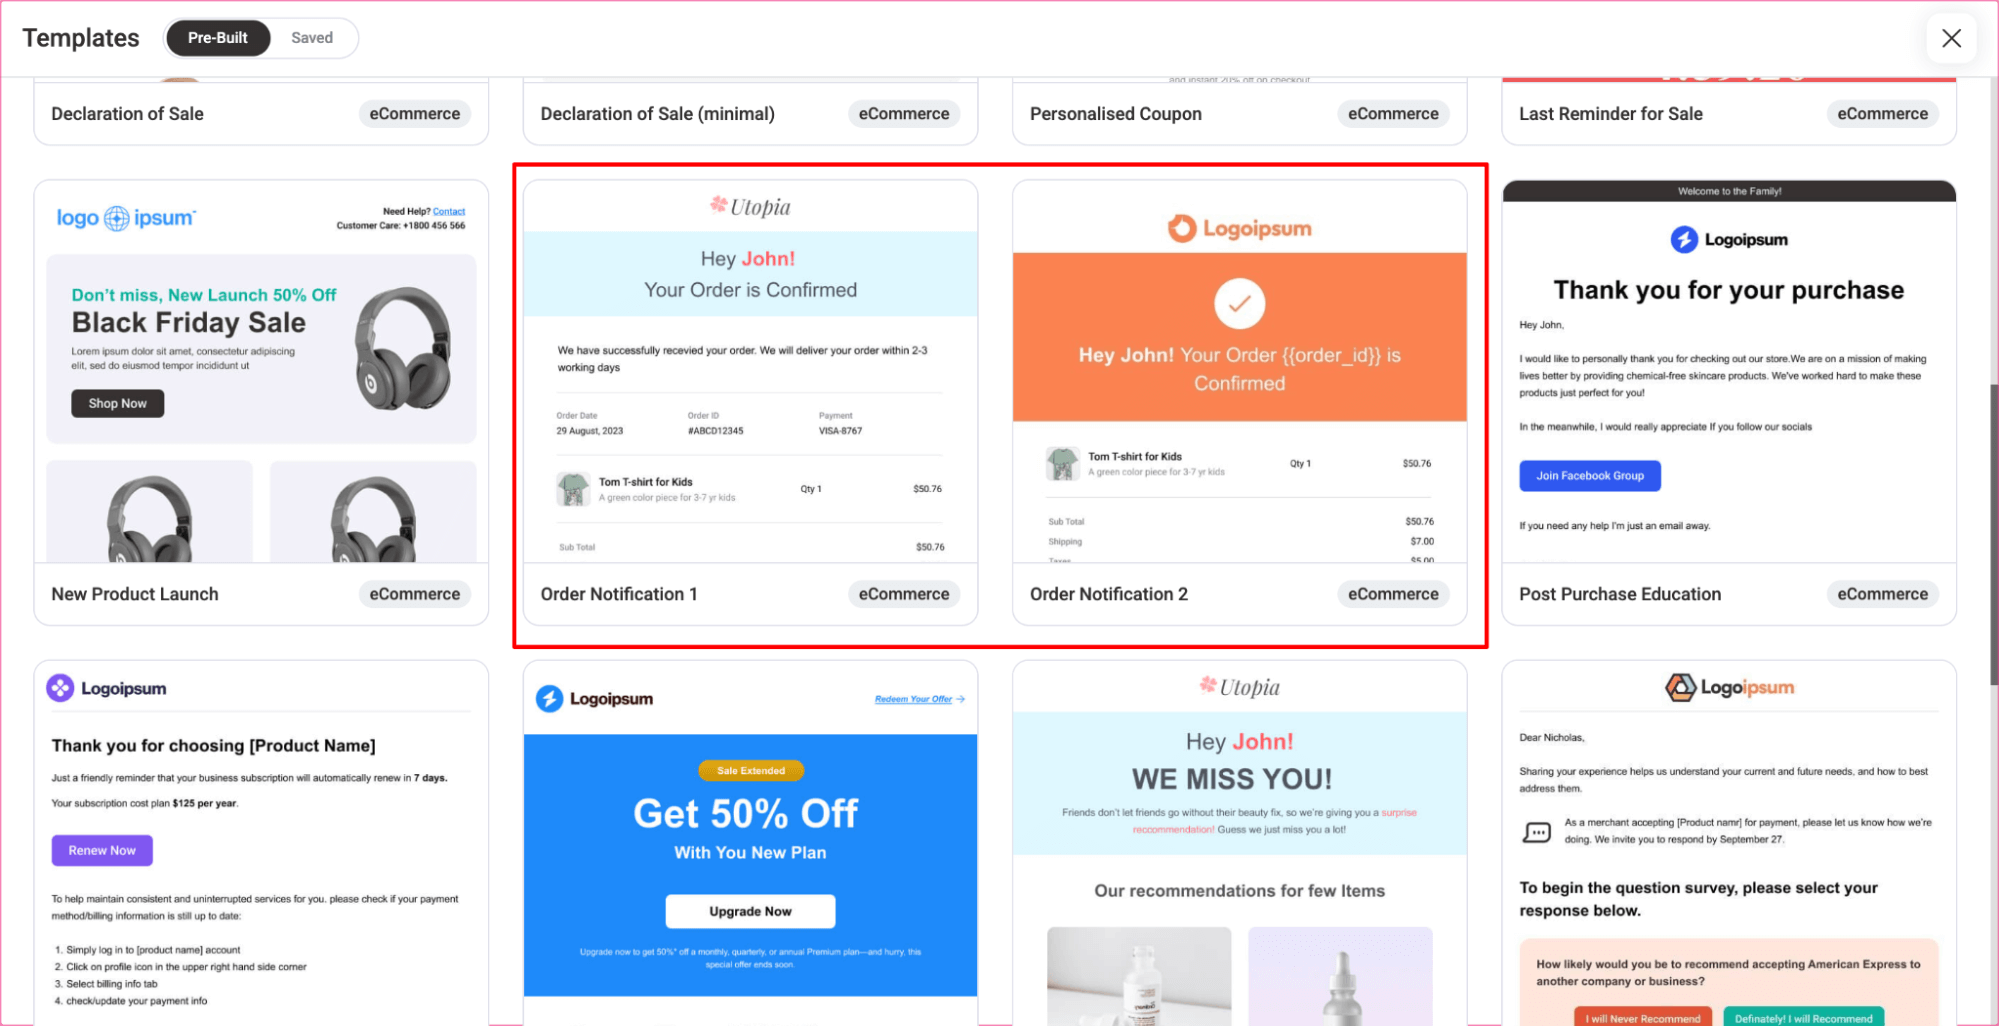
After importing the template, you can customize it with a drag-and-drop visual builder.
The template already contains a professional-looking order notification email. You can change the logo, color, and messaging according to your needs.
Once done, you can preview and test the email. Make sure to save the changes.
Finally, activate the automation to send custom order notification emails based on the products or categories ordered.

That’s how you can send custom notifications to different recipients based on the products and categories in an order.
8 Best Practices to Improve the Performance of WooCommerce Order Notification Emails
Let's look at some proven tactics to improve conversion rates for your order emails.
- Write inbox-friendly subject lines
Keep subject lines under 50 characters. Include the order number or the customer's first name. Example: "Order #1498 is on the way, Sarah."
- Include a complete order summary
Every email should display the product name, quantity, price, order total, and order number without requiring the customer to log in or click through.
- Give the reader one clear next step
Pick a single action per email (example, track the order, contact support, create an account, or leave a review). Avoid stacking multiple competing calls to action.
- Add cross-sell suggestions strategically
Add a relevant product recommendation block inside processing and completed order emails to drive additional revenue without interfering with the transactional purpose of the message.
- Include a discount code for the next order
A small next-purchase coupon in the completed order email turns a one-time buyer into a repeat customer. Keep the offer modest (10% to 15%) so it does not devalue your brand.
- Test across inbox providers
Send test emails to Gmail, Outlook, and Apple Mail on both desktop and mobile before going live. Transactional emails that break in any major client cost real customers.
- Personalize without overdoing it
Use merge tags for the customer's first name and order total. Avoid deep personalization that feels invasive or robotic.
- Set clear expectations
If your fulfillment takes 2 to 3 business days, state that clearly in the Processing email. Managing expectations up front prevents support queries and refund requests.
Frequently Asked Questions (FAQs)
Yes, if you're using a subscription plugin such as WooCommerce Subscriptions or Sublium. These plugins add their own email types for subscription events (renewal, failed, cancellation, new subscription), which can be customized alongside the standard WooCommerce order emails.
The most common reason order notification emails aren't sent is unreliable default WordPress mail delivery. Installing an SMTP service, verifying your sending domain, and using a From address on your own domain solves this in most cases.
The other two common causes are deactivated email types in WooCommerce settings and conflicts with caching or security plugins. Fixing them easily helps you resolve the issue of emails not sending.
You can add tracking information to order notification emails using plugins such as FunnelKit Automations. Open the transactional email you want to edit and check on the 'Automatically append UTM parameters to email links' option. Add the campaign source, medium, name, term and content. Next, hit 'Save' when done.
Build an automation with the 'Order Created' trigger, add a condition that the order total is above your threshold (for example, $500 or more), and send the notification email to your chosen team member's address. This works for any order attribute, not just total value.
Yes, you can install the official WooCommerce Mobile App for iOS or Android to receive free push notifications for new orders. For SMS alerts, use FunnelKit Automations combined with Twilio or BulkGate to trigger text messages on any order-related event.
Yes. Go to WooCommerce > Orders, open the Order actions dropdown and choose an email to send, such as the Customer Invoice or the Processing Order email. Click the update arrow to send it immediately.
Set Up Your WooCommerce Order Notification Emails the Right Way!
Order notification emails play a vital role in any eCommerce business. They keep both customers and your team updated on order progress, enhancing the overall shopping experience and streamlining fulfillment.
We covered every WooCommerce order notification email type and how to configure and customize them using different methods.
With FunnelKit Automations, you can customize your emails to match your brand, send order updates to the right people based on products or categories, and manage customer transactional notifications all in one place.
Plus, you get an intuitive visual builder and prebuilt templates, making it easy to design your emails.
Start with enabling the right notifications, configuring SMTP, and branding your templates. Layer on advanced capabilities like mobile notifications, conditional content, and discount code automation as your store scales.
Editorial Team
May 25, 2026Every WooCommerce store faces this. Shoppers add products to their cart and vanish before completing checkout. In fact, studies show that nearly 70.22% (about 7 out of 10) of online...
Editorial Team
May 21, 2026We're excited to announce that FunnelKit Automations 3.8.1 is now live! 🎉 This release is packed with upgrades that quietly transform how your store and courses run, putting them on...
Editorial Team
May 20, 2026Your customer just clicked place order, and the first thing they see is a plain, unbranded WooCommerce email that looks nothing like your store. A WooCommerce email customizer fixes that problem. It...


