
Around 24% of people abandon their carts when they're required to create an account. [Source: Baymard]
Yes, forcing account creation at checkout can drive users away.
Customers want a fast, hassle-free checkout, not a lengthy sign-up process. If they feel pressured to register, they might abandon their cart and not complete the purchase.
So, what's the solution?
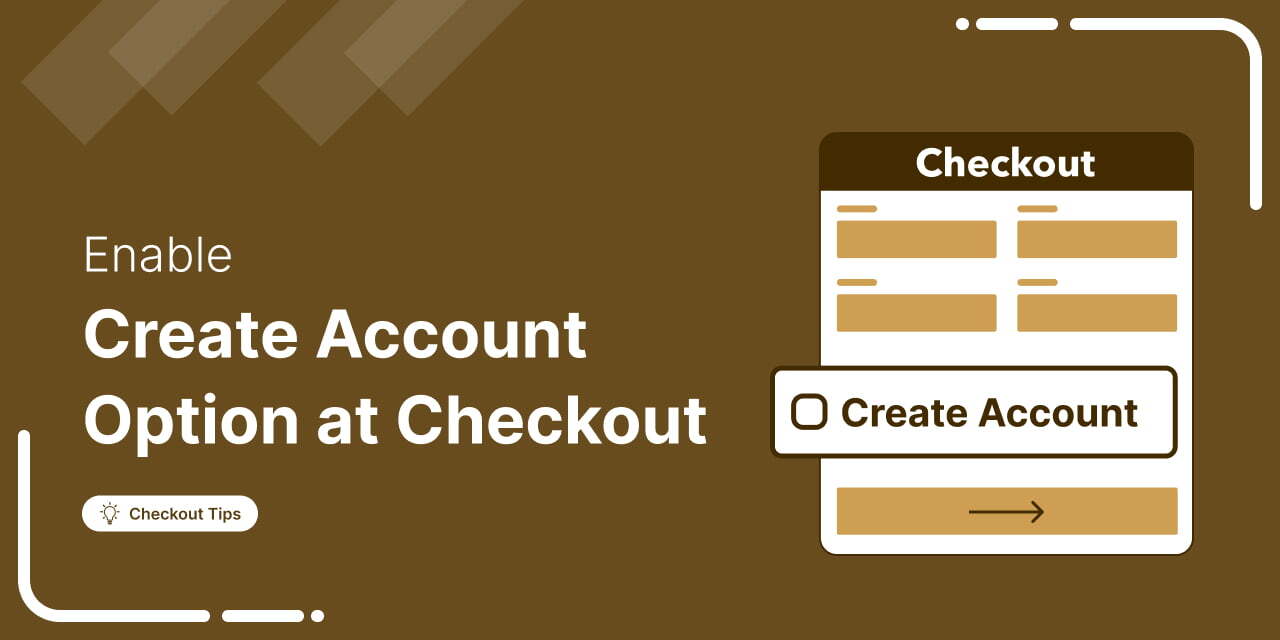
Let customers check out as guests, automatically create an account using their email, and send a friendly welcome email.
In this blog, we’ll show you how to set up automatic account creation on the WooCommerce checkout.
Table of Contents
- 1 Why Allow Automatic Account Creation at WooCommerce Checkout?
- 2 Guest Checkout vs. Account Creation: What’s the Difference
- 3 How to Enable the Automatically Create Account Option in WooCommerce Checkout
- 4 How to Test the Automatic Account Creation Option in WooCommerce Checkout?
- 5 How to Send a Custom WooCommerce Account Creation Confirmation Email?
- 6 5 Tips to Follow Along With WooCommerce Account Creation on The Checkout Page For Better Conversions
- 7 More Questions About WooCommerce Automatic Account Creation
- 8 Is automatic account creation in WooCommerce GDPR/compliant?
- 9 How are passwords handled in WooCommerce Automatic Account Creation?
- 10 Can I automatically send follow-up emails after account creation?
- 11 Does automatic account creation slow down checkout?
- 12 Ready to Automatically Create an Account On WooCommerce Checkout?
Why Allow Automatic Account Creation at WooCommerce Checkout?
Automatically allowing customers to create an account at checkout benefits both customers and store owners. Without this option, WooCommerce will prompt users to sign in to their accounts when they go to the checkout page to place an order.
Here is a preview:

This hinders the checkout process and can result in cart abandonment. Therefore, it’s important to allow customers to create an account on the checkout page.
Here are the reasons why automatic account creation matters:
- Reduced cart abandonment: Automatically creating accounts simplifies checkout, reducing cart abandonment.
- Enhanced customer experience: Customers can save their information, track their orders, and manage their preferences.
- Increased retention: Account leads to personalized recommendations, offers, and loyalty rewards.
- Improved communication: Easily send targeted emails and updates.
- Customer loyalty and trust: Account creation boosts trust by allowing easy access to order history.
Guest Checkout vs. Account Creation: What’s the Difference
When setting up your WooCommerce store, it’s important to understand the basic differences between guest checkout and account creation.
Guest Checkout allows users to complete a purchase without creating an account.
Conversely, enabling Account Creation means users must sign up or log in to place an order.
Here’s a breakdown:
| Topic | Guest Checkout | Account Creation |
|---|---|---|
| What it is | Customers can complete a purchase without signing up or logging in. | Customers must create an account or log in to complete the purchase. |
| Pros | Reduces checkout friction and cart abandonment. | Speeds up future checkouts and gives access to order history. |
| Cons | Limited ability to collect customer data for marketing or retention. | Extra steps can cause drop-off, especially for first-time buyers. |
| Ideal for whom? | Ideal for stores with many one-time or first-time buyers. | Best for businesses with repeat buyers, subscriptions, or loyalty programs. |
Experts recommendations:
While both options are different, it’s recommended to use them together. Allowing guest checkout ensures a quick and hassle-free purchase, while automatically creating an account enables you to continue engaging with the customer, fostering brand loyalty, and encouraging repeat purchases.
How to Enable the Automatically Create Account Option in WooCommerce Checkout
Follow these steps to enable automatic account creation on the WooCommerce checkout:
Step 1: Navigate to WooCommerce Accounts & Privacy settings
From the WordPress dashboard, go to WooCommerce ⇒ Settings, and then make sure you are on the “Accounts and Privacy” tab.
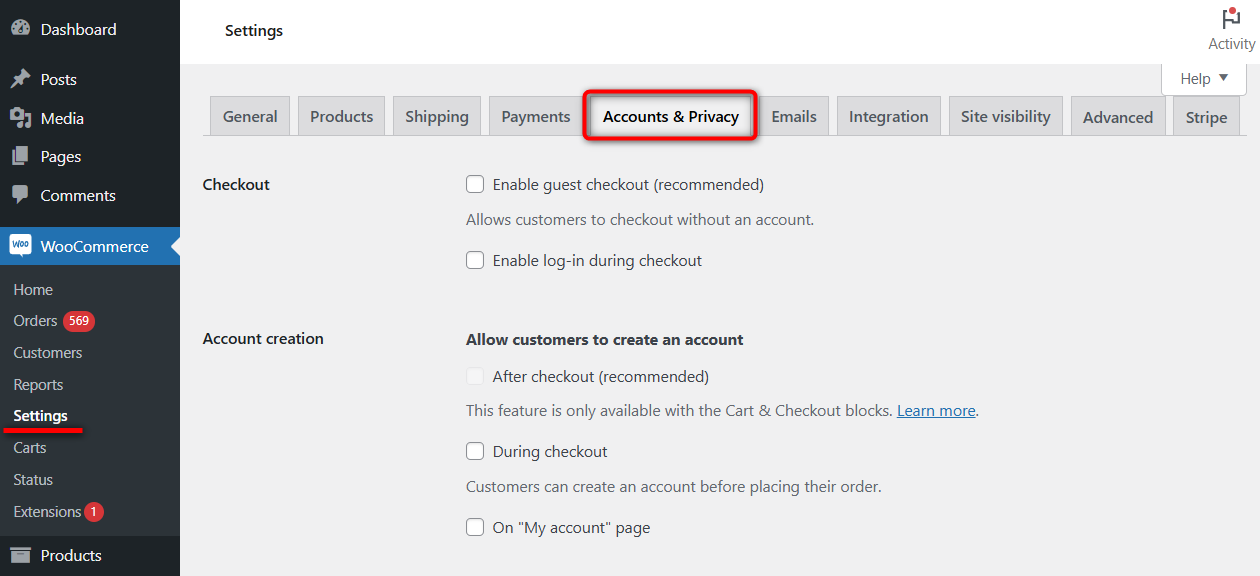
Step 2: Allow account creation during WooCommerce checkout
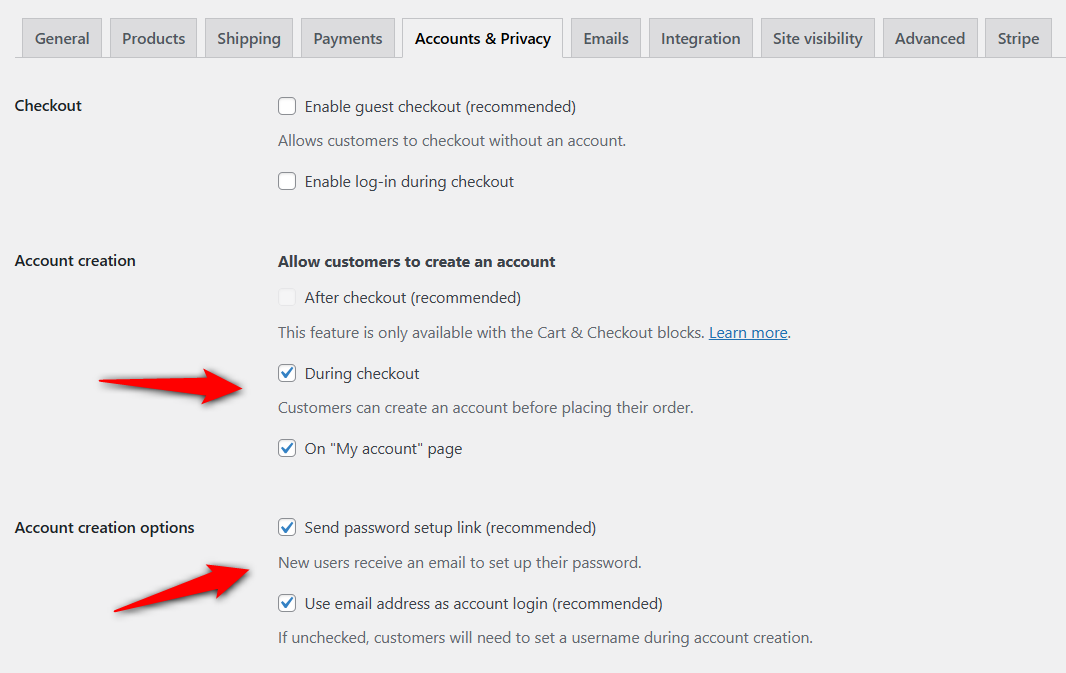
Next, on the Account Creation option, make sure to check the option “Allow customers to create an account on the 'My Account page”.
Since this is an automatic account creation, you should also enable the option “When creating an account, automatically generate an account username for the customer based on their name, surname, or email.” This option will generate a unique user name based on the given name, surname, or email.
Also, check the option “When creating an account, send the new user a link to set their password” to ensure users receive a confirmation email of the account creation with a link to set a password.
How to Test the Automatic Account Creation Option in WooCommerce Checkout?
To test, open your site in incognito/private mode, add products to your cart, and go to the checkout page.
Next, ignore the “Create an account” option if it's enabled. To test automatic account creation, use a new email address and place a test order.

Once you receive the confirmation email, confirm and set up the account. Log in to your account to check all the order details.
This is how you can test the automatic account creation process in WooCommerce.
However, the default email is bland, lacks personalization, and may fail to capture the user’s attention.
It should highlight the store's benefits, such as brand consistency, and invite them to join the social community to keep them engaged.
Move to the next section to learn how to send a custom WooCommerce account creation email.
How to Send a Custom WooCommerce Account Creation Confirmation Email?
We will use FunnelKit Automations to send users custom emails whenever an account is created.
Trusted by over 20,000 WordPress users, this all-in-one marketing solution allows you to design and send automated, stunning emails without leaving the comfort of your WordPress dashboard.
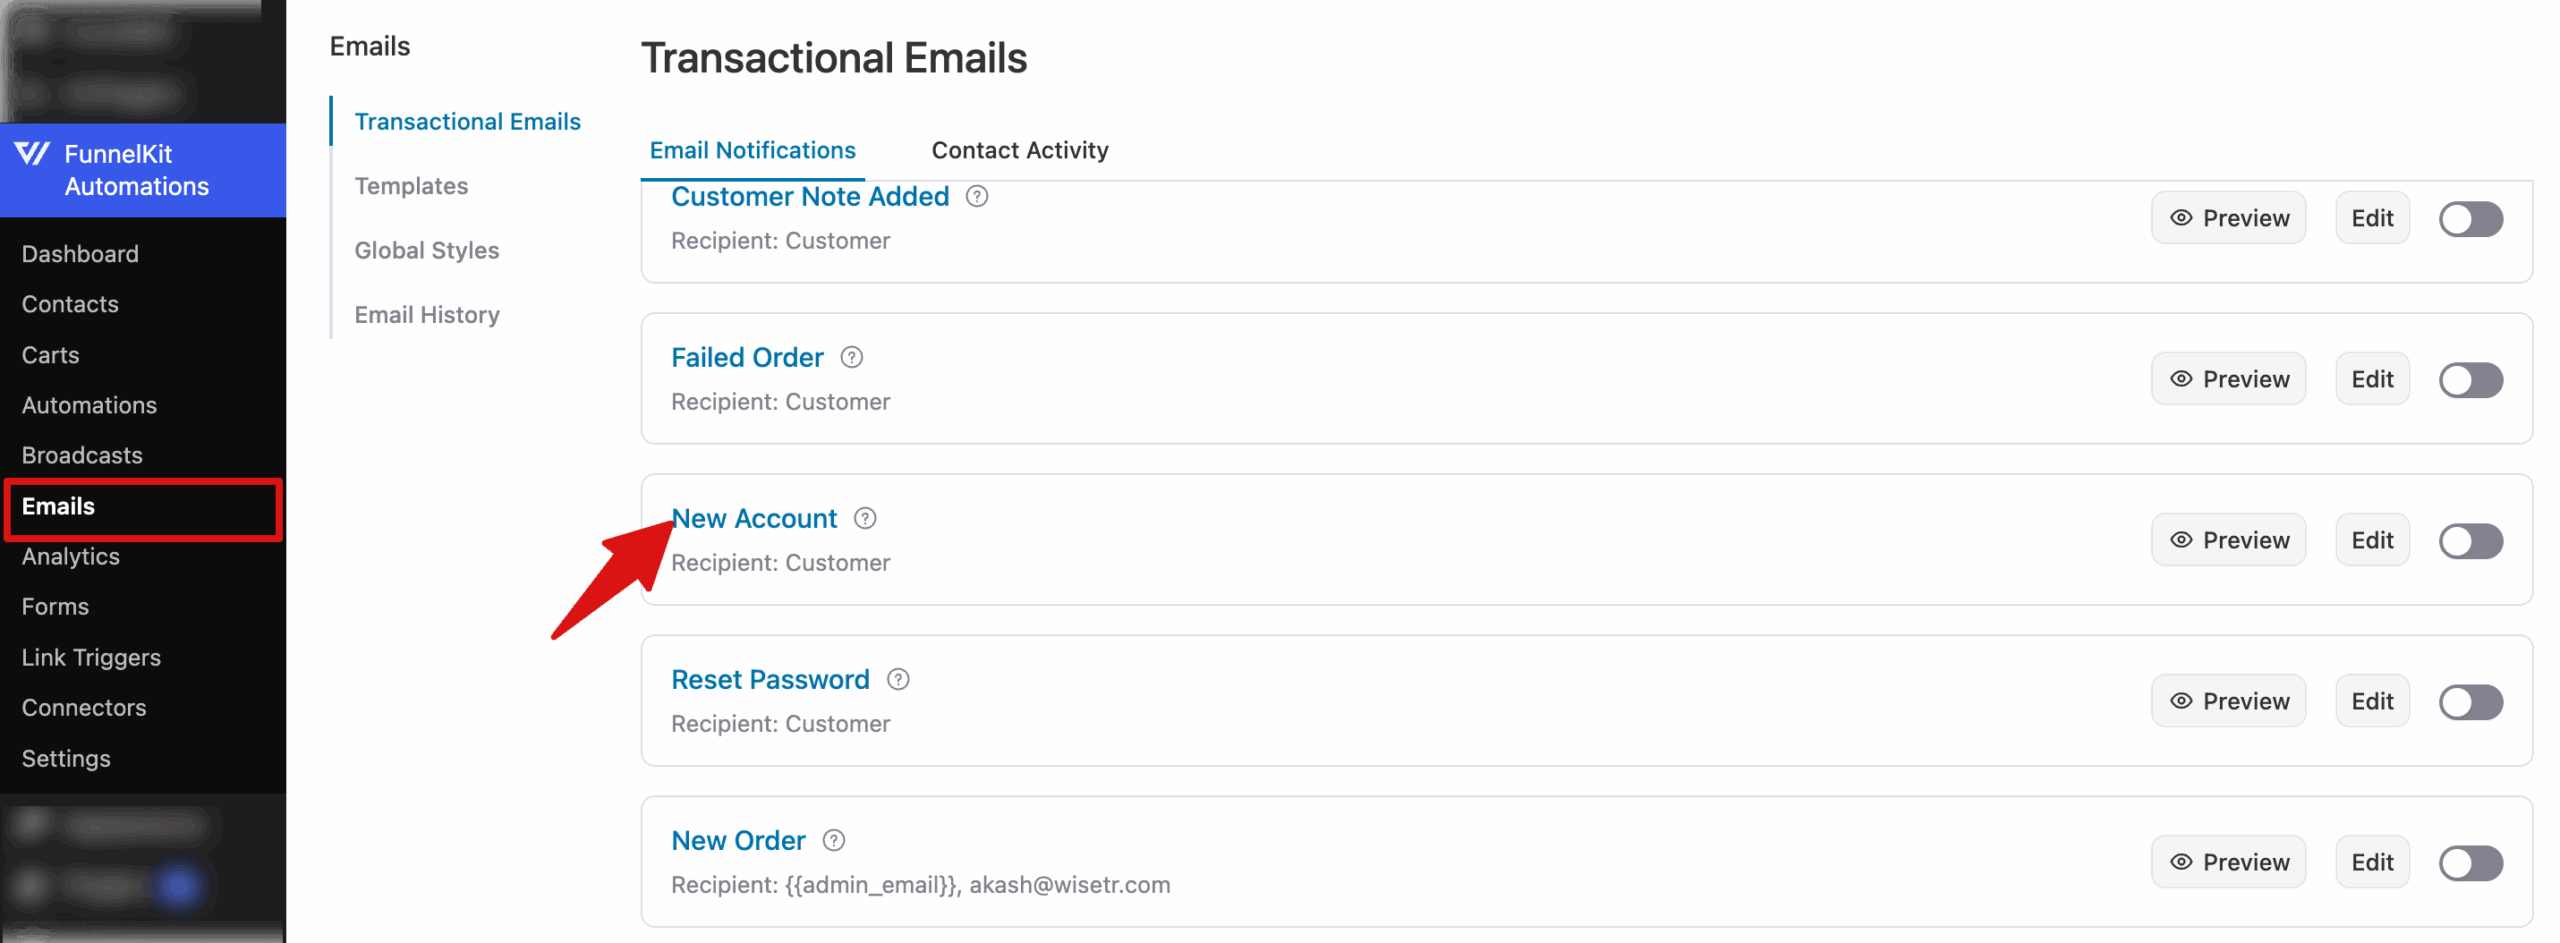
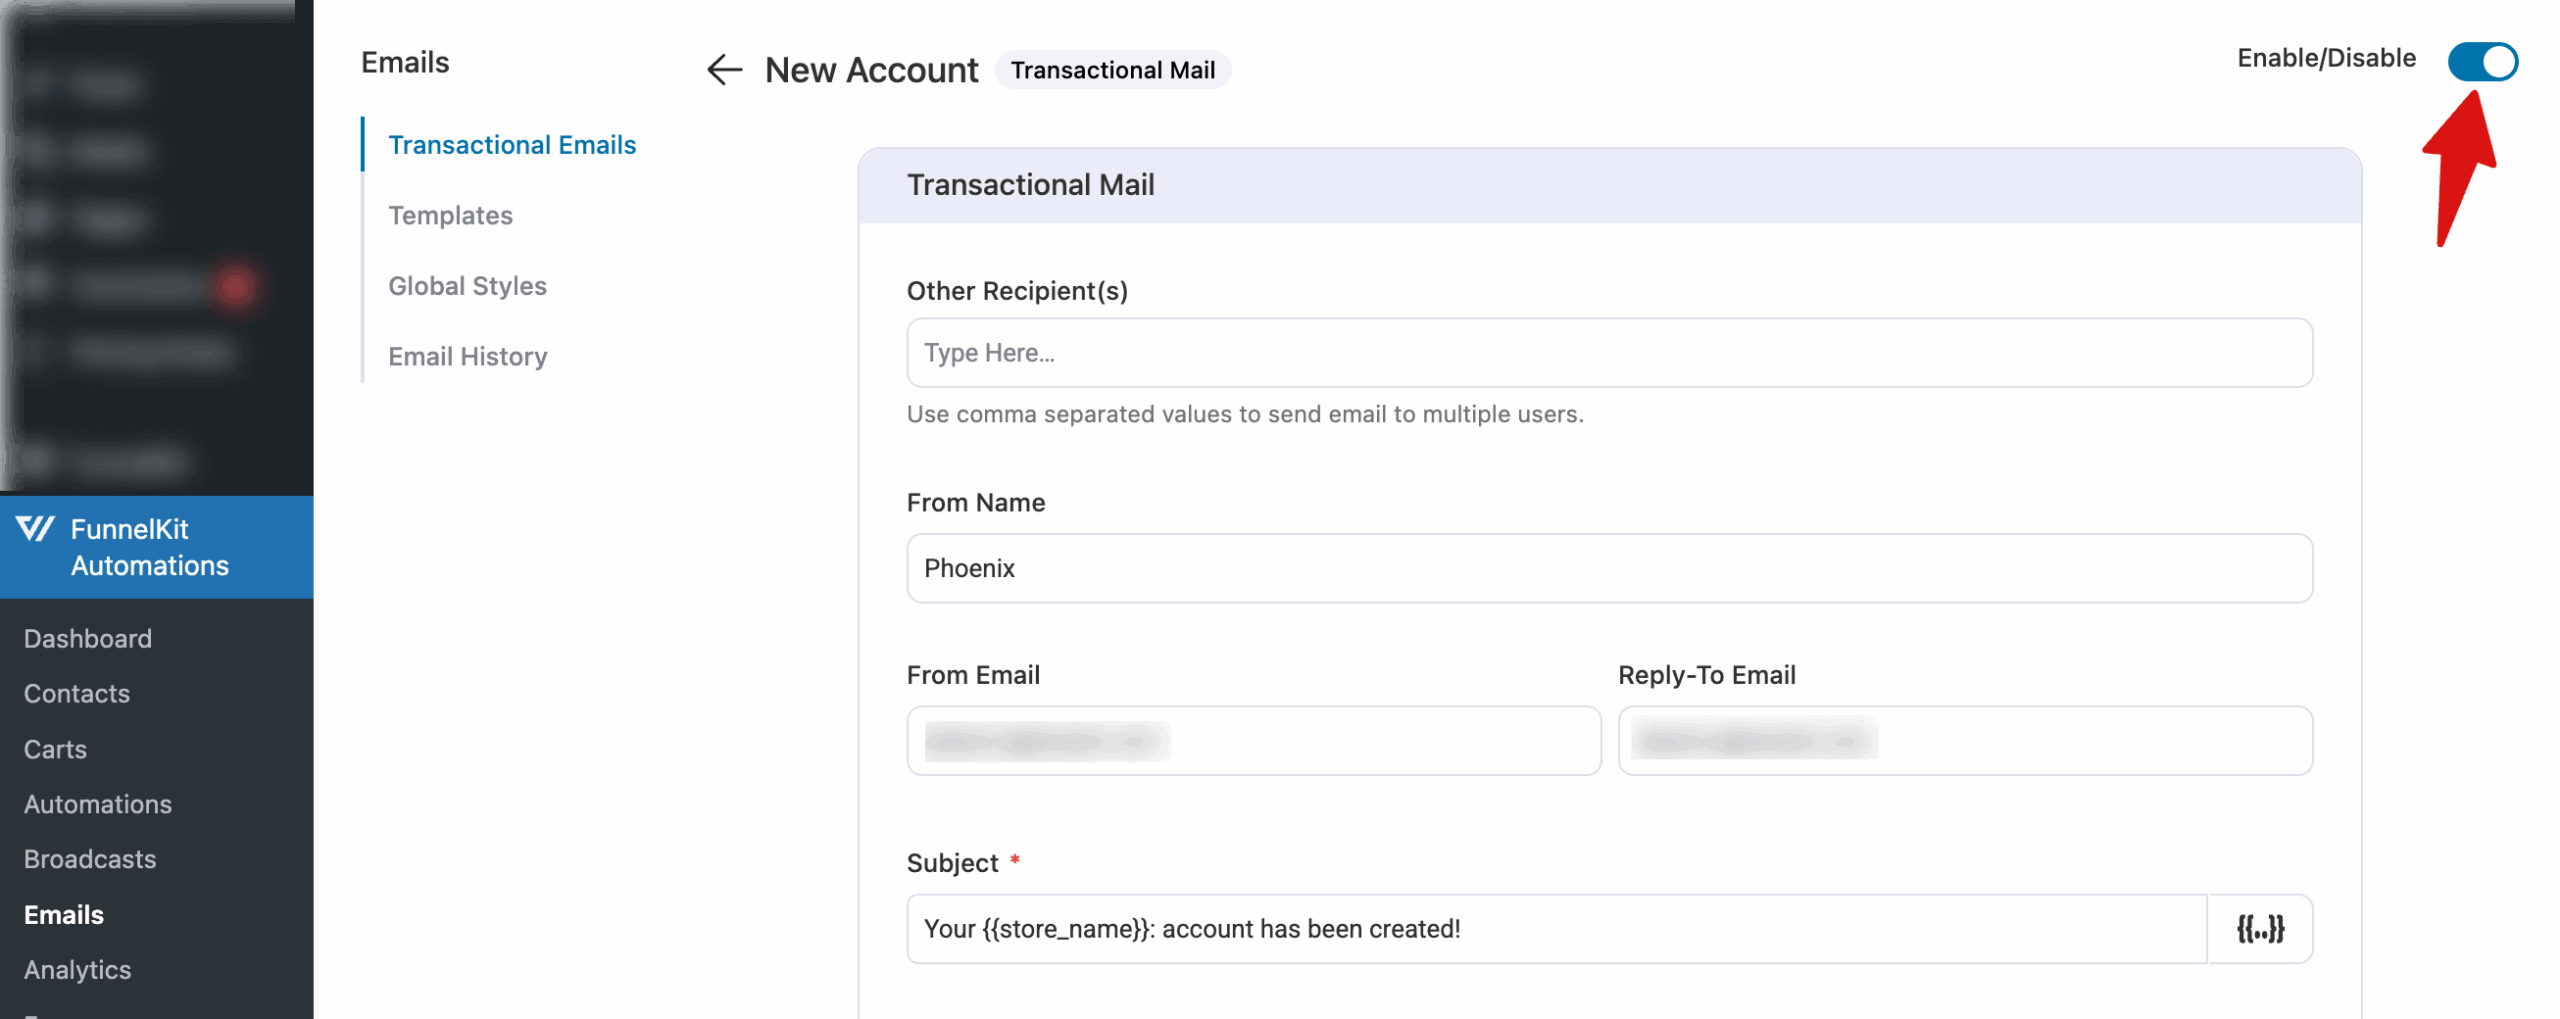
Step 1: Navigate to the new account email
Navigate to FunnelKit Automations ⇒ Emails and scroll down to the "New Account" email. This email is sent to the customer when a customer signs up via checkout or account pages.
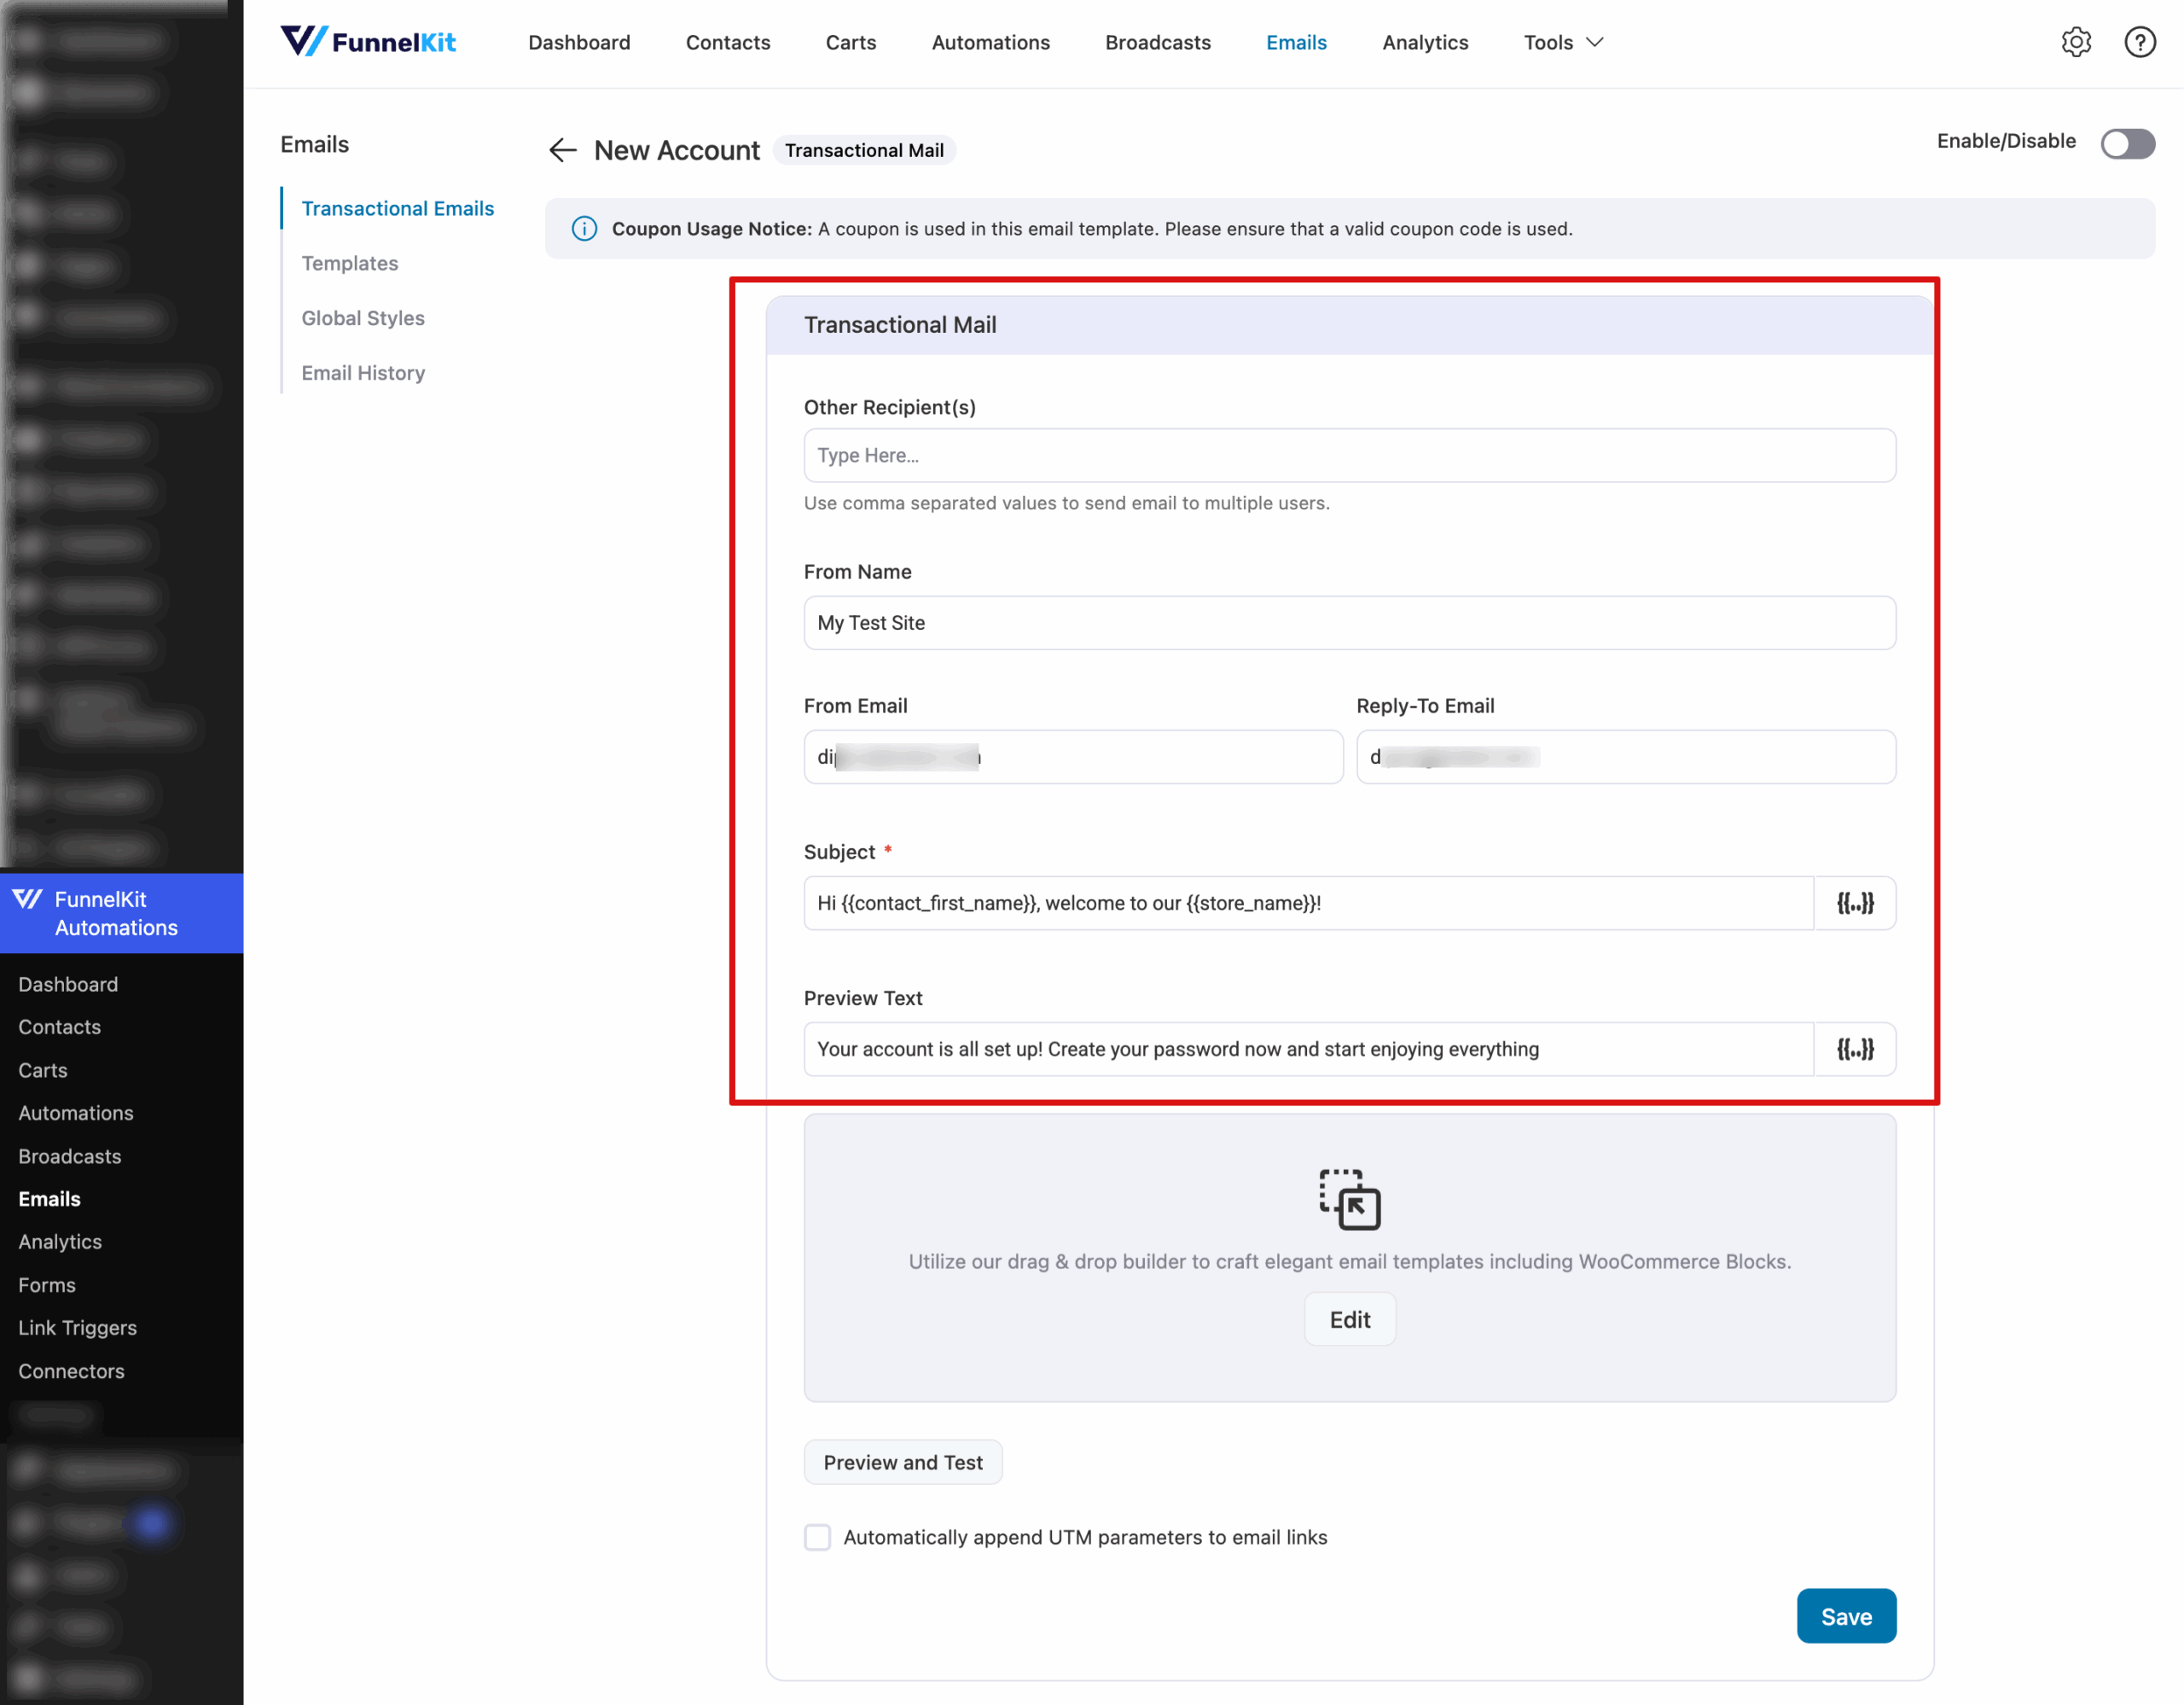
Step 2: Configure WooCommerce new account email header fields
Now set the following important email header fields:
- Other Recipients (optional): Enter any additional emails that should receive the email, separated by commas. By default, the email is sent to the customer's email.
- From Name: Set the name that appears as the sender.
- From Email: Set a professional, domain-based email to send the message.
- Reply-To Email (optional): Set the email where replies should go. If empty, replies go to the From Email.
- Subject: Write a short, friendly line using dynamic merge tags to personalize the email. Example: Hi {{contact_first_name}}, welcome to {{store_name}}!
- Preview Text: Write a concise message that summarizes the email and encourages the user to open it, using merge tags for personalization. Example: Your account is ready! Set your password and start exploring {{store_name}}.
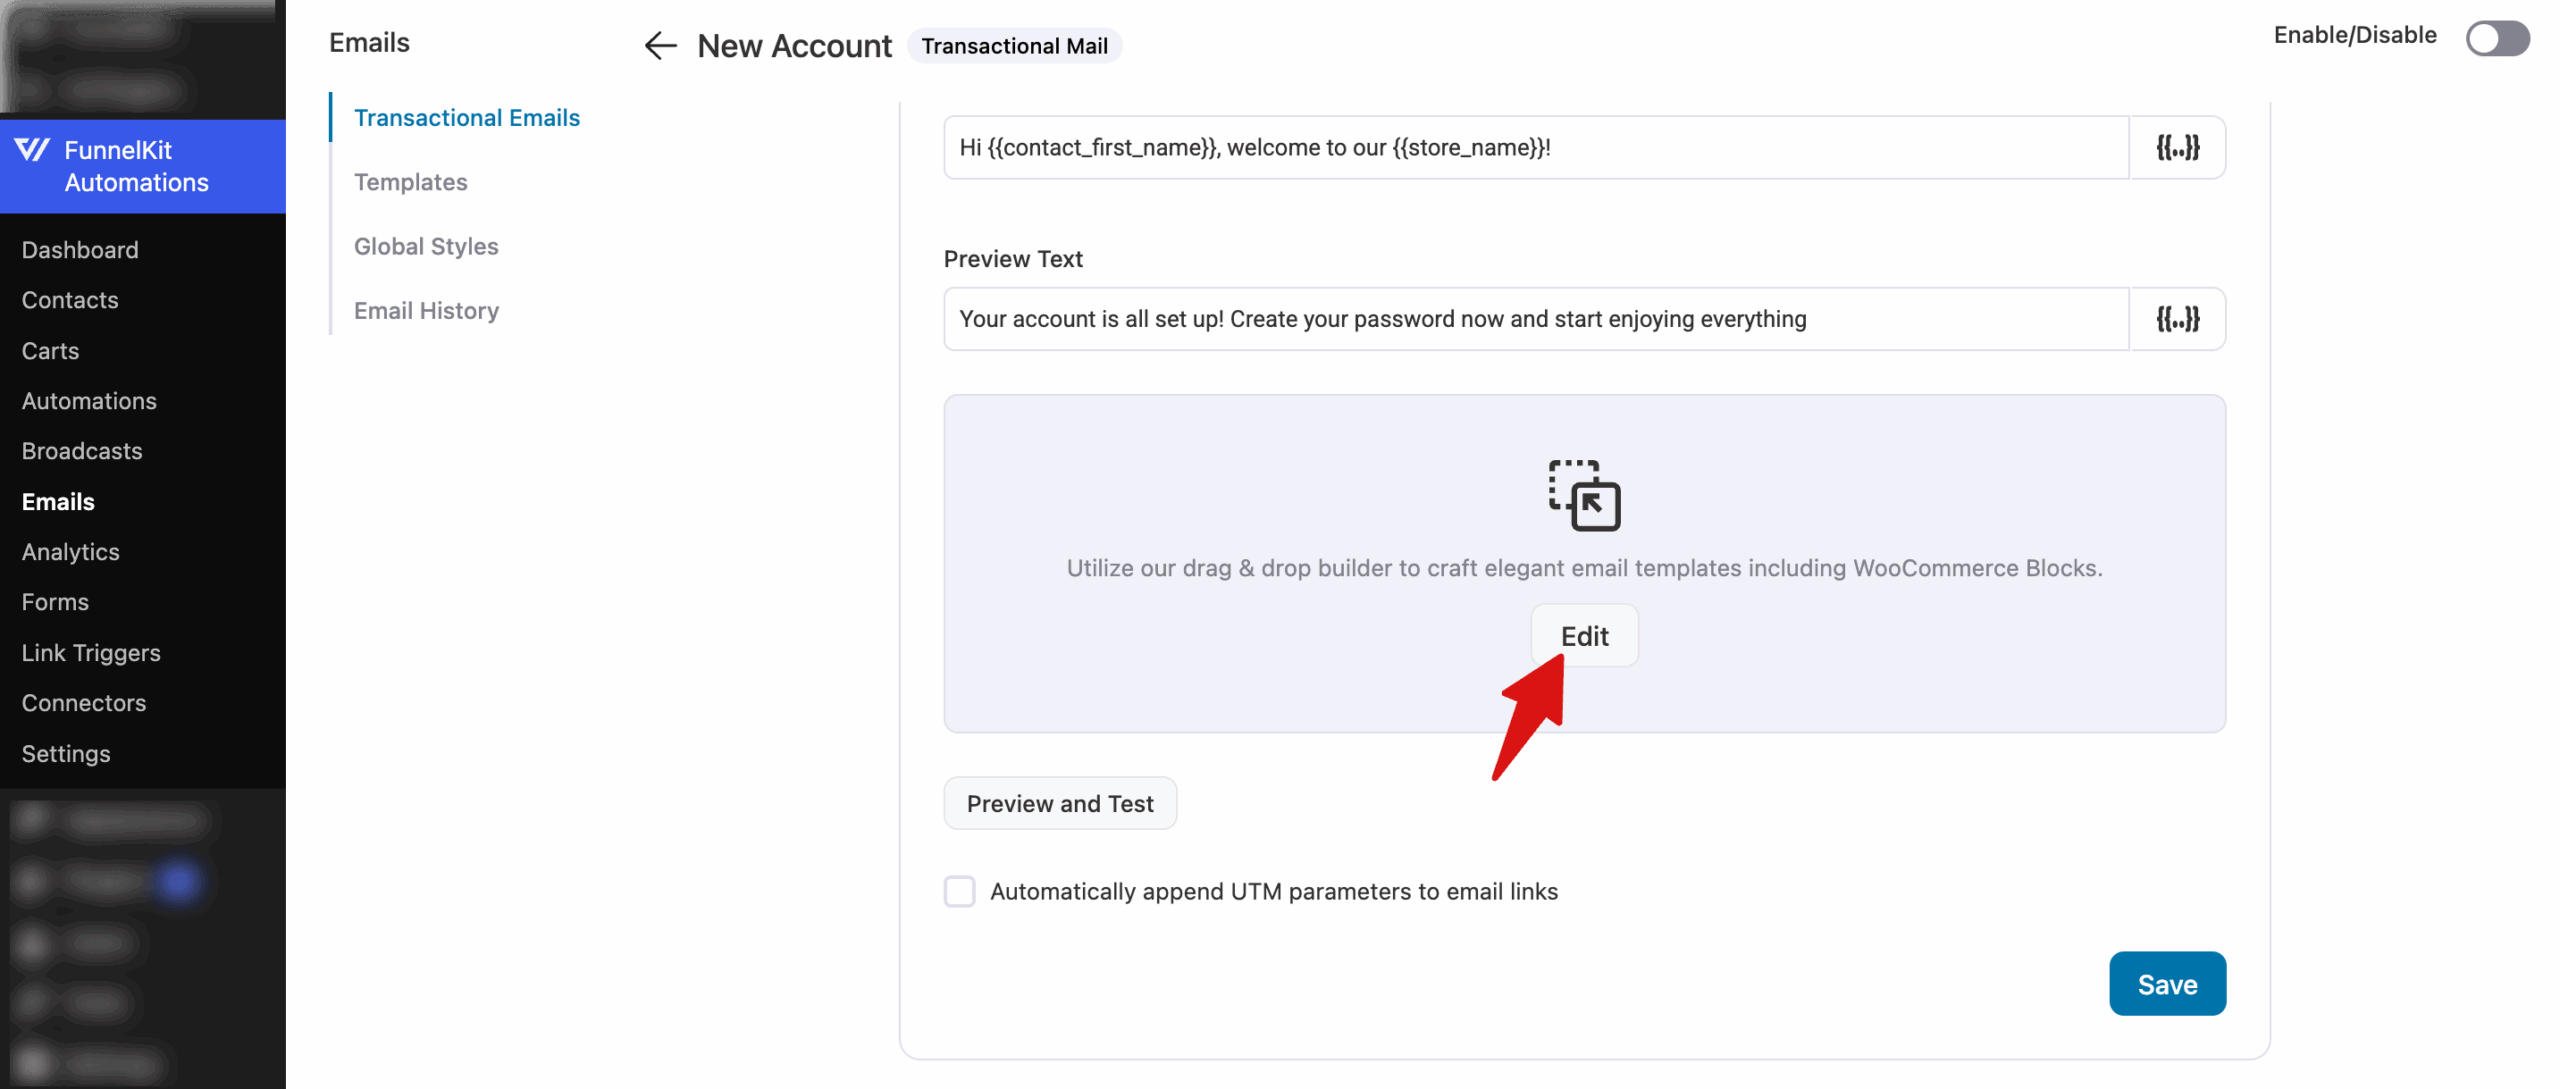
Step 3: Design the custom WooCommerce account creation email
Next, scroll down and hit Edit to design your email.
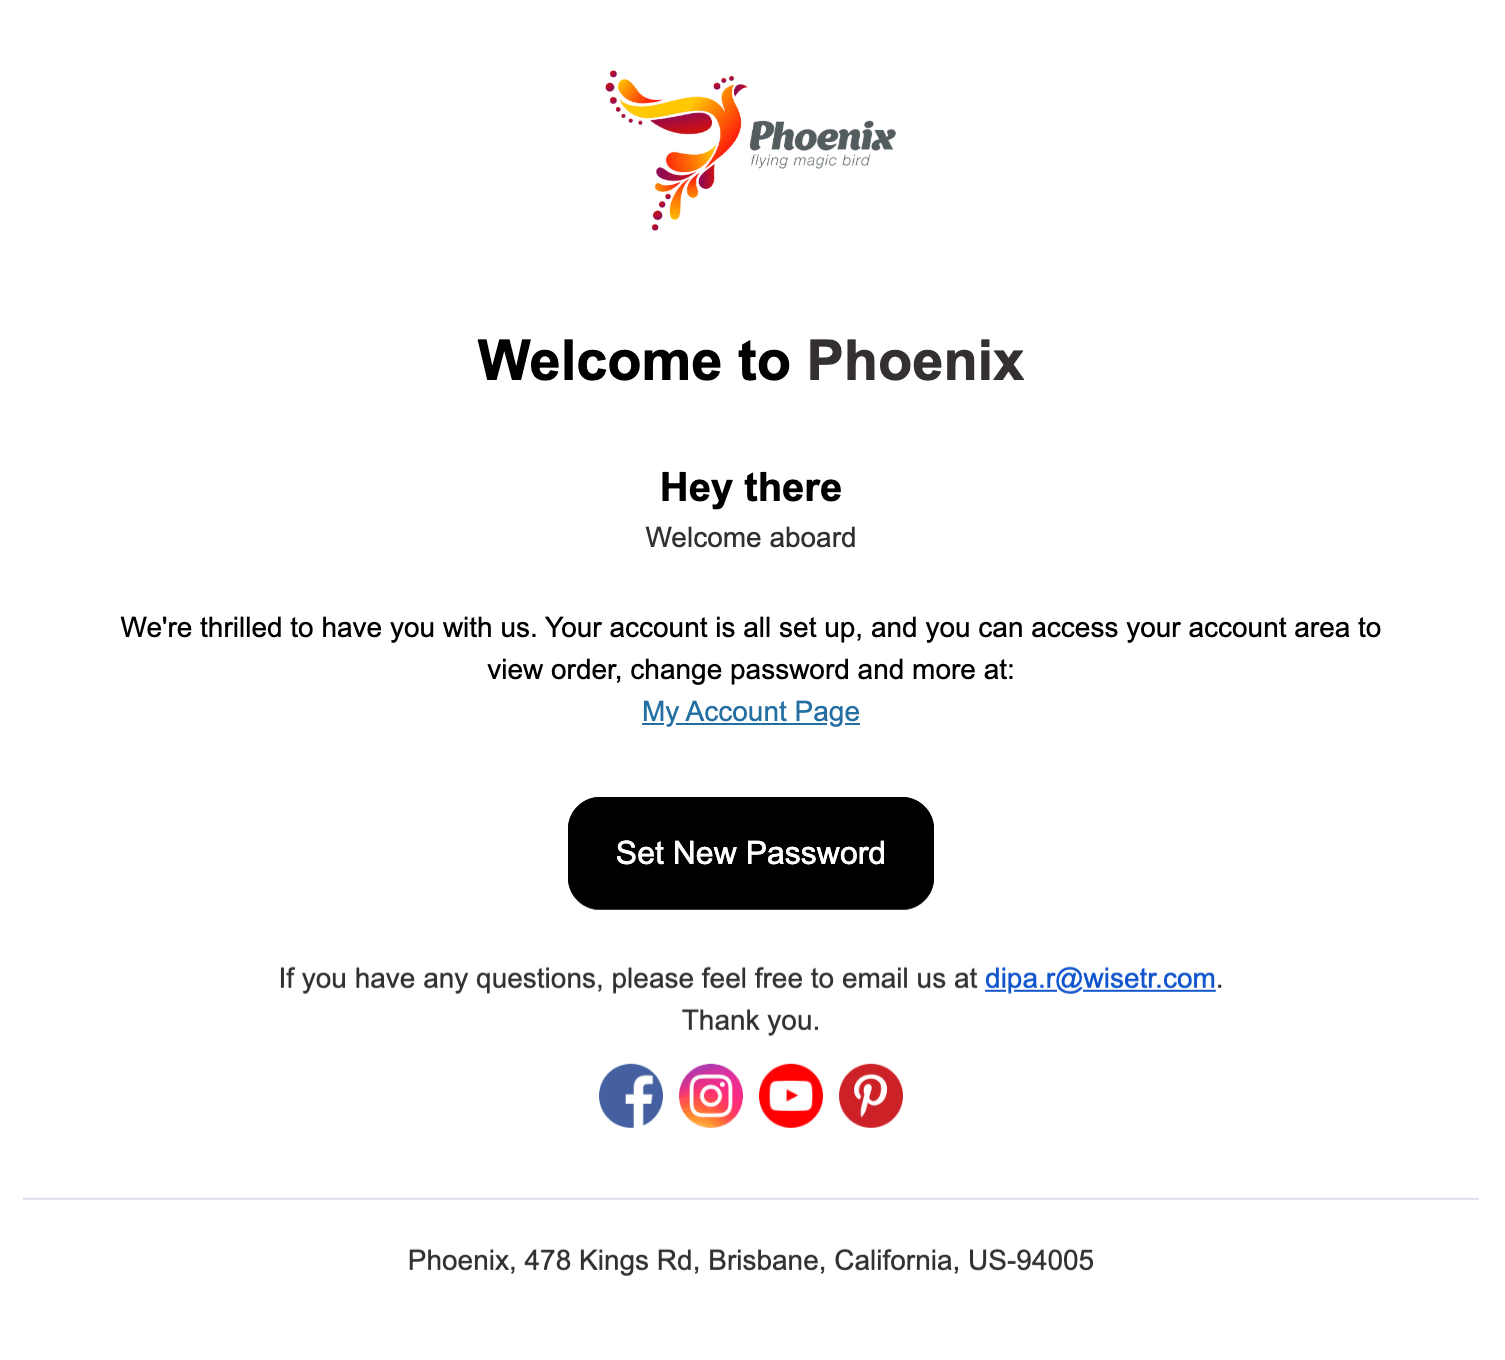
You will land on a prebuilt email template. This is a clean, professional welcome email that warmly introduces new users to your business.
It uses merge tags to dynamically display the business name using {{business_name}} and greet each customer personally by their first name using {{contact_first_name fallback='there'}}. creating a friendly and personalized experience.
The email provides essential account information, including access to the My Account page and a CTA to set a new password using the merge tag {{contact_password_setup_link}}.
The footer also includes an admin email so users can reach out if they need any help.
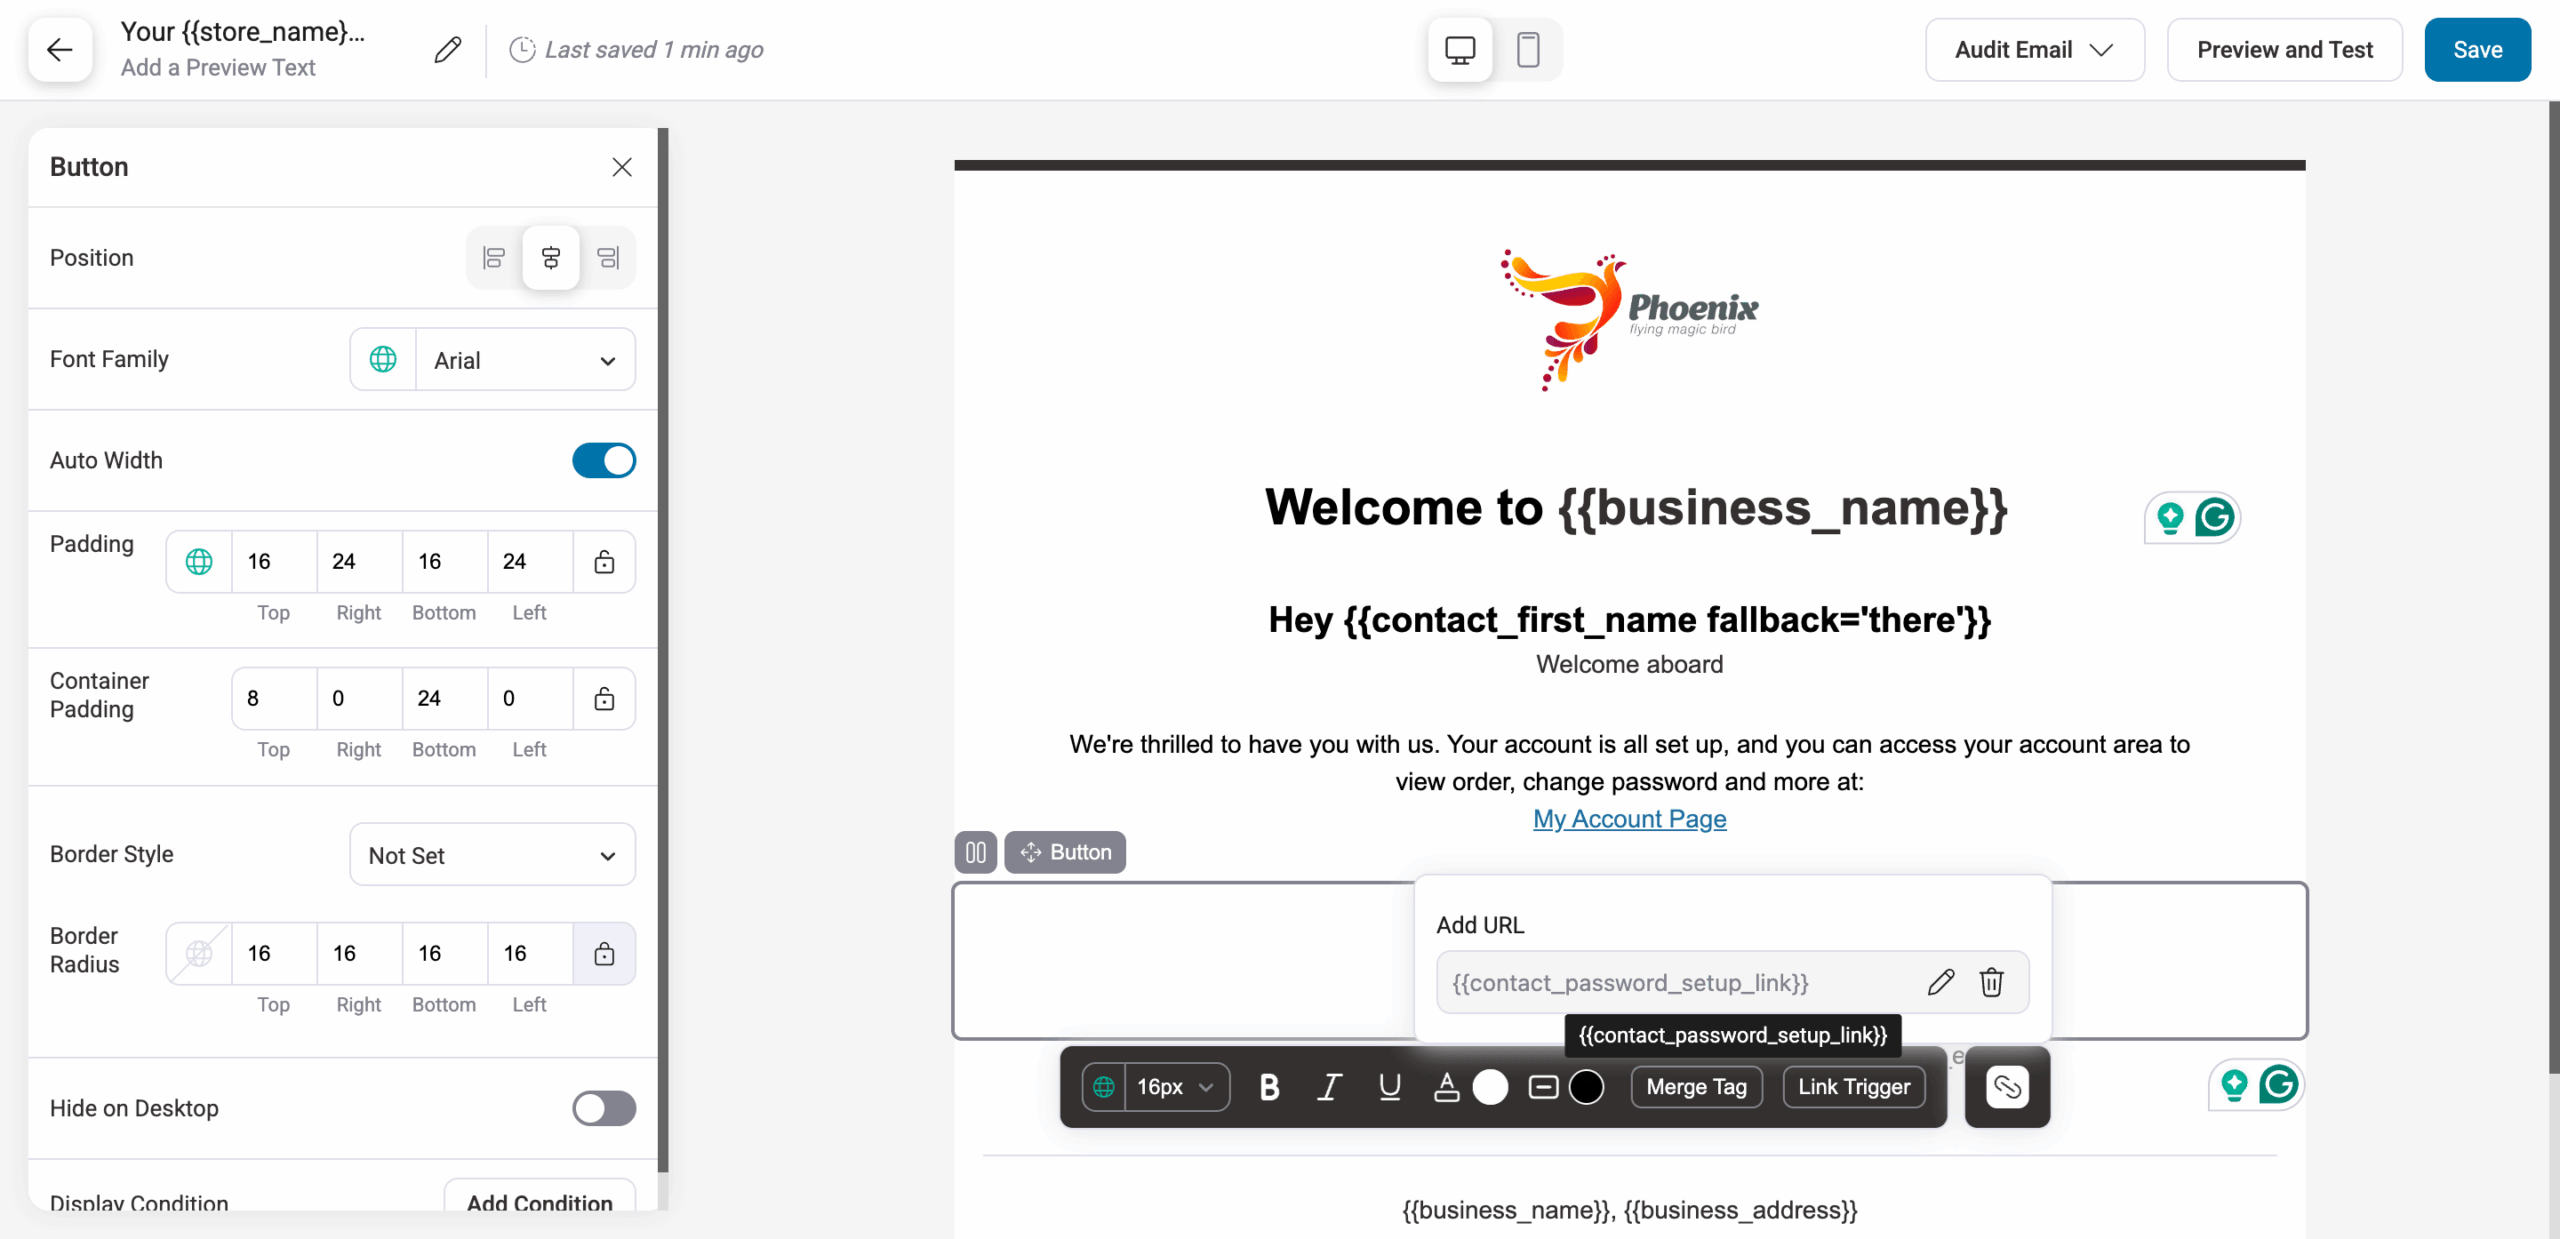
If you want, you can add more information here using different blocks like image, social, menu, product, coupon, etc. All you need to do is drag and drop, and then configure. Here, we added the social icon.
After designing the email, you can audit the email and send test emails to ensure everything is fine.

Once, you are happy, make sure to save the template.
Step 4: Activate the custom new account email
The final step is to activate the custom WooCommerce email.
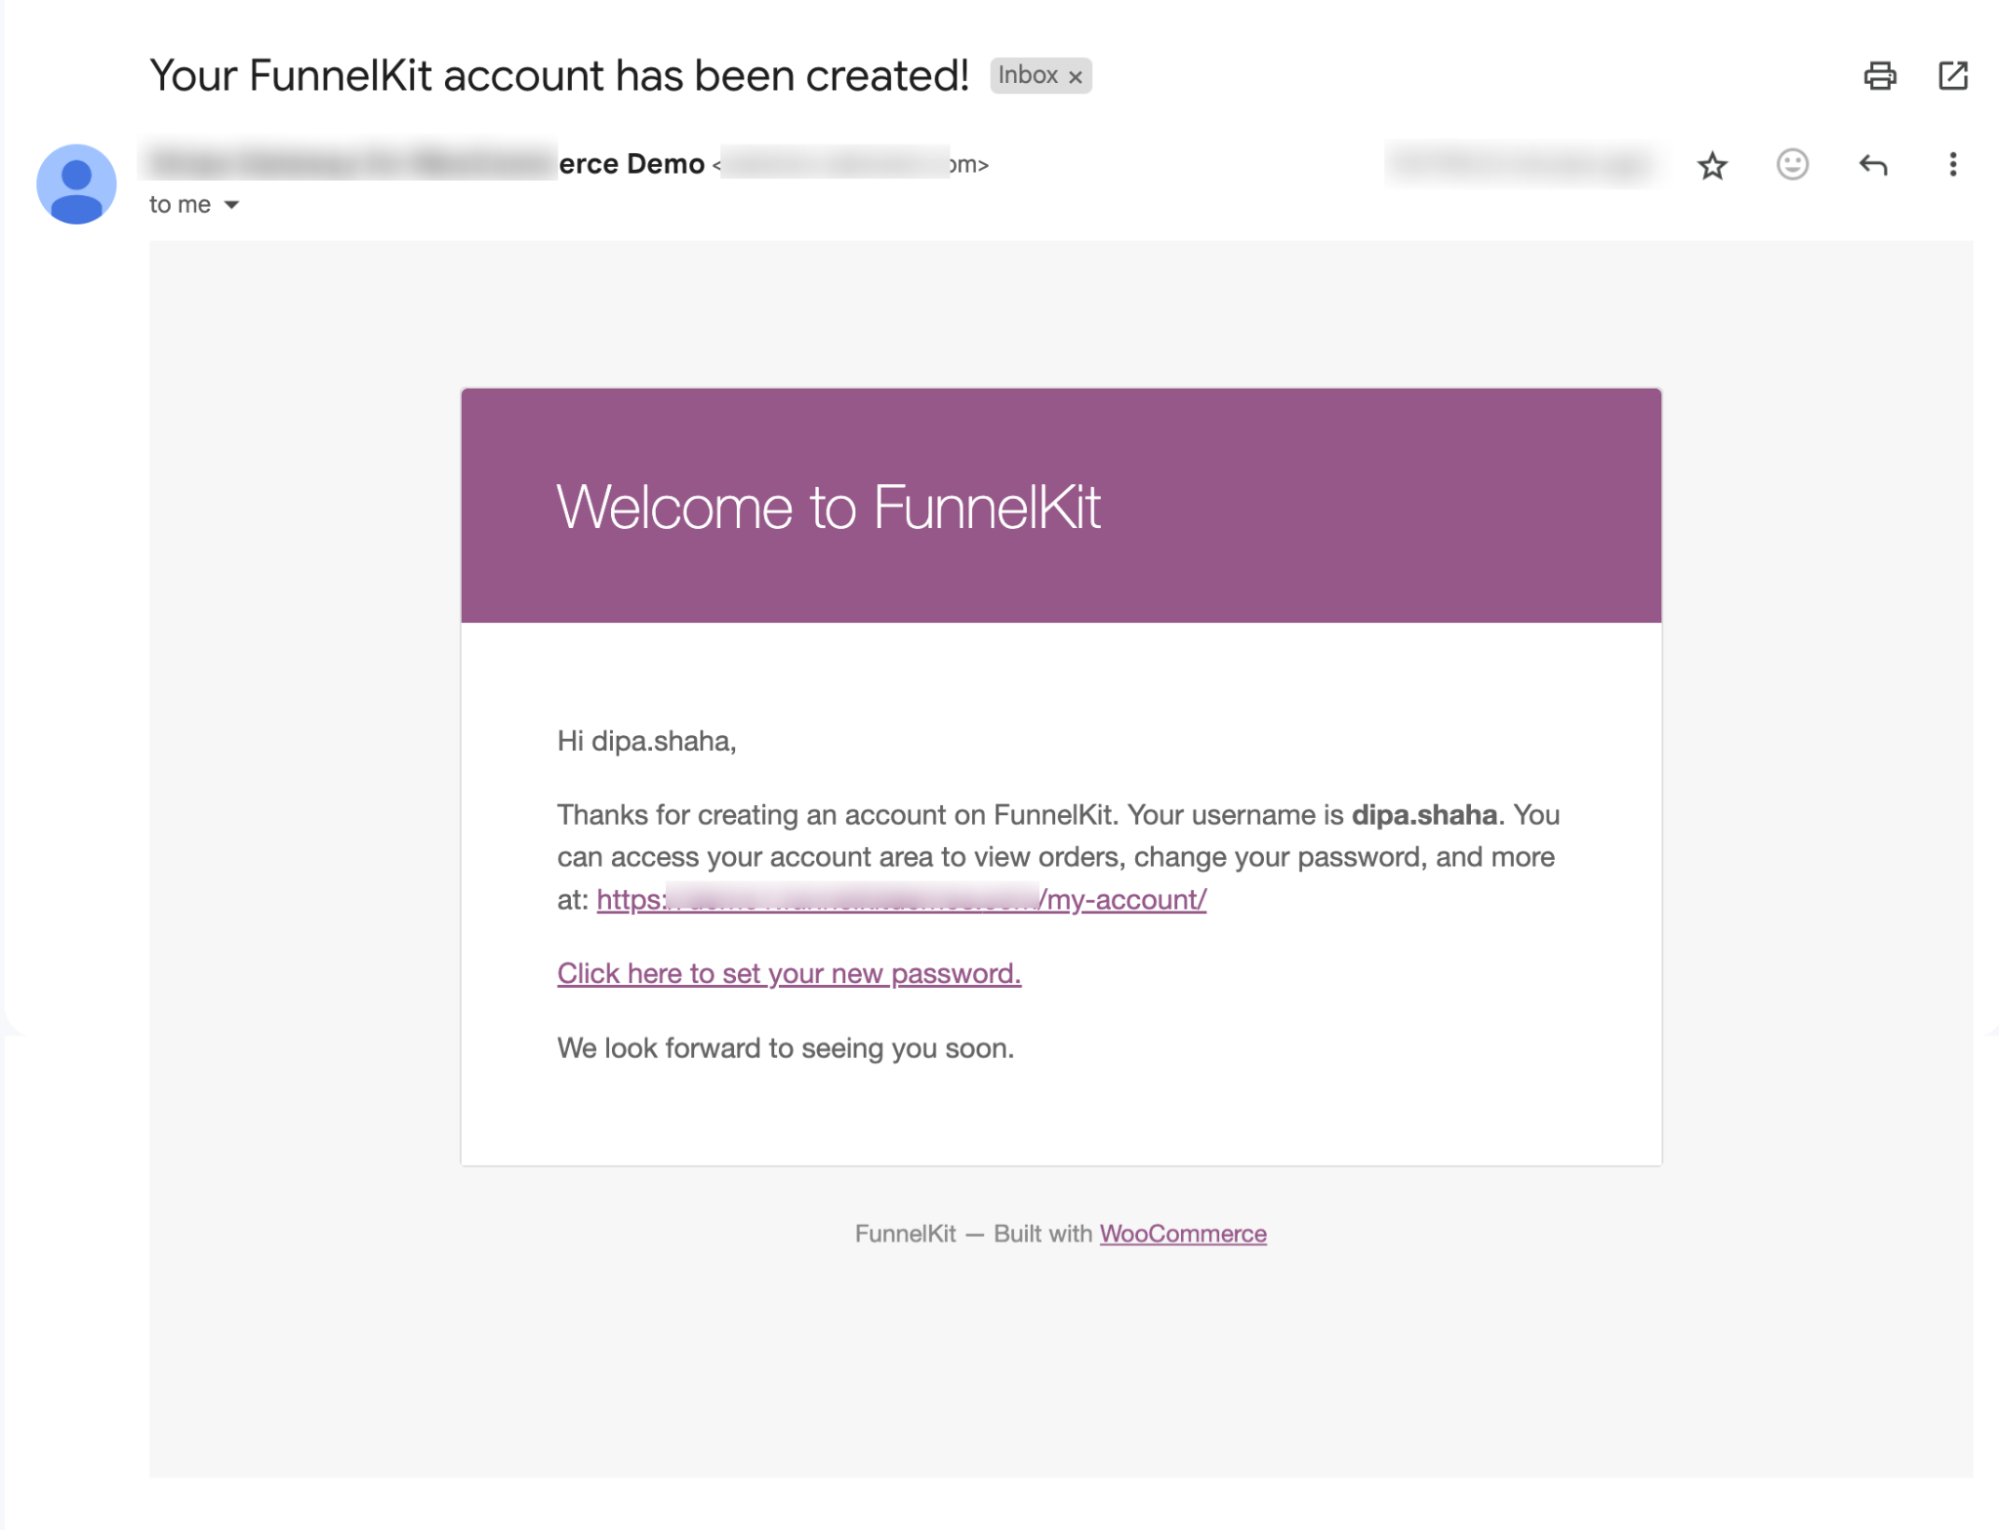
Now, new users will receive this email after automatic account creation on the WooCommerce checkout page:
Here is a preview of the email we created:
5 Tips to Follow Along With WooCommerce Account Creation on The Checkout Page For Better Conversions
- Offer a multi-step checkout process
28% of shoppers abandon their shopping carts midway due to a long, confusing checkout process.
A well-designed multi-step checkout can solve this problem by splitting the checkout fields into different steps, simplifying the buying process.
- Inline checkout field validation
A poorly validated checkout process frustrates customers and leads to lost sales.
A proper WooCommerce checkout field validation reduces errors, enhances satisfaction, and boosts conversions, ensuring a seamless experience.
- Enable Google Address autocomplete
Google Address Autocomplete provides real-time suggestions, reducing errors, ensuring accuracy, and speeding up checkout.
Additionally, incorrect addresses cause 41% of delays and 39% of delivery failures, which Google's address autocomplete can easily address.
- Auto apply coupons
Offering a discount always encourages users to complete a purchase. Automatically applying coupons at checkout makes things even smoother. It's like a shortcut that makes the checkout page friendlier and increases the likelihood that more people will complete their purchases.
- Offer a convenient payment gateway
Make sure you offer enough payment gateway options so everyone has convenient ways to pay. For instance, make sure to add express checkout, which makes it faster and easier for people to pay with a one-click checkout. Also, add local payments, buy now, pay later, to retain people with low budgets, and so on.
To boost sales for your WooCommerce store, follow these steps to set up automatic account creation at checkout.
More Questions About WooCommerce Automatic Account Creation
Got more questions? Have a look at these common questions with answers:
Is automatic account creation in WooCommerce GDPR/compliant?
Yes, but ensure your checkout includes consent checkboxes for storing personal data. FunnelKit can help you send compliance-friendly emails to new users.
How are passwords handled in WooCommerce Automatic Account Creation?
WooCommerce can auto-generate usernames and passwords and send a password setup link. Make sure password policies are clear, and consider allowing social login options to reduce friction.
Can I automatically send follow-up emails after account creation?
Yes. With FunnelKit Automations, you can send follow-up emails like welcome emails, product recommendations, review requests, or win-back campaigns automatically after an account is created.
Does automatic account creation slow down checkout?
No. When properly set up, accounts are created in the background, so customers experience a fast, seamless checkout without extra steps.
Ready to Automatically Create an Account On WooCommerce Checkout?
Automatically creating accounts at checkout helps ensure users don’t abandon their carts and complete their purchases.
In this competitive world, you can’t afford to make it harder for users to place an order. That’s why experts strongly recommend enabling automatic account creation on the checkout page.
To ensure users continue engaging with your brand even after a guest checkout, replace the default new-user email with a custom one.
In this blog, we have shared the account creation process, how to send a custom email, and some tips to boost your store's conversion rate.
The good part is that all of these can be implemented using FunnelKit’s products.
So, get yourself FunnelKit Funnel Builder and FunnelKit Automations to start your journey towards multiple revenue streams!

Editorial Team
June 16, 2026Utilizing the power of the WooCommerce sales funnel can boost your online sales and revenue. That means a product page that builds desire, an in-cart upsell, a checkout with an...
Editorial Team
June 15, 2026If you run a WooCommerce store, you've almost certainly come across FunnelKit. FunnelKit is a suite of three separate products, each with its own Lite (free) and Pro versions: FunnelKit...
Damanjeet Singh
June 12, 2026Hi, I'm Damanjeet, co-founder and CEO of FunnelKit. For the last 15 years, I've helped WooCommerce stores solve one expensive problem, which is that the default checkout wasn't built to...


