

Are you tired of losing international customers due to currency limitations?
Letting customers pick their preferred currency at WooCommerce checkout can make a big difference!
Not allowing your customers to select their preferred currency during checkout could be a barrier to completing purchases.
When a customer is forced to pay in a currency they don’t want, they’re more likely to leave the checkout process. This can increase your store's cart abandonment rate.
However, there is good news!
You can add the option to change the currency at checkout by using a WooCommerce currency switcher plugin.
We will share how you can offer currency change options at checkout with a solid plugin for free.
Why Offer Customers The Option to Change Currency At Checkout?
WooCommerce does not provide a built-in option to let users switch currencies at checkout. However, adding this feature through a plugin can significantly improve the customer experience and boost sales. Here’s why it matters:
- Global reach
According to Shopify, 92% of shoppers prefer to purchase on sites priced in their local currency. By offering currency change options at checkout, you can tap into a broader international market and cater to the diverse needs of your customers.
- Increased conversion
A Baymard Institute study found that 18% of users abandon their shopping carts due to high or unexpected shipping fees, often triggered by a need for more clarity on currency conversion. Providing a local currency option directly at checkout reduces the friction caused by surprise costs and can help improve conversion rates.
- Customer trust
According to the survey, 76% of customers feel more comfortable purchasing products with prices in their local currency. This gives users the sense that they can trust this brand. Providing the option to change currency can help you win customer trust.
- Competitive advantage
Offering currency flexibility sets you apart from your competitors. In a competitive eCommerce landscape, customers appreciate the ease of shopping in their preferred currency. For example, Shopify reported that stores offering multi-currency options saw a 25-30% increase in international sales.
- Convenience
When users can easily change the currency and see the price of the products in their local currency, they don’t have to do the manual conversion. This streamlines the checkout process and makes it super convenient for customers.
Table of Contents
How to Add Currency Change Option to WooCommerce Checkout For Free
We will use FOX Currency Switcher to add a currency switcher option at the WooCommerce checkout.
It offers excellent features and allows you to add a currency switcher at checkout for free, making it a great option for enhancing the user experience.
🔔 Note: The free version is enough to add the option to change currency on the checkout page in your WooCommerce store.
After installing and activating the plugin, follow these steps:
Step 1: Add currencies
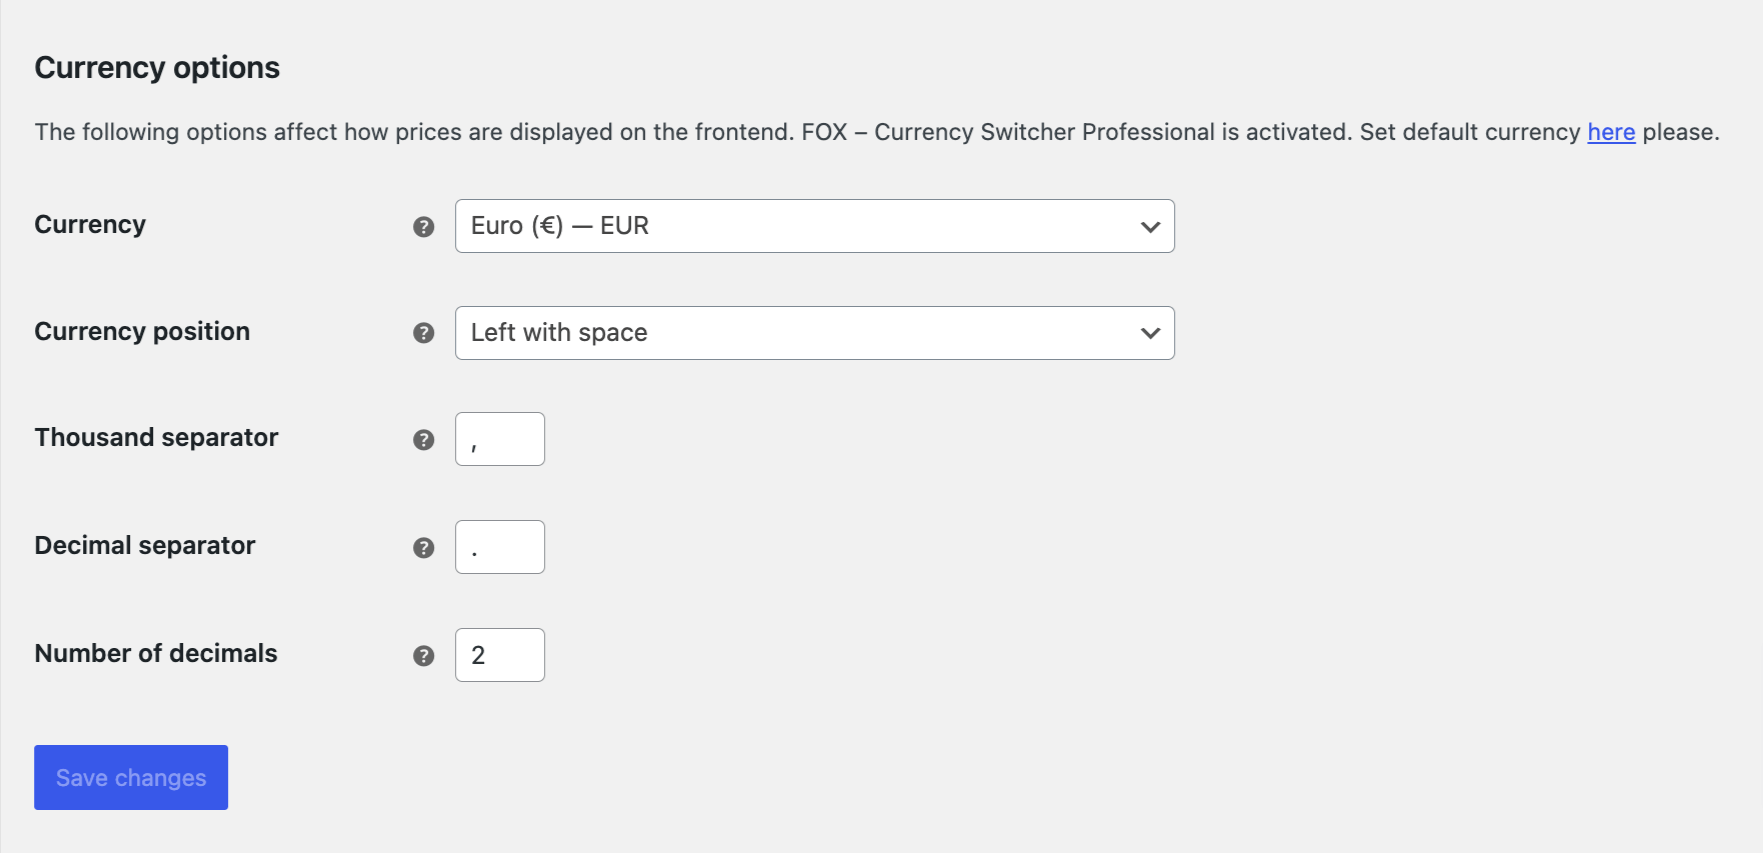
Next, go to WooCommerce ⇒ Settings and make sure you are on the Currency Tab.
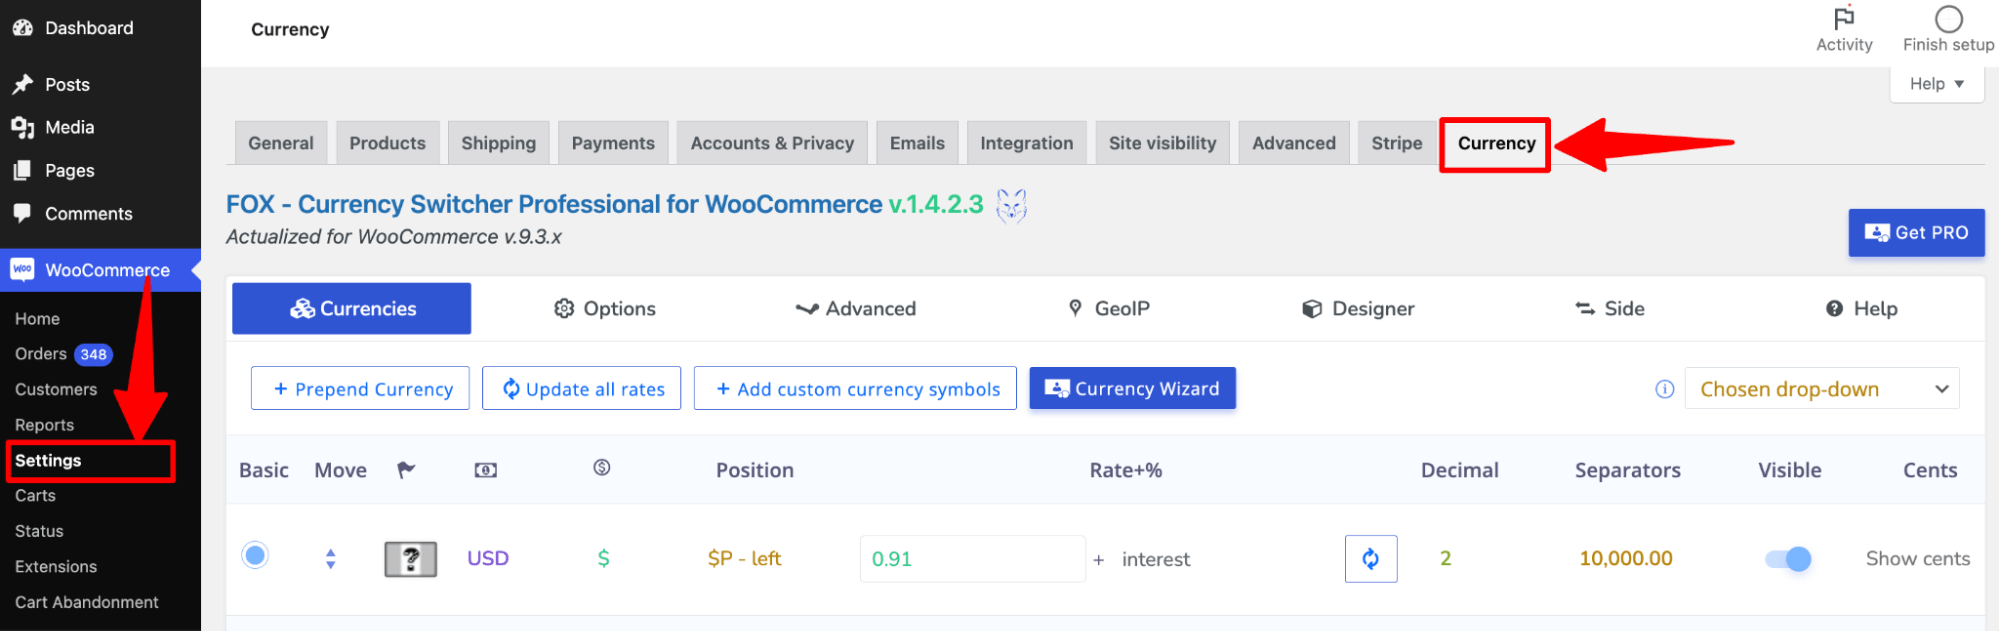
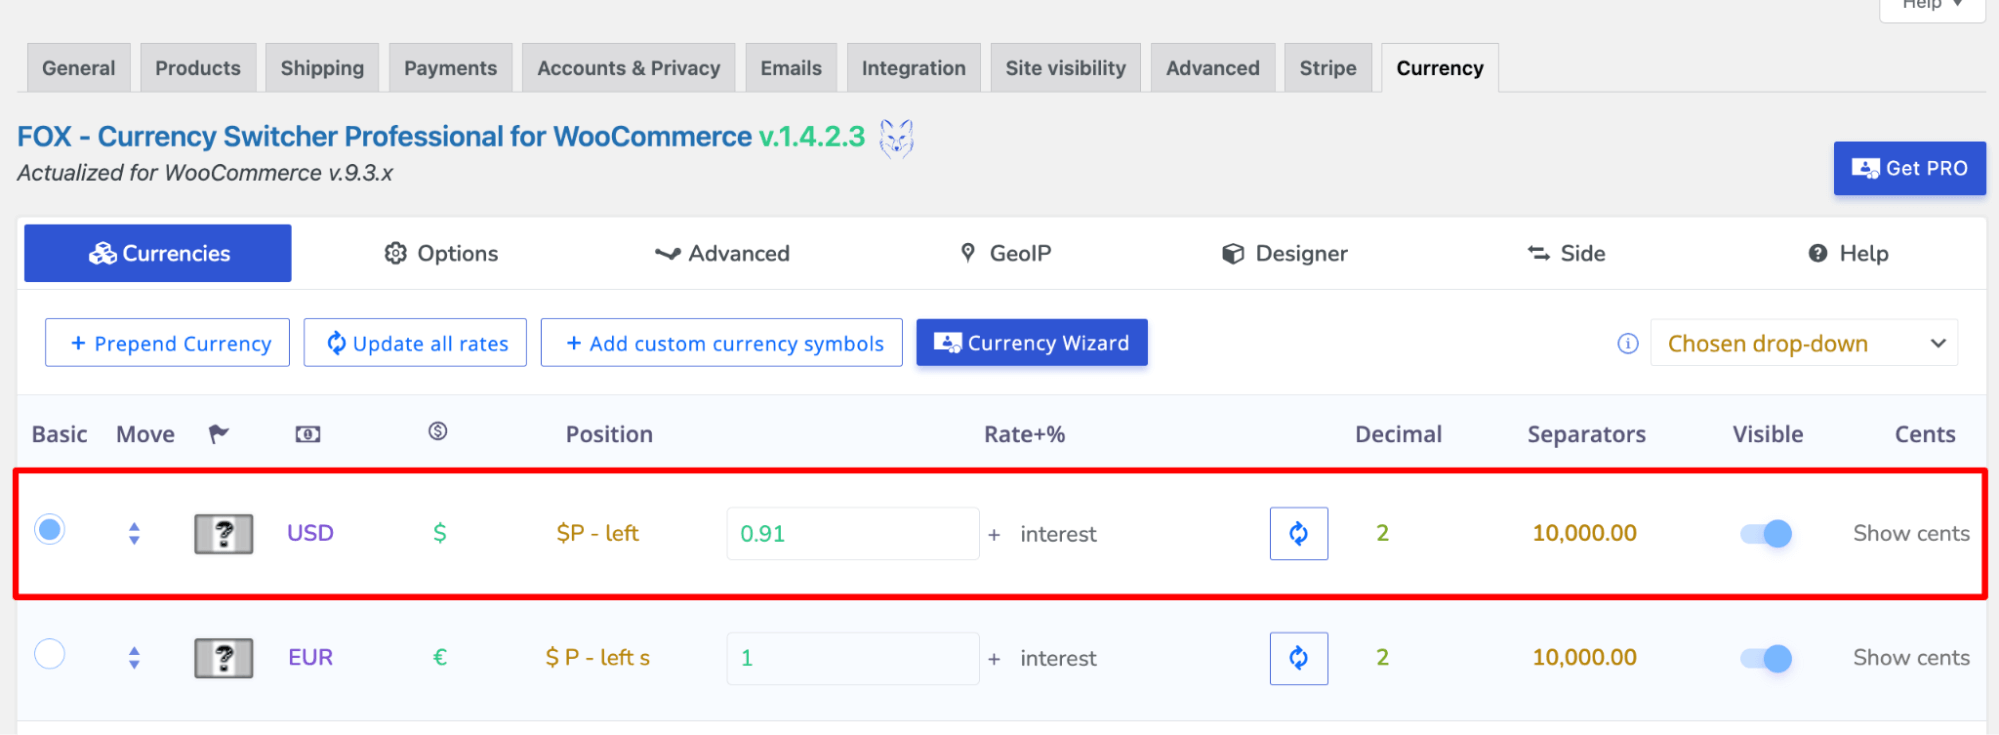
By default, the plugin supports two currencies: USD and EUR.
🔔 Note: The free version only allows you to offer two currency options.
You can customize the default currency to set your desired currency.
Here are the options you need to configure to set a currency:
- Flag: Click on the flag, and then from media, choose the file.
- Currency Code: The next option is to set the currency code. This document provides the 3-letter code for your desired country.
- Currency symbol: From the dropdown menu, choose the correct currency symbol.
- Position: Next, choose the currency position. You have four options: left, right, left space, and right space.
- Interest rate: Next, set the interest rate for the currency.
- Decimal: Set the number of decimal places for the currency.
- Separators: Choose the separator style from the dropdown.
- Visible: turn the toggle on so it's visible on the checkout page.
- Cents: Choose if you want to show/ hide cents.
- Description: Add a description of the currency.
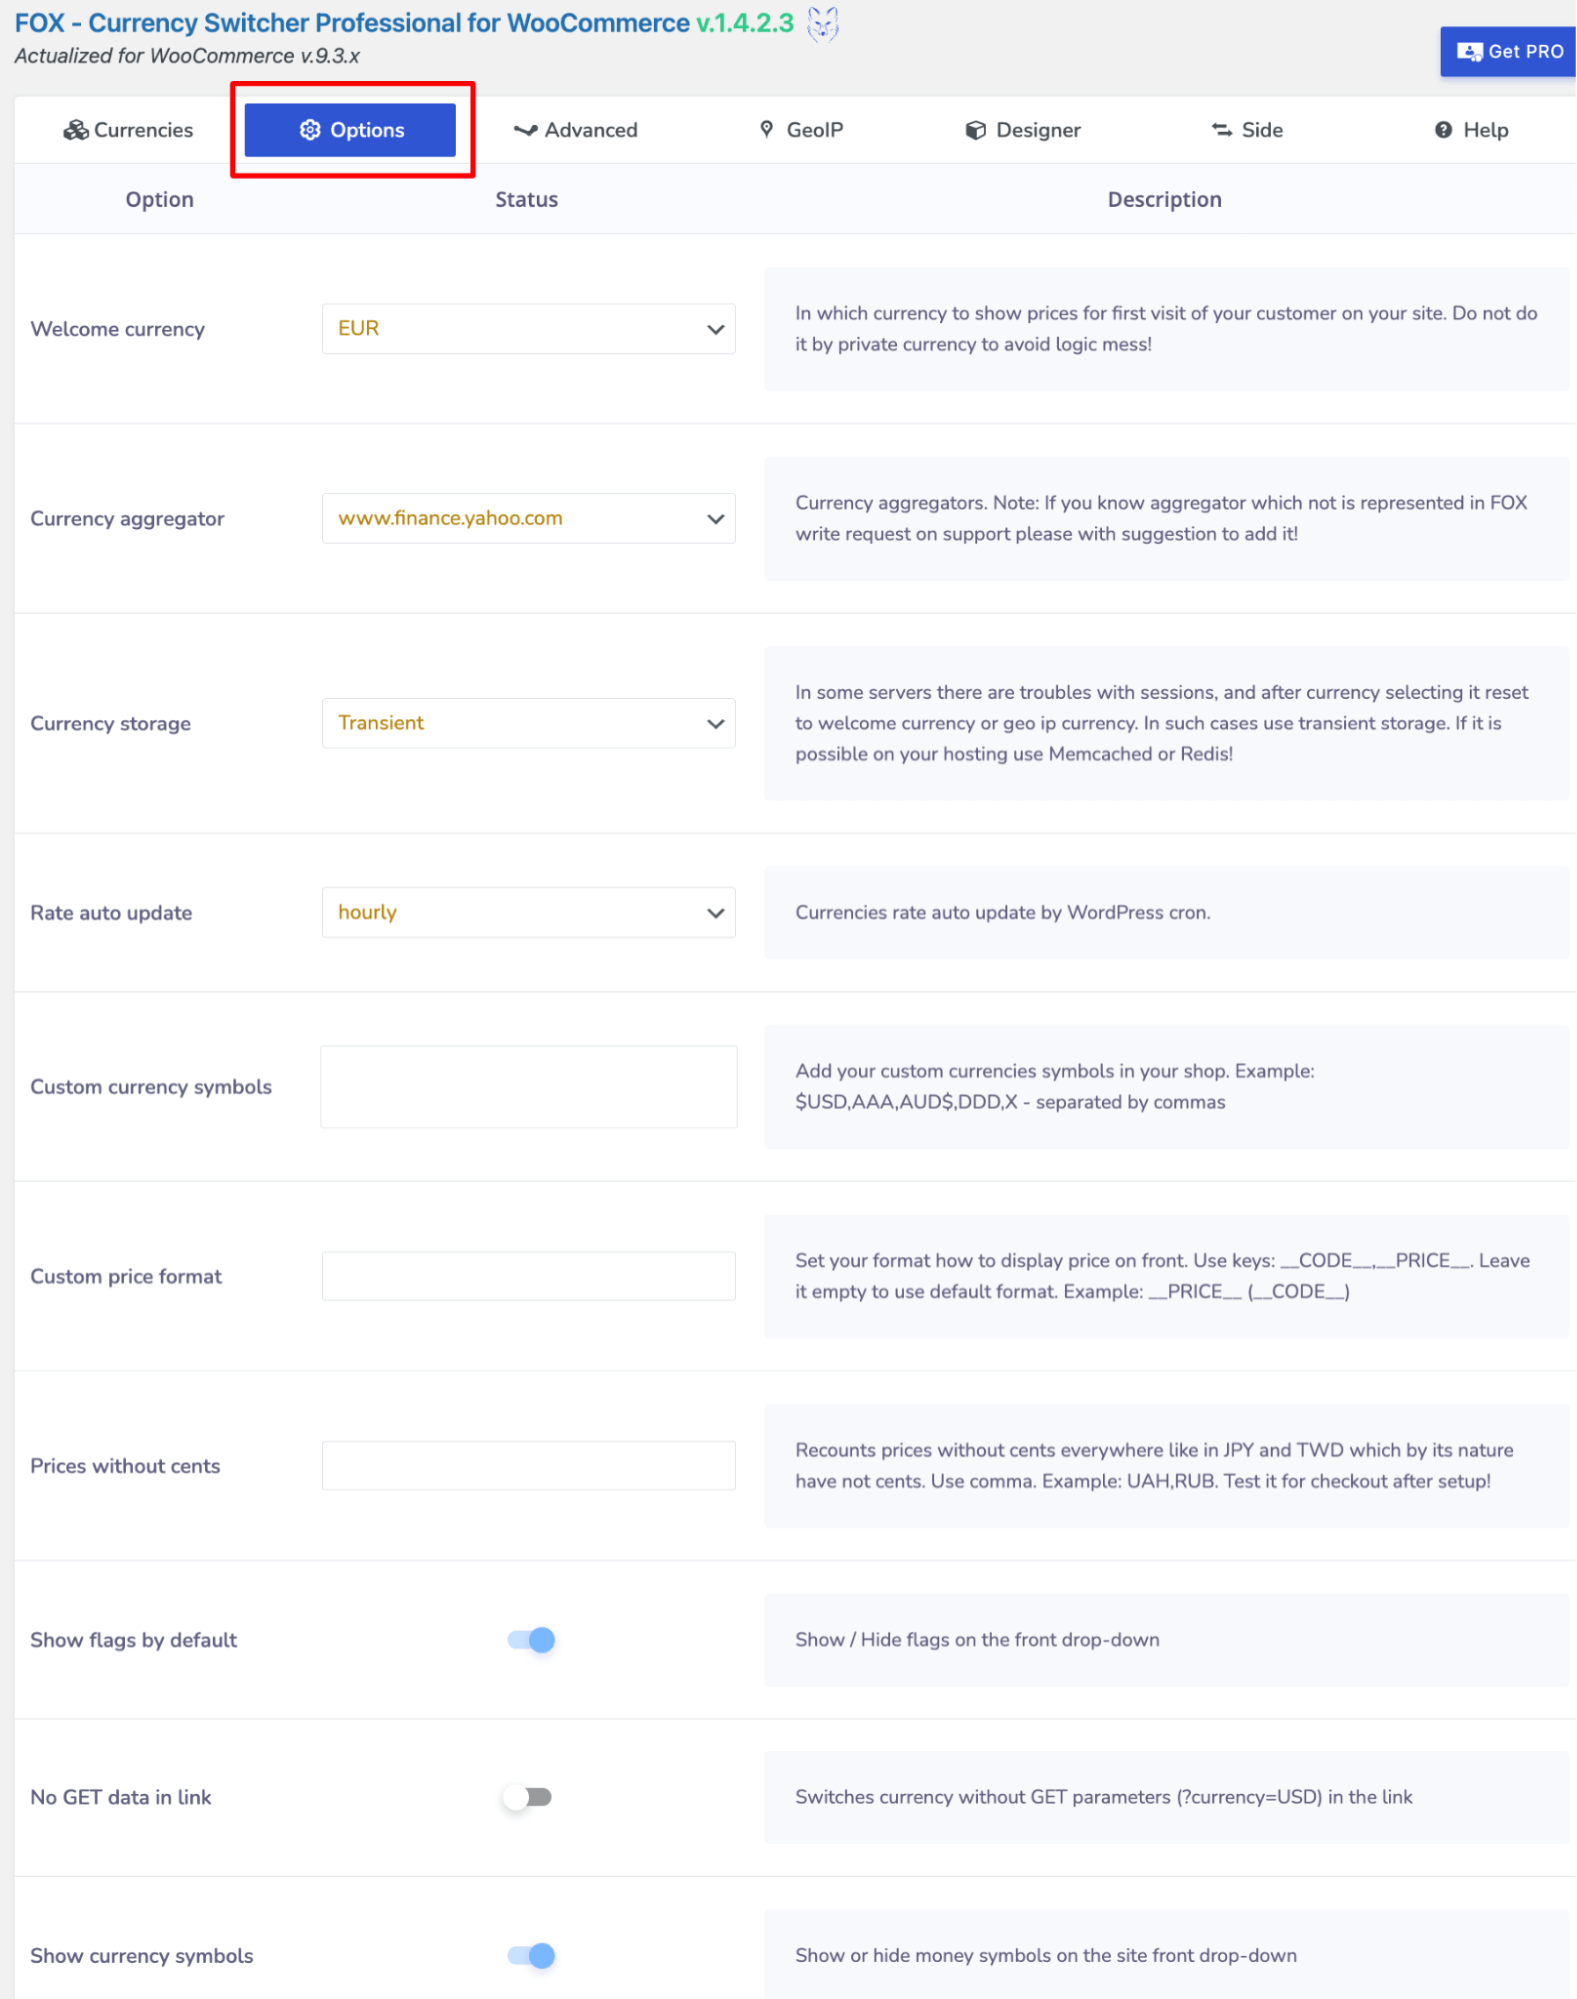
Step 2: Set up store currency switcher options
Next, move to the options tab and set the following:
- Welcome currency: Set the welcome currency that will be shown to first-time users.
- Currency aggregator: Select the currency aggregator you want to use for the conversion rate.
- Currency storage: Choose the currency storage option. The default option is transient, but you can also choose other storage options, such as a PHP session or a FOX session.
- Rate auto update: Choose how often you want the currency rate to update.
- Custom currency symbols: You can add custom currency symbols for your store. Use commas to separate multiple currencies.
- Custom price format: Set your display format using the CODE and PRICE keys. Leave empty for default format (e.g., PRICE (CODE)).
- Prices without cents: Round prices for currencies like JPY and TWD (no cents). Use a comma (e.g., UAH, RUB). Test after setup!
- Show flags by default: Enable flags to display by default next to currencies.
In this Options tab, you can control various settings, such as the Show price info icon, Email notice about "Rate auto update" results, and Show approximate amount, among others.
🔔 Note: Do not turn on the option “Hide switcher on the checkout page.”
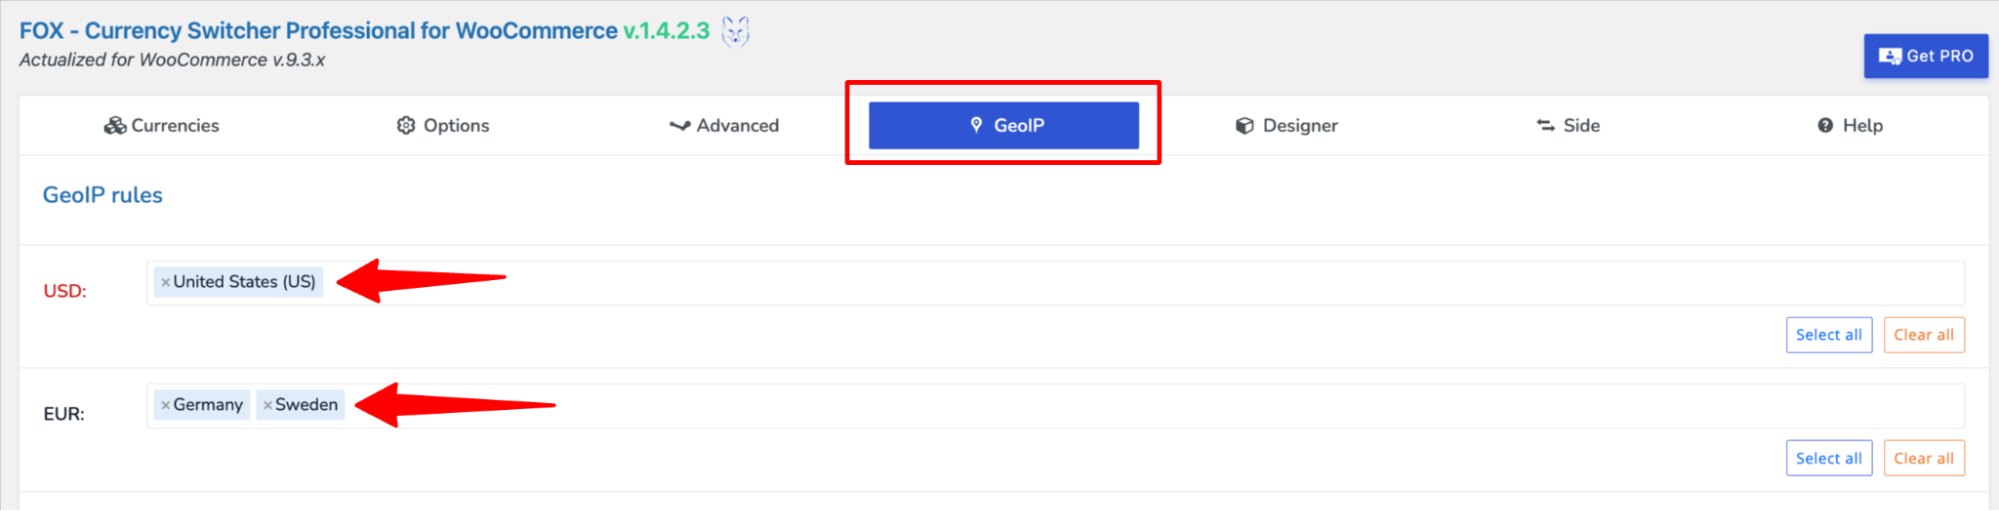
Step 3: Set the GeoIP rule
You can set the GeoIP rule to configure which currencies will be available in which location.
To add a search, select the tab for any currency and then add the county. Repeat the same process to assign currency to countries.
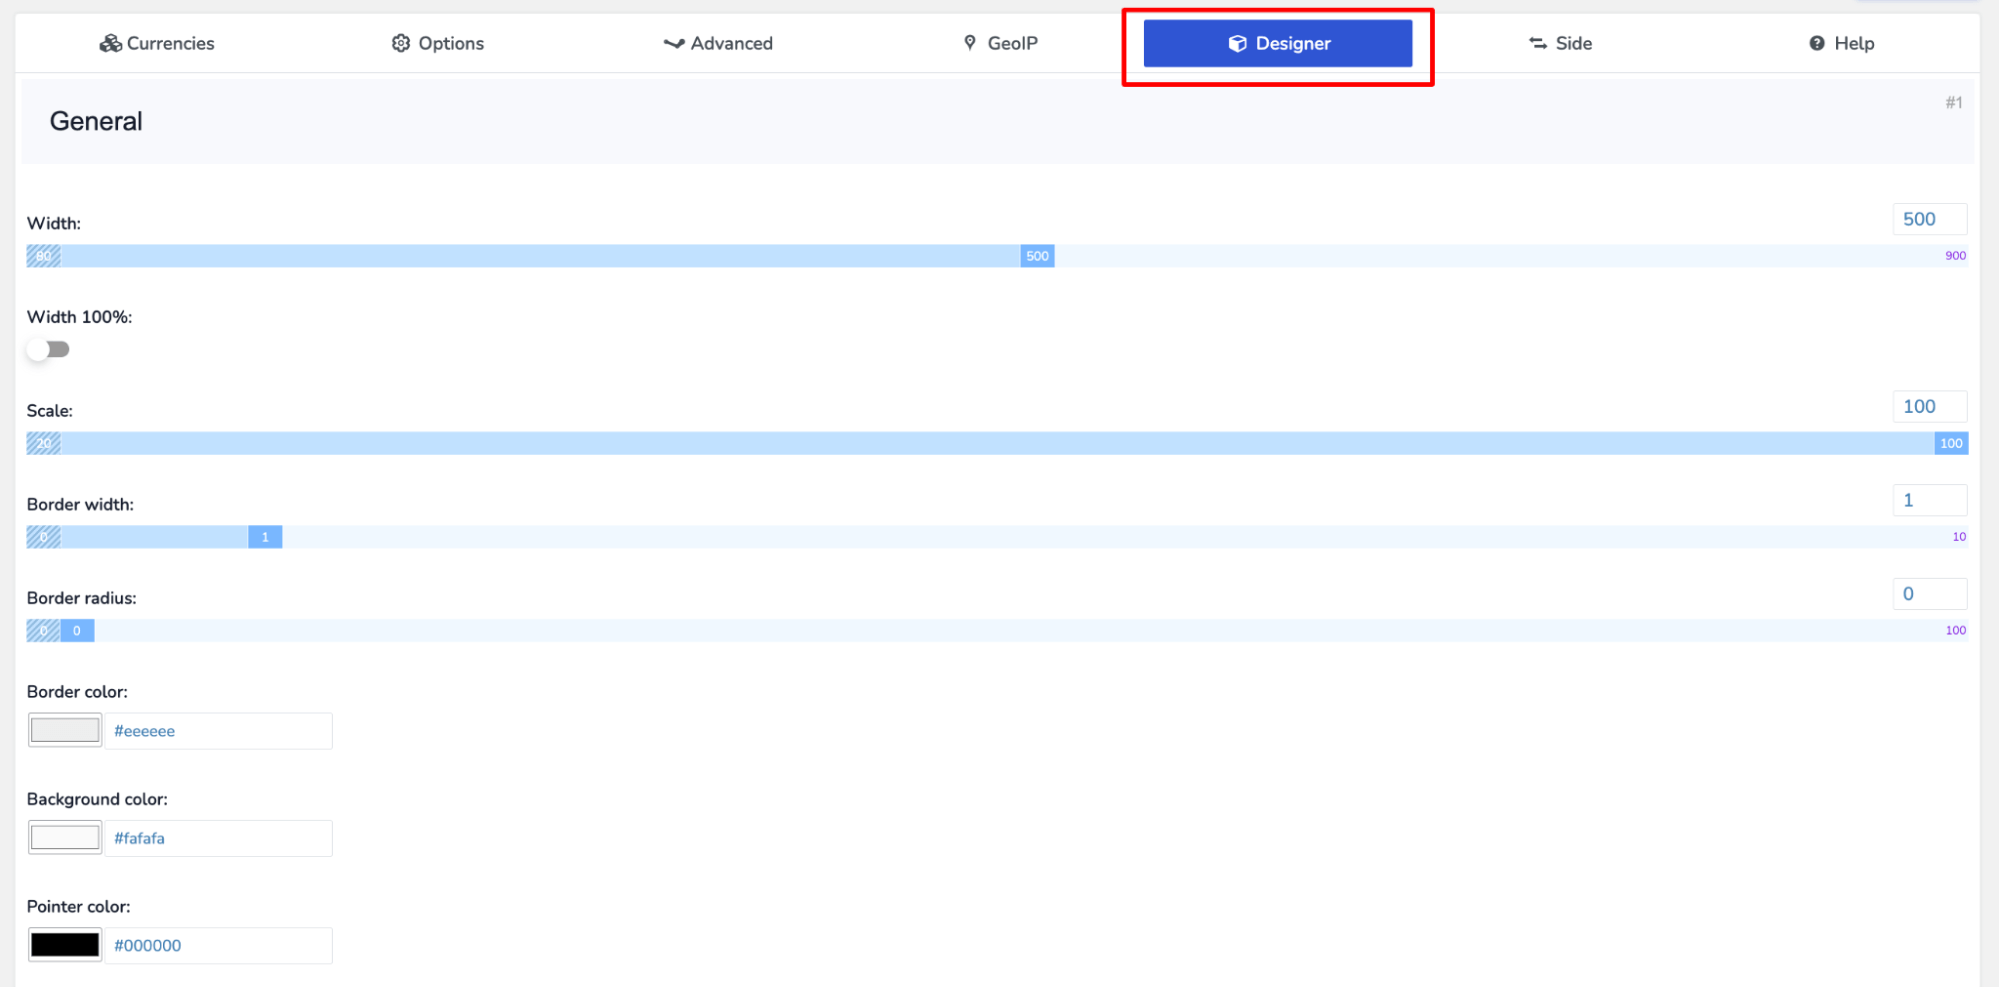
Step 4: Set the design of the currency switcher (optional)
On the Designer tab, you can create a new design and add it to your checkout page using a shortcode.
You can change generation options such as width, border radius, border color, and background color here.
If you scroll down a little, you can update the title color, font, etc. For description, you also get similar options like font family, font color, etc.
After making the changes to the design, make sure to hit “Save Changes.”
Step 5: Enable the side switcher
Now move to the Side tab and turn on the Toggle below status to enable it.
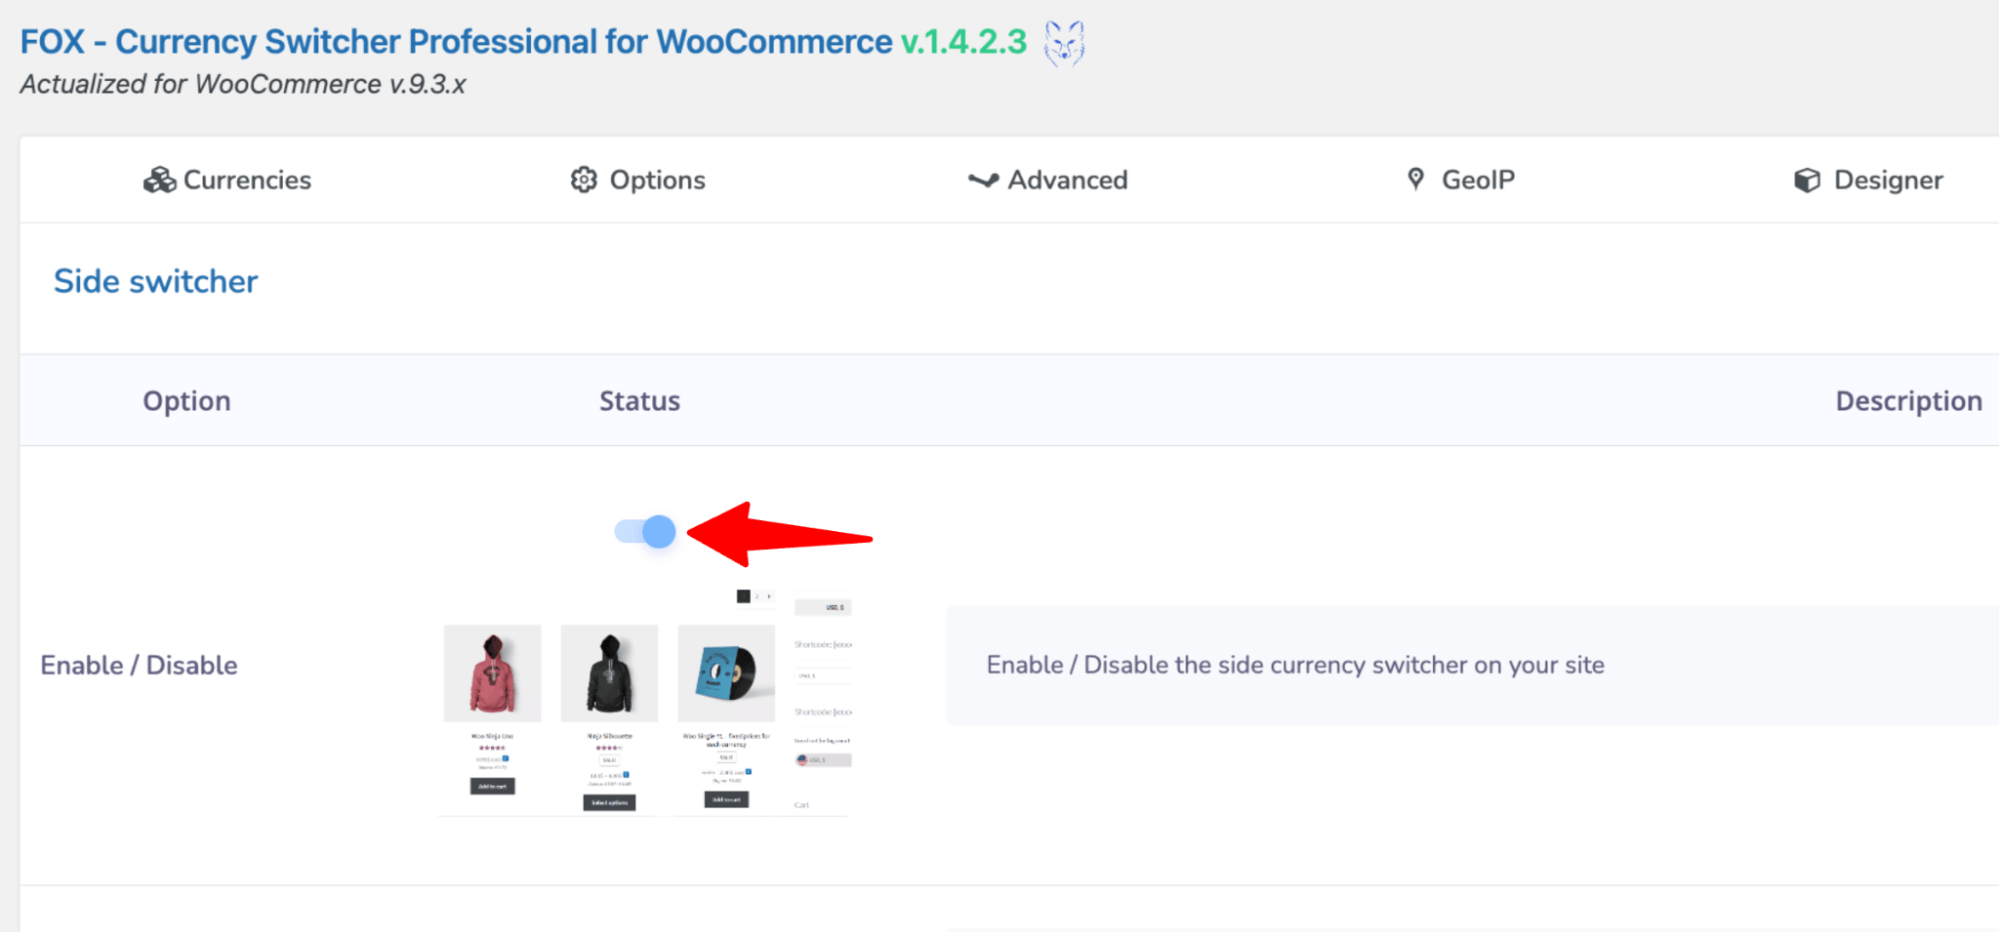
In this tab, you can choose the skin type for the currency switcher, select the sides it will appear on, add a margin, etc.
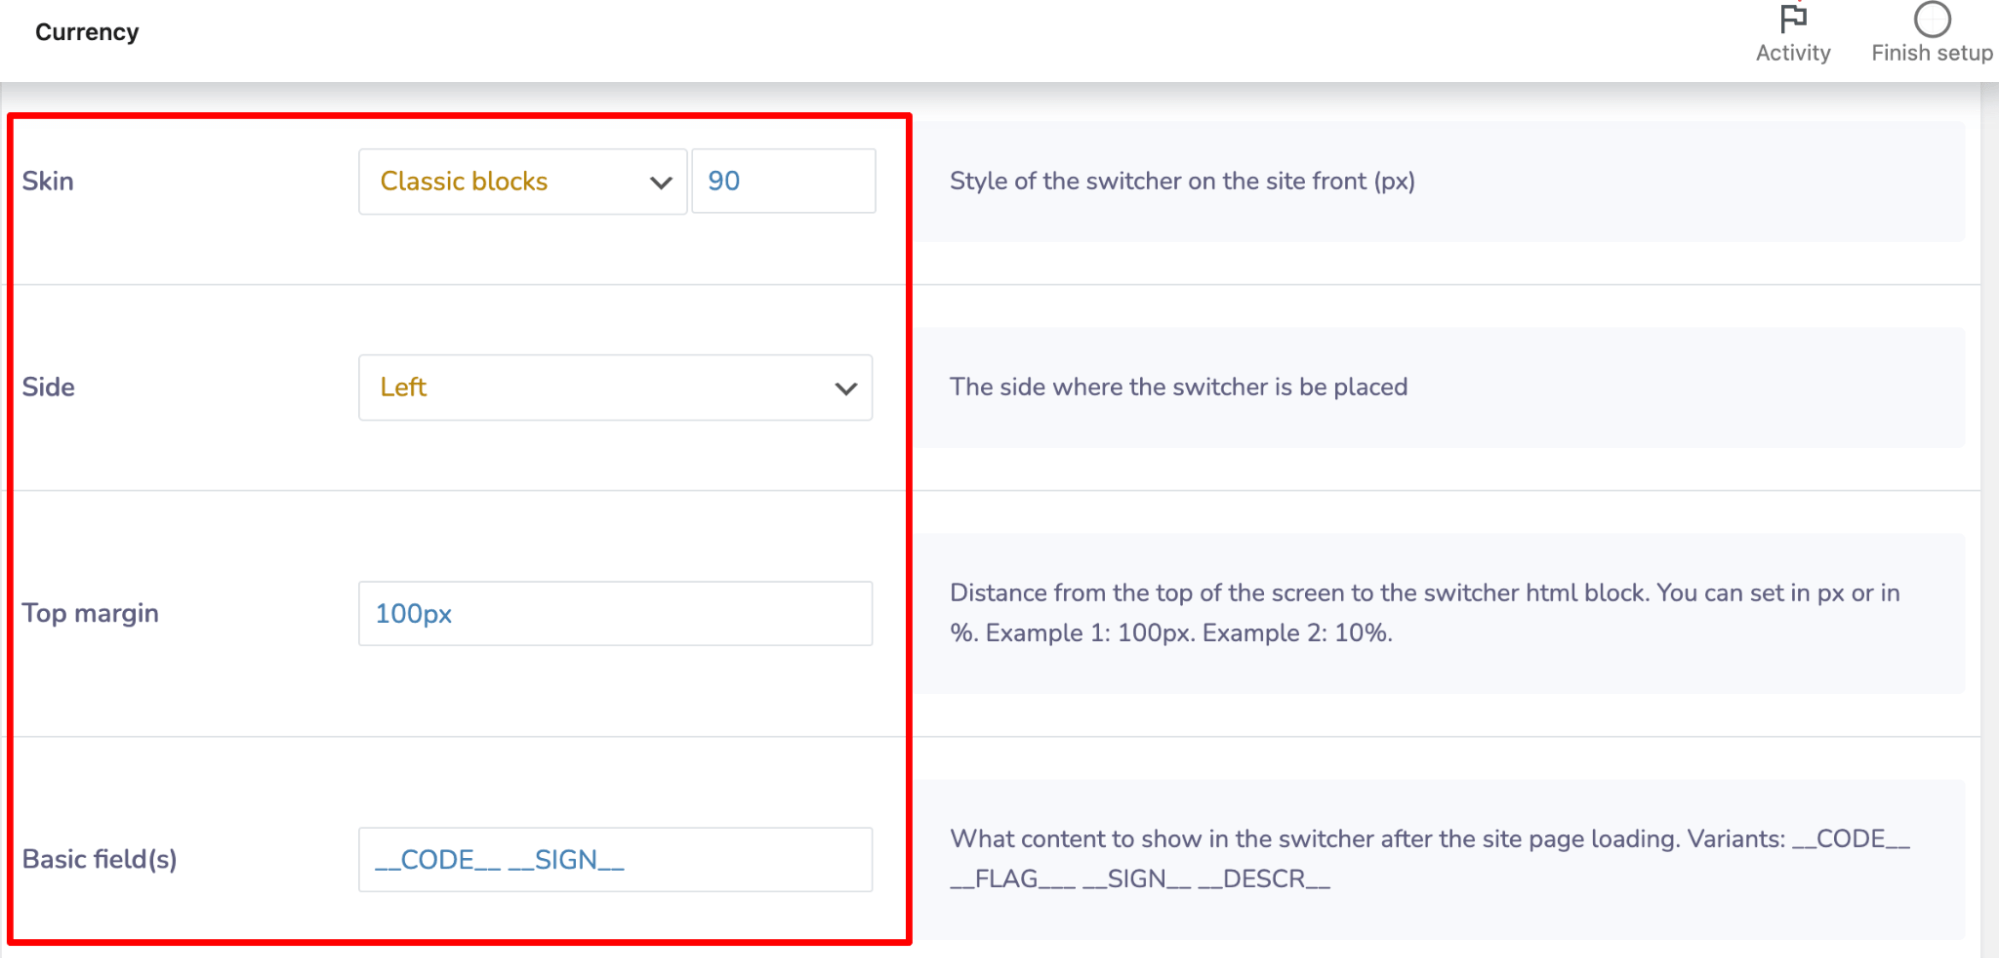
Scroll down to customize the currency switcher settings, where you can choose specific pages to display or hide the currency change option, control its visibility on different devices, and adjust the main and hover colors for a tailored look.

That's it. Currency switcher is ready.
Now, try placing a test order, and on the top left/right side, depending on your settings, see if the Currency Change option is there at checkout.
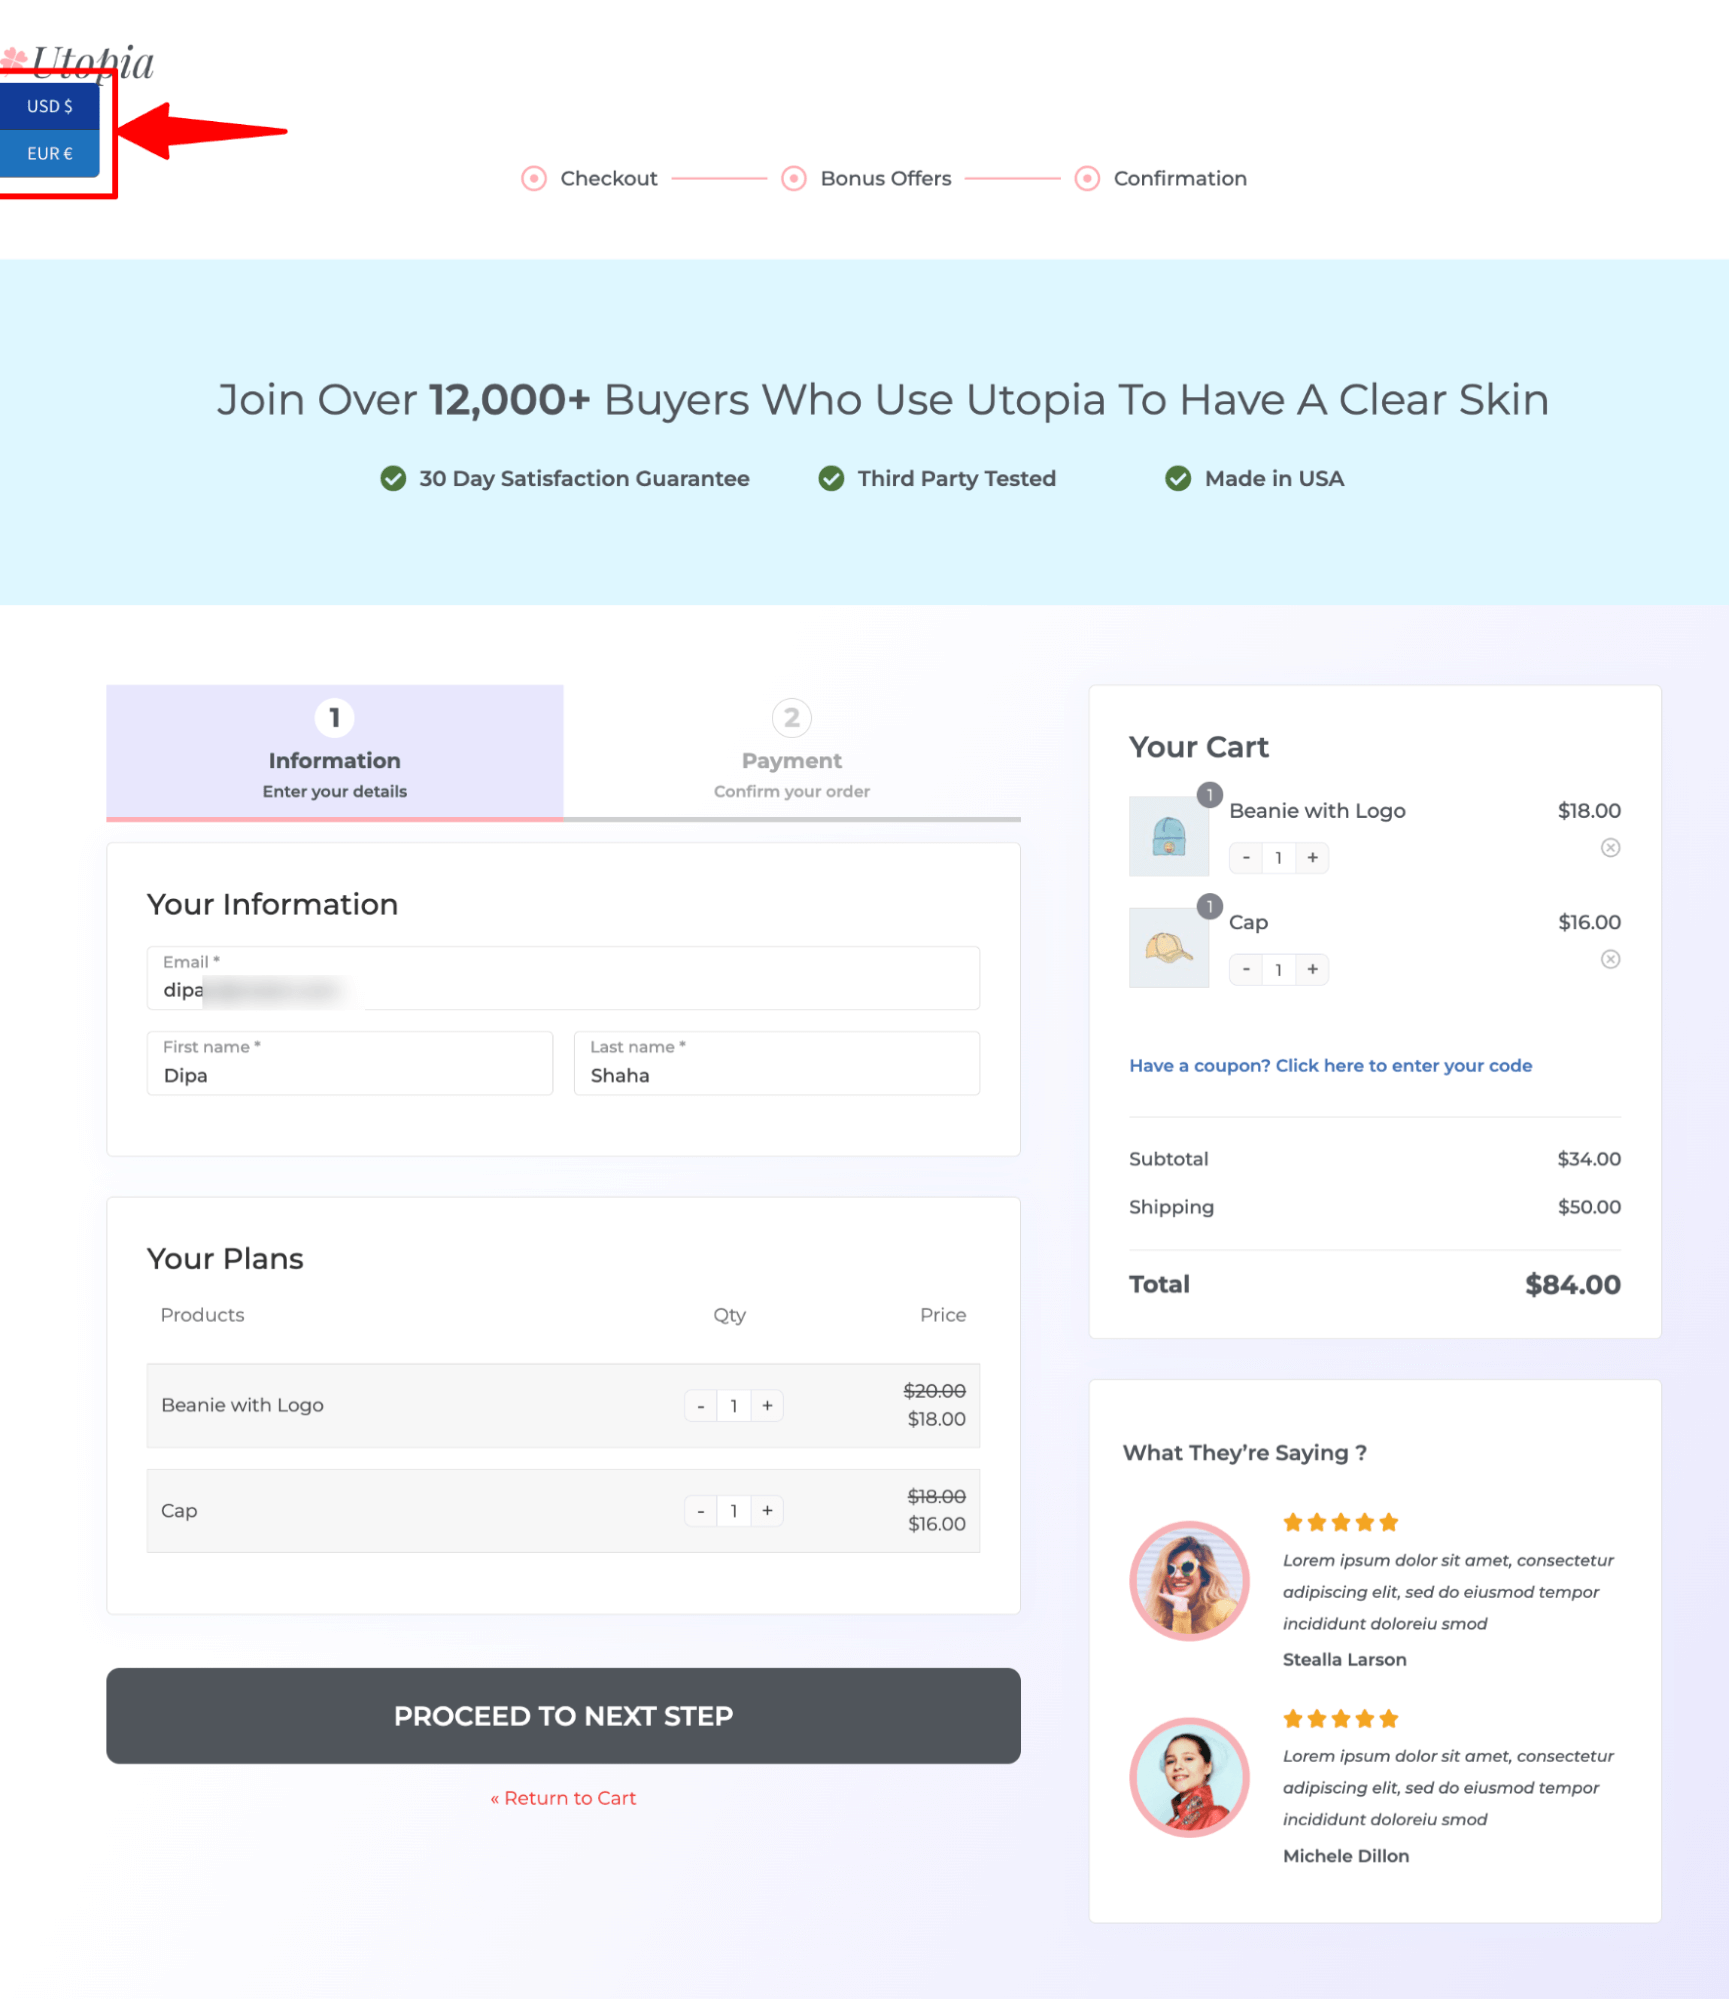
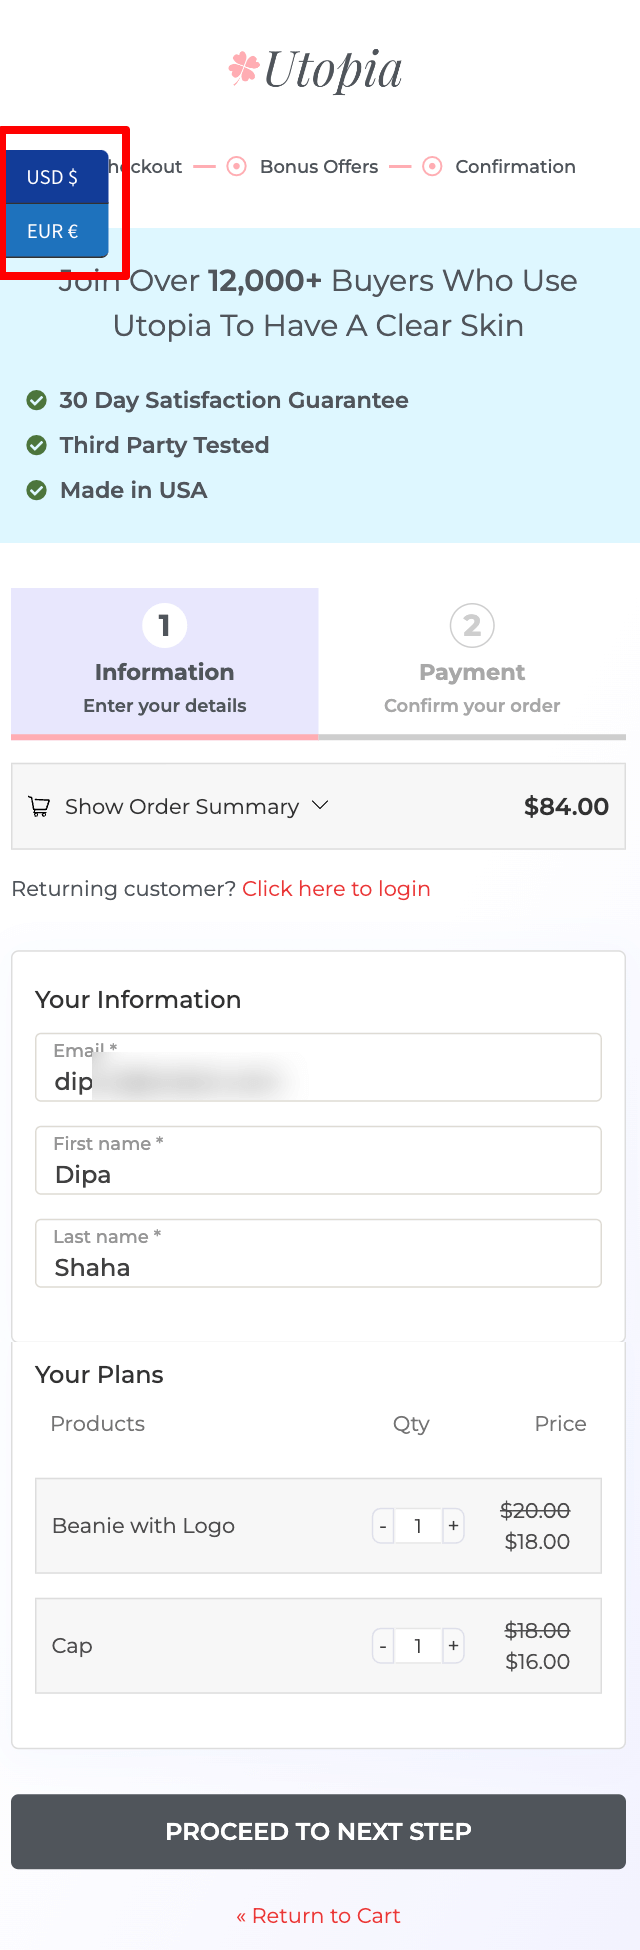
Here is what it looks like on mobile devices.
5 Best Practices for Using Currency Change at Checkout
- Manual currency selection options
Allow users to manually choose their preferred currency, as automated detection can sometimes be inaccurate. This prevents misalignments with user preferences and unnecessary location tracking.
2. Place currency switchers on key pages
Position the currency switcher on important pages like the homepage, product pages, and checkout, where users will interact with it most.
3. Clearly display currency and final payment amount
Ensure the selected currency is displayed throughout checkout, including the final payment screen. Highlight the currency and order total in the mini cart section using FunnelKit’s design.
4. Optimize for mobile devices
Make sure the currency switcher is mobile-responsive and positioned well on smaller screens, especially on the checkout page, for a smoother customer experience.
5. Show accurate, up-to-date currency rates
Regularly update currency rates to avoid discrepancies in payment amounts. Use plugins with automatic updates or manually check exchange rates to maintain accuracy.
Frequently Asked Questions About WooCommerce Change Currency at Checkout
Yes, using a lightweight currency switcher plugin, you can offer multiple currencies without impacting the website’s performance. However, it's crucial to choose reliable, well-coded plugins that are optimized for speed. You can choose any plugin from the list we shared in this blog.
No. In fact, if implemented properly, offering different currencies can enhance the shopping experience and help customers feel more comfortable completing purchases. It’s essential to clearly display the currency throughout the checkout process, ensuring that users know what currency they are being charged in.
Yes, a well-designed currency switcher can be configured to display taxes, shipping charges, and total costs in the selected currency.
While geo-location-based currency switching can be convenient, it’s important to give customers the ability to choose their currency manually. Geo-location features can sometimes be inaccurate, leading to users being presented with the wrong currency. By providing a manual option, you allow users to take control of their experience and avoid any potential mistakes.
No, WooCommerce doesn’t offer a built-in currency switcher at checkout. However, you can change your store’s default currency under WooCommerce ⇒Settings ⇒ General ⇒ Currency Options.
Offer Currency Change at WooCommerce Checkout and Boost Sales!
Integrating a currency change option at checkout in your WooCommerce store can significantly enhance the user experience for international shoppers.
By allowing customers to view prices in their preferred currency, you reduce confusion, build trust, and make the shopping process more transparent. This leads to higher conversion rates and can ultimately boost sales.
However, it’s essential to ensure that real-time exchange rates are displayed during checkout. Plus, the currency switcher should be prominent so users can easily find it and change the currency if they want to.
Along with offering the option to change currency, we also suggest utilizing the power of FunnelKit Funnel Builder to optimize your checkout page for conversion, featuring options such as Google Address autocomplete, Multi-step preview, and express checkout.
Do get your hands on FunnelKit Funnel Builder today!
Editorial Team
May 25, 2026WooCommerce variable products let you sell different versions of the same item from one product page. Sizes, colors, materials, styles, etc. Instead of a separate listing for each option, customers...
Editorial Team
May 22, 2026If you sell on WooCommerce, the checkout page is what makes or breaks conversions in your store. A clunky checkout leaks revenue. A clean one keeps customers moving from cart...
Editorial Team
May 15, 2026WooCommerce Ajax add to cart lets shoppers add products without reloading the page. This reduces friction, speeds up the buying flow, and lowers cart abandonment. By default, WooCommerce only enables...


