
With increasing competition and rising ad budgets, acquiring new customers is difficult.
Forbes reports that the conversion rate for new customers is just 5%-20%.
On the other hand, repeat customers are 60%- 70% more likely to purchase from the same store, which means less effort and more sales.
Next-order coupons are an effective way to drive repeat purchases by offering a discount.
Let’s explore how next-order coupons work and how you can automatically share them with your customers to increase their lifetime value.
Table of Contents
- 1 How Does the Next-Order Coupon Work
- 2 How to Time Next-Order Coupons To Ensure Maximum Conversion Rate
- 3 Part One: How to Get Started and Send Next Order Coupon to Your Customers
- 4 Part Two: How to Use Next Order Coupons Profitably So It Boosts Average Order Value
- 5 5 Tips to Make Your Next Order Coupon Convert Well
- 6 How to Measure Success and Improve the Effectiveness Of Next Order Coupon
- 7 More Questions About Next Order Coupons
- 8 What are other distribution channels I can use to send next-order coupons?
- 9 How can I avoid discount fatigue from frequent coupon offerings?
- 10 How can I A/B test different types of coupons, not just email templates?
- 11 Automate WooCommerce Next-Order Coupons: The Key to Lasting Customer Value
How Does the Next-Order Coupon Work
Here is the simple workflow:
Purchase → Coupon Generation → Receive Coupon → Redeem on Next Order
- Customers complete a purchase: The process begins with a customer completing a purchase in your WooCommerce store.
- The store generates a personalized coupon: Then, the store generates a personalized coupon via a plugin or tool.
- The coupon is shared via multiple channels: After the purchase, the customer receives that personalized coupon. This could be delivered through various channels, such as the thank-you page, an order confirmation email, follow-up emails, SMS or WhatsApp, etc.
- The customer redeems the coupon on the next order: The coupon motivates the customer to shop again and take advantage of the discount or reward.
Does WooCommerce Allow Users to Send Next-Order Coupons by Default?
By default, WooCommerce does not have a built-in feature to send next-order coupons to customers automatically. However, it does allow users to create and manage coupon codes.
However, it lacks an option to automatically share coupon codes via email or SMS for situations like next-order coupons.
Later in this blog, we will discuss how to share a personalized next-order coupon automatically, but before that, we have to consider the perfect times to share such a coupon.
How to Time Next-Order Coupons To Ensure Maximum Conversion Rate
One of the biggest challenges you might face as store owners is when is the best time to send the next order coupon email.
Research by OptinMonster shows that emails sent between 9 AM and 11 AM tend to have higher open rates.
However, the ideal delay after a purchase remains uncertain and varies based on customer behavior.
Here are some of the perfect times for sending the next order coupon based on customer behavior
1. Immediately after purchase or upon fulfillment
Sending a coupon 2-3 days after shipment is ideal. It gives customers time to use the product and develop a positive impression of your brand.
Plus, it encourages repeat purchases while their experience is still fresh and positive, especially for new customers.
This way, you can avoid overwhelming customers with immediate emails. It feels more intentional and helps build trust in your brand.
2. Customers who haven’t purchased for a while
Targeting customers who haven’t purchased in a certain period, like maybe between 30 days to 90 days, is a smart way to re-engage them. A relevant discount can reignite their interest and return them to your store.
This strategy is excellent for reducing churn and increasing repeat sales.
3. After receiving positive reviews
Surprise your customers by offering a coupon after they leave a positive review. This gesture not only shows appreciation but also motivates them to shop again.
Happy customers are more likely to return; a discount gives them an extra reason.
4. Purchase Anniversary
Plan to send your next-order coupons on occasions like your store's anniversary or the customer’s signup anniversary.
According to a Forbes study, Mastercard found that personalized offers can boost customer spending by up to 18%. A personal approach makes customers feel valued. It works better than holiday promotions, which offer discounts to everyone. A focused, exclusive offer can strengthen loyalty and encourage repeat purchases.
5. When cart abandonment occurs
Offering a coupon to customers who abandon their shopping carts can help recover lost sales. This strategy gives hesitant shoppers an extra nudge to complete their purchase.
Pairing the coupon with a sense of urgency, like “Offer valid for 24 hours,” can increase its effectiveness.
You can target these times to send your next order coupon email. If you implement these hacks with proper plans, you will get some positive results.
Now, let’s discuss how to create and customize a next-order coupon for your store. We’ll break down the process into two parts. In part one, we’ll show the tutorial, and in the second part, we’ll share some use cases.
These will help you improve your overall store performance. The second part will help you dive deeper into utilizing the next order coupon extensively.
Part One: How to Get Started and Send Next Order Coupon to Your Customers
To continue, we’ll use FunnelKit Automations.
It’s a complete marketing automation solution that helps you set up automation to send personalized next-order coupons.
It’s easy to set up and comes with a coupon to create events, so you don’t have to manually create coupons using the WooCommerce default option.
You can send coupons to different audiences based on their activity, such as order completion, inactivity, or cart abandonment.
With its advanced smart A/B testing features, you can try out different versions of emails with different discounts to determine what works best. You also get detailed analytics to see how your next-order coupon campaigns perform.
Before you start, install and activate (both FREE and PRO) FunnelKit Automations on your WordPress site.
Step 1: Create an automation
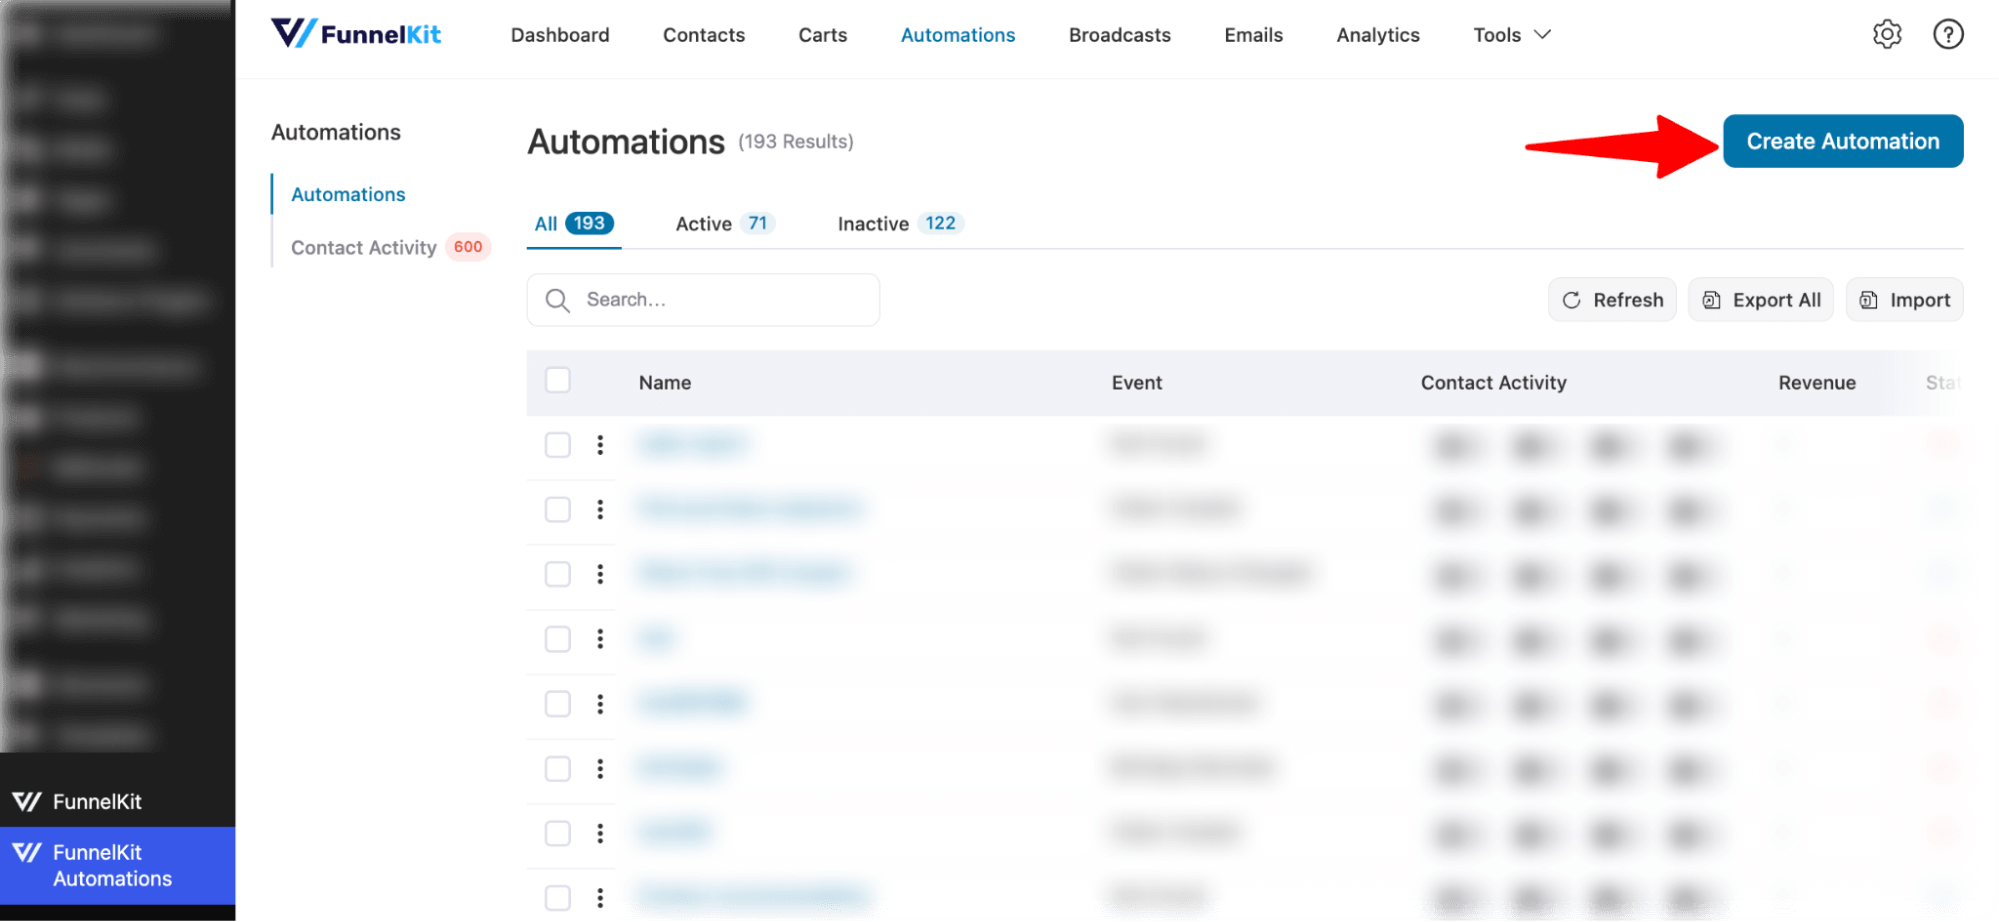
First, you need to create an automation.
To do so, navigate to FunnelKit Automations ⇨ Automations and click “Create Automation.”
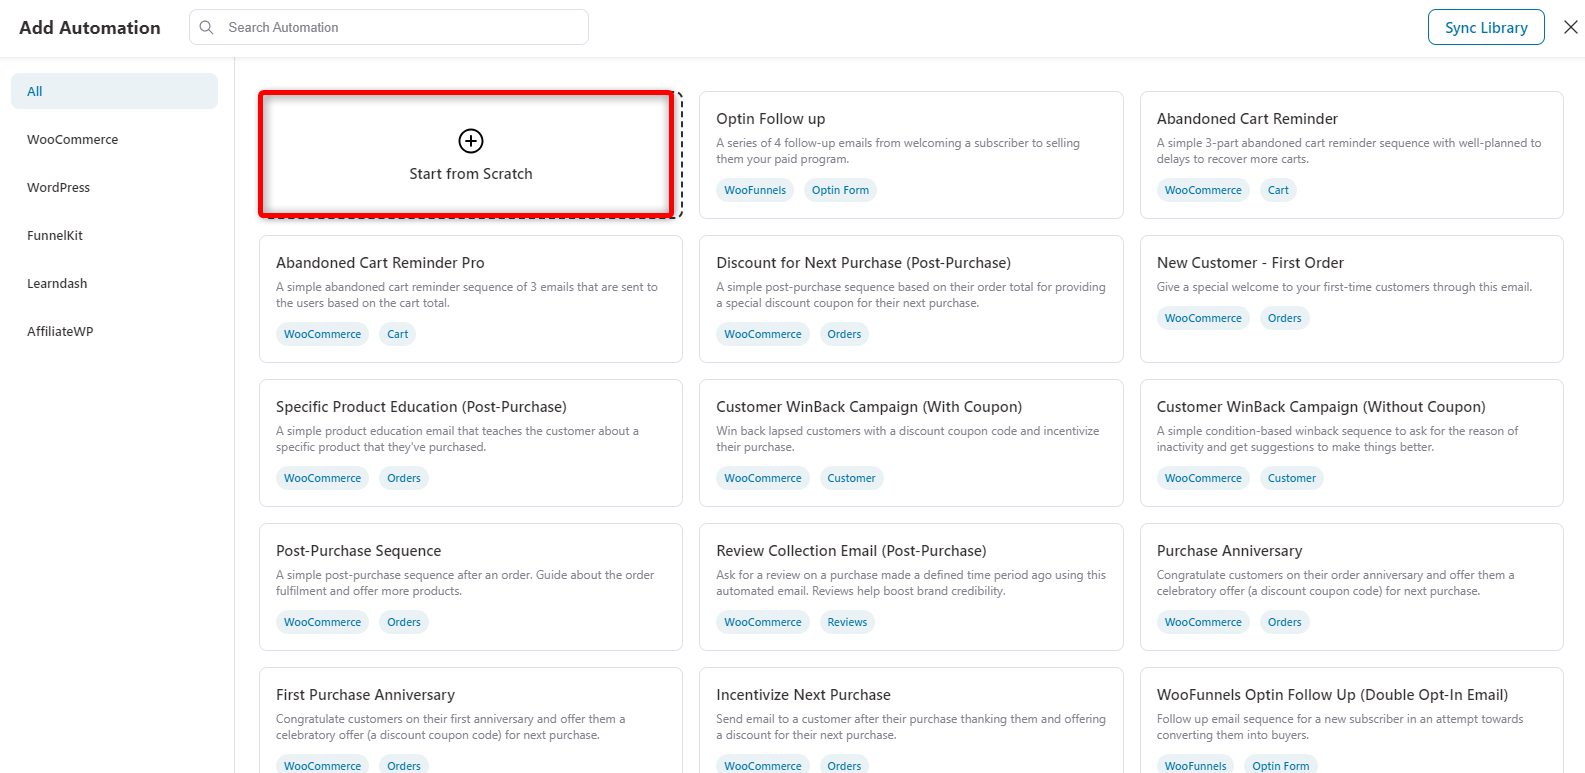
Next, import a pre-built recipe or create an automation from scratch.
For now, we’re choosing “Start from Scratch.”
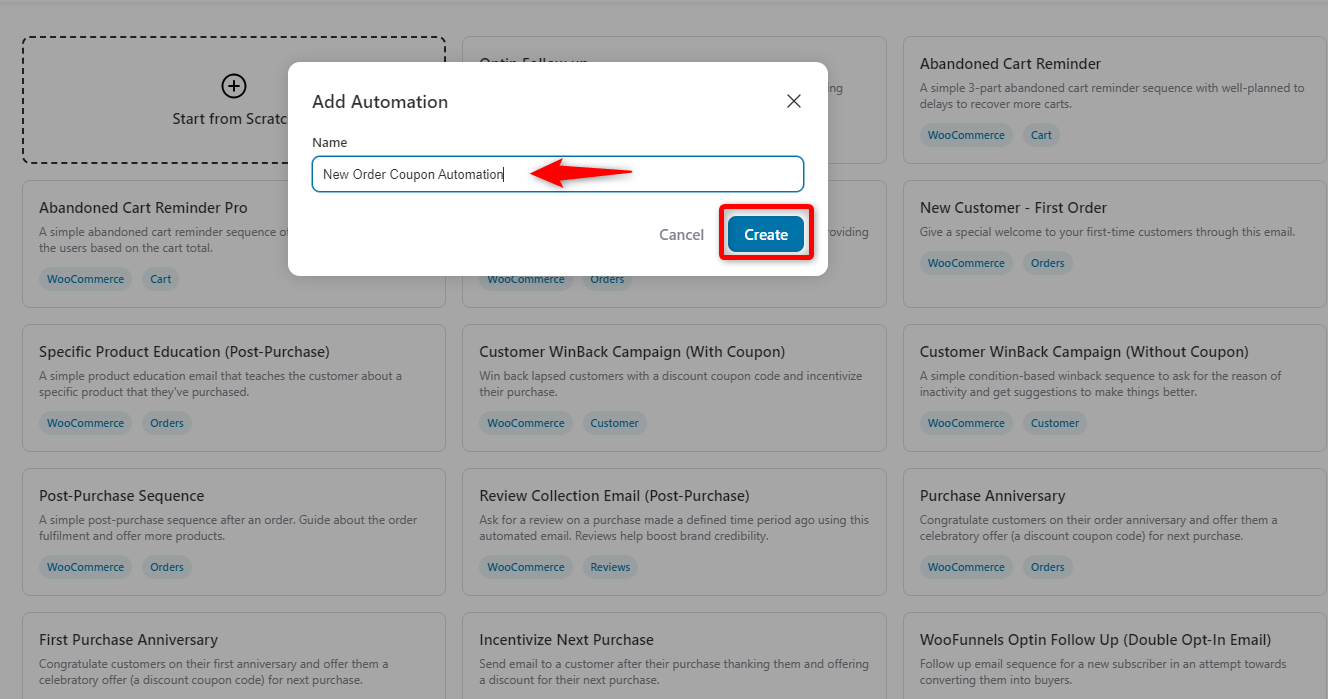
Then, provide a name for the automation.
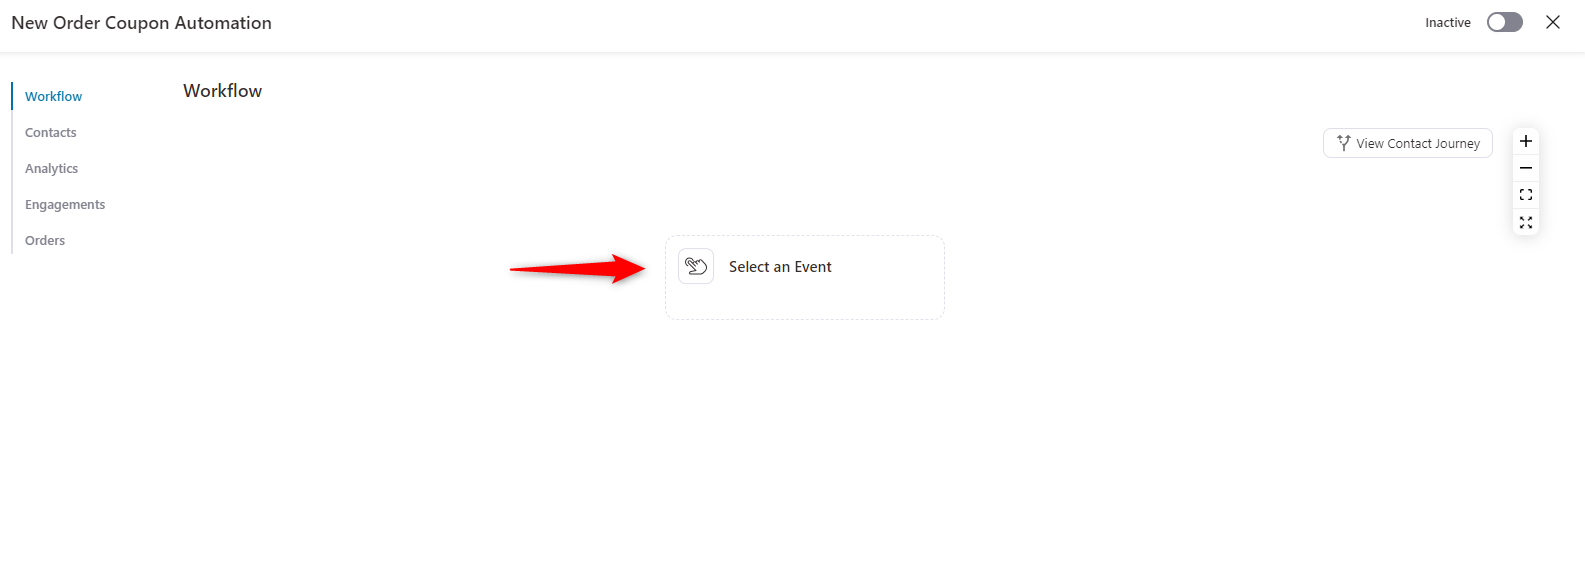
Step 2: Select an event
Next, you need to create an event. Click on the “Event” button.
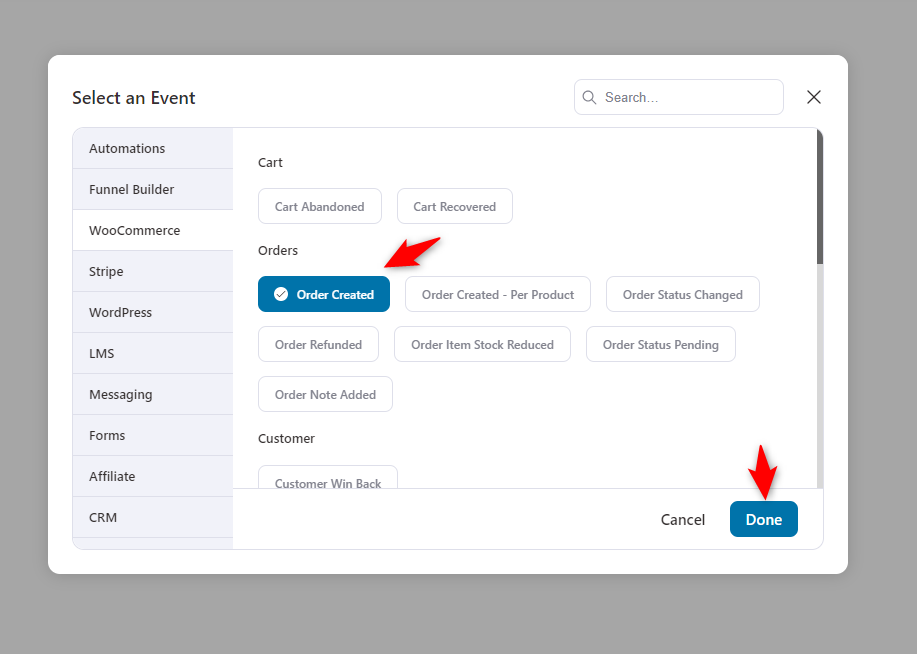
Next, under the WooCommerce section, select the “Order Created” event and click the “Done” button.
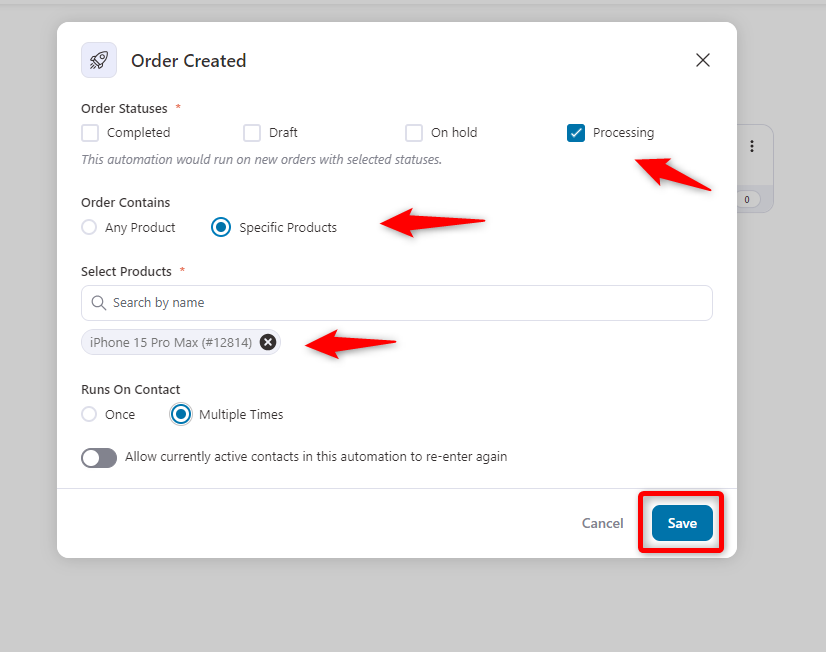
Next, choose the order status “Processing.” Set the order to contain specific or any products.
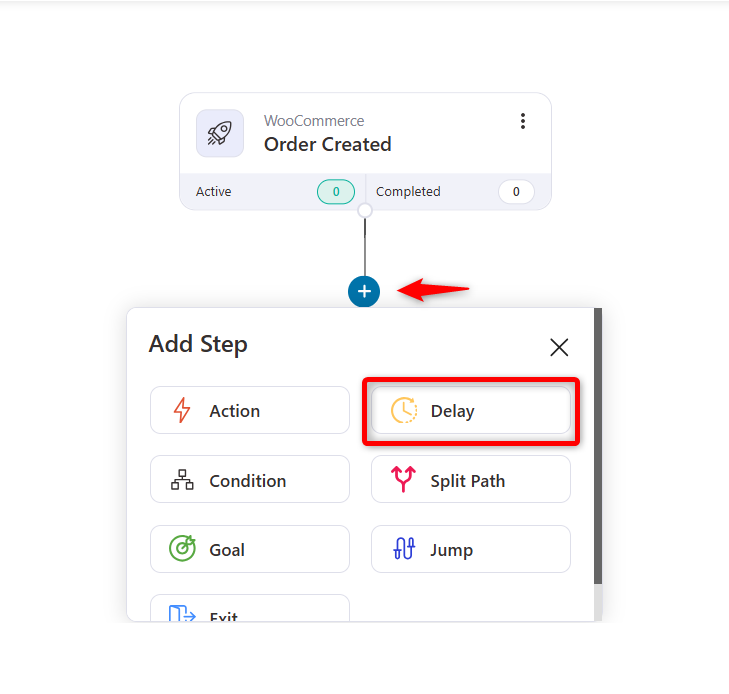
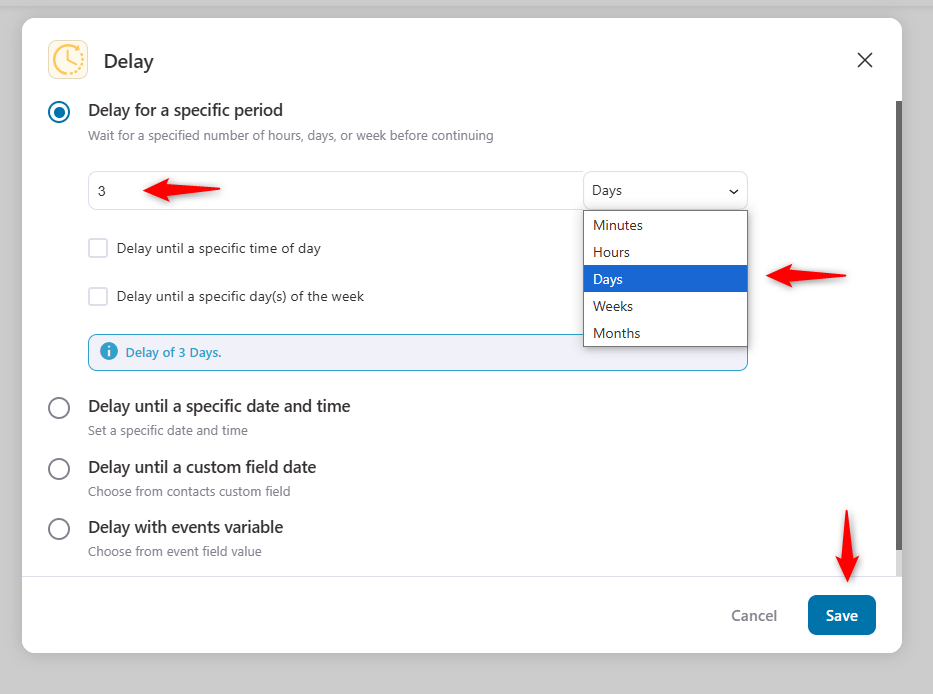
Step 3: Add a delay
The next step is to create a delay. For that, click on the plus icon and then delay.
Next, insert the delay. You can set it in minutes, hours, days, weeks, and months. When you’re done, hit save.
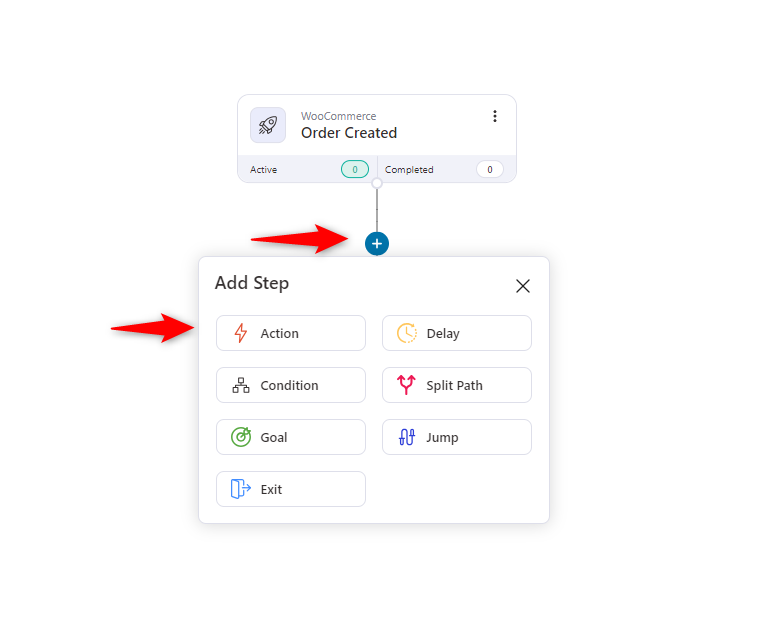
Step 4: Create a coupon
Next, you need to create a coupon. To do so, click on the + icon and then select action.
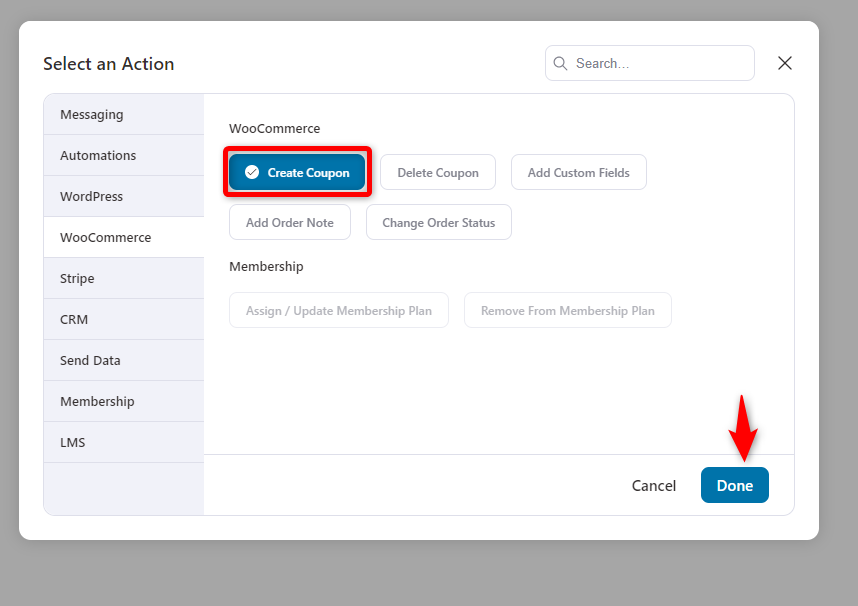
Then select “Create Coupon” under the WooCommerce tab and hit Done.
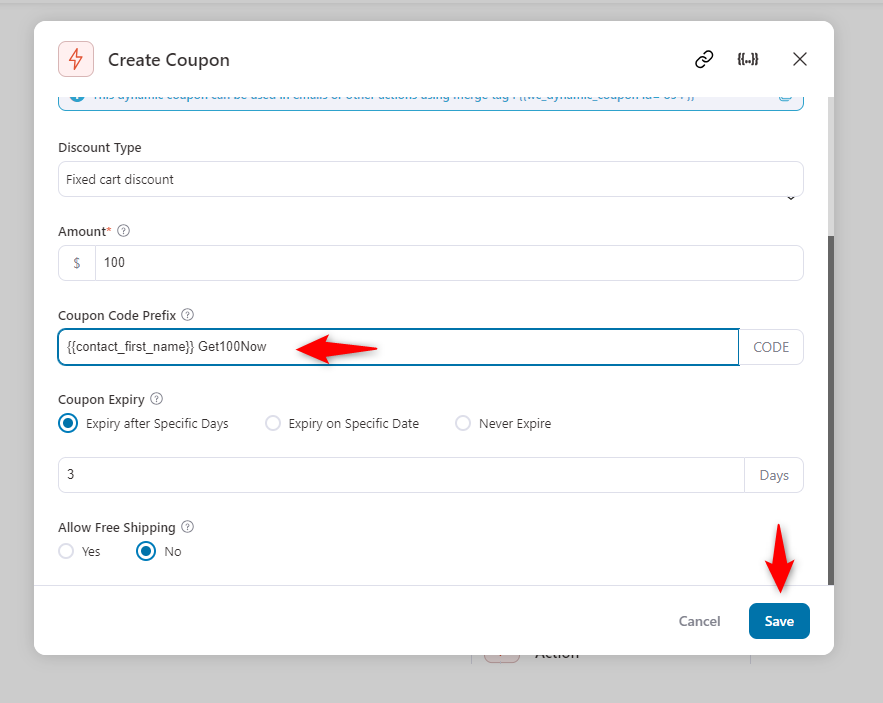
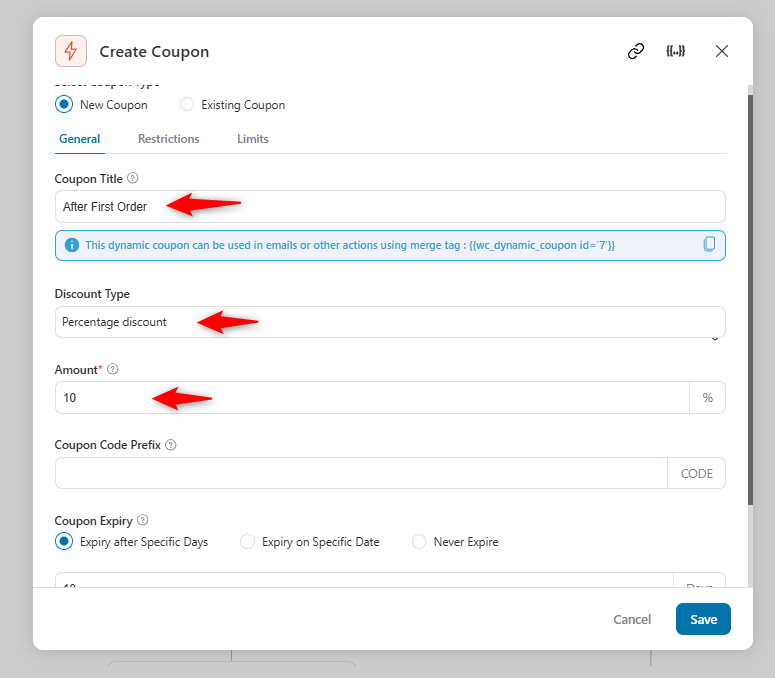
Provide a name for the coupon and discount type, and set the fixed amount and expiration date.
You can also use the dynamic information in the coupon code prefix. Copy the code and paste it into the coupon code prefix area.
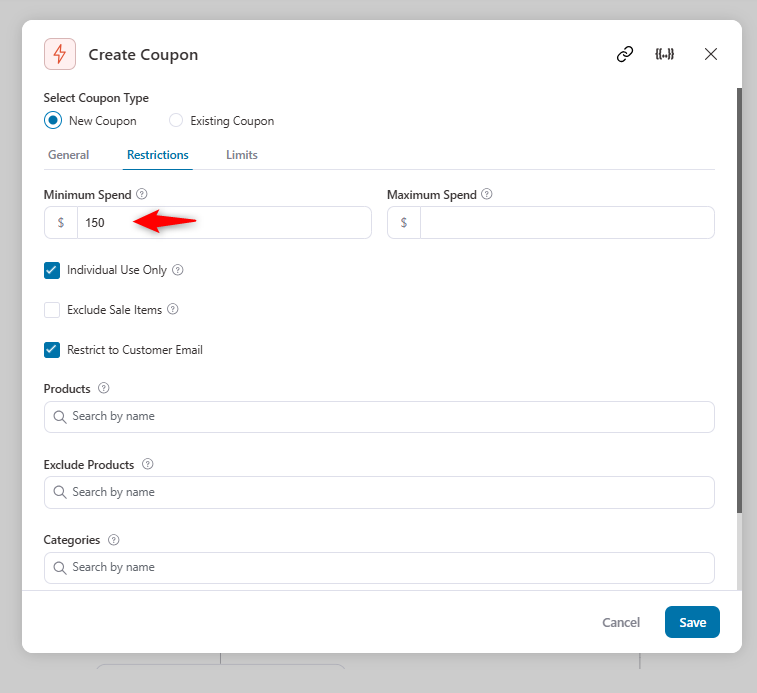
On the Restrictions tab, you can set the minimum spend amount to redeem the coupon, specify who can use it, and set other settings as needed.
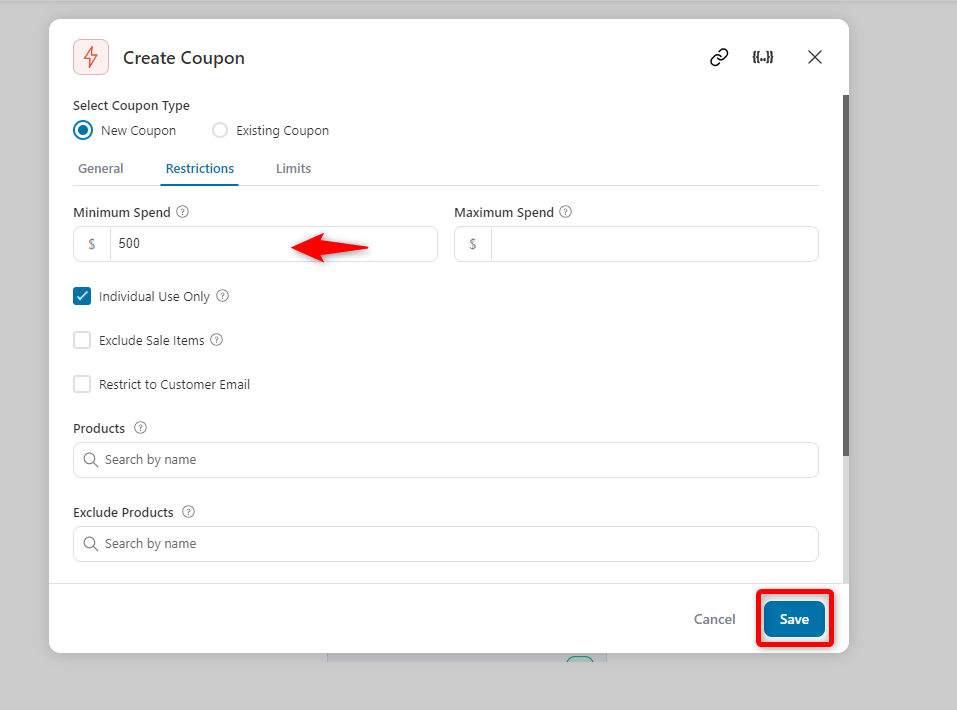
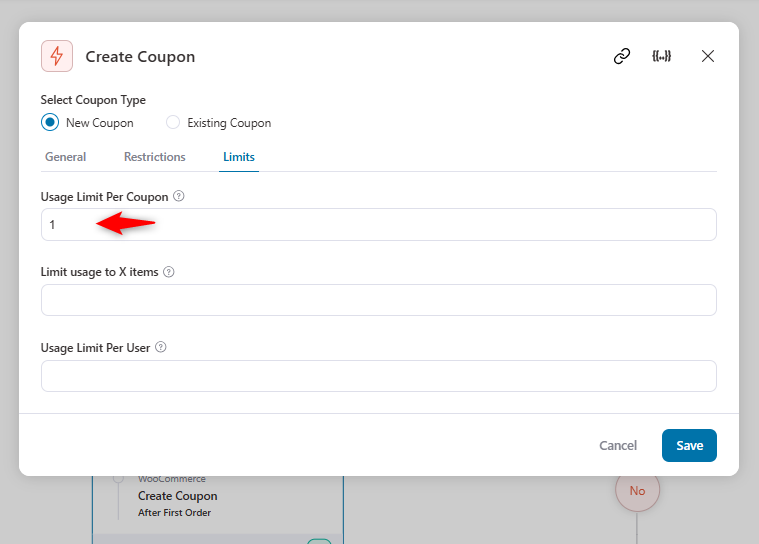
On the Limits tab, set the coupon usage limits and the per-user coupon use limit. This is how you can prevent coupon abuse from recurring.
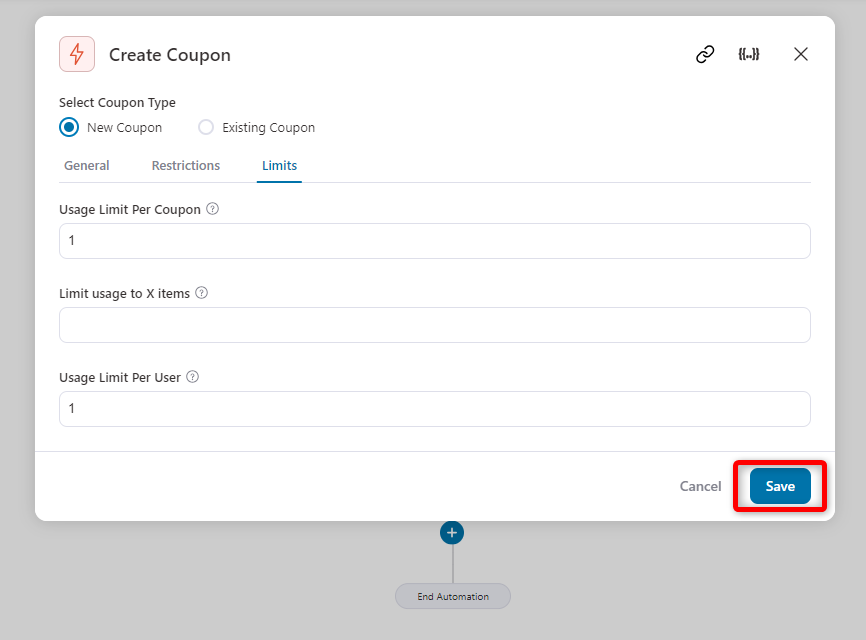
Once everything is done, hit the save button.
Step 5: Set an email to share the discount coupon
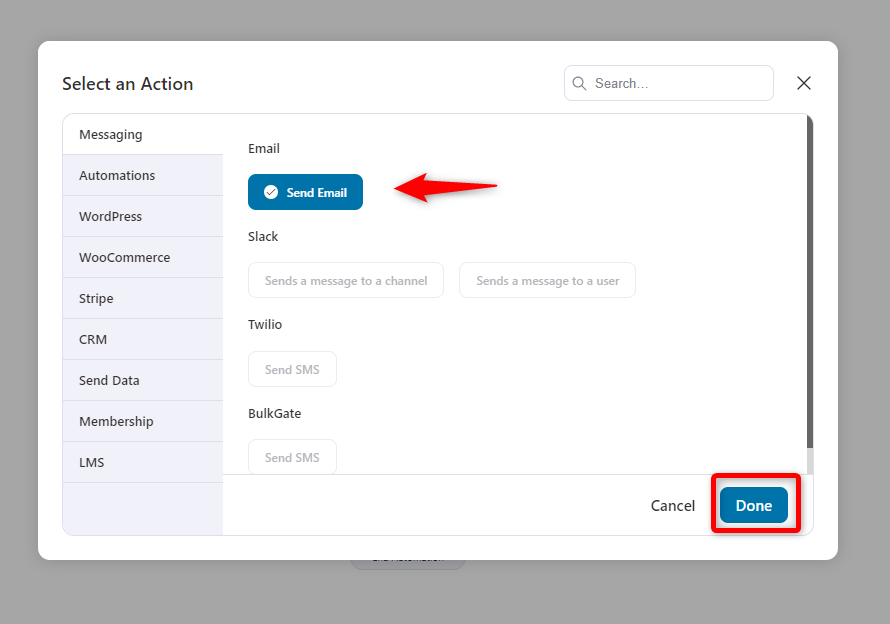
Next, let’s create an event to send the email. To do so, click the + icon, select “Send Email” under the messaging section, and hit the “Done” button.
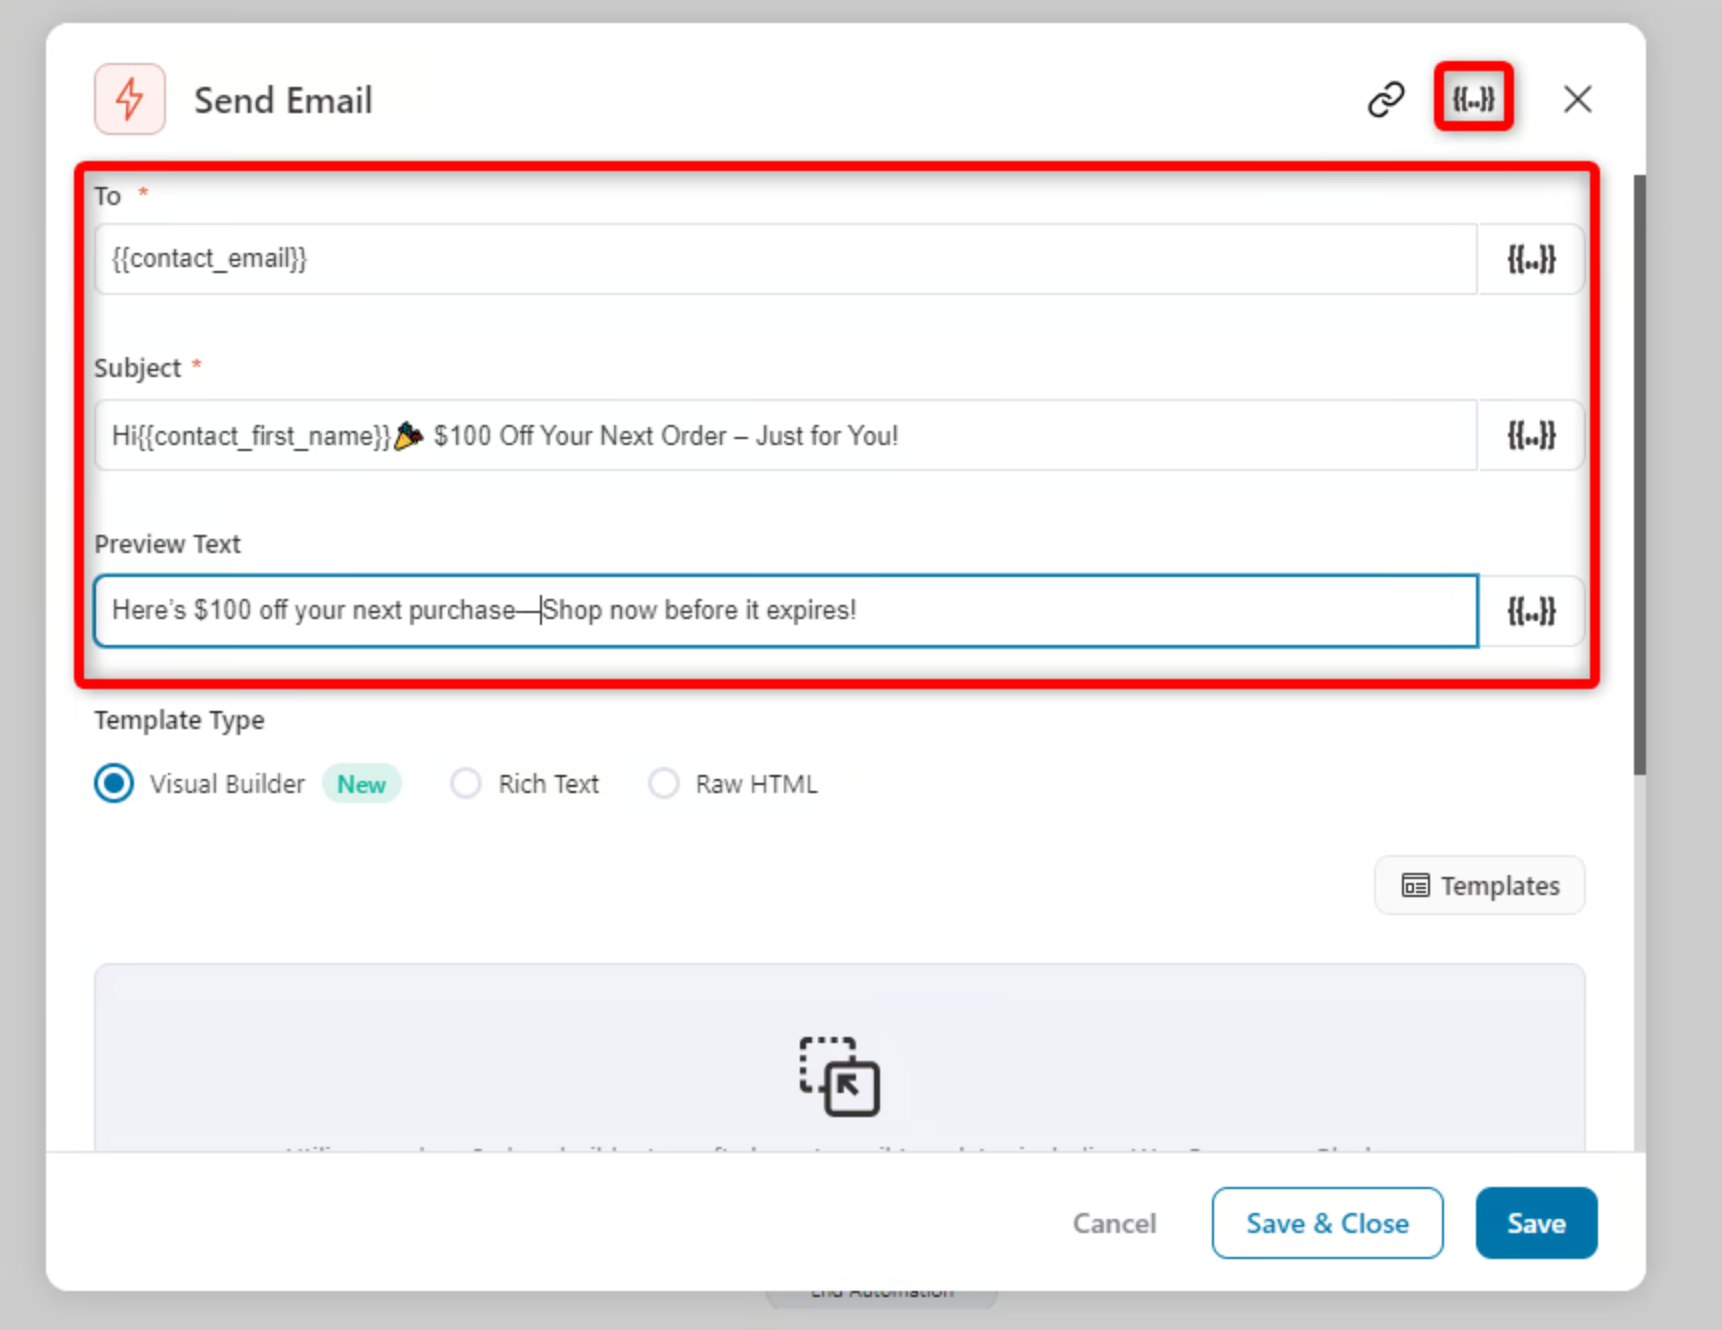
Next, add a subject line and a preview text. Remember to keep it simple and relevant.
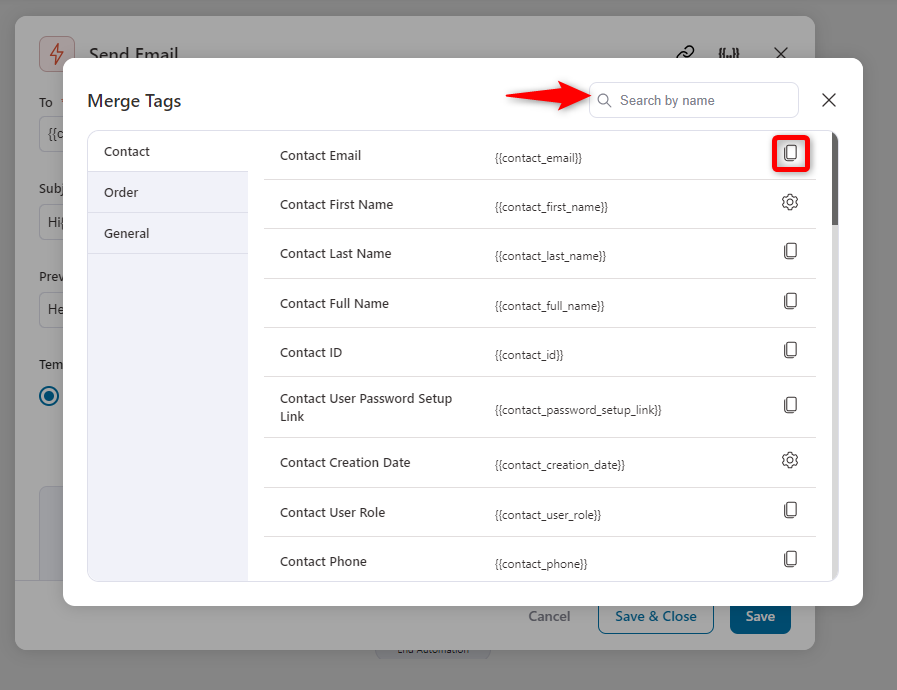
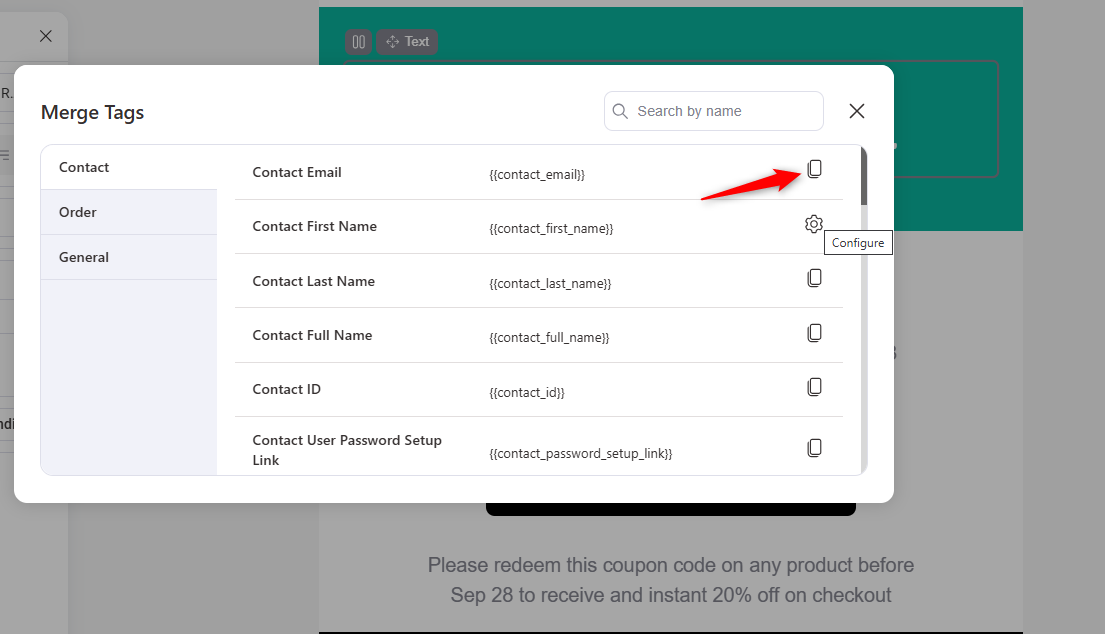
You can use some merge tags to trigger the personalized codes that bring in dynamic data values.
To do so, click on the “{{..}}” button to choose your preferred merge tag. Then, you’ll get a list of all merge tags. Just choose the one that you need and copy-paste it into the section.
After using the merge tags, here it looks like this:
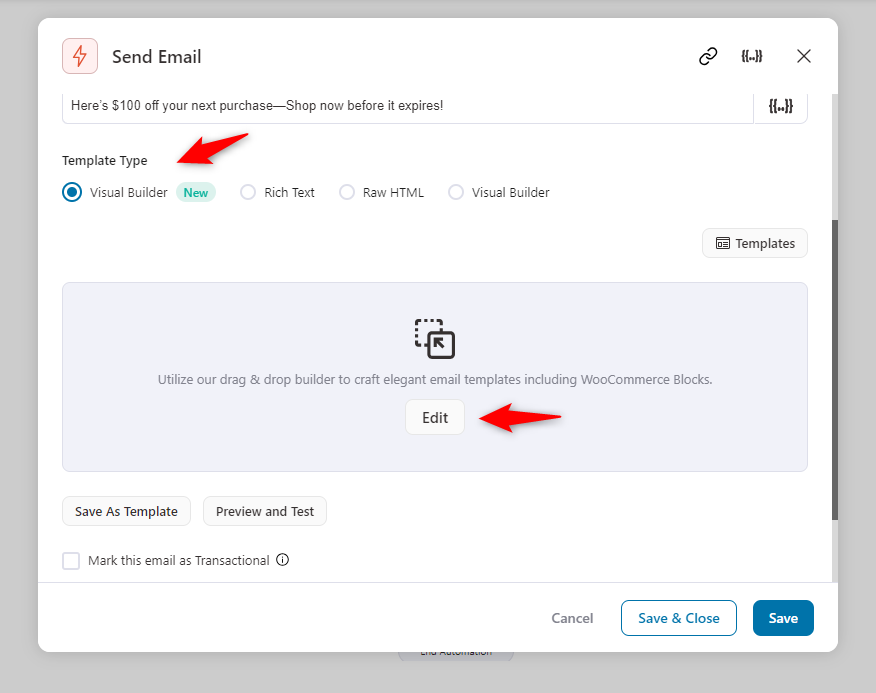
Step 6: Choose an email template
FunnelKit offers four email design options, but experts recommend using Visual Builder.
It provides a user-friendly interface, dynamic customization options, and visually engaging designs that align with your brand’s identity and drive higher engagement.
Then click on the “Edit” button.
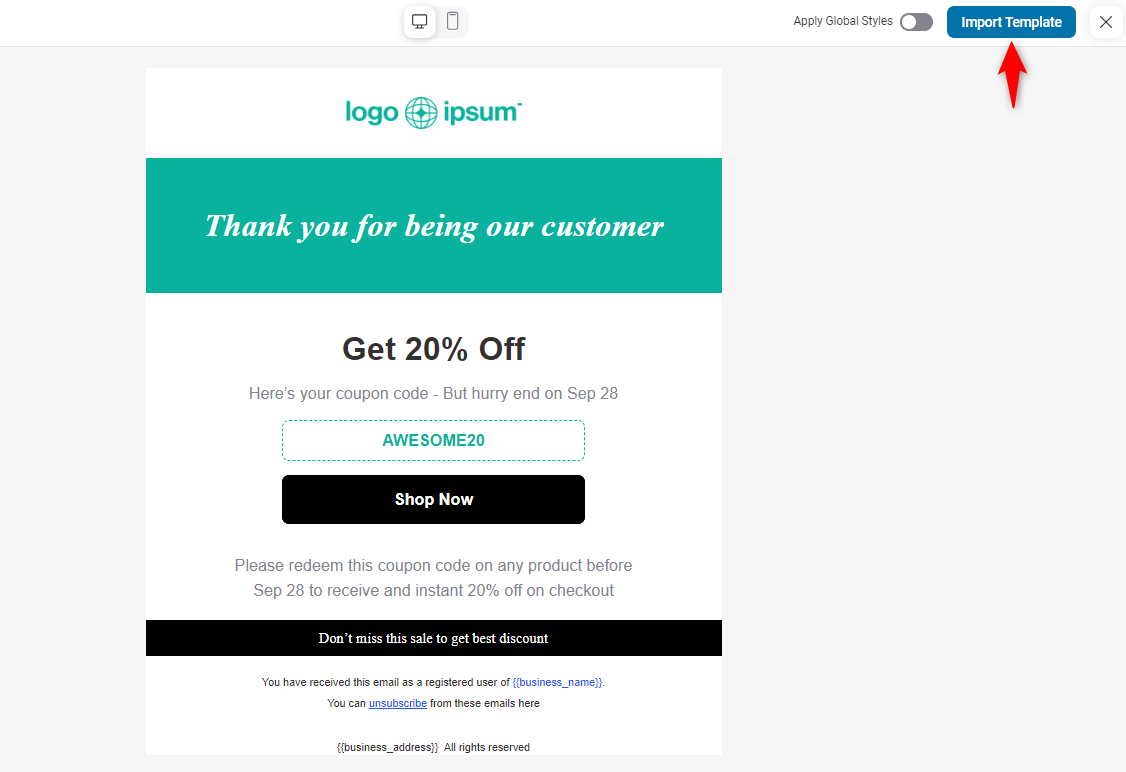
Then, choose the email template. We’re using the “Personalized Coupon” template.
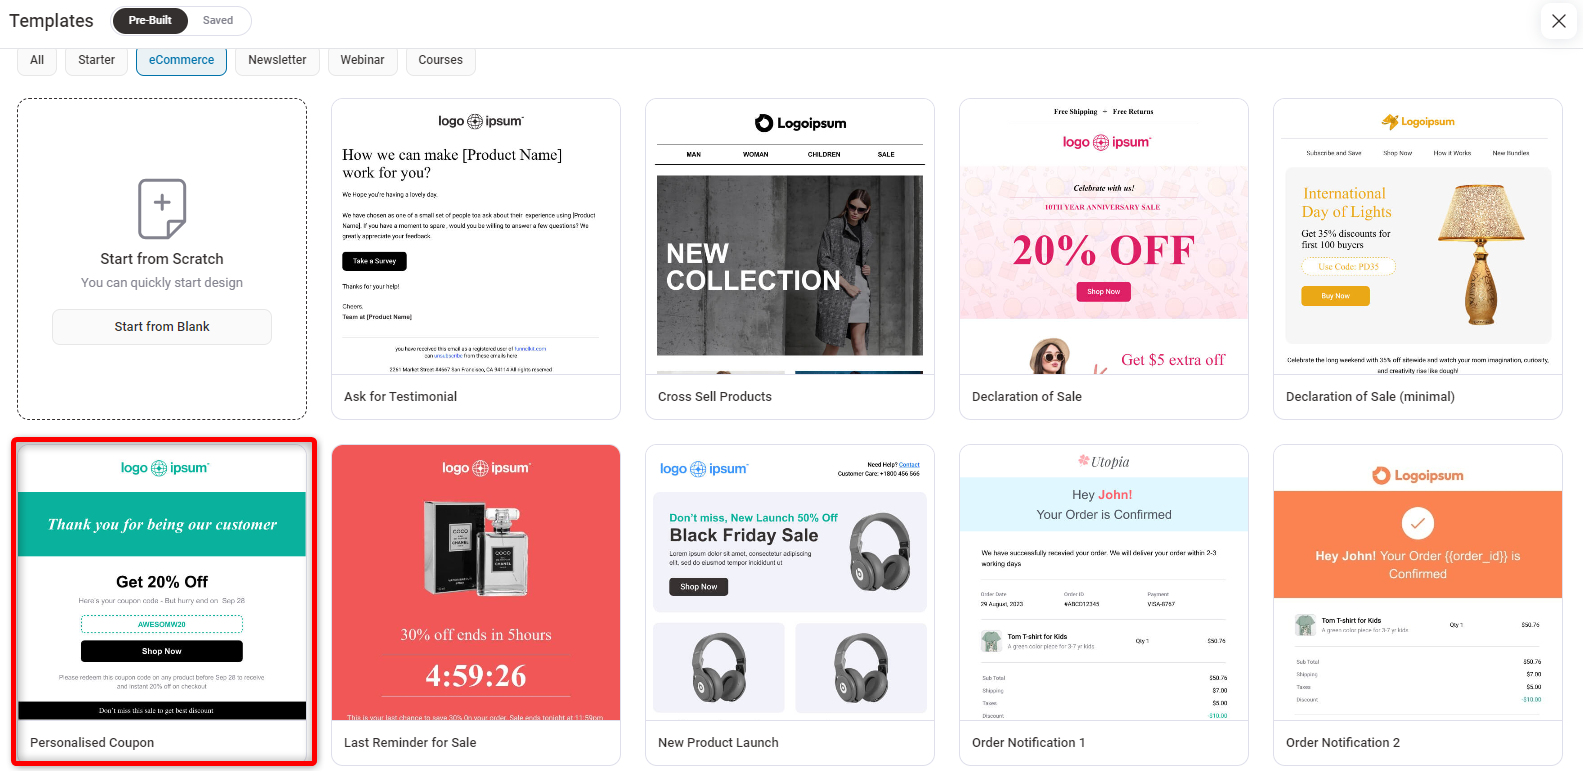
After checking it, click on the “Import Template” button.
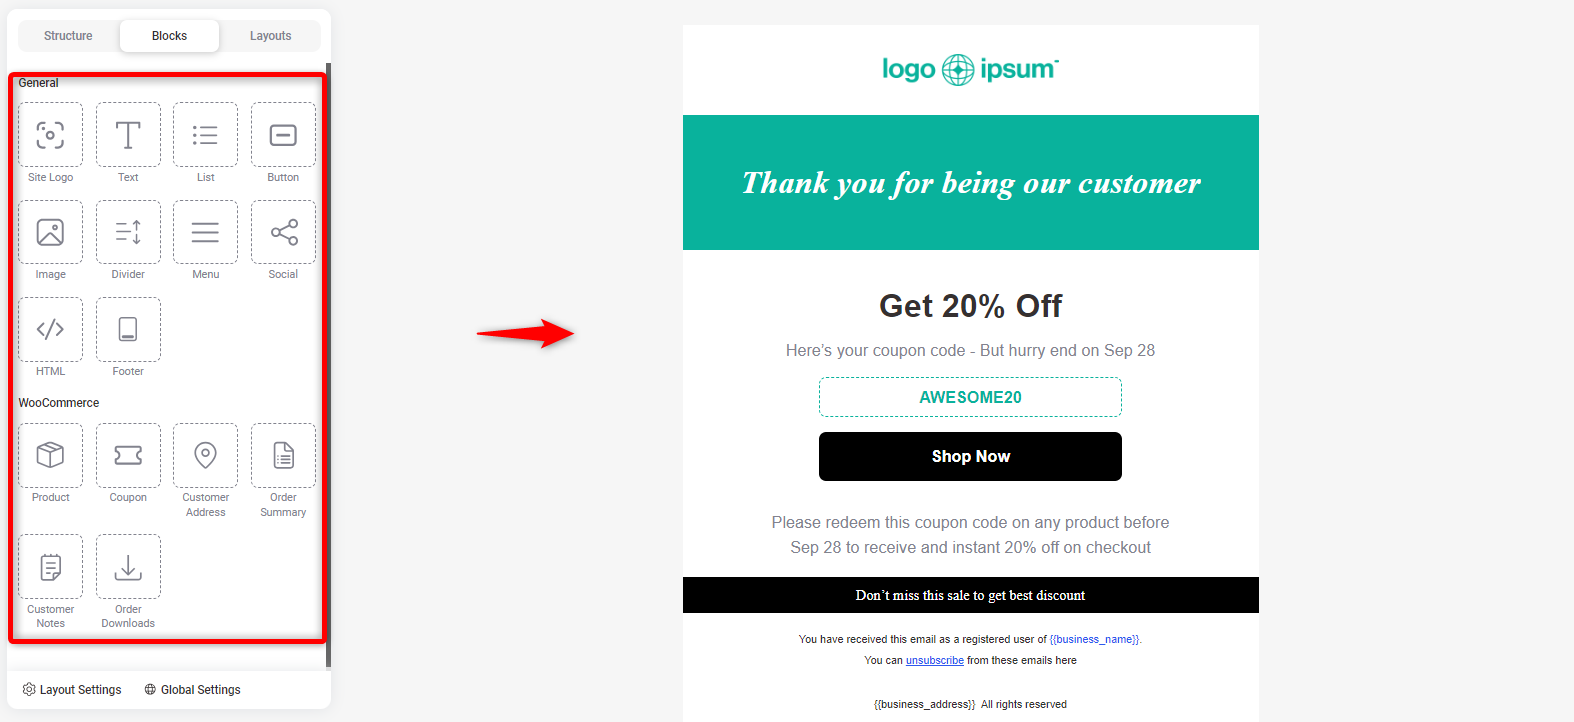
Step 7: Customize the email template
Here, on the left side, you’ll get the widgets to customize the template.
Logo customization
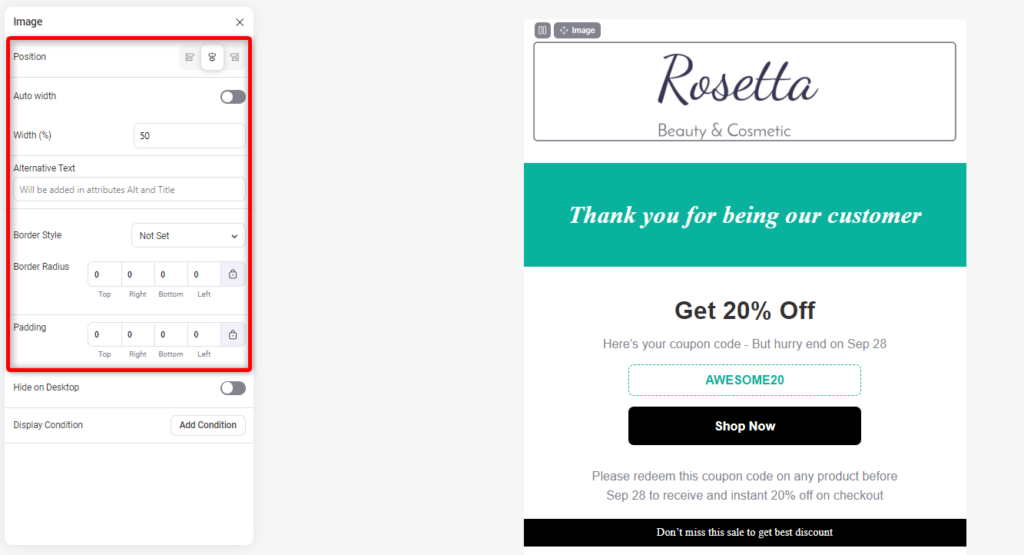
Click on the logo, and you can change it to suit your needs.
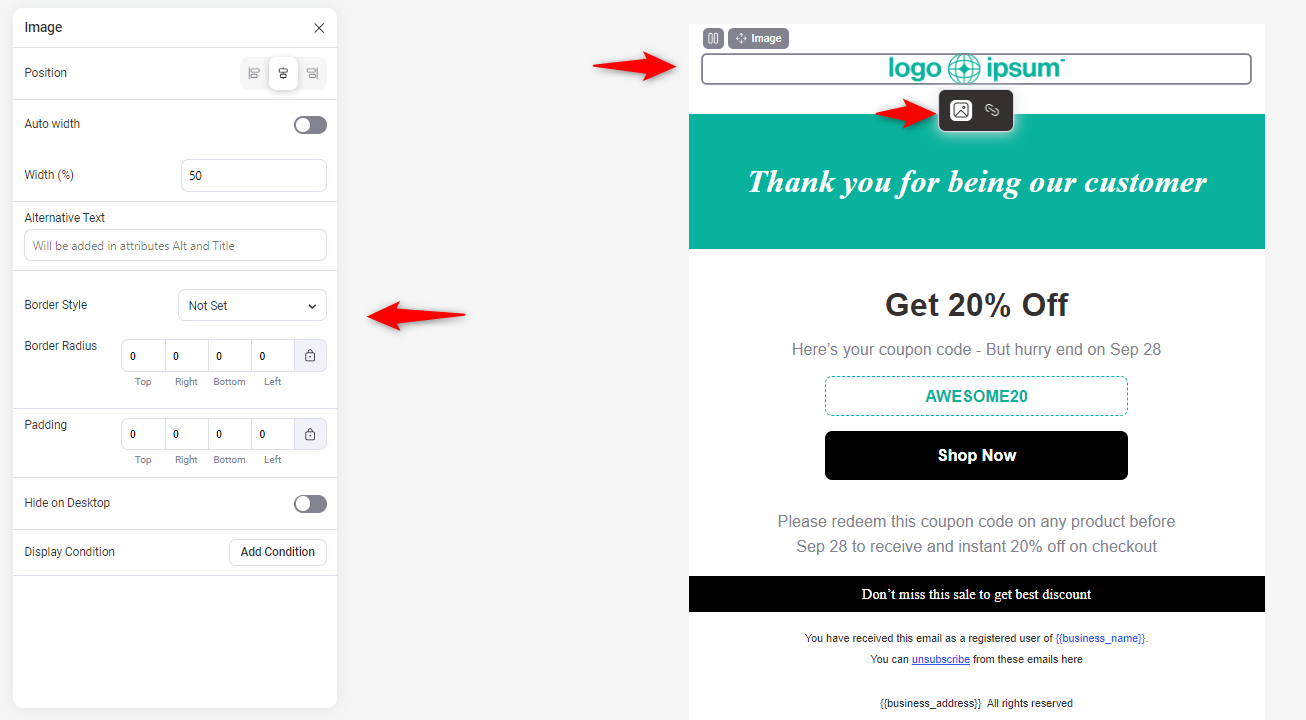
After changing the logo, you can access the widgets on the left side to customize the logo.
Heading customization
Now, click on the heading to customize it. You can change the text, color, font size, alignment, etc.
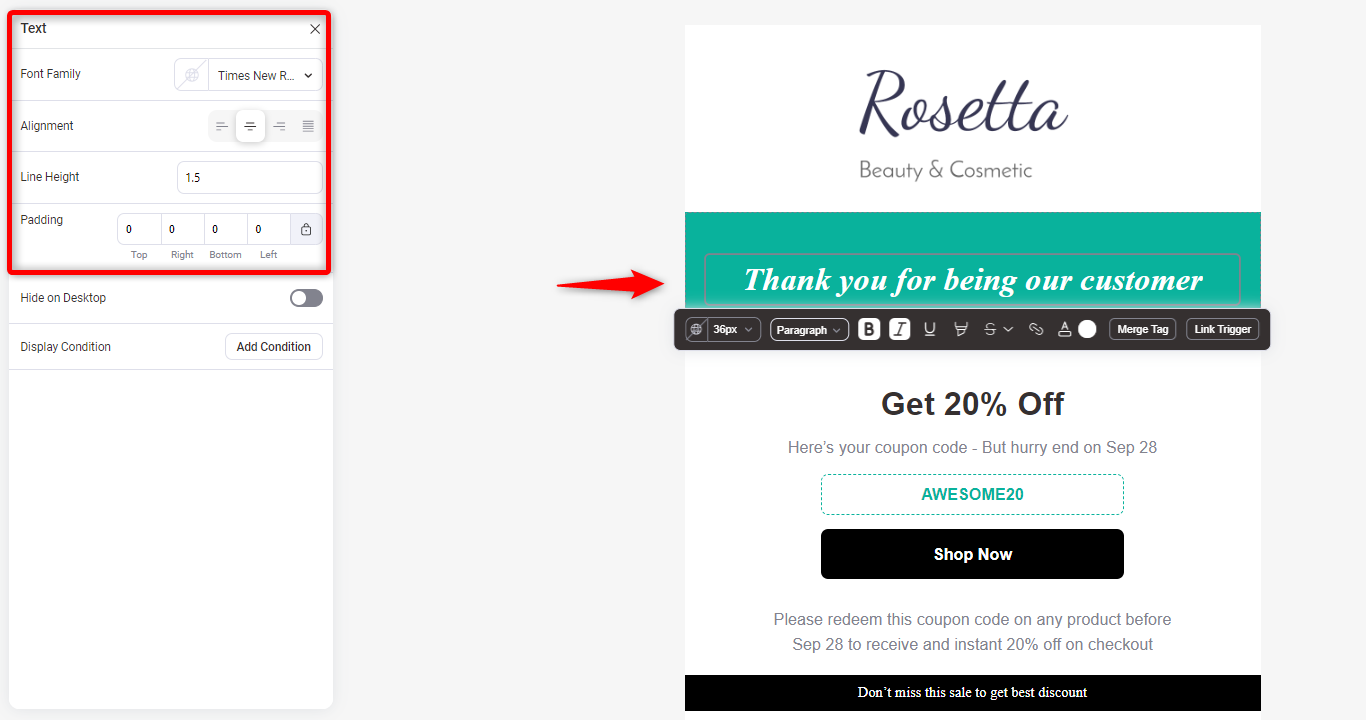
You can also add the merge tag here to personalize customers. Click on the heading to find the merge tag option.
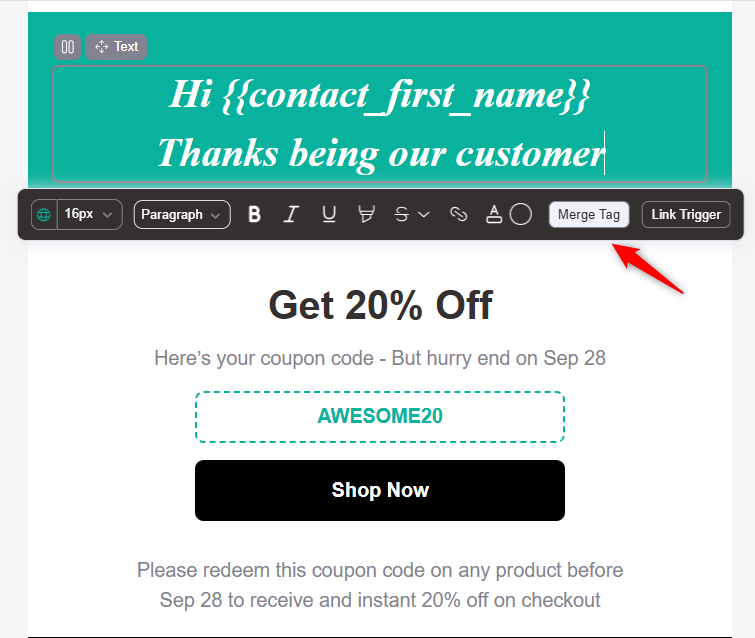
Then, you can copy and use the merge tag where you need.
You can add the text widget to the template by drag-drop.
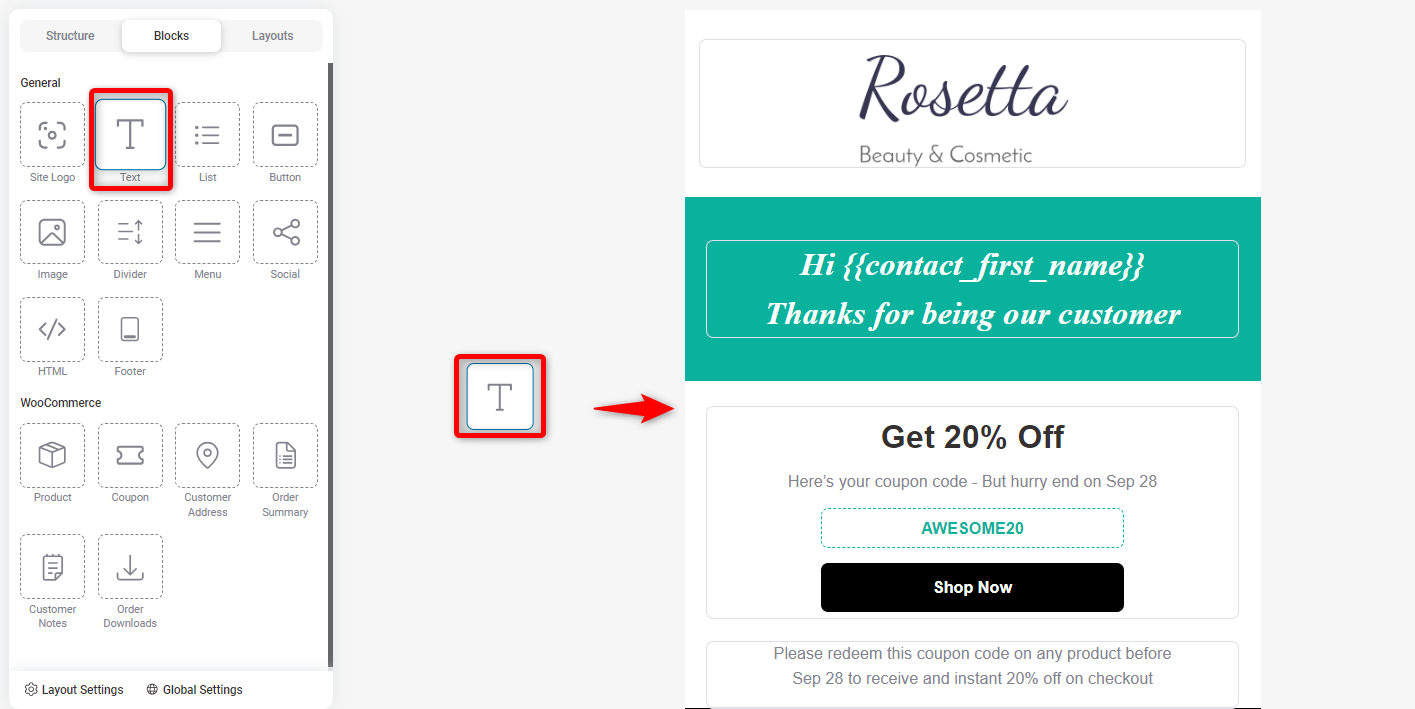
After adding, you’ll get the option to customize it.
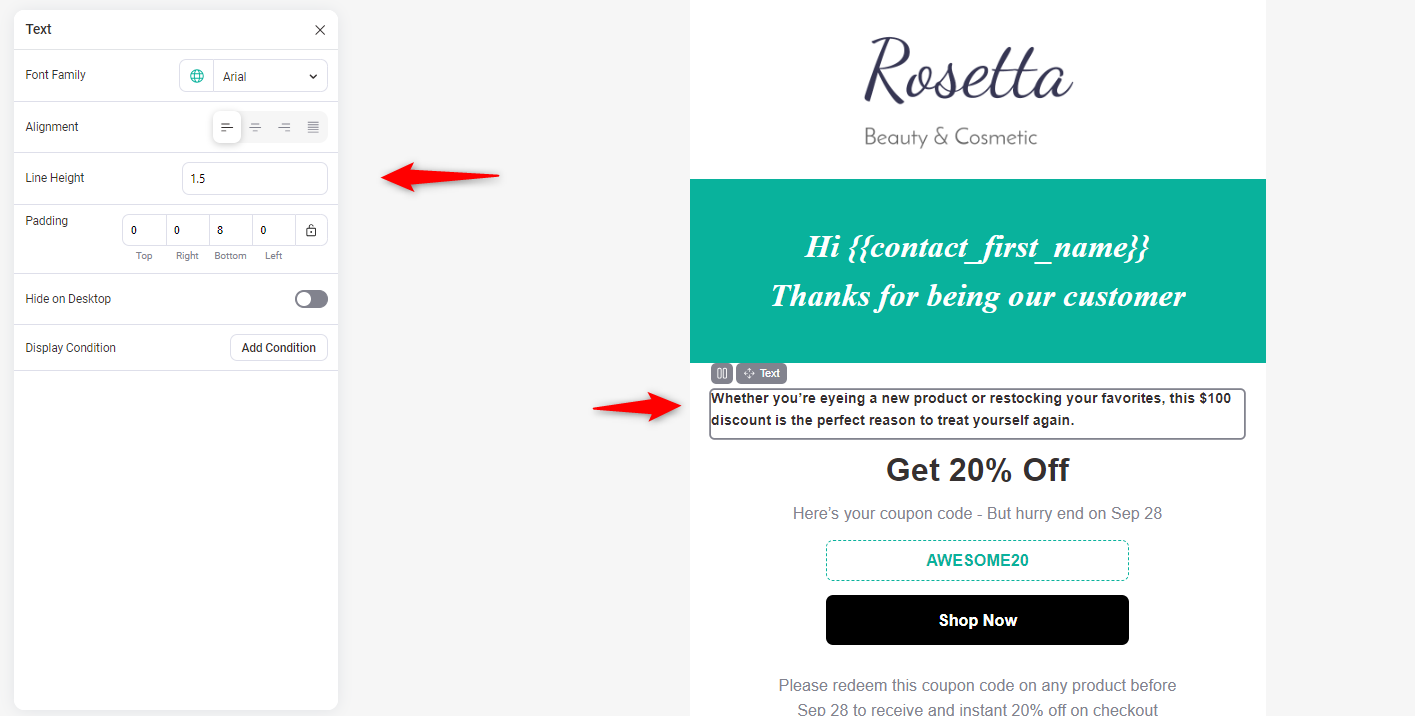
Customizing coupon
Next, customize the coupon. Click on it and choose the coupon type to Automation. Select the coupon you created earlier, “New Order Coupon.”
This will bring your dynamic, personalized coupon to the email template.
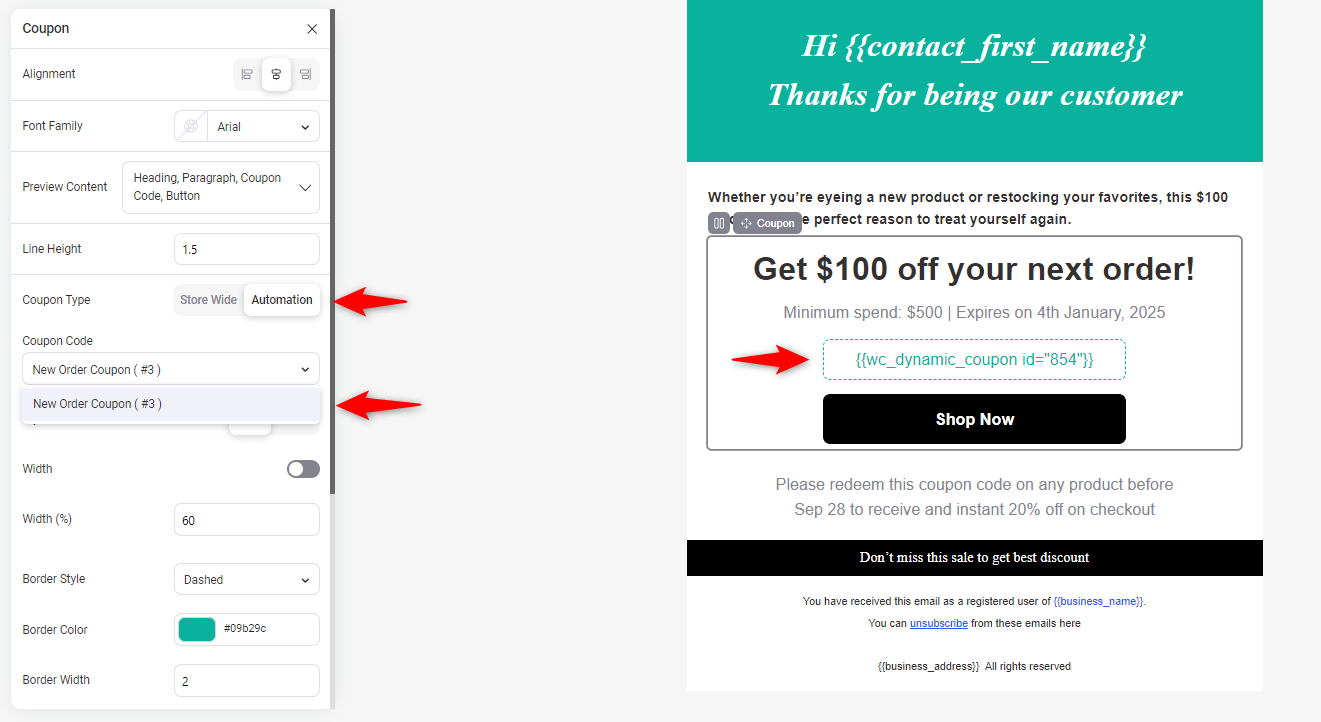
Now, customize the coupon section step-by-step to make your offering more elegant.
Make your CTA button visible and mention it. Also, please direct them to the page with curated products based on their purchase history or preferences.
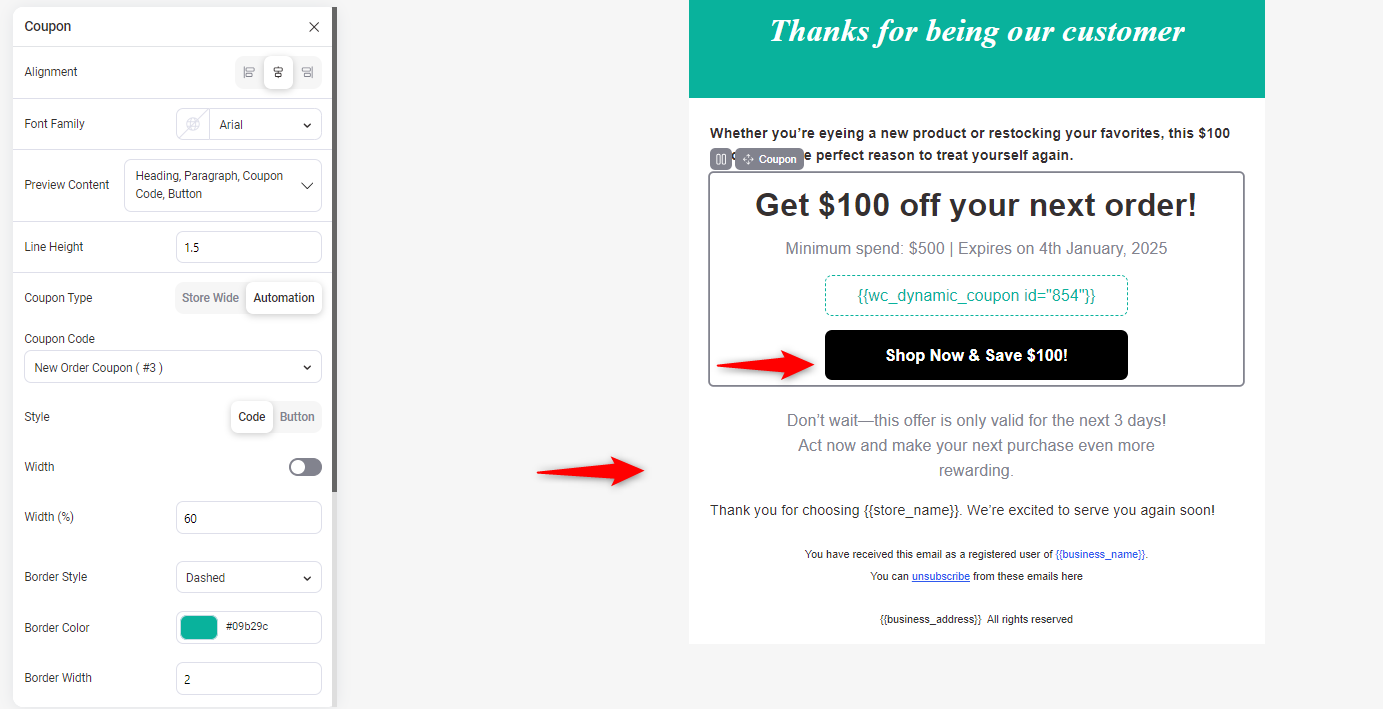
Once everything is done, click on the “Save” button.
Step 8: Enable the automation
Next, enable the automation.
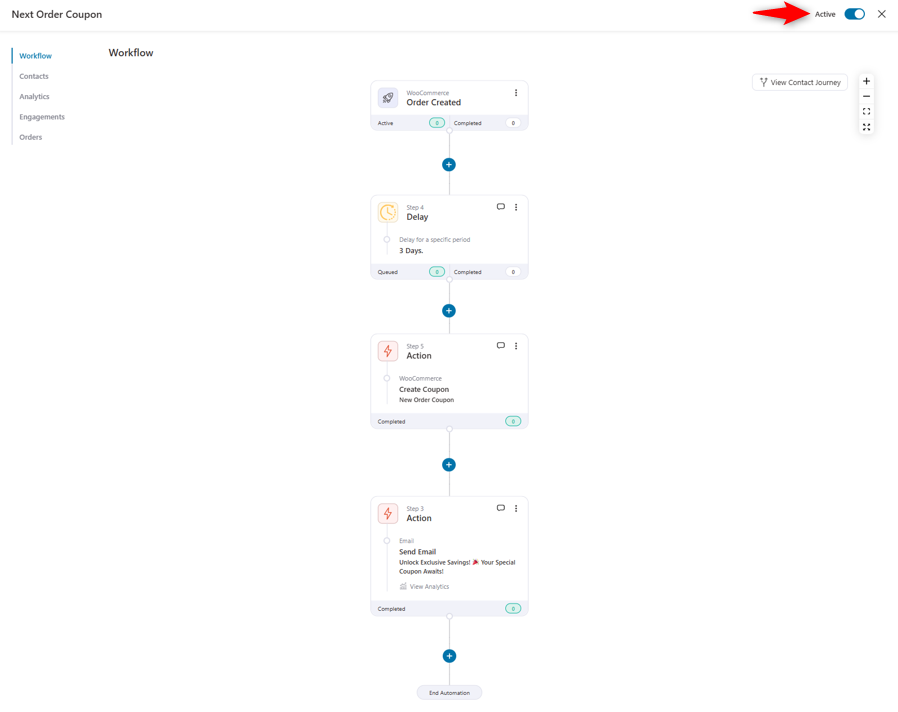
If your customer purchases the “iPhone 15 Pro Max,” you’ll receive the new order coupon email from your WooCommerce store.
That’s all. Using FunnelKit Automations, you can send your customers a personalized next-order coupon.
Part Two: How to Use Next Order Coupons Profitably So It Boosts Average Order Value
While discounts may reduce profits, they can drive sustainable growth when applied strategically.
Next-order coupons are a powerful tool for increasing repeat purchases, boosting average order value, and strengthening customer loyalty.
Focus on offering discounts for high-margin products, set minimum order thresholds, and target specific customer segments like inactive buyers.
When implemented thoughtfully, discounts become a trigger for long-term profitability, not a cost.
Here are some use cases that you need to check out:
1. Coupon with a minimum order total requirement
A minimum order total requirement for coupons ensures high-value orders, which helps you cover the discount amount and boosts AOV.
This will make your strategy both impactful and profitable.
While creating a coupon, you can set the minimum spending amount on the restrictions tab.

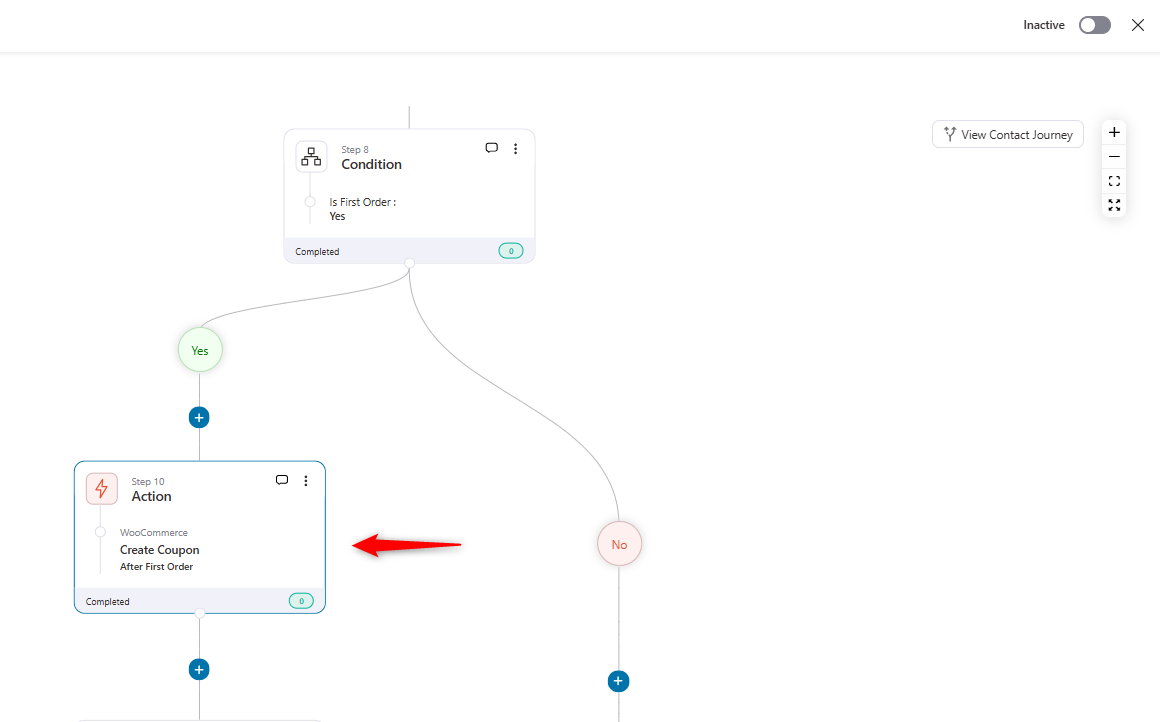
2. Provide a coupon to first-time purchasers
Offering a first-time purchase coupon boosts AOV by encouraging higher spending and reducing purchasing complexities.
It encourages customers to buy more, especially with a minimum order value, while also fostering a habit of larger purchases.
This strategy drives cart sizes and repeat sales, leading to long-term growth.
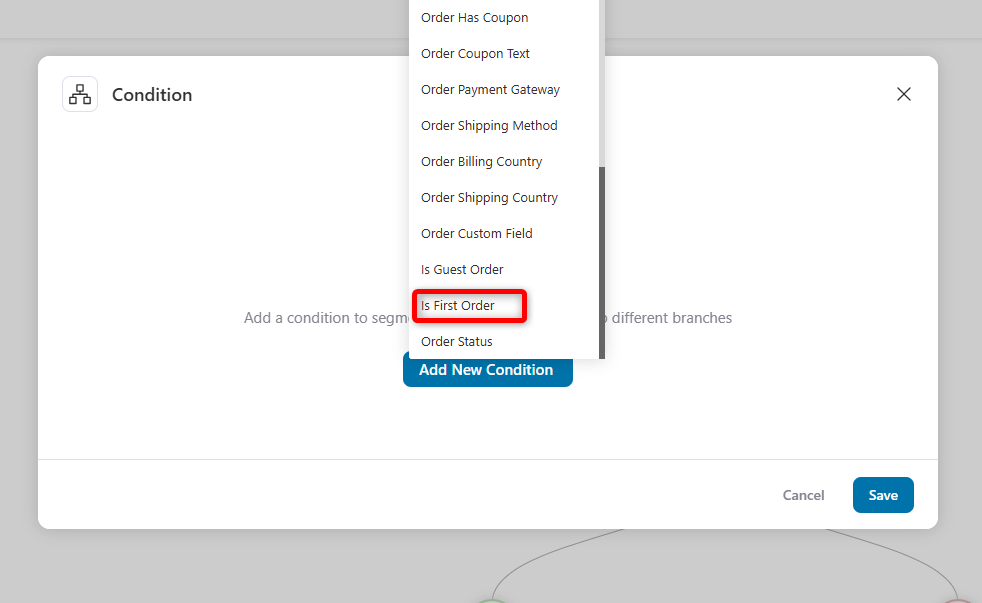
Just like the previous process, under the order tab, find the option “Is First Order.”
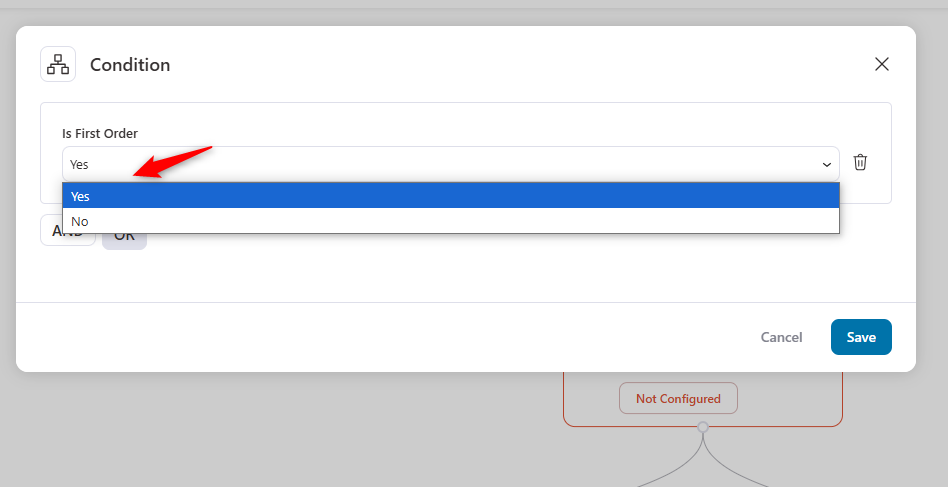
Then select Yes and hit save.
That’s all. Your condition is set for first-time purchasers. They will use the coupon code when purchasing anything from your store. You can add a delay of 3 or 5 days after purchasing.
3. Send a coupon after purchasing a particular product
Offering a coupon after a particular product purchase is also a powerful strategy to increase AOV. It boosts repeat purchases and strategic upsells.
Customers who receive a discount for a complementary or premium product are likelier to return and spend more.
This not only enhances customer retention but also encourages higher-value transactions over time. Let’s see how to set the conditions if anyone purchases a specific product.
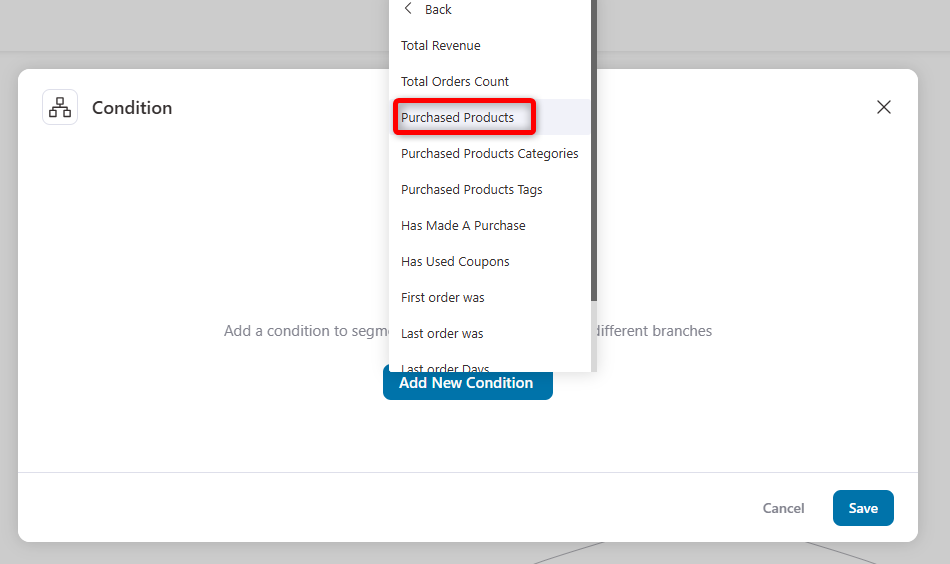
Find the “Purchased Products” option in the WooCommerce tab.
After that, select the “Matches Any Of” option and select the product you want to send.
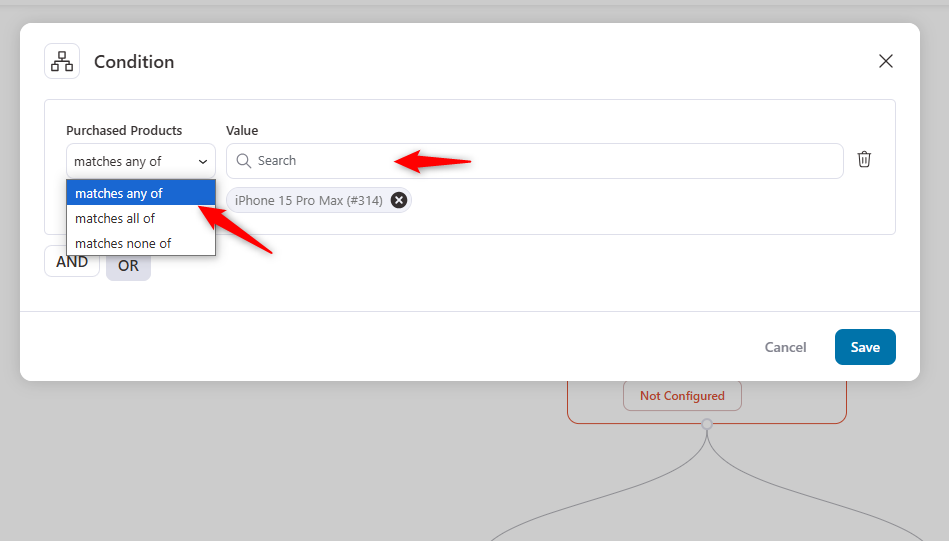
So whenever anyone purchases the selected product, they will get the following order coupon code.
4. Offer coupons to users for selected areas or countries
Offering coupons to customers in specific areas or countries can be effective for targeted marketing.
For example, location-based discounts can address challenges like higher shipping costs or local preferences.
A study by Winsavvy found that 63% of consumers feel more positive about a brand when offered location-based coupons.
It shows how it can boost customer loyalty engagement and drive more conversions effectively.
Click on the Geography section under the condition.
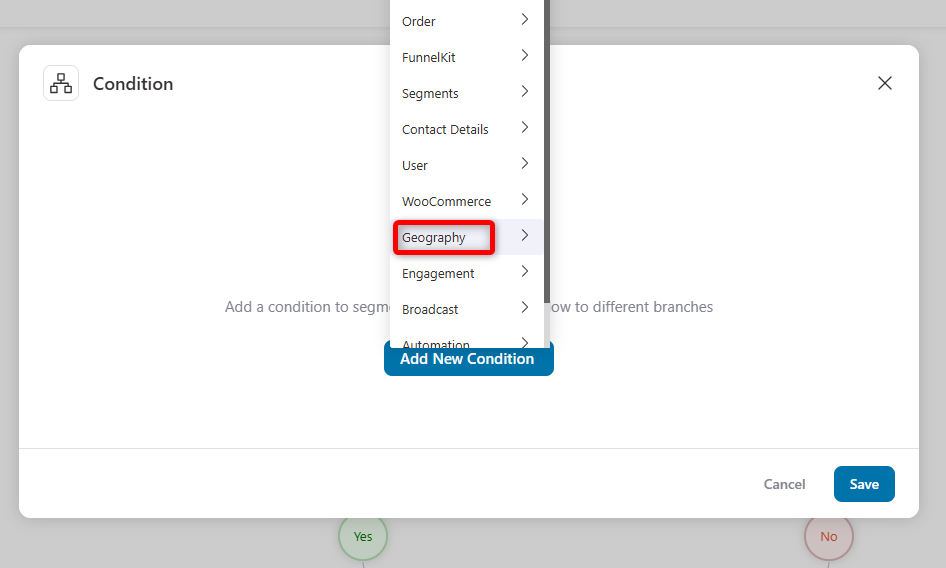
Then select the “Country” from the list.

Here, you can find two options. Select any of the options and search for the preferred country.
Also, you can exclude the customers from the option if you select.
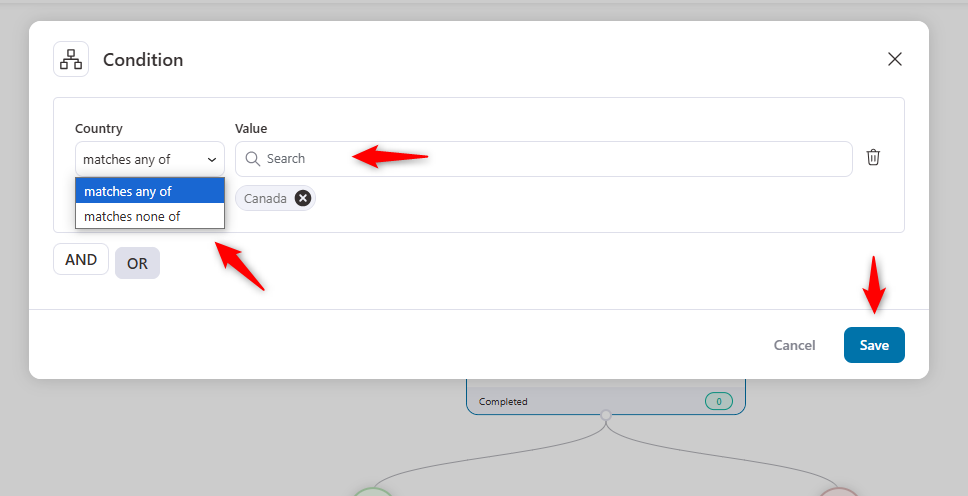
Once you’re done, you should send the following order coupon to Canadian customers who purchase anything from your store.
5. Offer a coupon to only high-value customers
Giving a coupon only to high-value customers encourages them to spend more while keeping discounts targeted.
Since they already trust your brand, a small incentive can drive them to buy higher-priced items or shop more often.vIt will boost AOV without forcefully pushing customers.
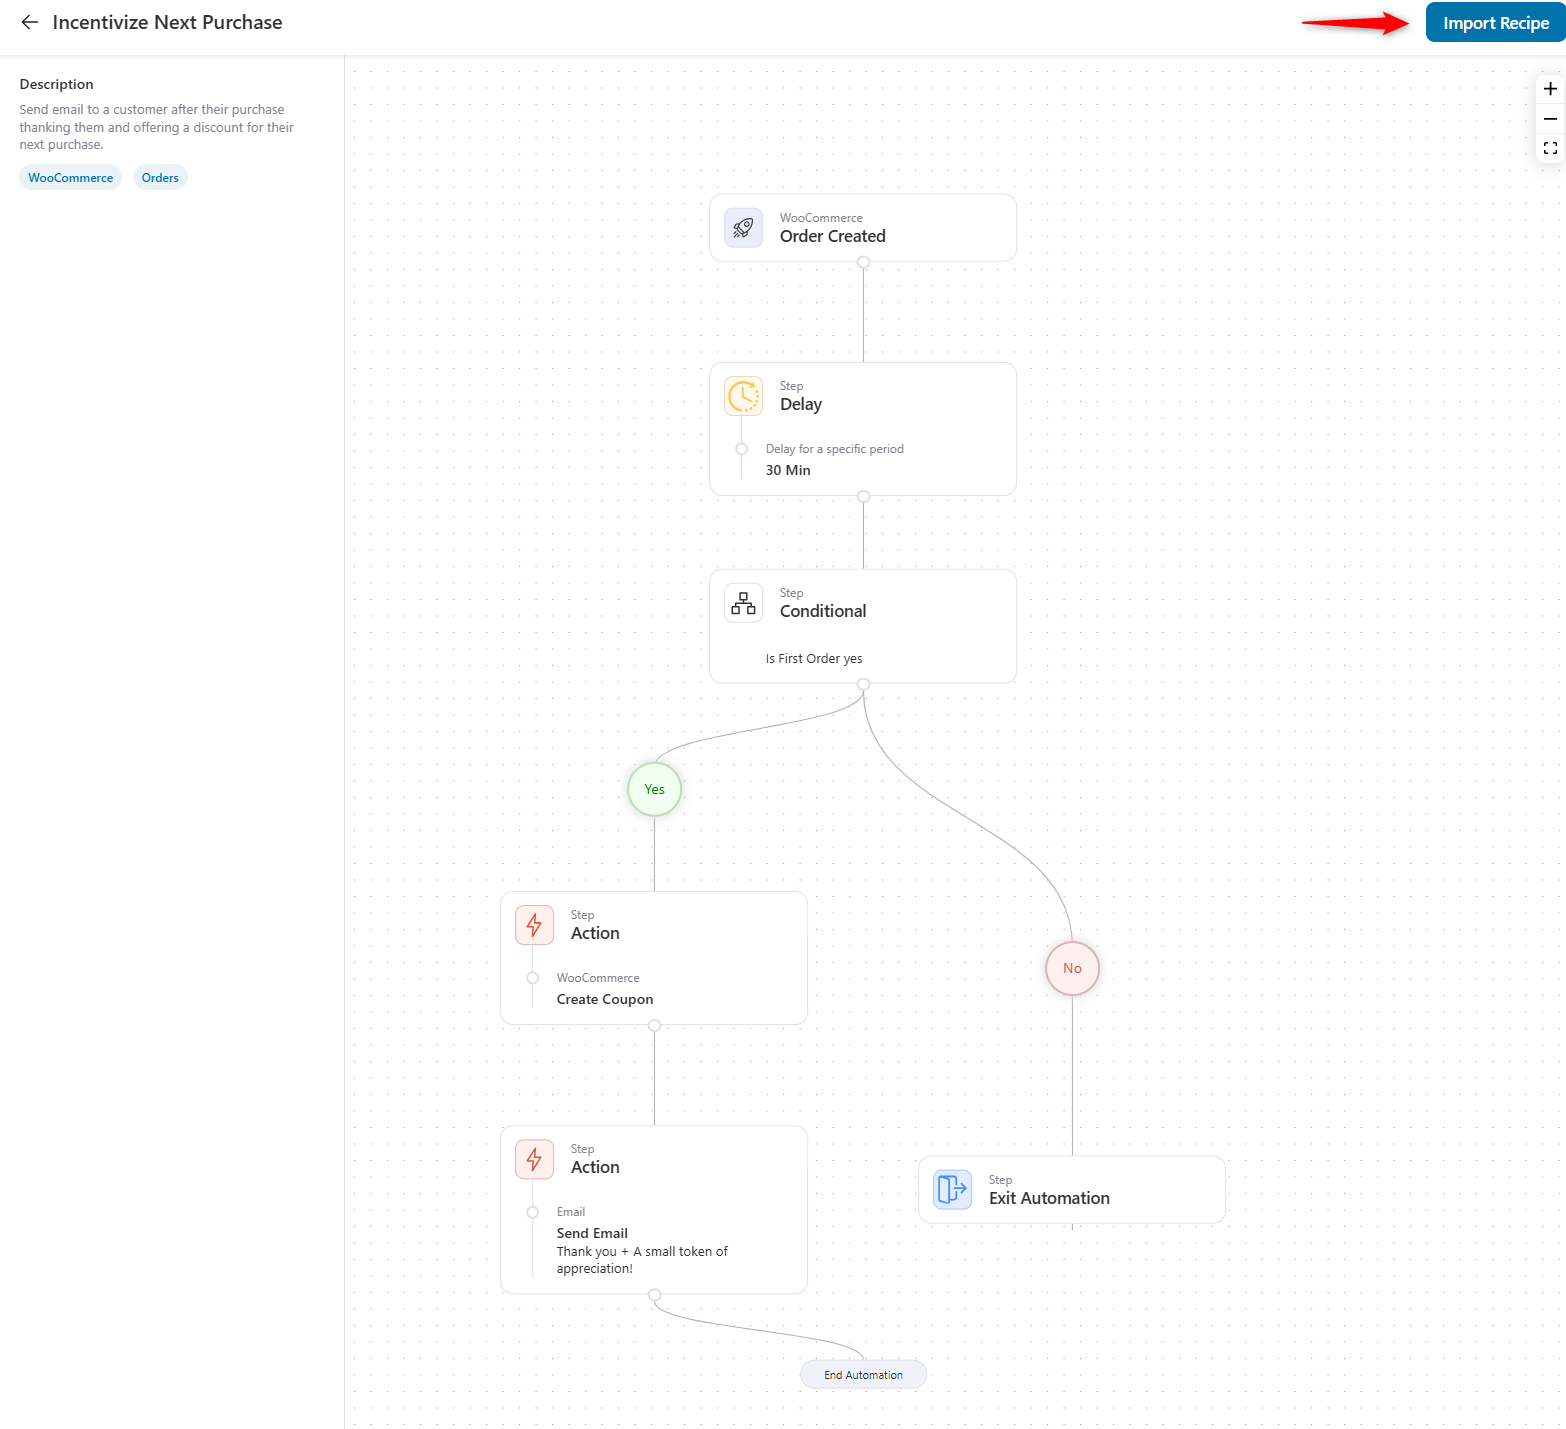
Select the “Incentivise Next Purchase” template on the automation recipe page. Here is the automation workflow.
After checking, import the template.
Now click on the marked area to customize the coupon.
Provide the coupon name, discount type, amount, and other stuff.
Now, insert the minimum amount spent and set who can use the coupon.
So, if the customer’s order exceeds $150, they will get the coupon.
You can set the limit here. Hit save once you’re done.
So whenever customers purchase anything from your store (first timer) with the minimum cart amount spent, this automation will run and send the coupon.
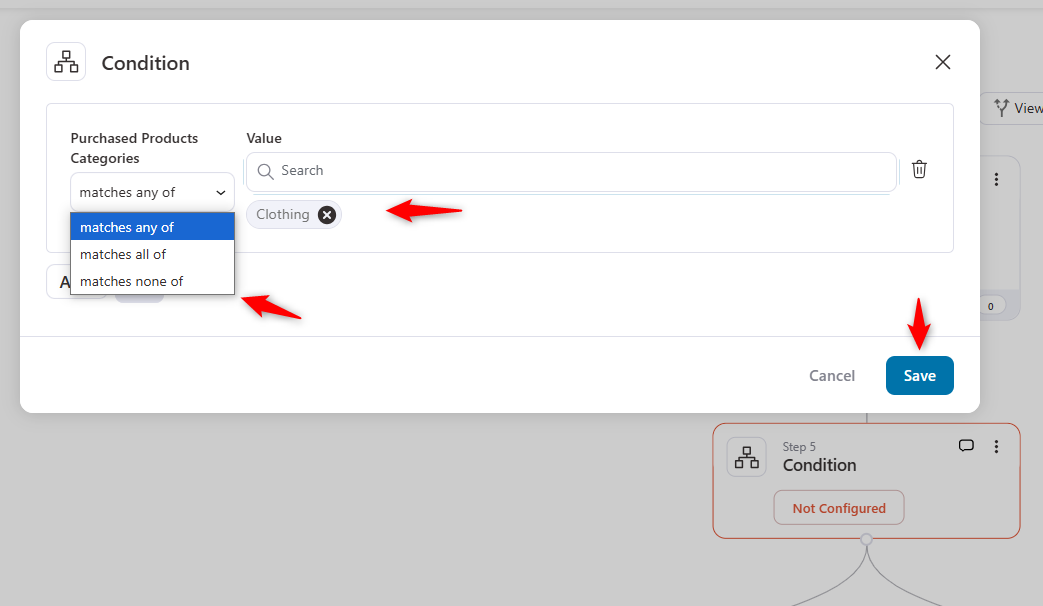
Bonus tip: Customers can get coupons if they buy from a specific category; this can help increase sales for slow-moving products.
Suppose you’re reviewing the sales reports and notice that specific product categories are underperforming. Then, you can send the coupon for that category to increase its AOV.
Another thing you can do is offer order bumps or upsells to increase the AOV of that low-performing product.
For example, the "Clothing" category has lower conversions than others and a higher-than-expected inventory.
In this case, you can offer an order bump or upsell and share a coupon for the product category.
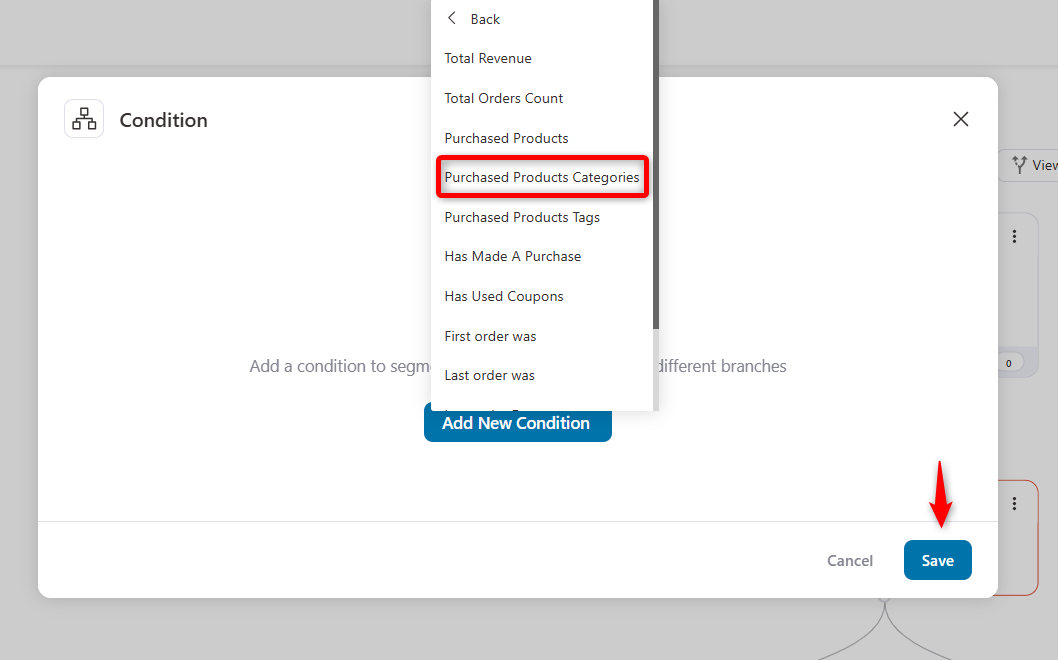
Here, select the category from the list and choose the option to “matches any of” from the dropdown list.
These are some of the most practical use cases you can implement to boost your store’s sales. As discussed in the previous section, you'll see success if you follow the correct time frame.
5 Tips to Make Your Next Order Coupon Convert Well
We assume you have figured out how the following order coupon works, how to create a coupon code with FunnelKit, and the use cases.
Now it’s time to make it better with some practical tips.
1. Use a high converting email templates
A high-converting email template can make all the difference in driving customer engagement and coupon redemptions. Start by personalizing the email with the customer’s name or purchase history to make it feel valued.
To guide customers effectively, include clear, action-oriented CTAs like “Redeem Your Discount.” Ensure the template is mobile-friendly, as many customers check emails on their phones.
Enhance the design with visuals such as product images or countdown timers to create urgency and capture attention.
When your email template combines these elements, it’s more likely to convert and boost your sales.
2. Implement dynamic and time-sensitive coupons
Time-sensitive coupons create urgency and drive quick action. Depending on your sales cycle, the ideal expiration date is 3 to 7 days.
Shorter deadlines work for frequent shoppers, while new customers prefer more time.
Always highlight the expiration date clearly to ensure customers act fast.
3. Try tiered discounts for higher spending
Tiered discounts encourage higher spending, like “Save 10% on $50+ and 20% on $100+.”
This approach increases average order value while rewarding bigger purchases.
Tailor offers are based on past spending habits and highlight savings to motivate customers to upgrade their orders.
Note: With FunnelKit Automations, you can easily set dynamic conditions and automate personalized emails to promote these offers effectively.
4. Combine next-order coupons with free shipping or gifts
You can boost coupon value by pairing it with free shipping or small gifts.
For instance, “10% off plus free shipping” makes the offer more rewarding and pleasing. You can also offer to shop in the next three days and get a gift.
You can highlight the combined savings to entice customers and address common hesitations like shipping costs.
5. Focus on the word-of-mouth marketing
Encourage customers to share their personalized next-order coupons with friends and family as gifts. This creates a natural word-of-mouth marketing effect on your store by rewarding the referrer and the recipient.
For example, offer a deal like, “Share this coupon with your friends, and you’ll get 15% off your next purchase!”
Focus on frequent buyers or satisfied customers who are more likely to recommend your brand and drive better results.
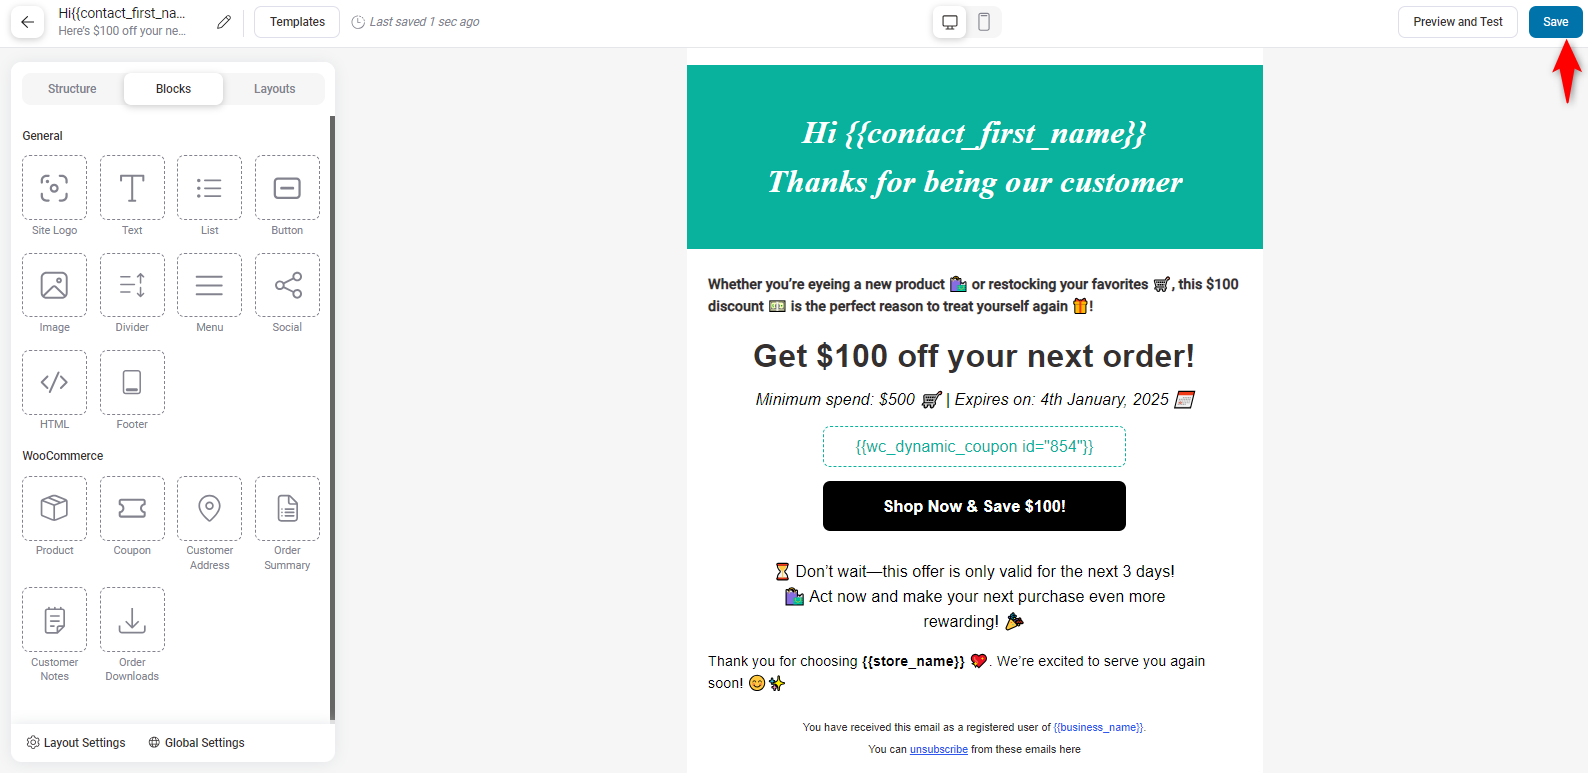
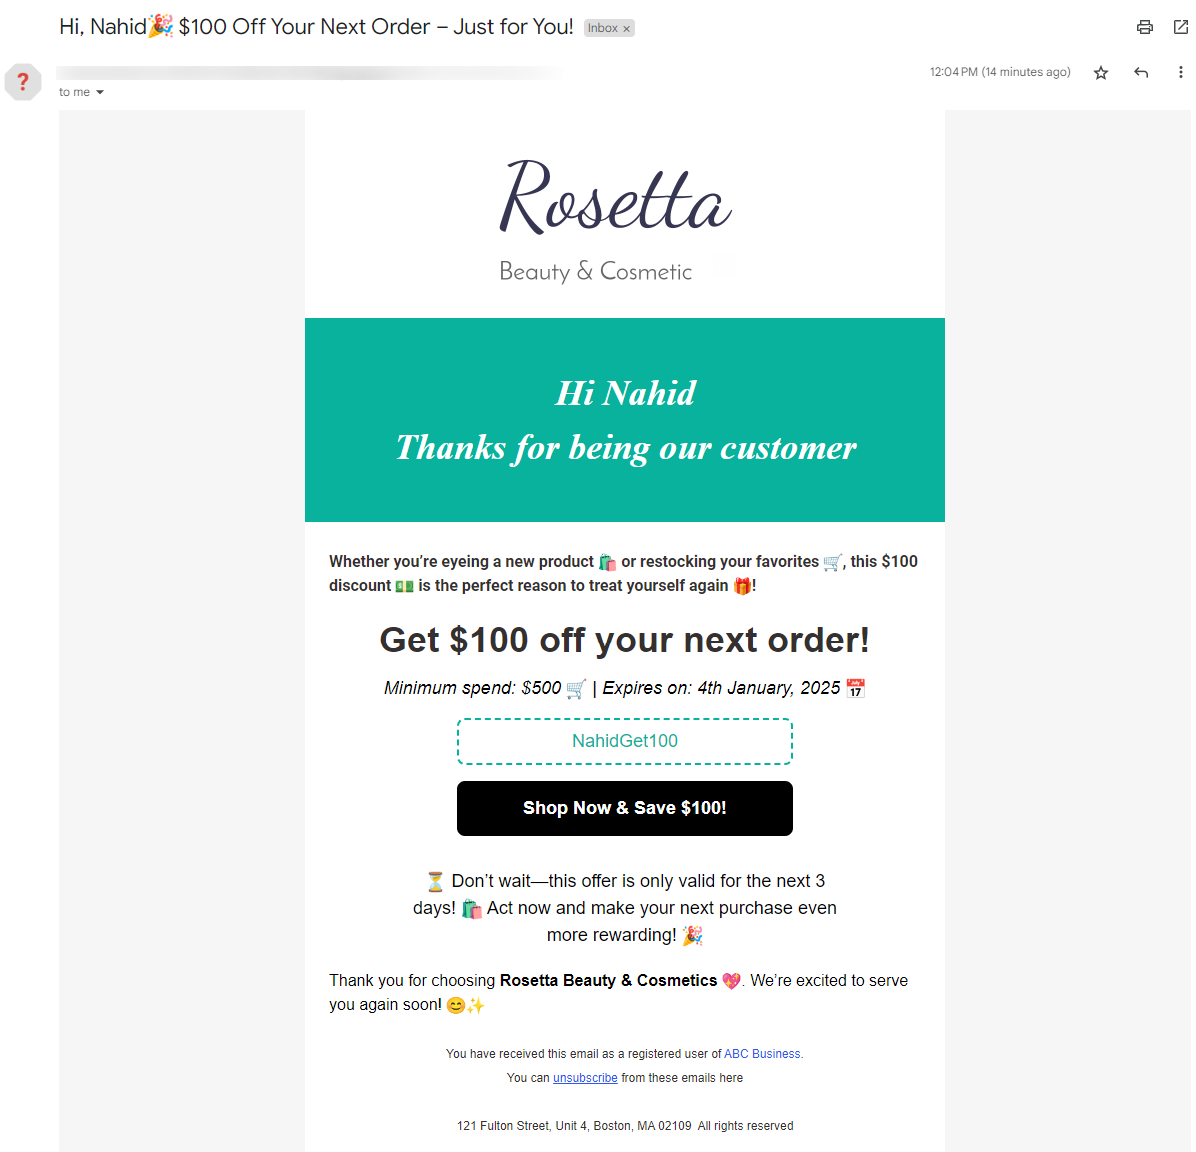
Here is the final look of a high-converting email template that you can utilize for the next-order coupon campaign.

Bonus tip: Send a follow-up email
Not all customers will redeem their next-order coupon immediately. A well-timed follow-up email can serve as a reminder and boost conversions. At least it performs 40% better than the initial one.
Here’s what you can do in a follow-up email:
- Send the reminder 24-48 hours before the coupon expires to create urgency.
- Mention the benefit of how they can save and get a discount
- Use a strong CTA like “Claim Your Discount Before It’s Gone!” to encourage action.
- Personalize the email with their name and last purchase to make it more engaging.
A simple nudge can turn an undecided customer into a repeat buyer. Don’t let your coupons go to waste—automate your follow-up emails and watch your conversions grow!
Recommended Read: WooCommerce Follow-Up Emails: 6 Types with Examples
How to Measure Success and Improve the Effectiveness Of Next Order Coupon
Once you’re done with the process and strategy, it’s time to measure the success rate of your campaign. There are different ways that you can follow to measure that.
We’ll share a few ways that you can follow.
How to measure success:
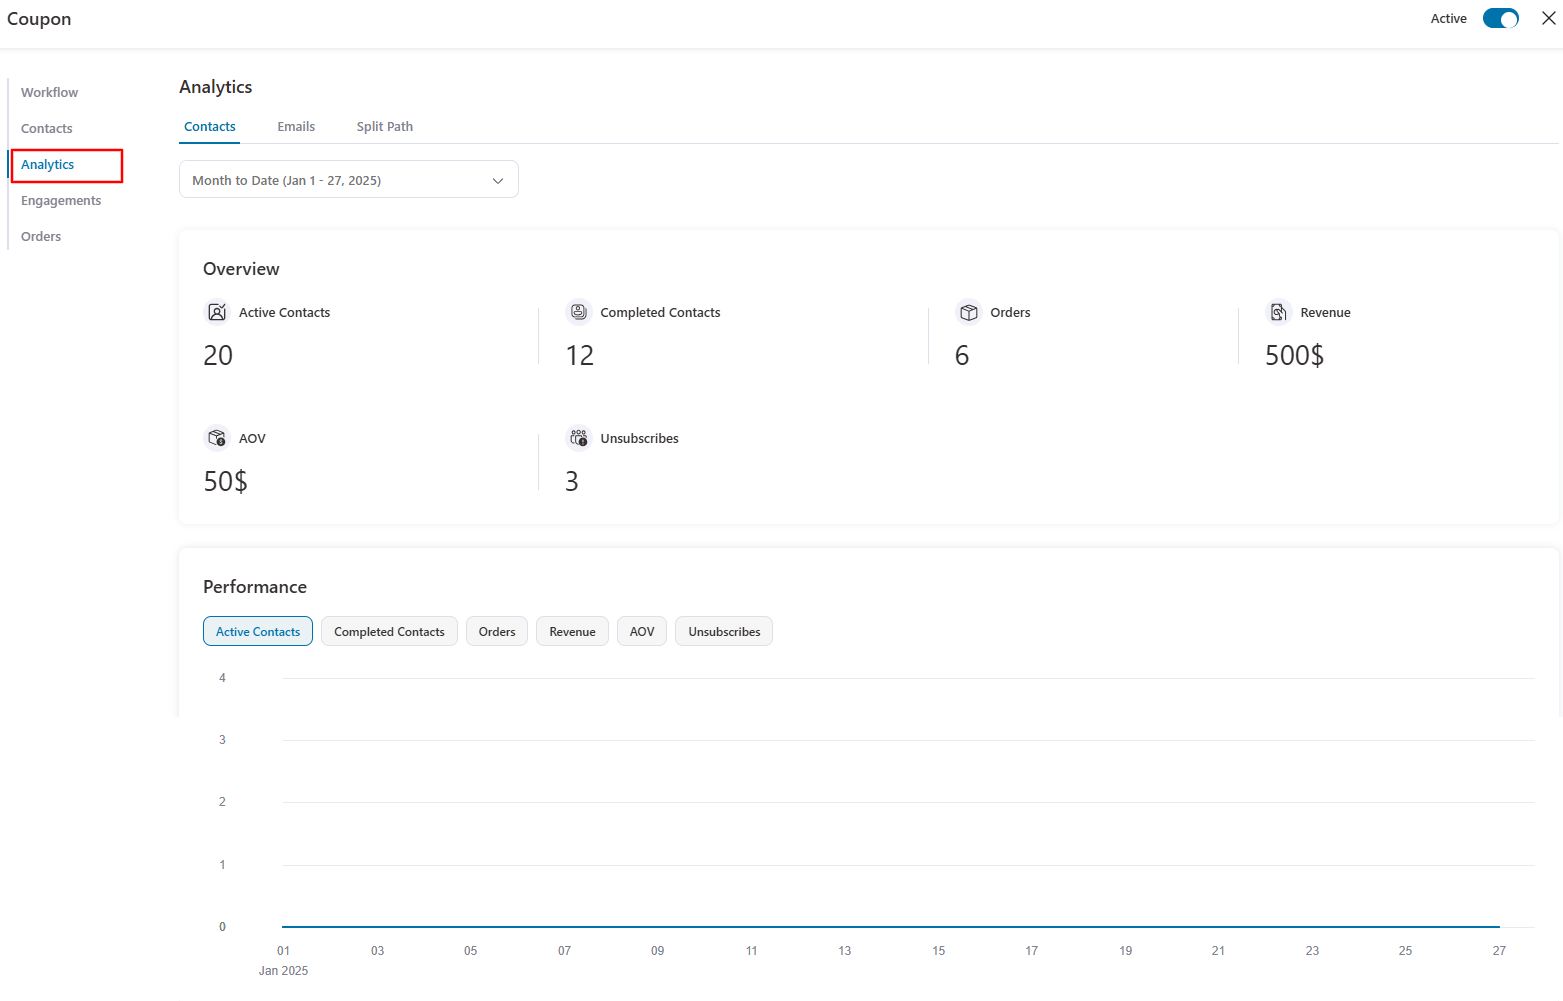
1. Reviewing analytics
FunnelKit Automations has a separate tab for analyzing the campaign's success rate. The analytics tab allows you to check everything about the campaign.
This includes the total active contacts, completed contacts, orders, revenue, AOV, and unsubscribed users, which will give you an idea of how your campaign is going.
2. Track engagement
On the engagement tab, you can see your customers' interactions with your campaign, including whether the email was sent, the open status, the click status, the unsubscribe status, and the revenue.
Here’s the preview of the engagement tab below the analytics tab:

3. A/B test your coupons
Try utilizing A/B to test your plans and see which one will work.
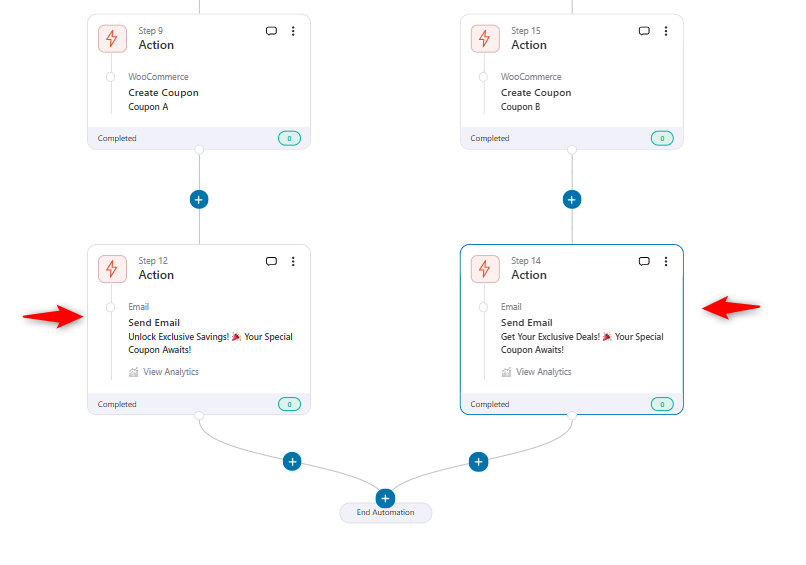
For instance, you’ll see an option to create under the trigger section. Just select the “Split Path” option. Two different paths are shown here.
Here, in the two paths, two coupons are created to see which performs best.
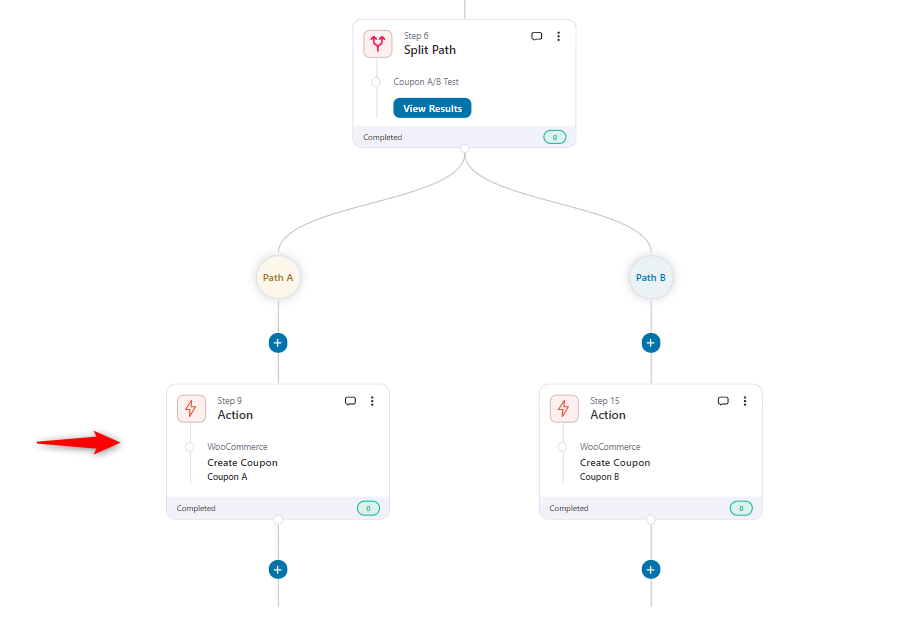
For two different coupons, we have created two email variations.
After that, depending on their performance, you can declare a winner, and your automation will go through depending on the settings set up in the winner.
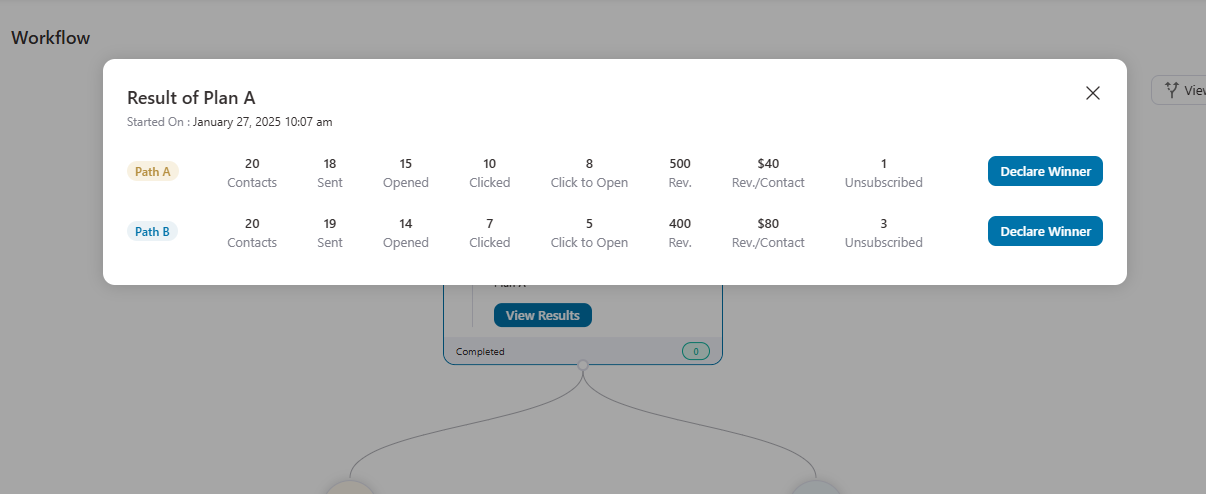
So, here is how you can measure success and check your campaign metrics. It will give you a complete picture of your marketing automation and provide tips to improve the campaign's success.
More Questions About Next Order Coupons
Have a look at some of the frequently asked questions about next order coupons:
What are other distribution channels I can use to send next-order coupons?
Next-order coupons can be distributed through multiple channels like email, SMS, WhatsApp, and even push notifications or in-app messages, depending on where your customers are most active.
How can I avoid discount fatigue from frequent coupon offerings?
To avoid discount fatigue, limit the frequency of coupons and incorporate them into a broader loyalty program. Offering targeted rewards for repeat customers is a better strategy than sending frequent discounts.
How can I A/B test different types of coupons, not just email templates?
You can A/B test different coupon formats by using the "Split Path" option in FunnelKit Automations. Create two paths with different coupon types or email variations and measure their performance. Based on the results, you can declare a winner and optimize your campaign accordingly to improve conversion rates.
Automate WooCommerce Next-Order Coupons: The Key to Lasting Customer Value
We have covered everything in this blog: how to share the next coupon discount, when to share it, how to measure results, and how to optimize for maximum profit.
Next-order coupons for a WooCommerce store are an effective marketing strategy for generating repeat sales.
FunnelKit Automations is a promising tool for meeting all your next-order coupon needs. It simplifies the process with powerful features, such as dynamic coupon creation, personalized emails, and advanced automation workflows.
So why wait? Take help from FunnelKit Automations to take care of your automation part and start sending good offers that add real value.
More WooCommerce Resources
- How to Create WooCommerce Birthday Coupons and Send Them to Customers
- How to Customize WooCommerce Canceled Order Email to Customer
- How To Design and Send Automated WooCommerce Conditional Emails
- How to Use WooCommerce Free Gift Coupon To Boost Sales
- How to Auto-Apply WooCommerce Coupon

Editorial Team
July 7, 2026Are shoppers adding products to their cart and leaving before they buy? According to Baymard Institute research on checkout usability, 18% of shoppers who abandon their cart do so because...
Editorial Team
July 7, 2026You’ve built your WooCommerce store, polished your product pages, and invested in marketing, but sales aren’t coming. Visitors browse, some add items to their cart, and most vanish before completing...
Editorial Team
July 3, 2026Discover how a canceled order doesn't have to mean a lost customer, and how the right WooCommerce canceled order email can turn it into a second chance. WooCommerce canceled order...


