
Have you ever struggled with calculating shipping fees for your online store?
Shipping can be complex and time-consuming, especially when calculating costs based on product weight or shipping rates for various regions.
The good news is that you can simplify this process with the WooCommerce shipping calculator on the checkout page.
This tool helps you quickly calculate shipping costs based on weight, location, and product dimensions. It saves you time, reduces errors, and enhances the customer experience.
This post will explore how to add the WooCommerce shipping calculator on the checkout page and how it can help streamline your e-commerce shipping process.
Table of Contents
- 1 What Is the WooCommerce Shipping Calculator and How Does It Work?
- 2 How to Setup the Shipping Calculator on Your WooCommerce Checkout Page?
- 3 5 Use Cases of WooCommerce Shipping Calculator
- 3.1 1. Set a fixed rate per item in WooCommerce shipping
- 3.2 2. Set shipping fee based on cart subtotal in WooCommerce
- 3.3 3. Set percentage-based shipping fees based on the shipping method in WooCommerce
- 3.4 4. Set handling fees based on order quantity in WooCommerce
- 3.5 5. Set up a percentage-based flat rate with a minimum fee applied in WooCommerce
- 4 6 Best Practices for Optimizing Your Shipping Calculator
- 5 Ready to Set Up a WooCommerce Shipping Calculator on the Checkout Page?
What Is the WooCommerce Shipping Calculator and How Does It Work?
The WooCommerce shipping calculator automatically determines shipping costs at The WooCommerce shipping calculator automatically determines shipping costs at checkout based on the customer’s location, item weight and size, and your configured shipping rules.
With the default WooCommerce shipping calculator, you can:
- Set up flat rate, free shipping, and local pickup
- Add multiple shipping zones and rules, allowing you to set region-specific rates or charge based on weight/size
- Seamlessly integrate with checkout to display accurate shipping rates upfront
This ensures customers see accurate rates, reducing confusion and saving you from manual calculations.
Example:
If you sell handmade candles and set flat rates like:
- $10 for orders within the USA
- $20 for international orders
The WooCommerce shipping calculator detects the customer’s location at checkout and automatically applies the correct rate. So, anyone from the USA will be charged $10, while international customers (e.g., from Canada, Australia, etc.) will see a $20 rate.
Accurate shipping calculations are key to customer satisfaction and operational efficiency. Automating these processes reduces errors, saves time, and ensures transparent pricing, ultimately boosting trust and profit margins.
Move to next section to find out how to set up shipping calculator.
How to Setup the Shipping Calculator on Your WooCommerce Checkout Page?
Now it’s time to set up the shipping calculator on the WooCommerce checkout page.
Suppose you want to offer three shipping facilities: Standard, Express, and Local Pickup. You can easily set these up in your WooCommerce store to meet customer needs.
- Standard shipping is a cost-effective option for customers waiting for regular delivery times. You can charge $10 for this method to cover basic shipping costs.
- Express shipping is for customers who need faster delivery. This premium option, such as $20, can be priced higher to account for the quicker shipping service.
- Local pickup is free for customers who prefer to collect their orders directly from your store or warehouse. This saves shipping costs and adds convenience for local buyers.
Let’s see how to do it:
Step 1: Create a shipping zone
First, you need to create a shipping zone. To do that, navigate to WooCommerce>Settings and click on the shipping tab.
There, you will find the option to add a “Shipping Zone”.
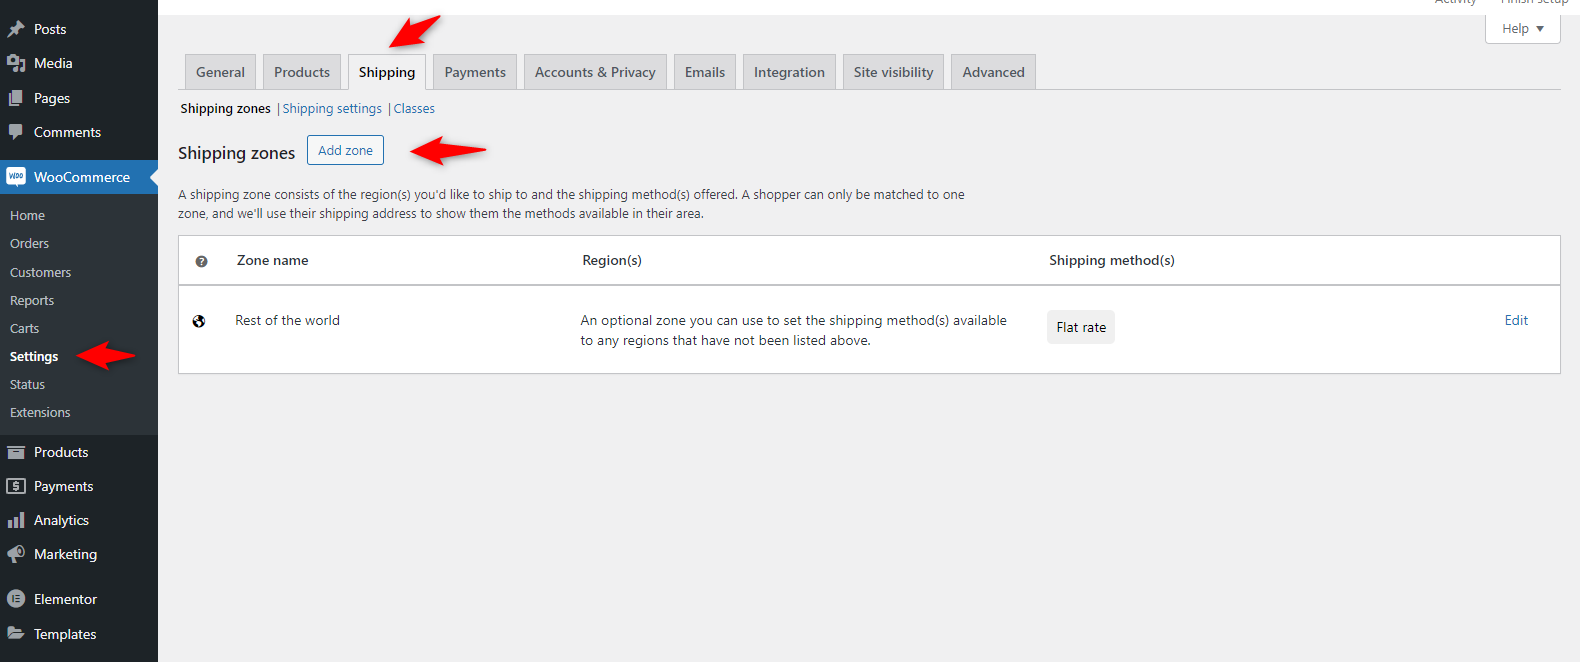
You can add the title of your shipping zone inside the menu and select the area.
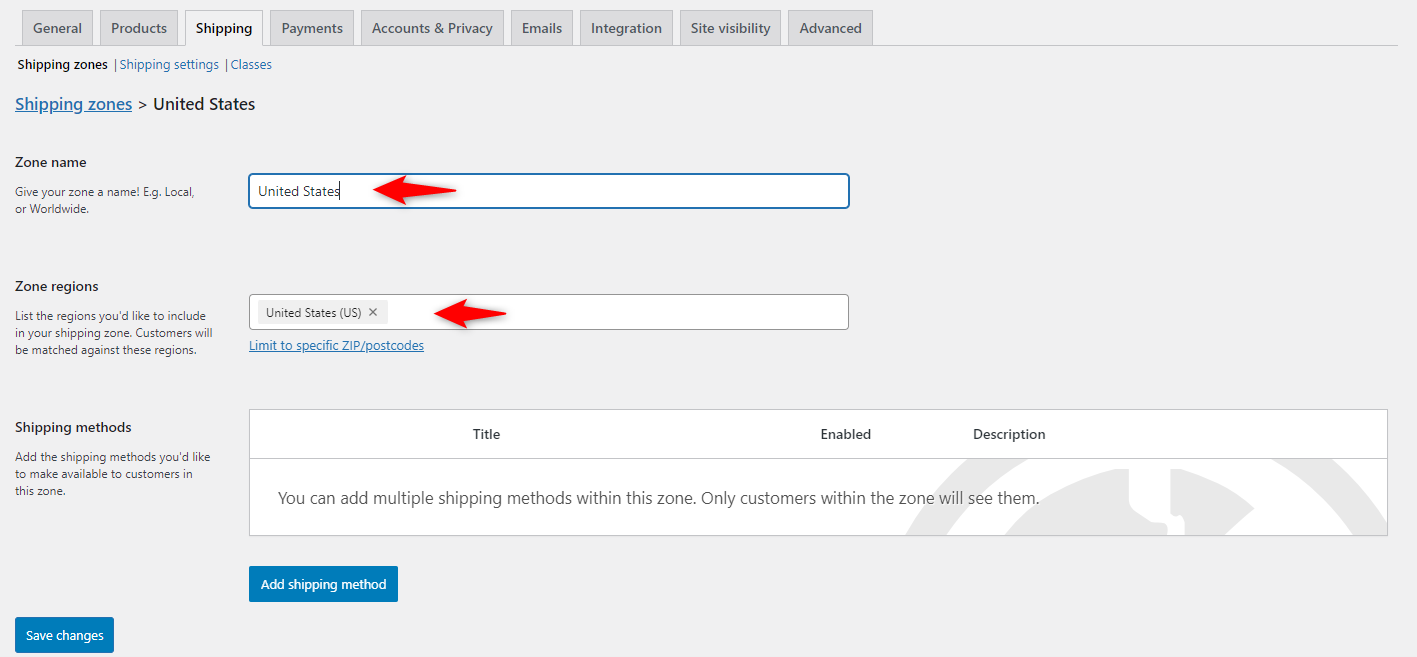
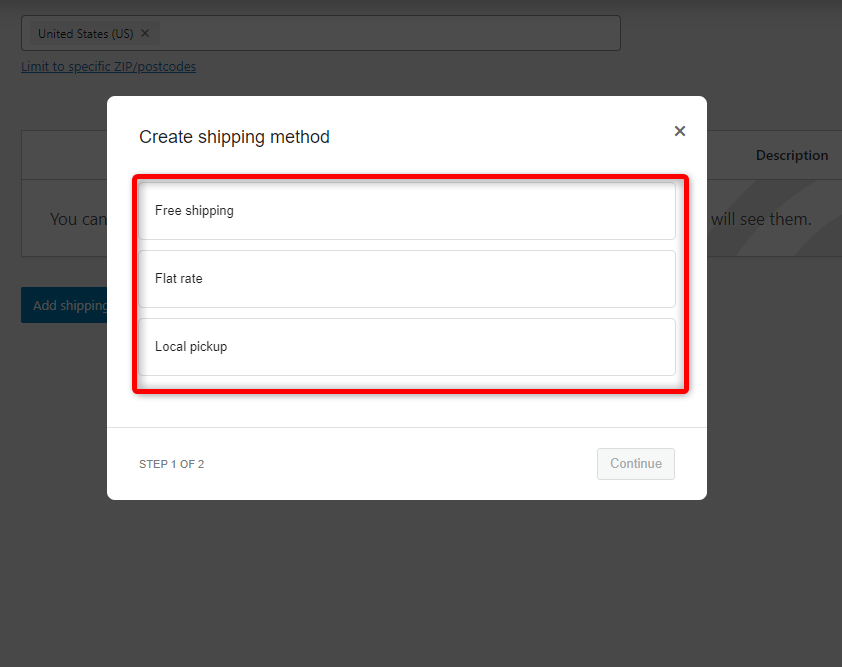
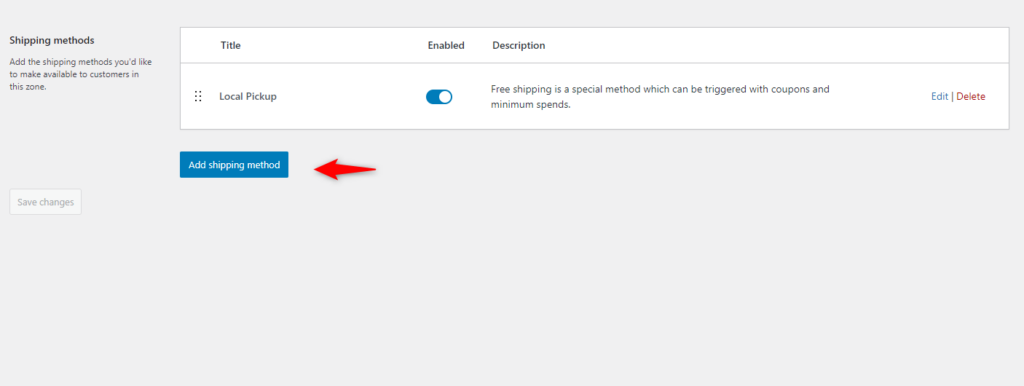
Step 2: Create a shipping method
Next, click on the “Add Shipping Method” button.
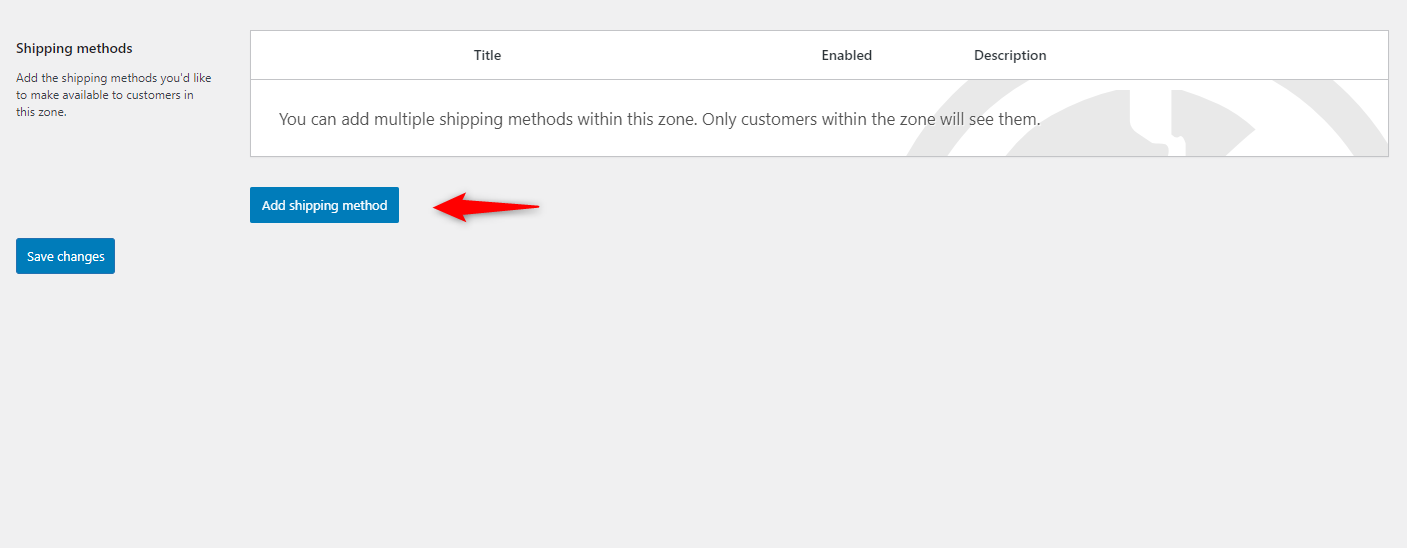
Here, you can create three types of shipping methods.
- Free shipping: Customers receive free delivery when they meet a minimum order value, like $50. This encourages higher-order values.
- Flat rate shipping: A fixed fee is charged regardless of order size or destination, simplifying the process for store owners and customers.
- Local pickup: Customers can collect their orders in person from your store, avoiding shipping fees and offering more convenience for local buyers.
Step 3: Add a free shipping or local pickup
Let’s now add a free shipping method to your WooCommerce site.
Click on the “Free Shipping” and hit continue.
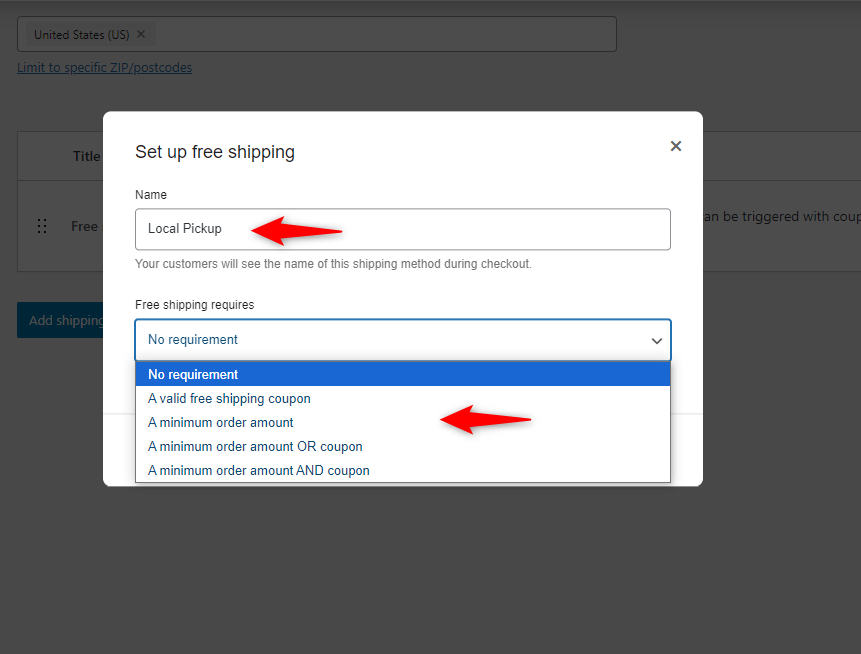
Then, provide the name of this method and set the free shipping cost condition.
In our case, we selected a minimum order value. If a customer adds a minimum amount to their cart, they will enjoy free shipping within the selected shipping zone.
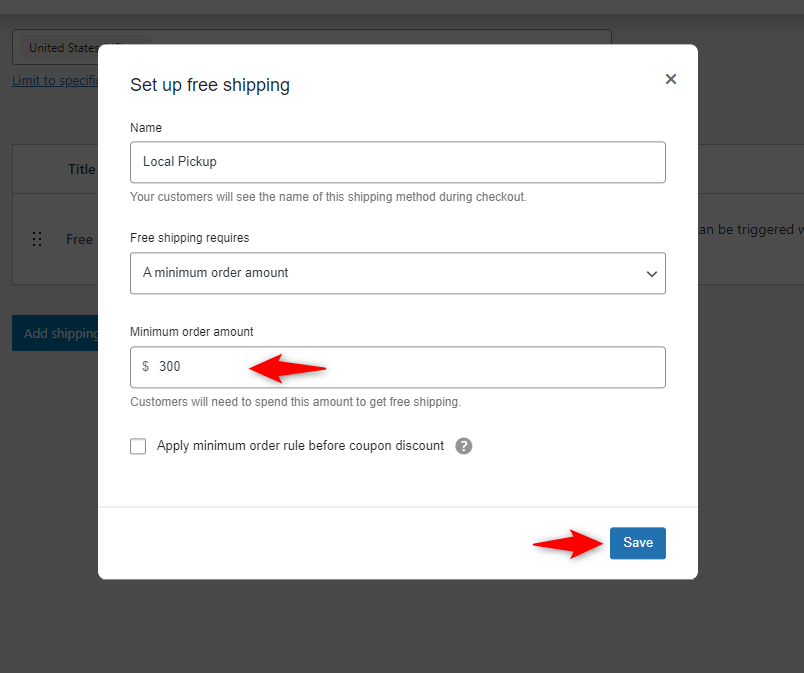
Next, select the free shipping cost. In our case, we selected $300 and hit save.
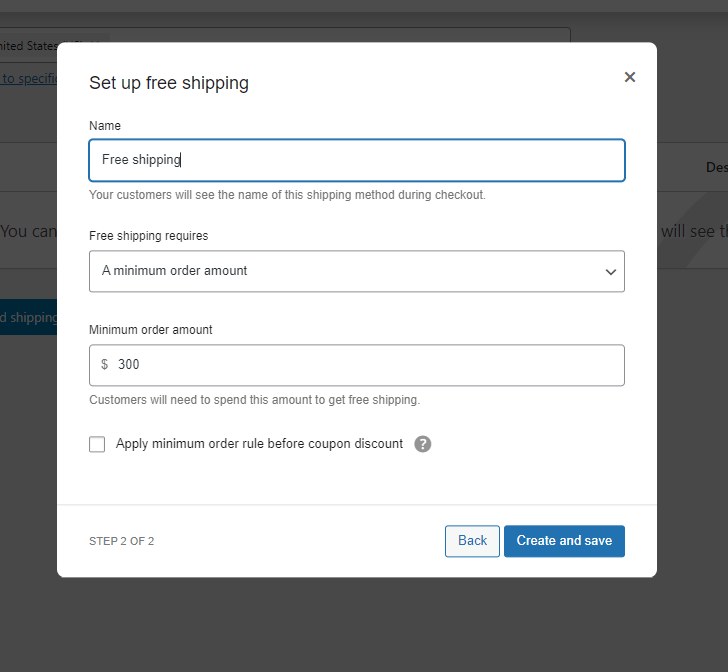
Here, you can see the method is on the list.
Let’s now add another shipping method.
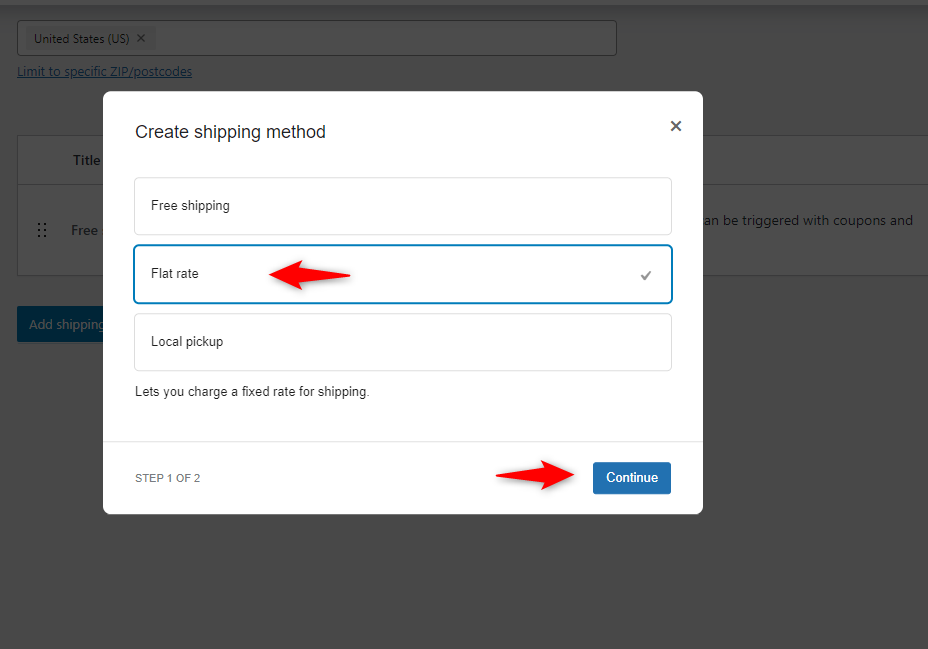
Step 4: Set a standard shipping rate
Click the “Add Shipping Method” button and select “Flat Rate”.
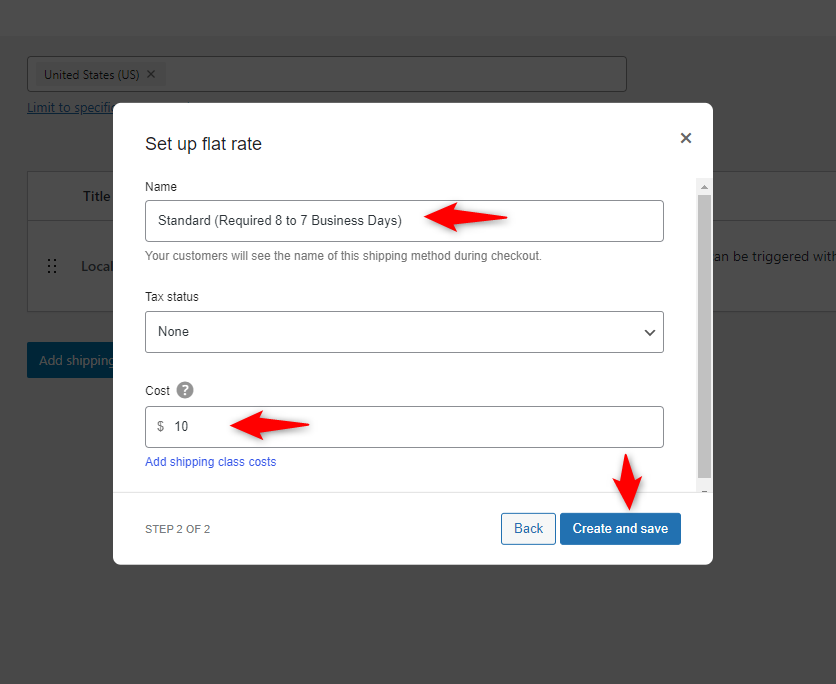
Provide the name of the method. We named it “Standard". It’s a basic one that ships in 7 to 8 business days. Also, set the cost at $10. Keep the tax status to none.
Hit the “Create and Save” button.
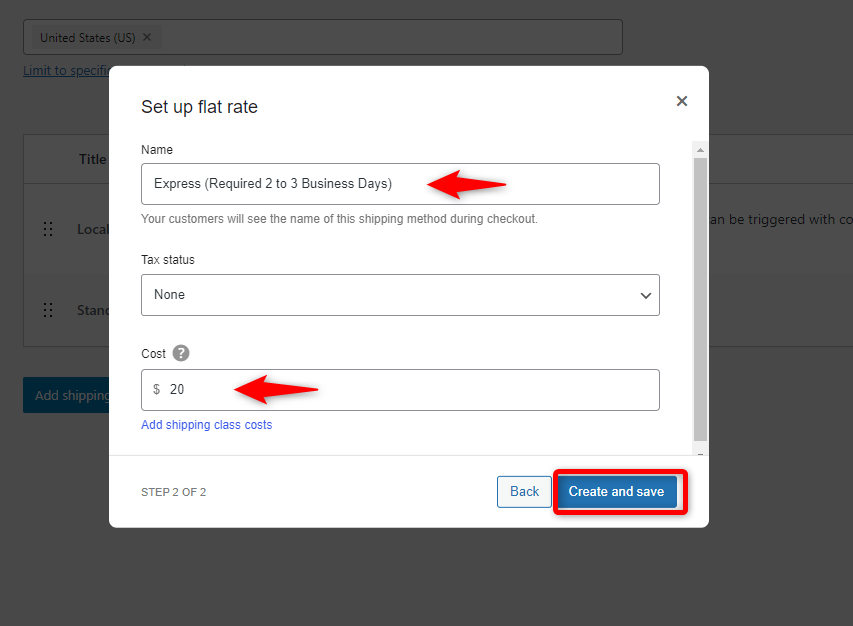
Step 5: Set an express shipping rate
Similarly, create another shipping method. We named it “Express.” You can choose this method if you want an urgent shipment to your preferred address.
So, click on the “Add Shipping Method” button.
Select flat rate. And then hit continue.
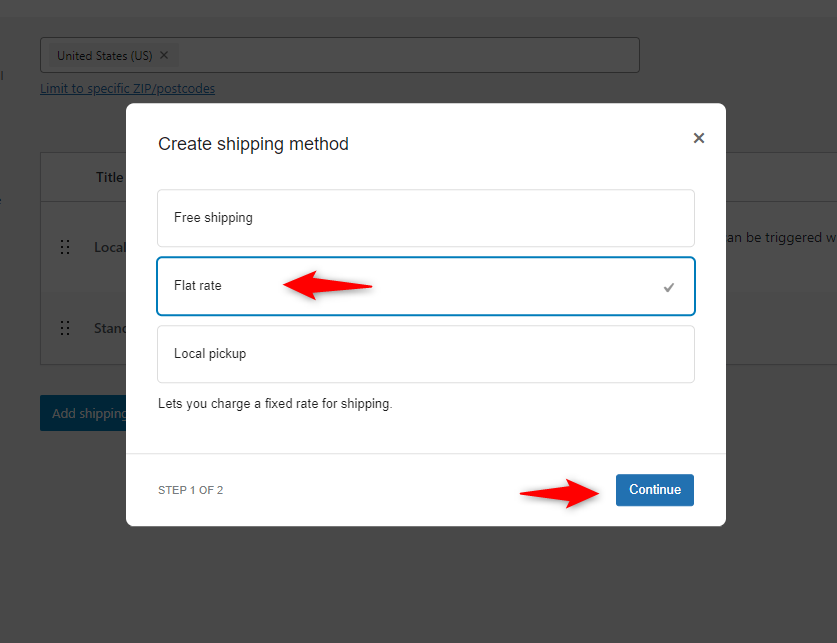
Provide the method's name and set the cost. Keep the tax status to none. Then, hit the “Create and Save” button.
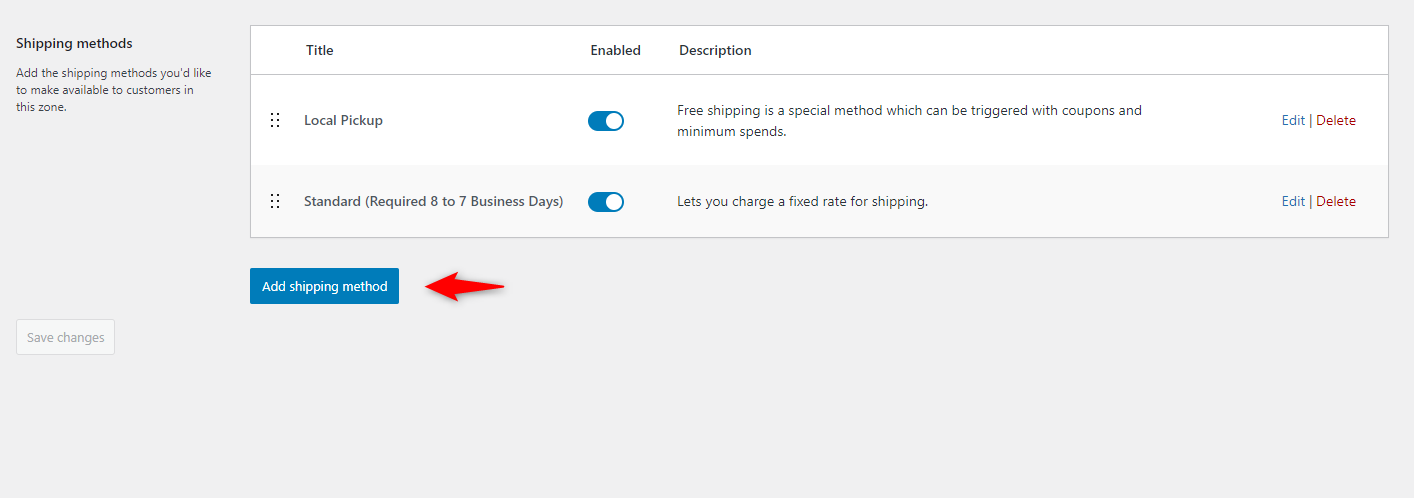
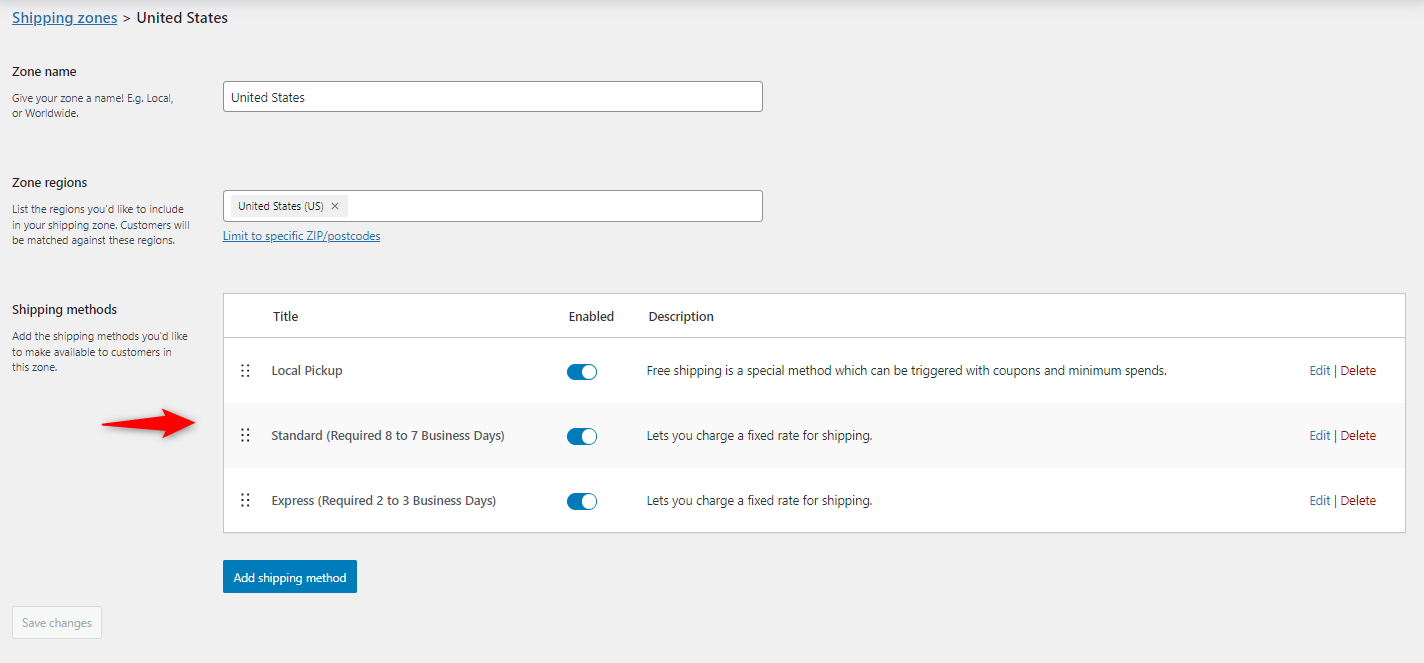
You’re all set. All of your three methods are added successfully.
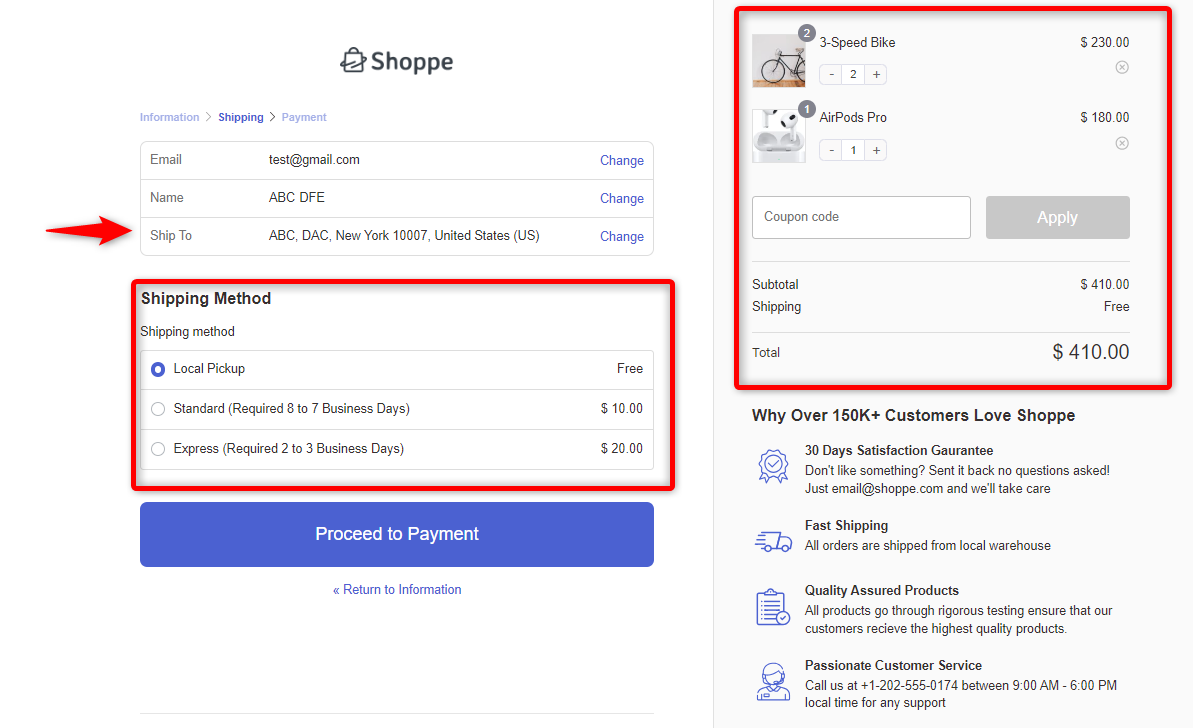
Step 6: Final preview of the shipping calculator on a checkout page
Now, open an incognito window and add some products to the cart. See the shipping method and how the shipping Calculator appears on your WooCommerce site.
Yes, everything is working fine. Inside the US region, if the cart amount reaches the minimum of $300, the user can enjoy the local pickup feature with zero shipping cost.
Users who want a regular shipping service can choose the “Standard” shipping method for $10.
And if users want to get an urgent shipment, they can choose the express shipping option.
Experts recommend using FunnelKit Funnel Builder instead of the basic WooCommerce checkout page.
It allows you to fully customize your checkout process, creating high-converting, user-friendly funnels that reduce cart abandonment and boost sales.
With features like upsells, downsells, and seamless shipping integrations, it enhances the overall customer experience and increases conversions.
FunnelKit Funnel Builder is available in Lite (free) and premium versions.
5 Use Cases of WooCommerce Shipping Calculator
We have discovered four important use cases that you should know. These will help you set up different shipping criteria based on your demand and needs.
Let’s see one by one and apply them along the way.
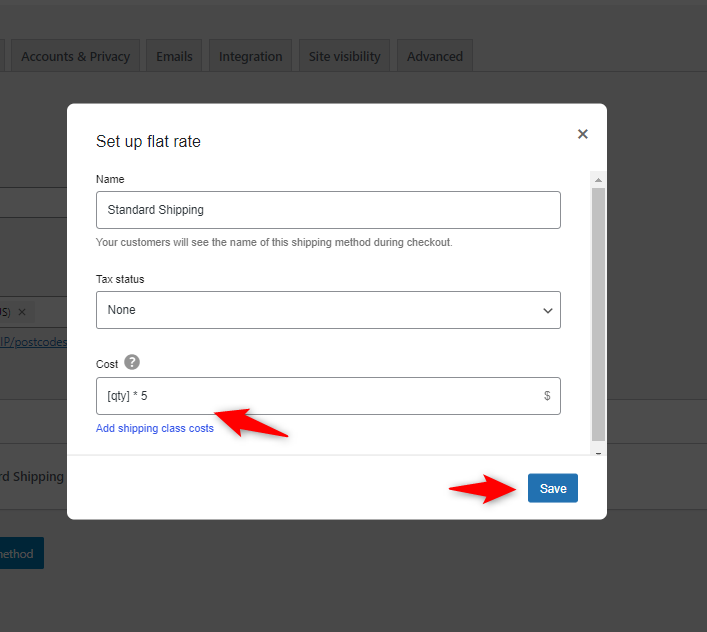
1. Set a fixed rate per item in WooCommerce shipping
To set a fixed rate per item in WooCommerce, open the flare rate option and provide the formula below.
Shipping Cost = [qty] * 5
It means if a customer purchases 3 items, the shipping fee would be; $5 * 3 = $15
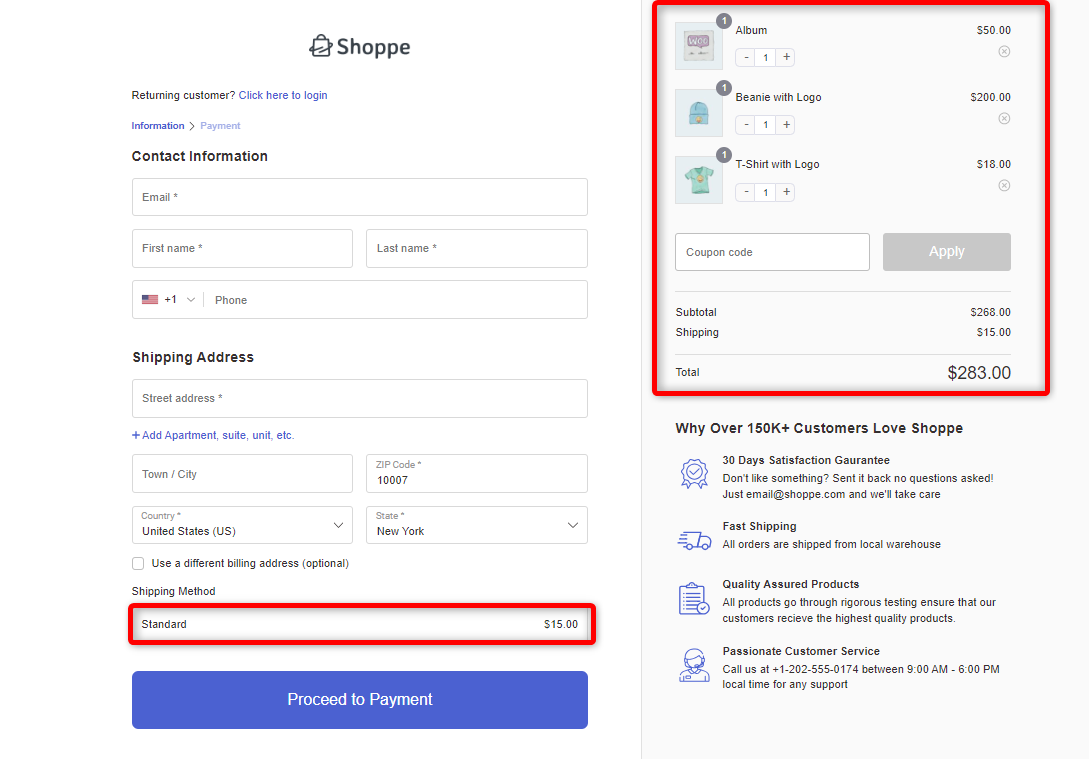
Let’s now add three items to the cart and see what happens.
Yes, it’s working, and the shipping calculator shows the cost depending on the number of cart items.
2. Set shipping fee based on cart subtotal in WooCommerce
This will charge a shipping fee based on the cart subtotal.
- If the subtotal is less than $50, the shipping fee will be $10.
- If the subtotal exceeds $50, the shipping fee will be $5.
To apply the shopping rate, use the formula below:
If the cart exceeds $50, the shipping charge will be $10.
Shipping Cost: [fee fixed="10"] if [subtotal] < 50
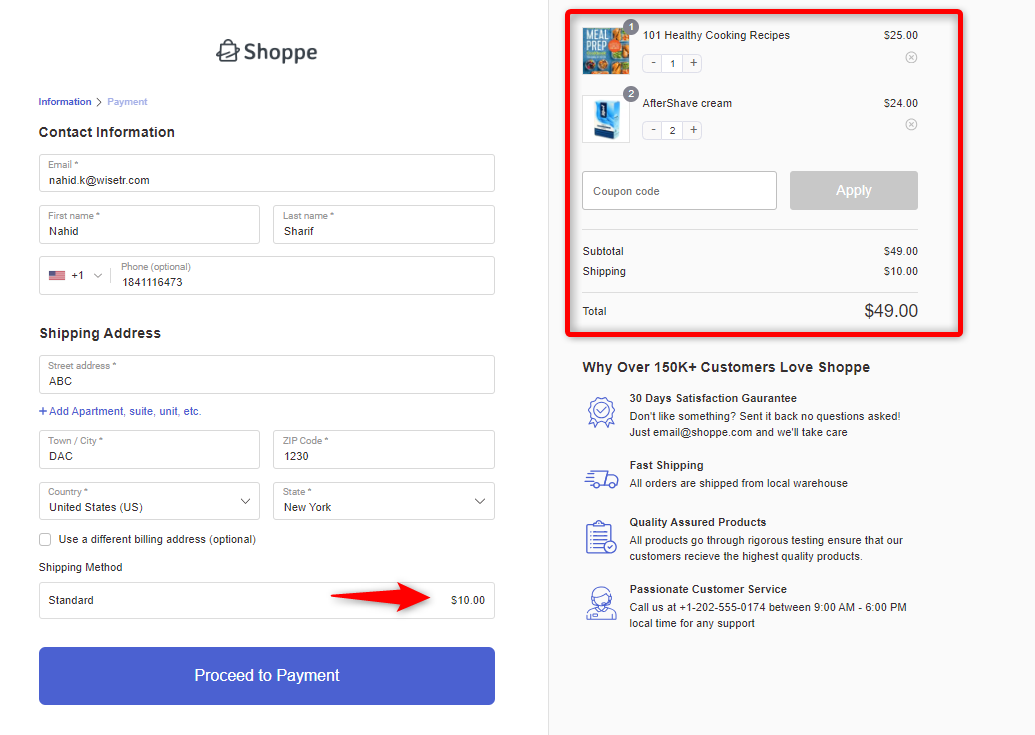
If the cart is less than 50, the shipping charge will be $5.
Shipping Cost: [fee fixed="5"] if [subtotal] >= 50
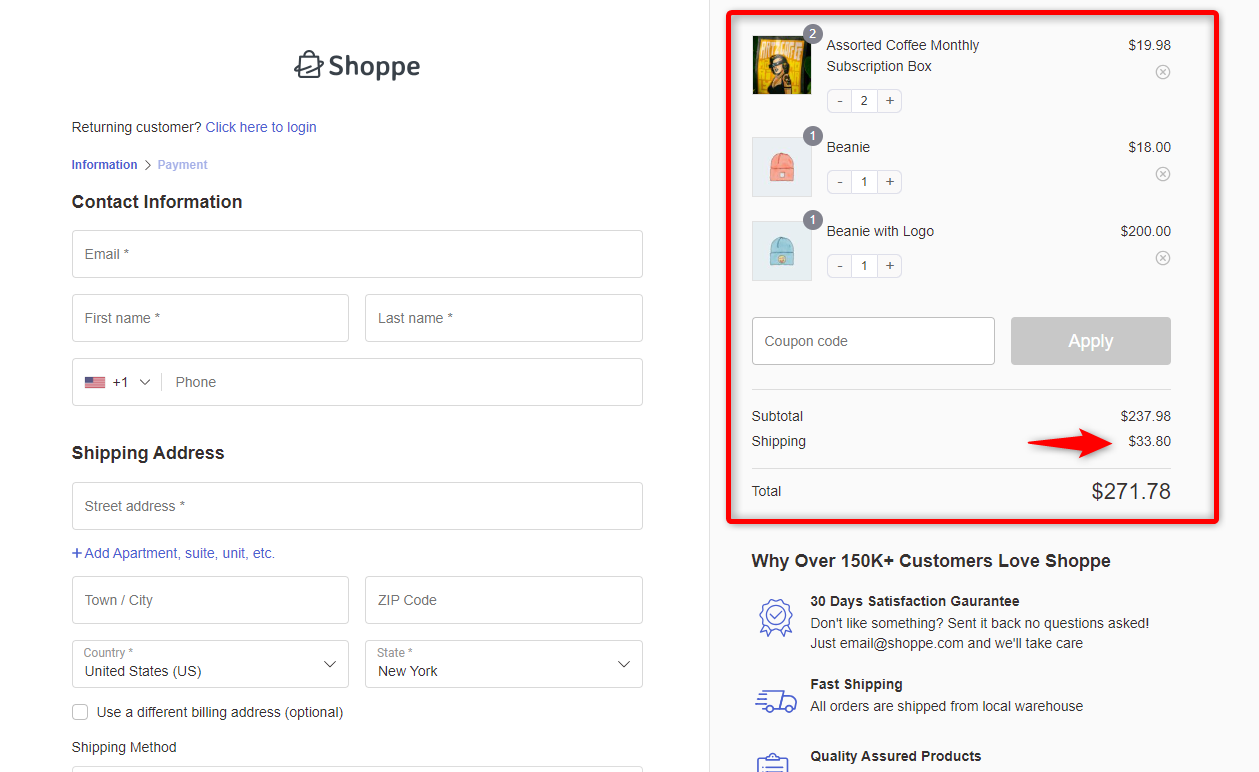
3. Set percentage-based shipping fees based on the shipping method in WooCommerce
Let’s now add a percentage-based shipping formula to your WooCommerce store.
For that, the formula will be 10 + [fee percent="10"]
It means:
- 10 represents a fixed shipping fee of $10.
- [fee percent="10"] calculates 10% of the cart total as an additional shipping fee.
So, this formula charges a base rate (fixed) and then adds a percentage of the cart value, providing a flexible approach to shipping fees that includes both a fixed amount and a variable percentage based on the order subtotal.
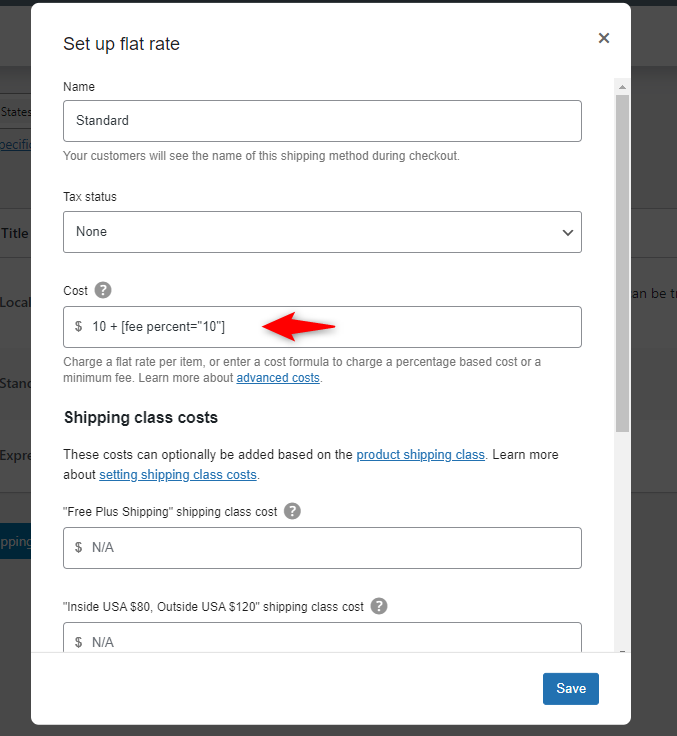
When your customers add products to the cart, the shipping calculator calculates the amount based on the rules.
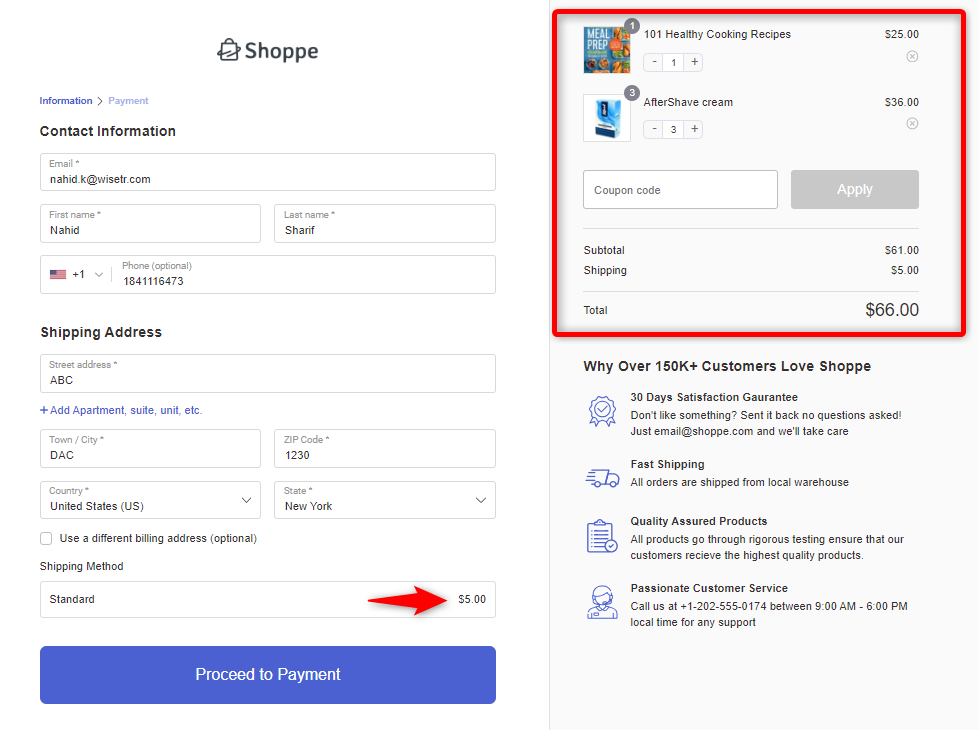
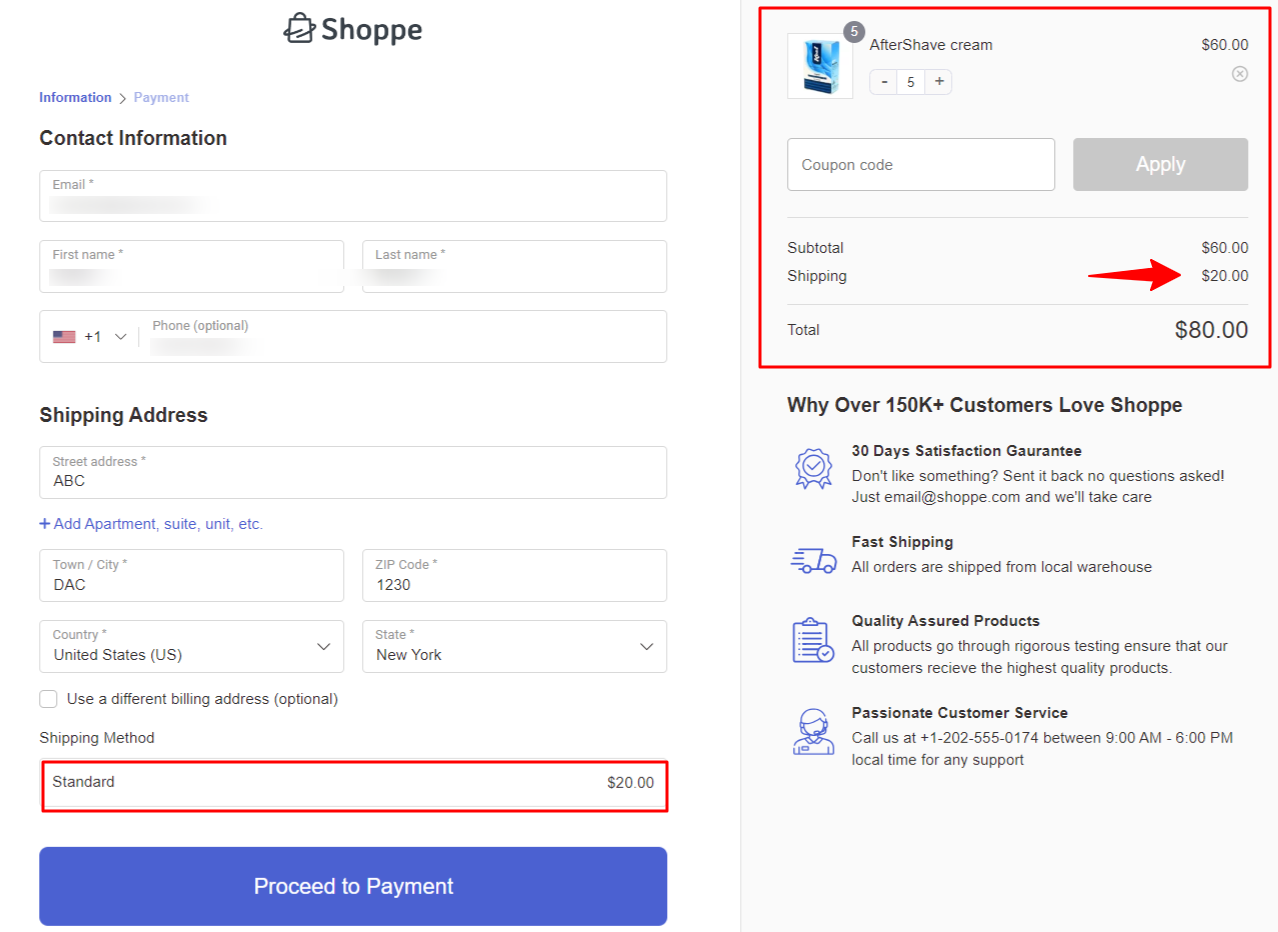
4. Set handling fees based on order quantity in WooCommerce
Let’s now add a shipping rate for quantity-based products in WooCommerce.
If you want to charge your customers a $10 standard flat rate and $2 for each item in their cart. You can use the formula:
10 + ( 2 * [qty] )
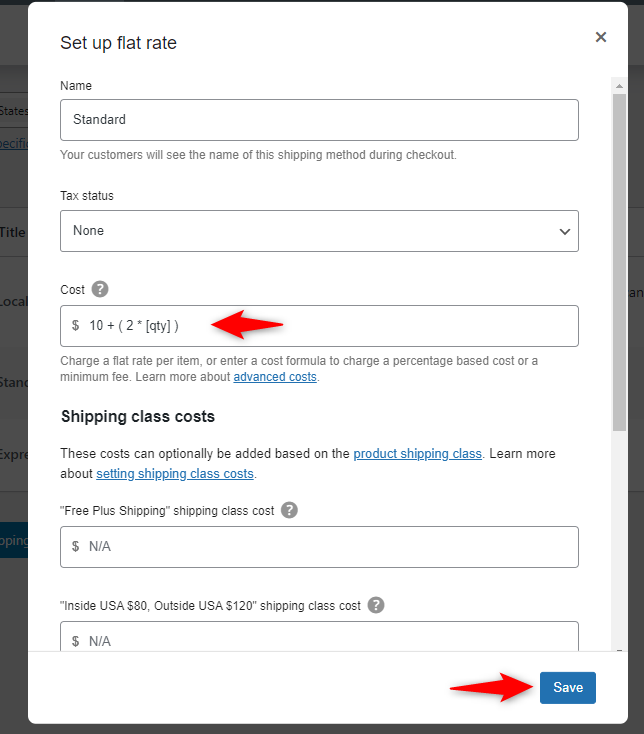
Here is how the shipping calculator calculates the charge for the cart item. The shipping charge is $20, and the cart item is $5.
It means the main charge is $10. Each item you add will cost $2.
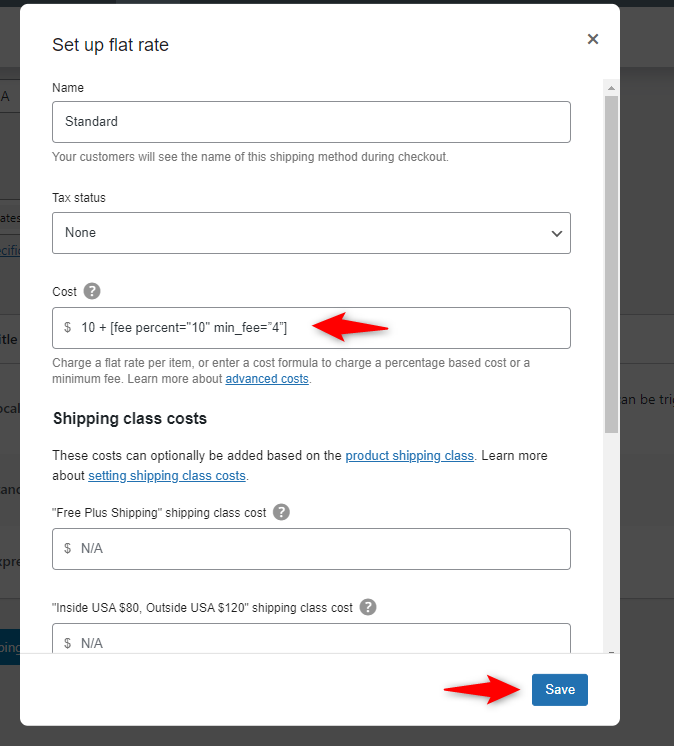
5. Set up a percentage-based flat rate with a minimum fee applied in WooCommerce
Let’s add a percentage-based flat rate, with a minimum fee applied to your WooCommerce store.
If you want to charge your customers a flat $10 shipping fee plus a 10% fee based on their total order while ensuring that the minimum shipping charge is never less than $4.00, here's how to set it up.
In the cost field, write this formula:
10 + [fee percent="10" min_fee=”4”]
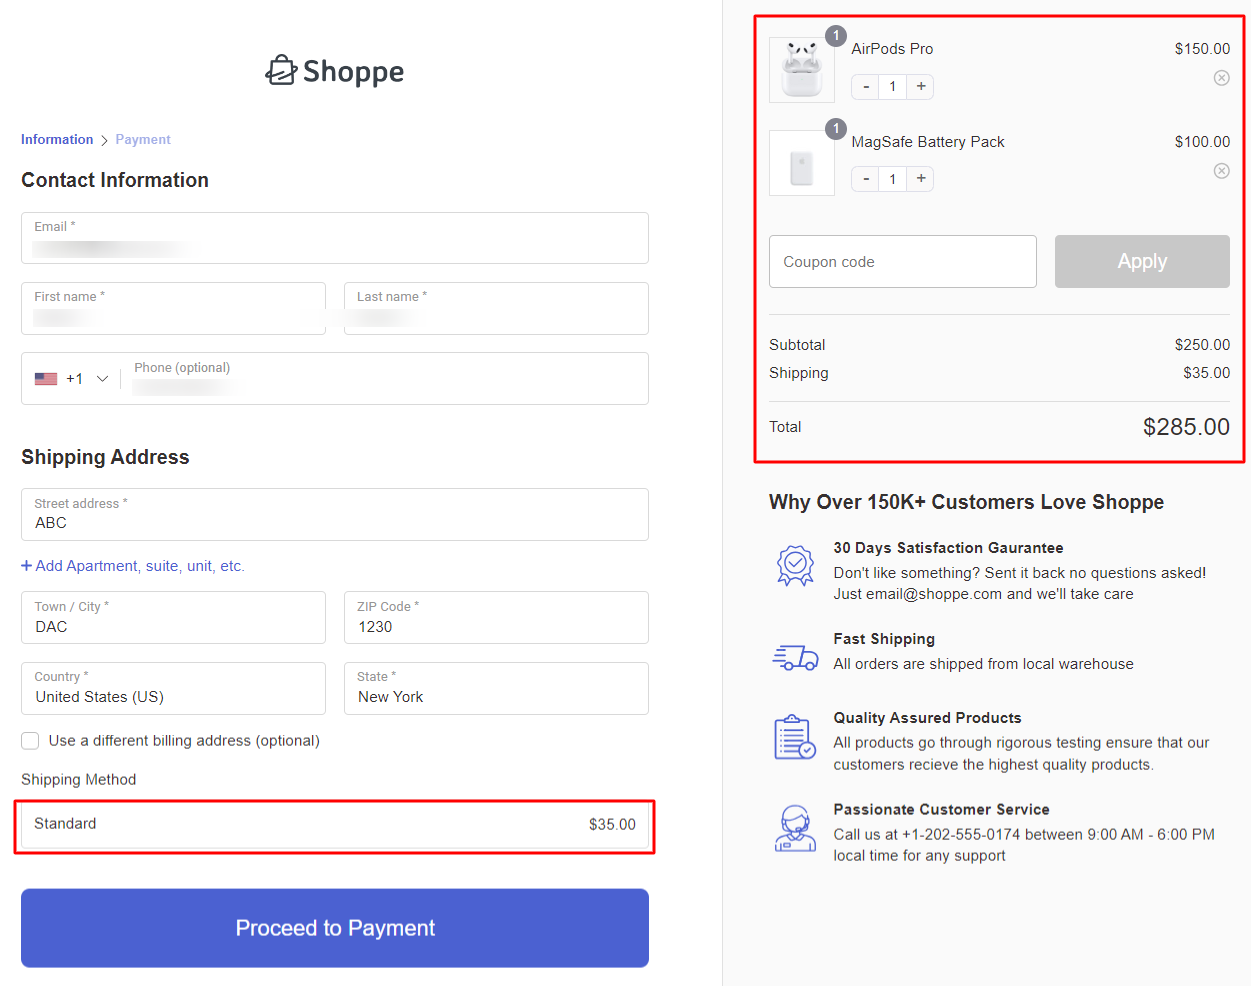
Now, let’s see how the shipping calculator works with this formula.
Here’s the preview of the checkout page after adding the product to the cart.
The shipping charge is $35.
These are the top 5 use cases of the WooCommerce shipping calculator.
We hope you find them interesting and helpful. Try these formulas and see which works best for your business and policy.
6 Best Practices for Optimizing Your Shipping Calculator
Optimizing your shipping calculator is essential for creating a smooth checkout experience. It ensures customers get accurate shipping costs while helping you manage logistics efficiently.
Following these best practices, you can balance affordability, accuracy, and convenience.
1. Keep it simple and transparent
Avoid overwhelming your customers with complicated shipping options. Provide precise, upfront shipping costs during checkout.
Hidden fees or unexpected charges can lead to cart abandonment. Simplicity and transparency build trust and improve customer satisfaction.
2. Leverage free shipping strategically
Offer free shipping to encourage larger orders. It’s a proven way to increase your average order value. However, use it wisely to avoid losing profits.
Set conditions for free shipping, such as a minimum order value or location-specific availability.
3. Integrate with carriers
Connect your shipping calculator with popular carriers like UPS, FedEx, or USPS.
This allows you to display real-time shipping rates. It ensures customers get accurate estimates based on location, package size, and delivery speed.
4. Multiple options
Provide customers with various shipping choices. Include options like standard, express, or local pickup.
This caters to different needs, whether customers want faster delivery or more affordable rates.
For instance, you can highlight delivery times and costs for each option during checkout. This will help customers make informed decisions and improve their experience.
5. Monitor performance regularly
Monitor the performance of your shipping rules. Look at metrics like cart abandonment rates or average order values.
Adjust your rules if you notice patterns, such as customers leaving due to high shipping costs. Check whether customers prefer your shipping rules or not.
For instance, you can test different strategies, like lowering shipping costs or expanding free shipping thresholds, to see what works best for your audience.
Ready to Set Up a WooCommerce Shipping Calculator on the Checkout Page?
The WooCommerce shipping calculator is a powerful tool for streamlining and simplifying your store’s shipping process.
Offering accurate, real-time shipping rates saves time, reduces manual errors, and ensures transparent shipping costs that keep customers happy.
With its flexibility, whether you charge by weight, location, or product dimensions, the calculator effortlessly adapts to your business needs.
But why stop there? To improve your store’s checkout experience, consider using FunnelKit Funnel Builder. It allows you to create custom, high-converting checkout pages that seamlessly integrate with your WooCommerce shipping options, boosting sales and reducing cart abandonment.
Take full advantage of these tools to create a smooth, efficient shipping process and deliver an exceptional shopping experience for your customers!

Editorial Team
July 7, 2026Are shoppers adding products to their cart and leaving before they buy? According to Baymard Institute research on checkout usability, 18% of shoppers who abandon their cart do so because...

Editorial Team
July 7, 2026You’ve built your WooCommerce store, polished your product pages, and invested in marketing, but sales aren’t coming. Visitors browse, some add items to their cart, and most vanish before completing...

Editorial Team
July 3, 2026Discover how a canceled order doesn't have to mean a lost customer, and how the right WooCommerce canceled order email can turn it into a second chance. WooCommerce canceled order...


