Are you struggling to provide a seamless shopping experience for customers across different regions around the world?
Shipping rates, taxes, and payment options often vary by location. Confusion or extra steps in pricing can lead to cart abandonment and lost sales.
Without precise location-based adjustments, you risk customer satisfaction and losing potential revenue.
That’s where WooCommerce’s geolocation feature is here to streamline everything!
With this powerful tool, your store can automatically detect a user’s location and adjust shipping, taxes, payment options, and product recommendations based on the location, making it easier to attract, convert, and retain a global audience.
In this guide, we'll show you how to enable WooCommerce GeoLocation and use geolocation to provide a better experience for customers so they keep coming back!
So, let’s begin.
Table of Contents
- 1 What is GeoLocation and How Does it Work in WooCommerce?
- 2 What Are the Benefits of Utilizing Geolocation in WooCommerce?
- 3 How to Enable Geolocation in WooCommerce?
- 4 How to Optimize Shipping in WooCommerce with Geolocation?
- 5 How to Use Geolocation for Accurate Tax Calculations in WooCommerce?
- 6 How to Use Geolocation for Payment Methods in WooCommerce?
- 7 How to Offer Product Recommendations Using Geolocation in WooCommerce?
- 8 FAQs About WooCommerce Geolocation
- 9 Ready to Utilize WooCommerce Geolocation To Optimize Your Store?
What is GeoLocation and How Does it Work in WooCommerce?
Geolocation is the process of identifying the physical location of a device or user based on data such as IP addresses, GPS coordinates, or Wi-Fi signals.
WooCommerce leverages geoLocation to detect customer locations, enabling you to personalize their shopping experience for a more seamless journey.
Here is a step-by-step breakdown of how WooCommerce GeoLocation works:
Step 1: Capture the customer’s IP address
When a customer visits your WooCommerce store, the platform immediately captures their IP address.
This is the unique identifier assigned by their internet service provider (ISP), providing a rough estimate of their geographical region.
Step 2: Cross-reference the IP address with Geolocation databases
WooCommerce uses a third-party geolocation database, like MaxMind, to match the IP address to a more specific location, such as a country or city.
This database cross-references the IP address against known locations to provide an accurate estimate.
Step 3: Apply location-based adjustments
Based on the detected location, WooCommerce automatically adjusts key shopping elements:
- Currency display: Prices are shown in the customer’s local currency, helping them understand pricing without manual conversions.
- Shipping options: Only relevant shipping methods are shown, tailored to the customer’s location and the seller’s shipping regions.
- Taxes: WooCommerce applies the correct tax rate based on local requirements, ensuring compliance with regional tax regulations.
Step 4: Set a location cookie
To prevent redundant location checks, WooCommerce places a temporary cookie in the customer’s browser.
This cookie stores the detected location, allowing WooCommerce to retain the location as the customer navigates through pages, speeding up page load times.
Step 5: Confirm location accuracy at checkout
Finally, during checkout, WooCommerce asks the customer to confirm their address. This final validation ensures that all settings, like shipping rates and taxes, are accurate based on their actual shipping address.
This step-by-step process enhances customer experience, increases conversions, and reduces friction while keeping the location detection process as seamless as possible.
What Are the Benefits of Utilizing Geolocation in WooCommerce?
Here are some benefits of utilizing Geolocation in WooCommerce :
- Personalized shopping experience
Geolocation helps automatically display the appropriate currency based on the customer’s location. Plus, you can offer location-based deals or discounts, increasing your store’s appeal in different markets.
- Accurate shipping and delivery options
WooCommerce can automatically show available shipping methods and rates depending on the customer’s location. This ensures that customers see accurate, real-time costs, preventing issues with incorrect charges at checkout.
- Correct tax calculations
Geolocation allows WooCommerce to automatically calculate the correct tax rate based on the customer’s location. This helps you stay compliant with local tax laws and avoids surprises for customers.
- Improved customer satisfaction
With an automatic population of location-based fields like shipping addresses and tax rates, customers don’t need to manually input location data, streamlining the checkout experience.
- Enhanced payment method options
Geolocation ensures that customers are only shown payment methods available in their region. By tailoring payment options, you improve conversion rates by avoiding confusion and checkout abandonment.
- Compliance with local regulations
Geolocation helps ensure that your store complies with local laws, especially regarding taxes, shipping restrictions, and data protection regulations (such as GDPR in the EU).
By integrating geolocation into your WooCommerce store, you not only improve the user experience but also streamline operations and marketing, ensuring a seamless, efficient, and compliant ecommerce environment.
How to Enable Geolocation in WooCommerce?
The good news is that WooCommere, by default, has a feature that enables geolocation.
Here are the steps you need to follow:
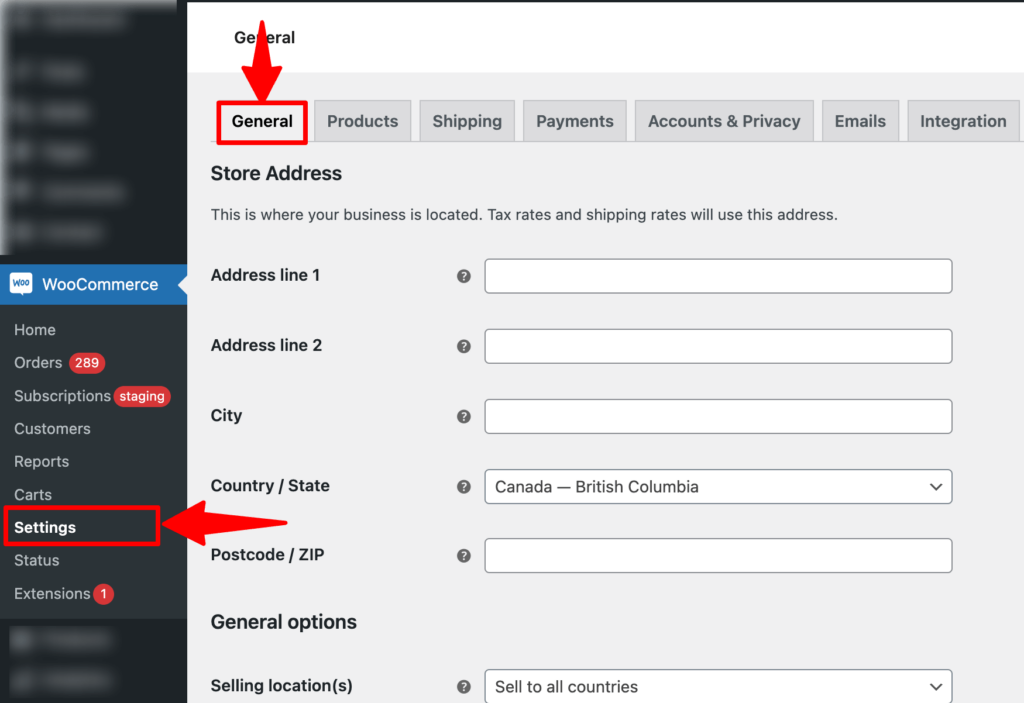
Step 1: Navigate to WooCommerce general options
First, navigate to WooCommerce ⇒ Settings and make sure you are on the General tab.
Step 2: Set default customer location to geolocate
Now scroll down to the “General Options” section and set the “Default Customer Location” to “Geolocate”.
🔔 Note: If you are using a Cache plugin, then choose the value “Gelocate (with page caching support).”
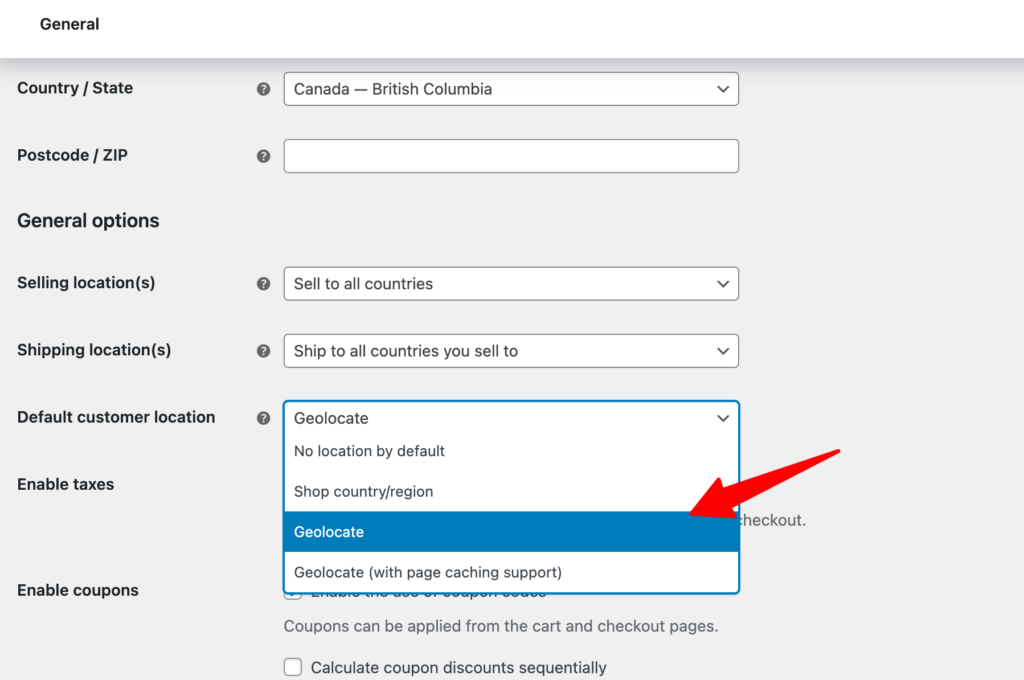
Make sure to save the changes.
Step 3: Test WooCommerce Geolocation
Try placing an order in incognito mode and see if the location is auto-selected at checkout. You can use a VPN to check for different locations.
Depending on the location, the country should be selected automatically.
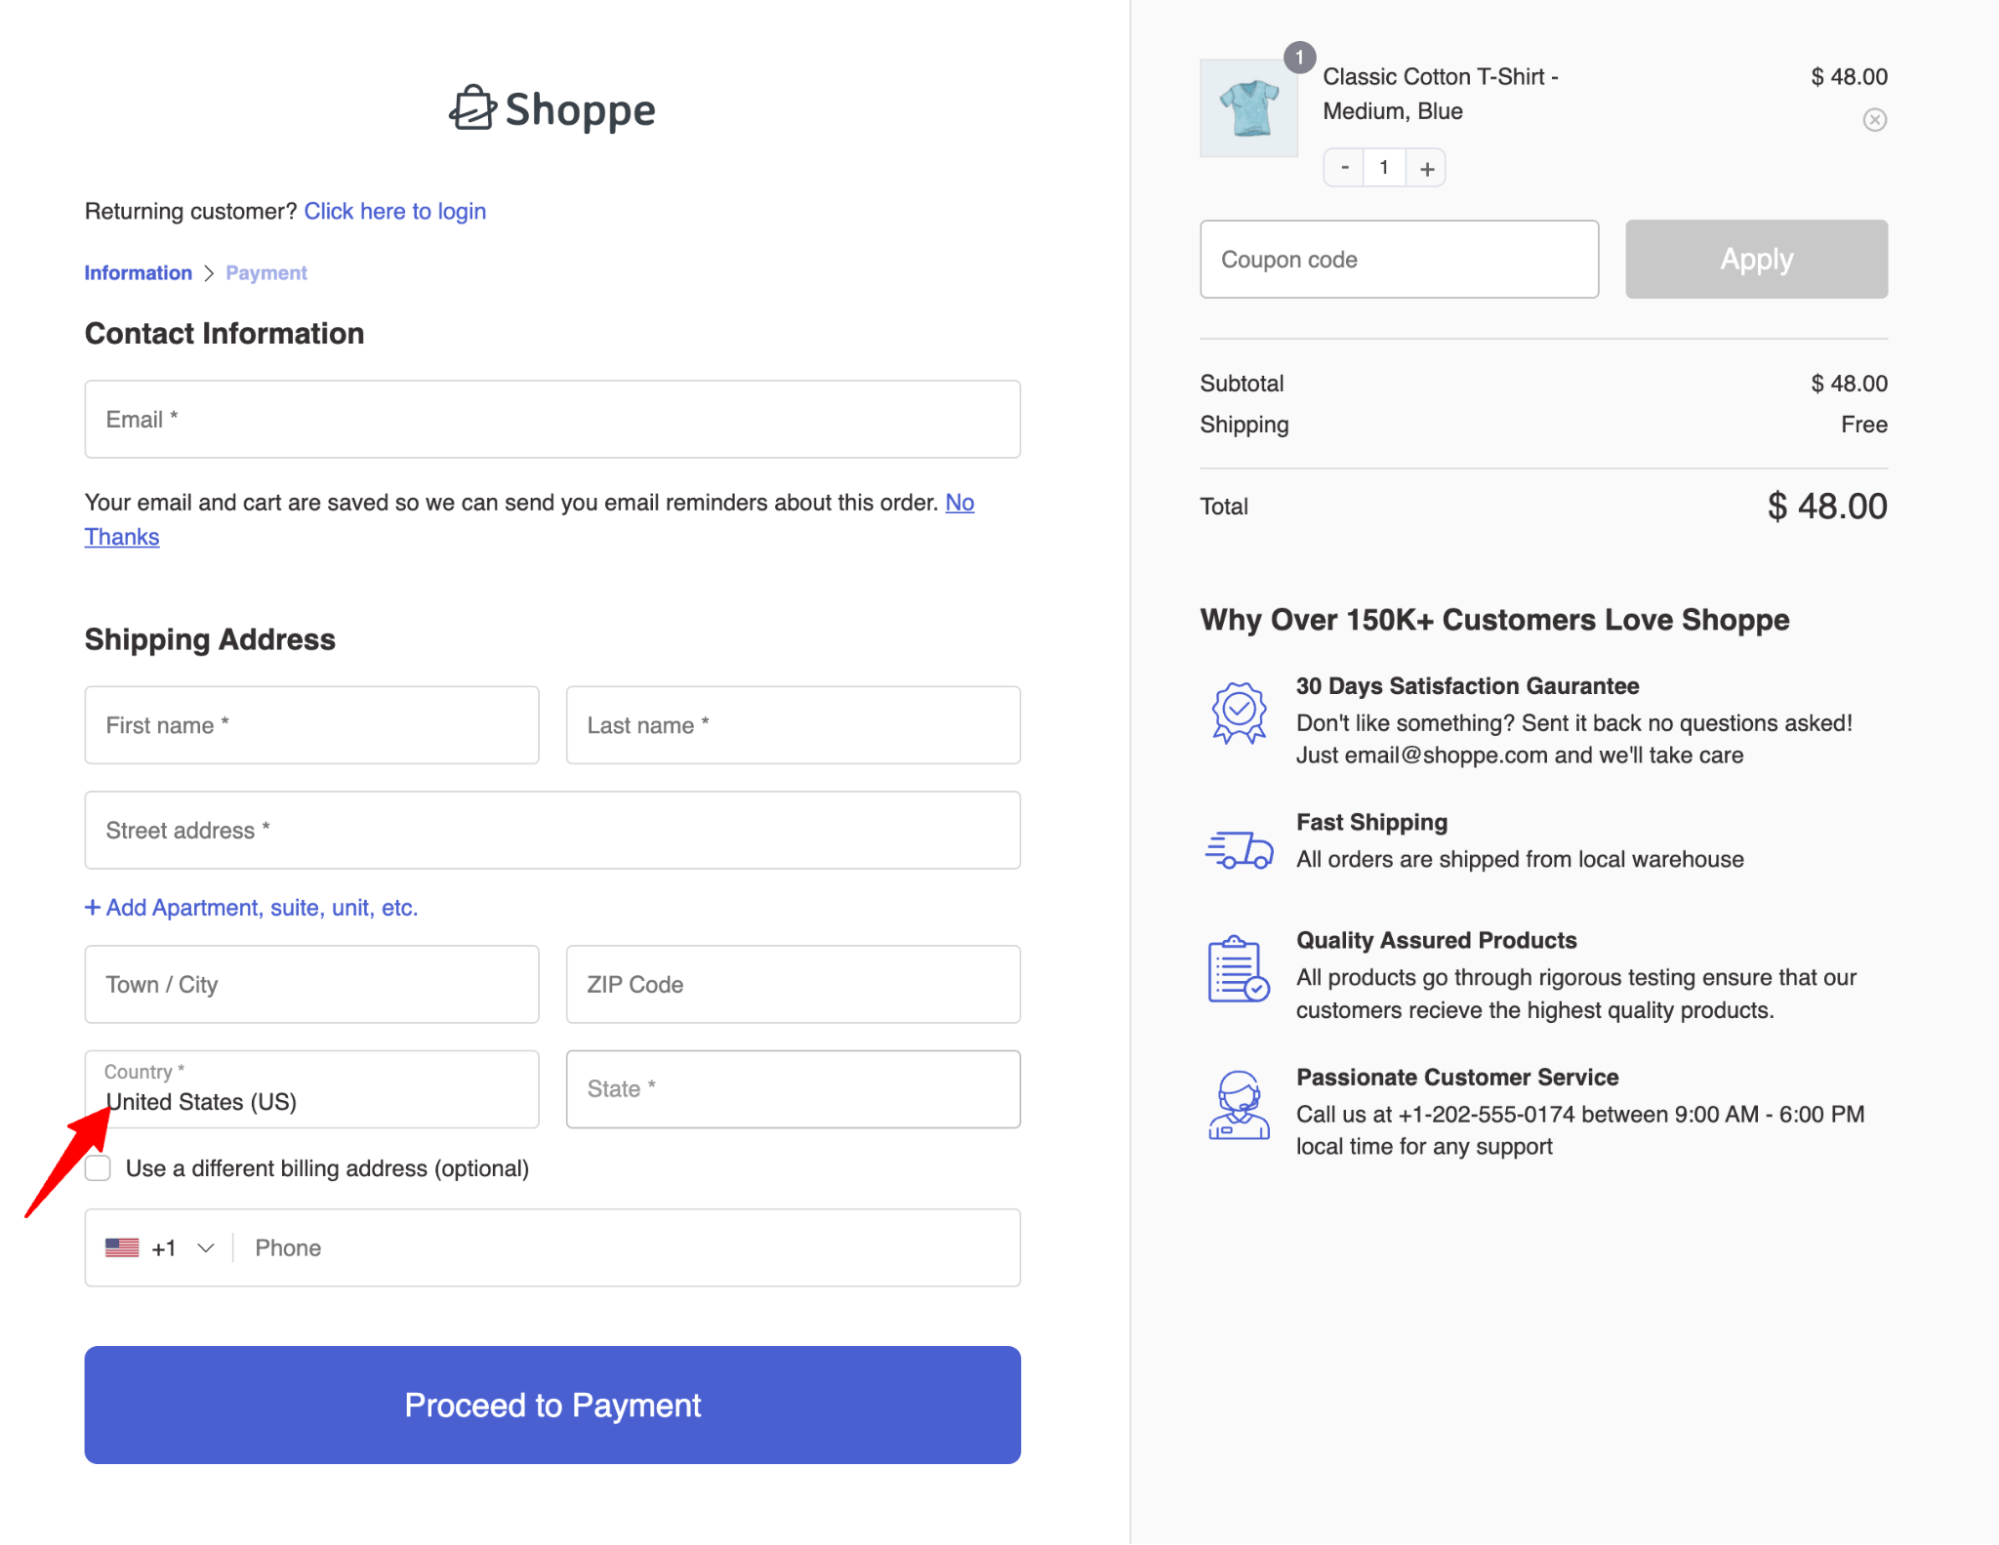
🔔 Note: The multi-step checkout below is built using FunnelKit Funnel Builder. This is a sales funnel builder plugin that comes with many AOV boosting features. Learn more about Funnelkit’s latest version.
How to Optimize Shipping in WooCommerce with Geolocation?
When you sell to multiple countries, you can easily use GeoLocation to optimize the shipping rates of your WooCommerce store.
Suppose you are a USA-based company, but you also sell to Canada. For the USA audience, you want to offer free delivery or local pick up, but for all Canadian orders, you only want to charge them at a flat rate.
Then, you can set up different shipping zones and set the shipping rates you want to charge.
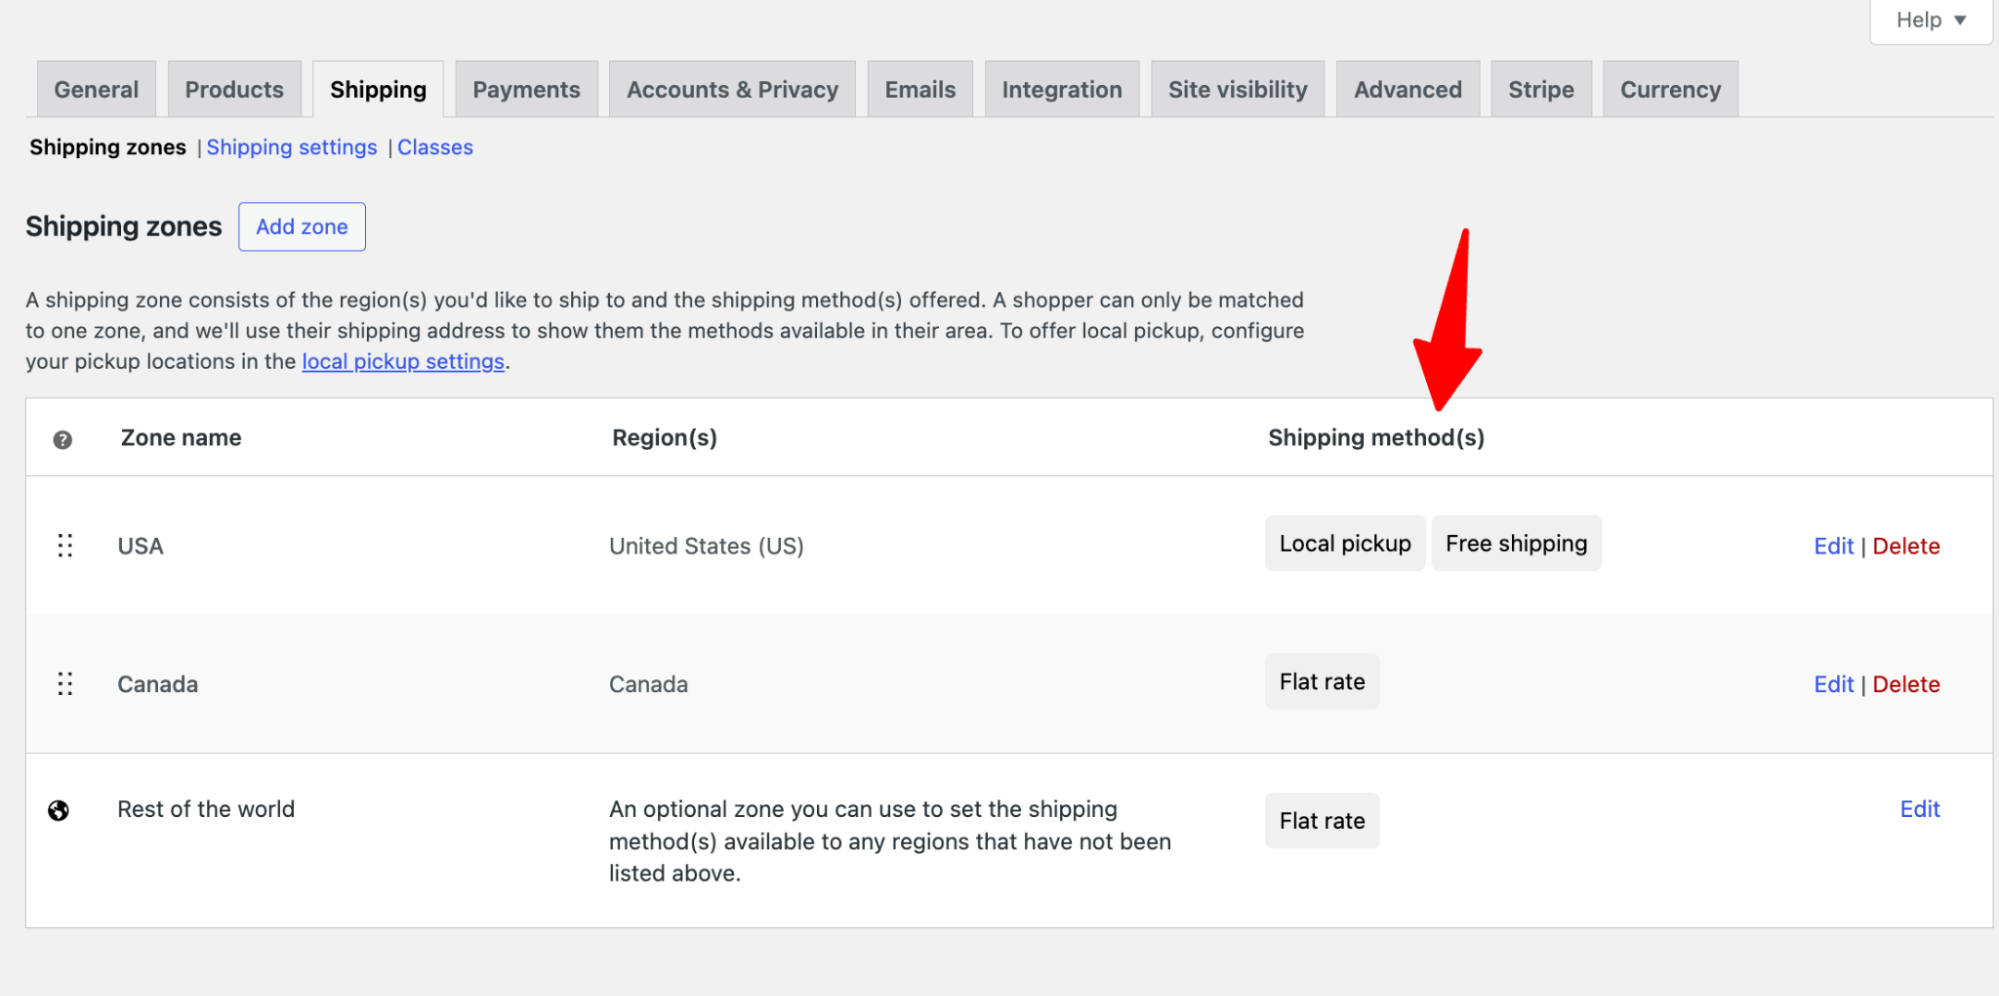
This way, when anyone tries to order from Canada, they will automatically only be shown the flat rate shipping fee.
How to Use Geolocation for Accurate Tax Calculations in WooCommerce?
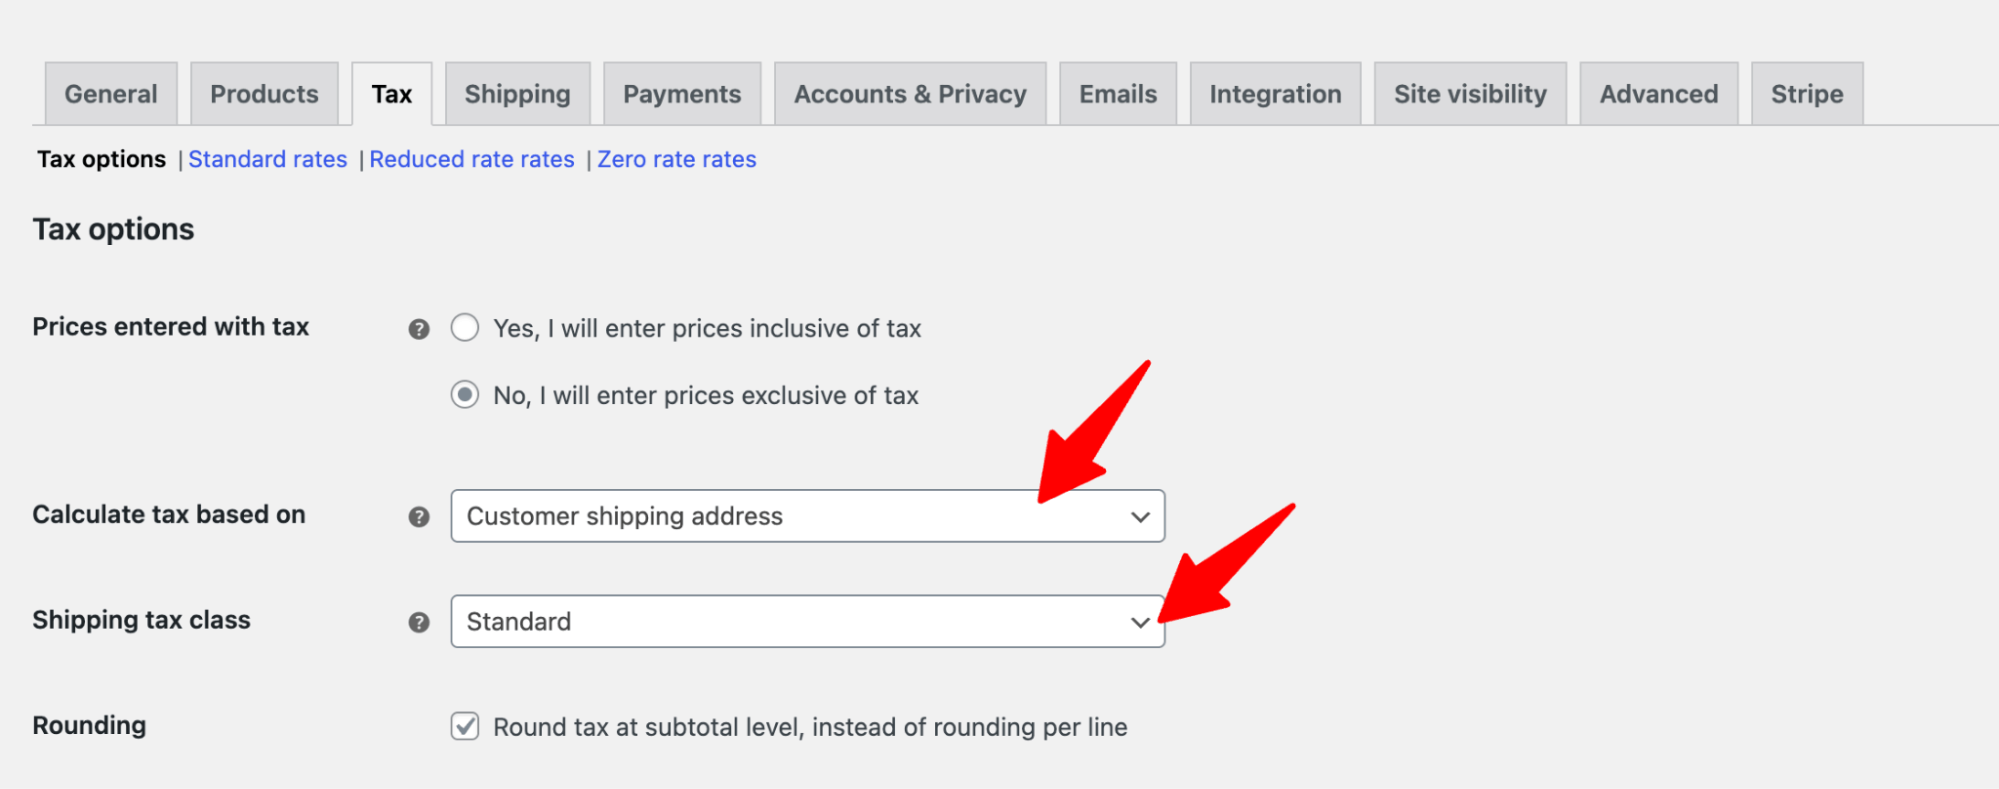
You can use WooCommerce geolocation to automatically calculate the applicable tax on orders for any country or state.
To ensure this, enable tax on your store and set the "Calculate tax based on" option for either the billing or shipping address, depending on your business requirements and tax law compliance.
Also, choose the shipping tax class.
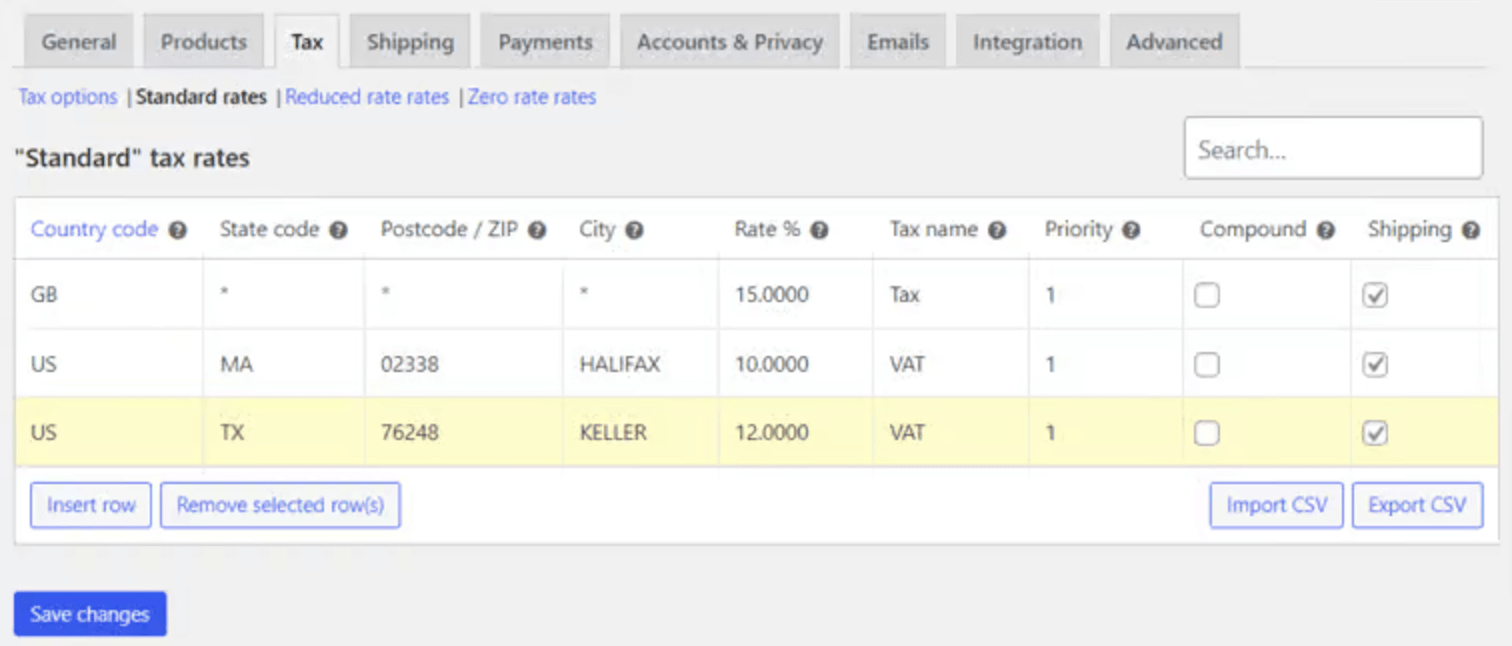
Under Standard rates, you can set up different standard tax rates for different geographical locations by specifying the country code (ISO 3166-1 alpha-2), state code, ZIP/postcode, city, etc.
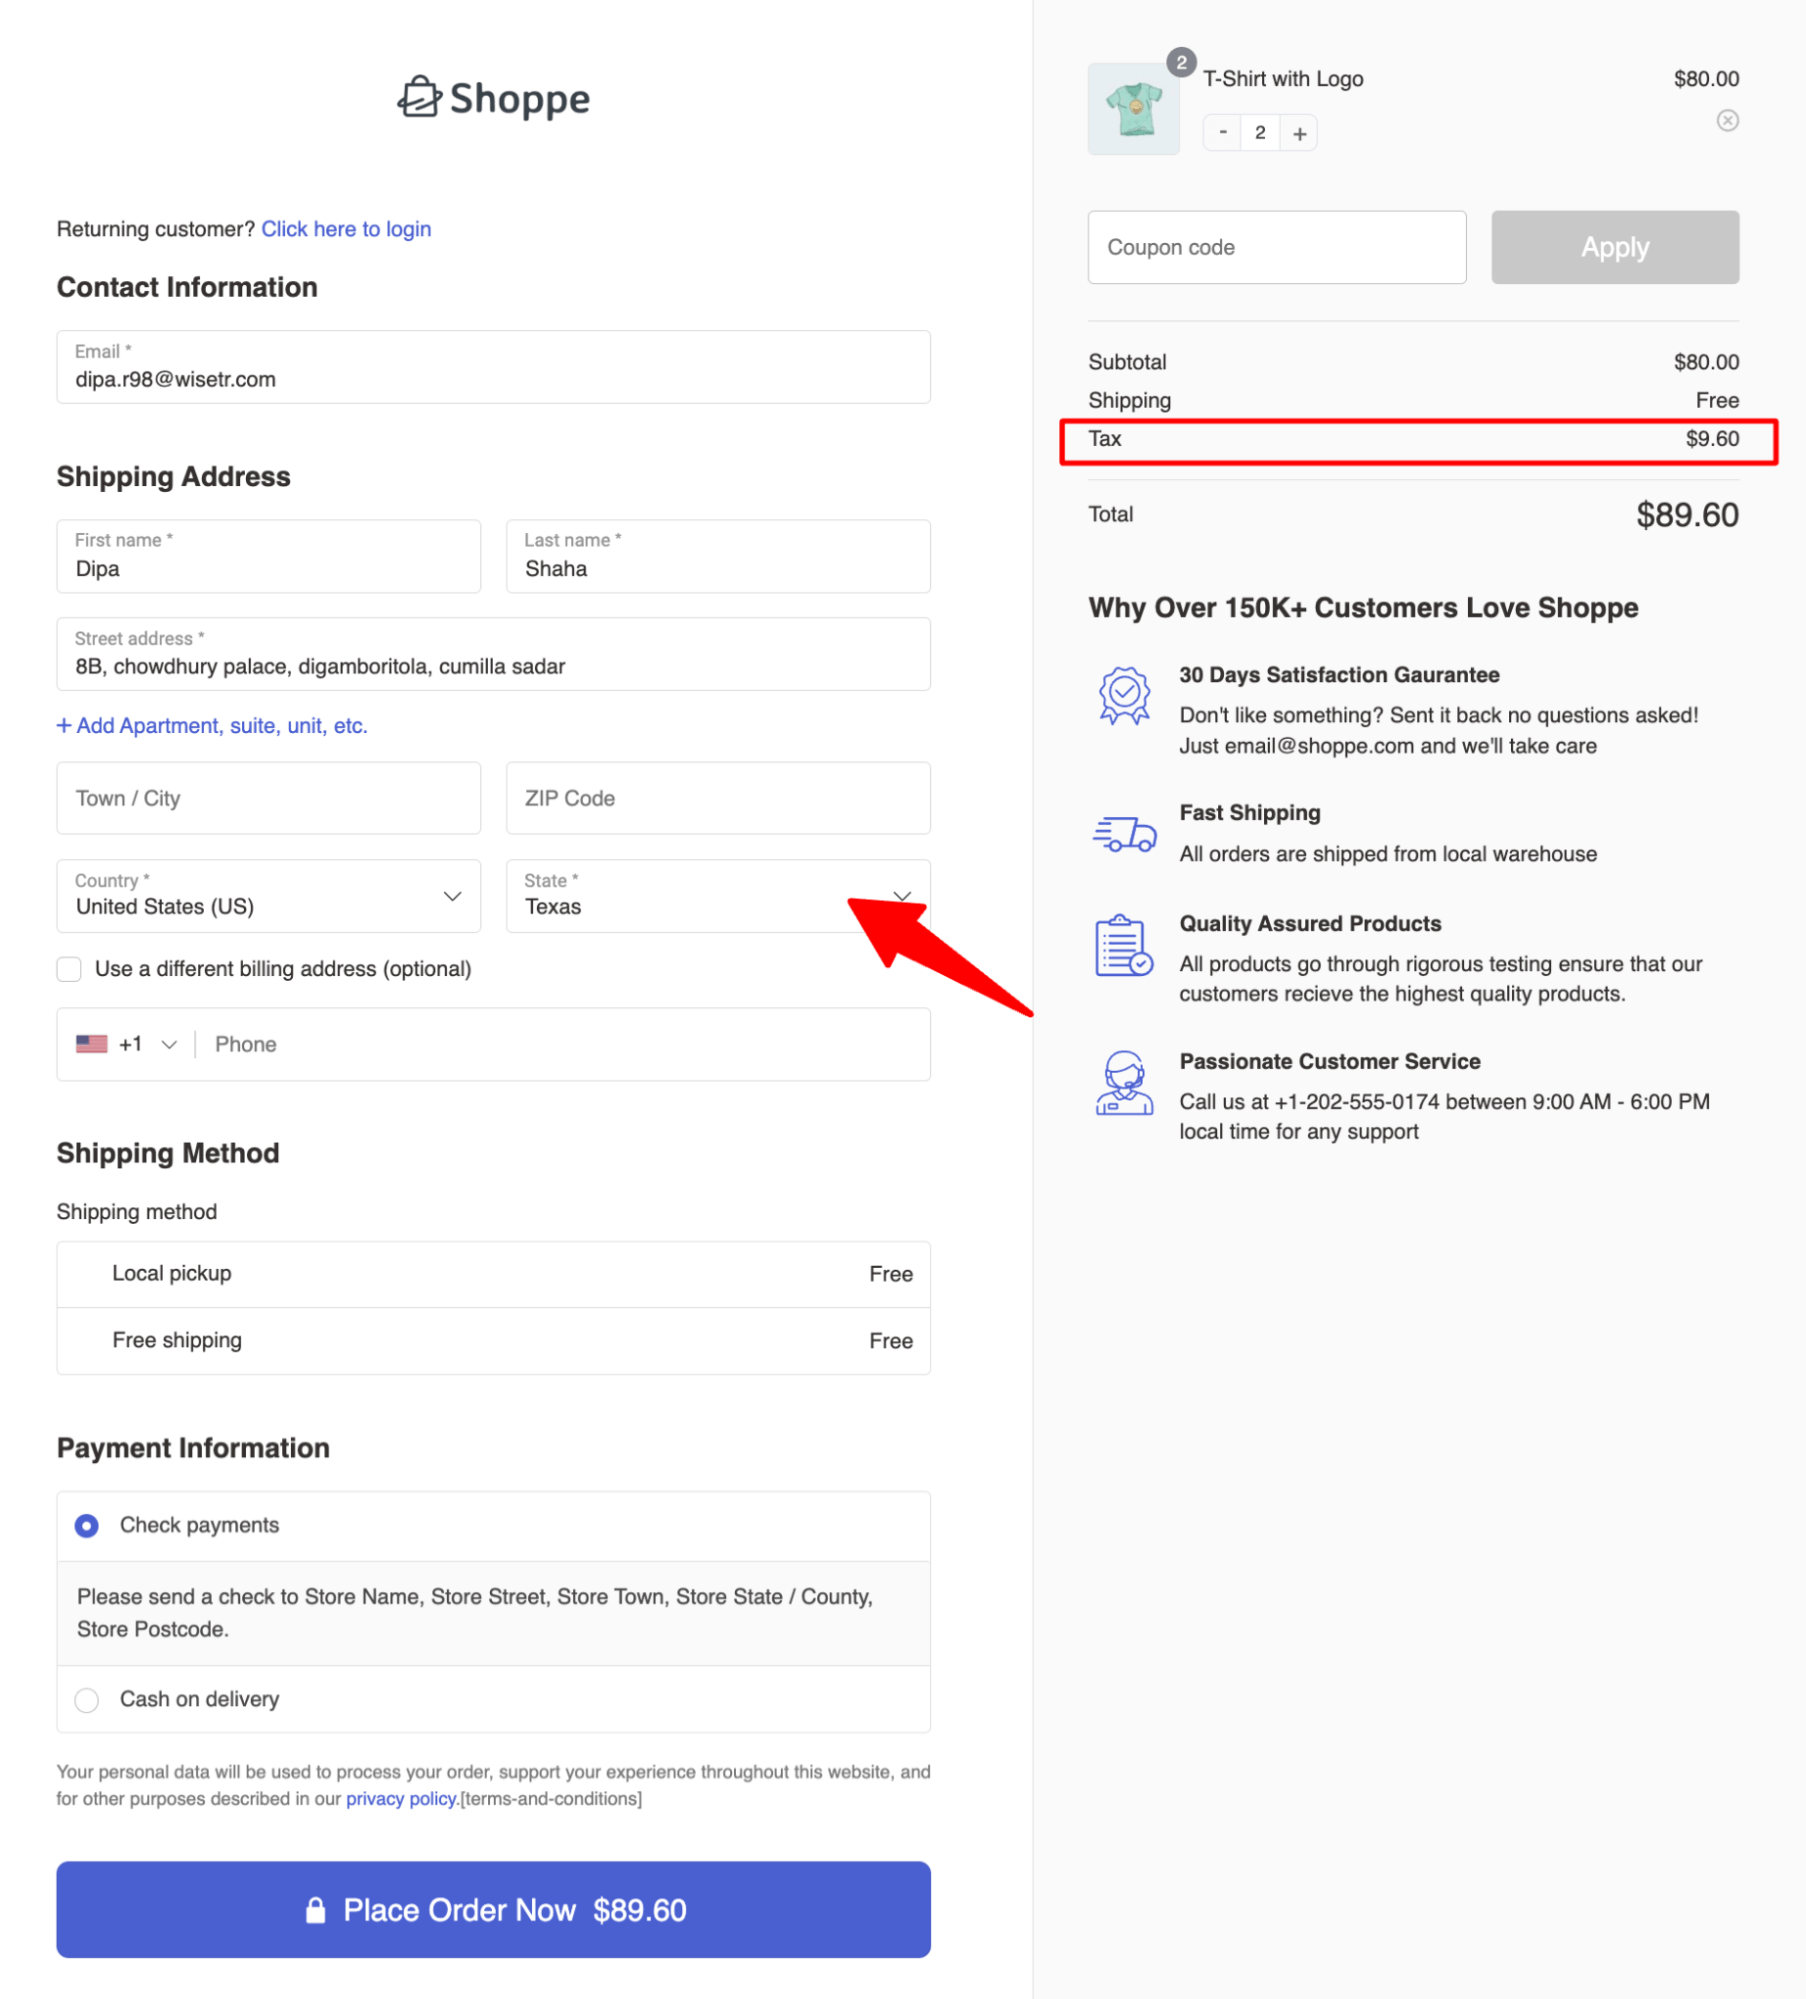
Now, you can place a test order to see if the correct tax rule is applied at checkout for the target location.
How to Use Geolocation for Payment Methods in WooCommerce?
With geolocation, you can enable different local payment methods on your WooCommerce store and display only the applicable payment options based on a customer’s location.
Offering convenient payment methods at the checkout page can help you lower the cart abandonment rate on your store and boost sales.
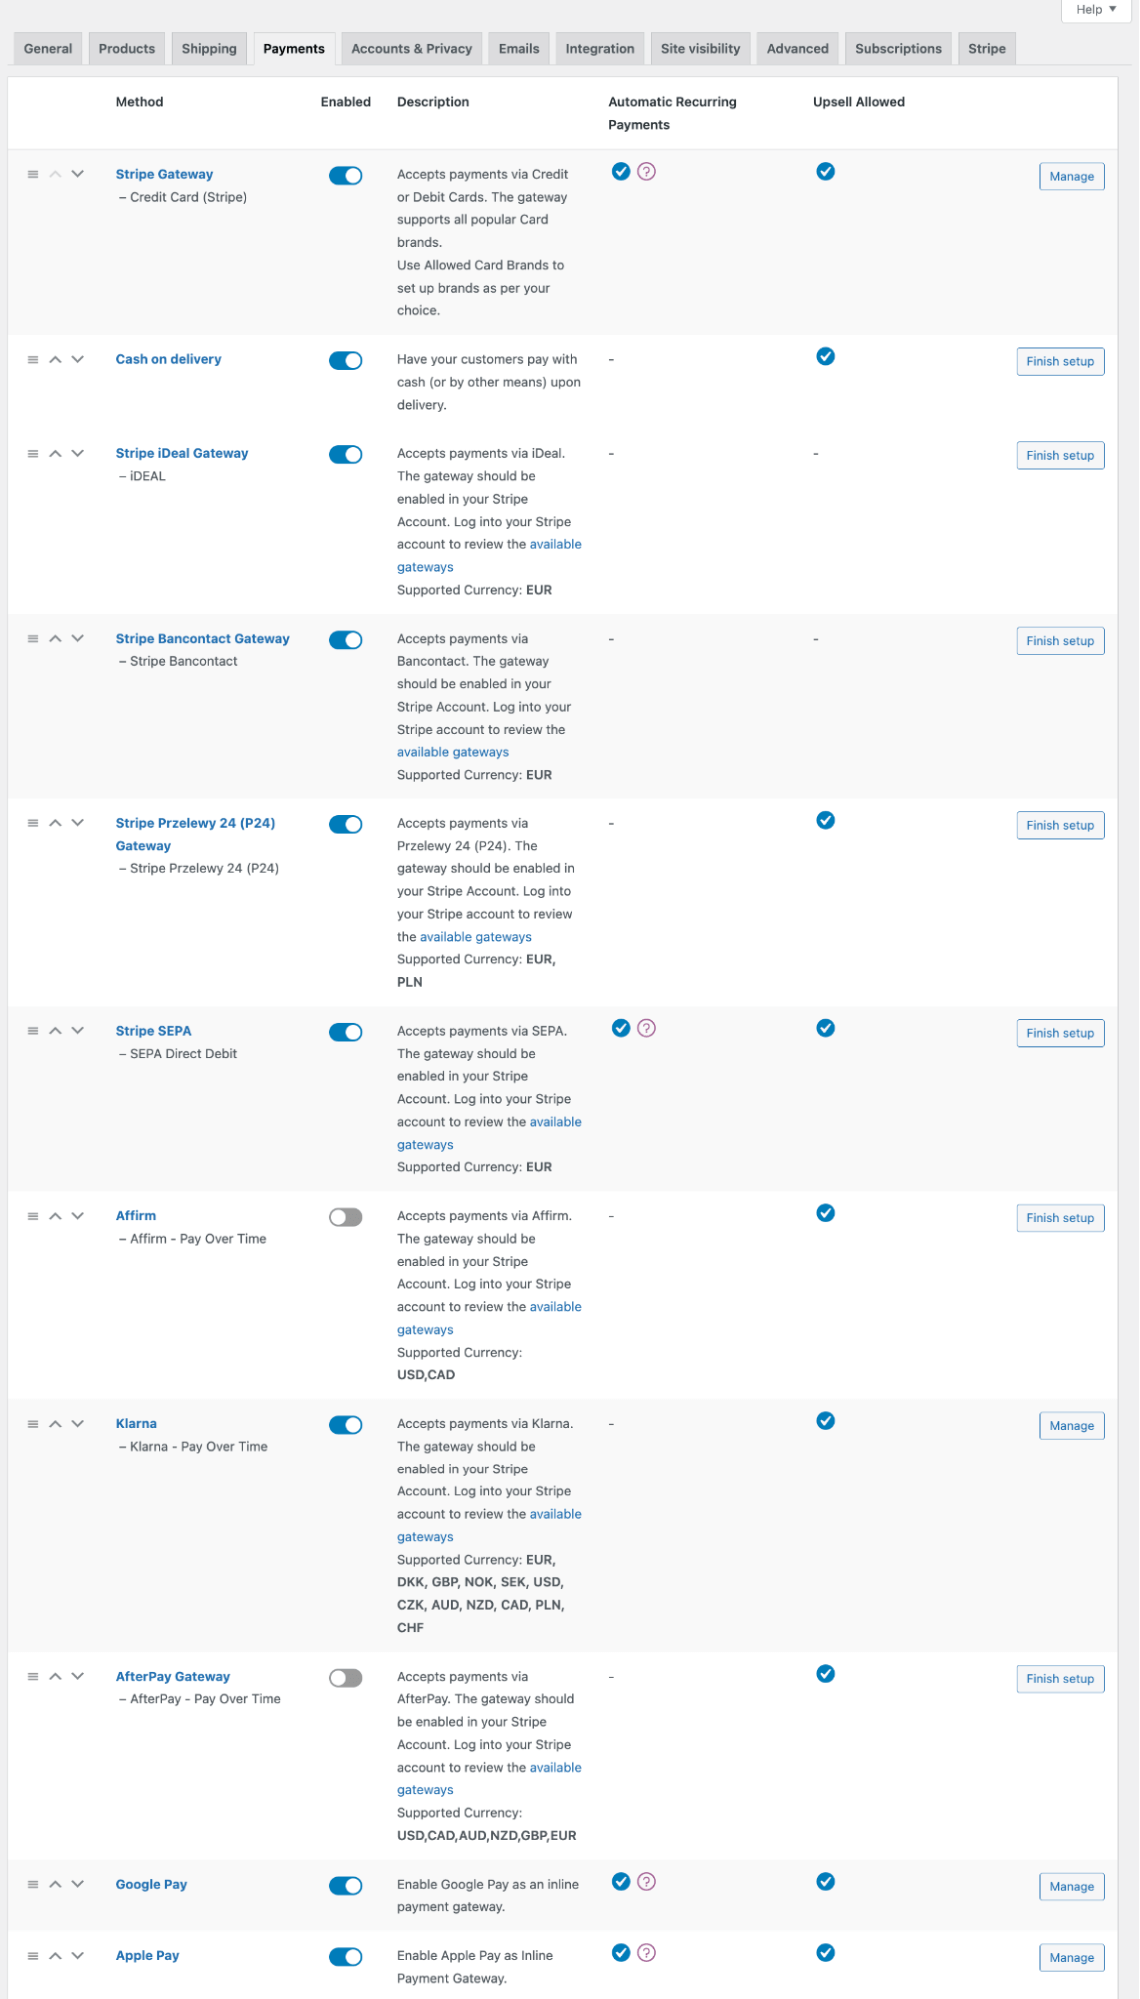
You can use FunnelKit Stripe to offer many different payment options. like
- All the major credit and debit cards are Visa, Mastercard, American Express, and more.
- Express checkouts like Apple Pay and Google Pay.
- Local payment options like SEPA and iDEAL allow you to offer more familiar payment choices to international customers.
- BNPL options such as Klarna, Afterpay, Affirm, etc., give customers added flexibility.
All you have to do is integrate Stripe with your WooCommerce store using FunnelKit Stripe, enable the payment method, and configure it.
How to Offer Product Recommendations Using Geolocation in WooCommerce?
Based on the user’s location, you can offer different product recommendations on the checkout page as an order bump and right after checkout as a one-click upsell.
This way, you can make the product recommendations more targeted and boost the order value of your store.
For this, you will need to install both FunnelKit Funnel Builder free and pro versions.
Next, follow these steps :
Step 1: Create a custom store checkout
Firstly, we must create a store checkout that will replace the default WooCommerce page. To do so, navigate to FunnelKit ⇒ Store Checkout and click “Create Store Checkout”.
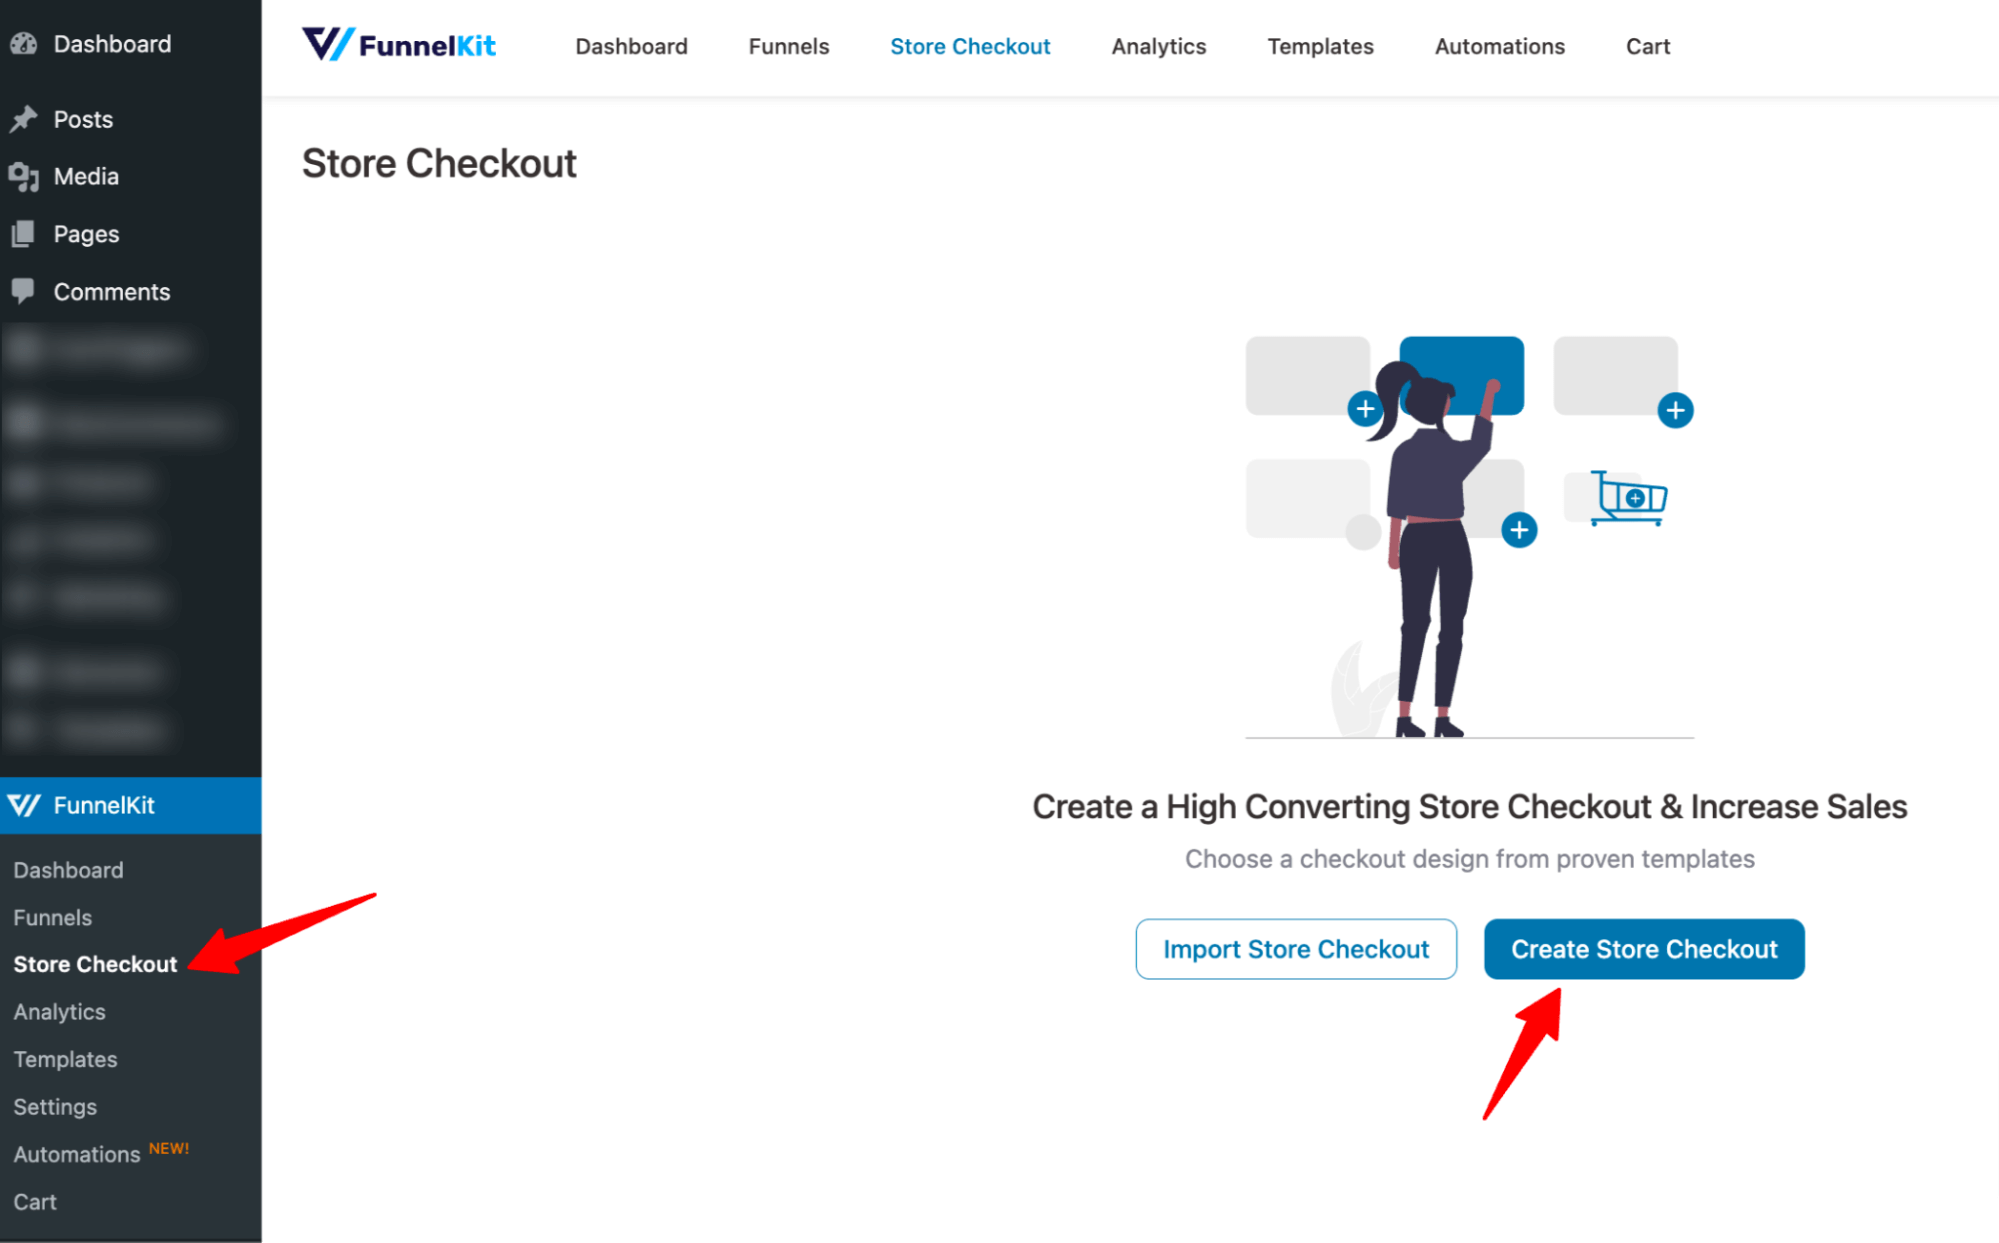
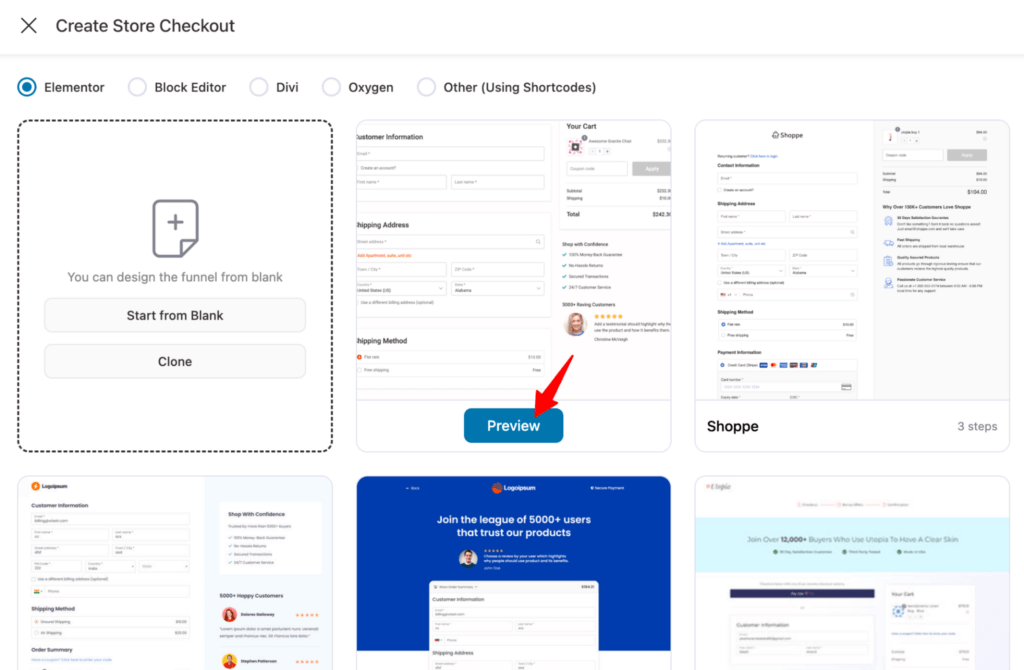
🔔 Note: FunnelKit offers many prebuilt templates to create custom store checkout and is compatible with all the popular page builders like Elementor, Divi, Oxygen, Bricks, etc.
Choose your page builder and then the template you like. We are going with Elementor and Minimalist here.
Now, choose whether you want a single-page checkout or a multi-page checkout.
After that, click on “Import This Funnel,” provide a name, and click on "Done" to import this funnel as your default checkout.
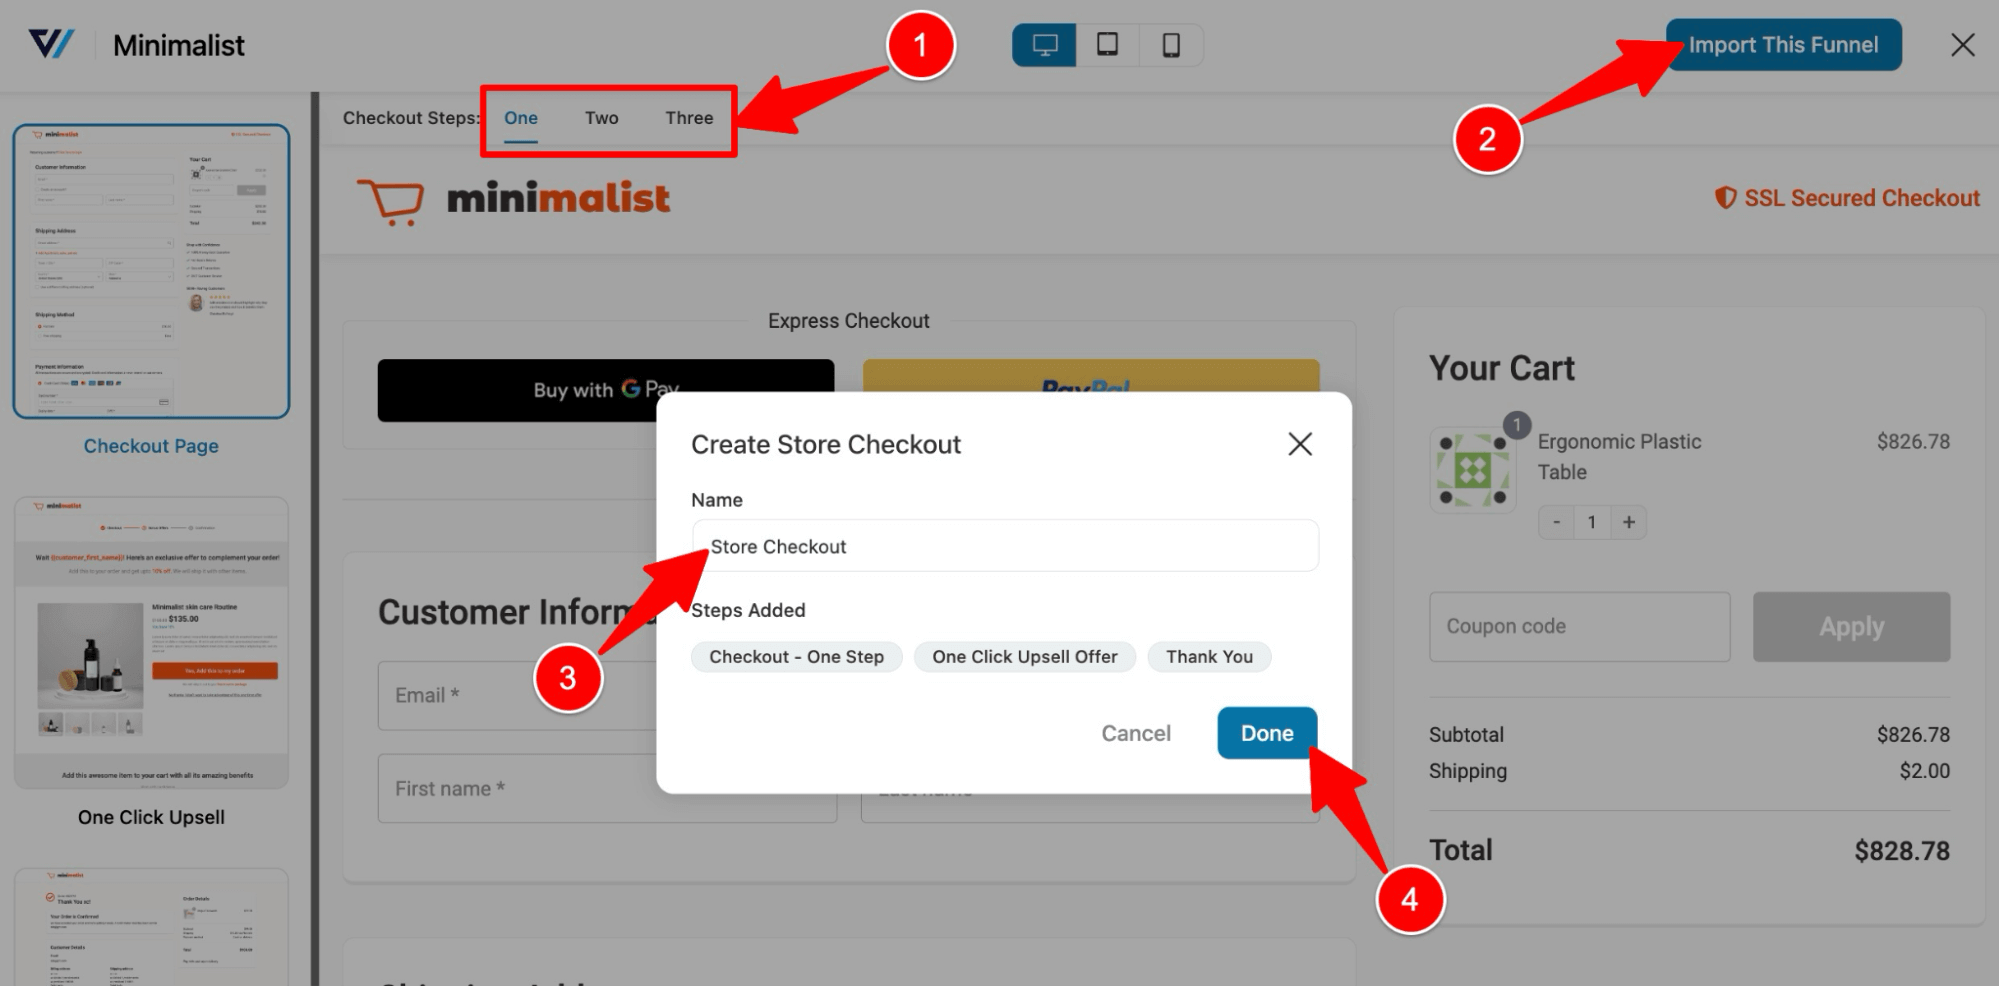
This will import a store checkout with three steps: Checkout, One click upsell, and Thank you page.
🔔 You can check out our guide on Checkout Page customizations.
Step 2: Add the order bump offer
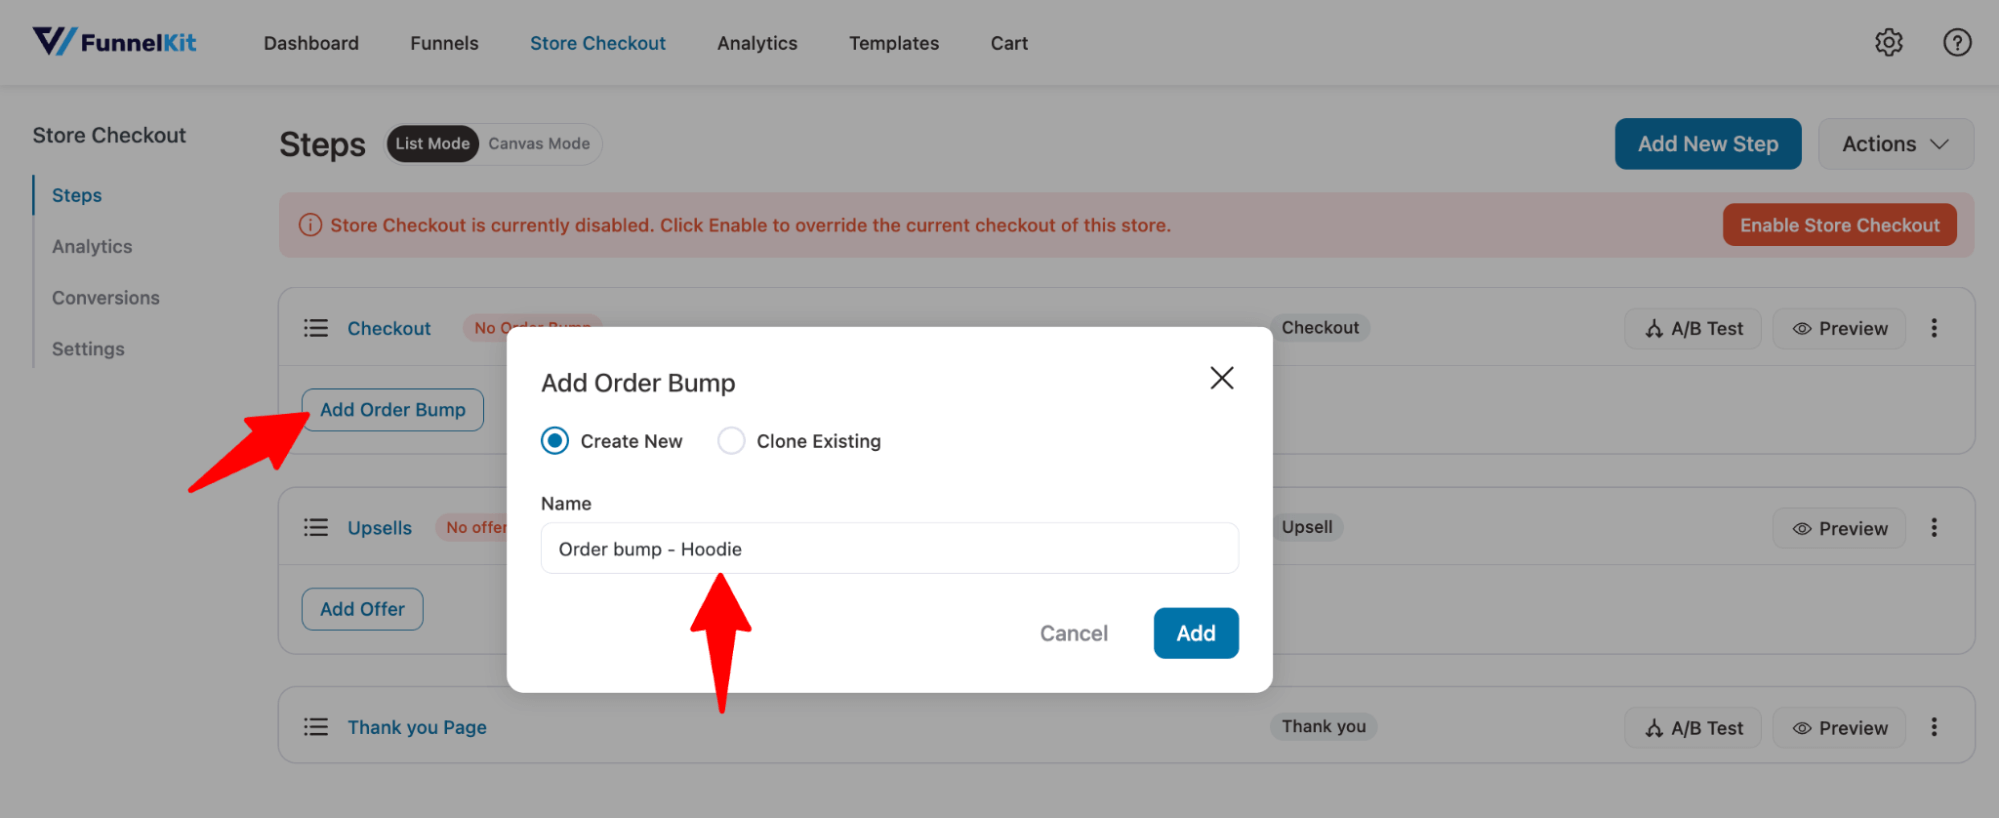
Now, you need to add a new step to offer an order bump on the checkout page. For that, click on “Add Order Bump,” provide a title, and click on Add.
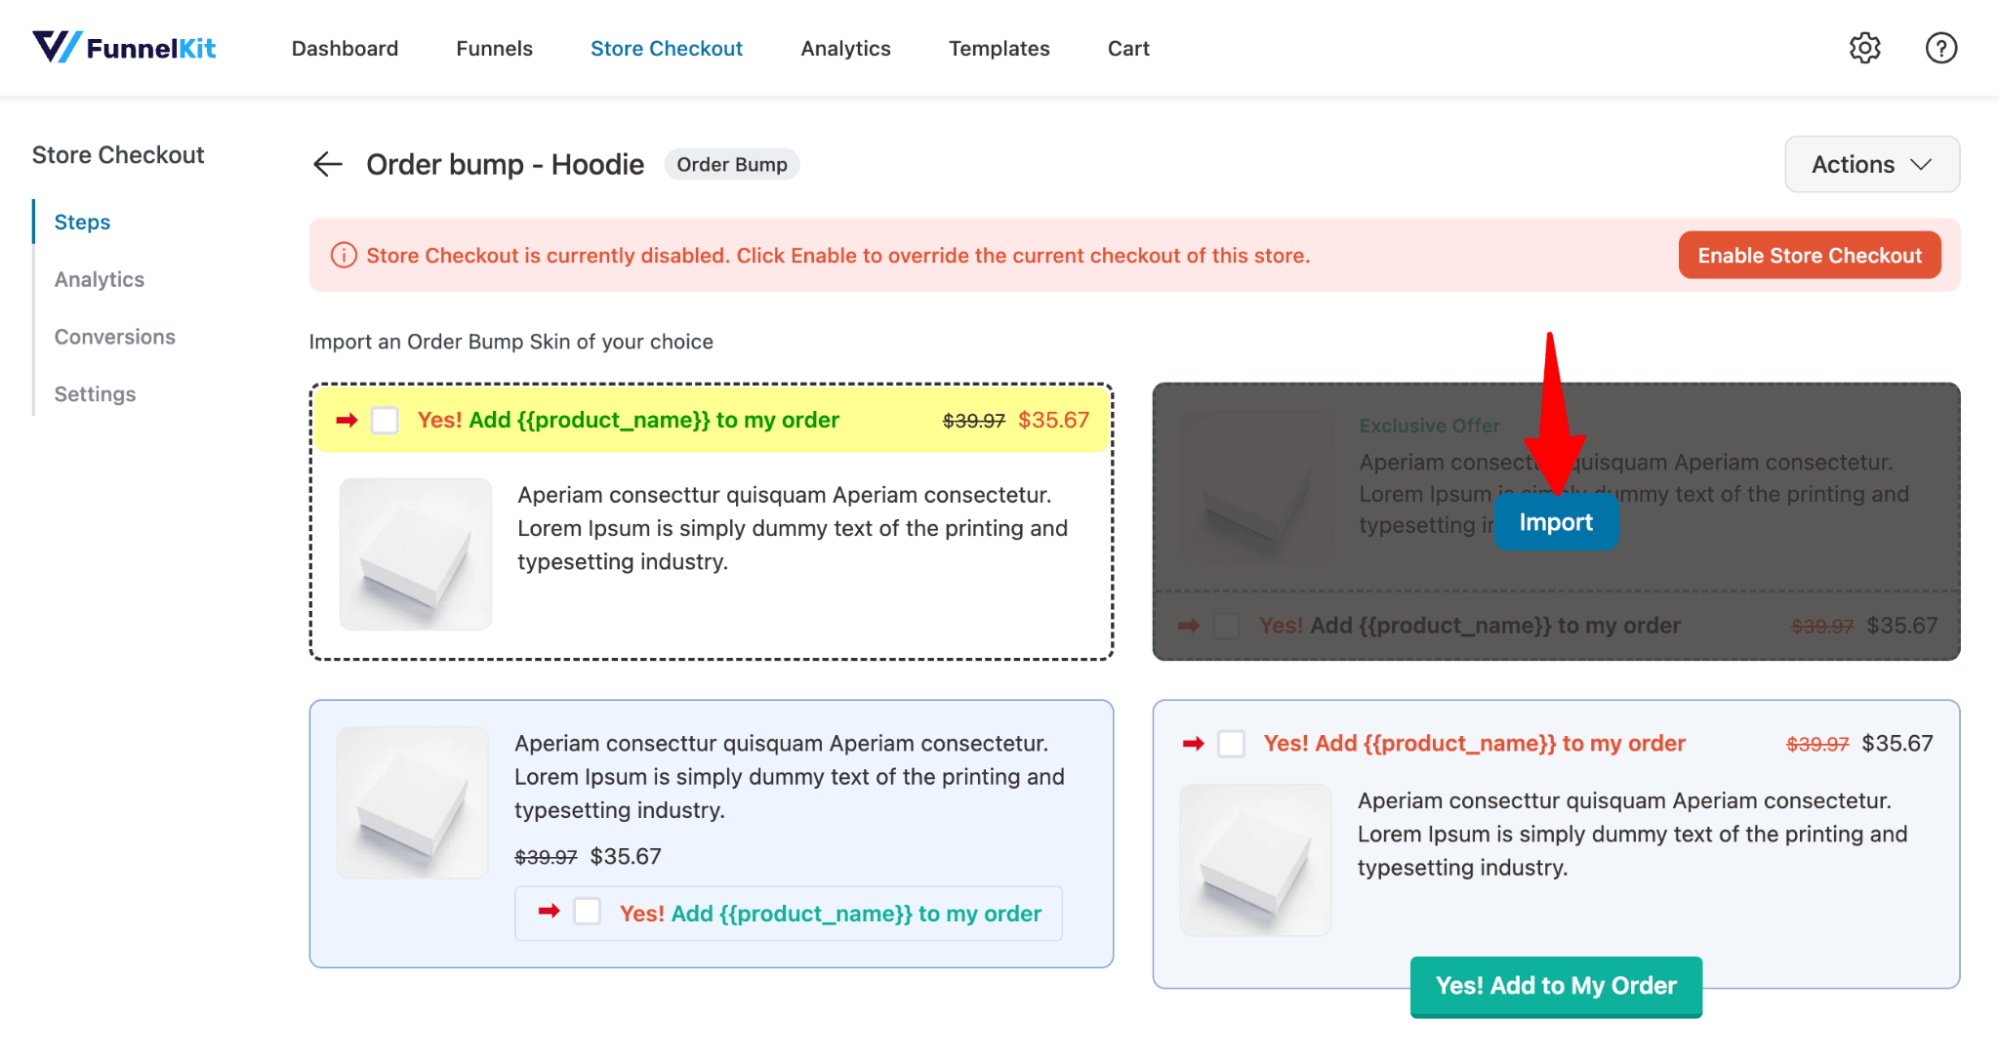
After that, choose an order for bump skin. To do so, hover on the skin you like and click on Import.
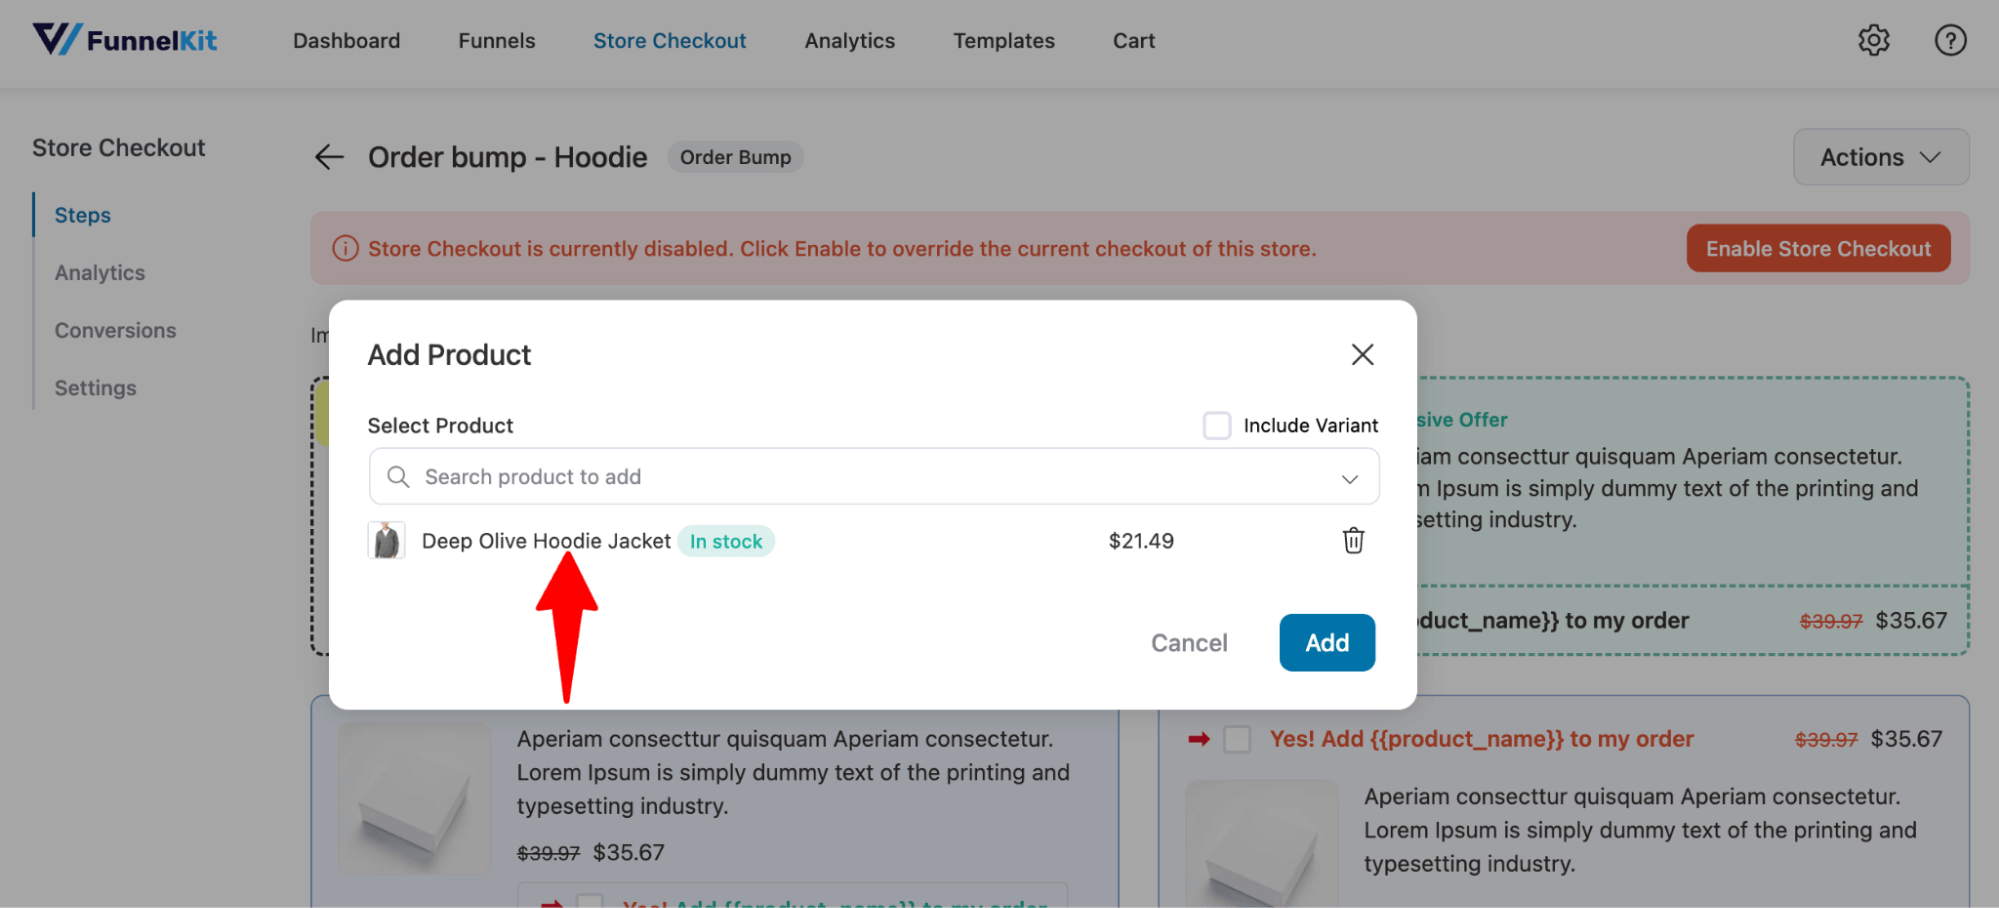
Now, search for the product and click on Add.
You can add a discount as well.
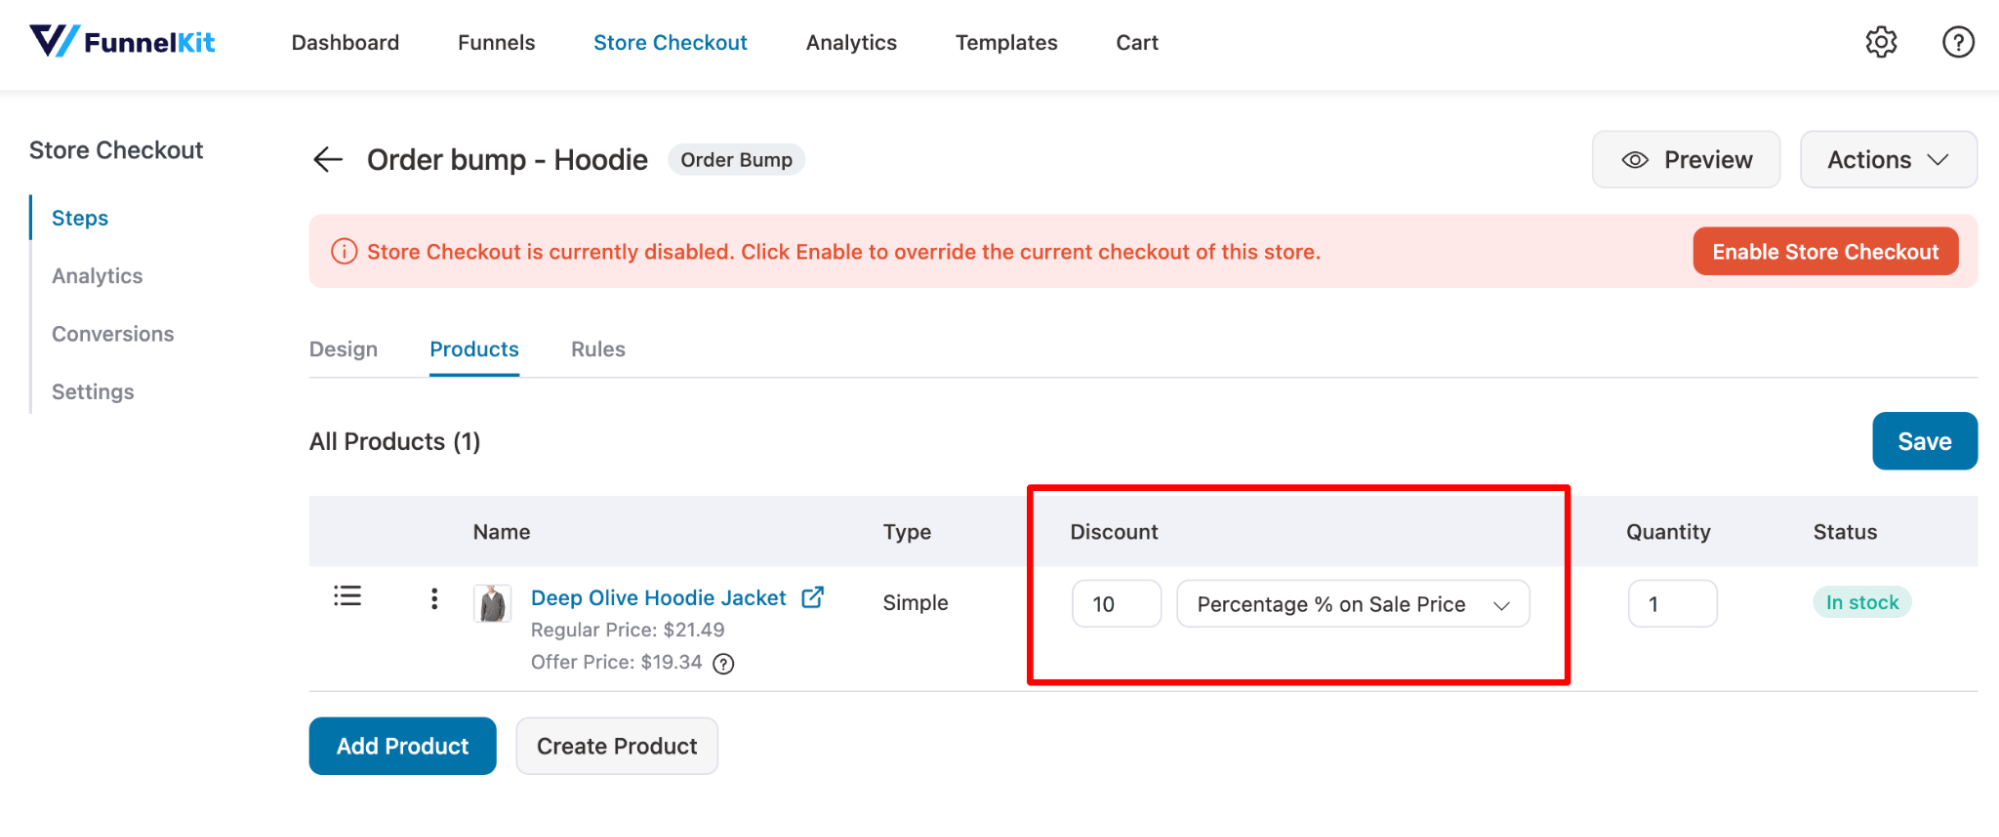
🔔Note: In case you want to offer a free gift, offer a 100% discount.
Step 3: Add Geolocation rule for order bump
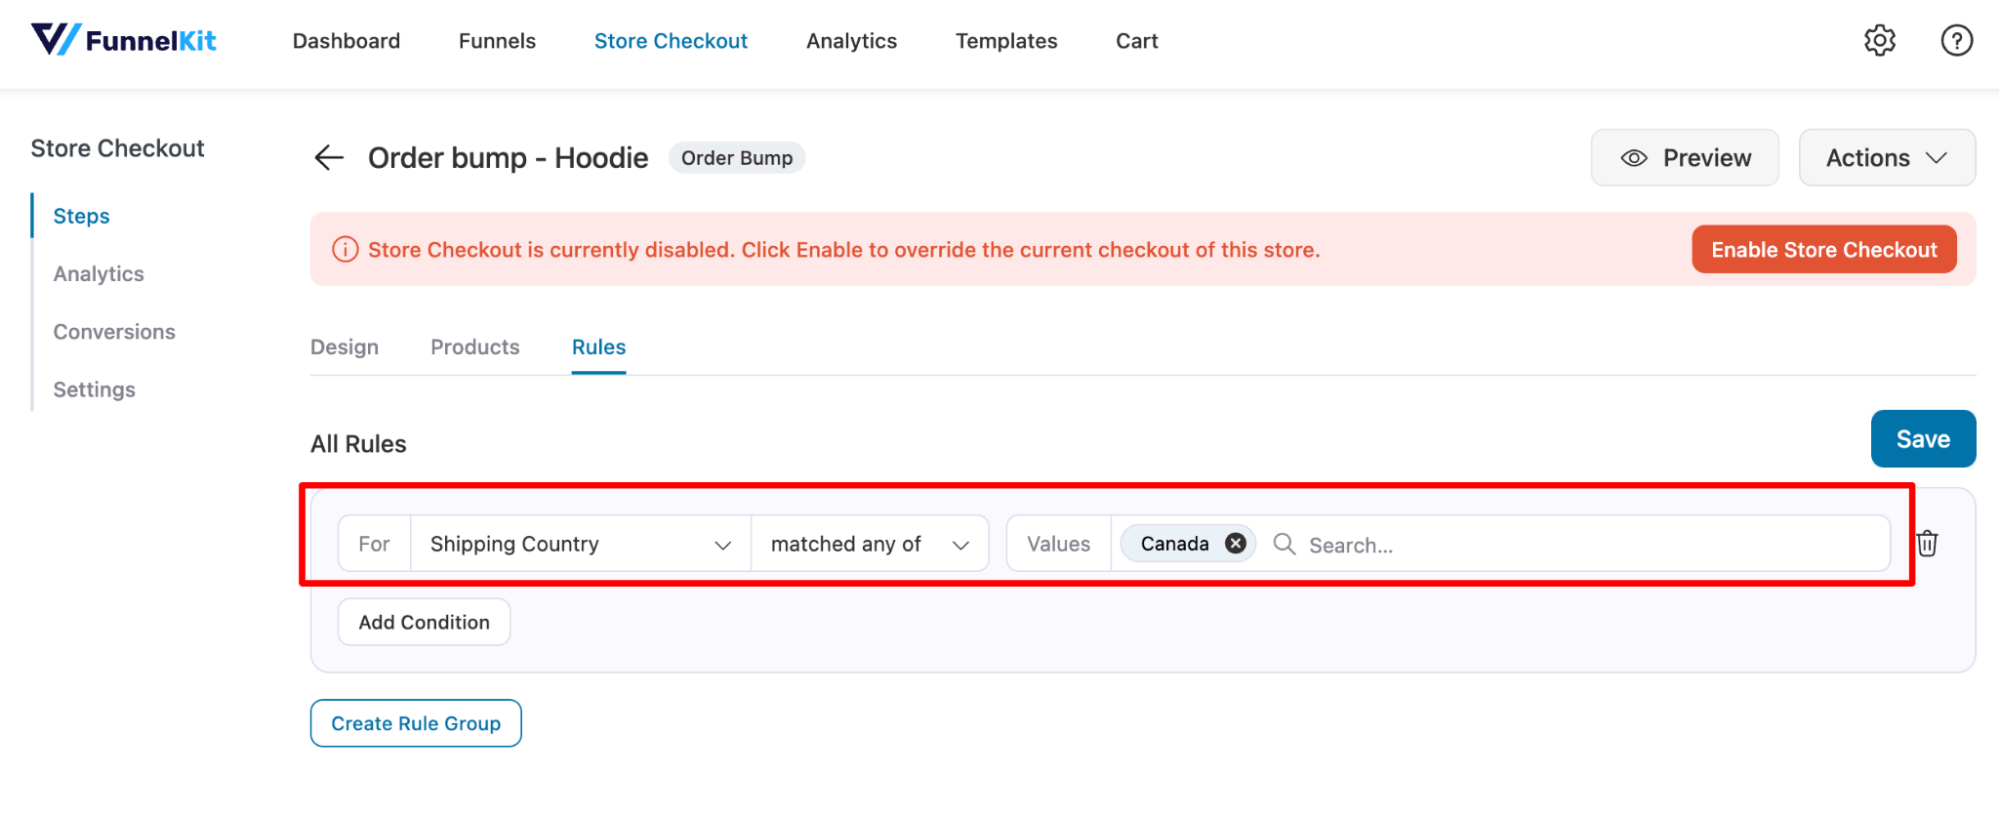
Navigate to the Rules tab and configure rules based on the customer's geographical location to target your audience with an order bump.
You can specify criteria using either the Shipping Country or the Billing Country associated with the customer's order.
Make sure to save the changes.
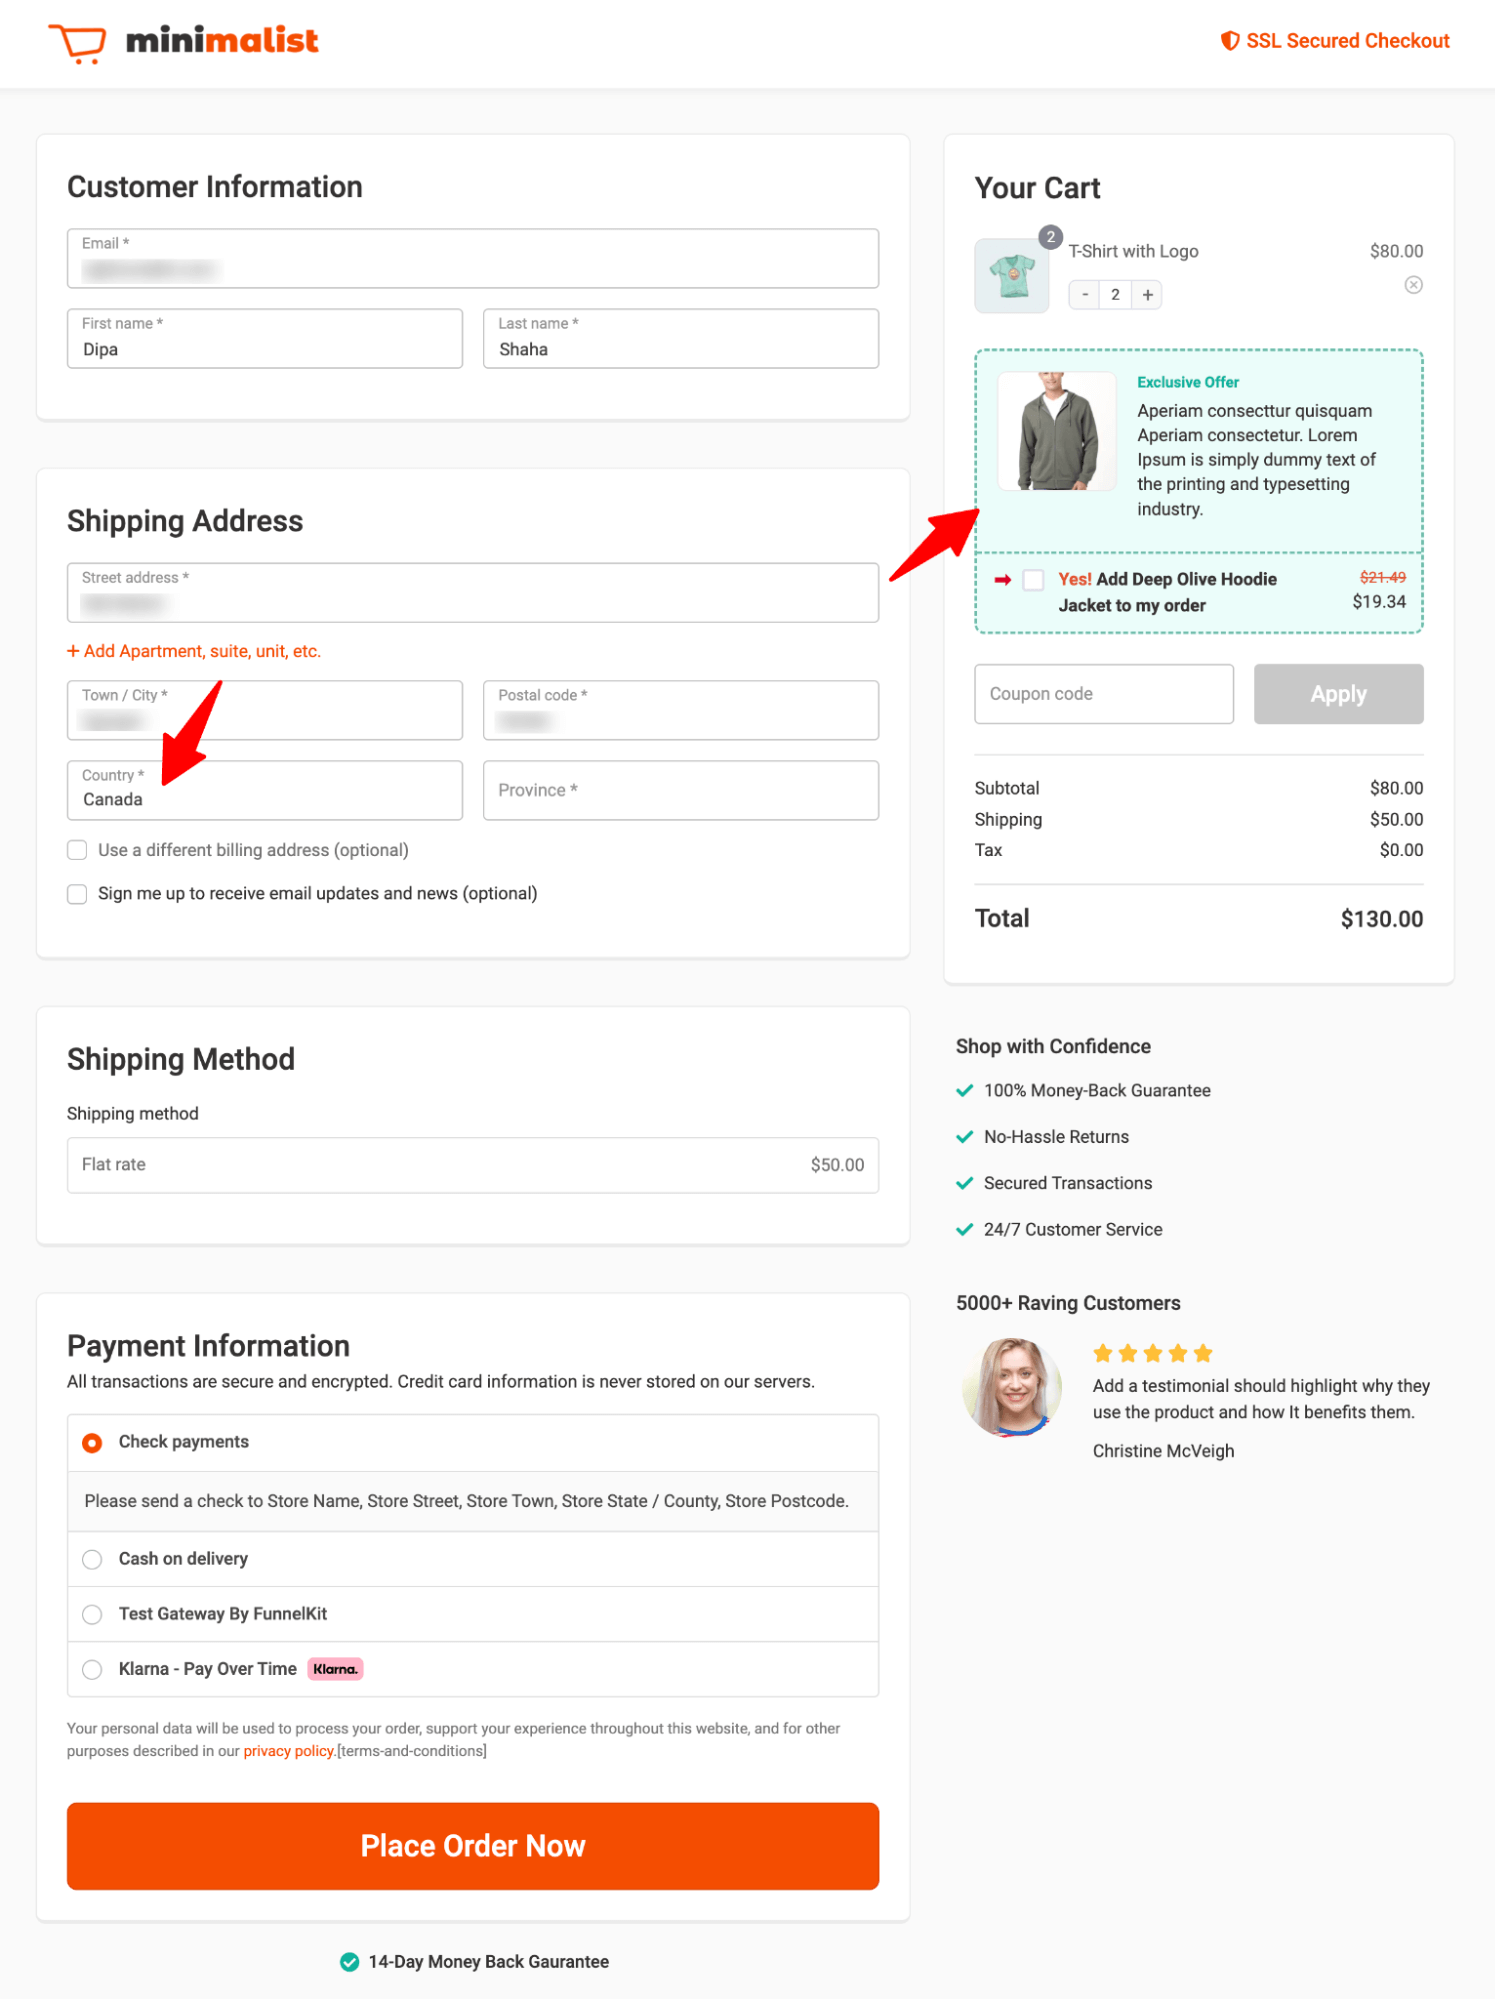
Here is what the order bump looks like on the checkout page:
For more details, read our blog on WooCommerce order bump.
Step 4: Add the one-click upsell offer
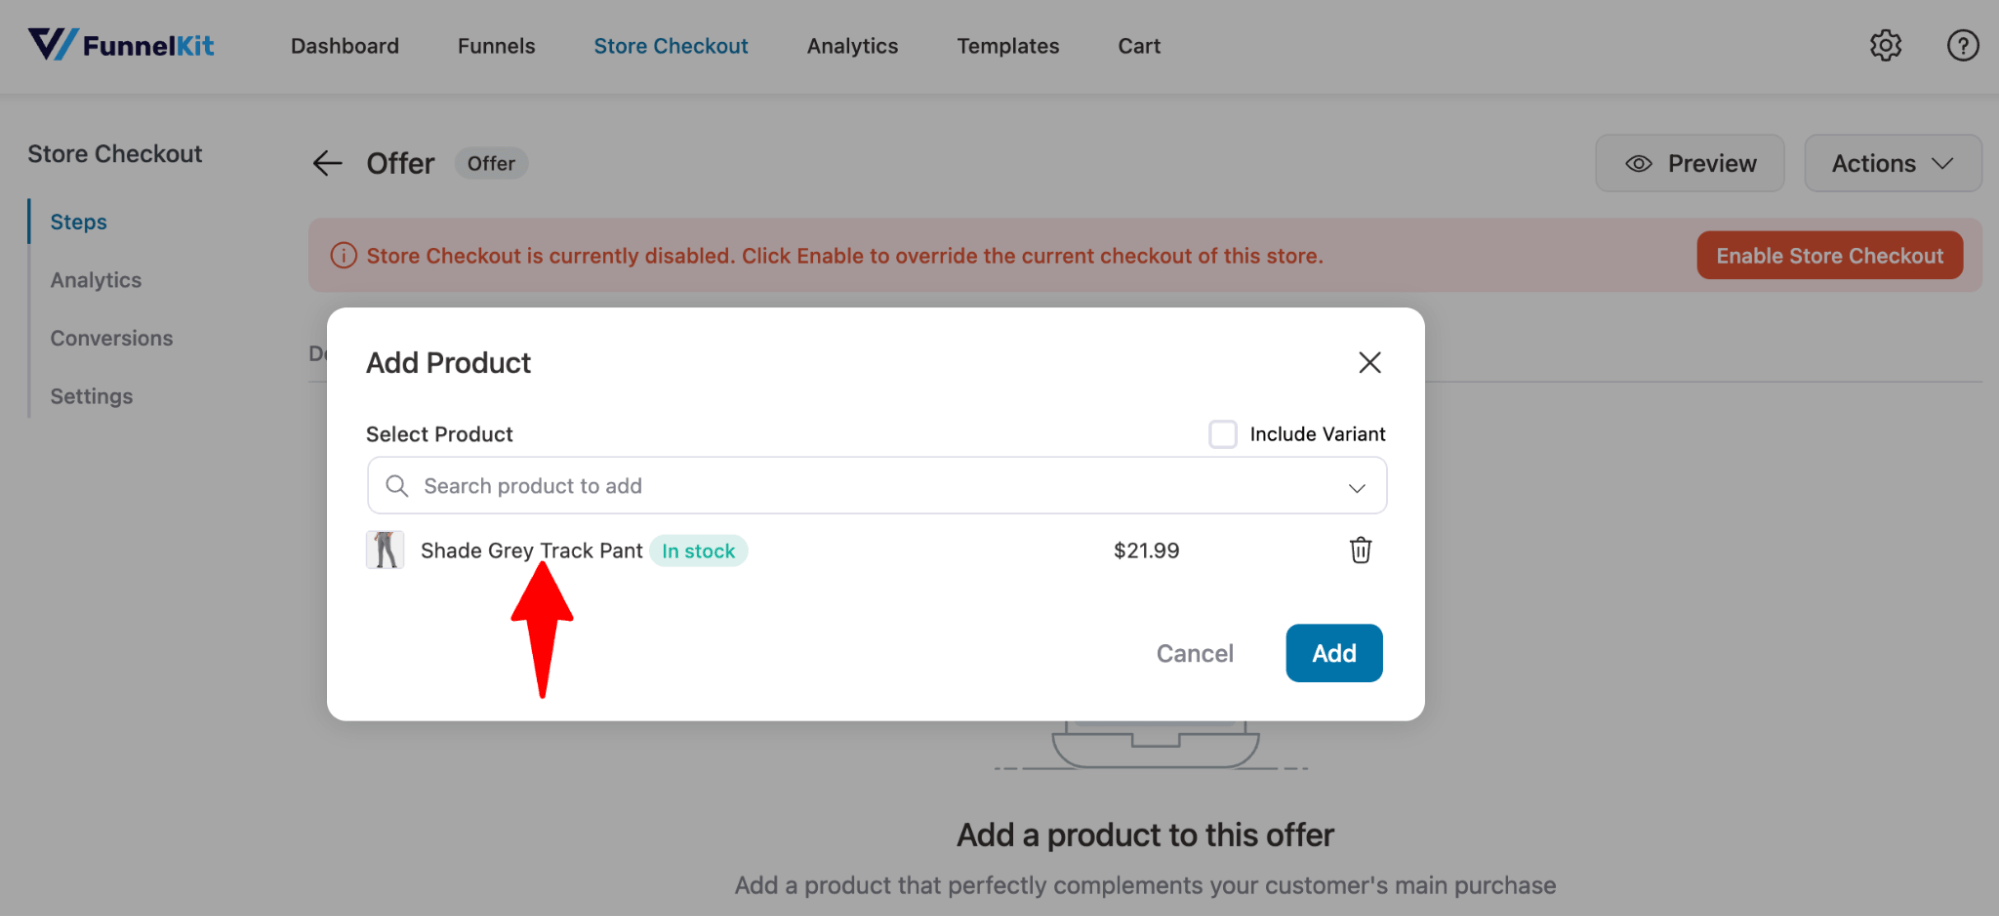
Next, hit the Offer tab, search for it, and add the upsell offer.
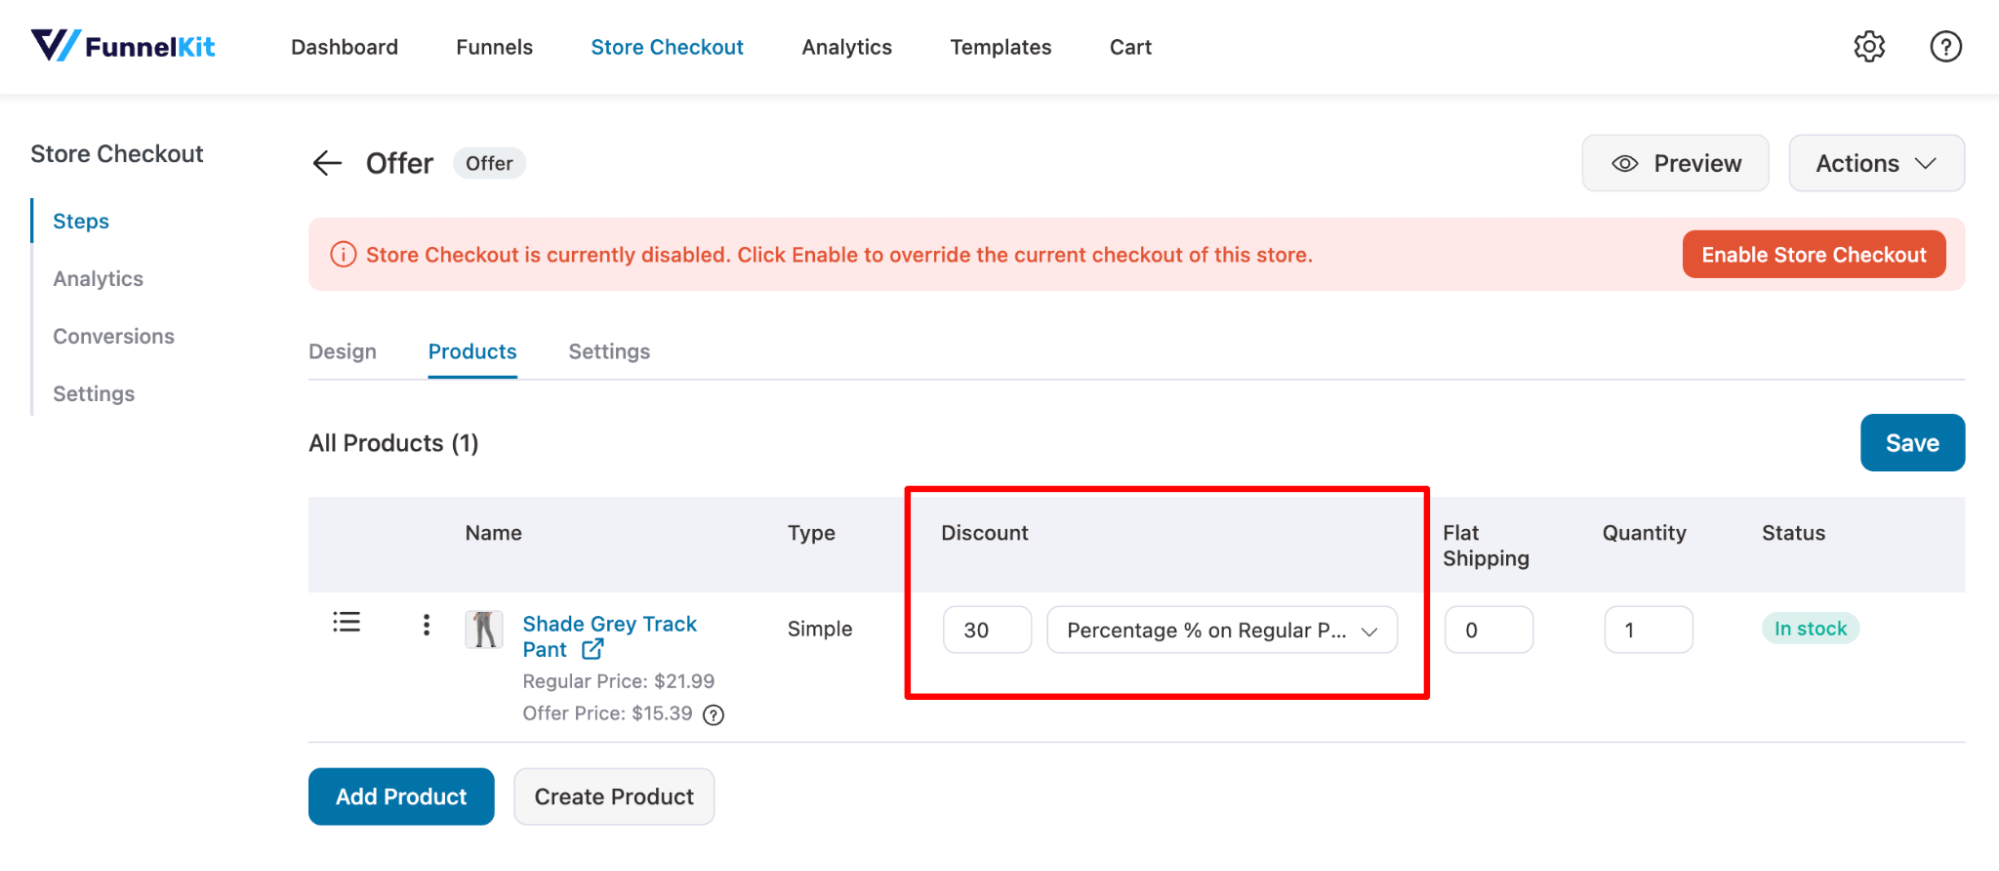
You can add a discount as well.
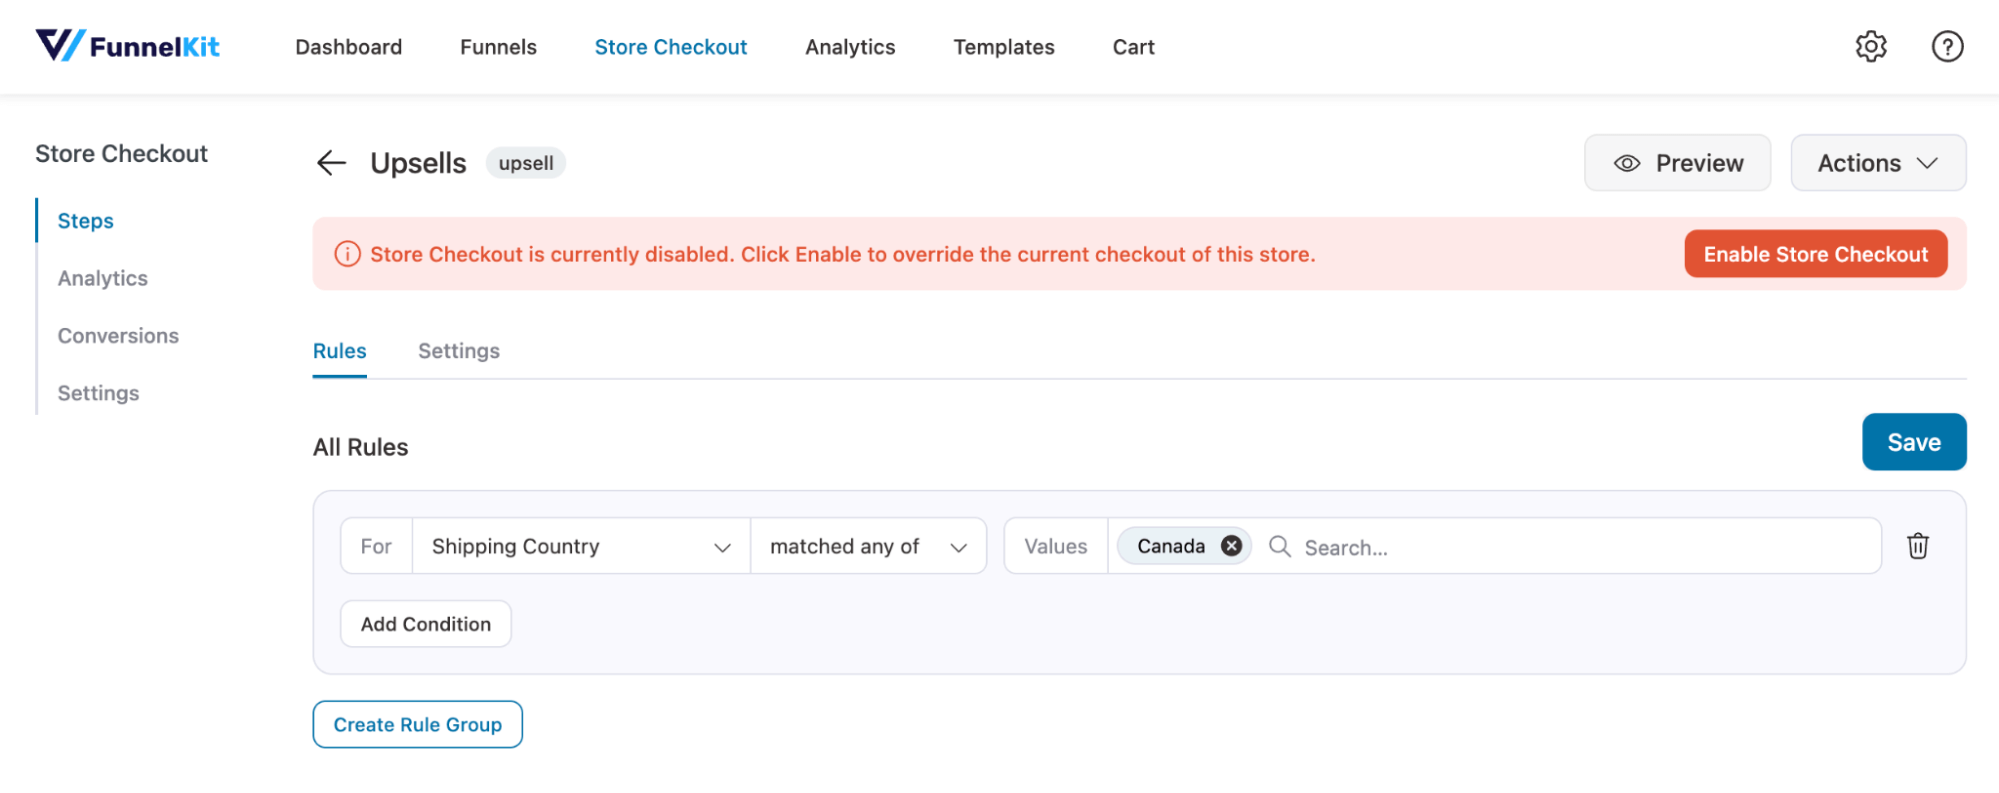
Step 5: Add Geolocation rule for upsell
Now hit the Upsell offer and move to the Rules tab to set your geolocation rule to offer this upsell only to the target audience.
Here is what the upsell offer looks like:
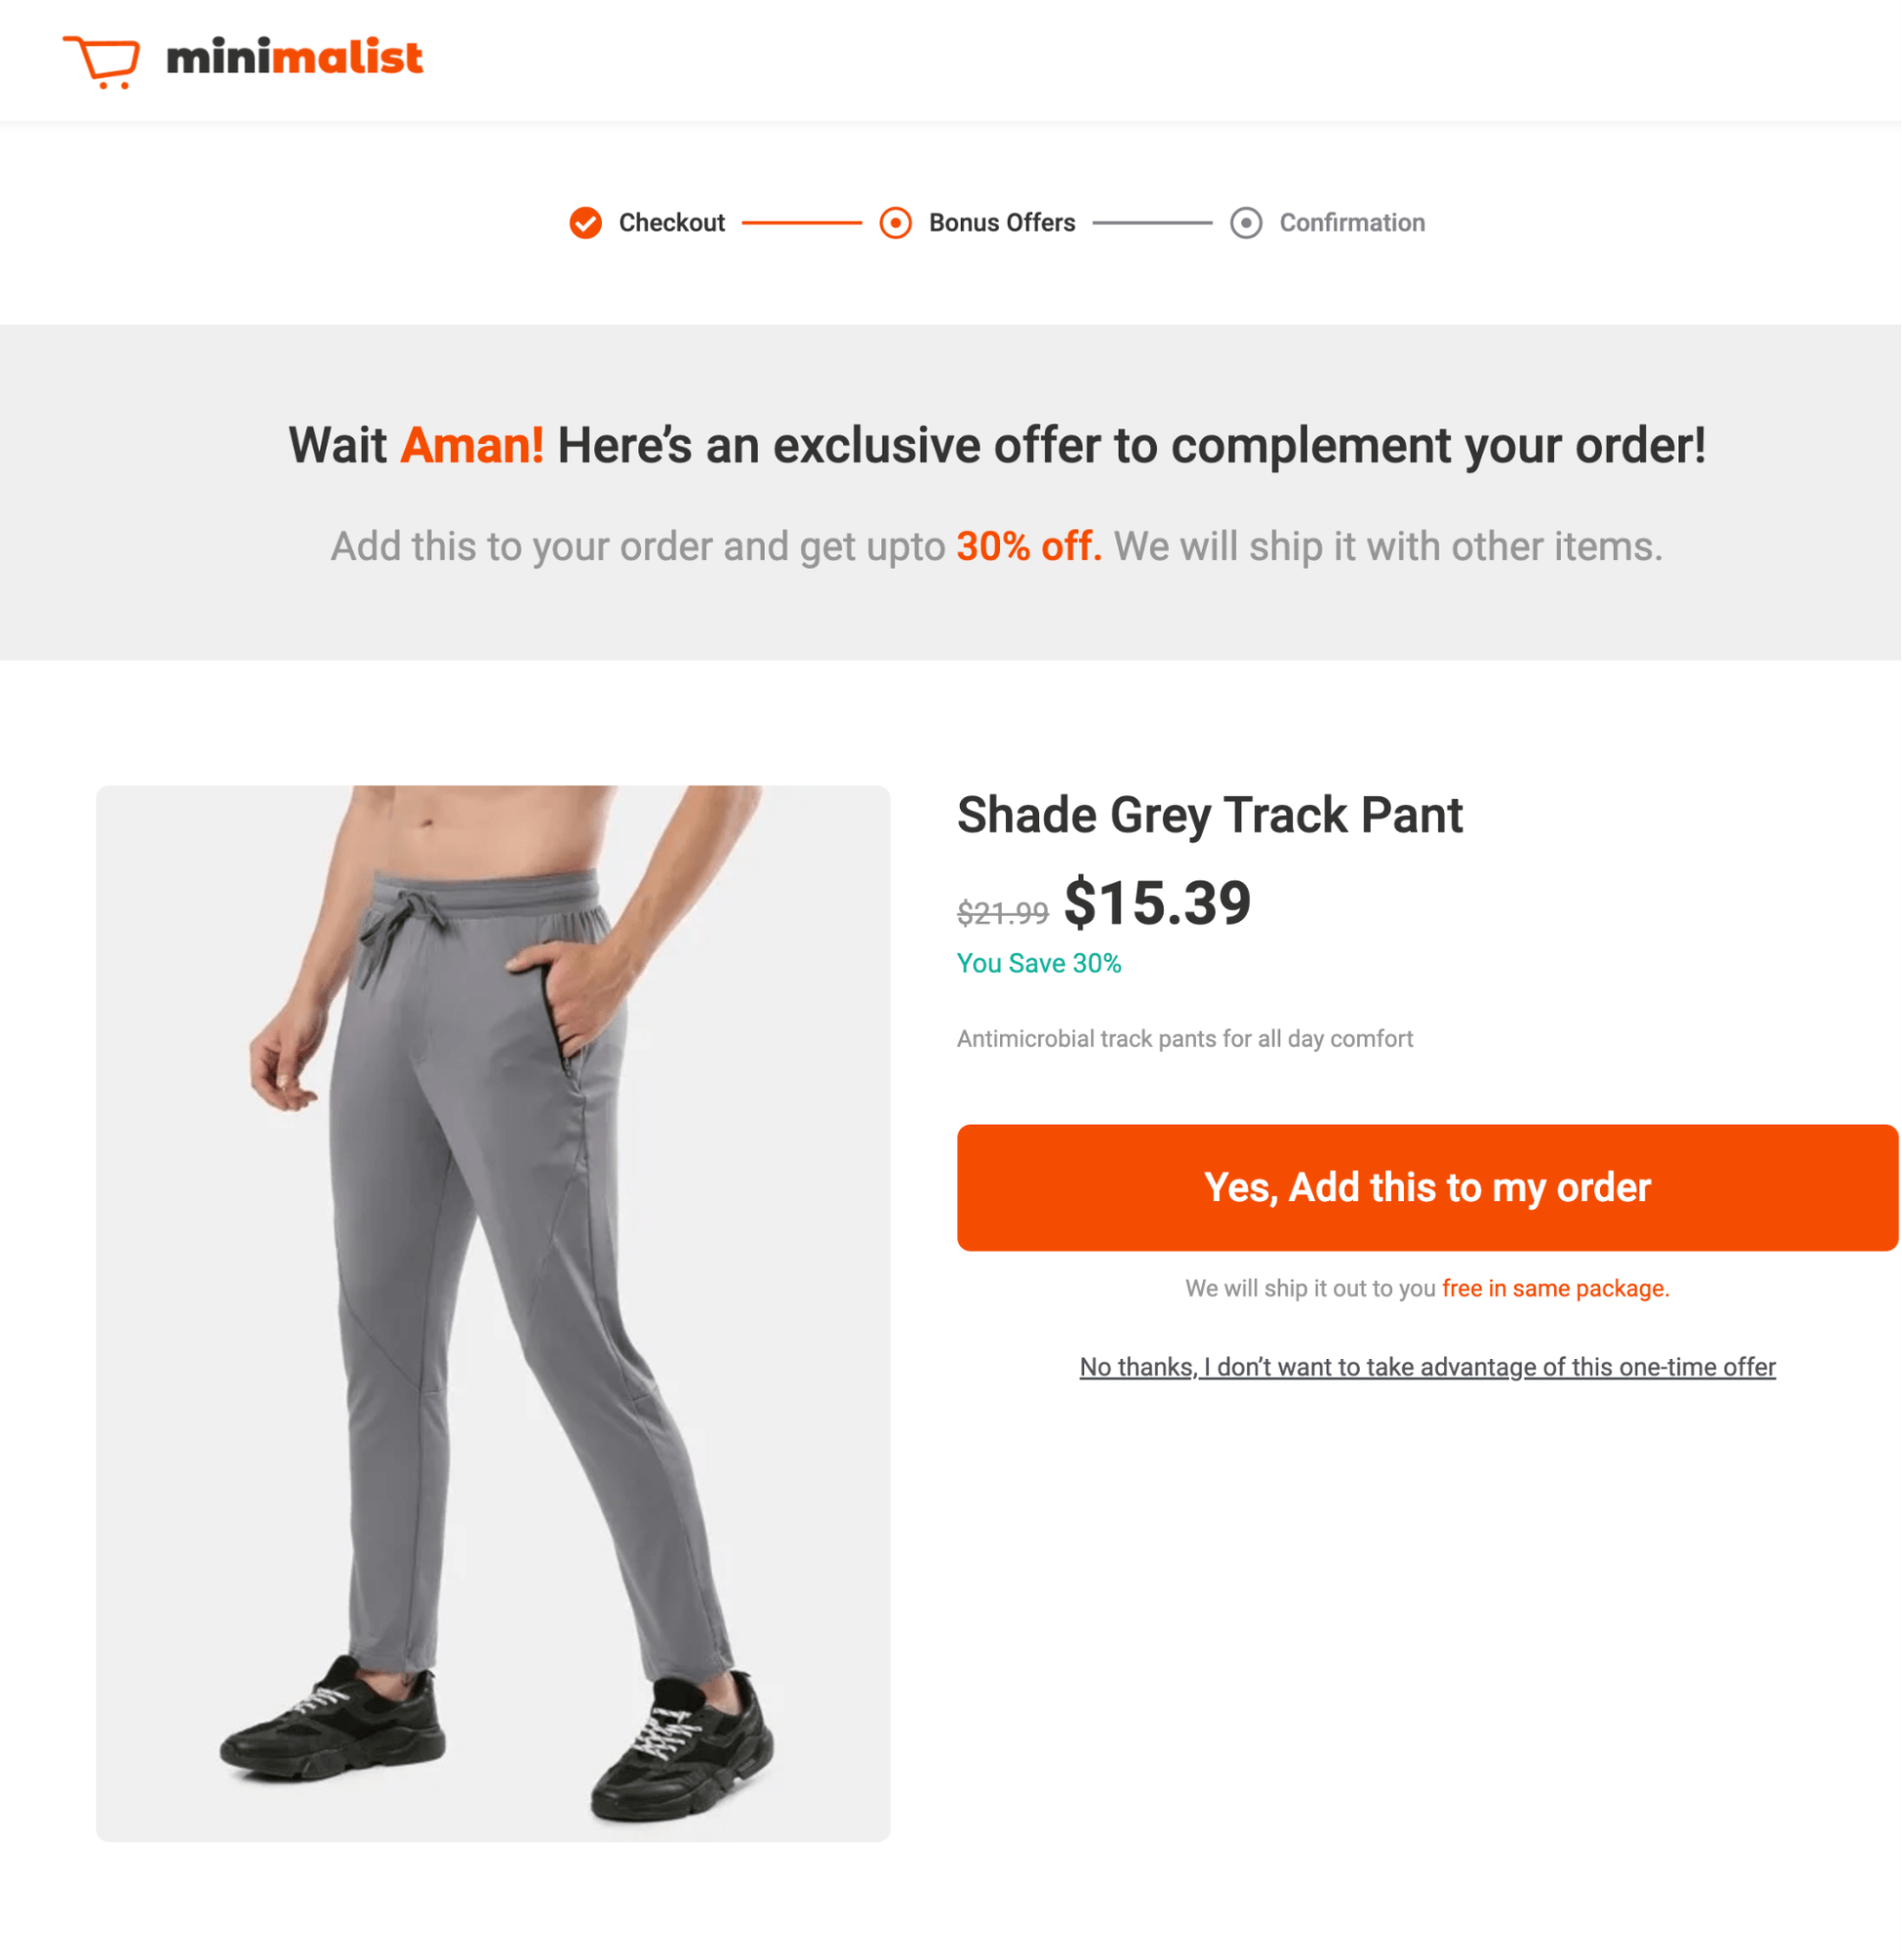
Note: You can also read our blog on WooCommerce one-click upsell.
Step 6: Activate custom store checkout
The last step is to enable the store checkout you built with geolocation-based product recommendations.
To do this, just hit the “Enable Store Checkout” button.
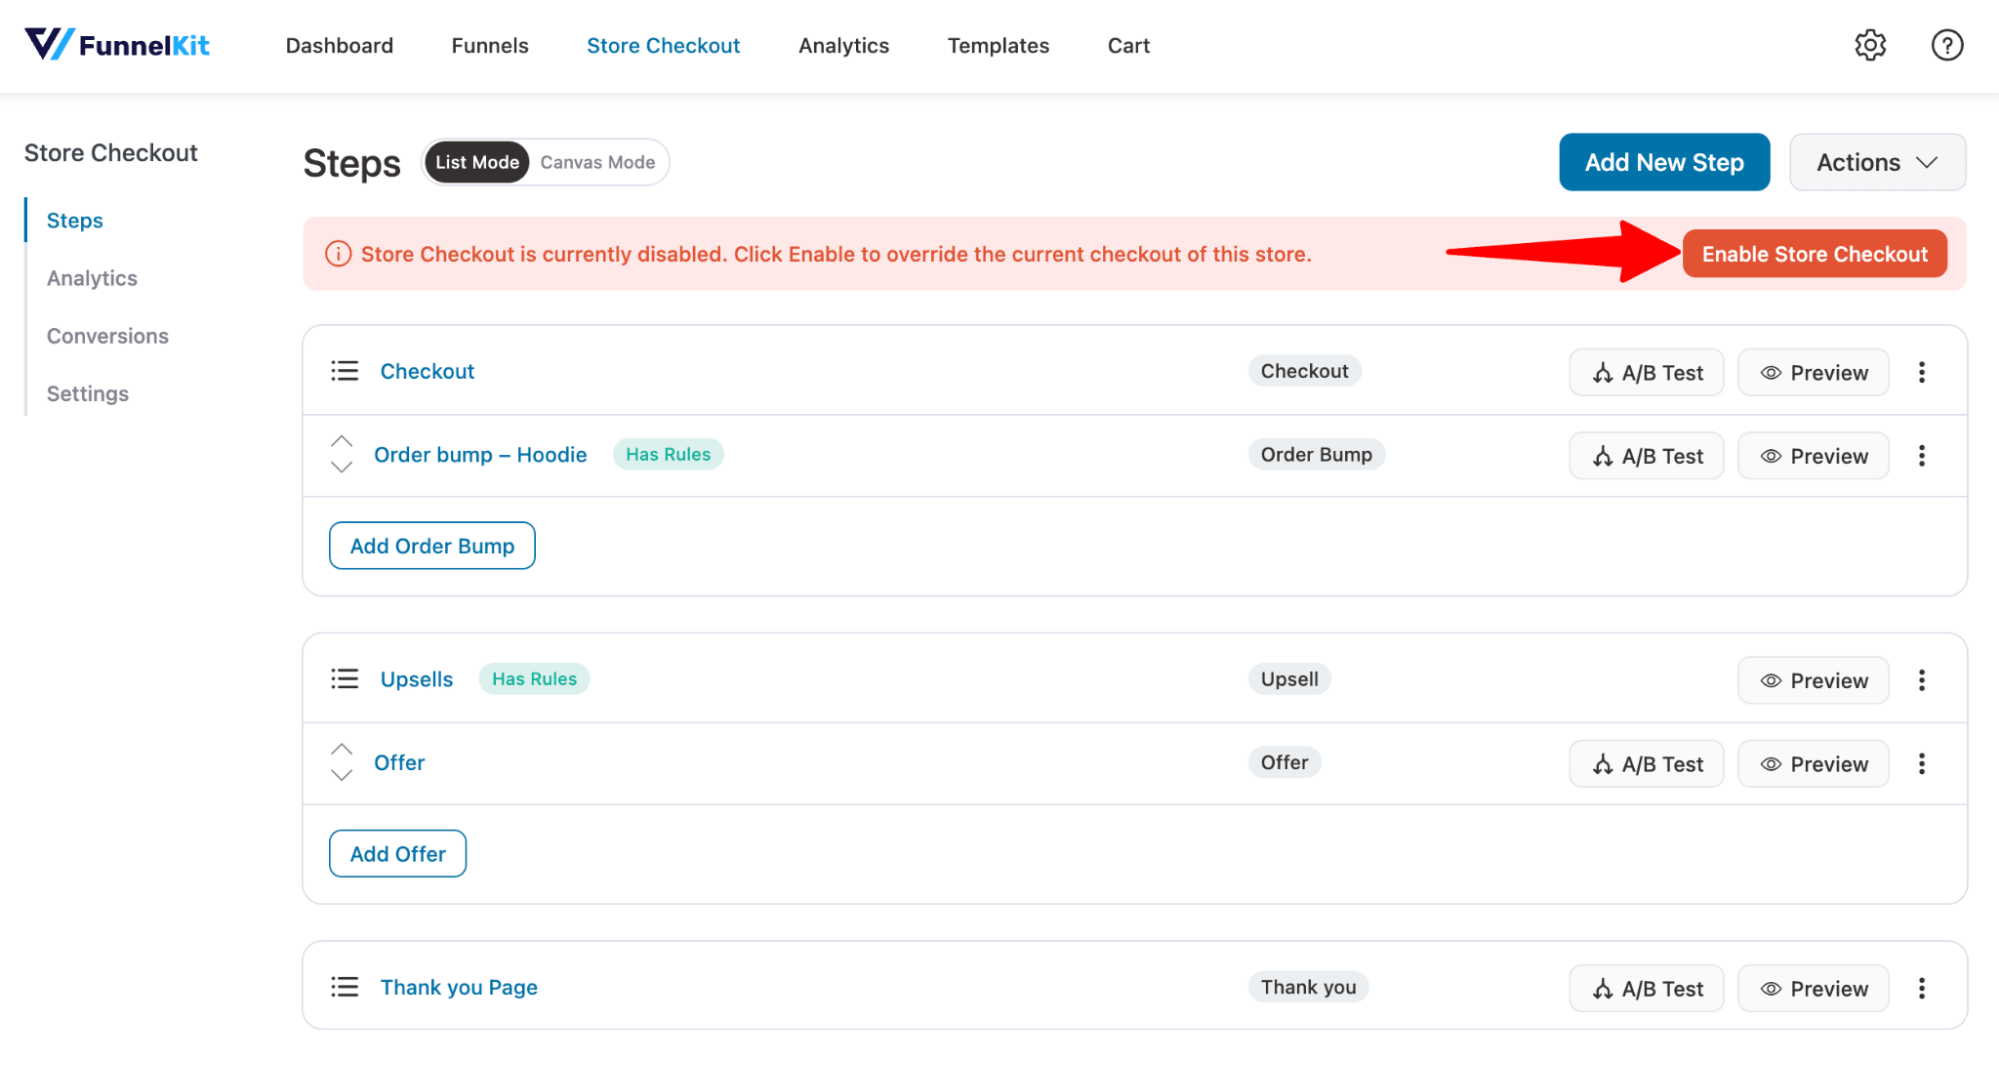
Now your store will offer product recommendations based on customer’s geolocation.
FAQs About WooCommerce Geolocation
Here are some commonly asked questions about WooCommerce geolocation:
- Why Geolocation on my WooCommerce store, and how can I fix it?
If Geolocation is not functioning properly in your store, there could be several reasons:
- Geolocation Settings Disabled: Ensure that geolocation is enabled in WooCommerce settings. Go to WooCommerce ⇒ Settings ⇒ General and check that "Default Customer Address" is set to "Geolocate" or "Geolocate (with cache)."
- Incorrect API Key Configuration: If you're using a third-party geolocation service, ensure that the API keys are correctly set up. Incorrect or expired API keys can prevent accurate location detection.
- Web hosting server configuration: Some hosting servers block geolocation requests due to security restrictions. Contact your hosting provider to ensure geolocation APIs can be accessed.
- How do you resolve Caching and Geolocation Data Conflicts?
Caching can interfere with geolocation data and cause incorrect shipping or tax calculations. Here’s how to resolve caching-related issues:
- Clear store’s cache: If you use caching plugins (like WP Rocket W3 Total Cache), clear the cache to ensure that fresh geolocation data is loaded.
- Ensure proper plugin compatibility: Some caching plugins or performance enhancers might conflict with geolocation services. Ensure your caching plugin is compatible with WooCommerce, or consult the plugin’s documentation for settings that might need adjustment.
- Use a CDN with Geolocation support: If your store uses a Content Delivery Network (CDN), ensure it supports geolocation features. Some CDNs may cache content globally, which could result in incorrect location data for your customers.
- Can I disable geolocation in WooCommerce?
Yes, you can disable geolocation if you don't need it. Go to WooCommerce ⇒ Settings ⇒ General, and under Default Customer Address, select an option such as "Shop base address" instead of "Geolocate" to prevent automatic location detection.

- Can I set my store to change currency based on Geolocation in WooCommerce?
Yes, you can set your store to change currency based on geolocation in WooCommerce by using a currency switcher plugin that supports geolocation features.
Ready to Utilize WooCommerce Geolocation To Optimize Your Store?
Geolocation is a powerful tool to provide a seamless shopping experience for your customers, helping to increase sales and build customer loyalty.
By leveraging geolocation, you can optimize shipping with tailored rates for each region and offer local payment methods to make checkout convenient for customers.
Along with Geolocation, you should also focus on optimizing your checkout page because this is the most important step of the shopping experience.
With FunnelKit Funnel Builder, you can create high-converting single or multi-step checkout, add/remove checkout fields, add Google Address auto-complete, etc.
Plus, you can offer pre and post-purchase upsells based on the average order value of your WooCommerce store.
Get FunnelKit Funnel Builder today and start optimizing your checkout page to drive more sales.
Editorial Team
February 13, 2026WooCommerce shipping allows you to charge customers for delivery when they purchase from your store. You create different delivery areas, called shipping zones, and then decide how much to charge...
Editorial Team
February 12, 2026Have you ever noticed the cart icon at the top of many online stores? It’s more than just a design choice. It can greatly improve your customers' experience. A cart...
Editorial Team
February 6, 2026With increasing competition and rising ad budgets, acquiring new customers is difficult. Forbes reports that the conversion rate for new customers is just 5%-20%. On the other hand, repeat customers...


