
Do you have an Elementor form funnel on your WordPress website/WooCommerce store?
Elementor forms are highly flexible and easy to customize.
You can do all the customizations on the front end and there's no custom CSS or coding required to stylize the forms.
But when it comes to doing advanced-level stuff like sending personalized well-timed email sequences to the lead, the process is not very intuitive.
Nor can you send a discount coupon code in those emails with a time-bound offer.
What's more?
You can't even segment users based on their responses to specific form fields!
So while Elementor lets you create beautiful single-step and multi-step forms, building intuitive workflows post the form submission is not possible.
In today's post, I will show you how to bring automation to the world of Elementor contact forms and put your lead nurturing process on autopilot. Sweet!
Stay with me till the end.
Here is a tutorial video on how you can create a lead generation quiz funnel using Elementor forms:
Let's get started with creating an Elementor forms funnel.
Table of Contents
- 1 Why 79% of Leads Never Convert into Sales
- 2 Introducing Elementor Forms Funnel: The New Way of Nurturing Leads
- 3 How to Create a Two-Step Elementor Forms Funnel?
- 4 How to Trigger an Automation after the Form Submission?
- 5 How to Personalize Your Emails & Send an Offer to Buy
- 6 Creating a One-Page Checkout to Turn Leads into Instant Sales
- 7 Ready to Turn More Leads into Sales Using ELementor Forms Funnel?
Why 79% of Leads Never Convert into Sales
Imagine joining a new company and being asked by your boss to sell products to someone you don't even know.
How can you crack the sale when you have no idea about their needs?
That’s why 79% of leads never convert into sales. {Source: SquadStack}
Because all you know about your leads is their name and email and that's a problem.
- You don't know the problem
You don’t have a way to ask them about their needs or preferences. Engagement with your leads is essential to qualify them. - You can't offer personalized product recommendations
You're not recommending the items they need. You leave them to explore the store on their own. And do not personalize their experience. - There's no way to activate the urgency hook
We all know that urgency drives more sales. By not having a time-bound campaign, you’re losing a chunk of your revenue.
What you instead need is a quiz with a few thought-provoking questions.
And on the final step, take their name and email.
We have discussed more about this game-changing system in the next section.
Introducing Elementor Forms Funnel: The New Way of Nurturing Leads
In this section, we'll look at how to set up a fool-proof system that captures leads and converts them into sales while you sleep.
It all starts with a good-looking Elementor form. Let's take a look:
Step 1: The user submits a 2-step Elementor form
We’ll be building a multi-step Elementor form to capture leads and ask them specific questions about their needs.
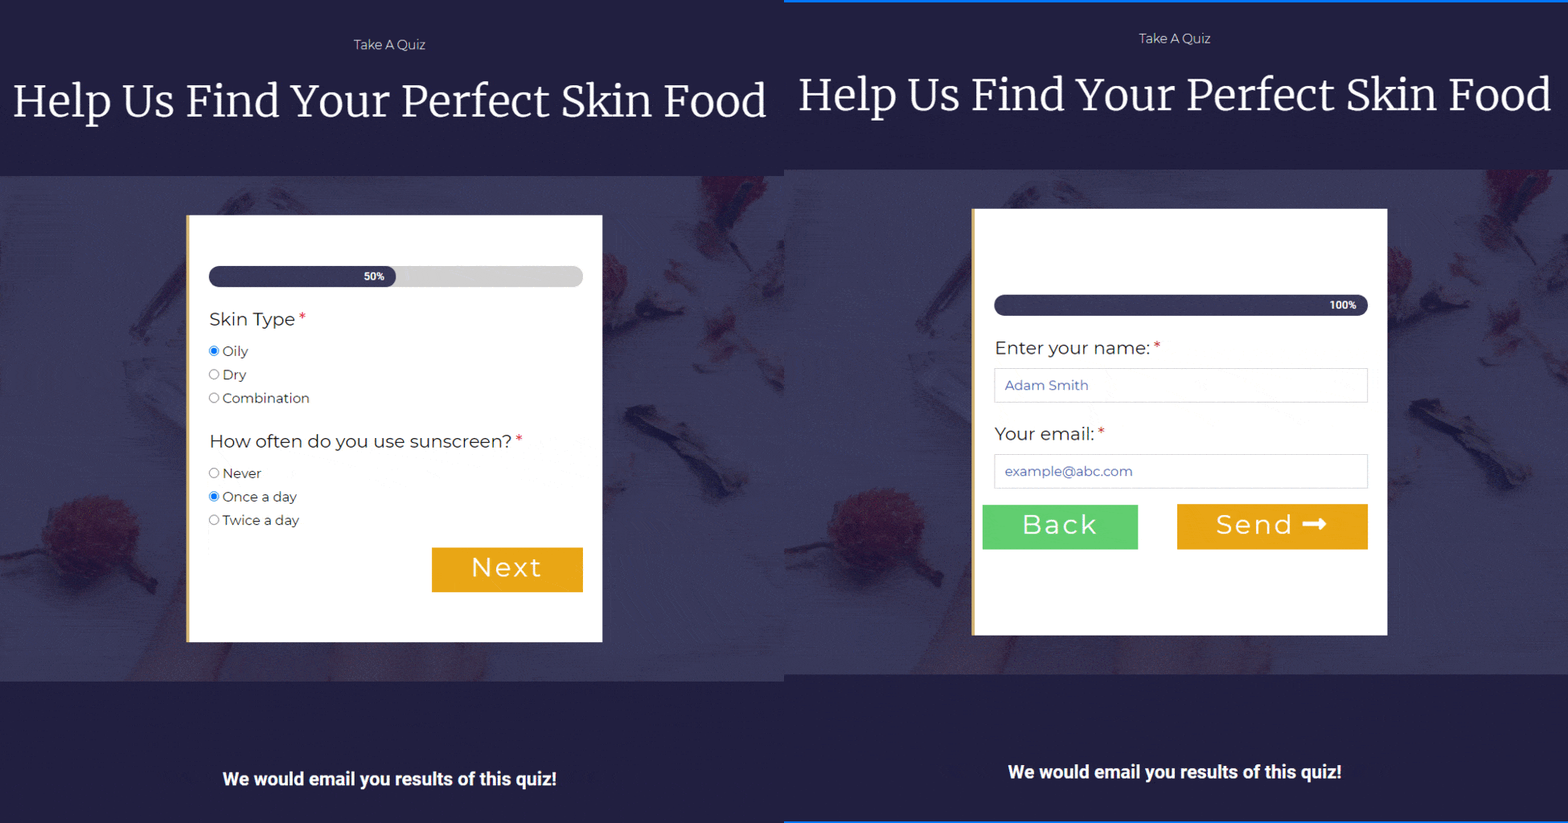
Step 2: An automation gets triggered based on their response
Their responses don't just get captured but we also take action based on the options they chose in the quiz.
For example, if they select oily skin, they'll be recommended items from the store that help nourish oily skin and so on.
Step 3: They receive a personalized product recommendation email
We’ll show you how to craft a personalized email that contains product recommendations based on the user's response.
You can even give additional tips in this email based on the problem they selected:
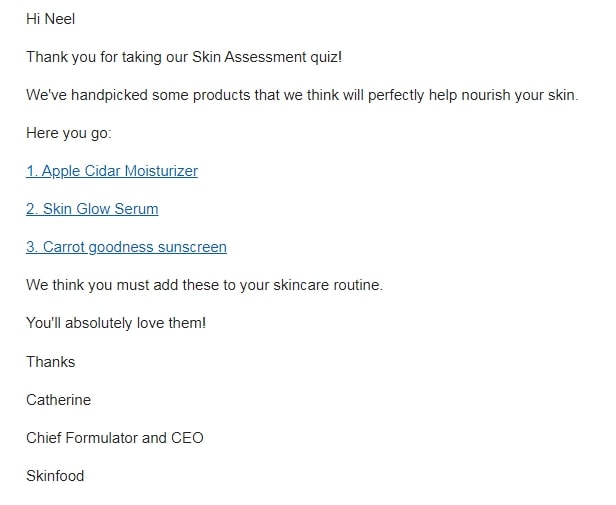
Step 4: You direct them to a dedicated one-page checkout from the email to buy those items
We’ll show you how to direct users to a dedicated one-page checkout.
They can check the items they want and uncheck those they don't. In fact, this is really the best part of the tutorial.
It's also the most fun!
How to Create a Two-Step Elementor Forms Funnel?
To create an Elementor forms funnel, you can either drag and drop a new form widget from the left-hand panel or choose a form-based template.
In our case, we chose a template with a pre-set design.
As you can see there are three tabs for customizing your Elementor form - Content, Style, and Advanced:

In the content section, you can add new form fields to your form.
Stylize the form, its colors, column width, and so on from the Style tab.
Take a look at our first form field, i.e. skin type:

The options are listed one below the other.
Besides, map the form field id perfectly with the field so the fields can be stored correctly.
To do that go to the advanced tab, and enter the ID. Here we've written an email for the email field:
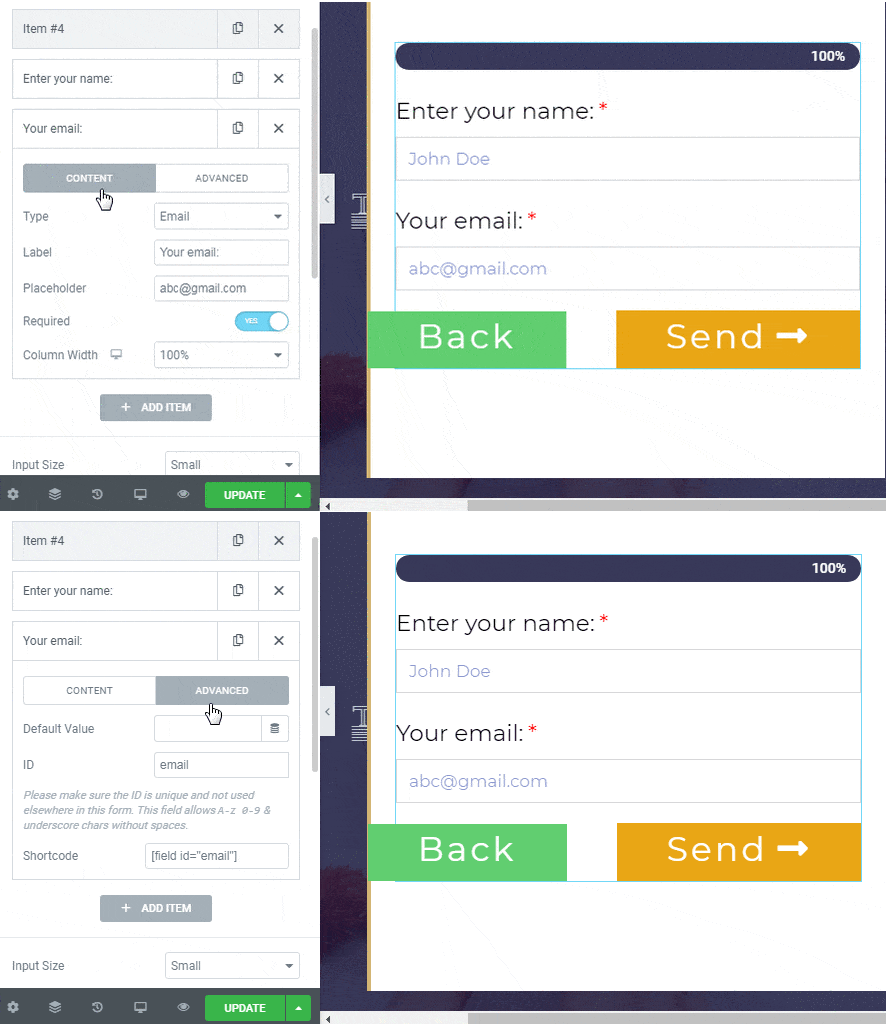
This will help store the field's value correctly and will help us in setting up the automation.
To add a new step in the form, all you need to do is add a new item >> then select 'Steps' from the drop-down.
Take a look:

That’s how you can have multiple steps in your form.
So here's how our quiz looks with all the questions added to it:

There are a ton of customization options available here.
You can customize the look and feel of the Elementor forms in the way you want to go with your brand.
Once you’re done, hit the 'Update' button.
That’s it, your multi-step Elementor form is now ready.
How to Trigger an Automation after the Form Submission?
To set up an automation, we’ll be using FunnelKit Automations.
FunnelKit Automations is a marketing automation engine- it connects your WordPress/WooCommerce website with other apps and tools you love.
You can connect it to your CRM (Active Campaign, Convertkit, Drip & more), form-builders like Gravity Forms, Ninja Forms, Contact Form7, Elementor forms, Zapier, Slack and so many other apps.
So you can use any form builder here but we're using Elementor forms purely because they recently came up with this multi-step form functionality which is great for our use case.
Here’s a glimpse at our workflow:
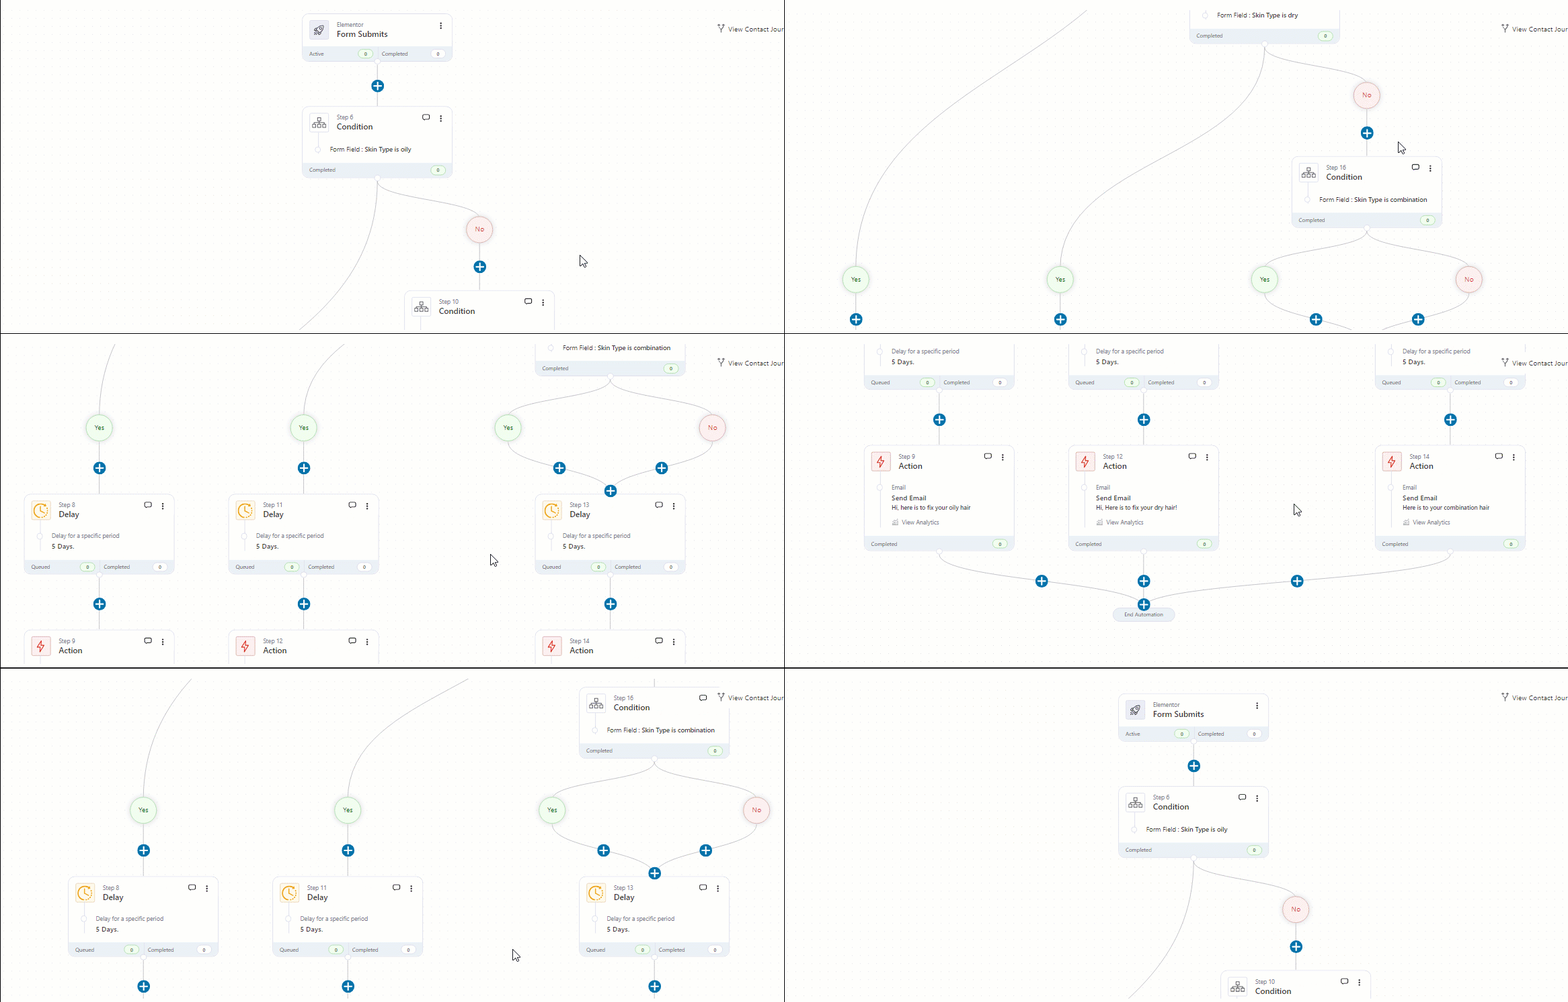
There are three different emails that the system sends out based on the options users select in the quiz for the skin type.
Let's now build this automation from scratch.
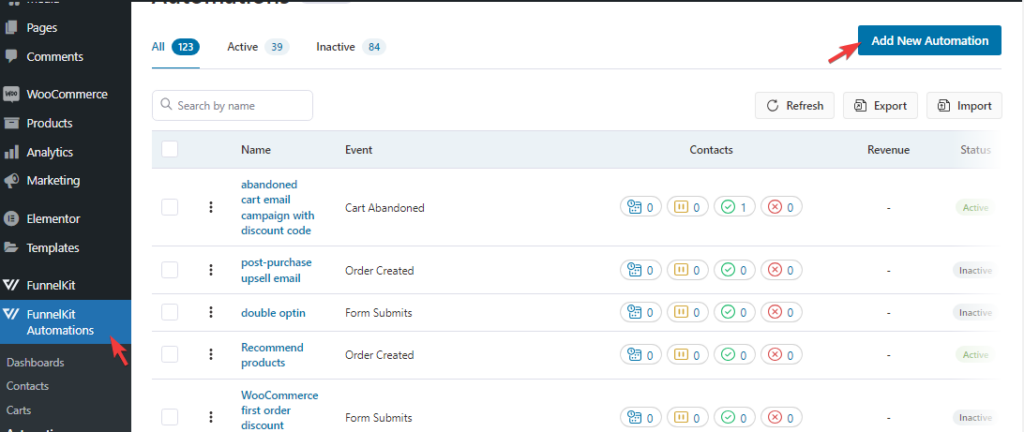
For that go to FunnelKit Automations and click on "Add New Automation".
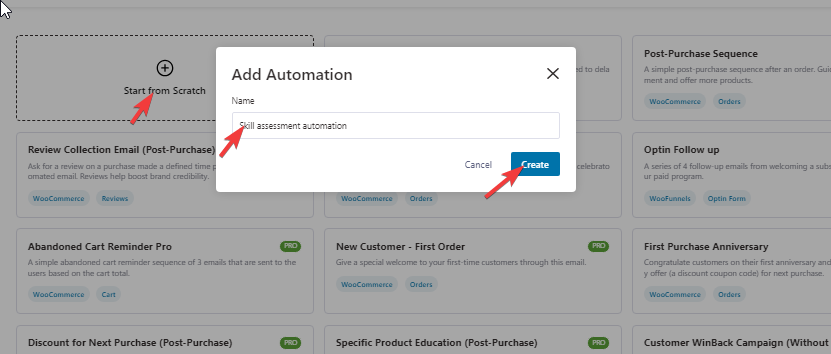
Click on "Start from Scratch", provide a name and click on Create.
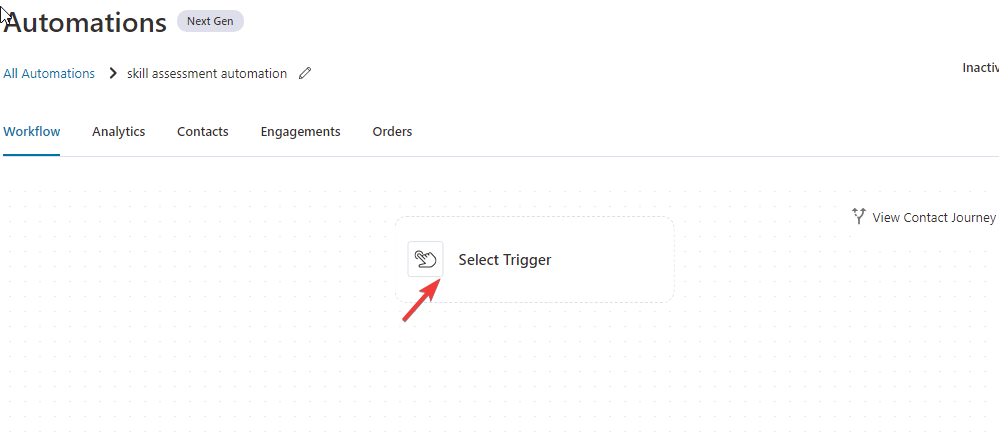
Now click on the trigger.
We'll first select the 'event':
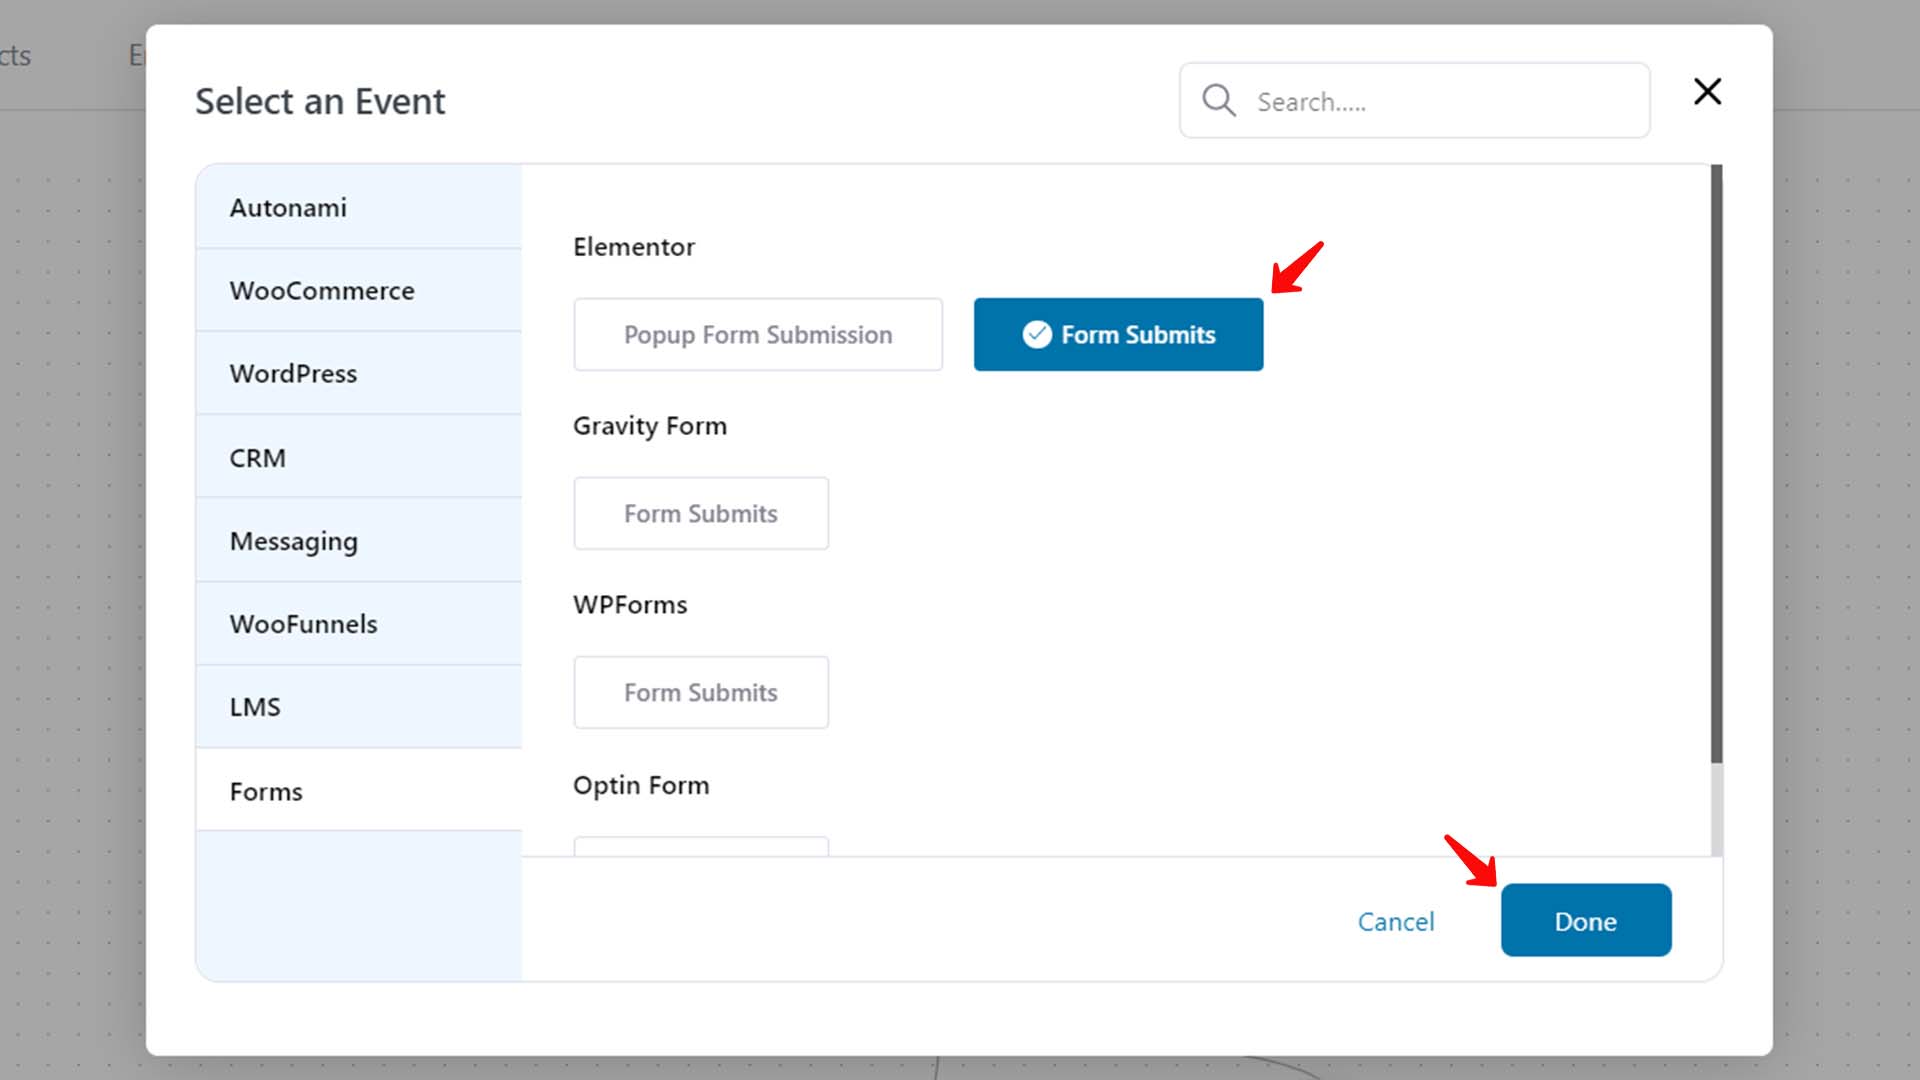
Select 'Form Submits' under Elementor.
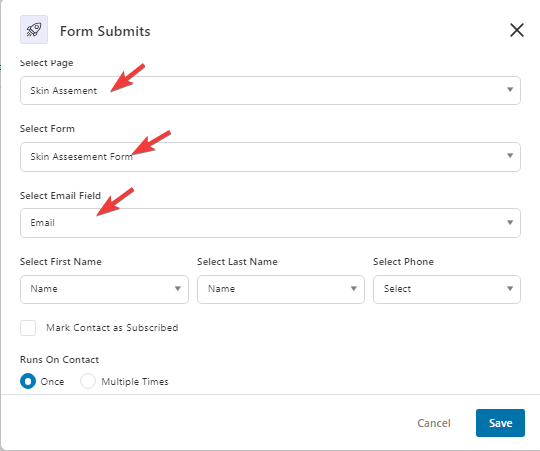
Next, select the Elementor page and the form that you've built. Then, map the form fields with this automation.
Now, click on the '+' button and select the type of step you want to add:
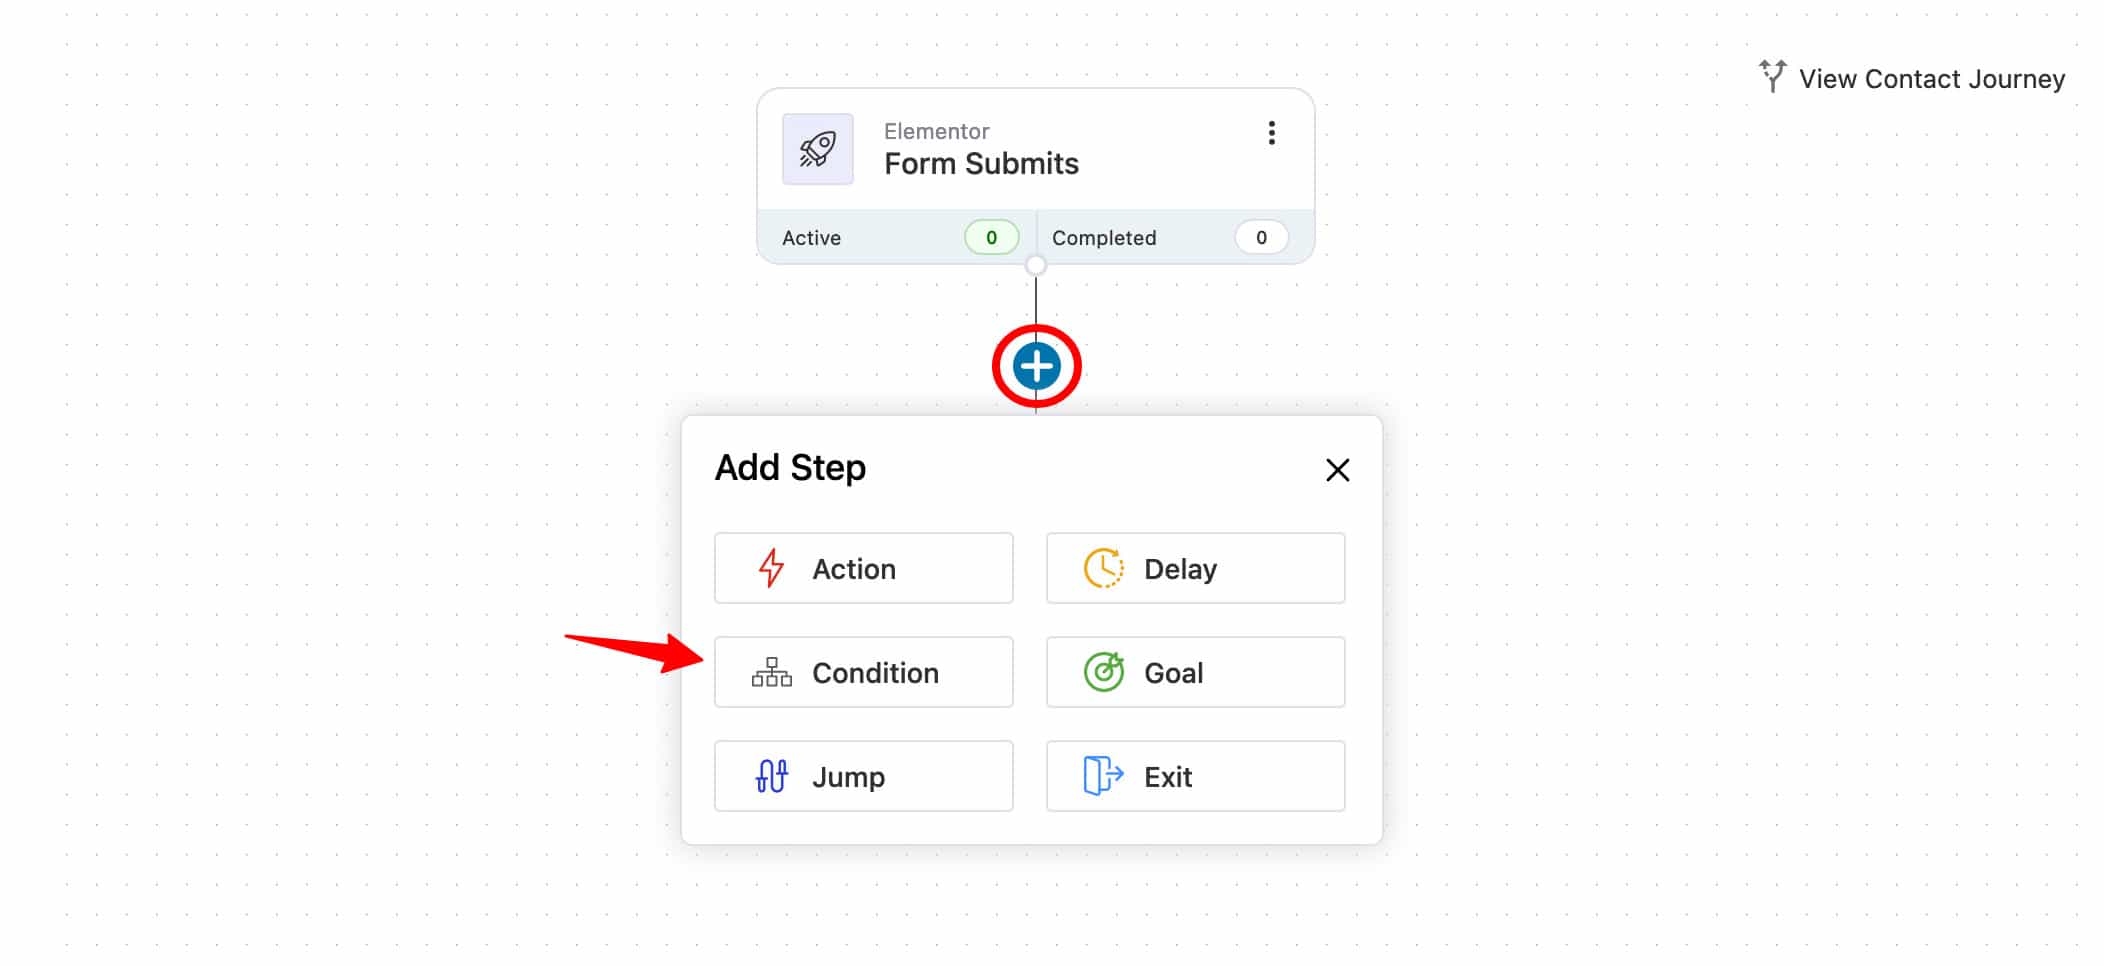
You get two options here:
- Action - If you want to take straight action whenever the specified event occurs.
- Delay - Set the delay to your step
- Condition - If you want to have rules/conditions to be met for the action to take place.
- Goal - Specify the objective of your automation
- Jump - Skip to a particular step
- Exit - Ends the automation
In our case, we’ll select 'Condition'.
Next, in the 'IF' section, set this rule:
Form Field - is - Choose Your Skin Type - Oily
So here, 'Choose Your Skin Type' is a field in the Elementor form, you’ll find it in the drop-down.
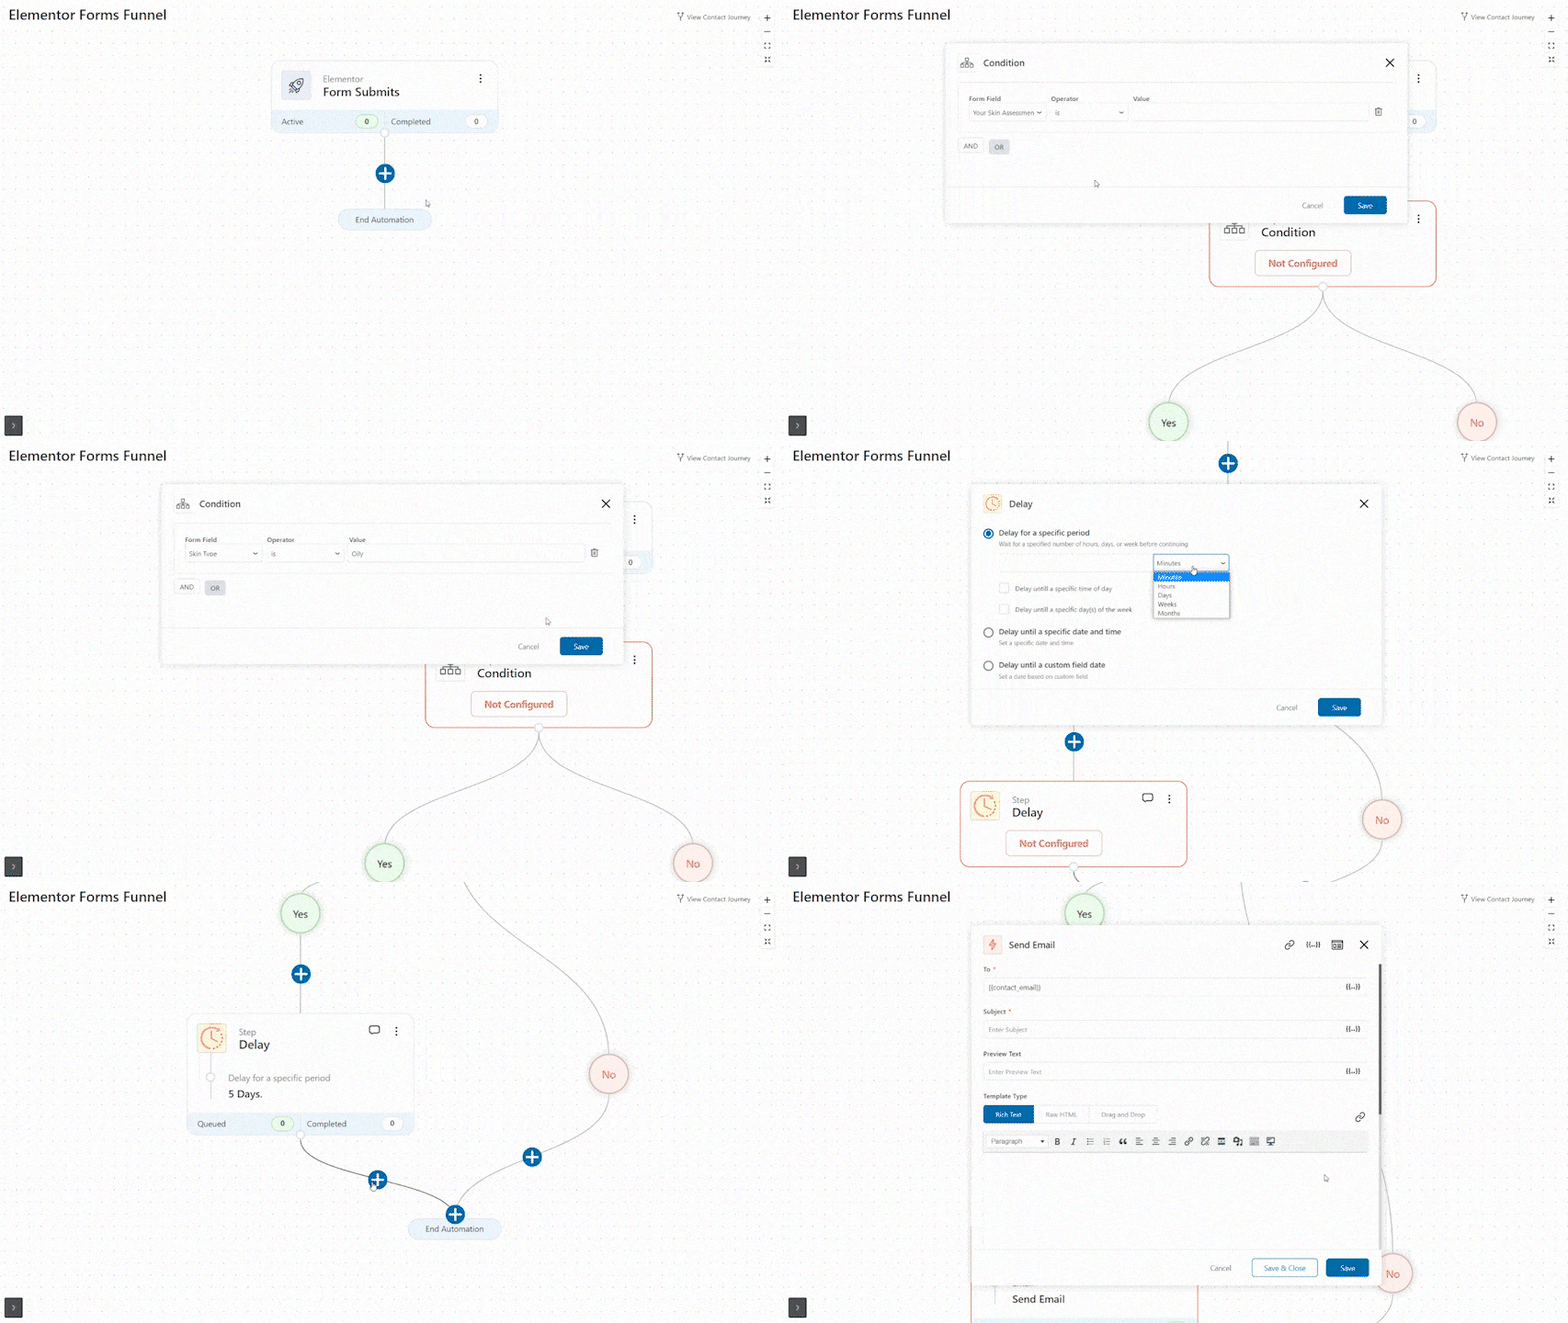
You can always select any field from the drop-down to set up rules for them and create different workflows.
Next, select the action for this automation.
Choose 'Send Email' under Messaging like the one shown above.
Now let’s see how to craft this email.
How to Personalize Your Emails & Send an Offer to Buy
When you select the 'Send Email' action, you'll see the email-builder on the right side.
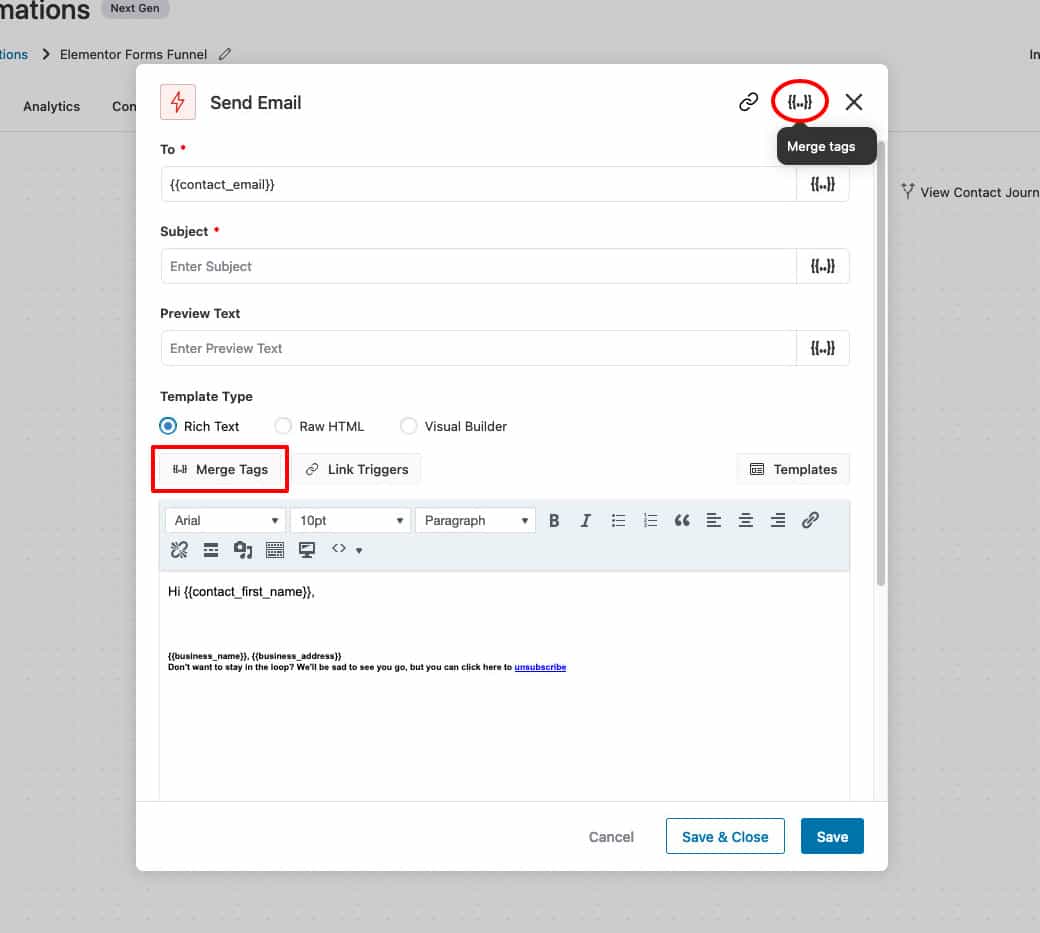
You can first choose the template you want for your email.
Next, specify the recipient of the email using the merge tag.
To do that, choose the 'Your email' field under the elementor_form_field merge tag.
Next select 'email' as the field:
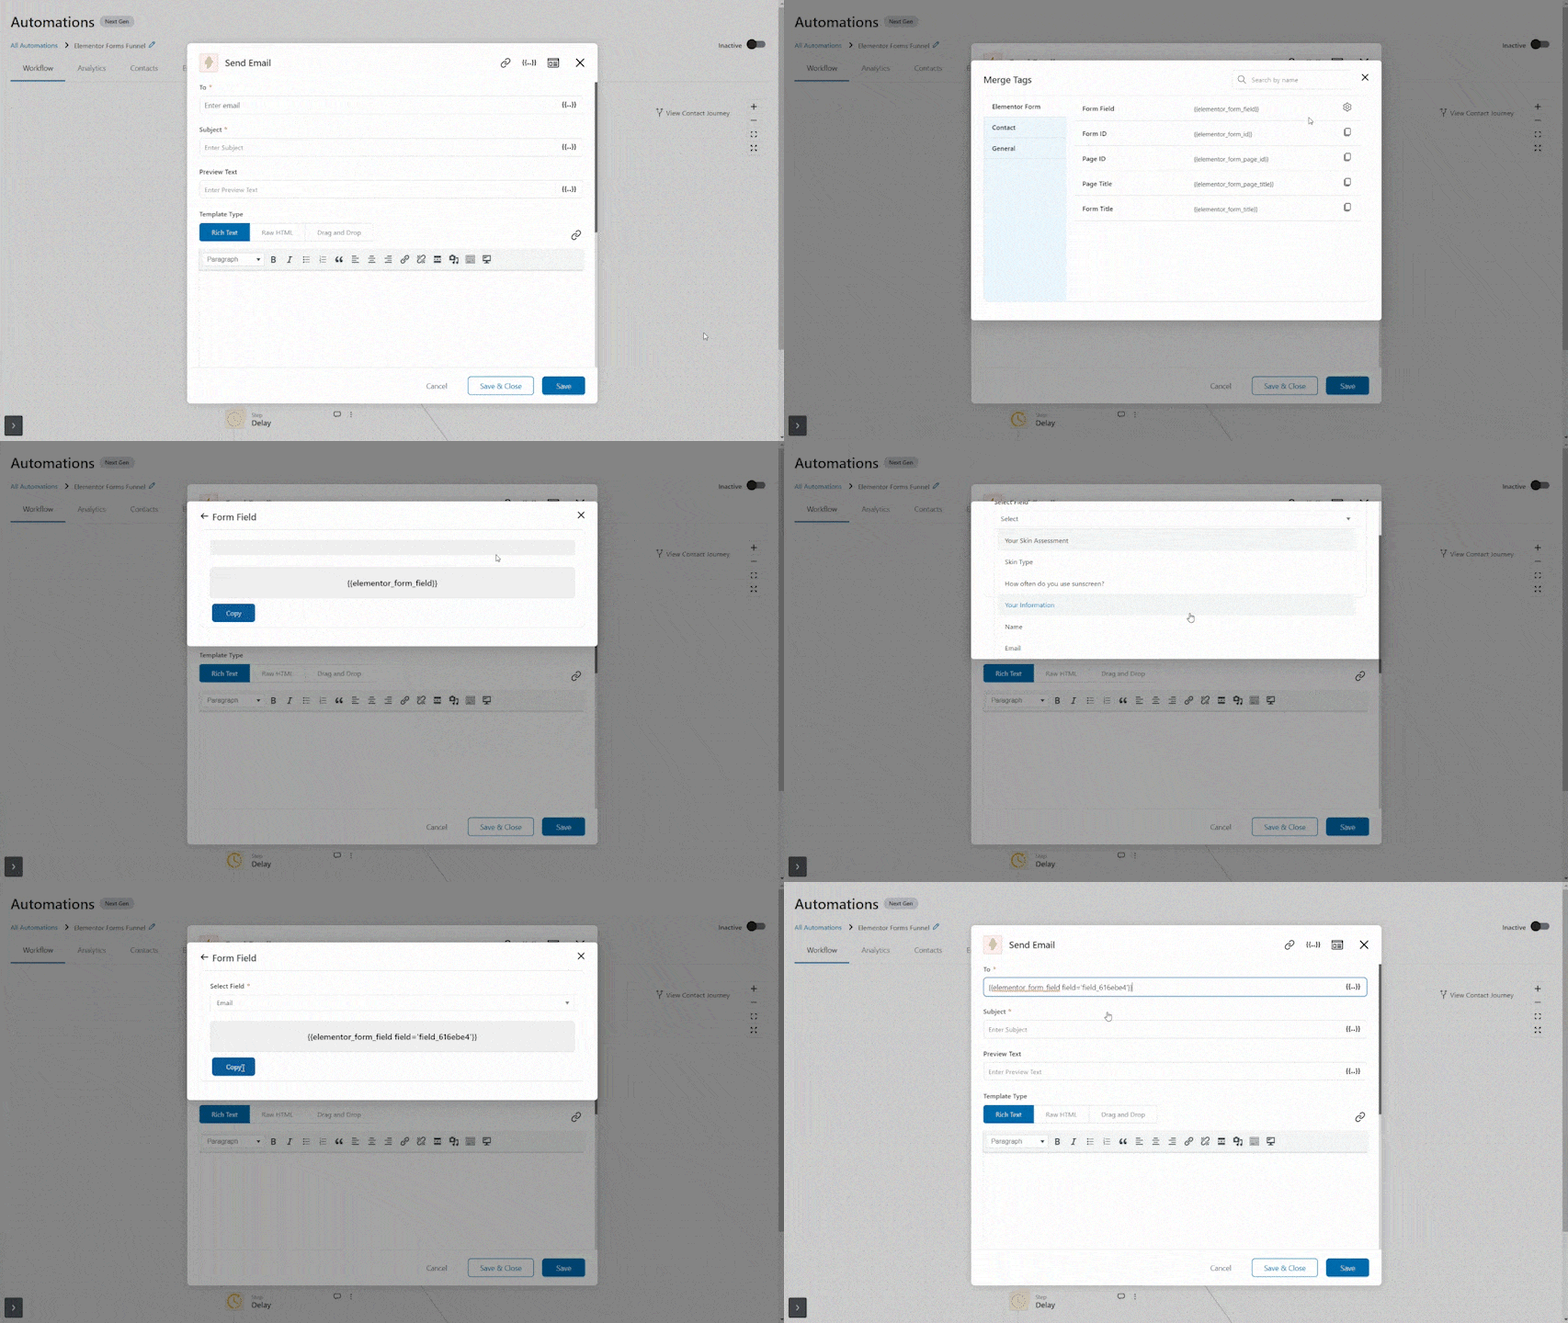
Copy the merge tag to the clipboard and paste it into the 'To:' textbox.
Next, specify the subject of your email.
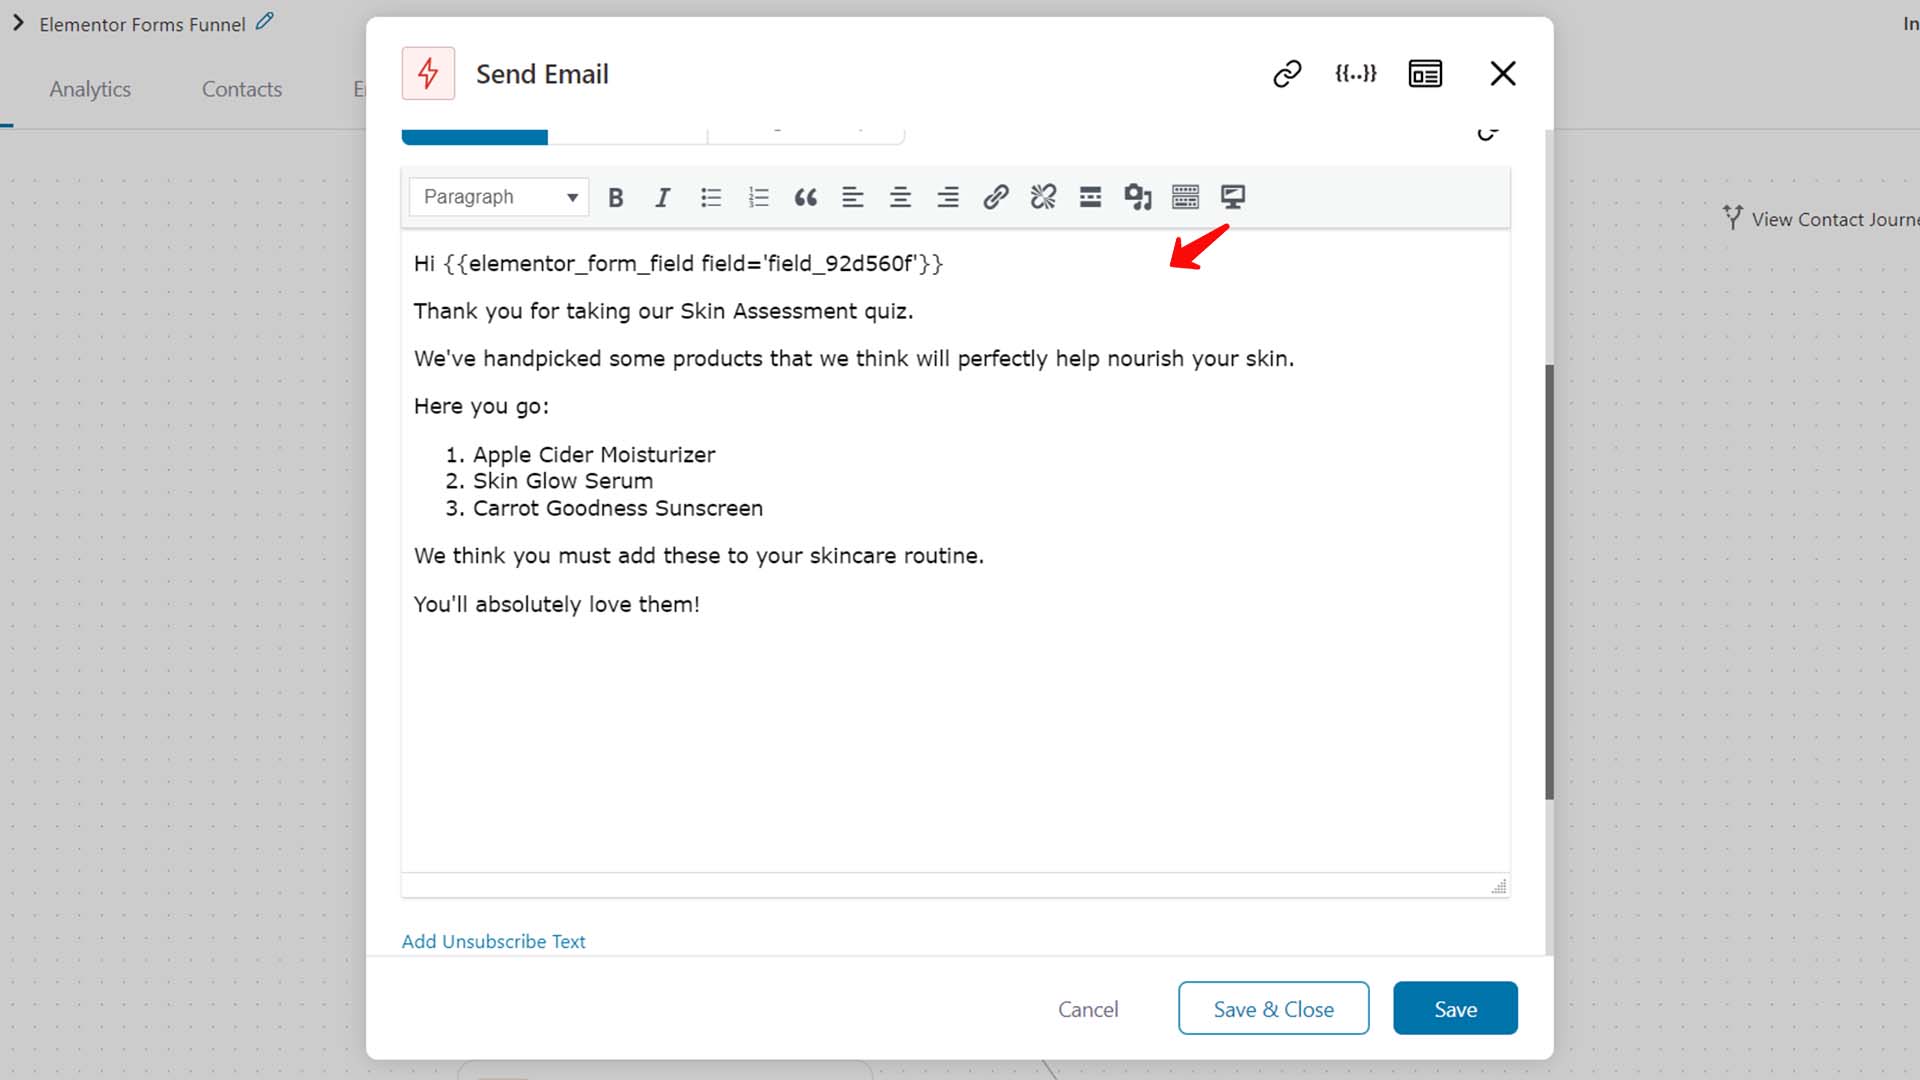
Next, to craft the email, start by adding the first name merge tag in the salutation.
To do that, select the 'Enter your name' field from the drop-down under the elementor_form_field merge tag.
Now list the recommendations based on the type of skin they’ve selected in the form.
List the items and hyperlink them to the product page where they’ll be able to browse the products and add them to their cart.
Additionally, you can also provide skin tips, skincare routines, and so on.
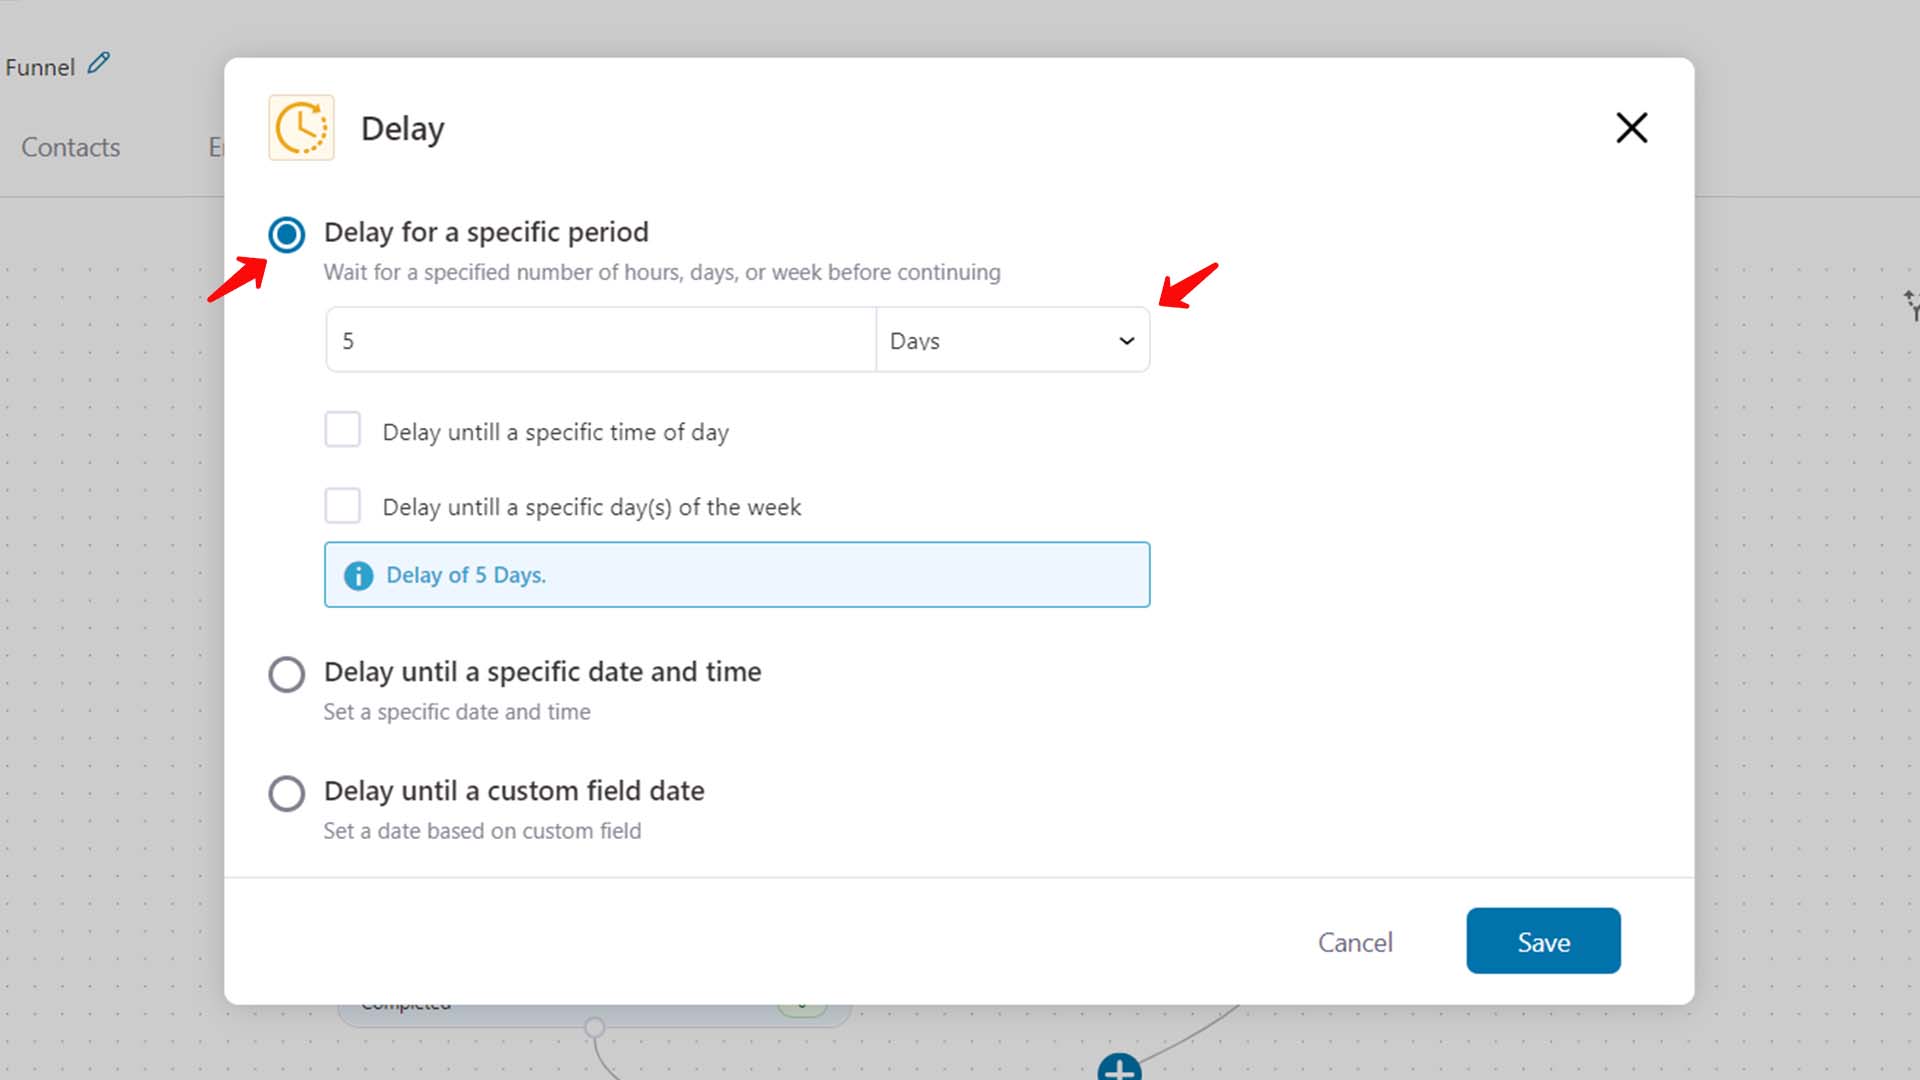
Further, set up a delay for this email.
We are setting the delay to 5 minutes because we want the email to go within 5 minutes of them submitting the form.
This is how you can do that:
In fact, the delay is a nifty feature if you're sending out a sequence of two or three emails.
It allows you to time your emails and also, create a well-planned sequence.
Similarly, you can add more rules to this automation to send out different emails when the skin type selected is 'Dry' and 'Combination'.

Note: Other than the WordPress ‘Send Email’ option, you can send emails through Active Campaign, Convert Kit, or Drip and you can send an SMS with Twilio. Besides, you can also choose to send the information to your slack channel.
Additionally, to fasten up the process, you can click on the 'Send Email' action, copy it, and paste it as an action for the next condition.
Once you’ve done that, you can make tweaks to the email body as per your needs.
Now let’s see how you can send your prospects directly to the one-page checkout that contains all the recommended products.
Creating a One-Page Checkout to Turn Leads into Instant Sales
The idea behind creating a one-page checkout is to ensure that users can buy all your recommended items from a single page.
This will increase your order value because you're giving users a chance to buy more than one item - and complete the set.
Your recommendations must be aligned with the problems they have (based on what they filled in the contact form). Here's how you can insert just one click in your email:
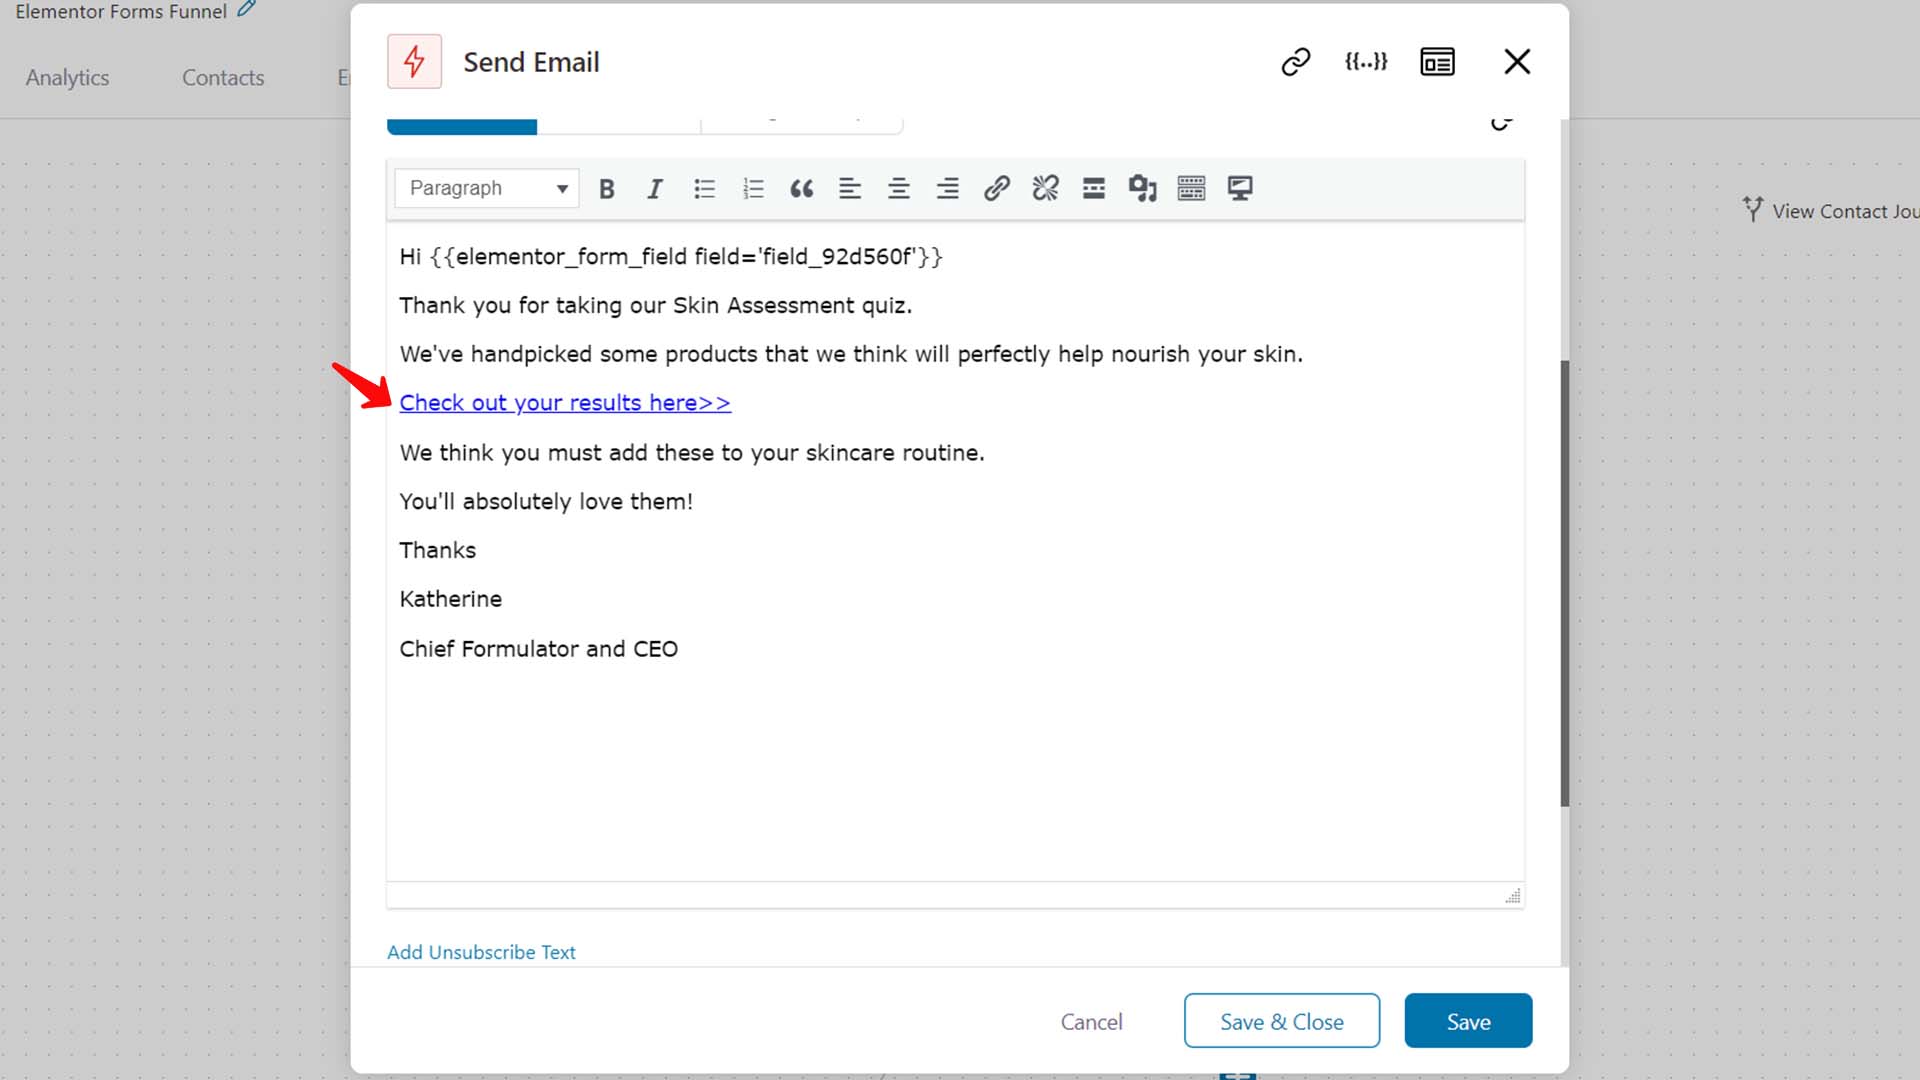
When they click on this link, they’ll be directed to the one-page checkout.
Here's an optimized one-page checkout that we’ve built using WooFunnel Checkout:
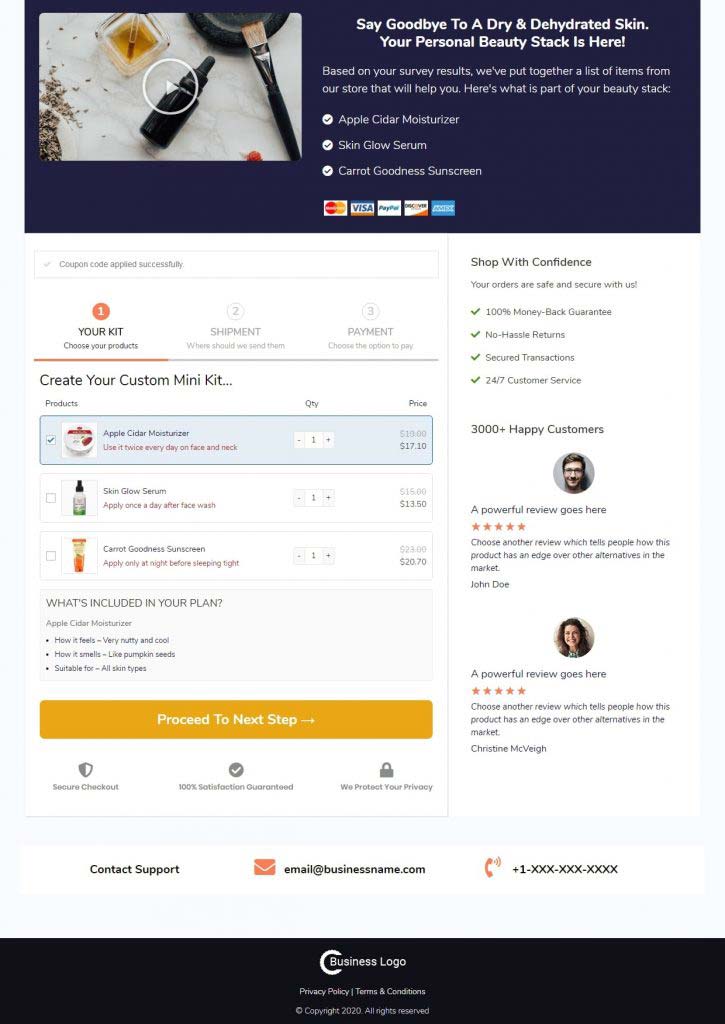
Yes, this is designed to close the sale!
The One Page Checkout displays product recommendations for the users, directly on the checkout page.
So you can create one-page checkouts for every skin type and add the link in your email.
The key features of this one-page checkout:
- At the top, you can have a short demo of the product or your company - your mission, vision, your story, or behind the scenes of how your products are made.
- List the products that you want to recommend them one below the other.
- After selecting the products they want and unchecking the items they don't, they can proceed to the next step
Take a look:

Moreover, there’s the quantity incrementer that allows them to increase the number of items they’re buying.
However, if you do not want it, you can choose to hide it.
On the right-hand side of the checkout, add customer testimonials and trust badges - these act as credibility boosters and make the decision-making process seamless for your buyers.
In the next steps, we ask about their basic details and shipping info and finally collect the payment.
Furthermore, you can add an Order Bump to increase your average order value.
Watch the video here to learn how to create a one-page checkout page from scratch using Elementor:
Ready to Turn More Leads into Sales Using ELementor Forms Funnel?
When we set out to create a system for capturing leads, we asked ourselves:
"Can there be a smarter way to capture leads? After all, all we know about our leads is their name and email, but nothing about their problems, preferences, or needs.
Further, could there be an automated system to turn them into sales?"
We didn't find any credible answers online. But we persisted.
Quizzing tools don't let you build workflows. Automation tools can't capture leads and send segmented emails based on users' responses.
So we created this smart system that we call Elementor Forms Funnel.
And we hope you had a great time learning about this strategy.
Leave a comment and tell us if you're using quizzes plus automation in your business.
Explore more about FunnelKit Automations here and FunnelKit (formerly WooFunnels) Funnel Builder here. Start unleashing the combined power of these two tools!
Editorial Team
February 17, 2026A WooCommerce auto apply coupon adds a discount to your customer's cart without them needing to type or paste a coupon code. Instead of relying on manual entry, the coupon...
Editorial Team
February 12, 2026First impressions matter, and in eCommerce, your welcome email is your first chance to shine. A WooCommerce welcome email is an automated message sent to new customers right after they...
Editorial Team
February 6, 2026With increasing competition and rising ad budgets, acquiring new customers is difficult. Forbes reports that the conversion rate for new customers is just 5%-20%. On the other hand, repeat customers...


