
Want to sell your LearnDash courses through WooCommerce and accept payments seamlessly through gateways like Stripe, PayPal, or Apple Pay?
To sell LearnDash courses through WooCommerce, you install the WooCommerce for LearnDash add-on, set your course to Closed access mode, create a matching WooCommerce product, and link the two.
This allows students to enroll automatically upon purchase.
But there's more to that!
In this guide, we'll walk you through the full setup, including screenshots, payment gateway configuration, conversion tips, and troubleshooting.
Plus, we'll give you the two proven ways to sell your online courses (a storefront for multi-course catalogs, a sales funnel for a single flagship course).
Table of Contents
- 1 Quick Steps: Connect LearnDash & WooCommerce
- 2 What Is the LearnDash WooCommerce Integration (and Why Use It)?
- 3 How to Sell LearnDash Course in WooCommerce?
- 4 Setting Up Payment Gateways for Your Courses
- 5 Two Ways to Sell Your LearnDash Courses With WooCommerce
- 6 Selling Courses As Bundles and Variable Products
- 7 Selling Course Subscriptions and Memberships
- 8 WooCommerce Memberships or MemberPress (for full membership sites)
- 9 5 Best Practices to Implement With LearnDash WooCommerce Integration
- 10 Frequently Asked Questions (FAQs)
- 11 Start Selling Your LearnDash Courses With WooCommerce Today!
Quick Steps: Connect LearnDash & WooCommerce
If you just want the mechanics, the whole integration is in five steps. The rest of the guide expands on each one.
1. Install both plugins: Make sure LearnDash and WooCommerce are installed and activated on your WordPress site.
2. Add the free integration add-on: Install and activate the WooCommerce for LearnDash add-on (two installation methods below via LearnDash LMS → Add-ons or by downloading the file and uploading it). It's a free extension available to active LearnDash users.
3. Set your course to Closed access mode: In the course settings, choose 'Closed' so the course can only be unlocked by a purchase.
4. Create a WooCommerce product and link it to the course: Add a new product, then associate your LearnDash course (or group) to it in the product data panel. We'll discuss this in detail later.
5. Test a purchase: Run a test order to confirm payment processes, and the buyer is automatically enrolled. Done.
What Is the LearnDash WooCommerce Integration (and Why Use It)?
LearnDash is a popular learning management system (LMS) plugin for WordPress.
It lets you build and manage online courses with a drag-and-drop course builder, quizzes, assignments, certificates, badges, and detailed student-progress reporting.
It works with virtually any WordPress theme and powers course sites for solo creators, universities, and enterprise training teams alike.
However, LearnDash is not built for advanced selling. Its native enrollment and payment options are deliberately basic.
The moment you want multiple payment gateways, coupons, order bumps, course bundles, real subscriptions, or a branded checkout, you've outgrown what LearnDash does on its own.
That's the gap WooCommerce fills.
WooCommerce is the most widely used eCommerce platform on WordPress, and it handles the entire sales side: product pages, 100+ payment gateways, taxes, coupons, order management, and reporting.
Connect the two, and each course becomes a sellable product that automatically enrolls the buyer the instant their order completes.
Overall:
- LearnDash handles course creation, delivery, progress tracking, and certificates.
- WooCommerce handles pricing, checkout, payments, and order management.
- The free integration add-on is the bridge that auto-enrolls buyers and keeps access in sync.
The result is automated course access, flexible global payments, professional product pages, and a checkout you can optimize for conversions, none of which LearnDash gives you alone.
How to Sell LearnDash Course in WooCommerce?
You need both core plugins live before anything else. Install WooCommerce from Plugins → Add New (search "WooCommerce") and run its setup wizard. Install LearnDash per your license.
If you're new to WooCommerce, it's worth skimming WooCommerce's own Getting Started guide so the store basics (currency, payments, tax) are configured before you connect courses.
Once done, follow these steps:
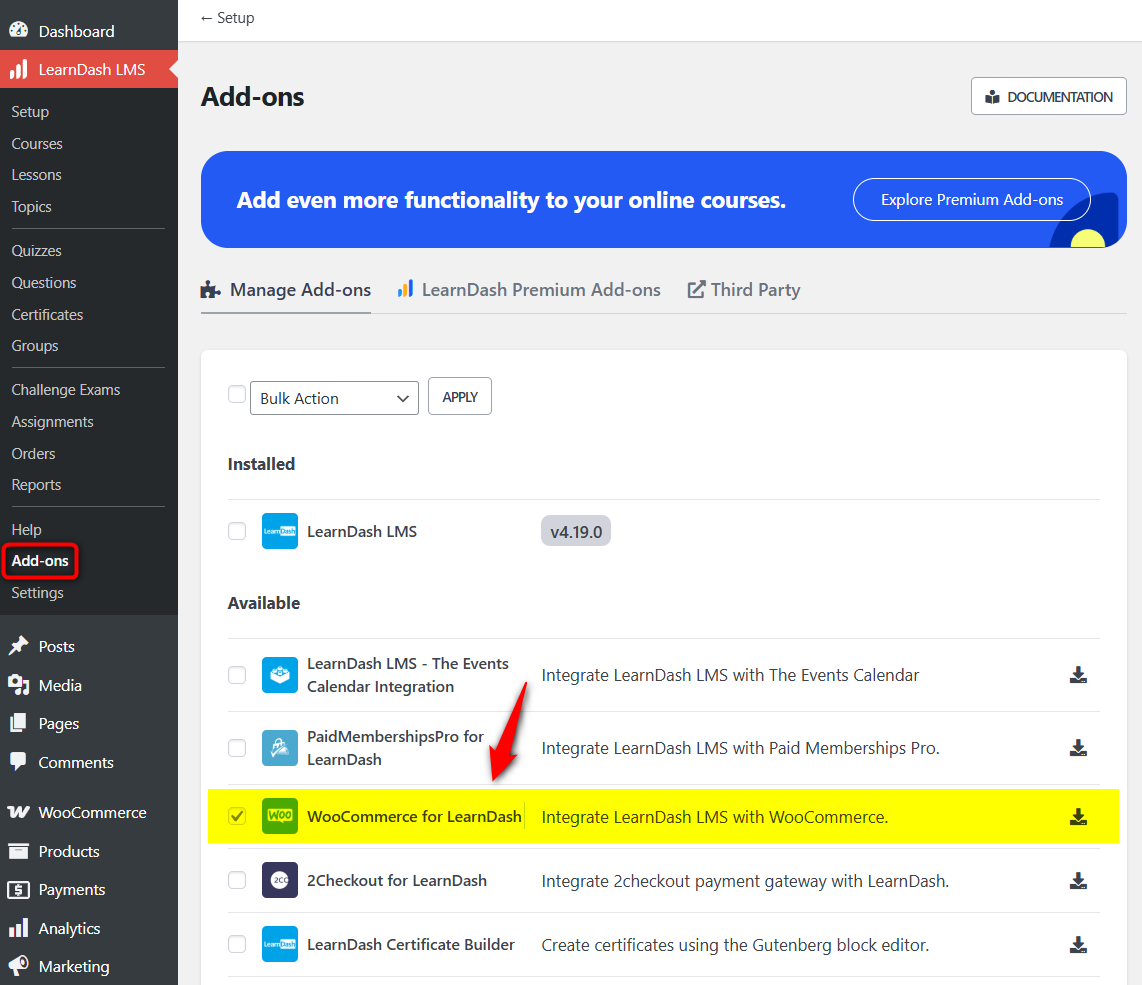
Step 1: Install the free WooCommerce for LearnDash add-on
The official add-on is free and gives you two installation paths. Use whichever fits your setup:
Option A - Add-ons menu (requires an activated LearnDash license):
- Go to LearnDash LMS → Add-ons in your WordPress dashboard.
- Find WooCommerce for LearnDash under the Available section.
- Click to install, then Activate.
Option B - Manual upload:
- Log in to your LearnDash account and open the Downloads section.
- Download the WooCommerce for LearnDash add-on .zip file.
- In WordPress, go to Plugins → Add New → Upload Plugin, click Choose File, select the downloaded .zip, click Install Now, then activate.
Once activated, the add-on adds course/group association options inside the WooCommerce product data panel. That's how you'll link products to courses in Step 4.
Step 2: Set your LearnDash course to closed access mode
Open LearnDash LMS → Courses, select the course you want to sell, and set its Access Mode to 'Closed'.
Here, enter the course price and button URL. This will be your WooCommerce product URL.
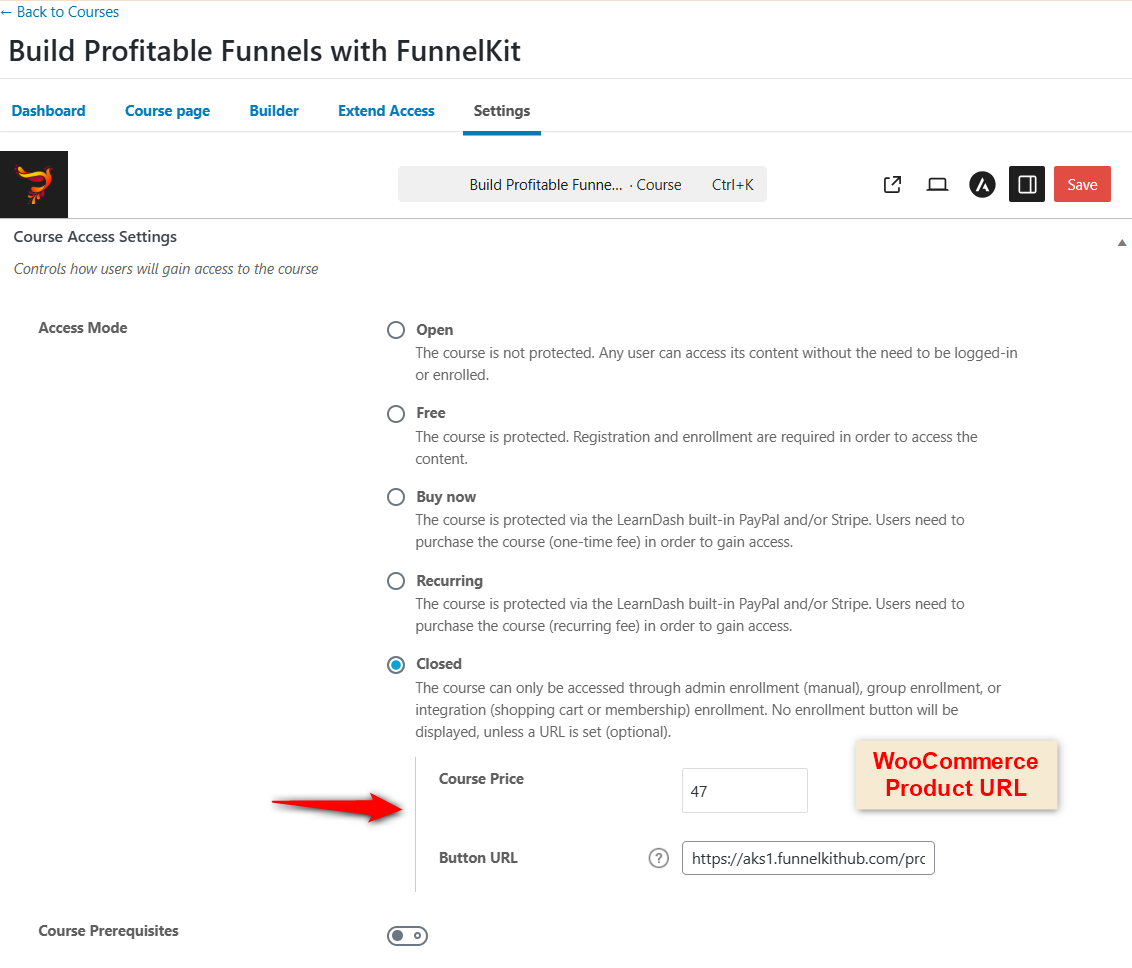
Closed mode means the course can’t be joined for free or by open registration. The only way in is a purchase you control.
Make sure the course is published before you link it.
Step 3: Create a WooCommerce product and link it to your course
To add the product, go to Products → Add New.
Fill in the details about the product - the course name (product title) and its description.
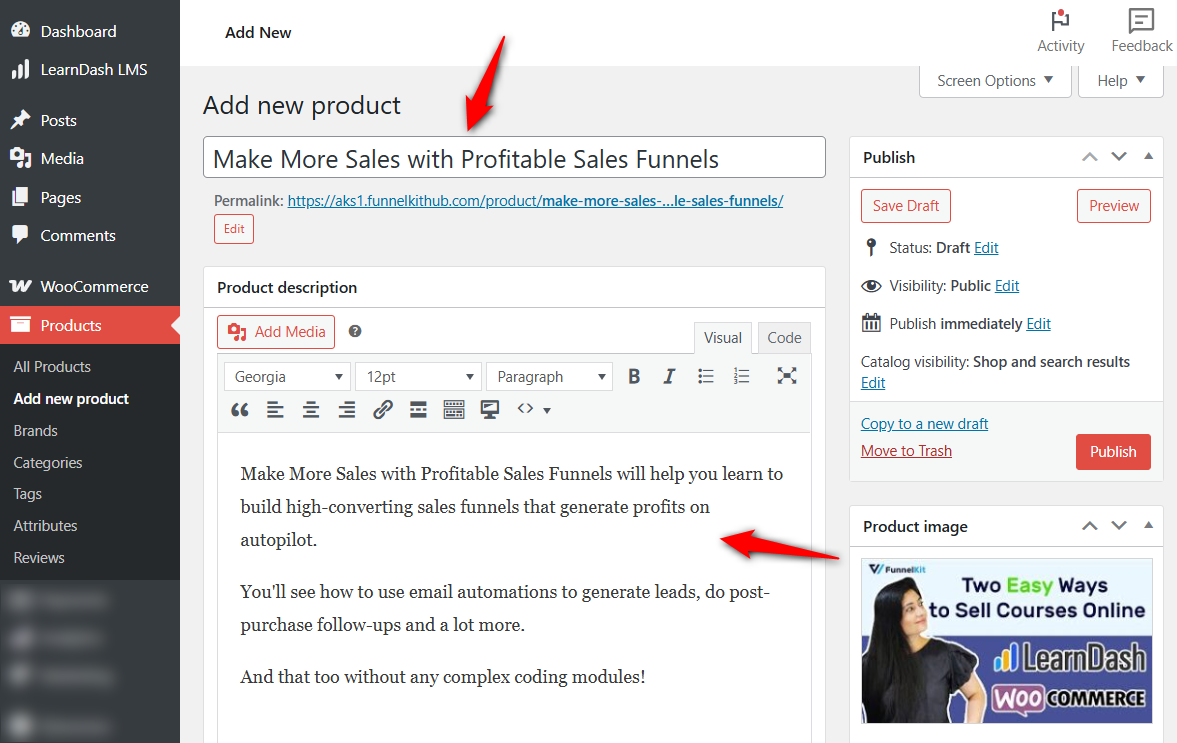
Next, select ‘Course’ from the Data - Product dropdown menu.
Specify the price and assign your created LMS course by its title in the LearnDash Courses field.
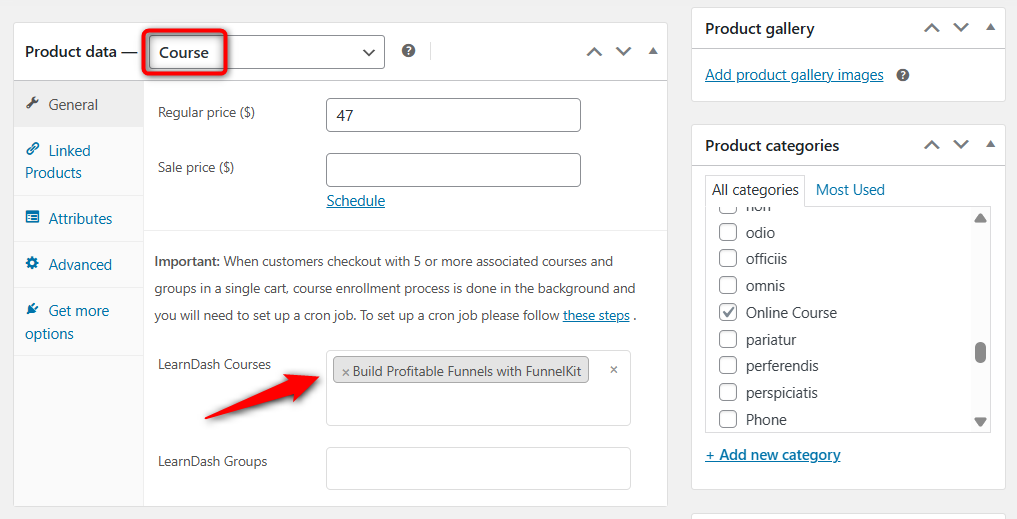
You can even associate multiple courses with a particular product if you want.
Once satisfied, hit the 'Publish' button to make it public.
Step 4: Test run your store checkout flow
Once you’ve published the product, click on ‘View the Product’ to get an idea of how the courses look on the website. The added lessons will automatically appear on the page.
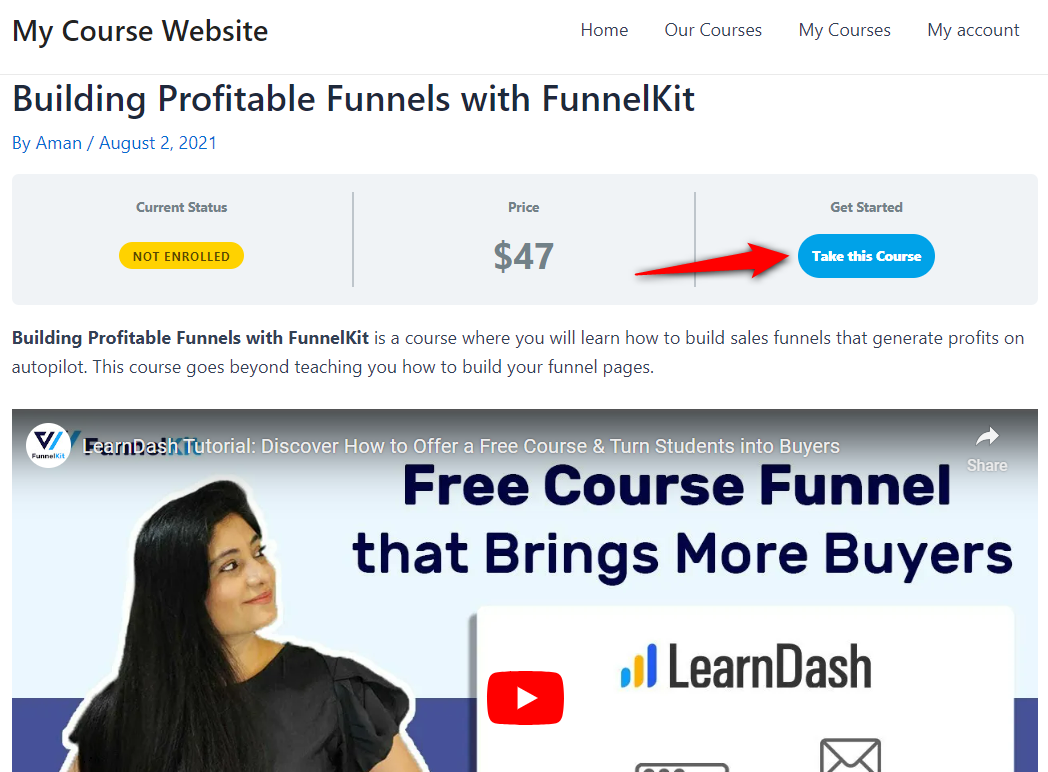
Clicking on 'Take this Course' will direct you to the WooCommerce product page, where you'll see this LearnDash course.
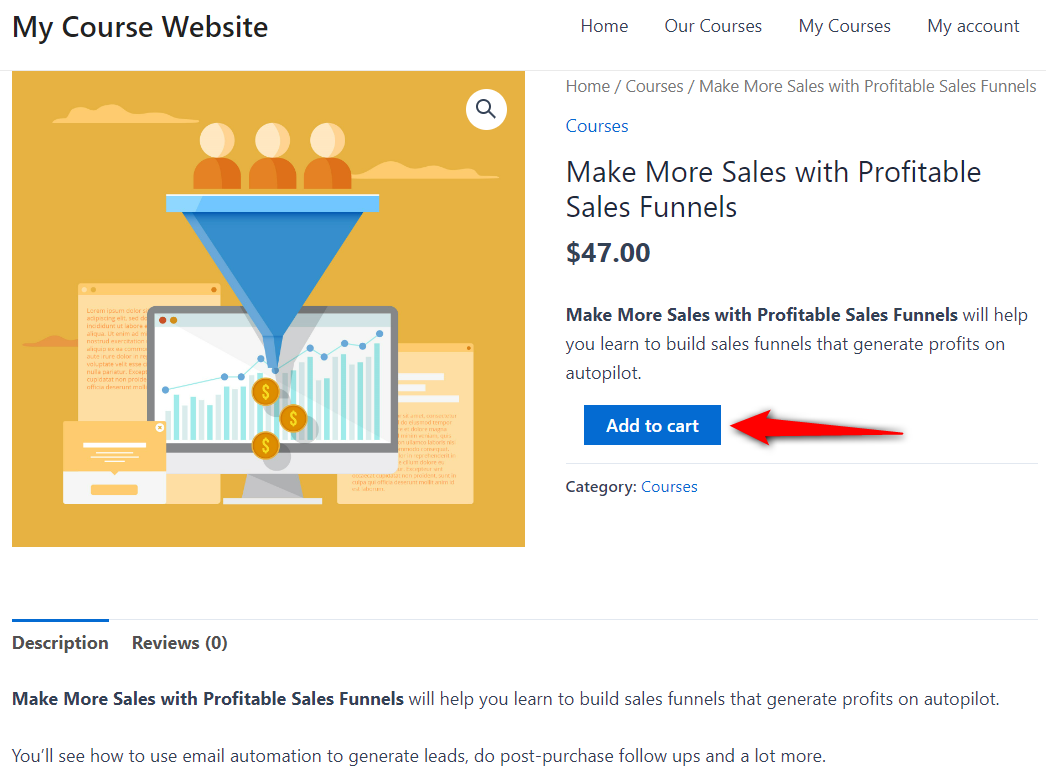
Take on the default WooCommerce flow path by adding the product to the cart, going to the cart page and then proceeding to the checkout page.
You'll see the default WooCommerce checkout page, which looks bland and doesn't match your brand colors.
Not just that, you don’t have a shipping address, which cannot be edited natively.
That’s where FunnelKit Funnel Builder comes into play. It helps you design a professional, on-brand custom checkout that gives the prospects the final push to make their purchases and not abandon with cold feet.
To design your pages, you get an ever-growing template library and compatibility with different page builders, like Elementor, Divi, Oxygen, Bricks, Block Editor, etc.
Setting Up Payment Gateways for Your Courses
One of the biggest reasons to sell through WooCommerce is payment flexibility. WooCommerce opens the door to 100+ gateways and digital wallets.
You need to install the payment gateway plugin to add payment options in your store. Here are some of your options:
- Stripe: Cards, Apple Pay, Google Pay, Buy Now, Pay Later methods (Affirm, Klarna and Afterpay), local payment such as SEPA, Bancontact, and more.
- PayPal: High buyer trust and broad international coverage; pairs well with Stripe as a backup option.
- Square: Convenient if you also sell in person and want one account for both online and offline sales.
- Regional and alternative gateways: Mollie, Razorpay, Paystack, and many more, depending on where your students are.
Integrating them is quite easy. Just follow the onboarding process and enable the payment methods you want. That's it!
Here are some effective practices to follow when setting up payment gateways in WooCommerce:
- Enable at least two gateways (for example, Stripe and PayPal). Some buyers strongly prefer one over the other, and a backup reduces failed checkouts.
- Turn on express wallets (Apple Pay and Google Pay) to reduce friction on mobile, where a large share of course buyers check out.
- Always run a live test transaction with each gateway before launch, then refund it.
- Remember, LearnDash itself charges no transaction fees. Your only per-sale cost is the payment processor's standard rate (typically ~2.9% + 30¢).
If you want a deeper gateway comparison, the choice usually comes down to where your audience is and which wallets they expect to see at checkout. See payment gateway comparisons here.
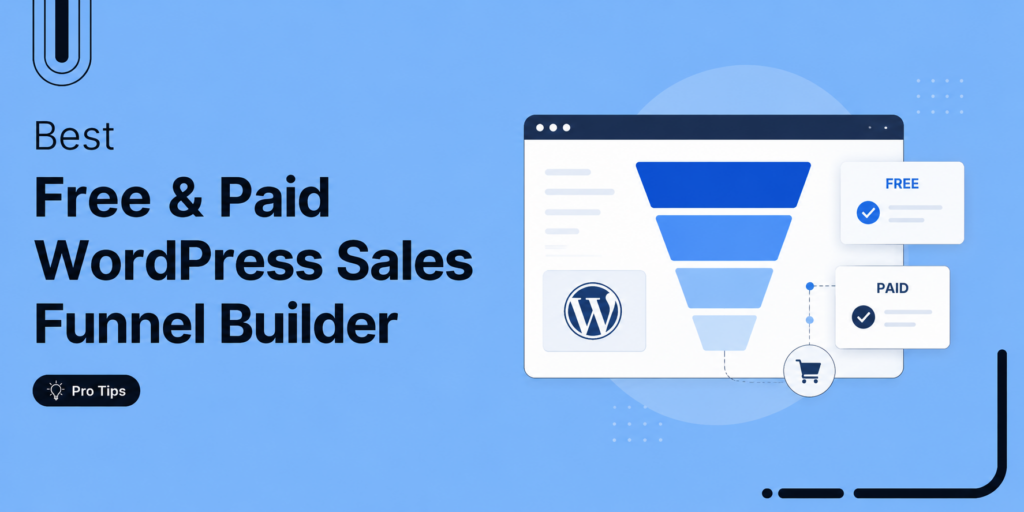
Two Ways to Sell Your LearnDash Courses With WooCommerce
The integration above makes courses sellable. How you present them is a separate decision, and it’s where your strategy (and conversions) are made.
There are two proven approaches.
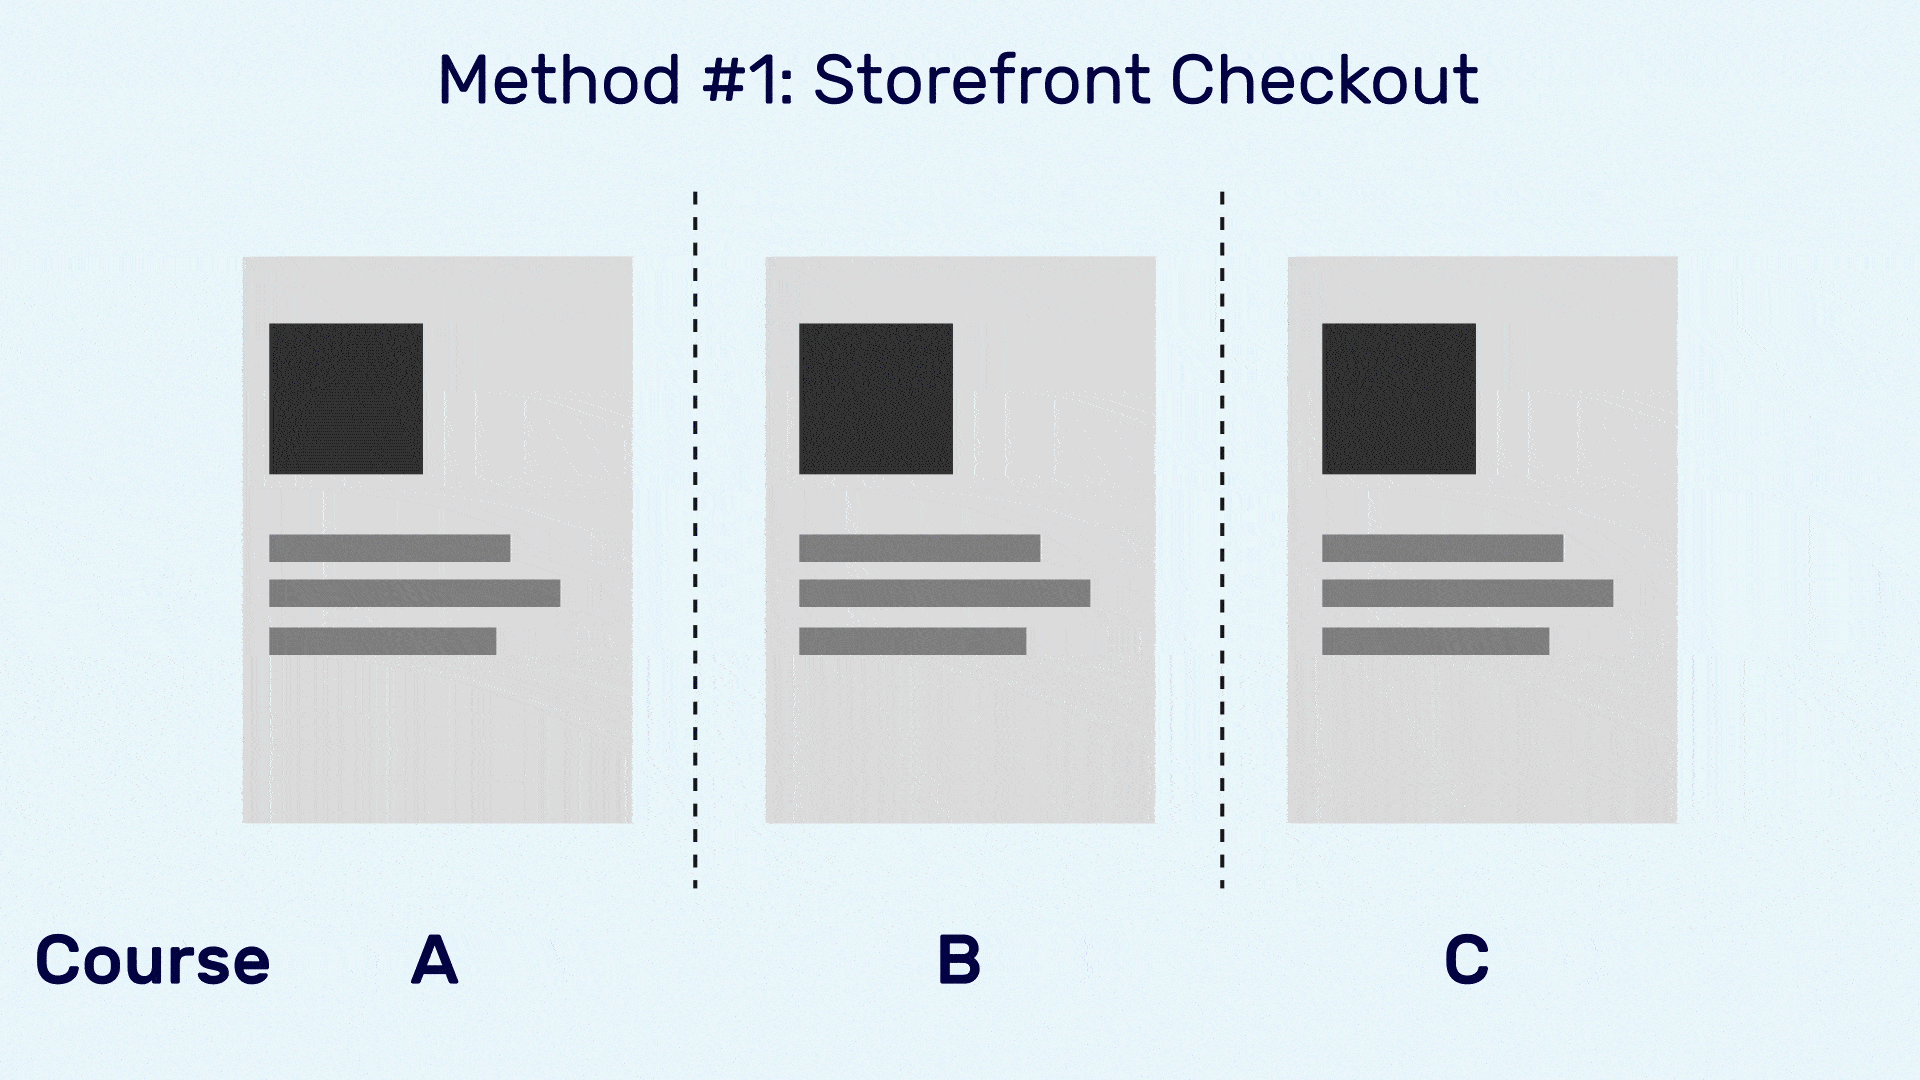
Method 1: Storefront checkout (best for multiple courses)
A storefront works like a normal online shop: a catalog of courses, a cart, and a standard checkout.
Students can browse, add several courses, and pay for them together. This is ideal if you have a catalog of courses and want an Amazon-style “browse and buy” experience.
- Best for: multi-course catalogs, course libraries, and academies.
- Pros: familiar shopping experience, easy cross-selling across courses, and effortless setup.
- Cons: More steps result in higher friction and drop-offs, and limited customization.
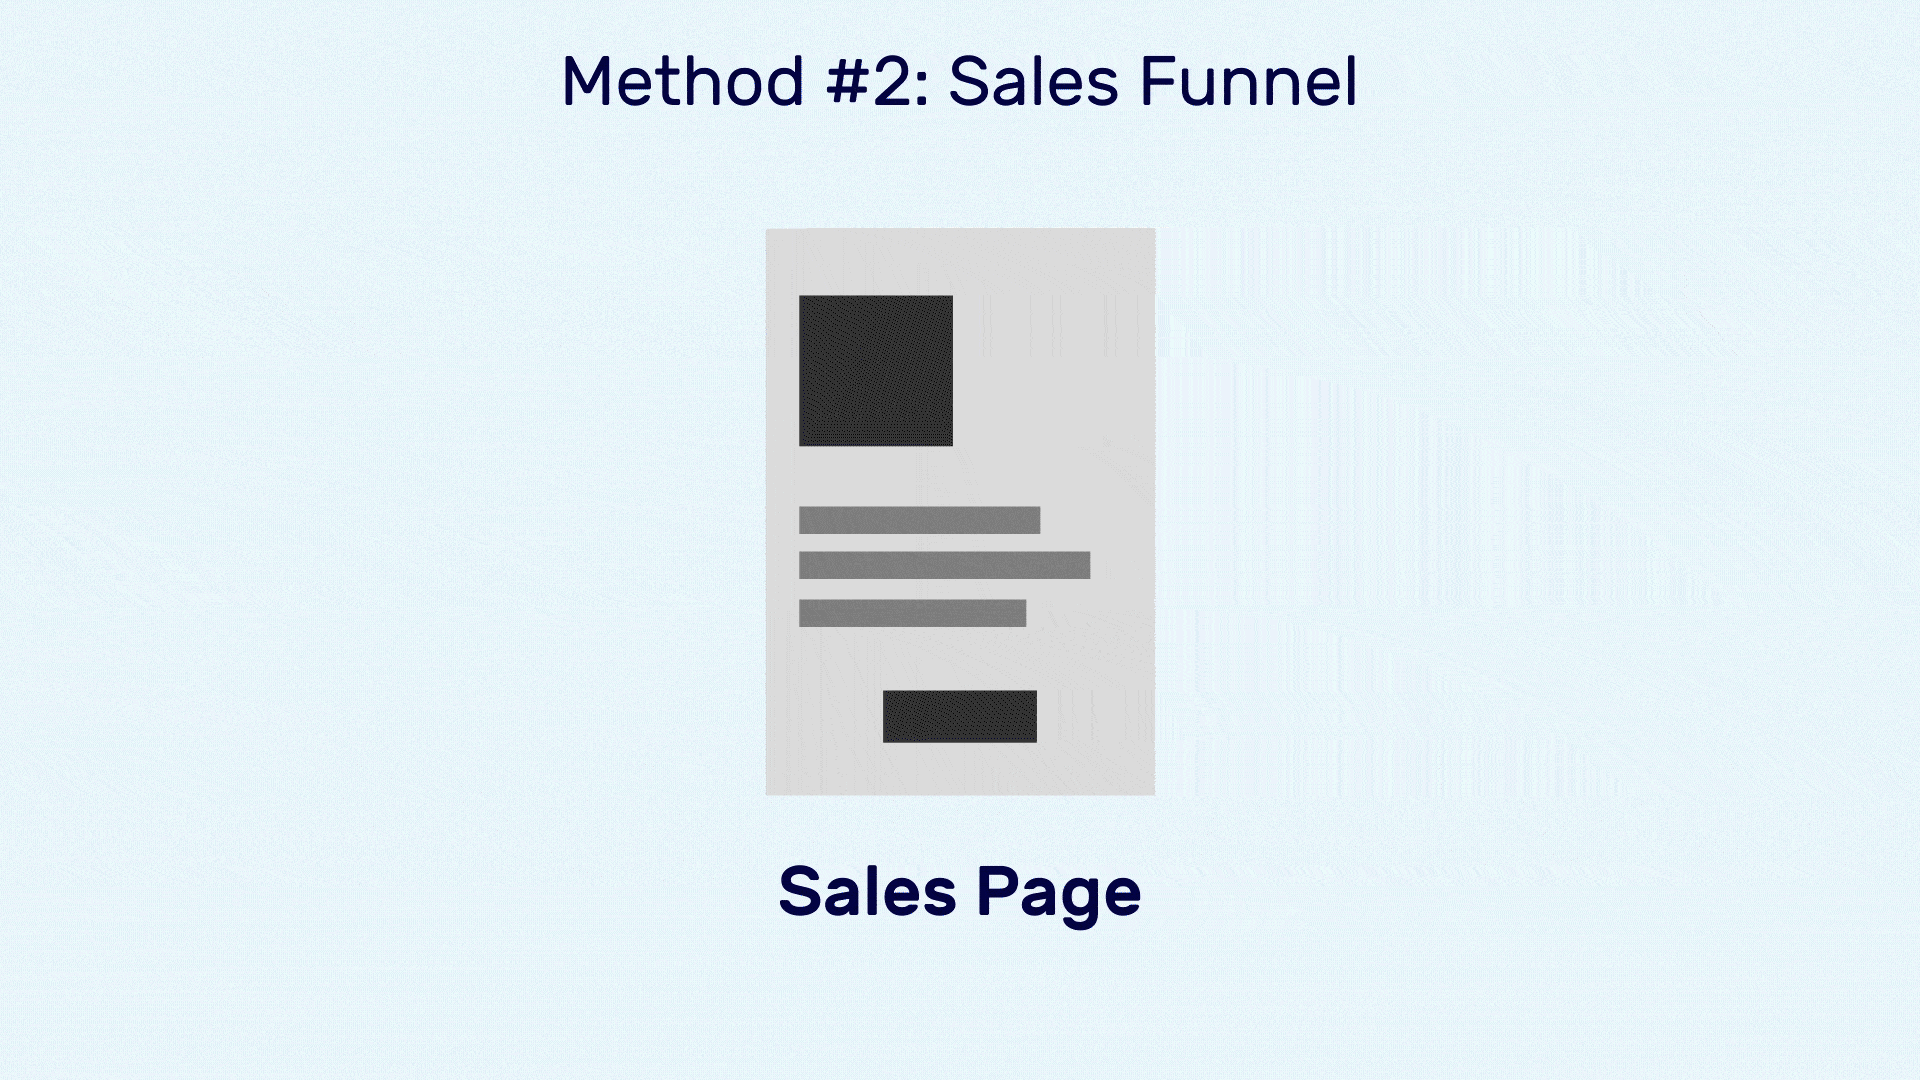
Method 2: Dedicated sales funnel (best for a single flagship course)
A sales funnel is a streamlined, distraction-free path: sales page → optimized checkout → upsell → thank-you.
There's no catalog to wander through. It's just a focused journey from interest to purchase, ideal for a single flagship course or a launch/promotion.
- Best for: one-signature courses, launches, and paid ad campaigns.
- Pros: higher conversion rate on a focused offer, room for order bumps and one-click upsells, and full customization.
- Cons: Not ideal for multi-course catalogs and requires design effort.
Selling Courses As Bundles and Variable Products
The official add-on supports more than simple, single-course products, and matching the right product type to your offer is a coverage area many guides skip.
- Course bundles
Group several courses into one higher-value product (for example, a “Complete SEO Track” containing three courses).
You can do this by associating a LearnDash group with a single WooCommerce product, so that a single purchase enrolls the buyer in every course in the group.
Bundling raises average order value and is an easy upsell at checkout.
- Variable products
Use a Variable product when one offer has multiple options. Let's say a course is sold as self-study vs. course + group coaching, or with different access durations.
With variable (and variable-subscription) products, the add-on requires you to associate the course/group at the variation level rather than at the parent product level.
- Coupons and promotions
Because the transaction runs through WooCommerce, you get the full coupon engine, including percentage discounts, fixed amounts, BOGO, time-limited launch codes, and cart conditions.
This flexibility is for WooCommerce only; none of it is offered by LearnDash's native selling.
Selling Course Subscriptions and Memberships
If you want predictable, recurring revenue instead of one-off sales, you have three solid paths. Pick based on how much you need beyond basic recurring billing.
Sublium Subscriptions (recommended for recurring course revenue)
Sublium is a WooCommerce subscription plugin built by the FunnelKit team, with a native LearnDash integration.
It's the modern way to run recurring course revenue. A subscriber is automatically enrolled in the linked course when they subscribe, and access is revoked automatically if a payment fails, no manual work, no code.
What makes Sublium a strong fit for course sellers:
- Recurring plans, free trials, sign-up fees, and installment ("pay in parts") options for high-ticket courses.
- Built-in failed-payment recovery (dunning) and cancellation-prevention flows to reduce churn.
- A subscriber self-service portal so students can pause, upgrade, or update cards without a support ticket.
- MRR, ARR, and churn analytics out of the box.
- Works seamlessly with FunnelKit for a branded subscription checkout page and subscription upsells.
A free Sublium Lite version is available on WordPress.org to evaluate before upgrading.
WooCommerce Subscriptions
The official WooCommerce subscriptions extension also works with the LearnDash add-on.
With it installed, the integration can regulate enrollment based on subscription status, and when a subscription expires, the student can be automatically de-enrolled.
It’s a proven option, though it's typically pricier, and you'll often need to add separate plugins for analytics and recovery.
WooCommerce Memberships or MemberPress (for full membership sites)
If you’re building a true membership site with gated content, tiered access, drip schedules across many courses, MemberDash (from the LearnDash/Liquid Web ecosystem) is purpose-built for memberships and integrates with WooCommerce for billing.
Use MemberPress when “membership” is the product itself rather than a single recurring course. The essentials cost $259/year.
Choose Sublium for clean, analytics-rich recurring course billing with the least friction; WooCommerce Subscriptions if you’re already invested in it; MemberDash when you need full membership-site architecture.
5 Best Practices to Implement With LearnDash WooCommerce Integration
To make the most of the WooCommerce LearnDash integration, keep the following best practices:
1. Configure guest checkout or account creation settings
If you wish to create an account for your course takers as they purchase products through the storefront, enable these WooCommerce settings to ensure the most frictionless flow.
Go to WooCommerce ⇨ Settings ⇨ Accounts & Privacy. Here are the options you can configure:
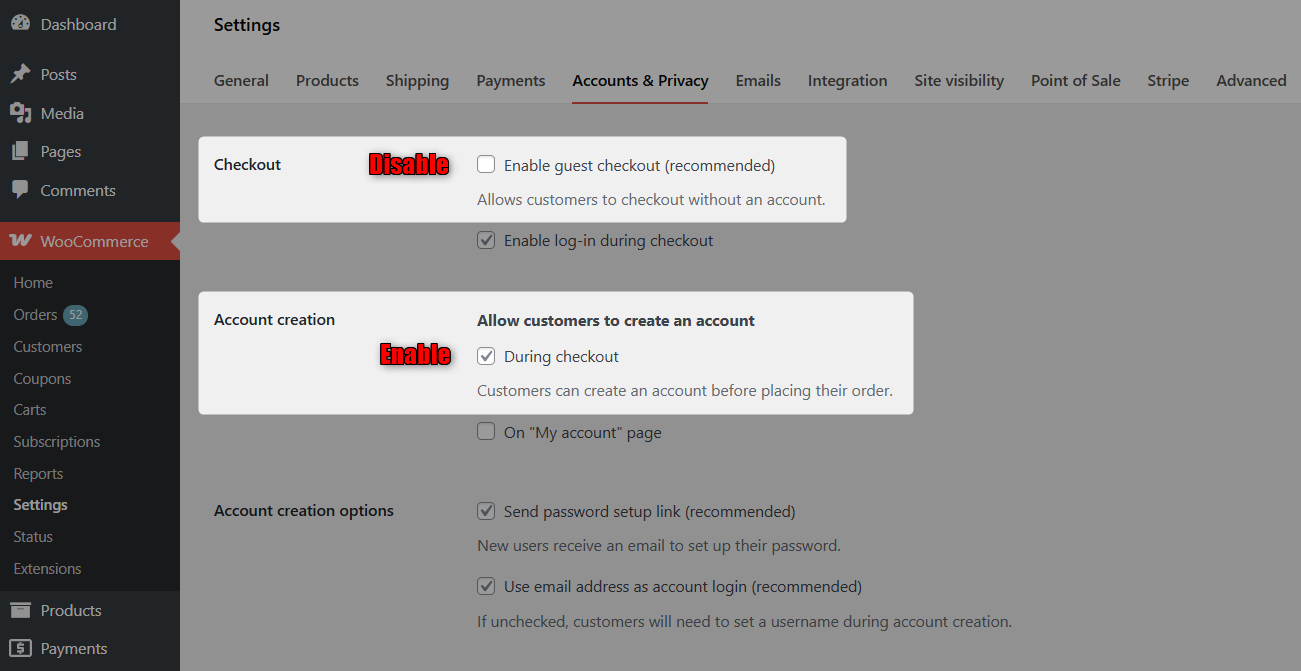
- Guest checkout settings: Under guest checkout, uncheck the first box so users cannot place an order without creating an account. When they create an account, you save their details for future reference. Also, you can have the "Log in with existing account" option checked or unchecked, as you prefer.
- Account creation settings: Enable the checkbox that allows users to create an account on the checkout page. Also, enable automatic account creation with a username and password on purchase.
2. Add upsell recommendations to boost the order value
Boost revenue on each purchase by placing WooCommerce checkout add-ons at key points in your shoppers' journeys.
The two most popular upsells include:
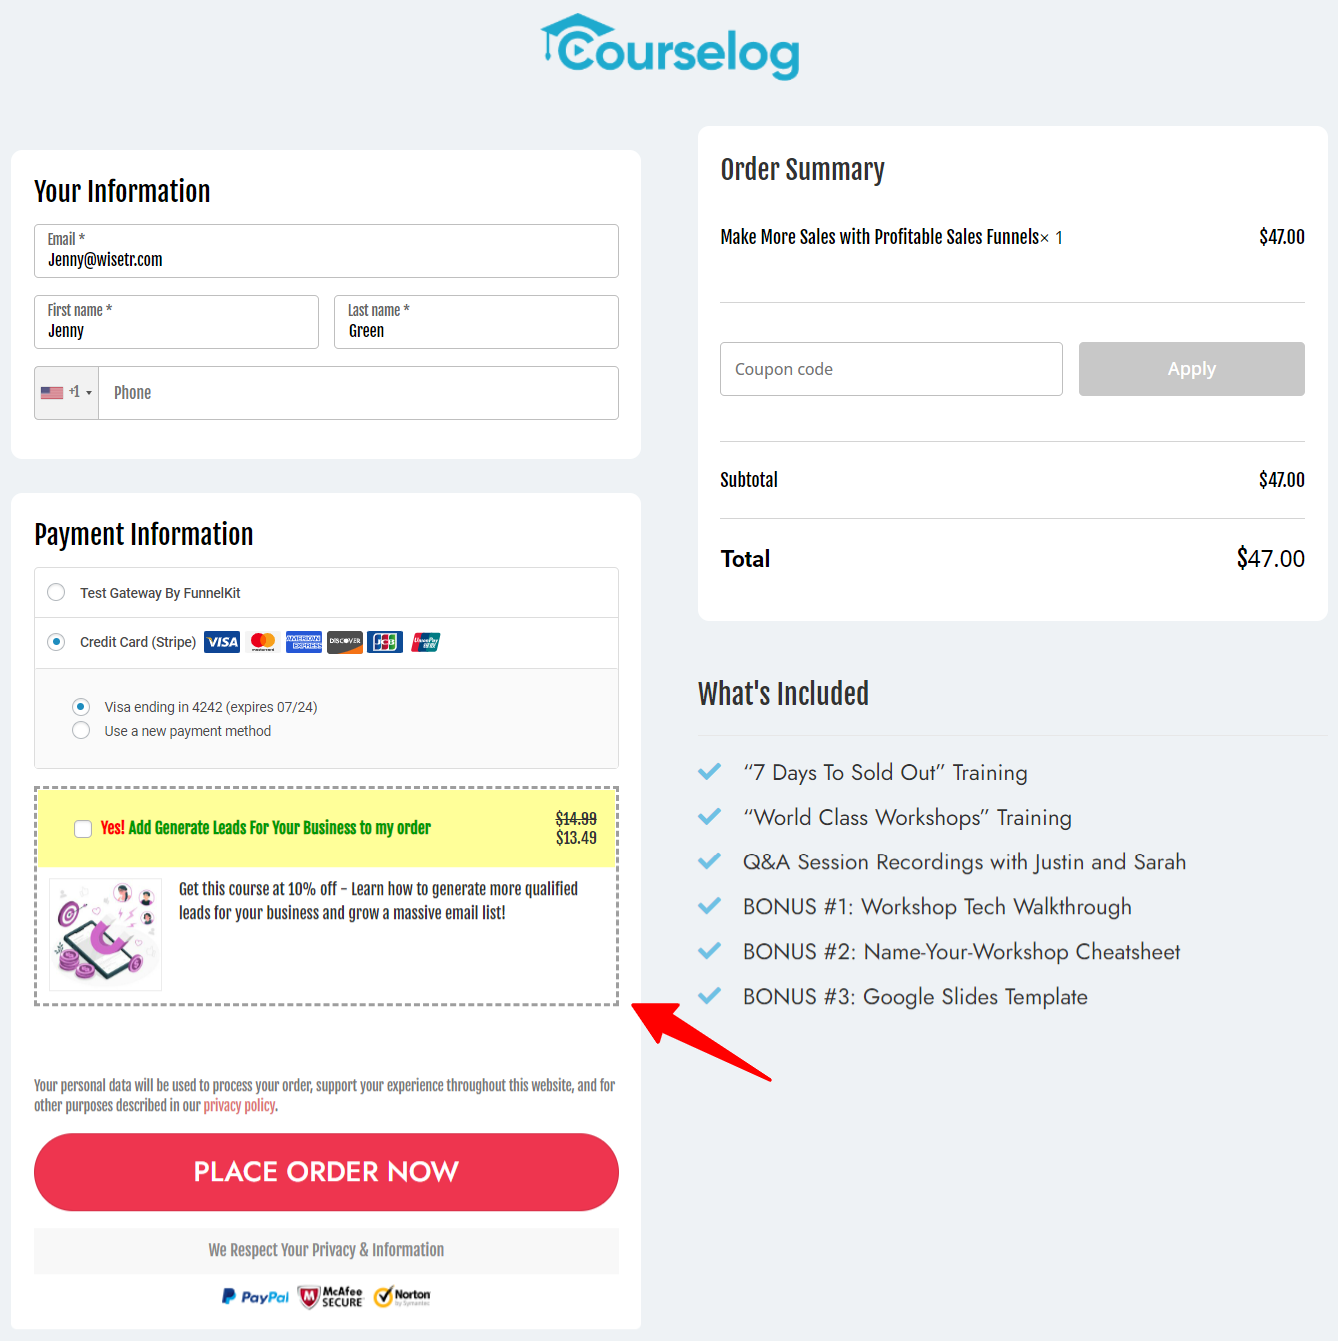
Order bumps (on the checkout page)
With funnel builders like FunnelKit, shoppers can add these order bumps to their shopping cart before payment with just one click.
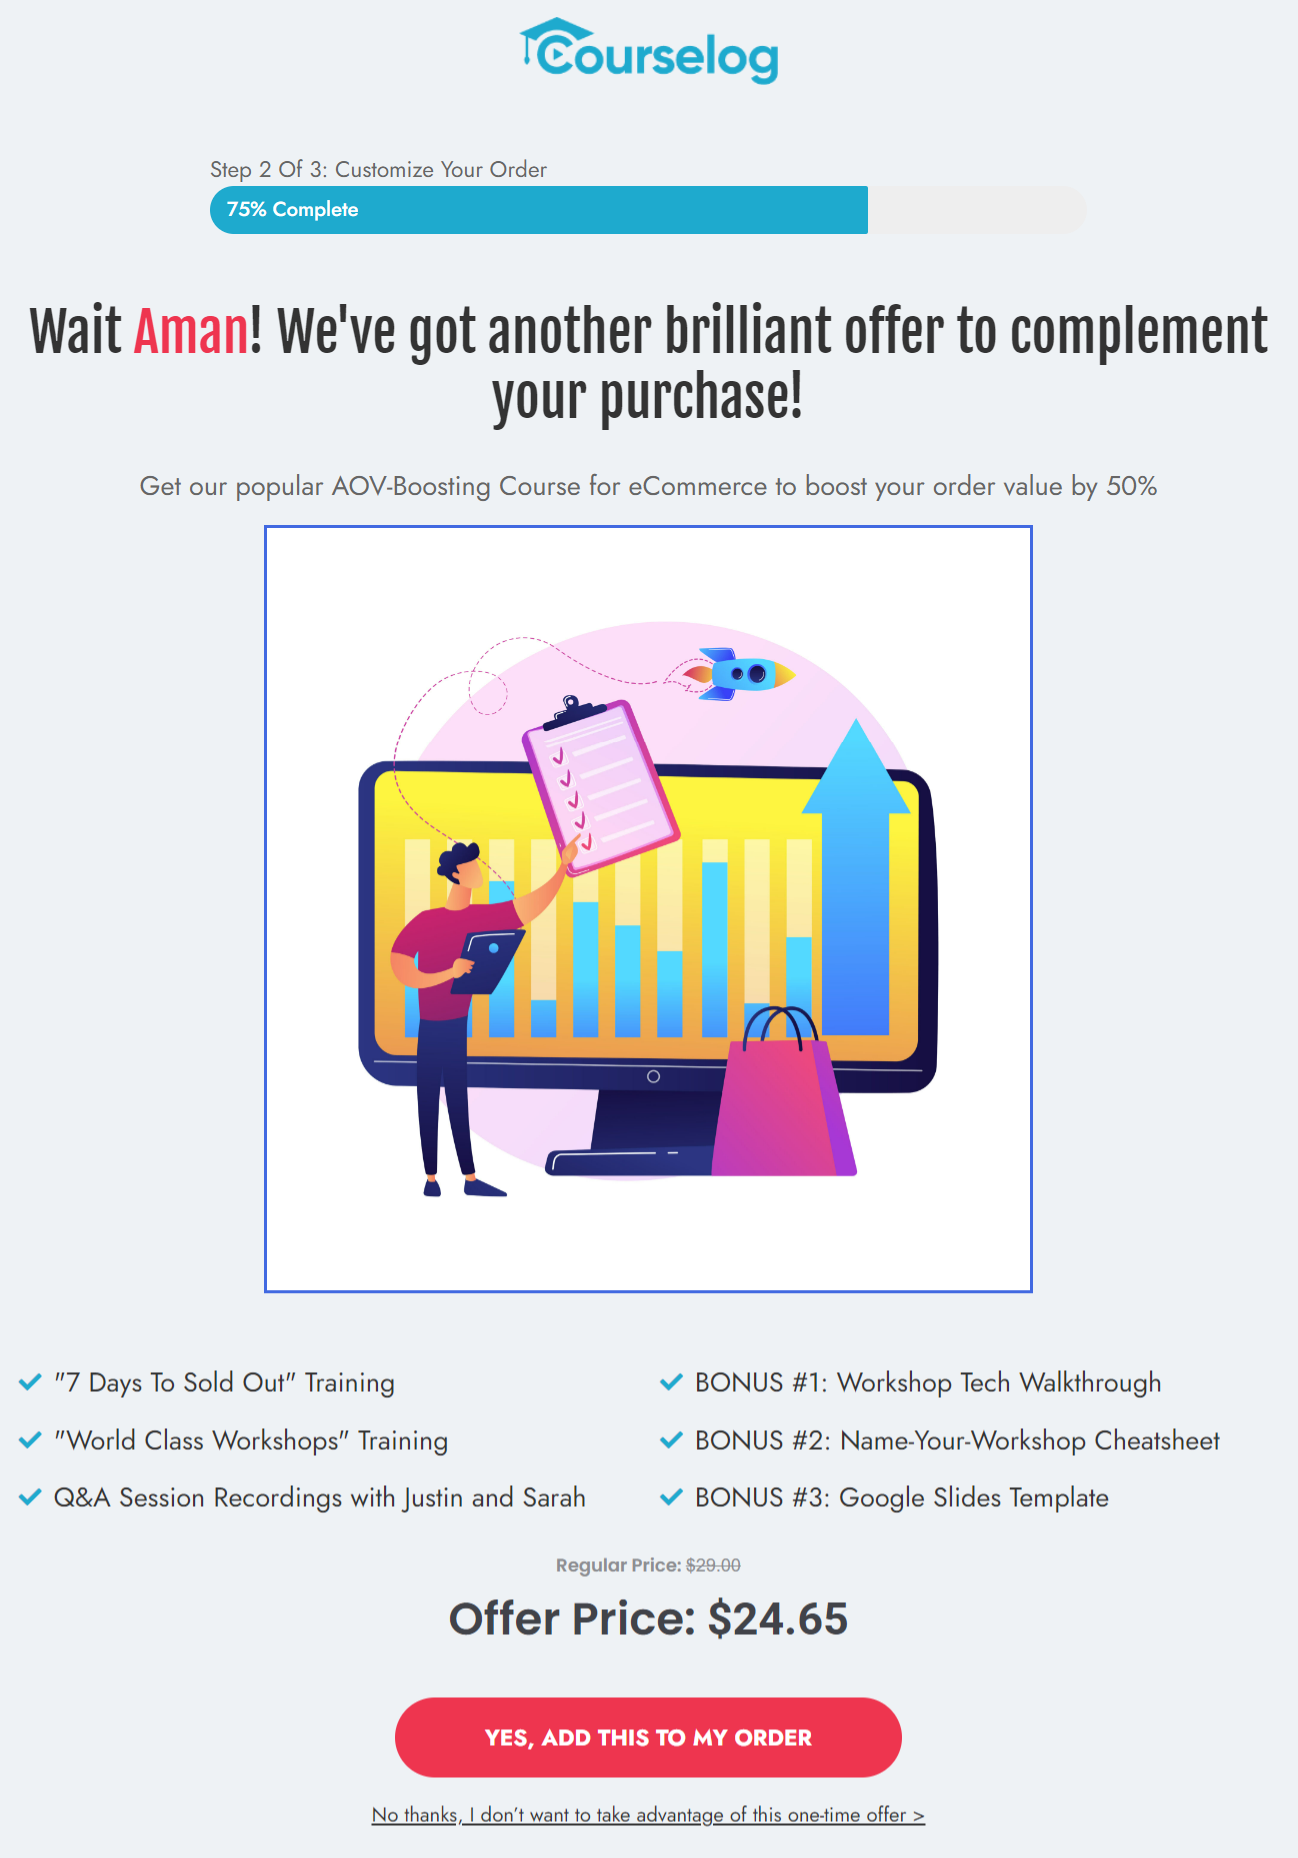
You can add a short LearnDash course to be offered as an order bump on the WooCommerce checkout.
Then, create a compelling offer by assigning some discounts there:
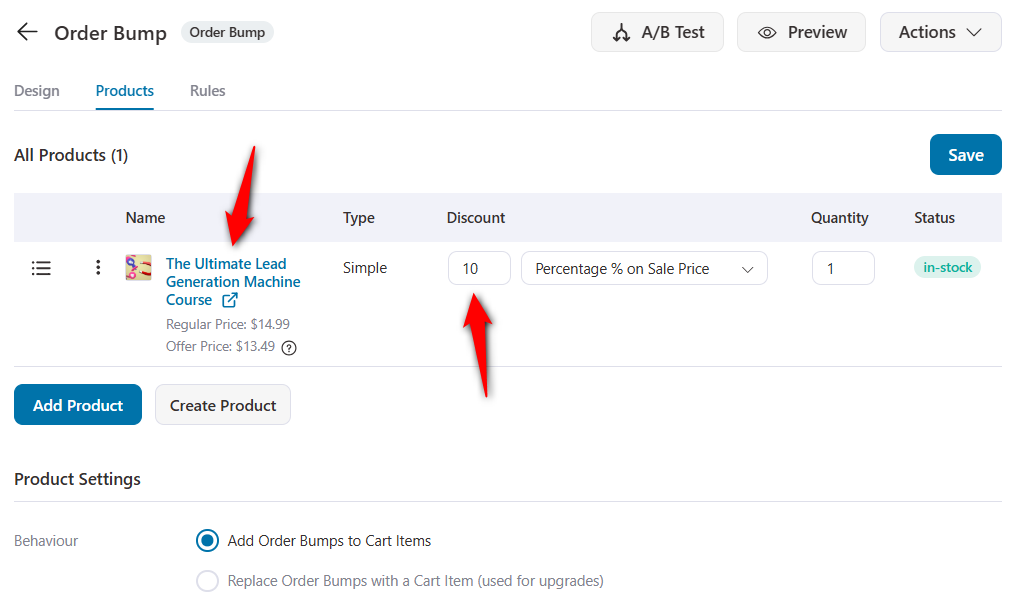
You can even select the bump skin, add content and style it from the Design tab.
Once everything is done, it'll get added to your checkout page:
One-click upsells (after the checkout page)
Another brilliant way to improve the store's revenue is through the post-purchase one-click upsells.
This page appears after checkout and before the thank-you page. It displays offers that complement the customer's primary purchase, making it difficult for the customer to reject them.
You can even add multiple products to the offer and multiple offers to the upsell page.
FunnelKit even allows you to interlink two or more offers, including a downsell based on the user's purchase behavior of accepting or rejecting the previous offer. This can be done with dynamic offer paths.
Here’s what it looks like:
3. Use LearnDash retroactive course access
The retroactive course access tool in LearnDash allows you to grant access to your enrolled members.
In case some WooCommerce customers (who have purchased the course) aren’t able to access it. Then this tool helps you to scan all the orders placed in WooCommerce.
It looks for ‘Completed’ orders associated with the LearnDash course. Once they’re found, it automatically grants those users access to the course.
You can find this setting in WooCommerce ⇨ Status under the Tools tab:
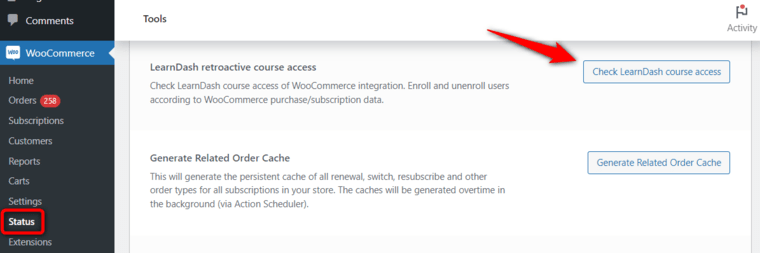
Once you click on the button, it’ll start scanning your WooCommerce orders. Wait a couple of minutes for the process to complete.
4. Send engaging follow-up emails
The average email opening rate in the education and training industry is around 28.5%. That’s why you should use it to drive user engagement and nurture your students, giving them a positive learning experience.
And the best way to do it is by setting up automated email sequences for each use case.
Using a WordPress CRM tool like FunnelKit Automations lets you send automated email campaigns and track their performance in real time.
Set up automated LearnDash email notifications for your users:
- Welcome your students when they enroll in your course
- Send congratulatory emails based on the scores your students got on their quiz
- Generate passwords to provide them with login access
- Create anticipation for their next lesson when completing a specific lesson
- Incentivize your students’ next purchase when they finish a course
These are just some of the use cases.
FunnelKit Automations offers you different triggers to set up your automation:
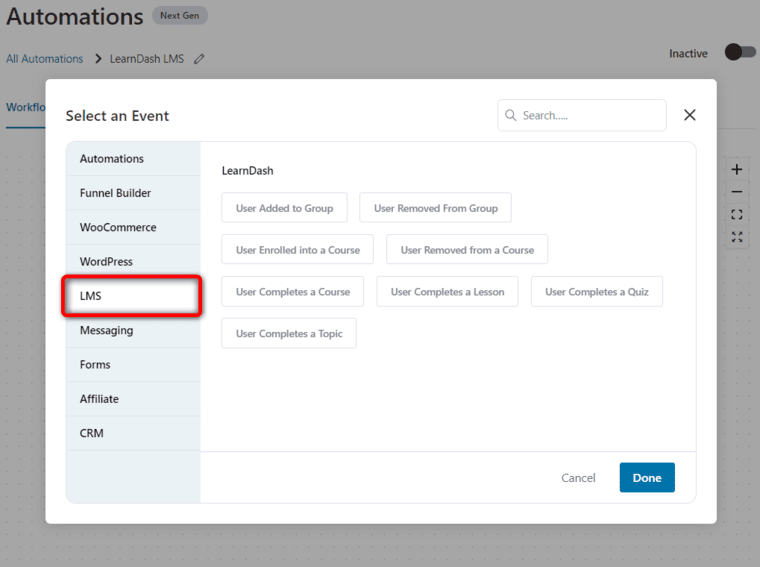
In fact, you get access to some pre-built LearnDash automated recipes that can be imported with a single click and customized as per your need.
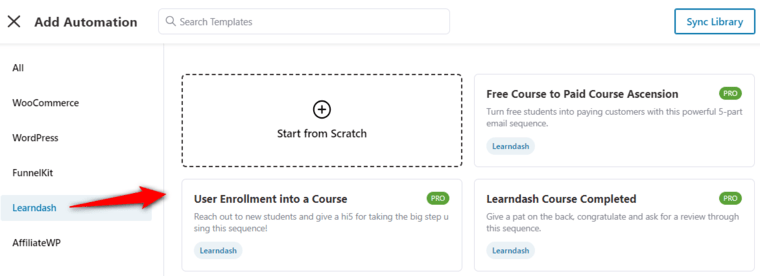
These all have pre-written emails and timed delays that you can customize as needed.
You can set up hundreds of custom workflows and automate your LearnDash WooCommerce business processes.
Not just that, you can set up a variety of automated workflows such as cart abandonment recovery, winback campaigns, post-purchase automation, and more.
5. Track performance with real-time analytics
Monitor your course sales, checkout conversions, and upsell performance using built-in FunnelKit analytics.
Track key insights like orders placed, revenue from order bumps and upsells, conversion rate per funnel, drop-off rate during checkout, and much more.
This helps you identify which courses and funnels perform best, so you can optimize continuously.
Frequently Asked Questions (FAQs)
Yes. The official WooCommerce for LearnDash integration add-on is free with your LearnDash premium plan that starts at $139.30 annually.
You can install it from LearnDash LMS → Add-ons (with an active license) or download the file from your LearnDash account and upload it via Plugins → Add New → Upload Plugin.
Students automatically get access after they purchase. When the WooCommerce order reaches Completed status, the buyer is enrolled in the linked LearnDash course or group with no manual step required.
- Access 100+ global payment gateways: Accept payments via Stripe, PayPal, Apple Pay, Google Pay, or any gateway your audience prefers without needing extra integrations.
- Free LearnDash WooCommerce Integration add-on: Download the free WooCommerce for Learndash plugin on your website and integrate the powerful functionalities into your LMS website.
- Sell courses like normal products in WooCommerce: Each LearnDash course can be listed as a WooCommerce product, allowing you to create bundles, offer discounts, or add related products and upsells.
- Automate course enrollments: Once a student completes checkout, LearnDash automatically grants access to the purchased course, with no manual setup required.
- Offer subscriptions and payment plans: Use a WooCommerce subscription plugin to sell recurring memberships or split large payments into manageable installments via gateways like Affirm, Klarna and Afterpay, giving you a predictable monthly income.
- Run promotions and coupons: WooCommerce’s built-in coupon and discount features make it easy to run flash sales or special offers to attract new learners.
- Gain access to a complete marketing ecosystem: From abandoned cart recovery and email automations to order bumps and one-click upsells (you need highly effective marketing plugins to do all these), WooCommerce helps you maximize every sale.
No, you don’t need to manually remove a student from a course when the LearnDash subscription expires. If you have set up LearnDash WooCommerce subscriptions, access to that associated course will be removed as soon as the subscription expires.
The most common cause is the order not being completed (it's stuck on Processing/On-hold, or set to require manual completion). Ensure course orders auto-complete on payment, and for past buyers, use the Retroactive Course Access tool.
Shopify is a hosted store builder but has no native LMS. You'd bolt courses on via third-party apps and you don’t own the platform. LearnDash + WooCommerce keeps everything on your own WordPress site with full control over course delivery, data, and checkout.
The better fit if course experience and ownership matter.
All 100+ WooCommerce gateways work with LearnDash and WooCommerce, including Stripe, PayPal, Square, Apple Pay, and Google Pay, because payments are handled by WooCommerce, not LearnDash. Configure them under WooCommerce → Settings → Payments.
The main WordPress LMS alternatives are LifterLMS and MemberPress (both WordPress plugins), as well as hosted platforms like Teachable, Thinkific, and Kajabi. WordPress-based options keep ownership and selling flexibility; hosted platforms trade control for simplicity.
The main WordPress LMS alternatives are LifterLMS and MemberPress (both WordPress plugins), as well as hosted platforms like Teachable, Thinkific, and Kajabi. WordPress-based options keep ownership and selling flexibility; hosted platforms trade control for simplicity.
Start Selling Your LearnDash Courses With WooCommerce Today!
Now you know that if you have a LearnDash course to sell, WooCommerce is the ultimate platform to make the sale.
Want to sell the courses through a storefront or sales funnels? WooCommerce gives you the freedom to choose the sales method and its design as per your liking.
No other platform would offer you as much flexibility or as many options as WooCommerce does.
You must have also realized that setting up your LearnDash courses with WooCommerce is just one part of the equation. You still need to generate leads by offering free courses, follow up with customers using post-purchase upsells, and more.
All of this can be done with FunnelKit. So install the WooCommerce for LearnDash plugin now, sell your courses online using the beautiful course pages and checkouts designed in FunnelKit, and check them out.

Editorial Team
July 3, 2026A WooCommerce side cart is a panel that slides in when shoppers add a product to their cart. Customers can review items, change quantities, apply coupons, and proceed to checkout...
Editorial Team
July 2, 2026There are four effective ways to get the TikTok pixel firing on a WooCommerce store with the official TikTok for WooCommerce plugin, a dedicated pixel plugin, a server-side Events API...
Editorial Team
July 1, 2026Finding a WordPress sales funnel builder that actually works is harder than it looks. Most plugins on the market do one or two things well and quietly skip the rest....


