
Do you use WordPress signup forms to capture leads?
In this post, we will show you how to integrate your sign-up forms built using a popular WordPress form builder plugin with FunnelKit Automations.
You'll discover how to map fields to store contacts information and send lead notification emails.
So without any more delay, let’s just dive right in!

Table of Contents
What is a Signup Form and Why Do You Need It?
“A simple and affordable way to increase leads and create more conversions through your website.”
A signup form allows you to collect useful information about your site visitors. It is also a medium for your visitors to get in touch with you to send information, place an order, ask a query, and more.
Forms are vital for lead conversions. They help in converting an interested site visitor into paying customers over a period of time.
There are multiple ways you can collect lead information on your online store.
Just like we discussed above, you can ask for the users’ details in exchange for a freebie they desire using a signup form.
These free products are called Lead Magnets and are used to generate leads for a business.

These signup forms can be added to the sales page of another product or have a dedicated page talking about the lead magnet.
Data collected from these forms can be viewed in the Contacts tab in FunnelKit Automations.
Building a Sign up Form
Before getting started and integrating your form with FunnelKit Automations, you’ll first need to create a signup form in WordPress.
FunnelKit Automations integrates with many form builders like -
- Elementor Forms
- WP Forms
- Gravity Forms
- Fluent Forms
- FunnelKit (formerly WooFunnels) Optin
Today we will be creating and integrating a signup form in WP Forms. To do the same, replicate the following steps.
But first, ensure that the WP Forms plugin is installed and activated on your WordPress account.
Step 1: Add a New Form in WP Forms
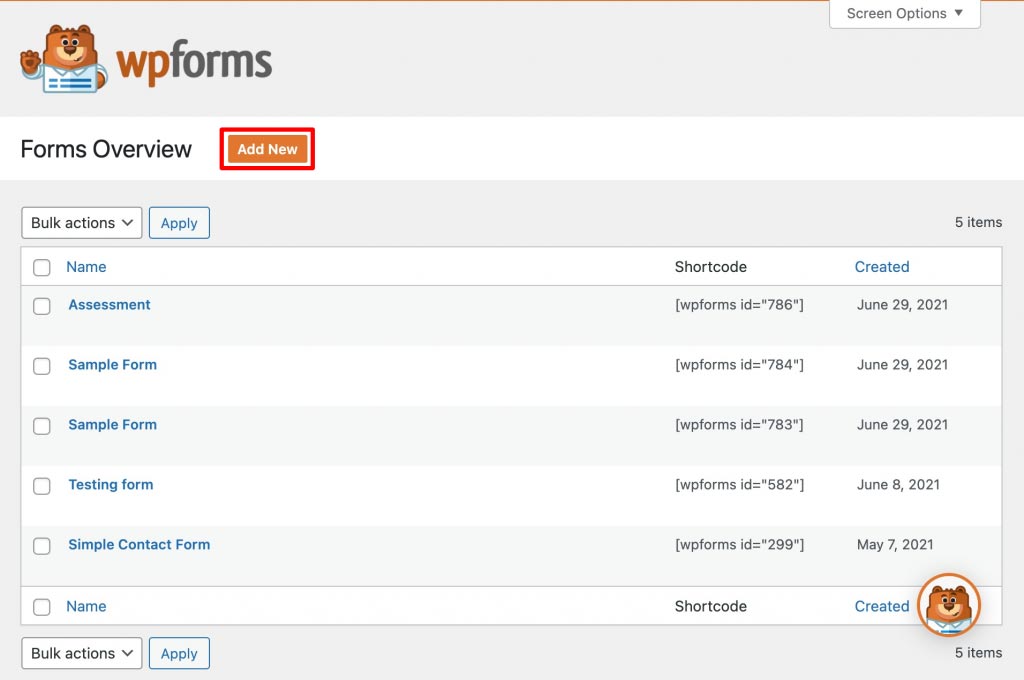
Go to WP Forms in the WordPress menu. Click on Add New to add a form.
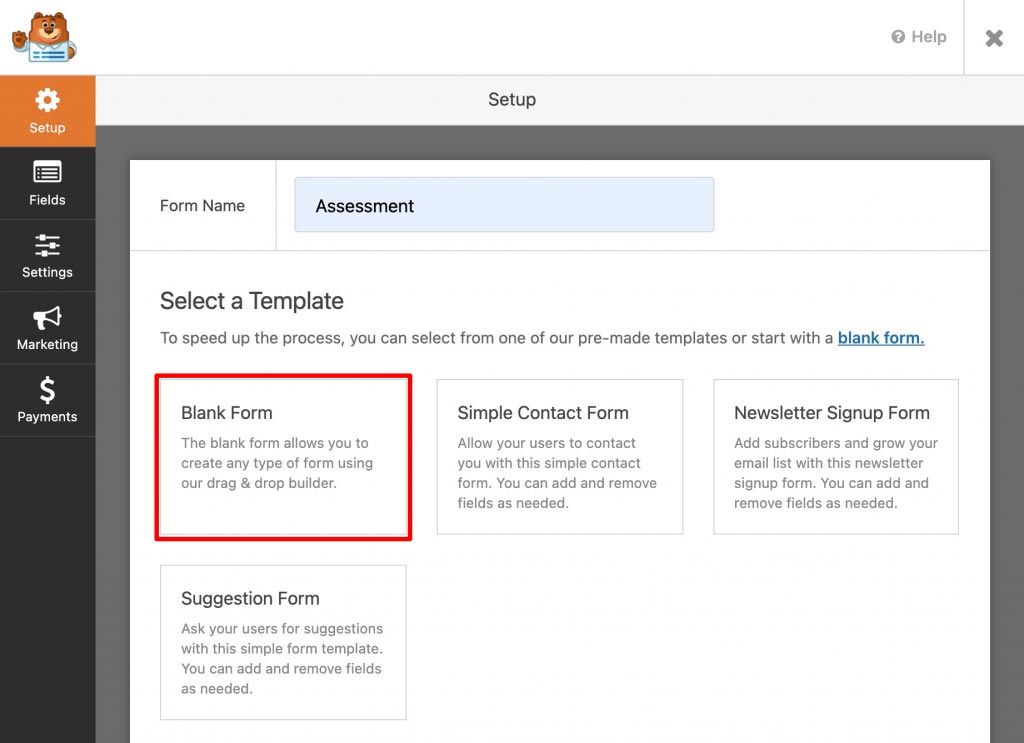
In the Setup section, enter the name of the signup form in the Form Name field. From below that, select a template of the form you wish to choose.
Here we will import the Blank Form.
Step 2: Add the Required Fields
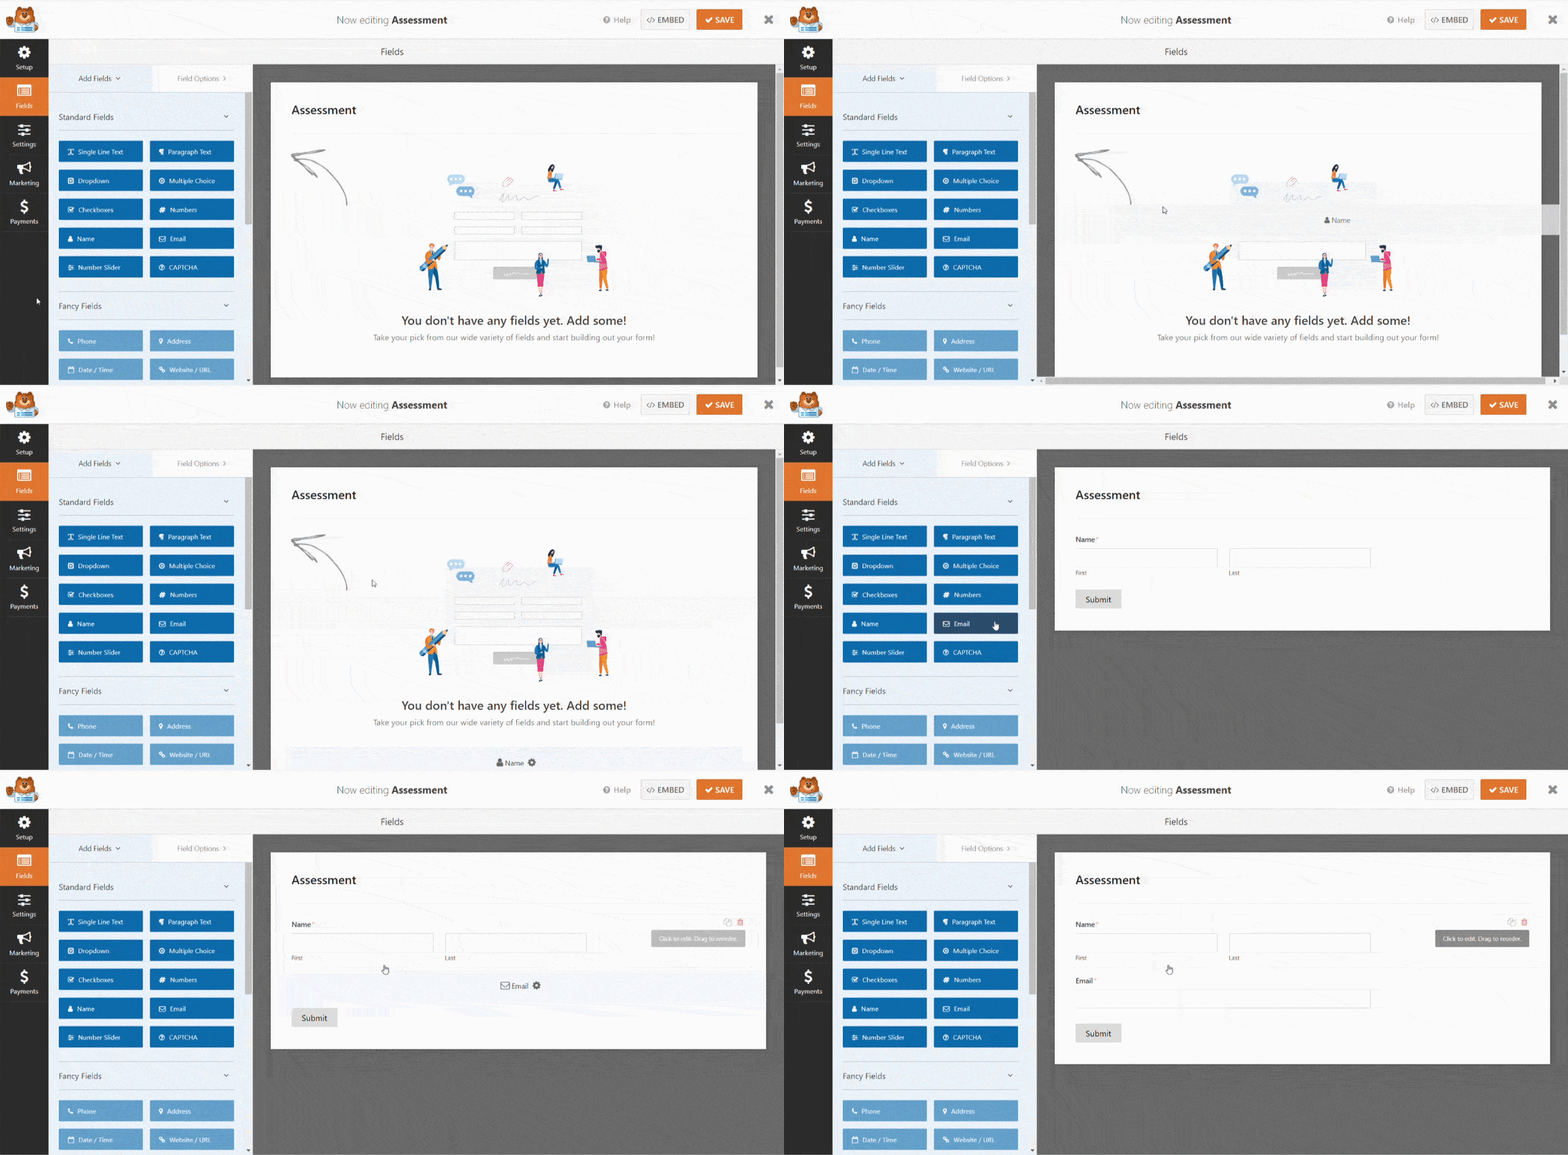
In the editor, add the needed fields by dragging and dropping them into the form preview area.
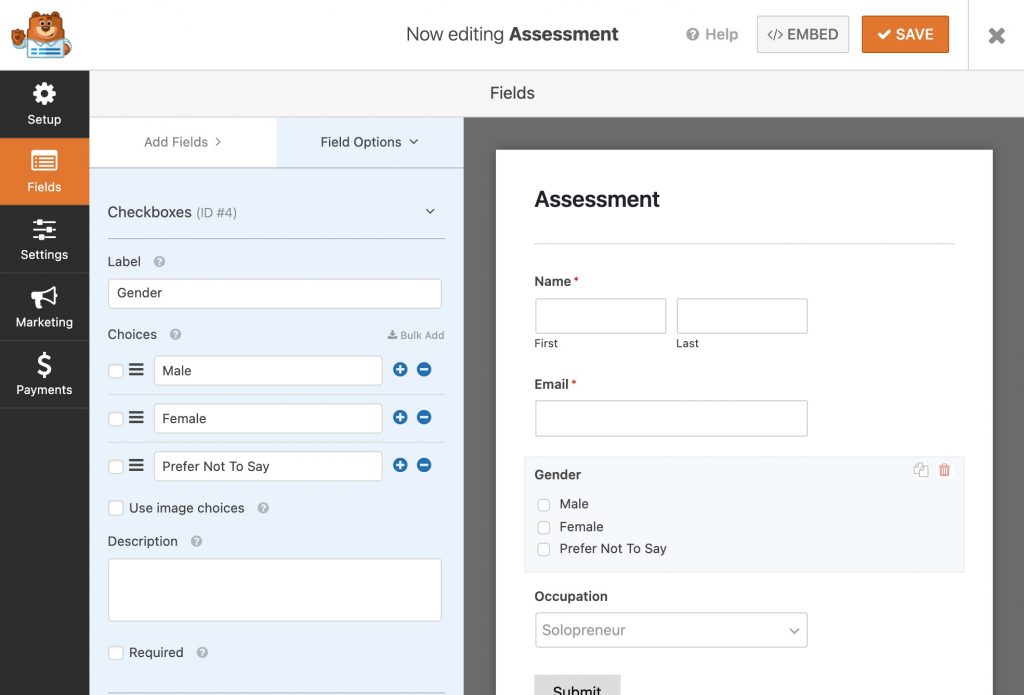
Customize the field options of your signup form by clicking on the individual field and making changes on the left.
When you’re happy with your form, click on the Save button.
Step 3: Embed the Form
Once you’ve got your signup form designed, you need to add it to add a page that can then be published for the world to see.
Click on the Embed button on the form editor window to open the page options.
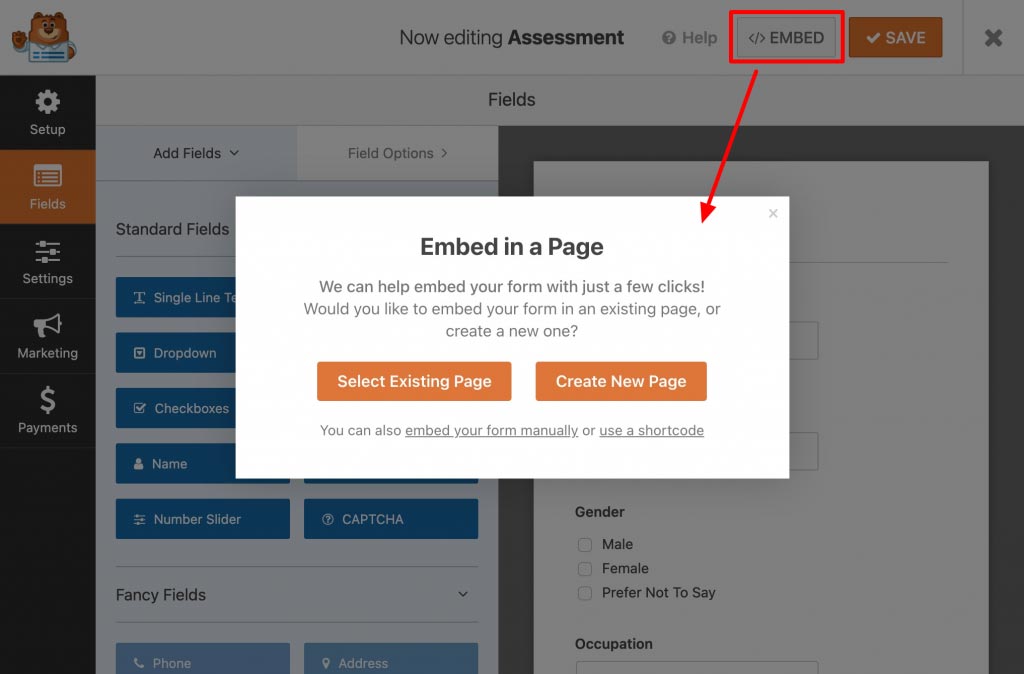
You can create a new page or add this form to a page previously created in Guttenberg, Oxygen, Elementor, or any other editor.
Add a Custom Field
In case FunnelKit Automations doesn’t already have a specific field that you’re looking to map, you can always create new custom fields to bridge that gap.
Go to Contacts > Fields in FunnelKit Automations, and click on Add New Field.
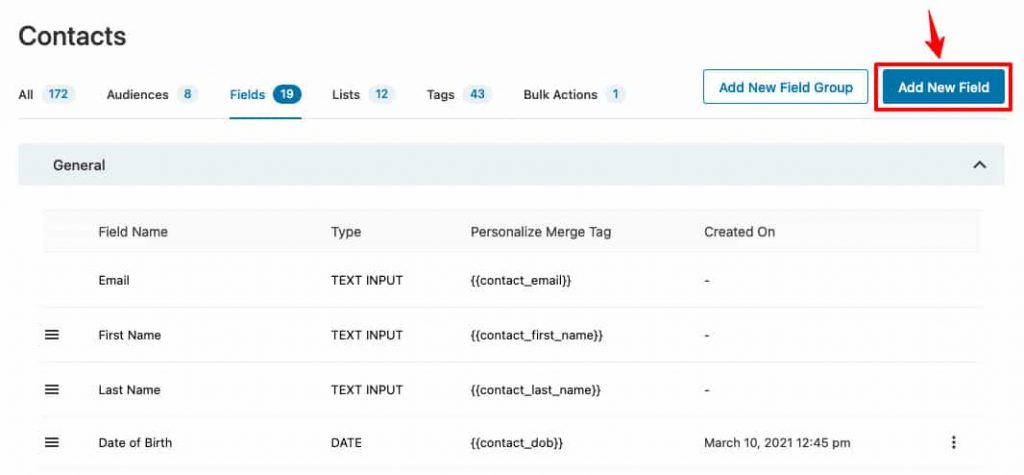
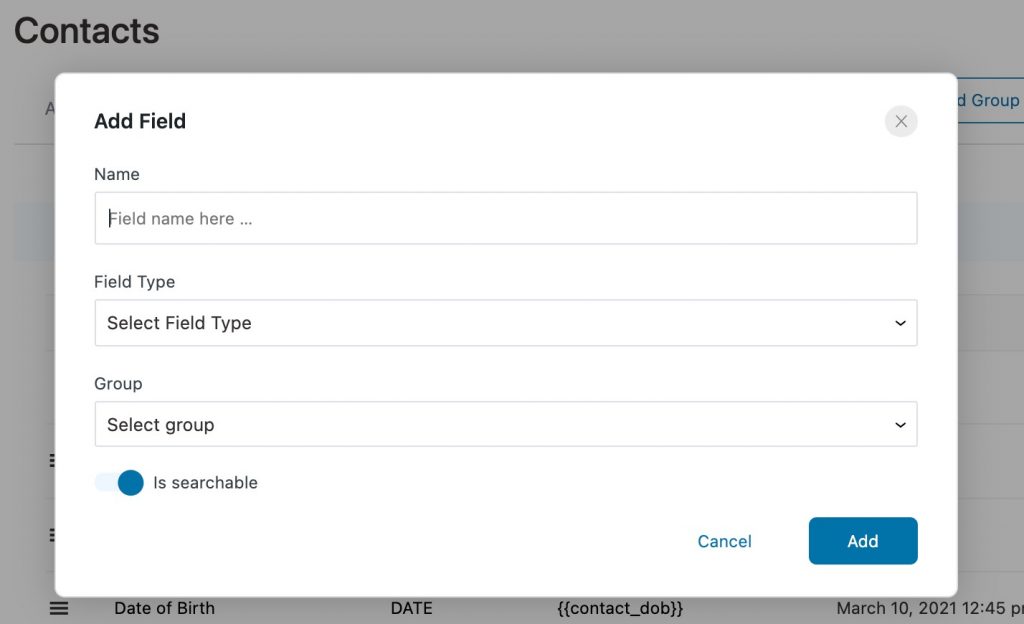
Enter the field details like - field name, type, group, and placeholder - before clicking Add.
In order to map the fields of our form correctly in FunnelKit Automations, we also created custom fields for gender and occupation.
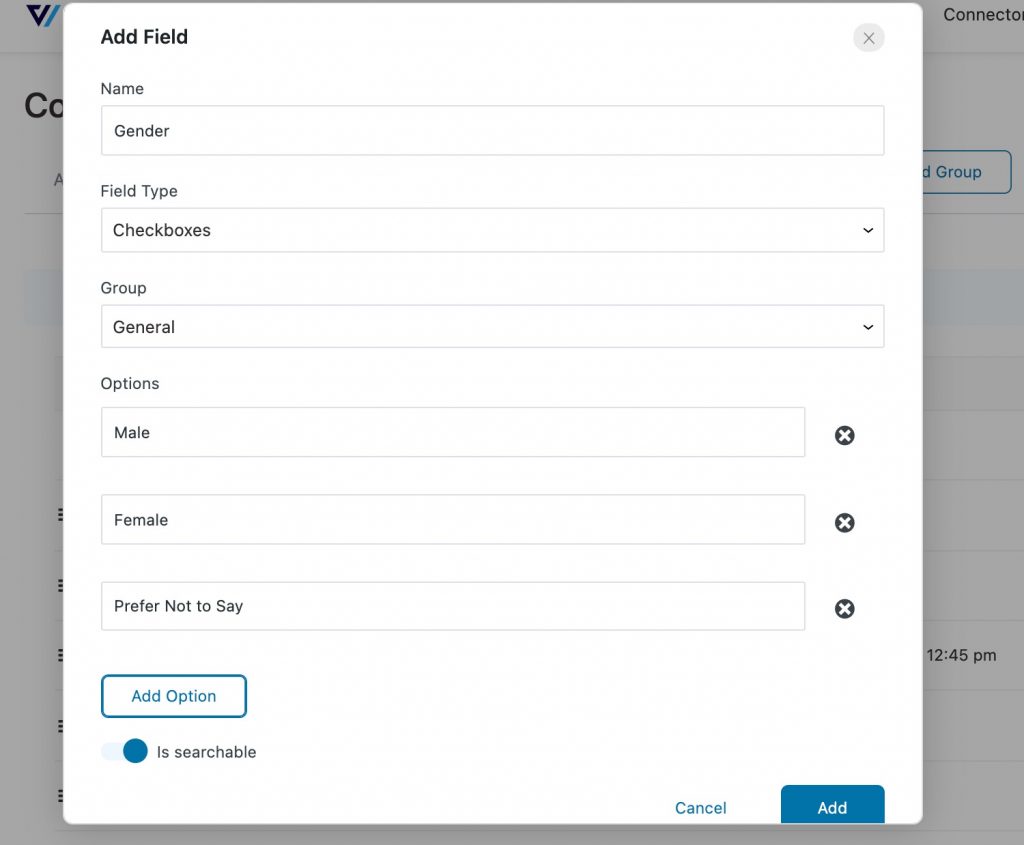
And just like that, you have your custom field ready to map to your signup form.
Note: If you wish to group multiple fields in one group, for example, in the case of address, you can add those by clicking on Add Field Group and then adding custom fields to this group.
Integrating the Signup Form With FunnelKit Automations
You can integrate the forms you’ve designed with any CRM of your choice to create and send automations related to them.
FunnelKit Automations allows you to not only send email but SMS broadcast campaigns to your contacts too.
To add and integrate a form in FunnelKit Automations, follow these steps:
Step 1: Add a New Form
Go to Tools > Forms. You can view all the already integrated forms here.
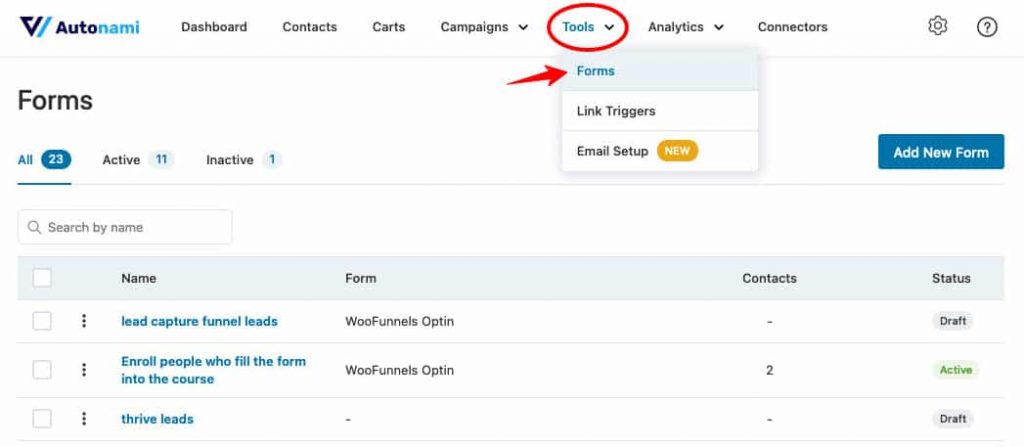
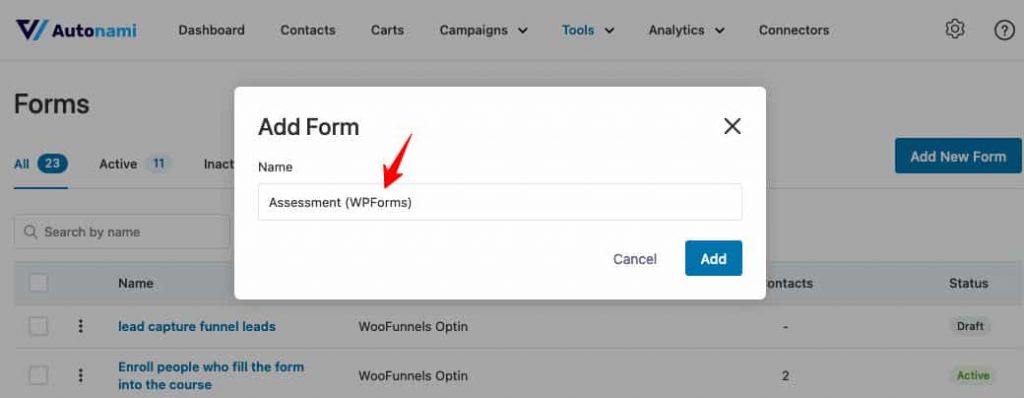
To add a new form, click on Add New Form and name the form.
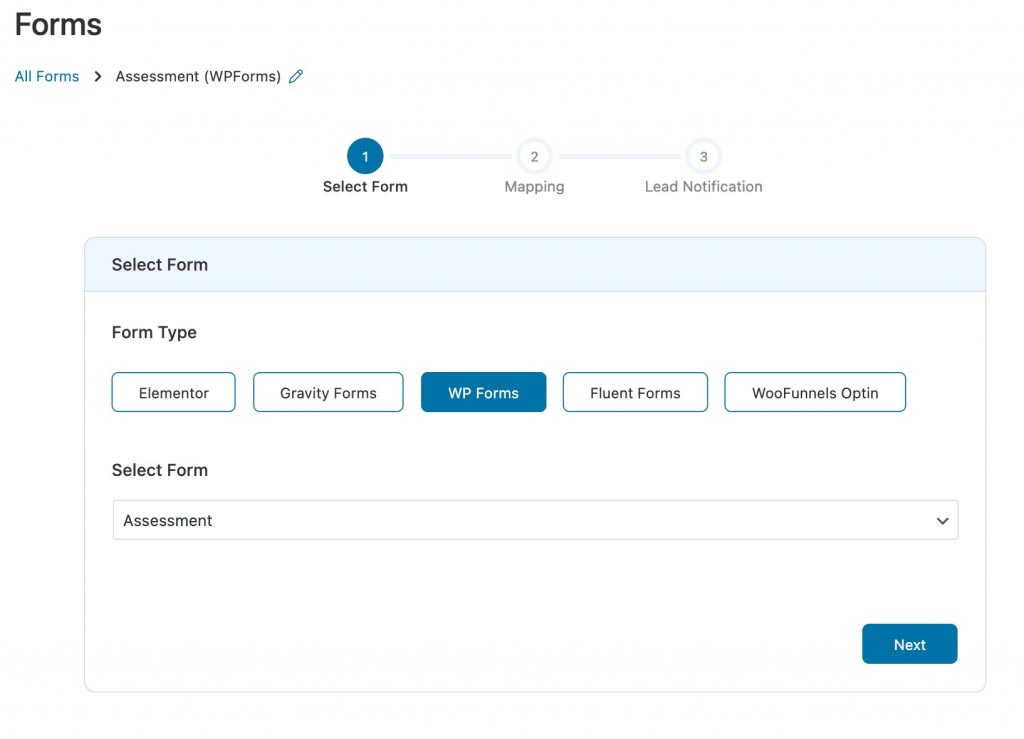
Step 2: Select the Signup Form you created
From the form plugin options shown, choose WP Forms. Then, from the dropdown menu select the name of the form you want to integrate, then click on Next.
Step 3: Map the Fields
Mapping the fields correctly is very vital. It is so that the information filled in the form is stored right and the form integrates well with FunnelKit Automations.
For example, map Email with the Email field, First Name with the First Name field, and so on.
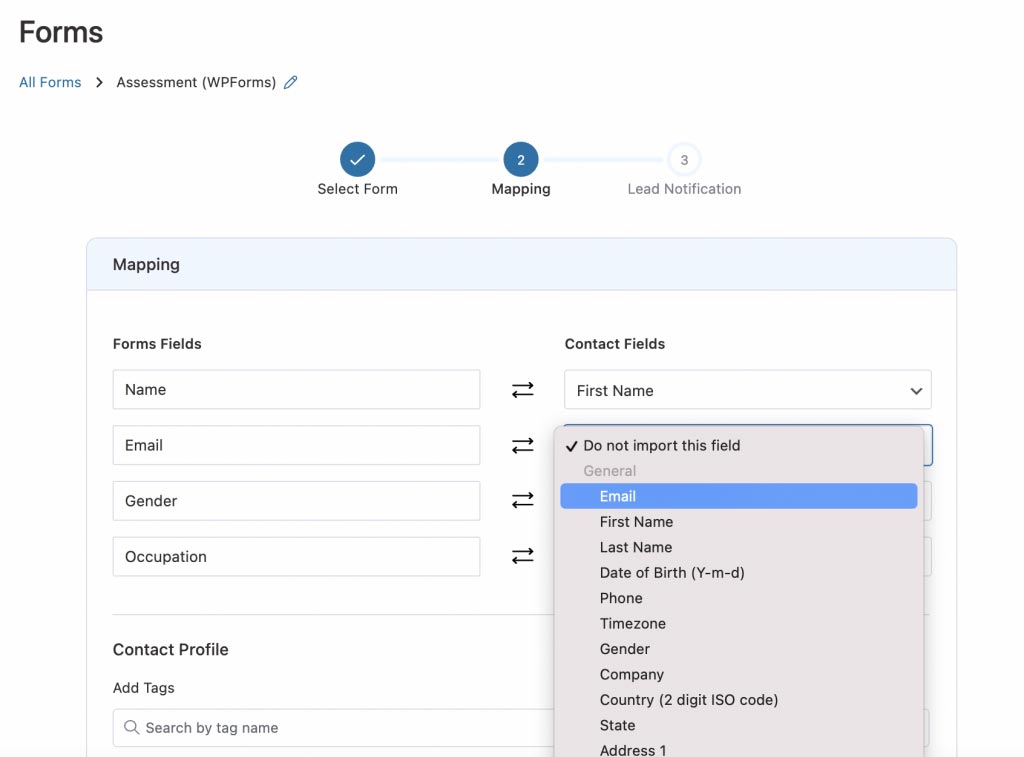
In case, a field you wish to map from your signup form does not exist in FunnelKit Automations, you can always create custom fields in Contacts.
FunnelKit Automations also allows you to add tags to the contacts that submit the form and/or subscribe to specific lists. This lets you sort the contacts and send emails/SMSs.
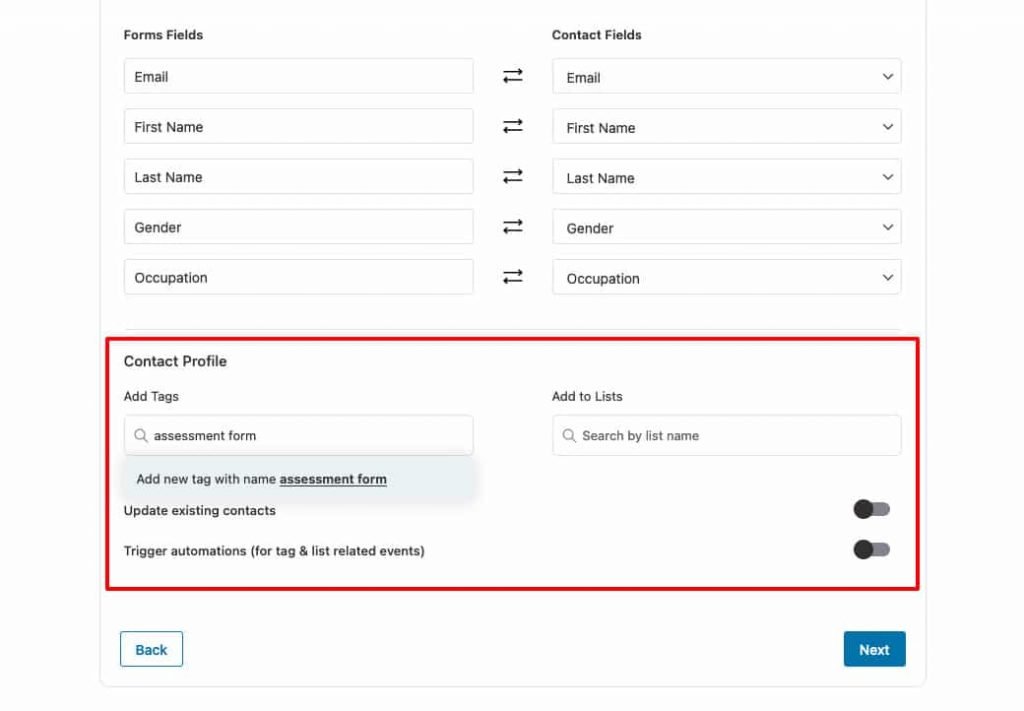
Map the fields carefully, and when you’re done, click on Next.
Step 4: Lead Notification
Lead notification steps allow you to accomplish the following:
- Send a Double Opt-in Email: It is a confirmation email that when clicked on confirms the user's subscription.
- Send Direct URL to Lead Magnets: Send links to access the lead magnet like PDF Guides, and more that you want to offer using your signup forms.
- Combination of the Two: Insert text 'get your freebie' but have a confirmation link, which when clicked confirms subscription and re-directs them to the lead magnet.
In this step, you’re provided with the options to send an Email Notification to your users and Auto-Confirm Contacts.
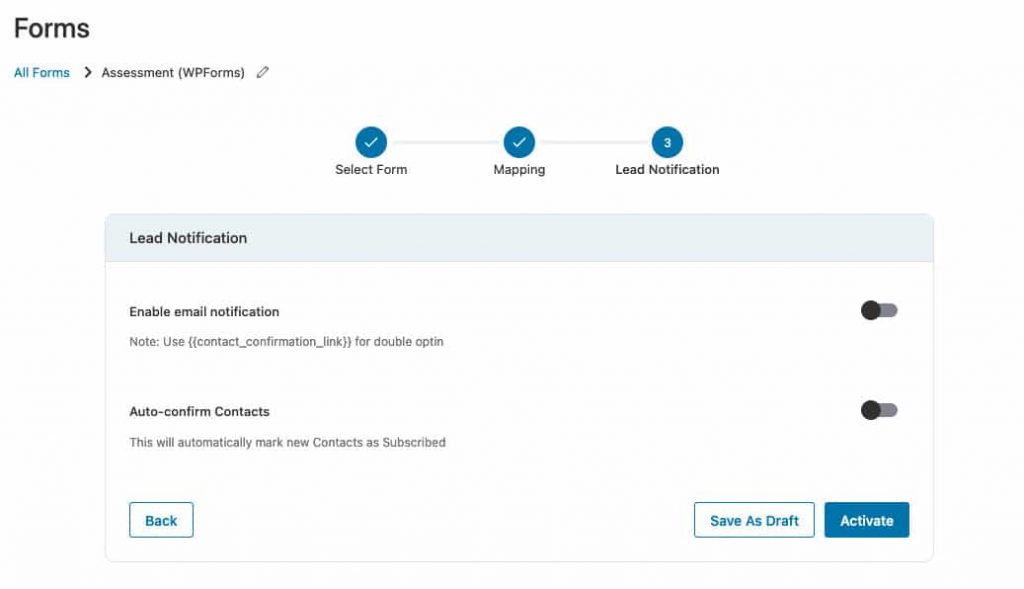
Let's look at these steps in a bit more detail:
Send a Double Opt-in Email
Email notification enables double opt-in email on your website.
What that means is that under GDPR Guidelines, if you want the leads to confirm their subscription before they hear from you again, send them a first handshake email along with a subscription confirmation link.
When you click on the Enable Email Notification toggle, you’re shown the tools to design an email.
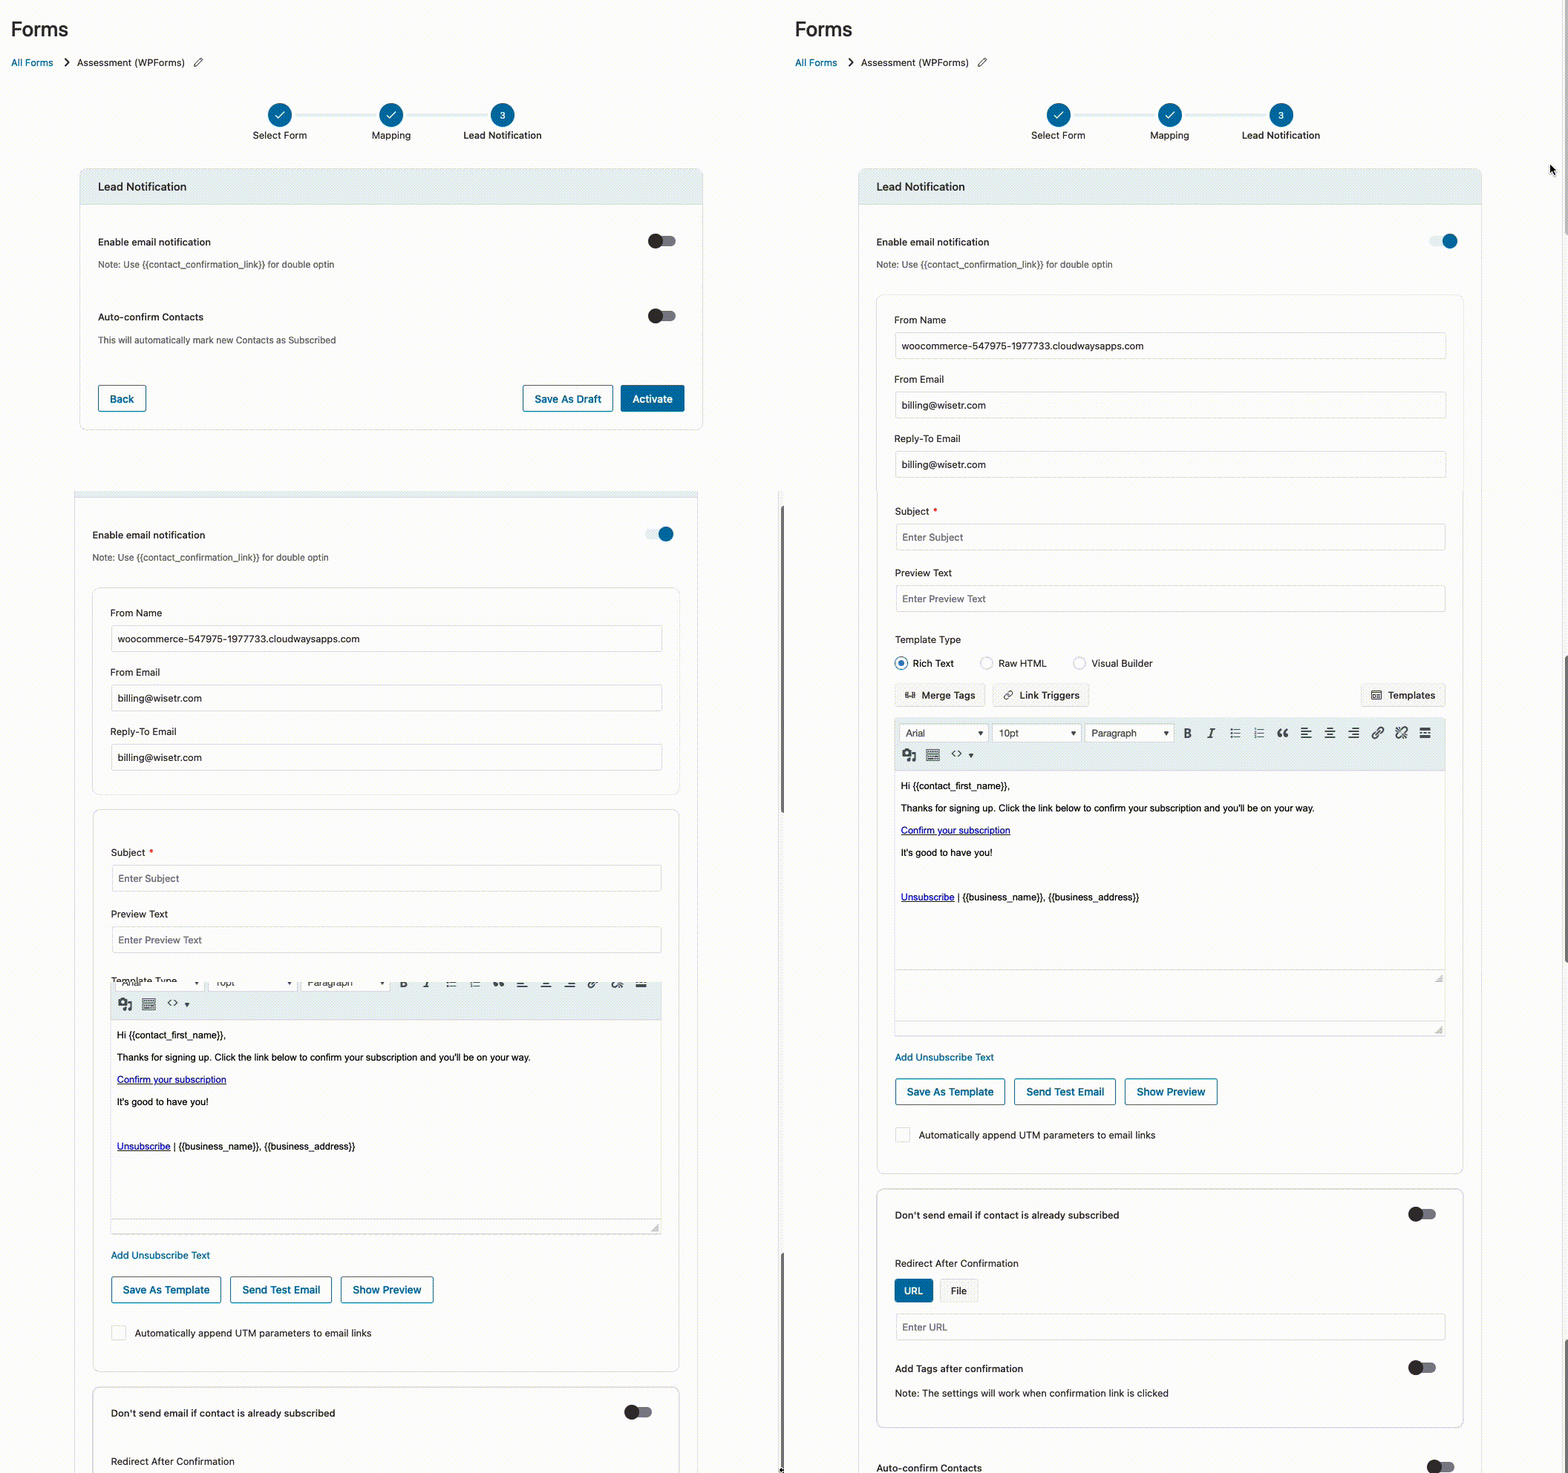
Being subscribed would allow you to reach out to them via broadcasts, emails, and other marketing at any given time.
In the email copy area, design your message and then add the confirmation link using merge tags.
Click on Merge Tags and copy the confirmation link merge tag from there.
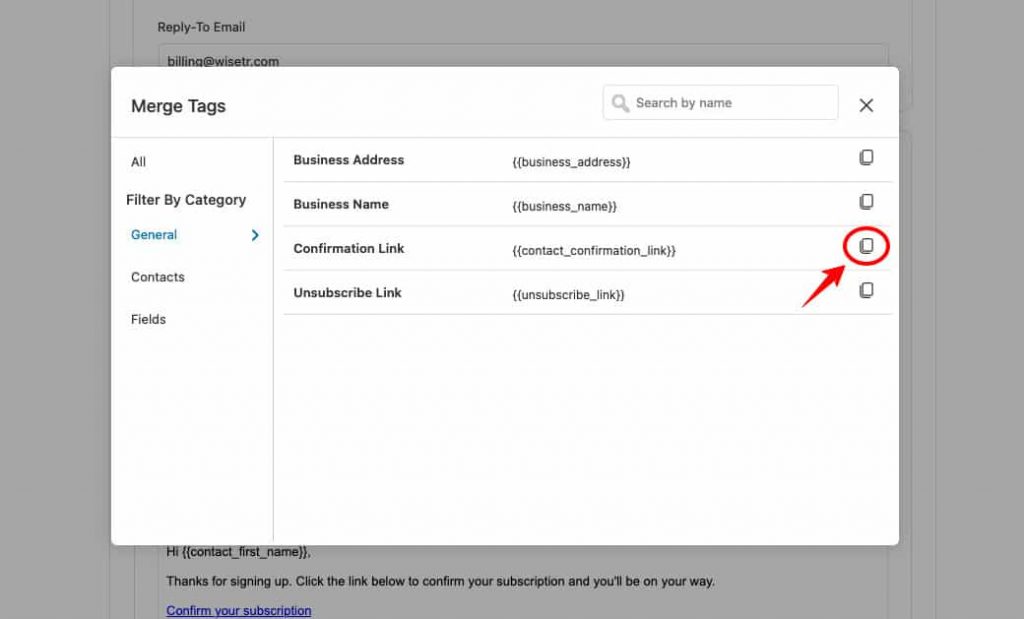
Then paste it over the desired text.
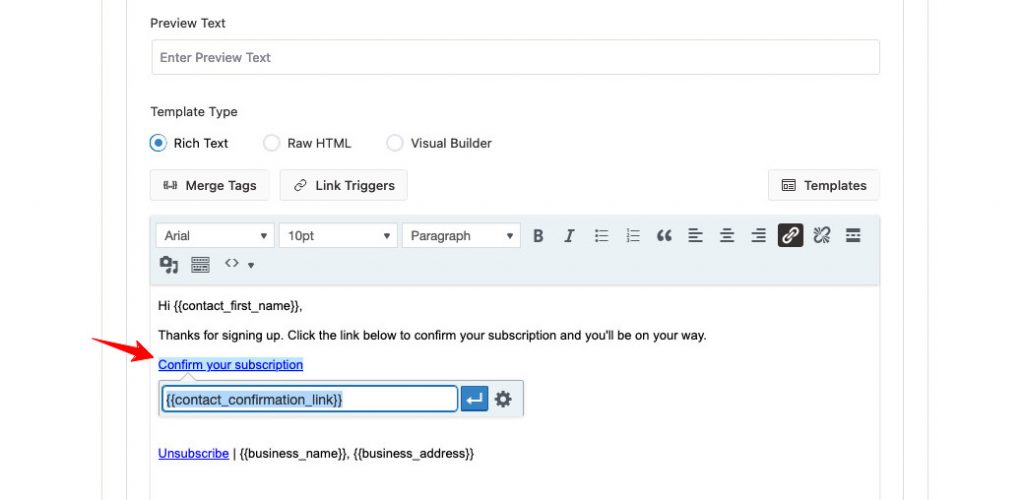
When a lead clicks on this link, their contact status would change to Subscribed.
Send Direct URL to Lead Magnets
If you want, you can not have your contacts choose if they want to subscribe to your emails or not.
For your first automated email, just design a simple welcome message, offering the opt-in product in the email body.
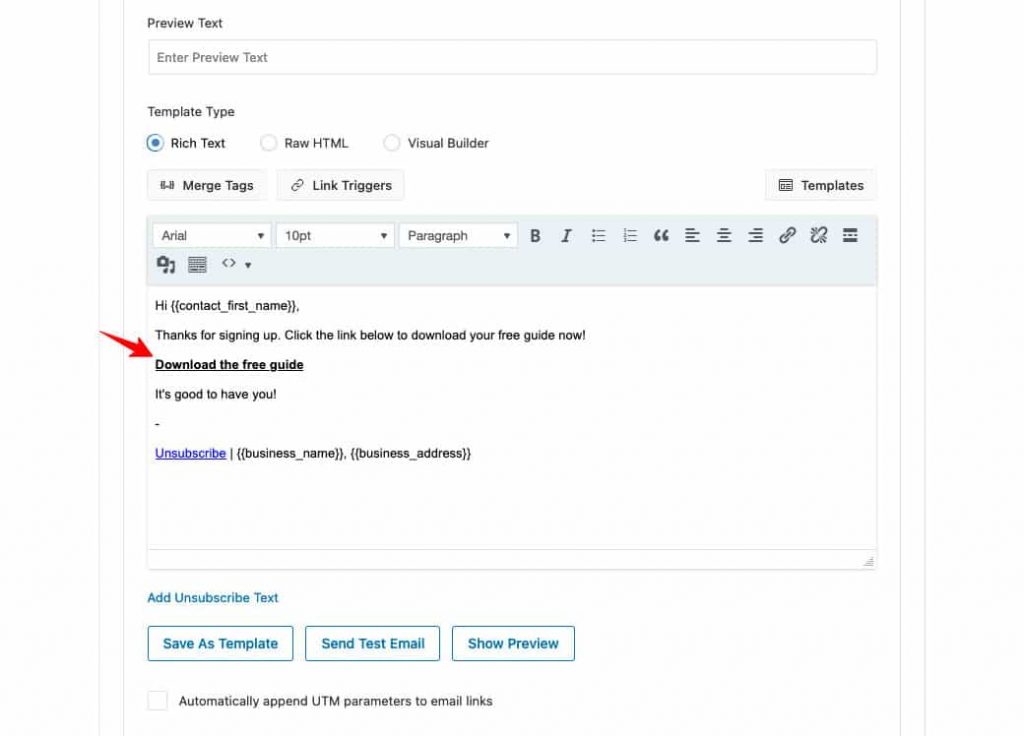
Provide the users with a link to download their freebie in the email, and don’t talk about subscribing.
Instead, enable the Auto-Confirm Contacts option.
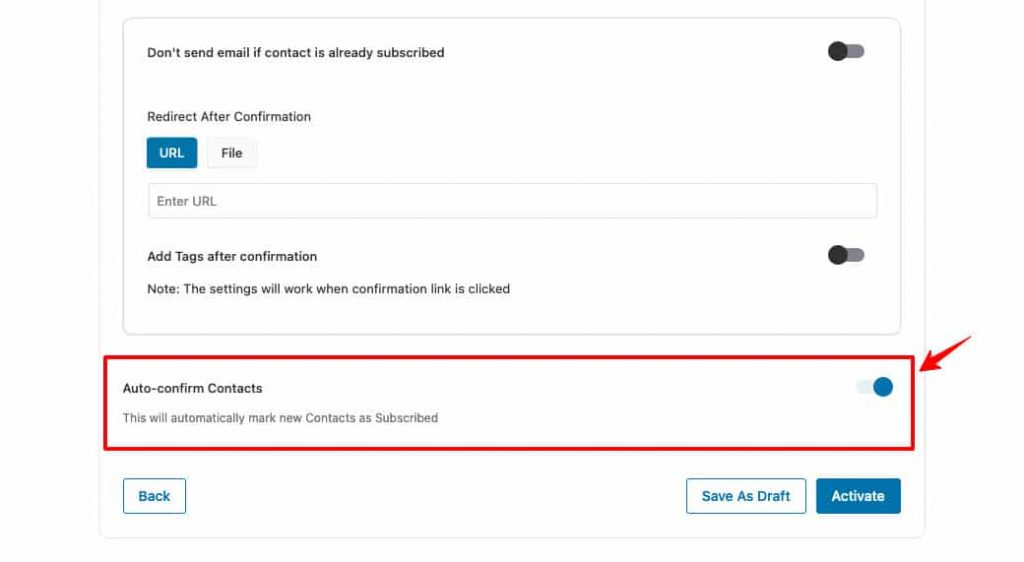
This would automatically mark the new contacts added through this form as Subscribed.
Offer Freebie When a User Confirms Their Subscription
FunnelKit Automations has a smart and never-seen-before method to confirm subscribers and send them their opted freebie at the same time.
First, add the confirmation link to the text that urges the user to click on it, like "Download the Free Guide". This eliminates the possibility of users skipping the email or not subscribing to your email list.
Copy the confirmation link from merge tags as mentioned before and paste it over the desired text.
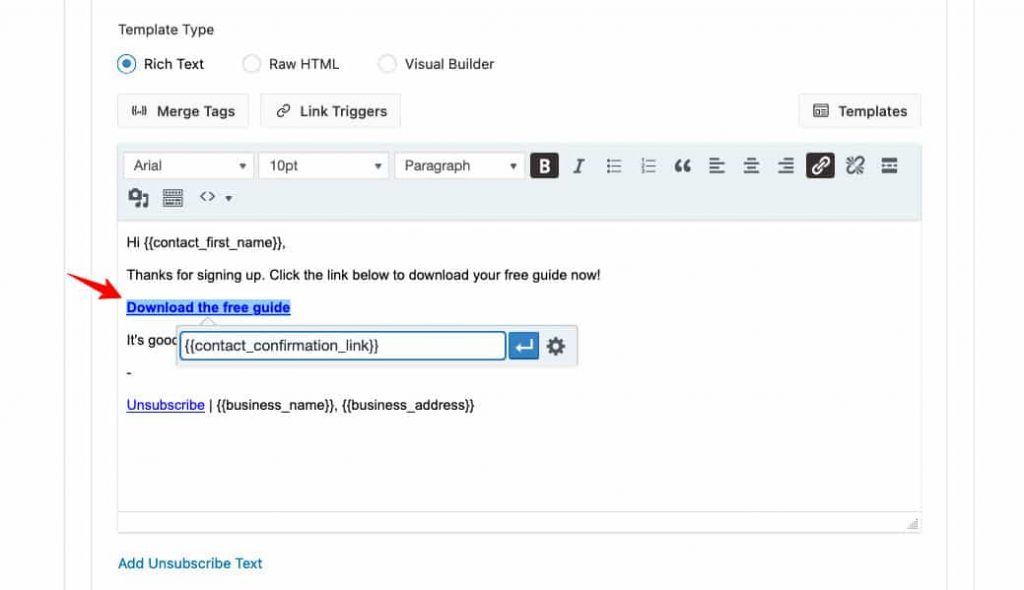
Then to deliver on the promise of a free guide and redirect the users once they’ve clicked on the confirmation link, by adding the free guide's URL or File in the Redirect After Confirmation field.
This means that you can redirect a user to the free product they signed up for in the first place and confirm their subscription - all in one click.
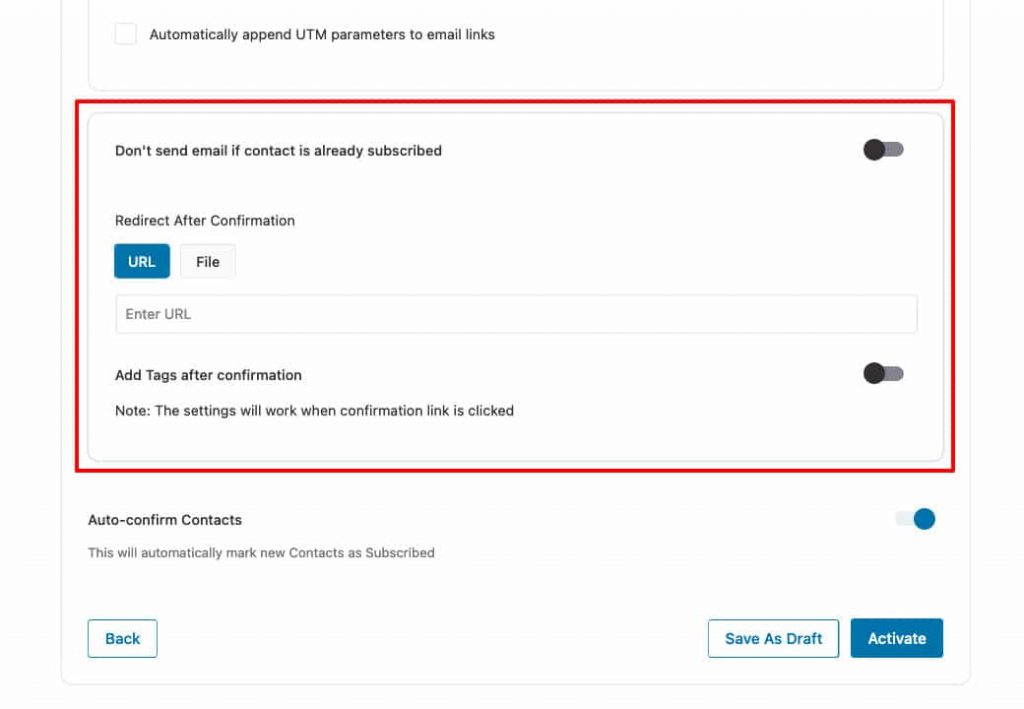
You even have the option to add tags to the contacts who click on the link.
When the form integration is all done and you’re happy with it, click on the Activate button to make the integration go live.
Step 5: Review the Form
After activating the form, you’ll be shown an overview of the form. Confirm the mapping selected, and change it by clicking on Edit Mapping if needed.
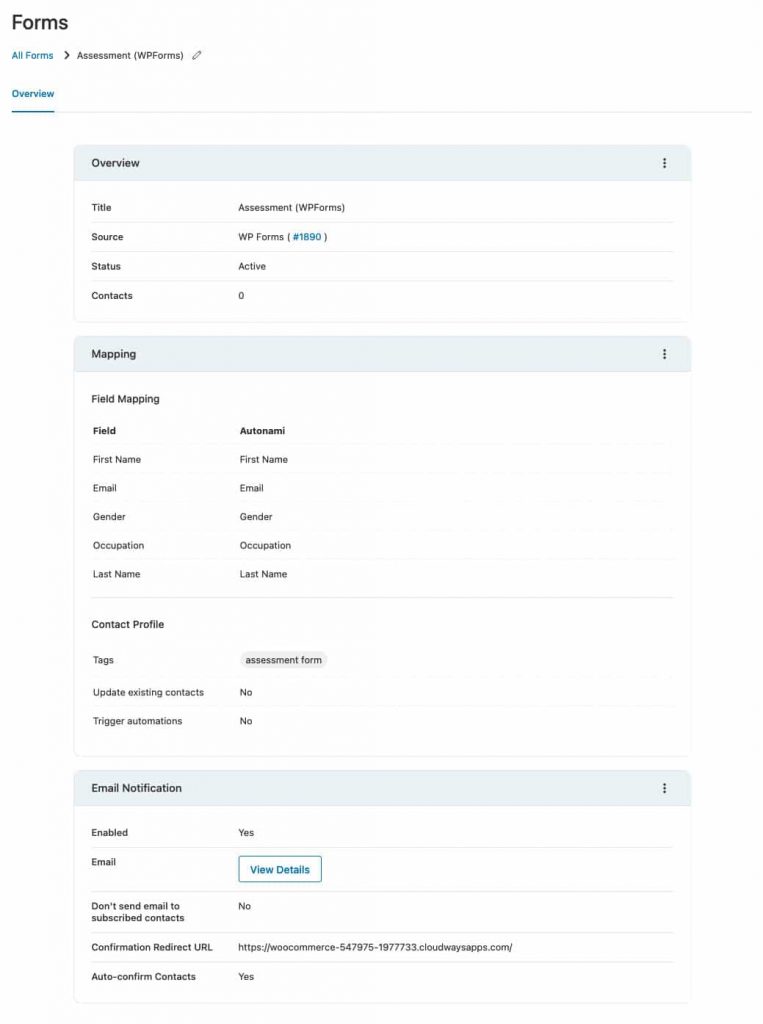
And that’s it!
The leads coming through the signup form will be captured in Contacts and you'll be able to view their information in detail when you click on their name.

Now you can send well-timed, relevant automated messages to your contacts that are added through the form.
Not only that, FunnelKit Automations lets you reach out to them via broadcast emails and SMSs as well.
Setting Up an Automation Using Data From the Integrated Signup Form
Now that you have customer information stored in the database, use them to send targeted automated emails and SMSs.
Welcome emails are one of the best examples of automated email.
After a user submits their details to subscribe to a newsletter or after they have purchased a product, send them an email that welcomes them to your store and gives them a little information about what they can expect in the future.
These emails set the tone for your store among the leads and customers, so make sure to keep it short and crisp.
Let’s see how you can design and send an automated email after a user fills out a particular form.
Step 1: Add a New Automation
Go to Campaigns > Automations from the WordPress menu and click on the Add New Automation button.
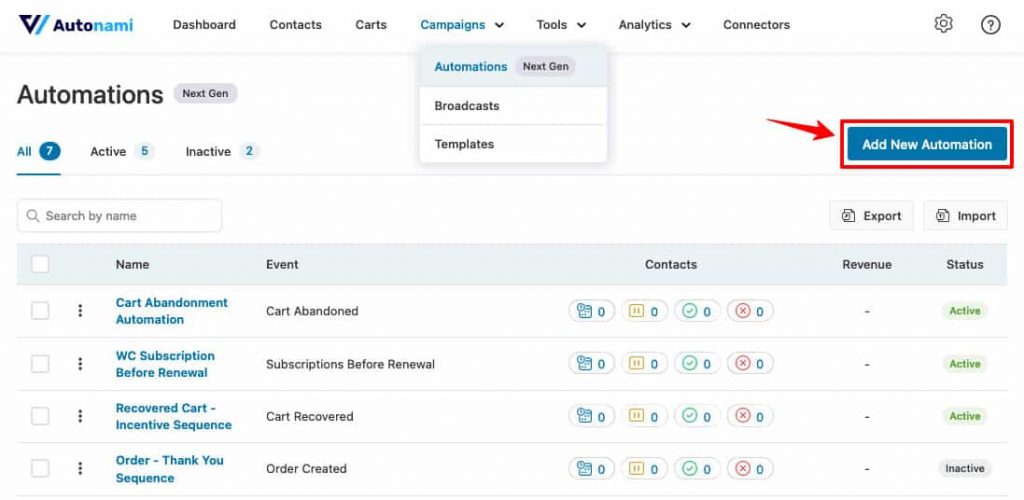
Then, click on the Start from Scratch and name your automation.
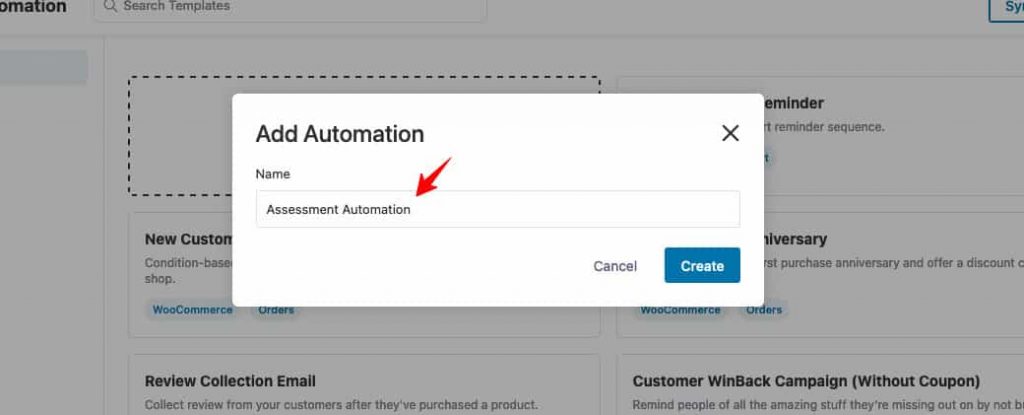
Step 2: Select an Event
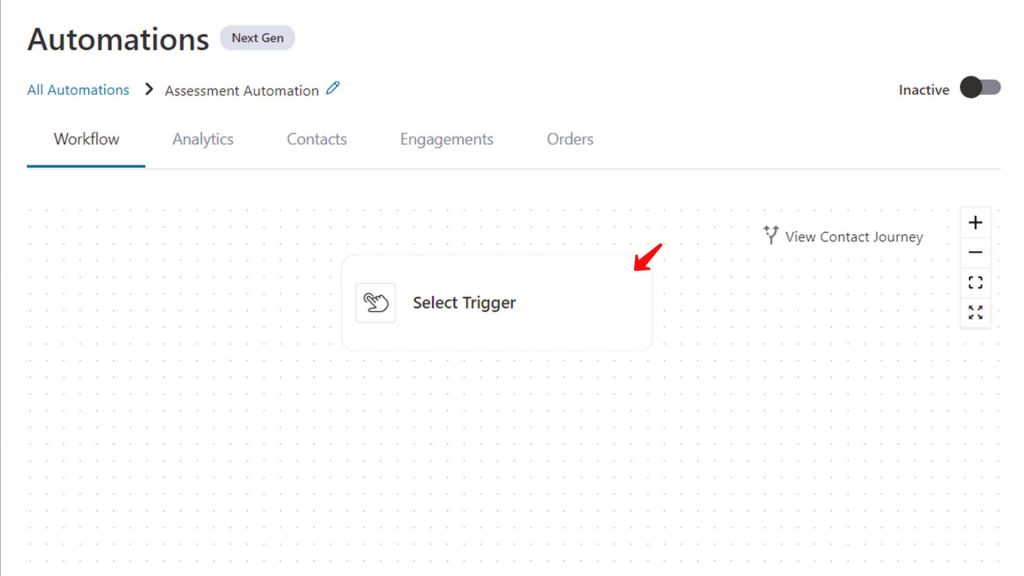
For the automation to run, you’ll have to specify the trigger event. Click on Select Trigger to open the list of events available.
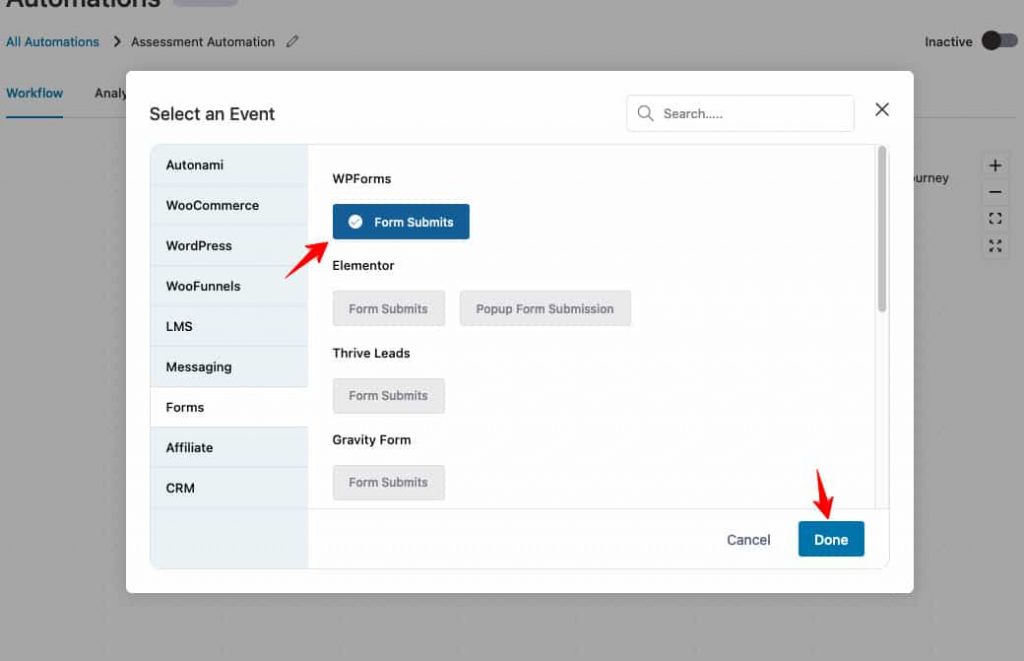
For this automaton, the said event will be Forms > Form Submits under WP Forms.
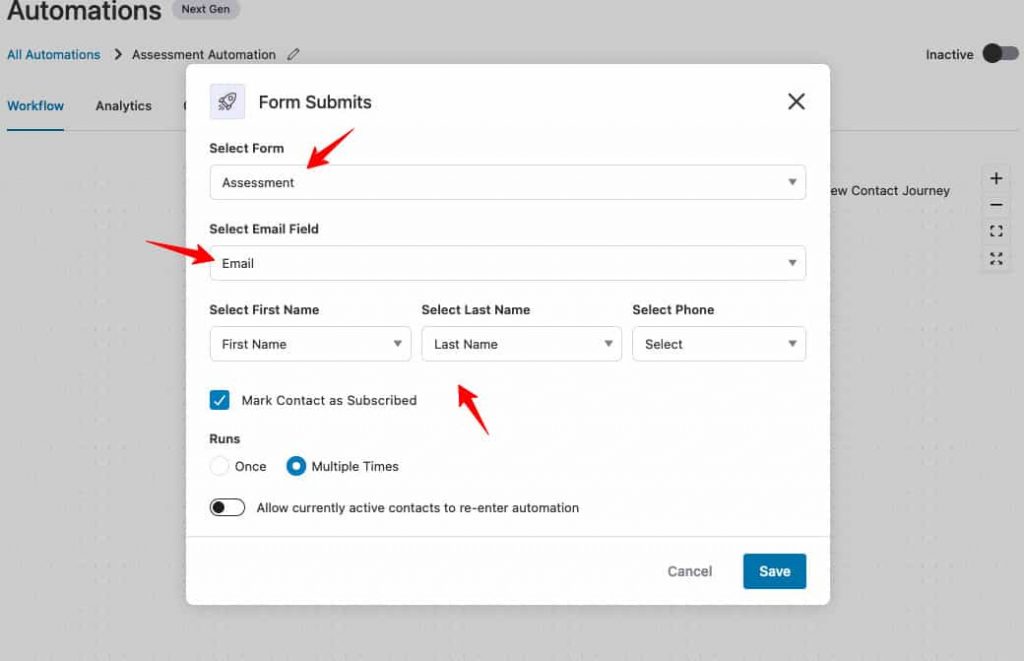
From the drop-down menu that shows up next, select the signup form and email field you wish to map for this automation.
Step 3: Add an Action
Next, click on the + icon to add a condition to the trigger event.
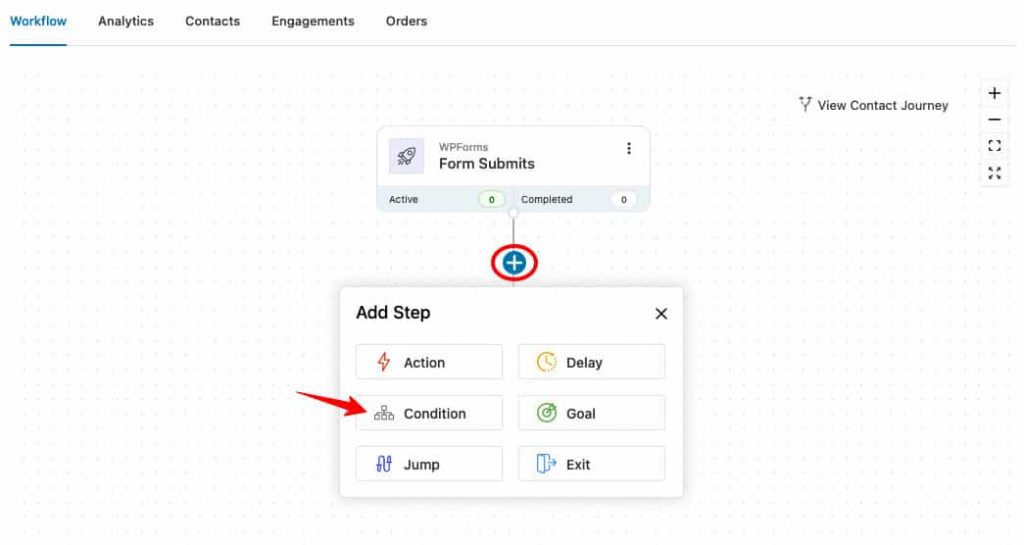
The conditions set are:
- IF the occupation of a user is Solopreneur, THEN send them a particular welcome email X.
- IF the chosen occupation is Agency Owner, THEN send them another email Y.
- And IF they are Employed, THEN add them to an existing automation.
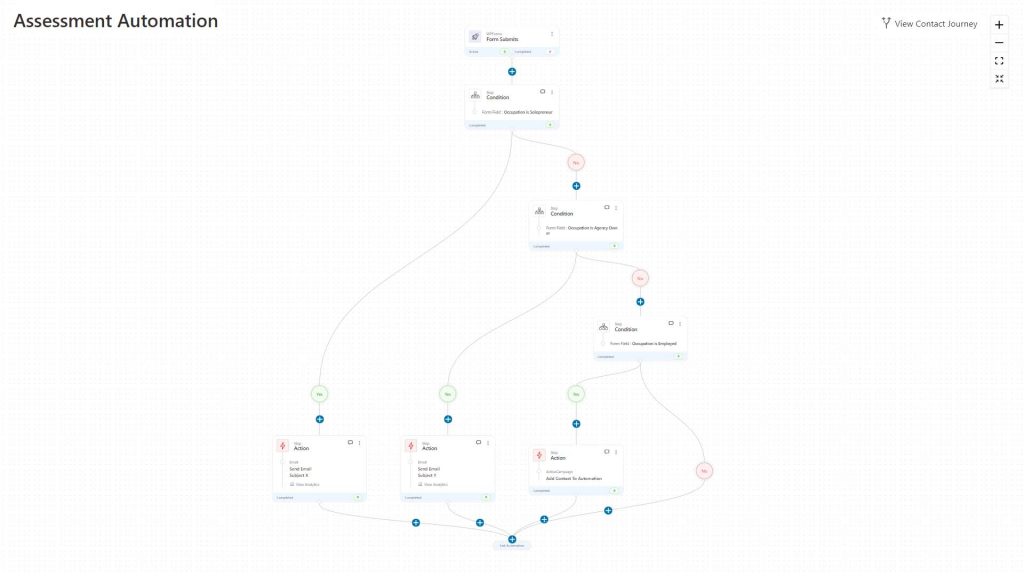
And when you’re happy with the designed automation, click on the toggle to make the automation live and watch these conditional actions come to life.
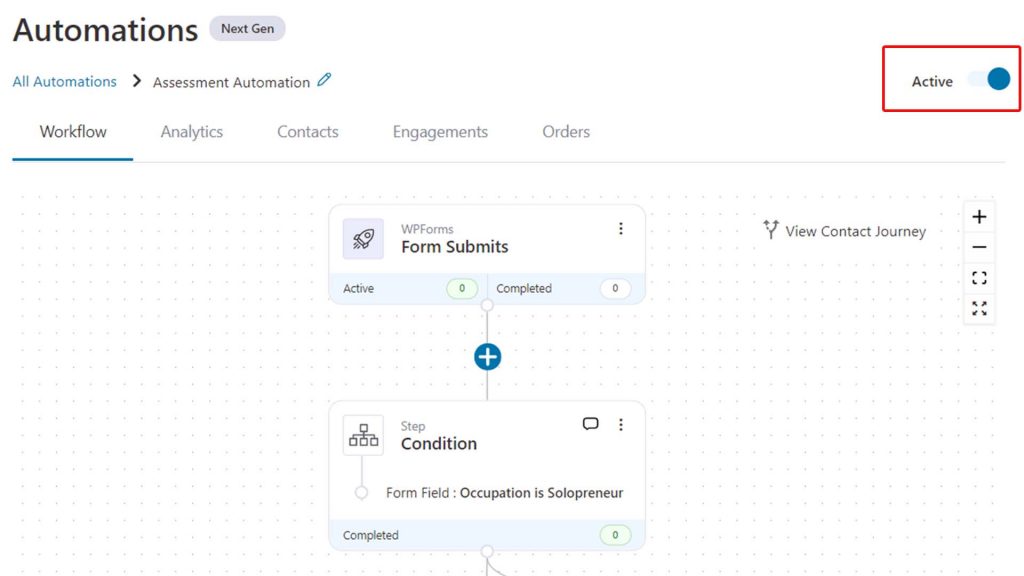
This is how FunnelKit Automations allows you to set diverse conditions to enable you to take precise actions towards targeted audiences.
Design Your Signup Form Automation Today!
Signup forms are versatile and can help you understand your contacts and their behavior much better.
Use the data collected from the forms to approach your leads and customers with relevant offers and in turn skyrocket your conversions.
Design automation to take custom actions based on consumer behavior and information.
There is so much more that can be done with FunnelKit Automations’s CRM features. Capture your contacts and build automations based on the database - with no coding knowledge needed.
Now without waiting any longer, get your hands on FunnelKit Automations today!

Editorial Team
February 17, 2026A WooCommerce auto apply coupon adds a discount to your customer's cart without them needing to type or paste a coupon code. Instead of relying on manual entry, the coupon...
Editorial Team
February 12, 2026First impressions matter, and in eCommerce, your welcome email is your first chance to shine. A WooCommerce welcome email is an automated message sent to new customers right after they...
Editorial Team
February 6, 2026With increasing competition and rising ad budgets, acquiring new customers is difficult. Forbes reports that the conversion rate for new customers is just 5%-20%. On the other hand, repeat customers...


