Did you know 80% of customers are more likely to make a purchase when they receive a personalized experience?
That’s why customer segmentation in WooCommerce isn’t just a nice-to-have; it’s essential. By segmenting your audience, even small eCommerce stores can build smarter email lists, deliver highly targeted campaigns, and drive more sales, just like the big brands do.
In this blog, you’ll learn:
- What is customer segmentation?
- The benefits of segmenting WooCommerce customers
- Must-have customer segments to create
- How to use these segments in broadcast campaigns
- and much more!
So, let’s begin.
Table of Contents
- 1 What is Customer Segmentation?
- 2 What are the Benefits of WooCommerce Customer Segmentation?
- 3 7 WooCommerce Customer Segments You Need to Create Today
- 3.1 1. Gender-based Segments for Special Holidays and Occasions
- 3.2 2. Repeat Customers Segment for Consistent Profits and Rewarding Customer Loyalty
- 3.3 3. High Revenue-Generating Customers to Pitch Premium Products
- 3.4 4. High Average Order Value (AOV) Customers to Test Your Pricing and Marketing Strategies
- 3.5 5. Upsell with Complementary Products to Customers Who Buy Specific Products
- 3.6 6. Disengaged Audience Segment to Win Back Lost Customers
- 3.7 7. Greet Your Customers on Their National Holidays with Geographical Segmentation
- 4 How to Use WooCommerce Customer Segmentations in Your Broadcast Campaigns?
- 5 Ready to Personalise Your Marketing with WooCommerce Customer Segmentations?
What is Customer Segmentation?
Clayton Christensen, a Harvard Business School professor, did a study on new consumer product launches.
He noted that each year, 30,000 new consumer products are launched in the market, and most of them fail due to ineffective market segmentation.
Customer segmentation is a strategic grouping of your customers based on purchase-influencing factors such as demography, psychography, online behavior, geographic location, and more.
- Demographic segmentation: Under this segmentation, you group your customers based on factors such as age, sex, marital status, family size, occupation, education level, income, etc.
- Psychographic segmentation: When you do target audience segmentation based on psychographic factors, you focus more on the personality of the consumer, including their opinions and interests.
- Behavioral segmentation: This segmentation is based on the user’s needs and actions. You can further segment them based on the occasions they buy, their usage habit, or the benefits they get.
- Geographic segmentation: One of the classic segments, geographic segmentation, is splitting your audience based on their country/city/region, etc. For instance, you can send emails on the right day, like Thanksgiving for Canadians on October 10 and Americans on November 24, using WooCommerce customer segmentation.
Now that you know how to categorize your audiences, let’s understand the benefits of these audience segmentation strategies.
What are the Benefits of WooCommerce Customer Segmentation?
Audience segmentation yields the best results when you have a clear understanding of your target market. Your target market is your core customer base that is most suited to your products and services.
Once you identify your target market, segmenting customers is a great strategy for many types of businesses seeking to enhance their marketing and sales efforts.
In addition to these WooCommerce customer segmentation benefits, there are additional benefits, such as:
- Personalized Communication
When marketing communication is personalized for customers, the business and customer develop a deeper relationship. This can immensely improve customer loyalty.
For your brand equity, acknowledge your customers as more than just email subscribers.
- Upselling/Cross-selling
Understanding your customers' buying behavior or income level can help you identify opportunities for upselling or cross-selling.
Offering special offers to recent customers can also increase sales of related products.
- Higher CRO and ROI
Blast campaigns lack engagement. This is because these campaigns are not relevant to the customers or of interest to them. A targeted campaign gets a better ROI since the customers have already shown interest in your product. Taking the time to segment your customers will greatly improve your CRO.
Braze Magazine noted that marketing campaigns targeting segmented audiences yielded 200% more conversions than those targeting broad audiences.
Creating audience segments is one of the most effective ways to manage customers in WooCommerce, so let’s do that.
7 WooCommerce Customer Segments You Need to Create Today
WooCommerce does not have any native CRM functionality, and thus, you need a robust WooCommerce marketing tool like FunnelKit Automations to handle your CRM needs.
FunnelKit Automations simplifies categorizing customers into segments and managing them regularly. Our WordPress marketing automation engine is available in two versions: Free (Lite) and Pro.
The free version allows you to get a head start in eCommerce marketing automation efforts, and the pro version allows you to build advanced workflows and integrate with other WordPress tools as well.
Creating audience segments requires FunnelKit Automations Pro, so grab your copy of FunnelKit Automations Pro now and let’s get started.
Ensure that both the FunnelKit Automations plugins (free and Pro) are installed and activated.
Now, you are all set to create WooCommerce customer segmentations.
1. Gender-based Segments for Special Holidays and Occasions
Splitting your customers based on their gender is one of the oldest audience segmentation strategies in the marketing world.
If a proportion of your customers is female, create an audience segment for them.
For creating these sub-segments, you will need to collect the data first. FunnelKit Automations integrates with various popular form builders like Elementor Forms, Gravity Forms, WP Forms, and more.
Create custom form fields in your sign-up form to collect the relevant details. You can even email your audience with a link to the form. FunnelKit Automations can update the custom fields for you, allowing you to store this data against the gender field.
Let’s create our first WooCommerce customer segmentation.
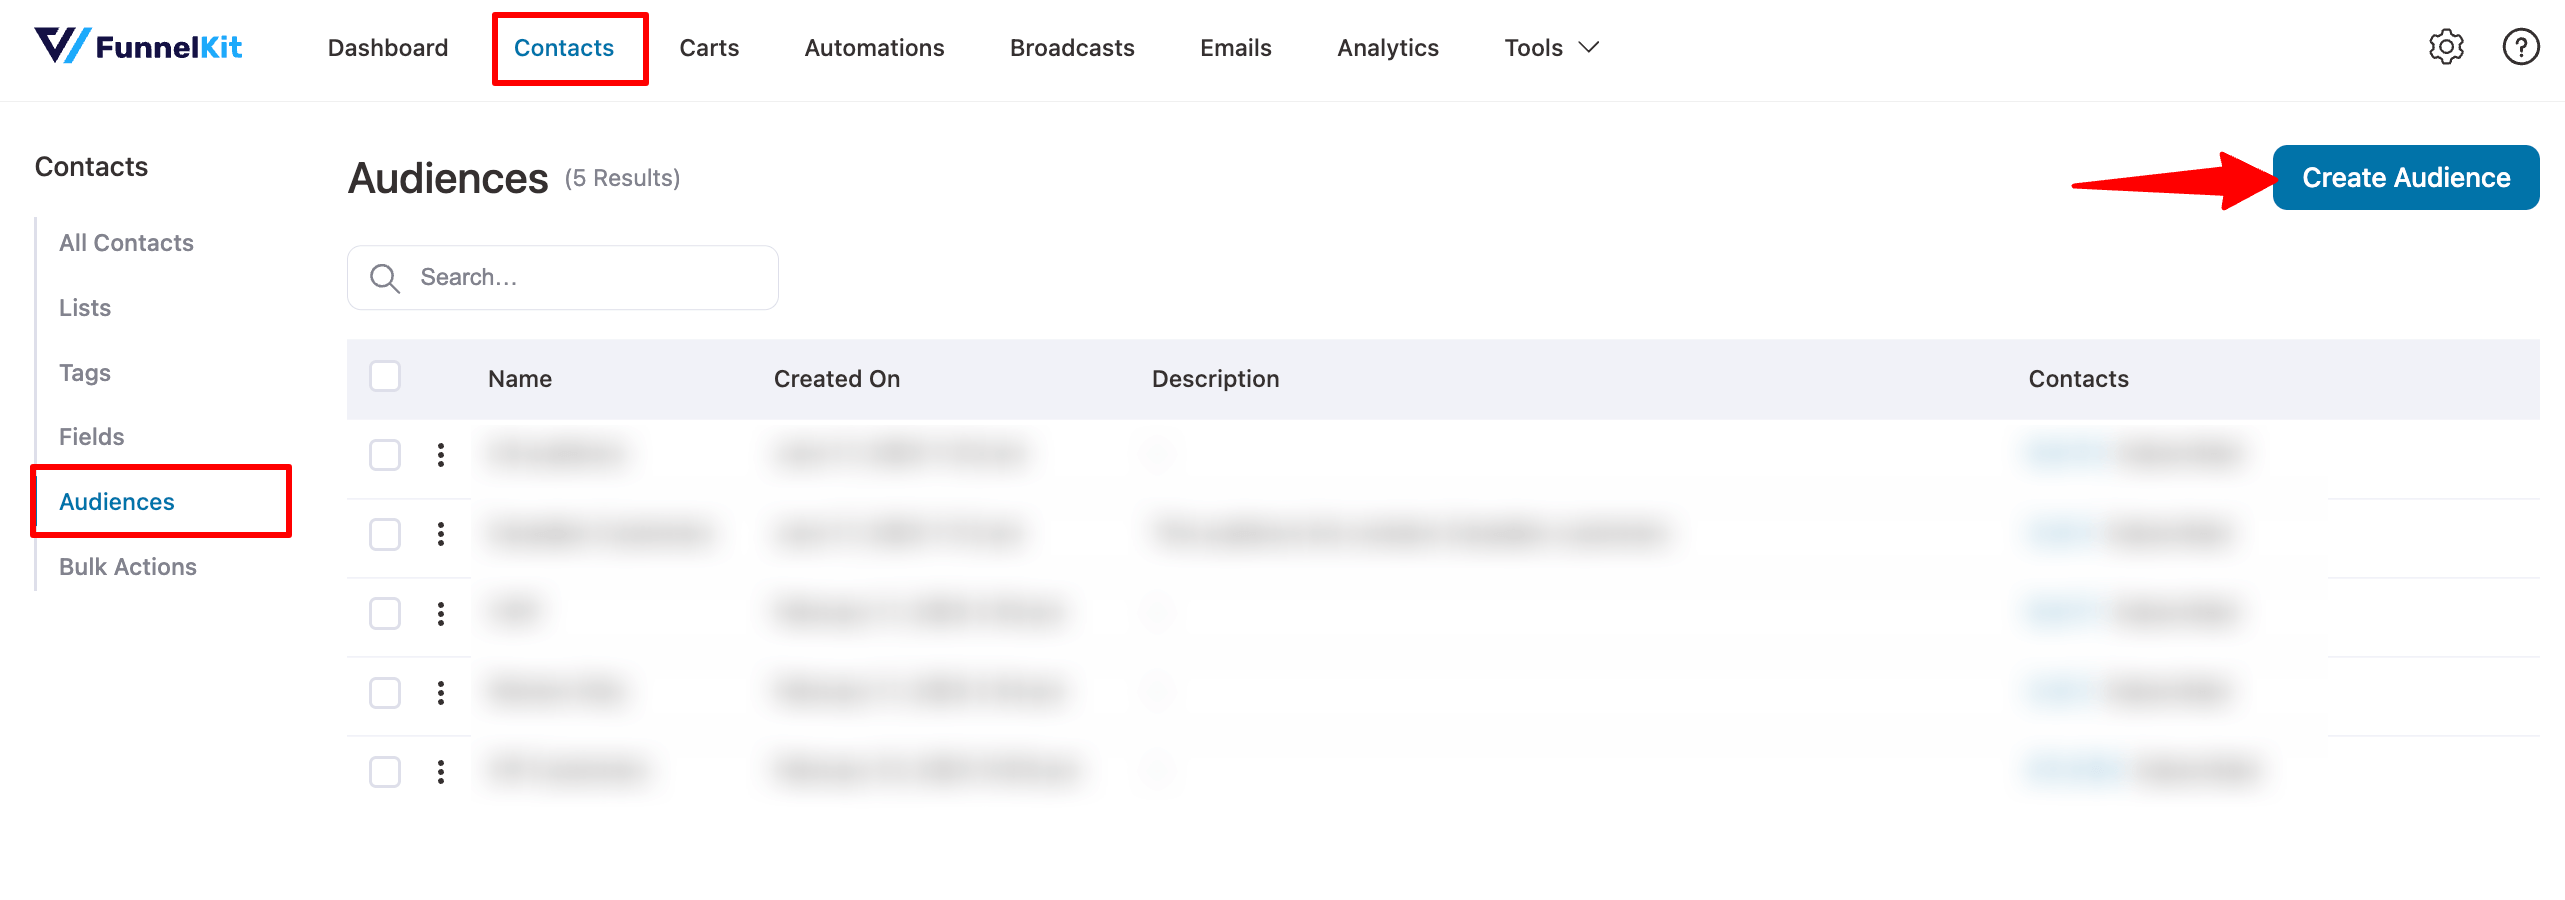
In the FunnelKit Automations dashboard, head to Contacts ⇒Audiences. Next, click on Create Audience.
Next, assign a name and description to your audience segments.
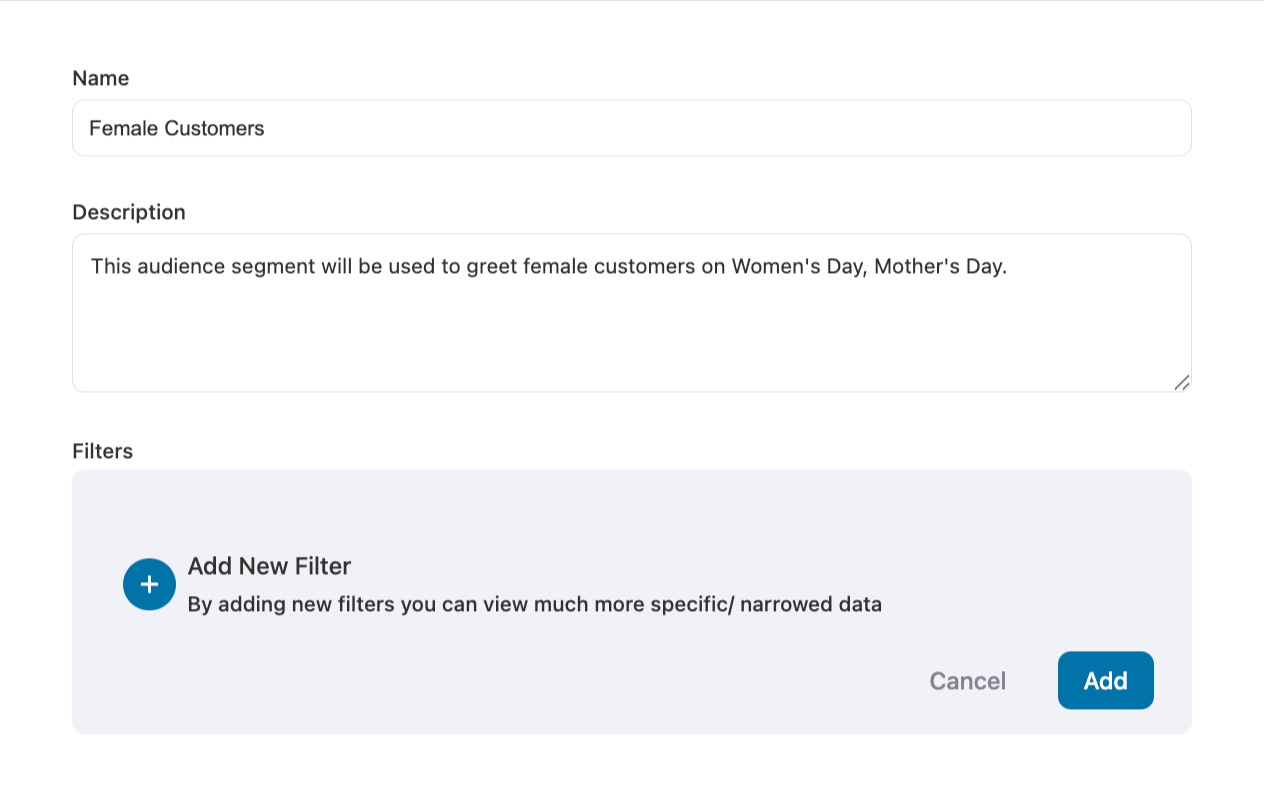
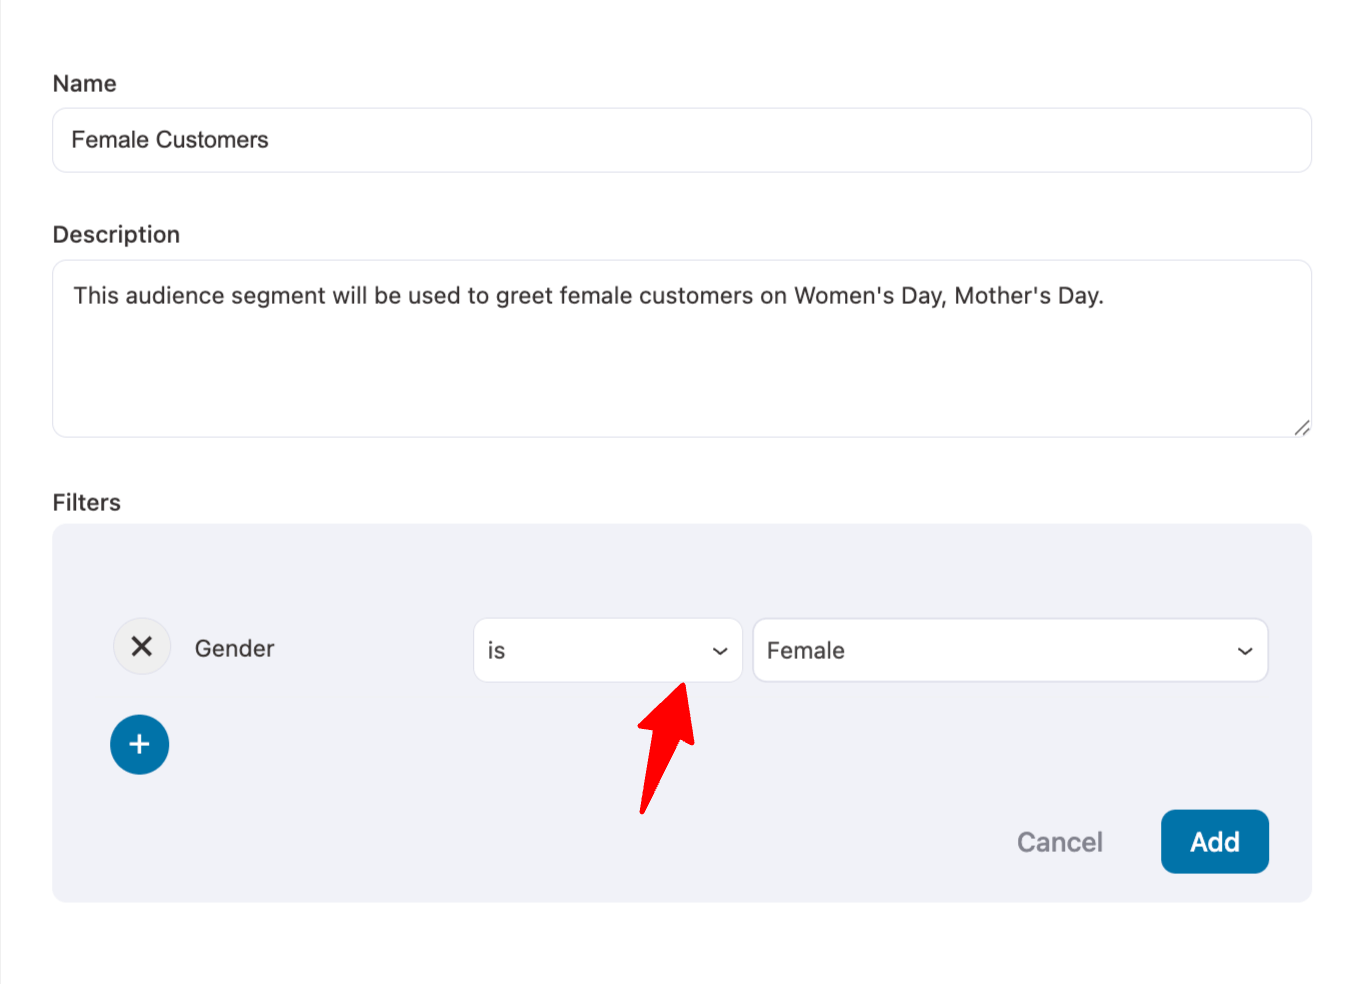
Now click on Add New Filter to create our Female Audience segment. Now, click on Customer Details. Select the criteria based on which you want to segment your audience. We are selecting Gender.
Customize the criteria. Here, we are selecting Female. Once selected, click on Add.
Now, you can see the female audience segment in your Audiences dashboard.

WooCommerce customer segmentation enables you to create an email list comprising relevant contacts. Furthermore, utilize FunnelKit Automations to create an advanced email sequence for these segments and achieve a better return on investment (ROI).
2. Repeat Customers Segment for Consistent Profits and Rewarding Customer Loyalty
Repeat customers are a surefire way to earn consistent profits.
Why?
Well, most of the new customers you bring to your store, 8 out 10, will never buy anything. Additionally, the cost of acquiring a new customer is five times higher than retaining an existing one.
Hence, it is essential that you create a WooCommerce customer segment for your repeat customers and provide them with the special treatment they deserve.
Under Contacts⇒ Audiences, click on Create Audience.
Add a suitable name and description for easy distinction. Once that’s done, click on the “+” icon to add a filter, and then click on WooCommerce. Next, click on Total Orders Count.
Select the number of orders that you deem as a criterion to be your repeat customer.
In our case, we are selecting: more than 3 orders. Therefore, any customer who has made more than three purchases from the store will be directed to our Repeat Customers audience segment.
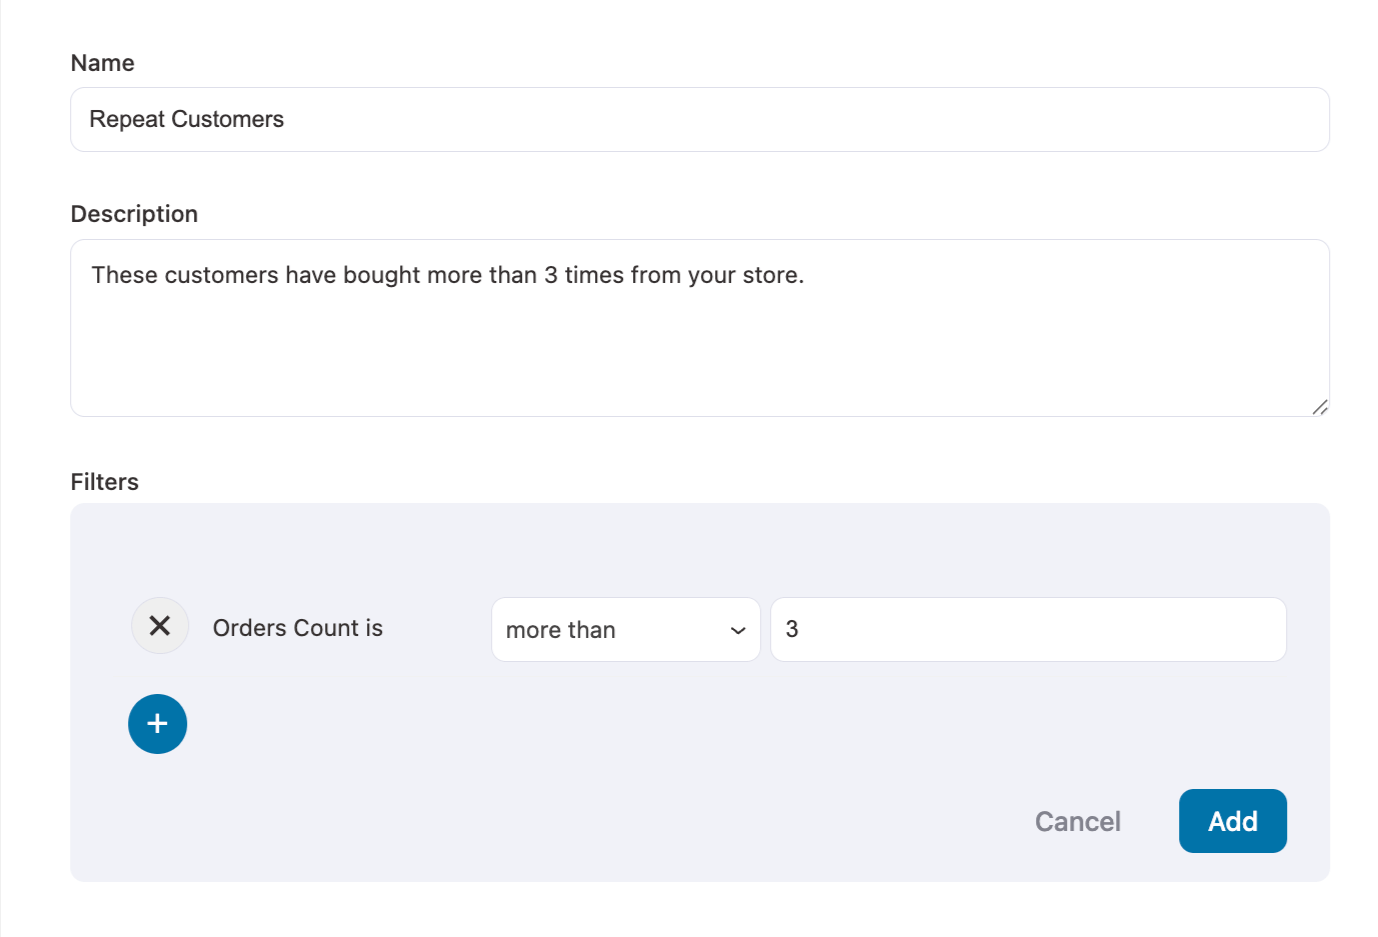
Once you are all set, click on Add. Now you can see the new WooCommerce customer segmentation in your Audiences list.

3. High Revenue-Generating Customers to Pitch Premium Products
High-ticket customers are those customers who have higher purchasing power than the rest of your customers. Their purchases make up a large chunk of your business’s revenue.
These are the customers who either frequently buy from you or buy the most premium items you have to sell. Either way, they are high-ticket customers for you.
Due to their higher purchasing power, these customers are more likely to convert from your product pitch emails. Thus, it is essential that you create a separate WooCommerce customer segmentation for these elite customers.
Under the FunnelKit Automations dashboard, click on Contacts ⇒ Audiences ⇒ Add New Audiences.
Name the segment, add a description, then click on WooCommerce. Now, select Total Revenue, and set your criterion. Our high-ticket audience segment comprises customers with a total revenue exceeding $ 2,000.
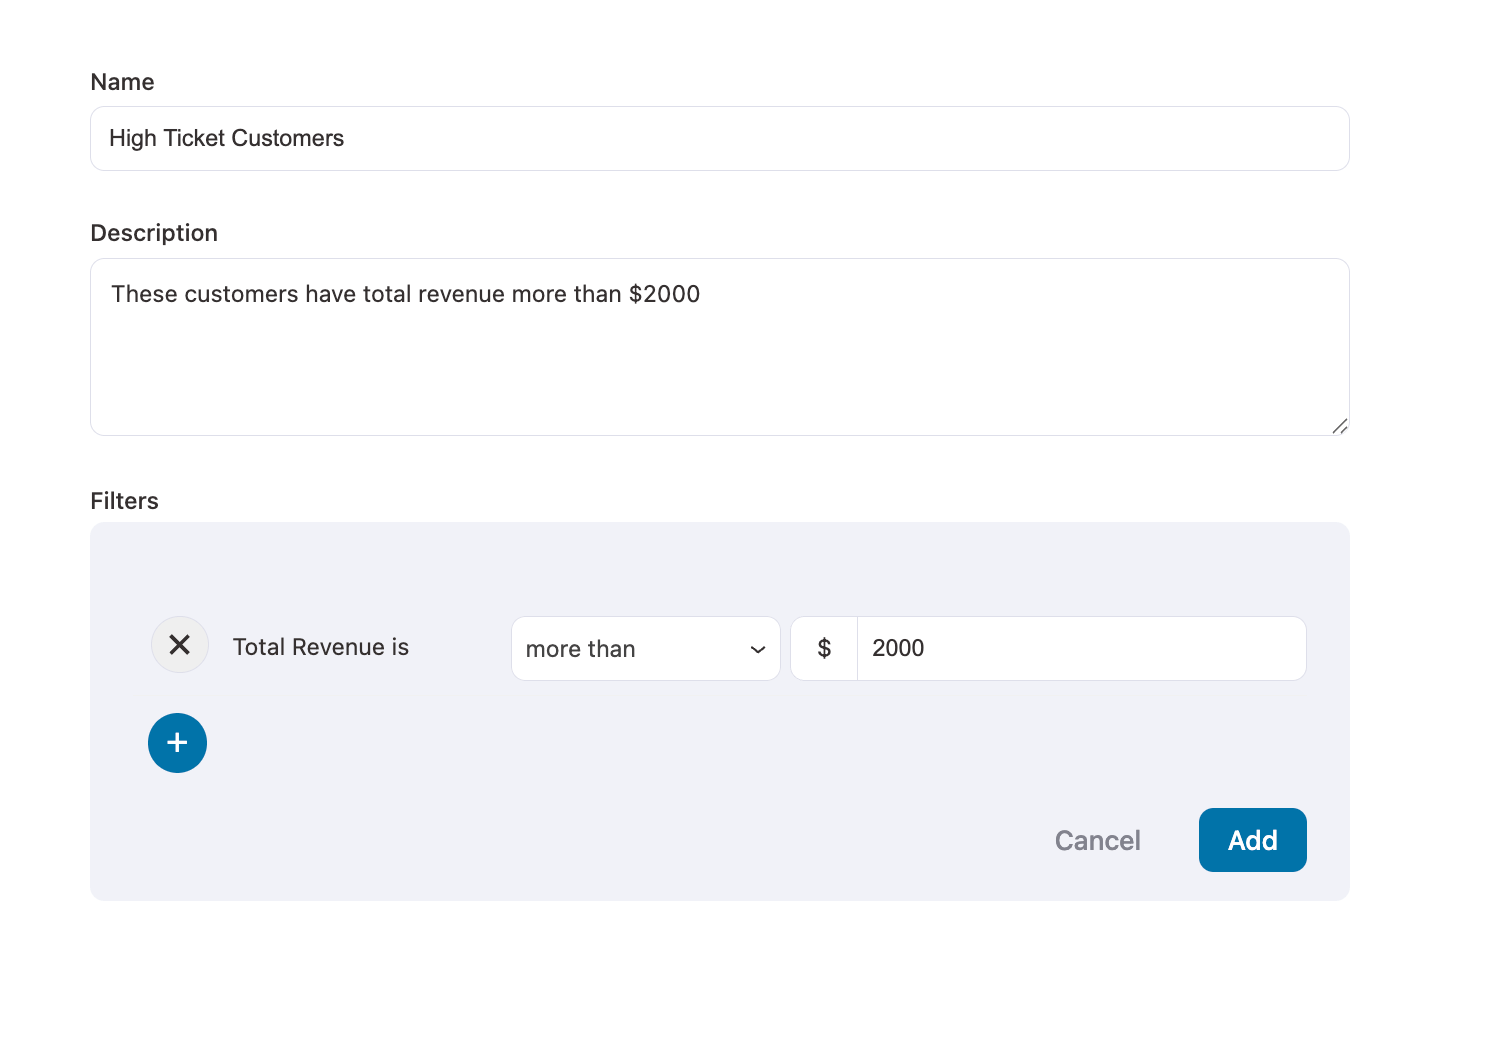
Now, in your Audiences list, you can see your High-Ticket customer segment.

4. High Average Order Value (AOV) Customers to Test Your Pricing and Marketing Strategies
The Average Order Value, as the name suggests, is the average of all the order totals of a particular customer.
AOV lets you know which customers really like to buy from you. The higher the AOV, the more they like your products.
FunnelKit Automations Pro shows you the individual customer’s AOV and a comparative AOV - compared to the entire store’s AOV.
Click on the contact’s name, and you can see their AOV (as shown below). Just beside it, you will see a number in either green or red.
If it’s green, then the AOV of that particular customer is more than the store’s collective AOV. If it is red (like in the image below), the individual AOV is less than the store’s AOV.
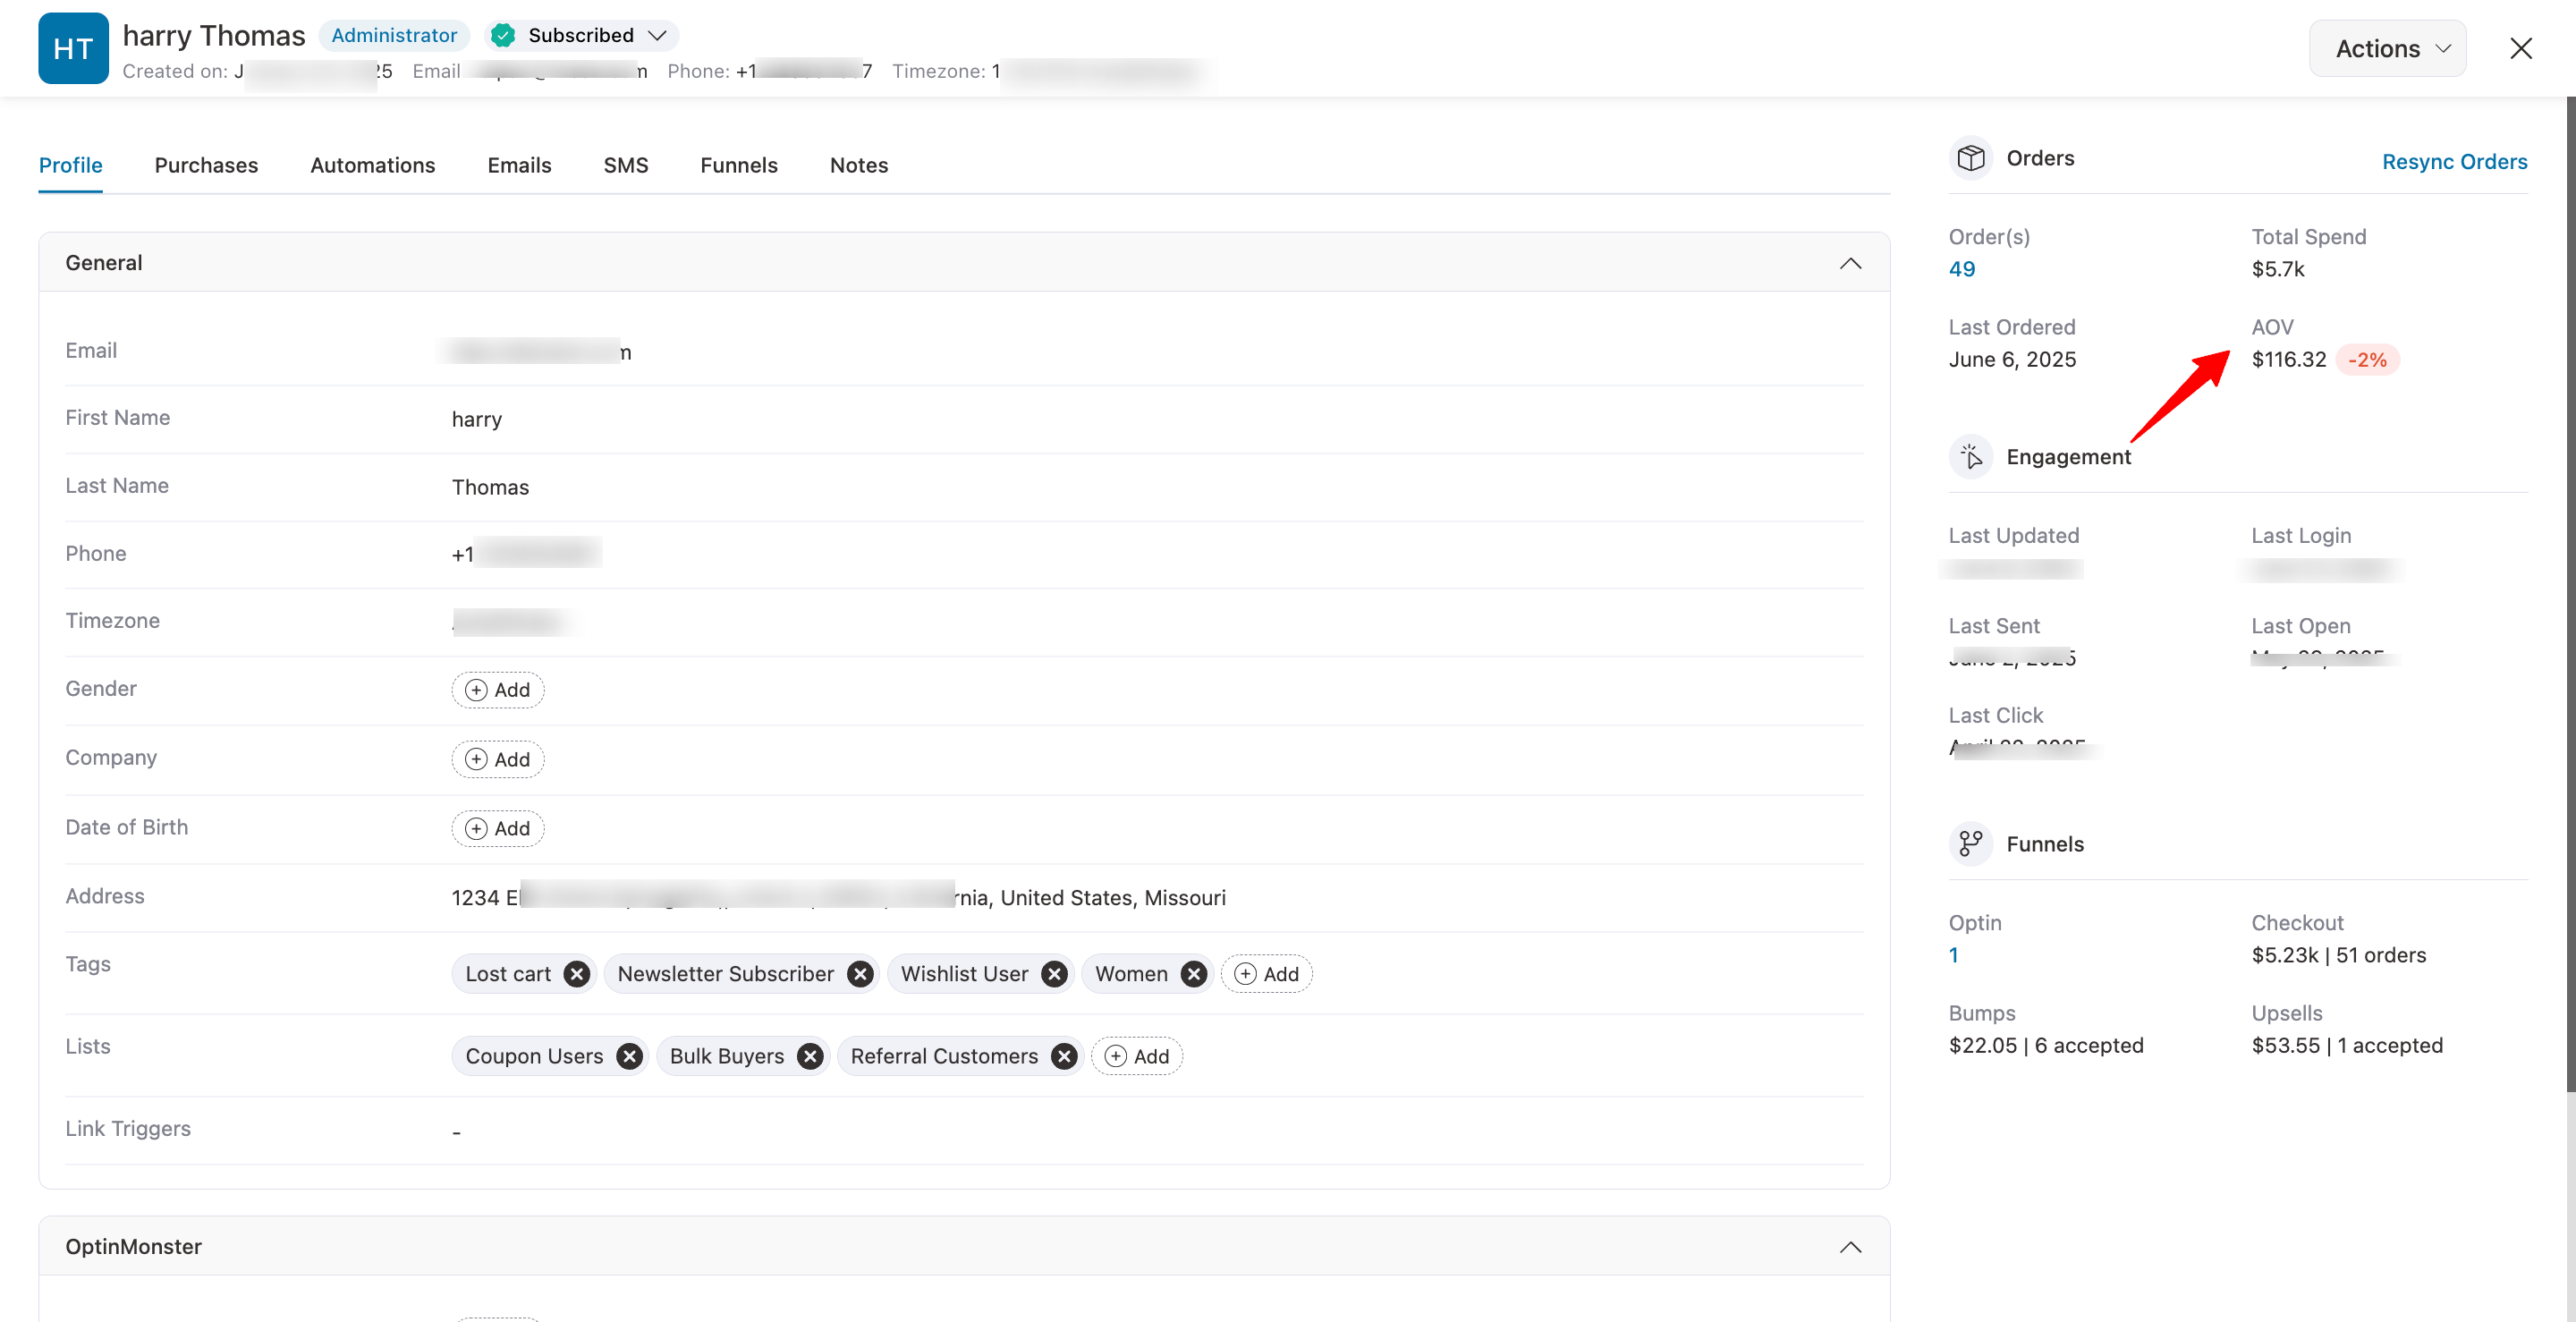
To create this WooCommerce customer segment, click on Apply New Audiences.
Assign a name and description to the segment, and then add a filter. Click on WooCommerce. Under the WooCommerce group, select Average Order Value.
Set the criterion for your store. We are creating an audience segment of customers whose AOV is more than $50.
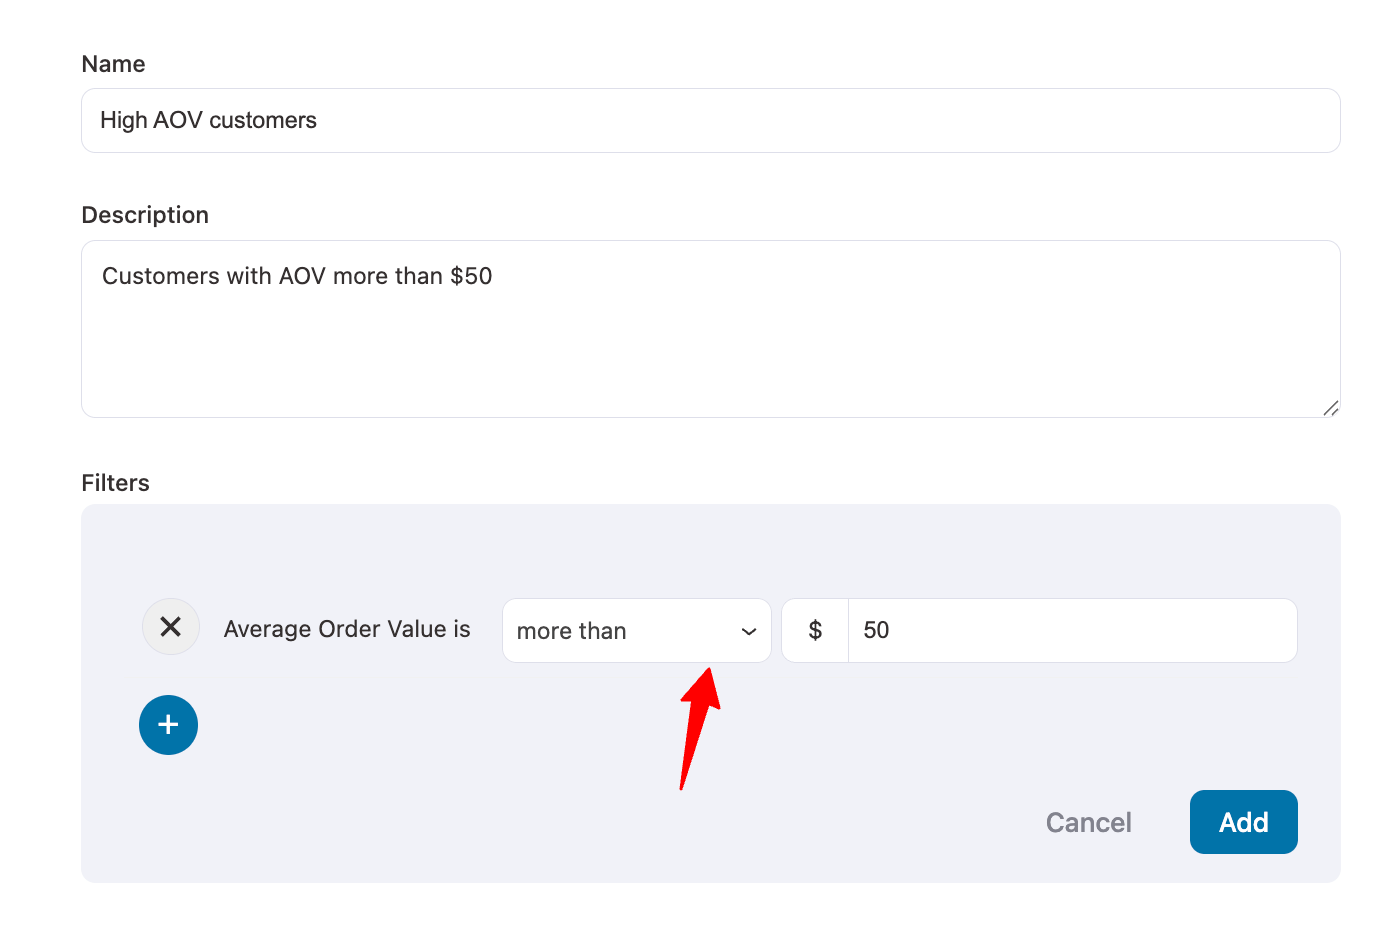
Once set, click on Add. You can see the newly built audience segment in your Audiences list.

5. Upsell with Complementary Products to Customers Who Buy Specific Products
There are always some products in your catalog that are premium or best-selling items.
So, when a customer buys such products, it opens up the opportunity to upsell by recommending complementary or exclusive products.
Let’s create this WooCommerce audience segment. Click on Add New Audience, add a name and description, and then click on WooCommerce.
Next, under the WooCommerce group, click on Purchased Products. Now, select the product on which you want to upsell a complementary product.
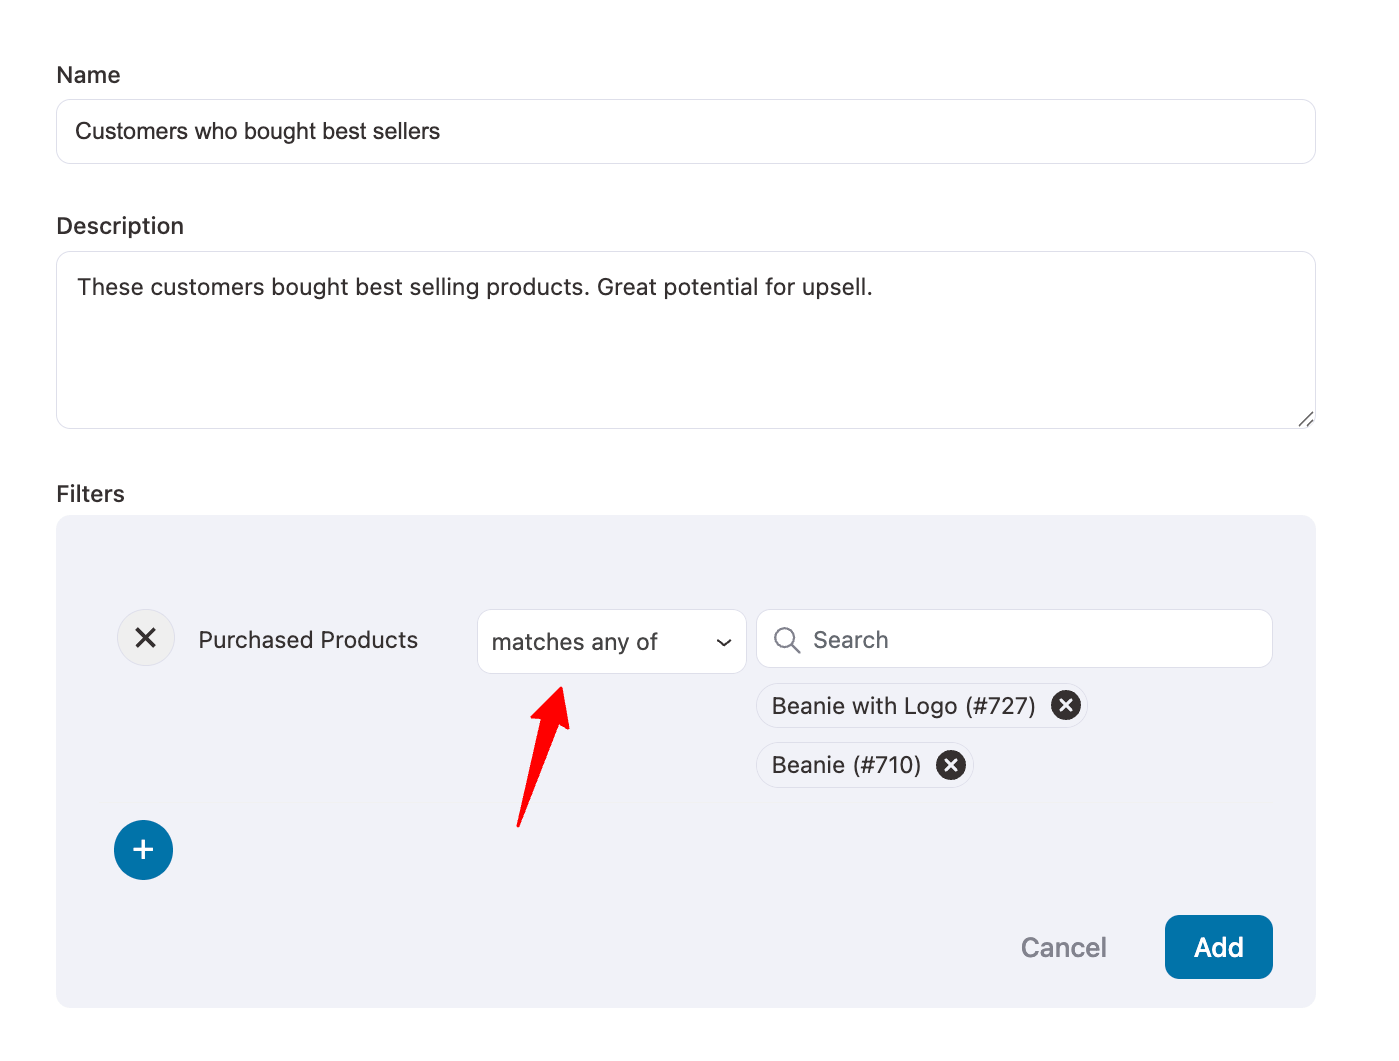
Once selected, click on Add. Now you can see the new audience segment in your audience list.

6. Disengaged Audience Segment to Win Back Lost Customers
Continuously sending emails to unengaged audiences can do two things:
- Lowers your click-through rate and open rate
- Unengaged audiences might mark your emails as spam, and spamming hurts email deliverability, which eventually tarnishes the sender's reputation.
This is why it is crucial that you create a separate segment of your unengaged audience and try to win them back.
Click Add New Audience, name and describe your segment, go to Engagement, choose Unengaged, and set it to target users inactive via email or SMS for the last 45 days.
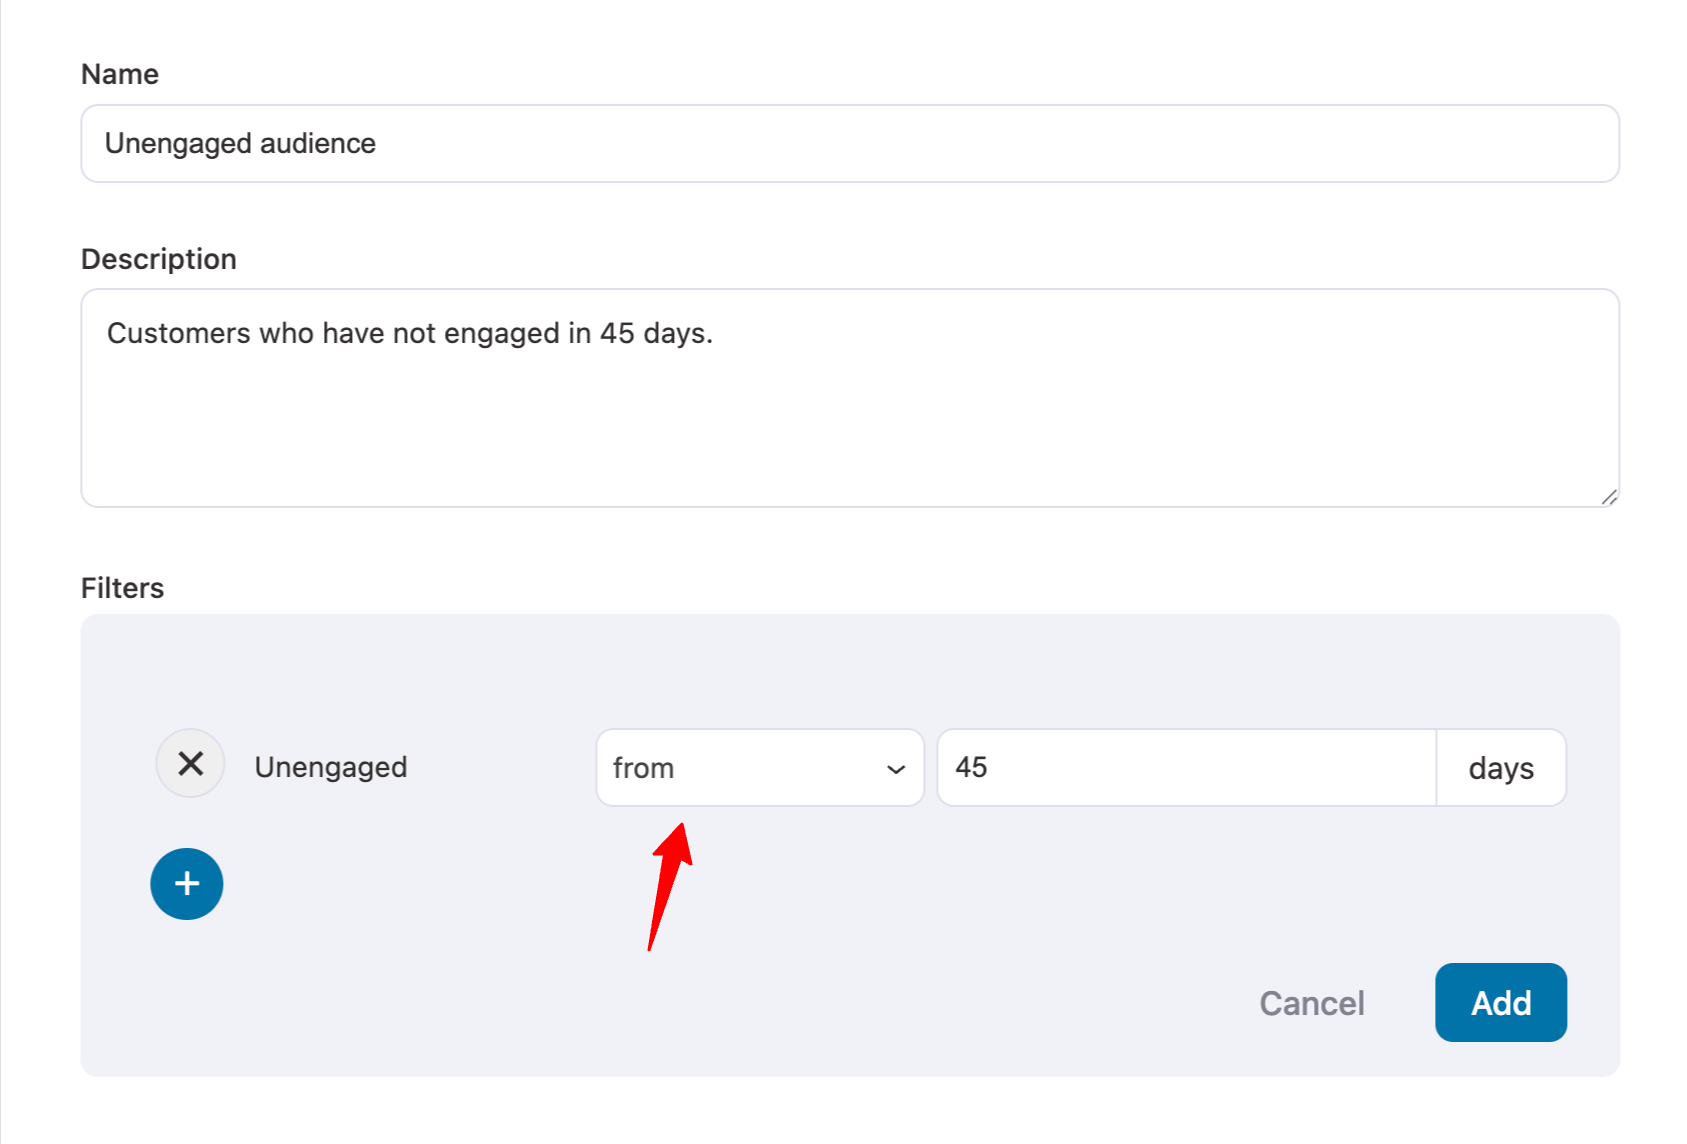
Click on Add. Now you can see this new audience set in your audience list.

7. Greet Your Customers on Their National Holidays with Geographical Segmentation
One of the most important audience segments and one of the classics - geographical segmentation.
FunnelKit Automations lets you segment your audience based on country, state, city, postcode, and more.
Customers from countries such as the US, UK, CA, AU, and some other European countries have higher purchasing power, that is why if you have a premium product, you can pitch them directly to these geographical audience segments.
There are some festivals/holidays that are celebrated in multiple countries but on different days. Let’s create our geography-based WooCommerce customer segmentation.
Click on Add New Audience, and assign a name and description to this target audience.
Once done, click on Geography.
Under the Geography group, select Country/Region. Select the country for which you want to create the geographical customer segmentation - we are choosing Canada.
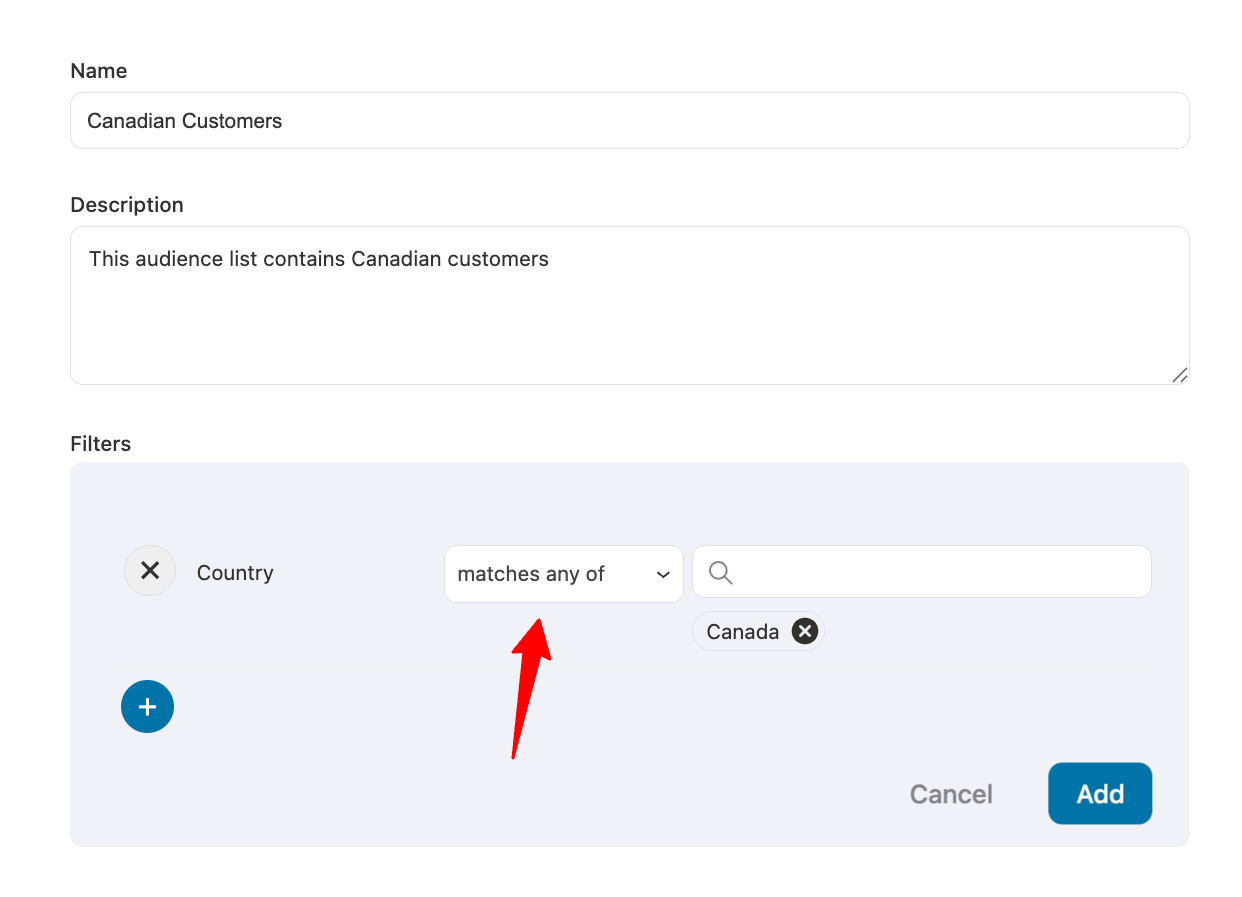
You can even narrow it down by choosing a State/City in that particular country. Just click on Add New Filter, and go to Geography ⇒ City. Select the City you want to target. We are selecting Toronto.
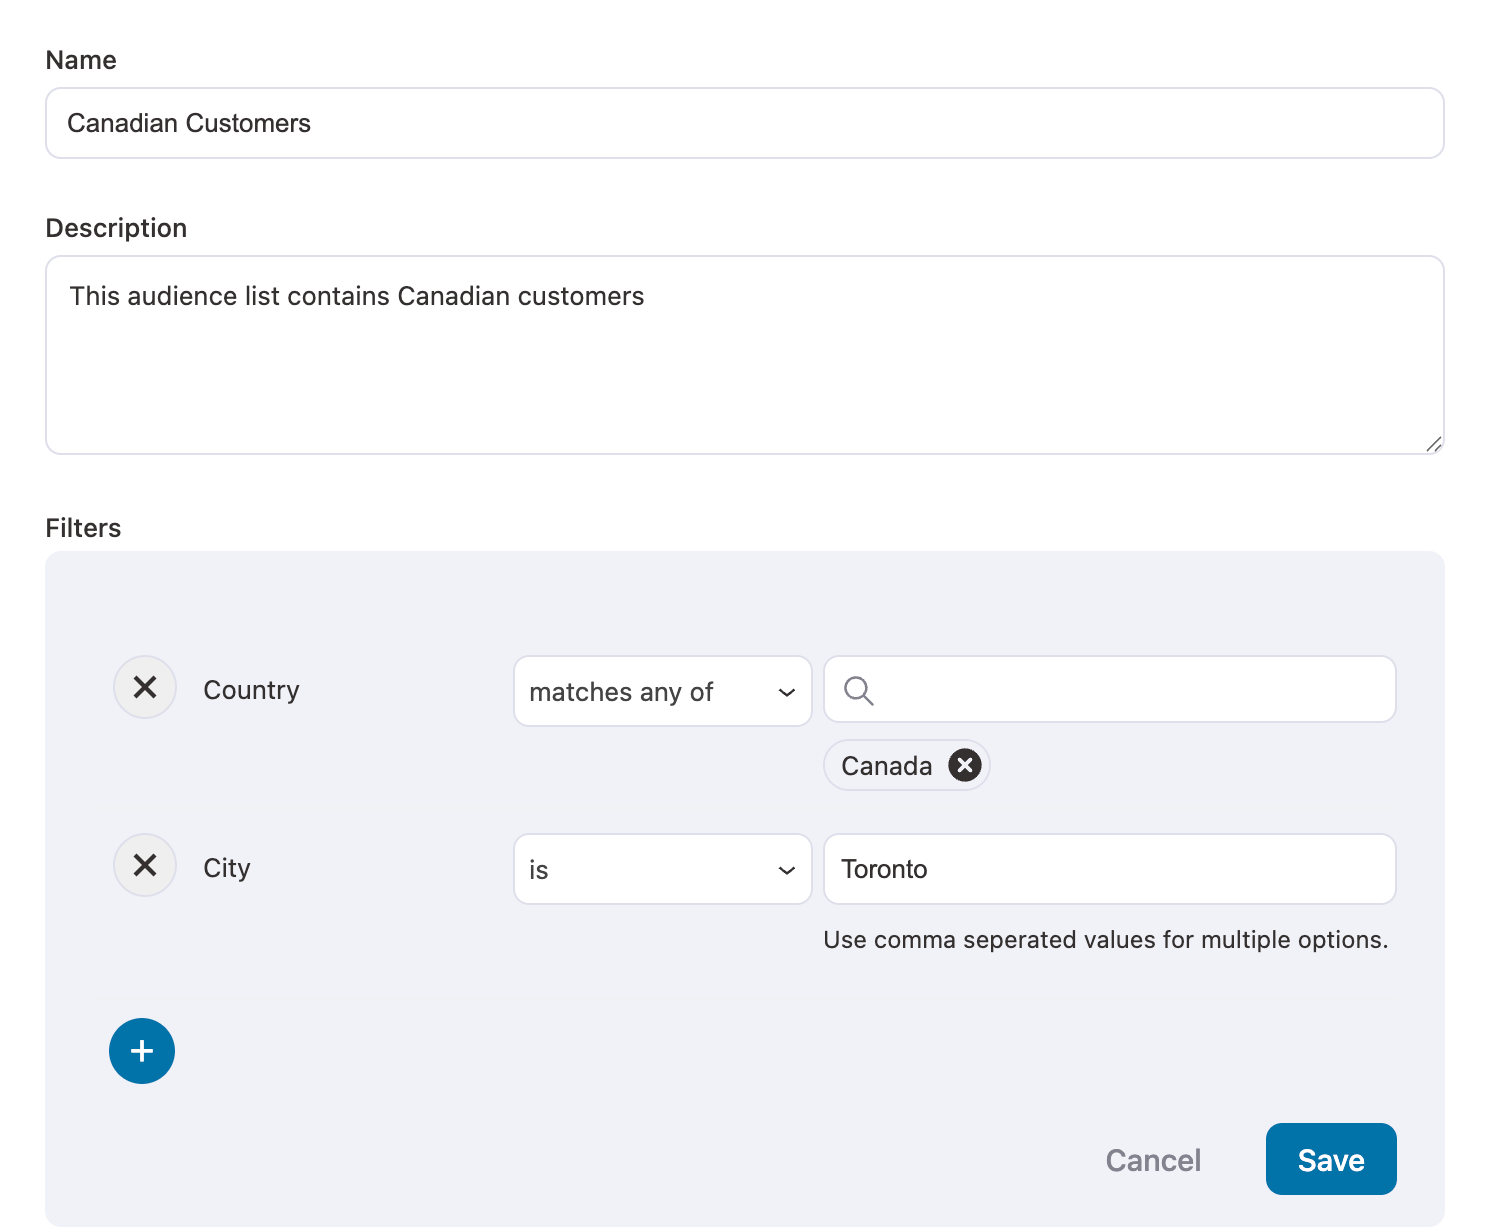
Click on Save, and then you can see your newly created audience segment in your audience lists.

Now you know how to do segmentation in WooCommerce. However, customer segmentation is not just helpful in identifying your target market, but it is also crucial in connecting with the right audience through the right content.
In the next section, learn how to connect to a segmented audience.
How to Use WooCommerce Customer Segmentations in Your Broadcast Campaigns?
Depending on the characteristics of a particular audience segment, your content voice and approach will differ.
Let’s say you are a clothing business, and you have designed an exclusive collection of clothing around the upcoming 4th of July, the US Independence Day.
Who is most likely to buy these products? Your US Customers.
So, let’s design a broadcast campaign where we greet US customers for the US Independence Day and offer them a discount coupon to encourage them to buy the exclusive Independence Day clothing line.
Step 1: Adding a new broadcast campaign
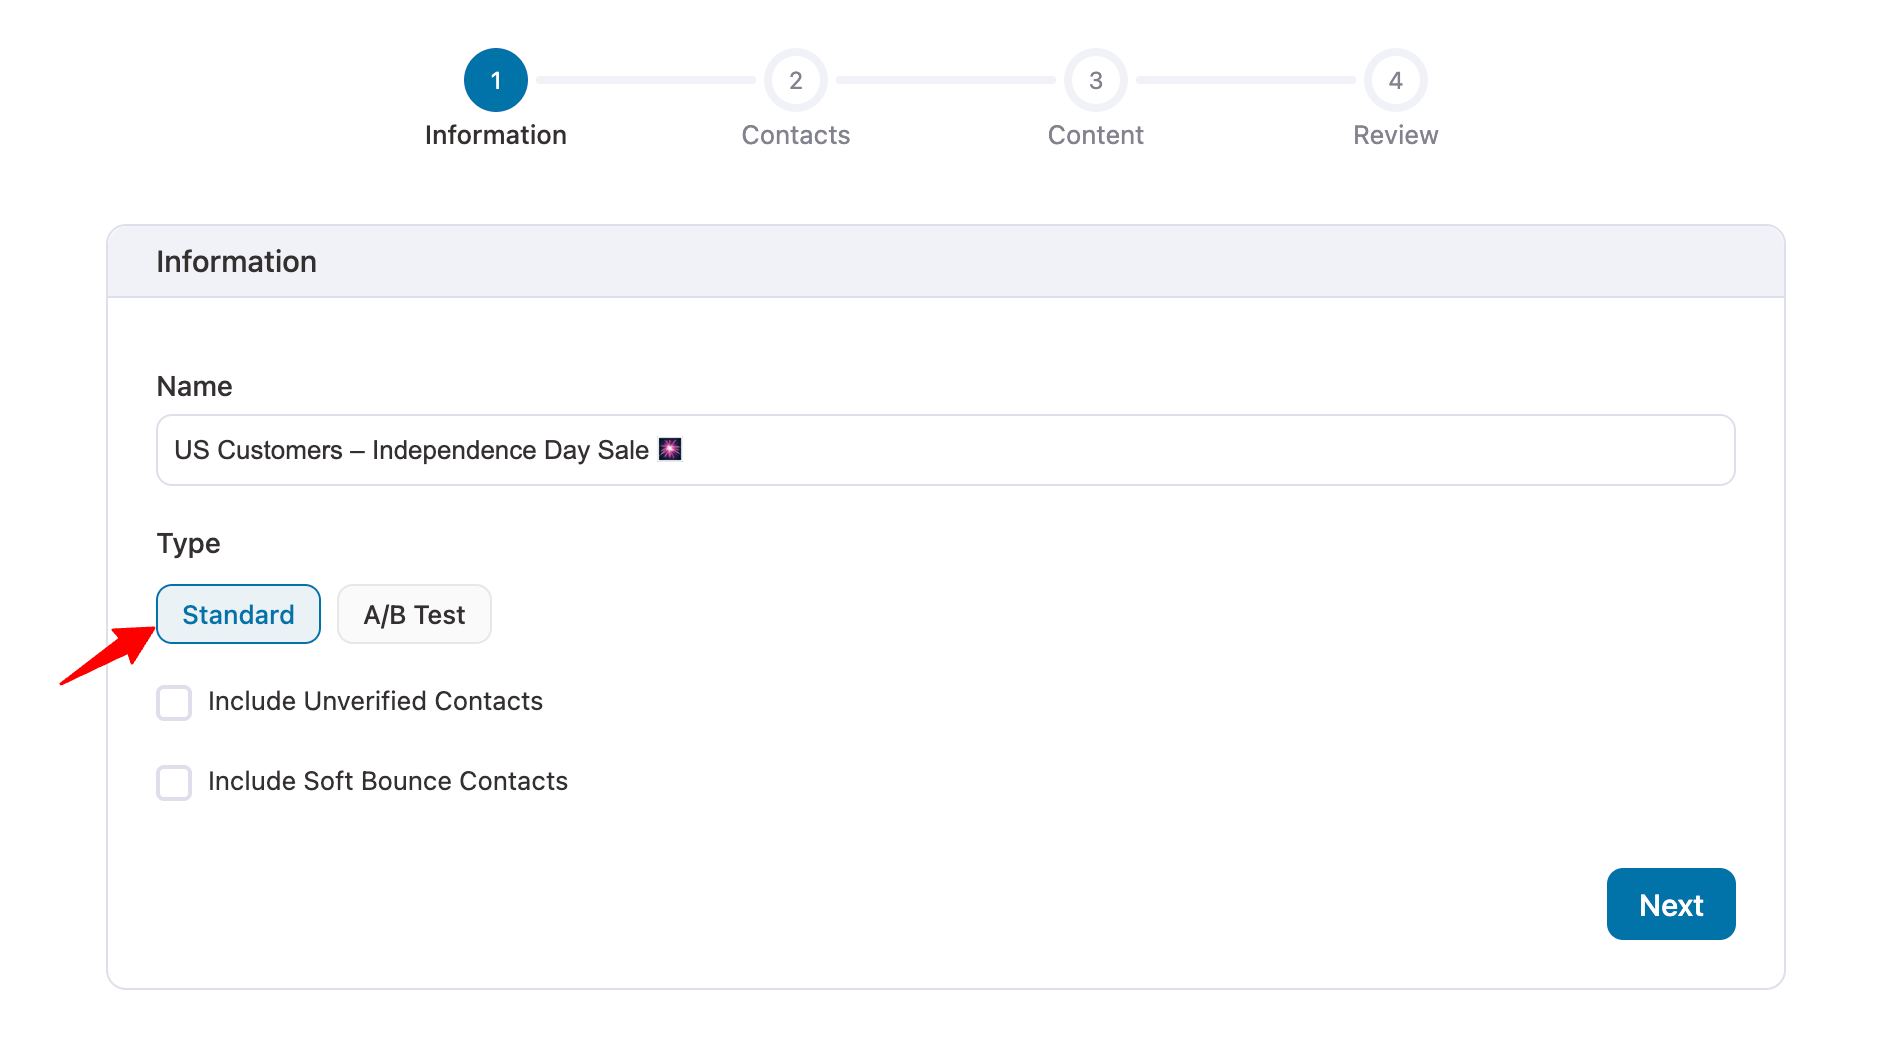
In the FunnelKit Automations dashboard, go to Campaigns and then select Broadcasts. Click on Add New Broadcast. Add a name to your newsletter campaign.

Here, you can select whether you want to send a standard email or create multiple versions and A/B test them. If you want to go with the Standard type, just click on Next.
Step 2: Applying new audiences you've created
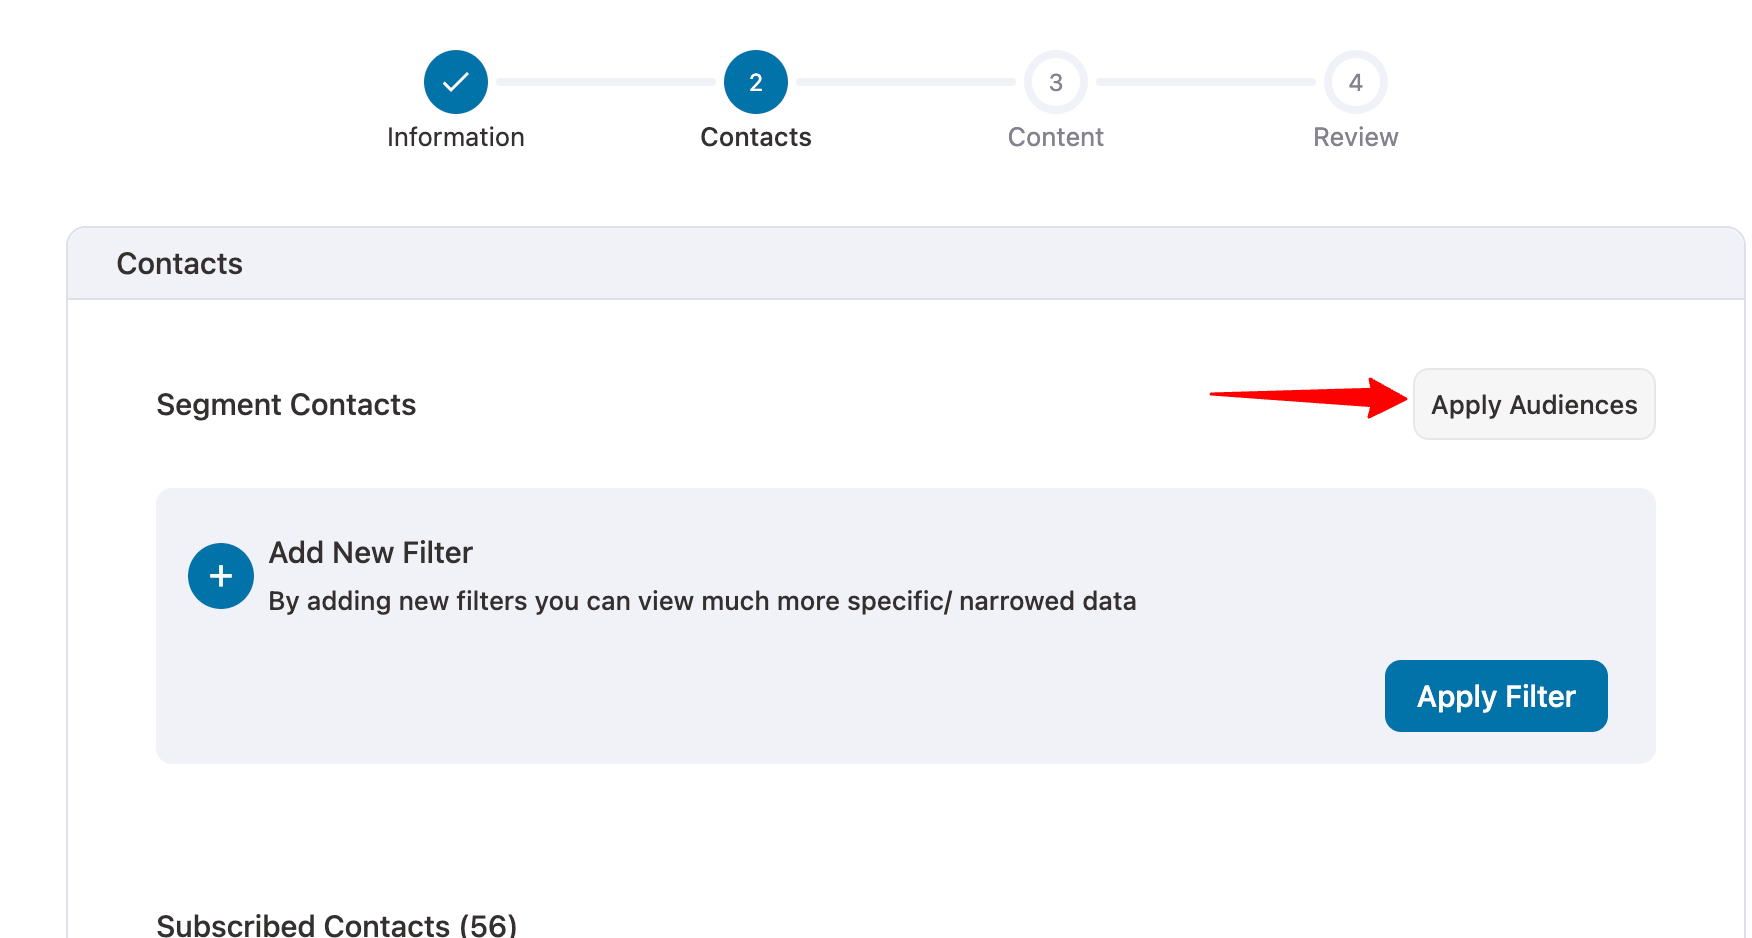
Now, under Contacts, choose the audience you want to send this broadcast to. Click on Apply Audiences.
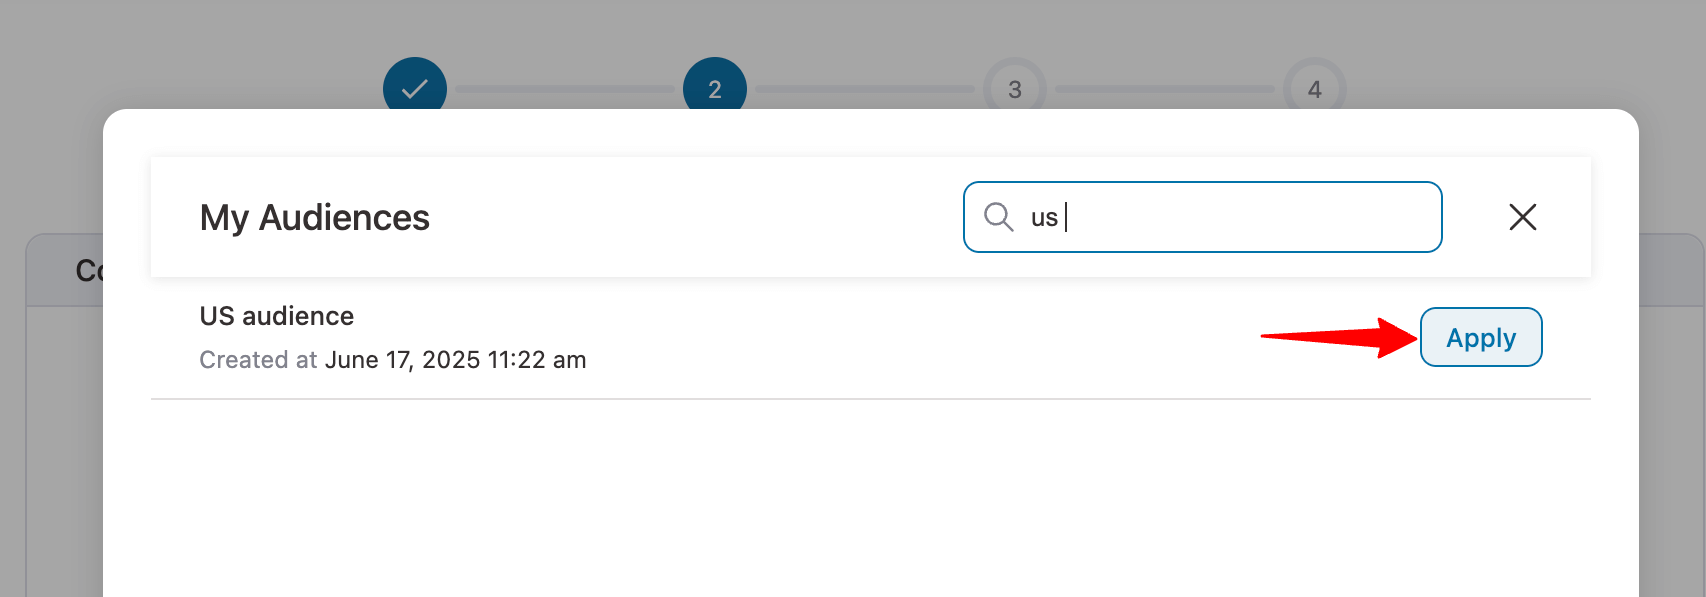
Search for your WooCommerce customer segmentation - US Customers and click on Apply.
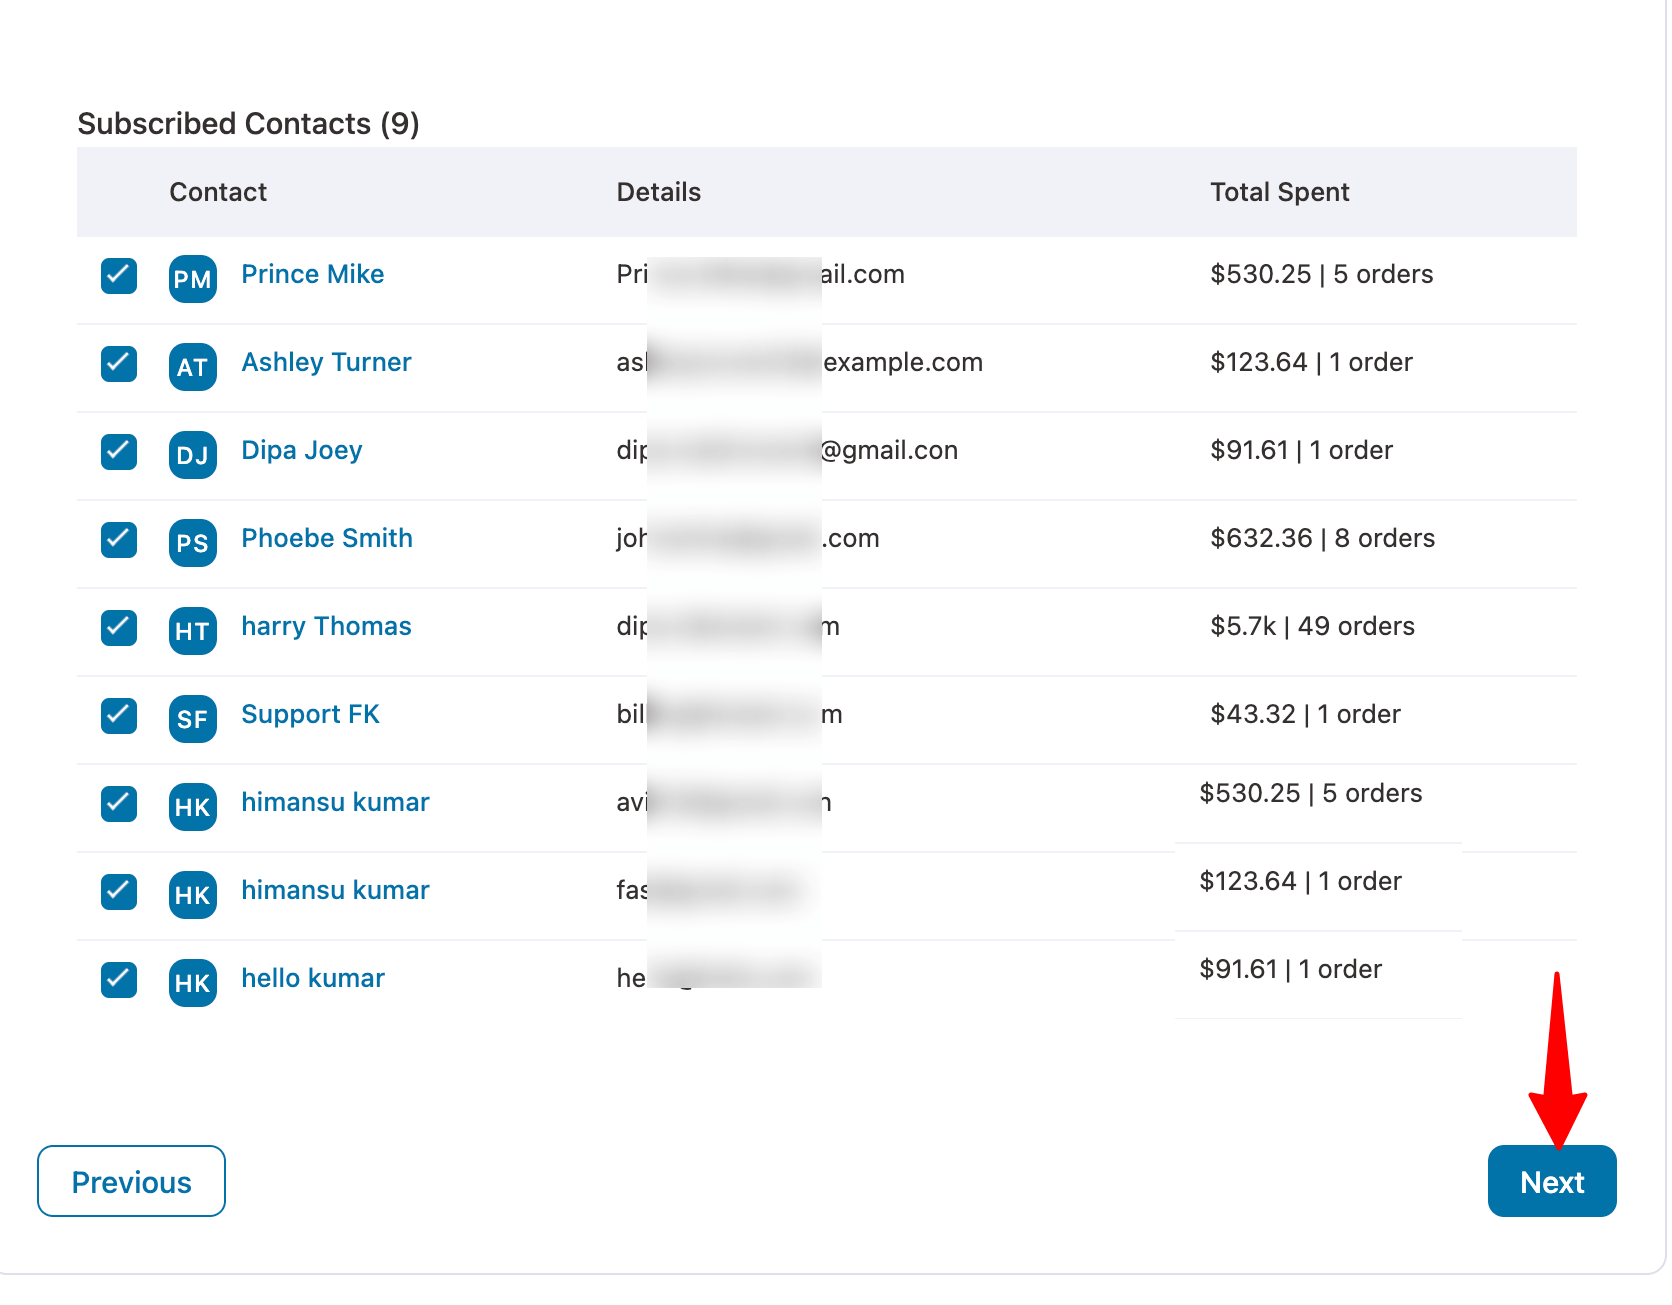
You will see the customers who are in this audience segment. Scroll down and click on Next.
Step 3: Create a broadcast campaign
In the next step, first set up your basic information - Name, Email, and Reply-to Email.
Then write a persuasive subject line and a curiosity-inciting preview text.
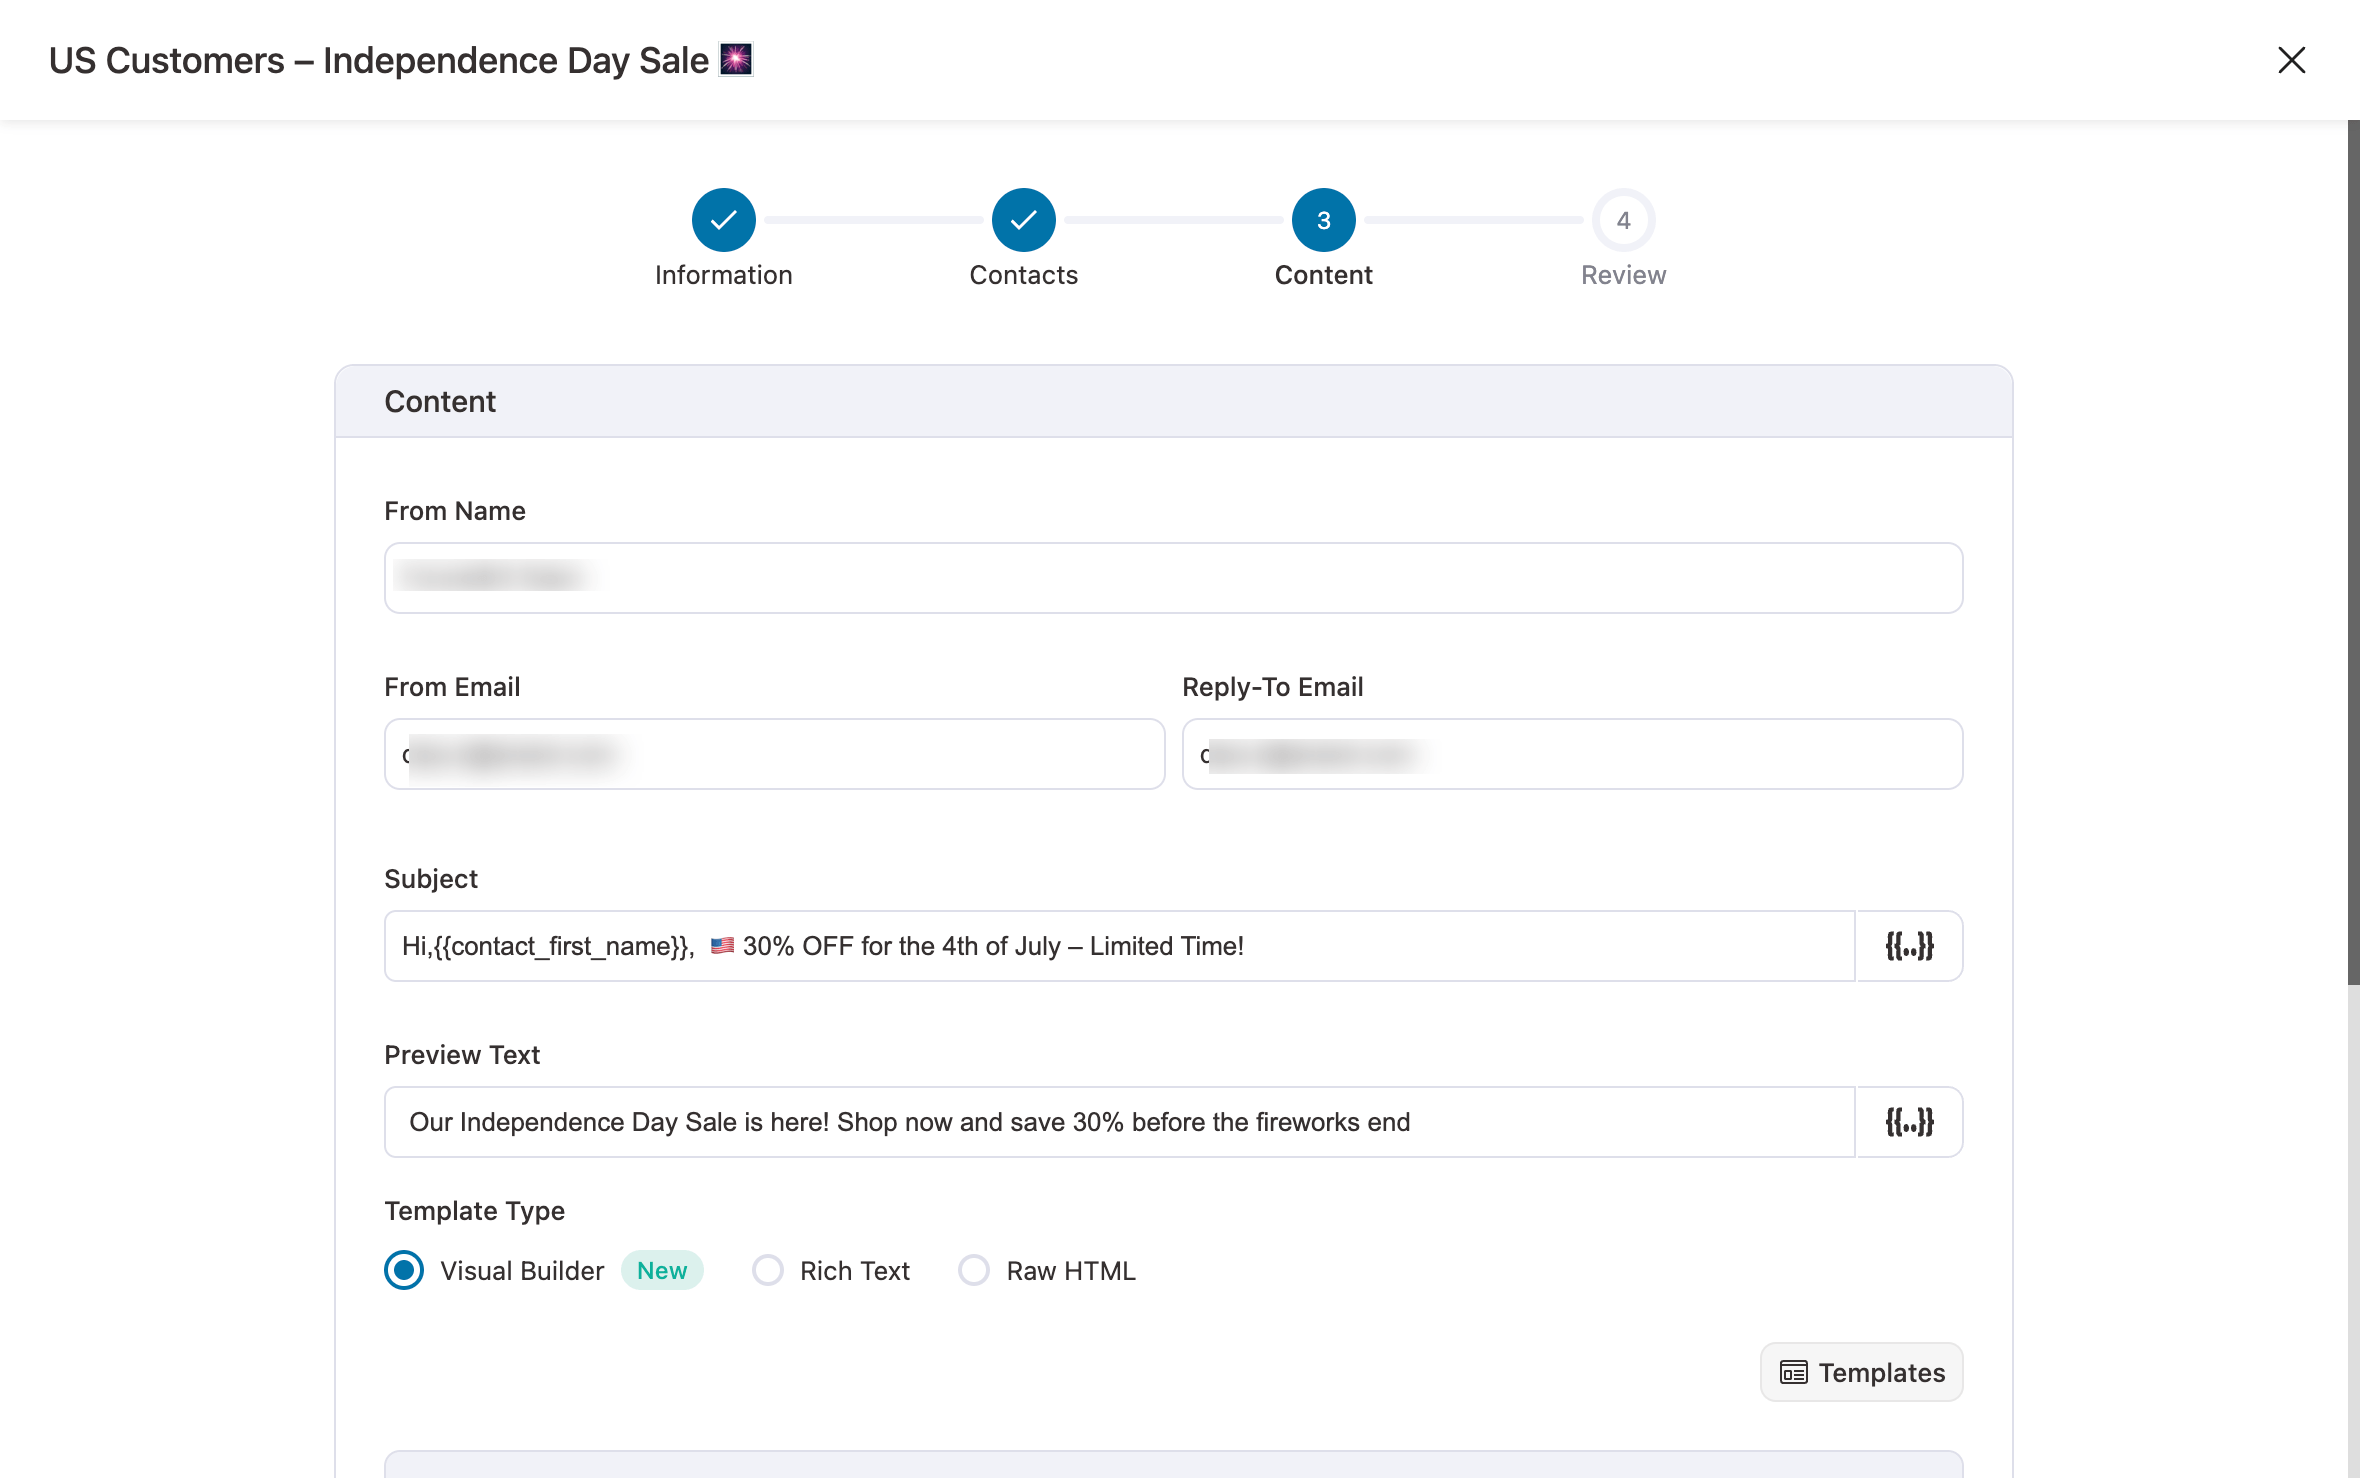
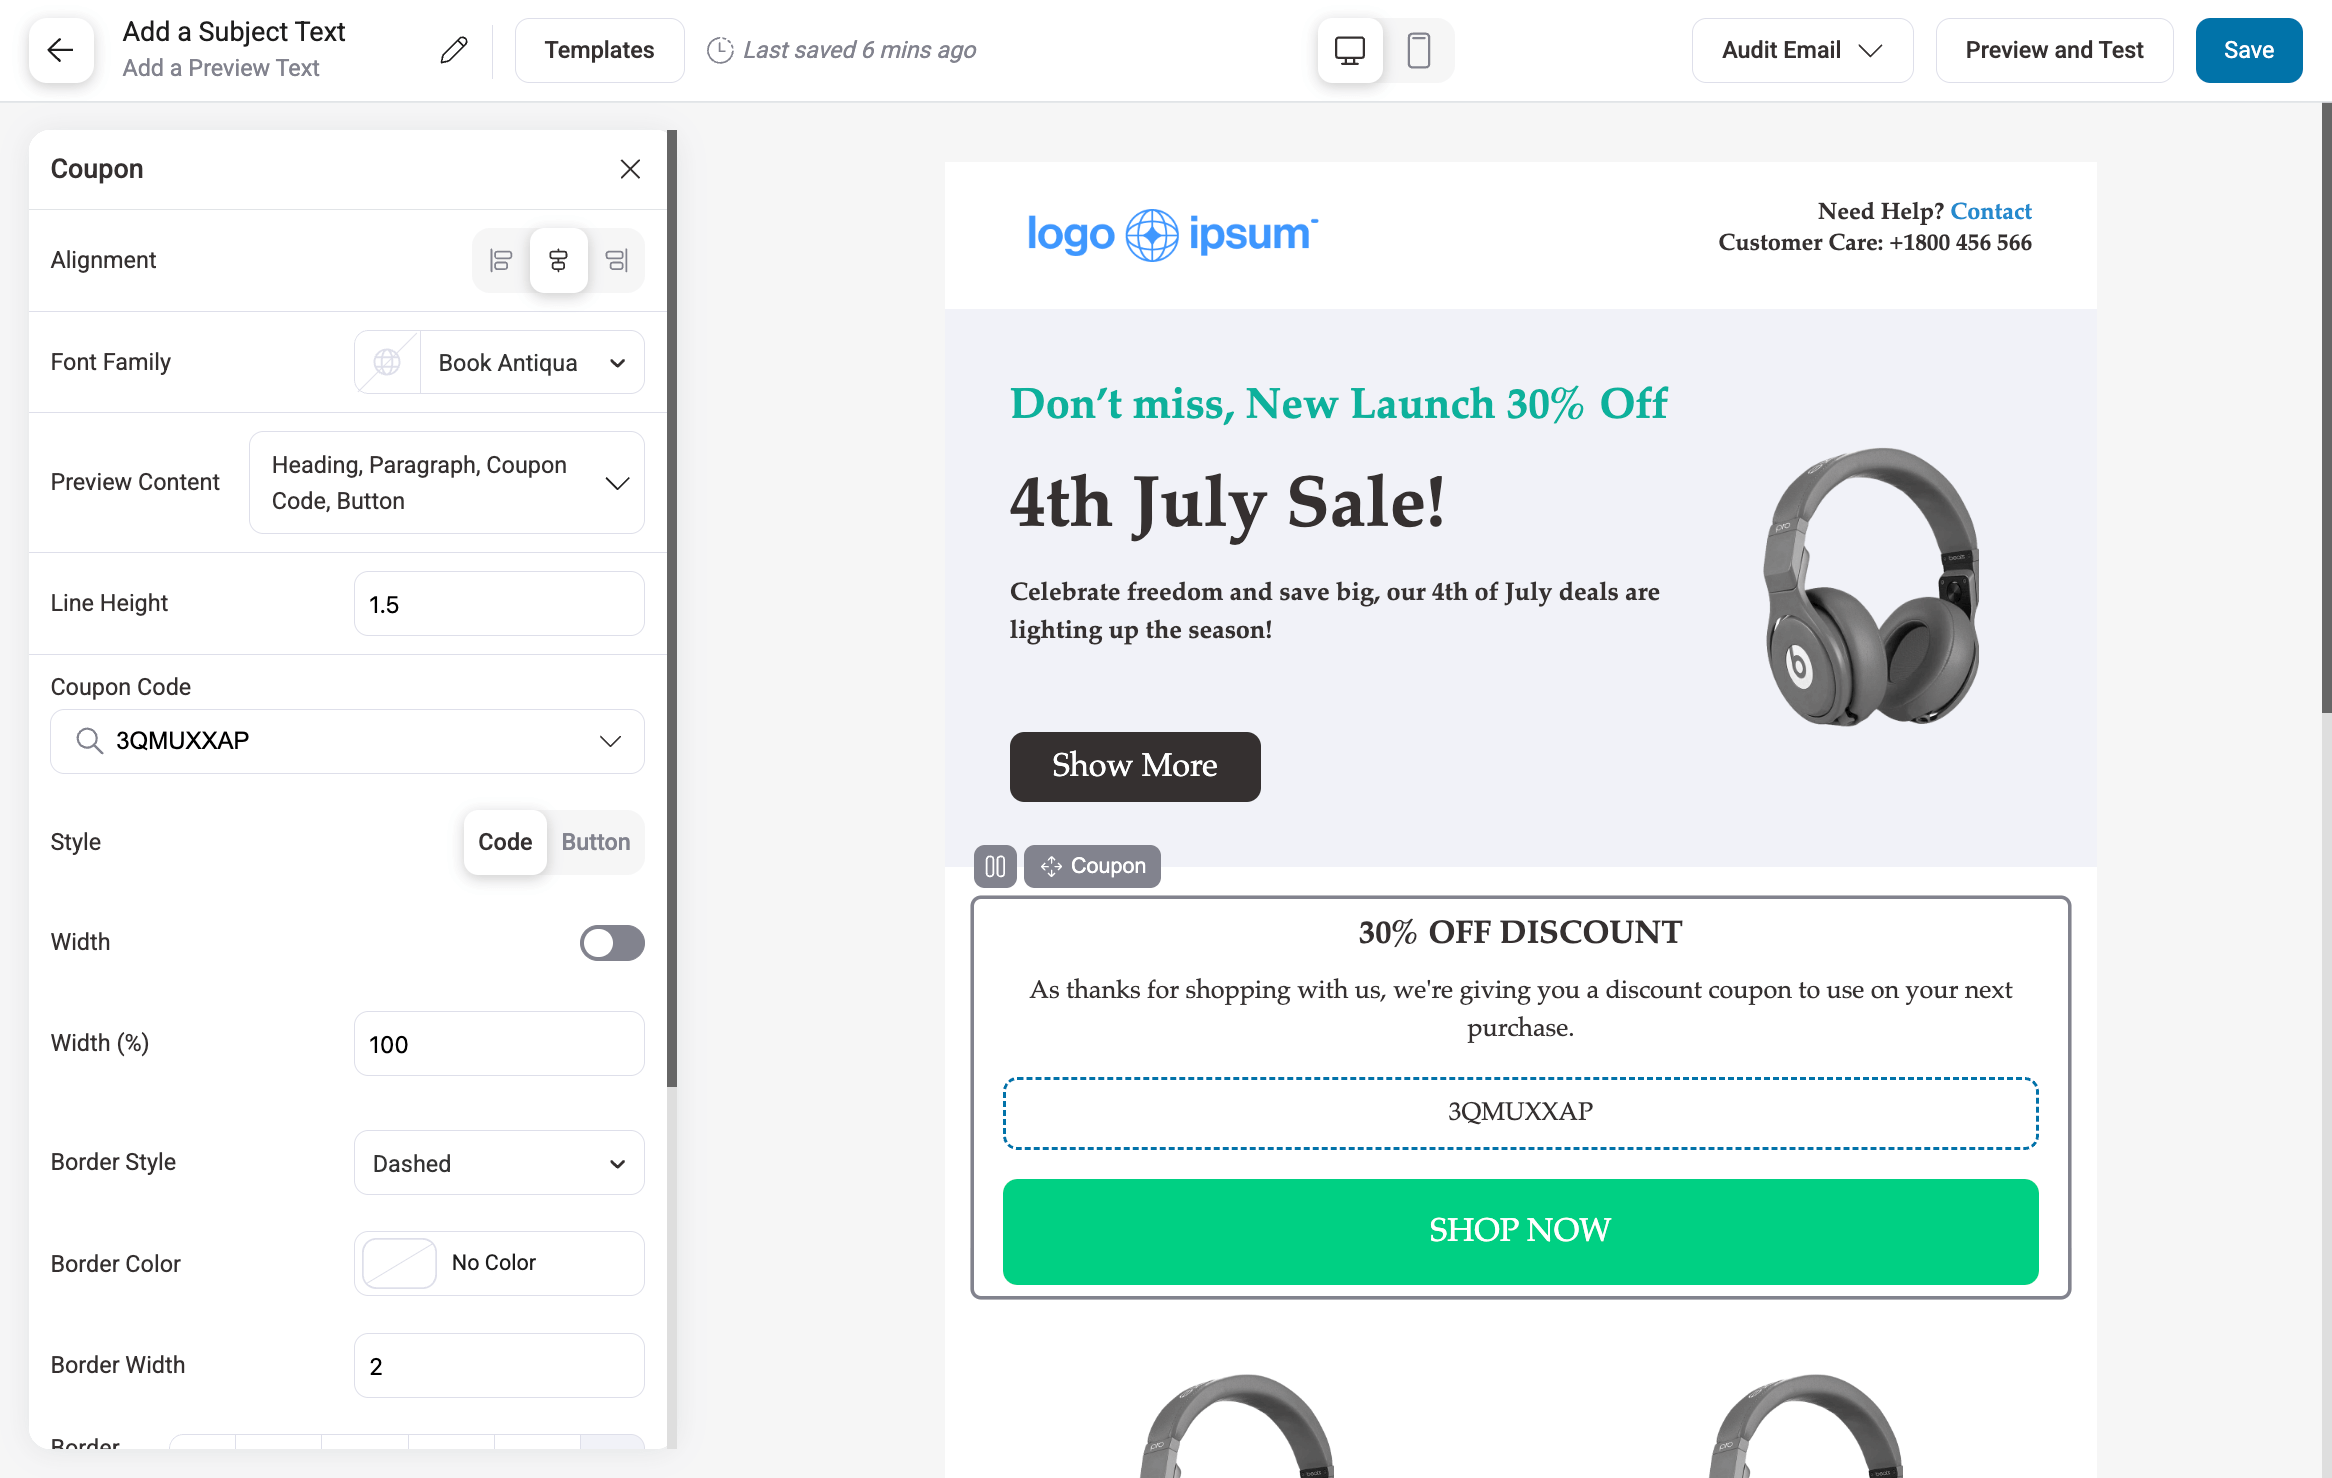
Now, you can either create a simple text email (as shown below) or you can use New Visual Builder to create an aesthetic email by simply dragging and dropping for your broadcast campaign.
Plus, the best part is that it comes with a prebuilt template that you can just import and customize to fit your brand and needs. It also offers a Coupon block to beautifully display any discount coupon if you wish to do so.
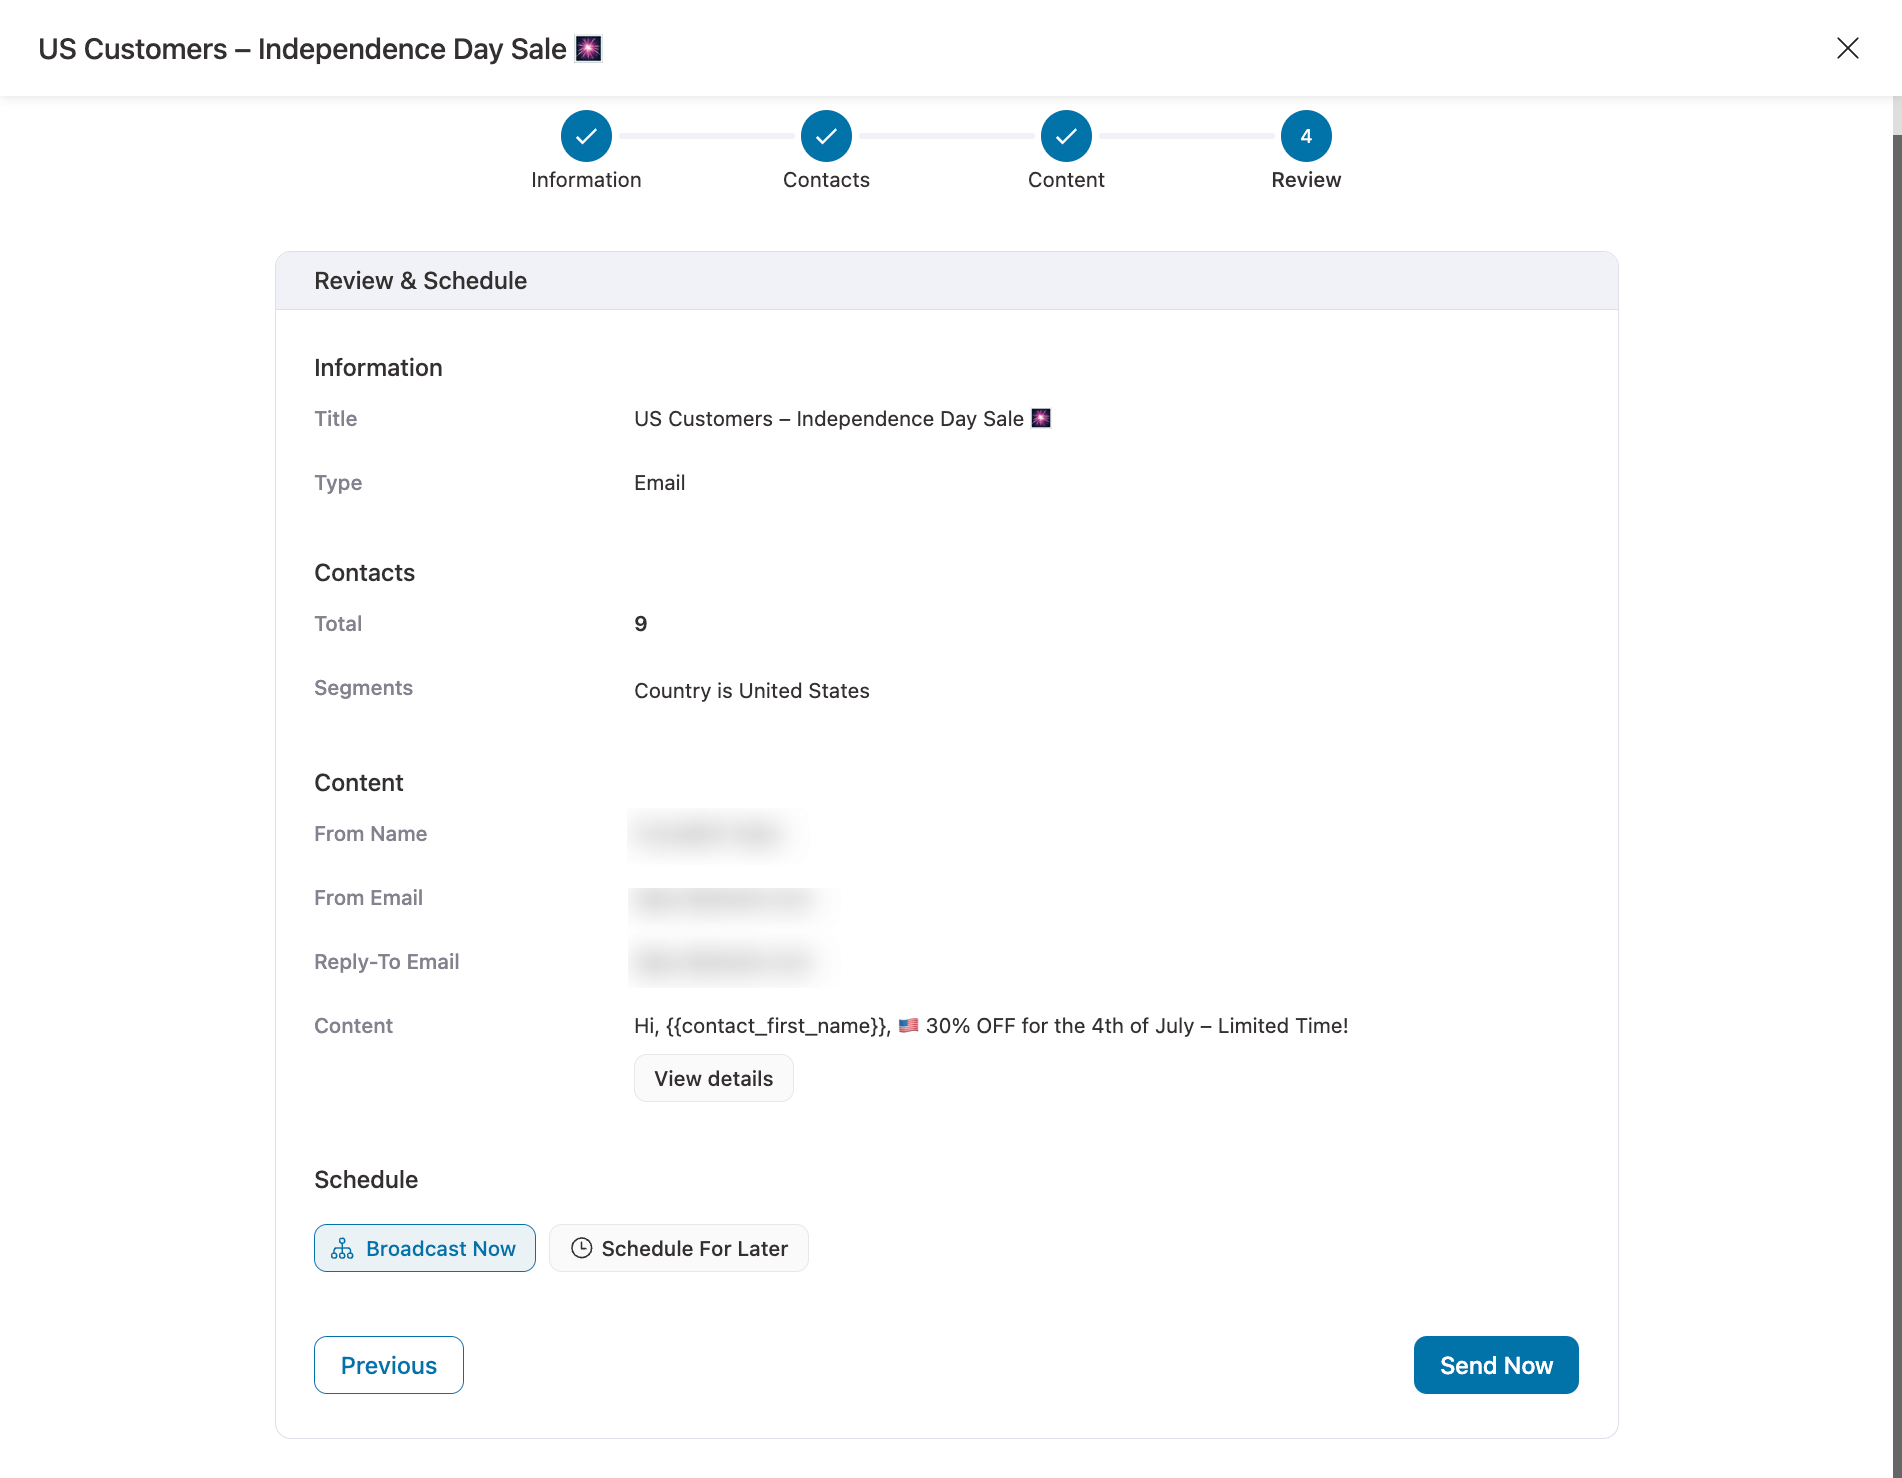
After designing, you are on the last step - reviewing the broadcast campaign and the content.
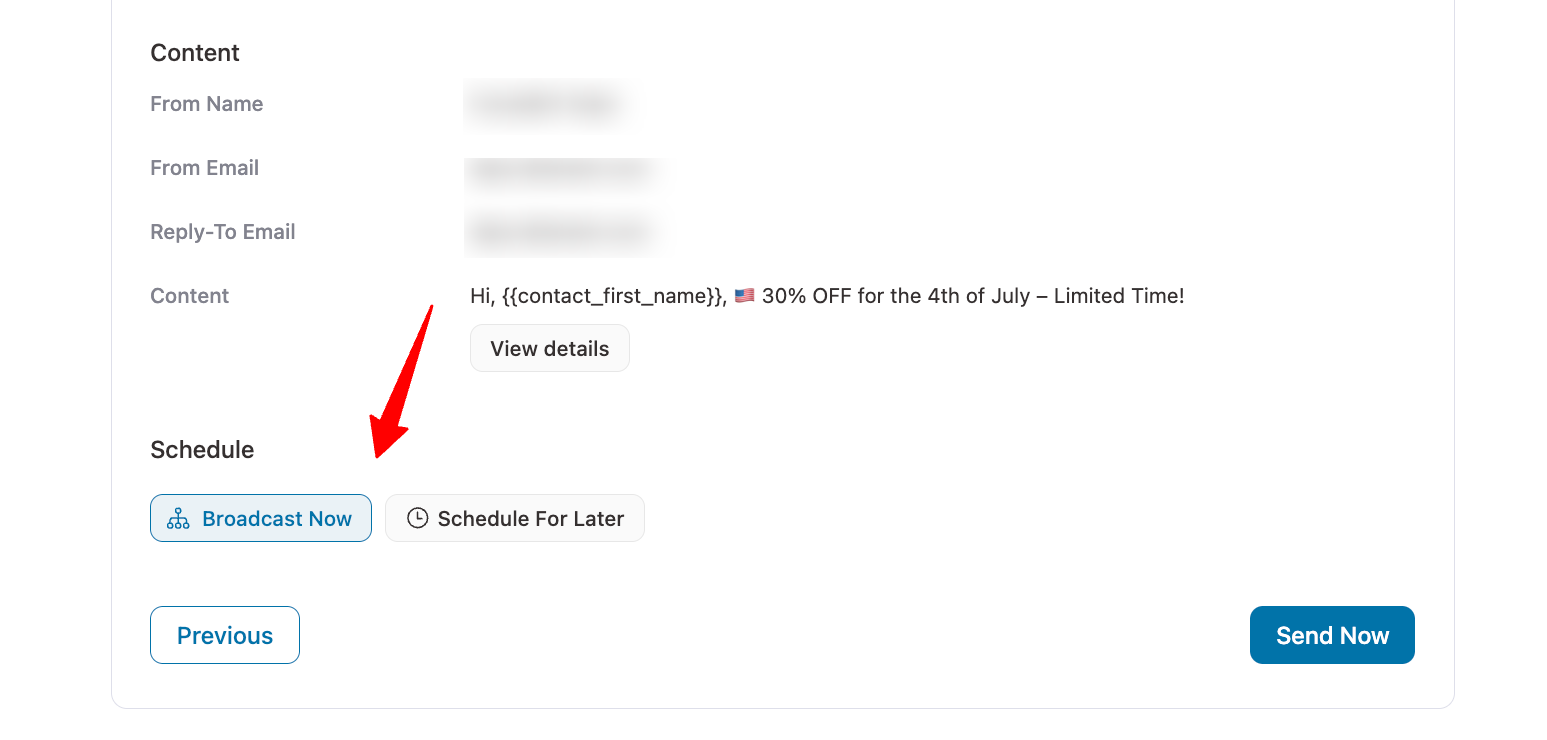
You can either run the campaign right away or schedule it for later.
If you want to make any last-minute changes, now’s the time to do it. If everything seems fine, then go ahead.
That's how you can communicate with a segmented audience in WooCommerce.
Ready to Personalise Your Marketing with WooCommerce Customer Segmentations?
So this post dove deeper into the most important aspect of customer segmentation. We explored various methods for grouping similar customers and targeting them through more targeted campaigns.
Clearly, batch and blast broadcasts are out of season. It's time to get more personalized, people-centered, and profit-focused.
The first step of marketing is understanding who to market to, and hence WooCommerce customer segmentation is so crucial to your business’s sustainability.
FunnelKit Automations’ smart functionality lets you narrow down your target market and interact with your core customers - the ones that are most suited to your product or service.
We can't wait to see what you build with the power that FunnelKit Automations has put at your disposal.
So, hop on the bandwagon and revolutionize your WooCommerce marketing with FunnelKit Automations today!
Editorial Team
February 6, 2026With increasing competition and rising ad budgets, acquiring new customers is difficult. Forbes reports that the chances of converting a new customer are just 5%-20%. On the other hand, repeat...
Editorial Team
February 5, 2026Leveraging WooCommerce email marketing efficiently can help you skyrocket your sales and revenue. With over 64% of businesses already using email marketing to connect with customers, it's clear this approach...
Editorial Team
February 3, 2026If you’re solely focusing on email marketing and ignoring SMS notifications, you’re leaving money on the table! WooCommerce SMS notifications let you send real-time text message updates to customers about...


