
Have you ever had a customer ask about their order details right after purchase?
A well-crafted invoice email can instantly clear things up, minimizing the customer's queries.
This email includes all the order and payment details, giving customers everything they need in one place.
In this blog, we will show you how to automatically send invoice emails and manually send one for a single order when needed.
So, let’s dive in.
Table of Contents
- 1 Does WooCommerce Include An Invoice Email Option?
- 2 Method 1: How to Customize and Manually Send a Default WooCommerce Invoice Email for a Single Order
- 3 Method 2: How to Design and Send A Custom Invoice Email in WooCommerce
- 4 Method 3: How to Attach a PDF Invoice to WooCommerce Emails
- 5 Method 4: How to Automatically Send an Invoice in WooCommerce For Every Order?
- 6 How to Track WooCommerce Invoice Email in WooCommerce?
- 7 Frequently Asked Questions About WooCommerce Invoice Emails
- 8 Why are my customers not receiving WooCommerce invoice emails?
- 9 Is it necessary to attach a PDF invoice with invoice emails?
- 10 How do I resend a WooCommerce invoice email?
- 11 Why is my WooCommerce invoice email going to spam?
- 12 What information should a WooCommerce invoice email include?
- 13 Send Custom WooCommerce Invoice Emails for an Enhanced Customer Experience!
Does WooCommerce Include An Invoice Email Option?
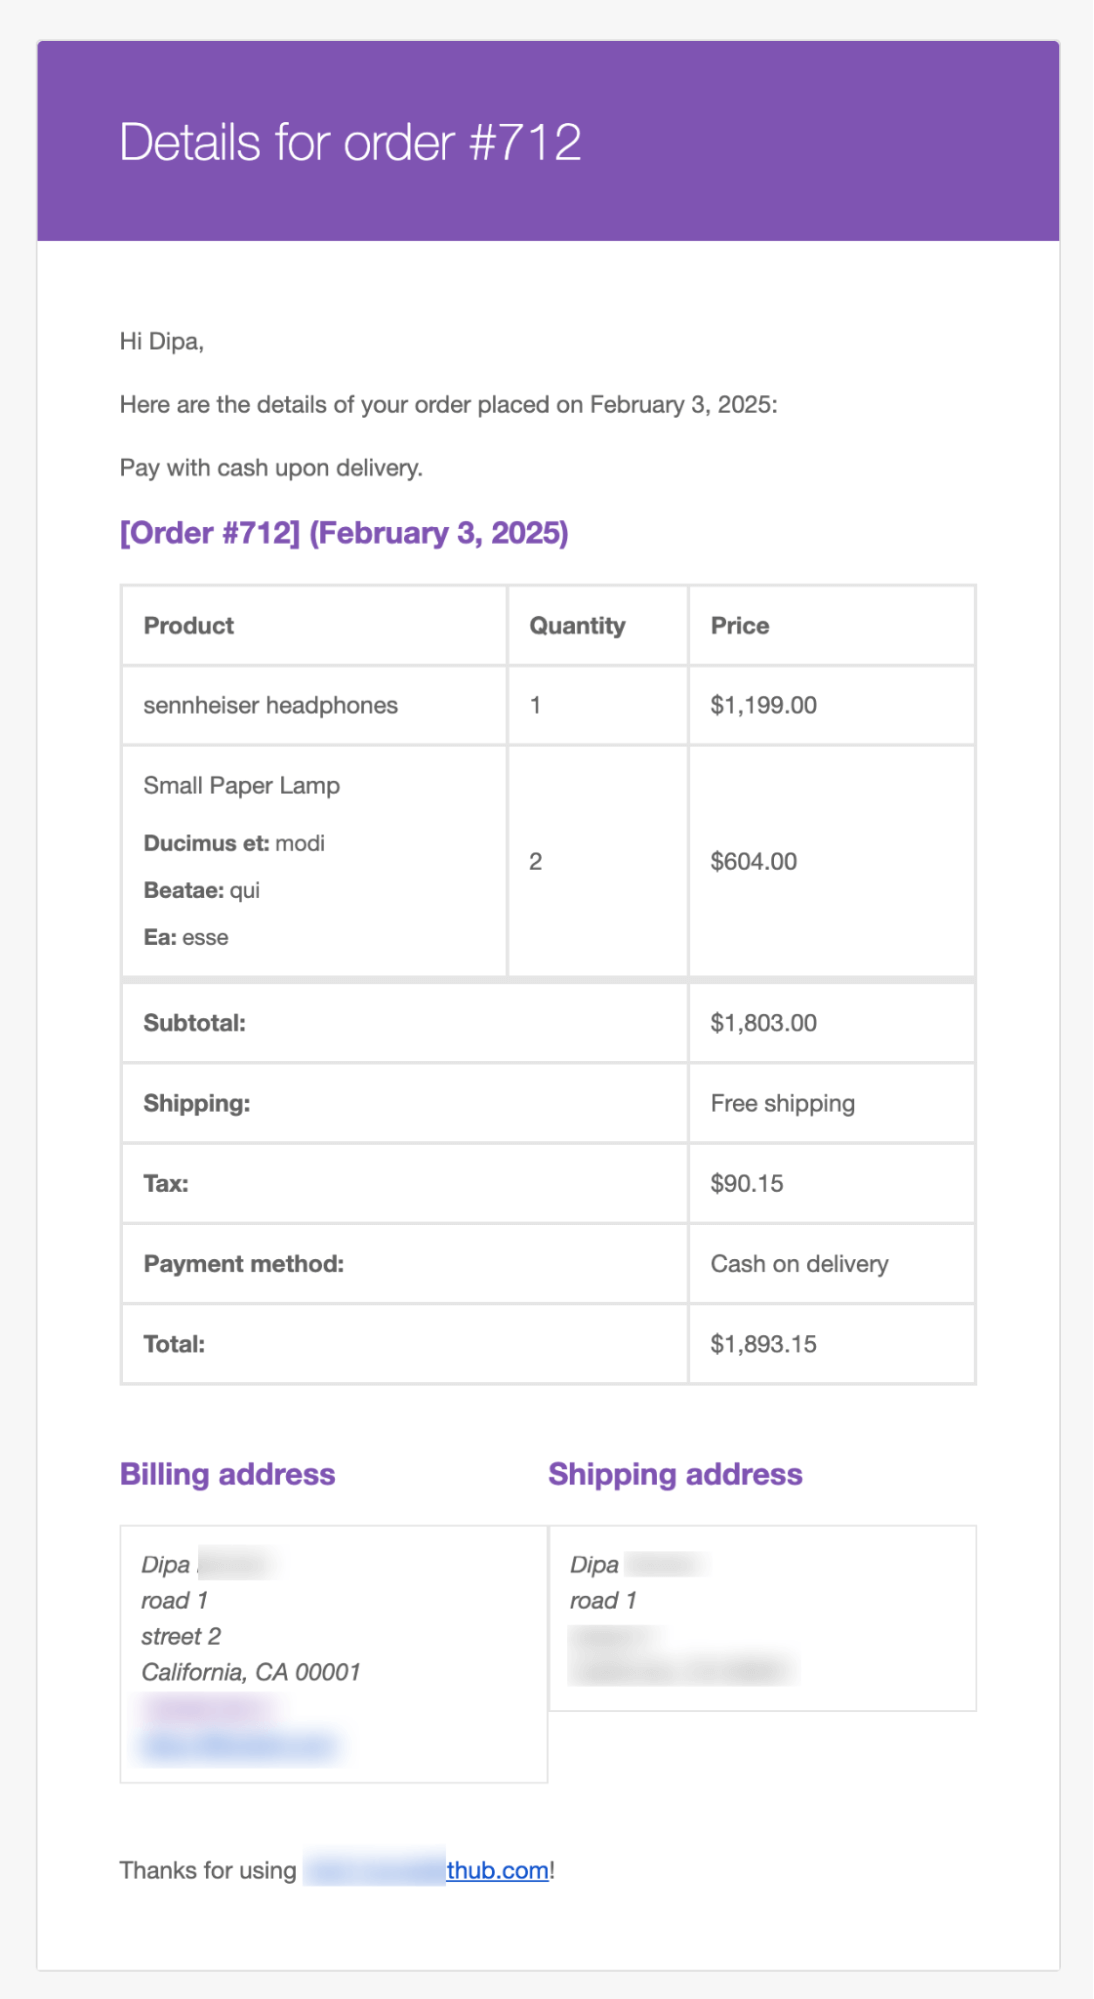
Yes, WooCommerce provides an option to send invoice emails manually. Admins can send invoice emails to customers from the order page.
Here is what a default WooCommerce invoice email looks like:
Why Sending Invoice Email Is a Good Idea And How It Can Benefit Your Business?
Invoice emails aren't just purchase receipts. They're a great way to enhance customer experience, streamline processes, and ensure transparency.
Here’s why sending an invoice email is a good idea:
- Provides clear documentation
An invoice email serves as an official record of the transaction, adding professionalism and trust.
For example, a customer buying a high-ticket item, like a designer watch, can use the invoice for warranty, returns, or future reference.
- Reduces customer confusion and queries
A well-structured invoice email can help prevent misunderstandings about what was purchased. Imagine a customer who’s unsure about the total amount or the specific items included in their order.
An invoice email clearly lists the item names, prices, taxes, and shipping costs, providing immediate answers to these questions and reducing the need for follow-up inquiries. This clarity boosts customer satisfaction and strengthens trust in your business.
- Supports tax and financial recordkeeping
Invoices help customers track expenses, especially businesses that need accurate tax and accounting records.
For example, a small business buying supplies from your store can use the invoice to track business expenses for tax deductions.
- Improves customer experience
When you send an invoice email, it shows that you’re organized and attentive to your customer’s needs. It improves their overall experience and makes them more likely to return.
For instance, if a customer made a bulk order for their business, receiving an invoice reassures them that their purchase is being processed correctly.
- Enhances credibility and professionalism
An invoice email reinforces your business’s credibility. When customers receive a neat, professional invoice after their purchase, it gives them confidence in your business and can encourage them to recommend your store.
These are some of the many positive sides of sharing an invoice email with your customers.
In the following section, we will share different ways to send WooCommerce invoice emails to customers.
Method 1: How to Customize and Manually Send a Default WooCommerce Invoice Email for a Single Order
With WooCommerce’s default settings, you can manually send invoice emails for any single order.
This is a useful option when a customer requests a copy of their invoice or has lost the original.
The process is pretty simple.
Before moving on to the process, let's check how you can customize the default invoice email.
Customize default invoice email in WooCommerce
WooCommerce provides a few options to customize the default invoice email.
To find the options, go to WooCommerce ⇒ Settings ⇒ Emails and hit ‘Manage’ next to Order Details.
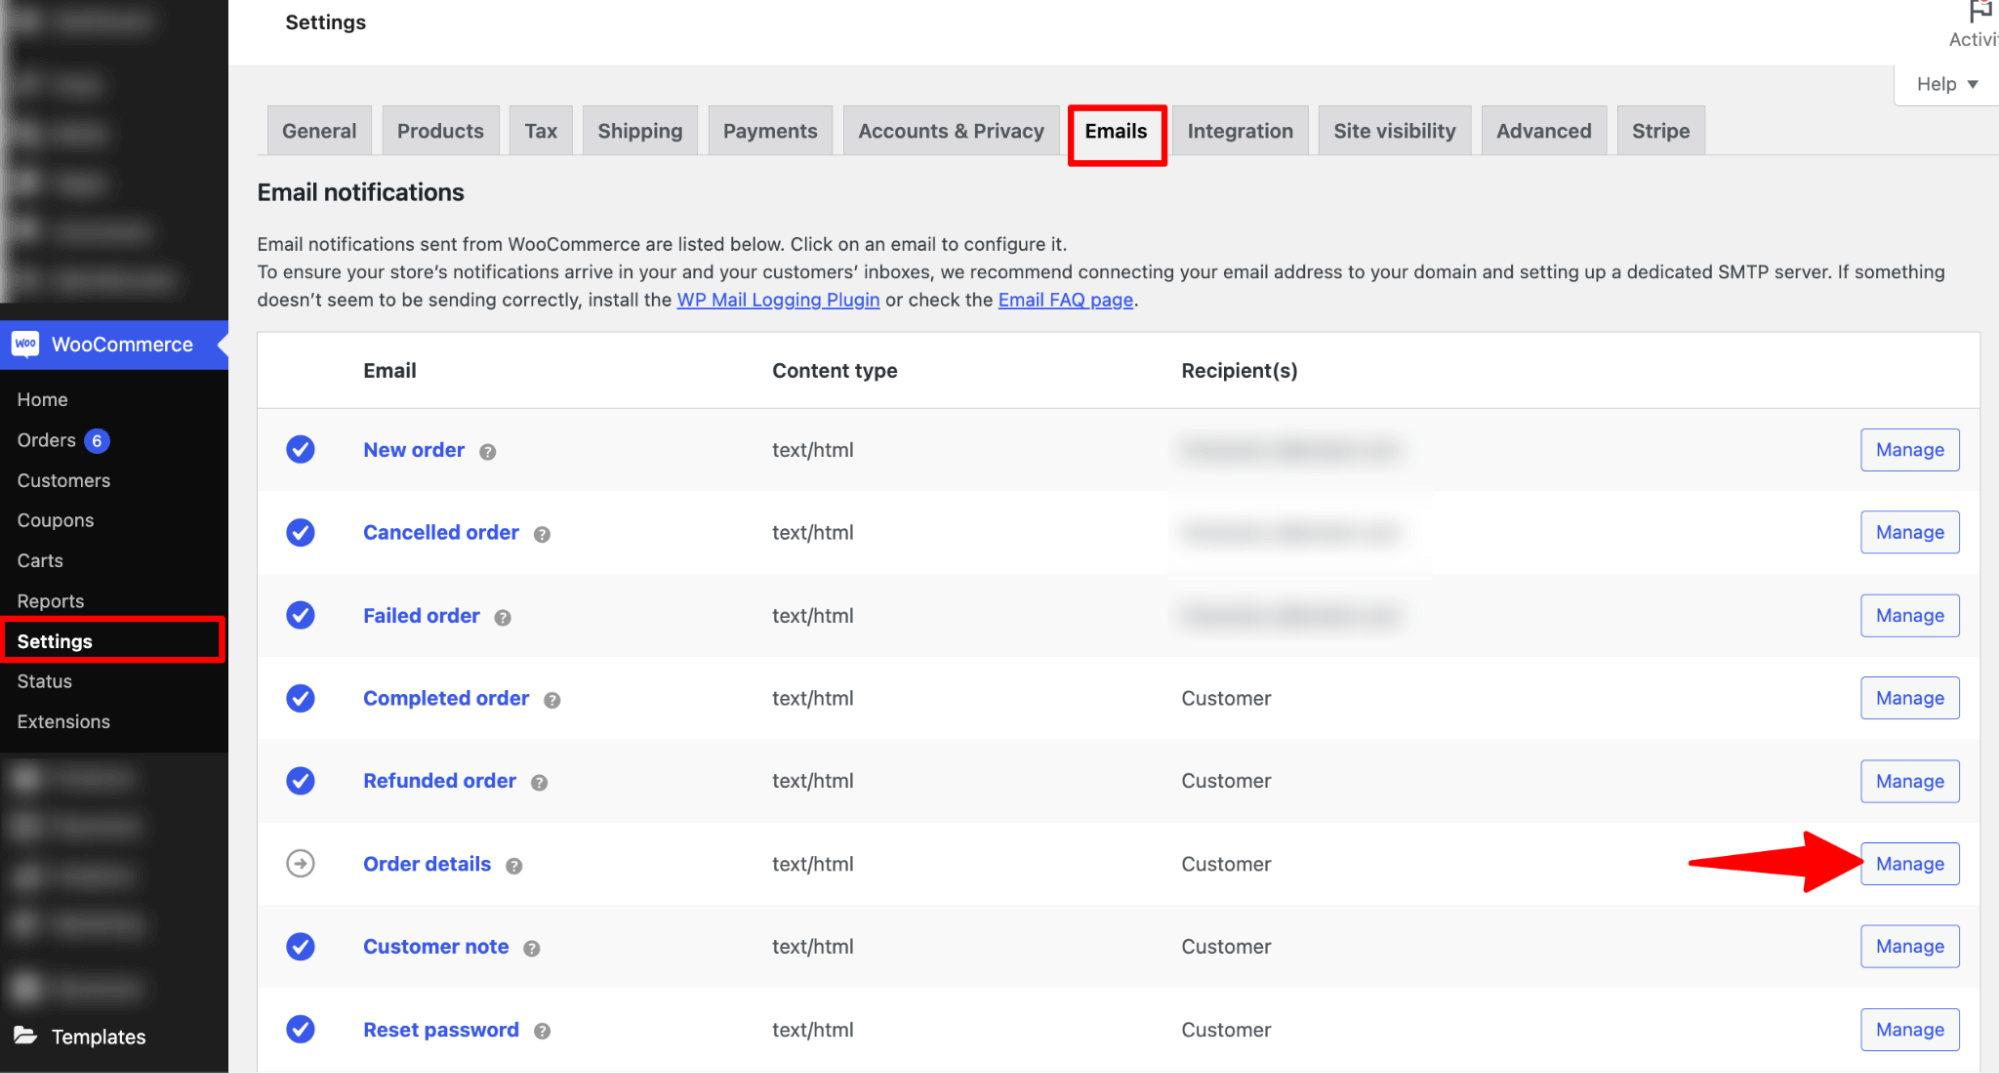
Here, you can customize the subject line, email heading, and additional content.
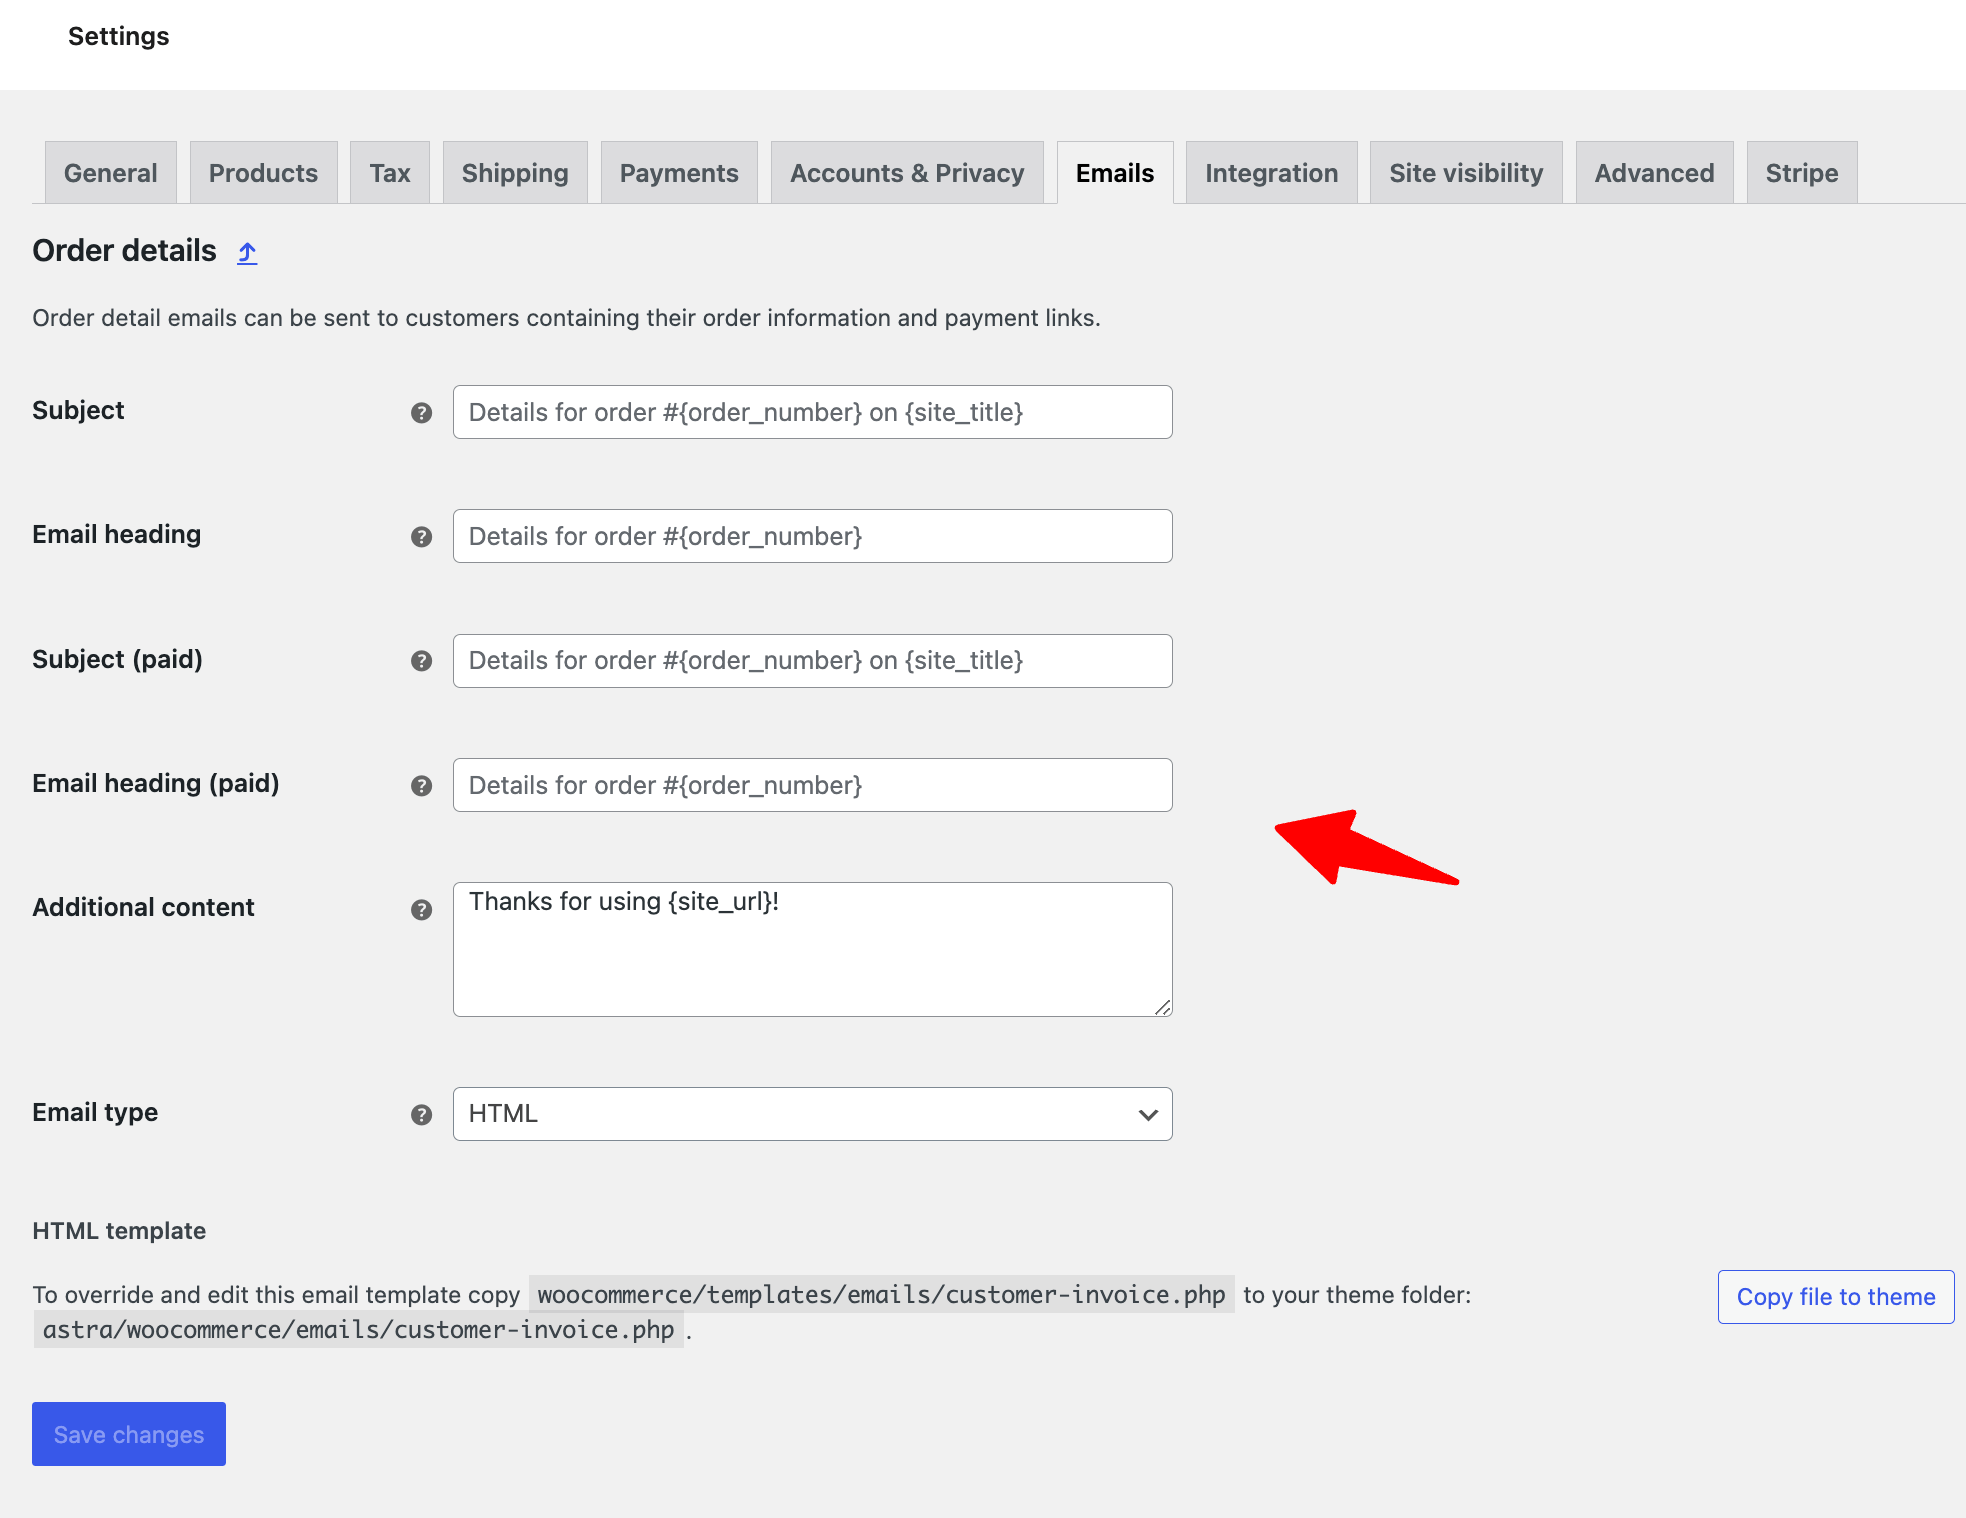
After making the changes, hit Save Changes to update.
Send an invoice email for a single order
Now, it’s time to learn how you can send invoice emails. To do this, go to Orders and hit the one you want to email.
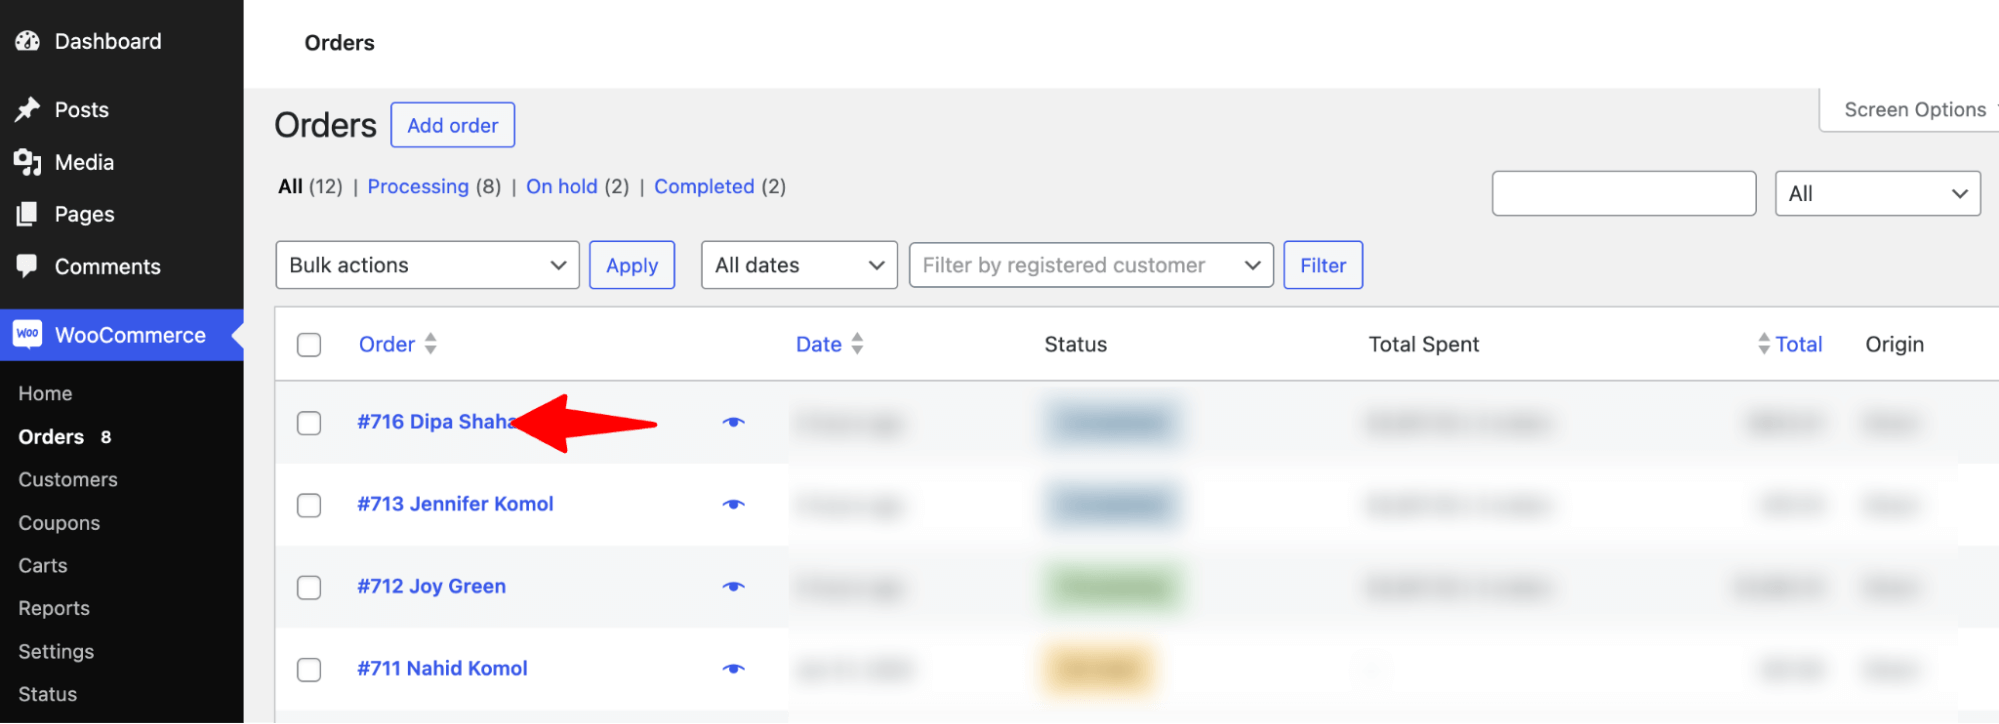
Then, on the left side, under Order Actions, choose “Send order details to Customers” and hit Update.
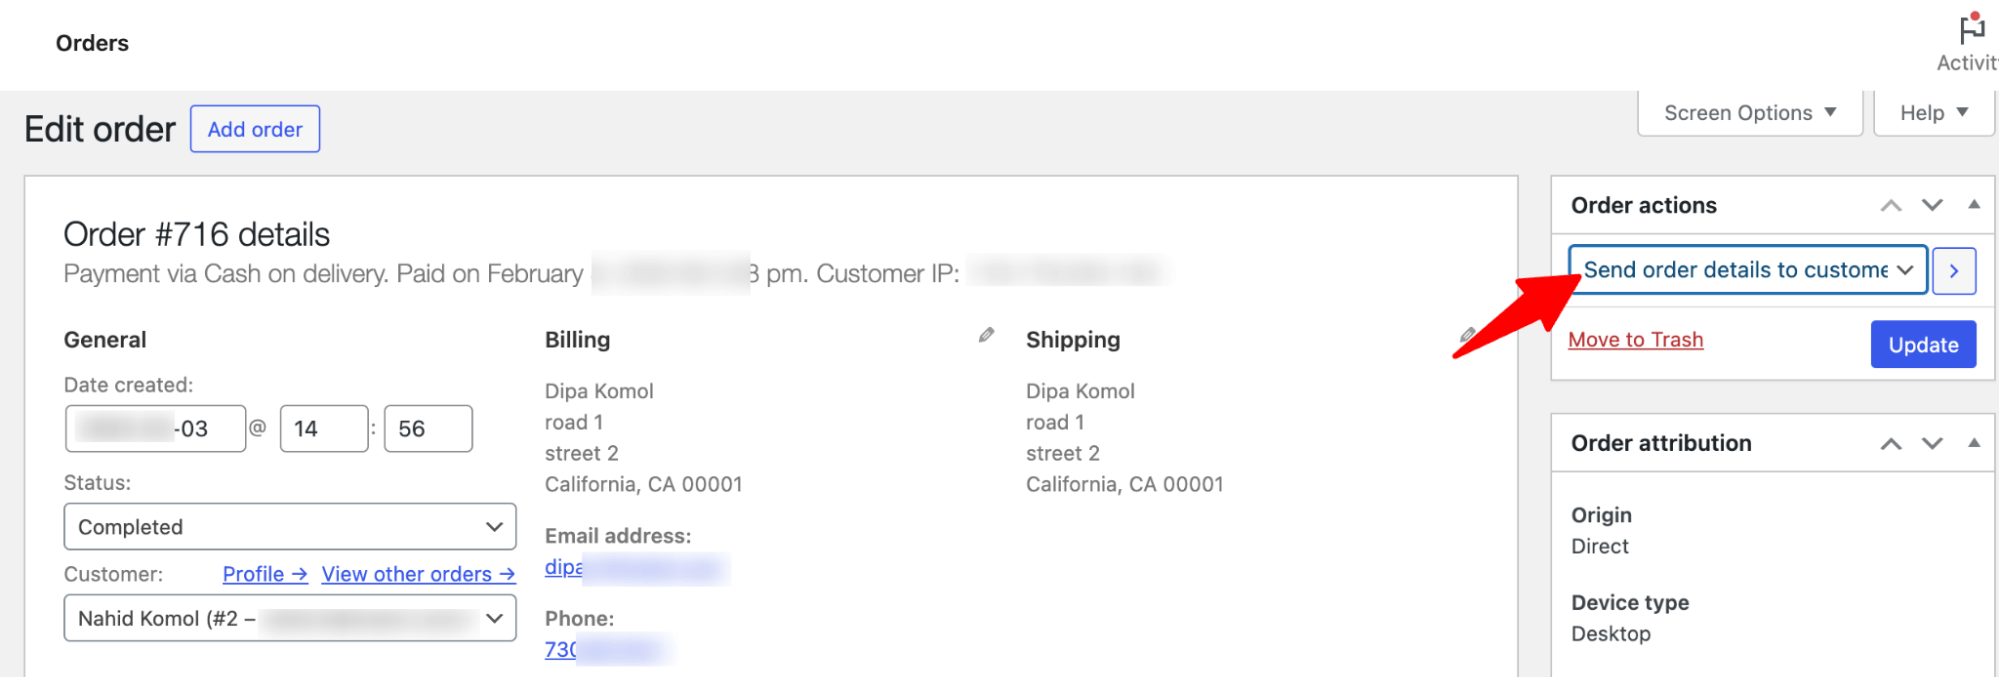
And that’s it! Now, your customers will receive the default invoice in their inbox.
As you can see, the default WooCommerce invoice email looks quite basic, with limited customization options, which are quite limited, giving you little flexibility.
With an additional plugin, you can send fully customized invoice emails to customers. Let’s see how in the next section.
Method 2: How to Design and Send A Custom Invoice Email in WooCommerce
To design a custom invoice email in WooCommerce, we will use FunnelKit Automations.
This is the ultimate email and SMS marketing automation and CRM solution that lets you customize all transactional emails from a single place.
It provides an intuitive drag-and-drop email builder for designing WooCommerce emails and advanced analytics to track email campaign performance.
In addition to customizing default emails, you can also send other promotional emails, such as winback campaigns, product recommendations, and product review reminders.
Before moving on to the main process, make sure to install both free and paid versions of FunnelKit Automations.
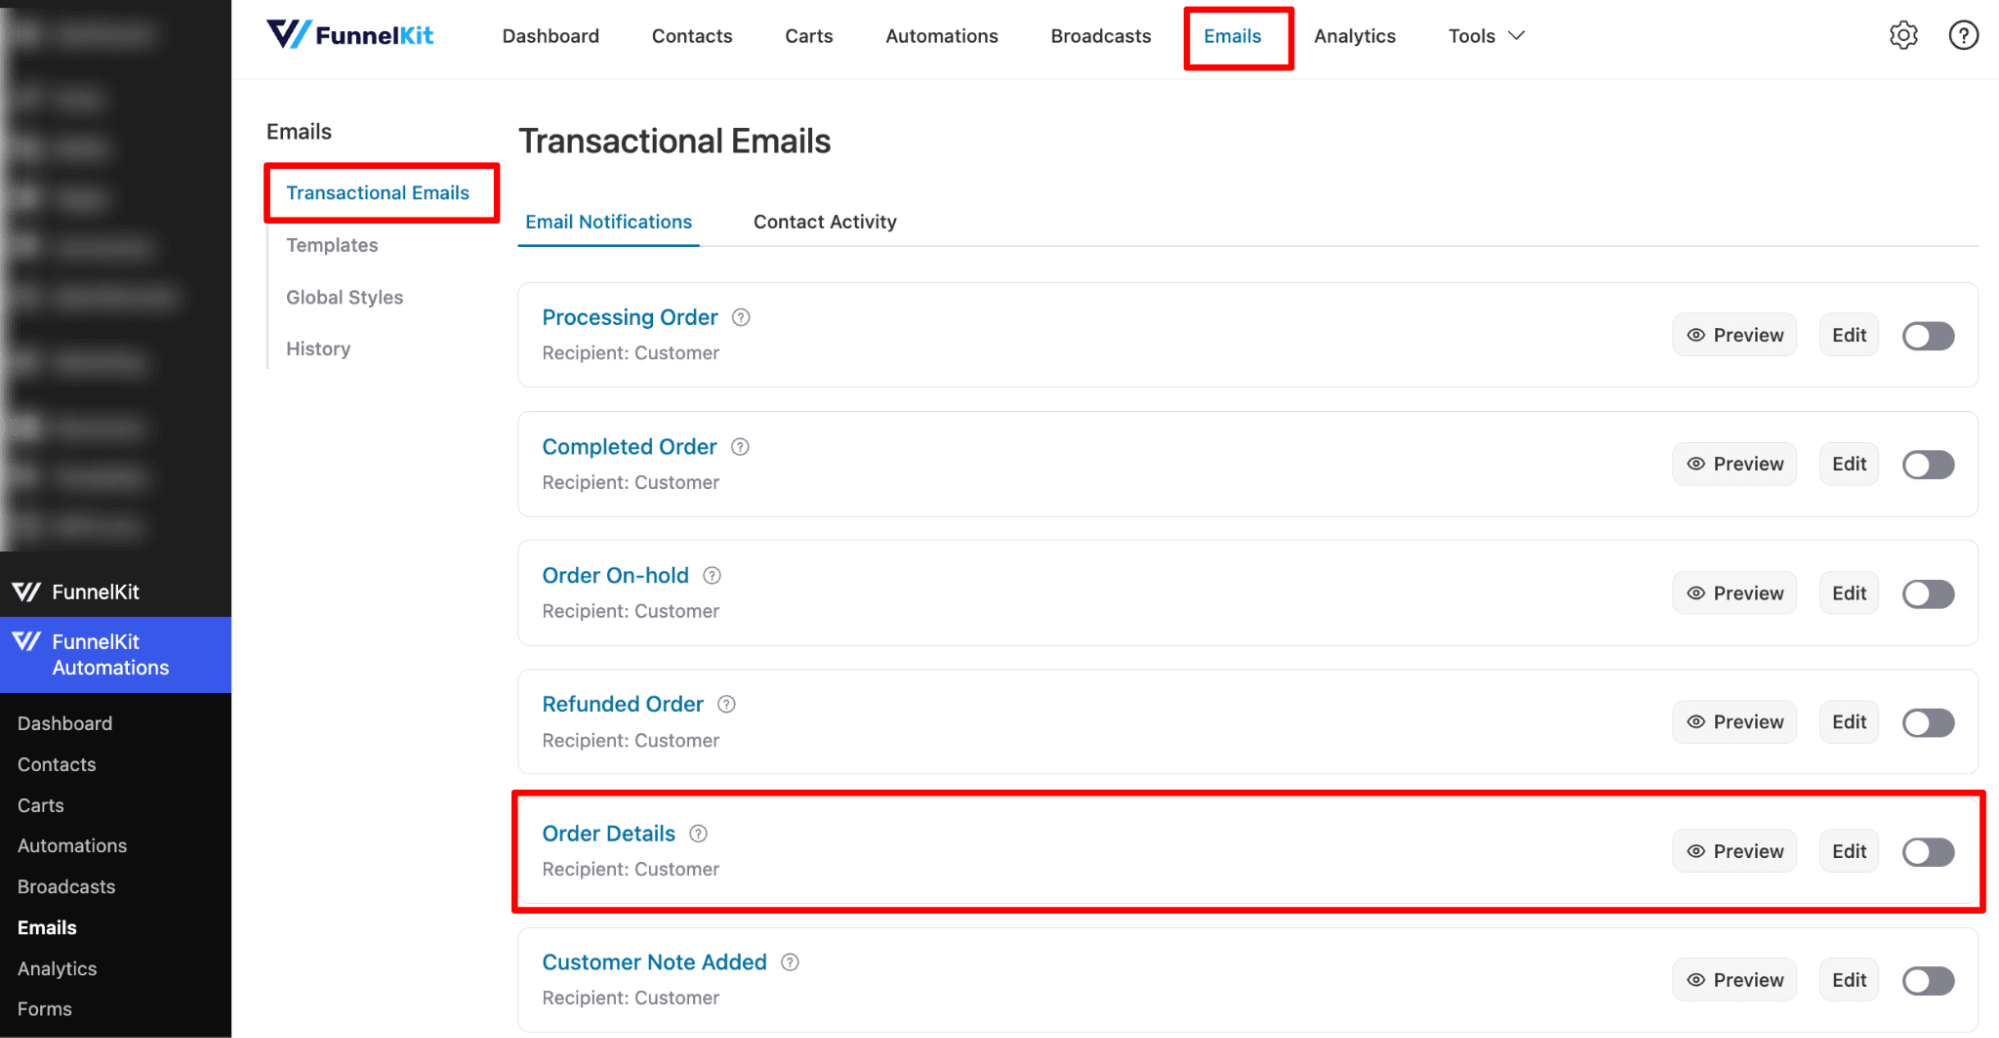
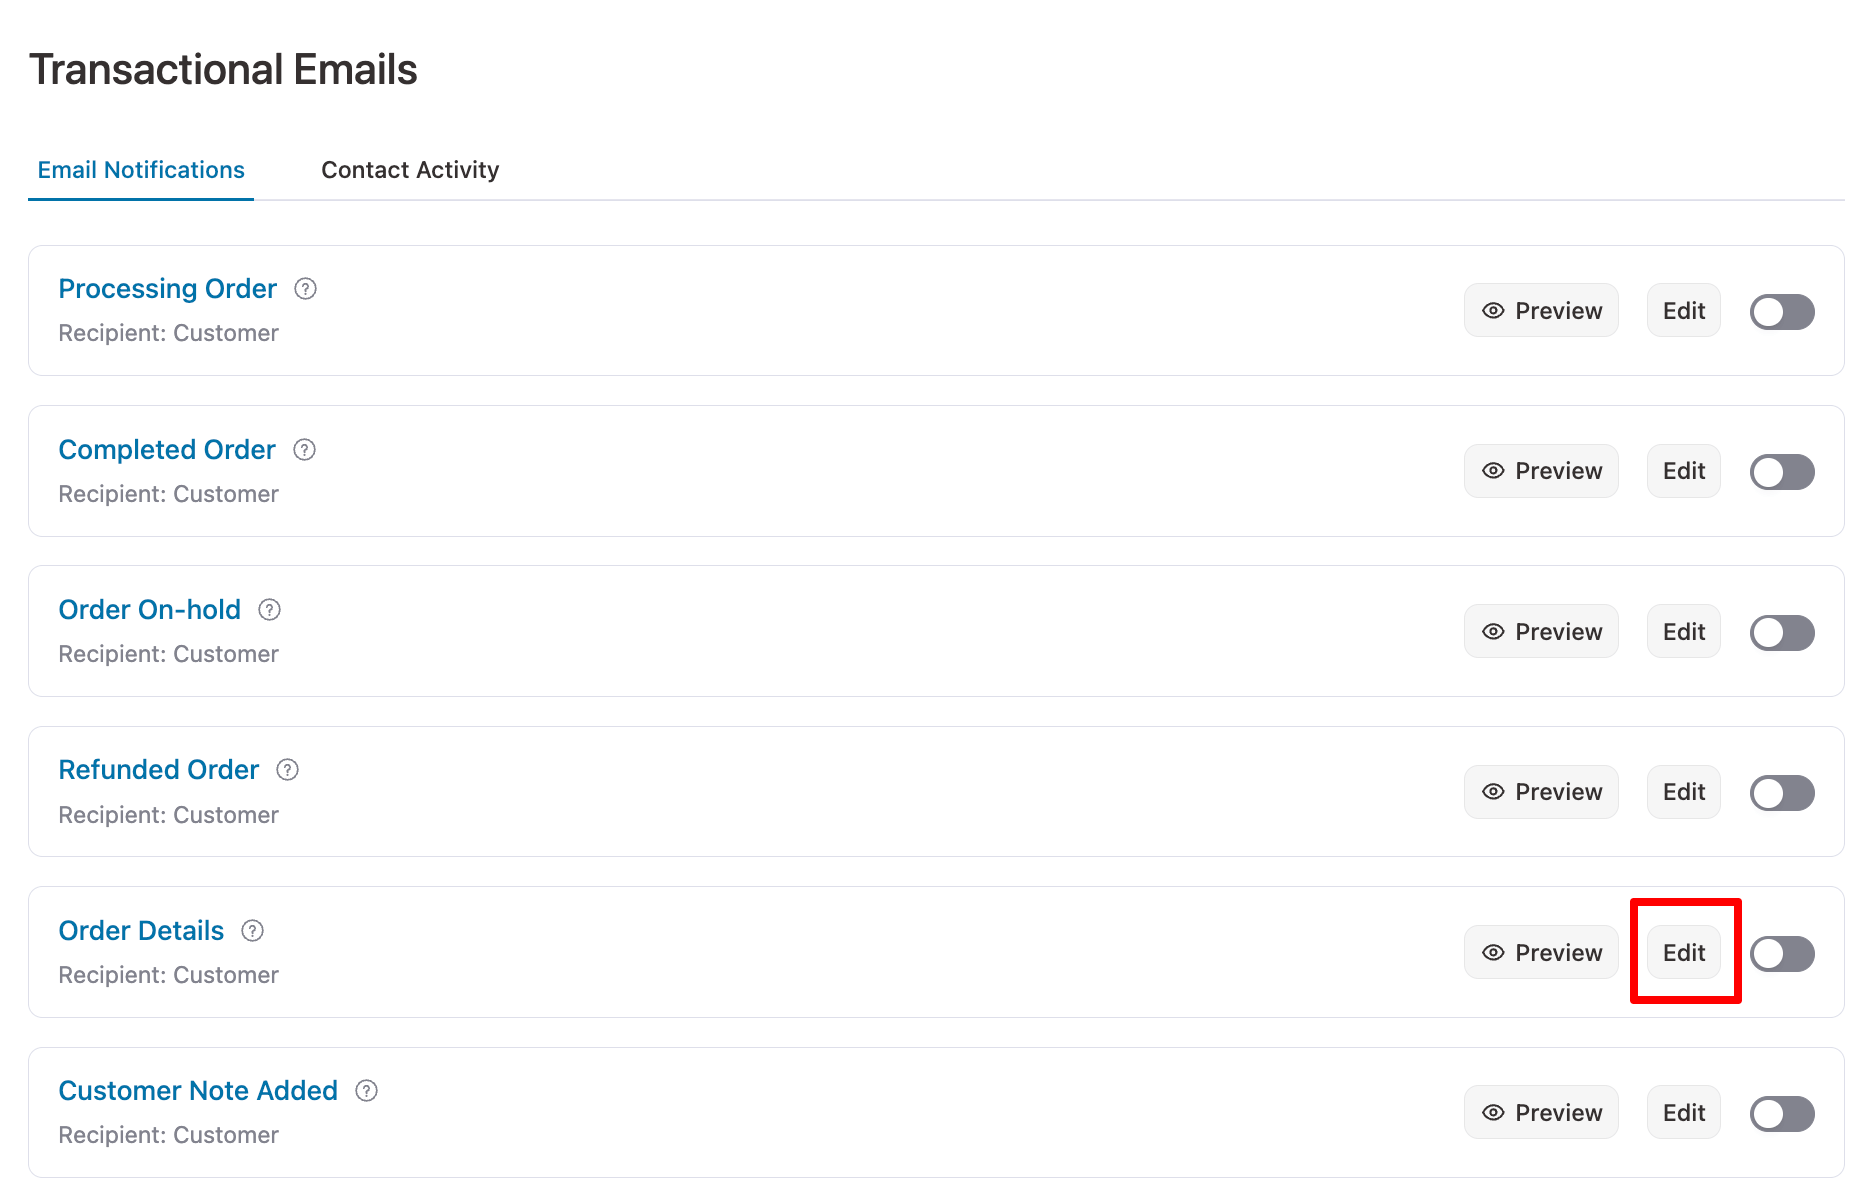
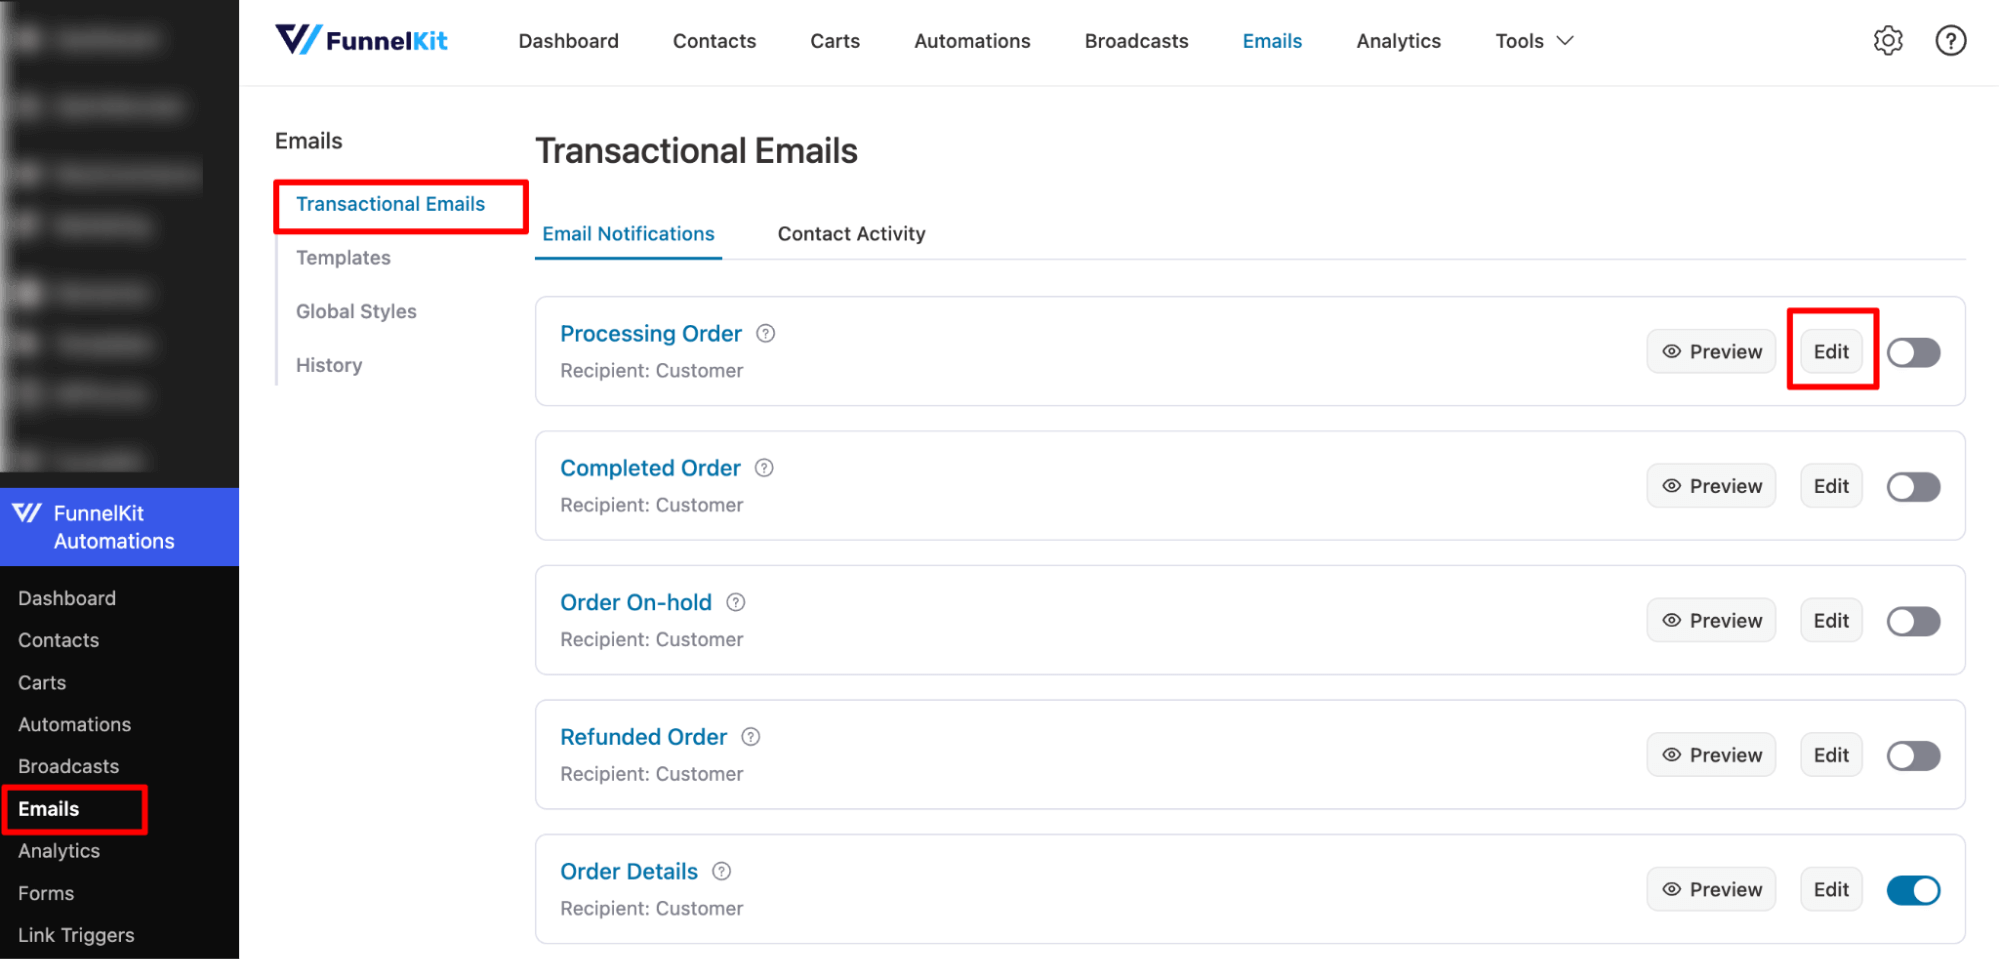
Step 1: Navigate to the transactional emails section
Navigate to FunnelKit Automations ⇒ Transactional Emails and look for the order details email.
🔔 Note: Order detail email sends an invoice to customers.
Step 2: Edit the order details email
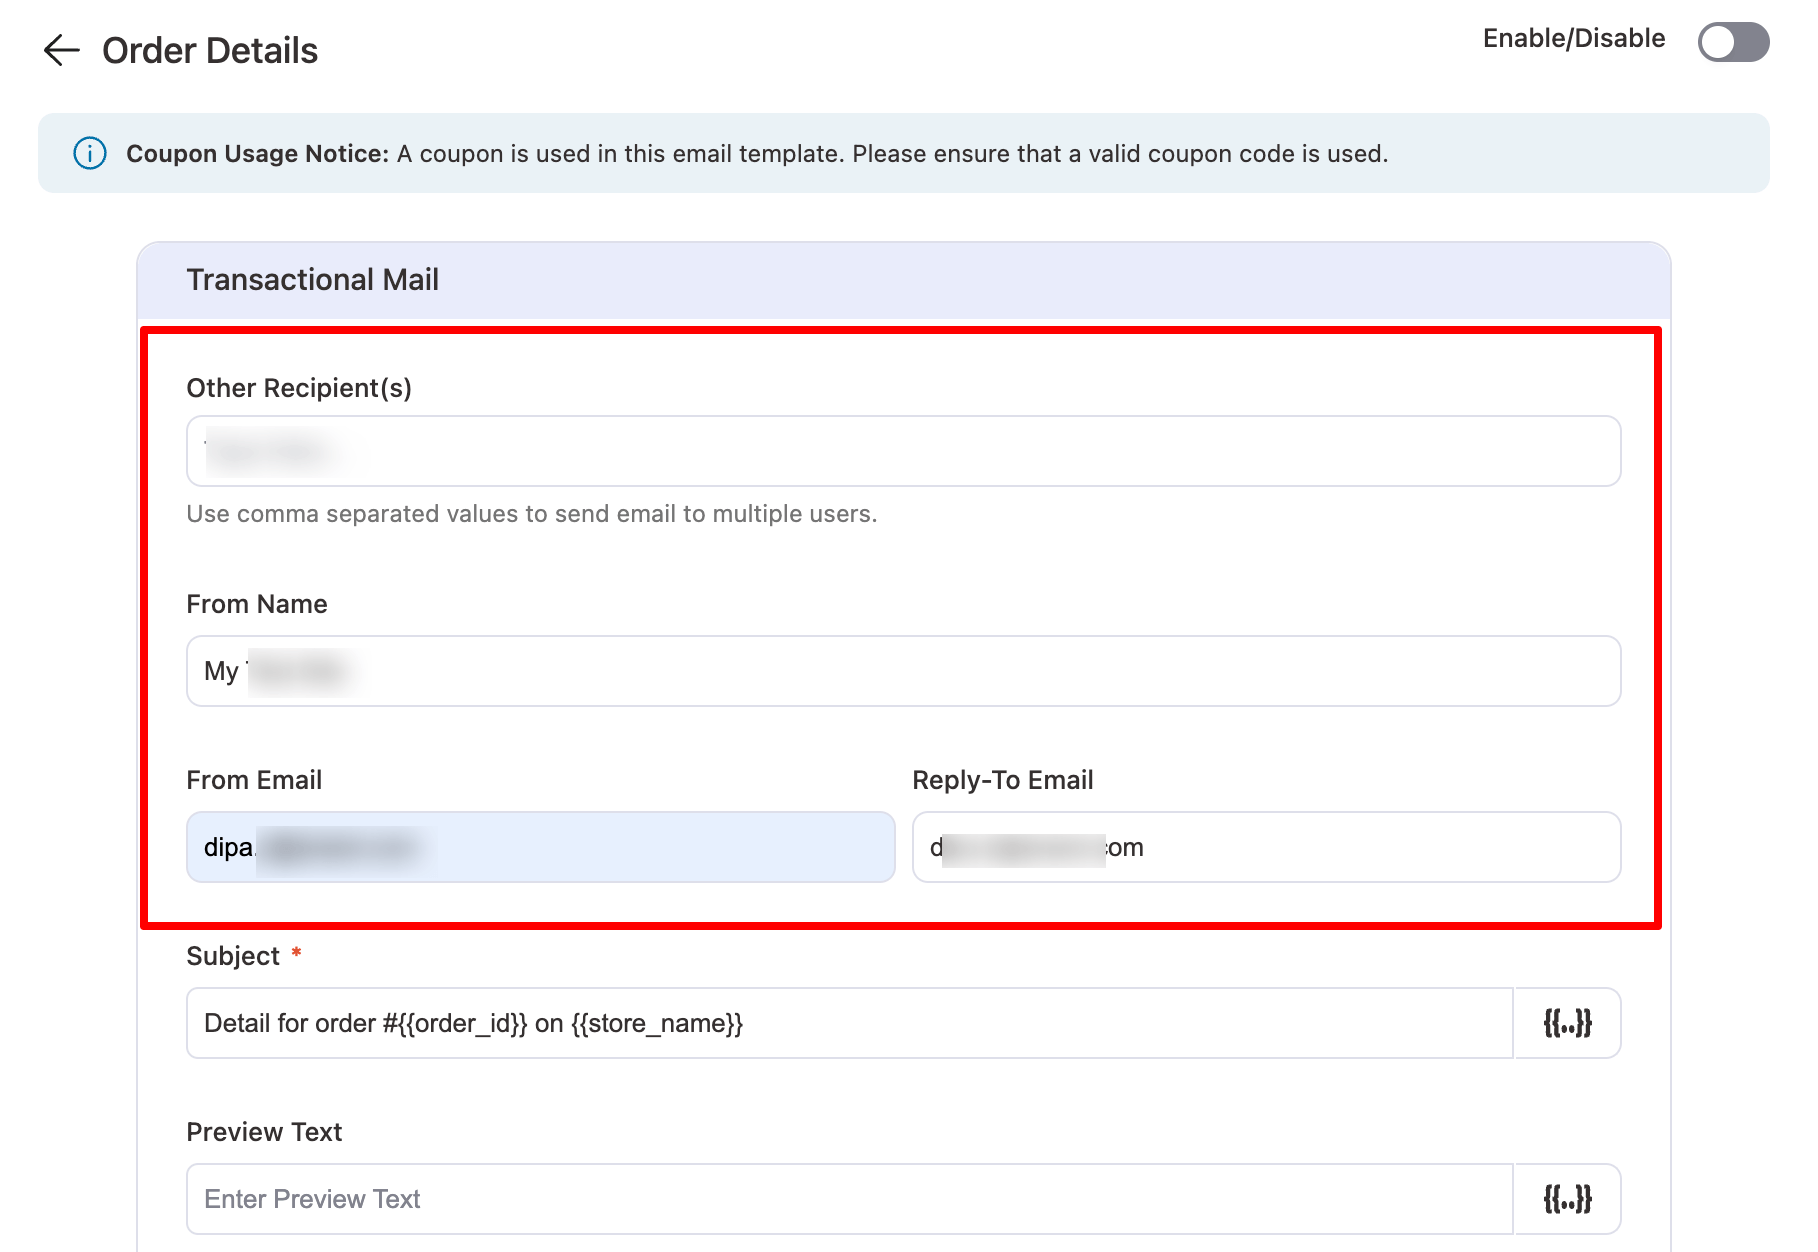
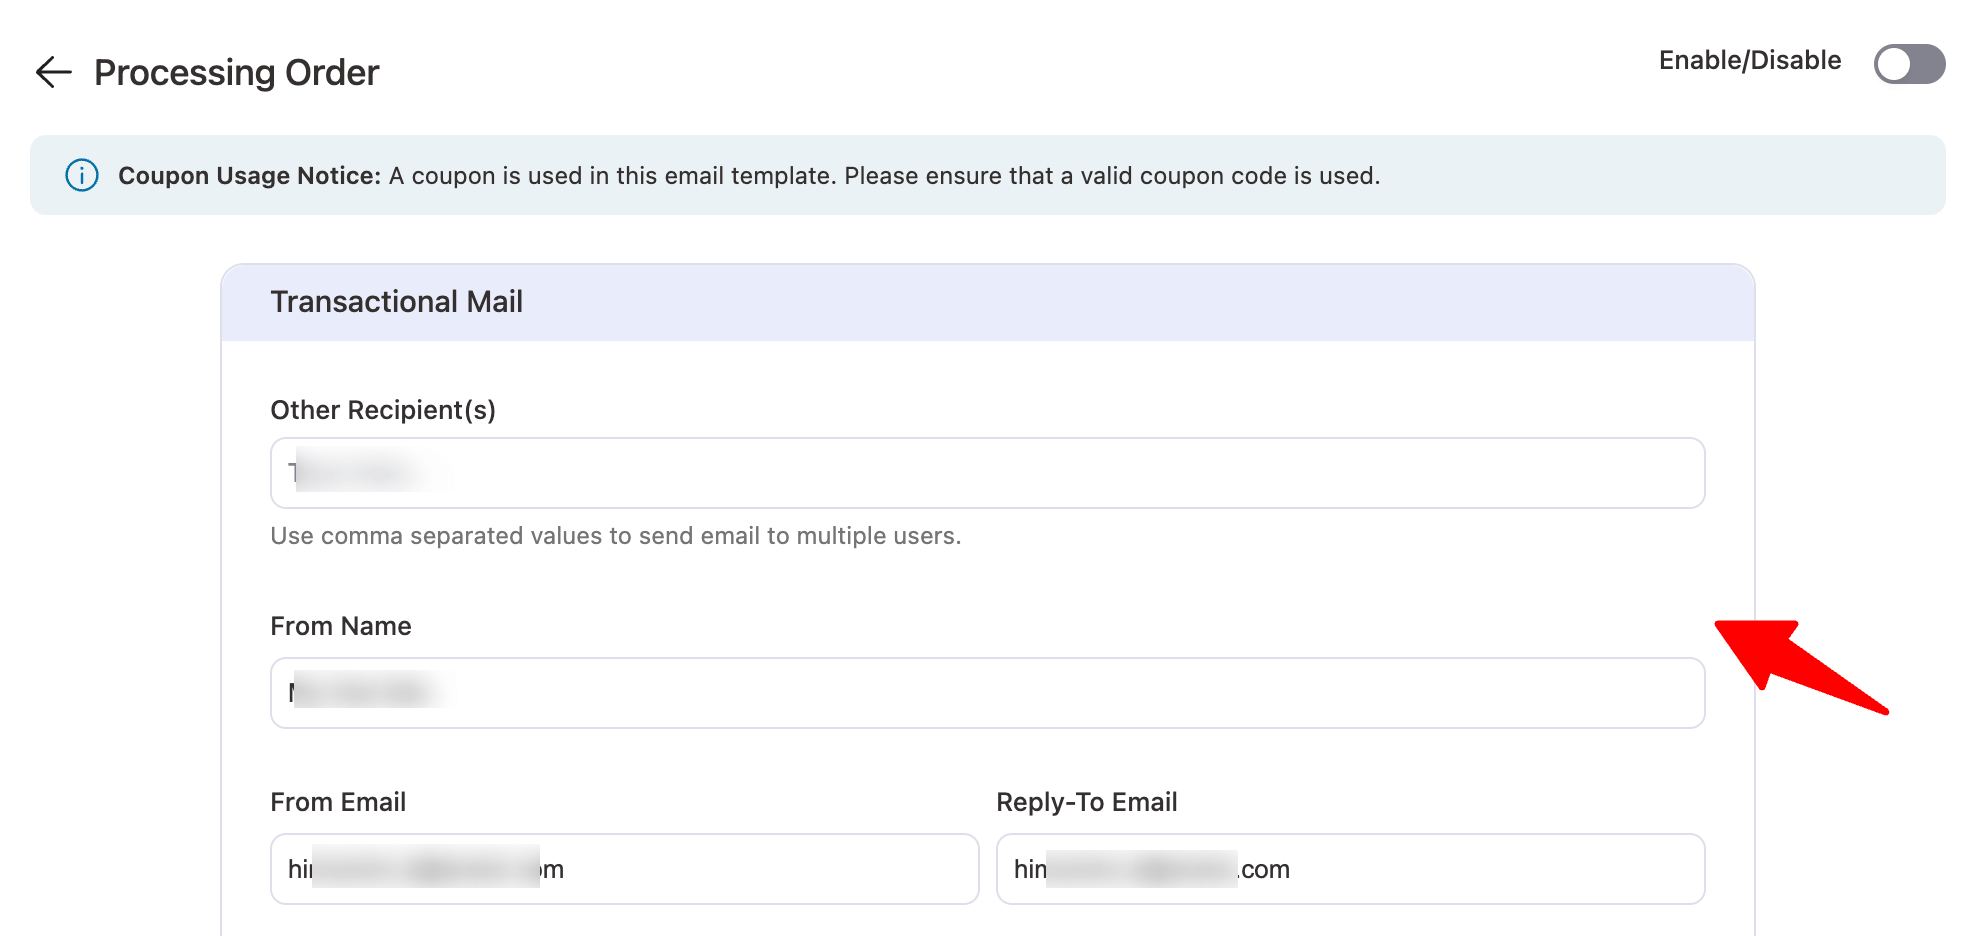
Now, hit the ‘Edit’ option next to Order Details to start customizing the Invoice email.
Here, you can add additional recipients along with customers and set the from name, from email, and reply-to email
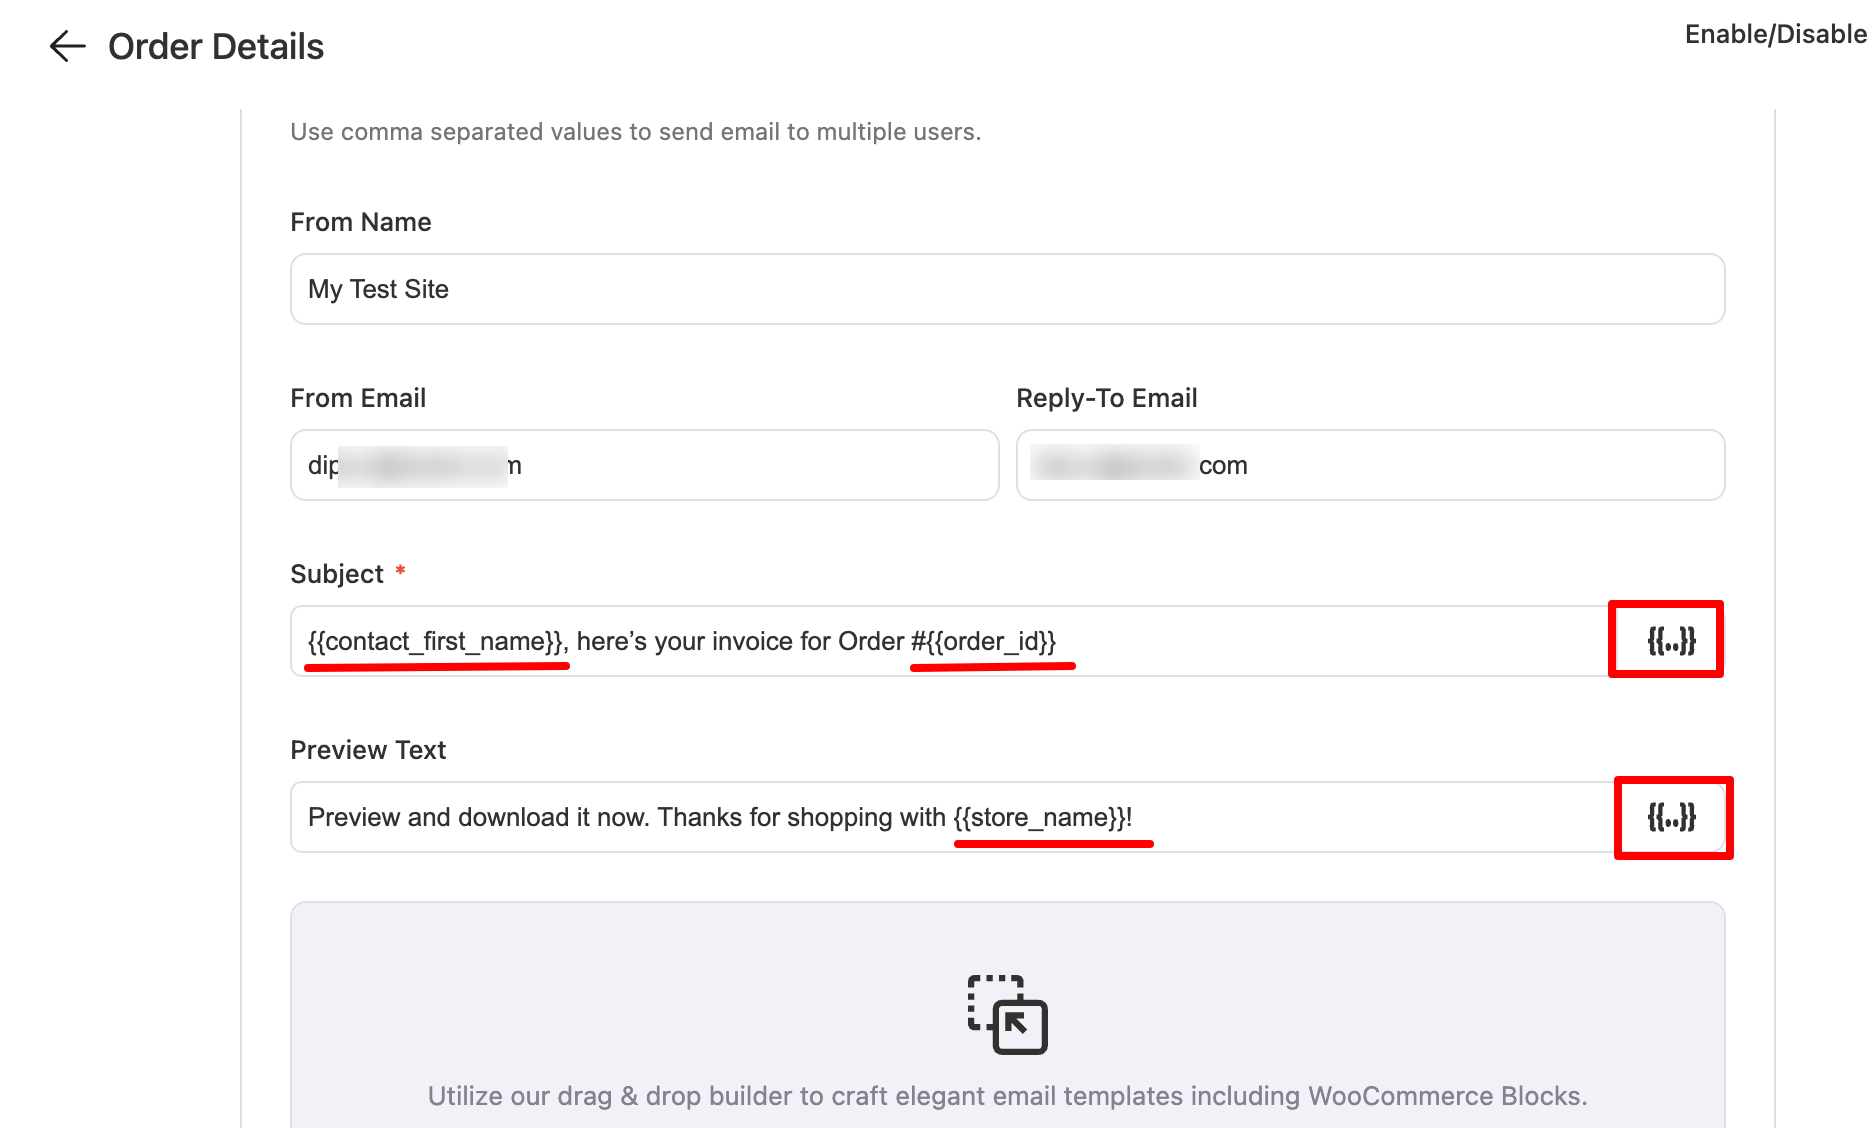
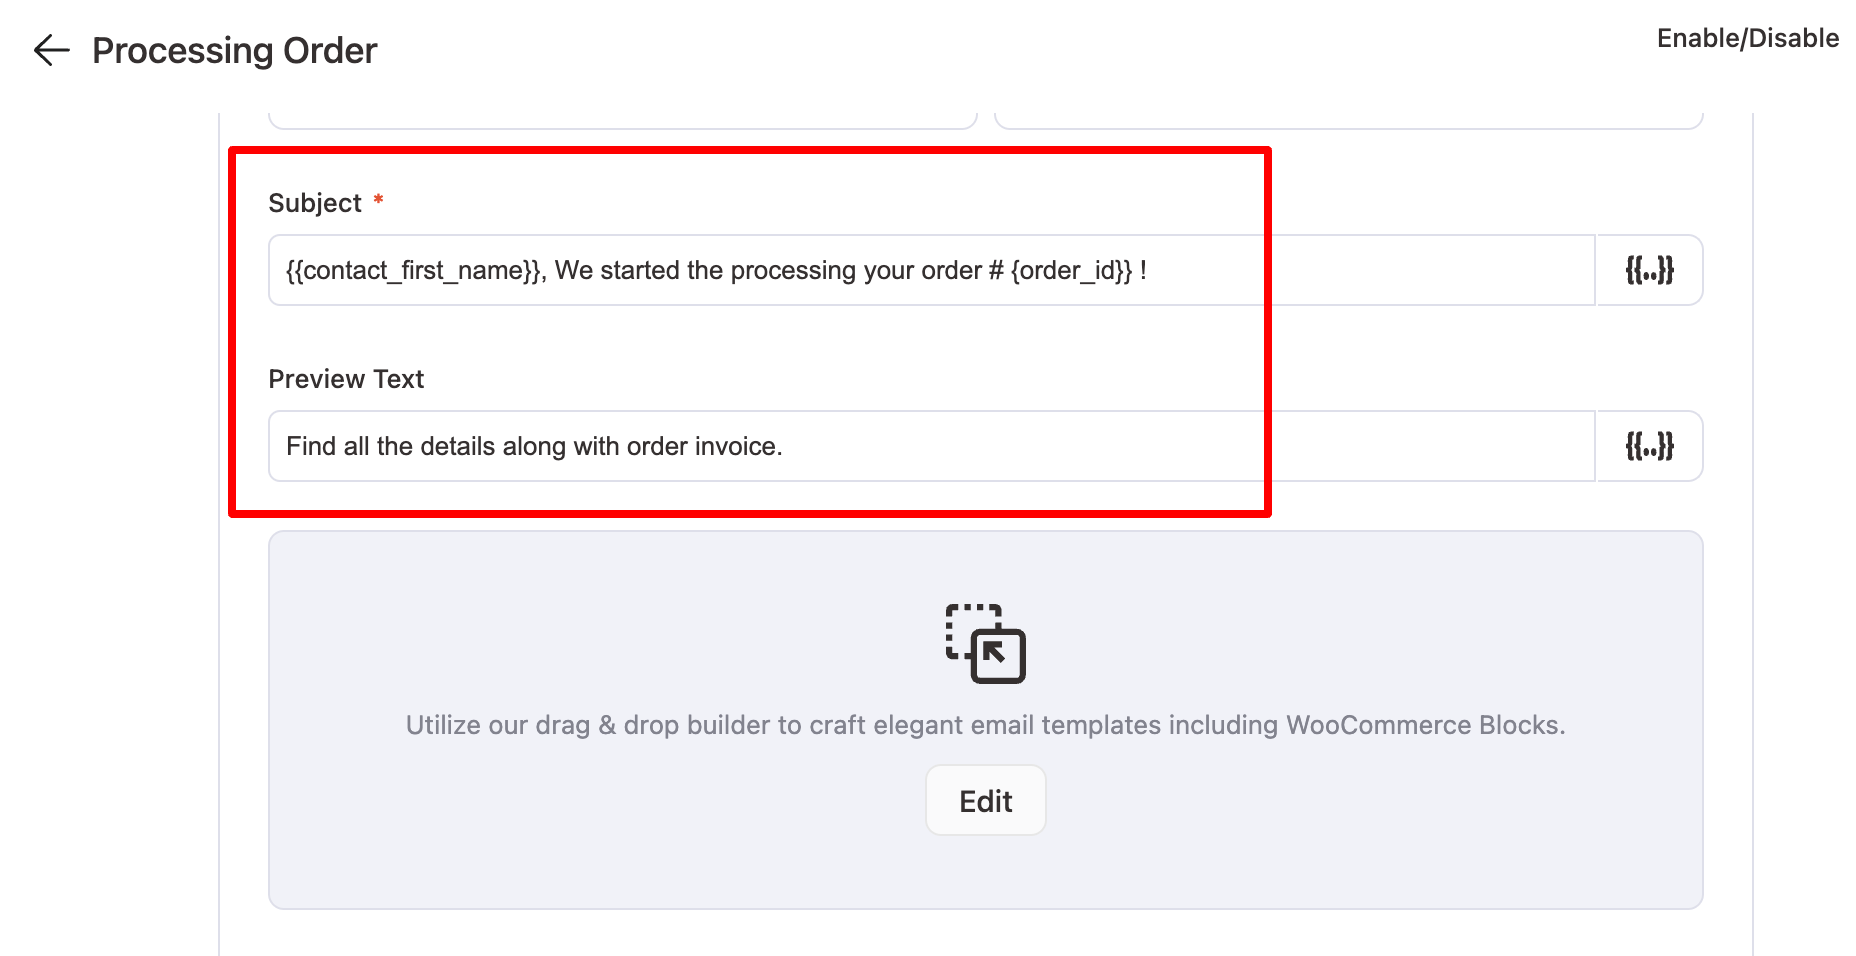
Step 3: Add a custom subject line and preview the text
Next, enter the subject and preview the text. Personalizing your emails can boost engagement. You can include customer names, order IDs, or store names to reinforce your brand.
FunnelKit Automation offers different merge tags to add dynamic information to your email content. You can access the merge tags by clicking on the “{{..}}” sign.
Here, we used the customer's first name, order ID, and store name.
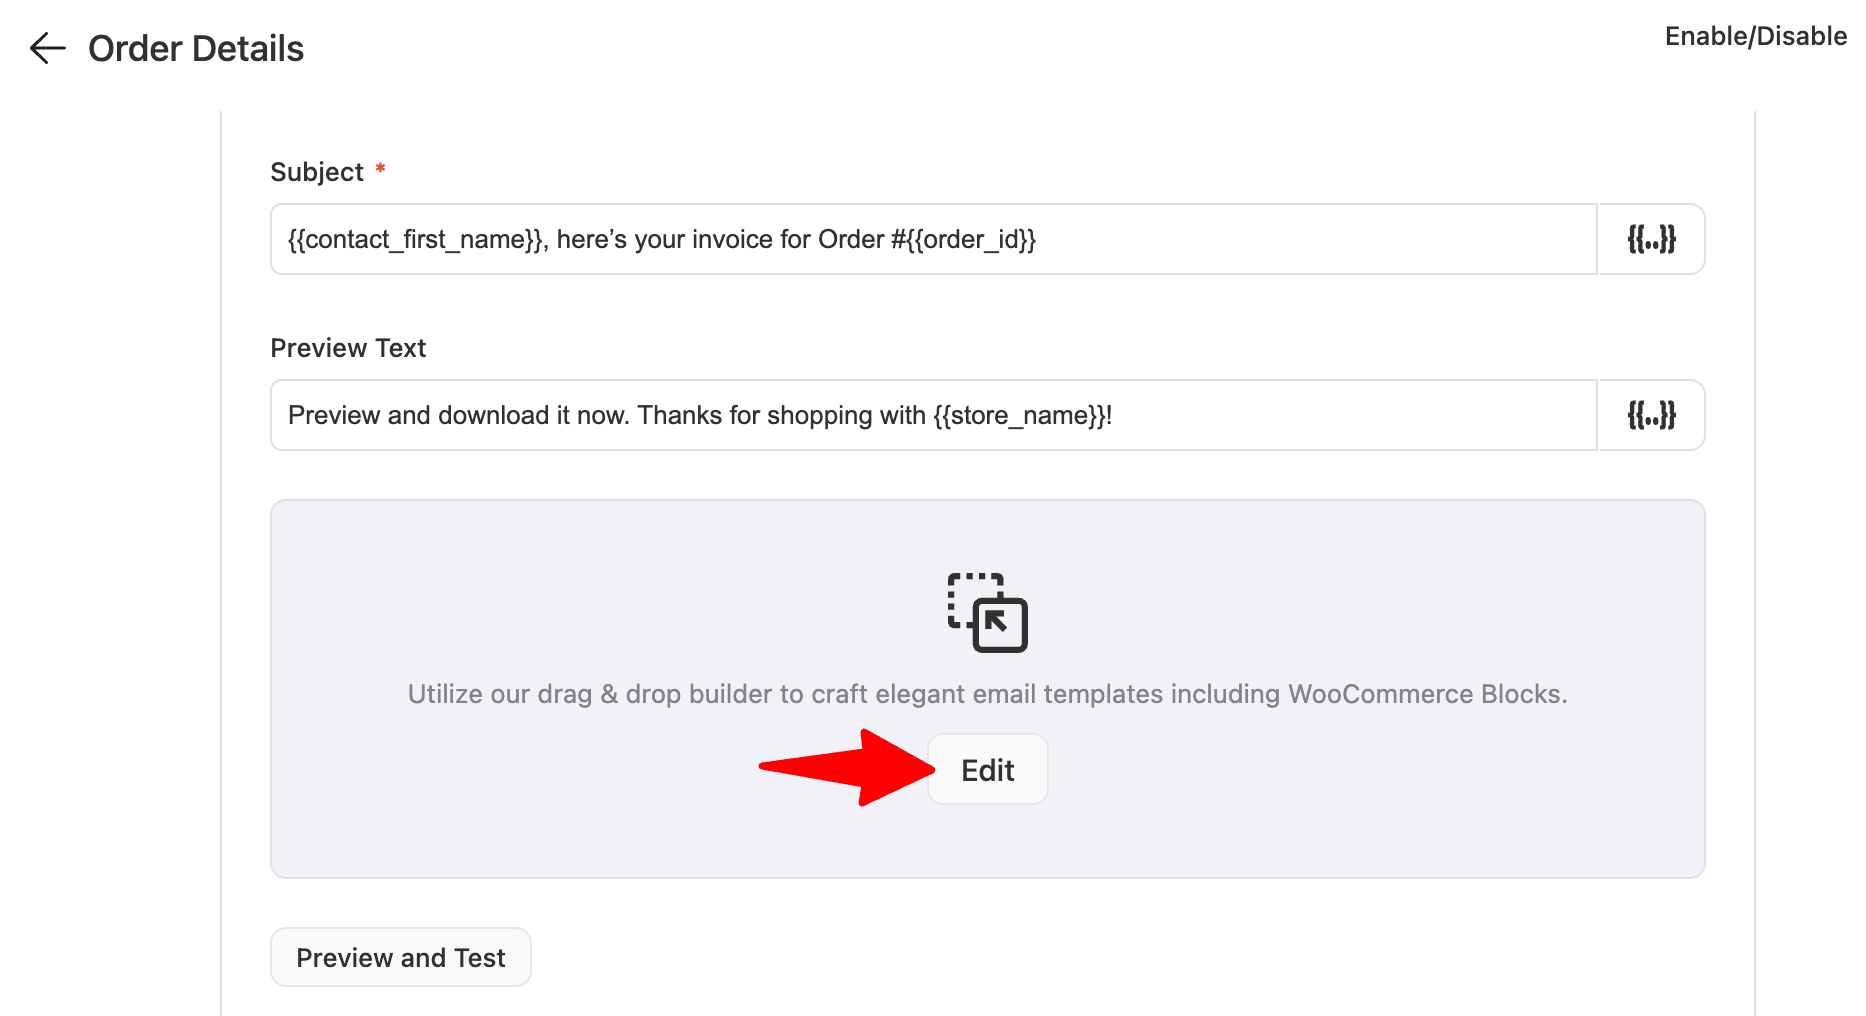
Step 4: Customize order details email
Next, start customizing the email body by clicking the ‘Edit’ option.
Now, you can customize the email template according to your preference.
- Upload a logo
First, upload a logo. You can select a logo from your library or Insert From URL to set it as your global site logo.
Once you load the logo, you can set the position, width, alternative text, and other styling options like Border Style, radius, padding, etc.
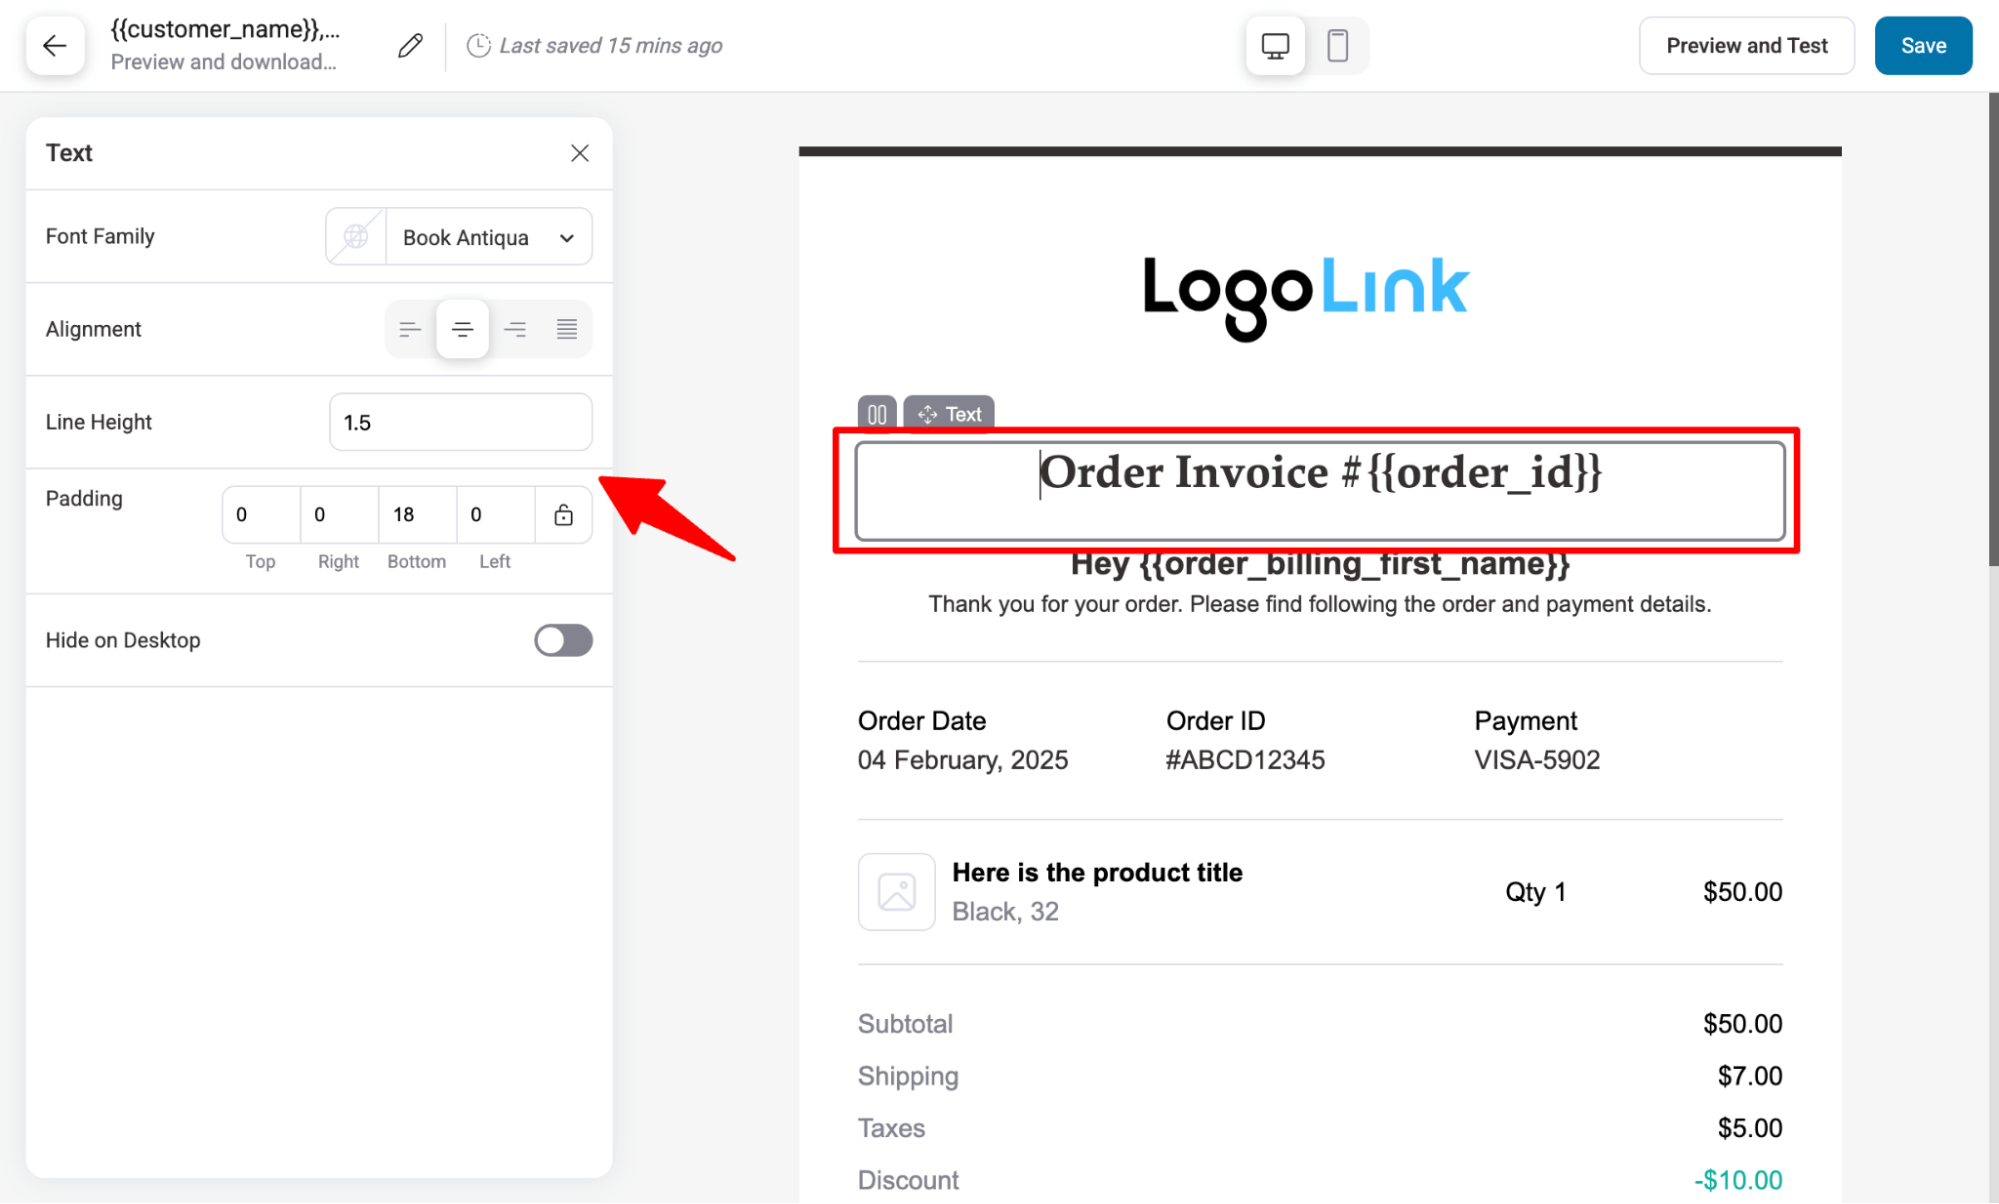
- Customize the heading
The default heading is “Order Invoice,” but you can customize it. To add dynamic information, click the heading, open the merge tag option, search for Order ID, and copy-paste the tag.
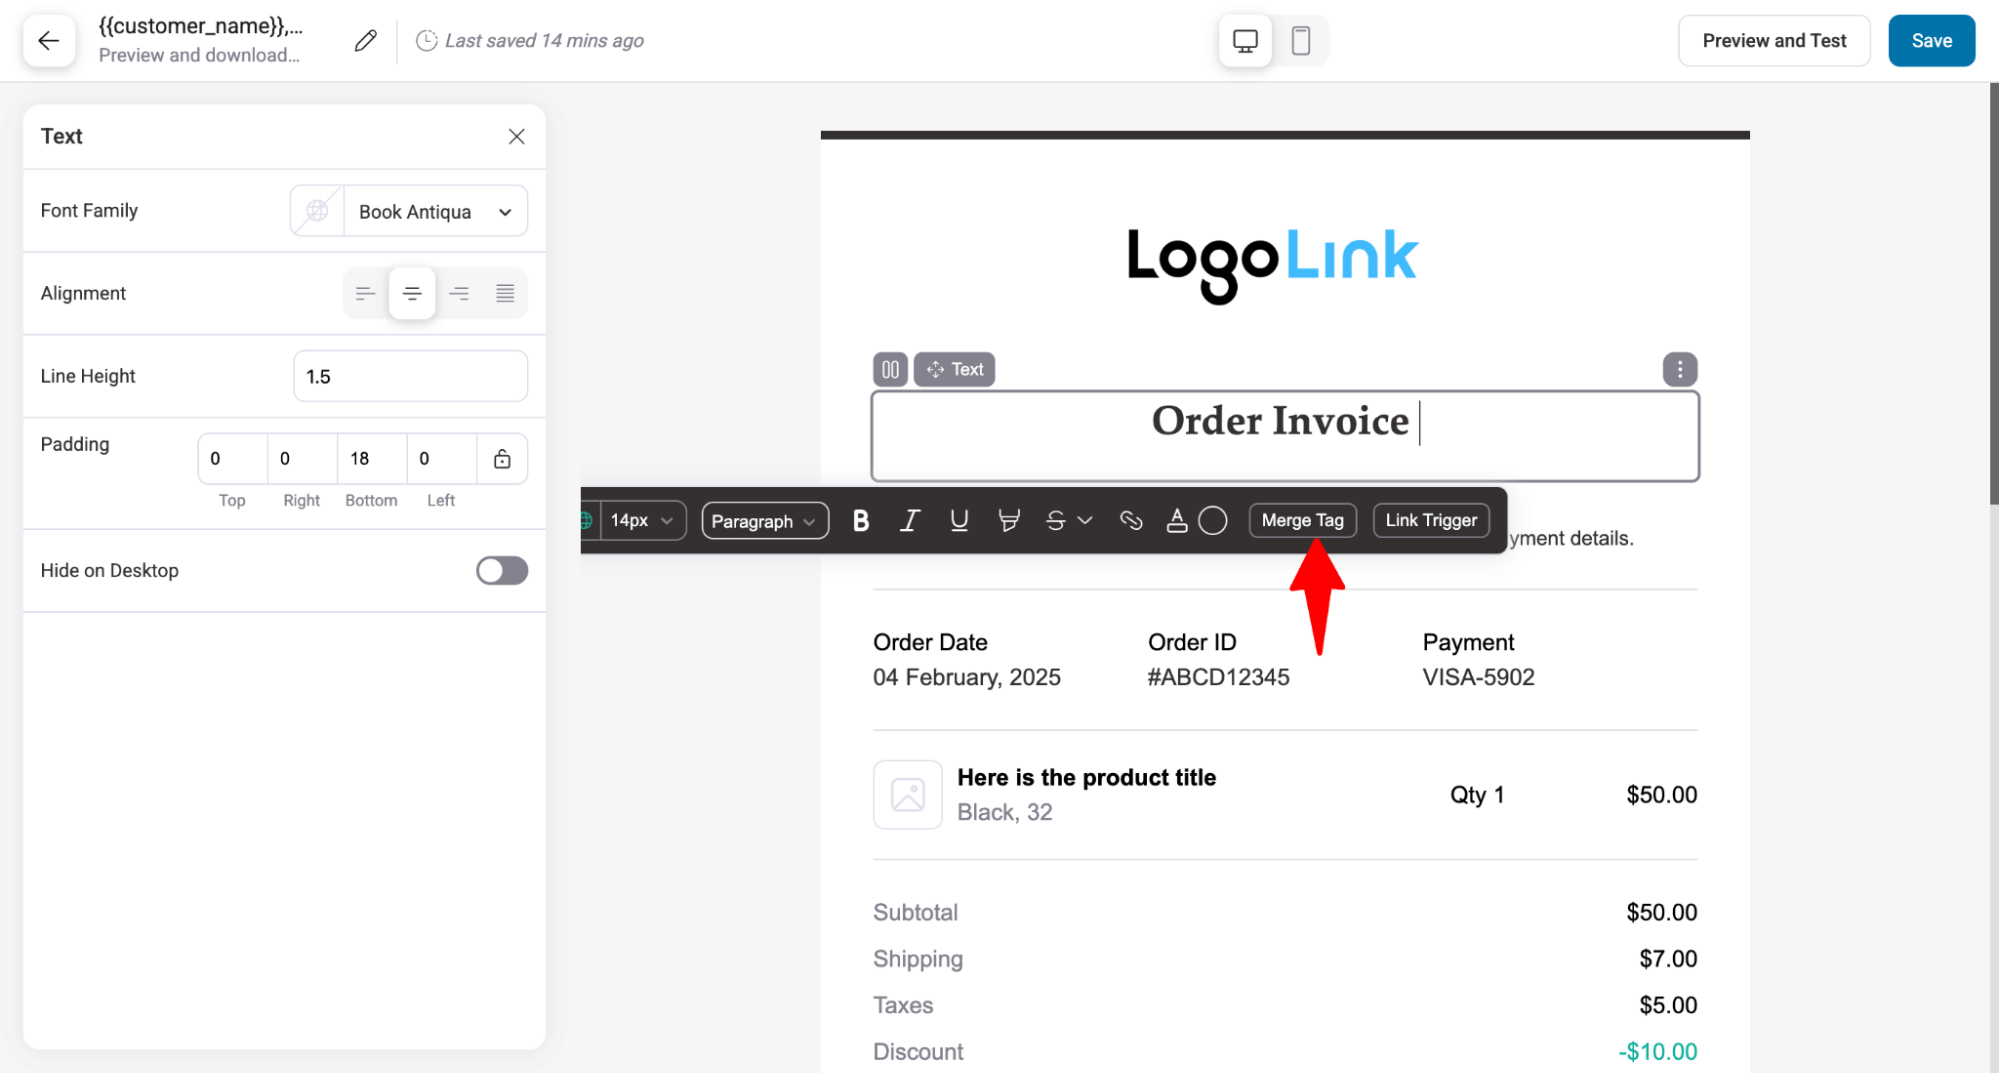
For the heading, you can set the font family, alignment, line height, and padding.
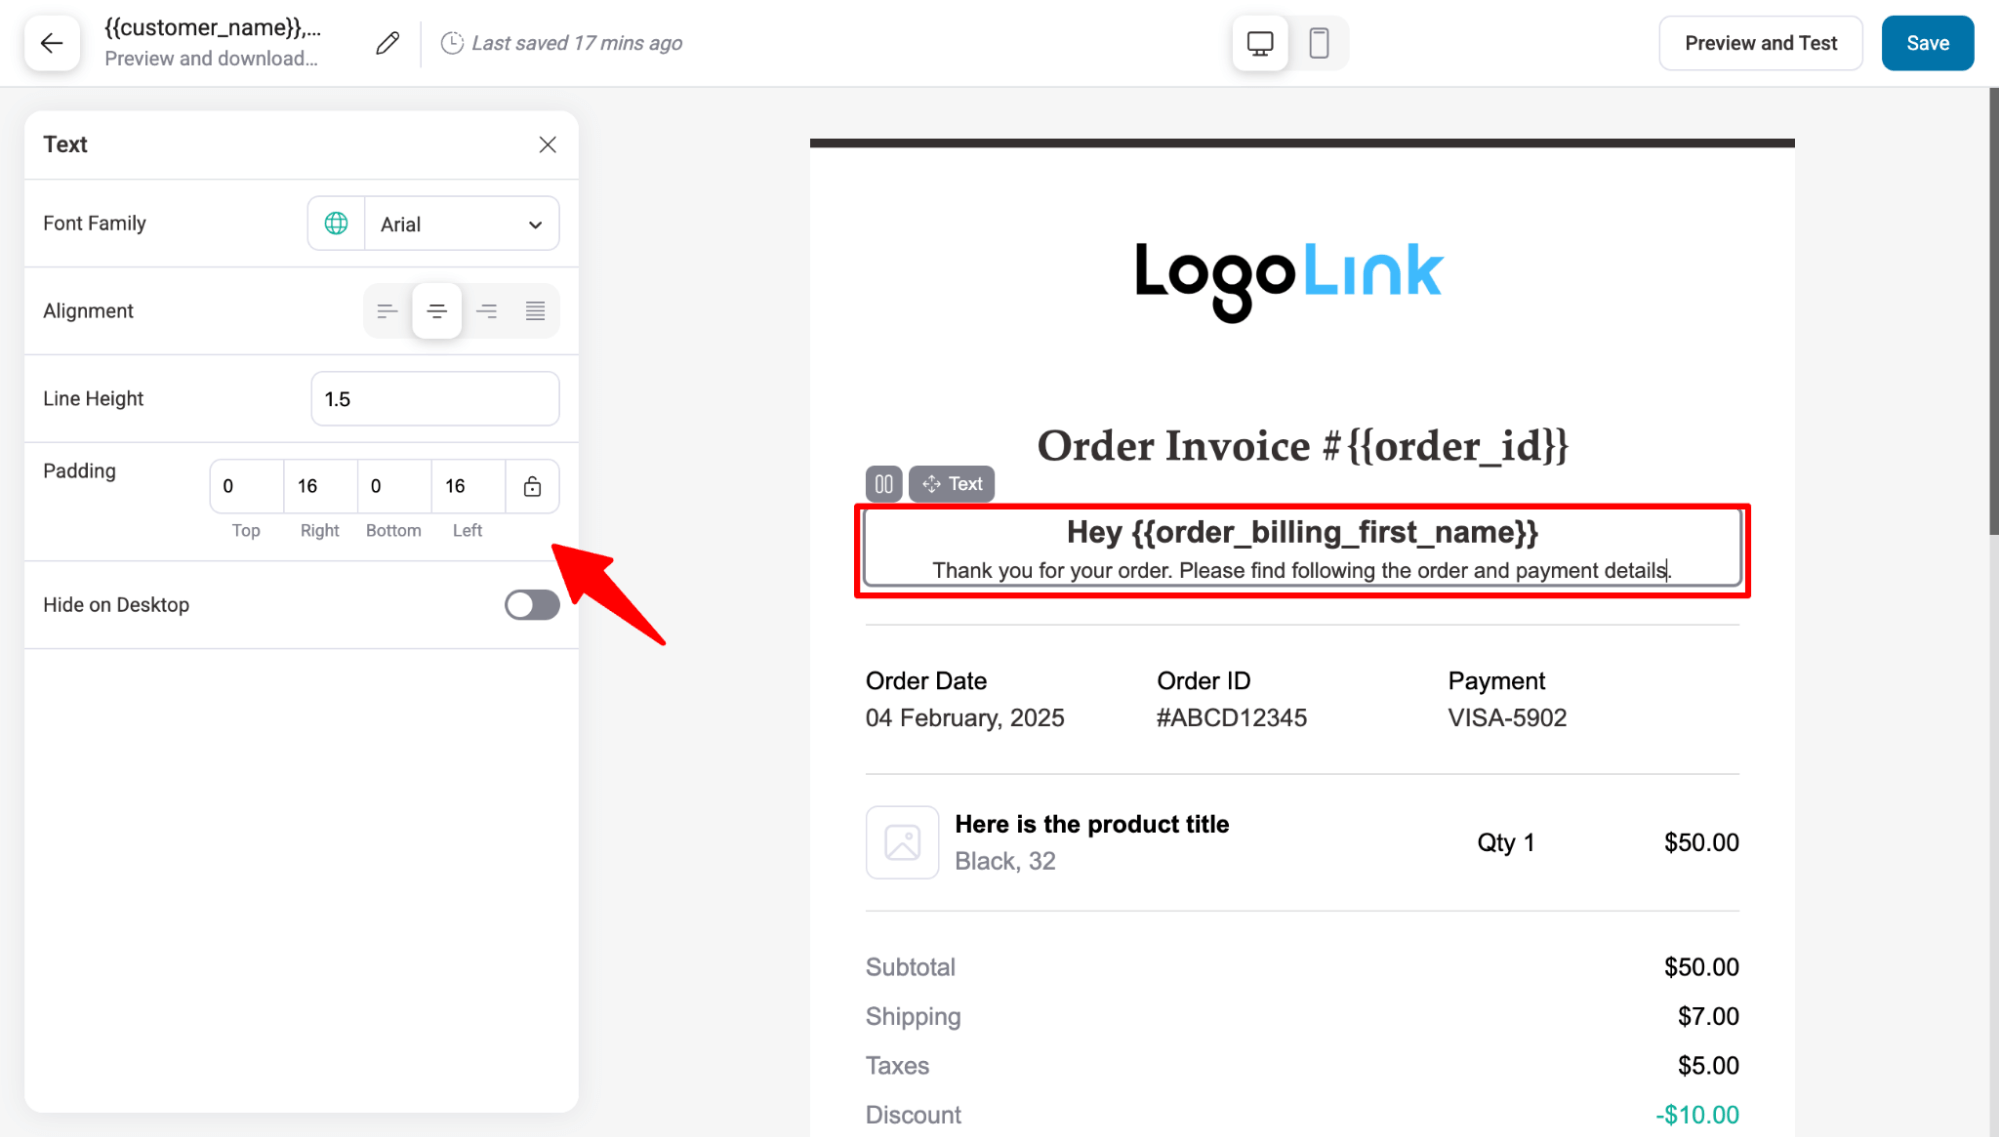
- Set the sub-heading
Customize the subheading if needed. Also, also set the font family, alignment, line height, and padding.
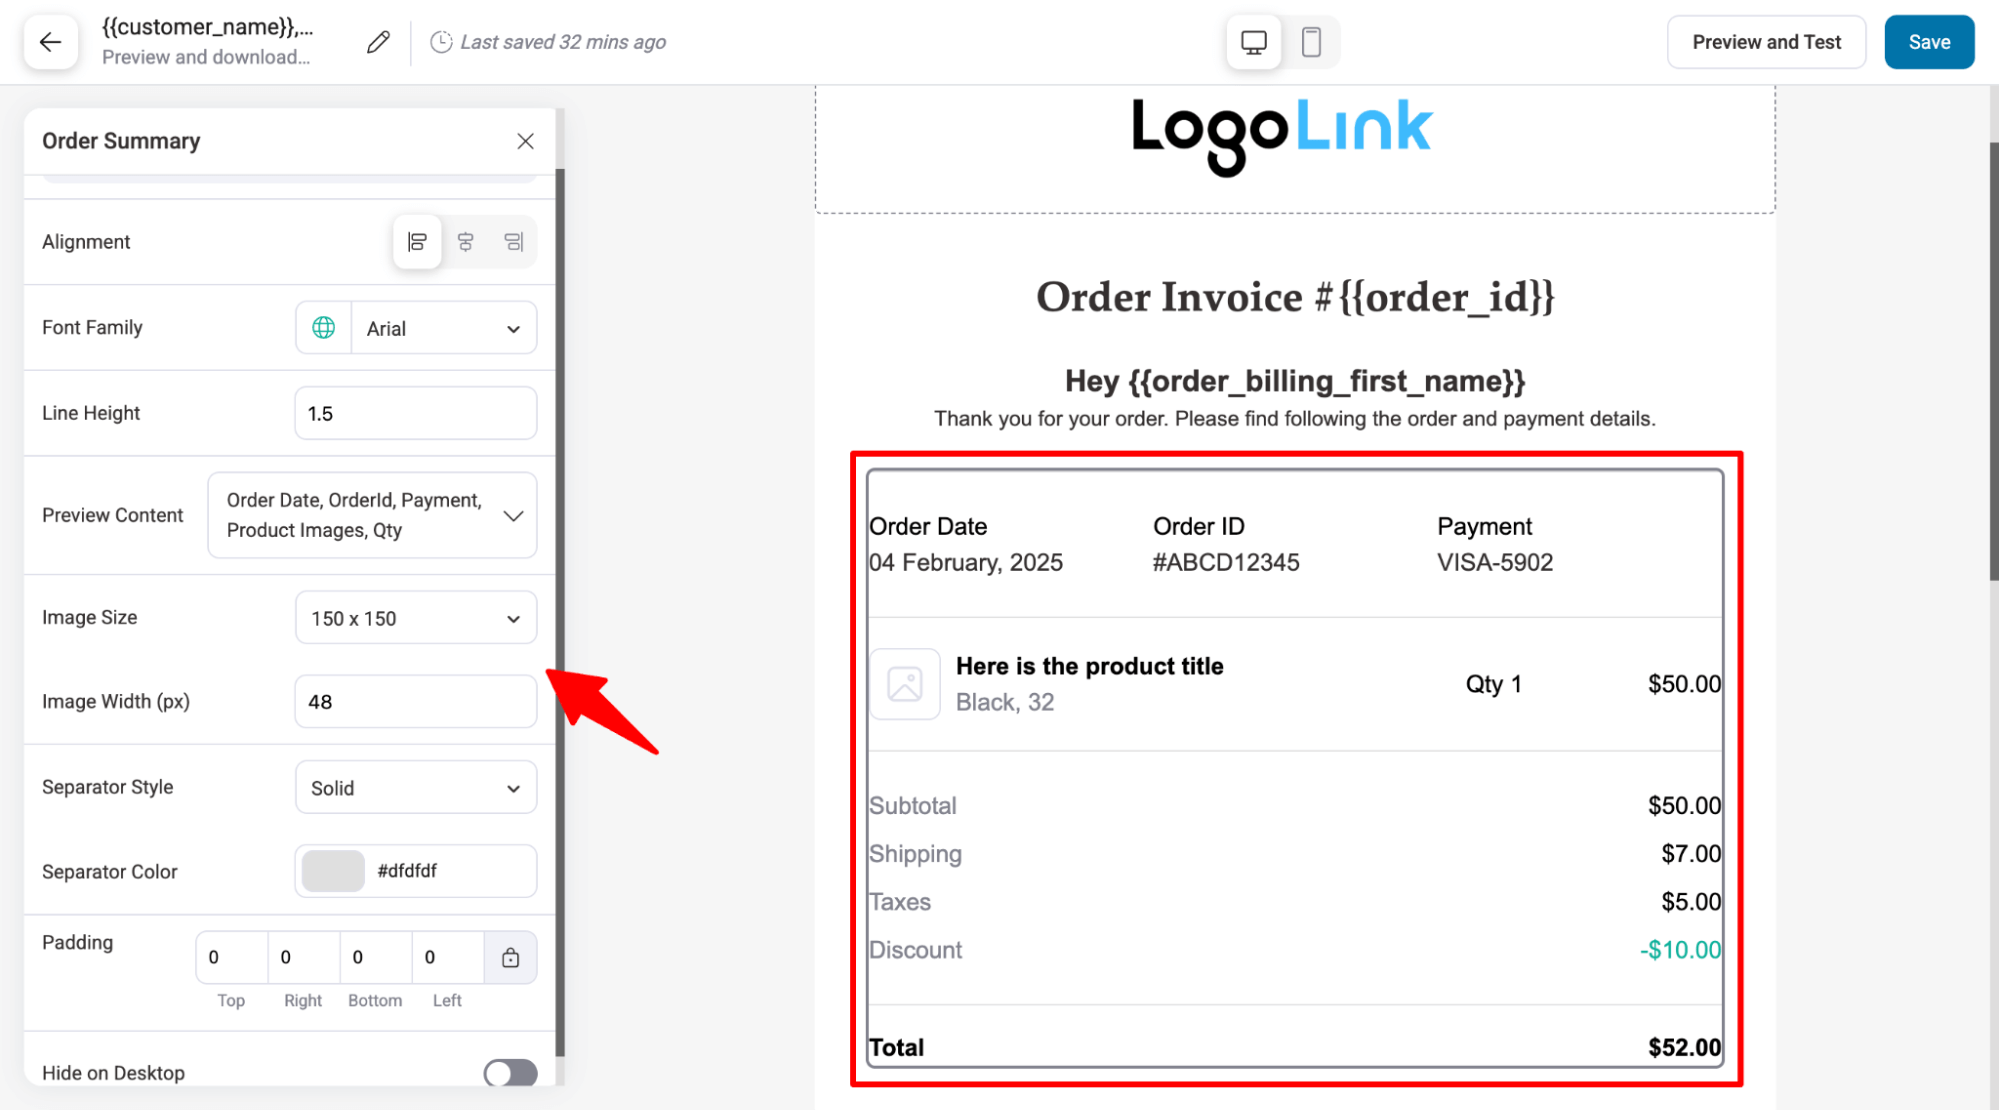
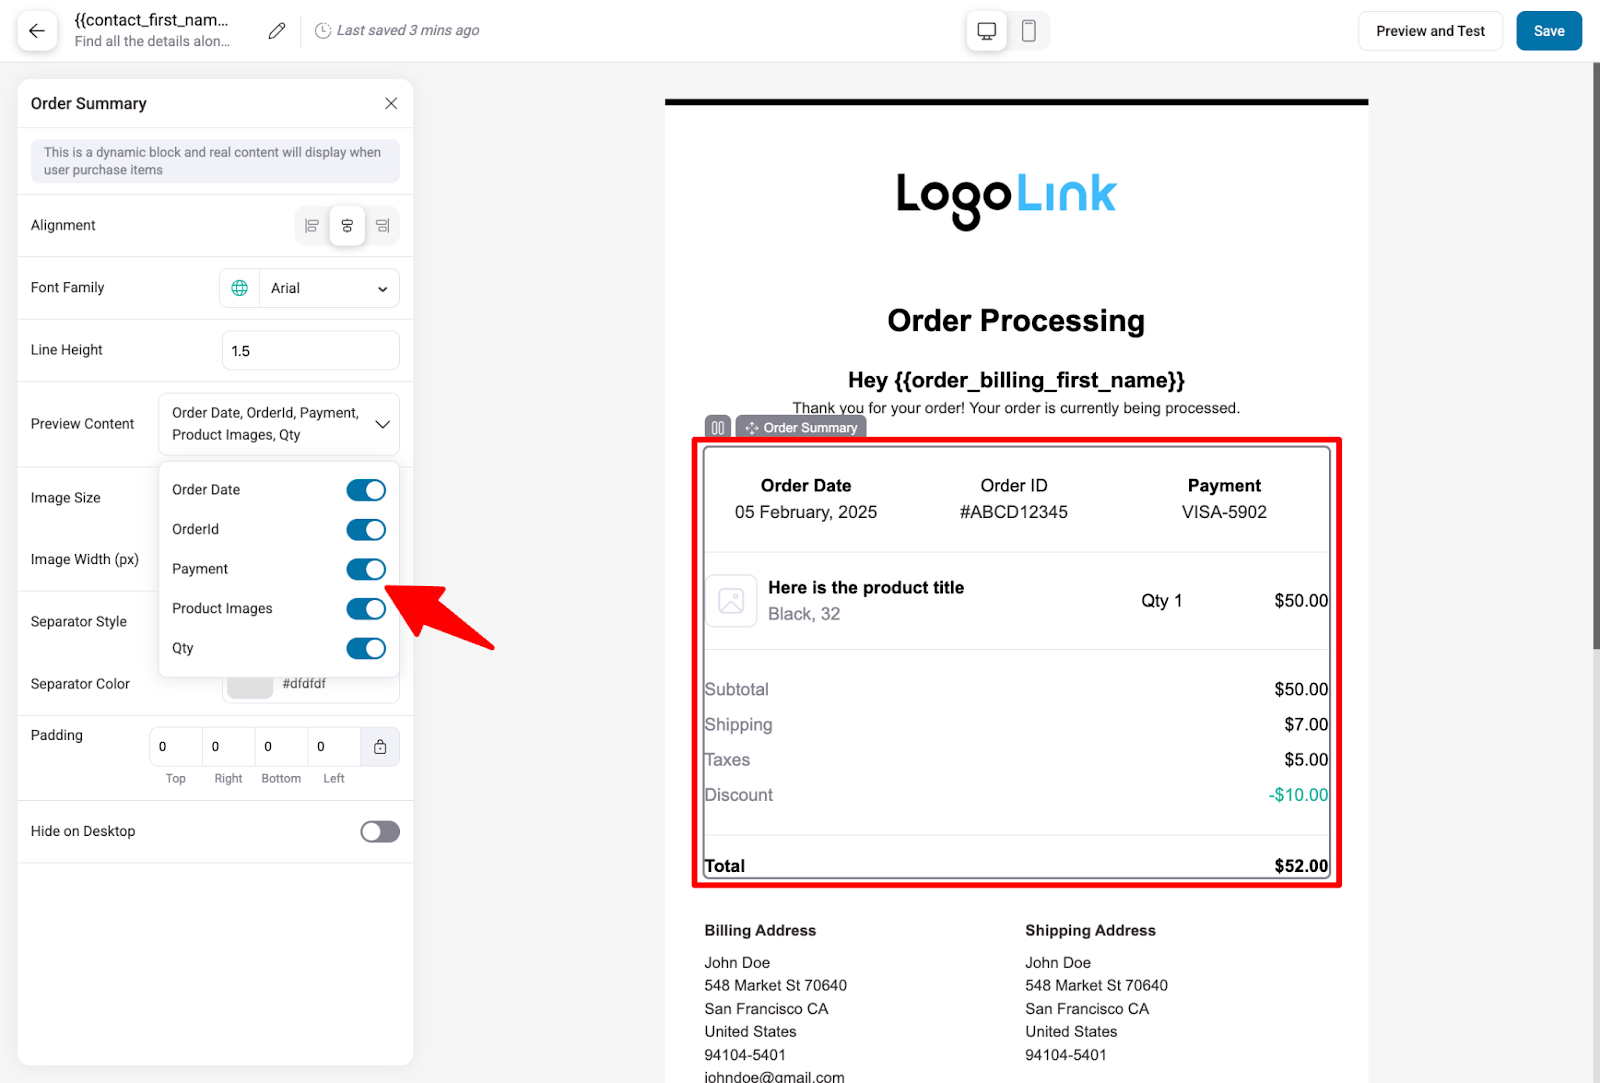
- Configure the order summary section
For the order summary section, you can choose what will be included in the invoice, such as Order Date, Order ID, Payment, Product Image, and Quantity.
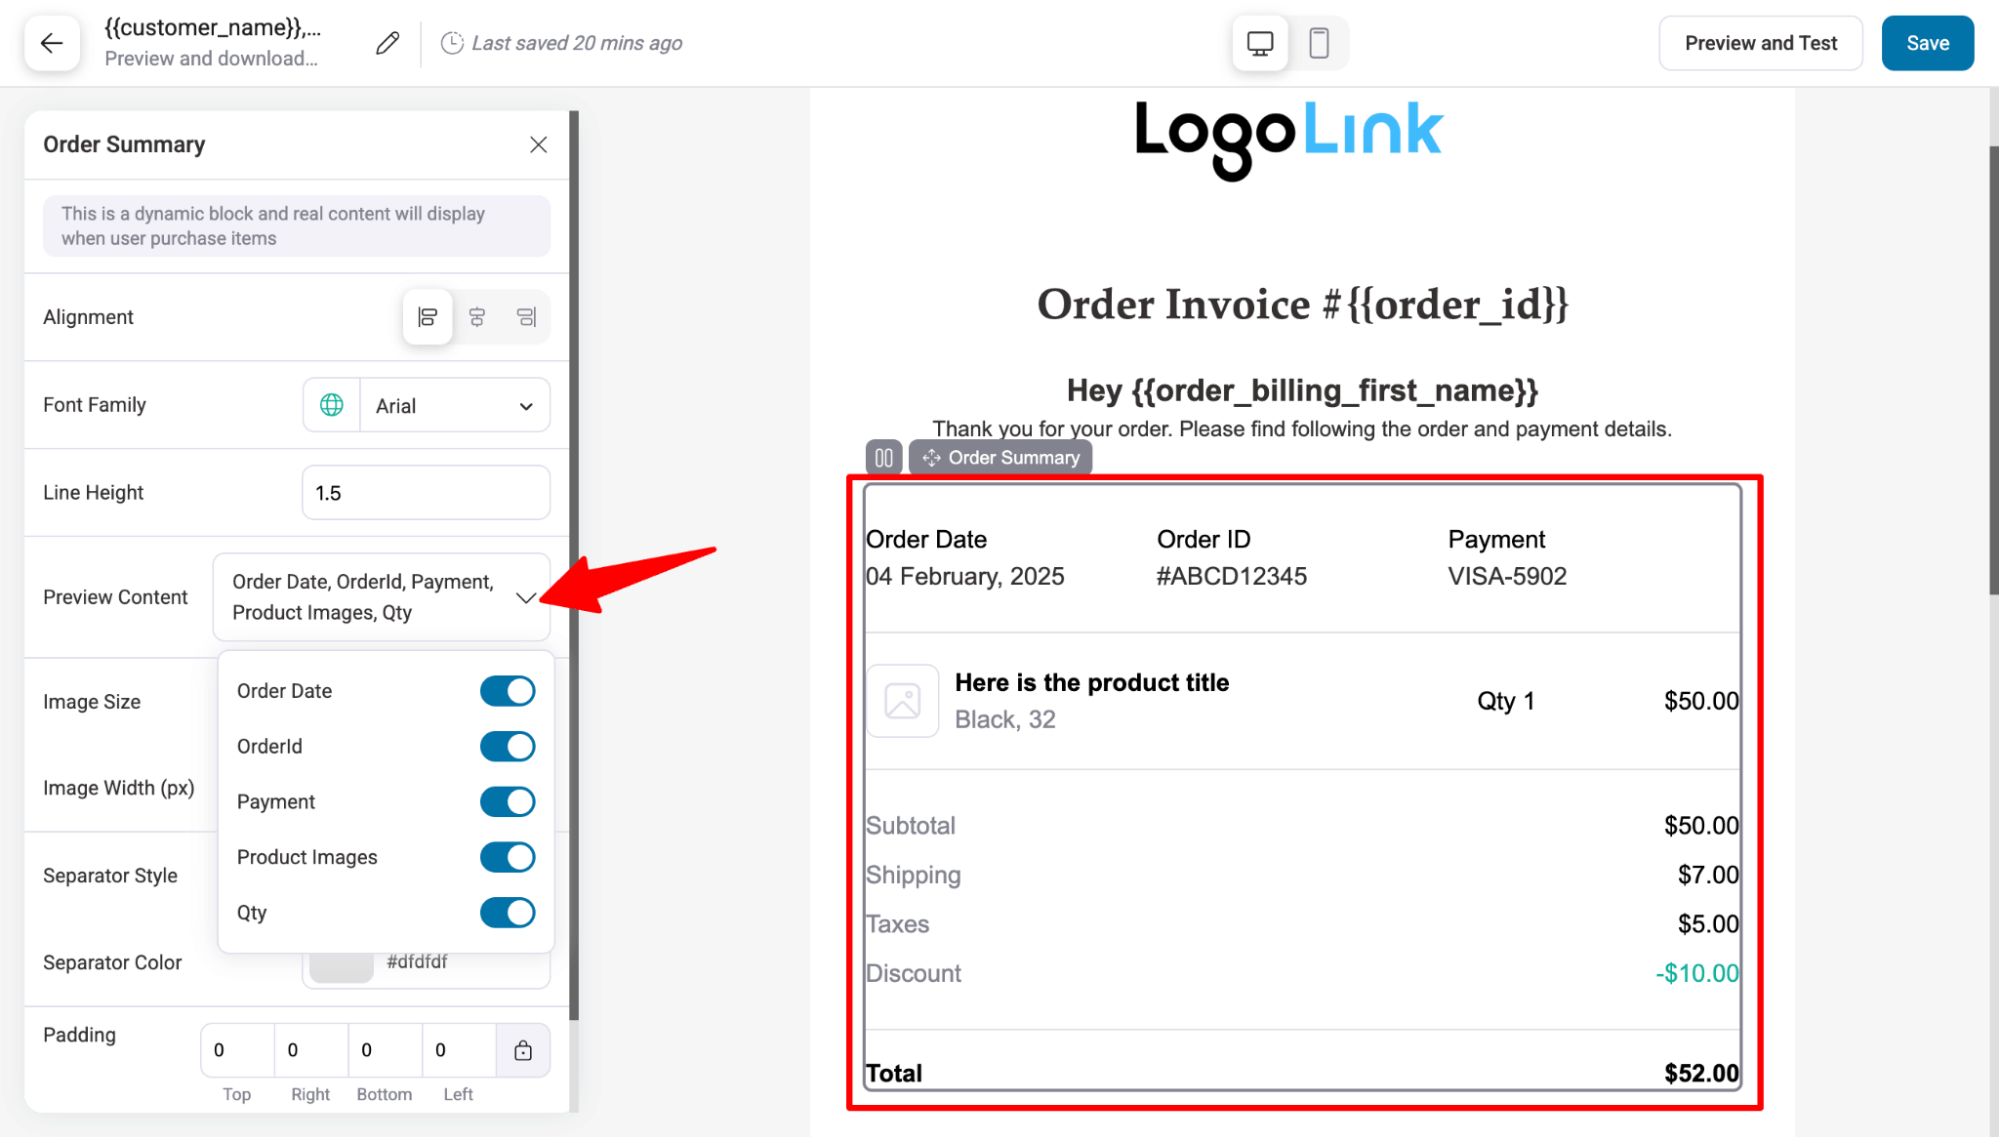
Apart from that, you can set the alignment, font family, line height, Image Size, Image width, separator style, separator color, padding, etc.
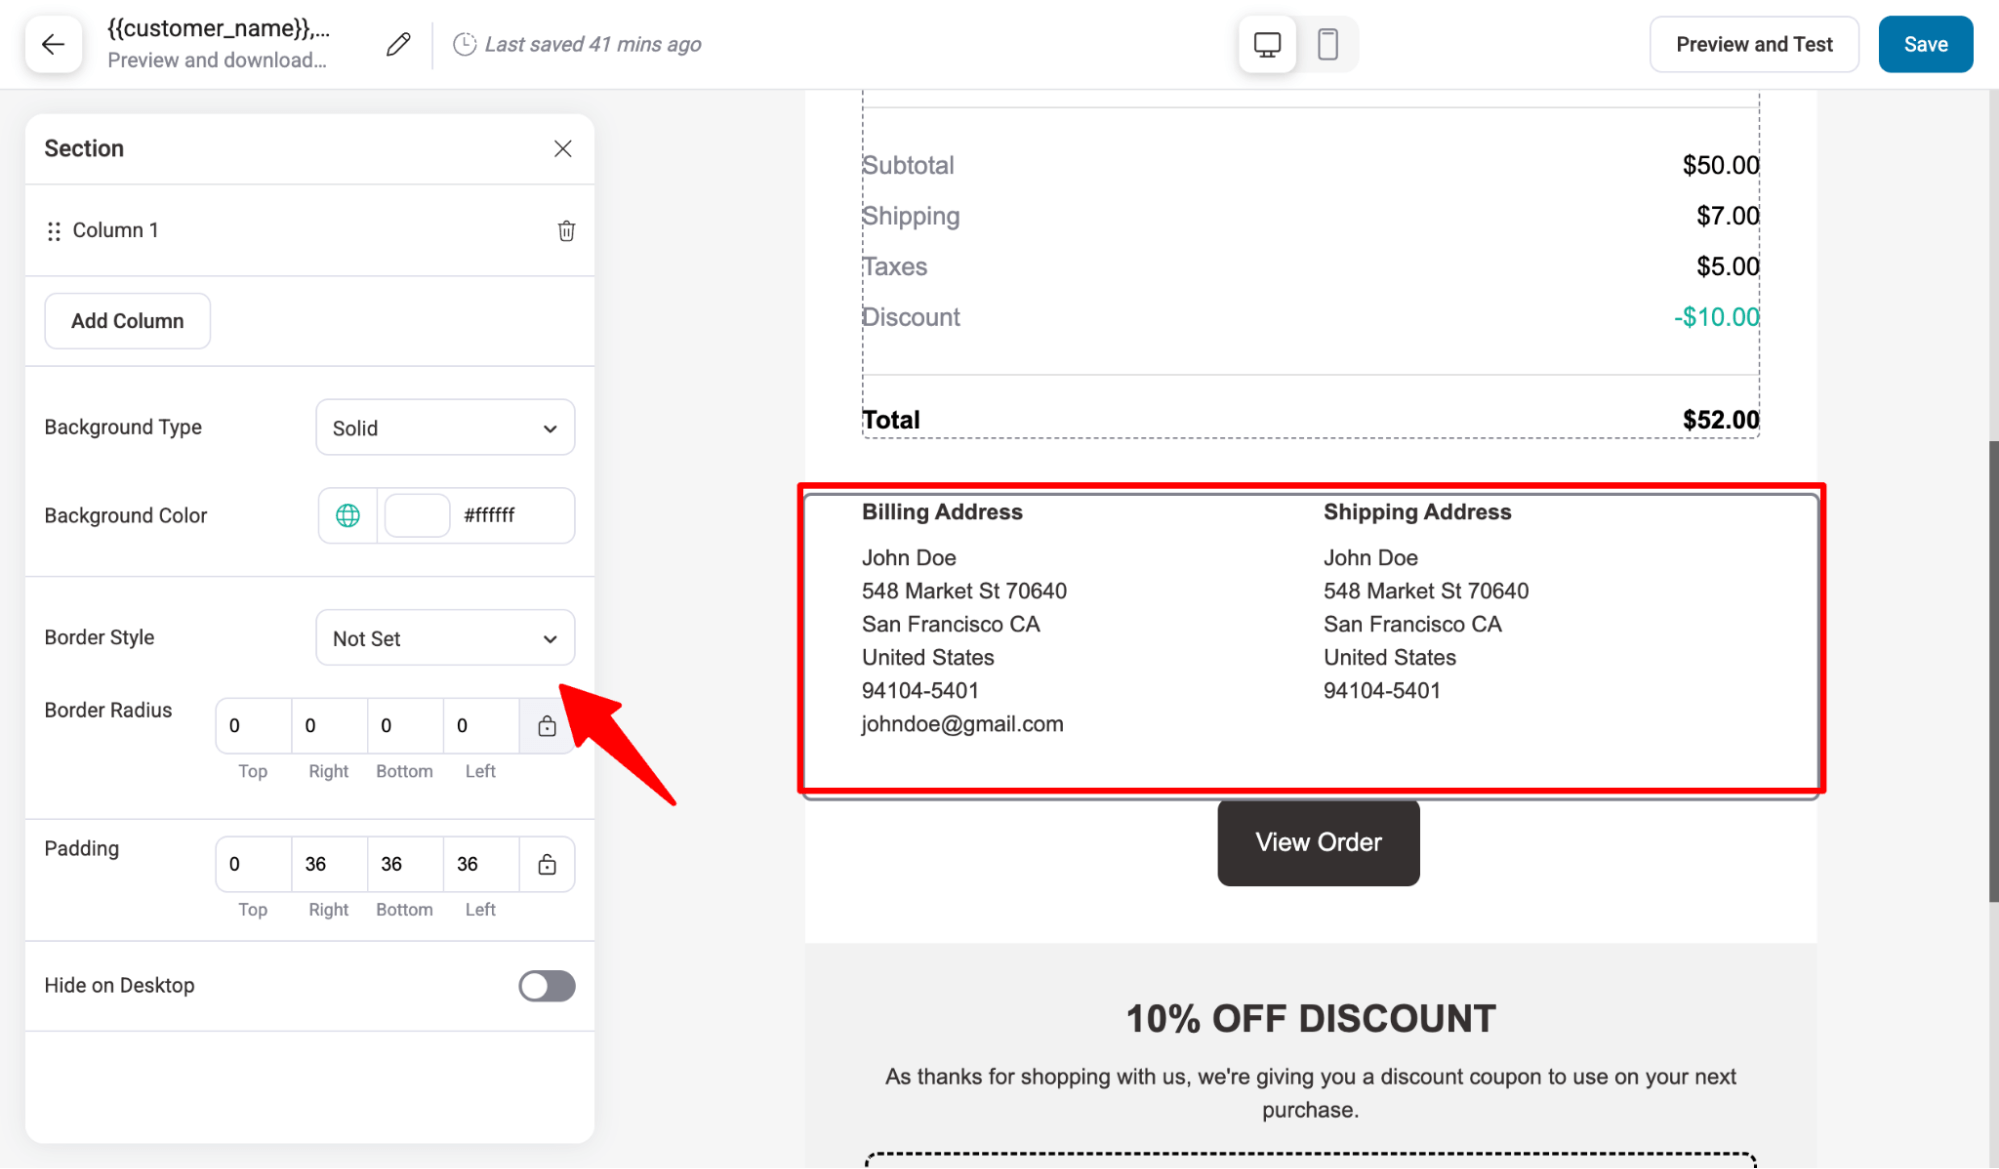
- Billing and shipping address
For the billing and shipping address part, you get customization options such as Background type, background color, border style, border radius, and padding.
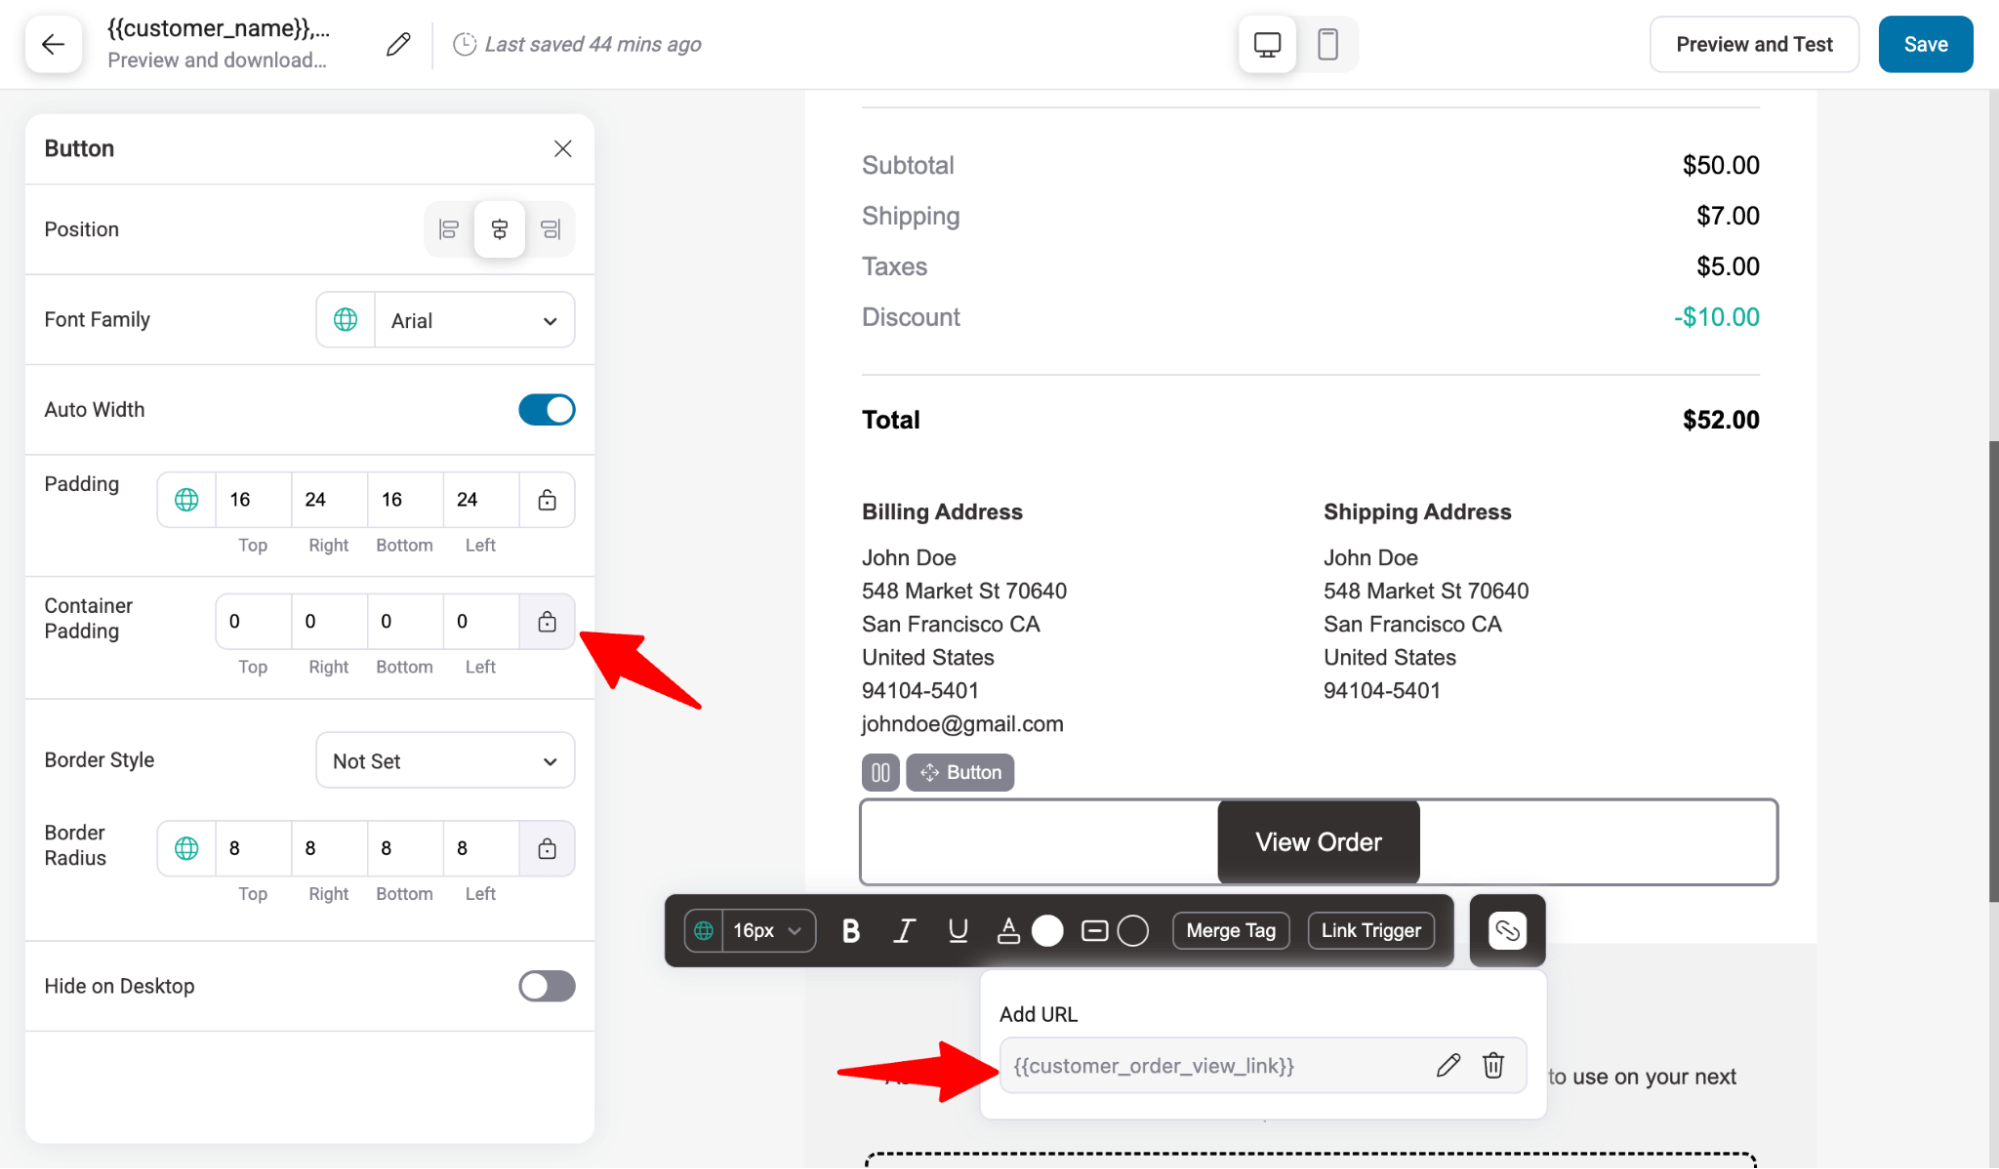
- Customize View Order Details CTA
The View Order CTA has a merge tag {{customer_order_view_link}} that will direct users to the order detail page. For the CTA button, you can set the position, font family, enable auto width, container padding, border style, border radius, etc.
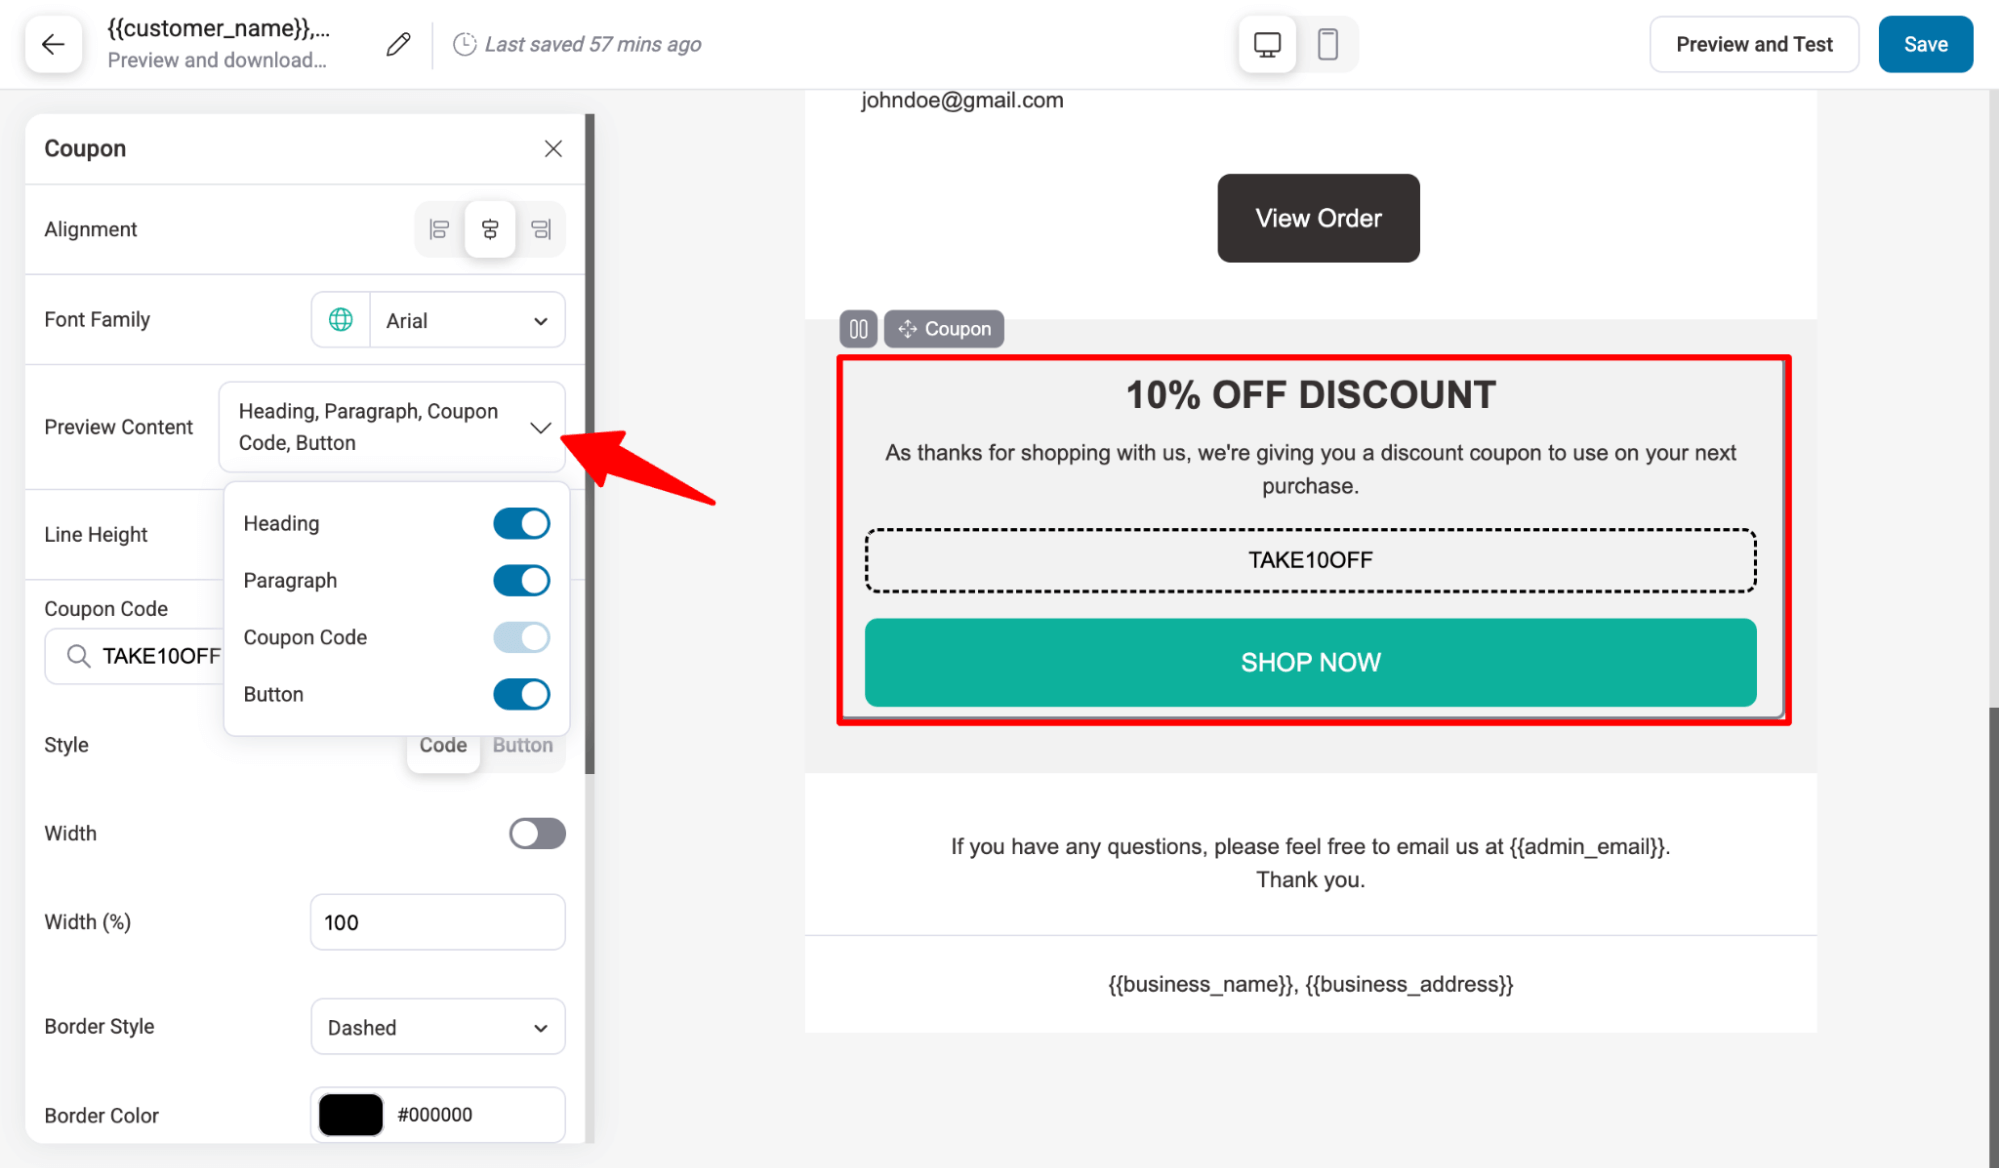
- Add a coupon code for the next purchase.
The template also includes a coupon section. It uses a prebuilt Coupon block that beautifully highlights the coupon code and key details of the offer.
First, add the coupon code from the existing store coupons.
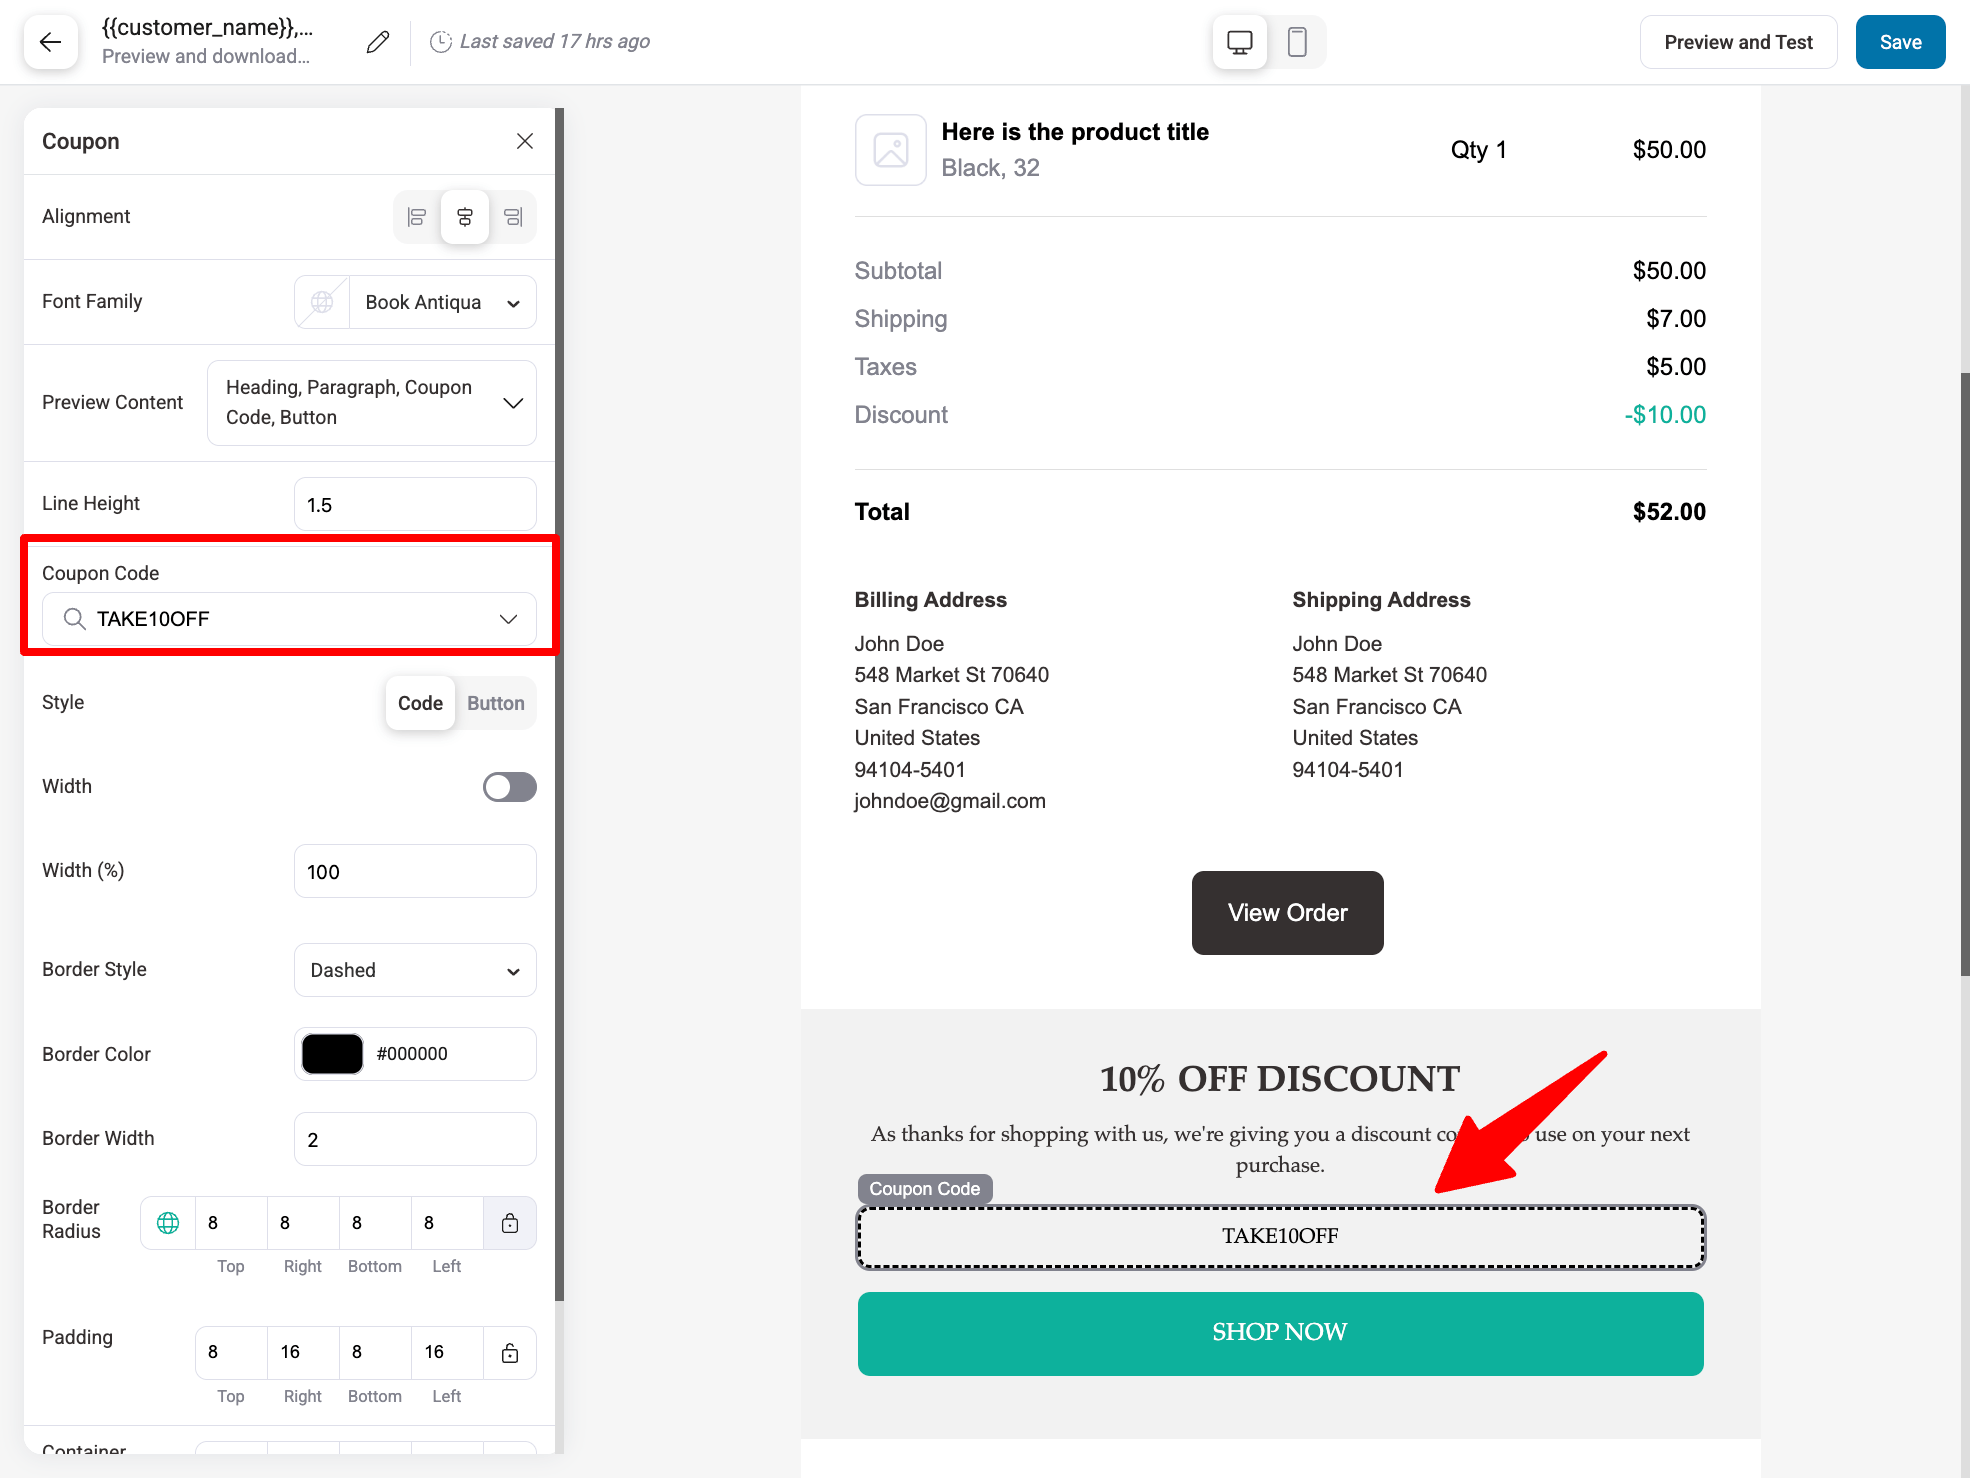
You can choose to show or hide the heading, paragraph, coupon code, and button.
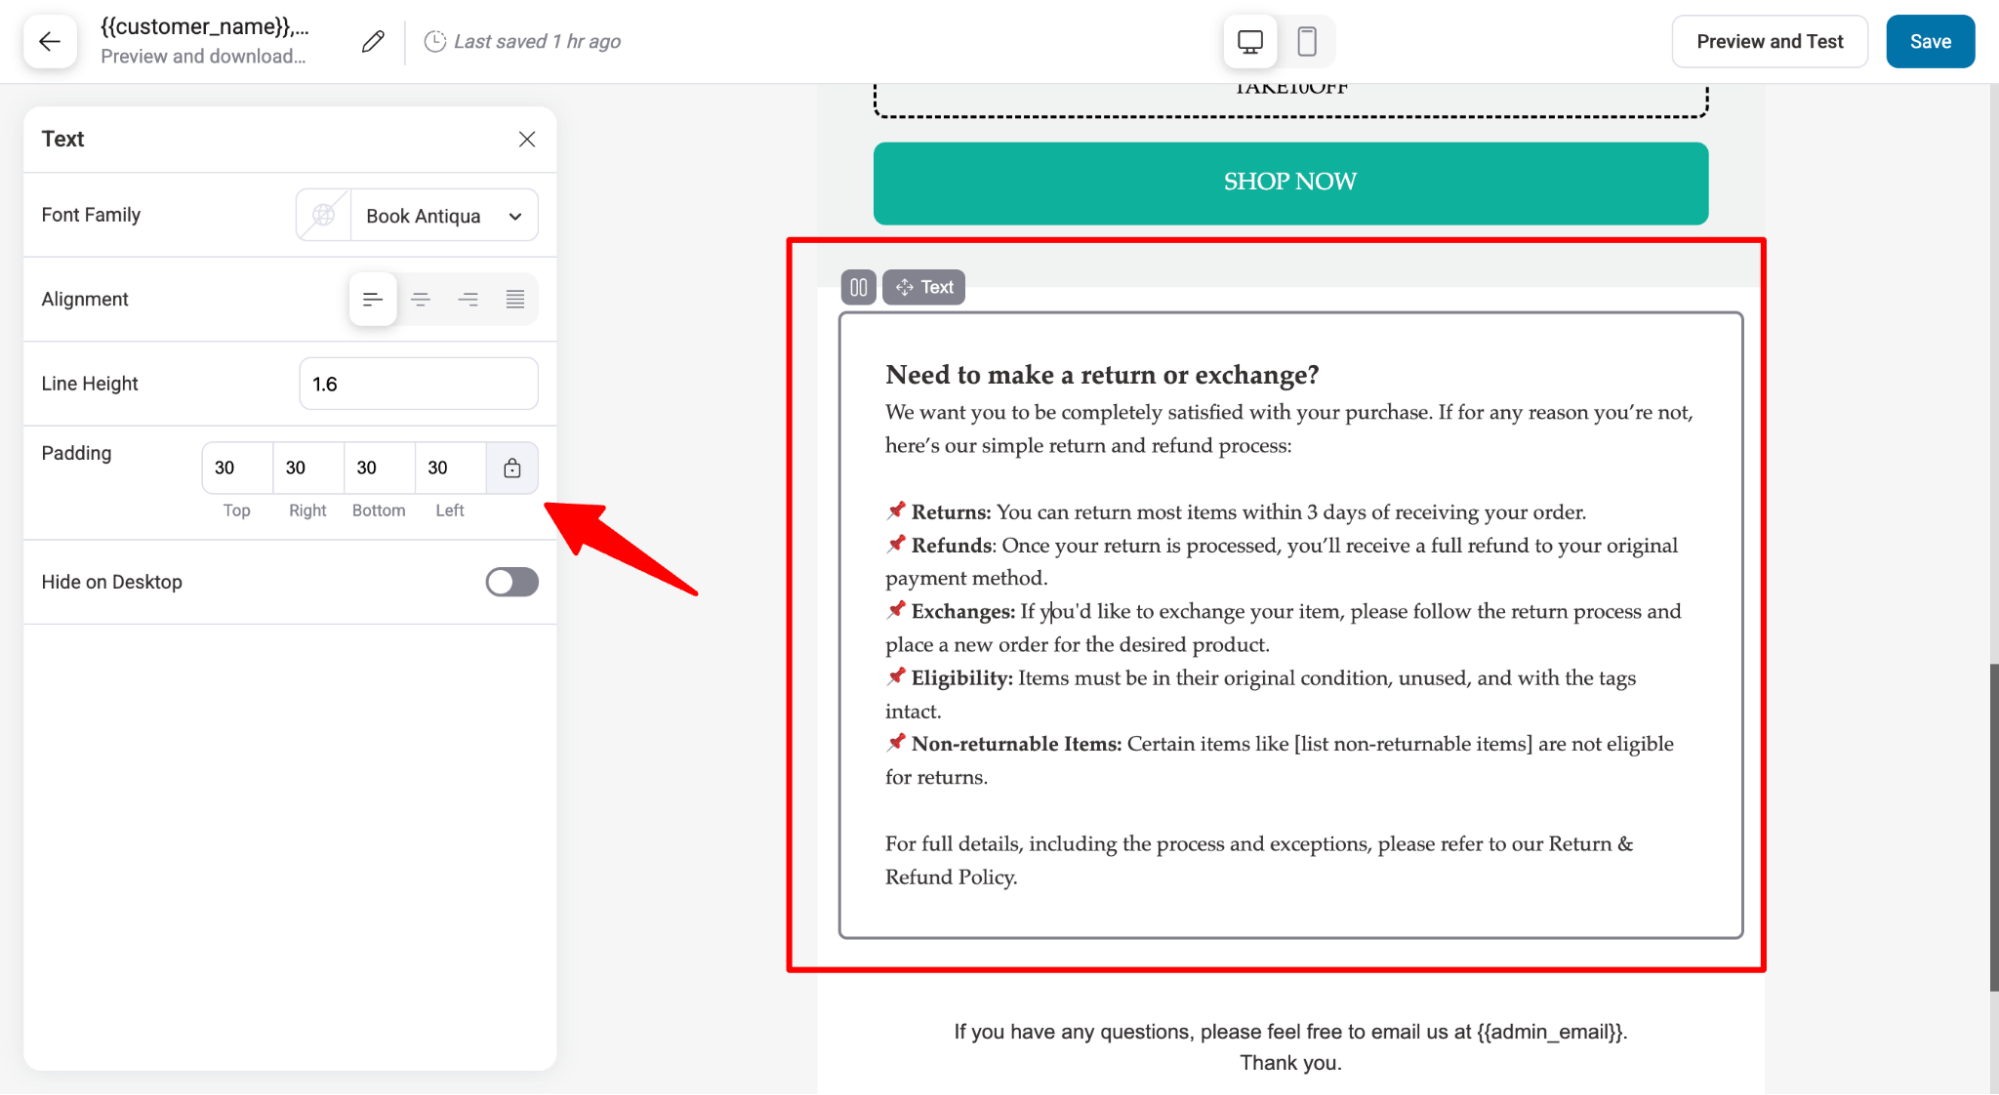
- Add additional content
After you customize the existing sections, you can also add additional content.
For instance, you can add a return policy if you sell physical products. Use the Text block to add such a section and customize the font family and alignment line height if needed.
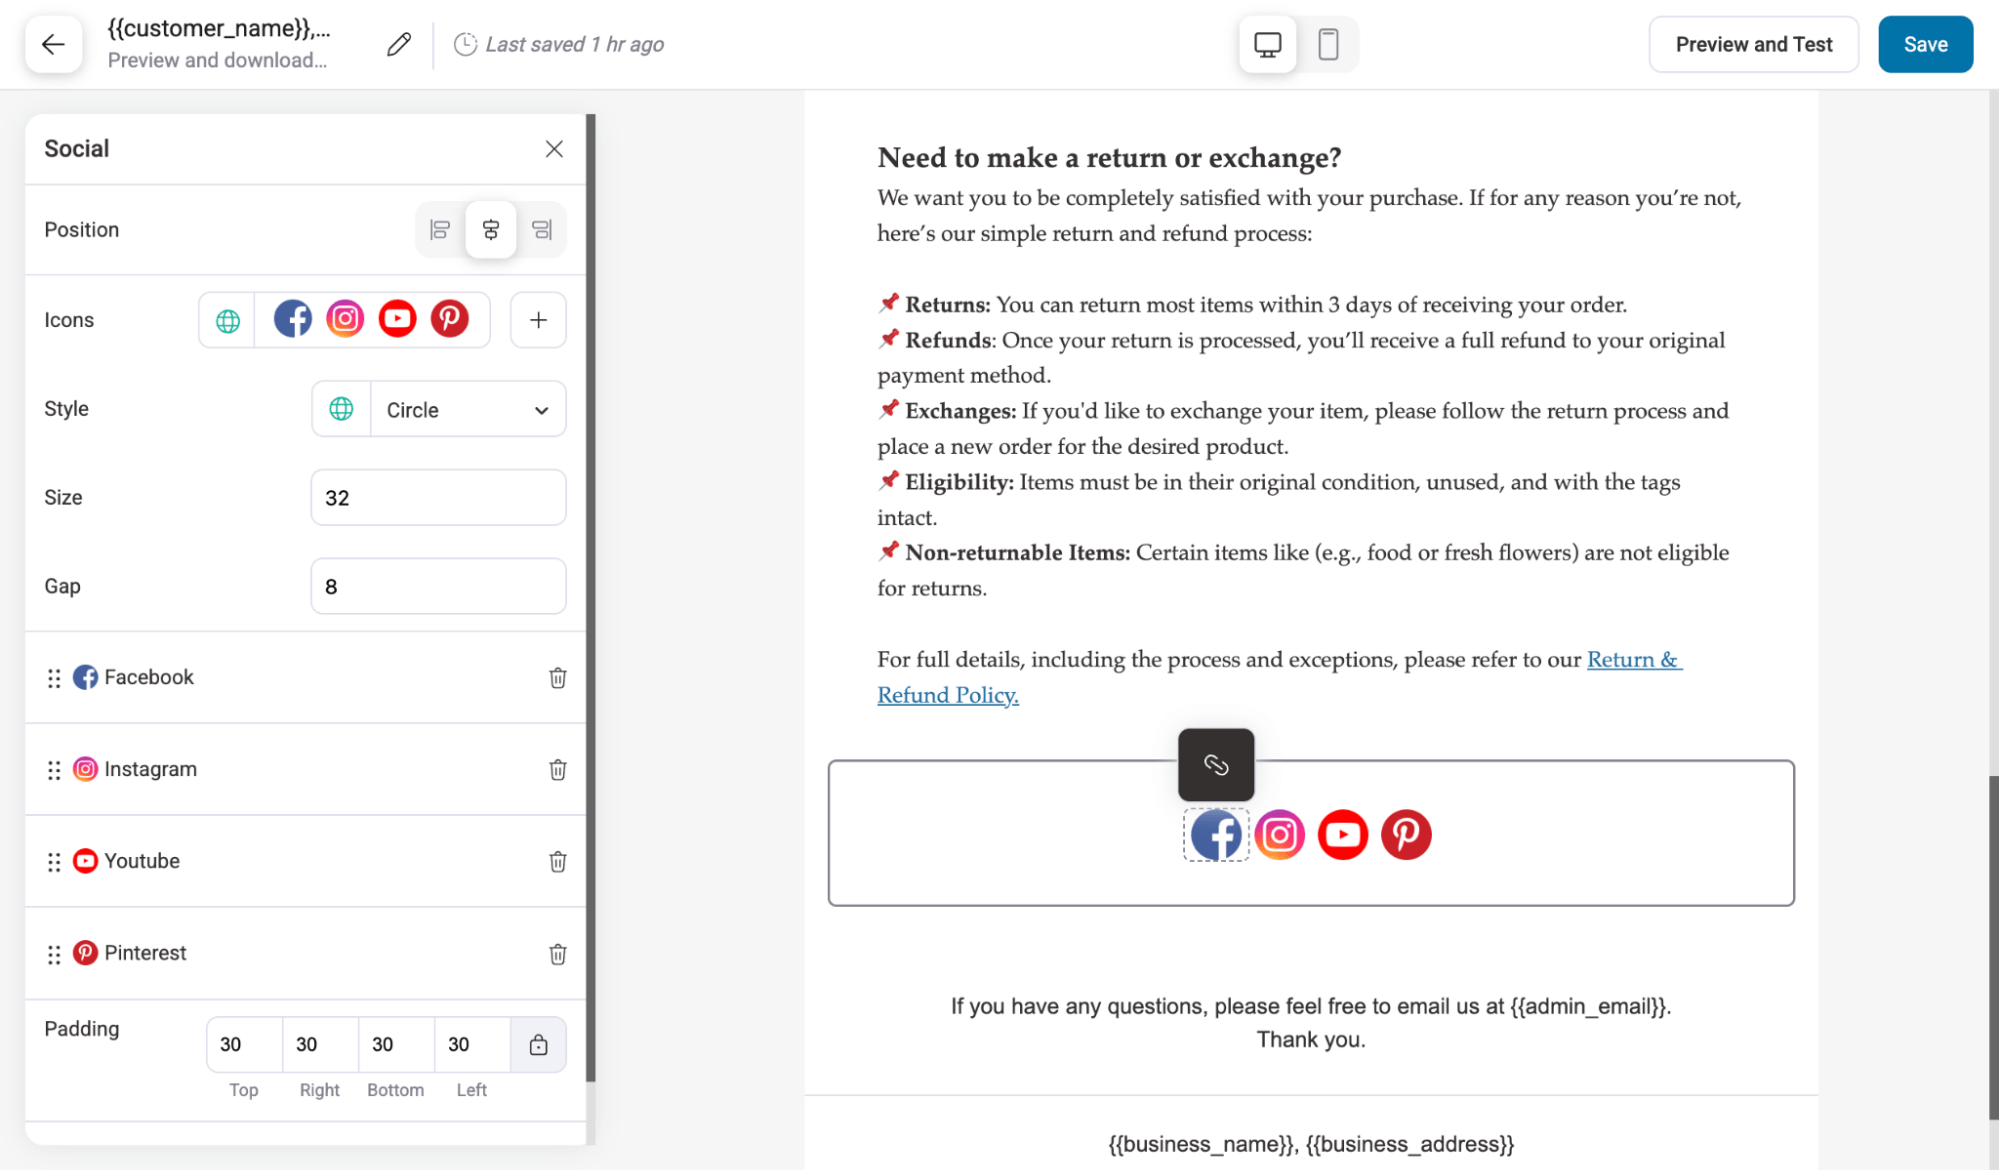
You can also add social icons using a prebuilt block here.
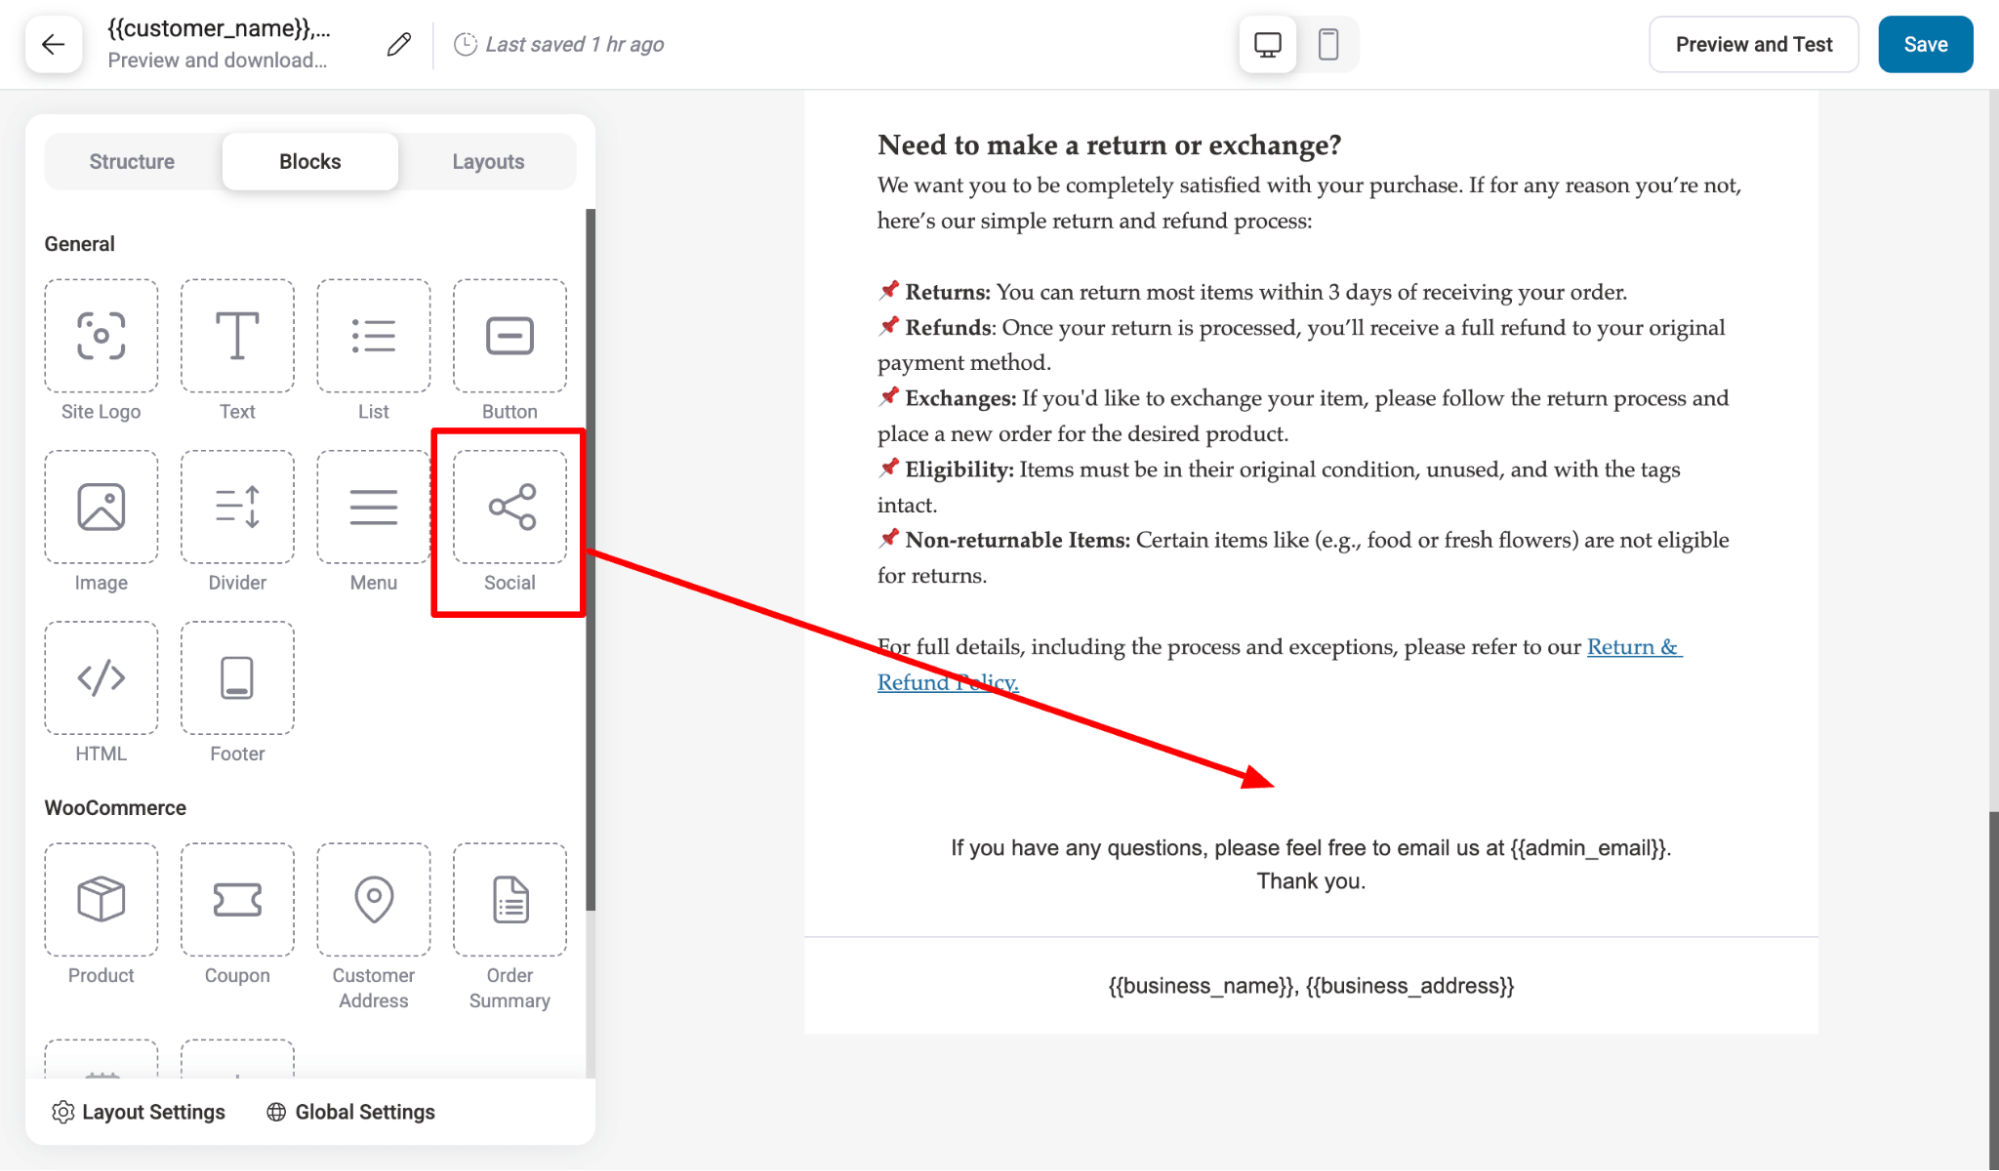
Simply drag and drop and then add the relevant links.
Once you are done designing the invoice email, hit Save to update.
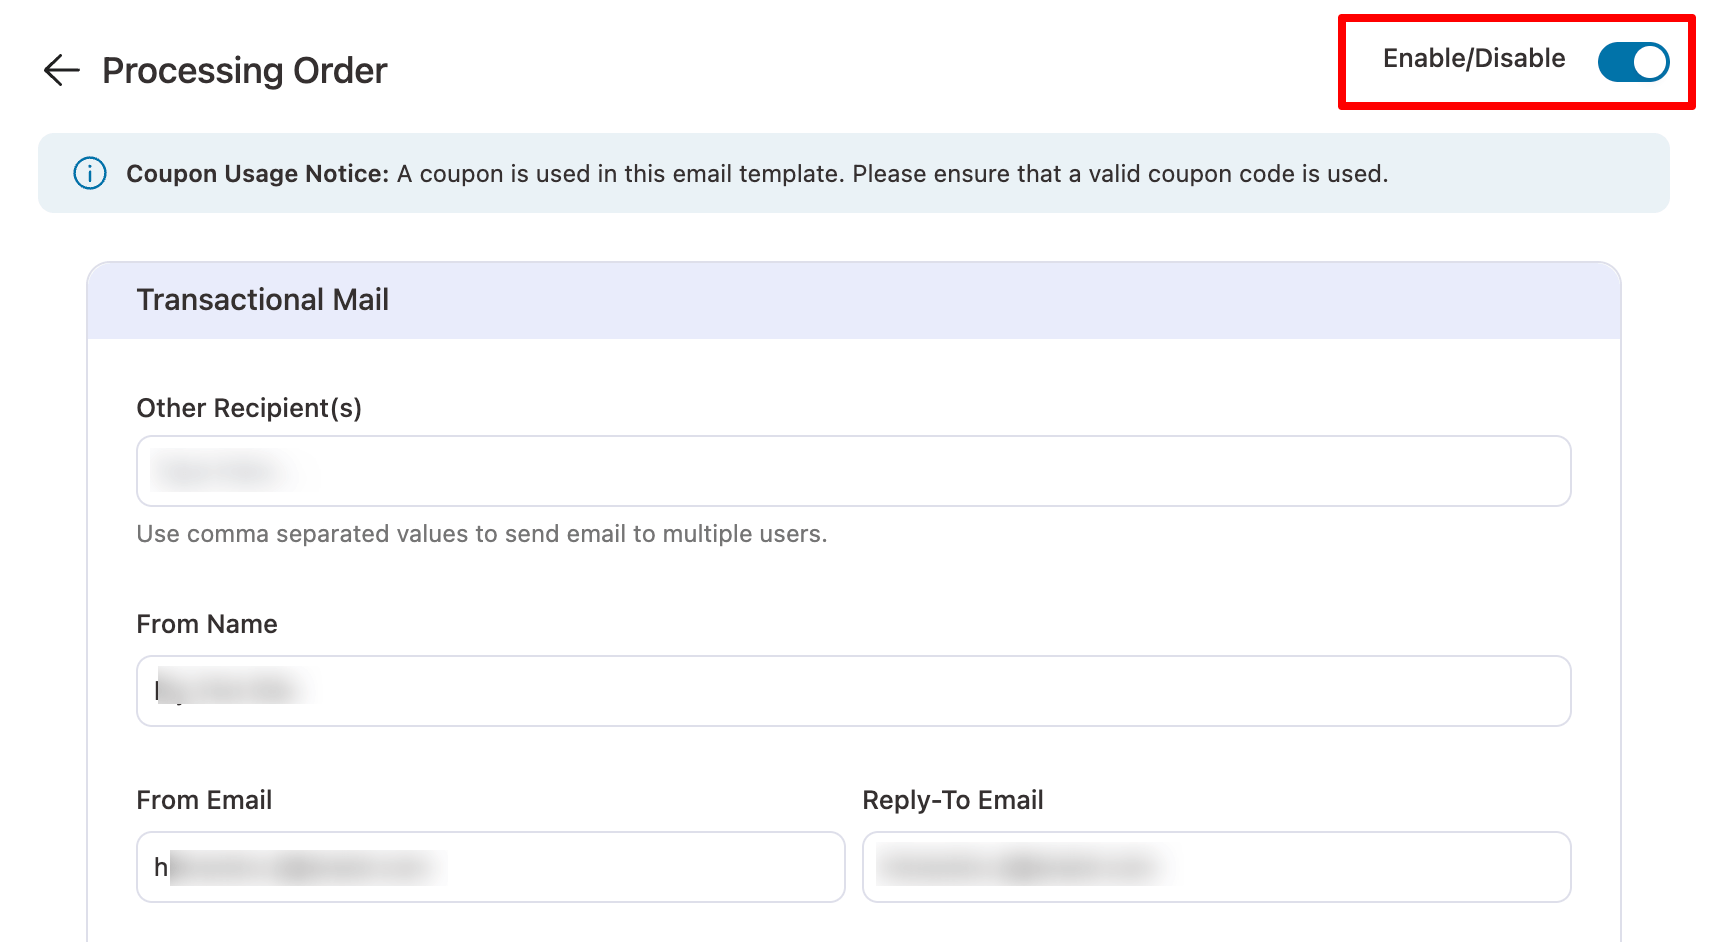
Step 5: Enable the invoice email
The last step is to enable the invoice email by FunnelKit Automations. For this, toggle the enable button. It will override the default invoice email.

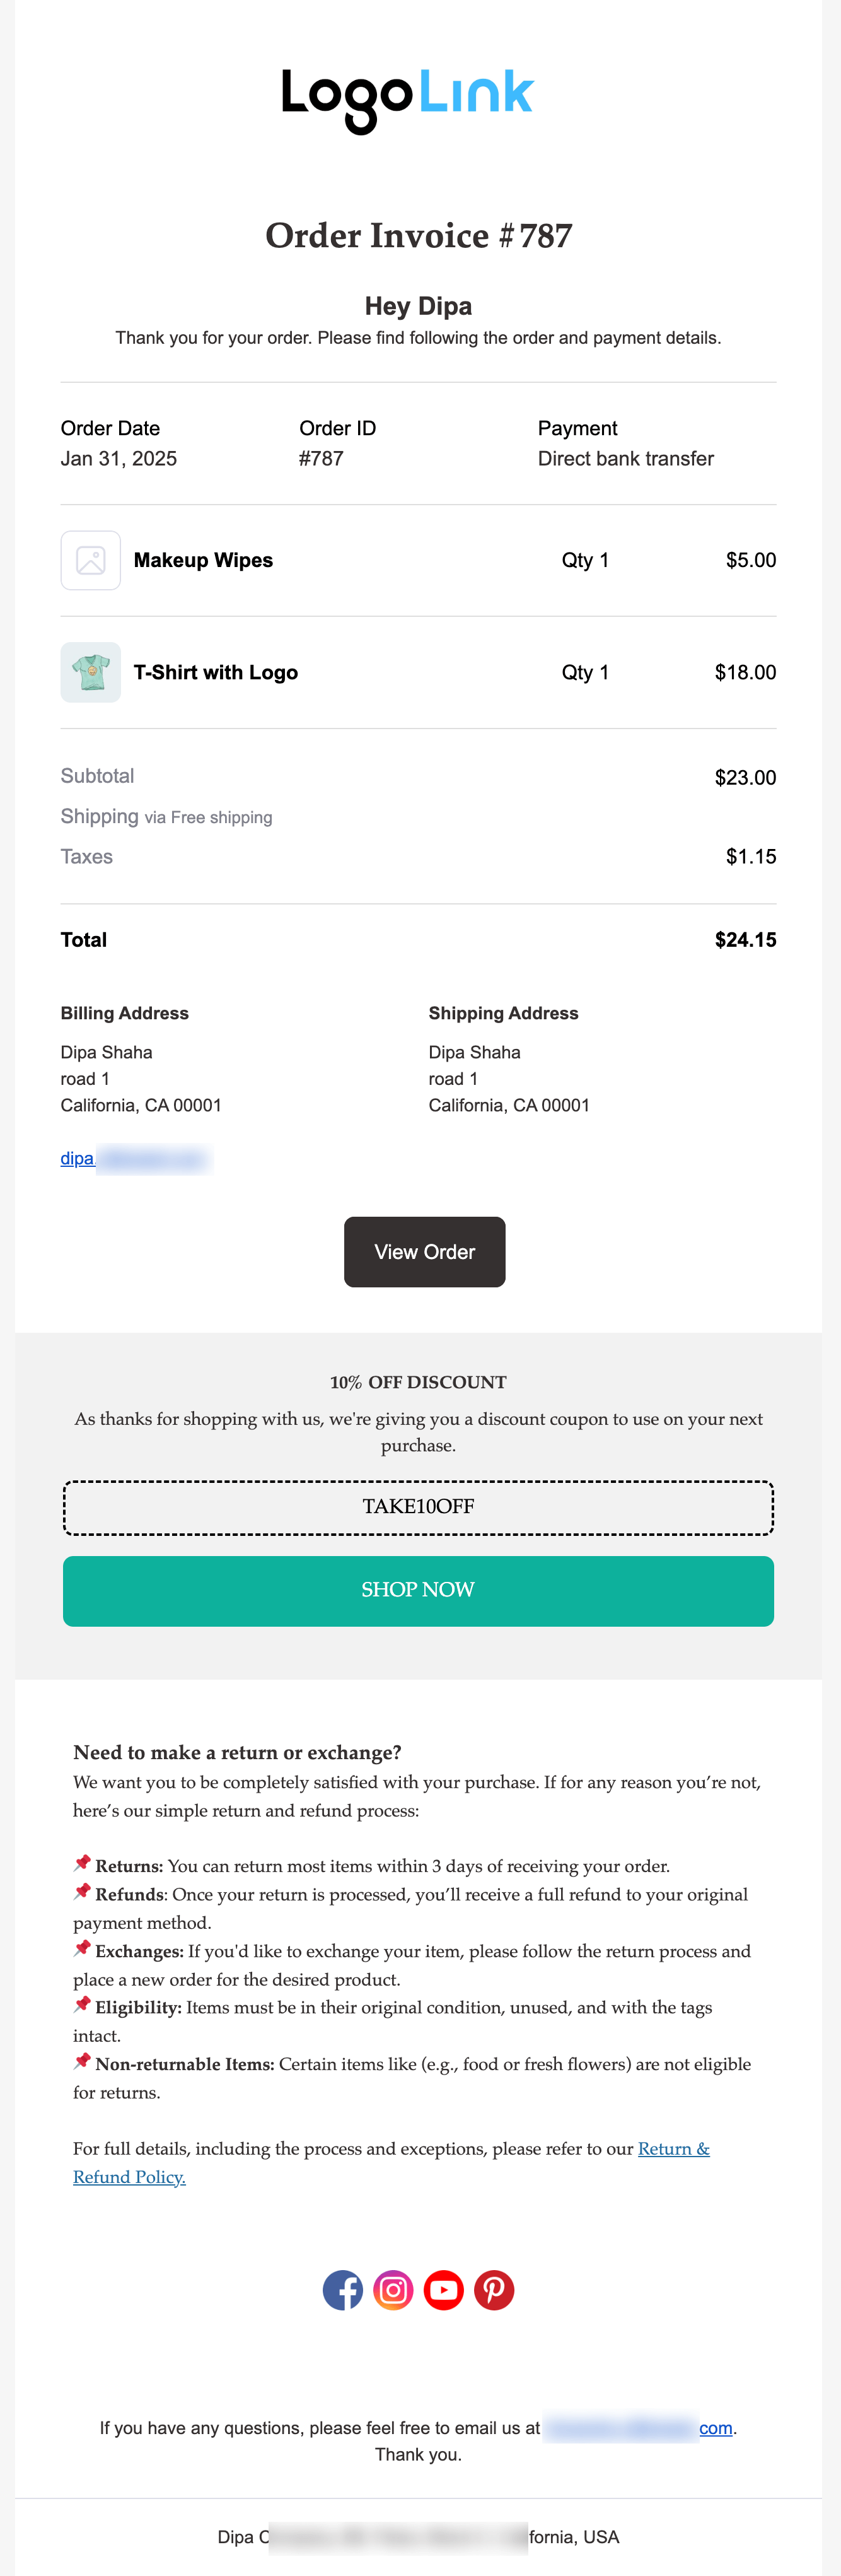
Here’s a preview of the custom invoice email we designed.
Sometimes, you might want to attach a PDF invoice to your email, offering customers a convenient way to download and keep a copy of the purchase details for their records.
This can also be helpful for any future queries or refund requests.
Find out how you can attach an invoice pdf with your email in the next section.
Method 3: How to Attach a PDF Invoice to WooCommerce Emails
To do this, you need to install another plugin named PDF Invoices & Packing Slips for WooCommerce By WP Overnight.
This plugin helps you create and attach invoice PDFs to WooCommerce emails, including the default manual order detail email.
🔔 Note: This plugin is compatible with FunnelKit Automations. You can easily attach a PDF invoice to custom emails designed with FunnelKit Automations. Make sure the custom email option is enabled.
The free version is enough to attach a PDF to your email. You can download it from WordPress.org.
Once activated, follow the instructions:
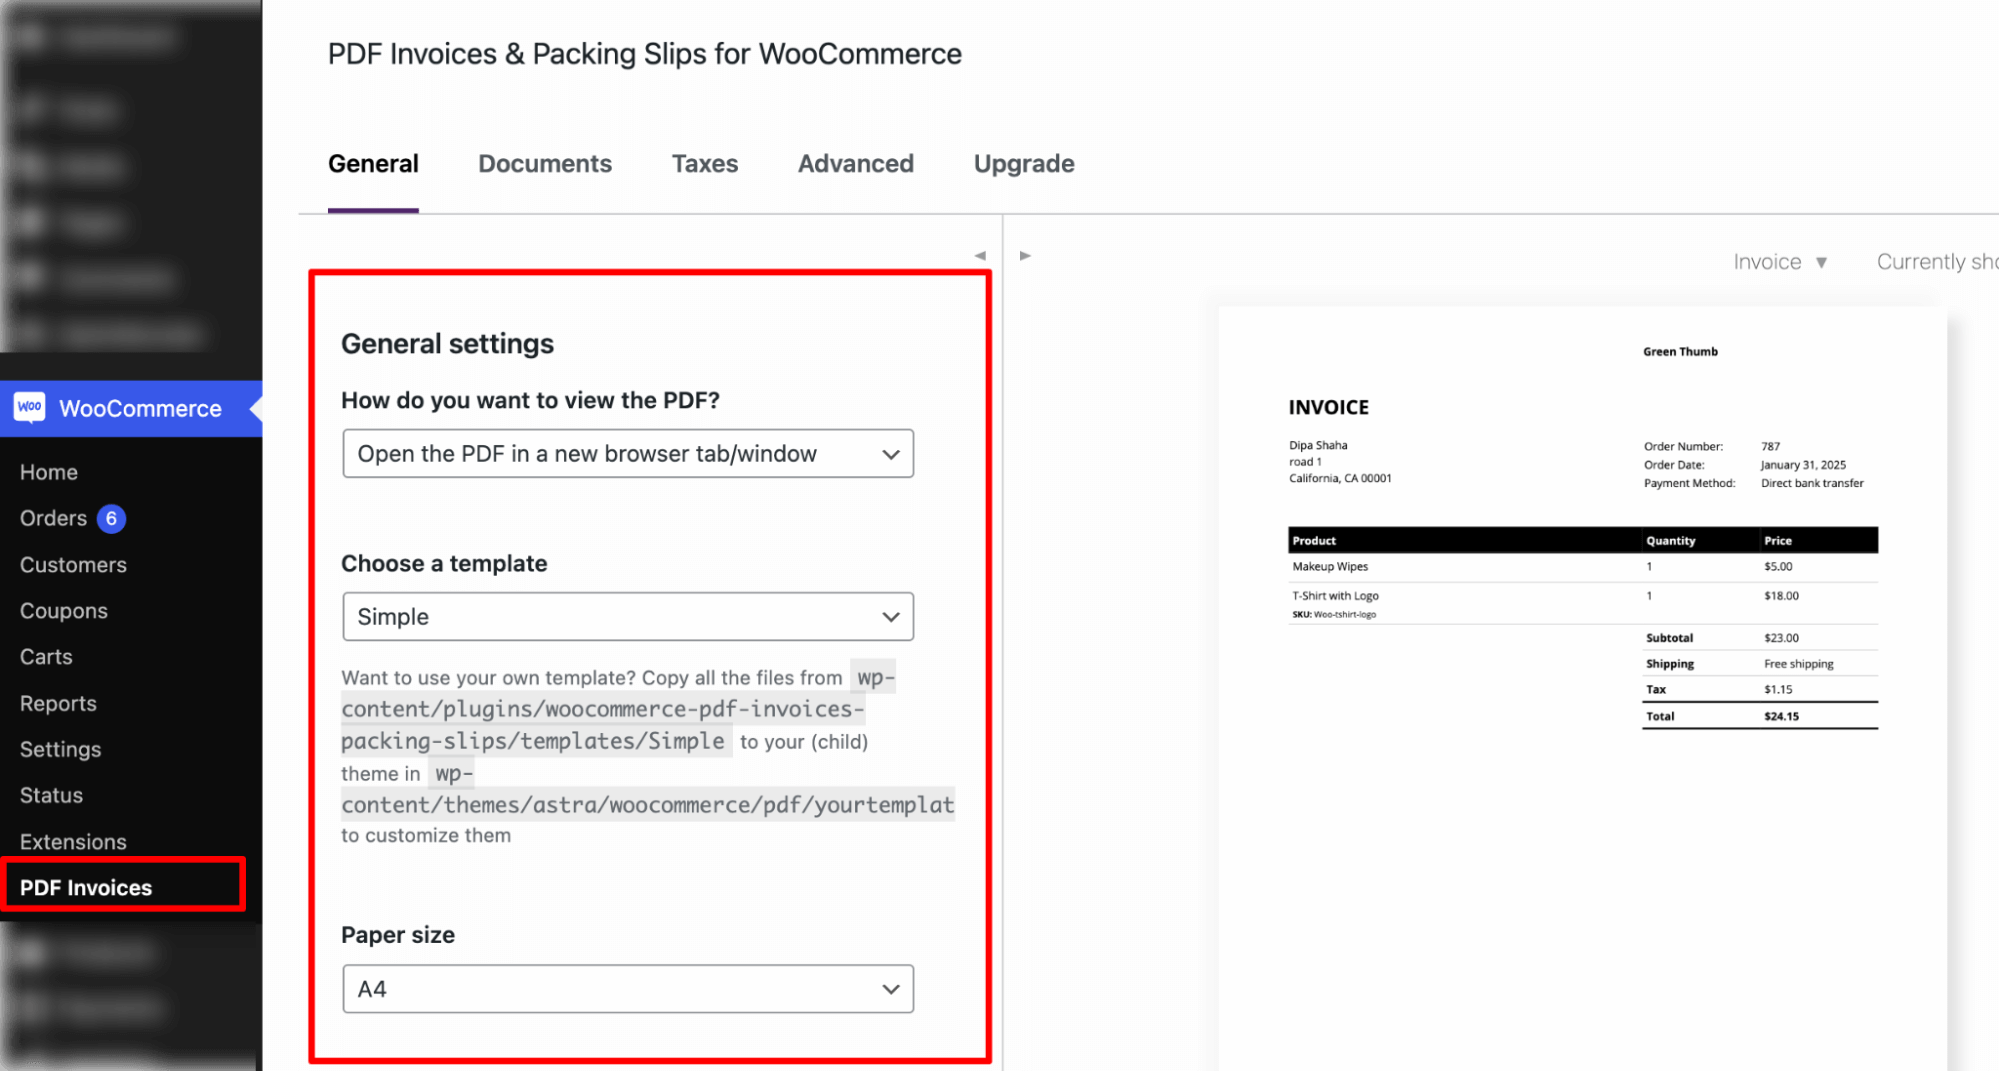
Step 1: Configure the invoice settings
After successfully activating the plugin, you will find an additional option under WooCommerce named “PDF Invoices”.
Go to that option, and in the General Settings, you can choose how to view the PDF (open in a new browser tab/window), select a template (one is available in the free version ), and set the preferred paper size for your invoice PDFs.
🔔 Note: On the right site, you can view how the invoice will look like.
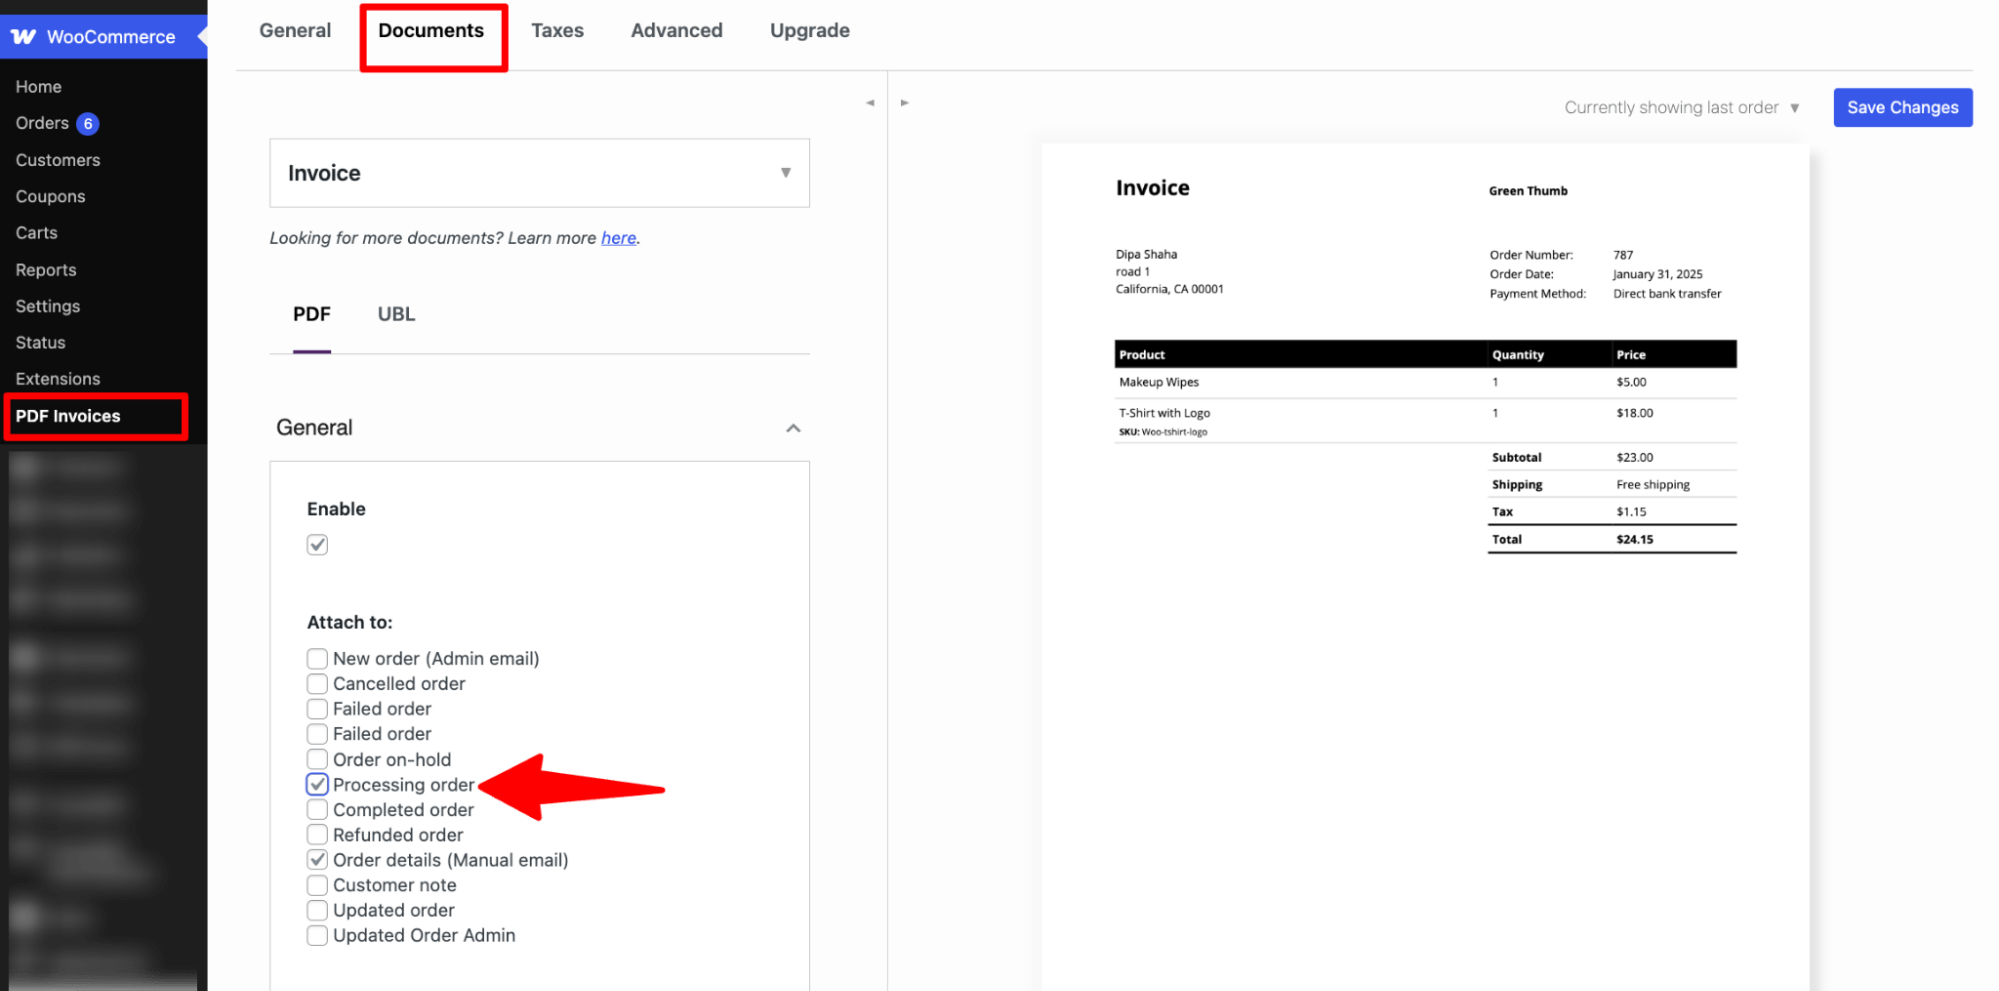
Step 2: Attach the Invoice PDF to the email
Now move to the Documents tab and make sure to check the Enabled option for PDF. Next, mark the emails to which you want to attach the PDF invoice; in this case, you must select Order Detail (Manual Email).
You can also choose when a user can download the invoice; the default option is when the invoice is created and sent.
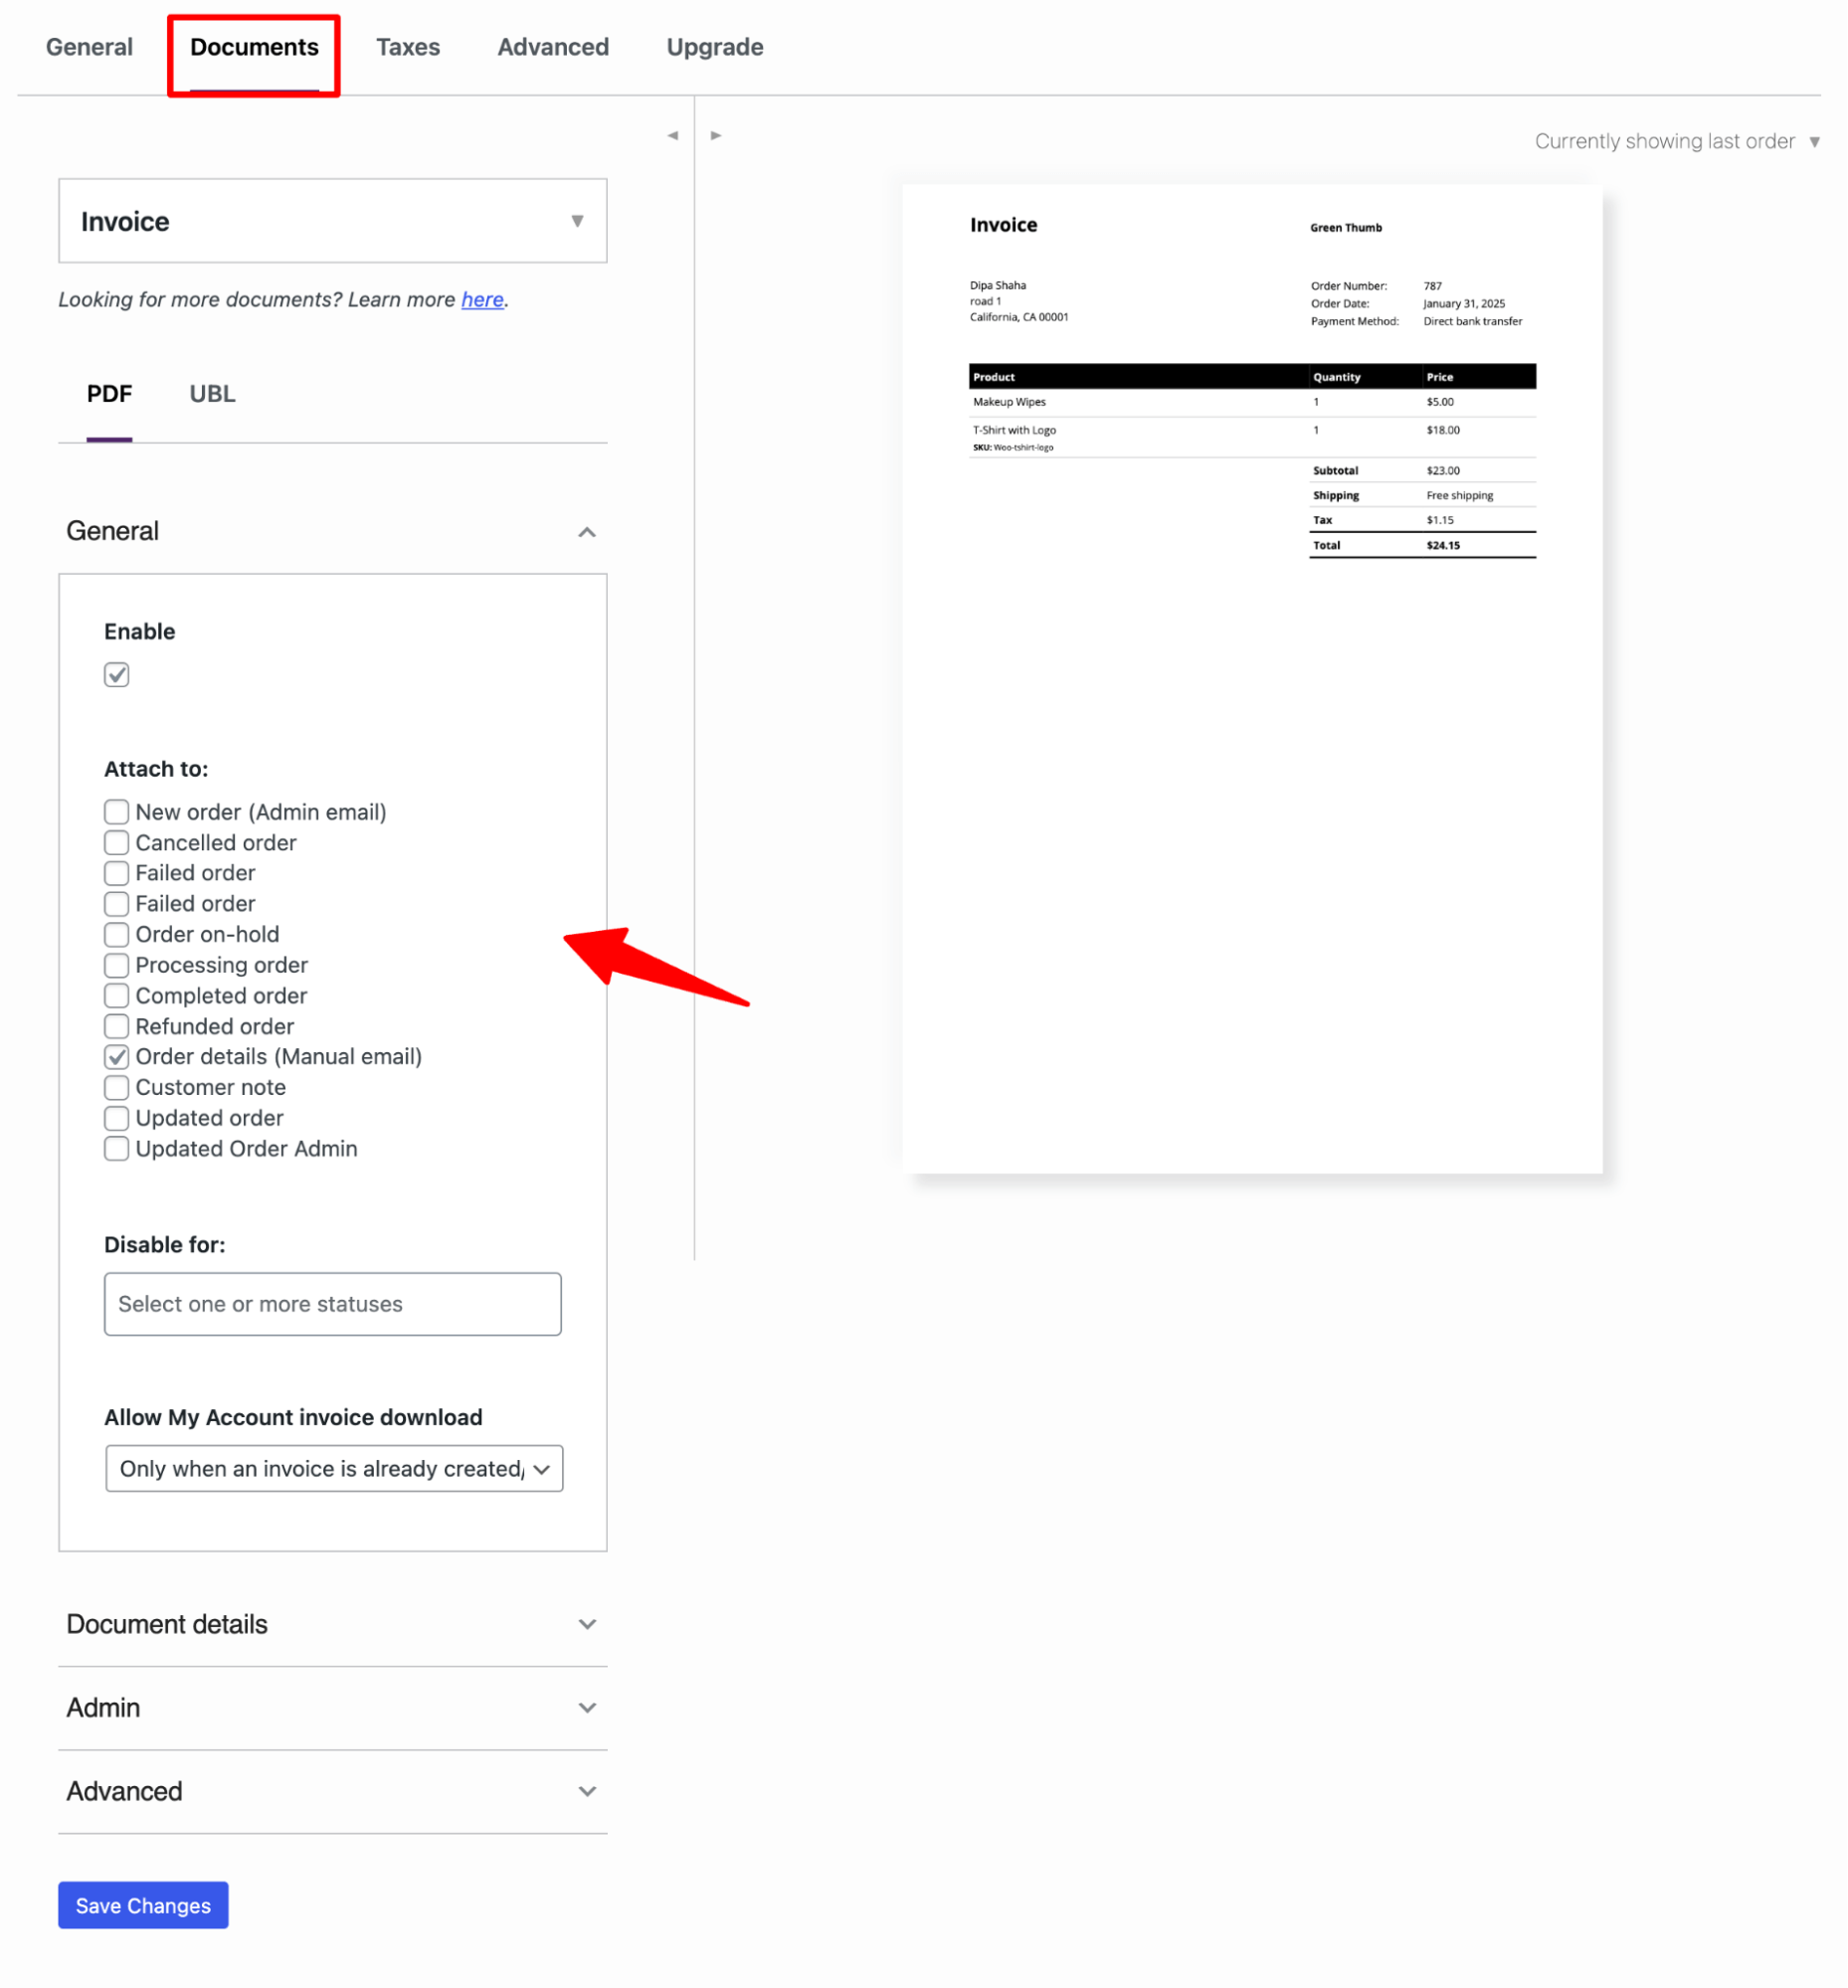
You can check out other settings as well. Make sure to hit Save Changes.
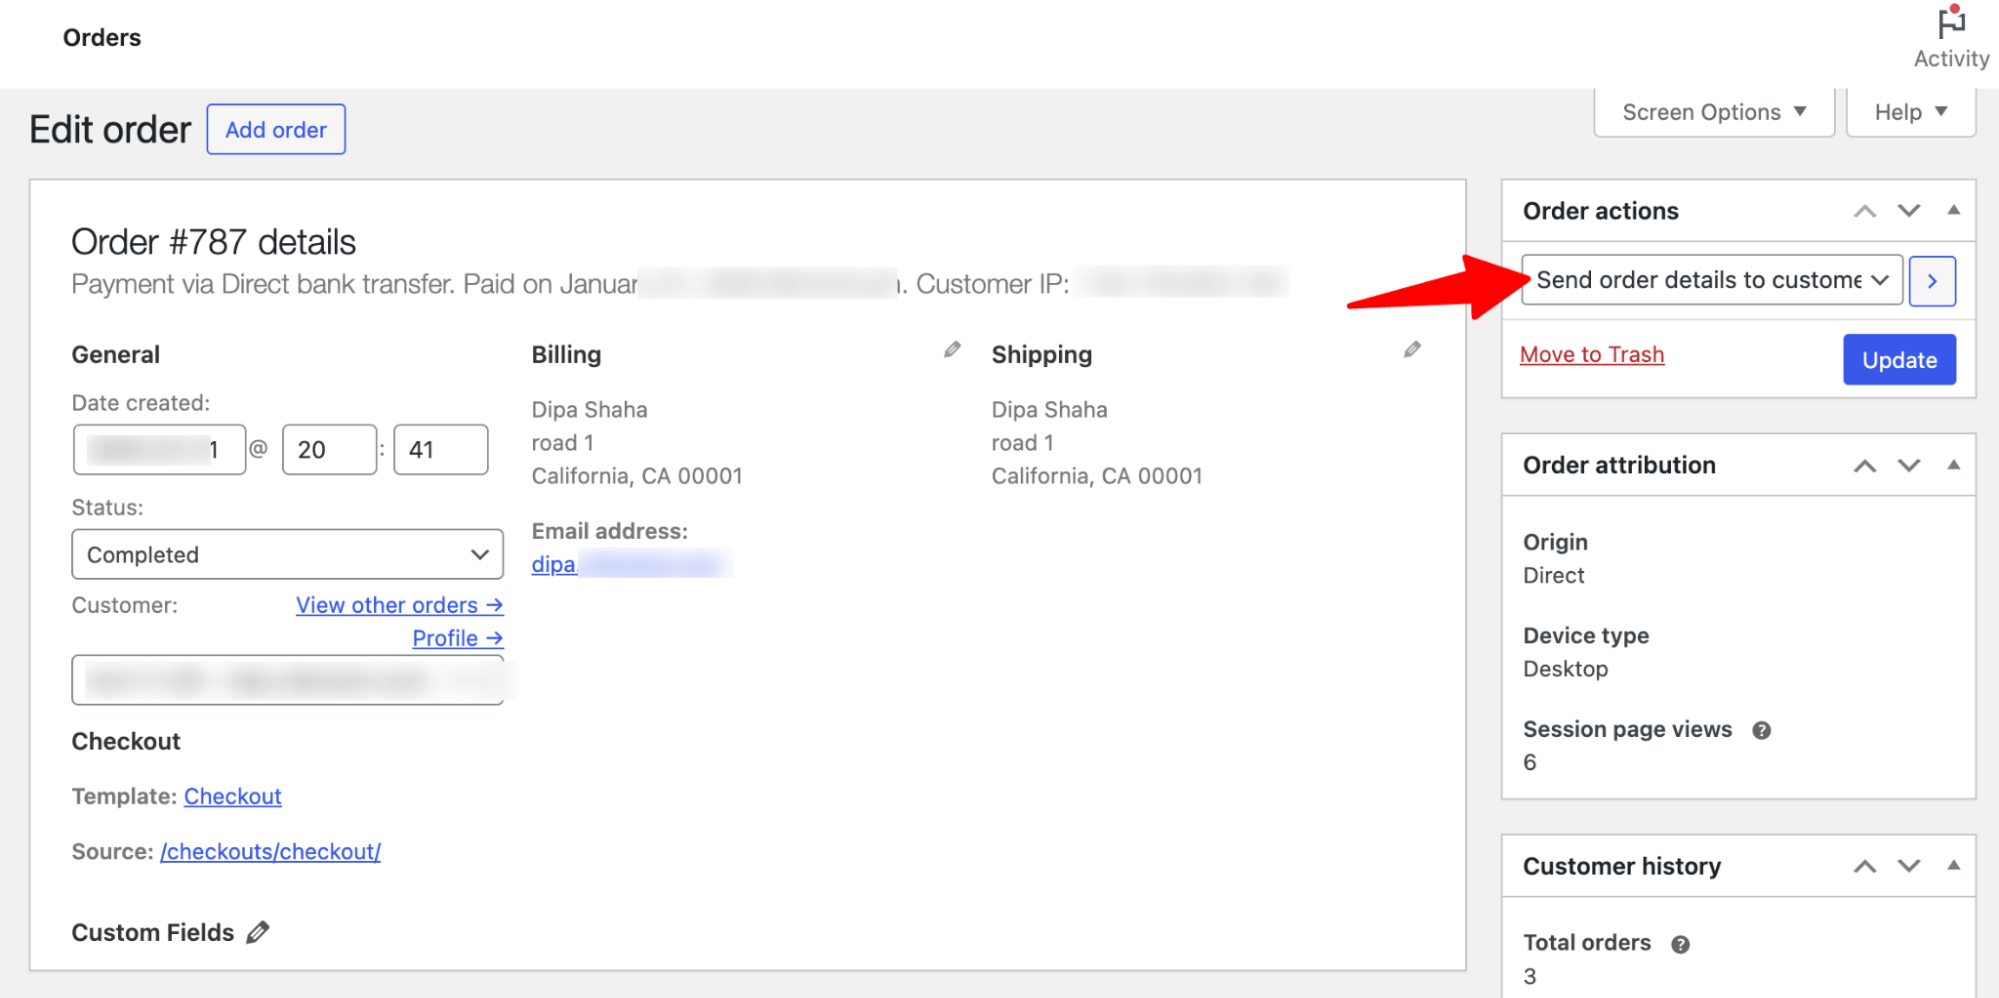
Step 3: Test the Invoice email with the attached PDF
Now, send an invoice from Order Action for any test order.
If you check the inbox, along with the custom email, you will also find a PDF invoice attached.
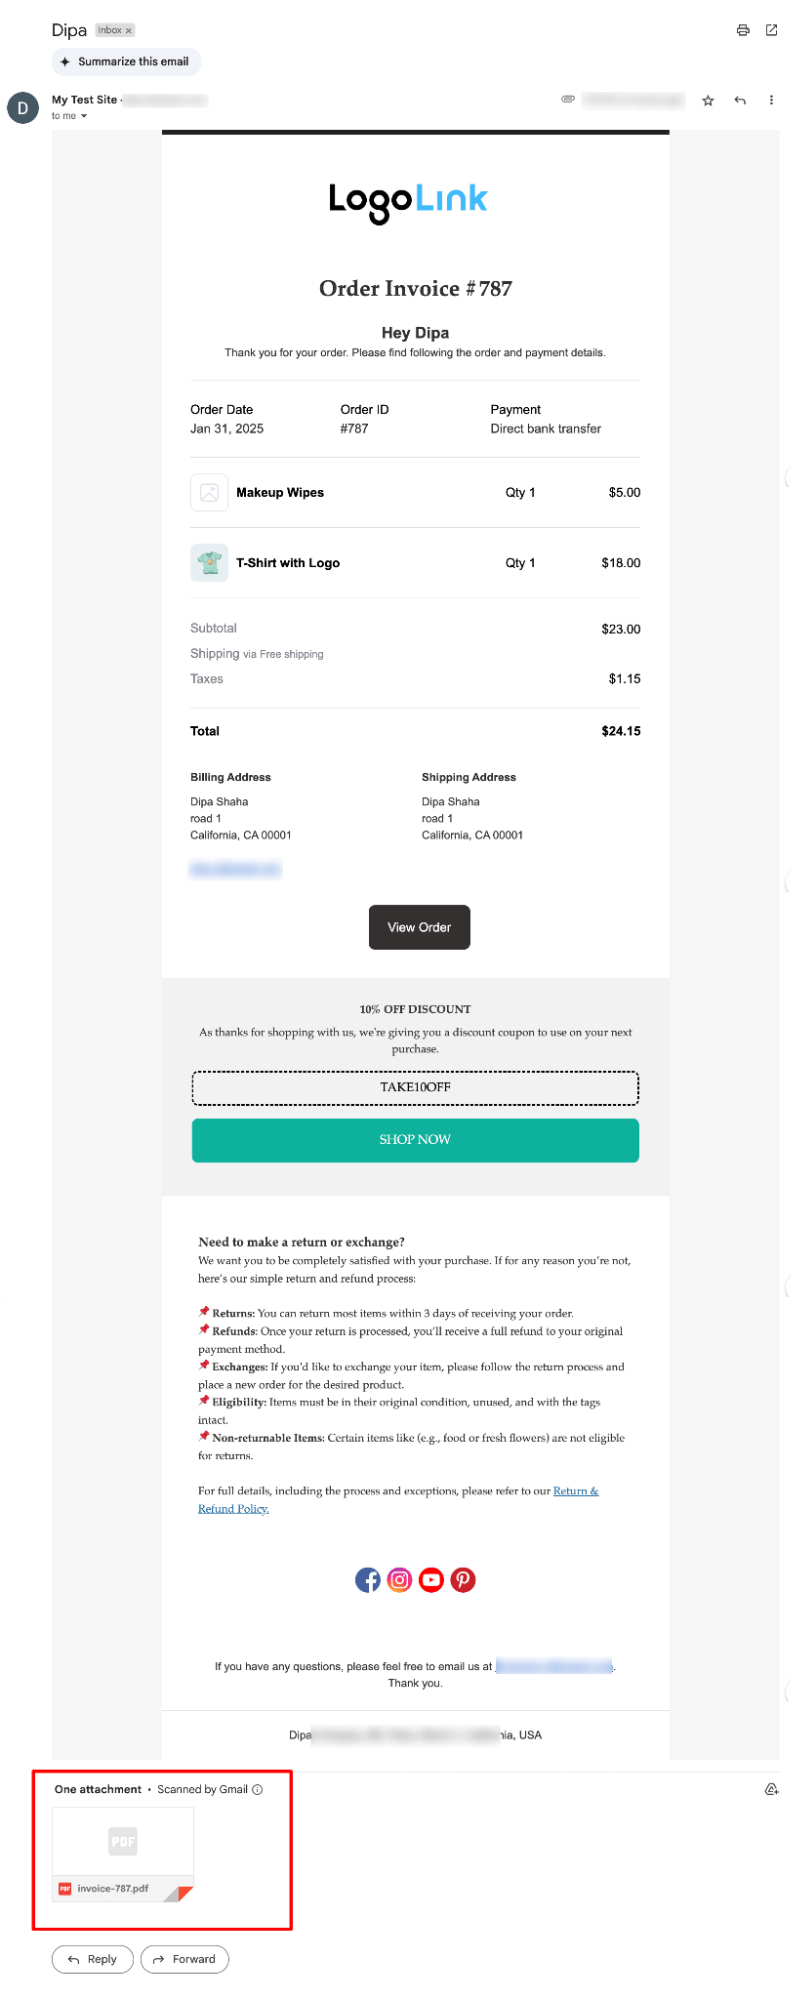
You can download the invoice with a single click.
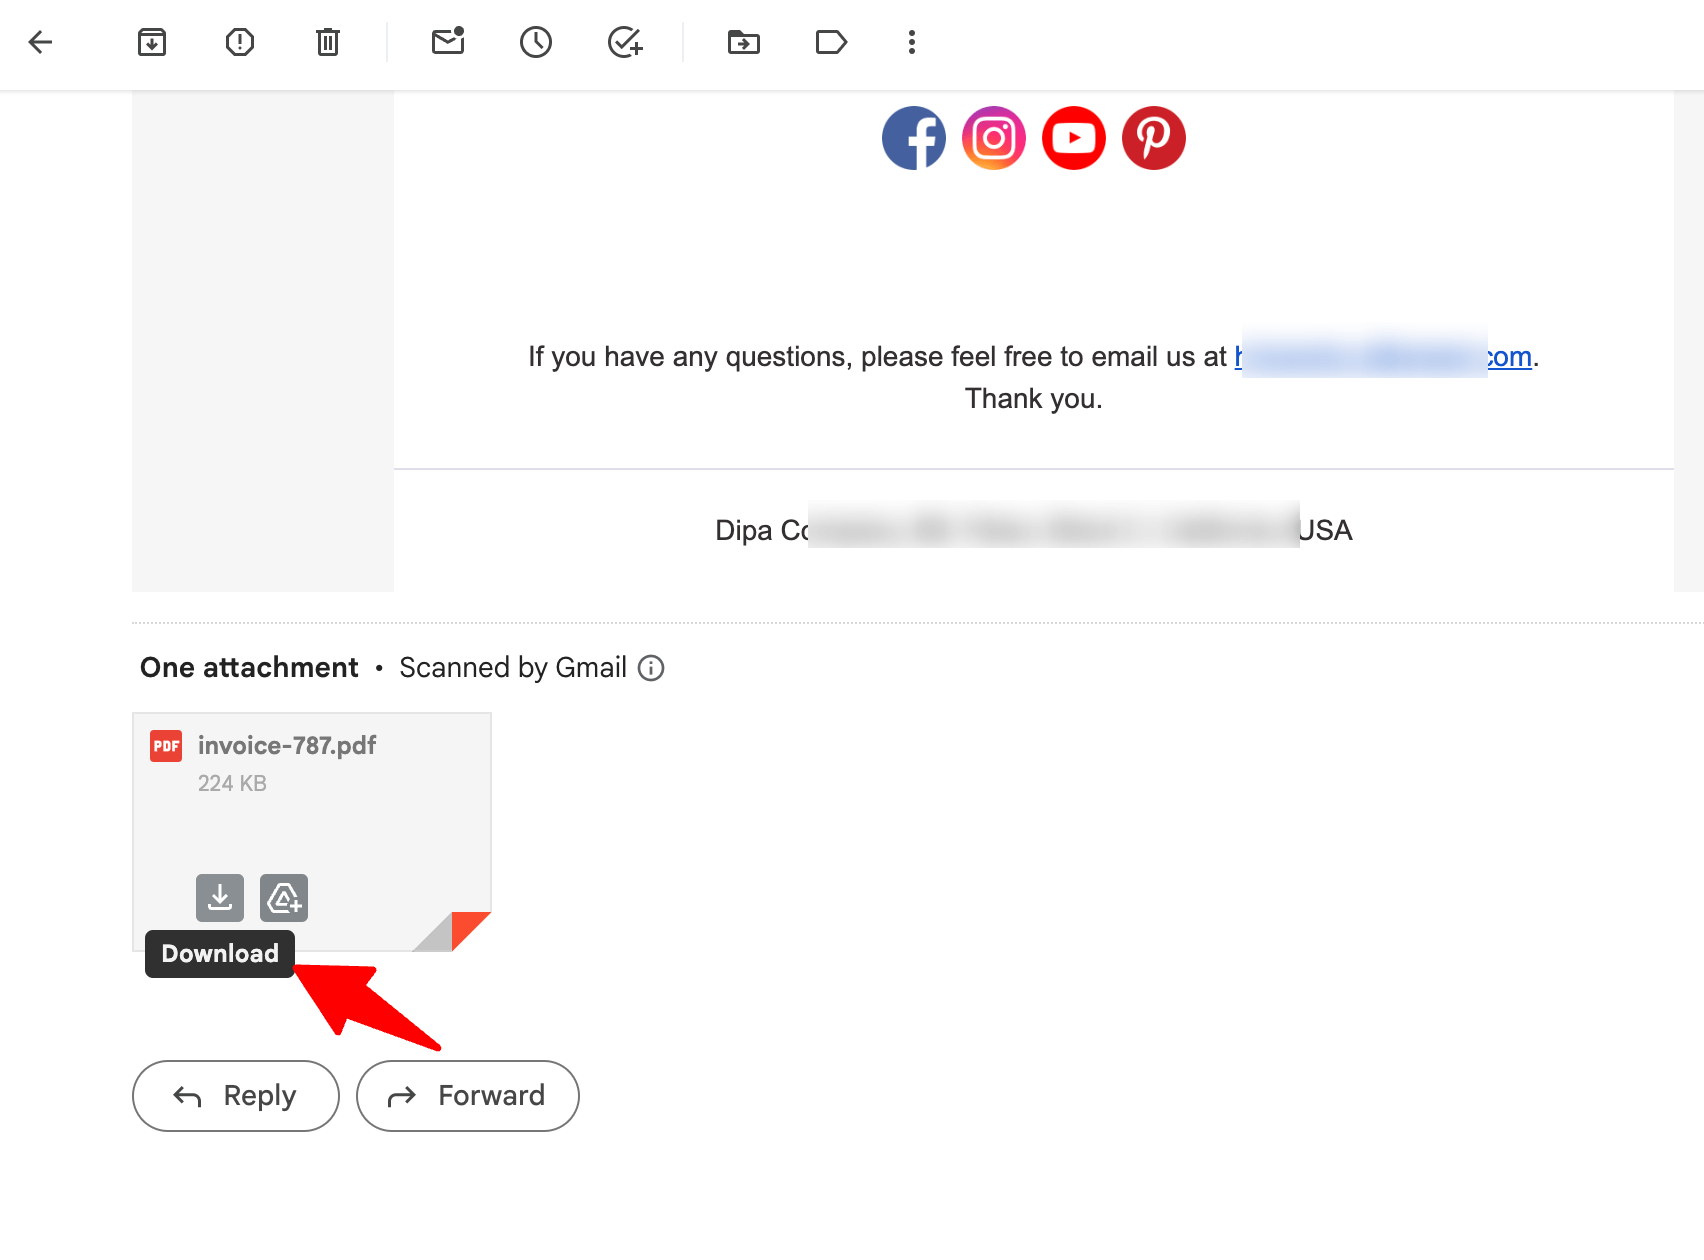
Here is what the pdf invoice looks like:

And that’s it. That is how you can easily add a PDF invoice with a custom WooCommerce invoice email.
But how about sharing invoices with every order automatically?
Well, you can do that with FunnelKit Automations, too.
Method 4: How to Automatically Send an Invoice in WooCommerce For Every Order?
As mentioned earlier, you can customize all transactional emails with FunnelKit Automations.
To send an invoice with every order, you can use the automatic email sent when the order is processed. The prebuilt processing order email template already includes all invoice details, and you can also attach a PDF invoice if needed.
Follow these steps to automatically send an invoice to customers for every order:
Step 1: Edit the processing email
To edit the email, go to FunnelKit Automations ⇒ Transactional Emails and hit Edit next to Processing Order.
Next, set other receipts along with customers, from the name, from email, and reply to the email.
Step 2: Add a custom subject line and preview the text
Next, add a subject line and preview text.
Step 3: Customize the email template and order details
Next, edit the email.The prebuilt email template includes a logo, heading, subheading, order summary, CTA, and a coupon, similar to the order details email we customized earlier in this blog.
You can customize all the sections. For instance, choose to show what will be shown in the order summary section.
After customizing the template, make sure to save it.
Step 4: Enable the processing email with an invoice
Toggle the enable button to enable this automatic email.
Step 5: Add a PDF invoice to the email
Now, go to WooCommerce ⇒ PDF Invoices and then on the Documents tab. Next, attach to choose the option “Processing” and save the changes.
And that’s it. Now every time a person successfully places an order and the order is processed, he/ she will receive a confirmation email with invoice details and invoice PDF automatically.
How to Track WooCommerce Invoice Email in WooCommerce?
With FunnelKit Automations, you can easily track invoice emails in WooCommerce.
Just head to the History tab and Filter the source to Transactional Emails.
Now, you can find details of all the transactional emails, including invoice emails, processing order emails, etc. You can find sources, Types, subjects, sent-on statuses, and details for emails, including invoice emails.
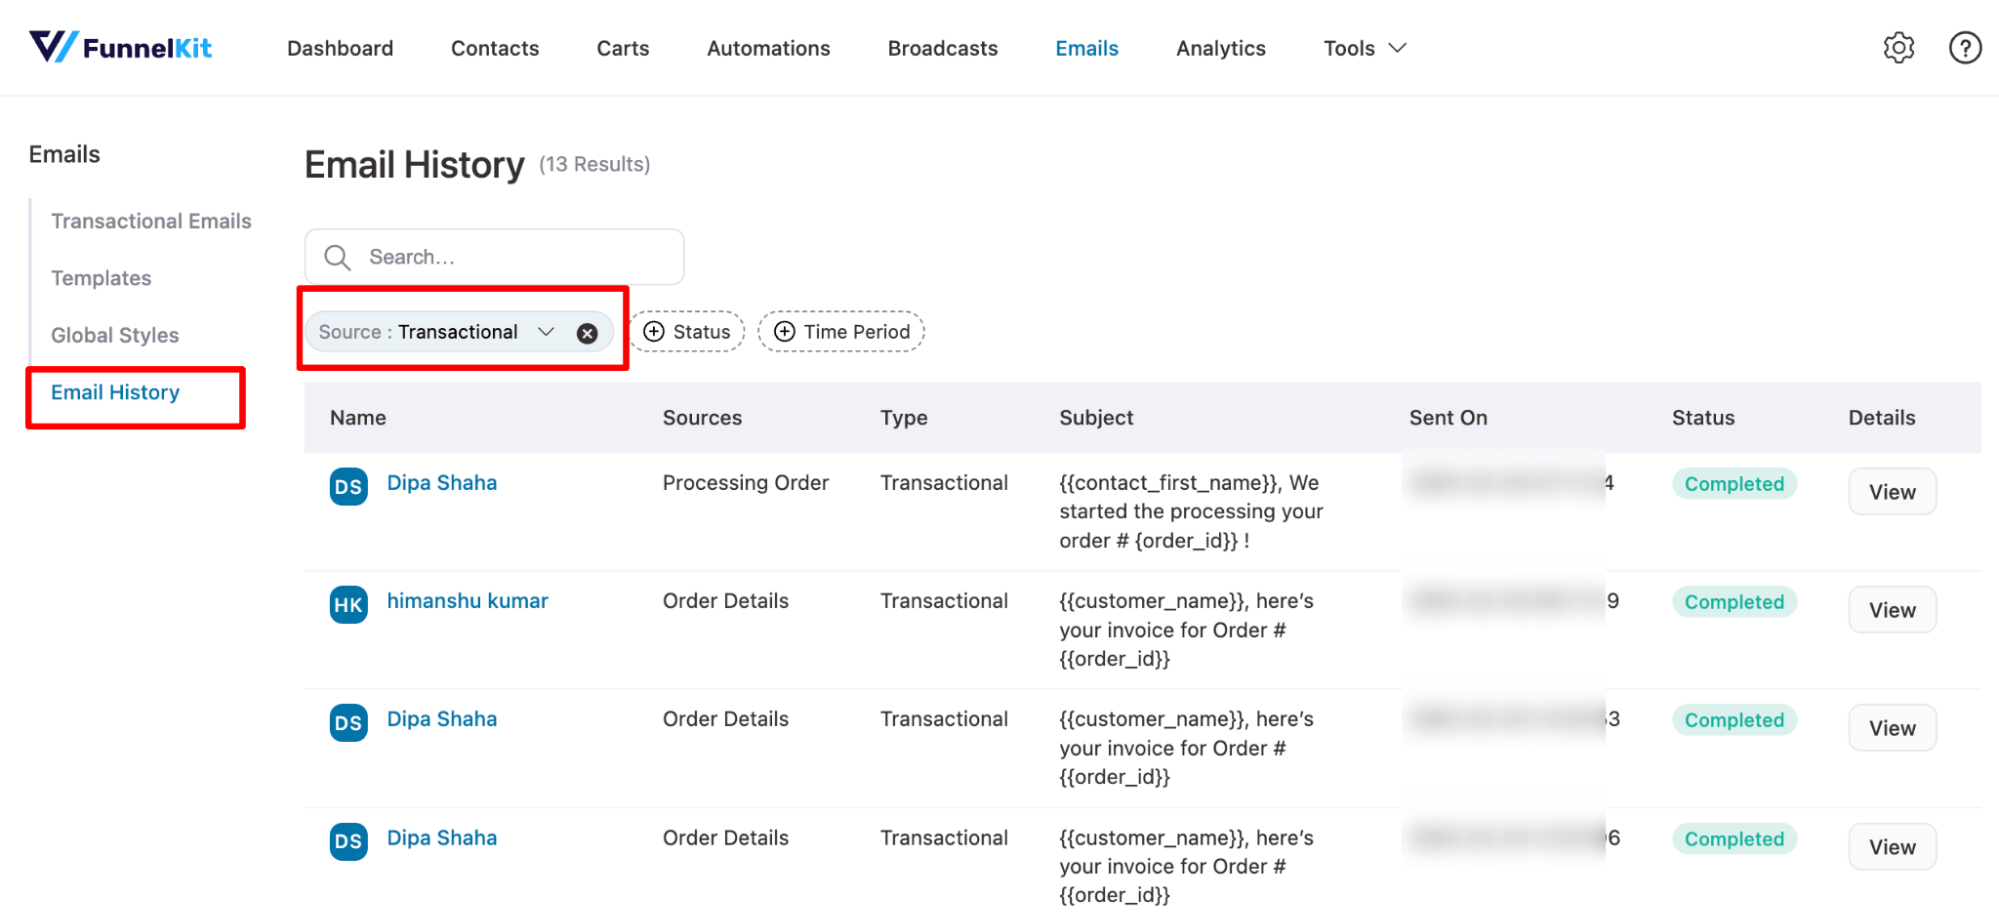
You can hit on the View button to see details for each email.
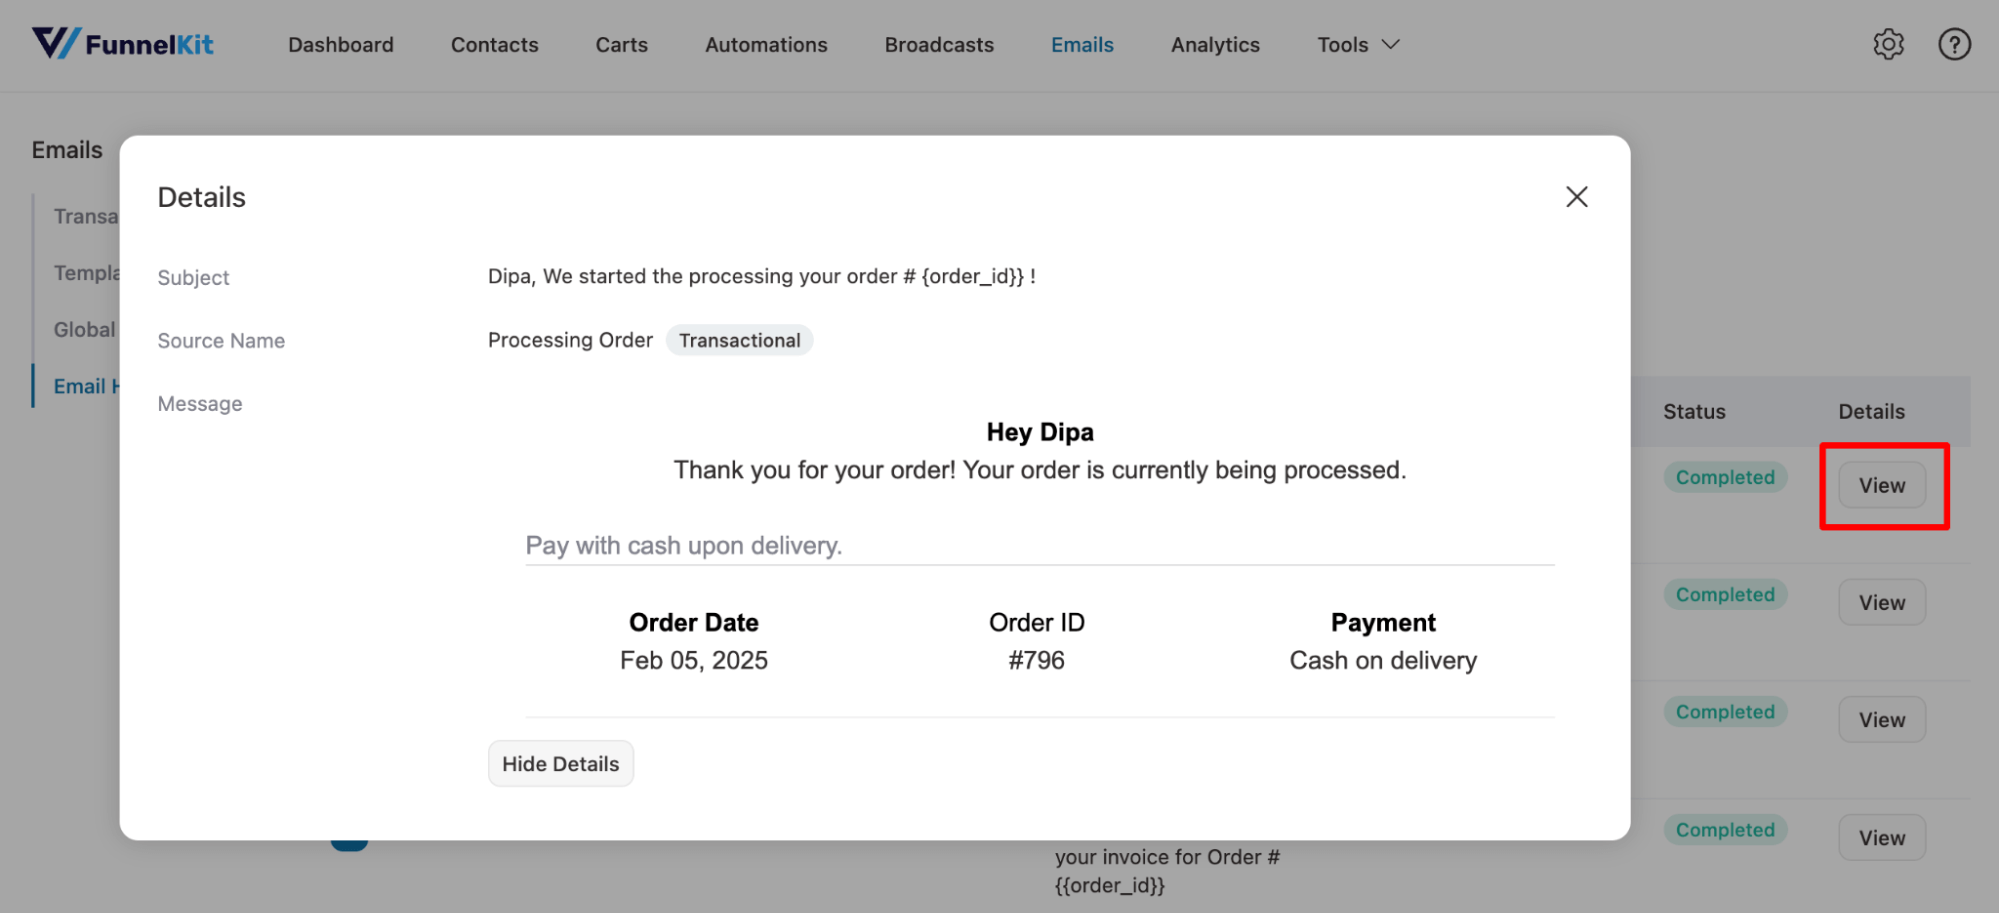
Clicking on the name also takes you to the customer profile, which allows you to track all the emails sent to this user.
Frequently Asked Questions About WooCommerce Invoice Emails
Why are my customers not receiving WooCommerce invoice emails?
Your customers may not receive WooCommerce invoice emails due to poor email delivery.
To improve this, ensure your SMTP settings are correctly configured for better email delivery. You can get help from our guide on Boost Email Deliverability with WordPress SMTP.
Is it necessary to attach a PDF invoice with invoice emails?
No, it’s not necessary, as the email includes all the information an invoice should provide.
However, you can add one for a better user experience and to offer customers a downloadable PDF version for their records, which can also help with future reference or potential issues.
If you use a PDF invoice plugin with FunnelKit Automations, you can easily attach a PDF invoice to your custom emails.
How do I resend a WooCommerce invoice email?
To resend a WooCommerce invoice email, go to WooCommerce → Orders and open the specific order. On the right side under Order Actions, select "Send order details to customer" from the dropdown and click the arrow button.
This instantly resends the invoice email to the customer's registered email address. If you're using FunnelKit Automations, you can also resend it from the email history log under the History tab by filtering for Transactional Emails.
Why is my WooCommerce invoice email going to spam?
WooCommerce invoice emails go to spam primarily because WordPress sends emails via PHP mail, which lacks proper authentication. To fix this, set up an SMTP plugin and configure SPF, DKIM, and DMARC DNS records for your sending domain.
What information should a WooCommerce invoice email include?
Here's what a complete WooCommerce invoice email actually needs.
Order details first number, date, and an itemized breakdown of every product or service with quantities and individual prices. Then the financials: applied discounts or coupon codes, subtotal, full tax breakdown including VAT, shipping cost, and the total amount paid. Round that out with billing address, shipping address, payment method, and a link to the order page on your store.
Three additions that aren't required but pay off quickly. A return and refund policy note, a support contact, and a downloadable PDF version. Customers stop emailing, asking for things they should have already received. That alone makes it worth the extra five minutes of setup.
Send Custom WooCommerce Invoice Emails for an Enhanced Customer Experience!
Sending a custom WooCommerce invoice email is a simple yet powerful way to improve your customer experience.
It not only gives your customers a clear record of their purchase but also builds trust and professionalism.
By attaching the invoice PDF, you give customers easy access to all their order information, making future queries or returns hassle-free.
With FunnelKit Automations, you can easily set up automatic custom invoice emails that include an attached invoice with each order. You can also share the invoice manually whenever needed.
In addition, this email marketing solution can take care of all your email marketing needs, whether it's transactional emails, marketing emails, or broadcasts.
So, get yourself FunnelKit Automations and upgrade your email communications and marketing today!
Editorial Team
June 12, 2026AutomateWoo gets the job done, but switching away from AutomateWoo is becoming increasingly common among WooCommerce store owners. If you're looking for the best AutomateWoo alternative for your WooCommerce store,...
Editorial Team
May 4, 2026Want to keep your customers engaged and ensure they never miss a subscription renewal? Sending automated WooCommerce subscription reminder emails is the best way to achieve that. Reminder emails can...
Editorial Team
April 22, 2026Want to customize WooCommerce emails that actually get opened? WooCommerce's default emails do one thing well: they get sent. That's about it. No branding. No personality. Just a wall of...


