


WooCommerce shipping controls what customers pay to get their orders delivered, and you have to set it up yourself. Out of the box, WooCommerce doesn't know where you ship or what to charge.
There's also a plugin with the same name. WooCommerce Shipping, made by WooCommerce, is a free tool that lets US stores buy and print discounted carrier labels right from the order screen.
Same name, completely different job.
The built-in settings are enough for most stores, so that's what we'll cover here.
In this blog we will share how zones, methods, and classes work together, then set up free shipping, flat rate, and local pickup step by step.
After that, you'll learn how to use shipping classes to charge more for heavier products, manage your zones as the store grows, and pick a plugin if you ever outgrow the defaults.
The basic setup takes about 10 to 15 minutes.
Table of Contents
- 1 Why Your WooCommerce Shipping Setup Matters
- 2 How Shipping Works in WooCommerce
- 3 How to Set Up WooCommerce Shipping Zones and Methods
- 4 How to Set Up Shipping Classes for Different Products to Charge Accurate Shipping Fees
- 5 Manage Shipping Zones And Methods in WooCommerce
- 6 7 WooCommerce Shipping Plugins to Expand Functionality
- 7 Common Questions About WooCommerce Shipping
- 8 Closing Notes on WooCommerce Shipping
Why Your WooCommerce Shipping Setup Matters
Shipping is usually the first cost a shopper sees beyond the product price. If it shows up late, looks higher than expected, or doesn't show up at all, plenty of people close the tab. Baymard Institute's checkout research ranks extra charges like shipping, taxes, and fees as the leading cause of cart abandonment.
Most of the trouble comes from a handful of setup mistakes:
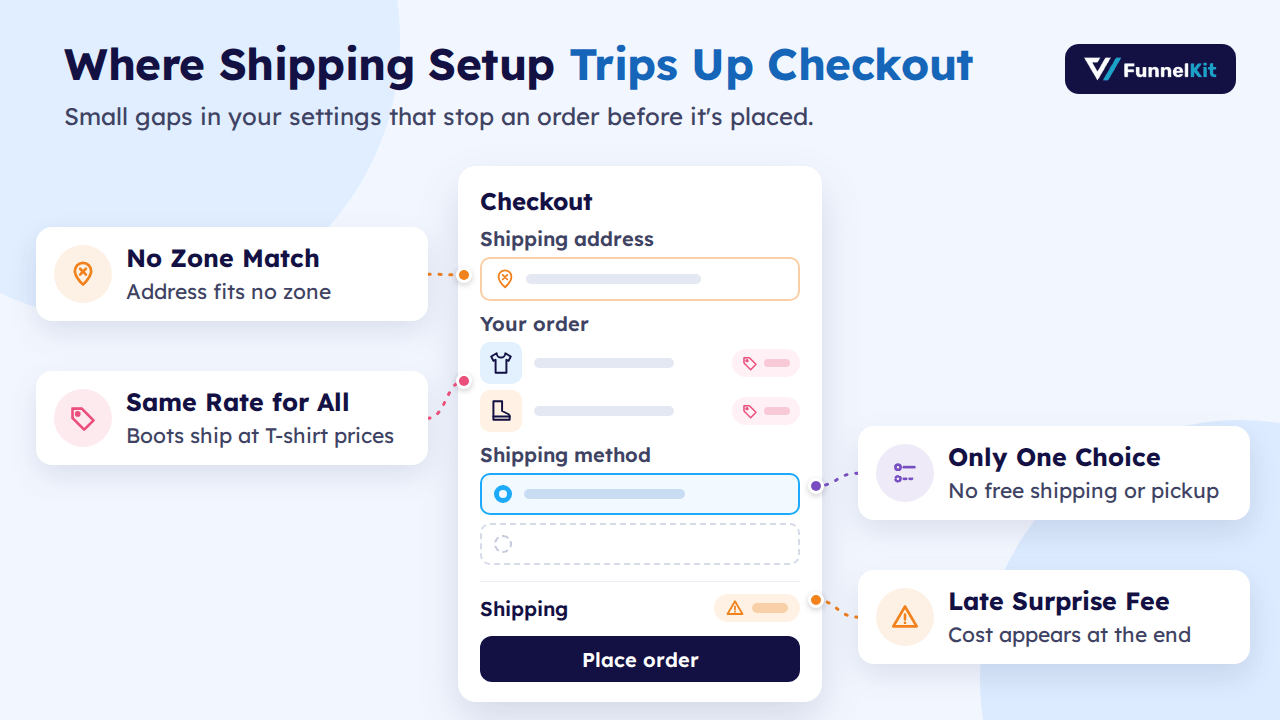
- Missing zones. If a customer's address doesn't match any zone, checkout says no shipping options are available, and the order stops there.
- Surprise costs. A shipping fee that first appears on the last step feels worse than the same fee shown earlier on the cart page.
- One rate for every product. Charging the same to ship a T-shirt and a pair of boots means you either overcharge the shopper or cover the difference yourself.
- Too few options. Free shipping over a set amount, or local pickup, gives shoppers a way to bring the cost down on their own.
Get the setup right once, and shipping stops being the reason people leave at checkout.
How Shipping Works in WooCommerce
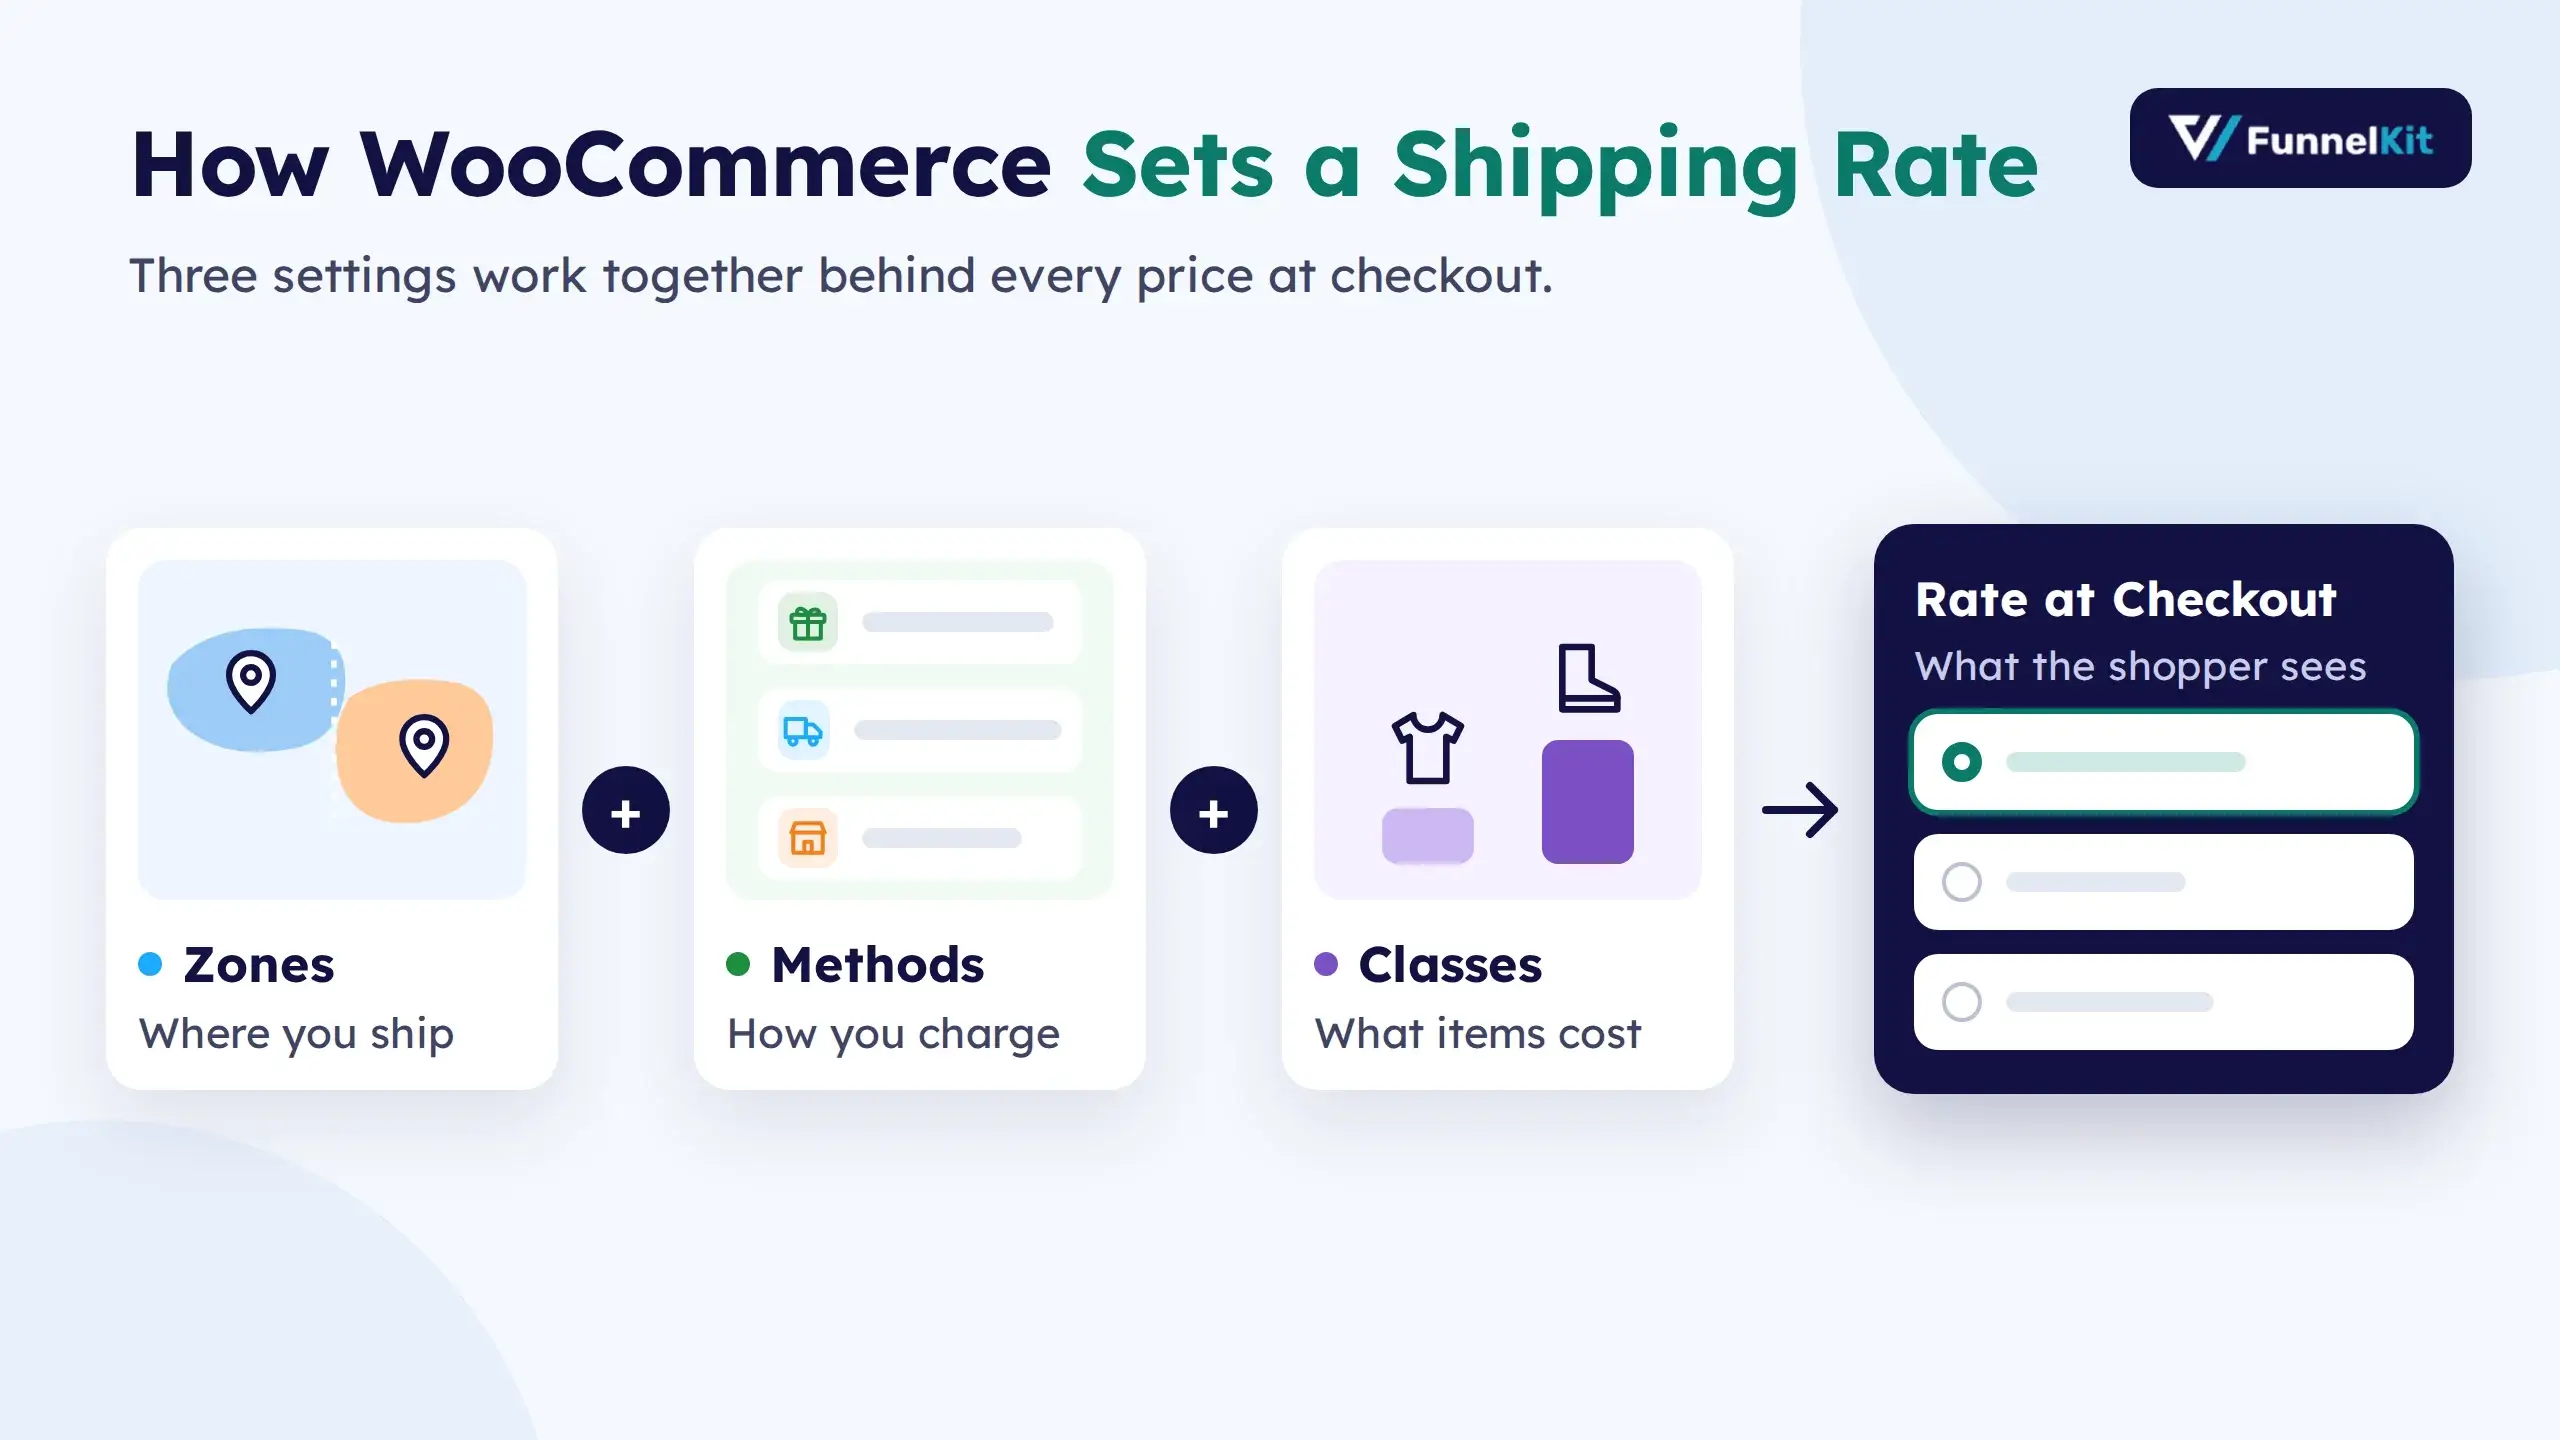
Before you touch any settings, it helps to know the three pieces behind every shipping price. Each one answers a different question:
- Zones: where are you sending the order?
- Methods: what options does the customer get?
- Classes: does this product need its own price?
Get these three right and the rest of the setup falls into place.
1. Shipping Zones: Where You Ship
Think of a zone as a delivery area with its own price list. It can be as broad as an entire country or as narrow as a handful of postcodes around your warehouse.
Say you sell to customers in the US and Canada. You'd set up one zone for each country. Your US zone might charge $10 and your Canada zone $25. Each zone keeps its own prices, so changing one never touches the other.
2. Shipping Methods: How You Charge
Methods are the delivery choices a shopper picks from at checkout. Out of the box, WooCommerce gives you three:
- Free shipping: no charge, with or without conditions like a minimum spend
- Flat rate: a fixed fee per order, per item, or per class
- Local pickup: the customer collects the order in person
Mix them however you like within each zone. Your US customers could get free shipping over $50, a $10 flat rate on smaller orders, and pickup for $2. Canadian customers might only see the $25 flat rate. Which options show up depends on the address the shopper enters.
One gap to know about: WooCommerce can't pull live prices from carriers like USPS or FedEx by itself. That takes an extension, which we'll get to later.
3. Shipping Classes: What Each Product Costs to Ship
Shipping a T-shirt and shipping a pair of boots aren't the same job, so they shouldn't cost the same. Classes let you tag products by weight, size, or handling needs and give each tag its own price.
Picture two classes: Lightweight at $5 and Heavyweight at $15. A customer buys one T-shirt and one pair of boots. You decide how WooCommerce totals that up:
- Per class: both classes are charged, for a total of $20
- Per order: only the priciest class counts, so the customer pays $15
Per class suits stores where heavy items really do cost more to send. Per order keeps prices simpler for customers who buy several things at once.
Now for the actual setup, starting with your first zone.
How to Set Up WooCommerce Shipping Zones and Methods
You'll build this in two passes. First you create a zone, which tells WooCommerce where you ship. Then you add methods to that zone, which tells it what to charge. Once both are saved, shoppers in that area see their options at checkout.
Plan on 10 to 15 minutes for your first zone. Each one after that goes faster.
Step 1:Make sure shipping is turned on
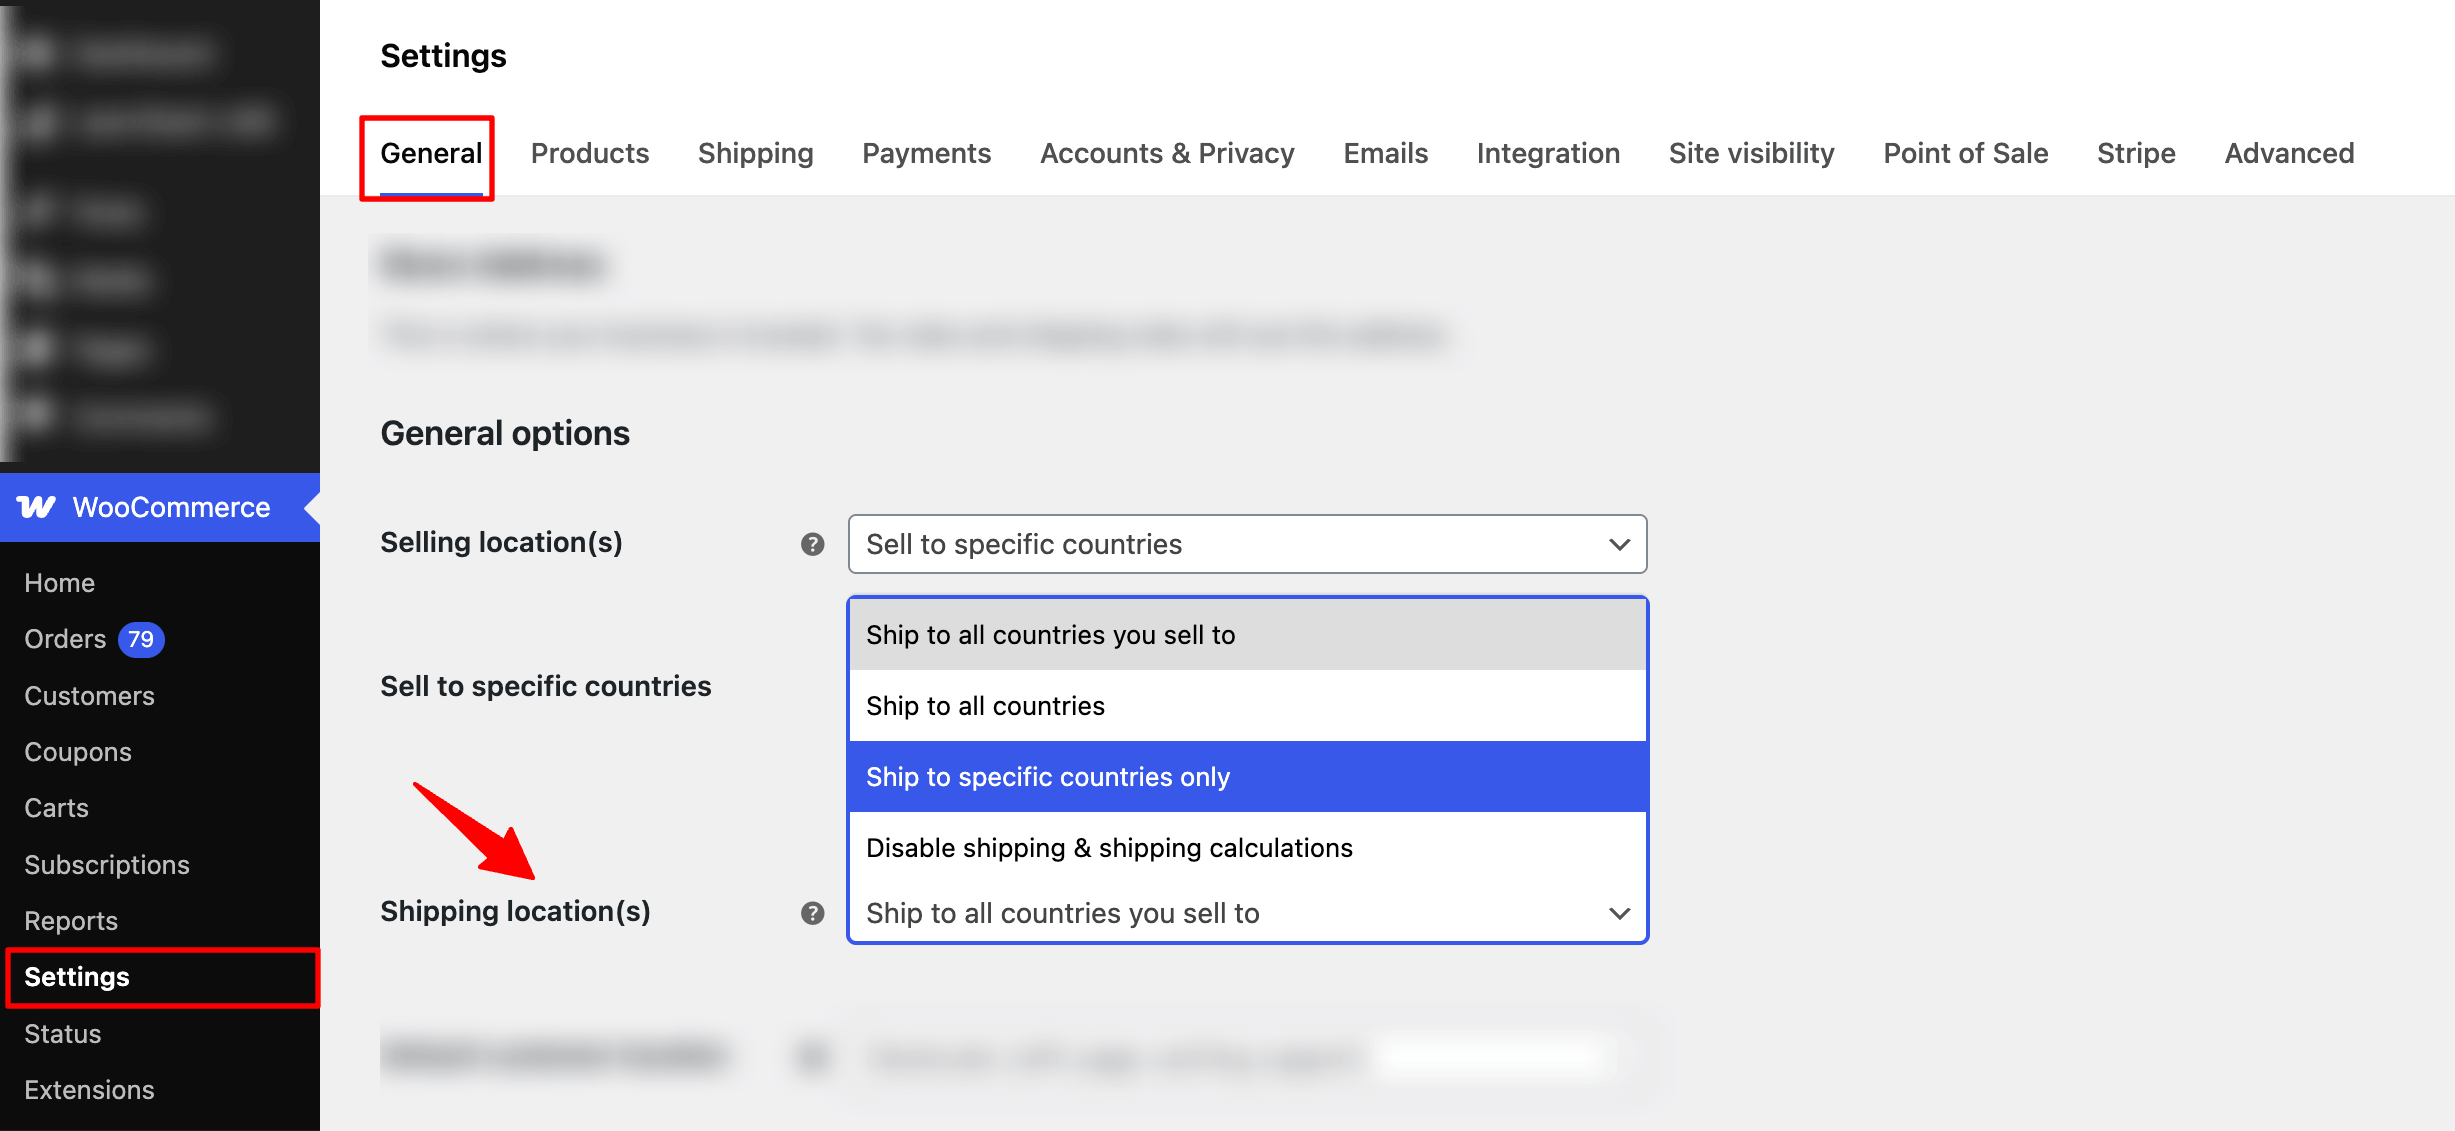
Go to WooCommerce > Settings and stay on the General tab. Find the Shipping location(s) dropdown. Pick any option except Disable shipping & shipping calculations, then save.
Step 2: Create a shipping zone
Next, go to the Shipping tab in WooCommerce settings and click the Add Shipping Zone button.
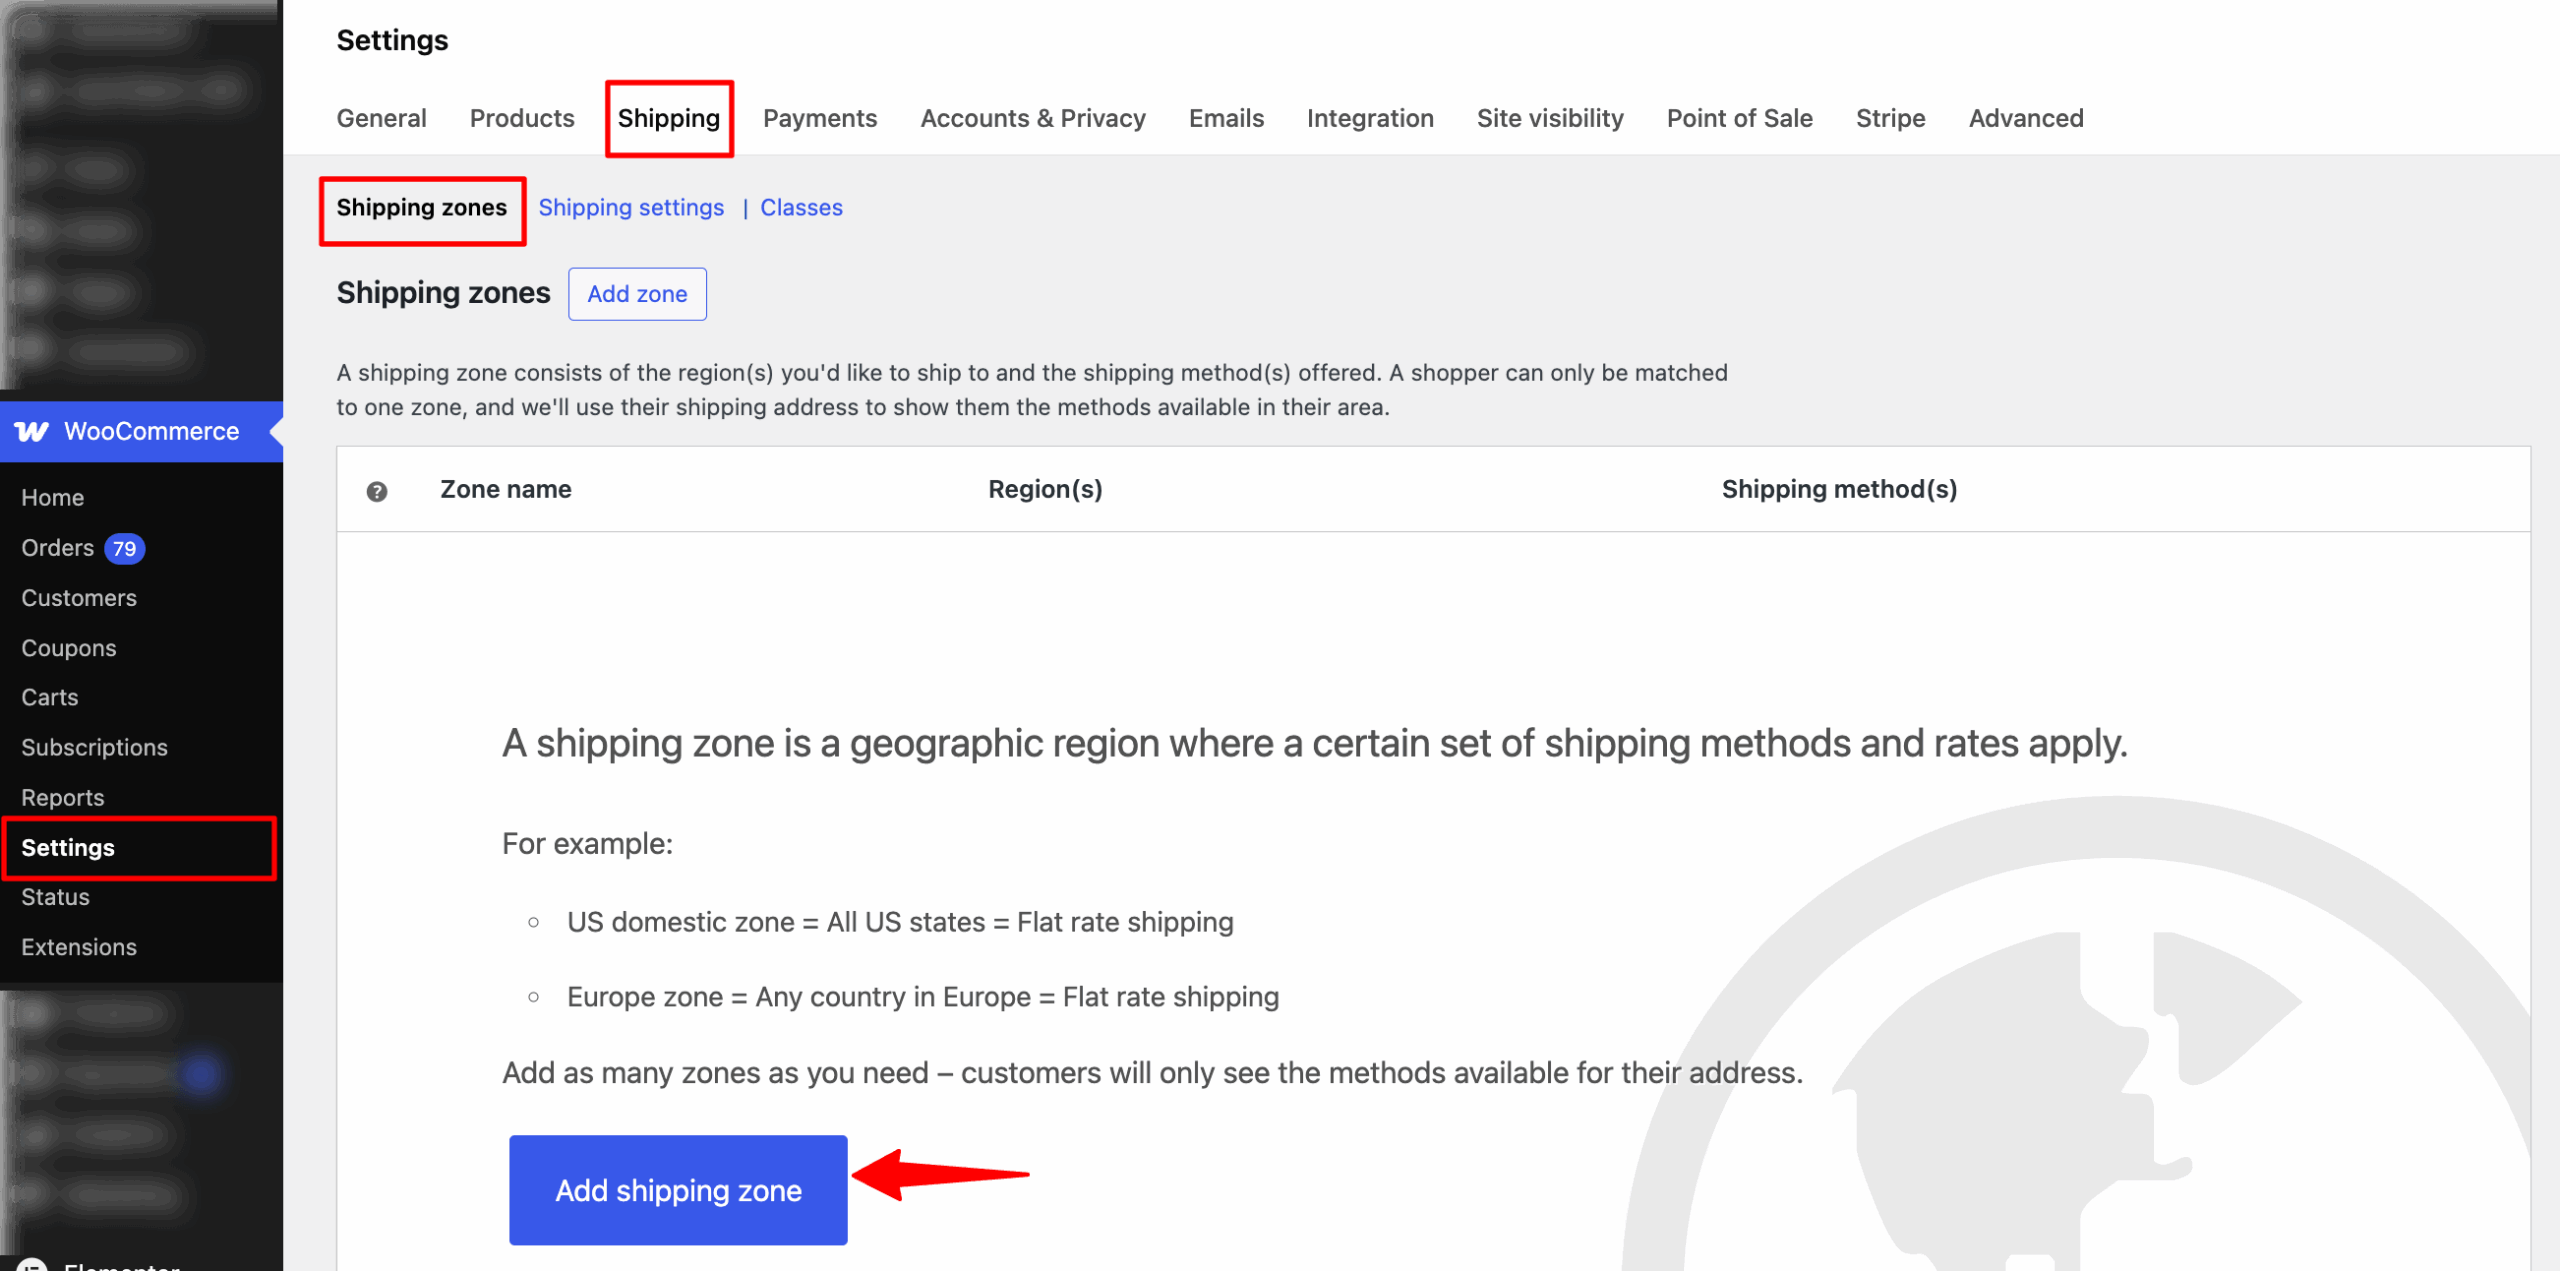
After that, provide a name for the Zone and specify the region.
You can type the initial of the region you want to choose and then select from the suggested dropdown list.
As mentioned earlier, you can select a country or state if you want. As shown below, you can choose the whole country, Australia, or any of the states.
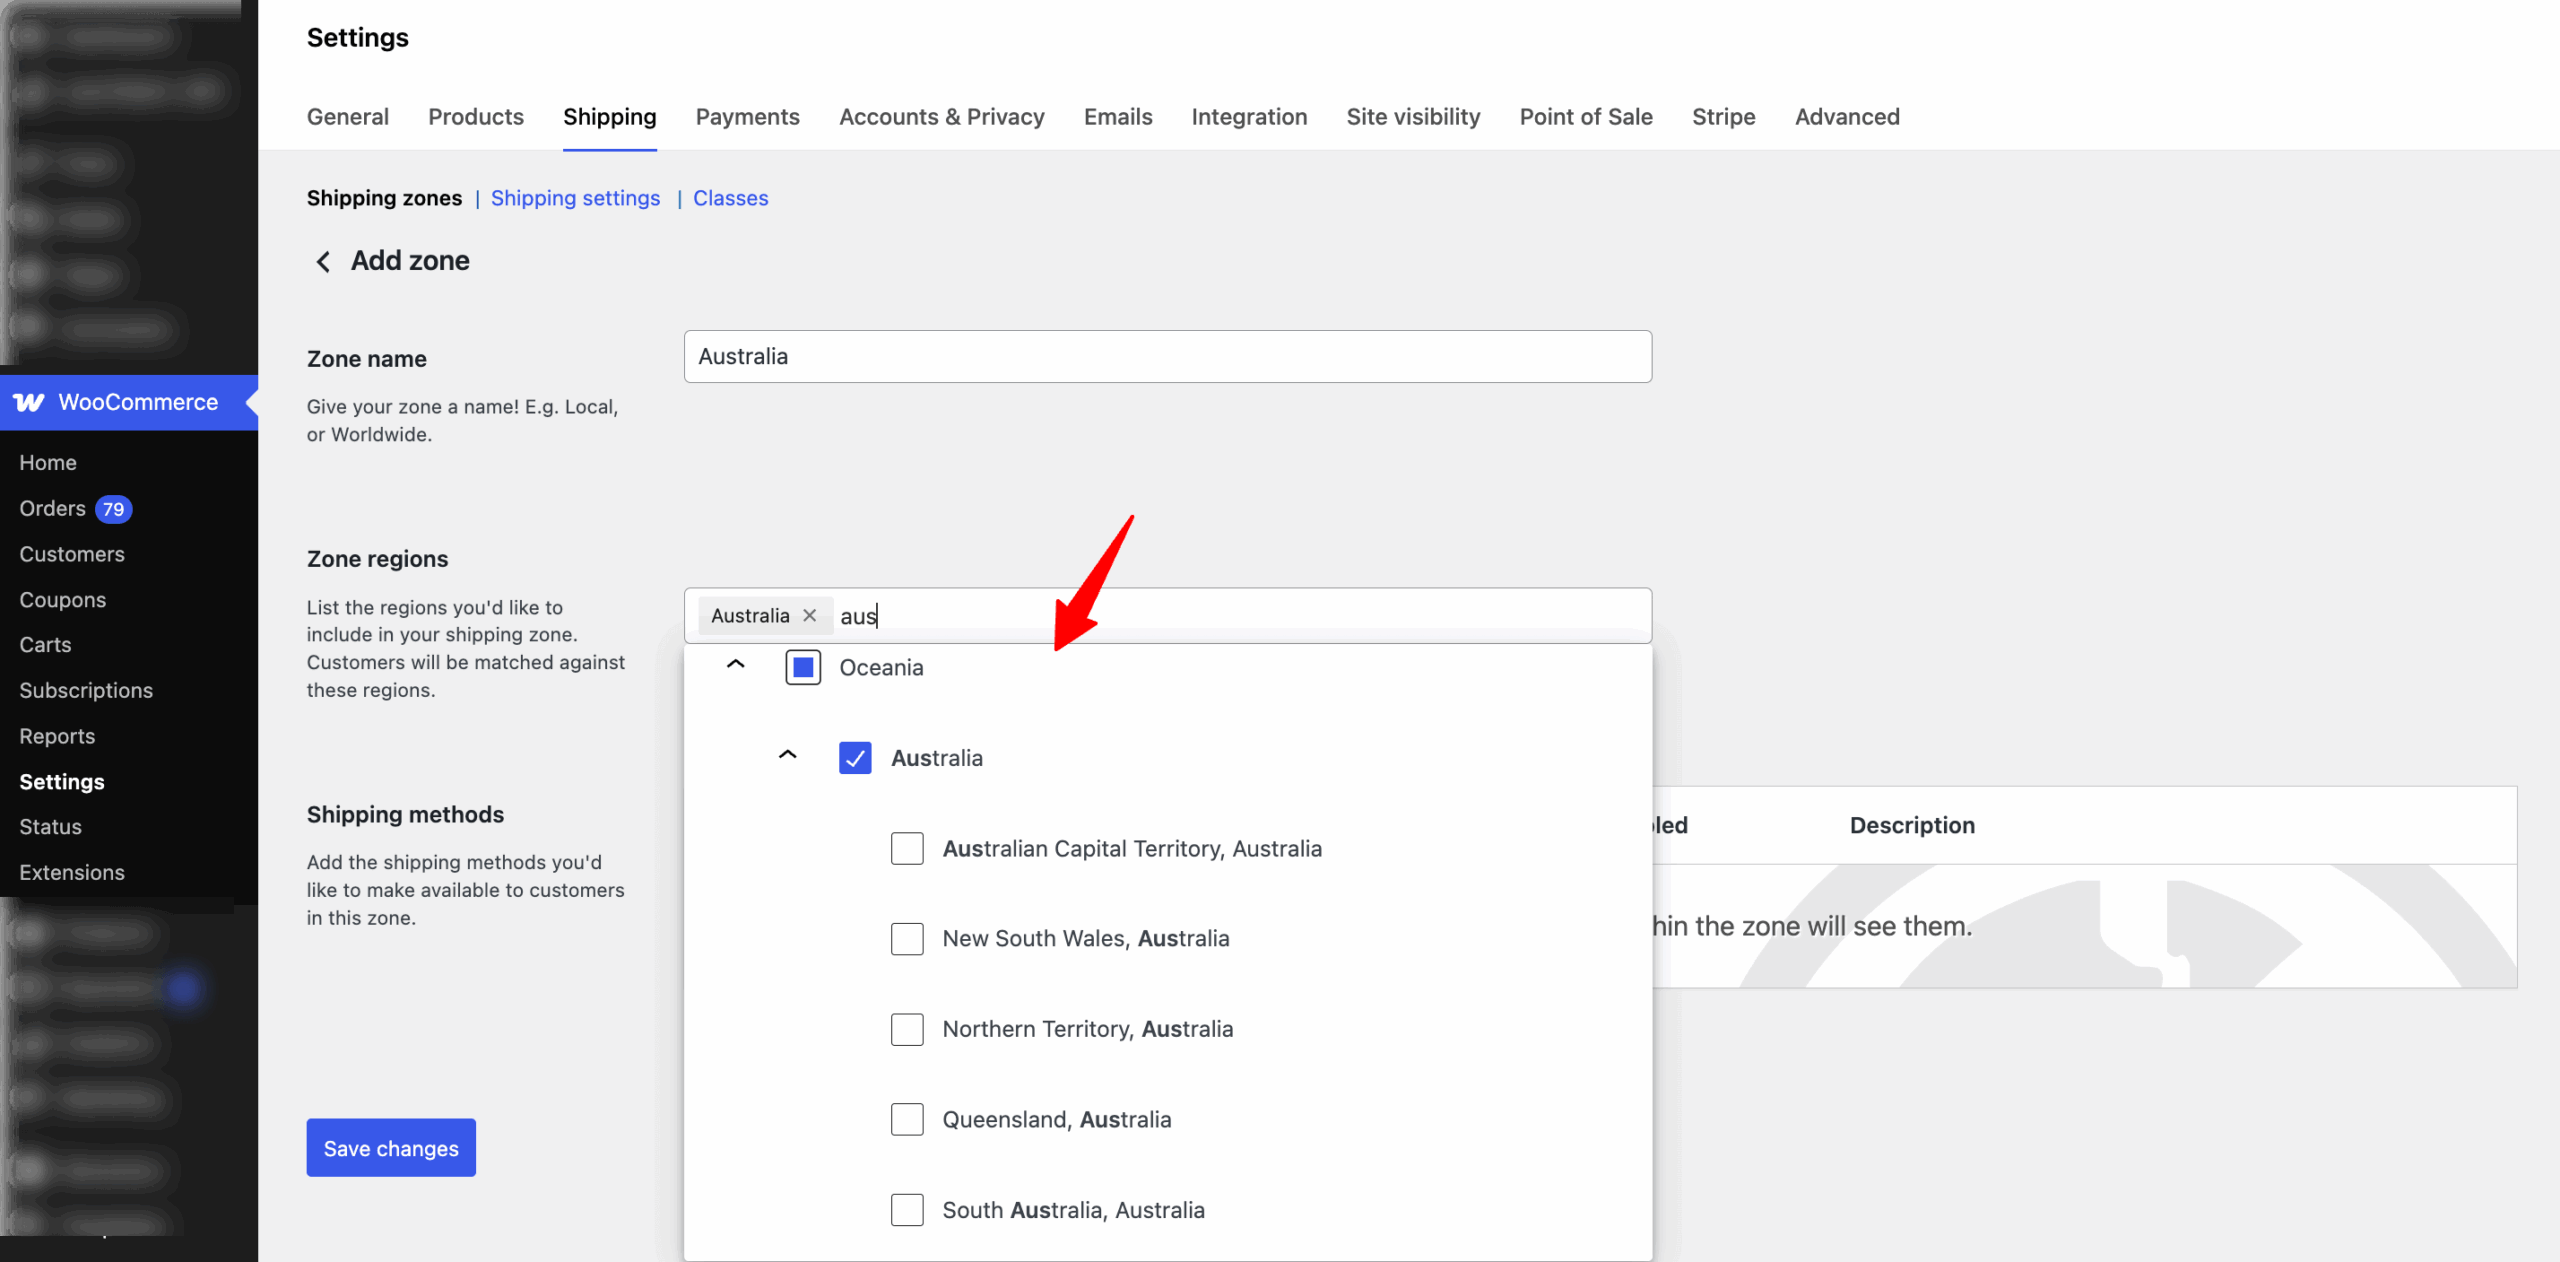
Regions can consist of multiple countries, states, or continents.
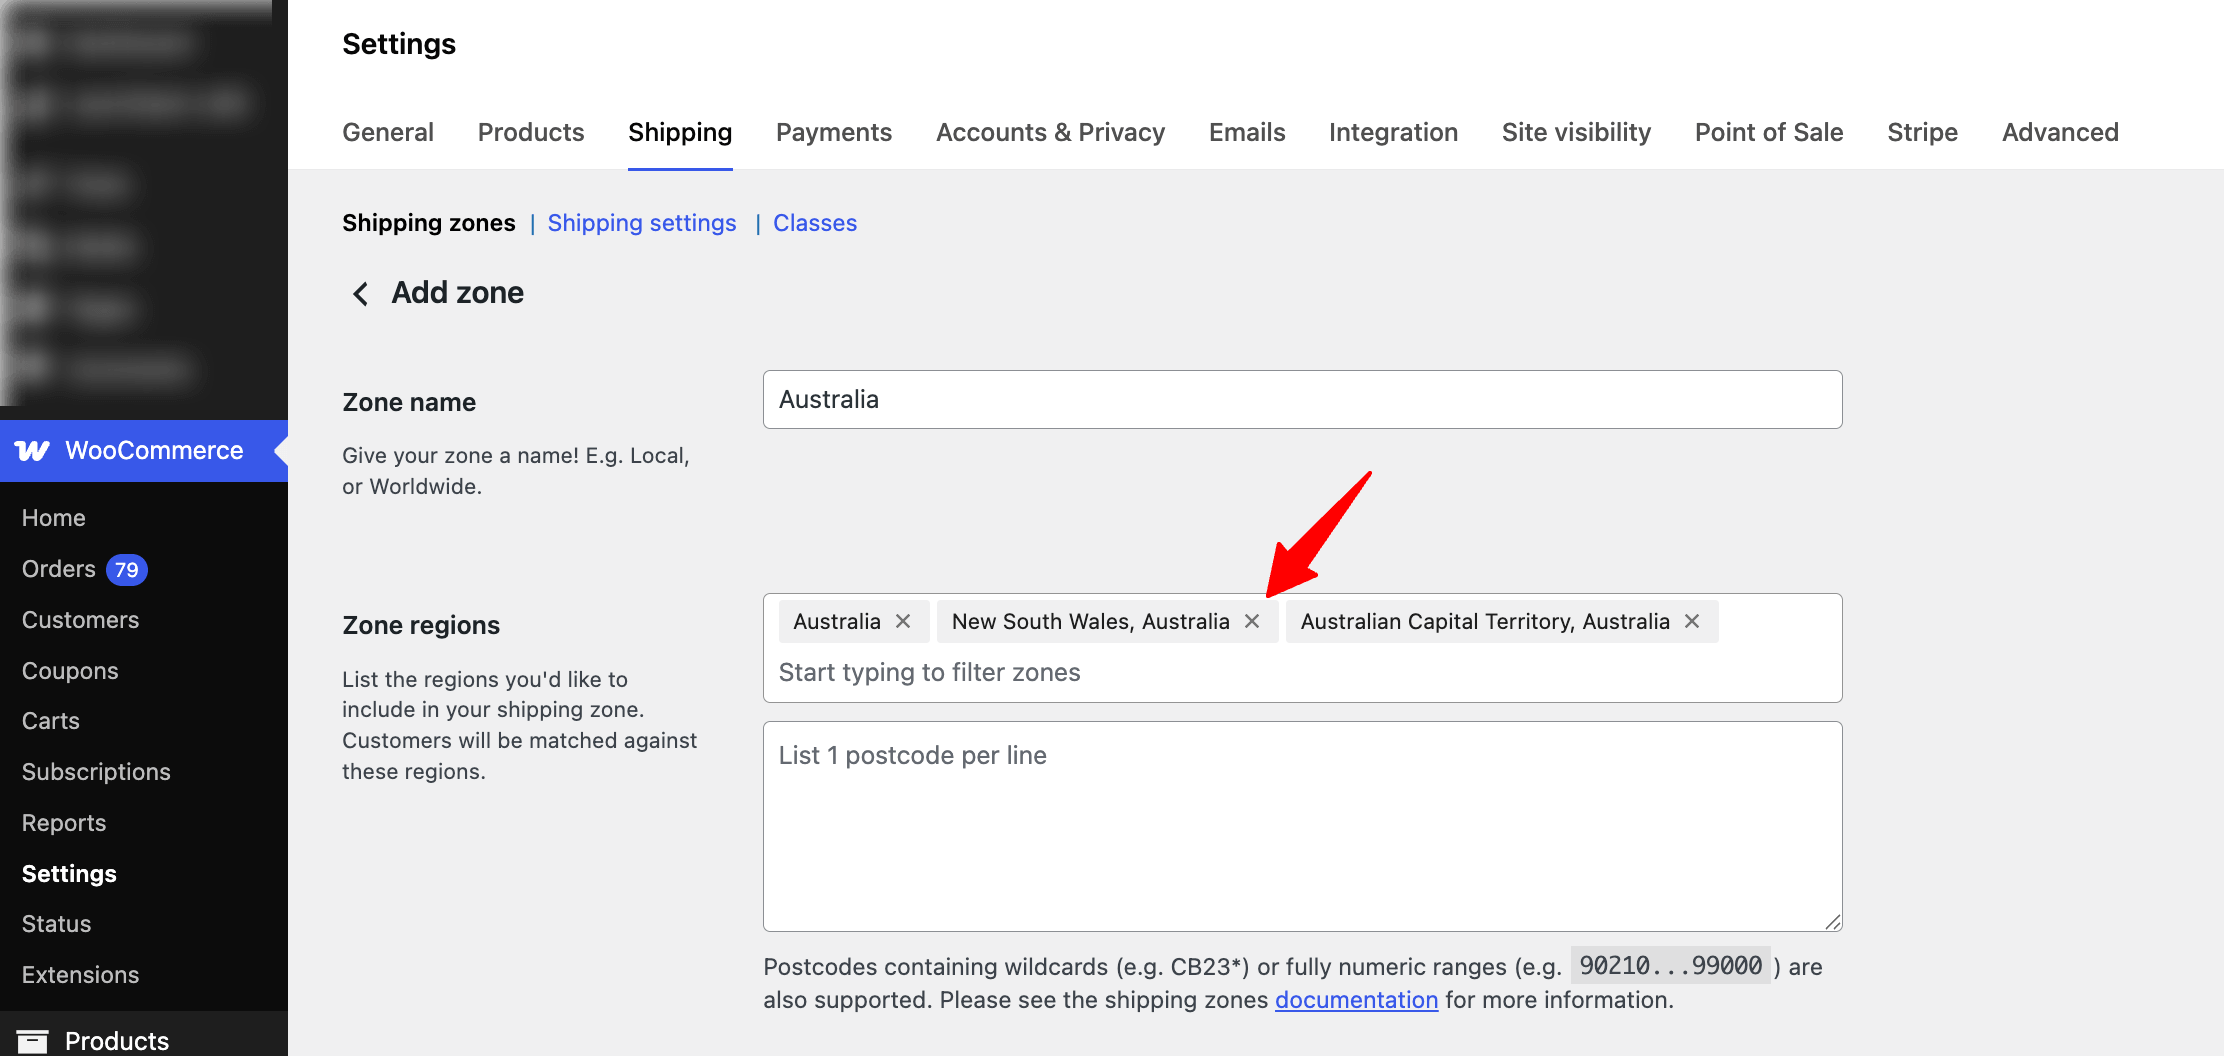
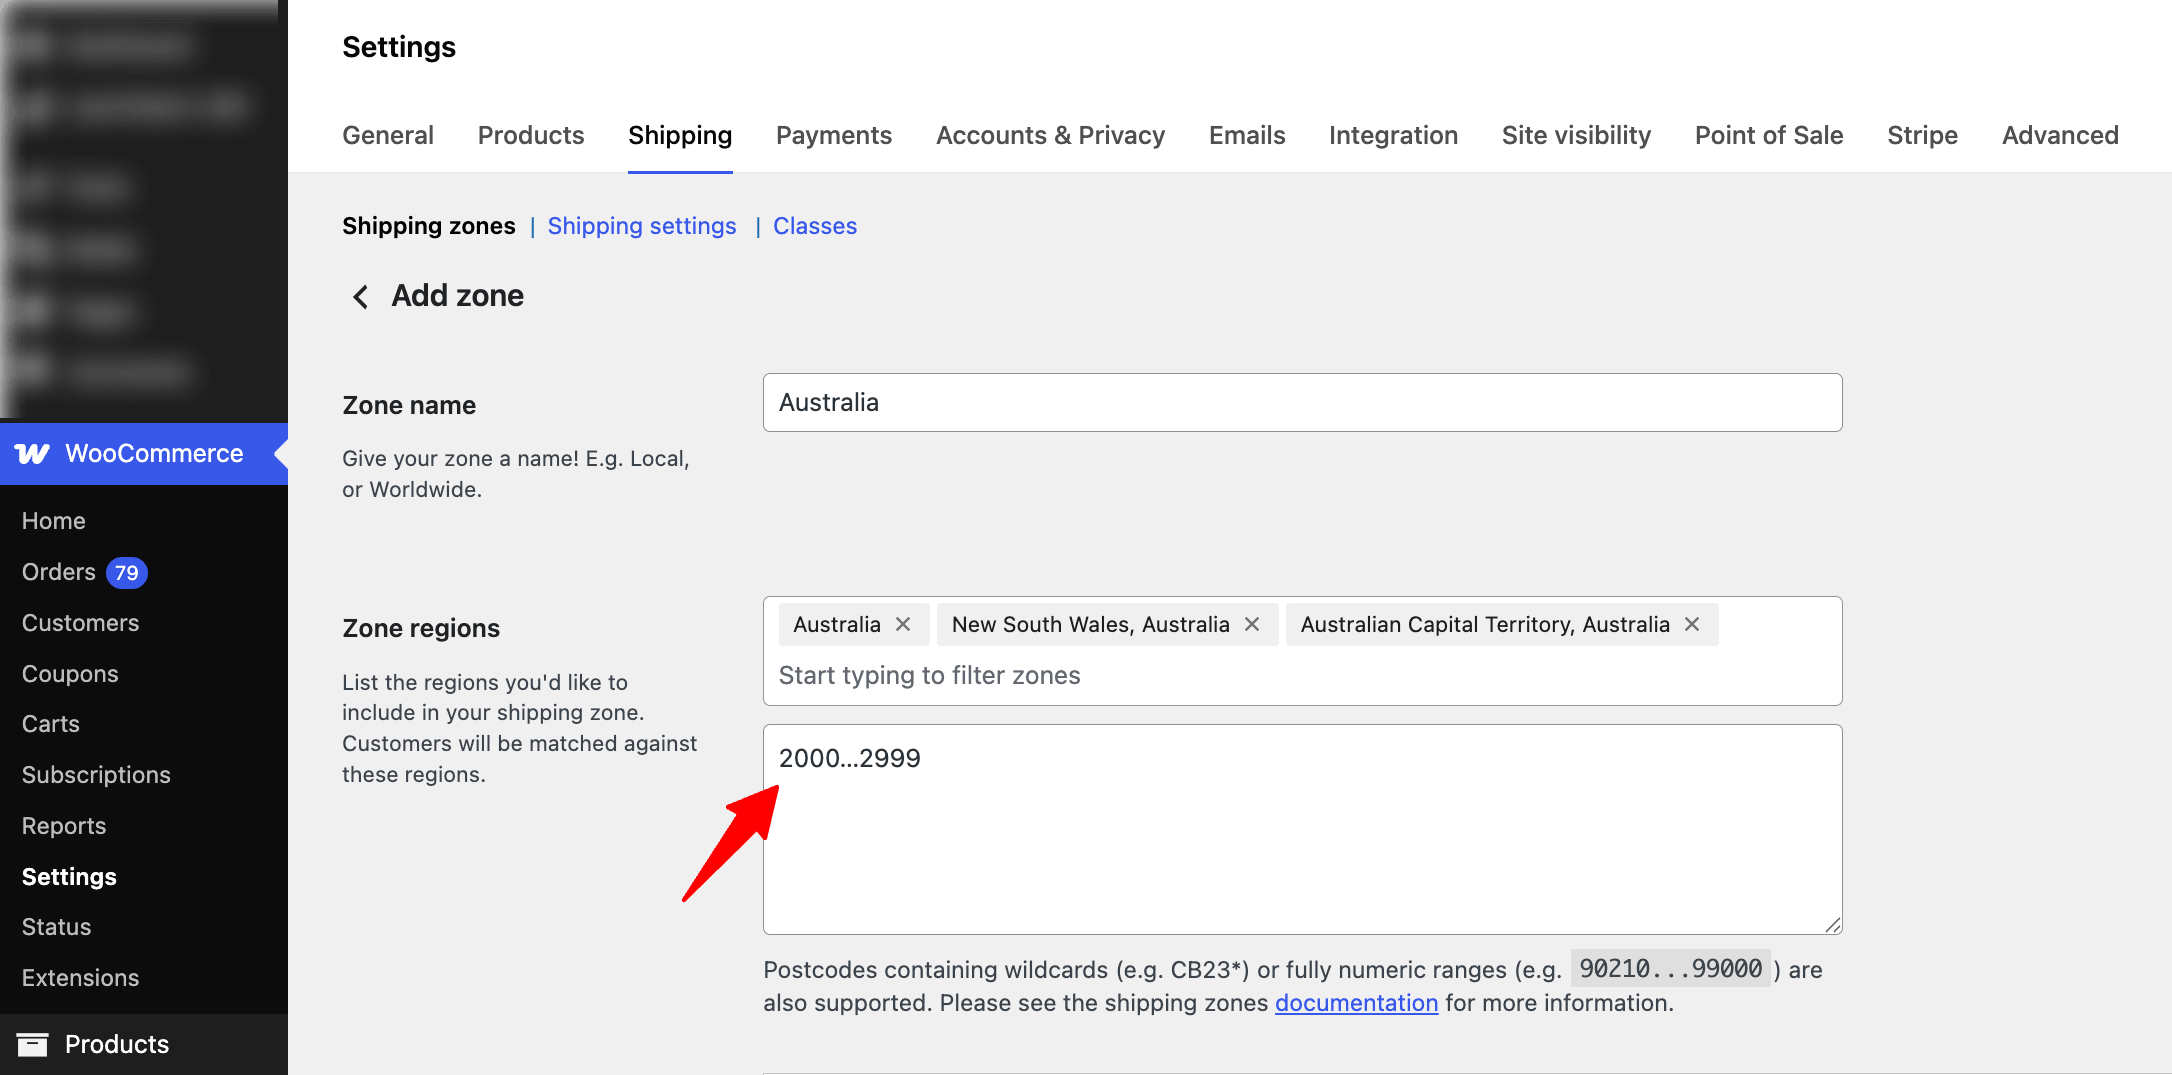
Want to go narrower? Click Limit to Specific Postcodes. You can enter codes three ways:
- One per line: a list of exact postcodes
- A range: two codes with three dots between them, like
2000...2999for NSW - A wildcard: a partial code with an asterisk, like
20*
This works well for local delivery, where you only drive to a few nearby areas.
Save the zone, then repeat for every other area you ship to.
Tip: At the bottom of your zone list, you'll see Locations not covered by your other zones. Any address that doesn't match a zone lands here. If this zone has no shipping method, those customers can't check out at all. Add a method to it, even a higher flat rate, so no order gets stuck.

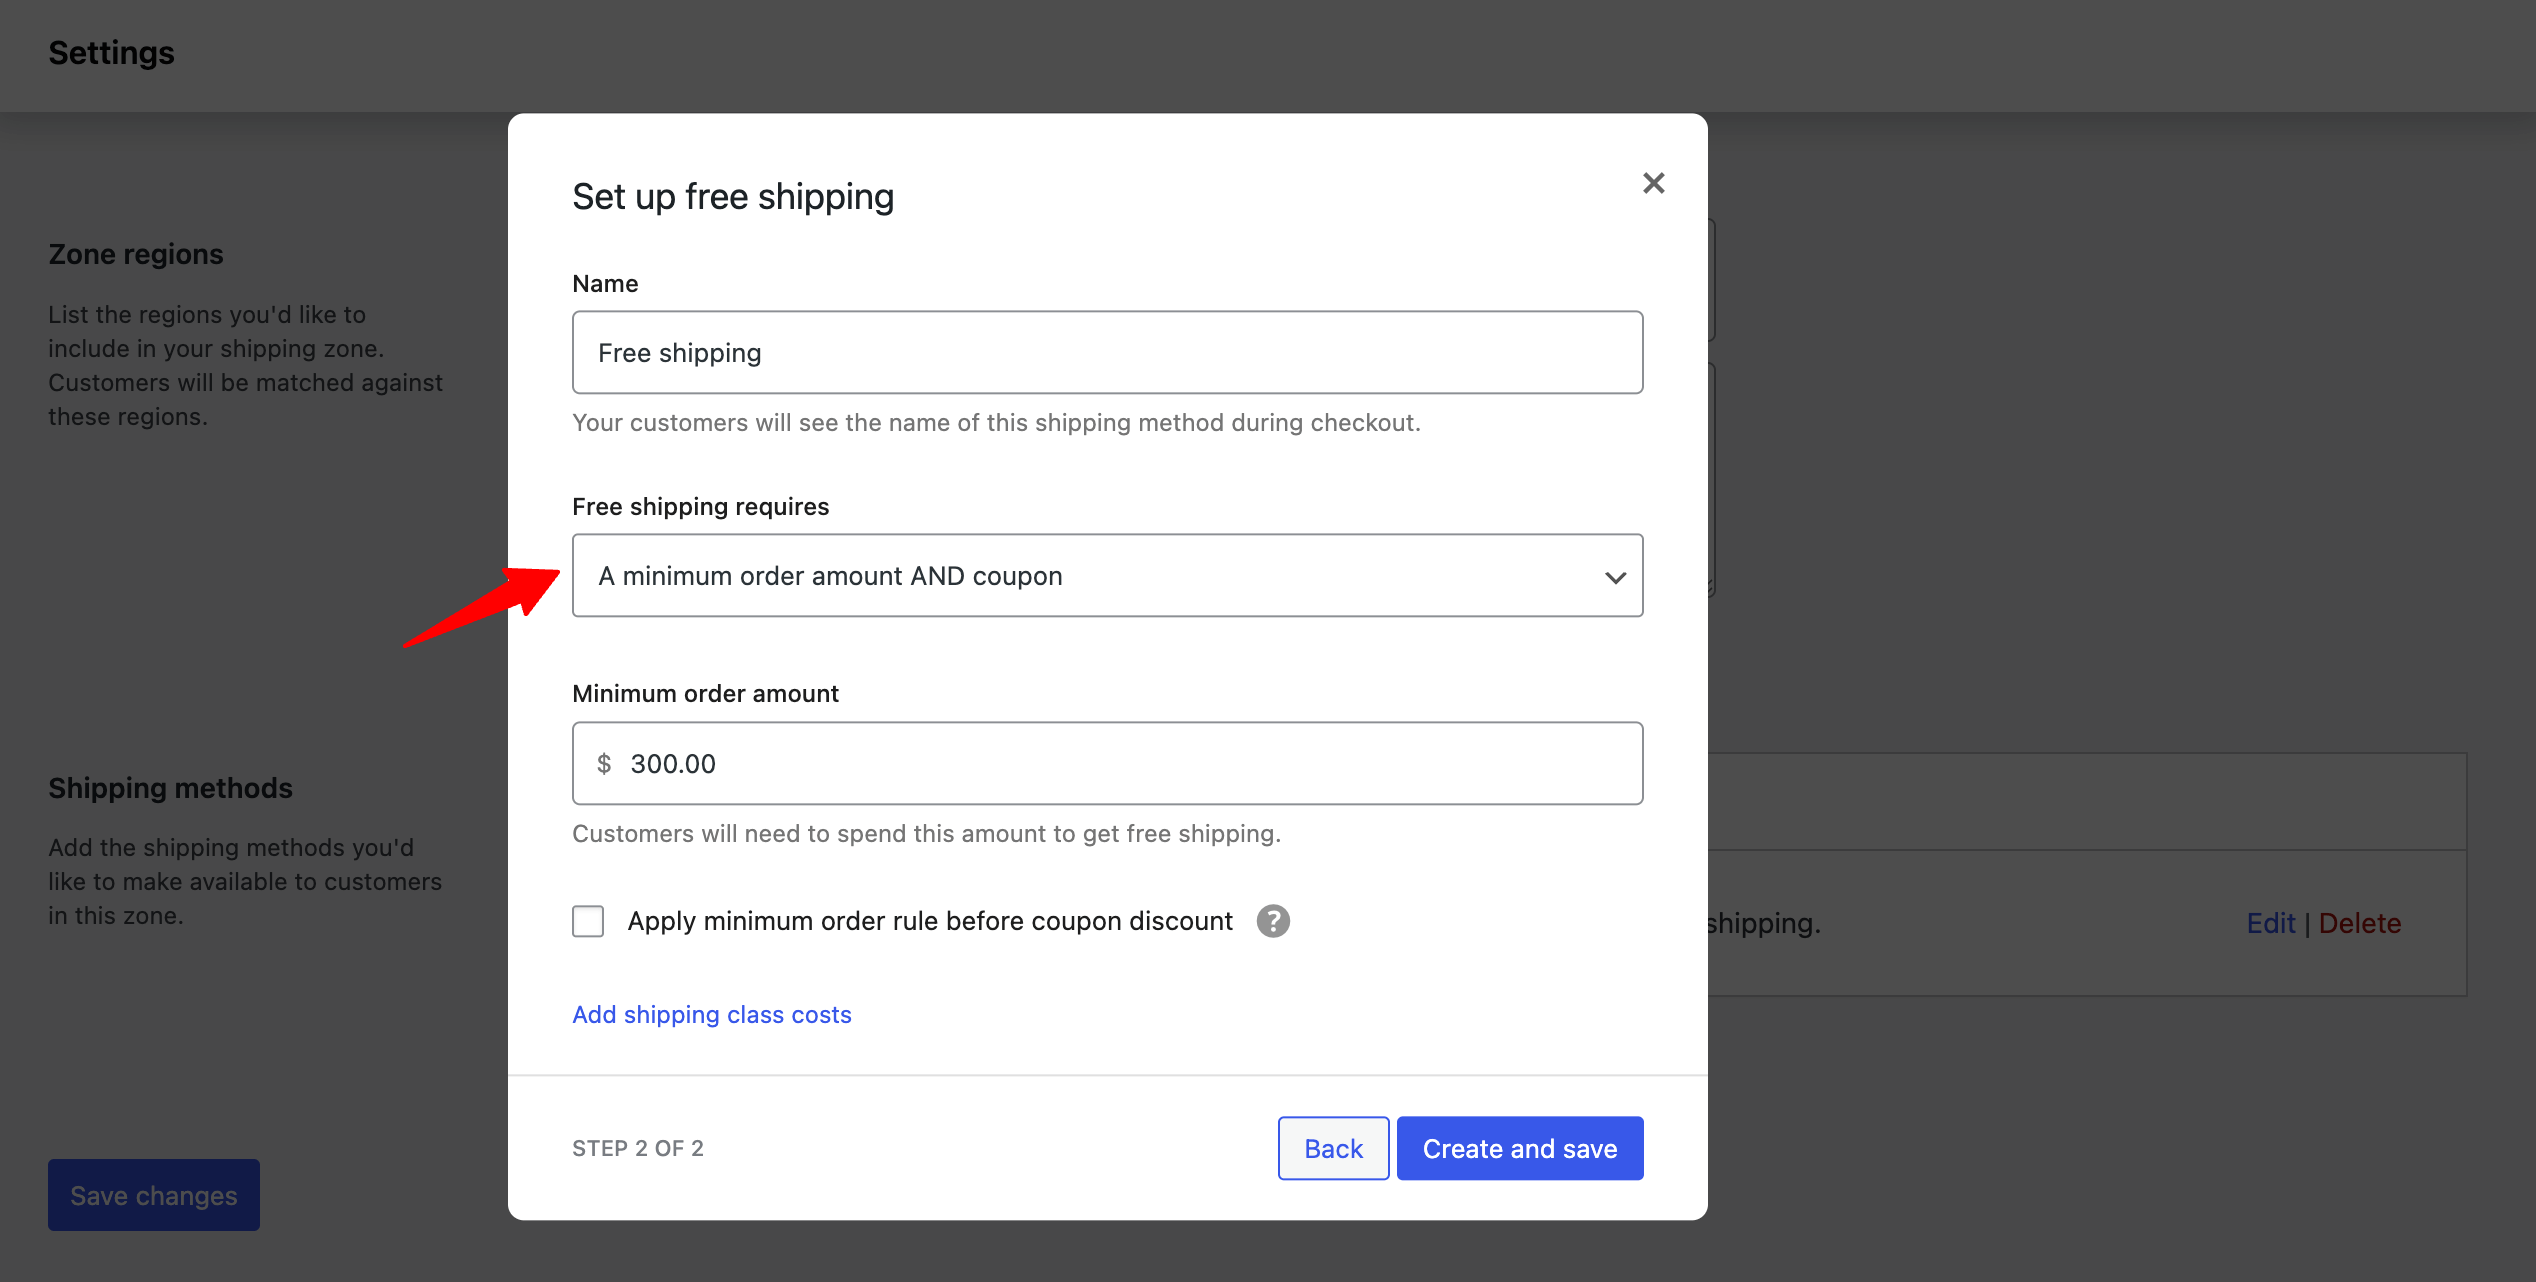
Step 3: Add a free shipping
To add a shipping method, click Add Shipping Method and choose Free shipping from the list.
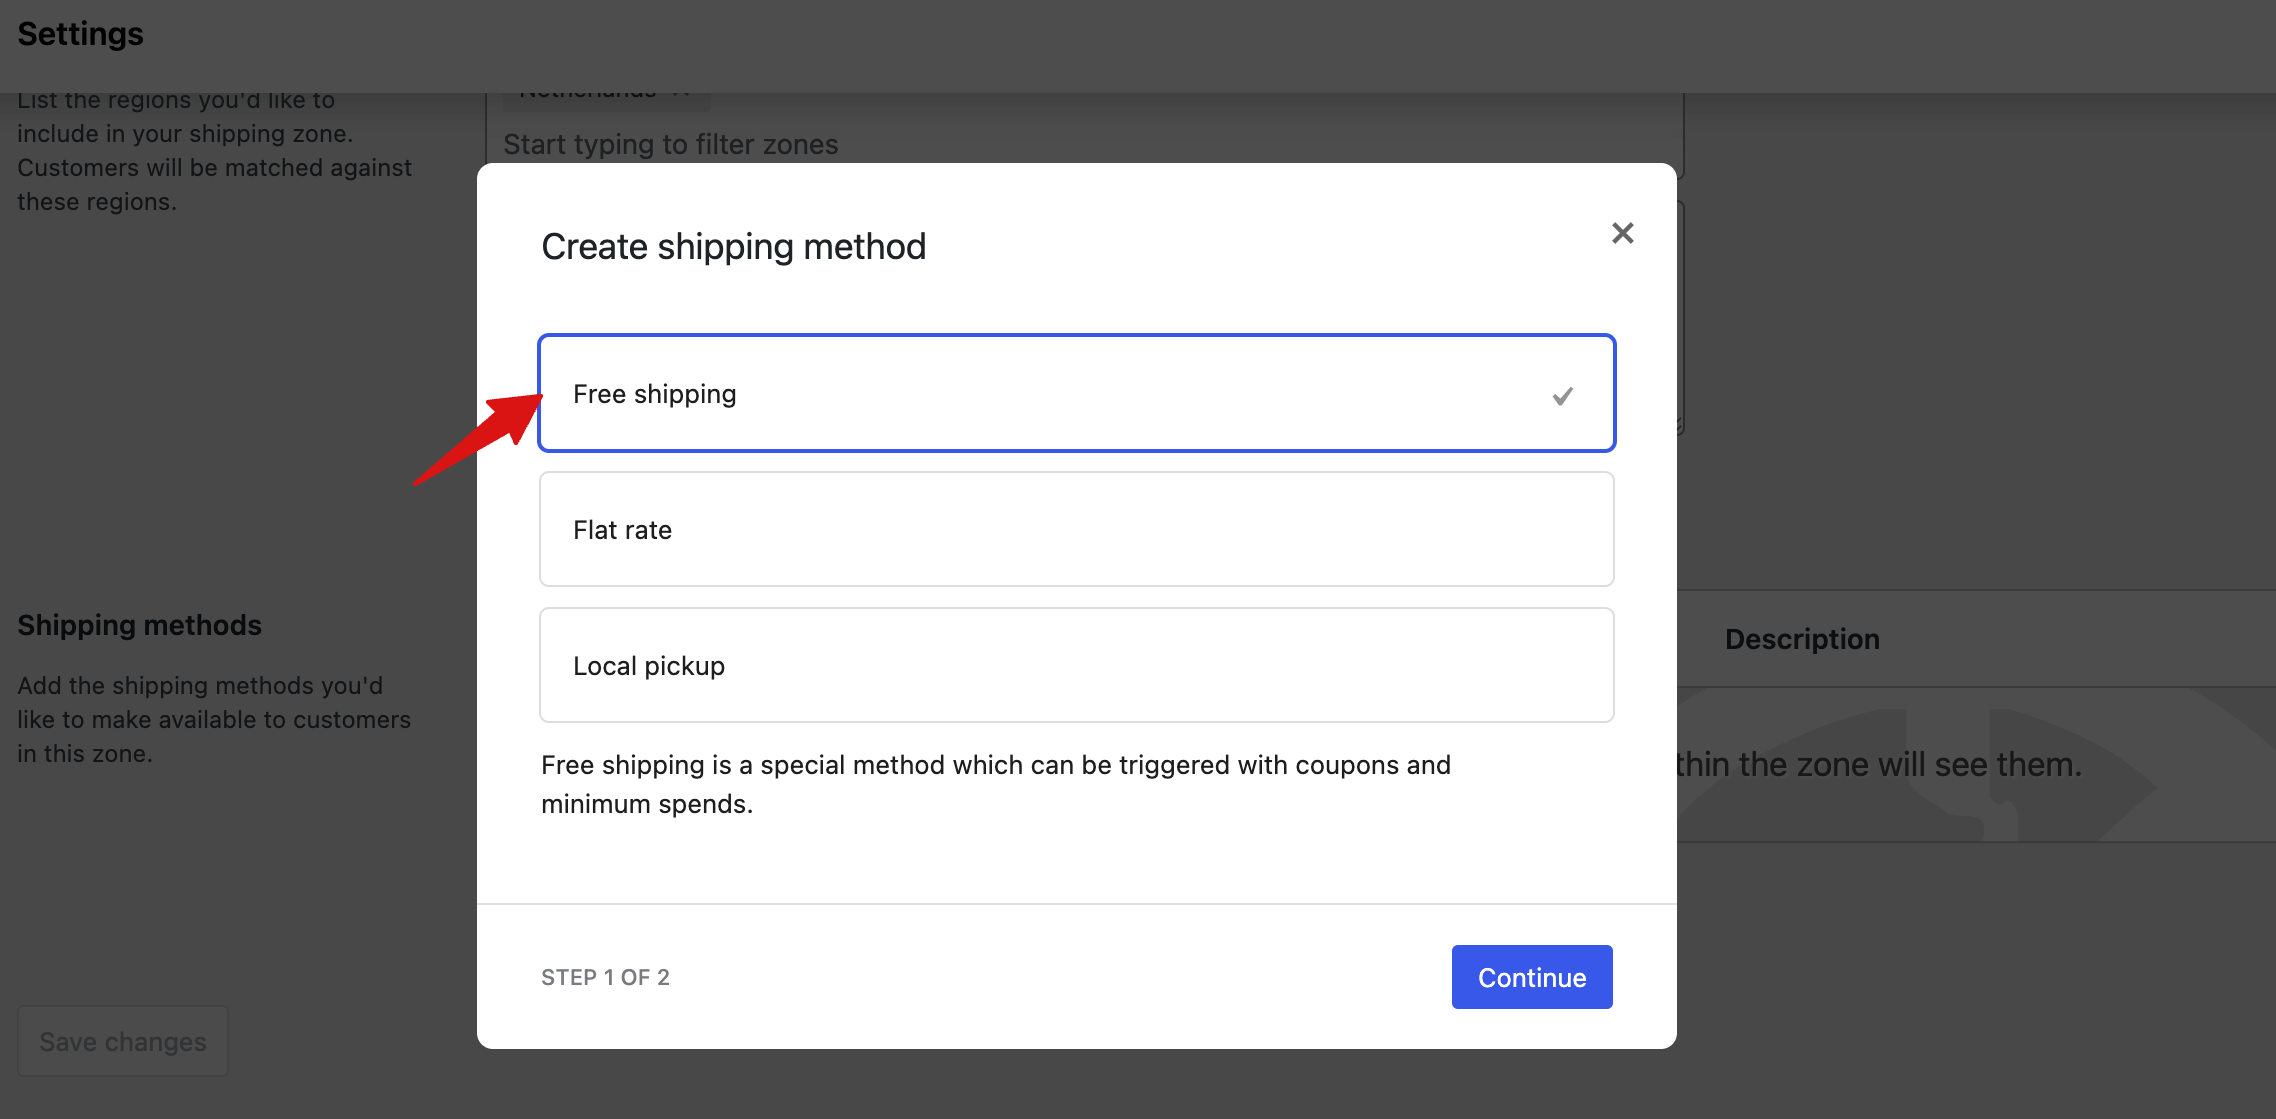
Give it a title. This is the label customers see at checkout, so something like "Free Shipping" or "Free Standard Delivery" works well.
Then choose when free shipping applies. Pick No requirement to offer it on every order in this zone.
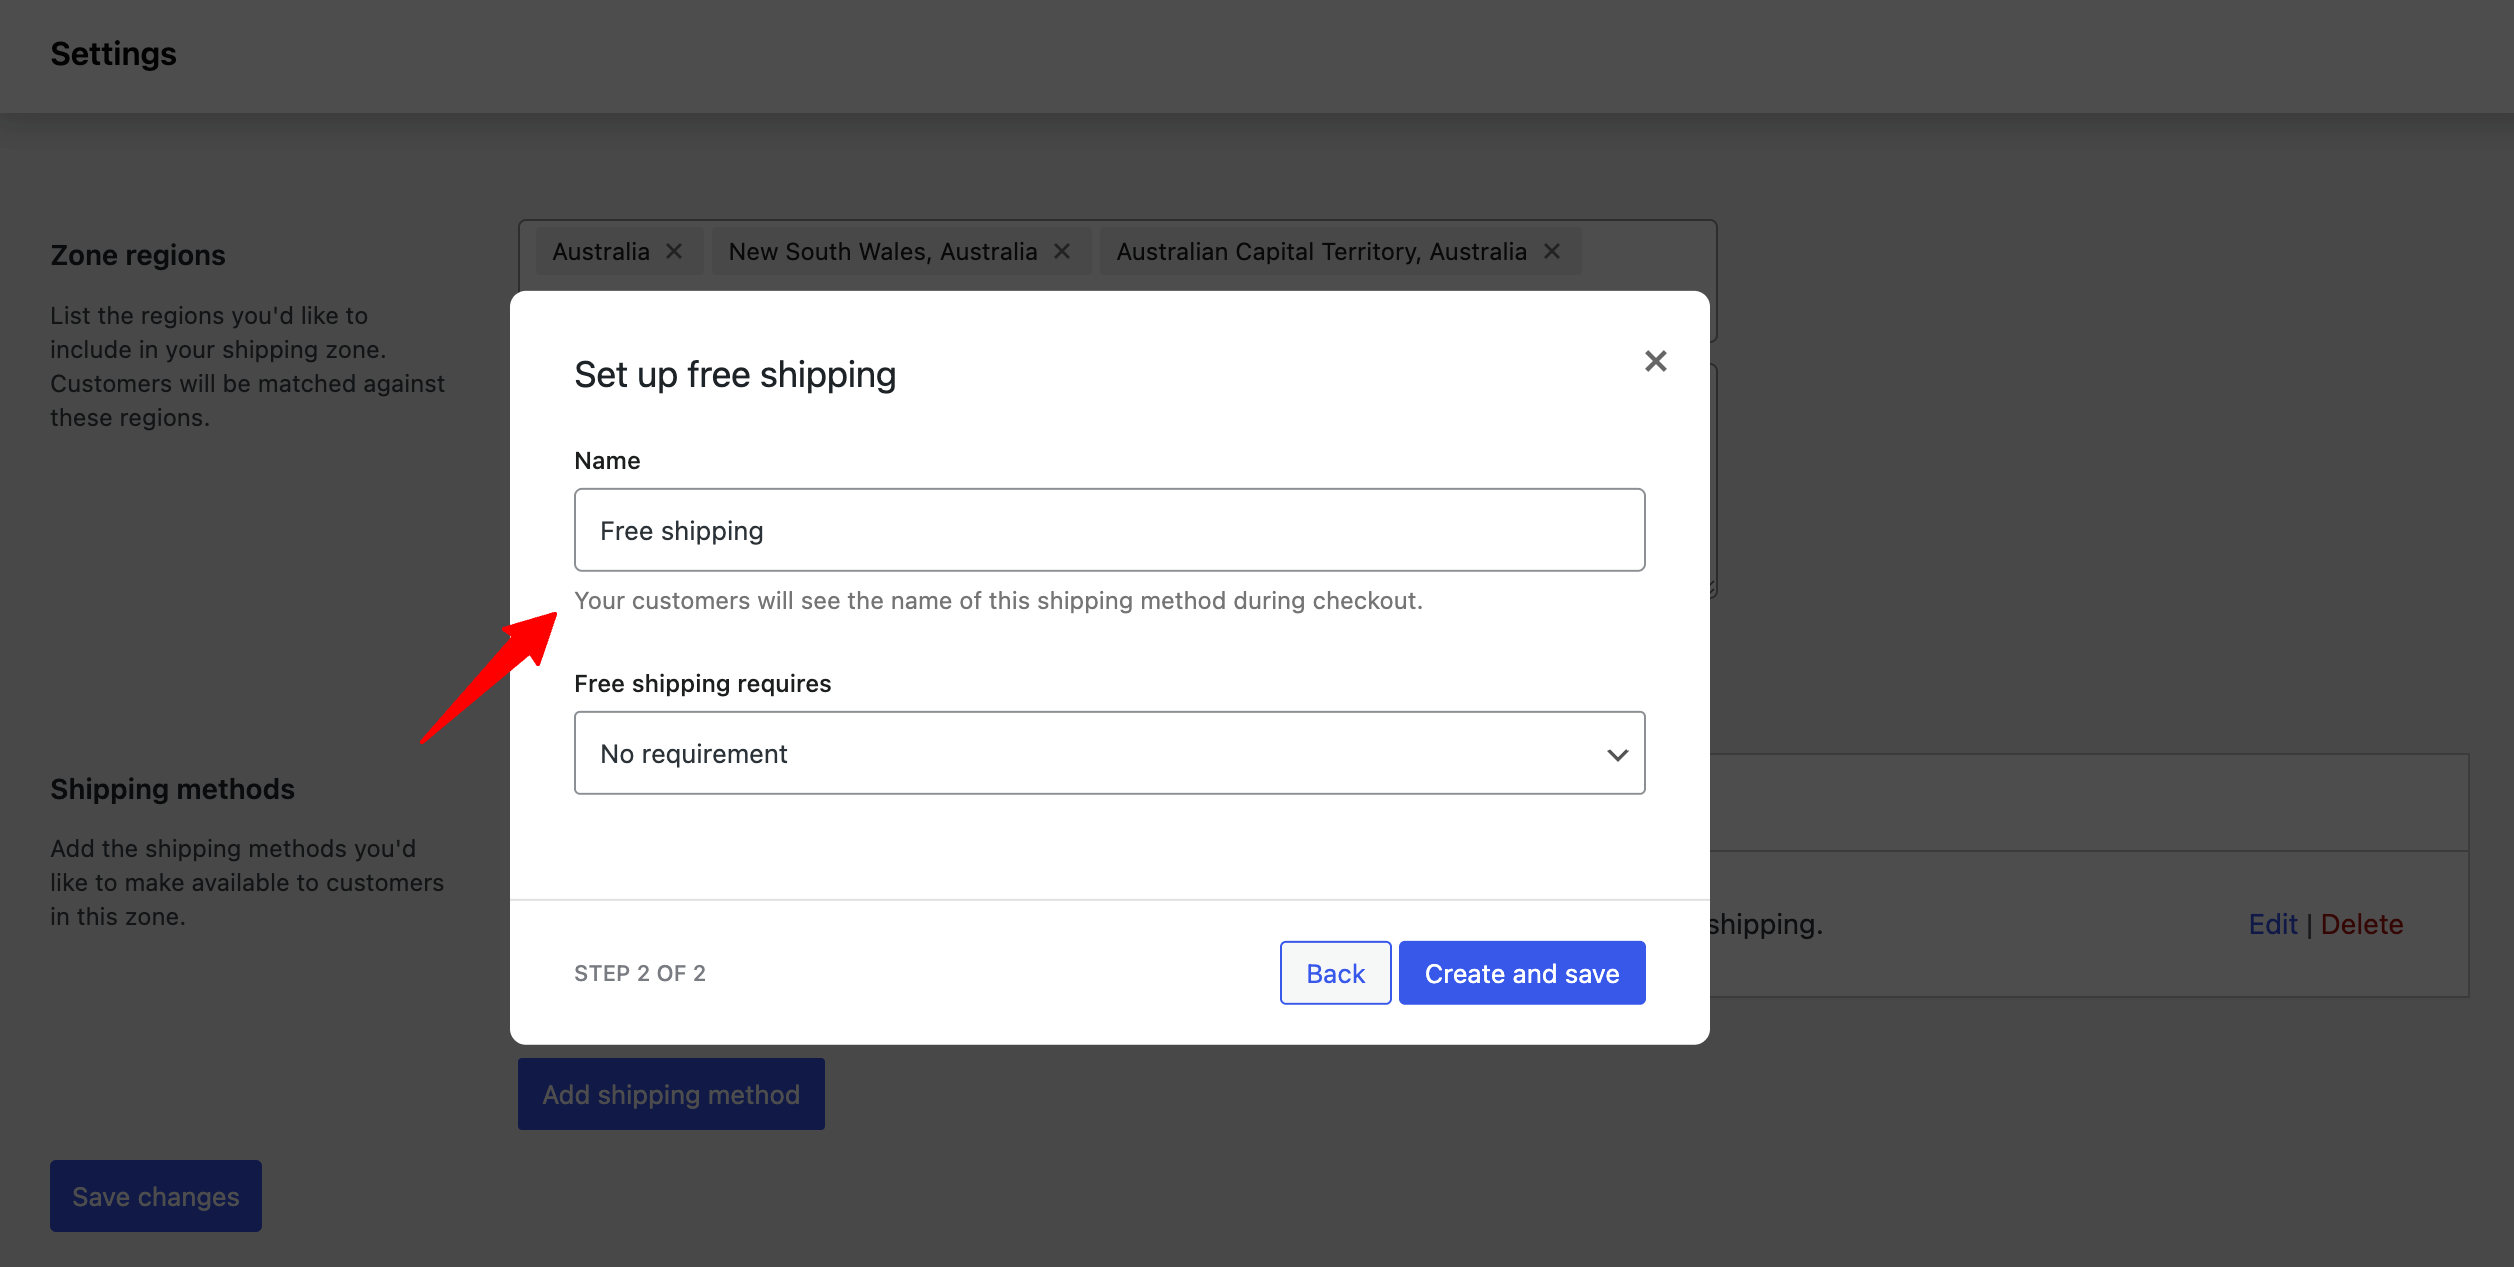
Want to put conditions on it? You have four other options.
A valid free shipping coupon: If you choose this option, anyone with a valid coupon can avail themselves of free shipping for an order.
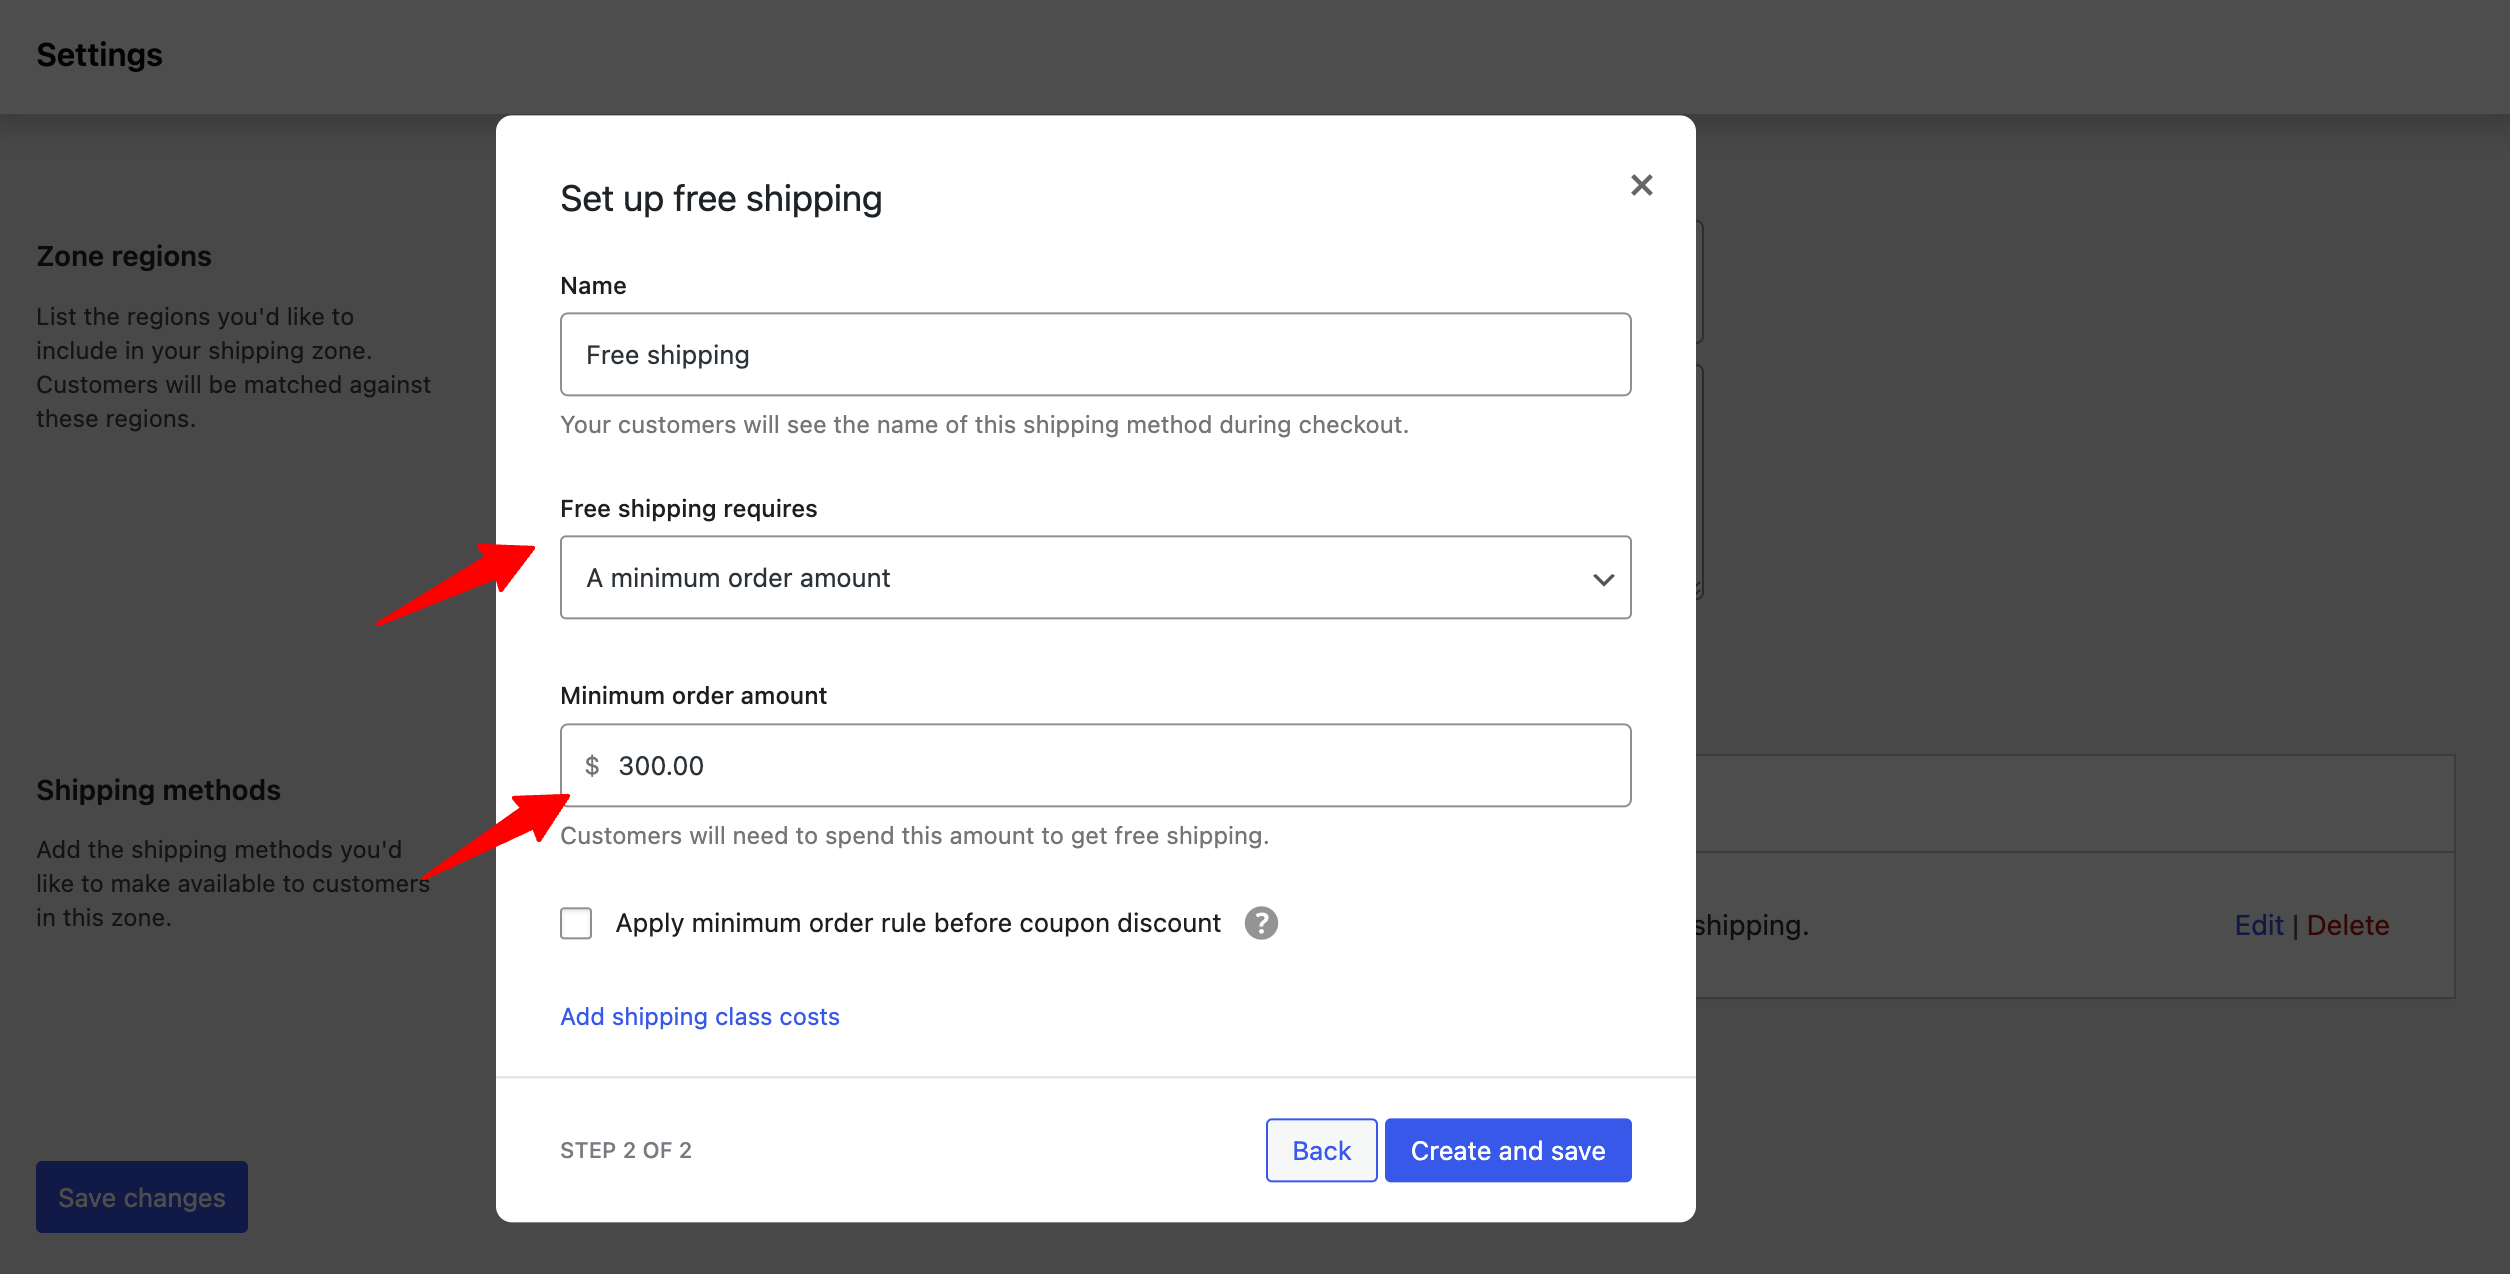
A minimum order amount: This option allows you to set a minimum order amount that a customer must place to qualify for free shipping. If you choose this option, you will get two more options:
- Minimum order amount: Set a minimum amount that must be spent to qualify for free shipping. For example, we have set a minimum of 150, so if someone wants to avail of free shipping, they have to purchase at least 150.
- Coupon discounts: To apply coupon discounts, check the “Apply minimum order rule before coupon discount” option. The checking option will allow free shipping based on the pre-discount order amount.
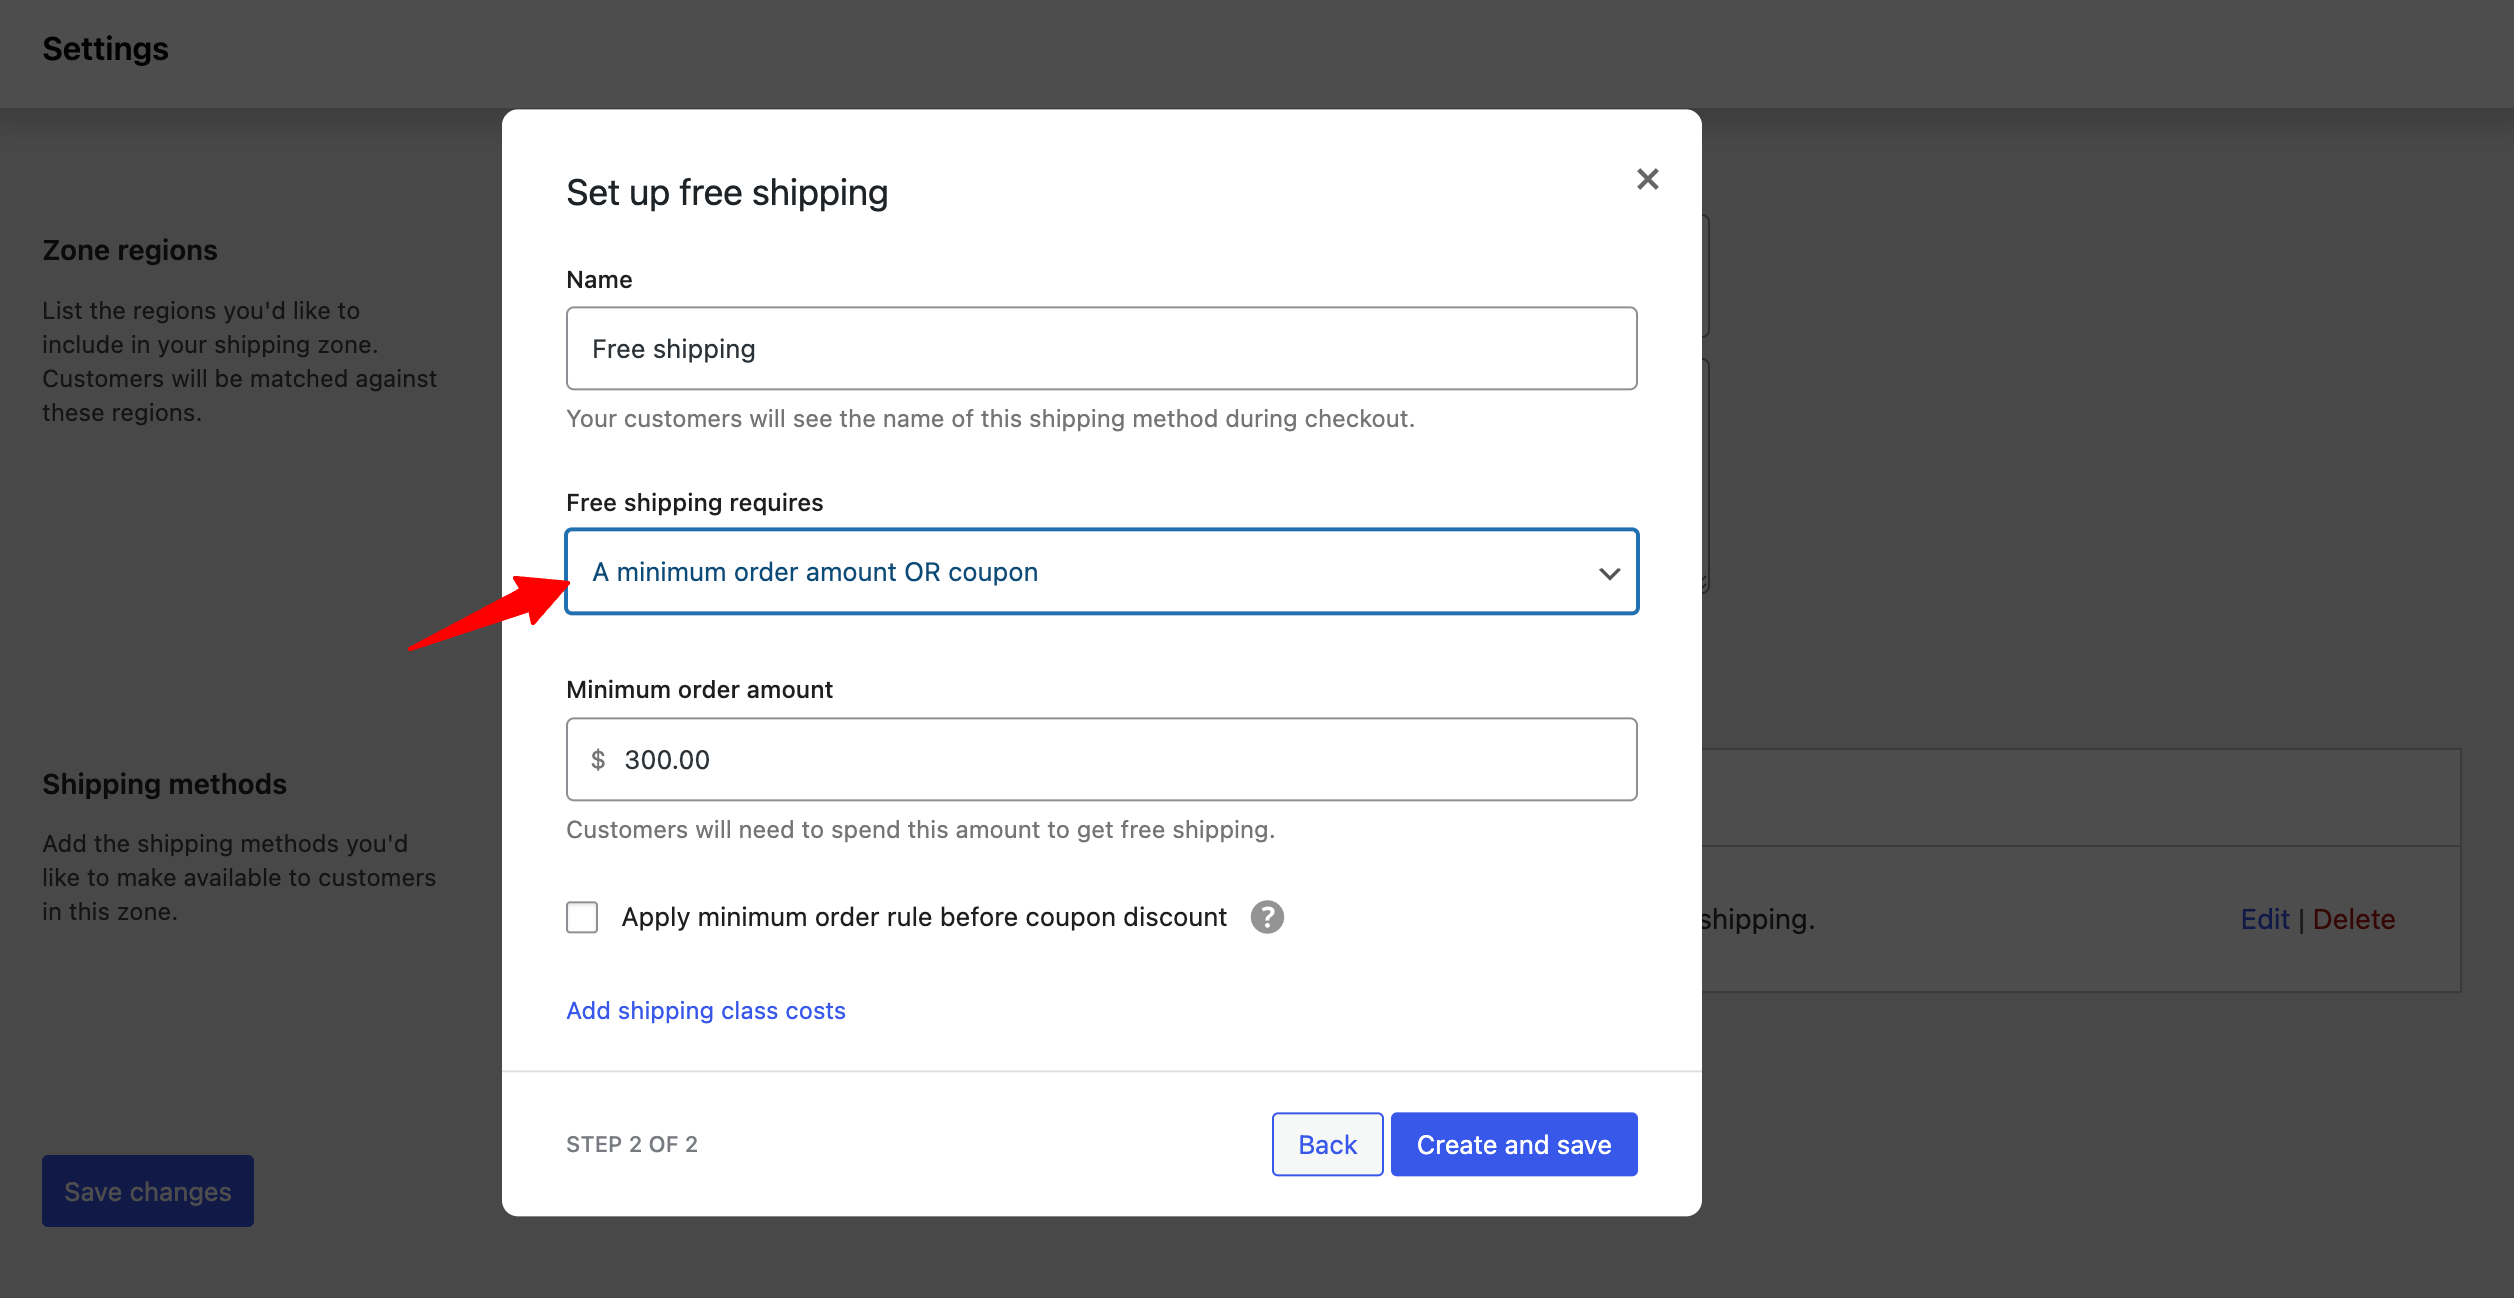
A minimum order amount OR a coupon: This option gives users both options. Either they can avail free shipping using a coupon, or if they purchase a product worth a certain amount.
A minimum order amount AND a coupon: If you choose this option, then customers have to do both: buy products worth a certain amount and apply a coupon code to avail of free shipping.
Step 4: Add a flat rate
The "Flat Rate" shipping method is a commonly used and flexible option that allows you to charge a fixed shipping fee for orders based on various criteria.
To add a flat rate, click on "Add Shipping Method", select Flat rate, and hit Continue.
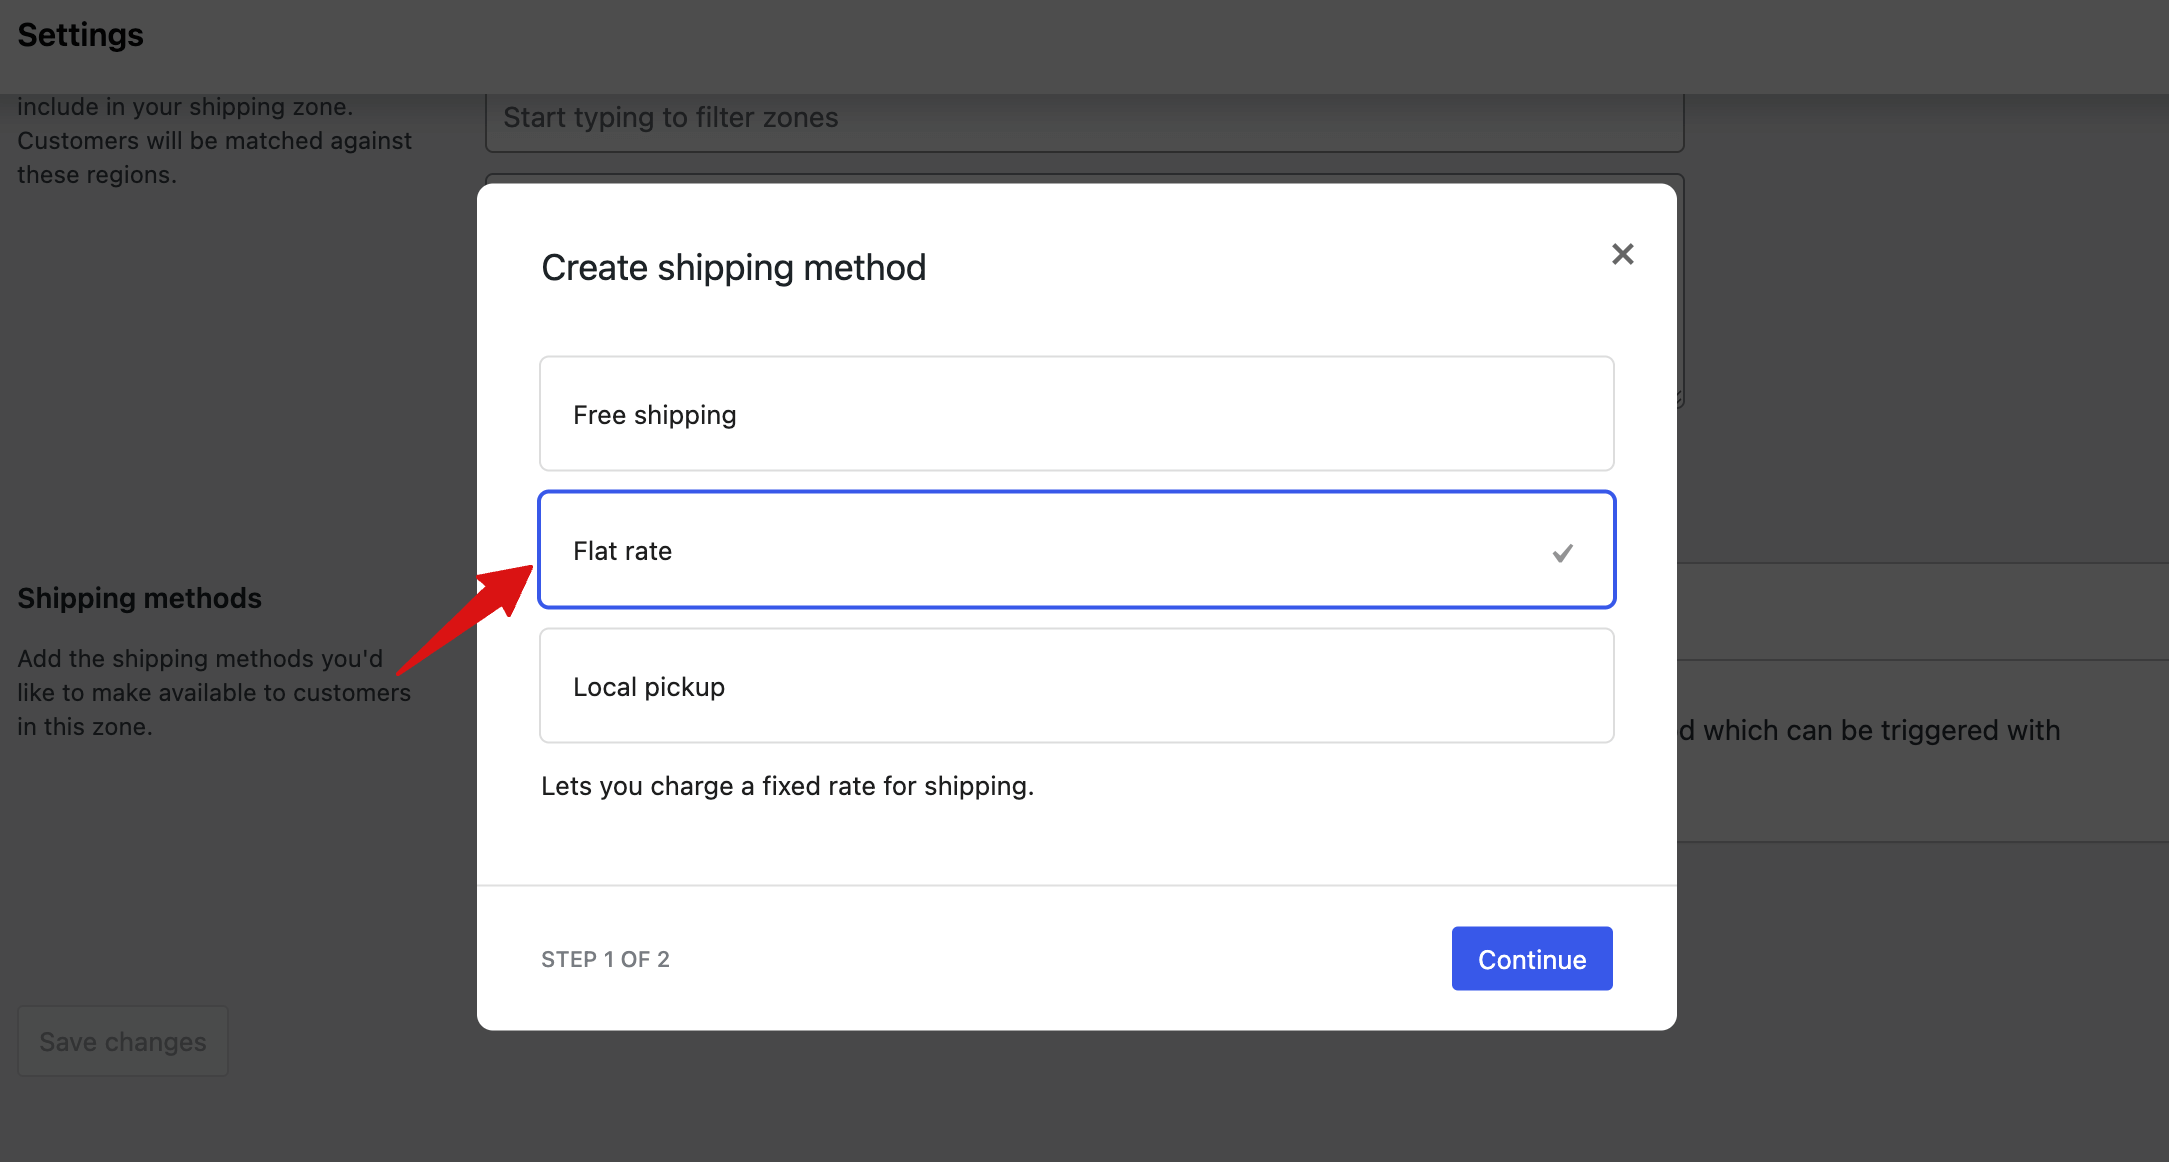
Here's how the flat rate settings work in WooCommerce:
- Title: Set a title for the Flat Rate shipping method. It will be displayed to customers during the checkout process.
- Tax Status: Choose whether the shipping fee will be taxable or not.
- Cost: You define a fixed cost or fee that will be charged for shipping using the Flat Rate method. You can use a placeholder to charge per item or a percentage of the total order total instead of a flat rate.
The placeholder[qty] charges an additional fee for each product in the cart. For example, using 10 + (2 * [qty]) will charge a base of $10 plus $2 for each item in the order.
The placeholder [fee] adds an extra shipping fee as a percentage of the total. Set a percentage, then a min_fee or max_fee, so the fee can’t go below or above a certain amount.
For example, you can use something like 5 + [fee percent=”5″ max_fee=”15″]. This will cost your customer $5 dollar plus 5 percent of their order total, but not exceeding $15.
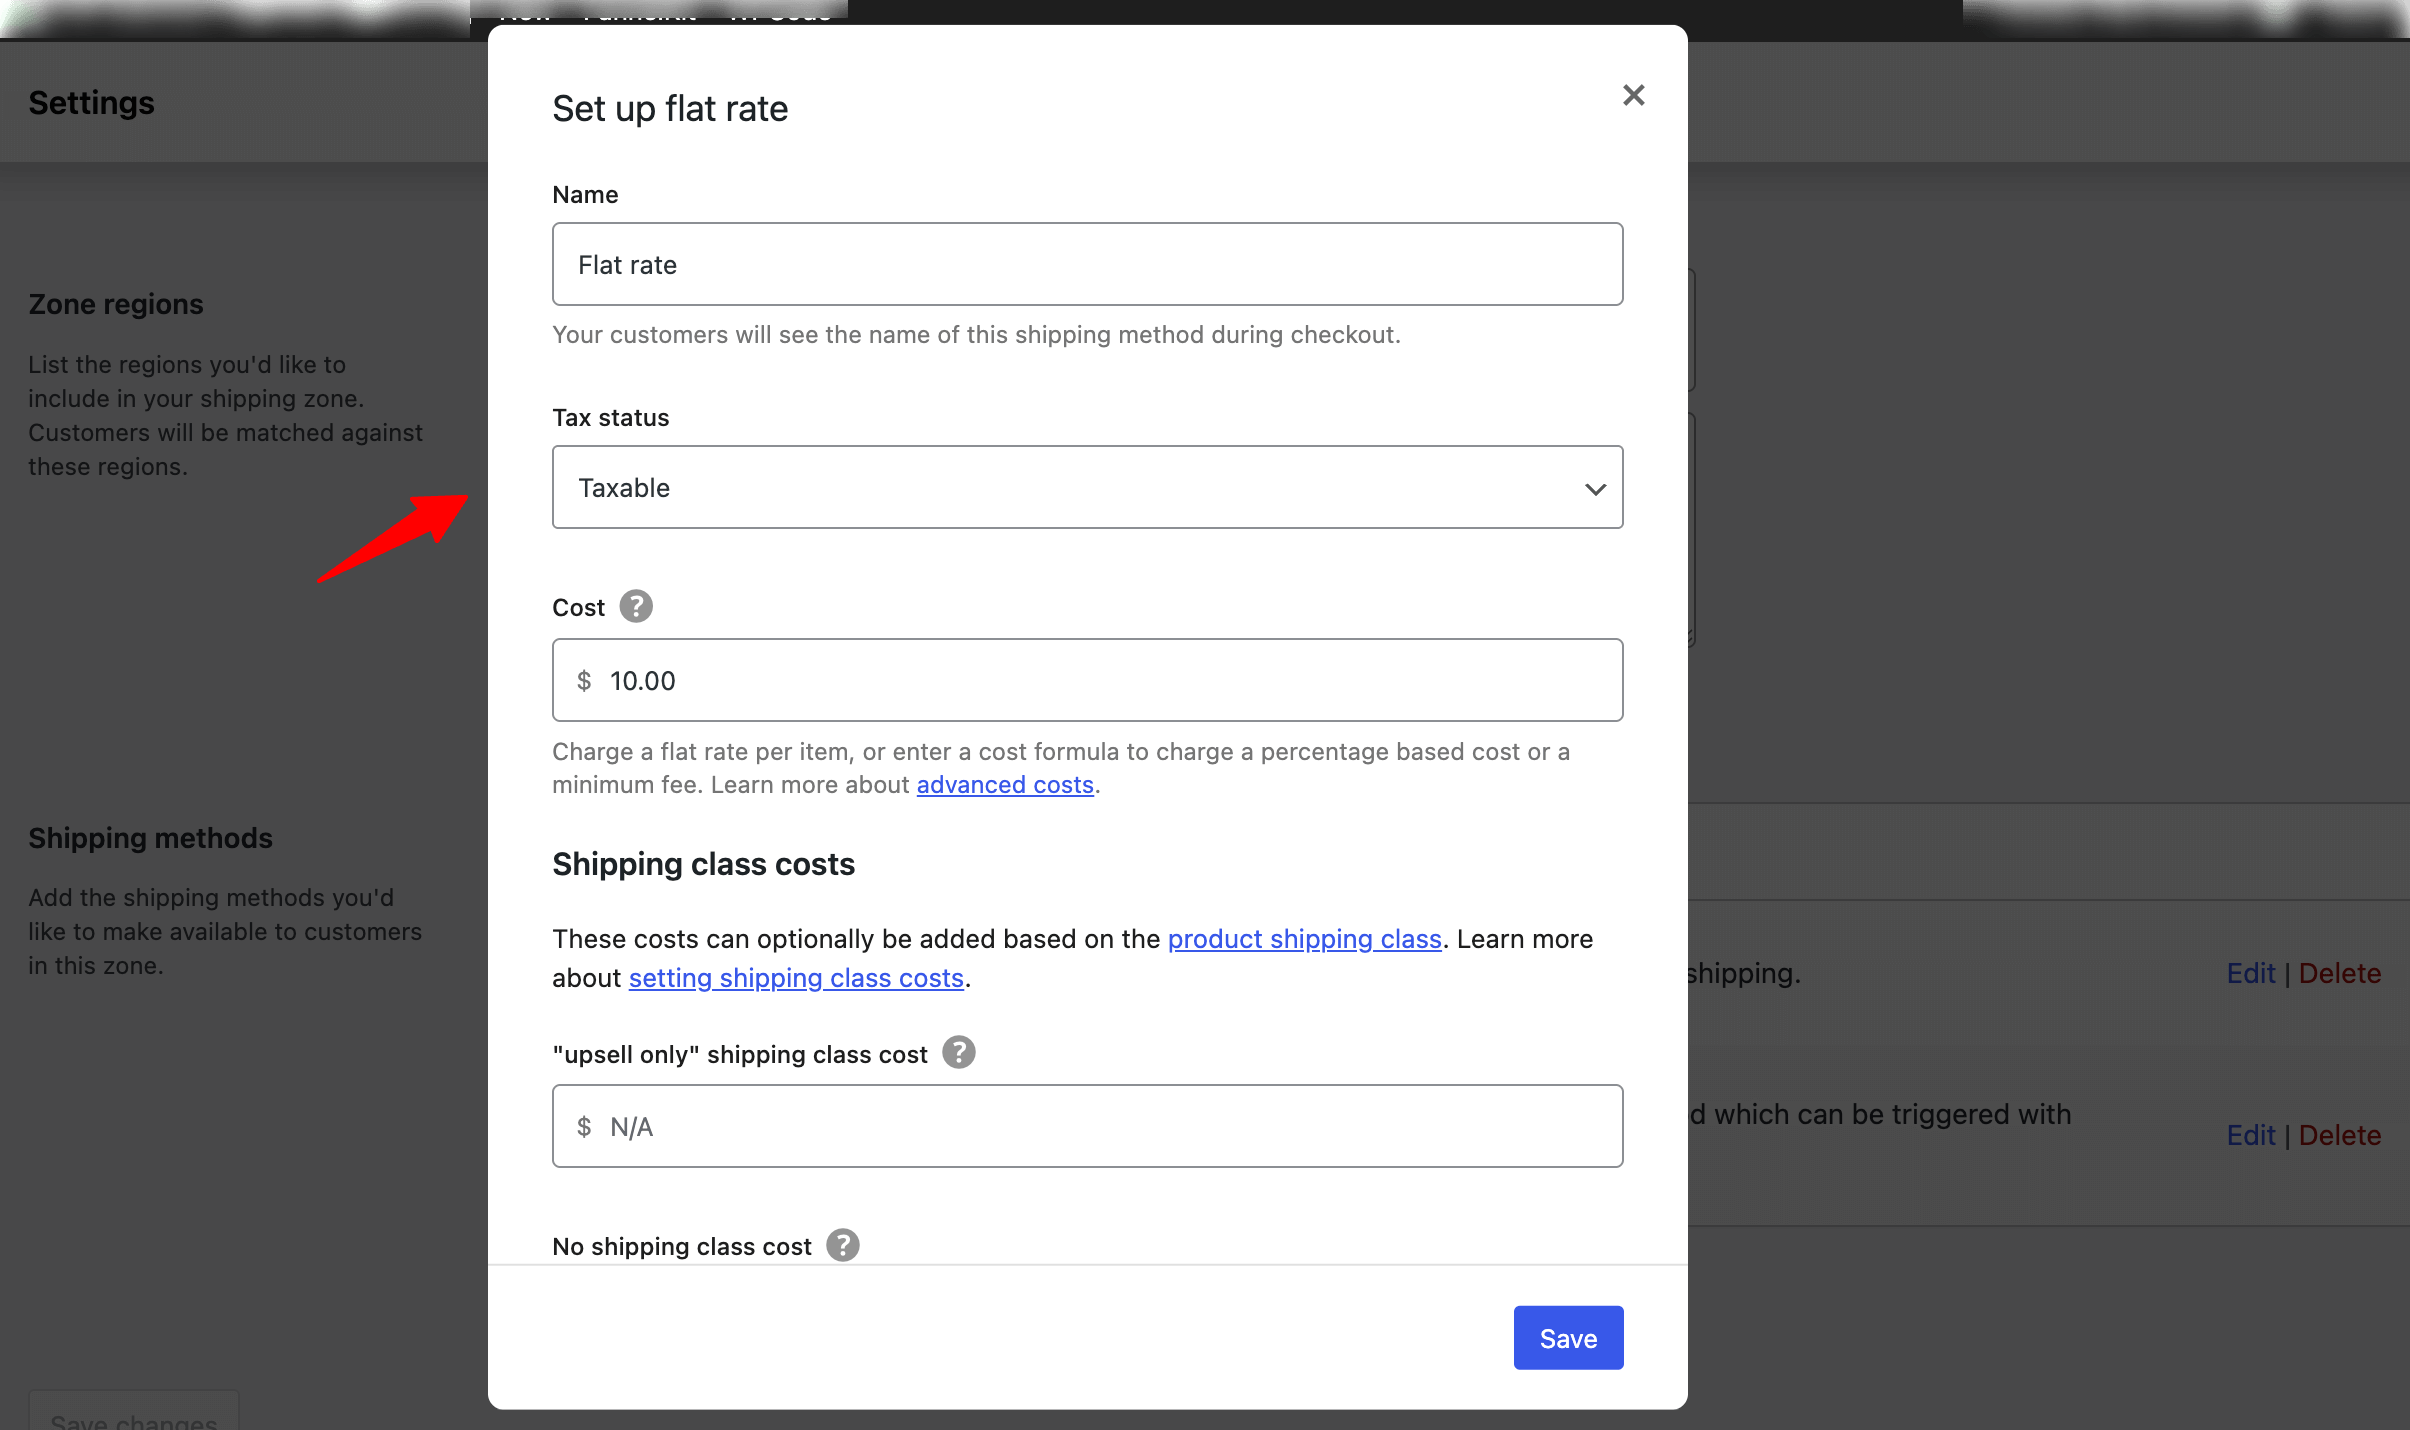
Make sure to hit the ‘Save changes’ button when done.
Step 5: Add a local pickup method
The local pickup shipping option allows customers to place orders online and then pick up their purchased items in person from a physical location, such as a retail store, warehouse, or any pickup point.
Again, to add local pick, click on "Add Shipping Method", select Local pickup, and hit Continue. Next, configure the following:
- Title: Set a title that will be displayed to customers during the checkout process.
- Cost: Define a fixed cost or fee that will be charged for this type of shipping.
- Tax Status: Specify whether the cost will be taxable or not. You can choose between "Taxable" and "None".
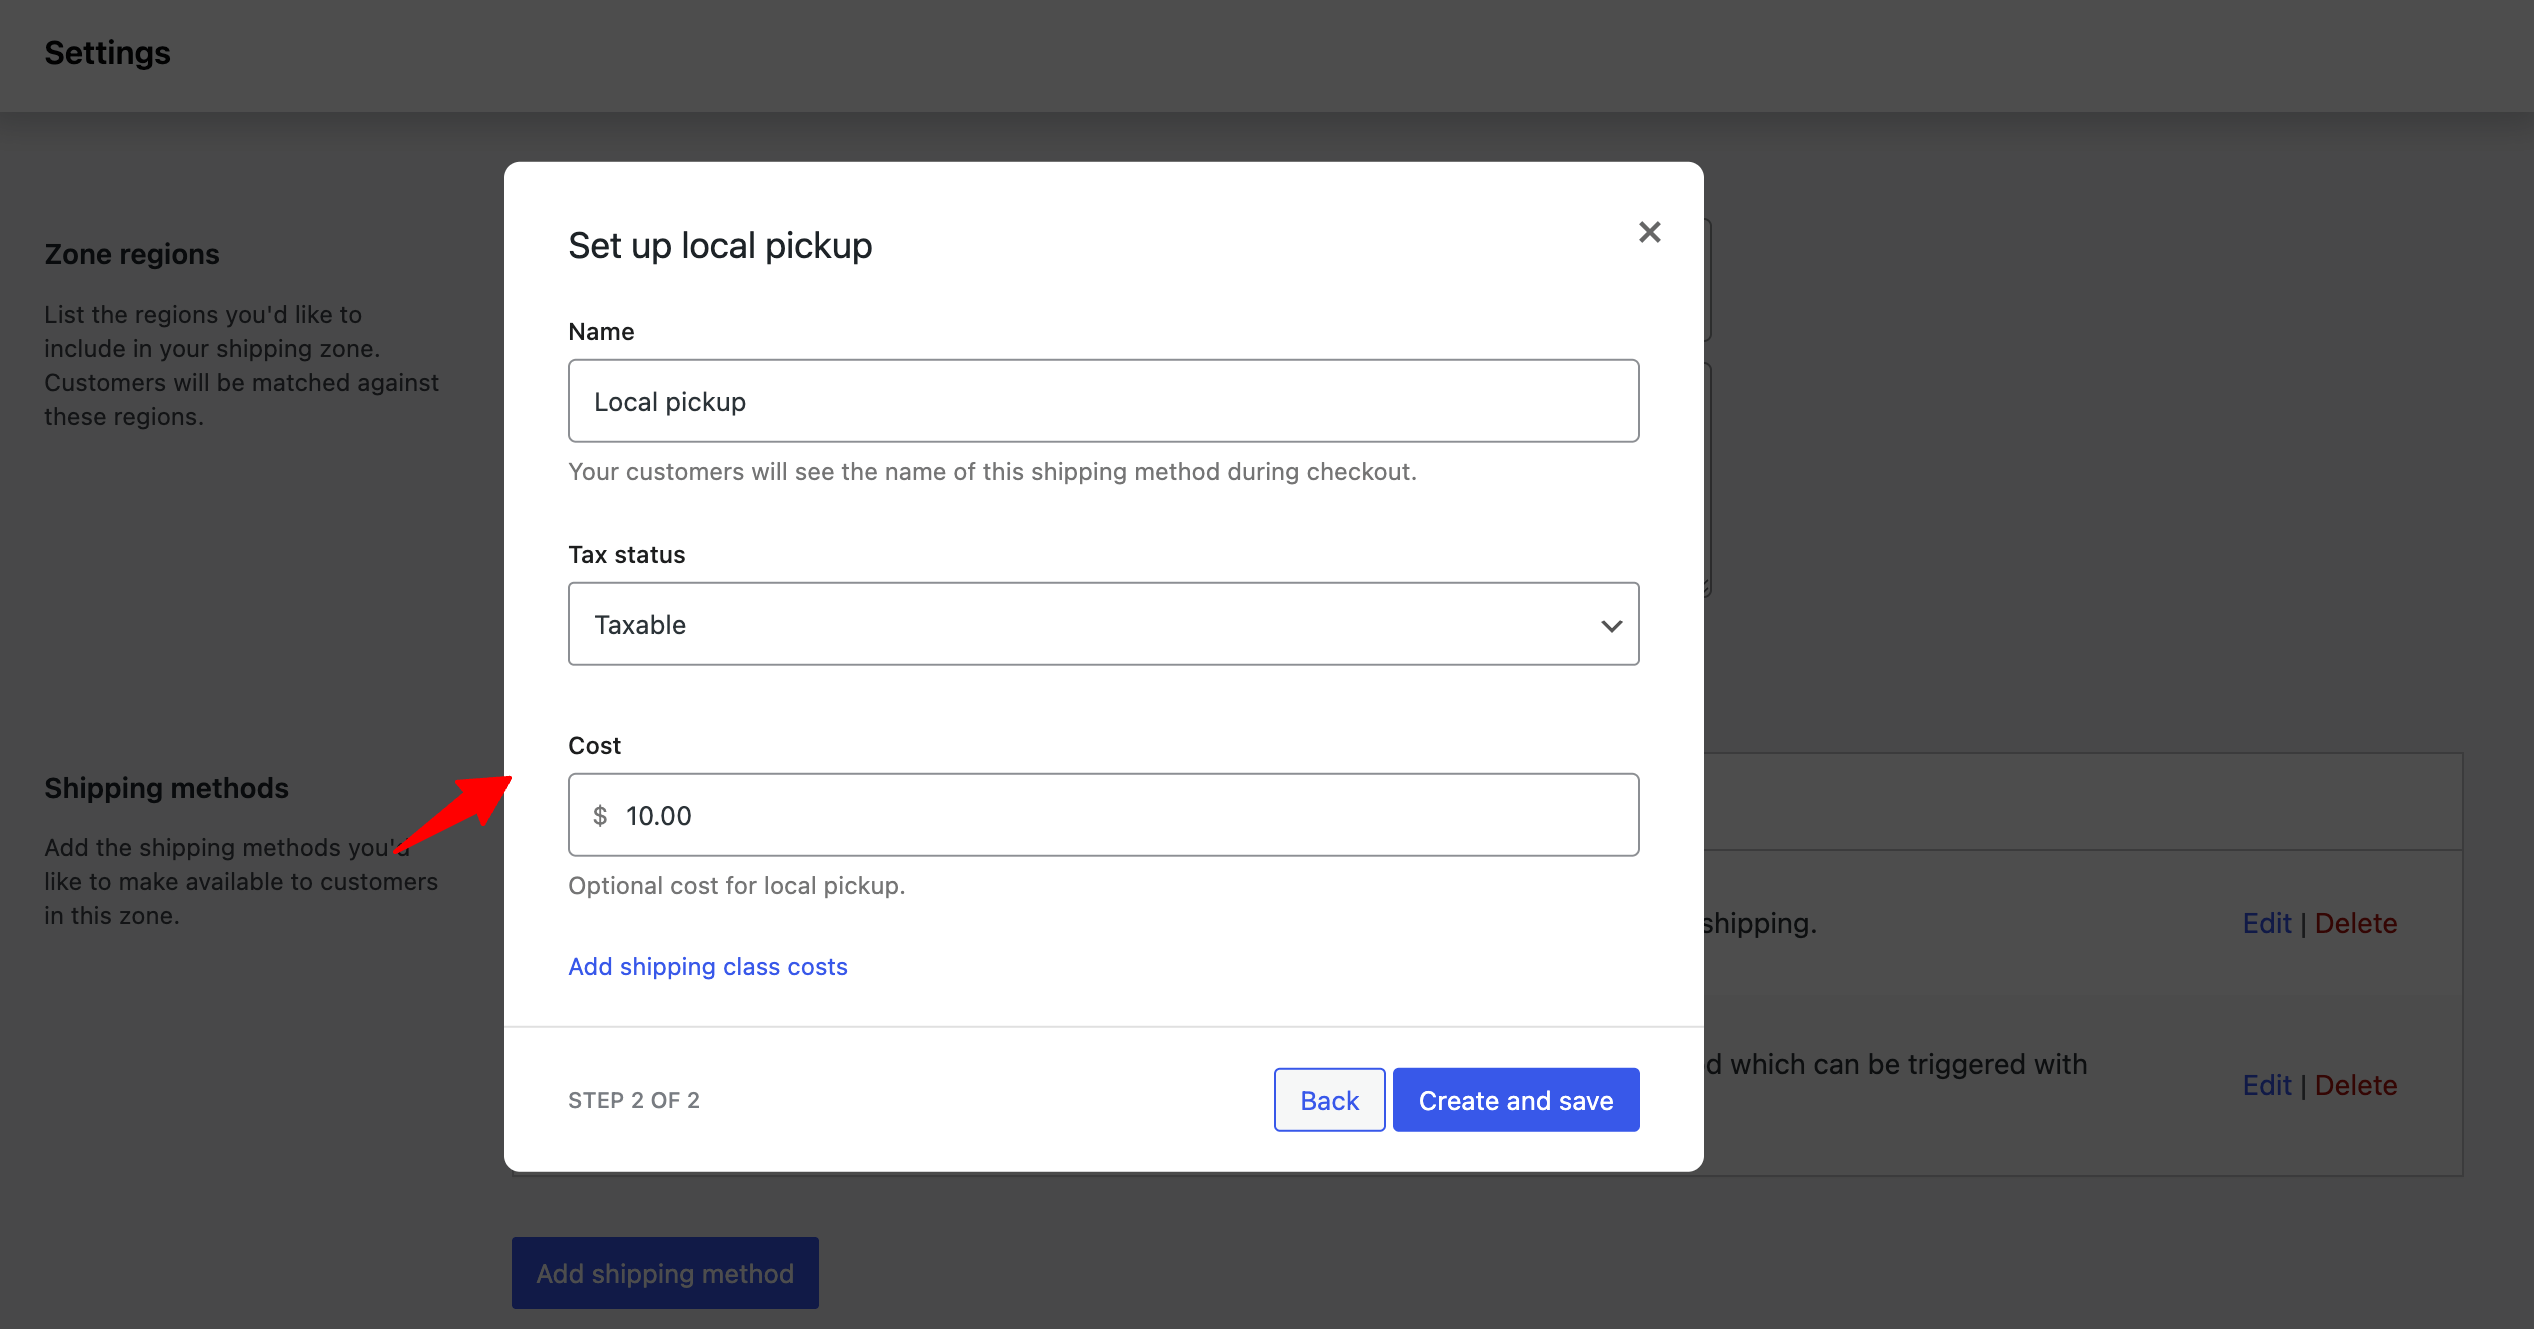
After adding the shopping methods, click on Save Changes to save the zone.
Here is how to configure a shipping zone and set different shipping methods.
You can repeat the same process to create multiple shipping zones and set methods based on your strategy. Later, in this blog, you can learn how to manage different shipping zones.
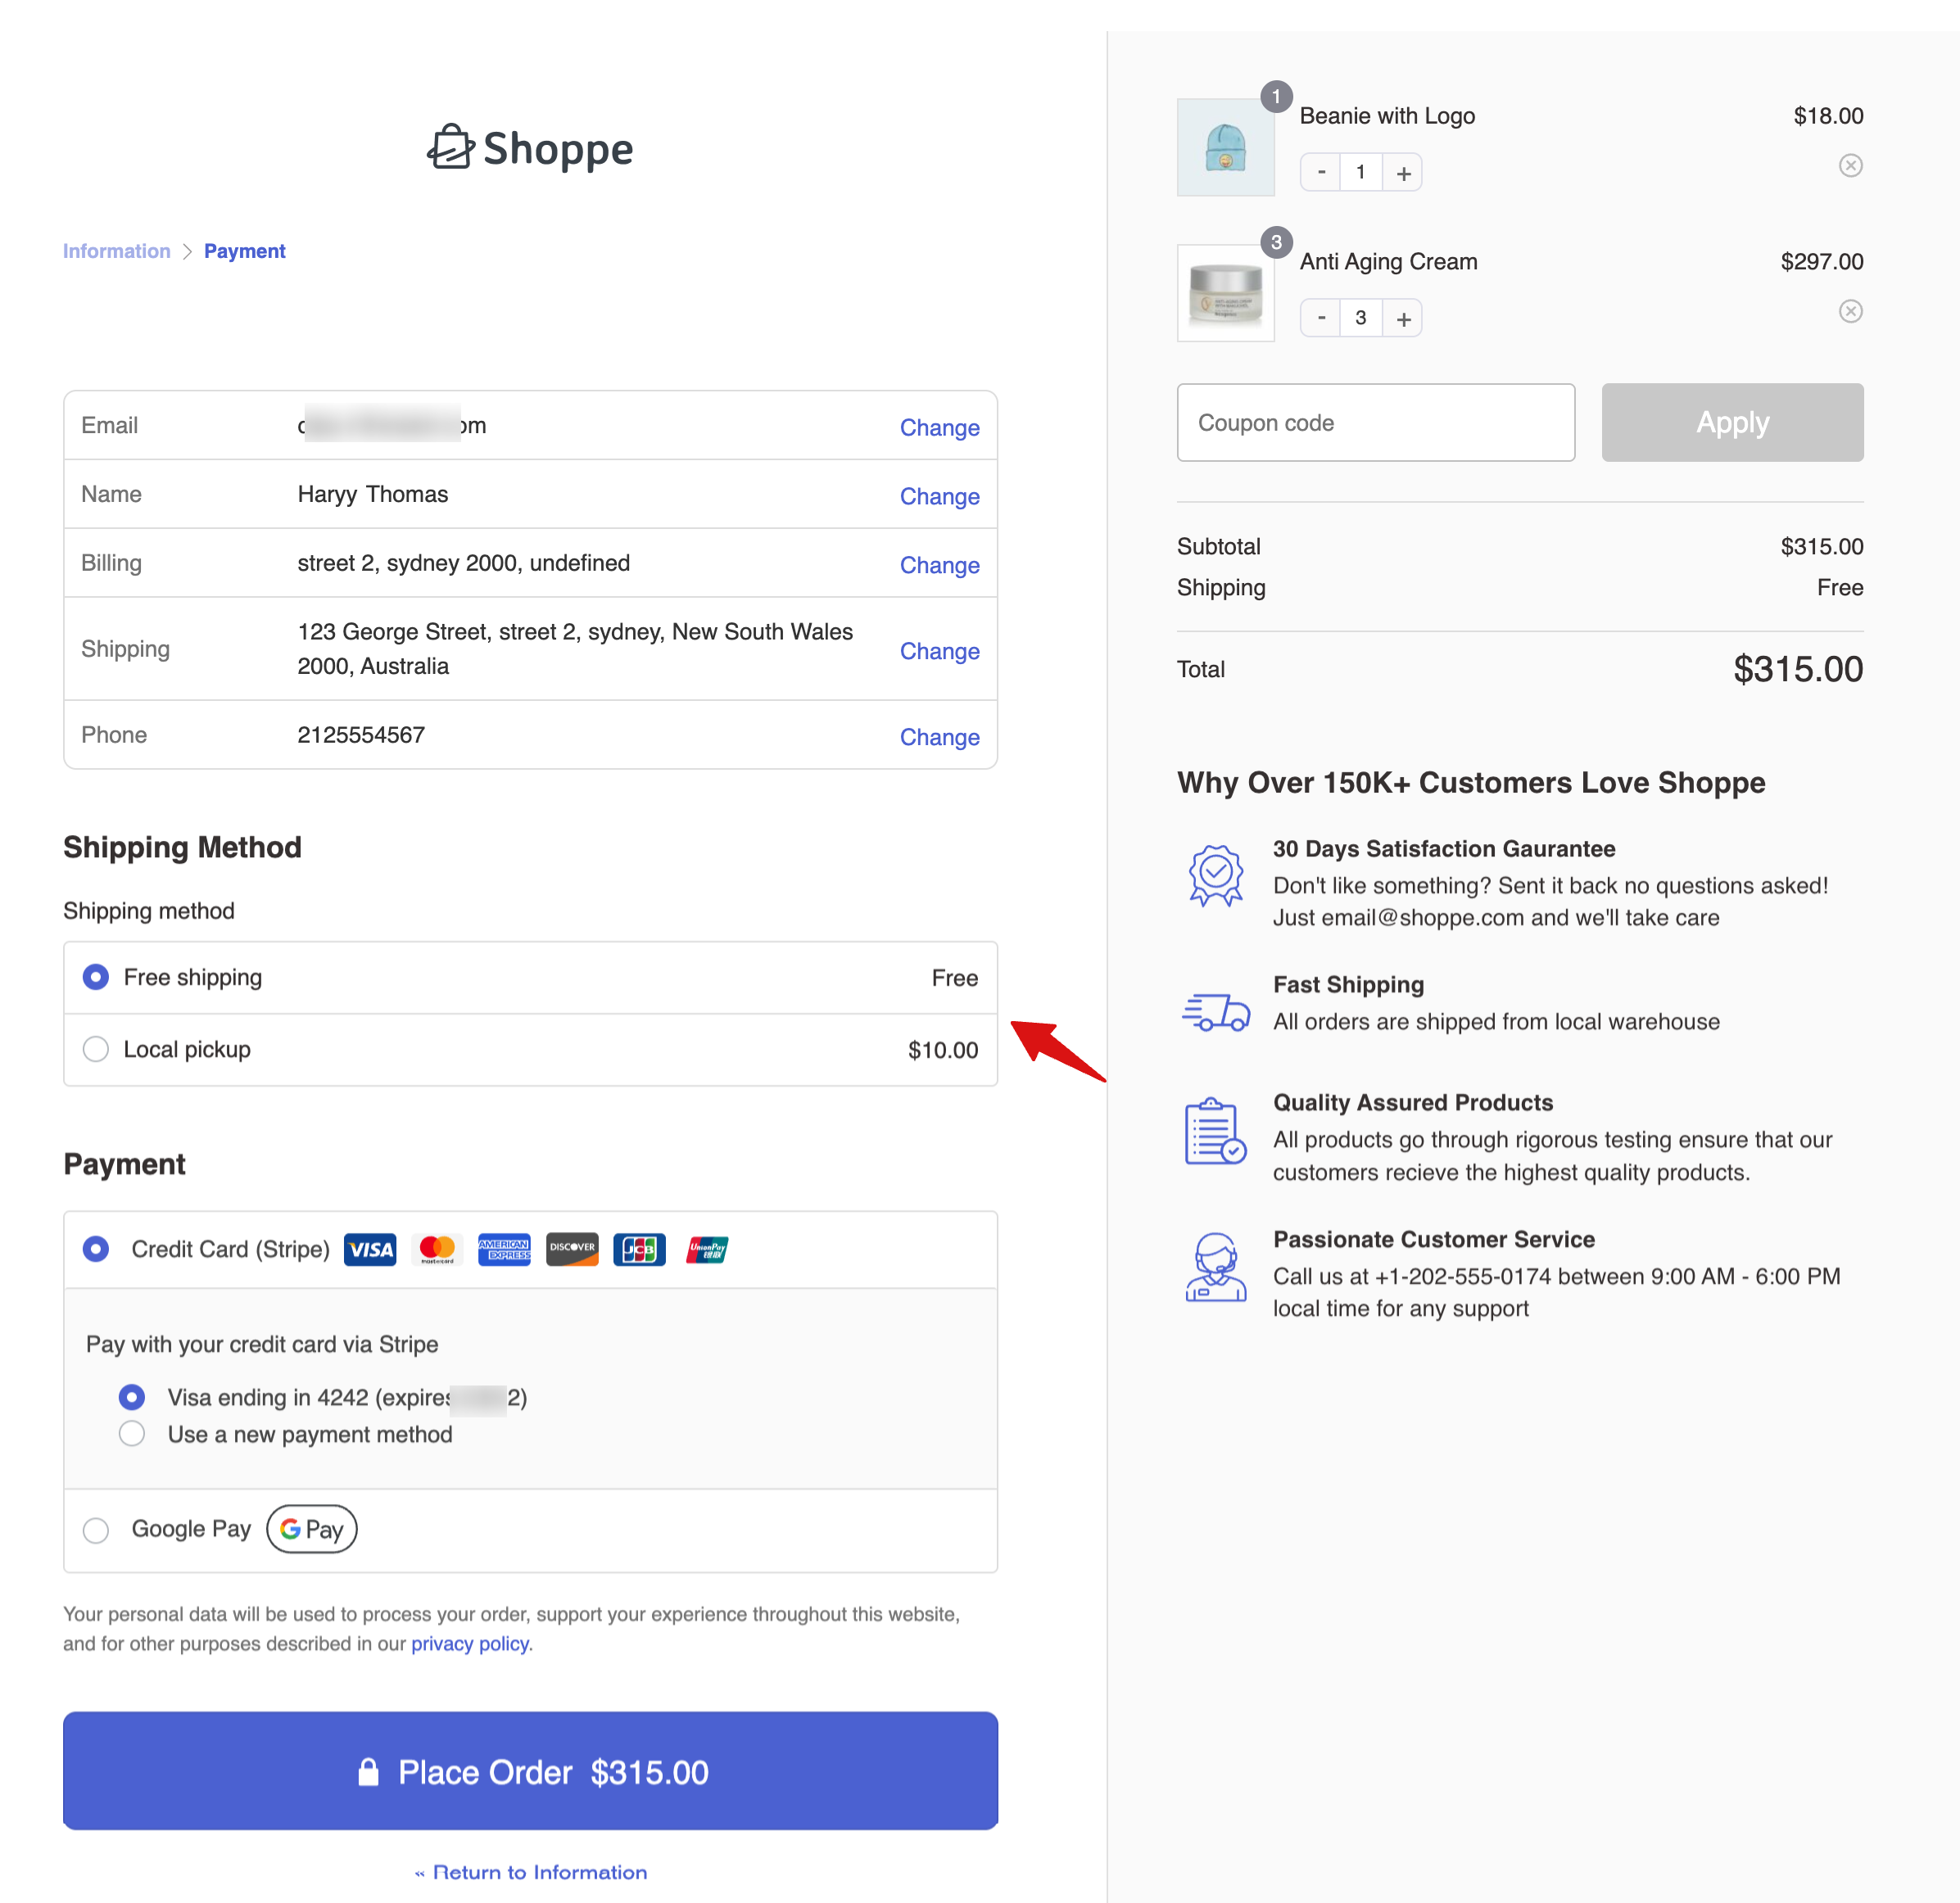
When a customer tries to place an order, WooCommerce automatically calculates and displays the available shipping methods at checkout based on the customer’s location and your shipping settings.
How to Set Up Shipping Classes for Different Products to Charge Accurate Shipping Fees
Shipping classes in WooCommerce let you group similar products to apply the same shipping rates and methods.
This feature is particularly useful when you have products with different shipping requirements, such as size, weight, or shipping destination, and you want to apply specific shipping rules to each group of products.
For example, a shirt weighs much less than boots. In this scenario, if you want to charge differently for these two items, you can set different shipping classes for them, like assigning lightweight to t-shirts and heavyweight to boots.
To use a WooCommerce shipping class, first, you need to create the class, then set up rates, and lastly, assign the classes to the products for which you want the WooCommerce shipping rates applicable.
Step 1: Create a shipping class
To create a shipping class, navigate to WooCommerce ⇒ Settings ⇒ Shipping. Then go to the WooCommerce shipping classes tab and click on “Add Shipping Class.”
After that, provide the shipping class name, slug, and description. Finally, click “Create” to save the new class.
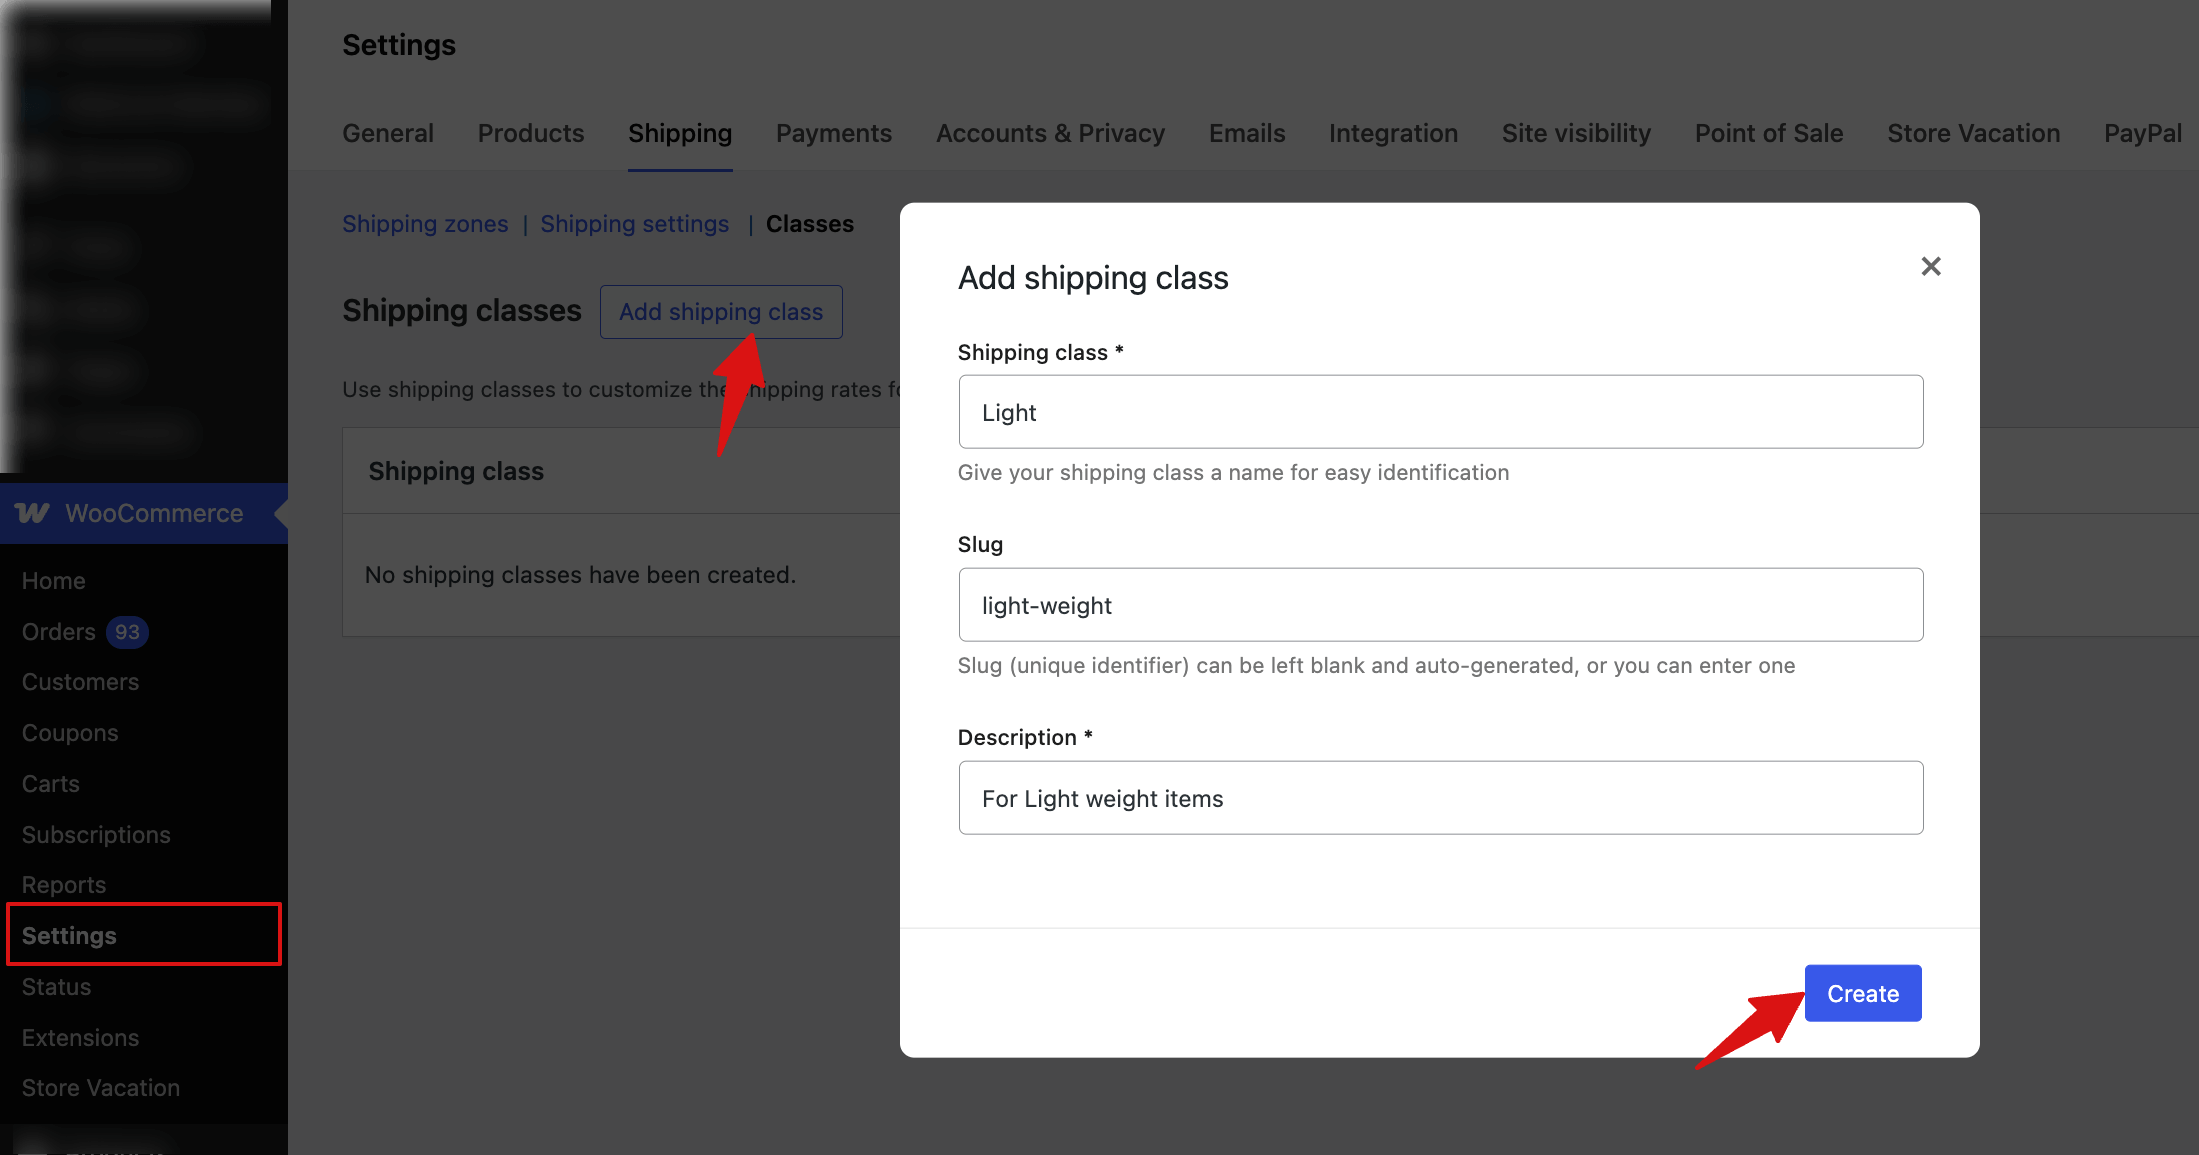
You can add as many WooCommerce shipping classes as you want.
Now, you can set up different rates for the WooCommerce shipping zones with flat rates for products with different shipping classes.
Step 2: Set up different rates for different shipping classes
Edit the Flat Rate shipping for the zone where you want to set up custom rates. You’ll now see new settings options.
Here, you’ll find fields to set shipping rates for all the WooCommerce shipping classes you’ve created.
You also have to choose the calculation type. The options are listed below:
- Per Class: The shipping class determines the shipping cost.
- Per Order: The most expensive item determines the shipping cost.

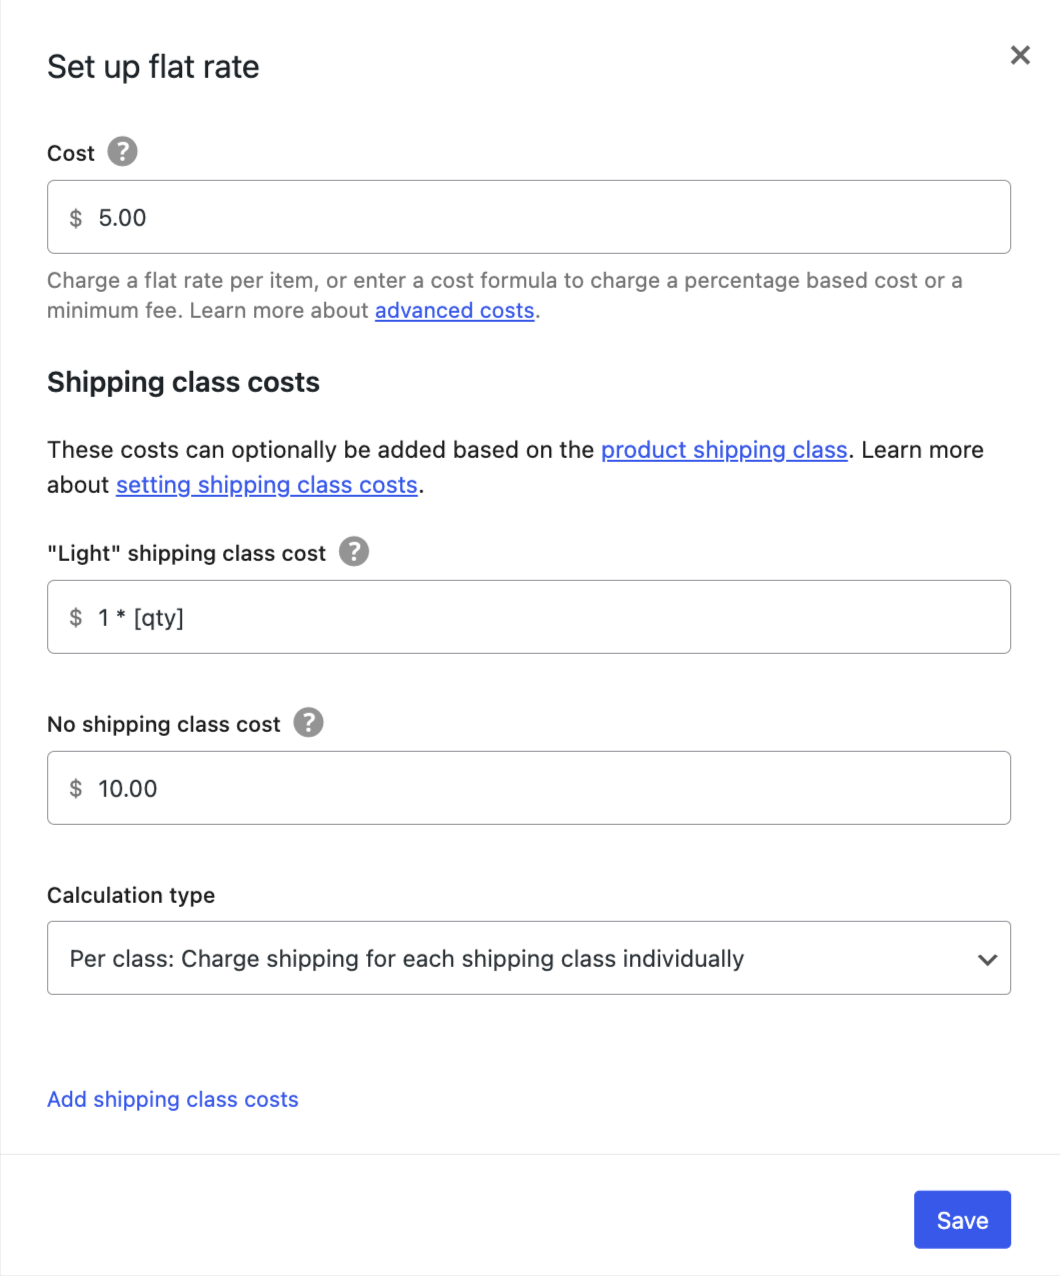
After setting up the rates, click on Save Changes.
Once your shipping classes are created, you must assign them to your WooCommerce store products.
Step 3: Assign WooCommerce shipping classes to products
To assign a shipping class, edit the product. Then, under the Product settings, go to the Shipping tab.
Here, you can add the shipping class from the dropdown.
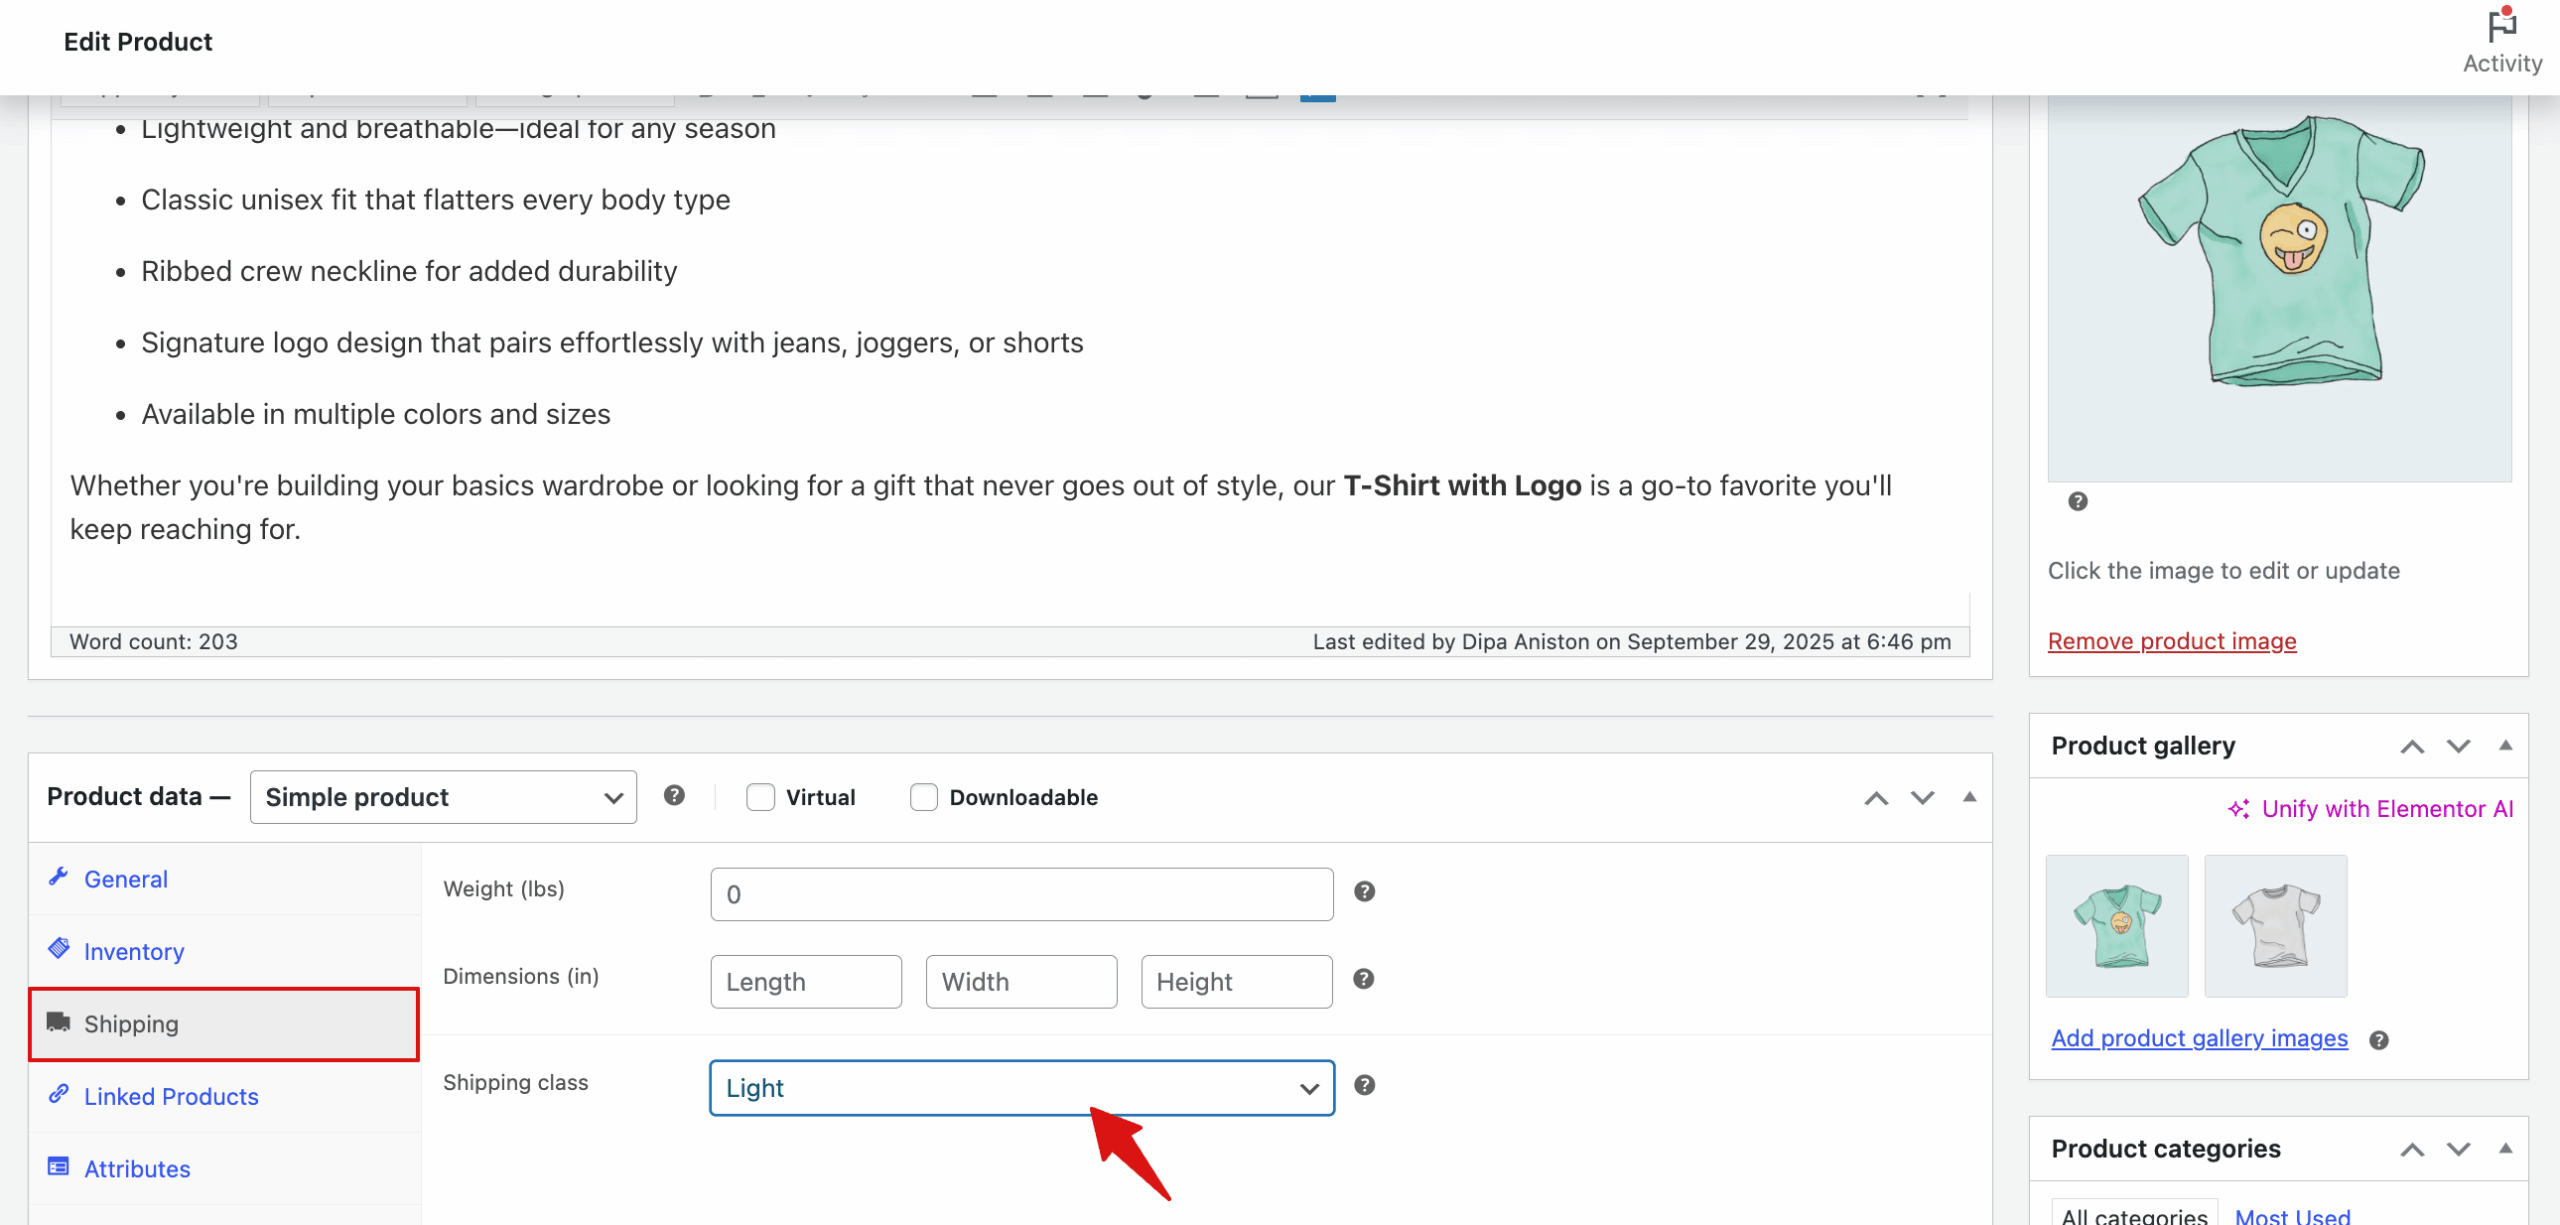
After adding the shipping class, click on Update.
This is how you can set up different shipping rates for different product groups.
Manage Shipping Zones And Methods in WooCommerce
Shipping zones let you control which shipping methods are available to customers based on their location.
Properly managing zones ensures accurate shipping costs and a smooth checkout experience.
Sort WooCommerce Shipping Zones
WooCommerce will match a customer’s shipping address to a single zone and offer them the shipping methods assigned to that zone. Shipping zones match the customer address from top to bottom; the first to match is always used.
You can sort the existing shipping zones just by drag and drop. Just click the six dots on the left side and drag and drop to change the order.
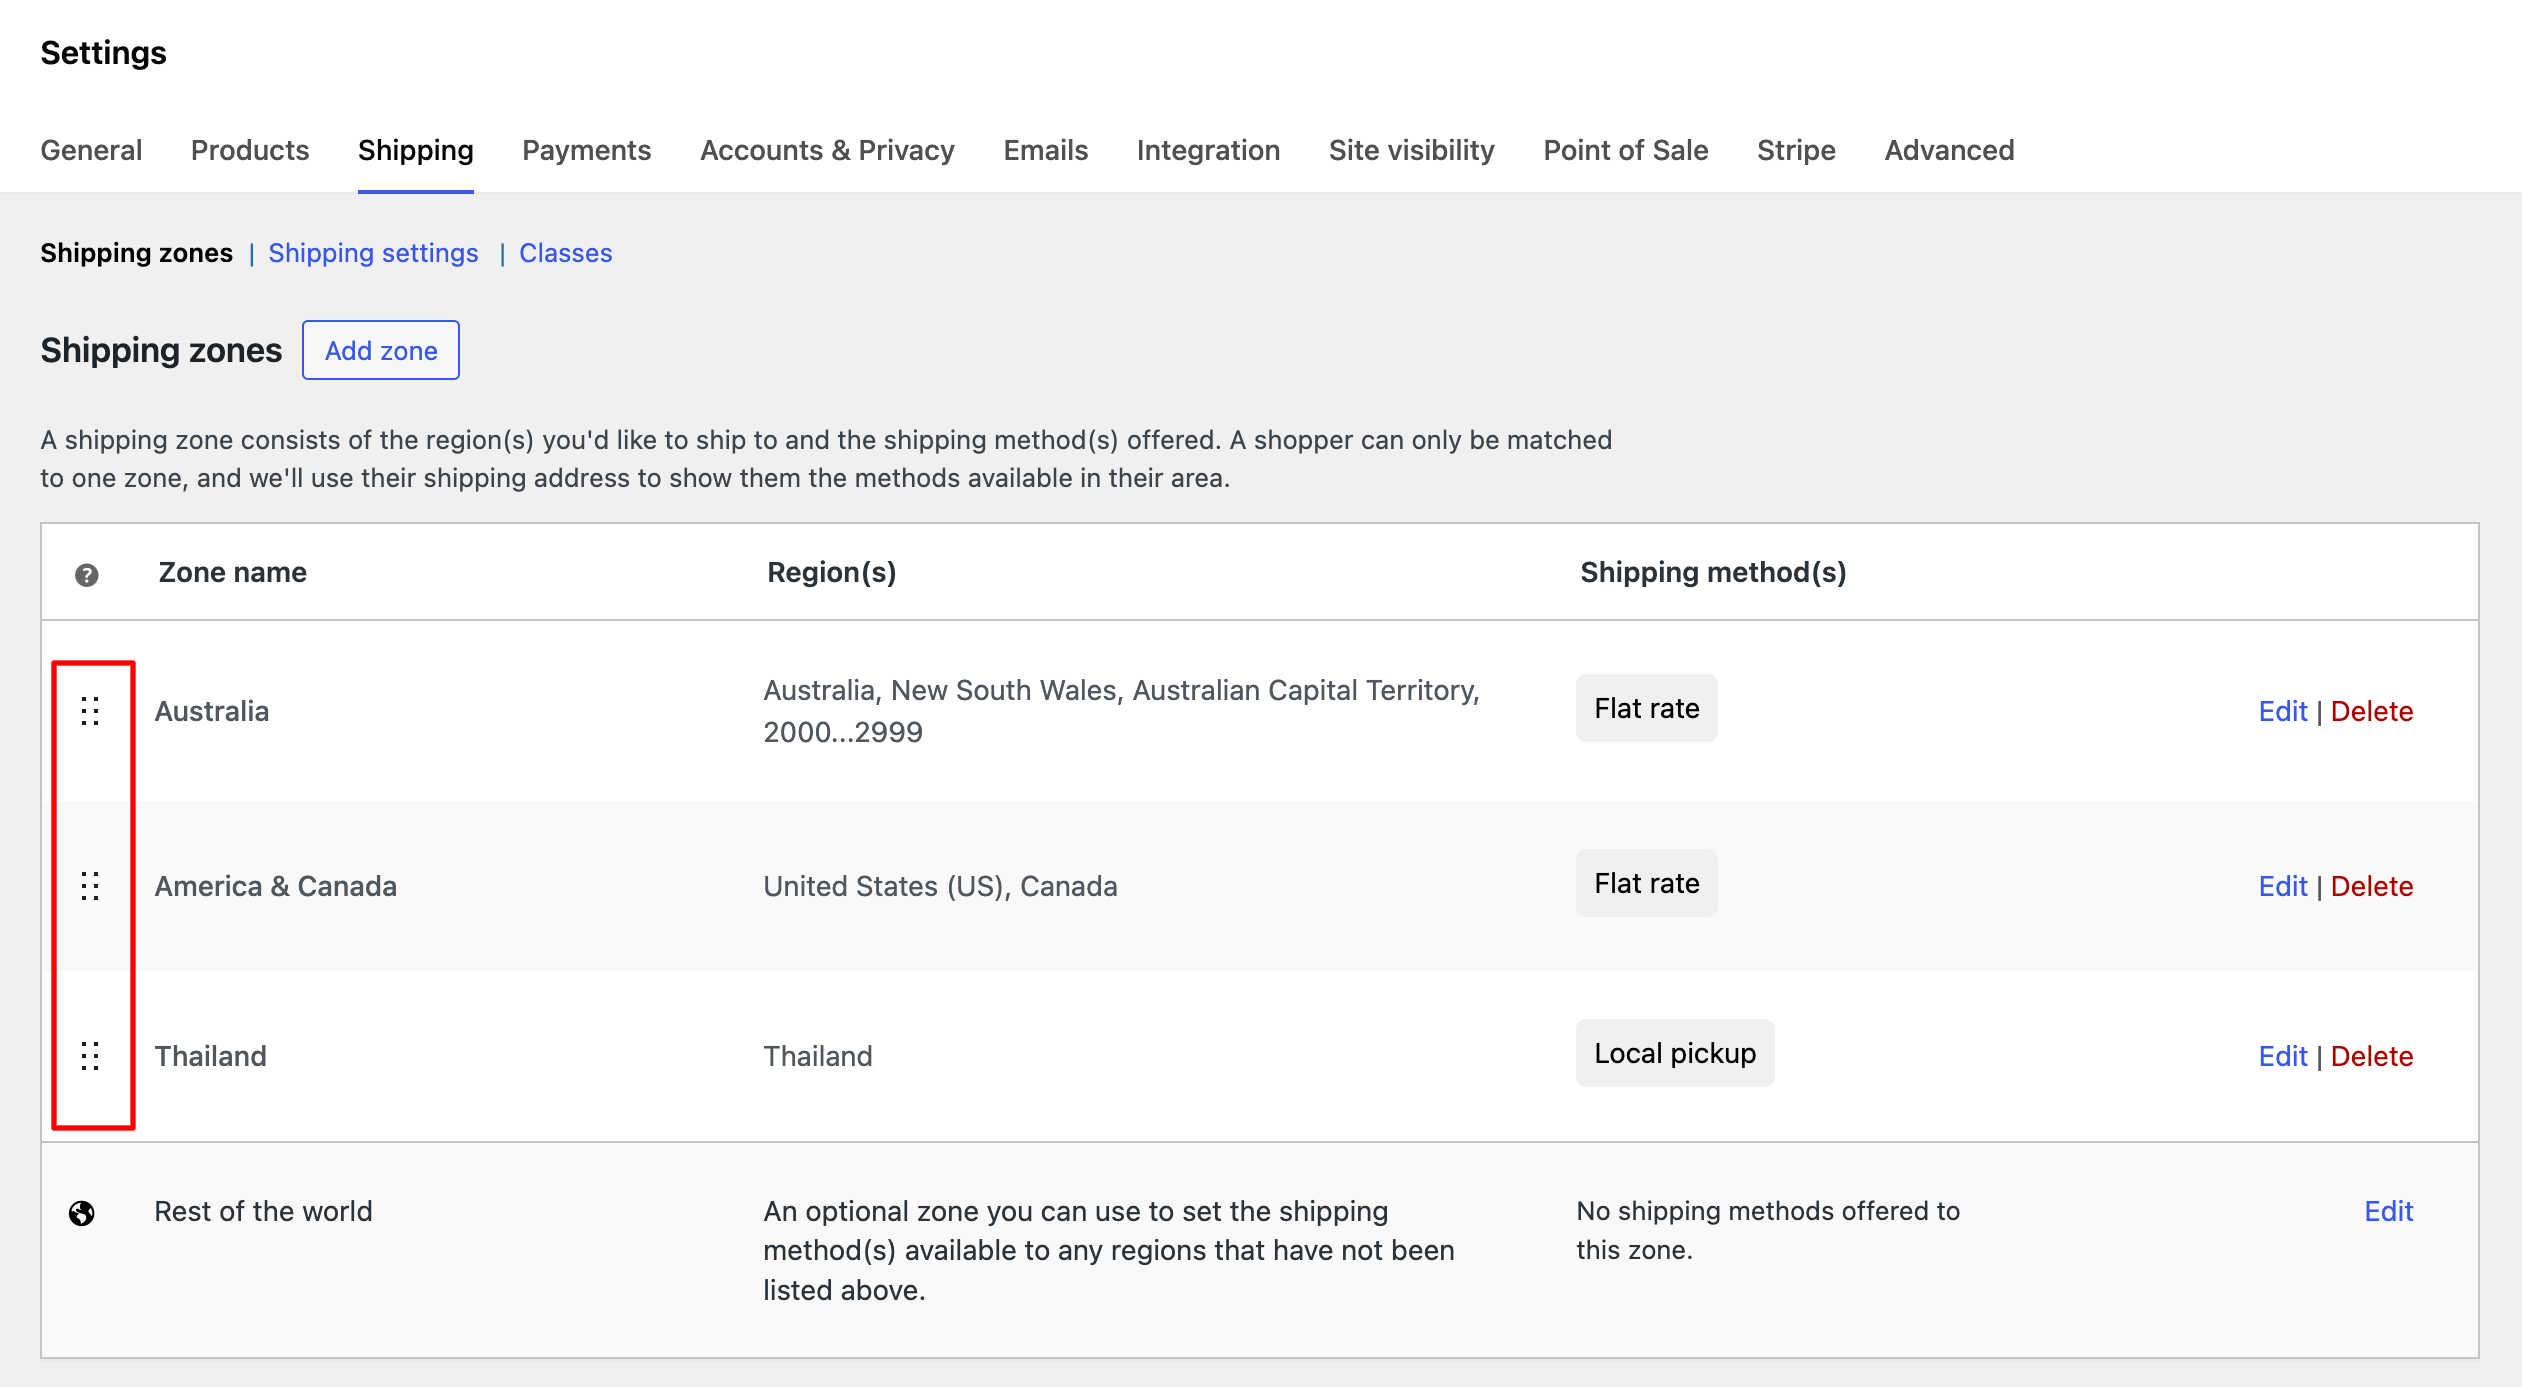
Here is how to rearrange your WooCommerce shipping zones.
Edit Shipping Zones in WooCommerce
To edit a shipping zone, hover over the Zone and click on the “Edit” option.
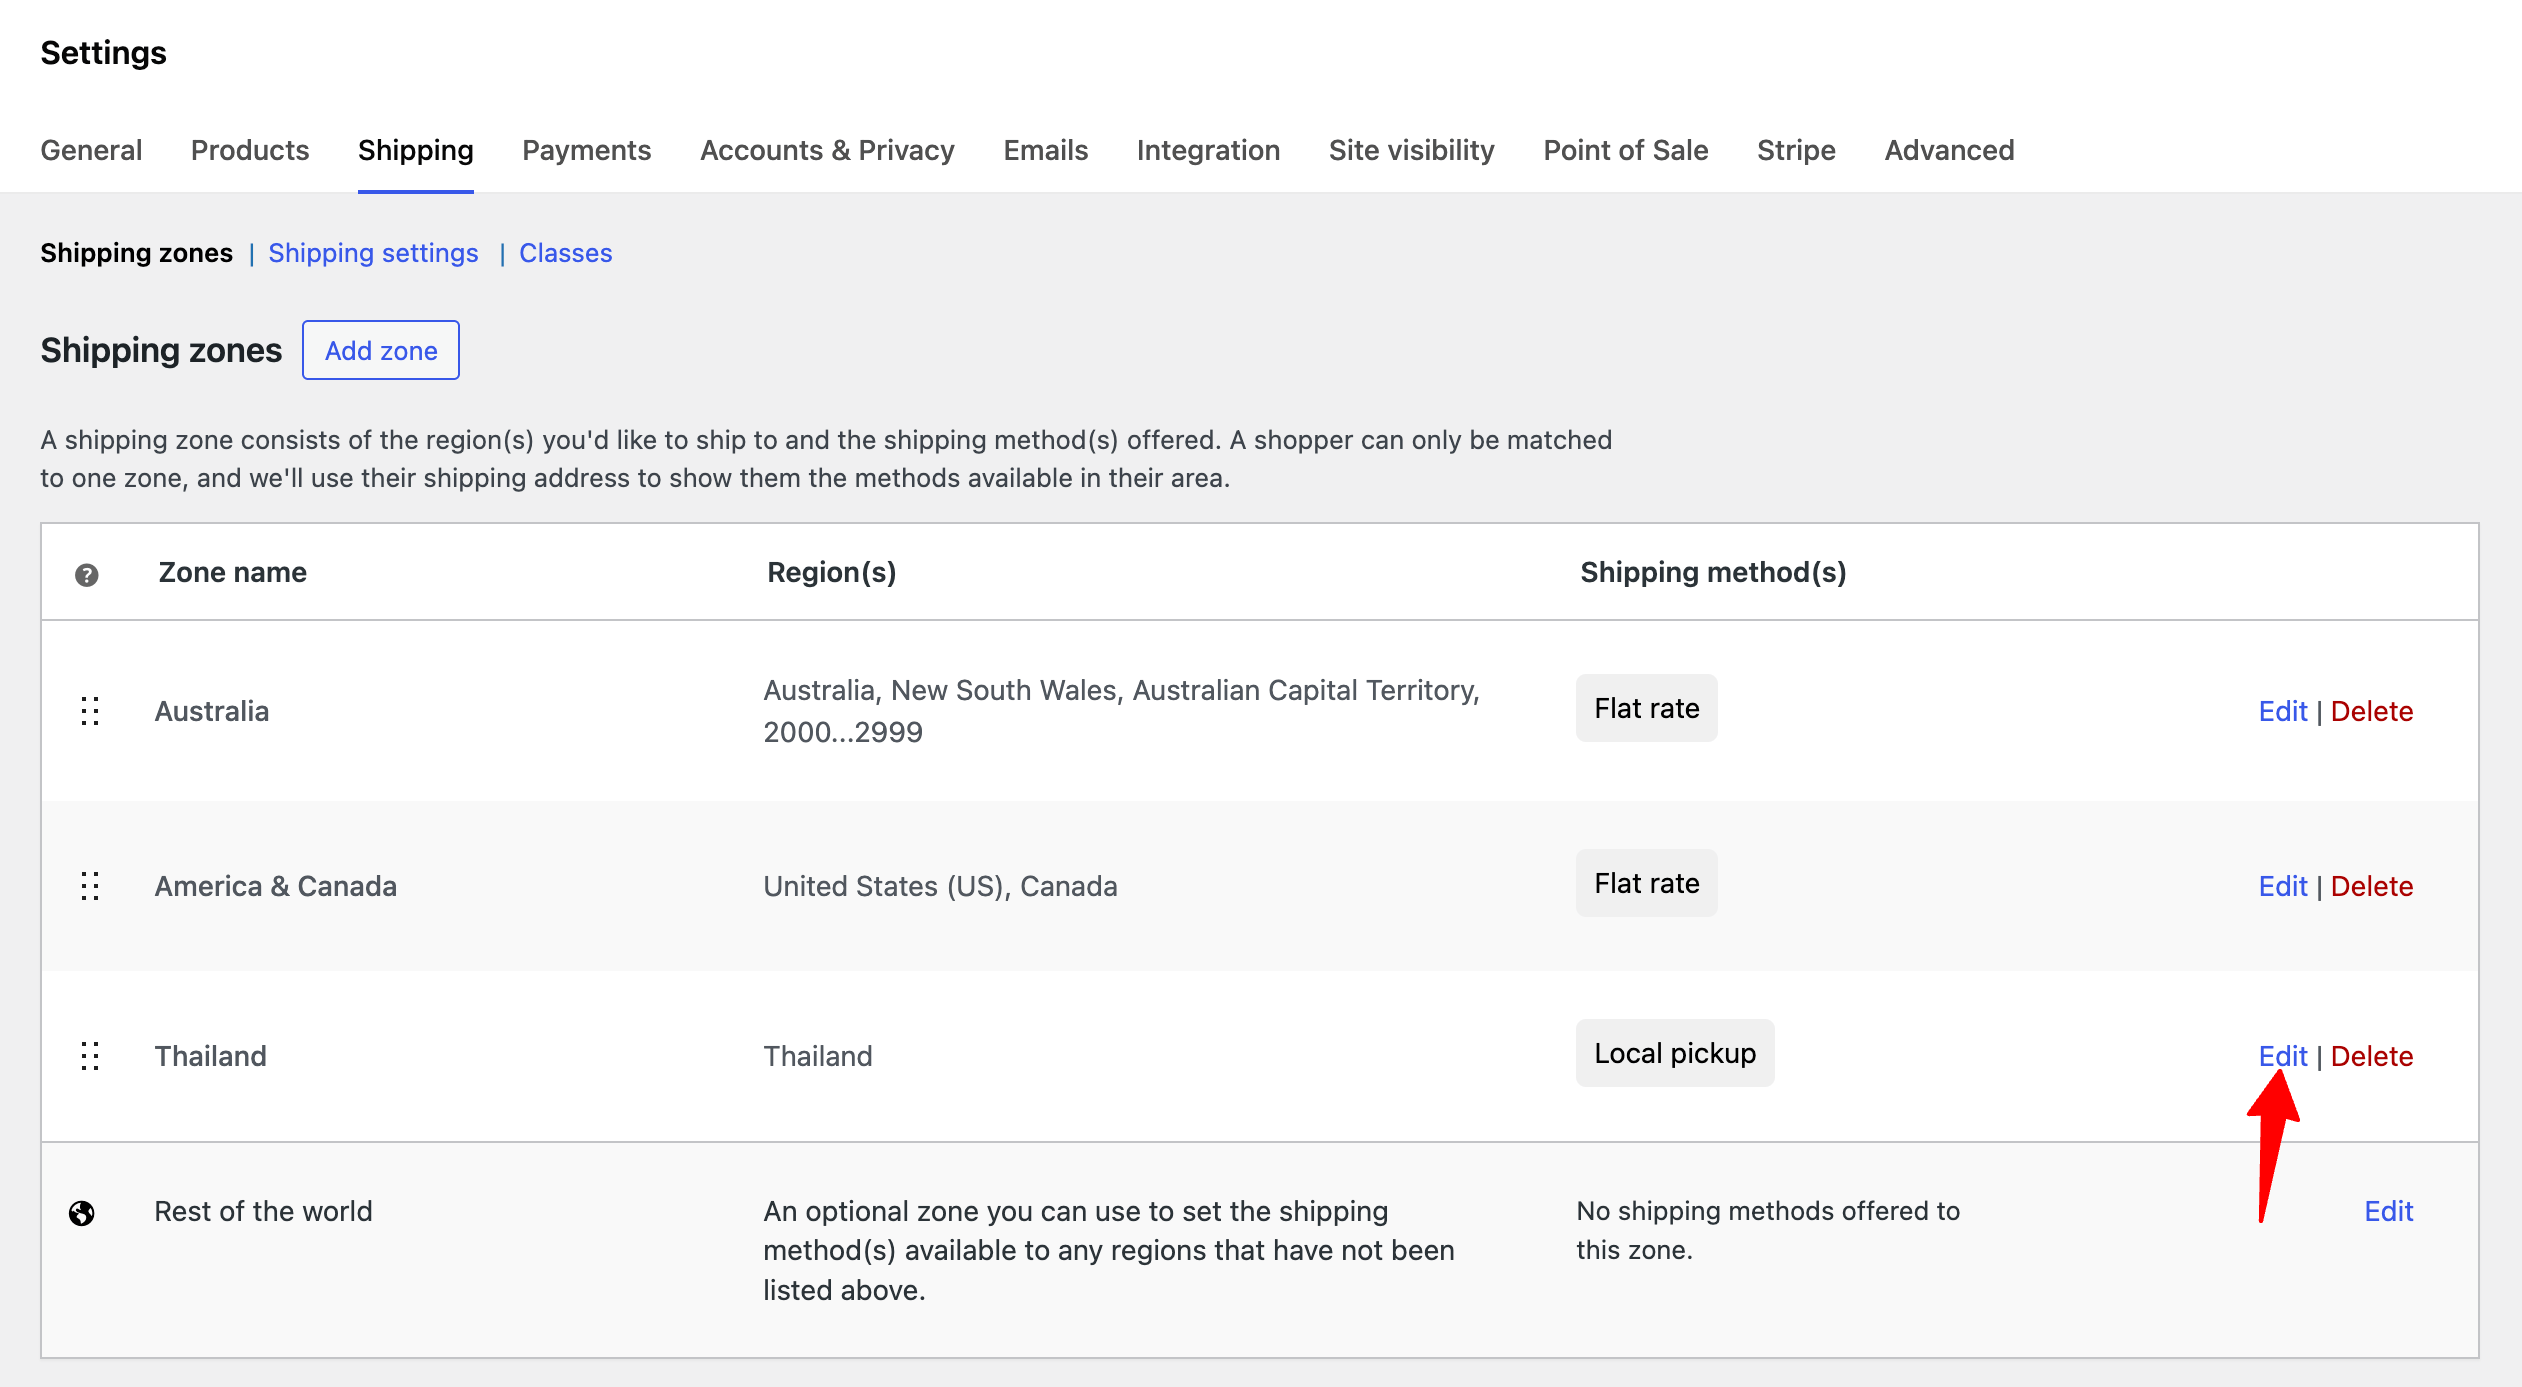
Now, you can modify the shipping name, zone, and shipping methods in WooCommerce. After making the changes, click on Save Changes.
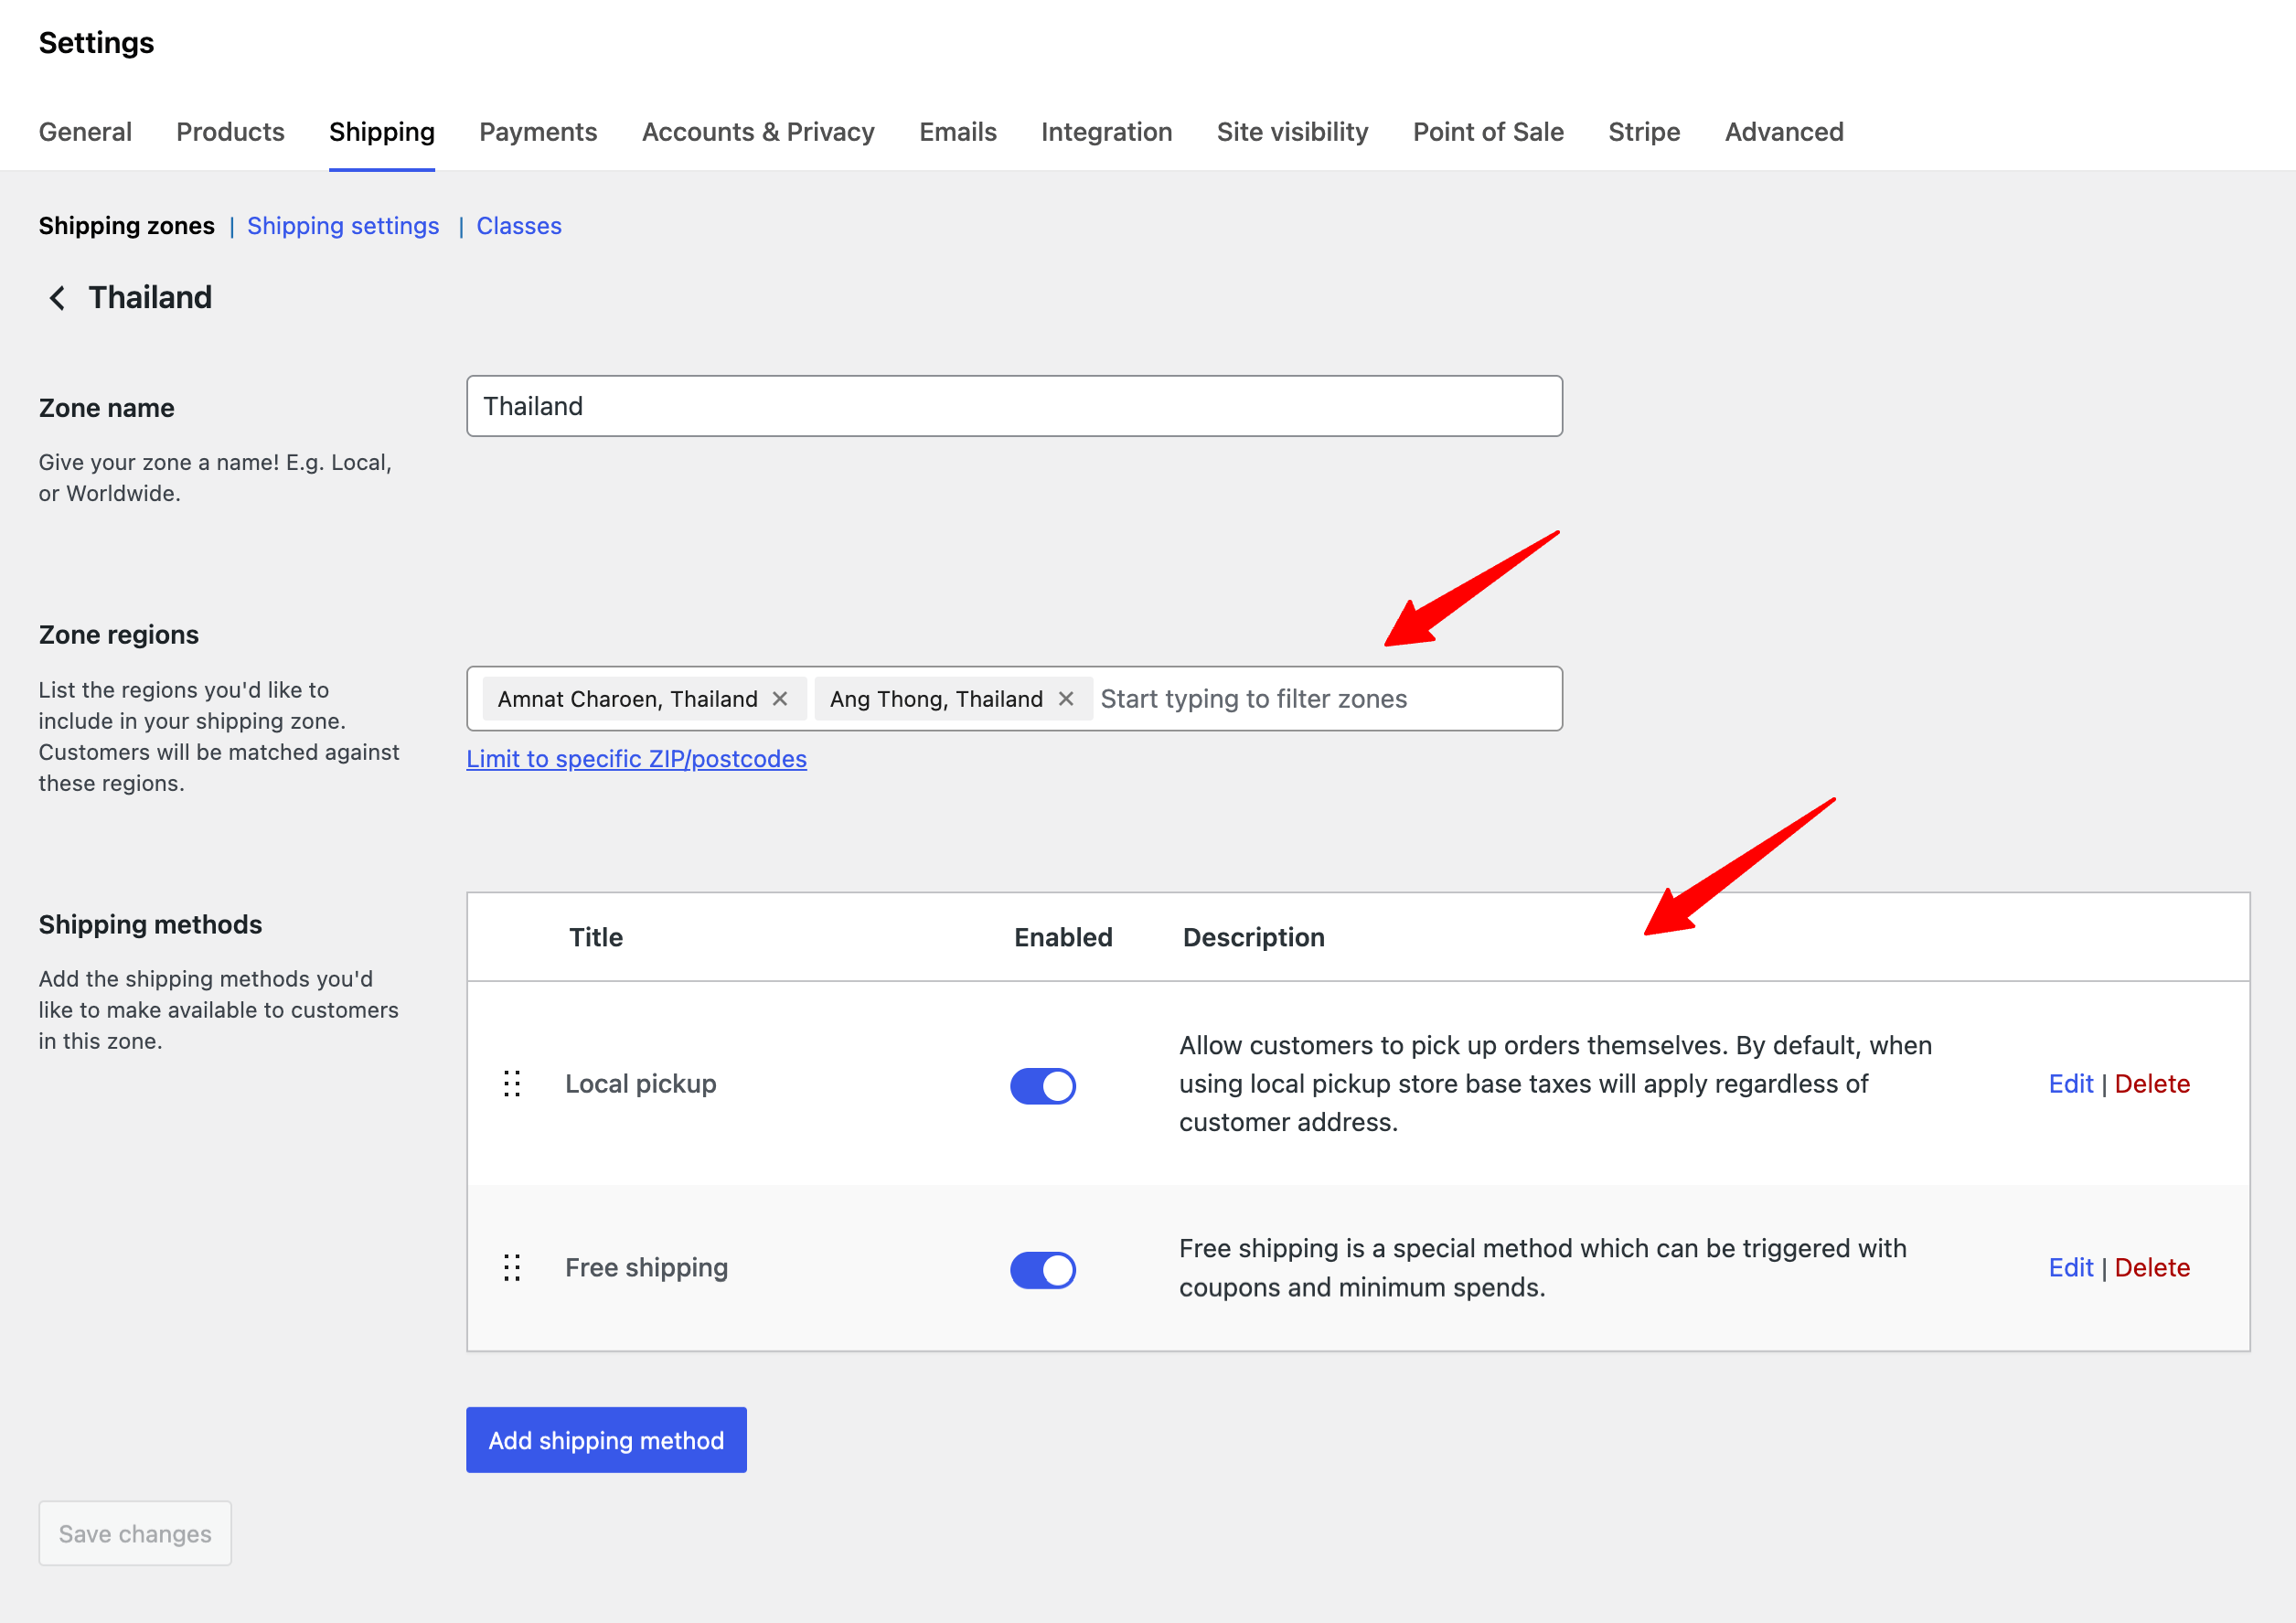
This will update the shipping Zone.
That's how you can update a shipping zone's details.
Delete a Shipping Zone in WooCommerce
You can delete a shipping zone if you want. To delete any WooCommerce shipping zone, hover over it and click on Delete. After that, you will be asked to confirm; click OK to confirm and delete the shipping zone.
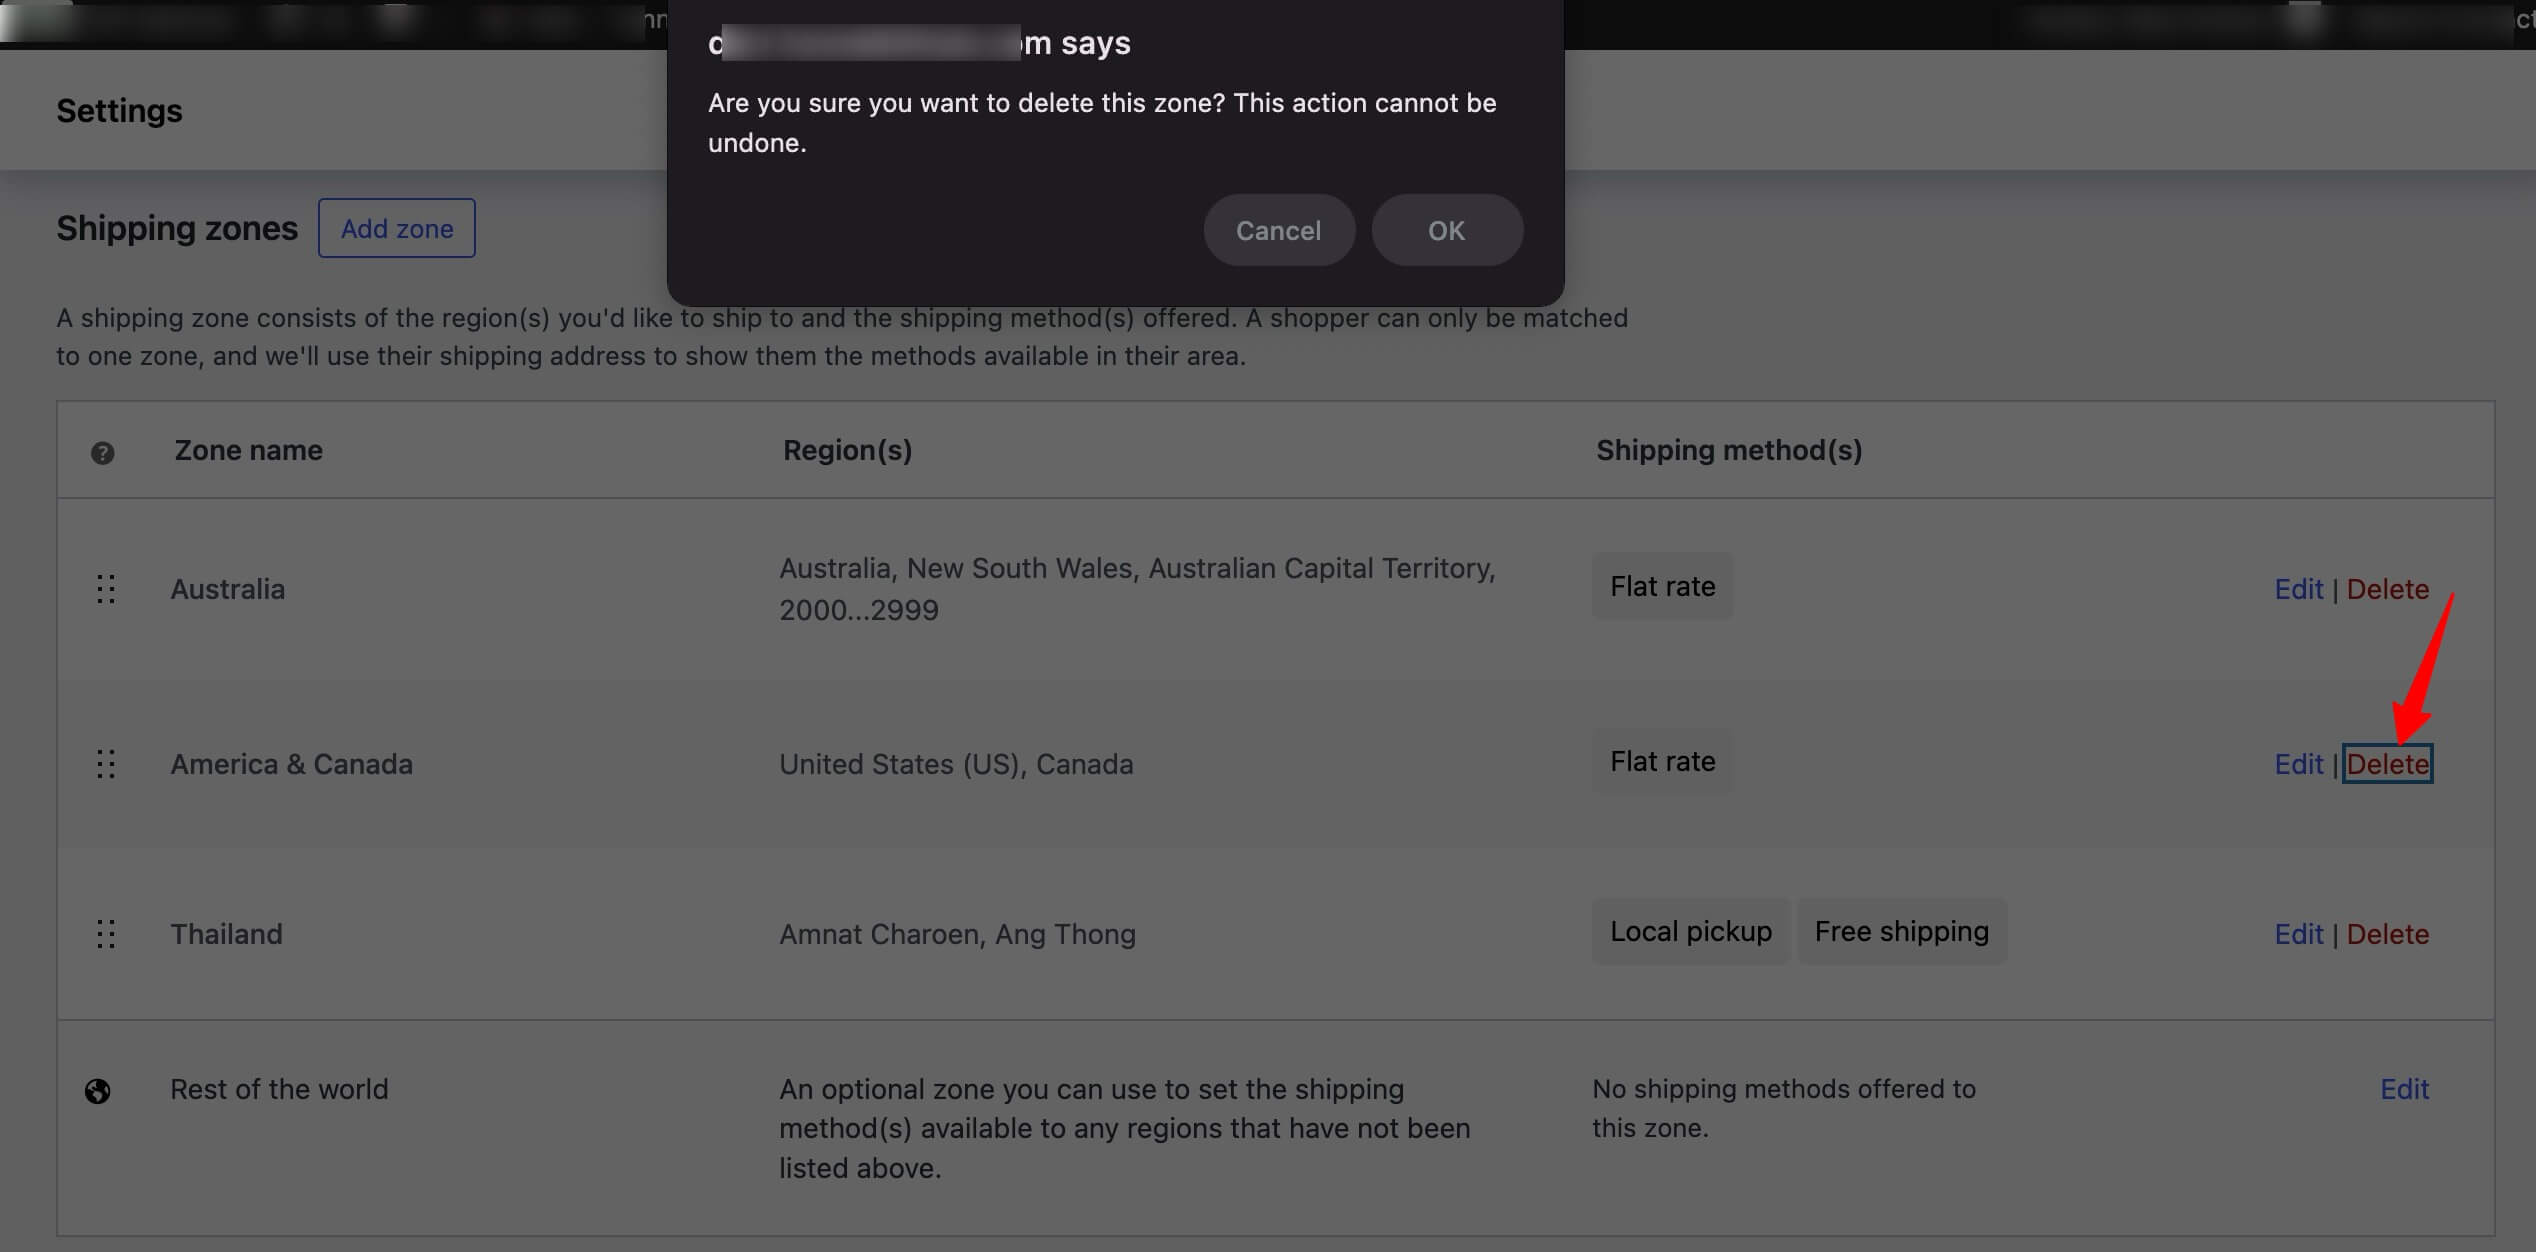
Remove a shipping method from a shipping zone
As mentioned earlier, you can offer multiple shipping methods for a single shipping zone in WooCommerce.
But you can remove any unnecessary shipping methods from a shipping Zone at the same time.
To do that, go to the shipping zone, hover over the shipping method, and click ‘Delete’. After that, click on “OK” to confirm and delete the shipping method.
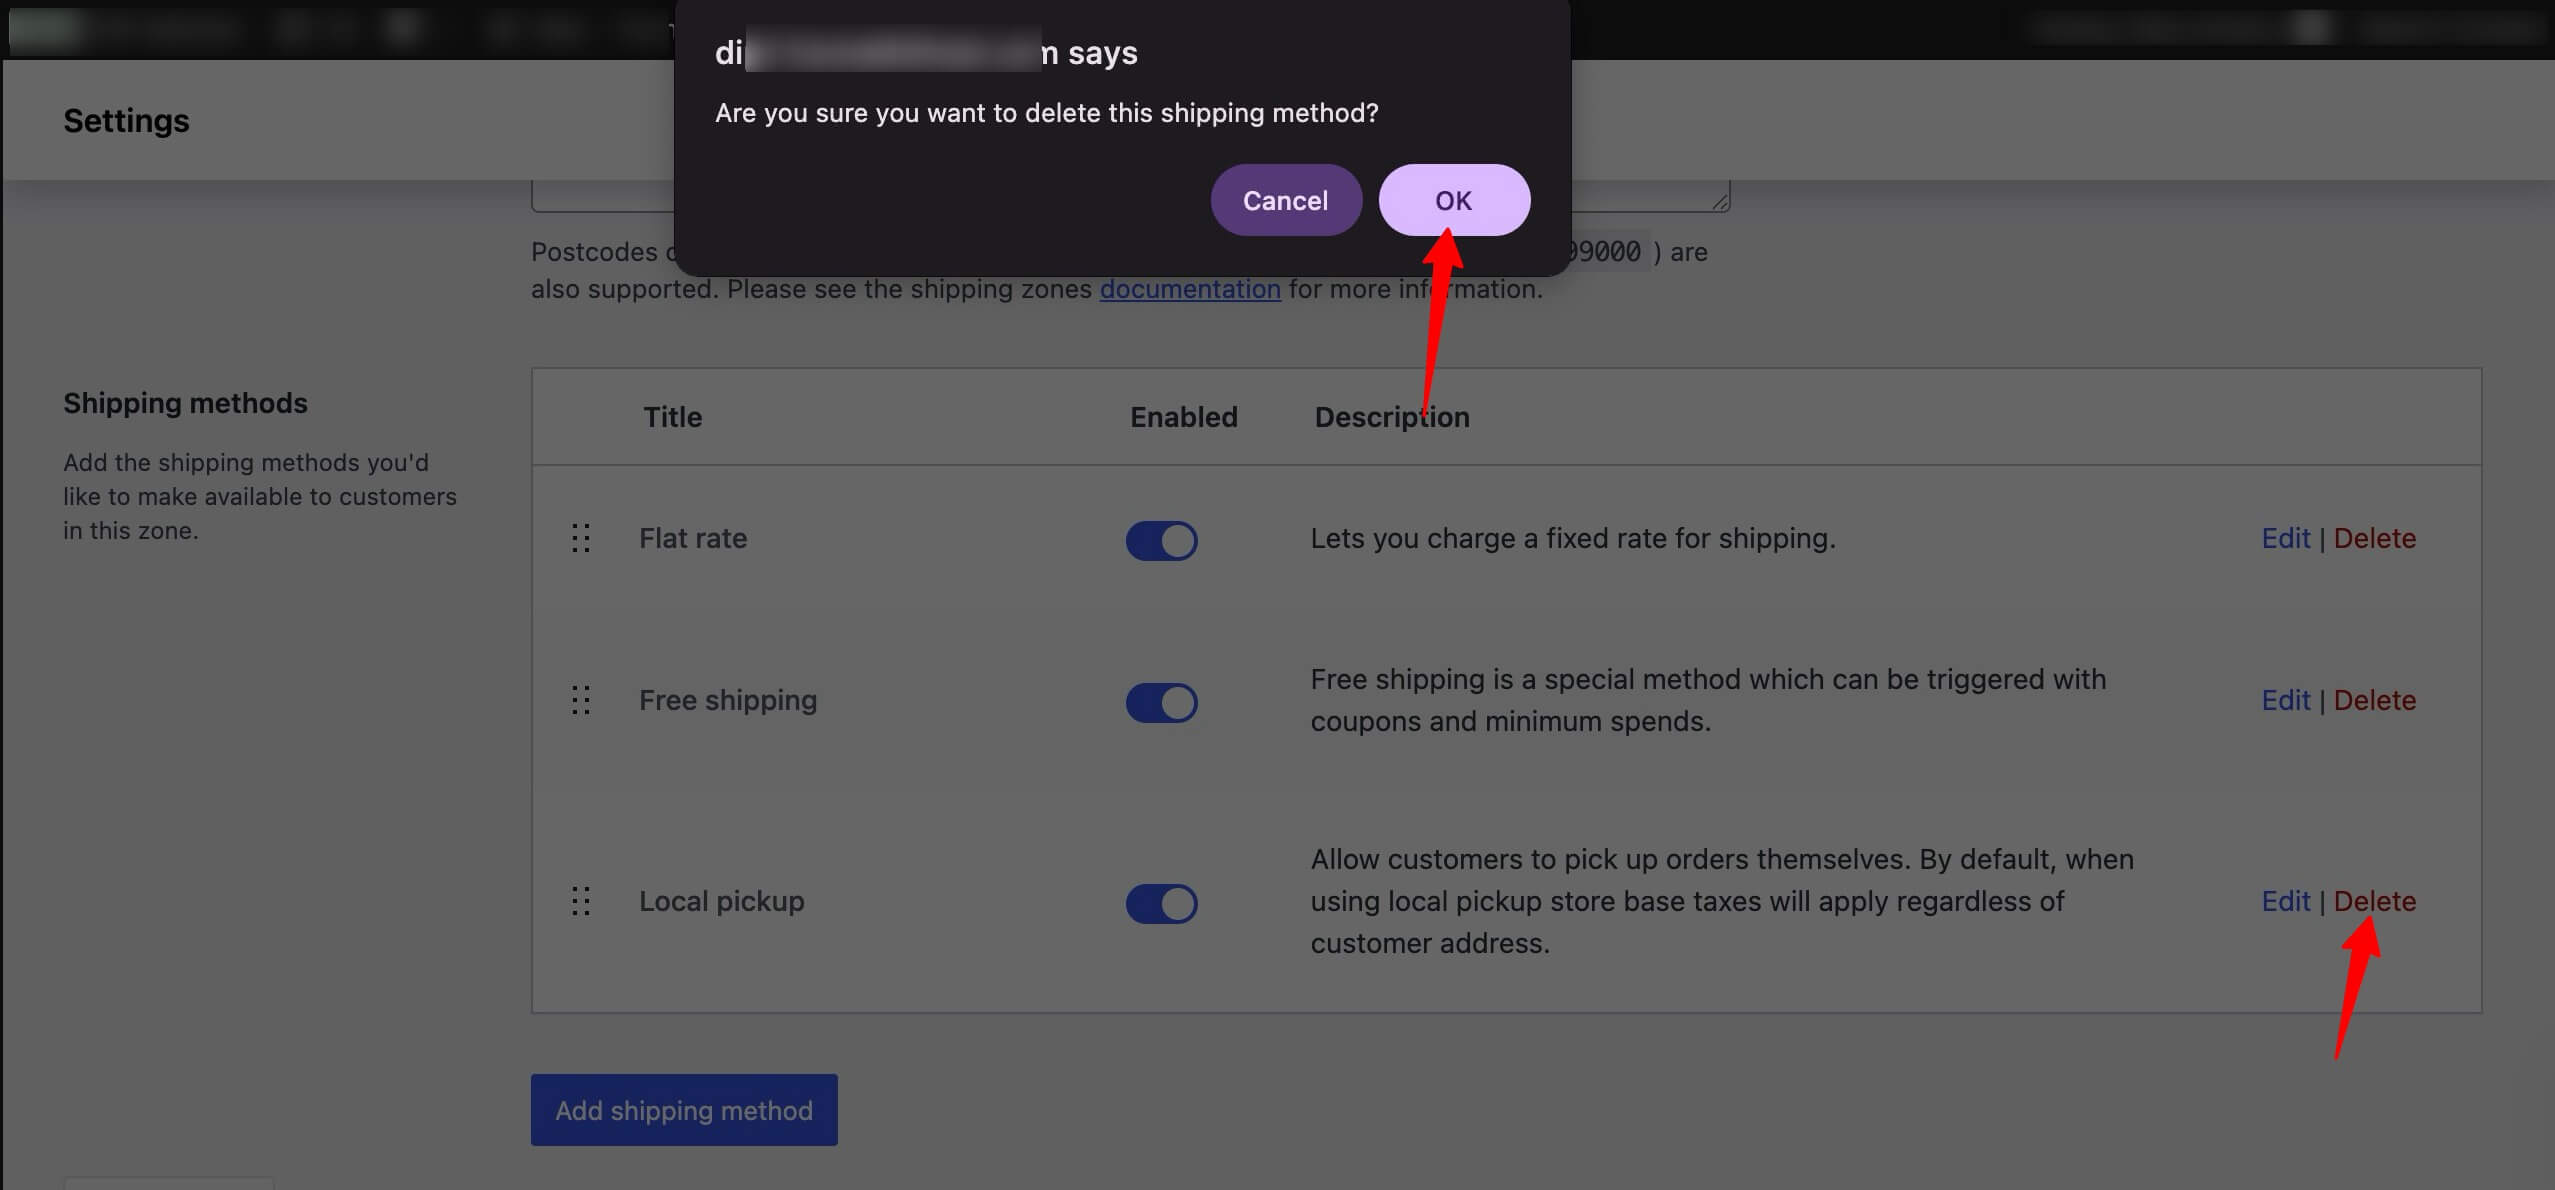
If you do not want to remove the shipping method completely, you can temporarily disable it by turning off the toggle button.
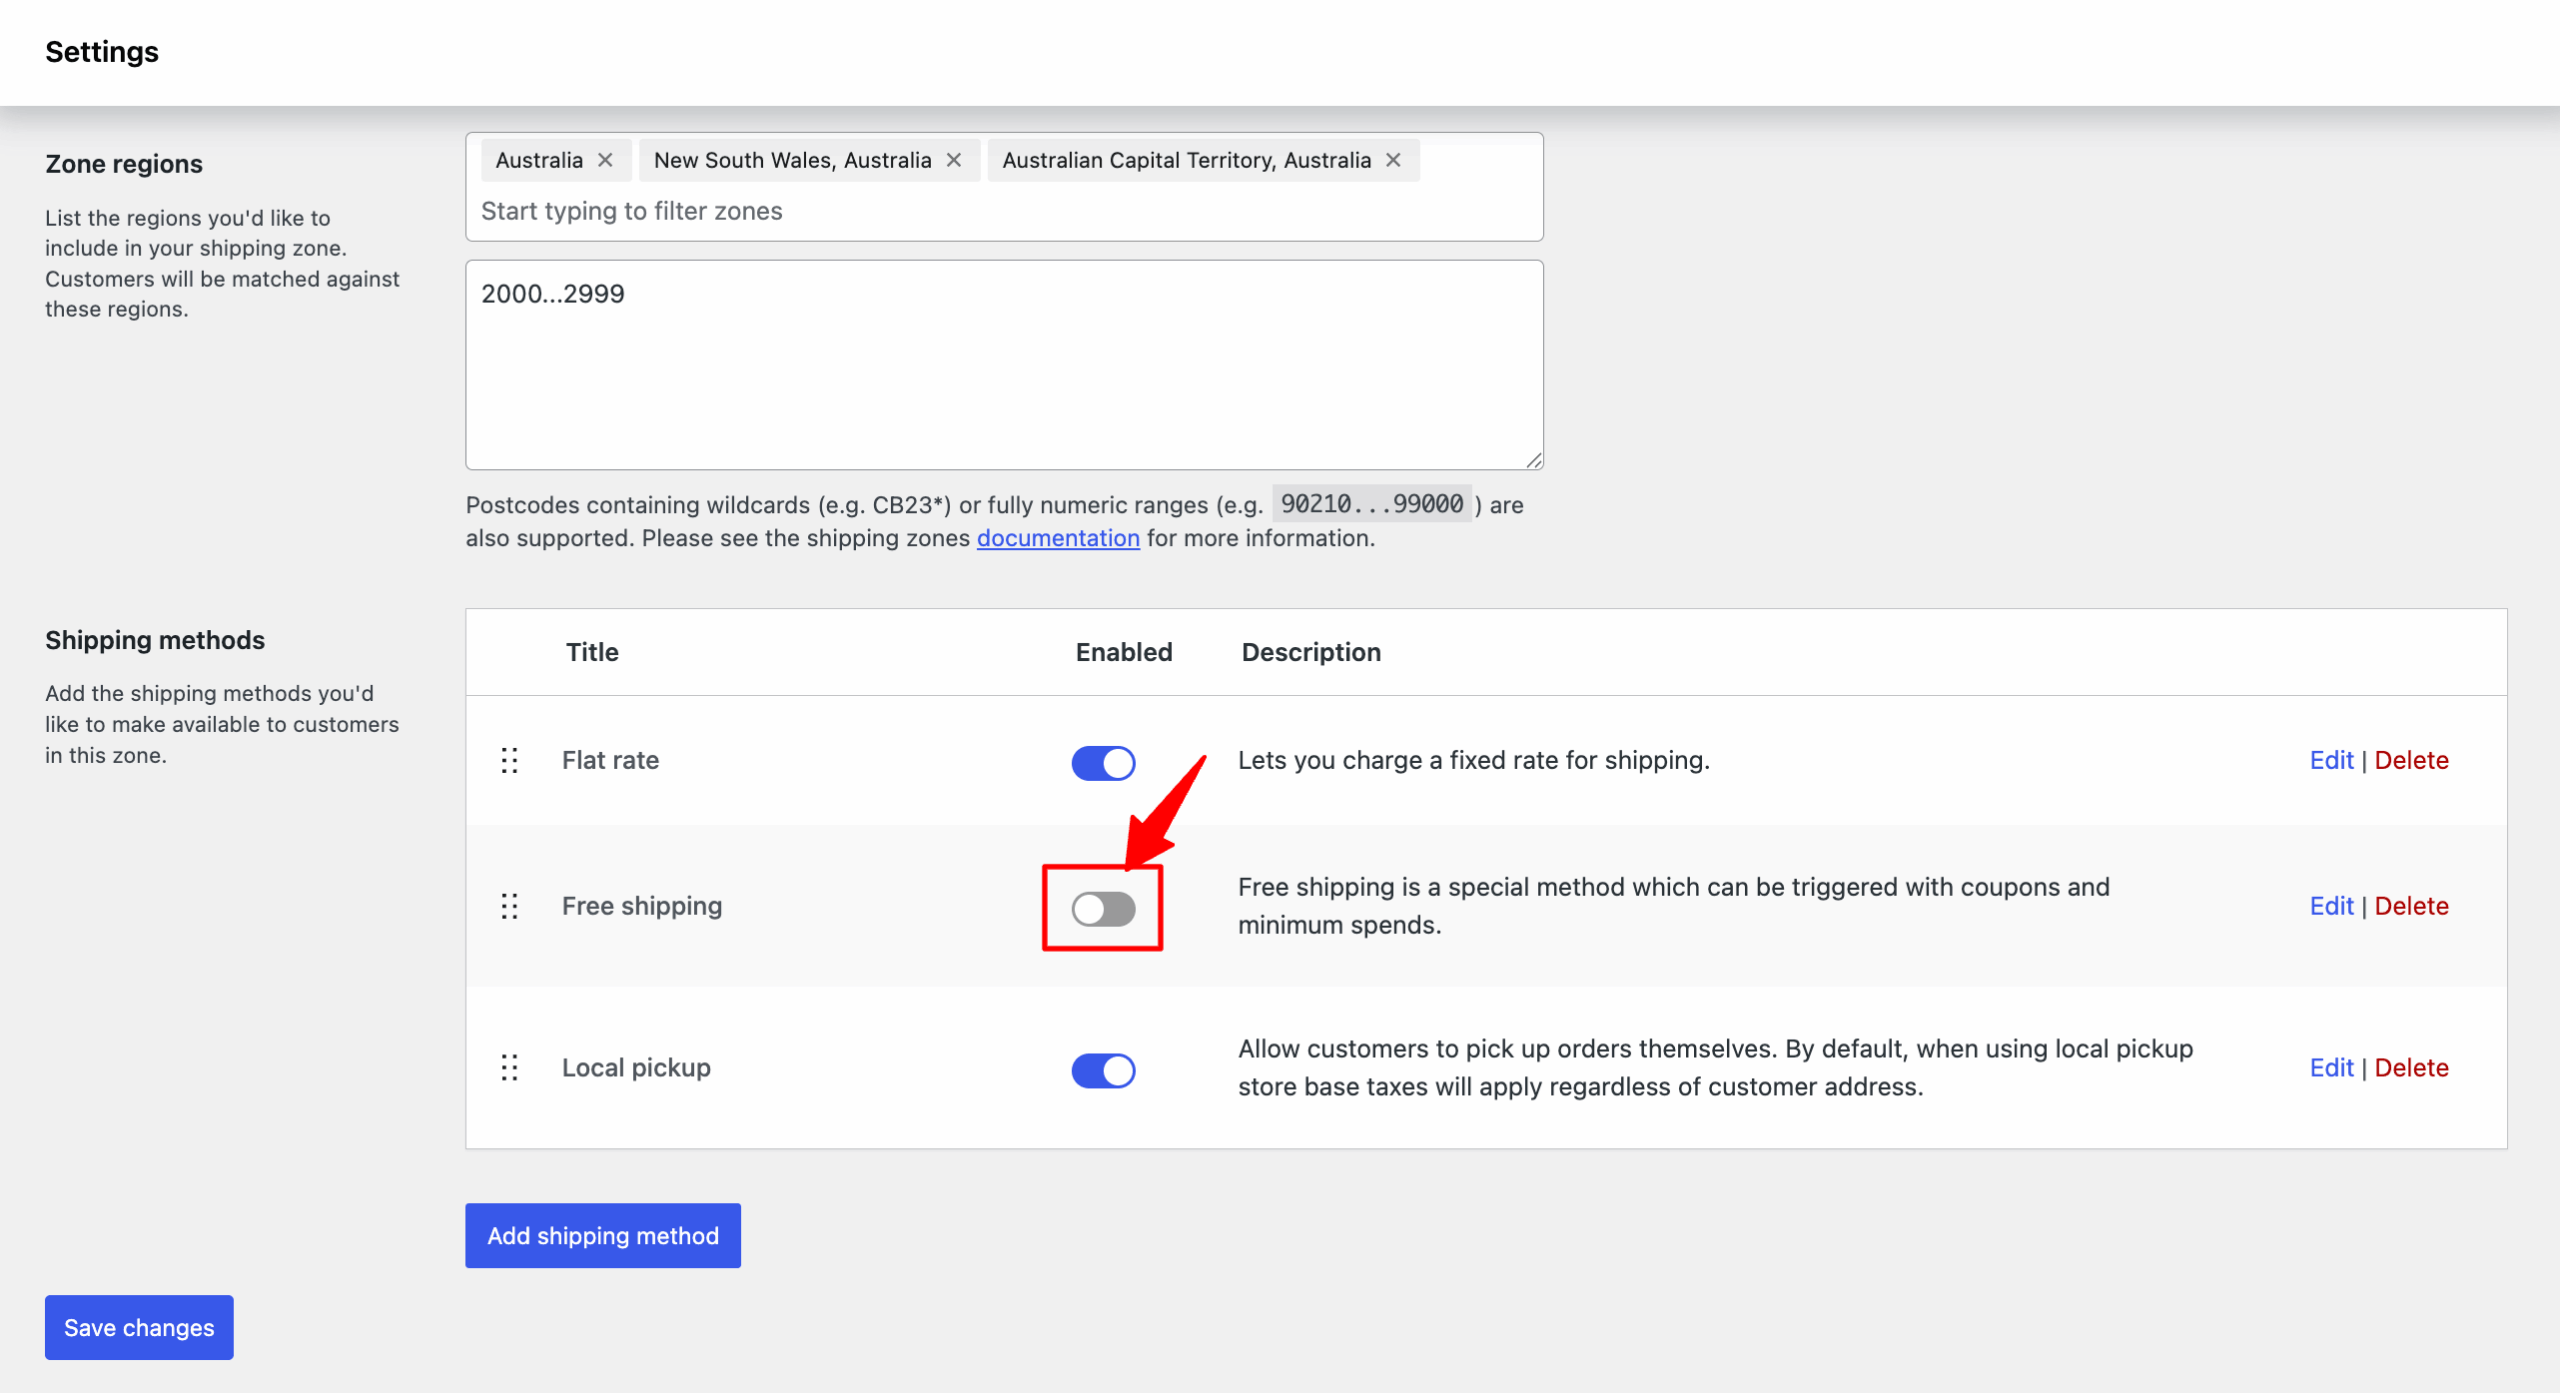
This will remove shipping from the WooCommerce checkout page.
As you can see, your WooCommerce checkout page displays all shipping options here.
The shipping rates have been calculated using the formula assigned to the heavy shipping class to which this product in the cart belongs.
7 WooCommerce Shipping Plugins to Expand Functionality
You can expand WooCommerce's shipping functionality with a range of advanced plugins.
We installed and tested each plugin on a live WooCommerce environment, configuring multi-zone shipping with weight-based rates. We checked checkout behavior, verified compatibility with common themes and page builders, and reviewed each plugin's update frequency and support quality.
Here are some of the best free and paid WooCommerce shipping plugins:
| Plugin Name | What It Does | Best For | Pricing |
| Table Rate Shipping | Creates multiple shipping rates based on location, price, weight, item count, or product class, with support for multiple rules per zone | Stores with complex or variable shipping pricing | $119/year |
| Order Tracking for WooCommerce | Shares order status and shipment tracking details on order pages and via email | Stores that want to reduce support queries and improve post-purchase trust | $49/year |
| FedEx Shipping Method | Shows real-time FedEx shipping rates at checkout using the FedEx API | US and Canada-based stores using FedEx carrier rates | $109/year |
| Flat Rate Shipping Plugin For WooCommerce | Builds conditional flat-rate or cost-based shipping methods by product, category, country, or quantity | Stores needing simple and predictable shipping rules | Free, Premium starts at $179/year |
| WooCommerce Weight-Based Shipping | Applies shipping rules based on order weight, destination, and cart subtotal | Stores selling products with varying weights or bulk orders | Free |
| WooCommerce PDF Invoices, Packing Slips, Delivery Notes, and Shipping Labels | Generates branded shipping documents directly from the WooCommerce dashboard | Stores handling in-house fulfillment and shipping paperwork | Free |
| Conditional Shipping for WooCommerce | Enables or restricts shipping methods based on products, weight, dimensions, or order value | Stores with shipping limitations or special delivery rules | Free |
Common Questions About WooCommerce Shipping
Got more questions? Have a look at these with quick answers:
Setting up shipping is free. You only pay for extras.
- Built-in settings: Free. This covers zones, flat rate, free shipping, local pickup, and shipping classes.
- WooCommerce Shipping plugin: Free to install, and you pay per label you print.
- Live carrier rates or complex rules: Usually a paid extension, though a few free plugins exist.
You'll need a carrier extension. WooCommerce can't fetch live prices on its own, and the WooCommerce Shipping plugin only prices the labels you buy.
- Install the official USPS Shipping Method or a free live-rates plugin from WordPress.org.
- Add weights and dimensions to your products.
- Add the new method to a shipping zone.
You do, through the carrier of your choice. WooCommerce handles the store, not the delivery.
- US stores: The free WooCommerce Shipping plugin prints USPS, UPS, DHL Express, and FedEx labels from the order screen.
- Other countries or local couriers: Look for that carrier's own WooCommerce plugin.
Almost always, the address doesn't match a zone with an active method. Check these in order:
- Every region you sell to is covered by a zone.
- Each zone has at least one shipping method switched on.
- "Locations not covered by your other zones" has a method too, since stray addresses end up there.
- Shipping isn't disabled under WooCommerce > Settings > General.
Closing Notes on WooCommerce Shipping
Effective shipping management is crucial for the success of any WooCommerce store. By setting clear shipping policies and offering multiple shipping options, you can enhance your customers' shopping experience.
A great WooCommerce shipping strategy helps you meet customer expectations and leads to increased sales, customer loyalty, and overall business growth.
If you need more features than the default shipping options in WooCommerce, you can always rely on the advanced WooCommerce shipping plugin we discussed.
So make sure you develop a solid WooCommerce shipping strategy to help your business grow.
More WooCommerce Resources:
- How to Set Up WooCommerce Free Shipping
- How to Set Up WooCommerce Free Shipping Progress Bar
- How to Set Up WooCommerce Flat Rate Shipping
- Best WooCommerce Shipping Plugins
- The Ultimate Guide to Set Up Taxes in WooCommerce
Editorial Team
October 1, 2026Want to drive more sales and customer loyalty with WooCommerce coupons? From simple percentage discounts to auto-applied deals, free gifts, and personalized offers, coupons give shoppers a reason to buy...
Editorial Team
October 1, 2026A WooCommerce flash sale works because it puts a deadline in front of shoppers. A discount that ends tonight gets a decision today. One that runs for months gets saved...
Editorial Team
September 30, 2026WooCommerce BOGO deals give shoppers a free or discounted item when they buy a qualifying product. The classic version is buy one, get one free, where the shopper gets a...






