
WooCommerce taxes are easily the worst part of launching an eCommerce store. You go into the settings thinking it will be a simple checkbox, and instead, you are hit with a wall of empty rate tables, tax classes, and obscure shipping toggles.
If you guess on these settings, you either end up eating the cost of uncollected taxes out of your own profit margins or you accidentally break a regional compliance law.
WooCommerce has all the plumbing required to calculate tax correctly, but it is completely dumb out of the box.
You have to tell it exactly how to behave. You have to decide if you are entering your catalog prices inclusive or exclusive of tax. You have to manually assign tax classes to your products.
If you only sell locally, you can probably just configure the built-in rate tables by hand.
But if you are shipping across multiple US state lines or dealing with international VAT, managing tax tables manually is a complete nightmare.
At that point, you have to offload the math to an automated service.
In this post, we'll walk you through setting up and efficiently managing WooCommerce taxes to ensure your online store complies with tax regulations.
Furthermore, we'll also look at how you can optimize your tax strategy for maximum efficiency.
Table of Contents
- 1 What is WooCommerce Tax and How Does It Work?
- 2 How to Set Up WooCommerce Taxes Properly?
- 3 How to View Your WooCommerce Tax Reports?
- 4 Troubleshooting Common WooCommerce Tax Issues
- 5 5 Best Practices to Keep Your WooCommerce Store Tax-Compliant
- 6 Frequently Asked Questions on WooCommerce Taxes
- 7 Start Collecting the Right WooCommerce Taxes Today!
What is WooCommerce Tax and How Does It Work?
Generally, taxes are charges imposed by the government that individuals and businesses are required to pay. These financial contributions help the government to fund public goods and services and invest in the country’s infrastructure and various programs.
Every business needs to comply with tax-related rules and regulations.
To help you with that, WooCommerce has built-in tax features.
WooCommerce tax is the built-in tax calculation system that lets store owners charge, calculate, and manage sales tax (or VAT, GST, and other tax types) on orders placed through their WooCommerce store.
WooCommerce taxes ensure you efficiently calculate and maintain taxation norms to comply with the regulations of different cities, countries, or states for each product.
It works by configuring and applying tax rates to the products based on different factors. These factors include geographical location, tax class, and product type.
By default, WooCommerce lets you define product prices in two ways:
- Including taxes
The combination of product prices and taxes of the store's base country.
Please note that the tax calculations are done per line, not per item.
Here's how tax calculation will be done for a tax rate of 20%:
Tax = Line Price - (Line Price / 1.2)Let's look at the other one.
- Excluding taxes
Here, a product's listed price does not include any applicable taxes. Customers will be able to see the base price of a product before taxes are added to the final price.
Let's look at the tax calculation that will be done for a tax rate of 20% here:
Tax = Line Price * 0.2That's how simple it is.
If you want to calculate the taxes across different countries or regions, you can refer to the official WooCommerce document.
This document helps you calculate taxes in various countries for both tax-exclusive and tax-inclusive prices.
How to Set Up WooCommerce Taxes Properly?
The easiest way to handle tax calculation is to use the built-in WooCommerce tax settings combined with the free WooCommerce Tax plugin for automated rate calculation.
Because the WooCommerce team maintains this extension, it integrates perfectly.
Behind the scenes, it uses the TaxJar API on the checkout page to determine where your customer lives and automatically calculate real-time tax rates. You never have to touch a manual rate table.
There is one major catch, though. If you ship from multiple warehouses or physical store locations, this free plugin cannot handle it. It only calculates tax based on a single origin address.
If your supply chain is that complex, you will have to pay for a heavyweight service.
But if you operate from a single main location, the free tool is exactly what you need. Here is how to get it wired up.
Follow the step-by-step instructions below to set up WooCommerce taxes for your store:
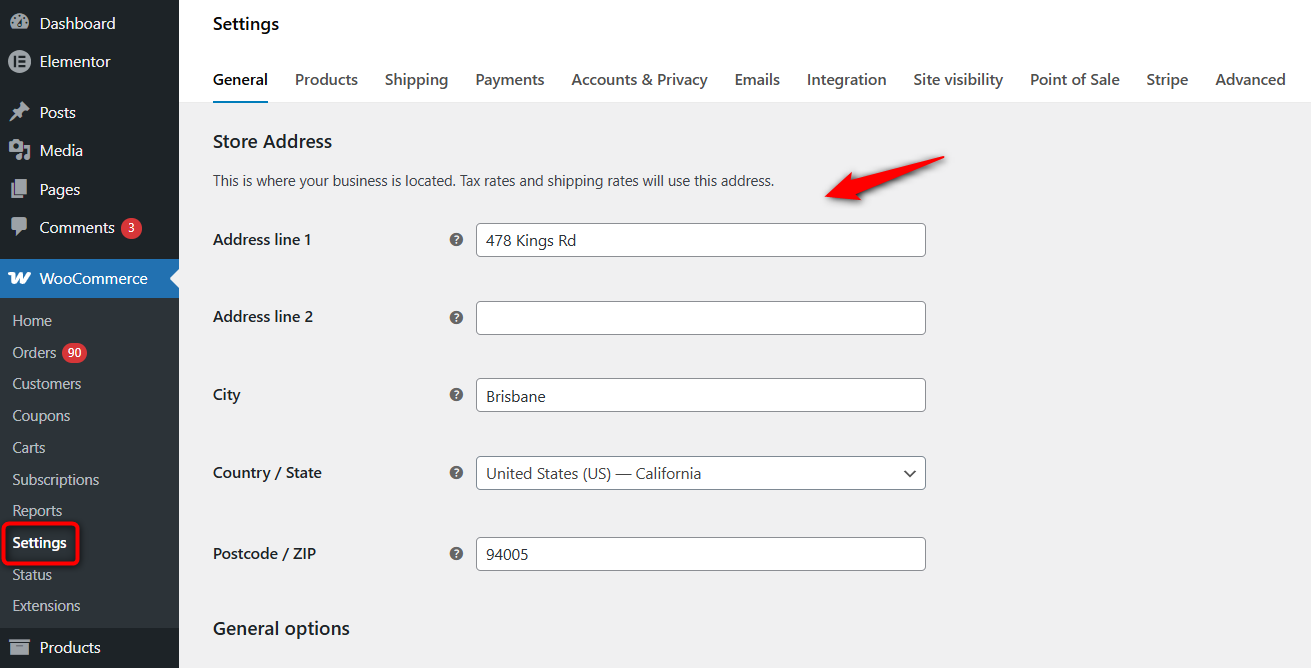
Step 1: Enable tax calculations and set your store address
Before configuring taxes, you must first enable them in WooCommerce settings.
For that, navigate to WooCommerce ⇨ Settings ⇨ General and confirm that your store address (country, state, and ZIP code) is accurate.
There, check the ‘Enable taxes and tax calculations’ option.
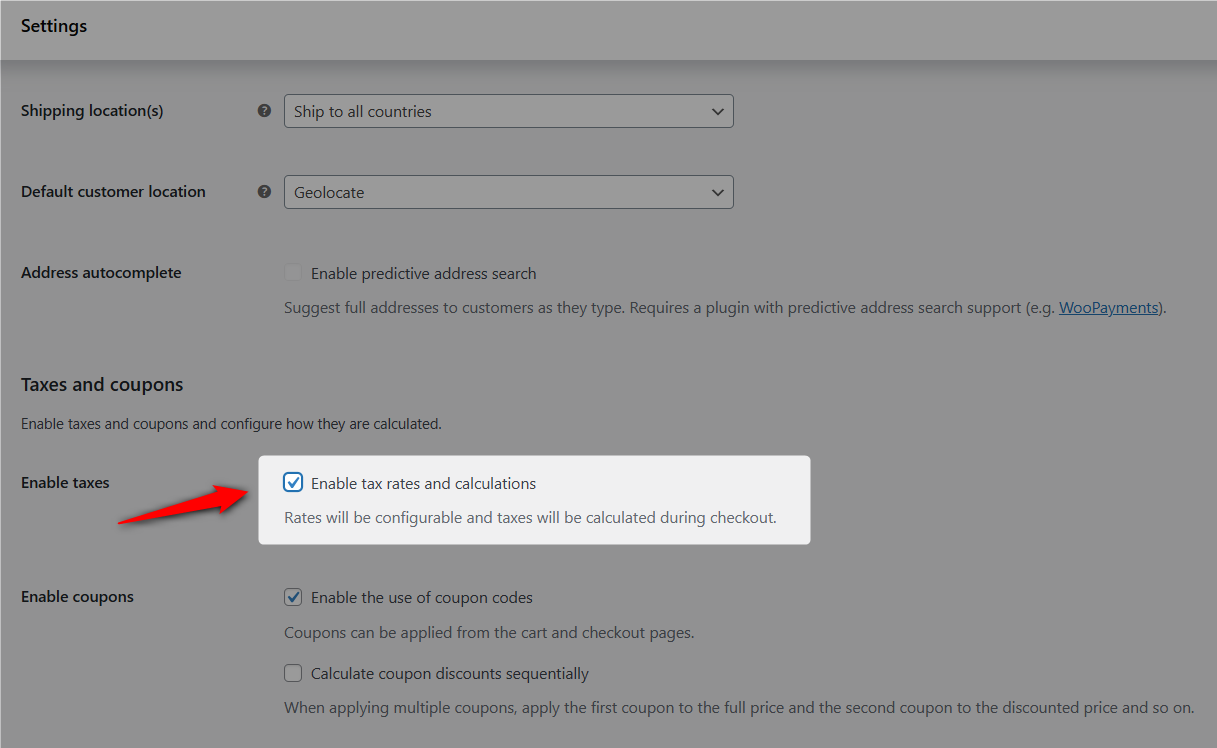
Scroll down and hit the 'Save changes' button once done.
This will enable the tax-related functionalities in your store. WooCommerce will add a new taxes section in your store's settings.
Step 2: Configure your core tax options
In this section, we'll go through different tax-related settings in WooCommerce.
Prices entered with tax
This setting determines whether your product prices are inclusive or exclusive of WooCommerce taxes.
If you choose prices exclusive of tax, WooCommerce will automatically calculate and add tax to the final price at checkout.
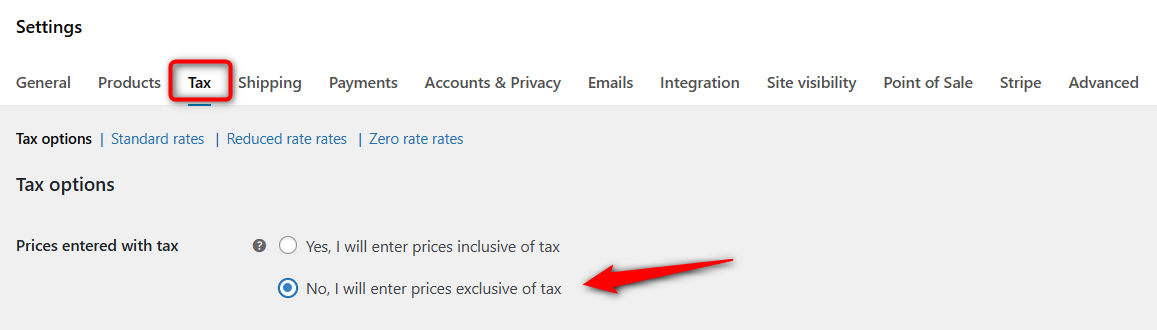
However, if you choose prices inclusive of taxes, all costs will be added to the product price and displayed at your store's base tax rate.
Calculate tax based on
This option helps calculate taxes based on the following:
- Customer shipping address
- Customer billing address
- Shop base address
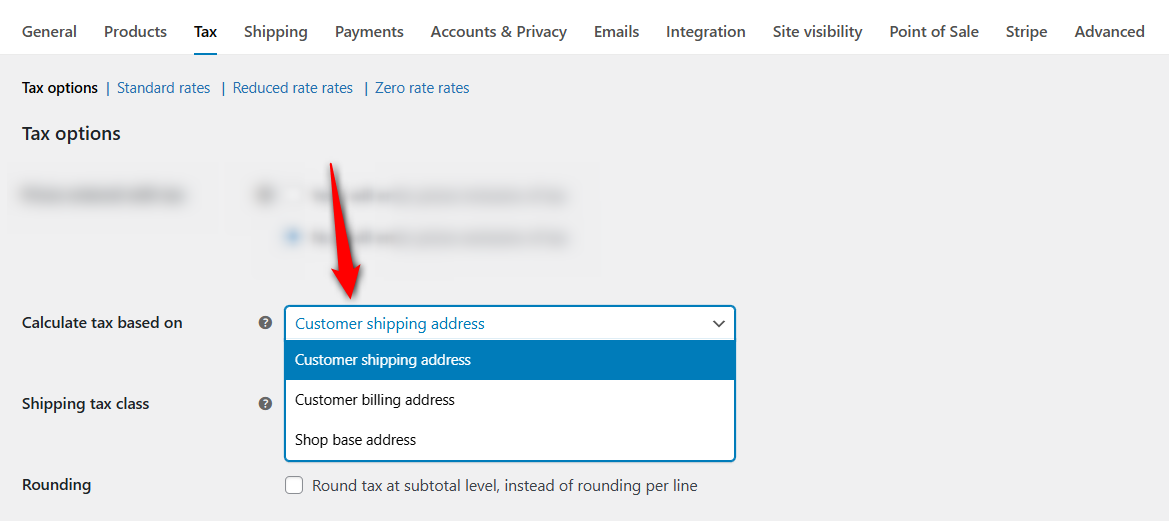
The first two settings will calculate taxes based on your customer's shipping and billing addresses, respectively.
You can even turn on the Geolocate option to determine the customer's default location.
Go to WooCommerce general settings to enable this option:
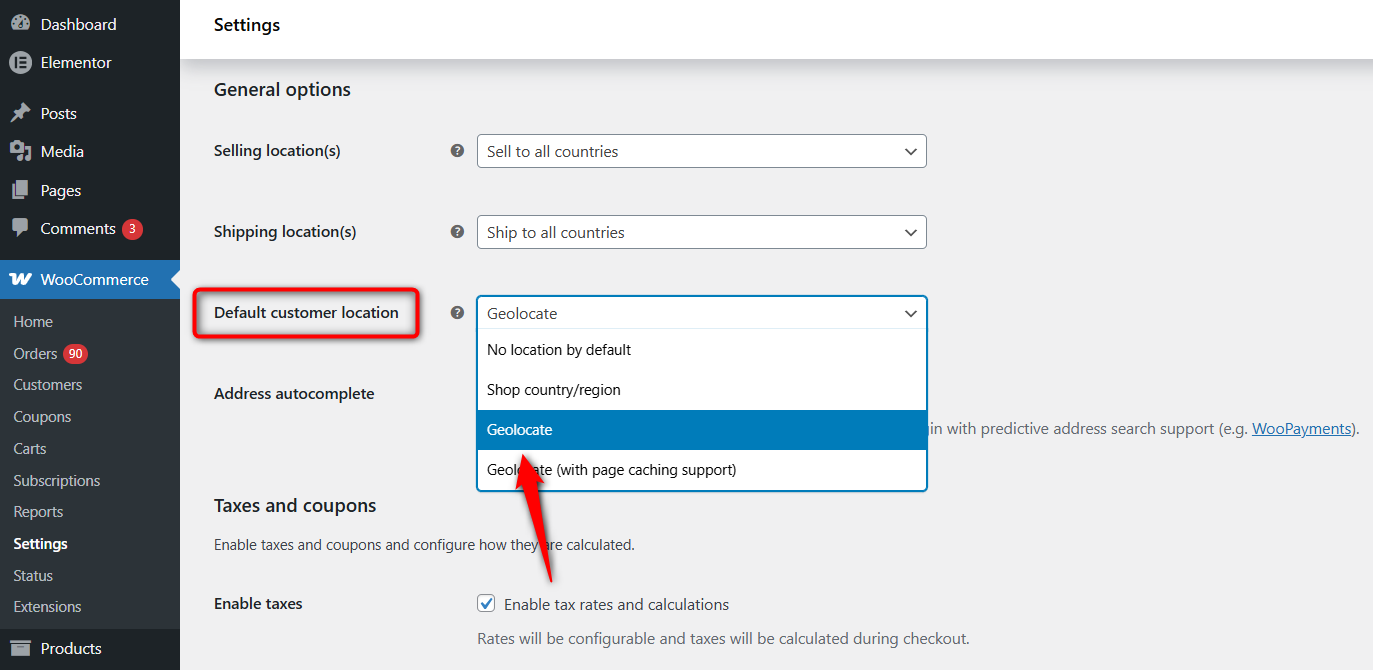
If you choose your store's base address, taxes will be calculated based on your store's location rather than the customer's address.
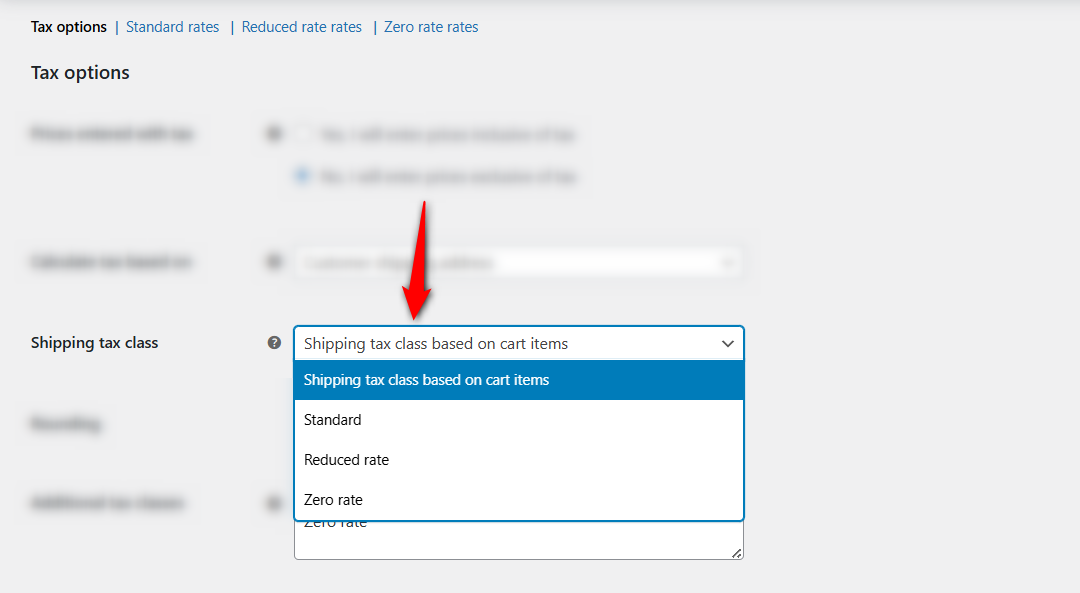
Shipping tax class
A shipping tax class determines the tax rate applied to shipping or delivery charges for different products and services.
By default, shipping tax classes are based on the items in the user's shopping cart.
If a user buys an item with a specific tax rate, the shipping tax will be calculated at that rate. You should choose a different tax class if it isn't allowed in your tax jurisdiction.
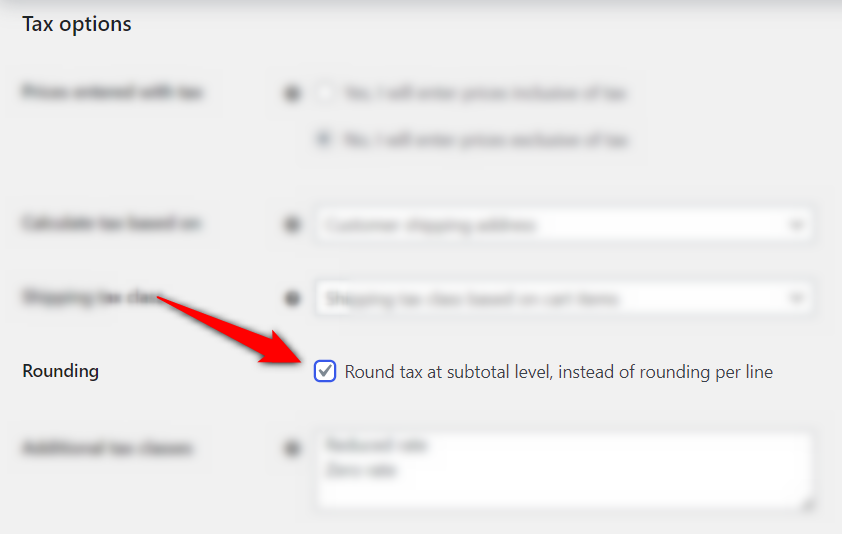
Rounding
This checkbox typically specifies whether you should or not round the tax at the subtotal level.
Enable this option to round tax prices to a subtotal level rather than the default per-line rounding.
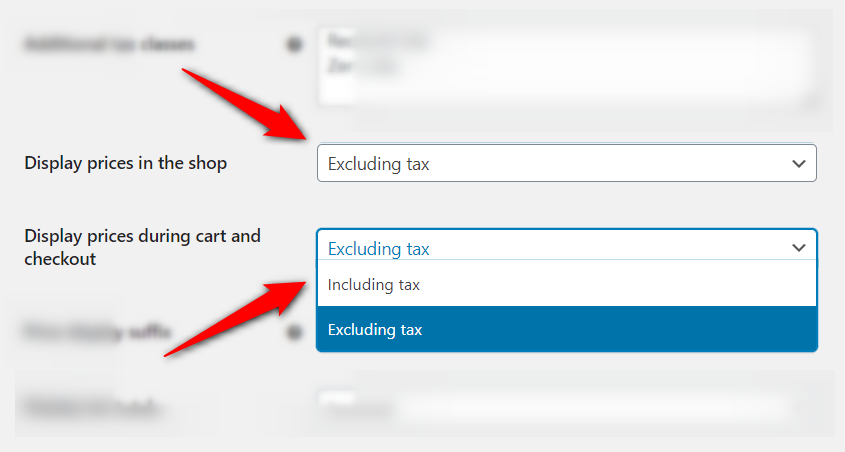
Display prices on the shop, during cart and checkout
These two WooCommerce sales tax settings determine how prices are displayed in your store (whether they are displayed excluding or including tax).
You can specify how product prices will show up on the shop page, during the cart and checkout page.
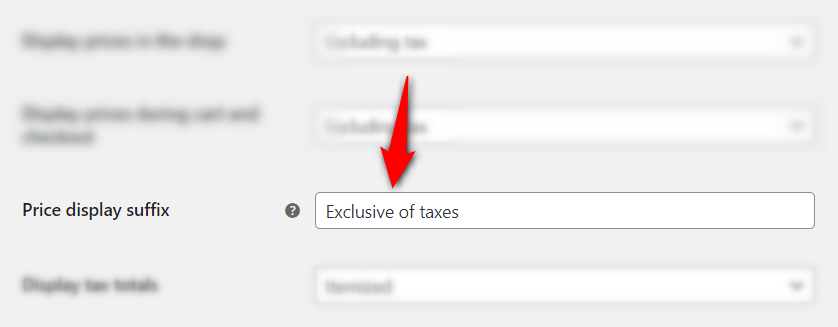
Price display suffix
Fill in the text to display next to your product’s prices. You can include something like “Inclusive of taxes”, “VAT included”, ”Exclusive of taxes”, etc.
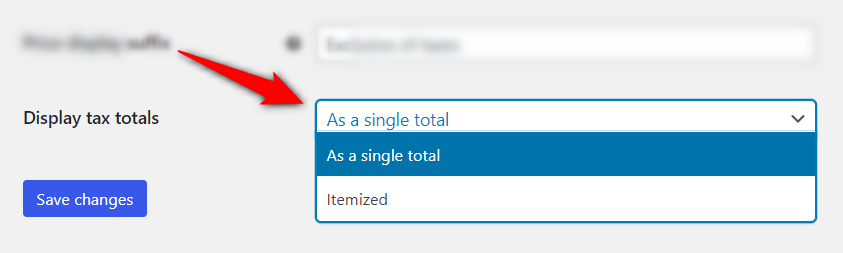
Display tax totals
This setting lets you specify how the tax total will be displayed during checkout.
It gives you the option to show multiple taxes either pooled as a total or listed separately.
Once done, hit the 'Save changes' button. This is how you can configure your tax options settings in WooCommerce.
Step 3: Add tax rates (manually or automatically)
You can add WooCommerce tax rates either by letting a plugin do the math or by doing it manually in spreadsheets.
It helps you calculate and apply taxes to the different types of products you sell, based on the tax regulations in your area.
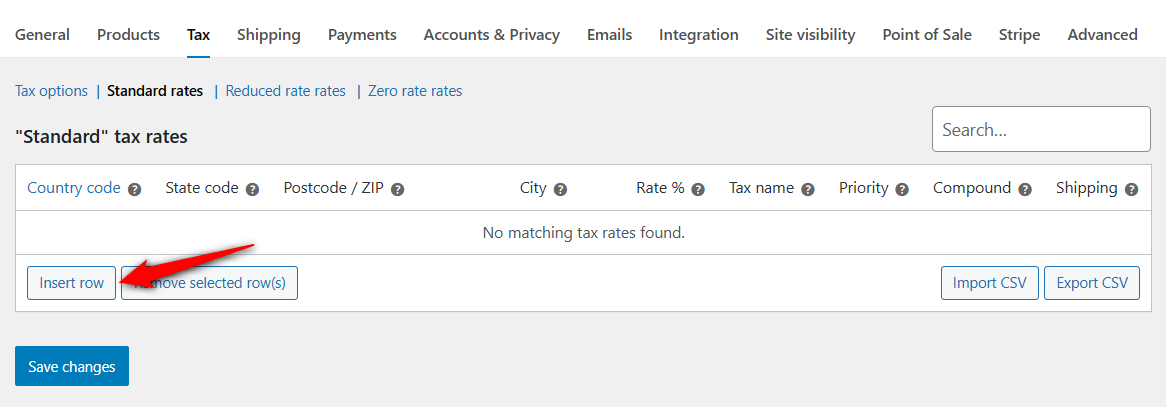
Setting up tax rates manually
By default, WooCommerce lets you set up standard tax rates under the ‘Standard Rates’ class.
Click on ‘Insert Row’ to enter a new tax rate.
Let’s set up our standard taxes by going through the detailed process.
Geographical options
Here, you can set up standard tax rates for geographical areas:
- Country code - Enter a two-digit country code per the standard ISO 3166-1 alpha-2. Leaving this field blank will apply the tax rate to all countries.
- State code - Specify the two-digit state code. You can also leave the field empty if you want the tax rate to apply to all the states of your chosen country.
- ZIP/Postcode - Enter the individual or multiple ZIP / postal codes separated by semicolons. Leaving the field blank will apply the same tax to all areas.
- City - Enter the name of the city or cities to which you want to apply this tax rate. You can enter multiple cities separated by commas. Leave this field empty to apply this tax rate to all cities.
Tax rate options
Configure the WooCommerce standard tax rate options here:
- Rate % - Enter the tax value in percentage up to 4 decimal places. For example, 14.0000 or 8.3333.
- Tax name - Specify the name of this tax that will be visible to the shoppers in your WooCommerce store, along with invoices.
- Priority - Determine the order of tax rates to decide which should be applied first. Please note that the priority number must be different for each tax rate you specify here; otherwise, only one tax will appear on your invoices.
- Compound - Enable this field to specify this tax rate as a combination rate. The compound rate will apply after other taxes are calculated. This means that, for the tax rate you have enabled this field for, a compound tax will be applied to the already taxed product.

Let’s understand a bit more about priority and compound in WooCommerce taxes.
Priority and compound
Priority and compound are essential when a country has national and local taxes.
Let’s say the national tax is 30%, and a particular city or state applies an additional 5% tax, which must be added for customers in that city or state.
In this case, priorities and compound interest will be crucial to calculate taxes accurately.
Shipping tax
WooCommerce lets you choose whether to apply the tax rate to shipping costs.
Please note that you must have at least one shipping rate; otherwise, it will not be taxed. If you select multiple tax rates for shipping, the tax will be applied in order of priority.
This will add the sales/VAT taxes to the shipping charges.
Setting up tax rates automatically in WooCommerce
For automated tax calculation, install and activate the WooCommerce Tax plugin.
Once activated, go to WooCommerce ⇨ Settings ⇨ Tax and enable the 'Automated taxes' option.
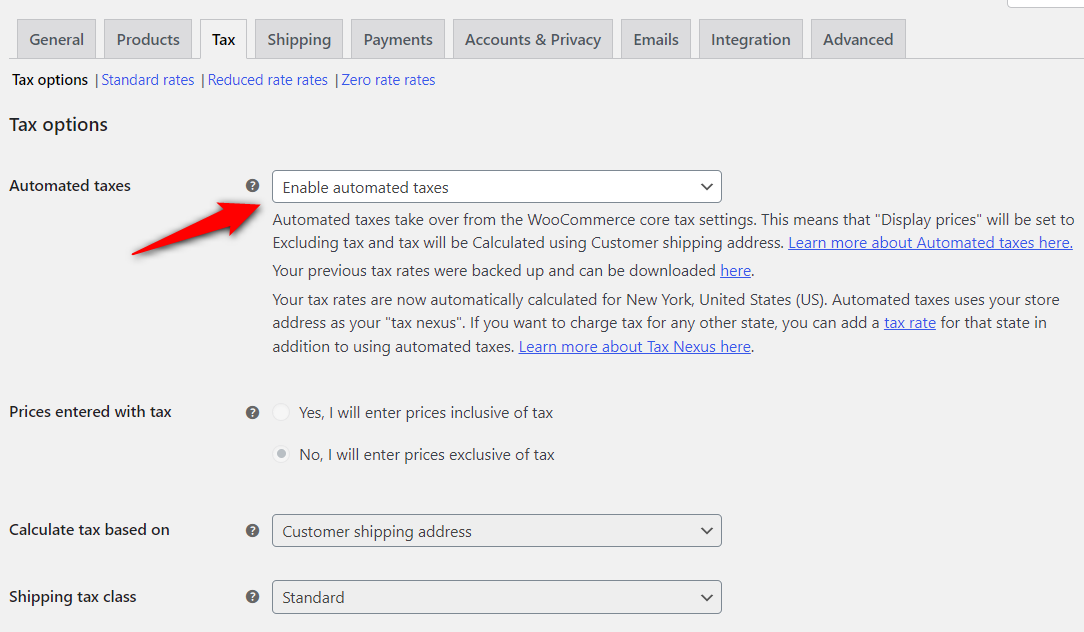
This tells WooCommerce to pull tax rates automatically based on the customer’s location at checkout. The plugin handles rate lookups for you, so you do not need to manually enter or update individual tax rates.
Import WooCommerce tax rates
You can also import tax rates via CSV if you have a spreadsheet of rates prepared.
WooCommerce allows you to import or export different configurations of tax rates in your store. You can do this by importing or exporting a CSV file.
To import tax rates, click on ‘Import CSV’ under any tax rate options available in WooCommerce.
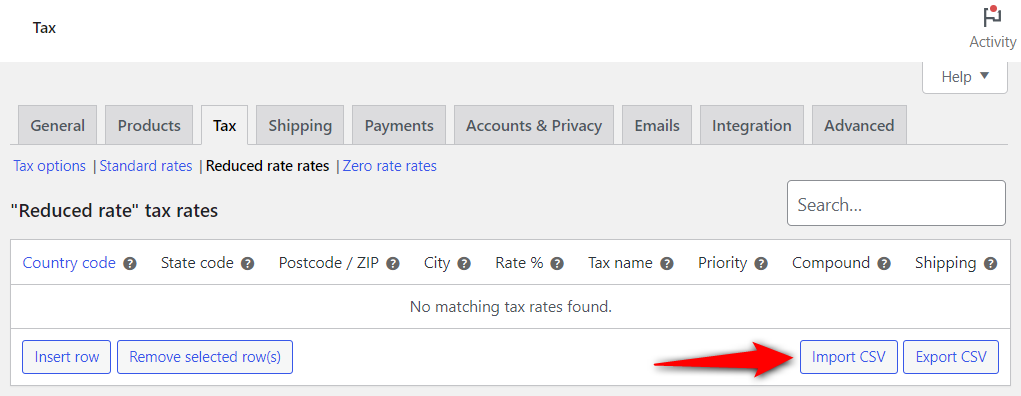
For example, we’ve downloaded the ready-to-import EU CSV sample from WooCommerce with tax rates on our device. Let’s now import this file here.
Enter the path to store this file on the server.
This CSV file will help ensure your tax rates are correctly set up. You’ll be able to generate WooCommerce invoices and safely keep an account of critical data.
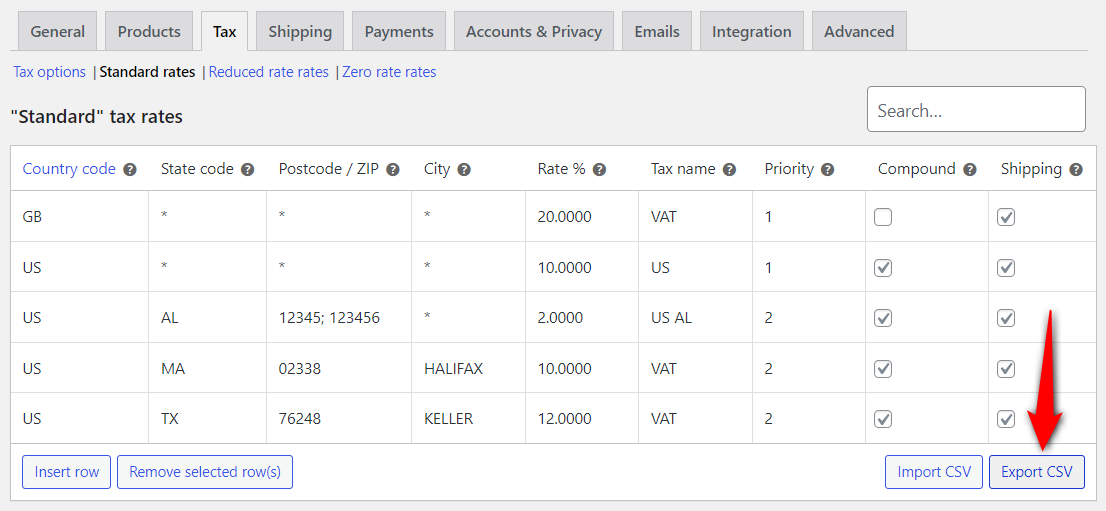
Export WooCommerce tax rates
Once you’ve configured your WooCommerce tax rates and classes, you can export all the data and keep it safe in a CSV file format on your device.
All you have to do is hit the ‘Export CSV’ button and your data will be exported to your system.
If you ship across the US and need accurate tax calculations for every jurisdiction, automated calculation is the approach we recommend.
It saves time, reduces the risk of charging incorrect rates, and keeps up with the frequent local rate changes that happen throughout the year.
Step 4: Set up tax classes for different product types
Tax classes help you categorize and assign tax rates to different types of products in your online store.
Suppose you sell products taxed by different rates, such as 8% and 15%, in your store. Then, it’ll be best to create two WooCommerce tax classes. One can be Electronics (or just 8%) and the other can be Beauty (or just 15%).
This will make it easier for you to configure products. All you have to do is choose the suitable class for your products and the particular tax rate will be applied to your product.
Next, if you want to sell products to foreign countries where different WooCommerce taxes are applicable.
For example, let’s say you want to impose a 20% tax rate in the United Kingdom and a 27% tax rate in Switzerland. In this case, you can set different tax rates for different countries by adding the country code in the WooCommerce tax classes section.
Setting up additional tax classes
To set up additional tax classes, do it from the ‘Tax Options’ tab under the WooCommerce taxes settings.
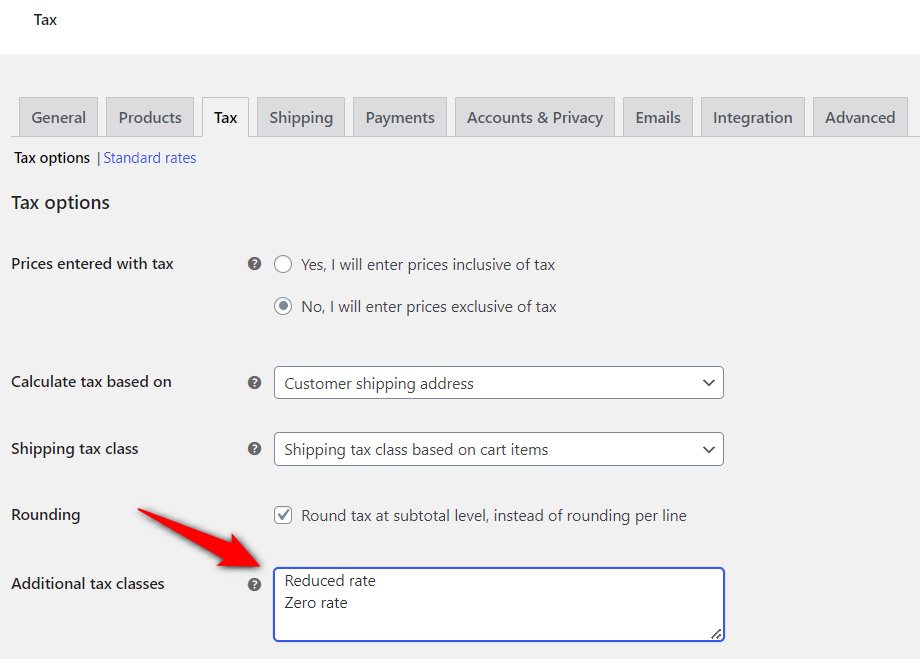
These classes will appear as additional sections or tabs in the taxes menu.
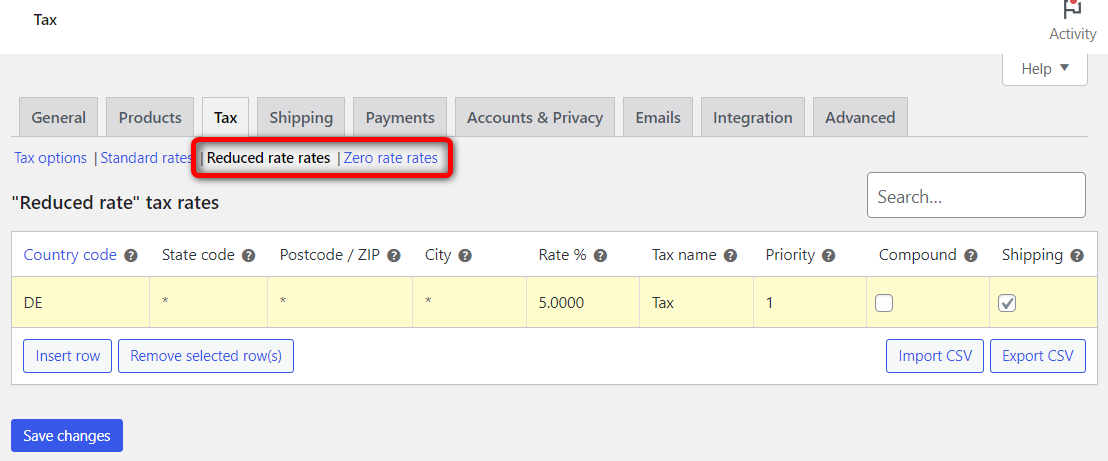
Setting up these additional tax classes is similar to standard rates, as explained in the complete process above.
Once done, you can assign these additional tax classes to your WooCommerce products.
Assign tax classes to products
For that, go to Products - edit the selected product. Under the Product Data - General tab, set the tax class for your product.
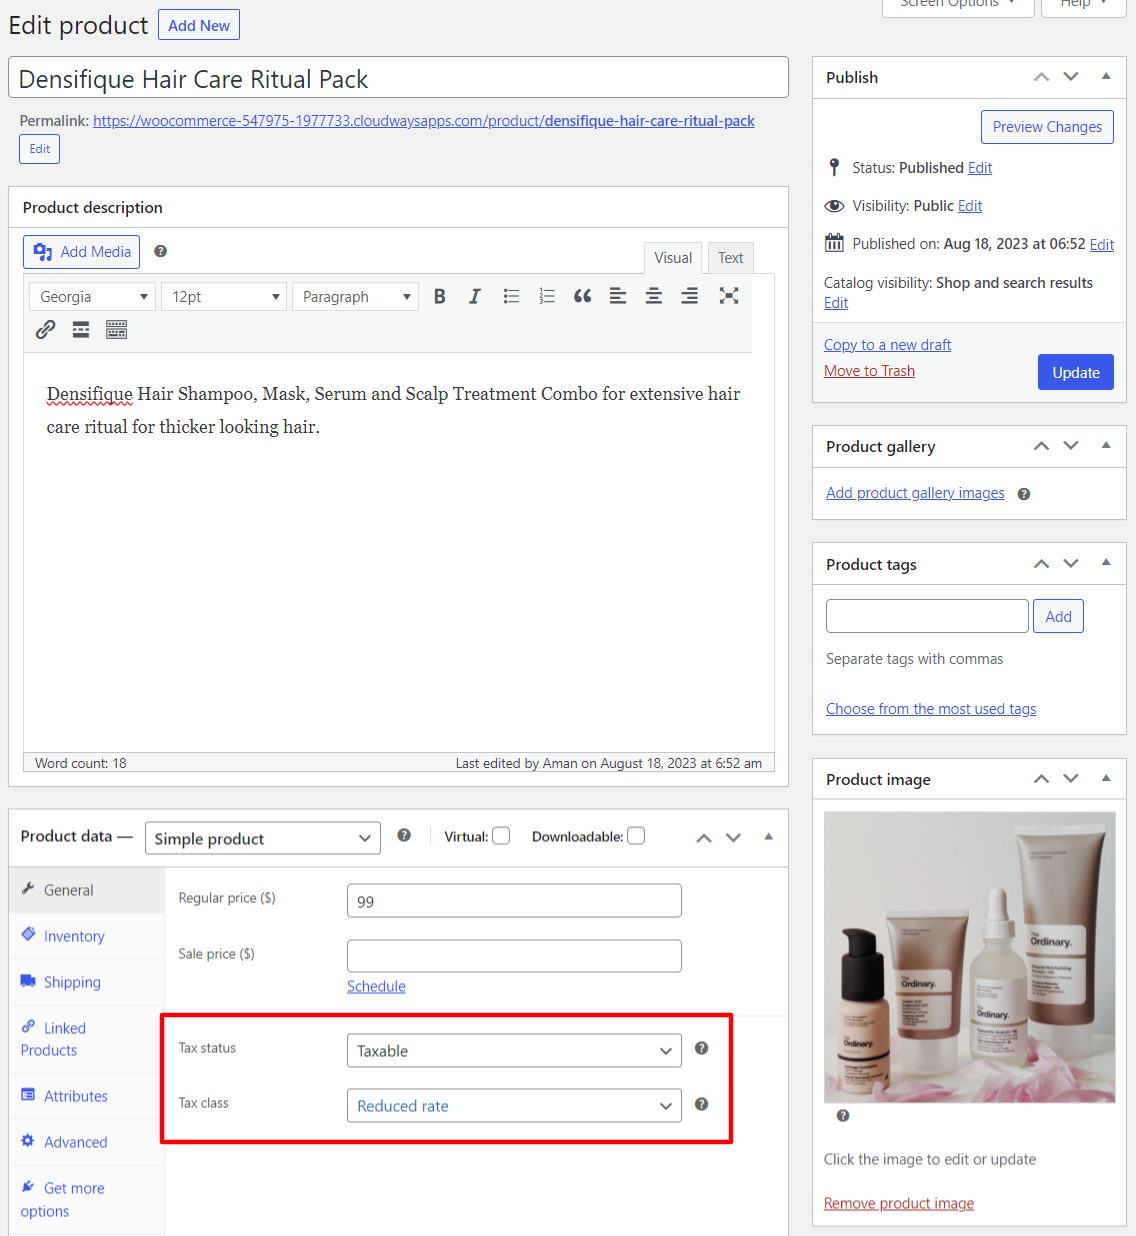
Once done, hit ‘Update’ to save your changes. This way, you'll get the tax rate for this product in WooCommerce.
Tax classes for variable products
For variable products, the tax class is set at the parent product level by default, and all variations inherit it. However, you can override the tax class on individual variations if needed.
Go to the Variations tab in the product editor, expand a specific variation, and change its tax class. This is useful when you sell a product in both physical and digital formats, each taxed differently.
Well done! This is how you can set up additional tax classes in WooCommerce.
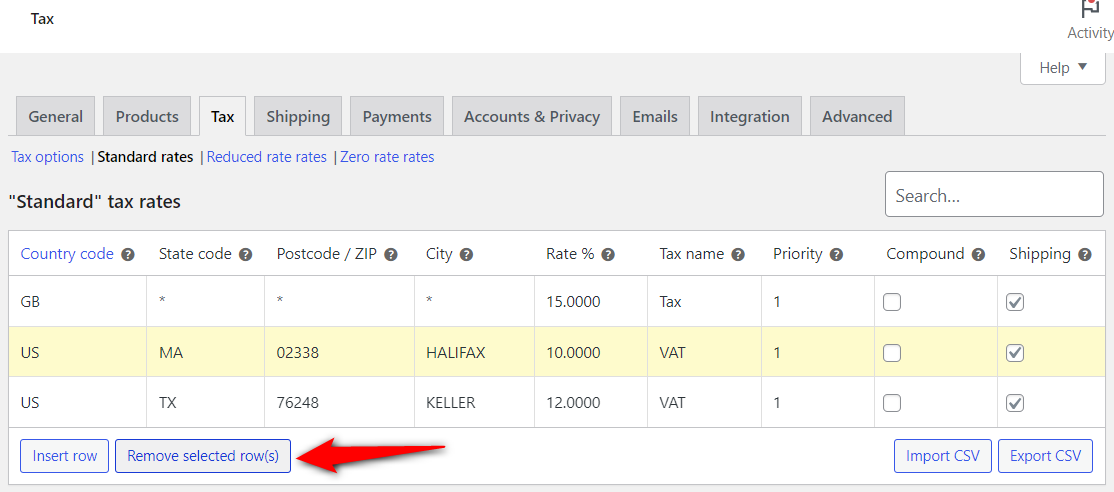
Deleting WooCommerce tax rates
You can delete individual tax rates or all of them in bulk.
To remove a tax rate individually, click a row to select it, then click 'Remove selected row(s)'.
To delete all tax rates, go to WooCommerce ⇨ Status.
Under the Tools section, click on the 'Delete WooCommerce tax rates' button.
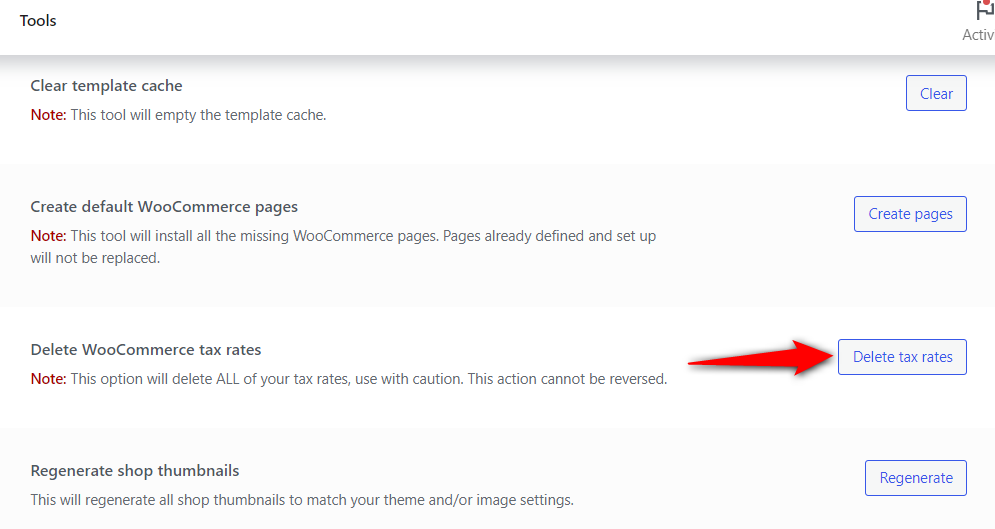
This will remove all the tax rates in WooCommerce. Please note that this action cannot be reversed.
Step 5: Save, test and verify your tax setup in WooCommerce
Click 'Save changes' on the Tax settings page, then run a test order to confirm everything works.
Now, if we add products to the cart and head to the checkout page, we’ll see the tax rates below the subtotal and shipping charges.
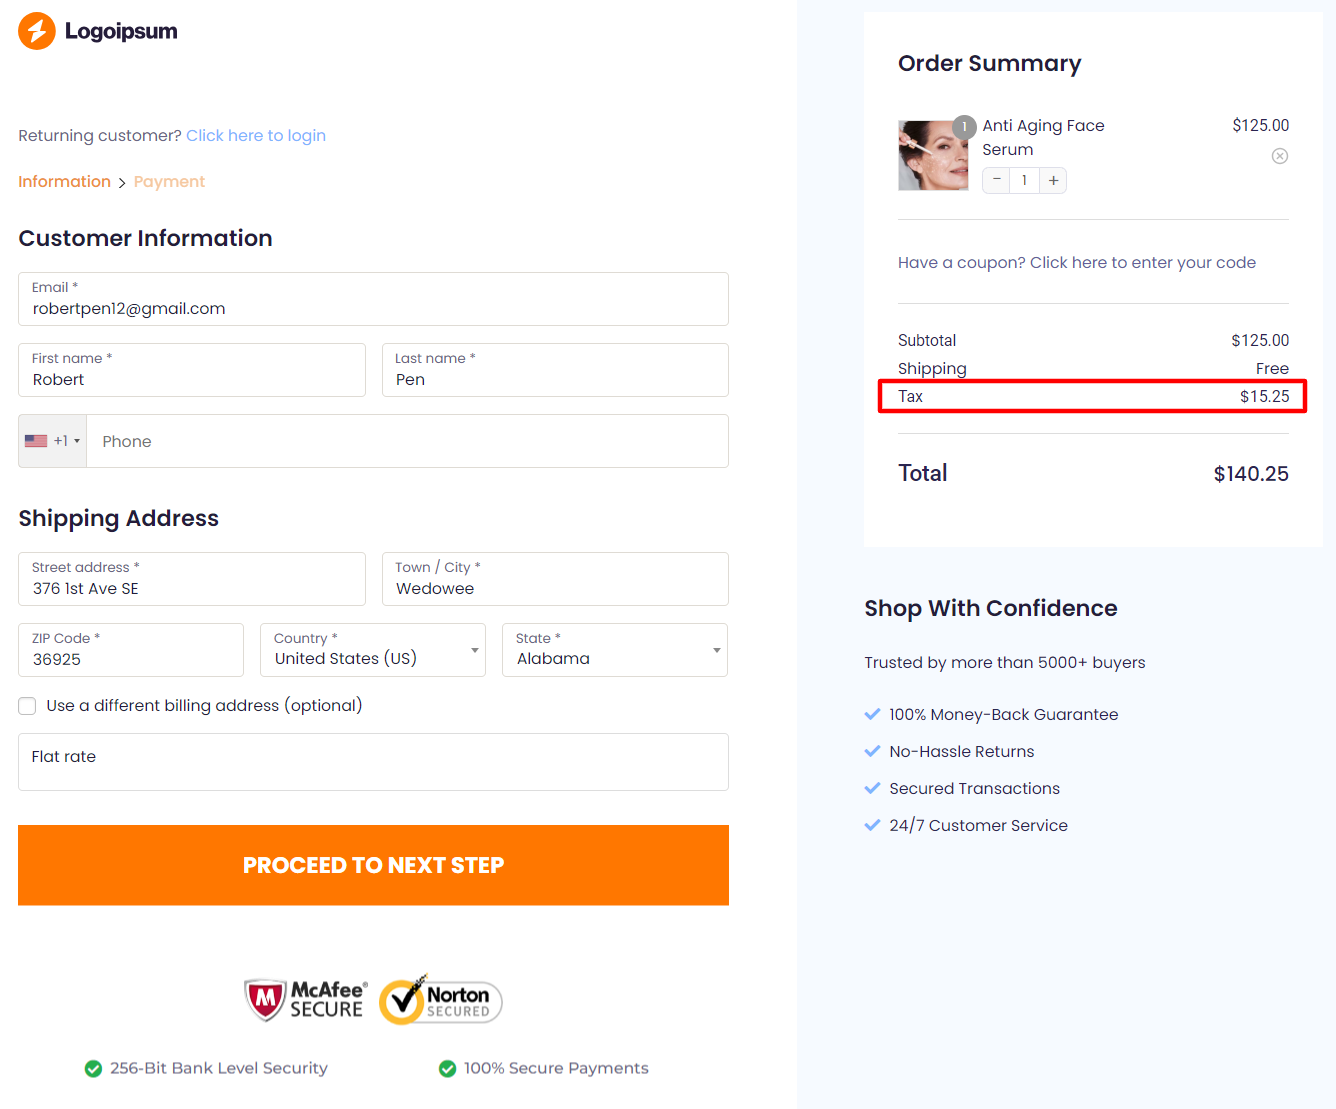
The total value of the product becomes a total of subtotal, shipping and taxes. This is the amount a shopper must pay for a successful purchase.
It helps maintain transparency regarding the amount of taxes you collect under tax laws and regulations.
Please note that we have used a custom store checkout page to replace the default WooCommerce checkout using the FunnelKit Funnel Builder plugin.
It helps you design beautiful sales funnels that increase sales and conversions in your WooCommerce store.
How to View Your WooCommerce Tax Reports?
Once you've set up and configured WooCommerce taxes, they'll automatically get applied when customers make their purchases.
To keep track of taxable sales and liabilities, WooCommerce stores this information for financial planning and tax reporting.
To access tax reports, navigate to Analytics ⇨ Taxes.
Here, you’ll be able to see the complete tax reports for your WooCommerce store, including:
- Total tax
- Order tax
- Shipping tax
- Orders

You can select a date range to view data for that period.
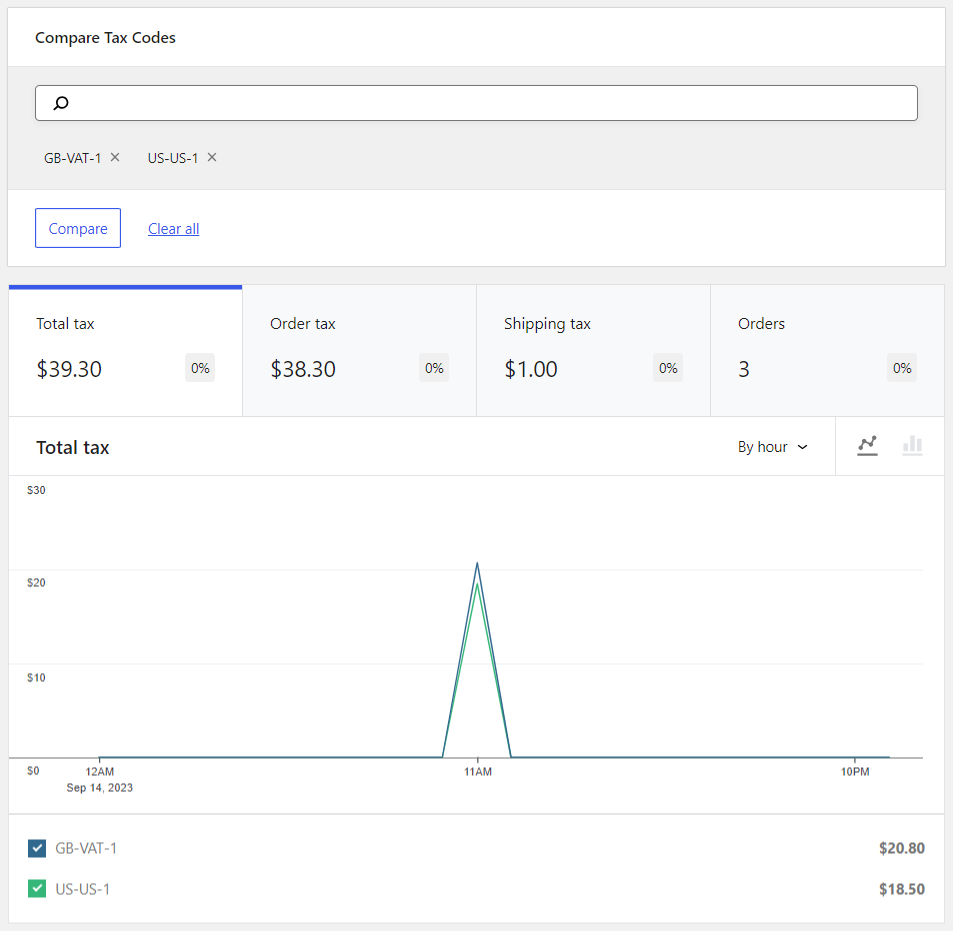
To compare reports for different tax codes, go to the Show field and select 'Comparison'. Just enter the WooCommerce tax codes you want to compare in your store.
Here's how you can set up tax codes to compare:
If you scroll down to the bottom of this analytics page, you'll see a breakdown of the taxes.
It'll show the tax code, tax rate, total tax, order tax, shipping tax and number of orders placed.
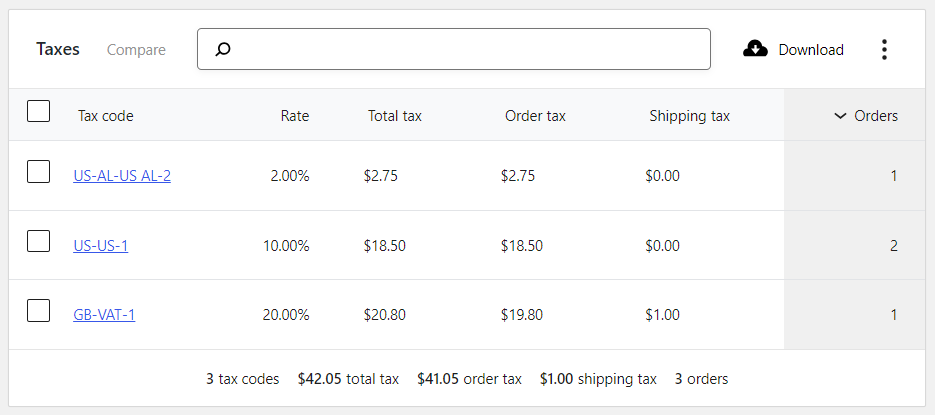
This tool is great for comparing the different tax rates.
If you want to look at a more advanced tax reporting tool that sorts your taxes by code or date, navigate to WooCommerce ⇨ Reports.
Under the Taxes section, you’ll see all the tax reports collected in your store.
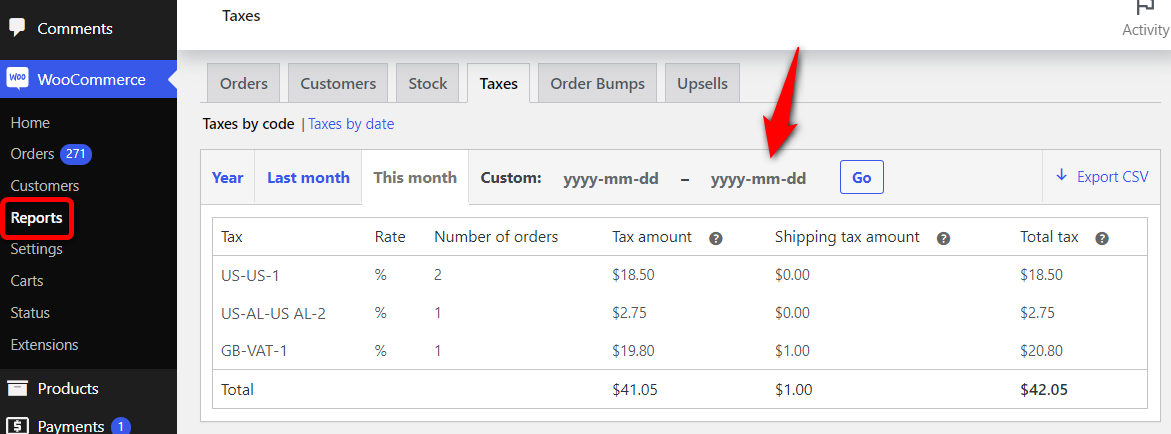
You can even specify a custom date and see the data for that period.
For US multi-state reporting, plugins like TaxJar and TaxCloud provide return-ready reports that organize your sales data by state and jurisdiction.
For integration with accounting software, tools like Link My Books, Quaderno, or direct TaxJar integrations can sync your WooCommerce tax data with QuickBooks or Xero.
Troubleshooting Common WooCommerce Tax Issues
Even with proper configuration, WooCommerce tax issues can occur. These are the most common problems store owners encounter and how to fix them.
- Taxes are only calculated for your store’s city or ZIP code
This is one of the most frequently reported WooCommerce tax issues, especially on Reddit and WordPress forums. It happens when 'Calculate tax based on' is set to 'Shop base address' instead of 'Customer shipping address'.
When this setting is active, WooCommerce applies your local tax rate to each order, regardless of the customer's location.
If you have entered a rate only for your own city or state, orders from other locations will show zero tax.
The fix is to go to WooCommerce ⇨ Settings ⇨ Tax and set it up to 'Customer shipping address'.
- Automated taxes are not working after enabling
If you are using the automated WooCommerce Tax plugin and it just silently fails, check your Jetpack connection.
The plugin relies on Jetpack to ping the TaxJar API. Go to Jetpack ⇨ Dashboard to verify your connection status. Also, confirm that your store address is complete and accurate.
The automated tax service uses this address as the origin for calculations.
- Tax showing as $0.00 at checkout
Check that the 'Enable tax rates and calculations' option is checked under WooCommerce general settings.
Next, verify that the product you are testing has its Tax Status set to 'Taxable' in the product editor. If the product's Tax Status is set to 'None' or 'Shipping only', WooCommerce will not apply product-level tax.
Next, if you are using manual tax rates, confirm that you have a rate entered that matches the customer's location. An empty Standard Rates table means no tax will be applied to any order.
- Rounding errors are causing totals that are off by a cent
This is a misalignment issue between 'Prices entered with tax', 'Display prices in the shop', and 'Display prices during cart and checkout' settings.
If one is set to inclusive and the other to exclusive, WooCommerce performs back-and-forth calculations that can lead to rounding discrepancies.
Set all three to the same logic. Still broken? Try toggling "Round tax at subtotal level" to stop compound calculation errors dead in their tracks.
- Tax does not apply to shipping
WooCommerce only taxes shipping if two conditions are met.
First, the shipping method must have its Tax Status set to “Taxable” (check this under WooCommerce ⇨ Settings ⇨ Shipping ⇨ Your Shipping Zone ⇨ Edit the shipping method).
Second, at least one of your tax rate rows must have the 'Shipping' checkbox enabled. If both are configured correctly and shipping is still not being taxed, check the 'Shipping tax class' setting under Tax Options. Make sure it is not set to 'Zero Rate'.
- Plugin conflicts are causing tax calculation errors
If taxes worked previously but stopped after installing or updating a plugin, there is likely a conflict.
To identify the culprit, go to Plugins ⇨ Installed Plugins, deactivate all plugins except WooCommerce, and test whether taxes calculate correctly.
If they do, reactivate plugins one at a time, testing after each activation.
The plugin that breaks tax calculations is the one causing the conflict. Also, clear all caches (browser, plugin-level, and server-level) after each test, as cached checkout pages can show stale tax data.
- Taxes are not updating when the customer changes their address
This is usually a WooCommerce caching issue. Exclude your cart, checkout, and my-account pages from any caching plugin you are using.
WooCommerce needs to recalculate taxes dynamically when the customer enters or changes their shipping address, and cached pages prevent this recalculation from happening.
5 Best Practices to Keep Your WooCommerce Store Tax-Compliant
Staying tax-compliant as a growing ecommerce store is a nightmare. Here are effective best practices you can follow.
1. Use automated tax calculations instead of manual rates
If you are still trying to manage manual tax rate tables yourself, you are basically asking for an audit.
One outdated rate can mess up your books for months.
You need to automate the actual calculations immediately so you never have to think about them.
2. Monitor your economic nexus thresholds in every state you sell to
The biggest hidden threat to your business isn't your local sales tax. It is crossing an economic nexus in another state without realizing it.
In most states, the second you hit $100,000 in sales to their residents, you are legally on the hook for collecting their taxes.
You need a tool like TaxJar or TaxCloud running in the background, specifically to alert you before you cross that line.
3. Display taxes transparently before the final checkout step
You also have to get your frontend and backend completely aligned.
Do not hide the tax until the final payment screen; that is a guaranteed way to spike your abandoned cart rate.
Show it in the slide-out cart or in the order summary section on the checkout page.
4. Assign the correct tax class to every product, including variations
When you add new product types, such as digital downloads, food items, clothing, or subscription products, check whether they fall into a different tax category in your selling regions.
For variable products, verify that each variation inherits the correct tax class or has an override applied where needed.
5. Consult a tax professional for jurisdiction-specific questions
WooCommerce handles the technical side of tax calculation and collection, but it cannot advise you on what to charge or when to charge it.
Tax rules vary significantly between states, countries, and product types.
A qualified accountant or tax advisor can help you determine your obligations, especially if you are approaching nexus thresholds in new states or expanding into international markets.
Frequently Asked Questions on WooCommerce Taxes
Yes. The free WooCommerce Tax plugin automates sales tax calculations for stores in over 30 supported countries. It uses the TaxJar API to fetch real-time rates at checkout based on the customer's location.
For more advanced automation, including automatic filing, nexus tracking, and return-ready reports, premium plugins such as TaxJar, TaxCloud, or Avalara offer additional features. Automated tax calculation is strongly recommended for stores that sell across multiple states or countries.
The $600 rule refers to IRS reporting thresholds for third-party payment processors. Payment platforms like PayPal or Stripe are required to report sellers who receive over $600 in payments via a 1099-K form. This does not change how you configure WooCommerce taxes.
It is a separate income-reporting requirement, not a sales-tax obligation. It does not affect what taxes you charge customers at checkout. Consult your accountant for details on how this affects your income tax filing.
The free WooCommerce Tax plugin supports single-location stores only. If your business ships from multiple warehouses or has retail locations in different states, you need a plugin that supports origin-based and destination-based tax calculations from multiple addresses.
TaxJar and Avalara both support multi-location setups. You configure each location in the plugin, and it calculates tax based on the correct origin and destination for each order. This is especially important in origin-based tax states where the shipping origin, not just the destination, determines the tax rate.
Yes. WooCommerce provides tax-related functions and hooks that developers can use to calculate or modify taxes through custom code. The WC_Tax class includes methods such as find_rates() and calc_tax() for retrieving tax rates and computing tax amounts. You can also use the woocommerce_calc_tax filter to modify tax calculations.
However, for most store owners, using a tax automation plugin is far simpler and less error-prone than writing custom PHP code. Custom code also needs to be maintained with each WooCommerce update, adding ongoing development overhead.
Here are some reasons why setting up taxes in WooCommerce is essential:
Legal compliance - Tax laws and regulations vary by region and can be complex. If you fail to comply with these laws, you may face substantial penalties. That’s why WooCommerce helps you accurately collect and remit taxes, minimizing the risk of getting into any legal issues.
Transparency for shoppers - Taxes are part of the total cost of products and services. This way, businesses clearly display taxes at checkout, helping you ensure transparent pricing and build trust with shoppers.
Accurate pricing - WooCommerce taxes lets you configure tax rates based on your customers' locations and the types of products you sell. This process ensures the pricing in your WooCommerce store remains accurate, provided tax rates apply to each transaction.
Financial reporting - WooCommerce tracks taxable sales, liabilities, and tax collections in one place. You can use this information for financial planning, accounting, and tax reporting.
Tax efficiency - Setting up WooCommerce taxes helps streamline the tax collection process. This saves you time and effort in managing your business finances. Setting up automated tax calculations in WooCommerce helps reduce the risk of making errors.
Start Collecting the Right WooCommerce Taxes Today!
We hope you’ve understood everything you need to know about setting, configuring and managing WooCommerce taxes in your online store.
By default, WooCommerce offers several options for setting up taxes in your store.
You can configure price display as inclusive or exclusive of taxes, calculate taxes based on the customer's location, add tax rates for different countries, and more.
To that end, this guide will help you comply with certain tax regulations.
Furthermore, if you don’t want a manual tax setup, you can use a WooCommerce tax plugin to automate your sales taxes.
Not just that, if you want to use custom checkout or effective sales funnels, you can download the FunnelKit Funnel Builder on your WordPress website.
It helps you enhance your store’s conversions by setting up custom checkouts and AOV-boosting offers.
It’s a great way to boost your profits and make big sales by setting up sales funnels and tracking your conversions.
So what are you waiting for?

Editorial Team
July 7, 2026Are shoppers adding products to their cart and leaving before they buy? According to Baymard Institute research on checkout usability, 18% of shoppers who abandon their cart do so because...

Editorial Team
July 7, 2026You’ve built your WooCommerce store, polished your product pages, and invested in marketing, but sales aren’t coming. Visitors browse, some add items to their cart, and most vanish before completing...

Editorial Team
July 3, 2026Discover how a canceled order doesn't have to mean a lost customer, and how the right WooCommerce canceled order email can turn it into a second chance. WooCommerce canceled order...


