



There are four effective ways to get the TikTok pixel firing on a WooCommerce store with the official TikTok for WooCommerce plugin, a dedicated pixel plugin, a server-side Events API setup, or your funnel builder if you already run one.
Each method suits a different situation, and the wrong choice leads to broken events and wasted ad spend.
In this guide, we'll walk you through the setup step by step and show you how to confirm every event is tracking correctly.
If you're already stuck with the pixel installed, but purchases aren't showing up, skip to the troubleshooting section. That's the most common problem and takes only five minutes to fix.
Table of Contents
- 1 What Is the TikTok Pixel (and Do You Also Need the Events API)?
- 2 4 Ways to Add the TikTok Pixel to WooCommerce
- 3 Method 1: The Official TikTok for WooCommerce Plugin
- 4 Method 2: A Dedicated Pixel Plugin
- 5 Method 3: TikTok Pixel + Events API for Server-Side Tracking
- 6 Method 4: Track TikTok Events With Your Funnel Builder
- 7 Events You Should Track
- 8 How to Test That Your TikTok Pixel is Firing?
- 9 4 Effective Tips to Follow When Setting Up TikTok Pixel for WooCommerce
- 10 Fixing a TikTok Pixel That Isn't Firing
- 11 Frequently Asked Questions (FAQs) on WooCommerce TikTok Pixel
- 12 Set Up Your WooCommerce TikTok Pixel and Start Tracking Conversions
What Is the TikTok Pixel (and Do You Also Need the Events API)?
The TikTok pixel is a small JavaScript snippet that loads in your visitor's browser and reports their actions back to TikTok with page views, product views, add-to-carts, checkouts, and completed orders.
TikTok uses that signal to attribute sales to your ads, build retargeting and lookalike audiences, and train its delivery algorithm on who actually buys.
About 58% of TikTok users say they discover new products through the platform, which is why getting this tracking right directly affects your return on ad spend.
But the browser pixel alone has a structural weakness in 2026. It fires in the browser, and browsers increasingly block it.
Ad blockers (run by roughly a third of users globally), Safari and Firefox tracking protection, and cached pages all stop the pixel script from executing.
Every blocked pixel is a conversion TikTok never sees and cannot optimize toward.
That's where the Events API (TikTok's server-side tracking, sometimes called TikTok CAPI) comes in.
Instead of relying on JavaScript in the browser, your server sends the confirmed WooCommerce order directly to TikTok after checkout. No browser, no ad blocker, no cache in the way.
However, if you run both the pixel and the Events API to send the same events, you have to deduplicate them using a shared event ID, or a single purchase will be counted twice.
For a store spending real money on TikTok ads, you need the browser pixel for behavioral coverage, Events API for accuracy, and deduplication to keep the numbers honest.
Browser-only is fine for a store just starting out; server-side becomes worth the setup once ad spend and lost conversions start costing you more than the effort.
4 Ways to Add the TikTok Pixel to WooCommerce
All four methods get a pixel onto your store; they differ in server-side support, cost, and who they suit.
| Method | Browser Pixel | Events API (Server-Side) | Deduplication | Cost | Best For |
|---|---|---|---|---|---|
| Official TikTok for WooCommerce | ✅ Yes | ✅ Yes | ✅ Handled automatically | Free | Stores wanting the “official” path and catalog sync, but note the Shop deprecation below |
| Dedicated pixel plugin (PixelYourSite / Pixel Manager) | ✅ Yes | ✅ Yes (paid tier) | ✅ Yes | Free core, paid for API | Multi-platform stores (Meta + Google + TikTok) wanting one tracking hub |
| TikTok Pixel + Events API (manual/server-side) | ✅ Optional | ✅ Yes | ✅ Manual (event_id) | Free to build, dev time | Stores that want maximum accuracy and control |
| Funnel builder (FunnelKit) | ✅ Yes | ✅ Yes | ✅ Yes | Free core | Stores already building funnels/checkout who want pixel tracking without a separate plugin, in any country |
Here are a few things to note:
- The official extension is the default and syncs your catalog, but as of 2026, it's stepping back from TikTok Shop (details below) and is tied to markets where TikTok's commerce features are live.
- Dedicated plugins win when you're already tracking Meta and Google and want TikTok in the same place, but full server-side support sits behind a paid tier.
- Manual Events API provides the cleanest server-side accuracy but requires technical setup, such as token generation, hashing, and deduplication that you have to get right.
- A funnel builder is the pragmatic choice if you already own one, because it adds the pixel and Events API without a second tracking plugin, and it isn't tied to TikTok's commerce-market availability.
Method 1: The Official TikTok for WooCommerce Plugin
The official plugin installs the pixel and Events API together, supports advanced matching, and syncs your product catalog. It's free and the safest first stop if you want the officially supported route.
Step-by-step setup
In your WordPress admin, install and activate the TikTok for WooCommerce extension from the WooCommerce marketplace.
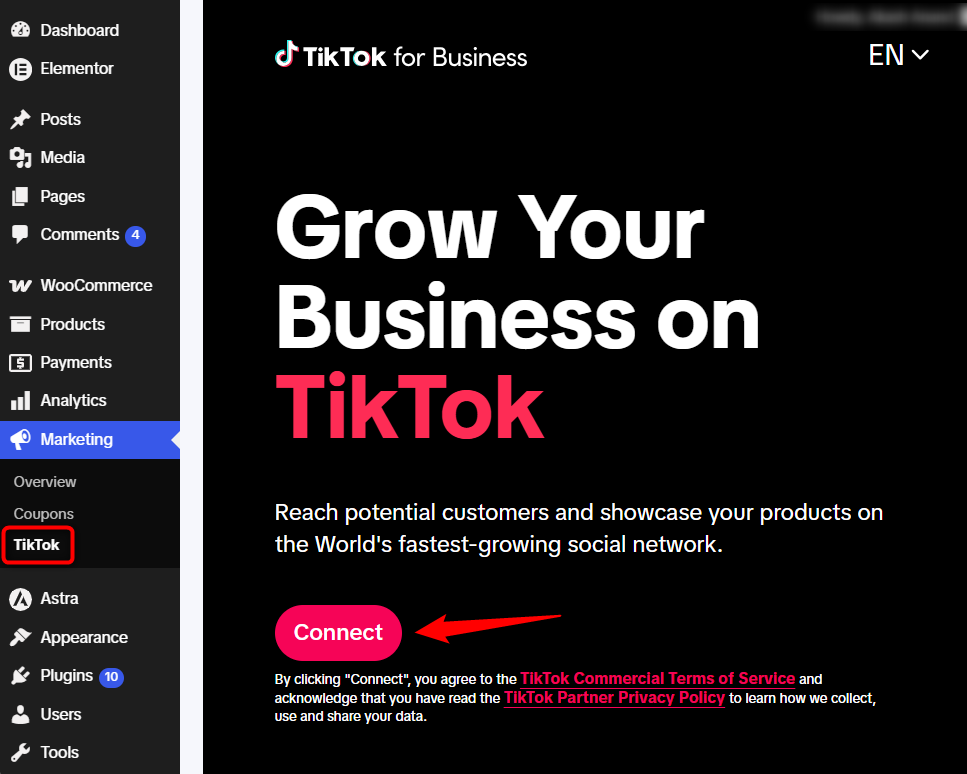
From the WordPress menu, open TikTok under Marketing, then click 'Connect Account'.
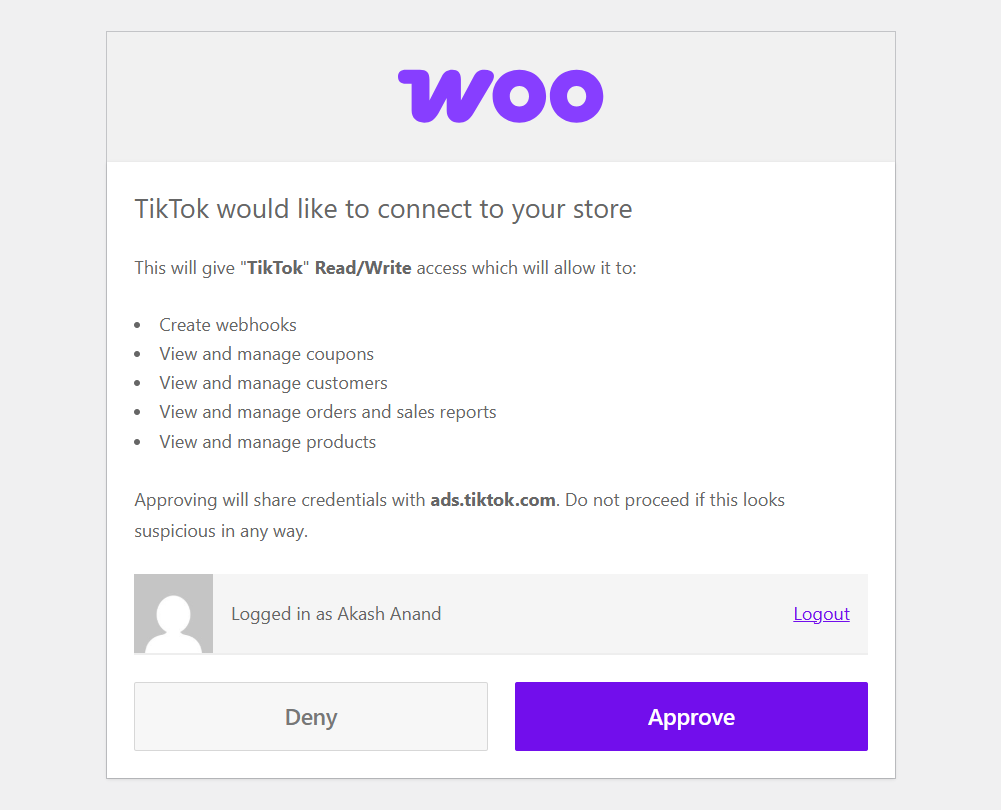
Click 'Approve' to authorize TikTok for Business to access your TikTok account.
Make sure to create a new TikTok for Business account or connect to your existing one.
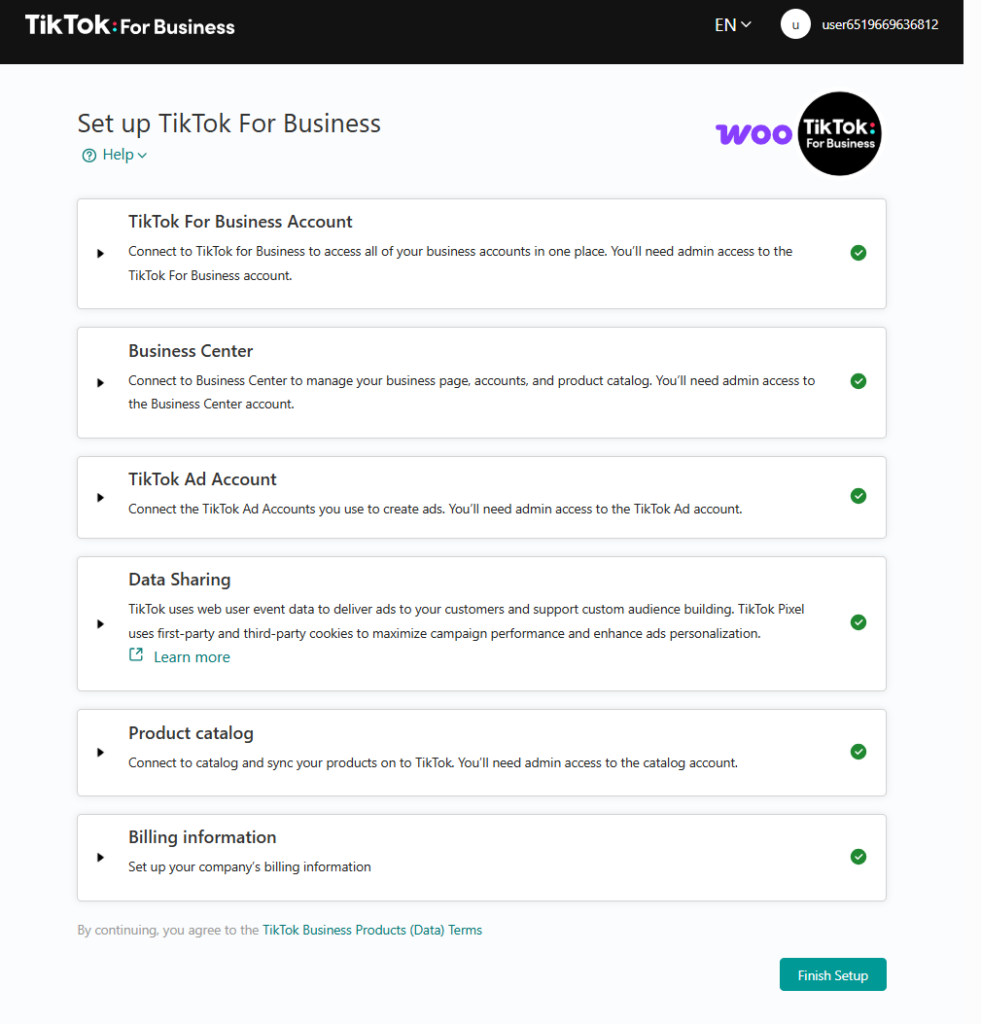
Once connected, the extension creates and installs a new TikTok pixel and wires up the Events API for browser- and server-side tracking, with automatic updates.
Make sure to verify events are flowing in TikTok Events Manager ⇨ Test Events.
The reason TikTok recommends allowing the extension to create a new pixel rather than connecting to an existing one is deduplication, as the freshly created pixel automatically keeps browser and server events aligned.
If you bolt an old custom pixel onto it, you may need to do deduplication work to ensure accurate reporting.
Limitations to know before you commit
The official plugin is solid, but it isn't the best choice for every store. Let's look at its limitations that most guides skip:
- The TikTok Shop features are being deprecated
As of March 2, 2026, the official TikTok for WooCommerce plugin stopped accepting new TikTok Shop connections, and TikTok Shop features will be discontinued in the plugin on June 1, 2026.
Ads and pixel tracking continue, but if you came for catalog-to-Shop selling through this extension specifically, that path is closing.
TikTok now points merchants to the TikTok Shop App Store and Seller Center instead.
- Tied to markets where TikTok commerce is live
TikTok Shop and its Seller Center are only available in a limited set of countries (around 16+ in North America, Europe, and Asia as of 2026).
If you're outside those markets, the commerce side of this extension isn’t an option, even though the ads pixel still works.
- Caching can silently break it
The plugin's server-to-server tracking can fail when a caching plugin (WP Rocket, LiteSpeed, W3 Total Cache) serves a stored version of your thank-you page and the dynamic script never runs.
Method 2: A Dedicated Pixel Plugin
If you're already running Meta and Google tracking and want TikTok in the same dashboard, a dedicated tracking plugin is the natural fit.
PixelYourSite and Pixel Manager for WooCommerce both specialize in multi-platform, e-commerce-grade tracking and tend to go deeper into server-side accuracy than a single-platform plugin.
PixelYourSite supports both browser and API events for TikTok.
Add your API secret token, and it fires View Content, Add to Cart, Initiate Checkout, and Place an Order (Complete Payment) through both the tag and the API, with automatic conversion-value tracking.
It maps WooCommerce actions to TikTok's standard event names (TikTok's API only accepts standard names, not custom ones) and integrates with consent tools, so the pixel and Events API can be blocked until a visitor opts in.
When to pick this method over the official plugin
- You track more than one ad platform and want a single source of truth instead of three separate plugins fighting over the same events.
- You want logging to verify exactly what data is being sent on the server side. This is useful for debugging match quality.
- You're comfortable with a steeper learning curve and a paid tier for full TikTok Events API support (the TikTok add-on is a paid feature in PixelYourSite).
Dedicated plugins are powerful but not free once you need the API, and the configuration surface is larger. If you only run TikTok and want the simplest official path, this is more tool than you need.
Method 3: TikTok Pixel + Events API for Server-Side Tracking
This is the method that fixes the browser pixel's core weakness, which is 20-40% of events that ad blockers, privacy browsers, and cached pages silently swallow.
If you're spending seriously on TikTok and your reported ROAS looks worse than your actual sales, this is usually why.
Browser vs. server-side
- The browser pixel fires JavaScript on the shopper's device. It can see rich behavior (scroll, time on page), but it's blocked for a large share of users and can miss a purchase entirely if someone closes the confirmation page before it loads.
- The Events API is triggered on your server after the WooCommerce order is confirmed in your database. No browser required, no blocker can reach it. It sends the confirmed order value pulled directly from WooCommerce (not guessed from a URL), plus SHA256-hashed customer data (email, phone), which improves your match quality.
TikTok's own data show that advertisers using both the pixel and the Events API capture roughly 19% more events and see about a 15% improvement in cost per action compared to pixel-only.
However, you need to handle token generation, hashing, and deduplication.
Deduplication
If both the pixel and the Events API send the same purchase, TikTok will count it twice and inflate your conversions (sometimes by up to 100%) unless the two events share an identical event_id.
Here are two rules to follow:
- Events that arrive within 5 minutes of each other are automatically merged, regardless of event_id.
- Events arriving within 48 hours are only deduplicated if the event_id matches exactly.
In practice, use a stable identifier, such as the WooCommerce order ID, and ensure that any tool you use passes the same event_id through both the browser and the server.
Mismatched IDs (common when two different plugins each generate their own) are the number-one cause of doubled conversions.
Setup process
You have three realistic paths:
- Let the official extension or a dedicated plugin handle it (Methods 1, 2, or 4). This is the right call for most stores as the plugin manages the token, hashing, and event_id for you.
- A first-party server-side solution that receives the confirmed WooCommerce order and forwards it to TikTok's Events API (and often Meta CAPI and GA4 at the same time). More setup time, but maximum control.
- Google Tag Manager server-side. This enterprise route is powerful, but it needs a server container, data-layer expertise, and ongoing maintenance that's overkill for most WooCommerce stores.
If you're not sure, don't hand-roll it. Pick a method below that manages deduplication for you and verify it in Events Manager.
Method 4: Track TikTok Events With Your Funnel Builder
If you already build your checkout, upsells, and opt-ins with a funnel builder, you can add TikTok tracking without installing a separate pixel plugin.
FunnelKit Funnel Builder is deeply integrated with the TikTok pixel and Events API, so it fires site-wide and funnel-specific events from the same tool you already use to run your store.
Two reasons this method earns its place, positioned honestly against the others:
- You avoid a second tracking plugin: If FunnelKit already powers your checkout and offers, adding the pixel here means one less plugin loading scripts and one less place for conflicts to start.
- It works in any country: Unlike the official TikTok extension, which is tied to markets where TikTok Shop and Seller Center are live. A funnel builder's pixel tracking doesn't depend on TikTok's commerce availability. If you're outside those markets, this is a straightforward way to get the pixel and Events API running.
This method works best for stores already building funnels in FunnelKit that want the pixel plus the Events API without adding a dedicated tracking plugin. And it works on the FunnelKit free plugin.
If you're not already a FunnelKit user and you only need tracking, Method 1 or 2 is the more natural starting point.
Create your TikTok pixel in Events Manager
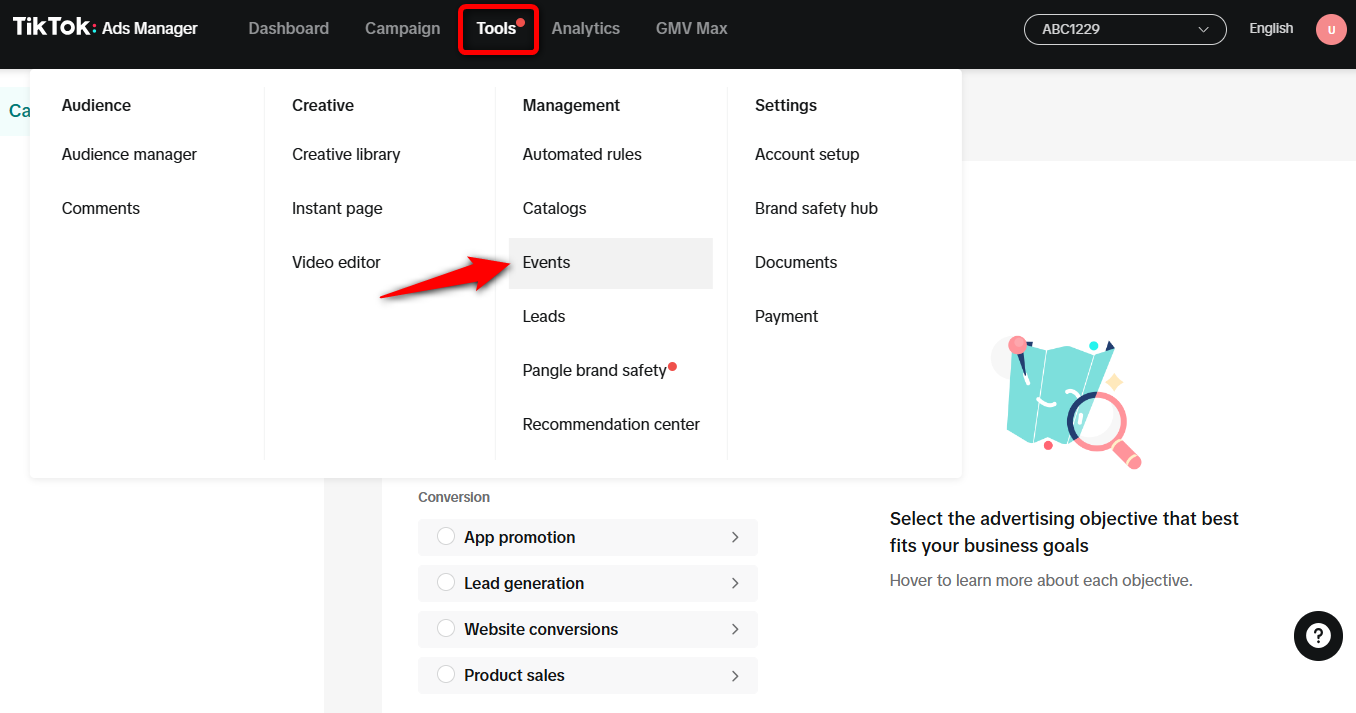
Go to TikTok Business Manager and log in to your account.

Next, click on Events under Tools.
Hit Get Started to start the process.
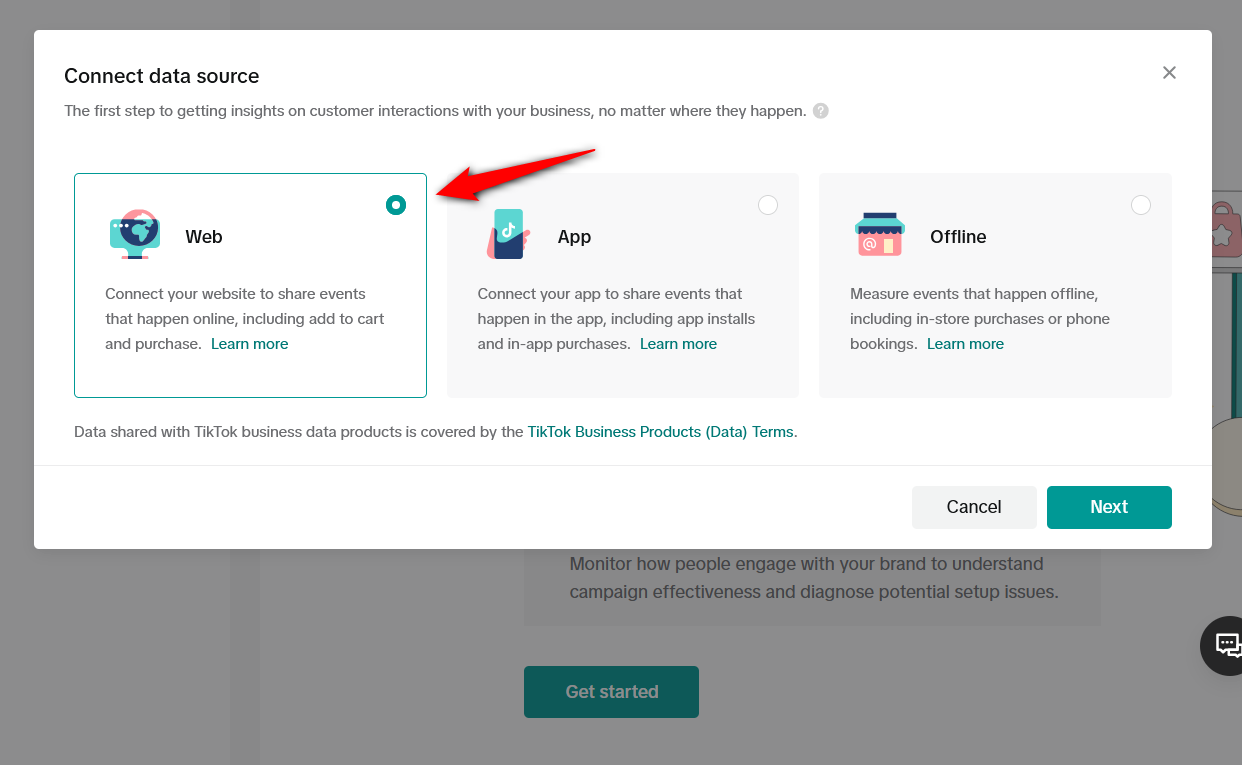
Next, click Web to connect your website to share events.
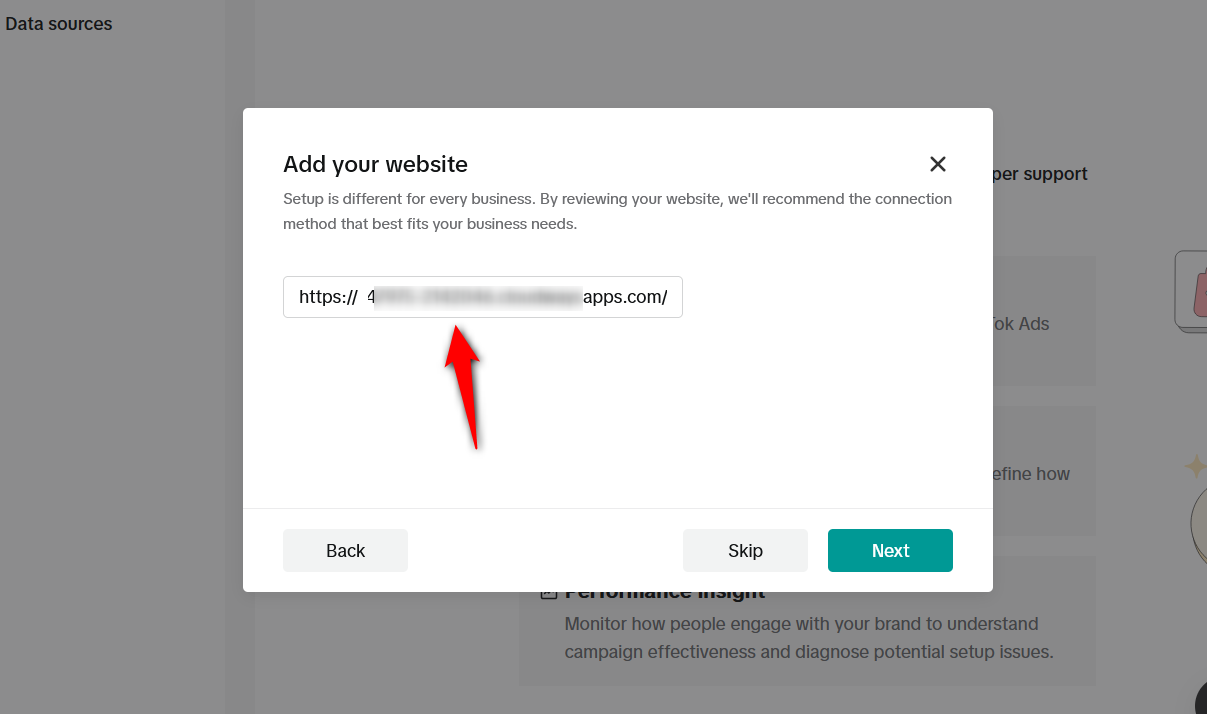
Next, enter the URL of your website.
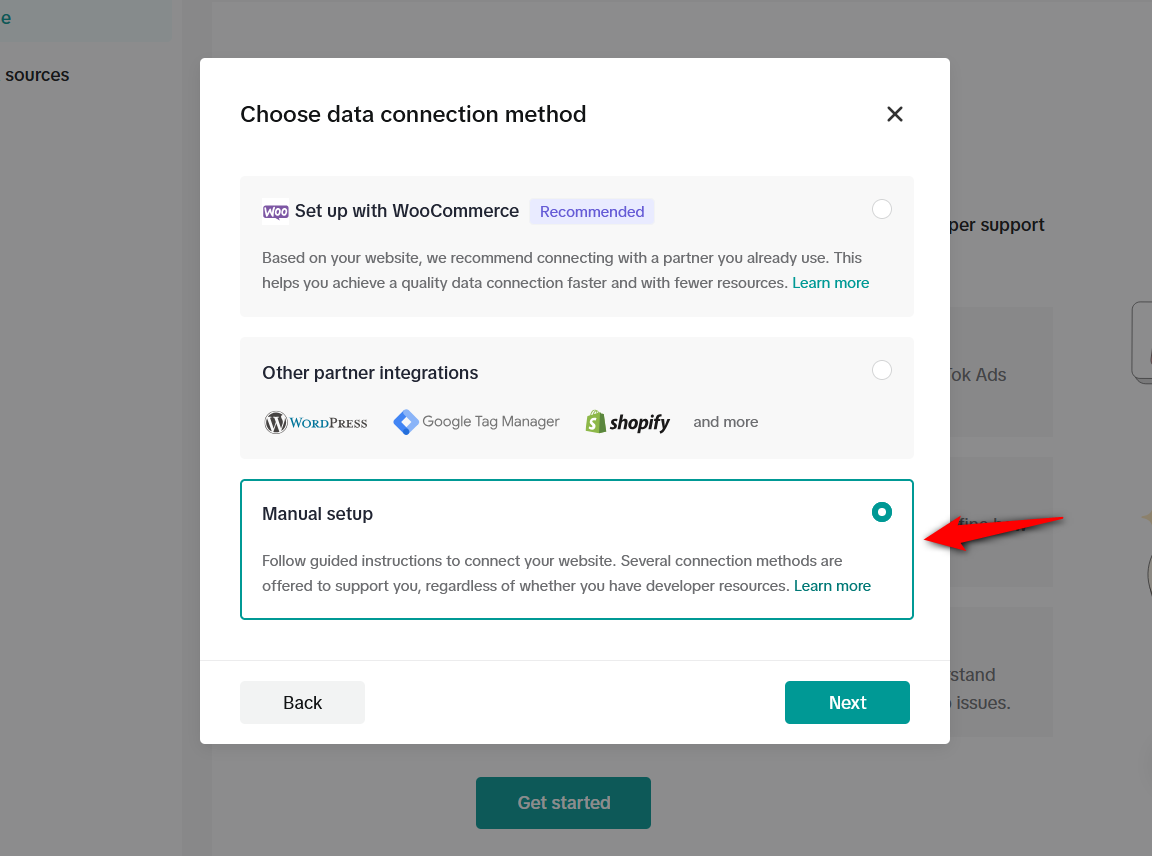
Choose the type of pixel installation you want on your WooCommerce website.
- Automatically set up web events through partner integrations
- Manually install pixel code
Here, we will select Manual setup.

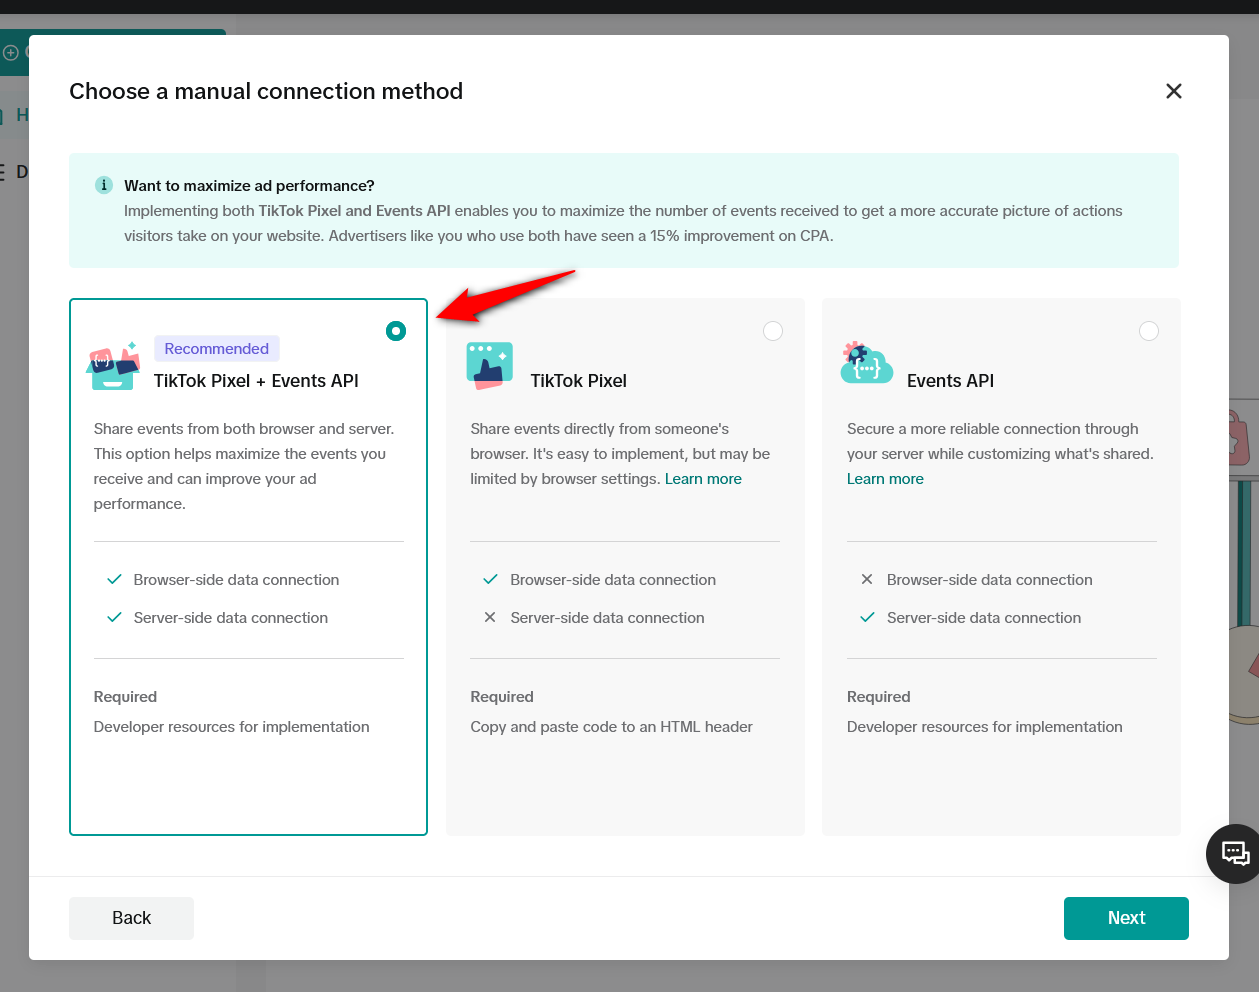
Choose the connection method. It basically means how you want your WooCommerce website to send data to TikTok.
Select TikTok Pixel + Events API and hit the ‘Next’ button.
Next, enter the name of the TikTok Pixel you want to create for your WooCommerce website.
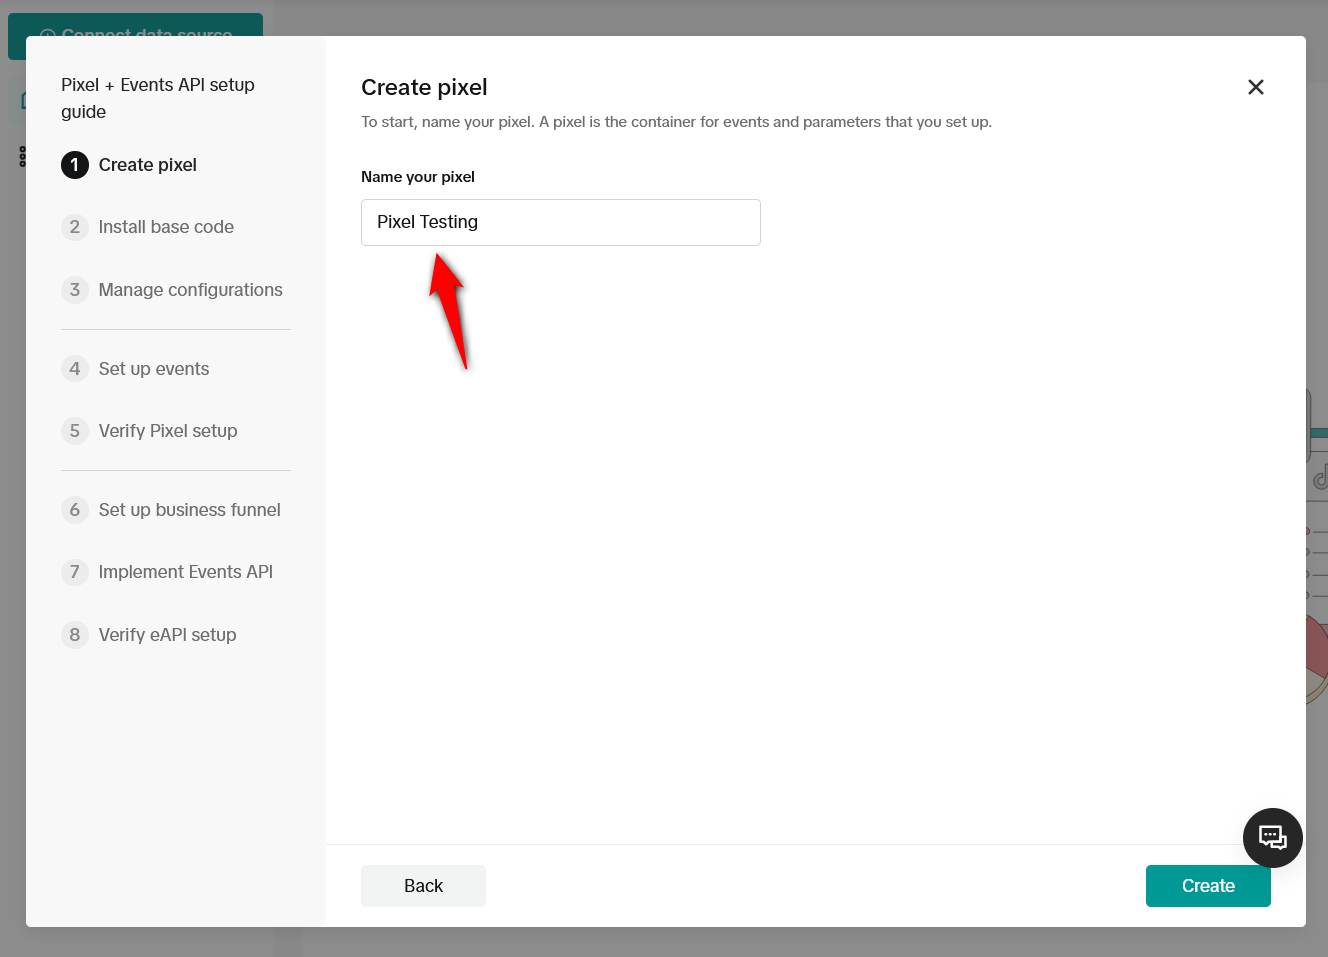
Click on Create.
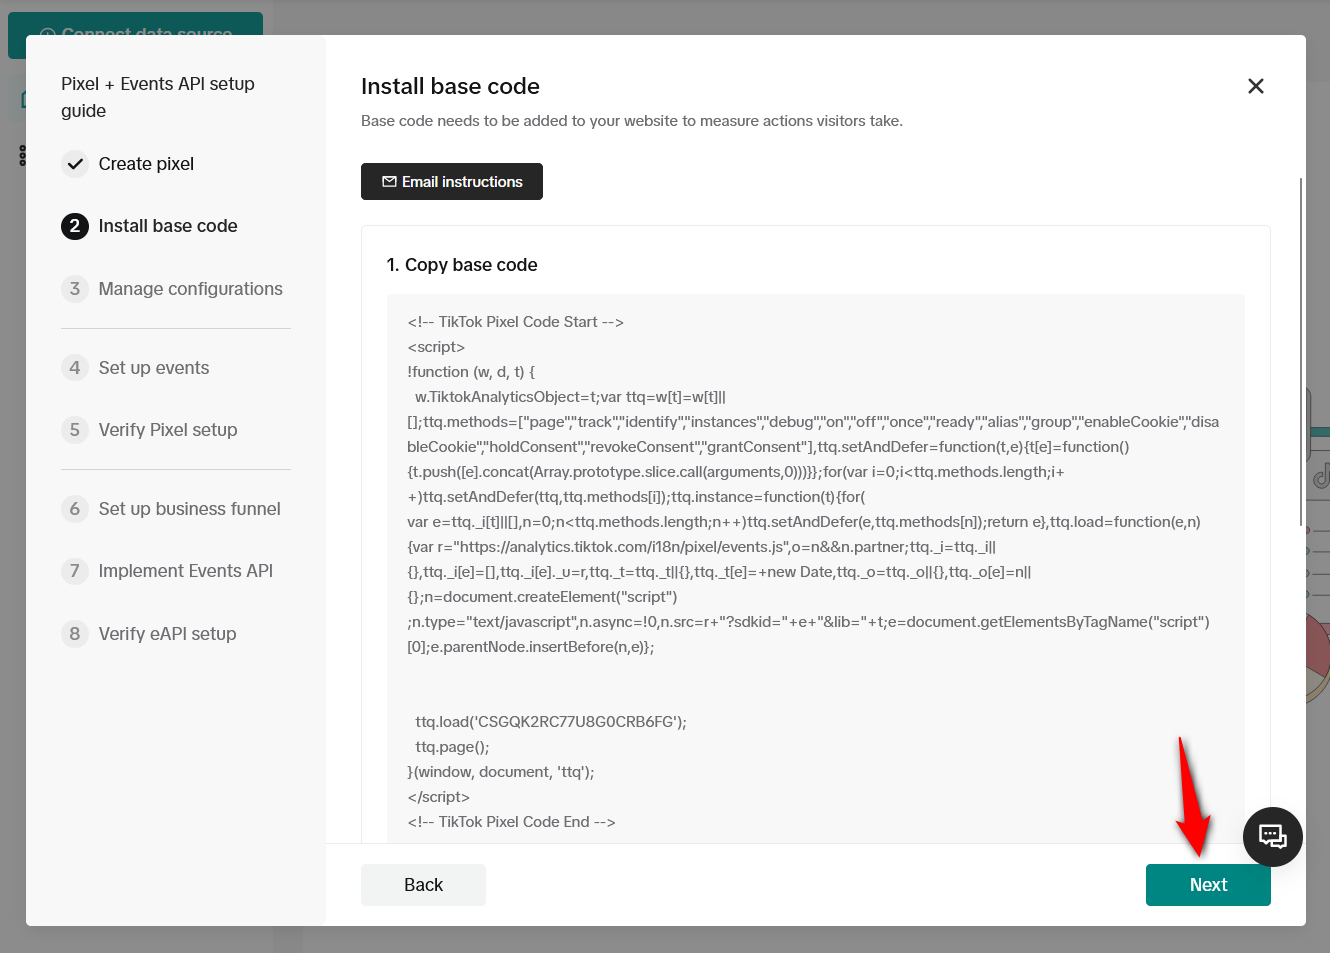
Next, here is the WooCommerce TikTok pixel setup guide to copy and install the base code on your website.
But you don’t have to worry about it because FunnelKit takes care of it. You just need to generate the Pixel ID and paste it into FunnelKit settings.
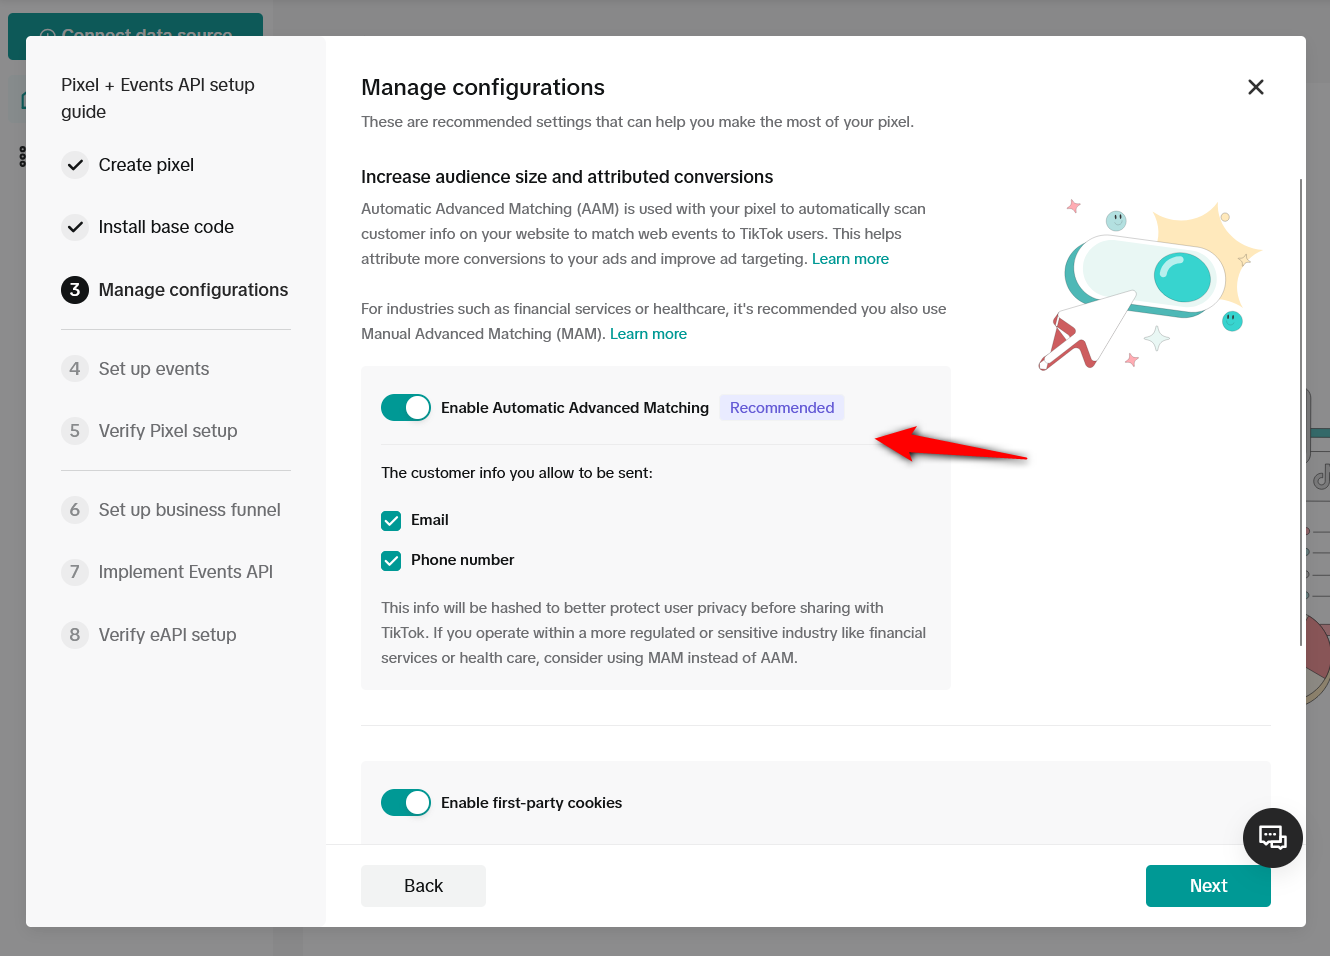
You can enable Automatic Advanced Matching. This helps you improve your ad targeting by more effectively capturing key visitor information.
When enabled, AAM captures the email addresses and phone numbers of visitors who interact with your WooCommerce website.
Here are some of its benefits:
- Better audience matching
- Privacy-protected data handling
- Enhanced retargeting potential
- Improved conversions
- Optimized lookalike audiences
You’ll be asked to set up events using the TikTok Event Builder.
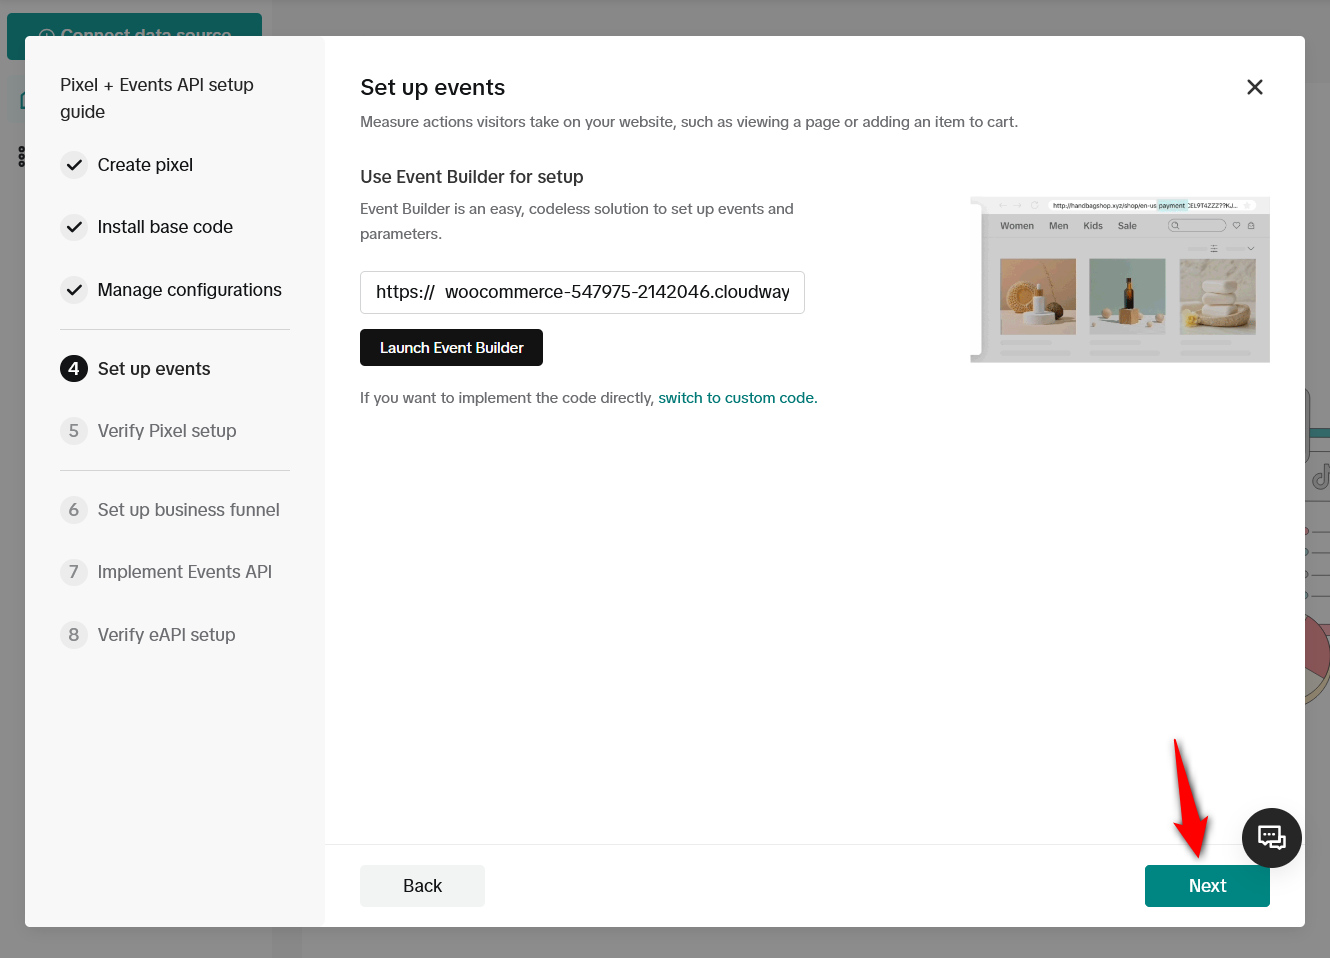
Hit Next once done.
Now, you’ll be asked to verify your pixel setup. Go to the Test Events to see your generated TikTok Pixel ID.
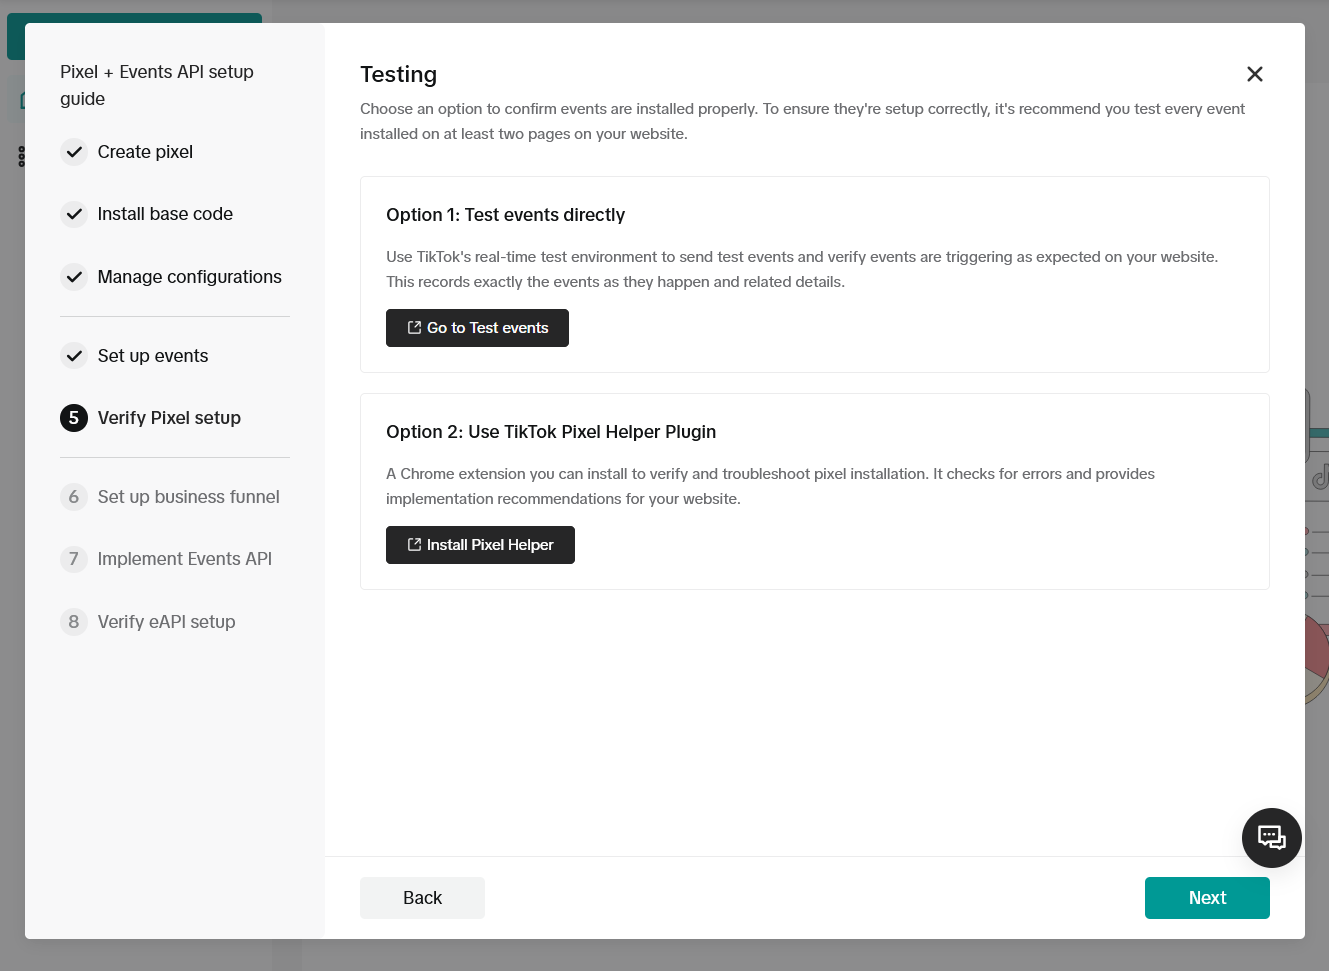
Your TikTok Pixel will be successfully created.
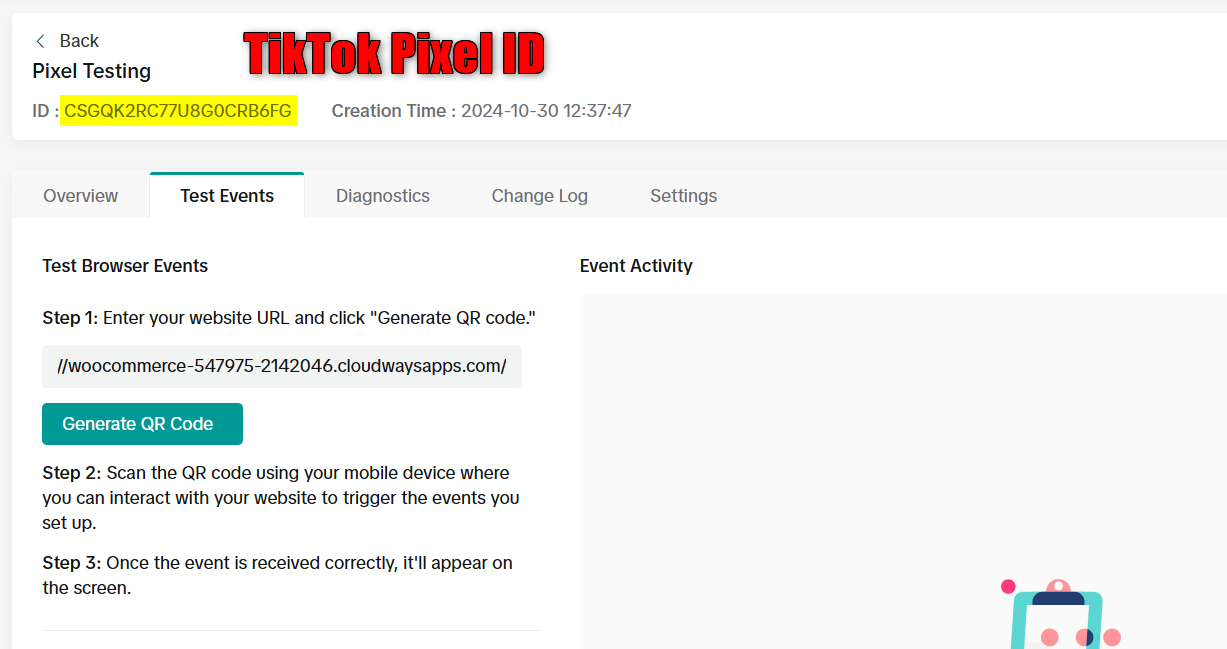
Copy this TikTok Pixel ID from here.
Add the TikTok Pixel ID to WooCommerce via FunnelKit
Go to the ‘Settings’ section under the FunnelKit Funnel Builder. Under TikTok, paste the Pixel ID.
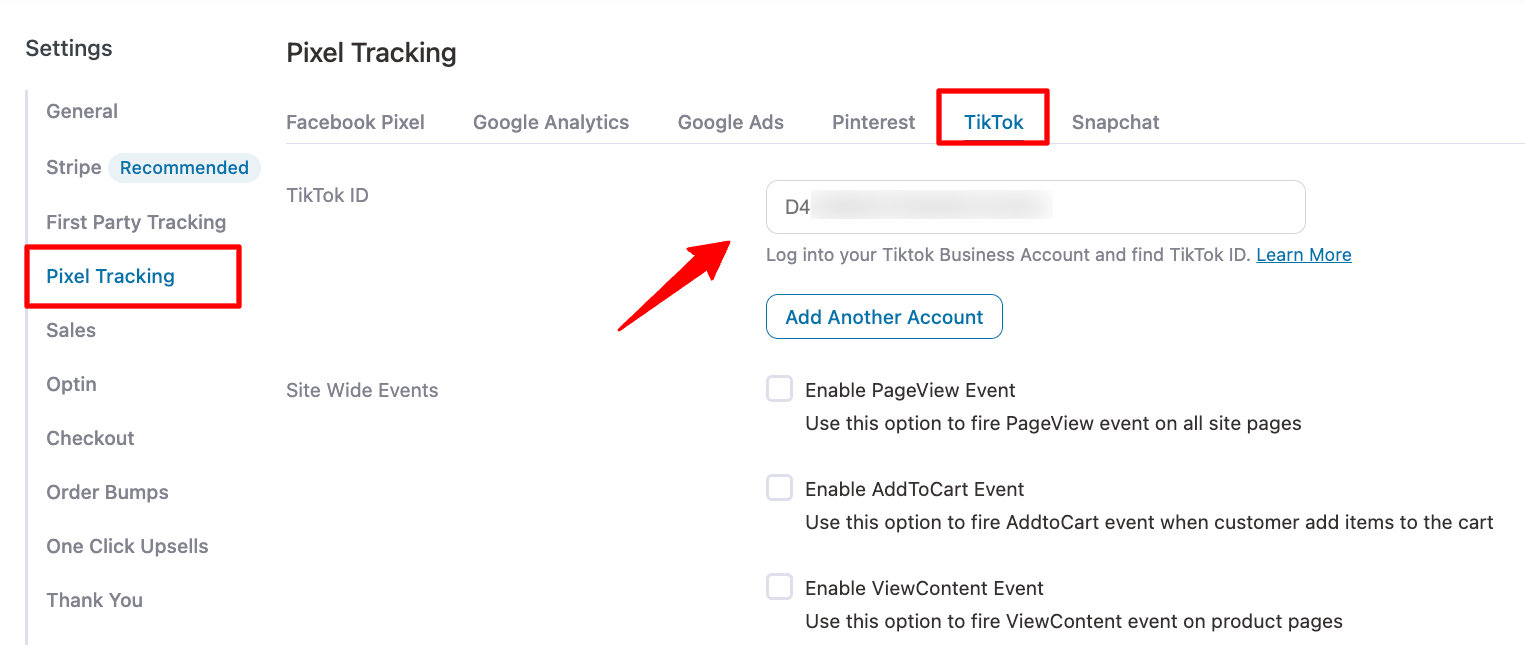
You can click on Add Another Account and add multiple TikTok IDs.
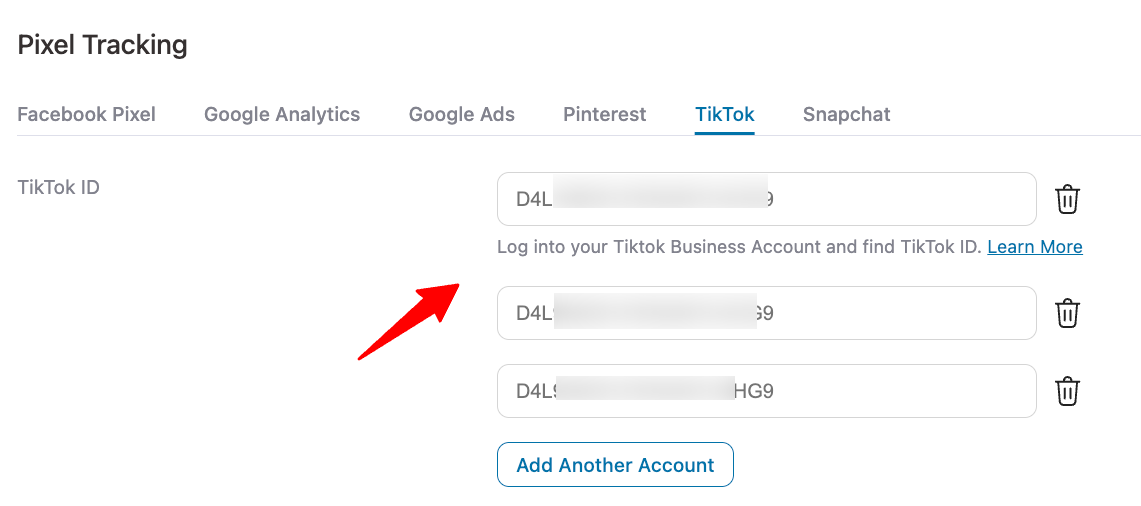
That’s it! You have successfully added the TikTok Pixel to WooCommerce using FunnelKit.
Enable the events you want to track
Enable the events that you want to track with your TikTok pixel.
Funnel Builder gives you various events, such as:
Site-wide events
- Page View
- Add to Cart
- View Content
Sales Page events
- Page View
Optin Page events
- Page View
Order Bump events
- Add to Cart
Checkout events
- Page View
- Add to Cart
- Initiate Checkout
Purchase Events
- Page View
- Place Order
- Complete Payment
Advanced
- Enable this option to send the parent product ID in case of variable products
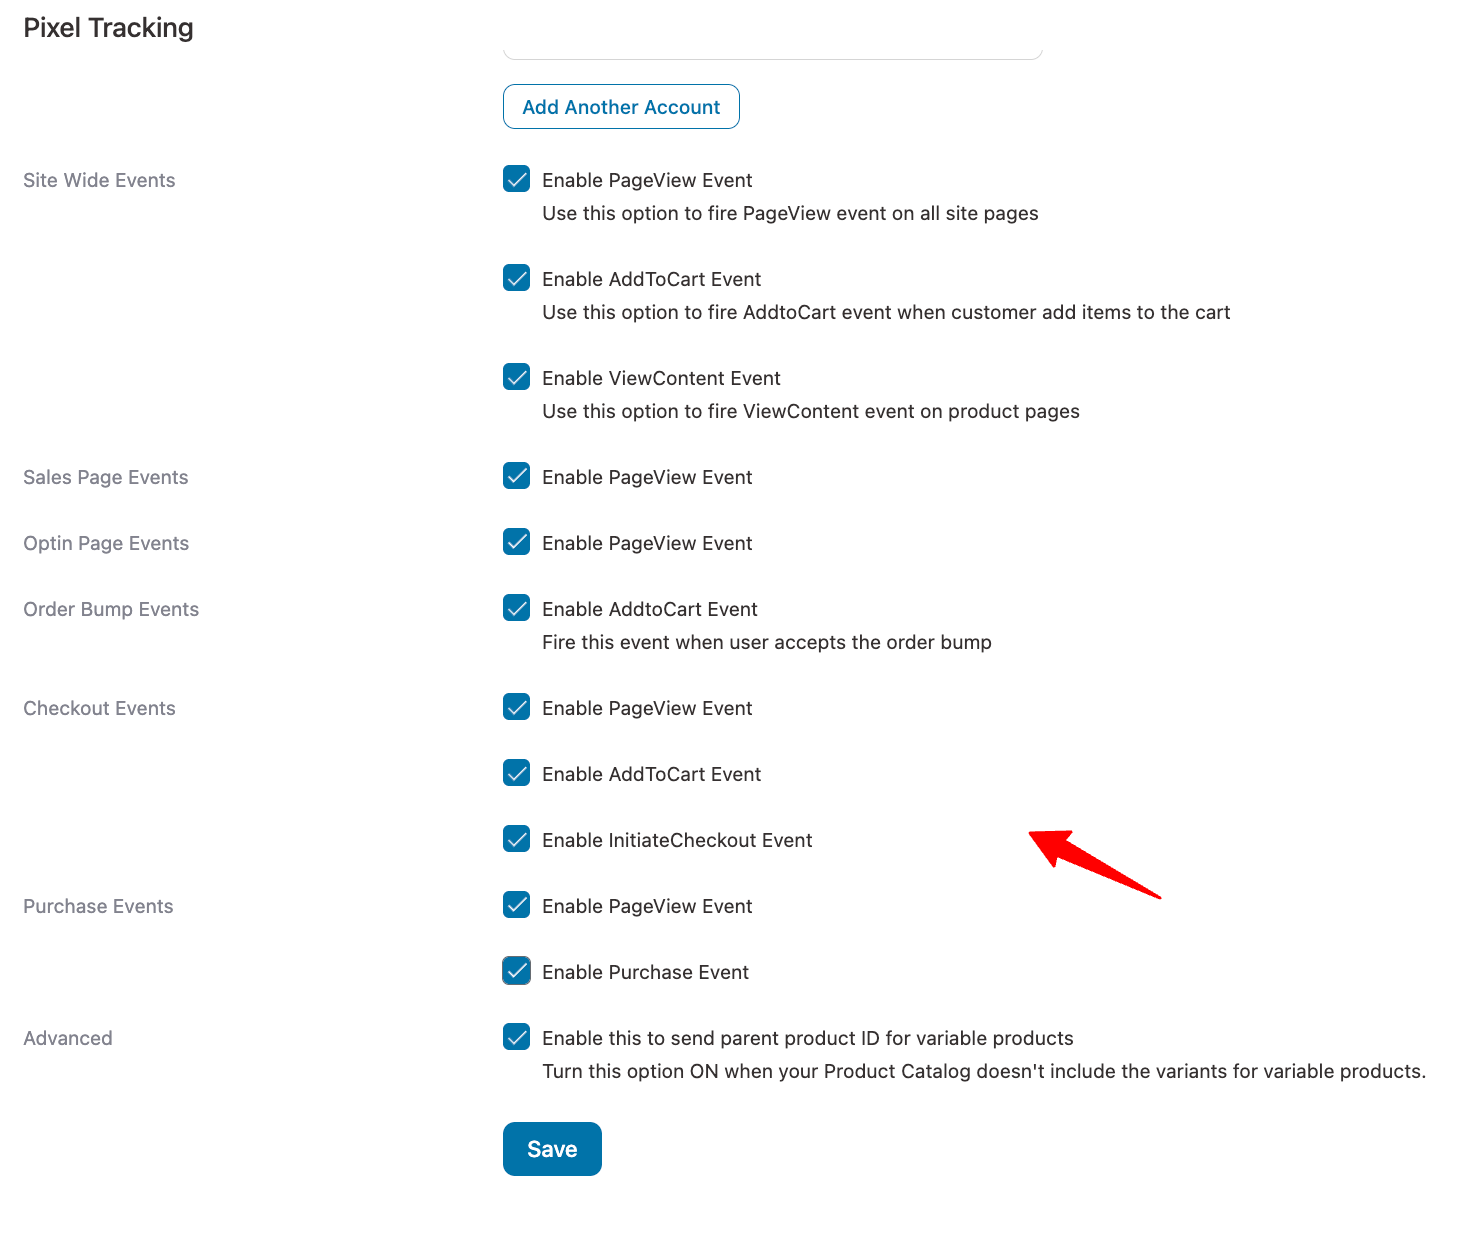
Click on ‘Save’ once done.
That’s it! This is how you can set up WooCommerce TikTok Pixel and enable event-based tracking on your online store.
Events You Should Track
Whichever method you choose, you want the same core funnel to fire from the first product view to confirmed payment. These are TikTok's standard events mapped to WooCommerce actions:
- View Content: Shopper opens a product page
- Add to Cart: Product added to the cart (including order-bump acceptances)
- Initiate Checkout: Checkout process begins
- Purchase: Order placed and payment confirmed, on the thank-you page
This covers the full path with View Content → Add to Cart → Initiate Checkout → Purchase.
Complete Payment is the one that matters most for optimization and the one most likely to break, because it fires on the order confirmation page, which behaves differently from the rest of your site.
How to Test That Your TikTok Pixel is Firing?
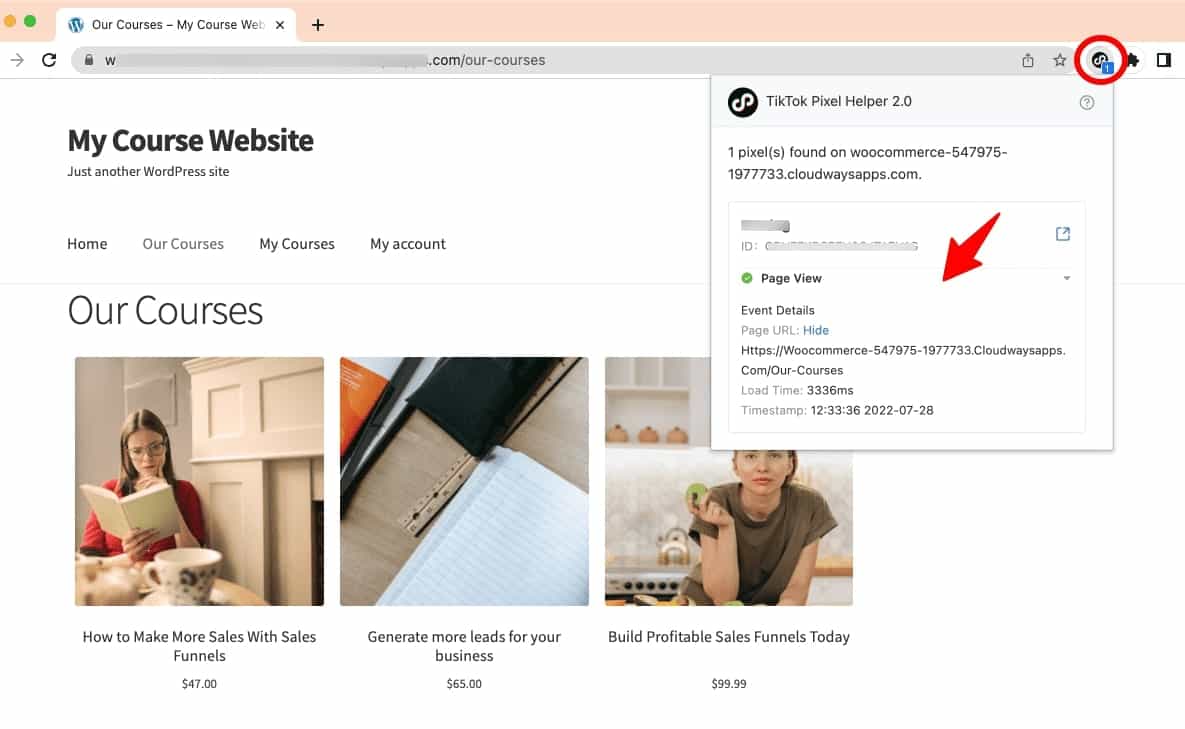
Use TikTok Pixel Helper (Google Chrome extension) to test the events on our website. Test event firing by navigating to our product catalog in your WooCommerce store.
Here, the TikTok Pixel Helper will notify you of how many pixels are running on a specific page.
Here, you’ll see the 'PageView' event being fired.
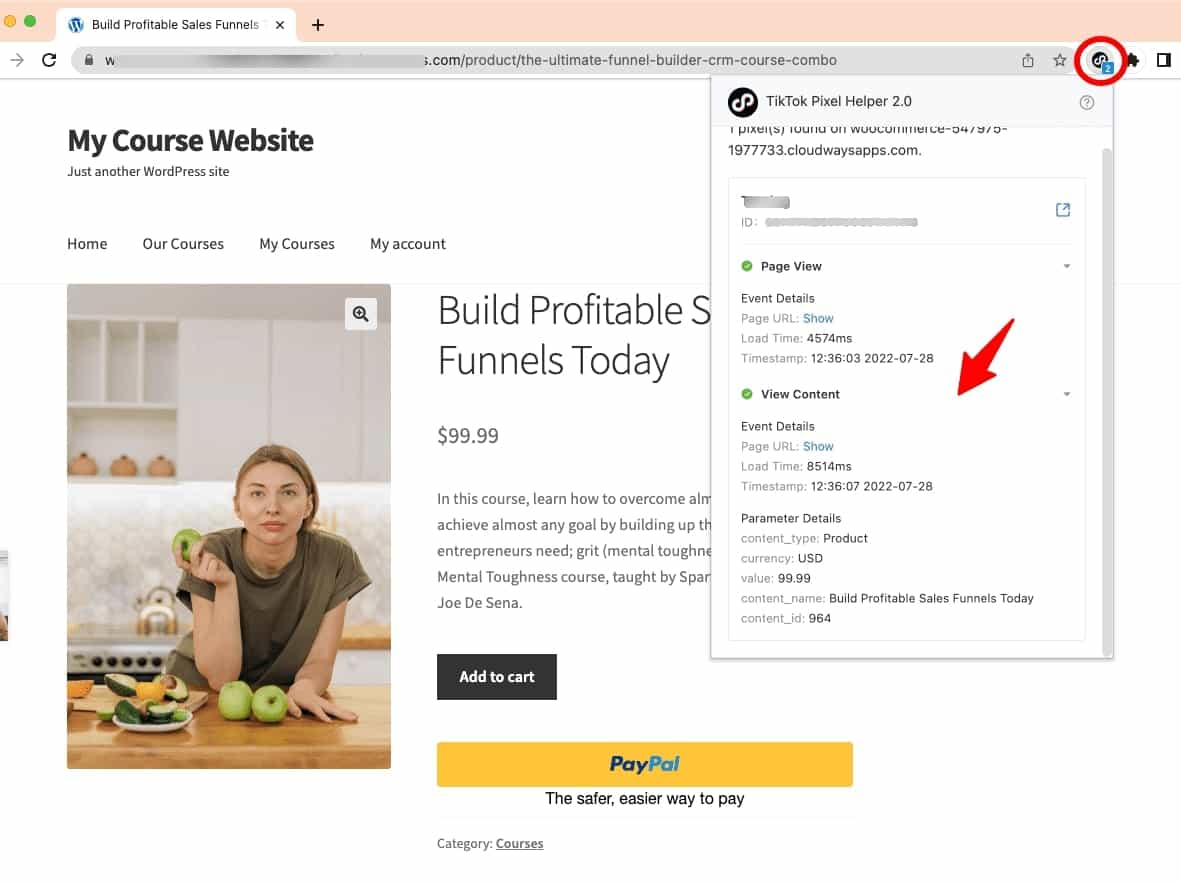
Next, click on any product.
The 'Page View' and 'View Content' events are on the extension.
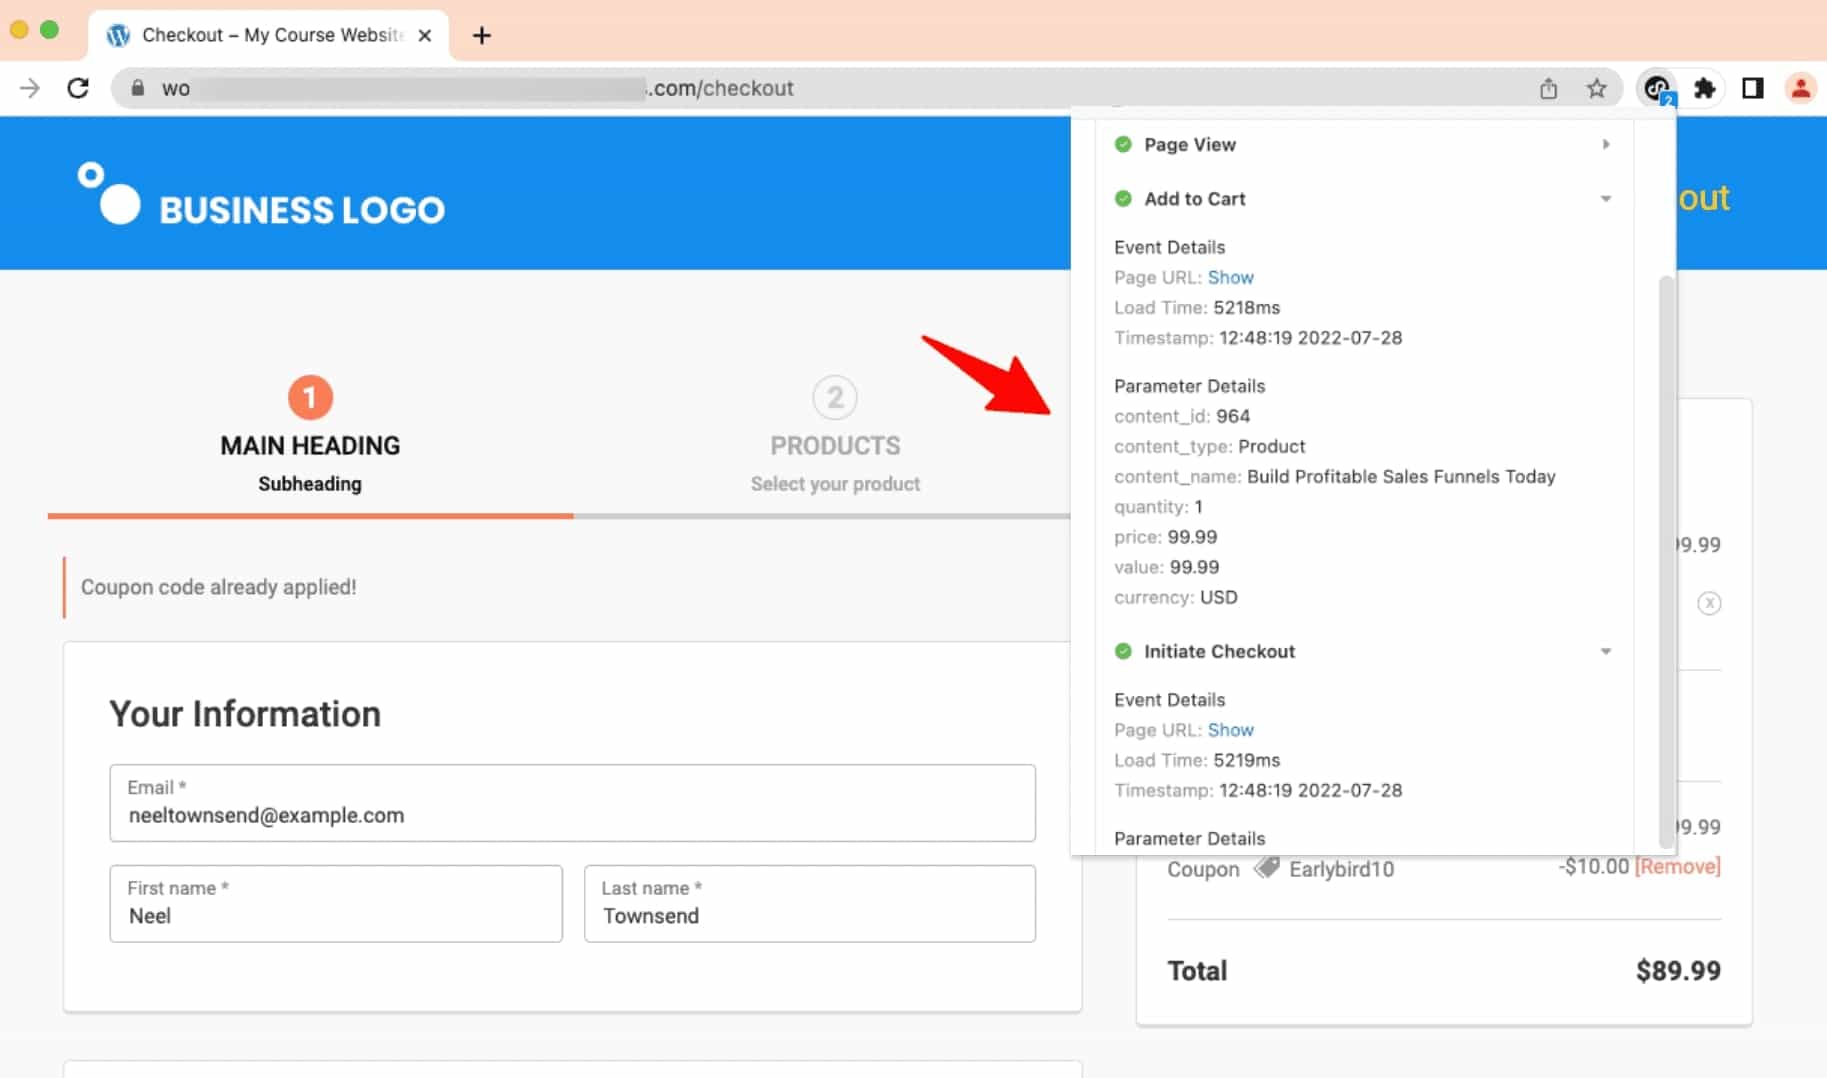
Next, add this item to your cart and start the checkout process.
Here, you’ll see the 'Page View,' 'Add to Cart,' and 'Initiate Checkout' events.
After you complete the purchase, you will see the ‘Place an Order’ and ‘Page View’ events.
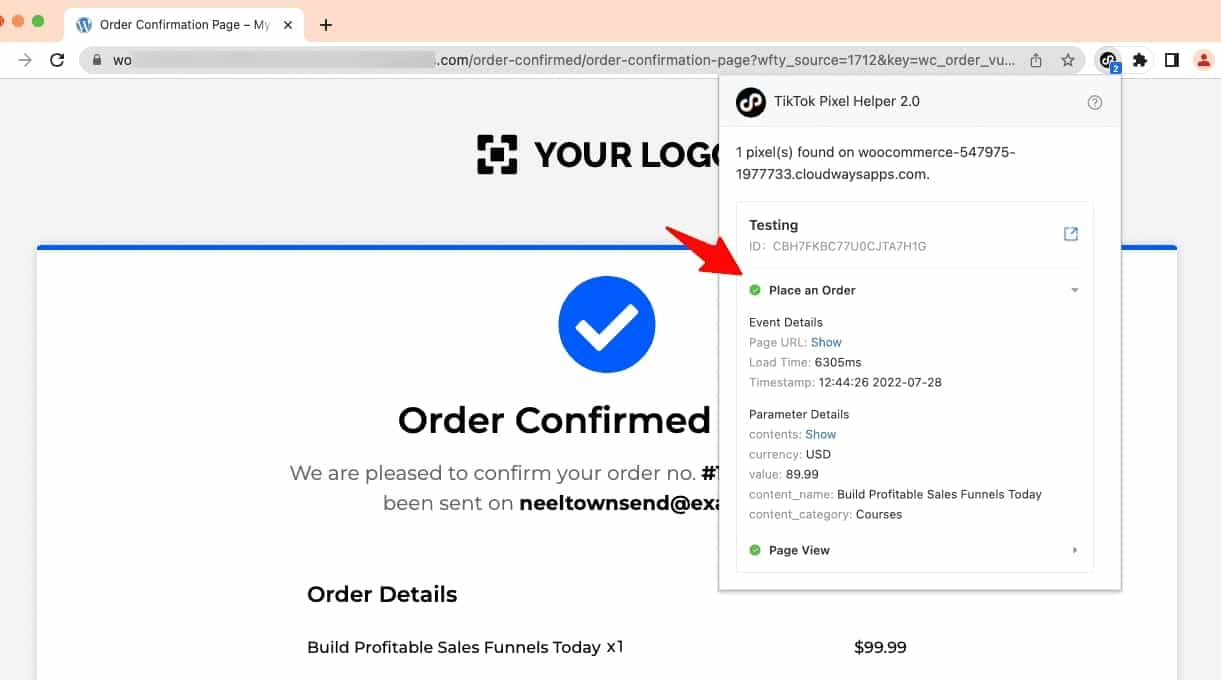
Since all the events were reflected in the extension, it means the events are being fired correctly.
Cross-check in Ads Manager by going to Events ⇨ Web Events, select your pixel, and watch events arrive in real time as you test in a fresh browser session.
Drill into each event to confirm that parameters such as value, currency, and contents are attached.
Remember there is a 24-48 hour reporting delay in the main dashboard, so use Test Events for live verification rather than waiting on the overview tab.
4 Effective Tips to Follow When Setting Up TikTok Pixel for WooCommerce
If you're looking to optimize the WooCommerce TikTok pixel for better tracking and ad performance, here are some effective tips:
1. Enable advanced matching
Turn on Advanced Matching to send important customer information, such as email and phone number, to TikTok. This helps improve attribution and TikTok's algorithm-optimized ad delivery.
2. Use UTM parameters
Add UTM tracking to your ad links to analyze TikTok-driven traffic inside FunnelKit UTM and conversion reports.
3. Set up retargeting and lookalike audiences
Create custom audiences based on past visitors, purchasers, or add-to-cart users. Use lookalike audiences to find new customers matching your best buyers.
4. A/B test multiple creatives and offers
TikTok users prefer engaging and fast-paced content. Test different ad formats, including Spark Ads, UGC-style videos, and product demos.
Fixing a TikTok Pixel That Isn't Firing
"The pixel is installed, but events aren't showing" is the most common WooCommerce TikTok problem, and it almost always traces to one of these four issues.
Find the fixes below and implement them in order.
Pixel not firing at all
Open TikTok Pixel Helper on your homepage. If it shows nothing:
- Caching or speed plugins are the usual culprits. WP Rocket, LiteSpeed, and W3 Total Cache can serve a stored HTML version of the page before the tracking script loads. Exclude tracking scripts and dynamic pages (especially the thank-you page) from caching.
- There is a plugin or theme conflict. Another plugin, a page builder (Elementor, Divi), or custom theme code may block or override the script. Check your browser console (F12) for JavaScript errors from analytics.tiktok.com being blocked.
- Ad blocker on your own browser. Disable it while testing, or the extension will report a false negative.
Purchase event not tracking
If every event fires except the purchase:
- The pixel likely isn't on your thank-you (order confirmation) page (it's only on landing pages). The Complete Payment event registers on that confirmation page. If the pixel isn't there, conversions never record no matter how many real sales you make.
- Your custom checkout or one-page checkout may load the confirmation page differently than a standard page, so the script's normal hook doesn't fire. Confirm the pixel is present specifically on the order-received URL.
- Caching on the thank-you page blocks the dynamic script. Exclude that page from cache explicitly.
Duplicate events (conversions doubled)
If TikTok reports roughly twice the orders WooCommerce shows:
- You almost certainly have two tracking sources sending the same event. For example, a leftover pixel plugin plus a new one, or the pixel and Events API without matching IDs. Audit your installed plugins for anything with tiktok, pixel, or tracking in the name and consolidate to one source of truth.
- If you're intentionally running both pixel and Events API, make sure they share the same event_id (the WooCommerce order ID works well). Mismatched IDs outside the 5-minute merge window are what create the duplicates.
Add-to-cart not firing
- WooCommerce AJAX add-to-cart (adding without a page reload) can be missed if your tracking method doesn't hook the AJAX event. Confirm your plugin supports AJAX-based carts, or test by adding a product from a page that does a full reload.
- On variable products, enable the option to send the parent product ID so the event has a valid product reference.
If you've worked through all four and it's still broken, the fastest structural fix is often to move the purchase event server-side via the Events API (Method 3), which sidesteps caching and ad blockers entirely.
Frequently Asked Questions (FAQs) on WooCommerce TikTok Pixel
Here, we have answered the top questions asked by users related to WooCommerce TikTok integration:
- Enhanced ad targeting
TikTok Pixel tracks user behavior on your WooCommerce store, such as page visits, product views, and completed purchases.
This data allows you to create custom and lookalike audiences on TikTok, enabling highly targeted ads for users who have shown interest in your products.
- Optimize ad spends
TikTok Pixel lets you allocate your ad budget effectively by tracking user interactions and conversions.
You can focus on high-performing campaigns, minimizing costs associated with less effective ads while improving your return on ad spend (ROAS).
- Accurate conversion tracking
TikTok pixel captures detailed conversion data, enabling you to see the number of sales, leads, or other valuable actions directly attributed to your TikTok ads.
This data insight is key for assessing the effectiveness of your ad campaigns while identifying areas for improvement.
- Retargeting capabilities
TikTok pixel allows you to target potential customers who visited your WooCommerce store but didn’t make a purchase.
By retargeting, you can re-engage these users with reminders, discounts, or promotions, increasing the likelihood of conversion.
- Valuable insights into user behavior
The TikTok pixel provides detailed insights into how users interact with your WooCommerce site.
It helps you identify the most popular products, users’ buying behavior, and potential obstacles they face.
You can view TikTok pixels for campaign performance inside your TikTok Ads Manager account. Click on 'Reporting' to view how your ad campaigns are performing. It can also automate generating your report in XLSX or CSV format. Therefore, you can view all the details about your TikTok ads campaign performance tracking here.
This one's a common mix-up. The “TikTok pixel” for conversion tracking isn’t an image and has no dimensions; it’s a tracking code. If you mean TikTok ad creative, the recommended video resolution is 1080×1920 (9:16 vertical), which fills the full-screen feed. The tracking pixel and the ad's visual size are unrelated.
Yes, you can manually paste TikTok’s base pixel code into your theme header. We do not recommend it for stores, because you lose automatic e-commerce event tracking, dynamic values, and deduplication, and any theme update can wipe your changes. A plugin handles all of this for you.
Set Up Your WooCommerce TikTok Pixel and Start Tracking Conversions
Amplifying your TikTok advertising campaigns should be the first step toward taking your business to the next level.
To do so, you must set up a WooCommerce TikTok Pixel on your store to track the ROI of your ad campaigns.
You can create it in four ways:
- Just want the officially supported pixel and you're in a TikTok-commerce market? Start with Method 1, the official extension, but know the Shop features are sunsetting in June 2026.
- Already tracking Meta and Google and want one hub? Use a dedicated plugin (Method 2) and budget for its paid Events API tier.
- Spending heavily and losing conversions to ad blockers? Prioritize server-side Events API (Method 3) with proper deduplication.
- Already building funnels, or based outside a TikTok Shop market? A funnel builder (Method 4) adds the pixel and Events API without a second plugin and works in any country.
Whichever you pick, the finish line is the same.
Walk your own funnel with TikTok Pixel Helper open, confirm View Content, Add to Cart, Initiate Checkout, and Complete Payment all fire, and verify them in Events Manager.
A pixel you haven’t tested is a pixel you can't trust and untracked ad spend is the most expensive kind.
With FunnelKit Funnel Builder, you cannot just track pixel events but optimize your checkout for a seamless buying journey.
It also has site-wide event tracking, eliminating the need for extra plugins that add unnecessary overhead to WordPress.
Editorial Team
October 7, 2026WooCommerce upsells are products you recommend in place of the one a shopper is viewing, usually a better or higher-priced version of it. WooCommerce has a built-in upsell field for...
Editorial Team
October 7, 2026WooCommerce checkout optimization is about making it easier for shoppers to finish their purchase. A customer can reach your checkout on their phone, look at the form for a few...
Editorial Team
October 5, 2026A WooCommerce Shopify checkout recreates the parts of Shopify’s checkout that shoppers already know. It includes a logo-only header, email first, express payment options at the top, address autocomplete, a...






