
Adding a newsletter opt-in checkbox to your WooCommerce checkout is one of the simplest ways to grow an email list that actually drives revenue.
Every customer completing a purchase is already engaged with your store, already trusts your brand, and is more likely to say yes to staying in touch than a cold visitor who landed on your homepage.
That moment at checkout is valuable, and most stores let it go to waste.
According to Litmus, 35% of companies see between $10 and $36 back for every dollar they put in.
For WooCommerce stores, those numbers climb higher because you are emailing people who have already bought from you. Unlike paid ads that stop the moment your budget runs out, or social media reach that disappears when an algorithm shifts, your email list is an asset you own outright.
In this guide, I will walk you through how to add a newsletter checkbox to your WooCommerce checkout, where to place it for the best results, and how to stay compliant.
Why You Need Explicit Permission Before Adding Anyone to Your Email Newsletter List
Auto-subscribing customers to your newsletter without their consent causes three problems that are harder to fix than growing your list the right way from the start.
- Violates email marketing laws
GDPR in the EU and UK, CASL in Canada, and CAN-SPAM in the US all require explicit consent before you send marketing emails. Completing a purchase doesn't count as consent. Regulators treat the two as separate things, and fines have been issued to businesses of all sizes.
- Damages your sender's reputation
People who didn't sign up don't read the emails, and they are likely to mark them as spam. Enough reports and Gmail, Outlook, and others start routing all your mail to junk, including order confirmations and shipping notifications. Recovering from that takes months. A list of 500 people who opted in will consistently outperform a list of 5,000 who didn't.
- Increases unsubscribe rates
A high unsubscribe rate tells email platforms your content is unwanted, which reduces deliverability and shrinks your list faster than it grows. Subscribers who opt in willingly open emails, engage, and buy again. Those who were added without asking leave quickly and bring your sender score down on the way out.
The fix is straightforward. Add a clearly worded, unchecked opt-in checkbox to your checkout page. Only email the people who checked it.
Table of Contents
- 1 How to Add the Newsletter Checkbox to WooCommerce Checkout
- 2 Alternative Plugins to Add a Newsletter Checkbox to WooCommerce Checkout
- 3 6 Best practices for adding a newsletter checkbox to WooCommerce checkout
- 4 More Questions About Adding Newsletter Checkbox To Checkout
- 5 Should the newsletter checkbox at WooCommerce checkout be mandatory or optional?
- 6 Does WooCommerce include a built-in newsletter checkbox?
- 7 How do I make sure the checkbox is not checked by default?
- 8 Will subscribers be added to my email list automatically?
- 9 Can I customize the label and position of the checkbox?
- 10 Can I trigger a welcome email when someone subscribes at checkout?
- 11 What happens if a customer places an order but does not check the box?
- 12 Start Building Your Email List at the Most Valuable Moment in the Customer Journey
How to Add the Newsletter Checkbox to WooCommerce Checkout
Before getting into setup, one thing is worth clarifying. WooCommerce does not include a native newsletter checkbox.
The checkbox comes from whichever newsletter or marketing plugin you are using to manage your list and send emails. That plugin handles your subscribers, sends your campaigns, and tracks opens and clicks, so it makes sense for it to also handle the checkout opt-in.
When someone checks the box, they should go straight into your list and trigger whatever welcome sequence you have set up, without any manual steps in between.
The plugin you use for this matters. We recommend FunnelKit Automations.
It handles the consent checkbox, creates the contact profile, assigns a subscription status, and can send a welcome email and tag the subscriber the moment someone opts in.
Everything is managed inside one tool, so there are no manual exports, no copy-pasting between platforms, and no subscribers getting lost in the process.
The newsletter checkbox option is available in the free version, but to fully utilize the power of newsletters, it is recommended to install both the free and premium versions of the plugin.
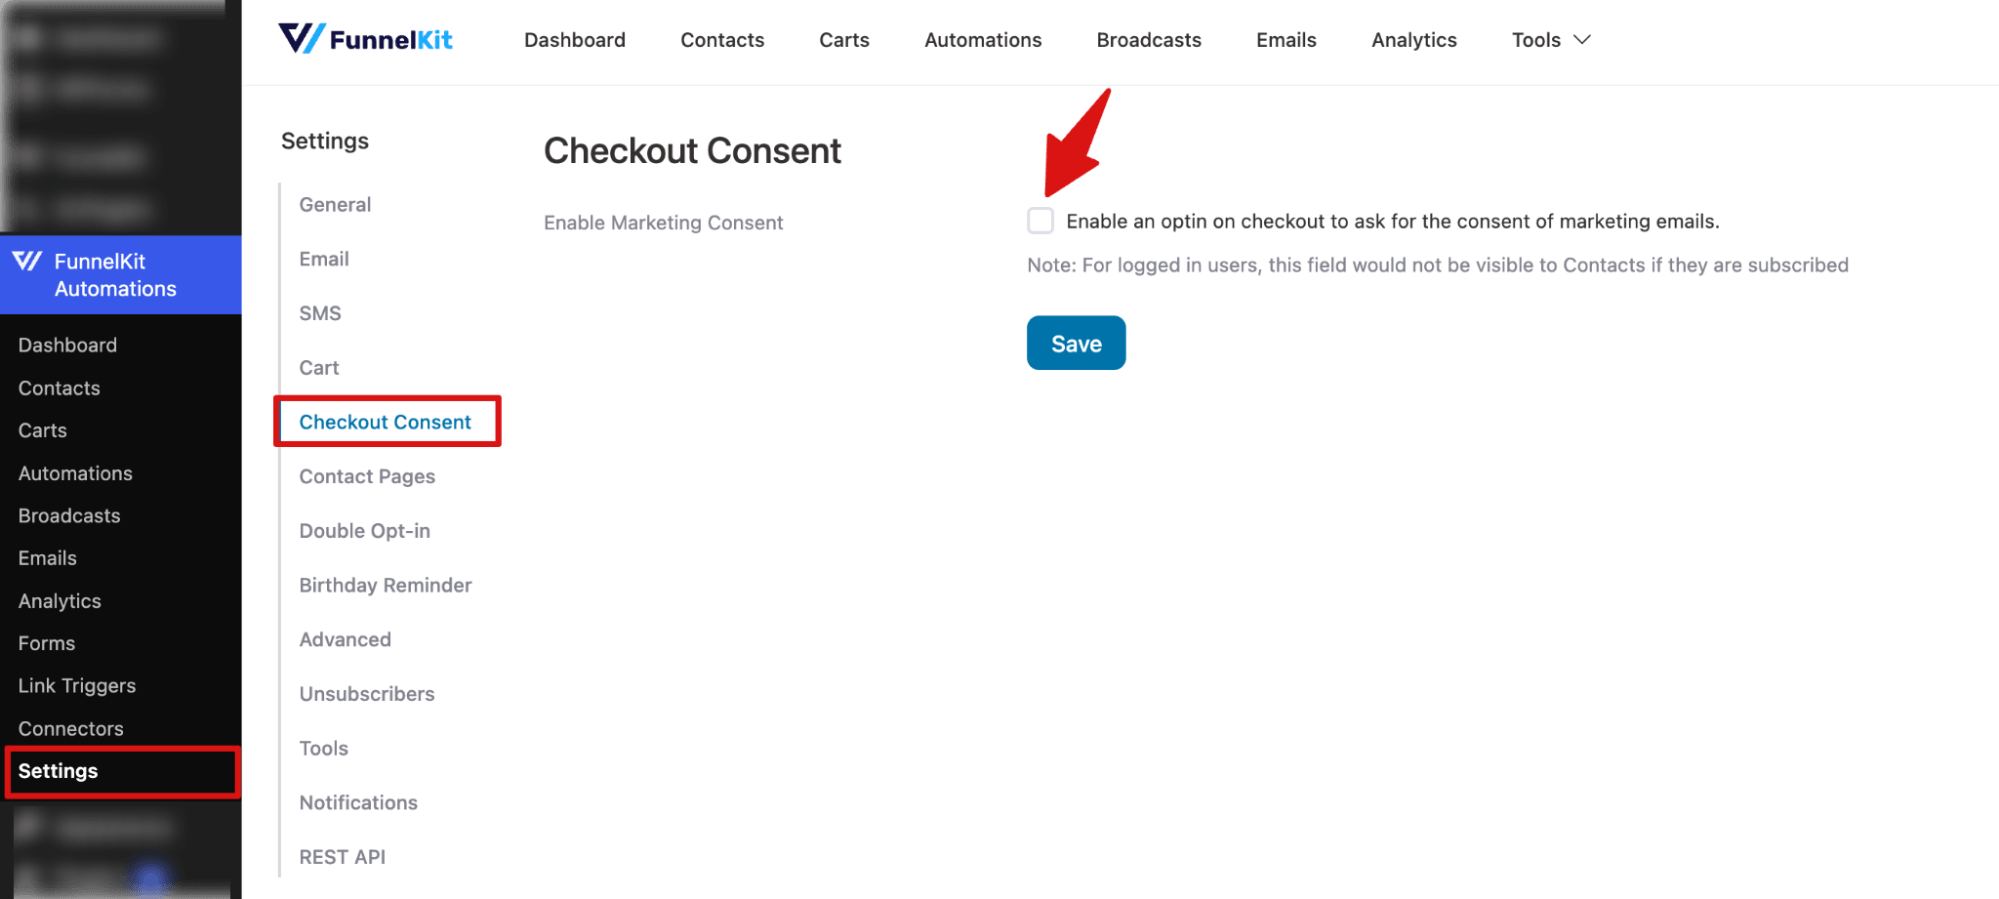
Step 1: Enable the Checkout Consent Checkbox
Navigate to FunnelKit Automations ⇒ Settings ⇒ Checkout Consent and check the option “Enable an optin on checkout to ask for consent to marketing emails.”
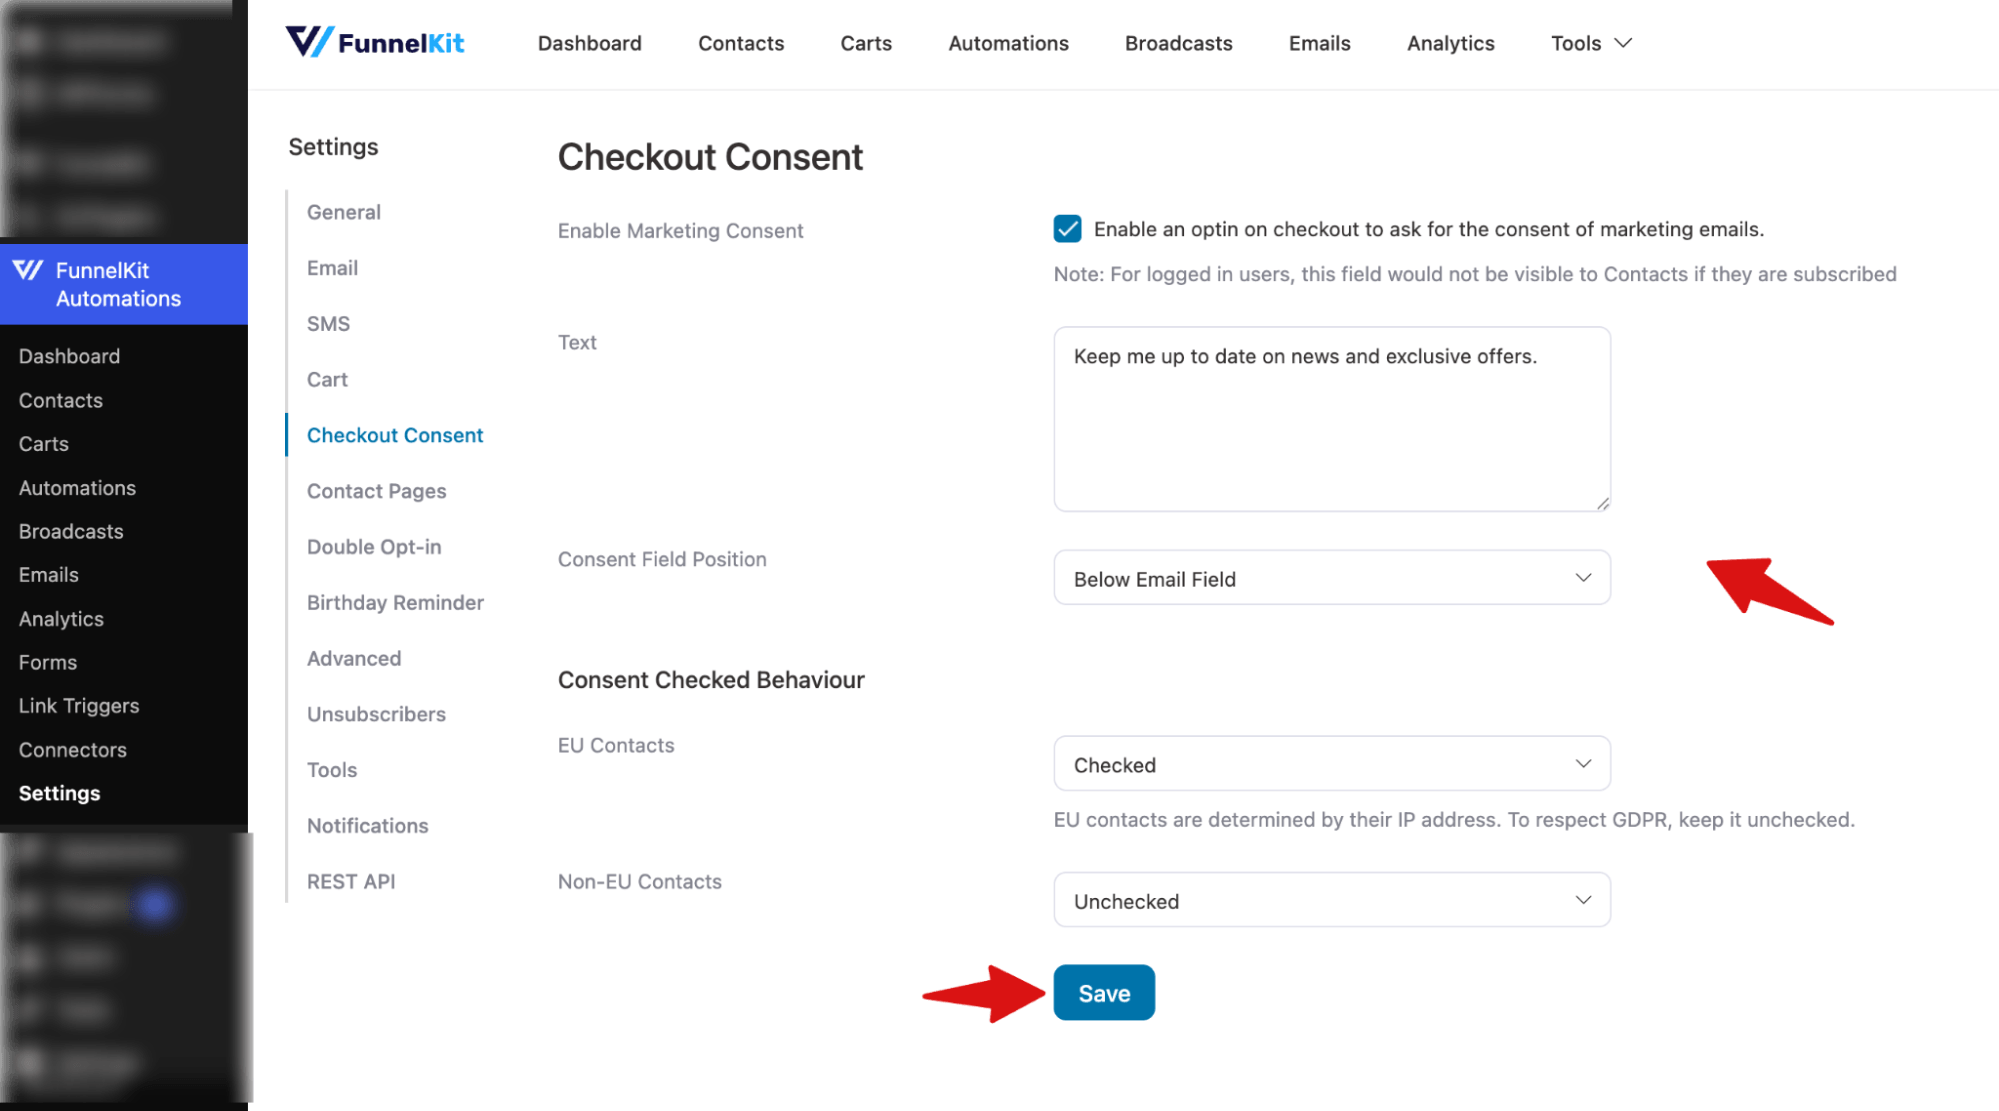
Step 2: Set up Newsletter Checkbox placement to WooCommerce Checkout
After you check the newsletter content, you can set up the following options:
- Text: Defines the message shown next to the checkbox. For example: Keep me up to date on news and exclusive offers.
- Consent Field Position: Controls where the checkbox appears on the checkout page. There are three options: Below Terms & Conditions, Below Email Field, and Below Phone Field.
- EU Contacts: Determines whether the checkbox is pre-selected for EU users.
- Non-EU Contacts: Controls default checkbox state for non-EU users.
Make sure to Save changes.
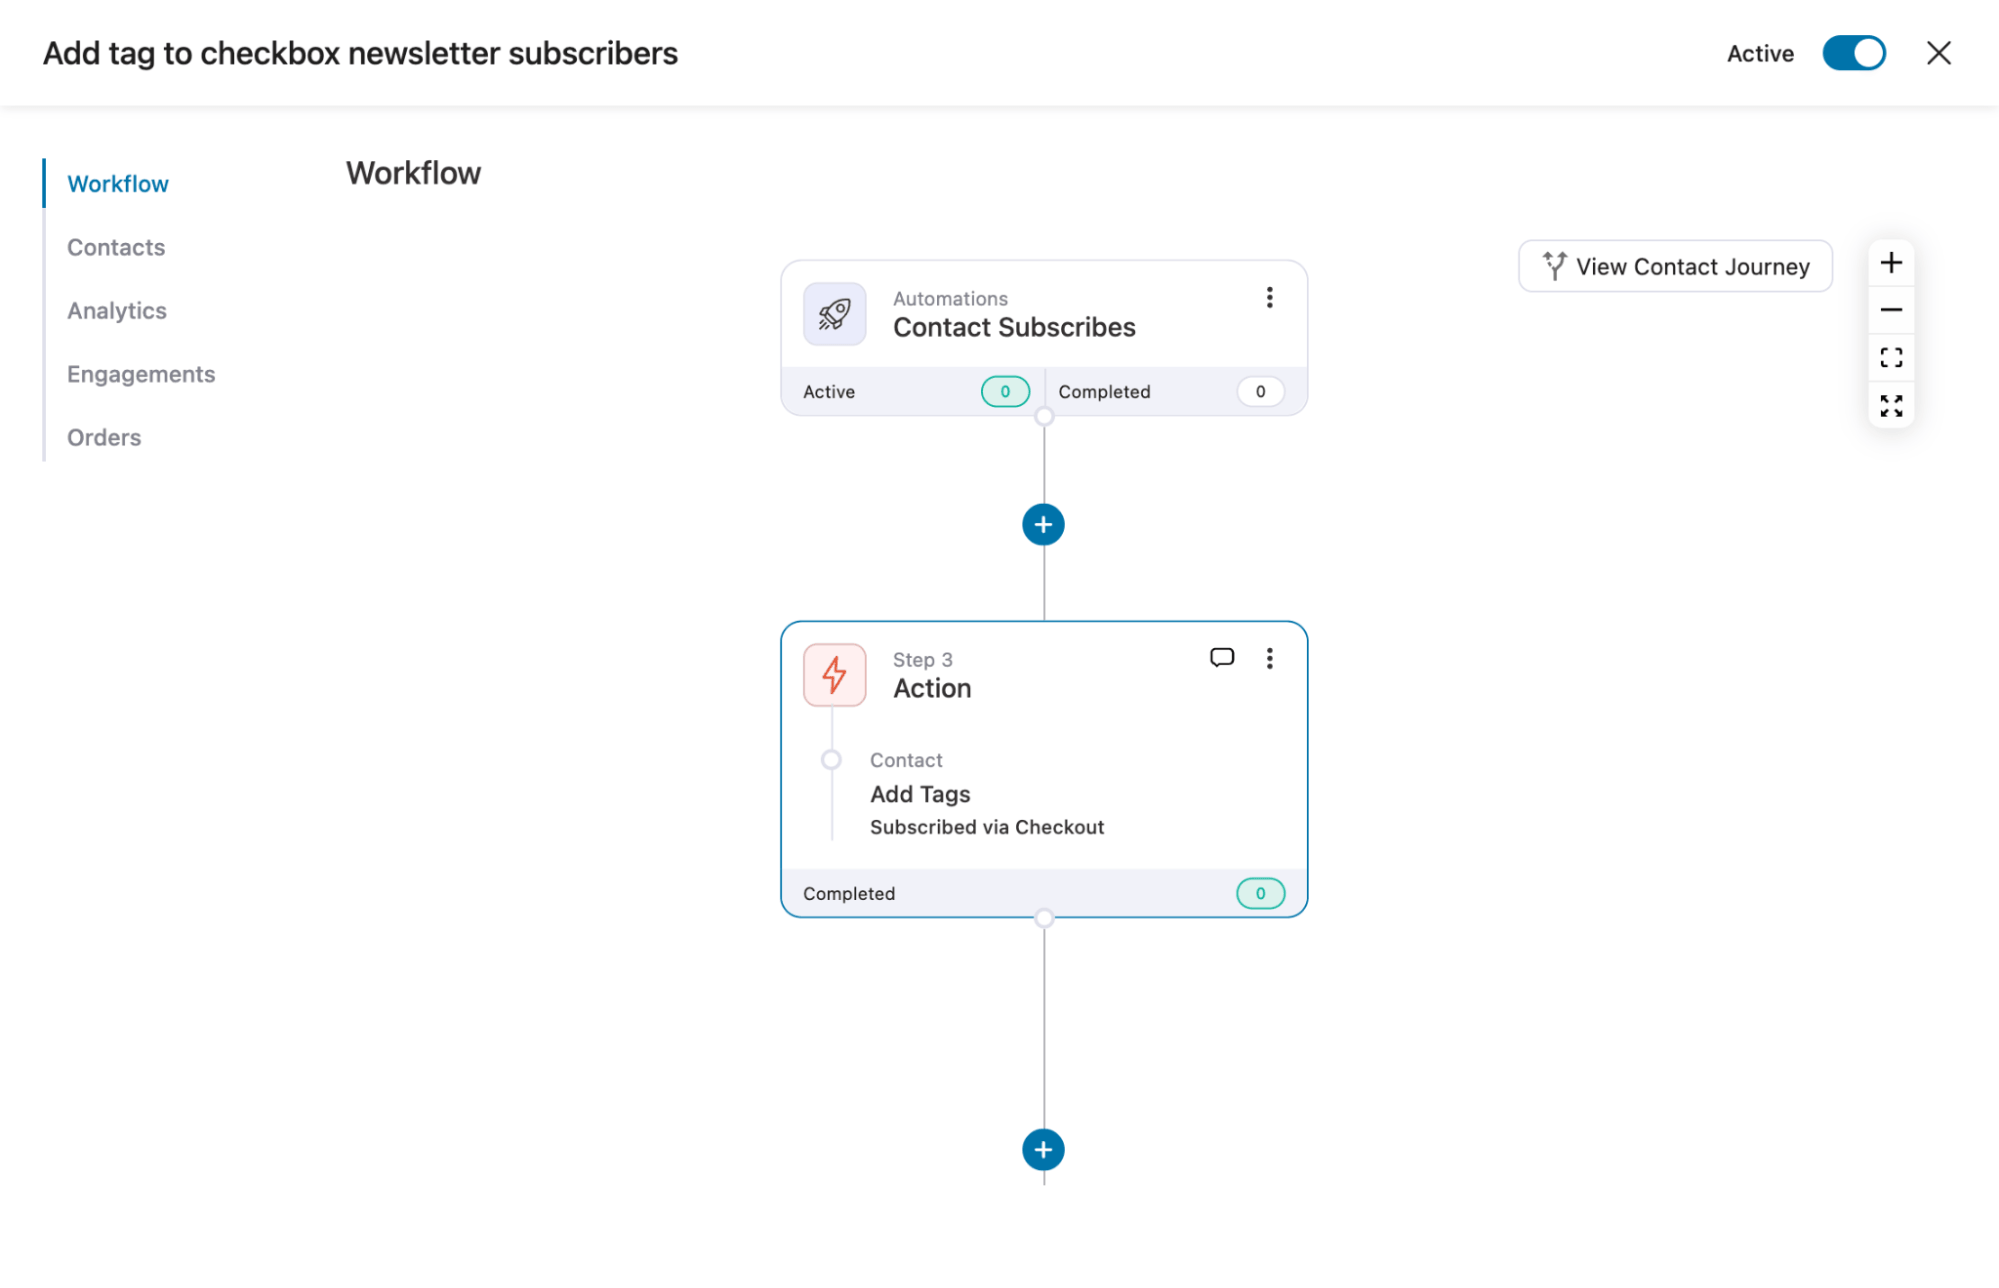
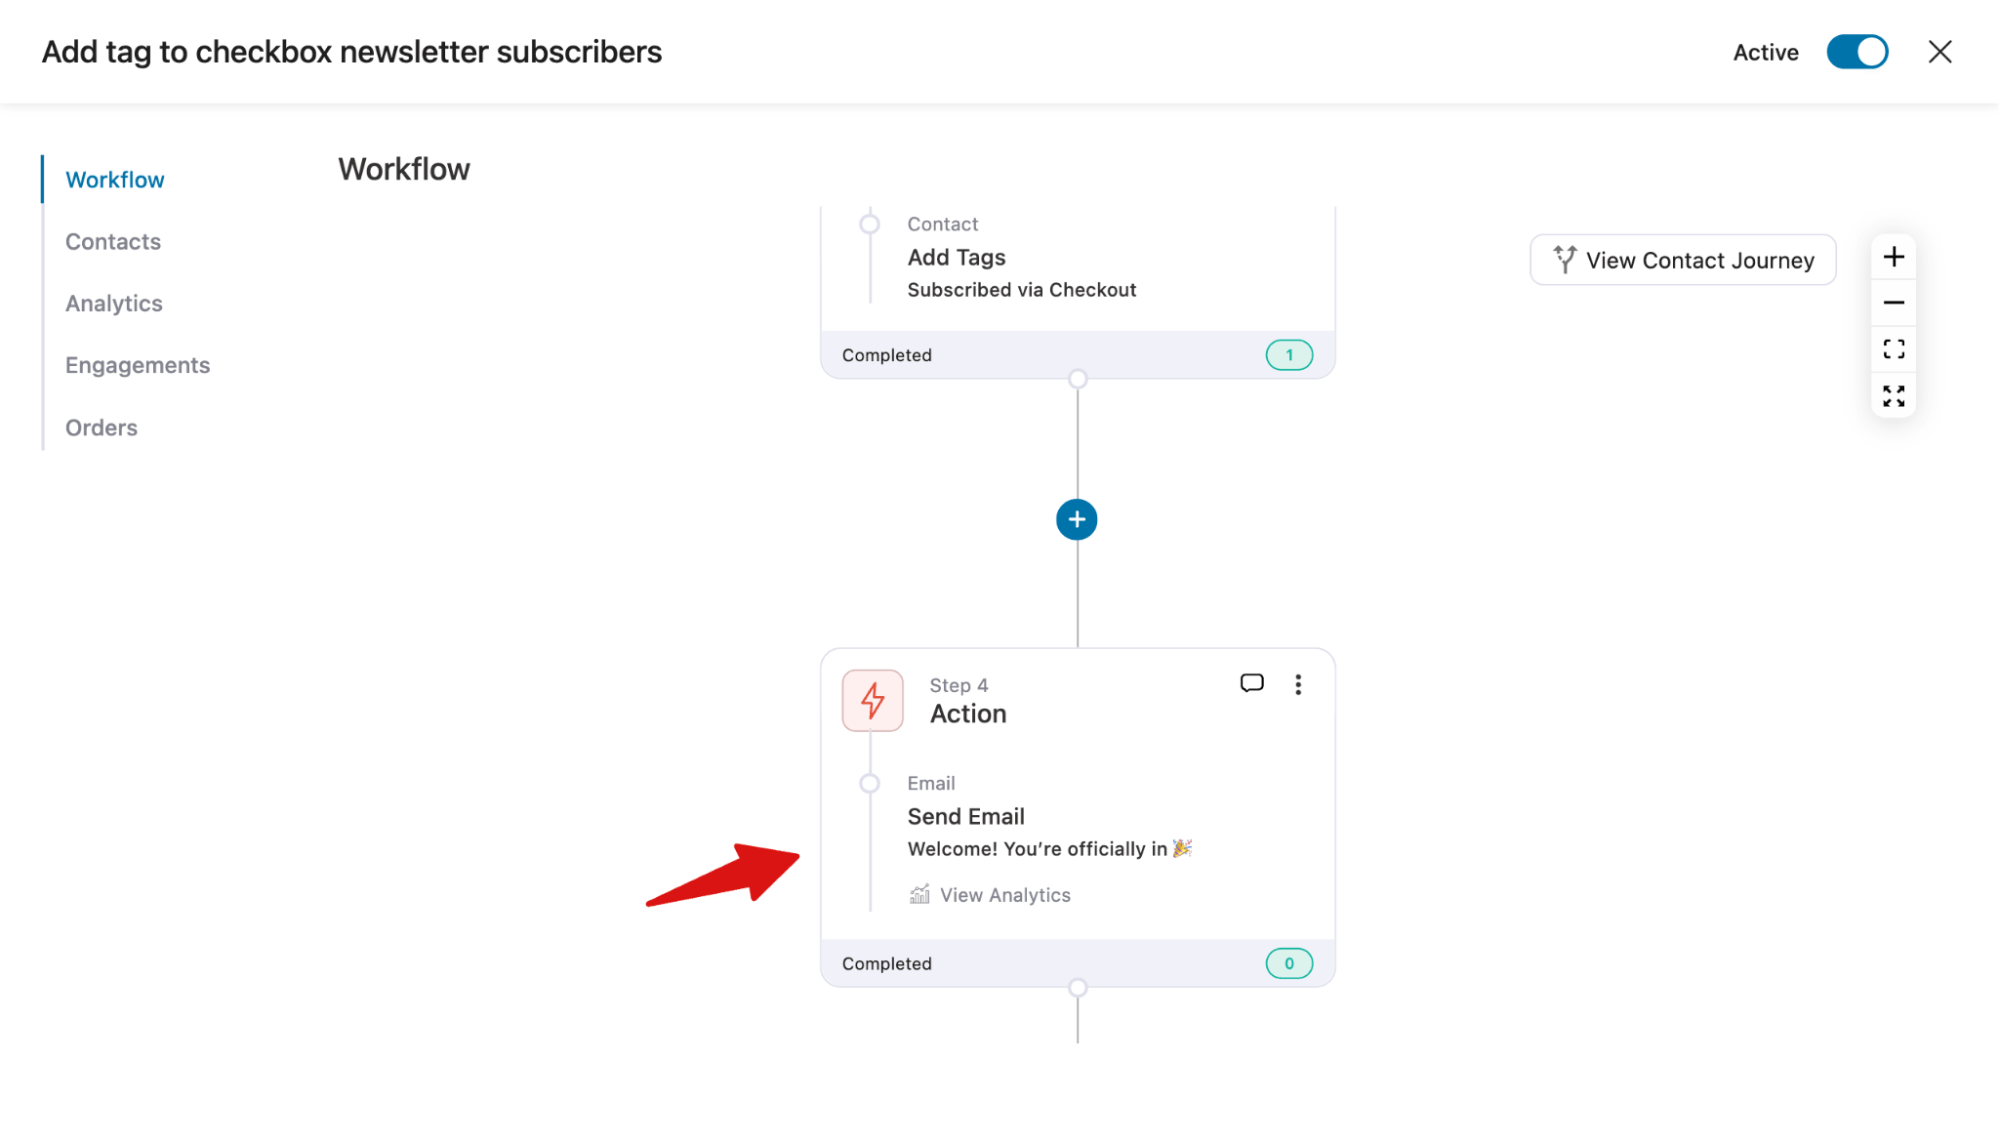
Step 3: Tag or List the Subscriber So You Can Send Them Relevant Newsletters
It’s always a good idea to tag users when they opt in through the newsletter checkbox or add them to a dedicated list.
This makes it easier to segment them from other subscribers and send highly targeted newsletters that drive better sales.
For this, you can create an automation where a contact subscribes, you can add a tag to them, or add the user to a list. For more details, check our guide on Managing Lists and Tags.
After that, you can also set up a welcome text for the new newsletter subscriber.
Step 4: Test the newsletter checkbox on the checkout page
Now, try placing an order and see if the newsletter checkbox appears correctly.
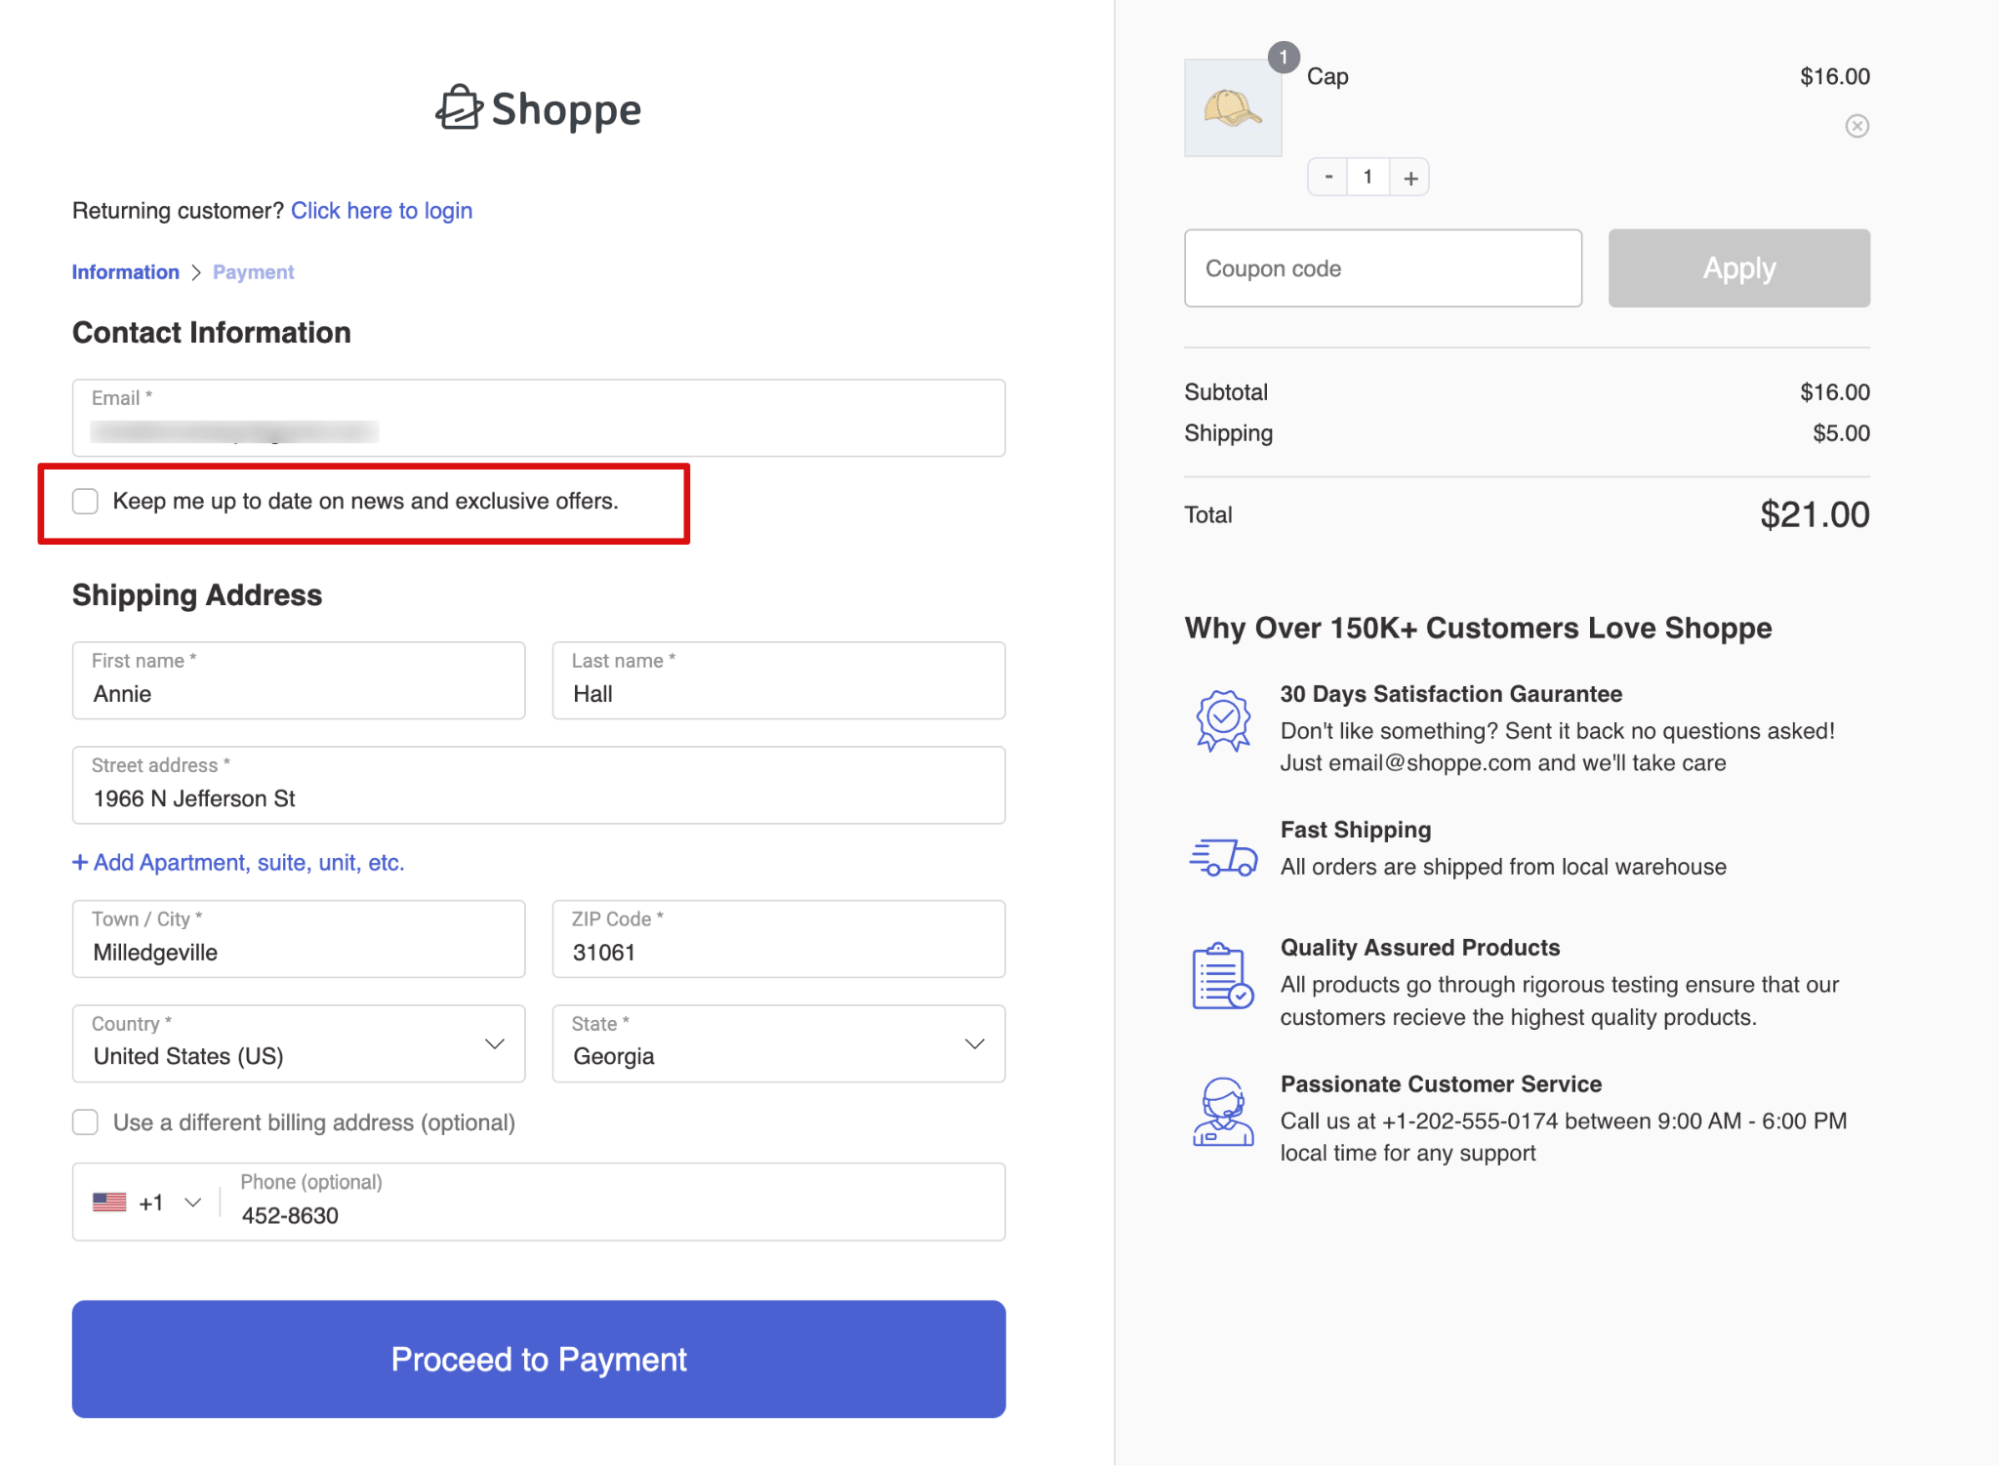
First, check the newsletter box to opt in, then place your order. Now, if you go to Contacts, you should see a new contact.
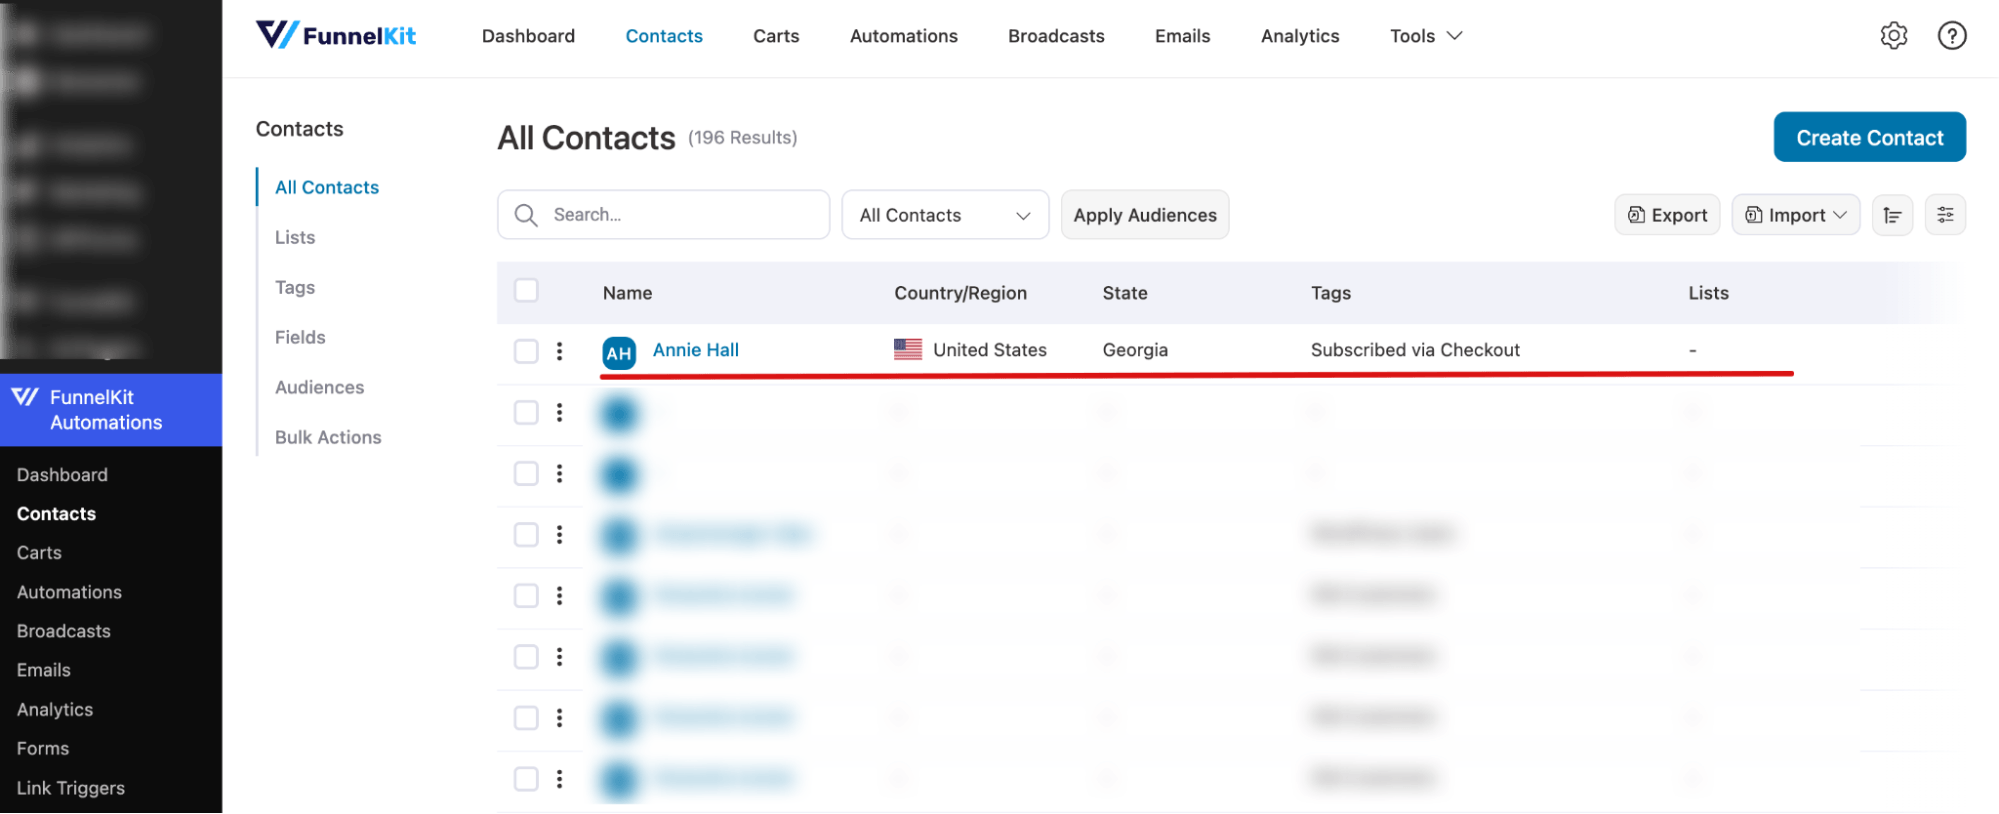
And if you click on it, you will see the status is Subscribed. Plus, you can also see the tags or lists based on your automation.
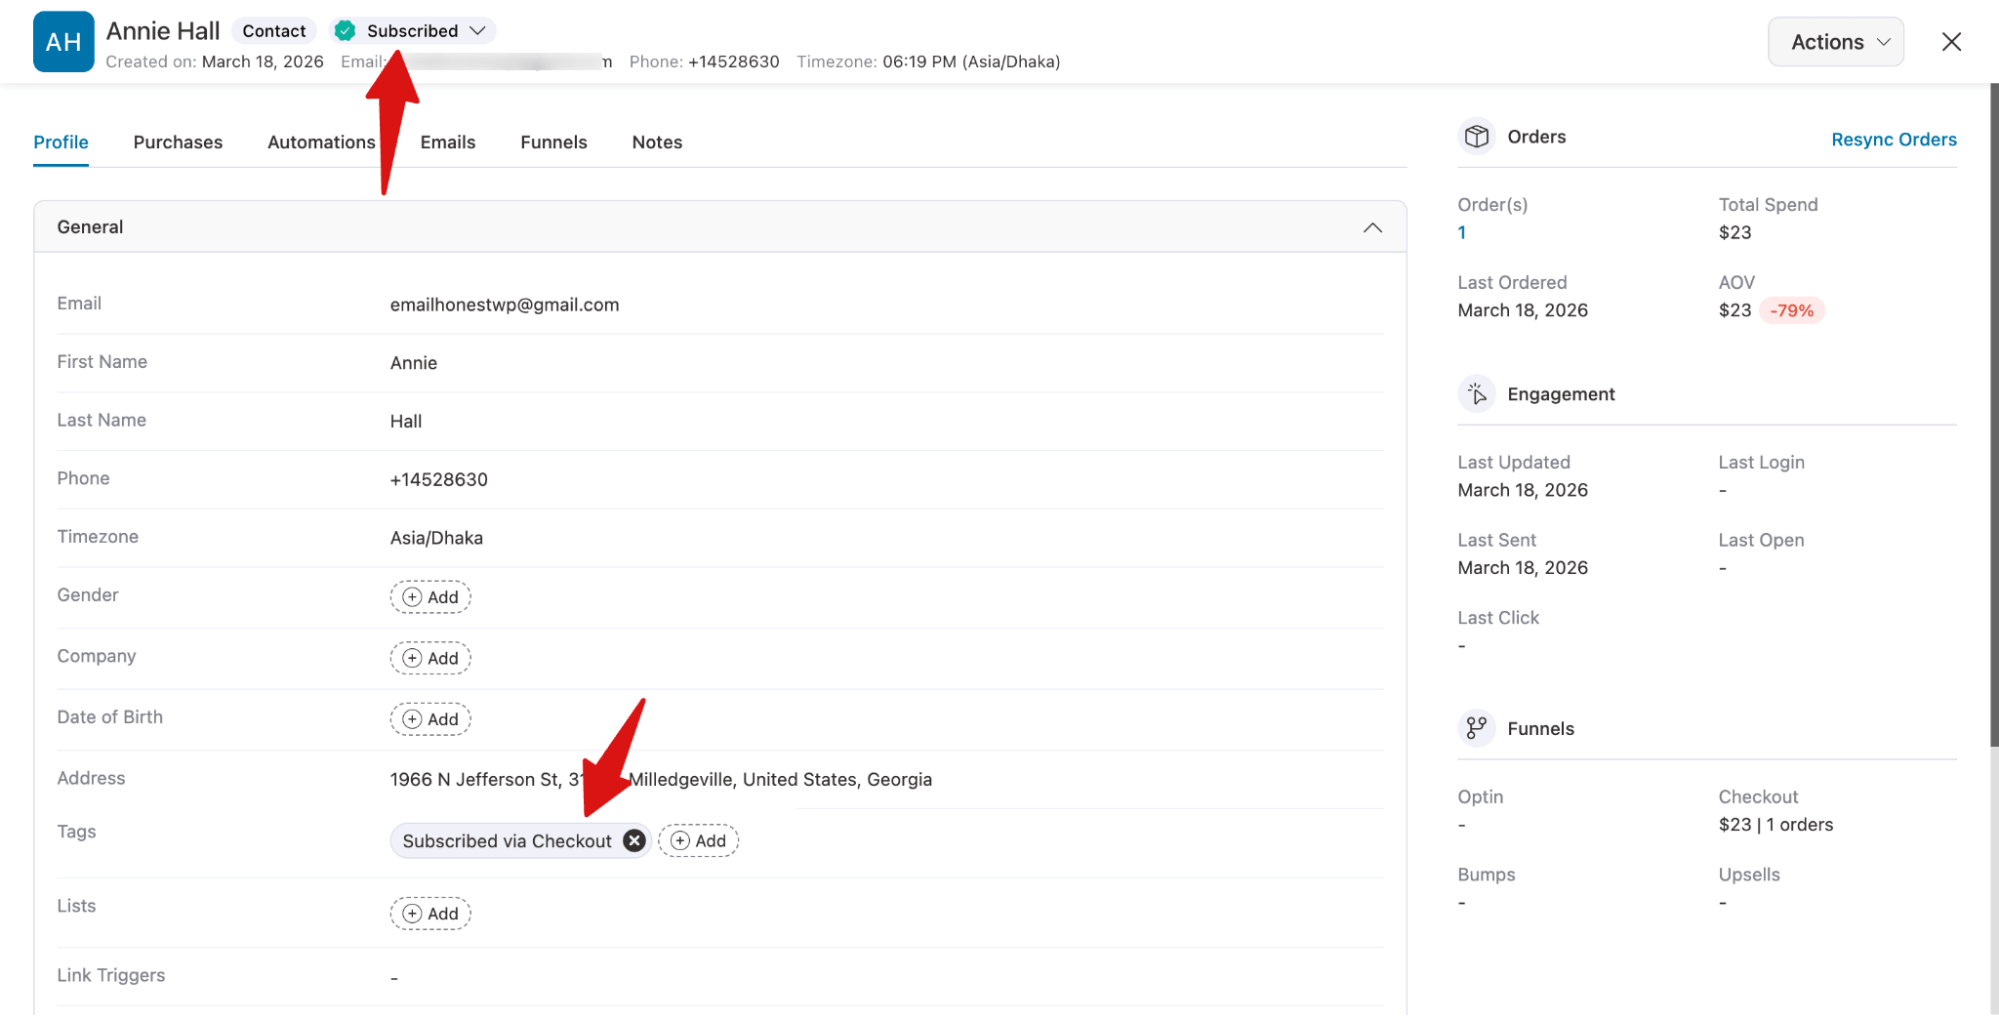
That’s it. Now you can start sending a newsletter to the subscribed contacts.
Alternative Plugins to Add a Newsletter Checkbox to WooCommerce Checkout
Already using a different email platform?
All popular newsletter plugins add their own opt-in checkbox to your WooCommerce checkout page out of the box.
You can also pair them with a checkout customizer plugin to control exactly where the checkbox appears on the form
The supported plugins are:
- ActiveCampaign for WooCommerce: Connect via API key, then drag the field onto your checkout form.
- Mailchimp for WooCommerce: Sync your audience, configure opt-in settings, and drop the field wherever you want it.
- GetResponse for WordPress: Link your GetResponse account and add the checkbox to your checkout in minutes.
- Klaviyo: Integrate your Klaviyo list and place the checkbox exactly where you want it on the checkout form.
- Brevo (formerly Sendinblue) for WooCommerce: Add subscribers directly to your Brevo contact list at checkout.
- MailerLite for WooCommerce: Connect your MailerLite account and grow your list from every order.
That said, if you are starting fresh or want the tightest integration with WooCommerce, FunnelKit Automations is still our recommendation.
It handles consent, contact profiles, tags, lists, and welcome sequences inside a single tool built specifically for WooCommerce stores.
6 Best practices for adding a newsletter checkbox to WooCommerce checkout
Getting the checkbox on the page is the easy part. How you set it up determines whether it actually converts. Follow these best practices to make sure your checkbox is compliant, visible, and set up to convert.
- Always keep the newsletter checkbox optional
The checkbox must be completely optional. Customers should be able to complete their purchase whether they check it or not. Making it required is not valid consent under GDPR and will frustrate customers at the most critical moment in their journey.
- Place the checkbox just above the Place Order button
Put it just above the Place Order button. The customer has finished filling everything in, so a single checkbox at that moment is easy to notice and act on.
If your checkout is long with multiple steps or an account creation field, move it below the billing address block instead.
Never place it next to the terms and conditions checkbox; grouping them causes customers to miss it or confuse the two.
- Write a label that says exactly what they are signing up for
"Subscribe to our newsletter for offers and updates" is good. "Stay in the loop" is not. Be specific so there is no ambiguity about what the customer agreed to.
- Keep the checkbox unchecked and separate from the terms
It must be unchecked by default. Pre-ticking is not valid consent under GDPR. It must also be a separate checkbox from the terms and conditions acceptance. Bundling the two is explicitly invalid under GDPR, regardless of how the label is worded.
- Tag or list the subscriber the moment they opt in
The moment someone checks the box, they should be added to a list or assigned a tag automatically. This keeps your subscribers organized from day one and makes it easy to segment them later. Whether you want to target first-time buyers, repeat customers, or people from a specific campaign, you can do it without any manual sorting.
- Send a welcome email automatically to confirm the subscription
As soon as someone opts in, trigger a welcome email that confirms their subscription and sets expectations. Let them know what they signed up for, whether that is exclusive discounts, product updates, or weekly tips, so they know what to look forward to. This also builds trust early and reduces the chance they forget they subscribed and mark your emails as spam.
More Questions About Adding Newsletter Checkbox To Checkout
Got more questions? Here are some of the frequently asked questions with answers:
Should the newsletter checkbox at WooCommerce checkout be mandatory or optional?
Optional. A mandatory newsletter checkbox is not valid consent and will put customers off. The checkbox must be something the customer can freely choose to check or leave blank without it affecting their ability to complete the purchase.
Does WooCommerce include a built-in newsletter checkbox?
No. Core WooCommerce has no native newsletter opt-in checkbox. The checkbox comes from whichever newsletter or marketing automation plugin you use. There is no setting inside WooCommerce > Settings that adds one without a plugin.
How do I make sure the checkbox is not checked by default?
When you add the checkbox to the checkout page, make sure the default value is unchecked.
Will subscribers be added to my email list automatically?
Yes, they will be added to your contacts and email list. If you want them to add to a specific list then you can do that with an automation.
Can I customize the label and position of the checkbox?
Yes. Usually, with every plugin, you get multiple placement options for the newsletter checkbox on the WooCommerce store.
Can I trigger a welcome email when someone subscribes at checkout?
Yes, this is where FunnelKit Automations goes beyond a basic newsletter plugin. You can build an automation that fires immediately when a customer opts in, sends a personalized welcome email, and tags the contact for future segmentation, all without any manual work on your end.
What happens if a customer places an order but does not check the box?
With FunnelKit Automations, their contact profile is marked as Unverified, meaning they are in the system as a customer but not as a newsletter subscriber. Your marketing automations filter by subscription status, so they will not receive newsletter emails unless they opt in later. With other plugins, unchecked customers are simply not added to your marketing list.
Start Building Your Email List at the Most Valuable Moment in the Customer Journey
The newsletter checkbox may seem like a small addition to your checkout page, but it captures subscribers at the moment they’re most engaged, right after deciding to buy from you.
When set up correctly with a clear label, smart placement, and an unchecked default, it helps you grow your list in a compliant and automated way.
The real value builds over time. A growing list of customers who opted in at checkout becomes one of the most reliable assets for any WooCommerce store.
These aren’t cold leads. They already trust your brand and have chosen to hear from you.
To take it further, you can automatically trigger a welcome sequence, tag subscribers, and segment your list without any manual effort. Tools like FunnelKit Automations make this seamless. Set it up once, and it runs in the background every time a customer opts in.
Start with the checkbox, and let your email list grow from there.

Editorial Team
July 7, 2026Are shoppers adding products to their cart and leaving before they buy? According to Baymard Institute research on checkout usability, 18% of shoppers who abandon their cart do so because...
Editorial Team
July 7, 2026You’ve built your WooCommerce store, polished your product pages, and invested in marketing, but sales aren’t coming. Visitors browse, some add items to their cart, and most vanish before completing...
Editorial Team
July 3, 2026Discover how a canceled order doesn't have to mean a lost customer, and how the right WooCommerce canceled order email can turn it into a second chance. WooCommerce canceled order...


