
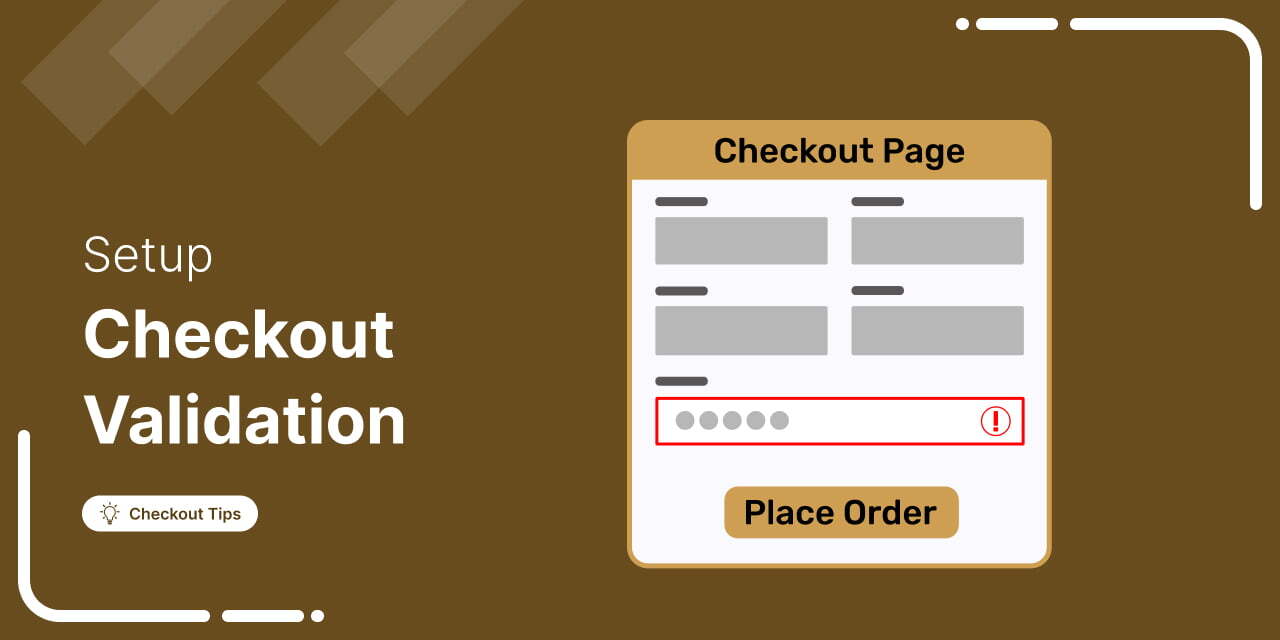
WooCommerce checkout validation is essential for ensuring a smooth order process and efficient order management.
It reduces errors, improves customer satisfaction, and boosts conversion rates, ensuring a seamless experience for both customers and store owners.
Without proper validation, customers may encounter issues that lead to cart abandonment and lost sales.
While WooCommerce automatically validates essential fields, it does not validate optional fields, such as phone numbers or custom fields, by default.
In this post, we will show you how to set up WooCommerce checkout validation using both the WordPress plugin and through custom code.
By the end, you'll be able to validate any checkout field. This includes your required and custom email, phone, postcode, age, address, and more across both the classic shortcode checkout and the newer block-based checkout.
Plus, you can easily test and verify the field validation across any front-end (server-rendered, headless, or mobile app).
Table of Contents
- 1 What WooCommerce Validates by Default (and What It Misses)
- 2 Method 1: How to Add WooCommerce Checkout Validation Without Code
- 3 Method 2: How to Validate WooCommerce Checkout Fields With Custom Code
- 3.1 Modifying field properties with woocommerce_checkout_fields
- 3.2 Server-side validation with woocommerce_after_checkout_validation
- 3.3 Customizing default validation error messages
- 3.4 Real-time inline validation with JavaScript
- 3.5 Block-based checkout (validation data store)
- 3.6 Limitations of Custom Code Validation
- 4 7 Best Practices to Prevent Failed Orders With WooCommerce Checkout Validation
- 5 Frequently Asked Questions About WooCommerce Checkout Validation
- 6 Validate WooCommerce Checkout Field to Ensure a Seamless Shopping Experience and Boost Sales!
What WooCommerce Validates by Default (and What It Misses)
WooCommerce checkout validation ensures that customers enter complete and correctly formatted details, such as email, name, address, and payment information.
It helps catch errors in real-time, making the checkout smoother and more reliable.
WooCommerce validates these fields out of the box:
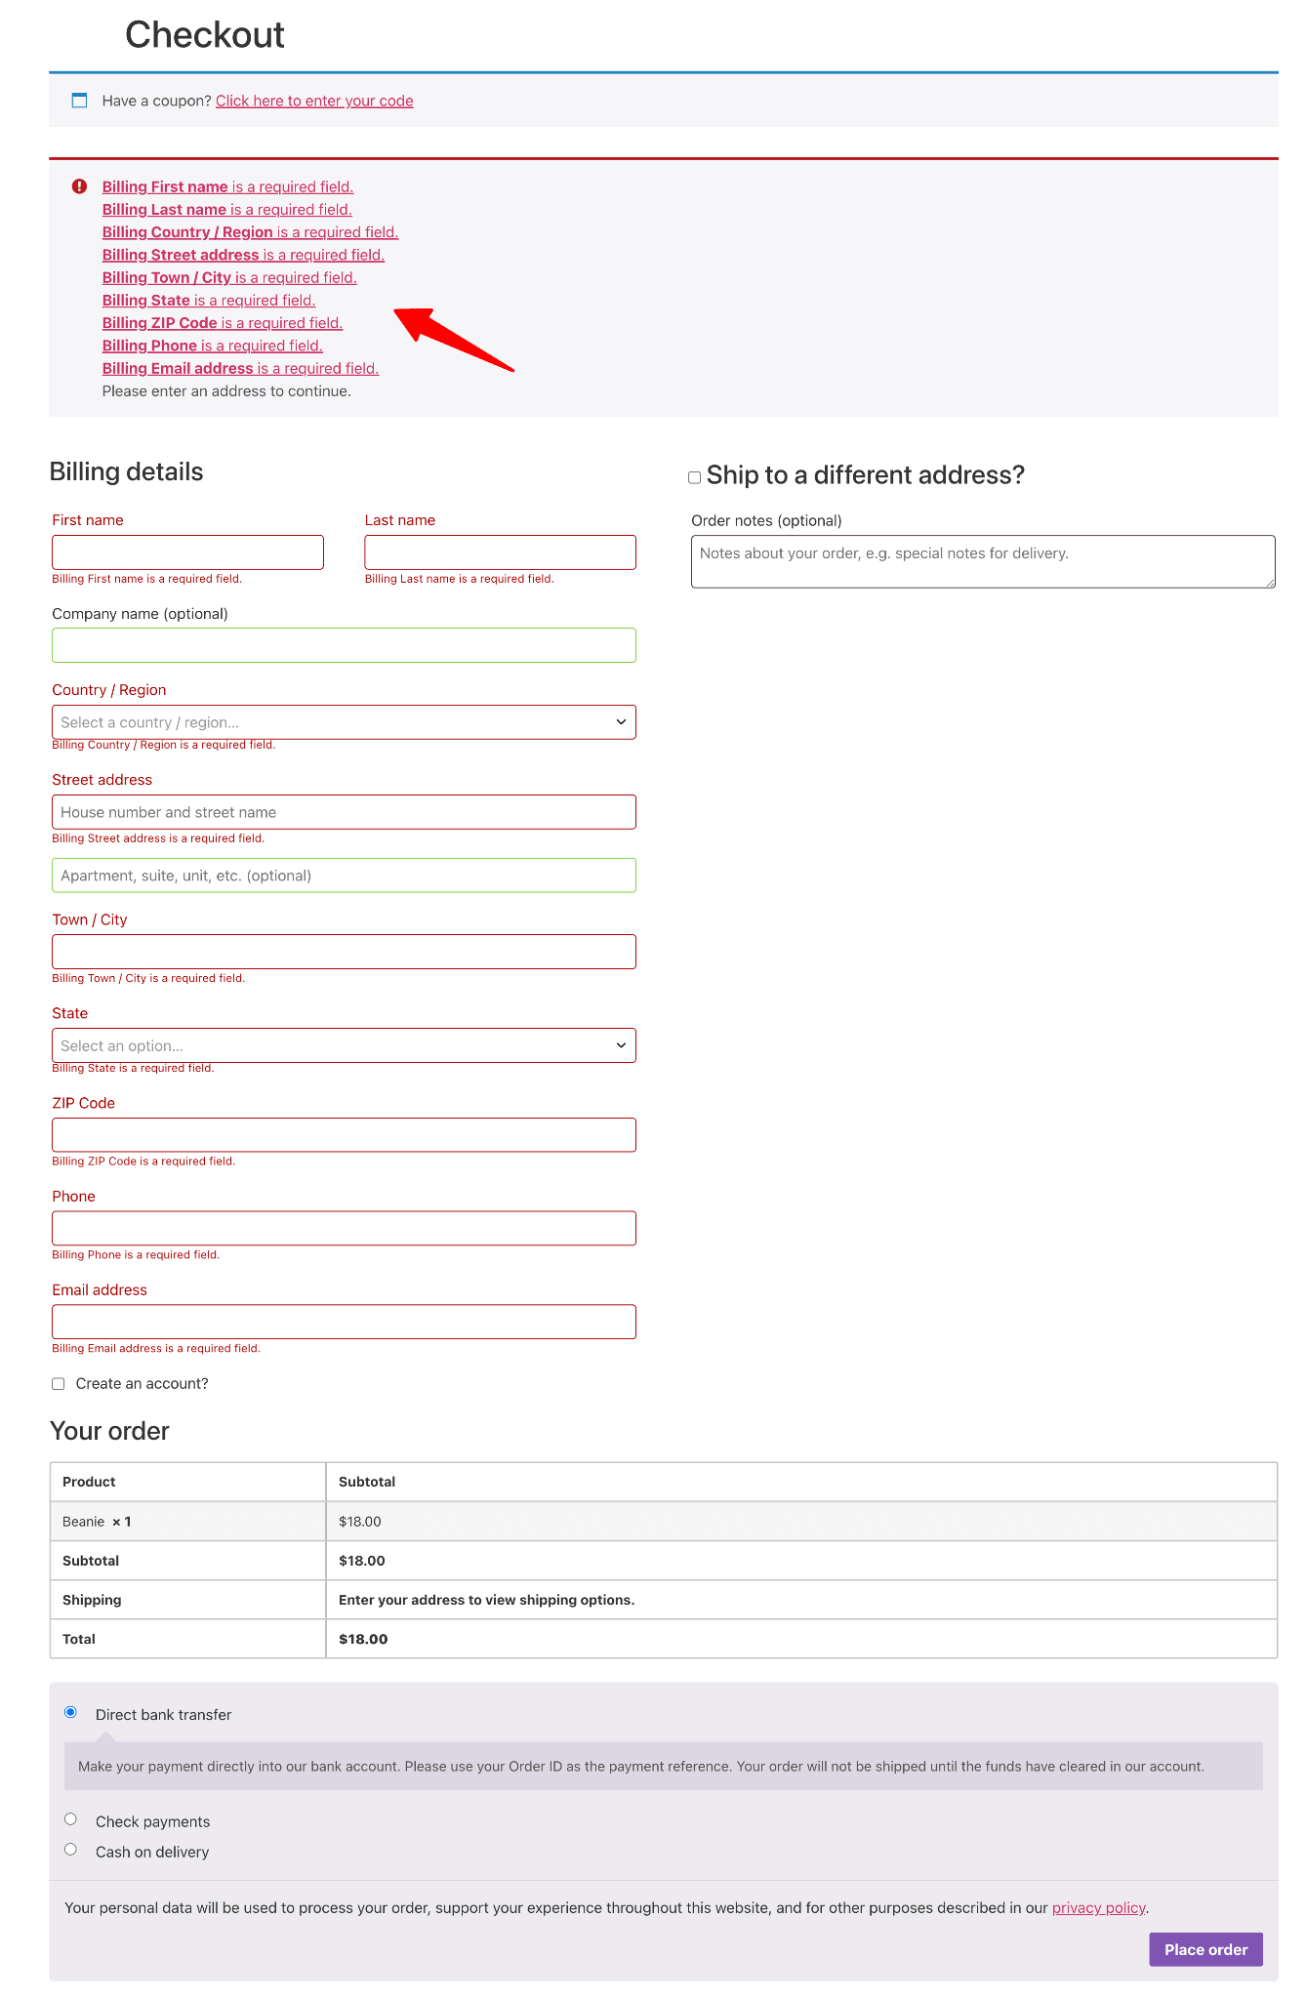
- Required fields: Billing first name, last name, address, city, postcode, country, email, and phone are marked required by default. Empty required fields trigger an inline error and block order submission.
- Email format: WooCommerce uses a regex pattern to confirm the email contains an “@” symbol and a valid domain structure. It does not verify the email actually exists or that the domain accepts mail.
- Country-specific postcodes: For supported countries, WooCommerce validates the postcode format. A US ZIP code must be 5 digits, a UK postcode must mix letters and numbers, and so on. Countries without built-in patterns fall back to a basic non-empty check.
- Phone format: The default phone validation only allows digits, hyphens, underscores, plus signs, and parentheses. It does not check the length or whether the number matches the customer’s country.
- Required asterisks: Under WooCommerce settings, a 'Highlight required fields with an asterisk' option controls whether required fields display the asterisk visually.
What default WooCommerce validation does not handle (limitations):
- International phone number length and country prefix
- Email confirmation (a “confirm email” field that must match the first one)
- Free email domain blocking for B2B stores
- Minimum order amounts as a soft validation rule
- Age verification, date of birth, or government ID checks
- VAT number validation against the EU VIES database
- Forbidden words in shipping addresses (for example, “PO Box” or “Postbox” for restricted shipping)
- User role-based or product-based checkout restrictions
- Real-time inline validation on blur (the default validates only on submit for most fields)
Method 1: How to Add WooCommerce Checkout Validation Without Code
In this section, we’ll show you how to create an inline WooCommerce checkout validation for a smoother shopping experience. Plus, add phone-field validation with an automatic country flag and prefix.
We’ll use FunnelKit Funnel Builder to replace the basic WooCommerce checkout with a more user-friendly, multi-step form.
This will help reduce cart abandonment, as 18% of shoppers abandon their carts due to a lengthy, confusing checkout process.
Make sure to install and activate both the free and premium versions of FunnelKit Funnel Builder to get started.
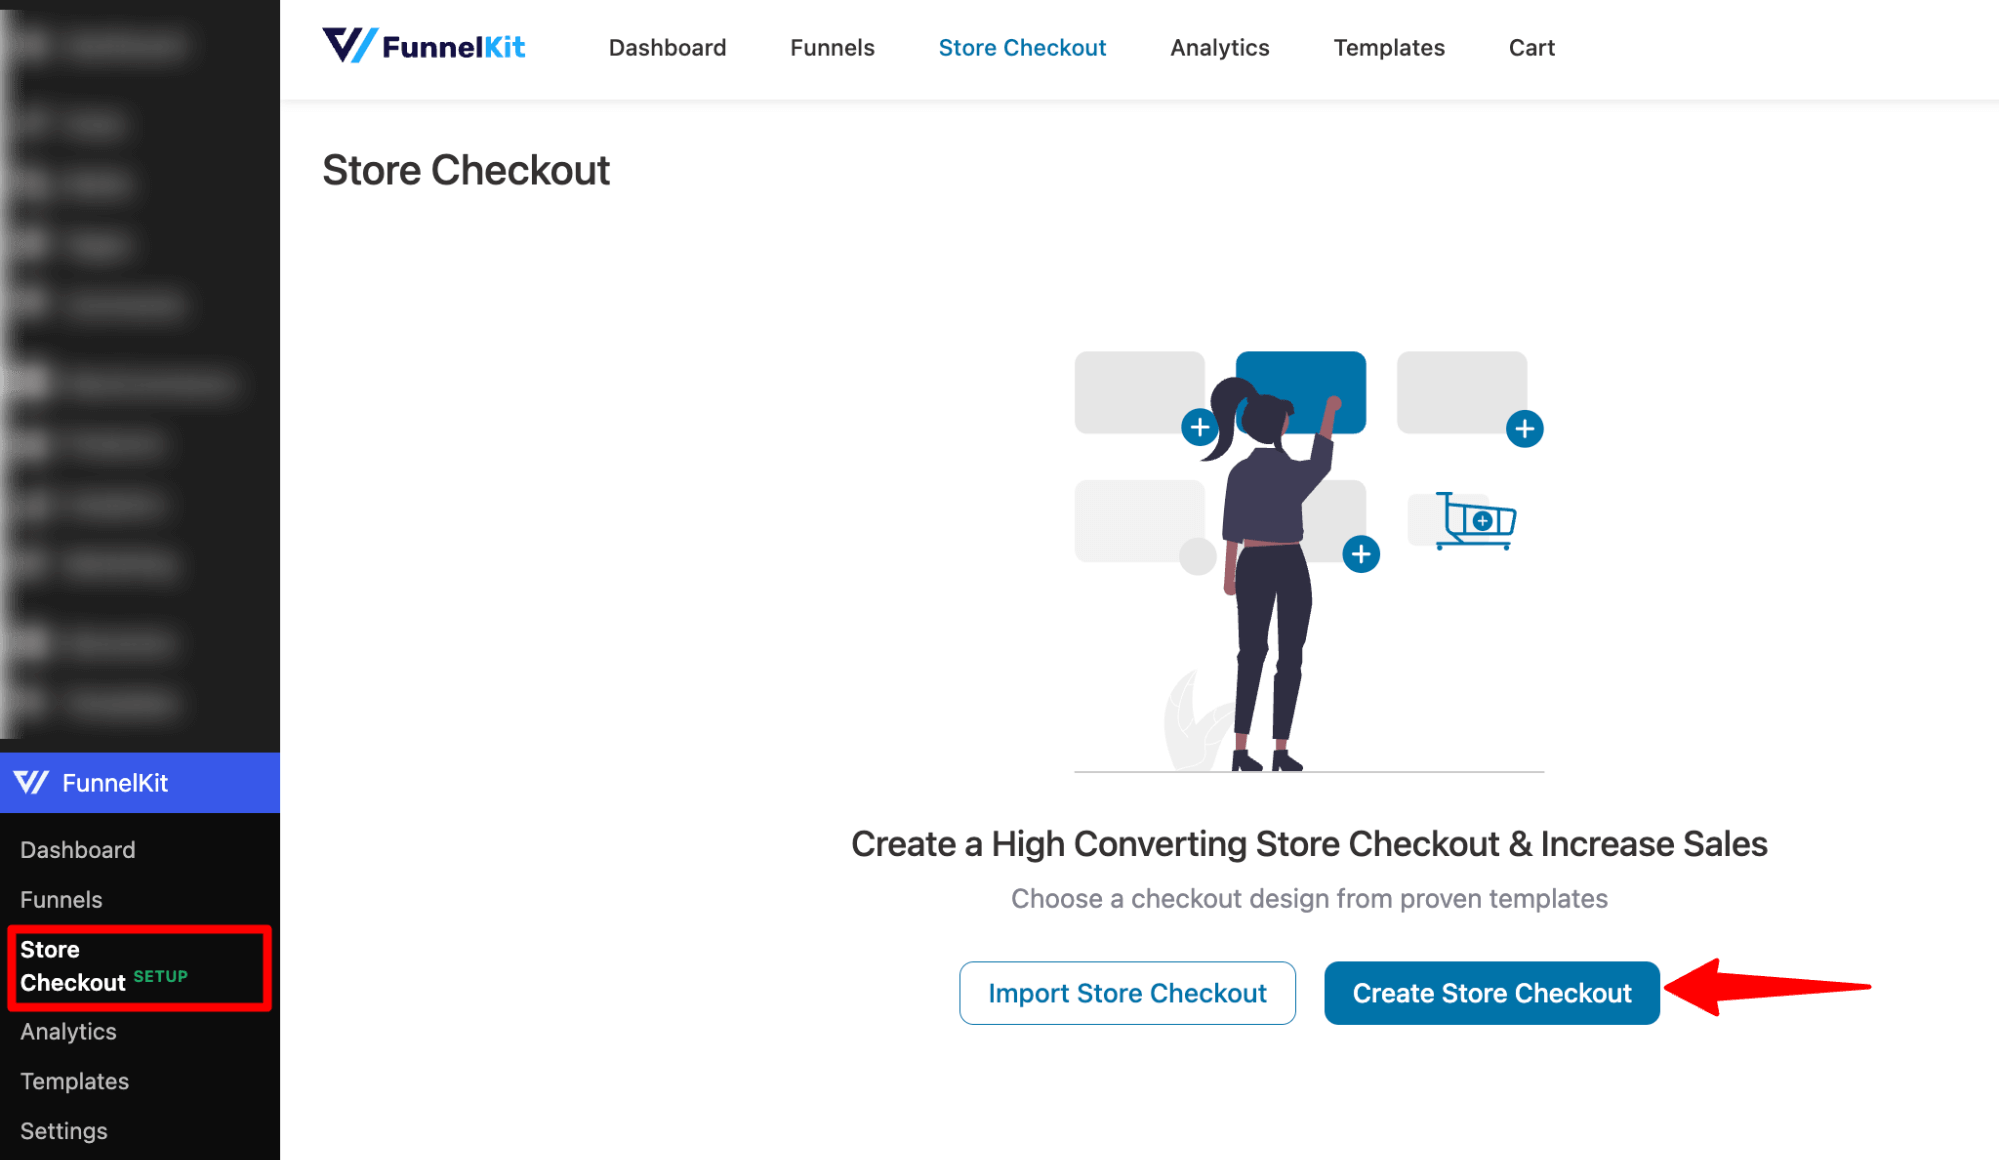
Step 1: Create a store checkout
First, we need to create a store checkout to replace the default WooCommerce checkout page.
To do so, navigate to FunnelKit ⇒ Store Checkout and click on the ‘Create Store Checkout’ button.
FunnelKit Funnel Builder offers many pre-built templates. To select a template, hover over it and click Preview.
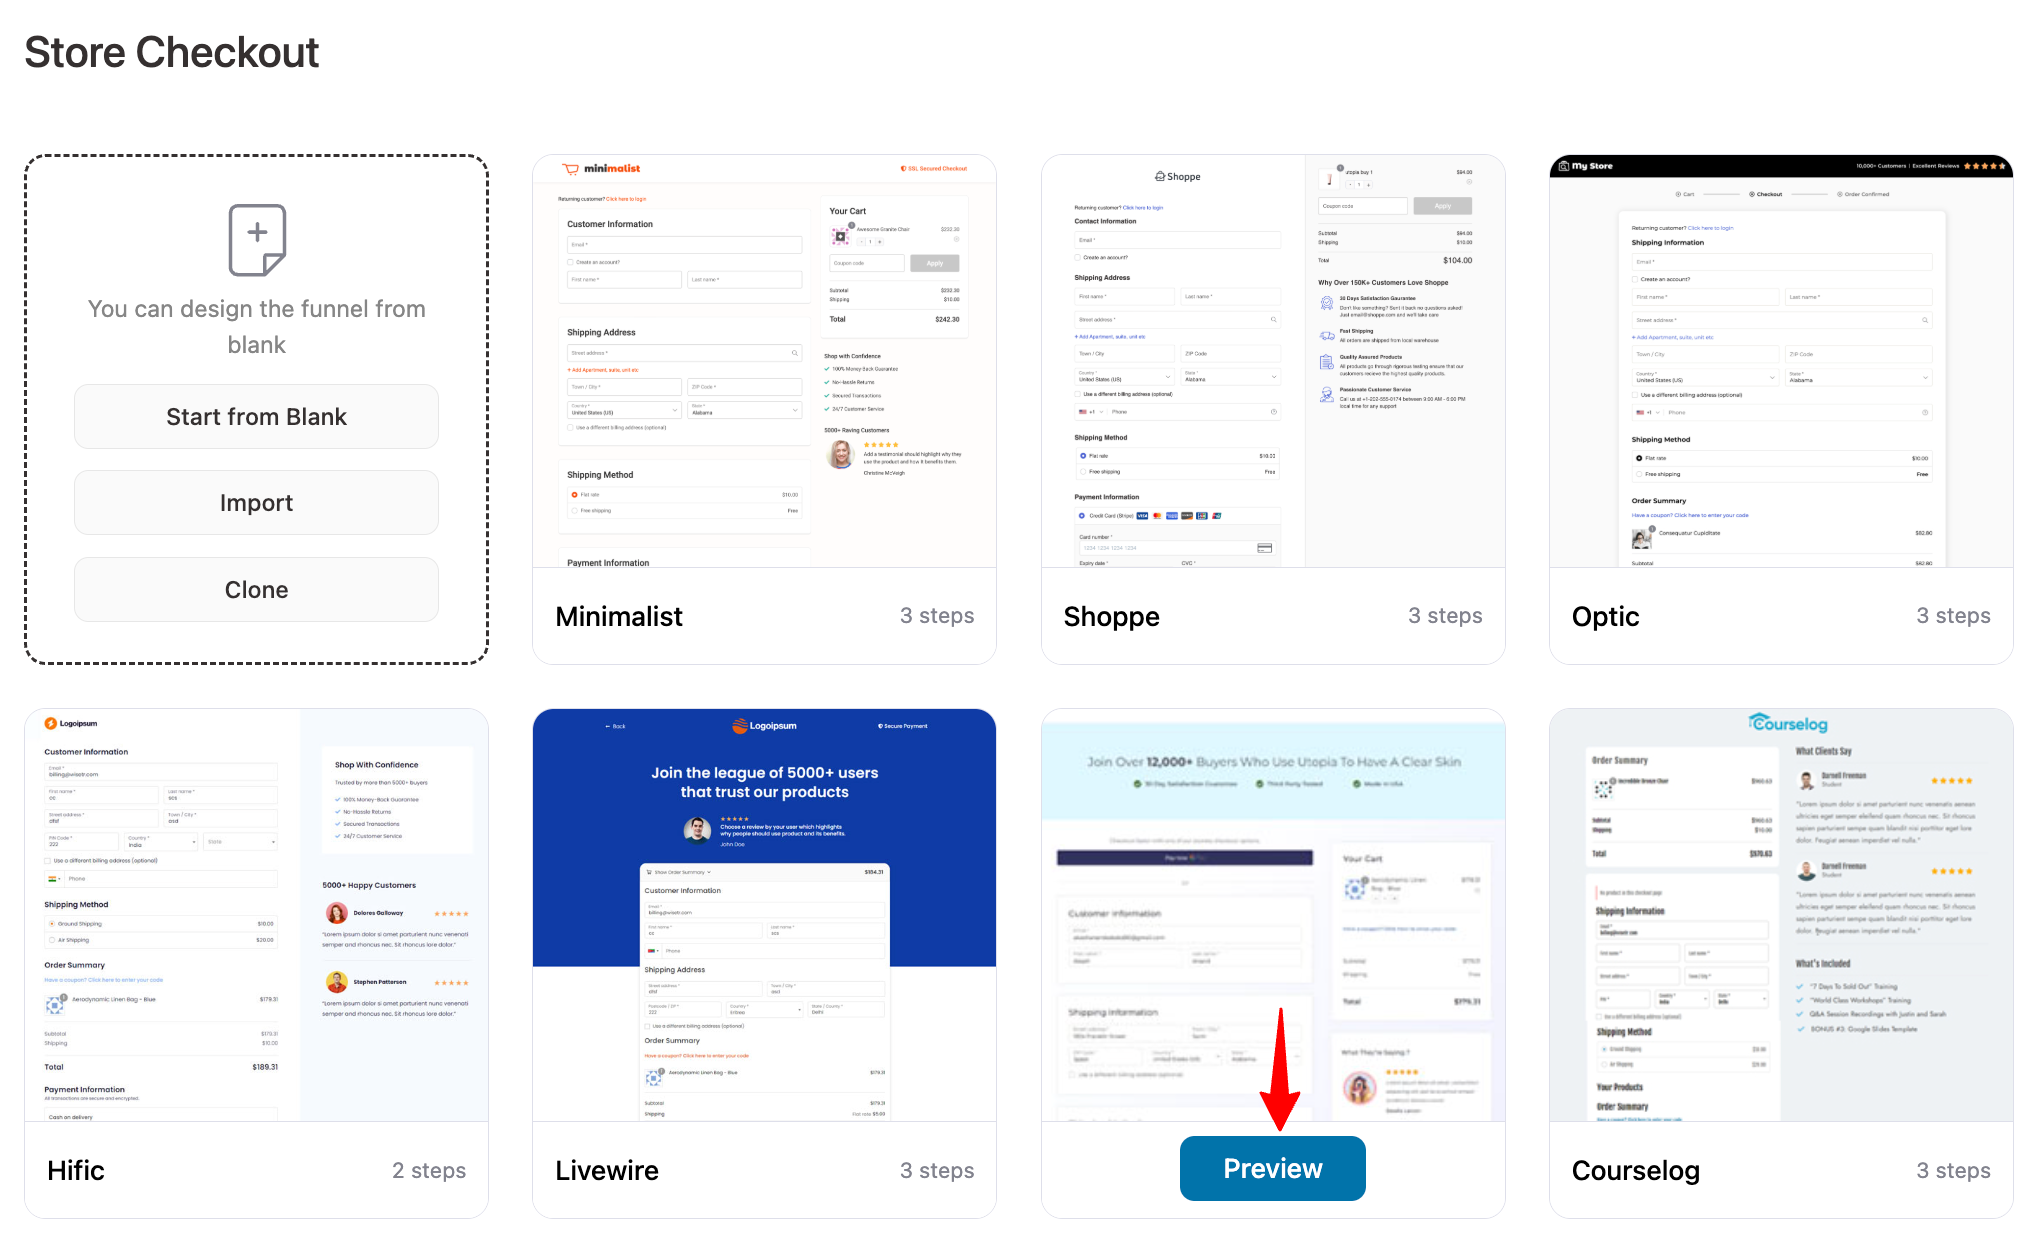
To import the template, hit Import This Funnel, provide a name, and hit Done.
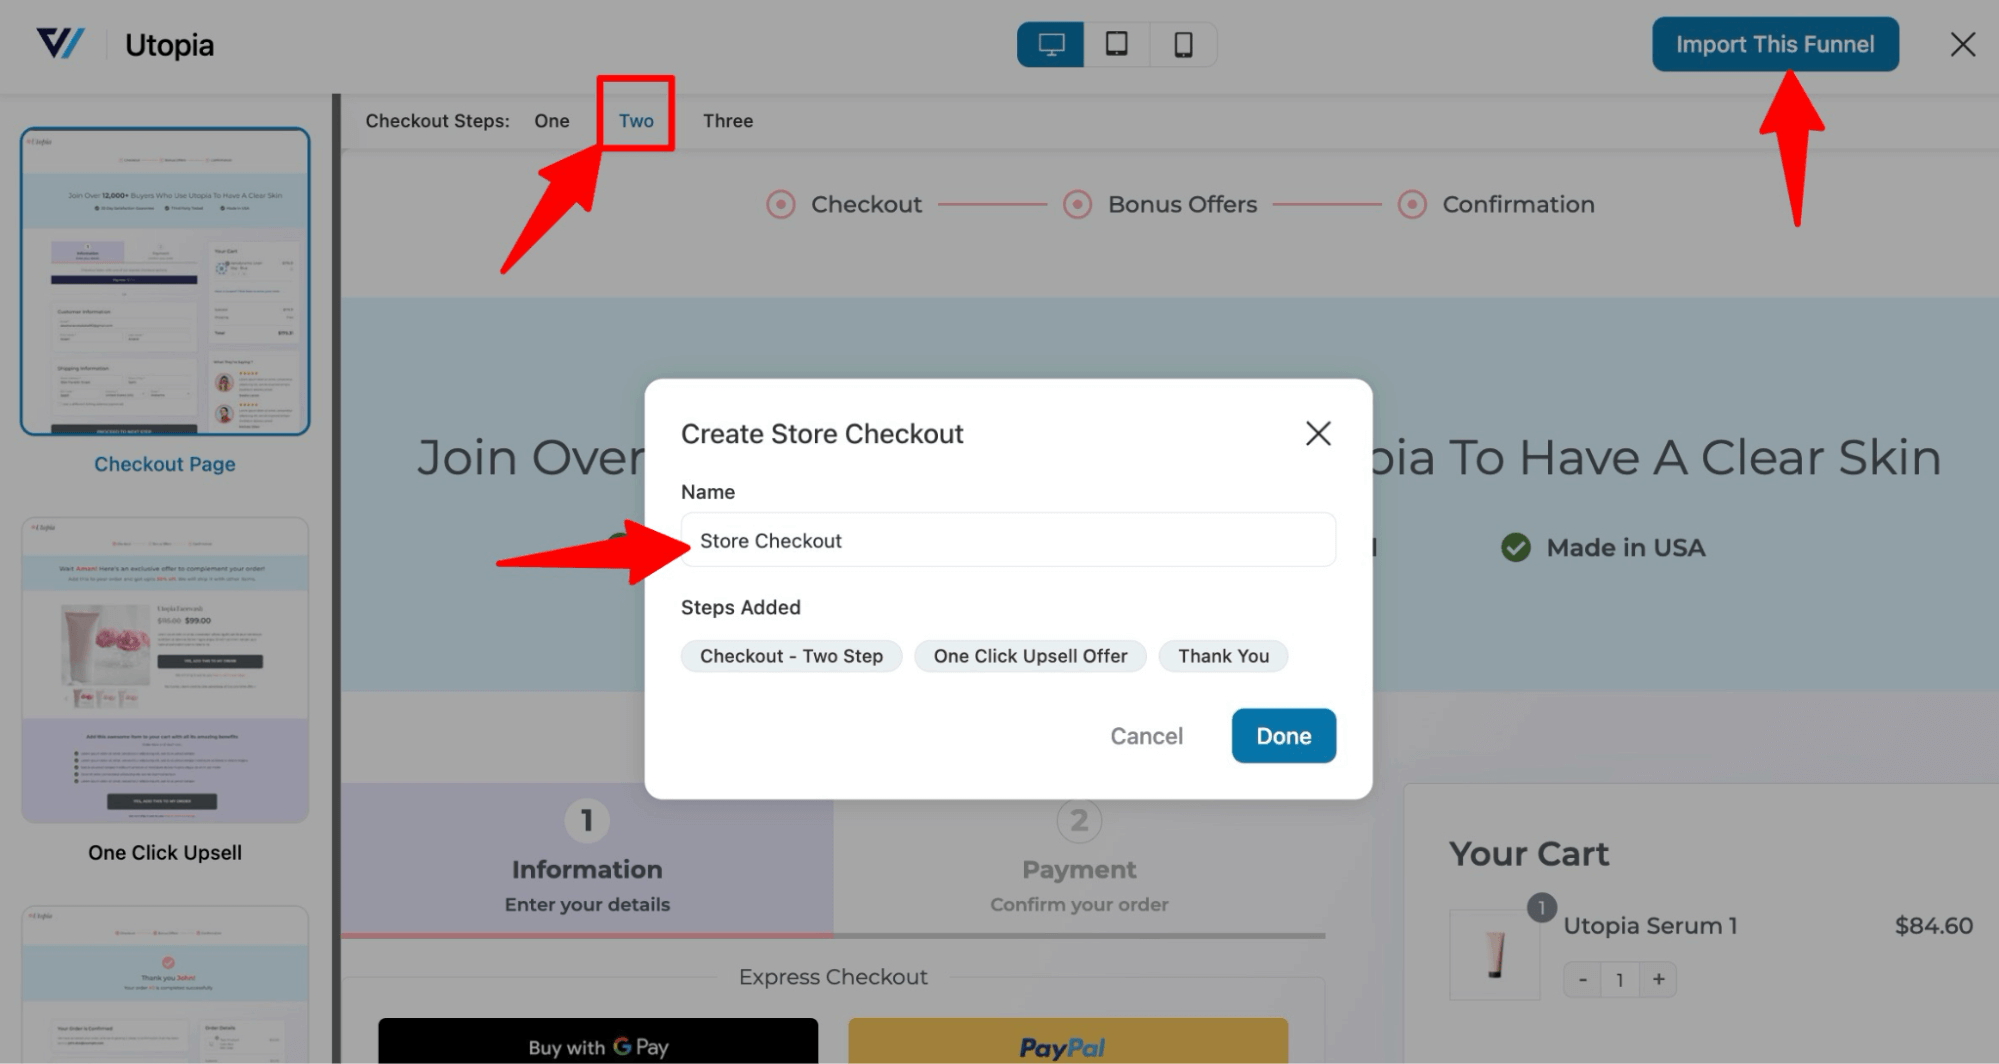
Now you should have a new store checkout with three steps: Checkout, Upsell, and Thank You.
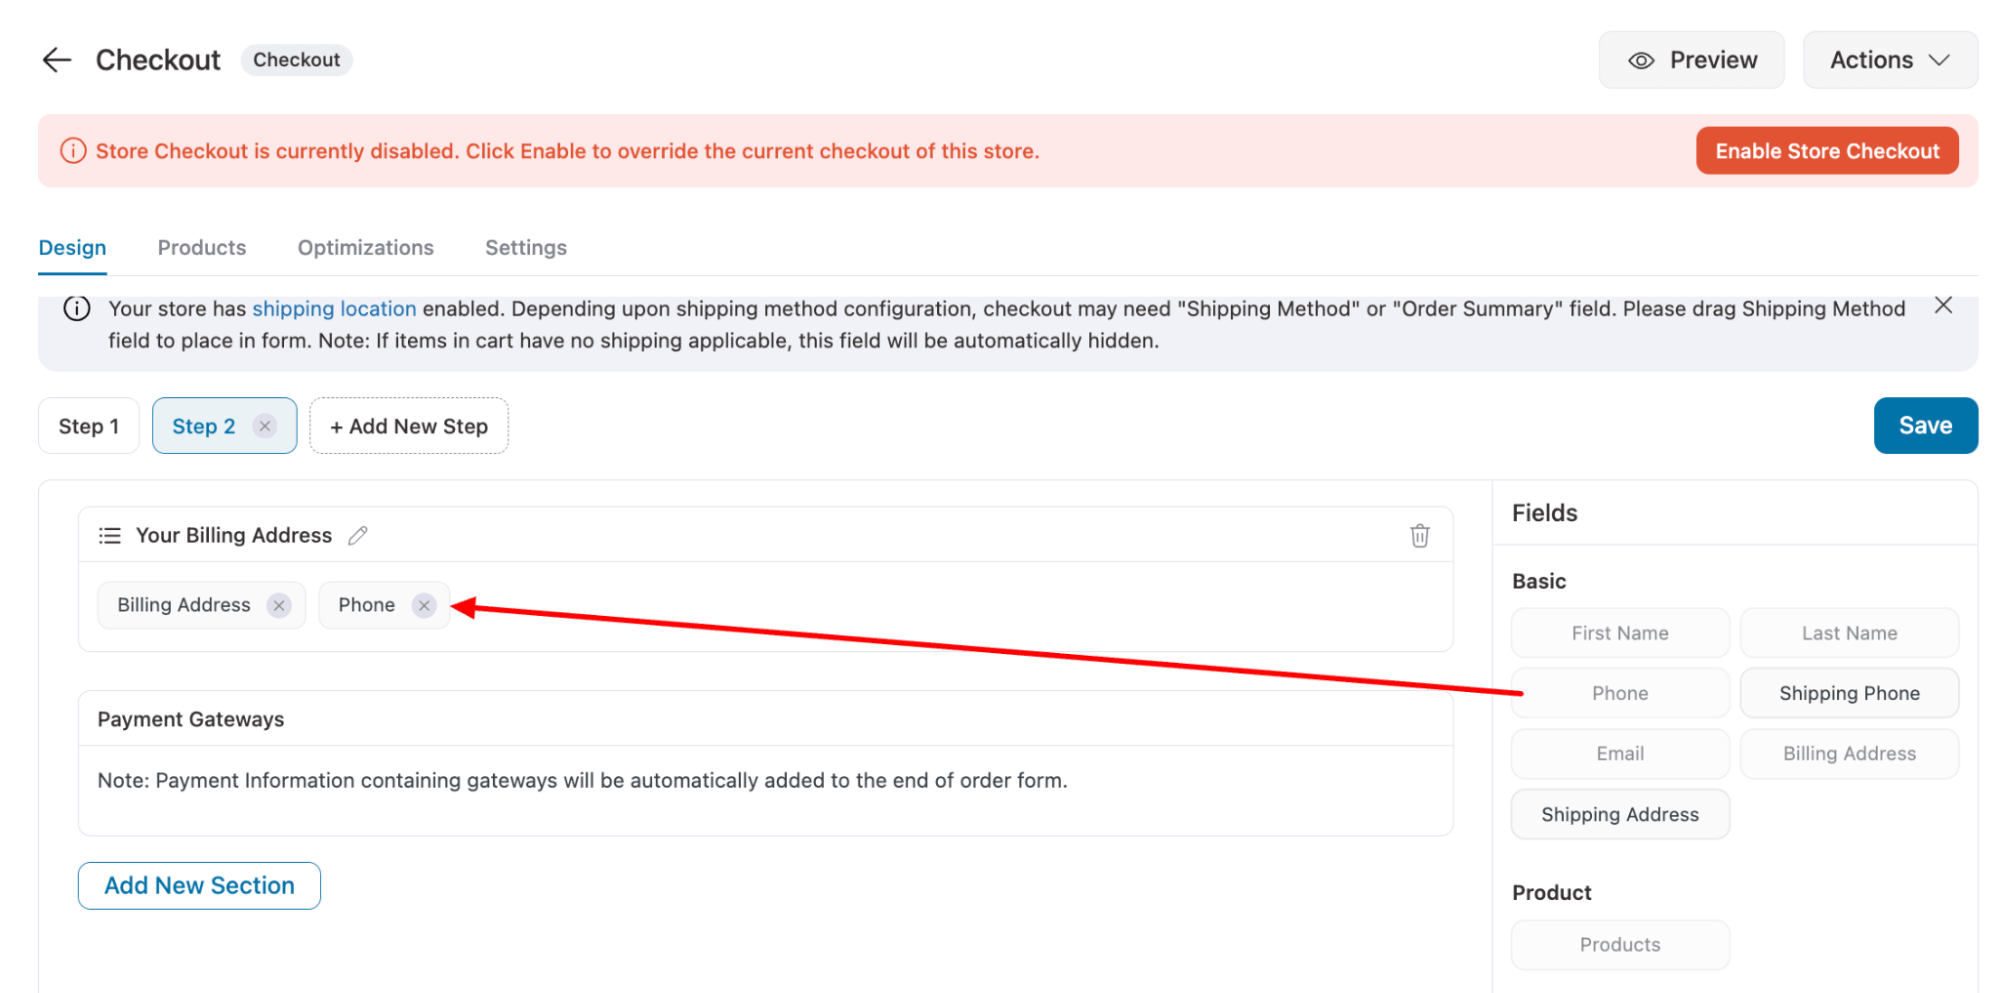
Step 2: Edit checkout fields to implement validation
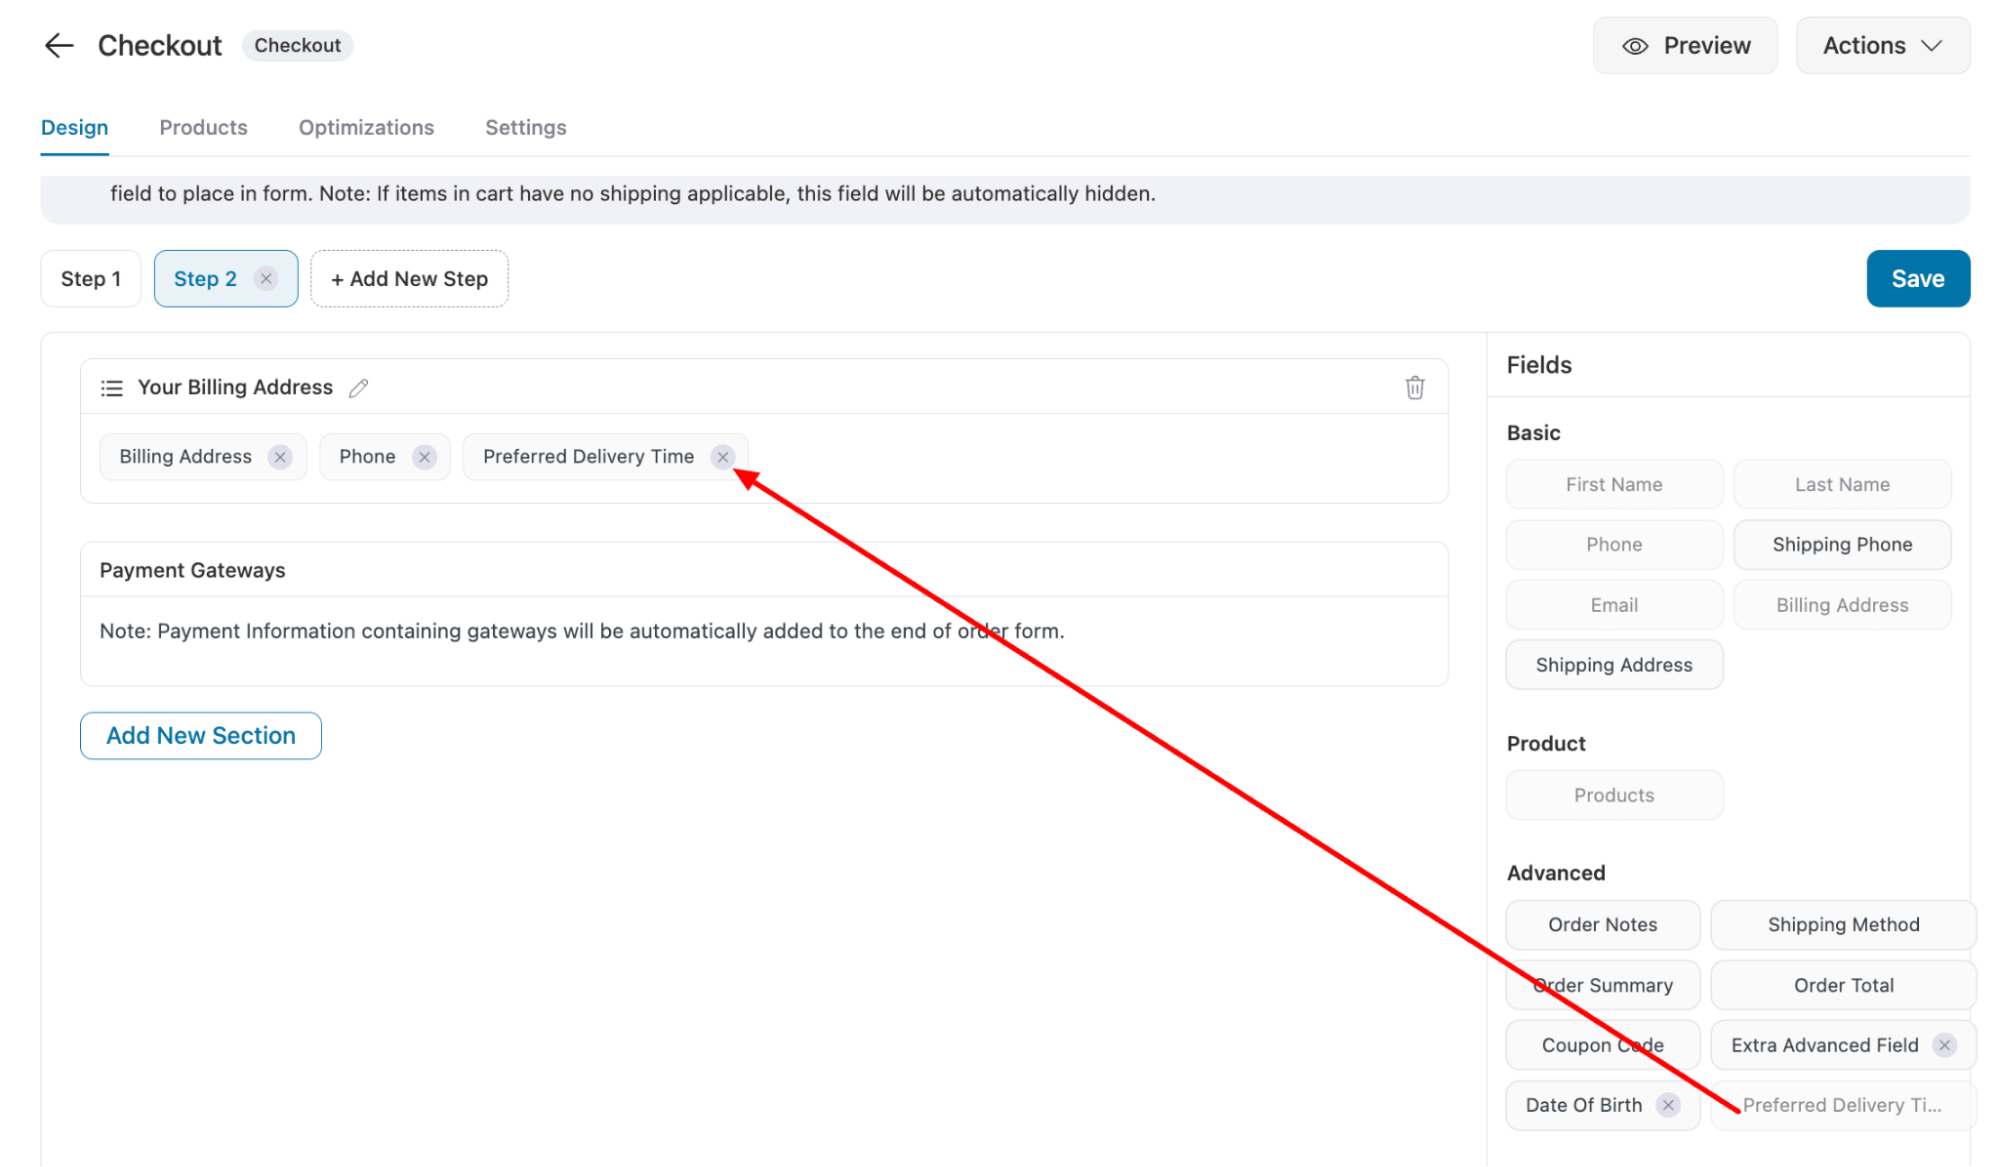
To add validation to the checkout fields, hit the checkout step, next, scroll down to the Checkout Form Fields section.
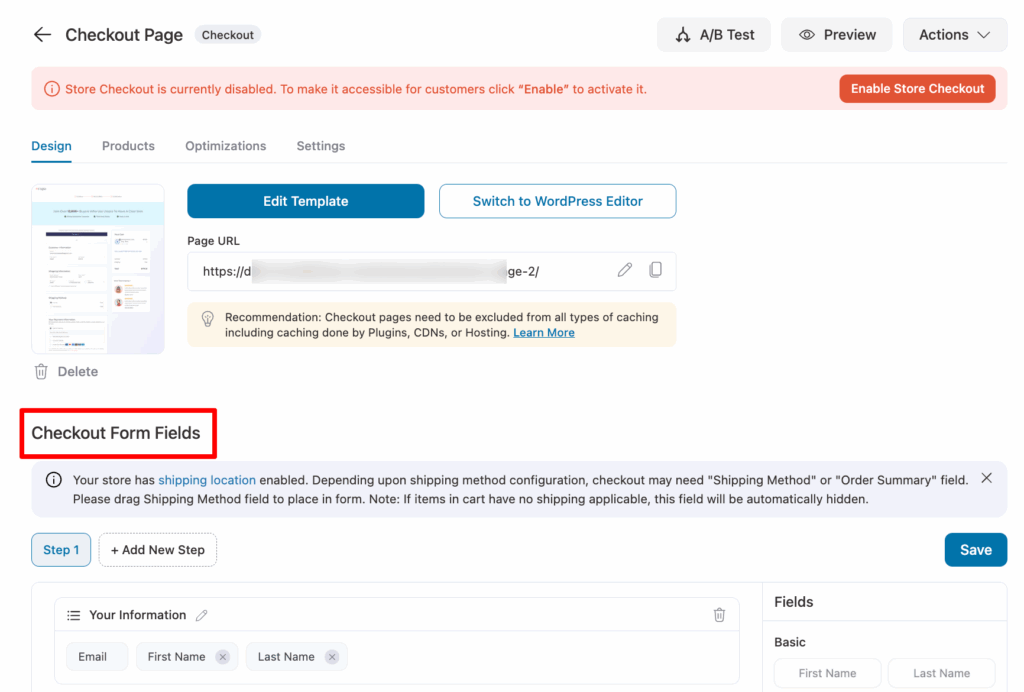
You can edit the content and design of your checkout page using the Edit Template option. For more details, refer to our blog post on WooCommerce multi-step checkout.
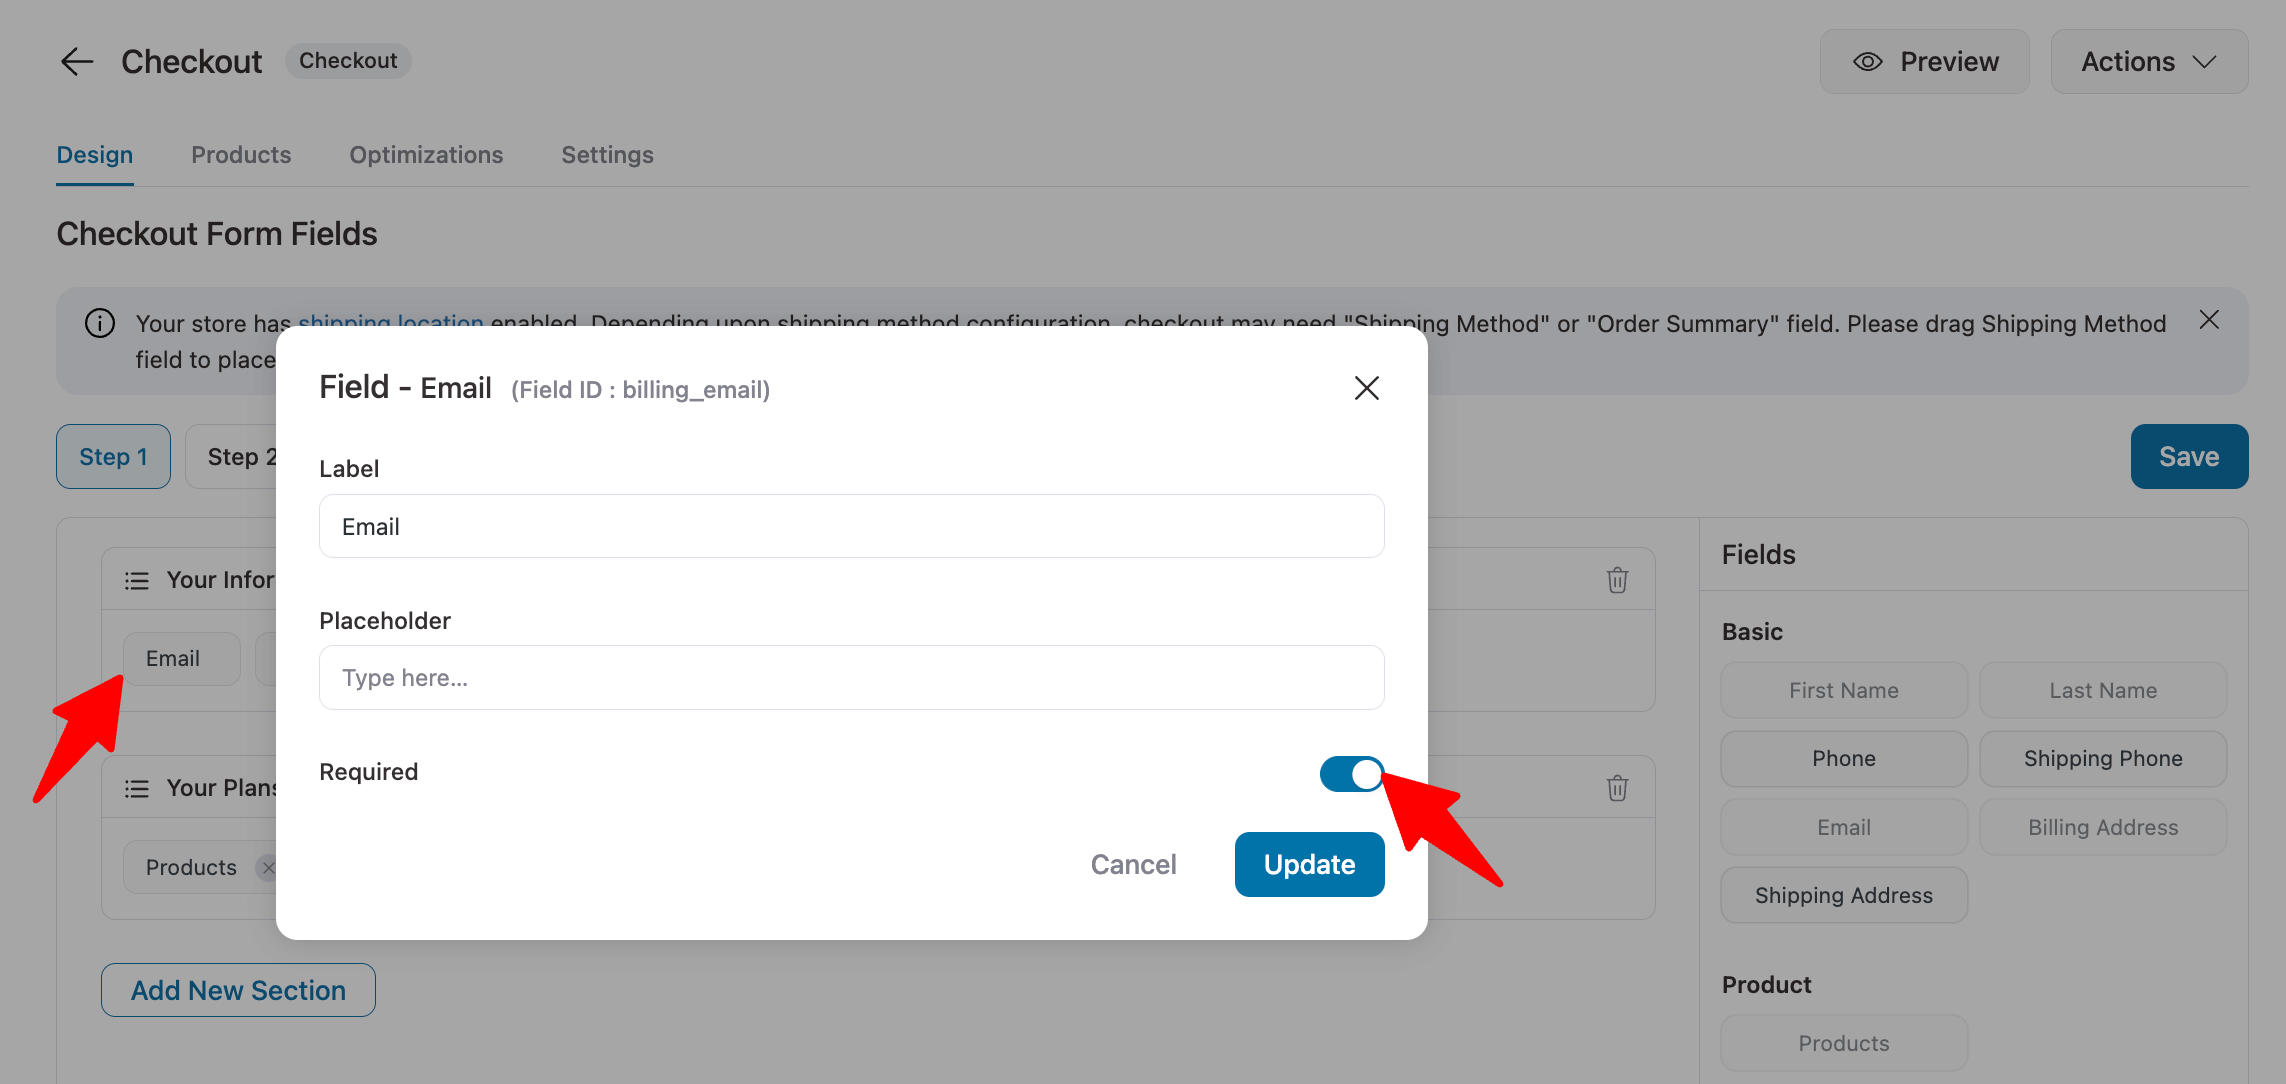
- Mark fields as required
To add validation to any field, click on the field. Then, make it required.
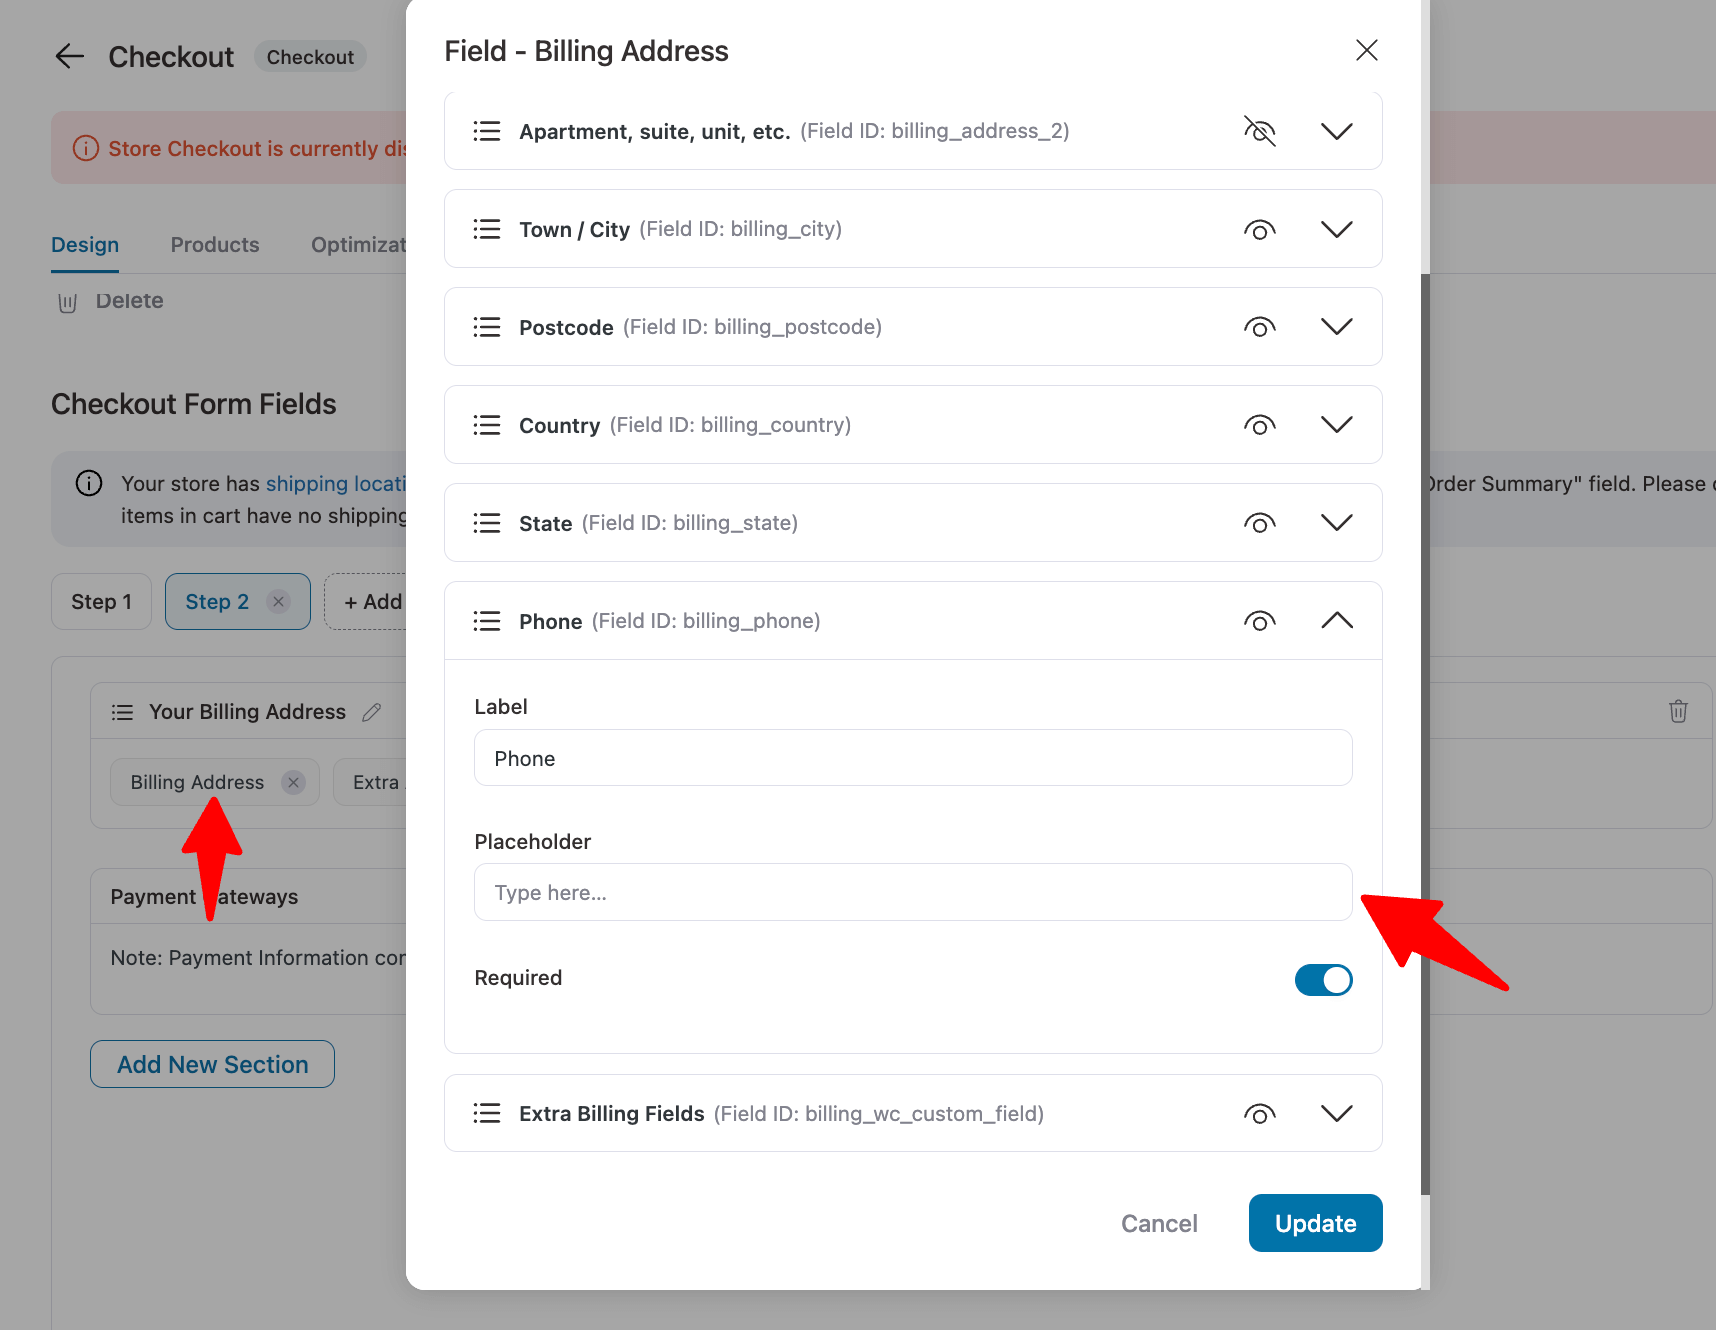
- Show/hide certain fields in billing or shipping addresses
For the shipping and billing address sections, select any option. Here, you can hide certain fields or make them optional or required.
For example, you can make the billing phone field required.
Next, if you want, you can add a separate phone field to your checkout page, similar to the default checkout.
We are adding it next to the billing address field.
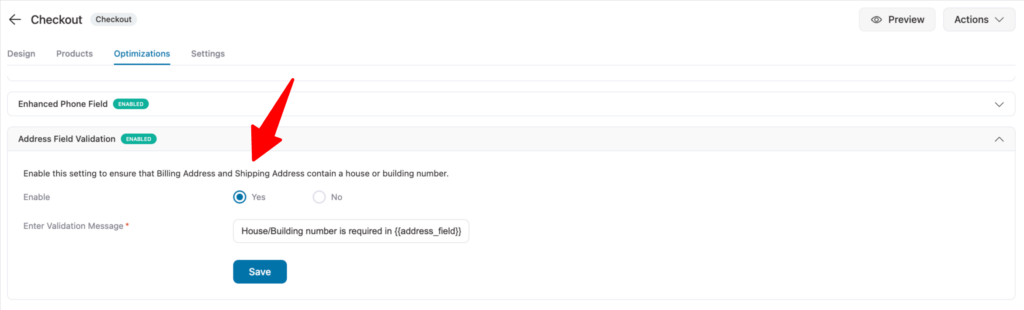
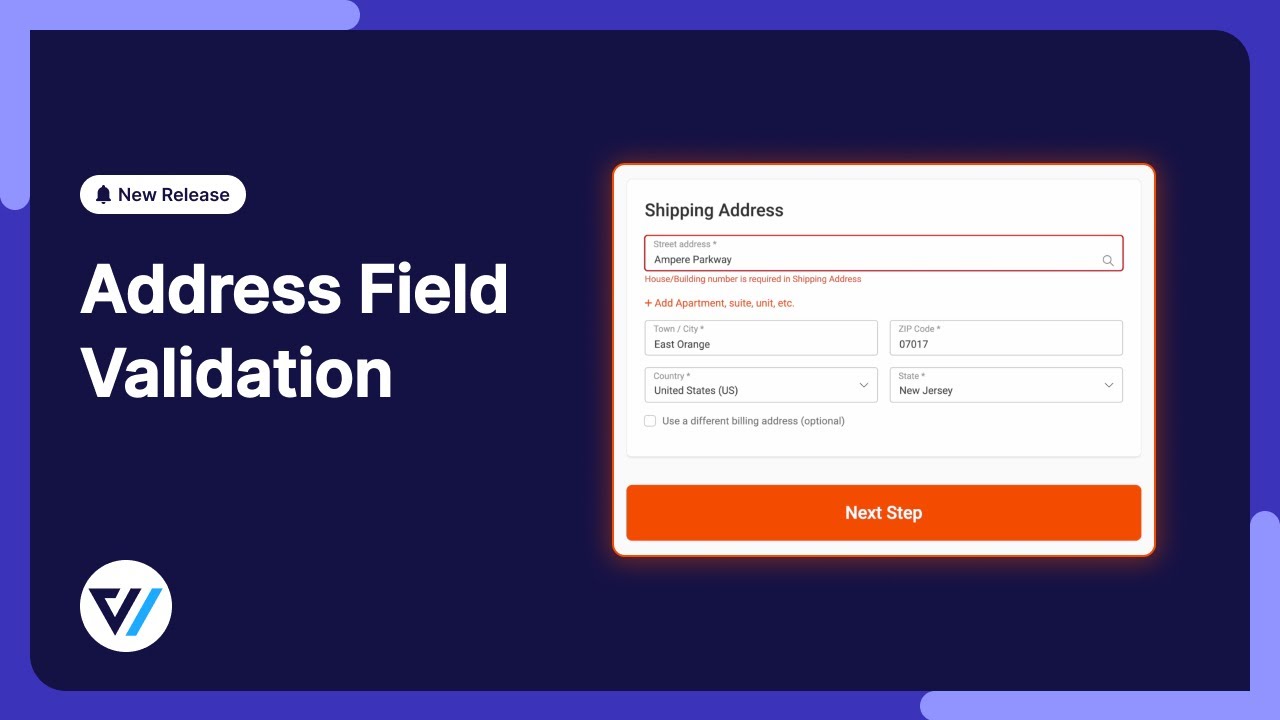
- Address field validation
On the optimization tab, enable WooCommerce address field validation to ensure customers enter complete and accurate shipping details, including house or building number, at checkout.
This helps you collect a complete address, reducing delivery errors and avoiding costly returns.
Watch this video to understand the full details:
- Add new custom fields with validation
Click the 'Add New Field' button to add a custom field to your checkout form.
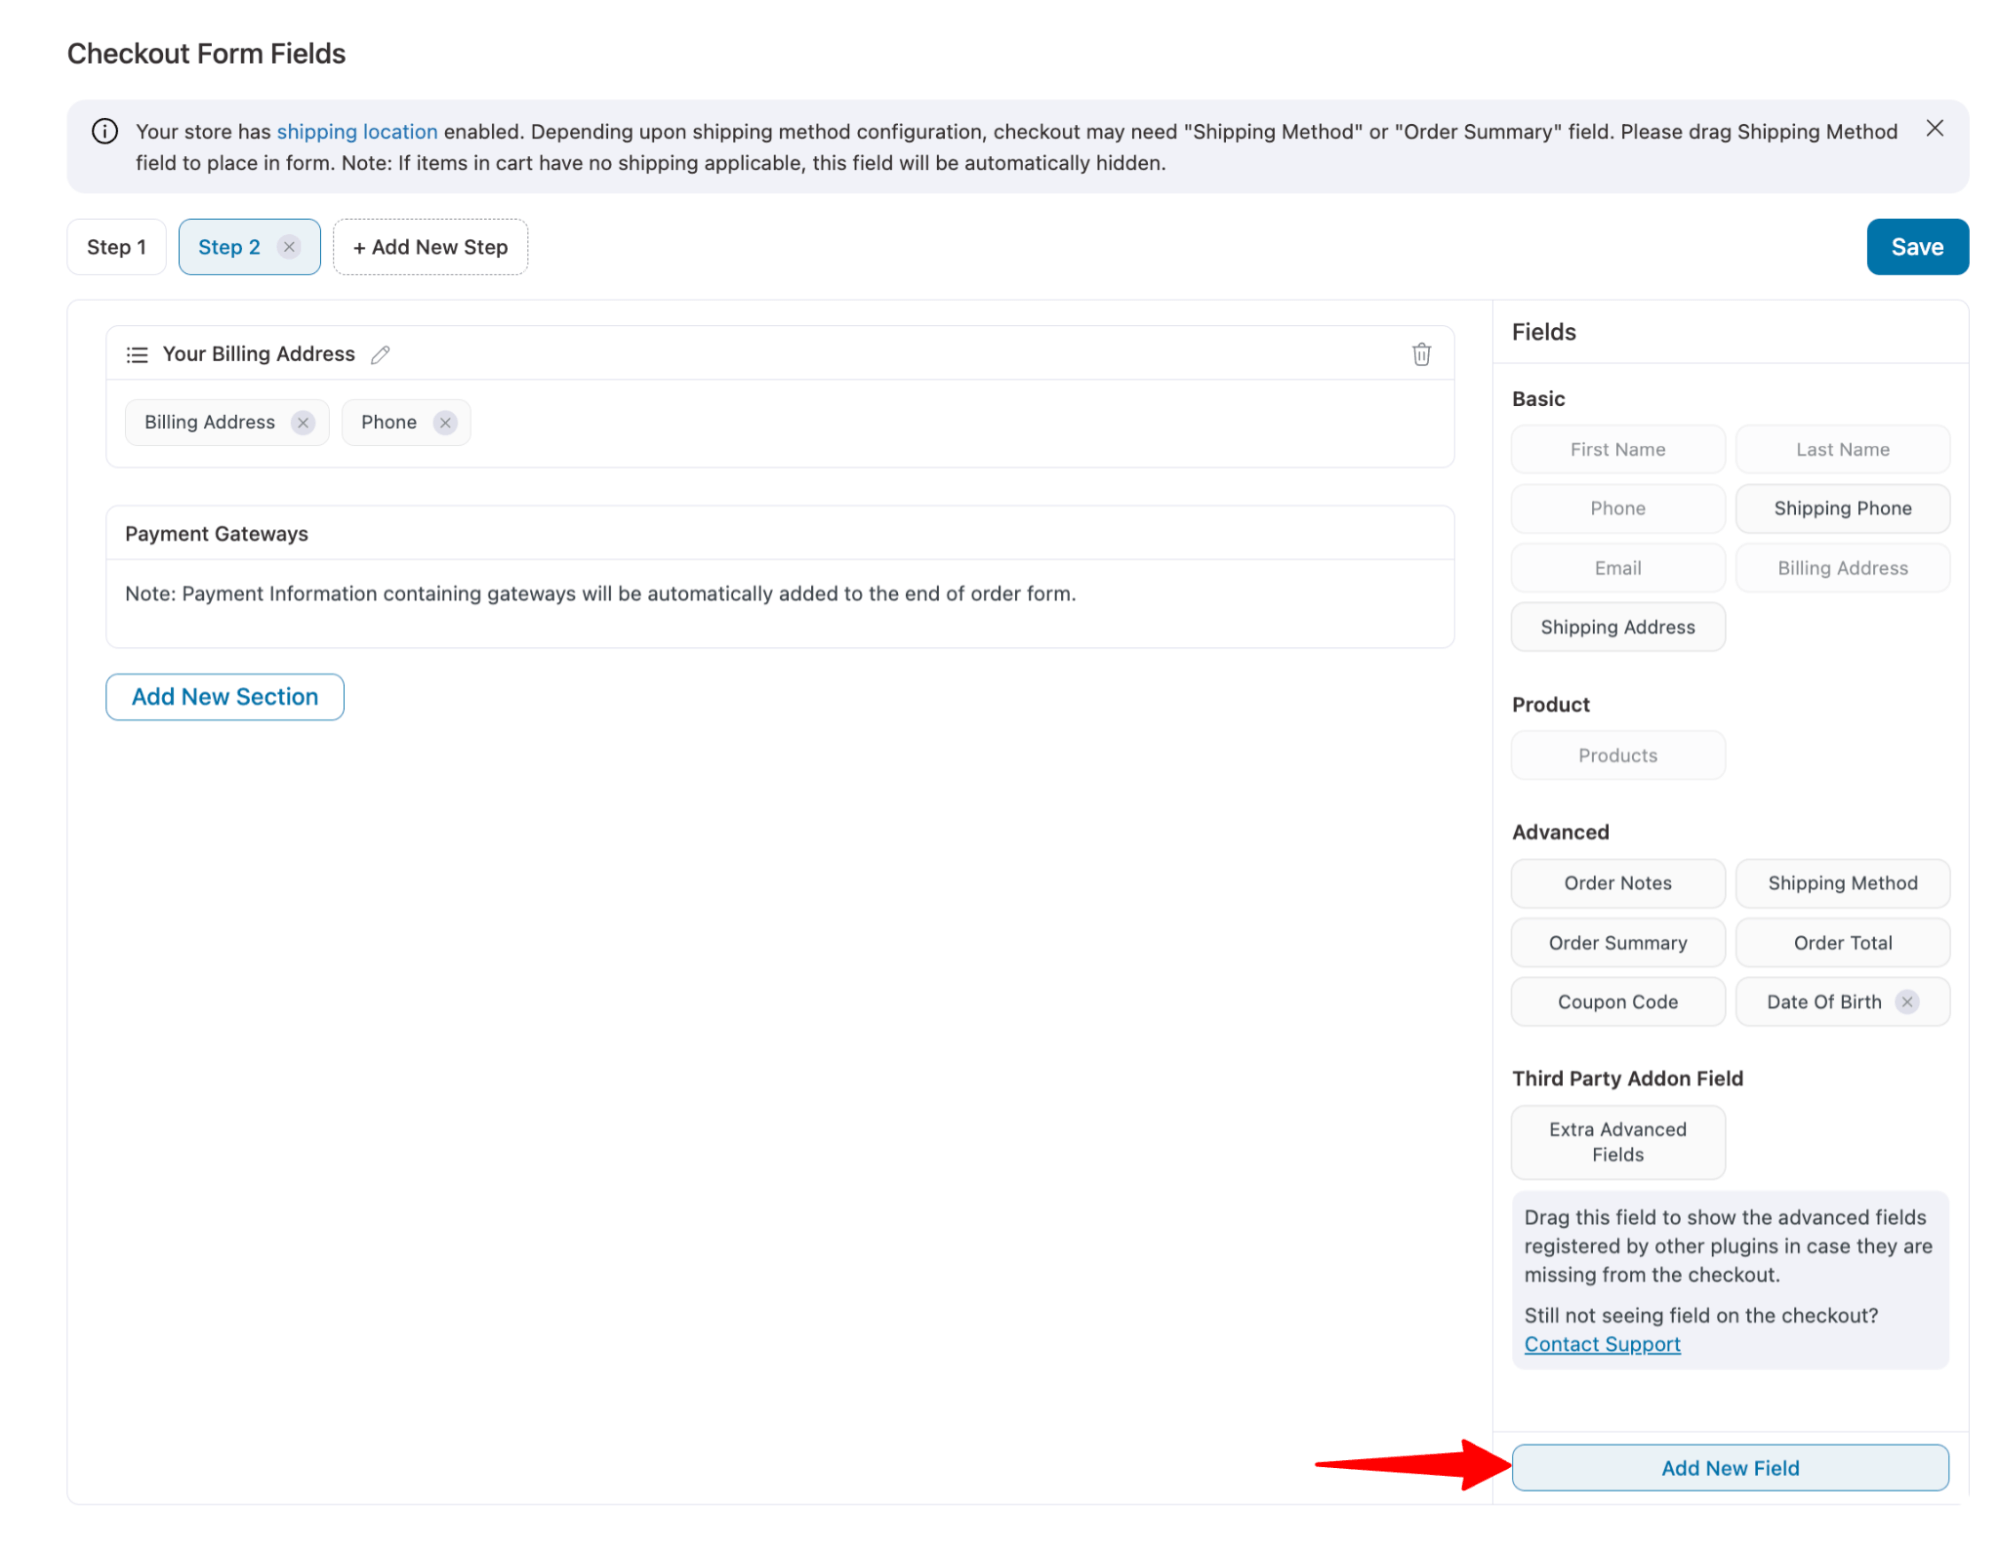
Add a field type, label, ID, and placeholder, and display it as required on the thank-you page or in order emails.
For example, we are adding a single-line text field here.
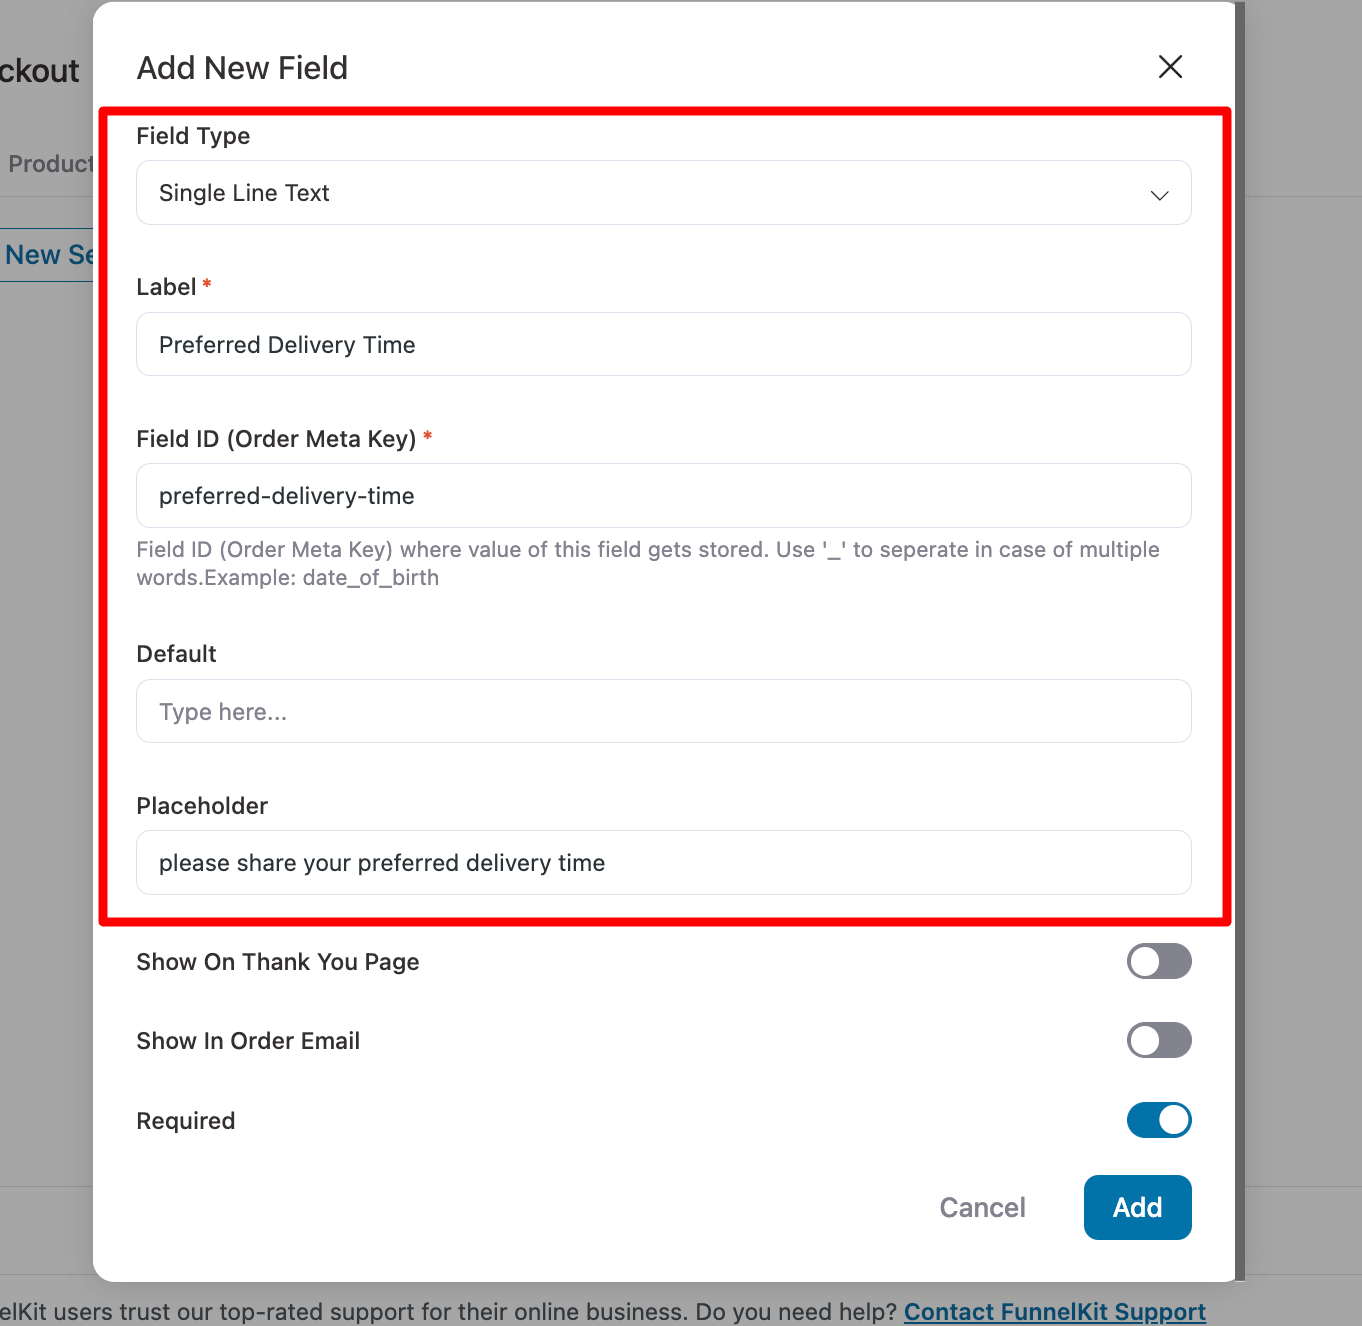
Now, to validate that users must provide this information, turn on the Required toggle.
After creating it, drag and drop the custom field onto the checkout form.
If your inline validation is enabled, it'll display error messages inline, rather than at the top, ensuring a smoother shopping experience.
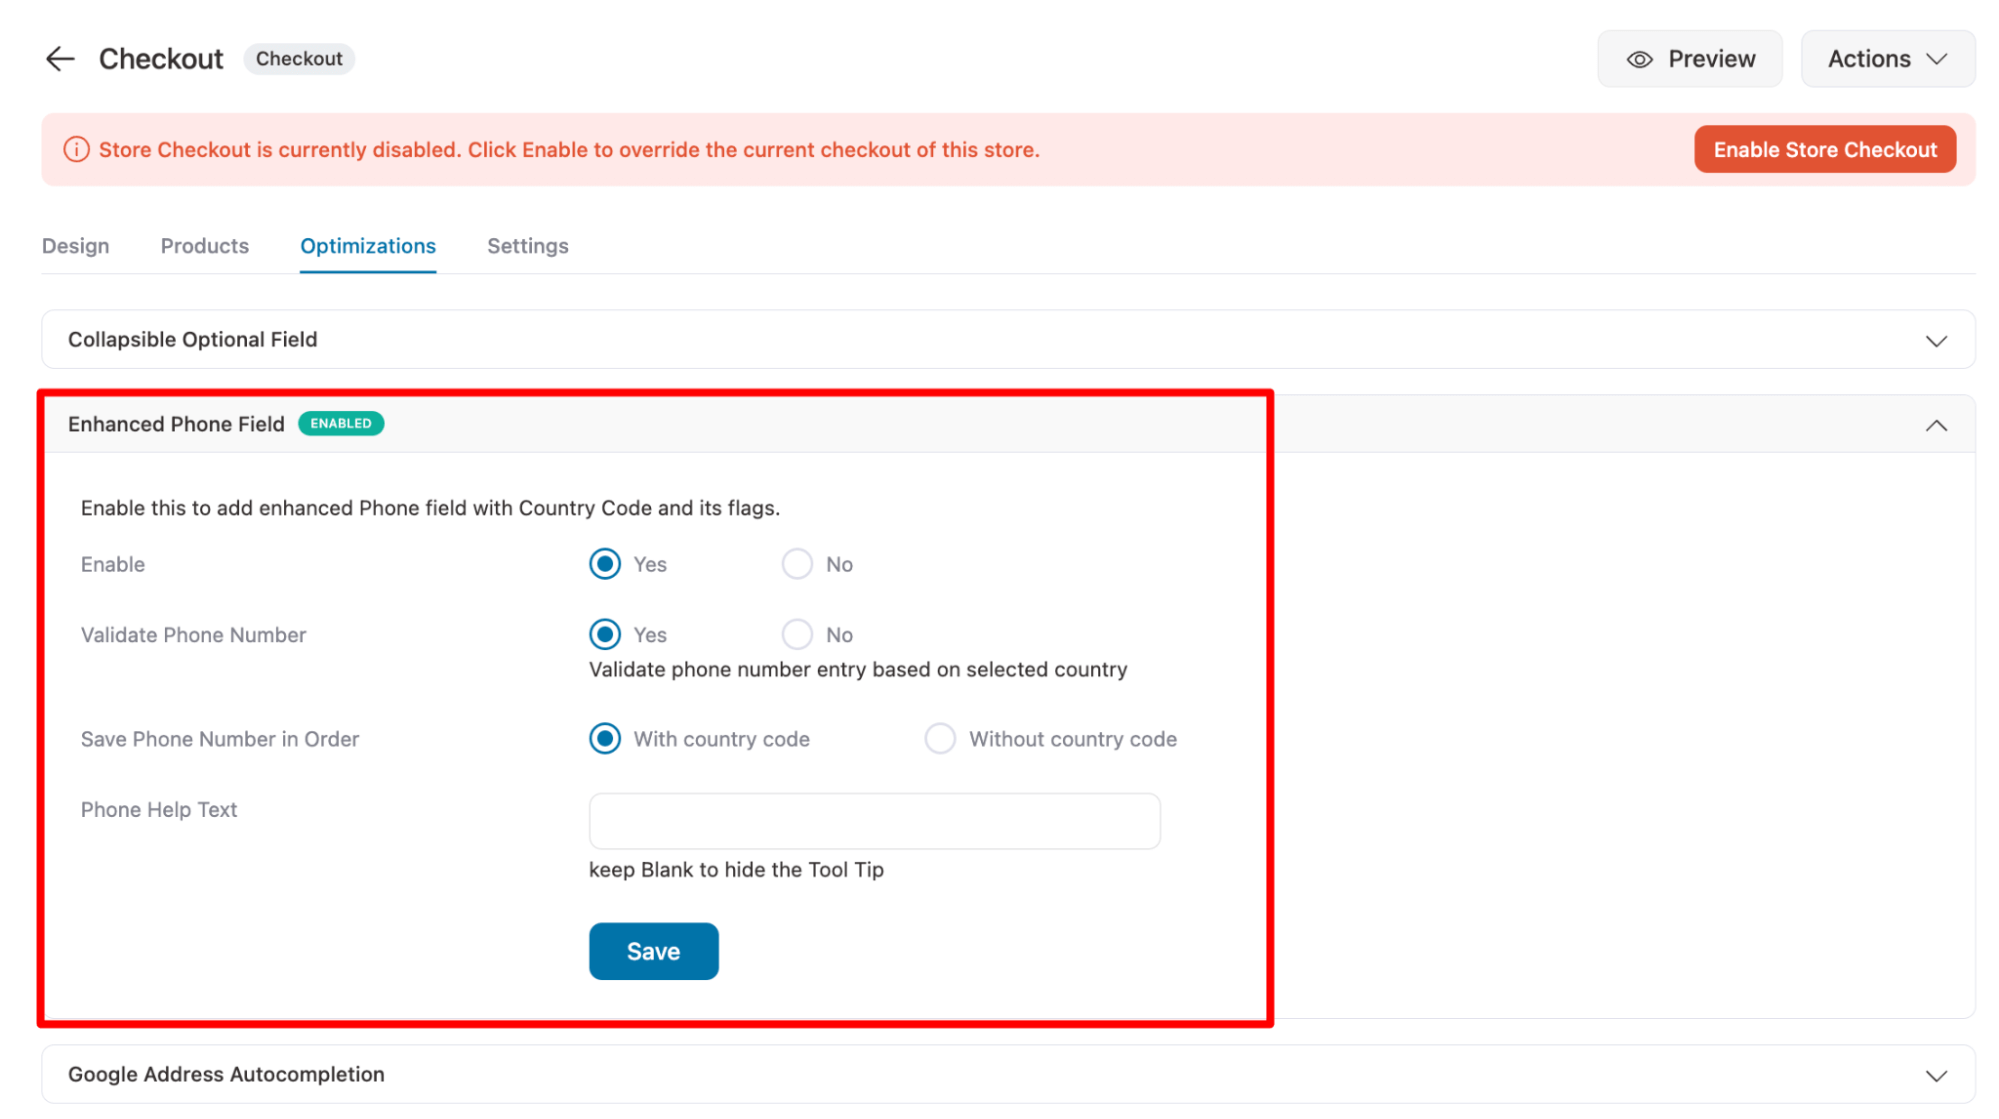
- Add phone field validation
Scroll down to find the “Enhanced Phone Field” option. Enabling this feature will configure phone number validation for the selected country.
After enabling, you can also choose to save the phone number with or without the country code in the order.
Make sure to hit Save to update.
Also, to help users, you can add a phone number in the help text.
Once everything is set up, click on 'Save' to lock all your changes.
Step 4: Add conditional logic for advanced validation rules
For rules that depend on cart contents, customer type, or location, use the conditional checkout fields. Conditional logic lets you show, hide, or require fields based on rules you define.
Here are some conditional validation setups you can use:
- Show a VAT number only when the billing country is in the EU
- Require a date of birth field only when the cart contains age-restricted products
- Hide the company field for customers with a "wholesale" user role and require it for everyone else
- Require a specific shipping note when the order total is above a threshold
- Block specific shipping classes for certain states or countries (for example, alcohol shipping restrictions)
- Require a discount code field only for B2B accounts
This is where checkout validation moves beyond simple field checks into store-specific business rules without writing code.
Step 5: Activate the store checkout
As with the checkout page, you can customize the one-click upsell offer and thank-you page.
The final step is to enable the store checkout. To do this, click on the 'Enable Store Checkout' button.
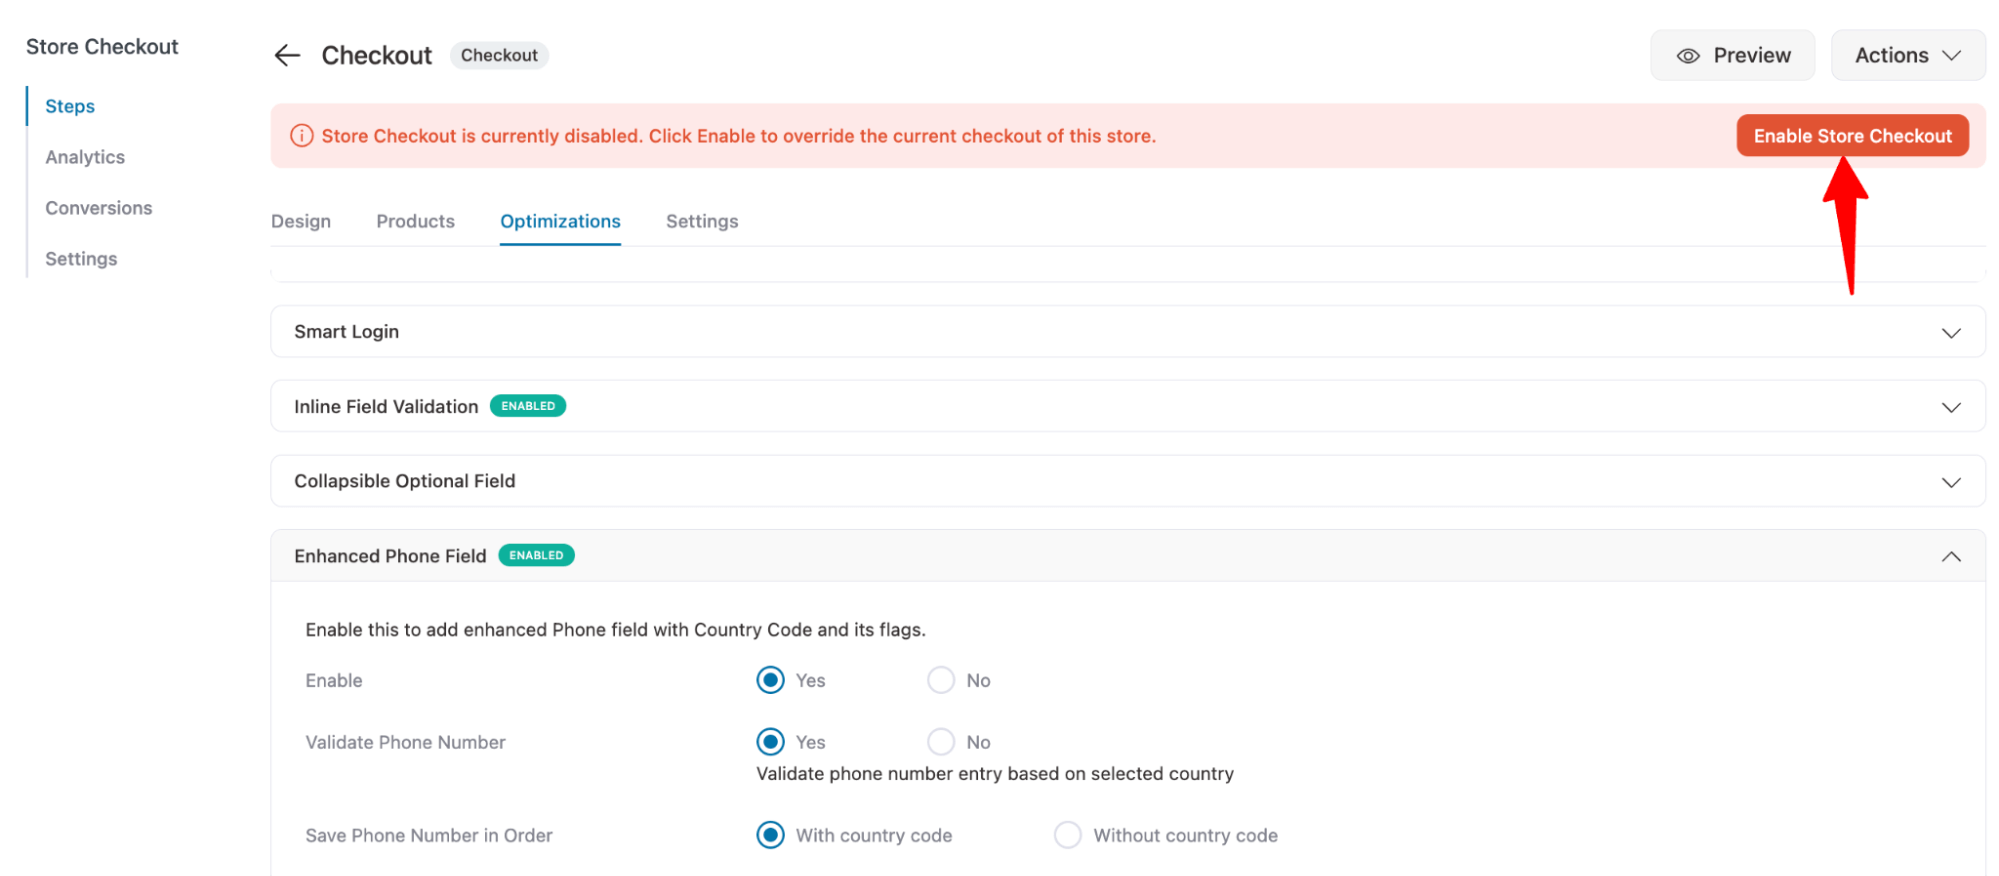
This will make your store checkout active and live on your WooCommerce store.
That’s how simple it is to add validation to your WooCommerce checkout fields without code.
Method 2: How to Validate WooCommerce Checkout Fields With Custom Code
This method is only helpful if you're a developer comfortable working in your theme's functions.php file or code snippet plugin.
We will cover server-side hooks for the classic checkout, JavaScript patterns for real-time inline validation, and the new validation data store for the block-based checkout.
Modifying field properties with woocommerce_checkout_fields
The woocommerce_checkout_fields filter is used to change existing field properties before validation runs.
You can mark optional fields as required, add CSS validation classes, change labels, or remove fields entirely.
add_filter( 'woocommerce_checkout_fields', 'fk_modify_checkout_fields' );

function fk_modify_checkout_fields( $fields ) {
    // Make phone required and add a custom validation class.
    $fields['billing']['billing_phone']['required'] = true;
    $fields['billing']['billing_phone']['class'][]  = 'validate-phone';

    // Remove the company field.
    unset( $fields['billing']['billing_company'] );

    return $fields;
}
The validate array for each field accepts values such as email, phone, postcode, and state.
Server-side validation with woocommerce_after_checkout_validation
Use the woocommerce_after_checkout_validation action hook for adding custom validation logic on the classic checkout.
It receives the submitted $data array and an $errors object, which lets you cleanly add field-specific error messages.
Example 1: Block free email domains for a B2B store
add_action( 'woocommerce_after_checkout_validation', 'fk_block_free_email_domains', 10, 2 );

function fk_block_free_email_domains( $data, $errors ) {
    $blocked_domains = array( 'gmail.com', 'yahoo.com', 'hotmail.com', 'outlook.com' );
    $email_parts     = explode( '@', $data['billing_email'] );

    if ( isset( $email_parts[1] ) && in_array( strtolower( $email_parts[1] ), $blocked_domains, true ) ) {
        $errors->add(
            'billing_email',
            __( 'Please use a business email address. Free email providers are not accepted.', 'your-textdomain' )
        );
    }
}
Example 2: Validate that the first name and last name contain only letters
The snippet below adds an error if either name field contains a digit.
add_action( 'woocommerce_after_checkout_validation', 'fk_validate_name_fields', 10, 2 );

function fk_validate_name_fields( $data, $errors ) {
    if ( preg_match( '/\d/', $data['billing_first_name'] ) || preg_match( '/\d/', $data['billing_last_name'] ) ) {
        $errors->add(
            'name_validation',
            __( 'First and last names cannot contain numbers.', 'your-textdomain' )
        );
    }
}
Example 3: Validate phone number with country-aware regex
This validates the phone number format. Replace the regex with a country-specific pattern if your store ships to a single country.
add_action( 'woocommerce_after_checkout_validation', 'fk_validate_phone_format', 10, 2 );

function fk_validate_phone_format( $data, $errors ) {
    if ( ! empty( $data['billing_phone'] ) ) {
        // Allow digits, plus, hyphens, parentheses, and spaces. Minimum 10 digits.
        if ( ! preg_match( '/^[\d\+\-\(\)\s]{10,}$/', $data['billing_phone'] ) ) {
            $errors->add(
                'billing_phone',
                __( 'Please enter a valid phone number with at least 10 digits.', 'your-textdomain' )
            );
        }
    }
}
Customizing default validation error messages
WooCommerce's default error messages start with the field label, resulting in messages like “Billing First Name is a required field."
To remove the 'Billing' prefix or rewrite the message entirely, use the woocommerce_checkout_required_field_notice filter.
add_filter( 'woocommerce_checkout_required_field_notice', 'fk_customize_required_notice', 10, 2 );

function fk_customize_required_notice( $message, $field_label ) {
    return str_replace( 'Billing ', '', $message );
}
If you want to combine multiple required-field errors into a single message, use this custom code:
add_action( 'woocommerce_after_checkout_validation', 'fk_single_error_message', 9999, 2 );

function fk_single_error_message( $data, $errors ) {
    $error_codes = $errors->get_error_codes();
    $had_required_error = false;

    foreach ( $error_codes as $code ) {
        if ( 'required-field' === $code ) {
            $errors->remove( $code );
            $had_required_error = true;
        }
    }

    if ( $had_required_error ) {
        $errors->add( 'validation', __( 'Please fill in all required fields to place your order.', 'your-textdomain' ) );
    }
}
This pattern combines payment and terms-and-conditions errors and consolidates required-field errors into a single clear message.
Real-time inline validation with JavaScript
WooCommerce uses two CSS wrapper classes to style validation states:
- woocommerce-validated for valid fields
- woocommerce-invalid for invalid ones
To add real-time inline validation that highlights fields as the customer types, attach a blur or change handler that toggles these classes on the field’s parent .form-row.
add_action( 'wp_footer', 'fk_inline_validation_script' );

function fk_inline_validation_script() {
    if ( ! is_checkout() ) {
        return;
    }
    ?>
    <script>
    jQuery( function( $ ) {
        $( 'body' ).on( 'blur change', '#billing_first_name, #billing_last_name', function() {
            const wrapper = $( this ).closest( '.form-row' );
            wrapper.removeClass( 'woocommerce-validated woocommerce-invalid' );
            if ( /\d/.test( $( this ).val() ) ) {
                wrapper.addClass( 'woocommerce-invalid' );
            } else if ( $( this ).val().length > 0 ) {
                wrapper.addClass( 'woocommerce-validated' );
            }
        } );
    } );
    </script>
    <?php
}
Block-based checkout (validation data store)
If your store uses the new block-based checkout, the legacy hooks above will not run for fields registered as additional checkout fields.
The block checkout uses a different validation system based on the wc/store/validation data store and a dedicated PHP action called woocommerce_validate_additional_field.
Server-side validation for additional fields:
add_action( 'woocommerce_validate_additional_field', 'fk_validate_additional_field', 10, 3 );

function fk_validate_additional_field( $errors, $field_key, $field_value ) {
    if ( 'my-plugin/vat-number' === $field_key && strlen( $field_value ) < 8 ) {
        $errors->add(
            'invalid_vat',
            __( 'VAT number must be at least 8 characters long.', 'your-textdomain' )
        );
    }
}
Client-side validation through the validation store:
The wc/store/validation data store manages validation errors for fields rendered inside the Cart and Checkout blocks. Each error has a message and a hidden boolean.
When hidden is true, the field gets a red highlight without a visible message. When hidden is false, the message is displayed.
The store exposes these actions:
- setValidationErrors(errors) adds or updates errors
- clearValidationError(errorId) removes one error
- clearValidationErrors(errorIds) removes a list of errors, or all errors if no array is passed
- hideValidationError(errorId) sets hidden: true without removing the error
- showValidationError(errorId) sets hidden: false
- showAllValidationErrors() reveals every error in the store
- clearAllValidationErrors() removes every error
And these selectors:
- getValidationError(errorId) returns one error object
- getValidationErrorId(errorId) returns the prefixed HTML element ID
- getValidationErrors() returns all errors
- hasValidationErrors() returns true if any errors exist
Limitations of Custom Code Validation
Custom code works well for individual rules, but managing several rules across products, user roles, cart conditions, and both classic and block checkouts gets quite complex.
You also need to maintain the snippets through WooCommerce updates, write your own admin interface if non-developers need to update rules, handle edge cases, and more.
Therefore, most store owners prefer plugin validation over custom code.
7 Best Practices to Prevent Failed Orders With WooCommerce Checkout Validation
Let's look at some effective tips and strategies to follow when implementing checkout validation in WooCommerce.
- Show real-time field validation
Real-time validation allows users to correct information instantly, reducing friction and frustration. Users can fix errors as they go, rather than waiting until the form is submitted.
For instance, if an email address is entered incorrectly, an error message should appear immediately, not after the user tries to submit the form.
- Display clear and helpful error messages
When validation fails, provide clear, specific error messages that explain what went wrong and how to fix it. This helps users quickly understand and correct errors, reducing the chances of cart abandonment.
Instead of a generic "Enter the correct" message, use messages like “The provided phone number is not valid”.
- Focus on the required fields only
Mark fields as required only when necessary to avoid overwhelming users with too many required inputs.
As a standard practice, use a “*” symbol next to fields needed to indicate that they are mandatory. To keep the checkout page clean, consider making optional fields collapsible.
- Use proper field types and formats
Match input field types to the requested data (e.g., use the email type for email addresses, the number type for phone numbers, etc.).
This ensures that users enter data in the correct format, reducing validation errors and speeding up form completion.
- Test validation on both desktop and mobile
Mobile keyboards default to text. If you collect a phone number, set the input type to tel so the numeric keyboard appears, reducing typing errors and improving the mobile completion rate.
Frequently Asked Questions About WooCommerce Checkout Validation
Validating WooCommerce checkout fields is essential to ensure customers provide accurate and complete information. It reduces errors like missing phone numbers or invalid email addresses, which can lead to shipping issues and customer dissatisfaction. Effective field validation improves order processing, minimizes cart abandonment, and boosts conversion rates.
You should validate all required fields, such as name, email, phone number, and payment details. Additionally, ensure that field formats (e.g., email addresses or phone numbers) are correct and that no essential fields are left blank to avoid issues when processing orders.
No, proper validation actually speeds up the process. Real-time validation helps users fix errors instantly, preventing the need to re-enter information and improving the overall checkout experience.
To validate custom fields in WooCommerce, add the fields via your checkout settings and enable validation for them. You can also use plugins like FunnelKit to validate custom fields and ensure users enter the required information.
No, WooCommerce checkout validation actually improves checkout speed by catching errors in real time. Customers can fix mistakes immediately, reducing the need to go back and edit information later, which helps in increasing conversion rates.
Phone number validation ensures that customers provide correct contact details, reducing delivery errors and preventing incorrect data from being stored. This leads to more accurate information and a better overall user experience.
Validate WooCommerce Checkout Field to Ensure a Seamless Shopping Experience and Boost Sales!
WooCommerce checkout validation helps users place orders quickly and accurately, ensuring a smooth, seamless ordering process that leads to customer satisfaction.
Additionally, collecting all necessary information accurately will enable more efficient order management.
We walked through a no-code method using FunnelKit Funnel Builder and shared custom code for woocommerce_after_checkout_validation, woocommerce_checkout_fields, real-time inline JavaScript validation, and the new block-based wc/store/validation data store with full action and selector reference.
We recommend FunnelKit Funnel Builder for most stores because it handles field validation, conditional logic, country-aware phone validation, and full checkout optimization in a single plugin, with no code maintenance.
Get FunnelKit Funnel Builder today, and optimize the shopping experience in your WooCommerce store with modern checkout field optimization options!

Editorial Team
July 7, 2026Are shoppers adding products to their cart and leaving before they buy? According to Baymard Institute research on checkout usability, 18% of shoppers who abandon their cart do so because...
Editorial Team
July 3, 2026Sometimes, the difference between a visitor leaving and placing an order comes down to something surprisingly small, like a better headline, a cleaner checkout, or a more compelling offer. That's...

Editorial Team
July 1, 2026Are you leaving money on the table by not fully leveraging your customers’ shopping behavior? Many store owners don’t realize that every time a customer adds a product to the...


