

Adding and managing products in WooCommerce isn't complicated, it just takes the right guidance.
WooCommerce powers over 6 million stores worldwide, thanks to its user-friendly dashboard and flexible features. But if you're just getting started, managing products can feel a bit daunting.
In this blog, we will break it all down for you, with a step-by-step guide on adding and managing different types of WooCommerce products.
Plus, smart plugin recommendations to save time on product management and help you sell more effectively.
Let’s get into it.
What Are the Different Types of WooCommerce Products?
By default, WooCommerce provides six types of products:
- Simple product: A standalone product with no variations, like a book or mug.
- Variable product: A product with multiple options, such as size or color variations.
- Grouped product: A collection of related simple products sold together, like a furniture set.
- External/affiliate product: A product listed on your site but sold on another website via a link.
- Virtual product: A non-physical item that doesn’t require shipping, like a service.
- Downloadable product: A digital item customers can download, such as an eBook or software.
In the following section, we will share how to create and manage all these types of WooCommerce products.
Table of Contents
- 1 How To Create a Simple Product in WooCommerce
- 2 Create Variable Products in WooCommerce
- 3 Create Group Products in WooCommerce
- 4 Create External/Affiliate Product in WooCommerce
- 5 Create Virtual Products in WooCommerce
- 6 Create Downloadable Products in WooCommerce
- 7 How To Manage WooCommerce Products
- 8 Best WooCommerce Plugins for Product Management and Sales Growth
How To Create a Simple Product in WooCommerce
Adding products to your WooCommerce store is quite easy. In this section, we will share how to add a simple product (later, we will share all the other types).
Ensure you’ve already installed and set up WooCommerce on your website. Follow the steps to create a product. You don’t need any additional plugins to add products to WooCommerce.
Step 1: Create a new product
From the WordPress dashboard, navigate to Products below WooCommerce and click on “Add New”.
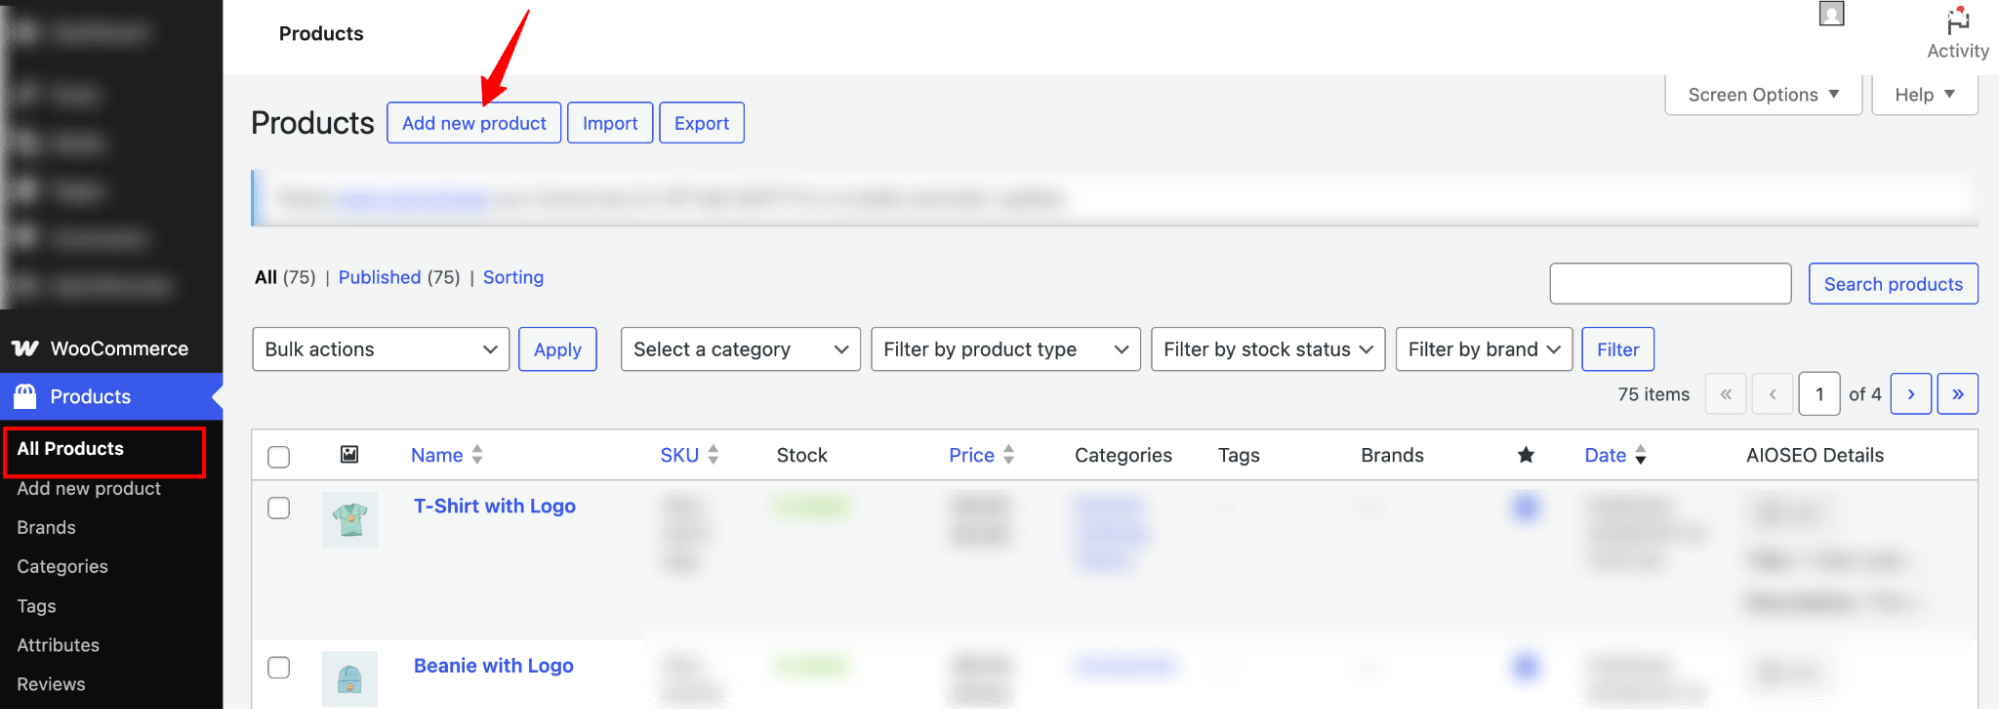
It’ll open up the WooCommerce product addition window.
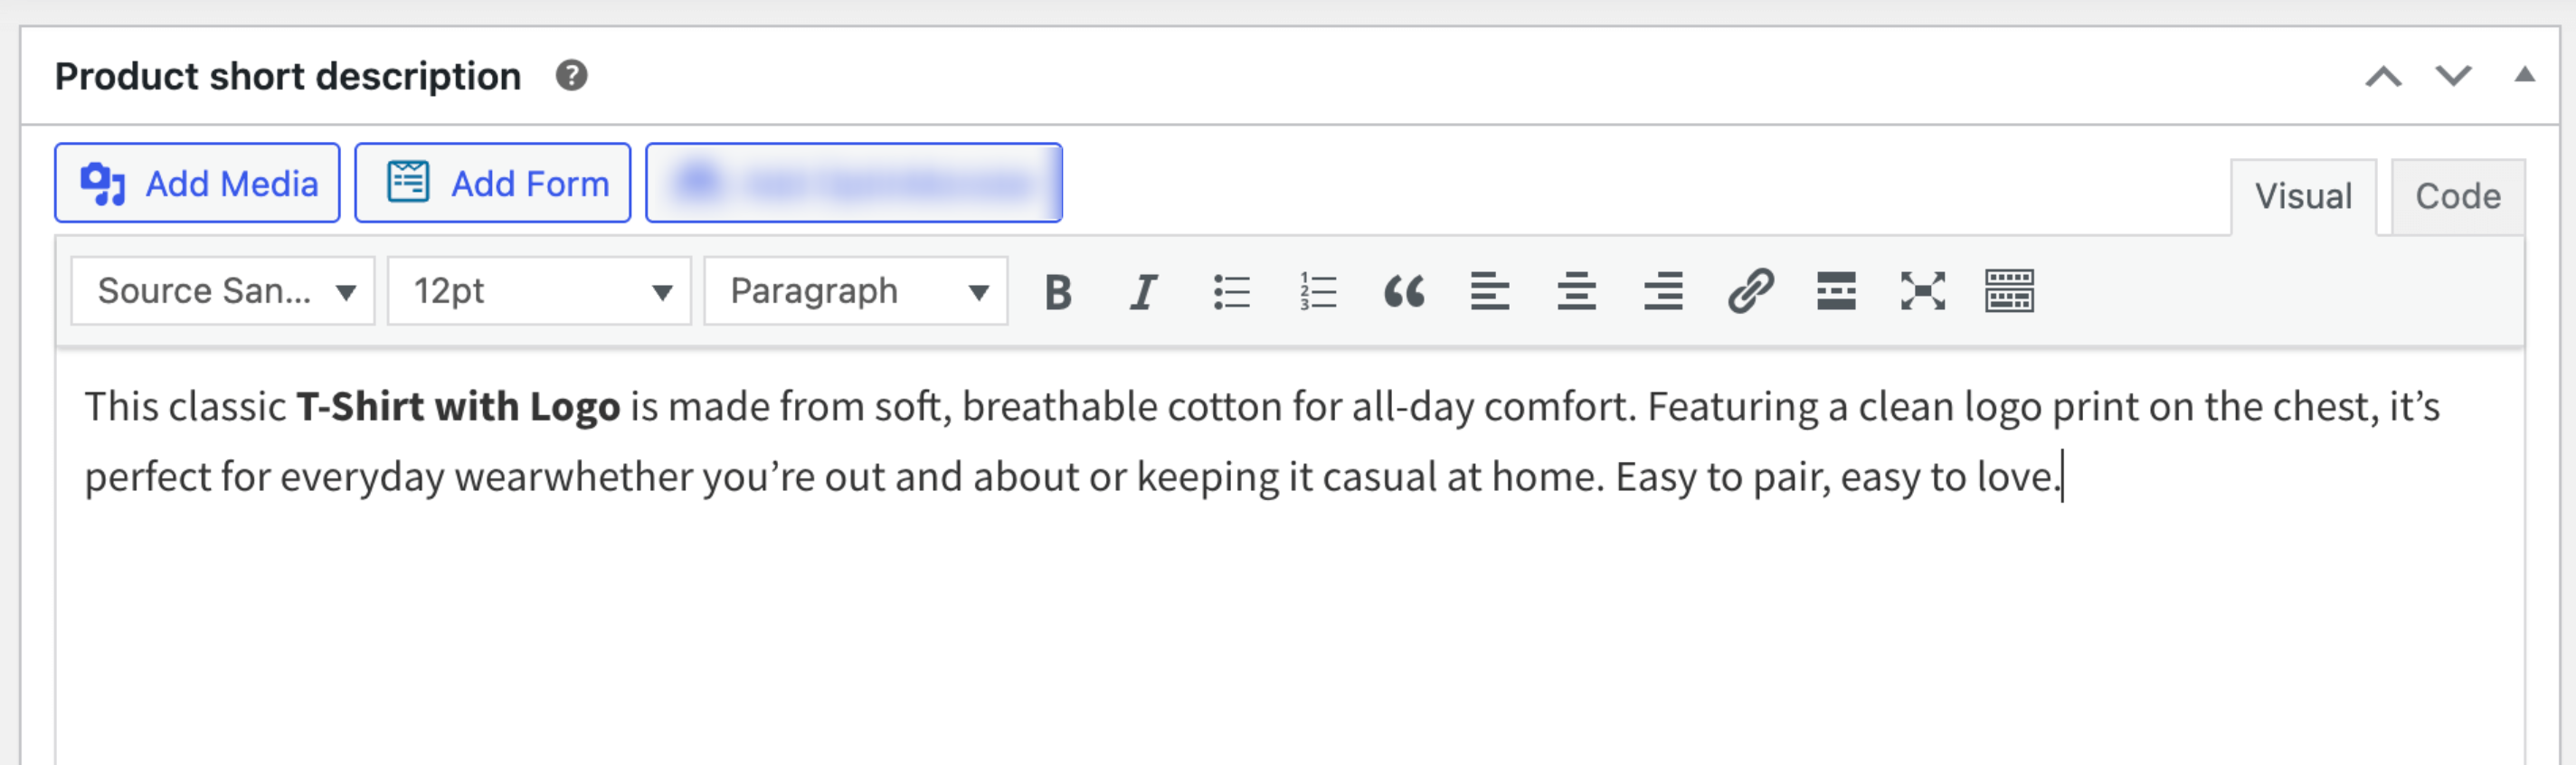
Step 2: Add a title and description
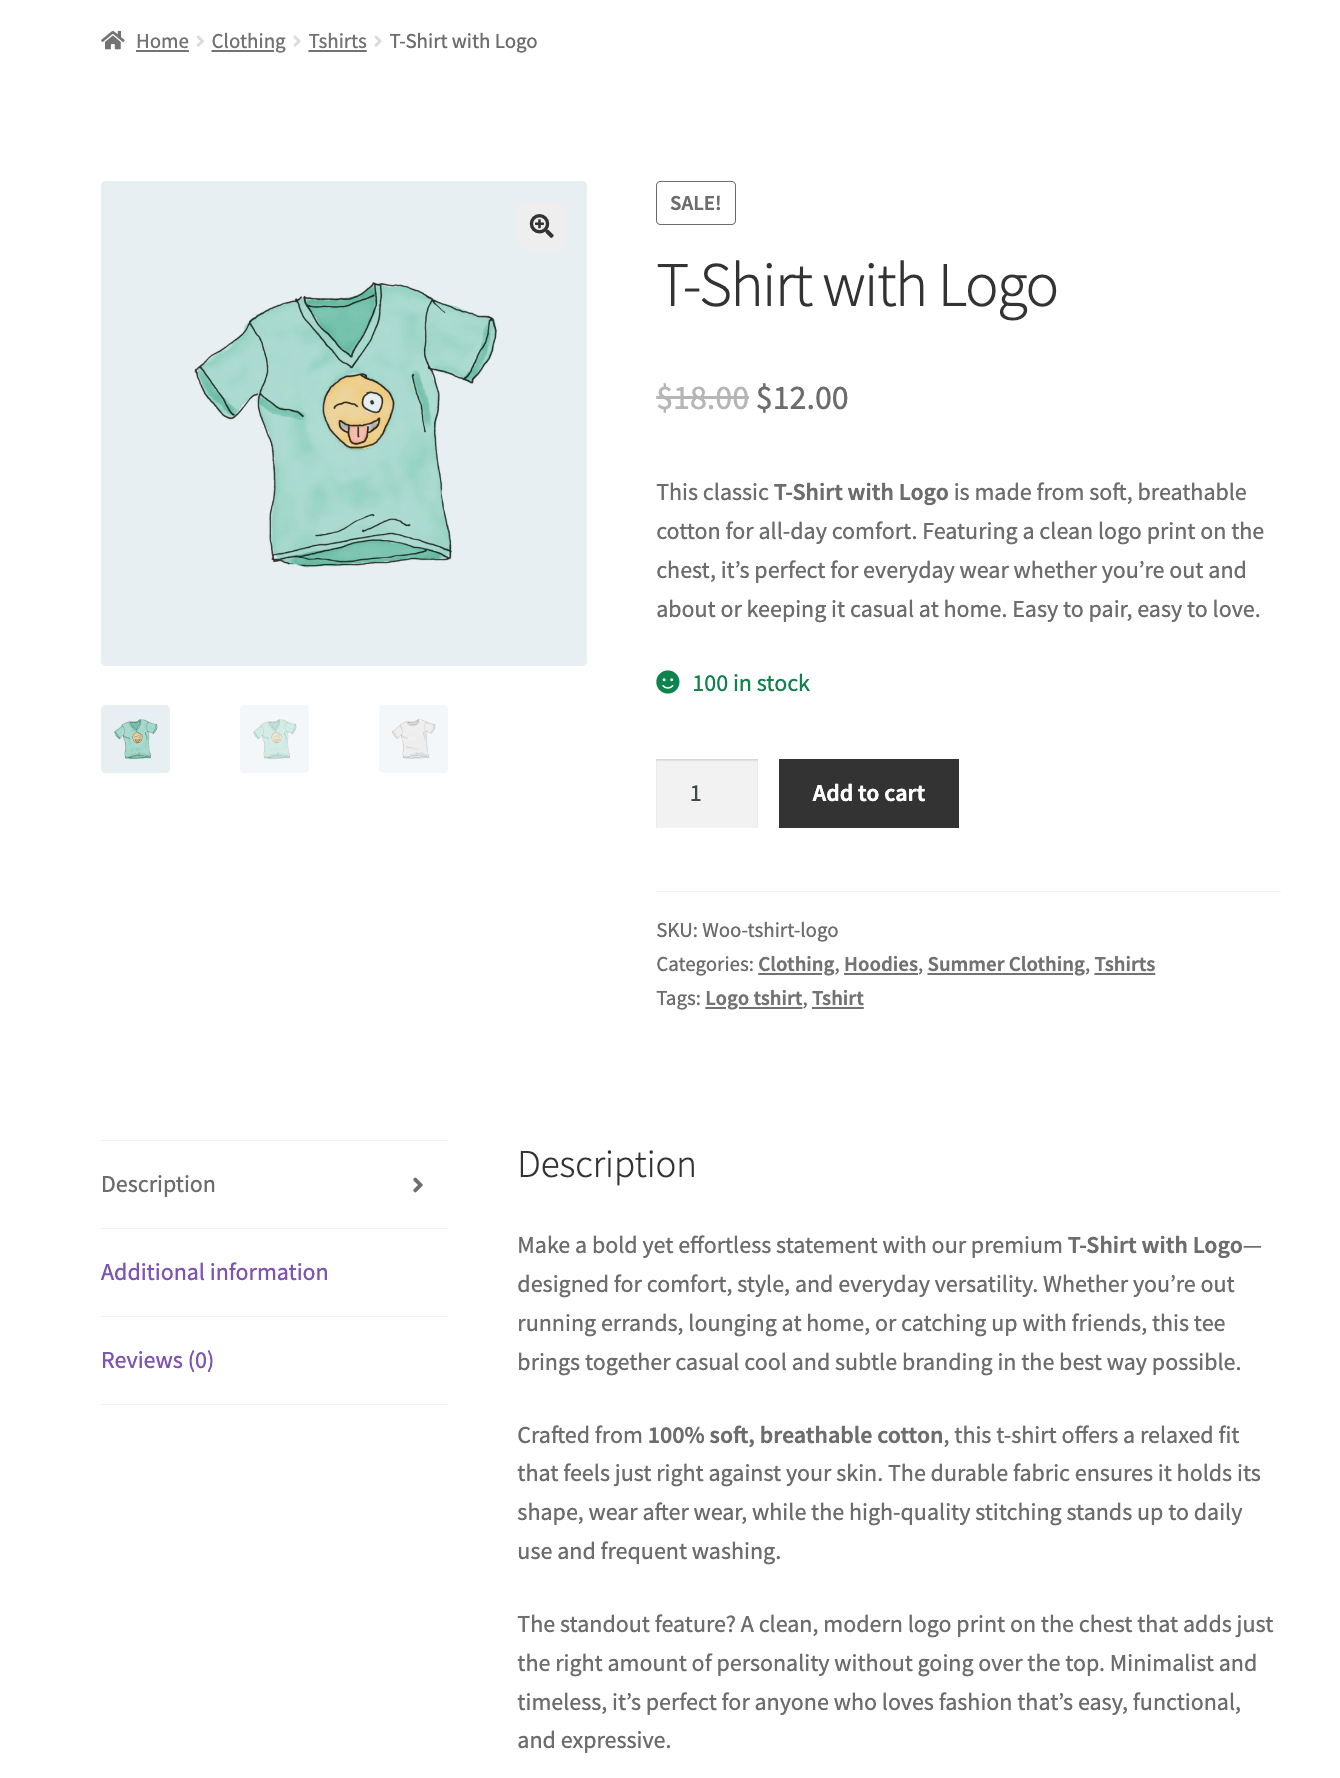
Now, it’s time to add the product title and product descriptions. The name will be the title of your product listed on your WooCommerce shop page.
With WooCommerce, you can provide two descriptions: a long one and a short one. Write a detailed description in the “Product description” section.
For the short description, you need to scroll down a little and find the input field “Product short description”. The short description appears beneath the title on your shop page.
Step 3: Add product data
In the product data section, you must provide important information related to your products. The first product data you need to specify is the product type.
Since our product will be a simple physical product, we’ll choose the option “Simple Product”.
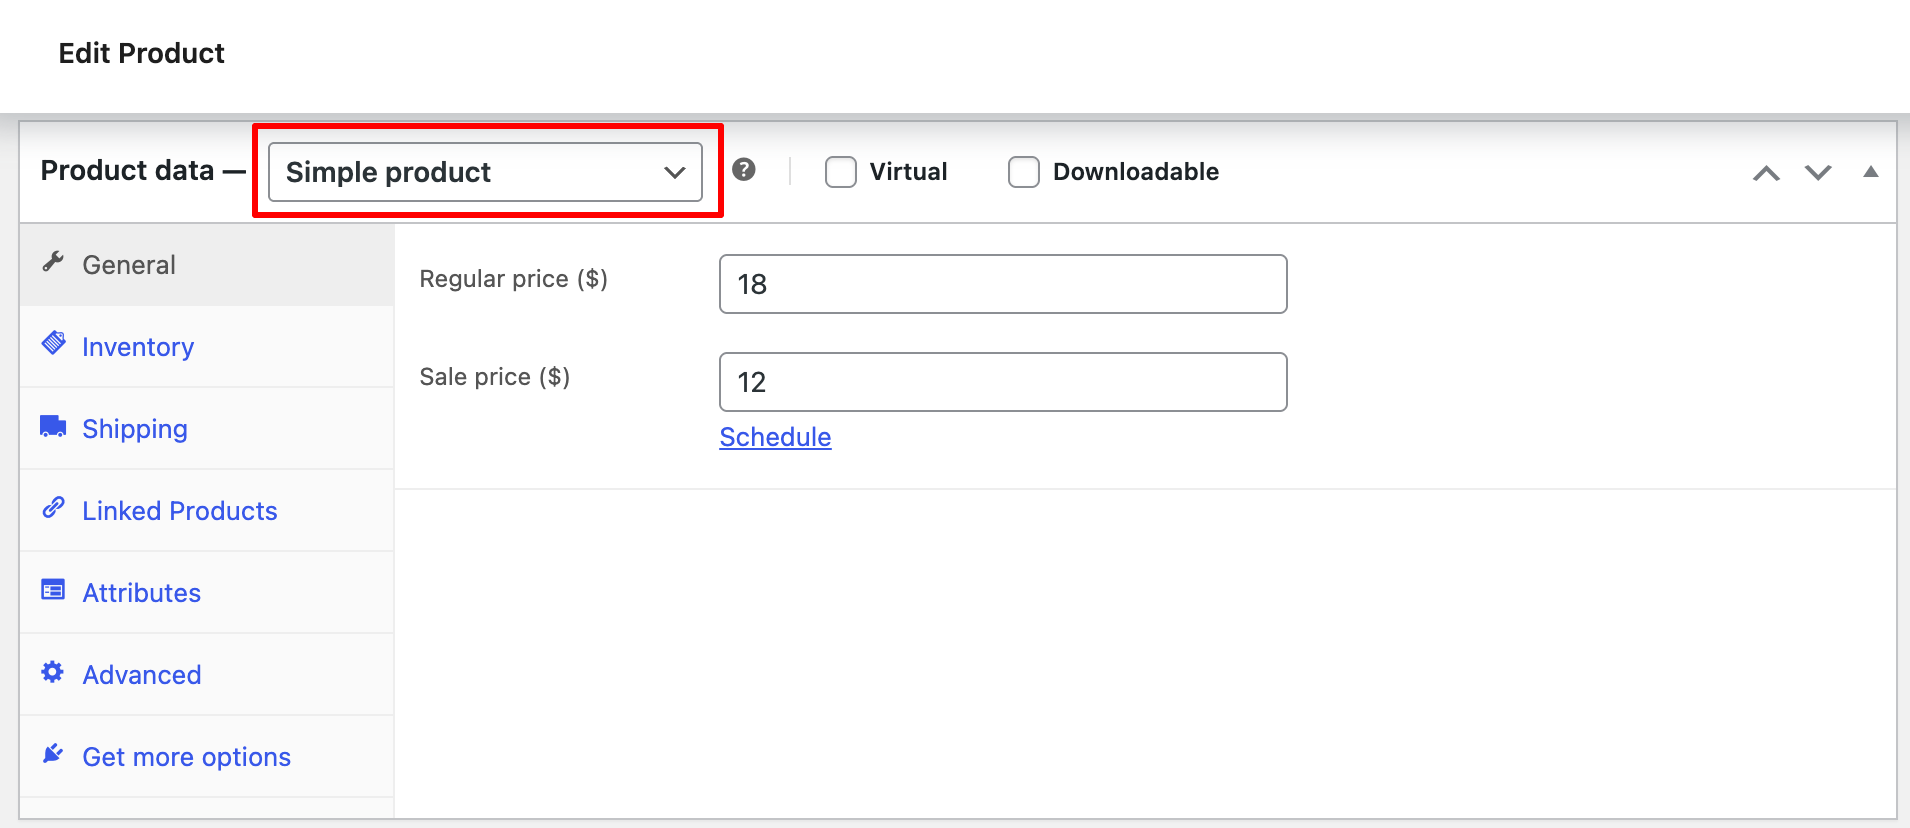
Now, let’s go through each tab to fill out the product data.
General
Here, set up the pricing for your product. You will get two options:
- Regular Price: The retail price of your product.
- Sale Price: If your product is currently on sale, enter the sale price here. You can leave this field blank if your product is not on sale. You can also set the sale period if you want (we’ve discussed it later in this post).
Inventory
On the Inventory tab, you will need to fill up the following options:
- SKU: A product SKU (stock-keeping unit) is a unique identifier for each product you have in stock. While it’s optional, you should provide each product with a SKU, as it’s important for product inventory management.
- Stock management: Check this option if you want to control more aspects of stock quantity management. If you turn on this option, you will get three more options:
- Quantity: Enter the number of items that are available in your store’s stock for sale.
- Allow backorders?: If you want, you can allow backorders. For allowing backorders, you get two options: “Allow” and “Allow, but notify the customer”. If you don’t want to allow backorders, choose “Do not allow.”
- Low stock threshold: Choose the number of products you want to receive an email notification about when stock is running low.
- Stock status: Choose the stock status of your item from the options: In stock, Out of stock, and On backorder.

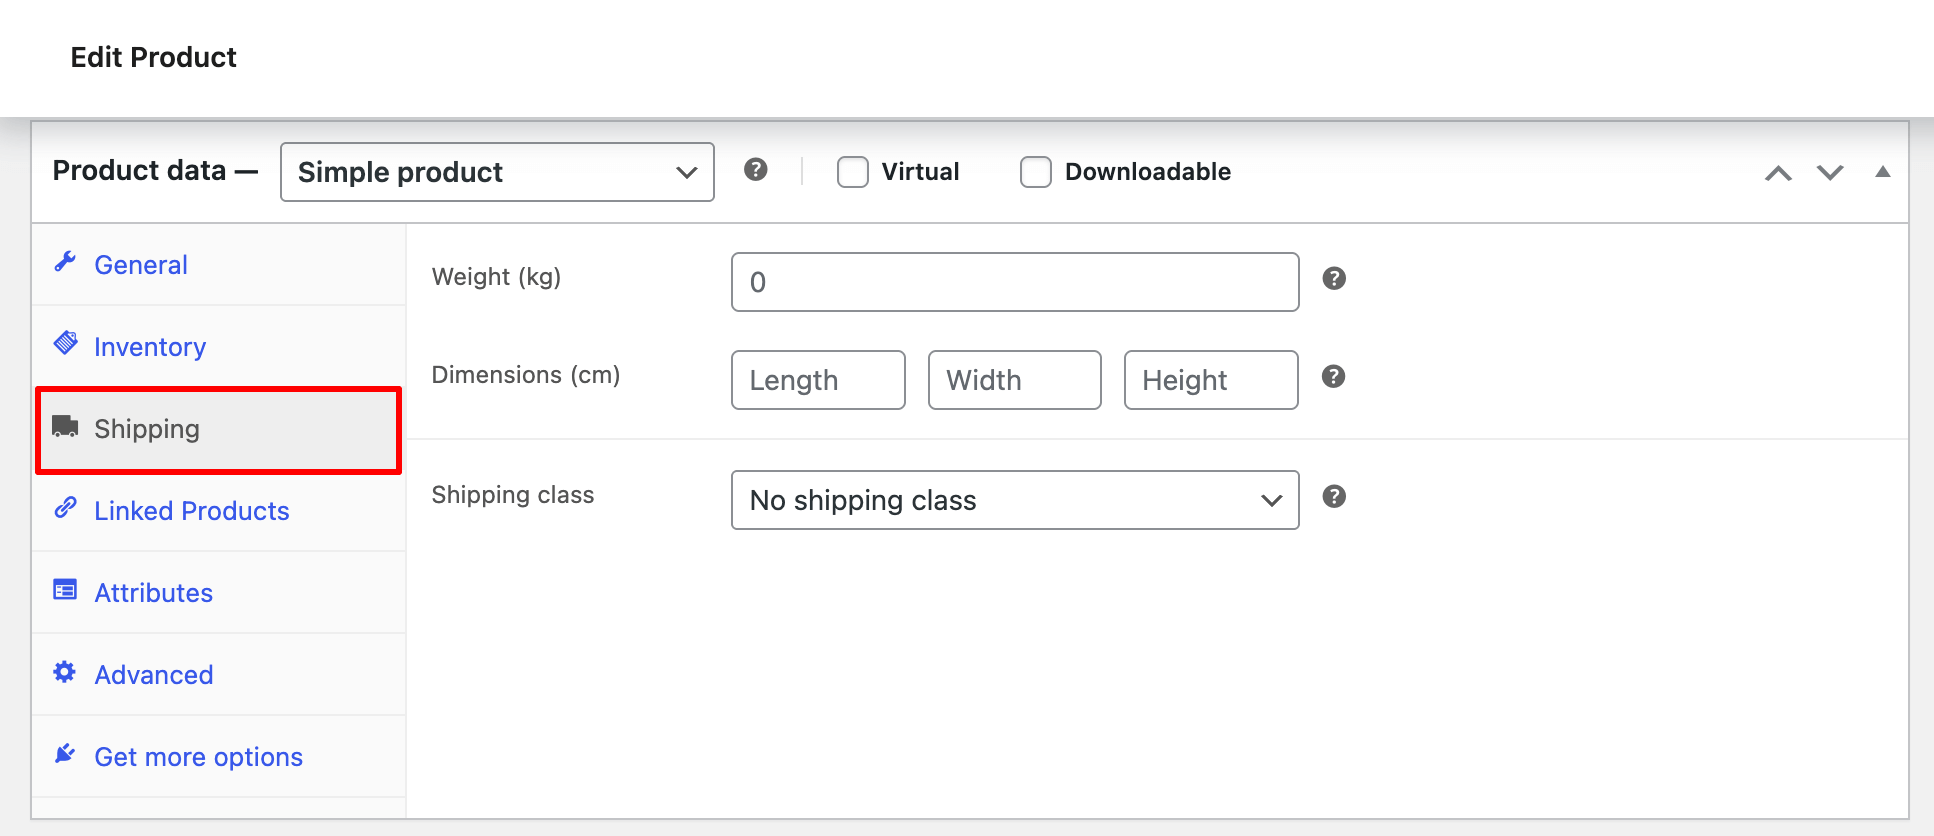
Shipping
On the Shipping tab, you can input shipping-related data for your product.
- Weight: Enter the product weight; you can input in either pounds or kilograms.
- Dimensions: Mention the product’s length, width, and height in centimeters.
- Shipping class: Assign a shipping class to your product.
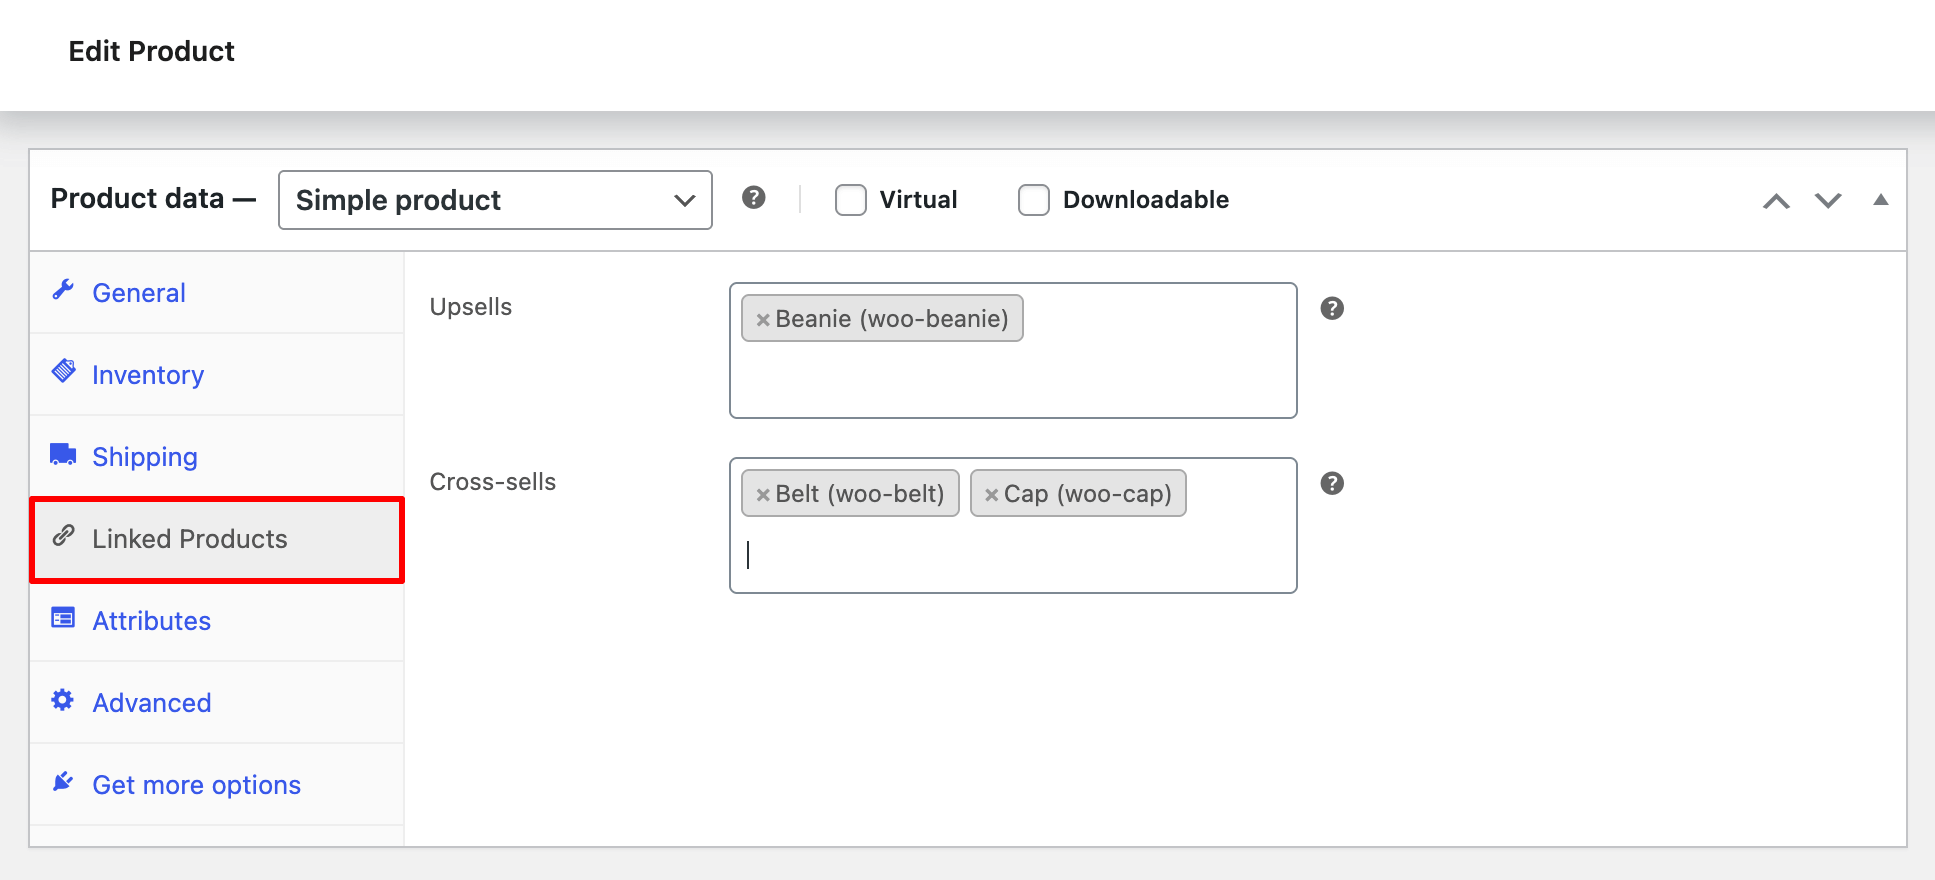
Linked Products
In the Linked Products section, you can assign the products you want to sell as upsells or cross-sells. You can searchfor and add the products.
- Upsells: Upselling involves selling a relevant, higher-end product that helps increase the order value.
- Cross-sells: With cross-sells, you can sell any relevant product that will complement the main product.
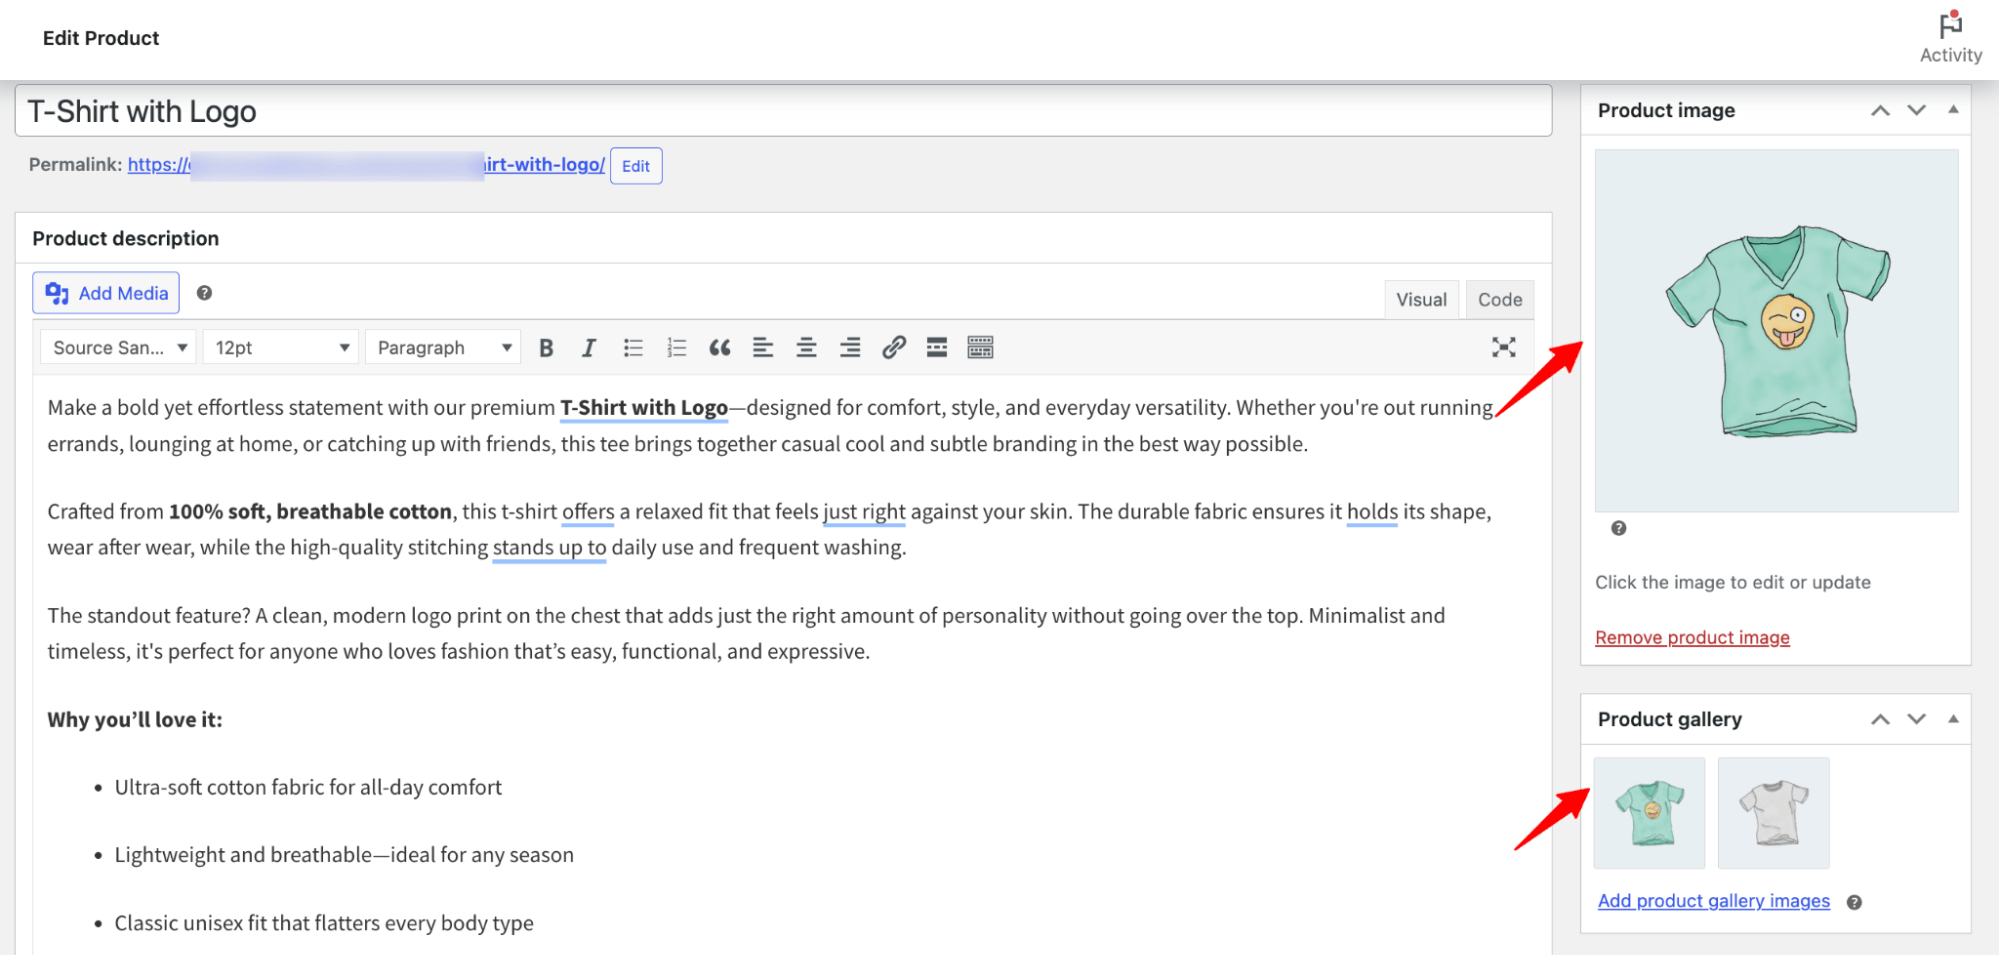
Step 4: Add product image
To add product images, click “Add product gallery images” and upload or select multiple images from the media library.
Then, click “Set product image” to choose the main thumbnail either from the gallery or by uploading a new image.
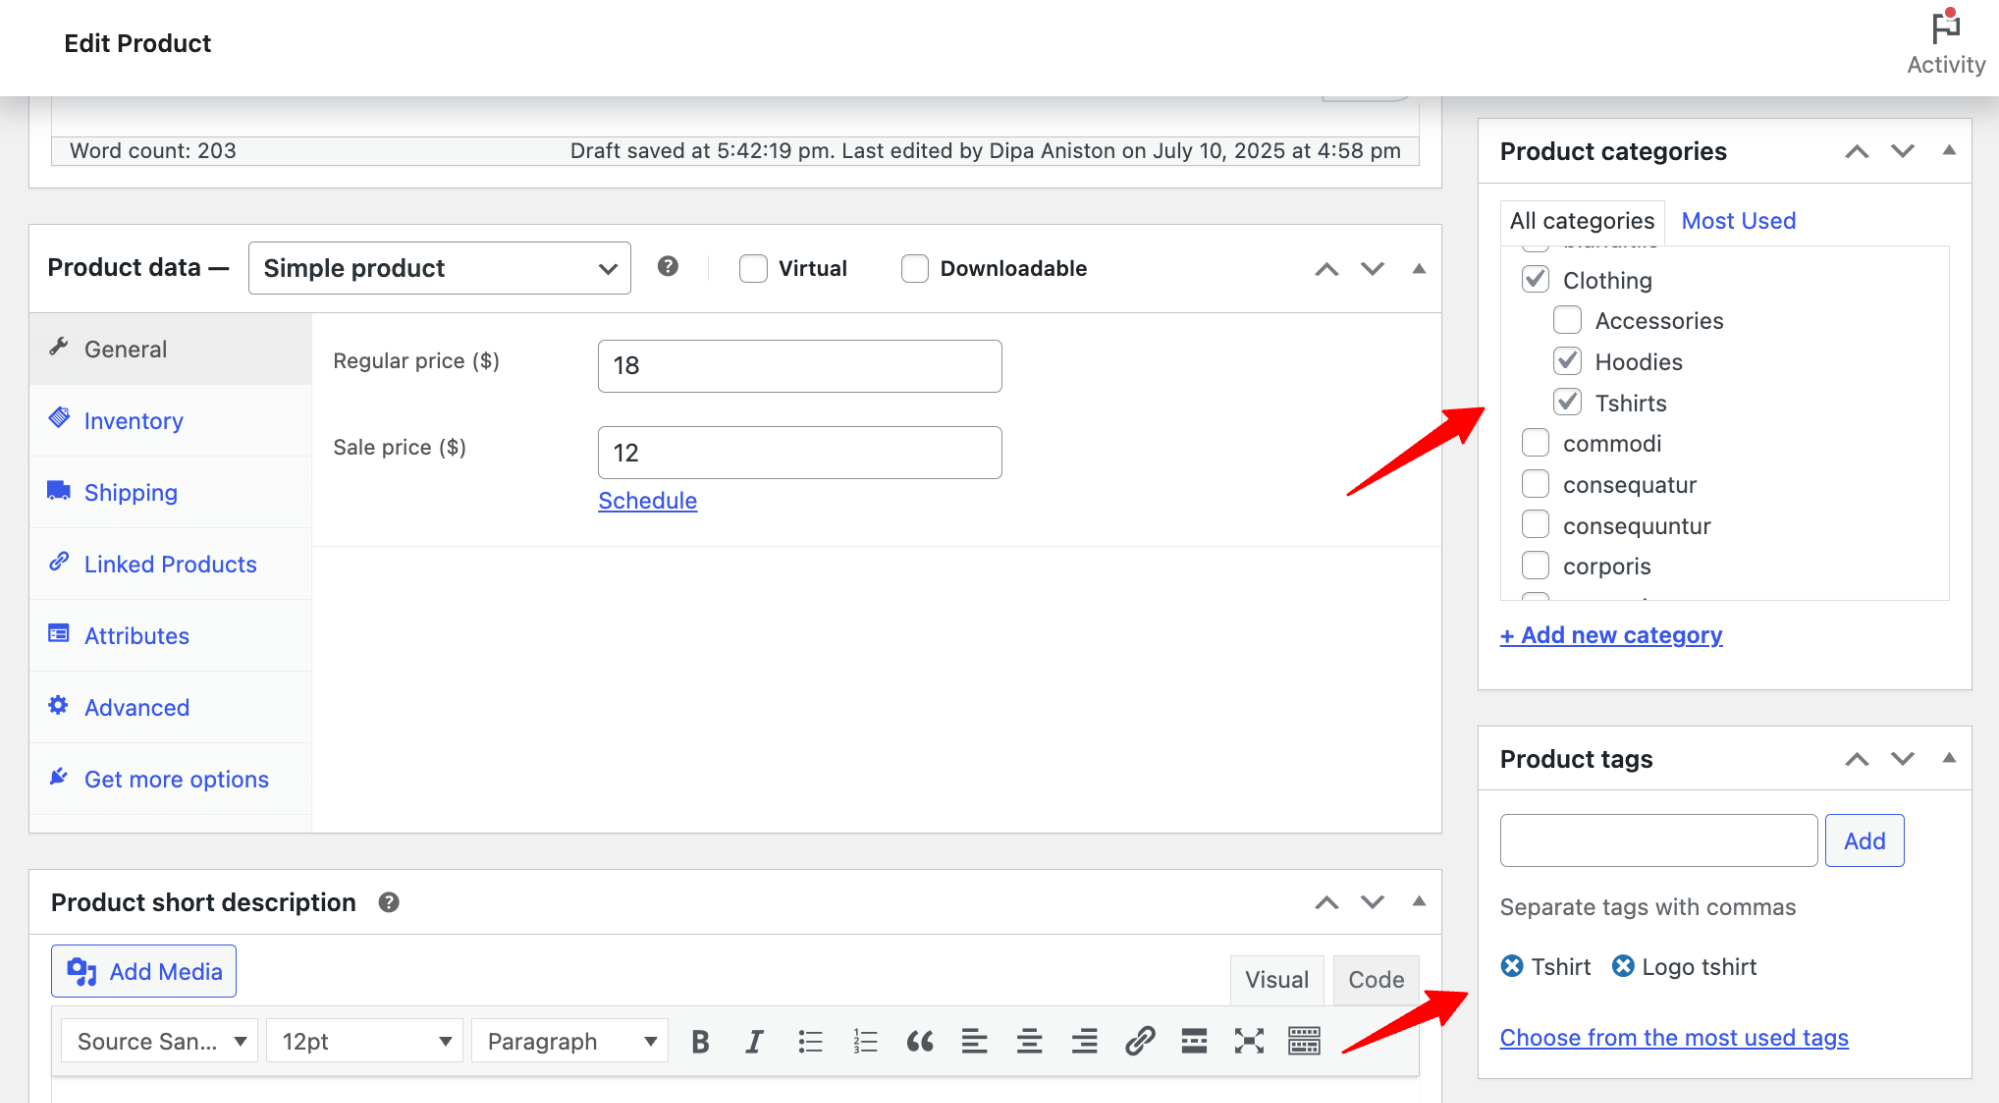
Step 5: Add tags and categories
Next, add tags and categories to organize your products and help customers find similar items.
In the Tags section, type to see suggestions or create new ones by clicking “Add.” We’ve added two tags for this product as an example.
For categories, select from existing ones or click “+ Add new category” to create a new group. Categories help group related items, like t-shirts and Hoodies, under clothing.
Step 6: Publish the product
Once everything’s set, click the Publish button in the top right to make your product live.
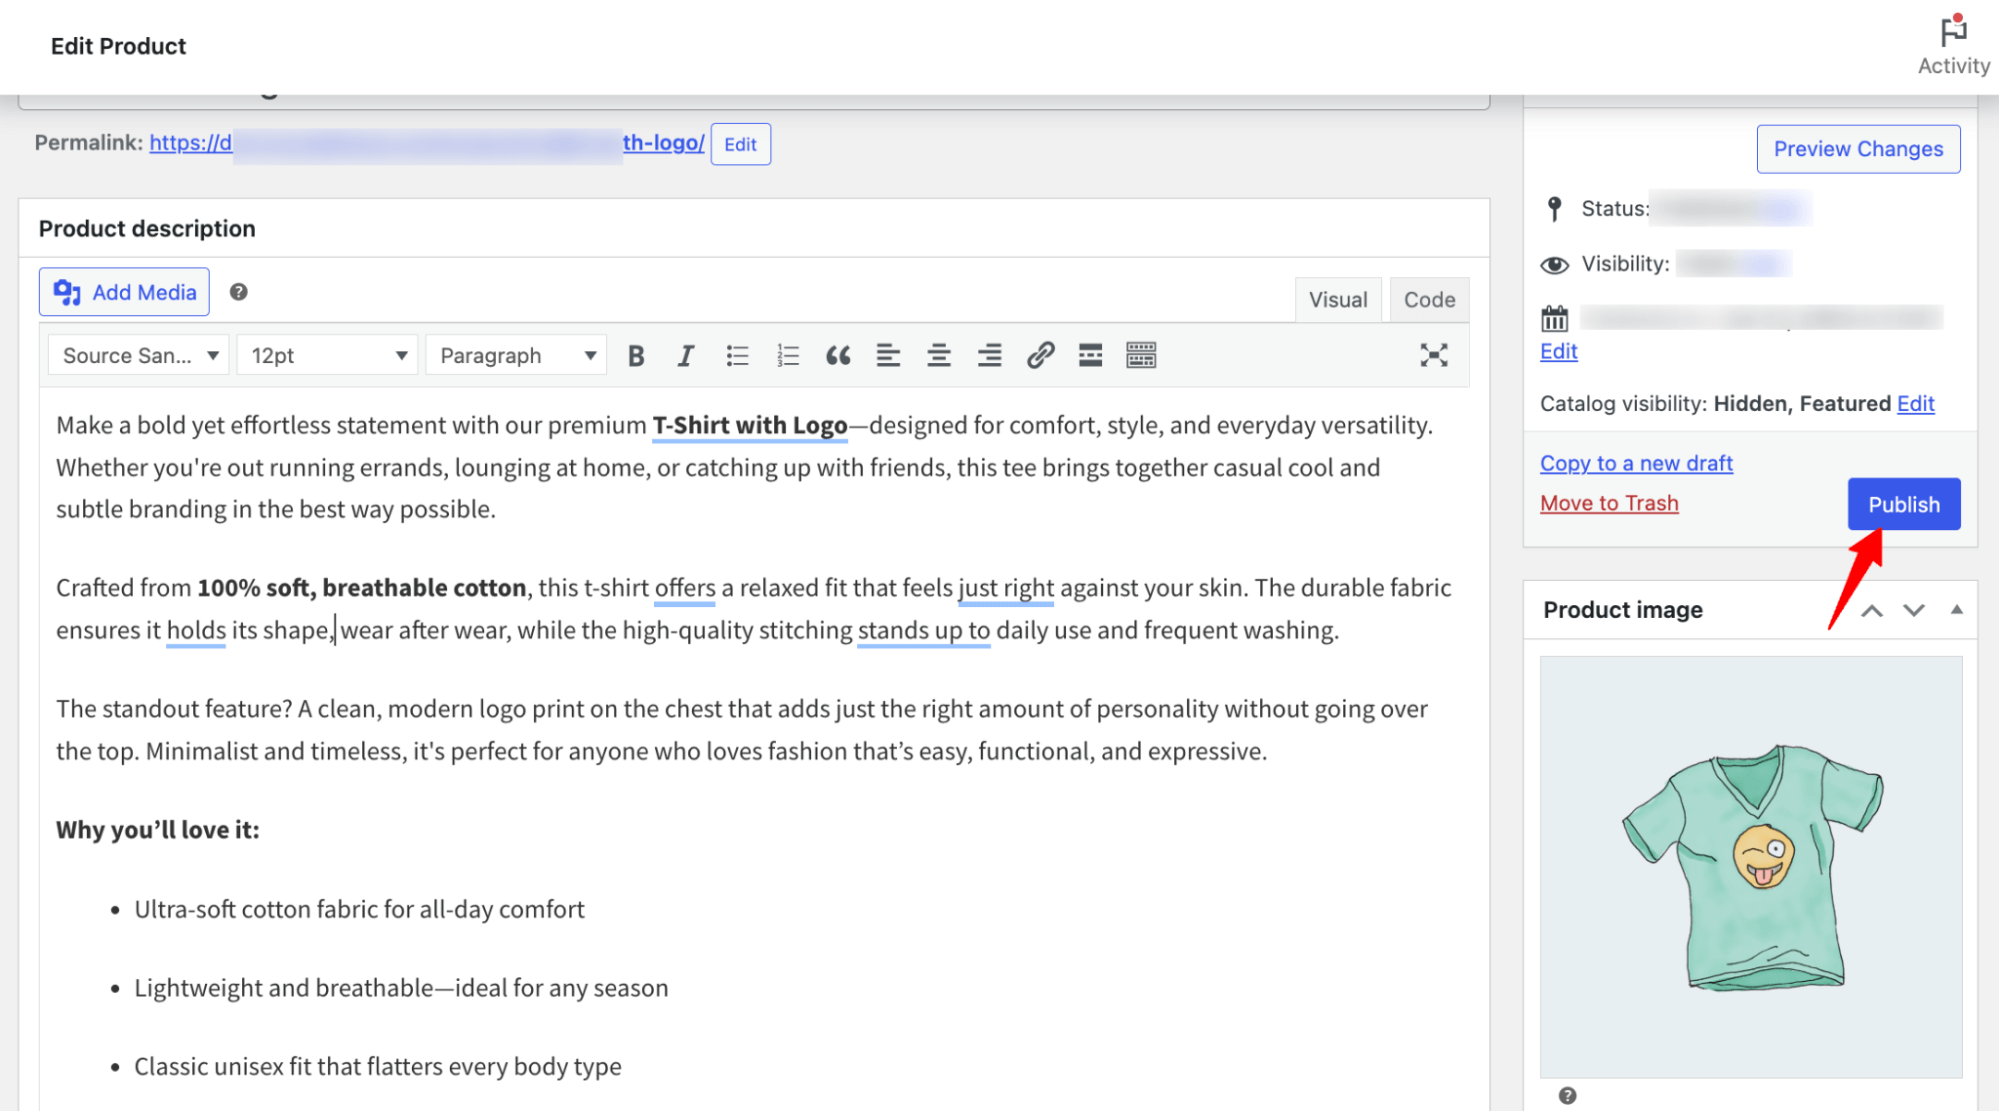
You can also hit Preview to see how it looks on your site (appearance may vary by theme).
Next, let’s explore the different product types WooCommerce supports.
Create Variable Products in WooCommerce
To create a variable product in WooCommerce, start by going to Products ⇒ Add New.
Enter the basic details like product name, description, categories, tags, inventory, and shipping information as you did with the simple product.
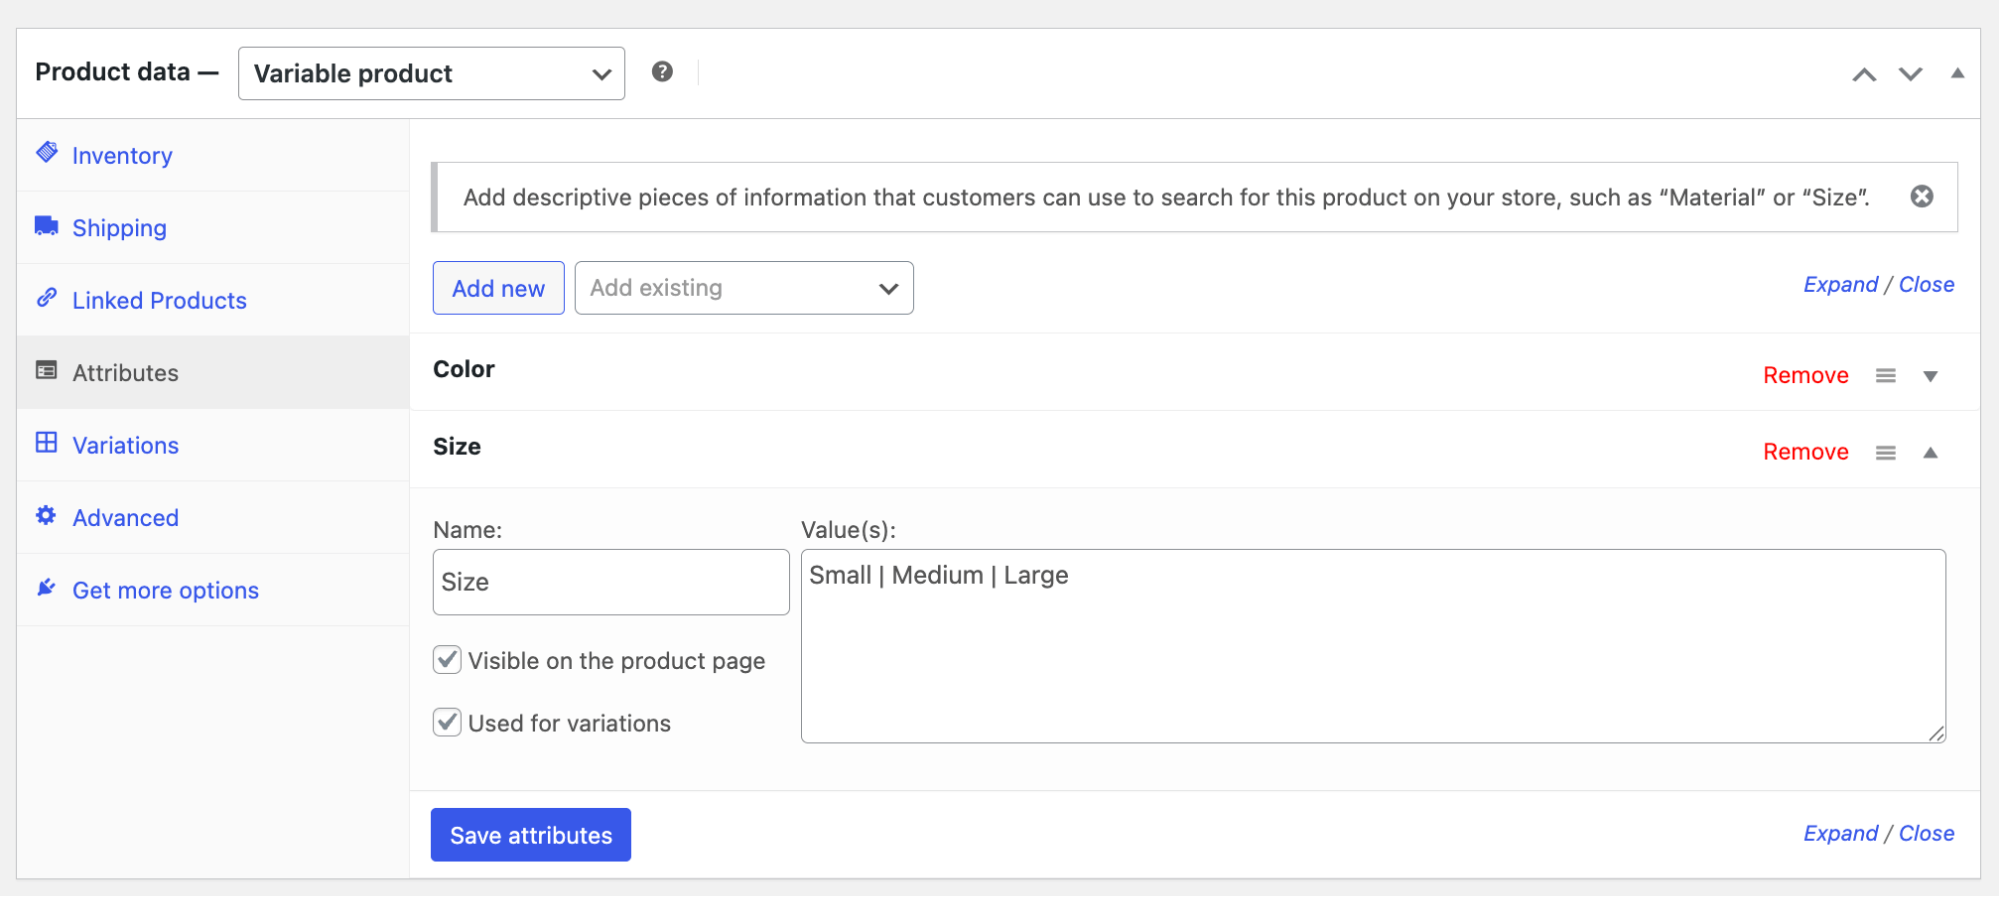
In the Product Data section, change the type to Variable Product.Then, go to the Attributes tab and click Add.
Next, enter an attribute name (e.g., "Size" or "Color"), and in the value field, add options separated by a pipe symbol (|). For example, for an attribute Color, you can create Blue | Green | Red.
Check the box for “Used for variations” and hit Save Attribute.
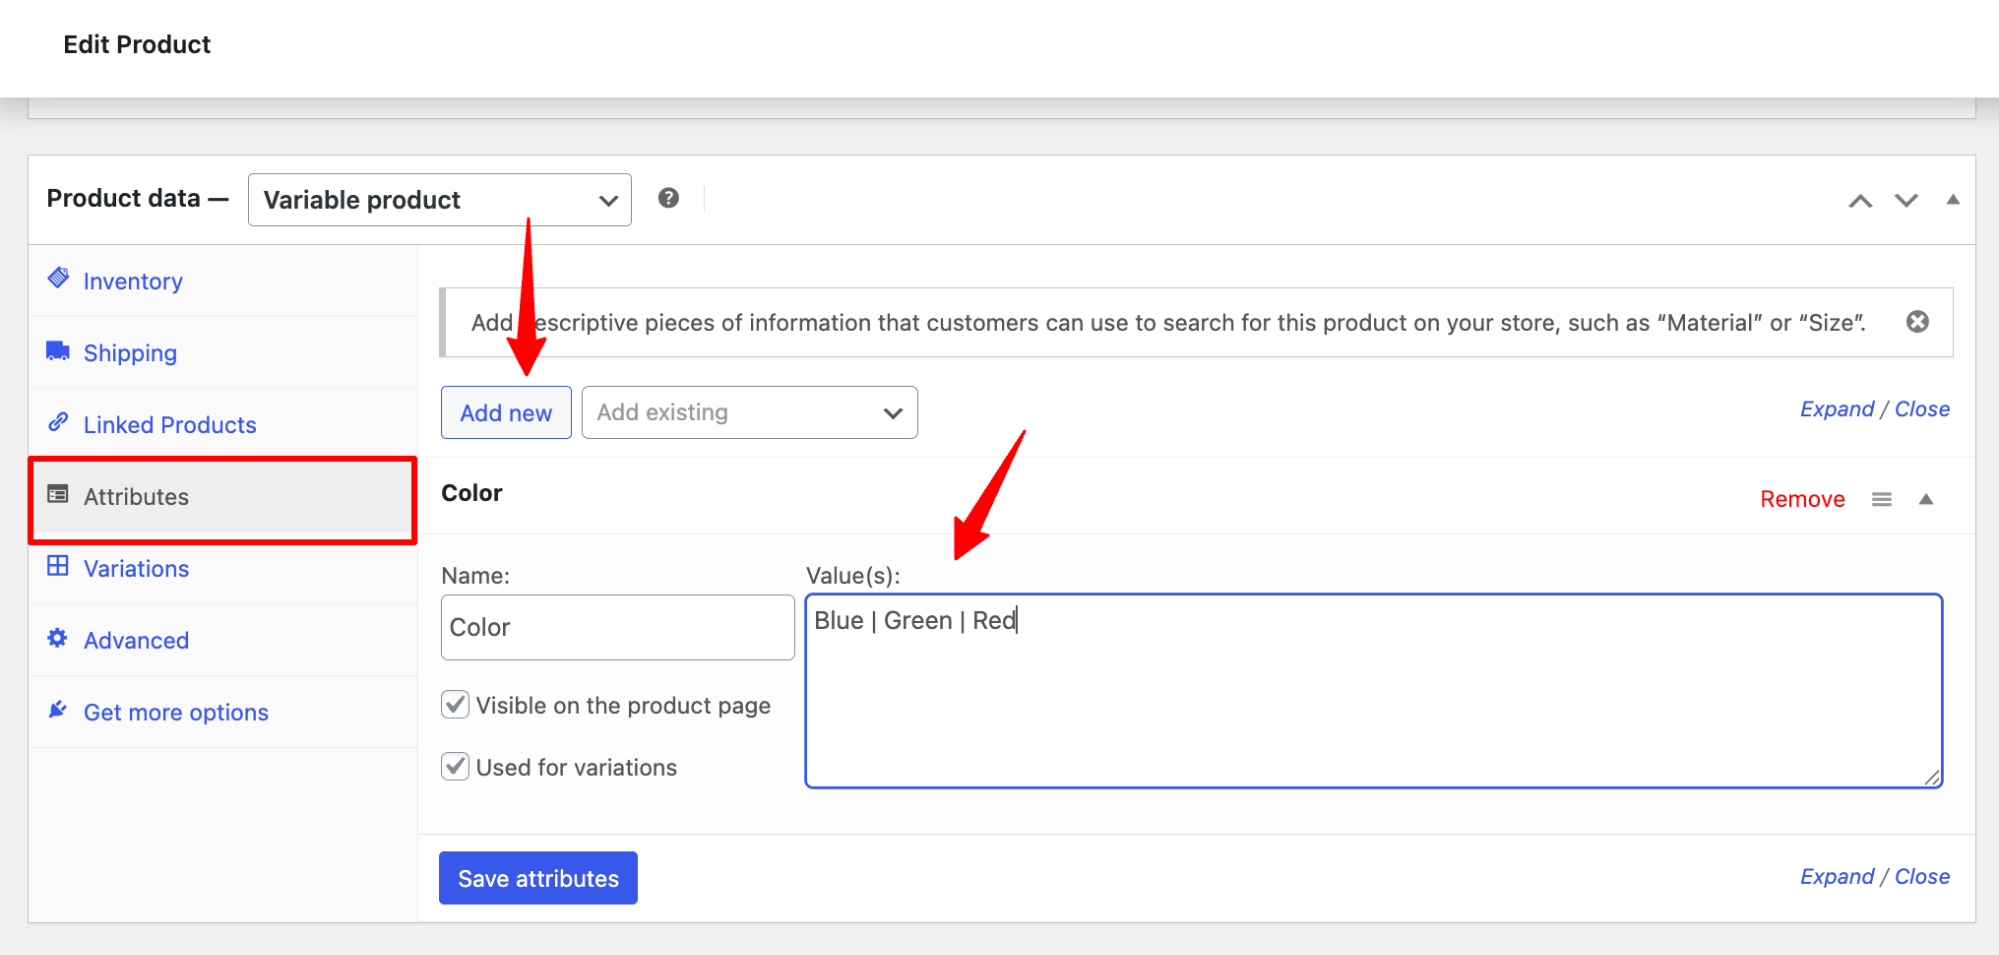
You can add multiple attributes if needed, following the same process.
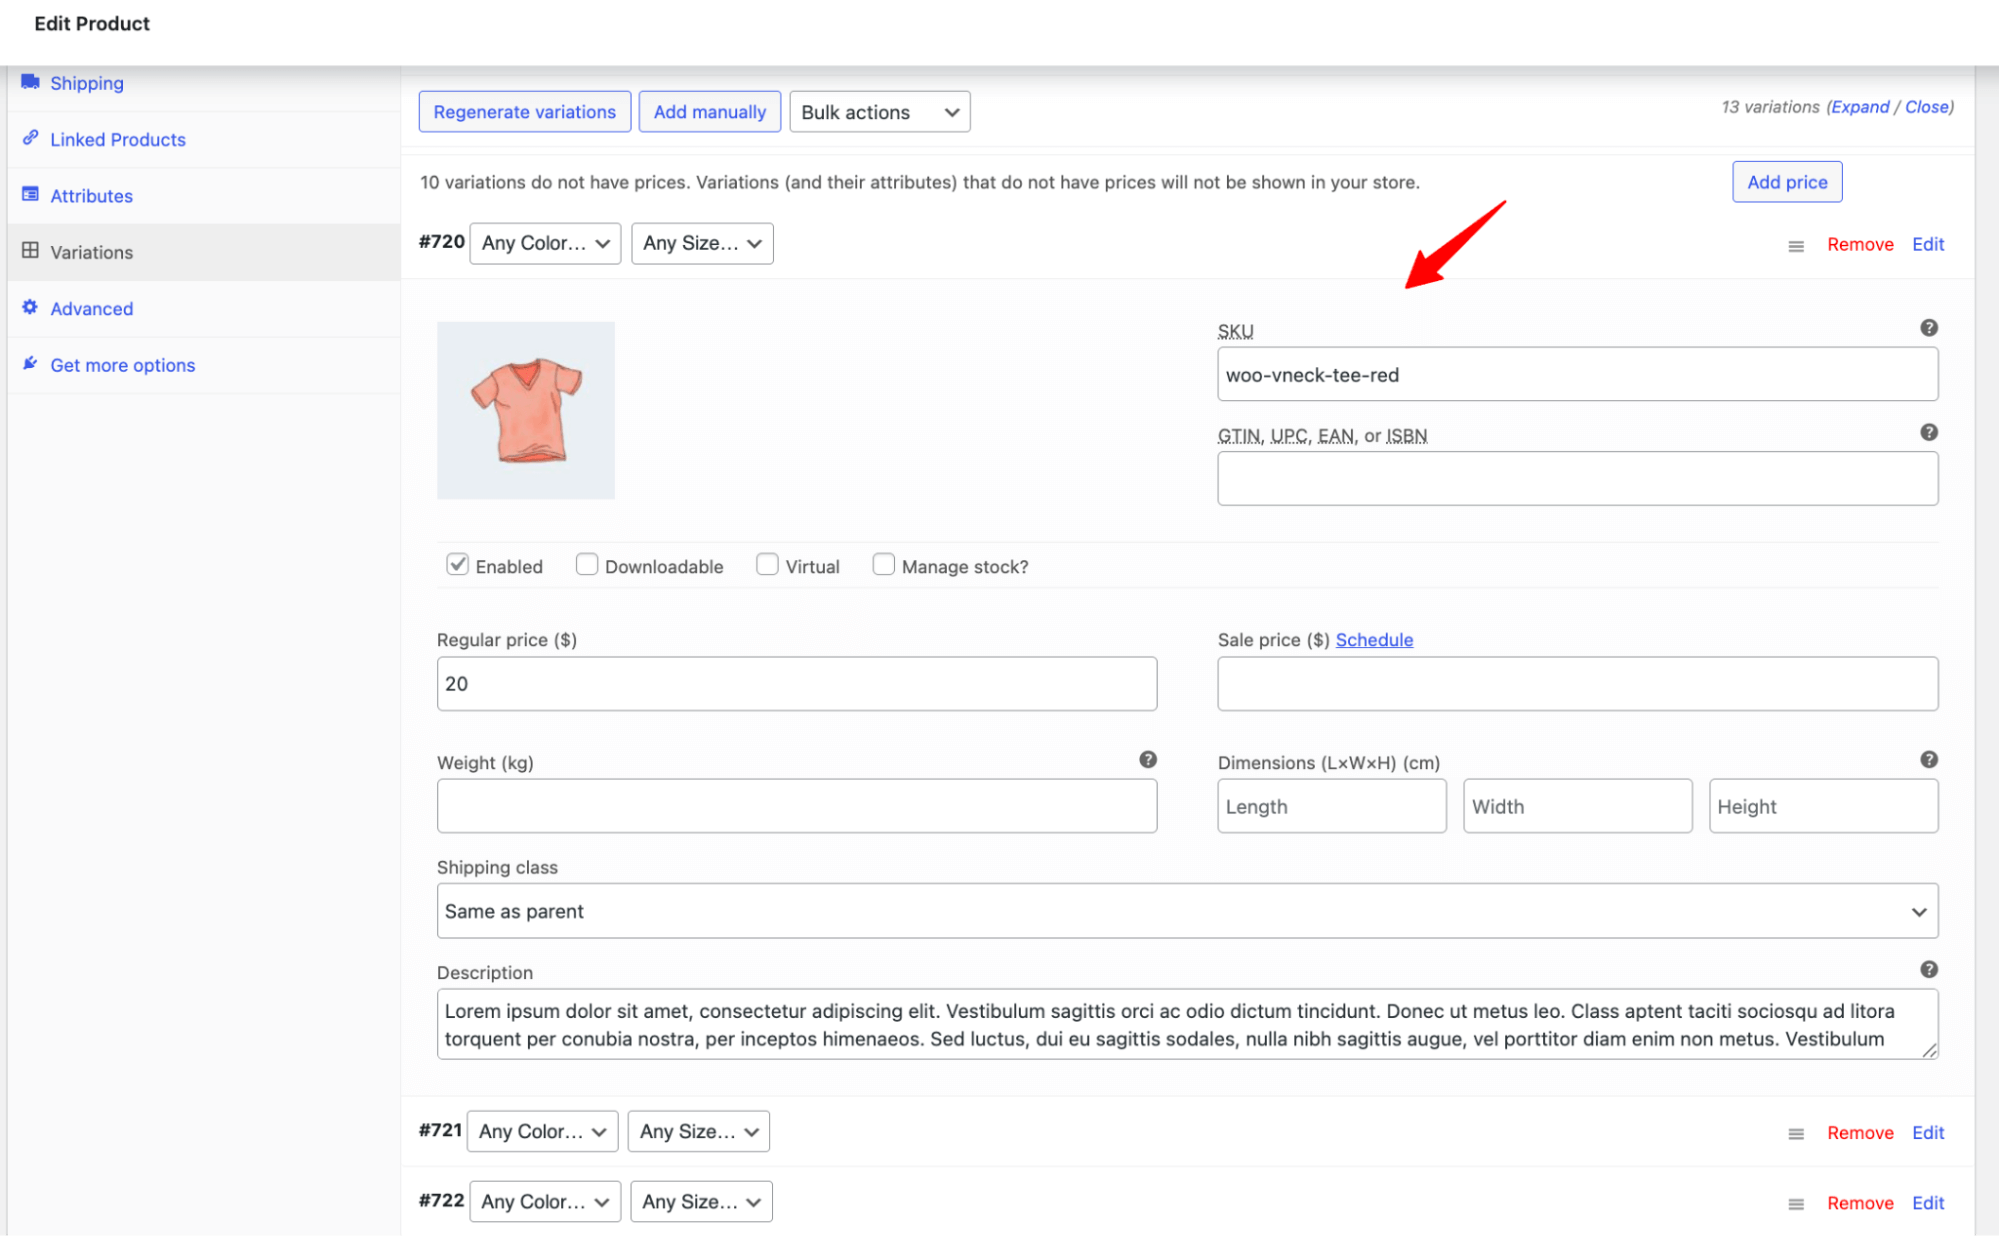
Next, switch to the Variations tab and either auto-generate variations or add them manually. For each variation, set its price, stock status, and image. Once done, publish the product.
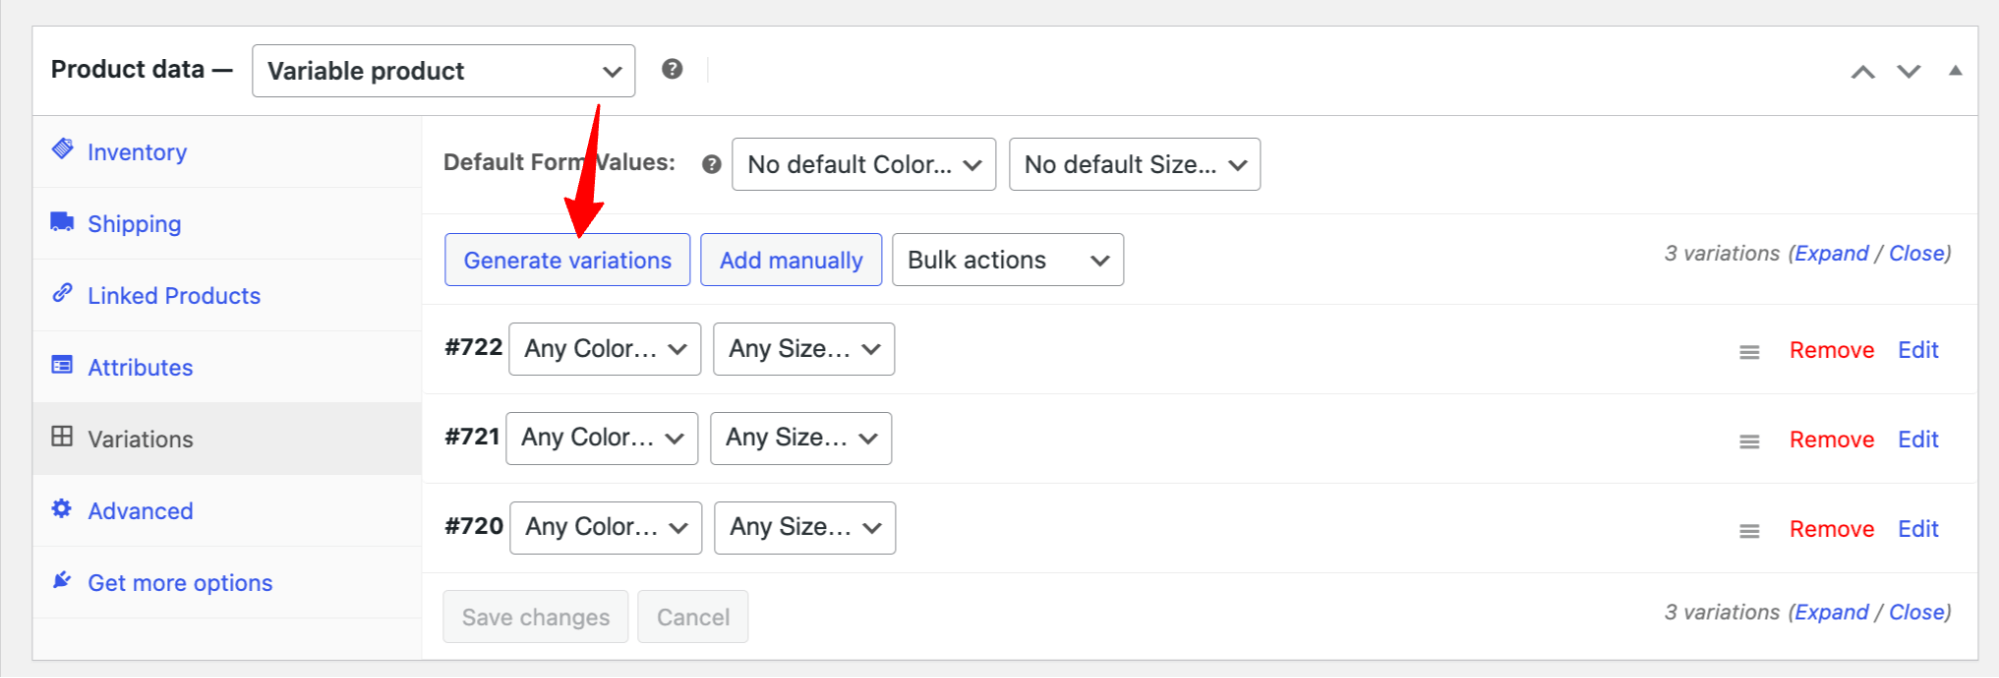
After creating, you can edit each variation separately. You can expand any of the variations and then customize SKU, manage stock, set regular price, sell price, add description, and more based on your needs.
Guide: For more details, check our guide on variable products.
Create Group Products in WooCommerce
Creating a grouped product in WooCommerce is straightforward. A grouped product is essentially a collection of individual simple products.
Note: Make sure all the products you want to group are already created and published.
Then, create a new product. Enter the basic details like the product name and description.
In the Product Data section, select Grouped Product as the product type. You won’t need to set a price or inventory here, as each item in the group manages its own.
Next, go to the Linked Products tab. Under Grouped Products, search for and select the products you want to include in the group. Once added, publish the product.

Create External/Affiliate Product in WooCommerce
To create an affiliate (external) product in WooCommerce, go to Products ⇒ Add New. Enter the product name, description, and other basic details.
In the Product Data section, select External/Affiliate Product from the dropdown. This will add two new fields: Product URL and Button Text.
Paste the affiliate link into the Product URL field. This is where users will be redirected when they click the button.
Next, customize the Button Text (e.g., “Buy on Amazon” or “View Product”) as needed.

After that, add a product image, category, and any other necessary information, then publish the product.
Create Virtual Products in WooCommerce
To create a virtual product in WooCommerce, go to Products ⇒ Add New. Enter the product name, description, category, tags, and other basic details.
In the Product Data section, select Simple Product (or another type if needed), then check the box labeled Virtual.
This removes shipping-related fields since virtual products don’t require delivery.
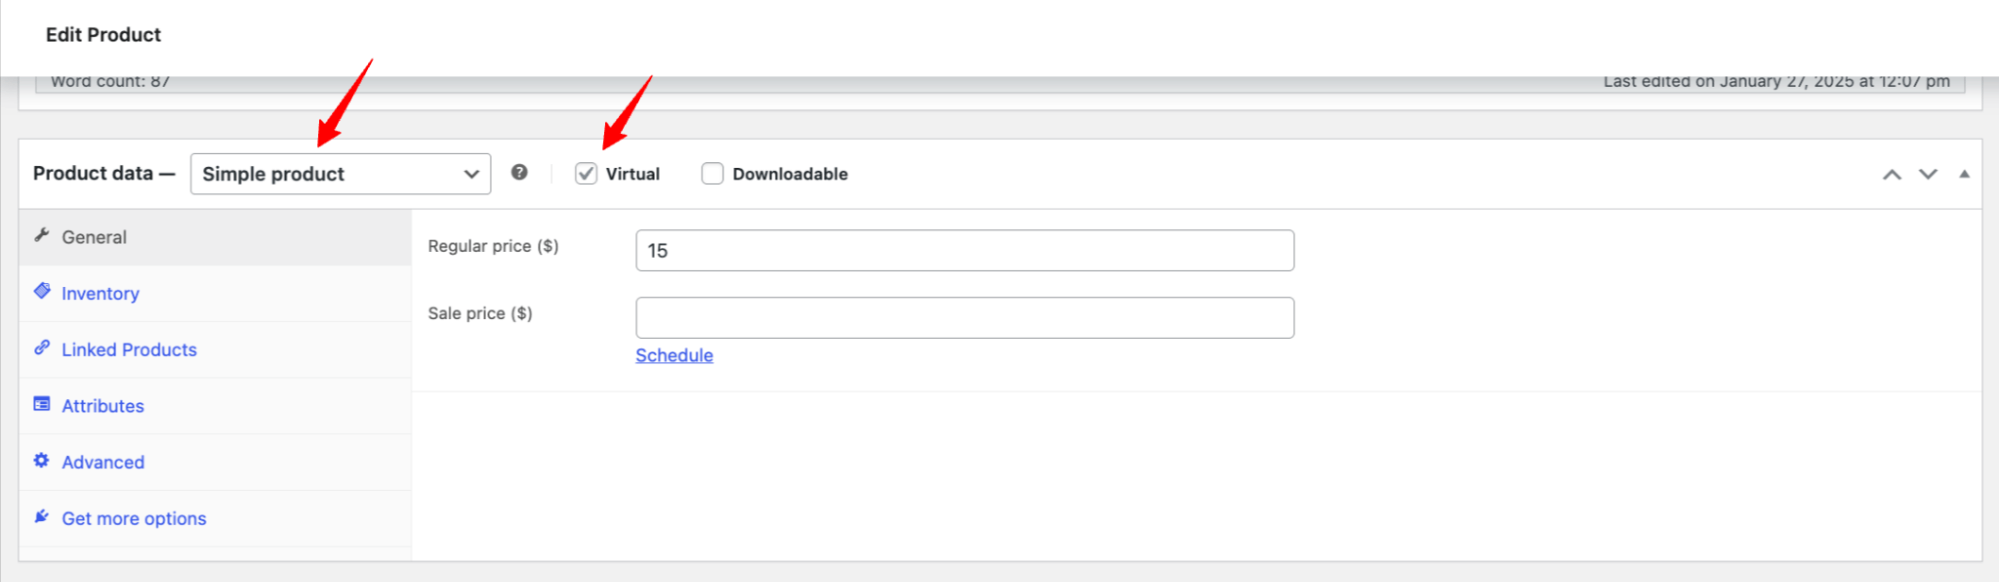
Next, set the regular and sale price, configure inventory if needed, and add any relevant product images or attributes. Once all details are filled out, click Publish.
Create Downloadable Products in WooCommerce
To create a downloadable product in WooCommerce, go to Products ⇒ Add New. Enter the product name, description, category, tags, and other basic details.
In the Product Data section, select Simple Product, then check the boxes labeled Virtual and Downloadable.
This enables file upload fields and removes shipping-related options, as downloadable products don’t require physical delivery.
Upload your file, set the download limit and expiry if needed.
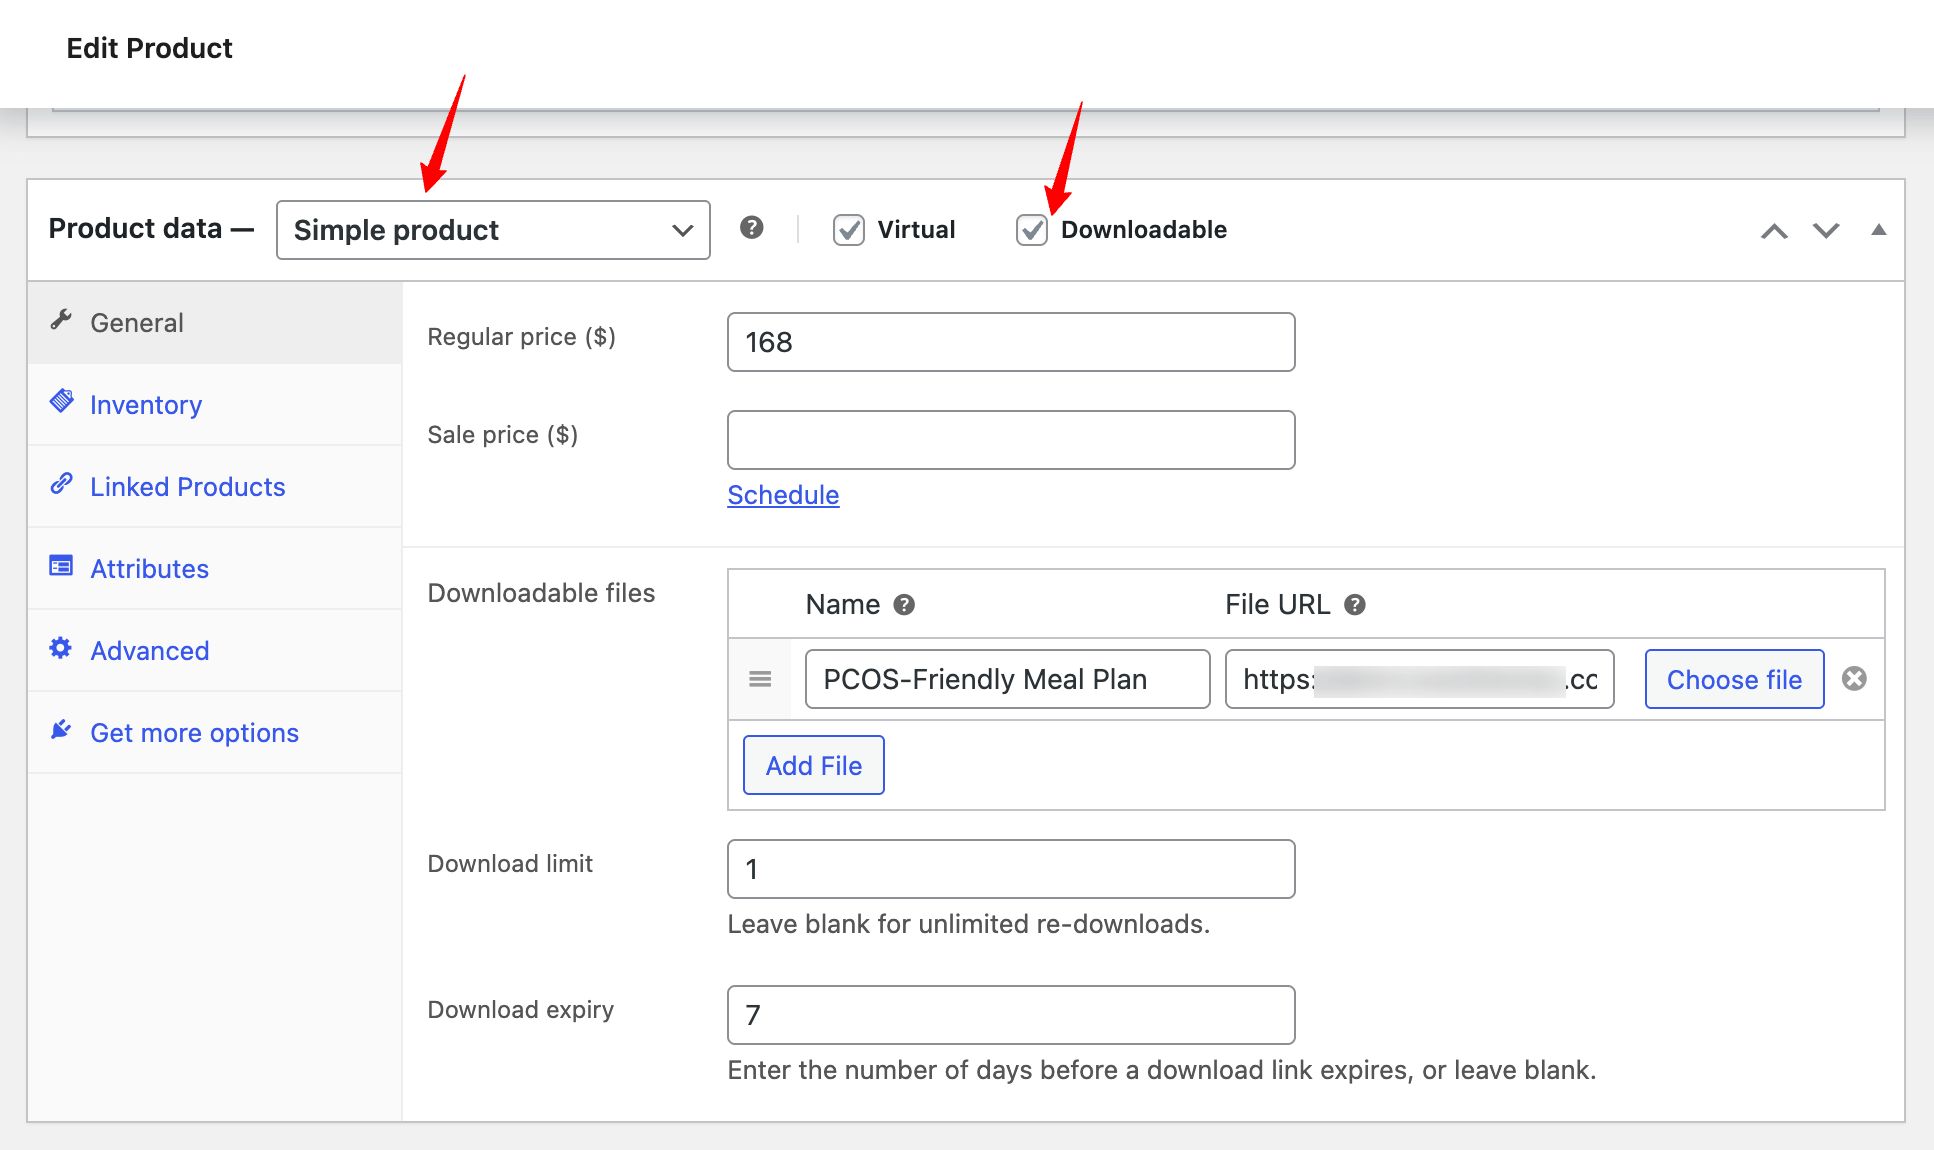
Next, enter the regular and sale price, and configure inventory settings. Add product images or attributes as needed, then click Publish.
How To Manage WooCommerce Products
Managing your WooCommerce products efficiently is key to running a successful online store. Here are essential tasks to help you stay on top of your products.
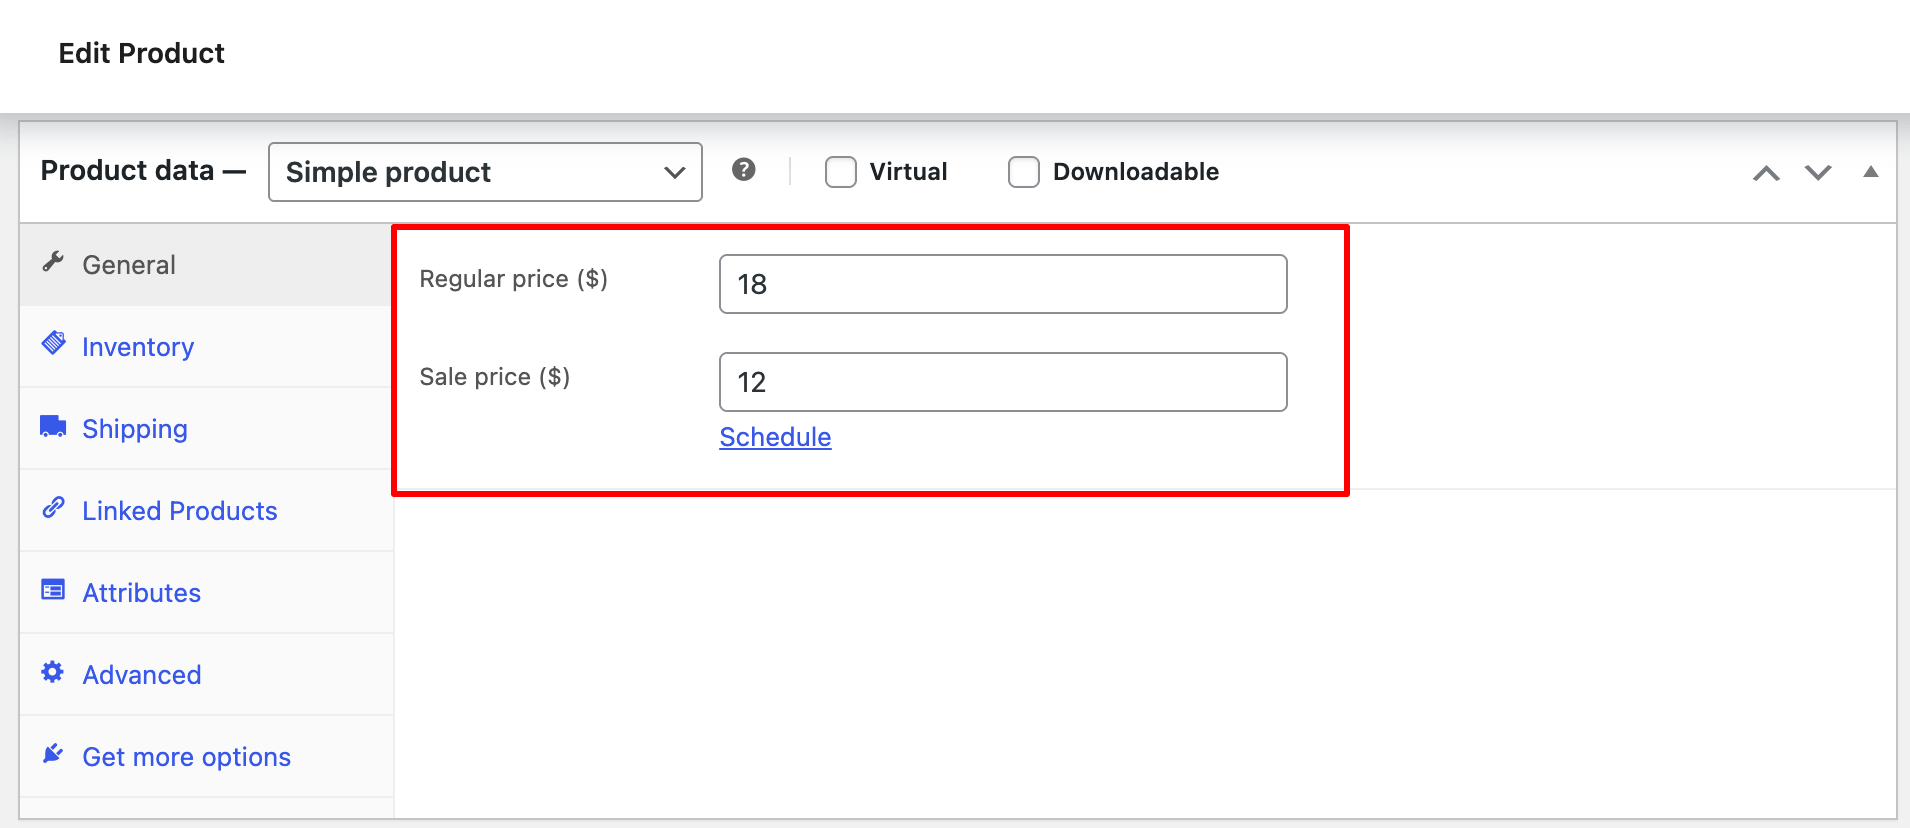
Schedule WooCommerce Product On Sale
Edit the product and in the Product Data section, enter the Sale price.
To schedule the sale, click Schedule and set the start and end dates.

Click Update to save. The discounted price will show during the sale period.
Manage Product Stock and Inventory in WooCommerce
Edit the product and go to the Inventory tab in Product Data. Now check the “Stock Management” section.
Next, set the Stock quantity, allow or disallow backorders, and set a Low stock threshold if desired.
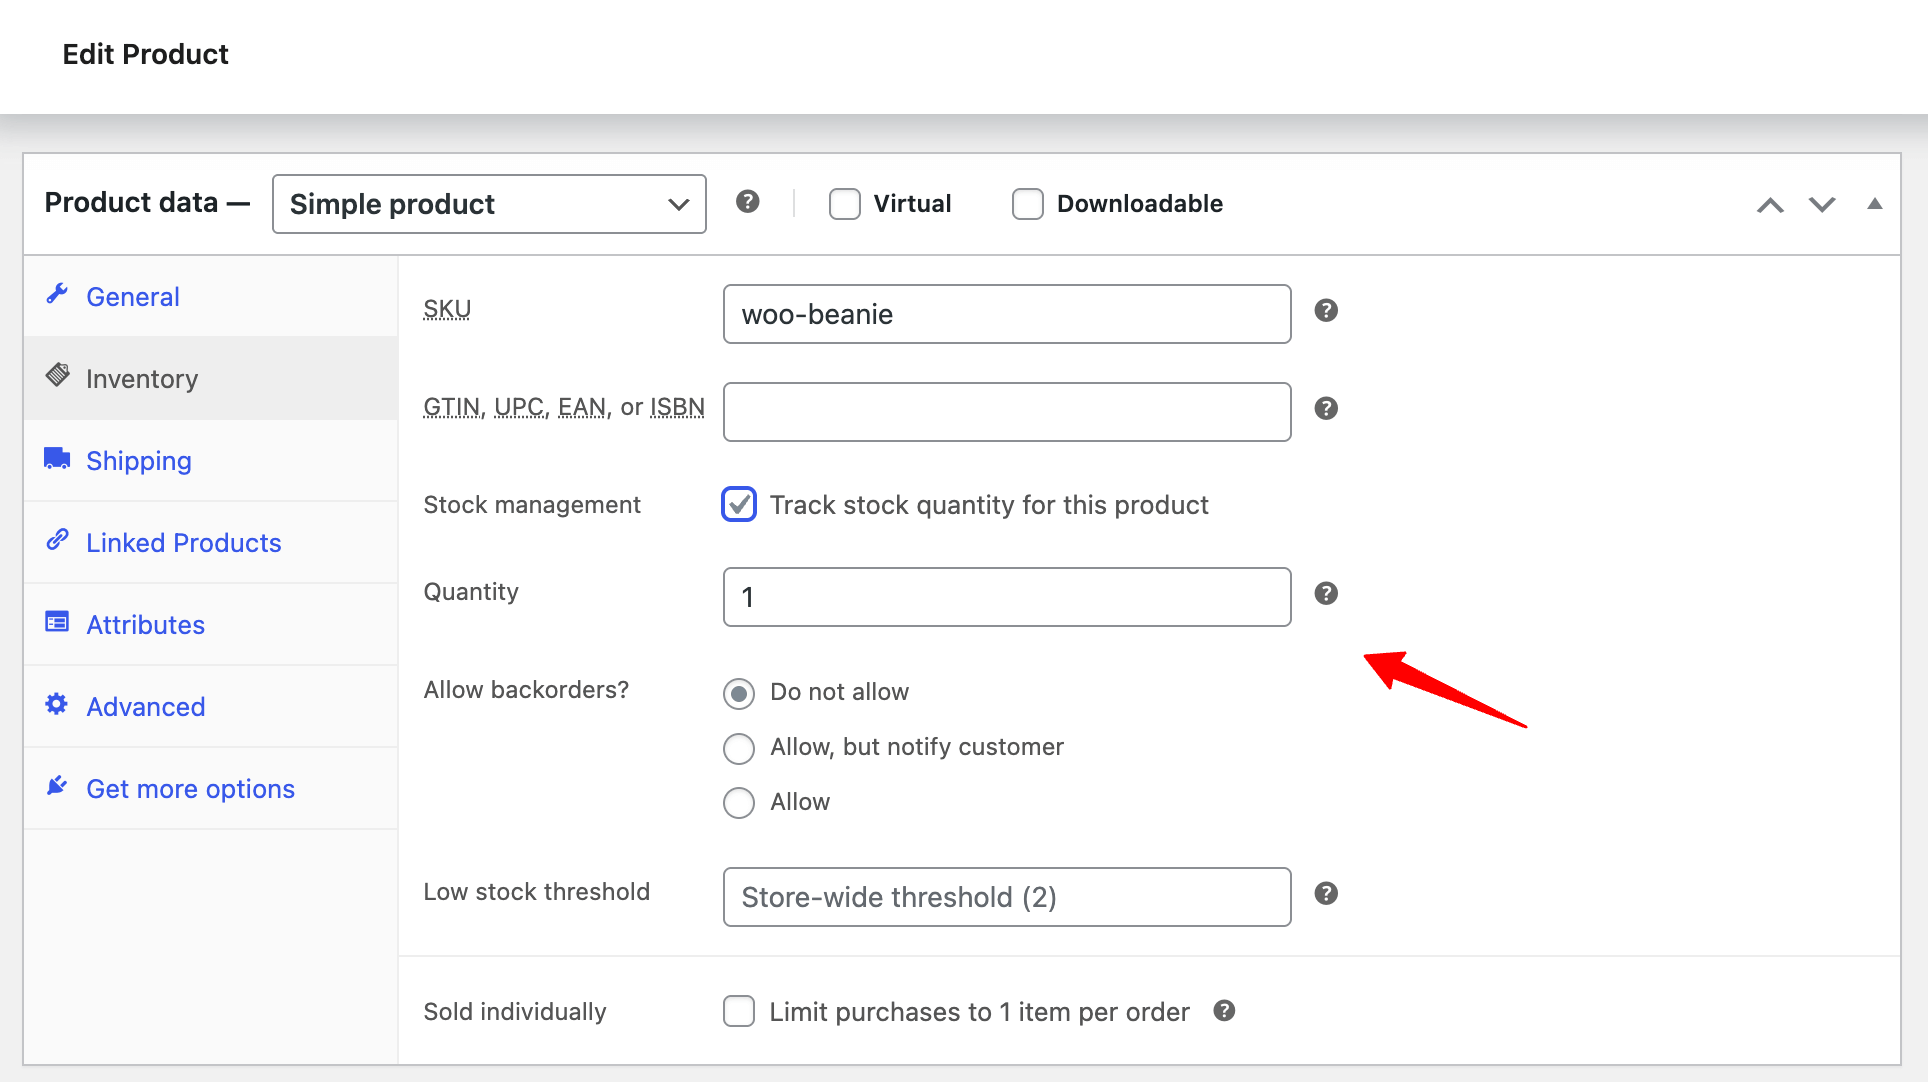
Click Update to save changes.
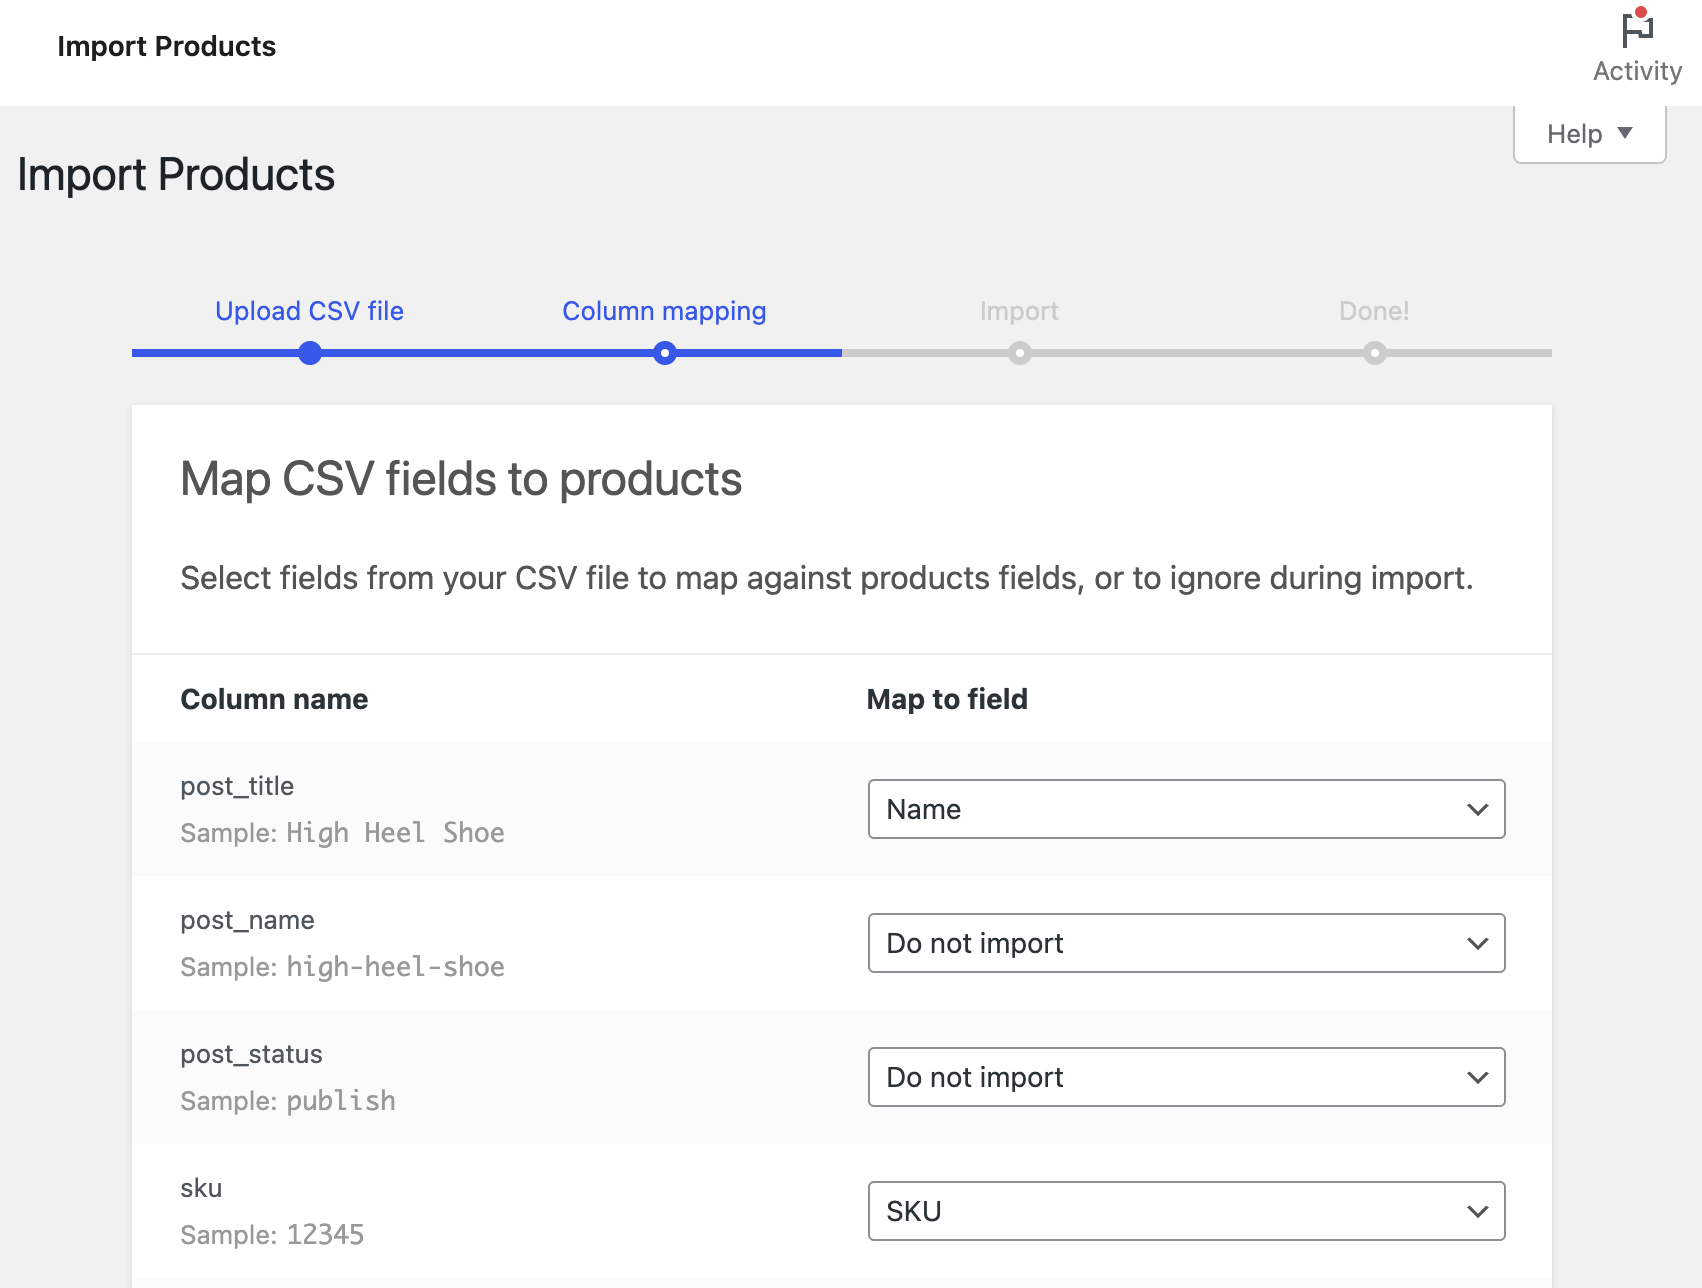
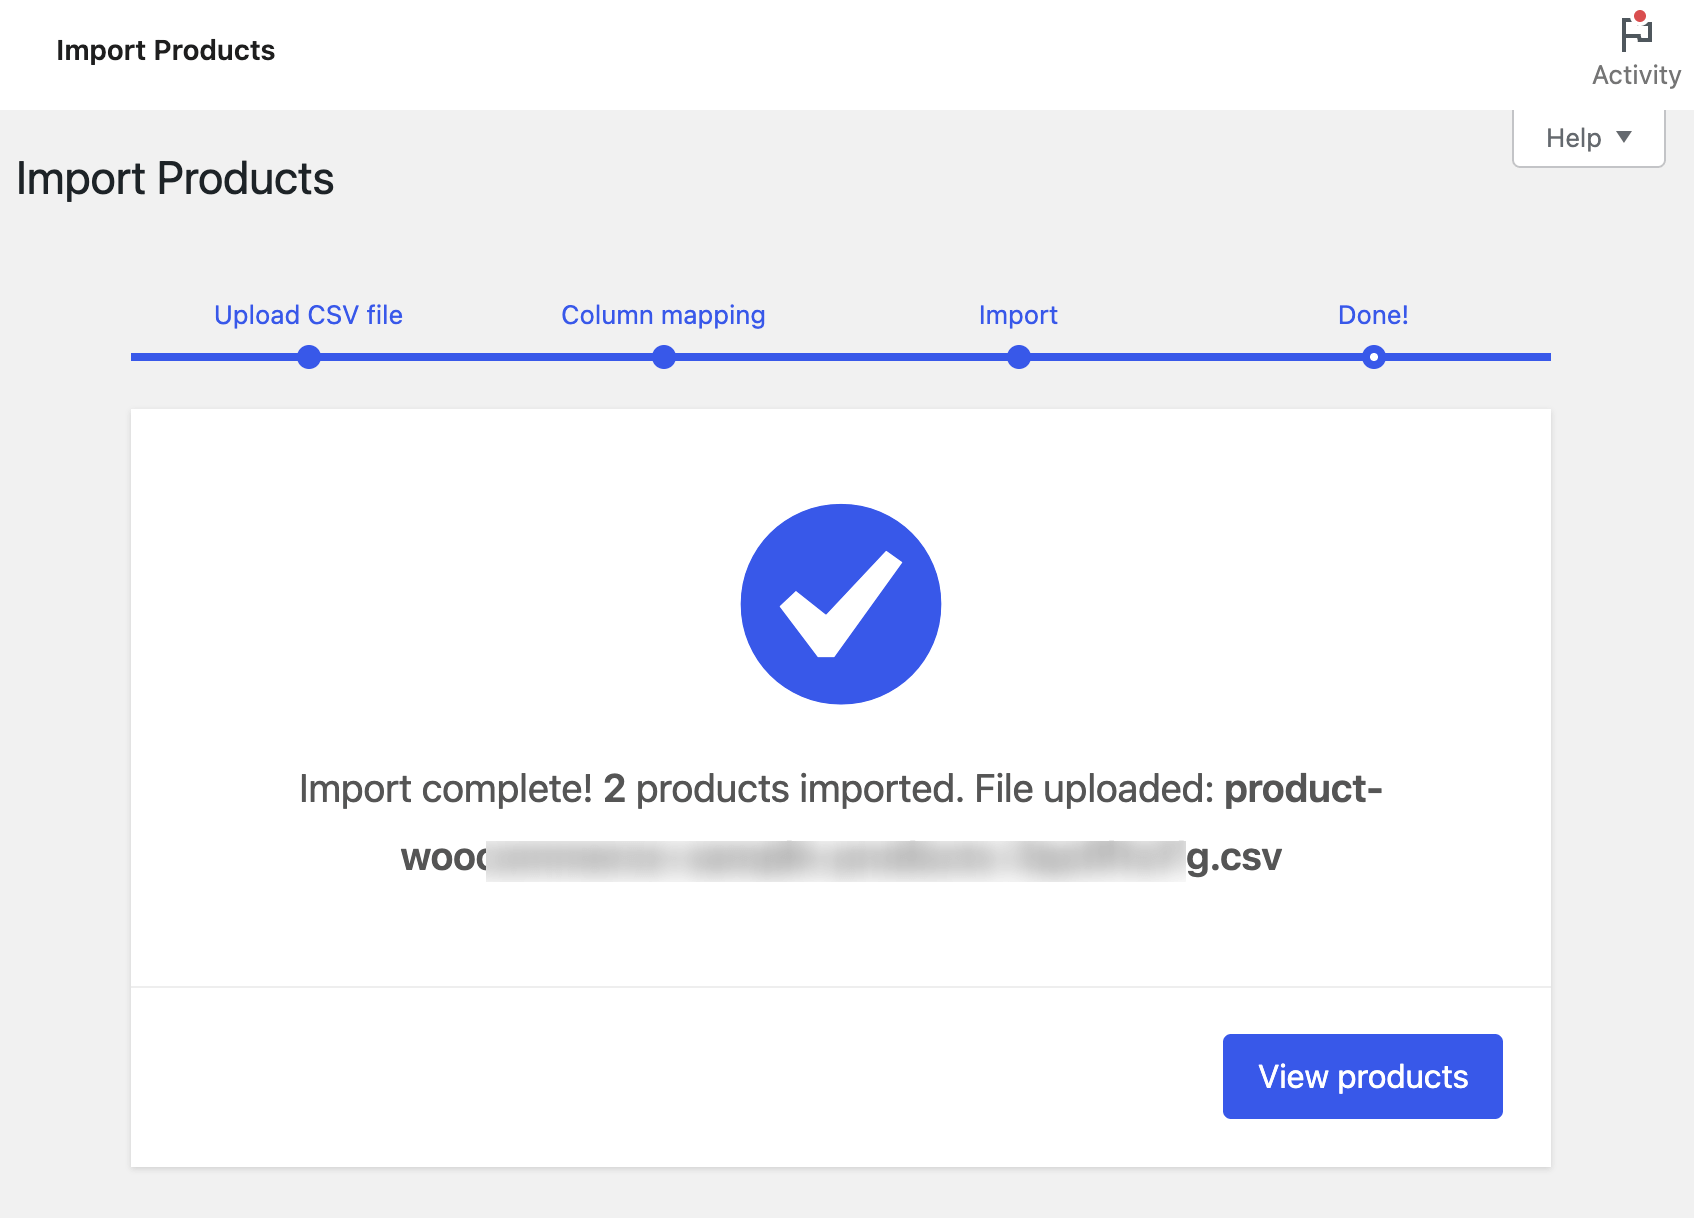
Import Products Using a CSV in WooCommerce
Go to Products ⇒ All Products and click Import. Select your CSV file,map columns if needed, then click Run the Importer.
After completion, click View Products to see the imported items.
Make a Product Hidden in WooCommerce
Edit your product and click Edit under Catalog Visibility. Then, choose Hidden to hide the product or Private to restrict access to authorized users only.
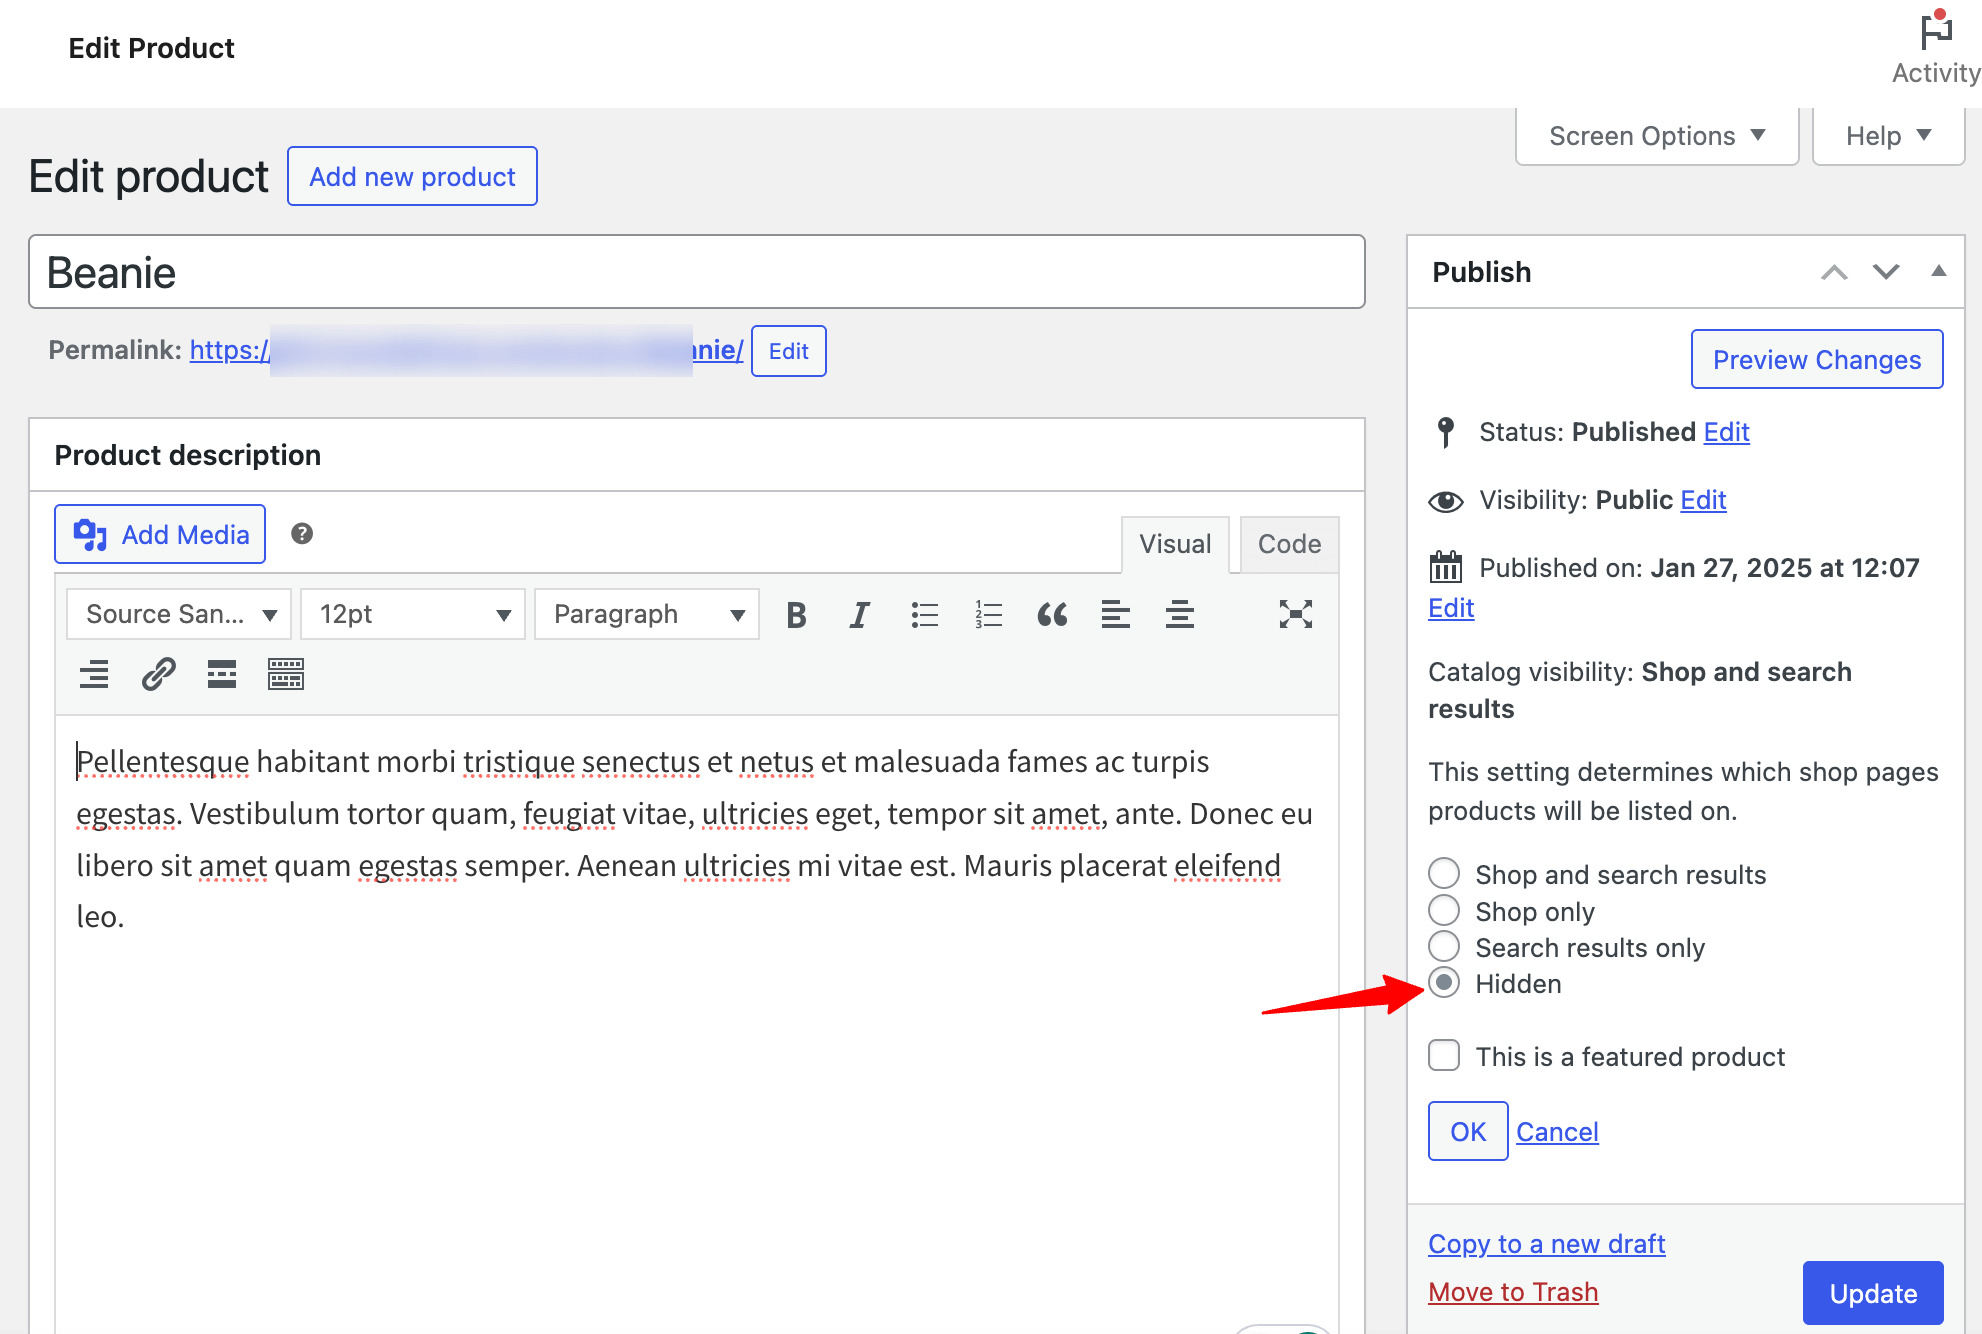
Click Update to save.
Best WooCommerce Plugins for Product Management and Sales Growth
- FunnelKit Cart: A powerful cart optimization plugin that boosts conversions with in-cart product recommendations along with rewards like free shipping, discount, and free gift.
- FunnelKit Funnel Builder: Create sales funnels visually to guide customers smoothly from product discovery to purchase.
- Stock Manager for WooCommerce: Best free plugin for bulk stock management from the WordPress dashboard.
- WooCommerce Dynamic Pricing & Discounts: Create advanced pricing rules, discounts, promotions, etc. to increase sales.
- WooCommerce Bulk Edit Products: Quickly update multiple products’ prices, stock, and attributes with bulk editing tools.
- Wholesale Suite: A complete B2B solution for WooCommerce to manage wholesale pricing, roles, and order forms.
- WC Vendors: Turn your WooCommerce store into a multi-vendor marketplace where sellers can create and manage their own products, while you stay in control of commissions and the overall storefront.
- Sublium Subscriptions: Create recurring subscription plans, manage customers with automated email notifications, and access detailed analytics to track predictable revenue and grow your subscription business.
- AffiliateWP: Manage your own affiliate program to drive more traffic and sales through affiliate marketing.
Ready to Start Adding WooCommerce Products?
We hope this guide has given you a clear and practical understanding of how to create and manage various types of WooCommerce products. WooCommerce’s flexible settings and user-friendly interface make it easy to showcase your products in a way that attracts and converts customers.
Don’t forget to focus on strong product descriptions, high-quality images, and smart pricing strategies to capture your audience’s attention and encourage purchases.
To take your store further, consider using powerful plugins like FunnelKit for funnels and carts, Wholesale Suite for B2B pricing, WooCommerce Stock Manager for efficient inventory control, and more.
These tools make product management easier and help boost sales with minimal effort.
More WooCommerce Guides to Explore:
- How to recommend related products in WooCommerce
- How to Set Up Cross-Sell Products in WooCommerce
- How to sell digital products in WooCommerce
- Best WooCommerce product recommendation plugins
Editorial Team
July 27, 2026WooCommerce subscription upsell can help boost your revenue through subscription-based sales. Moreover, subscription-based products allow you to add predictability to your revenue. You can sell physical and digital products and...

Editorial Team
July 7, 2026Are shoppers adding products to their cart and leaving before they buy? According to Baymard Institute research on checkout usability, 18% of shoppers who abandon their cart do so because...

Editorial Team
July 7, 2026You’ve built your WooCommerce store, polished your product pages, and invested in marketing, but sales aren’t coming. Visitors browse, some add items to their cart, and most vanish before completing...


