


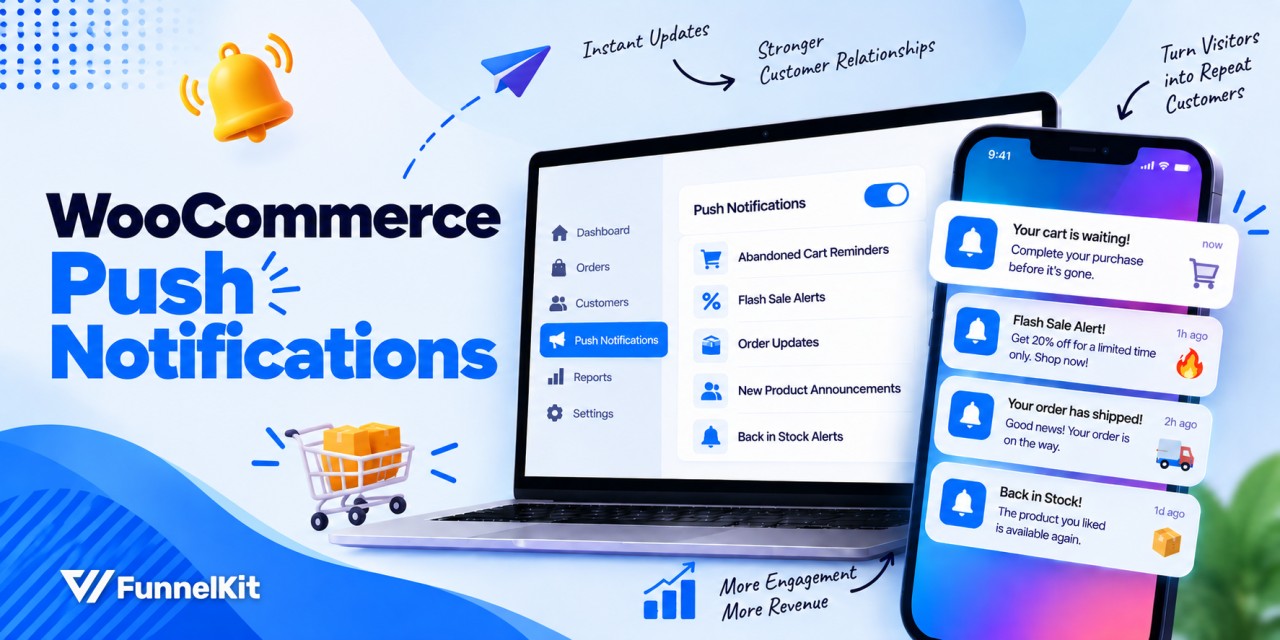
WooCommerce push notifications are basically a tap on the shoulder when a shopper leaves without buying.
Picture a shopper adding a jacket to their cart, getting almost to checkout, and then disappearing.
You could wait a few days and send an email hoping they come back. But by then, they may have forgotten about the jacket completely.
That's the problem with relying on abandoned cart emails alone. They have to open their inbox, notice your message, and still care enough to come back.
Push notifications work differently.
If the shopper has opted in, you can reach them directly on their device, often within seconds of the action you want to follow up on.
They don't need to be sitting on your store or checking their inbox at the right moment.
And that's the part worth paying attention to. You're not trying to find more shoppers. You're giving the ones who already showed buying intent one more reason to finish.
WooCommerce doesn't include push notifications out of the box.
Its built-in emails cover new orders, order updates, and customer notifications, but it has no native system for sending web or mobile push messages.
So what do you actually need to set this up?
This guide breaks down WooCommerce push notifications, the five message types often mixed together, and how to set everything up without code.
We'll explore which plugins are worth considering, how to build a subscriber list, and the GDPR details you need to get right.
Table of Contents
- 1 What Are WooCommerce Push Notifications?
- 2 5 Types of Push Notifications (And Which One You Actually Want)
- 3 How to Set Up Push Notifications in WooCommerce (Step-by-Step)
- 4 Going Beyond Standalone Push: Triggering Notifications From Custom Workflows
- 5 Which Browsers and Devices Support Web Push?
- 6 Best WooCommerce Push Notification Plugins (Free and Paid)
- 7 How to Grow Your Push Subscriber List
- 8 Frequently Asked Questions
- 9 Start Recovering Revenue With WooCommerce Push Notifications
What Are WooCommerce Push Notifications?
WooCommerce push notifications are short, opt-in messages you can send directly to a subscriber's device.
They can arrive through a web browser (web push) or a mobile app (app push).
The signup is simple. A shopper visits your store, sees a browser prompt asking whether they want notifications, and taps Allow without any email address to type or signup form to fill out.
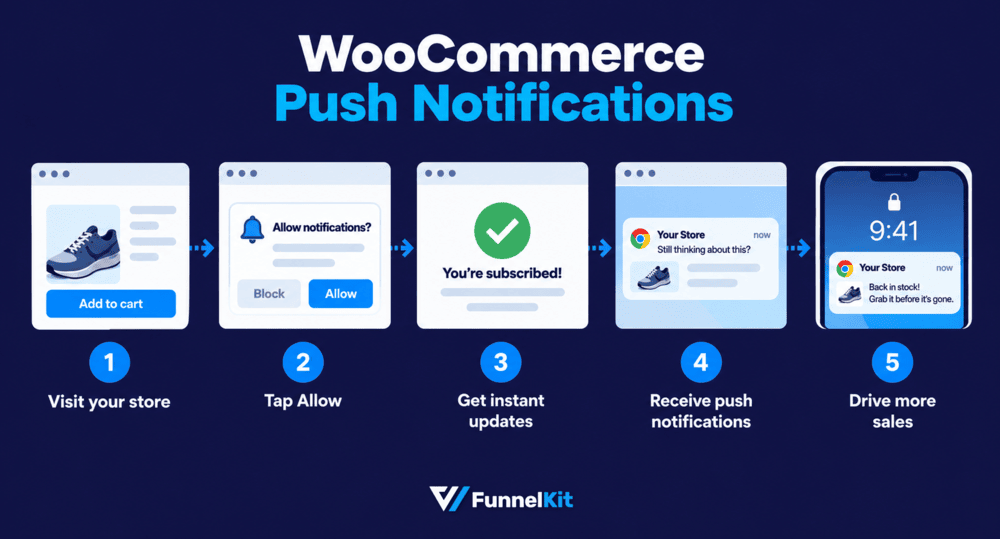
That's the big difference between push and email. Push is much quicker to join and much harder to miss.
But email still has one major advantage: you can use it for much longer, more detailed messages, and you have more control over your list.
| Parameter | Push notification | Marketing email |
|---|---|---|
| Where it appears | Lock screen, notification tray, or desktop | Inbox, Promotions tab, or Spam folder |
| Time to attention | Usually seconds | Could be hours, days, or never |
| What the customer gives you | One tap | Their email address |
| Message length | Usually a line or two | As long as you need |
| Works when they leave your site | Yes | Yes |
| How they opt out | Browser or device settings | Unsubscribe link |
Neither channel replaces the other. Push is great when you need to get someone's attention quickly. Email is better when you need room to explain something.
The stores that get the most out of both usually use them together.
How web push actually works
You don't need to understand the technical side to set up push notifications, but knowing what's happening behind the scenes can save you some head-scratching when something goes wrong.
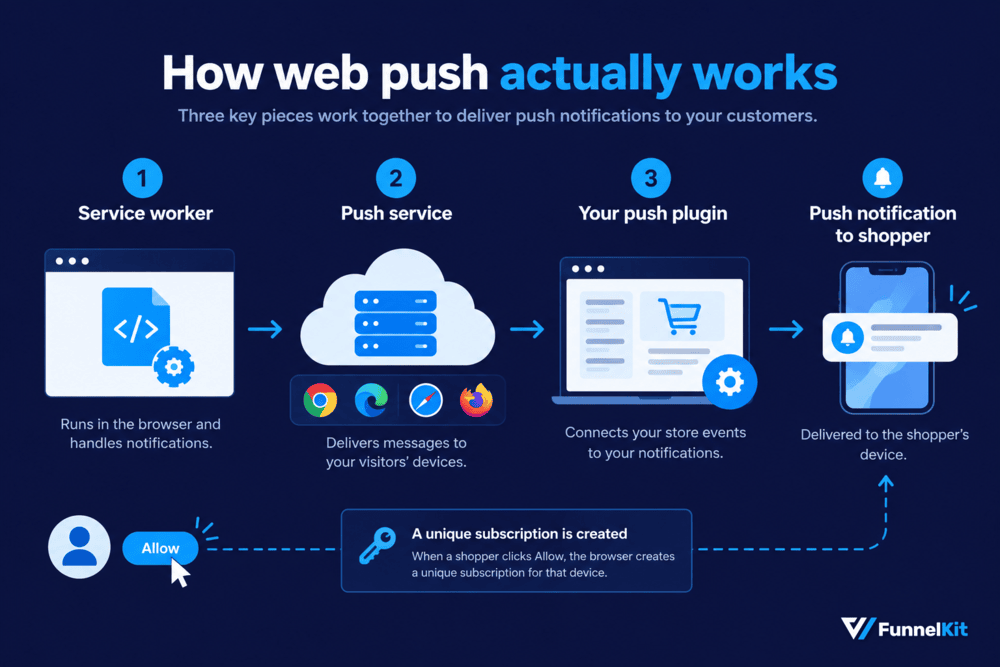
Here are three main pieces:
- The service worker
This small JavaScript file runs in the visitor's browser.
It handles push notifications even when your store isn't open in a browser tab.
- The push service
Think of this as the delivery system between your store and the shopper's browser or device.
Different browsers use different push services. Chrome and Edge use Firebase Cloud Messaging, Safari uses Apple Push Notification Service, and Firefox uses Mozilla Autopush.
- Your WooCommerce push plugin
This is the part you actually work with. It connects your store events to your notifications, so you can trigger messages when someone places an order, abandons a cart, or when a product comes back in stock.
When a shopper clicks Allow, the browser creates a unique subscription for that device.
Your push service uses that subscription to deliver future messages until the shopper unsubscribes or clears the relevant browser data.
What can you actually send?
Once the setup is working, you can use push notifications for much more than abandoned carts:
- Order updates: Order received, processing, shipped, out for delivery, and delivered
- Abandoned cart reminders: Give shoppers a reason to come back and finish
- Back-in-stock alerts: Tell shoppers when an unavailable product is available again
- Price-drop alerts: Let interested shoppers know when a product gets cheaper
- New product launches: Get a new product in front of subscribers as soon as it goes live
- Flash sales and promotions: Send time-sensitive offers without waiting for an email to be opened
- Coupon codes: Deliver a discount directly to subscribers
- Browse abandonment: Follow up with shoppers who viewed products without adding anything to their cart
- Wishlist reminders: Nudge shoppers about products they saved
- Review requests: Ask for a review after an order has been delivered
- Subscription reminders: Remind customers about upcoming renewals
- Admin alerts: Notify your team about new orders, low stock, refunds, or failed payments
5 Types of Push Notifications (And Which One You Actually Want)
Push notification can mean a few different things, and that's where the confusion usually starts.
Before you pick a plugin, figure out which kind you actually need.
1. Web push for customers
These are the notifications most WooCommerce store owners have in mind.
They appear through browsers such as Chrome, Firefox, Edge, Safari, or Opera and can reach shoppers on desktop and Android without requiring a mobile app.
Abandoned cart reminders, back-in-stock alerts, and sale announcements all fit here.
2. Mobile app push
If your store has a customer-facing mobile app built with something like AppMySite, AppPresser, or WooMobile, you can send notifications directly through the app.
They work like any other app notification.
The trade-off is that you need to build and maintain the app first, so this is a much bigger project than adding web push to an existing store.
3. Admin order alerts
The official WooCommerce mobile app can notify you when things happen in your store, such as a new order, a new review, or low stock.
These notifications are for you and your team, not your customers. They won't help you recover an abandoned cart.
4. On-site activity popups
You've probably seen these notifications such as "John from Texas just bought this" or "Someone in California is viewing this product".
They're often called push notifications, but they're really social-proof popups.
Tools such as TrustPulse use them to create urgency while someone is already on your site. Once that visitor closes the tab, the message is gone.
5. Loyalty and reward notifications
These are tied to things like points, membership tiers, or rewards that are about to expire.
For example, a loyalty plugin such as WPLoyalty can turn an event like "You have 240 points expiring Friday" into an automated message instead of making you pull a list and send it manually.
For the rest of this guide, we're focusing on web push notifications for customers.
It's the most accessible option for most WooCommerce stores because you don't need to build an app, and a plugin can handle most of the setup for you.
How to Set Up Push Notifications in WooCommerce (Step-by-Step)
We'll use PushEngage for this walkthrough. You can follow along without knowing anything else in this guide.
It handles abandoned carts, browse abandonment, price drops, and back-in-stock alerts without custom code.
The free tier covers up to 200 subscribers and unlimited notifications. That gives you enough room to test actual conversion rates before committing to a paid plan.
Once you scale, the paid tiers unlock automated drip campaigns and triggered recovery.
Here's the full step-by-step instructions.
Step 1: Install and connect PushEngage
In your WordPress dashboard, install the PushEngage plugin from the official WordPress repository and activate it.
The setup wizard should open after activation.
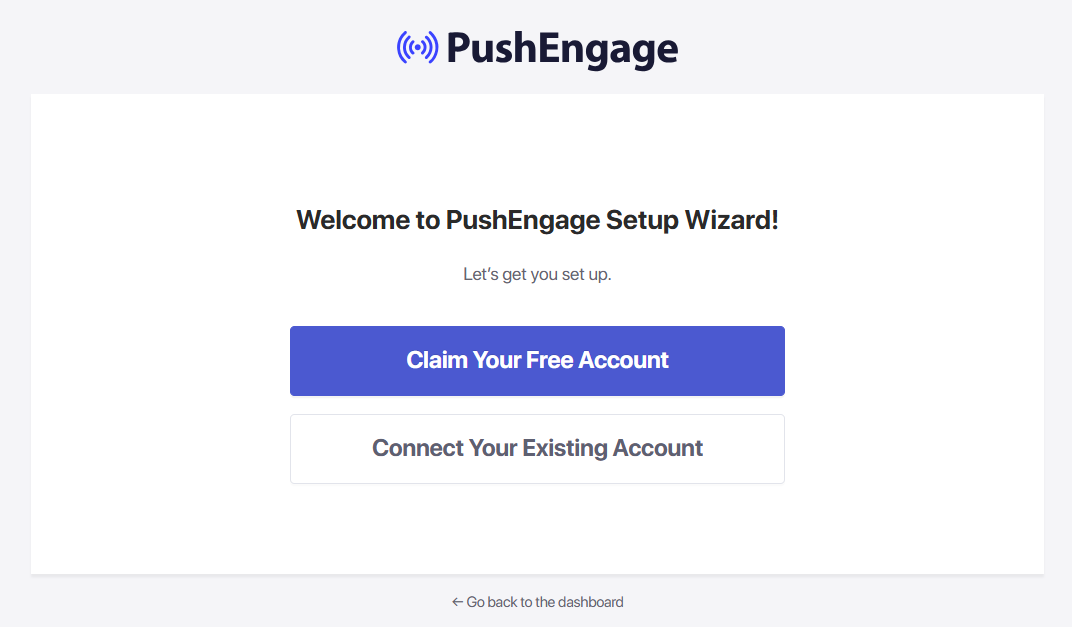
Create your account by entering your name, email address, site URL, and password.
The wizard connects your WordPress site to PushEngage, so you don't have to create an API key and copy it between two dashboards.
Step 2: Configure the subscription opt-in box
The opt-in is the little prompt that asks visitors whether they want notifications from your store.
It's the point where a casual visitor becomes someone you can reach again, so don't treat the wording as an afterthought.
Open the PushEngage design settings and choose between a single-step and two-step opt-in.
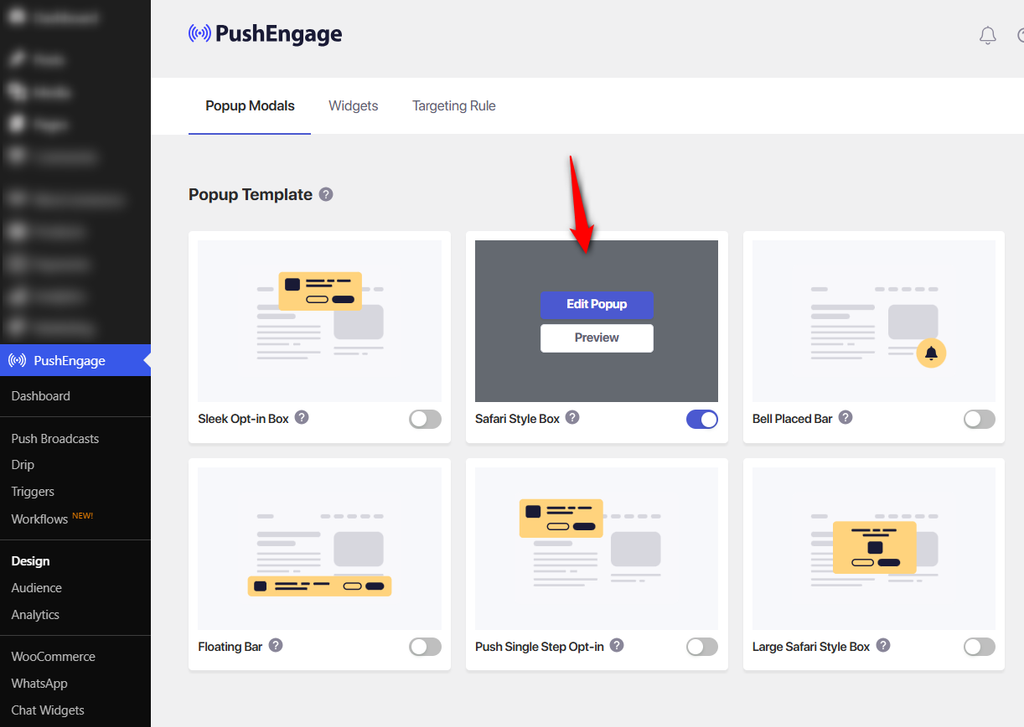
For an ecommerce store, we'd start with the two-step version.
It gives you a chance to explain why someone should subscribe before the browser displays its own permission prompt.
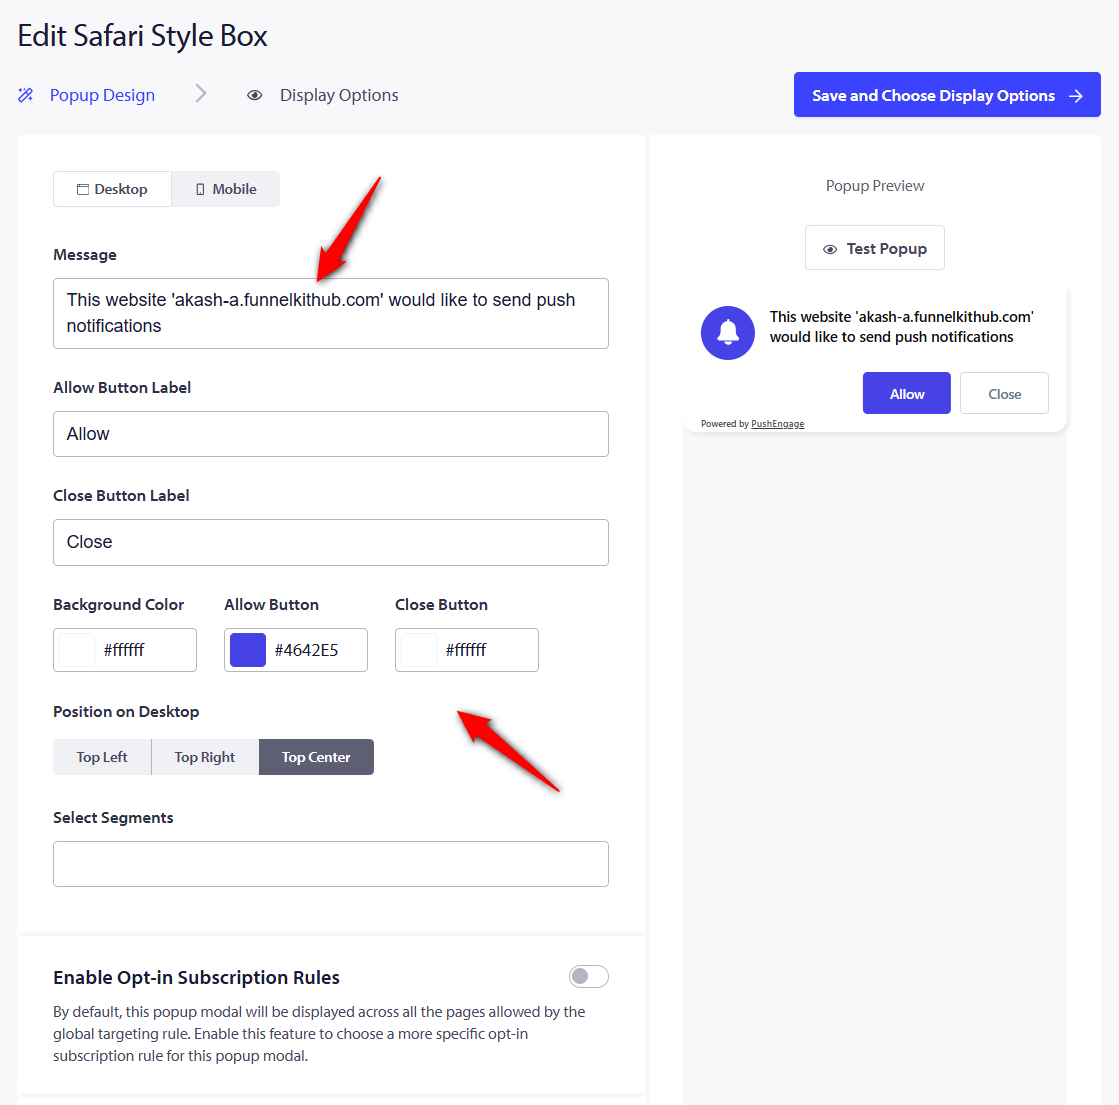
Now change the copy to give people an actual reason to say yes.
Instead of something generic like "yourstore.com wants to send notifications", try something tied to what they might care about.
For example, use "Get early access to sales and restocks".
Step 3: Create your first triggered campaign
In PushEngage, go to Campaigns ⇨ Triggered Campaigns. This is where you set up messages that fire automatically when a shopper does something specific.
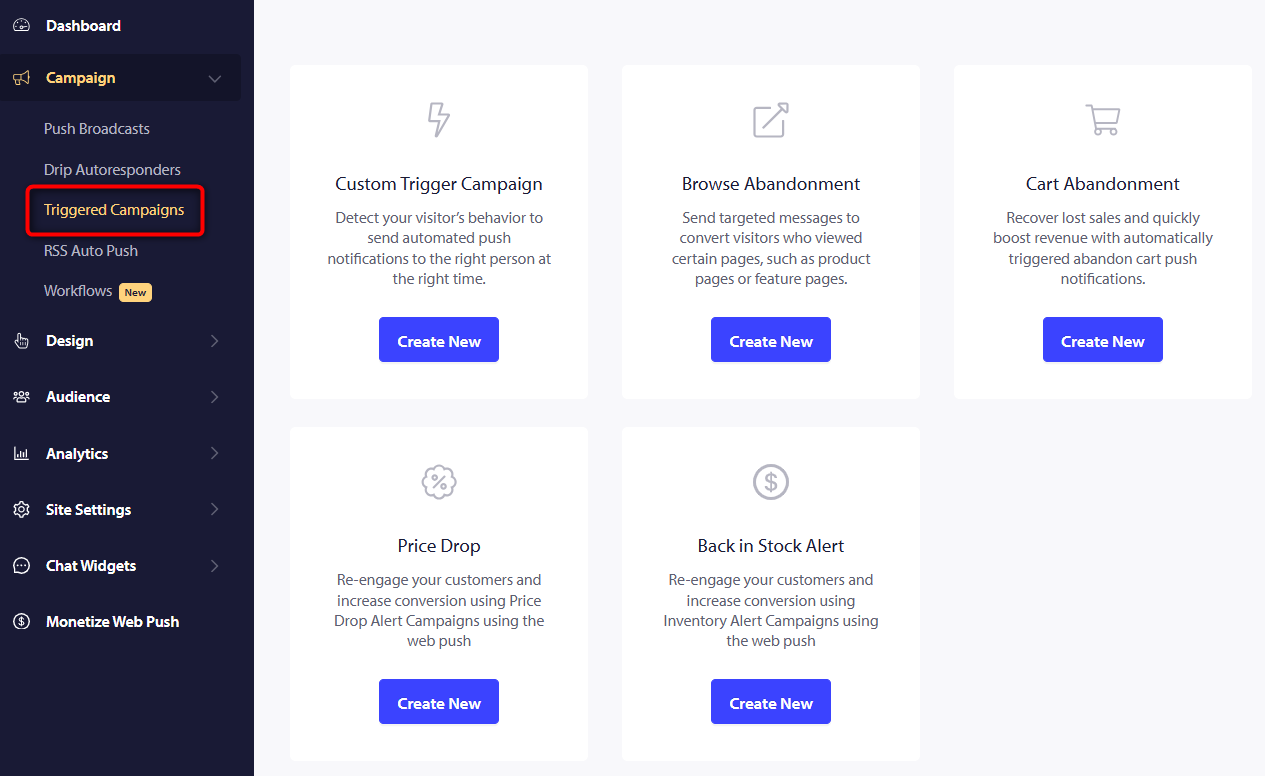
You'll typically see options such as:
- Cart abandonment: Remind subscribers when they add something to their cart but don't complete the purchase.
- Browse abandonment: Follow up with subscribers who viewed a product without adding it to their cart.
- Price drop alerts: Let shoppers know when a product they were interested in gets cheaper.
- Back-in-stock alerts: Tell subscribers when a product they've been waiting for is available again.
- Inventory alerts: Use low-stock messages to create urgency around products that are running low.
Start with cart abandonment for your store.
Give the campaign a name, write the notification, and send shoppers back to the cart when they click.
Use dynamic values or merge tags for things such as the product name and image, so you don't have to create a separate notification for every product.
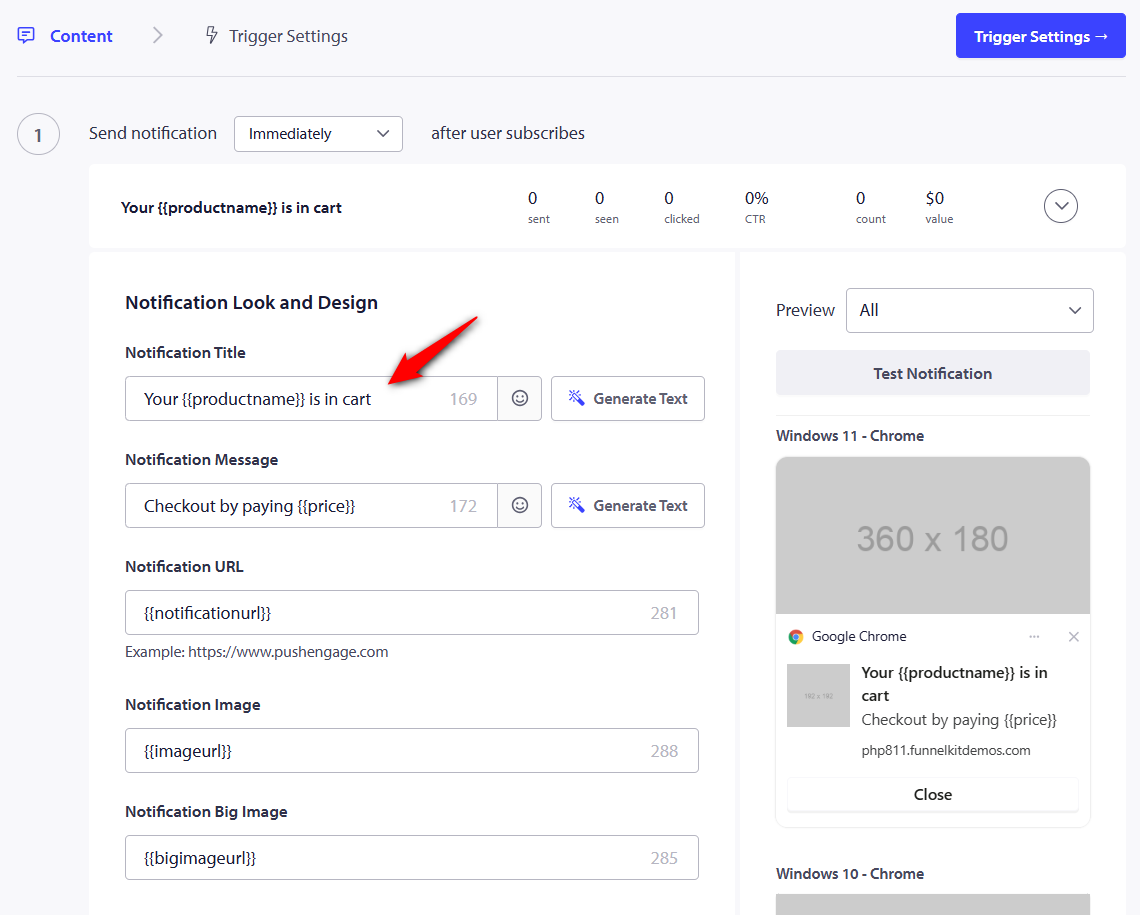
A simple three-message sequence is a good place to start.
- 30 minutes: “Still thinking about your {{product name}}? It's waiting in your cart.”
- 24 hours: Remind them that the product is popular or selling quickly, if that's genuinely true.
- 72 hours: Introduce the discount if you want to use one.
We'd keep the discount for the final message. If every abandoned cart immediately triggers a coupon, shoppers can quickly learn that abandoning the cart is the easiest way to get one.
Next, set a frequency limit so someone doesn't receive a stream of notifications just because they browsed a few products.
Add UTM parameters to your links as well. That makes it much easier to see which push campaigns are actually driving visits and sales in your analytics.
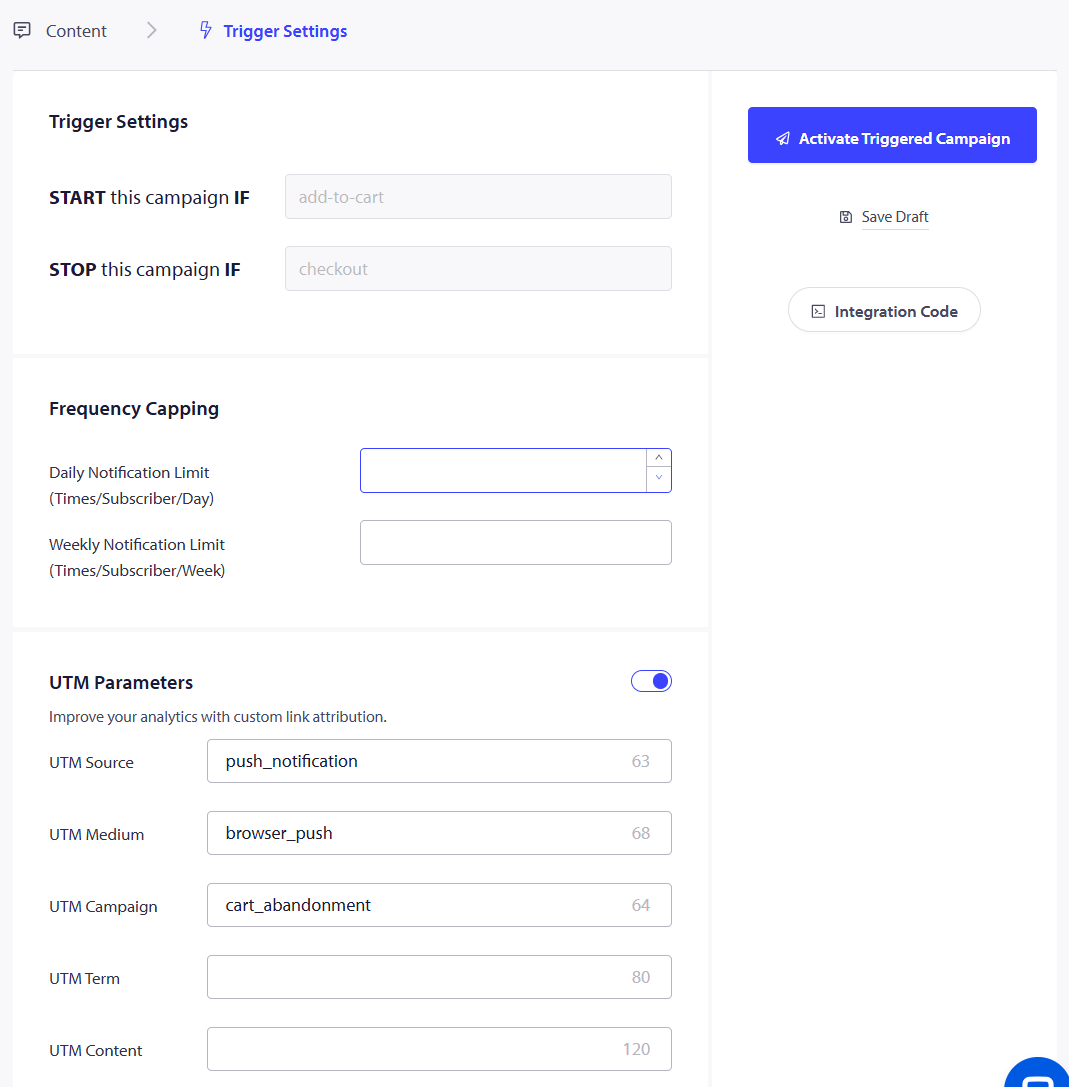
Click Activate, and the automation is live.

One important point: push notifications should be part of your recovery strategy, not the entire strategy. If you also use email, SMS, or other channels, build the sequence so customers aren't getting the same reminder everywhere at once.
Step 4: Send your first push broadcast
Triggered campaigns happen automatically. Broadcasts are one-off messages that you send when you have something specific to announce, such as a new product, flash sale, or restock.
From the PushEngage dashboard, choose 'New Broadcast' and add your title, message, image, and destination URL.
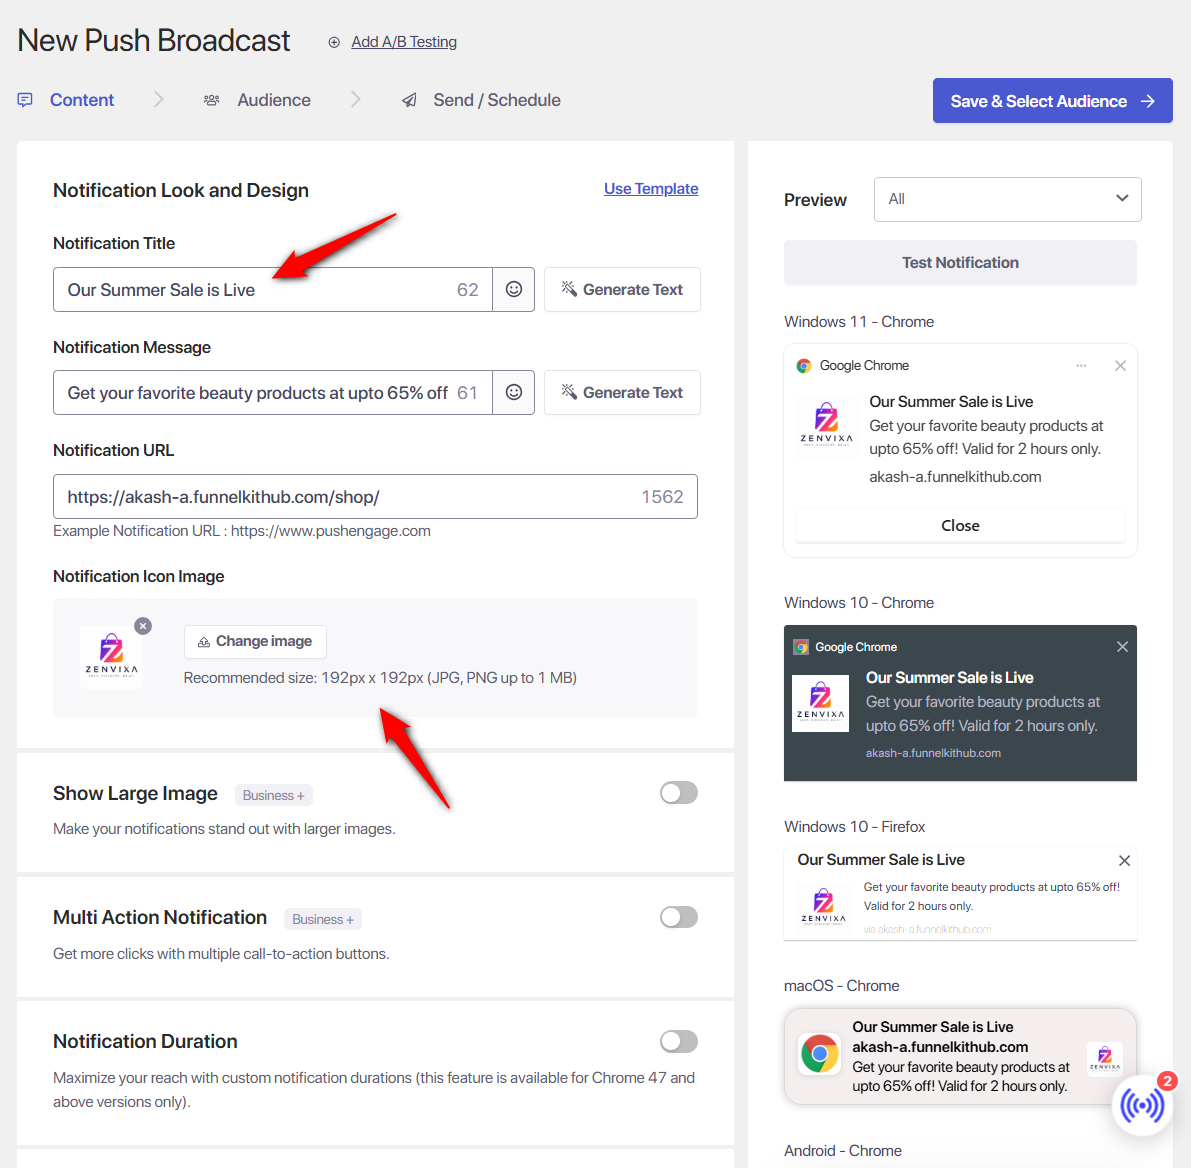
Before hitting send, look at your audience.
You don't necessarily want to send every notification to every subscriber. If PushEngage lets you segment based on things such as pages viewed, products purchased, or previous campaign activity, use that information.
For example, someone who has already viewed the Vitamin C Serum is a much better audience for a restock alert than someone who has never shown any interest in skincare.
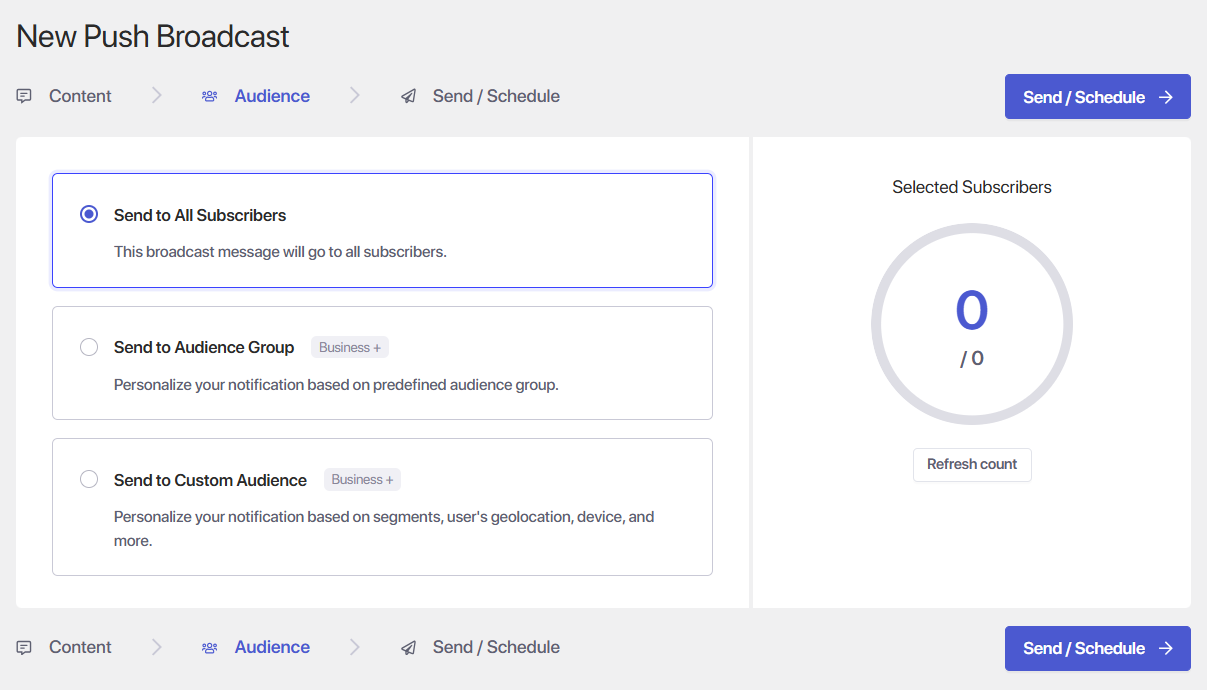
Next, send this push broadcast immediately or schedule it.
Step 5: Test, activate, and monitor
Before going live, send a test notification to your own browser.
Open your store in an incognito window, allow notifications, and check that the opt-in flow looks right on desktop and mobile.
Then place a test order and watch the cart abandonment trigger actually fire.
Once the store is live, give yourself a baseline for the first week. The three numbers we'd watch first are delivery rate, click-through rate, and revenue per message.
If hardly anyone subscribes, look at the opt-in. If people subscribe but don't click, look at the notification copy and offer. If they click but don't buy, the problem is probably further down the funnel.
Those are three different problems, and treating them as one usually leads to a lot of unnecessary tweaking.
Going Beyond Standalone Push: Triggering Notifications From Custom Workflows
PushEngage is enough if all you want are the usual push campaigns, such as abandoned carts, browse abandonment, price drops, and back-in-stock alerts.
But eventually, you may want your notifications to react to what a customer has actually done.
Maybe someone hasn't ordered in 60 days. Maybe they bought from one category and would probably be interested in a new product from that same category.
Or maybe a subscription payment failed and you want to catch it before the customer notices their subscription has stopped.
And then there are workflows that span multiple channels.
A push notification might be the first reminder, followed by an email, then an SMS if the customer still doesn't act.
That's where a standalone push tool starts to feel limiting.
You need something that can make decisions based on customer data and store events, then use push as one of the actions.
FunnelKit Automations can sit in that layer.
It connects with PushEngage, so push notifications become another action you can add to a WooCommerce workflow alongside emails, SMS, tags, delays, conditions, and other actions.
Here are seven examples of what that setup can look like.
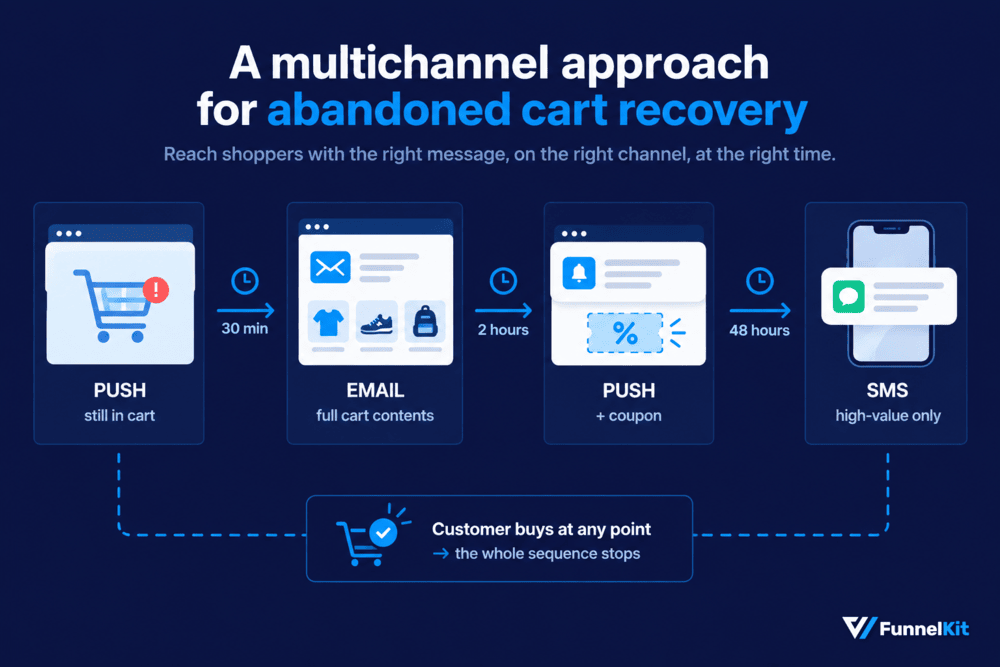
1. Multi-channel abandoned cart recovery
Instead of sending three push notifications and hoping one works, build a recovery sequence across channels.
Start the workflow when the cart is abandoned. Send a push notification after 30 minutes.
If the customer still hasn't purchased, follow up with an email two hours later.
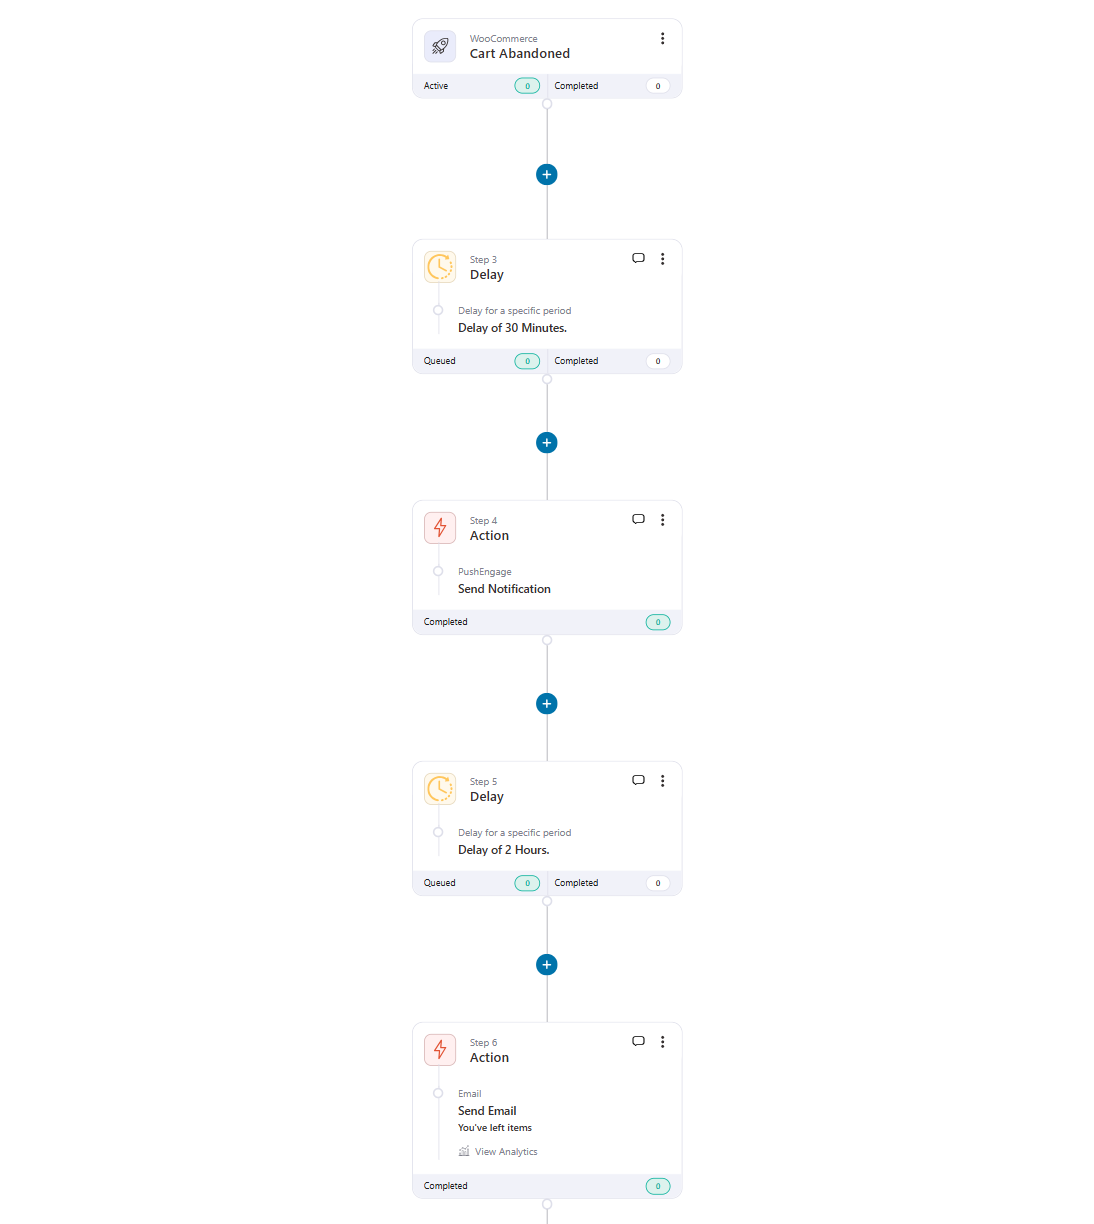
Send another push with a coupon after 24 hours, then reserve an SMS for higher-value carts after 48 hours.
The useful part isn't simply having more messages. It's being able to control when each channel gets used and stop the sequence as soon as the customer buys.
2. Order status updates
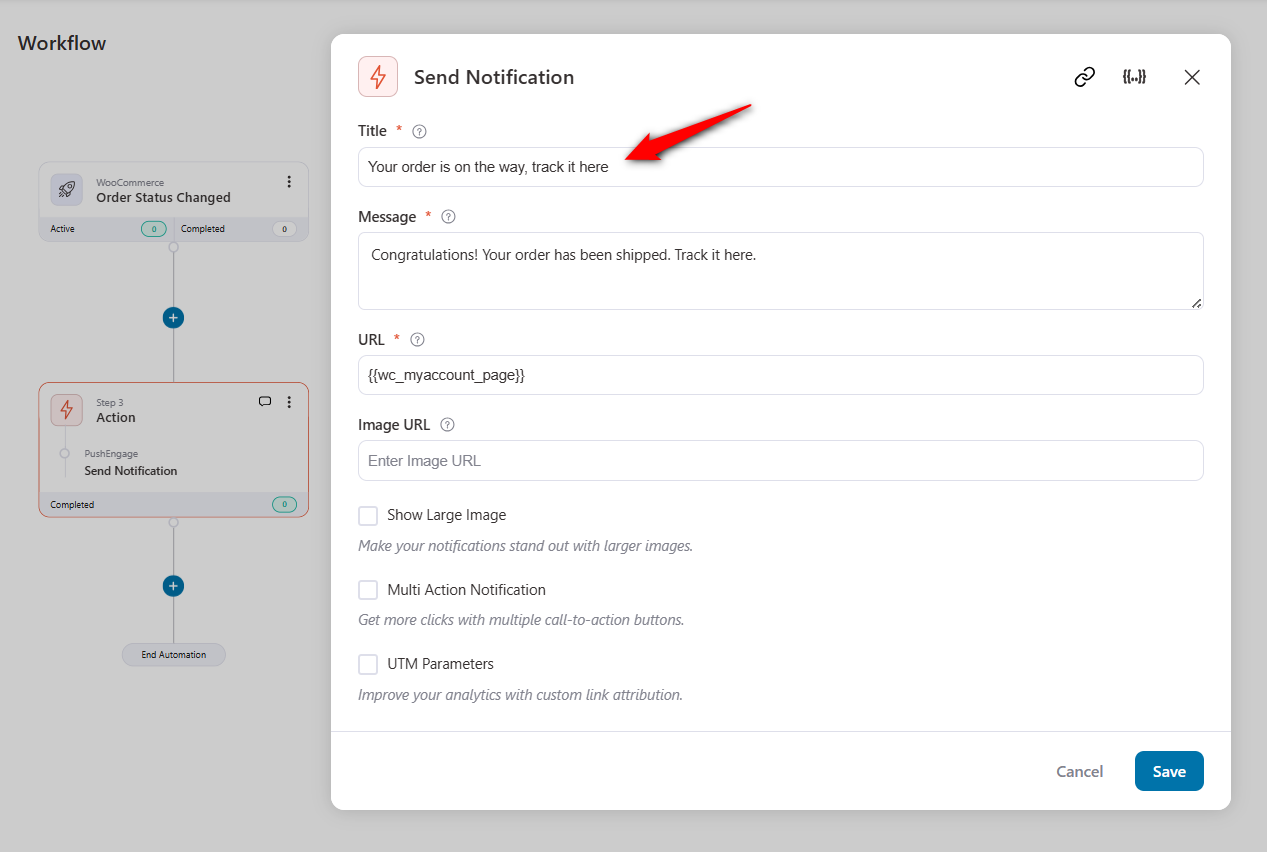
Trigger the workflow when an order status changes.
When the order ships, send something like: "Your order is on the way. Track it here."
When it's delivered, another one lands: "Your package has arrived, leave a review for 10% off your next order".
These messages aren't particularly exciting, but they're useful.
They keep customers informed without making them dig through their inbox or contact support to ask where an order is.
3. Wishlist price-drop notifications
If you're using a compatible WooCommerce wishlist plugin, you can use wishlist activity as part of your automation.
When something a customer has saved goes on sale, trigger a push notification letting them know.
That's a much stronger signal than sending the same sale announcement to your entire subscriber list.
The customer already told you they wanted the product. You're simply letting them know the price changed.
4. Personalized product recommendations
Build conditions around things such as previous purchases, average order value, or the categories a customer buys from most often.
Then use those conditions to decide which push notification they receive.
For example, someone who bought running shoes from your store last month could receive a notification when you add new running accessories.
The message is more relevant because it is based on something the customer actually did, rather than a guess about what everyone on your list wants.
5. Post-purchase follow-up sequences
Start the workflow when an order is completed and let the messages unfold over time.
You might send a thank-you notification immediately, then a few days later send a useful guide or how-to video related to the product.
After the customer has had enough time to use it, send a review request.
Later, you can bring them back with a replenishment reminder or a relevant offer.
The goal isn't to keep pushing promotions at someone who just bought.
It's to give the relationship somewhere to go after the first order.
6. Subscription renewal reminders
If you sell subscriptions through WooCommerce Subscriptions or Sublium, push notifications can become another way to catch important subscription events.
For example, you could notify customers when a renewal payment fails, when a card is about to expire, when a trial is ending, or a few days before their next renewal.
Failed renewals are particularly worth watching.
A customer can churn without ever deciding to cancel simply because their payment method stopped working.
A timely notification gives them a chance to fix the payment before the subscription disappears.
7. Win back customers with dynamic coupons
Winback campaigns are another good use for workflow-based push notifications.
Set a period of inactivity, such as 60 days without an order.
When a customer reaches that point, the workflow can send them a personalized message and, if appropriate, generate a unique coupon for the offer.
Instead of sending everyone the same: "We miss you. Here's 15% off."
You can make the message specific to that customer and add an expiry date to the coupon.
That combination of personalization and a real deadline gives the message a much better reason to be opened than another generic "come back and shop" notification.
PushEngage handles the delivery. Your automation layer decides why, when, and to whom to send the message.
Once you separate those two jobs, push notifications become much more useful than a collection of standalone campaigns.
Which Browsers and Devices Support Web Push?
| Browser | Desktop | Android | iOS |
|---|---|---|---|
| Chrome | ✅ Yes | ✅ Yes | ⚠️ PWA only (iOS 16.4+, WebKit) |
| Firefox | ✅ Yes | ✅ Yes | ⚠️ PWA only (iOS 16.4+, WebKit) |
| Edge | ✅ Yes | ✅ Yes | ⚠️ PWA only (iOS 16.4+, WebKit) |
| Safari | ✅ Yes | ✅ Yes | ⚠️ PWA only (iOS 16.4+, WebKit) |
| Opera | ✅ Yes | ✅ Yes | ⚠️ PWA only (iOS 16.4+, WebKit) |
For most desktop and Android shoppers, web push is straightforward. They can subscribe directly from the browser without installing an app.
iPhone is the odd one out. On iOS, web push works only for a site added to the Home Screen as a progressive web app.
That extra step means you should not treat push as your only retention channel if a large share of your traffic comes from iPhones.
In that case, make the opt-in instructions clear and keep email or SMS available as a backup.
Push works best as another way to reach customers, not the only one.
Best WooCommerce Push Notification Plugins (Free and Paid)
| Plugin/Service | Free Plan | Best For | Standout Feature |
| PushEngage | Yes (200 subscribers) | eCommerce-focused stores | Web and app push notification service with built-in WooCommerce triggers |
| FunnelKit Automations | Yes (free version available), PushEngage connector on Pro plan | Stores wanting smart workflow automation | Multi-channel workflows (push + email + SMS), customer winback, subscription reminders, dynamic coupons |
| OneSignal | Yes (10,000 web subscribers) | High-volume free use | Most generous free tier, multi-channel (web, mobile, email) |
| PushAlert | Yes (3,000 subscribers) | Visual customization | Rich media notifications, custom prompts, smart segmentation |
| Gravitec | Yes (10,000 subscribers) | Content publishers and stores | RSS-to-push automation, A/B testing |
| Pingbell | Free trial | Simple WooCommerce steps | Lightweight WooCommerce-specific integration |
| Push Notification for WooCommerce | No (paid) | Self-hosted, Firebase-based | Firebase Cloud Messaging, no third-party SaaS |
| Webkul Push Notifications | No (paid) | Multi-vendor and marketplace stores | Multi-vendor support, custom segmentation |
| YITH Live Push Notifications | No (paid) | On-site social proof | Live activity popups (not browser push) |
| PushWave (Open Source) | Yes (fully free) | Developers and budget stores | Self-hosted, no SaaS dependency, no subscriber cap |
Once you get past the table, the choice is actually pretty simple.
OneSignal is a good place to start if keeping costs down is the priority.
Its free web subscriber allowance is generous enough for a smaller store to test push without immediately paying for another marketing platform.
If you mainly want broadcasts and basic automation, that may be all you need.
PushEngage makes more sense when WooCommerce-specific triggers matter.
The value is less about sending another broadcast and more about what happens after someone browses, adds something to their cart, abandons it, or waits for a product to come back in stock.
If you also use FunnelKit Automations, the PushEngage connector gives you another channel to use inside your workflows.
Gravitec is worth a look if content is a big part of your traffic strategy.
RSS-to-push can automatically turn new posts or other published content into notifications, so you don't have to create every campaign manually.
That's much more useful for a content-heavy store or publisher than it is for a catalog with only a handful of launches each year.
PushWave is the option for people who would rather manage the infrastructure themselves. It's open source and removes the usual SaaS subscription and subscriber limits.
The trade-off is pretty obvious. You're responsible for the setup, maintenance, and whatever dashboard or reporting you need. If you're comfortable with that, it's worth exploring.
If you just want push notifications working this afternoon, an established service will be easier.
Push Notification for WooCommerce takes a similar self-hosted approach.
It uses Firebase Cloud Messaging instead of putting the whole notification layer in a third-party SaaS platform.
You get more control, but the setup is more technical, so it's usually a better fit for stores with someone comfortable managing the infrastructure.
How to Grow Your Push Subscriber List
You can build the perfect abandoned-cart sequence and still recover almost nothing if hardly anyone has subscribed.
That's why subscriber growth matters just as much as the automation itself.
A sequence sent to 500 people and the same sequence sent to 5,000 are very different.
- Use a two-step opt-in
The browser's default permission prompt asks for a decision before you've given the visitor much context.
A custom prompt lets you explain the benefit first, then sends the visitor to the browser permission request once they're interested.
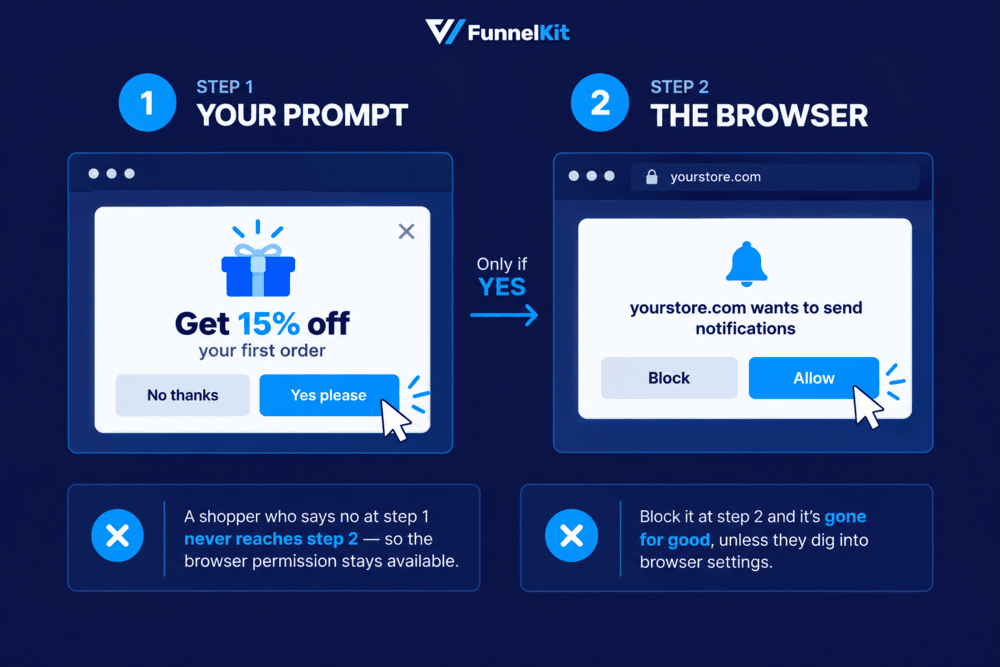
PushEngage, OneSignal, and PushAlert support custom opt-in experiences, so you don't have to rely entirely on the default browser prompt.
- Ask at the right moment
Showing the prompt the second someone lands on your site is an easy way to get dismissed.
Try waiting until they've spent some time on the page, scrolled, or viewed another product.
Someone who has already shown interest is more likely to understand why the notification is useful.
- Give people a reason to subscribe
"Get notified" isn't much of a reason on its own.
"Get 15% off your first order and be the first to know when this product is back in stock" gives the visitor something concrete.
Whatever you promise, deliver it in the first notification. That first message sets expectations.
- Add another opt-in opportunity after the purchase
The thank-you page is easy to overlook, but it's one of the best places to ask. Someone who has just completed an order already trusts your store.
You can offer browser notifications for shipping updates, restocks, or subscriber-only offers instead of asking them to opt in to generic marketing.
With FunnelKit Funnel Builder, you can replace WooCommerce's default order-received page with a custom thank-you page and use that space for the opt-in.
- Use the channels you already have
Your email list is an easy starting point. Add a short note to your emails or order confirmations explaining that customers can also get faster browser notifications for things like restocks and order updates.
You're giving an existing audience another way to hear from you without spending more on acquisition.
The goal isn't to get every visitor to subscribe.
It's to make the people who actually want to hear from you understand why push is worth the one extra tap.
Frequently Asked Questions
Yes, and not in a stingy trial-that-expires way. Several plugins run genuinely free plans.
OneSignal covers up to 10,000 web push subscribers at no cost. Gravitec matches that at 10,000. PushEngage gives you 200.
And PushWave, the open-source option on GitHub, is completely free with no subscriber cap. Paid tiers only come into play once you outgrow the free subscriber limit or need advanced WooCommerce automation triggers.
The five most common causes why your WooCommerce push notifications are not working are an SSL/HTTPS issue (push notifications require HTTPS), an opt-in popup that is hidden by your theme or cookie banner, a misconfigured service worker file, a caching plugin that is caching the service worker, or a visitor on an unsupported browser like Safari on older iOS.
Recheck your plugin's setup wizard, exclude the service worker file from your caching plugin, clear all caches, then test in an incognito window in Chrome on Android or desktop.
Still no opt-in showing up? At that point, you’re likely looking at a JavaScript conflict in your theme, which is the one case where a developer earns their fee.
Yes, but with a catch big enough to plan around. Web push on iOS only works on iOS 16.4 or later, and only for sites the user has saved to their home screen, which Apple calls a web app.
Someone has to deliberately add your store to their home screen before a single notification can reach them.
In practice, that shrinks your iPhone web push reach well below what you'll see on Android.
That's the main reason we push people to pair push with email and SMS when the audience skews iOS-heavy.
For admin order alerts on your phone, install the official WooCommerce mobile app from the App Store or Google Play.
Log in with your store credentials and enable notifications in the app settings.
The customer-facing push plugins discussed in this guide send notifications to your customers, not to the store owner.
Yes. All major plugins let you customize the notification title, message, image, icon, and destination URL.
Some support larger rich notifications with multiple action buttons (for example, “View Cart” and “Apply Discount”).
The operating system controls the notification chrome itself (rounded box, fonts, sounds), not the plugin.
Yes. This is the highest-converting setup for most stores: a first push at 30 minutes after cart abandonment, an email at 24 hours, a push + SMS combo at 72 hours.
Automation platforms like FunnelKit Automations let you build these branching, multi-channel workflows in a single visual builder.
Start Recovering Revenue With WooCommerce Push Notifications
WooCommerce push notifications are relatively inexpensive to test, and you don't need a complicated setup to find out whether they work for your store.
Start with the tool that fits your setup. PushEngage is a good choice if WooCommerce triggers and ecommerce automation are the priority.
OneSignal makes sense if you want to start with a generous free tier.
And if you have the technical skills to manage your own infrastructure, PushWave is an option for a fully self-hosted setup.
Don't build five campaigns on day one. Start with one. An abandoned-cart campaign is a sensible first test because you can measure the result directly.
Let it run for 30 days, then look at deliveries, clicks, recovered orders, and revenue.
If the numbers look promising, expand from there. Add back-in-stock alerts, broadcasts, price-drop notifications, or browse-abandonment campaigns based on what your customers actually do.
And when you need more than standalone push campaigns, FunnelKit Automations can bring push into larger workflows.
You can combine it with email and SMS, add dynamic coupons, build win-back sequences, recommend products based on customer behavior, and trigger reminders around subscriptions or renewals.
The goal isn't to send more notifications. It's to send useful notifications to the right people at the right moment.
Start with one campaign this week. Check the numbers after 30 days. Then let the data decide what you build next.
Editorial Team
October 6, 2026The WooCommerce checkout coupon field is where shoppers enter a discount code before they pay. Once coupons are turned on, WooCommerce adds it to both the cart and the checkout...
Editorial Team
October 2, 2026A WooCommerce invoice email gives customers a clear record of what they bought, what they paid, and how they paid. WooCommerce can send one out of the box, but only...
Editorial Team
October 1, 2026Want to drive more sales and customer loyalty with WooCommerce coupons? From simple percentage discounts to auto-applied deals, free gifts, and personalized offers, coupons give shoppers a reason to buy...






