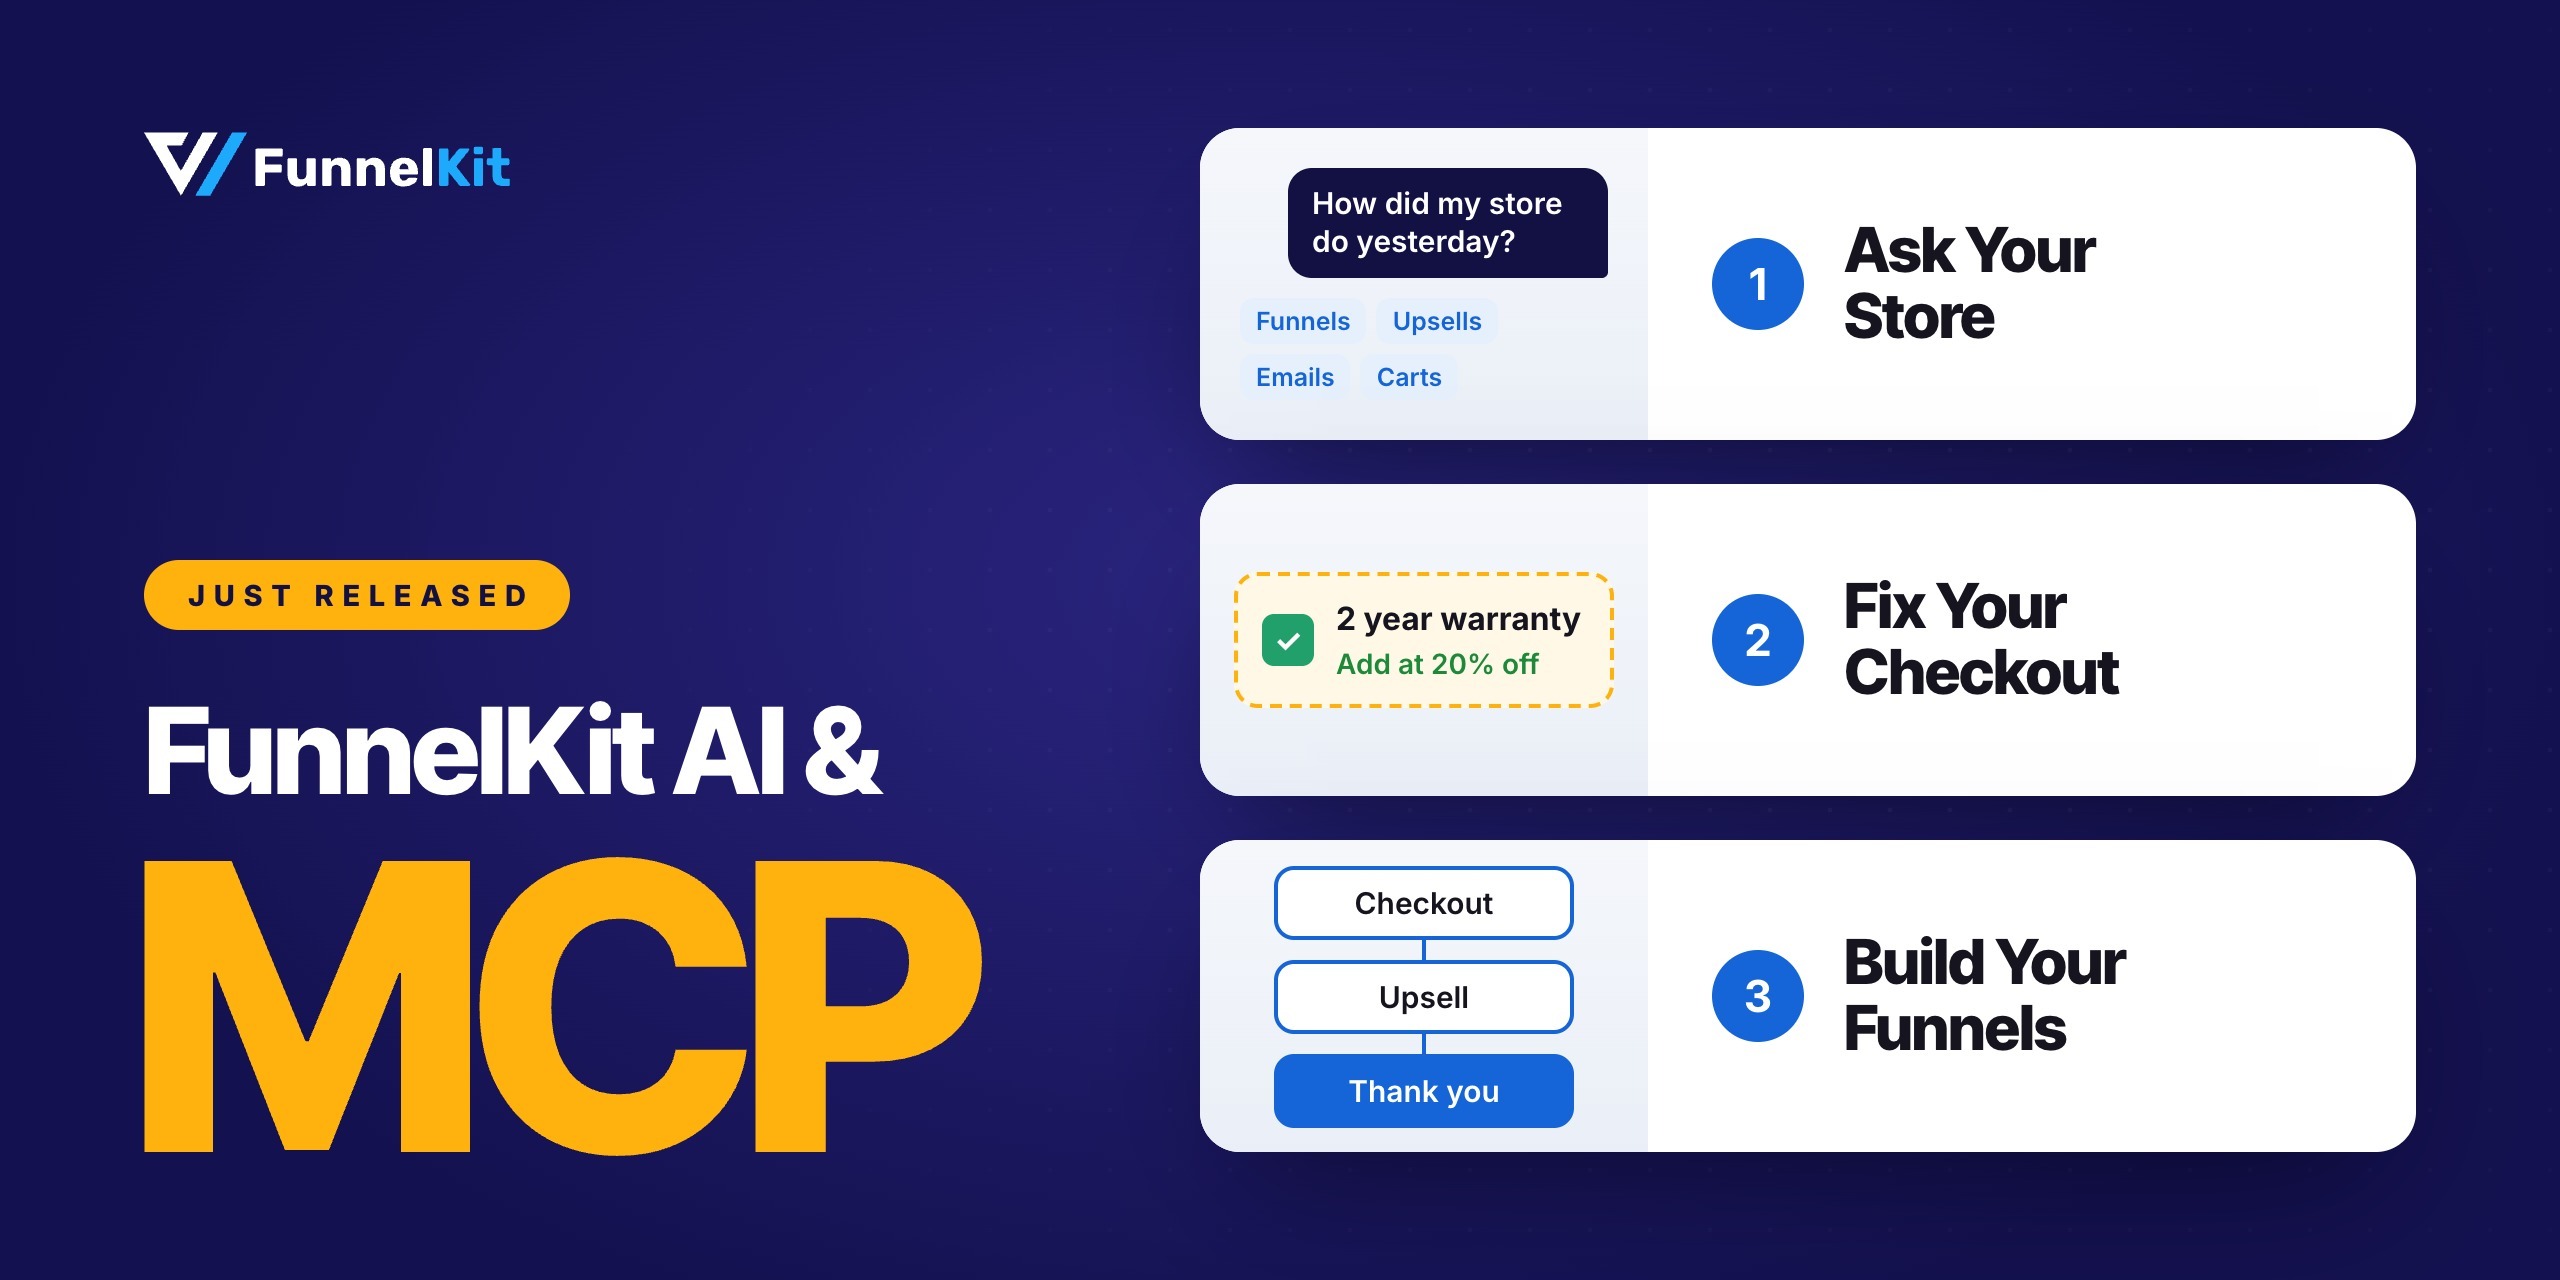
With FunnelKit MCP, you can ask how your WooCommerce store did yesterday and get the numbers in a single reply. It pulls data directly from your funnels, emails, and carts.
You know that daily store report you keep meaning to put together? The one that's been sitting on your to-do list since March?
The numbers you need are spread across different dashboards.
Funnel revenue is in one place, email revenue in another, and abandoned carts somewhere else.
To check upsell revenue, you have to export the data and sort through a spreadsheet.
By the time you've checked everything, something else usually needs your attention. The report gets pushed to tomorrow, again.
FunnelKit Funnel Builder 3.18.0 and FunnelKit Automations 3.9.0 make this easier.
Instead of pulling numbers from different places, you can ask a question in plain English and get your store report in one reply.
Here's a quick video to understand all about it:
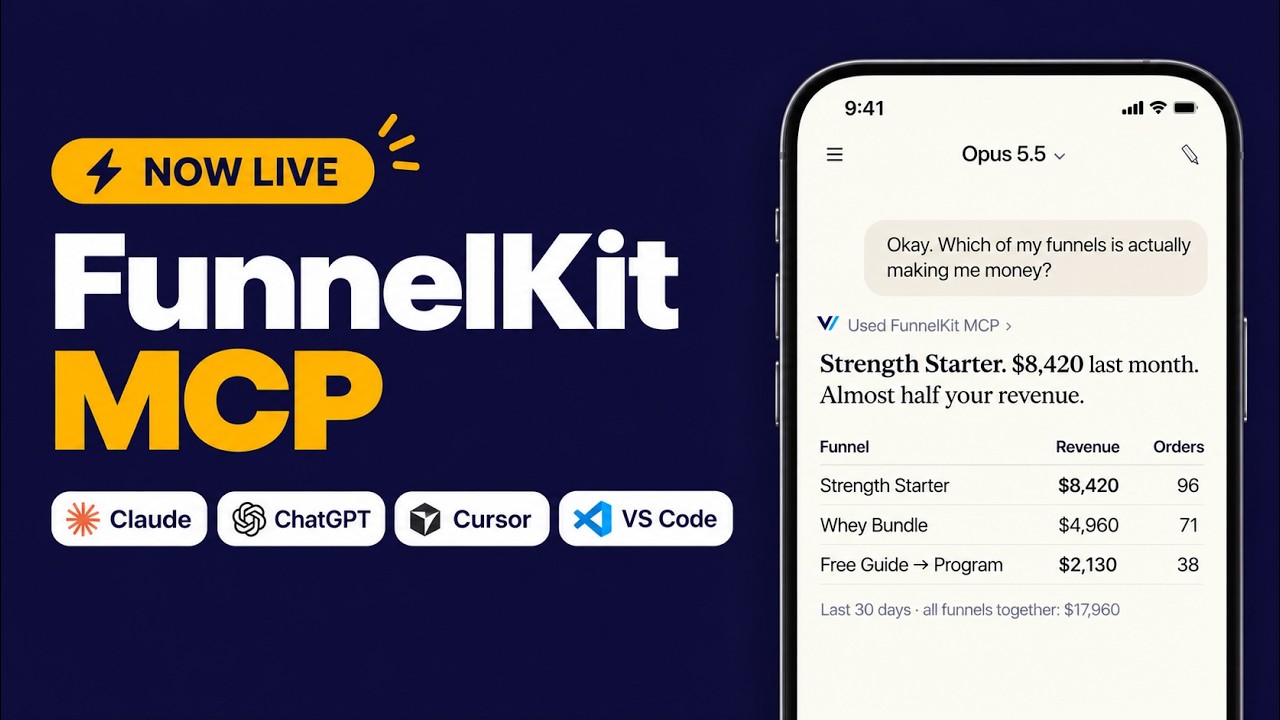
Table of Contents
- 1 What is FunnelKit MCP?
- 2 What the Assistant Can Read and Change
- 3 How to Set Up FunnelKit MCP
- 4 What the Assistant Can Change and How You Stay in Control
- 5 Ask: Answers from Your Store in One Sentence
- 5.1 Get a daily WooCommerce store report
- 5.2 Find out which funnel made the most money
- 5.3 Find where shoppers drop off in your funnel
- 5.4 Find out which upsells are worth keeping
- 5.5 See where your sales are coming from
- 5.6 Find out which emails generate the most revenue
- 5.7 Look up a customer's orders and email history
- 6 Change: Fix Your Checkout By Describing It
- 7 Build: Funnels, Emails and Automations from a prompt
- 8 Set Up Your WooCommerce Black Friday Campaign With AI
- 9 Frequently Asked Questions
- 10 Ready to Build With AI?
What is FunnelKit MCP?
FunnelKit MCP connects FunnelKit to the AI assistant you already use.
So instead of guessing what's happening in your WooCommerce store, the assistant can pull real data and answer your questions.
MCP stands for Model Context Protocol. It's an open standard that lets AI assistants connect to other apps and tools, and clients like Claude, Cursor, and VS Code support it.
FunnelKit MCP gives the assistant specific abilities, such as reading store data or performing certain actions.
You choose which permissions to grant.
Think of it like giving a new hire their own login with access only to what they need. They can check the numbers themselves instead of asking you for screenshots every time.
Why an AI Inside Your Store Beats One Outside It
Most store owners already lean on AI for something.
Business.com's 2026 Small Business AI Outlook surveyed 1,009 people at U.S. companies with fewer than 250 employees and found that managers save about 7.2 hours a week using AI tools.
Most of that AI sits outside the store. It can draft a product description or a subject line.
But it can't tell you which upsell converted last week, because it has never seen your data. So you export a CSV, paste it into a chat, and explain your funnel structure from scratch.
The same busywork with an extra step.
This connection closes that gap. The assistant reads the same data your FunnelKit dashboards use.
Ask which funnel made the most money last month, and you get your own funnels, ranked by revenue.
One connection covers both plugins
If you run FunnelKit Funnel Builder and Automations together, one connection answers questions about both.
Funnel data travels over the same connection, so you don't need a second setup or extra installs.
In practice, one chat can move from funnel numbers to contact tags without switching tools.
It can cover more than one store, too. If you run several WooCommerce sites, you can add each one to the same AI client.
What the Assistant Can Read and Change
What the assistant can do depends on which FunnelKit plugins you use and whether you have Lite or Pro.
Each capability is called an "ability" and appears as a separate tool in your AI client and the FunnelKit AI & MCP tab.
| Plugin and tier | Total abilities | Read abilities | Change (Write) abilities |
|---|---|---|---|
| FunnelKit Funnel Builder Lite | 39 | 19 | 20 |
| FunnelKit Funnel Builder Pro | 50 | 26 | 24 |
| FunnelKit Automations Lite | 18 | 18 | 0 |
| FunnelKit Automations Pro | 47 | 29 | 18 |
Each Pro tier adds abilities to its Lite version rather than replacing them. If you run both plugins with Pro, you get access to 154 abilities in total.
Each plugin also has a context tool that the assistant uses to check what's available and active.
FunnelKit Funnel Builder Lite: 39 abilities
Funnel Builder Lite lets the assistant create funnels from templates, add steps, change their status, configure checkout products, adjust checkout settings, and manage other funnel options.
It doesn't include funnel analytics. To ask questions about funnel revenue, conversions, or offer performance, you'll need Funnel Builder Pro.
| Area | What the assistant can read | What the assistant can change |
|---|---|---|
| Funnels | List Funnels, Get Funnel, List Funnel Templates, Get Import Status | Create Funnel, Update Funnel, Reorder Funnel Steps, Publish Funnel Steps, Import Funnel, Export Funnel |
| Steps | Get Step, List Step Types, Resolve URL, Get Optin Fields, Get Optin Settings, Get Step Settings | Create Step, Update Step, Update Step Status, Update Step Template, Update Optin Settings, Update Optin Actions, Update Thank You Settings |
| Checkout | Get Store Checkout, Get Checkout Fields, Get Checkout Products, Get Checkout Optimizations, Get Checkout Settings, Search Products | Create Store Checkout, Update Store Checkout, Update Checkout Products, Update Checkout Optimizations, Update Checkout Settings |
| Settings | Get Global Settings, Get Funnel Settings | Update Global Settings, Update Funnel Settings |
| Context | Get Funnel Builder Context | None |
Please note that export funnel is classified under write access because an export can contain credentials, even though exporting itself doesn't change your store.
Some checkout features, such as letting shoppers choose between products, also require Pro.
FunnelKit Funnel Builder Pro: 50 additional abilities
Pro adds funnel analytics and reporting, order bumps, upsells, A/B testing, and page design editing.
These abilities let the assistant do more than build a funnel's basic structure.
| Area | What the assistant can read | What the assistant can change |
|---|---|---|
| Analytics | Get Funnel Analytics, Get Dashboard Overview, Get Revenue Attribution, Get Funnel Performance, Get Offer Performance | None |
| Funnels | List Funnel Orders, List Funnel Leads, Get Top Funnels, Get Funnel Graph, Get Funnel Order | Duplicate Funnel |
| Steps | Get Step Stats, Get Order Bump, List Order Bump Skins, List Step Rule Types, Get Thank You Rules | Create Order Bump, Update Order Bump Products, Update Order Bump Rules, Update Order Bump Design, Update Order Bump Skin, Update Order Bump Settings, Update Thank You Rules |
| Checkout | List Payment Methods, Get Checkout Conditional Fields | None |
| One-Click Upsells | Get Upsell Offers, Get Upsell Settings | Create Upsell Offer, Update Upsell Offer Products, Update Upsell Rules, Update Upsell Settings, Update Offer Settings, Update Offer Template |
| Contacts | List Funnel Contacts, Get Funnel Contact | None |
| A/B Tests | List A/B Tests, Get A/B Test, Get A/B Test Results | Create A/B Test, Create A/B Test Variant, Update A/B Test, Start A/B Test, Pause A/B Test, Declare A/B Test Winner, Archive A/B Test Variant, Restore A/B Test Variant |
| Step Design | Get Step Design, Read Design | Prepare Step Design, Edit Design |
The page design abilities work only on steps built with Elementor.
FunnelKit Automations Lite: 18 read-only abilities
Automations Lite lets the assistant look up contacts, inspect automations, and review abandoned carts. It can't change your CRM or email workflows.
| Area | What the assistant can read |
|---|---|
| Contacts | List Contacts, Get Contact, Get Contact Orders, Get Contact Engagements |
| Automations | Get Contact Automations, List Automations, Get Automation, Get Automation Stats, List Automation Contacts |
| Carts | List Abandoned Carts, Get Abandoned Cart |
| Segments | List Tags, List Contact Lists, List Custom Fields |
| Context | Get Automations Context |
| Analytics | Get Cart Analytics |
| Emails | List Merge Tags |
| Connectors | List Connectors |
FunnelKit Automations Pro: 47 more abilities
Pro adds abilities to update contacts, manage automations, send emails, create broadcasts, work with audiences, and design email templates.
| Area | What the assistant can read | What the assistant can change |
|---|---|---|
| Analytics | Get Automations Overview, Get Email Performance, Get Email Analytics | None |
| Contacts | Filter Contacts, List Contact Filters | Create Contact, Update Contact, Manage Contact Tags & Lists, Change Contact Status, Add Contact Note, Send Email to Contact, Delete Contact |
| Automations | Get Automation Run, List Recipes, Describe Automation Part | Create Automation, Update Automation, Set Automation Status |
| Broadcasts | List Broadcasts, Get Broadcast, Get Broadcast Stats | Create Broadcast, Update Broadcast |
| Audiences | List Audiences, Get Audience | Create Audience, Update Audience |
| Link triggers | List Link Triggers | None |
| Email design | Get Email Design Schema, List Email Templates, Get Email Template, List Email Layouts, List Email Starter Designs, Get Email Starter Design, List Email Images, List Products, List Product Categories, List Coupons, List Block Conditions, Preview Email Design, Validate Email Design, Audit Email Design | Create Email Template, Update Email Template, Edit Email Design, Clone Email Template |
| Other | Get Webhook Sample | None |
You decide which abilities the assistant can use
You don't have to enable everything. The FunnelKit AI & MCP tab lets you turn individual abilities on or off, including specific write actions.
For example, if a team member only needs reporting access, you can disable abilities such as Delete Contact while leaving the relevant read abilities enabled.
Write abilities are off by default and must be granted per user.
Enabling MCP gives the assistant access to the abilities you permit, not unrestricted control over your store.
Automations Lite is read-only, so it has no automations write abilities to enable.
How to Set Up FunnelKit MCP
You can get FunnelKit MCP running in a few minutes without a developer.
First, update to Funnel Builder 3.18.0 or FunnelKit Automations 3.9.0, depending on which plugin you use.
You'll also need an MCP-compatible AI client. We used Claude for the examples in this guide.
Step 1: Go to the FunnelKit AI & MCP section
Open your Funnel Builder or FunnelKit Automations and go to the new AI & MCP tab.
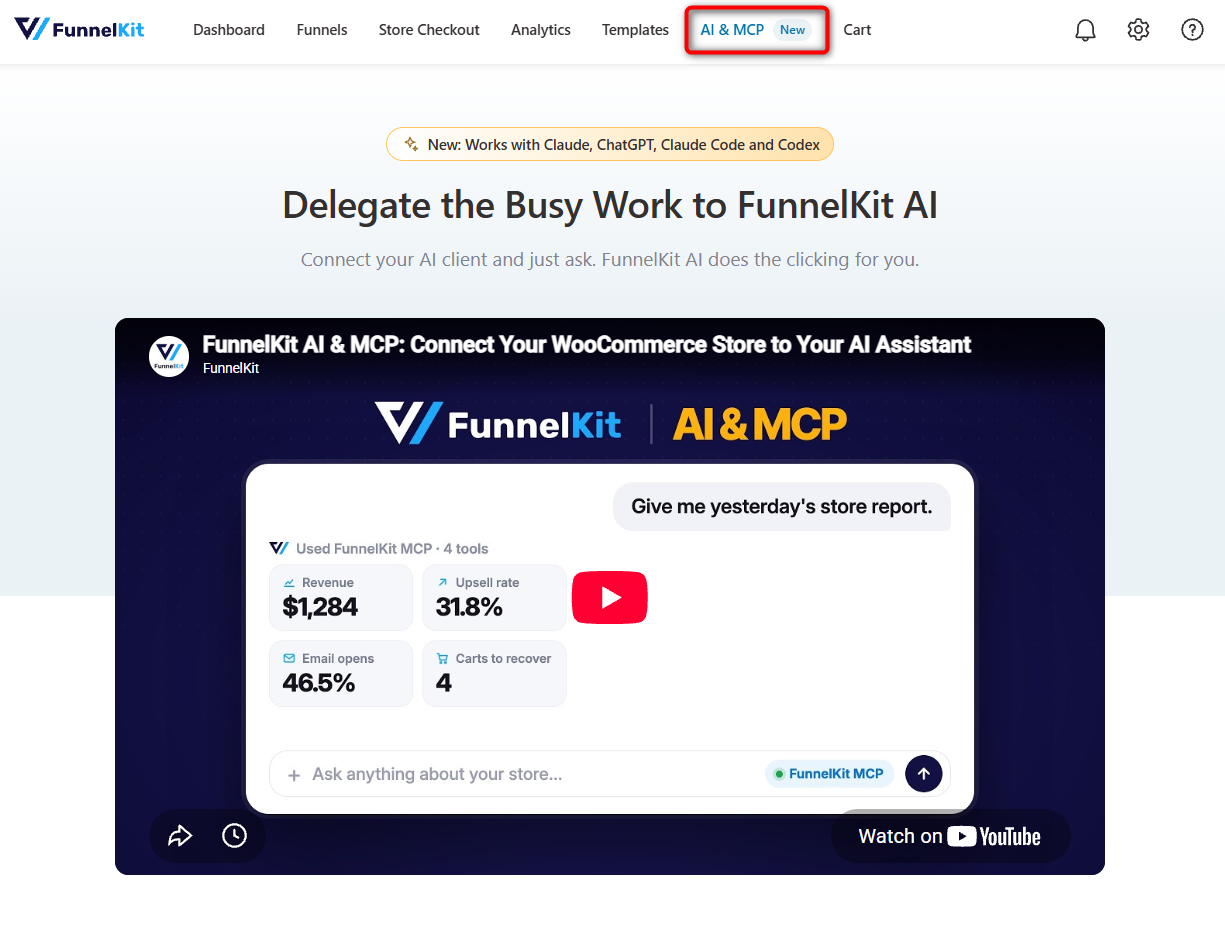
If you've already connected another store to FunnelKit AI, you'll see a short message in this tab letting you add this site to your existing connection.
You don't need to repeat the full setup. See Connect another store below.
Step 2: Connect your AI client
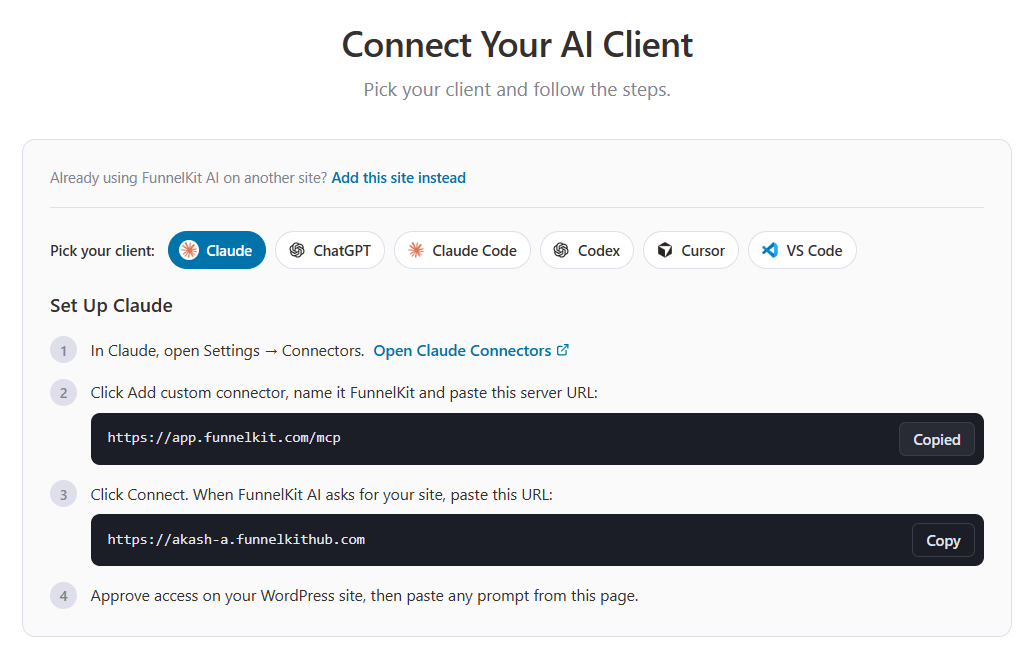
FunnelKit uses a companion plugin to connect your store to the AI client.
Select your AI client and copy the connector MCP URL. For example, we'll use Claude:
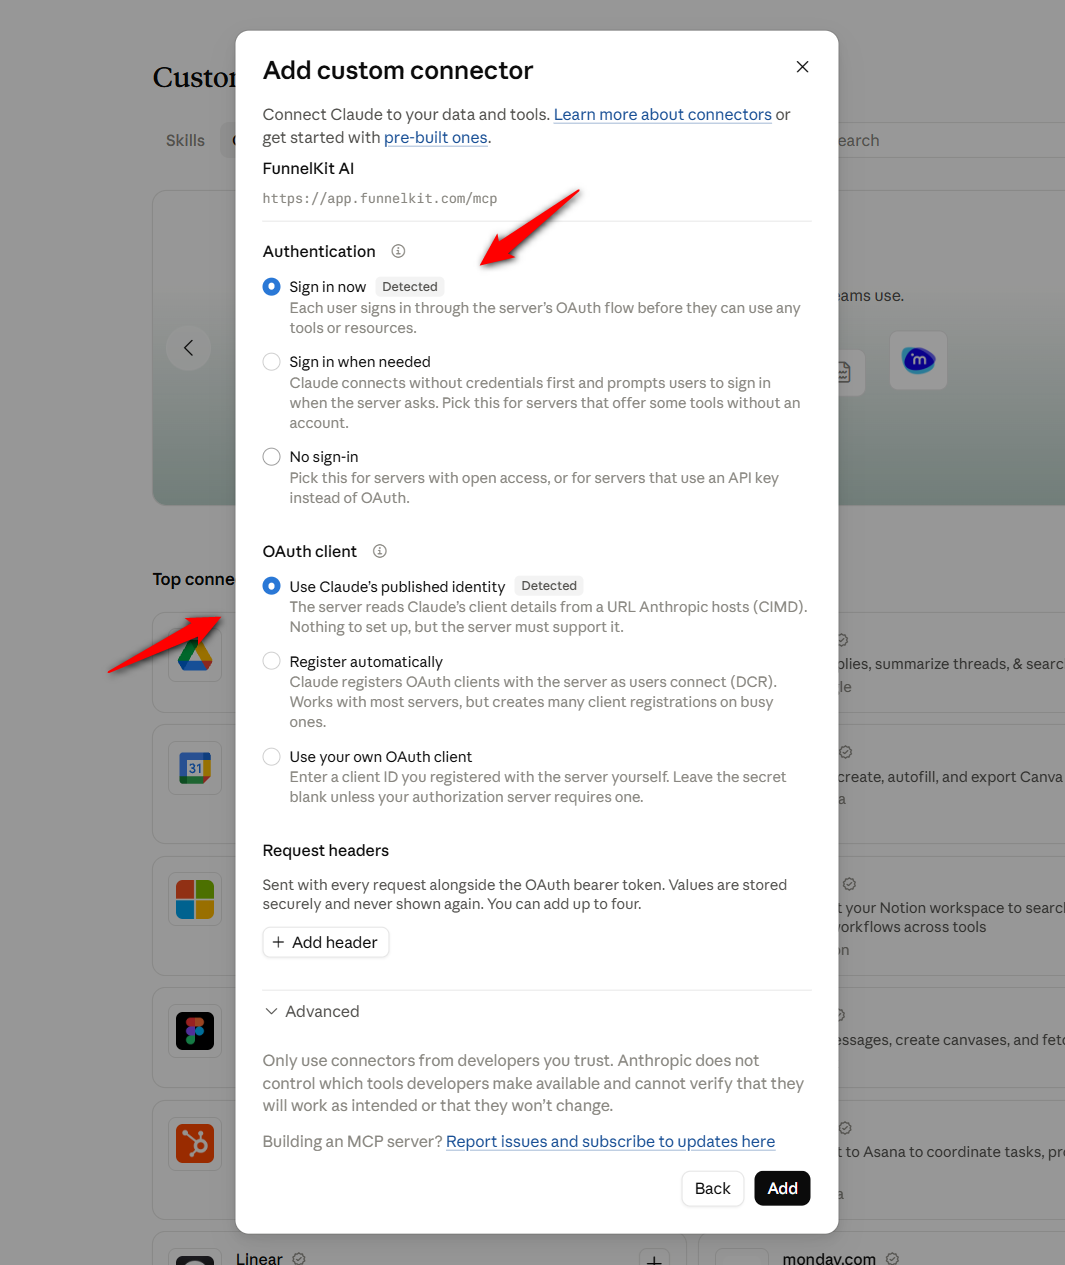
Step 3: Choose how to authenticate
Open Claude or your selected AI assistant, and paste the custom connector URL there in the settings.
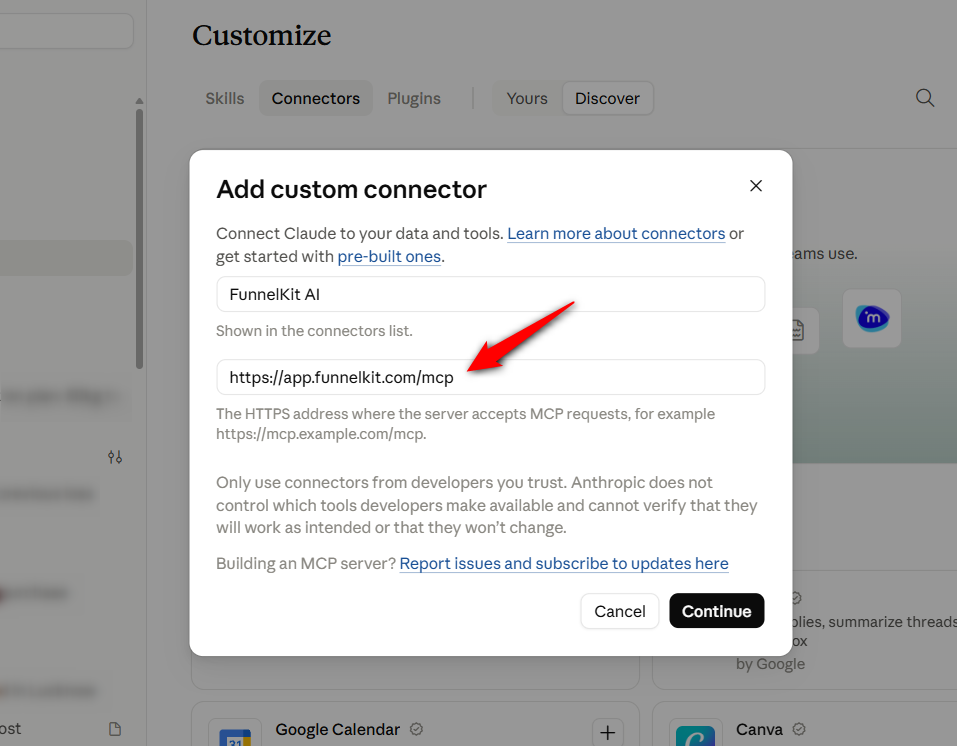
You can connect using Claude client details, DCR, or your own OAuth client.
Select your authentication, OAuth client, and hit 'Add'.
Step 4: Sign in and approve the connection
The connector you added in Steps 2 and 3 isn't linked to a store yet. That happens during authorization.
Click 'Connect' to start authorizing, then enter your store's URL and your email address on the authorization form and click 'Find my store'.
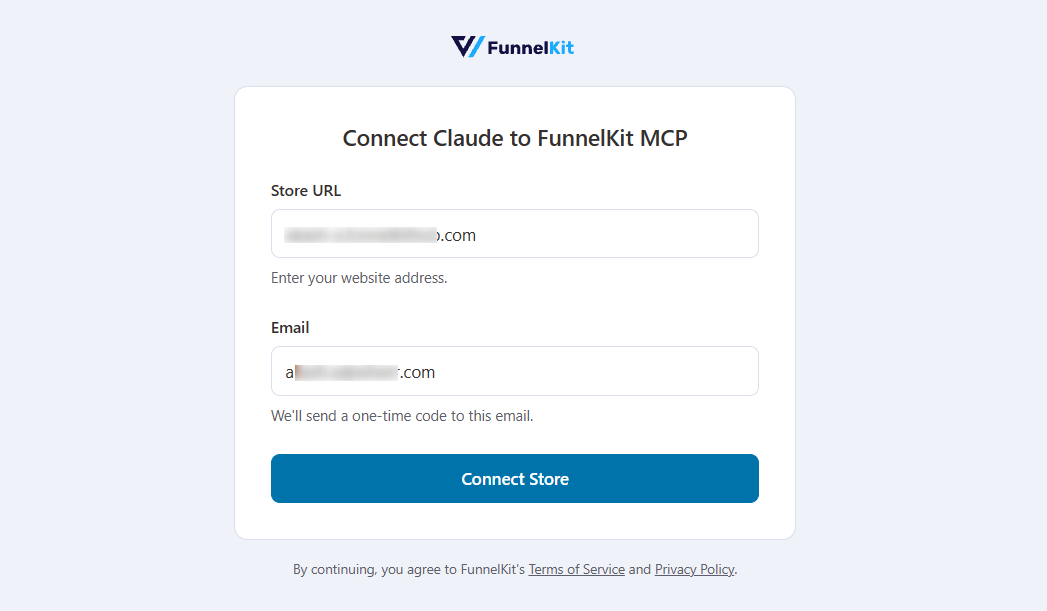
Confirm your store in the next step.
You'll receive a 6-digit verification code by email.
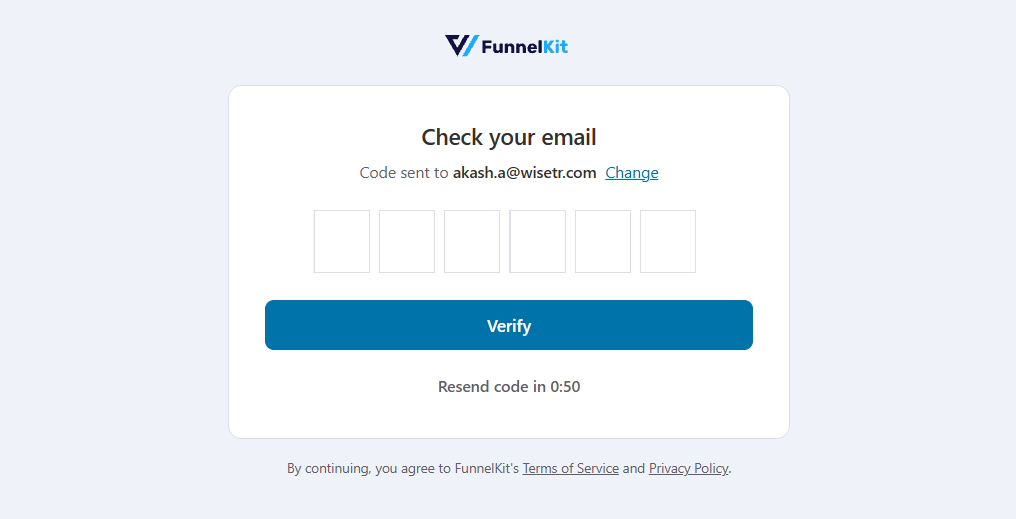
FunnelKit AI will connect your store with your client once you approve the connection in the final step.
In Claude, you'll be asked how to use these tools.
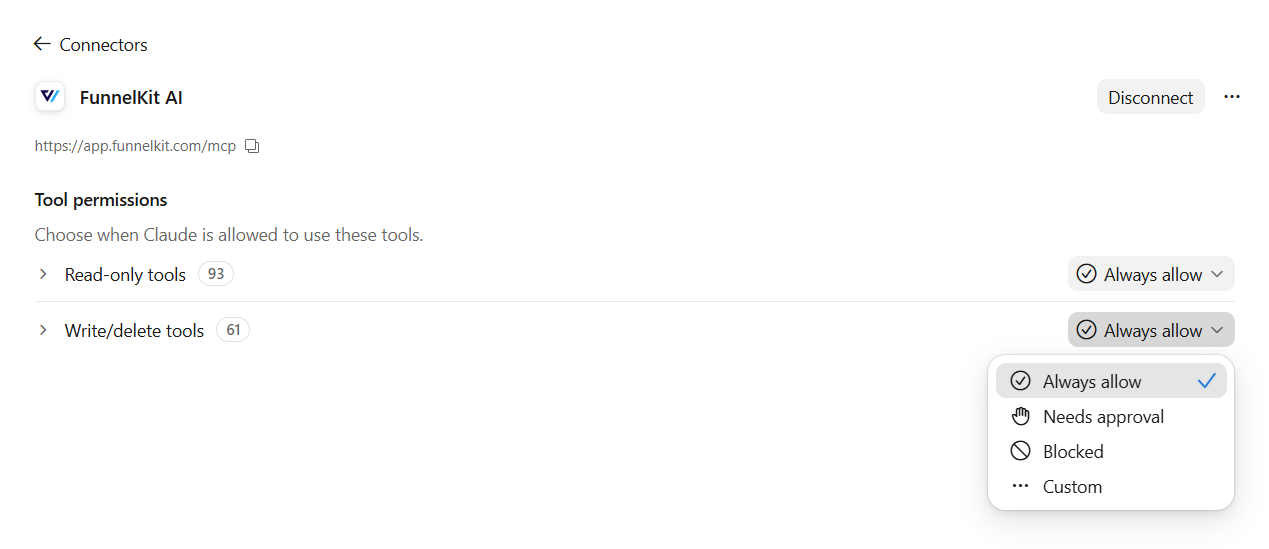
Return to the AI & MCP tab to see the available read and write abilities.
Turn off any abilities you don't want this connection to use.
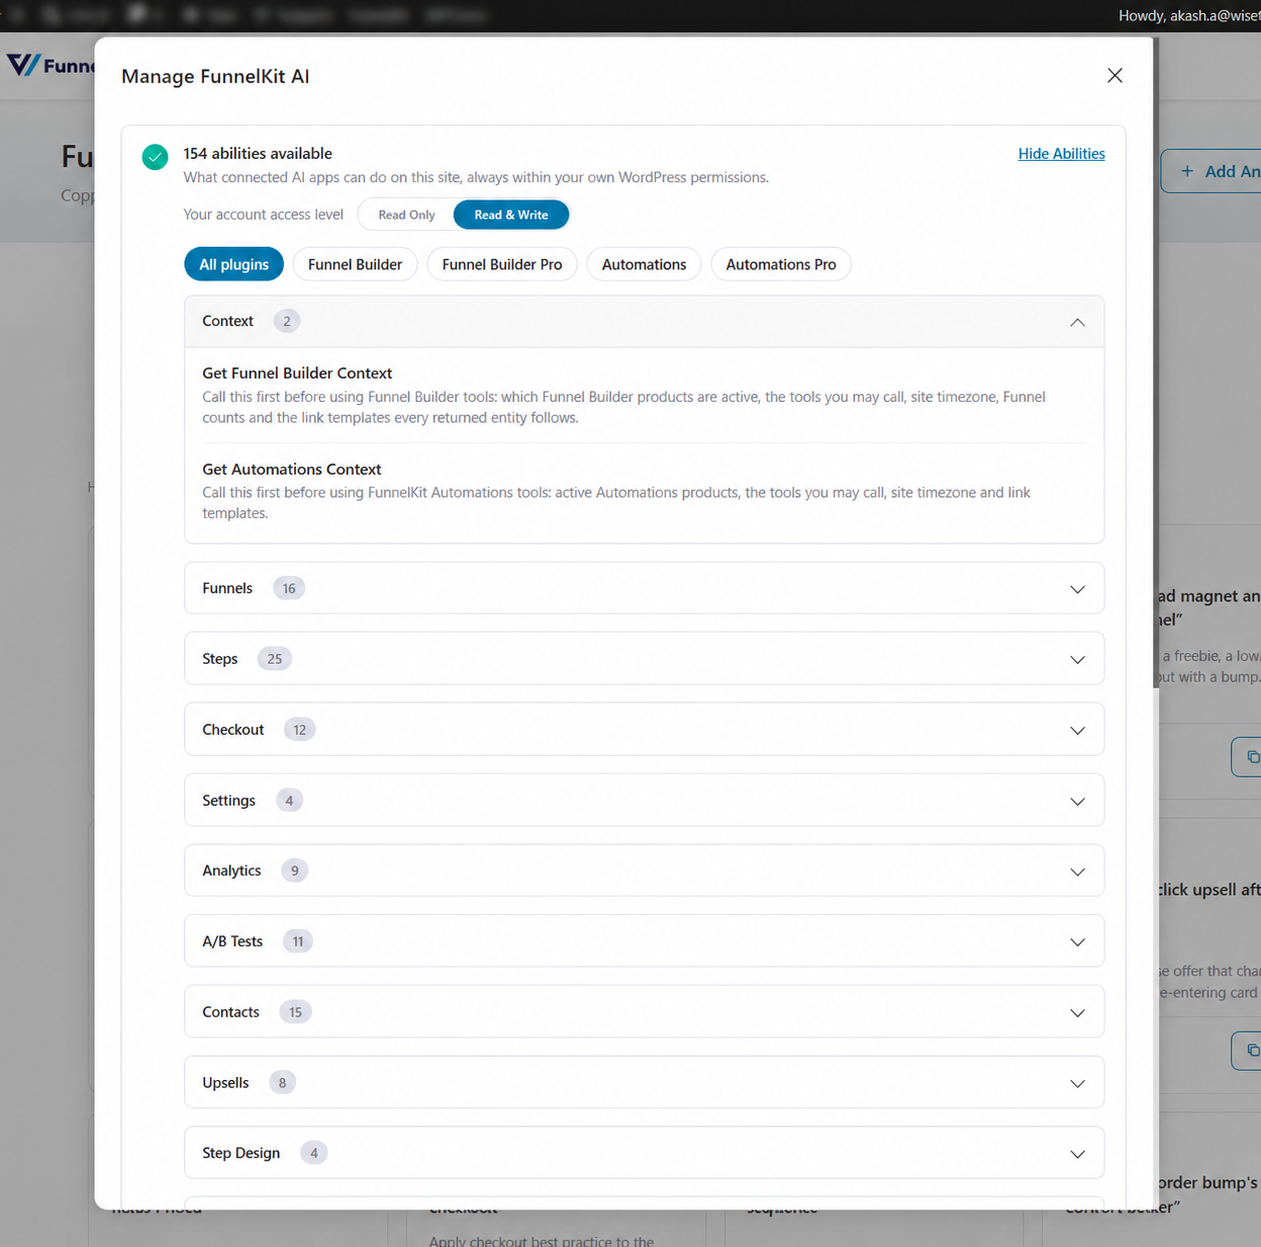
Run the built-in connection test to see if you're connected.
Once the test looks right, open your AI client and confirm that FunnelKit MCP is connected. You're ready to start asking questions about your store.
Step 5: Connect another store (optional)
FunnelKit AI also supports multiple stores on the same connection.
Once you connect your first store, open the FunnelKit AI & MCP tab for the next store and copy the prompt shown there.
Paste it into Claude, and it connects that store too.
With more than one store connected, name the store in your question so the assistant pulls data from the right one.
What the Assistant Can Change and How You Stay in Control
Giving an AI assistant access to your checkout and customer data can feel risky. FunnelKit MCP lets you control what it can access and what actions it can take.
- MCP is opt-in: It stays off until you enable it, and you can switch it off at any time.
- Write access is off by default: You must grant write permissions to each user separately.
- Changes require confirmation: The assistant asks for your approval before making changes. Destructive actions, such as deleting a contact, also require explicit confirmation.
- You control individual abilities: Enable or disable specific read and write abilities for each connection.
- Everyone uses their own login: Team members connect with their own WordPress accounts instead of sharing credentials.
Even with these safeguards, take a moment to read each confirmation before approving it.
A request like "Tag these 14 contacts for a win-back campaign" is specific enough to check. But "Clean up my list" leaves too much room for interpretation.
The same goes for "my main checkout" if your store has three different checkouts.
Name the exact funnel, checkout, or segment you want to work with, then review the proposed changes before approving them.
This quick check can save you from unintended changes.
Ask: Answers from Your Store in One Sentence
Start with questions that only read data. These prompts won't change anything in your store, and you can copy and paste them as-is.
Get a daily WooCommerce store report
Ask: "How did my store do yesterday? Show funnel revenue, upsell conversions, which emails brought in sales, and any carts still waiting to be recovered."
FunnelKit pulls the numbers together in one reply. Instead of checking your funnel dashboard, email analytics, and cart recovery reports separately, you get the full picture in one place.
If you use FunnelKit Automations, you can also ask for a weekly summary:
Ask: "Give me the automation overview for last week."
The reply covers new contacts, unsubscribes, emails sent, attributed revenue, top-performing emails and automations, recent broadcasts, and cart recovery results.
You'd normally have to check several reports to get all of that.
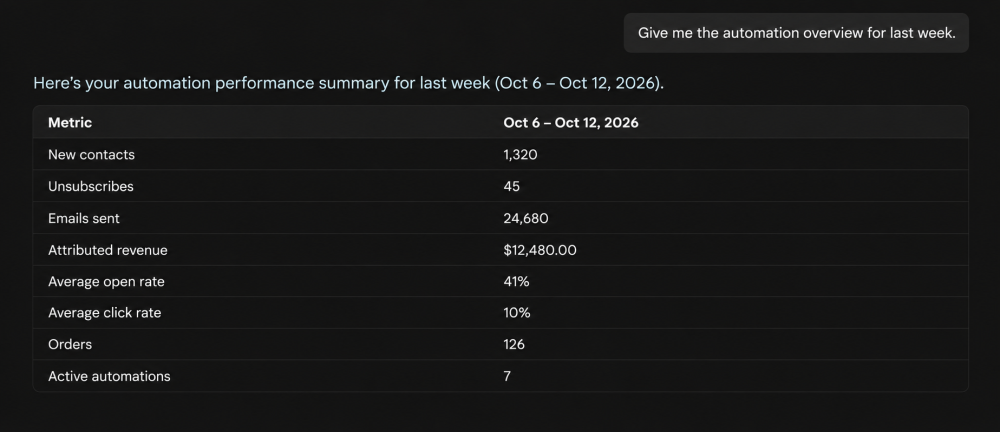
Save the prompt and reuse it each day to compare results over time.
Some AI clients also support scheduled prompts, so you may be able to have the report ready before you start work.
Find out which funnel made the most money
Ask: "Which funnel made the most revenue this year?"
The assistant ranks your top four funnels by revenue. You can also ask it to rank them by orders.
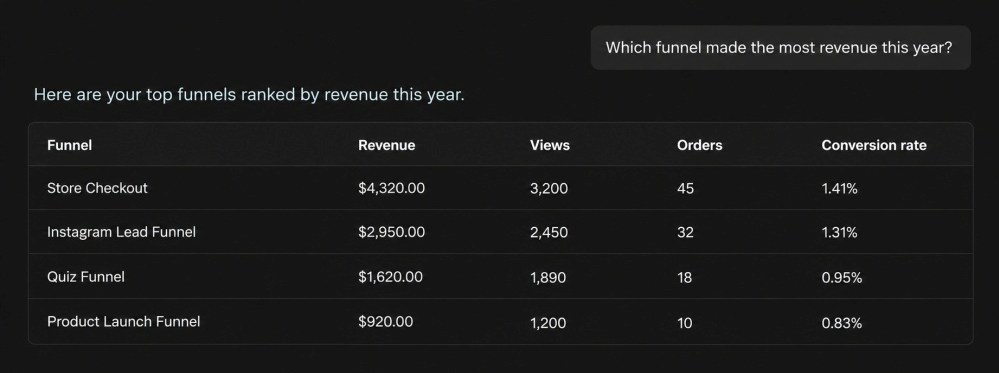
This helps because a funnel selling an expensive product might generate more revenue from fewer orders, while another brings in more customers.
Find where shoppers drop off in your funnel
Revenue shows you which funnel performs best, but it doesn't tell you where shoppers leave without buying. To find that, look at the conversion rate at each step.
Ask: "Show me the step-by-step drop-off for the Black Friday funnel."
The assistant returns the conversions and drop-off for each step.
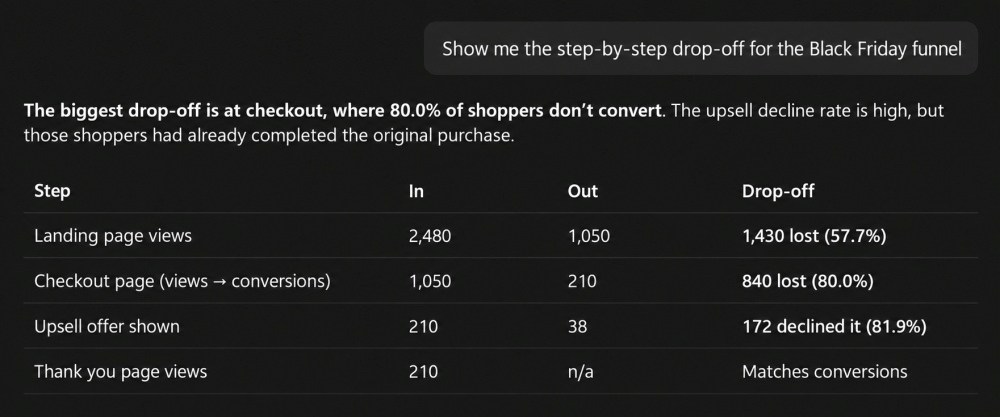
The upsell might look like the obvious problem because 82% of buyers declined it. But those shoppers had already purchased a purifier, so declining the extra filters didn't cost you the original sale.
Checkout deserves a closer look. Of the 1,050 shoppers who reached it, only 210 completed the purchase. That's 840 shoppers who left without ordering.
We'd start by checking the checkout fields, express payment options, and order summary.
Making checkout easier to complete could help recover some of those lost sales.
Want to improve that checkout? See our guide to customizing the WooCommerce checkout page.
Find out which upsells are worth keeping
Ask: "Which upsell offers are converting, and which ones aren't performing well right now?"
The assistant lists your upsell offers and their take rates, making it easier to see which ones are bringing in extra revenue.
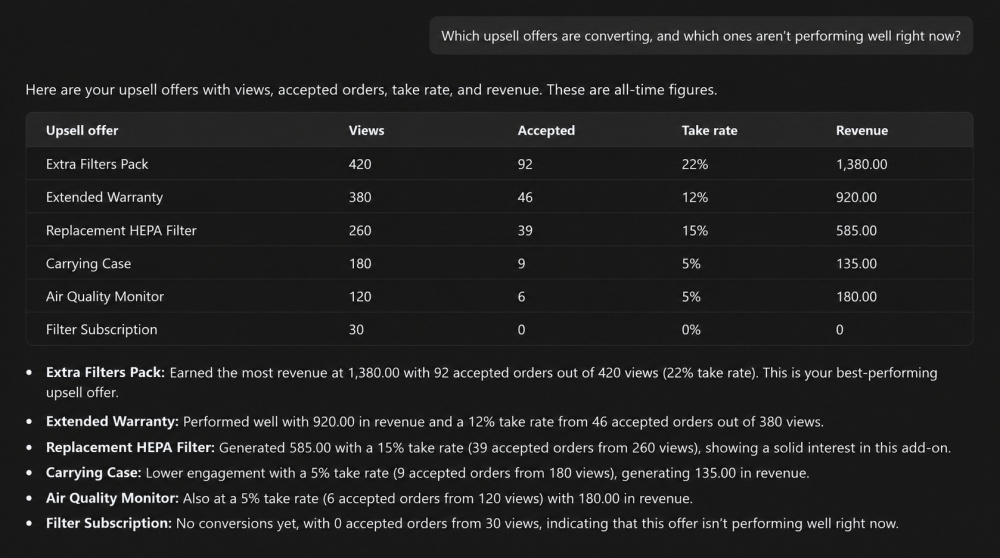
Don't rush to remove an offer just because it has a low take rate. If only 30 people have seen it and nobody has accepted, you don't have enough data to conclude anything.
Give it more traffic, then consider testing a lower price or a different product.
See where your sales are coming from
Ask: "Where are my sales actually coming from?"
You'll get orders, revenue, and opt-ins by traffic source, along with each source's share of the total.
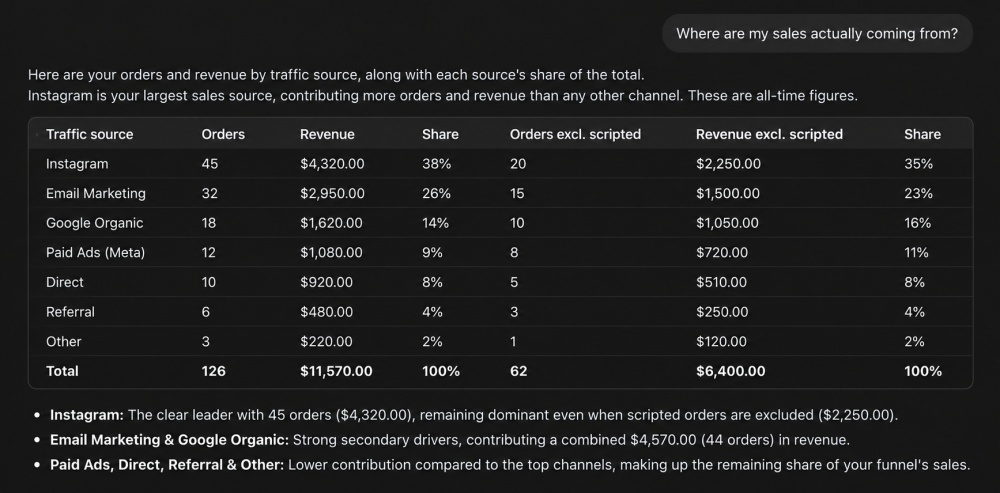
Keep in mind that the report depends on how well you track your traffic.
If your Instagram bio link or email broadcast links don't have UTM parameters, some visits may show up as direct traffic. That can make direct traffic look more valuable than it is.
Tag your links consistently before using these numbers to decide where to spend your marketing budget.
Find out which emails generate the most revenue
Ask: "Which emails brought in the most revenue last month?"
The assistant lists your top-performing emails and the revenue each one generated.
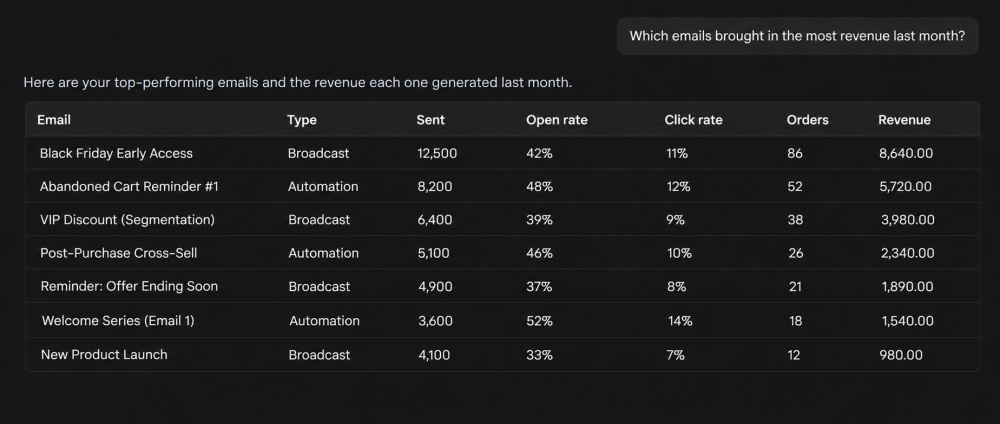
If you're using FunnelKit Automations Pro, you can also dig into a specific broadcast's performance.
This makes it easier to see which emails drive sales and which ones might need a different subject line, offer, or message.
Look up a customer's orders and email history
Say a customer contacts support because they never received their filter reminder. Instead of opening several screens to investigate, ask:
Ask: "Look up [email protected]. What has he ordered, which emails has he received and opened, and is he stuck in any automation?"
The assistant can find the contact's profile and orders, check which emails they received and opened, and identify automations they're stuck in.
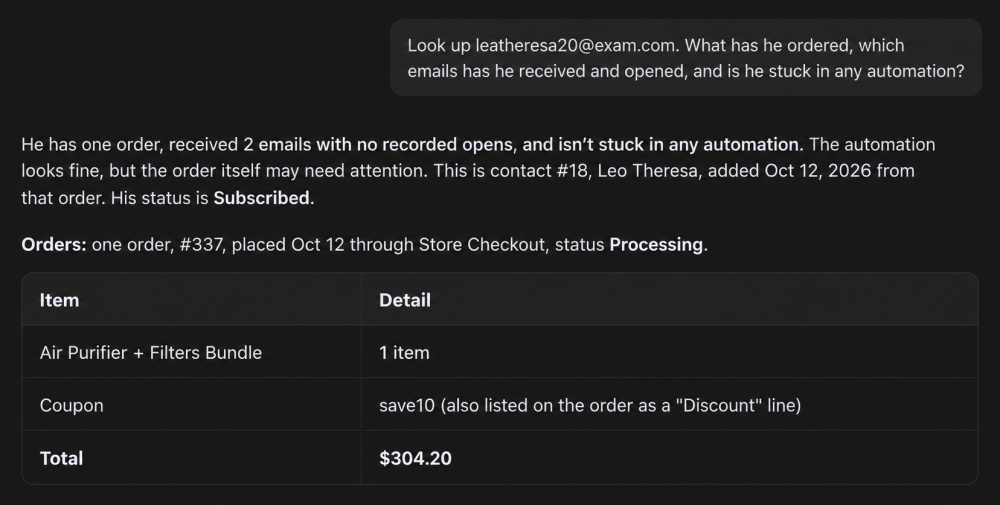
With Automations Pro, you can also review the contact's journey to see where they dropped out of a sequence.
That gives your support team the information they need to investigate without jumping between dashboards.
Change: Fix Your Checkout By Describing It
Checking your store's numbers is useful, but acting on them is even better.
If your morning report shows something that needs fixing, you can ask the assistant to make the change.
Every example below requires write access, and the assistant asks you to confirm before making changes.
Add an order bump with a single prompt
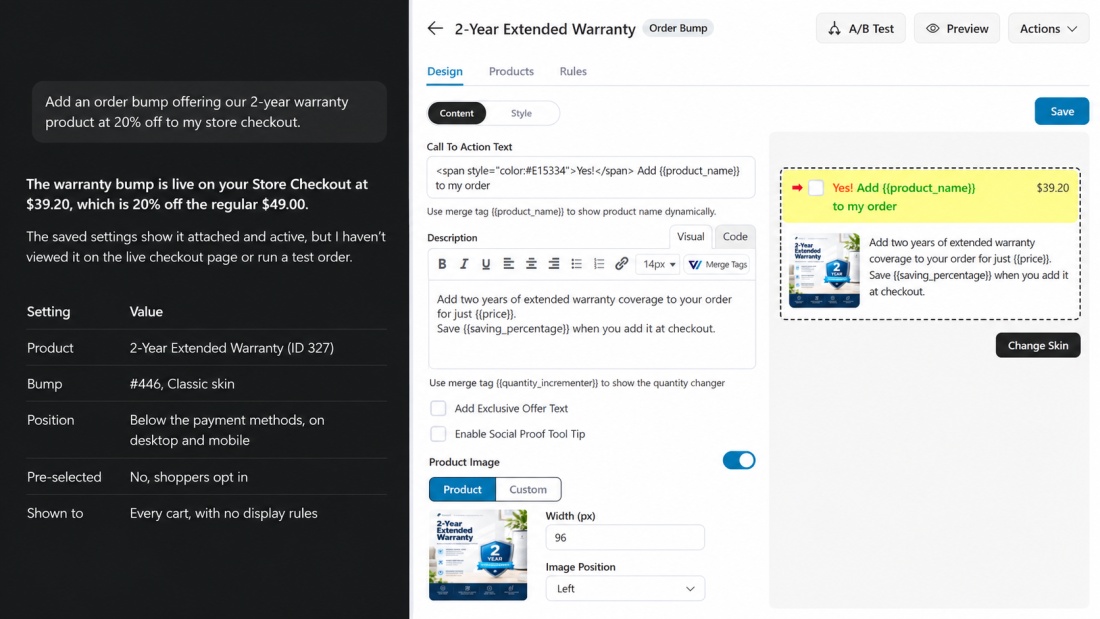
For an electronics store, a 2-year extended warranty is a natural add-on. Let's say it costs $49 and you can set up the offer with a simple prompt.
Ask: "Add an order bump offering our 2-year warranty product at 20% off to my store checkout."
The assistant confirms the details and creates the order bump on your checkout.
You can then add a condition to control when shoppers see it.
Ask: "Only show it when the cart is above my free shipping threshold."
On this store, free shipping starts at $99. Filter-only orders rarely reach that amount, so the warranty won't appear alongside a $39 filter pack.
Shoppers buying a purifier are more likely to qualify, making the offer more relevant.
At 20% off, the warranty costs $39.20. If the store ships 300 purifier orders a month and 10% of those buyers accept the offer, that's 30 warranty sales, or $1,176 in additional monthly revenue.
That's just an estimate. Your actual results will depend on how many shoppers see and accept the offer. Check its performance after two weeks and adjust if needed.
For more on placement, design, and copy, see our WooCommerce order bump guide.
Set up a checkout A/B test without the usual setup screens
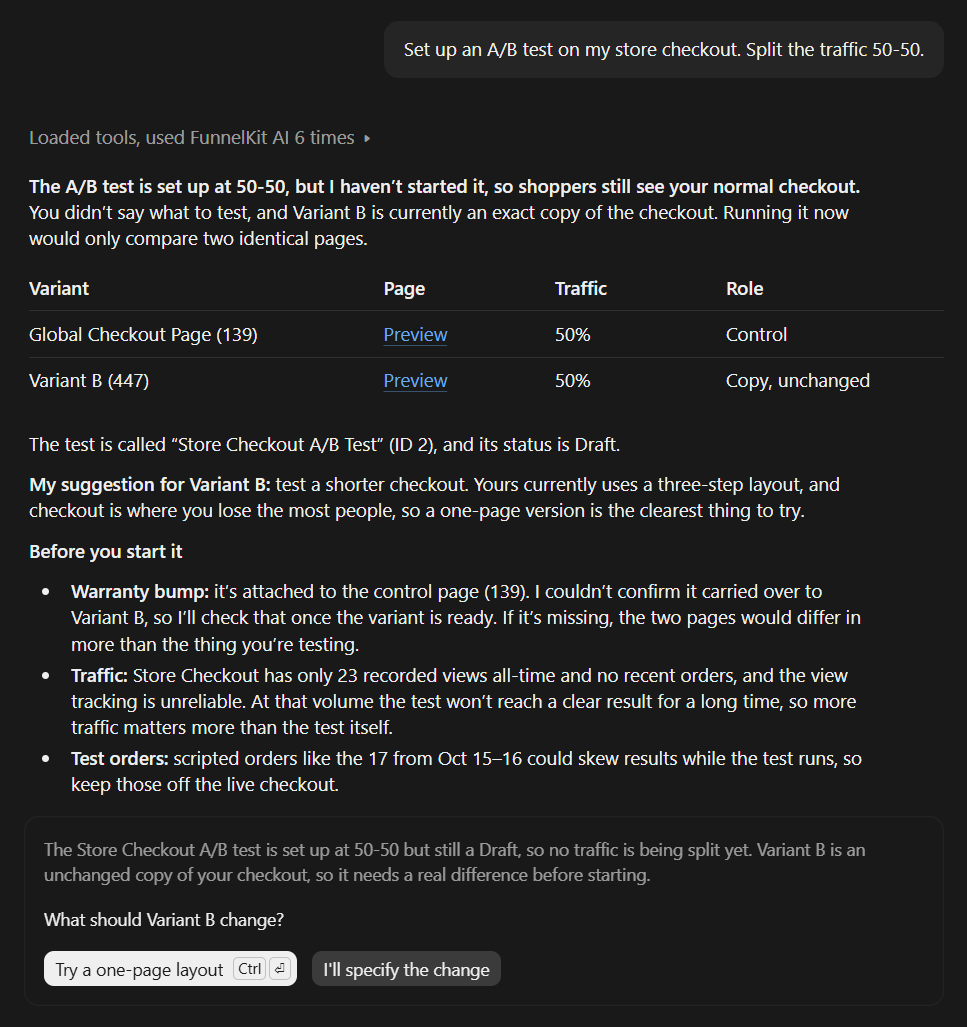
Ask: "Set up an A/B test on my store checkout. Split the traffic 50-50."
The assistant creates a test, duplicates your existing checkout as the variant, and starts the test.
Keep in mind that the variant initially looks exactly like the original. If you don't change anything, you're testing two identical pages.
Decide what you want to compare first, such as a one-page checkout versus a multi-step checkout, or an expanded order summary versus a collapsed one.
Then edit the variant before collecting meaningful results.
Don't rush to pick a winner, either. A store processing 20 orders a day may need several weeks to collect enough data for a useful comparison.
Check how each version converts, and wait until you have enough orders to make a reasonable decision.
For ideas on what to test and how to interpret the results, see FunnelKit A/B testing.
Create a Shopify-style WooCommerce checkout
Shoppers who regularly buy through Shopify are familiar with its checkout layout: contact details up front, express payment options near the top, and an order summary alongside the form.
You can create a similar experience in WooCommerce without spending an afternoon manually configuring your checkout.
Ask: "Create a Shopify-style checkout for my store, with express payments at the top and the order summary on the right."
The assistant selects a matching FunnelKit checkout template and sets it up for you to review.
Once the layout is ready, look at the form fields, too. Removing fields you don't need can make checkout quicker to complete.
Baymard Institute research shows checkout forms often ask for more information than necessary, so keep only the fields your store needs to process and ship orders.
Create a one-page WooCommerce checkout
For a single-product offer, a one-page checkout lets shoppers choose their product and complete their purchase without moving through a separate cart page.
Ask: "Create a one-page checkout for the purifier, with the purifier and the purifier-plus-filters bundle as the two options."
This works well when you’re selling one product with a couple of options or bundles. If customers regularly add several different products to their carts, the standard cart and checkout may be a better fit.
See how the options compare in our WooCommerce one-page checkout roundup.
Build a checkout with multiple changes in one prompt
You don't have to request every change separately. If you already know what you want, combine the requirements in a single prompt.
Ask: "Build a checkout for the purifier with only the fields needed for shipping, Apple Pay and Google Pay at the top, our 30-day guarantee next to the order button, and the warranty bump shown only when the cart is above the free shipping threshold."
Once the assistant has set it up, review checkout on your phone and your desktop. A layout that looks great on a large screen might push the order button too far down on mobile.
Check that the payment options appear correctly, the form is easy to complete, and the warranty offer only appears when its condition is met. Test the full purchase flow before making the checkout live.
Build: Funnels, Emails and Automations from a prompt
You don't have to build every funnel or automation from scratch. Describe what you want, and FunnelKit MCP can create the initial setup for you to review and edit.
Build a WooCommerce sales funnel with one prompt
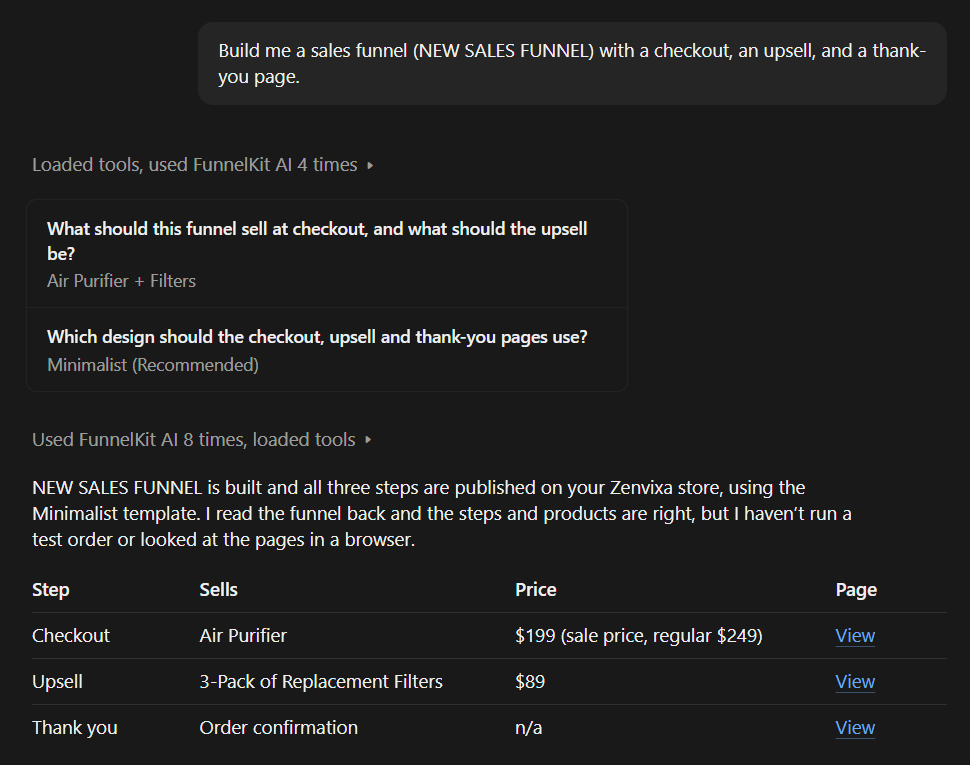
Ask: "Build me a sales funnel with a checkout, an upsell, and a thank-you page."
The assistant further asks which upsell product and FunnelKit template to choose. Then it imports the pages and creates a funnel with the steps in place.
You'll have the basic structure ready to edit, but you'll still need to add the details that make it yours: product photos, guarantee terms, and the reasons customers should choose your offer.
Create a sales funnel around your product and offer
The more details you provide, the more useful the first draft will be. Instead of asking for a basic funnel, describe what each page should include.
Ask: "Build a sales funnel for our air purifier. Use a landing page that leads with the allergy-season angle, a checkout with the warranty bump, an upsell for the 3-pack of filters at $89, and a thank-you page that tells buyers when to change their first filter."
This gives the assistant your offer, messaging, and funnel structure. Review each page, add your images, and place a test order through every step before publishing.
For more on planning each step, see our guide to building a WordPress sales funnel.
Find and recover abandoned WooCommerce carts
If your automation report shows carts that haven't been recovered, start by finding the ones worth following up on.
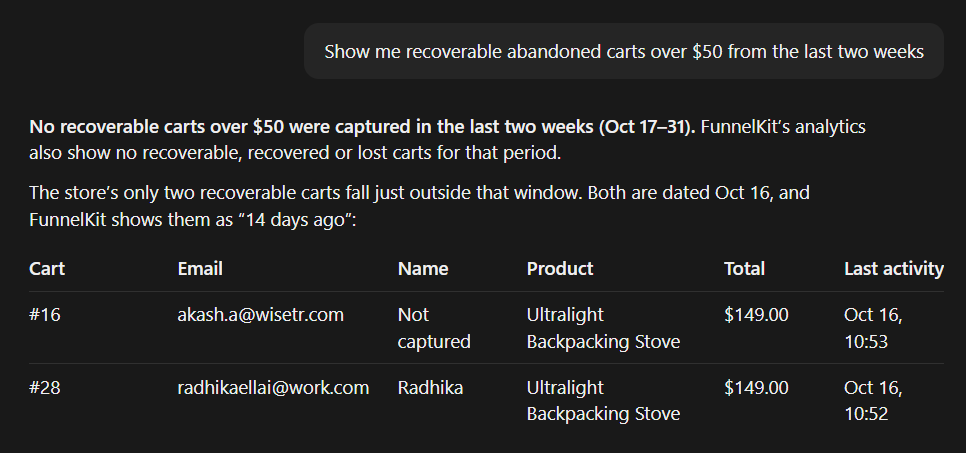
Ask: "Show me recoverable abandoned carts over $50 from the last two weeks."
The assistant retrieves the matching carts, their totals, and relevant contact details.
After you review the list, you can take action. With write access enabled in FunnelKit Automations Pro, ask:
Ask: "Tag these contacts for a win-back campaign."
The assistant asks you to confirm before applying the tags. Once you approve, FunnelKit tags the contacts, and they can enter an automation that uses that tag as its trigger.
For the complete recovery process, see our abandoned cart recovery guide.
Draft a WooCommerce email with AI
Once you've tagged the contacts, you can create a campaign email.
Ask: "Design a win-back email for contacts tagged for the win-back campaign. Feature the air purifier, mention free shipping over $99, and keep it short enough to read on a phone."
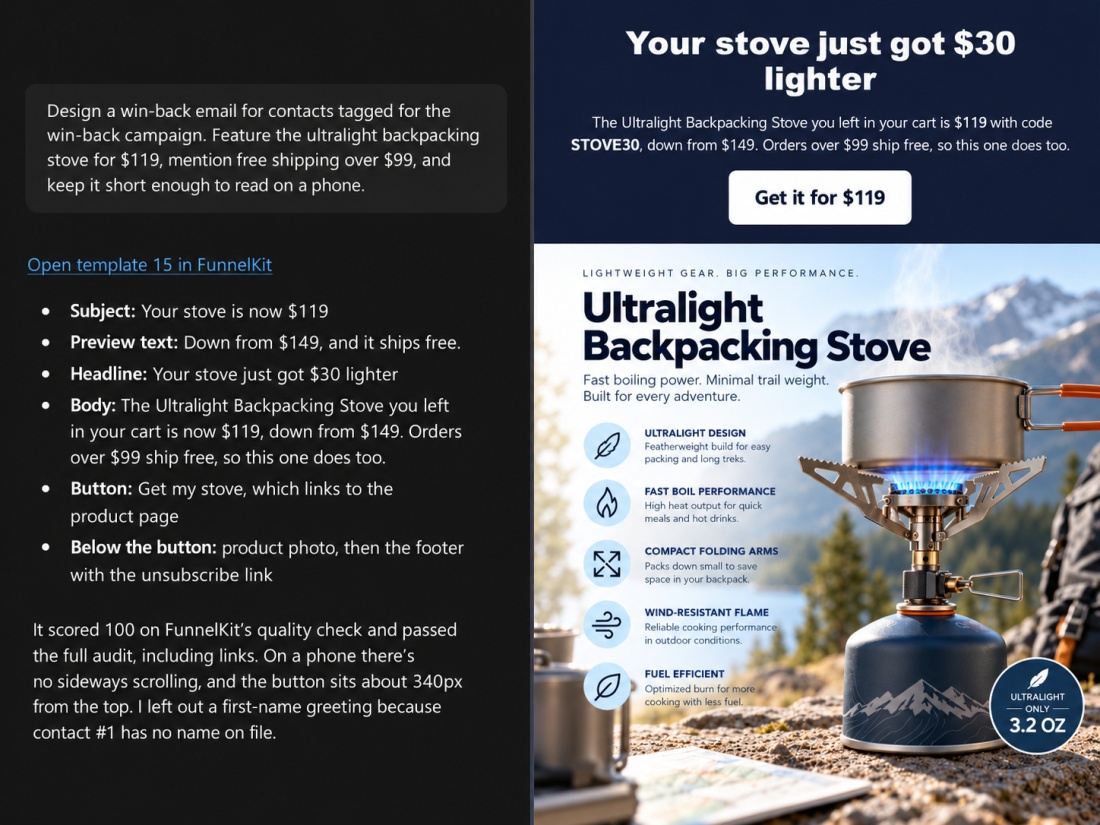
Review the draft before sending it. Check that the offer is accurate, the message sounds like your brand, and the email reads well on a phone.
We'd pay particular attention to the subject line and opening sentence, since AI-generated copy can sound generic without a little editing.
Build a WooCommerce automation with AI
The final step is connecting the tag to an email sequence so the campaign can run automatically.
Ask: "Build an automation: when a contact gets the win-back tag, wait one day and send the win-back email. If they haven't ordered three days later, send a reminder."
Before activating it, open the automation in FunnelKit Automations and check the trigger, delays, and exit conditions.
Most importantly, make sure customers leave the sequence as soon as they place an order. Otherwise, someone who has just bought an air purifier could still receive another win-back email.
Set Up Your WooCommerce Black Friday Campaign With AI
Black Friday prep is already busy enough without building every page and email from scratch. For your WooCommerce store, you can get the initial campaign ready with three prompts.
Prompt 1: Build the funnel
Ask: "Build a Black Friday sales funnel for the air purifier at $199, with a checkout, an upsell for the 3-pack of filters at $89, and a thank-you page."
Prompt 2: Add the order bump
Ask: "Add an order bump offering the 2-year warranty at 20% off to the Black Friday checkout. Only show it when the cart is above $99."
Prompt 3: Draft the email
Ask: "Design a Black Friday announcement email for the air purifier at $199. Lead with the price, mention that the deal ends on Cyber Monday, and link to the Black Friday funnel."
These prompts give you a starting point. Before the campaign goes live, check each part yourself:
- Preview every funnel step on desktop and mobile.
- Place a test order, accept the order bump and upsell, and check the entire buying experience.
- Send the email to yourself and test every link.
- Schedule the funnel and email to go live on your Black Friday start date.
After Black Friday, ask the assistant to show you the step-by-step drop-off for the campaign funnel.
Compare the checkout results with last year's lost shoppers to see whether your changes helped. Any major drop-off you find this year gives you a starting point for next year's improvements.
Frequently Asked Questions
FunnelKit MCP works with MCP-compatible AI clients, including Claude, Cursor, and VS Code. If your client supports custom MCP servers or connectors, you can connect it to FunnelKit.
That depends on what you want to do. FunnelKit Funnel Builder and Automations Lite include read-only abilities.
FunnelKit Automations Pro adds more abilities, including actions such as managing tags and lists, updating contacts, adding notes, and sending emails.
In FunnelKit Funnel Builder, features such as order bumps and A/B tests also depend on Pro.
No, AI cannot change your store without your permission. Write abilities are disabled by default and must be granted to each user.
The assistant asks for confirmation before making changes and requires explicit confirmation for destructive actions such as deleting a contact.
You can also disable individual abilities or switch MCP off entirely at any time.
Yes. Each team member connects using their own WordPress account and approves the connection.
Write permissions are granted per user, so you can let your support team look up customer details while restricting checkout changes to authorized team members.
No. Enable MCP in the FunnelKit AI tab, install the companion plugin, and copy the connector URL into your AI client.
Next, enter your store's URL and sign in with your WordPress account when you authorize the connection.
No. It gives you another way to work with your store, not a replacement for the dashboard.
The AI assistant helps you get reports, make quick changes, and create first drafts of funnels and automations. For detailed design work, copy edits, and checking how a page looks before publishing, you'll still want to use the FunnelKit builder.
In practice, the two work together: use the assistant to get things started, then open the dashboard when you need to fine-tune the details.
Yes. After you connect your first store, open the FunnelKit AI & MCP tab for the next store, copy the prompt shown there, and paste it into Claude or another assistant to add that store.
Ready to Build With AI?
FunnelKit MCP makes it easier to check your store's performance and act on what you find. Instead of jumping between dashboards to pull reports together, you can ask a question and get the numbers in one reply.
When something needs fixing, you can describe the change you want and let the assistant handle the initial setup.
For the purifier store, even a simple change like adding a warranty bump could bring in an estimated $1,176 a month, based on 30 sales at $39.20 each.
To get started, update to the latest Funnel Builder 3.18.0 or FunnelKit Automations 3.9.0, enable MCP in the FunnelKit AI tab, and connect your AI assistant.
The next morning, start with one question: "How did my store do yesterday?"
If you want the assistant to do more than read reports, check the Pro features available in Funnel Builder and FunnelKit Automations.
Editorial Team
October 6, 2026The WooCommerce checkout coupon field is where shoppers enter a discount code before they pay. Once coupons are turned on, WooCommerce adds it to both the cart and the checkout...
Editorial Team
October 2, 2026A WooCommerce invoice email gives customers a clear record of what they bought, what they paid, and how they paid. WooCommerce can send one out of the box, but only...
Editorial Team
October 1, 2026Want to drive more sales and customer loyalty with WooCommerce coupons? From simple percentage discounts to auto-applied deals, free gifts, and personalized offers, coupons give shoppers a reason to buy...