
Removing the address field from WooCommerce checkout means taking out the billing and shipping address lines that your customers do not actually need to fill in.
For stores selling digital products, services, or subscriptions, those fields add friction without serving any purpose.
In this guide, we will show you how to remove the billing and shipping address from your WooCommerce checkout in four ways: with a WordPress plugin and no code, through the block checkout editor, and with custom PHP for both the classic and the block checkout.
We will also show you how to fix the address required error that can block orders after you remove a field, and how to remove address fields only for virtual products.
Table of Contents
- 1 Quick Answer: Pick Your Method
- 2 Classic Checkout vs. Block Checkout: Why Your Method Matters
- 3 Method 1: Remove Address Fields With a Checkout Plugin (Works on Any Checkout)
- 4 Method 2: Hide Address Fields in the Block Checkout Editor (Works on Block Checkout Only)
- 5 Method 3: Remove Address Fields With PHP
- 6 Method 4: Hide the Shipping Address via WooCommerce Settings (Virtual Products Only)
- 7 How to Fix the 'Address Is Required' Error After Removing Fields?
- 8 Remove Address Fields for Virtual Products Only (Conditional Logic)
- 9 Remove the Address From Order Emails, Admin, and the Thank-You Page
- 10 5 Things to Consider While Removing the Address Field from the WooCommerce Checkout Page
- 11 Frequently Asked Questions
- 12 Streamline Your WooCommerce Checkout and Recover Lost Sales!
Quick Answer: Pick Your Method
| Method | Works on classic checkout | Works on block checkout | Code needed? | Best for |
|---|---|---|---|---|
| 1. Checkout plugin (FunnelKit) | ✅ Yes | ✅ Yes (replaces the checkout) | ❌ No | Anyone who wants it to stick through updates |
| 2. Block editor field toggles | ❌ No | ✅ Yes (Phone, Company, Address 2 only) | ❌ No | Quick wins on the default checkout |
| 3. PHP snippet | ✅ Yes (woocommerce_checkout_fields) | ✅ Yes (woocommerce_get_country_locale) | ✅ Yes | Developers who want full control |
| 4. WooCommerce settings | ✅ Yes | ✅ Yes | ❌ No | Hiding shipping on virtual-only carts |
Let’s explore all these methods one by one.
Classic Checkout vs. Block Checkout: Why Your Method Matters
WooCommerce ships two different checkouts, and they don’t respond to the same code.
The block checkout (built on the Cart and Checkout blocks, sometimes called the Gutenberg checkout) has been the default for new stores since WooCommerce 8.3, but only on sites running a block theme.
The classic checkout uses the [woocommerce_checkout] shortcode and is still what most older stores and classic-theme sites run.
The old woocommerce_checkout_fields filter to remove WooCommerce address fields does nothing on the block checkout.
The block checkout took back control of how fields are rendered and validated.
So if your old snippet suddenly stopped removing the address, it's not broken. Your checkout changed underneath the code.
How to tell which checkout you’re running:
- In your WordPress dashboard, go to Pages ⇨ Checkout and open it in the editor.
- If you see a single Checkout block with its own settings panel on the right, you’re on the block checkout.
- If you instead see [woocommerce_checkout] sitting inside a shortcode block, you’re on the classic checkout.
Every method below is labeled for the checkout it works on.
Method 1: Remove Address Fields With a Checkout Plugin (Works on Any Checkout)
If you want a method that works on both checkouts and survives WooCommerce updates, a dedicated checkout plugin is the most reliable route. FunnelKit is built for exactly this.
FunnelKit's checkout replaces the native WooCommerce checkout entirely. That means it’s immune to the block-hook lockdown that’s breaking everyone’s PHP snippets.
You’re no longer fighting the block checkout’s field restrictions because you’re using a no-code checkout field editor that lets you add, reorder, and delete fields with drag-and-drop.
The code that kept breaking isn’t your problem anymore because it's gone.
Get FunnelKit Funnel Builder for your WordPress site by clicking on the button below:
Make sure to install and activate FunnelKit Funnel Builder on your website.
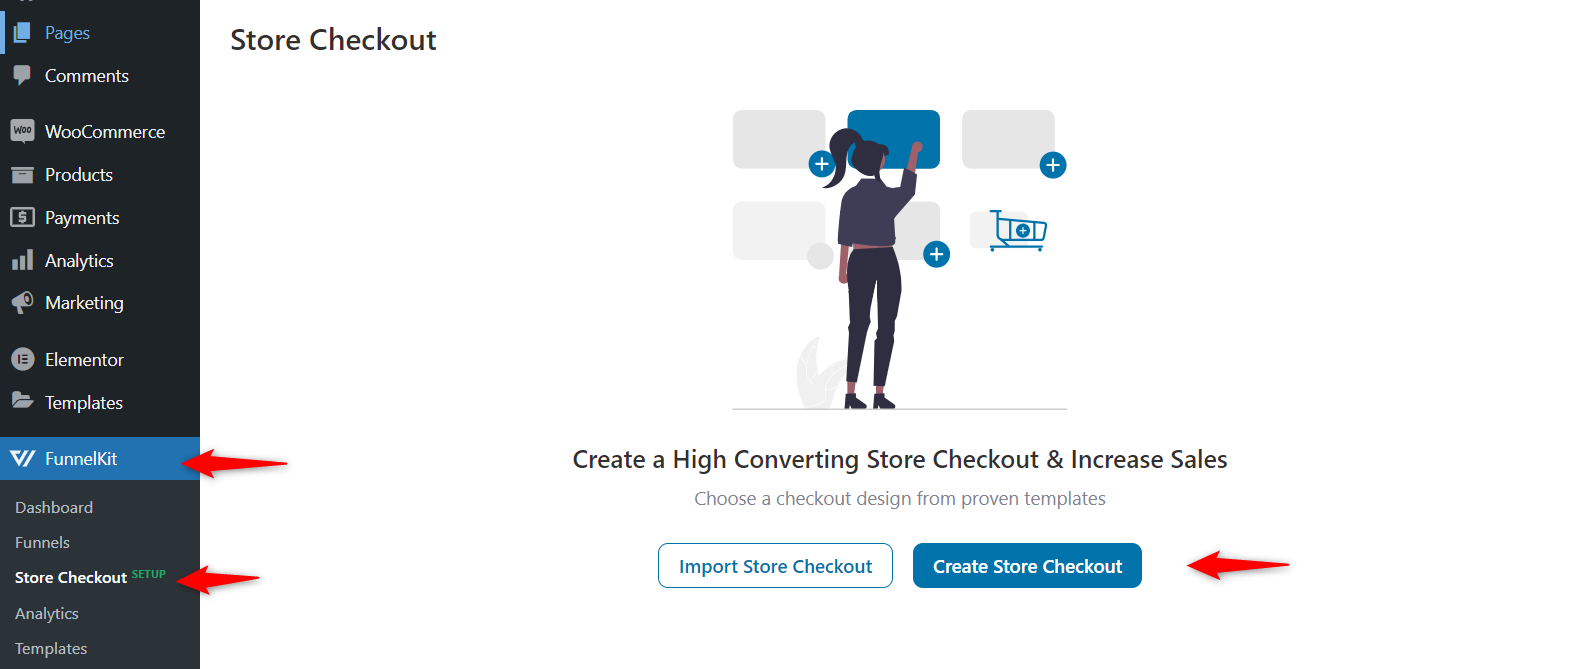
Step 1: Create a store checkout
First, you need to create a store checkout page.
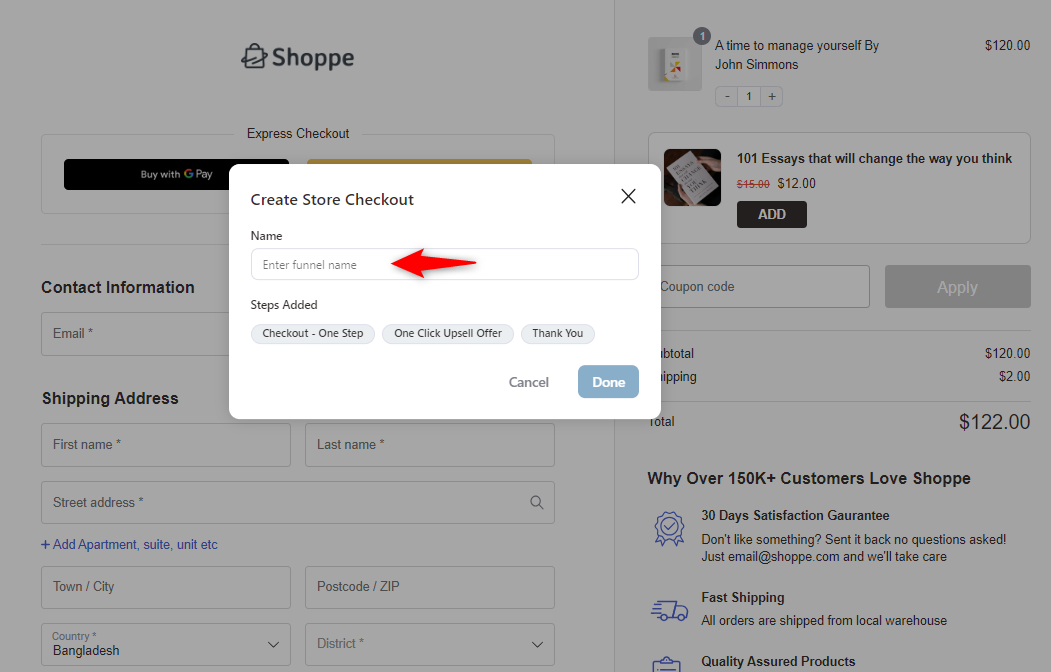
Navigate to the FunnelKit > Store Checkout and click on the Create Store Checkout.
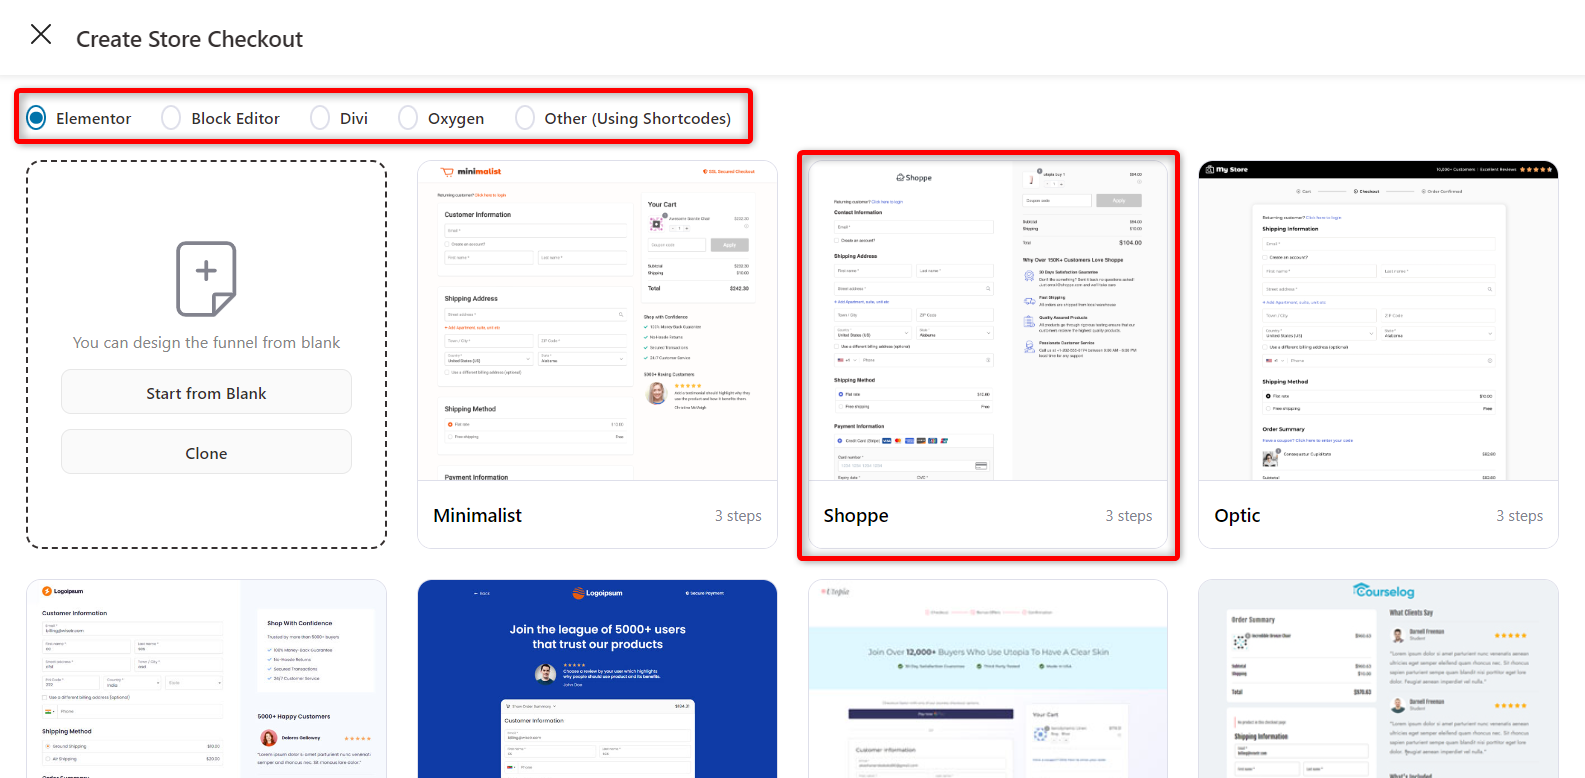
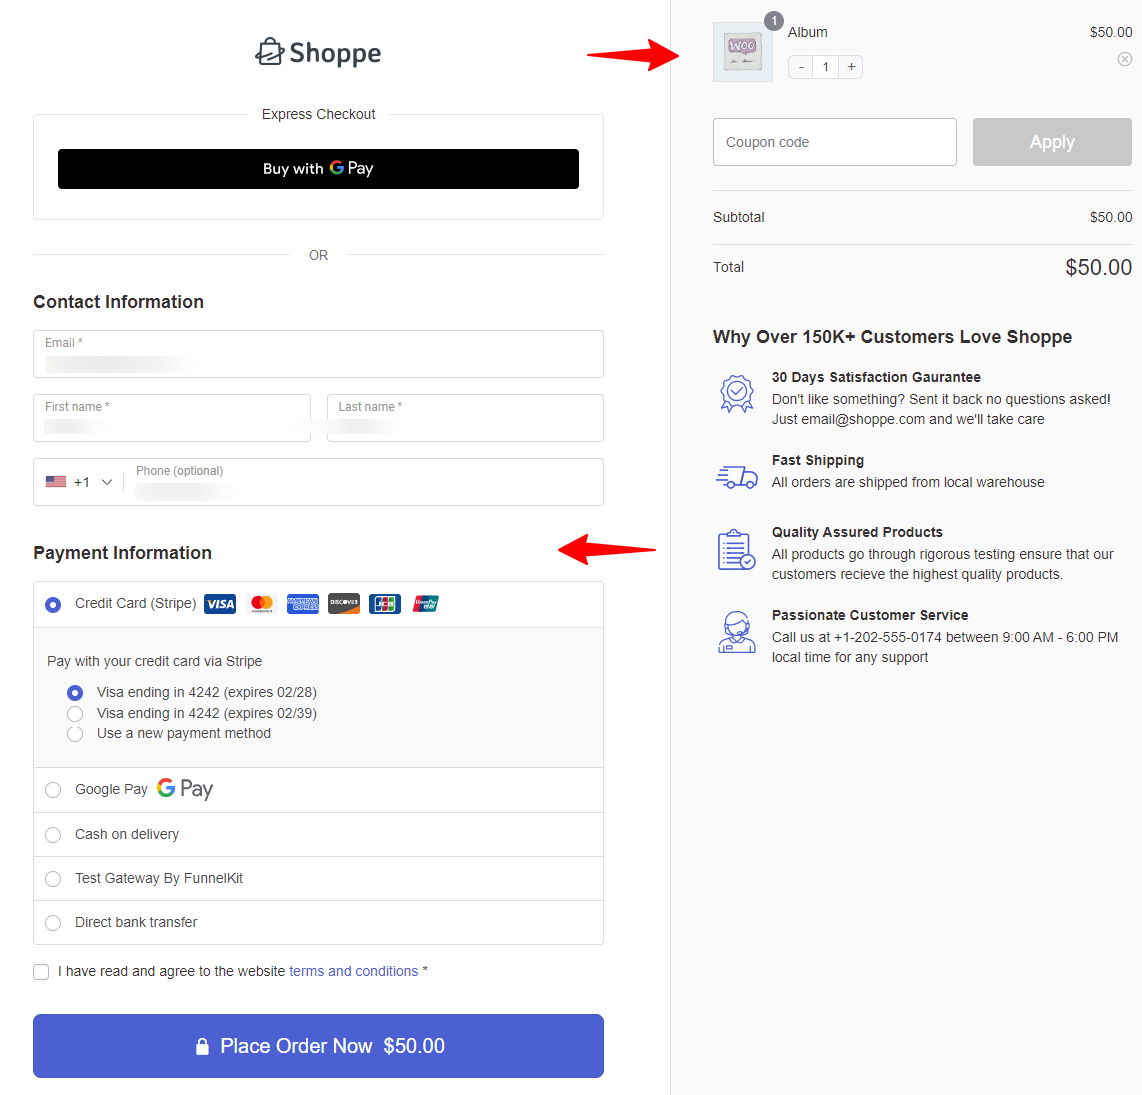
Choose the best checkout template that fits your needs. We recommend using the “Shoppe”. Because it’s sleek, elegant and seems nice.
You can also choose a page builder, such as Elementor, Divi, Gutenberg, Bricks, or Oxygen, to customize your page.
Once you have checked everything, click on “Import this Funnel”.
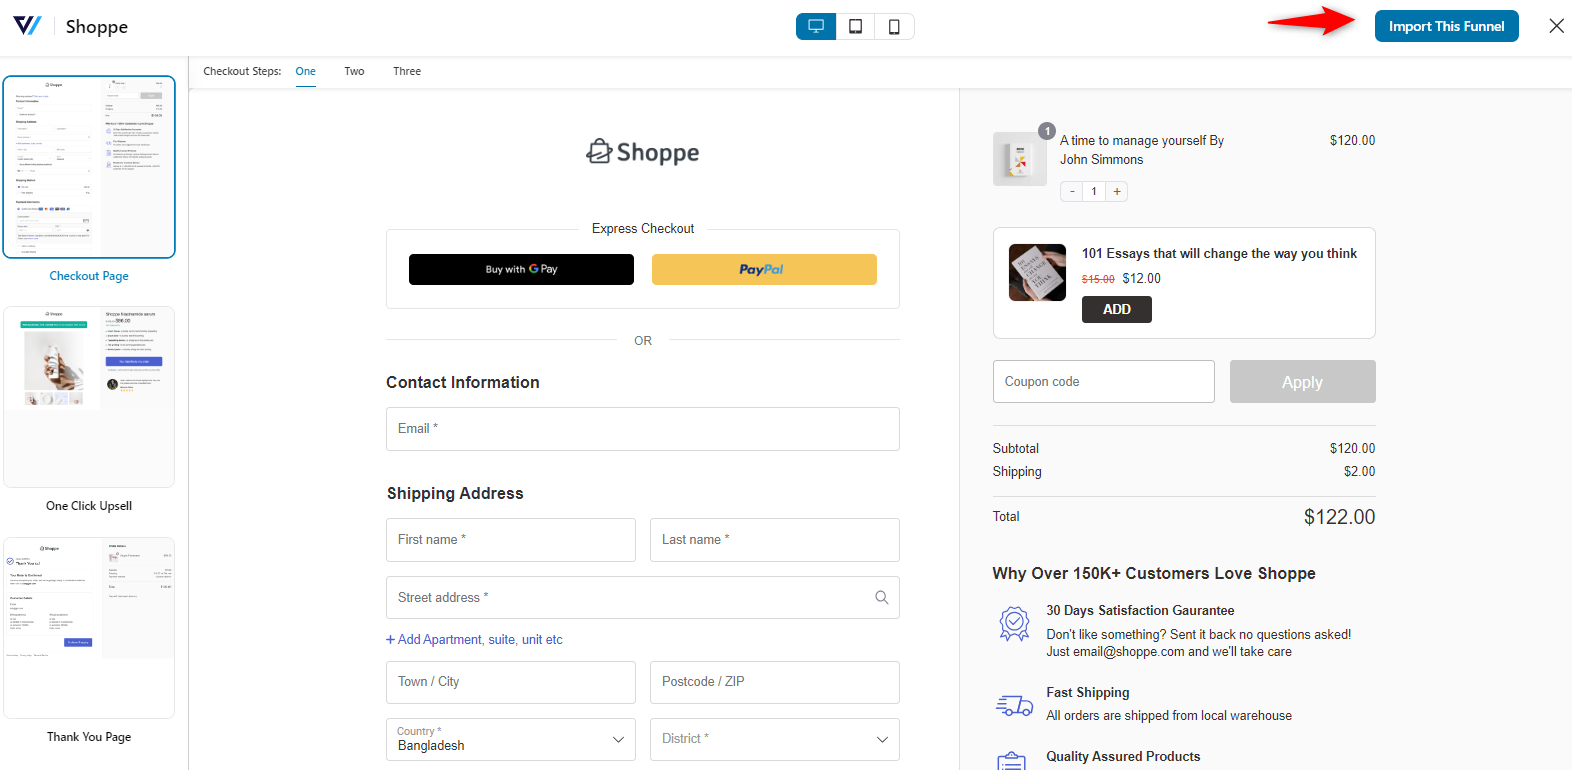
Then, provide a good name for your store checkout page.
Step 2: Customize the store checkout page
Next, click on the “Checkout” button to customize it.
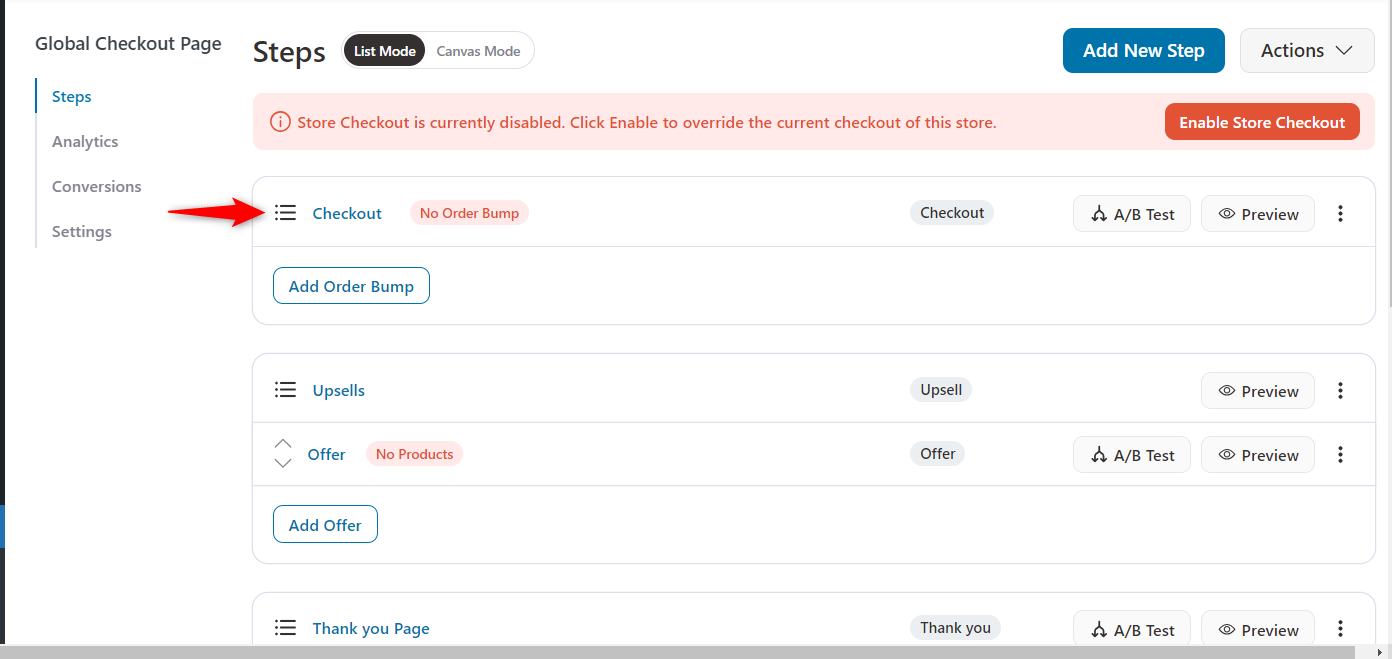
On the checkout page, you’ll get the available checkout fields.
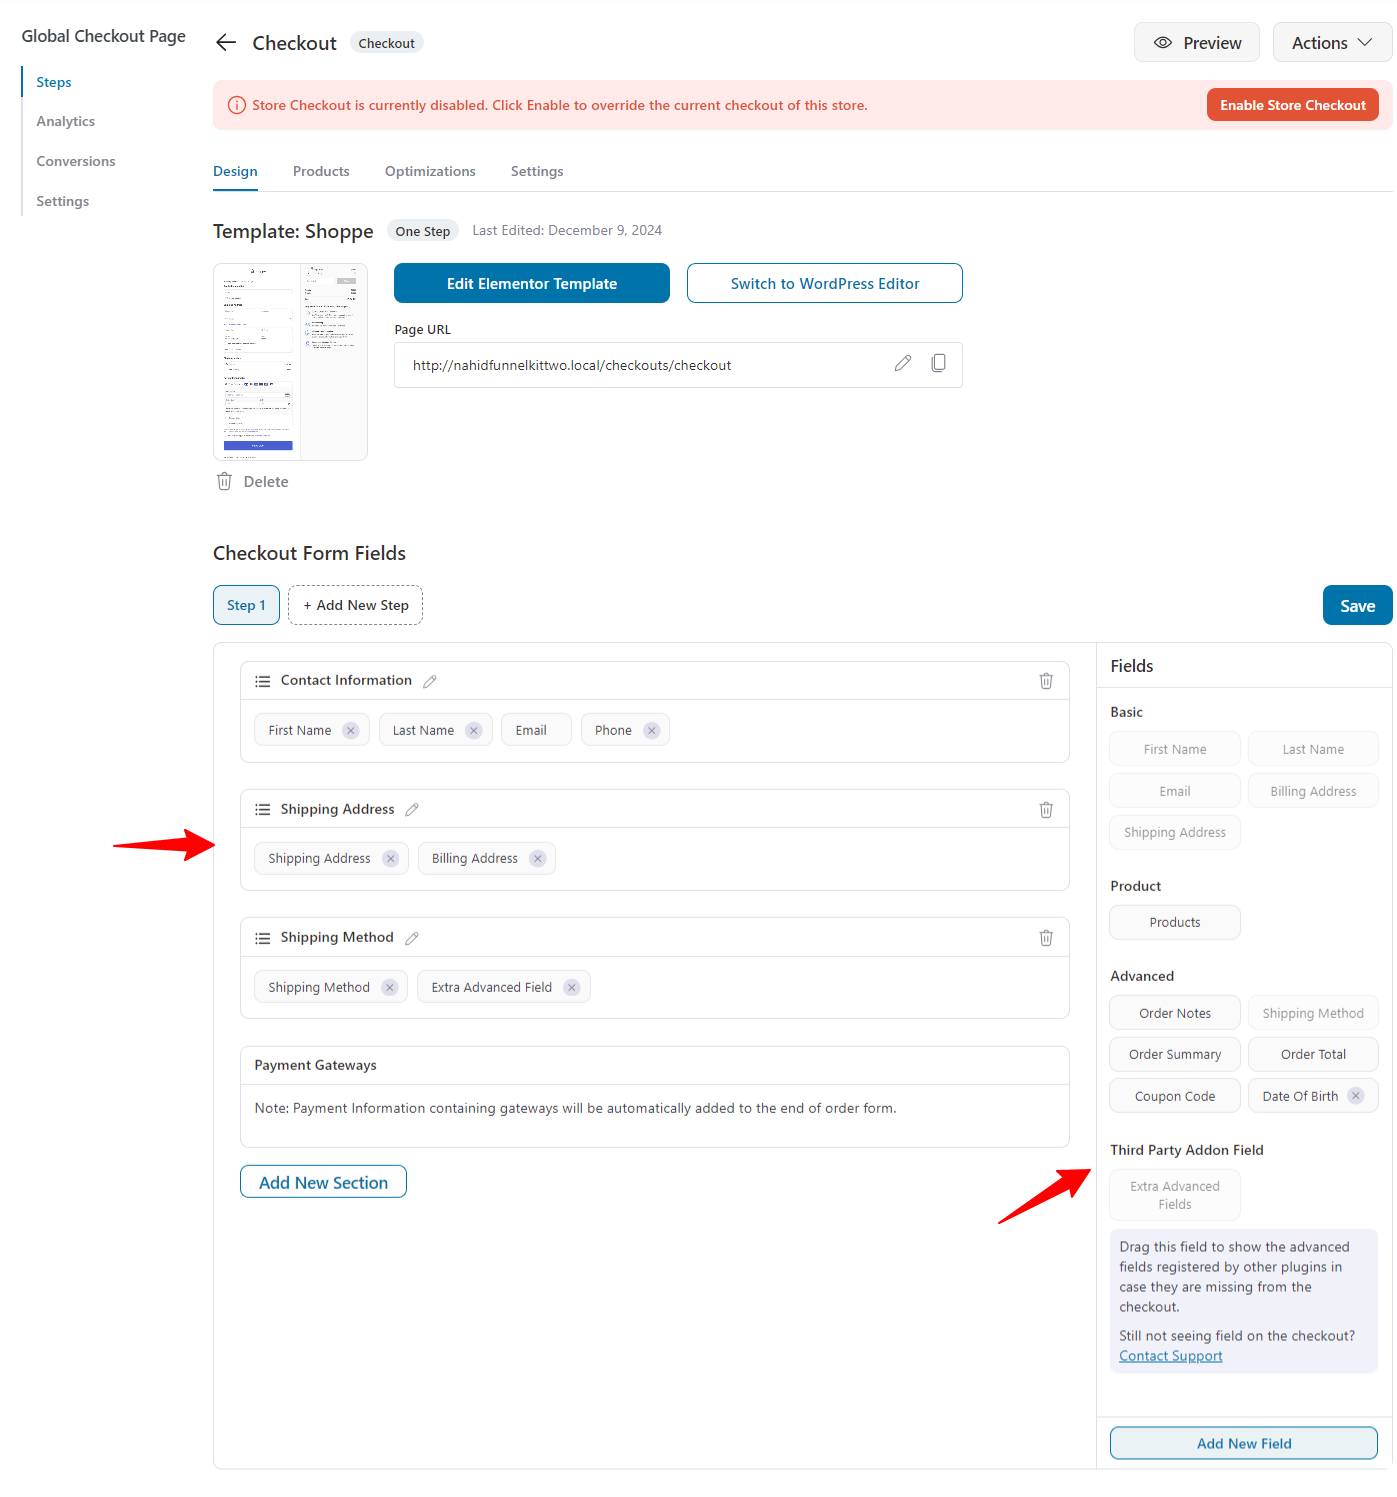
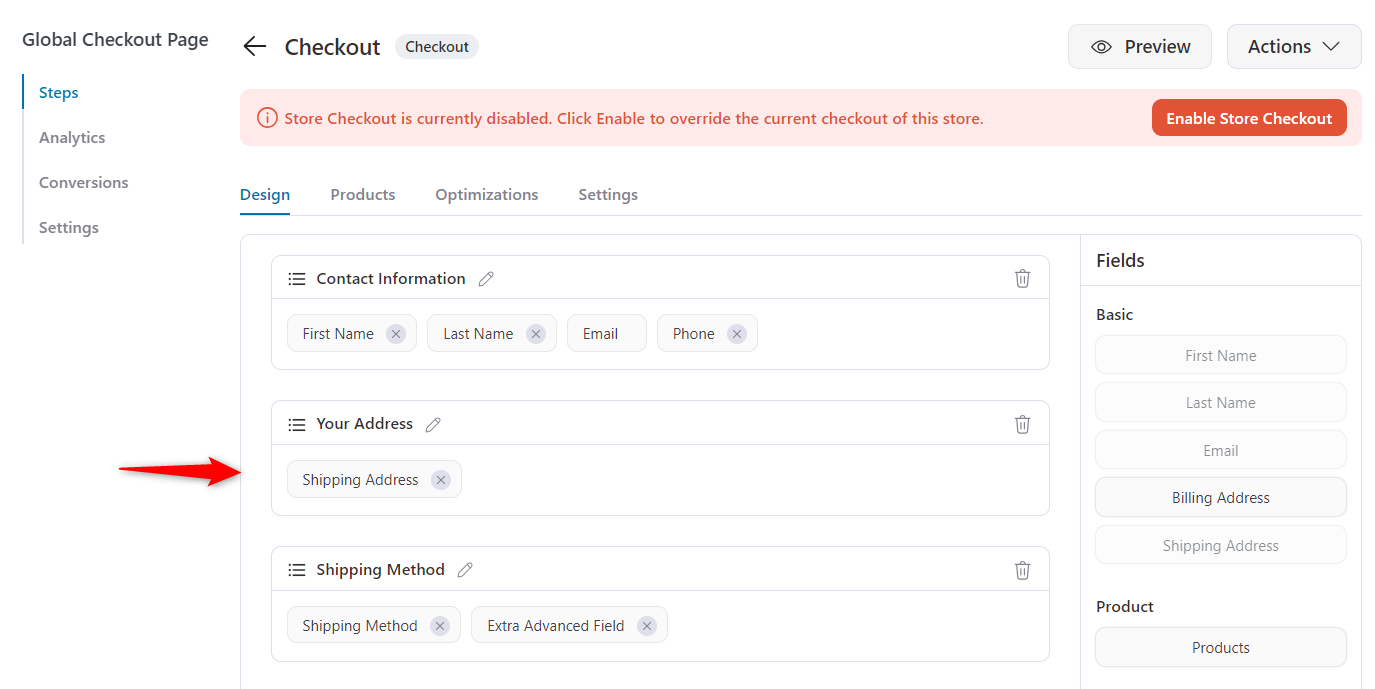
Step 3: Remove the billing address from the WooCommerce checkout page
Imagine you sell digital products like eBooks or online courses. Since no shipping is involved, you don't need to ask for a billing address.
On the customization page, click the cross icon to remove the billing address from the checkout form.
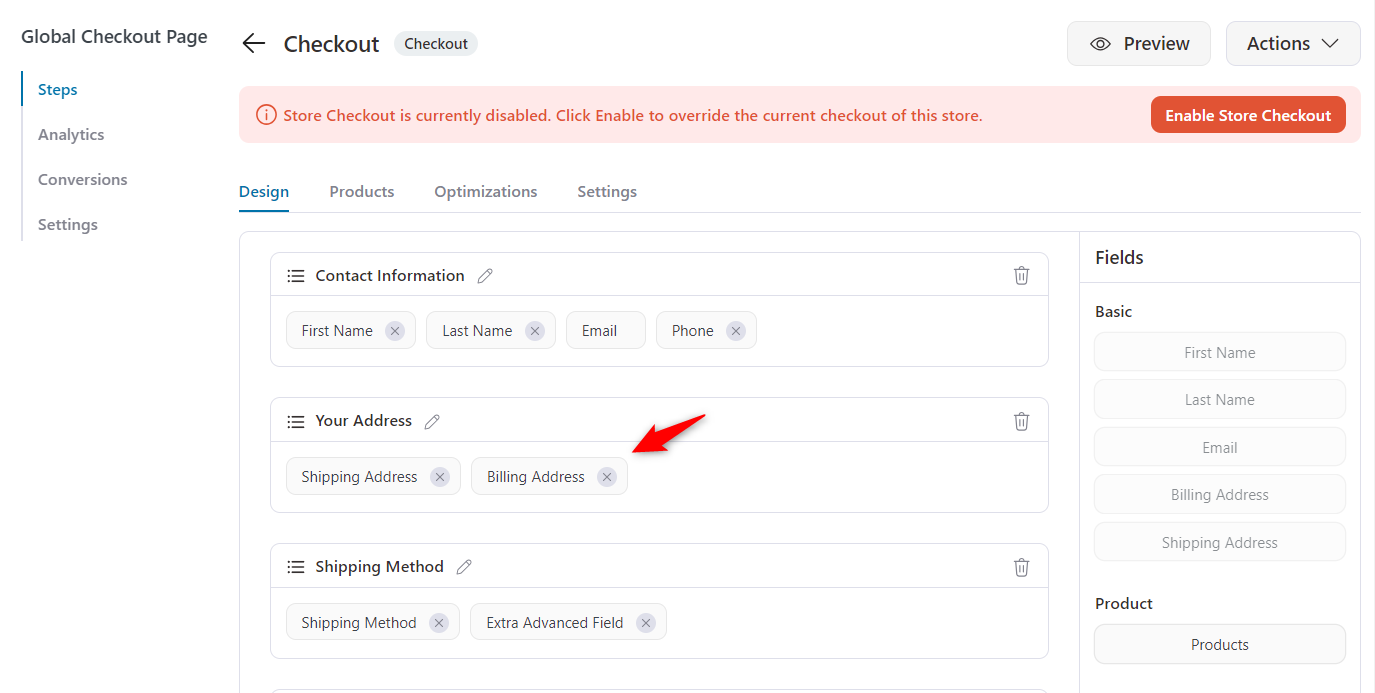
So, it’s removed from the checkout.
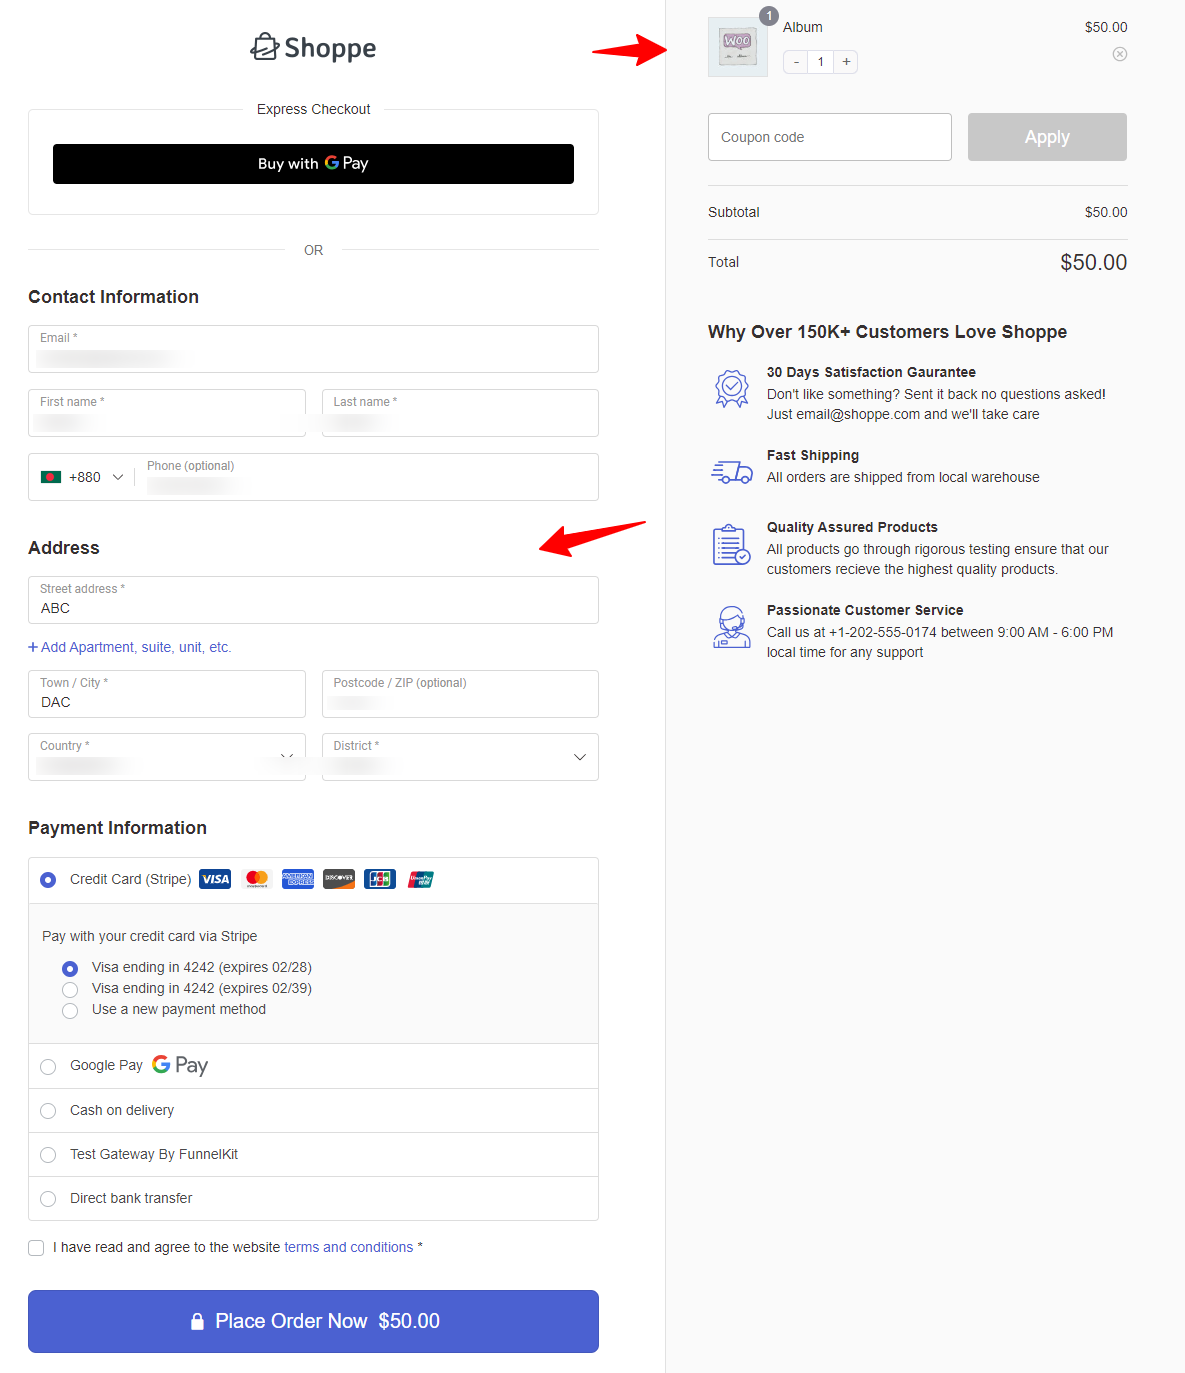
After removing the billing address, this is how it looks:
Step 4: Remove the shipping address from the WooCommerce checkout page
Suppose you sell digital products like software or online memberships. Since no physical delivery is required, you don’t need a shipping address.
On the same page, just click on the cross button, or you can click on the “Delete” icon to remove the entire address section.
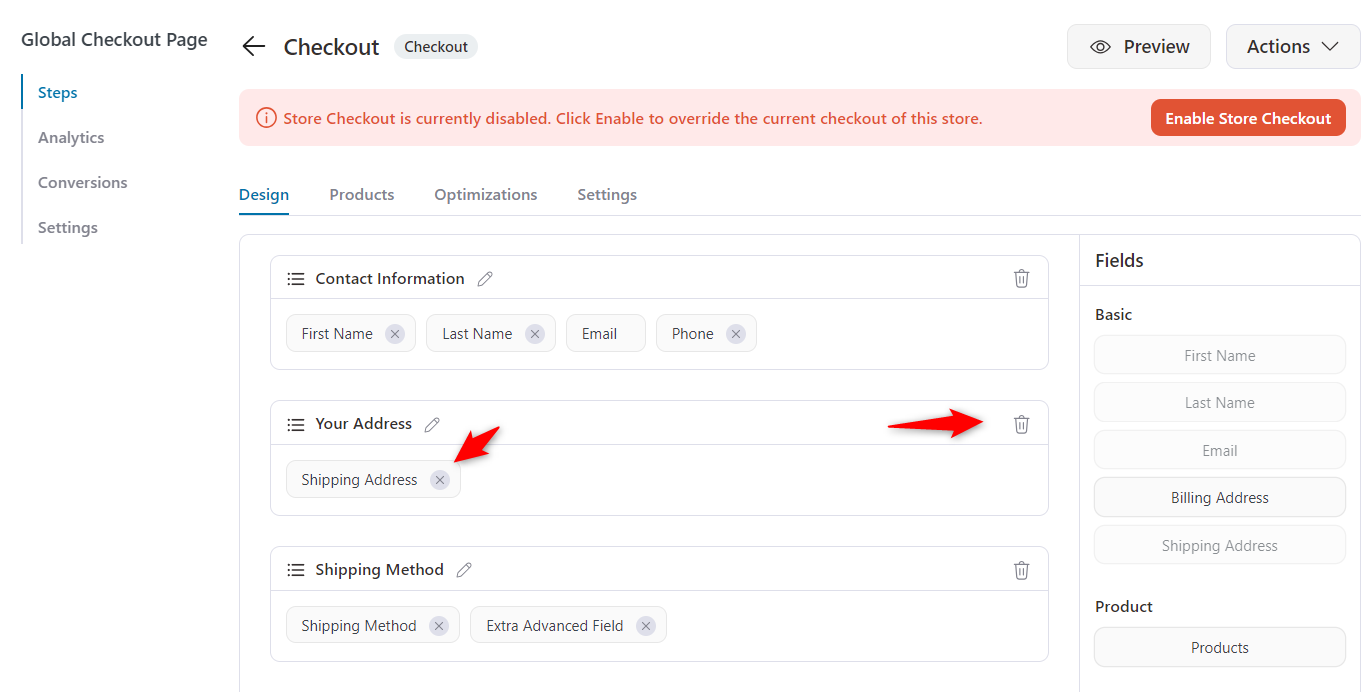
After removing the shipping address, you can see that the section is no longer here.
Since we are removing the shipping address, there is no need to keep the shipping method. So we are also removing it.
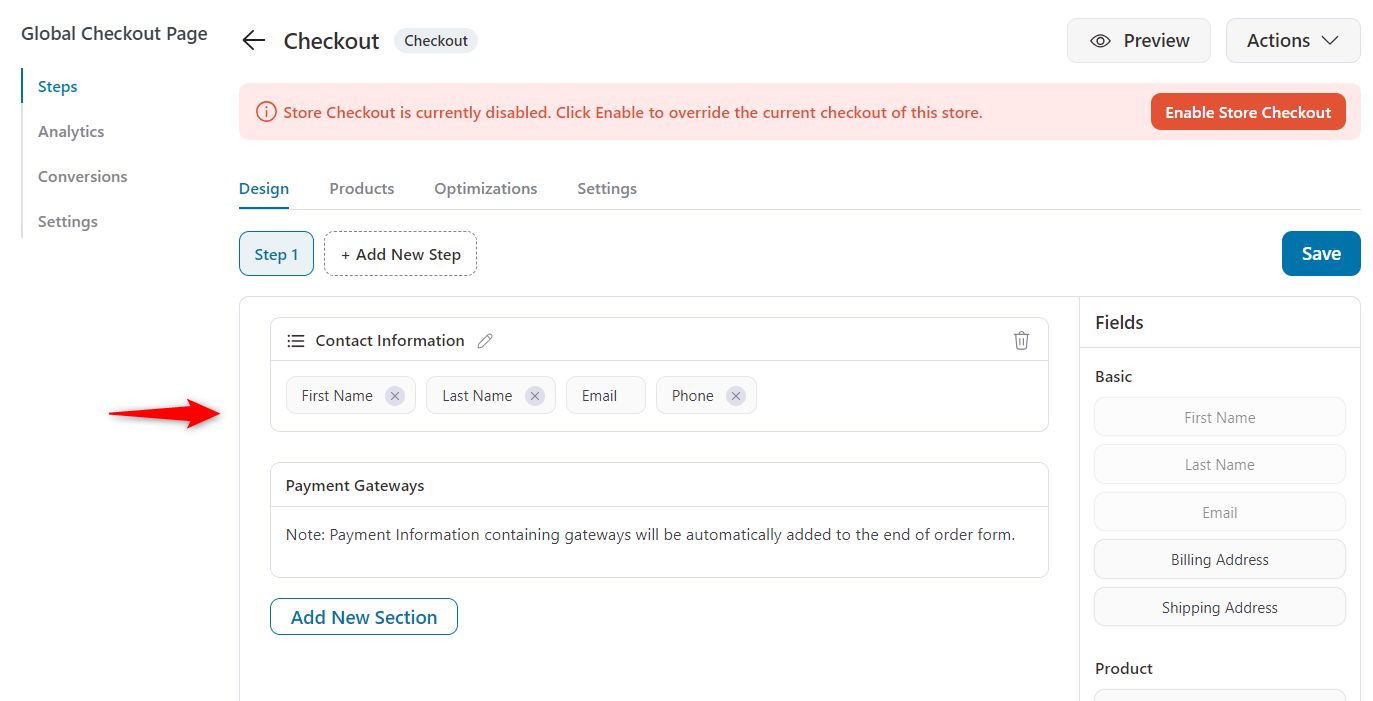
Let’s see how it looks on the checkout page without the shipping address.
Because FunnelKit handles validation on its own checkout, you also sidestep the “field is required” error that trips up the code methods.
This is the path we’d point most non-developers to because it’s the one that doesn’t break on the next update.
Method 2: Hide Address Fields in the Block Checkout Editor (Works on Block Checkout Only)
To remove the address field in the settings, navigate to Appearance > Themes > Customize, then select the checkout option under WooCommerce.
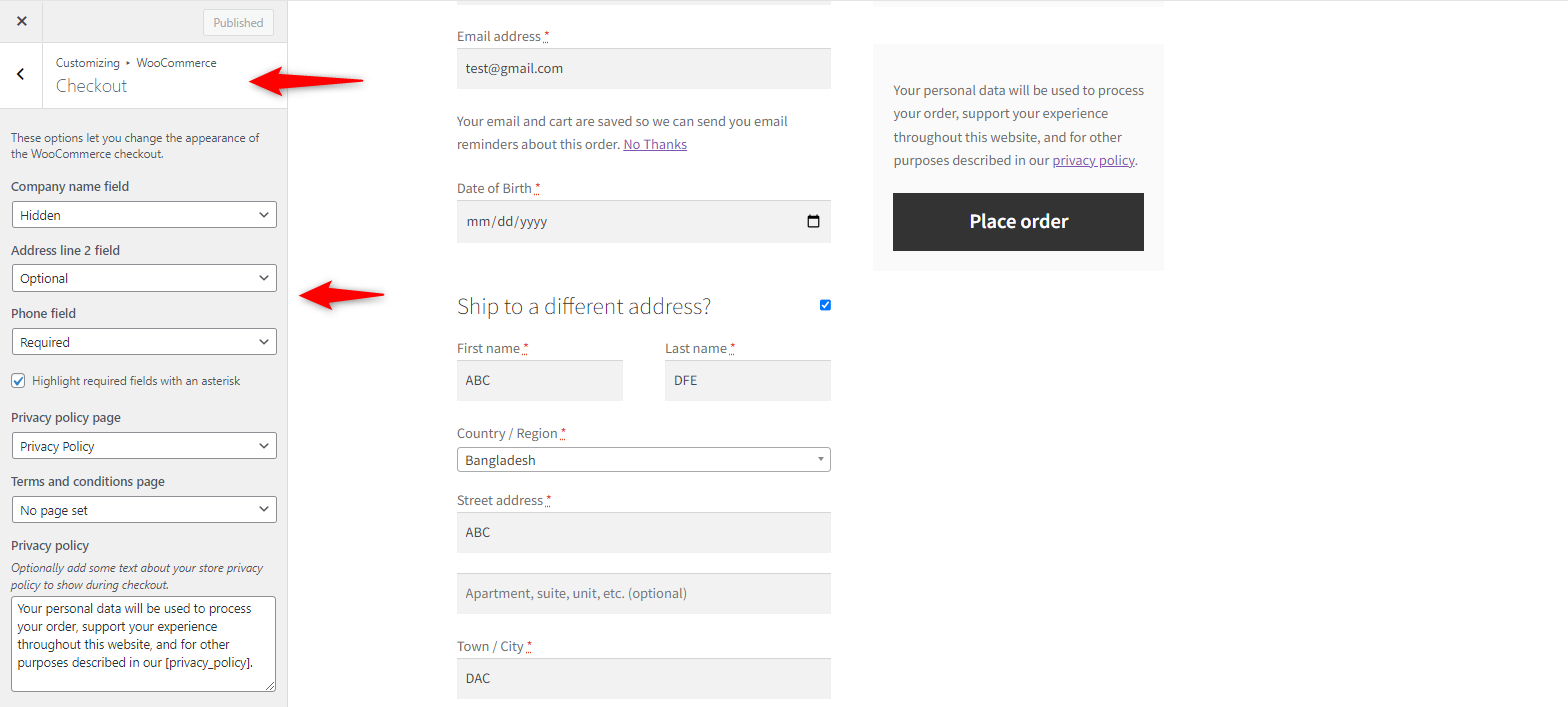
In the block settings panel on the right, you’ll see options to set Phone, Company, and Address line 2 as optional or hidden.
Here, make the address line 2 hidden. The extra address line is disabled on the checkout page.

These three fields are special as their state (required, optional, or hidden) is saved to the database as a WooCommerce option, so the setting sticks.
The other address lines (address 1, city, state, postcode) can't be toggled here. For those, you need Method 1 or Method 3.
Please note that if you hide address line 1, address line 2 is skipped automatically, so you don’t need to hide it separately.
This is the fastest no-code win on the default checkout, but it only gets you partway. To clear the full address section, keep reading.
Method 3: Remove Address Fields With PHP
If you want more control over the checkout fields in WooCommerce, you can remove the address fields using custom PHP code.
Always add custom PHP through a child theme’s functions.php or a code snippets plugin like WPCode, and never directly in the parent theme, or your changes will vanish on the next theme update.
We recommend that you back up your site first before proceeding.
Block checkout snippet (woocommerce_get_country_locale)
On the block checkout, the filter that actually reaches the address fields is woocommerce_get_country_locale. This snippet hides and un-requires the street-level address fields for every country:
add_filter( 'woocommerce_get_country_locale', function( $locales ) {
    foreach ( $locales as $country => $locale ) {
        foreach ( array( 'address_1', 'address_2', 'city', 'state', 'postcode' ) as $field ) {
            $locales[ $country ][ $field ]['required'] = false;
            $locales[ $country ][ $field ]['hidden']   = true;
        }
    }
    return $locales;
}, 100 );
Follow these rules to help you save time when debugging:
- Adding the country to the loop above causes the block checkout to break and re-show all the fields. Country has to stay (hide it with CSS if you must, see the validation fix below).
- Use boolean true/false, not the strings "true"/"false". The string version silently fails.
Classic checkout snippet (woocommerce_checkout_fields)
This is for classic (shortcode) checkout only. This snippet removes the billing fields entirely:
add_filter( 'woocommerce_checkout_fields', function( $fields ) {
    unset( $fields['billing']['billing_company'] );
    unset( $fields['billing']['billing_address_2'] );
    unset( $fields['billing']['billing_city'] );
    unset( $fields['billing']['billing_postcode'] );
    unset( $fields['billing']['billing_state'] );
    // Keep billing_country, or the order will fail.
    return $fields;
}, 100 );
To strip shipping fields instead, target $fields['shipping']['shipping_city'] and so on. To remove only billing, leave the shipping array untouched (and vice versa).
When you unset fields with woocommerce_checkout_fields, keeping the locale in sync is quite crucial.
On classic checkout, pair field removal with a locale update (or just keep your changes minimal and test thoroughly).
The code path works, but if you’re not comfortable maintaining snippets through every WooCommerce release, Method 1 is the safer long-term home.
Method 4: Hide the Shipping Address via WooCommerce Settings (Virtual Products Only)
This method works for both checkouts but has a limited scope (as mentioned below).
If your products are virtual (no shipping at all), WooCommerce will stop asking for a shipping address on its own:
- Edit each product and tick the Virtual checkbox under the Product data panel. This removes the Shipping tab and tells WooCommerce there’s nothing to ship.
- Go to WooCommerce ⇨ Settings ⇨ Shipping and, if you have no physical products at all, you can disable shipping zones entirely.
This removes the shipping address prompt, but the billing address fields stay on the form. So this is a partial fix, not a “name and email only” checkout.
To clear the billing address too, combine this with Method 1, 2, or 3. If you came here to drop both address blocks, treat this as a complement to the other methods rather than a replacement.
How to Fix the 'Address Is Required' Error After Removing Fields?
Even if you hide the address, the order won’t be placed. An error with "Postcode is required", "Please enter an address", or the Place Order button does nothing.
Here are the reasons why and how to fix each cause.
The core problem is that hiding a field on the front end doesn’t make it optional on the back end.
WooCommerce still validates it server-side, so a hidden-but-required field blocks the order if the customer can’t even see it.
Work through these four fixes:
- Make it "not required": Whenever you set 'hidden' => true, also set 'required' => false for the same field (as in the Method 3 block snippet). A hidden field that’s still required is the most common cause.
- Keep the Country field: WooCommerce needs a country to calculate tax and complete the order. Don’t remove or hide the country in the locale filter, as it'll break the block checkout and re-show fields. If you don’t want customers to see it, leave it in place and hide it visually with CSS instead: billing_country_field { display: none; }
- Use boolean values, not strings: 'required' => false works; 'required' => "false" does not. The string is truthy in PHP and keeps the field required silently.
- Don’t disable validation by leaving a required field on the form: If a field exists for a gateway or tax, but you want it optional, set it to not required rather than hiding it. A visible-but-empty required field is what prevents the Place Order button from being enabled.
Remove Address Fields for Virtual Products Only (Conditional Logic)
Keep the full address for physical orders, but strip it when the cart contains only virtual/downloadable products.
You can do this conditionally on the classic checkout by checking the cart before WooCommerce renders the fields:
add_filter( 'woocommerce_checkout_fields', function( $fields ) {
    if ( ! WC()->cart ) {
        return $fields;
    }

    $only_virtual = true;
    foreach ( WC()->cart->get_cart() as $item ) {
        $product = $item['data'];
        if ( $product && ! $product->is_virtual() ) {
            $only_virtual = false;
            break;
        }
    }

    if ( $only_virtual ) {
        foreach ( array( 'billing_address_1', 'billing_address_2', 'billing_city', 'billing_state', 'billing_postcode', 'billing_company' ) as $field ) {
            unset( $fields['billing'][ $field ] );
        }
    }

    return $fields;
}, 100 );
On the block checkout, conditional field logic based on cart contents is far harder to implement reliably with the locale filter alone, since locale is country-based rather than cart-based.
For mixed catalogs where you need this behavior on the block checkout, a checkout plugin that owns its own rendering (Method 1) is the pragmatic answer.
Remove the Address From Order Emails, Admin, and the Thank-You Page
Once the address is gone from checkout, the next question is why it is still showing up in the order confirmation email, the admin order screen, and the thank-you page.
Those pull from order meta and address formatting, not the checkout form, so removing the field doesn’t clear them automatically.
To stop an empty or unwanted billing address block from rendering in emails and on-screen, filter the formatted address:
add_filter( 'woocommerce_order_formatted_billing_address', function( $address, $order ) {
    // Return only the fields you kept (e.g. name + email handled elsewhere).
    return array(
        'first_name' => $order->get_billing_first_name(),
        'last_name'  => $order->get_billing_last_name(),
    );
}, 10, 2 );
For the admin order screen, the same formatted-address filters apply, and you can hide leftover blocks using targeted CSS.
5 Things to Consider While Removing the Address Field from the WooCommerce Checkout Page
Removing address fields from your WooCommerce checkout page might seem like an easy way to simplify the process, but there are a few things you should keep in mind before making those changes.
Let’s review some important considerations to ensure you’re doing it right.
1. Are you selling physical products?
Removing address fields entirely isn’t ideal if your store sells physical products. You'll still need accurate shipping details to fulfill orders. However, you can sometimes safely remove shipping and even billing fields for digital products or services.
To further optimize checkout, consider a multi-step process that breaks the checkout into clear steps to improve the user experience.
You can also A/B test checkout pages to find the version that converts best, ensuring a smooth and efficient checkout process.
2. Compliance with tax regulations
In some regions, the law may require you to collect billing addresses to calculate taxes properly. For example, collecting the billing address in the EU is important for VAT (Value Added Tax) compliance.
Make sure removing billing address fields doesn’t violate your business region's tax or legal obligations.
3. Fraud prevention
Payment gateways, such as credit card companies, often use billing address information to help detect fraud.
Removing the billing address field could increase the risk of fraudulent orders, especially if you rely on payment methods like credit cards.
Consider how this might impact your ability to verify transactions and protect against fraud.
4. Impact on shipping calculations
Without address fields, you'll no longer have shipping details to calculate shipping costs. If you need to charge customers based on their location, you’ll have to find another way to determine their location.
If you plan to offer shipping, consider using a "one-page checkout" or enabling customers to enter their location another way.
5. Test before going live
Before you change your checkout page live, test it thoroughly. Ensure you can process orders properly, especially if you’ve altered shipping or billing details.
Test it across different devices (especially mobile) and try completing orders as a customer to ensure a smooth user experience. You don't want to make changes that might break your customers' checkout process.
Frequently Asked Questions
WooCommerce’s default checkout collects a lot of information, but if you're selling digital products or services, much of it may be unnecessary.
Removing the address field can simplify the process, speed up checkout, and improve the overall experience. Here's why it's worth doing:
- Faster checkout: Customers complete purchases more quickly with fewer fields.
- Ideal for digital products: No need to collect shipping addresses when nothing is being shipped.
- Reduced cart abandonment: Long forms frustrate shoppers. A simpler checkout keeps them moving.
- Cleaner layout: A tidy, focused form improves the user experience.
- Mobile-friendly: Fewer fields are easier to fill out on small screens.
- Less manual work: You save time by skipping data you don’t need to process.
A simplified checkout helps you sell more while making things easier for your customers.
Yes, for virtual products. Remove the address fields, but keep the Country field running in the background so WooCommerce can complete the order. A checkout plugin makes a true name-and-email checkout much easier to maintain.
Using custom code might seem like a quick fix, but it comes with risks. Even a small error can break your checkout or conflict with theme or plugin updates. If you're not experienced with PHP or WooCommerce hooks, you could unintentionally impact order processing or customer data collection.
For a safer, more reliable solution, it's better to use a trusted plugin like FunnelKit Funnel Builder, which lets you remove fields without touching any code. We shared the whole process in this blog.
It might. Some gateways use the billing address for AVS fraud checks or to authorize the charge. Always run a live test order with your real gateway before going live.
Streamline Your WooCommerce Checkout and Recover Lost Sales!
The reason this used to be a one-snippet job and now isn’t is because WooCommerce split into a classic checkout and a block checkout, and they don’t obey the same code.
Figure out which one you have, then strip the address fields the way that checkout supports, block editor toggles, or the get_country_locale filter on the block checkout, the classic checkout_fields filter on the shortcode checkout, or a no-code checkout editor that sidesteps the whole hook problem by replacing the checkout entirely.
For most stores, we recommend FunnelKit Funnel Builder, since it removes fields with a few clicks, works regardless of the block-checkout limitations, and optimizes the rest of your funnel at the same time.
Ready to build a faster checkout that converts? Get FunnelKit Funnel Builder and start streamlining your checkout today.

Editorial Team
July 7, 2026Are shoppers adding products to their cart and leaving before they buy? According to Baymard Institute research on checkout usability, 18% of shoppers who abandon their cart do so because...

Editorial Team
July 7, 2026You’ve built your WooCommerce store, polished your product pages, and invested in marketing, but sales aren’t coming. Visitors browse, some add items to their cart, and most vanish before completing...
Editorial Team
July 3, 2026Discover how a canceled order doesn't have to mean a lost customer, and how the right WooCommerce canceled order email can turn it into a second chance. WooCommerce canceled order...


